


BenchMark
Repeatable Precision Bench Crimper

TABLE OF CONTENTS
V05272014
INTRODUCTION ……………………………………………………………….………. 1
SAFETY PRECAUTIONS ………………………………………………………….. 2
BenchMark FEATURES …………………………………………….……………. 3
INITIAL SETUP INSTRUCTIONS ……………………………………………….. 4-16
QUICK SETUP INSTRUCTIONS (AFTER INITIAL SETUP) ……….… 17-25
OPERATING INSTRUCTIONS ……………………………………….…………… 26
APPENDIX - BenchMark SETTINGS LOG ……………………………………… 27

INTRODUCTION AND SAFETY
INTRODUCTION
The BenchMark is a bench top vial seal crimping device that is designed to provide
precise and highly repeatable quality crimps. The crimp pressure and head height
can be easily adjusted to accommodate a variety of vial sizes and seal types.
Recordable coarse and fine setting adjustments allow the BenchMark to be quickly
set up for subsequent runs. Unlike most bench top crimpers currently on the
market, the BenchMark is designed to also apply down pressure on the vial during
the crimp cycle. The down pressure ensures that the seal is completely in contact
with the lip of the vial, and maximizes the proper wrap of the seal.
The BenchMark is constructed with corrosion resistant, machined steel and
aluminum parts that will provide reliable and accurate operation for many years.
The fine quality that Kebby Industries is known for is evident in the smooth, easy
operation of the BenchMark.
*** Manufactured in the U.S.A. ***
1

INTRODUCTION AND SAFETY, continued
SAFETY PRECAUTIONS
1. Do not set up or operate the BenchMark until you have read and understand this
manual and/or have been properly trained on its use.
Improper setup or misuse of the BenchMark may cause damage to the vial
being crimped, including breakage of glass that may cause injury.
2. Review and follow all warning labels on the BenchMark to avoid injury and damage to
the device.
3. Always wear impact resistant safety glasses and protective gloves while setting up or
operating the BenchMark, due to the possibility of glass breakage.
4. Do not set any objects on the BenchMark, other than the appropriate accessories
installed according to this manual. Any other objects set on the crimper base may
interfere with the crimp cycle and cause damage.
5. Keep hands and fingers clear of the head jaws when the crimp lever is pulled forward to
avoid being pinched.
6. When returning to the BenchMark after an absence, always recheck the setup. The
device may have been used and not reset correctly, knocked out of adjustment, or
tampered with.
7. Do not attempt to set up or operate the BenchMark if you suspect the device is
damaged or defective.
8. Contact Customer Service if you have any questions or concerns regarding the safe and
proper setup or operation of the BenchMark.
Kebby Industries, Inc.
Customer Service
(815) 963-1466
2

NON-ADJUSTABLE
VIAL HOLDER
ADJUSTABLE
VIAL HOLDER
PRODUCT OVERVIEW
BenchMark FEATURES
3

WARNINGS:
If the BenchMark is not set up properly for the vial size and seal type
that is to be crimped, there is a chance of vial breakage during the
crimp cycle.
Wear impact resistant safety glasses and protective gloves while setting
up the BenchMark.
INITIAL SETUP INSTRUCTIONS
IMPORTANT – Read before beginning Initial Setup.
The Initial Setup Instructions must be followed for each unique combination of vial
size and seal type to be crimped.
Have empty vials and unused seals on hand for the setup process.
4

INITIAL SETUP INSTRUCTIONS, continued
STEP 1 – Assemble Head to BenchMark.
A. Select the correct size and type of Head for the seals to be crimped.
B. Screw the Head into the bottom of the Crimper Body counterclockwise by hand just
until snug. DO NOT OVERTIGHTEN.
5

NON-ADJUSTABLE
VIAL HOLDER
OR
ADJUSTABLE
VIAL HOLDER
INITIAL SETUP INSTRUCTIONS, continued
STEP 2 – Assemble Vial Holder to BenchMark.
A. Select the correct size of Vial Holder for the vials to be crimped, based on the outside
diameter of the vial. Vial Holders are available as adjustable and non-adjustable styles,
and are labeled with the applicable vial diameters.
B. Push the Vial Holder Lock Lever inward and hold. Place the Vial Holder into the center
hole of the Base, so that it is sitting flat against the Base. Gently release the Vial Holder
Lock Lever.
6

A
B
INITIAL SETUP INSTRUCTIONS, continued
STEP 3 – Slide Vial Stop back.
NOTE: If using a Non-Adjustable Vial Holder, Step 3 does not apply.
A. Loosen both Vial Stop Lock Knobs (A).
B. Slide the Vial Stop (B) back as far as it will go.
C. Leave the Vial Stop Lock Knobs (A) loose. They will be tightened later.
7

WARNING:
There is risk of pinching hands or fingers during the setup process if there is
not enough clearance between the Head and Vial Holder.
A
C
B
INITIAL SETUP INSTRUCTIONS, continued
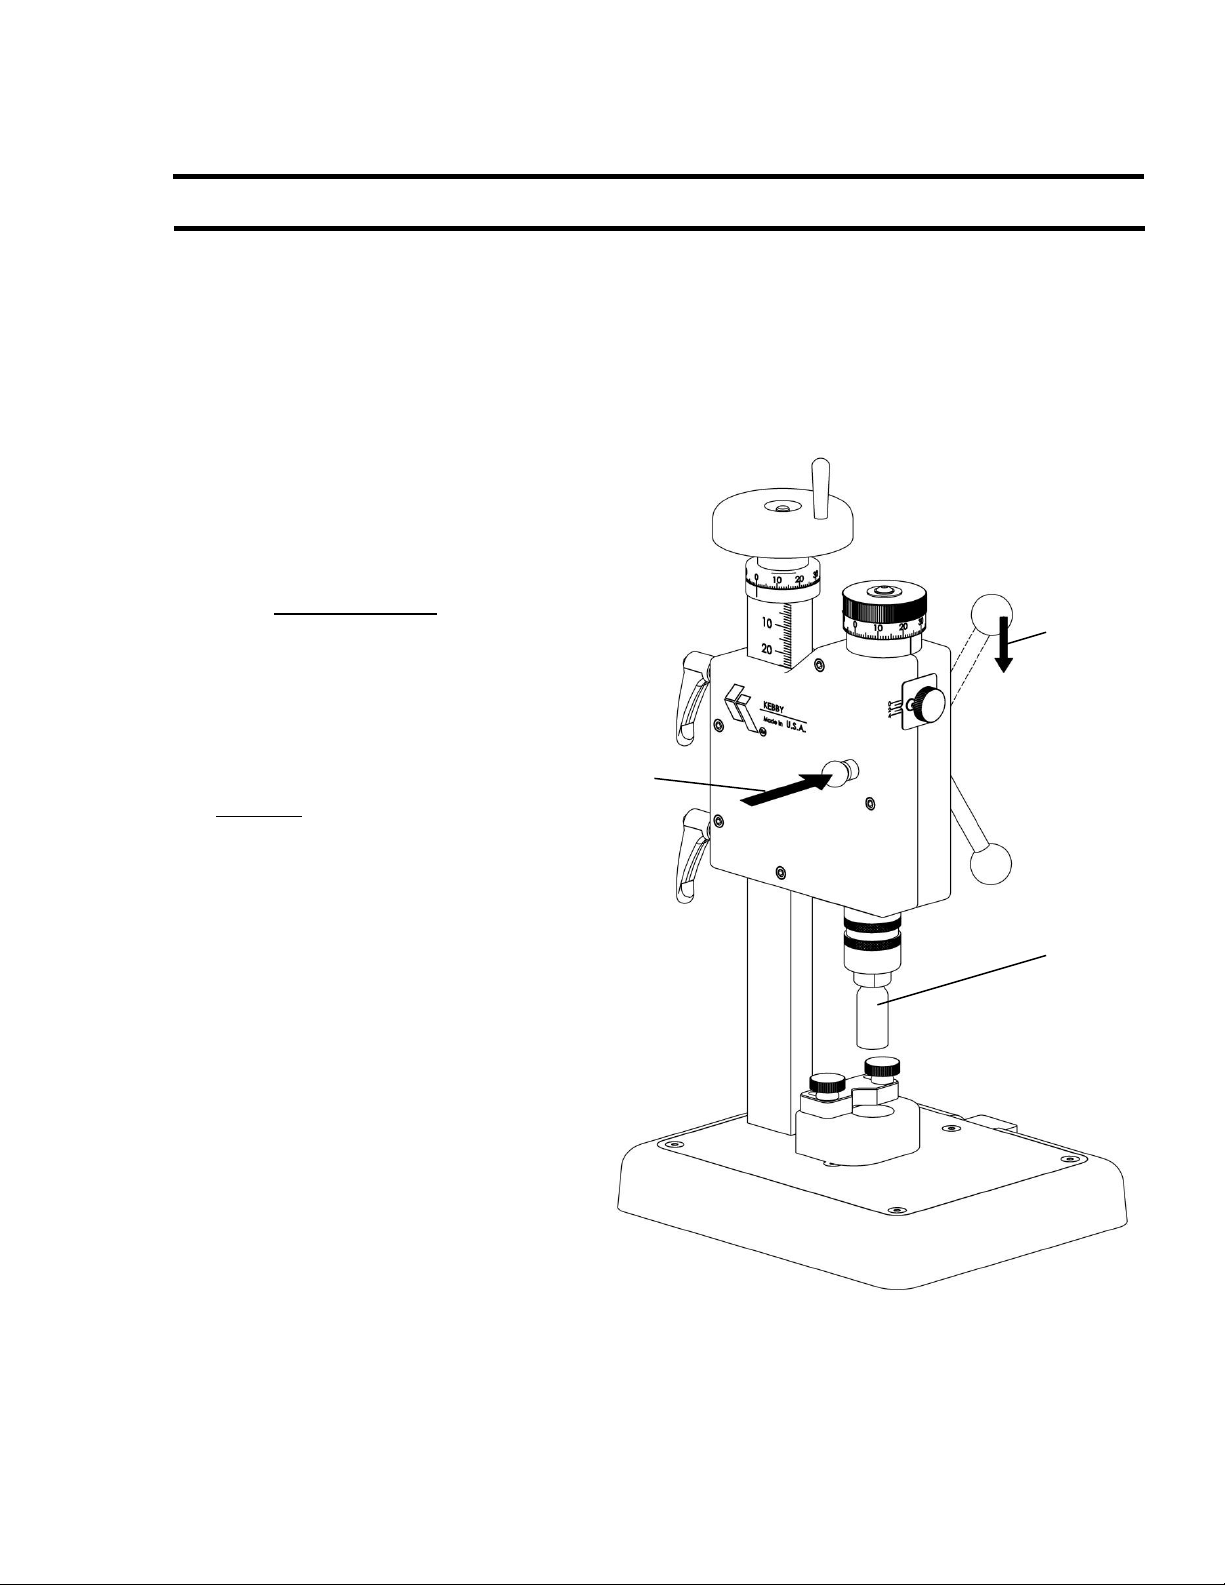
STEP 4 – Raise the Crimper Body for setup clearance.
A. Loosen both Height Lock Handles (A)
by less than 1 turn.
B. Place an empty vial on the Rubber
Pad of the Vial Holder (B).
C. Turn the Height Adjustment Dial (C)
clockwise to raise the Crimper Body
until there is approximately 2 inches
of clearance between the bottom of
the Head and the top of the vial.
8

C1 - Fine Pressure Setting
B
B1 - Coarse Pressure Setting
A
INITIAL SETUP INSTRUCTIONS, continued
STEP 5 – Set preliminary Pressure Settings.
A. Loosen the Pressure Lock Knob (A) by less than 1 turn.
B. Turn the Pressure Adjustment Dial (B) to set the Coarse Pressure Setting (B1) to “1”.
C. Turn the Pressure Adjustment Dial (B) in the nearest direction to set the Fine Pressure
Setting (C1) to “0”.
9

A
B
C
INITIAL SETUP INSTRUCTIONS, continued
STEP 6 – Adjust Pressure.
A. Place a seal on an empty vial, and hold the
vial up into the Head as far as it will go.
B. While holding the vial in place (A), pull
the Crimp Lever (B) forward until it
stops. Gently release the Crimp Lever
and remove the vial from the Head.
NOTE:
The Crimp Lever is adjustable, so it may be
moved to a position most comfortable for
the operator. See label near Crimp Lever
for adjustment instructions.
C. Inspect the seal on the vial.
If there is little to no crimp,
increase the pressure by turning
the Pressure Adjustment Dial (C)
clockwise by no more than 50
fine increments (half of a turn of
the dial).
If there is enough crimp to
prevent the seal from freely
moving, increase the pressure by
turning the Pressure Adjustment
Dial (C) clockwise by no more
than 10 fine increments.
If the seal is overcrimped, then decrease the pressure by turning the Pressure
Adjustment Dial (C) counterclockwise, and make smaller incremental adjustments
than previously used.
D. Repeat steps 6.B. and 6.C. until a satisfactory crimp is achieved. Unless the seal is
overcrimped, the same vial and seal may be used for each pressure adjustment.
10

B2 - Fine Pressure Setting
B1 - Coarse Pressure Setting
A
INITIAL SETUP INSTRUCTIONS, continued
STEP 7 – Lock and record Pressure Settings.
A. Tighten the Pressure Lock Knob (A) just until snug. DO NOT OVERTIGHTEN.
B. In order to be able to easily set up and reproduce the desired crimp in the future, record
the Coarse Pressure Setting (B1) and Fine Pressure Setting (B2). See Appendix for a
BenchMark Settings Log that may be used to record the settings.
11
A B C
INITIAL SETUP INSTRUCTIONS, continued
STEP 8 – Secure vial into Head using Height Setup Knob.
A. With your left hand, hold an empty
vial with a crimped seal back up
into the Head.
B. With your right hand, pull the
Crimp Lever (B) forward until it
stops and hold it there. Let go of
the vial so that it is held only by
the Head.
C. Still holding the Crimp Lever (B)
forward, use your left hand to push
and hold the Height Setup Knob (C)
inward.
D. Gently let go of the Crimp Lever (B)
(which should now stay in the
forward position), then let go of
the Height Setup Knob (C). The
Height Setup Knob should stay
pushed inward, and the vial will
remain in the Head for the next
step.
12
B
D
A
C
INITIAL SETUP INSTRUCTIONS, continued
STEP 9 – Adjust Height and secure Vial Stop.
NOTE: If using a Non-Adjustable Vial Holder, Steps 9C and 9D do not apply.
A. Confirm that both Height Lock
Handles (A) are loosened (by less
than 1 turn).
B. Turn the Height Adjustment Dial
(B) counterclockwise to lower the
Crimper Body down until slight
resistance is felt when the vial
meets the Rubber Pad on the Vial
Holder.
C. Gently slide the Vial Stop (C) up
against the vial and visually check
that the vial appears centered with
the Head and Rubber Pad.
NOTE:
The entire Vial Holder may be
rotated by hand to a comfortable
position for the operator.
D. Tighten the Vial Stop Lock Knobs (D)
just until snug. DO NOT OVERTIGHTEN.
13

A
B
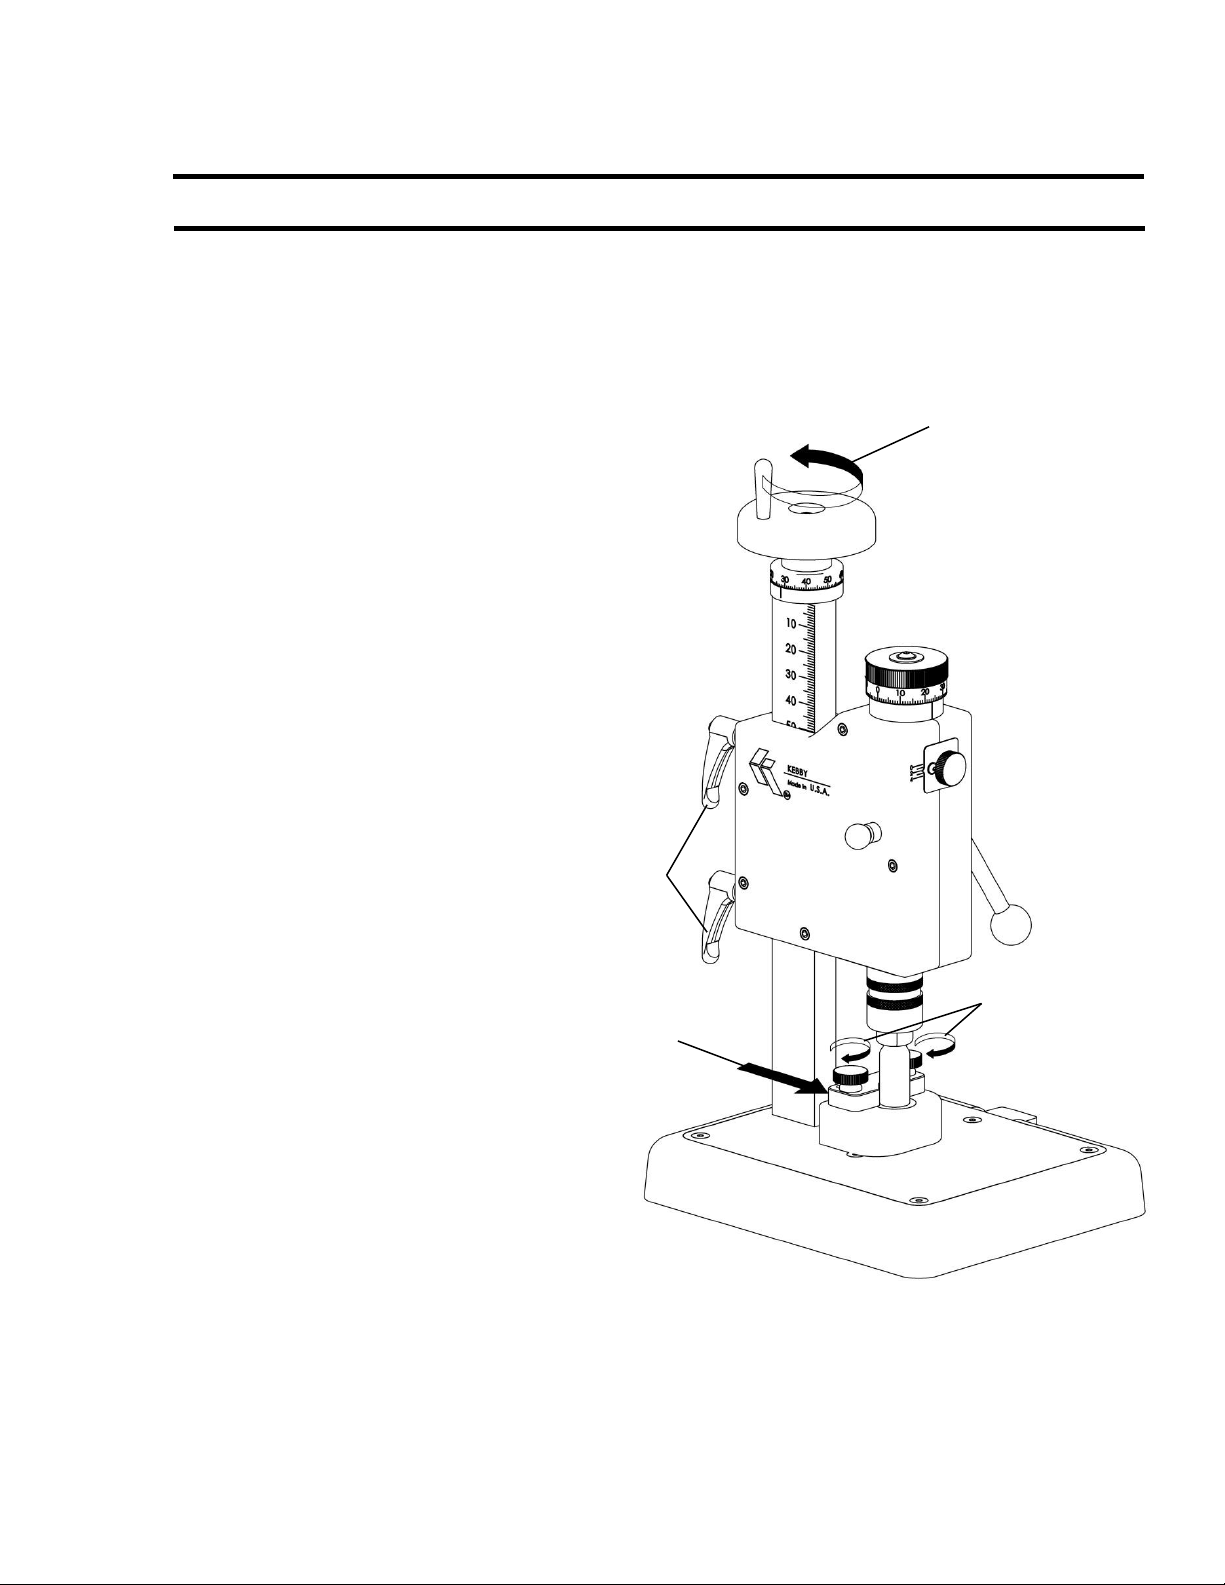
INITIAL SETUP INSTRUCTIONS, continued
STEP 10 – Release Height Setup Knob and remove Vial.
A. Push downward on the Crimp Lever (A) to release the Height Setup Knob, and gently
allow the Crimp Lever to return to its original position.
B. Remove the vial from the Vial Holder (B).
14

A
B2 - Fine Height Setting
B1 - Coarse Height Setting
INITIAL SETUP INSTRUCTIONS, continued
STEP 11 – Lock and record Height Settings.
A. Tighten both Height Lock Handles (A) just until snug. DO NOT OVERTIGHTEN.
B. In order to be able to easily set up and reproduce the desired crimp in the future, record
the Coarse Height Setting (B1) and Fine Height Setting (B2). See Appendix for a
BenchMark Settings Log that may be used to record the settings.
15

A
B
WARNING:
If there is too much down pressure, there is a chance of vial breakage during
the crimp cycle. Wear impact resistant safety glasses and protective gloves.
INITIAL SETUP INSTRUCTIONS, continued
STEP 12 – Test the setup.
A. Place a new seal on an empty vial and
set the vial on the Vial Holder so that it is
up against the Vial Stop (A).
B. Pull the Crimp Lever (B) forward as far
as it will go, then gently allow the
Crimp Lever to return to its original
position.
C. Remove the vial from the Vial Holder
and inspect the seal.
If the crimp is not acceptable, then
both the Pressure and Height Settings
must be adjusted by repeating the
Initial Setup Instructions beginning
with Step 4.
If the crimp is acceptable but slightly
more down pressure is desired, then
loosen both Height Lock Handles, turn
the Height Adjustment Dial
counterclockwise by no more than 5
fine increments, retighten both Height
Lock Handles, and repeat Steps 12A
through 12C.
If the crimp is acceptable, the BenchMark is now ready for operation. Follow the Operating
Instructions in this manual.
16

WARNINGS:
Use Quick Setup Instructions only if Initial Setup Instructions have been
already performed for the particular vial size and seal type to be
crimped.
If the BenchMark is not set up properly for the vial size and seal type
that is to be crimped, there is a chance of vial breakage during the
crimp cycle.
Wear impact resistant safety glasses and protective gloves while setting
up the BenchMark.
QUICK SETUP INSTRUCTIONS
IMPORTANT – Read before beginning Quick Setup.
17

OR
ADJUSTABLE
VIAL HOLDER
NON-ADJUSTABLE
VIAL HOLDER
QUICK SETUP INSTRUCTIONS, continued
STEP 1 – Assemble correct Head and Vial Holder to BenchMark.
A. If applicable, remove
incorrect Head from
Crimper Body by
unscrewing the Head
from the Crimper
Body clockwise by
hand.
B. If applicable, remove
incorrect sized Vial
Holder from Base by
pushing and holding
the Vial Holder Lock
Lever inward, then
lifting the Vial Holder
up and out of the
Base.
C. Assemble the correct
Head and Vial Holder
to the BenchMark
following the INITIAL
SETUP INSTRUCTIONS
Steps 1 and 2.
18

B
A
QUICK SETUP INSTRUCTIONS, continued
STEP 2 – Slide Vial Stop back.
NOTE: If using a Non-Adjustable Vial Holder, Step 2 does not apply.
A. Loosen both Vial Stop Lock Knobs (A).
B. Slide the Vial Stop (B) back as far as it will go.
C. Leave the Vial Stop Lock Knobs (A) loose. They will be tightened later.
19

B
A
B2 - Fine Pressure Setting
B1 - Coarse Pressure Setting
QUICK SETUP INSTRUCTIONS, continued
STEP 3 – Set Coarse and Fine Pressure Settings.
A. Loosen the Pressure Lock Knob (A) by less than 1 turn.
B. Turn the Pressure Adjustment Dial to first set the Coarse Pressure Setting (B1) and then
the Fine Pressure Setting (B2) to the settings previously recorded for the particular vial
size and seal type to be crimped.
20

A
B
QUICK SETUP INSTRUCTIONS, continued
STEP 4 – Lock Pressure Settings and loosen Height Lock Handles.
A. Tighten the Pressure Lock Knob (A) just until snug. DO NOT OVERTIGHTEN.
B. Loosen both Height Lock Handles (B) by less than 1 turn.
21

A
C
D
B
QUICK SETUP INSTRUCTIONS, continued
STEP 5 – Raise Crimper Body, then secure vial into Head
using Height Setup Knob.
A. Set an empty vial on the Rubber Pad
of the Vial Holder, then turn the
Height Adjustment Dial (A) clockwise
to raise the Crimper Body until there
are approximately 2 inches of
clearance between the bottom of the
Head and the top of the vial (refer to
diagram on page 8).
B. Place a seal on the vial, and hold the
vial up into the Head (B) as far as it
will go with your left hand.
C. With your right hand, pull the Crimp
Lever (C) forward until it stops and
hold it there. Let go of the vial so that
it is held only by the Head.
D. Still holding the Crimp Lever (C)
forward, use your left hand to push
and hold the Height Setup Knob (D)
inward.
E. Gently let go of the Crimp Lever (C)
(which should now stay in the forward
position), then let go of the Height
Setup Knob (D). The Height Setup
Knob should stay pushed inward, and
the vial will remain in the Head for
the next step.
22

B
C
A
A2 - Fine Height Setting
A1 - Coarse Height Setting
QUICK SETUP INSTRUCTIONS, continued
STEP 6 – Set Coarse and Fine Height Settings, then secure Vial Stop.
NOTE: If using a Non-Adjustable Vial Holder, Steps 6B and 6C do not apply.
A. Turn the Height Adjustment Dial (A) to first set the Coarse Height Setting (A1) and then
the Fine Height Setting (A2) to the settings previously recorded for the particular vial
size and seal type to be crimped.
B. Gently slide the Vial Stop (B) up against the vial.
C. Tighten the Vial Stop Lock Knobs (C) just until snug. DO NOT OVERTIGHTEN.
23

A
B
QUICK SETUP INSTRUCTIONS, continued
STEP 7 – Release Height Setup Knob, then lock Height Settings.
A. Push downward on the Crimp Lever (A) to release the Height Setup Knob, and gently
allow the Crimp Lever to return to its original position.
B. Tighten both Height Lock Handles (B) just until snug. DO NOT OVERTIGHTEN.
24

A
B
QUICK SETUP INSTRUCTIONS, continued
STEP 8 – Test the setup.
A. Place a new seal on an empty vial and
set the vial on the Vial Holder so that
it is up against the Vial Stop (A).
B. Pull the Crimp Lever (B) forward as far
as it will go, then gently allow the
Crimp Lever to return to its original
position.
C. Remove the vial from the Vial
Holder and inspect the seal.
If the crimp is acceptable, the
BenchMark is now ready for
operation. Follow the Operating
Instructions in this manual.
In the unlikely event that the
crimp is not acceptable, repeat
the Initial Setup Instructions to
again determine the proper
settings for that particular vial
size and seal type.
25

WARNINGS:
If the BenchMark is not set up properly for the vial size and seal type that is to be crimped,
there is a chance of vial breakage during the crimp cycle. As a precaution, the following
checks should be made prior to operating the BenchMark:
Make sure the correct Vial Holder and Head are assembled to the BenchMark.
Make sure all four settings are correct for the vial size and seal type to be
crimped (refer to settings recorded during the initial setup).
Wear impact resistant safety glasses and protective gloves while operating the BenchMark.
A
B
OPERATING INSTRUCTIONS
CRIMPING OPERATION
INSTRUCTIONS
A. Place a seal on a filled vial and set
the vial on the Vial Holder so that it
is up against the Vial Stop (A).
B. Pull the Crimp Lever (B) forward as
far as it will go, then gently allow
the Crimp Lever to return to its
original position.
C. Remove the sealed vial from the
Vial Holder.
D. Repeat steps A through C until all
vials have been sealed.
26

APPENDIX
BenchMark Settings Log
is on the next page.
27

BenchMark Settings Log
VIAL DESCRIPTION
SEAL DESCRIPTION
BenchMark
ACCESSORIES
PRESSURE
SETTINGS
HEIGHT
SETTINGS
DATE OF
INITIAL
SETUP
DESCRIPTION
OR PART NO
OUTSIDE
DIAMETER
OVERALL
HEIGHT
DESCRIPTION/PART
NO/SIZE/TYPE
VIAL
HOLDER
PART NO
HEAD
PART NO
COARSE
FINE
COARSE
FINE
SETUP
BY
 Loading...