

Page 1
USER MANUAL
• Do not attempt to disassemble the product or replace the batteries. This will invalidate the warranty.
• Use only the micro USB cable supplied with KURIO Snap. Do not damage or deform the power supply micro USB cable and
connector. When removing it from the device, be sure to remove by holding the plug attachment and not by pulling the cord.
• In case of data transfer from the KURIO Snap to the PC or MAC, to avoid data corruption or lost data, follow the instructions in this
manual. The user is responsible for any loss of data, the misuse, malfunction or modification.
• If for any reason, the screen (display) is cracked or broken, immediately stop using the product.
• Do not use and do not expose the device to extreme temperature (hot or cold), dusty conditions or damp conditions. Do not expose
to direct sunlight. Do not expose the device to water, liquids, rain, dust or moisture. If your KURIO Snap is exposed to liquid, power
off the device immediately and clean/dry it.
• All information is subject to change without prior notification. Please follow your actual device’s operational procedures.
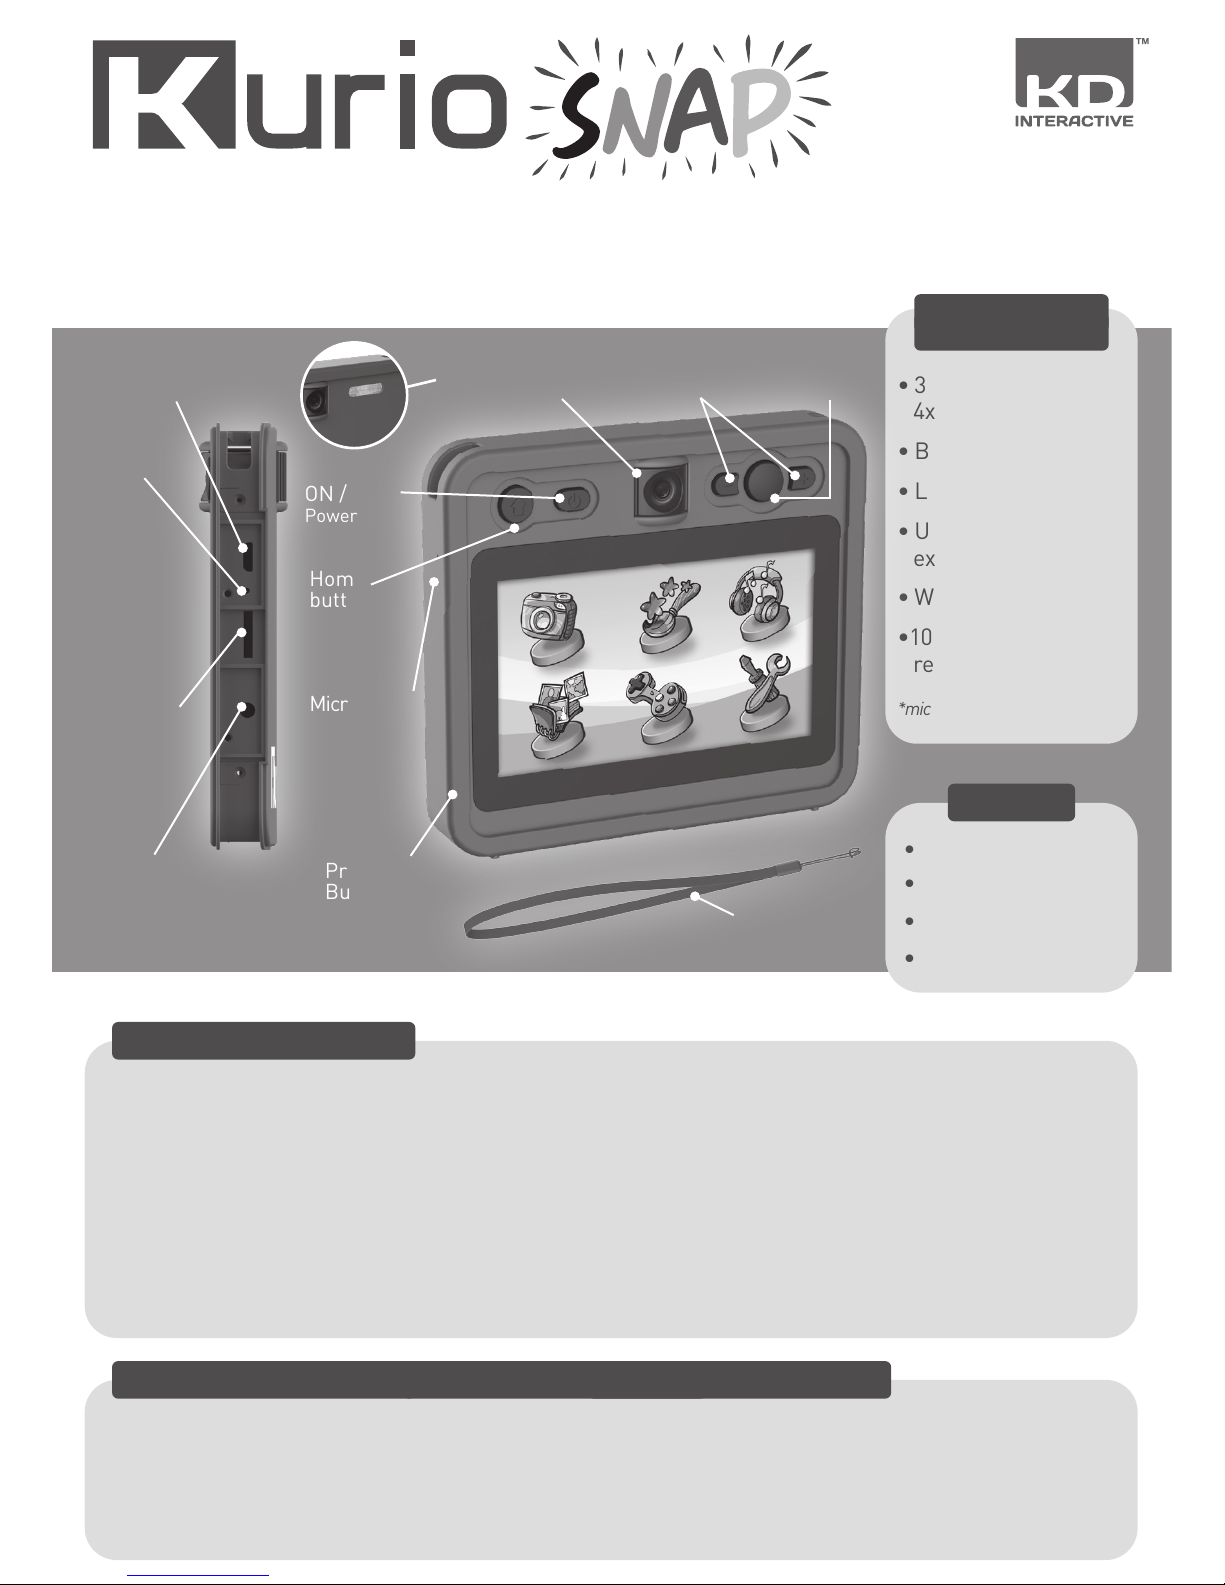
• KURIO Snap
• Micro USB cable
• User Manual
• Strap
Included
• 3MP swivel lens with
4x zoom
• Built-in flash
• Large touchscreen
• Up to 32GB
expandable storage
*
• Wi-Fi
•1000mAh built-in
rechargeable battery
*micro SD card sold separately
Technical
Specifications
Safety precautions
• To turn off your KURIO Snap correctly, press the power button until the pop up message appears on screen, and then select "Power
off". Avoid switching off the device by pressing and holding the power button until the unit stops.
• Do not fully discharge the battery (keep at 5% or more). Recharge it to full power regularly to preserve it.
• If you encounter any issue with your device, please do not return it to the store. Please review our FAQs & troubleshooting info or
contact our tech support team for help at www.kurioworld.com/support/
More tips and information at WWW.KURIOWORLD.COM
IMPORTANT INFORMATION
- PLEASE READ BEFORE USING UP YOUR KURIO
TAKE PHOTOBOOTH STYLE PICTURES ANYWHERE, ANYTIME!
®
Protective
Bumper
Strap
Home
button
ON / OFF
Power button
Swivel lens
camera
Flash
Volume &
Zoom buttons
Camera
shortcut
Microphone
Micro
USB port
Reset
button
Micro SD
card slot
Headphone
connection
Page 2
Data Transfer
It's possible to connect the KURIO Snap to a computer (MAC / PC) and share photos* (jpg, png), videos (mp4),
music (mp3). Use the Micro USB that was included to connect your KURIO Snap.
Please follow the below steps:
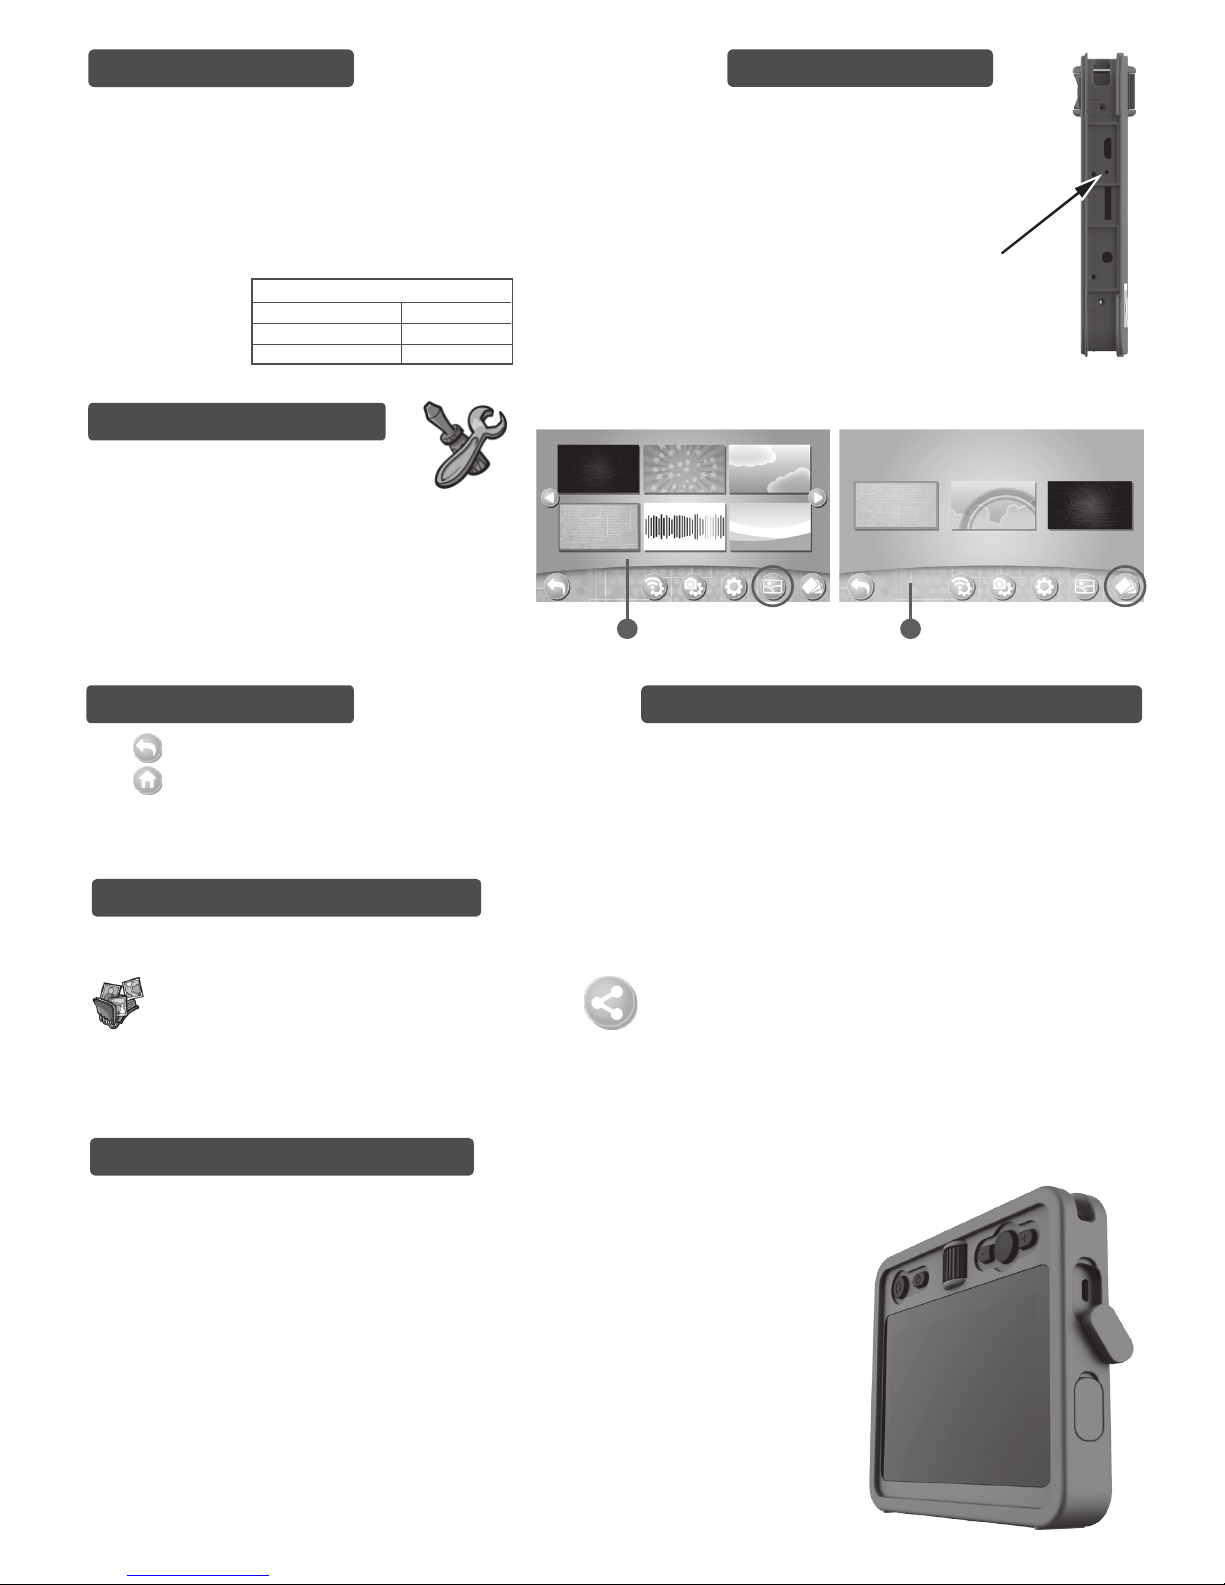
• Pull up the USB door on the right side of the camera.
• Insert the Micro USB plug into the KURIO Snap.
• Insert the USB plug (standard size) into a USB port of your computer. Choose the option “use
KURIO Snap as external drive”.
• A removeable drive - KURIO Snap - will appear on your computer.
Use this drive to transfer data to and from your KURIO Snap.
• There are 5 folders available in your KURIO Snap drive - Download, Music, Photo, SlideShow, Video.
Make sure that you move the files to and from the appropriate folders so they will appear
properly on your KURIO Snap.
You can upload MP3 files of your favorite music from your PC or MAC. Please note that videos and
photos transfered from PC, MAC can not be viewed by KURIO Snap.
While files are uploading/downloading, do not disconnect your KURIO Snap. Once finished, remove the
KURIO Snap by following the steps to safely remove hardware from your computer. You can then
physically unplug the KURIO Snap from the computer.
Minimum PC requirements: From any version after Windows XP.
Minimum MAC requirements: From any version after MAC OS 10.10.
*Photos edited with sound, slideshows and videos with boomerang effect can not be viewed on PC or MAC.
Share Photos, Videos, Music
Getting Started!
Please remove the screen protective film before turning on your KURIO Snap.
We recommend fully charging your device before use. A full charge takes about
3 hours. To charge your KURIO Snap, connect it to a USB port with the Micro
USB cable included with the product or connect to AC power plug (you can
re-use any USB compatible plug from the marketplace). How long the battery
lasts depends on the device usage. More frequent usage drains the battery
more quickly. Additionally, some activities require more battery consumption,
such as games, videos, WiFi connection etc.
BATTERY TIME FOR REFERENCE
Standby
Normal Use
Heavy Use
10 days
1 day
2 hours
Settings
When you launch your KURIO Snap for the
first time, you will follow a quick setup
guide: language - time and date. In
addition, you can modify photo and video
resolution or activate WiFi connection.
You can also personalize your background (1) and
menu bar theme (2).
WARNING
If you find that the screen freezes
during initial setup, and that the
device cannot be turned off by
pressing the power button, please
proceed as follow:
Pull up the USB cover, you will find a
small hole. Insert a paper clip inside
the hole, and press once to Reset.
This will automatically restart the
KURIO Snap.
Navigation
Press to go back in most cases.
Press to go to the main menu. Swipe right (from left edge) to go
back to the previous screen. Swipe across the screen (starting from
the left side of the black frame), to go to the home screen.
WARNING: On the gallery and photo editing menus, the swipe function may
be disabled.
Connecting to a printer
Print your decorated photos by connecting your KURIO Snap to
a printer.*
The connection should be established using the USB cable. To print
your Photobooth, please make sure to change your printer's setting to
Bordered option. Then, adjust cropping and enlarge or reduce the
print area to ensure your Photobooth is printed correctly!
*Subject to compatibility of equipment.
Connecting to other devices
Connect with other devices to share photos, videos, boomerang files and slideshows. You can share them with another KURIO Snap or appropriate Android &
iOS devices.*
Step 1: Go to GALLERY and select your photo. Step 2: Press this icon and follow the instructions.
WARNING: Please make sure that the KURIO Snap’s WiFi function is turned ON.
* Download the free app KURIO Snap on Google Play Store & Apple store on any version after Android 4.5 and iOS 10.
Note: If you want to share your photos or videos with Android or iOS device, the first connection must be initiated and established by this device, using
KURIO Snap application. The connection’s password is 11223344.
1 2
Page 3
Micro SD Card
You can use Micro SD card to expand the storage capacity of your KURIO Snap. You can also share data using a Micro SD card sold separately. To
insert a Micro SD card, remove the bumper of your KURIO Snap. As soon as you insert a Micro SD card into your KURIO Snap, 5 folders will be
created - Download, Music, Photo, SlideShow, Video. Make sure to move the files to and from the appropriate folders so that they can appear
properly on your KURIO Snap. We recommend that you transfer your photos and videos regularly. Please note that Music, Photo, Video files are
automatically visible. Slideshow and Download files won’t be visible if there is no content.
Games
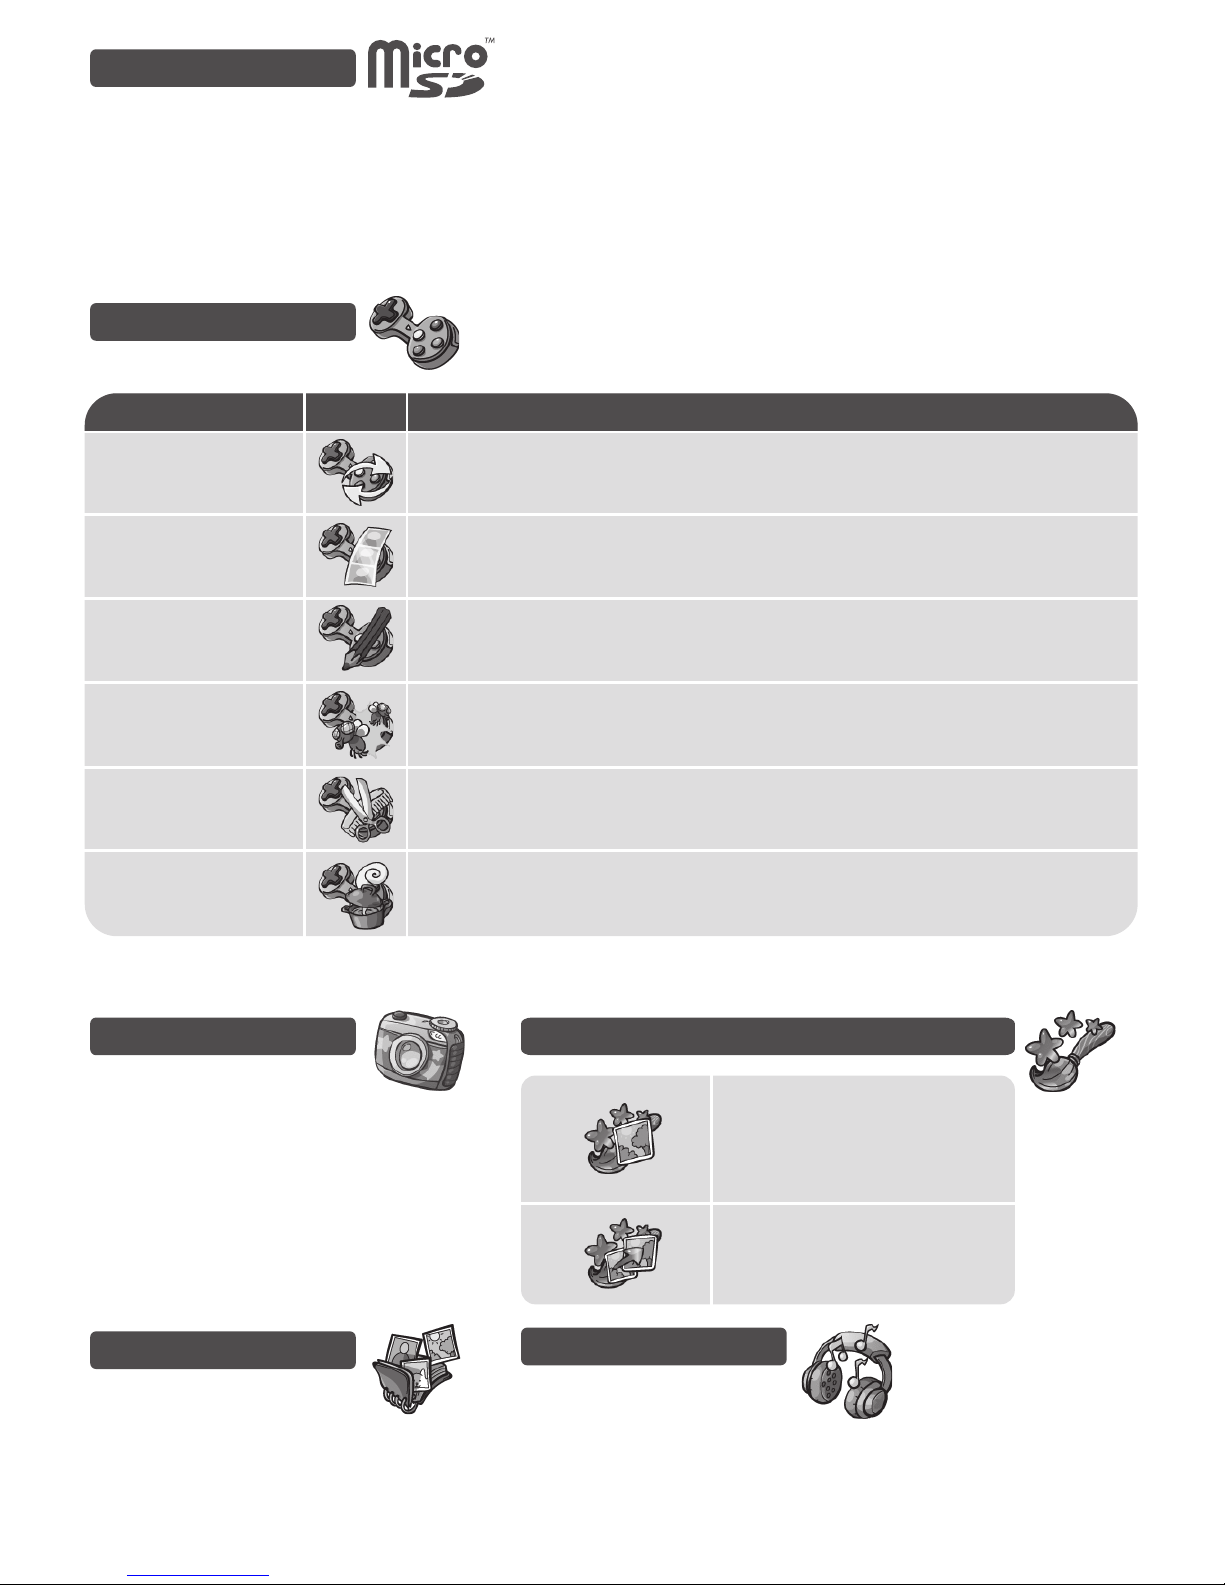
FOLDER
BOOMERANG EFFECT
ICONS
Play to create short videos with 3 different speeds:
- Slow
- Normal
- Fast
Take photobooth style pictures and customize them with stickers.
Draw and write on your photos.
You can select the line thickness and the color.
Take a selfie and shoot the flies to earn points.
Take a selfie and cook with 3 different recipes!
DESCRIPTION
DRAWING PHOTO
FLIES ATTACK
HAIR SALON
PHOTOBOOTH
COOKING TIME
Take a selfie and then choose a hair color, cut it, shower and shampoo it! Then save your customized selfies.
Take photos and videos* with funny
stickers and frames.
* Please note the default setting for video
recording is set to 30 seconds and the
maximum length of video recording is 10
minutes.
Camera
Find all your photos, videos
and slideshows.
Edit them directly.
Gallery
Listen to your favorite songs* and use
them for your slideshow.
*You can add your favorite music via PC or
MAC using the USB cable. Please refer to
data transfer chapter for more details.
Music
Edit photos and make your own slideshow
Choose a photo from the gallery or take a
new one. Then edit it to add some funny
stickers and frames or a funny sound effect.
You can resize the sticker to adjust it best to
your photo size using -, + icons. Else, press
and hold the sticker to move it around.
Choose multiple photos from the gallery and
a preloaded song to make a real slideshow.
Page 4
Tech Support & Warranty Information
If you have any questions about setting up or using your KURIO Snap,
please visit us at www.kurioworld.com to learn more. All of our
products are backed by a 1 Year Limited Warranty. In the unlikely event
that you experience a problem, please visit www.kurioworld.com/support
to contact our KURIO Support Team.
Please note, this device is warranted only to the original purchaser for
a period of twelve months from the original date of purchase, under
normal use and service, against defective workmanship and materials.
If the product is damaged due to accident, improper or unreasonable
use or maintenance (such as a broken screen, fall, water damage, etc.),
these damages are not covered by the warranty.
Restricted Use of Electronic Devices
The use of electronic/electric devices may interfere with safe
operation of some aircraft and can be restricted with some airline
companies. Please check with your airline company before traveling.
C17700US_KDUS_AW_UM_02_002_170804
Kidz Delight, Ltd.
1431 Opus Place Suite 110
Downers Grove
Illinois, IL 60515
United States of America
Imported by
Made in China.
Printed in China.
© 2017 KURIO & KD INTERACTIVE are registered trademarks of CIDE
INTERACTIVE SLU. Other trademarks and trade names are those of
their respective owners. MicroSDHC Logo is a trademark of SD-3C, LLC.
Copyrights
Avoid using the KURIO Snap while charging: this may alter the battery
charging process and the battery life of the device. The device should not
be exposed to dripping or splashing liquid and never place objects filled
with liquid on the device - such as a glass of water. Do not expose the
device to flames. Never use KURIO while operating a motor vehicle or
bicycle. If you feel discomfort or any pain using KURIO, please stop
immediately. If a small part is coming out of the KURIO, don’t try to
remove it. Keep it away from small children. Never force a connector
into a port of KURIO. Make sure that the micro USB connector matches
the USB port. To clean the screen, simply use a soft damp cloth. Do not
use alcohol, solvent, aerosol spray, liquid or abrasive cleaners to clean
your KURIO. The product and micro USB cable should be periodically
examined to check that they are in good condition. In case of defect, the
micro USB cable should not be repaired, but replaced.
Warning
This device complies with Part 15 of the FCC Rules. Operation is subject to the following two conditions: (1) this device may not cause harmful
interference, and (2) this device must accept any interference received, including interference that may cause undesired operation.
Warning: Changes or modifications to this unit not expressly approved by the party responsible for compliance could void the user’s authority to
operate the equipment.
NOTE: This equipment has been tested and found to comply with the limits for a Class B digital device, pursuant to Part 15 of the FCC Rules. These
limits are designed to provide reasonable protection against harmful interference in a residential installation. This equipment generates, uses and
can radiate radio frequency energy and, if not installed and used in accordance with the instructions, may cause harmful interference to radio
communications. However, there is no guarantee that interference will not occur in a particular installation. If this equipment does cause harmful
interference to radio or television reception, which can be determined by turning the equipment off and on, the user is encouraged to try to correct the
interference by one or more of the following measures:
• Reorient or relocate the receiving antenna.
• Increase the separation between the equipment and receiver.
• Connect the equipment into an outlet on a circuit different from that to which the receiver is connected.
• Consult the dealer or an experienced radio/TV technician for help. The device must not be co-located or operating in conjunction with any other
antenna or transmitter.
FCC statement
This device complies with RSS247 of Industry Canada. This device complies with Industry Canada license-exempt RSS standard(s). Operation is
subject to the following two conditions: (1) this device may not cause interference, and (2) this device must accept any interference, including
interference that may cause undesired operation of the device. Radiation Exposure Statement: The product comply with the Canada portable RF
exposure limit set forth for an uncontrolled environment and are safe for intended operation as described in this manual. The further RF exposure
reduction can be achieved if the product can be kept as far as possible from the user body or set the device to lower output power if such function is
available.
This device meets the government's requirements for exposure to radio waves. This device is designed and manufactured not to exceed the emission
limits for exposure to radio frequency (RF) energy set by the Canada RSS-102. The exposure standard for wireless devices employs a unit of
measurement known as the Specific Absorption Rate, or SAR. The SAR limit set by the RSS-102 is 0.08 W/kg. Tests for SAR are conducted using
standard operating positions accepted by the IC with the device transmitting at its highest certified power level in all tested frequency bands.
Although the SAR is determined at the highest certified power level, the actual SAR level of the device while operating can be well below the
maximum value. This is because the device is designed to operate at multiple power levels so as to use only the poser required to reach the network.
In general, the closer you are to a wireless base station antenna, the lower the power output. While there may be differences between the SAR levels
of various devices and at various positions, they all meet the government requirement.
IC statement
This device meets the government's requirements for exposure to
radio waves. This device is designed and manufactured not to exceed
the emission limits for exposure to radio frequency (RF) energy set
by the Federal Communications Commission of the U.S.
Government.
The exposure standard for wireless devices employs a unit of
measurement known as the Specific Absorption Rate, or SAR. The
SAR limit set by the FCC is 1.6 W/kg. Tests for SAR are conducted
using standard operating positions accepted by the FCC with the
device transmitting at its highest certified power level in all tested
frequency bands. Although the SAR is determined at the highest
certified power level, the actual SAR level of the device while
operating can be well below the maximum value. This is because the
device is designed to operate at multiple power levels so as to use
only the power required to reach the network.
In general, the closer you are to a wireless base station antenna, the
lower the power output. While there may be differences between the
SAR levels of various devices and at various positions, they all meet
the government requirement.
RF exposure information (SAR)
 Loading...