

GESTUREBOTICS
1 Aura Glove Controller battery
GESTUREBOTICS
GESTUREBOTICS
A
A
B
B
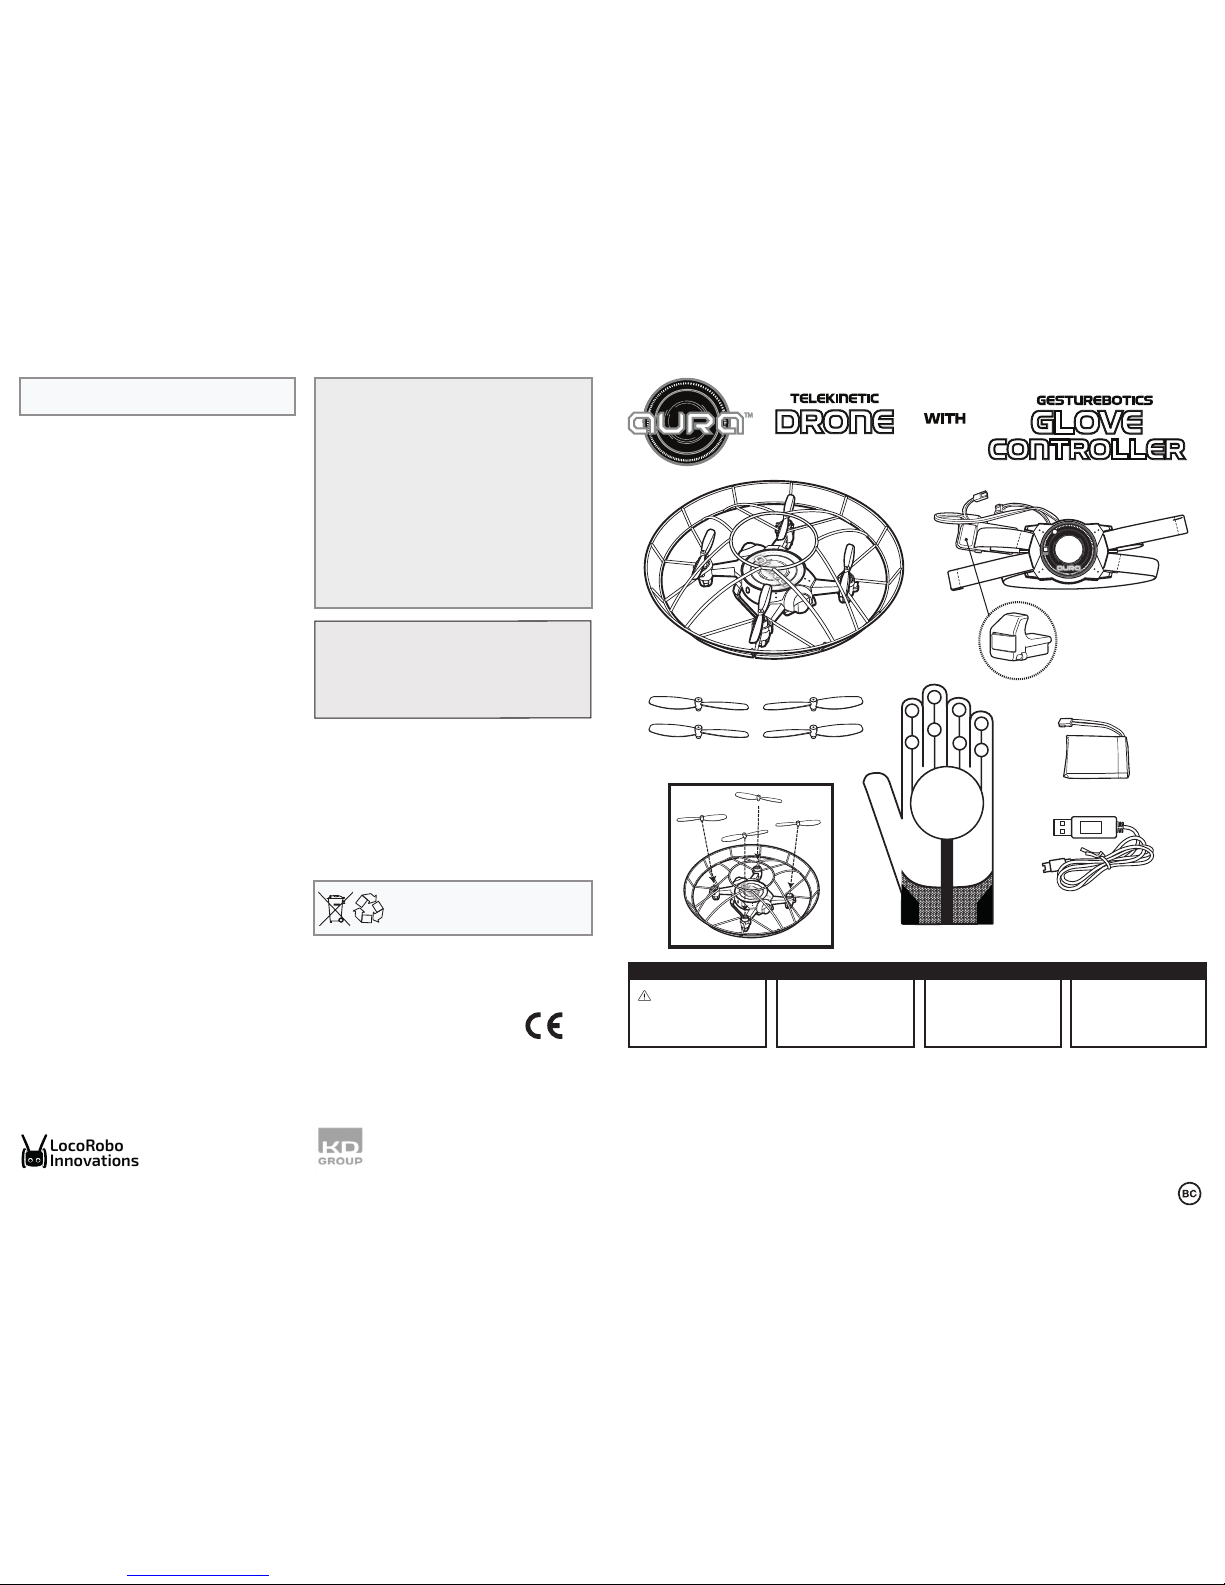
1 Aura Drone
4 x Spare Propellers
1 Aura Glove
1 Aura Drone battery
1 USB Charging Cable
1 Aura Glove Controller
A
A
B
B
GESTUREBOTICS
GESTUREBOTICS
A
A
B
B
WARNING
CHOKING HAZARD —
Small Parts. Not for
children under 3 years.
CAUTION
HAIR ENTANGLEMENT —
Tie back and cover hair and
secure loose clothing prior to
play.
CAUTION
Children must learn to fly the
toy under the direct supervision
of an adult.
FOR SAFETY
Fly in a room that is sufficiently
large
Parents and children should read this Instruction Manual together before using the GestureBotics AuraTM Glove Controller and Telekinetic Drone
1
TECH SUPPORT & WARRANTY INFORMATION
• If you have any questions about setting up or using your drone & glove controller, please visit www.aura-drone.com to find out more about
GestureBotics Aura
TM
, read our FAQs, and for technical support. In the unlikely event you experience any problems with your product, please visit
www.aura-drone.com to contact GestureBotics AuraTM Customer Care.
If the service representative is unable to solve the issue, he or she will provide instructions regarding how to have your GestureBotics AuraTM serviced if
it is under warranty.
• Please note that this drone & glove controller is warranted only to the original purchaser for a period of 90 days from the original purchase date,
under normal use and service, against defective workmanship and materials. If the product is damaged due to accident, improper or unreasonable
use or maintenance, such as fall, water damage, etc., this damage is not covered by the warranty. Please contact GestureBotics AuraTM Customer
Service for repair & replacement options, especially for broken propellers or other spare parts.
• Please visit www.aura-drone.com for the full details of GestureBotics AuraTM 90 Day Limited Warranty.
If you encounter any issues with your device, please do not return it to the store. Please review our FAQs & troubleshooting info or contact our tech
support team for help at www.aura-drone.com.
Find more tips and information at WWW.AURA-DRONE.COM
Model: LR723
SAFETY PRECAUTIONS: Strictly follow the instructions in this user manual
to operate the GestureBotics Aura
TM
. Parental guidance is recommended
for the flight. Keep your eyes, fingers, hair, other body parts and loose
clothing away from propellers. Always fly away from your face to avoid
face and eye injuries. Always take-off from a flat & even surface. DO NOT
hold the drone in your hand during take-off. Keep drone in sight at all
times. Keep drone away from electrical hazards and obstacles. DO NOT
fly the drone close to people and animals.
IMPORTANT NOTICE TO ADULTS: Use the drone only with the
GestureBotics
Aura
TM
Glove Controller. Check for damage to the charger, drone body,
glove controller body, batteries, and other parts regularly. If any damage
occurs, the toy must not be used until the damage is repaired. Parental
guidance is advised for positioning, charging or replacing batteries.
Rechargeable batteries are to be removed from the drone before being
charged. Not for children under 3 years old.
MAINTENANCE: Always remove the batteries from the drone when it is not
in use. Always disconnect the glove controller battery when not in use.
Regularly wipe the toy lightly with a clean, dry cloth.
NOTE: Strong electro-magnetic interference may cause the normal
behavior of the product to be disrupted. Reset the product by turning it
completely off, then turning it back on. If the product still does not
behave normally, try using the product in another location. Keep
batteries charged to ensure normal performance.
Designed + Developed In Philadelphia
With Love by:
LocoRobo Innovations Inc.
2323 Race Street, 814
Philadelphia, PA, 19103
United States of America
LocoRobo
Innovations
© LocoRobo Innovations Inc., 2016
Gesturebotics Aura is a registered trademark of LocoRobo Innovations Inc.
FCC STATEMENT: This device complies with Part 15 of the FCC Rules. Operation is
subject to the following two conditions: (1) this device may not cause harmful
interference, and (2) this device must accept any interference received, including
interference that may cause undesired operation.
Warning: Changes or modifications to this unit not expressly approved by the
party responsible for compliance could void the user’s authority to operate the
equipment.
NOTE: This equipment has been tested and found to comply with the limits for
a Class B digital device, pursuant to Part 15 of the FCC Rules. These limits are
designed to provide reasonable protection against harmful interference in a
residential installation. This equipment generates, uses and can radiate radio
frequency energy and, if notinstalled and used in accordance with the
instructions, may cause harmful interference to radio communications.
However, there is no guarantee that interference will not occur in a particular
installation. If this equipment does cause harmful interference to radio or
television reception, which can be determined by turning the equipment off and
on, the user is encouraged to try to correct the interference by one or more of
the following measures:
• Reorient or relocate the receiving antenna.
• Increase the separation between the equipment and receiver.
• Connect the equipment into an outlet on a circuit different from that to which
the receiver is connected.
• Consult the dealer or an experienced radio/TV technician for help.The device
must not be co-located or operating in conjunction with any other antenna or
transmitter.
Imported in Europe by:
KD Group
Catalunya 83-85, Planta 1
Viladecans Business Park,
Edificio Brasil
08840 Viladecans (Barcelona)
SPAIN
Imported in the USA by:
Kidz Delight, Ltd.
1431 Opus Place Suite 110
Downers Grove
Illinois, IL 60515
United States of America
Product : Aura Drone
& Glove Controller
CIDE Model : 08017
EU Declaration of conformity
CIDE INTERACTIVE, SLU
Viladecans Business Park,
Edificio Brasil, C/Catalunya, 83-85 PL. 1 B1,
08840 VILADECANS – BARCELONA
SPAIN
Hereby, CIDE INTERACTIVE SLU declares that the radio equipments type
08017 is in compliance with Directive 2014/53/EU RED DIRECTIVE and
2014/30/EU EMC DIRECTIVE. The full text of the EU declaration of
conformity is available at the following internet address:
http://aura-drone.com/download/08017_CE.pdf
Xavier Ferrer-Piera Issue date: March 31, 2017
Marketing Manager
WARNING:
• All packing materials such as internal bags, plastic collars, plastic films,
and carton inserts are not part of this product and should be removed
before handing the device over to a child. Please keep the box and this
guide for further reference.
• Do not try to disassemble the unit.
• To charge the drone or the glove, only use the USB cable supplied with
the toy.
• Keep the unit out of direct sunlight and away from any direct heat
source.
• Do not expose the unit to moisture or water.
This can damage the
electronic assemblies.
• If a small part is coming out of the toy, keep it away from small
children.
• Never force a connector into a port of the toy. If a connector and a port
do not join with reasonable force, make sure that the connector
matches the port and that you have positioned the connector correctly
in relation to the port.
• The product and USB charging cable should be periodically examined
to check that they are in good condition. In case of defect, the USB
charging cable should not be repaired but replaced.
• Do not drop the product or subject it to severe impact.
• Do not use and do not expose the toy in extreme temperatures (hot or
cold), dusty conditions or damp conditions. Do not expose to direct
sunlight. Do not expose the toy to water, liquids, rain, dust or moisture.
If the toy is exposed to liquid, power off the toy immediately and
clean/dry it.
• Avoid using the toy near strong magnetic fields. If your toy has been
exposed to magnetic fields, please restart the toy, following the
instructions in this manual, if necessary.
•
In an environment with electrostatic discharge, the toy may malfunction
and require user to reset the toy.
• Please keep the box and this manual for further reference. This
manual may not reflect your actual toy’s operation. All information is
subject to change without prior modification. Please follow your actual
toy’s operational procedures.
•
Batteries are to be inserted with the correct polarity. Exhausted batteries
are to be removed from the drone. The supply terminals are not to be
short-circuited. Battery charger is made only for the LiPo rechargeable
battery used in your toy. Do not use it to charge any battery other than that
in the toy.
Battery requirement for Aura
Drone
Power Supply:
Rating: DC 3.7 V, 500 mAh
Batteries: 1 x 3.7 V 500 mAh LiPo
Rechargeable Battery Pack
Requires 1 x 3.7 V LiPo
RechargeableBattery Pack
(included)
Battery requirement for Aura
Glove Controller
Power Supply:
Rating: DC 3.7 V, 180 mAh
Batteries: 1 x 3.7 V 180 mAh LiPo
Rechargeable Battery Pack
Requires 1 x 3.7 V LiPo
Rechargeable Battery Pack
(included)
INSTRUCTIONS FOR GLOVE CONTROLLER BATTERY REMOVAL: The
GestureBotics Aura
TM
Glove Controller battery is factory installed and
removal must be performed only by an adult. Do not tear, cut, puncture,
deform or compress glove controller during disassembly. Ensure the
glove controller is turned off and the battery connector is disconnected.
Remove all 3 screws from the battery compartment with a screwdriver.
Separate the battery compartment plastic body parts to expose the
internal battery. When battery is visible, gently pull it out of the battery
compartment. Dispose of battery in accordance with your local battery
recycling or disposal laws.
NOTE: Opening of drone and/or glove controller and/or removal of glove
controller battery will render GestureBotics Aura
TM
inoperative and voids
all warranties. Dispose remaining components according to local laws.
Waste electrical products and batteries should not be
disposed of with household waste. Please recycle where
facilities exist. Check with your local authority for recycling
advice.
WARNING: IF PROPELLER(S) BECOME DAMAGED OR BROKEN, DO
NOT FLY. FLYING WITH BROKEN PROPELLERS MAY CAUSE DAMAGE
OR LEAD TO INJURY.
4
FOR INDOOR USE
6-23 Feet (1.8-7 Meters) Recommended
Indoor Range*
*Longer range is possible
NOTE: The content and colours of this package
may vary slightly from the photographs.
C17800US_GB_KDUS_KDGB_ALL_UM_AW_01_170531
Non-rechargeable batteries are not to be recharged
•

Glove battery connector
Glove battery
housed inside
Side Button
Drone battery
connector
2. Make sure that the
battery connector
faces the outside and is
not pushed inside.
1. Gently insert the big
battery into the
battery compartment
located on the bottom
of the Aura Drone.
2. The Aura Glove
Controller comes with
a pre-installed battery
that cannot be
removed.
1. Turn Aura Drone OFF by
disconnecting the battery
from its connector.
2. Plug the USB cable
into a computer or a
USB charging wall
adapter. The
Charging Indicator
light will turn red.
3. Carefully plug the other
end of the USB cable
into the connector of
the Drone battery.
4. The Charging Indicator
light will turn off while
charging.
5. The Charging Indicator
light will turn on red
when fully charged. Once
fully charged, remove the
charging wire and store
back in a safe place.
ON/OFF switch
ON
OFF
ON
OFF
Connector
4. The Charging Indicator
will turn off while charging.
3. Plug the USB cable into a
computer or a USB charging
wall adapter. The Charging
Indicator light will turn red.
Carefully plug the other end
of the USB cable into the
connector of the Glove
Controller.
5. The Charging Indicator
light will turn on red when
fully charged.
1. The Aura Glove Controller
LEDs will blink red when
the battery needs to be
charged. Turn the Aura
Glove Controller OFF by
using the ON/OFF switch.
2. Disconnect the battery
of the Aura Glove
Controller from the
connector.
Charging indicator off
Charging
indicator off
Charging Indicator Red
Charging Indicator Red
HOW TO INSTALL BATTERIES
HOW TO CHARGE - Charging Aura Drone
HOW TO CHARGE - Charging Aura Glove Controller
Light of the Drone
GESTUREBOTICS
GESTUREBOTICS
GESTUREBOTICS
GESTUREBOTICS
6. Extend your arm. Position your hand parallel to the
ground, palm facing down. Keep the Aura Glove
Controller flat. The Glove Controller will calibrate
showing rainbow colors. Then the LEDs on the glove
controller will blink green to show the Glove controller
binding with the Aura Drone.
1. Always switch on the
drone by connecting the
battery connector of the
Aura Drone to the battery.
Drone battery
connector
Aura Drone
connector
4. Put the glove controller
on by ensuring that one
band goes behind the
thumb and the other is
between the thumb and
first finger.
3. Connect the battery
connector of the glove
controller.
7. Once the Glove Controller
LEDs are solid green color and
the drone LED is solid blue
color, press the Take Off/Landing
button 1 time and the Aura
Drone will take off.
Take-off/Landing Button
HOW TO FLY
2
HOW TO REMOVE BATTERIES
1. Gently slide the battery
out of the battery
compartment located on
the bottom of the Aura
Drone.
ON
OFF
5. Switch the Aura Glove
Controller on using the
ON/OFF switch. The LEDs will
turn white during the power
on state.
GESTUREBOTICS
GESTUREBOTICS
GESTUREBOTICS
GESTUREBOTICS
Light of the Drone
2. Place the Aura drone on a
flat surface with the light
of the drone facing you.
NOTE ON GLOVE CALIBRATION:
It is important to keep the hand flat to allow
the Aura Glove controller to calibrate to your
hand. The LEDs will flash a rainbow pattern
and then blink green. Once calibration is
complete, the light of the drone stops blinking
and becomes solidly lit.
Connect
NOTE ON DRONE ORIENTATION:
The blue light of the drone should always face
you. If the drone changes orientation and the
blue light faces away from you, it is
recommended that you change the position of
your body to face the light of the drone.
Forward
Backward
G
E
S
T
U
R
E
BO
T
I
C
S
G
E
S
T
U
R
E
BO
T
I
C
S
G
E
S
T
U
R
E
BO
T
I
C
S
G
E
S
T
U
R
E
BO
T
I
C
S
G
E
S
T
U
R
E
B
O
T
I
C
S
G
E
S
T
U
R
E
B
O
T
I
C
S
G
E
S
T
U
R
E
B
O
T
I
C
S
G
E
S
T
U
R
E
B
O
T
I
C
S
GESTUREBOT
I
CS
GESTUREBOT
I
CS
GESTUREBOT
I
CS
GESTUREBOT
I
CS
G
E
S
T
U
REBOTI
C
S
G
E
S
T
U
REBOTI
C
S
G
E
S
T
U
REBOTI
C
S
G
E
S
T
U
REBOTI
C
S
G
E
S
T
U
R
E
BO
T
ICS
G
E
S
T
U
R
E
BO
T
ICS
G
E
S
T
U
R
E
BO
T
ICS
G
E
S
T
U
R
E
BO
T
ICS
G
E
ST
U
R
E
B
O
T
I
C
S
G
E
ST
U
R
E
B
O
T
I
C
S
G
E
ST
U
R
E
B
O
T
I
C
S
G
E
ST
U
R
E
B
O
T
I
C
S
Right
GE
STU
R
E
BOTI
CS
GE
STU
R
E
BOTI
CS
GE
STU
R
E
BOTI
CS
GE
STU
R
E
BOTI
CS
G
E
ST
URE
B
O
TI
CS
G
E
ST
URE
B
O
TI
CS
G
E
ST
URE
B
O
TI
CS
G
E
ST
URE
B
O
TI
CS
GE
S
TURE
BO
TI
CS
GE
S
TURE
BO
TI
CS
GE
S
TURE
BO
TI
CS
GE
S
TURE
BO
TI
CS
G
ESTUR
EBOT
I
CS
G
ESTUR
EBOT
I
CS
G
ESTUR
EBOT
I
CS
G
ESTUR
EBOT
I
CS
GE
ST
UR
E
BOT
I
C
S
GE
ST
UR
E
BOT
I
C
S
GE
ST
UR
E
BOT
I
C
S
GE
ST
UR
E
BOT
I
C
S
G
E
STUR
E
BOT
I
C
S
G
E
STUR
E
BOT
I
C
S
G
E
STUR
E
BOT
I
C
S
G
E
STUR
E
BOT
I
C
S
Left
G
E
S
TU
RE
B
OT
I
C
S
G
E
S
TU
RE
B
OT
I
C
S
G
E
S
TU
RE
B
OT
I
C
S
G
E
S
TU
RE
B
OT
I
C
S
G
E
S
T
U
R
E
B
O
T
I
C
S
G
E
S
T
U
R
E
B
O
T
I
C
S
G
E
S
T
U
R
E
B
O
T
I
C
S
G
E
S
T
U
R
E
B
O
T
I
C
S
G
E
S
T
UR
E
BOT
ICS
G
E
S
T
UR
E
BOT
ICS
G
E
S
T
UR
E
BOT
ICS
G
E
S
T
UR
E
BOT
ICS
Side button
G
ES
T
UREB
O
T
I
CS
G
ES
T
UREB
O
T
I
CS
G
ES
T
UREB
O
T
I
CS
G
ES
T
UREB
O
T
I
CS
G
ES
TU
R
EBO
TIC
S
G
ES
TU
R
EBO
TIC
S
G
ES
TU
R
EBO
TIC
S
G
ES
TU
R
EBO
TIC
S
GE
ST
U
R
E
BO
T
IC
S
GE
ST
U
R
E
BO
T
IC
S
GE
ST
U
R
E
BO
T
IC
S
GE
ST
U
R
E
BO
T
IC
S
Side button
GE
STU
R
E
BO
T
ICS
GE
STU
R
E
BO
T
ICS
GE
S
TUREBOTIC
S
GE
S
TUREBOTIC
S
1. Press the Take Off/Landing button
1 time.
Take-off/Landing Button
G
E
STU
R
E
B
OT
I
CS
G
E
STU
R
E
B
OT
I
CS
G
E
STU
R
E
B
OT
I
CS
G
E
STU
R
E
B
OT
I
CS
G
E
S
T
U
R
E
B
O
T
I
C
S
G
E
S
T
U
R
E
B
O
T
I
C
S
G
E
S
T
U
R
E
B
O
T
I
C
S
G
E
S
T
U
R
E
B
O
T
I
C
S
G
E
S
T
U
R
E
B
OT
I
C
S
G
E
S
T
U
R
E
B
OT
I
C
S
G
E
S
T
U
R
E
B
OT
I
C
S
G
E
S
T
U
R
E
B
OT
I
C
S
GE
S
T
U
R
E
B
O
T
I
CS
GE
S
T
U
R
E
B
O
T
I
CS
GE
S
T
U
R
E
B
O
T
I
CS
GE
S
T
U
R
E
B
O
T
I
CS
G
E
S
T
U
R
E
B
O
T
I
C
S
G
E
S
T
U
R
E
B
O
T
I
C
S
G
E
S
T
U
R
E
B
O
T
I
C
S
G
E
S
T
U
R
E
B
O
T
I
C
S
GE
S
T
U
R
E
B
O
T
I
C
S
GE
S
T
U
R
E
B
O
T
I
C
S
GE
S
T
U
R
E
B
O
T
I
C
S
GE
S
T
U
R
E
B
O
T
I
C
S
G
E
ST
U
R
E
B
O
T
I
CS
G
E
ST
U
R
E
B
O
T
I
CS
G
E
ST
U
R
E
B
O
T
I
CS
G
E
ST
U
R
E
B
O
T
I
CS
G
E
S
T
U
R
E
B
O
T
I
C
S
G
E
S
T
U
R
E
B
O
T
I
C
S
G
E
S
T
U
R
E
B
O
T
I
C
S
G
E
S
T
U
R
E
B
O
T
I
C
S
GES
T
U
R
EBOT
IC
S
GES
T
U
R
EBOT
IC
S
GES
T
U
R
EBOT
IC
S
GES
T
U
R
EBOT
IC
S
G
ESTU
REBOT
IC
S
G
ESTU
REBOT
IC
S
G
ESTU
REBOT
IC
S
G
ESTU
REBOT
IC
S
GE
S
TU
RE
B
O
TI
C
S
GE
S
TU
RE
B
O
TI
C
S
GE
S
TU
RE
B
O
TI
C
S
GE
S
TU
RE
B
O
TI
C
S
GE
STU
R
E
B
O
TIC
S
GE
STU
R
E
B
O
TIC
S
GE
STU
R
E
B
O
TIC
S
GE
STU
R
E
B
O
TIC
S
G
ES
T
U
RE
B
O
T
I
C
S
G
ES
T
U
RE
B
O
T
I
C
S
G
ES
T
U
RE
B
O
T
I
C
S
G
ES
T
U
RE
B
O
T
I
C
S
G
E
S
TUR
E
B
OT
I
CS
G
E
S
TUR
E
B
OT
I
CS
G
E
S
TUR
E
B
OT
I
CS
G
E
S
TUR
E
B
OT
I
CS
GEST
U
REB
O
T
IC
S
GEST
U
REB
O
T
IC
S
GEST
U
REB
O
T
IC
S
GEST
U
REB
O
T
IC
S
HOW TO FLY - Forward/Backward
HOW TO FLY - Change the Height
HOW TO FLY - Land
HOW TO FLY - Left/Right
HOW TO FLY - Flip
1. Press the side button with your
thumb. Keep it pressed and tilt up
to increase the height. The LEDs
will animate with an orange color.
2. Keep it pressed and tilt down to
decrease the height. The LEDs
will animate with an purple
color.
1. Press the side button with your
thumb. Keep it pressed, and tilt to
the right to flip right. The LEDs will
blink with a turquoise color. Flip
won’t work if the Aura Drone
battery is low and the Aura Drone
Light is flashing.
2. Press the side button with your
thumb. Keep it pressed, and tilt to
the left to flip left. The LEDs will
blink with a yellow color. Flip won’t
work if the Aura Drone battery is
low and the Aura Drone Light is
flashing.
2. Direct the drone to safety using forward/backward/left/right gestures to
land.
3. The drone will automatically land.
1. Switch OFF the glove controller
using the ON/OFF switch.
2. Switch off the drone by
disconnecting the batteries.
ON
OFF
Drone battery
connector
Aura Drone
connector
The drone needs two shapes of propellers A and B. You can find markings of A and B on the
propellers and the body of the drone. When replacing propellers, match one A propeller to one A
slot on the drone and one B propeller to one B slot on the drone.
1. Choose a replacement propeller that belongs to the drone slot by matching the labels, A to A
and B to B.
2. Hold the drone steady with one hand from the bottom of the plastic housing of the motor. Do
not hold the drone from the protective frame. Use your other hand to gently pull the propeller
straight up until you feel and see it release.
3. Line up the motor shaft (little metal rod coming out of the motor body) with the hole in the body
of the replacement propeller. The shaft will go in the hole.
4. Gently push the propeller from the top down into the shaft until the propeller is secure. Do not bend
the frame while doing this step.
A
A
B
B
GE
STUREBOTICS
GE
STUREBOTICS
A
A
B
B
BLADE REPLACEMENT
If your drone drifts while taking off, it needs to be calibrated. Place the
drone on a flat surface. Press the Take Off/Landing button and hold it
down for 2 seconds. The LEDs on the Aura Glove controller will blink blue
and the light of the Aura drone will blink fast. When the calibration is
complete, the light of the drone will become solidly lit and the LEDs of
the Aura Glove Controller will return to green.
Take-off/Landing Button
Light of the Drone
GESTUR
E
BO
TICS
GESTUR
E
BO
TICS
HOW TO FLY - Switch Off HOW TO FLY - Drone Calibration
3
NOTE: The height of the drone will lock at an approximate
height of 7 to 8.5 feet (2.1 - 2.6 meters) above height of drone at
take-off. This range may vary.
 Loading...