

KDDI sportio water beat User Manual

Introduction
Thank you for purchasing the Sportio water beat. Before using your Sportio water beat, be sure to read the Sportio water
beat Basic Manual (this PDF manual) to ensure correct usage. After you have finished reading this manual, store this PDF
manual and the printed manuals in safe places so you can retrieve them whenever you need them.
Manuals for the Sportio water beat
The Sportio water beat comes with the Basic Manual and Instruction Manual.
● For learning the basics:
Read the Sportio water beat Basic Manual (this manual).
● For learning details on using each function:
Read the supplied Sportio water beat Instruction Manual (Japanese). Be sure to read the Safety Precautions “安全上の
ご注意” to ensure proper usage of the Sportio water beat.
The keyword searchable au Online Manual is also available on the au homepage:
http://www.au.kddi.com/manual/index.html
To access from EZweb:
•
Scan this QR code to access the au Online Manual. ▶
M ⇒ au one Top ⇒
オンラインマニュアル
auお客さまサポート
(Online Manual)
(au Customer Support) ⇒
Descriptions in This Manual
A
B
C
A
B
C
DD
FF
EE
GG
Note on Illustrations
■
The illustrations in this manual may look different from the actual cell phone in shape, color and typeface. The key
illustrations are also simplified as shown below.
Key Illustration
Key Illustration
[EGF
[EGF
A
A
ABDC
ABDC
S
B
B
C
C
S
H
H
Key Illustration
K<
L I M
D
N]
QR
TW
E
O[
!
J
%
S
U
P
Key Illustration
12
456
F
78
*0;
Y R W
A
G
D [ C
B
Descriptions in This Manual
3
9

Note on Screenshots
■
Descriptions in This Manual
The screenshots in this manual are simplified and may look
different from the actual cell phone screens.
The display design themes of the Sportio water beat
•
vary by model color. The screenshots for the Fresh
Green model are used in this manual.
■
Note on Operating Procedures
The operating procedures described in this manual are
based on operations performed using the side cursor key
(page 14). Operations with the touch panel (page 11) are
simpler than those with the side cursor key.
Also, the procedure for activating the virtual keypad (page
12) in each screen is omitted.
Example: Starting the calculator
When using the side cursor key:
When the standby screen is displayed, press [.
Use E to select TOOLS and then press
➡
[ (Select).
Use G to select Calculator and then press
➡
[ (Select).
The calculator starts.
When using the touch panel:
When the standby screen is displayed, tap <.
Tap TOOLS.
➡
Tap Calculator.
➡
The calculator starts.

Notes on Cell Phone Use
Cell Phone Etiquette
The cell phone always emits weak radio waves when power
is on.
Use the cell phone in an enjoyable and safe manner without
forgetting to be considerate of others around you.
Use of cell phones is not allowed in some places.
●
Do not use the cell phone while you are driving. Doing
•
so is both dangerous and prohibited by law.
Using a cell phone in an aircraft is prohibited by law.
•
Set Airplane Mode to ON and turn the cell phone
power off.
Radio waves from cell phones may interfere with
●
medical electrical equipment.
Some people close to you in crowded places such
•
as packed trains may be using a cardiac pacemaker.
Turn the cell phone off in such places.
Abide by the rules of hospitals and other medical
•
institutions where it is forbidden to use or carry cell
phones.
Be considerate of where you use the cell phone and
●
how loudly you talk.
Do not make calls in theaters, museums, libraries, and
•
other similar places. Turn power off or turn on manner
mode not to disturb others around you by ring tones.
Do not use the cell phone on a street where you might
•
interrupt the flow of pedestrians.
Move to areas where you will not inconvenience others
•
on trains or in hotel lobbies.
Refrain from talking in a loud voice.
•
Obtain the permission of other people before you take
•
their photos with the cell phone’s camera.
Do not record information with the cell phone’s camera
•
in bookstores and other locations where taking photos
is not permitted.
Notes on Cell Phone Use
Do Not Use the Cell Phone While Driving!
Turn off your cell phone or put it in Drive Mode while
driving.
Do not use the cell phone while driving a car/motorcycle
or riding a bicycle. It may result in a traffic accident. Using
a cell phone while driving is prohibited by law. Using a
cell phone while riding a bicycle may also be punishable
by law.
Prohibited!
Looking at a cell phone display
•
Talking on a cell phone while holding it
•
Drive Mode
In Drive Mode, a Japanese message meaning “I’m
driving now, so I can’t answer your call.” is played
when a call is received, and asks the caller to leave a
message on the answer memo.
When the standby screen is displayed, press
gG to select Drive, and then press {[ (Set).
hH, use
Disaster Message Board Service
When a large scale disaster occurs, you can register your
Notes on Cell Phone Use
safety information from EZweb. The registered information can
be referred from anywhere in Japan from EZweb or Internet.
When a large scale disaster occurs,
Registering
Registering
safety
safety
information
information
Inquiring
Inquiring
for safety
for safety
information
information
Access
The maximum storage period of the registered
•
information is 72 hours.
The maximum available number of registrations is ten
•
per phone number. When the number of registrations
exceeds ten, the oldest one is overwritten.
•
from an au phone, you can register your
safety information (i.e. your condition and
comments) to the 災害用伝言板 (Disaster
Message Board) created on the EZweb.
After registration of your safety
•
information, e-mail is sent to your family
or acquaintances you have previously
designated to notify that your safety
information has been uploaded to the 災
害用伝言板 (Disaster Message Board).
You can inquire for safety information
•
of a person by entering his/her phone
number from EZweb or Internet.*
* To inquire from other carriers’ cell
phone, a PHS or PC, access
“http://dengon.ezweb.ne.jp/”.
M ⇒ au one Top ⇒
Message Board)
http://dengon.ezweb.ne.jp/
災害用伝言板
(Disaster
The demonstration of this service can be referred to
•
anytime by tapping mM ⇒ au one Top ⇒
サポート
⇒
(Demo Version)).
To view the Disaster Message Board in English, select
•
English from the top menu of the Disaster Message Board.
(au Customer Support) ⇒
災害用伝言板(デモ版)
(Disaster Message Board
auお客さま
調べる
(Search)
Water Resistance
The Sportio water beat complies with IPX5*¹ and IPX7*²
water protection standards (JIS C 0920).
*1 IPX5 compliant means that this cell phone continues
to function as a phone after being subjected to a
water jet (approximately 12.5 liters/min.) discharged
from a nozzle (inner diameter: 6.3 mm), from all
directions (approximately three meters from the cell
phone) for three minutes or more.
*2 IPX7 compliant means that this cell phone
continues to function as a phone and no water
seeps inside after being gently lowered into a tank
filled with still tap water (at normal temperature) to
the depth of one meter, and immersed at the bottom
for approximately 30 minutes.
The Sportio water beat is resistant to fresh or tap water
•
at normal temperature (5°C - 35°C) only.
The Sportio water beat is resistant to water when the
•
external connection jack cover and battery pack cover
are closed firmly.
Malfunction resulting from misuse is not covered by
•
the warranty.

Contents
Introduction
Descriptions in This Manual
Notes on Cell Phone Use
Cell Phone Etiquette ……………………………………
Do Not Use the Cell Phone While Driving! ……………
Disaster Message Board Service ……………………
Water Resistance ………………………………………
Contents 5
Getting Ready
Checking the Contents of the Box …………………… 7
Names of Parts ………………………………………… 8
Replacing the Battery Pack …………………………… 9
Charging the Battery Pack …………………………… 0
Operating the Touch Panel ……………………………
Operation Using the Side Cursor Key …………………
Using the AV Menu ……………………………………
Learning the Basics ……………………………………
Turning On Power ……………………………………… 7
Switching the Display Language to English ………… 7
Initial Setup of E-mail and EZweb …………………… 7
Checking Your Phone Number and E-mail Address … 7
Display Indicators ……………………………………… 8
Using Main Menu ……………………………………… 9
Changing Your E-mail Address ……………………… 0
Security Code and Passwords …………………………
Making and Answering Calls 22
Making a Call ……………………………………………
Making an International Call ……………………………
1
3
Answering a Call ………………………………………
Returning a Call (Outgoing History/Incoming History)
One-ring Calls ……………………………………………
Adjusting the Earpiece Volume during a Call ………
Turning On Manner Mode ………………………………
Changing the Incoming Ring Tone ……………………
Adjusting the Incoming Ring Tone Volume …………
Turning On the Answer Memo ………………………… 6
Global Function 27
7
Setting the Area ………………………………………… 7
Obtaining the Latest PRL (Preferred Roaming List) … 7
Calling Japan from Overseas ………………………… 8
Character Input 29
Character Entry Modes ………………………………… 9
Entering Alphanumeric Characters …………………… 9
Entering E-mail Addresses …………………………… 0
Entering Pictograms ……………………………………
Phone Book 32
Saving a Phone Book Entry ……………………………
Dialing from the Phone Book …………………………
Editing Phone Book Entries ……………………………
Saving a Phone Number from the Incoming
or Outgoing History ……………………………………
…
Contents

Pair Function 34
Registering a Pair Partner ……………………………
Making a Call to a Pair Partner ………………………
Sending Mail to a Pair Partner …………………………
Contents
Mail 35
Using E-mail ……………………………………………
Creating and Sending E-mail Messages ……………
Reading Received E-mail Messages ………………… 6
Reading an E-mail Message
with an Attached Photo or Movie ……………………… 6
Replying to Received E-mail Messages ……………… 6
Rejecting Spam ………………………………………… 7
Using C-mail …………………………………………… 8
Creating and Sending C-mail Messages …………… 8
Reading Received C-mail Messages ………………… 8
Camera 39
Photo Taking Tips ……………………………………… 9
About Photo Modes …………………………………… 0
Taking a Photo ………………………………………… 0
Viewing Photos ………………………………………… 0
EZweb 41
Accessing Sites …………………………………………
Bookmarking Frequently Accessed Pages …………
Viewing Bookmarked Pages …………………………
Checking Charges ………………………………………
Downloading Chaku-Uta-Full-Plus™/
Chaku-Uta-Full®/Chaku-Uta® …………………………
EZ News Flash/au one Gadget 45
Basic Operations ………………………………………
Setting EZ News Flash …………………………………
EZ Navi 47
Passenger Seat Navi for People
in the Passenger Seat to Check the Route ………… 7
Security Navi to Check Where Your Kids Are ……… 7
EZ Navi Walk for When You Go Out ………………… 8
Evacuate Navi to Guide You Home or to Nearby
Evacuation Areas during Disasters …………………… 9
TV (1Seg) 50
Initial Setup of au Media Tuner ………………………
Watching TV (Seg) ……………………………………
Basic Operations ………………………………………
Exiting the au Media Tuner ……………………………
In Case of Loss of Your Sportio water beat
Setting Conditions for Activating
the Remote Ctrl Lock ……………………………………
Remotely Activating the Remote Ctrl Lock
on Your Sportio water beat ……………………………
Activating the Remote Ctrl Lock
by the Security Lock Service …………………………
53
Troubleshooting 55
Index 5
7
6
Getting Ready
Checking the Contents of the Box
The box contains the cell phone and accessories.
Cell Phone• Battery Pack• CD-ROM
An AC adapter, earphone plug adapter 01 for external connection jack, USB cable, stereo earphone, and microSD
•
memory card are not included with your cell phone. Purchase these items separately.
•
Instruction Manual (Japanese)
•
Warranty (Japanese)
•
Safety Precautions (Japanese)
•
Global Passport CDMA Owner’s Guide (Japanese)
•
Osaifu-Keitai® Guide (Japanese)
•
JIBUN BANK Launcher Operation Guide (Japanese)
•
Touch Panel Operation Guide (Japanese)
•
Notice Sheet (Japanese)
•
Getting Ready
7
8
Getting Ready
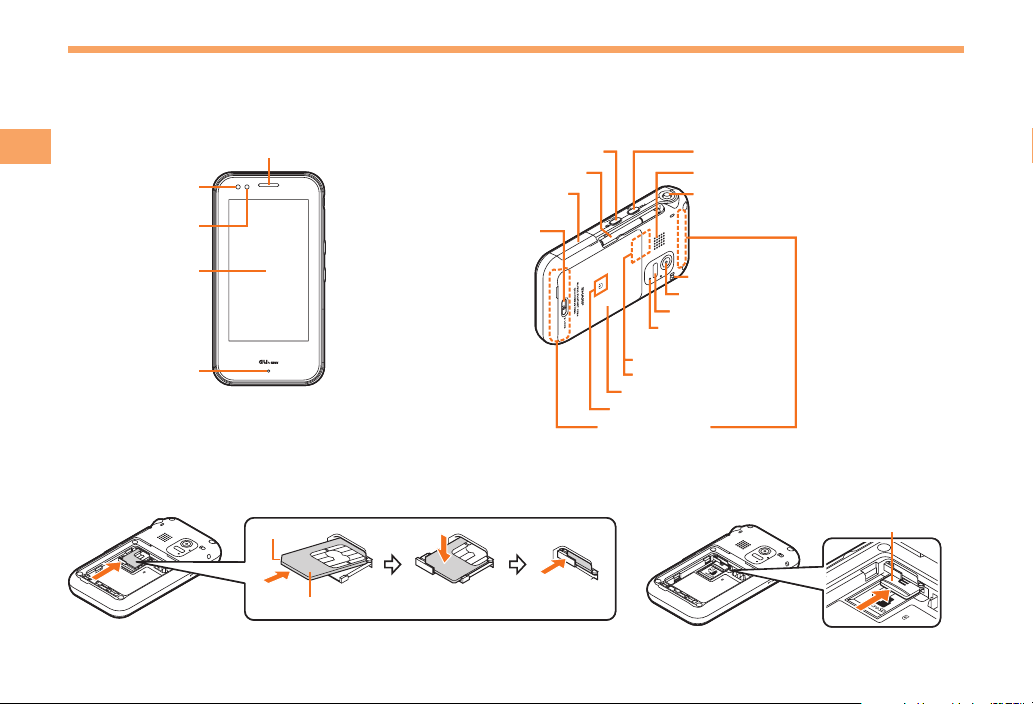
Names of Parts
Earpiece
Incoming/Charge
indicator
Light sensor
Display
Microphone
Earpiece
Incoming/Charge
indicator
Light sensor
Display
Microphone
Side clear/manner key
Television antenna
External connection jack/
cover
Lock slider
Power/End key
Speaker
Side cursor key
Strap eyelet
Camera lens
Infrared port
Camera confirmation
light
Internal au IC-Card
microSD memory card slot
Battery pack/cover
FeliCa mark
Internal antennas
Side clear/manner key
Television antenna
External connection jack/
cover
Lock slider
Power/End key
Speaker
Side cursor key
Strap eyelet
Camera lens
Infrared port
Camera confirmation
light
Internal au IC-Card
microSD memory card slot
Battery pack/cover
FeliCa mark
Internal antennas
* Do not remove this card unnecessarily as your phone number is recorded on it.
au IC-Card*
Cutout
* Do not remove this card unnecessarily as your phone number is recorded on it.
au IC-Card*
Cutout
* Insert this card with the microSD logo side up.
microSD memory card*
* Insert this card with the microSD logo side up.
microSD memory card*
From Front ■
Diagonally from Back ■
Tab
1
Contacts
2
3
Lock slider
1
2
Lock slider
Battery pack
Tab
3
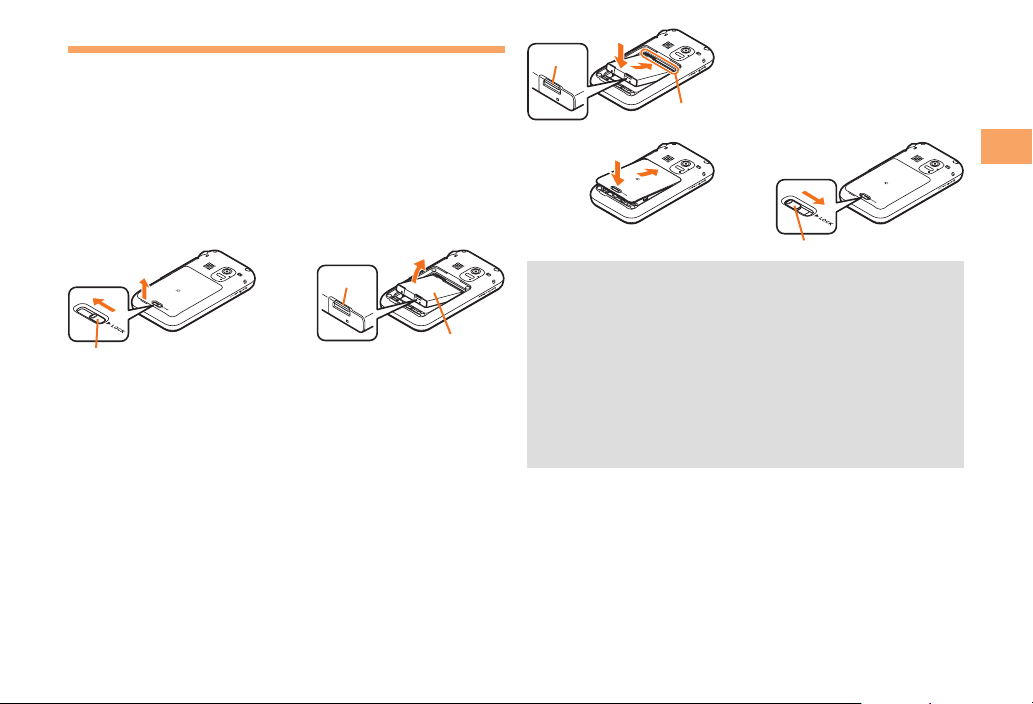
Replacing the Battery Pack
Removing the Battery Pack
■
Move the lock slider in the direction of the
➡
arrow.
Remove the battery pack cover on the back of
➡
the cell phone by lifting it up.
Remove the battery pack by pulling up the tab
➡
on the end of the battery pack.
Attaching the Battery Pack
■
Check the contacts position on the cell phone
➡
and then attach the battery pack securely.
Insert the tab of the battery pack cover into the
➡
groove of the cell phone, and then close the
battery pack cover properly.
Move the lock slider to the “LOCK” position in
➡
the direction of the arrow.
When removing the battery pack, turn the cell phone
•
power off.
Before attaching the battery pack, make sure that the
•
au IC-Card is inserted.
When attaching the battery pack, make sure that the
•
battery pack cover is closed properly so that it does
not open so as to maintain water resistance.
Failure to follow the correct procedure when removing
•
or attaching the battery pack may result in damage to
the battery pack or the battery pack cover.
Getting Ready
9
0
Getting Ready
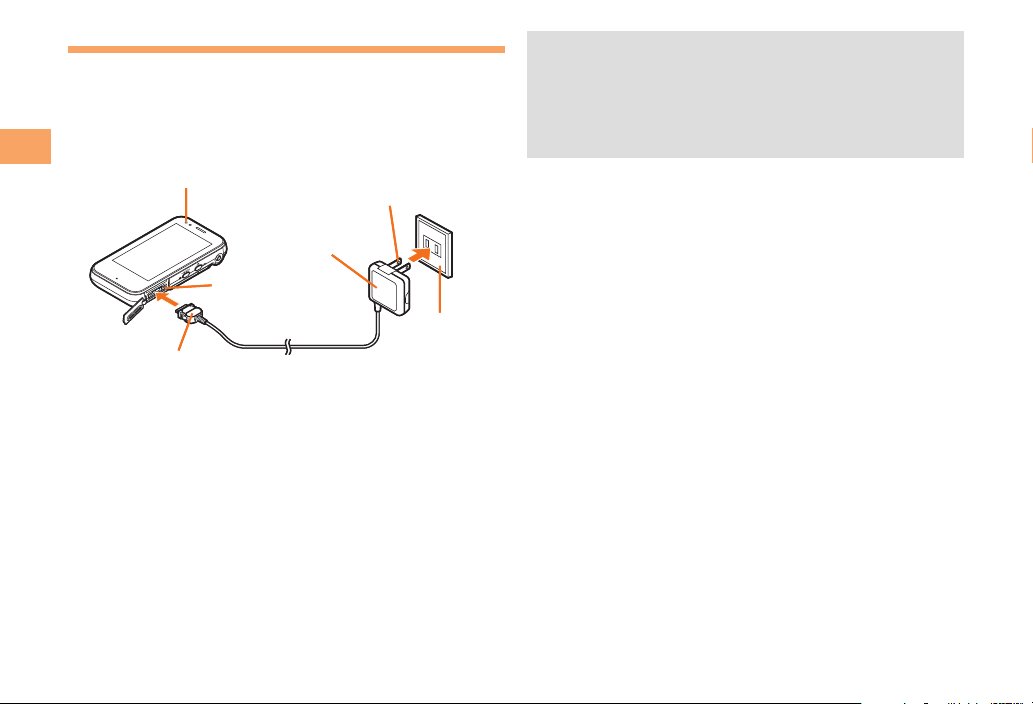
Charging the Battery Pack
1
2
Incoming/Charge indicator
3
Connector
100 V AC
power outlet
Power plug
AC adapter
External
connection jack
1
2
Incoming/Charge indicator
3
Connector
100 V AC
power outlet
Power plug
AC adapter
External
connection jack
The battery pack is not fully charged at the time of purchase.
Be sure to charge the battery pack before using the cell
phone for the first time.
An AC adapter is not included with your cell phone.
•
Purchase a specified AC adapter (sold separately).
Connect a specified AC adapter to the cell
➡
phone with the battery pack attached.
Open the cover of the external connection jack. Check
•
the shape of the connector of the AC adapter, and
plug it straight into the external connection jack.
Unfold the power plug of the AC adapter and plug
➡
it into a 100 V AC power outlet.
Confirm that the incoming/charge indicator lights.
➡
Charging: The incoming/charge indicator lights.
•
Charging finished: The incoming/charge indicator
•
goes out.
Be sure to close the cover of the external connection
•
jack when charging is finished.
Do not pull or twist the cover of the external
•
connection jack forcibly.
Be sure to use the common AC adapter 02 (sold
•
separately) when charging overseas.
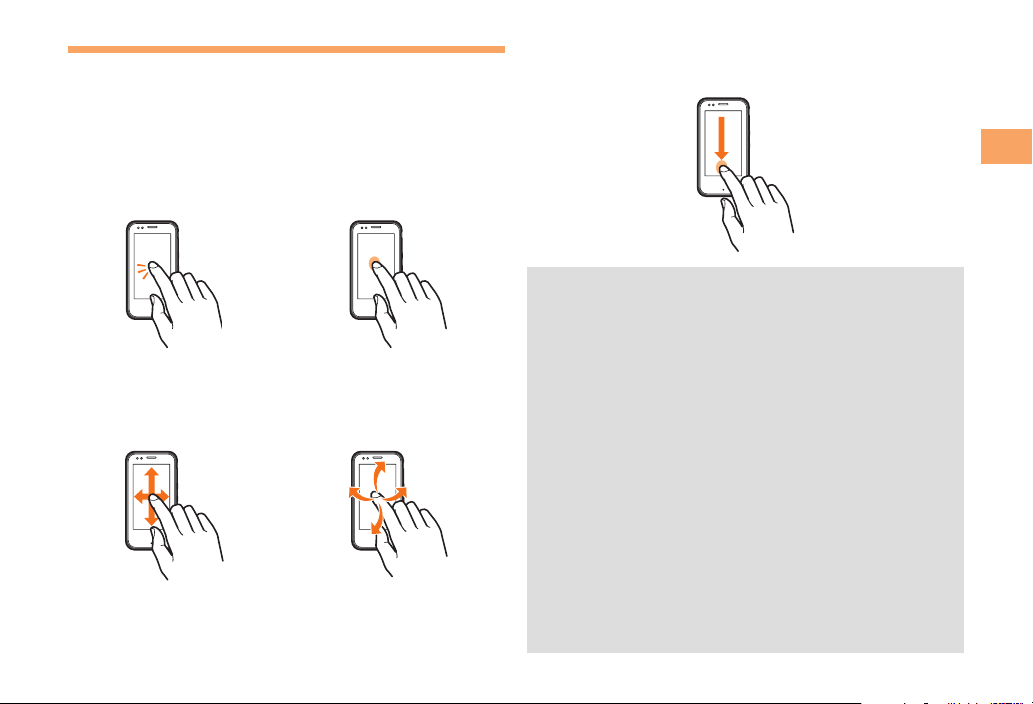
Operating the Touch Panel
You can operate Sportio water beat by directly touching the
screen.
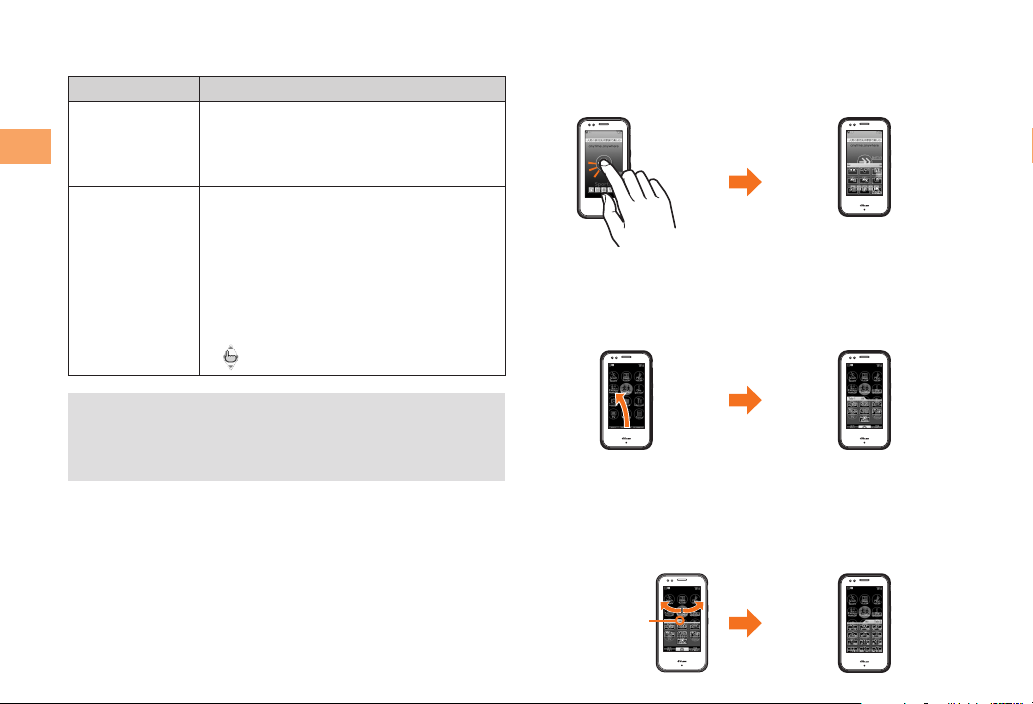
Basic Operations
■
Tap
Gently touch an item or
button and then immediately
release your finger.
Slide
While your finger is gently
touching an item, drag it to
the desired position.
Long Touch
Keep touching an item or
button.
Flick
Operate the screen by
quickly moving (flicking) your
finger up, down, right, or left.
Slide and Long Touch
While your finger is gently touching an item, drag it to the
desired position and then keep it in a stopped state.
Use one finger to perform touch operations. Operation
•
may not be possible when operations such as the
following are performed.
Operation with a finger when you are wearing gloves
•
or operation with a fingernail
Operation with an object that has a sharp tip such as
•
a ballpoint pen or pencil
Operation while foreign matter is on the display
•
Be careful because the following cases may result in
•
misoperation.
Operation with a touch pen
•
Operation with a wet finger
•
Operation while the display is wet
•
Operation in which the touch panel is pressed hard
•
Operation while your hand is touching the area
•
surrounding the touch panel
Operation while a sticker or sheet (commercially
•
available protective sheet, privacy screen sticker,
etc.) is stuck on the touch panel
Getting Ready
Getting Ready
Operation Modes
■
The following two operation modes are available.
Mode Description
Touch Panel
Mode
Flick Arrow Key
Mode
You can use the side cursor key to select/execute an
•
item regardless of the operation mode.
Even in Touch Panel mode, performing an operation
•
by tapping may not be possible in some cases.
Using the Virtual Keypads
■
This function is for displaying the operation keys, number
keys, and other items on the screen. You can display a
virtual keypad by flicking or tapping on the screen.
Allows you to directly tap the screen to
select/execute the desired item. You
can also slide the cursor or scroll the
screen.
Does not allow you to directly tap the
screen to select/execute the desired
item. Flick the screen to move the
cursor to the desired item and then
directly tap the indication, such as
“OK”, at the bottom of the screen to
execute the item.
When you are in this mode,
•
appears at the top of the screen.
Virtual Keypad for the Standby Screen
You can display this when the standby screen is displayed
and nothing is selected by tapping the wallpaper part or
flicking upward from the bottom of the screen.
Virtual Keypad 1
You can display this in various Touch Panel mode screens
such as the Main menu screen by flicking upward from the
bottom of the screen.
Virtual Keypad 2
You can display this when the virtual keypad for the
standby screen or virtual keypad 1 is displayed by tapping
the arrow at the top of the virtual keypad or flicking in either
the right or left direction.
Tap the arrow.
Virtual Keypad for Flick Arrow Key Mode
You can display this by tapping the screen in Flick Arrow
Key mode.
You can close a virtual keypad by tapping “Close” at
•
the top of the virtual keypad, flicking downward, or
tapping the background part.
Adjusting the Touch Panel
■
If you are unable to perform selection of keys and items
with the touch panel as intended, please adjust the touch
panel.
When the standby screen is displayed, press [.
Use E to select SETTINGS and then
➡
press [ (Select).
Use G to select Touch Panel Adj and
➡
then press [ (Select).
Tap the centers of the six circles
➡
displayed on the screen in the
vertical screen position.
Rotate Sportio water beat to the left horizontal,
➡
and tap the centers of the six circles displayed
on the screen.
The message “Touch panel adjustment is finished” is
displayed once all of the circles have changed color.
To adjust the touch panel, perform the steps with the
•
finger you normally use in a position allowing for ease
of operation.
Getting Ready
Getting Ready
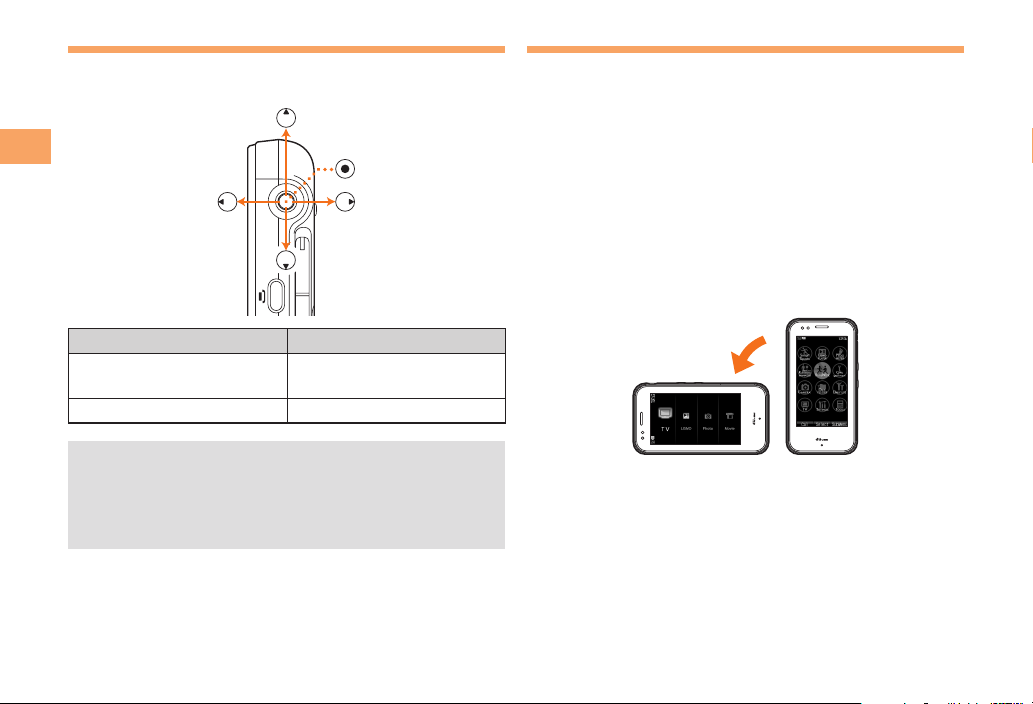
Operation Using the Side Cursor Key
Sportio water beat allows you to perform operations using
the side cursor key instead of the touch panel.
Side Cursor Key Operation Description
Tilt up/down/right/left Moves the cursor up,
Press straight down Performs an operation.
When using the side cursor key in the up, down, right,
•
or left direction, push the key in the desired direction
with the ball of your finger. You may not be able to
use the side cursor key correctly in some cases using
other parts of your finger such as the fingernail.
down, right, or left.
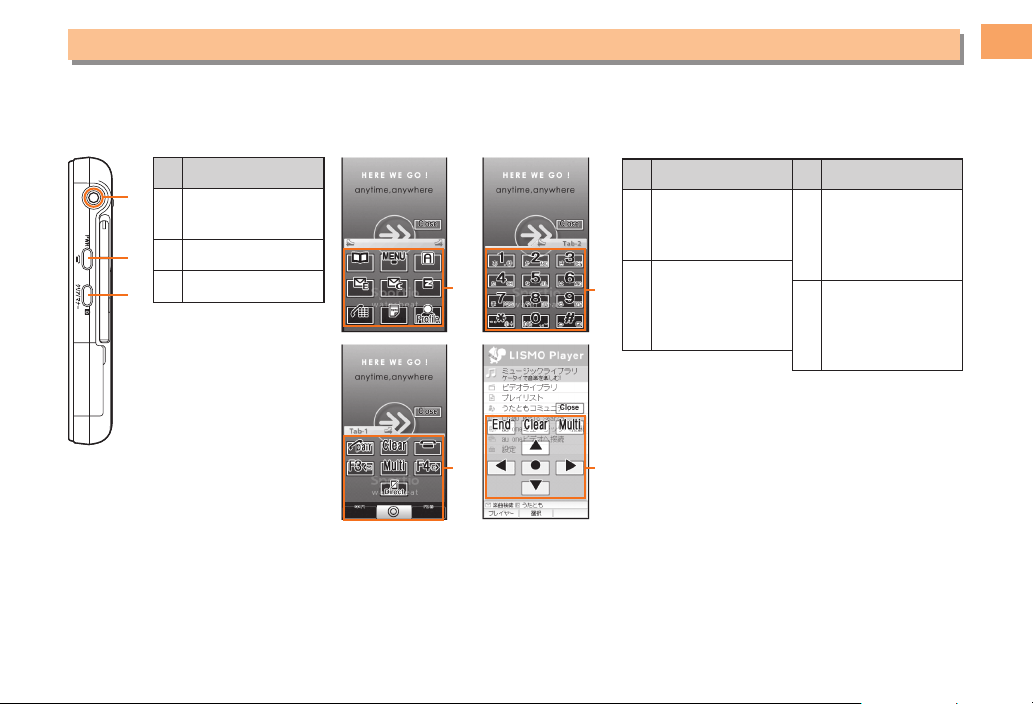
Using the AV Menu
With Sportio water beat, you can start the TV or camera
from the AV menu.
Each function is started in a horizontal screen from the AV
menu.
Rotate Sportio water beat to the left horizontally
when the Main menu screen is displayed, or
rotate Sportio water beat to the left horizontally
and then press [ when the standby screen is
displayed.
Use F to select the desired function, and
➡
then press [.
#
%
&
$
=
5
*
: Display the ticker field, search
window, info pane and gadget
(setting icon).
: Display Outgoing History.
: Display Incoming History.
: Display the Notification window
and Shortcut menu.
: Display Main menu.
: Turn power on/off (long press).
End call/communication.
Cancel operation.
: Display Manner Mode menu.
Set/cancel manner mode
(long press).
Cancel operation.
,
.
+
/
0
?
: Use Phone Book.
: Display Main menu.
: Display EZapps menu.
: Display E-mail menu.
: Display C-mail menu.
: Display EZ Service menu.
: Display Phone number entry
screen.
: Display Voice/Memo menu.
: Display Profile screen.
Learning the Basics
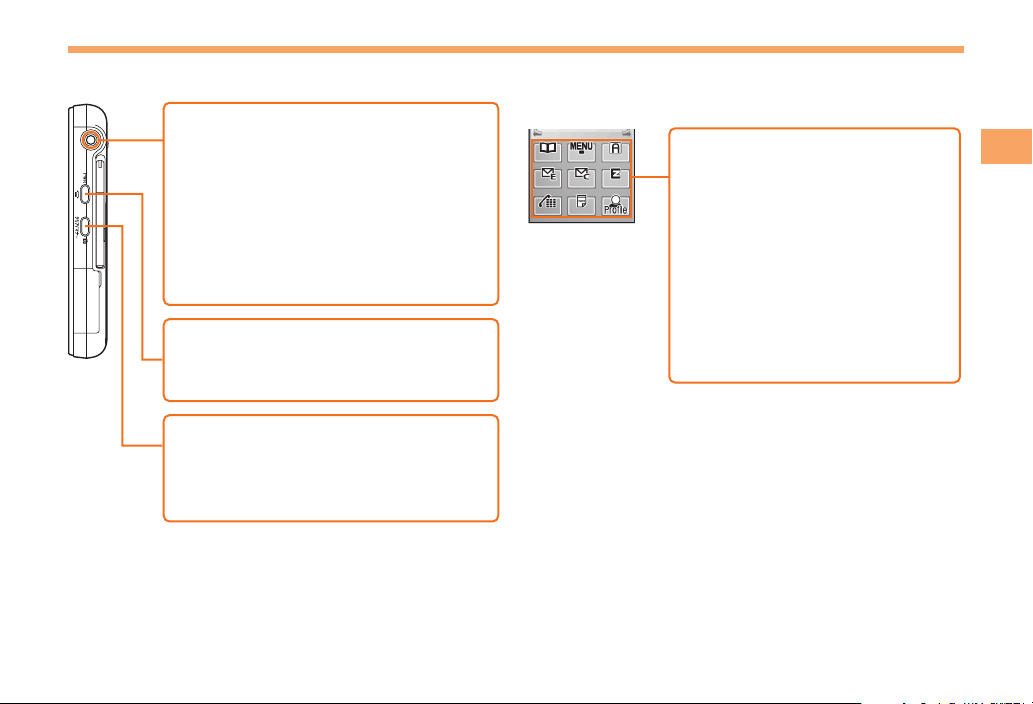
Side Key Assignments
■ Virtual Keypad Key Assignments
■
Virtual Keypad for the Standby Screen
Getting Ready

6
Getting Ready
Virtual Keypad 1
3
4
5
6
9
7
1
=
2
: Use the Pair function.
Make/answer calls.
: Display Voice/Memo menu.
Delete characters.
Cancel operation.
: Turn power off (long touch).
End call/communication.
Cancel operation.
: Display previous screen.
Display E-mail/C-mail menu.
: Start another function
during a call or operation.
: Display next screen.
Display EZ Service menu.
: Start function preset as
Direct Start Key.
Set/cancel new Veil View
(long touch).
: Select/execute left soft key
at the bottom of the screen.
Use Phone Book.
: Perform operation.
Display Main menu.
: Select/execute right soft key
at the bottom of the screen.
Display EZapps menu.
㨪
:
Input phone numbers and
characters.
;
4
9
#
&
=
%
$
: End current screen.
: Cancel operation.
: Start another function during
a call or operation.
: Move cursor up.
: Move cursor left.
: Perform operation.
: Move cursor right.
: Move cursor down.
Virtual Keypad 2
Virtual Keypad for Flick Arrow Key Mode
If you lose track of where you are or if you make a
•
mistake, press hH (side key) or tap rR (virtual key)
to return to the previous screen. Return to the standby
screen by holding down sS (side key) or keeping
touching sS (virtual key) for at least one second.
Hiding/Redisplaying the
■
Notification windowNotification window
Notification Window
When the notification window is displayed
on the standby screen, you can
temporarily hide it by tapping Back, and
then display the Main menu by pressing
[
. To redisplay a hidden notification
window, press B or flick downward
when the standby screen is displayed.
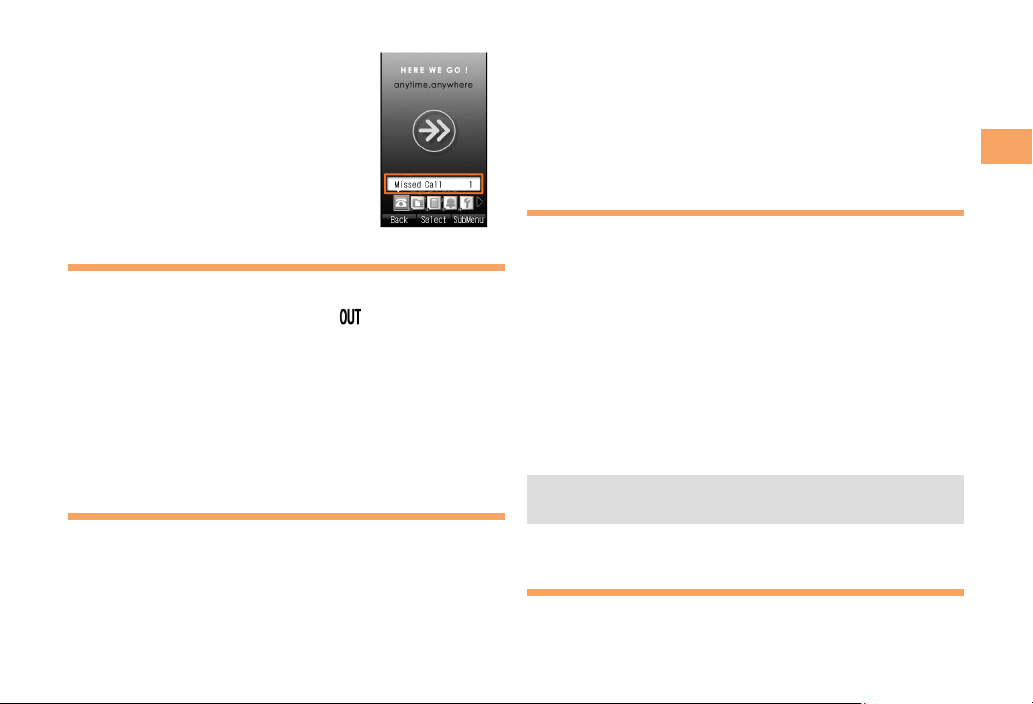
Turning On Power
Hold down S (side key) for at least one second.
You cannot receive or make calls if (out of range
•
indicator) is displayed.
Turning Off Power
■
When the standby screen is displayed, hold down
S (side key) or keep touching S (virtual key) for at
least one second.
Switching the Display Language to English
You can switch the display language for function names
and other items to English.
When the standby screen is displayed, press [.
Use E to select 設定 (Settings) and then press
➡
[ (選択 [Select]).
Use G to select
➡
画面表示
(Screen Display) and
then press [ (選択 [Select]).
Use G to select Set Language and then press
➡
[ (選択 [Select]).
Use G to select English and then press
➡
[ (Set).
Initial Setup of E-mail and EZweb
To use e-mail and EZweb, you need to apply for an EZweb
subscription. If you did not apply for an EZweb subscription
at the time of purchase, contact an au shop or the au
Customer Service Center.
Also, before use, you need to configure initial settings. Your
e-mail address is assigned automatically in the initial setup.
When the standby screen is displayed, tap
Press [ (OK).
➡
After a short while, your e-mail address is displayed.
Press [ (OK).
➡
The initial settings are complete.
You can also configure initial settings by tapping mM
•
or jJ.
L.
Checking Your Phone Number and E-mail Address
When the standby screen is displayed, tap %.
Getting Ready
7
 Loading...