


KCS Digital, Inc.
http://www.KCSDigital.com
DIGIZON 211B
USER MANUAL
Thank you for purchasing on DIGIZON.
For the first installation, please fully understand entire content and
description. We will guide you through the installation setup program
process and you will have the boundless enjoyment.
I. DIGIZON Introduction
A) Checklist / p. 1
B) System Requirement / p. 1
C) Hardware Connection / p. 2
II. Watch TV on PC
A) PC Player Installation/ p. 3
B) About PC Player / p. 4
C) Player and Control Panel / p. 4
D) Connect to DIGIZON / p. 5
E) TV Channel Scan / p. 5
F) Start to Watch TV / p. 7
G) Disconnect from DIGIZON / p. 8
III. Advanced Setting
A) Channel Setting/ p. 9
B) Network Setting/ p. 10
C) Preference/ p. 11
D) Management/ p. 12
E) AV Channel Setting/ p.13
F) About/ p. 16
Appendix A. Setting UPnP and DMZ/ p.15

DIGIZON III
Installation

[1]
MY DIGIZON USER MANUAL
I. DIGIZON Introduction
A) Checklist
B) System Requirement
1. Source:Cable TV (NTSC/PAL)
2. Network Connection
a. ADSL/WiMAX (Minimum transmission bandwidth: 256Kbps)
b. IP Sharing Device/Router (Wired Network)
c. Ethernet Cable (Product accessories included, please refer to Checklist.)
3. PC System Requirement
a. OS: Windows 7/ Vista/XP
b. CPU: Pentium 4, 1.2GHz or above (MMX, SSE, and SSE2 support)
c. Memory: 256MB or above
d. Display Card/Sound Card: DirectX compatible

[2]
MY DIGIZON USER MANUAL
C) Hardware Connection

[3]
MY DIGIZON USER MANUAL
II. Watch TV on PC
A) PC Player Installation
Step 1. Insert the installation CD and installation will start automatically. If not,
please double click the icon named “Setup” in the root directory.
Step 2. Language Selection: English/Korean/Japanese/Traditional Chinese.
Step 3. Select a folder where the application will be installed automatically.
Step 4. Follow the introduction till installation finished. Click the “Finish” button
to exit this installation.

[4]
MY DIGIZON USER MANUAL
B) About PC Player
Step 1. Click the desktop shortcut of “DIGIZON Player,”
and the panel shows.
C) Player and Control Panel
Key
Function
Connect to DIGIZON/Disconnect from DIGIZON
Video Source
Dropdown menu
Channel setting
Numeric pad
( Last choice; Enter.)
Up/down: Channel control
Left/right: Volume control
Advanced Setup
-Minimize
-Double Size
-Full Screen
-Close
[5]
MY DIGIZON USER MANUAL
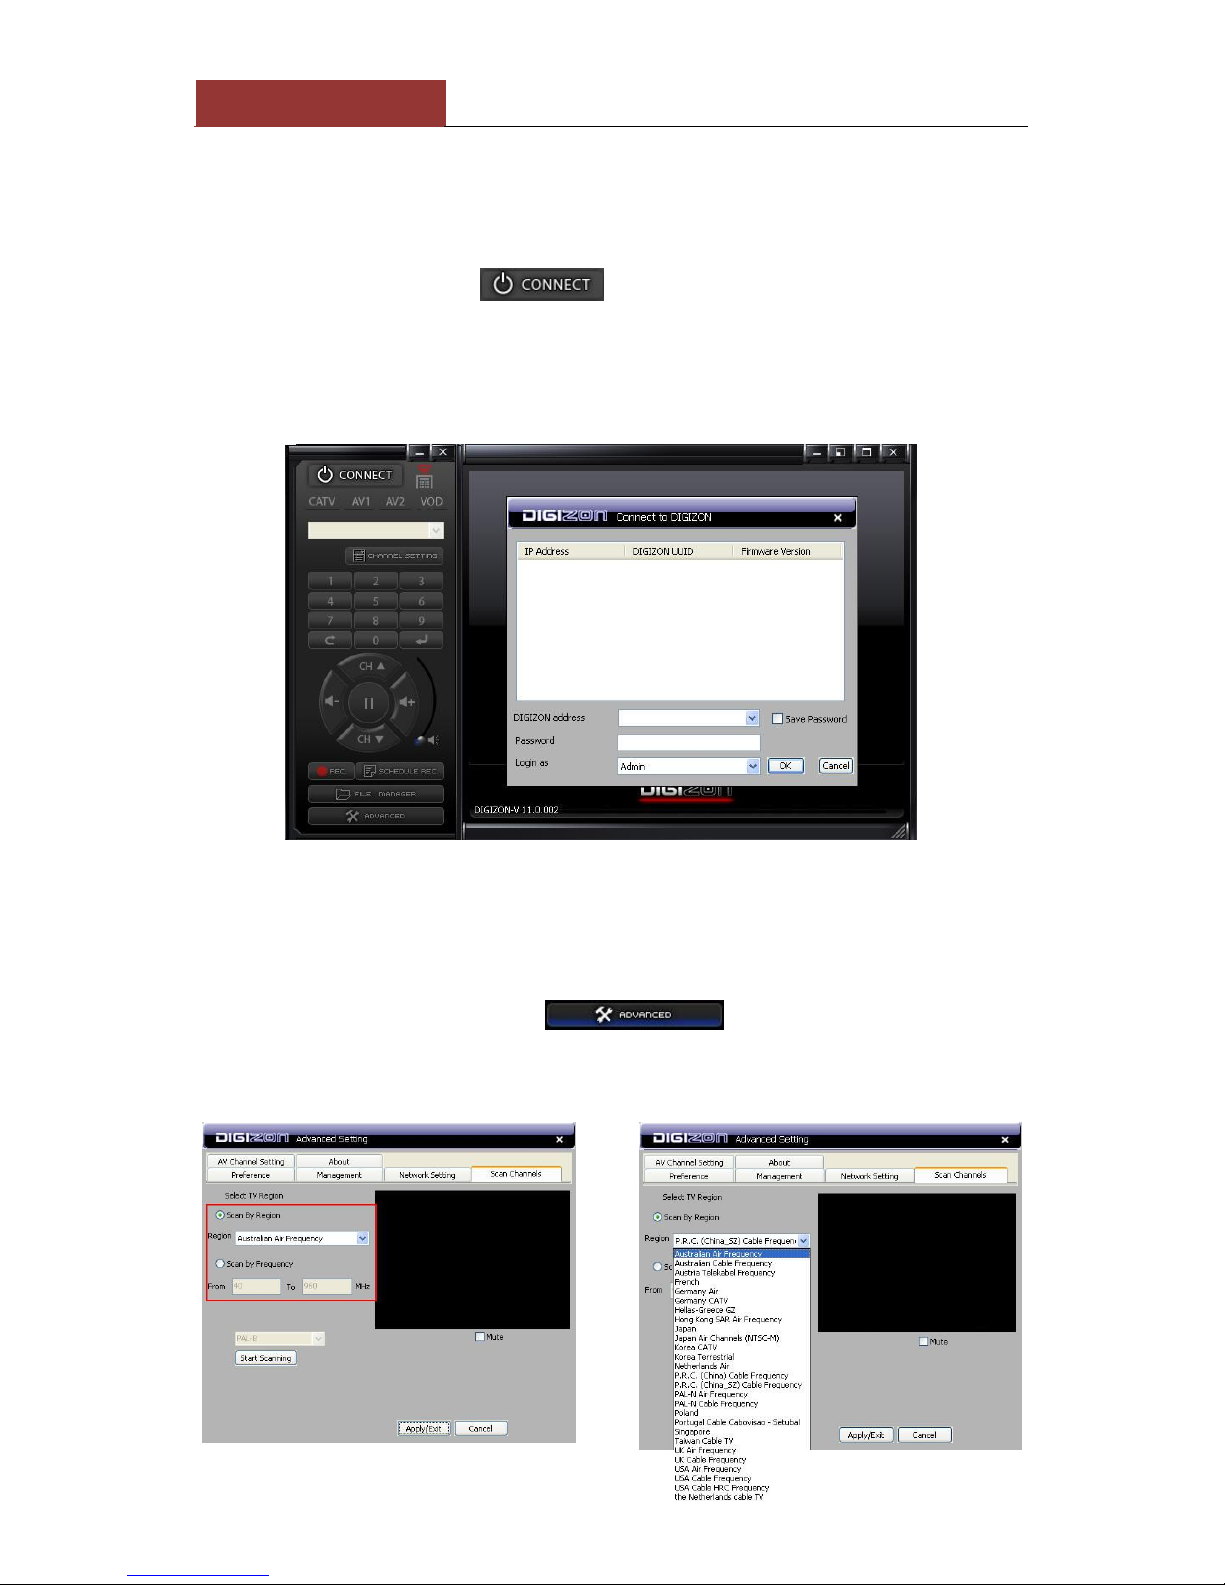
D) Connect to DIGIZON
Step 1. Power on the router/AP and DIGIZON.
Step 2. Make sure the Ethernet cable is well connected.
Step 3. Click “Connect.”( )
Step 4. Enter DIGIZON ID which is labeled at the bottom of DIGIZON box and
password. (Null as default.)
Step 5. It takes a few minutes to setup the connection configuration.
E) TV Channel Scan
For the user to use DIGIZON at first time and TV source is from cable or antenna,
please take this step.
Step 1. Click “Advanced” ”Scan Channels.”
Step 2. Choose the region from the region list”Start Scanning.”

[6]
MY DIGIZON USER MANUAL
Step 3. It takes 5 to 10 minutes to scan. And you can enable “Mute” during
scanning.
Step 4. Click “Apply/Exit” when Finish.
[7]
MY DIGIZON USER MANUAL
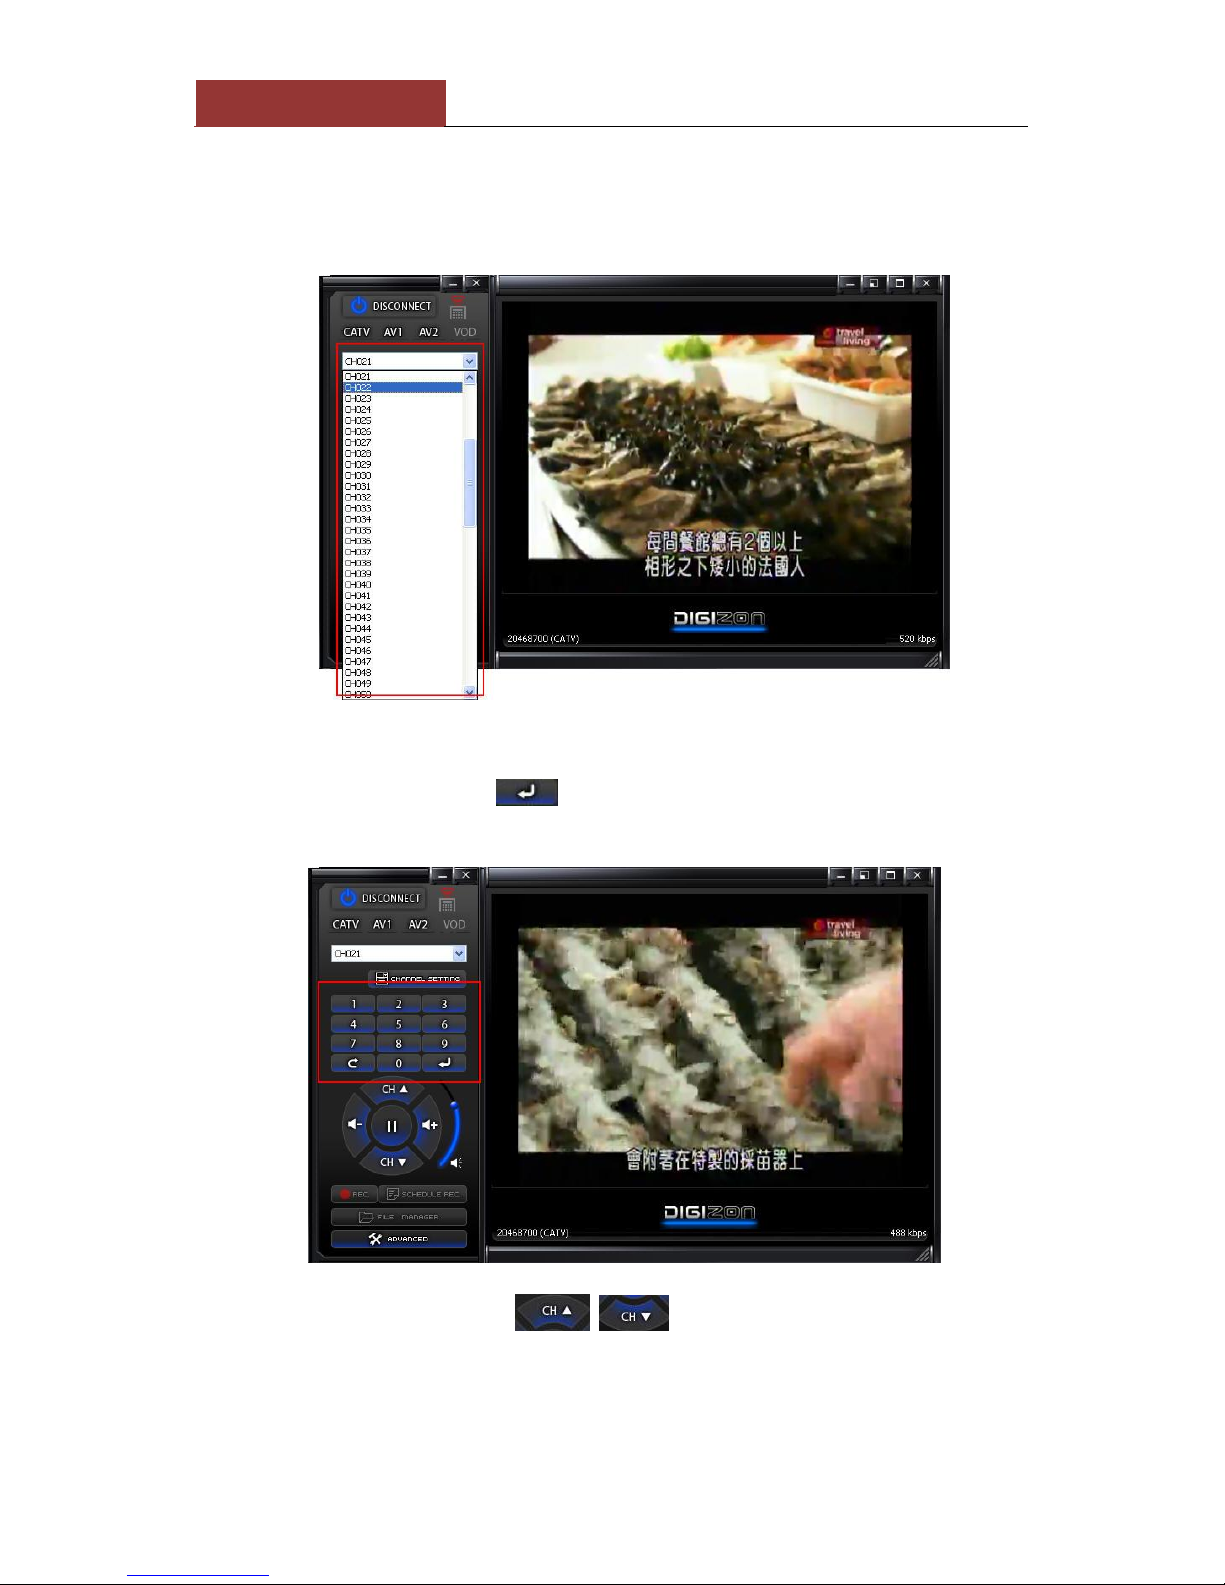
F) Start to Watch TV
1. Switch channels
1-1 Using dropdown channel list.
1-2 Using the numeric pad and enter the number of channel which you want
to watch, and press or wait about 5 seconds, then it will switch
channel automatically.
1-3 To switch channels by on the panel, or press up/down key
on the keyboard.

[8]
MY DIGIZON USER MANUAL
2. Volume Control
2-1 (Volume down), (Volume up),or up/down to control volume.
2-2 Using right/left key on keyboard can control volume as well.
G) Disconnect from DIGIZON
Click “Disconnect”( ) or press on the top right corner of the
player and will disconnect from DIGIZON.

[9]
MY DIGIZON USER MANUAL
III. Advanced Setting
A) Channel Setting (Click )
1. Name channel: Select the channel from the list, and enter channel (in
22 characters) and press “Set” to confirm the setting.
2. Enable/Disable the channel: The disabled channel is still on the list, and you
can enable it whenever you need.
3. Backup/Restore data: For saving channel information.
[10]
MY DIGIZON USER MANUAL
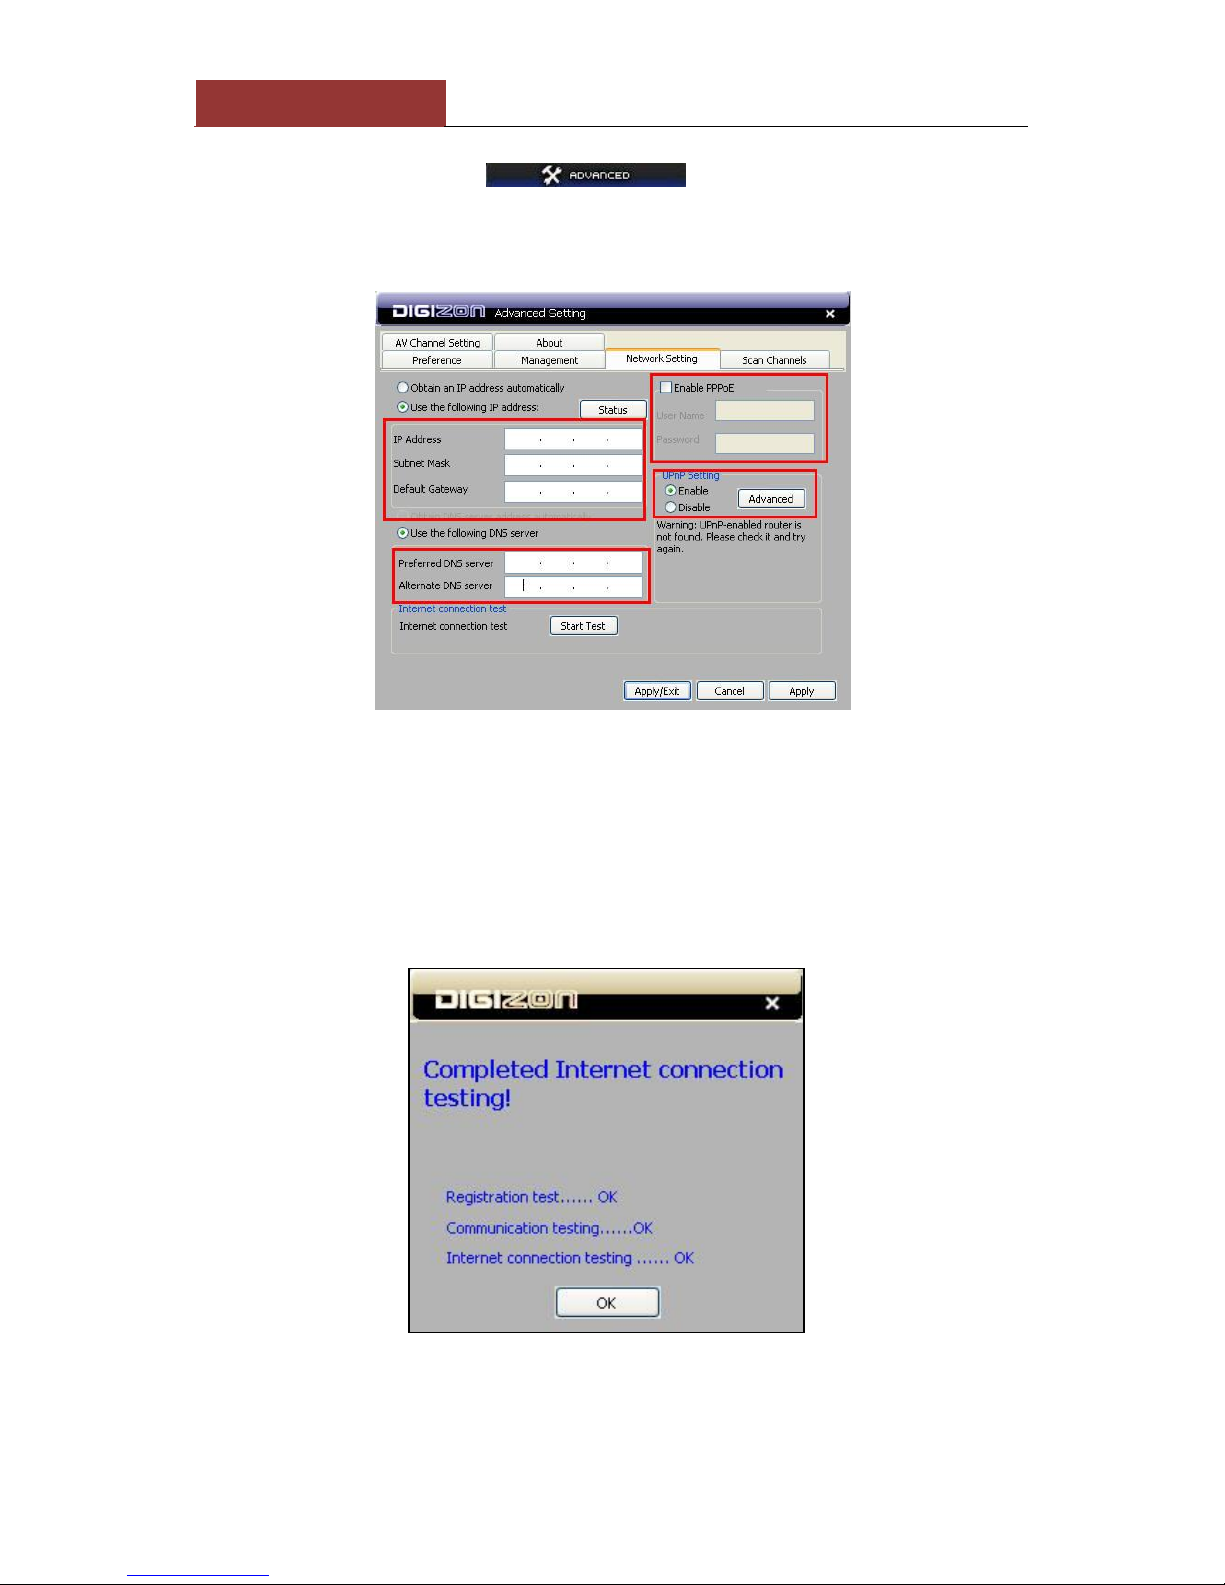
B) Network Setting (from )
Step 1. The settings are for remote use through internet.
Step 2. Assign the IP and DNS address for DIGIZON, if necessary.
Step 3. Internet Connection Test : Press “Start Test” to test internet
connection. It will show “Registration test”,” communication test”,
and “Internet connection test” is ok or not. If “ok”, it means user
can connect to DIGIZON easily. (Please refer to the Appendix A, if PC
couldn’t connect to DIGIZON.)

[11]
MY DIGIZON USER MANUAL
C) Preference
1. Set the comfortable brightness and contract.
2. Speed Test: Select “Speed Test”, it will take about 1 minute to test, and
it will show the internet speed.
3. Player Setting
Step 1. When speed test finished, user will find internet condition, then
choose the best video/audio quality for DIGIZON.

[12]
MY DIGIZON USER MANUAL
Step 2. User Define: Click “Set Parameter” and start to set video
(bitrates, resolution, frame rate), audio (bitrates). When finish
setting, press “OK” to confirm the configuration.
Step 3. Back to main interface of preference, and click “Apply/Exit”to
confirm the configuration.
D) Management
1. Change Password
Enter current password, null as default.
Enter new password and retype to confirm.
The new password will be effective after rebooting.

[13]
MY DIGIZON USER MANUAL
2. Set Guest Time
Enter limit time for guest to log in and press “OK” to confirm.
Management-reboot, set guest time, set com. Port, set alias.
E) AV Channel Setting
1. Connecting hardware: Connecting of the en AV Cable to AV Output of the
video equipment, and then connect the other end to AV1 (or AV2.) Clipping the
enclosed IR Emitter to IR receiver port of video equipment, and the connect the
jack end to the IR Emitter of DIGIZON.
2. IR Learning
Step 1. Select AV1 (or AV2) and press “Add profile.” Please enter the profile
name of the remote controller and press “Add.”

[14]
MY DIGIZON USER MANUAL
Step 2. Select the name of profile and press “Learn.”
Step 3. IR Learning: Take the number “1” for example. Click “1” on
control panel of DIGIZON, then put your STB remote controller
censor aim at DIGIZON censor (within 3 to 4 cm is suggested.) Press
“1” on your STV remote controller.
Step 4. If the key has been set successfully, then the color of key will be
changed from grey to green and show“key learning successfully.”

[15]
MY DIGIZON USER MANUAL
Step 5. Repeat the process of configuration to complete the setting. If you
want to stop IR Learning, please press “Test,” and it will stop
immediately.
Step 6. After IR learning, the key on control panel will become white. (If the
key hasn’t been set or failed, it will be grey one.)
Step 7. Saving profile. Path of saving: Advanced→AV Channel Setting→Save
profile.
[16]
MY DIGIZON USER MANUAL
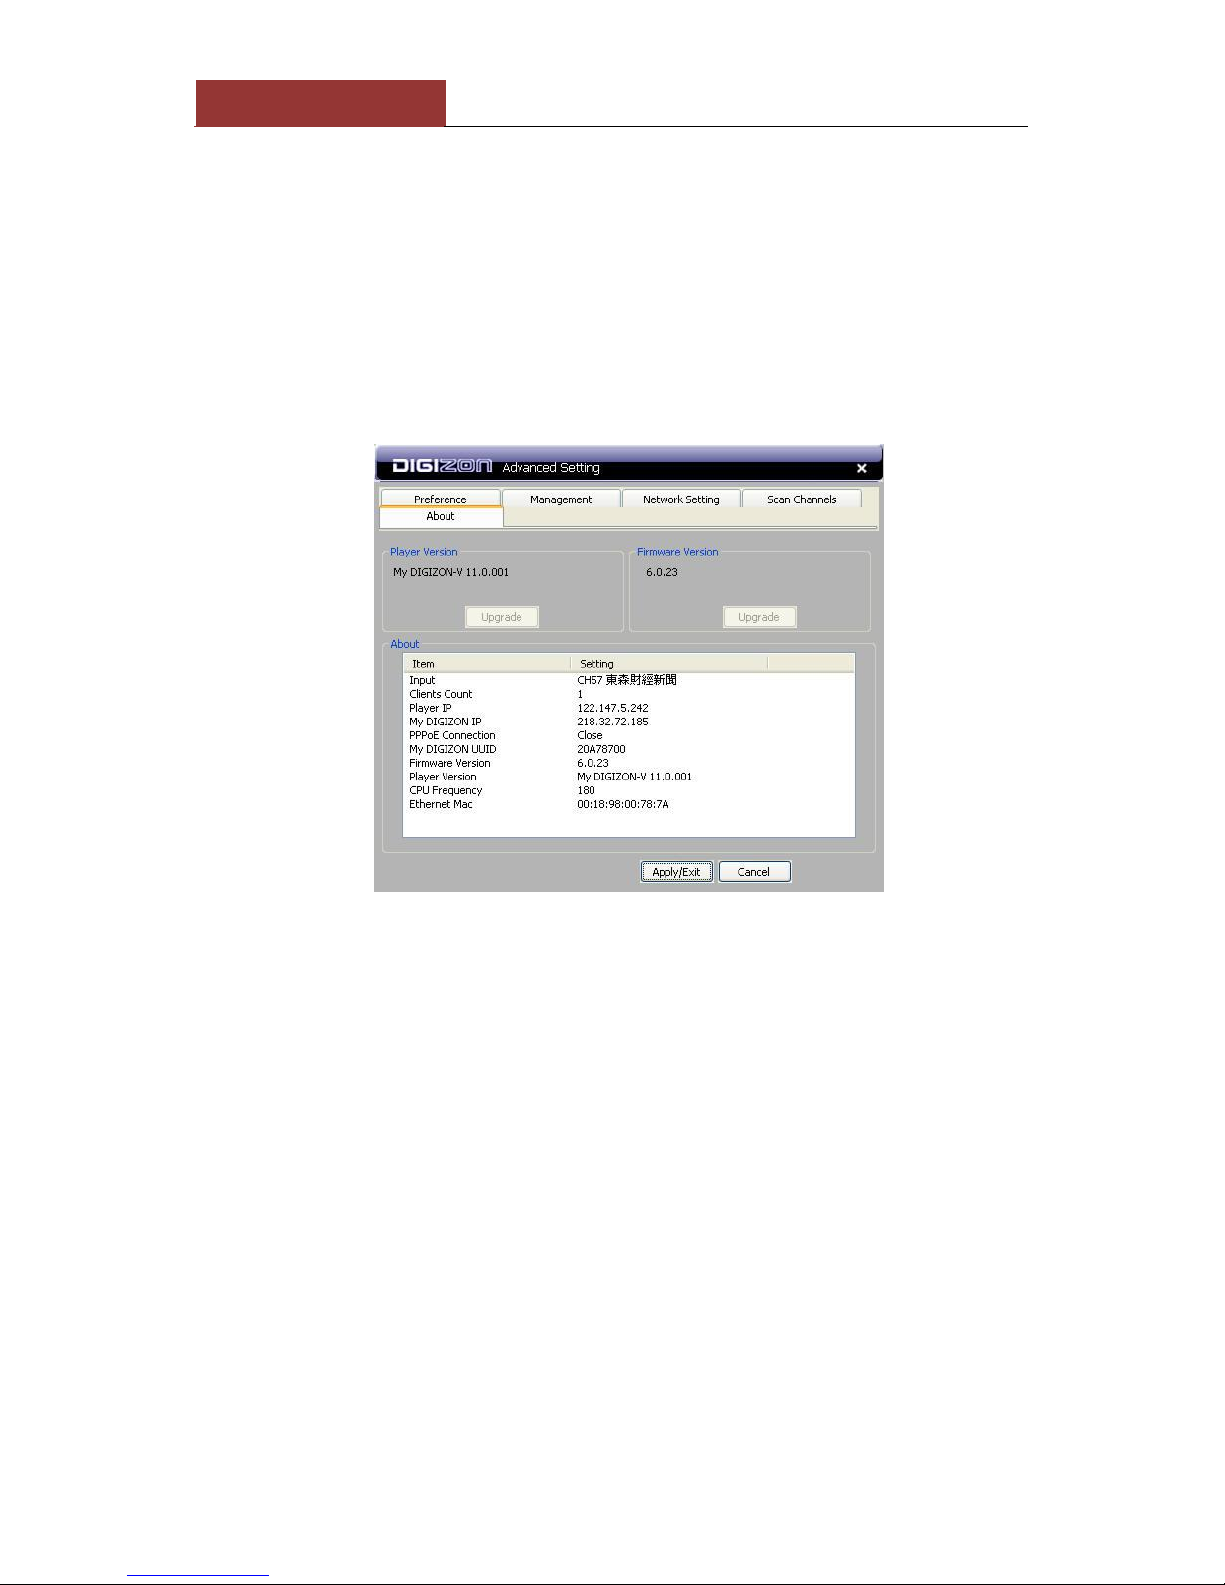
F) About
Click “About” and it will show the version of DIGIZON player and firmware.
The system will inform user to upgrade the firmware, if the version of player
or firmware is not the latest one. Furthermore, user will get the complete
status information from “About.”

[17]
MY DIGIZON USER MANUAL
Appendix A. Setting UPnP and DMZ
Step 1. Router Setting
Enter router setting interface,and enable the
function of UPnP
Step 2. Setting DIGIZON PC Player
Network Setting UpnP
Setting EnableAdvanced (Default:
40001)
A
Step 1. Confirm IP
ConsoleNetwork and Sharing Center LAN Content
B
(Connection)
Set UPnP
Connect!
Internet Test
Set Router and Port
Connect!
Set DMZ
A
B
C
Internet Test

[18]
MY DIGIZON USER MANUAL
Step 2. Set Router
Enter Router setting interface and Virtual Server
setting。
If Router reboot or other unknown reason make IP changed, please reset
from step 1.
Step 3. Set DIGIZON PC Player
ManagementSet Com.
Port (Default:40001)
Set UPnP
Connect!
Internet Test
Set Router and Port
Connect!
Set DMZ
A
B
C
Internet Test
Step 1. Confirm IP
Step 1” Please refer to ”Set router and port,
Step 2. Router Setting
Enter Router setting interface, and
DMZ setting.
If Router reboot or other unknown reason make IP changed, please reset from
step 1: confirm IP.
C
B
 Loading...