

Page 1

Thank you for your interest or for purchasing State Of The Loop !!
State Of The Loop is a pedal board designed to control and monitor up to 99 instances of Ableton Live’s
Looper device.!
The foot switches allow to select and to control which Looper is currently monitored / controlled, and the
LEDs will light according to the state of the Looper device (red if it’s recording, green if it’s playing, blue if
it’s overdubbing, purple if it’s stopped and contains a sample, and the LEDs will be off if the Looper is
stopped without a sample loaded).!
It works in conjunction with a Max For Live device named StateOfTheLoop that adds a few features to
Live’s Looper device.!
You can plug 2 expression pedals to the pedal board, that will control each instance of the
StateOfTheLoop device. You can map the pedals with any parameter you want in Live. This means for
example that if you load 3 instances of the StateOfTheLoop MFL device, you can control up to 6
parameters!
Finally, State of the Loop features a «#Scene#» mode, where the foot switches will allow to select and play
Scenes, the LEDs showing the colors of the Scenes, along with the 2 first letters of the Scene’s name.$
1
State of the Loop
User Manual
KB Devices
Page 2
!
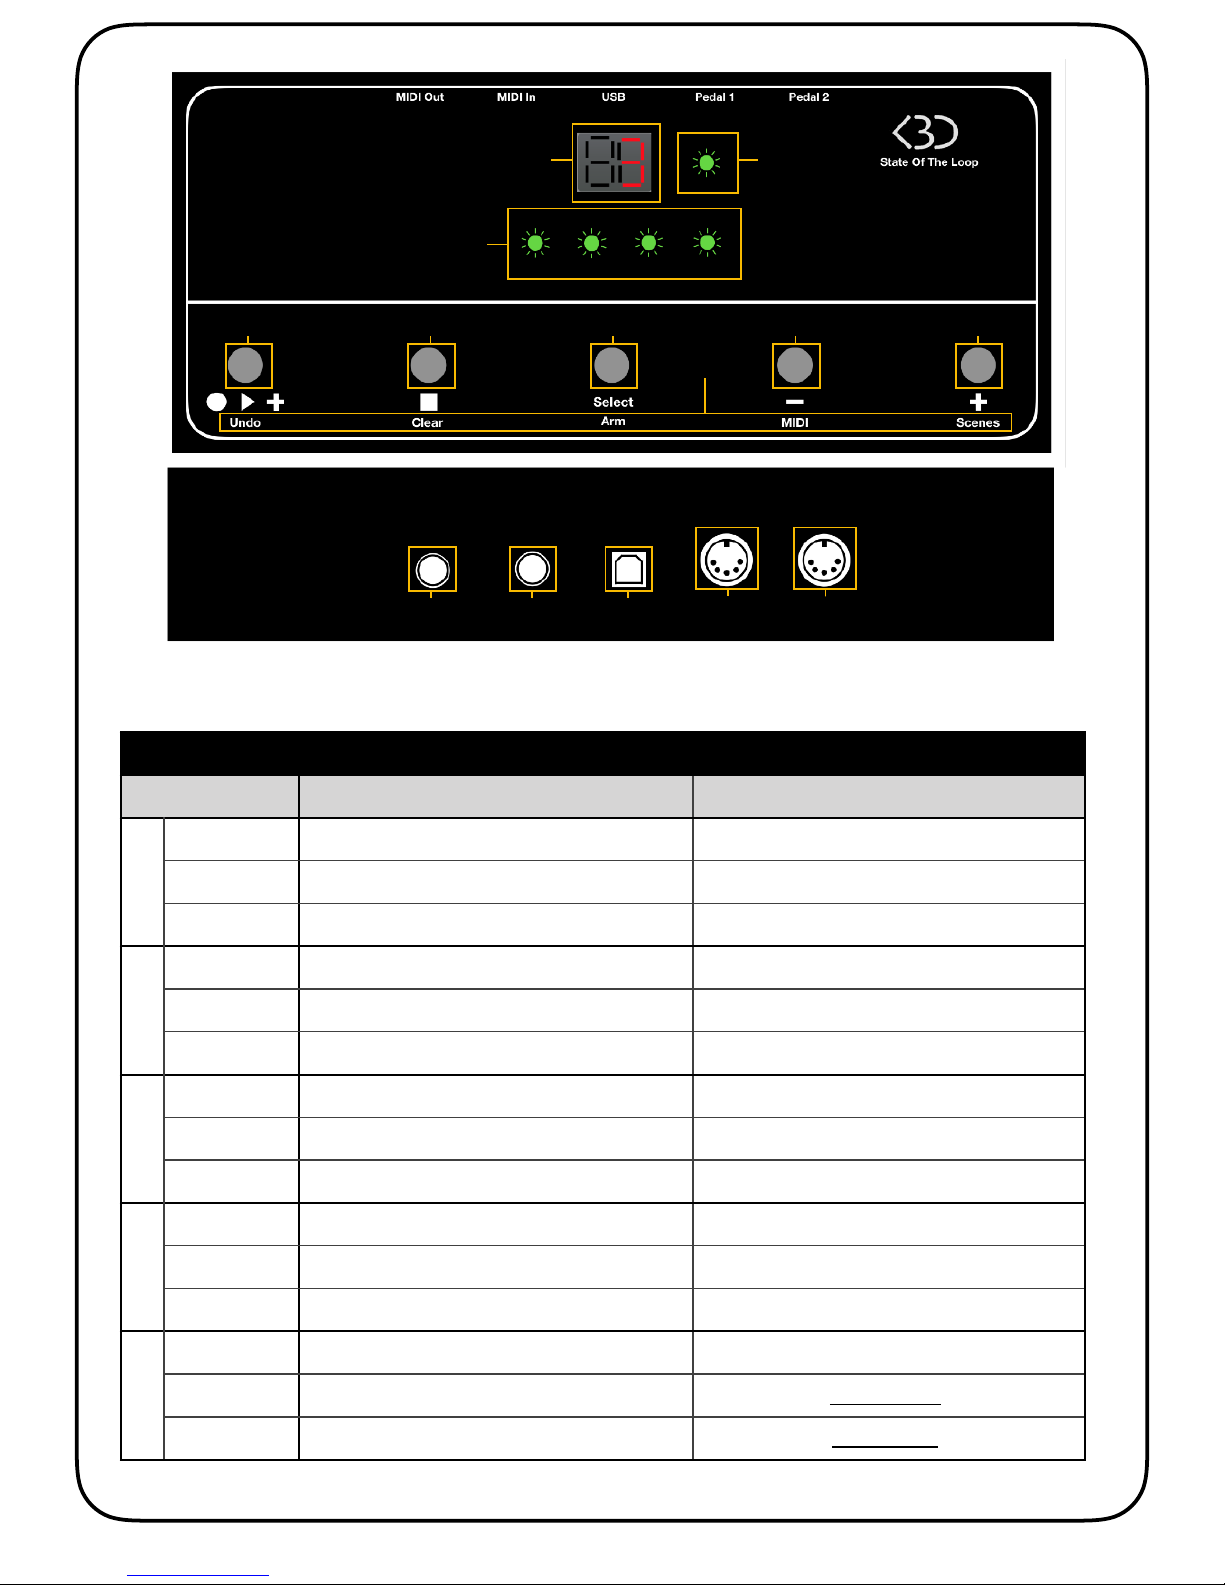
Foot switches
Normal
Hold
①
Looper Mode
Alternates between Play / Record / Overdub
Undo last action
Scene Mode
Launches selected Scene
-
MIDI Mode
CC52
-
②
Looper Mode
Stops selected Looper
Clears Selected Looper
Scene Mode
Stops playback
-
MIDI Mode
CC53
-
③
Looper Mode
Displays selected Looper in Live
Arms the track where the Looper is located
Scene Mode
Jumps to currently playing Scene
-
MIDI Mode
CC54
-
④
Looper Mode
Selects previous Looper
Activates MIDI Mode
Scene Mode
Selects previous Scene
Activates MIDI Mode
MIDI Mode
CC55 Channel 15
Returns to Looper Mode (if enabled)
⑤
Looper Mode
Selects NEXT Looper
Activates Scene Mode (if enabled)
Scene Mode
Selects next Scene
Returns to Looper Mode (if enabled)
MIDI Mode
CC55 Channel 15
Returns to Scene Mode (if enabled)
2
⑨⑩⑪⑫⑬
⑥
⑦
⑧
①& & ② & ③ & & & ④ & & ⑤
Hold
Page 3

Display / LEDs
⑥
Looper Mode
Displays the selected Looper status :!
Red : recording (4 LEDS if playback is stopped, Synched LEDs if playback is running) !
Synched Green = Playing!
Synched Blue = Overdubbing!
Purple = Stopped with sample!
Off = Stopped without sample
Scene Mode
Displays the color of the selected Clip on the StateOfTheScene track
MIDI Mode
-
⑦
Looper Mode
Displays the number of the selected Looper
Scene Mode
Displays the 2 first characters of the selected Clip on the StateOfTheScene track
MIDI Mode
-
⑧
Looper Mode
Shows the « Armed » status of the track where the selected Looper is :
Red if the track is armed, Off if it is unarmed
Blinks Green when the Expression Pedal meets the current value on the selected Looper
Scene Mode
Shows the position / status of the selected Clip :!
Yellow : the selected Clip is above the currently playing Clip!
Blue : the selected Clip is below the currently playing Clip!
White : there is no playing Clip!
Green : Currently playing Clip
MIDI Mode
-
Inputs / Outputs
⑨
Expression Pedal 2
⑩
Expression Pedal 1
⑪
USB
⑫
MIDI In
⑬
MIDI Out
3
Page 4

I Installation!
1. Connect the State of the Loop pedal board!
2. Open the Preferences in Live and in the MIDI/Link tab, select Max For Live as a control surface, and
State of the Loop for both In and out ports. '
In the lower part of the window, check the «#Remote#In» button for State of the Loop. '
Open the Preferences in Live and in the MIDI/Link tab, select Max For Live as a control surface, and
State of the Loop for both In and out ports. '
In the lower part of the window, check the «#Remote#In» button for State of the Loop.!
3. Open the provided «#State of the Loop Install.als#» LiveSet, and on the first track, locate the 2 Audio
Effect Racks named «#StateOfTheLoop#» and «#StateOfTheScene#». '
Save them both as presets, they will now appear in your Ableton User Library. '
You can also put them in a Collection for easier access.!
!
4
Click here to save the Rack as a preset, then
!
Never change the name of the Audio Effect Rack (StateOfTheLoop), or
the device will stop working, as the instances are detected by their
name.!
Also, don’t give this name to another preset to avoid confusion.
!
Minimum requirements : Live 10.0.1 Suite (with Max For Live)
REMPLACER
AVEC DEVICE
CONNECTEE
Page 5

II Looper mode!
Connect the State Of The Loop pedal board, make sure it has been set properly as in I.1.!
When State Of The Loop is connected and no device is loaded, it will run in MIDI mode, and display [ - - ]
on its LED display ⑦.!
Add your first device
On the track you want to record on, drop the StateOfTheLoop.adg device. It must be located in your User
Library. If you’re note sure where to find it, just use the search function in Live’s browser.!
As you drop it, the display on the pedal board will change from [ - - ] to [ 1], reflecting the fact that the
pedal board knows that there is a Looper device connected now.!
As with the «#normal#» Live Looper, you need to MIDI map the «#big button#» on the Looper to the «#Play#»
foot switch ①.!
To do so, enter MIDI mapping mode (PC : Ctrl-M / Mac : Cmd-M), click on the Looper#«#big button#», and
press the foot switch ①.!
You should see 15/nn appear, where nn is the name of a MIDI note.!
If you look at the MFL device, you can see a yellow rectangle with a MIDI note. This is the note that is
attributed to the Looper device. It must be similar to the one appearing on the MIDI mapping.!
You can now quit MIDI mapping mode, and start using the State Of The Loop pedal board to control Live’s
Looper device !!
Let’s start using the foot switches
To start recording, press the Play/Rec foot switch ①.!
If Live’s playback is stopped, the 4 LEDs ⑥ will turn red, indicating that you’re recording, and that Live
engine is currently not running.!
5
!
In the very unlikely case where 2 devices were given the same note
number, you must delete one of them and load another one at its place.!
A new note number will be attributed, solving the conflict.!
REMPLACER PAR
MIDI MAPPING
Page 6

If live’s playback is already running, the LEDs ⑥ will light up successively (still red), synchronized to the
metronome.!
If you press again foot switch ①, the Looper will stop recording. Depending on your Looper settings, it will
either start playing back the loop or overdubbing, the LEDs ⑥ will turn green or blue accordingly.!
If you keep on pressing foot switch ①, you will alternate between play and overdub states.!
If you press and hold foot switch ① for more than 1s, it will perform an Undo action on the Looper.!
If you press the Stop foot switch ②, the loop will stop, and the 4 LEDs ⑥ will turn purple, indicating that
the Looper is stopped, and that there’s a sample loaded.!
If you press foot switch ① again, the Looper will start playing the loop again, according to the quantization
settings.!
If you hold the foot switch ② for more than 1s, this will clear the Looper and the LEDs ⑥ will turn black
(off), indicating that the Looper is stopped and empty.!
Add more devices
Now it’s time to add another Looper.!
Select another track, and drop another StateOfTheLoop Rack on it.!
You will see the number [ 2] appear on the pedal board, reflecting the fact that there are now 2 devices
loaded.!
As for the first one, you must MIDI map the Play/Rec foot switch ① to the Looper’s «#big button#».!
Now you can use pedals + and - (④ and ⑤) to select either Looper 1 or Looper 2.!
As you add or remove more devices, the maximum number of loopers appearing on the pedal board will
adapt, and the MIDI mappings will remain consistent (ie you don’t need to re-do the MIDI mapping each
time you modify the number or position of the tracks or devices).!
You can even have several instances on the same track.!
For now, you can’t have devices within Racks or on Return or Master track.!
If you press pedal ③, the currently selected device will get selected in Live and will be displayed in the
application. This is useful in case of problem or when doing the MIDI mappings.!
Additional options
Quite often, it happens that we want to record several loops from the same instrument.!
6
!
It might happen that the «#Has Sample#» button
might not reflect the current state of the Looper
(for example if you click on the Clear button in
Live’s Looper).!
If that is the case, you can click on the «#Sample#»
button on the Max For Live device.!
It is recommended to always clear the samples
using the pedal board.
Page 7

In this case, we most likely have several tracks with the same input (for instance, a guitar or a
microphone).!
If we set the monitoring in Live to «#Auto#», the tracks need to be armed in order to
record. This can be achieved by holding pedal ③ for more than 1s. This will arm the
track were the device is located. The LED ⑧ will turn red, indicating that the current
track is armed.!
In case you want the tracks to be armed automatically each time you select a
device, you can check the «#Auto Arm#» button on the Max For Live device!
!
While this method works, this can sometimes cause clicks in the audio, depending
on how busy your live set is.!
Another method is to set the monitoring of all the tracks to «#In#». This way, you don’t
need to arm the tracks anymore as the audio goes through.!
One problem you will face though, is that you will hear your instrument or voice as
many times as you have tracks. !
This can be solved by checking the «#Auto Mute#» button. With this button switched
on, the audio will be muted before the Looper if the device is not currently selected.!
Finally, when the Auto Select button is activated, Live will automatically display the
currently selected device.!
This can be useful if you want to monitor on the computer what you are doing. !
Express yourself !
State Of The Loop features 2 stereo jack inputs to connect expression pedals (see the list of approved
models). If you click on the «#Pedals#» icon on the Max For Live device, it will unfold a panel that allows
you to map each pedal to the parameters in Live.!
Just click the «#Map#» button, then the parameter of your choice.!
The mappings are device-based. This means that you can control 2 different parameters on device 1 and
2, and so forth. This also means that you can control up to 198 parameters with only 2 pedals !!
When you switch from one device to the other, the position of the expression pedal will probably be
different. To avoid sudden jumps, the value of the pedal won’t be sent until they reach the actual value of
the parameter. When this happens, you will see the status LED ⑧ blink shortly in green.!
III Scene mode!
State of The Loop can also be used to navigate through Scenes in Live, and show Names and Colors of
Scenes.!
7
Page 8
To do this, you must first drop the StateOfTheScene.adg device on a track.!
I recommend creating a dedicated MIDI track that will reflect the structure of your set, where you can give
custom length, names and colors to the Clips.!
This way you will make the most out of the device.!
To put the State Of The Loop pedal board into Scenes mode, simply hold the + foot switch ⑤.!
The pedal board will then show the color of the selected clip on LEDs ⑥. The LEDs ⑥ will be off is no Clip
is present on the selected slot.!
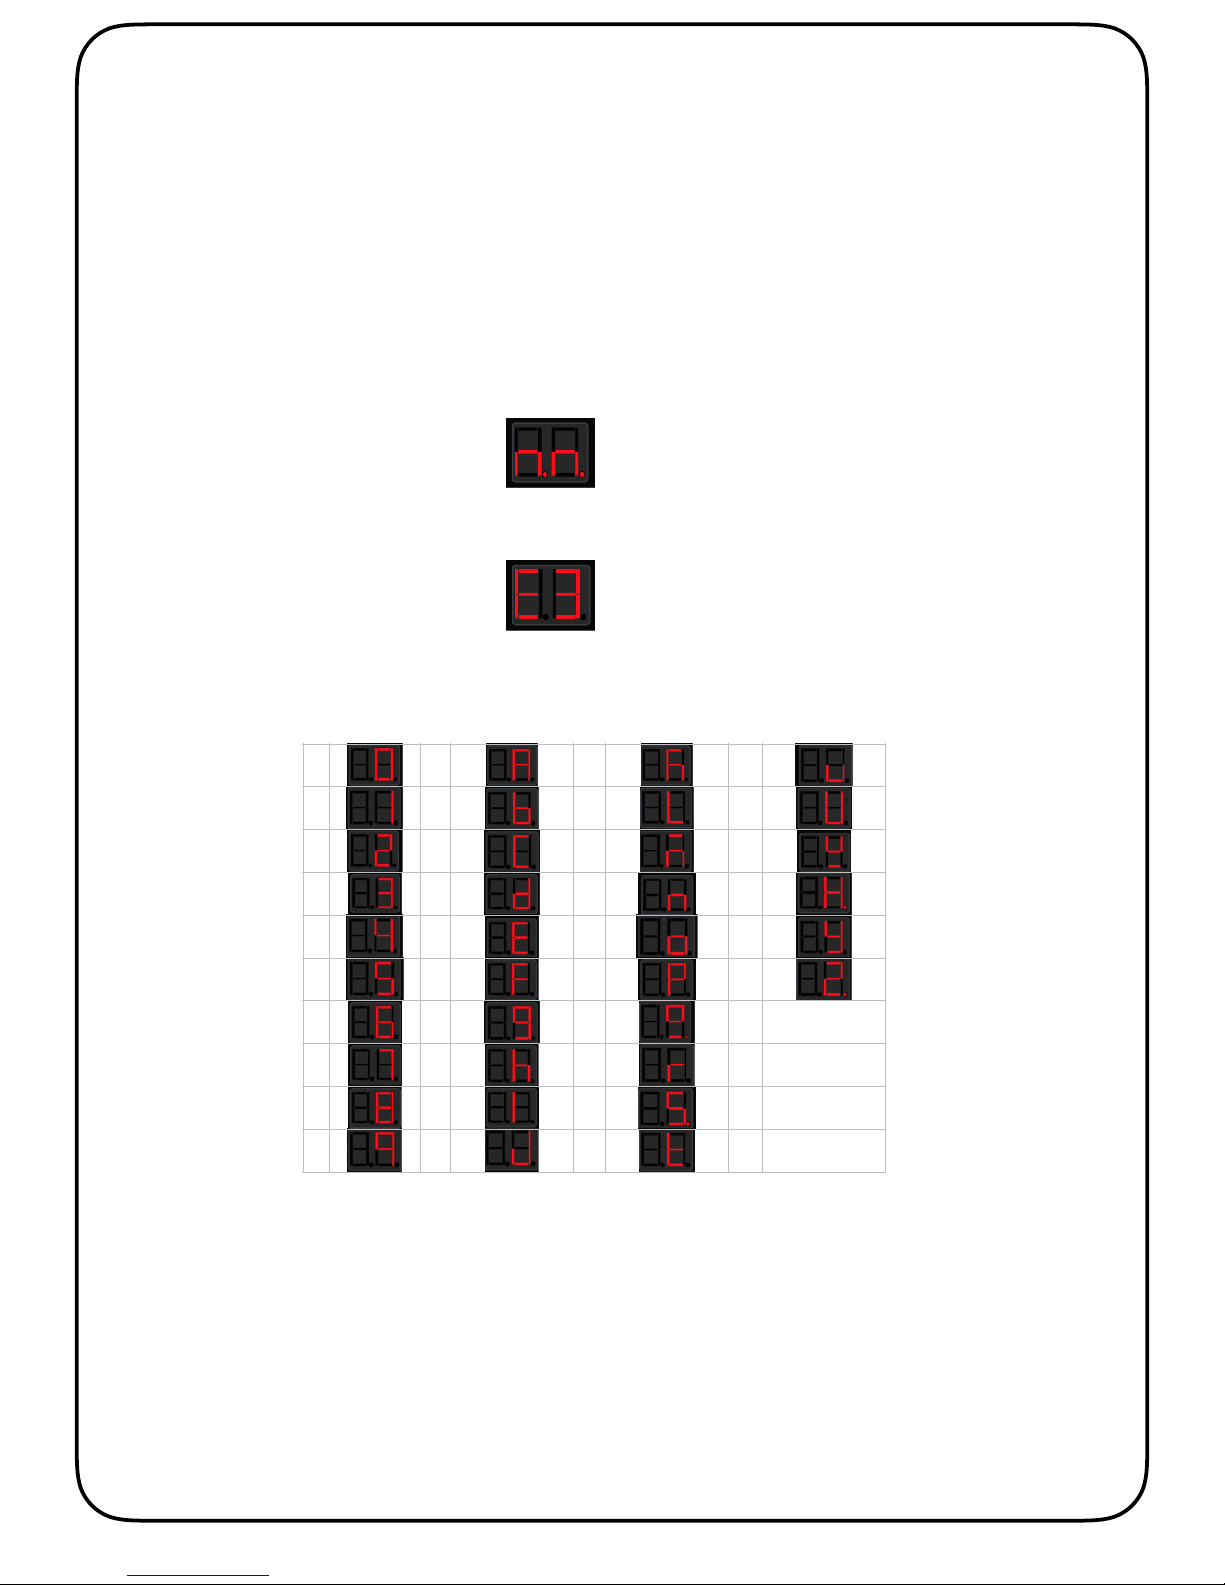
The LED display ⑦ will show the first 2 characters of the selected clip. If the Clip has no name, the
characters «#n.n.#» will appear.!
If the slot is empty, it will display this symbol :!
Note : the nature of the display makes it impossible to display correctly all 26 letters of the alphabet. Here
are the all the characters with their State Of The loop equivalent (characters are not Caps sensitive) :!
IV MIDI mode
8
0AK
U
1BL
V
2CM
W
3DN
X
4EO
Y
5FP
Z
6GQ
7HR
8IS
9JT
 Loading...