

Qty Description
Quick Start Guide
WESII-*A-** 17dBi/11dBi Point to Point Host
Introduction
Welcome to KBC Networks’ Quick Start Guide for the WESII point-to-point Host with
an integral 17dBi antenna, for 5GHz & 4.9GHz operation and an integral 11dBi
antenna for 2.4GHz operation. This document provides some quick tips on how to get
up and running. For more detailed information see the Downloads section below.
Note: 4.9GHz units are only available in the USA.
Features
• 2.4GHz, 4.9GHz or 5GHz operation
• MIMO technology
• Dynamic Frequency Selection
• Transmission Power Control
• Antenna alignment & signal survey tools
• IP66 casing
Downloads
Installation manual - Other features and functions are described in the unabridged manual:
http://www.kbcnetworks.com/downloads
Specification Sheets:
http://www.kbcnetworks.com/downloads
System Contents
1 WESII Single Host/AP RF Module
1 Mid-span compliant Power Injector Module (PIM)
1 24VDC PSU for each Power Injector Module included
1 Cable weather proof kit assembly
1 Wall or pole-mount bracket and assembly kit each including:
1 Bracket body
1 Pole clamp bracket
1 Connecting piece 1
1 Connecting piece 2
1 50mm, 1.98” long ¼” hex bolt
3 ¼” hex nuts
1 27mm, 1.06” long ¼” hex bolt
3 Flat washers 15mm, 0.59”
3 Locking washers 10mm, 0.39” long
1 U bolt
4 ¼-20 lock washers
QSG-11_or_17dBi_ ptp_Host-Rev1212.docx
Copyright © KBC Networks Ltd. 2012
www.kbcnetworks.com
Equipment Required for Physical Deployment
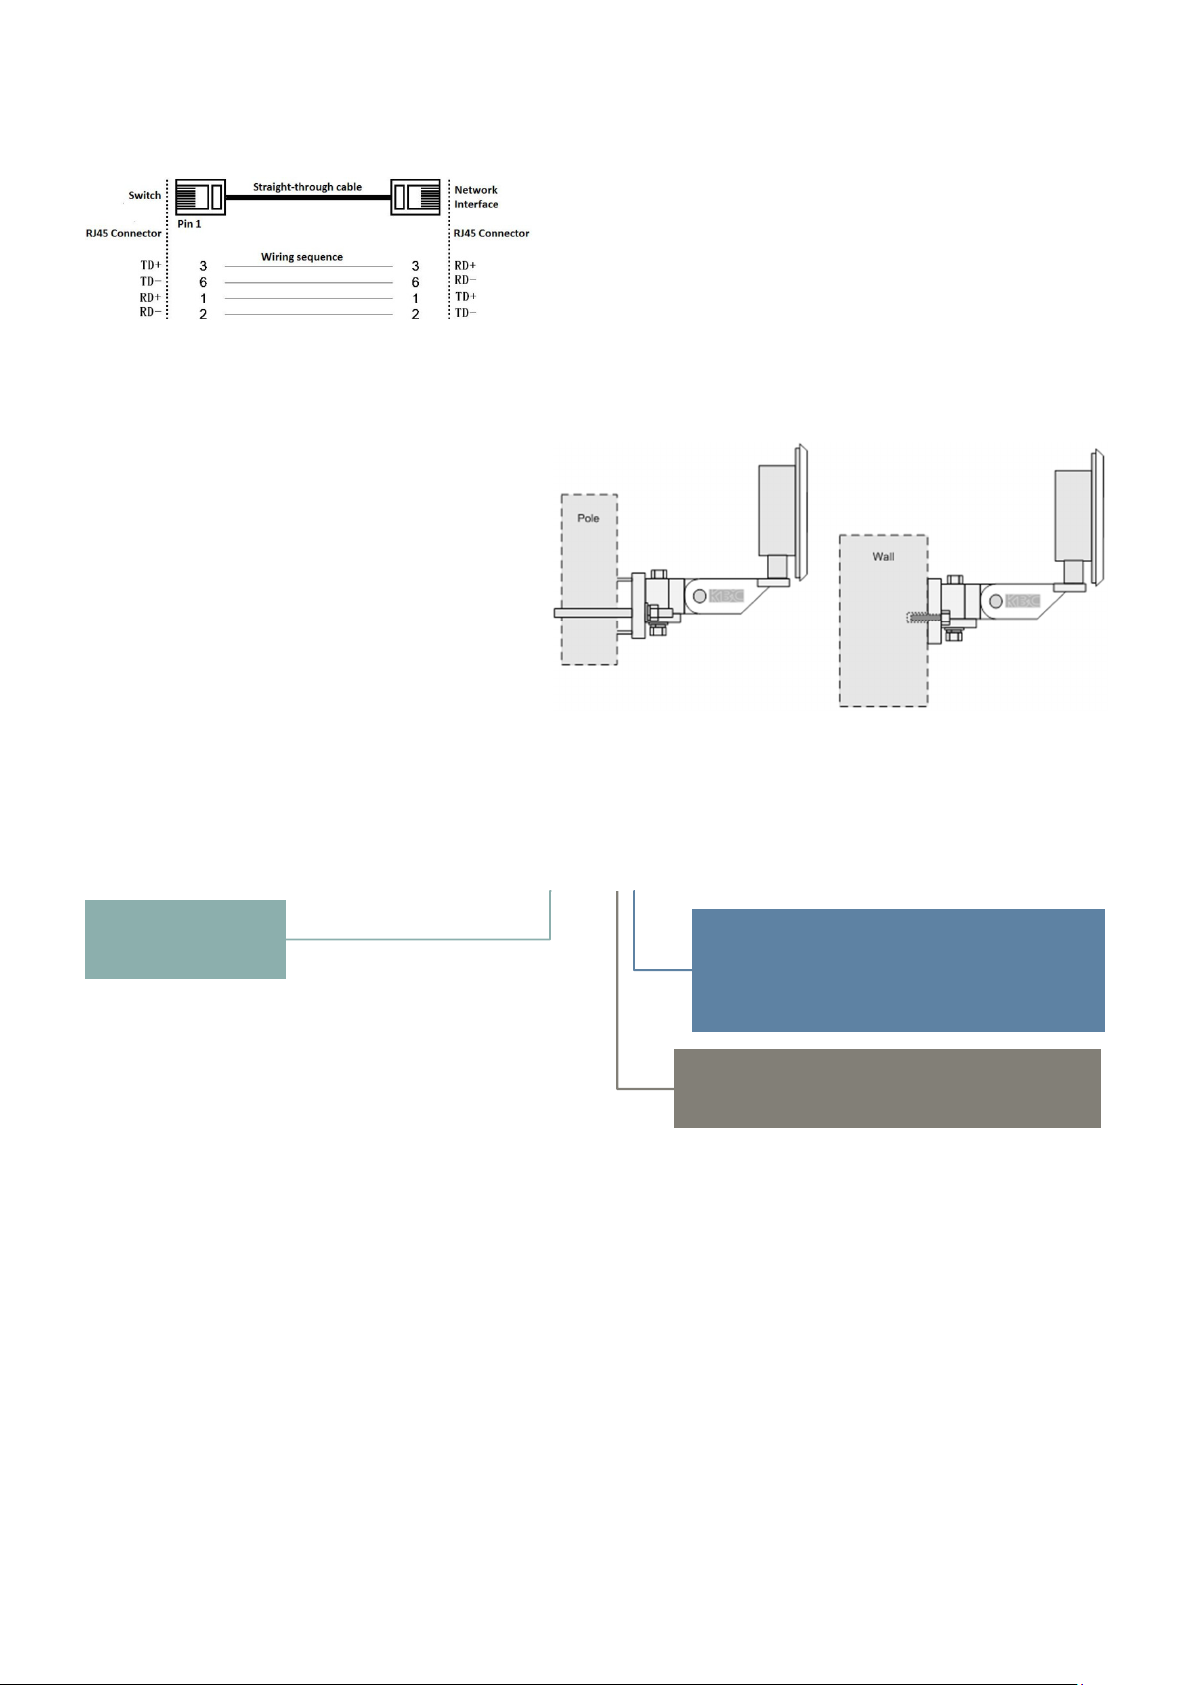
You will need 2 straight-through Ethernet cables:
KBC recommends shielded outdoor rated Ethernet cables when connecting near power outlets and when
exposed to the elements.
Physical Deployment
This equipment must be installed and operated in
accordance with instructions found in the KBC
Networks’ manual. The orientation of the units
must be as depicted, failure to comply with these
instructions will invalidate warranty.
Part Number Configurator (Frequency, Power Connection & Firmware Options)
WESII-*A-
A: 5GHz
B: 4.9GHz
C: 2.4GHz
**
A: US Power Connection & Firmware
B: UK Power Connection & EMEA Firmware
C: Euro Power Connection & EMEA Firmware
E: Australian Power Connection & Firmware
C: 17dBi Directional Antenna (4.9GHz & 5GHz)
E: 11dBi Directional Antenna (2.4GHz)
Configuring the WESII-*A-**
Refer to provided documentation for pre-set configuration settings. The following procedures may be necessary if purchased
from distribution stock or in order to set custom configurations.
1. Connect the first Ethernet straight-through cable from the ‘IN’ on the PIM to either a laptop or a PC LAN
port.
2. Connect the second Ethernet straight-through cable from the ‘OUT’ on the same PIM to the Host LAN
port.
3. Apply power to the PIM with the provided 24VDC PSU and allow 60s for the unit to boot.
4. Verify that the static IP address on the laptop is set to 192.168.1.x subnet.
5. Open a web browser to access the Host on its 192.168.1.200 IP address; this is the default address for
the unit.
6. Enter the following to access the GUI:
ID: admin Password: admin
Note: Ensure that all other network interface connections including your laptop Wifi are disabled.

7. Select: ‘Basic Wireless’ and choose your country – not required for units purchased in the US.
Select: <Apply Settings>
Select: <Save>
Note: It is the user’s responsibility to ensure that the correct country is chosen. KBC accepts no liability for
incorrectly set up equipment.
8. Select: <Interference Analyzer> to determine which frequencies are available in your location.
Select: one of the available channels.
Select: <Apply Settings>
Select: <Save>
Note: The Client will not need the frequency selection but will need the country setting, SSID and the channel
spectrum width to be the same as the Host.
9. Note down all the MAC addresses and SSIDs used in the application for future reference.
Note: Point to point Host/Aps and their respective Clients must be MAC locked to one another.
Configuring the Mapping Option
If you have chosen the mapping option on your WESII unit you will
be able to view the system configuration and health all on one
page. Mapping is purchased as a separate option; please contact
KBC Networks if you would like to add this to your unit.
Note: only KBC nodes are shown on the topology page.
1. In the web browser
Select: ‘Basic Network’
Enter: enter a gateway address
Note: the gateway address must be a ping-able network device that is connected to any one of the system
node’s Ethernet port.
2. Once the complete system has been configured and is properly connected, a generic map will be created
in the Topology page.
Note: the router symbol is used to represent the gateway. All nodes will have the same gateway IP address
which is set to the gateway shown connected to Node 1.
3. In the Topology page to upload a background image
Select: <Browse>
4. Choose a file
Select: <Upload>
Note: The image size is limited to 120kB and must be JPEG or GIF format.
5. Move the nodes around on the page to represent their physical locations.
Select: <Save>
6. Hover over the node to display details of the radio link.

Parameter
Setting
Default Configurations
LAN IP Address 192.168.1.200 (Host/AP) 192.168.1.201 (Client)
GUI User ID admin
GUI Password admin
SSID KBC-WESII
Pre-shared Key 11111111
Frequency selection (Host
only)
Bandwidth 20/40
Long Range Parameters Enabled
Note: A restore to defaults will erase custom configuration settings and disable the MAC lock feature.
Auto
WESII Status Indicators
1. Signal Strength Indicator – 40 RSSI
2. Signal Strength Indicator – 30 RSSI
3. Signal Strength Indicator – 20 RSSI
4. Signal Strength Indicator – 10 RSSI
5. Ethernet Link Activity
6. Power
1 2 3 4 5 6
Compliance
FCC
Changes or modifications not expressly approved by the party responsible for compliance could void the user’s
authority to operate the equipment. This device complies with Part 15 of the FCC Rules. Operation is subject to
the following two conditions:
• This device may not cause harmful interference, and
• This device must accept any interference received, including interference that may cause undesired
operation.
This equipment has been tested and found to comply with the limits for a Class A digital device, pursuant to
part 15 of the FCC Rules. These limits are designed to provide reasonable protection against harmful
interference when the equipment is operated in a commercial environment. This equipment generates, uses,
and can radiate radio frequency energy and, if not installed and used in accordance with the instruction manual,
may cause harmful interference to radio communications. Operations of this equipment in a residential area is
likely to cause harmful interference in which case the user will be required to correct the interference at his own
expense.
Industry Canada
This Class A digital apparatus complies with Canadian ICES-003. To reduce potential radio interference to other
users, the antenna type and its gain should be so chosen that the equivalent isotropically radiated power
(E.I.R.P.) is not more than that permitted for successful communication. This device complies with Industry
Canada license-exempt RSS standard(s).
Operation is subject to the following two conditions:
• This device may not cause interference, and
• This device must accept any interference, including interference that may cause undesired operation of
the device.
Cet appareil numérique de la classe A est confrome à la norme NMB-003 Canada. Pour réduire le risque
d’interférence aux autres utilisateurs, le type d’antenne et son gain doivent être choisies de façon que la
puissance isotrope rayonnée équivalente (PIRE) ne dépasse pas ce qui est nécessaire

pour une communication réussie. Cet appareil est conforme à la norme RSS Industrie Canada exempts de
licence norme(s). Son fonctionnement est soumis aux deux conditions suivantes:
17 Compliance
• Cet appareil ne peut pas provoquer d’interférences et
• Cet appareil doit accepter toute interférence, y compris les interférences qui peuvent causer un mauvais
fonctionnement du dispositif.
RF Exposure Warning
The antennas used for this transmitter must be installed to provide a separation distance of at least 37.2 cm
from all persons and must not be located or operating in conjunction with any other antenna or transmitter.
Les antennes utilisées pour ce transmetteur doivent être installé en considérant une distance de séparation de
toute personnes d'au moins 37.2 cm et ne doivent pas être localisé ou utilisé en conflit avec tout autre antenne
ou transmetteur.
CE Marking
CE marking on this product represents the product is in compliance with all directives that are applicable to it.
This equipment may be operated in the following countries:
Great Britain and Northern Ireland, Austria, Belgium, Denmark, Finland, France, Germany, Ireland, Italy,
Netherlands, Norway, Portugal, Romania, Switzerland, Sweden
Installer Compliance Responsibility
Devices must be professionally installed and it is the professional installer's responsibility to make sure the
device is operated within local country regulatory requirements.
RoHS/WEEE Compliance Statement
European Directive 2002/96/EC requires that the equipment bearing this symbol on the product and/or its
packaging must not be disposed of with unsorted municipal waste. The symbol indicates that this product
should be disposed of separately from regular household waste streams. It is your responsibility to dispose of
this and other electric and electronic equipment via designated collection facilities appointed by the government
or local authorities. Correct disposal and recycling will help prevent potential negative consequences to the
environment and human health. For more detailed information about the disposal of your old equipment, please
contact your local authorities, waste disposal service, or the shop where you purchased the product.
Need Help?
Visit our website http://www.kbcnetworks.com or contact your nearest KBC office or dealer:
USA
Phone: +1 949 297 4930
Toll Free: +1 888 366 4276
Email:
techsupport@kbcnetworks.com
EMEA
Phone: +44(0)1622 618787
Email: emeatechsupport@kbcnetworks.com
APAC
Phone: +65 98463323
Email: apactechsupport@kbcnetworks.com
 Loading...