

Page 1
PO
W
E
R
MO
D
E
PRECISION HEAT
TM
DIGITAL HEATER FAN
HZ-7000, HZ-7010, HZ-7020, HZ-7030,
HZ-7040 Series
IMPORTANT
SAFEGUARDS
READ AND SAVE THESE
SAFETY INSTRUCTIONS
BEFORE USING THIS
HEATER.
When using electrical appliances, basic precautions
should always be followed to reduce the risk of fire,
electric shock, and injury to persons, including the
following:
IMPORTANT
INSTRUCTIONS
1. Read all instructions before using this heater.
2. This heater is hot when in use. To avoid burns , do not
let bare skin touch hot surface. If provided, use handles when moving this heater. Keep combustible
materials, such as furniture, pillows, bedding,
papers, clothes, and curtains at least 3 feet (0.9 m)
from the front of the heate r and keep them away f rom
the sides and rear.
3. Extreme caution is necessary when any heater is
used by or near children or invalids and whenever
the heater is left oper ating and unattended.
4. Always unplug heater when not in use.
5. Do not operate any heater with a damaged cord or
plug or after the heat er malfunctions, has been
dropped or damaged in any manner. Return heater
to authorized service facility for examination, electrical or mechanical adjustment, or repair.
6. Do not use outdoors.
7. This heater is not intended for use in bathroom, laundry areas and similar moist indoor lo ca tions. Never
locate heater where it may fa ll int o a bat ht ub or ot her
water container.
8. Do not run cord under carpeting. Do not cover cord
with throw rugs, runners, or the like. Arrange cord
away from traffic areas wh ere it will not be tripped
over.
9. This appliance has a polarized plug (one blade is
wider than the other). To reduce the risk of shock,
this plug is intended to fit onl y one way in a polar iz ed
outlet. If the plug does not fit fully in the outlet,
reverse the plug. If it still does not fit, contact a qualified electrician.
safety feature.
10. This heater draws 12.5 amps during operation. To
prevent overloading a circuit, do not plug the heater
into a circuit that already has other appliances working.
11. It is normal for the plug to feel warm to the touch;
however, a loose fit between the AC outlet (receptacle) and plug may cause overheat ing and distortion
of the plug. Contact a qualified electrician to replace
loose or worn outlet.
12. To disconnect the heat er, first turn controls to the
OFF position, then grip the plug and pull it from the
wall outlet. Never pull by the cord.
13. Do not insert or allow foreign objects to enter any
ventilation or exhaust opening as this may cause an
electric shock or fire, or da mage the heater.
14. To prevent a p os sible f ire, do not b lock ai r i nta kes or
exhaust in any manner. Do not use on soft surfaces,
like a bed, where openings may become blocked .
15. A heater has hot and ar cing o r spark ing p arts inside.
Do not use it in the areas where gasoline, paint, or
flammable liquids are used or stor ed.
16. Use this heater only as described in this manual.
Any other use not recommended by the manufacturer may cause fire, electric shock, or injury to persons.
17. Avoid the use of an exte nsion cord because the
extension cord may overh eat and cau se a risk of f ire.
However, if you have to use an extension cord, th e
cord shall be No. 14 AWG minimum size and rated
not less than 1875 watts.
18. The output of this heater may vary and its temperature may become intense enough to burn exposed
skin. Use of this heater is not recommended for persons with reduced sensitivity to heat or an inability to
react to avoid burns.
SAVE THESE
19.
DO NOT attempt to defeat th is
INSTRUCTIONS.
1
Page 2
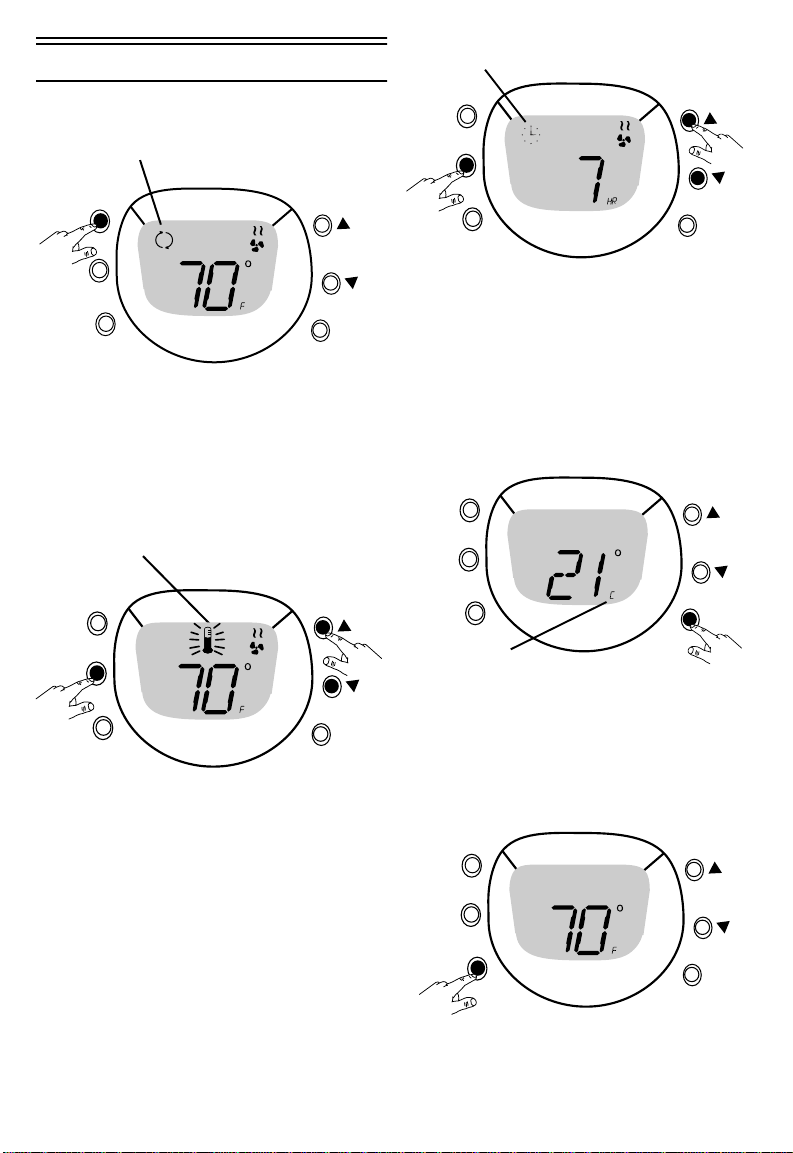
BASIC CONTROL PANEL OPERATION:
MODE: SET TIMER
Timer
POWER
Continuous Run
Power
Mode
F/C
• Press Power once to start the heater on High Power,
Continuous Run.
• Press Power again to change to Low Power, Continuous
Run.
• Press Power a third time to turn the heater off.
MODE: SET TEMPERATURE
Temperature
Power
Mode
Power
Mode
F/C
• Press Mode until the Timer icon blinks. The Hour
display will appear
• Use the Up or Down arrows to set an operation time
between 1 and 10 hours.
• The heater will turn-off when time runs out.
FAHRENHEIT/CELSIUS
Power
Mode
F/C Temperature
Display
F/C
F/C
• Press Mode until the Temperature icon blinks. The
current room temperature will appear.
• Use the Up or Down arrows to set the desired temperature.
• The Temperature icon will stop blinking and the current room temperature will reappear after the
desired temperature is set.
• The heater will turn-off shortly after the desired temperature is reached and the Power light above the
display will blink.
• The heater will turn back on when the room temperature drops approximately 2 degrees below the
desired temperature. The Power light will stop
blinking and will remain lit.
• F/C feature functions from only the Power or Set
Temperature screens.
• Press the F/C button to toggle between Fahrenheit
and Celsius.
OSCILLATION (HZ-7020, HZ-7030, HZ-7040
SERIES)
Power
Mode
Oscillation
• The Oscillation feature functions in any power or
mode setting.
• Press the Oscillation button to toggle this feature on
and off.
2
F/C
Page 3

BACK-LIT DISPLAY (HZ-7000, HZ-7010
SERIES)
Power
Mode
POWER:
Back-Lit
• The Back-lit feature provides light to the heater display and functions in any power or mode setting.
F/C
• Press the Back-lit button to toggle this feature on
and off.
FOOT PEDAL (HZ-7010 SERIES)
• The Foot Pedal works the same as the Power button.
• Press the Foot Pedal once to start the heater on High
Power, Continuous Run.
• Press the Foot Pedal again to change to Low Power,
Continuous Run.
• Press the Foot Pedal a third time to turn the heater off.
REMOTE CONTROL OPERATION
Two (2) AAA batteries required.
Models HZ-7030 and HZ-7040:
Remote Control included when originally purchased.
Models HZ-7000, HZ-7010 and HZ-7020:
Remote Control may be purchased separately at
www.honeywellconsumerproducts.com.
Power
Basic Remote
LCD Remo t e
• Press Power once to start the heater on High Power,
Continuous Run.
• Press Power again to change to Low Power, Continuous Run.
• Press Power a third time to turn the heater off.
MODE: SET TEMPERATURE
Temperature
Mode
Adjust Up or
Down
Basic Remote
• Press Mode until the Temperature icon blinks on the
Control Panel. The current room temperature will also
appear on the Control Panel.
• Use the Up or Down arrows to set the desired temper-
ature.
• The Temper atur e i con wil l s top b li nki ng a nd t he c urr ent
room temperature will reappear after the desired temperature is set.
• The heater will turn-off shortly after the desired tem-
perature is reached and the Power light above the display will blink.
• The heater will turn back on when the room tempera-
ture drops approximately 2 degrees below the desired
temperature. The Power light will stop blinking and will
remain lit.
LCD Remote
The Remote Control works the same as the corresponding buttons on the Control Panel. The
Control Panel display on the heater will show the
appropriate icons when the various functions are
activated.
3
Page 4

MODE: SET TIMER
Timer
BACK-LIT DISPLAY (HZ-7000, HZ-7010
SERIES)
Mode
Adjust Up or
Down
Basic Remote
• Press Mode until the Timer icon blinks on the Control
Panel. The Hour display will also appear on the Control Panel.
• Use the Up or Down arrows to set an operation time
between 1 and 10 hours.
• The heater will turn-off when time runs out.
MODE
LCD Remote
OSCILLATION (HZ-7020, HZ-7030, HZ-7040
SERIES)
MODE
Oscillation
Basic Remote
• The Oscillation feature functions in any power or
mode setting.
• Press the Oscillation button to toggle this feature on
and off.
LCD Remote
MODE
Back-lit
Basic Remote
• The Back-lit feature provides light to the heater display
and functions in any power or mode setting.
• Press the Back-lit button to toggle this feature on and
off.
LCD Remote
TROUBLESHOOTING:
If your heater shuts off unexpectedly, safety features may have been activated to prevent overheating. If this happens:
• Be sure the power cord is plugged into a working electrical outlet.
• Check your thermostat setting. The unit may
simply be off because you have reached your
desired heat setting.
• Check for any obstructions. If you find one,
turn the heater OFF and unplug it. Wait at
least 10 minutes to allow the heater to cool
completely before removing any obstruction.
When done, plug-in the heater and follow the
OPERATION INSTRUCTIONS.
For more troubleshooting tips, visit our website at:
www.honeywellconsumerproducts.com
NOTE: IF YOU CONTINUE TO EXPERIENCE A
PROBLEM, PLEASE RETURN THE HEATER
TO THE PLACE OF ORIGINAL PURCHASE OR
SEE YOUR WARRANTY. DO NOT ATTEMPT
TO OPEN THE HEATER YOURSELF. D O IN G
SO MAY VOID YOUR WARRANTY AND
CAUSE DAMAGE TO THE HEATER OR PER-
4
Page 5

SONAL INJURY. IF YOU HAVE ANY QUESTIONS REGARDING THIS HEATER, PLEASE
CALL OR WRITE:
Honeywell
Consumer Relations Department
250 Turnpike Road
Southborough, MA 01772
Toll Free 1-800-332-1110
E-mail: honeywell@protocolusa.com
CLEANING AND STORAGE:
We recommend that the heater be cleaned at
least once a month and before off-season storage.
• Turn the heater OFF and unplug it. Allow it to
cool completely.
• Use only a dry cloth to clean the external surfaces of the heater. DO NOT USE WATER ,
WAX, POLISH, O R A N Y C H EMICAL SOLUTION.
• Clean your heater using the above-mentioned
steps, then pack the heater in its original container and store it in a cool, dry place.
• This heater does not disassemble.
ACCESSORIES:
Your HZ-7000 series heater is compatible with
both the Basic and Digital LCD Remote Control.
To upgrade your heater, or to get a listing of
heater accessories, visit our website at:
www.honeywellconsumerproducts.com
ELECTRICAL RATING:
This product is rated 12.5 Amps (1500 Watts) at
120 VAC, 60 Hz.
5 YEAR LIMITED WARRANTY
You should first read all instructions before
attempting to use this product. Register your
product on-line at
www.honeywellconsumerproducts.com or
complete and return the Customer Response
Card within 7 days.
A. This 5 year limited warranty applies to repair
or replacement of product found to be defective in material or workmanship. This warranty
does not apply to damage resulting from commercial, abusive, unreasonable use or supplemental damage. Defects that are the result of
normal wear and tear will not be considered
manufacturing defects under this warranty.
• HONEYWELL IS NOT LIABLE FOR INCI-
DENTAL OR CONSEQUENTIAL DAMAGES
OF ANY NATURE. ANY IMPLIED WARRANTY OF MERCHANTABILITY OR FITNESS FOR A PARTICULAR PURPOSE ON
THIS PRODUCT IS LIMITED IN DURATION
TO THE DURATION OF THIS WARRANTY.
Some jurisdictions do not allow the exclusion
or limitation of incidental or consequential
damages or limitations on how long an implied
warranty lasts, so the above limitations or
exclusions may not apply to you. This warranty
gives you specific legal rights, and you also
may have other rights which vary from jurisdiction to jurisdiction. This warranty applies only
to the original purchaser of this product from
the original date of purchase.
B. At its option, Honeywell will repair or replace
this product if it is found to be defective in
material or workmanship. Defective product
should be returned to the place of purchase in
accordance with store policy. Thereafter, while
within the warranty period defective product
may be returned to Honeywell.
C. This warranty does not cover damage result-
ing from any unauthorized attempts to repair or
from any use not in accordance with the
instruction manual.
D. Return defective product to Honeywell Con-
sumer Products with a brief description of the
problem. Include proof of purchase and a $10
US/$14.50 CAN check or money order for handling, return packing and shipping charges.
Please include your name, address and daytime phone number. You must prepay shipping
charges. Send to:
In the US:
Honeywell
Attn: Returns Department
4755 Southpoint Drive
Memphis, TN 38118 USA
In Canada:
Honeywell
Attn: Returns Department
510 Bronte Street S.
Milton, ON L9T 2X6 Canada
5
© 2002 All rights reserved. P/N 035-02405-000, Rev 0
 Loading...