

Page 1
(ATX2/ATX2-f)
Owner’s Manual
Introduction
Playing the Piano
Music Menu
Recorder
Settings
Appendix
Page 2

Page 3

Thank you for purchasing a KAWAI AnyTimeX2 piano!
The AnyTimeX2 piano is a revolutionary new instrument that combines the capabilities of an acoustic
piano and a digital piano. With the AnyTimeX2 piano, one can enjoy the pleasing, expressive tone of
KAWAI acoustic pianos, with the convenience of powerful, exciting features that can only be found on
a digital instrument.
As its name implies, the most compelling aspect of the AnyTimeX2 piano is that it can be played at
literally any time, without disturbing family or neighbours. It will allow you to enjoy the touch of a ne
KAWAI acoustic piano while retaining the privacy and power of built-in digital sound. The AnyTimeX2
piano will o er many creative new possibilities for music-making in your home, school, or recording
studio.
To get the most from your AnyTimeX2 piano, please read this manual carefully and become familiar with
all its powerful functions and features. We trust that you and your AnyTimeX2 piano will be making
beautiful music together (at any time of the day or night) for many years to come.
Page 4
IMPORTANT SAFETY INSTRUCTIONS
IMPORTANT SAFETY INSTRUCTIONS
SAVE THESE INSTRUCTIONS
INSTRUCTIONS PERTAINING TO A RISK OF FIRE, ELECTRIC SHOCK, OR INJURY TO PERSONS
WARNING
CAUTION
RISK OF ELECTRIC SHOCK
DO NOT OPEN
AVIS : RISQUE DE CHOC ELECTRIQUE - NE PAS OUVRIR.
TO REDUCE THE RISK OF ELECTRIC SHOCK, DO NOT REMOVE COVER (OR BACK).
NO USER-SERVICEABLE PARTS INSIDE. REFER SERVICING TO QUALIFIED SERVICE PERSONNEL.
The lighting flash with arrowhead symbol, within an
equilateral triangle, is intended to alert the user to
the presence of uninsulated “dangerous voltage”
within the product’s enclosure that may be of
sufficient magnitude to constitute a risk of electric
shock to persons.
TO REDUCE THE RISK OF
FIRE OR ELECTRIC
SHOCK, DO NOT EXPOSE
THIS PRODUCT TO RAIN
OR MOISTURE.
The exclamation point within an equilateral triangle
is intended to alert the user to the presence of
important operating and maintenance (servicing)
instructions in the literature accompanying the
product.
Examples of Picture Symbols
denotes that care should be taken.
The example instructs the user to take care not to allow fingers to be trapped.
denotes a prohibited operation.
The example instructs that disassembly of the product is prohibited.
denotes an operation that should be carried out.
The example instructs the user to remove the power cord plug from the AC outlet.
Read all the instructions before using the product.
1) Read these instructions.
2) Keep these instructions.
3) Heed all warnings.
4) Follow all instructions.
5) Do not use this apparatus near water.
6) Clean only with dry cloth.
7) Do not block any ventilation openings. Install in
accordance with the manufacturer’s
instructions.
8) Do not install near any heat sources such as
radiators, heat registers, stoves, or other
apparatus (including amplifiers) that produce
heat.
9) Do not defeat the safety purpose of the
polarized or grounding-type plug. A polarized
plug has two blades with one wider than the
other. A grounding type plug has two blades
and a third grounding prong. The wide blade or
the third prongs are provided for your safety.
If the provided plug does not fit into your outlet,
consult an electrician for replacement of the
obsolete outlet.
10) Protect the power cord from being walked on
or pinched particularly at plugs, convenience
receptacles, and the point where they exit from
the apparatus.
11) Only use attachments/accessories specified by
the manufacturer.
12) Use only with the cart, stand, tripod, bracket, or
table specified by the manufacturer, or
sold with the apparatus. When a cart is used,
use caution when moving the cart/apparatus
combination to avoid injury from tip-over.
13) Unplug this apparatus during lightning storms
or when unused for long periods of time.
14) Refer all servicing to qualified service
personnel. Servicing is required when the
apparatus has been damaged in any way,
such as power-supply cord or plug is
damaged, liquid has been spilled or objects
have fallen into the apparatus, the apparatus
has been exposed to rain or moisture, does not
operate normally, or has been dropped.
Page 5
WARNING - When using electric products, basic precautions should always be followed,
including the following.
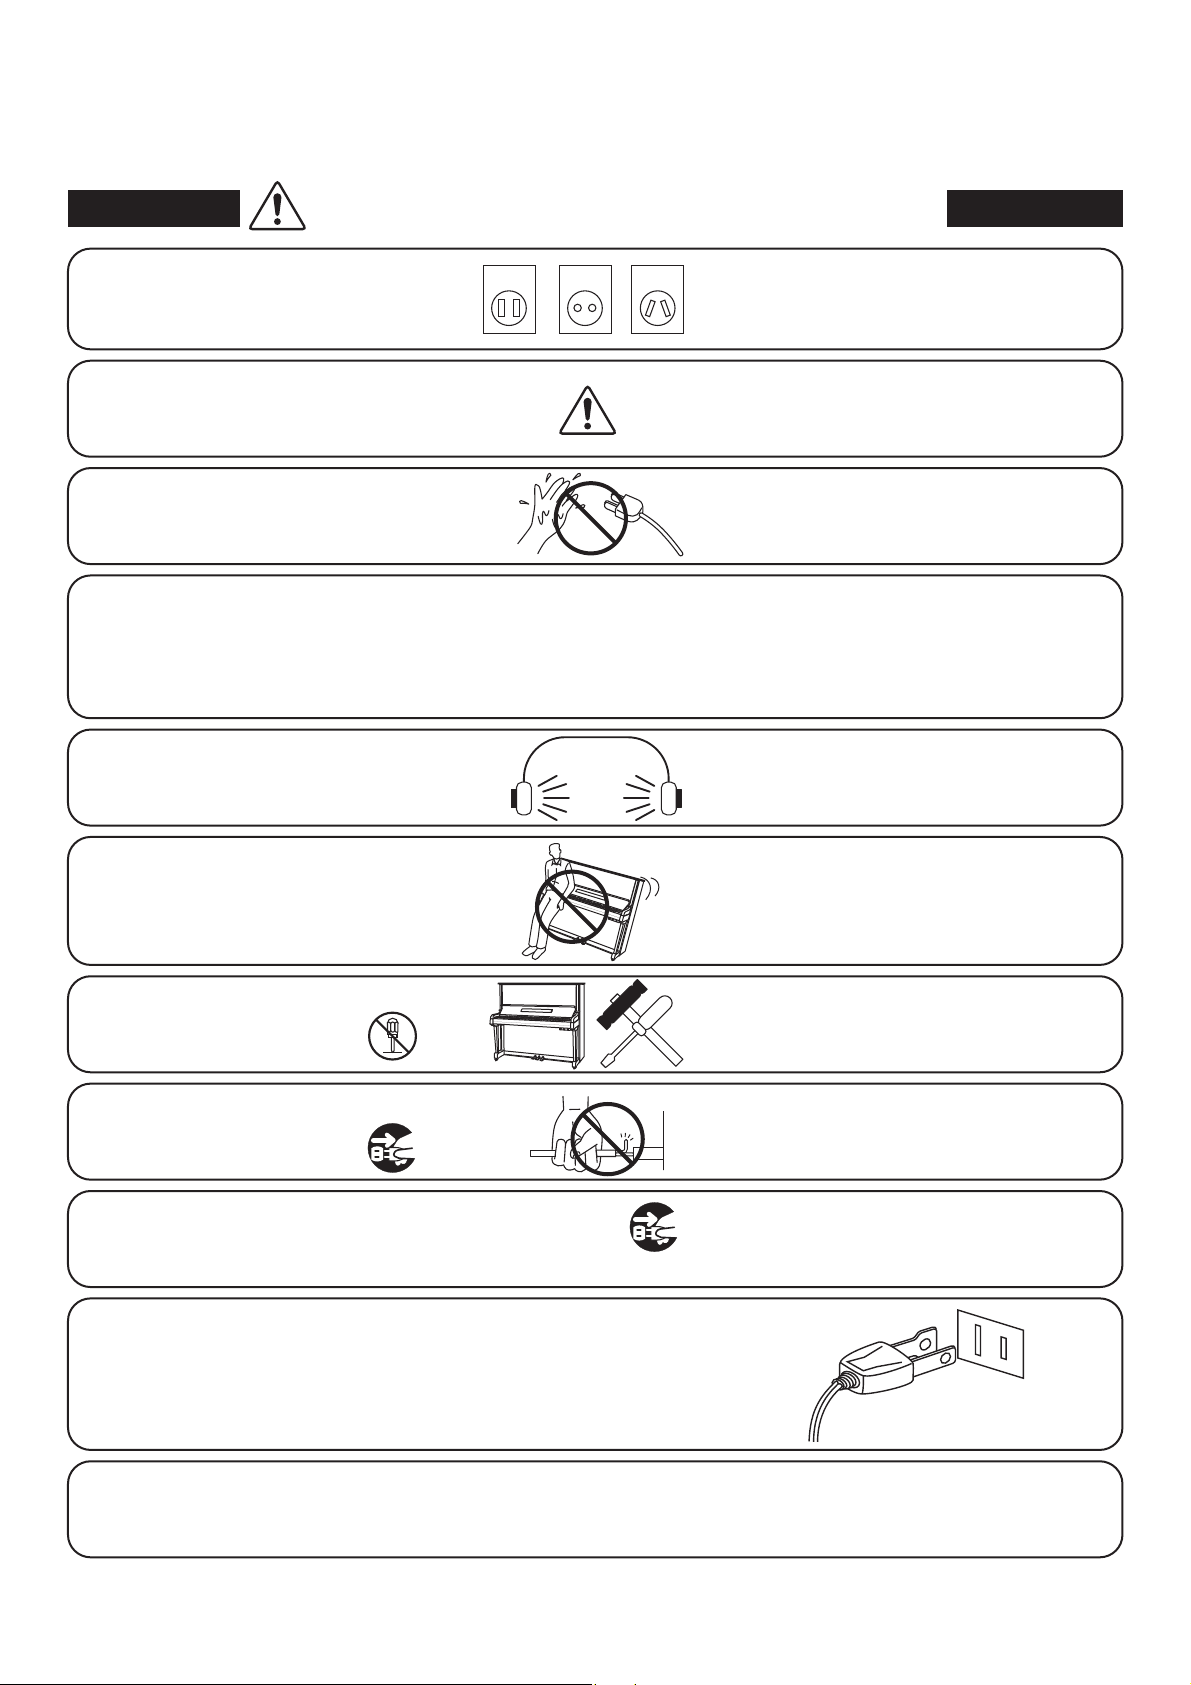
WARNING
The product should be connected to
an AC outlet of the specified voltage.
Use only the AC adaptor included with
this instrument to power the instrument.
Do not insert or disconnect the power
cord plug with wet hands.
The chair must be used properly (it must be
used only when playing the product).
● Do not play with it or stand on it.
● Only one person is allowed to sit on it.
● Do not sit on it when opening the lid.
● Re-tighten the bolts occasionally.
When using the headphones, do not
listen for long periods of
time at high volume levels.
Indicates a potential hazard that could result in death
or serious injury if the product is handled incorrectly.
120V 240V230V
● If you are going to use an AC power cord,
make sure that it has the correct plug shape
and conforms to the specified power voltage.
● Failure to do so may result in fire.
● Do not use other AC adaptors to power this
instrument.
● Do not use the included AC adaptor or AC
power cord to power other equipment.
Doing so may cause electric shock.
Doing so may cause the chair to fall over or your
fingers to be trapped, resulting in injury.
Doing so may result in hearing problems.
Do not lean against the keyboard.
Do not disassemble, repair or modify
the product.
When disconnecting the AC power cord’s
plug, always hold the plug
and pull it to remove it.
The product is not completely disconnected from the
power supply even when the power switch is turned
off. If the product will not be used for a long time,
unplug the AC power cord from the AC outlet.
Doing so may cause the product to fall over,
resulting in injury.
Doing so may result in product breakdown, electric
shock or short-circuit.
● Pulling the AC power cord itself may damage
the cord, causing a fire, electric shock or
short-circuit.
● Failure to do so may cause fire in case of
lightning.
● Failure to do so may over-heat the product,
resulting in fire.
This product may be equipped with a polarised line plug (one blade
wider than the other). This is a safety feature.
If you are unable to insert the plug into the outlet, contact an
electrician to replace your obsolete outlet.
Do not defeat the safety purpose of the plug.
It is a good practice to place the instrument near the AC outlet and to place the power cord plug in a
position that allows the plug to be disconnected easily in the event of an emergency. Electricity is always
charging while the plug is in the AC outlet even when the power switch is in the ‘OFF’ position.
Page 6
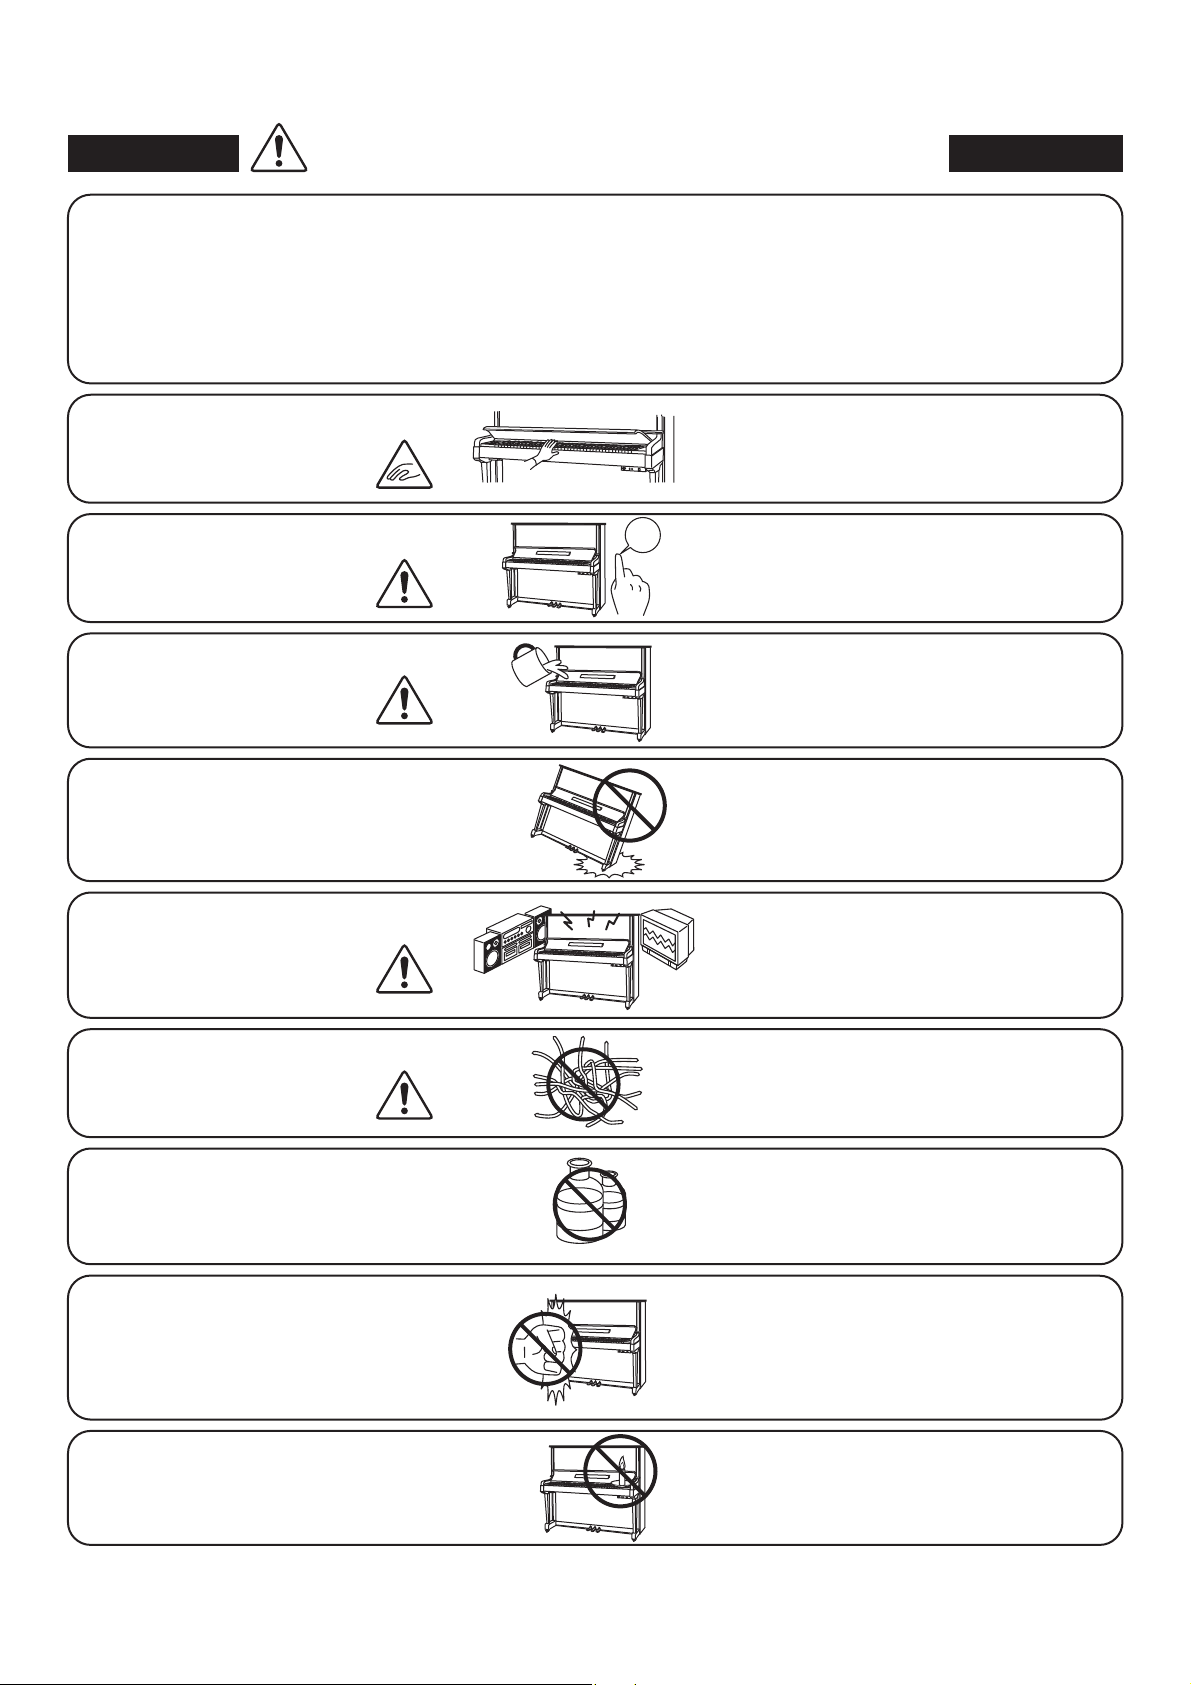
CAUTION
Indicates a potential hazard that could result in injury
or damage to the product or other property if the
product is handled incorrectly.
Do not use the product in the following areas.
● Areas, such as those near windows, where the product is
exposed to direct sunlight
● Extremely hot areas, such as near a heater
● Extremely cold areas, such as outside
● Extremely humid areas
● Areas where a large amount of sand or dust is present
● Areas where the product is exposed to excessive
vibrations
When closing the fallboard, close
it gently.
Before connecting cords, make sure
that the power to this product
and other devices is turned
OFF.
Take care not to allow any foreign
matter to enter the product.
Do not drag the product on the floor.
Take care not to drop the product.
OFF
Using the product in such areas may result in
product breakdown.
Use the product only in moderate climates (not
in tropical climates).
Closing it roughly may trap your fingers,
resulting in injury.
Failure to do so may cause breakdown of this
product and other devices.
Entry of water, needles or hair pins may result
in breakdown or short-circuit.
The product should not be exposed to dripping or
splashing. No objects filled with liquids, such as
vases, should be placed on the product.
Please lift up the product when moving it.
Please note that the product is heavy and must
be carried by more than two persons.
Dropping the product may result in breakdown.
Do not place the product near electrical
appliances such as TVs and
radios.
When connecting the AC power cord
and other cords, take care
not to entangle them.
Do not wipe the product with benzene
or thinner.
Do not stand on the product or exert
excessive force.
Do not place naked flame, such as lighted
candles on the product.
● Doing so may cause the product to generate
noise.
● If the product generates noise, move the
product sufficiently away from the electrical
appliance or connect it to another AC outlet.
Failure to do so may damage them, resulting in
fire, electric shock or short-circuit.
● Doing so may result in discoloration or deformation
of the product.
● When cleaning the product, put a soft cloth in
lukewarm water, squeeze it well, then wipe the
product.
● Doing so may cause the product to become
deformed or fall over, resulting in breakdown
or injury.
Doing so may cause the illumination to fall over,
resulting in fire.
Page 7
Ensure that the ventilation is not
impeded by covering the ventilation
openings with items, such as newspaper,
table-cloths, curtains, etc.
The product should be located so that its location or position does not interfere with its proper
ventilation. Ensure a minimum distance of 5cm around the product for sufficient ventilation.
The product should be serviced by qualified service personnel when:
● The power supply cord or the plug has been damaged.
● Objects have fallen, or liquid has been spilled into the product.
● The product has been exposed to rain.
● The product does not appear to operate normally or exhibits a marked change in
performance.
● The product has been dropped, or the enclosure damaged.
Failure to do so may over-heat the product,
resulting in fire.
Notes on Repair
Should an abnormality occur in the product, immediately turn the power OFF, disconnect the
power cord plug, and then contact the shop from which the product was purchased.
CAUTION:
To prevent electric shock, match the wide blade of the plug with the wide socket slot and insert fully.
ATTENTION:
Pour éviter les chocs électriques, introduire la lame la plus large de la fiche dans la borne
correspondante de la prise et pousser jusqu’au fond.
Instruction for AC power cord (U.K.)
Do not plug either terminal of the power cord to the ground of the AC outlet on the wall.
FCC Information
This equipment has been tested and found to comply with the limits for a Class B digital device,
pursuant to Part 15 of the FCC Rules. These limits are designed to provide reasonable
protection against harmful interference in a residential installation. This equipment generates,
uses and can radiate radio frequency energy and, if not installed and used in accordance with
the instructions, may cause harmful interference to radio communications.
If this equipment does cause harmful interference to radio or television reception, which can be
determined by turning the equipment off and on, the user is encouraged to try to correct the
interference by one or more of the following measures:
• Reorient or relocate the receiving antenna.
• Increase the separation between the equipment and receiver.
• Connect the equipment into an outlet on a different electrical circuit from the receiver.
• Consult the dealer or an experienced radio/TV technician for help.
Canadian Radio Interference Regulations
This instrument complies with the limits for a class B digital apparatus, pursuant to the Radio
Interference Regulations, C.R.C., c. 1374.
Page 8

Table of Contents
IMPORTANT SAFETY INSTRUCTIONS . . . . . . . . . . . . . . . . 4
Table of Contents . . . . . . . . . . . . . . . . . . . . . . . . . . . . . . . . . . . . 8
Introduction
Owner’s Manual Conventions . . . . . . . . . . . . . . . . . . . . . . 10
Part Names and Functions . . . . . . . . . . . . . . . . . . . . . . . . . . 12
Basic Operation . . . . . . . . . . . . . . . . . . . . . . . . . . . . . . . . . . . . . 14
Playing the Piano
Selecting Sounds . . . . . . . . . . . . . . . . . . . . . . . . . . . . . . . . . . . . 16
Dual Mode . . . . . . . . . . . . . . . . . . . . . . . . . . . . . . . . . . . . . . . . . . . 17
Dual Mode settings . . . . . . . . . . . . . . . . . . . . . . . . . . . . . . . . . 18
Split Mode . . . . . . . . . . . . . . . . . . . . . . . . . . . . . . . . . . . . . . . . . . . 19
Split Mode settings . . . . . . . . . . . . . . . . . . . . . . . . . . . . . . . . . 20
Four Hands Mode . . . . . . . . . . . . . . . . . . . . . . . . . . . . . . . . . . . 21
Recorder
Song Recorder (Internal Memory) . . . . . . . . . . . . . . . . . . . . . . 38
1. Recording a song . . . . . . . . . . . . . . . . . . . . . . . . . . . . . . . . . 38
2. Playing a song . . . . . . . . . . . . . . . . . . . . . . . . . . . . . . . . . . . . 40
3. Internal Recorder Edit menu . . . . . . . . . . . . . . . . . . . . . . . 41
4. Erasing a part/song . . . . . . . . . . . . . . . . . . . . . . . . . . . . . . . 42
5. Converting a song to an audio le . . . . . . . . . . . . . . . . . 43
Audio Record/Playback (USB Memory) . . . . . . . . . . . . . . . . 44
1. Recording a MP3/WAV audio le . . . . . . . . . . . . . . . . . . . 44
2. Playing an MP3/WAV audio le . . . . . . . . . . . . . . . . . . . . 46
3. Playing a MIDI song le . . . . . . . . . . . . . . . . . . . . . . . . . . . 48
4. USB Recorder Edit menu . . . . . . . . . . . . . . . . . . . . . . . . . . 50
5.
Converting a MIDI song le to an MP3/WAV audio le
6. Overdubbing a MP3/WAV audio le . . . . . . . . . . . . . . . . 52
. . . 51
Settings
Four Hands Mode settings. . . . . . . . . . . . . . . . . . . . . . . . . . . 22
Reverb . . . . . . . . . . . . . . . . . . . . . . . . . . . . . . . . . . . . . . . . . . . . . . . 23
Reverb settings . . . . . . . . . . . . . . . . . . . . . . . . . . . . . . . . . . . . . 23
E ects . . . . . . . . . . . . . . . . . . . . . . . . . . . . . . . . . . . . . . . . . . . . . . . 25
Metronome / Drum Rhythms . . . . . . . . . . . . . . . . . . . . . . . 27
Metronome settings . . . . . . . . . . . . . . . . . . . . . . . . . . . . . . . . 27
Panel Lock . . . . . . . . . . . . . . . . . . . . . . . . . . . . . . . . . . . . . . . . . . . 29
Music Menu
Demo Songs . . . . . . . . . . . . . . . . . . . . . . . . . . . . . . . . . . . . . . . . . 30
Piano Music . . . . . . . . . . . . . . . . . . . . . . . . . . . . . . . . . . . . . . . . . 31
Lesson Function . . . . . . . . . . . . . . . . . . . . . . . . . . . . . . . . . . . . . 32
1. Selecting a lesson book/song. . . . . . . . . . . . . . . . . . . . . . 32
2. Listening to the selected lesson song . . . . . . . . . . . . . . 33
3. Lesson Function settings . . . . . . . . . . . . . . . . . . . . . . . . . . 34
4. Repeating sections of a lesson song . . . . . . . . . . . . . . . 35
5. Recording a lesson song practice . . . . . . . . . . . . . . . . . . 36
6. Finger Exercises . . . . . . . . . . . . . . . . . . . . . . . . . . . . . . . . . . 37
Function menus . . . . . . . . . . . . . . . . . . . . . . . . . . . . . . . . . . . . . 53
Basic Settings . . . . . . . . . . . . . . . . . . . . . . . . . . . . . . . . . . . . . . . 54
1. Key Transpose . . . . . . . . . . . . . . . . . . . . . . . . . . . . . . . . . . . 55
2. Song Transpose . . . . . . . . . . . . . . . . . . . . . . . . . . . . . . . . . 56
3. Tone Control . . . . . . . . . . . . . . . . . . . . . . . . . . . . . . . . . . . . 57
User Tone Control . . . . . . . . . . . . . . . . . . . . . . . . . . . . . . . 58
4. Speaker Volume (AnyTimeX2-f only) . . . . . . . . . . . . . . . . . . 59
5. Phones Volume . . . . . . . . . . . . . . . . . . . . . . . . . . . . . . . . . 60
6. Line In Level . . . . . . . . . . . . . . . . . . . . . . . . . . . . . . . . . . . . . 61
7. Line Out Volume . . . . . . . . . . . . . . . . . . . . . . . . . . . . . . . . . 62
8. Wall EQ (AnyTimeX2-f only) . . . . . . . . . . . . . . . . . . . . . . . . . . 63
9. Tuning . . . . . . . . . . . . . . . . . . . . . . . . . . . . . . . . . . . . . . . . . . 64
10. Damper Hold . . . . . . . . . . . . . . . . . . . . . . . . . . . . . . . . . . . . 65
11. Four Hands . . . . . . . . . . . . . . . . . . . . . . . . . . . . . . . . . . . . . . 66
12. LCD Contrast . . . . . . . . . . . . . . . . . . . . . . . . . . . . . . . . . . . . 67
13. User Memory . . . . . . . . . . . . . . . . . . . . . . . . . . . . . . . . . . . . 68
14. Factory Reset . . . . . . . . . . . . . . . . . . . . . . . . . . . . . . . . . . . . 69
Virtual Technician Settings . . . . . . . . . . . . . . . . . . . . . . . . . 70
1. Touch Curve . . . . . . . . . . . . . . . . . . . . . . . . . . . . . . . . . . . . . 71
User Touch Curve . . . . . . . . . . . . . . . . . . . . . . . . . . . . . . . . 72
2. Voicing . . . . . . . . . . . . . . . . . . . . . . . . . . . . . . . . . . . . . . . . . 73
3. Damper Resonance . . . . . . . . . . . . . . . . . . . . . . . . . . . . . . 74
4. Damper Noise . . . . . . . . . . . . . . . . . . . . . . . . . . . . . . . . . . . 75
5. String Resonance . . . . . . . . . . . . . . . . . . . . . . . . . . . . . . . . 76
8
Page 9

Settings (cont.)
Appendix
6. Key-o E ect . . . . . . . . . . . . . . . . . . . . . . . . . . . . . . . . . . . . 77
7. Fall-back Noise . . . . . . . . . . . . . . . . . . . . . . . . . . . . . . . . . . 78
8. Hammer Delay . . . . . . . . . . . . . . . . . . . . . . . . . . . . . . . . . . 79
9. Topboard . . . . . . . . . . . . . . . . . . . . . . . . . . . . . . . . . . . . . . . 80
10. Decay Time . . . . . . . . . . . . . . . . . . . . . . . . . . . . . . . . . . . . . 81
11. Minimum Touch . . . . . . . . . . . . . . . . . . . . . . . . . . . . . . . . . 82
12. Stretch Tuning . . . . . . . . . . . . . . . . . . . . . . . . . . . . . . . . . . . 83
User Tuning . . . . . . . . . . . . . . . . . . . . . . . . . . . . . . . . . . . . . 84
13. Temperament . . . . . . . . . . . . . . . . . . . . . . . . . . . . . . . . . . . 85
User Temperament . . . . . . . . . . . . . . . . . . . . . . . . . . . . . . 86
14. Temperament Key . . . . . . . . . . . . . . . . . . . . . . . . . . . . . . . 87
15. User Key Volume. . . . . . . . . . . . . . . . . . . . . . . . . . . . . . . . . 88
16. Half-Pedal Adjust . . . . . . . . . . . . . . . . . . . . . . . . . . . . . . . . 89
17. Soft Pedal Depth . . . . . . . . . . . . . . . . . . . . . . . . . . . . . . . . . 90
MIDI Settings . . . . . . . . . . . . . . . . . . . . . . . . . . . . . . . . . . . . . . . . 91
MIDI Overview . . . . . . . . . . . . . . . . . . . . . . . . . . . . . . . . . . . . . . 91
1. MIDI Channel . . . . . . . . . . . . . . . . . . . . . . . . . . . . . . . . . . . . . 93
Connecting to Other Devices . . . . . . . . . . . . . . . . . . . . . . 109
Jack Panel . . . . . . . . . . . . . . . . . . . . . . . . . . . . . . . . . . . . . . . . . 110
Front Panel . . . . . . . . . . . . . . . . . . . . . . . . . . . . . . . . . . . . . . . . 110
Tro ub leshoo tin g . . . . . . . . . . . . . . . . . . . . . . . . . . . . . . . . . . . .111
Demo Song List . . . . . . . . . . . . . . . . . . . . . . . . . . . . . . . . . . . . 113
Sound List . . . . . . . . . . . . . . . . . . . . . . . . . . . . . . . . . . . . . . . . . . 114
Program Change Number List . . . . . . . . . . . . . . . . . . . . . 115
Drum Rhythm List . . . . . . . . . . . . . . . . . . . . . . . . . . . . . . . . . . 116
Speci cations . . . . . . . . . . . . . . . . . . . . . . . . . . . . . . . . . . . . . . 117
MIDI Implementation Chart . . . . . . . . . . . . . . . . . . . . . . . 118
2. Send Program Change Number . . . . . . . . . . . . . . . . . . . . 94
3. Local Control . . . . . . . . . . . . . . . . . . . . . . . . . . . . . . . . . . . . . 95
4. Transmit Program Change Numbers . . . . . . . . . . . . . . . 96
5. Multi-timbral Mode . . . . . . . . . . . . . . . . . . . . . . . . . . . . . . . 97
6. Channel Mute . . . . . . . . . . . . . . . . . . . . . . . . . . . . . . . . . . . . 98
USB Menu . . . . . . . . . . . . . . . . . . . . . . . . . . . . . . . . . . . . . . . . . . . 99
1. Load Song . . . . . . . . . . . . . . . . . . . . . . . . . . . . . . . . . . . . . . 100
2. Load User Memory . . . . . . . . . . . . . . . . . . . . . . . . . . . . . . 101
3. Save Song . . . . . . . . . . . . . . . . . . . . . . . . . . . . . . . . . . . . . . . 102
4. Save SMF Song . . . . . . . . . . . . . . . . . . . . . . . . . . . . . . . . . . 103
5. Save User Memory . . . . . . . . . . . . . . . . . . . . . . . . . . . . . . . 104
6. Rename File . . . . . . . . . . . . . . . . . . . . . . . . . . . . . . . . . . . . . 105
7. Delete File . . . . . . . . . . . . . . . . . . . . . . . . . . . . . . . . . . . . . . . 106
8. Format USB . . . . . . . . . . . . . . . . . . . . . . . . . . . . . . . . . . . . . 107
Power Settings . . . . . . . . . . . . . . . . . . . . . . . . . . . . . . . . . . . . . 108
Auto Power O . . . . . . . . . . . . . . . . . . . . . . . . . . . . . . . . . . . . 108
9
Page 10
Owner’s Manual Conventions
h
ol
d
This owner’s manual utilises a number of illustrative conventions in order to explain the AnyTimeX2 piano’s various
functions. The examples below provide an overview of the button LED indicator states and press types, and the
appearance of di erence kinds of text.
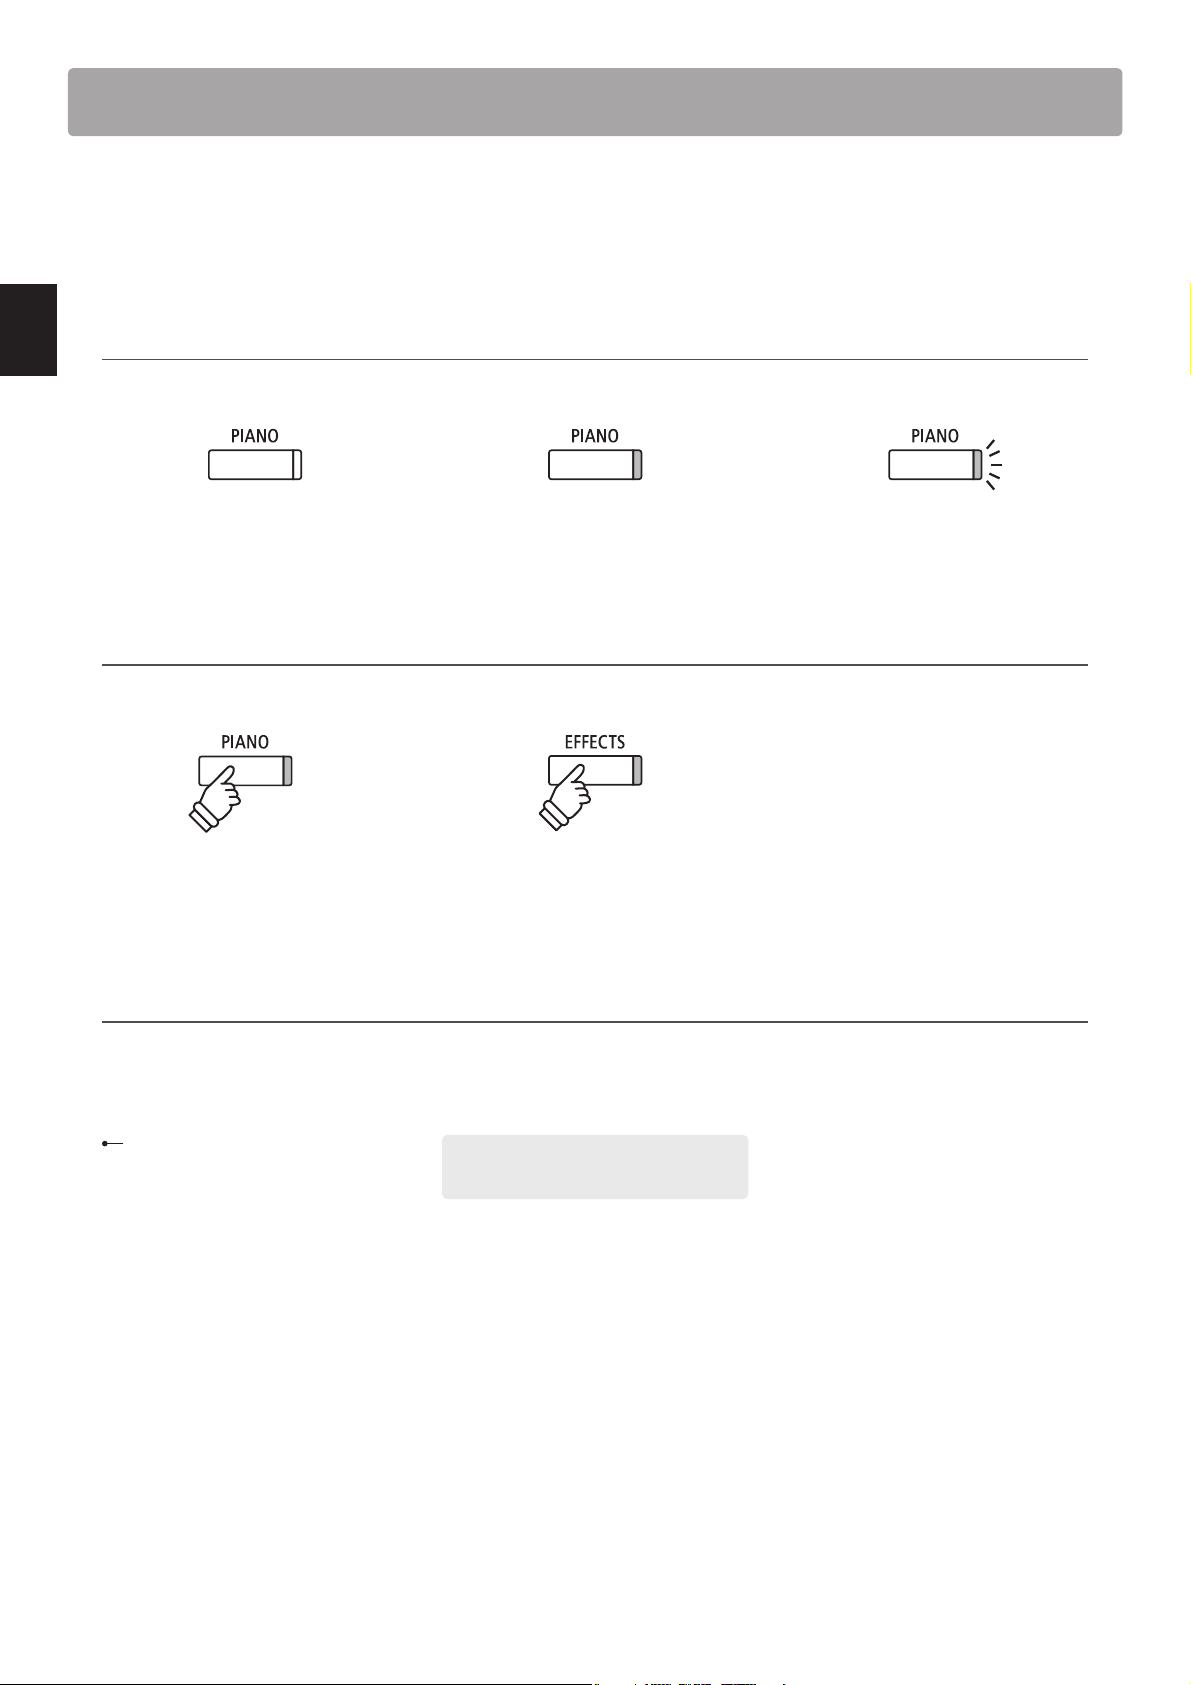
Button LED indicator states
Introduction
LED indicator o :
Sound/Function is not selected.
Button press types
Normal press:
Select a sound or function.
Text appearance
Normal instruction and explanation text
is written in regular type at 9 pt. size.
LED indicator on:
Sound/Function is selected.
hold
Press and hold:
Select a function’s settings etc.
* Notes about functions are marked with an
asterisk and written in 8 pt. size.
LED indicator ashing:
Sound/Function is selected in a
temporary state.
Reminders about previous operations are
written in italic type at 9 pt. size.
10
Captions explaining the LCD display
or button functions, are written in
bold type at 8.5 pt. size.
Example ope rations are written in italic t ype
at 8 pt. size, and enclosed within a grey box .
Page 11

Introduction
11
Page 12
Part Names and Functions
ON
OFF
Introduction
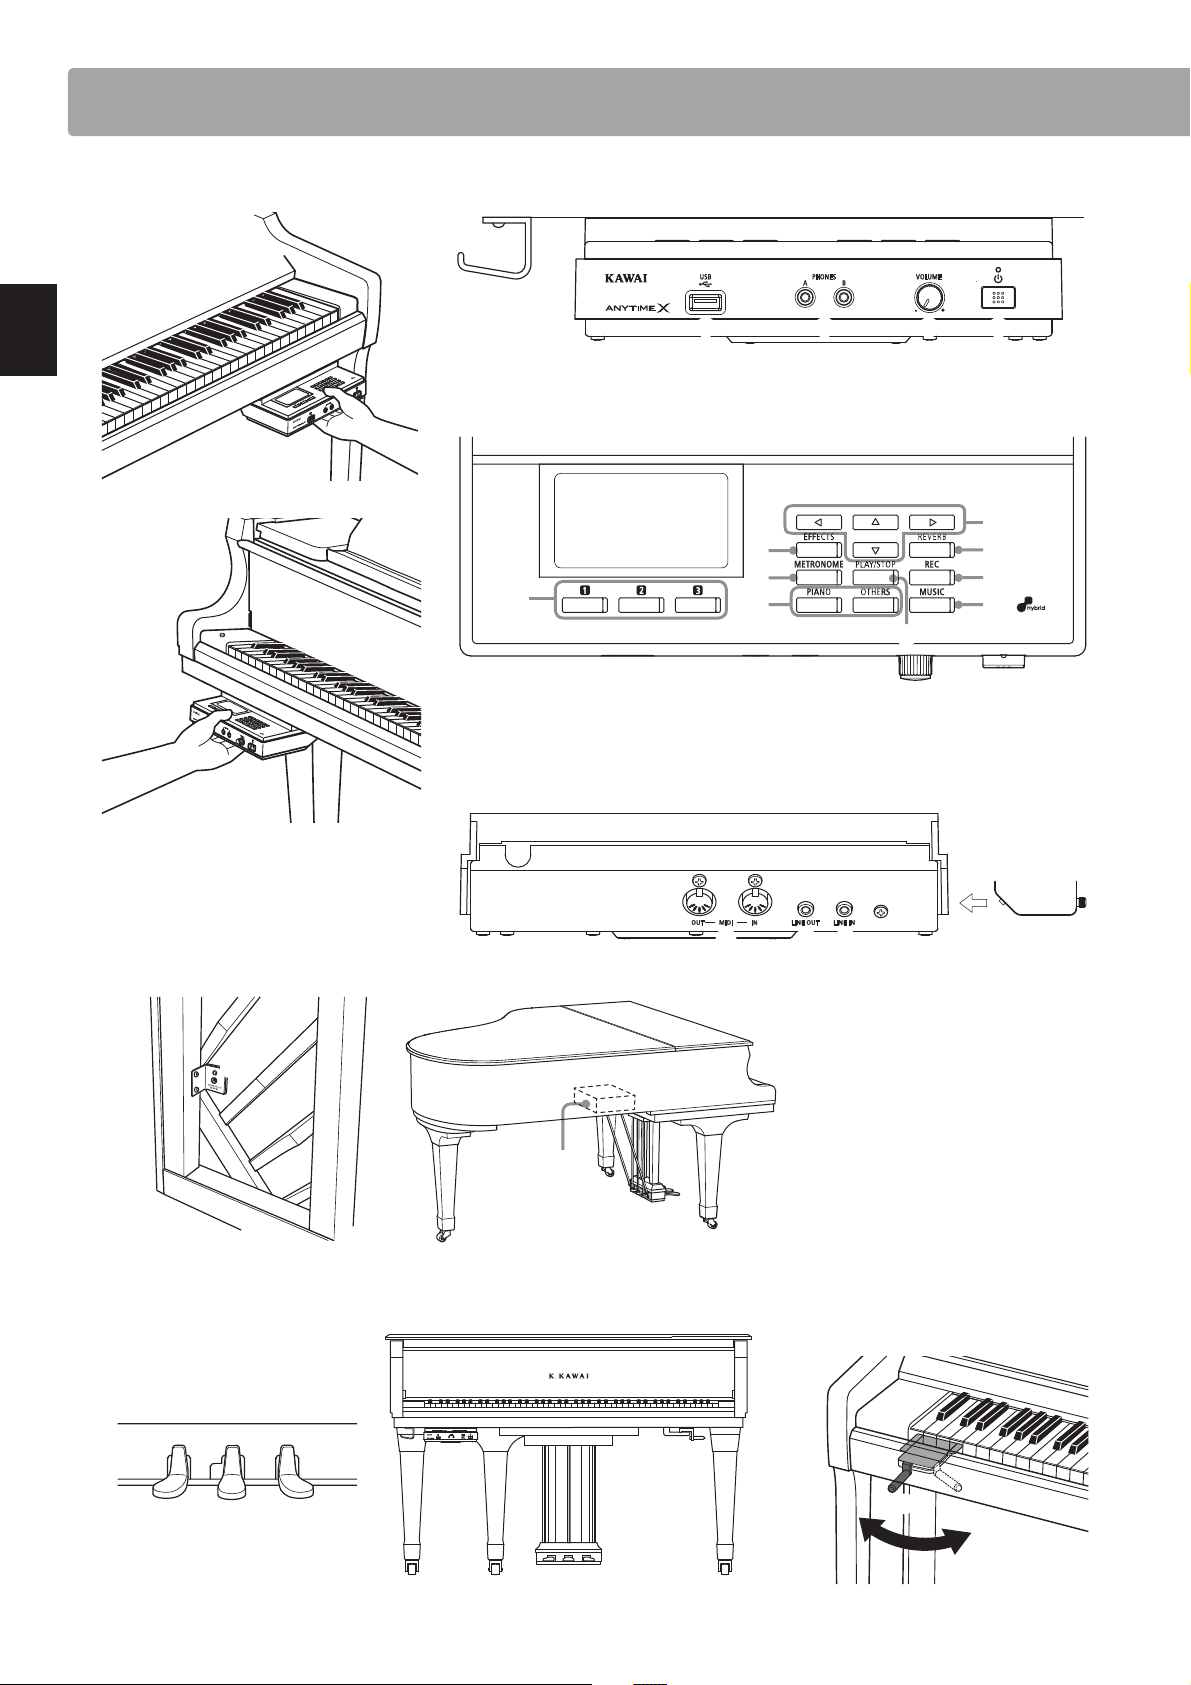
Control box: panel open
Upright piano
Control box: panel & headphone hook (front view)
e
d
Control box: panel open (above view)
f
i
k
g
Please do not place any objects on top of the control panel.
n
c
ab
h
j
m
o
Grand piano
DC IN connector
s
Upright piano Grand piano
Pedals & Muting lever
Control box: MIDI, LINE IN/OUT connectors (rear view)
r
s
qlp
Mu er lever
12
v
Upright piano
t
wuu
v
Grand piano
x
ON
y
OFF
Upright piano
Page 13
a POWER button
This switch is used to turn the instrument on/o . Be sure to turn o the
instrument after playing.
* The AnyTimeX2 piano features a power saving mode that can turn o the
instrument automatically after a speci ed period of inactivity. For more
information, please refer to the ‘Auto Power O ’ setting on page 108.
b VOLUME knob
Th is kn o b is us ed to ad ju st th e v ol um e w he n A nyT im e m od e i s a ct iv at ed .
Turn the knob clockwise to increase the volume.
c PHONES jacks
These jack s are used to connect stereo headphones to the AnyTimeX2 piano.
Two pairs of headphones can be connected and used simultaneously.
d USB to DEVICE port
This port is used to connect a FAT or FAT32 formatted USB memory
device to the instrument in order to load/save recorded song data and
MP3/WAV/SMF les etc.
e Headphone Hook
This hook is used to conveniently hang the headphones when not in use.
* The headphone hook is not pre-attached for grand pianos. Attach the
included headphone hook with the two screws provided, as shown in the
illustration on the previous page.
f LCD display
The LCD display provides useful information such as the currently
selected sound name, settings values, and the status of other functions
when active.
* A protective plastic lm is attached to the display during production.
Please remove this lm before attempting to play the instrument.
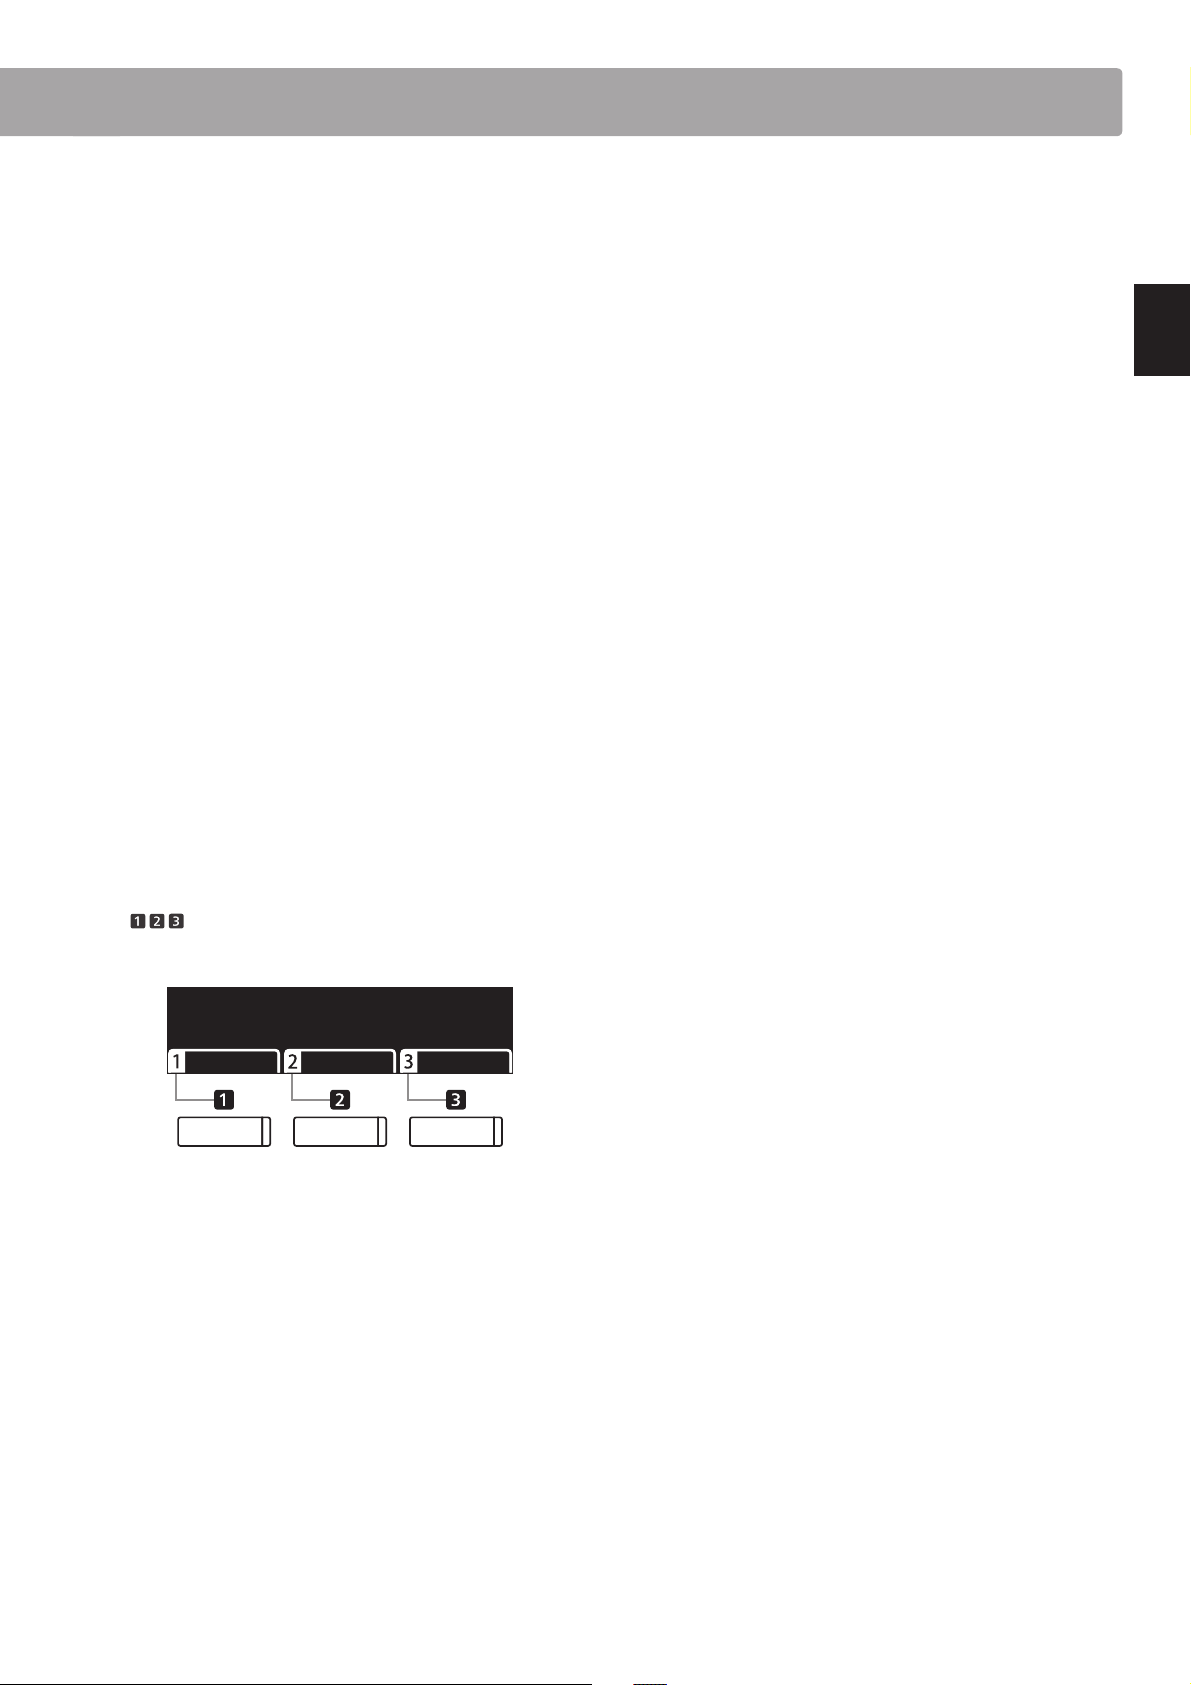
g FUNCTION button
These buttons are used to select one of three functions/options shown
at the bottom of the LCD display.
m REC button
Th is bu tton is us ed to reco rd pe rfo rman ces t o inte rna l mem ory or a U SB
memory device as MP3/WAV audio les.
n SOUND buttons
These but tons are used to select the sound(s) that will be heard when playing
the keyboard in AnyTime mode. M ultiple sounds are assigne d to each category
button, and can be selected by pressing the same button repeatedly.
o MUSIC button
This button is used to select AnyTimeX2 piano’s built- in Demons tration
songs, Piano Music pieces and Lesson songs.
p LINE IN jack
This jack is used to connect the stereo output from audio equipment,
computers, or other electronic instruments to the AnyTimeX2 piano.
q LINE OUT jack
This jack is used to conne ct the stereo output of the A nyTimeX2 piano to
external ampli ers, mixers, recording devices, and similar equipment.
r MIDI IN / OUT jacks
These jacks are used to connect the AnyTimeX2 piano to external MIDI
devices such as other musical instruments or a computer in order to
send and receive MIDI data.
* For more inform ation about the instrume nt’s connectors and jack s, please
refer to ‘Connecting to Other Devices’ on page 109.
s DC IN Jack
This jack is used to connect the AC adaptor.
t Mute Pedal (upright piano)
This pe dal is used to mute the acousti c piano so und. D epre ss thi s ped al
and slide it gently to the left to activate AnyTime mode.
Do not attempt to ac tivate/deactivate AnyTime mode while playin g the piano
as this can cause serious damage to the action mechanism of the instrument.
Introduction
DUAL MENUSPLIT
h ARROW buttons
These buttons are used to navigate around the various menus and
screens, adjust values, and answer on-screen prompts.
i EFFECTS button
This button is used to turn e ects for the selected sound on/o , to
select the di erent e ect types, and to adjust their settings.
j REVERB button
This button is used to turn reverb for the selected sound on/o , to
select the di erent reverb types, and to adjust their settings.
k METRONOME button
This button is used to turn the metronome function on/o , and also to
adjust the tempo, time signature (or beat), and volume settings.
l PLAY/STOP button
This button is used to start/stop the playback of demonstration songs,
Piano Music pieces, and Lesson and Finger Exercises, and to start/stop
the recording and playback of recorder songs, and MP3/WAV audio les.
u Damper Pedal
This pedal is used to remove all dampers from the strings, allowing
them to vibrate freely. This greatly enriches the piano’s sound, while
also assisting the pianist to play smooth ‘legato’ passages.
v Soft Pedal / Sostenuto Pedal (upright piano)
This pedal is used to soften the sound, reducing its volume.
When ‘Jazz Organ’ or ‘Drawbar Organ’ sounds are selected, the soft
pedal is used to alternate the speed of the rotary speaker simulation
between ‘Slow’ and ‘Fast’ e ect modes.
With upright AnyTimeX2 instruments, it is also possible to use the Soft
pedal as a Sostenuto pedal by depressing the pedal while turning on
the AnyTimeX2 piano control panel.
w Sostenuto Pedal (grand piano)
This pedal is used to sustain one group of notes while other notes are
played without sustain.
x Muting Lever (grand piano)
This lever is used to mute the acoustic piano sound. Pull the lever gently to
the left to activate AnyTime mode. Do not attempt to activate/deactivate
AnyTime mode while playing the instrument as this can cause serious
damage to the action mechanism of the instrument.
y Mu er lever (upright piano)
This lever is used to activate/deactivate the mu er system of the
acoustic piano.
Pull the lever to activate and push it back to deactivate.
13
Page 14

Basic Operation
This section explains the basic procedures for turning the power on, activating AnyTime mode, and performing
with headphones.
Introduction
1. Plug the AC adaptor into the DC IN connector
located at the rear of the instrument.
3. Press the POWER button.
The LED above the POWER button will light up to indicate that
the AnyTimeX2 control box is turned on.
Press
* The AnyTimeX2 piano features a power saving mode that can turn o the
instrument automatically after a speci ed period of inactivity. For more
information, please refer to the ‘Auto Power O ’ setting on page 108.
2. Plug the AC adaptor’s power plug into the
electric wall outlet.
4. Turn the VOLUME knob clockwise to the
half-way position.
5. [Upright piano] Depress the Mute pedal, then
slide it gently to the left to mute the acoustic
piano sound and activate AnyTime mode.
Pedals
(Mute)(Soft) (Damper)
Do not attempt to activate/deactivate AnyTime mode while playing the piano,
as this can cause serious damage to the action mechanism of the instrument.
6.
Connect a pair of headphones to one of the PHONES jacks located on the front of the control box.
Two pairs of headphones can be connected simultaneously,
allowing two people to listen to the AnyTimeX2 piano at the
same time.
[Grand piano] Pull the Muting lever to the
left to mute the acoustic piano sound and
activate AnyTime mode.
14
Page 15

Play the piano.
The sound of a Concert Grand piano will be played through the
headphones, with the acoustic piano sound muted.
About the soundboard speaker (ATX2-f)
ATX2-f upright and grand pianos feature a uniqe integrated soundboard speaker system, allowing the AnyTimeX2 sound to be
played without the use of headphones.
In addition, when AnyTime mode is deactivated (i.e. the acoustic piano sound is not muted), it is also possible to enjoy playing
ensemble pieces that feature both the acoustic piano sound and AnyTimeX2 sound simultaneously, such as piano with strings.
Introduction
15
Page 16
Selecting Sounds
The AnyTimeX2 piano features a wide selection of realistic instrument sounds suitable for various musical styles.
Sounds are arranged into eight categories, with several sounds assigned to each category button. For a complete
listing of available instrument sounds, please refer to page 114 of this owner’s manual.
By default, the ‘Concert Grand’ sound will be selected automatically when the instrument is turned on.
Selecting a sound
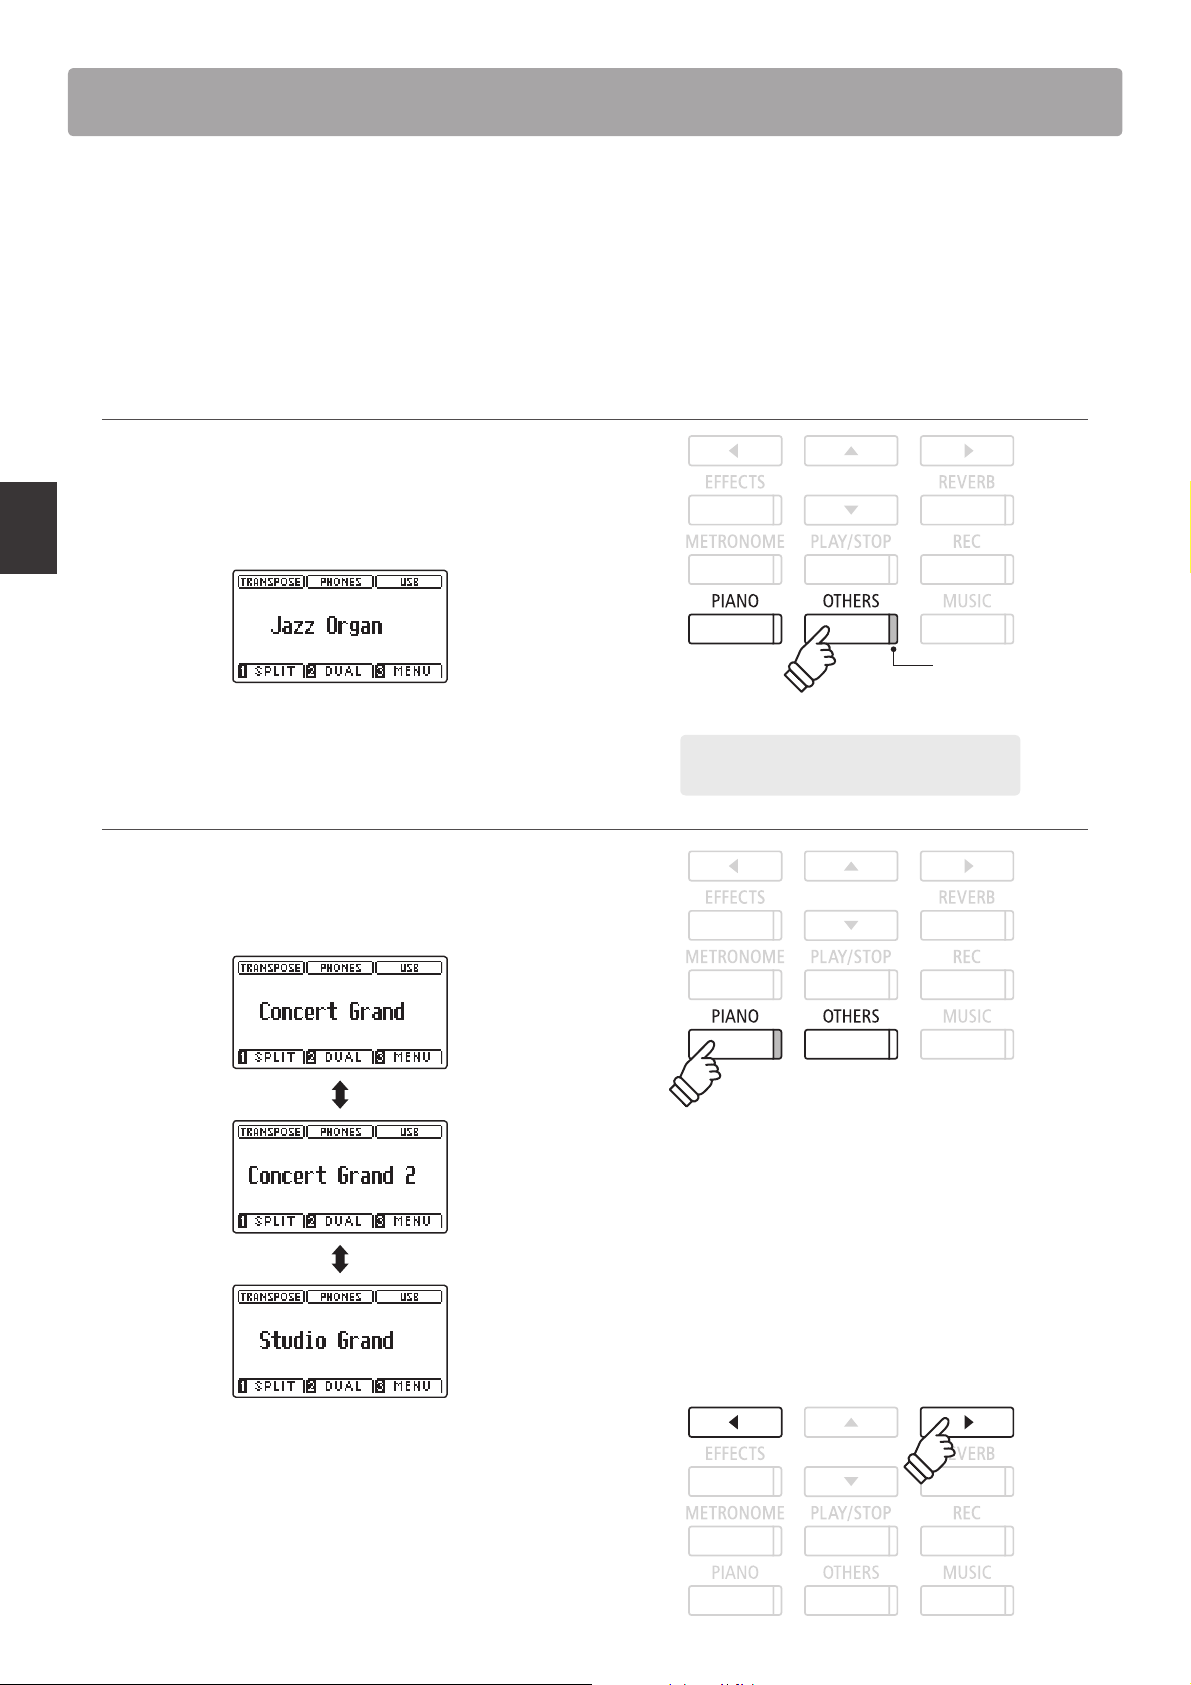
Press the desired SOUND button.
The LED indicator for the button will turn on to indicate that this
category has been selected, and the name of the sound will be
shown in the LCD display.
LED indicator on:
Sound category is
selected.
Playing the Piano
Changing the sound
Several sounds are assigned to each category button.
Press the selected category button repeatedly to cycle through
the di erent sound variations.
Example: To select the OTHERS category, press
the OTHERS button.
The or buttons can also be used to select sounds and cycle
through the di erent sound variations.
16
Page 17
Dual Mode
The Dual Mode function allows two sounds to be layered together, creating a more complex sound.
For example, a piano sound layered with strings, or a church organ combined with a choir, etc.
1. Entering Dual mode
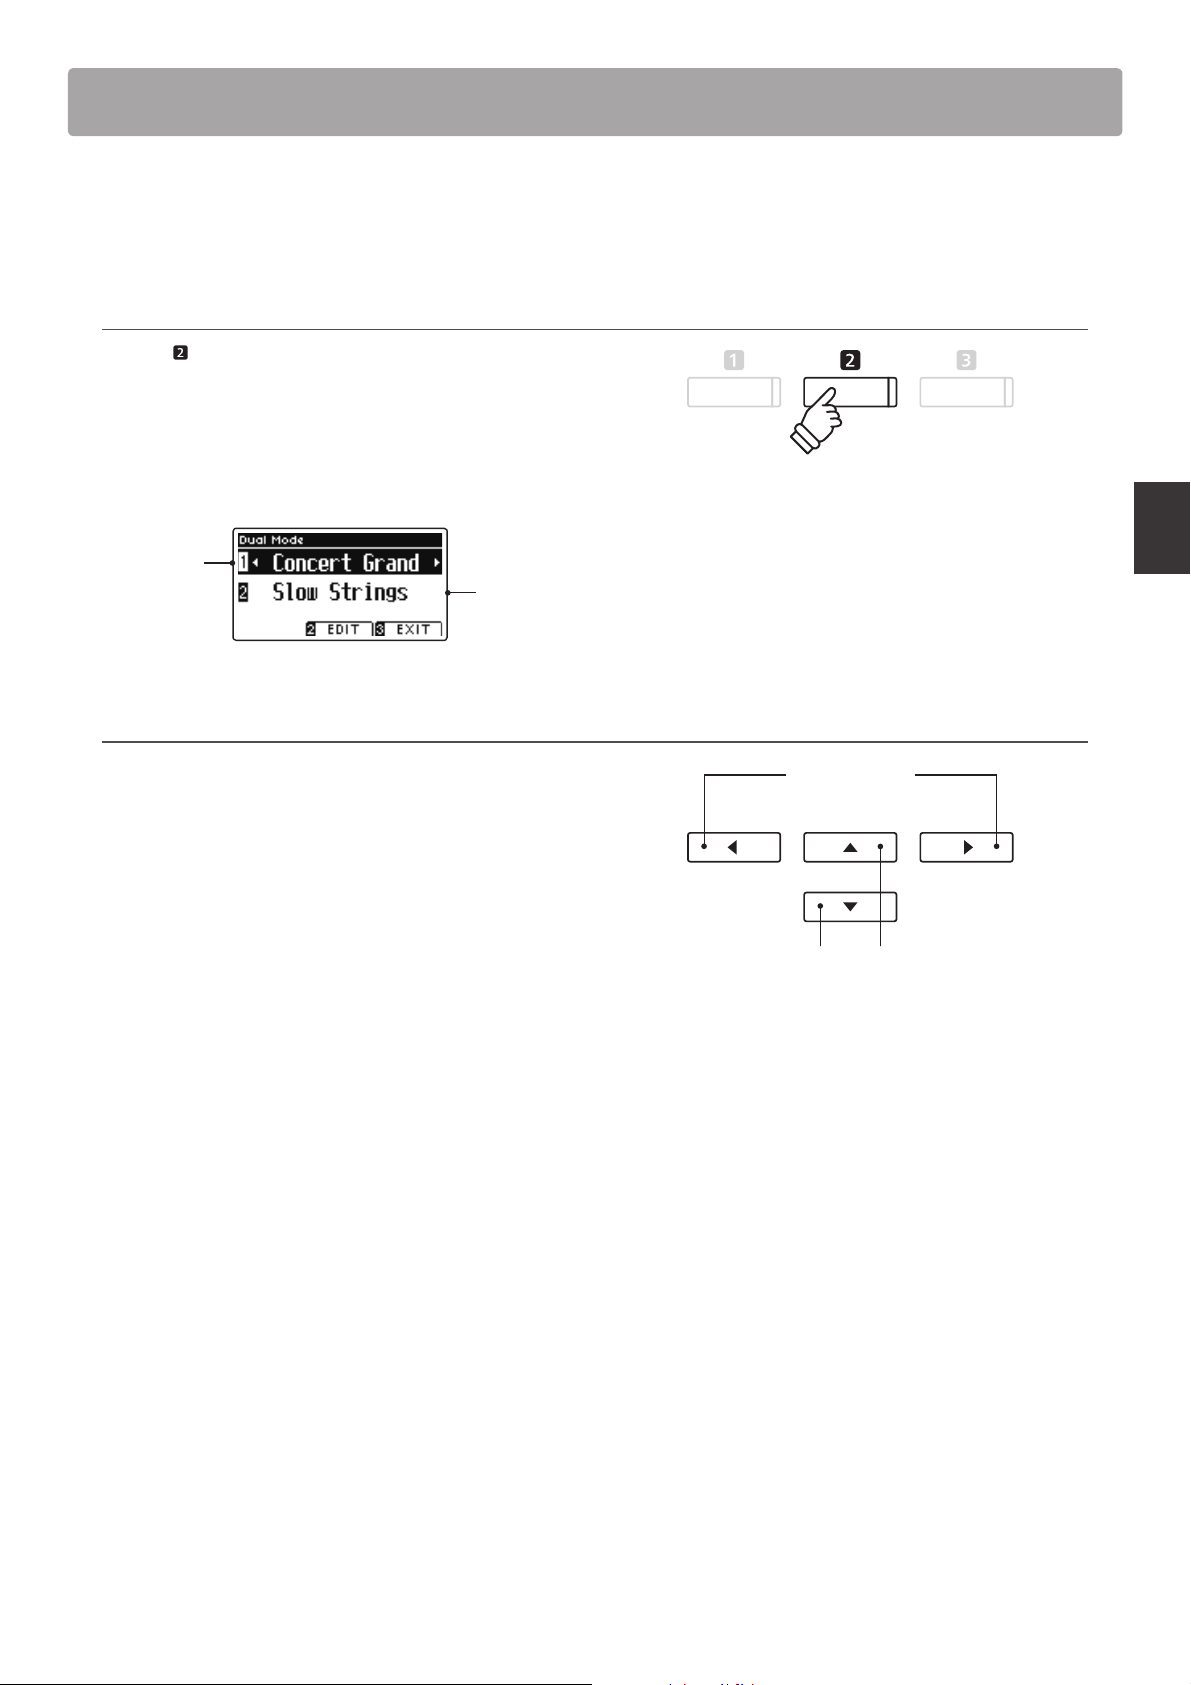
Press the FUNCTION button (DUAL).
The DUAL Mode screen will be shown in the LCD display.
The currently selected sound is shown on the rst line. Slow
Strings is selected as layered sound and shown on the second
line.
Main
sound
Layered
sound
2. Changing the main/layered sounds
Press the or buttons to move the selection cursor over the
main sound or layered sound.
Press the or buttons to cycle through the di erent sound
variations.
buttons:
Change sound variation.
buttons:
Move selection cursor.
Playing the Piano
17
Page 18
Dual Mode
Dual Mode settings
The Dual Mode settings menu allows characteristics of the combined sound to be adjusted.
Dual Mode settings
Dual Mode setting Description Default setting
Balance Adjust the volume balance between the main and layered sounds. 5 : 5
Layer Octave Shift Raise/lower the pitch of the layered sound in octave steps. 0
Dynamics Adjust the dynamic sensitivity of the layered sound relative to the main sound. 10
Entering the Dual Mode settings menu
While the Dual Mode screen is shown in the LCD display:
Playing the Piano
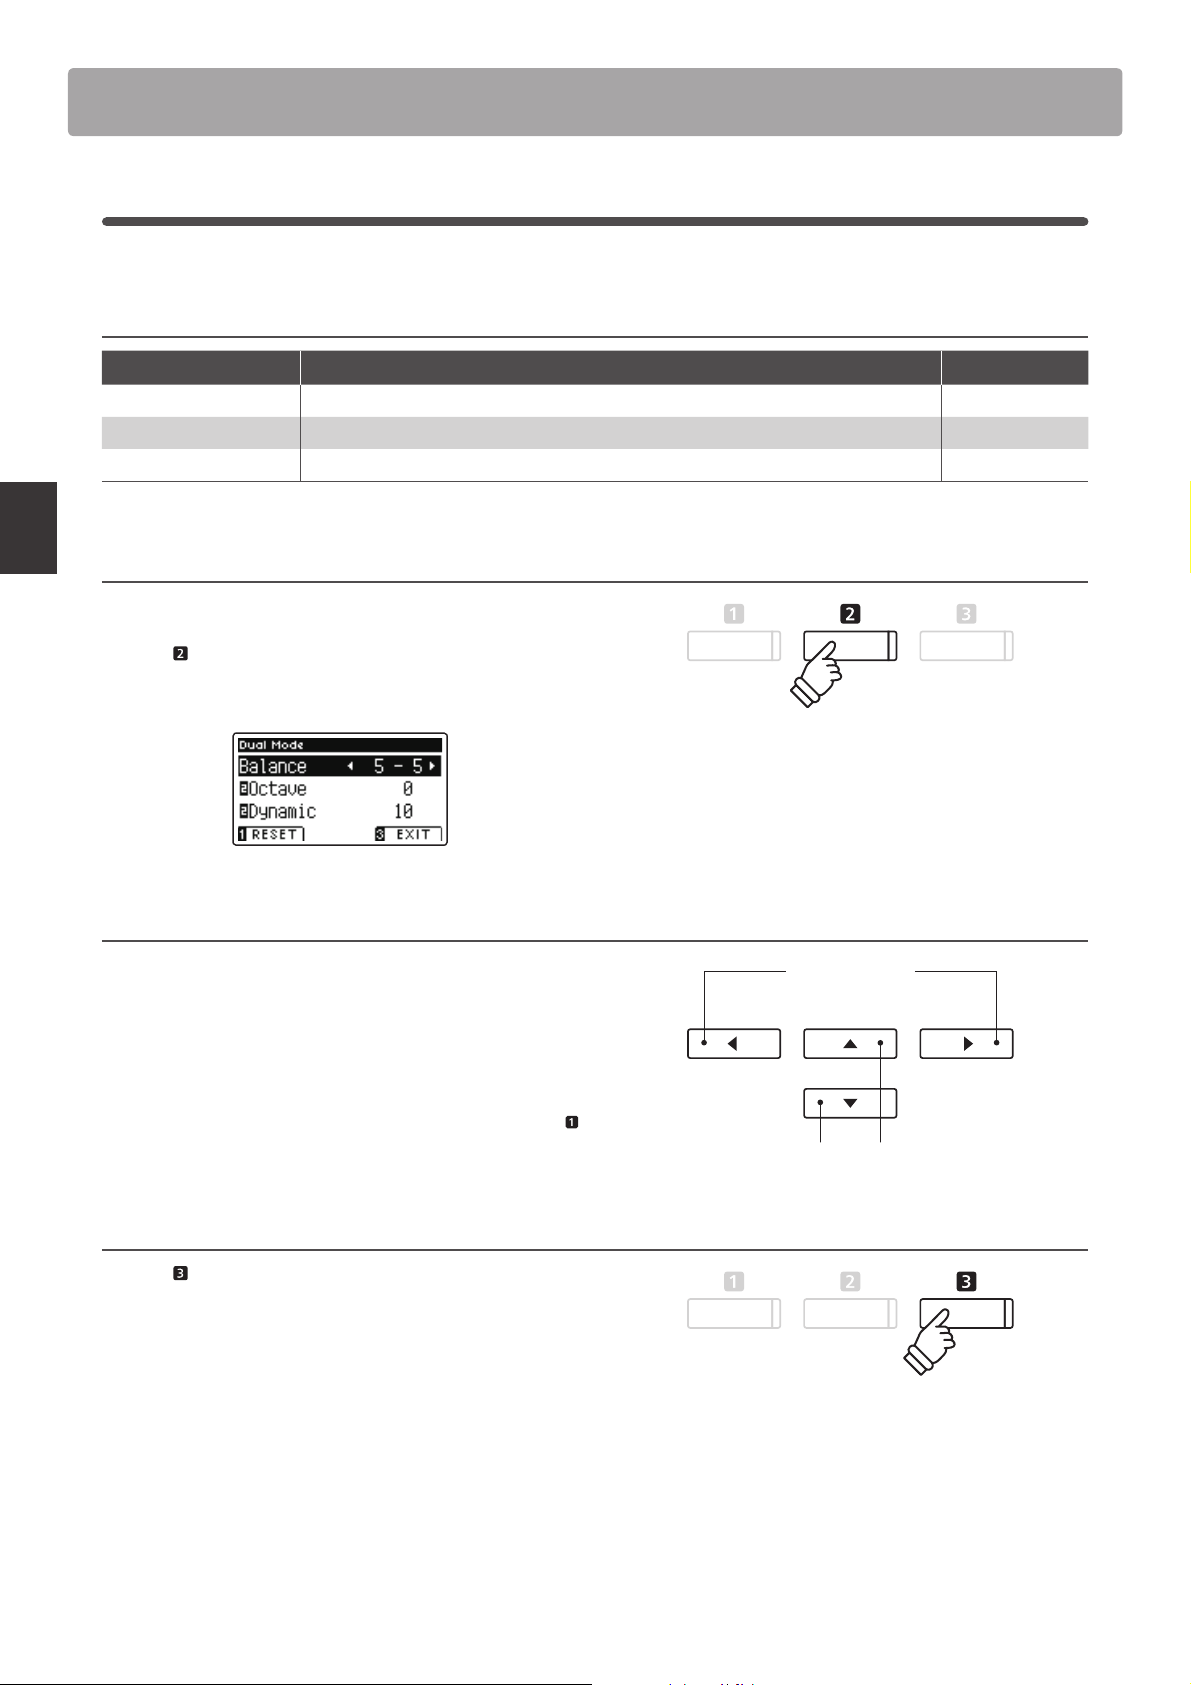
Press the
The Dual Mode settings menu will be shown in the LCD display.
Adjusting Dual Mode settings
After entering the Dual Mode settings menu:
Press the or buttons to move the selection cursor over the
desired setting.
Press the or buttons to adjust the selected setting.
* To reset the current setting to the default value, press the
FUNCTION button (RESET).
FUNCTION button (EDIT).
3. Exiting Dual mode
buttons:
Adjust selected setting.
buttons:
Move selection cursor.
Press the FUNCTION button (EXIT) to exit Dual Mode.
18
Page 19
Split Mode
ho
l
d
The Split Mode function divides the keyboard into two sections, allowing each section to be played with a di erent
sound. For example, a bass sound in the lower section, and a piano sound in the upper section.
1. Entering Split mode
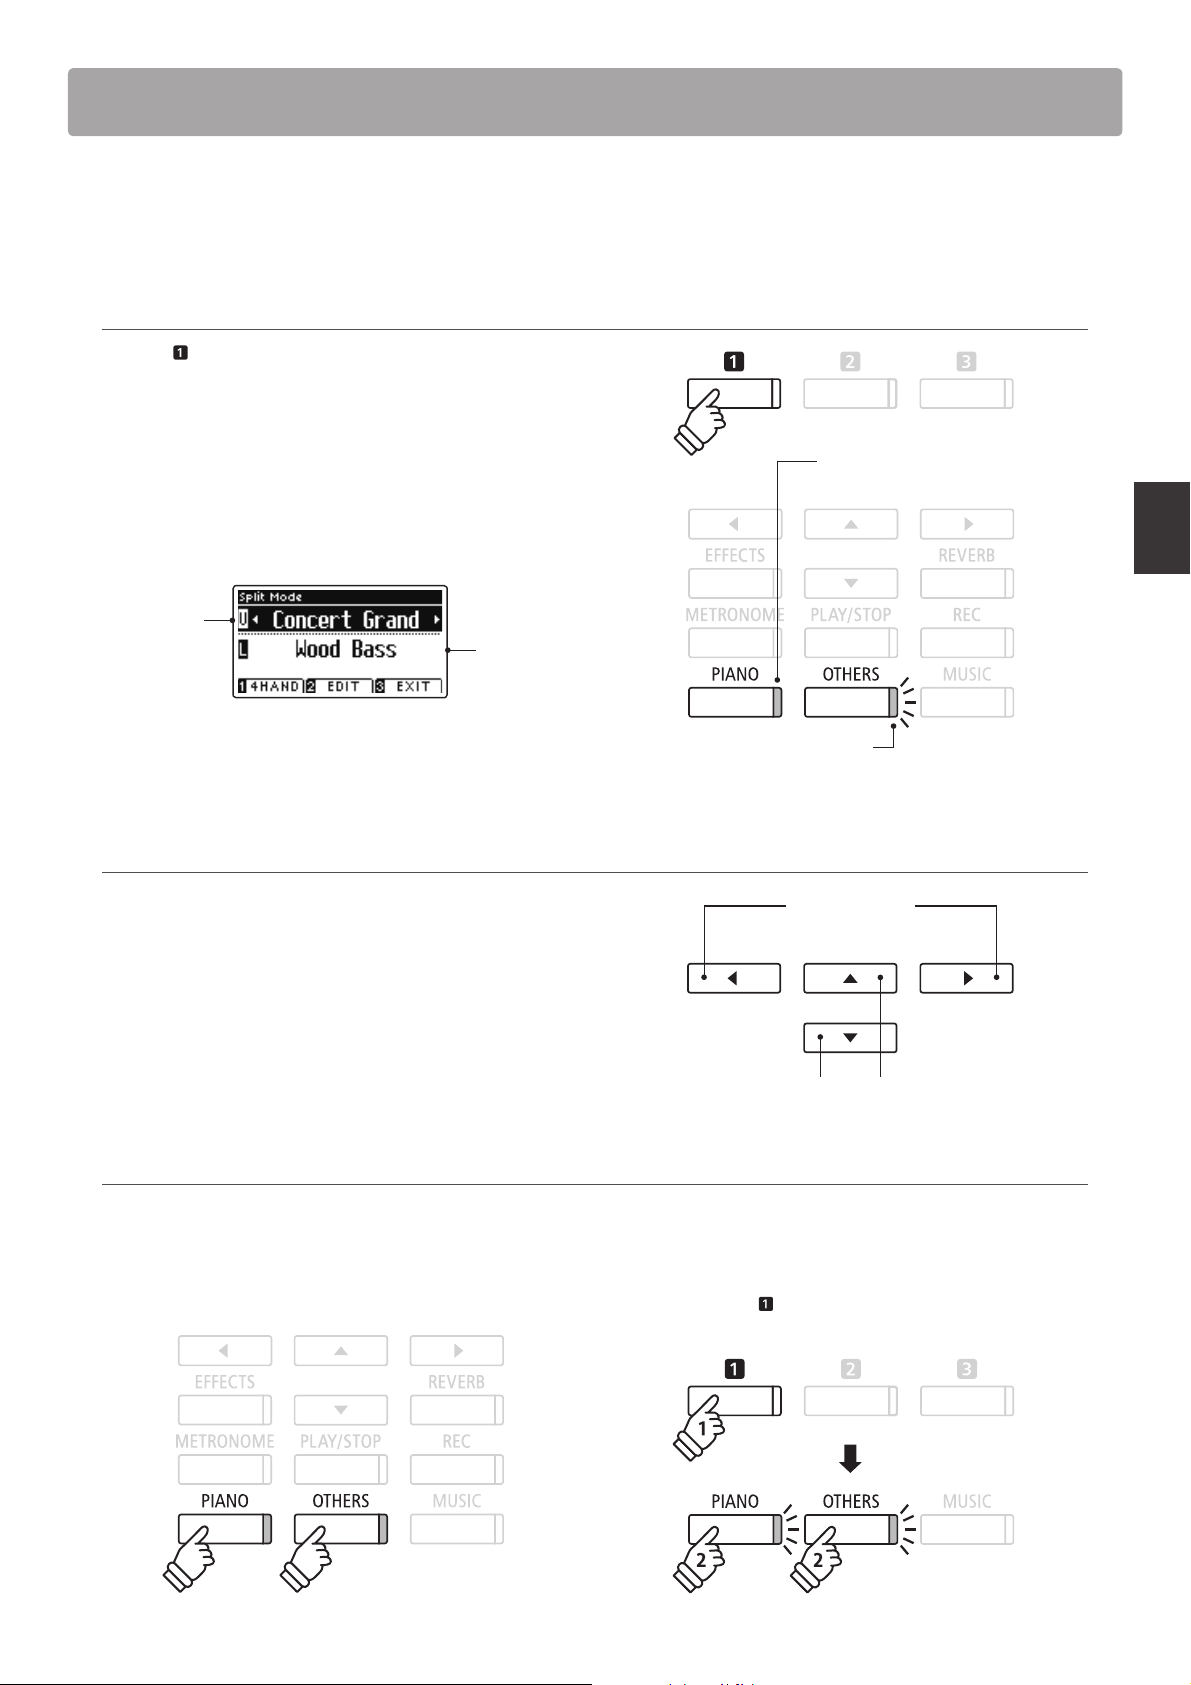
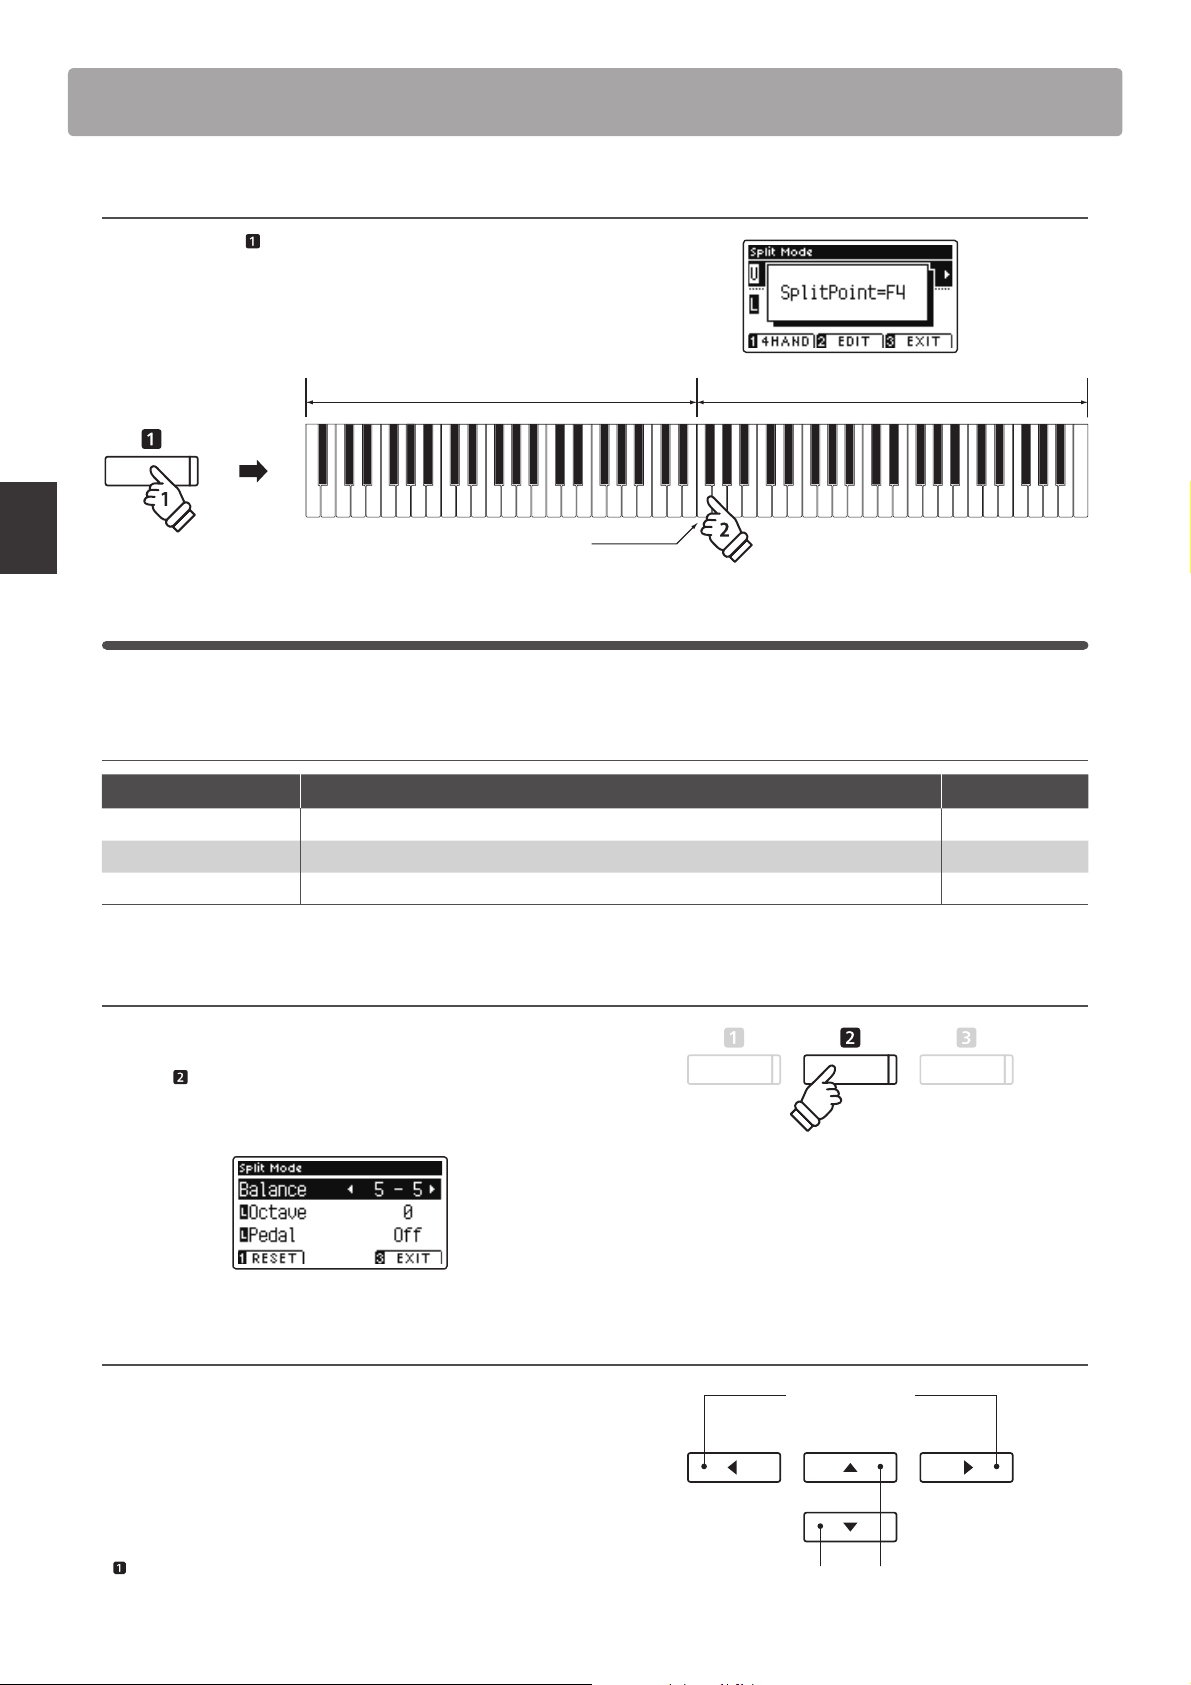
Press the FUNCTION button (SPLIT).
The Split Mode screen will be shown in the LCD display.
* The default split point is set between keys B3 and C4.
LED indicator on:
The upper section and lower section sound names will be
shown in the LCD display. The LED indicator for the upper
section sound button will turn on, and the LED indicator for the
lower section sound button will start to ash.
Upper
section
sound
Lower
section
sound
Upper section sound.
* By default, the lower section will be set to the ‘Wood Bass’ sound.
LED indicator ashing:
Lower section sound.
2a. Changing the upper/lower section sounds: Method 1
Press the or buttons to move the selection cursor over the
upper section or lower section sound.
Press the or buttons to cycle through the di erent sound
variations.
buttons:
Change sound variation.
buttons:
Move selection cursor.
2b. Changing the upper/lower section sounds: Method 2
It is also possible to change the upper/lower section sound by pressing the PIANO or OTHERS buttons.
To select a di erent sound for the upper section:
Press the PIANO or OTHERS buttons repeatedly.
To select a di erent sound for the lower section:
Press and hold the
or OTHERS buttons repeatedly.
FUNCTION button, then press the PIANO
Playing the Piano
or
hold
or
19
Page 20
Split Mode
hold
3. Changing the split point
Press and hold the FUNCTION button, then press the desired
split key on the keyboard.
The name of the pressed key will brie y be shown in the LCD
display, and will become the new split point.
Upper sectionLower section
hold
New split point
Split Mode settings
The Split Mode settings menu allows characteristics of the Split Mode sound and operation to be adjusted.
Playing the Piano
Split Mode settings
Split Mode setting Description Default setting
Balance Adjust the volume balance between the upper and lower sections. 5 - 5
Lower Octave Shift Raise/lower the pitch of the lower section sound in octave steps. 0
Lower Pedal Enable/disable the sustain pedal for the lower section sound. O
Entering the Split Mode settings menu
While the Split Mode screen is shown in the LCD display:
Press the
The Split Mode settings menu will be shown in the LCD display.
FUNCTION button (EDIT).
Adjusting Split Mode settings
After entering the Split Mode settings menu:
Press the or buttons to move the selection cursor over the
desired setting.
Press the or buttons to adjust the selected setting.
* To reset the current setting to the default value, press the
FUNCTION button (RESET).
20
buttons:
Adjust selected setting.
buttons:
Move selection cursor.
Page 21
Four Hands Mode
ho
l
d
The Four Hands Mode function divides the keyboard into two sections in a similar way to that of the Split Mode
function. However, with Four Hands Mode enabled, the octave/pitch of each section is automatically adjusted to
create two separate 44-key instruments with the same playing range. Furthermore, the damper (right) pedal and
soft (left) pedal act as separate damper pedals for the respective upper and lower sections, allowing two people to
perform piano duets using a single instrument.
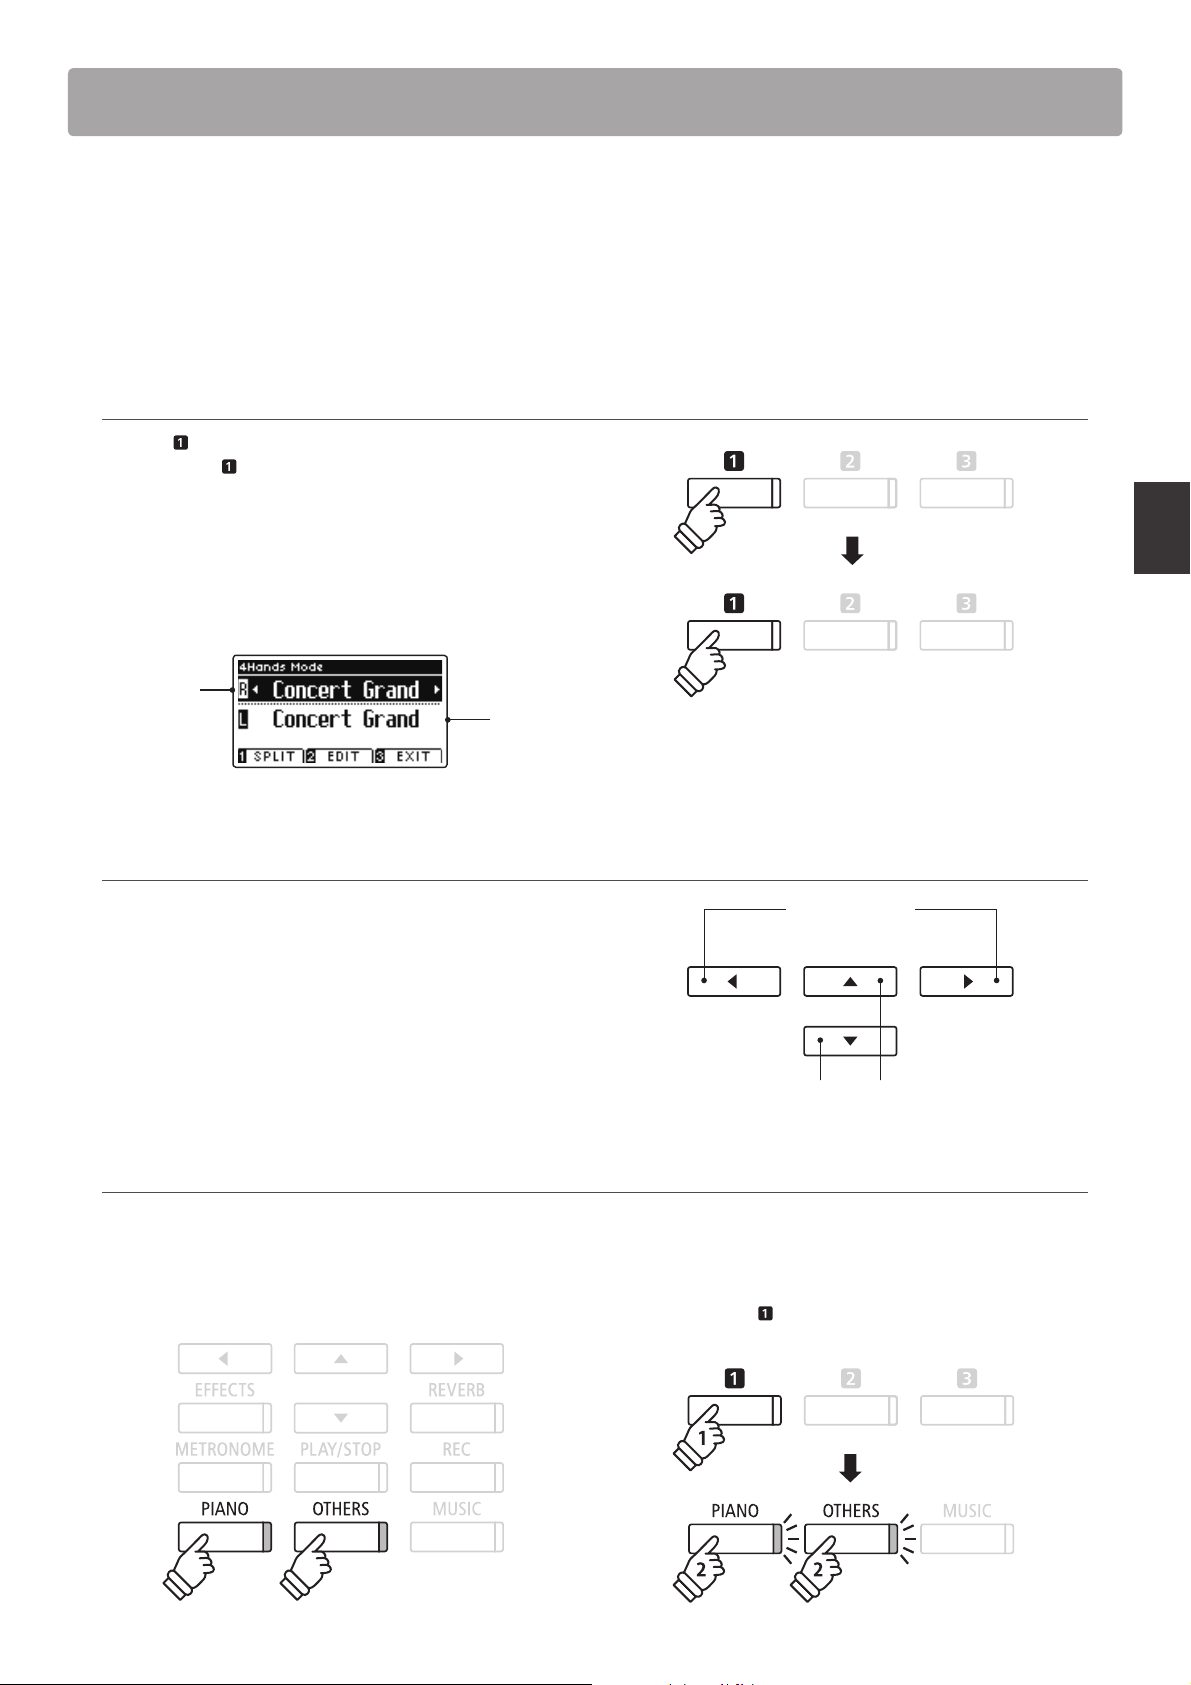
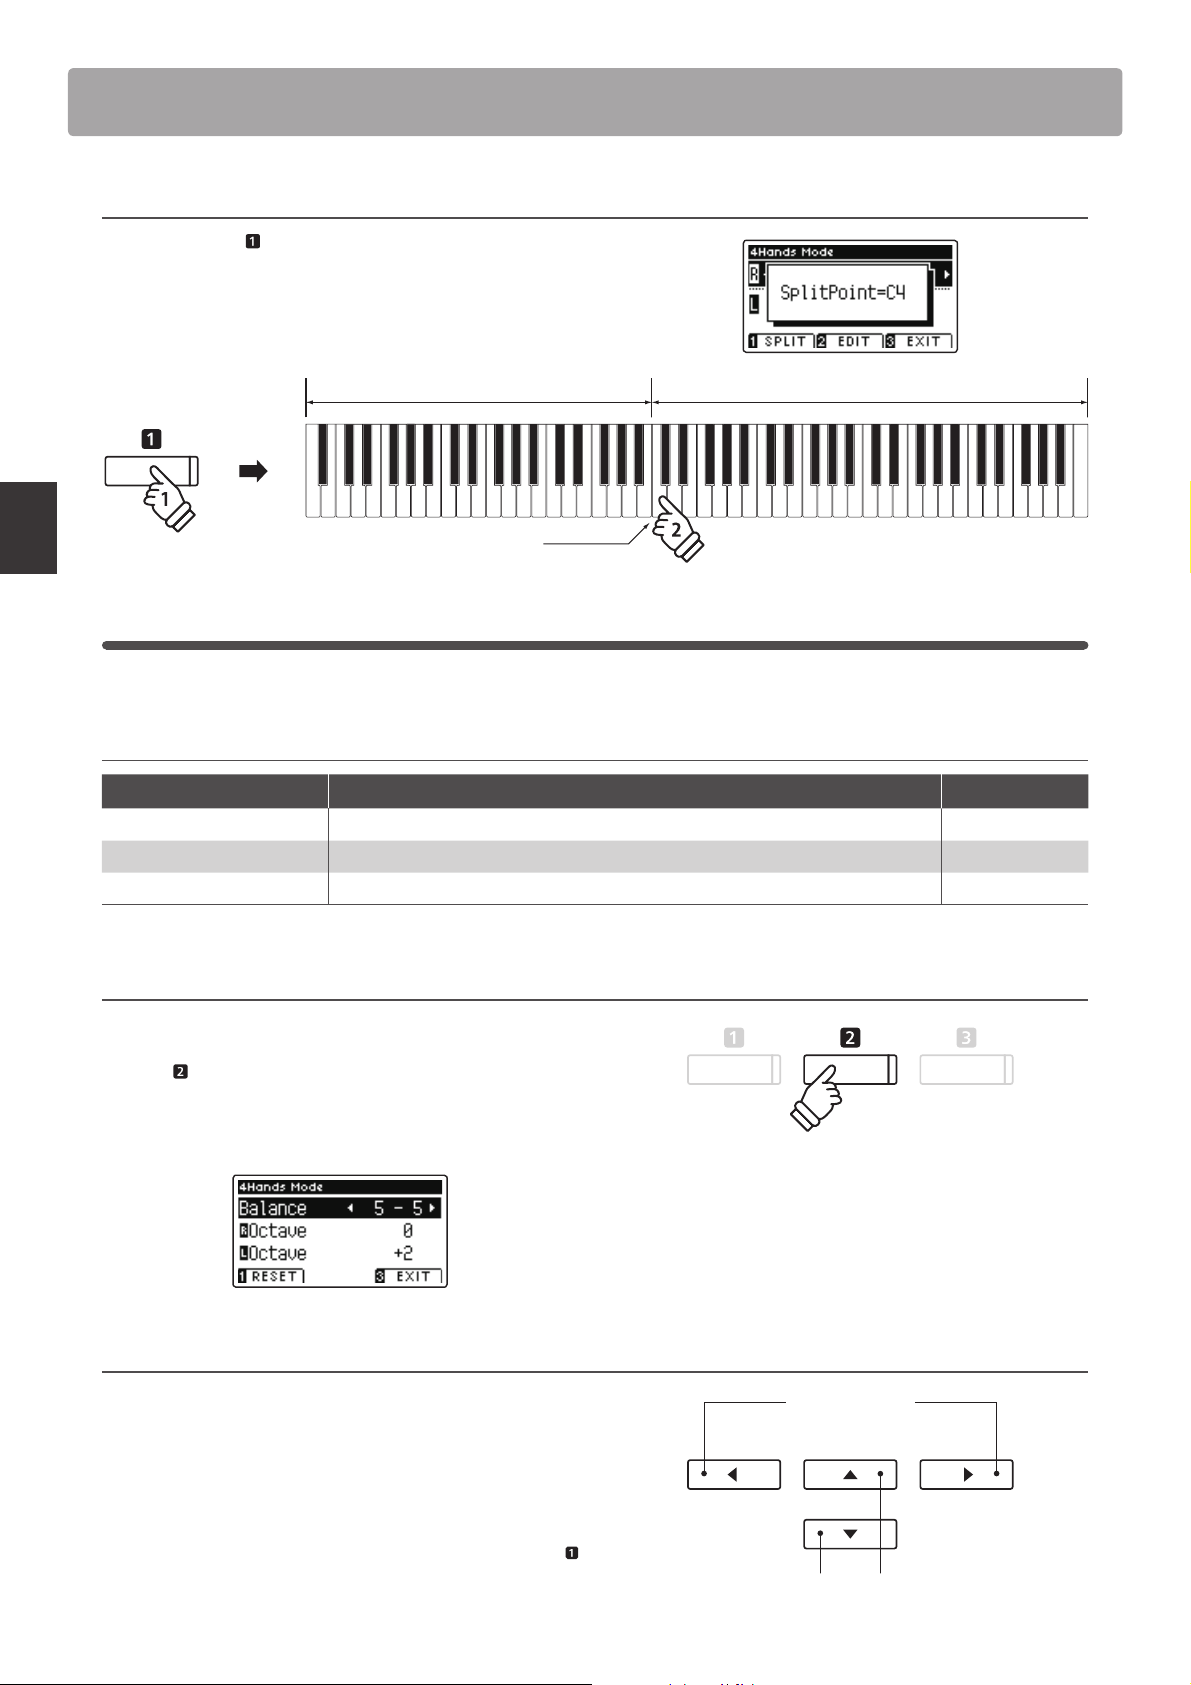
1. Entering Four Hands mode
Press the FUNCTION button (SPLIT) once to enter Split Mode,
then press the
Four Hands Mode.
* The default four hands mode split point is set between keys E4 and
F4.
The Four Hands Mode screen and right/left section sound
names will be shown in the LCD display.
Right
section
sound
FUNCTION button (4HAND) again to select
Left
section
sound
* By default, the right and left sections will both be set to the ‘Concert
Grand’ sound.
Playing the Piano
2a. Changing the right/left section sounds: Method 1
Press the or buttons to move the selection cursor over the
right section or left section sound.
Press the or buttons to cycle through the di erent sound
variations.
Change sound variation.
Move selection cursor.
2b. Changing the right/left section sounds: Method 2
It is also possible to change the right/left section sound by pressing the PIANO or OTHERS buttons.
To select a di erent sound for the right section:
Press the PIANO or OTHERS buttons repeatedly.
To select a di erent sound for the left section:
Press and hold the
PIANO or OTHERS buttons repeatedly.
FUNCTION button (SPLIT), then press the
buttons:
buttons:
or
hold
or
21
Page 22
Four Hands Mode
hold
3. Changing the Four Hands mode split point
Press and hold the FUNCTION button, then press the desired
split key on the keyboard.
The name of the pressed key will brie y be shown in the LCD
display, and will become the new split point.
Right sectionLeft section
hold
New split point
Four Hands Mode settings
The Four Hands Mode settings menu allows characteristics of the Four Hands Mode sound to be adjusted.
Playing the Piano
Four Hands Mode settings
Four Hands Mode setting Description Default setting
Balance Adjust the volume balance between the right and left sections. 5 - 5
Right Octave Shift Raise/lower the pitch of the right section sound in octave steps. 0
Left Octave Shift Raise/lower the pitch of the left section sound in octave steps. + 2
Entering the Four Hands Mode settings menu
While the Four Hands Mode screen is shown in the LCD display:
Press the
The Four Hands Mode settings menu will be shown in the LCD
display.
FUNCTION button (EDIT).
* Changes made to the Four Hands Mode settings will not a ect the
Split Mode settings, and vice versa.
Adjusting Four Hands Mode settings
After entering the Four Hands Mode settings menu:
Press the or buttons to move the selection cursor over the
desired setting.
Press the or buttons to adjust the selected setting.
* To reset the current setting to the default value, press the
FUNCTION button (RESET).
22
buttons:
Adjust selected setting.
buttons:
Move selection cursor.
Page 23
Reverb
Reverb adds reverberation to the sound, simulating the acoustic environment of a recital room, stage, or concert
hall. Some sound types, such as acoustic piano, enable reverb automatically in order to improve acoustic realism.
The AnyTimeX2 piano features six di erent reverb types.
Reverb types
Reverb type Description
Room Simulates the ambiance of a small rehearsal room.
Lounge Simulates the ambiance of a piano lounge.
Small Hall Simulates the ambiance of a small hall.
Concert Hall Simulates the ambiance of a concert hall or theater.
Live Hall Simulates the ambiance of a live hall or stage.
Cathedral Simulates the ambiance of a large cathedral.
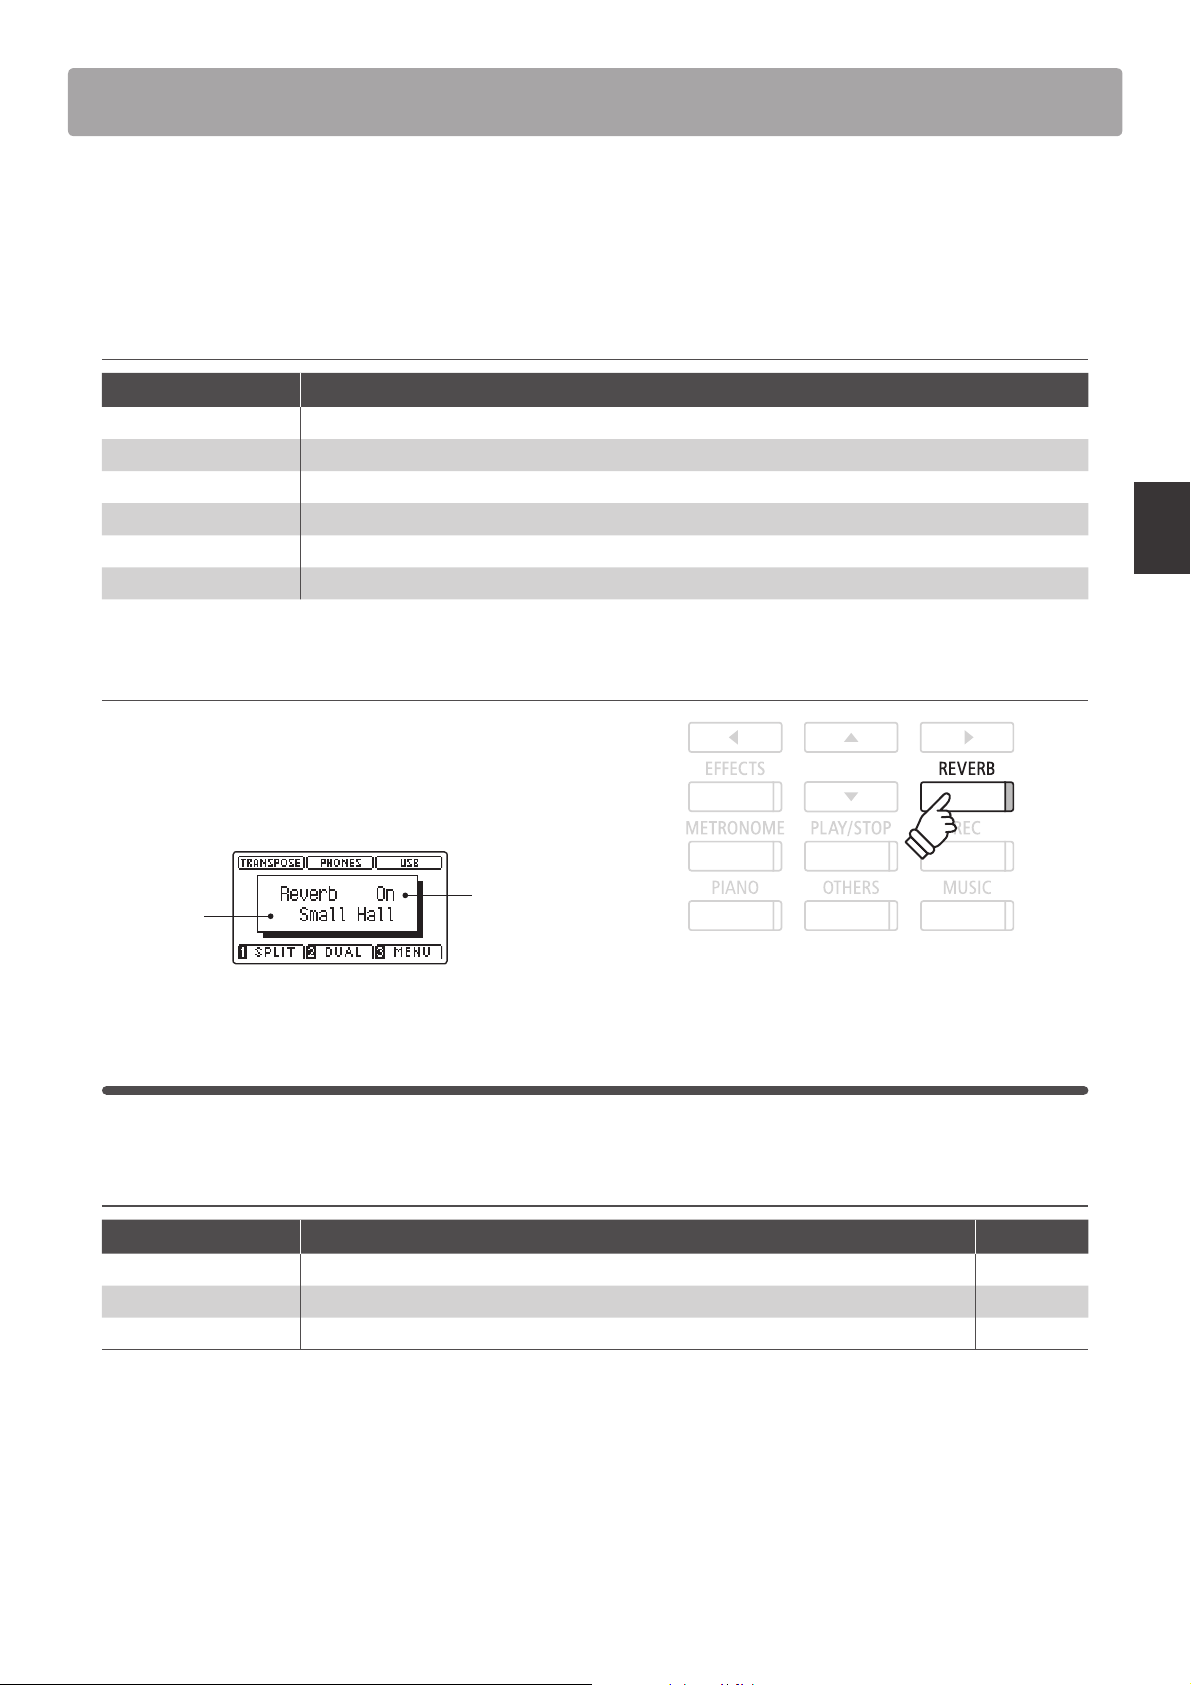
1. Turning Reverb on/o
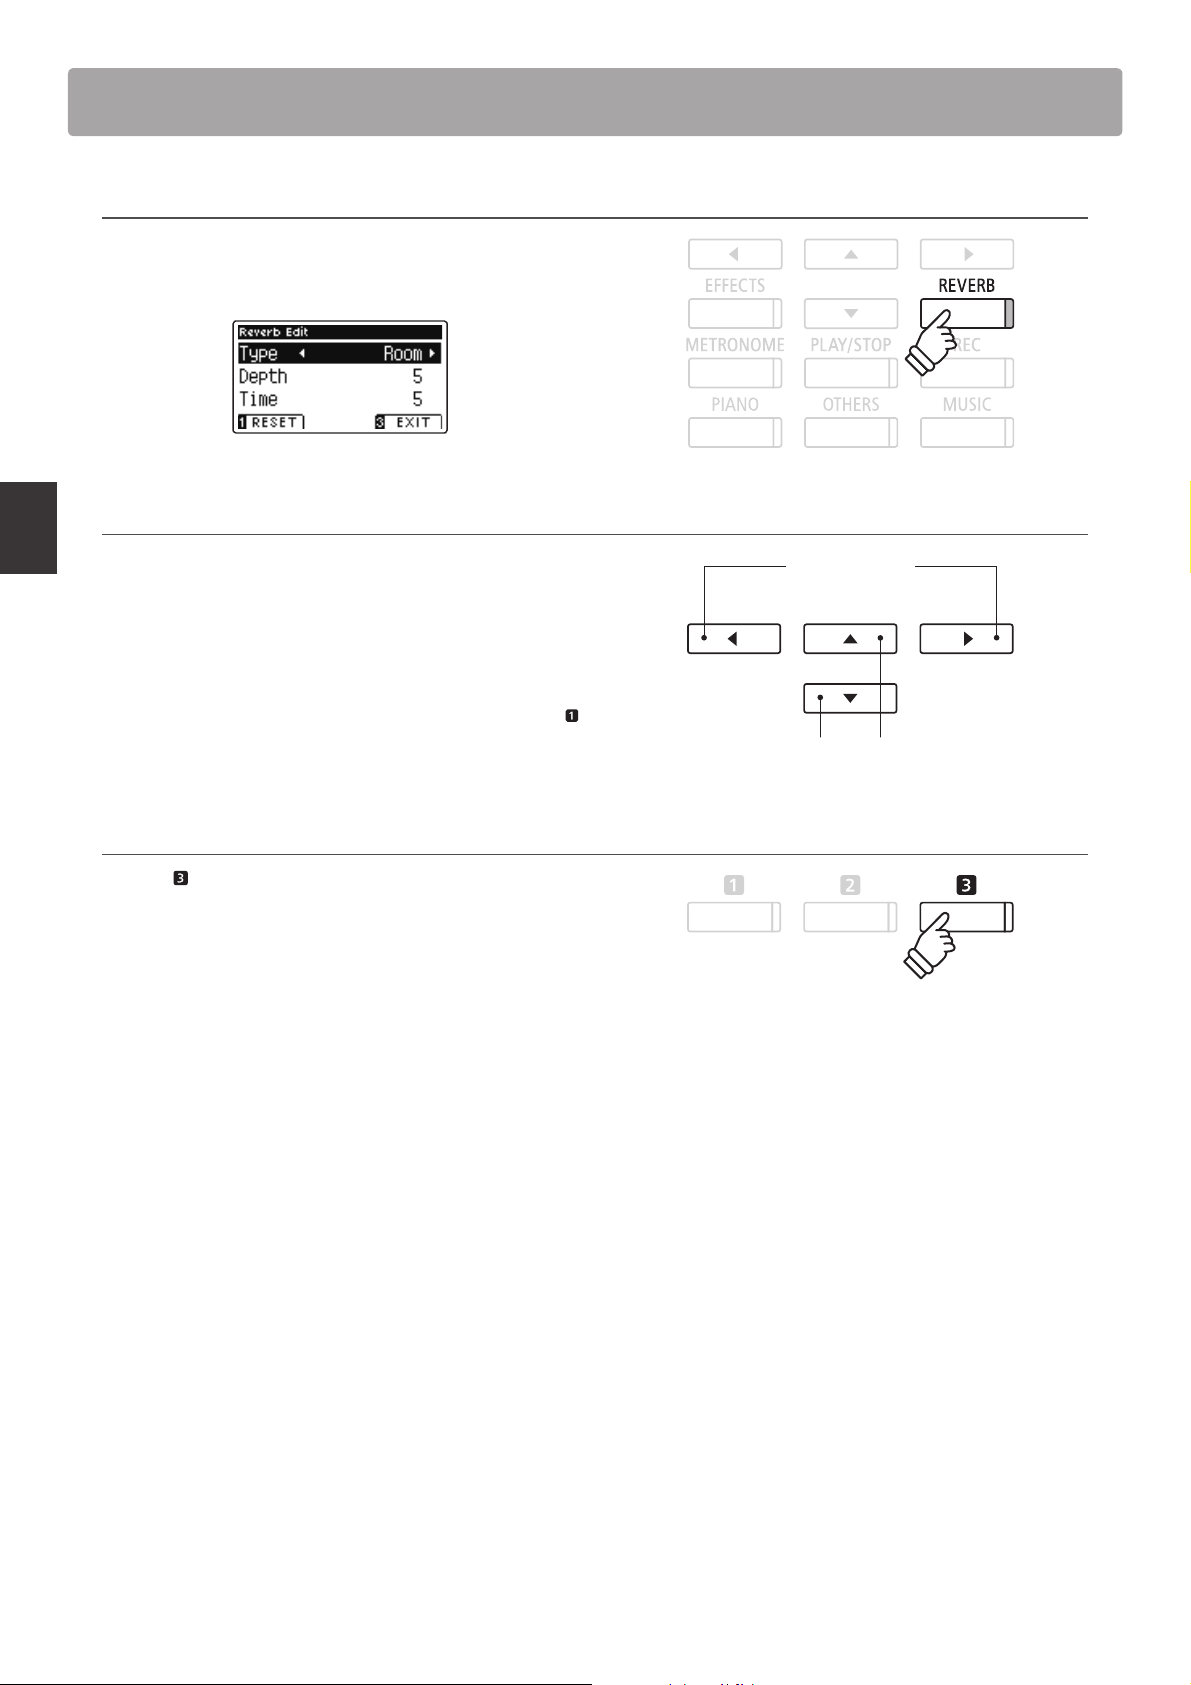
Press the REVERB button to turn reverb on/o .
The LED indicator for the REVERB button will turn on to indicate
when reverb is in use, and the current status will brie y be
shown in the LCD display.
Reverb
Reverb
type
status
Reverb settings
The Reverb settings menu allows the type and characteristics of the reverb to be adjusted.
Reverb settings
Reverb setting Description Range
Type Changes the type of environment. –
Depth Adjusts the depth of the environment (i.e. amount of reverberation to apply). 1 - 10
Time Adjusts the decay length/speed of the reverberation. 1 - 10
Playing the Piano
23
Page 24
Reverb
ho
l
d
Entering the Reverb settings menu
Press and hold the REVERB button.
The Reverb settings menu will be shown in the LCD display.
Adjusting Reverb settings
hold
Playing the Piano
After entering the Reverb settings menu:
Press the or buttons to move the selection cursor over the
desired setting.
Press the or buttons to adjust the selected setting.
* To reset the current setting to the default value, press the
FUNCTION button (RESET).
Exiting the Reverb settings menu
Press the FUNCTION button (EXIT) to exit the Reverb settings
menu.
* Reverb settings are independent for each sound variation.
* Any changes made to the reverb type, settings, or on/o status will
remain until the power is turned o .
buttons:
Adjust selected setting.
buttons:
Move selection cursor.
24
Page 25
E ects
In addition to reverb, various other e ects can be applied to the selected sound, altering the tonal character and
feeling of the instrument. As with reverb, some sound types enable cer tain e ects automatically in order to enhance
tonal quality. The AnyTimeX2 piano features 11 di erent e ect types, with 4 combination e ects, and 3 additional
ampli ed e ects.
E ect types
E ect type Description
Stereo Delay Adds an echo e ect to the sound, playing through both speakers (stereo) simultaneously.
Ping Delay Adds a ‘ping pong’ echo e ect to the sound, giving the impression that it is ‘bouncing’ from left to right.
Triple Delay Similar in principle to Ping Delay, but with an additional centre echo.
Chorus Layers a slightly detuned version of the sound over the original, thus enriching its tonal character.
Classic Chorus Similar in principle to Chorus, but intended for vintage electric piano sounds.
Tremolo Continuously varies the volume at a constant speed, adding a vibrato type e ect to the sound.
Classic Tremolo Similar in principle to Tremolo, but intended for vintage electric piano sounds.
Auto Pan Alternates the sound output from left to right across the stereo eld using a sine wave.
Classic Auto Pan Similar in principle to Auto Pan, but intended for vintage electric piano sounds.
Phaser Applies a cyclic phase change to the sound, giving the impression that the sound is moving.
Simulates the sound of a rotary speaker commonly used with vintage electronic organs.
Rotary
Combination E ects
Ampli ed E ects A selection of the above e ects, with a vintage electric piano speaker e ect applied.
There are three di erent levels of overdrive, with and without a Chorus e ect.
* The soft pedal can be used to alternate the speed of the rotary simulation between ‘Slow’ and ‘Fast’ e ect modes.
Di erent combinations of the above e ects, applied simultaneously.
* Combination e ect types: Phaser+Chorus, Tremolo+Chorus, Phaser+AutoPan, Chorus+Chorus
Playing the Piano
1. Turning E ects on/o
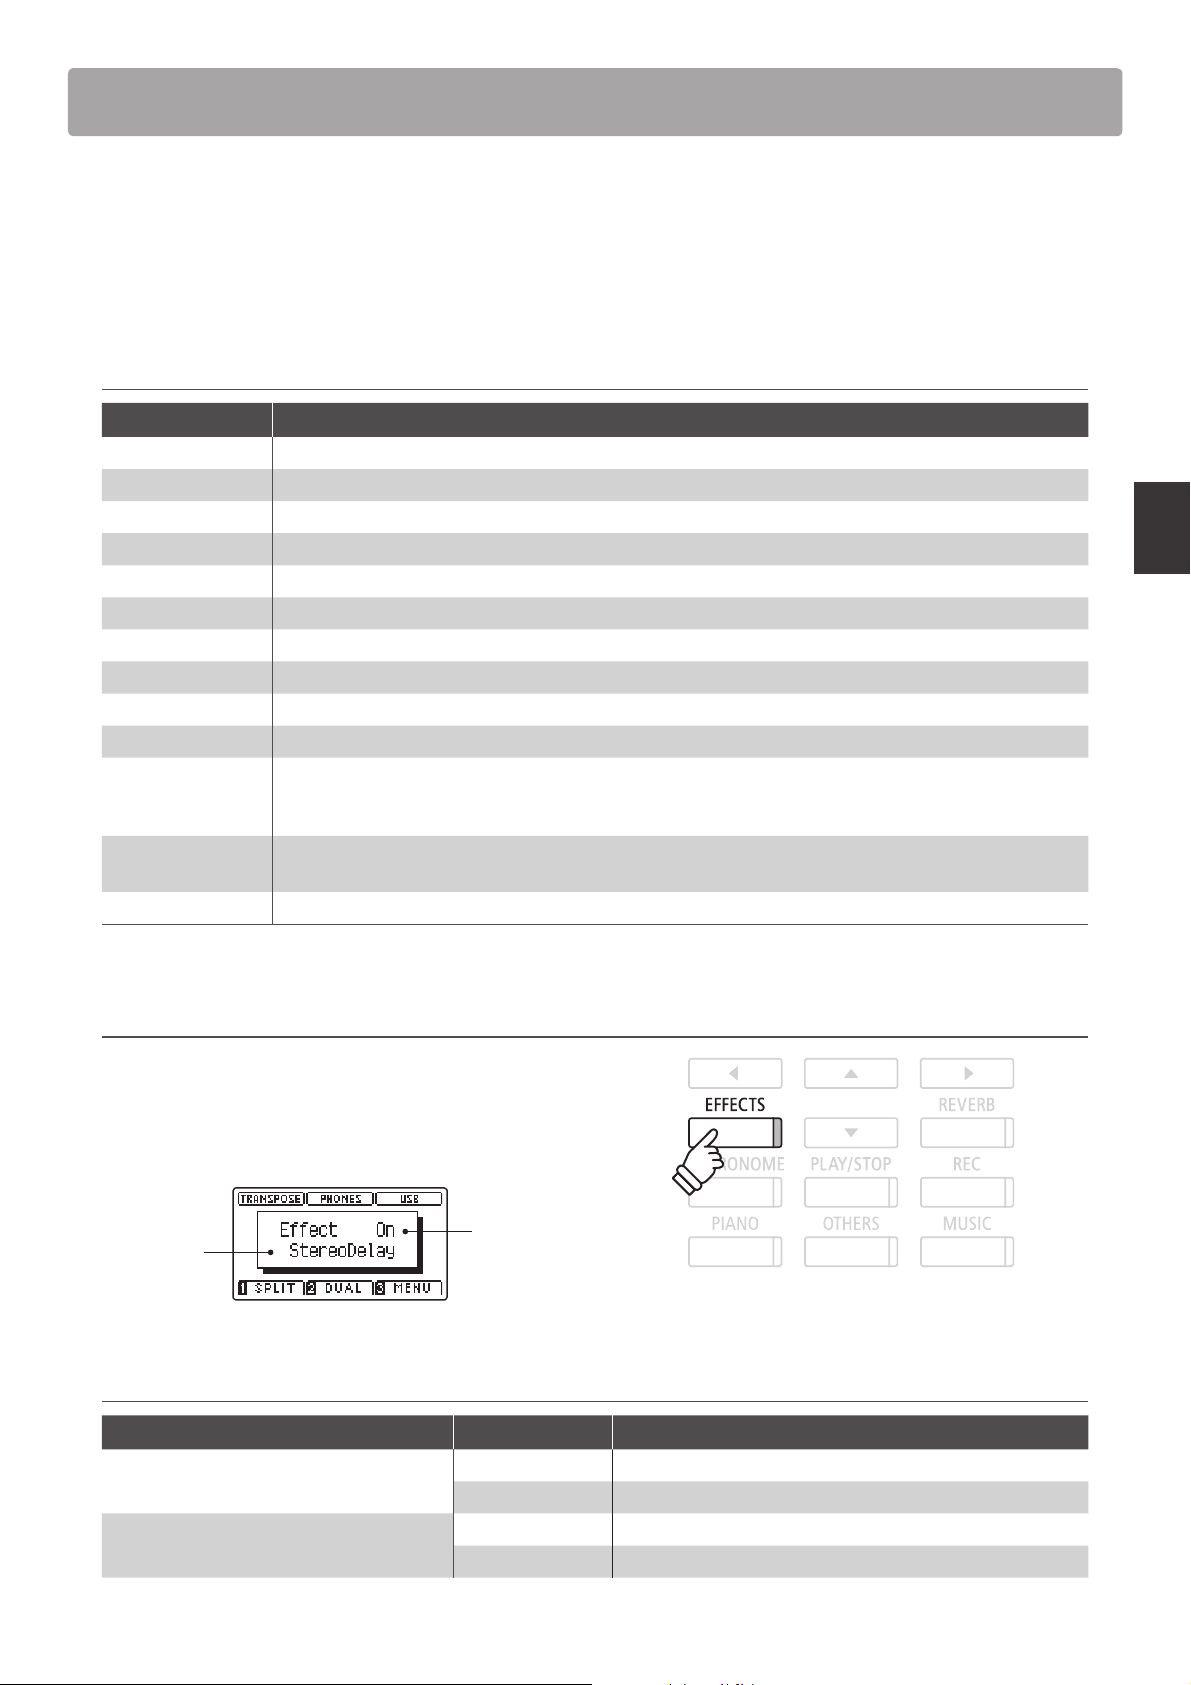
Press the EFFECTS button to turn e ects on/o .
The LED indicator for the EFFECTS button will turn on to indicate
when e ects are in use, and the current status will brie y be
shown in the LCD display.
E ect
E ect
type
E ects settings
E ect type E ect setting Description
Stereo Delay / Ping Delay / Triple Delay Dry / Wet Adjust the intensity of the delay.
Chorus Dry / Wet Adjust the intensity of the chorus.
status
Time Adjust the interval of time between each delay.
Speed Adjust the speed of the chorus.
25
Page 26
E ects
ho
l
d
E ects settings (cont.)
E ect type E ect setting Description
Classic Chorus Mono / Stereo Toggle between a Mono or Stereo effect.
Speed Adjust the speed of the chorus.
Tremolo / Classic Tremolo Dry / Wet Adjust the intensity of the tremolo.
Speed Adjust the speed of the tremolo.
Auto Pan / Classic Auto Pan Dry / Wet Adjust the intensity of the pan.
Speed Adjust the speed of the pan.
Phaser Dry / Wet Adjust the intensity of the phaser.
Speed Adjust the speed of the phaser.
Rotary Accel. Speed Adjust the acceleration speed between slow and fast modes.
Rotary Speed Adjust the speed of the rotary speaker.
Combination E ects / Ampli ed E ects Dry / Wet Adjust the intensity of the e ects.
Speed Adjust the speed of the e ects.
Playing the Piano
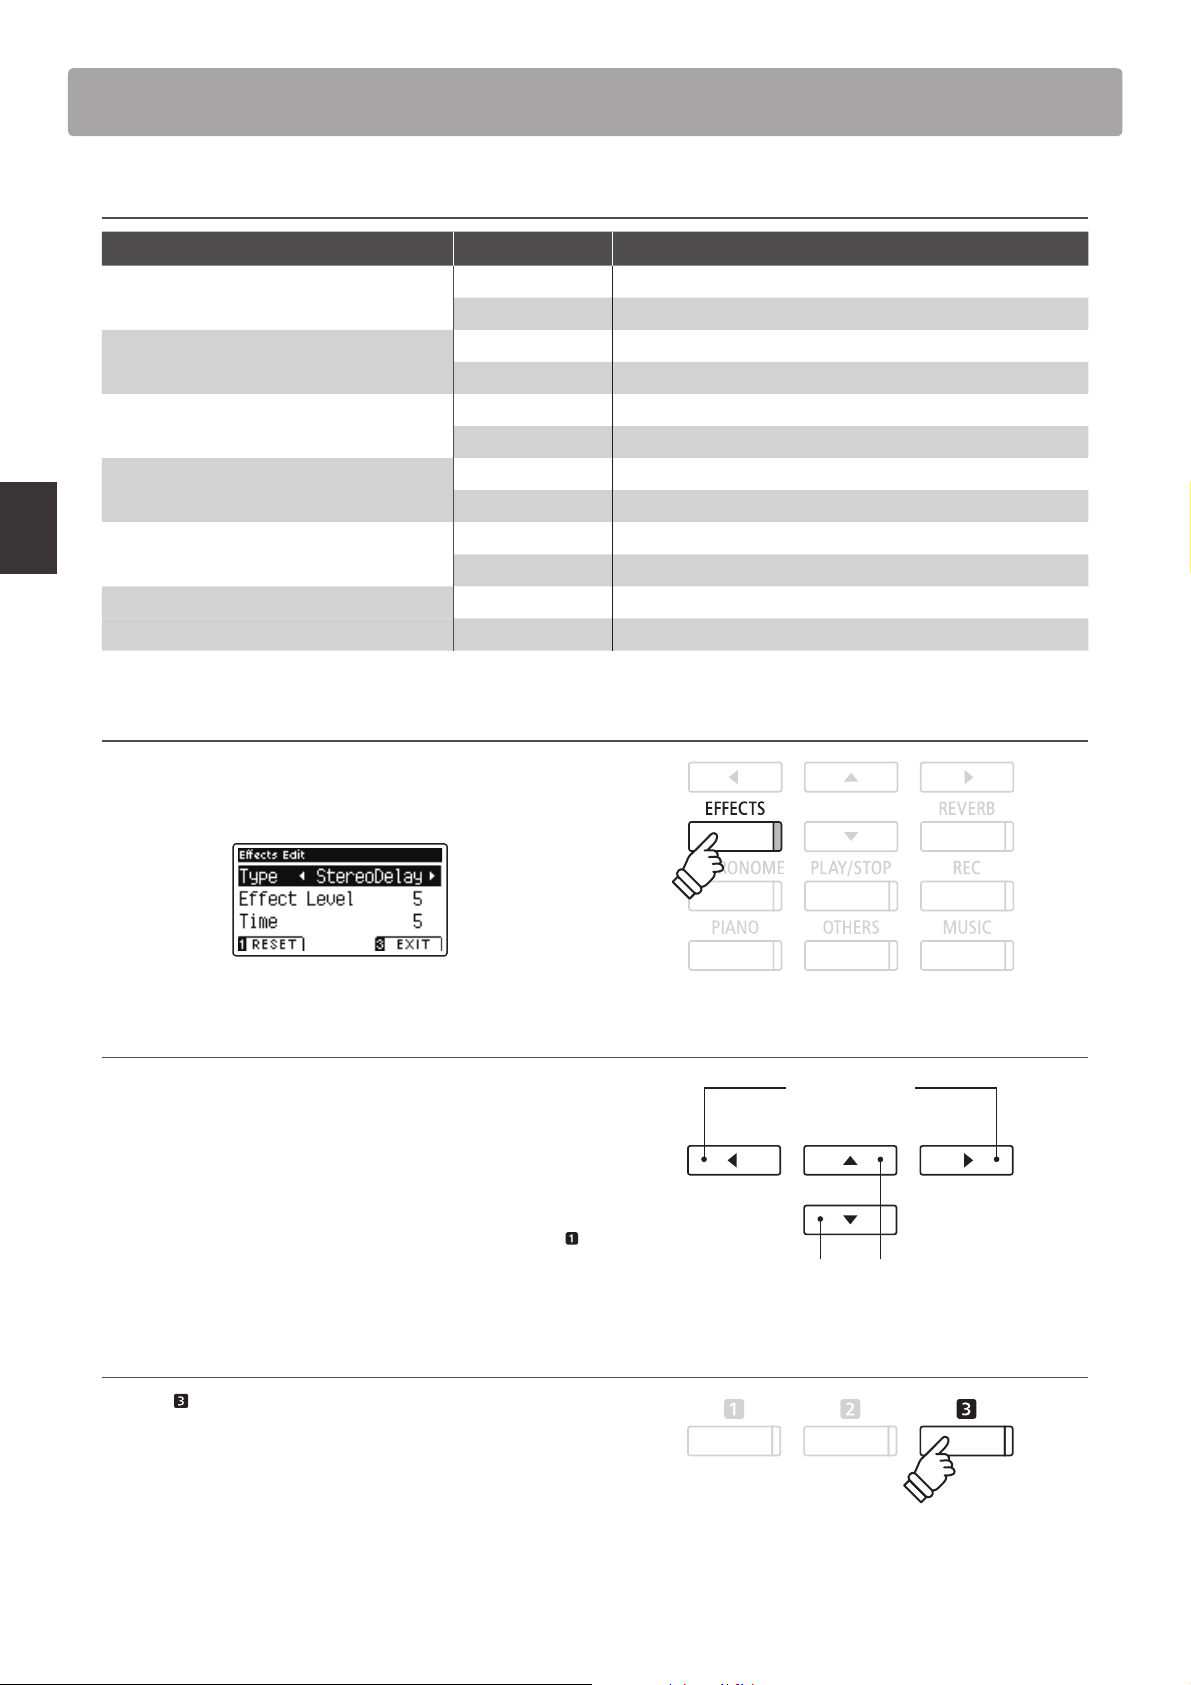
Entering the E ects settings menu
Press and hold the EFFECTS button.
The E ects settings menu will be shown in the LCD display.
Adjusting E ects settings
After entering the E ects settings menu:
Press the or buttons to move the selection cursor over the
desired setting.
Press the or buttons to adjust the selected setting.
* To reset the current setting to the default value, press the
FUNCTION button (RESET).
hold
buttons:
Adjust selected setting.
buttons:
Move selection cursor.
Exiting the E ects settings menu
Press the FUNCTION button (EXIT) to exit the E ects settings
menu.
* E ects settings are independent for each sound variation.
* Any changes made to the e ects type, settings, or on/o status will
remain until the power is turned o .
26
Page 27
Metronome / Drum Rhythms
h
ol
d
The Metronome function provides a steady beat to aid practicing the piano at a consistent tempo. In addition
to regular metronome beats, the AnyTimeX2 piano also features a variety of drum rhythms to accompany most
playing styles and musical genres.
For a complete listing of available drum rhythms, please refer to page 116 of this owner’s manual.
Turning the Metronome on/o
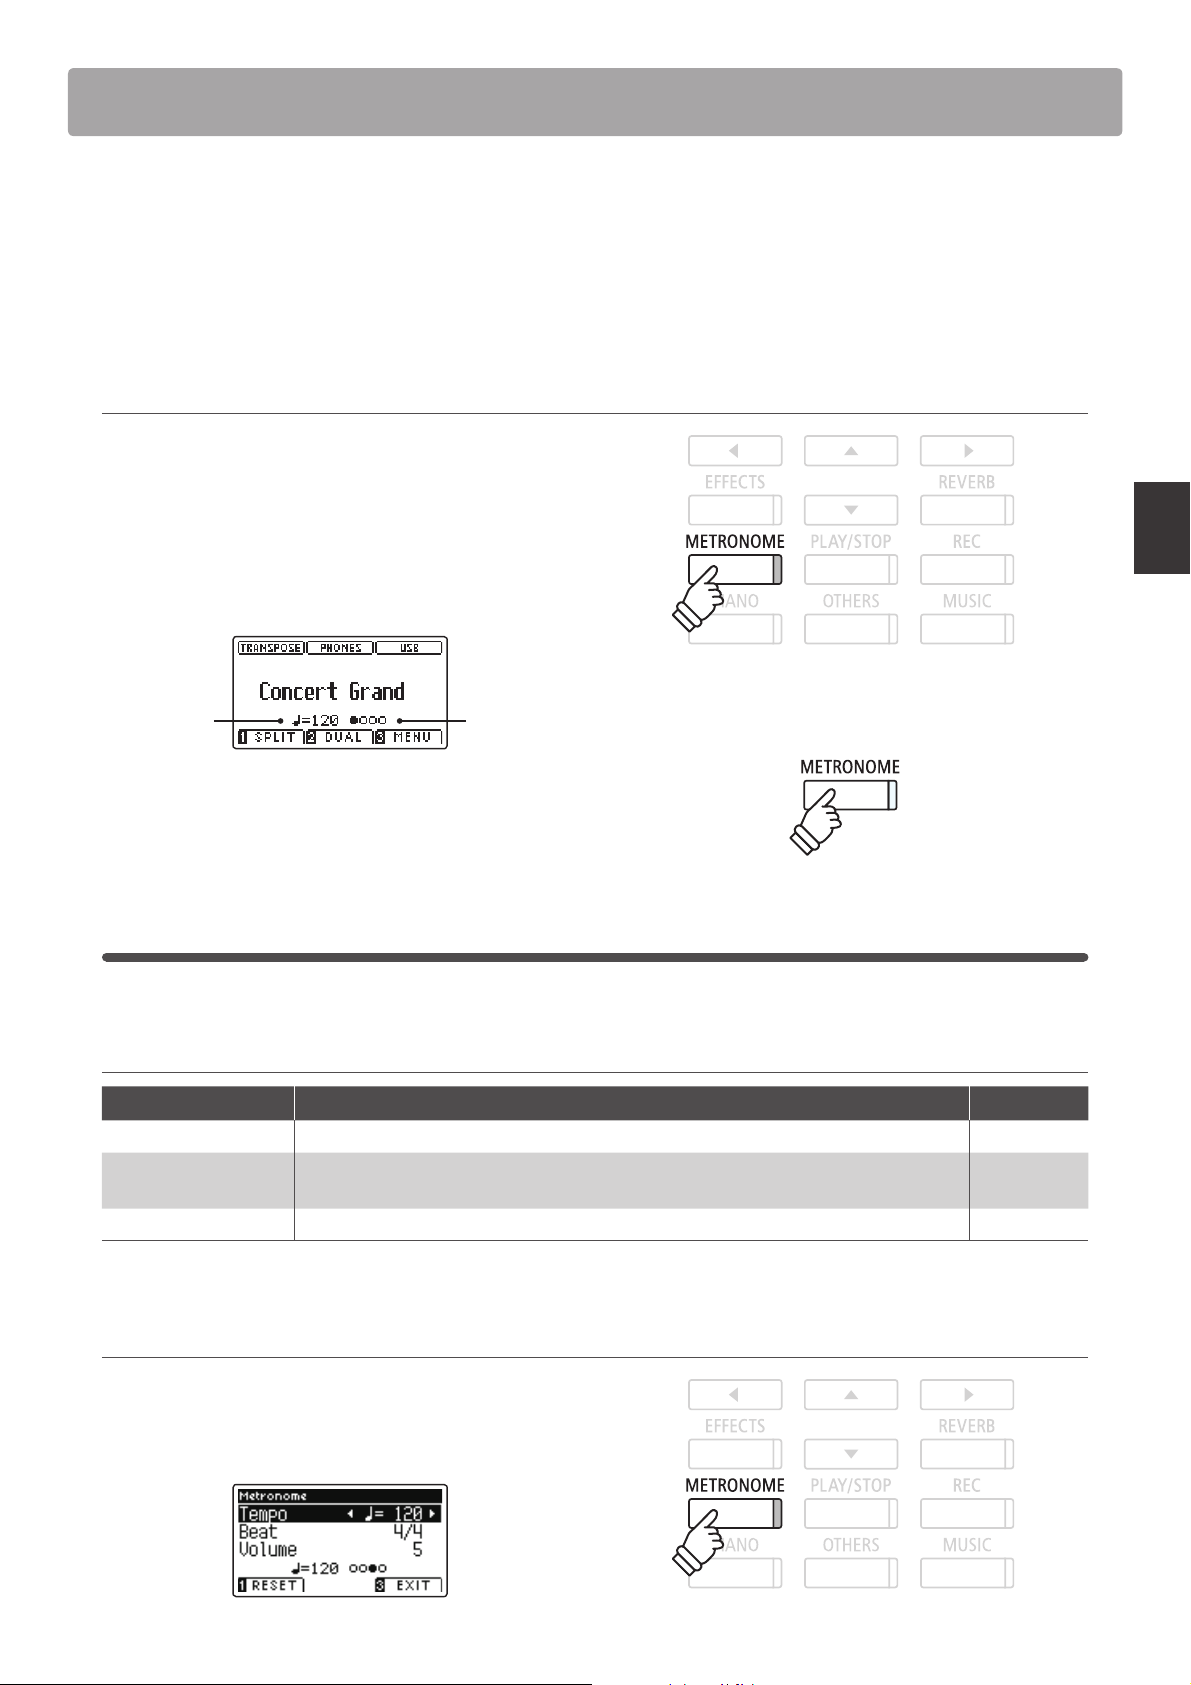
Press the METRONOME button.
The LED indicator for the METRONOME button will turn on to
indicate that the metronome function is in use, and a 1/4 beat
will start to count.
The current metronome tempo in beats per minute (BPM) and
beat of the bar will also be shown in the LCD display.
BeatTem po
Press the METRONOME button again to stop the metronome.
The LED indicator for the METRONOME button will turn o .
Metronome settings
The Metronome settings menu allows the tempo, beat, and volume of the metronome to be adjusted.
Metronome settings
Metronome setting Description Range
Tempo Adjust the tempo of the metronome beat / drum rhythm in beats per minute (BPM). 10 - 400 bpm
Beat
Volume Adjusts the volume of the metronome beat / drum rhythm. 1 - 10
Change the metronome beat (time signature) / drum rhythm.
* There are ten di erent time signature available: 1/4, 2/4, 3/4, 4/4, 5/4, 3/8, 6/8, 7/8, 9/8, and 12/8.
–
Playing the Piano
Entering the Metronome settings menu
Press and hold the METRONOME button.
The Metronome settings menu will be shown in the LCD
display.
hold
27
Page 28
Metronome / Drum Rhythms
Adjusting Metronome settings
Playing the Piano
After entering the Metronome settings menu:
Press the or buttons to move the selection cursor over the
desired setting.
Press the or buttons to adjust the selected setting.
* To reset the current setting to the default value, press the
FUNCTION button (RESET).
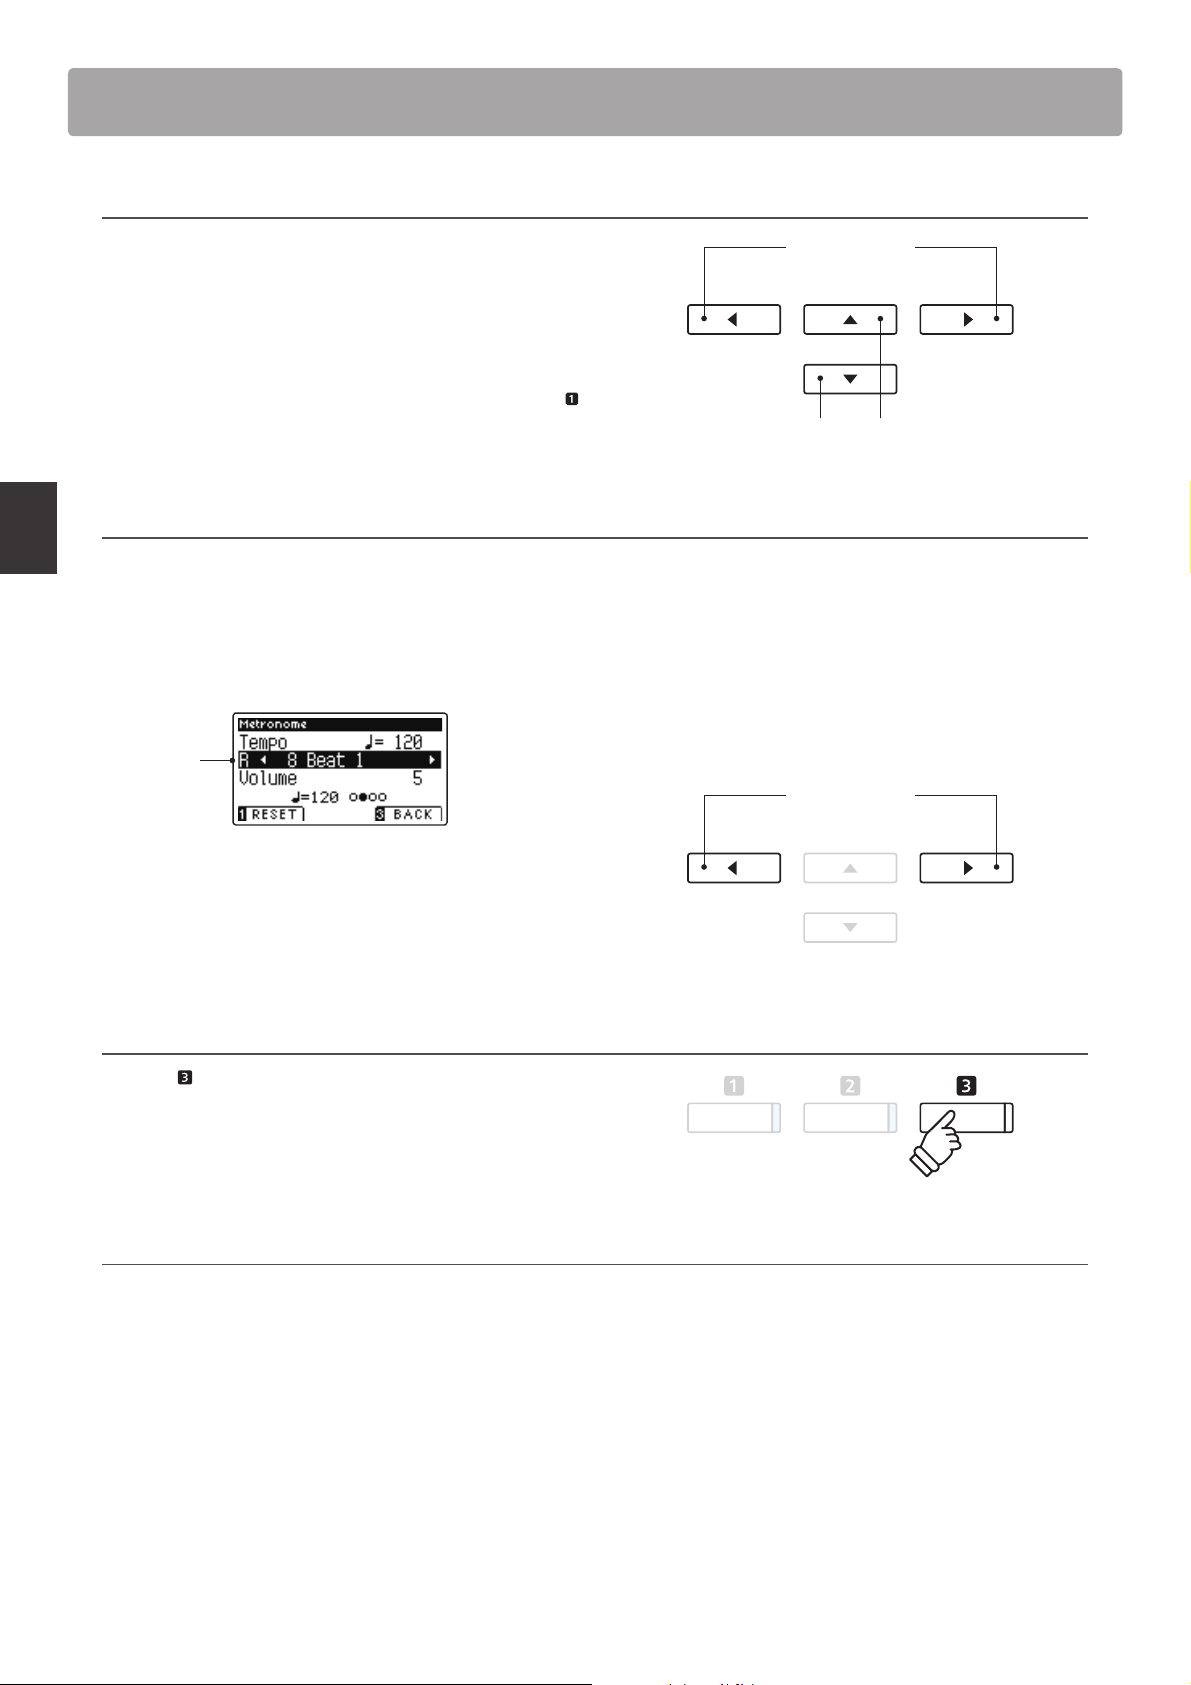
Drum rhythms
As an alternative to the simple metronome count, it is also possible
to select a drum pattern from one of 100 di erent rhythm styles.
Enter the Metronome settings menu and select the Beat setting.
Press the or buttons to cycle through the available beats
until reaching the ‘8 Beat 1’ drum rhythm.
Drum
rhythm
buttons:
Adjust selected setting.
buttons:
Move selection cursor.
buttons:
Select drum rhythm.
Continue to press the or buttons to select the desired
drum rhythm.
* For a complete listing of available drum rhythms, please refer to page
116 of this owner’s manual.
Exiting the Metronome settings menu
Press the FUNCTION button (BACK) to exit the Metronome
settings menu.
* Any changes made to the metronome tempo, beat, or volume
settings will remain until the power is turned o .
Recording with the metronome
It is also possible to record songs with the metronome activated. This is useful when recording parts separately, or wishing to
maintain correct timing throughout complex passages. Note that the standard metronome ‘click’ will not be heard when the song
is played back, however if a drum rhythm is selected, the pattern will be heard.
* For more information about the instrument’s Recorder function, please refer to page 38.
28
Page 29
Panel Lock
hold
The Panel Lock function allows the state of all panel buttons to be temporarily locked, preventing sounds and other
settings from being changed. This function may prove useful in teaching environments, ensuring that students are
not distracted by changing sounds etc.
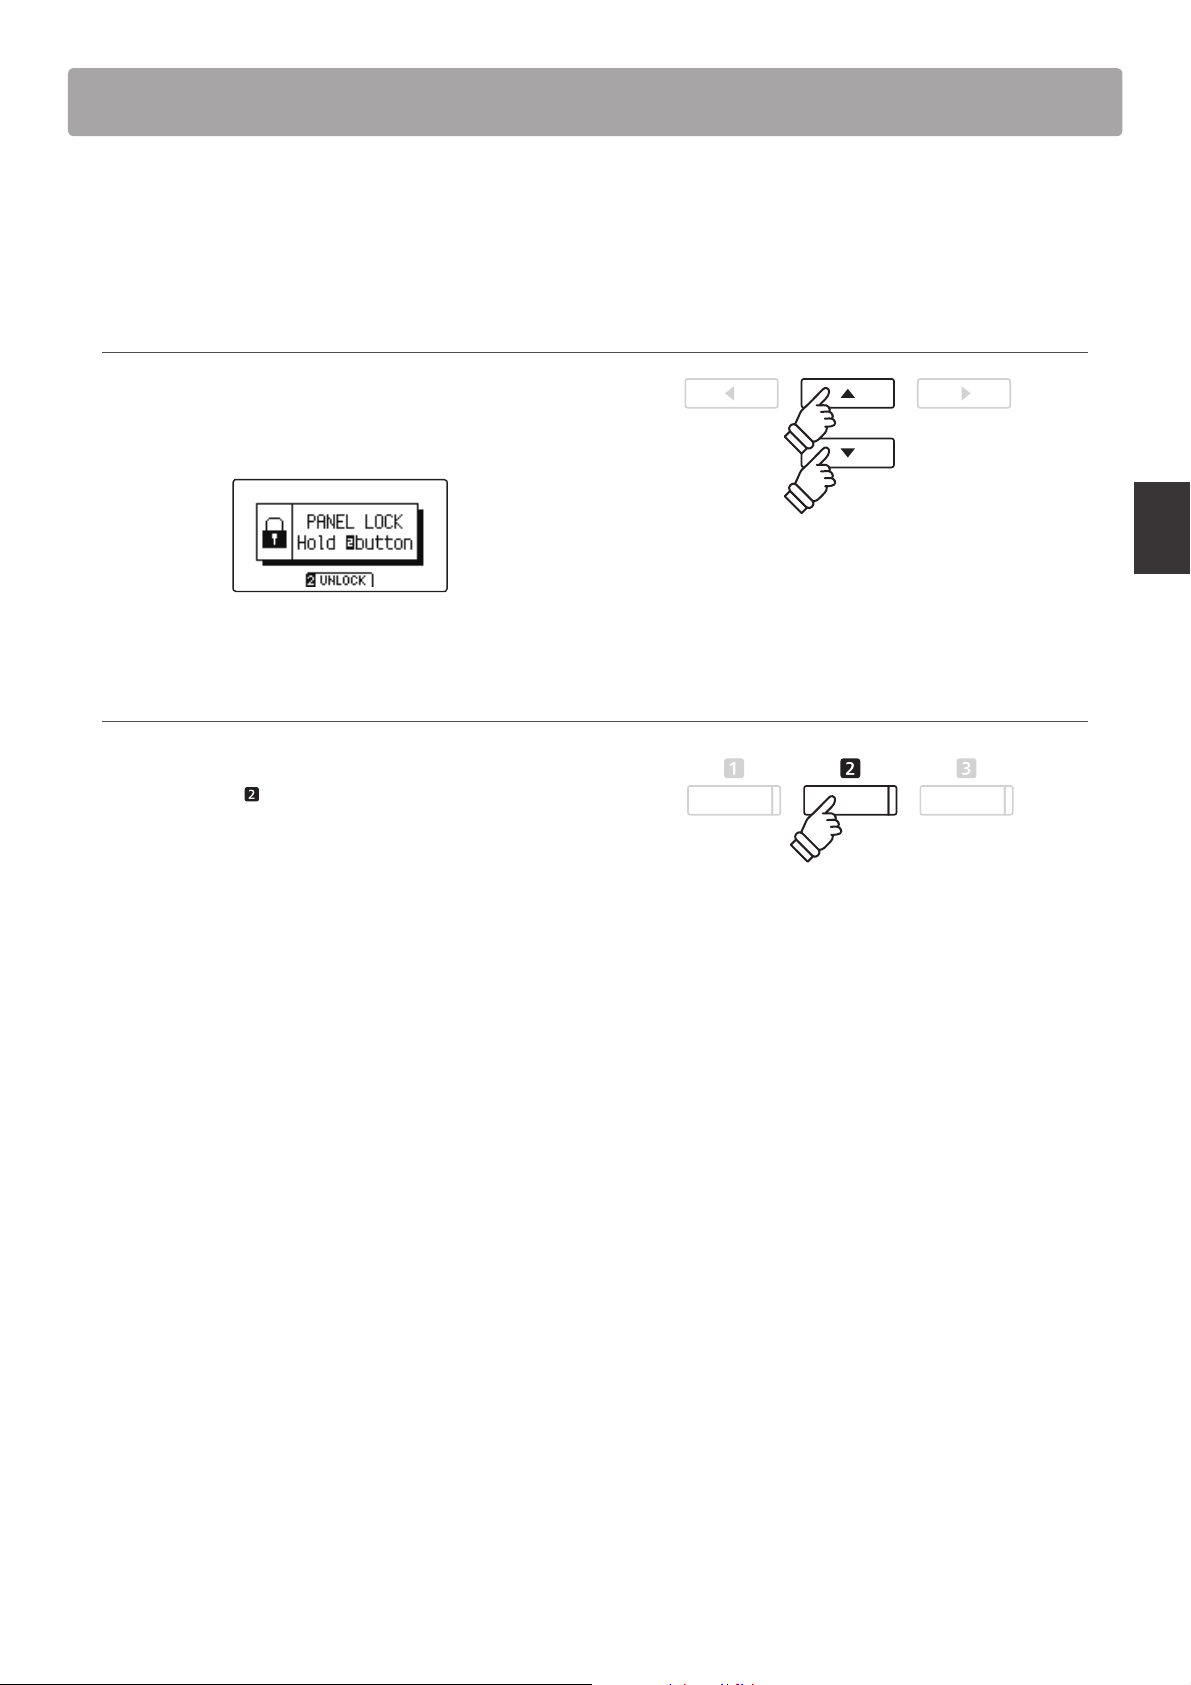
1. Activating the Panel Lock
Press the and buttons simultaneously.
The Panel Lock screen will be shown in the LCD display, and the
instrument will stop responding to panel button presses.
* When activated, the Panel Lock will remain until the power is turned
o .
* While Panel Lock is activated, the LED indicators for all buttons will
turn o .
2. Deactivating the Panel Lock
While the Panel Lock is activated:
Press and hold the
A message will be shown in the LCD display to indicate that
the Panel Lock has been deactivated, and the instrument will
resume responding to panel button presses as normal.
FUNCTION button (UNLOCK).
hold
Playing the Piano
29
Page 30
Demo Songs
The Demo function provides an excellent introduction to the varied capabilities of AnyTimeX2 piano. There are over
20 di erent demonstration songs available, highlighting the instruments’ rich selection of high quality sounds.
For a complete listing of demonstration songs, please refer to page 113 of this owner’s manual.
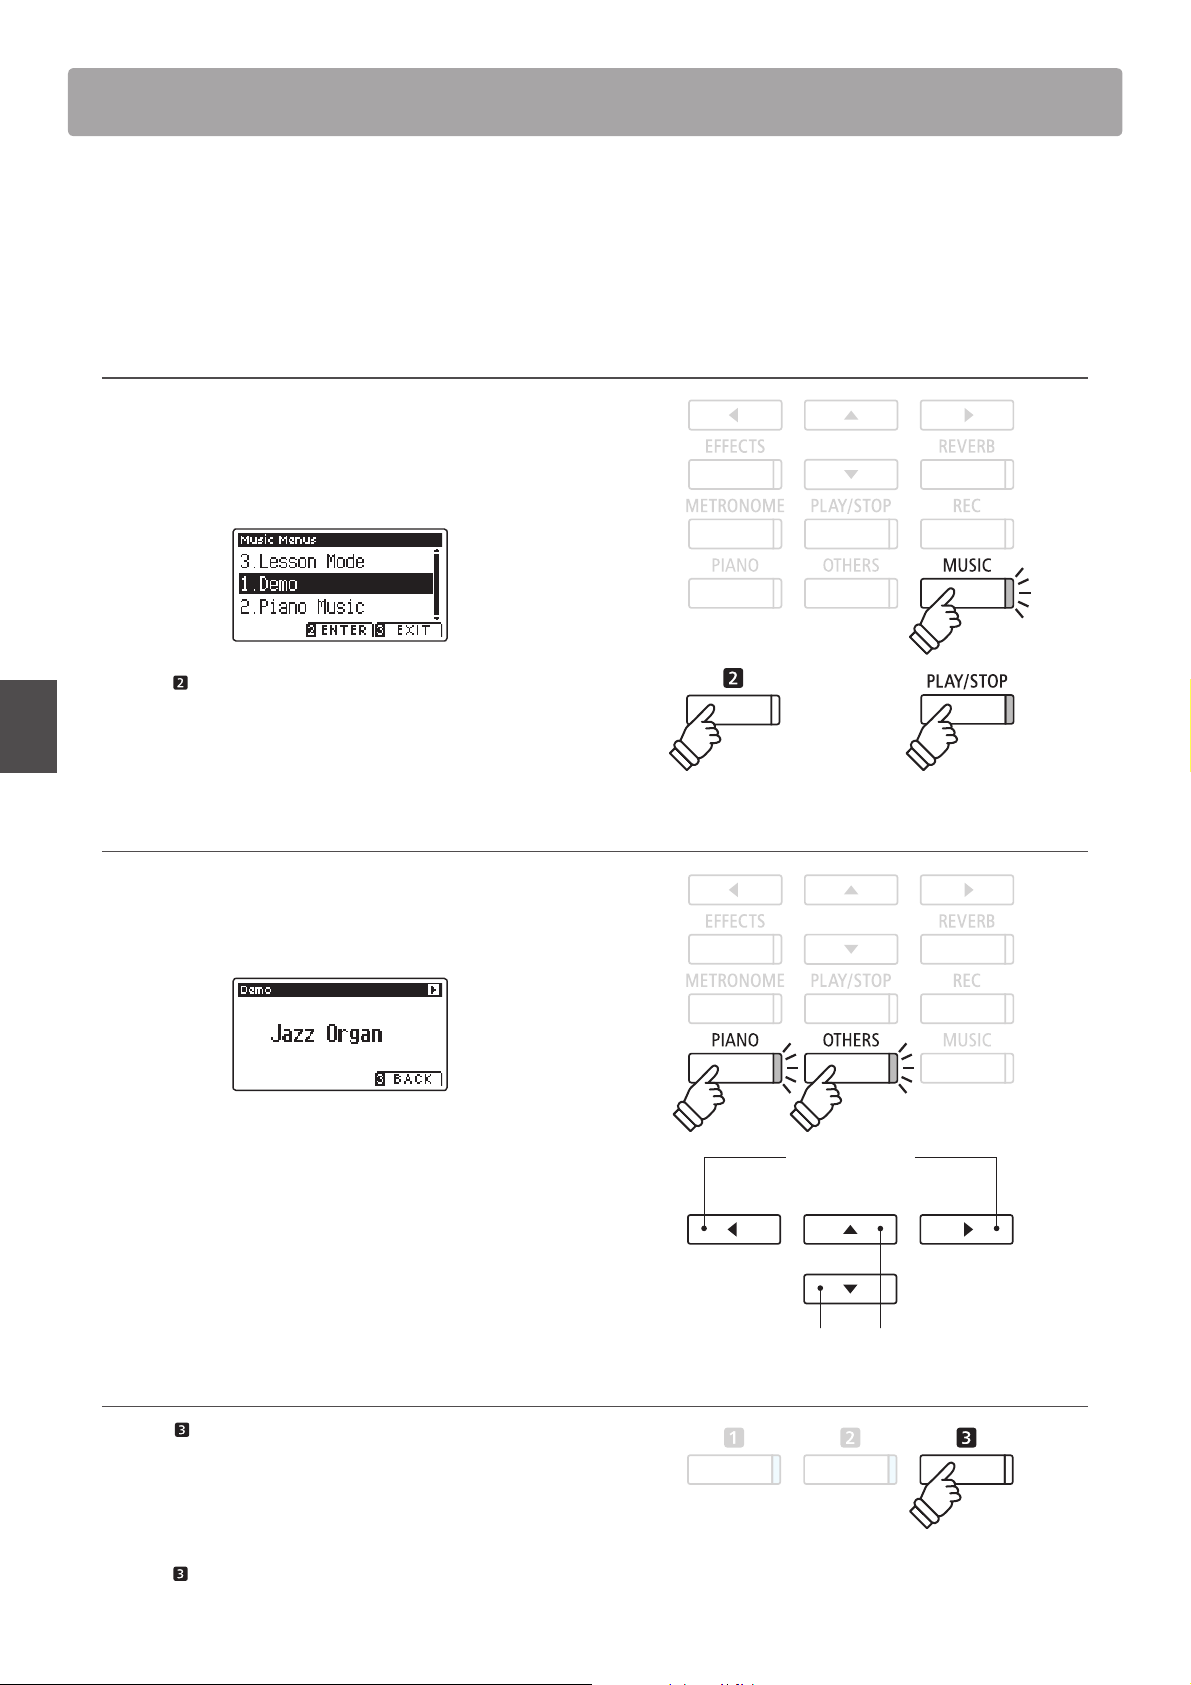
Entering Demo mode
Press the MUSIC button.
The LED indicator for the MUSIC button will start to ash, and
the Music Menu will be shown in the LCD display. Demo mode
will be selected automatically.
Press the FUNCTION (ENTER) or PLAY/STOP buttons.
or
The LED indicator for the PIANO button will start to ash, and
the ‘Concert Grand’ demo song will start to play.
Selecting a demo song
While Demo mode is selected:
Music Menu
Press the PIANO or OTHERS buttons to select a sound category.
The rst demo song of the sound category will start to play.
Press the or buttons to cycle through the di erent sound
categories, and the or buttons to cycle through the demo
songs in the selected sound category.
* When the selected song has nished, the next demo song in the
category will begin to play automatically.
Stopping the demo song and exiting Demo mode
or
buttons:
Select demo song
buttons:
Select sound category
Press the FUNCTION (BACK) or PLAY/STOP buttons while the
song demo is playing.
The LED indicator for the selected SOUND button will stop
ashing, and the song demo will stop playing.
Press the FUNCTION (EXIT) button to exit the Music Menu.
30
Page 31

Piano Music
In addition to the sound demonstration songs, the AnyTimeX2 piano also features a selection of popular classical
piano works from the Baroque and Romantic periods. Notated scores are provided in the separate ‘Classical Piano
Collection’ book*, assisting the musical appreciation and study of each piece.
For a complete listing of Piano Music pieces, please refer to the separate ‘Internal Song Lists’ booklet.
Entering Piano Music mode
Press the MUSIC button, then press the or buttons to select
Piano Music mode.
Press the FUNCTION (ENTER) button.
The title and composer of the selected piece will be shown in
the LCD display.
* Depending on market area.
* The balance of the left hand and right hand parts can be adjusted by
Title
Composer
Press the PLAY/STOP button.
The rst piece will start to play.
Selecting a piano music piece
While Piano Music mode is selected:
Press the or buttons to cycle through the di erent piano
music pieces.
Stopping the piano music piece and exiting Piano Music mode
Press the FUNCTION (BACK) or PLAY/STOP buttons while the
piano music piece is playing.
pressing the FUNCTION (EDIT) button, and adjusting the Balance
setting.
Music Menu
The LED indicator for the PLAY/STOP button will turn o , and
the piano music piece will stop playing.
Press the FUNCTION (EXIT) button to exit the Music Menu.
31
Page 32

Lesson Function
The Lesson function allows budding pianists to practice the piano using a selection of built-in song books and
nger exercises. The left and right hand parts of each piece can be practiced separately, adjusting the tempo to
perfect di cult passages, before being recorded for self-evaluation.
Built-in lesson mode song books
US, Canada, Australia
Alfred’s Premier Piano Course Lesson 1A
Alfred’s Premier Piano Course Lesson 1B
Alfred’s Basic Piano Library Lesson Book Level 1A
Alfred’s Basic Piano Library Lesson Book Level 1B
Alfred’s Basic Adult Piano Course Lesson Book Level 1
* Lesson books sold separately - please refer to the separate ‘Internal Song Lists’ booklet for more information.
1
. Selecting a lesson book/song
Rest of the World
Burgmüller 25 (25 Etudes Faciles, Opus 100)
Czerny 30 (Etudes de Mécanisme, Opus 849)
Czerny 100 (Hundert Übungsstücke, Opus 139)
Beyer (Vorschule im Klavierspiel, Opus 101)
J.S. Bach: Inventionen, Sonatinen Album 1
1. Entering lesson mode
Press the MUSIC button, then press the or buttons to select
Lesson Mode.
Music Menu
Press the FUNCTION button (ENTER) to enter lesson mode.
The name of the selected lesson book, song, and current bar
will be shown in the LCD display.
2. Selecting a lesson book/song
Press the or buttons to move the selection cursor over the
lesson book name or song title.
Press the or buttons to cycle through the di erent lesson
books and song titles.
Book name
Song title
It is also possible to select songs by pressing and holding the
FUNCTION button (EDIT), then pressing the relevant key on
the keyboard.
buttons:
Select lesson book/song.
buttons:
Move selection cursor.
* Please refer to the separate ‘Internal Song Lists’ booklet for a
complete listing of available lesson books/songs and corresponding
key numbers.
32
Page 33

2
. Listening to the selected lesson song
This page will explain how to play and stop the selected lesson song, and change the playback position.
1. Playing the lesson song
After selecting a lesson book and song:
Press the PLAY/STOP button.
The LED indicator for the PLAY/STOP button will turn on, and a
one bar count-in will be heard before the song starts to play.
* If the rst bar of the song begins on an ‘up’ beat (i.e. pickup notes),
the rst bar number will be shown as zero in the LCD display.
* The metronome will not continue after the count-in bar, but can be
turned on manually by pressing the METRONOME button.
2. Changing the playback position (Bar)
Press the or buttons to move the selection cursor over the
third line of the LCD display (Bar).
Press the or buttons to rewind or cue the playback position
(Bar) of the current song.
Current bar
To reset the playback position to the rst bar of the song, press
the REVERB and EFFECTS buttons simultaneously.
Stopping and resuming the lesson song
While the lesson song is playing:
Press the PLAY/STOP button to stop the lesson song playback.
Press the PLAY/STOP button once again to resume playback
from the stopped position.
buttons:
Change playback position.
Music Menu
buttons:
Move selection cursor.
3. Exiting lesson mode
Press the FUNCTION (EXIT) button to exit the Music Menu.
33
Page 34

Lesson Function
3
. Lesson Function settings
The Lesson Function settings menu allows the left and right-hand part volumes of the current lesson song to be
adjusted, allowing each part to be practiced separately. It is also possible to adjust the playback tempo of the
current lesson song, allowing di cult passages to be practised more conveniently.
Lesson Function settings
Lesson Function setting Description Default setting
Balance Adjust the volume balance between the left and right-hand parts. 5 - 5
Tempo Adjust the playback tempo of the current lesson song in beats per minute (BPM). Song specific
Entering the Lesson Function settings menu
After selecting a lesson book and song:
Press the
The Lesson Function settings menu will be shown in the LCD
display.
Adjusting the left/right-hand part volume
Press the or buttons to move the selection cursor over the
Music Menu
Balance setting, then press the or buttons to adjust the
volume of the left/right-hand part volume.
Increasing the volume of the left-hand part will reduce the
volume of the right-hand part, and vice versa.
* If the Beyer lesson book is selec ted, increasing the left-hand value will
decrease the volume of the student’s part, while increasing the righthand value will decrease the volume of the teacher’s part.
FUNCTION button (EDIT).
buttons:
Adjust left/right-hand volume.
Example: To practice the right-hand part while listening
to the left-hand part, set the left-hand volume to 9.
Adjusting the playback tempo of the lesson song
Press the or buttons to move the selection cursor over the
Tempo setting, then press the or buttons to adjust the
playback tempo of the lesson song.
* To reset the playback temp o of the selected lesson son g to the default
value, press the FUNCTION button (RESET).
34
buttons:
Adjust playback tempo.
Page 35

4
. Repeating sections of a lesson song
The ‘A-B Loop’ feature of the Lesson Function allows sections of the selected lesson song to be ‘looped’ between
two points in order to practise di cult passages continuously.
1. Playing the lesson song
After selecting a lesson book and song:
Press the PLAY/STOP button.
The LED indicator for the PLAY/STOP button will turn on, and a
one bar count-in will be heard before the song starts to play.
2. Specifying the start point (A) of the loop
Press the FUNCTION button (A-B) to specify the start point
of the loop.
The LED indicator for the FUNCTION button will start to ash,
indicating that the start point (A) of the loop has been set.
Point ‘A’ set
3. Specifying the end point (B) of the loop
Press the FUNCTION button (A-B) again to specify the end
point of the loop.
The LED indicator for the FUNCTION button will turn on,
indicating that the end point of the (B) of the loop has been set.
Point ‘B’ set:
loop active
The de ned ‘A-B’ section of the lesson song will repeat (loop),
allowing the passage to be practiced continuously.
4. Cancelling the ‘A-B’ loop
Press the FUNCTION button (A-B) once again to cancel the
loop.
Music Menu
* The Balance and Tempo lesson function settings can continue to be
adjusted while the A-B loop is in operation.
The LED indicator for the FUNCTION button will turn o , and
the lesson song will resume normal playback.
35
Page 36

Lesson Function
5
. Recording a lesson song practice
The Lesson Function’s Record feature allows the left or right-hand parts of the selected lesson song to be recorded
to internal memory, and then played back for self-evaluation.
1. Starting the lesson song recording
After selecting a lesson book and song:
Press the REC button.
The LED indicators for the REC and PLAY/STOP buttons will turn
on to indicate that recording mode is in use.
* It may be desirable to adjust the Balance and Tempo lesson function
settings before starting the recording.
A one bar count-in will be heard before the lesson song starts
to play and record.
2. Stopping the lesson song recording
Press the PLAY/STOP button.
The LED indicators for the REC and PLAY/STOP buttons will turn
Music Menu
o , and the lesson song recording and playback will stop.
3. Playing back the recorded lesson song
Press the PLAY/STOP button again.
The LED indicator for the PLAY/STOP button will turn on, and a
one bar count-in will be heard before the recorded lesson song
starts to play.
Press the PLAY/STOP button.
The LED indicator for the PLAY/STOP button will turn o , and the
recorded lesson song will stop playing.
36
* The Balance and Tempo lesson function settings can continue to be
adjusted while the recorded lesson song practise is playing.
* The ‘A-B’ loop function cannot be used when recording a lesson song
practice.
* Press the REC and PLAY/STOP buttons simultaneously to erase the
recorded lesson song practice. The recorded practice will be erased
automatically when a di erent lesson song is selected.
Page 37

6
. Finger Exercises
The lesson function also includes a selection of nger exercises for practicing major and minor scales, arpeggios,
chords, cadences, and Hanon exercises, with notated scores provided in the separate ‘Finger Exercises’ book.
The AnyTimeX2 piano can also evaluate one’s practice, analysing note accuracy, timing evenness, and note volume
consistency, before displaying results for each category. Using this function, players can objectively review their
performances, and concentrate on improving a particular area of their technique.
1. Selecting and recording a Hanon nger exercise
While Lesson mode is in use:
Select the Hanon lesson book, then select a song number.
* It may be desirable to adjust the Balance and Tempo lesson function
settings before starting the recording.
Press the REC button.
The LED indicators for the REC and PLAY/STOP buttons will turn on to indicate that recording mode is in use.
A one bar count-in will be heard before the nger exercise starts to play and record.
2. Evaluating the recorded nger exercise
Press the PLAY/STOP button
The LED indicators for the REC and PLAY/STOP buttons will turn
o , and the nger exercise recording and playback will stop.
The recorded practice will be evaluated for note accuracy,
timing evenness, and volume consistency, with the results
shown alternately in the LCD display.
* Press the REC and PLAY/STOP buttons simultaneously to erase the
recorded lesson song practice. The recorded practice will be erased
automatically when a di erent lesson song is selected.
3. Playing back the recorded nger exercise
Music Menu
Press the PLAY/STOP button again.
The LED indicator for the PLAY/STOP button will turn on, and
a one bar count-in will be heard before the recorded nger
exercise starts to play.
Press the PLAY/STOP button once again.
The LED indicator for the PLAY/STOP button will turn o , and the
recorded nger exercise song will stop playing.
* Press or buttons to cycle through the evaluation results. The
recorded nger exercise can be replayed even after cancelling the
evaluation result screen.
37
Page 38

Song Recorder (Internal Memory)
The AnyTimeX2 piano allows up to 10 di erent songs to be recorded, stored in internal memory, and played back
at the touch of a button. Each song consists of two separate tracks - referred to as ‘parts’ - that can be recorded and
played back independently. This allows the left-hand part of a song to be recorded rst on one track, and the right-
hand part to be recorded later on the other track.
1
. Recording a song
1. Entering song recorder mode
Press the REC button.
The LED indicator for the REC button will start to ash, and the
Record Internal screen will appear with the currently selected
song and part number shown in the LCD display.
* If a USB memory device is connected, press the FUNCTION button
(INT) to select the internal song recorder.
2. Selecting the song/part to be recorded
Press the or buttons to move the selection cursor over the
song memory or part.
Press the or buttons to change the selected song memory
or part to be recorded.
If a part has already been recorded, a * symbol will be shown.
buttons:
Select song memory/part.
buttons:
Move selection cursor.
Recorder
Part has been recorded
When recording part 1 and part 2 separately, select the song and part number
carefully in order to prevent accidentally overwriting a previously recorded part.
3. Starting the song recorder
Press a key on the keyboard, or the PLAY/STOP button.
The LED indicators for the REC and PLAY/STOP buttons will turn
on, and recording will start.
The current bar and beat will also be shown in the LCD display.
Recording
Metronome
tempo/beat
(if enabled)
38
or
* Pressing the PLAY/STOP button allows a rest period or empty bar to
be inserted at the beginning of the song.
* Press the METRONOME button before or during the recording to
turn on the metronome. The metronome ‘click’ sound will not be
recorded, however drum patterns will be recorded.
Page 39

4. Stopping the song recorder
Press the PLAY/STOP button.
The LED indicators for the PLAY/STOP and REC buttons will turn
o , the recorder will stop, and the part/song will be stored in
internal memory.
* The maximum recording capacity is approximately 90,000 notes, with
button and pedal presses also counted as one note.
* If the maximum recording capacity is reached during recording, the
recorder will stop automatically.
* Recorder songs will remain in memory after the power is turned o .
To play back the recorded song, please refer to the ‘Playing a Song’
instructions on page 40.
Recording a second part
To record a second part, repeat the above instructions, selecting the part that has not been recorded to.
Recording with the metronome
It is also possible to record songs with the metronome activated. This is useful when recording parts separately, or wishing to
maintain correct timing throughout complex passages. Note that the standard metronome click will not be heard when the song is
played back, however if a drum rhythm is selected, the pattern will be heard.
* For more information about the instrument’s Metronome function, please refer to page 27.
Changing panel settings while recording
In some cases, it may be desirable to make changes to the selected sound or style while recording a song. The tables below list the
various functions which will and will not be remembered during recording.
Panel operations remembered during recording
Changes made to the sound type. (SOUND buttons etc.)
Switching between dual/split modes.
Panel operations NOT remembered during recording*
Changes made to the reverb settings.
Changes made to the e ects settings.
Changes made to the tempo.
Changes made to the volume balance in dual/split mode.
Changes made to transpose, tuning, touch, etc.
* Desired e ects, reverb, and tempo settings etc. should be prepared
before recording a new song.
Recorder
5. Exiting song recorder mode
Press the FUNCTION button (EXIT), to exit the Internal Song
Recorder and return to normal operation.
39
Page 40

Song Recorder (Internal Memory)
2
. Playing a song
This function is used to playback recorder songs stored in internal memory. To playback a song/part immediately
after recording, start this process from step 2.
1. Entering song play mode
Press the PLAY/STOP button.
The Internal Recorder screen will be shown in the LCD display.
Stopped
Seek bar
* If a USB memory device is connected, press the FUNCTION button
(INT) to select the internal song recorder.
2. Selecting the song/part(s) to be played back
Press the or buttons to move the selection cursor over the
song memory or part.
Press the or buttons to change the selected song memory
(1-10) or part (1, 2, or 1&2) to be played back.
If a part has already been recorded, a * symbol will be shown.
Part has been recorded
buttons:
Select song memory/part.
buttons:
Move selection cursor.
3. Starting/stopping song playback
Recorder
Press the PLAY/STOP button.
The LED indicator for the PLAY/STOP buttons will turn on, and
the selected song/parts will start to play.
* The selected part can be changed during song playback.
* To adjust the playback tempo of the recorded song, press and hold
the METRONOME button, then press the or buttons.
Press the PLAY/STOP button again.
The LED indicator for the PLAY/STOP button will turn o and the
song will stop playing.
5. Exiting song play mode
Press the FUNCTION button (EXIT), to exit the Internal
Recorder and return to normal operation.
40
Page 41

3
. Internal Recorder Edit menu
The Internal Recorder Edit menu features transpose settings that allow the pitch of the keyboard or song to be
adjusted in semi-tone steps. This menu also includes functions to delete the song, or convert the song to an audio
le.
Internal Recorder Edit menu
Function Description Default setting
Key Transpose Raise or lower the pitch of the keyboard in semi-tone steps. 0 (C)
Song Transpose Raise or lower the pitch of the recorder song in semi-tone steps. 0
Erase Erase a part of a recorder song from memory (see page 42). –
Audio Convert Convert a recorder song to an MP3/WAV audio le (see page 43). –
Entering the Internal Recorder menu
While the Internal Recorder screen is shown in the LCD display:
Press the
The Internal Recorder menu will be shown in the LCD display.
Adjusting the Internal Recorder settings/functions
After entering the Internal Recorder menu:
Press the or buttons to move the selection cursor over the
desired setting.
Press the or buttons to adjust the selected setting.
* To reset the current setti ng to the default value, press the FUNCTION
button (RESET).
Exiting the Internal Recorder menu
FUNCTION button (EDIT).
buttons:
Adjust selected setting.
buttons:
Move selection cursor.
Recorder
Press the FUNCTION button (BACK), to exit the Internal
Recorder menu and return to normal operation.
41
Page 42

Song Recorder (Internal Memory)
h
o
ld
h
o
ld
4
. Erasing a part/song
This function is used to erase recorder parts that may have been recorded incorrectly or songs that are no longer
listened to. Once a part/song has been erased from memory it cannot be recovered.
1. Selecting the Erase function
After entering the Internal Recorder menu (see page 41):
Press the or buttons to move the selection cursor over the
Erase function.
buttons:
Move selection cursor.
Press the FUNCTION button (ENTER) to select the Erase
function.
2. Selecting the song/part to be erased
Press the or buttons to move the selection cursor over the
song memory or part.
Press the or buttons to change the selected song memory
(1-10) or part (1, 2, or 1&2) to be erased.
If a part has already been recorded, a * symbol will be shown.
buttons:
Select song memory/part.
buttons:
Move selection cursor.
3. Erasing the selected song/part
Press the FUNCTION button (OK) to Erase the selected song
Recorder
and part.
A con rmation message will be shown in the LCD display,
prompting to con rm or cancel the erase operation.
Press the FUNCTION button (YES) to con rm the erase
operation, or the
Erasing all recorder songs from memory
Press and hold the PLAY/STOP and REC buttons, then turn the
instrument’s power o /on.
All recorder songs stored in memory will be erased.
FUNCTION button (NO) to cancel.
42
hold
YES: Erase NO: Cancel
hold
Page 43

5
. Converting a song to an audio le
This function allows recorder songs stored in internal memory to be played back and saved (converted) as an audio
le to a USB device in either MP3 or WAV format.
1. Selecting the Convert to Audio function
After entering the Internal Recorder menu (see page 41):
Press the or buttons to move the selection cursor over the
Convert to Audio function.
buttons:
Move selection cursor.
Press the FUNCTION button (ENTER) to select the Convert to
Audio function.
2. Selecting the song/part to be converted
Press the or buttons to move the selection cursor over the
song memory or part.
Press the or buttons to change the selected song memory
(1-10) or part (1, 2, or 1&2) to be converted.
If a part has already been recorded, a * symbol will be shown.
Press the
FUNCTION button (OK) to continue.
3. Selecting the audio le format
Press the or buttons to select the desired le format for the
converted song.
It is also possible to adjust the recording gain at this stage.
* For more information about the instrument’s audio recorder gain
setting, please refer to page 44.
4. Starting the conversion
Press the PLAY/STOP button, or a key on the keyboard.
buttons:
Select song memory/part.
buttons:
Move selection cursor.
buttons:
Select audio recorder format.
Recorder
The LED indicator for the PLAY/STOP and REC buttons will turn
on, the selected song will play, and the convert to audio process
will start.
* Notes played on the keyboard will also be recorded to the audio le.
Naming and saving the converted audio le
Please follow the ‘Recording a MP3/WAV audio le’ instructions on page 45 from step 5.
43
Page 44
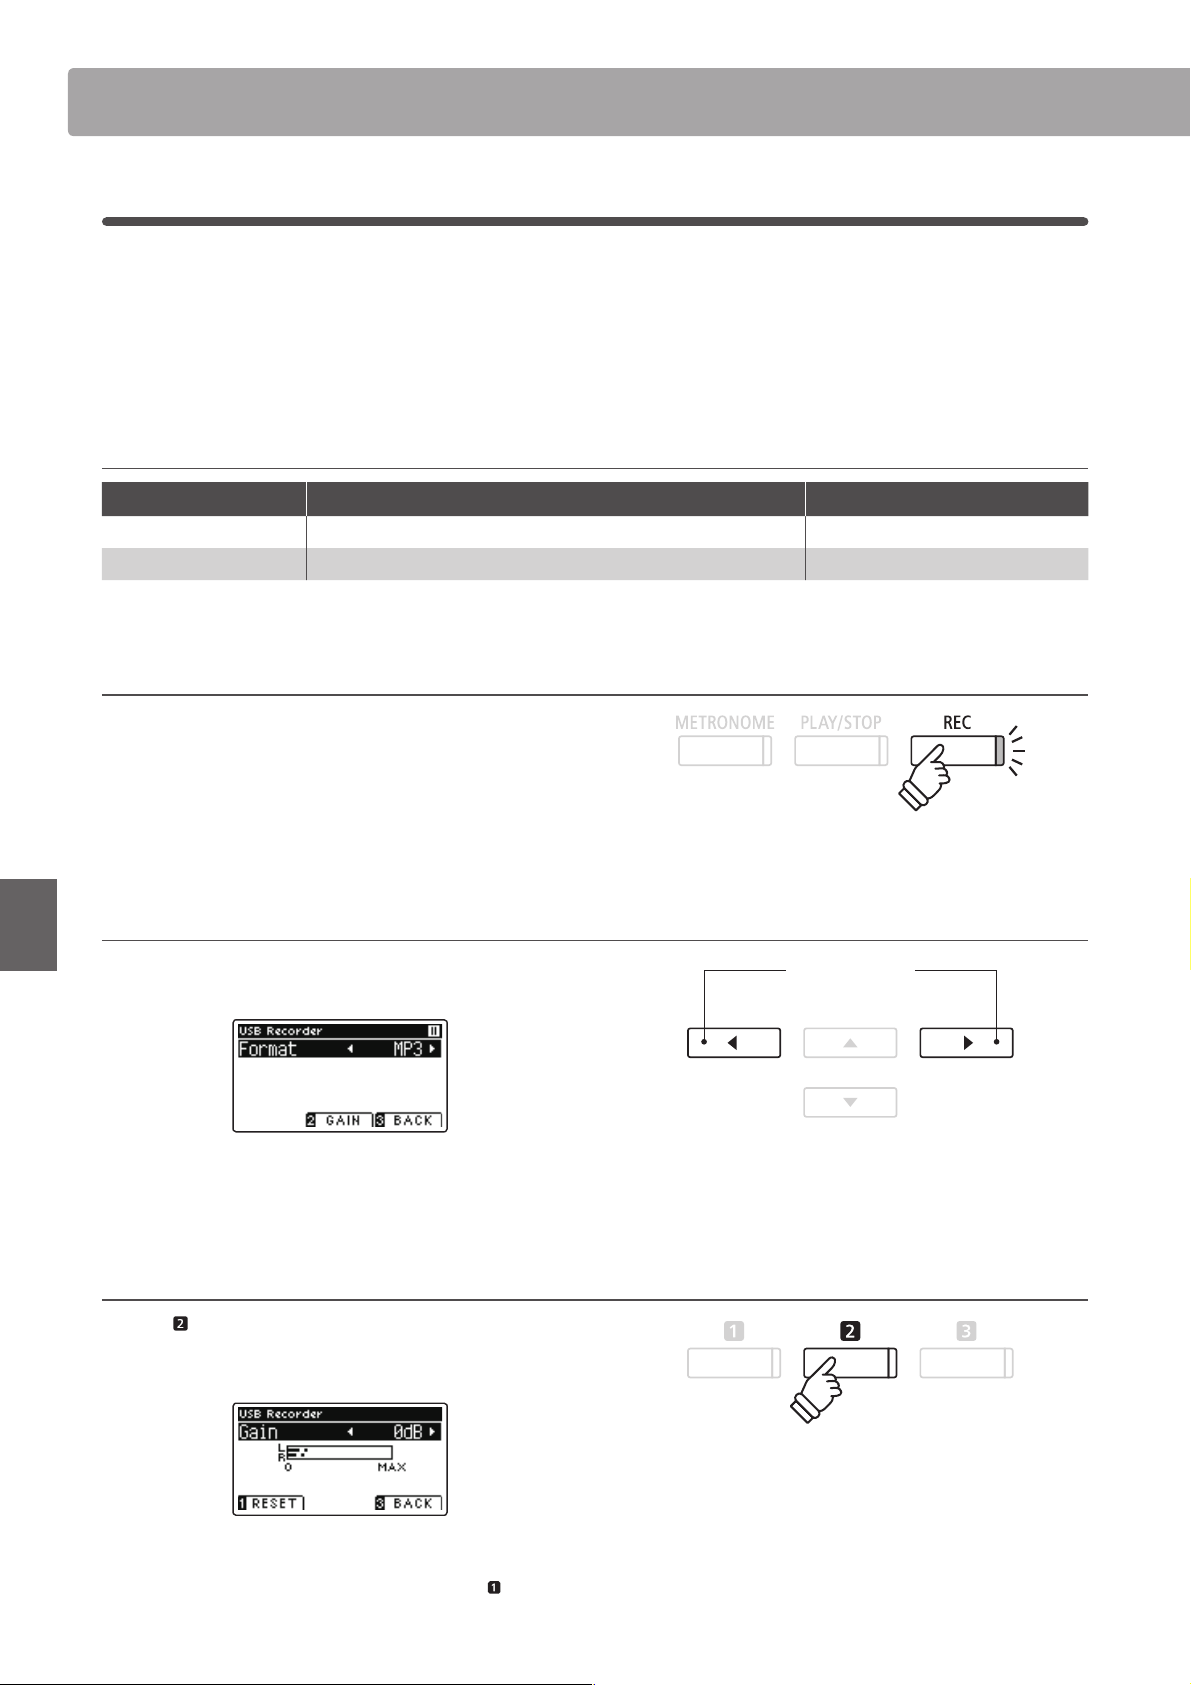
Audio Record/Playback (USB Memory)
1
. Recording a MP3/WAV audio le
The AnyTimeX2 piano is also capable of recording performances as digital audio - saving the data to a USB memory
device in either MP3 or WAV format. This useful function allows professional quality recordings to be produced
directly on the instrument - without the need for additional sound equipment - then emailed to friends and family,
listened to away from the instrument, or edited and remixed further using an audio workstation.
In addition, the AnyTimeX2 piano also supports mixing the LINE IN audio source with the recorded MP3/WAV le.
Audio Recorder format speci cations
Audio format Speci cations Bitrate
MP3 44.1 kHz, 16 bit, Stereo 192 kbit/s (fixed)
WAV 44.1 kHz, 16 bit, Stereo 1,411 kbit/s (uncompressed)
MPEG Layer-3 audio coding technology licensed from Fraunhofer IIS and Thomson.
MP3 codec is Copyright (c) 1995-2007, SPIRIT.
1. Entering USB recorder mode
Connect a USB memory device to the USB port.
Press the REC button.
The LED indicator for the REC button will start to ash, and the
USB Recorder format screen will be shown in the LCD display.
2. Selecting the USB recorder le format
Press the or buttons to select the desired USB recorder
audio le format (WAV or MP3).
buttons:
Select audio recorder format.
Recorder
* MP3 audio les require less storage space than WAV audio les.
* A 1 GB USB memory device can store over 12 hours of MP3 audio data.
Adjusting the recording volume (Gain)
Press the FUNCTION button (GAIN).
The gain adjustment screen and recording level meter will be
shown in the LCD display.
Press the or buttons to adjust the recorder gain setting.
* To reset the gain setting to the default level, press the FUNCTION
button (RESET).
44
* The gain setting can be adjusted within the range of 0 dB - 15 dB.
* Express caution when increasing the gain setting, as higher levels may
result in distorted recordings.
* The gain meter will also display the sound level of the LINE IN audio.
Page 45

3. Starting the USB recorder
Press a key on the keyboard, or the PLAY/STOP button.
The LED indicators for the REC and PLAY/STOP buttons will turn
on, and recording will start.
The current recording time will also be shown in the LCD display.
Recording
Time
4. Stopping the USB recorder, saving the le
Press the PLAY/STOP button.
The LED indicators for the PLAY/STOP and REC buttons will turn
o , and recording will stop
A con rmation message will be shown in the LCD display,
prompting to con rm or cancel the save operation.
or
* Pressing the PLAY/STOP button allows a rest period or empty bar to
be inserted at the beginning of the song.
* Press the METRONOME button before or during the recording to
turn on the metronome. The metronome ‘click’ sound will not be
recorded, however drum patterns will be recorded.
Press the FUNCTION button (YES) to con rm the save
operation, or the
FUNCTION button (NO) to cancel.
5. Naming the recorded audio le, con rming save
After con rming the save operation:
Press the or buttons to cycle through the alphanumeric
characters, and the or buttons to move the cursor.
Press the FUNCTION button (OK) to con rm the save
operation, or the
The recorded audio le will be saved with the speci ed name.
After a few seconds, the Play Audio screen will be shown in the
LCD display, indicating that the audio is ready for playback.
To play back the recorded audio le, please refer to the ‘Playing an
MP3/WAV audio File’ instructions on page 46.
FUNCTION button (BACK) to cancel.
* ‘MP3 Song 01’ or ‘WAV Song 01’ will be used as the default name for the
* The recorded audio le will be saved in the root folder of the USB
YES: Save NO: Cancel
Recorder
buttons:
Move selection cursor.
buttons:
Select character.
OK: Save BACK: Cancel
recorded audio les, with the number increasing automatically.
memory device. It is not possible to save the le in a di erent folder.
45
Page 46

Audio Record/Playback (USB Memory)
2
. Playing an MP3/WAV audio le
The AnyTimeX2 piano is also capable of playing MP3 and WAV audio les stored on a USB memory device directly
through the instrument’s speaker system. This function is particularly useful when attempting to learn the chords
or melody to a new piece, or to simply play along with one’s favorite song.
Audio Player supported format speci cations
Audio format Speci cations Bitrate
MP3 32 kHz/44.1 kHz/48 kHz, Mono/Stereo 8-320 kbit/s (fixed & variable)
WAV 32 kHz/44.1 kHz/48 kHz, Mono/Stereo, 16 bit -
MPEG Layer-3 audio coding technology licensed from Fraunhofer IIS and Thomson.
MP3 codec is Copyright (c) 1995-2007, SPIRIT.
Preparing the USB memory device
First, prepare a selection of MP3 or WAV audio les, copying the
data to a USB memory device.
* USB devices sho uld be formatted to use th e ‘FAT’ or ‘FAT32’ lesystems.
Please refer to page 110 for more information.
1. Entering USB playback mode
Connect a USB memory device to the USB port.
Press the PLAY/STOP button.
The Song Browser screen will be shown in the LCD display.
Song Browser screen
Recorder
The Song Browser screen provides a listing of relevant les and
folders stored on the connected USB device.
The icon is used to represent an audio/song le.
The
icon is used to represent a folder.
The
icon is used to represent the current/previous folder.
An example of a typical le/folder listing screen is shown below.
Please note that the visible screen height has been extended for
the purpose of this illustration.
Current/previous folder
Folders
Files
buttons:
Move selection cursor.
* Files and folders will be listed in alphabetical order, with folder s shown
at the top of the screen.
* When the USB Player function is selected, only MP3, WAV, and MID les
will be shown.
* The LCD display is capable of showing lenames with a maximum
length of 12 characters (+3 character su x). Filenames longer than 12
characters will be truncated automatically.
FUNCTION button:
Select le/enter folder.
46
Page 47

2. Selecting an audio le
Press the or buttons to move the selection cursor, then
press the
The audio play screen will be shown in the LCD display.
FUNCTION button (SELECT) to select the audio le.
3. Playing the selected audio le
Press the PLAY/STOP button.
The selected audio le will start to play, and information about
the le will be shown in the LCD display.
Audio le,
artist/song
Playback
volume
Controlling audio le playback
While the audio le is playing:
Press the PLAY/STOP button to pause and resume playback.
Press the or buttons to rewind or advance the playing
position of the audio le.
Press the or buttons to adjust the playback volume of the
audio le.
* The playback volume can be adjusted within the range of 1 - 100.
Press the FUNCTION button (A-B) twice to set the start and
end points of the A-B loop.
* Pressing the A-B button for a third time will turn o the loop.
Playing
position
* If the selected audio le contains embedded metadata (e.g. ID3 tags)
such as artist name and song title, this information will be also be
shown beside the lename.
buttons:
Rewind/advance playing position.
buttons:
Adjust playback volume.
* There may be a noticeable di erence in volume between audio le
playback and the AnyTimeX2 keyboard sound. When playing back
audio data, please adjust the volume of the audio le as desired.
Recorder
USB Recorder Edit menu
The USB Reco rder Edit men u allow s the pl ayback mode (Single , 1-Repeat, All-Repeat, Random) to be changed, and the pitch of the keyboard
to be transposed in semi-tone steps. Please refer to page 50 for more information.
Overdub function
The Overdub function allows the sound of the AnyTimeX2 to be recorded (overdubbed) to an existing MP3 or WAV audio le.
Please refer to page 52 for more information.
4. Exiting USB playback mode
Press the FUNCTION button (BACK) to exit USB playback
mode and return to normal operation.
47
Page 48

Audio Record/Playback (USB Memory)
3
. Playing a MIDI song le
The AnyTimeX2 piano also supports the playback of Standard MIDI File (SMF) les and AnyTimeX2 recorder songs
stored on a USB memory device, allowing a vast selection of widely accessible music to be heard through the
instrument’s exquisite Harmonic Imaging XL sound engine.
Song Player supported format speci cations
Song format Speci cations
MID Format 0, Format 1
KS0 Kawai Song le
Preparing the USB memory device
First, prepare a selection of MID (SMF) song les, copying the
data to a USB memory device.
* USB devices sho uld be formatted to use th e ‘FAT’ or ‘FAT32’ lesystems.
Please refer to page 110 for more information.
1. Entering USB playback mode
Connect a USB memory device to the USB port.
Press the PLAY/STOP button.
The Song Browser screen will be shown in the LCD display.
Song Browser screen
Recorder
The Song Browser screen provides a listing of relevant les and
folders stored on the connected USB device.
The
icon is used to represent an audio/song le.
The
icon is used to represent a folder.
The
icon is used to represent the current/previous folder.
An example of a typical le/folder listing screen is shown below.
Please note that the visible screen height has been extended for
the purpose of this illustration.
Current/previous folder
Folders
Files
buttons:
Move selection cursor.
* Files and folders will be listed in alphabetical order, with folder s shown
at the top of the screen.
* When the USB Player function is selected, only MP3, WAV, and MID les
will be shown.
* The LCD display is capable of showing lenames with a maximum
length of 12 characters (+3 character su x). Filenames longer than 12
characters will be truncated automatically.
FUNCTION button:
Select le/enter folder.
48
Page 49

2. Selecting a MIDI le
Press the or buttons to move the selection cursor, then
press the
The MIDI play screen will be shown in the LCD display.
FUNCTION button (SELECT) to select the MIDI le.
3. Playing the selected MIDI le
Press the PLAY/STOP button.
The selected MIDI le will start to play, and information about
the le will be shown in the LCD display.
MIDI le,
artist/song
Playback
volume
Controlling MIDI le playback
While the MIDI le is playing:
Press the PLAY/STOP button to pause and resume playback.
Press the or buttons to rewind or advance the playing
position of the MIDI le.
Press the or buttons to adjust the playback volume of the
MIDI le.
* The playback volume can be adjusted within the range of 1 - 100.
Press the FUNCTION button (A-B) twice to set the start and
end points of the A-B loop.
* Pressing the A-B button for a third time will turn o the loop.
Playing
position
* The AnyTimeX2 piano does not contain the full General MIDI/GM2
sound bank selection. Consequently, some SMF song les may not be
reproduced entirely accurately when played through the instrument.
buttons:
Rewind/advance playing position.
buttons:
Adjust playback volume.
Recorder
USB Recorder Edit menu
The USB Recorder Edit menu allows the playback mode (Single, 1-Repeat, All-Repeat, Random) to be changed, the tempo of the MIDI song to
be adjusted, and the pitch of the keyboard or song to be transposed in semi-tone steps. Please refer to page 50 for more information.
Convert MIDI to Audio function
The Convert MIDI to Audio function allows MIDI les or AnyTimeX2 recorder songs stored on a USB memory device to be converted to MP3/
WAV audio les. Please refer to page 51 for more information.
Exiting USB playback mode
Press the FUNCTION button (BACK) to exit USB playback
mode and return to normal operation.
49
Page 50

Audio Record/Playback (USB Memory)
4
. USB Recorder Edit menu
The USB Recorder Edit menu allows the playback mode of the audio/MIDI le to be changed to one of four types.
Th is m enu also f eat ures settin gs t o adjust t he M IDI son g pl ayback te mpo , and to tra nsp ose the pi tch of the keyboard
or MIDI song in semi-tone steps.
USB Recorder Edit menu
Function Description Default setting
Play Mode Change the audio/MIDI le playback mode (see below). Single
Tempo Adjust the playback tempo of the MIDI song in beats per minute (BPM). –
Key Transpose Raise or lower the pitch of the keyboard in semi-tone steps. 0 (C)
Song Transpose Raise or lower the pitch of the recorder/MIDI song in semi-tone steps. 0
* Tempo and Song Transpose settings will not be shown when an audio le is selected.
Play Mode settings
Play Mode setting Description
Single The selected audio/MIDI le will be played once.
1-Repeat The selected audio/MIDI le will be repeated.
All-Repeat All audio/MIDI les in the current folder will be played repeatedly.
Random All audio/MIDI les in the current folder will be played in random order.
Entering the USB Recorder menu
While the USB Recorder screen is shown in the LCD display:
Press the
Recorder
The USB Recorder menu will be shown in the LCD display.
FUNCTION button (EDIT).
Adjusting the USB Recorder settings
After entering the USB Recorder menu:
Press the or buttons to move the selection cursor over the
desired setting.
Press the or buttons to adjust the selected setting.
* To reset the current setti ng to the default value, press the FUNCTION
button (RESET).
50
buttons:
Adjust selected setting.
buttons:
Move selection cursor.
Page 51

5
. Converting a MIDI song le to an MP3/WAV audio le
This function allows MIDI les or AnyTimeX2 recorder songs stored on a USB memory device to be played back and
saved (converted) as an audio le (to the USB device) in either MP3 or WAV format.
1. Selecting the MIDI song to be converted
While the Song Browser screen is shown in the LCD display:
Press the or buttons to move the selection cursor over the
desired MIDI le, then press the REC button.
The LED indicator for the REC button will start to ash, and the
USB Recorder screen will be shown in the LCD display.
2. Selecting the audio le format and the mode
With the Format setting selected, press the or buttons to
select the desired USB recorder audio le format (WAV or MP3).
With the Mode setting selected, press the button to select
‘Conv.to Audio’.
* It is also possible to record a new song directly to the USB device (i.e.
not convert the previously selected song to an audio le) by changing
the Mode setting to ‘New Song’.
3. Starting the conversion
Press the PLAY/STOP button, or a key on the keyboard.
The LED indicator for the PLAY/STOP and REC buttons will turn
on, the selected song will play, and the convert to audio process
will start.
buttons:
Adjust selected setting.
buttons:
Move selection cursor.
Recorder
* Notes played on the keyboard will also be recorded to the audio le.
When the end of the song is reached, press the PLAY/STOP
button and the save con rmation screen will be shown in the
LCD display.
Naming and saving the converted audio le
Please follow the ‘Recording a MP3/WAV audio le’ instructions on page 45 from step 5.
51
Page 52

Audio Record/Playback (USB Memory)
6
. Overdubbing a MP3/WAV audio le
This function allows the sound of the AnyTimeX2 to be recorded (overdubbed) to an existing MP3 or WAV audio le.
In addition, the AnyTimeX2 piano also supports mixing the LINE IN audio with the overdubbed MP3/WAV le.
* This function records/overdubs to a copy of the selected le - the original audio le will not be modi ed.
1. Selecting the audio le to be overdubbed
While the Song Browser screen is shown in the LCD display:
Press the or buttons to move the selection cursor over the
desired MP3/WAV le, then press the REC button.
The LED indicator for the REC button will start to ash, and the
USB Recorder screen will be shown in the LCD display.
2. Selecting the audio le format and the mode
With the Format setting selected, press the or buttons to
select the desired USB recorder audio le format (WAV or MP3).
With the Mode setting selected, press the button to select
‘Over Dubbing’.
* It is also possible to record a new audio le directly to the USB device
(i.e. not overdub the previously selected audio le) by changing the
Mode setting to ‘New Song’.
buttons:
Adjust selected setting.
buttons:
Move selection cursor.
3. Starting the recording/overdubbing
Recorder
Press the PLAY/STOP button, or a key on the keyboard.
The LED indicator for the PLAY/STOP and REC buttons will
turn on, the selected audio le will play, and the recording/
overdubbing process will start.
Notes played on the keyboard will be recorded to the audio le.
* The playback volume of the selected audio le will automatically be
set to 100, in order to prevent a distorted recording.
When the end of the MP3/WAV is reached, press the PLAY/STOP
button and the save con rmation screen will be shown in the
LCD display.
Naming and saving the overdubbed audio le
Please follow the ‘Recording a MP3/WAV audio le’ instructions on page 45 from step 5.
52
Page 53

Function menus
The Function menus contain a variety of options to adjust the AnyTimeX2 piano’s operation and sound. Settings
are grouped by category, providing convenient access to relevant controls. Once adjusted, settings can be stored
as the default power-on settings with the User Memory function (page 68).
Entering the Function menus
While the normal playing mode screen is shown in the LCD display:
Press the
The Function Menus screen will be shown in the LCD display.
Press the or buttons to cycle through the di erent menus.
Press the
Function menu.
Exiting the Function menus
Press the FUNCTION button (EXIT ) to exit the Function menus
and return to normal operation.
Overview of Function menus
FUNCTION button (MENU).
FUNCTION button (ENTER) to enter the selected
buttons:
Move selection cursor.
FUNCTION button:
Select function.
1. Basic Settings
Key Transpose, Song Transpose, Tone Control, Speaker Volume*,
Phones Volume, Line In Level, Line Out Volume, Wall EQ*, Tuning,
Damper Hold, Four Hands, LCD Contrast, User Memory, Factory Reset
3. MIDI Settings
MIDI Channel, Send Program Change No., Local Control,
Transmit Program Change No., Multi-timbral Mode, Channel Mute
5. Power Settings
Auto Power O
* ATX2-f only.
2. Virtual Technician Settings
Touch Curve, Voicing, Damper Resonance, Damper Noise,
String Resonance, Key-o E ect, Fallback Noise, Hammer Delay,
Topboard, Decay Time, Minimum Touch, Stretch Tuning,
User Tuning, Temperament, User Temperament, Temperament Key,
User Key Volume, Half-Pedal Adjust, Soft Pedal Depth
4. USB Functions
Load Internal Song, Load User Memory, Save Internal Song,
Save SMF Song, Save User Memory, Rename File, Delete File,
Format USB
Settings
53
Page 54

Basic Settings
The Basic Settings menu contains settings to adjust the pitch, tuning, and general sound of the instrument.
This menu also allows favourite panel settings to be stored, or reset back to the original factory con guration.
Basic Settings
No. Setting Description Default setting
1 Key Transpose Raise or lower the pitch of the keyboard in semi-tone steps. 0 (C)
2 Song Transpose Raise or lower the pitch of the recorder/MIDI song in semi-tone steps. 0
3 Tone Control Change the EQ settings of the instrument’s sound. O
4 Speaker Volume* Change the maximum volume level of the speaker output. Normal
5 Phones Volume Change the maximum volume level of the headphones output. Normal
6 Line In Level Adjust the input volume of the Line In connectors. 0 dB.
7 Line Out Volume Adjust the output volume of the Line Out connectors. 10
8 Wall EQ* Optimise the instrument’s speaker system based on instrument placement. O
9 Tuning Raise or lower the pitch of the instrument in 0.5 Hz steps. 440.0 Hz
10 Damper Hold Change the e ect of pressing the sustain pedal on organ, string, etc. sounds. O
11 Four Hands Enable the ‘Four Hands Mode’ function. O
12 LCD Contrast Adjust the contrast of the instrument’s LCD display. 5
13 User Memory Store current panel settings as the default (power-on) con guration. -
14 Factory Reset Restore all panel settings to the original factory con guration. -
Settings
* Speaker Volume and Wall EQ settings are available on the ATX2-f model only. Settings page numbers shown will di er on the ATX2 model.
* Default settings will be shown in the rst LCD display illustration (i.e. Step 1) for each setting explanation below.
Entering the Basic Settings menu
While the normal playing mode screen is shown in the LCD display:
Press the
The Function Menus screen will be shown in the LCD display.
Press the FUNCTION button (ENTER) to enter the Basic
Settings menu.
Selecting and adjusting the desired setting
After entering the Basic Settings menu:
Press the or buttons to move the selection cursor over the
desired setting.
FUNCTION button (MENU).
buttons:
Adjust selected setting.
Press the or buttons to adjust the selected setting.
* To reset the current settin g to the default value, press the FUN CTION
button (RESET).
54
buttons:
Move selection cursor.
Page 55

1
. Key Transpose
The Key Transpose setting allows the pitch of the AnyTimeX2 piano keyboard to be raised or lowered in semi-tone
steps. This is particularly useful when accompanying instruments tuned for di erent keys, or when a song learned
in one key must be played in another key. When transposed, the song can be played in the original key, yet heard
in a di erent key.
1. Selecting the Key Transpose setting
After entering the Basic Settings menu (page 54):
Press the or buttons to select the Key Transpose setting.
2. Adjusting the Key Transpose value
Press the or buttons to increase or decrease the value of
the Key Transpose setting.
* The keyboard pitch can be raised or lowered by up to 12 semi-tones.
* To reset the Key Transpose setting to the default value, press the
FUNCTION button (RESET).
* Any changes made to the Key Transpose setting will remain until the
power is turned o .
Current Transpose state
If the Key Transpose setting is set to a value other than 0 (C),
the TRANSPOSE indicator shown in the normal playing mode
screen will be highlighted.
3. Exiting the Key Transpose setting
Press the FUNCTION button (BACK) to exit the Key Transpose
setting and return to the Function Menus screen.
Tra nsp os e
enabled
Settings
55
Page 56

Basic Settings
2
. Song Transpose
The Song Transpose setting allows the pitch of MIDI les or AnyTimeX2 recorder songs stored on a USB memory
device to be raised or lowered in semi-tone steps when played back.
1. Selecting the Song Transpose setting
After entering the Basic Settings menu (page 54):
Press the or buttons to select the Song Transpose setting.
2. Adjusting the Song Transpose value
Press the or buttons to increase or decrease the value of
the Song Transpose setting.
* The song pitch can be raised or lowered by up to 12 semi-tones.
* To reset the Song Transpose setting to the default value, press the
FUNCTION button (RESET).
* Any changes made to the Song Transpose setting will remain until the
power is turned o .
Settings
3. Exiting the Song Transpose setting
Press the FUN CT ION button ( BACK) to e xit th e Song Transp ose
setting and return to the Function Menus screen.
56
Page 57

3
. Tone Control
The Tone Control setting allows the overall sound character of the AnyTimeX2 piano to be adjusted to provide
the best sound quality within the area that the instrument is located. There are ve di erent preset EQ settings
available, with an additional ‘User’ setting allowing ner control over the di erent frequency bands.
Tone Control setting
Tone Control type Description
O (default) Tone control adjustment is not applied.
Loudness Emphasises frequencies to retain the instrument’s sound character when playing at low volume levels.
Bass Boost Emphasises low-range frequencies, creating a deeper sound.
Treble Boost Emphasises high-range frequencies, creating a brighter sound.
Mid Cut Reduces mid-range frequencies, creating a clearer sound.
User Allows the low, mid, and high-range frequency bands to be adjusted separately.
1. Selecting the Tone Control setting
After entering the Basic Settings menu (page 54):
Press the or buttons to select the Tone Control setting.
2. Changing the Tone Control type
Press the or buttons to cycle through the di erent Tone
Control types.
* To reset the Tone Control setting to the default type, press the
FUNCTION button (RESET).
* Any changes made to the Tone Control setting will remain until the
power is turned o .
3. Exiting the Tone Control setting
Press the FUNCTION button (BACK) to exit the Tone Control
setting and return to the Function Menus screen.
Settings
57
Page 58

Basic Settings
User Tone Control
The User Tone Control option allows ner control over the instrument’s sound character, allowing the volume of
four frequency bands to be adjusted individually. It is also possible to adjust the frequency range of the mid-low
and mid-high frequency bands.
User Tone Control setting
No. User Tone Control Description
1 Low Adjusts the volume of the low range frequency band (20 - 100 Hz).
2 Mid-low Frequency Adjusts the frequency of the mid-low band (355 - 1000 Hz).
Mid-low dB Adjusts the volume of the mid-low range frequency band.
3 Mid-high Frequency Adjusts the frequency of the mid-high band (1120 - 3150 Hz).
Mid-high dB Adjusts the volume of the mid-high range frequency band.
4 High Adjusts the high range frequency band (5000 - 20000 Hz).
Settings
1. Selecting the User Tone Control setting
After selecting the Tone Control setting (page 57):
Press the or buttons to select the User Tone Control type,
then press the FUNCTION button (EDIT).
The User Tone Control screen will be shown in the LCD display.
2. Selecting and adjusting the User Tone Control settings
Press the or buttons to select the User Tone Control
setting.
Press the or buttons to increase or decrease the value of
the selected User Tone Control setting.
* Each User Tone Control band can be adjusted within the range of
–6 dB - +6 dB.
* To reset the User Tone Control setting to the default type, press the
FUNCTION button (RESET).
* Any changes made to the User Tone Control setting will remain until
the power is turned o .
3. Exiting the User Tone Control setting
Press the FUNCTION button (BACK) to exit the User Tone
Control setting and return to the Tone Control setting.
58
Page 59

4
. Speaker Volume (AnyTimeX2-f only)
The Speaker Volume setting allows the maximum volume level of the AnyTimeX2-f piano’s speaker output to be
reduced, providing ner adjustment control over the master volume. This setting can also function as a volume
limiter, preventing the instrument from being played too loudly in the home or classroom etc.
* This setting does not a ect the headphones or Line Out volume.
Speaker Volume setting
Speaker Volume Description
Normal (default) The instrument’s speakers will output sound at the normal volume level.
Low The instrument’s speakers will output sound at a reduced volume level.
1. Selecting the Speaker Volume setting
After entering the Basic Settings menu (page 54):
Press the or buttons to select the Speaker Volume setting.
2. Changing the Speaker Volume type
Press the or buttons to alternate between ‘Normal’ and
‘Low’ Speaker Volume settings.
* To reset the Speaker Volume setting to the default setting, press the
FUNCTION button (RESET).
* Any changes made to the Speaker Volume setting will remain until
the power is turned o .
3. Exiting the Speaker Volume setting
Press the FU NC TI ON bu t to n (B AC K) to ex it th e S pe ak er Vol um e
setting and return to the Function Menus screen.
Settings
59
Page 60

Basic Settings
5
. Phones Volume
The Phones Volume setting allows the maximum volume level of the headphones output to be increased.
The default setting for Phones Volume is ‘Normal’ in order to protect an individual’s ears from excessive volume
levels. The ‘High’ setting may be selected when using headphones with a high impedance, or in situations where it
is desirable to increase the maximum volume level of the headphones output.
* This setting does not a ect the speaker or Line Out volume.
Phones Volume setting
Phones Volume Description
Normal (default) The instrument’s headphone connectors will output sound at the normal volume level.
High The instrument’s headphone connectors will output sound at an increased volume level.
1. Selecting the Phones Volume setting
After entering the Basic Settings menu (page 54):
Press the or buttons to select the Phones Volume setting.
2. Changing the Phones Volume type
Press the or buttons to alternate between ‘Normal’ and
‘High’ Phones Volume settings.
* To reset the Phones Volume setting to the default setting, press the
FUNCTION button (RESET).
* Any changes made to the Phones Volume setting will remain until the
power is turned o .
3. Exiting the Phones Volume setting
Settings
60
Press the FUNCTION but ton ( BACK) to exi t the Phones Volu me
setting and return to the Function Menus screen.
Page 61

6
. Line In Level
The Line In Level setting allows the volume level of the AnyTimeX2’s Line In input jacks to be adjusted. This setting
may be useful when using the USB Recorder function and attempting to balance an external audio source with the
instrument’s sound.
1. Selecting the Line In Level setting
After entering the Basic Settings menu (page 54):
Press the or buttons to select the Line In Level setting.
2. Adjusting the Line In Level value
Press the or buttons to increase or decrease the value of
the Line In Level setting.
* The Line In Level can be adjusted within the range of –10 dB - +10 dB.
* To reset the Line In Level setting to the default value, press the
FUNCTION button (RESET).
* Any changes made to the Line In Level setting will remain until the
power is turned o .
3. Exiting the Line In Level setting
Press the FUNCTION button (BACK) to exit the Line In Level
setting and return to the Function Menus screen.
Settings
61
Page 62

Basic Settings
7
. Line Out Volume
The Line Out Volume setting allows the level of the instrument’s Line Out output to be adjusted. This setting may
be useful when connecting the AnyTimeX2 piano to mixers and other audio equipment.
* This setting does not a ect the speaker or headphone volume.
1. Selecting the Line Out Volume setting
After entering the Basic Settings menu (page 54):
Press the or buttons to select the Line Out Volume setting.
2. Adjusting the Line Out Volume value
Press the or buttons to increase or decrease the value of
the Line Out Volume setting.
* The Line Out Volume can be adjusted within the range of O , 1 - 10.
* To reset the Line Out Volume setting to the default value, press the
FUNCTION button (RESET).
* Any changes made to the Line Out Volume setting will remain until
the power is turned o .
Settings
3. Exiting the Line Out Volume setting
Press the FUNCTION button (BACK) to exit the Line Out
Volume setting and return to the Function Menus screen.
62
Page 63

8
. Wall EQ (AnyTimeX2-f only)
The Wall EQ setting optimises the sound character of the soundboard speaker depending on whether the
AnyTimeX2-f piano (back) is placed beside a wall, or in an area away from a wall.
* This setting does not a ect the headphones or Line Out output.
Wall EQ setting
Wall EQ Description
O (default) Optimise the speaker system for placing the AnyTimeX2-f piano in an area away from a wall.
On Optimise the speaker for placing the AnyTimeX2-f piano beside a wall.
1. Selecting the Wall EQ setting
After entering the Basic Settings menu (page 54):
Press the or buttons to select the Wall EQ setting.
2. Changing the Wall EQ setting
Press the or buttons to turn the Wall EQ setting on or o .
* To reset the Wall EQ setting to the default setting, press the
FUNCTION button (RESET).
* Any changes made to the Wall EQ setting will remain until the power
is turned o .
3. Exiting the Wall EQ setting
Press the FUNCTION button (BACK) to exit the Wall EQ setting
and return to the Function Menus screen.
Settings
63
Page 64

Basic Settings
9
. Tuning
The Tuning setting allows the overall pitch of the AnyTimeX2 piano to be raised and lowered in 0.5 Hz steps, and
may therefore prove useful when playing with other instruments.
1. Selecting the Tuning setting
After entering the Basic Settings menu (page 54):
Press the or buttons to select the Tuning setting.
2. Adjusting the Tuning value
Press the or buttons to increase or decrease the value of
the Tuning setting.
* The Tuning value can be adjusted within the range of 427.0 - 453.0 Hz.
* To reset the Tuning settin g to the default value, press the
button (RESET).
* Any changes made to the Tuning setting will remain until the power is
turned o .
FUNCT ION
Settings
3. Exiting the Tuning setting
Press the FUNCTION button (BACK) to exit the Tuning setting
and return to the Function Menus screen.
64
Page 65

10
. Damper Hold
The Damper Hold setting is used to determine whether sounds such as organ or strings should be sustained
continuously when the sustain (damper) pedal is pressed, or whether these sounds should decay, naturally.
Damper Hold setting
Damper Hold Description
O (default) Organ, strings, etc. sounds will gradually decay, even while the sustain pedal is pressed.
On Organ, strings, etc. sounds will be sustained continuously while the sustain pedal is pressed.
1. Selecting the Damper Hold setting
After entering the Basic Settings menu (page 54):
Press the or buttons to select the Damper Hold setting.
2. Changing the Damper Hold setting
Press the or buttons to turn the Damper Hold setting on
or o .
* To reset the Damper Hold setting to the default setting, press the
FUNCTION button (RESET).
* Any changes made to the Damper Hold setting will remain until the
power is turned o .
3. Exiting the Damper Hold setting
Press the FUNCTION button (BACK) to exit the Damper Hold
setting and return to the Function Menus screen.
Settings
65
Page 66

Basic Settings
11
. Four Hands
The Four Hands setting provides an alternative method to enabling the Four Hands Mode function.
When enabled, all Four Hands Mode control operations are identical to those explained on page 21.
Four Hands setting
Four Hands Description
O (default) Four Hands Mode will be turned o .
On Four Hands Mode will be turned on.
1. Selecting the Four Hands setting
After entering the Basic Settings menu (page 54):
Press the or buttons to select the Four Hands setting.
2. Changing the Four Hands setting
Press the or buttons to turn the Four Hands setting on or
o .
* To reset the Four Hands setting to the default setting, press the
FUNCTION button (RESET).
* Any changes made to the Four Hands setting will remain until the
power is turned o .
3. Exiting the Four Hands setting
Press the FUNCTION button (BACK) to exit the Four Hands
setting and return to the Function Menus screen.
Settings
66
Page 67

12
. LCD Contrast
The LCD Contrast setting is used to adjust the contrast of the LCD display. The contrast of the display becomes
sharper as the value increases.
1. Selecting the LCD Contrast setting
After entering the Basic Settings menu (page 54):
Press the or buttons to select the LCD Contrast setting.
2. Adjusting the LCD Contrast value
Press the or buttons to increase or decrease the value of
the LCD Contrast setting.
* The LCD Contrast value can be adjusted within the range of 1 - 10.
* To reset the LCD Contrast setting to the default value, press the
FUNCTION button (RESET).
* Any changes made to the LCD Contrast setting will remain until the
power is turned o .
3. Exiting the LCD Contrast setting
Press the FUNCTION button (BACK) to exit the LCD Contrast
setting and return to the Function Menus screen.
Settings
67
Page 68

Basic Settings
13
. User Memory
The User Memory function allows preferred panel functions/settings to be stored in the instrument’s memory, and
automatically recalled as the default settings every time the AnyTimeX2 piano is turned on.
* User Memory settings can also be saved to and loaded from USB memory devices. Please refer to pages 101/104 for more information.
Functions/Settings stored in User Memory
Functions
Selected sound (including primary sound for each category)
Dual Mode / Split Mode / Four Hands Mode (including settings)
Reverb, E ects (Type, Settings)
Tra nsp os e (Key Transpose, So ng Transpose)
Metronome (Beat, Tempo, Volume)
1. Selecting the User Memory function
After entering the Basic Settings menu (page 54):
Press the or buttons to select the User Memory setting.
2. Storing current settings to User Memory
Press the REC button.
A con rmation message will be shown in the LCD display, and
the current panel settings will be stored to User Memory.
* The Factory Reset function can be used to restore all settings to their
default values. Please refer to page 69 for more information.
Settings
Basic Settings
Virtual Technician Settings
MIDI Settings
* Changes made to the Auto Power O setting will be stored to User
Memory automatically.
Settings
68
3. Exiting the User Memory function
Press the FUNCTION button (BACK) to exit the User Memory
setting and return to the Function Menus screen.
Page 69

14
. Factory Reset
The Factory Reset function clears any settings stored using the User Memory function, restoring the AnyTimeX2
piano to its factory default settings.
* This function will not clear recorder songs stored in internal memory.
1. Selecting the Factory Reset function
After entering the Basic Settings menu (page 54):
Press the or buttons to select the Factory Reset setting.
2. Restoring factory settings
Press the REC button.
All the settings will be restored to their default values, and
the LCD display will automatically return to the initial sound
selection screen.
69
Settings
Page 70

Virtual Technician Settings
An experienced piano technician is essential to fully realise the potential of a ne acoustic piano. In addition to
meticulously tuning each note, the technician also performs numerous regulation and voicing adjustments that
allow the instrument to truly sing.
The Virtual Technician settings of the AnyTimeX2 piano simulate these re nements digitally, allowing performers
to shape various aspects of the instrument’s character to suit their personal preferences.
* The table below indicates which Virtual Technician settings a ect to all sounds, or acoustic piano and electric piano sounds only.
Virtual Technician Settings
No. Setting Description All AP EP Default
1 Touch Curve Adjust the touch sensitivity of the keyboard.
2 Voicing Adjust the tonal character of the instrument.
3 Damper Resonance Adjust the resonance that is heard when pressing the damper pedal.
4 Damper Noise Adjust the sound that is heard when pressing the damper pedal.
5 String Resonance Adjust the resonance that is heard when notes are held.
6Key-o E ect Adjust the sound that is heard when keys are released.
7 Fall-back Noise Adjust the sound that is heard when the key action falls back.
8 Hammer Delay Adjust the delay of the hammer striking strings when playing pianissimo.
9 Topboard Adjust the position of the grand piano topboard.
10 Decay Time Adjust the decay time of the piano sound while the keys are pressed.
11 Minimum Touch Adjust the minimum key velocity required to produce a sound.
12 Stretch Tuning Adjust the level of stretch tuning for equal temperaments.
User Tuning Adjust the individual tuning of each of the 88 keys.
13 Temperament Adjust the tuning system to suit Renaissance and Baroque periods etc.
User Temperament Create a custom, user-de ned tuning system.
14 Temperament Key Adjust the key of the selected tuning system.
15 User Key Volume Adjust the individual volume of each of the 88 keys.
16 Half-Pedal Adjust Adjust the point at which the damper pedal begins to sustain the sounds.
17 Soft Pedal Depth Adjust the depth/e ectiveness of the soft pedal.
Normal
Normal
5
5
5
5
5
O
Open 3
5
1
Normal
–
Equal Temp.
–
C
O
5
5
Settings
70
* Default settings will be shown in the rst LCD display illustration (i.e. Step 1) for each setting explanation below.
Entering the Virtual Technician menu
While the normal playing mode screen is shown in the LCD display:
Press the
FUNCTION button (MENU).
Selecting and adjusting the desired setting
After entering the Virtual Technician menu:
Press the or buttons to move the selection cursor over the
desired setting.
The Function Menus screen will be shown in the LCD display.
Press the or buttons to adjust the selected setting.
Press the or buttons to select the Virtual Technician menu.
* To reset the current settin g to the default value, press the FUN CTION
button (RESET).
Press the FUNCTION button (ENTER) to enter the Virtual
Technician menu.
Page 71

1
. Touch Curve
As with an acoustic piano, the AnyTimeX2 piano produces a louder sound when the keys are struck with force, and
a softer sound when the keys are played gently. The volume and tonal character change in relation to the strength
and speed of playing.
The Touch Curve setting allows the touch sensitivity of the keyboard to be conveniently adjusted. There are six
di ere nt pres et touc h curve se ttings avail able, w ith two ad dition al ‘Use r’ s ettings allowi ng per formers to customise
the instrument’s responsiveness to suit their individual playing style.
* This Virtual Technician setting will a ect all sounds.
Touch Curve types
Touch Curve Description
Light + Requires less striking force to achieve a forte note. For players with a very delicate touch.
Light
Normal (default) Reproduces the standard touch sensitivity of an acoustic piano.
Heavy Requires a heavier touch to produce a loud volume. Ideally suited to those with stronger ngers.
Heavy + Requires considerably more striking force to achieve a loud volume.
O (constant)
User 1 / User 2 A custom touch curve, created to suit an individual’s personal playing style.
A louder volume is produced even when playing with a soft touch. For those still developing nger strength.
* This touch curve is recommended for children and organ players.
A constant volume is produced regardless of how hard the keys are struck.
* This touch curve intended for playing sounds of instruments that have a xed dynamic range (e.g. organ and harpsichord).
Touch Curve graph
The illustration below provides a visual representation of the di erent Touch Curve settings.
Light +
Light
(default)
Normal
Heavy
Heavy +
O (constant)
LoudSoft
Sound Volume
f
b d e
ca
Gentle Strong
Keyboard Pressure
a
b
c
d
e
f
Settings
71
Page 72

Virtual Technician Settings
1
. Touch Curve (cont.)
1. Selecting the Touch Curve setting
After entering the Virtual Technician menu (page 70):
Press the or buttons to select the Touch Curve setting.
2. Changing the Touch Curve type
Press the or buttons to cycle through the di erent Touch
Curve types.
* To reset the Touch Curve setting to the default type, press the
FUNCTION button (RESET).
* Any changes made to the Touch Curve type or User Touch setting will
remain until the power is turned o .
Settings
3. Exiting the Touch Curve setting
Press the FUNCTION button (BACK) to exit the Touch Curve
setting and return to the Function Menus screen.
User Touch Curve
Creating a User Touch Curve
After selecting the Touch Curve setting:
Press the or buttons to select the User 1 or User 2 touch
curve, then press the REC button.
A message will be shown, prompting for the keyboard to be
played.
Play the piano dynamically from very soft to very loud, allowing
the instrument to examine the personal playing technique.
* More than one attempt may be re quired in order to create an accurate
User Touch Curve.
* Reducing the master volume fader to the lowest position before
creating the User Touch Curve may help to reduce user distractions,
thus improving accuracy.
Press the PLAY/STOP button.
The new User Touch Curve will be stored to the ‘User1’ or ‘User2’
touch types, and selected automatically.
72
Page 73

2
. Voicing
The Voicing setting allows the tonal character of the AnyTimeX2 piano to be set to one of six di erent types.
* This Virtual Technician setting will a ect all sounds.
Voicing types
Voicing type Description
Normal (default) The normal tonal character of an acoustic piano throughout the entire dynamic range.
Mellow 1 A softer, more mellow tonal character throughout the entire dynamic range.
Mellow 2 An even soften tonal character than Mellow 1.
Dynamic A tonal character that changes dramatically from mellow to bright, depending on the strength of key strike.
Bright 1 A bright tonal character throughout the entire dynamic range.
Bright 2 An even brighter tonal character than Bright 1.
1. Selecting the Voicing setting
After entering the Virtual Technician menu (page 70):
Press the or buttons to select the Voicing setting.
2. Changing the Voicing type
Press the or buttons to cycle through the di erent Voicing
types.
* To reset the Voicing set ting to the default type, press the FUN CTION
button (RESET).
* Any changes made to the Voicing setting will remain until the power
is turned o .
3. Exiting the Voicing setting
Press the FUNCTION button (BACK) to exit the Voicing setting
and return to the Function Menus screen.
Settings
73
Page 74

Virtual Technician Settings
3
. Damper Resonance
Pressing the damper pedal of an acoustic piano raises all dampers, allowing the strings to vibrate freely. When a
note or chord is played on the piano with the sustain pedal pressed, not only will the strings of the notes played
vibrate, but also the strings of other notes, vibrating in sympathetic resonance.
The AnyTimeX2 piano recreates this phenomenon, with the Damper Resonance setting allowing the volume of this
resonance sound to be adjusted.
* This Virtual Technician setting will a ect acoustic piano sounds only.
1. Selecting the Damper Resonance setting
After entering the Virtual Technician menu (page 70):
Press the or buttons to select the Damper Resonance
setting.
Settings
2. Adjusting the Damper Resonance volume
Press the or buttons to increase or decrease the volume of
the Damper Resonance setting.
* The Damper Resonance volume be adjusted within the range of
O , 1 - 10, with higher values resulting in a louder e ect.
* To reset the Damper Resonance setting to the default value, press the
FUNCTION button (RESET).
* Any changes made to the Damper Resonance setting will remain until
the power is turned o .
3. Exiting the Damper Resonance setting
Press the FUNCTION button (BACK) to exit the Damper
Resonance setting and return to the Function Menus screen.
74
Page 75

4
. Damper Noise
When the damper pedal of an acoustic piano is pressed and released, it is often possible to hear the sound of the
damper head touching and releasing the strings.
The AnyTimeX2 piano reproduces this sound, with the Damper Noise setting allowing the volume of this sound to
be adjusted.
* This Virtual Technician setting will a ect acoustic piano sounds only.
1. Selecting the Damper Noise setting
After entering the Virtual Technician menu (page 70):
Press the or buttons to select the Damper Noise setting.
2. Adjusting the Damper Noise volume
Press the or buttons to increase or decrease the volume of
the Damper Noise setting.
* The Damper Noise volume be adjusted within the range of
O , 1 - 10, with higher values resulting in a louder e ect.
* To reset the Damper Noise setting to the default value, press the
FUNCTION button (RESET).
* Any changes made to the Damper Noise setting will remain until the
power is turned o .
3. Exiting the Damper Noise setting
Press the FUNCTION button (BACK) to exit the Damper Noise
setting and return to the Function Menus screen.
Settings
75
Page 76

Virtual Technician Settings
h
ol
d
5
. String Resonance
String Resonance refers to a phenomenon that exists in acoustic pianos whereby the strings of held notes resonate
‘sympathetically’ with other notes of the same harmonic series.
The AnyTimeX2 piano recreates this phenomenon, with the String Resonance setting allowing the volume of this
resonance to be adjusted.
* This Virtual Technician setting will a ect acoustic piano sounds only.
Demonstrating String Resonance
To experience the string resonance phenomenon, gently hold down the ‘C’ key as shown in the illustration below, then press any of
the keys marked with a
rst ‘C’ key resonating ‘sympathetically’, thus demonstrating String Resonance.
symbol. In addition to the sound of each note played, it should also be possible to hear the strings of the
C
A
A
Settings
FGC B FGC GCEGCDEGC
hold
1. Selecting the String Resonance setting
After entering the Virtual Technician menu (page 70):
Press the or buttons to select the String Resonance
setting.
2. Adjusting the String Resonance volume
Press the or buttons to increase or decrease the volume of
the String Resonance setting.
* The String Resonance volume be adjusted within the range of
O , 1 - 10, with higher values resulting in a louder e ect.
* To reset the String Resonance setting to the default value, press the
FUNCTION button (RESET).
* Any changes made to the String Resonance setting will remain until
the power is turned o .
3. Exiting the String Resonance setting
Press the FUNCTION button (BACK) to exit the String
Resonance setting and return to the Function Menus screen.
76
Page 77
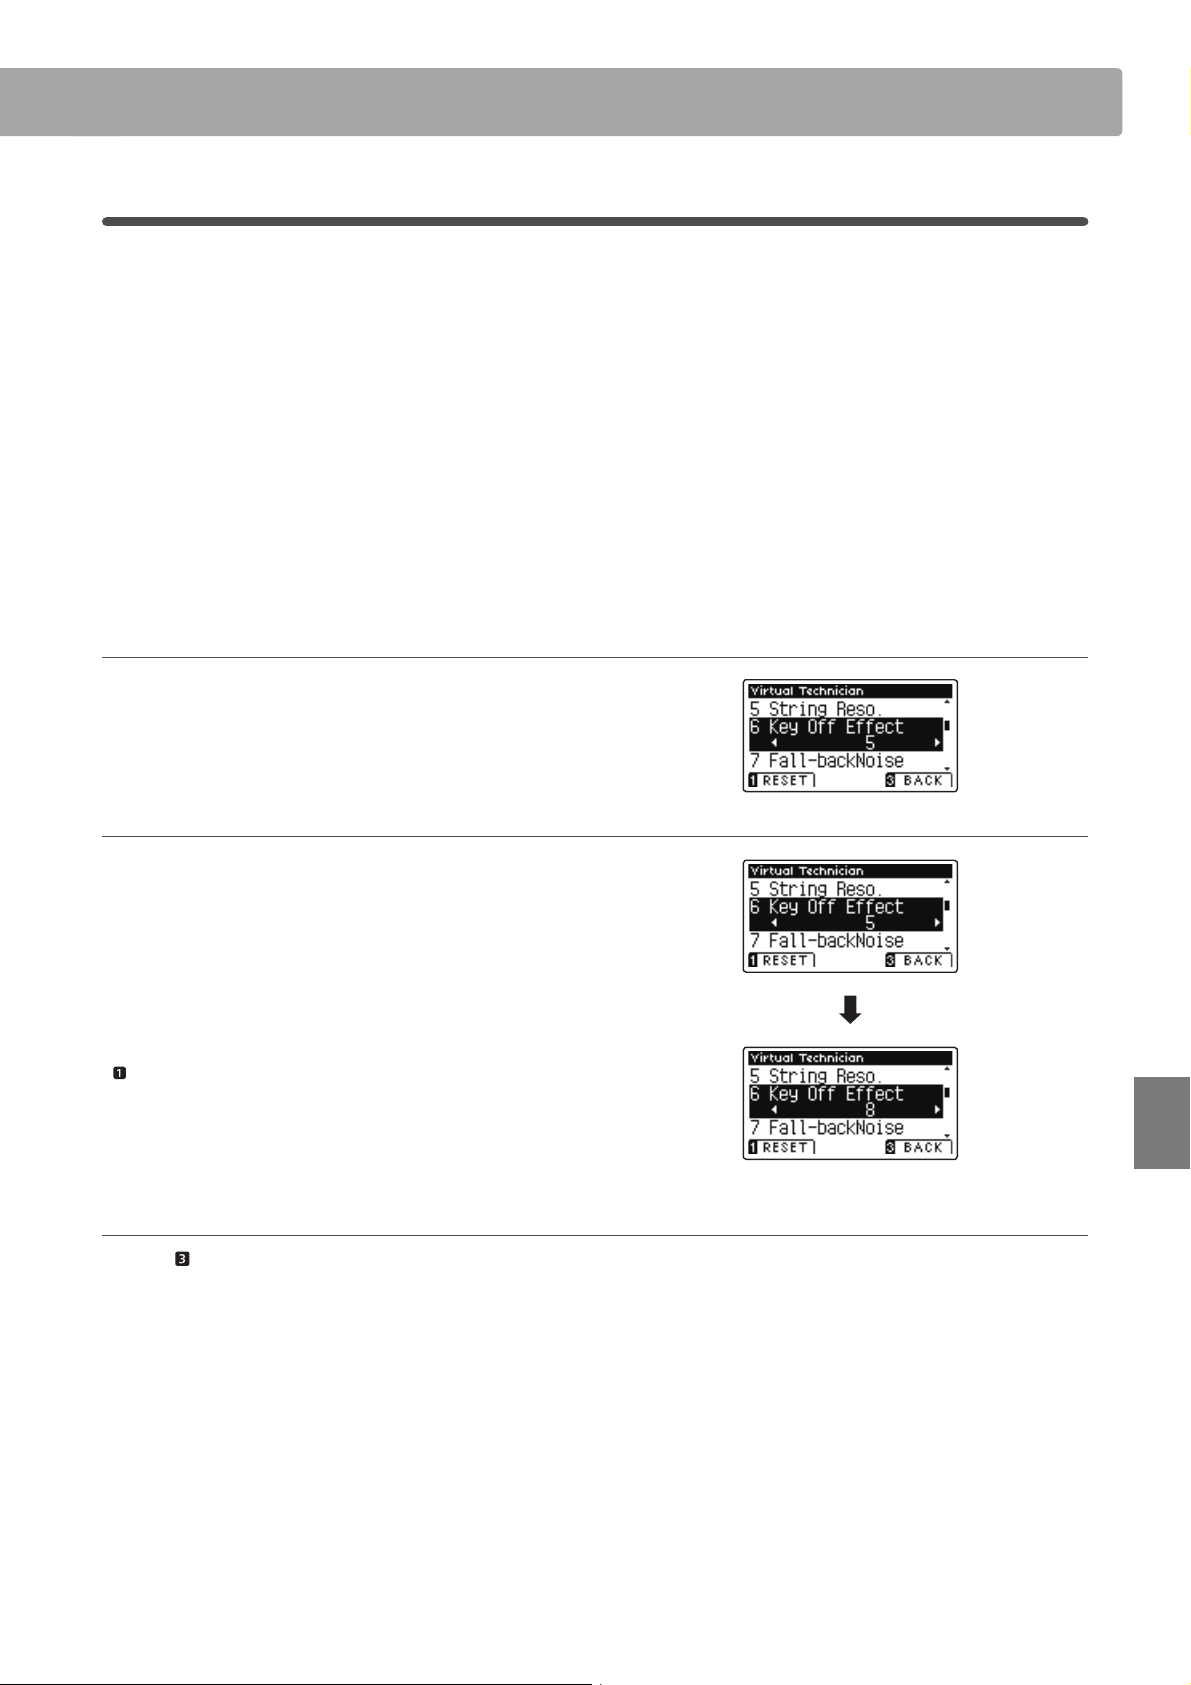
6
. Key-o E ect
When playing an acoustic piano – particularly in the bass region of the keyboard – if a key is played with force and
released quickly, it is often possible to hear the faint sound of the damper touching the strings immediately before
the vibrations are stopped.
In addition, the speed at which keys are lifted will also a ect the character of the sound. For example, when lifting
the keys quickly (e.g. staccato playing) the ‘release’ portion of the sound will be noticeably shorter than when
lifting the keys slowly (e.g. legato playing).
The AnyTimeX2 piano reproduces both characteristics, with the Key-o E ect setting allowing the volume of the
key-o sound to be adjusted, and the key-o release speed detection to be turned on or o .
* This Virtual Technician setting will a ect acoustic piano and electric piano sounds.
1. Selecting the Key-o E ect setting
After entering the Virtual Technician menu (page 70):
Press the or buttons to select the Key-o E ect setting.
2. Adjusting the Key-o E ect volume
Press the or buttons to increase or decrease the volume of
the Key-o E ect setting.
* The Key-o E ect volume be adjusted within the range of
O , 1 - 10, with higher values resulting in a louder e ect.
* When the Key-O E ect setting is set to O , the key-o release speed
detection will also be disabled, and the speed at which keys are lifted
will not a ect the character of the sound.
* To reset the Key-o E ect setting to the default value, press the
FUNCTION button (RESET).
* Any changes made to the Key-o E ect setting will remain until the
power is turned o .
3. Exiting the Key-o E ect setting
Press the FUNCTION button (BACK) to exit the Key-o E ect
setting and return to the Function Menus screen.
Settings
77
Page 78

Virtual Technician Settings
7
. Fall-back Noise
When playing an acoustic piano, it is often possible to hear the faint sound of the keyboard action returning (i.e.
‘falling back’) to the neutral position after a key is released.
The AnyTimeX2 piano reproduces this sound, with the Fall-back Noise setting allowing the volume of this sound to
be adjusted.
* This Virtual Technician setting will a ect acoustic piano and harpsichord sounds.
1. Selecting the Fall-back Noise setting
After entering the Virtual Technician menu (page 70):
Press the or buttons to select the Fall-back Noise setting.
2. Adjusting the Fall-back Noise volume
Settings
Press the or buttons to increase or decrease the volume of
the Fall-back Noise setting.
* The Fall-back Noise volume be adjusted within the range of
O , 1 - 10, with higher values resulting in a louder e ect.
* To reset the Fall-back Noise setting to the default value, press the
FUNCTION button (RESET).
* Any changes made to the Fall-back Noise setting will remain until the
power is turned o .
3. Exiting the Fall-back Noise setting
Press the FUNCTION button (BACK) to exit the Fall-back Noise
setting and return to the Function Menus screen.
78
Page 79

8
. Hammer Delay
When playing pianissimo passages using an acoustic piano, there may be a perceived delay between a key being
pressed and the hammer striking the strings.
If desired, the AnyTimeX2 piano can recreate this delay, with the Hammer Delay setting allowing the delay length
to be adjusted.
* This Virtual Technician setting will a ect acoustic piano sounds only.
1. Selecting the Hammer Delay setting
After entering the Virtual Technician menu (page 70):
Press the or buttons to select the Hammer Delay setting.
2. Adjusting the Hammer Delay value
Press the or buttons to increase or decrease the value of
the Hammer Delay setting.
* The Hammer Delay value can be adjusted within the range of
O , 1 - 10, with higher values resulting in an increased delay.
* To reset the Hammer Delay setting to the default value, press the
FUNCTION button (RESET).
* Any changes made to the Hammer Delay setting will remain until the
power is turned o .
3. Exiting the Hammer Delay setting
Press the FUNCTION button (BACK) to exit the Hammer Delay
setting and return to the Function Menus screen.
Settings
79
Page 80

Virtual Technician Settings
9
. Topboard
When playing an acoustic grand piano, the position of the instrument’s topboard (lid) a ects both the volume and
‘openness’ of the tone produced. A fully open topboard allows sound waves to re ect o the polished lid surface
and project into the room, while a closed lid has the opposite e ect, resulting in a darker, more opaque tone.
The AnyTimeX2 piano attempts to simulate these characteristics, with four di erent topboard positions.
* This Virtual Technician setting will a ect acoustic piano sounds only.
Topboard posi tions
Topboard position Description
Open 3 (default) Simulates the character of a fully open topboard.
Open 2 Simulates the character of a half open topboard.
Open 1 Simulates the character of a partially open topboard.
Closed Simulates the character of a closed topboard.
Settings
1. Selecting the Topboard setting
After entering the Virtual Technician menu (page 70):
Press the or buttons to select the Topboard setting.
2. Changing the Topboard position
Press the or buttons to cycle through the di erent
Topboard types.
* To reset the Topboard setting to the default position, press the
FUNCTION button (RESET).
* Any changes made to the Topboard setting will remain until the
power is turned o .
3. Exiting the Topboard setting
Press the FUNCTION button (BACK) to exit the Topboard
setting and return to the Function Menus screen.
80
Page 81

10
. Decay Time
When playing an acoustic grand piano, the length of the instrument in uences the speed at which held notes decay,
with longer grand pianos (i.e. longer strings) characterised by longer decay times.
The AnyTimeX2 piano attempts to simulate this characteristic, with the Decay Time setting allowing the length of
decay while keys are pressed to be adjusted.
* This Virtual Technician setting will a ect all sounds.
1. Selecting the Decay Time setting
After entering the Virtual Technician menu (page 70):
Press the or buttons to select the Decay Time setting.
2. Adjusting the Decay Time volume
Press the or buttons to increase or decrease the value of
the Decay Time setting.
* The Decay Time value can be adjusted within the range of
1 - 10, with larger values resulting in increased decay times.
* To reset the Decay Time setting to the default value, press the
FUNCTION button (RESET).
* Any changes made to the Decay Time setting will remain until the
power is turned o .
3. Exiting the Decay Time setting
Press the FUNCTION button (BACK) to exit the Decay Time
setting and return to the Function Menus screen.
Settings
81
Page 82

Virtual Technician Settings
11
. Minimum Touch
The Minimum Touch setting allows the minimum key velocity required to produce a sound to be adjusted. By
default, this setting attempts to recreate the extremely ne touch sensitivity of a concert grand piano, allowing
a very soft sound to be produced with the slightest of key touches. However, it may be desirable to reduce this
sensitivity, when wishing to recreate the sensitivity of a small grand piano or an upright piano.
* This Virtual Technician setting will a ect acoustic piano and electric piano sounds.
1. Selecting the Minimum Touch setting
After entering the Virtual Technician menu (page 70):
Press the or buttons to select the Minimum Touch setting.
2. Adjusting the Minimum Touch value
Press the or buttons to increase or decrease the value of
the Minimum Touch setting.
* The Minimum Touch value can be adjusted within the range of
1 - 20, with larger values resulting in a less sensitive key touch.
* To reset the Minimum Touch setting to the default value, press the
FUNCTION button (RESET).
* Any changes made to the Minimum Touch setting will remain until
the power is turned o .
Settings
3. Exiting the Minimum Touch setting
Press the FUNCTION button (BACK) to exit the Minimum
Touch setting and return to the Function Menus screen.
82
Page 83

12
. Stretch Tuning
Stretch tuning is a piano-speci c tuning method in which the tuning for the lower notes is slightly lower and the
tuning for the higher notes is slightly higher than the settings made in the Equal temperament.
The Stretch Tuning setting allows the degree of stretch tuning to be adjusted when Equal (piano) or Equal
temperament are selected. It is also possible to create custom tuning methods using one of the four User types.
* This Virtual Technician setting will a ect all sounds.
Stretch Tuning setting
Stretch Tuning Description
Normal (default) Normal stretch tuning.
Wide Wide stretch tuning.
User 1-4 User de ned tuning methods.
1. Selecting the Stretch Tuning setting
After entering the Virtual Technician menu (page 70):
Press the or buttons to select the Stretch Tuning setting.
2. Changing the Stretch Tuning type
Press the or buttons to alternate between ‘Normal’ and
‘Wide’ Stretch Tuning settings.
* To reset the Stretch Tuning setting to the default type, press the
FUNCTION button (RESET).
* Any changes made to the Stretch Tuning setting will remain until the
power is turned o .
3. Exiting the Stretch Tuning setting
Press the FUNCTION button (BACK) to exit the Stretch Tuning
setting and return to the Function Menus screen.
Settings
83
Page 84

Virtual Technician Settings
User Tuning
The User Tuning function allows each of the 88-keys to be tuned individually.
1. Selecting the User Tuning memory
After selecting the Stretch Tuning setting (page 83):
Press the or buttons to select one of the User Tuning
memories.
* Up to four di erent User Tuning memories can be created and stored.
Press the FUNCTION button (EDIT).
The User Tuning screen will be shown in the LCD display.
2. Selecting the note, adjusting the user tuning value
Settings
Press the or buttons to select the desired note to be
adjusted.
* To select a note directly, press and hold the FUNCTION button
(+ KEY) then press the desired key.
Press the or buttons to adjust the user tuning value for the
selected note.
* The User Tuning value can be adjusted within the range of –50 - +50.
* To reset the User Tuning setting to the default value, press the
FUNCTION button (RESET).
* Any changes made to the User Tuning setting will remain until the
power is turned o .
3. Exiting the User Tuning function
Press the FUNCTION button (BACK) to exit the User Tuning
tuning screen and return to the Stretch Tuning setting.
84
Page 85

13
. Temperament
The Temperament setting allows the tuning system used by the AnyTimeX2 piano to be changed from the modern
‘Equal Temperament’ standard to one of the various temperaments popularised during the Renaissance and
Baroque periods. It is also possible to create customised temperaments using the User Temperaments function.
* This Virtual Technician setting will a ect all sounds.
Temperament types
Temperament type Description
Equal Temperament (piano)
(Equal P.only)
Pure Temperament
(Pure Major/Pure Minor)
Pythagorean Temperament
(Pythagorean)
Meantone Temperament
(Meantone)
Werckmeister III Temperament
(Werkmeister)
Kirnberger III Temperament
(Kirnberger)
Equal Temperament ( at)
(Equal Flat)
Equal Temperament
(Equal Stretch)
User Temperament
(User)
This is the default temperament. When a piano sound is selected, the tuning will be stretched like an
acoustic piano (equal temperament).
* If any other type of sound is selected, the tuning will be set to equal temperament ( at).
This temperament, which eliminates dissonances for thirds and fths, is still popular in choral music
because of its perfect harmony. Any key modulation will result in dissonances.
* The key of the temperament, and major/minor setting must be correctly matched.
This temperament, which uses mathematical ratios to eliminate dissonance for fths, is very limited for
use with chords, but produces very characteristic melodic lines.
This temperament, which uses a mean between a major and minor whole tone to eliminate dissonance
for thirds, was devised to eliminate the lack of consonances experienced with certain fths for the
Mersenne pure temperament.
It produces chords that are more beautiful than those played with equal temperament.
These two temperaments are placed in between Meantone and Pythagorean. For music with few
accidentals, this temperament produces the beautiful chords of the mean tone, but as accidentals
increase, the temperament produces the characteristic melodies of the Pythagorean temperament.
It is used primarily for classical music written in the Baroque era to revive the original characteristics.
This is an ‘unstretched’ equal temp erament that divides the scale into twelve equal s emi-tones. It produces
the same chordal intervals in all twelve keys, and has the advantage of limitless modulation of the key.
However the tonality of each key becomes less characteristic and no chord is in pure consonance.
This is the most popular piano temperament. The hearing ability of a human is uneven and is not as
accurate with high frequency and low frequency as it is with the middle range. This temperament’s
tuning is stretched to compensate for this so the sound will be heard naturally to the ears. This
‘stretched’ equal temperament is a practical variation of the ‘unstretched’ equal temperament which
was invented on a mathematical basis.
A custom, user temperament, created by raising or lowering the pitch for each semi-tone.
1. Selecting the Temperament setting
After entering the Virtual Technician menu (page 70):
Press the or buttons to select the Temperament setting.
2. Changing the Temperament type
Press the or buttons to cycle through the di erent
Temperament types.
* To reset the Temperament setting to the default type, press the
FUNCTION button (RESET).
* Any changes made to the Temperament setting will remain until the
power is turned o .
Settings
85
Page 86

Virtual Technician Settings
User Temperament
The User Temperament setting allows custom temperaments to be created.
1. Selecting the User Temperament
After selecting the Temperament setting (page 85):
Press the or buttons to select the User temperament, then
press the FUNCTION button (EDIT).
The User Temperament screen will be shown in the LCD display.
2. Selecting the note, adjusting the user temperament value
Press the or buttons to select the desired note to be
adjusted.
Press the or buttons to adjust the cent value for the selected
note.
* The User Temperament value can be adjusted within the range of
–50 - +50.
* To reset the User Temperament setting to the default value, press the
FUNCTION button (RESET).
* Any changes made to the User Temperament setting will remain until
the power is turned o .
3. Exiting the User Temperament function
Press the FUNCTION button (BACK) to exit the User
Temperament screen and return to the Temperament setting.
Settings
86
Page 87

14
. Temperament Key
The Temperament Key setting allows the key of the selected temperament to be speci ed. When using a
temperament other than Equal temperament, use this setting to specify the key signature of the piece.
* This Virtual Technician setting will a ect all sounds.
1. Selecting the Temperament Key setting
After entering the Virtual Technician menu (page 70):
Press the or buttons to select the Temperament Key setting.
2. Adjusting the Temperament Key
After selecting a temperament other than Equal (piano) or Equal
temperament types (page 85):
Press the or buttons to change the Temperament Key.
* The Temperament Key can be set within the range of C to B.
* To reset the Temperament Key setting to the default key, press the
FUNCTION button (RESET).
* Any changes made to the Temperament Key setting will remain until
the power is turned o .
3. Exiting the Temperament Key setting
Press the FUNCTION button (BACK) to exit the Temperament
Key setting and return to the Function Menus screen.
Settings
87
Page 88

Virtual Technician Settings
15
. User Key Volume
The User Key Volume settings allows the volume of each of the 88-keys to be adjusted individually.
* This Virtual Technician setting will a ect all sounds.
1. Selecting the User Key Volume setting
After entering the Virtual Technician menu (page 70):
Press the or buttons to select the User Key Volume setting.
2. Selecting the User Key Volume memory
Press the or buttons to select one of the User Key Volume
memories.
* Up to four di erent User Key Volume memories can be created and
stored.
Settings
Press the FUNCTION button (EDIT).
The User Key Volume adjustment screen will be shown in the
LCD display.
2. Selecting the note, adjusting the User Key Volume
Press the or buttons to select the desired note to be
adjusted.
* To select a note directly, press and hold the FUNCTION button
(+ KEY) then press the desired key.
Press the or buttons to adjust the User Key Volume for the
selected note.
* The User Key Volume value can be adjusted within the range of
–50 - +50.
* To reset the User Key Volume setting to the default value, press the
FUNCTION button (RESET).
* Any changes made to the User Key Volume setting will remain until
the power is turned o .
3. Exiting the User Key Volume function
Press the FU NC TI ON bu tt on (B AC K) to ex it th e Us er Ke y V ol um e
adjustment screen and return to the User Key Volume setting.
88
Page 89

16
. Half-Pedal Adjust
The Half-Pedal Adjust setting allows the point at which the damper/sustain pedal becomes e ective (i.e. when
the dampers of the piano begin to lift from the strings) to be adjusted. This setting may be useful for pianists that
habitually rest their right foot on the damper/sustain pedal, but do not necessarily wish to sustain the sound.
* This Virtual Technician setting will a ect all sounds.
1. Selecting the Half-Pedal Adjust setting
After entering the Virtual Technician menu (page 70):
Press the or buttons to select the Half-Pedal Adjust
setting.
2. Adjusting the Half-Pedal Adjust value
Press the or buttons to increase or decrease the value of
the Half-Pedal Adjust setting.
* The Half-Pedal Adjust value can be adjusted within the range of
1 - 10, with higher values resulting in a later damper pedal point.
* To reset the Half-Pedal Adjust setting to the default value, press the
FUNCTION button (RESET).
* Any changes made to the Half-Pedal Adjust setting will remain until
the power is turned o .
3. Exiting the Half-Pedal Adjust setting
Press the FUNCTION button (BACK) to exit the Half-pedal
Point setting and return to the Function Menus screen.
Settings
89
Page 90

Virtual Technician Settings
17
. Soft Pedal Depth
The Soft Pedal Depth setting adjusts the e ectiveness (i.e. depth/strength) of the soft pedal.
* This Virtual Technician setting will a ect all sounds.
1. Selecting the Soft Pedal Depth setting
After entering the Virtual Technician menu (page 70):
Press the or buttons to select the Soft Pedal Depth setting.
2. Adjusting the Soft Pedal Depth value
Press the or buttons to increase or decrease the value of
the Soft Pedal Depth setting.
* The Soft Pedal Depth value can be adjusted within the range of
1 - 10, with higher values resulting in a softer sound.
* To reset the Soft Pedal Depth setting to the default value, press the
FUNCTION button (RESET).
* Any changes made to the Soft Pedal Depth setting will remain until
the power is turned o .
Settings
3. Exiting the Soft Pedal Depth setting
Press the FUNCTION button (BACK) to exit the Soft Pedal
Depth setting and return to the Function Menus screen.
90
Page 91

MIDI Settings
MIDI Overview
The term MIDI is an acronym for Musical Instrument Digital Interface, an international standard for connecting
musical instruments, computers, and other devices to allow the exchange of performance data.
MIDI Terminals
MIDI terminal Function
MIDI IN Receiving note, program change, and other data.
MIDI OUT Sending note, program change, and other data.
MIDI channels
MIDI uses channels to exchange data back and forth between MIDI devices. There are receive (MIDI IN) and transmit (MIDI OUT)
channels. Most musical instruments or devices with MIDI functions are equipped with both MIDI IN and OUT jacks and are capable of
transmitting and receiving data via MIDI. The receive channels are used to receive data from another MIDI device, and the transmit
channels are used to transmit data to another MIDI device.
The illustration below shows three musical instruments, connected together using MIDI.
Transmit ting instrument a Receiving instrument b Receiving instrument c
Transmitting instrument a sends transmit channel and keyboard information to receiving instruments b/c.
The information arrives at the receiving instruments b/c.
Receiving instruments b/c will respond to MIDI data that is sent if their receive channel is the same as the transmit channel of the
transmitting instrument a. If the channels do not match, the receiving instruments b/c will not respond to any data that is sent.
For both receiving and transmitting, channels 1-16 can be used.
Recording/playing with a sequencer
When connected to a sequencer (or a computer running MIDI
sequencing software), the AnyTimeX2 piano can be used to
record and playback multi-track songs, with separate sounds
playing simultaneously on each channel.
Settings
Sequencer
91
Page 92

MIDI Settings
MIDI Functions
The AnyTimeX2 piano supports the following MIDI functions:
Transmit/receive note information
Transmit/receive note information to/from a MIDI-connected
musical instrument or device.
Transmit/receive channel settings
Specify transmit/receive channels within the range of 1 to 16.
Transmit/receive exclusive data
Transmit/receive front panel or menu function settings as
exclusive data.
Multi-timbral mode setting
Receive multiple channel MIDI data from a MIDI-connected
musical instrument or device.
MIDI Settings
No. Setting Description Default setting
Transmit/receive program change information
Transmit/receive program change data to/from a MIDIconnected musical instrument or device.
Transmit/receive pedal data
Transmit/receive sustain, sostenuto, and soft pedal data to/
from a MIDI-connected musical instrument or device.
Receive volume data
Receive MIDI volume data sent from a MIDI-connected
musical instrument or device.
* Please refer to the ‘MIDI Implementation Chart’ on page 118 for
further information regarding the MIDI capabilities of the AnyTimeX2
piano.
Settings
1 MIDI Channel Specify the channel that is used to transmit/receive MIDI information. 1
2 Send PGM Change # Send a MIDI program change number from 1 to 128. 1
3 Local Control Specify whether internal sounds will be heard when the keyboard is pressed. On
4 Trans. PGM Change Specify whether program change data is sent when sounds are changed. On
5 Multi-timbral Mode Specify whether the instrument can receive Multi-timbral MIDI information. O
6 Channel Mute Specify which channels (1-16) are activated to receive MIDI information. Play All
* Default settings will be shown in the rst LCD display illustration (i.e. Step 1) for each setting explanation below.
Entering the MIDI Settings menu
While the normal playing mode screen is shown in the LCD display:
Press the
The Function Menus screen will be shown in the LCD display.
Press the or buttons to select the MIDI Settings menu.
FUNCTION button (MENU).
Selecting and adjusting the desired setting
After entering the MIDI Settings menu:
Press the or buttons to move the selection cursor over the
desired setting.
Press the or buttons to adjust the selected setting.
* To reset the current settin g to the default value, press the FUN CTION
button (RESET).
Press the FUNCTION button (ENTER) to enter the MIDI Settings
menu.
92
Page 93

1
. MIDI Channel
The MIDI Channel setting allows the transmit/receive channel to be speci ed. The selected channel will function as
both the transmit and receive channel (separate transmit/receive channels cannot be speci ed).
1. Selecting the MIDI Channel setting
After entering the MIDI Settings menu (page 92):
Press the or buttons to select the MIDI Channel setting.
2. Changing the MIDI Channel value
Press the or buttons to increase or decrease the value of
the MIDI Channel setting.
* The MIDI Channel value can be adjusted within the range of 1 - 16.
* To reset the MIDI Channel setting to the default value, press the
FUNCTION button (RESET).
* Any changes made to the MIDI Channel setting will remain until the
power is turned o .
3. Exiting the MIDI Channel setting
Press the FUNCTION button (BACK) to exit the MIDI Channel
setting and return to the Function Menus screen.
Omni mode
When the AnyTimeX2 piano is turned on, the instrument is automatically set to ‘omni mode on’, allowing MIDI information to be
received on all MIDI channels (1-16). When the MIDI Channel setting is used to specify a transmit/receive channel, the instrument
will be set to ‘omni mode o ’.
Multi-timbral mode and Split/Dual modes
Using Split mode with Multi-timbral mode enabled
Notes played in the lower section of the keyboard will be
transmitted on the channel that is 1 channel higher than the
speci ed channel. For example, if the MIDI channel is set to
3, notes played in the lower section of the keyboard will be
transmitted on channel 4.
Using Dual mode with Multi-timbral mode enabled
Notes played will be transmitted on two channels: the
speci ed channel and the channel that is 1 channel higher.
For example, if the MIDI channel is set to 3, notes played on
the keyboard will be transmitted on channels 3 and 4.
Settings
* If the speci ed MIDI channel is 16, the lower section / layered part will be transmitted on channel 1.
93
Page 94
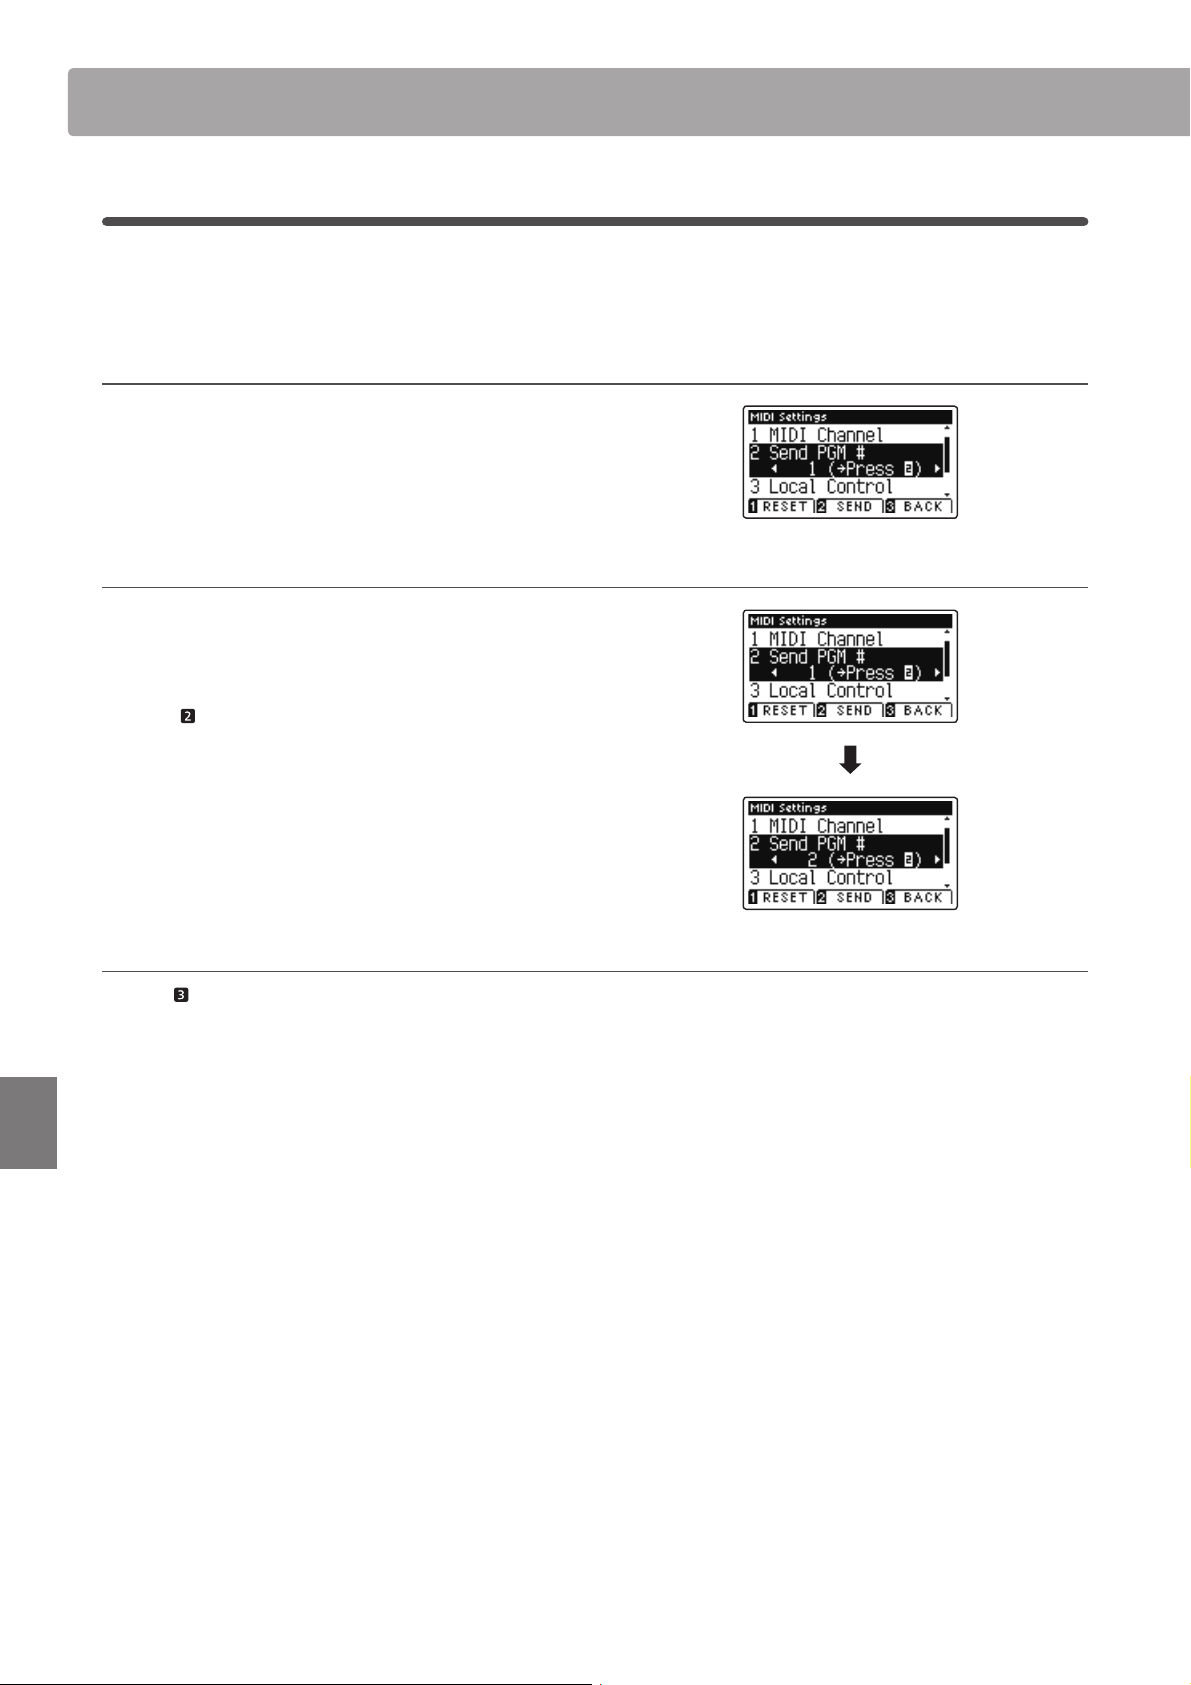
MIDI Settings
2
. Send Program Change Number
The Send Program Change Number function is used to send a Program Change Number (1-128) to the connected
MIDI device.
1. Selecting the Send Program Change Number function
After entering the MIDI Settings menu (page 92):
Press the or buttons to select the Send Program Change
Number function.
2. Specifying and transmitting a Program Change Number
Press the or buttons to decrease or increase the Program
Change Number.
* The program change number can be set within the range of 1-128.
Settings
Press the FUNCTION button (SEND) to send the speci ed
Program Change Number.
3. Exiting the Send Program Change Number function
Press the FUNCTION button (BACK) to exit the Send Program
Change Number function and return to the Function Menus
screen.
94
Page 95

3
. Local Control
The Local Control setting determines whether the instrument will play an internal sound when the keys are pressed.
This setting may be useful when using the AnyTimeX2 piano to control an external MIDI device that is connected to
the instrument’s ampli er/speakers.
Local Control setting
Local Control Description
O The instrument will transmit information to an external MIDI device only.
(default) The instrument will play an internal sound and transmit information to an external MIDI device.
On
1. Selecting the Local Control setting
After entering the MIDI Settings menu (page 92):
Press the or buttons to select the Local Control setting.
2. Changing the Local Control setting
Press the or buttons to turn the Local Control setting on
or o .
* To reset the Local Control setting to the default setting, press the
FUNCTION button (RESET).
* Any changes made to the Local Control setting will remain until the
power is turned o .
3. Exiting the Local Control setting
Press the FUNCTION button (BACK) to exit the Local Control
setting and return to the Function Menus screen.
Settings
95
Page 96

MIDI Settings
4
. Transmit Program Change Numbers
The Transmit Program Change Numbers setting determines whether the AnyTimeX2 piano will transmit program
change information via MIDI when the instrument’s panel buttons are pressed.
Transmit Program Change Numbers setting
Transmit PGM# Multi-timbral setting E ect of pressing panel buttons
On (default) O , On1 SOUND buttons will send PGM# shown in the left column*.
On On2 SOUND buttons will send PGM# shown in the right column*.
O O Program Change information will not be transmitted via MIDI.
* Please refer to the ‘Program Change Number List’ on page 115.
1. Selecting the Transmit Program Change Numbers setting
After entering the MIDI Settings menu (page 92):
Settings
Press the or buttons to selec t the Transmit Program Change
Numbers setting.
2. Changing the Transmit Program Change Numbers setting
Press the or buttons to turn the Transmit Program Change
Numbers setting on or o .
* To reset the Transmit Program Change Numb ers setting to the default
setting, press the FUNCTION button (RESET).
* Any changes made to the Transmit Program Change Numbers setting
will remain until the power is turned o .
3. Exiting the Transmit Program Change Numbers setting
Press the FUNCTION button (BACK) to exit the Transmit
Program Change Numbers setting and return to the Function
Menus screen.
Omni mode
When using Dual or Split mode, On/O information and sound
type settings for are transmitted as exclusive data, however
program change numbers will not be transmitted.
96
Program change numbers will also be transmitted when
Multi-timbral mode is set to On1 or On2.
Page 97

5
. Multi-timbral Mode
The Multi-timbral Mode setting determines whether or not the AnyTimeX2 piano is able to receive MIDI information
on more than one MIDI channel simultaneously. This allows the instrument to play back multi-track, multi-timbral
performance data sent from an external MIDI device.
Multi-timbral Mode setting
Multi-timbral Mode Selected sound
O (default) The sound shown in the left column is selected*.
On1 The sound shown in the left column is selected*.
On2 The sound shown in the right column is selected*.
* Please refer to the ‘Program Change Number List’ on page 115.
1. Selecting the Multi-timbral Mode setting
After entering the MIDI Settings menu (page 92):
Press the or buttons to select the Multi-timbral Mode
setting.
2. Changing the Multi-timbral Mode setting
Press the or buttons to change turn the Multi-timbral
Mode setting.
* To reset the Multi-timbral Mode setting to the default setting, press
the FUNCTION button (RESET).
* Any changes made to the Multi-timbral Mode setting will remain until
the power is turned o .
3. Exiting the Multi-timbral Mode setting
Press the FUNCTION button (BACK) to exit the Multi-timbral
Mode setting and return to the Function Menus screen.
Settings
97
Page 98

MIDI Settings
6
. Channel Mute
The Channel Mute setting determines which MIDI channels (1-16) are activated to receive MIDI information when
Multi-timbral mode is enabled.
* This setting is only available when the Multi-timbral Mode setting is set to ‘On1’ or ‘On2’.
1. Selecting the Channel Mute setting
After entering the MIDI Settings menu (page 92):
Press the or buttons to select the Channel Mute setting.
Press the
The Channel Mute selection screen will be shown in the LCD
display.
FUNCTION button (EDIT).
2. Selecting and playing/muting channels
Press the or buttons to select the desired MIDI channel.
Press the or buttons to alternate between ‘Play’ and ‘Mute’
states.
* To reset the Channel Mute setting to the default value, press the
FUNCTION button (RESET).
* Any changes made to the Channel Mute setting will remain until the
power is turned o .
3. Exiting the Channel Mute function
Settings
98
Press the FUNCTION button (BACK) to exit the Channel Mute
adjustment screen and return to the MIDI Settings menu.
Page 99

USB Menu
The USB Menu contains functions to load/save registration memories and recorder songs from/to a USB memory
device. This menu also allows les to be renamed and deleted, and for the USB memory device to be formatted.
USB Menu functions
No. Function Description
1 Load Song Load a recorder song from a USB memory device into the instrument’s internal memory.
2 Load User Memory Load User Memory settings from a USB memory device into the instrument.
3 Save Internal Song Save a recorder song stored in internal memory to a USB memory device.
4 Save SMF Song Save a recorder song stored in internal memory to a USB memory device as an SMF (MIDI) le.
5 Save User Memory Save the instrument’s current User Memory settings to a USB memory device.
6 Rename File Rename a le stored on a USB memory device.
7 Delete File Delete a le stored on a USB memory device.
8 Format USB Format a USB memory device, erasing all stored data.
Entering the USB Menu menu
While the normal playing mode screen is shown in the LCD display:
Press the
The Function Menus screen will be shown in the LCD display.
Press the or buttons to select the USB Menu.
Press the FUNCTION button (ENTER) to enter the USB Menu.
Selecting the desired USB Menu function
After entering the USB Menu:
Press the or buttons to move the selection cursor over the
desired function.
Press the
FUNCTION button (MENU).
FUNCTION button (ENTER) to select the function.
buttons:
Move selection cursor.
buttons:
Move selection cursor.
Settings
FUNCTION button:
Select function.
99
Page 100

USB Menu
1
. Load Song
The Load Song function is used to load AnyTimeX2 recorder songs stored on a USB memory device into the
instrument’s internal memory.
* This function will overwrite any song data stored in the selected song memory.
* For more information about the instrument’s ‘Internal Song Recorder’ feature, please refer to page 38.
1. Selecting the Load Song function
After entering the USB Menu (page 99):
Press the or buttons to select the Load Song function.
2. Selecting the song memory
Press the or buttons to sele ct the internal song memor y for
the song to be loaded into.
* If a song memory contains song data, a * symbol will be shown.
Settings
Press the FUNCTION button (ENTER).
The le selection screen will be shown in the LCD display, listing
AnyTimeX2 song les stored on the USB memory device.
3. Selecting the song to be loaded
Press the or buttons to move the selection cursor, then
press the
A con rmation message will be shown in the LCD display,
prompting to con rm or cancel the load operation.
FUNCTION button (LOAD) to select the song le.
4. Con rming the load operation
Press the FUNCTION button (YES) to con rm the load
operation, or the
FUNCTION button (NO) to cancel.
5. Exiting the Load Song function
Song has been recorded
Press the FUNCTION button (BACK) to exit the Load Song
function and return to the Function Menus screen.
To play back the loaded song le, please refer to the ‘Playing a Song’
instructions on page 40.
100
 Loading...