

Page 1

1
User Guide for Kata Venus.
GSM/GPRS Digital Mobile Phone
© 2011 SAA Asia Limited. All rights reserved. Kata is a trademark of SAA Asia Limited, registered
in the H.K. and other countries.Other product and company names mentioned herein may be
trademarks of their respective companies.
Page 2

2
Table of content
1. PREFACE....................................................................................................... 6
1.1 INTRODUCTION ........................................................................................... 6
1.2 FOR YOUR SAFETY ..................................................................................... 6
1.3 SECURITY WARNING AND PRECAUTIONS..................................................... 7
1.3.1 General Precautions................................................................... 7
1.3.2 Notice for using mobile phone ................................................. 7
1.3.3 Notice for using battery ............................................................. 9
1.3.4 Charge the mobile phone .......................................................... 9
1.3.5 Cleaning and maintenance...................................................... 10
2. ABOUT YOUR DEVICE ................................................................................11
2.1 AT A GLANCE.............................................................................................11
2.2 SPECIFICATION......................................................................................... 13
2.3 ICON STATUS ............................................................................................ 13
3. GETTING START......................................................................................... 14
3.1 POWER ON / OFF..................................................................................... 14
3.2 INSERT SIM .............................................................................................. 15
3.3 INSERT MICRO-SD .................................................................................... 16
3.4 USE OF TOUCH SCREEN ............................................................................ 16
4. CALL FUNCTIONS...................................................................................... 17
4.1 MAKE A CALL............................................................................................ 17
4.1.1 Domestic Calls .......................................................................... 17
4.1.2 Extension of fixed line telephone........................................... 17
Page 3

3
4.1.3 International call ....................................................................... 18
4.1.4 Dial phone number form list.................................................... 19
4.1.5 Emergency call.......................................................................... 19
4.2 CALL MENU .............................................................................................. 19
4.3 PHONE BOOK ............................................................................................ 20
4.4 MESSAGE ................................................................................................. 22
4.4.1 SMS............................................................................................. 22
4.4.2 MMS ............................................................................................ 27
4.4.3 Chat............................................................................................. 29
4.4.4 E-mail.......................................................................................... 29
4.4.5 Voice mailbox ............................................................................ 32
4.4.6 Cell broadcast ........................................................................... 32
4.5 INCOMING CALL CITY................................................................................. 32
4.6 VIEW THE CALL RECORD ........................................................................... 33
5. SYSTEM SETTING...................................................................................... 35
5.1 PRIMARY SETTING .................................................................................... 35
5.1.1 Mobile phone setting................................................................ 35
5.1.2 Call settings............................................................................... 35
5.1.3 Dual SIM mode setting ............................................................. 38
5.1.4 Touch screen calibration ......................................................... 38
5.1.5 Echo modes & sound effect .................................................... 38
5.1.6 Input methods ........................................................................... 38
5.1.7 Bluetooth ................................................................................... 38
5.2 NETWORKING............................................................................................ 40
5.2.1 Network setting ......................................................................... 40
5.2.2 Network service ........................................................................ 40
Page 4

4
5.3 FILES MANAGEMENT................................................................................. 43
5.4 ENTERTAINMENT AND GAMES .................................................................... 43
5.4.1 Games ........................................................................................ 43
5.4.2 Java Games ............................................................................... 44
5.4.3 Java Programs .......................................................................... 44
5.4.4 Java setting ............................................................................... 45
5.5 ACCELERATION TRANSDUCER SETTINGS ................................................... 46
5.6 MEMORY CARD ......................................................................................... 47
5.7 SECURITY SETTING ................................................................................... 48
5.8 UNLOCK SIM CARD................................................................................... 51
5.9 UNLOCK THE MOBILE PHONE..................................................................... 51
6. ENTERTAINMENT ....................................................................................... 53
6.1 CAMERA ................................................................................................... 53
6.2 IMAGE FUNCTION ...................................................................................... 53
6.2.1 Album ......................................................................................... 53
6.2.2 Photo editor ............................................................................... 54
6.3 VIDEO FUNCTIONS..................................................................................... 54
6.3.1 Video player ............................................................................... 54
6.3.2 Video recorder........................................................................... 55
6.4 AUDIO FUNCTIONS .................................................................................... 55
6.4.1 Music player .............................................................................. 55
6.4.2 Recorder .................................................................................... 57
6.5 BROADCASTING........................................................................................ 57
6.5.1 Mobile TV ................................................................................... 57
6.5.2 FM Radio & Schedule FM record ............................................ 58
6.6 ELECTRONIC BOOK................................................................................... 58
Page 5

5
6.7 NETWORK SERVICE................................................................................... 60
6.7.1 STK Service ............................................................................... 60
6.7.2 WAP ............................................................................................ 60
6.7.3 Data account.............................................................................. 61
6.7.4 Wireless LAN Network ............................................................. 61
6.7.5 Connection Management......................................................... 62
7. ACCESSORIES TOOLS & ADDITIONAL FUNCTIONS............................ 63
7.1 CALCULATOR............................................................................................ 63
7.2 UNITS CONVERSION.................................................................................. 63
7.3 CONVERSION OF EXCHANGE RATE ............................................................ 64
7.4 ANSWERING MACHINE ............................................................................... 64
7.5 CALENDAR................................................................................................ 64
7.6 TASKS....................................................................................................... 65
7.7 ALARMS.................................................................................................... 65
7.8 UNIVERSAL TIME ....................................................................................... 65
7.9 STOPWATCH ............................................................................................. 65
8. FAQ............................................................................................................... 66
Page 6

6
1. Preface
1.1 Introduction
Thank you for choosing Kata Venus Mobile Phone brought to
you by SAA Limited. You can fully understand the usage of this
mobile phone and enjoy the sound functions and simple operation
ways by reading this manual.
This manual specifies the excellent performance of model
Kata Venus. Besides basic call functions, it also provides you with
numerous practical functions and services which makes it
convenient for your work and entertainment.
This color-screen mobile phone complies with GSM/GPRS
technical specifications and has been certified by domestic and
overseas authorities.
Some service and functions described depend on the network
and subscribed services. Therefore not all menus in the phone are
available, and shortcut numbers of menus and functions may be
different due to different phones.
SAA Limited reserves the rights to modify the contents herein
without otherwise notify the users in advance.
1.2 For your safety
If your cell phone is lost or stolen, please notify the Telecom
service center or distributor to suspend the use of your
phone and SIM Card by others for fear of the economic
damages caused by making phone calls in your name by
others.
Your IMEI Code which showed on the sign of the back of the
cell phone (remove your battery and find it) shall be provided
to the Telecom service centre or distributor when contacting
with them. Please copy and save the number for future use.
For fear of your cell phone being misused, please take these
measures:
- Set your PIN Code for SIM Card properly and revise it in
time when known by other people.
- Please don’t put your phone in the place where is easy to
be found when leaving your car. Had better take along
Page 7

7
with you or lock it in your suitcase.
- Set call barring.
1.3 Security warning and Precautions
Please carefully read these precautions before use in order to use the
mobile phone securely.
1.3.1 General Precautions
Please only use the battery and charger designated by SAA
Limited as the use of other products may cause battery
leakage, overheating, blowout or fire.
Please don’t strike, shake or throw your mobile phone
violently in fear of causing troubles to your mobile phone
and fire burning.
Never put the battery, mobile phone and charger into the
microwave oven or high pressure equipment, or it may
cause the accidents like circuit damage and fire, etc.
Please don’t use your mobile phone in the areas where
flammable and explosive gases existed, or it may cause
troubles to your mobile phone and fire burning.
Please don’t disclose your mobile phone under
high-temperature, high-moisture or somewhere dust
congested, or it may cause troubles to the mobile phone.
Put the mobile phone out of reach of children to prevent
them playing the phone as a toy and cause personal injury.
Please don’t put your mobile phone over the place where is
uneven or unstable for fear of the troubles or damages to
the mobile phone.
1.3.2 Notice for using mobile phone
Please power off in the occasions when the use of mobile
phone is forbidden, like on plan and in the hospital, etc. as
the mobile phone may impact the normal operation of
electronic equipment and medical apparatus, so please
observe the relative regulations in these places. The mobile
Page 8

8
phone is equipped with timed auto power-on function,
please check your clock setting to make sure your mobile
phone will never automatically power on during flight.
Never use the mobile phone in places with weak signals or
near the high fidelity electronic device. Radio interference
may lead to the mal-operation of electronic device and
other issues. Please pay special attention near the
following equipment: hearing aid, pacemaker and other
medical electronic device, fire detector, automatic door and
other auto control device. Please consult with the phone
manufacturer or local dealers for the influence of mobile
phone upon the pacemaker and other medical electronic
device.
Please don’t strike the LCD screen heavily or use it to strike
other things, or the LCD screen may be damaged and the
liquid may leak out. The liquid entering into eyes may cause
the danger of blindness, in this case, never rub your eyes
with hands, just wash with clean water and then go to the
doctor immediately.
Please don’t dismantle or re-equip the mobile phone, or it
may cause damages, electronic leakage and circuit trouble.
In few circumstances, the use of the mobile phone in some
cars may influence some electronic equipment. At this
circumstance, please don’t use the mobile phone for
security.
Please don’t use something with sharp-point such as
needle, pen point to press the keys, or it may cause
damages to the mobile phone or disoperation.
If the antenna is broken, please don’t use the mobile phone,
or it may cause personal injury.
Keep the mobile phone away from the magnetic
substances like mag-cards, etc., as the radiated waves of
mobile phone may clear the information saved on the floppy
disks, bank cards and credit cards.
Keep the earphone of the mobile phone away from
drawing-pin, as when the loudspeaker works, it will become
magnetic which can attract those small metal parts and
may cause personal injury or mobile phone damages.
Page 9

9
Keep the mobile phone dry, as water and other liquid may
cause the phone overheating, creepage and malfunction.
1.3.3 Notice for using battery
Avoid battery short circuit by metals like electric wire and
needles or necklace, as it may cause battery leakage,
overheating, blowout or fire.
The battery liquid entering into eyes may cause the danger
of blindness, in this case, never rub your eyes with hands,
just wash with clean water and then go to the doctor
immediately.
In case of any anomaly of temperature rise, discoloration
and distortion, etc. during battery use, charging or storage,
please stop using it and replace with new battery.
The liquid of the battery splashing to skin or clothing may
cause skin burns, in this case, wash with clean water
immediately or go to the doctor when necessary.
If the battery leaks out liquid or smells awful, please shift it
from open fires to avoid burning up and explosion.
Never make the battery damped, or the battery may be
overheated, burned up and rotted.
Never use or put the battery in places with direct sunshine,
near the car or with high temperature, r it may cause battery
liquid leakage and overheating, and may reduce the
performances and curtail the service life.
Never charge over 24 hours successively.
1.3.4 Charge the mobile phone
Charge the mobile phone in the ventilate place with
temperature at 5℃ to 40℃ above zero and make sure to
use the charger provided by SAA Limited. Use of other
chargers which are not certified may cause danger and
make the warranty services invalid.
Charge the mobile phone with 220V Alternating Current.
Use of other current may cause electronic leakage, fire and
damages to the mobile phone and the charger.
Page 10

10
Please don’t charge in the place with high-humidity like
bathroom, or it may cause an electric shock, fire and
damages to the charger.
1.3.5 Cleaning and maintenance
The mobile phone, battery and charger are not water-proof,
so never use it in the place with high humidity, like
bathroom, etc, and keep it away from rain.
Use soft and dry cloth to wipe the mobile phone, battery
and charger.
Never wipe the mobile phone with the solutions like alcohol,
thinner or benzene.
Please clean the socket periodically, as a grimed socket
would cause bad connection, electric leakage so that it
can’t be charged any more.
Page 11
11
2. About your device
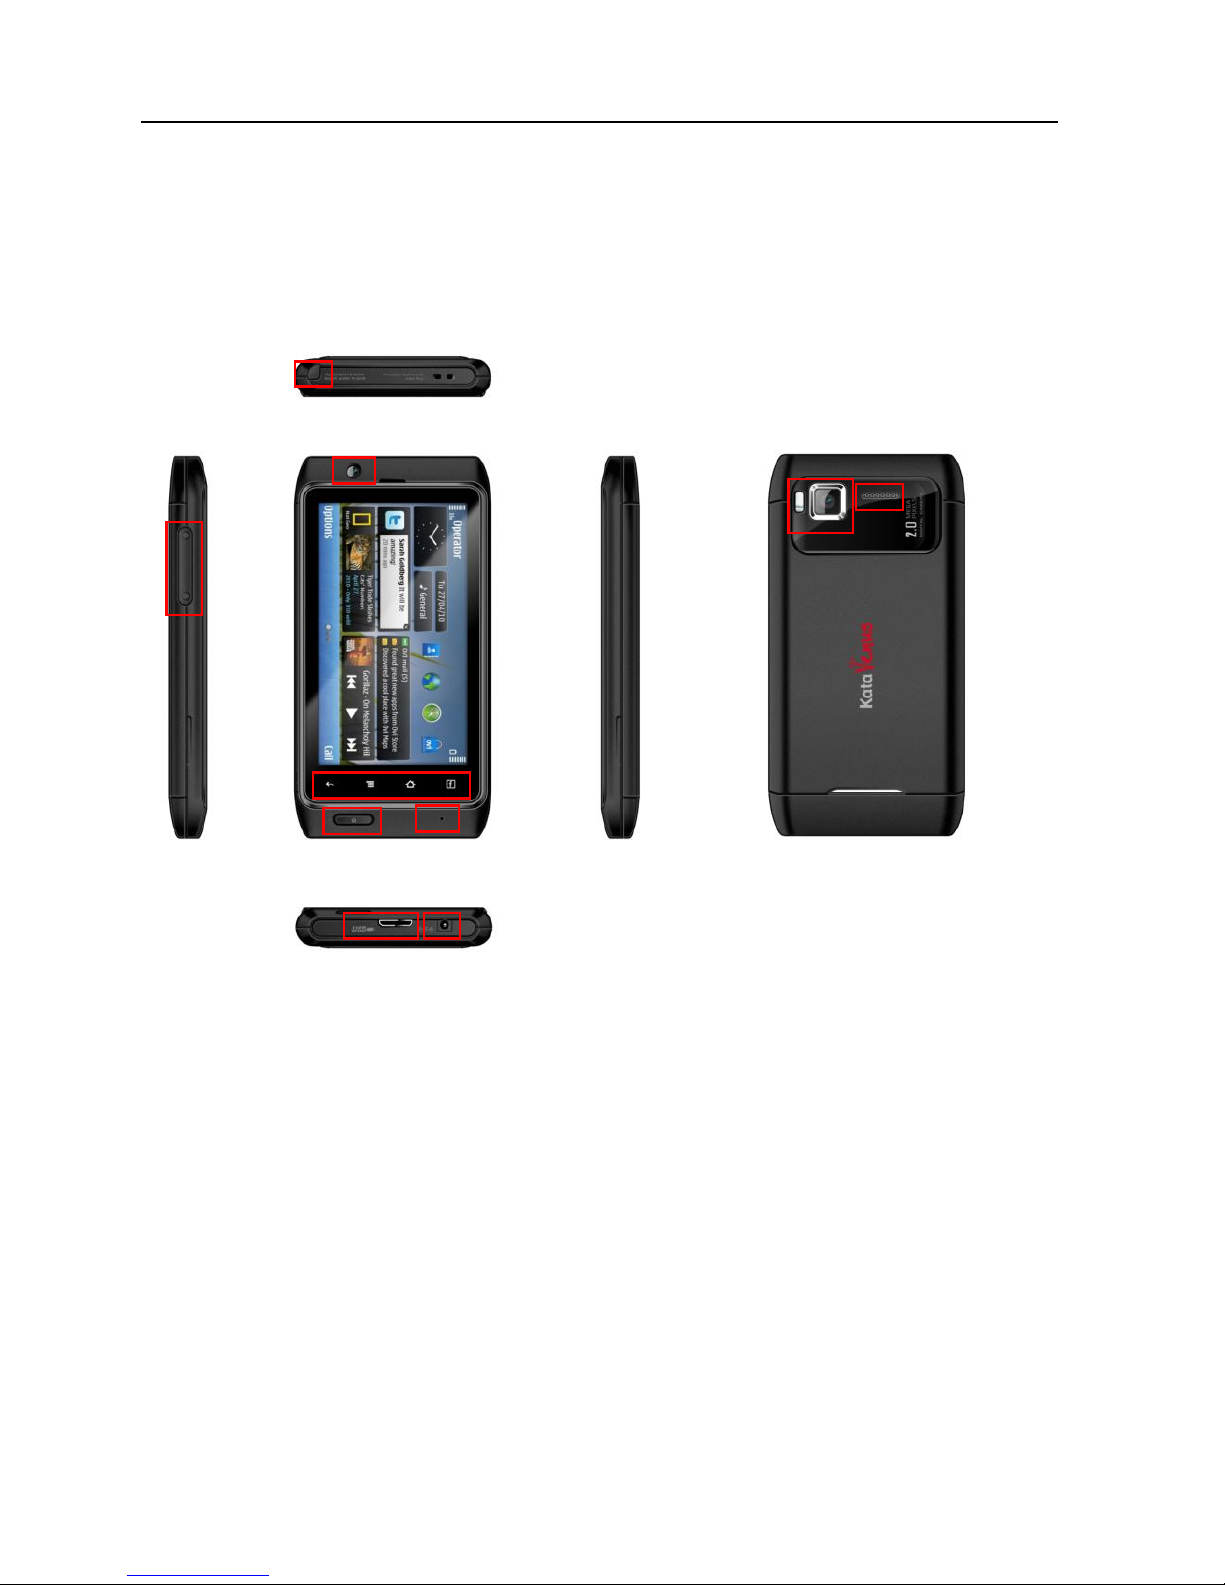
2.1 At a glance
1. Front camera
2. Navigation bar: Back, Menu,
Home, Zoom
3. Power
4. Microphone
5. Volume Control
6. TV antenna
7. USB Connection
8. Power Charger
9. Camera and Flash
10. Speaker
2
3
5
6
7
8
9
10
4
1
Page 12

12
Keys Description
Side volume key Turn it up or down to tune up or down the
volume when talking;
Turn it up or down to tune up or down the
volume in MP3, MP4, FM and TV playing
interface.
Power key
(On-Off key)
On the left bottom of the phone, long press this key
to turn on/off the mobile phone and short press to
lock the phone.
Press the key for one time to unlock the keyboard to
do operations when talking, and press twice to hand
up.
Note: ‘press a key’ in this manual represents pressing the key and then
release it at once; ‘Long press a key’ represents pressing the key for 2
seconds or longer.
The description and some of the functions of the keys mentioned above
depend on specific model.
Page 13
13
2.2 Specification
Host Unit
Model: Kata Venus
Dimensions (115.8mm×61mm ×11.8mm)
Weight: 91.7g
Lithium battery
Model: HiFi780
Nominal voltage: 3.7V
Limited charge voltage: 4.2V
Rated capacity : 900mAh
Continuous standby time: 120 hours
Continuous conversation time: 4-5hours
Travel Charger
Model
Input
2.3 Icon status
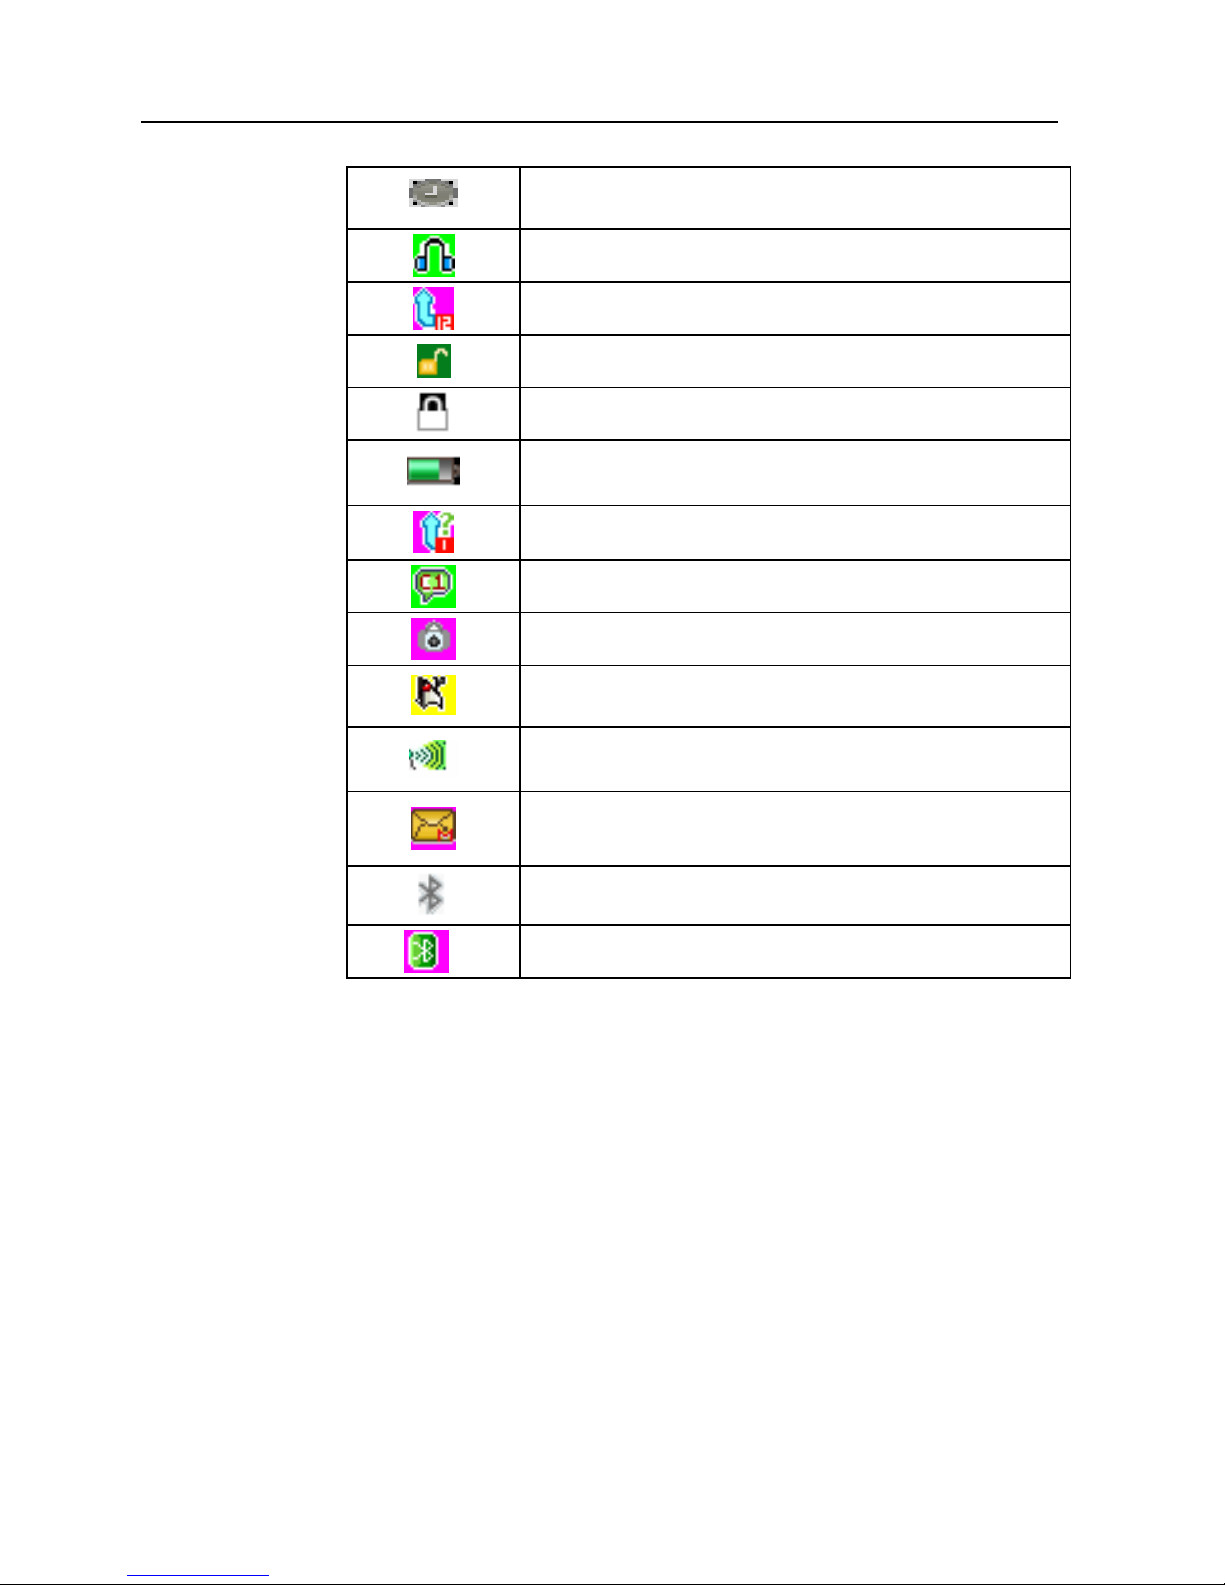
There maybe some small icons appearing in standby interface.
Please refer to the following for detailed description:
Icons Description
Represents the strength of network signal.
Represents that you can use GPRS service.
Enable vibration function.
New SMS.
New MMS.
Page 14
14
Clock is set and activated.
Appear when earphone is inserted.
Call forwarding feature is activated.
Keypad lock is not activated.
Keypad is locked.
Indicates battery level.
Indicates missed calls.
Enable chat function.
Enable multidirectional stopwatch feature.
Turn on JAVA function.
Connect to wireless network.
Receive new service message.
Turn on Bluetooth headset.
Bluetooth Headset pair successfully.
3. Getting start
3.1 Power ON / OFF
Press On/Off key for a longer time to equally power on or off the
mobile phone.
If you have powered on the mobile phone without inserting SIM
Card, the phone will warn you to insert SIM Card. After SIM Card is
inserted, the mobile phone will automatically verify if the SIM Card
is useful.
Page 15
15
And then the following prompts will be displayed on the screen
subsequently:
1) Enter PIN1 --- If you have set the SIM Card code.
2) Enter mobile phone password --- If you have set the
unlock password.
3) Search network --- The mobile will search until the
suitable network is found.
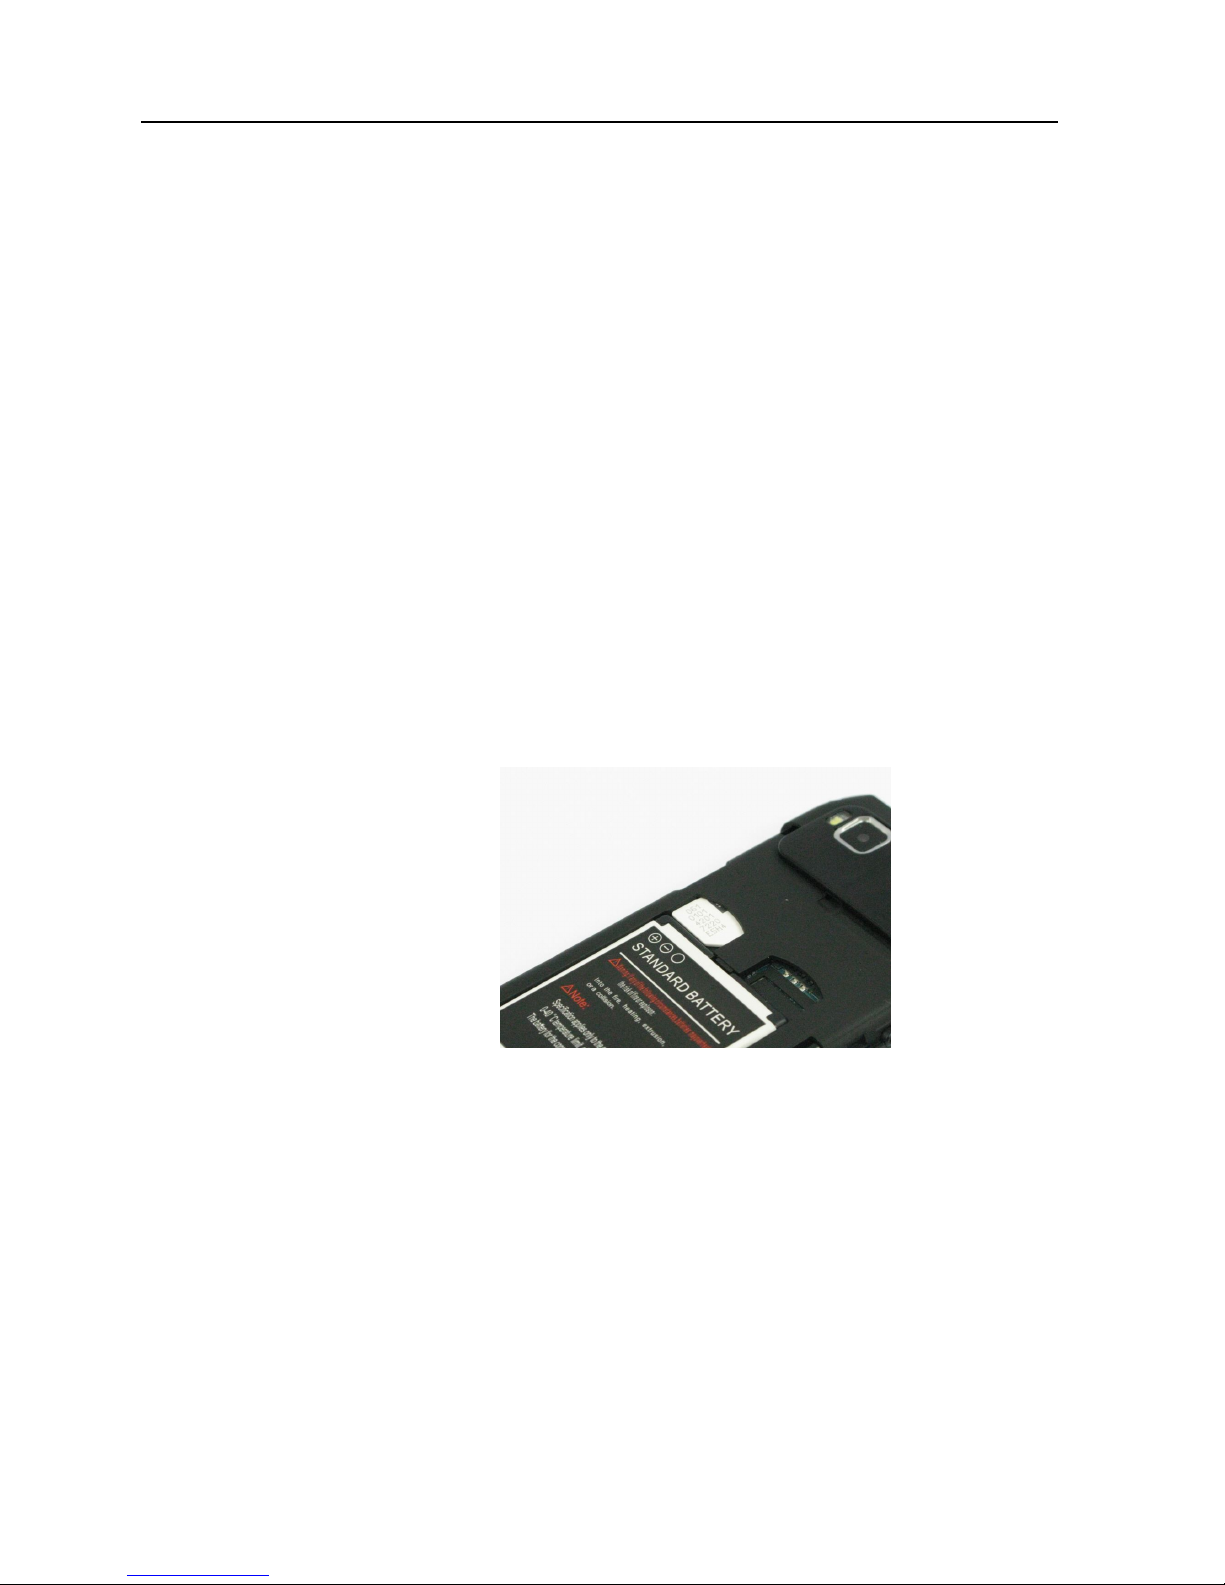
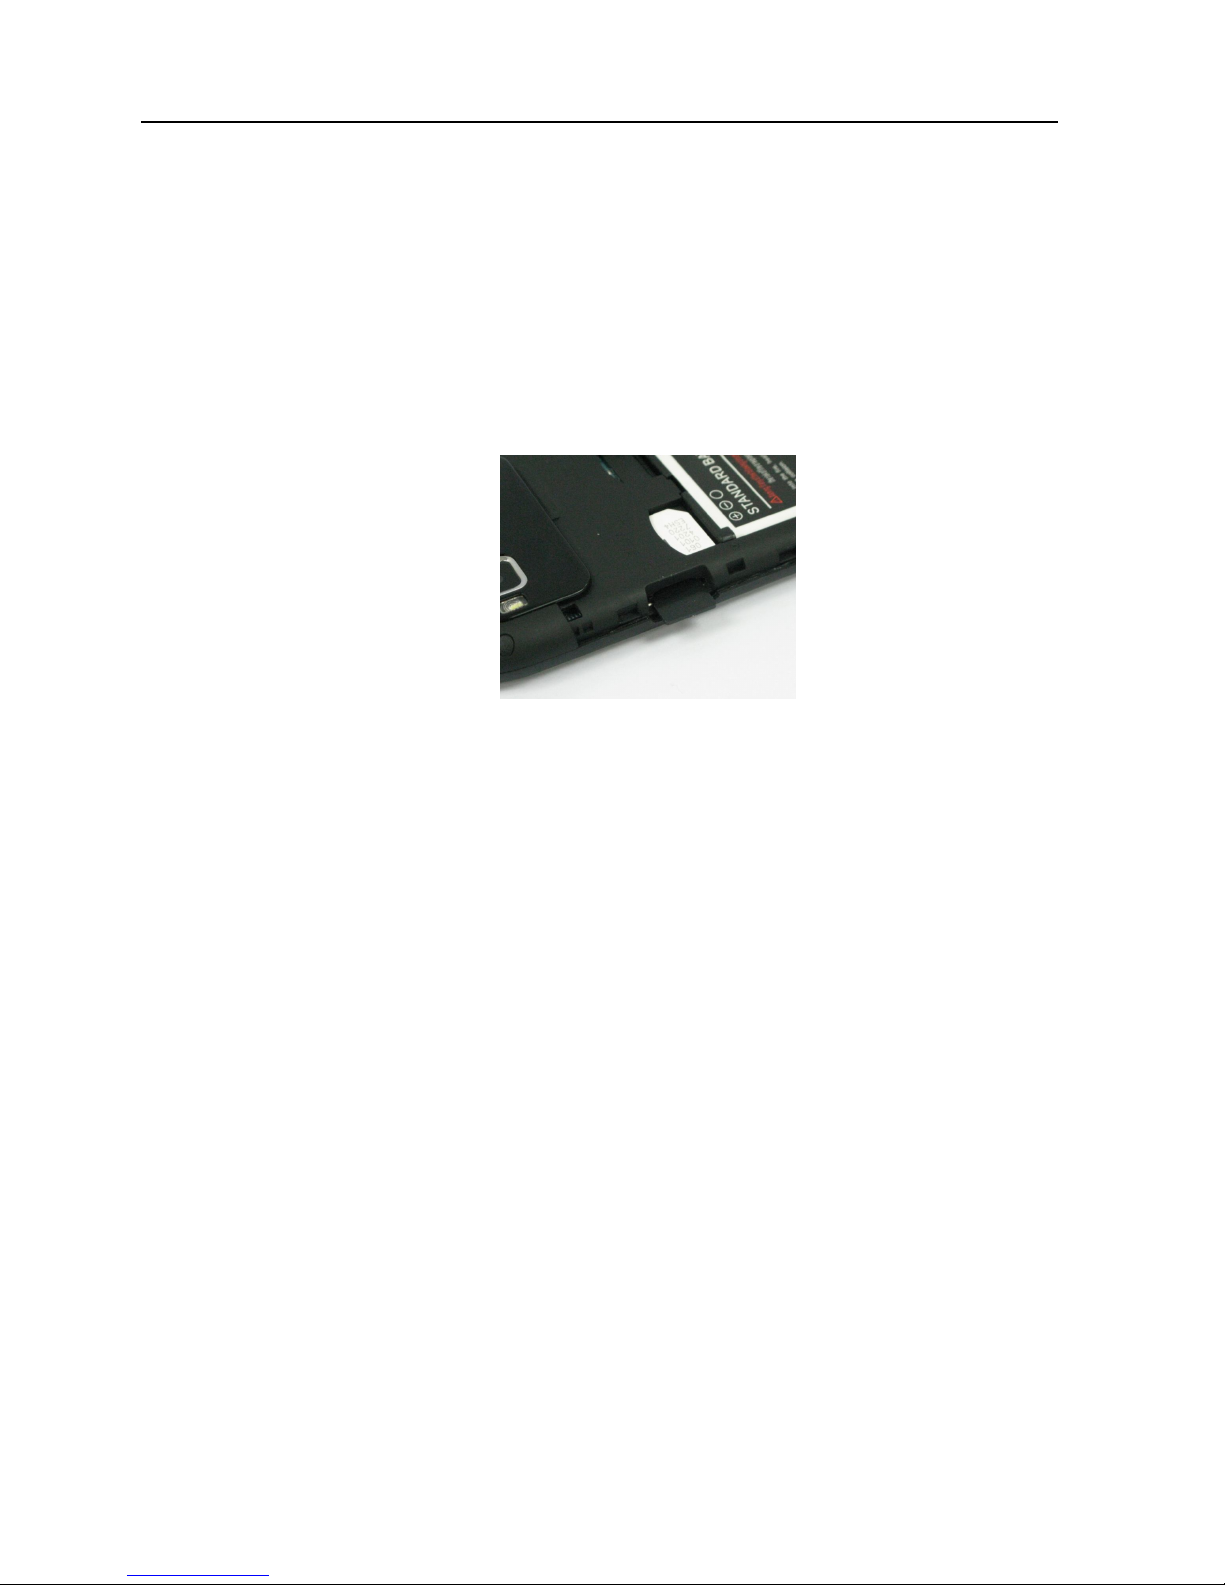
3.2 Insert SIM
1. Remove back cover
2. Remove Battery
3. Insert SIM 1 and SIM 2 (if applicable) (with its gold
contacts facing down and cut-off corner face out) all the
way into the SIM card slots.
Page 16
16
3.3 Insert micro-SD
1. Insert the SIM card (with its gold contacts facing up) all the
way into the SIM card slot.
2. There’s already a micro-SD card in your phone, which is in
the left panel. (Push the micro-SD card in to eject and
remove it. To reinsert, push it in until it clicks into place).
3.4 Use of touch screen
Caution: Please don’t use pen point or other sharp objects to click
or write on the screen in fear of scratch marks.
On the main screen, there are 6 touch keys that can identify
fingertips. Please read ‘touch-screen calibration’ (details see 5.4)
before you use it to ensure you use it properly. Meanwhile, please
follow these instructions:
■ Don’t touch the keys with wet hands.
■ Don’t press the keys forcefully.
■ Don’t use any metal or electricity conducting materials
to touch the keys.
■ When necessary, please reset in the ‘ touch-screen
calibration’to ensure proper identification.
Page 17

17
4. Call functions
4.1 Make a call
When you can check the network provider identities, you can make
or answer calls. The message bar on the left upper corner of
display indicates the network signal strength.
Call quality is impacted by barriers, so just move within small scope
to improve the call quality effectively.
4.1.1 Domestic Calls
Input the telephone numbers with dial pad and then click
Dial key to call. To change the telephone number, just click
Delete key to clear the last character. The display screen
will display the dialing animation during dialing and will
display the call state and information after the called has
answered the call. If the Connected warning tone is turned
on, the warning tone will sound, it shall be supported by
network.
Press Hang-up key to end call after the conversation.
Area Code + Telephone Number + Dial Key
4.1.2 Extension of fixed line telephone
Some extensions of fixed-line telephones cannot be dialed
directly. You can first dial the switch board, and then
extension number. If you insert a pause character “P”
between central exchange number and extension number
upon dialing, this mobile phone will complete the dial for
you and dial the extension automatically. Just press * for a
longer time to input “P” and the display screen will shown
“P”.
Area Code +Switch Board+ P+ Extension No.+ Dial Key
Page 18

18
Example of using the pause character:
For example, if you have voice mailbox information for the
telephone number of 8880000 that is used by dialing, with
the mailbox number of 6666 and password of 8888, then
you can dial as below:
8880000 P 6666 P 8888
The first part of number is used to dial the voice mailbox
system.
When the call is answered, issue 6666 to select the
mailbox.
Before issuing the password of 8888, the second pause
character will be delayed for 5 seconds, the first P indicates
the call waiting and the second P indicates time delay of 5
seconds.
4.1.3 International call
To dial overseas telephone number, just press * key in Dial
Pad interface for a longer time till the screen displays the
prefix “+” for international long-distance phone call, it will
allow you to dial international call from any country when
you don’t know the local international call prefix, e.g., the
prefix is 00 when you call from China.
After having keyed in the prefix, you shall input the country
code and complete telephone number to be dialed. The
country codes are used commonly in global practice, for
instances, Germany is 49, British is 44 and Sweden is 46
and so on.
Like calling the international numbers, just exclude “o”
before the city code during dialing.
For example, to dial the Telecom service hotline of
Shanghai from other countries, you shall dial:
+86 21 114
+Country Code + Complete telephone number+ Dial Key
Page 19

19
4.1.4 Dial phone number form list
Every telephone you dialed and answered will be saved
into a list in the phone and the telephone numbers you
dialed and answered recently will be listed first in this list,
please refer to “Call Record” in Section 3.3.1). Every
telephone number is classified as per the dialed number,
answered number and unanswered number, and the cell
phone can provide all telephone options for you to check all
call records. When the telephone number stopwatch is
stored fully, the old numbers will be automatically deleted.
To check the list, please operate with the following keys:
Dialed Calls can be checked by the option menu.
All telephone numbers in the list may be operated by
the option menu.
When the telephone number list appears, you can press
CONFIRM to check the details and after having selected an
option, you can press SAVE to directly save the number
into the telephone book.
4.1.5 Emergency call
You can make the emergency calls when you are within the
network coverage, you can see this by the network signal
strength indication bar on the left up corner of phone screen.
If your network provider does not provide the roaming
service in the region, the screen will display the texts of
“Only EMERGENCY call is available” to tell you that you
can only make emergency calls. You can still make
emergency calls even without SIM card if you are located
within the network coverage.
4.2 Call Menu
Press Hands-free in calling status for hand-free feature and
access the call options accordingly.
This call menu is only visible during calls, and the functions
of call waiting, call forwarding and multiple party call, etc.
Page 20

20
shall be supported by Internet connection. Please contact
with your network provider for consultation.
You can operate as below in the call option menu:
Retain the one-way call
Retain the current call or Restore the retained
call.
End one-way call
End the current call.
New Call
Make another call.
Phone book
Enter phone book browsing state.
Message Center
Compile and send an SMS.
Dual-tone Multi-frequency (DTMF)
Press the left soft key to turn on or off Dual-tone
Multi-frequency (DTMF).
Hands-free
Turn on the megaphone to magnify the call
voice.
4.3 Phone book
You can use phone book function to save some VIP business
card information like names, mobile phone numbers, home TEL
numbers, company TEL numbers, etc. Select phone book in the
mobile phone icon to access the phone book.
Note: This mobile phone can store 800 phone numbers.
In the phone book, you can see the options of quick search,
name search, add number, copy all, delete, caller group, other
numbers, settings, caller picture, caller ring tone, etc.
■ Quick Search: Select this option to access the telephone
book to browse the interface. A search input box will appear
at the bottom of this window, you can input the corresponding
information here to screen the call records.
Page 21

21
■ Name search: Search the record in the phone book by name.
■ Add contacts: Add a new call record into the phone book.
■ Copy All: Copy all records in mobile phone or SIM Card.
■ Delete: Select this option to delete the call records. (Note: You
have to input password to delete the call records in SIM Card
1, SIM Card 2 and this phone, the default password is 1122.)
■ Caller group: This mobile phone provides five caller groups.
You can rename, change the ring types, caller image, caller
picture and group members for every group and set the
personal features of group members.
■ Other numbers: It refers to other numbers saved in SIM Card
(owner number/ service hotline/ emergency numbers). You
can view and change them.
■ Phone book settings: There are five menus for phone book
settings, including storage status, preferred storage position,
label, my business card and business card version.
■ Storage status: It refers to the storage status of call records in
SIM Card and mobile phone.
■ Preferred storage position: Select the preferred storage
position as mobile phone, Card A or Card B.
■ Label: Set the contents recorded in the mobile phone phone
book, including eight setting items of home TEL, company
name and e-mail, etc.
■ My Business Card: You can edit your business card, send
your business card by SMS, MMS, e-mail or Bluetooth or
save the edited business card into a folder.
■ Business Card Version: You can select the business card
version as Version 2.1 or Version 3.0.
■ Caller image: Select the picture displayed for the incoming
callers.
■ Caller ring tone: Select the ring tone for the incoming callers.
Page 22

22
4.4 Message
Select “SMS” menu to access the sub-menu.
If it’s supported by your network and you have applied for the
service with the network provider, you can share the services of
SMS Service Center to receive and send SMS and multi-media
message in Chinese and English.
4.4.1 SMS
1. New message
When a SMS is received, the phone will vibrate (if vibration
is activated) or make warning tone (if tone prompt feature is
activated) and animation will appear on the screen. If you
won’t read it immediately, new message warning will also
appear in standby interface and will be automatically saved
into the SIM Card.
The SMS number saved in SIM Card including the received
and locally saved SMS) depends on SIM Card capacity.
To read new message, you can access submenu of in-box
and press CONFIRM to read new SMS.
2. Write SMS
SMS network service allows you to send text SMS to other
mobile phones that can receive SMS.
Make sure you can set SMS service center number before
writing new message. (Please refer to “SMS Settings”).
Access the submenu and write SMS. Click the Option
button in Input interface to operate as below:
Complete: Select this option to complete
SMS input and go to next step.
Insert
template:
Insert the preset common phrases
into the current SMS.
Insert object: Insert objects like pictures, ring
tones and animations, etc. into
the current SMS.
Page 23

23
Text format: Define the text form of the current.
Insert contact
number:
Insert the telephone number of
selected item in the telephone
book.
Insert contact
name:
Insert the name of selected item in
the telephone book.
Insert
bookmark:
Insert the selected bookmark
web-site.
Input method: Change the input method for
editing SMS.
After compilation, select Complete (it may be SIM
Card 1 or SIM Card 2 depending on the card slot
type), you can use the touch pen to scroll and select
Send, Save & Send, Save, Send to Multiple Parties
or Send to Groups as per your actual demands to
send the current message to other mobile phone
number.
Send: In case of Card Slot 1, it will send the current
message by Card 1 number, selection this option and
access Receiver Edition box, you can touch the small
digital icons in the bottom of interface to input number,
or press Search to call out the telephone book, select the
number of receiver from the telephone book and press
Confirm to send.
Save and Send: Send the current message and at the
same time, save it into Out-Box.
Save: Do not send the current SMS, but just save it into
Out-Box.
Send to Multiple Parties: Send the current SMS to
several phone numbers.
Send to Groups: Select a particular group and send the
current SMS to all members in this group.
Page 24

24
Note: SMS centers in some cities and regions cannot
support the long SMS with more than 70 Chinese
characters or 160 English characters.
3. Check the Received and Saved Message
Access the submenu of In-box to check the received
SMS; and access Out-Box to check the SMS saved in
SIM Card.
Upon checking the message list in In-Box, you can
see the receipt date, time, sender number or name
when the phone number already exists in the
telephone number.
To check the message list, you can select to previous
message or next message.
After SMS list of In-box appears, you can press
CONFIRM to read the message and can operate as
per the options:
Reply: Send SMS to the sender of current
SMS.
Delete: Delete the current SMS.
Forward: Forward the current SMS
Copy to
mobile phone
(copy to SIM
Card):
Copy the current SMS on SIM Card
(or mobile phone) to the mobile
phone (or SIM Card) and save.
Move to
mobile phone
(move to SIM
Card):
Move the current SMS on SIM Card
(or mobile phone) to the mobile
phone (or SIM Card) and save.
Delete All: Delete all SMS saved in In-box.
Copy All: Copy from SIM Card or this mobile
phone.
Move All: Move from SIM Card or this mobile
phone.
Number used: Extract the phone number of current
SMS sender, you can choose to dial,
save it to the telephone book or send
Page 25

25
message.
Web-site
used:
You can extract the web-site if the
web-site is contained in the message.
USSD used: Extract the numbers.
E-mail used: Extract the e-mail account.
Chat: Access chat room
Print: Turn on the Bluetooth and match
Bluetooth device.
When SMS list of Out-box appears, you can press
CONFIRM to read the message and operate as below
pursuant to the options:
Send from
SIM Card 1
(Card 1 or Card
2 depending on
SIM slot
position):
Send the current SMS. You can
select Send, Send to Multiple
Parties and Send to Group to send
the current SMS to several contacts.
Edit: Extract and edit the contents of
current SMS.
Delete: Delete the current SMS.
Copy to
mobile phone
(copy to SIM
Card):
Copy the current SMS on SIM Card
(or mobile phone) to the mobile
phone (or SIM Card) and save.
Move to
mobile phone
(move to SIM
Card):
Move the current SMS on SIM Card
(or mobile phone) to the mobile
phone (or SIM Card) and save.
Delete All: Delete all SMS saved in Out-box.
Copy All: Copy from SIM Card or this mobile
phone.
Move All: Move from SIM Card or this mobile
phone.
Number used: Extract the phone number of current
SMS sender, you can choose to dial,
Page 26

26
save it to the telephone book or send
message.
Web-site
used:
You can extract the web-site if the
web-site is contained in the message.
USSD used: Extract the numbers.
E-mail used: Extract the e-mail account.
Print: Turn on the Bluetooth and match
Bluetooth device.
4. Template
■ You can add some common sentences into the
template to avoid inputting repeatedly into SMS. After
completeness, you can choose to edit, remove and
write short message.
5. SMS Settings
First you shall make the necessary settings to use SMS
functions.
Access the submenu of SMS Settings.
Mode
Settings:
Select a proper mode for mobile
phone SMS. You can set the
corresponding names; SMS service
center numbers, valid period and
sending format for all modes.
State
Settings:
Set whether or not to turn on the
message report or reply path.
Memory
status:
View the space occupation status of
SIM Card or mobile phone.
Preferred
storage
position:
Select the mobile phone or SIM Card.
Set SMS service center number: Please contact with
your network provider to get SMS service center
Page 27

27
number. For example, An SMS service center number
of China Telecom in Shanghai is +8613800210500.
Just select any mode setting in SMS Setting submenu,
input your SMS service center number in the second
option and press CONFIRM to save the settings.
Status Report: If you set message report ON, then
SMS center will send the status report to you when the
receiver has received SMS from you or failed to
receive SMS for some reasons, you can understand if
the receiver has received your SMS or not.
Note: This function shall be supported by your service
provider.
4.4.2 MMS
■ Write message: To create a new multimedia message,
you should provide the receiver, copy, bcc (blind carbon
copy), subject matter, content and attachment.
In-box: Check the received multimedia message. (The
operations are same with In-box in text SMS)
- View: View the current MMS.
- Reply: Send MMS to the sender of current MMS.
- Replay SMS: Reply the sender with SMS.
- Reply All: Send MMS to all receivers of current
MMS.
- Forward: Forward to others.
- Delete: Delete the current MMS.
- Delete All: Delete all contents in In-Box.
- Save as template: Save the current MMS to the
defined users of pre-sent message.
- Message details: View the details of current MMS.
- Use details: Extract the sender number, you can
write MMS, dial or save it into the telephone book.
Out-box: It’s used to save the multimedia message sent
unsuccessfully. (The operations are same with Out-box
Page 28

28
in text)
- View: View the current MMS.
- Send: Send the current MMS.
- Delete: Delete current MMS.
- Delete All: Delete all contents in In-box.
- Save as template: Save the current MMS to the
defined users of pre-sent message.
- Message details: View the details of current MMS.
- Use details: Extract the sender number, you can
write MMS, dial or save it into the telephone book.
Draft: The MMS edited and not sent can be saved here.
- View: View the current MMS.
- Send: Send the current MMS.
- Edit: Edit the current MMS.
- Delete: Delete current MMS.
- Delete All: Delete all contents in In-Box.
- Save as template: Save the current MMS to the
defined users of pre-sent message.
- Message details: View the details of current MMS.
- Use details: Extract the sender number, you can
write MMS, dial or save it into the telephone book.
Template: The user can customize MMS and use the
MMS pre-set in the system.
- User-defined: You can save MMS edit by yourself
here to view, create new message from the template,
delete or view the message.
- Default: Select the pre-set MMS to view, create new
message from the template, delete or view the
message.
MMS settings: Set the parameters related to multimedia
sending and receiving.
- Editing settings: Set the parameters for editing MMS,
like editing mode, picture size, optimal play time, auto
signature and signature, etc.
Page 29

29
- Sending setting: Set the parameters for sending
MMS, like Term of using life, Send report, Read report,
Priority and Interval time, etc..
- Receiving setting: Set the parameters for receiving
MMS like Master network, Roaming network, Read
report and Send report, etc..
- Filter: Filter some MMS.
- Server setting file: Select the servers corresponding
to SIM Card 1 and SIM Card 2.
- Memory status: View MMS capacity information.
4.4.3 Chat
■ Chat room setting: Select a chat room and set the pet
name and the mobile phone numbers of chatters.
■ Start to chat: Input message and start to chat with the
preset mobile phone owners.
4.4.4 E-mail
Select Mail and access the E-mail submenu as below:
■ Send and Receive: After having set and turn on the
e-mail, select this option to send and receive e-mails.
■ Edit E-mail: Create a new e-mail. You should provide the
receiver, cc to, bcc to, subject matter, priority, content
and attachment. After completeness, you can select to
send, send and save, save to draft box or leave without
saving.
■ In-box: You can check the received e-mail information,
view, and sort, mark to delete, delete or forward it.
■ Out-box: Save the e-mail not sent successfully, same as
In-Box.
■ Draft: After having edit the e-mail, you can save it to draft
box if not sending it out, you can view, sort, mark to
delete or delete it.
■ Empty mailbox: There are five submenus in Empty
Page 30

30
Mailbox menu, including In-box, Out-box, Sent Mails,
Draft and All Mailboxes.
The user can select to empty a certain list and delete all
e-mails in all boxes if you select all boxes.
■ Delete the marked e-mails: There are five submenus
here, including In-box, Out-box, Sent Mails, Draft, All
Mailboxes.
The user can select to empty a certain list and delete all
marked e-mails in all boxes if you select all boxes.
■ E-mail account: Access the option
1. Create new account: Start to create a new
account and input the e-mail address applied by
you like [email protected]. Click option to select the
Next Step, input method or cancel. Then access
the next step for communications protocol.
2. Communications Protocol: Select the
Communications Protocol of mails as IMAP4 or
Pop3, the protocol provided by your mail server
like POP3. After completeness, click option to the
next step for Data Account.
3. Data Account: Select GPRS account used for
mail transmission, like CHINA MOBILE GPRS,
which is provided by the network operator. After
completeness, click option to the next step for
Receipt Server.
4. Receipt Server: Set pop3 address of mail receipt
server like pop3.126.com. After completeness,
click option to the next step for Sending Server.
5. Sending Server: Input smtp address of mail
server, like smtp.126.com. After completeness,
click option to the next step for User Name.
6. User Name: Input the e-mail name, like A, you
must input A here, i.e., all characters before @.
After completeness, click option to the next step
for Password.
7. Password: Key in e-mail password like B. After
completeness, click option to the next step for
Account Name.
Page 31

31
8. Account Name: The default account name is
pop3.126.com.
The new account is set now.
Then you can click e-mail account to access the built
account, or start up, edit, create a new account or delete
the account.
Accesses EDIT to change the relative items.
Item 2 Display Name: Your name displayed when the
receiver receives your mails, like C, you can key in the
name as you will.
Item 7 Senior Settings:
Account Settings: Set relative mail parameters and then
access:
Network service - >Data Account-GPRS, select the
previously selected transmission account like CHINA
MOBILE GPRS.
Then, change Item 2 GPRS connection point from “cmwap”
into “cmnet” (Note: please change it back to “cmwap” when
connecting wap, including MMS, with this account).
Maximum receipt capacity: The maximum capacity for
receiving each mail, you can select not to change this
option.
Sending Server Settings:
-Outgoing Port: Generally, it’s set as 25, you can select
not to change this option.
- Attestation: Please keep the default as “Open”.
Receipt Server: Select 110 as default for Receiving Port.
Signature: Display the signature at the end of mail. You
can select not to change this option
Page 32

32
■ Template: It represents the pre-stored information. You
can edit, remove the template information or edit it into
e-mail.
4.4.5 Voice mailbox
The voice message you received is saved in the network,
so you have to dial the voice mailbox number to listen to the
message.
Call the voice mailbox: Call the voice mailbox you have
set to listen to the message.
Edit: You can add/ edit the voice mailbox number to make it
much quicker to use the voice mailbox.
4.4.6 Cell broadcast
■ Receive mode: Select and turn on to access the receiving
mode and turn off “Refuse to receiving cell broadcast
message”.
■ Read message: Access this menu to read your customized
cell broadcast message.
■ Language: Set the receiving language of cell broadcast.
■ Channel setting: Set the cell broadcast channels.
Note: Services of cell broadcast and voice mailbox are provided
by network operator, please contact your operator.
4.5 Incoming call city
Input the number to be inquired, users can know the incoming
call city.
Note: This function shall be supported by related data of T-flash
card.
Page 33

33
4.6 View the call record
Call record includes that of SIM Card 1 and SIM Card 2.
Take that of Card 1 as the example as the operation of Card 2 is
same with that of Card 1.
■ Missed calls: Press CONFIRM to check the missed call list.
■ Dialed calls: Press CONFIRM to check the dialed call list.
■ Answered calls: Press CONFIRM to check the answered call
list.
Press CONFIRM in Missed Calls, Dialed Calls and answered
Calls list interface to check the details of record, including date,
call time, telephone numbers and call frequency.
Press OPTION in detailed information interface to operate the
currently selected call record as below.
■ Delete: Delete this record.
■ Save to telephone book: Save this number into SIM Card or
mobile phone.
■ Call: Dial this telephone number.
■ IP dial-up: Dial this number by IP.
■ Edit: Edit this telephone number and save it to the telephone
book.
■ Send SMS: Send SMS to this number.
■ Send MMS: Send MMS to this number.
■ Delete Call Records
There are four sub-menus in the menu of Delete Call Records,
including Missed Calls, Dialed Calls, Answered Calls and
Delete All.
The user can select to clear a certain call record list and to
delete all records in the selected call record list.
■ Call Duration
There are four sub-menus in the menu of Call Time, including
Last Call Time, Total Dialed Calls, Total Answered Calls and
Reset All.
■ Last Call Time: View the last call time.
■ Total Dialed Calls: View the total time of dialed calls.
■ Total Answered Calls: View the total time of answered calls.
Page 34

34
■ Reset All: Clear the statistic data and restart to time.
■ Call Charge: Call Charge function will save the accumulated
call charge for you.
■ Last Call Charge: Access the submenu of Last Call Charge
and view the Last Call Charge.
■ All Call Charges: Access the submenu of All Call Charges
and view the accumulated call charges.
■ Reset Call Charge: Key in PIN 2 Code, clear the price
calculator and restart to charge.
■ Charge Limitation: Access the submenu of Charge Limitation,
you can browse, modify or cancel this function. To modify and
cancel it, you have to key in PIN 2 Code.
■ Price and Rate: Access the submenu of Price and Rate, you
can browse, modify or cancel this function. To modify and
cancel it, you have to key in PIN 2 Code.
Note: You have to key in PIN 2 Code for some operations.
Please contact your network provider to get it.
■ SMS Counter:
Sent: Record the number of sent SMS.
Received: Record the number of received SMS.
A query box of “Reset Counter?” will pop up once you click
Record, then you can click “Yes” to clear it and “No” to save
the data.
■ GPRS Counter
Sent last time: To record the bytes sent last time.
Received last time: To record the bytes received last time.
Total sent: To record the total bytes sent.
Total received: To record the total bytes received.
Reset counter: Restart to count.
Page 35

35
5. System setting
5.1 Primary Setting
5.1.1 Mobile phone setting
Time and date: Set the time and date.
- Set city: Select a city for the time set in this mobile.
- Time/ date setting: Set the current time and date.
- Format setting: Set the display format of time and
date as 12 hour system or 24 hour system.
- Binding of time zone and time: You can choose to
open or close this feature. When it’s open, time zone
and time will be bound.
Time switch on/off: Set time to automatically switch on
or off to the set time.
Language: Set the languages displayed in mobile phone
menus.
Input options: Set default input language.
Prior Input method: Set default input method.
Encoded method: Select the corresponding encoded
method of the language set, such as Big5 or GB2312.
Standby menu display:
- Wall paper: Select the wall paper for standby
interface after the keypad is locked.
- Screen saver: Select a screen saver image for
standby interface of phone screen and set the waiting
time.
- On Animation: Select On Animation picture.
- Off Animation: Select Off Animation picture.
Greetings: Display the greetings during On Animation.
Greetings will not appear if setting it OFF.
5.1.2 Call settings
Note: Set SIM Card 1 and Card 2 respectively. Take Card 1
for example, the setting for Card 2 is same with that for
Card 1.
Magic Voice:
During the talk of Card1, magic voice can be open to select
Page 36

36
a personalized sound which makes the other party hear
a different voice effect from the owner.
Owner Number:
- System Presetting: Whether or not to send the
number depends on the system default.
- Hide Number: The called or caller cannot see your
number, it shall be supported by your network
operator
- Send number: The called or caller can see your
number.
Call Waiting:
Turn on or off call waiting function. You can select Inquiry
to check the current call waiting state.
Call Diverting:
- Divert all voice calls: Divert when the incoming call
is voice call.
- Divert when not reachable: When “divert when not
reachable” is ON, it will divert the incoming calls to
the number you set before hand when the caller
cannot put through.
- Unconditional transfer: W hen “unconditional
transfer” is ON, it will divert the incoming calls to the
number you set before hand in any case.
- No Answer Forward: W hen “No Answer Forward”
is ON, your mobile phone it will divert the incoming
calls to the number you set before hand when you
do not answer the calls.
- Call forward on busy: W hen “Call forward on busy”
is ON, your mobile phone will divert the incoming
calls to the number you set before hand when you
are using the cell phone.
- Divert all data incoming data calls: Divert when the
incoming calls are data calls.
- Cancel diverting: Cancel all call forwarding settings.
Page 37

37
Call Restriction: Restrict the call dialing.
- Dial barring: Restrict the outgoing calls.
- Incoming call barring: Restrict the incoming
calls.
- Startup all: Restrict both outgoing and incoming
calls. You have to key in the password.
- Cancel all: Cancel all restriction settings. You
have to key in the password.
- Change password: Change password.
Line Switch-over: Select Line 1 or 2.
Senior Settings:
Blacklist: Numbers saved in the blacklist will be
shielded.
Auto redial: When this option is ON, it will
automatically redial when the call is failed every time.
Quick dial: When this option is ON, you can press the
corresponding keys in standby status for quick dial
and you can set numbers 2-9 as quick dial numbers.
IP dial-up: Set and start up this option for IP dial-up by
the number record in telephone book.
Background voice: You can select to turn on or off
the background voice.
Call time display: Display the call time, you can
select “OFF” not to display the call time.
Call time prompt: Set the frequency, the warning tone
will prompt hen the time expiries.
Auto time limit: When it’s ON, you can set time limit
and the phone will automatically hang off when the
preset time limit expiries.
Page 38

38
5.1.3 Dual SIM mode setting
You can select to turn on dual SIMs, only SIM Card 1 or
SIM Card 2 and flight mode.
5.1.4 Touch screen calibration
With the touch screen calibration feature, you can make the
touch pen more precise.
5.1.5 Echo modes & sound effect
The user can select different echo modes and define
several echo modes at the same time. This mobile phone
provides six echo modes, including Standard Mode,
Meeting Mode, Outdoor Mode, Indoor Mode, and
Earphone Mode and Bluetooth Mode.
Regulate the sound play effect. The optional audio
equalizers for sound effect include Echo Sound Effect,
Stereo surrounding sound effect and shut off.
5.1.6 Input methods
You can select different input methods to input text, number
and special marks. This mobile phone offers you these
input methods: Handwriting, English input in upper/lower
case letters, number input, Pin Yin (Chinese character),
stroke input and special marks.
5.1.7 Bluetooth
- Activate Bluetooth: Enable or disable Bluetooth function.
- Search hands-free device: The mobile phone can
automatically search the hands-free peripheral components.
Generally the default Bluetooth earphone password is 0000,
please refer to Bluetooth earphone user’s guide for details.
- Remote control: It provides remote control feature.
- My device: You can search for new device to
Page 39

39
automatically search for the Bluetooth device and display
the existing device name on mobile phone screen, match
the settings as per the prompts appearing on mobile.
- Device being connected: Set the menu after Bluetooth
earphone is connected.
- Setting:
This phone may be searched: When this is set ON,
other Bluetooth device may search this phone;
when this is set OFF, other Bluetooth device may
not search this phone.
Device name of this phone: Define this phone
name.
Certification demand: When this is set ON, it will
ask you to input Bluetooth password when this
phone is found by search; when this is set OFF, it
will not prompt when this phone is found by search.
- Set sound path:
1) Leave it in the mobile phone: When this option
is selected, you can only use the mobile phone
instead of Bluetooth earphone.
2) Transfer to hands-free device: When this
option is selected, you can only use the
Bluetooth earphone instead of mobile phone.
- Blockade device: Display the blocked device.
-Storage device: Options include the mobile phone,
memory card or Always Ask.
- File Transfer Setting:
(1) Directory authority: Set the transfer authority.
- Image files object transfer setting:
(1) Shared directory: Select the shared file path.
Page 40

40
- My Bluetooth: Display relative Bluetooth information.
5.2 Networking
5.2.1 Network setting
Network Selection:
- Search again: Press CONFIRM to re-register the
network.
- Select network: Select network to register in the
network list.
- Search mode:
i) Auto: Automatically search for the network of
SIM Card.
ii) Manual: Search for the all currently available
networks and register manually.
iii) Preferred settings: Pre-store some preferred
network.
5.2.2 Network service
5.2.2.1 STK service
This function is provided by the network provider.
When SIM Card and network provider do not support
this service, this function is unavailable. Please get
contact with your network provider for more
information.
5.2.2.2 WAP
Your mobile phone support W ireless Application
Protocol (WAP) services. You can share the services
supported by your network operator. You can obtain the
information on news, weather forecast and flight
schedule, etc. from this service menu.
Note: GPRS services shall be supported by network,
Page 41

41
you have to apply for Internet services and can only
access GPRS services when you are located within
GPRS network coverage.
- Home page: Log in the home page, it is a WAP
web-site set in the connection setting you select. If you
have not set it, the pre-set web-site of manufacturer will
be visited first.
- Bookmark: Display all existing bookmarks. You can
select it and directly connect to the bookmark web-site.
- Web-page history record: It will record the web sites
you have browsed before.
- Saved web pages: It will record the web sites you
have saved before.
- Input web-site: You can select this option and input
any WAP or other Internet site.
- Service In-Box: It will save the message sent by the
service provider.
- Set: Set the Internet service.
5.2.2.3 Data account
- GSM data:
Access one of the accounts:
1. Account Name: It refers to the account
name, you can select “Edit” to change it.
2. Number: It refers to the account number.
3. User name: It refers to the account name of
dial server (not WAP gateway).
4. Password: It refers to the password of dial
server (not WAP gateway).
5. Line type: Select the line type as analogue
Page 42

42
or digital.
- GPRS data:
Access one of the accounts:
1. Account Name: It refers to the account
name, you can select “Edit” to change it.
2. GPRS connection point: Input APN.
3. User name: It refers to the account name of
dial server (not WAP gateway).
4. Password: It refers to the account
password of dial server (not WAP gateway)
5. Certification type: It refers to the selected
certification encryption means.
6. Main DNS address: Display the main
address.
7. Subordination DNS address: Display the
subordination address.
- WLAN (Wireless Local Area Network): You can
select and set W LAN. After setting you can get
wireless Internet by your mobile phone.
5.2.2.4 Wireless network
WLAN (Wireless Local Area Network):
You can select to use the wireless local area network,
connect he wireless router for Wireless Internet
Service.
Connection and setting:
After having entered into W LAN, click Search for
Network, and then select a network with intensive
signal to connect in the searched available network
lists. If this network is set with password, it needs the
Defined Access Point, enter into the Access Point
Setting and select Item 6—WEP key setting; set it
accordingly as per the router.
For example: Change WEP Encryption into “128
digits”;
Change WEP key mode into “ASCII”; WEP
Page 43

43
key, input the password, click Complete and then
select Connect. (This setting is unnecessary if you
have not set any password for the router);
Exit from this menu after the defined point is set and
access “WAP/ Setting/ Setting File/ SIM Card 1/ Create
New”. Change the Data Account into WLAN, after
clicking Complete, activate the network setting created
newly.
After having, access the network service menu to select
the corresponding bookmark or web-site for Internet
surfing.
5.2.2.5 Connection management
Use this menu to check the connection status.
5.3 Files Management
Save the user files in the mobile phone or memory card. Access the
folder options as below:
- Open: Display the contents in this folder.
- Create a new folder: Create a new folder in this folder.
- Format: Format this folder.
5.4 Entertainment and games
This function includes UMI Smart Game Center, UMI Sound book,
MSN, Multi-media E-book, Mobile QQ, Java, Java setting, Java
default security, games and motion games.
5.4.1 Games
This mobile phone offers 3 games, including Bejeweled,
Lianliankan (Linking pictures) and Dice.
Game Settings:
- Game background sound effect: You can select to turn on
Page 44

44
or off this feature.
- Sound effect: You can select to turn on or off this feature.
- Game vibration: You can select to turn on or off this
feature.
- Volume: You can select from 1 to 7.
5.4.2 Java Games
For this function, you shall first download the supporting
programs or files from Internet, generally the supporting
format of games and electronic book is ‘.jar’, download
them from Internet into the mobile phone, install locally and
use the from the list.
Java: Display the downloaded program list.
5.4.3 Java Programs
5.4.3.1 Opera mini
This mobile phone is furnished with multilingual versions
for opera mini mobile phone network browser. (Note:
This function may only be available when SIM Card is
inserted and you have selected the card corresponding
to SIM Card in network service -WAP-setting, so that you
can log in successfully. Please also notice if the time
displayed on mobile phone is synchronous with the
actual local time, please refer to “Time and Date” in
Section 3.4.4---Mobile Phone Setting For details).
With the mobile phone network browser, you can log in
first and then access the Internet.
Define the changeable skin to make the mobile phone
browser gorgeous unprecedented and customize it as
per your favorite.
Like WAP, you have to log in by GPRS service provided
by your network operator for this function, or you can log
in by WLAN. If you use GPRS, you shall change cmwap
Page 45

45
into cmnet in data account for login. It’s recommended
that you customize the relative suite service with your
network operator to cut down GPRS flow cost incurred
from Internet browse.
5.4.3.2 Google map
This map shall be supported by Internet connection and
it’s more convenient for you to log in Google Maps. With
this map, you can consult the road name, bus, map
inspection and record my favorite, etc.
5.4.3.3 eBuddy
Your mobile phone provides you with the on-line chat
service.
Follow three steps to access the menu:
Step One: Select Language
Several languages re provided for your option.
Step Two: Establish an eBuddy ID
Information provided here includes eBuddy
account, your eBuddy ID password, e-mail
address, sex or age, etc.
Step Three: Choose the chatting network and log
in the chat room
Select the chatting network as MSN, Yahoo, AIM,
Gtalk, ICQ or Facebook, fill in the user name and
password and access the chat room.
5.4.4 Java setting
■ Java settings:
Java sound effect: Select volume level.
Java vibration: Turn on or off.
Select SIM Card: You can select SIM Card 1 or SIM
Card 2.
Page 46

46
Java SIM Card 1 set group: Select the address of
network provider.
Java SIM Card 2 set group: Select the address of
network provider.
Executive memory capacity: Display the memory
capacity.
■ Java Default Security:
Third Party: You can set some parameters, like
network access, auto enforcement, information,
multimedia, read the user information, write the user
information, local on-line.
Non-confidence scope: You can set some
parameters, like network access, auto enforcement,
information, multimedia, read the user information,
write the user information, local on-line.
Restore default settings: Restore the default
settings.
Scope option: You can select to turn on or off the
third party and non-confidence scope.
UMI Smart Game Center, UMI Sound book, MSN,
Multi-media E-book, Mobile QQ and MSN need certain
GPRS charges and related data support of T-flash card.
5.5 Acceleration transducer settings
This menu contains the specific submenus for the acceleration
transducer. You can select or cancel to select the application scope
of customized acceleration transducer.
Select and set the menu to realize gravity sensor features.
Functions realized by some specific menus of dynamic
Page 47

47
accelerator
Jiggle right and left in the music player interface, accelerate
to switch over to previous music or next music; jiggle up
and down, and accelerate to switch over Play and Pause.
Jiggle right and left in TV interface to select channels up
and down. Rotate the mobile phone to different directions to
receive the different TV channels in different angles.
Jiggle right and left in the video interface to switch over
video programs up and down. Rotate the mobile phone to
different directions to receive the different video in different
angles.
Upon browsing the photo album, rotate the mobile phone to
different directions to view the pictures in different angles.
Set the caller ring tone mute by rotating the phone body for
180 degree in Incoming Call interface.
Jiggle the mobile phone right and left in the animated game
interface to play games.
5.6 Memory card
This mobile phone supports T-Flash memory card to extend the
storage space. Please insert or remove the card as per the sign on
it.
As one of mobile phone memorizers, T-flash Card serves as the
default memorizer set before delivery so that you can use it directly
without any setting.
Used as a mobile phone memorizer: When inserting T-flash
Card for the first time, you shall set the default memorizers as
memory card, including the music player, video player, animation
recorder, camera and recorder to access the storage space and
contents of T-flash Card. The relative settings are mentioned in the
foregoing functions herein.
Use as USB floppy: After having connected USB data line, you
can directly copy the data in computer. Please refer to the Usage
of USB Disk for details.
Page 48

48
Note: This mobile phone supports plug and play (driver free)
functions. But please insert or take out T-flash card in ON state
and it’s recommended to restart up the phone by manual to ensure
the normal use of play information. Generally it’s not
recommended to assemble and disassemble T-flash card.
5.7 Security Setting
SIM Lock:
In this menu, you can set the security options of mobile phone
to prevent the mobile phone or SIM Card being used illegally.
- PIN Code
PIN code may be used to prevent your SIM Card being used
illegally.
If the current PIN code is closed, you can select ON to
activate PIN code protection and the phone will ask you for
PIN code when powering on next time; if the current PIN Code
is ON, you can select OFF to close PIN Code protection. You
can select to change PIN Code and set new PIN Code, for this
purpose, please input the old PIN Code, new PIN Code and
repeat the new PIN Code as per the guidance.
Note: If PIN Code is inputted incorrectly for successively thrice,
SIM Card will be locked. Then you have to provide PUK Code
to unlock SIM Card. PIN Code and PUK Code may be
provided to you together with your SIM Card. If not, please get
contact with your network provider. Generally the default PIN
Code is 1234, but you are advised to change it into your own
password as soon as possible.
Phone Lock:
The mobile phone lock is used to prevent your mobile phone
from being used without authorization.
Select the mobile phone lock to activate mobile phone
password protection, the phone will ask you about mobile
phone password upon startup next time; press it again to shut
off the mobile phone password protection.
Page 49

49
Note: The default password of mobile phone lock is 1122, you
are advised to change it back to your own password as soon
as possible.
Keypad lock: Set the waiting time of keypad lock. Then the
keypad will be locked when the mobile phone is not used within
the pre-set standby time.
Change passwords: Change passwords, including the
passwords for PIN, PIN2 and mobile phone lock.
Note: Please make sure to set the tracking number as the number
that can receive SMS and is used normally.
Incoming Call Firewall
This mobile phone supports the incoming call firewall feature.
You can select various types of called telephone numbers
pursuant to your actual demands. For example, you can select
to answer or not answer some telephone numbers, or select to
answer some numbers in the business card holder, hide
yourself from the undesired calls and only answer your desired
numbers.
SMS Firewall
This mobile phone supports SMS firewall feature. W hen you
have activated this feature and set the filtered numbers, you
can impede SMS sent by such numbers.
Remote Control
With this feature, you can send SMS to your own mobile phone
by other telephone number when your mobile phone is not
taken with you so as to realize the remote control upon the
mobile:
Note: The ex-factory default password to access the remote
control setting interface is 0000; the user can change this
password in Settings menu.
I. Remote control setting: Optional
1 Power off remotely
2 call forwarding
3 phone lock
4 disk formatting
Page 50

50
5 forward SMS
6 send business card
Note: 1. Only when you have selected some features, this remote
control feature may enter into force.
2. Call forwarding feature shall be supported by network.
II. Set the controller number: You can select an arbitrary number
or appointed number as the remote control number.
1 Arbitrary number (To send the remote control information to
your mobile phone from an arbitrary number)
2 Appointed number (To send the remote control information
to your mobile phone from an appointed number)
III. Change password: Change the ex-factory default password to
access the remote control setting interface.
IV. Remote control command presetting: With the system
default remote control command, select the corresponding
commands, input the correct commands and send SMS
directly:
1. Remote power-off command:
Command for: POWER OFF
2. Call forwarding command:
Command for: CALL DIVERT
3. Phone lock command:
Command for: PHONE LOCK
4. Disk formatting command:
Command for: DATA RESTORE
5. Forward SMS command:
Command for: SMS DIVERT
6. Cancel forwarding SMS command:
Command for: CANCEL SMS DIVERT
7. Send business card command:
Command for: PHONEBOOK DIVERT
Note:
1. W hen changing the remote control command, you can select
the command as numbers, letters and symbols, the characters
Page 51

51
of numbers, letters and symbols supported cannot exceed 19
(included).
2. Send the system default call forwarding command by directly
sending SMS, forward SMS command, it will reply automatically.
If you add the transferred number after the currently pre-set
command, you can forward calls to that number.
3.Send business card command: Add the desired name after the
command to send SMS, it will reply automatically.
5.8 Unlock SIM card
To prevent the illegal use, SIM Card is protected by the encrypt
PIN1 (personal identity number). When this feature is selected, you
have to input PIN1 code upon startup every time to unlock your SIM
Card, then you can make or answer calls normally. The user can
clear SIM Card protection (Please refer to the “Security Settings”).
But in this case, SIM Card may be used illegally.
Press Hang-up key to start up the mobile phone;
Input PIN1 Code, click the Clear key on the upper corner to
clear the error characters inputted and then click CONFIRM
to end. For example, if PIN1 code is set as 1234, just input :
1 2 3 4
When you input the code incorrectly for successively thrice, your
SIM Card will be locked by the network and the cell phone will ask
you for PIN1 Code. Please do not input PUK1 Code if you don’t
know about it, just turn SIM Card to the network operator for
processing. Please refer to the “Security Settings”.
Note: Your network provider may set a standard PIN1 code (4-8
digits) for your SIM Card; you are advised to change in into your
own private password as soon as possible. Please refer to the
“Security Settings” for details.
5.9 Unlock the mobile phone
To prevent the illegal use, you can set password protection for your
mobile phone. W hen this feature is activated, you must key in the
phone password after having keyed in PIN1 Code (if you have set
Page 52

52
PIN code protection) every time, to unlock the mobile phone and
then make or answer calls. The user can clear the mobile phone
password (Please refer to the “Security Settings”), to prevent the
mobile phone from being used illegally.
Key in the phone password and use the right soft key to
clear the wrong input and press CONFIRM to end it. For
example, if your phone password is set as 1122, just input
1 1 2 2
In case of having forgotten your mobile phone password, you
should contact with your distributor or local authorized maintenance
service center to unlock your mobile phone password.
5.10 Restore default settings
The default password of resuming the ex-factory setting is 1122.
Page 53

53
6. Entertainment
6.1 Camera
Your mobile phone provides camera feature. Use the touch pen to
click the small Shooting Icon in the middle of bottom. Press all
small icons on the edge of view-finding interface to set the special
effect, white balance, delay shooting, step-and-repeat setting, echo
mode, picture quality and picture sizes, etc. Or you can press
different options for different settings.
Select different options to access:
- To photo album: Access the photo album.
- Camera settings: Set some relative parameters for
photograph.
- Lens switch-over: Switch over to Lens 1 or Lens 2.
- Picture Settings: Set the picture sizes and quality
- White balance: Set the picture luminous color
- Echo mode: Set the photography mode.
- Special effect settings: Select the view-finding style.
- Frame Setting: Select a frame for pictures.
- Storage position: Select to save to the mobile phone or
memory card.
- Restore default settings: Restore to the ex-factory default
settings.
Note: Click the corresponding icons in shooting view-finding
interface to direct set the corresponding image effects.
6.2 Image function
6.2.1 Album
Access the photo album to set, including view the pictures,
show the slides, edit, print, browse mode, use as, send,
rename or delete.
Page 54

54
6.2.2 Photo editor
Photo Artist
Users can edit photos or pictures as follows
Automatic change of size:
- Save new file: Resave the photos or pictures edited.
- Photo frame: There are12 fames for users to select.
- Add mini chop: Users can add a personalized mini chop
on photos or pictures.
- Add texts: Users can add characters to photos and edit
the characters including color, size, etc.
6.3 Video functions
6.3.1 Video player
Your mobile phone provides the animation recording feature
and the default storage location is the memory card. Select
and access the Video Recorder menu and press the red
button in the middle for video recording.
Note: Press the left and right keys to regulate the video
recording brightness and press keys to regulate the
video recording focal distance.
Access the option:
- Video recorder setting: Select this menu to access
some relative parameter settings of video recorder.
- Video setting: Set the relative parameters, like video
quality, file size limitation and recording time, etc.
- Lens switch-over: Switch over to Lens 1 or Lens 2.
- Special effect setting: You can select a special
effect for the video recording this time.
- Storage position: You can select to save the video
recording to the mobile phone or memory card
- Restore default settings: Restore all settings as
default ones.
Page 55

55
6.3.2 Video recorder
Access and play the animation.
Access as per the option
Nominal definition:
Play: Play the currently selected file.
Send: Send the currently selected file (By MMS,
E-mail or Bluetooth).
Rename: Change the currently selected file name.
Delete: Delete the currently selected file.
Delete all files: Delete the current all files.
Sort: Sort the files (by name, type, time, size or
none).
Stream Media web-site: Built-in web-site, history
web-site and inputted web-site
Network setting file: Five options for each one
separately.
Storage position: Select to save the video files into
the mobile phone or memory card
Note: The default storage position of video player is
the memory card with the corresponding file folder
named Video
6.4 Audio functions
6.4.1 Music player
The following captions will appear at the bottom of music
player screen: List and Return. In the list, you can select
“Option” to play, view details, add into ring tone base, update
the play list and set, etc.
0. Nominal definition
Play: Play the currently selected music.
Detailed information: Check the detailed information of
this music.
Add into ring tone base: Add the current music into the
ring tone base of echo mode.
Update play list: Update music in ring tone base.
Page 56

56
Note: The following models of mobile phones supporting
touch screen can furnish the following functions:
- Touch key description: Drag the slider at the bottom
of screen to tune up or down the music volume.
- ► and Press to turn on or off the music player and
pause.
- ■ Press to stop playing music.
- and Press to separately switch to the previous
or next music.
Setting: Set the multimedia music play options.
1. Play Settings
Preferred list: Mobile phone space of memory card space.
Auto generate list: Select to turn on or off.
Repeat: When it’s turned on, it will play the music
repeatedly.
Random: When it’s turned on, it will play the music in
random order.
Background play: When it’s turned on, the music play will
not be stopped when you exit from the menu
2. Panel Setting
Energy display style: Turn on this option to display the
energy style during mp3 play.
Libretto display: When it is turned on, it will display libretto
when playing MP3, when it’s turned off, it will not display
libretto.
3. Sound effect setting: Turn on or off the sound effect.
4. Bluetooth Setting:
Bluetooth stereo output: Turn it on or off.
Bluetooth stereo earphone: When Bluetooth stereo
output is turned on, you can listen to MP3 music with
Bluetooth earphone after having seared the Bluetooth
device and inserted Bluetooth earphone.
Note: The default file name for music player is My Music in
Page 57

57
the mobile phone and memory card.
6.4.2 Recorder
Select this menu to record and access:
- Record: Record a new voice.
- Play: Play the record audio selected currently.
- Attachment: Attach a section of recording in the stored
recording sections.
- Rename: Change the currently selected file name.
- Delete: Delete the currently selected file.
- Delete all:Delete all files.
- Used: Use the currently selected record as echo mode.
- Send: Send the currently selected record by MMS,
E-mail or Bluetooth.
6.5 Broadcasting
6.5.1 Mobile TV
Your mobile phone is built in with a handheld video broadcast
receiver, which can receive telecast signals with TV watching
functions. You can select and access TV mobile phone menu.
In PLAY interface, you can click the corresponding button
icons as per your actual demands to regulate the volume,
video brightness and so on. Press different options to set the
below items:
My Channel: Add the favorite TV channels into My
Channel List; also play, rename or delete this
channel.
Channel search: Automatically search channels.
Channel list: List of best channels searched.
Region setting: Select the local position.
Add to my channel: Add the current channel to My
Channel List.
Page 58

58
※ Please be advised that the video screen effect received by
TV mobile phone is subject to the TV station signal coverage
where you are located to some extent.
6.5.2 FM Radio & Schedule FM record
FM Broadcast
Enter into the interface and set as the prompts.
Select “Edit” to enter into menu to set related parameters;
ON/OFF: Select
Channel list: It
Schedule FM record
Select “Edit”, enter the menu settings of the relevant
parameters:
Turn On/Off: Select to open, it will take time to record.
Time: Set the recording time.
Repeat: Select the frequency of recording from time to time,
one day, custom, weekly, or monthly.
Channel settings: It contains two menus: channel list and
manually input.
Channel list: A list of FM radio channel list, press the
“select” key to select the current channel.
Manually input: You can enter any of your favorite FM
radio channels.
6.6 Electronic Book
Electronic book files are saved in the memory card. You can
download them by USB data line, and save them in a folder
named “E-book”. If this folder does not exist in the memory
card, just create a new folder named “E-book”.
Access the electronic book list to select “Option”:
- Open electronic book: Read the contents of electronic
book.
- System settings: Set the electronic book page display
means, including text style, page curl, auto page curl, page
Page 59

59
curl speed, full screen, etc).
- Message: Check the details of current electronic book.
- Delete: Delete the current electronic book.
- Delete all files: Delete all contents in the electronic book
list.
- Sort type: Sort the electronic book list by name, type, time,
size or no sort.
- Execute the system settings: Restore the existing
settings to default settings.
- Help: Prompt the help information.
Note: Access the electronic book list and you can use the
touch pen to click the soft key to set it.
Page 60

60
6.7 Network service
6.7.1 STK Service
This function is provided by the network provider. W hen SIM
Card and network provider do not support this service, this
function is unavailable. Please get contact with your network
provider for more information.
6.7.2 WAP
Your mobile phone support Wireless Application Protocol
(WAP) services. You can share the services supported by
your network operator. You can obtain the information on
news, weather forecast and flight schedule, etc. from this
service menu.
Note: GPRS services shall be supported by network, you
have to apply for Internet services and can only access GPRS
services when you are located within GPRS network
coverage.
- Home page: Log in the home page, it is a WAP
web-site set in the connection setting you select. If
you have not set it, the pre-set web-site of
manufacturer will be visited first.
- Bookmark: Display all existing bookmarks. You can
select it and directly connect to the bookmark
web-site.
- Web-page history record: It will record the web sites
you have browsed before.
- Saved web pages: It will record the web sites you
have saved before.
- Input web-site: You can select this option and input
any WAP or other Internet site.
- Service In-Box: It will save the message sent by the
service provider.
- Set: Set the Internet service.
Page 61

61
6.7.3 Data account
GSM data:
Access one of the accounts:
1. Account Name: It refers to the account name, you can
select “Edit” to change it.
2. Number: It refers to the account number.
3. User name: It refers to the account name of dial server
(not WAP gateway).
4. Password: It refers to the password of dial server (not
WAP gateway).
5. Line type: Select the line type as analogue or digital.
- GPRS data:
Access one of the accounts:
1. Account Name: It refers to the account name, you can
select “Edit” to change it.
2. GPRS connection point: Input APN.
3. User name: It refers to the account name of dial server
(not WAP gateway).
4. Password: It refers to the account password of dial
server (not WAP gateway)
5. Certification type: It refers to the selected certification
encryption means.
6. Main DNS address: Display the main address.
7. Subordination DNS address: Display the
subordination address.
6.7.4 Wireless LAN Network
- WLAN (Wireless Local Area Network): You can select to
use the wireless local area network, connect he wireless
router for Wireless Internet Service.
- Connection and setting:
After having entered into WLAN, click Search for Network,
and then select a network with intensive signal to connect in
the searched available network lists. If this network is set
with password, it needs the Defined Access Point, enter
Page 62

62
into the Access Point Setting and select Item 6—WEP
key setting; set it accordingly as per the router.
For example: Change WEP Encryption into “128 digits”;
Change WEP key mode into “ASCII”;
WEP key, input the password, click Complete and then
select Connect. (This setting is unnecessary if you have
not set any password for the router);
Exit from this menu after the defined point is set and access
“WAP/ Setting/ Setting File/ SIM Card 1/ Create New”.
Change the Data Account into WLAN, after clicking
Complete, activate the network setting created newly.
After having, access the network service menu to select the
corresponding bookmark or web-site for Internet surfing.
6.7.5 Connection Management
Use this menu to check the connection status.
Page 63

63
7. Accessories tools & additional functions
7.1 Calculator
Your mobile phone provides a calculator with four basic
functions to make it convenient for you to make simple
operations.
Select Calculator menu and click to access it.
- Touch the screen to key in the numbers to be calculated into
the interface.
- Click the Left arrow to clear the recent input characters or
results, press the central key “Return” to exit from the
calculator.
Note: Please understand that the precision of this calculator is
not so high, with round-off error.
7.2 Units Conversion
Your mobile phone provides you with Unit converter function
to convert different units, including weight and length units.
Weight: Weight units include the conversion of kilogram<->
pound and kilogram <-> ounce. Just input the numbers to be
converted in the corresponding Edit box and press the left soft
key to confirm, the value you desired will appear in another
Edit box.
Length: Length units include the conversion of kilometer<->
mile, meter<-> yard, meter<-> foot, centimeter <-> foot. Just
input the numbers to be converted in the corresponding Edit
box and press the left soft key to confirm, the value you
desired will appear in another Edit box.
Page 64

64
7.3 Conversion of exchange rate
For Currency converter, first input the exchange rate and then
the local currency value, press the left soft key to confirm, the
value you desired will appear in another Edit box.
7.4 Answering machine
1. Incoming call message record: This menu is used to
save all answered incoming call message record. You can
access it to check and play the leave message. When there
is new leave message, press one shortcut key in Standby
Interface to check it and generally OK key is set as the
shortcut key.
2. Setting: You can set to turn on or off the Answering
Machine.
ON/OFF: Select it to turn on or off the answering
machine.
Storage position: You can select the mobile phone or
memory card.
Answering time: Set the corresponding time. The
incoming call will enter into leave message mode after
the waiting time set for the incoming calls.
Recording time: Set the recording time duration.
Greetings: You can select the corresponding greetings
as per your own preference, and select the default file
from the mobile phone or memory card.
7.5 Calendar
Access the Schedule management submenu and press
CONFIRM to display date. Set date and month with the
directional key on the top of the touch interface.
Press Option to access the submenu:
■ View/View all: Create a new schedule and set an alarm
warning. You can select One time, Every day,
Page 65

65
User-defined, Every week and Every month.
Add New Events: Click “+” on the right upper corner to list
Other, Meeting and Curriculum. You can choose the proper
edited schedule warning as per your actual demands.
Delete Events: Delete all events, passed events and
events in a period.
View by Week: When it’s activated, the displayed calendar
will be shown by week and it’s more convenient for you to
view your time table and add new events.
Print: Print by the Bluetooth device.
7.6 Tasks
50 pieces of memorandum information may be saved in this
mobile phone. Select Memorandum in the submenu to View,
Add, Edit, Delete, Delete Outdated Missions, Delete All,
Skip to the Appointed Date, Send Schedule or Save as file
the memorandum.
7.7 Alarms
This mobile phone offers five groups of alarms. Select one
and edit.
7.8 Universal time
Touch the screen or press the left and right direction key to
select the time for all countries in the world and you can
choose to turn on or off the time of other cities to start up the
daylight-saving time.
7.9 Stopwatch
It provides stopwatch functions.
- General stopwatch:
General stopwatch is used for separately Separate Time
and Time by Circles, Click Left Arrow to reset and Right
Arrow to time separately.
Time separately: It records one record and time will
Page 66

66
not be cleared to zero. It applies for the test record
performances below 20 persons, e.g., 1,000-meter
running test for a class.
Time by circles: It records one record and time will be
cleared to zero. It applies for recording the
performance of one person running every circle in the
long-distance running with several circles, i.e.,
professional athlete, 20 circles at the maximum.
View records: View the saved records for time
separately and time by circles.
- Multidirectional stopwatch: Multidirectional stopwatch
can time for four directions, you can click different
directions for timing.
Note: Method to clear stopwatch to zero: First pause the
operation of stopwatch and click the left arrow to clear it to
zero.
8. FAQ
Please refer to the following table to remove any troubles of mobile
phone.
FAQs Cause Solutions
You are using the mobile phone
in place with poor signal
receiving effect, like high
buildings or basement, and the
radio waves cannot be
transferred effectively.
Avoid using the phone
in such conditions.
Poor
receiving
effect
You use the mobile phone
during the intensive
communication time, e.g., rush
hour, and the line blockade
makes it impossible to call.
Avoid using the phone
in such conditions.
Page 67

67
It’s caused by the distance of
network transmitter base station.
You can ask the
network service
provider to provide the
service area map.
It’s caused by poor network
junction line and it’s a problem of
the whole region.
Echo or
noise
Communication lines are poor in
some service areas.
Hang up and redial
and replace with better
junction line.
The standby time is subject to
the network system setting.
You are located in the
area with poor
receiving signals,
please shut off the
mobile phone
temporarily.
Battery is exhausted. Replace with new
battery
Curtailing
standby
time
The phone will constantly launch
signals to find the base station
when it cannot receive any
signals, so it will consume a lot
of battery power and curtail the
standby time.
Try again in place with
stronger signals or
shut off the mobile
phone temporarily.
Fail to
power on
Battery power is low. Check the battery
power or charge the
battery.
SIM Card is damaged. Contact your network
provider
SIM Card is not loaded properly. Make sure SIM Card is
loaded properly.
SIM Card
error
The metal side of SIM Card is
dirty.
Wipe the metal contact
of SIM Card with clean
cloth.
SIM Card is invalid. Contact your network
provider.
Fail to
connect the
network
Out of GSM service area. Inquire the service
area with your network
provider.
Page 68

68
Weak signals. Try again in place with
stronger signals.
Call Restriction is enabled. Cancel Call Restriction
setting.
Fail to make
calls
Fixed Dialing is enabled. Cancel Fixed Dialing
setting.
PIN error PIN Code is inputted incorrectly
for successively three time.
Contact your network
provider.
Batter or charger is damaged. Replace with new
battery or charger.
Charge in the environment
temperature below -10℃ or
above 55℃.
Charge in better
conditions.
Fail to
charge
Poor contact. Check if the plug is
connected well.
Impossible
to add new
records into
telephone
book
The memory of telephone book
is full.
Delete some records
in telephone book.
Impossible
to set some
functions
The network provider does not
support this function, or you
have not applied for this
function.
Contact your network
provider.
 Loading...