


RADAR . LASER . G-FORCE
TRAXX
OWNER’S MANUAL
SERVICE
If you wish to return the TRAXX, please contact KAT Inc.
Phone: (915) 533-1335 Fax: (915) 533-1344

INTRODUCTION
Thank you for purchasing the TRAXX developed by KAT Inc.
TRAXX is the first and unique sophisticated device in the world,
which has radar/laser detection, vehicle performance meter
and Safety alarm features.
We are pleased to have you as a valued customer and hope
you will be delighted with your TRAXX. This manual provides all
the information you need for putting the TRAXX to work for you.
WARNING: Always obey all local and federal laws when using
this device to measure the performance of your vehicle. Use
only in designated areas with care and do not take your eyes off
the road when you measure acceleration. TRAXX records the
results after the run. We are not responsible for any accident or
injures that occur while using this device. Drive safely.
WHAT’S IN THE PACKAGE
3
TRAXX
OWNER’S MANUAL
WINDSHIELD BRACKET & SUCTION CUPS
TRAXX
POWER CORD & FUSE
HOOK AND LOOP FASTENER TAPE
INTRODUCTION 3
WHAT’S IN THE PACKAGE 3
CONTROL AND BUTTONS 4
INSTALLATION 5
HOW DOES IT WORK? 8
WHAT CAN IT MEASURE AND DETECT? 8
SET-UP 9
MODE OPERATION 12
BUTTON OPERATION FOR ACCELERATION MODES 16
RADAR DEVICE MODE OPERATION 18
TROUBLE SHOOTING 21
FCC INFORMATION 22
FEATURE MEMORY 22
FACTORY RESET 23
REPLACING FUSE 23
SPECIFICATIONS 24
LIMITED WARRANTY 25
SERVICE 25
Contents
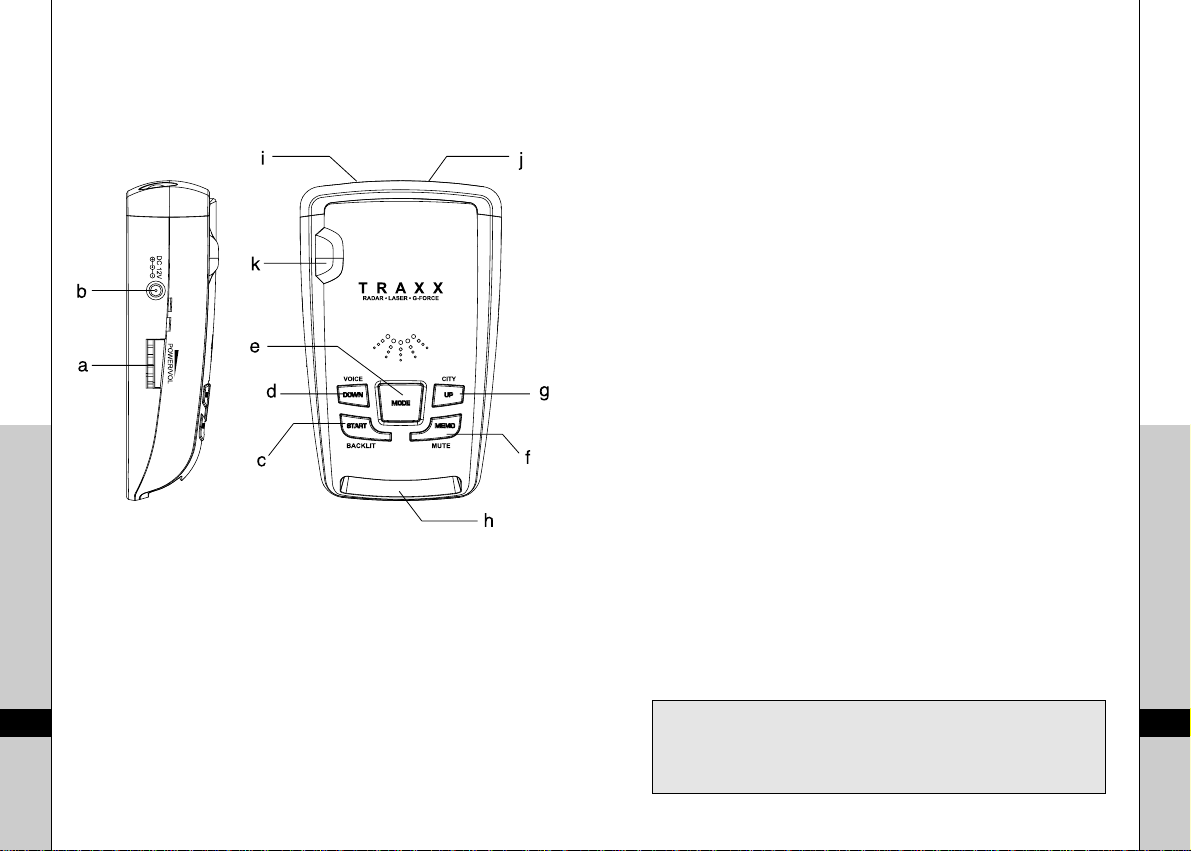
CONTROL AND BUTTONS
a. Power on/off and Volume Control
b. DC 12V Power Input Jack
c. Start Button/ Backlit Button
d. Down Button/ Voice on/off button
e. Mode Button
f. Memory Button/ Mute Button
g. Up Button/ City Button
h. Display
i. Front Laser Detection Lens
j. Radar Antenna
k. Rear Laser Detection Lens
INSTALLATION
For the best performance of acceleration features, mount
TRAXX on the windshield centered between driver and
passenger. TRAXX must be positioned straight across the
vehicle. Do not angle the device toward the driver. The front of
the device does not have to be perfectly level. This device
automatically compensates for mounting angles up to 30
degrees from level.
Adjust the device on its windshield bracket until it is
approximately level. It is important that the device stays in
position during use. If the device moves too easily, attach
suction cups firmly.
For the best performance of radar detector feature, select the
proper location for the device where it has a direct view of the
road. The radar antenna and laser lens are located behind the
rear panel of the device. The antenna and lens should not be
obstructed by metal or metallic surface and should be pointed
at the horizon for accurate long range detection.
∙
Choose a location that does not block the driver’s vision.
∙
Mount the device in a level position.
∙
Do not mount the device behind metal surfaces, windshield
antenna, wiper blades, ornaments or mirrored glass.
∙
Headed windshields, currently available as an option on
some Ford or GM vehicles act as an impenetrable barrier to
radar signals.
∙
Do not mount the device where the driver or passenger
might collide in the case of an abrupt halt.
Note: Whichever mounting method you choose, remember to
place the device out of view when you leave your vehicle. This
keeps the device out of sight from thieves and prevents exposure
to extremely high temperatures.
5
TRAXX
OWNER’S MANUAL
4
TRAXX
OWNER’S MANUAL
Caution: On some newer model cars, a plastic safety coating
has been applied to the windshield. The suction cups may leave
permanent marks on the windshield once they are removed.
Check your vehicle owner’s manual to see if your car has the
plastic safety coating.
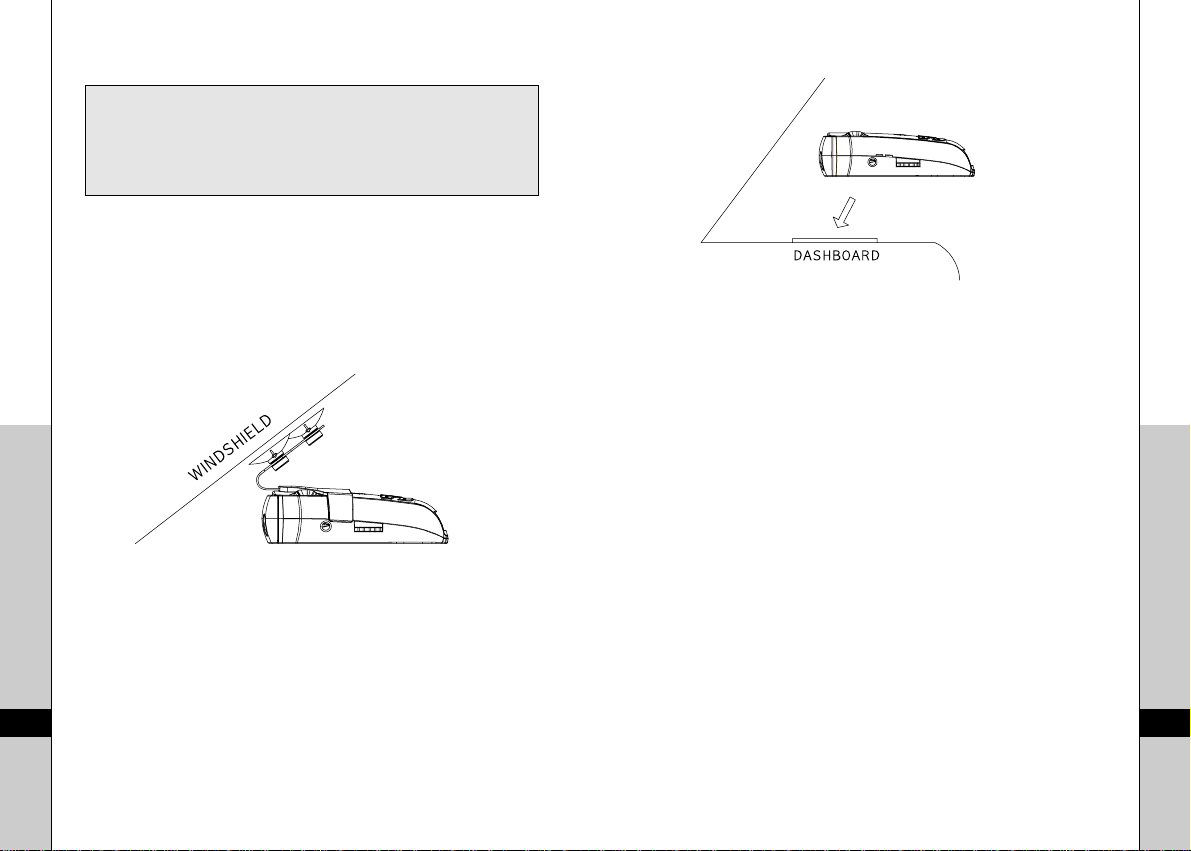
�Windshield Mounting
1. Attach bracket to windshield
2. Bend bracket for correct detection angle
3. Plug power cord into the device
4. Attach bracket to device
5. Plug power cord into cigarette lighter
�Dashboard Mounting
1. Peel protective paper off one side of hook-loop
2. Tape on device’s bottom
3. Peel top paper off
4. Place device on dash board
5. Plug power cord into the device and cigarette lighter
�Power and Volume Control
The TRAXX is designed to operate on most DC12V negative
ground vehicle electrical system. The power cord provided with
the device has a cigarette light socket plug at one end and a
small connector at the other.
To turn on the TRAXX, connect power and rotate the wheel
controller, located on the side of the device, until you hear it
click. To turn it off, rotate the wheel controller in the opposite
direction. You can control volume level with this wheel
7
TRAXX
OWNER’S MANUAL
6
TRAXX
OWNER’S MANUAL
HOW DOES IT WORK?
The TRAXX measures the performance of your vehicle by
sensing acceleration forces. It uses a three-axis accelerometer
to measure acceleration. This digital three-axis accelerometer
sensor tracks your vehicle’s acceleration and cornering forces.
This device analyzes data and calculates corrected G-Forces
for the G Meter operation, speed and distance data. The result
is the most accurate.
The TRAXX provides distinct visual and voice alerts to warn
you of the presence of X, K and all kinds of Ka band radar guns
in the front and rear of you. This model also provides the
benefit of ‘undetectability’ by alerting you to the presence of
VG-2 (The Radar Device device).
The TRAXX has Safety alarm mode for safe driving. You can
set safety level of lateral G-force. TRAXX gives warning sound
and visual blinking whenever you exceed your level setting.
WHAT CAN IT MEASURE AND DETECT?
�TRAXX can measure the followings:
1. Time to go from 0 to 60MPH (0 to 100Km)
2. Speed at the end of 1/4 mile (400m)
3. G-Force
4. Peak and Average Horsepower
�TRAXX can detect the followings:
1. X, K and Superwide Ka band radar guns
2. Laser guns (Laser speed monitoring devices)
3. VG-2 undetectability
SET-UP
If this is the first time the device is powered since installation or
if the orientation has changed, please move the vehicle to a
level place and calibrate the three-axis accelerometer. Press
Mode button to go G-FORCE mode and complete calibration
by pressing START button.
To accurately measure horsepower, the correct vehicle weight
and the correction factor for the vehicle must also be entered to
allow a horsepower calculation. To enter set-up mode, press
MEMORY button for three (3) seconds at any mode of GFORCE / 0 TO 60/ 1/4mile except Radar Detector mode until
default weight of 2000lbs shows in the display. Please enter
your vehicle weight and each correction factors.
�SET-UP FOR METRIC USE
You can set up your TRAXX for US or Metric unit and calculate
engine power in HP or PS (metric horsepower). When pressing
‘DOWN’ button and turn on the Power at the same time, it
displays current engaged mode. Press UP/DOWN button to
toggle ‘US’ or ‘METRIC’ and press ‘MEMORY’ button to select.
The factory default is ‘US’. Please enter its metric calculation
factor. When ‘US’ or ‘METRIC’ is changed each other, its
measurement will be changed as follows.
- US: Time to go from 0 to 60MPH / METRIC: 0 to 100Km
- US: Speed at the end of 1/4 mile / METRIC: 400m
9
TRAXX
OWNER’S MANUAL
8
TRAXX
OWNER’S MANUAL
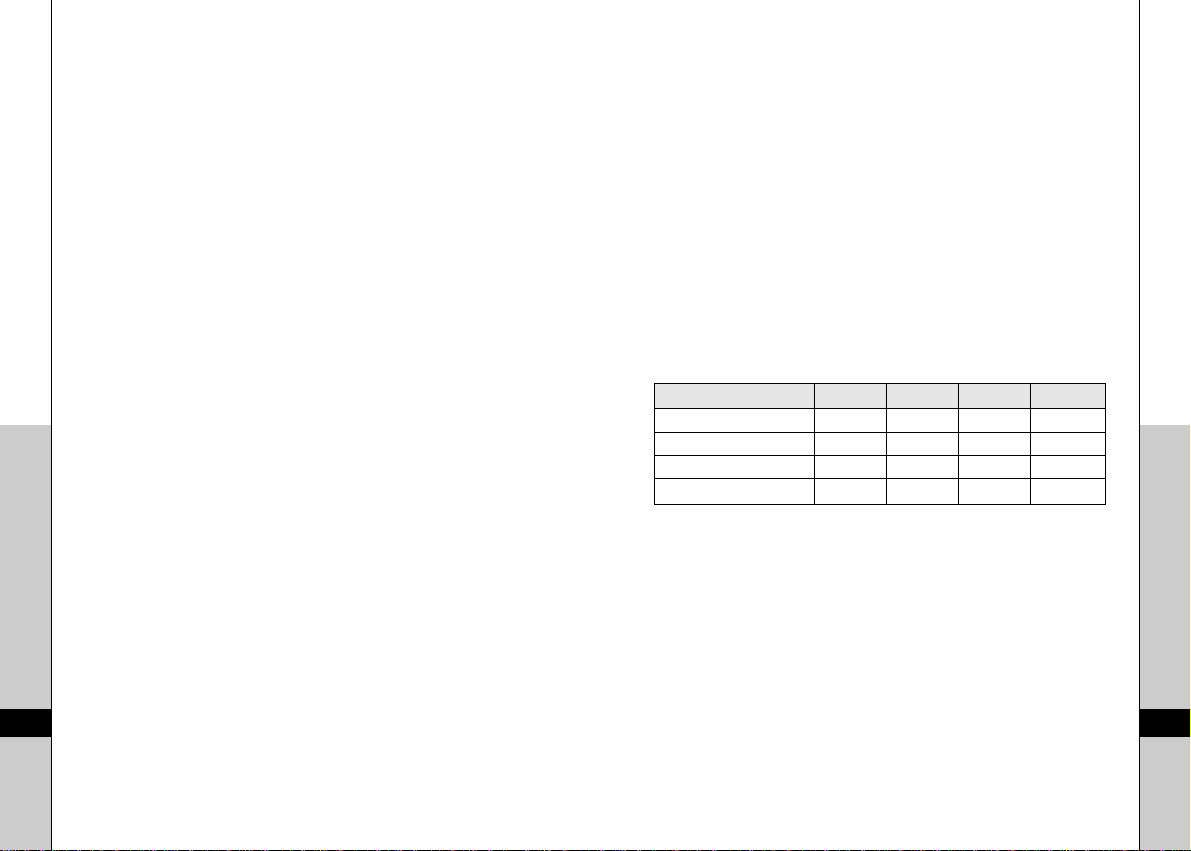
SETUP ITEM MIN MAX DEFAULT STEP
VEHICLE WEIGHT (LBS) 25 16000 2000 5
HP FACTOR 1.00 2.00 1.00 0.01
HP MIN SPEED (MPH) 10 60 30 1
HP MAX SPEED (MPH) 30 100 50 1

WARNING: Changing any of this SET UP between US and
Metric deletes all stored data in the memory and user’s setting
such as vehicle weight and vehicle correction factor. Please do
SET-UP process whenever you change it.
�Vehicle Weight
You must enter the weight of your vehicle. This information is
available in your vehicle’s manual. You should add the weight
of the driver, passengers and cargo plus any additional
equipment added to the vehicle.
Press the UP or DOWN button until the correct weight is
shown. Holding either button for 1 second causes the weight to
change rapidly. Press Start button to store the setting.
�Horsepower Factor
This is a correction factor you can set for an approximate
conversion from wheel horsepower to engine horsepower.
Factory default is 1.00.
The TRAXX is affected by drive train losses, rolling resistance
and aerodynamic drag which determine the vehicle’s
performance. Manufacturers’ ratings list a higher engine
horsepower which is not reduced by these other real-world
factor so you may need to increase the wheel horsepower
readings to approximately correlate to higher engine
horsepower.
After storing vehicle weight, it automatically goes to
Horsepower Factor. Display flashes previously set value.
Press the UP and DOWN buttons until the vehicle correction
shows in the display. Press Start button to store the setting.
�Horsepower Speed Range
You must select the speed range for horsepower calculations.
The TRAXX will calculate the average horsepower over this
range and the peak horsepower within this range.
The setup item HP MIN SPEED sets the speed that the TRAXX
starts measuring horsepower. The setup item HP MAX SPEED
sets the speed that the TRAXX stops measuring horsepower.
After storing horsepower factor, it automatically goes to this
Speed Range. Display flashes previously set value. Set the
minimum speed for the average horsepower measurement by
pressing the UP or DOWN buttons. Press START button to
store it. Set the maximum speed for the average horsepower
measurement by pressing the UP or DOWN buttons. Press
Start button to store it.
11
TRAXX
OWNER’S MANUAL
10
TRAXX
OWNER’S MANUAL
SETUP ITEM MIN MAX DEFAULT STEP
VEHICLE WEIGHT (KG) 10 7000 900 2
HP FACTOR 1.0 2.0 1.0 0.01
HP MIN SPEED (KPH) 1.5 100 50 1
HP MAX SPEED (KPH) 50 160 80 1
2000lbs 900kg
HPF 1.00 PSF 1.00
HPmin 30 PSmin 50
HPmax 50 PSmax 80

The maximum of the HP MIN Speed cannot exceed the
minimum of the HP MAX speed.
The device enters G-Force mode after setup and the display
shows the current G-Force reading. G-Force can be zeroed at
any time by pressing START button.
MODE OPERATION
TRAXX has two operation modes, which are COMBO and
ACCELEROMETER.
Combo mode: There are four(4) operations in Combo mode.
Press Mode button to select Radar Detector mode or G Force
mode or 0-60 Mile mode or 1/4 Mile mode.
If the TRAXX receives Radar or Laser signal when it is in
accelerometer operation, it stops measurement and gives
Radar or Laser warning. We recommend you to select Radar
Detector mode while driving.
Accelerometer mode: There are three(3) operations in
Accelerometer mode. Press mode button to select G-Force
mode or 0-60 Mile mode or 1/4 Mile mode. Radar-Laser
detection is not active in Accelerometer mode. We recommend
you to enter Accelerometer mode when you measure
acceleration.
The factory default is Radar Detector mode in Combo.
Press Mode button for three(3) seconds to change the mode
between COMBO and ACCELEROMETER.
�CALIBRATION
Calibration is performed automatically when you press START
button at G-FORCE mode.
�0 to 60 MILE MODE / 0 to 100KM MODE
Your vehicle must be stopped before you perform any
measurement. Pressing start Button to perform an internal
calibration. After the calibration is completed successfully, its
display shows 'READY' with blinking:
The measurement begins as soon as the vehicle starts moving
and the display shows the elapsed time until 60 MPH (100km)
is reached. Then it shows the time to reach 60 MPH (100km).
13
TRAXX
OWNER’S MANUAL
12
TRAXX
OWNER’S MANUAL
COMBO ACCELEROMETER
RADAR DETECTOR MODE
G-FORCE MODE
G-FORCE MODE
0 TO 60 MILE / 0 TO 100Km 0 TO 60 MILE / 0 TO 100Km
1/4 MILE / 400 METER 1/4 MILE / 400 METER
-.00 �.00
READY
4.75 sec

Pressing the UP or DOWN button once causes the display to
show average horsepower between the two speeds chosen in
setup.
Pressing the UP or DOWN button again shows the peak
horsepower reached during the measurement.
�1/4MILE MODE / 400M MODE
Pressing Start Button to perform an internal calibration. After
the calibration is completed successfully, its display shows
'READY' with blinking:
The measurement begins as soon as the vehicle starts moving
and the display shows current elapsed time. At the end of 1/4
mile (400m), the speed reached is displayed.
Pressing the UP or DOWN button causes the display to show
the time for 1/4 mile (400m).
Pressing the UP or DOWN button causes the display to show
average horsepower between the two speeds chosen in setup.
Pressing the UP or DOWN button shows the peak horsepower
reached during the test.
�G-FORCE
Pressing the MODE button until the display shows G FORCE.
The display shows the number of horizontal and forward Gs.
The right indicator is sideways acceleration with the arrow
indicating direction. The left is forward acceleration. The ‘+’
shows up when speed is increasing and ‘-’ shows up when
speed is decreasing.
�ERROR MESSAGES WITH VOICE
∙
The display scrolls with 'TILT ERR - Adjust Mounting' with
voice of 'Tilt error, adjust mouning'
→
Please check its mounting and calibrate again. It should
be tilted more than 30 degrees during calibration.
∙
The display scrolls with 'ERR - Must be stationary' with voice
of 'Must be stationary'
→
There is vibration during calibration.
∙
The display scrolls with 'DecelerationERR' with voice of
'deceleration error'
→
The speed should be decelerated during measurement.
15
TRAXX
OWNER’S MANUAL
14
TRAXX
OWNER’S MANUAL
HPavg289 PSavg293
96MPH
14.35sec
154KPH
HPavg289 PSavg293
HPpk 306
+.24 �.34
PSpk 310
HPpk 306 PSpk 310
READY

BUTTON OPERATION FOR ACCELERATION MODES
�MODE BUTTON
Press MODE button for three (3) seconds to go COMBO or
ACCELEROMETER mode.
Press MODE button to select Radar Device mode or G Force
mode or 0-60 Mile mode or 1/4 Mile mode in COMBO mode.
Press MODE button to select G Force mode or 0-60 Mile mode
or 1/4 Mile mode in ACCELEROMETER mode.
�START BUTTON
Press START button at each mode for internal calibration.
�MEMORY BUTTON
At the end of 0 TO 60 MILE (0 to 100Km) and 1/4 MILE (400
METER) measurement, press the MEMORY button until the
desired memory location, MEMORY# 1~ MEMORY#5 shows in
the display. Then press START button to store the new
measurement information. The measurements are stored in
memory.
Press the MEMORY button to check stored measurement at
the MEMORY #1 ~#5, which it toggles from MEMORY#1 to #5
by pressing the MEMORY button, at any time except Radar
Device mode and a measurement is not running. Press the UP
and DOWN button to scroll the measurement data. Press
START or MODE button to exit the MEMORY mode.
Press MEMORY button for three (3) seconds to enter set-up.
�UP AND DOWN BUTTONS
Press UP or DOWN buttons to review data from the MEMORY.
�SAFETY ALARM MODE OPERATION
Hold down MEMORY button and turn on the Power to set up
Safety Alarm mode.
a. The TRAXX displays safety mode on/off: ‘SA ON’ or ‘SA
OFF’
b. Select ‘SA ON’ or ‘SA OFF’ by using UP/DOWN buttons.
When voice mode is off, ‘On’ gives “one beep” and ‘Off’
gives “two beeps” .
c. Press Memory button to set ‘On’ or ‘Off’. If you select
‘Off’ by pressing Memory button, the unit exits the safety
alarm mode.
If you select ‘On’ by pressing Memory, it displays Safety
Alarm Level. Press ‘UP/DOWN’ button to adjust the Gforce level. Long button press makes fast level
adjustment. Press Memory button to exit this mode.
d. Factory default is Safety Alarm ‘On’ and level is ‘0.6G’.
The level can be set minimum 0.2G to maximum 2.0G.
Safety alarm ‘On’/’Off’ and level are stored in the
memory.
It makes warning sound whenever you exceed your level
setting.
17
TRAXX
OWNER’S MANUAL
16
TRAXX
OWNER’S MANUAL
SA ON SA OFF
SA 0.6

RADAR DEVICE MODE OPERATION
�CITY/ HIGHWAY MODE
When TRAXX is in Radar Detector mode, it displays
'HIGHWAY' or 'CITY'. To toggle HIGHWAY/CITY mode, press
UP button. In City mode, X band is not detected and K/Ka band
sensitivity is lowered. The CITY mode can reduce false alerts,
which caused in urban areas by automatic door openers and
alarm systems.
�BACKLIGHT ON/OFF
Press START button to turn on/ off the backlight at Radar
Device mode.
�VG-2 SELECT
Hold down the START button for three seconds. It will disengage
VG-2 feature. To engage it again, press START button for three
seconds.
�SELECT TONE
Hold down the MEMORY button for three seconds. The TRAXX
will change tone to ALTO or SOPRANO.
�MUTE MODE
Mute can be used when you manually turn the audio alert off.
Press MEMORY button to silence the alert sound. To restore
audio alarm, press MEMORY button again.
�VOICE ON/OFF
Press DOWN button to turn off voice messages. To restore
voice messages on, press DOWN button again.
�RADAR/ LASER ALERT DISPLAY
When TRAXX receives each Radar, Laser and VG-2 signal, it
displays a detection band with voice alarm. The signal strength
level of Radar is displayed as follows.
X Band Detection
K Band Detection
Ka Band Detection
LASER Detection
VG-2 Detection
19
TRAXX
OWNER’S MANUAL
18
TRAXX
OWNER’S MANUAL
VG2-ON VG2-OFF
CITY HIGHWAY
MUTE ON MUTE OFF
ALTO SOPRANO
VoiceOn VoiceOff
X
▶▶ ▶▶
K
▶▶ ▶▶ ▶▶ ▶▶ ▶▶ ▶▶
LASER
VG-2
Ka
▶▶

�TEST MODE
Hold down UP button for three seconds, the TRAXX will
demonstrate how it operates when each radar and laser signal
is detected.
X Band signal detected operation
K Band signal detected operation
Ka Band signal detected operation
Laser signal detected operation
VG-2 signal detected operation
TROUBLE SHOOTING
If the device does not turn on:
1. Check the power cord. Be sure all power connectors are
properly installed.
2. Check the fuse that controls power to the cigarette
lighter socket. See your vehicles owner's manual
3. The cigarette lighter socket might be dirty. Clean it with
fine emery cloth to ensure a good and clean connection.
4. Vehicle electrical problem exists.
5. Make sure that the volume control is in the ON position.
CAUTION: Do not place any metal object other than the
cigarette lighter or a cigarette lighter plug in the cigarette lighter
socket.
If the device gives a false Radar/Laser alert when the
vehicle hits or bumps:
1. Check the vehicle's electrical system, including main
battery cable and alternator connections.
2. Install a filter capacitor(470uF. 25volts) on the back of
the cigarette lighter socket, across the power
connections.
If the receiving Radar/Laser signals are weak:
1. Check the angle of device.
2. Point device to the horizon.
3. Radar antenna / laser sensor is obstructed.
4. Relocate the device.
21
TRAXX
OWNER’S MANUAL
20
TRAXX
OWNER’S MANUAL
X
▶
X
▶▶
X
▶▶▶▶▶▶
K
▶
K
▶▶
K
▶▶ ▶▶ ▶▶ ▶▶ ▶▶ ▶▶
Ka
▶▶
Ka
▶▶ ▶▶
Ka
▶▶ ▶▶ ▶▶ ▶▶ ▶▶ ▶▶
LASER
VG-2

FCC INFORMATION
This product has been designed and certificated to comply with
Part 15 of the FCC Rules. Operation is subject to the following
two conditions: (1) this device may not cause harmful
interference, and (2) this device must accept any interference
received, including interference that may cause undesired
operation.
Any changes or modifications not expressly approved by K.A.T.
Inc. may void your authority to use this product.
FEATURE MEMORY
The TRAXX will automatically remember your settings when
the unit is turned off or removed from the power. All features
selected are retained in memory.
a. STORED TEST DATA AT MEMORY (#1~#5)
b. BACKLIT ON/OFF
c. BEEP SOUND (SOPRANO-ALTO)
d. HIGHWAY-CITY
e. COMBO-ACCELEROMETER MODE
f. VOICE ON-OFF
g. VG-2 ON-OFF
h. SETUP DATA
i. CALIBRATION DATA
j. SAFETY ALARM ON-OFF
k. SAFETY ALARM LEVEL
FACTORY RESET
Press DOWN button for five (5) seconds to enter Factory
Reset. When the display is blinking ‘RESET’, press START
button to reset all data to factory default. If you do not want to
factory reset, press MEMORY button to exit.
- Clear all measurement data
- Set-up items
- Calibration data
Factory reset default:
a. BACKLIT ON
b. SOPRANO
c. COMBO MODE
d. HIGHWAY
e. VOICE ON
f. VG-2 ON
g. SETUP DATA DEFAULT
h. CALIBRATION DATA DEFAULT
i. SAFETY ALARM ON
REPLACING FUSE
To replace the fuse, unscrew the top of the plug. Remove and
check the fuse to see if it has blown. If it has, replace it.
23
TRAXX
OWNER’S MANUAL
22
TRAXX
OWNER’S MANUAL

SPECIFICATIONS
25
TRAXX
OWNER’S MANUAL
24
TRAXX
OWNER’S MANUAL
LIMITED WARRANTY
RADAR
Receiver Type: Dual Conversion Superheterodyne
Antenna Type: Linear Polarized. Self-Contained
Device Type: Frequency Discriminator
Frequency of Operation: 10.525GHz/±50MHz(X-Band)
LASER
Receiver Type: Pulsed Laser Signal Receiver
Device Type: Digital Signal Processor
Opto Sensor: Photo Diode with Convex Condenser
Antenna
24.150GHz/±100MHz(K-Band)
34.700GHz/±1,300MHz
(Ka Super Wideband)
Lens
ACCELEROMETER SENSOR
3-axis(x,y,z) with error compensation : +/-2g
GENERAL
Temperature Range: -20°C to + 70°C
Power Requirements: 12~15V DC, 150mA (Negative Ground)
Dimensions HxWxD: 1.2〃X 2.9〃X 4.6
Weight: appr. 4.0ounces
〃
The manufacturer warrants your TRAXX against all defects in
materials and workmanship for a period of one (1) year from
the date of the original purchase, subject to the following terms
and conditions: The sole responsibility of the manufacturer
under this Warranty is limited to either repair or, at the option of
the manufacturer, replacement of the TRAXX. There are no
expressed or implied warranties, including those of fitness for a
particular purpose of merchantability, which extend beyond the
face hereof. Some states do not allow limitations on how long
an implied warranty lasts, so the above limitations may not
apply to you.
SERVICE
If you wish to return the TRAXX, please contact KAT Inc.
Phone: (915) 533-1335
Fax: (915) 533-1344
*Specifications are typical. Individual units might vary.
Specifications are subject to change without notice.

 Loading...