

Page 1

KASPERSKY LAB
Kaspersky Security® 5.5
for Microsoft Exchange Server
2003
ADMINISTRATOR'S
GUIDE
Page 2

KASPERSKY SECURITY 5.5
FOR MICROSOFT EXCHANGE SERVER 2003
Administrator's
Guide
© Kaspersky Lab
http://www.kaspersky.com
Revision date: November 2006
Page 3

Table of Contents
CHAPTER 1. INTRODUCTION ...................................................................................... 7
1.1. Threats to the computer security .......................................................................... 7
1.2. The purpose and major functionality of the application...................................... 10
1.3. Hardware system requirements.......................................................................... 12
1.4. Software system requirements ...........................................................................12
1.5. Distribution kit ...................................................................................................... 12
1.6. Services provided for registered users ............................................................... 13
1.7. Conventions......................................................................................................... 14
CHAPTER 2. OPERATION OF THE APPLICATION .................................................. 15
2.1. Security Server architecture................................................................................ 16
2.2. Server protection deployment............................................................................. 17
2.3. Server protection system maintenance .............................................................. 18
2.4. Application’s operation on a cluster of servers................................................... 18
CHAPTER 3. INSTALLING, UPDATING AND REMOVING THE APPLICATION..... 20
3.1. Installing the application ......................................................................................20
3.1.1. First-time installation ..................................................................................... 21
3.1.2. Reinstalling the application........................................................................... 24
3.2. Removing the application.................................................................................... 25
3.3. Upgrading from a previous version..................................................................... 25
CHAPTER 4. STARTING USING THE APPLICATION............................................... 26
4.1. Starting the application........................................................................................ 26
4.2. Application interface ............................................................................................26
4.2.1. Main application window .............................................................................. 26
4.2.2. Shortcut menu .............................................................................................. 28
4.3. Creating the list of managed servers.................................................................. 30
4.4. Connecting the Management Console to the server ......................................... 31
4.5. Minimum required configuration.......................................................................... 32
4.6. Mail server protection without additional configuration....................................... 33
4.7. Verifying the application performance ................................................................ 35
Page 4

4 Kaspersky Security 5.5 for Microsoft Exchange Server 2003
4.7.1. Testing the anti-virus protection system ...................................................... 35
4.7.2. Testing the anti-spam protection system..................................................... 36
CHAPTER 5. UPDATING THE ANTI-VIRUS AND THE CONTENT FILTRATION
DATABASES.............................................................................................................. 38
5.1. Manual updating.................................................................................................. 39
5.2. Automatic updates............................................................................................... 40
5.3. Selecting the updates source.............................................................................. 41
5.4. Configuring the connection settings.................................................................... 43
5.5. Running updates under a different user account ............................................... 45
CHAPTER 6. ANTI-VIRUS PROTECTION .................................................................. 47
6.1. Anti-virus protection levels................................................................................... 49
6.2. Enabling and disabling the anti-virus server protection. Selecting anti-virus
protection level ................................................................................................... 51
6.3. Scanning attachments......................................................................................... 53
6.4. Scanning of routed e-mail traffic ......................................................................... 56
6.5. Selecting actions to be performed with objects.................................................. 57
6.6. Background scan................................................................................................. 62
CHAPTER 7. ANTI-SPAM PROTECTION................................................................... 65
7.1. Enabling/disabling anti-spam protection............................................................. 66
7.2. Selecting the action to be performed with the message.................................... 67
7.3. Configuring TCP/IP settings................................................................................ 70
7.4. Configuring e-mail filtration.................................................................................. 70
CHAPTER 8. APPLICATION'S OPERATION EFFICIENCY....................................... 72
8.1. Anti-virus protection efficiency............................................................................. 72
8.2. Anti-spam protection efficiency ........................................................................... 73
CHAPTER 9. BACKUP COPYING ............................................................................... 74
9.1. Viewing backup storage...................................................................................... 75
9.2. Backup storage filter............................................................................................ 77
9.3. Restoring objects from the backup storage........................................................ 80
9.4. Sending e-mails to addressees .......................................................................... 81
9.5. Sending objects for analysis ............................................................................... 81
9.6. Deleting objects from the backup storage .......................................................... 82
9.7. Configuring the backup storage settings ............................................................83
Page 5

Table of Contents 5r
CHAPTER 10. NOTIFICATIONS.................................................................................. 86
10.1. Creating a notification template......................................................................... 87
10.2. Viewing and editing notification parameters..................................................... 91
10.3. Customizing general notification settings .........................................................91
CHAPTER 11. PREVENTING VIRUS OUTBREAKS.................................................. 93
11.1. Creating a new virus outbreak counter............................................................. 95
11.2. Viewing and modifying virus outbreak notification settings.............................. 99
CHAPTER 12. REPORTS........................................................................................... 100
12.1. Receiving reports............................................................................................. 102
12.1.1. Creating a report template........................................................................ 104
12.1.2. Viewing and fine-tuning the report templates .......................................... 107
12.2. Viewing reports................................................................................................ 108
CHAPTER 13. APPLICATION’S EVENT LOGS........................................................ 111
13.1. Configuring the diagnostics level ....................................................................112
13.2. Configuring log settings................................................................................... 114
CHAPTER 14. LICENSE KEYS.................................................................................. 115
14.1. License information .........................................................................................117
14.2. Installing the license key ................................................................................. 119
14.3. Removing a license key .................................................................................. 121
14.4. License-related notifications............................................................................ 121
14.5. Unprotected storage areas ............................................................................. 122
CHAPTER 15. APPLICATION MANAGEMENT USING KASPERSKY
ADMINISTRATION KIT............................................................................................ 124
15.1. Managing policies............................................................................................ 126
15.1.1. Creating a policy ....................................................................................... 126
15.1.2. Viewing and editing policy settings .......................................................... 130
15.1.2.1. Viewing information about the application ........................................ 131
15.1.2.2. Enabling / disabling server protection ............................................... 132
15.1.2.3. Scanning of attachments................................................................... 133
15.1.2.4. Scanning of routed mail..................................................................... 134
15.1.2.5. The choice of actions over objects.................................................... 135
15.1.2.6. The choice of actions over spam messages .................................... 136
15.1.2.7. Configuring the server protection productivity................................... 137
15.1.2.8. Updating the anti-virus and content filtration databases................... 138
Page 6

6 Kaspersky Security 5.5 for Microsoft Exchange Server 2003
15.1.2.9. Notifications on detected objects....................................................... 139
15.1.2.10. Virus outbreak notification ...............................................................140
15.1.2.11. General notification settings ............................................................140
15.1.2.12. Additional settings............................................................................ 141
15.1.2.13. Registration of events on program operation on Administration
Server.................................................................................................... 142
15.1.2.14. Reviewing the results of policy application ..................................... 144
15.2. Management of application settings ............................................................... 145
15.2.1. Reviewing the information about application........................................... 147
15.2.2. Reviewing the license key information..................................................... 148
15.2.3. Start background scan ............................................................................. 148
15.2.4. Selection of protected storage ................................................................. 149
15.2.5. Viewing reports......................................................................................... 150
15.3. Task management .......................................................................................... 152
15.3.1. Running and stopping tasks..................................................................... 154
15.3.2. Configuring task parameters .................................................................... 155
CHAPTER 16. FREQUENTLY ASKED QUESTIONS............................................... 156
APPENDIX A. TABLE OF SUBSTITUTION MACROS ............................................. 160
APPENDIX B. CONTACTING THE TECHNICAL SUPPORT SERVICE ................. 163
APPENDIX C. GLOSSARY......................................................................................... 165
APPENDIX D. KASPERSKY LAB............................................................................... 170
D.1. Other Kaspersky Lab Products ........................................................................ 171
D.2. Contact Us ........................................................................................................ 179
APPENDIX E. LICENSE AGREEMENT..................................................................... 180
Page 7

CHAPTER 1. INTRODUCTION
The main source of viruses today is the global Internet. Most virus infections
happen via e-mail. The facts that almost every computer has e-mail client
applications installed and that malicious programs are able to take a full
advantage of software address book in order to find new victims are favorable
factors for the distribution of malware. Without even suspecting it, the user of an
infected computer is sending infected e-mail messages to his or her contacts,
who, in turn, send new waves of infected messages and so on. It is not
uncommon when infected files, due to someone's negligence, enter commercial
mailing lists of large companies. In this case, the virus will affect not just five, but
hundreds or even thousands recipients of such mailings who then will send
infected files to dozens thousands of their contacts.
Apart from the threat of virus or malware infection, there is a problem of
unsolicited e-mail messages (SPAM) and misuse of the Internet resources.
Although not a direct threat, unsolicited e-mail messages increase the load on
the mail servers, fill mailboxes with unwanted messages, cause the loss of
working time and inflict serious financial losses.
Additionally, it is to be noted that the newest malicious programs use the socalled spamming technologies for efficient mass distribution and the methods of
social psychology to make the user open the message, etc. Therefore, SPAM
filtering is important not only for convenience, but also in order to protect your
computer against some new types of viruses.
It is now acknowledged that information has become an important asset. At the
same time, in order to gain profit through the use of the information, it has to be
available to the company's employees, clients and partners. This raises the issue
of data security and, as its important element, the issue of protection of the
corporate mail servers against the external threats, preventing virus outbreaks
within the corporate networks and filtering out the unsolicited correspondence.
1.1. Threats to the computer
security
There are a vast number of threats that could affect your computer today.
Reading this chapter will give you a general understanding of them.
Worms
This malicious program category largely exploits operating system vulnerabilities to spread itself. The class was named for the way the worms
Page 8
8 Kaspersky Security 5.5 for Microsoft Exchange Server 2003
crawl from computer to computer, using networks, e-mail, and other data
channels. This feature gives many worms a rather high speed in spreading themselves.
Worms penetrate a computer, calculate the network addresses of other
computers, and send a burst of self-made copies to these addresses. In
addition to network addresses, worms often utilize data from e-mail client
address books. Some of these malicious programs occasionally create
working files on system disks, but they can run without any system resources at all (with the exception of RAM).
Viruses
Programs that infect other programs, adding their own code to them to
gain control of the infected files when they are opened. This simple definition explains the fundamental action performed by a virus – infection.
Trojans
Programs that carry out unauthorized actions on computers, such as deleting information on drives, making the system hang, stealing confidential
information, etc. These malicious programs are not viruses in the traditional sense of the term, since they do not infect other programs or data;
Trojans are not capable of independently penetrating computers. Their
users spread them under the guise of useful software. The damage that
they incur can exceed that done by traditional virus attacks by several
fold.
Recently, worms have become the most widespread type of malware, followed
by viruses and Trojans. Some malicious computer programs have characteristics
of two or even all three of the above categories.
Henceforth in the text of this Administrator’s Guide the term "virus" will
be used to refer collectively to viruses, Trojan Horses, and worms. A
particular type of malware will be mentioned only when it is required.
The following potentially dangerous types of malware have also become
widespread:
Adware
Program code included in software, unbeknownst to the user, designed to
display advertisements. Adware is usually built into software that is distributed for free. The advertisement is situated in the program interface.
These programs often also collect personal data on the user and send it
back to their developer, change browser settings (start page and search
pages, security levels, etc.) and also create traffic that the user cannot
control. All this can lead to breach of the security policy and to direct financial losses.
Page 9

Introduction 9
Riskware
Potentially dangerous software that does not have a malicious function but
can be used by hackers as an auxiliary component for a malicious code,
since it contains holes and errors. Under certain conditions, having such
programs on your computer can put your data at risk. These programs include, for instance, some remote administration utilities, keyboard layout
togglers, IRC clients, FTP servers, and all-purpose utilities for stopping
processes or hiding their operation.
Spyware
Software that collects information about a particular user or organization
without their knowledge. You might never guess that you have spyware
installed on your computer. In general, the goal of spyware is to:
• trace user actions on a computer;
• gather information on the contents of the hard drive; in such
cases, this more often than not involves scanning several
directories and the system registry in order to compile a list of
the software installed on the computer;
• gather information on the quality of the connection, bandwidth,
modem speed, etc.
Jokes
Software that does not do any direct damage but displays messages stating that damage has already been done or will be done under certain conditions. These programs often warn the user of dangers that do not exist,
such as messages that pop up about formatting the hard drive (although
no formatting actually takes place) or detecting viruses in uninfected files.
PornWare
Programs that make modem connections with various pay-per-use websites, generally pornographic in nature.
Hack Tools
Software used by hackers to penetrate your computer for their own ends.
They include various illegal vulnerability scanners, password cracking
programs, and other types of programs for cracking network resources or
penetrating a system.
Other dangerous programs
Programs created to set up DoS attacks on remote servers, hacking into
other computers, and programs that are part of the development environment for malicious programs. These programs include hack tools, virus
Page 10

10 Kaspersky Security 5.5 for Microsoft Exchange Server 2003
builders, vulnerability scanners, password cracking programs, and other
types of programs for cracking network resources or penetrating a system.
Although malicious programs are distributed mainly via email and the Internet, a
floppy disk or a CD can also be a source of infection. Therefore, the task of
comprehensive protection from potential threats now extends far beyond simple
regular scans for viruses, and includes the more complex task of real-time antivirus protection.
Another threat that e-mail users face daily is spam. Spam is anonymous junk email. Spam includes mailings that are marketing, political and provocative in
nature and e-mails asking for assistance. Another category of spam includes emails that ask one to invest large amounts of money or to get involve in pyramid
schemes, e-mails aimed at stealing passwords and credit card numbers, and emails that ask to be sent to friends (chain letters), etc. Spam significantly
increases the load on mail services and increases the risk of losing information
that is important for the user. Spam can be roughly divided into four categories:
• Formal messages – messages that are automatically generated and sent
to recipients by automated mail program functions (as, for example,
notifications of undeliverable messages or confirmation of the user's
registration at some Internet website);
• Probable SPAM - messages that can not be unambiguously identified as
SPAM, but that raise suspicions when checked (for example, some types
of mass mailing and advertising messages);
• Obscene messages– messages that contain obscene language;
• SPAM messages – message that definitely contain SPAM.
1.2. The purpose and major
functionality of the application
Kaspersky Security 5.5 for Microsoft Exchange Server 2003 (hereinafter referred
to as Kaspersky Security) is designed to ensure protection of mailboxes and
public folders located on Microsoft Exchange Server 2003 (hereinafter Microsoft
Exchange Server) against malicious programs and unsolicited e-mail messages
(SPAM).
Kaspersky Security performs the following functions:
• scanning and analyzing incoming and outgoing e-mail messages for the
presence of malicious objects. This analysis processes the bodies and
attachments of e-mail messages. Depending on the settings configured,
the application will disinfect or delete a malicious object or will add a
warning message to such objects;
Page 11

Introduction 11
• scanning e-mail messages received by the Exchange server via SMTP
protocol for SPAM including the analysis of all attributes and attachments
of the message. Depending on the settings, the application will deliver the
message to the Inbox folder, move the message to the Junk E-mail
folder, block the message or delete it. In addition to the first two actions,
special markers can be added to the subject line of the message;
• saving backup copies of the message's objects before an attempt to
disinfect or delete such object (during an anti-virus scan) and copies of
messages before they are blocked or deleted (during an anti-spam scan);
copies are saved to a special storage for the consequent restoring which
prevents the loss of data. Configurable filters allow to easily locate the
original copies of objects;
• notifying the sender, the recipient and the system administrator about
messages that contain malicious objects or may contain SPAM.
• maintaining the event log and creating regular reports about the operation
of the application, the status of the anti-virus protection and anti-spam
protection. The application allows generation of reports using templates
with a preset level of detail and at a required interval;
• detecting virus outbreaks as they emerge and notifying about such events.
The application identifies attempts of mass-mailing infected messages
both from the Internet and from the computers within the corporate
network;
• configuring application settings depending on the intensity and the nature
of the traffic as well as the characteristics of the hardware installed
(amount of RAM, speed, number of processors, etc.);
• updating the anti-virus database and content filtration database
automatically or manually. The databases can be updated from the
Kaspersky Lab's FTP and HTTP web servers or from a local/network
folder that contains the latest set of updates;
• scanning old (previously scanned) messages for the presence of new
viruses each time your anti-virus database is updated or according to the
schedule. This task is performed as a background scan and does not
have any considerable effect on the performance of the mail server;
• creating the list of protected storage areas, which offers additional
flexibility in regards with license restrictions on the number of protected
mailboxes;
• managing license keys.
Kaspersky Security 5.5 for Microsoft Exchange Server 2003 includes the
following components:
Page 12

12 Kaspersky Security 5.5 for Microsoft Exchange Server 2003
• Security Server performs the scan of the mail traffic for viruses and
spam, updates the anti-virus database and content filtration database,
provides administrative services for remote management, configuring and
ensuring the integrity of the application and of the data stored.
• Management Console that provides the user interface for managing the
administrative services of the application and enables you to configure
settings and manage the server component. The management module is
implemented as the extension of the Microsoft Management Console.
1.3. Hardware system requirements
• Intel Pentium 300 MHz or higher;
• about 256 MB free RAM (recommended);
• 50 MB free disk space for the application files (in addition to the size of the
backup storage and other service folders).
1.4. Software system requirements
Requirements to protected server:
• Microsoft Windows Server 2000 with Service Pack 4 installed or higher /
Microsoft Windows 2000 Advanced Server with Service Pack 4 and higher
installed or higher / Microsoft Windows Server 2003 Standard Edition and
higher / Microsoft Windows Server 2003 Enterprise Edition and higher;
• Microsoft Exchange Server 2003 Enterprise Edition / Standard Edition.
Requirements to the computer from which the application management will
be performed:
• Microsoft Windows 2000 with Service Pack 4 installed or higher /
Microsoft Windows XP / Microsoft Windows 2003;
• Microsoft Management Console (ММС) version 1.2 or higher.
1.5. Distribution kit
You can purchase the product from our dealers (retail box) or online (for
example, you may visit www.kaspersky.com
The retail box package includes:
• a sealed envelope with the installation CD containing the application files;
• User's Guide
• a license key written on a special disk;
and follow the E-Store link).
Page 13
Introduction 13
• License Agreement
Before you open the envelope with the CD make sure that you have
carefully read the license agreement.
If you buy Kaspersky Security online, you will download the application from the
Kaspersky Lab's website. In this case, the distribution kit will include this Guide
along with the application. The license key will be e-mailed to you upon the
receipt of your payment.
License Agreement is a legal contract between you and Kaspersky Lab Ltd. that
contains the terms and conditions on which you may use the anti-virus product
that you have purchased.
Read the License Agreement carefully!
If you do not agree with the terms of this License Agreement, you can return the
box with the software product to the dealer you purchased it from for a full refund
provided that the envelope with the installation CD remained sealed.
By opening the envelope containing the installation CD or by installing the
product on your computer you accept all terms and conditions of the License
Agreement.
1.6. Services provided for registered
users
Kaspersky Lab Ltd. offers to all legally registered users an extensive service
package enabling them to boost the performance of Kaspersky Security 5.5 for
Microsoft Exchange Server 2003.
After purchasing a subscription, you become a registered user and, during the
period of your subscription, you will be provided with the following services:
• you will be receiving new versions of the purchased software product;
• support on issues related to the installation, configuration and use of the
purchased software product. Services will be provided by phone or via
email;
• information about new Kaspersky Lab products and about new viruses
appearing worldwide (this service is provided to users who subscribe to
the Kaspersky Lab's newsletter).
Page 14
14 Kaspersky Security 5.5 for Microsoft Exchange Server 2003
Support on issues related to the performance and the use of operating
systems or other technologies is not provided.
1.7. Conventions
Various formatting features and icons are used throughout this document
depending on the purpose and the meaning of the text. The table below lists
adopted conventions used in the text.
Format feature Meaning/Usage
Bold font
Note.
Attention!
In order to perform...,
1. Step 1.
2. …
Task, example
[key] – modifier name
Information messages and command
line text
Titles of menus, menu items, windows,
dialog boxes and their elements, etc.
Additional information, notes
Information requiring special attention
Description of the successive user's
steps and possible actions
Statement of a problem, example of the
demonstration of the application's
capabilities
Command line modifier
Text of configuration files, information
messages and command line
Page 15

CHAPTER 2. OPERATION OF THE
APPLICATION
Kaspersky Security 5.5 for Microsoft Exchange Server 2003 scans and, if it is
possible, disinfects all incoming and outgoing e-mail messages as well as
messages stored at the server. The application analyzes the body of the
message and attached files of any format.
Additionally, Kaspersky Security performs an anti-spam scan of all messages
received by Exchange server via SMTP protocol.
The detection of malicious programs, disinfection of infected objects and
detection of messages that contain any type of SPAM is performed based on the
records contained in the anti-virus and the content filtration databases. These
databases are updated by Kaspersky Lab on a regular basis and the updated
versions are uploaded to the Kaspersky Lab's website. Additionally, the
application uses a special analysis facility called a heuristic analyzer that allows
detecting new viruses that are not even known at the moment.
The application scans objects received by the server in the real-time format. The
user cannot open and view a new message before it is scanned.
E-mail messages stored at the server and the content of all public folders are
scanned each time the anti-virus database is updated or according to the
schedule. The scan may identify new viruses that were not described in the antivirus database at the time when previous scans were performed. This task is
performed in the background mode and does not have any effect on the
performance of the mail server. If the user requests a message that has not been
scanned with the updated database, such message will be re-scanned prior to
the delivery to the user. Thus, the user will always receive e-mail messages that
have been analyzed using the latest version of the database, no matter when a
particular message arrived to the server.
The application processes each object applying actions specified by the
administrator to objects of a particular type. For instance, an infected object can
be disinfected, deleted or replaced with a notification. The administrator may
select a mode in which the application will deliver messages with infected objects
to the user, although it will change the object's name (by adding information
about the virus) and the object's extension.
Before processing an object, the application can save a copy of this object to a
special backup storage for the consequent restoring or sending to Kaspersky Lab
for analysis.
Page 16

16 Kaspersky Security 5.5 for Microsoft Exchange Server 2003
The application sends notifications about events occurred to the administrator,
the recipient and the sender of the infected message and also places a record
about this event into the Kaspersky Security application log file and into the
Microsoft Windows event log.
If the virus outbreaks detection facility is enabled, the application will register the
virus activity level and will send a notification about the virus outbreak threat or
place a corresponding record into the Microsoft Windows event log and into the
Kaspersky Security application log file.
2.1. Security Server architecture
The server component of the application, Security Server, consists of the
following subsystems:
• E-mail VSAPI Interceptor intercepts objects arriving to Microsoft
Exchange Server and forwards them to the anti-virus scan subsystem. It is
integrated into the Microsoft Exchange Server processes using VSAPI 2.5
technology.
• SMTP E-mail Interceptor intercepts objects arriving to Microsoft
Exchange Server via SMTP protocol and forwards them to the anti-spam
scan subsystem.
• Anti-spam Scan Subsystem scans e-mail messages for spam. This
feature is implemented as a Microsoft Windows service, which starts
automatically when a message that must be scanned arrives.
• Anti-virus Scan Subsystem performs anti-virus scan of objects. This
component includes several processes with one anti-virus kernel per
process. The anti-virus scan subsystem also includes storage of
temporary objects for scanning objects in RAM. The storage is located in
working folder Store that is created in the installation folder and must be
excluded from the scan scope of any anti-virus applications installed in the
corporate network.
• The Internal Application Management and Integrity Control Module is
launched in a separate process and is a Microsoft Windows service. This
service is launched automatically and does not depend on the state of
Microsoft Exchange Server (started, stopped) which allows configuring the
application even if Microsoft Exchange Server is stopped. For the correct
operation of the application, the Internal Application Management
Module must always be running; stopping this service manually is not
recommended.
Page 17
Operation of the application 17
2.2. Server protection deployment
In order to create the system of mail servers protection against malicious programs and SPAM using Kaspersky Security 5.5 for Microsoft
Exchange Server 2003:
1. Install the Security Server component on all protected Exchange
servers. The installation shall be performed from the distribution kit
individually for each server.
2. Install the Management Console on a computer within the
corporate network. The Management Console provides a centralized
access to all network resources from a single administrator's
workstation; therefore, it can be installed on one computer only.
However, if several administrators are working together, the
Management Console can be installed to each administrator's
computer.
If the Management Console is not installed, the application will function within the default limitations and using
the default settings (see section 4.6, page 33).
The server protection against malicious programs and
SPAM will be enabled automatically when Microsoft Exchange Server is started.
3. Create the list of managed servers (see section 4.3, page 30)
4. Connect the Management Console to the servers (see section 4.4,
page 31).
5. Configure the protection system for each server:
• Configure the anti-virus database and content filtration
database updating settings (details see Chapter 5, page 38).
• Verify the correctness of the settings and of the application's
operation
o using a test "virus" EICAR (see section 4.7.1, page 35).
o using a test message that contains spam attributes (see
section 4.7.2, page 36).
• Configure the notification system that issues notifications about
events registered during the application's operation (see
Chapter 10, page 86)
• Configure the event logs and reports (Chapter 12, page 100,
Chapter 13, page 111).
Page 18

18 Kaspersky Security 5.5 for Microsoft Exchange Server 2003
• Configure the settings for detecting virus outbreaks and
notification about such events. (Chapter 11, page 93).
2.3. Server protection system
maintenance
Maintaining the server protection system in the up-to-date state involves:
• periodic updating of the anti-virus and the content filtration databases;
• receiving and processing notifications about detection of objects
containing malware or SPAM and about threats of virus outbreaks;
• regular review of reports about the application operation and about the
state of the mail server protection;
• processing and cleaning of the backup storage.
2.4. Application’s operation on a
cluster of servers
Kaspersky Security 5.5 for Microsoft Exchange Server 2003 does not fully
support the cluster technology; however, it will function correctly on a cluster of
servers treating each node as a separate physical Exchange server.
A message arriving at a virtual Exchange server will be forwarded to one of the
cluster’s nodes. Streams of e-mail messages for each node may not intersect.
The application will process a message at the node to which this message had
been forwarded by the virtual Exchange server.
The scan results for each node of the cluster, namely,
• backup storage contents;
• information included into the reports;
• the group of events registered in the Microsoft Windows event log and in
the application’s log files;
• values of virus outbreak counters
will be provided only for those messages that had been forwarded to this node of
the cluster by the virtual Exchange server.
Page 19
Operation of the application 19
In order to create protection of Microsoft Exchange Server, installed on
the cluster, against malware and SPAM:
1. Install the Security Server component on each node of the cluster.
The installation shall be performed from the distribution kit
individually for each server.
Specify a folder on a local disk of the server file system as
the installation folder.
Shared disks should not be used for this purpose as when
the Microsoft Exchange Server application is moved to a different node of the cluster, the shared disk will be moved
along with the application.
2. Install the Management Console on a computer within the
corporate network.
3. Create the list of managed servers by adding all cluster nodes as
servers (see section 4.3, page 30).
When adding managed servers and configuring connection
of Management Console to the Server, use the names of
physical servers on which the Security Server is installed.
The use of a virtual Exchange server name may cause an
addressing error when the Microsoft Exchange Server is
moved to a different node of the cluster.
4. Connect the Management Console to the servers (see section 4.4,
page 31).
5. Configure the anti-virus protection system for each server using
identical settings values taking into consideration the following:
• As the backup storage folder, select a folder located on the
physical server where the Security Server component is
installed (see section 9.7, page 83).
• As a folder to be used to store reports and logs, select folders
located on the physical server where the Security Server
component is installed (see section 12.1.2, page 107 and
section 13.2, page 114).
• The list of unprotected storage areas on all servers must match
(see section 14.5, page 122).
Page 20
CHAPTER 3. INSTALLING,
UPDATING AND REMOVING
THE APPLICATION
Before starting installation of the application, make sure that the software and
hardware of your computer meet the installation requirements (details see
section 1.4, page 12).
In order to install, update the version or remove Kaspersky Security 5.5
for Microsoft Exchange Server 2003 from your computer, you will need
administrator privileges on the domain.
3.1. Installing the application
The installer is a Microsoft Windows setup wizard, which will guide you through
several dialogs (steps), which can be navigated using the Back and Next
buttons. The setup wizard will complete its work after clicking the Finish button.
The Cancel button can be used at any moment to exit the wizard.
The wizard will offer you to install the application components of Kaspersky
Security 5.5 for Microsoft Exchange Server 2003 (Security Server and
Management Console). This configuration is recommended at the initial stage of
creating the Exchange servers anti-virus protection system. You can select either
complete or custom installation of the application or repair an incorrect
installation of Kaspersky Security.
After the Management Console is installed, a group Kaspersky Security 5.5 for
Microsoft Exchange Server 2003 and an application icon will appear in
Run/Programs menu in your computer.
The Security Server will be installed on your computer as a service with a set of
attributes as follows:
• name – Kaspersky Security 5.5 for Microsoft Exchange Server 2003;
• startup type – automatic;
• account – Local system.
The properties of the Security Server can be viewed and its operation can be
monitored using standard Microsoft Windows administration tools - Computer
Management/Services. Information about the operation of the Security Server
Page 21
Installing, updating and removing the application 21
is registered and saved in the Microsoft Windows event log on the computer on
which the Security Server is installed.
3.1.1. First-time installation
In order to install Kaspersky Security into your computer run the executable file
on the installation CD included into the distribution package. The installation
process will be facilitated by the setup wizard. Setup wizard will offer you to
configure the installation parameters and start the installation. Following below is
a detailed discussion of each step of the application installation.
The procedure used to install the application from the distribution kit
downloaded from the internet is identical to the procedure used for application installation from the installation CD.
Step 1. Verifying the installed operating system version
Prior to the installation, a check will be performed to determine whether your
operating system, mail application(s) and the Service Packs installed meet the
software requirements of Kaspersky Security 5.5 for Microsoft Exchange Server
2003.
If Microsoft Exchange Server is not installed on your computer or if its version
does not meet the software requirements, a warning will be displayed on your
screen. In this case, you can proceed with the installation, but you will only be
able to use one of the application components – the Management Console.
In order to install the full version of Kaspersky Security, abort the installation
process, install or update your software as per the software requirements and
reinstall Kaspersky Security.
Step 2. Searching for other anti-virus software
This step involves searching for other installed anti-virus products for Microsoft
Exchange Server, which may conflict with Kaspersky Security.
• If an incorrect registration of an anti-virus application for Microsoft
Exchange Server is detected, the installation program will display a
warning message with a suggestion to remove the registration detected.
In order to proceed with the installation of Kaspersky Security, agree to
remove the incorrect registration.
• If other vendors' anti-virus software for Microsoft Exchange server is
detected installed on your computer, a message will be displayed with a
recommendation to remove such existing application before installing
Page 22

22 Kaspersky Security 5.5 for Microsoft Exchange Server 2003
Kaspersky Security. Remove the existing program and then run the
installer of Kaspersky Security again.
• If the setup detects that Kaspersky Security 5.5 for Microsoft Exchange
Server 2003 (release version, MP1) is installed on the computer, it will
suggest upgrading the application to Kaspersky Security 5.5 for Microsoft
Exchange Server 2003 MP2 (see section 3.3, page 25).
• If the setup detects that Kaspersky Anti-Virus for Microsoft Exchange is
installed, it will display a warning. Then you will have to remove the earlier
version of Kaspersky Anti-Virus to install Kaspersky Security. Then run
again the installer from the distribution package of Kaspersky Security.
Step 3. Greeting and License Agreement
As soon as the installer completes checking conformity of software requirements
and searching for installed anti-virus applications, it will display a greeting window
and a window containing the License Agreement.
Read the text of the License Agreement and accept the terms and conditions
contained therein to proceed with the installation.
Step 4. Selecting the type of the installation
In the dialog for setup type selection, specify whether both application
components (Security Server and Management Console) should be installed
(complete installation) or just one of them (custom installation).
If you run installation from the Exchange server that needs to be protected and
you plan to manage the application from this computer, select the complete
installation option. The application will be installed into the default folder
(…\Program files\Kaspersky Lab\Kaspersky Security for Microsoft
Exchange Server).
If you wish to install only one component of the application (either the Security
Server or the Management Console) or to change the default installation folder,
use the custom type of the installation.
Step 5. Selecting application components to be installed
If you selected the custom installation at the previous step, you will have to
specify which application components must be installed on your computer in the
dialog box shown on Figure 1. You can also change the default destination
folder.
If the computer, from which the installation is performed, is a protected Exchange
server, select the Security Server component.
Page 23
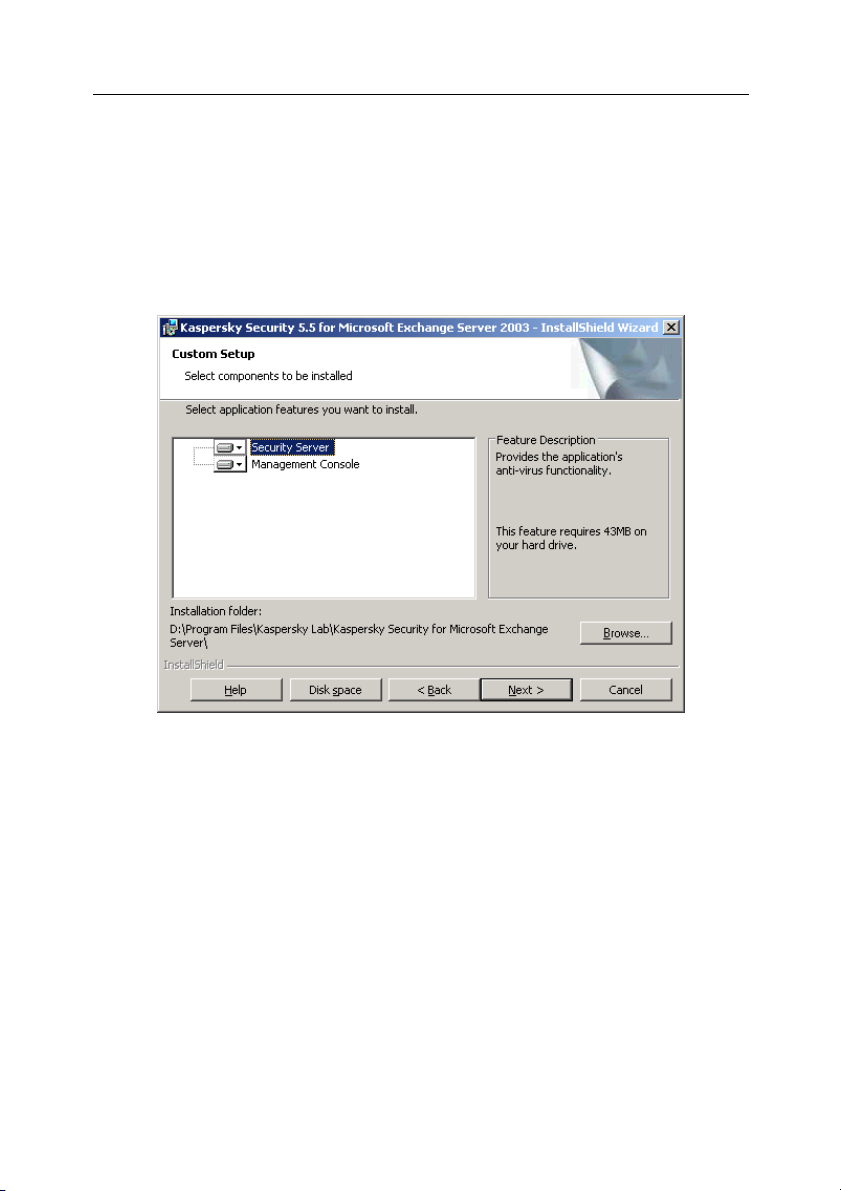
Installing, updating and removing the application 23
If this computer is the administrator's workstation and you plan to manage the
protection of the Exchange servers from this computer, select the Management
Console.
Note that the setup wizard will display reference information about the selected
component and the disk space required for its installation.
By default, the application components will be installed to the Program
files\Kaspersky Lab\Kaspersky Security for Microsoft Exchange Server
folder. You can change the default installation folder using the Browse button.
Figure 1. Selecting components for the installation
Step 6. Enabling server protection
In the Server protection window, you will be offered to enable automatically the
anti-virus protection and server protection against spam immediately after the
wizard completes its work. You can do that manually using the application
Management Console (see section 6.2, page 51).
If the application performance at the level and with the parameters applied by
default (see section 4.6, page 33) meets the requirements of your server, we
advise to accept the option of automatic anti-virus protection startup after
completion of the setup wizard.
Please keep in mind that by default all mailbox storage areas created on the
server will be selected as protected storage areas. If the maximum number of
protected mail accounts quoted by the license you have purchased is less than
Page 24

24 Kaspersky Security 5.5 for Microsoft Exchange Server 2003
the number of storage areas created on the server, you must remove anti-virus
protection from some of these areas before the protection is started (see
section 14.5, page 122).
If you wish to adjust the application settings first, disable automatic activation of
anti-virus and anti-spam protection in the respective checkboxes.
Step 7. Copying files
In order to proceed with the setup, press the Install button in the wizard window.
This will start the process of copying the application files to your computer.
Step 8. Installing the license key
After the installation is complete, press the Finish button in the final window of
the setup wizard.
If you installed the Security Server component, a window prompting you to add a
license key will be displayed after the installation is complete.
The license key is your personal "key" that contains all service information
required for the full-featured functionality of the application, namely:
• support information (who is providing support and how you can get help);
• restriction on the number of mailboxes;
• the license name, number and expiration date.
Install the key to ensure full functionality of the application. In order to do this,
press the Add button and select the key file in the standard Microsoft Windows
File Select dialog box.
If, at the time of the installation, you still do not have the license key (for example
you ordered it from Kaspersky Lab via internet but have not received it yet), you
can install it later when you run the application for the first time using the
Management Console.
You can also install a backup license key that will be activated automatically
upon the expiry of the current license key.
3.1.2. Reinstalling the application
Reinstallation of Kaspersky Security is performed if the initial installation of the
application was incorrect or during program operation the integrity of executable
files was broken.
Page 25
Installing, updating and removing the application 25
In order to reinstall the application, run the executable file from its distribution
package and select the Repair option in the wizard window. This will reinstall
Kaspersky Security using the settings of the previous installation. For example, if
the previous installation was a custom installation, then the reinstallation initiated
by the Repair button will also be a custom type installation.
3.2. Removing the application
You can remove Kaspersky Security from your computer using standard
Microsoft Windows Add/Remove Programs tool or the application distribution kit.
This will remove all installed application's components (i.e. both the Security
Server and the Management Console) from your computer.
During the uninstallation process, a prompt will be displayed asking you to
confirm stopping the Microsoft Exchange Information Store and the Microsoft
Internet Information services. Agree to stop these services to let the uninstallation
process complete its work correctly. Once the uninstallation process is complete,
the initial status of these services will be automatically restored.
3.3. Upgrading from a previous
version
If the installer detects that your business is running Kaspersky Security 5.5 for
Microsoft Exchange Server 2003 (release version, MP1), you can upgrade it to
Kaspersky Security 5.5 for Microsoft Exchange Server 2003 MP2.
You are advised to process objects in the Backup before upgrading.
In order to upgrade, run the setup executable file from the distribution package of
Kaspersky Security. During the installation of Kaspersky Security, the wizard will
ask you to confirm removal of previously installed application. It will be
uninstalled automatically.
During an upgrade of the application, the installer will automatically preserve the
current settings for further use.
Page 26
CHAPTER 4. STARTING USING
THE APPLICATION
4.1. Starting the application
The server component of the application is started automatically at the operating
system startup. If the anti-virus protection of the server and the anti-spam
protection features are enabled, they will start functioning immediately after the
Microsoft Exchange Server is launched.
The operation of the application is controlled from the administrator's workstation
– a computer where the Management Console is installed.
In order to start the Management Console
select the Management Console item in the programs group Kaspersky
Security 5.5 for Microsoft Exchange Server 2003 from the standard
Start / Programs Microsoft Windows menu. This programs group is cre-
ated only on the administrator's workstations when the Management Console is installed.
4.2. Application interface
The user interface of the application is provided by the Management Console
component. The Management Console is a dedicated isolated facility integrated
into MMC.
4.2.1. Main application window
The main application window (see Figure 2) contains a menu, a toolbar, a view
pane and a results pane. The menu provides the files and windows management
functions as well as the access to the help system. The set of buttons on the
toolbar ensures the direct access to some frequently used items of the main
menu. The view pane displays the Kaspersky Security 5.5 for Microsoft
Exchange Server 2003 namespace in the form of the console tree, the results
pane displays the list of all elements of the object chosen in the tree.
Page 27

Starting using the application 27
The Kaspersky Security 5.5 for Microsoft Exchange Server 2003 namespace
may contain several nodes with the names of the servers managed via the
console. The namespace does not contain any elements immediately after the
installation of the Management Console.
Figure 2. Main application window
After a new server is added (see section 4.3, page 30), it is displayed in the
console tree as a node <Server Name>. When the server is selected in the
console tree (see Figure 2) the results pane will display hyperlinks, which can be
used for application control and configuration.
• General settings
– used for viewing general application's operation
settings, license details and information about installed license keys,
renewing the license and configuring the application operation diagnostics
settings.
• Anti-virus protection
– used for viewing and configuring the managed
server's anti-virus protection settings
• Anti-Spam protection
– used for viewing and configuring the settings of
the server protection against unsolicited correspondence (SPAM).
• Updates
– used to configure settings for the anti-virus and content
filtration database update service, to set up an automatic update schedule
and to update databases manually.
If the connection to the server has been established the node will include nested
folders; each of these folders is intended for management of a specific
application feature:
Page 28
28 Kaspersky Security 5.5 for Microsoft Exchange Server 2003
• Notification templates – for configuring notifications about infected or
suspicious objects and messages containing spam detected during the
scan.
• Backup storage – for working with the backup storage where backup
copies of objects are stored; includes the list of objects stored in the
backup storage.
• Report templates – for managing reports; contains a list of report
templates used to create reports about the program operation and the
status of the server protection.
• Virus outbreak counters – for configuring the criteria for identifying virus
outbreaks and settings used in notification about detected outbreaks.
4.2.2. Shortcut menu
Each category of objects in the console tree has its own shortcut menu that
opens after right-clicking an object with the mouse.
In addition to standard MMC commands, this shortcut menu contains commands
used for handling a particular object. The list of objects and the corresponding set
of commands accessible via the context menu are provided in the table below.
Object Command Purpose
Kaspersky
Security 5.5 for
Microsoft
Exchange
Server 2003
<Server name>
Add a new Exchange server with the
Add server
Disconnect from
the server
Connect to the
server
Remove the
server from the
console tree
Security server installed to be
managed via the console.
Disconnect from the currently selected
server.
Establish a connection with the
currently selected server.
Remove the selected server from the
view pane.
Page 29

Starting using the application 29
Create and configure a new notification
Notification
templates
Backup
storage
New notification
New filter
Properties
template about infected and suspicious
objects revealed by a scan and about
messages containing spam.
Create and configure a new filter used
to search for objects located in the
backup storage.
Configure general Backup parameters.
New report
Report
templates
Virus outbreak
counters
Additional shortcut menu commands are also provided for report templates and
for the backup storage objects.
Using the Create a report command you can create a report based on the
selected template.
The Get file command allows you to obtain the original copy of the object that
had been saved before it was processed by the application. Send file for
analysis – send an object from the Backup storage to Kaspersky Lab for
analysis (the action is possible for infected or suspicious objects only).
Send message to recipients – send the message that was deleted or rejected
by the spam scan to recipients.
Properties
Clear report
statistics
New counter
Create a new report template.
Configure general parameters of report
generation.
Delete contents of the statistical
database on program operation used
for creating reports.
Create and configure a new criterion to
be used for identifying a virus outbreak
and settings to be used for notification
about such outbreak.
Page 30
30 Kaspersky Security 5.5 for Microsoft Exchange Server 2003
4.3. Creating the list of managed
servers
In order to be able to control the application via the console, the Exchange
server, where the Security Server component is installed, must be added to the
list of managed servers. You can add either a local computer or any Exchange
server within the network to this list. Adding a server may be accompanied by
establishing a connection between the Management Console and the Kaspersky
Security application.
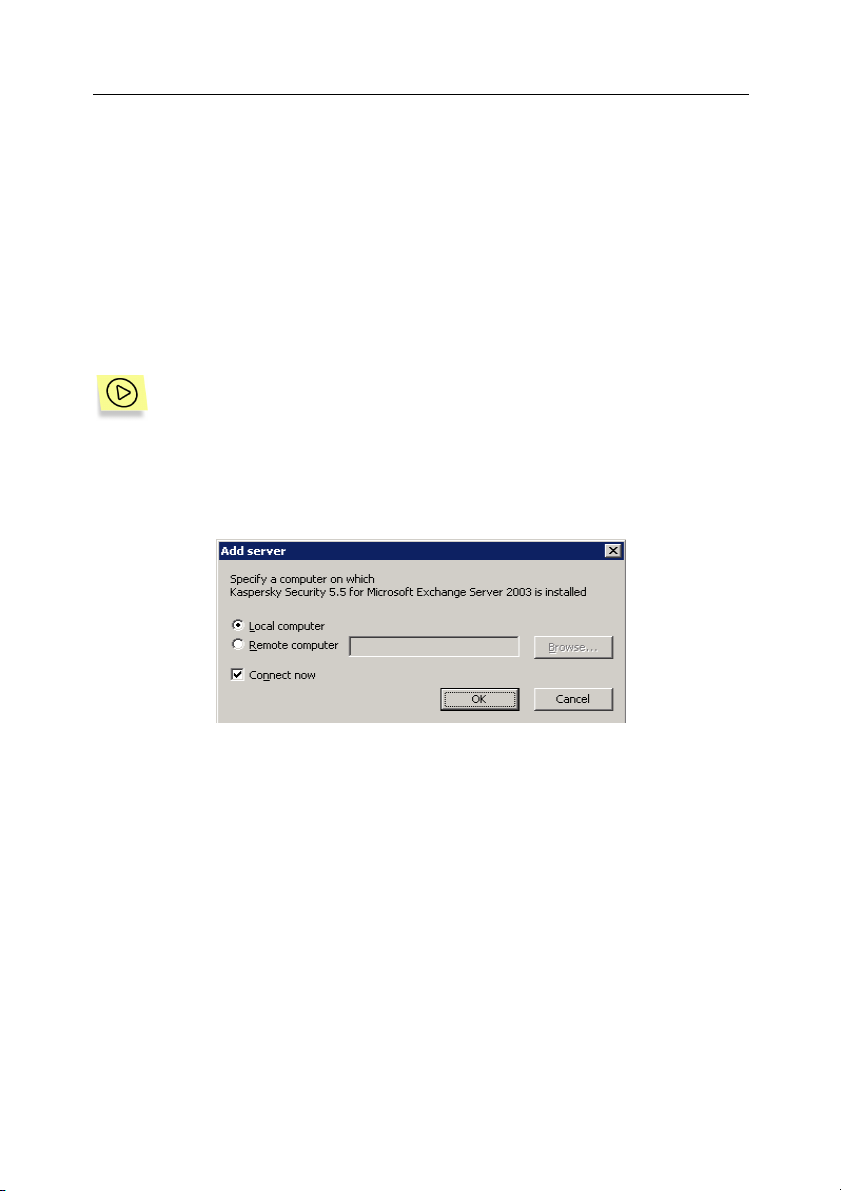
In order to add a server to the list of managed servers:
1. Select Kaspersky Security 5.5 for Microsoft Exchange Server
2003 node in the console tree, open the shortcut menu and select
the Add server command or a similar item from the Action menu.
This will open the Add server window (see Figure 3).
Figure 3. The Add server dialog box
2. Specify a computer with the Security Server component installed. If
the server component is installed on the same computer as the
Management Console, select Local computer. In order to add an
Exchange server from the computers installed in the network, select
Remote computer and specify the computer name in the entry
field. You can enter the name manually; to do this, specify one of
the following:
• IP address;
• full domain name (FQDN in the following format <Computer
name>.<DNS-domain name>);
• computer's name in the Microsoft Windows network (NetBIOS
name);
Page 31

Starting using the application 31
or select the computer from the list using the Browse button.
Later on, the Management Console will use this name to establish connection with the Security Server.
The connection is established using DCOM protocol.
In order to establish connection between the Management Console and
Kaspersky Security when adding the server, check the Connect now
box (details see section 4.4, page 31).
The server you select must have the Security Server component installed.
As a result, the server that you selected will be displayed as a <Server name>
node in the console tree. The local computer will be displayed as the <Server
name>(localhost). If the connection with the server was successfully
established, the node structure will include nested folders: Notification
templates, Backup storage, Report templates and Virus outbreak counters.
If the connection has not been established or could not be established you can
connect to such server manually (see section 4.4, page 31).
In order to remove a server from the list of managed servers,
select the node that corresponds to the server you wish to remove in the
console tree, open the shortcut menu and select the Remove the server
from the console tree command or use a similar item in the Action
menu.
As a result, the selected node will be removed from the console tree.
4.4. Connecting the Management
Console to the server
In order to be able to configure and manage Kaspersky Security 5.5 for Microsoft
Exchange Server 2003 using the Management Console, you have to connect to
the Security Server component installed on the server. The application will then
receive information from the server and display it as the console tree.
Page 32

32 Kaspersky Security 5.5 for Microsoft Exchange Server 2003
In order to be able to connect to the Security Server, the user must
have the local administrator rights for the computer to which the connection is attempted.
The rights verification is performed based on the standard Microsoft
Windows network user authentication process.
In order to connect to the Security Server:
select the node that corresponds to the necessary server in the console
tree, open the shortcut menu and select the Connect to the server command or use a similar item in the Action menu.
If the connection with the server was successfully established, the settings of this
server will be displayed in the main application window: the node structure will
include folders Notification templates, Backup storage, Report templates and
Virus outbreak counters.
If the connection could not be established, the application will display a warning
with the indication of the problem and a suggestion to connect next time the
Management Console is started.
One Security Server can have several Management Consoles connected to it. In
this case, working with the same server from several consoles, you should
regularly update information on each console. In order to do this, use the
Refresh command available via the shortcut menu or the similar command in the
Action menu.
4.5. Minimum required configuration
After the installation, the application will start working with the minimum set of
parameters, most of which are default optimum settings recommended by the
Kaspersky Lab's experts. If necessary, depending on the network properties and
the characteristics of the computer where Microsoft Exchange Server is installed,
you can make all required changes and additions.
If you connect to the internet using a proxy server, you will have to configure your connection settings to receive updates (see section 5.4,
page 43).
In order to ensure full functionality of the mail server protection, it is necessary to
configure settings used to notify the administrator or other users about the events
occurred and about the virus outbreaks threat (see Chapter 11, page 93).
The application settings are configured from the administrator's workstation – a
computer on which the Management Console is installed. This operation can be
performed irrespective of whether the Microsoft Exchange server application is
running on the server.
Page 33

Starting using the application 33
4.6. Mail server protection without
additional configuration
Exchange server protection against malware and SPAM starts operating
immediately after the Security Server component is installed. The default
operation mode of the application provides for the following:
• The application will scan objects for the presence of currently known
malicious software (with the standard anti-virus protection level applied);
• the body of the message and attached objects of any format will
be scanned, except for container objects with the level of
nesting above 32;
• the maximum time for scanning 1 object is 180 seconds;
• when an infected object is detected, the application saves a
copy of this object (attachment or the body of the message) in
the backup storage, then attempts to disinfect the object and, if
disinfection is impossible, the application deletes the object and
replaces it with a text file containing a notification in the
following format:
Malicious object %VIRUS_NAME% has been
detected. File (%OBJECT_NAME%) was deleted by
Kaspersky Security 5.5 for Microsoft Exchange
Server 2003.
If an object that cannot be disinfected is detected in the body of
the message, the body of the message will be replaced with a
similar text notification.
• when a suspicious object is detected, the application will save
its copy (attachment or the body of the message) in the backup
storage.
Suspicious objects detected in message body are replaced with
a notification of the following format:
A suspicious object (possibly %VIRUS_NAME%) has
been detected. File (%OBJECT_NAME%) was deleted
by Kaspersky Security 5.5 for Microsoft
Exchange Server 2003.
If a suspicious object is detected in the attached file, the
application will change filename and extension of attached
objects. Renamed objects will have txt extension.
Page 34

34 Kaspersky Security 5.5 for Microsoft Exchange Server 2003
• when a protected or corrupted object is detected, the
application will save its copy (file or the body of the message) in
the backup storage.
Objects detected in message body are replaced with a
notification of the following format:
The attached file %OBJECT_NAME% was deleted by
Kaspersky Security 5.5 for Microsoft Exchange
Server 2003. File was password-protected or
corrupted.
If a protected or corrupted object is detected in the attached file,
the application will change filename and extension of attached
objects. Renamed files will have txt extension.
• Messages received by Exchange server via SMTP protocol, will be
scanned for SPAM:
• the maximum time allowed for scanning 1 object is 200
seconds;
• when formal messages (for example, messages automatically
generated by mail bots) or messaged that do not contain SPAM
are detected, these messages will be delivered intact to the
Inbox of the user’s e-mail client.
• when a suspicious message, which possibly contains SPAM, or
message containing obscene words or message definitely
containing SPAM are detected, such message will be moved to
the Junk E-mail folder of the user's e-mail client.
• All public folders, all storage areas created on the Exchange Server and
all users registered with this mail server will be protected.
• Mail traffic routed by the Exchange server will not be scanned.
• The anti-virus and content filtration databases are updated hourly via
internet from the Kaspersky Lab's HTTP and FTP servers.
• The administrator will not be notified about objects detected during the
scan.
• The detection of virus outbreaks will be recorded: detection of infected
objects will be recorded five times a day without issuing notifications to the
administrator.
• Reports on the status of the protection system are created on the first day
of each month and cover last 30 days.
Page 35

Starting using the application 35
4.7. Verifying the application
performance
After Kaspersky Security is installed and configured, we recommend verifying the
correctness of its settings and operation:
• using a test "virus" and its modifications (see section 4.7.1, page 35);
• using a test SPAM message (see section 4.7.2, page 36).
4.7.1. Testing the anti-virus protection
system
This test "virus" was specially designed by EICAR (The European
Institute for Computer Antivirus Research) for testing anti-virus products.
The test “virus” IS NOT A VIRUS because it does not contain code that can harm
your computer. However, most anti-virus products manufacturers identify this file
as a virus.
Never use real viruses for testing the operation of an anti-virus product!
You can download this test “virus” from the official website of the EICAR
organization at http://www.eicar.org/anti_virus_test_file.htm. If you have no
Internet connection, you can create your own test "virus". To create a test “virus”,
type the following string in any text editor and save the file as eicar.com:
X5O!P%@AP[4\PZX54(P^)7CC)7}$EICAR-STANDARD-ANTIVIRUS-TESTFILE!$H+H*
The file downloaded from the EICAR website or created as described above
contains the body of a standard test “virus”. Kaspersky Security 5.5 for Microsoft
Exchange Server 2003 will detect it, assign it to the Infected category and apply
the action defined by the administrator for processing objects of this type.
To test the response of the application when other types of objects are detected,
modify the content of this standard test “virus” by adding one of the prefixes listed
in Table below.
You can test the correctness of the anti-virus component operation using the modified EICAR “virus” only if your anti-virus database was last
updated on or after October 24, 2003 (October, 2003 cumulative updates).
Page 36

36 Kaspersky Security 5.5 for Microsoft Exchange Server 2003
Prefix Object type
No prefix, standard
test "virus"
CORR- Corrupted.
SUSP- Suspicious (unknown virus code).
WARN- Warning (modified code of a known virus).
ERRO- An error corresponding to detection of a corrupted object.
CURE-
DELE-
The first table column lists prefixes to be added at the beginning of the string of
the standard test "virus" (for example,
DELE-X5O!P%@AP[4\PZX54(P^)7CC)7}$EICAR-STANDARD-ANTIVIRUSTEST-FILE!$H+H*).
After adding a prefix to the test "virus" save it, for example, to a file under the
name eicar_dele.com (assign names to all the modified "viruses" in the same
manner).
The second column of this table contains the types of objects identified by the
anti-virus application after you have added a prefix. The actions for each type of
objects are defined by the anti-virus scan settings (see section 6.5, page 57)
customized by the administrator.
Infected. An error occurs during an attempt to disinfect
the object; apply action set for objects that cannot be
disinfected.
Infected (can be cured). The object will be disinfected; the
text of the "virus" body will be replaced with the word
"DISINFECTED".
Infected (cannot be cured). Apply action set for objects
that cannot be disinfected.
4.7.2. Testing the anti-spam protection
system
You can use a test message identified as SPAM to test the anti-spam server
protection.
The subject of the test message must contain the following line: Spam is bad
do not send it.
Page 37

Starting using the application 37
When such message arrives at Exchange Server, Kaspersky Security will assign
it SPAM status and will process it applying the action specified for this type of
objects by the administrator (see section 7.2, page 67).
Page 38

CHAPTER 5. UPDATING THE
ANTI-VIRUS AND THE
CONTENT FILTRATION
DATABASES
Users of Kaspersky Lab's products can update:
• anti-virus database used to detect malicious programs and disinfect
infected objects. Anti-virus database files contain description of all
currently known malicious programs and disinfection methods for objects
infected with such malware as well as the description of all potentially
dangerous software (riskware);
• content filtration database, used for the linguistic analysis to detect SPAM
in the message body and attachments. The content filtration database
contains examples of spam messages as well as words and phrases
characteristic of SPAM messages.
It is extremely important to keep you databases up-to-date. We recommend that you update your databases immediately after your application
is installed because the databases included into the distribution kit will
be out-of-date by the moment you install your application.
These databases are updated on an hourly basis on the Kaspersky
Lab's server. We recommend that you setup automatic updates with the
same frequency (see section 5.2, page 40).
The anti-virus and the content filtration databases can be updated from the
following sources:
• from Kaspersky Lab's internet update servers;
• from a local updates’ source - a local or a network folder.
The updating is performed manually or according to the schedule. After the files
are copied from the specified source of updates, the application automatically
connects the databases received and performs mail scan for viruses and spam
using these new databases.
Page 39

Starting using the application 39
In order to review the status of the databases and modify the updating
settings,
In the main application window select the Kaspersky Security 5.5 for
Microsoft Exchange Servers 2003 node in the console tree, open it, se-
lect the node corresponding to the server you need and follow the Up-
dates link in the results pane.
You can do the following in the anti-virus and content filtration database updating
settings window:
• review the database status and launch the update manually (see section
5.1, page 39);
• schedule automatic updates (see section 5.2, page 40);
• specify the updates source (see section 5.3, page 41);
• configure the network connection settings (see section 5.2, page 40).
You can setup different updates parameters for the anti-virus database
and for the content filtration database.
5.1. Manual updating
In order to update the anti-virus and the content filtration databases in
the manual mode,
In the main application window select the Kaspersky Security 5.5 for
Microsoft Exchange Servers 2003 node in the console tree, open it, se-
lect the node corresponding to the server you need and follow the Up-
dates link in the results pane.
The General tab in the Updates window (see Figure 4) that will open contains
information about the currently used database version and the result of the last
update.
Page 40

40 Kaspersky Security 5.5 for Microsoft Exchange Server 2003
Figure 4. Configuring update settings.
The General tab
In order to update the anti-virus database and content filtration database
immediately, press the Update now button in the corresponding section. The
application will launch the updating process using the selected settings.
5.2. Automatic updates
In order to update the database in the automatic mode,
1. In the main application window select the Kaspersky Security 5.5
for Microsoft Exchange Server 2003 node in the console tree,
open it, select the node corresponding to the server you need and
follow the Updates
2. Switch to the Schedule tab in the Updates window that will open.
link in the results pane.
Page 41

Starting using the application 41
Figure 5. Configuring update settings.
Schedule tab
In order to enable the automatic updates of the anti-virus and the content filtration
databases, check the Update automatically box and set up the schedule for
receiving updates. If the box is not checked, the databases must be updated
manually (see section 5.1, page 39).
You can select different modes for updating the anti-virus and the content
filtration databases. In order to do this, check the Allow different anti-virus and
anti-spam settings box. This will divide the schedule setup window into two
corresponding sections.
For example, you can create separate schedules for updating the anti-virus and
the content filtration databases and disable the automatic updating feature for
one of the two types.
5.3. Selecting the updates source
By default, the anti-virus and the content filtration databases are updated from
the Kaspersky Lab's internet update servers.
Page 42

42 Kaspersky Security 5.5 for Microsoft Exchange Server 2003
Additionally, you can configure the updates to be downloaded from a HTTP, FTP
server or a network folder.
If you have Kaspersky Administration Kit (the centralized Kaspersky Lab's
applications management system) installed in your corporate network, then the
databases updates received by the Administration Servers will be copied to a
public folder (details see Kaspersky Administration Kit Guide). This folder can be
used as the updates source for your copy of Kaspersky Security 5.5 for Microsoft
Exchange Server 2003.
In order to select a different anti-virus and content filtration databases
updates source:
1. In the main application window select the Kaspersky Security 5.5
for Microsoft Exchange Server 2003 node in the console tree,
open it, select the node corresponding to the server you need and
follow the Updates
link in the results pane.
2. Switch to the Source of updates tab in the Updates window that
will open (see Figure 6) and specify the updates source required:
• Updates’ servers of Kaspersky Lab - Kaspersky Lab's HTTP-
and FTP internet servers where new updates are uploaded
every hour (default option).
Below you can specify the update server of Kaspersky Lab,
which is nearest to your geographical location. In order to do
that, select your current location from the respective drop-down
list. That will help decrease the time necessary to download
updates and increase their transfer speed.
• HTTP-, FTP-server or network folder - a network or a local
folder or the Kaspersky Administration Kit Administration Server
where the updates downloaded from the internet are copied. If
you selected this option, enter the path to the folder in the entry
field or select the folder in the standard Microsoft Windows
dialog box that opens by pressing the Browse button.
You can specify different updates sources for the anti-virus database and the
content filtration database. In order to do this, check the Allow different anti-
virus and anti-spam settings box. This will divide the source selection window
into two corresponding sections.
Page 43

Starting using the application 43
Figure 6. Configuring update settings.
The Source of updates tab
5.4. Configuring the connection
settings
In order to view/modify the network connection settings:
1. In the main application window select the Kaspersky Security 5.5
for Microsoft Exchange Server 2003 node in the console tree,
open it, select the node corresponding to the server you need and
follow the Updates
2. Switch to the Network Settings tab (see Figure 7) in the Updates
window that will open and configure the network connection settings:
• If you connect to the internet using a proxy server, check the
Use proxy server box and specify the connection settings:
address and number of the port used for connection.
link in the results pane.
Page 44

44 Kaspersky Security 5.5 for Microsoft Exchange Server 2003
• If you use a password in order to access the proxy server,
specify the proxy user's authentication settings. In order to do
this check the Proxy server authentication box and fill in the
Name and the Password fields.
• Specify time limit for establishing connection with the update
server in the Connection timeout (sec.) field. If the connection
was not established within the specified time limit, the
application will attempt to establish connection to the next
update server until the connection is established or until all
servers will be tried for connection.
• Check the Use passive FTP mode box if your server has a
firewall and you cannot connect to the required FTP server in
the active mode.
You can restore the default settings by pressing the Restore the default
settings button.
Figure 7. Configuring update settings. The Network Settings tab
Page 45

Starting using the application 45
5.5. Running updates under a
different user account
Kaspersky Security program updates can be run under a different user account.
This feature is disabled by default, and tasks are run under the system profile.
For example, you might want to run a task under a different user account if you
are updating from a source that the computer does not have access to (such as a
network update folder) or from a source where it does not have authorized user
privileges to the proxy server. You can use this feature to run updates with
another profile that has those rights.
To configure an update to start under a different user profile:
1. In the main program window, select Kaspersky Security 5.5 for
Microsoft Exchange Server 2003, from the console tree, open it,
select the node that corresponds to the server needed, and click the
Updates
2. In the Updates window that opens, go to the Startup options (see
Figure 8) and enter the data for the account under which you want to
start the update (username, password, confirm password). You can
enter the username manually or add an account in the standard
Microsoft Windows window that opens when you click Browse.
hyperlink in the results pane.
Page 46

46 Kaspersky Security 5.5 for Microsoft Exchange Server 2003
Figure 8. Configuring update settings.
The Startup options tab
Page 47

CHAPTER 6. ANTI-VIRUS
PROTECTION
The main task of Kaspersky Security for Microsoft Exchange Server 2003 is to
perform an anti-virus scan of mail traffic and to disinfect mail messages using the
information contained in the current (latest) version of the anti-virus database.
Depending on the anti-virus protection level selected by the administrator (see
section 6.1, page 49), the application allows detection of:
• malicious objects;
• potentially dangerous objects;
All mail messages arriving to the Exchange server are scanned in the real-time
mode. The processing is provided both for the incoming and outgoing traffic and
all traffic routed by the Exchange server via SMTP protocol. In order to decrease
the load on the server, you can disable the scan of the routed mail traffic (details
see section 6.3, page 53).
When the traffic scan mode is enabled, the application remains loaded in the
computer's RAM and the E-mail Interceptor analyzes the mail traffic received
from the Exchange server and transfers it to the Anti-Virus Scan Subsystem.
The Anti-Virus Scan Subsystem processes e-mail messages based on the
settings configured:
• scans and analyzes the object using the anti-virus database;
• if an e-mail message or its part is infected, the application processes the
detected object in accordance with the selected settings (details see
section 6.4, page 56);
• before the processing, a copy of the object can be saved in the backup
storage.
If the anti-virus server protection is enabled (details see section 6.1, page 49),
then starting and stopping of the traffic scan will be performed simultaneously
with the starting and stopping of the Microsoft Exchange Server.
Kaspersky Security does not scan messages created by protected users in the
Public folders of unprotected Exchange servers. If messages are transferred
from Public folders of an unprotected area to a protected one, the application
will scan them. In case of data replication in protected and unprotected areas
changes will not be synchronized.
Page 48

48 Kaspersky Security 5.5 for Microsoft Exchange Server 2003
E-mail messages stored on the server and the content of public folders are also
rescanned on a regular basis using the latest version of the anti-virus database (if
the background storage scan is enabled). The scan is performed in the
background mode and can be launched either automatically each time the antivirus database is updated, or according to the schedule, or manually (details see
section 6.6, page 62).
If the background scan mode is enabled for the application used on a
servers cluster, the background scan can start when the Microsoft
Exchange Server is moved from one cluster node to another.
If the background scan mode is disabled, then the messages stored on the
server will be scanned only when the user requests a message, immediately
before the delivery.
Operation of the application in the background scan mode may slow
down the operation of Microsoft Exchange Server; therefore we do
not recommend using this type of protection frequently.
When the background scan is enabled, the Internal Application Management
Module, based on the settings configured, will receive from the Exchange server
all e-mail messages located in the public folders and protected storage areas. If
a message has not been analyzed using the latest anti-virus database, the
application will send it to the Anti-Virus Scan Subsystem for processing.
Objects’ processing in the background mode is performed in the same way as in
the traffic scan mode.
The application will analyze the body of the message and attached files of any
format.
It is to be noted that Kaspersky Security differentiates between simple objects (an
executable file, a message with a simple attachment) and containers (consisting
of several objects, for example, an archive or a message with any message
attached to it).
When scanning multiple-volume archives, Kaspersky Security treats
and processes each volume as a separate object. In this case, the
application can detect malicious code only if such code if fully located
in one of the volumes. If a virus is also divided into parts, then it cannot be detected when only part of the data is loaded. In this situation,
the malicious code may propagate after the object is restored as one
entity.
Multiple-volume archives can be scanned after they are saved to the
hard drive by the anti-virus application installed on the user's computer.
If necessary, you can define the list of objects that should not be scanned for
viruses. The following types of objects can be excluded from the scan scope: all
Page 49

Anti-virus protection 49
containers above the specified nesting level, file specified by mask or files
specified by type (details see section 6.3, page 53).
Kaspersky Security supports scanning several objects at the same time. The
number of objects that can be processed at the same time depends on the
number of started instances of the anti-virus kernel running simultaneously. The
mode of scanning objects in RAM allows scanning objects without saving them to
a temporary folder on the hard drive. Depending on the scan settings, the
program can simultaneously analyze up to 9 objects up to 1 MB each in the
computer's RAM without using the disk subsystem (details see section 8.1, page
72).
Files over 1 MB will be saved to a working folder Store for processing. The Store folder is located in the installation folder of the application. The Store folder and the temporary file storage – folder TMP
must be excluded from the scan scope of anti-virus applications installed in the enterprise local network.
6.1. Anti-virus protection levels
Kaspersky Security 5.5 for Microsoft Exchange Server 2003 allows detecting and
preventing the penetration of the following types of objects through the mail
server:
• All currently known malicious programs.
• Programs that do not contain malicious code as it is commonly under-
stood, but may impose a moral threat, inflict financial damage or facilitate
abduction of confidential information. This software category includes:
• adware;
• various harmless utilities that can be used by malicious soft-
ware and intruders;
• automatic dialing programs that connect the user's computer to
commercial internet sites (including porn websites);
• automatic porn files downloading programs;
• keyboard spies;
• password hacking programs;
• backdoor programs.
• Joke programs and programs with "bizarre" content or form that affect the
system in a way that cannot be qualified as beneficial. This type of software includes:
Page 50

50 Kaspersky Security 5.5 for Microsoft Exchange Server 2003
• programs that cause unexpected video or sound effects;
• programs that cause problems in the system operation;
• virus simulators.
• Programs that do not contain malicious code and do not inflict any dam-
age to the user, but can be a part of the environment used for development of malicious software. This software category includes:
• licensed software hacking programs, key generators, credit card
numbers generators;
• Java classes;
• programs that gather information about the system security
(anti-virus software installed, firewalls, etc.)
• network utilities (scanners, etc.)
Apart from the programs listed above, each of the above categories may include
legal software that may work in a way that can be viewed by the application as a
behavior characteristic of malicious or potentially dangerous software. Examples
of such software are backdoor and remote surveillance software.
Categories of objects detected by Kaspersky Security in the mail flow of the
protected server are determined by the anti-virus protection level selected. The
application provides for the following protection levels:
• Standard anti-virus protection level: protection against all currently
known malicious programs. This level is applied by default.
• Extended anti-virus protection level: protection against all currently
known malicious and potentially dangerous programs included under b in
the list above.
• Redundant anti-virus protection: protection against all currently known
malicious programs and potentially dangerous software included under b,
c, and d in the list above.
Page 51

Anti-virus protection 51
6.2. Enabling and disabling the antivirus server protection.
Selecting anti-virus protection
level
If the anti-virus server protection is enabled, then the anti-virus scan of the e-mail
traffic will be started or stopped when the Microsoft Exchange Server is started or
stopped. If the anti-virus protection settings provide for the background scanning
of storage areas, then it will be started either when the anti-virus database is
updated or according to the schedule (details see section 6.6, page 62).
Scan of objects is performed according to the determined anti-virus protection
level.
If the anti-virus server protection is disabled, then neither the anti-virus traffic
scan nor the background storage scan will be performed.
It is to be noted that disabling the anti-virus server protection considerably increases the risk of malware penetration via the e-mail system.
We do not recommend disabling the anti-virus protection for long periods of time.
In order to enable or disable the anti-virus protection or change antivirus protection level:
1. Select the node corresponding to the server you need in the
console tree and follow the Anti-virus protection
pane.
2. Go to the General tab in the Anti-virus protection (see Figure 9)
window that will open.
Select the one of the following options in the Anti-virus protection
group of fields:
• Disabled - in order to disable mail anti-virus protection
• Standard anti-virus protection, Extended anti-virus
protection or Redundant anti-virus protection - in order to
enable mail anti-virus protection using the corresponding level
(see section 6.1, page 49).
link in the results
Page 52

52 Kaspersky Security 5.5 for Microsoft Exchange Server 2003
The use of extended or redundant anti-virus protection
level may affect the speed of the program's operation.
Besides, some programs may be referred to potentially
dangerous programs when transferred by mail, and so
they may be deleted or blocked, depending upon the
application settings (see section 6.5, page 57).
You can restore the default settings by pressing the Restore the
default settings button.
In order to apply the changes, press the Apply or the OK button.
The anti-virus protection will then be enabled (or disabled) in several minutes.
Figure 9. Enabling the anti-virus protection
We do not recommend disabling the server’s anti-virus protection by
disabling the Kaspersky Security 5.5 for Microsoft Exchange Server
2003 service manually using the Computer Management / Services
snap-in.
If you need to disable Kaspersky Security 5.5 for Microsoft Exchange
Server 2003 service manually, do the following:
Page 53

Anti-virus protection 53
1. Disable the anti-virus mail protection using the Management
Console (see above).
2. Disable the anti-spam server protection using the Management
Console (see section 7.1, page 66).
3. Restart the Microsoft Exchange Information Store and IIS Admin
services.
4. Specify the Disabled startup type for the service of Kaspersky
Security 5.5 for Microsoft Exchange Server 2003.
In order to start the application after the automatic startup of the
Kaspersky Security 5.5 for Microsoft Exchange Server 2003 service has
been disabled, do the following:
1. Specify the Auto startup type for the service of Kaspersky Security
5.5 for Microsoft Exchange Server 2003.
2. Enable the anti-virus mail protection using the Management
Console (see above).
3. Enable the anti-spam server protection using the Management
Console (see section 7.1, page 66).
6.3. Scanning attachments
In order to decrease the load on the server when the anti-virus scan is
performed, you can limit the list of the objects to be scanned and put a restriction
on the time for scanning one object. These scan restrictions will be used both for
scanning the traffic and for the background storage scan.
It is to be noted that the body of the message will always be scanned as
the restrictions apply only to scanning the attachments.
In order to define objects that will not be scanned,
1. Select the node corresponding to the server you need in the
console tree and follow the Anti-virus protection
pane.
2. Go to the Attachment Scan tab in the Anti-virus protection (see
Figure 10) window that will open.
link in the results
Page 54

54 Kaspersky Security 5.5 for Microsoft Exchange Server 2003
Figure 10. Configuring restrictions for the attachment scan
3. In the Exclude from the scan scope group, specify objects that
you wish to exclude from the anti-virus scan scope:
• Archives – exclude archives from the scan scope.
• Objects-containers with nesting level above... – exclude
from the scan scope containers with the nesting level exceeding
the value specified in the field to the right.
Since archives are one of the types of containers, the restrictions applied to the scan of archives and containers are interrelated.
If you impose a restriction to the scan of containers, archives
will then be scanned only to the specified nesting level (if they
are not explicitly excluded from the scan scope).
However, excluding archives from the scan scope will not
affect the scan of containers.
There are objects that cannot be infected. In order to reduce the load on
the server while the anti-virus scan of mail messages is in progress, we
recommend specifying types and/or names of such attachments and ex-
Page 55

Anti-virus protection 55
cluding them from the scan scope. In order to do this, specify exclusions
by the file type or using a mask:
• Files defined by mask. Using the Append and Delete buttons,
create the list of exclusion masks. When adding an exclusion in
the Adding a mask window (see Figure 11), enter the exclusion
mask into the corresponding field.
Examples of allowable masks:
o *.txt – all files with mask *.txt
o *.tx? – all files with mask *.tx?
o test – all files with name test
Figure 11. Specifying the masks for files to be excluded from the scan scope
• Files defined by type. Using the Append and Remove
buttons, create the list of attachment types that will be excluded
from the scan scope. When adding an exception in the Adding
a type window (see Figure 12), select a type from the dropdown list.
Figure 12. Specifying the type of files to be excluded from the scan scope
4. In order to restrict the time for processing one object check the
Stop scan if it takes longer than {NN} sec. box and specify the
scan time in seconds.
Page 56

56 Kaspersky Security 5.5 for Microsoft Exchange Server 2003
You can restore the default settings by pressing the Restore the default
settings button.
6.4. Scanning of routed e-mail traffic
In order to reduce the load on the server in the traffic protection mode, we
recommend that mail traffic routed by the server, shall not be scanned.
In order to exclude mail routed to other servers from the scan scope,
1. In the main application window select the Kaspersky Security 5.5
for Microsoft Exchange Server 2003 node in the console tree,
open it, select the node corresponding to the server you need and
follow the Anti-virus protection
2. Go to the Protected Mail (see Figure 13) tab in the Anti-virus
protection window that will open.
3. Check the Do not scan routed mail box in the Routed mail group
of boxes (checked by default).
While enabling scanning of routed mail, please make sure that the anti-virus
protection for the Microsoft Exchange Server storage, containing the System
Attendant mailbox, is enabled. Otherwise traffic will not be scanned and all routed
mail will be blocked in the queue of Messages pending submission.
In addition, you are advised to restart Microsoft Internet Information Services using the iisreset command after you enable scanning of routed mail.
You can restore the default settings by pressing the Restore the default
settings button.
link in the results pane.
Page 57

Anti-virus protection 57
Figure 13. Excluding transit traffic from the scan scope
6.5. Selecting actions to be
performed with objects
As a result of an anti-virus scan each object can be assigned a status as listed
below:
• Not infected – object does not contain viruses.
• Infected – object contains at least one of the known viruses.
• Suspicious – object's code is similar to the code of a known or unknown
virus.
• Protected – object is password-protected.
• Corrupted – object is corrupted.
Depending on the object's status different actions will be applied.
Page 58

58 Kaspersky Security 5.5 for Microsoft Exchange Server 2003
The most important major function of the application is the disinfection of
infected objects. Disinfection is performed based on the information contained in
the anti-virus database. According to the results of the attempted disinfection, an
object can be assigned a status as listed below:
• Disinfected – object was successfully disinfected.
• Non-disinfectable – object disinfection failed.
A special processing procedure can be used for non-disinfectable objects.
Infected objects found in the message body are processed using the
action that is assigned to objects that could not be disinfected.
The following actions can be applied to objects with one of the following statuses:
infected, non-disinfectable, suspicious, protected and corrupted.
• Pass – pass the object to the recipient with no changes.
• Replace message body with text and rename attached objects – replace
the infected message body with text created using the corresponding
replacement template and change the name and extension of the infected
attached objects. Such renamed objects will have .txt extension.
The name change affects attached objects only; if a virus was
detected in the message body, no renaming is performed.
• Replace infected objects with text – delete the detected object and replace
it with text (message body) or a txt file (attachments) created based on the
replacement template.
• Delete the entire message – delete the infected message along with all
attachments.
If the infected attachments are disinfected, replaced with text or renamed, a separate copy of a message for each recipient is saved in the
Exchange server database. In order to reduce the size of this database
we recommend that you defragment it regularly.
Before the processing, a copy of the object can be saved in the backup storage
so that later it can be restored or sent to Kaspersky Lab for analysis (see Chapter
8, page 72).
The application can send notification about the object detected to the
administrator or to other users or register such event in the Microsoft Windows
event log (see Chapter 10, page 86 and Chapter 13, page 111).
By default, the application attempts to disinfect infected objects detected and if
the disinfection is not possible, the application will replace the object with a txt
file. The Replace message body with text and rename attachments action will
be assigned to objects with a different status, and the text of the informative
Page 59

Anti-virus protection 59
message will include the name of the virus detected and the name of the infected
object.
If an object attached to the message was processed (disinfected, deleted, replaced) by Kaspersky Security, then before the message is
closed, your e-mail client application (for example, Microsoft Outlook)
will offer you to save changes although the user has made no
changes. You must save the message.
In order to define the rules for processing objects detected during an
anti-virus scan,
1. Select the node corresponding to the server you need in the
console tree and follow the Anti-virus protection
link in the results
pane.
2. Go to the Actions tab in the Anti-virus protection window (see
Figure 14) that will open.
Figure 14. Configuring actions to be applied to infected objects
The tab displays rules for processing objects with the followings
statuses (each status individually): infected, suspicious and pro-
tected/corrupted.
Page 60

60 Kaspersky Security 5.5 for Microsoft Exchange Server 2003
3. Determine the rule for object processing for each status individually.
In order to do this, press the Modify rule… button in the
corresponding section. As a result the Master is started. Follow its
instructions.
4. In the window that will open (see Figure 15) select actions from the
list.
Figure 15. Creating the replacement template
Depending on the status of the object for which configuration is performed; the list may contain different values. A detailed description
of the option selected in the table is provided in the bottom part of
the window.
The further steps will depend on the selection you have made. In
order to continue using the wizard, press the Next button.
If no additional settings configuration is required, the Finish button
will become enabled. In order to complete the wizard, press this
button.
5. If you selected disinfection as the action to be performed with the
object, during the next step you will be offered to determine the
procedure to be used to process objects that could not be
disinfected (see Figure 16).
Select the required option from the list in the wizard window and
press the Finish or the Next buttons.
Page 61

Anti-virus protection 61
Figure 16. Selecting an action to be performed with an object that could not be disinfected
6. If you selected one of the actions that involve replacement of the
object with text, you will be offered to create a replacement
template (see Figure 17). The informational message created
based on this template will be copied to the message body and into
the replacement txt file.
Create a replacement template. In order to do this, enter the message text into the wizard window. The text of this notification may
include information about the virus detected and about the infected
object. To include this information add corresponding substitution
macros to the template selecting them from the dropdown list accessible via the Macros button. A description of the macros in the
list is provided in Appendix A, page 160.
Figure 17. Creating a replacement template
Page 62

62 Kaspersky Security 5.5 for Microsoft Exchange Server 2003
In order to close the wizard, press the Finish button.
7. In order to ensure that a copy of the object is saved to the backup
storage before the object is processed, check the Save a copy of
the original object in the backup storage box (see Figure 14).
You can restore the default settings by pressing the Restore the default
settings button.
6.6. Background scan
Kaspersky Security 5.5 for Microsoft Exchange 2003 scans mail stored on the
server and the content of the public folders (including all public folders and
protected mailbox storages). Only those messages that had not been scanned
with the current (latest) version of the anti-virus database will be scanned. The
application scans the body of the message and attached files in accordance with
the general settings of the anti-virus scan.
If background storage scan is disabled, e-mail messaged stored on the server
will be scanned only when a particular e-mail message is requested by the user.
In this case, such e-mail message will be scanned immediately before the
delivery.
Only mailboxes located in the protected storage areas will be scanned
(see section 14.5, page 122).
In order to ensure that Kaspersky Security scans e-mail messages
stored on the server and the content of public folders,
1. In the main application window select the Kaspersky Security 5.5 for
Microsoft Exchange Server 2003 node in the console tree, open it,
select the node corresponding to the server you need and follow the
Anti-virus protection
2. Go to the Additional settings tab in the Anti-virus protection window
(see Figure 18) that will open.
link in the results pane.
Page 63

Anti-virus protection 63
Figure 18. Configuring background scan settings and anti-virus protection performance
3. Check the Enable background scan box (unchecked by default) and
specify the desired scan launch option:
• Every time the anti-virus database is updated – launch the
scan every time the anti-virus database is updated.
• According to schedule – launch the scan according to the
specified schedule. Specify the mode and the time for the scan
in the window that opens by pressing the Configure button (see
Figure 19).
Page 64

64 Kaspersky Security 5.5 for Microsoft Exchange Server 2003
Figure 19. Creating the background scan schedule
If you need to start the scan immediately, press the Start now button
(Figure 18).
4. You can restrict the scan time. In order to do this, check the Stop scan
in [NN] hours box and specify the desired time period in hours. After
this period of time (24 hours by default) expires, the scan will be
stopped.
In order to apply the changes, press the Apply or the OK button.
Page 65

CHAPTER 7. ANTI-SPAM
PROTECTION
One of the main tasks of Kaspersky Security 5.5 for Microsoft Exchange Server
2003 is protection of mailboxes and public folders of the Exchange server against
unsolicited e-mail messages (SPAM).
The anti-spam scan module filters the incoming e-mail messages while they are
being received via SMTP protocols that is, before the messages get into the
users' mailboxes.
The application scans for spam:
• Internal and external traffic generated by SMTP clients using anonymous
authentication on the server.
• Messages arriving at the server via anonymous external connections
(front-end server).
The application does not filter spam in:
• Internal LAN traffic.
• External traffic arriving at a server via authenticated sessions.
Each e-mail message will be scanned for the presence of spam attributes. In
order to do this, the applications checks, first of all, various message attributes:
the sender's and the recipient's addresses, message size, headers (including the
From and the To headers).
Secondly, anti-spam content filtration is used to analyze the content of the
message (including the Subject header) and the attached files
uses unique linguistic and heuristic algorithms based on the comparison of actual
messages with the sample messages and on the deeper analysis of the text,
formatting features and other attributes of the e-mail messages.
1
. The application
The content filtration database is continuously updated in the linguistic
laboratory based on the everyday monitoring of spam sources. Therefore, in order to maintain the application in the up-to-date state, the database shall be updated on an hourly basis (see Chapter 5, page 38).
Messages, in which no SPAM has been found by the anti-spam filtering, will be
delivered intact to the user's mailbox. Other messages that were related to
unsolicited correspondence are assigned one of the four categories of SPAM:
1
Attachments of the following formats are scanned: Plain text, HTML, Microsoft Word, RTF.
Page 66

66 Kaspersky Security 5.5 for Microsoft Exchange Server 2003
SPAM, suspicious message, formal message, obscene message (details see
section 1.1, page 7).
Messages in which traces of SPAM have been detected, will be processed by
applying actions described in section 7.2, page 67.
7.1. Enabling/disabling anti-spam
protection
In order to enable/disable anti-spam protection:
1. In the main application window select the Kaspersky Security 5.5
for Microsoft Exchange Server 2003 node in the console tree,
open it, select the node corresponding to the server you need and
follow the Anti-Spam protection
2. Сheck/uncheck the Enable anti-spam box in the General tab (see
Figure 20) in the window that will open.
link in the results pane.
Page 67

Anti-Spam protection 67
Figure 20. Configuring anti-spam protection settings.
The General tab
When you click the Restore the default settings button, Anti-Spam will be
enabled.
We do not recommend disabling Anti-Spam by disabling the Kaspersky
Security 5.5 for Microsoft Exchange Server 2003 start function manually
through Manage computer / Services (see section 6.2, page 51).
7.2. Selecting the action to be
performed with the message
In order to select an action to be performed with a message in which
spam has been found,
In the main application window select the Kaspersky Security 5.5 for
Microsoft Exchange Server 2003 node in the console tree, open it, se-
lect the node corresponding to the server you need and follow the Anti-
Spam protection link in the results pane.
Page 68

68 Kaspersky Security 5.5 for Microsoft Exchange Server 2003
Specify the rules for processing messages for each type of SPAM in the Actions
tab (see Figure 22) of the window that will open:
• Skip – deliver the message into the user's Inbox. By default this action is
applied to messages that do not contain spam attributes and to formal emails.
• Move to the Junk E-mail folder – deliver message to a special folder of the
e-mail client on the recipient's computer. The action is used by default for
all categories of spam messages except for formal ones.
This action is only available in Microsoft Office Outlook 2003. In other mail
clients, e-mails will be moved to the Inbox folder. To identify e-mails containing signs of spam, we recommend flagging subjects with special
markers in the Inbox folder (see below).
Note that e-mail processing rules assigned in the mail client
are carried out after the action Move to the Junk E-mail folder.
For example, if the rule requires automatic deletion of all
messages from the Junk E-mail folder, then the message will
be deleted. No copies of this message will be saved to the
backup storage.
• Decline - block the message delivery to the recipient.
The declined message, sent via SMTP protocol by the user
within the corporate network, will remain with an error code in
the Sent Items folder. Such message can only be deleted
manually.
• Remove - delete the message.
In addition to the action Skip or Move to the Junk E-mail folder you can flag
subject lines with special markers. For example, for e-mail in the category "emails containing spam", the marker [!!! SPAM] can be added to the subject line.
To add a marker, click Mark. In the window that opens (see Figure 21) check the
Add label to the message subject checkbox, enter the text of the marker in the
field below, and specify the position of the market in the subject line of the e-mail.
Please note that only Latin characters can be used in the text of the
marker.
Page 69

Anti-Spam protection 69
Figure 21. Adding markers to the subject line of the message
By default, if a message is declined or deleted, a copy of such message is saved
to the backup storage (see Chapter 6, page 47). If necessary, you can restore
the message from the backup storage or forward it to recipients unchanged. If
you do not want copies to be saved, uncheck the Save a copy of the original
object in the backup storage box.
You can restore the default settings by pressing the Restore the default
settings button.
Figure 22. Configuring Anti-Spam settings.
The Actions tab
Page 70

70 Kaspersky Security 5.5 for Microsoft Exchange Server 2003
7.3. Configuring TCP/IP settings
Anti-spam mail scan is performed by the service using the TCP/IP settings.
These settings will be applied in automatically during the program's installation.
In case of a conflict with other applications installed on your computer using the
same port for TCP/IP, we recommend changing it. In order to do this, enter the
appropriate values in the TCIP/IP settings section in the Advanced tab of the
Anti-Spam protection window (see Figure 23).
Figure 23.Configuring anti-spam protection settings.
The Advanced tab
7.4. Configuring e-mail filtration
Kaspersky Security does not have its own e-mail filtration using Realtime Block
List (RBL) or e-mail addresses. This function is carried out by Microsoft
Exchange Server 2003 features.
Microsoft Exchange Server 2003 supports filtration of connections and recipient
s. These features can be used to reduce the amount of spam sent to
organizations.
Page 71

Anti-Spam protection 71
Connection filtration allows the Exchange Server to access block lists and
determine if the computer sending an e-mail is on those lists. Exchange Server
can also be used to specify exclusions from block lists.
In addition, Exchange Server can be used to create recipient filters that restrict
delivery of e-mail to defined recipients in the organization or beyond.
To configure connection filtration:
1. Open Exchange System Manager.
2. Open the Global Settings node, select Message Delivery, and select
Properties from the context menu.
3. In the window that opens, select the Connection filtering tab.
You can read more about creating, configuring, and applying connection filters in
the documentation or help files of Microsoft Exchange Server 2003.
To configure recipient filtration:
1. Open Exchange System Manager.
2. Open the Global Settings node, select Message Delivery, and
select Properties from the context menu.
3. In the window that opens, select the Recipient Filtering tab.
You can read more about creating, configuring, and applying recipient filters in
the documentation or help files of Microsoft Exchange Server 2003.
Page 72

CHAPTER 8. APPLICATION'S
OPERATION EFFICIENCY
Kaspersky Security for Microsoft Exchange Server 2003 provides the possibility
to fine-tune the application's operation efficiency depending on the amount and
the characteristics of the mail traffic through the Exchange servers and on the
system features of the computer: amount of RAM, operation speed, number of
processors, etc.
Additionally, you can fine-tune various efficiency levels of anti-virus and antispam protection.
8.1. Anti-virus protection efficiency
In order to configure the anti-virus protection efficiency settings:
1. In the main application window select the Kaspersky Security 5.5
for Microsoft Exchange Server 2003 node in the console tree,
open it, select the node corresponding to the server you need and
follow the Anti-virus protection
2. Go to the Additional settings tab in the Anti-virus protection
window (see Figure 18) that will open.
3. In the Protection performance group of fields specify the desired
parameters, which determine the performance of anti-virus
protection:
• The number of streams that contain objects to be scanned.
Microsoft recommends that the value of this setting equals
2 x number of processors + 1. This is the default value for this
parameter.
• The number of instances of the anti-virus kernel running
simultaneously (the default value is 2 x number of processors +
1).
• Specify whether the application must scan objects in RAM
without first saving these objects in the temporary folder. In
order to enable this mode, check the Max. size of object to
scan in memory box and specify the maximum size in
link in the results pane.
Page 73

Application's operation efficiency 73
kilobytes. By default, the box is checked and the size of the
object is 1024 KB.
8.2. Anti-spam protection efficiency
In order to configure the anti-spam protection efficiency settings:
1. In the main application window select the Kaspersky Security 5.5
for Microsoft Exchange Server 2003 node in the console tree,
open it, select the node corresponding to the server you need and
follow the Anti-Spam protection
2. Go to the Advanced tab in the Anti-Spam protection window (see
Figure 23) that will open and specify the values for the efficiency
settings:
• Specify the number of kernel instances that are running
simultaneously in the Number of copies of the anti-spam
kernel field (the default value is 2 x the number of processes +
1).
• Specify the time restriction for processing each message in the
Maximum time to scan 1 message (sec) field. The default
value is 200 seconds.
link in the results pane.
Page 74

CHAPTER 9. BACKUP COPYING
Kaspersky Security for Microsoft Exchange Server 2003 allows saving a backup
copy of an initial object before processing. For example, before an attempt to
disinfect or delete such object or before declining or deleting a message
containing SPAM attributes, an initial copy can be saved to the backup storage.
Later on objects located in the backup storage may be:
• restored - in order to obtain information contained in the object.
Additionally, you can restore the infected object and try to scan it with the
file anti-virus using an updated anti-virus database (see section 9.3, page
80).
• deleted - (see section 9.6, page 82).
• sent to be inspected by Kaspersky Lab (only for suspicious files
containing a modification of a known virus or code of a virus still
unknown). Our specialists will analyze the file, attempt to recover the data,
and if it turns out that the file is infected with malicious code, make an
entry in the anti-virus database. Then, when you scan this file with File
Anti-Virus using the updated database, you can disinfect it and maintain
the integrity of the data in it (see section 9.4, page 81).
• sent to recipients unchanged (only for e-mails deleted or rejected by a
spam scan). For more, see section 9.4, page 81.
A backup copy of the object will be created only if the Save a copy of
the original object in the backup storage box in the anti-virus protection settings (see section 6.5, page 57) and anti-spam settings (see
section 7.2, page 67) is checked.
The object is stored in the backup storage in the encrypted form, which ensures:
• no risk of infection (object is not accessible without decoding);
• saving time for the anti-virus application (encrypted files stored in the
backup storage are not identified as infected).
Data that can be stored in the backup storage may be restricted by one of the
two following parameters: backup storage size or objects storage period. By
default, the size of the backup storage is limited; the maximum size is 500 MB.
The compliance with the restrictions is checked when a new backup copy is
saved to the backup storage. The application performs the following actions:
• if the backup storage size is limited and there is no enough free disk
space to save the new object, the application will free the required space
by removing the "oldest" objects;
Page 75

Backup copying 75
• if the object storage period is limited, the application will delete objects
with the expired storage period.
The object can stay in the backup storage longer than the
established storage period if no new objects are added to the
storage.
Viewing the backup storage (details see section 9.1, page 75), configuring
backup storage parameters (details see section 9.7, page 83) and managing
backup copies (details see section 9.3, page 80, section 9.4, page 81 and section
9.6, page 82) features are available via the Backup Storage service folder (see
Figure 24). This folder is included into the structure of each node reflecting the
managed Exchange server.
For convenient viewing and searching for data in the backup storage and for data
structuring purposes a custom filters configuration capability is provided (details
see section 9.2, page 77). Filters, created for the backup storage, can be viewed
in the Backup Storage folder as subfolders under the names assigned by the
administrator when the filters were created.
9.1. Viewing the backup storage
In order to view the backup storage:
In the main application window select the Kaspersky Security 5.5 for
Microsoft Exchange Server 2003 node in the console tree, open it, se-
lect the node corresponding to the server you need and select the
Backup storage folder in the console tree.
A table containing the full list of all objects contained in the backup storage will
appear in the results pane (see Figure 24).
Page 76

76 Kaspersky Security 5.5 for Microsoft Exchange Server 2003
Figure 24. Viewing the backup storage
In addition to the standard e-mail message attributes (Sender, Recipi-
ents, Cc, Subject, Sent time), this table will contain the following information for each object:
• Object name. Attachments will retain their original names,
while the message body will be saved as <message body>
(result of anti-virus scan) or <message> (result of spam scan).
• Object status. The status assigned to the object as a result of
an anti-virus scan (see section 6.5, page 57) or anti-spam scan
(details see Chapter 7, page 65).
The application places into the backup storage a
copy of an object before this object is processed by
the application. The Status field displays the object
status after processing.
• Detected. Exact date and time when the object was detected
by Kaspersky Security.
• Reason. The reason that has caused object addition to the
backup storage.
• Type. The type of the object saved to the backup storage
(Message body or Attachment) indicates where the infected
object was detected.
• Storage folder. Path to the disk folder where the backup copy
is stored.
Page 77

Backup copying 77
You can perform ascending and descending sorting of the data contained
in the table by any column.
9.2. Backup storage filter
The use of filters allows performing search and data structuring tasks on the data
contained in the backup storage as after applying the filter only information
complying with the filtering parameters becomes available. This feature becomes
very important as the number of objects stored in the backup storage increases.
The filter can be used, for example, to search for objects that must be restored.
In order to create a backup storage filter:
1. In the main application window select the Kaspersky Security 5.5 for
Microsoft Exchange Server 2003 node in the console tree, open it,
select the node corresponding to the server you need and select the
Backup Storage folder in the console tree.
2. Use the New Filter command in the context menu or the analogous
item under the Action menu.
3. In the filter settings window that opens, assign e-mail filtration settings
on the Filter tab (see Figure 25):
• name, under which the filter will be included in the Backup
Storage folder;
• object status (several values can be selected).
Page 78

78 Kaspersky Security 5.5 for Microsoft Exchange Server 2003
Figure 25. Creating a new filter.
The Filter tab
4. On the Additional tab (see Figure 26) specify the values for the filter
settings that will be used to search for objects in the backup storage. To
configure settings, use the following file attributes:
o file type. E-mails may be filtered by type: Message (result
of spam scan), Message Body, Attachment (result of antivirus scan), or all types together;
o object name (only available if you select attachment filtering
in the Type field);
o sender of the e-mail;
o recipient of the e-mail;
o recipient of e-mail copy;
o e-mail subject;
o time interval during which the e-mail was sent.
When completing the fields of the filter, you can use the wildcards – * (any
combination of characters) or ? (any character).
Page 79

Backup copying 79
Figure 26. Creating a new filter.
The Additional tab
5. After you are done with the filter settings, press the Apply or the OK
buttons to create the filter. If you wish to cancel creation of the filter,
press the Cancel button.
As a result of this action, a subfolder with the filter's name will be created in the
console tree inside the Backup Storage folder. When the filter is selected in the
console tree, only data that complies with the filter criterion will be displayed in
the results pane.
Later on you can alter the values of filter parameters or delete the filter using the
shortcut menu commands or the Action menu items.
In order to change the filter parameters:
1. Select the filter you need to modify in the Backup Storage folder in the
console tree and use the Properties command in the shortcut menu or
the analogous item under the Action menu. This will open a filter
settings configuration window (see Figure 25).
Page 80

80 Kaspersky Security 5.5 for Microsoft Exchange Server 2003
2. Modify the filter parameter values as required.
3. In order to apply the changes, press the Apply or the OK buttons. To
exit without saving the changes, press the Cancel button.
As a result, the information displayed in the results pane will be updated
according to the new values of the filter settings.
In order to delete a filter:
Select the name of the filter in the Backup Storage folder and use the
Delete command from the shortcut menu or the analogous item under the
Action menu.
As a result of these actions, the filter will be removed from the Backup Storage
folder.
When the filter is deleted, no objects are removed from the backup
storage. Objects that meet the filter parameters will still be available in
the Backup Storage folder.
9.3. Restoring objects from the
backup storage
In order to restore an object from the backup storage:
1. Select the Backup Storage folder in the console tree.
2. Select the object you wish to restore in the table displaying the
content of the backup storage (see Figure 24). You can use filter to
search for the object (see section 9.2, page 77).
3. Open the shortcut menu and use the Get file command or the
analogous item under the Action menu.
4. In a window that will open specify the folder to which you wish to
save the object restored, and if required, enter or modify the
object's name.
5. Before restoration a warning message will be displayed, asking you
to confirm that you wish to proceed with the restoring. Press the
Yes button to restore the object.
Page 81

Backup copying 81
As a result of these actions the object will be moved from the backup storage into
the specified folder, decoded and saved with the specified name. The restored
file will have the same format as it had when it was first processed by the
application. After the object is successfully restored, a corresponding notification
is displayed on the screen.
We recommend restoring only those messages that contain spam
attributes or that have suspicious, protected or corrupted status. A
new scan of such objects using the updated databases may result in
the change in their status: the object may be disinfected or a new
virus unknown before may be found in this object.
Restoring other objects may result in infecting your computer!
9.4. Sending e-mails to recipients
E-mails can only be sent to the original recipients specified in the To field for
objects deleted or rejected by a spam scan. Note that the e-mail will not be sent
to the recipients listed in the Cc field.
To send an e-mail to its recipients:
1. In the main program window, select Kaspersky Security 5.5 for
Microsoft Exchange Server 2003, from the console tree, open it,
select the node that corresponds to the server needed, and select the
Backup storage folder from the console tree.
2. Select the object to send from the table that displays the contents of the
backup storage (see Figure 24). Use a filter to search for the objects
(see section 9.2, page 77).
3. Open the context menu and select the Send message to recipients
command or select the same item from the Action menu.
Warning: if more than one virtual SMTP server is installed on the computer, the e-mail will always be sent through the first server. Therefore,
to send an e-mail correctly, the server must be configured to route emails to the necessary address.
9.5. Sending objects for analysis
The user can send for analysis to Kaspersky Lab only those objects that are
suspected of being infected with a modification of a known virus or contain code
of a virus that is known yet known.
Page 82

82 Kaspersky Security 5.5 for Microsoft Exchange Server 2003
In order to send a suspicious object to Kaspersky Lab's experts for
analysis,
1. Select the Backup Storage folder in the console tree.
2. Select the object with the suspicious status you wish to send for
analysis in the table displaying the content of the backup storage
(see Figure 24). You can use filter when searching for the object
(see section 9.2, page 77).
3. Open the shortcut menu and use the Send file for analysis
command or the analogous command under the Action menu.
As a result of these actions an e-mail message with the selected object attached
will be created on the computer where the managed Exchange server is installed,
and this message will be sent to Kaspersky Lab.
After the message is sent a notification confirming that the file has been sent will
be displayed by the computer from which the control is maintained.
9.6. Deleting objects from the
backup storage
The following objects are automatically deleted from the backup storage:
• "older" objects if there is a restriction imposed on the backup storage size
and if there is not enough space to store a new object. The application will
delete the number of older objects required to free the space needed.
• objects whose storage period has expired, if there is a restriction imposed
on the storage period.
A possibility to manually remove objects from the backup storage is also
provided. This feature may prove useful to delete objects that have been
successfully restored or sent for analysis and to free space in the backup
storage if the automatic object removal methods did not help.
In order to manually delete an object from the backup storage,
1. In the main application window select the Kaspersky Security 5.5
for Microsoft Exchange Server 2003 node in the console tree,
open it, select the node corresponding to the server you need and
open the Backup storage folder in the console tree.
Page 83

Backup copying 83
2. Select the object you wish to delete in the table displaying the
content of the backup storage (see Figure 24). You can use filter
when searching for the object (see section 9.2, page 77).
3. Open the shortcut menu and use the Delete command or the
analogous command under the Action menu.
As a result of these actions, the object will be deleted from the backup storage
directory.
9.7. Configuring the backup storage
settings
The backup storage is created during installation of the Security Server
component. The settings of the backup storage are determined by default and
can be altered by the administrator.
In order to modify the backup storage parameters,
1. Select the Backup Storage folder in the console tree.
2. Open the shortcut menu and use the Properties command or the
analogous command under the Action menu.
3. In the Backup Storage Properties window that will open (see
Figure 27) select the required settings values.
In order to change the folder where the backup storage is located, type the path
to the new folder and the folder name in the Backup storage folder field or
specify the corresponding folder using the Browse button.
Page 84

84 Kaspersky Security 5.5 for Microsoft Exchange Server 2003
Figure 27. Configuring the backup storage settings
By default, the backup copy of the object is stored in qb folder. This is a service
application folder, which is created in the application installation folder at the time
when the Security Server is installed. When you change the backup folder,
backup copies that had been created earlier will remain in the folder where they
had been placed initially. Objects from all folders are removed automatically
based on the application restriction selected.
Please note that objects cannot be transferred from the old backup
storage to the new backup directory!
To set a restriction on the size of the backup storage or on the time objects are
stored in it, check the Auto delete objects from storage box, select one of the
restriction options, and enter the desired value for the setting:
• Maximum backup storage size – if you wish to restrict the total size of
objects located in the backup storage (default option), specify the value in
the entry text field (the default value is 500 MB). During the calculations,
the total size of all objects is summed up no matter which folder a
particular object is stored in.
Page 85

Backup copying 85
• Maximum objects storing time – if you wish to restrict the period objects
are stored in the backup storage (unlimited by default), specify the number
of days in the entry field (the default value is 30 days).
If the size of the backup storage does not need to be restricted, deselect the
Auto delete objects from storage box.
In order to apply the changes, press the Apply or the OK buttons. To exit without
saving the changes, press the Cancel button.
Page 86

CHAPTER 10. NOTIFICATIONS
Kaspersky Security allows notifying about revealed infected objects and about
messages that contain SPAM.
Notifications can be delivered using the following methods:
• by sending e-mail messages;
• by sending messages using Net Send tools;
• by registering the event in the Microsoft Windows event log on the
computer where the Security Server component is installed. In this case,
access to the information will be provided using Events Viewer, a
standard Microsoft Windows tool used for viewing and managing the logs.
There is a provision to notify the sender and the recipient of the message about
the infected object or about blocking the message containing SPAM attributes.
No notifications are sent to the recipients of blind carbon copies (Bcc).
The procedure used for notification, the method of distribution and the text of the
messages sent are created by the administrator in the form of a notification
template.
When a certain event occurs, an automatic notification of the corresponding type
is issued based on such template.
Several templates of the same type but with different parameter values may be
created which allows creating notifications for the administrator, sender, recipient
and security services that vary as far as the content and the delivery method are
concerned.
By default, notification template informing about found infected objects is
generated during Security Server installation. Notification using this template is
not issued. You can configure notification using this template as the basis.
Notification templates are stored in the Notification templates service folder.
This folder is included into each node that reflects the managed Exchange
server.
The list of created notification templates is provided in the form of a table (see
Figure 28). The table contains the name of the template, notification type and
status for each template (enabled or disabled).
Page 87

Notifications 87
You can learn more about templates parameters in the settings window that
opens by the Properties command available through the shortcut menu (details
see section 10.2, page 91).
Figure 28. The Notifications templates folder
The administrator can create new templates, view and edit parameters of the
existing templates and rename or delete templates using the shortcut menu
commands.
In order to enable notification about objects detected during scan.
1. Create a notification template (see section 10.1, page 87) or select
an existing template and configure its settings (see section 10.2,
page 91).
2. Check the Notify about event box in the General tab of the
notification template settings dialog box (see Figure 29).
10.1. Creating a notification
template
In order to create a new notification template:
Page 88

88 Kaspersky Security 5.5 for Microsoft Exchange Server 2003
1. Select the Notification templates folder in the console tree.
2. Open the shortcut menu and use the New template command or an
analogous command under the Action menu.
3. As a result of these actions a <New notification> window used for
configuring new notification template will open (Figure 29). Specify
the required values for the parameters in the tabs of the window.
Perform the following actions on the General tab (see Figure 29):
Figure 29. Notification template. The General tab
• Enter the template name in the Name field.
• Specify the notification type. It must match the event which would trigger
the notification to be created. In order to specify the type, select the
required value from the Type drop-down list.
• If necessary, enter a more detailed description of the notification in the
Description field.
• Determine whether notifications will be created based on this template. In
order to do this check (or uncheck) the Notify about event box.
Create a template of the message that will be sent as a notification on the Text
tab (see Figure 30):
Page 89

Notifications 89
• Enter a brief description of the notification in the Notification subject
field. This line will be used as a header of the message.
• Create the message text in the Full notification text field. The message
may include information about a registered event. To include this
information add corresponding substitution macros to the template
selecting them from the dropdown list accessible via the Macros button
(the list of macros will depend upon notification type). A description of the
macros in the list is provided in Appendix A, page 160.
Figure 30. Notification template. The Text tab
Select the notification method and specify the corresponding parameter values in
the Actions tab (see Figure 31). The application provides for several methods to
be used.
• In order to send messages via the mail server, check the Notify by e-mail
box and specify the recipients' addresses for the mailing.
• In order to notify recipients and senders of the infected
message about the event occurrence, check the Recipients
and Senders boxes.
• In order to notify other users, as for example, administrator,
enter his or her e-mail address in the Additional e-mail
addresses field.
Page 90

90 Kaspersky Security 5.5 for Microsoft Exchange Server 2003
The validity of the addresses can be verified using the Test button. A
message will be sent to the specified address.
Entering several e-mail addresses is allowed, the addresses entered must
be separated by semicolons.
Figure 31. Notification template. The Actions tab
• In order to send messages via network using the Net Send service, check
the Send network notifications using Net Send box and specify the
addresses of the computers-recipients in the Computers-recipients field
IP address or NetBIOS-computer name can be used as the computer address. Entering several addresses is allowed, the addresses entered must
be separated by semicolons.
The validity of the addresses can be verified using the Test button. A
message will be sent to the specified address.
• In order to register events in the Microsoft Windows system log, check the
Register in Windows event log box.
After you are done with the settings press the Apply or the OK buttons.
As a result of these actions the notification template will be added to the
Notification templates folder and will be included in the table displayed in the
Page 91

Notifications 91
results pane and, if the Notify about events box in the General tab is checked,
notifications will be issued using this template.
10.2. Viewing and editing
notification parameters
In order to view or modify notification parameters,
1. Select the Notification templates folder in the console tree.
2. Select the required notification template in the table containing the
list of created templates (see Figure 28).
3. Open the shortcut menu and use the Properties command or the
analogous command under the Action menu.
4. As a result of these actions a notification template settings windows
will open Properties: <Template name>. This window consists of
the following tabs: General, Text, Actions and is completely similar
to the <New Notification> window (see Figure 29). Parameters are
changed in the same way they were specified when the notification
was created (details see section 10.1, page 87).
After you have made the changes, press the OK or the Apply buttons to apply
changes. To exit without savings the changes, press the Cancel button.
10.3. Customizing general
notification settings
When the application sends e-mail notifications, it places the KSE (Kaspersky
Security for Microsoft Exchange Server) value in the From field by default. That
may cause identification of such messages as formal spam. To resolve the
problem, specify an existing SMTP address that will be used to send the
notifications instead of KSE.
You can modify the information, which will appear in the From field of
sent e-mail notifications. In order to do this, perform the following actions:
1. In the main application window, select in the console tree the
Kaspersky Security 5.5 for Microsoft Exchange Server 2003
node, open it, select the node corresponding to the necessary
server and use the General settings
hyperlink in the results pane.
Page 92

92 Kaspersky Security 5.5 for Microsoft Exchange Server 2003
2. It will open the General settings window, where you should select
the Advanced (see Figure 32) tab. Enter the information that will be
displayed as the sender of messages generated by Kaspersky
Security in the From field.
Figure 32. Configuring common notification settings
Page 93

CHAPTER 11. PREVENTING
VIRUS OUTBREAKS
Kaspersky Security 5.5 for Microsoft Exchange Server 2003 allows to detect
increases in the virus activities on the protected Exchange server and to notify
the administrator and other users about such events. This feature may be very
useful in the periods of virus outbreaks as it helps the administrator to timely
react to the emerging threats of virus attacks.
Virus activity level is determined based on the server anti-virus protection data
and allows registering events of the following types:
• An infected object detected
• A suspicious object detected
• A corrupted object detected
• One and the same virus detected several times
The administrator specifies the virus activity level threshold – a maximum
allowable number of events of the specified type within a certain limited time
interval. If the virus activity level is greater than the specified threshold, a
notification will be issued.
Notifications can be delivered using the following methods:
• by e-mail messages;
• by messages sent over the network using Net Send;
• by registering the event in the Microsoft Windows system log on the
computer where the Security Server component is installed. In this case,
the information is accessible through the use of Events Viewer, a
standard Microsoft Windows logs viewing and management tool.
The virus activity level threshold, notification procedures, delivery method and the
text of messages sent are determined by the administrator in the virus outbreak
counter settings.
If the specified virus activity level threshold is exceeded, a notification about the
threat of a virus outbreak will be issued based on the settings of the virus
outbreak counter. Upon the expiration of a specified period, the counter's values
will be reset.
Page 94

94 Kaspersky Security 5.5 for Microsoft Exchange Server 2003
The values of all virus outbreak counters will be reset if the Security
Server component or the server operating system, where the component is installed, are restarted.
Several counters with different settings values can be created for any event.
During Security Server setup a virus outbreak counter is created. The counter
can be used to set up a respective notification. By default, notifications about
increased virus activity level are not issued.
Virus outbreak counters are located in the Virus outbreak counters service
folder. This folder is included into the structure of each node reflecting the
managed Exchange server.
The list of the virus outbreak counters created is displayed in the form of a table
in the results pane (see Figure 33). The table displays the name, type and status
(is notification about virus activity enabled or disabled) for each counter. The
counter type corresponds to the type of events traced by this counter.
Detailed information about the virus outbreak counter settings is provided in the
settings window accessible through the Properties shortcut menu command
(details see section 11.2, page 99).
Figure 33. The Virus outbreak counters folder
The administrator can create new counters, view and edit the settings of the
existing counters, rename and delete counters using the shortcut menu
commands.
Page 95

Preventing virus outbreaks 95
In order to set up issuing notifications about increased virus activity
level:
1. Create a new virus outbreak counter (see section 11.1, page 95) or
select an existing counter and configure its settings (see section
11.2, page 99).
2. Check the Notify me about virus outbreaks box in the General
tab of the virus outbreak counter settings (see Figure 34).
11.1. Creating a new virus outbreak
counter
In order to create a new virus outbreak counter,
1. Select the Virus outbreak counters folder in the console tree.
2. Open the shortcut menu and use the New counter command or the
analogous command under the Action menu.
3. As a result of these actions, a new virus outbreak counter settings
window New counter will open (see Figure 34). Specify the
required values for the settings displayed in the tabs of this window.
Page 96

96 Kaspersky Security 5.5 for Microsoft Exchange Server 2003
Figure 34. Virus outbreak counter. The General tab
Perform the following in the General tab (see Figure 34):
• Enter the counter name in the Name field.
• Specify the type of the event that will be traced by the counter. In order to
do this, select the required value from the Type drop-down list.
• Specify the value of the virus activity level threshold. In order to do this,
specify the values for the settings in the Frequency group using the
following order:
• maximum allowable number of events of the specified type;
• time period during which these events must be registered;
• time unit seconds, minutes, hours or days.
• If required, enter a more detailed description of the virus outbreak counter
in the Description field.
• Specify whether notifications will be issued based on this counter's
settings.
Check the Notify me about virus outbreaks box if you want a notification
to be issued when the virus activity level threshold on the events of the
Page 97

Preventing virus outbreaks 97
specified type is exceeded. Uncheck this box if you do not want notifications to be issued.
Create the template of a message that will be sent as a notification in the Text
tab (see Figure 35):
Figure 35. Virus outbreak counter. The Text tab
• Enter a brief description of the notification in the Notification subject
field. This line will be used as a header of the message.
• Create the message text in the Full notification text field. The message
may include information about a registered event. To include this
information add corresponding substitution macros to the template
selecting them from the dropdown list accessible via the Macros button.
The full list of the substitution macros is provided in Appendix A, page
160.
Select the notification method and specify the corresponding parameter values in
the Notifications tab (see Figure 36). The application provides for several
methods to be used.
Page 98

98 Kaspersky Security 5.5 for Microsoft Exchange Server 2003
Figure 36. Virus outbreak counter. The Notifications tab
• In order to send messages via the e-mail server, check the E-mail
notifications box and enter the e-mail addresses in the To and Copy
fields.
The validity of the addresses can be verified using the Test button. A
message will be sent to the specified address.
Entering several e-mail addresses is allowed, the addresses entered must
be separated by semicolons.
• In order to send messages via network using the Net Send service, check
the Network notification using Net Send box and specify the addresses
of the computers-recipients in the Computers-recipients field.
IP address or NetBIOS-computer name can be used as the computer address. Entering several addresses is allowed, the addresses entered must
be separated by semicolons.
The validity of the addresses can be verified using the Test button. A
message will be sent to the specified address.
• In order to register virus outbreaks in the Microsoft Windows system log
on the computer where the Security Server component is installed, check
the Register in Windows event log box.
Page 99

Preventing virus outbreaks 99
After you are done with the settings press the Apply or the OK button.
As a result:
• the virus outbreak counter will be added to the Virus outbreak counters
folder and will be displayed in the table in the results pane;
• if the Notify me about virus outbreaks box in the General tab is
checked, the specified types of the virus activity will be monitored;
• once the specified virus activity level threshold is exceeded, notification
about a virus outbreak threat will be issued.
11.2. Viewing and modifying virus
outbreak notification settings
In order to view or modify the virus outbreak notification settings,
1. In the main application window select the Kaspersky Security 5.5 for
Microsoft Exchange Server 2003 node in the console tree, open it,
select the node corresponding to the necessary server and select the
Virus outbreak counters folder in the console tree.
2. Select the counter you need in the table displaying the list of created
counters (see Figure 33).
3. Open the shortcut menu and use the Properties command or the
analogous command under the Action menu.
4. As a result of these actions a counter settings window <Counter
name>: Properties will open. This window includes the following tabs:
General, Text, Notifications and is completely analogous to the New
counter window (see Figure 34). Notification settings can be modified in
the same way as they are specified when the notification is created
(details see section 11.1, page 95).
After you have made the changes, press the Apply or the OK button to apply the
new settings. To exit without saving the changes, press the Cancel button.
Page 100

CHAPTER 12. REPORTS
Kaspersky Security 5.5 for Microsoft Exchange Server 2003 allows receiving
reports about the results of the anti-virus Exchange Server protection and about
the anti-spam protection results.
Reports are generated automatically according to the schedule or manually by
request and can be saved in a specified folder and sent by e-mail. Information
contained in the reports saved on disk and those sent by e-mail is identical;
however the format, structure and viewing method differ.
Reports saved on disk are created in html-page format and have frame-based
structure. They are saved to a folder that contains a predetermined set of files
that support frame-based report structure and enable report viewing (details see
section 12.2, page 108). This folder is created with the name that reflects the
date and the time when the report was created in the following format <report
name: DD.MM.YYYY_HH-MM-SS>. The default storage location for the reports
is the Reports folder. It is created in the application's installation folder during the
installation of the Security Server component. Any other folder selected by the
administrator can be used as the report storage (details see section 12.1.2, page
107).
Reports sent by e-mail are files in HTML format sent by e-mail as attachments.
The message contains clarification text as follows: This message is created by
Kaspersky Security 5.5 for Microsoft Exchange Server 2003. The attached file
contains a report on the anti-virus server scans during the period from:
<DD.MM.YYYY_HH:MM:SS> until: <DD.MM.YYYY_HH:MM:SS>.
Reports are viewed using the default browser.
Reports are created based on the report templates created by the administrator.
The following is specified in the template: the reporting period, report creation
schedule and report format.
By default, during Security Server installation two in-built report templates are created - the anti-virus scan report and the anti-spam scan report. Based on these templates, the application generates reports on the first day of each month covering last 30 days. They are stored in the Reports subfolder of the application directory.
Report templates are stored in the Report templates service folder. This folder is
included into the structure of each node reflecting the managed Exchange server.
The list of the report templates is displayed in the form of a table in the results
pane (see Figure 37).
 Loading...