

Page 1

KASPERSKY LAB
Kaspersky Anti-Virus
for Firewall
USER GUIDE
Page 2

KASPERSKY ANTI-VIRUS
FOR FIREWALL
User
Guide
Kaspersky Lab Ltd.
Tel. +7 095 797 87 00 • Fax +7 095 948 43 31
Visit our Web site:
http://www.kaspersky.com/
Page 3

Contents
1. KASPERSKY™ ANTI-VIRUS FOR FIREWALL............................ 6
1.1. Function And Features
1.2. KAV for Firewall: Protecting Local Network From
Viruses
1.3. What’s New…
1.4. Distribution Kit
1.5. Help Desk For Registered Users
1.6. Information In The Book
2. INSTALLING KAV FOR FIREWALL ........................................13
2.1. Software And Hardware Requirements
2.2. Step-By-Step Inst allation
2.3. The *.KEY File
3. PREPARING TO RUN THE PROGRAM.................................... 29
3.1. Binding Firewall With KAV For Firewall
3.2. Adding CVP Server
3.3. Adding Resources
3.4. Creating Rules
3.5. Saving New Settings
4. RUNNING THE PROGRAM.................................................... 48
4.1. Various Methods To Launch The Program
5. CONFIGURING THE PROGRAM............................................. 51
5.1. Anti-Virus Settings
5.2. Various Configuration Methods
5.3. Defining General Anti-Virus Settings
.................................................................................. 8
........................................................... 9
......................................................... 9
........................................................ 28
....................................................... 43
........................................... 6
......................... 11
..................................... 12
............. 13
..................................... 14
.............. 29
................................................ 29
.................................................. 33
............................................. 47
........ 48
................................................. 51
........................... 52
.................. 54
3333
Page 4

5.4. Defining Setting For Each Protocol Separately
..57
6. ACTIONS TAKEN FOR INFECTED FILES.................................69
7. PERFORMANCE STATISTICS AND OPERATION LOG................71
7.1. Displaying The Performance Statistics
7.2. Log File
7.3. Alerts From Control Centre
....................................................................73
...................................74
...............71
8. KASPERSKY ANTI-VIRUS F O R FIREWALL AGENT ...................76
8.1. General Information
8.2. Configuring The Agent
..............................................76
..........................................76
APPENDIX A. KASPERSKY LAB LTD................................78
APPENDIX B. FREQUENTLY ASKED QUESTIONS .......80
4444
Page 5

Dear Customer,
Thank you for choosing KASPERSKY ANTI-VIRUS to protect your
computer from viruses. The best anti-virus experts worked hard to make
this product meet the highest possible standards and feel sure that you
will find it efficient and effective. By choosing our software, you acquire
the unbeatable protection against viruses.
Our company always seeks to make the software products more friendly
and easy-to-use while keeping their functionality at the highest possible
level. KASPERSKY ANTI-VIRUS provides its users with the highly
reliable anti-virus protection, heuristic code-analyser, ability to check for
viruses in all the commonly used mail formats and compressed files,
easy-to-use anti-virus managing tools. Furthermore, the user is provided
with round-the-clock technical support, information services, and
personal attention to every client and immediate response to new
viruses.
We highly appreciate your confidence in our product and hope you'll find
it fairly efficient and useful.
Kaspersky Lab
5555
Page 6

Chapter
1
1. Kaspersky™ Anti-Virus
For Firewall
What is Kaspersky Anti-Virus for Firewall?
Distribution kit.
1.1. Function And Features
Kaspersky™ Anti-Virus for Firewall is a special plug-in module for
the centralised filtering of data traffic passing through firewalls
supporting Content Vectoring Protocol (CVP).
Kaspersky™ Anti-Virus for Firewall is based on the world's famous
anti-virus kernel used in other Kaspersky Lab products. KAV for
Firewall allows to protect user workstations from viruses passing via
the firewall from the Internet.
KAV for Firewall is installed on any computer running one of the
following operating systems: Windows NT Server, Windows 2000
Server, Windows 2000 Advanced Server, Windows NT
Workstation, Windows 2000 Professional, and works with Check
Point Firewall-1 copies regardless of the operating system they are
running under. The firewall transfers incoming data packets to KAV
for Firewall via TCP/IP. KAV sorts these packets by the protocols
6666
Page 7

KASPERSKY ANTI-VIRUS
that have been used to download them, i.e. SMTP, FTP and HTTP,
checks for viruses and returns these to the firewall with the banner
indicating the check results. To speed up the check procedure you
can use different workstations to scan for viruses in different types
of traffic (SMTP, FTP and HTTP).
The KAV for Firewall features:
9In real-time, Kaspersky™ Anti-Virus for Firewall checks for and
deletes all types of malicious code from data passing through
the firewall and received by HTTP, FTP, SMTP and other
protocols.
9The program searches for viruses in archived and packed files
and e-mail.
9A powerful heuristic code analyser and redundant scan feature
will protect your network from even unknown viruses.
9You can define the quarantine directory where the program will
transfer all infected and suspicious objects that have been
detected in the Internet traffic. All detected virus attacks are
immediately reported by Kaspersky™ Anti-Virus to the predefined e-mail addresses.
9Kaspersky™ Anti-Virus for Firewall logs all the program activity
and the virus attack statistics.
9You may change any program setting without needing to restart
it. All changes will be activated right after you have confirmed
them.
Content Vectoring Protocol (CVP) was developed by
Check Point Software Technologies within the framework
of the Open Platform for Secure Enterprise Connectivity
project. CVP allows «coupling» the firewall with other
programs.
7777
Page 8

KAV FOR FIREWALL
Kaspersky™ Anti-Virus for Firewall is developed for Check Point
Firewall-1, versions 3.0, 4.0, and 4.1.
1.2. KAV for Firewall: Protecting
Local Network From Viruses
Nowadays more and more large, medium or small companies
provide their staff with access to the Internet. Consequently, the
probability that one day a virus will pass from the Internet onto your
private network increases every day. According to International
Computer Security Association (ICSA) practically all the medium
and large companies suffered from virus attacks (1998 Virus
Prevalence Survey) and in most cases the virus was carried in with
email messages.
Today, the corporate Internet-gateway is the main entry point for
viruses attempting to penetrate corporate networks. Most network
administrators take care to protect their file servers and
workstations, but leave Internet gateways unprotected, hoping that
their firewall protects them from the Internet viruses. To our regret
firewalls monitor just the source of incoming files what makes them
weak in the face of a virus attack. Nevertheless, integration of such
an anti-virus software as KAV with the OPSEC architecture allows
to develop the internal security policy that will stop viruses before
they reach user workstations.
The on-line scanner, KAV for Firewall, is used for anti-virus
protection. The firewall transfers incoming data packets to KAV for
Firewall via TCP/IP. KAV checks these packets for viruses and
returns to the firewall with the banner indicating the check results.
KAV for Firewall uses all the features of FireWall-1 to register
events, it also records its performance statistics and logs it to a
separate file. This data is very important and allows to define the
source of incoming viruses. It allows you to increase the protection
level by, for example, prohibiting the download of files from this
“problem” source.
8888
Page 9

KASPERSKY ANTI-VIRUS
Different servers require different approaches to their anti-virus
protection. The HTTP server, for example, runs ActiveX and Java
applets. These elements may contain viruses that must be deleted
before they reach the browser. To protect email (SMTP) from
viruses the anti-virus program must access each database and find
any hidden viruses attached to messages before the recipient
reads or readdresses this message. Finally, FTP corresponds to
the file transfer protocol enabling you to download applications that
can be infected with a virus. KAV for Firewall features enable it to
provide protection for the different server types.
KAV for Firewall is a quality product with high scanning speed and
reliable check results. The latter quality is guaranteed by the ability
to regularly update anti-virus databases via the Internet by means
of the KAV for Firewall one-click automatic updating feature.
1.3. What’s New…
In this version, users are provided with the ability to optimise the
KAV for Firewall processing of examined files (percentage of a
large-size file, transferred to the user without checking).
Besides, we added the feature allowing to view the quantity of
simultaneously launched sessions and, if necessary, to terminate
them.
The package also includes the Kaspersky Anti-Virus for Firewall
Agent module that launches the appropriate support program or
restarts KAV for Firewall in case of the program failure.
1.4. Distribution Kit
1.4.1. What is in the distribution kit
Your KAV distribution kit contains the following items:
9999
Page 10

KAV FOR FIREWALL
• license agreement;
• sealed envelope with CD containing the program
installation files;
• User Guide;
• registration card.
Before you unseal the envelope with CD make sure to
review thoroughly the license agreement.
1.4.2. License agreement
License Agreement is a legal agreement between you (either an
individual or a single entity) and the manufacturer (Kaspersky Lab
LTD) describing the terms on which you may employ this anti-virus
product.
Make sure to peruse this LA!
If you do not agree to terms of this LA, Kaspersky Lab is not willing
to license the software product to you and you should return the
unused product to your KAV dealer for a full refund, but make sure
the envelope with CD is sealed.
By unsealing the envelope, you agree to all the LA terms.
1.4.3. Registration card
To register you must fill the detachable coupon of your registration
card (your full name, telephone and e-mail address) and mail it to
the Kaspersky Lab legal dealer that sold this kit to you.
If your mail/e-mail address or telephone number changed, please
notify the entity to which you mailed the coupon.
10
10
1010
Page 11

KASPERSKY ANTI-VIRUS
When registered you obtain the status of Kaspersky Lab legal
customer and will be provided with the product support and antivirus database updates for the period of your subscription.
Furthermore, Kaspersky Lab provides Kaspersky Anti-Virus
registered users with information about the new products released
by the company.
1.5. Help Desk For Registered
Users
Kaspersky Lab offers a large service package enabling its legal
customers to efficiently employ Kaspersky Anti-Virus for Firewall.
If you register and purchase a subscription, you will be provided
with the following services for the period of your subscription:
• anti-virus database DAILY updates provided by e-mail;
• new versions of the Kaspersky Lab anti-virus software
provided on the FREE basis;
• PHONE, E-MAIL or IN-OFFICE advising on matters
related to the operation of our anti-virus software;
• information about the Kaspersky Lab new products and
about new computer viruses (for those who subscribe
to our newsletter http://www.kaspersky.com/subscribeNow.asp).
For more information about our services, refer to the file
README.TXT.
Kaspersky Lab does not provide information related to
operation and use of your operating system, and various
technologies.
11
11
1111
Page 12

KAV FOR FIREWALL
1.6. Information In The Book
This book contains information on how to install, configure and
manage the software product, explains its basic concepts and the
way they can be applied, recommends how to manage and change
settings.
12
12
1212
Page 13

Chapter
2
2. Installing KAV for
Firewall
Step-by-step in stallation. File *.KEY.
2.1. Software And Hardware
Requirements
In order to run KAV for Firewall you need:
• an IBM PC or a 100%-compartible computer with
Processor Pentium 133 MHz;
• 64 MB RAM;
• 100 MB of hard disk space (for the server to work
efficiently 500 MB of hard disk space is recommended);
• CD-ROM (for the KAV distribution kit that includes
CDs);
• One of the following operation systems: Windows NT
Server, Windows 2000 Server, Windows NT
Workstation, Windows 2000 Professional, and Windows
2000 Advanced Server.
13
13
1313
Page 14

INSTALLING KAV FOR FIREWALL
KAV for Firewall is installed on any computer of your local network
and works with Check Point Firewall-1 copies regardless of the
operating system they are running under. To speed up the check
procedure you can use different workstations to scan for viruses in
different types of traffic (SMTP, FTP and HTTP).
2.2. Step-By-Step Installation
2.2.1. Installing the first time
)
To install KAV for Firewall on a computer, follow the
steps:
1. Insert the supplied CD into the CD-ROM drive of your
computer.
2. Start the installation wizard setup.exe.
3. The installation wizard will start (see figure 1). Follow
instructions on your screen.
Figure 1. The installation wizard welcome window
14
14
1414
Page 15
KASPERSKY ANTI-VIRUS
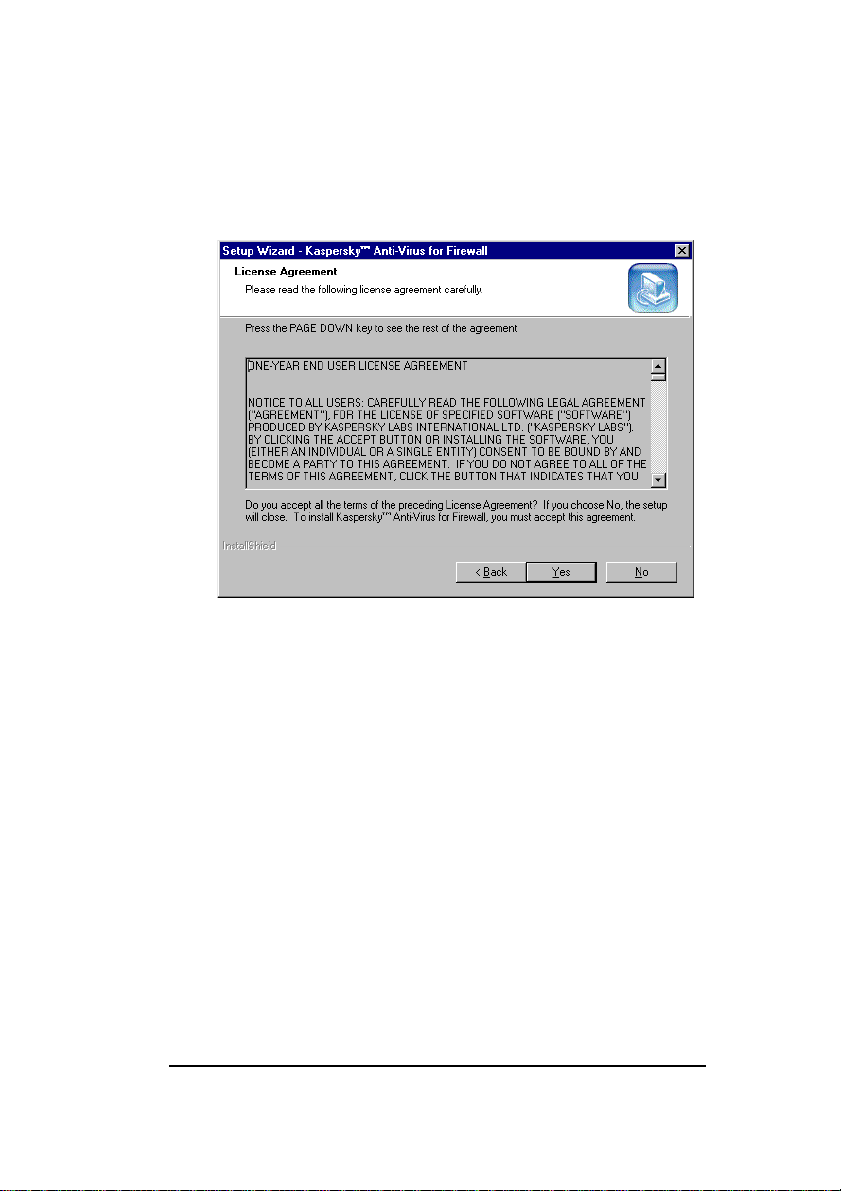
4. Read the wizard window information and click Next
to proceed. The License Ag reement wizard window
will appear on your screen (see figure 2).
Figure 2. The License Agreement wizard window
5. Review all the agreement terms. If they are
acceptable click Yes to proceed. Click No to abort
the installation if the terms are not acceptable. If you
accepted the terms, the Customer Information
wizard window will appear on your screen (see
figure 3).
15
15
1515
Page 16

INSTALLING KAV FOR FIREWALL
Figure 3. The Customer Information wizard window
6. Type in the required information in the User Name
and the Company Name fields. Then click Next to
proceed. The Choose Destination Location wizard
window will appear on your screen (see figure 4).
Figure 4. The Choose Destination Location wizard window
16
16
1616
Page 17
KASPERSKY ANTI-VIRUS
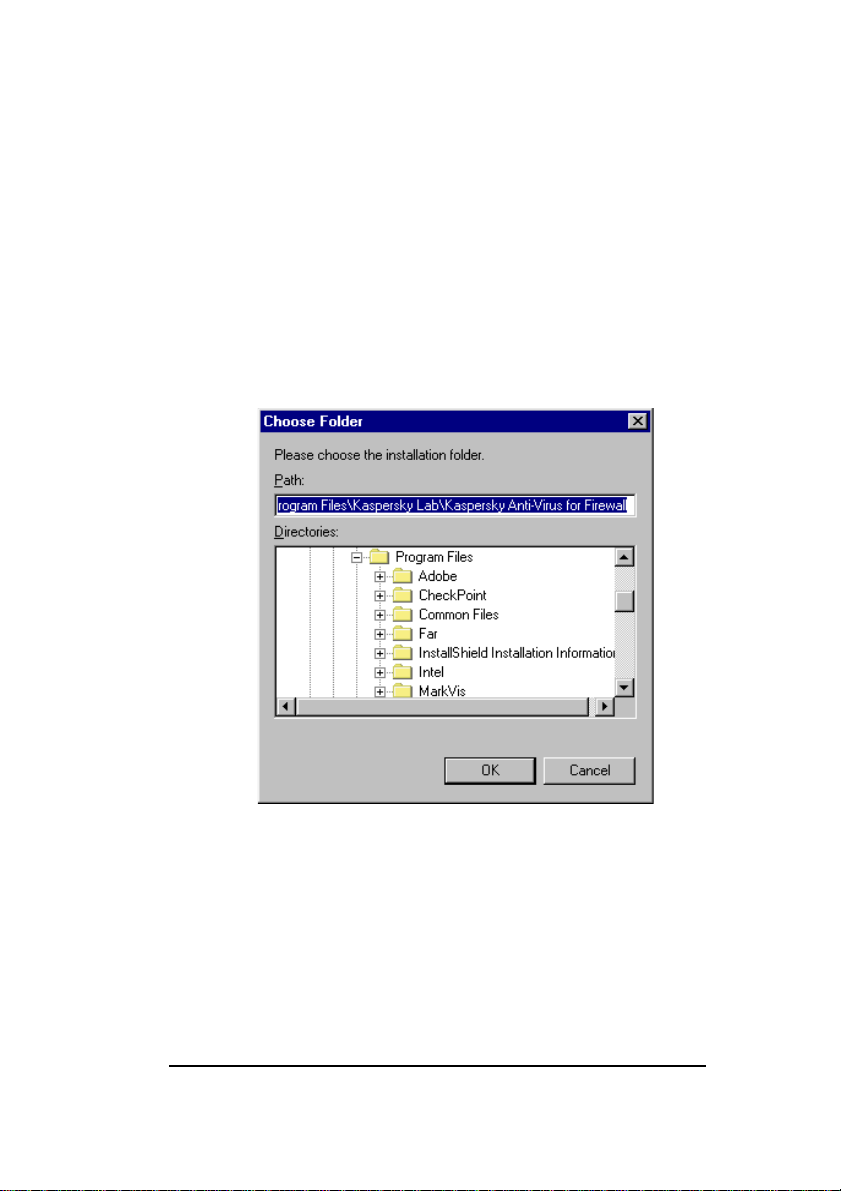
7. In this wizard window, you must choose a directory
where your KAV for Firewall will be installed:
• To do this, press the Browse button and select
the required directory (see figure 5).
• Then click OK.
• In the Choose Folder wizard window on your
screen, click Next to proceed.
Figure 5. The Choose Folder wizard window
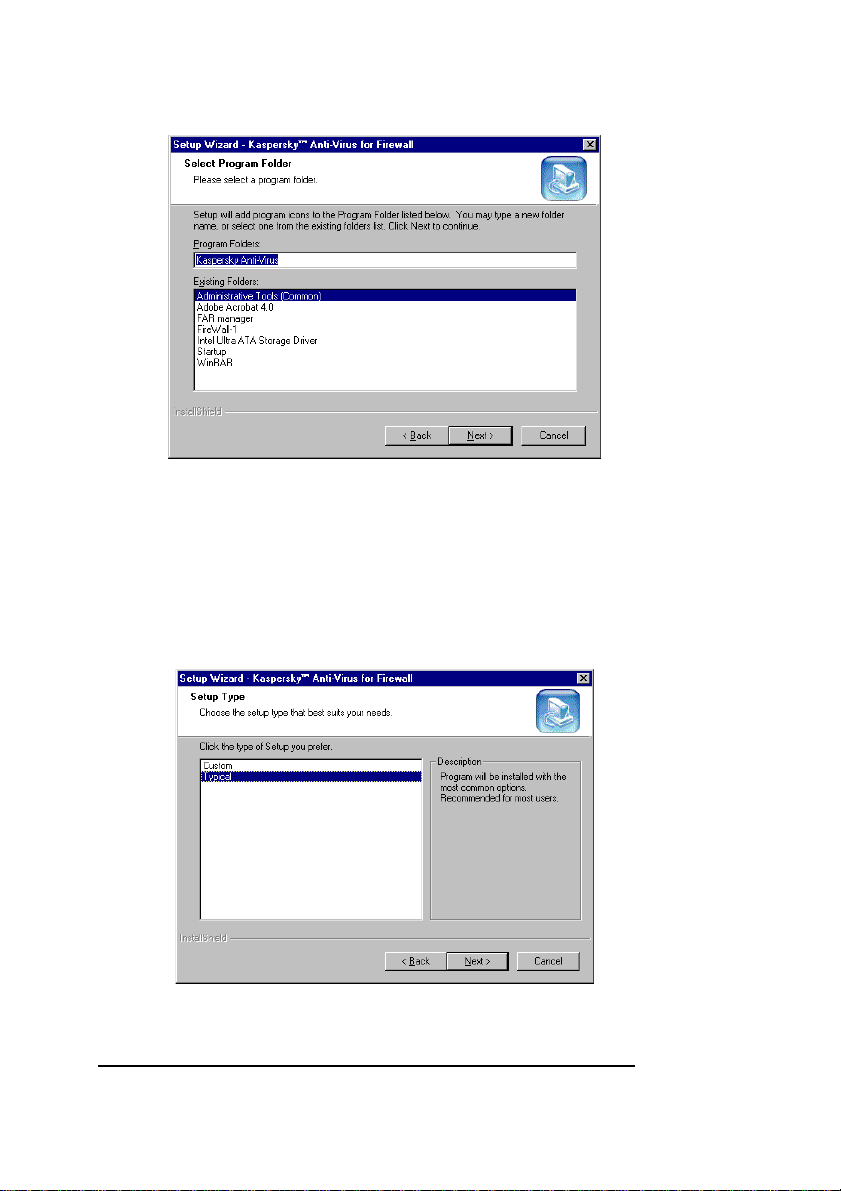
8. The Select Program Folder wizard window will
appear on your screen (see figure 6). In this window,
select the name of the program folder under which
your KAV for Firewall software will appear on the
Windows Start menu. Click Next to proceed.
17
17
1717
Page 18
INSTALLING KAV FOR FIREWALL
Figure 6. The Select Program Folder wizard window
9. The Setup Type wizard window will appear on your
screen (see figure 7). In this window, you must
choose the type of installation you want the
installation wizard to perform. The choices are:
Figure 7. The Setup Type wizard window
18
18
1818
Page 19
KASPERSKY ANTI-VIRUS
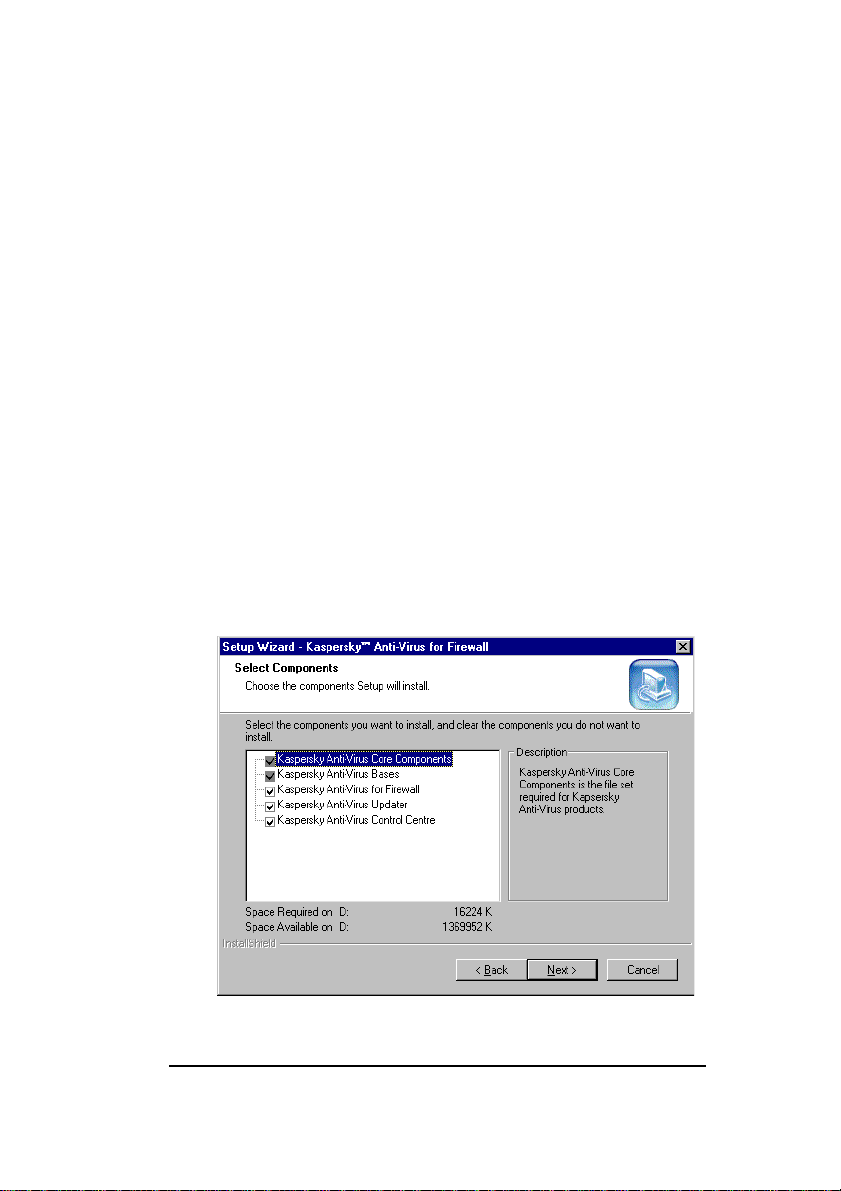
• Custom — allows you to choose exactly which
components to install;
• Typical — installs all the program components.
This option skips the steps 11 and 12 described
below.
10. Click Next to proceed.
11. If you choose Custom in the Setup Type wizard
window, the Select Components wizard window will
appear on your screen (see figure 8). In this window,
you must choose the required components. By
default, all the components are selected. You can
choose not to install any of the components by
unchecking the box alongside it. When done, click
Next to proceed.
If you choose not to install Kaspersky Anti-Virus for
Firewall, the steps 13 and 14 described below will be
skipped.
Figure 8. The Select Components wizard window
19
19
1919
Page 20
INSTALLING KAV FOR FIREWALL
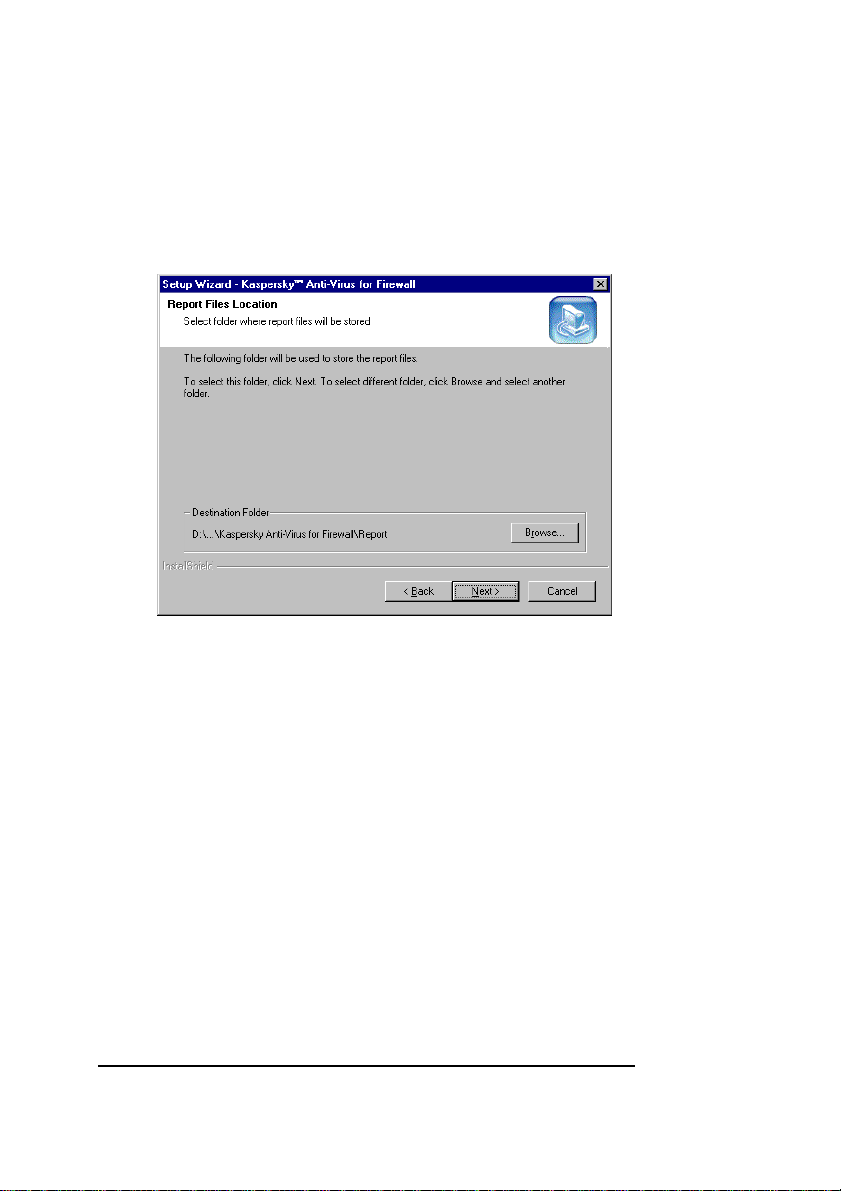
12. The Report Files Location wizard window will
appear on your screen (see figure 9). In this window,
you must select a directory where KAV for Firewall
will place its log files. When done, click Next to
proceed.
Figure 9. The Report Files Location wizard window
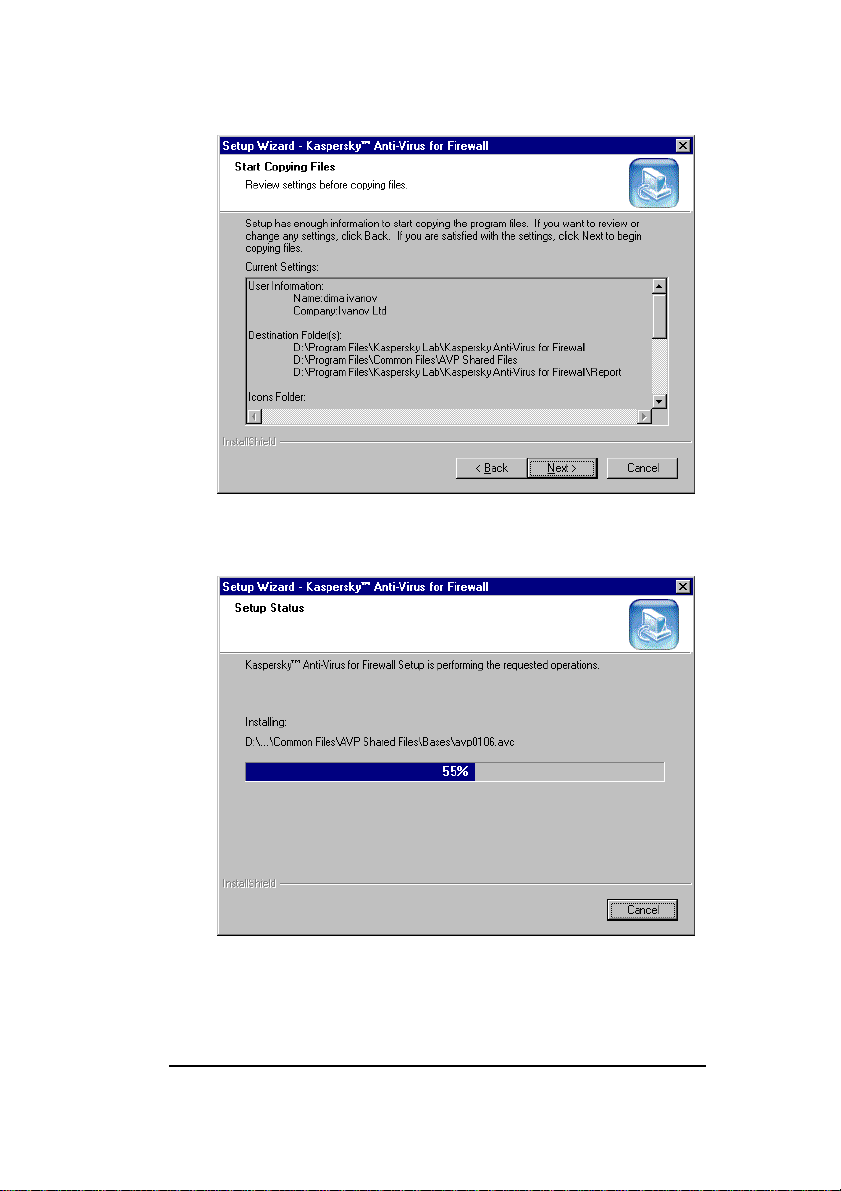
13. The Start Copying Files wizard window will appear
on your screen (see figure 10). Read the installation
information and click Next to proceed. The
installation wizard will start copying files on your
computer (see figure 11).
20
20
2020
Page 21
KASPERSKY ANTI-VIRUS
Figure 10. The Start Copying Files wizard window
Figure 11. The Setup status wizard window
14. When the wizard is done, the Configuration wizard
window will appear on your screen (see figure 12). In
21
21
2121
Page 22
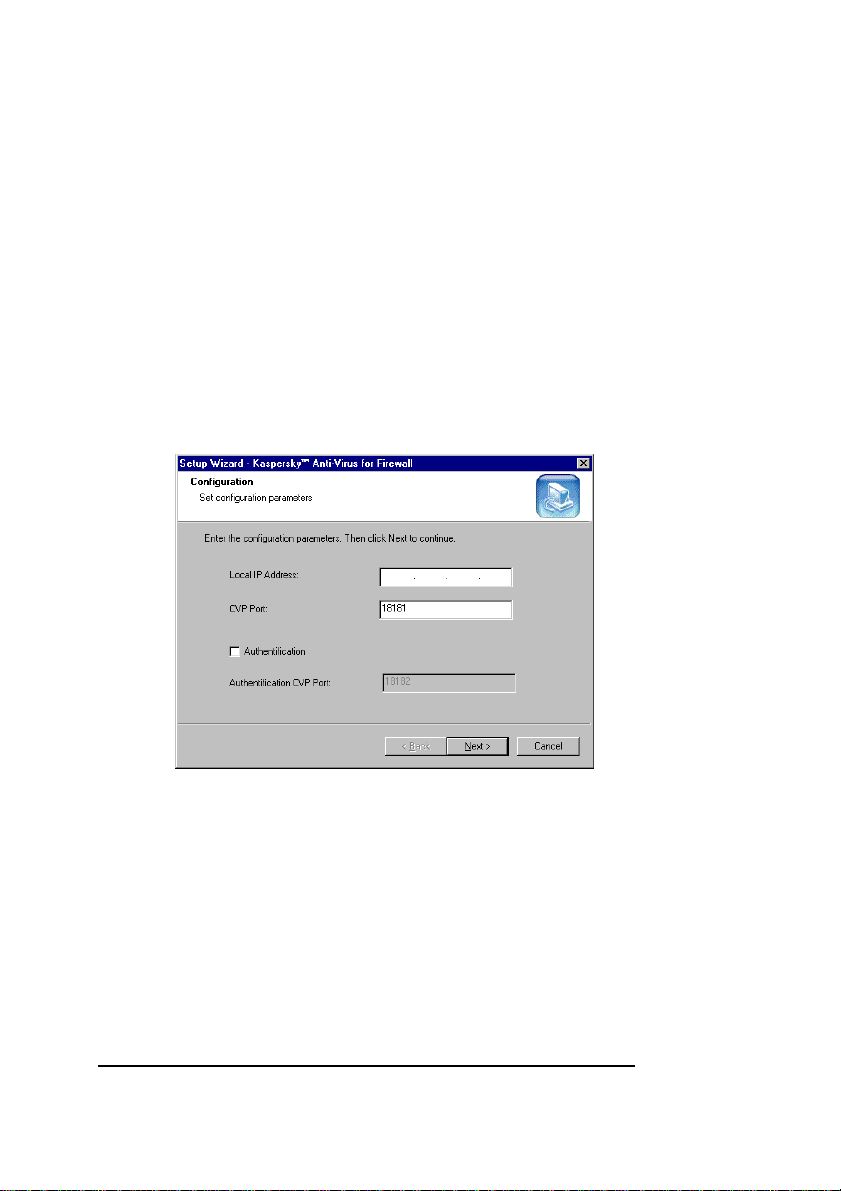
INSTALLING KAV FOR FIREWALL
the Local IP Address field on this wizard window,
you must specify the local IP address of the
computer where you installing the program, and in
the CVP Port field — the required port number.
If in order to work with the firewall the program needs
additional authentication, you must check the
Authentification box and specify the required port
number in the Authentification CVP Port field. Then
click Next to proceed.
If you leave these fields blank, the program by default will
use the appropriate settings of your workstation.
Figure 12. The Configuration wizard window
15. The Temporary Files Location wizard window will
appear on your screen (see figure 13). Here you
must choose the directory where KAV for Firewall will
generate its temporary files. Click Next to proceed.
22
22
2222
Page 23

KASPERSKY ANTI-VIRUS
Figure 13. The Temporary Files Location wizard window
16. The Key File wizard window will appear on your
screen (see figure 14). In this window, you must
define the key file and its location (see
subchapter 2.3). If the file is located in the folder from
which you are running the installation wizard, it will
be automatically displayed in the List of key files to
install list. If the key file is located in some other
directory, you must press the Add button and choose
this file in the directory tree. If necessary, you can
use several key files simultaneously. After you
selected all required key files, click Next to proceed.
23
23
2323
Page 24

INSTALLING KAV FOR FIREWALL
Figure 14. The Key File wizard window
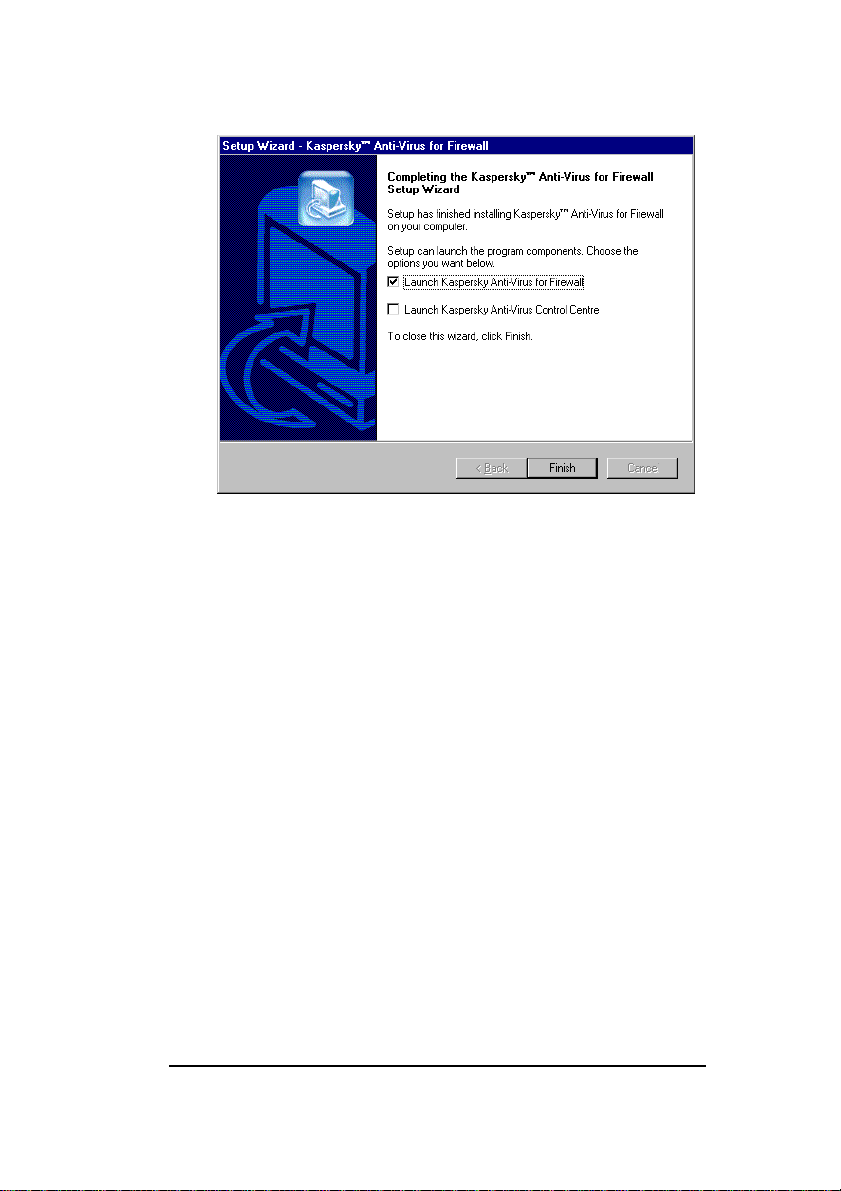
17. When the installation procedure is completed the
Completing the Kaspersky Anti-Virus for Firewall
Setup Wizard wizard window will appear on your
screen (see figure 15). Check the KAV components
that you want to start immediately after the
installation and press the Next button.
24
24
2424
Page 25
KASPERSKY ANTI-VIRUS
Figure 15. The Completing the Kaspersky Anti-Virus for
Firewall Setup Wizard wizard window
2.2.2. Reinstalling the program
If when started the installation wizard will detect a previous
installation of the program on your computer, the Program
Maintenance wizard window will appear on your screen (see
figure 16). In this window, you must choose the re-installation type.
The choices are:
• Modify — adds new KAV components to the previous
installation;
• Repair — reinstalls all the KAV components;
• Remove — removes the KAV copy from your computer
(see subchapter 2.2.3).
Choose the required option button and click Next to proceed.
25
25
2525
Page 26

INSTALLING KAV FOR FIREWALL
Figure 16. The Program Maintenance wizard window
If you selected the Modify option, the Select Components
wizard window will appear on your screen (see figure 17). In this
window, you must check boxes of the components that you want to
add to the previous installation.
When done, click Next to proceed. The Setup status
(see figure 11) and Completing the Kaspersky Anti-Virus for
Firewall Setup Wizard (see figure 15) wizard windows in
sequence will appear on your screen.
26
26
2626
Page 27

KASPERSKY ANTI-VIRUS
Figure 17. The Select Components wizard window
If you selected the Repair option on the Program Maintenance
wizard window, the Confirm File Repair wizard box will appear on
your screen (see figure 18). Press the OK button to confirm or the
Cancel button to cancel the reinstallation.
Figure 18. The Confirm File Repair wizard box
2.2.3. Removing the installation
If, by some reasons, you want to uninstall the KAV for Firewall copy
from your computer, choose Remove option on the Program
Maintenance wizard window (see figure 16) and click Next to
proceed.
27
27
2727
Page 28

INSTALLING KAV FOR FIREWALL
The confirm un-installation wizard box will appear on your screen.
To initiate the removal operation, click OK. The installation wizard
will erase the program files from your computer.
If while uninstalling the wizard detected a KAV file that might be
used by some other programs on your computer, the file-removal
confirmation box appears on your screen. To erase the file, press
the Yes button.
2.3. The *.KEY File
The *.KEY file is a kind of your personal key, that contains all the
housekeeping information required for your Kaspersky Anti-Virus
operation. The information includes:
9version vendor contact information;
9technical support information (the support provider, and the
appropriate contact information);
9product release date;
9validation that the program is a registered copy;
9period of license validity.
0
If no *.KEY file is present, the program copy will function
as a demo version and some of its functionality, such as
the ability to disinfect files, will be disabled.
0
Keep your *.KEY file safe!!!. It is advisable that you back
up the file.
28
28
2828
Page 29

Chapter
3
3. Preparing To Run The
Program
Configuring your CheckPoint firewall to work with
KAV for Firewall
3.1. Binding Firewall With KAV
For Firewall
To ensure the co-operation between KAV for Firewall and the
firewall program, the latter should be appropriately configured.
3.2. Adding CVP Server
First, you need to create the CVP server.
)
To add the CVP server follow the steps:
1. Select Servers from the Manage menu of your
firewall program. The Servers dialog box with existing
CVP servers will appear on your screen (see
figure 19).
29
29
2929
Page 30

PREPARING TO RUN THE PROGRAM
2. Press the New button and select CVP from the drop
down list (see figure 20).
3. For the server to operate correctly you must define it.
Use the CVP Server Properties dialog Name text
field to name the new server (see figure 21). It’s
advisable for the name to indicate the server
functional load, so that to make it easy for your
colleagues to identify it in your absence. Select the
computer running KAV for Firewall from the Host drop
down list. Select FW1_cvp from the Service drop
down list. Click OK.
4. Now you can see the name of your new CVP server in
the Servers dialog box list. (see figure 22). Press the
Close button to exit the box.
Figure 19. The Servers dialog box
30
30
3030
Page 31

KASPERSKY ANTI-VIRUS
Figure 20. The Servers dialog box: Adding the new server
31
31
3131
Page 32

PREPARING TO RUN THE PROGRAM
Figure 21. The CVP Servers Properties dialog box
Figure 22. The server is in the Servers dialog box list
32
32
3232
Page 33

KASPERSKY ANTI-VIRUS
3.3. Adding Resources
KAV for Firewall is able to monitor data traffic passing through the
protocols: HTTP, SMTP and FTP. If you wish, you can enable the
program to check for viruses in all of these three traffic types.
3.3.1. Adding the HTTP resource
)
To add the HTTP resource, follow the steps:
1. Select Resources from the Manage menu of your
firewall to display the Resources dialog box. (see
figure 23).
2. In the Resources dialog box, press the New button.
Select URL from the drop down list (see figure 24).
3. Type a name of the resource (e.g. KAV_HTTP)in the
Name text field on the URL Definition dialog box
General page (see figure 25). So that to make it easy
for you and your colleagues to work with the resource,
it’s advisable for the name to be meaningful.
4. Switch to the Match tab and check the HTTP box in
the Schemes section (see figure 26). This way you
confirmed that the name belongs to an HTTP
resource.
5. Switch to the Action tab and select the name of your
KAV CVP server (KAV_CVP) from the Server drop
down list in the CVP section. By doing so you confirm
that these settings are made for that server.
Now you must select one of the following option
buttons: None - does nothing, i.e. transfers no data to
the KAV server for checking, Read Only – allows the
KAV_CVP server only to read the data-packets it
receives, Read/Write — allows the KAV server to
33
33
3333
Page 34

PREPARING TO RUN THE PROGRAM
read and disinfect the data-packets it receives (see
figure 27). It’s advisable that you select the
Read/Write option button. Click OK.
If any problem of routing the data is detected (some data
was not received or could not be sent) and you suspect
your KAV for Firewall is the reason, you can check it. To
do this, select the None option button as an action of your
KAV server for all the protocols. If the problem persists, it
means that it is not resulted from the KAV for Firewall
performance. If no sign of this problem is left, immediately
contact the technical support service of Kaspersky Lab.
Figure 23. The Resources dialog box
34
34
3434
Page 35

KASPERSKY ANTI-VIRUS
Figure 24. Adding the HTTP recourse
Figure 25. The URL Definition dialog box: The General page
35
35
3535
Page 36

PREPARING TO RUN THE PROGRAM
Figure 26. The URL Definition dialog box: The Match page
Figure 27. The URL Definition dialog box: The Action page
36
36
3636
Page 37

KASPERSKY ANTI-VIRUS
3.3.2. Adding the SMTP resource
)
To add the SMTP resource, follow the steps:
1. Select Resources from the Manage menu of your
firewall to display the Resources dialog box. (see
figure 28).
2. In the Resources dialog box, press the New button
and select SMTP from the drop down list. Type a
name of the resource (e.g. KAV_SMTP)in the Name
text field on the SMTP Definition dialog box General
page (see figure 29).
3. Switch to the Match tab (see figure 30) and fill in the
Sender and the Recipient fields as required.
4. Switch to the Action1 page (see figure 31) and fill in
the Sender, the Recipient, the Field and the
Contents fields as required.
5. Switch to the Action2 page (see figure 32). Select the
name of your KAV CVP server (KAV_CVP) from the
Server drop down list in the CVP section. Select the
Read/Write option button. Click OK.
0
Make sure to delete the default value from the Strip MIME
of Type text field and leave it blank. Otherwise, some files
attached to incoming messages might be lost.
37
37
3737
Page 38

PREPARING TO RUN THE PROGRAM
Figure 28. The Resources dialog box
Figure 29. The SMTP Definition dialog box: The General page
38
38
3838
Page 39

KASPERSKY ANTI-VIRUS
Figure 30. The SMTP Definition dialog box: The Match page
Figure 31. The SMTP Definition dialog box: The Action1 page
39
39
3939
Page 40

PREPARING TO RUN THE PROGRAM
Figure 32. The SMTP Definition dialog box: The Action2 page
3.3.3. Adding the FTP resource
)
To add the FTP resource, follow the steps:
1. Select Resources from the Manage menu of your
firewall to display the Resources dialog box. (see
figure 33).
2. In the Resources dialog box, press the New button
and select FTP from the drop down list. Type a name
of the resource (e.g. KAV_FTP)in the Name text field
on the FTP Definition dialog box General page (see
figure 34)..
3. Switch to the Match page (see figure 35) and check, if
required, one or both the check boxes: GET and PUT.
4. Switch to the Action page (see figure 36). Select the
name of your KAV CVP server (KAV_CVP) from the
Server drop down list in the CVP section. Select the
Read/Write option button. Click OK.
Review the Resources dialog box on your screen to make sure
that you’ve done everything correct (see figure 44).
40
40
4040
Page 41

KASPERSKY ANTI-VIRUS
Figure 33. The Resources dialog box
Figure 34. The FTP Definition dialog box: The General page
41
41
4141
Page 42

PREPARING TO RUN THE PROGRAM
Figure 35. The FTP Definition dialog box: The Match page
Figure 36. The FTP Definition dialog box: The Action page
42
42
4242
Page 43

KASPERSKY ANTI-VIRUS
Figure 37. The Resources dialog box: Check the changes you
made
3.4. Creating Rules
In order for the added resources to affect the data traffic you (the
local network administrator) must add new or edit existing rules for
the firewall.
Below we will discuss examples of creating three rules for different
protocols (FTP, HTTP, SMTP).
To create a new rule you must click on an existing rule number with
your mouse right button. Then, select Insert rule above (or Add
rule below) from the right click menu that appeared in your screen.
43
43
4343
Page 44

PREPARING TO RUN THE PROGRAM
Figure 38. Adding new rule
To add the resource you created
(see subchapters 3.3.1, 3.3.2, 3.3.3) to the existing rule you must
click on the Service cell of the rule with your mouse right button
and select Add With Resource from the right-click menu that
appeared in your screen.
Figure 39. Adding a resource to the existing rule
The Service with Resource dialog box will appear on your screen.
Select the required resource from the list (in this case, it is
KAV_FTP) and click OK
44
44
4444
Page 45

KASPERSKY ANTI-VIRUS
Figure 40. The Service with Resource dialog box
After you added the resource to the rule, you must inform the
firewall how to handle the data packets passing through the
resource protocol. To do this, click on the Action cell of the rule
with your mouse right button. If you want the data packets that were
checked for viruses (and disinfected) by your KAV for Firewall to
proceed to their recipients select Accept from the right click menu
that appeared in your screen.
45
45
4545
Page 46

PREPARING TO RUN THE PROGRAM
Figure 41. Selecting the action
The same way you can create rules for other protocols.
Figure 42. Adding the HTTP resource to the rule
46
46
4646
Page 47

KASPERSKY ANTI-VIRUS
Figure 43. Adding the SMTP resource to the rule
Review the firewall window for the changes, you made.
Figure 44. Review the changes you made
3.5. Saving New Settings
Now in order to apply the settings you defined, you must save
these.
To do this, select Install from the Policy menu of your firewall.
47
47
4747
Page 48

Chapter
4
4. Running The Program
How you can launch K AV for Firewall.
Command line switches.
4.1. Various Methods To Launch
The Program
4.1.1. …from the Windows Program menu
You can launch KAV for Firewall from the W indows Program
menu Kaspersky Anti-Virus for F irewall group, that have been
created during the installation.
)
To launch your KAV for Firewall from the Windows
Program menu, follow the steps:
1. Click the Start button, and point to Programs.
2. Point to KAV for Firewall.
3. Then point and click Start (Restart) KAV for
Firewall.
48
48
4848
Page 49

KASPERSKY ANTI-VIRUS
)
To stop your KAV for Firewall from the Windows
Program menu, follow the steps:
1. Click the Start button and point to Programs.
2. Point to KAV for Firewall.
3. Then point and click Stop KAV for Firewall.
4.1.2. … from the command line. Using
the switches
You can start your KAV for Firewall from the command line where
options are selected by means of command line switches. The
general format of the KAV for Firewall command line is:
[path to the file]KAWALL [switch1] [switch2]…
[switchN]
To start the program use the command KAWALL /START.
To stop the program use the commands:
KAWALL /DOWN – stops
the program after it is finished current checking operations, and
KAWALL /STOP – stops the program immediately by interrupting the
current checking process.
Available switches:
/INSTALL — installs or reinstalls KAV for Firewall in the list of
Windows NT services.
/REMOVE — removes KAV for Firewall from the list of Windows NT
services.
/START — starts or restarts KAV for Firewall.
/DOWN[=time, min]
stops the program after it is finished
—
current checking operations.
49
49
4949
Page 50

RUNNING THE PROGRAM
/STOP — stops KAV for Firewall by interrupting current checking
operations .
/CONFIG[=filename] — reloads the configuration file. If you want
to load new settings from a configuration file other then the default
one, specify its name with the switch.
/RELOAD — reloads virus-definition databases.
/STAT — displays your KAV for Firewall performance statistics.
/RESET — refreshes your KAV for Firewall performance statistics.
/INFO — displays information about your KAV for Firewall.
/PURGE — clears the KAV for Firewall log file.
/PLIST — displays the list of sessions.
/PKILL=<number> — terminates the <number> session.
4.1.3. … from your Control Centre
KAV for Firewall, as well as all other programs included in the KAV
package, may be started from the Control Centre. Control Centre is
an integrated shell utility that allows you to schedule your KAV for
Firewall to start at required time everyday or at stated intervals.
50
50
5050
Page 51

5. Configuring The
Program
The KAV for Firewall settings. Defining
anti-virus settings. Settings for various
protocols.
5.1. Anti-Virus Settings
Chapter
5
If you want to change operational characteristics of your KAV for
Firewall, you can configure it, i.e. define the objects that must be
checked, actions that must be taken, extra scanning tools that must
be used and etc.
You can configure the program using your Control Centre or by
editing the configuration file kawall.cfg.
You can also create various groups of settings and save them to
configuration files. It might be useful if you frequently start KAV for
Firewall from the command line. In this case, next time when you
need to run KAV for Firewall with settings corresponding to one of
your configuration files, you will not waste your time and manually
configure the program. You will simply load the required
51
51
5151
Page 52

CONFIGURING THE PROGRAM
configuration file by defining its name in the /CONFIG command line
switch. For example,
<filename> is a name of the configuration file to be loaded.
KAWALL/CONFIG[=<filename>], where
5.2. Various Configuration
Methods
5.2.1. … from your Control Centre
)
To display the KAV for Firewall dialog window from
your Control Centre, so that to change the program
settings, follow the steps:
1. In the Control Centre main window, switch to the
Tasks tab.
2. In the task list, click your mouse right button on the
task that you created for KAV for Firewall.
3. Select Properties from the right click menu on your
screen to display the Properties dialog window.
Here, you can define general ant-virus settings (see
subchapter 5.3), and the required check settings for each protocol
separately (see subchapter 5.4).
5.2.2. … by editing the configuration file
You can change settings of your KAV for Firewall by editing its
configuration file
in the directory where you installed the program.
To edit the configuration file, you may use any text editor program.
kapwall.cfg
. The file
52
52
5252
kapwall.cfg
is located
Page 53

KASPERSKY ANTI-VIRUS
kapwall.cfg is a conventional text file (ASCII format). It contains
several sections listing parameters and the values. The general
format of such section is:
[Section_title]
Parameter_name=Parameter_value
Parameter_name=Parameter_value
...
The first string of a section introduces its title enclosed with square
brackets. The other strings introduce parameters and their values.
Each string contains a parameter name, an equals sign and the
required value. Some of the strings may contain no value. In this
case, KAV for Firewall assigns the default value to this parameter.
If a string of the configuration file begins from the semicolon, KAV
for Firewall regards it as a commentary and does not use the value
in this string.
For more details about the configuration file refer to the
corresponding chapters of this Guide (see
subchapters 5.3, 5.4).
53
53
5353
Page 54

CONFIGURING THE PROGRAM
5.3. Defining General Anti-Virus
Settings
.
Figure 45. Settings tree: The Globals branch
5.3.1. Enabling/disabling the check mode
If you uncheck the Globals box, your KAV for Firewall will
be disabled to check for viruses in the data passing
through the firewall.
This check box corresponds to the Enable parameter of the
[Commons] section in kapwall.cfg (see subchapter 5.2.2).
54
54
5454
Page 55

KASPERSKY ANTI-VIRUS
5.3.2. The file describing your virusdefinition databases
In the Set file text field you must define the name and the location
of a file containing description of your virus-definition databases.
By default the virus-definition database file that have been
installed on your computer together with the KAV for
Firewall is specified in this field (see subchapter 2.2).
This field corresponds to the DatabasesSetFile parameter of
the [Commons] section in kapwall.cfg (see subchapter 5.2.2).
5.3.3. Temporary file directory
In the Temp folder text field, you must define the directory where
your KAV for Firewall will generate temporary files. The default
value is .\TEMP, i.e. the TEMP folder in the program directory.
This field corresponds to the TempFolder parameter of the
[Commons] section in kapwall.cfg (see subchapter 5.2.2).
5.3.4. The log file
In the Log file text field, you must define the file that will contain
your KAV for Firewall operation log.
The default value is kawall.log.
If the joint box is unchecked, the program will not save its operation
log.
Besides, you can use the Li mit size check box and the text field to
limit the size of your log file.
55
55
5555
Page 56

CONFIGURING THE PROGRAM
)
To limit the size of your log file, follow the steps:
1. Check the Limit size box.
2. Define the maximum size of your log file (in Kb) in the
text field.
If you check the Append box, KAV for Firewall will add each new
report to the file’s existing contents. If the box is not checked, only
the most recent check report will be available.
These options correspond to parameters of the [LogFile] section
in kapwall.cfg (see subchapter 5.2.2).
5.3.5. Changing general settings in the
configuration file
To change general settings of KAV for Firewall you must edit
strings of the
[Commons]
and the
configuration file
This sections contain the following parameters:
[LogFile]
sections in the
Enable
— enables/disables KAV for Firewall to check for viruses in
the data passing through the firewall via all the protocols. Available
values: Yes or No (see subchapter 5.3.1).
TempFolder
— contains a name of the directory for your KAV for
Firewall temporary files (see subchapter 5.3.3).
DatabasesSetFile
— contains a full pathname of the program
SET file (see subchapter 5.3.2).
Enable
— enables/disables the program to save check reports to a
log file. Available values: Yes or No (see subchapter 5.3.4).
FileName
LimitSize
— contains a name of the log file (see subchapter 5.3.4).
— allows to limit the size of your log file. Available
values: Yes or No (see п. 5.3.4).
56
56
5656
Page 57

KASPERSKY ANTI-VIRUS
LimitSizeKB — contains the maximum size of your log file (see
subchapter 5.3.4).
Append — appends to/substitutes the log file contents by the new
report. Available values:
or No (see subchapter 5.3.4).
Yes
5.4. Defining Setting For Each
Protocol Separately
KAV for Firewall allows to change settings for every type of traffic
separately.
Since all the protocol branches of the settings tree are identical, we
shell discuss how to change settings for HTTP and you can apply it
to other protocols (see figure 46).
Figure 46. The settings tree: The HTTP branch options
57
57
5757
Page 58

CONFIGURING THE PROGRAM
5.4.1. Enabling/disabling the HTTP check
mode
)
To enable KAV for Firewall to check for viruses in
objects passing through the firewall by HTTP, you
must check the HTTP box.
This check box corresponds to the Enable parameter of the
[HTTP Scan] section in kapwall.cfg (see subchapter 5.2.2).
5.4.2. Objects to be checked
To define the objects to be checked for viruses you must use
options of the Objects branch.
The File mask options allow you to select file masks that will be
checked by the system.
If you select:
• All files, the program will check every file with every
extension;
• User defined, the program will check file masks of your
choice that you must define in the below text field. You
can type in more than one file mask, but make sure to
separate them by commas, or semicolons, or spaces.
Besides, you can define the file masks that must be ignored by the
system.
)
To exclude files of your choice from the check, follow
the steps:
1. Check the Exclude box.
58
58
5858
Page 59

KASPERSKY ANTI-VIRUS
2. Define the required file masks or file names in the
below text field.
The Compound files list of check boxes allows you to check for
viruses in complex objects, i.e. the files containing graphics,
databases and data from other applications.
Check the
Packed check box to scan for viruses in packed executable
modules;
Archives check box to scan for viruses in archived files;
Mail databases check box to scan for viruses in mail databases
with the following formats:
• Microsoft Outlook, Microsoft Exchange (files *.PST and
*.PAB, MS Mail archives);
• Microsoft Internet Mail (files *.MBX, MS Internet Mail
archives).
While scanning mail databases, KAV for Firewall checks
each record in the databases and scans for viruses in the
attached files. The program supports the following formats:
UUEncode; XXEncode; btoa (up to 5.0); btoa 5.*; BinHex
4.0; ship; NETRUN 3.10; NETSEND 1.0 (not packed);
NETSEND 1.0C (packed); MIME base64.
Plain mail check box to scan for viruses in plain mail files with the
following formats:
• Eudora Pro & Lite;
• Pegasus Mail;
• Netscape Navigator Mail;
59
59
5959
Page 60

CONFIGURING THE PROGRAM
• JSMail SMTP/POP3 server (user database).
Besides, you can limit the size of complex objects that will be
checked for viruses.
)
To do this, follow the steps:
1. Check the Limit size box.
2. Define the maximum size of a complex file (in Kb) to
be checked for viruses in the below text field.
These options correspond to the following parameters of the
[HTTP Scan] section in kapwall.cfg: FileMask,
UserDefined, ExcludeMask, ExcludeDefined,
CompoundPacked, CompoundArchives,
CompoundMailDatabases, CompoundPlainMail,
CompoundLimitSize, CompoundLimitSizeKB (see
subchapter 5.2.2).
5.4.3. Actions
KAV for Firewall allows to define how the virus-free, infected,
suspicious and non-scanned objects must be handled by the
program.
To define the actions that must be taken by the program you must
use the Actions branch under the HTTP joint of the settings tree
(see figure 47).
Go down one level to the Infected branch to define actions for
infected files.
60
60
6060
Page 61

KASPERSKY ANTI-VIRUS
)
To enable KAV for Firewall to attempt curing infected
files you must check the Try to cure check box.
If you want the program to copy any infected files it finds to a
separate folder on your hard drive check the Copy to check box
and define the corresponding directory in the below text field. To
limit the size of the files that can be saved on your hard drive, check
the Limit size check box and define their maximum and minimum
sizes in the below text fields.
The default folder for infected files is Infected. This folder
is created when you install KAV for Firewall on your
computer.
Besides, you can instruct KAV for Firewall how to handle infected
files that it failed to cure:
• If you select the Let through option button, these files
will be transferred to the firewall without any changes;
• If you select the Refuse option button, KAV for Firewall
will reject those files.
61
61
6161
Page 62

CONFIGURING THE PROGRAM
Figure 47. The Actions branch
The same way you can define actions for suspicious (the
Suspicious branch) and non-scanned objects (the Non-scanned
branch) the only difference is that these objects cannot be
disinfected by KAV for Firewall.
Non-scanned objects are the objects that your KAV for
Firewall, by some reasons, could not check for viruses
(e.g., passworded archives).
These options correspond to the following parameters of the
[HTTP Scan] section in kapwall.cfg: InfectedAction,
InfectedCopyT, InfectedCopyFolder,
InfectedCopyLimitSize,
InfectedCopyLimitMinSizeKB,
InfectedCopyLimitMaxSizeKB, InfectedCopyCurable,
InfectedTryToCure (see subchapter 5.2.2).
62
62
6262
Page 63

KASPERSKY ANTI-VIRUS
5.4.4. Extra scanning tools
The Options branch of the settings tree allows you to
enable/disable extra scanning tools that might be used by your KAV
for Firewall (see figure 48).
Figure 48. The Options branch
5.4.4.1.
5.4.4.1. Heuristic tool
5.4.4.1.5.4.4.1.
Heuristic tool
Heuristic toolHeuristic tool
To enable the heuristic detection tool you must check the Code
Analyzer box.
63
63
6363
Page 64

CONFIGURING THE PROGRAM
Code Analyzer checks file codes searching for virus-similar
instructions. If the instructions (such as - to open a file, to write into
it, to intercept the interrupt vectors or etc.) are detected the file is
suspicious and the program generates the appropriate record in the
log file.
This check box corresponds to the CodeAnalyser parameter of
the [HTTP Scan] section in kapwall.cfg (see
subchapter 5.2.2)
5.4.4.2.
5.4.4.2. Redundant scan
5.4.4.2.5.4.4.2.
To enable the redundant scanning tool you must check the
Redundant scan box.
This tool checks for viruses not just the entry points into a file that
are used by the system when processing, but the entire contents of
the examined files. This tool allows to detect a virus in a file that is
infected in the so-called «incorrect» way and has been «undertreated», what means that it’s recovered but the virus isn't cut off.
These options correspond to the following parameters of the [HTTP
Scan] section in kapwall.cfg: Redundant,
RedundantLimitSize, RedundantLimitSizeKB (see
subchapter 5.2.2).
5.4.4.3.
5.4.4.3. Copying rules
5.4.4.3.5.4.4.3.
Copying rules
Copying rulesCopying rules
You can check the Copy branch boxes to define the following
settings::
Make subfolder — allows to create new folders for copying.
Rename folder — allows to rename files.
These options correspond to the following parameters of the
[HTTP Scan] section in ka pwall.cfg: Copy MakeSubFolder,
CopyRenameFile (see subchapter 5.2.2)
64
64
6464
Page 65

KASPERSKY ANTI-VIRUS
5.4.4.4.
5.4.4.4. Holding settings
5.4.4.4.5.4.4.4.
Holding settings
Holding settingsHolding settings
One of the most important features of this new version of KAV for
Firewall is that it allows to define holdin g settings for the examined
files.
The point is that, quite often users failed to download files of a large
size. It happened because KAV for Firewall took a lot of time
checking for viruses in those files, and remote computers
automatically suspended operations after a specified time-out
interval.
Now you yourself can define the Hold settings:
the Percent numerical field allows to define the percentage of
object size that can be held by KAV for Firewall for checking. If the
value in this field is 100, it means that KAV for Firewall will hold the
files in whole. If the value is zero, the program will not check for
viruses in the files.
These options correspond to the following parameters of the [HTTP
Scan] section in kapwall. cfg: HoldTimeSE C, HoldFilePER
(see subchapter 5.2.2).
5.4.5. Defining setting by editing the
configuration file
The [HTTP Scan] section of the configuration file also allows to
change the program settings for HTTP.
This section contains the following strings:
Enable
HTTP traffic. Available values: Yes or No (see subchapter 5.4.1).
FileMask
the system (see subchapter 5.4.2). Available values:
— enables/disables the program to check for viruses in the
— allows you to select file masks that will be checked by
65
65
6565
Page 66

CONFIGURING THE PROGRAM
0 — corresponds to the All files option button;
1 — corresponds to the User defined option button.
UserDefined
— contains file masks that will be checked by KAV
for Firewall. Effective only if the above parameter value is 1 (see
subchapter 5.4.2).
ExcludeMask
— allows you to exclude some file masks from the
check. Available values: Yes or No (see subchapter 5.4.2).
ExcludeDefined
— contains file masks that will be ignored by KAV
for Firewall. Effective only if the above parameter value is Yes (see
subchapter 5.4.2).
CompoundPacked, CompoundArchives, CompoundMailDatabases
CompoundPlainMail
and
- enable/disable the program to check for
viruses in packed executable files, archives, mail databases and
plain mail files respectively. Available values: Yes or No (see
subchapter 5.4.2).
CompoundLimitSize
— allows you to limit the size of complex
objects to be checked. Available values: Yes or No (see
subchapter 5.4.2).
CompoundLimitSizeKB
— contains the maximum size of a
complex object that is allowed for the check. Effective only if the
above parameter value is Yes (see subchapter 5.4.2).
The below strings allow to define how the virus-free, infected,
suspicious and non-scanned objects must be handled by the
program.
InfectedAction
— allows to define the action for infected files.
Available values are 0 (to pass files to the firewall without any
changes) or 1 (to reject files).
66
66
6666
Page 67

KASPERSKY ANTI-VIRUS
InfectedCopyTo
— enables/disables the program to copy infected
files to a separate folder. Available values are
Yes
or No.
InfectedFolder
folder. Effective only if the above parameter value is
InfectedCopyLimitSize, InfectedCopyLimitMinSizeKB and
InfectedCopyLimitMaxSizeKB - allow you to limit the size of
— contains the pathname of the corresponding
.
Yes
infected files to be copied to the folder and to define their max. and
min. sizes in Kb.
InfectedTryToCure
curing infected files. Available values are
— enables/disables the program to attempt
or No.
Yes
The same way, you can define actions for suspicious and nonscanned files.
CodeAnalyser — enables/disables the heuristic checking tool.
Available values are
Redundant — enables/disables the redundant scanning tool.
Available values are
RedundantLimitSize — allows you to limit the size of files to be
checked by the redundant scanning tool. Available values are
or No (see subchapter 5.4.4.1).
Yes
or No (see subchapter 5.4.4.2).
Yes
Yes
or No (see subchapter 5.4.4.2).
RedundantLimitSizeKB — contains the maximum size of a
redundantly scanned file in Kb. Effective only if the above
parameter value is
(see subchapter 5.4.4.2).
Yes
CopyMakeSubFolder — allows to create new folders for copying.
Available values are
CopyRenameFile — allows to rename files when copied. Available
values are
or No (see subchapter 5.4.4.3).
Yes
or No (see subchapter 5.4.4.3).
Yes
67
67
6767
Page 68

CONFIGURING THE PROGRAM
HoldTimeSEC — contains the maximum time during which the
program is allowed to hold an object.
HoldFilePER — contains the maximum percentage of the object
size that can be held by KAV for Firewall (see subchapter 5.4.4.4).
68
68
6868
Page 69

Chapter
6
6. Actions Taken For
Infected Files
Actions that are taken by your KAV for Firewall
when it detected a virus in the data traffic for various
protocols.
When KAV for Firewall detects infected files, it captures and holds a
share of each of those files (the share that is held by the program is
measured in percentage from the entire size of the file and must be
defined for every protocol separately (see subchapter 5.4.4.4)) .
Consequently, the user doesn’t receive the file as a whole, what, in
most cases, prevents the virus from being started on the user
computer.
However, there are some differences between various protocols as
to how the infected files are processed (if you enabled the program
not to pass the infected files):
• The SMTP traffic allows the program to capture and
hold 100% of the examined file, i.e. if the file is infected
it is possible that the user will not receive any of it.
69
69
6969
Page 70

ПРОСМОТР РЕЗУЛЬТАТОВ
ПРОВЕРКИ ДИСКОВ
• The HTTP and the FTP traffics do not allow the
program to capture and hold 100% of the examined file.
If the user will try to download an infected file via one of
these protocols, he(she) will receive only a share of the
file.
70
70
7070
Page 71

Chapter
7
7. Performance Statistics
And Operation Log
Information and performance statistics of
your KAV for Firewall. How to view the
reports.
7.1. Displaying The Performance
Statistics
At any time, you can use your KAV Control Centre to review the
KAV for Firewall performance statistics and its status.
)
To display the KAV for Firewall performance
statistics, follow the steps:,
1. In the KAV Control Centre main window, switch to the
Tasks tab.
2. In the task list, click your mouse on the task that you
created for your KAV for Firewall.
71
71
7171
Page 72

PERFORMANCE STATISTICS
AND OPERATION LOG
In the right frame of this page you will see the task performance
statistics (see figure 50). Here you can review the statistics for
every protocol separately.
Figure 49. The KAV for Firewall performance statistics
The on-line viewing of the statistics and current status of your KAV
for Firewall makes it simple to analyse and compare check reports
and allows before-the-fact prevention of the infection.
Besides, to review the performance statistics you can use the
appropriate command line switch. In this case you must type
kawall.exe –stat
)
To review details about the performance of your KAV
in the command line.
for Firewall, follow the steps:
1. In the KAV Control Centre main window switch to the
Tasks tab.
72
72
7272
Page 73

KASPERSKY ANTI-VIRUS
2. Select the task created for your KAV for Firewall from
the list, by clicking on it with your mouse.
3. Click your mouse right button and select View Report
from the right click menu.
The Report Viewer contains a table with information about the date
and the time when the check was performed, the object checked
and the result of this check.
Figure 50. The example log
Besides, to review the operation log you can use the appropriate
command line switch. In this case you must type
in the command line.
info
kawall.exe –
7.2. Log File
If the appropriate option is enabled, the program saves its operation
log to the file (see subchapter 6.3.4). You can open and view this
log file in any text or worksheet editor.
73
73
7373
Page 74

PERFORMANCE STATISTICS
AND OPERATION LOG
7.3. Alerts From Control Centre
If in the Properties dialog window you switch to the Alerts tab, you
will see the list alerts that the program generates at alarm
conditions (see figure 51). If your KAV Control Centre operates as a
part of the KAV Network Control Centre, these alerts can be
emailed to your network administrator.
Below you can see the list of alert messages that can be generated
by your KAV for Firewall and broadcasted by the KAV Control
Centre.
Figure 51. The Alerts page of the Properties dialog window
The operation of broadcasting alert messages to the network
administrator may be suppressed or activated.
74
74
7474
Page 75

KASPERSKY ANTI-VIRUS
To do this, you simply have to check/uncheck the corresponding
check box.
For information about how to define destination addresses
for your alerts refer to the KAV Control Centre
documentation.
The alert message subject line contains a name of the workstation,
a name of the component that generated this alert and the
message itself. The sender field contains an address of the server.
The alert body contains information similar to this in the subject line
but in the more detailed form.
Alert number: <ALERT_NUMBER>
Alert priority: <ALERT_PRIORITY>
Alert name: <ALERT_NAME>
From KAV component: <COMPONENT_NAME>
From computer: <COMPUTER NAME>
Date: <DATE>
Time: <TIME>
where
<ALERT_NUMBER> is the serial number of this alert in the list of alerts
generated by KAV for Firewall;
<ALERT_PRIORITY> is the priority level of this alert;
<ALERT_NAME> is the alert message;
<COMPONENT_NAME> is the name of the KAV package component
that generated this message, i.e.
<COMPUTER_NAME> is the name of the computer the alert was
KAV for Firewall
;
broadcasted from;
<DATE>, <TIME>
are the date and the time when this alert has been
generated.
75
75
7575
Page 76

Chapter
8
8. Kaspersky Anti-Virus
for Firewall Agent
Kaspersky Anti-Virus for Firewall Agent.
8.1. General Information
Kaspersky Anti-Virus for Firewall Agent is a program that is
included in the KAV for Firewall distribution kit and developed to
automatically monitor the performance of KAV for Firewall and to
launch the appropriate support program in case of the KAV for
Firewall failure (or it can restart the KAV for Firewall).
8.2. Configuring The Agent
To configure Kaspersky Anti-Virus for Firewall Agent you must edit
its file .
AGENT\kawallag.ini.
To enable the agent in case of the KAV for Firewall failure to run the
appropriate support program you must enter the following values in
the agent configuration file:
Enable=Yes
76
76
7676
Page 77

KASPERSKY ANTI-VIRUS
RunOnStop=Yes
RunOnStopProgram=<Absolute_path_to_the_support_program>
77
77
7777
Page 78

Appendix A.
Kaspersky Lab Ltd.
Kaspersky Lab Ltd. is an international, privately owned softwaredevelopment company based in Moscow, with representative
offices in Cambridge (United Kingdom), Walnut Creek (United
States), and Johannesburg (South Africa). The company was
founded in 1997, and concentrates its efforts on development,
marketing and distribution of the world-class data-security
technologies and related computer software. Kaspersky Lab is one
the world leaders in data-security and anti-virus technologies. The
company was the first to develop many features that are now an
essential part of all modern anti-virus protection: an external antivirus database with embedded specialised modules, a search
capability within archived and compressed files, integrated antivirus protection for Linux, etc.
In addition to anti-virus software, Kaspersky Lab is committed to the
development of general data-security software. Our current product
line includes Kaspersky Inspector and Kaspersky WEB Inspector,
whose unique capabilities allow users full control over any
unauthorised alteration to the file system and content of a Web
server. Upcoming add-on features include Kaspersky Personal
Firewall for general workplace defence against any hacker attacks,
and Kaspersky Access Control for reliable regulation of user access
rights to a computer. Kaspersky Lab's flagship product, known as
Kaspersky Anti-Virus (KAV), has been in constant development
since 1989, and has been rated consistently by numerous
computer magazines and virus research centres as the best antivirus product on the market.
Kaspersky Anti-Virus covers all reliable methods of anti-virus
protection: anti-virus scanners, resident "on-the-fly" virus
interceptors, integrity checkers and behaviour blockers. Kaspersky
Anti-Virus supports all of the most popular operating systems and
78
78
7878
Page 79

KASPERSKY ANTI-VIRUS
applications. It provides strong anti-virus defence for mail gateways
(MS Exchange Server, Lotus Notes/ Domino, Sendmail, Qmail, and
Postfix), firewalls and WEB servers. All Kaspersky Anti-Virus
products rely on Kaspersky's own database of over 55,000 known
viruses and types of malicious code. The product is also powered
by a unique technology combating even future threats: the built-in
heuristic code analyser is able to detect up to 92% of unknown
viruses and the world's only behaviour blocker for MS Office 2000
provides 100% guaranteed protection against any macro-viruses.
If you have any questions, comments or suggestions please refer
them to our distributors listed in your Readme.txt or directly to
Kaspersky Lab. We will be glad to advise you on any matters
related to our product by telephone or e-mail and all your
recommendations and suggestions will be thoroughly reviewed and
considered.
Address: 10, Geroyev Panfilovtcev Street, 123363, Moscow, Russia,
Phone:
Fax: +7 095 797 87 00, 948 43 31, 948 83 50
BBS: +7 095 948 63 33, +7 095 948 36 01 (round-the-clock)
E-Mail: sales@kaspersky.com Sales Department
support@kaspersky.com Technical Support
newvirus@kaspersky.com Anti-virus Lab (for archived virus
info@kaspersky.com Marketing and Advertising
WWW: http://www.kaspersky.com
Kaspersky Lab
+7 095 797 87 00
+7 095 948 43 31
+7 095 948 83 50
+7 095 797 87 00
+7 095 493 03 00
+7 095 948 56 50 Marketing and Advertising
http://www.viruslist.com
Sales Department
Technical Support
Department
copies only)
Department
79
79
7979
Page 80

Appendix B.
Frequently Asked
Questions
Question: It seems that K AWALL performance is co rrect. But
when I try opening a page in my Internet Explorer, the page is
not loading. However, when I do it with Netscape, everything is
ok. Why does it happen?
Answer: This problem is not related to your KAWALL, it
concerns your HTTP security server. It is possible that your
server does not support HTTP1.1 and does not open the
pages.
Some authors recommend to add a certain code to the
$FWDIR/conf/objects.C, but it doesn’t help.
There are several ways to overpass this problem:
1. Install SP5, if you are using the 4.0 version.
2. Install the 4.1 version with SP1 (the same problem is
detected in the 4.1 version build 41439).
3. The simplest solution is to configure your Internet
Explorer in the appropriate way (example for v. 5.x):
Tools=>Internet Options=>Advanced=>
HTTP 1.1 Settings=>uncheck the Use HTTP 1.1
box;
80
80
8080
Page 81

KASPERSKY ANTI-VIRUS
Question: Firewall-1 generates a lot of records about the
authentication between KAWALL and Firewall-1 in its logs.
How can I suppress these records?
Answer: It happens because by default the firewall modules
expect the authentication data from the CVP server.
You can edit the firewall file
$FWDIR/conf/fwopsec.conf
Delete the following string from this file:
server <IP address> 18181 AUTH_OPSEC
Then restart the firewall.
Question: When I download a file, the operation proceeds
much slower and, when the file is downloaded up to about
50% the operation fails. Why does it happen?
Answer: First you must know one thing about the KAWall
performance concept.
1. When a user downloads a file, the data is transferred
by the firewall (Firewall Check Point) to the CVP
server (KAWALL), and then the CVP server transfers
it to the user. This double transfer operation results in
essential slow-down of the operation.
2. While transferring the data packets KAWALL
withholds some part of the data (usually the file end),
and passes the rest of file to the firewall. If the
program detects a virus in the withheld part, it
terminates the transfer operation.
Compromise between your computer safety and friendliness
of the program depends on the percentage of data held by
the CVP server.
81
818181
Page 82

KASPERSKY LAB LTD.
The new version of KAWALL provides this option. And now
the user can define it him(her)self.
Parameters=>HTTP (SMTP/FTP)=>Options=>
Hold=>Percent.
Or in the configuration file kawall.cfg (the
HoldFilePER= parameter).
Question: After the installation of KAWall the messages are
coming in without attachments (the attachments are cut off).
What I must do to solve this problem?
Answer: The solution is as follows: go to the firewall settings
(SMTP Definition) and make sure the Strip MIME of Type
field on the Action2 page is left blank (the default value in
this field is message/partial – it must be deleted).
Question: I have some problems with routing of the data
packets and suspect that my K AWall is the reason. How can I
check this?
Answer: To check this, follow the steps:
1. Select Resources from the Manage menu of your
firewall.
2. In this window, select the firewall settings window for
the required protocol and open it for editing.
3. In the CVP section of this window (the CVP server
settings for the certain protocol) select the None
option button instead of Read Only or Read/Write.
If the problem persists, it is not related to your KAWALL. If no
sign of the problem is left, immediately contact the technical
support service of Kaspersky Lab.
82
82
8282
Page 83

KASPERSKY ANTI-VIRUS
Question: What data I must provide when contacting the
technical support service?
Answer: If you have a problem and would like to contact our
technical support service, you must describe the problem
and provide the following information:
1. Version of your Firewall Check Point.
2. What SPs for Firewall Check Point are installed on
your computer?.
3. How many computers working through your Firewall
Check Point?
4. Version of your KAWALL.
83
838383
 Loading...