

Page 1

KASPERSKY LAB
Kaspersky® Administration Kit
version 5.0
Reference Book
Page 2

KASPERSKY® ADMINISTRATION KIT
VERSION 5.0
Reference Book
© Kaspersky Lab
Visit our website: http://www.kaspersky.com/
Revision date: December, 2005
Page 3

Contents
CHAPTER 1. KASPERSKY® ADMINISTRATION KIT..................................................6
1.1. The purpose of the document...............................................................................8
1.2. Conventions used in this book..............................................................................8
CHAPTER 2. GETTING STARTED.............................................................................. 10
2.1. Starting the program and connecting to the administration server....................10
2.2. Granting rights to users.......................................................................................13
2.3. Viewing information about the computer network IP subnetworks....................17
2.4. Quick Start Wizard...............................................................................................21
CHAPTER 3. VIEWING, CREATING, AND CONFIGURING A LOGICAL
NETWORK................................................................................................................. 27
3.1. Viewing the logical network structure .................................................................27
3.2. Finding a computer in the logical network.......................................................... 35
3.3. Computer queries................................................................................................40
3.4. Creating, modifying, and deleting logical network groups..................................45
3.5. Adding, moving and deleting a computer from a logical network......................47
3.6. Moving a client to another logical network.......................................................... 49
3.7. Local connection of the client computer to the Administration Server............... 52
3.8. Verifying connection of the client computer to the Administration server..........54
CHAPTER 4. HIERARCHY OF ADMINISTRATION SERVERS................................ 56
4.1. Connecting a slave Administration Server to a master Server..........................56
4.2. Viewing the logical network of a slave Administration Server............................58
CHAPTER 5. INSTALLATION AND DEINSTALLATION APPLICATIONS ON
CLIENTS..................................................................................................................... 59
5.1. Viewing the installation package parameters.....................................................59
5.2. Creating installation packages............................................................................63
5.3. Configuring installation package settings for the Network Agent.......................66
5.4. Creating an application deployment task...........................................................67
5.5. Configuring the remote installation task..............................................................76
5.6. Remote software uninstallation........................................................................... 78
Page 4

4 Kaspersky Administration Kit
5.7. Application Deployment Wizard.......................................................................... 79
5.8. Local installation of Network Agent..................................................................... 82
5.9. Local installation of Network Agent Console Plug-in..........................................86
5.10. Installing applications in silent mode.................................................................87
CHAPTER 6. POLICY MANAGEMENT.......................................................................88
6.1. Creating a policy for an application.....................................................................88
6.2. Viewing and modifying a policy........................................................................... 91
6.3. Activating a policy..............................................................................................100
6.4. Creating a Network Agent policy.......................................................................101
6.5. Exporting and importing policies.......................................................................103
CHAPTER 7. TASK MANAGEMENT.........................................................................105
7.1. Creating a group task........................................................................................105
7.2. Creating a global task........................................................................................114
7.3. Creating a local task..........................................................................................115
7.4. Viewing and changing task settings..................................................................117
7.5. Application start / stop task................................................................................124
7.6. Exporting and importing tasks...........................................................................126
7.7. Starting and stopping tasks............................................................................... 127
7.8. Monitoring and viewing task performance results............................................128
7.9. Deploying group tasks on slave Administration Servers..................................135
CHAPTER 8. MANAGING APPLICATION SETTINGS............................................. 136
8.1. Viewing application settings..............................................................................136
8.2. Administration Server settings.......................................................................... 140
8.3. Network Agent settings.....................................................................................150
CHAPTER 9. UPDATING THE ANTI-VIRUS DATABASE AND PROGRAM
MODULES................................................................................................................151
9.1. Creating the update task...................................................................................151
9.2. Configuring the update task..............................................................................154
9.3. Viewing update list.............................................................................................155
9.4. Automatic update deployment..........................................................................157
CHAPTER 10. WORKING WITH QUARANTINE......................................................159
CHAPTER 11. EVENTS, REPORTS AND NOTIFICATIONS...................................161
11.1. Logging and viewing events and receiving notifications................................161
Page 5

Contents 5
11.2. Viewing and modifying report templates........................................................ 169
11.3. Creating a report template ..............................................................................171
11.4. Generating and viewing reports...................................................................... 173
11.5. Generating summary reports on slave Administration Servers.....................174
CHAPTER 12. MANAGING LICENSE KEYS............................................................176
12.1. Viewing information about license keys..........................................................176
12.2. Installing a new license key.............................................................................178
12.3. Creating and viewing the license key report...................................................180
CHAPTER 13. BACKUP COPYING AND RESTORATION OF THE
ADMINISTRATION SERVER DATA.......................................................................181
13.1. Backup data copying task...............................................................................181
13.2. Backup data copying utility..............................................................................184
APPENDIX A. FREQUENTLY ASKED QUESTIONS...............................................186
APPENDIX B. GLOSSARY.........................................................................................190
APPENDIX C. KASPERSKY LAB...............................................................................196
C.1. Other Kaspersky Lab Products........................................................................197
C.2. Contact Us ........................................................................................................202
APPENDIX D. LICENSE AGREEMENT ....................................................................203
Page 6

CHAPTER 1. KASPERSKY®
ADMINISTRATION KIT
Kaspersky
centralized solution for most important administration tasks associated with
managing the corporate network anti-virus security system base d on Kaspersky
Lab’s applications included into Kaspersky Anti-Virus Business Optimal and
Kaspersky Corporate Suite . Kaspersky Administration Kit supports all network
configurations that use TCP/IP protocol.
Kaspersky Administration Kit is a tool for corporate network administrators an d
anti-virus security officers.
The application enables the administrator to:
• Deploy Kaspersky Lab applications
• Manage licenses
• Remotely manage Kaspersky Lab applications
®
Administration Kit is an application that is designed to provide a
across a network connection to computers running Windows. This feature enables the administrator to copy
the required set of Kaspersky Lab's applicat ions to a selected computer
and then deploy these applications on the network computers.
. This feature allows to install license keys to all installed
Kaspersky Lab's in a centralized way, monitor the observance of the License Agreement (that is, the conformity of the number of licenses to the
number of applications operating in the network) and the expiration date.
across a network connection to computers running Windows. This feature enables the administrator to create a multi-level anti-virus protection system and manage the
operation of all applications from a single administrator's workstation. This
is particularly important for larger companies that have a local network
consisting of a large number of computers that may cover several separate buildings or offices. This feature enables the administrator to:
• group computers into administration groups based o n the func-
tions performed by such computers and the set of applications
installed on them;
• configure the application settings in a centralized way by creat-
ing and applying group policies;
• configure individual settings of the application for individual
computers using the application settings.
• manage the operation of the applications in a centralized way
by creating and running group and global tasks.
Page 7

Kaspersky® Administration Kit 7
• create individual patterns for the application's operation by cre-
ating and running tasks for a set of computers from different
administration groups.
• Automatically update the anti-virus database and applicati on modules on
computers. This features allows centralized updating of the anti-virus database for all installed Kaspersky Lab's applications without accessing the
Kaspersky Lab's internet updates server for each individual update. The
updating can be performed automatically according to the schedule set up
by the administrator. The administrator can monitor the installation of the
updates on the client computers.
• Receive report s using a de dicated system
. This feature allows centralized
collection of statistical information about the operation of all installed
Kaspersky Lab's applications, monitoring the correctness of the operation
of these applications and creating reports based on the information obtained. The administrator can create a cumulative net work report about
the operation of an application or reports about the opera tion of application installed on each computer.
• Use events notification s ystem. Mail notifica tion sending system
. This feature allows the administrator to create a list of events in the operation of
the applications about which her or she will receiv e notifications. The list
of such event may, for example, include detection of a ne w virus or an error that occurred when attempting to update the anti-virus database on a
computer, detection of a new computer in the network.
Kaspersky Administration Kit application consists of three major components:
• Administration server performs the function of centralized storage of in-
formation about Kaspersky Lab's applications installed in the corporate
network and about managing such applications.
• Network Agent coordinates the interaction between the Administration
Server and Kaspersky Lab's applications installed on a specific network
node (a workstation or a server). This component supports all applications
included in the Kaspersky Lab Business Optimal and Kaspersky Cor porate Suites.
• Administration Console provides a user interface to the administration
services of the Administration Server and Network Agent. The management module is implemented as the extension of the Microsoft Management Console (MMC).
Page 8
8 Kaspersky Administration Kit
1.1. The purpose of the document
This Reference Book describes the purpose of Kaspersky Administration Kit and
contains a step-by-step discussion of all its functions. The basic concepts an d
the general operation scheme of the application are discu ssed in the Kaspersky
Administration Kit Administrator's Guide.
In order to review questions that our users often ask Kaspersky Lab' s support
specialists visit our website and follow the ServicesÆ Knowledge base link.
This section contains information about installation, configurat ion and functioning
of Kaspersky Lab's applications and about removal of most commonly spread
viruses and disinfection of infected files.
1.2. Conventions used in this book
Various formatting features and icons are used throughout this document
depending on the purpose and the meaning of the te xt. The table belo w lists the
conventions used in the text.
Format feature Meaning/Usage
Bold font
1. Step 1.
2. …
Note.
Attention!
In order to perform...,
Titles of menus, menu items, windows,
dialog boxes and their elements, etc.
Additional information, notes
Information requiring special attention
Description of the successive user's
steps and possible actions
Page 9

Kaspersky® Administration Kit 9
Format feature Meaning/Usage
Task, example
Solution
[key] – modifier name
Information messages and
command line text
Statement of a problem, example of the
demonstration of the application's
capabilities
Implementation of the task
Command line modifier
Text of configuration files, information
messages and command line
Page 10

CHAPTER 2. GETTING STARTED
2.1. Starting the program and
connecting to the
administration server
In order to start the application,
select the Kaspersky Administration Kit item in the Kaspersky Administration Kit group of the standard Run\Programs menu. This pro-
grams group is created only on the administrator's workstations at the
time when the Administration Console is installed.
To connect to an Administration Server, select the Kaspersky
Administration Server (<Server name>) node in the console tree.
After this, the application tries to connect to the administration server. If
there are several administration servers on your network, the program
will connect to the last server it connected to during the previous
Kaspersky Administration Kit session. Upon the first launch of the
application, it is assumed that the administration server and
administration console are running on the same computer. Therefore,
the program will try to detect the administration server on this computer.
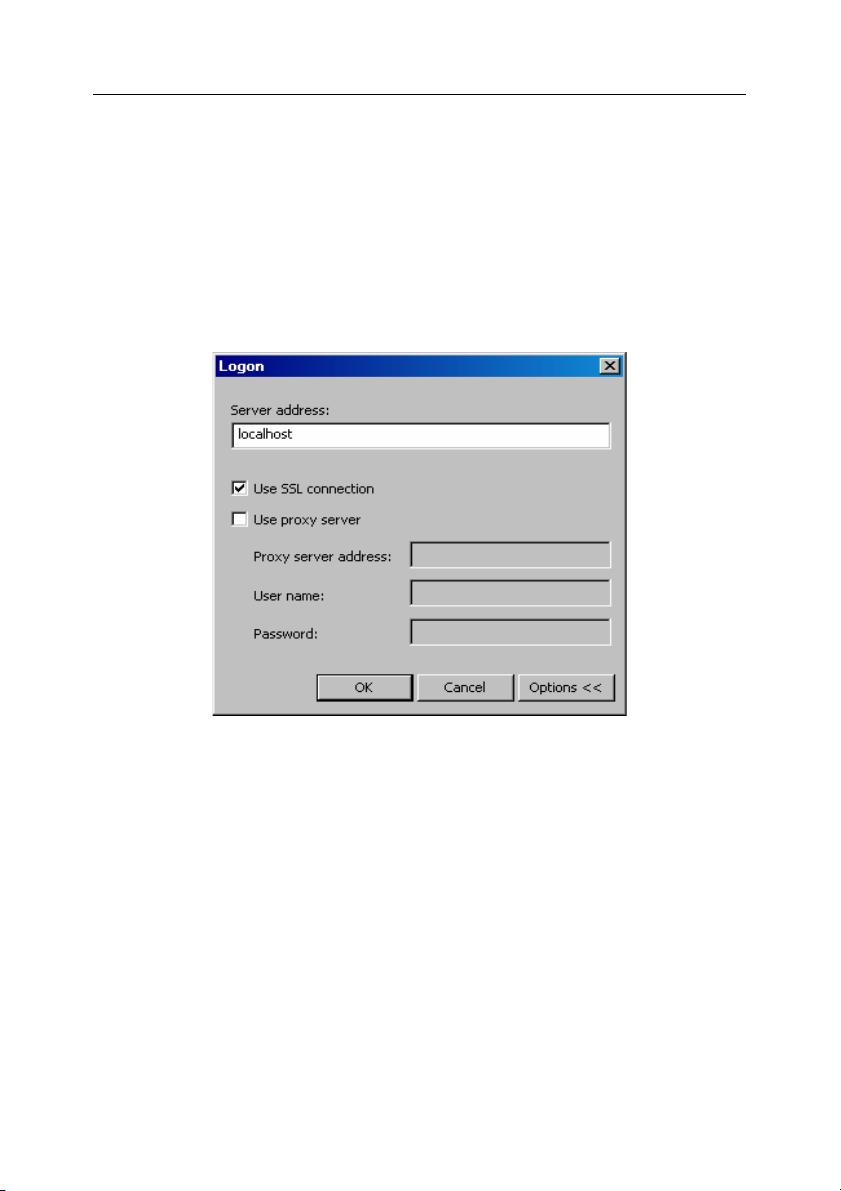
If the server is not found, you will be asked to specif y the server name
manually in the Logon dialog box (see Figure 1). Enter the required
server name in the Server address field. You can enter the IP-address
or NetBIOS name (computer name on the MS Windows network).
Communications between the Administration Server and Administration
Console are secured by SSL. If you want to disable the SSL protocol,
uncheck the Use SSL connection checkbox. However, this might
impair information security and data integrity.
To connect to the Administration Server through a port that
differs from the default one, enter <Server name>:<Port
number> in the Server address field.
Click the Options button to show/hide the following advanced connection
settings:
Page 11
Getting started 11
• Use SSL connection. Select this checkbox to transmit data be-
tween the Administration Server and Administration Consol e via
SSL. Unselect this box if you do not want to communicat e via
SSL. However, this might impair the integrity and safety of the
data transmitted.
• Use proxy server. Select this checkbox if you want to connect
to the Administration Server via a proxy se rver. Enter the address for connecting to the proxy server in the Proxy server
address field. Fill in the User name and Password fields if
user authorization is required on that proxy server.
Figure 1. Connecting to the Administration Server
Then the Administration Console verifies user rights to connect to the
Administration Server. If the connection is SSL-enabled, the
Administration Console authenticates the Administration Server before
verifying user rights.
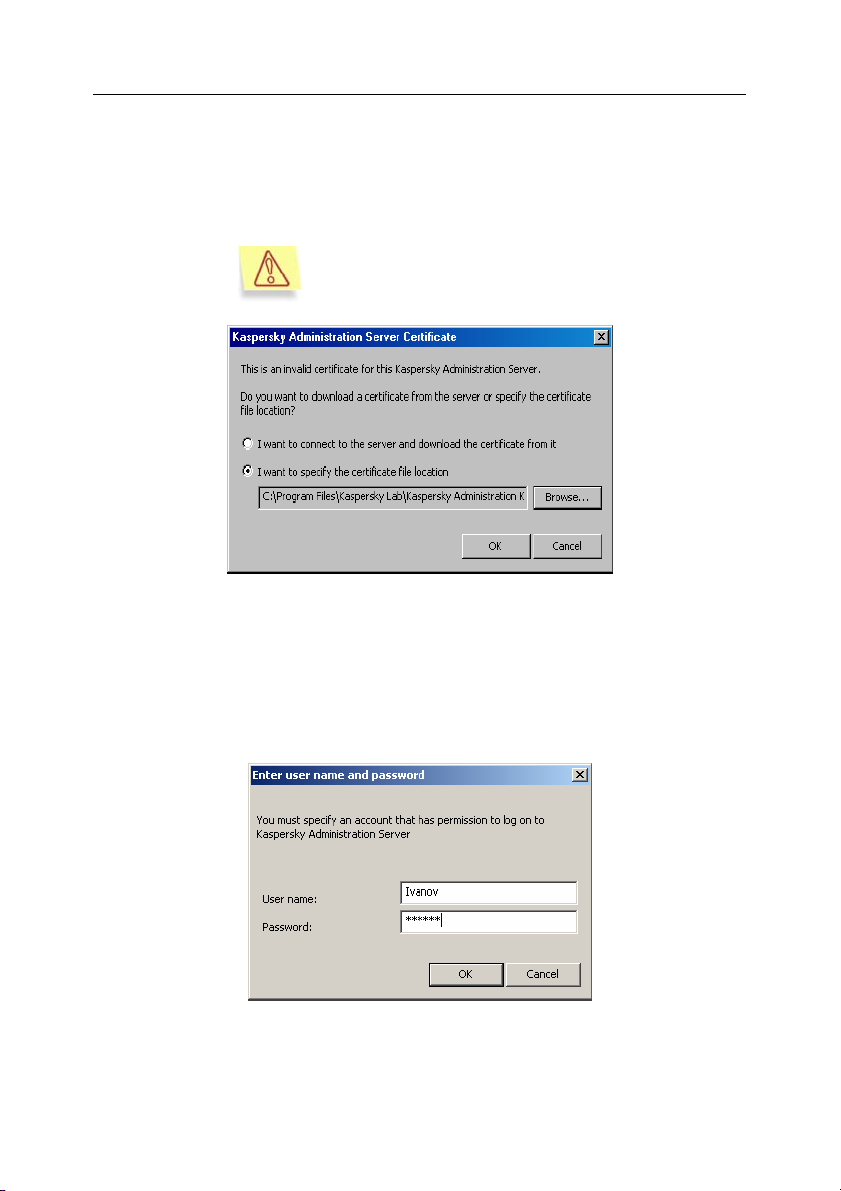
If you connect to the server for the first time or the server certificate for
this session differs from your local copy, a request for con necting to this
server and receiving a new certificate will be displayed (see Figure 2).
Select one of the following:
• I want to connect to the server and download the certificate
from it – Select this option to connect to this Administration
Server and receive a new certificate.
• I want to specify the certificate file location – Select this op-
tion to specify the location of the certificate file. Click Browse…
Page 12
12 Kaspersky Administration Kit
to browse for the certificate file. The file has the .cer extension
and is located in the Cert folder in the Kaspersky Administration
Kit directory on the Administration Server. The Console will attempt to authenticate the server using the certificate you specified.
You can copy the certificate file to a shared folder
or a floppy disk. This copy can be used to configure
access settings.
Figure 2. Request for connecting to the Administration Server.
User rights are verified using the Windows user authentication pr ocedure.
If the user is not authorized to access the Administration Server, i.e.
he/she has no logical network operator (KLOperators) or administrator
rights (KLAdmins), try logging on under another account (see Figure 3).
In the corresponding form, specify the user account (name and password)
that has a logical network operator or administrator rights.
Figure 3. Registering a user to access the Administration Server
Page 13

Getting started 13
If the connection is successful, the logical network structure and settings
appear in the console tree.
To disconnect from the Administration Server
select the Kaspersky Administration Server (<Server name>) node in
the console tree and select the Disconnect from the Administration
Server command or use the analogous shortcut menu item in the Action
menu.
To connect to another Administration Server:
Select the Kaspersky Administration Server (<Server Name>) node i n
console tree of the Kaspersky Administration Kit main windo w and click
the Logon server option on the shortcut menu or on the Action menu. In
the Logon dialog box (see Figure 1), e nter the server name (see above)
and, if necessary, check the Use SSL connection checkbox to enable
secure connection.
If you have no logical network operator or administrator rights for the
selected network, access to the Administration Server will be denied.
If the connection to the server is successful, the contents of the
Kaspersky Administration Server (<Server name>) node is refreshed.
To add a new administration server to the console tree:
Select the Kaspersky Administration Server node in the Kaspersky
Administration Kit main window, open the shortcut menu, and click the
New/KAV Server command (or select this command from the Action
menu).
As a result, a new node named Kaspersky Administration Server (<Not
connected>) will appear in the console tree. Use this no de to connect to
another server installed on your Windows network.
2.2. Granting rights to users
In order to grant rights to users for working with the logical network of
the Administration Server:
Page 14

14 Kaspersky Administration Kit
1. Select the node that corresponds to the Administration Server you
need in the main Kaspersky Administration Kit window, open the
shortcut menu and select the Properties command or use the
corresponding item in the Action menu.
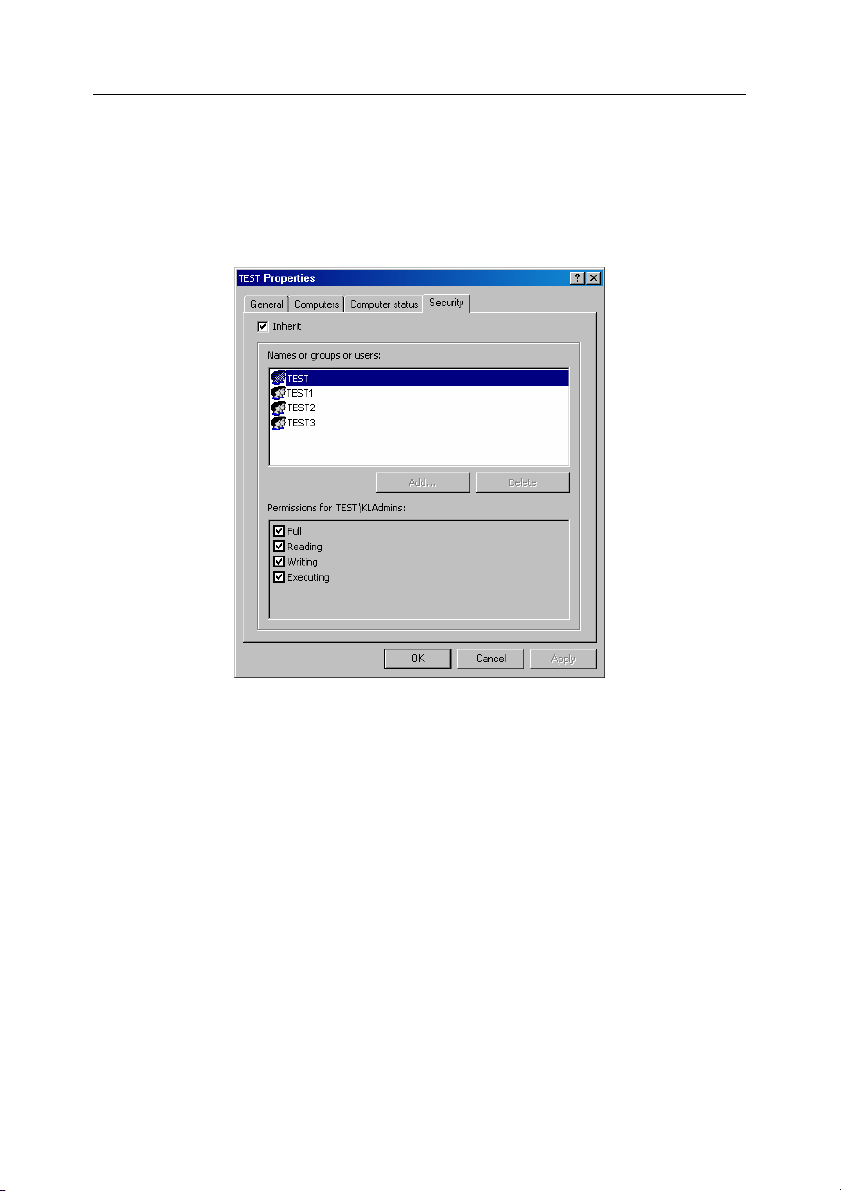
2. Select the Security tab in the Properties: <Server name> window
that will open (see Figure 4).
Figure 4. Granting rights to access the Administration Server
The top part of the tab contains the list of users registered on the
computer where the Administration Console is installed. The bottom part contains the list of possible permissions:
• All.
• Reading:
o connecting to the Administration Server
Page 15

Getting started 15
o viewing the logical network structure (or administration
group);
o viewing the values of application's policies, tasks, and set-
tings.
• Executing: starting and stopping existing group and global
tasks.
• Writing:
o creating a logical network, adding groups and client com-
puters to this logical network (or to an administration
group);
o installation of the Network Agent component to the client
computer;
o creating required installation packages for the Kaspersky
Lab's anti-virus applications and installing th em (along with
licenses keys to such applications) on the client computers;
o updating the version of applications installed on the client
computers;
o creating policies, tasks for groups and individual computers,
configuring application settings;
o centralized management of applications, receiving reports
about their operation using services provided by the Administration Server, the Network Agent and the Administration Console components;
o granting to users and groups of users access rights to the
functionality of Kaspersky Administration Kit.
In order to assign rights, select the required group of users and
check boxes next to the names of the permissions you wish to
grant. If you wish to check all boxes, check the All box.
You can add a new group or a new user by clicking the Add button.
You can add only users or groups of users that are registered on
the Administration Console computer.
1. After you are done with the settings, press the Apply or the OK
button.
In order to grant rights for working with an administration group:
Page 16
16 Kaspersky Administration Kit
1. Select the administration group you need in the console tree, ope n
the shortcut menu and select the Properties command or use the
analogous item from the Action menu.
2. Select the Security tab in the Properties: <Server name> window
that will open (see Figure xx). T his tab is similar to th e Security tab
of the Administration Server settings configuration window.
Figure 5. Granting access right to an administration group
Rights for working with the logical network and all objects included
into the structure of such network are configured in the Administration Server network.
In order to configure individual access rights for an administration
group that are different from those specified in the Administration
Server settings, uncheck the Inherit box.
1. After this configure the access rights you wish to grant to the us ers
and groups of users in the list. Right are granted the same way as for
the Administration Server.
2. After you are done with the settings, press the Apply or the OK
button.
Page 17

Getting started 17
2.3. Viewing information about the
computer network IP
subnetworks
In order to view information about the computer network, received by
the Administration Server during a regular poll:
Select the Network node in the console tree.
In order to select a presentation method of the computer network while
viewing the Network folder,
select the Network node in the console tree and select a comman d from
the View group in the shortcut menu:
• Domains – to displa y the structure of the computer net work as
an hierarchy of folders that reflects the structure of domains and
workgroups of the Windows corporate network. Each of the
folders on the end level contains a list of computers of the respective domain or workgroup not included into the structur e of
the logical network.
• Active Directory - to display the hierarch y of folders that cor-
responds to the Active Directory structure.
• IP subnetworks – to display the computer network as IP sub-
networks.
In order to create a new IP subnetwork:
1. Select the Network node in the console tree, open the sh ortcut menu
and select the New/IP subnetwork command or use the analogou s
item from the Action menu.
The New/IP-subnetwork command is available only when displaying
the Network folder as IP-subnetworks.
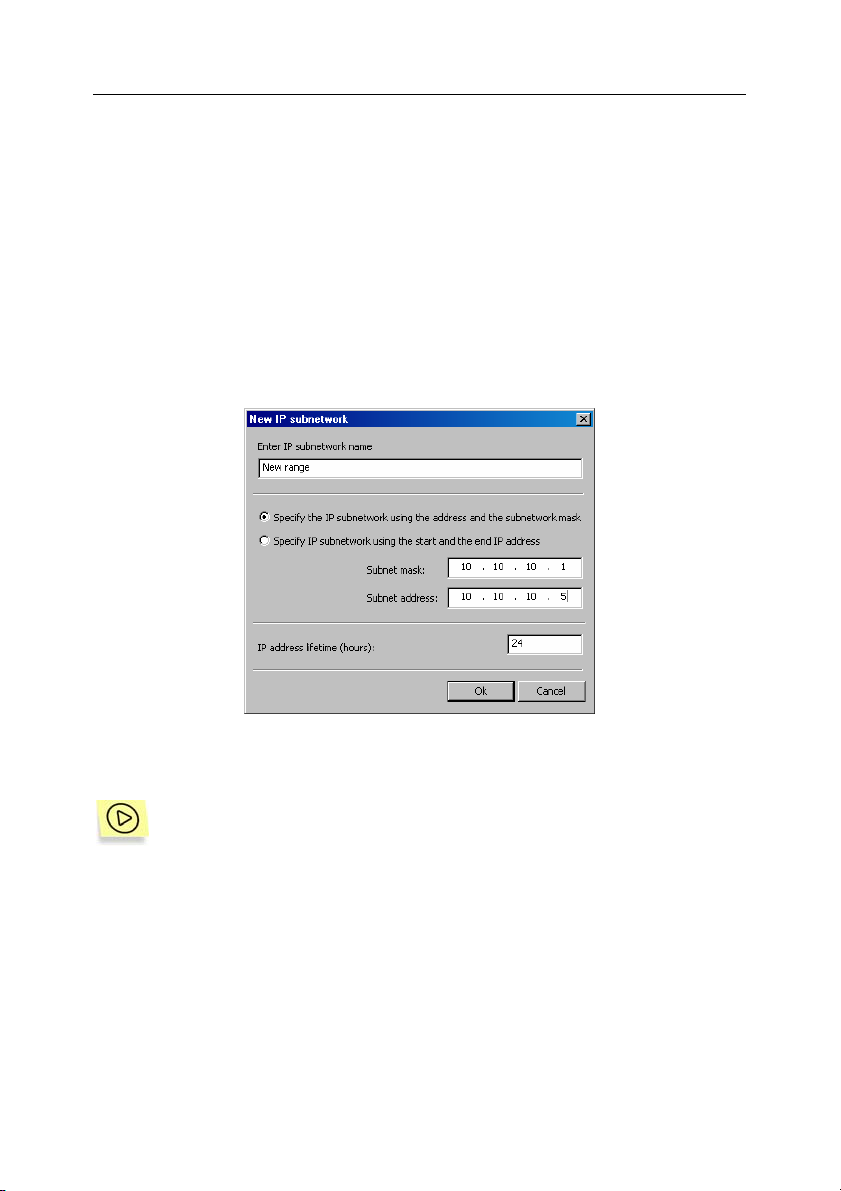
2. In the New IP subnetwork window that will open (see Figure 6xx)
specify values for the following settings:
• subnetwork name;
• method of description of the subnetwork and values of settings
for the method selected;
Page 18
18 Kaspersky Administration Kit
Select one of the following options:
o Specify the IP subnetwork using address and the sub-
network mask; in this case you must specify the Subnetwork mask and Subnetwork address in the correspond-
ing entry fields.
o Specify IP subnetwork using the start and the end ad-
dress; after this, enter the start and the end IP addresses.
The values of the settings are specified in the decimal notation.
• a time interval after which information about an inactive com-
puter will be deleted from the Administration Server database in the IP address validity period (hours).
Figure 6. Creating a new IP subnetwork
3. After you are done with configuring the settings, press the OK button.
In order modifying the IP subnetwork settings:
select the node that corresponds to the subnetwork you need in the Network folder, open the shortcut menu and select the Properties command
or use the corresponding item in the Action menu.
This will open dialog window Properties: <Subnetwork name> that in-
cludes the General and IP ranges tabs.
You can do the following in the General tab (see Figure 7):
Page 19

Getting started 19
Figure 7. Viewing IP subnetwork settings
The General tab
• change the subnetwork's name;
• determine the whether the A dministration Server will automati-
cally move new computers added to the subnet work to include
them to the structure of the logical network. In order to do this,
check the Move computers into group and select the required
administration group using the Select button.
• change the value of the time interval after which information
about an inactive computer will be deleted from the Administration Server database - in the IP address lifetime (hours).
• permit or cancel polling of the computers in this subnetwork by
the Administration Server when performing a regular polling of
the computer network. If you do not want the Administration
Server to poll the computers during the next poll, uncheck the
Allow IP subnetwork scanning box.
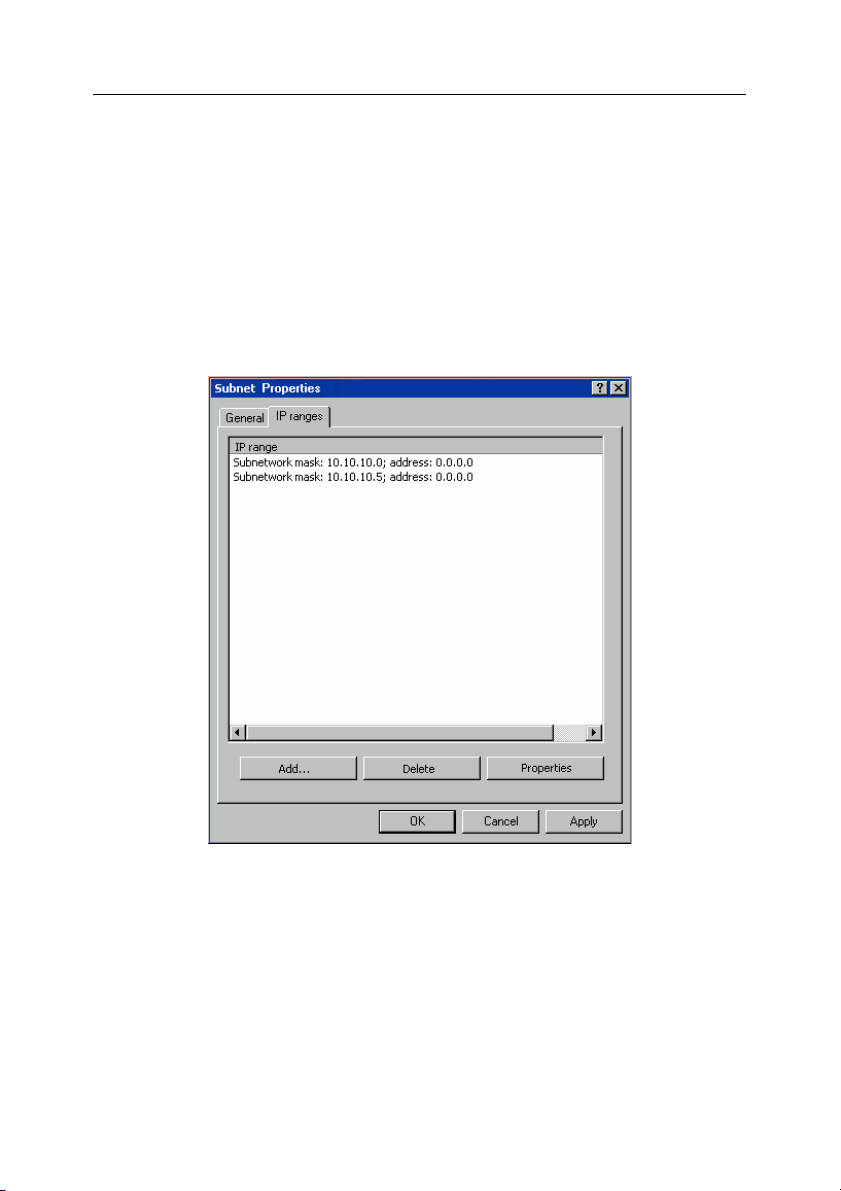
You can add or delete IP ranges that define the subn etwork and change
the alter their settings in the IP ranges tab (see Figure 8).
• start and end IP addresses of the range;
• subnet work mask and address .
Page 20
20 Kaspersky Administration Kit
In order to add an IP range that defines the subnet work press the Add
button. In the IP range window that will open (see Figure xx) specify the
method of the range description and enter the values for the method selected. Select one of the following options:
• Specify the IP subnetwork using address and subnetwork
mask; in this case you must specify the Subnetwork mask and
Subnetwork address in the corresponding entry fields.
• Specify IP subnetwork using the start and the end IP address; after this, enter the start and the end IP addresses.
The values of the settings are specified in the decimal notation.
Figure 8. Viewing IP subnetwork settings
The IP ranges tab
Page 21

Getting started 21
Figure 9. Adding an IP range
2.4. Quick Start Wizard
To create a system of centralized management of antivirus protection:
1. In the console tree of the Kaspersky Administration Kit main window,
select the Kaspersky Administration Server (<Server Name>)
node and open the shortcut menu for this node. Click Quick Start
Wizard on the shortcut menu or on the Action menu.
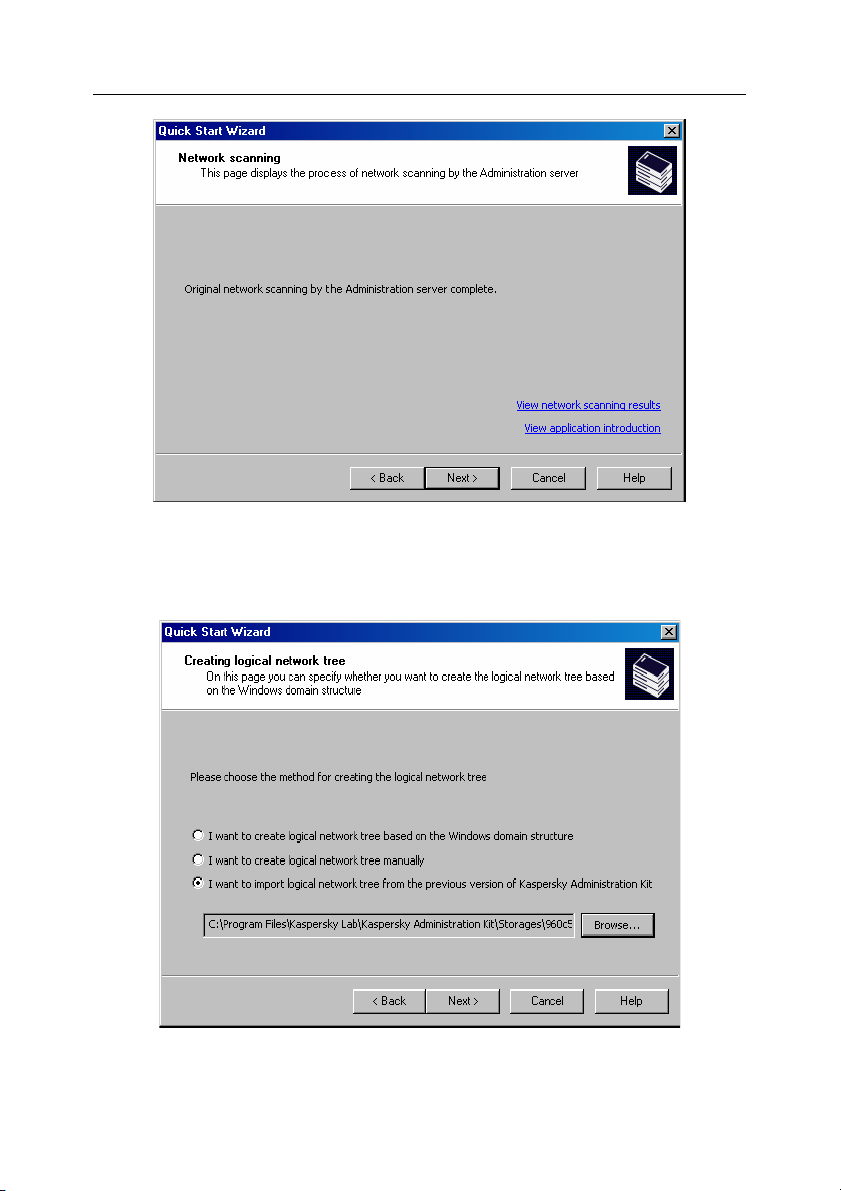
2. During the first stage the polling of the computer network and
identifying of computers within this network take place (see Figure
10). Based on the results of such polling, a service group Network
and the structure of the Network folder is formed. The information
obtained will be used for the automatic creation of the l ogical n et work.
In order to view the structure of the computer network use the View
the network scanning results hyperlink.
Page 22
22 Kaspersky Administration Kit
Figure 10. Polling the computer network
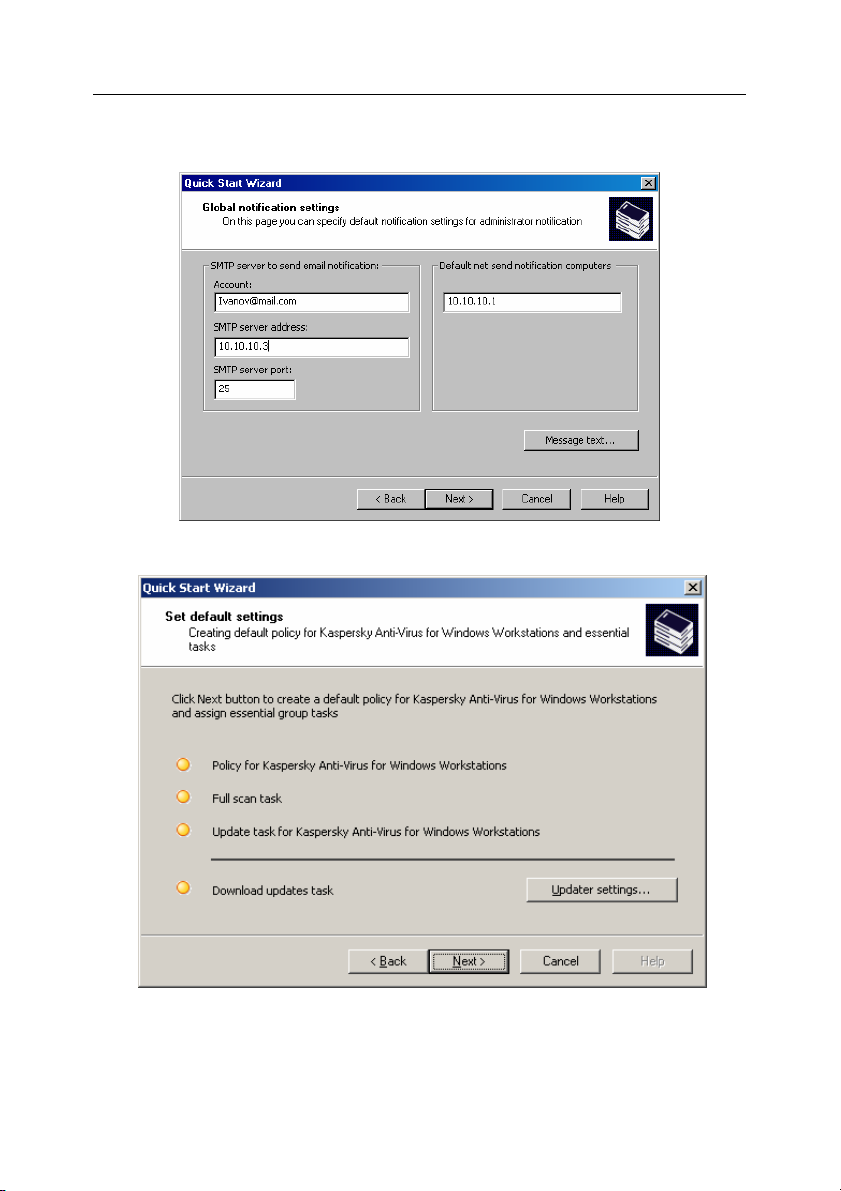
3. At this stage you will have to specify the method for creating a logical
network (see Figure 11). You can select one of the following options:
Selecting a method for creating a logical network
Figure 11. Quick Start Wizard.
Page 23

Getting started 23
• I want to create logical network tree based on the Windows
domain structure – Create a logical network automatically
based on the structure of Windows domains and user groups
displayed in the Unassigned group folder.
If a computer is not available in the Unassigned
mode when you are creating a logical network
(switched off or disconnected from the network), the
wizard will not add this computer to the logical
network. You can add this computer later when
manually configuring the logical network (see
section 3.5 on page 47).
Creating a logical network using the Quick Start
Wizard does not disturb network integrity: new
groups are added; they do not replace the existing
groups. A client computer that has been already
assigned to an existing group will not be added t his
time because the Unassigned group displays only
computers that are not included in the logical
network.
• I want to create logical network tree manually – Create a
logical network later.
• I want to import logical network tree from the previous version of Kaspersky Administration Kit – Use the logical net-
work structure as it existed in the previous versions of Kaspersky Administration Kit. The restored structure will be as follows:
servers and administration groups will be imported as administration groups, and workstations attached to each server will
be added as members of the corresponding administration
group.
To restore and import the structure of the previous logical network, the application uses data stored on the main server in the
configuration file ncd.dat. The file is located in a folder NCD in
the Kaspersky Administration Server installation folder. If the
Administration Server is now installed on the same computer
where the main server was previously installed, the configuration file will be found automatically. If the Administration Server
is unable to find the ncd.dat file, select it manually using the
Browse button.
4. In the next wizard box ( Figure 12), configure settings for sending
alerts via e-mail and NET SEND generated by Kaspersky Lab
applications and specify the template for alert messages (for more
details, see section 6.2 o n page 91). These settings will be used as
default settings for application policies.
Page 24
24 Kaspersky Administration Kit
5. In the next stage, you should configure the system of anti-virus
protection (Figure 13).
Figure 12. Configuring the notifications forwarding settings
-
Figure 13. Quick Start Wizard.
Configuring the anti-virus protection system
Page 25

Getting started 25
Quick Start Wizard creates a system of anti-virus protection for
logical network clients using Kaspersky Anti-Virus 5.0 for Windo ws
Workstations. In this case, the Administration Server creates a
policy and defines a minimum set of tasks for the highest
hierarchical level of Kaspersky Anti-Virus 5.0 for Windows
Workstations. It also configures a global task of retrievin g updates
for the Administration Server.
When forming a system of anti-virus protection for logical network
clients using Kaspersky Anti-Virus 5.0 for Windows Workstations.
The Administration Server creates the following:
• In the Policies folder of the Groups group, it creates a policy
for Kaspersky Anti-Virus 5.0 for Windows Workstations. This
policy is titled the Policy for Kaspersky Anti-Virus for Win-
dows Workstations and has default settings.
• In the Global Tasks node of the console tree, there is a global
task for updating the Administration Server. This policy is called
Download updates task and has default settings.
• The task of the backup copying of data of the Administration
Server in the Global Tasks node of the console tree with the
name Backup copying of Administration Server data and
default settings.
• In the Tasks folder of the Groups task, the updating task for
Kaspersky Anti-Virus 5.0 for Windows Workstations is created.
This task is called Update task for Kaspersky Anti-Virus for
Windows Workstations and has default settings.
• In the Tasks folder of the Groups group, the on-demand scan
task is created for Kaspersky Anti-Virus 5.0 for Windo ws Workstations. This task is titled Full scan task and has default settings.
A policy for Kaspersky Anti-Virus 5.0 for Windows
Workstations is not created if a policy for this
application already exists in the Groups folder.
If group tasks for the Groups group and the global
updating task with these names have been already
created, these tasks will not be formed at this time.
If necessary, you can customize updating options. T o do this, click
the Updater settings… button and specify the required values in
the dialog box that appears on your screen (for more details, see
section 9.2 on page 154).
Click Next. The wizard window displays the process of creating the
tasks and policy. If errors occur, you will see an error message.
Page 26

26 Kaspersky Administration Kit
6. In the final window of the wizard you will be offered to launch the Deploy wizard. You can use this wizard to install the Net work Agent. If
you do not wish to install the application immediately after the Quick
Start Wizard is completed, uncheck the Launch the Deploy Wizard
box.
Page 27

CHAPTER 3. VIEWING,
CREATING, AND
CONFIGURING A LOGICAL
NETWORK
3.1. Viewing the logical network
structure
To view information about the structure of a group that is a part of the
logical network group:
Select the desired group folder in the Groups folder. A list of objects
included in this group will be displaye d in the details panel (you can als o
expand the corresponding branch of the console tree).
• To view information about group policies, select the Policies
folder. If policies are applied to the selected group, they will be
displayed in the details panel; otherwise the details panel is
empty.
• To view information about group tasks, select the Tasks folder.
If tasks are defined for the selected group, they will be displayed in the details panel; otherwise the details panel is empty.
• To work with the logical network of the slave Administration
Server, select the Servers folder.
• A list of clients included in the selected group is displa ye d in the
details panel.
In order to view the group’s setting and settings of the interaction of the
Administration Server with the client computers that are a part of the
group:
select a folder with the name of the group you need in the Groups folder
and then use the Properties command from the shortcut menu or from
the Action menu. This will open the <Group name> Properties dialog
box with two tabs: General and Computers.
Page 28
28 Kaspersky Administration Kit
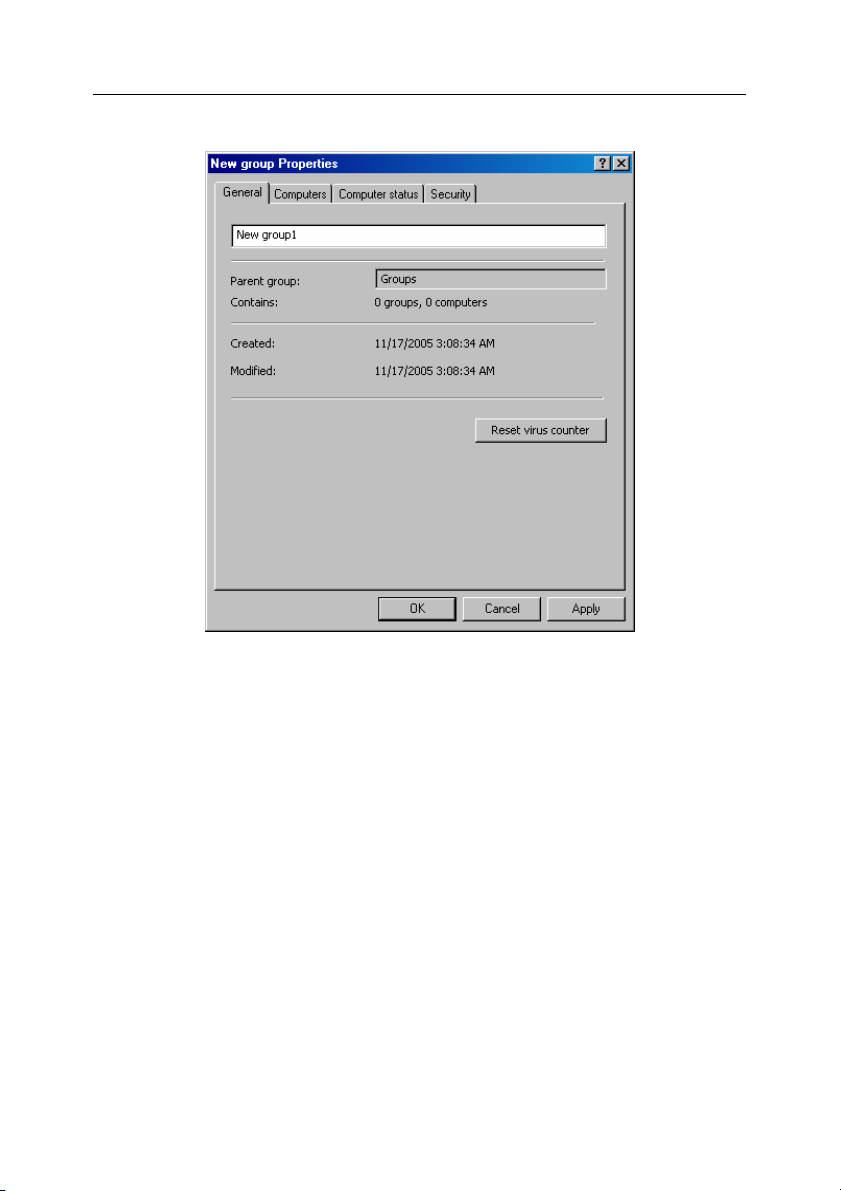
The General tab (Figure 14) displays the following informat ion:
Figure 14. Viewing group properties. The General tab
• Group name
• Parent group name (if there are no par ent groups for this gro up,
the value is Groups)
• Statistic information about the group structure – number of
nested groups and total number of clients, including clie nts in
the nested groups
• Creation date
• Date when the name or attributes of the group were last modi-
fied (if the group name and group properties have not chan ged,
the value is <Unknown>)
Click Reset virus counter to reset a virus detection counter for all clients in the
group.
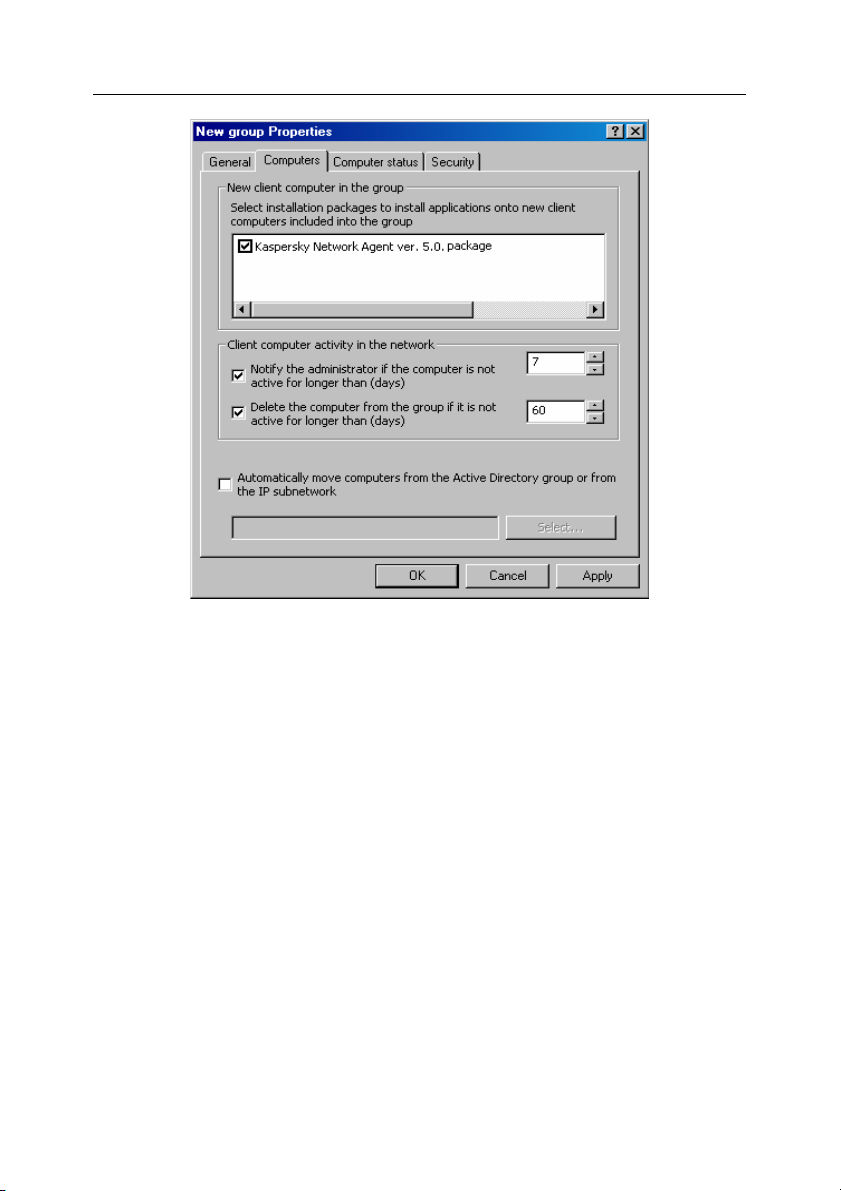
The Computers tab (Figure 15) displays the following information:
Page 29
Viewing, creating, and configuring a logical network 29
Figure 15. Viewing group properties. The Computers tab
• The New computer detected section shows what installation packages
are used to remotely install Kaspersky Lab applications on the new client
computers added to the group.
For the Unassigned group properties (see Figure 32), the New com-
puter detected section contains the Add computer to group checkbox.
If this checkbox is checked, new computers on the Windows network will
be automatically included in the logical net work group specif ied in the text
field below.
• The Computer activity text box shows the actions to be applied to clients
not responding over a specified time interval (for example, notifying
logical network administrators or removing the clients from the group).
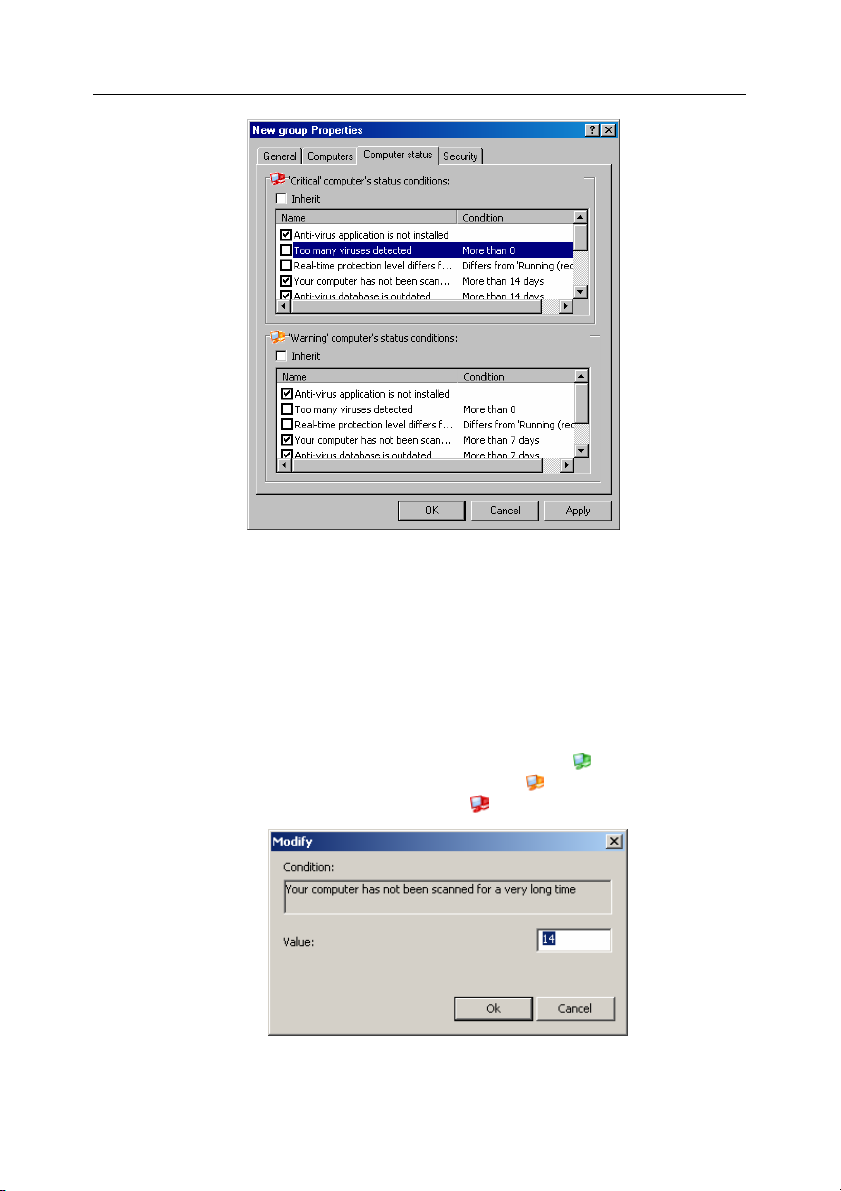
The Computer status tab contains the criteria for the diagnostics of the
status of the client computers based on the information about the status
of the anti-virus protection for this computer and about the activity of the
client computer in the network. Based on these conditions, the client
computer will be assigned one of the statuses: Critical or Warning. If the
client computer does not meet any of the above c onditions, its status will
be OK.
Page 30
30 Kaspersky Administration Kit
Figure 16. The Computer status tab
You can change the threshold values for some of the conditions. In order
to do this, select the required condition in the Cond ition column and double-click it to open the editing window (see Figure 117).
For example, you can establish the maximum number of days during
which the client computer will not connect to the Administration Server.
After this period of time is elapsed, the computer will be assigned the
Critical status.
If the computer status is OK, then a green icon -
will appear. If the
computer status is Warning, a yellow icon - will be displayed. If the
computer status is Critical, a red icon -
will be displayed.
Figure 17. The Computer status tab
Page 31

Viewing, creating, and configuring a logical network 31
The criteria for determining the status of the client computer are
configured in the setting of the previous hierarchy l evel group and will be
inherited by all groups of the logical network. In order to configure
individual criteria for a group, uncheck the In herited box an d configure the
settings.
The Security tab (see Figure 5) is designed to configure access rights tot
he administration group (see section 2.2 on page 14).
To view information about a logical network client:
Select the group in the Groups folder that includes the desired client. The
list of clients included in this group will be displa yed in the details panel
(you can also expand the corresponding branch in the console tree).
Select the required client and click Properties on the shortcut menu or on
the Action menu. This will open the <Computer name > Properties
dialog box with several tabs (Figure 18).
In order to find the client computer you need, you can use the
Find function (see section 3.2 on page 35).
On the General tab (Figure 18), you can do the following:
• View network properties of this client.
• View information about the client configuration by clicking Sys-
tem Info (Figure 19).
• Edit the host name (the host name is gener ally assigned by the
Administration Server; it coincides with the computer name on
the MS Windows network.
• Define connection settings with the admi nistration server b y us-
ing the Keep connection checkbox. If the checkbox is
checked, the client-server connection is permanent. By default,
the client-server connection is established periodicall y for synchronizing or transmitting data.
Note that permanent connection should only be provided for the most important clients because the total
number of simultaneous connections supported by
the Administration Server is limited to several hundred.
The information reflects the data received during the last synchronization
session.
Page 32

32 Kaspersky Administration Kit
Figure 18. Viewing client properties. The General tab
Page 33

Viewing, creating, and configuring a logical network 33
Figure 19. Viewing system characteristics of a client computer
The Protection tab (Figure 20) shows information about the current
status of anti-virus protection on a client computer. You can view the
following data:
• Real-time protection status – Current anti-virus protection
status.
• Last full scan date – date and time of the last virus scan.
• Viruses found – Total number of viruses detected from the first
scan until the virus counter was reset. To reset the counter,
click Reset virus counter on the shortcut menu or on the Ac-
tion menu.
• Computer status – the status of the client computer according
to the diagnostics criteria of the computer anti-virus protection
and the computer network activity set by the administrator. T he
Computer status description field lists the conditions based
on which the client computer is assigned of the statuses.
Page 34

34 Kaspersky Administration Kit
Figure 20. Viewing system characteristics of a client.
The Protection tab
The Applications tab (Figure 101) lists all Kaspersky Lab applications
installed on the client computer. You can view general information about
an application, manage its performance, and configure settings (for
details, see section 7.9 on page 135).
On the Tasks tab, you can manage tasks for client computers (view
existing tasks, delete and create new tasks, start and stop them, change
task settings, and view task performance results). The information about
tasks reflects the data received during the last client-server
synchronization session. The administration server queries the cl ient for
current task status. If connection fails, the status is not displayed.
Page 35

Viewing, creating, and configuring a logical network 35
Figure 21. Viewing system characteristics of a client. The Tasks tab
3.2. Finding a computer in the
logical network
To search for a computer or a group of computers that match the specified criteria,
select the <Administration Server name> node or the administration group,
open its shortcut menu and select Find computer. In the dialog box that opens,
you should specify search criteria on the follo wing tabs: Network, Application,
Computer Status, Virus Protection.
On the Network tab (Fig. 25), you can set the following search criteria:
• Computer name.
• Computer Windows name.
• Domain to which the computer belongs.
• IP-address range.
• Last connection time range. Specify a time interval in which this
computer connected to the Administration Server for the last time.
Page 36

36 Kaspersky Administration Kit
Figure 22. Searching for a computer. The Network tab.
On the Application tab (Figure 23), specify the following search criteria:
• Application name. Enter the name of the application installed on the
client computer.
• Application version. Specify the version of the application installed on
the client computer.
• Last update time. Specify the time interval in which the anti-virus
database and application modules on the client computer were u pdated
for the last time.
Page 37

Viewing, creating, and configuring a logical network 37
Figure 23. Searching for a computer. The Application tab
On the Computer Status tab (Figure 24), specify the following search criteria:
• Computer Status. Search for computers that have the following statuses:
OK, Critical, or Warning.
• Computer status description. Select conditions on which the client
computer was assigned this status
• RTP status. Select the current real-time protection status of the
computer(s) you want to find.
Page 38

38 Kaspersky Administration Kit
Figure 24. Searching for a computer. The Computer status tab
On the Virus Protection tab (Figure 25), you can specify the follo wing search
criteria:
• Anti-virus database date.
• Anti-virus database records range.
• Last full scan time. Specify the time interval during which the computer
was fully scanned for the last time.
• Viruses found.
Page 39

Viewing, creating, and configuring a logical network 39
Figure 25. Searching for a computer. The Virus Protection tab.
In order to include client computers that are included in the structure of the
logical networks of the slave administration servers into the search, check the
Include data with slave servers (up to level). After this specify the maximum
nesting level to be included into the search.
After specifying search criteria, click the Find Now button. A list of computers
matching the search criteria will be displayed at the bottom of the dialog box.
This list contains general information about the computers detected.
in order to save the search results to a text file
click the Export to file button in the Search for Computer windows (see
Figure 26) and specify the file to which you want to save the results in the
window that will open.
Page 40

40 Kaspersky Administration Kit
3.3. Computer queries
In order to create a computer query:
1. Select the Computer Queries node in the console tree, open the
shortcut menu and select the New/New Query command or use the
analogous item from the Action menu.
2. Enter the name for the query in the window that will open (Fig. 27)
press the OK button.
As the result a new folder with the name you have specified for the
query will appear in the console tree will appear in the Computer
Queries in the console tree. In order to add computers to the query,
configure the query parameters.
Figure 26. Creating a computer query
In order to configure a computer query:
1. Select the query you wish to configure in the consol e tree or in the
results panel and use the Properties command in the shortcut
menu or the analogous item under the Action menu.
2. This will open a query configuration window (see Fig. 28) that
contains the following tabs: General, Network, Application,
Computer status and Virus protection.
Using the General tab (see Figure 28) you can modify the query
name and define the computers search area by selecting one of the
following options:
• Search in groups and in the network – the search will be per-
formed for all computers within the network, whether included
into the structure of the logical network or not.
• Search in groups – search only among clie nt computers o f the
logical network.
Page 41

Viewing, creating, and configuring a logical network 41
• Search in network – search among the computers not in-
cluded into the logical network.
In order to include data from the slave administration servers into
the query, check the Include data with slave servers (up to level)
box. After this, specify the maximum nesting level to be included
into the search.
Figure 27. . Configuring a computer query
The Network tab
Specify attributes for the computes to be included into the quer y on
the Network tab (see Figure 29). You can use the following parameters:
• computer's name in the logic al network;
• computer's name in the Windows network;
• domain that must include computers;
• the range of IP addresses of the computers; in order to do this,
check the IP addresses range box and enter the start and the
end IP addresses;
• the time of the last connection of the client computer to the Ad-
ministration Server; in order to do this, check the Last connec-
Page 42

42 Kaspersky Administration Kit
tion time range box and specify the start and the end date and
time of the interval in the from and until fields.
• the time when ne w computers appear in the network; in order to
do this, check the New computers found during network
scan and specify period in days in the Detection period(days)
field.
Figure 28. Configuring computers query.
The Network tab
Specify which applications must be installed on computers using the
Applications tab (see Figure xx). You can use the following parameters:
• application name
• application version;
• the time of the last update of the application version; in order to
do this, check the Last update time box and specify the start
and the end date and time of the interval in the from and until
fields.
Page 43

Viewing, creating, and configuring a logical network 43
Figure 29. Configuring a computer query
The Applications tab
Specify the criteria for the evaluation of the anti-virus protection on
the computers what will be included into the query on the Anti-virus
protection tab (see Figure 31). You can specify:
• date of the creation of the anti-virus database used b y the ap-
plication; in order to do it, check the Anti-virus database date
and specify the start and the end date and time of th e time interval during which the database must be created;
• number of records in the anti-virus databas e used by the appli-
cations; in order to do it check the Anti-virus database re-
cords range box and specify the minimum and the maximum
possible values.
• the time when the full com puter scan by one of the Kaspersky
Lab's anti-virus applications was performed last time; in order to
do it, check the Time of the last full scan and specify the start
and end date and time of the time interval during which the scan
must have been performed;
• the number of viruses detected on the computer; in order to do
it, check the Number of viruses detected and specify the minimum and the maximum possible values for this parameter.
Page 44

44 Kaspersky Administration Kit
Figure 30. Configuring a computer query.
The Anti-virus protection tab
On the Computer status tab (see Figure 32), specify the parameters
that describe the status of the client computers and the status of the
real-time protection task performed on computers. In order to do
this:
• select the required value from the Computer status drop-down
list: OK, Critical or Warning;
• select the conditions based on which the client computer i s as-
signed the status from the Computer status description list.
• select the status of the real-time protection task running on the
client computers included into the query from the RTP status
list.
Page 45

Viewing, creating, and configuring a logical network 45
Figure 31. Configuring a computer query
The Computer status tab
3. After you are done with the settings press the Apply or the OK
button.
3.4. Creating, modifying, and
deleting logical network groups
To add a new group to the logical network structure:
1. If you want to create a nested group, select a parent group in the
console tree or the Groups folder in the details panel. If you want to
create an upper-level group, select the Groups folder.
2. Select New/Group… on the shortcut menu or the Action menu. A
new group wizard will start. Follow wizard’s instructions.
3. Enter the group name to create a folder for this group. The group
name should be unique within this hierarchical level (groups).
Page 46

46 Kaspersky Administration Kit
4. In the next wizard dialog box, in the Computers section, define
actions to be applied to client computers of this group that have been
inactive during a specified time interval:
• If you want the administration server to perform any actions,
check the Notify administrator after computer has been in-
active for checkbox and specify the number of days in the
days field to notify the administrator if the computer is inactive
for this length of time. After the specified time has elapsed, the
administration server will perform the selected actions.
• If you want clients to be removed from the group after a certain
number of days, check the Remove from group after com-
puter has been inactive for checkbox and specify the require d
number of days in the days field. After this period, the administration server will move this client to the Unassigned group.
After finishing with the wizard, a new folder for the group appears in the Groups
node of the console. The nested Policies and Tasks folders are automatically
created in the new group folder. New objects will be added to these folders
during creation of group policies and tasks.
To automatically install Kaspersky Lab applications on all new
computers in this group:
1. Select the desired group in the Groups folder and click Properties on
the shortcut menu or the Action menu.
2. In the <Group name> Properties dialog box, in the New computer
detected section on the Computers tab (Figure 15), check/uncheck
the checkboxes corresponding to the installation packages (see
section 5.2 on page 63) to enable/disable unmanaged installation of
Kaspersky Lab applications on clients. By default, the automatic
installation of Kaspersky Lab applications is disabled.
To enable automatic installation of Kaspersky Lab applications on ne w
networked computers running MS Windows 98/ME, the Network Agent
must be installed on them.
Then you can rename the group, move it to another group, or delete it.
In order to move a group:
select the corresponding folder in the console tree or in the results panel
and use the standard Cut / Paste commands of the shortcut menu or the
similar items in the Action menu, or perform the same operation using
the mouse.
Page 47

Viewing, creating, and configuring a logical network 47
To rename a group:
Select a group in the console tree or the details panel and click
Properties on the shortcut menu or the Action menu. On the General
tab of the <Group title> Properties dialog box, change the group name
(Figure 14).
You cannot rename the Groups folder because it is a built-in element
of the Administration Console.
In order to delete a group from the logical network,
select the corresponding folder in the console tree or in the results panel
and use the Delete commands of the shortcut menu or in the Action
menu.
A group can only be deleted if it does not contain slave servers, nested
groups or client computers.
3.5. Adding, moving and deleting a
computer from a logical
network
To add a computer/computers to your logical network:
1. In the Groups folder, select the group to which you want to add a
new client. To add a client to the upper hierarchical level, s elect the
Groups folder.
2. Open the shortcut menu and click select New/Workstation (or
choose this command on the Action menu) to start a wizard.
Follow wizard’s instructions.
3. At first, specify one of the methods of adding a computer:
• Automatically – A computer will be adde d to a group b ased on
the results of queries sent by the administration server over
your Windows network. Select I want to add computers to a
Page 48

48 Kaspersky Administration Kit
group using Windows Networking to move the computer
from the Unassigned group to the destination group.
• Manually – A computer will be added to a group based on the
data entered manually by the administrator. To add a computer,
select I want to define IP addresses for the computers in the
group. Here the data are verified for uniqueness to prevent
name conflicts. If the Administration Server database has information about a computer on the Windows net work that is not
included in the logical network, the computer will be included in
the desired group with user-defined properties.
1. Then you will be given the option of creating a list of com puters in
this group.
If you choose to automatically add computers, the wizard box
displays the Unassigned folder. Choose computers to be added t o
this group. You can select computers from different folders or all
computers in the group.
If you choose to manually add computers, you will have to create a
list of computers in this group. To create the list, use the Add and
Remove buttons or import the list from a text file by clicking the
Import button. For computer addresses, use IP-addresses (or a
range of IP addresses) or NetBIOS names (computer name on the
MS Windows network). To import the list from a file, browse for the
.txt file with computer addresses to be added. Each address must
be written on a separate line.
After finishing with the wizard, the computers will be added to the desired group
and displayed in the details panel with the names assigned by the Administration
Server.
To automatically add a computer to a group, you can drag the
corresponding icon from the Network folder to the target logical
network folder in the Kaspersky
Administration Kit main window.
Your administration server can be configured to automatically add new
computers detected in the Windows network to a certain logical
network group. To enable this feature:
open the properties dialog box for the Network group and s witch to the Client
computers tab (Figure 32). In the New computer in the network section, check
the Include computer into the structure of the group checkbox and click
Browse… to specify the group to which you want to add new computers.
Page 49

Viewing, creating, and configuring a logical network 49
Figure 32. Unassigned group properties.
The Computers tab
You can move clients from one group to another and d el ete them from the logical
network by using the standard Cut/Paste or Delete commands on the shortcut
menu or the Action menu. The computers deleted from the logical network are
moved to the Unassigned group.
You can also move computers by dragging them to the target location with your
mouse.
3.6. Moving a client to another
logical network
To create a task for changing the Administration Server:
1. Connect to the Administration Server to which the computers you
want to remove are attached (see section 2.1 on page 10).
Page 50

50 Kaspersky Administration Kit
2. Run the group or global task wizard (details see Chapter 7, page
105).
3. At the stage of selecting the application and defining the task type
(see Figure 33), specify the following:
• In the Choose the application for which to define a task
drop-down list – Kaspersky Network Agent;
• In the Choose type of task for execution drop-down list –
Change Kaspersky Administration Server Task.
Figure 33. Creating a task of changing the Kaspersky Administration Task.
Selecting the application to install.
4. At the next step (see Figure 34), define settings that will be used by
the Network Agent installed on clients to connect to the new server.
In the Kaspersky Administration Server connection parameters
group, specify the following:
• New Administration Server address – in the Address field. You
may use either the IP address or the net work computer name
(NetBIOS-name).
• Port number that will be used to con nect to the n ew Admini stra-
tion Server – in the Server port field.
Page 51

Viewing, creating, and configuring a logical network 51
• Port number that will be used to con nect to the n ew Admini stra-
tion Server through the SSL protocol – in the Server SSL port
field.
Using the Choose certificate… button specify the certificate file
used to authenticate the new Administration Server in the
Kaspersky Administration Server certificate field.
The file has the .cer extension and is located in the
Cert folder in the Kaspersky Administration Kit
directory on the Administration Server (to which the
computers are moved). You can copy the certificate
file to a shared folder or a floppy disk. This copy can
be used to configure access settings.
Figure 34. Creating a task for changing the Administration Server.
Defining the server and selecting the certificate.
Later, you can change the task settings on the Settings task (see
Figure 35) of the task settings window (about task settings, see
section 7.4 on page 117).
5. If you create a global task, you should form a list of target clients (see
section 7.2 on page 11 4). After the task completion, these clients will
be moved to the Unassigned group of another logical network and
attached to the specified Administration Server.
Page 52

52 Kaspersky Administration Kit
If you create a group task, all clients of the selected
group will be assigned to a new Administration Server.
6. Specify the account under which the task will start (see section 5.4 on
page 67).
7. To finish creating the task, schedule it to start at a certain time.
Figure 35. Viewing the properties of the Change Administration Server task.
3.7. Local connection of the client
computer to the Administration
Server
In order to connect a client computer to the Administration Server:
using the command line on the client computer start klmover.exe utility
included into the installation package of the Network Agent.
Page 53

Viewing, creating, and configuring a logical network 53
After the installation of the Network Agent, this utility is located in the root
installation folder for the component and when run from the command line
performs the following action depending on the modifiers used:
• connects the Network Agent to the Administration Server using the parameters supplied;
• logs the results of the operation into the events log file or displays them
on the screen.
Utility command line syntax:
• klmover [-logfile <filename>] 1 [-address <server address>] [-pn
<port number>] [-ps < SSL port number>] [-nossl] [-cert <path to the
certificate file>] [-silent] [-dupfix]
Modifiers description:
•
-logfile <filename> – log the results of the utility operation into
the log file, by default the information will be stored in file stdout.tx; if the
modifier is not used, then the results and error messages will be printed to
the screen.
-address <server address> – the address of the Administra-
•
tion Server for connection, address can be represented by IP address,
NetBIOS or DNS name of the computer.
-pn <port number> – number of the port that will be used for an
•
unsecured connection to the Administration Server, by default port 14000
is used.
-ps <SSL port number> – number of the SSL port that will be
•
used for a secured connection to the Administration Server using SSL.B y
default port 13000 is used.
• -nossl – use an unsecured connection to the Administration Server; if
no modifier is used, connection of the Network Agent will be establishe d
using a secured SSL protocol.
-cert <full path to the certificate file> – use the
•
specified certificate file for authentication when accessing the new Ad-
ministration Server. If no modifier is used, the Network Agent will receive
the certificate the first time it connects to the Administration Server.
1
В квадратных скобках приводятся необязательные ключи.
Page 54

54 Kaspersky Administration Kit
•
-silent – launch the utility in the silent mode; the use of this modifier
can be useful, for instance, when launching the utility from the launch
scenario when registering the user.
• -dupfix – this key is used when the Network Agent was installed b y a
method other than the traditional method (using the distribution kit), for
example, by restoring from the disk image.
3.8. Verifying connection of the
client computer to the
Administration server
In order to verify connection of the client computer to the Administration
server:
using the command line on the client computer start klnagchk.exe utility
included into the installation package of the Network Agent.
After the installation of the Network Agent, this utility is located in the root
installation folder for the component and when run from the command line
performs the following action depending on the modifiers used:
• outputs the values of the connection parameters used by the Network
Agent installed on the client computer to connect to the Administration
Server to the screen or into the log file;
• logs into the log file the statistics of the Net work Agent (since the moment
this component was launched last time) and the results of the utility operation or prints this information to the screen;
• attempts to connect the Network Agent to the Administration Server;
• if the connection could not be established, it sends a n ICMP packet to the
computer on which the Administration Server is installed.
Utility command line syntax:
klnagchk [-logfile <filename>] 2 [-sp] [-savecert
•
<path to the file certificate>] [-restart]
Description of modifiers
2
В квадратных скобках приводятся необязательные ключи.
Page 55

Viewing, creating, and configuring a logical network 55
•
-logfile <filename> – log the values of the connection parame-
ters used by the Network Agent to connect to the Server and the results
of the utility operation; by default the information will be stored in file
stdout.tx; if the modifier is not used, then the parameters, results and error messages will be printed to the screen.
• -sp – display the password used for authenticatio n of the user on the
proxy server; this parameter is used if connection to the Administration
Server is performed using a proxy server.
-savecert <filename> – save the certificate used to access the
•
Administration Server in the specified file.
-restart – restart the Network Agent after the utility is completed.
•
Page 56

CHAPTER 4. HIERARCHY OF
ADMINISTRATION SERVERS
4.1. Connecting a slave
Administration Server to a
master Server
In order to add a slave Administration Server to the logical network:
1. Select the required administration group, open the shortcut menu and
select the New / Administration Server item. You can access the
same option on the Action menu. A wizard will start. Follow the
wizard’s instructions.
2. You will need to specify the name of the slave server. Enter it
manually. The new Administration Server will be displayed under this
name in the administration group. The name must be unique within
the same level of hierarchy.
3. In the next wizard’s box you can specify the net work address of the
slave Administration server. After this, the master Administration
Server will send a command to connect the slave server and submit
all properties (network address of the master Server, name of the
slave server, certificate of the master Server).
If you do not want to specify the network address of the slave Serv er,
just click Next.
4. Specify the certificate of the slave Administration Server. Click
Browse and locate the certificate file.
After you finish with the wizards, the master Administration Server will add the
information about the slave Server to the database. The ico n and name of the
new Server will be displayed in the Servers folder of the corresponding
administration group.
Page 57

HIERARCHY of Administration Servers 57
In order to configure settings used for connecting a slave server to the
main Administration Server,
1. In the Administration Console, select the required Administration
Server, open the shortcut menu and select the Properties item. You
can also select this item on the Action menu. In the next dialog box,
select the Settings tab, where you should specify:
• Network address of the slave Administration Server
• Name of the slave Administra tion Server that will be displayed
on the master Server
• Certificate of the master Server
2. Click Apply or ОК. As the result, the slave Server will connect to the
master Server and retrieve all policies and tasks for the group to
which it is included.
3. The policies and tasks received from the master Server are displayed
on the slave Server in the following manner:
• The following icon will be displayed near the name of the policy
received from the master server –
• The
icon will indicate the policy settings locked on the master
(usual icon for policies – ).
Server (i.e. the settings that cannot be modified on the slave
Server).
• The following icon will be displayed near the name of a group
task received from the master Server –
(usual icon for tasks –
).
The policies and tasks received from a master Admin istration Server
cannot be modified on a slave Server.
Tasks received from a master Administration Server cannot be run or
started from a slave Server.
The status of the slave Administration Server displayed in the resu lts pane of the
Administration Console on the master Server will change to Connected.
Page 58

58 Kaspersky Administration Kit
4.2. Viewing the logical network of a
slave Administration Server
To view the logical network structure:
Select the required slave Administration Server. In the shortcut menu,
select the Connect to Administration Server item. You can select the
same command on the Action menu.
The structure of the logical network of the selected slave Server will be
displayed in the Administration Console. Then, you can vi ew the structure
as described in section 3.1 on page 27
.
Page 59

CHAPTER 5. INSTALLATION
AND DEINSTALLATION
APPLICATIONS ON CLIENTS
5.1. Viewing the installation
package parameters
In order to view the properties of the installation package and to modify
its name and settings:
open the Remote Install node in the console tree, select the required installation package in the results panel and use the Properties command
from the shortcut menu or from the Actions menu.
This will open a Properties <Installation package name> window (see
Figure 36) that consists of the following tabs: General, Settings, Licenses
and OS restart.
The General tab (Figure 36) shows general information about the package:
Page 60

60 Kaspersky Administration Kit
Figure 36. Installation package properties dialog box.
The General tab
• Application
• Version
• Size
• Created
The Settings tab (Figure 37) shows settings of the installation package,
corresponding to those of the application the package was created for. These are
the default settings, which can be modified if necessary.
Page 61

HIERARCHY of Administration Servers 61
Figure 37. Installation package properties dialog box.
The Installer Settings tab
The License info tab (see Figure 38) displays general information
on the license issued for the application for which the package has
been created.
Page 62

62 Kaspersky Administration Kit
Figure 38. Installation package properties viewing window
The License info tab
Using the OS restart (see Figure 41) you can determine the actions to be
performed if the computer must be restarted after the installation of the
application.
• Do not restart the operating system.
• Restart the operating system automatically.
• Prompt user for action – if you select this option, you can:
o create an information message that will be displayed to no -
tify the user that the operating system must be restarted, in
the entry field provided;
o specify the frequency of notification to restart the o perating
system by checking the Repeat prompt every (min.) and
specifying the interval to be used to display the notification.
o configure automatic restart of the computer operating sys-
tem if the system has not been restarted manually by the
user within a specified time interval after the application
Page 63

HIERARCHY of Administration Servers 63
was installed. In order to do this, check the Enforce the restart after (min.) and specify the time interval desired.
Figure 39. Installation package properties viewing window
The OS restart tab.
5.2. Creating installation packages
To create an installation package:
1. Connect to the administration server (see section 2.1 on page 10).
2. In the console tree, choose the Remote install node, open the
shortcut menu and click the New / Package item (this command ca n
also be accessed from the Action menu) to start a wizard. Follow the
wizard’s instructions.
3. You will be offered to specify the name of the installation package and
specify application to be installed during the ne xt step (see Figure 42).
When creating an installation package to install a Kaspersky Lab's
application, select the Create an installation package for Kasper-
sky Lab's application option and using the Browse... button, select
file containing the description of the application (file has extension
.kpd and is included in the installation pack ag e for all Kas per sk y Lab's
Page 64

64 Kaspersky Administration Kit
applications that support remote installation). As a result, the application name appears in the Application name field and version number, in the Application version field.
Figure 40. Creating a Kaspersky Lab's application installation package.
The installation package settings are set by default, depending o n the
application to install. You can change the installation package setting s
in the properties dialog box after the package has been created (see
above).
When creating an installation package for the installation of other applications:
• Select the Create an installation package for the application
specified by the user from the drop-down list;
• specify the path to the application distribution kit using the
Browse… button.
• check the Copy entire folder to the package box if you wish
to include the entire content of the folder containing the dis tribution file into the installation package.
• specify the parameters for launching executable file in the entr y
line provided, if such parameters are required for installation of
the application.
Page 65

HIERARCHY of Administration Servers 65
Figure 41. Creating of an installation package for installation of an application specified by
the user.
4. In the next wizard’s box (Figure 42), you can include a licen se key file
into the installation package by clicking Browse… and selecting the
required license key file (the file has .key extension).
If you do not want to add a license key to the installation package,
click Next.
Figure 42. Creating an installation package. Selecting a license key.
Page 66

66 Kaspersky Administration Kit
5. A set of files required for installing this application on clients is then
loaded to the shared folder on the administration server. The server
checks the administrator workstation for the availability of the Console
Plug-in for this application. If the plug-in has not been inst alled or its
version is earlier than that of the application, it will be installed or
replaced.
The Network Agent installation package is created automaticall y
during Kaspersky Administration Kit installation. The package
can be found in the Remote install node.
If you accidentally deleted the Network Agent installation
package, to create it again, select the klnagent.kpd file in the
NetAgent folder of the Kaspersky Administration Kit installation
package as a definition file.
After you finish with the wizard, a new installation package will be add ed to the
Remote install node and displayed in the details panel.
5.3. Configuring installation package
settings for the Network Agent
In order to configure the settings of the Network Agent installation
package:
select the Settings tab (see Figure 37) in the installation package settings
configuration window.
This tab displays the following settings related to the Network Agent's operation:
• Connection settings used to connect to the corresponding
Administration Server – in the Server connection field group (details
see section 6.3 on page 100).
• addr ess of the computer on which the Administration Server is
running.
• port number used to connect to the server.
• port number that will be used to connect to the new Administra-
tion Server through SSL protocol. To enable the SSL con nection, check the Use server SSL connection box.
• Administration Server certificate file used for authentication of
access to the new Administration Server;
Page 67

HIERARCHY of Administration Servers 67
• proxy server settings – To specify the settings, click the Settings button and enter the proxy server address, user login and
password. To enable connection via the proxy serv er, select the
Use proxy server checkbox.
After the Network Agent is installed, you can change the connectio n
settings using policies and application settings.
When you reinstall the Network Agent on a client, the
connection settings and Administration Server certificate are
automatically updated.
• A folder in the Unassigned group to which new computers will be
added after the installation of the Network Agent – in the Default
group name fields. You can select one of the following variants:
• Use Windows domain name – The client will be added to a
folder that corresponds to its current location on the W indows
network: domain or user group (this is the default option).
• Define group name – The client will be added to the specified
folder. Enter the name of the folder in the field below. If the Un-
assigned group has no folder with this name, it will be created
(you can also specify the name of the existing folder from the
Unassigned group).
After the Network Agent is installed, you will not be able to change
the name of the folder that will contain new computers added to th e
Unassigned group. This setting cannot be changed using policies
or application settings.
5.4. Creating an application
deployment task
To create an global application deployment task:
1. Connect to the administration server (see section 2.1 on page 10).
2. Choose the Tasks node in the console tree and the New / Task item
on the shortcut menu or the Action menu to start the task creation
wizard. Follow the wizard’s instructions.
3. Specify the task name. If the name you have chosen already exists,
_1 will be automatically added to the end of the name.
Page 68

68 Kaspersky Administration Kit
4. To set the application and task type (Figure 43) select the Kaspersky
Administration Kit and Application deployment task respectively.
Figure 43. Remote installation task setup. Defining the task type
5. Then define the installation package for this task (Figure 44). Select
the required package among other installation packages created for
that Administration Server or create a new one using the New…
button.
Figure 44. Creating an application deployment task. Selecting an installation package
Page 69

HIERARCHY of Administration Servers 69
6. In the next wizard box, specify one of the following installation
methods (Figure 45):
• Use push install – F orced in stallation;
• Use login script-based install – Installation using a login
script.
Figure 45. Creating an application deployment task. Specifying the installation method
7. If, during the previous stage you selected an installation method using
a launch scenario, you will have to select in the wizard window (see
Figure 48) the users' accounts for whom you need to make changes
in the launch scenario
Page 70

70 Kaspersky Administration Kit
Figure 46. Selecting accounts
If you selected the push installation method, define a method of
selecting the client computers on which to create this task (see Figur e
47)
• I want to select computers using Windows Networking. In
this case, the client computers on which to install ap plications
will be selected automatically, based on the data collected b y
the Administration Server during browsing the Windows network.
• I want to define IP addresses for the computers. The client
computers will be selected manually.
Page 71

HIERARCHY of Administration Servers 71
Figure 47. Defining a method of selecting client computers
If the client computers will be selected based on the Windows network
structure, the list will be created in the wizard’s dialog box (see Figur e
48) in a similar manner as during adding computers on the logical
network (see section 3.5 on page 47).
Page 72

72 Kaspersky Administration Kit
Figure 48. Creating a list of computers on which to install applications based on the
Windows-network structure.
If the client computers will be added manually, the list will be
populated by entering the IP addresses (or a range of IPs) of client
computers (see Figure 49).
Page 73

HIERARCHY of Administration Servers 73
Figure 49. Creating a list of computers using IP addresses.
8. In the next wizard’s box, specify the account under which the remote
installation task will be started on clients (see Figure 50).
The user account must have administrator rights for all
clients on which you are planning to run the application
deployment task.
If you are installing applications on computers that belong to
different domains, trust relationships must be enabled between the client computer’s domain and the domain the Administration Server belongs to.
Select one of the following:
• Default account – Run the task under the default account if the
Administration Server is started under the domain user ac count
and the user is authorized to install software.
• Specified account – Run the task under a spec ified user ac-
count if the Administration Server is started under the Local
System account or if the Administration Server service account
has no rights to run remote installation tasks.
Page 74

74 Kaspersky Administration Kit
To install Kaspersky applications on clients that do
not belong to this domain, log on as a user with
administrator rights for these clients to start the
remote installation task.
In the fields below, specify information about the user whose account satisfies the required conditions:
Figure 50. Selecting an account.
9. Define the task schedule (see Figure 51).
• In the Schedule for drop-down list, choose one of the foll ow-
ing:
o Every N hours
o Daily
o Weekly
o Monthly
o Once – Start the application deployment task only once,
regardless of task results.
o Immediately – Start the task immediately after you finish
with the wizard.
Page 75

HIERARCHY of Administration Servers 75
• Configure schedule settings in the fields corresponding to the
selected startup mode (for details, see section 7.1 on page
105).
Figure 51. Scheduling the application deployment task.
The task is scheduled to start Daily
In order to start the application deployment task creation wizard for a
specific installation package,
open the Remote Install node in the console tree, select the required
installation package in the results panel and use the Install command
from the shortcut menu or from the Actions menu. The new task wizard
described above will start. In this wizard, selection of the application and
installation package is omitted. Follow the wizard’s instructions.
In order to start the deployment group task creation wizard,
select the node that corresponds to the group you need in the console
tree, open the shortcut menu and select the Install command or use the
corresponding item in the Action menu. The appl ication deployment task
wizard will start. In this wizard, the steps of selecting the product and
group of computers are omitted. Follow the wizard’s instructions.
Page 76

76 Kaspersky Administration Kit
5.5. Configuring the remote
installation task
The remote installation task is configured in the same manner as other tasks
(see section 7.4 on page 117). Therefore, we shall only describe settings
displayed on the Settings tab that are specific to each type of task.
Provided below is a detailed discussion of settings sp ecific to a particular task
type that are displayed on the Settings tab.
You can edit the following settings for the forced installation task (see Figure 52):
• Change the account for starting this task.
• Select whether to reinstall the existing application on a client.
• Specify how installation files will be delivered to clients.
• Determine the number of attempts for starting this task (if the task is
scheduled).
To configure the above parameters, click the Advanced button to open the
Advanced dialog box (see Figure 53). In this dialog box, do the following:
• Check the Do not install on hosts on which this product is already
installed box to avoid installing the applic ation on comp uters that already
have it (this checkbox is checked by default).
• In the Download installation package field group, check the following:
• Download package using shared folder checkbox to deliver
installation files for the application using shared folders on the
Windows network (default value).
• Download package using Kaspersky Network Agent check-
box to deliver installation files for the application using th e Network Agent installed on the clients (default value). If this box is
checked, specify the maximum number of computers that can
simultaneously download files from the Administration Server in
the Maximum number of downloads field.
• In the Number of retries field, set the number of attempts to install the
application if the remote installation task is scheduled. Retries will be
performed in case of errors occurred during previous installations.
Page 77

HIERARCHY of Administration Servers 77
Figure 52. Remote Installation Tasks Settings.
Push install method
Figure 53. Remote Installation task.
The Advanced dialog box.
If you are configuring the script-based installation task, on the Settings tab you
can edit the list of user accounts to which the current changes will be applied
(see Figure 54). Use the Add… and Remove buttons to edit the list.
Page 78

78 Kaspersky Administration Kit
Figure 54. Configuring the remote installation task using scripts.
5.6. Remote software uninstallation
In order to remotely uninstall Kaspersky Lab's software:
Create a task similar to that of remote installation (deployment) (section
5.4 on page 67), select Remote application uninstallation as the task
type.
In order to ensure successful performance of the task, uncheck the Do not install application if it is already in-
stalled in the More tab (see Figure 53).
The task that you created will be run in accordance with the scheduled.
Page 79

HIERARCHY of Administration Servers 79
5.7. Application Deployment Wizard
To install the application using the Application Deployment Wizard:
1. Connect to the required Administration Server (see section 2.1 on
page 10).
2. In the console tree of the Kaspersky Administration Kit main window,
select the Kaspersky Administration Server (<Server name>) node
and open the shortcut menu. Click Application Deploy Wizard on
the shortcut menu or on the Action menu to start the wizard. Follow
the wizard’s instructions.
3. In the dialog box that appears (Figure 55), specify the installation
package that you will use. If you want to install an application from the
installation file and/ or the installation package has not been created,
create a new installation package. In order to do this, press the
New… button which will launch installation package creation wizard
(see section 5.2 on page 63).
Figure 55. Application Deploy Wizard.
Selecting an installation package
Page 80

80 Kaspersky Administration Kit
4. Specify computers on which you want to install Kaspersky Lab
applications (Figure 56). in the wizard window. Select one of the
following options:
• Install the application onto selected computers, if you select
this option, a group task of application deployment will be created after the completion of the wizard.
• Install application onto computers in the administration
group - as the result of the wizard operations a global task will
be created.
Figure 56. Selecting task type
5. T hen, after creating a group task, specify the group for which client
computers applications will be deployed (see Figure 60) or select
computers for the installation. If the application must be installed on
the client computers of the logical network, select the Groups group.
Page 81

HIERARCHY of Administration Servers 81
Figure 57. Application Deploy Wizard.
Selecting a group
6. Then you will have to specify the account under which the deployment
task for the client computers will run (for more details, see section 5.4
on page 67).
Figure 58. Selecting user account
Page 82

82 Kaspersky Administration Kit
7. After this, you will see a dialog box showing the progress of the
deployment task on the client computers of the selected group
(Figure 59). To view details of the task running on individu al clients,
click the Results button.
Figure 59. Running a deployment task
5.8. Local installation of Network
Agent
To locally install Network Agent:
1. Launch the setup.exe file in the NetAgent folder on the Kaspersky
Administration Kit installation CD. The setup wizard will give you a
choice installation settings. Follow the wizard’s instructions.
2. The first installation steps involve extracting files and copying them to
your hard disk, accepting the license agreement, and entering user
information.
3. In the Choose Destination Location dialog bo x define the Network
Agent destination folder. The default location is Program
Page 83

HIERARCHY of Administration Servers 83
Files\Kaspersky Lab\Network Agent. If this folder does not exist, it
will be created automatically. Click Browse to select another location.
4. In the Administration Server wizard’s box (see Figure 60), you
should specify the following settings for the Net work Agent to connect
to the Administration Server:
• The Server address field contains the address of the comp uter
running (or to be running the Administration Server. You may
use either the IP address or the network computer name (NetBIOS-name).
• The Server port field shows the port number used by the Net-
work Agent to connect to the Administration Server. The default
port is 14000. If this port is already in use, you can change it.
Use only multiples of ten.
• The Server SSL port field contains the port number used to
connect to the Administration Server through SSL. The default
port is 13000. If this port is already in use, you can change it.
Use only multiples of ten in this field. To enable the SSL connection, check the Use SSL to connect to server checkbox.
Figure 60. Installing the Network Agent.
Configuring connection settings
Page 84

84 Kaspersky Administration Kit
5. Determine the folder in the Unassigned group where the client will be
added by the Administration Server. Set the following options (see
Figure 61):
• Default group name – The client will be added to a fold er that
corresponds to its current location on the Windows network –
domain or user group (this option is enabled by default).
• Define group name – The client will be added to the specified
folder. Enter the name of the folder in the field below. If the Un-
assigned group has no folder with this name, it will be created
(you can also specify the name of the existing folder from the
Unassigned group).
Defining a folder in the Unassigned group to place new computers
Figure 61. Installing the Network Agent.
6. For the next step (see Figure 62), specify how the Administration
Server certificate will be obtained. Select one of the following:
• Default certificate file – T he Administration Server certificate
will be sent when the Network Agent connects to the Administration Server for the first time (default value).
• Select certificate file – The Administration Server will be au-
thenticated using a certificate selected by the administrator.
Click Browse to browse for the necessary file.
Page 85

HIERARCHY of Administration Servers 85
The file has the .cer extension and is located in the
Cert folder in the Kaspersky Administration Kit
directory on the Administration Server. You can
copy the certificate file to a shared folder or a floppy
disk. This copy can be used during the installation of
Network Agent.
Selecting a method for receiving the Administration Server certificate.
Figure 62. Installing the Network Agent.
7. In the last wizard dialog box (Figure 63), check the Launch
Kaspersky Network Agent checkbox to launch the Network Agent
immediately after the installation is complete. If you want to start
Network Agent later, uncheck this checkbox.
If you plan to use the computer's hard drive on which you plan to install the Network Agent, the Launch Kaspersky Network Agent box
shall be unchecked for creating the disk image and deployment on
other computers.
If you launch the Network Agent before the disk image is c reated, this
component cannot be restored correctly. The Administration Server
will view all computers as one and the same computers.
Page 86

86 Kaspersky Administration Kit
Figure 63 Installing Network Agent. Setting up the Network Agent launch
After the installation is complete, Network Agent will be installe d on your
computer with the following settings:
• Name – Kaspersky Network Agent
• Automatic launch at operating system startup
• The Local System account
You can view the Kaspersky Network Agent service properties, start
and stop this service, and monitor its performance by using Services, a
standard Windows administration tool.
5.9. Local installation of Network
Agent Console Plug-in
To install Network Agent Console Plug-in:
Launch the klcfginst.exe executable file from the application i nstallation
CD on the computer through the installed Administration Console. This
file is included in all applications that can be managed t hrough Kaspersk y
Page 87

HIERARCHY of Administration Servers 87
Administration Kit. The wizard will guide you through the installation.
Follow the wizard’s instructions.
The klcfginst.msi installation file for the Net work Agent Console
Plug-in is located in the NetAgent folder of the Kaspersky
Administration Kit installation package.
5.10. Installing applications in silent
mode
To install an application in silent mode:
1. Create the required installation package (see section 5.2 on page 63)
if you have not created it for this application.
2. On the computer where you want to silently install the application, run
setup.exe with key /s included in the created installation package.
Installation packages are stored on the Administration Server in
the Packages folder located in a shar ed folder defined during
the installation of Administration Server.
Page 88

CHAPTER 6. POLICY
MANAGEMENT
6.1. Creating a policy for an
application
To create a new group policy:
1. In the c onsole tree, select a group for which you want to create a
policy. In this group folder, select the Policies folder and click the
New/Policy item on the shortcut menu or the Action menu to start
a new policy wizard. Follow the wizard’s instructions.
2. Now you have to specify the policy name and the application for
which this policy is being created.
Enter the policy name. If a policy with this name already exists, the
_1 ending will be automatically added to the end of the new policy
name.
Select an application from the Choose the application for which
to define a policy drop-down list (Figure 64). The drop-down list
includes all applications that have their Console P lug-ins installed
on the administrator workstation.
Page 89

Policy management 89
Only one group policy can be assigned to a group per
application. No applications will have policies create d for
them.
Figure 64. Creating a policy. Selecting an application
3. In order to apply the policy you created as the active polic y for the
application, activate this policy by checking the Activate policy
active box (see Figure 65).
There can be several policies created in a group for one
application, but only one policy can be the active policy.
Page 90

90 Kaspersky Administration Kit
Figure 65. Creating a policy. Activating the policy
4. Then you have to consider the ge neral settings for the policy and
configure settings for the selected application (Figure 66). You can
lock policy settings for nested groups, application settings, or task
settings. The policy settings that can be locked are marked with the
icon . T o lock a setting, click this icon. The icon will change to
.
Local application settings have a higher priority than
policy settings. For a policy to take effect on client
computers, you should lock certain parameters.
When creating a policy, you can onl y configure a minimum set of
parameters required for operation of the application. All other
settings are set by default and correspond to default values applied
during the local installation of the application. The policy created
can be modified later (see section 6.2 on page 91).
For more information about configuring the policy for each
application, refer to the corresponding documentation.
Page 91

Policy management 91
Figure 66. Creating a policy for Kaspersky Anti-Virus 5.0 for Windows Workstations
6.2. Viewing and modifying a policy
To view group policy settings and/or modify them:
In the console tree, choose the required group and select the Policies
folder in this group. In the details pane, you will see a list of all policies
created for this group. Choose the policy required and click the
Properties command on the shortcut menu or the Action menu.
You will see the <Policy name> Properties dialog box with several tabs
on which you can configure a group policy for an ap plic ation . T he tabs are
specific to each application and their description is provided in the
documentation for the applications. Note that the General, Enforcement,
and Event processing tabs are common for all applications.
The General tab (Figure 67) displays general information about the
policy:
• Policy name
• Name of the a pplication for which the policy is created (for ex-
ample, Kaspersky Anti-Virus
• Application version
5.0 for Windows Workstations)
Page 92

92 Kaspersky Administration Kit
• Creation date and time
• Date and time of last modification
• The Activate policy based on the event box and the list used
to select an event that triggers the policy activation
• The Activate policy box that determines whether the polic y is
the active policy for the application
On this tab you can:
• change the policy's name;
• determine the automatic activation of the polic y upon a certain
event and select such event;
• activate or de-activate a policy
Figure 67. Editing a policy. The General tab
The Enforcement tab (Figure 68) displays the results of policy
enforcement on client computers included in the group. The tab shows
the numbers of computers for which the policy was:
Page 93

Policy management 93
• Defined
• Enforced
• Pending
• Failed
Figure 68. Editing a policy. The Enforcement tab
Detailed information on the results of policy enforcement on each client is
available in the dialog box (Figure 69), accessed b y clicking the Details
button. The Details dialog box displays a table that has the following
columns:
• Computer – Client name
• Domain – Name of the domain to which the client belongs
• Status – One of the following values:
o Pending – settings for this policy hav e been changed on
Administration server, but they were not yet synchronized
with workstation;
Page 94

94 Kaspersky Administration Kit
o Finished – The policy for an application on this computer
has been successfully applied;
o Scheduled – The policy for an application on this computer
has not been applied yet;
o Failed – The policy for an ap plication on this computer has
failed (the computer was turned off, disconnected, the
application did not run, or was not installed).
• Date – Date and time when the event occurred.
Figure 69. Information about policy enforcement results on clients of one group
The Event processing tab (Figure 70) shows settings that d efine rules
for handling application-related events – what type of events to record,
how to notify the administrator or other users upon virus protection-related
events, and where to store event logs.
Page 95

Policy management 95
Figure 70. Editing a policy editing. The Event processing tab
After the policy has been created, the values on the Event processing
tab are the default application settings. The settings are specific to each
Kaspersky Lab application and more information ab out them is available
in user guides for each application. If necessary, you can change the
policy settings as needed.
For all Kaspersky Lab applications, events related to anti-virus protection
may have the following severity levels:
• Critical – A critical event (for example, detection of a virus)
• Error – Application failure (for example, the license term has
expired)
• Warning – A warning message (for example, detection of a
suspicious object or a password protected archive)
• Info – informational message (for example, an object was disin-
fected or deleted).
Rules for handling events are defined for each severity level.
Page 96

96 Kaspersky Administration Kit
1. From the drop-down list, select the severity level: Critical, Error,
Warning, or Info.
2. Events corres pond ing to t he s elected sever ity level will be displayed
in the Events types field below. The list of events is specific to
each application. For more information about events, see the
application documentation. Select the types of events to be
recorded by pressing the Shift and Ctrl keys on your keyboard.
3. In the Register event information group, check:
• The Store events on the server for checkbox to set the ad-
ministration server to log events that occur on all clients in the
group. In the days field, specify the number of days for the
server to store information. When the specified period since
event logging is over, the entry corresponding to this event will
be deleted. You can view event logs stored on the administration server through the Administration Console on the administrator workstation. The events are logged in the Events node of
the console tree.
• The Store events locally checkbox to save events locally on
each client. In this case, you can only view event logs through
the locally installed Administration Console (Local computer
node).
To set the Windows event log on the administration to log virus
protection-related events, click Advanced to open the Events
registration dialog box (see Figure 71) and check the following
checkboxes:
• The Store events in server’s Windows Event Log checkbox
to enable logging all virus protection-related events on al l clients
in this group in the Windows Event Log on a computer with the
installed Administration Server.
• The Store events in host’s Windows Event Log checkbox to
set clients to log events locally in their Windows Event Logs.
The information can be viewed using Event Viewer, a
standard Windows event management tool.
Page 97

Policy management 97
Figure 71. The Windows Events registration dialog box
4. In the Notify administrator group, define how notifications will
be sent by checking the following checkboxes:
• Send email – To send notifications via a mail server
• Use NET SEND – To send notifications via the NET SEND
service
• Run executable – To run a program or a script following a
certain event.
You can check more than one checkbox.
5. Configure settings for the selected notification mode. Click Ad-
vanced to open the Advanced dialo g window, in which the following settings are specified (Figure 72):
• In the SMTP server to send email notification group of fields,
configure the following mail settings for sending notifications:
o Specify the recipient e-mail address in the Account field.
You can use more than one address, separated by a
comma or a semicolon.
o Enter the mail server address in the SMTP server address
field. You can use an IP address or a NetBIOS name.
o Specify the SMTP server port number in the SMTP server
port field. The default port number is 25.
• List computer addresses of notification recipients on your local
network in the Default net send notification computers group
of fields. You can also use an IP-address or a NetBIOS name.
You can enter more than one address separated with a comma
or a semicolon.
• Specify the path to the script to be e xecuted following an event
in the Default script for notification field.
Page 98

98 Kaspersky Administration Kit
Names of the variables of the executable module
environment coincide with the names of substitute
parameters used to format the notification message
text (see below).
• Enter a text of the notification to be sent to the defined recipients. Click the Message text… button and type the template in
the dialog box that appears (Figure 73).
The notification text may include information about the event
recorded. To provide this information, select the following
parameters from the drop-down lists accessed using the Insert
button:
o Event severity – Severity of this event.
o From computer – Name of the client on which this event
has occurred.
o From domain – Name of the domain that includes the
computer.
o Event – Event type.
o Event description – Event description.
o Registration time – Time when this event was recorded.
o Task name.
o Application.
o Version.
o IP address
o Connection IP address.
• Sender and subject of the notification m essa ge. To do this, click
Settings and, in the new window (see Figure 74), fill in the
From and Subject fields.
The availability of the fields depends on the notification delivery
mode.
The default settings are those set on the Notification tab of the
administration server properties (see section 8.2 on page 140).
In order to verify the correctness of the settings configured in this
window, you can manually send a test message. In order to do it,
press the Test button. As the result, messages created based on
Page 99

Policy management 99
the specified template will be sent to the addressed specified in th e
settings.
6. After all required s ettings have been configured, click Apply and
proceed to the next severity level.
Figure 72. Selecting a notification mode. Specifying notification delivery settings
Figure 73. Specifying notification delivery settings. Typing a notification message
Page 100

100 Kaspersky Administration Kit
Figure 74. Specifying notification delivery settings.
Specifying the sender and message subject
6.3. Activating a policy
In order to apply a group policy as the active policy for the application,
1. Select the group policy you need in the results panel, open the
context menu and select the Properties command or use the
analogous item in the Action menu.
2. In the group policy settings configuration Properties: <Policy
name> window that will open, select the General tab (see Figure
Figure 67. Editing a policy. The General tab
3.
4. Check the Activate policy box.
In order to deactivate the policy, uncheck this box.
5. Press the Apply or the OK button.
In order to activate a group policy automatically when a certain event
occurs,
1. Select a group you n eed in the results pa nel, open the cont ext menu
and select the Properties command or use the analogous item in
the Action menu.
2. Select the General tab (see Figure Figure 67. Editing a policy. The
General tab
 Loading...