

Page 1

KASPERSKY LABS
Kaspersky® Administration Kit 4.5
USER GUIDE
Page 2

KASPERSKY® ADMINISTRATION KIT 4.5
User Guide
Kaspersky Labs Ltd.
Visit our web site: http://www.kaspersky.com
Edition date: September 2003
Page 3

Contents
CHAPTER 1. KASPERSKY® ADMINISTRATION KIT .................................................. 7
1.1. What’s new in version 4.5? ................................................................................... 8
1.2. Software and hardware requirements .................................................................. 9
1.3. Distribution kit ...................................................................................................... 10
1.4. Help desk for registered users ............................................................................ 10
1.5. Conventions......................................................................................................... 12
CHAPTER 2. BUILDING UP ANTI-VIRUS PROTECTION......................................... 13
2.1. The Kaspersky Anti-Virus® logical network ........................................................ 13
2.2. Logical network addresses.................................................................................. 14
2.3. Creating a logical network................................................................................... 15
2.4. Logical network administrators. Access rights ................................................... 16
2.5. Maintaining a logical network.............................................................................. 17
2.6. Safety requirements. Joint operation of administrators...................................... 18
CHAPTER 3. INSTALLING THE SOFTWARE PACKAGE......................................... 20
3.1. Installing Kaspersky® Network Control Centre................................................... 20
3.2. Adding, reinstalling and/or uninstaling separate components ........................... 27
CHAPTER 4. GETTING STARTED.............................................................................. 28
CHAPTER 5. USER INTERFACE ................................................................................ 34
5.1. Main window........................................................................................................ 34
5.2. Menu .................................................................................................................... 35
5.3. Toolbars ............................................................................................................... 35
5.4. Network pane ...................................................................................................... 35
5.5. Shortcut menu ..................................................................................................... 36
5.6. Object property pane........................................................................................... 37
5.6.1. Tabs for groups............................................................................................. 38
5.6.2. Tabs for servers............................................................................................ 38
5.6.3. Tabs for workstations.................................................................................... 40
5.7. Info bar................................................................................................................. 42
5.8. Status bar............................................................................................................. 43
Page 4

4 Kaspersky Administration Kit
5.9. Help......................................................................................................................43
CHAPTER 6. CREATING AND EDITING A LOGICAL NETWORK ........................... 45
6.1. Creating groups ................................................................................................... 45
6.2. Adding servers..................................................................................................... 46
6.3. Adding workstations ............................................................................................ 47
6.4. Deployment of Kaspersky Anti-Virus® on workstations ..................................... 50
6.4.1. Uploading the software to the program storage. Customizing the
programs to be installed ............................................................................... 51
6.4.2. Deployment settings. Starting login script based deployment .................... 53
6.4.3. Computer based deployment....................................................................... 57
6.5. Adding objects to a logical network..................................................................... 61
6.6. Moving and removing logical network objects.................................................... 62
6.7. Searching for and renaming logical network objects ......................................... 63
CHAPTER 7. CONFIGURING A LOGICAL NETWORK ............................................. 65
7.1. General features of workstation settings ............................................................ 65
7.1.1. Copying Kaspersky Anti-Virus® settings to another workstation................. 65
7.1.2. Off–line mode. Pending application of new settings.................................... 66
7.2. Alerts and e-mail notifications from workstations and servers........................... 67
7.2.1. Alerts from workstations and their severity levels........................................ 67
7.2.2. Enabling workstations to send alerts via the supervising server................. 68
7.2.3. Forwarding alerts according to their severity level....................................... 69
7.2.4. Virus outbreak alerts..................................................................................... 71
7.2.4.1. Defining symptoms indicating a virus outbreak .................................... 72
7.2.4.2. Setting the virus outbreak alert.............................................................. 72
7.2.5. Customizing e-mail service settings............................................................. 72
7.2.5.1. Sending messages using MAPI ............................................................ 73
7.2.5.2. Sending messages via SMTP............................................................... 74
7.3. Defining remote management of servers and workstations .............................. 74
7.3.1. Remote management settings..................................................................... 74
7.3.2. Security settings for remote management................................................... 75
7.3.3. Network browsing settings ........................................................................... 76
7.3.4. Specifics of setting remote management of workstations........................... 77
7.4. Setting automatic updating of anti-virus databases on workstations................. 78
7.4.1. Updating anti-virus databases from a Kaspersky AV server ...................... 78
Page 5

Contents 5
7.4.2. Updating the anti-virus database storage on a server from another
server on the logical network........................................................................ 81
7.5. Configuring and using the quarantine function................................................... 83
7.5.1. Quarantine types .......................................................................................... 83
7.5.2. Selecting a quarantine type.......................................................................... 84
7.5.3. Working with quarantined files ..................................................................... 85
7.5.3.1. Working with server quarantine............................................................. 85
7.5.3.2. Local quarantine .................................................................................... 88
7.6. Scheduling Kaspersky Anti-Virus® components to be automatically started
on workstations .................................................................................................. 89
7.7. Exporting, importing, and printing settings.......................................................... 94
7.7.1. Exporting and printing the logical network hierarchy................................... 94
7.7.2. Exporting and importing server and workstation settings............................ 94
CHAPTER 8. ASSIGNING ACCESS RIGHTS TO OTHER USERS.......................... 96
8.1. Securing Kaspersky Anti-Virus® settings on workstations................................. 96
8.1.1. Preventing users from changing Kaspersky Anti-Virus® settings from
workstations .................................................................................................. 96
8.1.2. Synchronizing changes made by administrators and users to
Kaspersky Anti-Virus
8.2. Assigning an administrator to a group ................................................................ 99
CHAPTER 9. MAINTAINING A LOGICAL NETWORK ............................................. 102
9.1. Viewing network reports....................................................................................102
9.2. Selecting objects of a logical network...............................................................103
9.3. Viewing task performance results..................................................................... 106
9.4. If a workstation or a server are unavailable......................................................107
9.5. Receiving alerts from workstations. The Attention flag .................................... 108
9.6. Receiving e-mail from workstations .................................................................. 109
9.7. Starting tasks on workstations ..........................................................................110
9.8. Monitoring updating progress ........................................................................... 110
9.9. Key file installation on a workstation ................................................................. 111
®
settings..................................................................... 98
CHAPTER 10. ORGANIZING ADMINISTRATORS GROUP WORK....................... 113
10.1. Changing administrator names and passwords............................................. 113
10.2. Changing network access passwords to workstations and servers.............. 113
APPENDIX A. PROGRAM MENU..............................................................................116
A.1. The Network menu ........................................................................................... 116
Page 6

6 Kaspersky Administration Kit
A.2. The Edit menu...................................................................................................117
A.3. The View menu ................................................................................................. 118
A.4. The Object menu .............................................................................................. 119
A.5. The Tools menu ................................................................................................ 120
A.6. The Help menu.................................................................................................. 120
APPENDIX B. THE PROGRAM TOOLBAR DIRECTORY ....................................... 121
B.1. The Standard toolbar ........................................................................................121
B.2. The Action bar................................................................................................... 122
APPENDIX C. GLOSSARY......................................................................................... 124
APPENDIX D. FREQUENTLY ASKED QUESTIONS............................................... 129
APPENDIX E. KASPERSKY LABS LTD. ................................................................... 131
E.1. Other Anti-Virus products.................................................................................. 132
E.2. Contact Information........................................................................................... 134
APPENDIX F. LICENSE AGREEMENT..................................................................... 135
Page 7

CHAPTER 1. KASPERSKY®
ADMINISTRATION KIT
Kaspersky® Administration Kit was developed specially for administrators of
corporate networks or anti-virus security officers. Using this toolkit, a network
administrator can manage anti-virus protection (i.e. install, configure, and update
the Kaspersky Anti-Virus
virus outbreaks) SIMULTANEOUSLY on all workstations of a corporate network
DIRECTLY FROM THE ADMINISTRATING STATION.
Kaspersky
®
Administration Kit enables an administrator to:
• Remotely manage anti-virus settings across a corporate network. The
administrator can remotely manage anti-virus tools installed on other network computers from one location. Remote management is especially important for administrators of large networks that cover more then one
building or office.
• Remotely install (deploy) anti-virus software on workstations
facilitates creating of a unified anti-virus protection system across a network. The administrator downloads the Kaspersky Anti-Virus® package on
his computer (or a dedicated server) only once and then deploys it to the
workstations that are connected to the network.
• Remotely launch scheduled or on-demand scans
administrator to remotely launch scans on workstations and schedule the
scanning procedure to be automatically started at a specified time.
• Automatically update anti-virus databases on workstations. Updating of
anti-virus databases can be performed centrally: you do not need every
workstation to connect to the Kaspersky Labs web server. The updating
procedure can also be scheduled to run automatically on a regular basis.
• Receive the cumulative network report
detected by the anti-virus software on all protected workstations. The administrator can also request reports from individual workstations.
• Customize the notification system
define a list of events to be notified about by e-mail. For example, these
can be a detection of a virus on the protected network or an unsuccessful
attempt to update anti-virus databases on a workstation.
• Quarantine suspicious files.
cious files, encode them, and move them to the server quarantine. This
enables the administrator to maintain the highest level of anti-virus protec-
®
software, and also quickly and efficiently deal with
. This feature
. This feature allows the
. The network report logs all events
. This feature allows the administrator to
The administrator can centrally store suspi-
Page 8

8 Kaspersky Administration Kit
tion because even if an infected file has been deleted, it can be easily restored from the quarantine.
• Control user access to anti-virus protection settings
. The administrator
can prevent users from accessing anti-virus protection settings. This feature substantially enhances anti-virus protection security.
• Group computers into logical groups and delegate administrative control
over specific groups to particular group administrators. This feature simplifies administration of the anti-virus protection of a large number of
workstations.
1.1. What’s new in version 4.5?
Kaspersky® Administration Kit 4.5 has the following features not found in
previous versions:
• One installer
Virus
Virus
®
®
• Application of new settings can be delayed. Now the administrator can
define new settings for a workstation even if this workstation is not currently available on the network. The workstation can be merely switched
off at the moment. The changes are recorded in backup settings on the
primary server and are applied immediately after the workstation appears
on the network.
• Simultaneous customization of logical network objects
can simultaneously customize the anti-virus protection settings for several
workstations, servers, or groups.
• Network quarantine
minimizes the possibility of virus infection of the network.
• Extended search capabilities and a more easy-to-use interface
there are more criteria that can be used to find a computer on a logical
network. When adding a computer to the network, the administrator is
able to see the Microsoft network (not only the Kaspersky Anti-Virus
cal network).
• Detection of a virus attack
computers on the network. The administrator can customize the anti-virus
programs how to response to the outbreak.
• Network report
network objects and changes in the integrity of the logical network are
logged to a cumulative report.
for Kaspersky® Network Control Centre, Kaspersky Anti Server, Kaspersky Anti-Virus® Control Centre, and Kaspersky Anti Updater.
. The administrator
. Now quarantined files can be stored on servers. This
. Now
®
logi-
which is a simultaneous infection of several
. All events detected by the anti-virus software on logical
Page 9

Kaspersky® Administration Kit 9
1.2. Software and hardware
requirements
To run the Kaspersky® Administration Kit software package, you need:
• A TCP/IP network
• A configured MS Windows network
• The MS Windows 95/98/Me/NT/2000/XP operating system. If installing on
a computer running MS Windows NT 4.0, the service pack 6 must be preinstalled.
®
The administrating station must have (for the Kaspersky
Centre program):
• 16 Mb of available RAM
• 10 Mb of available hard disk space
(for the Kaspersky AV Server program):
• MS Windows 2000/NT/XP.
• 5 Mb of available RAM.
• 1 Mb of available hard disk space and also the disk space required to
store the updates for your anti-virus database, the Kaspersky Anti-Virus®
package components, and downloaded software products.
• The possibility to send e-mail messages using the MAPI client or via the
SMTP protocol. This is necessary to enable the server to forward alerts
from the tasks running on the supervised workstations. After the installation of the MAPI client, you must configure the appropriate profile for the
server mail system. To do this, select the Mail icon in MS Windows Control Panel and define the mail system settings.
Network Control
For information on hardware and software requirements for workstations please refer to User Guide "Kaspersky Anti-Virus
tions."
Kaspersky® Administration Kit 4.5 is designed for local area networks
with domain structure.
®
for Worksta-
Page 10
10 Kaspersky Administration Kit
1.3. Distribution kit
You can purchase Kaspersky Anti-Virus® Personal either from our distributors
(retail box) or online at one of our Internet shops (for example,
www.kaspersky.com
The retail box includes:
• A sealed envelope with an installation CD containing files for the software
product;
• User Guide;
• A license key written on the installation CD;
• License agreement.
Before you unseal the envelope containing the CD, be sure to thoroughly review the license agreement.
If you buy Kaspersky Anti-Virus
file of the product from the Kaspersky Labs website. This installation file includes
this User Guide and the license key. The license key can be also sent to you by
e-mail after receiving your payment.
The License Agreement (LA) is a legal agreement between you and the
manufacturer (Kaspersky Labs Ltd.) describing the terms on which you may
employ the anti-virus product which you have purchased.
, the Buy online link).
®
Personal online, you download the installation
Make sure you read the License Agreement!
If you do not agree to the terms of this LA, you can return the unused product to
your Kaspersky Anti-Virus
with the CD is sealed.
If you unsealed the envelope, you have agreed to all the terms of the LA.
®
dealer for a full refund, making sure the envelope
1.4. Help desk for registered users
Kaspersky Labs offers a large service package enabling its legal customers to
enjoy all available features of Kaspersky Anti-Virus
If you register and purchase a subscription you will be provided with the following
services for the period of your subscription:
®
.
Page 11

Kaspersky® Administration Kit 11
• new versions of this anti-virus software product provided free of charge;
• phone or e-mail advising on matters related to the installation, configura-
tion, and operation of this anti-virus product;
• information about new Kaspersky Labs products and about new computer
viruses (for those who subscribe to the Kaspersky Labs newsletter).
Kaspersky Labs does not provide information related to operation and
use of your operating system or various other technologies.
Page 12
12 Kaspersky Administration Kit
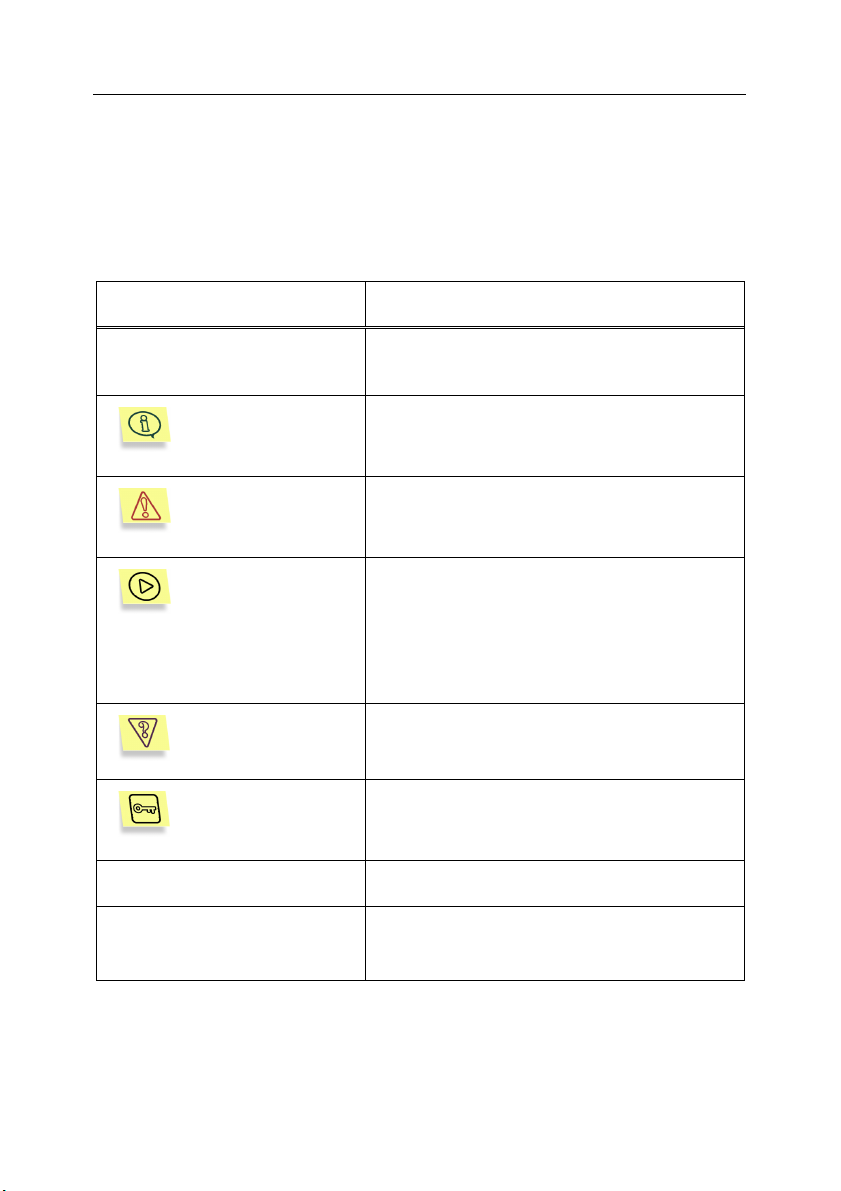
1.5. Conventions
In this book we use various conventions to emphasize different meaningful parts
of the documentation. The Table below lists the conventions used in this User
Guide.
Convention Meaning
Bold font
Note.
[key]— Function of the key.
Text of information
messages and the command line
Attention!
To do this,
1. Step 1.
2. …
Task or example
Solution
Menu titles, commands, window titles, dialog
elements, etc.
Additional information, notes
Critical information
Actions that must be taken
Formulation of the problem or an example of
how to use the product.
A solution of the problem formulated
Command line keys
Text of configuration files, information
messages, and the command line.
Page 13

CHAPTER 2. BUILDING UP ANTI-
VIRUS PROTECTION
2.1. The Kaspersky Anti-Virus®
logical network
The Kaspersky Anti-Virus® logical network (logical network) is a number of computers interconnected into a local network and running the Kaspersky AntiVirus® package components managed by Kaspersky® Administration Kit. Computers within a logical network can perform the following functions:
Kaspersky Anti-Virus
from viruses. The Kaspersky Anti-Virus
Centre component must be preinstalled on the workstation.
Kaspersky Anti-Virus
Server. This computer is used to store program installation files, update anti-virus
databases and package components, monitor for virus outbreaks (infection of
several workstations), and forward alerts from tasks (the Kaspersky Anti-Virus
components with pre-defined settings) performed on the supervised
workstations. These alerts, for example, may notify the administrator about a
virus detected on a workstation. Every server can control several workstations.
Logical group (group) is a defined number of servers and workstations controlled
by these servers. Several groups at a certain hierarchical level may constitute a
group of a higher level, etc. Each group must have at least one server.
Administrating stations are computers on which the Kaspersky® Network Control
Centre administration component is installed. From these administrating stations
the administrators can manage all the Kaspersky Anti-Virus® software
components installed on local network computers.
Logical network objects are workstations, servers, or groups of any hierarchical
level.
®
workstation (workstation1) is a computer that is protected
®
Server (server2) is a computer running Kaspersky AV
®
package with the Kaspersky AV Control
®
1
Below the word “workstation” means a Kaspersky Anti-Virus workstation.
2
Below the word “server” means a Kaspersky Anti-Virus server.
Page 14
14 Kaspersky Administration Kit
The structure of a logical network or the network configuration, i.e. information
about the hierarchical interconnections between groups, servers, and
workstations, is stored on one of the servers. This server is called the primary
server of the logical network.
The same computer can function as a workstation, a server, and an
administrating station. The number of workstations, servers, and administrating
stations is unlimited but there must be only one primary server.
A workstation and a server can be added to the logical network only
once. If your computer network has several logical networks, you cannot add elements of one logical network to another logical network.
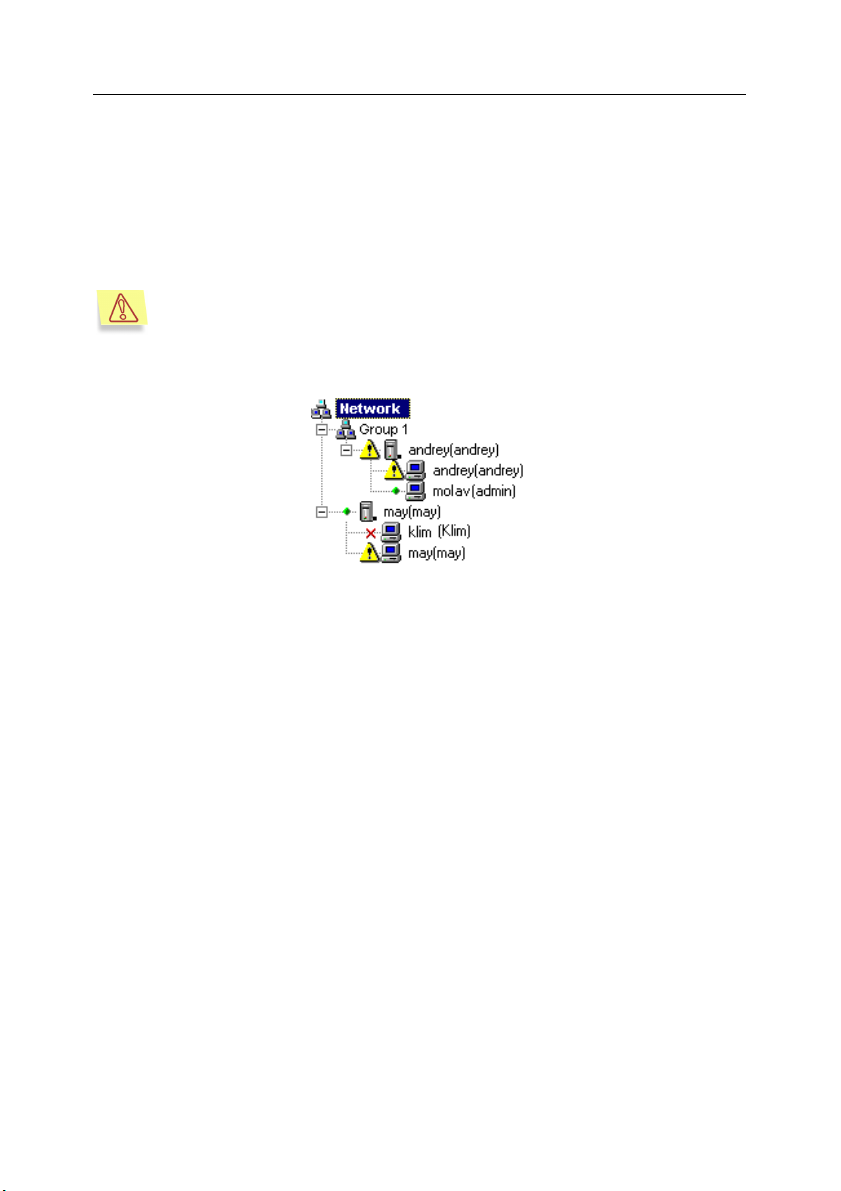
Figure 1 shows an example of the structure of a logical network.
Figure 1. An example of the structure of a logical network
2.2. Logical network addresses
Logical network objects (servers and workstations) are identified by network
addresses of computers on which the appropriate programs are installed. A
logical network object may have the following addresses (depending on network
settings):
• a static numerical IP address;
• a fully qualified domain name (FQDN);
• a computer name on the Microsoft network (NetBIOS name).
The first type of identification is available when the computer is assigned a static
IP address and is not available if the addresses are dynamically assigned by a
DHCP server.
The second type of identification is available if there is a DNS service and the
domain names are fixed and assigned to certain computers.
The third type is available if there is a WINS service.
Page 15

building up anti-virus protection 15
Below all the above mentioned types of addresses are referred to as
the object address.
2.3. Creating a logical network
The process may be divided into the following stages:
1. Project your logical network: the logical network administrator (the
administrator) chooses the computers on which to organize administrating
stations, the primary server, servers, and workstations. Logical networks can
have various configurations. Below you can see general recommendations
on how to create a logical network:
• All computers with installed Kaspersky Anti-Virus
• Each segment of the network must have at least one server (usually one
server is enough). All workstations of this segment are connected to this
server.
• It is advisable to set the primary server in the same network segment as
the administrating station (they may be configured on the same computer).
• If the projected logical network is too complicated to be controlled by a
single person, it is recommended that you divide it into groups containing
at least one server and the attached workstations.
• If required, you can assign particular group administrators and install the
software for administrating stations on their computers.
2. Install anti-virus software on your network computers:
®
• Install Kaspersky
Network Control Centre on the administrating station
(see subchapter 3.1 on page 20).
• Install Kaspersky AV Server on the computers reserved for the primary
server and other logical servers (see subchapter 3.1 on page 20).
• Install the workstation software on the selected computers (see subchap-
ter 6.3 on page 47).
3. Configure the logical network:
• Add servers to the logical network (see subchapter 6.2 on page 46).
• Attach workstations to the servers (see subchapter 6.3 on page 47).
• Set the server parameters (see subchapter 7.3 on page 74).
®
must be workstations.
Page 16

16 Kaspersky Administration Kit
• Define alert-forwarding settings on the servers (alerts are generated by
tasks running on workstations) (see Chapter 7 on page 65).
• Customize anti-virus settings for workstations.
• Divide (if required) the logical network into groups (see subchapter 6.1 on
page 45).
4. Assign access rights to other users:
• Allow or prohibit users to access the Kaspersky AV Control Centre set-
tings on workstations (see subchapter 8.1 on page 96).
• Assign group administrators (see subchapter 8.2 on page 99).
A company owns several offices in different buildings that are located
far from each other. All computers of this company are connected to a
computer network. The task of an administrator is to protect the company network from viruses. The administrator installs the Kaspersky
Administration Kit and Kaspersky Anti-Virus
computers and creates and configures the logical network. After this,
the administrator is able to monitor the network for virus-like activities
from his administrating station.
®
packages on the network
2.4. Logical network administrators.
Access rights
®
The logical network administrator is a user who installed the Kaspersky®
Administration Kit software package on the network computers. The
administrator has full control over all servers and workstations of the logical
network.
The group administrator is a user who is authorized to access the settings on
servers and workstations included in a certain group. Below, the logical network
administrator and group administrators are referred to as administrators. When
starting Kaspersky
defines the address of the primary server and specifies his or her user name and
password to access the program settings. Kaspersky® Network Control Centre
allows the administrator to:
• build the logical network by adding groups, servers, and workstations
(see Chapter 6 on p. 45);
• manage the Kaspersky Anti-Virus
workstations;
®
Network Control Centre the first time the administrator
®
package components running on
Page 17

building up anti-virus protection 17
• contol access to the settings of Kaspersky Anti-Virus
®
applications on
workstations (see subchapter 8.1 on page 96);
• assign administrators to the logical groups (see subchapter 8.2 on page
99).
To configure a logical network, the administrator must know not only his or her
user name and password but also the network access passwords to the
workstations and servers to be added to the logical network. Network access
passwords for workstations are defined when you install Kaspersky AV Control
Centre (see subchapter 6.3 on page 47). Network access passwords for servers
are defined when you install Kaspersky AV Server (see subchapter 3.1 on page
20).
When a logical network is constructed, the administrator may allow/prohibit other
users from accessing the Kaspersky Anti-Virus
®
settings on workstations (see
subchapter 8.1.1 on page 96).
The administrator may assign administrators of the groups included in his or her
logical network at any hierarchical level. In addition, the administrator may
change rights of the subordinate administrators, regardless of who originally
defined these rights.
The logical network structure may be configured by any authorized administrator but several administrators cannot do it at the same time.
Only one administrator with full access rights can log on to Kaspersky
®
Network Control Centre at a time.
2.5. Maintaining a logical network
After you have created and configured your logical network, you must regularly
do the following:
• Review the network reports and performance reports of the anti-virus
software on workstations on a daily basis (see subchapter 9.1 on page
102). The reports contain details of the last start of the corresponding
task. For example, the Kaspersky AV Scanner report contains information
about the number of scanned sectors, files, directories, archives, and
packed executable modules, about viruses and virus bodies detected,
about disinfected, deleted, suspicious, and corrupted objects, and also
about the time spent by the program to scan for viruses in all predefined
objects.
Page 18
18 Kaspersky Administration Kit
If the administrator fails to connect to a workstation (i.e. the connectionfailed message appears on the screen), and at the same time the computer is available on the local network, it is advisable to check whether
the Kaspersky Anti-Virus
it has been deleted or reinstalled by the user. For details see subchapter 9.4 on page 107.
• Check your mailbox and read alerts delivered from workstations (see sub-
chapter 9.6 on page 109).
For a complete list of alerts generated by the Kaspersky Anti-Virus
package components refer to their documentation. By configuring the
logical network using Kaspersky® Network Control Centre, you may
enable and disable various alerts (see the User Guide "Kaspersky AntiVirus® for Workstations"/ "Kaspersky Anti-Virus® for MS NT Server").
• Remotely perform the required tasks on workstations from the adminis-
trating station. For example, the administrator may disinfect files on a
workstation (see subchapter 9.7 on page 110).
• Update anti-virus databases of Kaspersky Anti-Virus
workstations. To update the anti-virus database, use the updating task
that is included in the list of tasks regularly performed on workstations.
Set the updates to be retrieved from the server (see subchapter 7.4 on
page 78). In this case, the updates will be copied from the updates storage on the supervising server. We recommend you to set your updates
storages on servers to be automatically updated from one server that will
retrieve the latest updates from the Internet.
®
software is still running on this workstation or
®
on supervised
®
2.6. Safety requirements. Joint
operation of administrators
To support the safety, integrity, and controllability of a logical network, the
administrators must follow these rules.
Administrators must not disclose to anyone their passwords to the network
configuration.
If a group administrator forgets his password, he or she can obtain a
new one from the supervising administrator.
If the logical network administrator forgets the password, he or she will
be denied access to the network configuration. In this case, the entire
logical network must be redeveloped.
Page 19

building up anti-virus protection 19
To avoid confusion, logical network administrators are not recommended to
change Kaspersky Anti-Virus
®
settings on the workstations supervised by
subordinate group administrators. If it is necessary to change the settings, the
supervising administrator must inform the subordinate administrator about this.
Page 20

CHAPTER 3. INSTALLING THE
SOFTWARE PACKAGE
3.1. Installing Kaspersky® Network
Control Centre
In this subchapter we describe the step-by-step installation of Kaspersky®
Administration Kit on a computer that does not have preinstalled components
from this package. For instructions on how to reinstall, add or uninstall separate
components, see subchapter 3.2 on page 27.
The setup wizard will suggest you to install Kaspersky
and Kaspersky AV Server on the same computer. This is recommended if you
have just started creating your logical network. By doing this, you are creating
both the administrating station and the primary server.
If you need to install only Kaspersky AV Server or only Kaspersky
Control Centre, you must skip some of the steps described below. For details
see the description of the steps below.
Before you begin the installation, we recommend that you exit all running Kaspersky Anti-Virus® programs.
To install Kaspersky® Network Control Centre and/or Kaspersky AV
Server on your computer, follow these steps:
1. Start Setup.exe on the installation CD. The Kaspersky
Administration Kit setup wizard info box will appear on your screen.
Click the Next button to proceed or the Cancel button to cancel the
installation. Every dialog box of the setup wizard contains these
buttons and the Back button that allows you to return to the
previous wizard box.
2. The license agreement box will appear on your screen. Review all
the agreement terms. If you agree to all the terms of the
agreement, click Yes to proceed. Otherwise, click No to abort the
installation.
3. After this, the user detail wizard box will appear on your screen.
Enter the required information in the User Name and the Company
Name fields (make sure to fill in both fields; otherwise you will not
be able to proceed with the installation).
®
Network Control Centre
®
Network
®
Page 21
Installing the software package 21
4. The destination folder wizard box will appear on your screen. The
Destination Folder info field displays the default destination
directory. To install the component to a different folder, click
Browse and select a folder into which you want to install
Kaspersky Anti-Virus® components.
5. The program group wizard box will appear on your screen. The
Program Folders input field displays the default program group.
Select an existing program group in the Existing Folders list to
add the program icon or enter the name of a new group in the
Program Folders input field.
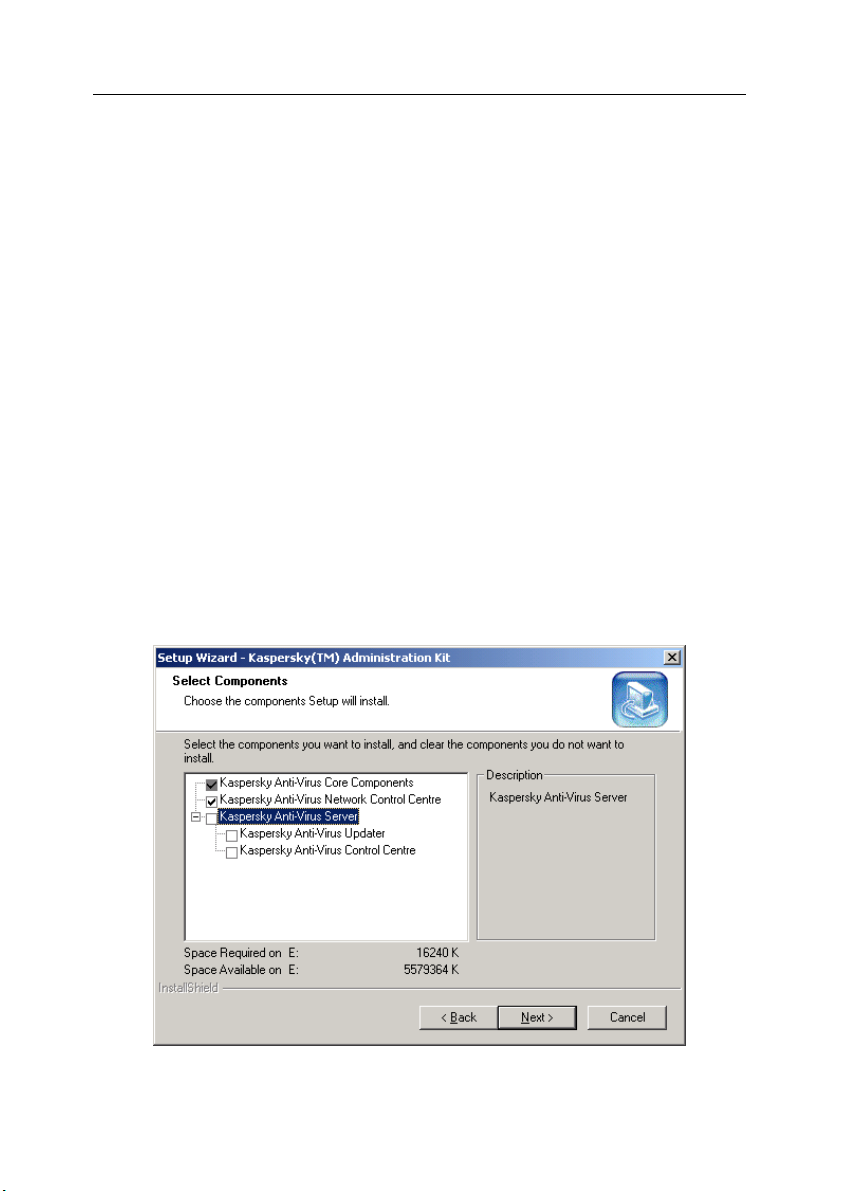
6. The Select Components wizard box will appear on your screen
(see Figure 2). By default, both components will be installed.
®
• If you want to install only Kaspersky
uncheck the Kaspersky Anti-Virus
Network Control Centre,
®
Server box (all dependent
components will also be unchecked).
• If you want to install only Kaspersky AV Server, uncheck the
Kaspersky
Virus
®
Network Control Centre box. The Kaspersky Anti-
®
Updater and Kaspersky® Control Centre boxes are
checked by default. These components are required for successful operation of servers but they are also included in the
Kaspersky Anti-Virus
®
package for workstations. If these components are already installed on this computer, their boxes may
also be unchecked.
Figure 2. Selecting the components to be installed
Page 22
22 Kaspersky Administration Kit
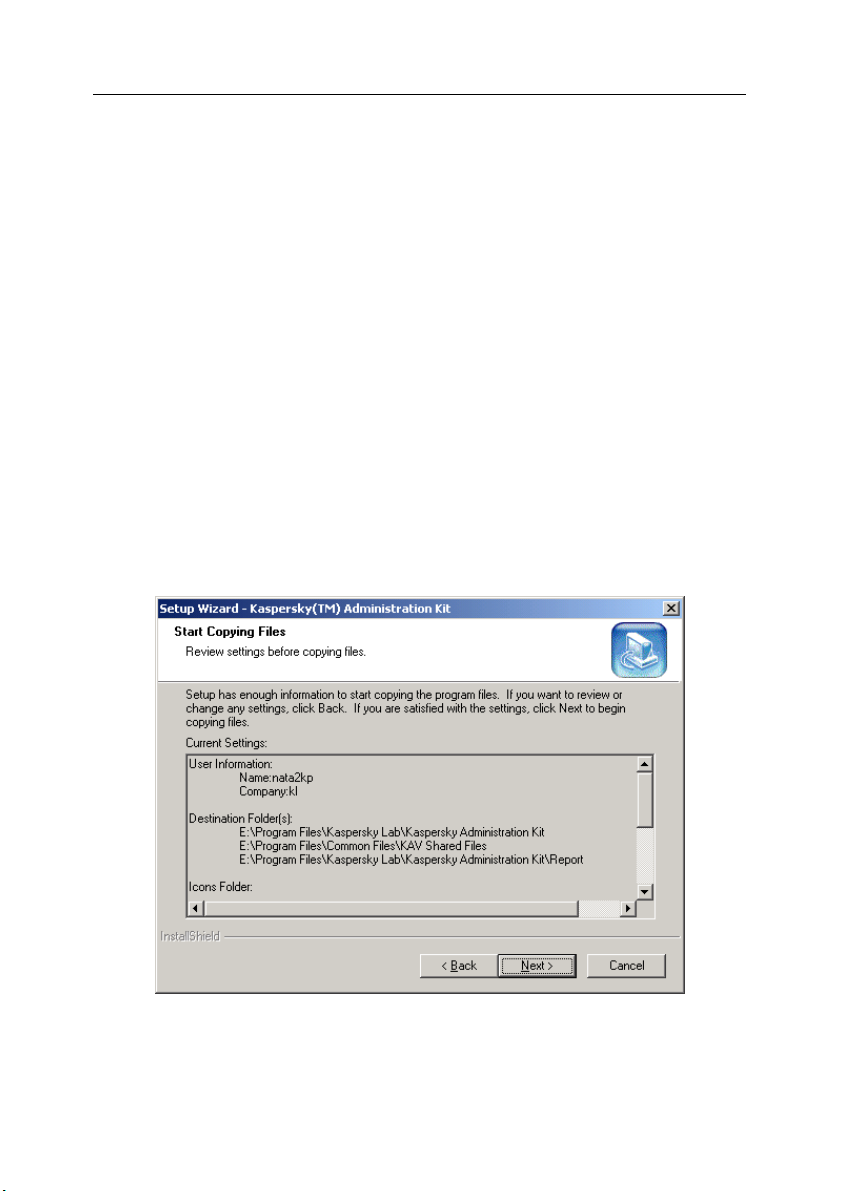
7. The Start Copying Files wizard box (see Figure 3) will appear on
your screen. This box displays the details you entered in the
previous box. Review the information before proceeding. If some
data are not correct, use the Back button to return to one of the
previous wizard boxes and correct the mistake.
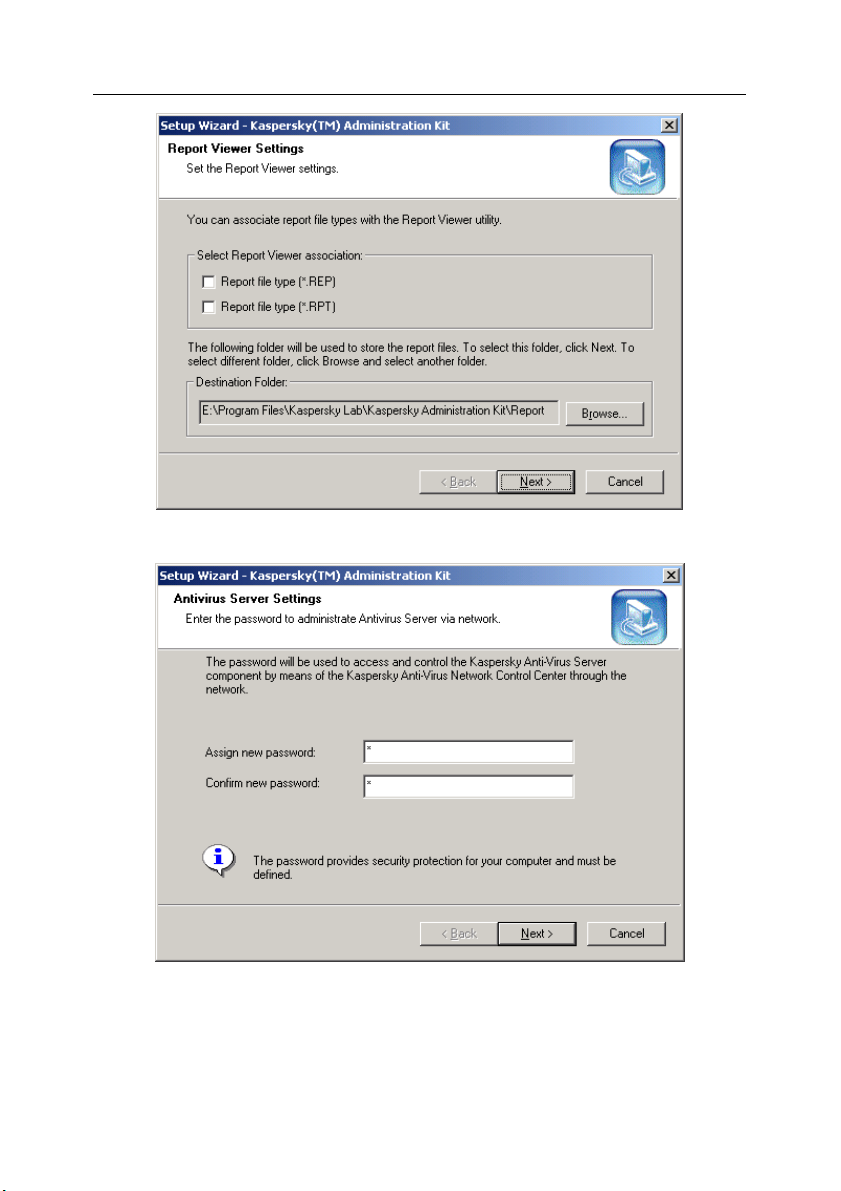
8. The Report Viewer Settings wizard box will appear on your
screen (see Figure 4). Use the Report file type check boxes to
select the files to be handled by the Report Viewer program: *.rep
and/or *.rpt. The Destination Folder field displays the default
location for the program report files. To change the directory, click
Browse and select the required directory in the MS Windows
standard dialog box.
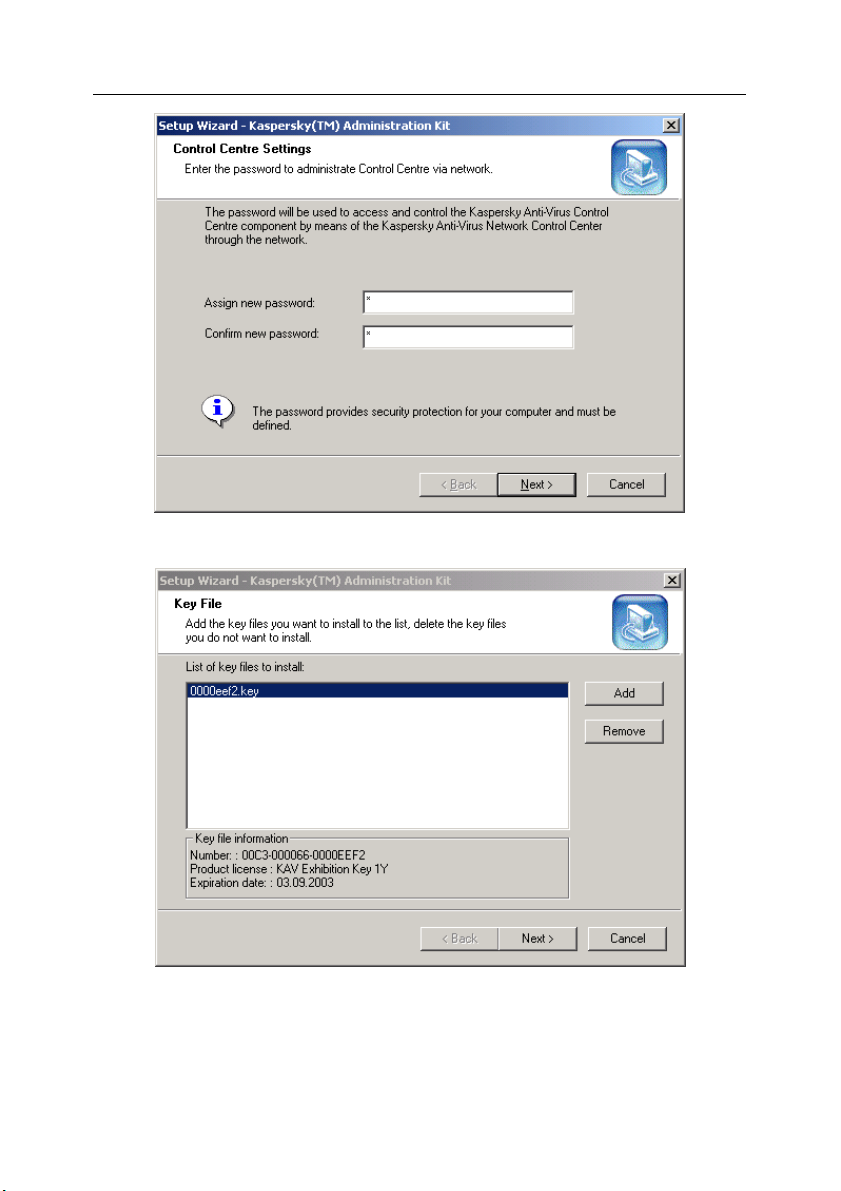
9. If you are installing Kaspersky AV Server, after the files are copied
onto the hard disk the password selection wizard box will appear on
your screen (see Figure 5). This password is required to
administrate the logical network server. Enter the password into the
Assign new password input field and confirm it in the Confirm
new password input field.
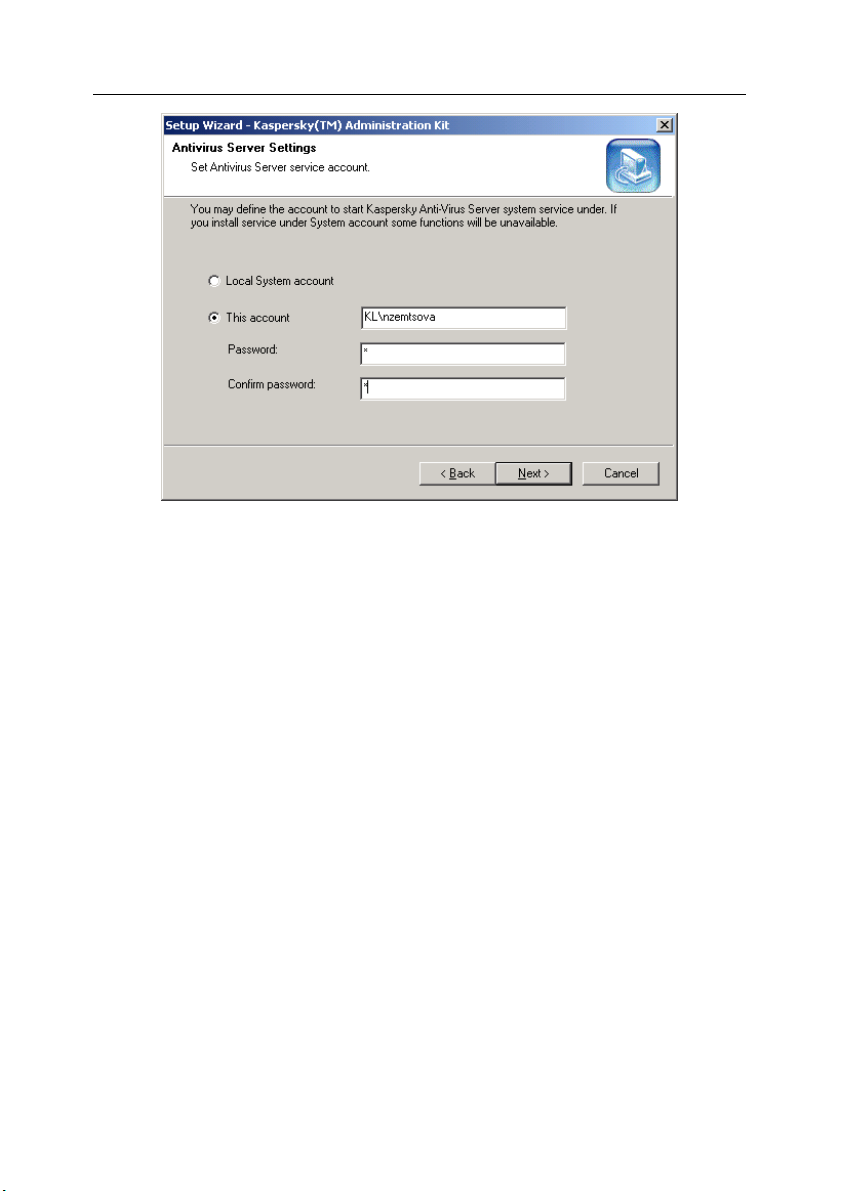
10. If you are installing Kaspersky AV Server on a computer running
MS Windows NT/2000/XP, the Kaspersky AV Server service
account box will appear on your screen (see Figure 6).
Figure 3. The Start Copying Files box.
Page 23
Installing the software package 23
Figure 4. The Report Viewer Settings box
Figure 5. Assigning a password for administrating a server via network
Page 24
24 Kaspersky Administration Kit
Figure 6. Setting a server service account
Using the option buttons in this dialog box, specify whether the
server will be started under the system account or under a userdefined account. If you choose the user-defined account, enter the
account name, a password, and password confirmation in the
corresponding input fields. It is advisable for the service to be
started under the system account (but keep in mind that in this
case the message forwarding via MAPI is not available).
11. If you are installing Kaspersky AV Server, use the next dialog box
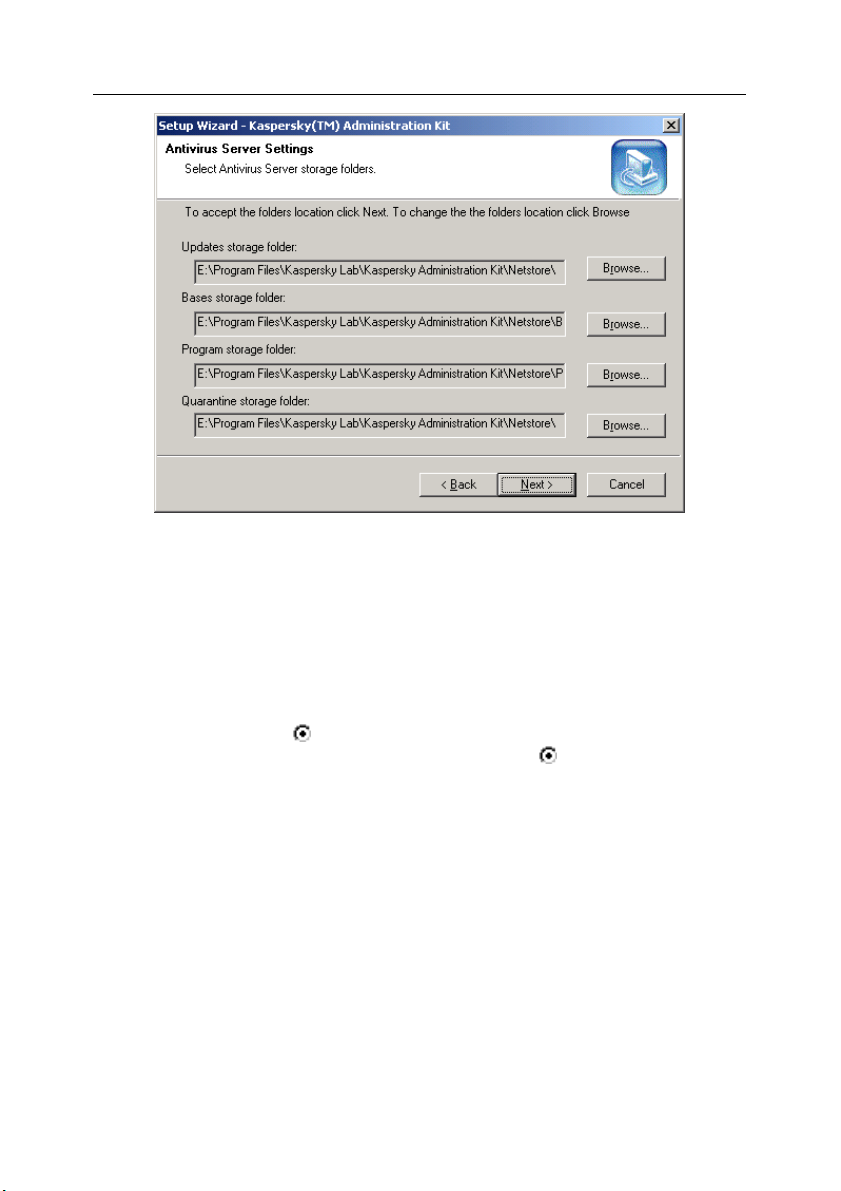
to specify folders for storing anti-virus database updates, program
updates, and quarantined files. In most cases, it is convenient to
choose the default paths to storage areas (see Figure 7). To
change the folder, click Browse and select a new directory in the
MS Windows standard dialog box.
12. If you choose to install Kaspersky AV Control Centre, the network
access password box will appear on your screen (see Figure 8).
Enter a password and confirm it in the corresponding input fields.
Page 25
Installing the software package 25
Figure 7. Selecting storage folders
13. After the selected component files are copied onto the hard disk,
the wizard will open the Key File dialog box (see Figure 9). By
default, the dialog box list contains the key file (files) that comes
with the installation CD. To add other files to this list, click Add and
select the required file in the MS Windows standard dialog box. To
remove an unwanted file from the list, select it and click Remove.
14. The Completing the Setup dialog box will appear on your screen.
Select the
restart your system immediately, or the
Yes, I want to restart my computer now option to
No, I will restart my
computer later option to postpone the restart. Note that to
correctly complete the installation, you must restart your system.
15. Click Finish to complete the installation.
Page 26
26 Kaspersky Administration Kit
Figure 8. The Kaspersky AV Control Centre network access password box
Figure 9. Defining a list of key files
Page 27
Installing the software package 27
3.2. Adding, reinstalling and/or
uninstaling separate
components
To add, uninstall, or reinstall any of the Kaspersky® Administration Kit
components, run the setup wizard as described in subchapter 3.1 on page 20.
However, the installation procedure will differ from that described for the first
installation of Kaspersky
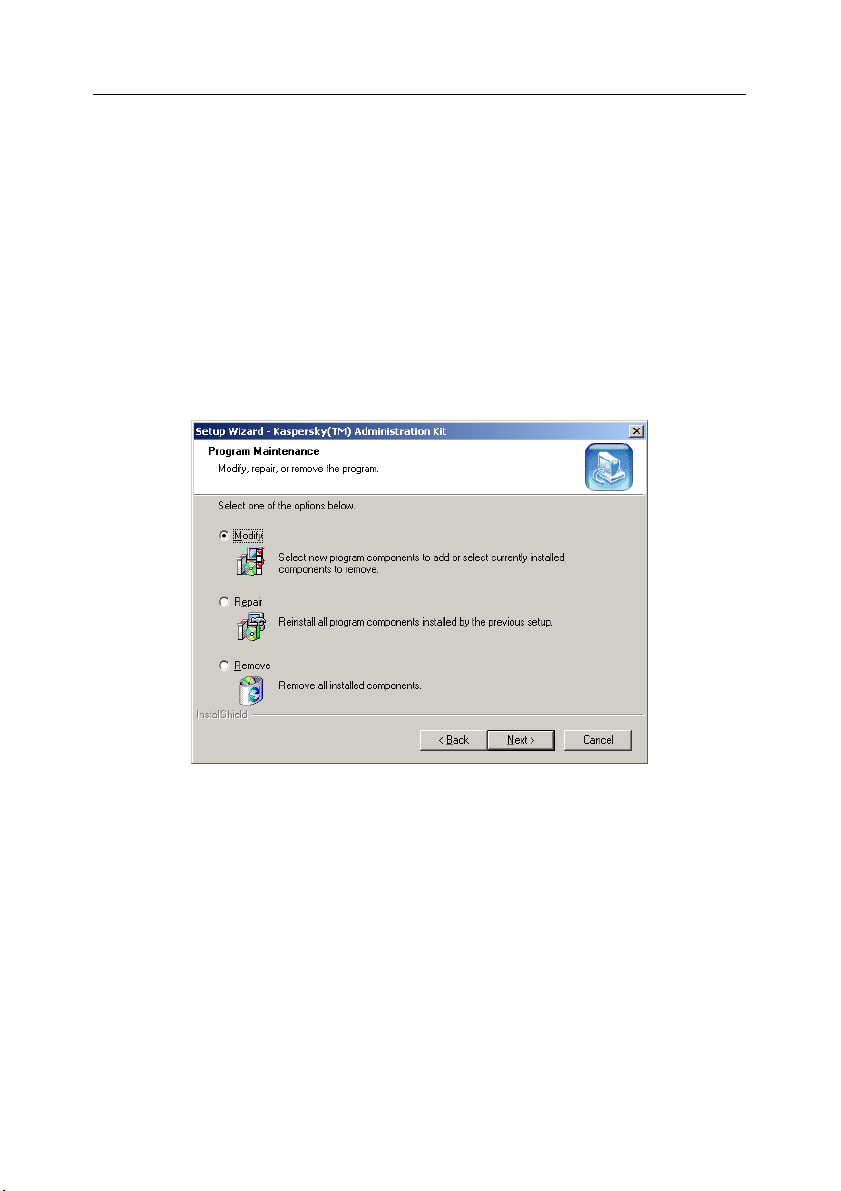
After the installation wizard info box, the installation mode wizard box will appear
on your screen (see Figure 10).
®
Administration Kit.
Figure 10. Selecting the installation mode
In this dialog box, select Modify if you want to add or remove a component,
Repair if you want to reinstall all the preinstalled components, or Remove if you
want to completely remove Kaspersky
If you select the Modify option, the Select Components dialog box will appear
on your screen. Check the components to be installed on your computer and
uncheck those to be removed. The remaining steps of the installation procedure
are similar to those described above.
If you do not have the installation CD, you can launch the Kaspersky
Administration Kit setup wizard to remove individual (or all) components of the
program. To run the Kaspersky® Administration Kit setup wizard, select
Add/Remove Programs in MS Windows Control Panel, select Kaspersky
Administration Kit program in the list of programs, and click Add/Remove.
®
Administration Kit from your computer.
®
®
Page 28

CHAPTER 4. GETTING STARTED
This chapter briefly describes how to start working with Kaspersky®
Administration Kit after it is installed on your computer. It also discusses how to
create and start working with a simple logical network. We assume that the user
is familiar with the basics of the standard MS Windows graphic interface.
In the following chapters, we describe in detail the Kaspersky
Centre user interface and provide step-by-step instructions on how to create,
modify, and configure a logical network. If the information in this chapter is too
brief, please refer to the chapters below.
Below it is assumed that the required software is already installed on computers:
Kaspersky
®
Network Control Centre is installed on an administrating station,
Kaspersky AV Server, Kaspersky AV Control Centre, and Kaspersky AV Updater
are installed on a server, and Kaspersky Anti-Virus® (including Kaspersky AV
Control Centre) is installed on a workstation. In the example below all the
components can be installed on the same computer.
To create a simple logical network, you should:
1. Start Kaspersky
®
Network Control Centre.
2. Define the primary server and create an empty logical network.
3. Add a server to the logical network.
4. Add a workstation to the logical network by attaching it to the
server.
After the above steps are completed, you will be able to get acquainted with the
features of the Kaspersky Anti-Virus
®
package.
Thus, let us create a simple logical network.
®
Network Control
Start Kaspersky
®
Network Control Centre. To do this:
1. Press the Start button on the MS Windows taskbar.
2. Point to Programs.
3. Point to Kaspersky Anti-Virus
®
and then to Administrative
Tools.
Page 29
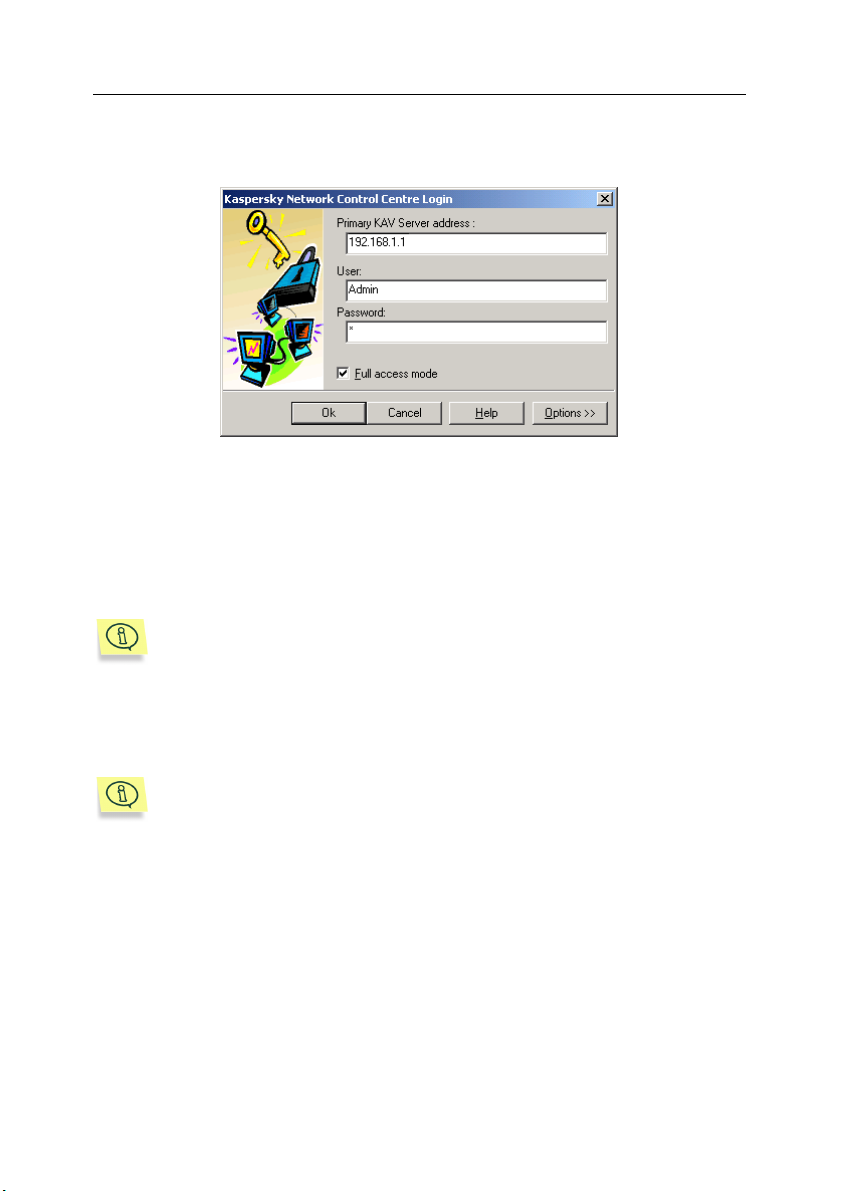
Getting started 29
4. Point and click Kaspersky® Network Control Centre. The
Kaspersky
®
Network Control Centre Login dialog box will
appear on your screen (see Figure 11).
Figure 11. Entering Kaspersky® Network Control Centre
5. Enter the primary server address in the Primary Kaspersky AV
Server address text field. Kaspersky AV Server must be
preinstalled and started on the defined computer.
6. Enter your user name in the User text field and the network
administrator password in and Password text field.
When Kaspersky
a new user name and a password, which you can use in future.
®
Network Control Centre is started the first time, enter
In future, you will be able to change the administrator name and password
(see subchapter 10.1 on page 113).
7. To be able to configure the logical network you are creating, check
the Full access mode box.
Two administrators cannot simultaneously change the logical network
configuration. For that reason, if an administrator is starting the program
at a time when another administrator has already logged on to the program in the full access mode, the first administrator will access Kasper-
®
Network Control Centre in the read only mode. In this mode, the
sky
administrator is able to change settings of the existing logical network
objects but is unable to add or remove the logical network objects.
8. Click OK. When started the first time, the program will open the
New Network Configuration dialog box. In this dialog box, define
the method of creating your logical network (see Figure 12):
! Create an empty network configuration - Create an empty
logical network. Select this option when you start creating your
logical network.
Page 30
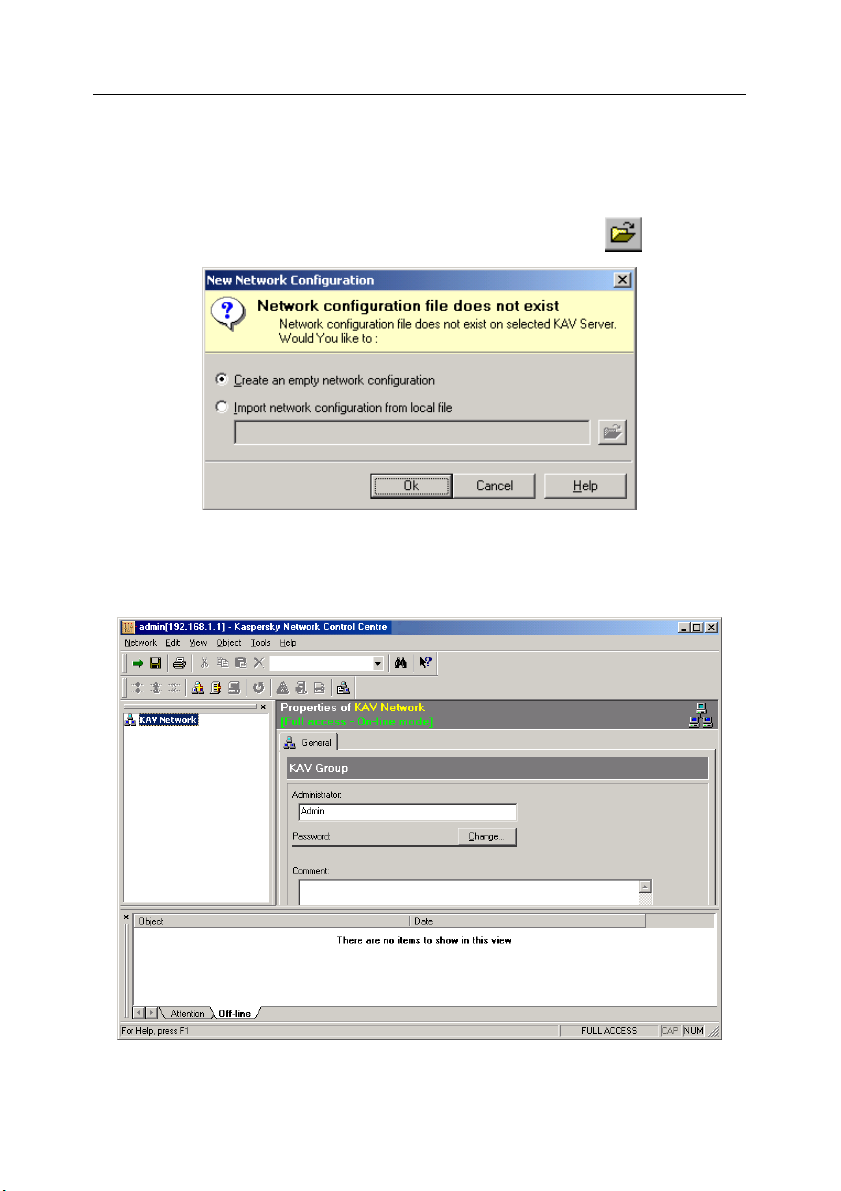
30 Kaspersky Administration Kit
! Import network configuration from local file – Import the
logical network configuration from a file. Select this option if you
have an existing network configuration file. This file can be created by exporting your previous logical network to a file (see
subchapter 7.7.1 on page 94). Enter the complete file name in
the text field below or select it using the button
.
Figure 12. Creating a new logical network configuration
9. After you have selected the required option, click OK. The program
main window will appear on your screen (see Figure 13).
Figure 13. The Kaspersky® Network Control Centre main window
Page 31

Getting started 31
Add a server to the logical network. To do this:
1. Click the KAV Network icon located in the upper left corner of the
main window.
2. Select Add server from the Object menu (<C
TR>+<E>) or press
the button on the toolbar. The Add KAV server dialog box will
appear on your screen (see Figure 14). Enter the required server
address in the Address text field.
Figure 14. Adding a server
3. Enter the server name to be added to the logical network in the
Name text field (if necessary).
4. Enter the network access password to the Kaspersky AV Server
program in the Password text field (the password you defined
during the installation of the program on the server) (see
subchapter 3.1 on page 20).
5. Click OK. The server is added to the logical network.
Add a workstation to the logical network. To do this:
1. Click the name or the icon of the supervising server in the left pane
(network pane) of the main window.
2. Select Add workstation from the Object menu (<C
press the
button on the toolbar. The Add KAV Workstation
TRL>+<W>) or
dialog box will appear on your screen (see Figure 15).
Page 32

32 Kaspersky Administration Kit
Figure 15. Adding a workstation
3. Enter the required workstation address in the Address of
workstation(s) text field.
It is impossible to add a workstation to the logical network if its
NetBios name consists of numbers only (e.g. 123). We recommend that you add such a station using its IP address.
4. Enter the network access password to the Kaspersky AV Control
Centre program in the Password text field (the password you
defined during the installation of the program on the workstation).
Click OK.
In future, you will be able to select workstations and their supervising servers in
the network pane of the main window and customize anti-virus settings on the
tabs in the object property pane . The object property pane occupies the major
part of the Kaspersky
®
Network Control Centre main window. An example of
settings for a workstation is shown in Figure 16.
®
In the figure below, you can see a list of Kaspersky Anti-Virus
tasks to be
performed on a workstation. You can select any task in this list and remotely
schedule this task to start, launch it on demand, terminate it, etc. For details of
these settings, see chapters below.
Page 33

Getting started 33
Figure 16. The Tasks tab for a workstation
Page 34

CHAPTER 5. USER INTERFACE
5.1. Main window
The Kaspersky® Network Control Centre main window (see Figure 17) contains
the following items:
• menu bar
• toolbars
• network pane
• object property pane
• info bar
• status bar.
Figure 17. The Kaspersky® Network Control Centre main window
Page 35

User interface 35
5.2. Menu
The menu bar is located at the top of the main window. Some commands in
these menus can substituted by appropriate key combinations or toolbar buttons
(see subchapter 5.3 on page 35). For example, instead of selecting the Login
item from the Network menu, you can use the key combination <Ctrl>+<L> or
press the
toolbar button.
The appropriate key combinations are displayed to the right of these
menu commands. For the list of key combinations and toolbar buttons
that might be used instead of some menu commands see Appendix A.
5.3. Toolbars
The toolbar contains a set of buttons. By clicking these buttons, you can initiate
various commands (see Figure 18).
Figure 18. Toolbar
The upper row of buttons is the standard toolbar, and the lower row is the action
bar. Every button on the toolbar corresponds to a certain menu command. For
the list of toolbar buttons and the corresponding menu items, see Appendix B.
To hide a toolbar:
select the Toolbars command from the View menu and uncheck the Standard Toolbar or Action Toolbar boxes. To display a toolbar, check the corresponding
box.
5.4. Network pane
At the left of the main window, you can see the network pane (see Figure 19)
that displays the logical network hierarchy.
The hierarchical structure of the network is as follows:
• The top level is represented by KAV Network, the root directory of the
entire logical network.
Page 36

36 Kaspersky Administration Kit
• The levels below may contain groups of the second, third, fourth, etc.
nesting levels. Groups of any level are marked with the
• The level above the last contains server addresses and their names en-
closed in brackets. Servers are marked with the
contain more than one server.
• The last level contains workstation addresses and names enclosed in
brackets. Workstations are marked with the icons.
Figure 19. Network pane
The current object of the logical network is the one selected in the network pane.
Every group or server in the network hierarchy is marked with a joint. By clicking
a joint, you can display or hide a branch with the contents of a group or a server.
If a hierarchy branch is visible, the corresponding joint looks like , and if a
branch is hidden, the joint looks like
To drag the network pane to another location or resize it, use your mouse.
To hide / display the network pane, select the Network Bar command
on the View menu. You can also hide the pane by clicking the
in the upper right corner of the pane.
.
icons. One group may
icon.
button
5.5. Shortcut menu
All logical network objects displayed in the network pane and on the property
tabs have shortcut menus. Using these shortcut menus, you can execute
commands specific to particular objects.
To open the shortcut menu for an object,
1. Point to the desired object.
Page 37

User interface 37
2. Right-click the object to open its shortcut menu (see Figure 20).
Figure 20. The shortcut menu for a group
5.6. Object property pane
In the right frame of the main window, you can see the current object property
pane. The pane contains the following items:
• object name
• object icon (
workstations);
• access details for the current object (Full access – full access to the ob-
ject, Acess denied – limited access to the object, Full access – Off-line
mode – Last known settings – there was a connection error and the last
known settings are displayed, and Read Only – the object is accessible
for reading only );
• object property tabs.
Depending on the object type (a group, a server, or a workstation), the quantity
and contents of the tabs vary.
The General tab, which is common for all the three types, is used to define
access rights to these objects.
for the logical network groups, for servers, and for
Page 38

38 Kaspersky Administration Kit
5.6.1. Tabs for groups
On the General tab for a group (see Figure 21), you can set the account and
password for an administrator who is authorized to access this group. Using the
fields on this tab, you can create a multilevel structure for administration of your
logical network.
To change the administrator name, enter the new name in the Administrator
text field.
To change the administrator password, click Change in the Password field to
open the password-input dialog box. Enter the new password and confirm it in
the corresponding text fields.
In the Comment text field, you may also enter any comments about, for
example, a group.
Figure 21. The General tab for a group
5.6.2. Tabs for servers
To define properties of servers, use the following four tabs: Storages, Options,
Deployment, and General.
Page 39

User interface 39
The Storages tab (see Figure 22) displays the following items:
• The contents of the directories where the anti-virus database and pro-
gram updates used by subordinate workstations are stored (see subchapter 7.4 on page 78).
• The contents of the folders that store suspicious files detected by the anti-
virus programs (the so-called server quarantine. For more details about
the quarantine please refer to subchapter 7.5 on page 83).
This tab also allows the user to handle individual objects located in these
directories.
Figure 22. The Storages tab for a server
The Options tab (see Figure 23) contains options allowing you to customize
settings for server remote administration (see subchapter 7.3 on page 74) and
for sending alerts from the tasks running on the subordinate workstations (see
subchapter 7.2 on page 67). On this tab, you can define actions to be taken in
response to a virus attack on several computers of the protected network (see
subchapter 7.2.4 on page 71).
Page 40

40 Kaspersky Administration Kit
Figure 23. The Options tab for a server
On the Deployment tab, you can remotely install (deploy) programs on
workstations (see subchapter 6.3 on page 47).
On the General tab, you can change the network access password to the server
(about the password, see subchapter 2.2 on page 14, and about changing the
password, see subchapter 10.2 on page 113).
5.6.3. Tabs for workstations
To define settings for a workstation, you can use the following five tabs.
The Tasks, Components, and Options tabs allow you to manage the
Kaspersky Anti-Virus
Centre installed on the workstation. On the Components tab, you can view
information about the Kaspersky Anti-Virus® package components running on the
workstation. The Tasks tab options (see Figure 24) allow you to schedule the
automatic start of tasks, launch them on demand, or view the task performance
results. For details of how to define anti-virus settings using these tabs, see the
description of Kaspersky AV Control Centre included in the User Guide
"Kaspersky Anti-Virus
Server".
®
package via the network using Kaspersky AV Control
®
for Workstations"/ "Kaspersky Anti-Virus® for MS NT
Page 41

User interface 41
Figure 24. The Tasks tab for a workstation
The Settings tab (see Figure 25) contains options allowing you to define the
Kaspersky AV Control Centre settings for management of the workstation via the
network (see Chapter 7, subchapter 8.1.1 on page 96, and the Kaspersky AV
Control Centre description).
The General tab allows you to change the network access password to the
workstation (about the password, see subchapter 2.4 on page 16 and about
changing the password, see subchapter 10.2 on page 113).
The Quarantine tab shows a list of suspicious files detected by the anti-virus
programs and quarantined on the workstation. On this tab, you can restore a file
from the quarantine, place it into the quarantine, or delete it. For details of the
quarantine see subchapter 7.5 on page 83.
The Quarantine tab is available only if the workstation is running the
Kaspersky Anti-Virus® package, version 3.5.5.x or later. This tab is unavailable for a workstation with installed Kaspersky Anti-Virus
®
3.5. that
is managed via the network. The tab is also unavailable if the workstation is off-line.
Page 42

42 Kaspersky Administration Kit
Figure 25. The Settings tab for a workstation
5.7. Info bar
The info bar contains the following two tabs: Attention and Off-line.
The Attention tab (see Figure 26) contains a list of objects with the Attention
status: the Object column contains the object name and the icon indicating its
type, the Severity column shows the severity level of the last message received
from this object,; the Message column contains the message text, and the Date
and Time columns indicate the date and time the message was received.
Figure 26. The info bar. The Attention tab
The Off-line tab (see Figure 27) contains a list of objects the program failed to
access: the Object column contains the object name and the icon indicating its
type and the Date and Time columns indicate the date and time the of the first
unsuccessful attempt of the program to access the object, respectively.
Page 43

User interface 43
Figure 27. The info bar. The Off-line tab
You may sort the rows in these lists by any column, either alphabetically or
numerically, in ascending or descending order. To do this, click the required
column title: once to sort in ascending order or twice to sort in descending order.
The info bar has its shortcut menu.
To hide or display the info bar:
select the Information bar command from the View menu. To hide the bar, click
the button in the upper left corner of the bar frame.
5.8. Status bar
The status bar is located at the bottom of the main window (see Figure 28).
The status bar displays:
• Context-sensitive tips
• Information about access rights to the logical network
• the Caps Lock on/off indicator
• the Num Lock on/off indicator.
Figure 28. The status bar
To hide or display the status bar, select the Status Bar item from the
View menu.
5.9. Help
While working with the Kaspersky® Network Control Centre program, you can
use its Help topics.
Page 44

44 Kaspersky Administration Kit
To refer to Help topics, select the Contents command from the Help
menu (<S
HIFT>+<F1>).
Click Help in any dialog box to display detailed information about this
dialog box.
By pressing the button (you will see a question mark to the right of
your cursor) and clicking any element of the Kaspersky
®
Network Con-
trol Centre window, you can view information about this element.
Page 45

CHAPTER 6. CREATING AND
EDITING A LOGICAL
NETWORK
The creation of a logical network includes the following standard stages:
• Creation of groups (see subchapter 6.1 on page 45);
• Addition of servers to the groups (see subchapter 6.2 on page 46);
®
• Installation of the Kaspersky Anti-Virus
subchapter 6.3 on page 47);
• Addition of workstations to the supervising servers (see subchapter 6.3 on
page 47);
• Customization of alert settings (see subchapter 7.2.1 on page 67);
• Customization of remote administration of servers and workstations (see
subchapter 7.2.2 on page 68, and also the Kaspersky AV Control Centre
description);
• Customization of the Kaspersky Anti-Virus
(see subchapter 7.3 on page 74).
programs on workstations (see
®
package on every workstation
6.1. Creating groups
You can create an unlimited number of groups at any hierarchical level of your
logical network.
To create a new group, follow these steps:
1. If you want to create a new group on the top level of the logical
network hierarchy, select KAV Network in the list of logical network
objects. If you want to add a group as a member of another group,
select the name of the parent group in the list of logical network
objects.
2. Select the Add group command from the Object menu or click the
button in the action bar. You can also select the Add group
command from the shortcut menu in the network pane
Page 46

46 Kaspersky Administration Kit
(<CTRL>+<G>). The Add KAV group dialog box will appear on
your screen (see Figure 29).
Figure 29. Adding a group
3. Enter the new group name in the Name text field.
4. Click OK.
6.2. Adding servers
You can add servers directly to the logical network as well as to the groups of
any nesting level. Each group must have at least one server.
To add a server, follow these steps:
1. If you want to add a server directly to the logical network, select the
KAV Network line in the list of objects. If you want to add a server
as a member of a group, select the name of the parent group in the
list of objects.
2. Select the Add server command (<C
menu or press the
the Add server command from the shortcut menu in the network
pane. The Add KAV server dialog box will appear on your screen
(see Figure 30). Enter the server address in the Address field.
3. If required, enter the server name in the Name field.
4. If the server is password protected for network access (see
subchapter 2.4 on page 16), enter the password in the Password
field.
button in the action bar. You can also select
TRL>+<E>) from the Object
Page 47

Configuring a logical network 47
Figure 30. Adding a server
5. Click OK.
6. If the server is password protected for network access and you did
not enter the password or entered a wrong password, the
Password to access object via network dialog box will appear on
your screen (see Figure 31).
Figure 31. Entering the password to access a server via network
7. Enter the password in the Password field. After this, the server will
be added to your logical network.
You cannot add a server to the logical network more than once because
this may result in incorrect performance of the program.
6.3. Adding workstations
You can add any number of workstations to a server. The required software
components must be preinstalled on the workstations before you start . In this
Page 48

48 Kaspersky Administration Kit
chapter we assume that the required software has already been installed on
computers. Keep in mind that Kaspersky
administrator to install Kaspersky Anti-Virus
®
Administration Kit allows the
®
on workstations (including those
computers that are supposed to be used as workstations) from the administrating
station. For details of the remote installation procedure (deployment) see
subchapter 6.4 on page 50.
To add a workstation to a server, follow these steps:
1. In the network pane, select the name of the server to which you
want to add the workstation.
2. Select the Add Workstation command (<C
Object menu or press the
button in the action bar. You can
TRL>+<W>) from the
also select the Add workstation item from the shortcut menu of
the network pane. The Add KAV Workstation dialog box will
appear on your screen. (see Figure 32).
Figure 32. Adding a workstation
3. Enter the address of workstation(s) in the Address of
workstation(s) text field.
! Select workstations located in the same network segment as
the server to which you are adding workstations. To define the
workstations, click the
button. The Browse for work-
station dialog box (see Figure 33) with the list of workstations
running Kaspersky AV Control Centre will appear on your
screen.
Page 49

Configuring a logical network 49
Note that workstations appear in the list not immediately
after you have installed the Kaspersky Anti-Virus® package on them. It may take more time, approximately
three minutes.
Now you can exclude the workstations already added to the logical network from the list. To do this, check the
Exclude ad-
dresses already added to KAV Network check box. If you want
to add workstations by their IP addresses, check the
Add by
IP address check box. Then, select the required workstation (or
several workstations) from the list and click OK.
Figure 33. Selecting the workstation
! To display the complete list of workstations located in the same
network segment as the administrating station, click the arrow
at the right side of the button. In the two-command
menu, select the Browse Microsoft network… command. The
Browse for workstation dialog box with the complete list of
computers on the Microsoft network will appear on your screen.
! If you want to add a workstation that is not defined in the list,
enter its address in the Address of workstation(s) field.
You can type more than one workstation address in the Address of
workstation(s) field. Every address must be enclosed in quotation
marks and separated by space characters (for example, "andrey"
"roma" "alex"). All the defined workstations will be added to the selected server.
It is impossible to add a workstation to the logical network if its NetBios
name consists of numbers only (e.g. 123). We advise that you add such
a station using its IP address.
Page 50

50 Kaspersky Administration Kit
4. If the workstation to be added is password protected for network
access, enter the password in the Password field. If you are
adding more than one workstation, the program will try to use this
password for all the workstations to be added. (The next step
allows you to define a separate password for every workstation to
be added.) Click OK.
5. If the network password of the workstation (see subchapter 6.3 on
page 47) differs from that you defined at the previous step, the
Password to access object via network dialog box will appear on
your screen.
6. Enter the network password for the selected workstation in the
Password text field.
7. Click OK.
8. The three previous steps must be repeated for every workstation if
the passwords you entered for them were wrong.
You cannot add a server to the logical network more than once because
this may result in incorrect performance of the program.
6.4. Deployment of Kaspersky AntiVirus
®
on workstations
To deploy Kaspersky Anti-Virus® on workstations the administrator must:
• Add at least one server to the logical network (see subchapter 6.2 on
page 46).
• Place the required software into the program storage on the server (see
subchapter 6.4.1 on page 51) (this step allows you to install the Kaspersky Anti-Virus
• Define the network password and other settings for the Kaspersky AV
Control Centre program (see subchapter 6.4.2 on page 53);
• Launch the remote installation of the software from the server on the
workstations (see subchapters 6.4.2 on page 53 and 6.4.3 on page 57).
Before you start the deployment of Kaspersky Anti-Virus
3.5.5.x or later on a computer with preinstalled Kaspersky Anti-Virus
version 3.5 or 3.0, make sure to manually remove the previous installation from this computer. Otherwise, the new version will overwrite the
previous one, and this will result in the incorrect performance of the
package programs.
®
software with network support);
®
of version
®
of
Page 51

Configuring a logical network 51
6.4.1. Uploading the software to the
program storage. Customizing the
programs to be installed
Kaspersky AV Server uses a special folder, the so-called program storage, to
store copies of installation files for software to be remotely installed on
workstations. The location of the program storage is defined during the
installation of Kaspersky AV Server (see subchapter 3.1 on page 20).
To place the Kaspersky Anti-Virus
on a server and customize it for subsequent deployment, follow these
steps:
1. In the network pane, select the required server.
2. In the server property pane, switch to the Storages tab and click
the Program storage button (see Figure 34).
®
software into the program storage
Figure 34. Working with the program storage
3. Press the button located at the right side of the pane or select
the New command from the shortcut menu. The upload product
wizard box will appear on your screen (see Figure 35).
Page 52

52 Kaspersky Administration Kit
Figure 35. The product upload wizard box
4. The installation file to be uploaded to the server must contain a
special file with the product description (the file extension is
.kpd).
Click the
button at the right of the KAV Product description
file path field and select the required file in the MS Windows
standard dialog box.
5. Click the
button at the right of the KAV Product key file path
field and in the MS Windows standard dialog box, select the file
with a user key for this product (the file extension is .key).
6. You can precustomize Kaspersky AV Control Centre before you
install it on the workstations (schedule tasks, etc.). If you do not do
this, the program will be installed with default settings. The required
settings may be copied from any existing installation of Kaspersky
AV Control Centre. To copy the settings, you must first export the
settings from the precustomized installation into the policy
For details of the export procedure, see the Kaspersky AV Control
Centre description in the User Guide "Kaspersky Anti-Virus
Workstations." You can also use Kaspersky
®
Network Control
.dat file.
®
for
Centre to export the workstation settings (see subchapter 7.7.2 on
page 94). If the file with the settings has already been created, click
the button at the right of the KAV Control Centre settings
file field and select the file in the MS Windows standard dialog box.
7. Click Next to proceed. The program will start copying the
installation files.
Page 53

Configuring a logical network 53
8. After the files are copied, the upload finished box will appear on
your screen. To view the operation report, click the Details button.
To finish uploading the program to the storage and exit the dialog
box, click the Finish button.
The name of the product copied into the storage will appear in the Contents of
Program storage list (see Figure 36).
Figure 36. The Contents of Program storage list after the product is placed into the
storage
To remove a product from the storage, select it from the list and press the
button or select the Delete command from the shortcut menu.
To update the list (for example if it was changed by another program), press the
button.
6.4.2. Deployment settings. Starting login
script based deployment
To configure the deployment of the programs from an installation file located in
the program storage on the server, switch to the Deployment tab (see
Figure 37).
Page 54

54 Kaspersky Administration Kit
Figure 37. Defining deployment settings
First, you must select one of the appropriate installation methods:
• Computer based deployment
• Login script based deployment
The first installation method provides more advanced features for the product
installation but it can be used only if both the server and the target workstation
are operating under the MS Windows NT/2000/XP operating systems.
The second installation method is more broad-based. It can also be used with
computers running MS Windows 95/98/Me. It requires a Windows NT domain
server on the local network and access to the operating system of the target
workstation via the domain. In addition, this method allows you to centrally
update the Kaspersky Anti-Virus® programs on workstations. This deployment
method is described below; for details of the computer based deployment, see
the next subchapter.
To perform login script based deployment, follow these steps:
1. Select Login script-based deployment in the upper area of the
Deployment tab.
2. The installation settings tree is located in the left pane of the
Deployment tab. The options on this tab are the same as those for
usual installation of the Kaspersky Anti-Virus
®
products. Use the
Page 55

Configuring a logical network 55
option buttons at the first level of the settings tree to select the
installation mode (Install, Modify, Repair, or Remove; for details
of the installation modes see subchapter 3.2 on page 27).
3. If you select the Install or Modify modes, click the corresponding
joint to expand the tree branch. Expand also the Components to
install branch and uncheck the components that you do not wish to
install (if you select the Install mode, these components will not be
installed; if you select the Modify mode, these components will be
removed from the workstation).
®
4. If you choose to install the Kaspersky Anti-Virus
Control Centre
component, expand the corresponding branch and click the
Remote management password item (see Figure 38).
Figure 38. Setting deployment options for Kaspersky AV Control Centre
5. Enter the password for remote management of the workstation in
the corresponding text field and press the <E
NTER> key.
6. If required, uncheck the Start component after installation box.
7. If you select the Install mode, expand the Registration
information, Destination folder, Program Group, and Report
folder branches, click the corresponding item, and change the
required setting in the text field. If you do not edit these settings,
the program will be installed with default settings.
8. Define the required destination folder in the Report folder text
field. This folder must be accessible for the server via the network.
The product will be placed into this folder for further installation.
You can also click the
button and select the folder in the MS
Windows standard dialog box.
9. Click the Deploy button. A confirmation box with the prompt
"Would you like to start KAV Deployment Tool?" will appear on
your screen. Click Yes to place the software product into the
destination folder.
10. The language selection dialog box will appear on your screen (see
Figure 39). Select the desired language for your product from the
drop-down list and click OK.
Page 56

56 Kaspersky Administration Kit
Figure 39. Selecting the product language
11. After the files have been copied, the information box with further
instructions will appear on your screen. Click OK to close this
dialog box.
The program creates the
places the selected installation file and the
subfolder. The avpdtup.exe application controls the installation procedure on the
workstation: it detects the product and checks whether this version has ever
been installed on this workstation. If the product has been installed, the program
does not take any actions; if the product has not been installed, the program
starts the installation procedure (installation is performed in the background
mode; therefore, no messages are displayed and no actions are expected from
the user).
If a system reboot is required after remote installation of the patch, a
request for rebooting will be displayed on the remote computer.
To schedule
to the workstation, the administrator must add the following string to the login
script of this user:
avpdtup.exe to start installation when a certain user has logged on
PRODUCT.AVP subfolder in the destination folder and
avpdtup.exe application into this
start \\computer\destination_folder\PRODUCT.AVP\avpdtup.exe
It depends on your network architecture what exactly you should do to add this
string to the login script. If the system directory of the primary domain controller
is called
string and place it into the
using User Manager for Domains, the administrator must assign this file as a
login script to the required user.
In this case, remote installation will start when the user logs on to the workstation
for the first time. The next time this user logs on, the program
started but it will not repeat the installation; therefore, you do not have to remove
the above string from the login script.
WinNT, the administrator must create a .bat file containing the above
Winnt\System32\Repl\Import\Scripts folder. Then,
avpdtup.exe will be
Page 57

Configuring a logical network 57
6.4.3. Computer based deployment
To start computer–computer deployment, select Computer based deployment in the upper area of the Deployment tab. Figure 40 shows the Deployment tab with the selected computer based deployment.
Figure 40. Computer based deployment
This installation method can be used only if the server, the target workstation, and the administrating station are running the MS Windows NT
operating systems: Windows NT 4 Server, Windows NT 4 Workstation,
Windows 2000 Server, Windows 2000 Professional, or Windows XP. If
the administrating station is running another version of the Windows
operating system, this option button will be unavailable.
Note that computer based deployment differs from login script based deployment
described above.
To perform computer based deployment, follow these steps:
1. In the network tree in the right pane of the tab that displays all
computers on this local network, check target computers
(installation is impossible on computers running MS
Windows 95/98/Me).
Page 58

58 Kaspersky Administration Kit
2. If you do not see the required computer in the network tree, add it
manually to the tree. To manually add a computer, select the Add
computer command from the shortcut menu of the Microsoft
Windows Network object (see Figure 41) and enter the name of
the target computer in the text field.
Figure 41. Adding a computer to the network tree
3. If necessary, you can view the Kaspersky Anti-Virus® products and
their components already installed on any computer in the network
tree (you should have administrator rights for this computer). To get
this information, select the Details command from the shortcut
menu of this computer. You will see a dialog box with lists of
installed Kaspersky Anti-Virus
®
products (in the upper pane) and
their components (in the lower pane) (see Figure 42).
Figure 42. Details of installed products and components
Page 59

Configuring a logical network 59
4. In the pane below the network tree, define the installation settings
for the selected computers:
! Administrative disk share name – the shared resource of the
computer whereon the installation file will be copied for further
installation. By default, the hidden shared resource is C$.
! User name and Password – the name and password of a user
with administrative privileges to this computer. If you skip these
fields, you will be logged on under the current account.
The hidden system resource C$ is accessible only
for the Administrators group members. If you do
not have administrator rights on the target computer,
the installation procedure will fail.
! Do not reboot computer after the installation – check this
box to restart / not to restart the target computer after the installation. The installed software will operate correctly only after the
system is restarted.
! Allow installer to interact with desktop –check this box to
enable/disable the installation wizard to interact with the desktop of the target computer.
If the installer is launched under an account that is different from the
current one, the messages it generates will be screened only if your
check the
Allow installer to interact with desktop box.
5. Define the deployment settings (for details of how to define these
settings, see the previous subchapter). The tab will look like the
one in Figure 43.
Figure 43. Deployment settings
Page 60

60 Kaspersky Administration Kit
6. Click the Deploy button.
7. The language selection dialog box will appear on your screen (see
Figure 44). Select the desired language for your product in the
drop-down list and click OK.
Figure 44. Selecting the product language
8. The program will begin copying files to the target workstations. The
copying progress will be tracked in a special dialog box (see
Figure 45).
If a system reboot is required after remote installation of the patch, a
request for rebooting will be displayed on the remote computer.
Figure 45. File copying progress
9. After the deployment is complete, you can view the deployment
report. To view the report, click the Details button. The report
window will appear on your screen (see Figure 46).
Page 61

Configuring a logical network 61
Figure 46. The deployment report
6.5. Adding objects to a logical
network
To add new objects to your logical network, follow the same steps as during
creating your logical network. Therefore, for details of how to add:
• groups, refer to subchapter 6.1 on page 45;
• servers, refer to subchapter 6.2 on page 46;
• workstations, refer to subchapter 6.3 on page 47. Kaspersky Anti-Virus
components can be installed on the workstations to be added to the logical network using setup wizards for these components or the deployment
tool (see subchapter 6.3 on page 47).
®
Page 62

62 Kaspersky Administration Kit
6.6. Moving and removing logical
network objects
You can move and remove servers, workstations, and groups from the logical
network.
To do this, you can use your keyboard, the program menu, toolbar buttons, and
the mouse. When moving logical network objects, keep in mind these rules:
• Any server can be moved to any group.
• Any workstation can be moved to any server.
• Any group can be moved to any group, excluding its own subgroups.
• An object is moved together with its contents. For example, if you move a
server, the supervised workstations are moved together with this server.
To move a server (workstation, group), follow these steps:
1. In the network pane, select the server (workstation, group) to be
moved.
2. Select the Cut (<C
press the button in the standard toolbar.
3. In the network pane, select the destination group (server, group).
4. Select the Paste command (<CTRL>+<V>) from the Edit menu or
TRL>+<X>) command from the Edit menu or
click the button in the standard toolbar.
To remove an object from the logical network, follow these steps:
1. In the network pane, select the object to be removed.
2. Select the Delete command from the Edit menu (<D
the
The copying operation (the Copy command in the Edit menu, the
button in the standard toolbar, or the key combination <Ctrl>+<C>) allows you to copy the Kaspersky Anti-Virus
workstation to another (see subchapter 7.1.1 on page 65).
button in the standard toolbar.
®
package settings from one
EL>) or click
Page 63

Configuring a logical network 63
6.7. Searching for and renaming
logical network objects
To find an object on the logical network, follow these steps:
1. Select the Find command from the Edit menu (<C
click the button in the standard toolbar.
2. In the Find network object dialog box (see Figure 47), select the
type of an object you are searching for: All, Group, Server, or
Workstation.
3. Enter a string from the object name in the Object name text field.
4. If required, enter a string from the object address in the Object
address text field. If both fields (name and address) are filled, the
program will search for objects satisfying both conditions.
5. Click the Find next button.
TRL>+<F>) or
Figure 47. Searching for logical network objects
After this, the first detected object that meets the search criteria will be displayed
as a current object in the network pane. To move to the next object meeting the
same search criteria, click the Find next button. To exit the Find network object
dialog box click the Cancel button.
Page 64

64 Kaspersky Administration Kit
To search for an object by its name, use the drop-down list in the toolbar. Enter a
string from the object name in the drop-down list and press the <E
To rename a logical network object, follow these steps:
NTER> key.
1. In the network pane, select the object to be renamed.
2. Select the Rename command from the Edit menu or from the
object’s shortcut menu.
Page 65

CHAPTER 7. CONFIGURING A
LOGICAL NETWORK
7.1. General features of workstation
settings
7.1.1. Copying Kaspersky Anti-Virus®
settings to another workstation
Kaspersky Anti-Virus® settings, including a list of tasks to be performed, can be
copied from one workstation to another.
To copy the Kaspersky Anti-Virus® package settings from one workstation to another, follow these steps:
1. Select the source workstation in the network pane.
2. Click the Copy command from the Edit menu (<C
TRL>+<С>) or
click the
3. Select the recipient workstation in the network pane.
4. Select the Paste command from the Edit menu (<C
click the button in the toolbar.
The Kaspersky Anti-Virus
the recipient workstation.
To save changes, click the Apply button in the recipient workstation
property pane.
button in the toolbar.
TRL>+<V>) or
®
settings from the source workstation will be copied to
Page 66

66 Kaspersky Administration Kit
7.1.2. Off–line mode. Pending application of
new settings
The settings for a Kaspersky Anti-Virus® workstation are stored on this
workstation and the supervising server. Usually these copies of settings are
identical. However, the workstation can be unavailable for the administrator (e.g.,
when it is disconnected from the power supply or the network, located in a
temporarily disconnected network segment, or when the Kaspersky AV Control
Centre program on the workstation is inactive). In these cases, the workstation is
in off-line mode.
The administrator can view and change settings for a workstation in off-line
mode. In dact,, the changes will be applied to the copy of the settings that is
stored on the supervising server. If at this time the workstation is operating, the
Kaspersky Anti-Virus
When the workstation appears on the network (or, to be more precise, upon the
first restart of Kaspersky AV Control Centre on the workstation, which is in the
on-line mode), the changes will be automatically applied to the copy of the
workstation settings.
In Figure 48, you can see a workstation in off-line mode. The workstation
property pane shows the corresponding message Off-line mode – Last known
settings.
®
programs use the old settings stored on the workstation.
Figure 48. Pending application of new settings
Page 67

Configuring a logical network 67
7.2. Alerts and e-mail notifications
from workstations and servers
7.2.1. Alerts from workstations and their
severity levels
After you have added a server to the logical network, it is advisable that you
define how the alerts will be processed. Alerts are delivered to the server from
the tasks performed on the supervised workstations3. For example, if Kaspersky
AV Scanner detects a virus, it generates the Infected object found alert or if
Kaspersky AV Updater fails to update the anti-virus database, it generates the
alert "An error has occurred during Kaspersky AV Updater Wizard process"
alert. The Kaspersky Anti-Virus® tasks performed on workstation send their alerts
to the server that forwards them to user-defined recipients.
You must enable all the controlled workstations to send alert messages
via the supervising server. To do this, define appropriate settings on
every workstation (see subchapter 7.2.2 on page 68).
For a complete list of alerts generated by the Kaspersky Anti-Virus
components, refer to the documentation for these components. While
configuring the logical network, the administrator can use Kaspersky AV
Control Centre to enable/disable workstations to send various alerts
(see the User Guide "Kaspersky Anti-Virus® for Workstations").
For example, Kaspersky AV Scanner (one of the Kaspersky Anti-Virus
components) can generate seven types of alert (see Figure 49).
The server classifies the received alerts by their severity and, if preset, forwards
different types of alerts to different addresses. Alert messages generated by the
Kaspersky Anti-Virus
• informational – informational messages
• low – messages of low severity
• high – messages of high severity
• critical – the message information is critical.
®
components can have the following severity levels:
®
®
3
In this version of the Kaspersky Anti-Virus software package, the warnings generated by the com-
ponents are not user-defined.
Page 68

68 Kaspersky Administration Kit
For example, the alerts Infected object found and Object deleted generated by
the Kaspersky AV Scanner program contain critical information.
Figure 49. Alerts generated by Kaspersky AV Scanner
7.2.2. Enabling workstations to send alerts
via the supervising server
To enable a workstation to send alerts via the supervising server, follow
these steps:
1. Select the required workstation in the network pane.
2. In the workstation property pane, switch to the Settings tab and
click the Alerts button.
3. In the settings tree (see Figure 50), select the
via KAV Server option.
4. To limit the number of alerts to be generated by a single task,
check the
maximum value in the corresponding field.
Maximum alerts for single task box and define the
Process alerts
Page 69

Configuring a logical network 69
Figure 50. Sending alerts via the server is enabled
7.2.3. Forwarding alerts according to their
severity level
Further processing of alerts and their forwarding to different recipients according
to their severity level is performed on the supervising server.
To define the alert forwarding settings, follow these steps:
1. Select the required server in the network pane.
2. In the server property pane, switch to the Options tab and click the
Alert forwarding button. A tree with alert forwarding settings will
appear (see Figure 51).
The alerts classification tree located in the right frame of the server property
pane (see Figure 52) allows you to define the processing method for each
severity level.
Page 70

70 Kaspersky Administration Kit
Figure 51. Defining recipient addresses for alerts
Figure 52. The alert-forwarding settings tree with hidden branches
Figure 53. The Alerts with severity level - … branch
You can select one of the following two processing methods:
Do not process
Disables processing alerts of the corresponding
severity level
Send e-mail message
Enables sending alerts of the corresponding severity
level by e-mail. If you select this option, you must
define the following settings:
To
The recipient address.
Each Alerts with
severity level - …
branch allows you to
define the processing
method for alerts of the
corresponding severity
level (see Figure 53).
Page 71

Configuring a logical network 71
Subject
Message
The subject of these alerts.
The alerts text.
7.2.4. Virus outbreak alerts
Detection of viruses on several workstations simultaneously or within a short
period of time indicates a special type of virus threat – a network virus outbreak
(in other words, we assume that a virus is proliferating throughout your local
network).
This type of virus threat requires prompt actions from the administrator;
therefore, he or she must be immediately notified about the outbreak. For this
purpose, the program provides a special alert function.
To define program actions in response to a virus outbreak, follow these
steps :
1. Select the required server in the network pane.
2. In the server property pane, switch to the Options tab and click the
Virus outbreak button to open the corresponding settings tree.
3. In the settings tree (see Figure 54), define symptoms indicating a
virus outbreak (see subchapter 7.2.4.1 on page 72) and actions to
be taken in this case (see subchapter 7.2.4.2 on page 72).
Figure 54. Defining actions to be taken in case of a virus outbreak
Page 72

72 Kaspersky Administration Kit
7.2.4.1. Defining symptoms indicating a virus
outbreak
If required, expand the Parameters branch (see Figure 54). A virus outbreak is
identified by the number of infected computers detected within a predefined
period of time. For the situation to be identified as a virus outbreak, this number
must be equal or exceed the value in the Number of virused computers within
watching time period field.
To set the time period, click the Watching time period (minutes) line and enter
the required value (in minutes) in the corresponding text field (the default value is
15 minutes).
To set the number of infected computers, click the Number of virused
computers within watching time period line and enter the required value in the
corresponding input field (the default value is 10).
7.2.4.2. Setting the virus outbreak alert
If you do not want the administrator to be notified about a virus outbreak, select
the Do not process option (see Figure 54). Otherwise, select the Send e-mail
message option.
If you choose to send an e-mail message, define the message settings. To do
this, expand the Send e-mail message branch, click on the lines below and
enter the required values in the corresponding text fields: the alert recipient
address in the To text field, the alert subject in the Subject text field and the
message text in the Message text field (if you leave the last two fields blank the
program will use the default values; in most cases the default values are
preferrable).
7.2.5. Customizing e-mail service settings
To define e-mail settings (message sender, the type of e-mail service, and e-mail
service settings) for a server, select the required server in the network pane,
switch to the Options tab and press the Mail settings button. The e-mail
settings tree will appear on the tab. This tree contains the From line and the E-
mail service branch allowing you to set the type of e-mail service and the e-mail
service settings (see Figure 55).
Page 73

Configuring a logical network 73
Figure 55. Defining mail service settings
There are two methods that can be used to send e-mail messages:
• MAPI (for details see subchapter 7.2.5.1 on page 73);
• SMTP (for details see subchapter 7.2.5.2 on page 74).
From The string that will be entered in the From field
of alerts. This parameter is required when
working with some SMTP servers and is used to
identify the user.
For details of the types of e-mail messages sent by the server, refer to
subchapter 9.6.
7.2.5.1. Sending messages using MAPI
Kaspersky AV Server can send messages using MAPI if your computer is
running Windows 9x (see Figure 56).
Figure 56. MAPI settings
Profile
Profile password
MAPI Client
Some MAPI clients do not use profiles. In this case, ;leave the
Profile and Profile password fields empty.
To enable the server to send
messages using MAPI, select
the Send mail using MAPI
option and define the following
settings:
profile name (configuration file)
of the MAPI client;
profile access password;
MAPI client name to be used
to send the messages.
Page 74

74 Kaspersky Administration Kit
7.2.5.2. Sending messages via SMTP
To send messages via SMTP you must select the Send mail using SMTP and
define the SMTP settings (see Figure 57).
Figure 57. SMTP settings
SMTP server address
SMTP server port
The SMTP server address. In this text field,
you can enter the dotted decimal notation
(e.g. 125.5.29.1), FQDN (e.g. test.mail.ru),
or the computer name on the Microsoft
network (e.g. test).
The SMTP server port number. The default
value is 25.
7.3. Defining remote management of
servers and workstations
7.3.1. Remote management settings
For every server and workstation on your logical network you can define the
following remote management settings: program security settings, port numbers
to be used and workstation polling settings. Below we describe in detail how to
define the remote management settings for servers. For details of the remote
management settings for workstations, refer to subchapter 7.3.4 on page 77.
To define the remote management settings, follow these steps:
1. Select a server in the network pane.
2. In the server property pane, switch to the Options tab and click the
Remote management button. The corresponding settings tree will
appear (see Figure 58).
Page 75

Configuring a logical network 75
Figure 58. Remote management settings for a server
The settings tree on the Options tab contains the following branches:
Security
Used TCP/IP Ports
Enable network browsing
The server security settings for the remote
management of Kaspersky Anti-Virus
details see subchapter 7.3.2 on page 75);
The port numbers (TCP and UDP) to be used
for the remote management of the package
components;
The polling settings for supervised workstations
(for details see subchapter 7.3.3 on page 76).
®
(for
7.3.2. Security settings for remote
management
The remote management security settings allow you to limit the number of
computers enabled to access the server.
Figure 59.Remote management security settings
Page 76

76 Kaspersky Administration Kit
The Security branch of the Remote management settings tree (see Figure 59)
contains the following options:
Allow all addresses
Allow only addresses from
the list
It is advisable that you enable remote management of the server only from
administrating stations. To do this, select the Allow only addresses from the
list option and define the IP addresses of the administrating stations in the list
below.
This option allows remote management
of the server from all network computers;
This option button allows remote management of the server only from those
computers whose IP addresses are listed
below (fixed IP addresses are required).
7.3.3. Network browsing settings
The network browsing settings for the server can be defined using the Enable
network browsing branch of the remote management settings tree (see
Figure 60). If the Enable network browsing box is checked, the server will
display a list of workstations running Kaspersky AV Control Centre when you are
clicking the button in the Add KAV Workstation dialog box (see
subchapter 6.3 on page 47).
Figure 60. Network browsing settings
Enable network browsing
Workstation response
waiting time (in minutes)
This check box allows you to browse the
network to create a list of workstations.
The time the server must wait for the
workstation to respond.
Page 77

Configuring a logical network 77
7.3.4. Specifics of setting remote
management of workstations
The remote management settings for a workstation can be defined on the
Settings tab in the workstation property pane. By clicking the Remote
management button, you display the remote management settings tree, which
looks similar to the one described above (see Figure 61).
Figure 61. Remote management settings for a workstation
Note the following differences in setting the remote management of workstations:
• An the top level of the settings tree, you are offered the Disable remote
management option. If you select this option, the workstation user will be
the only person managing this workstation. Be careful when selecting this
option.
• This settings tree doesn’t feature the Enable network browsing branch
(this function is specific to servers).
Page 78

78 Kaspersky Administration Kit
7.4. Setting automatic updating of
anti-virus databases on
workstations
It is advisable to regularly update Kaspersky Anti-Virus® anti-virus databases on
workstations. The best way to keep your computers safe is to set automatic
updating of anti-virus databases from the database-update storage on a server.
Update your anti-virus database on all workstations in a timely fashion to
minimize the possibility of virus penetration. When creating a logical network, the
administrator must configure the automatic updating of anti-virus databases and
Kaspersky Anti-Virus® programs on workstations from the corresponding server
storages. For details of this procedure, refer to subchapter 7.4.1 on page 78.
Depending on the complexity of your logical network, storages on a server can
be updated via the Internet or from other server storages that are, in turn,
updated via the Internet (see subchapter 7.4.2 on page 81).
7.4.1. Updating anti-virus databases from a
Kaspersky AV server
To schedule updating of the anti-virus database from a server:
1. Add the updating task to the list of tasks to be performed on the
workstation. To add the task, select the required workstation in the
network pane, switch to the Tasks tab in the workstation property
pane and click the
task wizard window will appear on your screen (see Figure 62).
2. Enter the task name in the Name text field and select this task from
the Task type drop-down list. Click Next to proceed.
3. In the Schedule window (see Figure 63), schedule the task to be
started automatically.
We recommend you to schedule updating of the anti-virus
database every day. To do this, select Daily and click the
button at the right side of the window. The Add time dialog box
(see Figure 64) will appear on your screen.
Enter the startup time in the Time text field.
button at the right side of the page. The new
Page 79

Configuring a logical network 79
Return to the Schedule window and click Next (for details of how
to schedule the automatic updating, refer to subchapter 7.6 on
page 89).
4. In the Alerts dialog box, you can configure alerts to be sent by the
task. Keep the default settings and click Next to open the User
Account dialog box.
5. In the User Account dialog box, specify the user account under
which the updating task will be performed and click Next.
6. The Connection window (see Figure 65) will appear on your
screen. Select the Update Kaspersky Anti-Virus
®
from KAV
Server and leave the Update Antivirus Bases and Update
Executable Modules boxes checked.
Figure 62. The New Task wizard box
Page 80

80 Kaspersky Administration Kit
Figure 63. Scheduling the task
Figure 64. Adding the start time for updating
For details of how to create and configure a new task, refer to the Kaspersky AV Control Centre description in the User Guide "Kaspersky
Anti-Virus
®
for Workstations".
If the updating task already exists on the workstation, select it from the task list
on the Tasks tab and click the
button at the right side of the tab (or select
the Properties command from the task shortcut menu). The Properties… dialog
box will appear on your screen. The tabs of this dialog box are similar to the
wizard dialog boxes described above. Switch to the Connection tab (see
Figure 67) and select the
Update Kaspersky Anti-Virus® from KAV Server
option.
Page 81

Configuring a logical network 81
Figure 65. Selecting the source for retrieving updates
7.4.2. Updating the anti-virus database
storage on a server from another
server on the logical network
If your logical network contains more than one server, you are recommended to
configure other servers to automatically retrieve the anti-virus database updates
from one server. This facilitates management of your network and reduces the
possibility that a server may fail to timely update its database storage.
Let us assume that you set the S0 server to update its database storage via the
Internet and the S1, S2, etc. servers to update their storages from the S0 server.
To configure the S1 server to automatically retrieve the updates from
the S0 server, follow these steps:
1. Install the software for workstations (Kaspersky AV Control Centre
and Kaspersky AV Updater included into Kaspersky®
Administration Kit) on the S1 server and add this workstation to the
S0 server as described in subchapter 6.3 on page 47. An example
of this network configuration is shown in Figure 66 (a workstation
with the address 192.168.1.1 exists on the same computer as the
S1 server and is added to the S0 server).
Page 82

82 Kaspersky Administration Kit
Figure 66. Logical network configuration for updating server storages
2. Select this workstation and, as described in subchapter 7.4.1 on
page 78, switch to the Connection tab (see Figure 67) in the
workstation property pane.
Figure 67. Updating storages from a server
3. Check the Update ‘Updates Storage’ folder of KAV Server and
Update ‘Bases Storage’ folder of KAV Server boxes.
4. Select the Update Kaspersky Anti-Virus
®
from KAV Server
option.
It is advisable that you schedule the server to retrieve updates right before the
supervised workstations begin updating their anti-virus databases from this
server.
Repeat the above steps for every server that will retrieve the updates from the
S0 server.
Page 83

Configuring a logical network 83
To configure the S0 server to retrieve updates via the Internet, follow
these steps:
1. Kaspersky AV Control Centre must be installed on the computer
with the S0 server (during the installation of Kaspersky AV Server,
this program is installed by default). Add it as a workstation to the
logical network and attach it to the S0 server (see subchapter 6.4
on page 50) if this has not been done before (in Figure 66 that
displays the logical network hierarchy, this is the WS0 workstation).
2. Select this workstation and, as described in subchapter 7.4.1 on
page 78, switch to the Connection tab (see Figure 68) in the
workstation property pane.
3. Check the Update ‘Updates Storage’ folder of KAV Server and
Update ‘Bases Storage’ folder of KAV Server boxes.
4. Select the Update Kaspersky Anti-Virus® from Internet option.
Figure 68. Updating storages via the Internet
7.5. Configuring and using the
quarantine function
7.5.1. Quarantine types
When a virus is detected, Kaspersky Anti-Virus® programs can place this file into
the quarantine (for details of the quarantine, see the User Guide "Kaspersky
Anti-Virus® for Workstations").
For your Kaspersky Anti-Virus
save files to this storage, you must check the Use quarantine box on the
Options tab in the properties dialog box. In this mode, the program quarantines
®
Scanner and Kaspersky Anti-Virus® Monitor to
Page 84

84 Kaspersky Administration Kit
infected files but does not delete them from their original locations. The infected
files are automatically deleted from the computer only if the Delete option in the
Kaspersky Anti-Virus
®
Scanner and Kaspersky Anti-Virus® Monitor settings is
enabled.
Quarantined files are stored in encoded form, which
• reduces the risk of infection from this virus (the executable code cannot
be started without decryption);
• saves time for your anti-virus programs (encoded quarantined files are not
detected as infected).
In future, you can study the quarantined files, restore them from the quarantine,
or delete them.
Network Control Centre allows the administrator to process the quarantined files
directly from the administrating station.
Quarantined files can be stored on the workstation (local quarantine) as well as
on the supervising server (server quarantine). Server quarantine protects
quarantined files from unauthorized restoration by workstation users. For that
reason it is advisable that you use server quarantine to store infected files.
7.5.2. Selecting a quarantine type
You must determine the quarantine type (local or server) for each individual
workstation.
To select the quarantine type for a workstation, follow these steps:
1. Select a workstation in the network pane.
2. In the workstation property pane, switch to the Settings tab.
3. Click the Quarantine button.
4. Select the required quarantine type on the tab (see Figure 69).
Figure 69. Selecting the quarantine type
Page 85

Configuring a logical network 85
7.5.3. Working with quarantined files
7.5.3.1. Working with server quarantine
You can review a complete list of files quarantined on the server, add files to the
quarantine, restore them from the quarantine or delete them.
To review a list of files quarantined on a server, follow these steps:
1. Select the required server in the network pane.
2. In the server property pane, switch to the Storages tab.
3. Press the Quarantine button.
You will see a frame with a list of quarantined files (see Figure 70) and buttons
that allow you to handle the quarantined files.
Figure 70. Server quarantine
To restore a file from the quarantine, follow these steps:
1. Select the file from the list of quarantined files and press the
button at the right side of the frame or select the Extract file from
quarantine command from the file shortcut menu.
Page 86

86 Kaspersky Administration Kit
2. In the Exctract files from Quarantine wizard box (see Figure 71),
press the
button to define the target folder where the restored
file will be placed.
Figure 71. The file restoration wizard box
3. Check the Decrypt box.
4. Click Next>.
5. The restoration progress box will appear on your screen. When the
file is restored click Finish.
To delete a file from the quarantine, follow these steps:
1. Select it from the list of quarantined files and click the button or
select the Delete command from the file shortcut menu.
2. The deletion confirmation box will appear on your screen. Click
Yes to confirm the operation.
The program will only delete the file from the quarantine but not from its
original location.
To update the list of quarantined files press the
object settings command from the shortcut menu.
To view file properties, follow these steps:
1. Select the required file from the list of quarantined files and click
the
button or select the Properties command from the shortcut
menu.
button or select the Reload
Page 87

Configuring a logical network 87
2. The file properties box will appear on your screen. The information
in this box is similar to the information displayed in the table but it is
arranged in a more convenient fashion (see Figure 72).
Figure 72. File properties
To add a file to the quarantine, follow these steps:
1. Press the
button or select the Add file to quarantine
command from the shortcut menu.
2. In the Quarantine file Wizard box (see Figure 73), define the file
to be quarantined by clicking the
button and selecting the
required file in the MS Windows standard dialog box.
3. Click Next and wait for the wizard to complete the task.
Figure 73. Selecting a file to be quarantined
Page 88

88 Kaspersky Administration Kit
7.5.3.2. Local quarantine
To view a list of files quarantined on a workstation, follow these steps:
1. Select the required workstation in the network pane.
2. In the workstation property pane, switch to the Quarantine tab.
The table listing the files quarantined in a local folder will appear on
the tab (see Figure 74).
The options for handling files quarantined in a local folder are similar to those
described for the server quarantine. For details of these options, refer to the
Kaspersky AV Control Centre documentation.
Figure 74. The list of files quarantined in a local folder
Page 89

Configuring a logical network 89
7.6. Scheduling Kaspersky AntiVirus
®
components to be
automatically started on
workstations
The task is understood as a program with predefined settings that is scheduled
to start at a certain time, or upon some event, or as required by the user. The
user can create, configure, delete and launch tasks on workstations. To schedule
the programs to be automatically started on a workstation, select the required
workstation in the network pane and switch to the Tasks tab in the workstation
property pane (see Figure 75).
Figure 75. Managing tasks
To schedule a Kaspersky Anti-Virus® component to be automatically
started with predefined settings on the workstation, follow these steps:
1. Select the required component from the task list and press the
button at the right side of the tab (or select the Properties
command from the component shortcut menu).
Page 90

90 Kaspersky Administration Kit
2. The task properties window will appear on your screen. Switch to
the Schedule tab (see Figure 76).
Figure 76. Scheduling the task
3. Select the condition for the task is to be started. When you select
the required option, you will see interface items that can be used to
set advanced scheduling options (see below).
4. Define the advanced settings and click OK.
! If you select the On event option (see Figure 77), select the re-
quired event from the Start task drop-down list. In addition, this
drop-down list contains the Manually item that is used to disable the task automatic start. If required, check the Once per
day box (in this case, the task will be started upon the first occurrence of the specified event but only than once a day).
Figure 77. Scheduling a task to be started upon an event
Page 91

Configuring a logical network 91
! If you select the By condition option (see Figure 78), choose
the required Kaspersky Anti-Virus
®
task from the If task dropdown list, and the required exit code from the Finished with
exit code drop-down list.
Figure 78. Scheduling a task to be started by condition
! If you select the Hourly option, enter the value indicating min-
utes of each hour (from 0 to 59) in the Minute field.
! If you select the Daily option (see Figure 79), add the required
time for the task start to the Time list.
Figure 79. Scheduling a task to be started daily
! To add the time to the list, click the button at the right of the
task list. The Add time dialog box (see Figure 80) will appear.
Page 92

92 Kaspersky Administration Kit
Figure 80. Adding the time for a task to be started
Enter the required value in the Time… field in the HH:MM format and press OK.
To delete an item from the time list, select it from the list and
click the
button.
To edit an item in the time list, select it from the list and click the
button. You will see the Modify dialog box that is similar to
the Add time dialog box described above.
! The Weekly option (see Figure 81) allows you to schedule a
task to be started every week on specified days and at specified
times (the same time every day).
Check the boxes corresponding to the required days and specify the time in the time list (for details of how to add time to the
list, see above).
The figure below shows that a task will be started four times a
week: every Sunday and Saturday at 7:30 p.m. and 1:40 a.m..
! The Monthly option (see Figure 82) allows you to schedule a
task to be started every month on specified dates and at specified times.
Page 93

Configuring a logical network 93
Figure 81. Scheduling a task to be started weekly
Figure 82. Scheduling a task to be started monthly
Check the boxes corresponding to the required dates and specify the time to the time list (for details of how to add time to the
list, see above).
The above figure shows a task that will be started every 1st,
11th, and 22nd days of a month at 7:30 p.m. and 1:40 a.m. (6
times per month).
®
To save the changes you made to the Kaspersky Anti-Virus
package
on a workstation, click the Apply button located in the workstation property pane.
For details of task management, refer to the User Guide "Kaspersky
Anti-Virus® for Workstations".
Page 94

94 Kaspersky Administration Kit
7.7. Exporting, importing, and
printing settings
7.7.1. Exporting and printing the logical
network hierarchy
You can print your logical network hierarchy or save it to a text file or to
a special network configuration file. To do this, follow these steps:
1. Select the root item called KAV Network from the list of logical
network objects.
2. Select one of the following commands from the Network menu:
! Export allows you to save the logical network description to a
file. If you select this command, you will see the submenu containing the following two options: As text file and As network
configuration data file. Select the required option. In the MS
Windows standard dialog box on your screen, define the file
name and location. If you create a network configuration file, it
can be used to define the network configuration when creating a
logical network on another local network.
! Print allows you to print the logical network configuration in the
form of the settings tree. To print the hierarchy, you can also
press the
! Print preview allows you to preview the document before print-
ing.
! Print setup allows you to set printer properties.
button in the standard toolbar.
7.7.2. Exporting and importing server and
workstation settings
You can save (export) the current settings of a server or a workstation to a file of
a special format with the
settings… command from the object shortcut menu. In the MS Windows
standard dialog box, define the file name and location.
.dat extension. To do this, select the Export object
Page 95

Configuring a logical network 95
The file created when exporting workstation settings can be used to apply these
settings to a new workstation during deployment (see subchapter 6.4.1 on page
51) or to import these settings to another existing workstation.
Page 96

CHAPTER 8. ASSIGNING
ACCESS RIGHTS TO OTHER
USERS
The administrator can grant / limit access of other users to the Kaspersky Anti-
®
Virus
settings on workstations (see subchapter 8.1 on page 96) and assign the
subordinate administrators to logical network groups (see subchapter 8.2 on
page 99).
8.1. Securing Kaspersky Anti-Virus®
settings on workstations
Kaspersky® Network Control Centre allows the administrator to prevent users
from changing the Kaspersky Anti-Virus
workstations.
®
settings on the supervised
8.1.1. Preventing users from changing
Kaspersky Anti-Virus
®
settings from
workstations
To deny access to the Kaspersky Anti-Virus® settings from a workstation, follow these steps:
1. Select the required workstation in the network pane.
2. In the workstation property pane, switch to the Settings tab (see
Figure 83).
3. Press the Security button.
Page 97

assigning access rights to other users 97
Figure 83. The Settings tab in the workstation property pane
Password
The password needed to access the workstation settings.
To change the password, click the
Change password dialog box will appear on your screen
(see Figure 84).
Figure 84. Changing the access password to the
Kaspersky Anti-Virus
Protect resident
task stopping
®
settings
If you check this box, the program will prompt for the
password when someone attempts to stop resident tasks
running on the workstation.
button. The
1. Define the password in
the New password text
field.
2. Confirm the password you
entered in the Confirm
password text field.
3. Click OK.
Page 98

98 Kaspersky Administration Kit
Protect nonresident task
stopping
Protect KAV
Control Centre
settings
modification
Protect KAV
Control Centre
exit
If you check this box, the program will prompt for the
password when someone attempts to stop non-resident
tasks running on the workstation.
If you check this box, the program will prompt for the
password when someone attempts to change the
Kaspersky Anti-Virus
If you check this box, the program will prompt for the
password when someone attempts to exit the Kaspersky
AV Control Centre program on the workstation.
®
settings on the workstation.
8.1.2. Synchronizing changes made by
administrators and users to
Kaspersky Anti-Virus
If a user tries to start Kaspersky AV Control Centre on a workstation whose
settings are being currently modified by the administrator (from the administrating
station), the following message will appear on the user’s workstation screen:
KAV Control Centre is locked by network administrator. If an administrator
accesses the Kaspersky Anti-Virus® settings on a workstation where the
Kaspersky AV Control Centre properties window is displayed, the window will
immediately close and the following message will appear on the workstation
screen: KAV Control Centre is locked by network administrator (see
Figure 85). In this case, all the unsaved modifications to the settings will be lost.
®
settings
Figure 85. The Workstation is locked message
Page 99

assigning access rights to other users 99
If an administrator tries to access the workstation settings that are being currently
modified by another administrator, Kaspersky
display the corresponding warning (see Figure 86).
Figure 86. The Network object is locked message
®
Network Control Centre will
8.2. Assigning an administrator to a
group
The administrator can delegate some of his or her administrative privileges to
group administrators. If a group administrator runs Kaspersky
Centre and enters his or her name and password, he or she will have access
only to certain groups. The group administrator can also delegate some of his or
her rights to a subordinate administrator.
To assign an administrator to a group, follow these steps:
1. Log on to the Kaspersky
access rights.
2. In the network pane, select the required group or several groups.
To add an object to the selected objects or exclude an object from
the selected group, press and hold down the <C
selecting the objects.
3. Define the new administrator name in the Administrator field on
the General tab.
4. Press the Change button under the Administrator field (see
Figure 87).
®
Network Control Centre program with full
®
Network Control
TRL> key when
Page 100

100 Kaspersky Administration Kit
Figure 87. Assigning an administrator to a group
5. The Change password dialog box will appear on your screen.
Enter the administrator password in the corresponding field and
confirm it in the field below (see Figure 88).
Figure 88. Changing the password
6. Click OK.
7. If required, enter comments for the new administrator in the
Comment frame on the General page (This frame is available only
of you selected one group).
8. Click the Apply button.
 Loading...