

Page 1

KASPERSKY LABS
Kaspersky Anti-Virus 4.00.02
for Novell Netware
USER GUIDE
Page 2

KASPERSKY ANTI-VIRUS 4.00.02 FOR NOVELL NETWARE
User guide
Kaspersky Labs Ltd.
Visit our website: http://www.kaspersky.com/
Edition date: September 2002
Page 3

Table of contents
CHAPTER 1. INTRODUCTION..........................................................................7
1.1. Purpose and Main Functions.............................................................................7
1.2. Supply Set.......................................................................................................... 9
1.2.1. What's in the Supply Set .............................................................................9
1.2.2. License agreement ...................................................................................... 9
1.2.3. Registration card........................................................................................ 10
1.3. What's in the Guide.......................................................................................... 10
1.4. Services for registered users...........................................................................10
CHAPTER 2. PROGRAM INSTALLATION .....................................................12
2.1. System requirements....................................................................................... 12
2.2. How to install Kaspersky Anti-Virus.................................................................12
CHAPTER 3. ANTI-VIRUS PROTECTION FOR SERVERS .........................21
3.1. Creating and Maintaining Anti-Virus Protection for Servers...........................21
3.2. Control Modules Interface ...............................................................................22
3.2.1. Control module interface for ConsoleOne ................................................22
3.2.2. Control module interface for NWAdmin .................................................... 24
3.3. Installing and Uninstalling Kaspersky Scanner (ConsoleOne).......................25
3.3.1. Installing Kaspersky Scanner on Server................................................... 25
3.3.2. Installing Kaspersky Scanner on Server Group .......................................27
3.3.3. Uninstalling Kaspersky Scanner from the Server or the Server Group...29
3.3.4. Upgrading Kaspersky Scanner .................................................................30
3.4. Loading Kaspersky Scanner ...........................................................................30
3.4.1. Loading via NWAdmin...............................................................................30
3.4.2. Loading via ConsoleOne ........................................................................... 32
3.5. Launching Kaspersky Scanner .......................................................................33
3.5.1. Three Modes of Operation ........................................................................33
Page 4

4 Kaspersky Anti-Virus for Novell NetWare
3.5.2.
Filter mode .................................................................................................33
3.5.3. On-demand Scanning ...............................................................................34
3.5.4. Scheduled Scanning..................................................................................35
3.6. Configuring Kaspersky Scanner...................................................................... 35
3.6.1. Kaspersky Scanner control module window.............................................35
3.6.2. Loading the program and viewing the program info. About tab page...... 36
3.6.3. On-demand scanning mode options. Manual Scanning tab page ..........38
3.6.3.1. Options list .......................................................................................... 38
3.6.3.2. Scan area ...........................................................................................38
3.6.3.3. Files to scan........................................................................................40
3.6.3.4. Heuristic Analyzer ..............................................................................41
3.6.3.5. Archive extracting engine................................................................... 42
3.6.3.6. Unpacking Engine for Processing Executable Modules...................43
3.6.4. Filter mode scanning options. Real-time Scanning tab page ..................44
3.6.5. Actions to take with infected and suspicious files. Actions tab page .......44
3.6.6. Notifying network users about found viruses. Alerts tab page.................47
3.6.7. Advanced options. Advanced tab page .................................................... 50
3.6.7.1. Specifying paths to working and "quarantine" directories.................50
3.6.7.2. Adjusting the load of a server with
Kaspersky Scanner running on it.......................................................51
3.6.7.3. Configuring the connection between control module and
Kaspersky AV server..........................................................................51
3.6.7.4. Specifying the number of scan requests ........................................... 52
3.6.8. Scheduled scanning options. Scheduled Scans tab page....................... 52
3.6.8.1. Scan area ...........................................................................................52
3.6.8.2. Files to scan........................................................................................54
3.6.8.3. Scheduling scanning .......................................................................... 54
3.6.9. Scanning result logs. Logging, Statistics tab pages ................................. 58
3.6.9.1. Configuring scanning result logs........................................................ 58
3.6.9.2. View scan results ...............................................................................62
CHAPTER 4. UPDATING ANTI-VIRUS BASES (CONSOLEONE) ............... 66
Page 5

Table of contents 5
4.1. Organizing Centralized Update Distribution.................................................... 66
4.2. Installing and Uninstalling Kaspersky Updater................................................67
4.2.1. System requirements.................................................................................67
4.2.2. Installing Kaspersky Updater.....................................................................67
4.2.3. Uninstalling Kaspersky Updater ................................................................ 68
4.2.4. Upgrading Kaspersky Updater..................................................................69
4.3. Kaspersky Updater Loading/Unloading ..........................................................70
4.4. Configuring and Launching Kaspersky Updater.............................................71
4.4.1. General information on program settings.
Kaspersky Updater in … dialog box..........................................................71
4.4.2. Configuring update retrieval settings. Settings tab page.......................... 73
4.4.2.1. Configuring updating from the network folder ...................................74
4.4.2.2. Configuring updating via the Internet................................................. 75
4.4.2.3. Configuring the mode for copying anti-virus bases...........................79
4.4.3. Connecting the control module with an Update server.
The Advanced tab page. ...........................................................................80
4.4.4. Scheduling the update retrieval by an Update server.
The Scheduler tab page. ........................................................................... 82
4.4.5. Creating a list of servers for distributing updates. Setting the
distribution modes. The About tab page. .................................................. 85
4.4.5.1. Creating and editing a list of servers for distributing updates ...........86
4.4.5.2. Setting the distribution mode .............................................................87
4.4.5.3. Loading/unloading Kaspersky Updater on the server....................... 88
4.4.6. Manual start of retrieving and distributing updates.
The Update tab page................................................................................ 89
4.4.6.1. Starting a session from an Update server.........................................89
4.4.6.2. Updating anti-virus bases from a workstation ...................................91
4.4.7. Configuring the log and viewing results. The Logging tab page. ............. 93
4.4.7.1. Configuring the log with updating results and distributing
anti-virus databases ...........................................................................93
4.4.7.2. Viewing the log ...................................................................................95
CHAPTER 5. UPDATING ANTI-VIRUS BASES (NWADMIN) .......................99
5.1. Launching the Updater ....................................................................................99
Page 6

6 Kaspersky Anti-Virus for Novell NetWare
5.2.
The purpose of Kaspersky AV Updater ........................................................ 100
5.3. Kaspersky AV Updater Interface................................................................... 100
5.3.1. Kaspersky AV Updater initial window......................................................100
5.3.2. The Connection window..........................................................................101
5.3.2.1. Configuring updating via Internet.....................................................102
5.3.2.2. Updating from the local folder .......................................................... 107
5.3.2.3. Choosing objects to be updated ...................................................... 108
5.3.3. The Options window................................................................................108
5.3.4. The Retrieving updates window..............................................................109
5.3.5. Updater wizard – task completed window .............................................. 110
APPENDIX A. KASPERSKY LABS LTD ......................................................... 112
APPENDIX B. INDEX .......................................................................................117
Page 7
CChhaapptteerr 11..IInnttrroodduuccttiioonn
11..11.. PPuurrppoossee aanndd MMaaiinn FFuunnccttiioonnss
Kaspersky Anti-Virus 4.00.02 for Novell NetWare (Kaspersky AV) is an anti-
virus software package consisting of various modules (see table) that provide a
high protection level for corporate networks running under Novell NetWare.
Kaspersky AV's implementation is based on a client-server technology. Server
side consists of two modules—Kaspersky Scanner and Kaspersky Updater,
The first module, Kaspersky Scanner, comprises functions of an anti-virus filter
and scanner, that is, it enables users to check files when they are opened or
copied, and provides an opportunity to check objects on demand or on certain
schedule. The second module, Kaspersky Updater, provides an Internet-based
updating. It allows the anti-virus databases used when searching for viruses to be
renewed, and the updated version is expanded over all the protected servers
1
of
the network. Kaspersky Updater can be configured for automatic scheduled
updating; moreover, the program will receive the latest updates via Internet or a
local network and distribute them to Kaspersky AV servers.
First
Update server
Internet
Second
Update sever
Kaspersky AV
server
Kaspersky AV
server
Kaspersky AV
server
Kaspersky AV
server
Kaspersky AV
server
Kaspersky AV
server
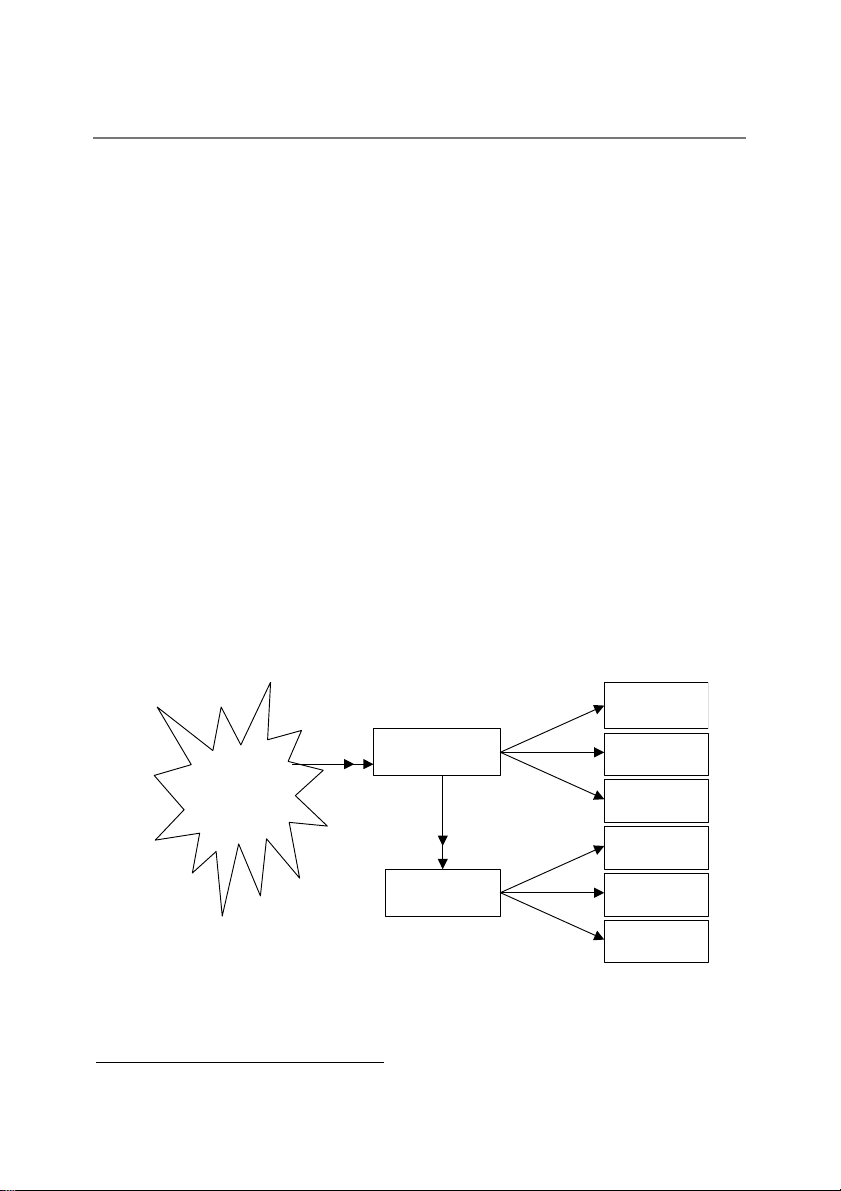
Figure 1. Updating anti-virus bases on Kaspersky AV servers (process flow diagram).
Legend: "!" – distributing updates, "!!" – receiving updates.
1
Hereinafter, the servers that are the objects of protection are referred to as Kaspersky
Example.
AV servers; the servers whose functions are updating anti-virus databases, Update
servers.
Page 8

8 Kaspersky Anti-Virus for Novell NetWare
Figure 1 displays the situation when the first Update server retrieves
anti-virus database updates via the Internet and then sends them to the
first three Kaspersky AV servers. The second Update server retrieves
updates from the network folder (saved here by the first server) and
sends them to the rest of the Kaspersky AV servers.
Client side is represented by two back-end control modules — NetWare
Administrator (NWAdmin) module and similar ConsoleOne module. Both
Kaspersky AV control modules allow users
• to configure Kaspersky Scanner options,
• to schedule program launching and define file checking options,
• to perform remote program loading /unloading,
• to start manual scanning and view checking results,
• to specify the mode for transferring warning messages to the
administrator's computer—for example, messages about detected
viruses present on the protected servers and/or switching an
infected workstation off the local network.
Furthermore, ConsoleOne control module has the following additional options:
• setting Kaspersky Updater module;
• performing batch operations with servers, including install/uninstall
operations, loading/unloading Kaspersky Scanner, etc.
• ability to operate a control module both on a workstation and a
server.
In contrast to ConsoleOne control module, NWAdmin control module:
• supports manual updating via Internet and does not support
automatic anti-virus bases updating via Internet,
• doesn't allow batch operations with servers (anti-virus base batch
updating on multiple servers is not available),
• works only on workstations.
The software package is equipped with an easy-to-use installation program that
installs the product on a server and records all options in NDS.
Module Short name Comments
Kaspersky
Scanner
Anti-virus filter and
scanner
Page 9

Introduction 9
Module Short name Comments
Front end: NWAdmin
control module
Front end: ConsoleOne
control module
Kaspersky AV users are provided with a day-and-night support service via phone
and e-mail (in Russian and English).
Kaspersky Labs recommends Kaspersky AV as a reliable solution for providing
anti-virus protection in Novell networks.
11..22.. SSuuppppllyy SSeett
Kaspersky
Updater
NWAdmin control
module
ConsoleOne control
module
11..22..11.. WWhhaatt''ss iinn tthhee SSuuppppllyy SSeett
This product's supply set contains the following:
• license agreement;
Automatic updating
support module
Kaspersky Scanner
control
Kaspersky Scanner and
Kaspersky Updater
control
• sealed envelope with the installation CD (floppy disks) inside;
• user guide;
• registration card.
Before you open the sealed envelope with CD-ROM (diskettes) inside,
read carefully the license agreement.
11..22..22.. LLiicceennssee aaggrreeeemmeenntt
License agreement is a legal agreement between you and Kaspersky Labs Ltd.,
specifying under which conditions you should use the purchased product.
Page 10

10 Kaspersky Anti-Virus for Novell NetWare
Read the license agreement carefully!
If you don't accept the terms of this license agreement, you can return Kaspersky
Anti-Virus retail box to your dealer and get back the subscription fee. If this
occurs, please make sure the envelope with diskettes remains sealed.
By opening the sealed envelope with diskettes you confirm that you agree with
the terms of this license agreement.
11..22..33.. RReeggiissttrraattiioonn ccaarrdd
Please fill in a detachable coupon of the registration card. If possible, give the
most detailed contact information: first name, last name, full patronymic (middle)
name, telephone number, e-mail address. Then send it to the dealer whom you
purchased the product from.
If there are any changes to your postal/e-mail address or telephone number,
please inform the organization where you sent the detachable coupon of the
registration card.
The registration card is a document which gives you gain the status of our
company's registered user. This entitles you to receive technical support and
updates within the period of the validity of the subscription. Moreover, registered
users receive information notifying about new software products released by
Kaspersky Labs Ltd.
11..33.. WWhhaatt''ss iinn tthhee GGuuiiddee
This guide comprises the information used for installing and operating the
product. The essential principles of the program, as well as operating methods,
are described here. You will also find various recommendations concerning the
program settings.
11..44.. SSeerrvviicceess ffoorr rreeggiisstteerreedd uusseerrss
Kaspersky Labs Ltd. provides registered users with a wide range of services that
increase Kaspersky Anti-Virus efficiency.
Acquiring the subscription gives you the status of a registered program user.
Within the period of its validity you receive the following services:
Page 11

Introduction 11
• daily updating of anti-virus bases;
• provision of new versions of this product;
• phone and e-mail consultations on matters which concern operating
this product;
• notifying about new Kaspersky Labs products and new viruses
detected in the world.
Consultations concerning functioning and using operating systems, as
well as using various technologies, are not provided.
Page 12

CChhaapptteerr 22..PPrrooggrraamm iinnssttaallllaattiioonn
22..11.. SSyysstteemm rreeqquuiirreemmeennttss
Kaspersky AV requires:
• Server with installed Novell Netware system versions 4.11, 4.2, 5.x
or 6.
• Corresponding Support Pack installed:
• for Novell NetWare 4.11 or 4.2: Support Pack 9 or higher; in
addition, it requires installed WinSock 2 and the server should
support the TCP/IP protocol.
• for Novell NetWare 5.0: Support Pack 6.а or higher;
• for Novell NetWare 5.1: Support Pack 3 or higher;
• for Novell NetWare 6: Support Pack 2 or higher;
• Approximately 12 MB of available (free) server system memory.
• Approximately 3.5 MB of free disk space on server volumes.
• A workstation operating under Windows 95/98/Me with installed
NetWare Client32 version 3.x or higher; or a workstation operating
under Windows NT/2000/SP with installed NetWare Client32 version
4.8x or higher.
ConsoleOne control module requires at least 128 MB of free memory;
optimally, 256 MB.
22..22.. HHooww ttoo iinnssttaallll KKaassppeerrsskkyy AAnnttii--VViirruuss
Kaspersky AV is installed from a workstation running under Windows
9x/NT/2000/Me.
To install Kaspersky AV:
1. Insert the installation diskette №1 into the floppy drive A: of the
workstation (or place the provided CD-ROM into the corresponding
drive).
Page 13

Program installation 13
2. Choose the Run item in the menu that appears when you click
Start.
3. Launch setup.exe (installation file).
4. Click OK.
5. This launches the installation program. Follow the instructions
carefully.
6. When you finish reading information in the Welcome window, click
Next (see Fig. 2).
Figure 2. Starting installation.
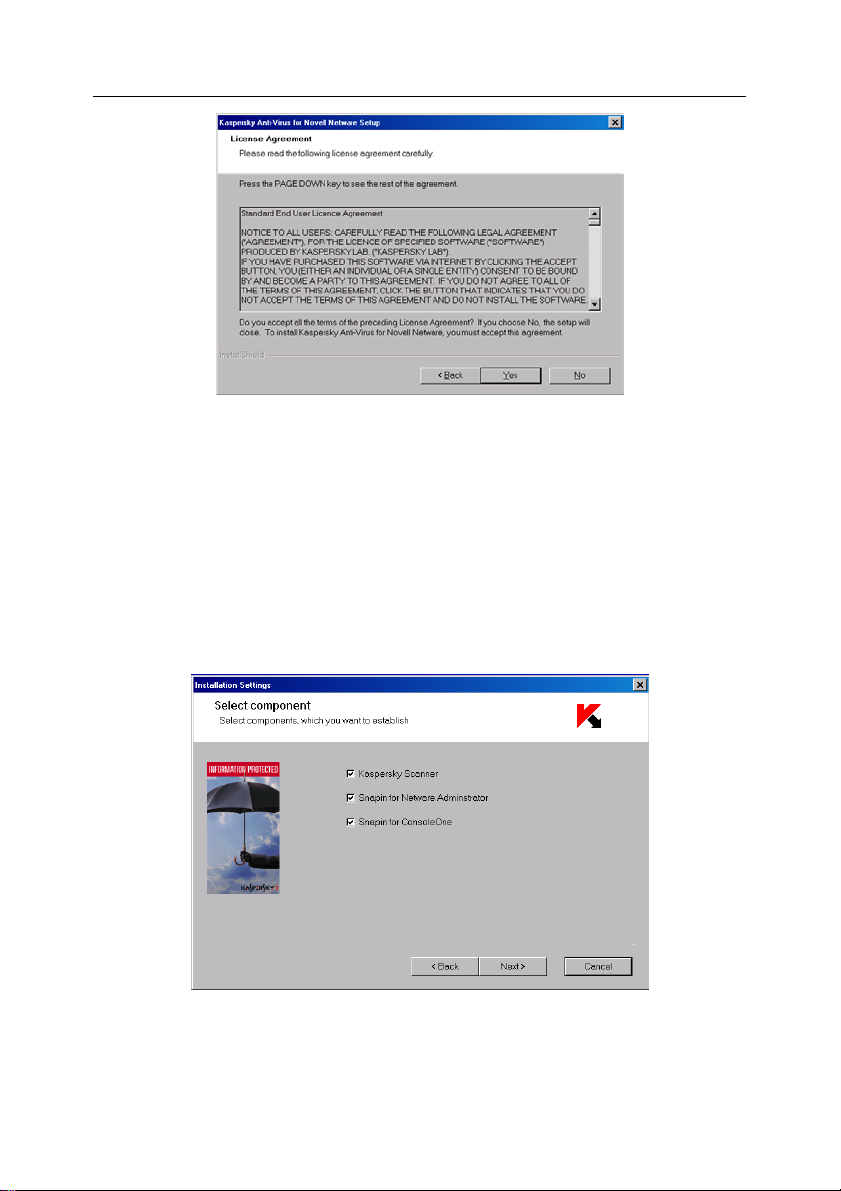
7. Read the license agreement, then click Yes if you accept the terms
of the license agreement. Otherwise, click No and abort the
installation process (see Fig. 3).
Page 14
14 Kaspersky Anti-Virus for Novell NetWare
Figure 3. License agreement.
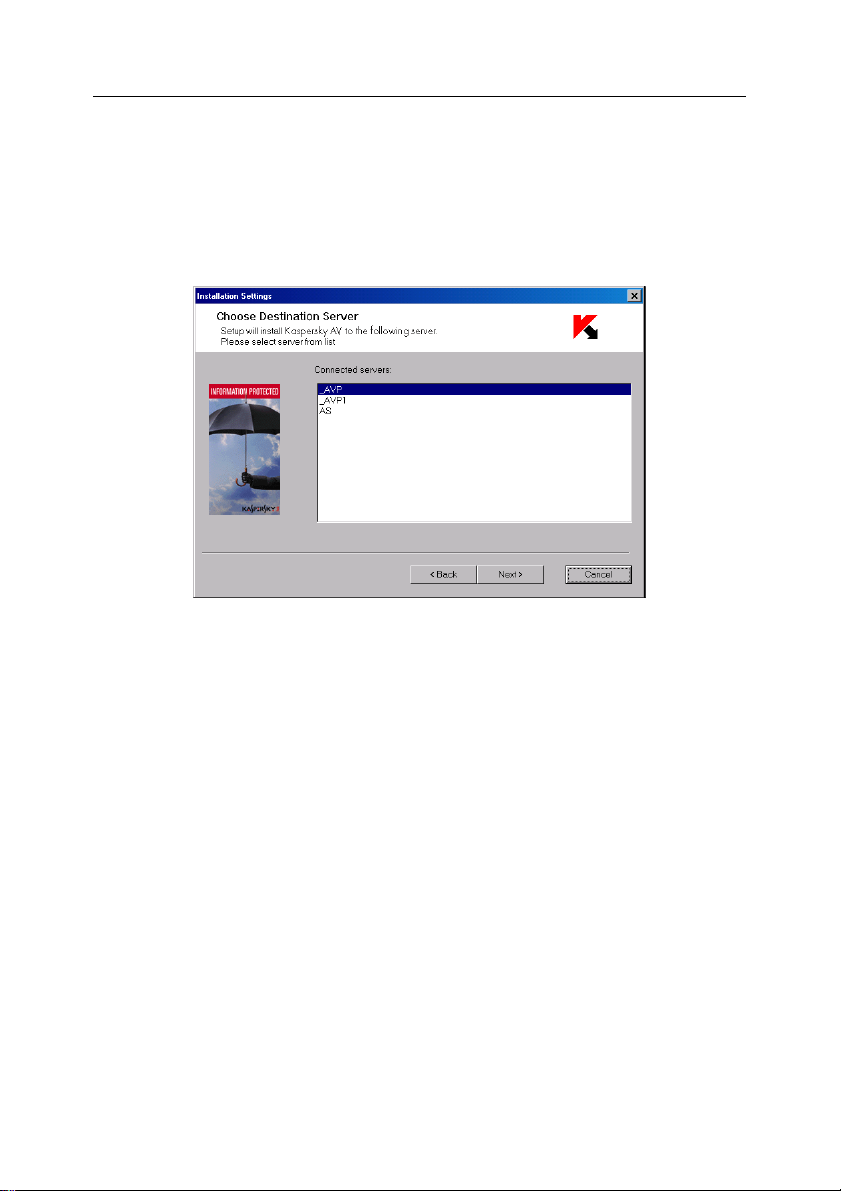
8. In the Select Component dialog box (see Fig. 4), select
components to install:
• Indicate what module(s) should be installed using the keys
Kaspersky Scanner, Snapin for ConsoleOne, and Snapin
for Netware Administrator;
• Сlick Next button.
Figure 4. Selecting components to install.
9. If you chose installing Kaspersky Scanner on the server, the
Choose Destination Server dialog box appears on the screen (see
Fig. 5). The Connected servers list of this dialog box displays all
Page 15
Program installation 15
the connected servers available at the moment of installation. Select
a server on which you want to install Kaspersky Scanner and click
Next.
This section describes installing Kaspersky Scanner on a single server. Using the
ConsoleOne control module, you can install Kaspersky Scanner on several
servers (see 3.3.2 on page 27).
Figure 5. Choosing server.
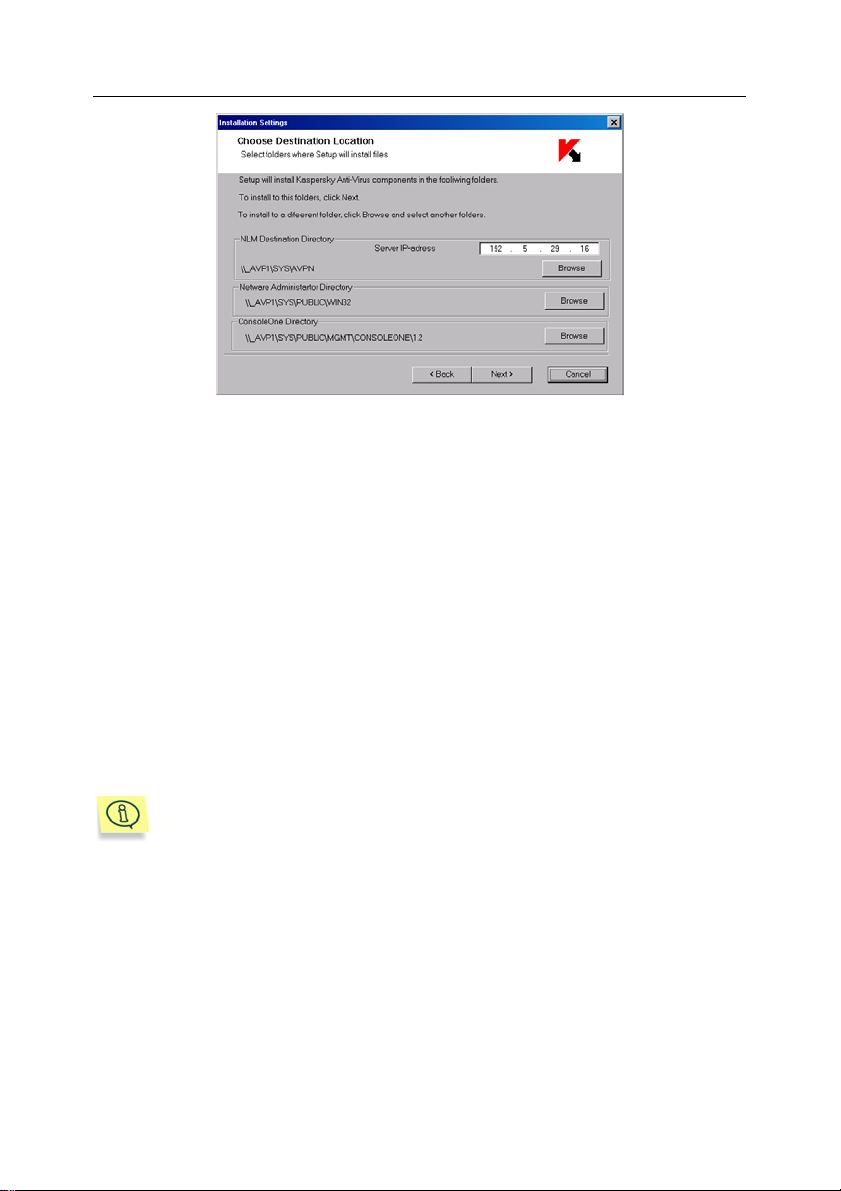
10. In the Choose Destination Location dialog box (see Fig. 6), select
directories to use for installing the Kaspersky Scanner components
selected (a group of items of a component is displayed in the box
only if you have previously chosen this component at step 8):
• if you install Kaspersky Scanner, specify the IP-address of the
server in the Server IP-address field and select an installation
directory by clicking the Browse button located near the NLM
Destination Directory field.
Page 16
16 Kaspersky Anti-Virus for Novell NetWare
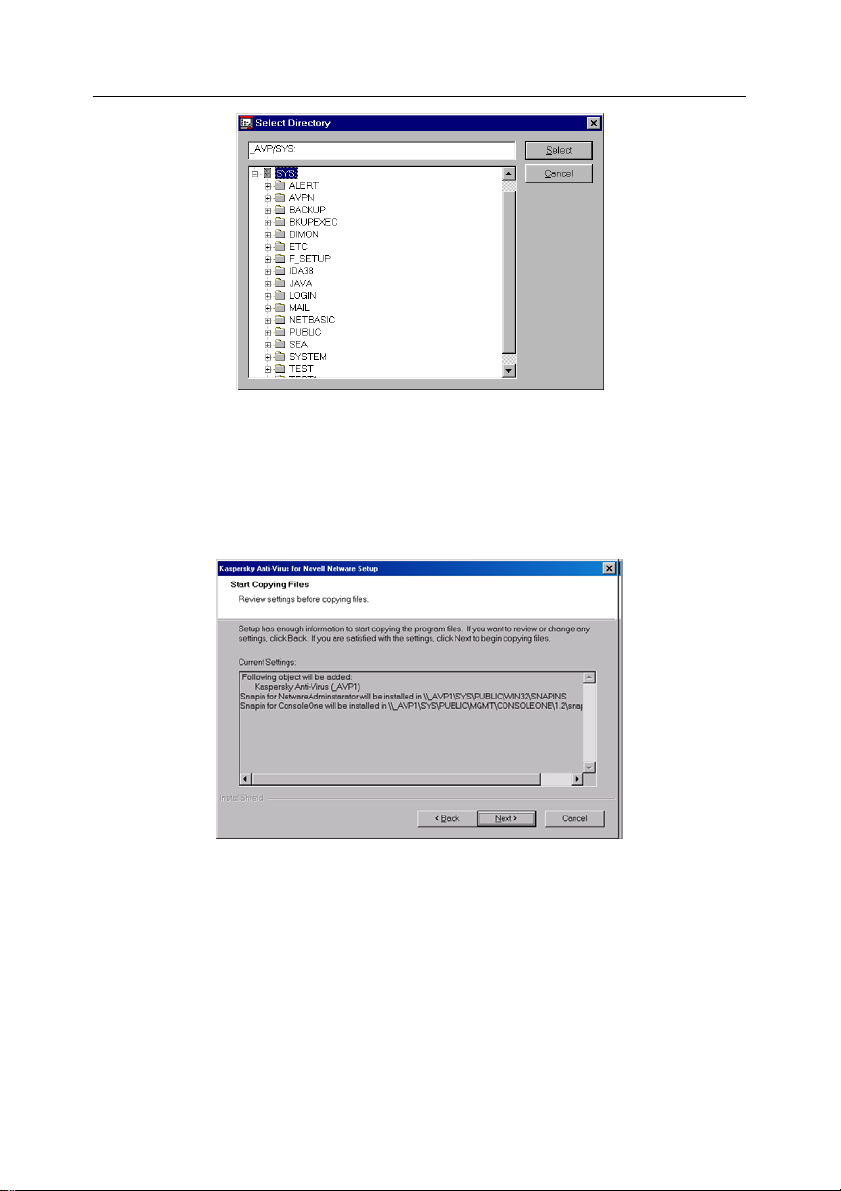
Figure 6. Selecting Directory.
• select the required directory in the directory list located in the
Select Directory dialog box and click Select (see Fig. 7).
• if you install Snapin for Netware Administrator program module
and/or Snapin for ConsoleOne, specify directory/directories
where NWAdmin32 and/or Novell ConsoleOne are installed.
You can select a directory by clicking the Browse button
located near the Netware Administrator Directory or the
ConsoleOne Directory fields, respectively. If you specify an
invalid directory and then click Next to get to the next window,
an error message will be displayed. You will be offered to
change the directory name;
You can select a directory both on the server and workstation. Typically,
a server directory is selected. Examples of typical directory names for
server and workstation are given below:
• NWAdmin on the server: SYS:\Public\win32
NWAdmin on the workstation: C:\Novell\win32
• ConsoleOne on the server:
SYS:\Public\mgmt\ConsoleOne\1.2
ConsoleOne on the workstation:
C:\Novell\ConsoleOne\1.2
• click Next in the Select Destination Location dialog box.
Page 17
Program installation 17
Figure 7. Selecting Directory.
11. Read the installation information in the Start Copying Files dialog
box. To continue installation, click Next button (see Fig. 8).
Figure 8. Installation information.
12. In the Install Key File dialog box (see Fig. 9), click Install Key and
specify a key file (*.key) for this very installation in the dialog box
that appears (see Fig. 10):
Page 18
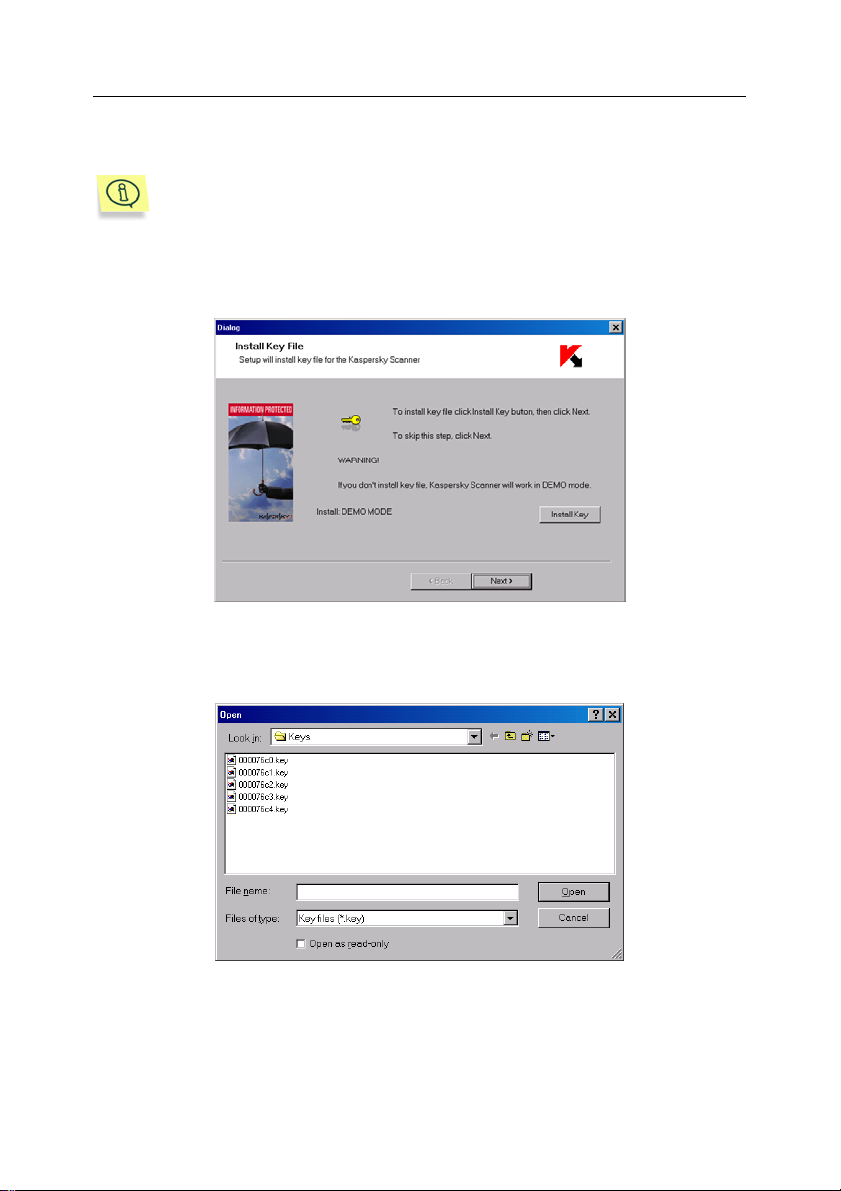
18 Kaspersky Anti-Virus for Novell NetWare
The key file is your own "key" containing the housekeeping information
necessary for proper running of the program, namely
Information on support (who provides support and where it
may be obtained);
License title, number, and expiration date.
Without the key file, the program runs as a demo Demo mode), when
only detection of infected files is available without "healing" them.
Figure 9. Installing key file.
Figure 10. Choosing key file.
• if you don't specify a key file, the program will run as a demo
(Demo mode);
• to continue installation, click the Next button.
Page 19
Program installation 19
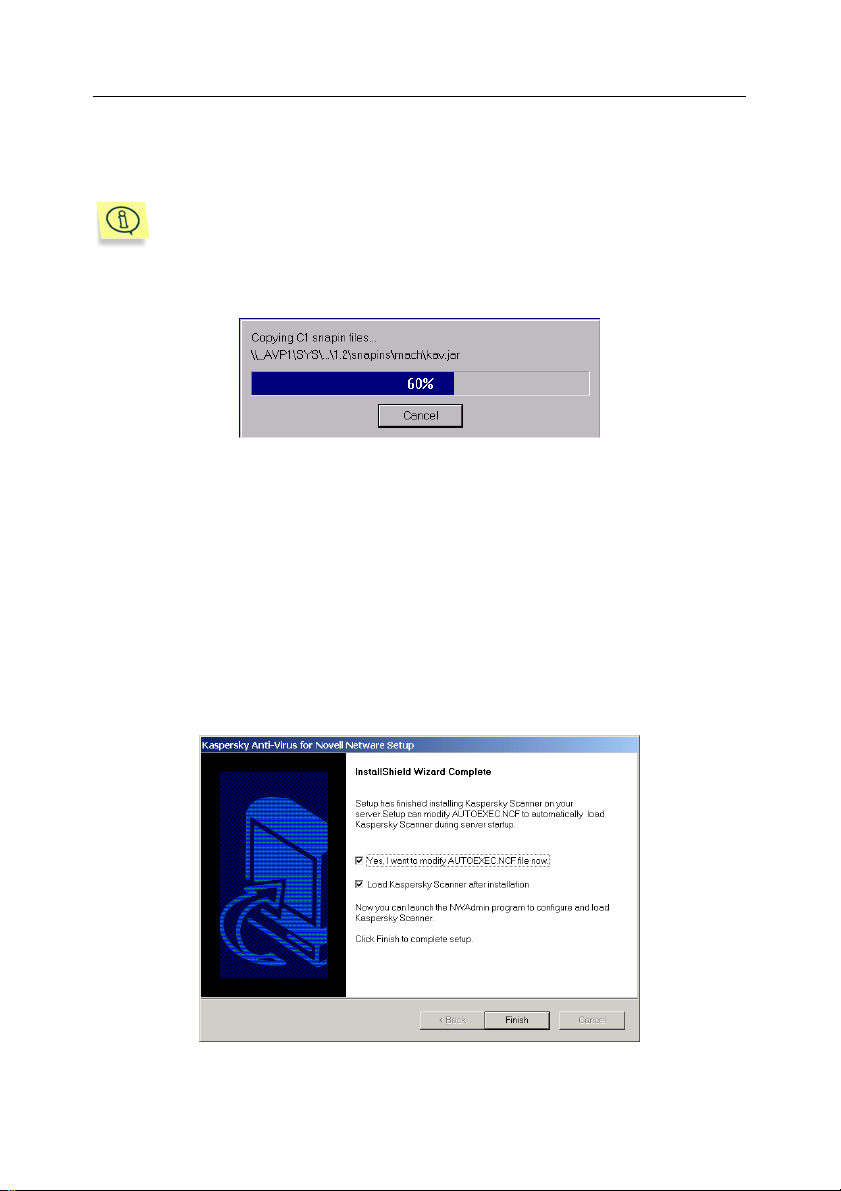
13. At this moment, the program starts copying files to the server and
storing settings in NDS.
During the installation, the NDS scheme is being changed in the
following way: a new "AVP" class is created, serving as a basis for the
new "Kaspersky Anti-Virus (<server_name>)" object where
<server_name> is a name of the server where Kaspersky Scanner is
installed.
Figure 11. Copying files.
14. Click Next upon completion of the installation process.
15. If you want Kaspersky Scanner to run automatically every time the
server is started, mark the Yes, I want to modify the
AUTOEXEC.NCF file now checkbox in the Setup Complete
window. To run the program automatically upon completion of
installation, mark the Load Kaspersky Scanner after installation
checkbox. Click Finish (see Fig. 12).
Figure 12. Installation complete.
Page 20

20 Kaspersky Anti-Virus for Novell NetWare
16. If you chose installing Snapin for Netware Administrator <see
Step 8>, the installation process will continue (see Fig. 13). Click
Next to install the required ActiveX components, then installation will
be completed.
Figure 13. Installing ActiveX components.
Page 21

CChhaapptteerr 33..AAnnttii--VViirruuss PPrrootteeccttiioonn ffoorr
SSeerrvveerrss
33..11.. CCrreeaattiinngg aanndd MMaaiinnttaaiinniinngg AAnnttii--VViirruuss
PPrrootteeccttiioonn ffoorr SSeerrvveerrss
To ensure an effective protection for local network servers,
administrator should perform the following steps:
1. Install control module for NWAdmin and/or ConsoleOne.
2. Select Kaspersky AV servers to act as protection units. Install
Kaspersky Scanner on these servers. Use control module to adjust
Kaspersky Scanner settings.
3. Choose Update servers that will update anti-virus databases on
Kaspersky AV servers. Install Kaspersky Updater on these
servers. Use control module to adjust Kaspersky Updater. (For
ConsoleOne only.)
Kaspersky AV servers located in the NDS tree can receive updates only
from the Update server which is located in the same NDS tree.
Therefore, for each NDS tree with servers subject to anti-virus
protection at least one Update server should be created. One and the
same computer can be a Kaspersky AV server and an Update server as
well. (For ConsoleOne only.)
Supporting the created anti-virus protection server system consists in the
following:
• receiving and processing messages about the viruses found and
• regular checkout of the reports on receiving and distributing
updates.
Page 22
22 Kaspersky Anti-Virus for Novell NetWare
33..22.. CCoonnttrrooll MMoodduulleess IInntteerrffaaccee
33..22..11.. CCoonnttrrooll mmoodduullee iinntteerrffaaccee ffoorr
CCoonnssoolleeOOnnee
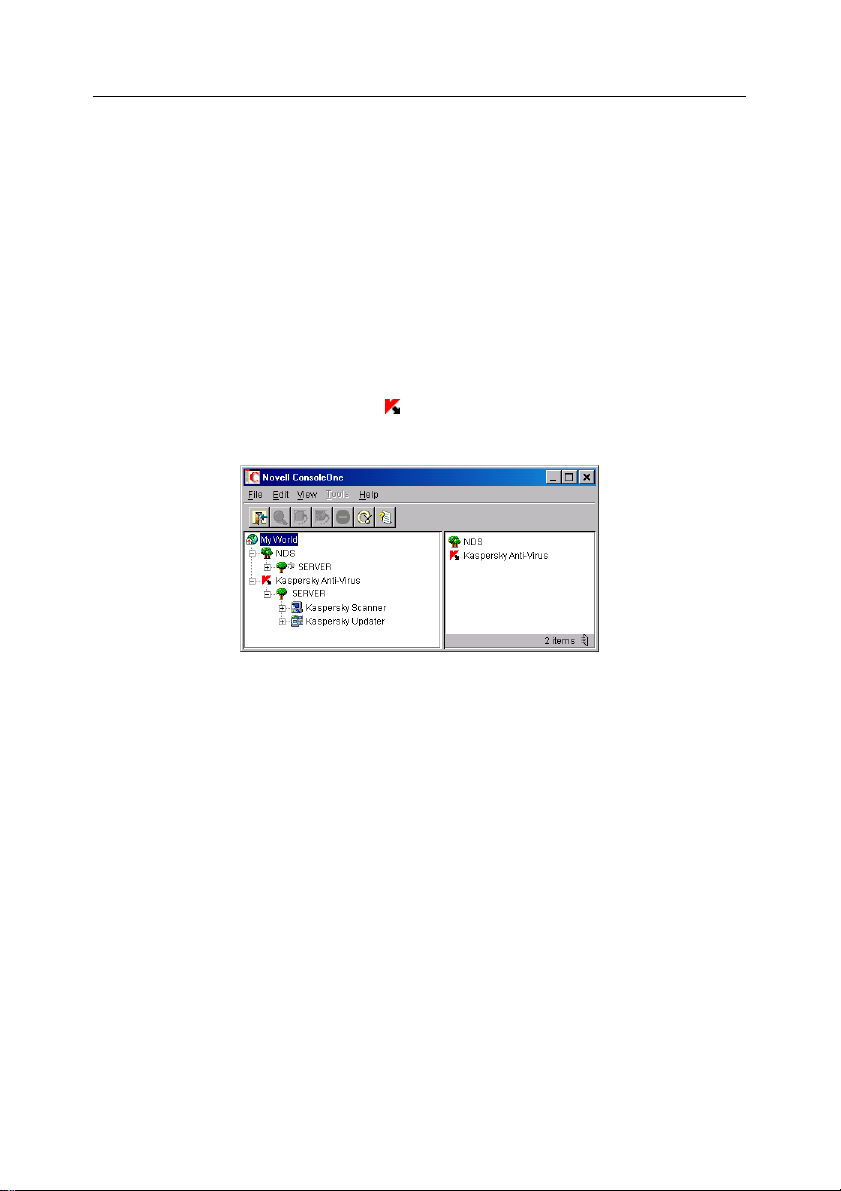
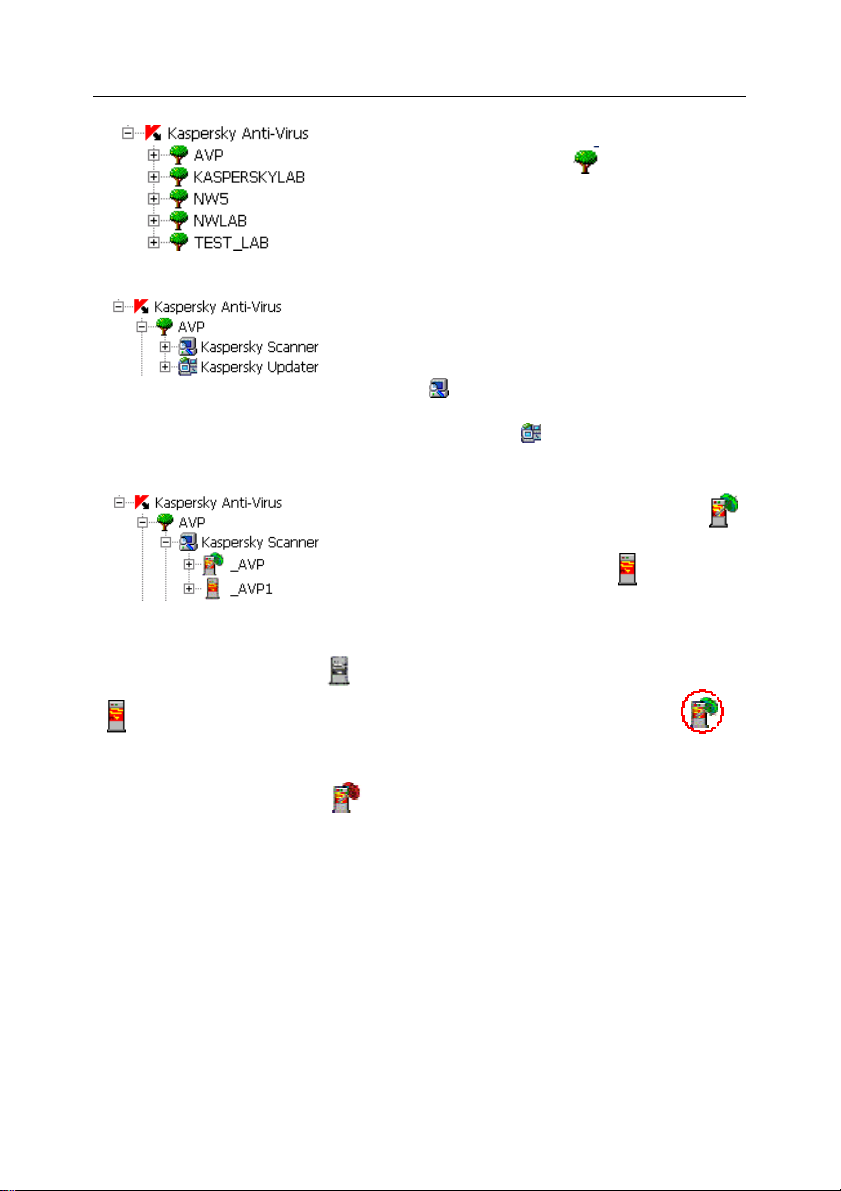
In the left panel of the Novell ConsoleOne main window, the resources of your
local network as well as other added items are displayed as a set of objects
headed by primary tree items with the "My World" item as a root object (see Fig.
14). Upon installing ConsoleOne control module, the Kaspersky Anti-Virus
primary item with the corresponding
Figure 14. Novell ConsoleOne window upon installation of the control module
icon appears in the items set.
Kaspersky Anti-Virus primary tree item contains the item hierarchy listed below.
Each item included into the Kaspersky Anti-Virus primary item has context
menu that enable users to perform different operations with these items.
Page 23
Anti-Virus Protection for Servers 23
The primary tree item comprises the list of NDS
trees, each indicated by the
icon.
An NDS tree contains the list of anti-virus
software products that can be installed on
servers included in this tree. The list contains
two software products: an anti-virus scanner
represented by the Kaspersky Scanner line
with the
icon and an automatic updating
program represented by the Kaspersky
Updater line with the
icon.
Kaspersky Scanner item always contains all
servers from the NDS tree. However, the
icon indicates the servers with installed
Kaspersky Scanner, while the
servers where this program has not been
icon, those
installed.
The server icon turns gray
if the server is turned off and becomes colored
if the server is turned on. The server icon is marked with a red circle if
another user blocks the access to Kaspersky Scanner.
The umbrella icon turns red
if the server has an old version of the program
installed. You cannot launch any old version of the program and should update
it.
The umbrella icon turns gray if Kaspersky Scanner is turned off, and green, if
it is turned on.
Using the context menu, you can install the Kaspersky Scanner module on
server, update, delete, or load it or access the control menu box for
configuring, loading, or launching this program (see 3.3−3.6 on pages 25–35).
You can access Kaspersky Scanner control module window by choosing the
Properties item in the context menu.
Page 24
24 Kaspersky Anti-Virus for Novell NetWare
The Kaspersky Updater item comprises the
names of only those tree servers where
Kaspersky Updater has been installed. These
items are indicated by the icon depicting the
globe with tools:
This served icon is marked with a red circle is another user blocks the access
to Kaspersky Updater.
The globe icon turns red if an old version of the program is installed on the
server. The old version cannot be launched and should be updated.
The icon turns gray if Kaspersky Updater is turned off; green, if it is turned on.
Using the context menu, you can install Kaspersky Updater module on servers,
delete it or access the control menu box for configuring or launching this
program (see details in Chapter 4). To access Kaspersky Updater control
module, choose the Properties item in the server's context menu.
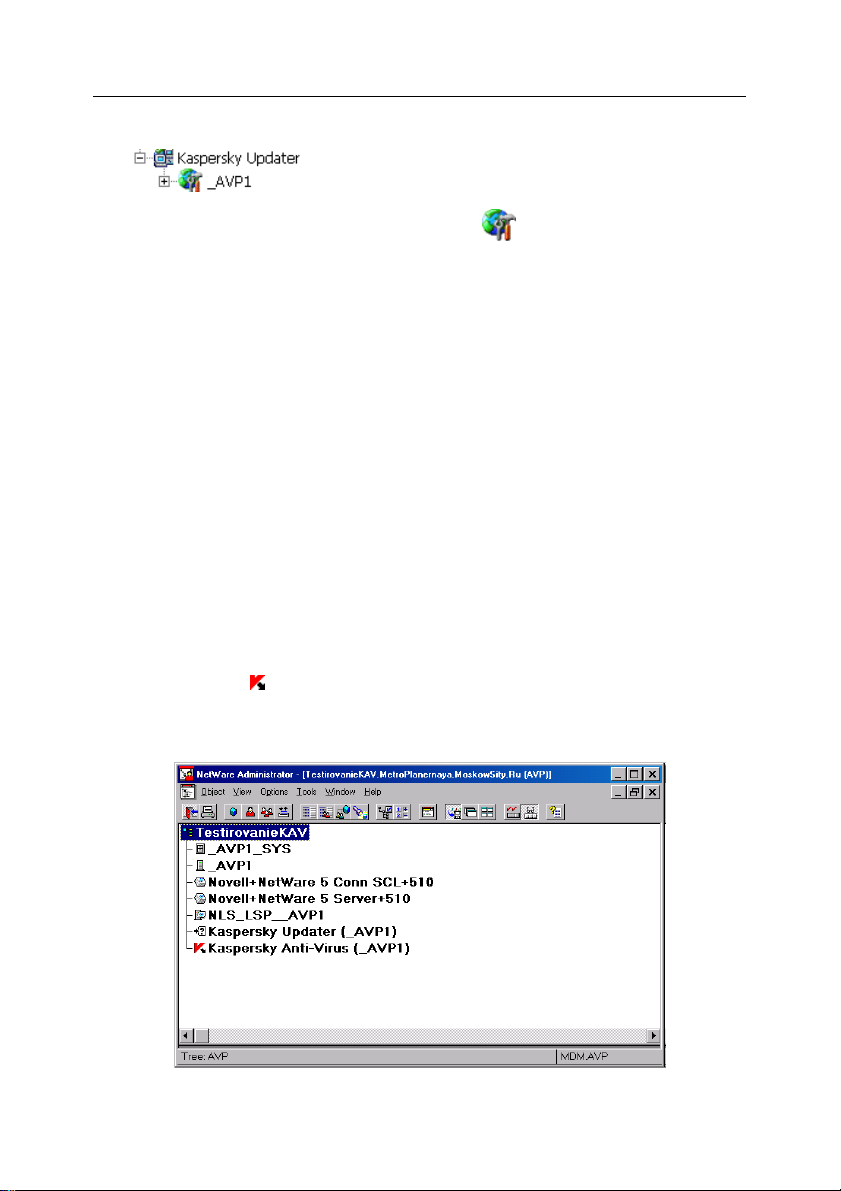
33..22..22.. CCoonnttrrooll mmoodduullee iinntteerrffaaccee ffoorr
NNWWAAddmmiinn
As the NWAdmin control module is installed, the Kaspersky Anti-Virus item with
the corresponding icon appears in the Netware Administrator items set (see
Fig. 15).
.
Figure 15. Netware Administrator program window after the control module was installed.
Page 25

Anti-Virus Protection for Servers 25
You can access the Kaspersky Scanner for NWAdmin control module window by
double clicking on the item or by choosing Details in the context menu of the
item.
33..33.. IInnssttaalllliinngg aanndd UUnniinnssttaalllliinngg
KKaassppeerrsskkyy SSccaannnneerr ((CCoonnssoolleeOOnnee))
33..33..11.. IInnssttaalllliinngg KKaassppeerrsskkyy SSccaannnneerr oonn
SSeerrvveerr
Kaspersky Scanner is installed from the workstation where the ConsoleOne
control module has been installed.
You can install Kaspersky Scanner on a single server using the
Kaspersky AV installation program (see 2.2 on page 12).
To install Kaspersky Scanner on a server,
1. Expand the Kaspersky Anti-Virus primary item in the left panel of
the Novell ConsoleOne window.
2. In the list of NDS trees, choose the name of the tree with the server,
which you want to install Kaspersky Scanner on.
3. Expand the NDS tree and choose Kaspersky Scanner from the list
of anti-virus products.
4. Expand the server list of the Kaspersky Scanner tree and select
the required server.
5. By clicking right mouse button on the selected server, open the
context menu and choose the Install line.
6. The name of the selected server is displayed in the Select servers
to install to list of the Installation Kaspersky Scanner for Novell
Netware dialog box (see Fig. 16).
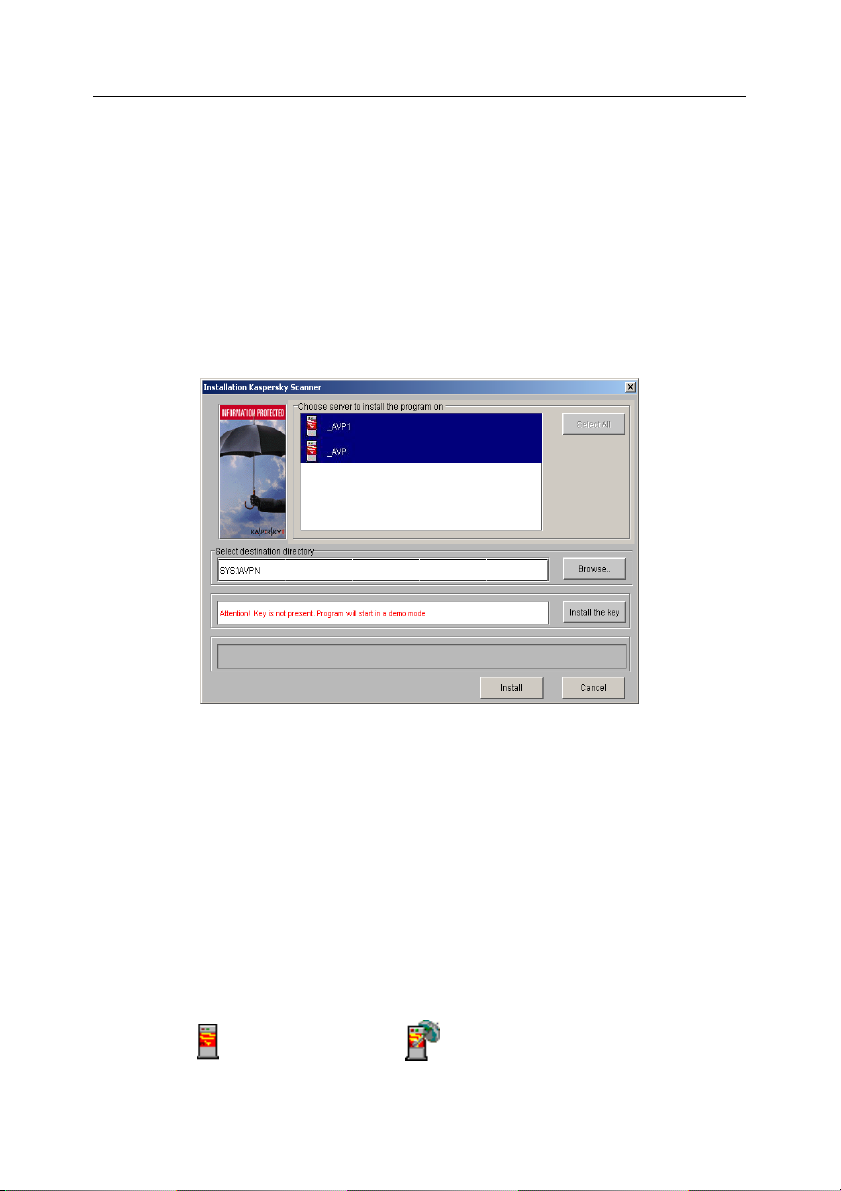
Page 26
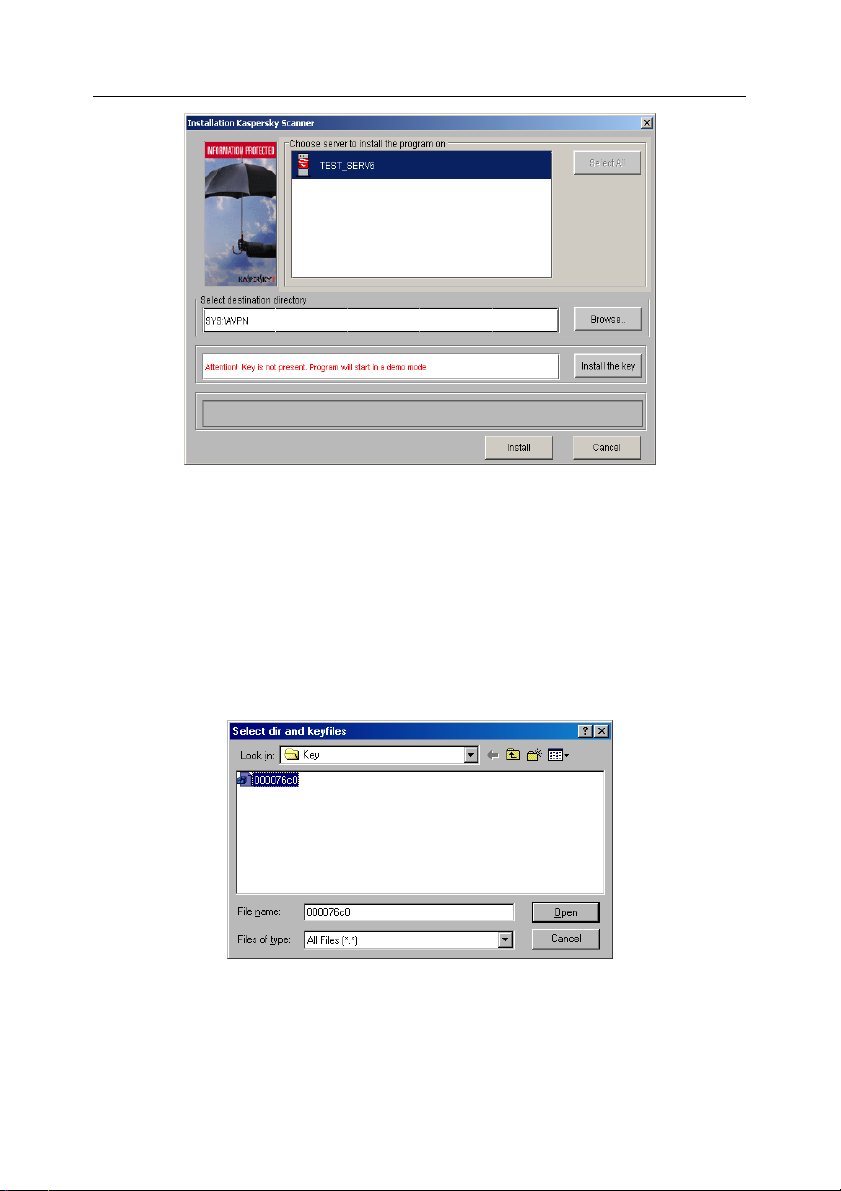
26 Kaspersky Anti-Virus for Novell NetWare
Figure 16. Installing Kaspersky Scanner for Novell NetWare dialog box.
7. If required, change the destination volume and directory names in
the Select destination directory field.
8. Select a key. To do this, click the Install Key button and specify the
key file in the Select dir and keyfiles dialog box that appears (see
Fig. 17).
Figure 17. Select dir and KeyFiles dialog box.
9. Click the Install button.
10. Wait until the Installation Kaspersky Scanner for Novell Netware
dialog box closes, indicating the installation completion.
Page 27
Anti-Virus Protection for Servers 27
After that, Kaspersky Scanner will be installed on the specified server and the
icon will change to the
Fig. 18).
Figure 18. Installing Kaspersky Scanner has been finished.
icon in the corresponding namespace line(see
33..33..22.. IInnssttaalllliinngg KKaassppeerrsskkyy SSccaannnneerr oonn
SSeerrvveerr GGrroouupp
Kaspersky Scanner is installed from a workstation or a server where the
ConsoleOne control module has been installed.
To install Kaspersky Scanner on a server group,
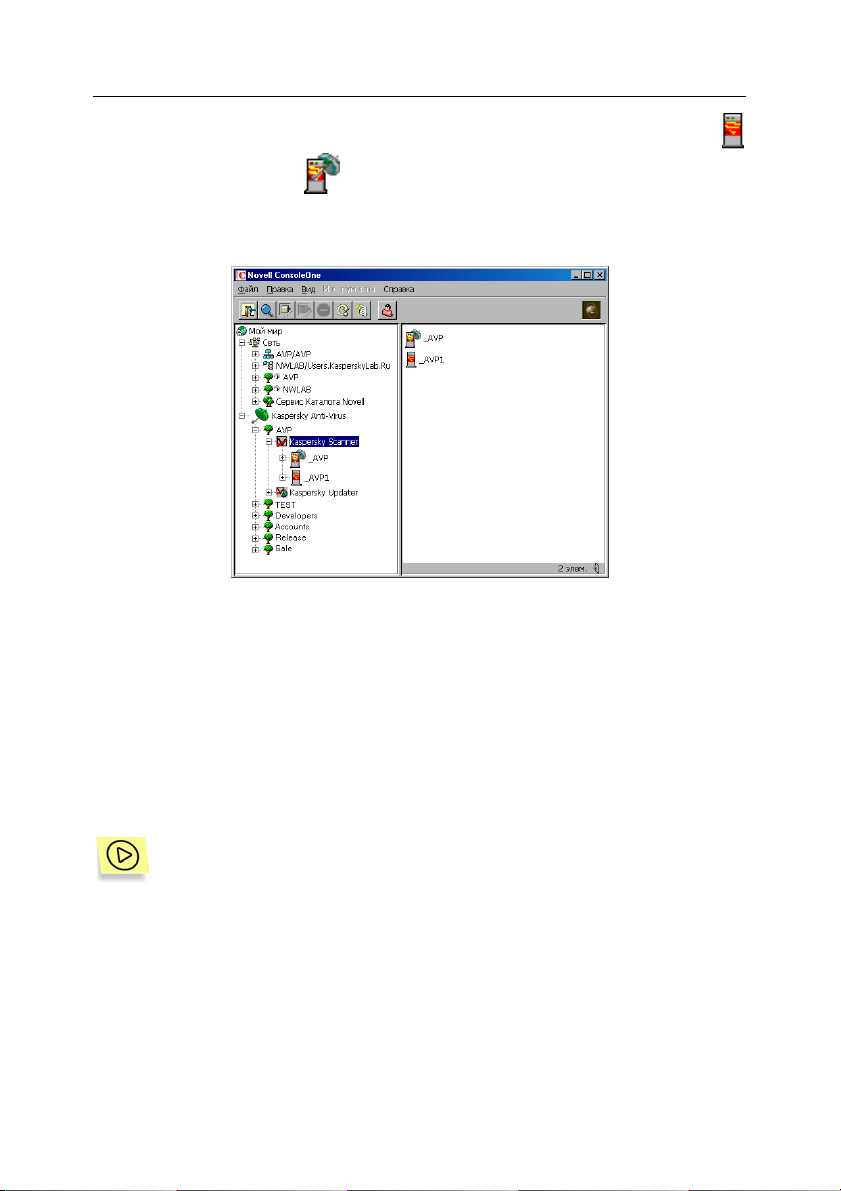
1. Expand the Kaspersky Anti-Virus primary item in the left panel of
the Novell ConsoleOne window.
2. In the list of NDS trees, choose the name of the tree with the
servers that you want to install Kaspersky Scanner on.
3. Expand the NDS tree and choose Kaspersky Scanner from the list
of anti-virus products.
Page 28
28 Kaspersky Anti-Virus for Novell NetWare
4. Right-click the product chosen to open the context menu and select
the Install line.
5. Select the names of the required servers in the Select servers to
install to list of the Installation Kaspersky Scanner for Novell
Netware dialog box (see Fig. 19).
6. Names of the volume and directory used for installing Kaspersky
Scanner on servers of the selected NDS tree are displayed in the
Select destination directory field.
Figure 19. Installing Kaspersky Scanner for Novell Netware for several servers dialog
box.
7. Select a key. To do this, click the Install Key button and specify the
key file in the Select dir and keyfiles dialog box that appears (see
Fig. 17).
8. Click the Install button.
9. Wait until the Installation Kaspersky Scanner for Novell NetWare
dialog box closes, indicating installation completion.
After that, Kaspersky Scanner will be installed on servers of the specified NDS
tree and the
icon will change to the icon in the corresponding namespace
lines.
Page 29
Anti-Virus Protection for Servers 29
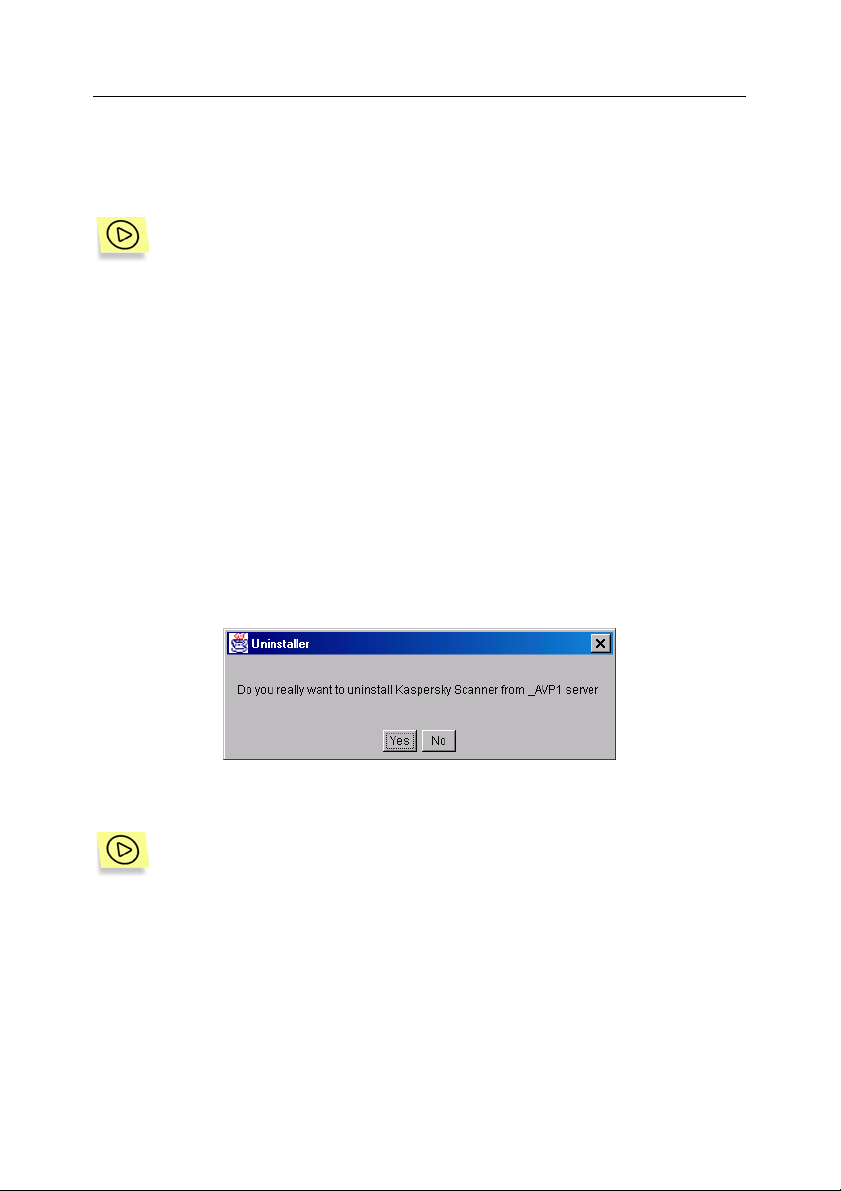
33..33..33.. UUnniinnssttaalllliinngg KKaassppeerrsskkyy SSccaannnneerr
ffrroomm tthhee SSeerrvveerr oorr tthhee SSeerrvveerr GGrroouupp
To uninstall Kaspersky Scanner from the server,
1. Expand the Kaspersky Anti-Virus primary item in the left panel of
the Novell ConsoleOne window.
2. In the list of NDS trees, choose the name of the tree with the server
you want to uninstall Kaspersky Scanner from.
3. Expand the NDS tree and select the Kaspersky Scanner item.
4. Expand the Kaspersky Scanner item and choose a server you
want to uninstall Kaspersky Scanner from.
5. Open the context menu and choose the Uninstall line.
6. Click Yes in the appearing Uninstaller uninstall request dialog box
(see Fig. 20).
Figure 20. Request for uninstalling Kaspersky Scanner.
To uninstall Kaspersky Scanner from the server group,
1. Expand the Kaspersky Anti-Virus primary item in the left panel of
the Novell ConsoleOne window.
2. In the list of NDS trees, choose the name of the tree with the
servers you want to uninstall Kaspersky Scanner from.
3. Expand the NDS tree and select the Kaspersky Scanner item.
4. Open the context menu and choose the Uninstall line.
5. Click Yes in the appearing Uninstaller uninstall request dialog box.
Page 30
30 Kaspersky Anti-Virus for Novell NetWare
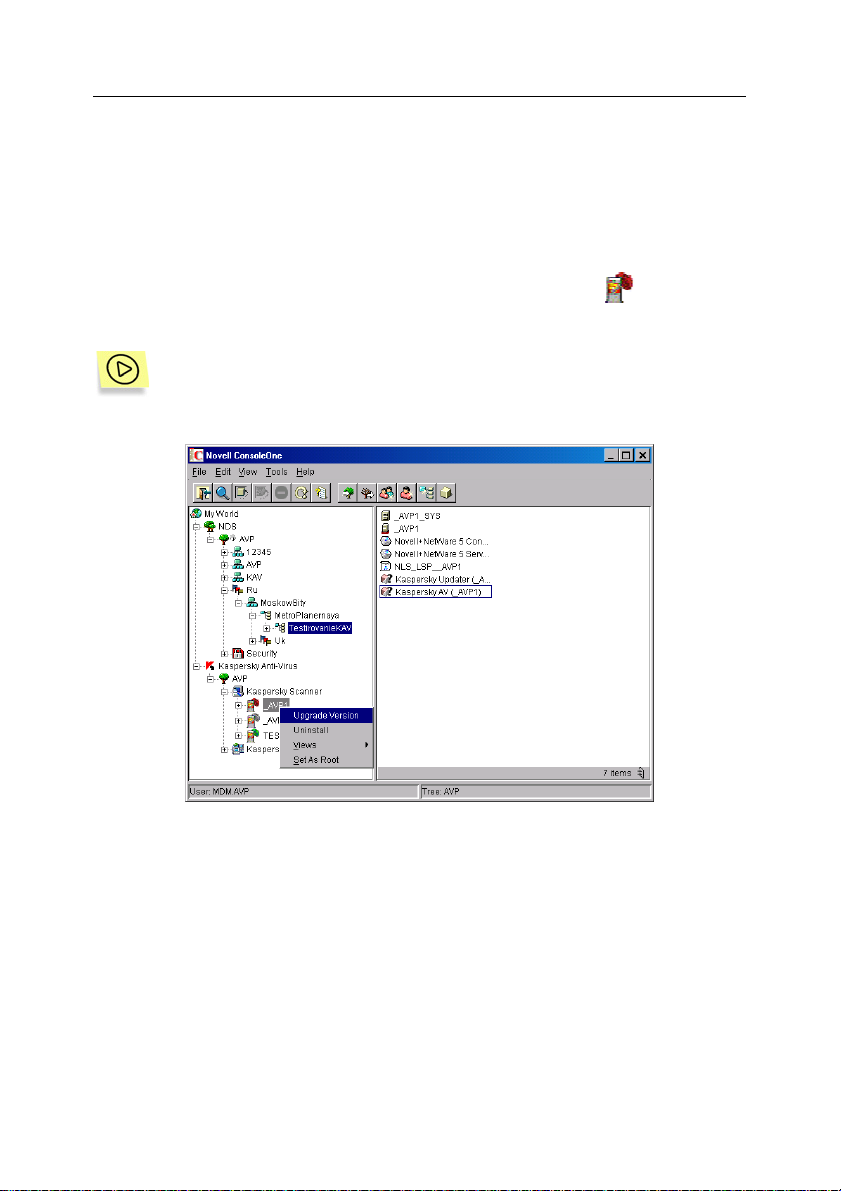
33..33..44.. UUppggrraaddiinngg KKaassppeerrsskkyy SSccaannnneerr
If you have Kaspersky Scanner version lower than 4.00.02 installed on your
server, you have to upgrade the program.
The servers on which the program should be upgraded are indicated in the
Kaspersky Anti-Virus primary item by the red umbrella icon page 22).
To upgrade Kaspersky Scanner on the server, choose the Upgrade
Version item in the context menu (see Fig. 21).
(see 3.2.1 on
Figure 21. Upgrading Kaspersky Scanner version on the server.
33..44.. LLooaaddiinngg KKaassppeerrsskkyy SSccaannnneerr
33..44..11.. LLooaaddiinngg vviiaa NNWWAAddmmiinn
Kaspersky Scanner is loaded from a workstation that works in Windows
9x/NT/2000/Me environment or from a server console, for instance, LOAD
AVKERNEL.
Page 31

Anti-Virus Protection for Servers 31
To load Kaspersky Scanner on a server from the workstation:
1. Launch the Netware Administrator (NWAdmin) remote
administration utility.
2. Choose the Kaspersky Anti-Virus item.
3. Double click the mouse or click the right mouse button, then choose
the Details item in the context menu. A dialog box for the Kaspersky
Scanner control module appears (see Fig. 23).
Figure 22. Netware Administrator window.
Figure 23. Dialog box for Kaspersky Scanner control module.
Page 32

32 Kaspersky Anti-Virus for Novell NetWare
4. Click Load NLM.
After that, a program kernel (AVKernel.NLM module), anti-virus databases will be
loaded into the server memory and the corresponding status window will appear
on the server.
Figure 24. Status window.
The control module automatically detects any changes that may happen
in the network. For example, the Load NLM and Unload NLM buttons
and the Connection to Server status line change their states with any
changes occurring in the network or on the server.
33..44..22.. LLooaaddiinngg vviiaa CCoonnssoolleeOOnnee
Loading and unloading the NLM-module while working with ConsoleOne are
similar to that of NWAdmin (see 3.2.2 on page 24).
Clicking the Load NLM/Unload NLM buttons on the About tab page of the
Kaspersky Scanner control module window loads/unloads the NLM. The statuses
of these buttons determine the presence/absence of NLM in the memory.
You can also load/unload Kaspersky Scanner using the context menu of the left
panel of the Novell ConsoleOne window.
To load/unload Kaspersky Scanner on all the servers of NDS tree,
1. Choose the name of the tree containing the servers
whereon/wherefrom you want to load/unload Kaspersky Scanner In
the list of NDS trees of the Kaspersky Anti-Virus primary item.
Page 33

Anti-Virus Protection for Servers 33
2. Expand the selected NDS tree by clicking on it.
3. Choose the Kaspersky Scanner item in the list of anti-virus
products.
4. Open the context menu and choose the Load Kaspersky AV on all
servers/Unload Kaspersky AV on all servers item.
To load/unload Kaspersky Scanner on a single server,
1. Choose the name of the server whereon/wherefrom you want to
load/unload Kaspersky Scanner in the NDS list of the Kaspersky
Anti-Virus primary item.
2. Open the context menu and choose the Load Kaspersky
AV/Unload Kaspersky AV item.
33..55.. LLaauunncchhiinngg KKaassppeerrsskkyy SSccaannnneerr
33..55..11.. TThhrreeee MMooddeess ooff OOppeerraattiioonn
Kaspersky Scanner has three operating modes:
• Filter mode.
• On-demand scanning mode.
• Scheduled scanning mode.
In searching for viruses, in all operating modes, Kaspersky Scanner uses antivirus bases which currently enable users to detect and delete all known types of
viruses. Anti-virus bases are constantly enlarged and updated (on updating, see
Chapter 4 on page 66 and Chapter 5 on page 99).
33..55..22.. FFiilltteerr mmooddee
Filter mode scanning (in a real-time mode) provides an automatic checking ("on
the fly" checking) of the files on a server that are accessed from the workstation
or other network servers. Filter mode serves as the main operating mode of
Kaspersky Scanner and is activated immediately after Kaspersky Scanner
module is loaded on a server.
Page 34

34 Kaspersky Anti-Virus for Novell NetWare
Kaspersky Scanner checks all the files before they are launched or opened,
allowing the viruses to be detected and disinfected before their expansion.
Filter mode scanning slightly slows the server operation. Thus, it is not
recommended to switch on archive unpacking in the filter mode.
If infected or "suspicious" files are detected using the heuristic analyzer, the
program will perform certain actions (for configuring the actions to be taken with
infected or suspicious files, see 3.6.5 on page 44).
Reports on filter mode scanning can be viewed in the result log.
33..55..33.. OOnn--ddeemmaanndd SSccaannnniinngg
When on-demand scanning mode is on, Kaspersky Scanner functions like an
anti-virus scanner—It goes down the subdirectory tree searching for infected
files. The virus-searching engine is activated manually by the network
administrator from the Kaspersky Scanner item window. Then, Kaspersky
Scanner goes down the subdirectory tree of specified server volumes and checks
files specified in options. If infected or "suspicious" files are detected (using the
heuristic analyzer), the program will perform certain actions (for configuring
actions to be taken with infected or suspicious files, see 3.6.5 on page 44). Upon
scanning completion, you can view the log of scanning results.
For NWAdmin control module:
• to start on-demand scanning, use the Kaspersky Scanner control
window on the Scan tab page of the Manual Scanning page. To
start scanning, click the Start Scan button.
For ConsoleOne control module:
• to start on-demand scanning, use the Kaspersky Scanner control
window on the Statistics tab page. To start scanning, mark the
View Manual Statistics checkbox and then click Start Scan.
Here, you need to specify a scanning path in the Path for scan window.
Before you start scanning, make sure the NLM module is loaded. Status of the
Load NLM button on the About page indicates the presence of NLM module in
the memory. If this button is active, the module hasn't been loaded. To load the
module, click this button.
After that, the process of scanning specified files in the selected directory will
start. This process is indicated on the screen in the form of a moving flashlight.
Page 35

Anti-Virus Protection for Servers 35
If infected or "suspicious" (resembling viruses) files are detected (using the
heuristic analyzer), the program will perform certain actions (for configuring
actions to be taken with infected or suspicious files, see 3.6.5 on page 44).
The checking statistics is constantly updated during the scanning
process. You can abort scanning at any moment. To do this, click
Stop. A record registering the interruption of on-demand scanning
will appear in the result log.
33..55..44.. SScchheedduulleedd SSccaannnniinngg
When the scheduled scanning mode is on, Kaspersky Scanner performs the
same actions as in the on-demand scanning mode—going down the directory
tree searching for infected files with the only difference of automatic activation of
the virus search scheduled in settings (see 3.6.8 on page 52). Files to check are
specified there, too. If infected or "suspicious" (resembling viruses) files are
detected (using the heuristic analyzer), the program performs certain actions (for
configuring actions to be taken with infected or suspicious files, see 0 on
page 44).
Results for scheduled scanning are registered in the scanning result log.
The scheduled scanning mode is activated immediately after AVKernel
module is loaded on the server.
If required, the scheduled scanning mode can be turned off (see 3.6.8
on page 52).
Scan area for scheduled scanning is specified the same way as for ondemand scanning.
33..66.. CCoonnffiigguurriinngg KKaassppeerrsskkyy SSccaannnneerr
33..66..11.. KKaassppeerrsskkyy SSccaannnneerr ccoonnttrrooll mmoodduullee
wwiinnddooww
While working with Novell ConsoleOne, the Kaspersky Scanner control module
window appears when selected in the context menu of the Properties item.
While working with Netware Administrator, you can access Kaspersky Scanner
control module by double clicking on the Kaspersky Anti-Virus item or by
choosing Details in this item's context menu.
Page 36

36 Kaspersky Anti-Virus for Novell NetWare
Both Kaspersky Scanner control module windows have a similar appearance.
Later in this guide, the NWAdmin control module window will be given upon
descriptions of this window, or, in case of any differences – windows of both
control modules.
Kaspersky Scanner control module window contains nine tab pages enabling
users:
About – to view general information about Kaspersky Scanner and load/unload it
from the server memory.
Manual Scanning – to configure options for the on-demand scanning mode:
scan area for the on-demand and scheduled scanning modes, types of
files to check, as well as other advanced scanning modes.
Real-time Scanning – to configure scanning options for the filter mode.
Actions – to configure actions which the program performs in relation to infected
and suspicious files.
Logging – to configure settings for the scanning result log.
Alerts – to configure the mode of notifying network users about found viruses.
Advanced – to configure additional scanning options: working and "quarantine"
directories, CPU usage, network settings, and number of scans to
perform.
Scheduled Scans – to configure the automatic scanning schedule.
Statistics – to view logs with scanning results. (For ConsoleOne only.)
Updates – to perform updating of anti-virus bases. (For NWAdmin only.)
After the program is installed on the server, you need to load it into the server
memory. It is also recommended to configure the scheduled scanning mode
settings on the Schedule tab page, and the filter mode settings on the Real-time
Scanning tab page.
33..66..22.. LLooaaddiinngg tthhee pprrooggrraamm aanndd vviieewwiinngg
tthhee pprrooggrraamm iinnffoo.. AAbboouutt ttaabb ppaaggee
You can view the general information about the program on the About tab page
(see Fig. 25).
Page 37

Anti-Virus Protection for Servers 37
Figure 25. Viewing information about the program.
The upper part of the About tab page contains the name of program, its version
number, and the date of last update, and the following information:
• Server name: name of the server whereon Kaspersky Scanner is
installed;
• Connection to Server: indicates connection to Kaspersky Scanner
and may contain the following information: Authenticated, the
control module established connection to Kaspersky Scanner; Not
Established, the control module failed to establish the connection;
and Locked, the access to Kaspersky Scanner is blocked by
another workstation.
• Scheduled Status: the line indicates whether the scheduled
scanning mode is activated and shows the scanning frequency. The
available values include Nonactive, scheduled scanning is disabled;
Daily, daily scanning is scheduled; Weekly, weekly scanning; and
Monthly, monthly scanning.
• Last Scan: the line contains the date of the last scan.
• Last Update: the line contains the date of the last updating.
• Number of Licenses: the line contains the number of licenses.
The middle part of the tab page contains the table with information on how to
contact Kaspersky Labs support service.
The lower part of the tab page contains buttons allowing the program to be
loaded/unloaded on a server and the program registration button:
Page 38

38 Kaspersky Anti-Virus for Novell NetWare
• Load NLM: loading the program on server;
• Unload NLM: unloading the program from the server;
• Register: registering the program. Upon clicking the button, a
standard file search dialog box appears where you should select a
key file (*.key extension) .
33..66..33.. OOnn--ddeemmaanndd ssccaannnniinngg mmooddee
ooppttiioonnss.. MMaannuuaall SSccaannnniinngg ttaabb ppaaggee
33..66..33..11.. OOppttiioonnss lliisstt
The Manual Scanning tab page specifies the on-demand scanning mode
options : scan area for the on-demand scanning mode, types of files to check, as
well as other advanced scanning modes, including archive checking, scanning of
packed executable files, and using the heuristic analyzer.
33..66..33..22.. SSccaann aarreeaa
Scan area for the on-demand scanning mode is specified on the Scan tab page
of the Manual Scanning page. The directory to be included into the scan area is
indicated in the Path for Scan field (see Fig 26).
Figure 26. Specifying scan area for the on-demand scanning mode (NWAdmin).
Page 39

Anti-Virus Protection for Servers 39
Figure 27. Specifying scan area for the on-demand scanning mode (ConsoleOne)
To specify the directory to be included into the scan area,
Clicking the Browse button near the Path for Scan field opens the
Select Directory dialog box (see Fig. 28). Select the necessary
directory from the list and click the Select button. You can specify
scanning of all the server’s volumes indicating *:\*.* in the input field.
Figure 28. Selecting Directory
Page 40

40 Kaspersky Anti-Virus for Novell NetWare
33..66..33..33.. FFiilleess ttoo ssccaann
Files to scan are specified by means of the Files to Scan field group (see Fig 29).
To specify files to be scanned,
1. In the option buttons group, specify which files you want to include
into the scan list:
• All Files — to include all files into the list;
• Files with These Extensions — to include files with certain
masks. Specify desired masks in the corresponding value field.
Figure 29. Specifying files for scanning (NWAdmin)
You can specify various file masks via space, for example: *.exe
*.com. To specify a mask, use the symbols available for filenames in
MS-DOS (for example, *.* mask indicates that all files with all available
extensions will be scanned).
• Smart Masks — to include programs into the list, that is, all
files with the following extensions: .bat, .com, .exe, .ov*, .sys,
.bin, .prg, .class, .ini, .vbs, .js, .htm, .dpl, .htt, .hta, .hlp, .pif, as
well as files with an internal DOS executable file format (*.com,
Page 41

Anti-Virus Protection for Servers 41
*.exe и *.sys), Windows and OS/2 (*.exe, *.dll), Linux (elf); files
of the Microsoft Office (OLE2 and Access) document and
spreadsheet type, Java-applets.
2. If you want to exclude files with certain masks from the scanning
procedure, mark the Except These checkbox and enter masks of
these files in the corresponding value field.
You can specify various file masks via space, for example: *.tmp *.txt.
3. If you want to scan archived files (for unpacking archive engine, see
3.6.3.5 on page 42), mark the Archives checkbox.
4. If you want to scan packed executable files(for unpacking
executable modules, see 3.6.3.6 on page 43), mark the Packed
Executables checkbox.
5. If you want to scan mail bases, mark the Mail Bases checkbox.
6. To scan mail format files, mark the Plain Mail Formats checkbox.
You can enable the heuristic file checking mode (see 3.6.3.4 on
page 41) to detect viruses unknown to the program (not included in the
anti-virus databases).
To do this, mark the Enable Code Analyzer checkbox.
33..66..33..44.. HHeeuurriissttiicc AAnnaallyyzzeerr
You can enable the heuristic file scanning using the Enable Code Analyzer
(enable the heuristic analyzer) checkbox. To enable/disable the heuristic
analyzer for the filter mode, turn to the Real-Time Scanning tab page, to
enable/disable analyzer for the on-demand and scheduled scanning, use the
Manual Scanning tab page.
Heuristic analyzer (Code Analyzer) checks file and sector codes in different
branches of the Kaspersky Scanner algorithm for the purpose of detecting any
virus-like instructions. If the heuristic analyzer detects such a combination of
commands as file opening or saving into file, interception of interrupt vectors,
etc., the file in check is considered "suspicious" and the corresponding message
appears (see 3.6.9.1.2 on page 60).
Of course, like any other algorithm of this type, this analyzer may occasionally
produce false alarms. However, it was tested on a large number of files and in result,
no real false operations have been recorded. If you encounter some false alarms on
virus-free files, please send these files for analyzing to Kaspersky Labs Ltd.
Page 42

42 Kaspersky Anti-Virus for Novell NetWare
Performing code scanning, the heuristic analyzer checks a variety of branches
constituting the program algorithm (including several sublevels). This mechanism
detects about 92% of viruses (including a lot of encrypted viruses) registered in
Kasperky Labs Ltd. virus databases, so we assume that new unknown viruses
will be found with the same degree of probability.
33..66..33..55.. AArrcchhiivvee eexxttrraaccttiinngg eennggiinnee
You can enable archive extracting engine using the Archives checkbox.
Archive extracting engine (Extracting Engine) is designed for searching viruses in
files packed in archives (ZIP, ARJ, LHA and RAR). When this archive extracting
engine is disabled, archives are checked as ordinary files (in this case only those
viruses that infected the archives themselves are found).
The current version of Extracting Engine contains the codes used for unpacking
ARJ, ZIP, LHA и RAR archives (existing versions).
Detecting viruses in archives is a very important task since a virus
can be stored in a packed file for several months or even years
without producing any harm, but then, at a sudden moment, it can
spread rapidly causing much trouble. Archives stored in BBS
present a special hazard.
Using the archive extracting engine, Kaspersky Scanner detects viruses in
archived files and reacts with corresponding messages.
The archive extracting engine cannot unpack password-protected
archives.
Kaspersky Scanner detects viruses in archives rather than deletes them
from these archives. To delete viruses, unpack the archive, delete
viruses from the infected files, delete the old archive and pack (this time
clean) files again.
Extracting Engine unpacks files from archives into temporary files and transfers
them to the main module for checking. After checking is completed, temporary
files are deleted.
Temporary files are stored in the working directory. You can specify a
path to this directory (see 3.6.7.1 on page 50).
Page 43

Anti-Virus Protection for Servers 43
33..66..33..66.. UUnnppaacckkiinngg EEnnggiinnee ffoorr PPrroocceessssiinngg
EExxeeccuuttaabbllee MMoodduulleess
You can enable executable module unpacking engine using the Packed
Executable checkbox. Being enabled, Kaspersky Scanner can start detecting
and deleting viruses from packed executable files.
Packed executable files contain a special unpacking module. When this
file is started, at first the main program is unpacked in RAM and only
then it is being executed.
Infected files can be packed the same way as any virus-free files. In
standard scanning, these infected files will be determined as noninfected since the virus body is packed with the program code.
With the unpacking executable modules engine enabled, files that have been
packed by various versions of the most popular utilities: DIET, PKLITE, LZEXE,
EXEPACK and etc., will be unpacked into temporary files so that the main
module can perform a recheck. When the check is completed, the temporary files
are deleted.
Temporary files are stored in the working directory. You can specify a
path to this directory (see 3.6.7.1 on page 50).
If a virus known to Kaspersky Anti-Virus is detected in a packed file, it can be
deleted (if disinfecting was specified as the action to take with infected files –
see 0 on page 44). In this case the source file will be replaced by the unpacked
and disinfected one. With the unpacking engine disabled, packed executable
modules will be scanned as unpacked and the program will detect only those
viruses that enrooted in files when they were already packed.).
The unpacking engine can correctly process files that have been compressed
multiple times. It also works with some versions of immunizers, programs
protecting executable files from viruses by attaching checking code blocks
(CPAV and F-XLOCK) and encrypting programs (CryptCOM) to them.
If the archive unpacking engine is enabled, Kaspersky Scanner will detect an
infected file, even if it was, for instance, encrypted by CryptCOM, packed by
PKLITE and, finally, put into an archive by PKZIP.
Page 44

44 Kaspersky Anti-Virus for Novell NetWare
33..66..44.. FFiilltteerr mmooddee ssccaannnniinngg ooppttiioonnss..
RReeaall--ttiimmee SSccaannnniinngg ttaabb ppaaggee
Filter mode scanning options are specified on the Real-time Scanning tab page
(see Fig. 30).
Scan area for the filter mode is specified on the Real-time Scanning tab page.
This tab page is similar to the Manual Scanning page designed for configuring
scan area for the on-demand scanning mode (see 3.6.2 on page 36), except the
following.
The exact moment for file testing is specified with the help of the Scan Files as
They are field group.
To test server files as they are created, mark the Created checkbox.
Created files are checked as they are closed.
To test server files as they are launched or opened, mark the Accessed
checkbox.
If the Created and Accessed checkboxes are unchecked, the filter
mode is disabled.
Figure 30. Specifying scan area for the filter mode (NWAdmin)
Page 45

Anti-Virus Protection for Servers 45
Figure 31. Specifying scan area for the filter mode (ConsoleOne)
33..66..55.. AAccttiioonnss ttoo ttaakkee wwiitthh iinnffeecctteedd aanndd
ssuussppiicciioouuss ffiilleess.. AAccttiioonnss ttaabb ppaaggee
To specify which actions to take with infected or suspicious files,
1. Choose the Actions tab page (see Fig. 32).
Figure 32. Actions to take with infected and suspicious files
Page 46

46 Kaspersky Anti-Virus for Novell NetWare
2. In the Action to Take with Infected Files option button group,
specify which actions should be taken regarding infected files:
• No Action— to perform no actions;
• Disinfect — to disinfect (if this is possible); if you want to make
a copy of the infected file in the "quarantine" directory before
disinfecting it, mark the Save a Copy in Quarantine Directory
before Disinfection checkbox;
• Delete — to delete;
• Move to Quarantine Directory — to move files to the
"quarantine" directory;
• Rename — to rename the file into a new one with the same
filename but another extension - .vir (or .vi1, .vi2, ..., if such file
already exists).
3. In the Action to Take with Suspicious Files option button group,
specify which actions should be taken regarding suspicious files:
"Suspicious" files are the files detected by the heuristic analyzer.
• No Action— to perform no actions;
• Delete — to delete;
• Move to Quarantine Directory — to move files to the
"quarantine" directory;
• Rename — to rename the file into a new one with the same
filename but another extension - .vir (or .vi1, .vi2, ..., if such file
already exists).
4. In the Action to Take with Infected Workstation option button
group, specify which actions should be taken regarding the
workstation from which the server received the infected file:
• if you want to send a warning message to the infected
workstation, mark the Show a Warning Message checkbox;
The workstation will receive a message specified on the Alerts tab page
(see 3.6.6 on page 47).
• if you want to block further server access performed from the
infected workstation, mark the Disable Further Access
checkbox.
Page 47

Anti-Virus Protection for Servers 47
Kaspersky Scanner blocks any accesses to server performed from this
workstation until the workstation is turned off the server by the network
administrator or a user.
5. In the If disinfection failed option button group, specify which
actions to take with an infected file that failed to be "cured":
• if you want to leave the file as it is and input information into a
report, select the Report Only option button;
• if you want to delete the file, select the Delete option button;
• if you want to save the file under another name, select the
Rename option button;
6. If you want the program to delete and rename archived files, mark
the Allow to Delete and Rename Archive checkbox.
33..66..66.. NNoottiiffyyiinngg nneettwwoorrkk uusseerrss aabboouutt
ffoouunndd vviirruusseess.. AAlleerrttss ttaabb ppaaggee
You can specify user names and/or user groups whose workstations will receive
messages if a virus infects the server (see Fig. 33).
Figure 33. A message that users receive when a virus is detected on the server.
The mode of notifying the administrator and/or other network users about found
viruses is enabled on the Alerts tab page.
Page 48

48 Kaspersky Anti-Virus for Novell NetWare
To do this, mark the Send Alerts checkbox on the Alerts tab page (see Fig. 34).
Use the Alert Recipients field to specify the list of network users who will receive
messages about detected viruses; write down the message text in the Alert
Message field.
While editing message lines, use the following macros:
NAME-OF-USER
NAMES-OF-INFECTED-FILES
NAMES-OF-VIRUSES
ANTI-VIRUS-SERVER
ser name;
ame of infected file;
irus name;
erver name.
Figure 34. Notifying network users about viruses found
To form a list of users who will receive messages about detected viruses,
1. Click Select. After that, the Select Recipient dialog box appears
(see Fig. 35).
Page 49

Anti-Virus Protection for Servers 49
Figure 35. Creating a list of users who will receive messages
2. Add those users who ought to receive messages about found users.
To add a user:
• click Add, the Select object dialog box appears (see Fig. 36);
Figure 36. Selecting a user who will receive messages about viruses
• select the required user from the list;
• click OK.
To delete a user from the group of message recipients, choose him in
the list of the Select Recipient dialog box and click Remove.
3. Click OK in the Select Recipient dialog box.
Page 50

50 Kaspersky Anti-Virus for Novell NetWare
33..66..77.. AAddvvaanncceedd ooppttiioonnss.. AAddvvaanncceedd ttaabb
ppaaggee
33..66..77..11.. SSppeecciiffyyiinngg ppaatthhss ttoo wwoorrkkiinngg aanndd
Kaspersky Scanner unpacks packed files and archives to temporary files in its
working directory. You can specify a path to the working directory on the
Advanced tab page (see Fig. 37). Here you can specify paths to the ''quarantine"
directories where infected and suspicious files are copied to (only if you
previously enabled the backup mode – see 3.6.5 on page 44).
""qquuaarraannttiinnee"" ddiirreeccttoorriieess
Figure 37. Paths to working and "quarantine" directories
To specify a working directory,
1. Click the Browse button that corresponds to the Working
Directory field. The Select Directory dialog box appears.
2. Choose the required directory from the list.
3. Click Select.
Page 51

Anti-Virus Protection for Servers 51
Use the same procedures to specify a path to the "quarantine" directory for
infected files in the Infected Files Quarantine Directory field, a path to the
corresponding directory used for storing suspicious files – in the Suspicious
Files Quarantine Directory field.
To stop virus distribution, the "quarantine" directories for infected and
suspicious files should be accessed only by the system administrator.
33..66..77..22.. AAddjjuussttiinngg tthhee llooaadd ooff aa sseerrvveerr wwiitthh
KKaassppeerrsskkyy SSccaannnneerr rruunnnniinngg oonn iitt
The level of utilizing the server resources by Kaspersky Scanner is specified on
the Advanced tab page.
In the CPU Usage rule box, specify the level of CPU utilization for
Kaspersky Scanner. To do this, use the mouse to pull the slider to the
desired position between minimal and maximum CPU usage values.
The less the CPU is utilized (that is, the closer the slider is to the Min of
the CPU Utilization rule box), the slower Kaspersky Scanner works in
the scanning mode, giving the server required control more often and
for longer periods of time.
33..66..77..33.. CCoonnffiigguurriinngg tthhee ccoonnnneeccttiioonn bbeettwweeeenn
ccoonnttrrooll mmoodduullee aanndd KKaassppeerrsskkyy AAVV
sseerrvveerr
Options for connecting the control module with Kaspersky AV server are
specified on the Advanced tab page.
To specify the connection settings, in the Manage Information field:
1. Enter the numeric IP-address of the Kaspersky AV server in the IP
address field.
2. Enter the communication port number (decimal value) in the Port
field. By default, the program sets port 8193.
Page 52

52 Kaspersky Anti-Virus for Novell NetWare
33..66..77..44.. SSppeecciiffyyiinngg tthhee nnuummbbeerr ooff ssccaann rreeqquueessttss
You can determine the number of file scan requests simultaneously processed by
the server on the Advanced tab page.
Enter the maximum number of requests in the Number of Scan Processes field.
The default field value is "2". The administrator is the one to determine the
optimal value on the basis of server resources data.
33..66..88.. SScchheedduulleedd ssccaannnniinngg ooppttiioonnss..
SScchheedduulleedd SSccaannss ttaabb ppaaggee
33..66..88..11.. SSccaann aarreeaa
Scan area for the scheduled scanning mode is specified in the Options tab page
of the Manual Scanning page using a set of Location to Scan fields (see
Fig. 38). The directories and/or volumes to be scanned are indicated in the Scan
These Folders list; the directories and/or volumes to be excluded from scanning,
in the Exclude These Folders list.
Figure 38. Specifying scan area for the scheduled scanning mode (NWAdmin).
Page 53

Anti-Virus Protection for Servers 53
Figure 39. Specifying scan area for the scheduled scanning mode (ConsoleOne).
To specify the directories and/or volumes to be scanned,
1. Click the Select button near the Scan These Folders field. The
Objects List dialog box appears (see Fig. 40).
Figure 40. The list of directories for scanning
2. Specify the path for scanning:
• To add a scanning path to the list, click the Add button to open
the Select Directory dialog box (see Fig. 41), select the
necessary directory, and click OK. You can specify scanning of
all the server’s volumes indicating *: in the input field.
Page 54

54 Kaspersky Anti-Virus for Novell NetWare
Figure 41. Selecting directory
The program checks ALL the directories added to the Folders to Scan
list. To view all the directories to be scanned, open the list.
• To exclude a directory, mark it in the list of the Objects List
dialog box and click the Remove button.
3. Click the OK button in the Objects List dialog box.
Similarly, directories can be excluded from the list to scan using the Select
button near the Exclude Folders.
33..66..88..22.. FFiilleess ttoo ssccaann
The files to be scanned are specified on the Options tab page of the Manual Scanning page using a set of Files to Scan fields (see Fig. 38). The settings
specified for the on-demand scanning mode are also valid for the scheduled
scanning mode (see 3.6.3.3 on page 40). Changing of the settings is similar to
their specifying.
33..66..88..33.. SScchheedduulliinngg ssccaannnniinngg
The schedule for automatic scan launching is specified on the Scheduled Scans
tab page (see Fig. 42).
You can set one of the following starting schedules for scanning:
• every day;
Page 55

Anti-Virus Protection for Servers 55
• every week;
• every month.
Furthermore, you can disable the scheduled scanning mode, if necessary.
Figure 42. Scheduled scanning mode. Configuring daily scanning.
To start daily scanning at the desired moment of time,
1. Select the Every Day option button.
2. Form the At these times list by adding the desired scanning start-
up times. To add scheduled scanning time:
• Click Add, and the Time dialog box appears (see Fig. 43);
Page 56

56 Kaspersky Anti-Virus for Novell NetWare
Figure 43. Choosing time for scheduled scanning
• enter the scanning start-up time in the Hours and Minutes
fields – hours and minutes, correspondingly;
3. Click OK.
You can launch scanning processes more than once a day. To do this,
add several items to the At these times list. You can delete a start-up
time by selecting the corresponding item in the list and clicking Delete.
To start the task on a weekly basis,
1. Select the Every Week option button (see Fig. 44).
2. Mark the checkboxes of the corresponding days of the week when
scanning is planned to start.
3. Form the At these times list by adding the desired scanning start-
up times.
Figure 44. Scheduled scanning mode. Configuring weekly scanning.
Page 57

Anti-Virus Protection for Servers 57
To start monthly scanning at the desired days of the month,
1. Select the Every Mont option button (see Fig. 45).
2. Using the mouse, click on the calendar days to specify when the
scheduled scanning should be performed.
3. Form the At these times list by adding the desired scanning start-
up times.
NWAdmin
ConsoleOne
Figure 45. Scheduled scanning mode. Configuring monthly scanning.
Page 58

58 Kaspersky Anti-Virus for Novell NetWare
To disable the scheduled scanning mode, select the "Never" option
button.
33..66..99.. SSccaannnniinngg rreessuulltt llooggss.. LLooggggiinngg,,
SSttaattiissttiiccss ttaabb ppaaggeess
After loading the AVKernel module on the server, scanning results are recorded
in logs:
• Manual Log — a result log for the on-demand and scheduled
scanning modes;
• RealTime Log — a result log for filter mode scanning.
33..66..99..11.. CCoonnffiigguurriinngg ssccaannnniinngg rreessuulltt llooggss
To specify which messages should be recorded in scanning result logs,
1. Choose the "Logging" tab page (see Fig. 46).
Figure 46. Result log configuration window
2. Use the Information to Record in the Logfile checkbox group to
specify which messages should be recorded in scanning result logs:
• Infected files — messages about infected files;
Page 59

Anti-Virus Protection for Servers 59
• Suspicious files — messages about suspicious files;
• Warnings — warnings notifying users that modified or
damaged viruses have been detected;
• Information about packed executables — information on
packed executable files;
• Information about archived files — information about
archived files;
• Clean files — information about clean files.
In addition, the log contains records on date and time of the scanning process,
file checking and unloading Kaspersky Scanner from the server memory. The
structure of different message types is described below.
33..66..99..11..11.. MMeessssaaggeess aabboouutt iinnffeecctteedd ffiilleess
In case an infected file is detected, the record of the following format is generated
in the report:
SYS:\TEST\MY_FILE.EXE : infected: <NAME> (User :
<USER_NAME>)
SYS:\TEST\MY_FILE.EXE : <ACTION>,
where <NAME> — virus name,
<USER_NAME> — name of the user whose file contains a virus,
<ACTION> — action to take with an infected file. Depending on which action (to
take with infected files) you chose (see 0on page 44), <ACTION> can have the
following value:
• "disinfected" — disinfected;
• "deleted" — deleted;
• "removed" — moved to the "quarantine" directory (see 3.6.7.1 on
page 50);
• "renamed" — the file was renamed into a new one with the same
filename (as the "source" infected file) but another extension - .vir (or
.vi1, .vi2, ..., if such file already exists).
If you decided to leave the infected file intact (No Action — see 0
on page 44), only a single line will be registered in the log file:
SYS:\TEST\MY_FILE.EXE : infected: <NAME> (User :
<USER_NAME>).
Page 60

60 Kaspersky Anti-Virus for Novell NetWare
If by any reason, it is not possible to perform the action (of your choice)
regarding the infected file, the record will have the following format:
SYS:\TEST\MY_FILE.EXE : infected: <NAME> (User :
<USER_NAME>)
SYS:\TEST\MY_FILE.EXE : <ACTION> failure
or, if disinfection was chosen as an action to take, but it turned out as an
impossible one,
SYS:\TEST\MY_FILE.EXE : disinfection failed:
33..66..99..11..22.. MMeessssaaggeess aabboouutt ssuussppiicciioouuss ffiilleess
In case a "suspicious" virus-like file is detected, the record of the following format
is generated in the report:
SYS:\TEST\MY_FILE.EXE : suspicion TYPE_<TYPE>,
where <TYPE> is one of the following lines:
• Com — looks like a file infected by an unknown virus that affects
.com files;
• Exe — looks like a file infected by an unknown virus that affects
.exe files;
• ComExe — looks like a file infected by an unknown virus that
affects COM and EXE files;
• ComTSR, ExeTSR, SysTSR, ComExeTSR — looks like a file
infected by an unknown memory resident virus that affects COM,
EXE and SYS files;
• Boot — file/sector looks like a file infected by an unknown boot-
virus or a boot-virus installer;
• Trojan — file looks like a trojan horse program;
• Trivial — looks like a file infected by an unknown virus which
replaces executable files in the current directory with himself
(typically, the file size of this virus doesn't exceed 300 bytes);
• HLL — looks like a file infected by an unknown virus that affects
executable files. Written in the high level programming code (C,
Pascal);
• Win32 — looks like a file infected by an unknown Windows-affecting
virus;
• Formula — an Excel file contains suspicious commands;
Page 61

Anti-Virus Protection for Servers 61
• Macro.Word97.Fs – a virus of the Macro.Word97.Fs type is
suspected.
• RemoteTemplate – a document contains a reference to the
template which automatically loads when the file is opened;
• HTML.SecurityBreach.2 – an HTML-file or an HTML-formatted e-
mail message contains a reference to a suspicious object;
• IRC-Worm.generic — looks like a file infected by an unknown
worm-virus which sends itself via IRC channels;
• BAT — looks like a file infected by an unknown virus that affects
BAT files;
• VBS.I-Worm — looks like a file infected by an unknown worm-virus,
which sends itself via e-mail.
33..66..99..11..33.. WWaarrnniinnggss
In case a modified or damaged virus is detected, the record of the following
format is generated in the report:
SYS:\TEST\MY_FILE.EXE : warning <NAME>,
where <NAME> — virus name.
33..66..99..11..44.. MMeessssaaggeess aabboouutt ppaacckkeedd eexxeeccuuttaabbllee ffiilleess
If packed executable files are unpacked, a record of the packaging utility (used to
pack these files) name of the following format will be registered in the report:
SYS:\TEST\MY_FILE.EXE : packed: <NAME>,
where <NAME> — name of the packaging utility.
33..66..99..11..55.. MMeessssaaggeess aabboouutt aarrcchhiivveedd ffiilleess
When archived files are unpacked, a record of the archiver's name is registered
in the report. The following format is used:
SYS:\TEST\MY_FILE.EXE : archive: <NAME>,
where <NAME> — name of the program that was used to create the archive.
33..66..99..11..66.. MMeessssaaggeess aabboouutt cclleeaann ffiilleess
A record for clean files of the following format is registered in the report:
SYS:\TEST\MY_FILE.EXE : ok.
Page 62

62 Kaspersky Anti-Virus for Novell NetWare
You can limit the size of scan result logs. To do this, in the Log File
Options group:
1. Mark the Limit Log File Size to a maximum of checkbox.
2. Enter the maximum log size (in kilobytes) in the value field.
33..66..99..22.. VViieeww ssccaann rreessuullttss
To view statistics and/or filter mode scan results, perform the following.
For NWAdmin control module:
1. Choose the Real-time Scanning page (see Fig. 47).
2. Switch to the Statistics tab page.
For ConsoleOne control module:
1. Choose the Statistics tab page (see Fig. 47).
2. Select the View RealTime Statistics option button.
NWAdmin
Page 63

Anti-Virus Protection for Servers 63
Console One
Figure 47. Statistics for filter mode scanning
The following is displayed in the Statistics table:
• Files — number of scanned files;
• Archives — number of scanned archives;
• Packed — number of scanned packed executables;
• I/O errors — number of errors occurred when the user tried to open
the file;
• Infected — number of infected files found;
• Suspicions & Warnings — number of detected suspicious (that is,
detected by means of the heuristic analyzer) files;
• Disinfected — number of disinfected files;
• Deleted — number of deleted files;
• Removed — number of files moved to "quarantine" directories;
• Renamed — number of renamed files.
Page 64

64 Kaspersky Anti-Virus for Novell NetWare
You can view the scan result log (see Fig. 48). To do this, click
View Log.
NWAdmin
ConsoleOne
Figure 48. Scan result log
To view statistics and/or the on-demand and scheduled scan results
log, perform the following.
For NWAdmin control module:
1. Choose the Manual Scanning page (see Fig. 49).
Page 65

Anti-Virus Protection for Servers 65
2. Switch to the Scan tab page.
For ConsoleOne control module:
3. Choose the Statistics tab page (see Fig. 49).
4. Select the View Manual Statistics option button.
Displaying statistics is similar to that of the filter mode scanning.
NWAdmin
Console One
Figure 49. Statistics for the on-demand scanning mode
Page 66

CChhaapptteerr 44..UUppddaattiinngg AAnnttii--VViirruuss BBaasseess
((CCoonnssoolleeOOnnee))
44..11.. OOrrggaanniizziinngg CCeennttrraalliizzeedd UUppddaattee
DDiissttrriibbuuttiioonn
Kaspersky Updater module is designed for automatic updating of anti-virus
databases on Kaspersky AV servers of a corporate network.
Kaspersky Updater:
• copies anti-virus databases to the Update server via the Internet
(using network or remote connections) or from the local folder.
Kaspersky Updater may be configured to retrieve automatically the
updates on a desired schedule: daily, weekly, or monthly;
• distributes the retrieved updates to one or several Kaspersky AV
servers. The updates may be distributed on a certain schedule.
Kaspersky Updater allows anti-virus bases to be updated in a centralized manner
within a large corporate network. To do this, the network administrator configures
the Kaspersky AV software package in the following way.
1. Kaspersky Updater regularly copies the updates of anti-virus bases
(via the Internet) to one of the Update servers available, referred to
as a main Update server.
2. For the rest Update servers, Kaspersky Updater regularly retrieves
anti-virus base updates from this main Update server.
3. On the same regular basis, Kaspersky Updater distributes updates
to Kaspersky AV network servers from all the Update servers.
Updating can be monthly, weekly, or daily. Kaspersky Labs recommends users to
update anti-virus bases daily.
Page 67

Updating Anti-Virus Bases (ConsoleOne) 67
44..22.. IInnssttaalllliinngg aanndd UUnniinnssttaalllliinngg
KKaassppeerrsskkyy UUppddaatteerr
44..22..11.. SSyysstteemm rreeqquuiirreemmeennttss
To run on a server, Kaspersky Updater requires:
• Novell NetWare operating system (version 5.x or 6).
• Approximately 5 MB of free disk space.
• Support for TCP/IP interface.
• JVM of any version (version 2 or higher is recommended).
44..22..22.. IInnssttaalllliinngg KKaassppeerrsskkyy UUppddaatteerr
Kaspersky Updater is installed on a server from the workstation or the server
where the ConsoleOne control module has been installed.
To install Kaspersky Updater on a server,
1. Expand the Kaspersky Anti-Virus primary item in the left panel of
the Novell ConsoleOne window.
2. In the list of NDS trees, choose the name of the tree with the server
where you want to install Kaspersky Updater on.
3. Expand the NDS tree and choose Kaspersky Updater from the list
of anti-virus products.
4. Open the context menu and choose the Install line.
5. Select the names of the required server(s) in the Select servers to
install to list of the Installation Kaspersky Updater for Novell
Netware dialog box (see Fig. 50).
Page 68

68 Kaspersky Anti-Virus for Novell NetWare
Figure 50. The Install Kaspersky Updater dialog box
6. If required, change the destination volume and directory names for
storing anti-virus databases in the Select destination directory
field.
7. Click the Install button.
These steps result in installing Kaspersky Updater on the selected server. In
addition, the name of this server and the
Kaspersky Updater item of the NDS tree.
icon will be included in the
44..22..33.. UUnniinnssttaalllliinngg KKaassppeerrsskkyy UUppddaatteerr
To uninstall Kaspersky Updater from a server,
1. Expand the Kaspersky Anti-Virus primary item in the left panel of
the Novell ConsoleOne window.
2. In the list of NDS trees, choose the name of the tree with the server
wherefrom you want to uninstall Kaspersky Updater.
3. Expand the NDS tree and choose the Kaspersky Updater item.
4. Expand the Kaspersky Updater item and choose the server
wherefrom you want to uninstall Kaspersky Updater.
5. Open the context menu and choose the Uninstall line.
6. Click Yes in the appearing Uninstaller uninstall request dialog box
(see Fig. 51).
Page 69

Updating Anti-Virus Bases (ConsoleOne) 69
Figure 51. Request for uninstalling Kaspersky Updater
To uninstall Kaspersky Updater from a group of servers, follow the same
procedure. The only difference is that in this case you have to access the context
menu in the line with the Kaspersky Updater item of the selected NDS tree, not
the name of a server. The program will be uninstalled from all the servers of this
tree.
44..22..44.. UUppggrraaddiinngg KKaassppeerrsskkyy UUppddaatteerr
If Kaspersky Updater (version 4.0.0 or lower) is installed on your server, you
need to upgrade the version.
The servers demanding updating are marked in the Kaspersky Anti-Virus
primary item with the icon depicting red-colored globe (see 3.2.1 on page 22).
To update Kaspersky Updater on a server,
1. Select the Upgrade Version command in the context menu (see
Fig. 52).
Figure 52. Upgrading Kaspersky Updater on a server.
Page 70

70 Kaspersky Anti-Virus for Novell NetWare
2. Click the OK button in the appearing Upgrade Kaspersky Updater
request (see Fig. 53).
Figure 53. Request for upgrading the version.
3. Click the OK button in the appearing system message on
successful Kaspersky Updater upgrading.
44..33.. KKaassppeerrsskkyy UUppddaatteerr
LLooaaddiinngg//UUnnllooaaddiinngg
Kaspersky Updater is loaded on/unloaded from a server from a workstation or a
server with installed ConsoleOne control module.
You can load/unload Kaspersky Updater using the context menu of the left panel
of the Novell ConsoleOne window (see Fig. 54).
Figure 54. Loading Kaspersky Updater to a server.
Page 71

Updating Anti-Virus Bases (ConsoleOne) 71
To load/unload Kaspersky Updater on/from a server
1. Expand the Kaspersky Anti-Virus primary item in the left panel of
the Novell ConsoleOne window.
2. In the list of NDS trees, select the name of the tree containing the
server whereto/wherefrom you want to load/unload Kaspersky
Updater.
3. Expand the NDS tree selected and choose the Kaspersky Updater
item.
4. Open the Kaspersky Updater item and select the server
whereto/wherefrom you want to load/unload Kaspersky Updater.
5. Open the context menu and select the Load Kaspersky Updater
on server/UnLoad Kaspersky Updater on server line.
Upon completing these steps, the program kernel (KAVScheduler.JAR
module) and anti-virus bases will be loaded to the server’s memory.
In addition, the program may be loaded/unloaded using the Kaspersky
Updater dialog box for configuring settings on the About tab page using the
keys Load Updater/Unload Updater (see 4.4.5 on page 85).
44..44.. CCoonnffiigguurriinngg aanndd LLaauunncchhiinngg
KKaassppeerrsskkyy UUppddaatteerr
44..44..11.. GGeenneerraall iinnffoorrmmaattiioonn oonn pprrooggrraamm
sseettttiinnggss.. KKaassppeerrsskkyy UUppddaatteerr iinn ……
ddiiaalloogg bbooxx
Kaspersky Updater on a server is configured from a workstation or a server
where the ConsoleOne control module has been installed. Its configuration does
not require loading the program on the server.
Page 72

72 Kaspersky Anti-Virus for Novell NetWare
To access the configuring dialog box of Kaspersky Updater installed on
a server,
1. Expand the Kaspersky Anti-Virus primary item in the left panel of
the Novell ConsoleOne window.
2. In the list of NDS trees, choose the name of the tree with the
required Update server.
3. Expand the NDS tree and choose Kaspersky Updater from the list
of anti-virus products.
4. Expand the Kaspersky Updater item and choose a required server
from the list of servers with installed Kaspersky Updater.
5. Open the context menu and choose the Properties item. The
Kaspersky Updater in …dialog box appears. It allows Kaspersky
Updater upgrading program to be configured on a server chosen
and retrieving and distributing of the updates of anti-virus databases
to be started (see Fig. 55).
Figure 55. The Kaspersky Updater in … dialog box.
The Kaspersky Updater in … dialog box comprises six tab pages designed to
configure Kaspersky Updater settings.
About – this tab page displays general information on program settings, forms
the list of Kaspersky AV servers to distribute the updated anti-virus bases
Page 73

Updating Anti-Virus Bases (ConsoleOne) 73
from a given Update server, enables users to set up the update
distribution mode and load/unload Kaspersky Updater on the server (see
4.4.5 on page 85).
Settings – enables users to configure settings for an Update server to retrieve
updates of anti-virus bases (see 4.2.2 on page 67).
Scheduler – schedules retrieving of updates of anti-virus bases by Update
server (see 4.4.4 on page 82).
Advanced – configures the settings for connection between control module and
an Update server (see 4.4.3 on page 80).
Logging – configures and views the work log on retrieving updates by an Update
server and distributing them to the Kaspersky AV servers (see 4.4.7 on
page 93).
Update – provides a manual launching of retrieving updates by Update server
and distributing them to the Kaspersky AV servers (see 4.4.6 on
page 89).
Upon installing Kaspersky Updater on a server, it is necessary to edit its settings
on the Settings, Advanced, Scheduler, and About tab pages. To activate the
settings, click the Apply button at the bottom of the Kaspersky Updater in …
dialog box. If the program is yet unloaded on the server, load it. Then, the antivirus bases on the servers specified will be updated automatically according to
the settings applied.
Manual startup of retrieving updates (from the Update tab page) is considered
optional.
To exit the Kaspersky Updater dialog box for configuring its settings,
• saving the changes introduced, click the OK button at the bottom of
the Kaspersky Updater in … dialog box.
• without saving the changes, click the Cancel button.
44..44..22.. CCoonnffiigguurriinngg uuppddaattee rreettrriieevvaall
sseettttiinnggss.. SSeettttiinnggss ttaabb ppaaggee
The Settings tab page enables users to configure the settings for update
retrieval by Update server.
First, select the source of updates on this tab page, choosing the Source of
updates line in the popup menu, called by clicking the shortcut on the Settings
tab page.
Page 74

74 Kaspersky Anti-Virus for Novell NetWare
Select one of the two update sources — via the Internet or from a network folder
— in the dialog box opened. The default source of updates is via the Internet.
44..44..22..11.. CCoonnffiigguurriinngg uuppddaattiinngg ffrroomm tthhee nneettwwoorrkk
ffoollddeerr
The updating from the network folder is recommended for Update servers that
retrieve updates from the main server.
To configure the Update server for retrieving updates from the network
folder ,
1. Mark the Network Path checkbox and click the Browse button
located to the right of the input field (see Fig. 56).
Figure 56. The Settings tab page; the Source of updates mode; updating anti-virus bases
2. Choose the server with the updates of anti-virus bases in the dialog
pox appeared and click the OK button (see Fig. 57).
from network folder.
Page 75

Updating Anti-Virus Bases (ConsoleOne) 75
3. In the next dialog box, select the directory of the server specified
with the updates—the update source. If Kaspersky Updater copies
the updates to the main server in an automatic mode, select the
Bases subdirectory in the directory for storing the anti-virus bases
(see Fig. 58). Address your network administrator for the location of
updates if the updates are copied manually from the Internet. Upon
selecting the directory, click the OK button.
Figure 57. Select main server dialog box
Figure 58. Select the directory with
updates dialog box
44..44..22..22.. CCoonnffiigguurriinngg uuppddaattiinngg vviiaa tthhee IInntteerrnneett
Updating via the Internet is recommended for the main Update server.
To configure an Update server for retrieving the updates via the Internet
,
1. Mark the Internet checkbox (see Fig. 59).
2. Form the list of WEB and FTP servers to retrieve updates (sources
of updates). The server with the first address in the list is the main
server for retrieving updates. The rest servers are used in turn in
case of a failure at the main server until the updating is successfully
completed or all the servers in the list are exhausted.
Page 76

76 Kaspersky Anti-Virus for Novell NetWare
Figure 59. The Settings tab page; the Source of updates mode; updating of anti-virus
bases via the Internet
The default list contains the addresses recommended by Kaspersky Labs for
retrieving updates of anti-virus bases. The list of servers may be changed using
the following buttons located rightward:
• New URL: adds new address to the list by selecting the type of
address—HTTP or FTP—in the appearing Enter new Url dialog
box, inputting the address into the input field, and clicking the OK
button (see Fig. 60).
• Edit URL: edits the address selected similarly to adding new
address.
• Delete URL: deletes the address selected.
• Up: moves the address selected one line upwards.
• Down: moves the address selected one line downwards.
Page 77

Updating Anti-Virus Bases (ConsoleOne) 77
Figure 60. The Enter new Url dialog box.
44..44..22..22..11.. CCoonnffiigguurriinngg ppaarraammeetteerrss ooff aa pprrooxxyy sseerrvveerr
If updating via the Internet is selected as the update source and a proxy server
will be used to connect to the Internet provider, its settings need configuring.
To configure the settings for connection via a proxy server,
1. Select the Proxy line in the popup menu called by the shortcut
button on the Settings tab page (see Fig. 61).
2. Mark the Use Proxy checkbox in the appearing window.
3. Indicate the settings for connection to proxy server in the set of
Servers fields:
• Address only in decimal format (for example, 125.5.29.1) in the
field Address;
• Port only in decimal format (for example, 3128) in the field
Port;
4. If a password is used to access the proxy server, it is necessary to
specify the authentication settings of the proxy user. For this
purpose,
• Mark the Authentication checkbox;
• Input the name of a proxy user into the Login field;
• Input the password for accessing the proxy server into the
Password field.
Address your system administrator for more detailed information on
the connection settings described above.
Page 78

78 Kaspersky Anti-Virus for Novell NetWare
Figure 61. The Settings tab page; Proxy mode.
44..44..22..22..22.. CCoonnffiigguurriinngg rreeccoonnnneeccttiioonn sseettttiinnggss
If connection with the update source in the automatic updating mode via the
Internet has failed, three attempts to reconnect will be made with a 5-min interval
(each next attempt is made after connection failure of the previous attempt). The
number of reconnection attempts with the source and the interval may be
changed on the Settings tab page.
The list of addresses starting from the first (main) address is exhausted at each
reconnection attempt until the connection is either successfully established or all
the servers in the list are tried.
To set the number of attempts for reconnecting with the source for
updating anti-virus bases,
1. Select the Modes of copying item in the popup menu called by
shortcut button on the Settings tab page (see Fig. 62)
2. Set the following parameters in the Attempts of connection field
group:
Page 79

Updating Anti-Virus Bases (ConsoleOne) 79
• The number of reconnection attempts in the field Amount;
• The time interval between reconnection attempts in the field
through.
44..44..22..33.. CCoonnffiigguurriinngg tthhee mmooddee ffoorr ccooppyyiinngg aannttiivviirruuss bbaasseess
Independently of the updating source selected, it is necessary to set the mode for
copying anti-virus bases. Only changes and new anti-virus bases will be copied
from the source by default.
To set the copying mode for anti-virus bases,
1. Select the Modes of copying item in the popup menu called by the
shortcut on the Settings tab page.
2. In the new window (see Fig. 62), mark the checkbox that
corresponds to the required copying mode in the Check files button
group:
• Without check – all anti-virus bases available on the source
will be copied;
• General check – only refreshed and new anti-virus bases will
be copied. Information about changes is obtained by comparing
files with the description of bases on the source and the Update
server.
• Check of each file – copy only refreshed and new anti-virus
bases. Information about changes is obtained by comparing
files of anti-virus bases on the source and Update server.
-
By default, the General check button is switched on.
Page 80

80 Kaspersky Anti-Virus for Novell NetWare
Figure 62. The Settings tab page. The Modes of copying mode.
44..44..33.. CCoonnnneeccttiinngg tthhee ccoonnttrrooll mmoodduullee
wwiitthh aann UUppddaattee sseerrvveerr.. TThhee
AAddvvaanncceedd ttaabb ppaaggee
Parameters for connection of the control module with an Update server and a
directory for storing anti-virus bases are specified on the Advanced tab page
(see Fig. 63).
Page 81

Updating Anti-Virus Bases (ConsoleOne) 81
Figure 63. The Advanced tab page.
To specify a directory for storing anti-virus bases, on an Update server:
1. Click the Browse button located on the right from the Directories
field.
2. In the dialog box appeared, select the directory of the Update server
whereto you want to place updates of anti-virus bases and click OK
(see Fig. 64). The default directory for storing anti-virus bases was
specified during installation of Kaspersky Updater. After the
directory has been chosen, click ОК.
Page 82

82 Kaspersky Anti-Virus for Novell NetWare
Figure 64. The dialog box for choosing a directory for storing updates.
To specify the connection parameters, in the Manage Information field
group:
1. Enter a numerical IP address of an Update server in the IP address
field. By default, the program has the server IP address in this field.
2. Enter the decimal number of the communication port into the Port
field. By default, the program has port 8194.
44..44..44.. SScchheedduulliinngg tthhee uuppddaattee rreettrriieevvaall bbyy
aann UUppddaattee sseerrvveerr.. TThhee SScchheedduulleerr ttaabb
ppaaggee
The Scheduler tab page is used to schedule the update retrieval by an Update
server (see Fig. 65). The default mode is manual update retrieval from the
Update tab page of the Kaspersky Updater in… dialog box (see 4.4.6 on
page 89).
To schedule retrieving updates by an Update server,
1. Set a value of the option button:
• Every Day – daily update retrieving;
• Every Week – weekly update retrieving;
Page 83

Updating Anti-Virus Bases (ConsoleOne) 83
• Every Month – monthly update retrieving;
• On Demand – manual update retrieving; corresponds to
disabling the scheduled updating mode.
The default value is Every Day, the time of update retrieving is 0:00 PM.
2. In the field group that corresponds to the selected mode, set the
schedule for retrieving updates.
• If the daily updating mode is selected, you should set a time for
retrieving updates by creating the At these times list (see
Fig. 65). The default time is 0:00 PM. The list can contain one
or more values.
Figure 65. The Schedule tab page. Setting the weekly updating mode.
• To add a time for retrieving updates to the list, click the
Add tab page. In the Time dialog box set the start-up time:
an hour in the upper field and minutes in the lower field (see
Fig. 66). The field values are set by spin buttons located on
the right. Click OK.
• To change the time for retrieving updates, double click the
specified time in the At these times list. Set the necessary
time in the Time dialog box. Click OK.
To remove a time from the At these times list, select it and
click the Remove button.
Page 84

84 Kaspersky Anti-Virus for Novell NetWare
• If the weekly updating mode is selected, mark the checkboxes
that correspond to the days of week when you need to receive
updates (see Fig. 65). You can mark several checkboxes at the
same time. After this, you must set the time for retrieving
updates by forming the At these times list (see above).
Figure 66. Setting the time for scheduled retrieving updates.
• If the monthly updating mode is selected, mark the checkboxes
that correspond to those days of the month when you want to
receive updates (see Fig. 67). You can mark several
checkboxes at the same time. After this, you must set the time
for retrieving updates by forming the At these times list (see
above).
Figure 67. The Schedule tab page. Setting the monthly updating mode.
Page 85

Updating Anti-Virus Bases (ConsoleOne) 85
44..44..55.. CCrreeaattiinngg aa lliisstt ooff sseerrvveerrss ffoorr
ddiissttrriibbuuttiinngg uuppddaatteess.. SSeettttiinngg tthhee
ddiissttrriibbuuttiioonn mmooddeess.. TThhee AAbboouutt ttaabb
ppaaggee
The About tab page serves to create a list of Kaspersky AV servers, which will
receive updates from an Update server, set the distribution modes for each of the
Kaspersky AV servers, and load/unload Kaspersky Updater on the server.
The upper part of the About – Kaspersky Updater tab page contains general
information on Kaspersky Updater settings (see Fig. 68):
Figure 68. The Kaspersky Updater in … dialog box. The About tab page.
• Connection to Server — this line indicates connection with an
Update server and can contain the following values: Authenticated
– successful connection, Not Established – unsuccessful
connected, Locked – access to the Update server is blocked by
another workstation.
• Scheduler Status — this line indicates the mode of retrieving
updates by the Update server:
• Demand – on user’s demand;
Page 86

86 Kaspersky Anti-Virus for Novell NetWare
• Daily – every day;
• Weekly – every week;
• Monthly – ever month.
• Source — this line shows an updating source for an Update server:
Internet – via the Internet and Folder – from a folder.
• Last Date of Update — this line contains the date and time when
the Update server received the last update of anti-virus bases.
In the middle of the About – Kaspersky Scanner tab page there is a table with a
list of Kaspersky AV servers, which receive updates from the Update server. The
table has the following columns:
• KAV Server – the name of a Kaspersky AV server;
• Update Mode – the mode of distributing updates to this server;
• On/off– current status of this Kaspersky AV server (active/inactive).
The buttons for creating a list of servers and setting distribution modes are on the
right of the table.
The buttons for loading/unloading Kaspersky Updater on the server are in the
lower part of the About tab page.
44..44..55..11.. CCrreeaattiinngg aanndd eeddiittiinngg aa lliisstt ooff sseerrvveerrss ffoorr
ddiissttrriibbuuttiinngg uuppddaatteess
To add a server/servers to a list of Kaspersky AV servers, which will
receive updates from an Update server,
1. Click the Add button.
2. In the KAV Servers dialog box, select necessary server/servers
from a list of Kaspersky AV servers (see Fig. 69). To select all
servers from the list, click All Servers.
Page 87

Updating Anti-Virus Bases (ConsoleOne) 87
Figure 69. The KAV Servers dialog box
The list of servers contains only those Kaspersky AV servers that
belong to the same NDS tree as the corresponding Update server. You
will not be able to update anti-virus bases on servers of other NDS
trees.
3. Click OK.
To remove a server from the list of Kaspersky AV servers that will
receive updates from an Update server, select it in the table an click
Delete.
You can simultaneously remove a group of servers. You can select several
Kaspersky AV servers using a mouse/keyboard or the Select All button.
44..44..55..22.. SSeettttiinngg tthhee ddiissttrriibbuuttiioonn mmooddee
To set the mode of distributing updates to a Kaspersky AV server
selected in the list of servers, click one of the buttons of the Update
Mode group:
• On Demand – for manual updating. In this mode, a user sends
updates from an Update server to a Kaspersky AV server using the
Update tab page of the Kaspersky Updater in… dialog window
(see 4.4.6, p. 89).
• Automatic – for automatically updating. In this mode, an Update
server sends updates to a Kaspersky AV server immediately after it
has retrieved it. This is a default mode.
• Scheduler – for scheduled updating. In this mode, an Update
server automatically sends updates to a Kaspersky AV server
according to user’s schedule.
The schedule for distributing updates on a Kaspersky AV server can
be set in the Kaspersky Scanner in… – Scheduler dialog box
(see Fig. 70) similarly to setting a scheduled for retrieving updates
by an Update сервером using the Scheduler tab page (see 4.4.4,
Page 88

88 Kaspersky Anti-Virus for Novell NetWare
p. 82). An exception is the value set for a default option –
Automatic.
Figure 70. The About tab page. Setting the schedule for distributing updates.
Note the difference between schedules, which you set on the
Scheduler tab page and the About tab page in the Kaspersky
Scanner in… – Scheduler dialog box. On the Scheduler tab page you
set a schedule for RETRIEVING updates by an Update server. In the
Kaspersky Scanner in… – Scheduler dialog box, you set schedules
for DISTRIBUTING the updates from the Update server to Kaspersky
AV servers. However, your steps during setting these processes are
similar.
The update distribution mode can be set for a group of Kaspersky AV servers.
You can select several Kaspersky AV servers by using a mouse or a keyboard or
the Select All button.
44..44..55..33.. LLooaaddiinngg//uunnllooaaddiinngg KKaassppeerrsskkyy UUppddaatteerr
oonn tthhee sseerrvveerr
Using the About tab page, Kaspersky Updater is loaded/unloaded on a server by
two buttons: Load Updater and Unload Updater. The status of these buttons
(active/inactive) indicates if the program is resident in the server memory.
Page 89

Updating Anti-Virus Bases (ConsoleOne) 89
To load Kaspersky Updater on a server using the About tab page,
click the Load Updater button to load and the Unload Updater button
to unload the program.
44..44..66.. MMaannuuaall ssttaarrtt ooff rreettrriieevviinngg aanndd
ddiissttrriibbuuttiinngg uuppddaatteess.. TThhee UUppddaattee ttaabb
ppaaggee
The Update tab page allows a manual start of retrieving updates by an Update
server and distributing them to the Kaspersky AV servers. The Update server
receives updates according to the settings on the Settings and Advanced tab
pages.
You can manually update or distribute the updates irrespectively of the
mode set for this server on the Scheduler/About tab page.
The updating/distributing session can be opened by the Update server and a
workstation that has a ConsoleOne control module. If a session is opened on the
Update server, all operations will be performed by the Kaspersky Updater
program. If the session is opened on a workstation, the process will be governed
by the ConsoleOne control mode with the Kaspersky Updater settings. Updating
from a workstation is helpful when a session from an Update server is
unavailable (the server is busy, no Internet connection, etc.).
44..44..66..11.. SSttaarrttiinngg aa sseessssiioonn ffrroomm aann UUppddaattee
sseerrvveerr
To start updating/distribution of anti-virus bases from an Update server,
1. If Kaspersky Updater is not loaded on the server, load it (see 4.3 on
page 70).
2. If the settings of Kaspersky Updater have been modified, it is
necessary to apply them by clicking the Apply button in the lower
part of the Kaspersky Updater in…. dialog box.
3. In the pop-up menu, which is activated by the button on the Update
tab shortcut, choose on the Server. As a result, the Update tab
Page 90

90 Kaspersky Anti-Virus for Novell NetWare
page is loaded in the mode of starting an updating session from an
Update server (see Fig. 71).
Figure 71. The Update tab page. Starting the session from the server
The upper part of the Update tab page contain information on the
following parameters of retrieving updates by the Update server:
• Current time on – the current time on the Update server;
• External updater on – the date when the Update server
received the last update;
• Connection in – the source from which the Update server
retrieves updates (Internet или Loсal).
The lower part of the Update tab page contains a table with information
on the Update server and a list of all Kaspersky AV servers that receive
updates from this Update server, irrespectively of the distribution mode
(the list of servers for distributing updates is formed on the About tab
page see section 4.4.5.1, p. 86). The table has the following columns:
• Receiver – the object name (Updater or the name of the
Kaspersky AV server);
Page 91

Updating Anti-Virus Bases (ConsoleOne) 91
• Scheduler – the mode of receiving/distributing updates for this
object;
• Last date of Update – the date of last updating of anti-virus
bases on this server;
• State – a percentage of completed updating / distributing; after
the process is completed, this cell gets empty.
• On/Off – the current status of the object (enabled/disabled).
4. Using a keyboard or a mouse, select those servers in the table,
whose anti-virus bases you want to update and click the Update
Now button in the upper right corner of the tab page.
If Kaspersky Updater is not launched on the server or updating or
distributing processes are being executed on the Update server, the
Update Now is inactive.
As a result, Kaspersky Updater will first update anti-virus bases on an
Update server, and after this, it will distribute the updates to the chosen
Kaspersky AV servers. In the Status cell of the table, you can see a
percentage of updated anti-virus bases.
If anti-virus bases of were updated manually only on the Update server,
the updates will be sent to the Kaspersky AV servers according to the
settings on the About tab pages.
44..44..66..22.. UUppddaattiinngg aannttii--vviirruuss bbaasseess ffrroomm aa
wwoorrkkssttaattiioonn
To start an updating session from a workstation,
open a menu from the shortcut on the Update tab page and choose on
the WorkStation in this menu. You will see the Update tab page using
which you can start an updating session from a workstation (see Fig. 72).
Page 92

92 Kaspersky Anti-Virus for Novell NetWare
Figure 72. The Update tab page. Starting an updating session from a workstation.
If an updating session is opened on a workstation, there is no need to
launch Kaspersky Updater, because all the necessary operations will be
performed by the ConsoleOne control module.
A source from which an Update server retrieves updates (Internet or
Loсal) is indicated in the upper part of the Update tab page in the
Connection in line. Using the Update Bases button, which is also
located here, you can start an updating session.
The Update Bases button is always active if an updating session is
started from a workstation.
The lower part of the Update tab page contains a table with information
about an Update server and a list of all Kaspersky AV servers which
receive updates from this Update server, irrespectively of the update
distribution mode. This table is identical to the table that corresponds to
starting the updating session from an Update server (see above for
description).
Using a keyboard or a mouse, select those servers in the table, whose
anti-virus bases you want to update and click the Update Bases button.
The ConsoleOne control module will first update anti-virus bases on an
Update server, and after this, it will distribute the updates to the chosen
Page 93

Updating Anti-Virus Bases (ConsoleOne) 93
Kaspersky AV servers. In the Status cell of the table, you can see a
percentage of updated anti-virus bases. The name of the Update Bases
button is changed for Stop Updater. Clicking this button, you can
terminate the updating process.
If anti-virus bases were updated manually only on an Update server, the
updates will be sent to the Kaspersky AV servers according to the
settings on the About tab pages.
44..44..77.. CCoonnffiigguurriinngg tthhee lloogg aanndd vviieewwiinngg
rreessuullttss.. TThhee LLooggggiinngg ttaabb ppaaggee
Results of each session on updating anti-virus databases on the Update and
Kaspersky AV servers are recorded in the log of the Kaspersky Updater – the
report file update.log.
Using the Logging tab page, you can configure and view the log.
44..44..77..11.. CCoonnffiigguurriinngg tthhee lloogg wwiitthh uuppddaattiinngg
rreessuullttss aanndd ddiissttrriibbuuttiinngg aannttii--vviirruuss
ddaattaabbaasseess
The log records the following events:
• date and time of updating – date, month, year, time (hour, minutes,
second);
• server name on which the anti-virus databases have been updated –
"Kaspersky Update <server name >" or "Kaspersky Scanner in
<server name >";
• updating mode – "schedule" for automatically updating and "<user
name ><IP address>" for manually updating;
• updating results (the content can be configured). By default, the
message reports about the source and results of updating.
To specify what information about the updating results must be
recorded in the log,
1. Select the Logging tab page (see Fig. 73).
2. Use the Information to Record in the Logfile checkbox group to
specify what messages should be recorded in the log:
Page 94

94 Kaspersky Anti-Virus for Novell NetWare
• Parameters — settings of Kaspersky Updater during the
current session on updating anti-virus databases on the
Update server (recorded only for the Update server);
• Source of update — information about connection to the
source of updates (recorded only for the Update server);
• Result of update — results of updating anti-virus databases on
the Update or Kaspersky AV servers;
• Error of update — warning about failed updating anti-virus
databases;
• File is not changed — notification about changed anti-virus
databases;
• File is successfully refreshed — notification about
successfully refreshed anti-virus databases.
Figure 73. The configuration window for logs with results of updating anti-virus databases.
You can limit the size of the log by setting a maximum value for a report file. After
the set value has been reached, the report file will be overwritten.
Page 95

Updating Anti-Virus Bases (ConsoleOne) 95
To limit the log size,
1. In the Log File Options group, tick the Limit Log File Size to a
maximum of checkbox.
2. Enter the maximum log size (in kilobytes) in the value field. By
default, the log has a value of 1024 Kb.
44..44..77..22.. VViieewwiinngg tthhee lloogg
To view the log of Update server's retrieving updates and distributing
them to Kaspersky AV servers, click View Log on the Logging tab
page. A log window will be opened.
The left table of the log window (see Fig. 74) contains general information on an
updating session, and the right table shows parameters and results og the
chosen updating session. The Object column contains the name of the
parameter, and the Result displays the value of this parameter for the current
updating session.
Figure 74. The log window with the updating results
Page 96

96 Kaspersky Anti-Virus for Novell NetWare
To view the parameters and results of an updating session,
select the corresponding row in the left table and you will see the
necessary information in the right table.
The content of the right table is defined by the settings on the Logging tab page
(see 4.4.7.1 on page 93).
To close the log, click Close.
44..44..77..22..11.. IInnffoorrmmaattiioonn aabboouutt aann uuppddaattiinngg sseessssiioonn oonn tthhee
UUppddaattee sseerrvveerr
If anti-virus databases were updated on an Update server, the right table of the
event log will contain the following information about this session:
#20 Aug 2002 13:24:56 Kaspersky Updater on
<SERVER_NAME>: schedule – for automatically
updating;
#20 Aug 2002 13:24:56 Kaspersky Updater on
<SERVER_NAME>: <USER_NAME> <IP-ADDRESS> – for
manually updating;
where <SERVER_NAME> is the name of the Update
server whose anti-virus database has been updated
and
<USER_NAME> <IP-ADDRESS> —are the name and the IP
address of a user who manually updated his antivirus databases.
The left table, depending on the log settings, can contain the following
information:
• Parameters – Kaspersky Updater settings during the current
updating session:
• Current path – the path to the current folder for storing updates
on the Update server;
• Scheduler – the regime for retrieving the updates by the
Update server (Demand – manually, Daily, Weekly and
Monthly);
• Mode of copying – the mode of copying the anti-virus
databases (Without check – all anti-virus databases available
on the source are copied; General check and Check of each
Page 97

Updating Anti-Virus Bases (ConsoleOne) 97
file – only refreshed and new databases are copied. See
section 4.4.2.3 on page 79).
• Server updates – a list of Kaspersky AV servers that receive
updates from the Update server and the mode of retrieving the
updates (Automatic – automated, Demand – manual, Daily –
everyday as scheduled, Weekly – every week as scheduled,
and Monthly – every month as scheduled);
• Source of updating – the means (Internet – via the Internet
and Local – from the Shared Documents folder) and sources
of retrieving the updates (a list of URLs or a path to the Shared
Documents folder);
• Using proxy server – proxy-server settings: the address and
the port;
• Source of update – displays the results of connection of the
Update server to the updating source;
• Result of update – shows the results of updating anti-virus
databases on the Update server;
• Error of update – reports about an error if updating has failed;
• File is not changed – reports that anti-virus databases have not
been refreshed;
• File is successfully refreshed – reports that anti-virus databases
have been successfully refreshed;
44..44..77..22..22.. IInnffoorrmmaattiioonn aabboouutt aann uuppddaattiinngg sseessssiioonn oonn tthhee
KKaassppeerrsskkyy AAVV sseerrvveerr
If anti-virus databases were updated on the Kaspersky AV server, the right table
of the event log will contain the following record about this session:
#20 Aug 2002 13:24:56 Kaspersky Scanner on
<SERVER_NAME>: schedule – if the updates were
sent automatically;
#20 Aug 2002 13:24:56 Kaspersky Scanner on
<SERVER_NAME>: <USER_NAME> <IP-ADDRESS> – if the
updates were sent manually;
where <SERVER_NAME> is the name of the Kaspersky
AV server whose anti-virus database has been
updated and
<USER_NAME> <IP-ADDRESS> are the name and the IP
address of a user who manually updated his antivirus databases.
Page 98

98 Kaspersky Anti-Virus for Novell NetWare
The left table, depending on the log settings, can contain the following
information:
• Result of update – informs about the results of updating the anti-
virus databases on the Kaspersky AV server;
• File is not changed – reports that the anti-virus databases have
remained unchanged;
• File is successfully refreshed – reports that the anti-virus
databases have been refreshed;
• Error of update – informs about an error if updating has failed.
Page 99

CChhaapptteerr 55..UUppddaattiinngg AAnnttii--VViirruuss BBaasseess
((NNWWAAddmmiinn))
55..11.. LLaauunncchhiinngg tthhee UUppddaatteerr
In managing Kaspersky AV server protection using the NWAdmin control
module, simultaneous updating of anti-virus bases on several servers, as well as
specifying an updating schedule, ARE NOT AVAILABLE. You will have to
perform a regular manual launching of Kaspersky AV Updater for each protected
server.
You can perform updating of anti-virus bases without interrupting Kaspersky AV
functioning on the server.
To update anti-virus bases on a server,
1. Select the Updates page in the NWAdmin control module window
(see Fig. 75).
Figure 75. Updating anti-virus bases
2. Click Update Now.
Kaspersky AV Updater will be launched.
Page 100

100 Kaspersky Anti-Virus for Novell NetWare
55..22.. TThhee ppuurrppoossee ooff KKaassppeerrsskkyy AAVV
UUppddaatteerr
Kaspersky Anti-Virus Updater (Kaspersky AV Updater) is designed for automatic
updating of anti-virus databases, which contain virus descriptions and methods of
disinfection.
The updater copies anti-virus databases and executable modules via Internet
(using network or remote connections) or from a local folder.
55..33.. KKaassppeerrsskkyy AAVV UUppddaatteerr IInntteerrffaaccee
The updater interface is executed in the Windows wizard-like fashion (Windows
Wizard) – it consists of several consecutive windows (steps); you can switch
between windows using Back and Next buttons, and complete the updating
process by clicking Done. To abort updating at any moment (step), click Cancel.
55..33..11.. KKaassppeerrsskkyy AAVV UUppddaatteerr iinniittiiaall
wwiinnddooww
Immediately after the updater is launched, the wizard's initial window appears on
the screen: Welcome to the Kaspersky AV Updater Wizard (see Fig. 76).
This window displays package components to update and update sources, as
well. If you want to change any program settings, mark the Change settings
checkbox. Otherwise, the following steps (described below) regarding changing
options will be omitted.
 Loading...