

Page 1

KASPERSKY LAB
Kaspersky Anti-Spam 2.0
Enterprise Edition / ISP Edition
ADMINISTRATOR’S GUIDE
Page 2

KASPERSKY ANTI-SPAM 2.0
ENTERPRISE EDITION / ISP EDITION
Administrator’s Guide
© Kaspersky Lab
http://www.kaspersky.com
© Ashmanov & Partners Ltd.
http://www.ashmanov.com
Revision Date: June 2004
Page 3

Contents
CHAPTER 1. KASPERSKY ANTI-SPAM 2.0 ENTERPRISE EDITION / ISP
EDITION ....................................................................................................................... 8
1.1. What's new in Kaspersky Anti-Spam 2.0 ........................................................... 10
1.2. Licensing policy ................................................................................................... 11
1.3. Hardware and software system requirements ................................................... 12
1.4. Distribution Kit...................................................................................................... 12
1.5. Services provided to registered users ................................................................ 13
1.6. Formatting conventions.......................................................................................14
CHAPTER 2. KASPERSKY ANTI-SPAM STRUCTURE AND ARCHITECTURE..... 16
CHAPTER 3. INSTALLING KASPERSKY ANTI-SPAM.............................................. 20
3.1. Preparing for the installation................................................................................ 20
3.2. Installing applications included in the Kaspersky Anti-Spam software
package.............................................................................................................. 21
3.3. Installing the license key...................................................................................... 22
3.4. Integrating Kaspersky Anti-Spam into your mail system ................................... 23
CHAPTER 4. KASPERSKY ANTI-SPAM OPERATION AND FILTERING
PHILOSOPHY ............................................................................................................ 24
4.1. Configuring filtering settings ................................................................................ 24
4.2. Data updating procedure..................................................................................... 24
4.3. Filtering philosophy.............................................................................................. 25
4.3.1. Address, headers and message size analysis ............................................ 26
4.3.2. Message content analysis – content filtering............................................... 27
4.3.3. Actions to be applied to messages .............................................................. 28
4.3.4. Filtering profiles and filtering rules application order.................................... 31
4.3.4.1. Profiles application order ....................................................................... 31
4.3.4.2. Message modification during processing.............................................. 32
4.3.4.3. Filtering results....................................................................................... 33
4.4. Preinstalled filter profiles...................................................................................... 35
4.4.1. Stages of the preinstalled filter profiles operation........................................ 35
4.4.1.1. Detection of spam attributes: analysis of message headers................ 36
Page 4

4 Kaspersky Anti-Spam 2.0 Enterprise Edition / ISP Edition
4.4.1.2. Message evaluation............................................................................... 36
4.4.1.3. Reaction to spam................................................................................... 38
4.4.2. Setting up preinstalled filter profiles.............................................................. 39
4.4.2.1. Selecting default reaction to spam ........................................................ 40
4.4.2.2. Choosing reaction to spam for particular users .................................... 42
4.4.2.3. Selecting filtering level severity.............................................................. 43
4.4.3. Specific headers assigned by the filter......................................................... 44
CHAPTER 5. CONFIGURING FILTERING PARAMETERS....................................... 47
5.1. Starting WebConfigurator.................................................................................... 47
5.2. Working with WebConfigurator ........................................................................... 48
5.2.1. Working with common profiles. The common tab ....................................... 48
5.2.1.1. Creating a common profile .................................................................... 49
5.2.1.2. Activating common profiles.................................................................... 50
5.2.1.3. Deleting profiles ..................................................................................... 51
5.2.2. Working with personal profiles. The personal tab........................................ 52
5.2.2.1. Creating personal profiles...................................................................... 52
5.2.2.2. Activating personal profiles.................................................................... 53
5.2.3. Editing filter profiles....................................................................................... 54
5.2.3.1. Creating filtering rules ............................................................................ 55
5.2.3.2. Switching to editing an existing rule ...................................................... 56
5.2.3.3. Deleting existing rules............................................................................ 56
5.2.3.4. Controlling rule application procedures................................................. 56
5.2.3.5. Editing filter profile name, description and field of application.............. 57
5.2.3.6. Saving profiles........................................................................................ 59
5.2.4. Filtering rule editing....................................................................................... 59
5.2.4.1. Filtering rule edit page ........................................................................... 59
5.2.4.2. Setting new conditions........................................................................... 61
5.2.4.2.1. Conditions related to the IP address of the sending
mail server............................................................................ 62
5.2.4.2.2. Conditions related to the sender’s e-mail .............................. 62
5.2.4.2.3. Conditions related to recipient’s e-mail address.................... 63
5.2.4.2.4. Conditions related to message headers................................ 64
5.2.4.2.5. Condition related to content filtering results .......................... 65
5.2.4.2.6. Condition related to message size ........................................ 66
5.2.4.3. Editing conditions................................................................................... 67
5.2.4.4. Deleting conditions................................................................................. 68
Page 5

Contents 5
5.2.4.5. Creating new actions .............................................................................68
5.2.4.5.1. Options and settings of the change recipient action.............. 68
5.2.4.5.2. Options and settings of the change header action ................ 69
5.2.4.6. Editing actions........................................................................................ 71
5.2.4.7. Deleting actions...................................................................................... 72
5.2.4.8. Saving rules............................................................................................ 72
5.2.5. Working with lists. The e-mails, ip addresses, dns blacklists tabs............. 73
5.2.5.1. Viewing lists............................................................................................ 74
5.2.5.2. Creating new lists................................................................................... 76
5.2.5.3. Editing lists ............................................................................................. 77
5.2.5.3.1. Creating a new list entry........................................................ 77
5.2.5.3.2. Editing list entries .................................................................. 78
5.2.5.3.3. Deleting list entries................................................................ 79
5.2.5.3.4. Editing list name and description........................................... 79
5.2.5.4. Deleting lists ........................................................................................... 80
5.2.5.5. Saving lists .............................................................................................81
5.2.6. Working with sample spam messages ........................................................ 82
5.2.6.1. Adding sample messages ..................................................................... 82
5.2.6.2. Editing sample messages ..................................................................... 83
5.2.6.3. Deleting sample messages ................................................................... 84
5.2.7. General filter settings.................................................................................... 84
5.2.7.1. Notifications of rejection sent to the original message sender ............. 85
5.2.7.2. Generating the list of licensed users .....................................................86
5.2.8. Saving Filter configuration ............................................................................ 87
CHAPTER 6. UPDATING THE CONTENT FILTERING DATABASE........................ 89
6.1. Selecting the source of the content filtering database update ........................... 90
6.2. Launching the updating process......................................................................... 90
6.2.1. Scheduled launch ......................................................................................... 91
6.2.2. Launching the content filtering database update process from the
command line................................................................................................ 91
6.3. Viewing results..................................................................................................... 92
APPENDIX A. ADDITIONAL INFORMATION ABOUT KASPERSKY ANTI-SPAM .. 93
A.1. The ap-process-server program (master process)............................................ 93
A.1.1. Starting and stopping the master process................................................... 93
A.1.2. The ap-process-server program configuration file ...................................... 94
Page 6

6 Kaspersky Anti-Spam 2.0 Enterprise Edition / ISP Edition
A.1.3. System log (syslog) records detail levels ....................................................95
A.2. The ap-mailfilter program (filtering process) command line parameters .......... 96
A.3. Client modules for mail systems......................................................................... 98
A.3.1. Interaction of the client modules with the filtering service........................... 98
A.3.2. kas-milter (client module for Sendmail) ....................................................... 99
A.3.2.1. Operation of the kas-milter program ..................................................... 99
A.3.2.2. The kas-milter program configuration file ........................................... 100
A.3.2.3. Configuring Sendmail when using kas-milter..................................... 101
A.3.3. kas-pipe (client module for Postfix, Exim) .................................................101
A.3.3.1. kas-pipe operation............................................................................... 101
A.3.3.2. kas-pipe configuration file.................................................................... 102
A.3.3.3. Configuring Postfix when using kas-pipe............................................ 104
A.3.3.4. Configuring Exim when using kas-pipe.............................................. 105
A.3.4. kas-exim (client module for Exim).............................................................. 106
A.3.4.1. Compilation of the kas-exim program................................................. 106
A.3.4.2. kas-exim configuration parameters..................................................... 107
A.3.5. kas-qmail (client module for Qmail) ........................................................... 108
A.3.5.1. kas-qmail operation ............................................................................. 108
A.3.5.2. The kas-qmail program configuration file ........................................... 108
A.3.5.3. Configuring Qmail when using kas-qmail........................................... 110
A.3.6. kas-cgpro (client module for Communigate Pro) ......................................110
A.3.6.1. kas-cgpro operation............................................................................. 110
A.3.6.2. The kas-cgpro configuration file.......................................................... 111
A.3.6.3. Configuring Communigate Pro when using kas-cgpro...................... 112
A.4. Configuration files.............................................................................................. 113
A.4.1. Configuration files and their location in the file system ............................. 113
A.4.2. Headers of XML files.................................................................................. 113
A.4.3. Filter profiles list (profiles.xml).................................................................... 114
A.4.4. Set of e-mail addresses lists (emails.xml) ................................................. 115
A.4.5. Set of IP address lists (Iplists.xml)............................................................. 115
A.4.6. Set of DNS-based RBL service lists (dnsblacklists.xml)........................... 116
A.4.7. Filter profile ................................................................................................. 116
A.4.8. E-mail addresses list .................................................................................. 121
A.4.9. IP addresses list ......................................................................................... 121
A.4.10. DNS-based RBL service list .................................................................... 122
A.4.11. List of sample spam messages for users (samples.xml)........................ 123
Page 7

Contents 7
A.4.12. User’s sample spam message ................................................................ 123
A.4.13. Advanced filter settings file (settings.xml)................................................ 124
A.4.14. List of predefined categories (catlist.xml) ................................................ 124
A.5. Updater script configuration file ........................................................................125
A.6. Updater script command line switches............................................................. 125
APPENDIX B. KASPERSKY LAB............................................................................... 126
B.1. Other Kaspersky Lab products......................................................................... 127
B.2. Contact Us......................................................................................................... 131
APPENDIX C. ASHMANOV & PARTNERS LTD....................................................... 132
APPENDIX D. INDEX .................................................................................................. 133
Page 8

CHAPTER 1. KASPERSKY ANTI-
SPAM 2.0 ENTERPRISE
EDITION / ISP EDITION
Kaspersky Anti-Spam 2.0 Enterprise Edition / ISP Edition is a software package that filters incoming e-mail messages in order to protect users against unsolicited bulk mailings or Spam.
Kaspersky Anti-Spam filters incoming e-mail messages received via SMTP
protocol before the messages are delivered to the user's mailbox. Depending on
the rules set by the administrator, Kaspersky Anti-Spam processes messages,
namely, it can deliver a message to the recipient unaltered, block it, generate a
notification on the message rejection, add or change header, etc.
Every incoming e-mail message is checked for attributes characteristic of
unsolicited bulk messages (Spam).
Firstly, the program checks all possible attributes of the incoming message:
sender's and recipient’s addresses (envelope), message size and its headers
(including the From and To headers). In particular, the program detects the
following "suspicious" situations:
• presence of the sender's address in the "black list" or its absence in the
"white list";
• presence of the sender's IP address in the "black list" or its absence in the
"white list";
• presence of the sender's IP address in a DNS-based real time black hole
list (RBL);
RBL (real time black hole list) – is a database of mail server IP
addresses that allow uncontrolled bulk mailings. These mail
servers allow receiving messages from any sender and
forwarding them to any recipient.
If spam is consistently sent from an address, and the
administration of the mail server does not take any preventive
measures, such server may be reported to RBL as a spammer.
The spammer will be included in the database and this make it
possible to automatically deny message delivery from this server.
Some RBL services include free mail services and other "decent"
servers in their databases. This is why their data should be used
Page 9
Kaspersky Anti-Spam 2.0 Enterprise Edition / ISP Edition 9
with caution to avoid false triggering.
• absence of the sender’s server in the DNS;
• matching of one of the message headers a regular expression stored by
the program;
• excessively large size of the message.
For more details on e-mail message analysis, see para 4.3.1, page 26.
Secondly, content filtering is used, i.e. the message content is analyzed
(including the header Subject) and attached files.
1
Linguistic algorithms based on
a comparison with sample messages and regular expressions (words and word
combinations) are used.
Messages that do not match the parameters of a filtering rule or of a content
filtering algorithm are sent to the recipients unaltered.
Messages that display features characteristic of spam will be processed in
accordance with the filtering rules (see para 4.3, page 25).
Profiles (sets of filtering rules), lists of addresses these rules refer to, and other
Kaspersky Anti-Spam settings can be modified by the mail service administrator
using the WebConfigurator program.
Kaspersky Anti-Spam is distributed with preinstalled filter profiles (sets
of filtering rules) that ensure effective spam detection and provide for
several options of spam processing. Before you start using the filter,
make sure that you have reviewed the filtering schemes suggested (see
para 4.4, page 35) and choose the scheme that suits you better.
If you wish to modify these preinstalled filter profiles or to create new
profiles, please carefully read chapters of this manual describing the
filter operation logic (see para 4.3, 25) and its setup using the
WebConfigurator program (Chapter 5, page 47).
Pay special attention to the filter setup. An Improper setup may result
in:
• inefficient filter operation (most of the unsolicited messages pass
through the filter)
• the loss of normally allowed e-mails.
1
Plain text, HTML, Microsoft Word and RTF formats analysis is provided. For more details
see para 4.3.2, page 27.
Page 10

10 Kaspersky Anti-Spam 2.0 Enterprise Edition / ISP Edition
Ashmanov & Partners is constantly working on the enhancement and updating of
the linguistic data used for spam detection. To ensure most efficient spam
protection, it is necessary to download the latest versions of these data using the
updater script (see Chapter 6, page 89).
We strongly recommend that you schedule automatic data updating
from cron to start at least 4-6 times per day.
We wish you trouble-free experience with Kaspersky Anti-Spam and hope that
you will appreciate the important benefits it offers:
• the use of Artificial Intelligence methods for message content analysis
(content filtering);
• integration of all filtering methods within a single module and the
possibility of their combination;
• centralized control of all filtering rules through the common web interface.
1.1. What's new in Kaspersky AntiSpam 2.0
The following features present in Kaspersky Anti-Spam 2.0 have undergone
extensive modifications compared to the previous version and have been
extended to include:
• Integration into e-mail client applications. If you choose standard
installation, Kaspersky Anti-Spam 2.0 will be integrated into the e-mail
client application installed on your computer and will operate as a filtering
module. Kaspersky Anti-Spam supports the following e-mail client programs:
Postfix, Sendmail, Qmail, Exim, Communigate Pro
• New installer has been implemented. Kaspersky Anti-Spam 2.0 is now
distributed as a standard package: rpm, deb for Linux or tgz FreeBSD and
its installation is performed using standard Linux or FreeBSD installers.
• The program now offers more user-friendly features:
• the feature used for entering system events into special log
(syslog) has been upgraded. Now it allows to gather statistical
data on the number of processed messages and on the
spam/no spam percentage ratio using standard Unix report
analysis tools.
Page 11

Kaspersky Anti-Spam 2.0 Enterprise Edition / ISP Edition 11
• the feature used for labeling spam messages has become more
convenient: the corresponding token is now added to the
beginning of the Subject of the message.
• The application operational stability has been enhanced:
• problems related to the application's work under Linux Red Hat
9, Suse 9, Red Hat Enterprise Edition and other operating
systems have been eliminated;
• an obsolete utility used for license verification (kavuccsf) has
been removed. The new license module delivers stable
performance under various versions of Linux and FreeBSD;
• an obsolete http server (_httpd) has been removed.
Communication with the WebConfigurator program is ensured
via a standard thttpd server (alternatively apache server can be
used).
• The efficiency of the program's operation has been doubled and
communication with rbl services has been optimized - now the queries are
executed considerably faster.
• Spam detection quality has been improved:
• improved reliability of detecting spam messages with attached
graphic files; GSG-2 technology has been introduced;
• a new feature has been added that allows to look-up the IP
address not only for the last mail transport (relay) agent, but
also for all previous agents (based on the analysis of the
Received header);
• the quality of HTML-format messages analysis has been
improved due to the filtering algorithms of "invisible" text,
random sequences, etc.
• the program can now analyze UUE-encoded messages.
• OEM version of the application has been developed. Along with standard
solutions (Kaspersky Anti-Spam 2.0 Enterprise and Kaspersky Anti-Spam
2.0 ISP), SDK for integration of spam filtering feature into OEM solutions
has been implemented.
1.2. Licensing policy
Kaspersky Anti-Spam 2.0 now offers two types of licensing:
Page 12
12 Kaspersky Anti-Spam 2.0 Enterprise Edition / ISP Edition
• traffic-based licensing (mail traffic filtered during a certain period of
time);
• based on the number of e-mail addresses processed.
The latter type of licensing provides control over the use of Kaspersky Anti-Spam
based on the number of e-mail addresses that the program processes during the
license period.
The list of licensed e-mail addresses is formed by the WebConfigurator program
(the Settings tab) based on the data contained in the key file (see para 5.2.7.2,
page 86). The total number of addresses shall not exceed the number
determined by the license. E-mail messages containing addresses added in
excess of the number of addresses allowed by the license or addresses not
registered altogether will not be filtered (mail messages will be delivered to the
user's mail box unaltered).
Please make sure that you edit the list of licensed recipients before you
start using the filter!
1.3. Hardware and software system
requirements
In order to ensure the proper operation of Kaspersky Anti-Spam, your system
must meet the following hardware and software requirement:
• Linux or FreeBSD 4.x operating system running on the Intel x86 platform;
• At least 500 MHz Intel Pentium III processor;
• At least 256 MB RAM;
• wget and bzip2 programs installed;
• one of the following e-mail client programs: Sendmail, Postfix, Exim,
Qmail, Communigate Pro.
1.4. Distribution Kit
You can purchase Kaspersky Anti-Spam from our dealers (retail box) or in one of
our online stores (visit our website www.kaspersky.com
link).
If you buy a boxed product, the distribution kit will include:
and follow the E-Store
Page 13
Kaspersky Anti-Spam 2.0 Enterprise Edition / ISP Edition 13
• A sealed envelope with the installation disk containing the program
installation files;
• User’s Guide;
• License key file on the installation disk;
• License agreement.
Before you open the envelope with the installation disk, make sure that
you have carefully read the License agreement.
If you buy Kaspersky Anti-Spam online, you will download the installation file
from the Kaspersky Lab website. In this case, the distribution kit will include,
along with the program, this User's Guide. The license key will be included with
the distribution kit or e-mailed to you upon the receipt of your payment.
License Agreement is a legal contract between you and Kaspersky Lab Ltd. that
contains terms and conditions on which you may use the product that you
purchased.
Please read License Agreement carefully!
If you do not agree with the terms and conditions of the License Agreement, you
may return the retail box to the Kaspersky Anti-Spam dealer you purchased it
from and the money you paid for subscription will be refunded to you on the
condition that the envelope with the installation disk has remained sealed.
By opening the sealed envelope with the installation disk, you accept all terms
and conditions of the License Agreement.
1.5. Services provided to registered
users
Kaspersky Lab Ltd. offers to all registered users of their products an extensive
service package enabling registered users to boost the efficiency of Kaspersky
Anti-Spam.
After you have purchased a subscription you become a registered program user
and during the period of your subscription will be provided with the following
services:
• availability of the program upgrades;
Page 14

14 Kaspersky Anti-Spam 2.0 Enterprise Edition / ISP Edition
• support on issues related to the installation, configuration and use of the
product provided by phone or via e-mail;
• information about new Kaspersky Lab products and about new computer
viruses throughout the world (for Kaspersky Lab Ltd. newsletter
subscribers).
Kaspersky Lab does not provide support on issues related to the
performance and the use of operating systems or other technologies.
1.6. Formatting conventions
Various formatting conventions are used throughout this Guide depending on the
purpose of the particular part. These conventions are explained in the table
below.
Convention Meaning
Bold type
Note
Attention!
In order to...,
1. Step 1.
2. …
Problem, example
Menu titles, commands, window
titles, dialog elements, etc.
Additional information, notes
Critical information that requires
special attention
Description of the sequence of
possible actions
Problem definition or an example of
using the program's capabilities
Page 15
Kaspersky Anti-Spam 2.0 Enterprise Edition / ISP Edition 15
Convention Meaning
Solution
[switch]— function
Information message and
command line text
Solution to the problem described
Command line switches
Text contained in the program
configuration files, delivered via
information messages or command
line entries
Page 16

CHAPTER 2. KASPERSKY ANTI-
SPAM STRUCTURE AND
ARCHITECTURE
Since version 2.0, Kaspersky Anti-Spam is no longer a full-featured mail
transport agent (MTA) able to receive, forward or deliver e-mail messages to the
users' mailboxes. These functions are now performed by the server-based MTA
system.
Kaspersky Anti-Spam 2.0:
1. integrates into the mail system;
2. receives messages from this system;
3. checks messages for the presence of spam attributes;
4. depending on the result of the check, modifies messages (labels and
modifies headers, edits the list of recipients);
5. returns messages to the mail system for delivery.
For internal architecture of Kaspersky Anti-Spam see Figure 1.
The client modules are designed to ensure integration of Kaspersky Anti-Spam
into various mail systems. Each client module is implemented so that it takes into
account the peculiarities of each particular mail system and of the integration
method selected.
The Kaspersky Anti-Spam distribution kit includes client modules for Sendmail,
Postfix, Exim, Qmail and Communigate Pro mail systems.
As a rule, the client module is installed in the MTA as a filter and ensures
receiving of messages to be processed from the mail system and returning
processed messages back to the system.
Client modules are launched by the mail system. MTA can launch several client
processes for the parallel processing of several messages. For more details on
the client modules and methods of their integration into the mail systems see
section A.3, page 98.
Page 17
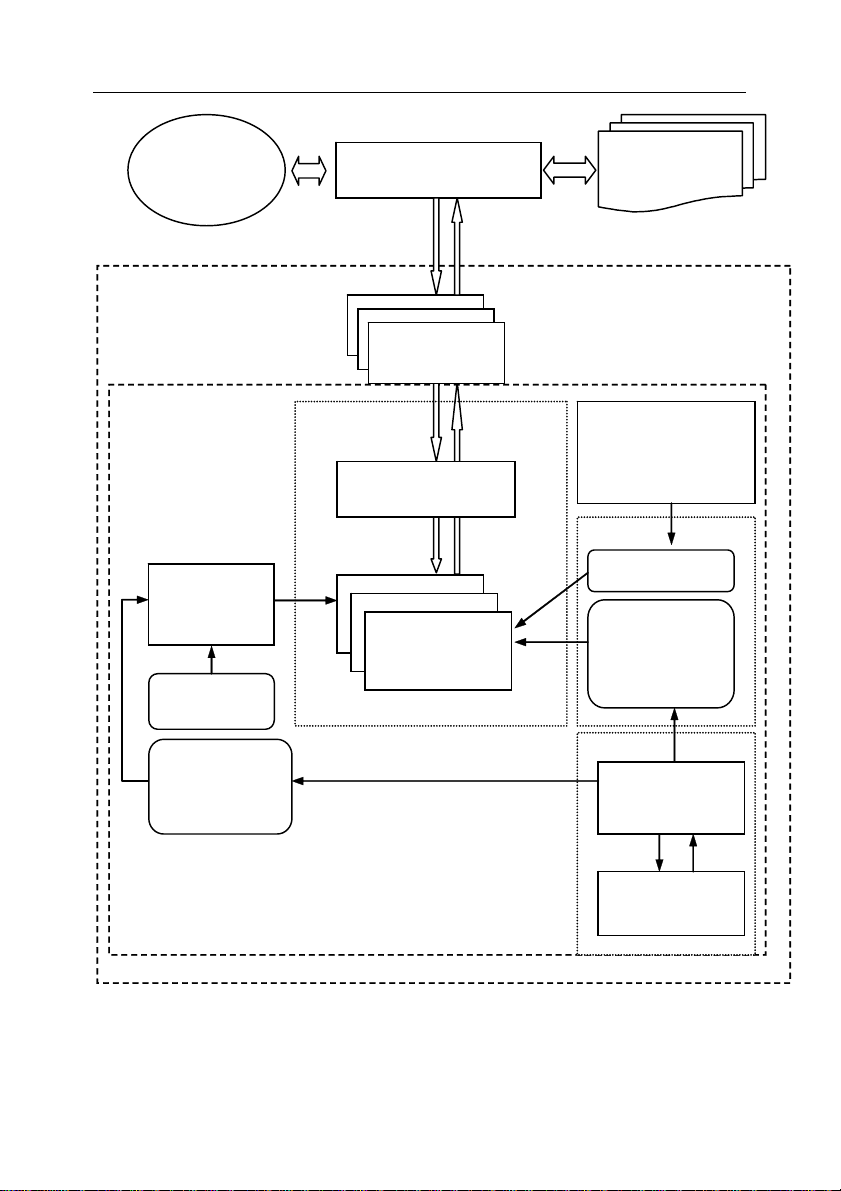
Kaspersky Anti-Spam Structure and Architecture 17
End users'
mailboxes
INTERNET
K
ASPERSKY ANTI-SPAM
MAIL SYSTEM
(MTA)
Client
Module
FILTERING SERVER
Licensing
service
(kas-license)
Key file
List of lic ens ed
mail addresses
Filtering Service
Master process
(ap-process-server)
Filtering process
(ap-mailfilter)
Automatic Internet
update of the filtering
database (sfupdates)
Data
Filtering database
Filter profiles and
local lists
WebTuner
Configuration scrip
(ap-mft-config.cgi)
http server
(kas-thttpd)
Figure 1. Kaspersky Anti-Spam internal architecture
Page 18

18 Kaspersky Anti-Spam 2.0 Enterprise Edition / ISP Edition
Irrespective of the peculiarities of a particular client module, the interaction
between the client and the main module of Kaspersky Anti-Spam, filtering server,
is implemented the same way, using internal data exchange protocol via a
network or a local socket.
The filtering server responses to the clients' requests, receives messages
subject to processing from them and returns results back to the clients.
If the standard installation procedure has been selected, the mail system with the
integrated client module and filtering server will be installed on the same
computer.
However, it is possible to install Kaspersky Anti-Spam filtering server on a
separate server: in this case clients running on a different computer (server), will
exchange data with the filtering server via the local area network using TCP
protocol.
If the filtering server is running on a dedicated computer, it is capable of servicing
several mail servers at the same time provided that this computer has sufficient
power to process the combined mail traffic.
The structure of the filtering server includes:
• the filtering service that checks messages;
• licensing service that checks the availability and the validity of the key
file and works with the list of licensed mail addresses;
• automatic filtering database download and compile script;
• WebConfigurator;
• auxiliary applications and scripts.
The operation of the filtering service is controlled by the master process (approcess-server), that:
• keeps track of requests for connection to the filtering process received
from the clients;
• if there are no free processes available, it starts new processes;
• keeps track of the statuses of the running processes (free/busy);
• once a signal (e.g. SIGHUP) is received, it transfers such signal to a
child process.
When the mail traffic is extensive, the number of running filtering processes may
reach several dozens. When the load on the mail system decreases, free filtering
processes will be stopped. The minimum and the maximum number of filtering
processes running at the same time are determined by the settings specified in
the master process configuration file (see para A.1.2, page 94).
Page 19

Kaspersky Anti-Spam Structure and Architecture 19
When the filtering process starts, it loads filter profiles (sets of filtering rules)
and opens the filtering database (set of data used for the content analysis). After
the connection to the client has been established, the filtering process receives
the header and the body of the message from the client, analyzes them and
returns the results back to the client.
Messages will be analyzed and rules and filter profiles will be applied only if there
is a valid license key installed. If the license is based on the number of mail
addresses, a message will be processes only if the address of the recipient of
such message is in the list of licensed mail addresses.
All checks related to licensing are performed by the licensing service (kaslicense) at the request received from the filtering process.
After the message processing is complete, the filtering process does not stop
and awaits a new request. The filtering process completes only after it has
processed the maximum number of messages (normally about 300) allowed to
be processed by one process or after it has been idle for a long time.
Automatic updater script (sfupdates) is launched according to a schedule
(using crontab) and initiates downloading and compilation of the latest version of
the content filtering database.
WebConfigurator is an administrator's tool that provides web interface for
editing filter profiles and filtering rules, maintaining white and black lists and the
list of licensed mail addresses.
Page 20
CHAPTER 3. INSTALLING
KASPERSKY ANTI-SPAM
Before the installation of Kaspersky Anti-Spam, please carefully read
this chapter as well as the readme-install file that may contain the latest
recommendations on the program installation.
3.1. Preparing for the installation
Before installing Kaspersky Anti-Spam:
• make sure that your system meets all hardware and software
requirements for the installation of Kaspersky Anti-Spam (see para 1.3,
page 12);
• make sure that you have a valid Kaspersky Ant-Spam 2.0 license key
(Enterprise or ISP Edition);
• make sure that you have wget, bzip and perl programs installed;
• make sure that the mail system installed on your server is functioning
properly;
• backup your mail system configuration files.
We recommend that you install the application during the off-work hours
or when the mail traffic is minimal!
Kaspersky Anti-Spam installation includes three steps:
1. installation of applications included into the Kaspersky Anti-Spam
software package;
2. installation of the license key;
3. integration into your mail system.
Page 21
Installing Kaspersky Anti-Spam 21
3.2. Installing applications included
in the Kaspersky Anti-Spam
software package
The installation of Kaspersky Anti-Spam should be performed by the
root user.
Kaspersky Anti-Spam 2.0 is distributed:
• as an rpm package for most versions of Linux OS (RedHat, SuSe,
Mandrake, Fedora, ASP Linux, Alt Linux, etc.);
• deb package for Debian Linux;
• tgz package for FreeBSD OS;
• tar.gz archive with a shell installer for operating systems that do not
include package managers (as for example, Slackware).
In order to install Kaspersky Anti-Spam using an rpm package, execute
command:
rpm –i
<package_name>
In order to install Kaspersky Anti-Spam using a deb package, execute
command:
dpkg –i
In order to install Kaspersky Anti-Spam using a tgz package, execute
command:
pkg_add
In order to install Kaspersky Anti-Spam using a tar.gz archive, execute
commands:
tar xzvf <archive_name>
cd <unpacked_distribution_package_name>
./install.sh
<package_name>
<package_name>
Page 22

22 Kaspersky Anti-Spam 2.0 Enterprise Edition / ISP Edition
The following will be performed during the installation process:
• creation of a user and of the mailflt group, required for the operation of
Kaspersky Anti-Spam;
• installation of all applications included in the Kaspersky Anti-Spam
software package into the /usr/local/ap-mailfilter folder;
• creation and installation of the filtering service launching script (approcess-server), licensing service (kas-license) and http server (kasthttpd) - all this performed at the operating system restart,
• launching all necessary applications and services;
• creation of a record in the mailflt user's crontab for the automatic
launch of the content filtering database updates download script.
As a result of the above actions, the Kaspersky Anti-Spam filtering service will be
installed and launched on your server. However, in order to enable the filtering of
e-mail messages, the license key must be installed and Kaspersky Anti-Spam
must be integrated in your mail system.
3.3. Installing the license key
The license key attached to the license your purchased, will be supplied with the
Kaspersky Anti-Spam distribution kit.
If, for any reason, you did not receive your license key, please contact
Kaspersky Lab's technical support service (support@kaspersky.com).
In order to install your license key, execute command:
/usr/local/ap-mailfilter/bin/install-key
<key_file_name>
If the license key is not installed or is invalid, Kaspersky Anti-Spam will not filter
e-mail messages, but the mail system will still be fully functional: all messages
will be delivered to the recipient, but no checking and labeling will be performed.
It is important to remember that if the license is based on the number of
registered mail addresses, checking will be provided only for the recipients
whose addresses are included in the list of e-mail addresses (within the
maximum number of addresses allowed by the license).
Do not forget to enter addresses into the list of licensed addresses
before you start using the filter!
Page 23
Installing Kaspersky Anti-Spam 23
3.4. Integrating Kaspersky AntiSpam into your mail system
Integration of Kaspersky Anti-Spam into the mail system involves the installation
of the client module in the mail system and modification of the mail system
configuration files.
These actions are performed automatically by the MTA configuration script or by
the configuration script of the mail system installed.
For detailed information on the client modules integration methods and about
modification of the mail system configuration files refer to section A.3, page 98.
In order to integrate Kaspersky Anti-Spam into the mail system installed
on your server, launch the universal MTA configuration script.
/usr/local/ap-mailfilter/bin/MTA-config.pl
In most cases, this script will determine the type of the MTA and will modify its
configuration files as required.
However, in case of non-standard installation or configuration of your MTA, script
MTA-config.pl will be unable to find the configuration files. In this case, you will
have to use the configuration script of the particular e-mail application used.
In order to integrate Kaspersky Anti-Spam into the Sendmail mail
system, execute command:
/usr/local/ap-mailfilter/bin/sendmail-config.pl
In order to integrate Kaspersky Anti-Spam into the Postfix mail system,
execute command:
/usr/local/ap-mailfilter/bin/postfix-config.pl
In order to integrate Kaspersky Anti-Spam into the Exim mail system,
execute command:
/usr/local/ap-mailfilter/bin/exim-config.pl
In order to integrate Kaspersky Anti-Spam into the Qmail mail system,
execute command:
/usr/local/ap-mailfilter/bin/qmail-config.pl
Integration of Kaspersky Anti-Spam into the Communigate Pro mail system is
performed using this mail system's web interface (see para A.3.6.3, page 112).
Page 24
CHAPTER 4. KASPERSKY ANTI-
SPAM OPERATION AND
FILTERING PHILOSOPHY
4.1. Configuring filtering settings
Kaspersky Anti-Spam provides you with powerful tools for detecting spam in the
incoming e-mail traffic. Actions with suspicious messages may range from most
severe (rejection) to quite moderate (e.g., adding an extra header to the
message for further processing by the e-mail program). The mail service
administrator decides which actions should be applied to a particular spam type.
The Kaspersky Anti-Spam distribution kit includes a set of preinstalled filter
profiles that ensure effective spam filtering and provide alternative means for
processing detected spam messages (for more details see para 4.4, page 35).
Filtering rules and profiles as well as the order of their application can be
modified by the system administrator via WebConfigurator (see Chapter 5,
page 47). In addition, the administrator can enable and disable particular profiles
via WebConfigurator.
Editing of filter profiles should be performed with extreme care as even
minor changes may result in serious undesirable consequences such
as false filter triggering or decreased spam detection quality.
All filter operation settings are configured using a convenient web interface
provided by WebConfigurator.
Description of WebConfigurator operation and filtering settings configuration are
described in Chapter 5, page 47.
It is strongly recommended that you familiarize yourself with the filtering
use philosophy before you start using these rules (see para 4.3,
page 25).
4.2. Data updating procedure
To analyze message content, Kaspersky Anti-Spam uses the content filtering
database that includes spam message examples, characteristic terms and other
Page 25

Kaspersky Anti-Spam Operation and Filtering Philosophy 25
data. The linguistic laboratory of Ashmanov & Partners JSC is constantly
improving and updating this database, therefore it is necessary to download the
database updates regularly in order to provide effective spam detection and
processing.
The updates are downloaded via the Internet by the updater script. We strongly
recommend that you include this script into crontab. It is recommended to
schedule it to start at least every hour.
By default the filter data updates are downloaded from
ftp://downloads1.kaspersky-labs.com/sfupdates
download location may be used.
The update can be either incremental (adding new entries to the database) or
complete (complete replacement of the old database with a new version).
Selection and downloading of the updates, content filtering database and the
filtering service restart are performed automatically.
For more details on the content filtering database updates see Chapter 6,
page 89.
; if necessary an alternative
4.3. Filtering philosophy
Processing of an e-mail message is provided by applying filtering rules to such
message.
Each filtering rule consists of an unordered set of conditions and an ordered set
of actions:
• processing of an e-mail message starts with analysis; checking whether
the conditions described in a certain rule are met;
• if at least one condition has not been met, processing of a message by
this rule will be stopped and no actions will be performed;
• if all conditions have been met, then actions defined by this rule will be
applied to this message in the order prescribed by the rule.
Filtering rules grouped into filter profiles. There are two types of filter profiles:
• Common profiles – for all messages, irrespective of the particular
recipient.
• Personal profiles – for messages sent to a certain recipients.
Page 26

26 Kaspersky Anti-Spam 2.0 Enterprise Edition / ISP Edition
4.3.1. Address, headers and message size
analysis
Filtering rules may contain description of the following conditions (as well as their
negations):
• the IP address of the server from which a message was received (i.e. the
relay server that sent the message) matches a specified address.
• the IP address of the server from which a message was received is
included in the specified list.
• one of the DNS-based RBL services included in the specified list
generates a message about "untrustworthiness" of the server from which
a certain message arrived.
• sender’s IP address is not found in the DNS.
• sender’s e-mail address matches a specified address.
• sender’s e-mail address is included in the specified list.
• recipient’s e-mail address (or one of the recipients if there are several
recipients) matches the specified one.
• recipient’s e-mail address (or one of the recipients if there are several
recipients) is included in the specified list.
• message has a header of the specified type (i.e. it contains a specified
name).
• message has a header with a specified name (e.g., From or To) that
matches specified template (regular expression).
• total message size exceeds the specified limit.
• the message content falls into a certain spam category (see para 4.3.2
page 27).
The lists to which filtering rules refer can be of the following types:
• IP addresses lists – contain IP addresses in the aaa.bbb.ccc.ddd or
aaa.bbb.ccc.ddd/nn format.
• E-mail lists – contain e-mail addresses in the user@hostname.domain or
@hostname.domain format. The latter format includes any user of the
specified domain.
• Lists of DNS-based RBL services – contain the names of zones used to
form requests to DNS to check if a certain IP address is included in the
Page 27
Kaspersky Anti-Spam Operation and Filtering Philosophy 27
black list (e.g. to check IP=202.103.129.8 via zone="blackholes.mailabuse.org" a request to DNS with the 8.129.103.202.blackholes.mailabuse.org domain name will be formed).
E-mail recipient’s check is performed:
• in common profiles – according to the full list of recipients.
• In personal profiles – according to the list of those message recipients to
whom this profile is applied.
A filtering rule can simultaneously contain several conditions of different types.
For example, it can block messages where a recipient belongs to list A and the
sender belongs to list B (B – stands for black list for the users included in list A).
4.3.2. Message content analysis – content
filtering
An e-mail message may not have any formal spam attributes – it can be
forwarded to a recipient from an address that is not included in any black list –
but may still contain some "suspicious" information. In order to detect and
process such messages (in the Russian or the English language) content filtering
algorithms are used.
The message content is analyzed using artificial intelligence methods (including
the Subject header). Attached files in the following formats are also processed:
• Text: plain text (ASCII, not multibyte);
• HTML (2.0, 3.0, 3.2, 4.0, XHTML 1.0);
• Microsoft Word (versions 6.0, 95/97/2000/XP);
• RTF.
The task of Kaspersky Anti-Spam is to decrease the flow of unwanted
mail that blocks up user’s mailboxes. 100% detection of all unwanted
mails cannot be guaranteed because excessively strict criteria would
inevitably cause "filtering out" of some non-spam messages.
Two basic methods are used to detect messages with "suspicious" content:
• checking against sample messages (by comparison of their lexical
content);
• detection of regular expressions – words and word combinations.
All data used by Kaspersky Anti-Spam – index (hierarchical category list),
sample messages, regular expressions, etc. are stored in the content filtering
database,.
Page 28
28 Kaspersky Anti-Spam 2.0 Enterprise Edition / ISP Edition
Linguistic lab of Ashmanov & Partners JSC is constantly working on the
enhancement and updating of the content filtering database. Therefore,
it is recommended that you regularly update the database (see Chapter
6, page 89). System administrator can also add new spam message
examples to the database (see para 5.2.6, page 82).
Based on the results of the content analysis, a message may be assigned one or
several index categories of the content filtering database.
Configuring filtering rules using WebConfigurator (Chapter 5, page 47), the
system administrator should set up rules for processing e-mail messages related
to various index categories
2
.
While configuring the program, the system administrator must give the
first priority to saving all "useful" e-mail messages as the loss of just
one important message may be much more harmful to the user than
receiving dozens of unwanted messages. To avoid the loss of
necessary data, it is recommended to apply only moderate processing
actions to the messages "rejected" based on the results of the content
analysis. For example:
• add warning [Spam] to the Subject header;
• add an extra header Keywords=... that will allow users to redirect
such messages to the special folders of their mail clients.
4.3.3. Actions to be applied to messages
If the conditions described in a filtering rule (see para 4.3.1, page 26 and
para 4.3.2 page 27), are met for a certain message, then actions described in
this rule will be applied to such message.
The actions can be:
• "severe" – these actions terminate message processing;
• "moderately severe" – these actions stop execution of the rule and of all
other rules of the current profile, although rules of other profiles can be
applied to a message;
• "moderate" – when this action is complete, other actions of the current
rule will still be applied as well as other rules of the same and/or of other
profiles.
2
If a message is assigned one of the index categories, it does not necessarily mean that
the message contains spam. For example, a message containing indecent vocabulary will
be assigned the Obscene category. System administrator can ignore it (not specify it in the
rule conditions).
Page 29
Kaspersky Anti-Spam Operation and Filtering Philosophy 29
Several actions can be described in a single rule, but if any of these actions are
severe or moderately severe, then message processing by this rule (as well as
by all other rules of the current profile) stops and no further actions will be
performed.
Actions within the same rule are arranged in strict order.
Actions of the following types can be described in filtering rules:
• "Severe" actions:
• reject – refuse to accept this message on the SMTP-chat level.
The filtering server returns error 550 to the sending server while
receiving the message via the SMTP protocol. The text of the
error message can be set using WebConfigurator (see para
5.2.7, page 84).
The personal profile provides for the execution of a combination
of the bounce + black hole actions rather than the reject action
(as a personal profile can be used only for a part of the
recipients and a "partial" rejection is impossible).
• black hole – delete the message (do not pass it further) without
generating a message to the sender.
Rules containing this type of actions should be
applied with care because the message will be
completely deleted and cannot be restored.
Message delivery is blocked for all users in the common profile
while for blocking message delivery to users this personal profile is
applied to a personal profile is used.
• accept – forward message to the recipient (recipients) without
modifying it, i.e. as it appears after the prior processing. When
such action is executed, the message is passed further without
any delay and no other filtering rules will be applied to it. The
rules with the accept action are used to support the use of the
white lists.
In addition, the accept action is executed by default at the end of
processing of any message (or a message copy), provided that no
reject or black hole actions has been executed:
o at the end of the private profile for all recipients of this
private profile;
o after execution of all private profiles for all recipients who
have not been processed.
Page 30

30 Kaspersky Anti-Spam 2.0 Enterprise Edition / ISP Edition
• "Moderately severe" skip action – stop execution of all current filter profile
rules and start execution of the next profile (if this is provided for by the
profile execution procedure, see para 4.3.4, page 31).
The skip action in a personal profile is equivalent to the accept action.
• "Moderate" actions:
• bounce – generate a message rejection notification to the
sender’s mail server.
The original message will be attached to the notification.
Notification text can be set up using WebConfigurator (see
para 5.2.7, page 84). Message processing goes on and if not other
rule that blocks the delivery is applied, the message will be
delivered to the recipient (recipients).
• change recipient – change the list of the message recipients:
o change addresses of all recipients to the address (or the
address list) specified in the rule (replace all);
o delete the specified recipient’s address (delete);
o add the address (or the address list) specified in the rule
(add) to the recipients list.
The ${SMTP_FROM} macrovariable indicating the sender's
address, specified in the SMTP-envelope, can be used when
generating a list of new recipients.
• change header – change message header specified in the
rule:
o having deleted the old header value with the specified
name (if the message had one), add a new one as
specified in the rule (replace);
o add a new value as specified in the rule (add) to the
header, leaving the old value unchanged (if it exists);
o add a new header with the specified name and value. The
header is added to the beginning of the header list;
duplication of headers having the same name in the list is
not monitored (create);
o delete all headers with the specified name if the message
had any (delete).
This action allows to assign attributes to the message, based on
which, client software (e.g. Microsoft Outlook) will be able to filter
or classify messages after they are delivered to the user’s mailbox.
Page 31

Kaspersky Anti-Spam Operation and Filtering Philosophy 31
The ${CATEGORY} operator can be used when specifying a new
header value. This operator denotes the list of spam categories
obtained based on the message text content analysis. For
example, such list can be entered in the Keywords header.
You can modify headers for all users using the common profile,
and headers for users of a particular profile using the
corresponding personal profile.
4.3.4. Filtering profiles and filtering rules
application order
4.3.4.1. Profiles application order
As was mentioned above, filter profiles can be common (their rules are executed
for all recipients of any message) or personal (their rules are executed for
selected recipients).
Messages are processed according to the following scheme:
1. For the entire message the rules of one common filter profile
executed. If a rule with a severe action has been executed, which
means canceling all further message processing (see para 4.3.3,
page 28), no other profiles will be applied to this message;
2. If the message processing has not been completed and the message
has several recipients, a virtual
4
message copy will be created for
each recipient;
3. The rules of a single personal filter profile are applied to each copy of
a message, or the accept action is executed;
4. At this point message processing finishes. Virtual copies that differ
only in their recipients are "glued" before sending messages to the
recipients and/or before sending rejections to the originators.
Selection of the common profile, which executes at stage 1, is identical for all
processed messages and is performed in a trivial way. The system administrator
can create several common filter profiles using WebConfigurator, however, only
3
The preinstalled filter profile set provides for the execution of two filter profiles, one of
which (that executes first) - is a hidden profile, that is it cannot be edited using
WebConfigurator. This hidden profile ensures detection of suspicious message headers
and is updated via the Internet automatically along with the content filtering database.
4
Copies are "virtual". This means that physical message copies are created only when
they must be processed in different ways for different recipients.
3
are
Page 32

32 Kaspersky Anti-Spam 2.0 Enterprise Edition / ISP Edition
one of them can be enabled at the same time. Other profile rules are not
executed.
Selection of the personal profile, which executes at stage 3, is more
complicated. This is done separately for each virtual copy (for each recipient, to
be more exact).
Using WebConfigurator the system administrator can create and enable any
number of personal profiles in any order. The administrator defines the user list
for each personal profile (this list can be empty). The administrator can extract
the user list to one of the available e-mail addresses directly or via a link (see
para 5.2.2.1, page 52).
For each virtual copy the first personal profile in the list, which contains this
virtual copy recipient, will be selected. (If the message recipient is specified in the
lists of several profiles, only the first one will work).
If such profile is missing, i.e. the recipient is missing in all lists, the first profile
with the empty list of recipients will be executed. Thus, this profile will be applied
by default to all message recipients not specified in other personal profiles
5
.
And finally, if such profile does not exist either, the accept action will be applied
to this virtual copy by default. Then the execution of stage 3 completes.
Thus, one common (active) profile is applied to each message, then, if the
message processing is not complete in the common profile, one of the personal
profiles will be applied to each recipient (or none of them will be used if the "right"
profile has not been found for a particular recipient).
If the list of recipients has been modified as a result of the use of a
common profile, then personal profiles will be applied to the modified list
of recipients. Modification of the list of recipients in a personal profile
does not affect the use of personal profiles – no other personal profiles
will be applied to a new recipient.
The rules are applied in accordance with their order in the profile, either until all
the rules have been executed in the current profile or until a severe or a
moderately severe action is executed in one of the rules.
4.3.4.2. Message modification during processing
There are two types of actions that modify messages. The Change recipient
action changes the list of the message recipients, and the change header action
changes one or some of its headers.
5
Other personal profiles with the empty list of users will never be used.
Page 33

Kaspersky Anti-Spam Operation and Filtering Philosophy 33
Both above actions are moderate and message processing resumes after their
execution. In this case the following actions will be applied to the modified
message version6.
Suppose that the change recipient action has been applied to a mail
message and recipient x has been replaced with recipient y. Now the
rule containing the condition that the recipient address of the message
is y will work and the rule with the condition that the recipient must be x
will not work.
If the list of addresses was modified during the execution of the common profile,
then the creation of virtual copies and the selection of the personal profile for
each such copy will be performed in accordance with the updated list.
All actions, performed during the execution of a personal profile, apply to a single
virtual copy of the message. Although this copy is associated with a particular
recipient, the change recipient action can be applied to it, i.e. its recipient can
be changed.
Changing the recipient during a personal profile execution does not
mean that a different profile (corresponding to the new recipient’s
address) rules should be applied to the message. Execution of the
current personal profile selected for the initial recipient of this copy will
continue.
4.3.4.3. Filtering results
The filtering results for a message (or its virtual copy for a particular recipient)
are determined by the set of actions performed and the order of the execution of
these actions.
The last action performed on the message has the greatest effect on this
message. This is why the report of the possible message (copy) processing
results depends on the last action applied.
It has been mentioned above that if none of the severe actions – reject, black
hole or accept – has been applied to a message (copy), the accept action is
executed by default at the end of processing. Thus, only one of the three
specified actions can be the last action.
The skip action is not mentioned in the report, since it affects only the order of
the rule execution, but does perform any direct actions on the message.
6
In this case the initial header values, etc. will be saved and used, if necessary. For
example the call to the content filtering library is performed using the initial value of the
Subject header.
Page 34

34 Kaspersky Anti-Spam 2.0 Enterprise Edition / ISP Edition
The last action – reject
If the reject action is applied when executing the common profile, the
message will be rejected at the SMTP-protocol level and error code 550
will be sent back to the originating server.
The actions that could have preceded the reject action – generation of
notification (bounce), changing of the header or of the recipient (change
header, change recipient) – will be ignored.
The reject action is replaced with bounce + black hole when executing a
personal profile.
The last action – black hole
The message will not be delivered to the recipients.
Notification of the message rejection will not be sent back to the sender
(provided that the bounce action had not been executed before the black
hole action).
If the bounce action has been executed before black hole, the message
(copy) will not be delivered to the recipients, but a notification of the
message rejection will be sent to the original sender.
Changes of the header or the recipient (change header, change
recipient) that could take place before black hole execution are
practically ignored.
Message delivery is blocked for all users in the common profile, in
personal profile – for those to whom this personal profile is applied.
The last action — accept
The message will be delivered to the recipients.
In this case some additional moderate actions that could be executed
before the accept action, directly affect the result. (This influence can be
complex if several additional actions have been executed).
The message will be delivered according to the modified list of recipients
if the change recipient action has been executed. For example, a
message can be sent to a special service address for archiving.
A message will be delivered with changed headers if the change header
action has been executed.
Notification of the message rejection will be sent to the originator if the
bounce action has been executed. (However such notification may be
inaccurate since this message may be delivered).
Page 35

Kaspersky Anti-Spam Operation and Filtering Philosophy 35
4.4. Preinstalled filter profiles
Kaspersky Anti-Spam is installed on your computer with a set of preinstalled
profiles that allow spam filtering to start immediately after the installation.
The following filtering mode is applied by default:
• The medium ("standard") severity level is applied during the evaluation of
the spam attributes (common profile
executed);
• The detected messages will be delivered to the recipients; in this case
they are labeled in the
The components of the preinstalled set of filter profiles and the logic of the
operations they perform are described below. Comparison of the alternative
profiles is also provided.
The administrator can change the default settings and setup user-dependent
processing modes of the detected messages (reaction to spam) (see para 4.4.2,
page 39).
Subject header.
Spam Detection Standard is
Read the
information about preinstalled profiles including information about
changes that may have taken place after this guide had been prepared.
readme-profiles file carefully. This file contains the latest
4.4.1. Stages of the preinstalled filter
profiles operation
Processing of each message includes three stages:
1. detection of formal spam attributes: analysis of message headers;
2. message evaluation, additional checks, if required;
3. processing of the messages identified as spam, possible spam, etc.
A separate profile is responsible for each of these stages. One common profile is
provided for the first stage but you may select profiles that will work at the
second and the third stages.
Page 36

36 Kaspersky Anti-Spam 2.0 Enterprise Edition / ISP Edition
4.4.1.1. Detection of spam attributes: analysis of
message headers
Formal spam attributes – "suspicious" headers and their combinations are
detected at the first stage of message processing. A "hidden" common profile
Analyze Message Headers, stored in the hidden/formal.xml file is used for this
purpose.
For example, if there is a significant number of spaces at the end of the Subject
header followed by a meaningless letter sequence such as 'TVIWEGEQO', this
message is probably spam.
The Bat! mail program does not provide the
the presence of such header along with the
an attribute of spam.
Rules that detect spam messages by analyzing their headers are complicated
and making even small changes to them may result in a great number of false
alarms. Therefore we have not provided the possibility of editing the
Message Headers
We do not recommend editing this profile manually. If you decided to do
it, please exercise EXTREME care!
In addition, this profile can be automatically updated through the Internet.
If you decide to support this profile independently and do not need
automatic profile updates downloads, delete the
string in the beginning of the hidden/formal.xml
The following specific headers are added to the message at the end of this
stage:
X-SpamTest-Method – The header containing information about the
•
headers identified as "suspicious";
X-SpamTest-Info – The header containing information about particular
•
problems detected.
profile via WebConfigurator.
X-MSMail-Priority header, therefore
X-Mailer: The Bat!... in a message is
Analyze
ALLOW_UPDATES=yes
file.
4.4.1.2. Message evaluation
Execution of this stage is determined by the following common profiles:
•
Spam Detection Standard (the detect-standard.xml file). This profile is
activated by default after installation of the filter;
Page 37

Kaspersky Anti-Spam Operation and Filtering Philosophy 37
• Spam Detection Standard (no RBL & DNS check) (the detect-standard-no-
rbl.xml file);
•
Spam Detection Soft (the detect-soft.xml file);
• Spam Detection Soft (no RBL & DNS check) (the detect-soft-no-bl.xml file);
• Spam Detection Hard (the detect-hard.xml file);
Spam Detection Hard (no RBL & DNS check) (the detect-hard-no-rbl.xml
•
file).
These profiles differ in:
• The "severity level" of spam attributes evaluation (the
fewer and the
• Usage of the RBL checks (as well as the availability of the sending server
in DNS).
For more details on the differences in various common profiles included in the kit
see para 4.4.2.3, page 43.
At this stage the message is first of all checked against the local black and white
e-mail lists and IP addresses. These lists should be compiled and updated by the
user via the WebConfigurator (see para 5.2.5, page 73).
Then an estimation is performed to decide if the results of the earlier message
header analysis are sufficient to identify this message as spam.
The checks executed in the first stage and taken into account at the
current stage may include checks for unreadable "oriental" encodings,
e.g. Chinese.
If some users receive mails encoded in this way, you should find and
delete the corresponding rules from the applied common profile.
If the checks performed are not sufficient to identify a message as "spam", the
following additional checks will be executed in sequence:
• check against three different RBL service lists (DNS-based real time black
hole lists) starting with the most reliable list;
• check for presence of the sending server in DNS;
• content filtering (analysis of the message content).
The message is evaluated again after each check. The checks stop if the
message is identified as spam. Content filtering is the most important, but the
most resource-consuming check. That is why it is performed last.
Hard profiles identify more messages as spam);
Soft profiles identify
Page 38

38 Kaspersky Anti-Spam 2.0 Enterprise Edition / ISP Edition
The following specific headers are added to a message at the end of this stage:
X-SpamTest-Categories – header containing information on the content
•
categories assigned to the message based on the content filtering results.
X-SpamTest-Status – header showing the final message status based on
•
the results of all checks: SPAM, Probable Spam, Trusted, or Not
Detected. This header is used during the following message processing
by the personal profiles. It can be used for message processing by the
recipient’s mail client as well.
4.4.1.3. Reaction to spam
The following personal profiles are used at this stage of the message check:
•
Marking Spam - Subject (the do-mark-subject.xml file ). This profile is
enabled by default after the filter installation;
•
Marking Spam - Keywords (the do-mark-keywords.xml file);
•
Archiving Spam (the do-archive.xml file);
• Archiving/Rejecting Spam (the do-archive-or-reject.xml file);
root: No Filtering (the rcpt-root.xml file).
•
The message is processed in accordance with the results received at the
previous stages. Various actions will be performed on the message depending
on the following conditions:
• Final message status (the
• Content categories (the
message. In particular, consideration can be made of whether a certain
message belongs to the Obscene (containing obscene expressions) or
Formal Messages (automatically generated notifications of message
rejection because of virus infection, of impossibility of message delivery to
a recipient, postcard delivery, etc.) categories;
• Methods that have been used for spam identification (the
Method
Reactions of various personal profiles to messages that have different status are
described below. The
account as it always "passes" an unchanged message to a recipient.
SPAM Status
• The
and marks it as
header).
root: No Filtering profile is not used for generating an
Marking Spam - Subject profile: delivers the message to the recipient
[!! SPAM] in the Subject header;
X-SpamTest-Status header);
X-SpamTest-Categories header) assigned to the
X-SpamTest-
Page 39

Kaspersky Anti-Spam Operation and Filtering Philosophy 39
• The Marking Spam - Keywords profile: delivers the message to the
recipient and marks it with the
status and/or assigned content categories are specified;
Keywords header where the message
• The
• The
Probable Spam Status
• The
• The
Trusted Status
Not detected Status
• The
Archiving Spam profile: forwards the message to the address
specified in rule 1;
Archiving/Rejecting Spam profile: rejects the message (reject) or
forwards it to the address specified in rule 3 depending on the methods
used to detect spam.
Marking Spam - Subject, Archiving Spam, Archiving/Rejecting Spam
profiles deliver the message to the recipient and mark it as [?? Probable
Spam]
in the Subject header (the mark can vary depending on the
identified content category, e.g. if the Invitation to a seminar, conference,
exhibition category has been recognized the mark
used instead.);
[?? Seminars etc.] is
Marking Spam - Keywords profile: delivers the message to the
recipient and marks it with the
status and/or assigned content categories are specified.
All profiles deliver messages to the recipient.
Keywords header where the message
Marking Spam - Subject, Archiving Spam, Archiving/Rejecting Spam
profiles: delivers the message to the recipient. If the message belongs to
the Obscene or Formal Messages category it can be marked with the
corresponding mark in the
Subject header;
• The Marking Spam - Keywords profile: delivers the message to the
recipient and marks it with the
categories, if there are any.
Keywords header specifying content
4.4.2. Setting up preinstalled filter profiles
The filter profiles are set via WebConfigurator. For more details see
para 5.2, page 48
Suggested profiles implement only some of the filter features. The language of
conditions and actions described in detail in para 4.3, page 25 open up virtually
unlimited setup options.
Page 40

40 Kaspersky Anti-Spam 2.0 Enterprise Edition / ISP Edition
We recommend starting with the profiles available, then modifying them or
creating new ones, if necessary, using existing profiles as patterns.
For example, you can set message processing conditions that will be applied to
all users by default (see para 4.4.2.1, page 40), or define them for individual
users (see 4.4.2.2, page 42). There is a provision for adjusting the severity level
of mail traffic filtering (see 4.4.2.3, page 43).
You can maintain your own data that help in spam identification:
• Black and white e-mail lists;
• Black and white IP address lists;
• Database of sample spam messages.
In addition you can change the RBL services lists to which the common profile
rules refer (see para 4.4.1.2, page 36).
We recommend adding new services to the RBL services lists with
extreme care as new additions may result in a number of false
triggering.
For more details on the list editing see para 5.2.5, page 73. For information on
updating of the sample spam messages database see para 5.2.6, page 82.
4.4.2.1. Selecting default reaction to spam
The preinstalled set of filter profiles implies several alternative patterns of
identified message processing (see para 4.4, page 35), i.e.:
• Marking in the Subject header (enabled by default after the filter
installation);
• Marking in the
• Archiving spam;
• Rejection of some spam types and archiving of other spam messages;
• No filtering.
Personal filter profiles included in the preinstalled set are responsible for
processing of the messages identified as spam (or possible spam). They can be
selected and configured on the
page 52).
For each e-mail processed the first active profile will work, where:
• the recipient specified in the
of Kaspersky Anti-Spam;
Keywords header;
personal tab of WebConfigurator (see para 5.2.2,
Valid for Recipient(s) field is a licensed user
Page 41

Kaspersky Anti-Spam Operation and Filtering Philosophy 41
• or the user is on the list specified in the Valid for Recipients List field;
• or no recipients are specified.
Thus, the first active personal profile, where particular recipients are not
specified, will be applied by default for all users left out by the previous active
profiles.
By default, spam messages are delivered to the recipients and marked in the
Subject header.
If you wish to have spam messages marked by default in the Keywords
header (which is displayed as the Categories field in Microsoft Outlook,
for example),
• Enable the
• Disable the other personal profiles enabled for all recipients.
If you wish to archive messages identified as spam (i.e. forward them to
a separate archive mailbox) by default,
• Enable the
• In rule 1 of this profile replace the
address with the name of a real mailbox to be used for spam
archiving;
• Disable the other personal profiles enabled for all recipients.
If you wish messages identified as spam on the basis of your black lists
(see below) that you maintain or RBL service data to be rejected and
other messages identified as spam to be archived by default,
• Enable the
• In rule 3 of this profile replace the
conditional address by the name of a real mailbox intended for
spam archiving;
• Disable other personal profiles enabled for all recipients.
Marking Spam – Keywords profile;
Archiving Spam profile;
spam-archive@host.name
Archiving/Rejecting Spam profile;
spam-archive@host.name
We do not recommend using this profile, let alone
possibly more severe filtering patterns, because if
false spam identification occurs the message
rejected by the server can not be restored.
Page 42

42 Kaspersky Anti-Spam 2.0 Enterprise Edition / ISP Edition
If you wish to "pass" all messages to all licensed users without
restrictions and visible changes by default,
• Make sure that the
heads the list of personal profiles.
• Apply this profile to all users:
o Open the profile for editing;
o Click the Properties button;
o Select the Valid for Recipient(s) radio button and clear the
corresponding text field.
If this filtering pattern is used, spam recognition results are marked with the
specific X-SpamTest-Status header only.
For more details about preinstalled personal profiles operation see para 4.4.1.3,
page 38.
root: No Filtering profile is enabled and
4.4.2.2. Choosing reaction to spam for particular
users
Different personal profiles implementing various spam filtering patterns may be
utilized for different users. For example, in the set of rules supplied:
• "Zero" filtering pattern is provided for the root@host.name user (all
messages are passed without additional marking);
• Marking in the Subject header is provided for the other users.
Individual filtering patterns will work for different users if:
1. The corresponding profiles are enabled;
2. Required users are specified in them;
3. The profiles are properly arranged.
It is appropriate to have one of the profiles running by default for all users not
specified in the other profiles. The list of recipients, i.e. the
file, should be left blank in this profile.
For every other profile it is necessary to specify the users for which this particular
profile is active.
Valid for recipient(s)
Page 43

Kaspersky Anti-Spam Operation and Filtering Philosophy 43
To specify the users to whom a personal profile is applied,
• Open the profile for editing, then click the Properties button.
• Enter user’s address (or users’ addresses) in the
recipient(s)
or
• select a user list in the Valid for recipient list field after you have
created it on the
The order of active profiles is very important because only the first profile valid
for this particular user will work for each user.
The default profile must be the last active profile in the list. It will work
for all users not covered by the preceding profiles and none of the
subsequent profiles will be applied.
For the Archiving Spam (rule 1) and Archiving/Rejecting Spam (rule 3) profiles
the conditional address should be replaced with the name of a real mailbox
intended for spam archiving.
spam-archive@host.name
profile; therefore if you want to forward spam to different addresses for
different users, several copies of such profiles should be created.
It is recommended that you rename the user-dependent profiles so that the
names show the users to whom they apply (e.g. root: No Filtering).
field,
e-mails tab.
is a common address for all recipients of this
Valid for
4.4.2.3. Selecting filtering level severity
Common profiles are responsible for determining the message status (spam,
possible spam, etc.). They can be selected on the common tab of
WebConfigurator (see 5.2.1, page 48).
The selected common profile works for all licensed mail recipients. We
recommend using the default Spam Detection Standard profile.
If you are concerned about false filter alarms, you can select the Spam Detection
Soft profile, which ensures "softer" filtering (fewer messages are detected as
spam). In this case, only the most reliable RBL service data are used to identify a
message as spam.
Page 44

44 Kaspersky Anti-Spam 2.0 Enterprise Edition / ISP Edition
If you want the filter to identify as many spam messages as possible, even at the
cost of higher probability of false alarms, you may use the Spam Detection Hard
profile.
Finally, if you do not want to use the RBL services check (as well as the check
for availability of the sending server in DNS), use one of the
Standard/Soft/Hard (no RBL)
Standard, Soft, and Hard profiles only in that the indicated checks are not
executed.
For more details on common profiles operation see para 4.4.1.2, page 36.
profiles. These are different from the corresponding
Spam Detection
4.4.3. Specific headers assigned by the
filter
The filter can assign or modify the following message headers during operation:
• X-SpamTest-Status
• X-SpamTest-Method
• X-SpamTest-Info
• X-SpamTest-Categories
• Keywords
• Subject (only adding marks to the header)
Each of the above headers is discussed below in more detail.
X-SpamTest-Status — This header is assigned by the common profiles to each
processed message (one per message) and contains message evaluation
results. It can possess the following values:
• SPAM – a message is identified as spam.
Probable Spam – a message is probably spam, however detected spam
•
attributes are not sufficient to confirm it.
• Trusted – a message originates from a known source (included in one of
the "white lists") and should be received regardless of possible spam
attributes.
• Not Detected – no spam attributes sufficient for the SPAM or Probable
Spam
status are detected in a message.
This header may be used during message processing by the end-user
mail-client.
Page 45

Kaspersky Anti-Spam Operation and Filtering Philosophy 45
X-SpamTest-Method – This header is assigned by the hidden common profile
Analyze Message Headers or by the other common profiles in the messages
where spam attributes have been detected. (In the course of further
message processing these attributes may be considered as insufficient and
the message receives the Not Detected or Trusted status). It can possess
the following values:
• Local Lists – E-mail or IP address of a message sender occurred in one of
the black or white lists.
• Headers: ... (e.g., Headers: Suspicious To) – message headers contain
spam attributes; the text after the colon indicates which of the headers is
suspicious (header To in this case). The following options are possible:
• Suspicious From – The suspicious From header
• Suspicious Reply-To – The
• Spamware Subject, Suspicious Subject – The last two options
refer to the
higher.
• Spamware X-Mailer, Suspicious X-Mailer – Identically, for the
Subject header; in the former the spam probability is
Reply-To header
X-Mailer header
• Incompatible Headers – Suspicious headers combination
• Spamware Received – The
spam
• Eastern Codepage – A message in one of the "oriental"
encodings (Chinese, Korean, Japanese),
• etc.
• RBL: 'premium' list, RBL: 'reliable' list, RBL: 'standard' list – a message
sender is registered in one of RBL services included in the corresponding
lists beginning with the most reliable one.
• DNS: not in DNS – the originating server is not registered in DNS.
• Content: Spam, Content: Probable Spam – content analysis assigned the
SPAM or Probable Spam category to a message.
A message may have several
X-SpamTest-Method headers.
Received header characterized as
X-SpamTest-Info – a header with two different functions:
• First, each filter profile that processes a message marks this header.
Page 46

46 Kaspersky Anti-Spam 2.0 Enterprise Edition / ISP Edition
• Secondly, the X-SpamTest-Info headers may contain more detailed
information on spam attributes detected in a message and recorded in the
X-SpamTest-Method headers.
A message may have several X-SpamTest-Info headers.
X-SpamTest-Categories – a header assigned by the common profiles; contains a
list of categories the messages were assigned as a result of content analysis
(if this analysis took place and a message received any categories as a
result).
A message may have only one
X-SpamTest-Categories header.
Keywords – a header assigned by the Marking Spam – Keywords personal profile
if a message is identified as spam or possible spam, or if the content
analysis assigned some content categories to the message.
The Marking Spam - Keywords profile starts by erasing the old Keywords
headers (if any). Other profiles keep the Keywords headers unchanged.
Subject – the Marking Spam - Subject, Archiving Spam, Archiving/Rejecting Spam
personal profiles can append their special marks to the existing
header, see para 4.4, page 35
Subject
Page 47

CHAPTER 5. CONFIGURING
FILTERING PARAMETERS
Kaspersky Anti-Spam provides mail server administrator with powerful and
convenient tools for user protection from unwanted mail (spam). Filtering logic is
not forced by the filter – the administrator is able to set it independently in
accordance with his/her company’s policy and mail recipients’ requirements.
Since the operation of Kaspersky Anti-Spam is completely defined by
the settings specified by the administrator, we recommend that you pay
particular attention to this process. Improper setup can result in:
• ineffective filter operation (most unwanted messages pass through
the filter).
• The loss of normally allowed e-mails.
All filtering parameters are set via WebConfigurator, that allows creation, editing,
and deletion of:
• Filter profiles (sets of rules) both common (valid for all users), and
personal (valid for some individual users or their groups).
• Filtering rules (conditions and corresponding actions), controlling their
application procedure.
• Black and white IP address and e-mail lists that filtering rules can refer to.
• DNS-based RBL lists.
Read the instructions on filter operation principles before you begin
configuring the settings (see para 4.3, page 25). Pay special attention to
description of the filter operations (see para 4.3.3, page 28) and to the
order of profiles and filtering rules application (see para 4.3.4, page 31).
Study the sample filter profiles supplied with the program.
You can work with WebConfigurator from a remote location using any web
browser.
5.1. Starting WebConfigurator
The Kaspersky Anti-Spam software package includes thtppd server (installed as
kas-thhtpd). This server starts on port 2880 and provides access to
WebConfigurator via http protocol.
Page 48

48 Kaspersky Anti-Spam 2.0 Enterprise Edition / ISP Edition
For safety reasons, access to kas-thttpd is allowed by default only from the
computer where the server is installed.
If required, remote administration of Kaspersky Anti-Spam may be allowed. In
order to do this:
• Replace line host=127.0.0.1 with host=0.0.0.0 in file /usr/local/apmailfilter/etc/kas-thttpd.conf.
• create new user and specify a password for accessing WebConfigurator
using program /usr/local/ap-mailfilter/bin/kas-htpasswd.
To launch WebConfigurator:
1. Start your web browser.
2. In the URL-address box enter
http://localhost::2880
5.2. Working with WebConfigurator
You can remotely set up filtering parameters using WebConfigurator, as follows:
• create and delete common filter profiles (see para 5.2.1, page 48).
• create and delete personal filter profiles (see para 5.2.2, page 52).
• edit filter profiles, create and delete filtering rules (see para 5.2.3,
page 54).
• edit filtering rules (see para 5.2.4, page 59).
• create, edit, and delete e-mail addresses, IP addresses, and DNS-based
RBL lists (see para 5.2.5, page 73).
• add, edit, and delete sample spam messages (see para 5.2.6, page 82).
• edit common filter settings (see para 5.2.7, page 84).
5.2.1. Working with common profiles. The
common
A list of the existing common profiles (see Figure 2) and a set of buttons used to
manage these profiles are located on the common tab, as follows:
• new – create new profile (see para 5.2.1.1, page 49)
tab
Page 49

Configuring Filtering Parameters 49
• activate – activate selected profile (see para 5.2.1.2, page 50)
• edit – edit the selected profile parameters (see 5.2.3, page 54)
• delete – delete selected profile (see para 5.2.1.3, page 51)
•
and – move the selected profile one position up or down
respectively.
The list of profiles may not entirely fit the window. Use the scroll button
to the right of the list.
Figure 2. The Common tab
5.2.1.1. Creating a common profile
In order to create a common filter profile:
1. Click the new button.
2. Enter requested profile parameters in the New common profile
window (see Figure 3):
• File — profile file name. Enter file name without extension (or
with the ".xml" extension) into the corresponding field.
Page 50

50 Kaspersky Anti-Spam 2.0 Enterprise Edition / ISP Edition
Make sure that you set a value for the File parameter,
otherwise an error message will be displayed and the
profile will not be created!
• Name — profile name. Filename (without extension) is used as
the profile name by default. You can enter a different profile
name in the parameter field.
3. Click the create button.
After the profile is created, you will be offered to edit its parameters (for more
details see 5.2.3, page 54).
Figure 3. The new common profile window
The new profile is not automatically enabled after creation. The profile
remains inactive (disabled, not participating in the filter operation) until
you activate it (for more details see para 5.2.1.2, page 50).
5.2.1.2. Activating common profiles
Profile activation is defined as integrating (connecting) the profile to the filter
operation. You can connect only one common profile.
To connect a common profile to filter operation:
Page 51

Configuring Filtering Parameters 51
1. Select profile name from the list of existing common profiles (see
Figure 2).
2. Click the activate button.
The selected profile will be enabled. In this case the profile selected previously
will be automatically deactivated.
The active profile is marked by the (+) symbol in the profile list.
5.2.1.3. Deleting profiles
To delete an existing profile:
1. Select the profile name you wish to delete from the list of existing
common profiles (see Figure 2).
2. Click the delete button.
3. Click the delete button in the deletion confirmation window (see
Figure 4).
Figure 4. Deleting filter profile
Page 52

52 Kaspersky Anti-Spam 2.0 Enterprise Edition / ISP Edition
5.2.2. Working with personal profiles. The
personal
The personal tab includes a list of the existing personal profiles (see Figure 5)
and a set of control buttons, namely:
• new – create new profile (see para 5.2.2.1, page 52)
• on/off – activate the selected profile (see para 5.2.2, page 52)
• edit –edit the selected profile parameters (see para 5.2.3, page 54)
• delete – delete the selected profile (deleting of a personal profile is
identical to common profile deleting procedure, see para 5.2.1.3,
page 51).
•
and – move the selected profile one position up or down
respectively.
tab
Figure 5. The personal tab
5.2.2.1. Creating personal profiles
When creating a personal profile, along with the filename and the name of the
profile itself (similar to the common profile, see para 5.2.1.1, page 49), it is
necessary to specify the field of profile application, i.e. an address or address list
for which this profile will be used (see Figure 6). You can specify the addresses
Page 53

Configuring Filtering Parameters 53
manually or select an address list from those formed on the e-mail tab (see para
5.2.5, page 73):
Valid for recipi ent(s) — independently create an address (address list)
for which this profile will be used. Specify the addresses in the
parameter field manually, separating addresses by semicolons.
E-mail addresses are created either in the
@domain format. The latter format includes any user of the
domain specified.
Valid for recipient list —select from the drop-down list a list of
addresses for which this profile will be used.
A list of recipients in the personal profile may remain empty (default
personal profile). In this case this personal profile can be used for all
recipients to whom no other personal profiles were applied (see para
4.3.4.1, page 31).
user@domain or
Figure 6. Creating personal profile
5.2.2.2. Activating personal profiles
WebConfigurator allows created profiles to be enabled (activated) and disabled
(deactivated).
Only active profiles are involved in the filter operation. All other profiles remain
backup profiles. They can be edited, or can be used for fast switching between
the filter operation modes, etc.
Page 54

54 Kaspersky Anti-Spam 2.0 Enterprise Edition / ISP Edition
A newly created profile remains inactive until you activate it.
You can activate any number of personal profiles. Active profiles are marked by
the (+) symbol in the profile list.
To activate (deactivate) a personal profile:
1. Select the profile you wish to activate (deactivate) from the profile
list.
2. Click the on/off button.
5.2.3. Editing filter profiles
Attention! Edit procedures for the common and personal profiles are
identical, therefore hereinafter the term filter profile includes both profile
types. Differences in some of the settings are described separately!
Creating and editing of filtering rules is the most important part of Kaspersky
Spam filter setup. When editing the rules, you define which conditions will be
checked and which actions will be performed on the messages that meet these
conditions.
Editing of filtering rules, e-mail, and IP address lists, etc., is performed
in the configuration file copies. To enable the changes, you should save
them (click the save button, see para 5.2.3.6, page 59).
To edit a filter profile:
1. Select the profile you wish to edit from profile list.
2. Click the edit button.
As a result, a window containing the following tabs will open (see Figure 7):
• a set of buttons:
• new – create new rule (see para 5.2.3.1, page 55)
• properties – edit profile parameters (name, description and field
of application). (See para 5.2.3.5, page 57)
• The Filtering rules table, containing the list of profile rules and buttons
used to modify them, appears as follows:
•
– edit rule (see para 5.2.4, page 59)
Page 55

Configuring Filtering Parameters 55
– delete rule (see para 5.2.3.3, page 56)
•
•
• rules list navigation buttons.
Up to 5 filtering rules at a time can be displayed on the filter profile editing page.
Use the arrow buttons below the table of rules to move to the next or previous
set of rules.
– move rule up or down one row in the table of rules (see
para 5.2.3.4, page 56)
Figure 7. Creating/editing filter profile
5.2.3.1. Creating filtering rules
In order to create a new filtering rule:
1. Click the new button located under the table containing the list of
the existing rules.
2. Edit the rule: enter conditions and actions in the Create new rule
window that will open (see Figure 8).
3. Click the create button to save the rule.
See para 5.2.4, page 59 for more details about editing filtering rules.
Page 56

56 Kaspersky Anti-Spam 2.0 Enterprise Edition / ISP Edition
Figure 8. Creating new filtering rule
5.2.3.2. Switching to editing an existing rule
To start editing an existing filtering rule:
1. Select the rule you wish to edit from the table.
2. Click the
See para 5.2.4, page 59 for more details about filtering rule editing.
button to the right of the rule.
5.2.3.3. Deleting existing rules
In order to delete an existing filtering rule:
1. Select the rule you wish to delete from the table.
2. Click the
button to the right of the rule.
5.2.3.4. Controlling rule application procedures
Rules, included in the filter profile, are executed according to the order in which
they are listed in the table (see Figure 7).
Page 57

Configuring Filtering Parameters 57
The order of rules application is extremely important! Profiles differing
from each other only in the order of rules applied may have completely
different results when processing the same message.
For example, suppose that a certain filter profile consists of two rules
where rule A rejects messages from servers without a DNS-name (the
action), and rule B receives messages from the servers included in the
white list (the
without a DNS-name included in this white list:
• will be rejected if rule A is executed first (after its execution the
message processing will stop and rule B will not be applied).
• will be delivered to the recipient if rule B is executed first (after its
execution the message processing will stop and rule A will not be
applied).
To move the existing filtering rule one level up:
1. Select the rule you wish to move in the table.
accept action). Then a message arriving from a server
2. Click the
To move the existing filtering rule one level down:
1. Select the rule you wish to move in the table.
2. Click the
button to the right of the rule.
button to the right of the rule.
5.2.3.5. Editing filter profile name, description
and field of application
Filter profile parameters can be edited in the Profile properties window (see
Figure 9) opened by the properties button in the list of profile rules (see Figure 7).
You can manually edit the following common profile parameters:
• Name – profile name
• Description – profile description
Profile description remains empty upon the profile creation and (No
description)
will be displayed in the profile editing window.
Page 58

58 Kaspersky Anti-Spam 2.0 Enterprise Edition / ISP Edition
The common profile type, as well as the filename of the file where its description
is saved, cannot be changed.
Figure 9. Editing common profile properties
In addition, you can edit the field of application for personal profile (see Figure
10) using the Valid for recipient(s) or Valid for recipient list parameters (see
para 5.2.2.1, page 52 for more details).
Click the accept button to save the settings.
Figure 10. Editing personal profile properties
Page 59

Configuring Filtering Parameters 59
5.2.3.6. Saving profiles
Editing of filter profiles (as well as e-mail and IP address lists, etc.) is performed
using copies of the configuration files (see para 5.2.8, page 87). Changes to
these files are saved by clicking the accept button each time a filtering rule or
parameter is edited. However this will not affect the filter operation before the
new filter configuration, obtained as a result of editing, has been saved.
To save and enable changes made to a filter profile description and
other configuration files:
Click the save button in the profile editing window (see Figure 7).
Filter configuration obtained as a result of editing is saved completely –
all profiles, e-mail, and IP address lists, etc.
After saving the configuration files WebConfigurator automatically starts
Configuration compiler that creates binary files from XML text files used during
the filter operation.
5.2.4. Filtering rule editing
5.2.4.1. Filtering rule edit page
A filtering rule consists of two lists – conditions that should be met in order for the
rule to work, and actions that are executed if all the conditions are met.
You can add, edit, and delete conditions and actions in the Rule properties
window (see Figure 11).
Page 60

60 Kaspersky Anti-Spam 2.0 Enterprise Edition / ISP Edition
Figure 11. Filtering rule editing
The order of conditions does not matter since all of them must be met in order for
the rule to be applied. The actions are executed according to the order in which
they are displayed in the table (THEN DO) in the right part of the filtering rule
editing window
symbol next to the action name shows that the action is severe or
The
7
.
moderately severe and the operation of the current rule stops after it is executed.
Thus, no action, preceded by this action in the table, will be executed.
The
symbol before a condition or an action shows either that the description
of this condition (action) is incorrect or that this condition (action) cannot be used.
For example, this symbol will mark any actions set in a rule together with the
Reject action (see Figure 12), since this action will be executed first and then
rule processing will stop and no actions will be executed. This symbol also marks
conditions and actions that have been set without one or several required
parameters specified. Thus in the following example, in the first condition an IP
address, that must match the sending mail server address, is not specified.
7
This order is determined by the “compatibility” of actions, e.g. the reject action is the first
in the hierarchy, as none of the actions can be combined with it. The accept action will be
the last one since it can be executed along with any other moderate action.
Page 61

Configuring Filtering Parameters 61
Figure 12. Invalid conditions and actions
5.2.4.2. Setting new conditions
In order to set up a new condition:
1. Select the condition type from the Add new condition drop-down
list in the filtering rule editing window (see Figure 11).
2. Click the add button to the right of the drop-down list.
3. From the Add new condition window that will open (see for
example Figure 13):
• select the condition option (there are several options for each
condition type).
• set the parameters related to the selected condition option (see
below for more details on each condition type parameter).
4. check the
necessary. In this case the negation of the specified condition will
be enabled.
5. click the add button.
If necessary, you can change the condition type by selecting it from the
Condition applies to list in the page that will open and clicking on the select
button if the page did not refresh automatically.
negative (NOT) box in the lower left page corner, if
Page 62

62 Kaspersky Anti-Spam 2.0 Enterprise Edition / ISP Edition
5.2.4.2.1. Conditions related to the IP address of the
sending mail server
The following conditions related to the IP address of the sending mail server are
available (see Figure 13):
Matches the following mask – IP address of the sending mail relay
matches (or does not match) the address specified. Specify the mask in the
corresponding field.
Figure 13. Conditions related to sending server's IP
Matches a mask from local list – Sending mail server IP address is
included (or not included) in the specified list. Select IP address (mask) list
name from the drop-down list.
Is on DNS black list – The sending mail server is registered (or not
registered) as "untrustworthy" in the DNS-based RBL system on one of the
specialized servers included in the specified list. Select DNS-based RBL
from the drop-down list.
Has no DNS name – The sending mail server has (or does not have) a DNS-
name.
5.2.4.2.2. Conditions related to the sender’s e-mail
The following conditions related to the sender’s e-mail address specified in
SMTP-envelope (see Figure 14) are available:
Page 63

Configuring Filtering Parameters 63
Is equal to – Sender’s e-mail matches (or does not match) the address
specified. Specify e-mail address in the parameter field.
Is on local list – Sender’s e-mail is included (or not included) in the specified
list. Select the name of the e-mail addresses list from the drop-down list.
Figure 14. Conditions related to the sender’s e-mail
5.2.4.2.3. Conditions related to recipient’s e-mail
address
The following conditions related to the recipient’s e-mail address specified in
SMTP-envelope (see Figure 15) are available:
Is equal to – Recipient’s e-mail address (or address of one of the recipients if
there are several recipients) matches (or does not match) the address
(address mask) specified in the field.
Is on local list – Recipient’s e-mail address (or address of one of the
recipients, if there are several) is included (or not included) in the specified
list. Select the name of the e-mail addresses list from the drop-down list.
Page 64

64 Kaspersky Anti-Spam 2.0 Enterprise Edition / ISP Edition
Figure 15. Conditions related to the recipient’s e-mail address
5.2.4.2.4. Conditions related to message headers
The following message header-related conditions are available (see Figure 16):
Name – Header name. Specify header name in the parameter field.
Matches regular expression – A message has (or does not have) a header
with a name specified in the Name
the matches regular expression
Exists – A message has (or does not have) a header with a name specified
in the Name field.
field that matches a template entered in
field.
Page 65

Configuring Filtering Parameters 65
Figure 16. Conditions related to message headers
5.2.4.2.5. Condition related to content filtering
results
The following condition related to content filtering results is available (see
Figure 17):
Incoming message falls into the following catego ry – Message content
is assigned (or not assigned) the specified content category. Select the
category name from the drop-down list.
Page 66

66 Kaspersky Anti-Spam 2.0 Enterprise Edition / ISP Edition
Figure 17. Condition related to content filtering results
5.2.4.2.6. Condition related to message size
The following condition related to message size is available (see Figure 18):
Incoming message is larger than ... bytes – Total message size exceeds
(or does not exceed) the specified limit. Specify the maximum message
size (in bytes) in the parameter field.
Figure 18. Condition related to message size
Page 67

Configuring Filtering Parameters 67
5.2.4.3. Editing conditions
There are two ways to edit conditions:
• change condition parameters without changing the condition type
• change the condition type
In order to edit a condition:
1. select the condition you wish to modify in the IF (Conditions) table
in the Rule properties window (see Figure 11).
2. click the
3. if necessary, change the condition type in the Condition properties
window (see Figure 19). To do so, select the required type from the
Condition applies to list. Click the select button if the window does
not refresh.
4. modify parameters related to the selected condition option (see
para 5.2.4.2, page 61 for more details).
5. if necessary, check the
corner of the page (in this case negation of the specified condition
will be enabled) or uncheck the box.
6. click the accept button.
button to the right of the condition.
negative (NOT) box in the left bottom
Figure 19. Editing condition (one of the options)
Page 68

68 Kaspersky Anti-Spam 2.0 Enterprise Edition / ISP Edition
5.2.4.4. Deleting conditions
In order to delete an existing condition:
1. select the condition you wish to delete from the IF (Conditions)
table of the Rule properties window (see Figure 11).
2. click the
button to the right of the condition.
5.2.4.5. Creating new actions
Possible action types and their options are described in section 4.3.3, page 28.
A new filtering rule action is created in the THEN DO (Actions) table of the Rule
properties window (see Figure 11).
To set up a new action:
1. Select the action type from the Add new action drop-down list.
2. Click the add button.
For actions that do not have advanced parameters
(reject, black hole, bounce, skip, accept) the
procedure will be complete at this stage. The below
steps are required only for actions that have options and
advanced settings.
3. Specify settings for the change recipient, chang e header actions
in the Add new action window (for example see Figure 20). Details
on the parameters provided below.
Here you can change the action type by selecting it
from the Action type list.
4. Click the add button.
5.2.4.5.1. Options and settings of the
recipient
The following settings are available for the change recipient action type (see
Figure 20):
action
change
Page 69

Configuring Filtering Parameters 69
Recipient's e-mail – recipient’s e-mail address. Specify address (or several
addresses) in the parameter field, separating addresses by semicolons.
Replace all – replace all recipients’ addresses with the address (address
list) specified in the Recipient's e-mail field.
Delete – delete the address (addresses) specified in the Recipient's e-
field from the recipients list.
mail
Add – add the address (addresses) specified in the Recip ient's e-mail
field to the recipients list.
To change one action type to another (that is forward the message to a
different address), it is necessary to perform the
one after another. Or simply perform the
full readdressing (changing of all recipients).
Delete and Add actions
Replace all action if you need
Figure 20. Adding the change recipient action
5.2.4.5.2. Options and settings of the
change header
action
The following settings are available for the change header action type (see
Figure 21):
Header – name of the header subject to change. For example, specify
Keywords or From in the parameter field.
New value – new header value of a header.
Page 70

70 Kaspersky Anti-Spam 2.0 Enterprise Edition / ISP Edition
The following macrovariables can be used during the replacement of
the new header value.
• ${CATEGORY} – a list of spam categories received after content
analysis of a message text (for instance, this list can be saved to
the Keywords header).
• ${SMTP_FROM} – sender’s address, specified in SMTP-envelope.
Figure 21. Adding the change header action
Replace – replace the old header text with one specified in the New value
field.
In this case old headers with the specified name (
will be deleted and a new header with this name and specified text will be
created (
header will be created for this message.
Append – add new text specified in the New value parameter field to the
New text (
headers with the specified name (
names exist, a new header will be created for a message.
New value). If no headers with the specified names exist, a new
old text (if there is any) of the specified header.
New value) is added to the end of the first of the existing
Header). If no headers with the specified
Header), if there are any,
Page 71

Configuring Filtering Parameters 71
Create – create a header with the name specified in the Header field, and
the text specified in the New value field, independently of the other
existing headers with the same name within a message.
A new header is added to the beginning of the header list.
Delete – delete header with the specified name. The New value
parameter is ignored in this action option.
5.2.4.6. Editing actions
Filtering rule actions editing is performed in the THEN DO (Actions) table of the
Rule properties window (see Figure 11).
In order to edit (change) an action:
1. Select the action you wish to change.
2. Click the
3. If necessary, change action type in the Action properties window
(see Figure 22). To do so, select the necessary action type from the
button to the right of the action.
Action type list. Click the select button if the window does not
refresh.
4. If an action, that you wish to enter instead of the action you edit, has
options and settings, enter them as described in section 5.2.4.5,
page 68.
5. Click the accept button.
Page 72

72 Kaspersky Anti-Spam 2.0 Enterprise Edition / ISP Edition
Figure 22. Editing actions (one of the options)
5.2.4.7. Deleting actions
You can delete a filtering rule action from the THEN DO (Actions) table of the
Rule properties window (see Figure 11).
To delete an existing action:
1. Select the action you wish to delete.
2. Click the
button to the right of the action.
5.2.4.8. Saving rules
The changes made when editing the filtering rule (i.e., during creation,
editing, and deletion of the conditions and actions) should be saved
("accepted"), otherwise they will be ignored. This is done to provide a
possibility to reject the changes and return to the previous rule
appearance, if required (see para 5.2.3.6, page 59 and section 5.2.8,
page 87 for details).
Page 73

Configuring Filtering Parameters 73
To save (accept) the changes made to the filtering rule:
Click the accept button in the Rule properties window (see Figure 11).
The rule edit window opens every time you finish working with a condition or an
action (when entering or editing is complete).
In order to reject all changes made to the filtering rule after it has been
opened for editing,
1. click the cancel button in the edit or condition/action addition
window.
2. click the cancel button in the rule edit window (see Figure 11).
Problem
rule. What should be done to enable these changes to be used in the
message filtering process?
Solution
1. click the accept button in the Condition properties window (see
2. click the accept button in the Rule properties window (see
3. click the save button in the filter profile window (see Figure 7).
As a result, all changes in the filter configuration will be saved, Configuration
compiler will be launched, and the changes will be enabled.
Suppose you have made changes to a condition of the filtering
To save and enable the changes:
Figure 19) to accept the changes.
Figure 11) to accept the changes made to the filtering rule.
5.2.5. Working with lists. The
e-mails, ip addresses, dns blacklists
tabs
E-mail and IP addresses lists as well as DNS-based RBL lists are used in the
filtering rules (see para 5.2.1 - 5.2.4, pages 48 - 59) to set conditions related to a
group of addresses (rather than to a separate address) that should be processed
the same way. Sometimes this group may be very large, e.g., a list of e-mail
spam senders or mail servers from which spam arrives. This list may include
hundreds or even thousands of records.
Page 74

74 Kaspersky Anti-Spam 2.0 Enterprise Edition / ISP Edition
The use of different address types during the filter setup is arranged identically,
including even the address specification format. Therefore this description covers
all types of addresses.
5.2.5.1. Viewing lists
Every e-mail and IP address list, as well as the DNS-based RBL list, is saved in
a separate xml file. You can browse the list of these files by opening the
corresponding tab.
E-mail addresses lists are managed using the e-mails tab (see Figure 23), IP
address lists – via the IP addresses tab (see Figure 24), and DNS-based RBL
lists – via the DNS blacklists tab (see Figure 25).
Figure 23. The e-mails tab
Page 75

Configuring Filtering Parameters 75
Figure 24. The IP addresses tab
Figure 25. The DNS blacklists tab
List editing on each tab is performed using the following buttons:
• new – add new list (see para 5.2.5.2, page 76)
• edit – edit parameters of the selected list (see para 5.2.5.3, page 77)
• delete – delete selected list (see para 5.2.5.4, page 80)
Page 76

76 Kaspersky Anti-Spam 2.0 Enterprise Edition / ISP Edition
The list may not entirely fit the window. Use the scroll bar to the right of
the list to scroll up or down the list.
5.2.5.2. Creating new lists
In order to create a new e-mail, IP address or DNS-based RBL list:
1. click the new button of the corresponding tab (see Figure 23 for the
e-mails tab, Figure 24 for the ip addresses tab and Figure 25 for
the dns blacklists tab).
2. enter the following list parameters in the window that will open (see
Figure 26):
• File – Name of the file where the list will be stored. Enter file
name without extension or with the ".xml" extension to the
parameter field.
• Name – List name.
3. click the create button.
Make sure you enter the file name, otherwise an error message will be
generated. A file name without extension is used as a list name (if it is
absent).
Figure 26. Creating new lists (e.g., DNS-based RBL list)
Page 77

Configuring Filtering Parameters 77
5.2.5.3. Editing lists
To start editing an existing e-mail, IP address, or DNS-based RBL list:
1. select the list whose parameters you wish to edit from the
corresponding tab.
2. click the edit button.
A list edit window will open (see Figure 27) where you can add, edit, and delete
list elements (addresses, black lists).
Figure 27. Editing separate lists
(e.g., e-mail list)
5.2.5.3.1. Creating a new list entry
To create a new entry of e-mail, IP address or DNS-based RBL list:
1. click the add button in the list editing window (see Figure 27).
2. enter a new list item: correspondingly
mask)
, or DNS-based black list in the window that will open (e.g.,
Figure 28).
3. click the add button.
E-mail or IP address (network
Page 78

78 Kaspersky Anti-Spam 2.0 Enterprise Edition / ISP Edition
Possible e-mail address input formats:
•
user@domain
• @domain
The latter format includes any user of the specified domain.
Possible IP address (network mask) input formats:
• aaa.bbb.ccc.ddd
• aaa.bbb.ccc.ddd/nn
The aaa.bbb.ccc.ddd entry is equivalent to aaa.bbb.ccc.ddd/32.
Figure 28. Adding new list entries (e.g., IP address)
5.2.5.3.2. Editing list entries
In order to edit an e-mail, IP address or DNS-based RBL list entry:
1. select the entry you wish to edit from the list editing window (see
Figure 27).
Page 79

Configuring Filtering Parameters 79
2. click the edit button.
3. edit list item: correspondingly
or DNS-based black list in the window that will open (see Figure
29).
4. Click the accept button.
Figure 29. Editing list entries (e.g., e-mail list)
5.2.5.3.3. Deleting list entries
E-mail or IP address (network mask),
In order delete an entry from e-mail, IP address or DNS-based RBL list:
1. select the entry you wish to delete from the list editing window (see
Figure 27).
2. click the delete button.
5.2.5.3.4. Editing list name and description
Name and description of e-mail address, IP address, or DNS-based RBL lists are
edited in the E-mail properties, IP address properties, or DNS-based black
list properties windows respectively.
List description remains empty after it is created and
be displayed in the list editing window. The name of the file where the list
description is saved cannot be changed.
(No description) will
Page 80

80 Kaspersky Anti-Spam 2.0 Enterprise Edition / ISP Edition
To edit list parameters:
1. click the properties button in the list editing window (see Figure
27).
2. edit the following list parameters in the window that will open (see
Figure 30):
• Name – list name. Edit name in the name field.
• Description – list description. Specify necessary information in
this field.
File name cannot be modified.
3. click the accept button.
Figure 30. Editing list properties
(e.g., IP address list)
5.2.5.4. Deleting lists
In order to delete an existing e-mail, IP address, or DNS-based RBL list:
1. select the list you wish to delete in the corresponding tab.
2. click the delete button.
Page 81

Configuring Filtering Parameters 81
3. click the delete button again in the deletion confirmation window
(see Figure 31).
Figure 31. Deleting a list (e.g., IP address list)
5.2.5.5. Saving lists
Similarly to the filter profiles, editing of the e-mail address, IP address, and DNSbased RBL lists is performed using copies of the configuration files. Changes are
saved to these files after each time a list or a profile is edited. However, this does
not affect the filter operation before the new filter configuration, obtained as a
result of editing, has been saved.
To save and enable changes made to the configuration files:
Click the save button.
The filter configuration, obtained as a result of editing, is saved
including all elements – all profiles, e-mail and IP address lists, etc.
After saving the configuration files WebConfigurator automatically starts
Configuration compiler creates binary files used during the filter operation from
xml text files.
Page 82

82 Kaspersky Anti-Spam 2.0 Enterprise Edition / ISP Edition
5.2.6. Working with sample spam
messages
WebConfigurator allows addition of sample spam messages to the content
filtering database in order to avoid receiving same or similar messages, and also
to edit and delete the added samples.
Sample spam messages are managed via the samples tab (see Figure 32).
Figure 32. The samples tab
5.2.6.1. Adding sample messages
When adding a message, it is necessary to specify the category of
unwanted mail this message falls into.
To add a sample message:
1. Click the new button of the samples tab (see Figure 32).
2. Set the following sample message options in the Create new
message sample window that will open (see Figure 33).
• Category – spam category. Select the corresponding category
from the drop-down list.
Page 83

Configuring Filtering Parameters 83
• Subject
header in the parameter field.
• Body – sample message text. Enter sample message text in
the parameter field.
3. Click the create button.
– sample message header. Enter sample message
Figure 33. Adding new sample messages
5.2.6.2. Editing sample messages
To edit a sample message:
1. Select the message you wish to edit in the samples tab (see
Figure 32).
You can do this in the original tab condition (
category
convenient to select the spam category the message falls into
from the list beforehand.
2. Click the edit button.
3. In the Edit message sample window that will open (see Figure 34)
choose:
), but, if there are many sample messages, it is more
select content
Page 84

84 Kaspersky Anti-Spam 2.0 Enterprise Edition / ISP Edition
• Category – select from the drop-down list a category the
message falls into. The message will immediately be moved to
a new category.
• Subject – edit message header.
• Body – edit message text.
4. Click the accept button.
Figure 34. Editing sample messages
5.2.6.3. Deleting sample messages
To delete a sample message:
1. Select the message in the samples tab (see Figure 32).
2. Click the delete button.
5.2.7. General filter settings
The general filter settings are:
• notifications of message rejection sent to the original message sender.
• list of licensed recipients whose incoming mail is checked for spam.
Page 85

Configuring Filtering Parameters 85
Creating the list of licensed recipients is extremely important since incoming email messages for these particular users will be analyzed by the filter. Note that
the total number of addresses must not exceed the number specified in the
license.
All the abovementioned settings are available in the settings tab (see
Figure 35). A more detailed discussion of these settings is provided below.
Figure 35. The settings tab
5.2.7.1. Notifications of rejection sent to the
original message sender
Spam filter generates notifications of message rejection to be sent to the original
message sender. These notifications are sent in two cases:
• When the reject action is executed.
• When the bounce action is executed.
Notification texts are provided on the settings tab in the filter settings section.
In order to change the text of notifications sent to its originator when
the reject and bounce actions are executed:
1. Click the edit button in the filter settings section.
2. Edit message text in the Edit filter setting window that will open
(see Figure 36).
Page 86

86 Kaspersky Anti-Spam 2.0 Enterprise Edition / ISP Edition
3. Click the accept button.
Figure 36. Notifications editing window
5.2.7.2. Generating the list of licensed users
Generating the list of licensed recipients is extremely important since incoming
e-mail messages for these particular users will be analyzed by the filter.
After the product installation the list remains empty. You will have to list the email addresses of users whose mail you would like to process.
Click the edit button in the settings tab (see Figure 36) of the Licensed
recipients section to browse and edit the list of licensed Kaspersky Anti-Spam
recipients.
You can edit the list using the add and delete buttons in the window that will
open (see Figure 37).
Page 87

Configuring Filtering Parameters 87
Figure 37. The list of licensed recipients’ addresses
5.2.8. Saving Filter configuration
Copies of all necessary configuration files are created by WebConfigurator
during the program operation and changes are saved to these copies.
Configuration files themselves remain unchanged and the changes made can be
reversed any time (before the files are saved). See below.
In order to move the changes to the "active" configuration files and enable them,
you have to save configuration.
In order to save the filter configuration:
Click the save button located in the top right corner of the window on any
tab.
When you save the configuration, temporary copies of the configuration files are
saved as permanent and configuration compiling process is started. It is
necessary to obtain binary configuration files, used by the filter (to provide the
required processing speed), from XML text files that can be edited by
WebConfigurator.
After the successful compilation, updating of the binary representation of the
configuration files used by the filter, is performed. The filter will receive a signal
indicating the necessity to read the updated data.
Page 88

88 Kaspersky Anti-Spam 2.0 Enterprise Edition / ISP Edition
In case of file copying or compiling failure, you will get a list of detected errors.
The binary image of the configuration files in this case will not be overwritten,
and the filter will continue using the existing (old) data.
One of the possible reasons of failure when saving and compiling the
configuration is the absence of the rights required to overwrite the
files.
After the configuration is saved, it impossible to reverse changes
(rollback to the previous configuration).
To reject changes made to the filter configuration (before saving):
1. open any tab.
2. click the exit button located in the right top corner of the window.
As a result, a confirmation will be requested and if such confirmation is received,
you will exit the Spam filter configuration without saving temporary copies of the
configuration files.
It is extremely undesirable to exit Spam filter setup by closing the
WebConfigurator window without clicking on the save or exit
button. Changes made to the configuration will be ignored in this
case. The modified copies of the configuration files will remain on
your computer, but it will be practically impossible to use them.
Page 89

CHAPTER 6. UPDATING THE
CONTENT FILTERING
DATABASE
The content filtering database, used for analyzing messages for spam, is
updated by the updater script (sfupdates).
The update can be performed from the following sources (for more details see
para 6.1, page 90):
• from the Internet.
• from a network folder.
Content filtering database update can be launched in one of the following ways
(see para 6.2, page 90):
• from the command line.
• using the cron standard utility (scheduled program launch).
The following tasks are performed during updating:
1. Content filtering database archive is downloaded from the specified
location (Internet, network folder) to the following folder:
mailfilter/cfdata/received_updates.
2. If cumulative (complete) database update has been downloaded, the old
data will be deleted from the content filtering database storage folder
/usr/local/ap-mailfilter/cfdata/updates, the downloaded update will then be
unpacked and copied to this folder. If a partial update has been received,
it will be unpacked and copied to the content filtering database data
storage folder.
3. The downloaded data will be compiled and the application will be
restarted to be able to use the updates.
/usr/local/ap-
Page 90

90 Kaspersky Anti-Spam 2.0 Enterprise Edition / ISP Edition
6.1. Selecting the source of the
content filtering database
update
The content filtering database update settings are stored in the updater script
configuration file – /usr/local/ap-mailfilter/conf/src/updater.ini (see para A.5,
page 125 for more details). You can change the database update source by
editing the settings.
By default, the updates are downloaded via the Internet from the Kaspersky Lab
website (ftp://downloads1.kaspersky-labs.com/sfupdaters
conditioned by the download value of the METHOD parameter. You should edit
the value of the URL parameter to change the update address. For example:
METHOD=download
URL=ftp://user:password@localhost/dir/subdir
If you need to update the content filtering database on several computers it is
more convenient to obtain the database once, save it to a folder, and then
update the database from this folder, rather than updating it repeatedly via the
Internet. To select this source of updating you should set the METHOD
parameter to copy and specify the full path to the folder as a value of the
UPDATE_PATH parameter. For example:
METHOD=copy
UPDATE_PATH=/usr/local/share/updates/sfupdates
). This update mode is
6.2. Launching the updating process
There are two ways to update the content filtering database; automatic
scheduled launch or manual launch from the command line.
We strongly recommend that you schedule automated update as it
allows using the newest data provided by Ashmanov & Partners
linguistic laboratory during the filtering process and ensures the highest
efficiency of spam filtering.
Page 91

Updating the Content Filtering Database 91
6.2.1. Scheduled launch
Any distribution kit for any Unix-type operating system includes a standard
scheduled
automated content filtering database update via the Internet.
You can register the updater script execution in crontab for the root user or for
the mailflt user on whose behalf the filter works. Make sure in advance that the
mailflt user’s rights include writing to the following folders:
For example, the file with crontab may have the following content:
In order to change the launch settings saved in cron use the following command:
program launch utility called cron. Using this utility you can setup
It is recommended that the database updating be scheduled to start
every hour.
/usr/local/ap-mailfilter/cfdata – the content filtering database folder
/usr/local/ap-mailfilter/conf – The filter configuration folder.
SHELL=/bin/sh
26 * * * * /usr/local/ap-mailfilter/bin/sfupdates
• For the root user: % crontab -e
• For the mailflt user: $ crontab —u mailflt —e
6.2.2. Launching the content filtering
database update process from the
command line
Launching of the content filtering database update process from the command
line can be performed as follows:
./sfupdates [switch]
where [switch] – is one of the possible switches. A complete list of switches
and their functions is provided in section A.6, page 125.
When the content filtering database updater script is launched without any
command line switches, the new updates will be downloaded from the Internet,
checked for integrity, and the update compiler will start. Then the filter will restart
and will be able to use the updated database.
Page 92

92 Kaspersky Anti-Spam 2.0 Enterprise Edition / ISP Edition
6.3. Viewing results
By default, the results of the content filtering database updater script actions are
sent to the console and saved to the system log (syslog). Only most important
messages concerning the update mode, the updating process and its results are
registered in the log.
When the updater script is launched from the command line you may select the
mode of reporting on the content filtering database updating process using the
command line switches.
For example, launch the script with the -q switch to disable message display.
If you wish to obtain the debugging data as well as the reference data, specify
the -v switch when you start the script.
Page 93

APPENDIX A. ADDITIONAL
INFORMATION ABOUT
KASPERSKY ANTI-SPAM
A.1.
The ap-process-server
program
(master process)
A.1.1. Starting and stopping the master
process
The ap-process-server program (master process) starts during the installation of
Kaspersky Anti-Spam and at the server restart.
For normal operation of Kaspersky Anti-Spam the master process must operate
continuously.
The master process is started by the following command:
/usr/local/ap-mailfilter/bin/ap-process-server
[<configuration file name>]
The default name of the configuration file is:
process-server.conf
When started, the program creates a pid file. The name of this pid file and the
path to it are specified in the configuration file. The default path is: /var/tmp/ap-
process-server.pid.
The master process re-reads the configuration file every time it receives the
SIGHUP signal.
The master process stops after it receives the SIGTERM signal. While preparing
to stop, the master process awaits while its child processes complete for 10
seconds and if they did not complete within these 10 seconds, a SIGKILL signal
will be sent to the child processes.
.
/usr/local/ap-mailfilter/etc/ap-
Page 94

94 Kaspersky Anti-Spam 2.0 Enterprise Edition / ISP Edition
A.1.2. The
ap-process-server
program
configuration file
The ap-process-server program configuration file includes the configuration
parameters (keyword and the argument separated by a space, one for each line)
and the comments. The comments are preceded with the # or by the; sign
Examples of configuration files:
FilterPath /usr/local/ap-mailfilter/bin/ap-mailfilter
FilterParam -a -V 1 -g mailflt:mailflt -K 1
StartFilters 0
MaxFilters 20
MinSpareFilters 0
PidFile /usr/local/ap-mailfilter/run/ap-process-server.pid
LogLevel 1
SysLogFacility Mail
Listen tcp:127.0.0.1:2255
Provided below is the description of configuration parameters:
FilterPath – filename of the filtering process executable file. The default
value is: /usr/local/ap-mailfilter/libexec/ap-mailfilter.
FilterParam – command line parameters sent to the filtering process; see
para A.2, page 96. The default value is: –V 1.
StartFilters – number of filters that must be started immediately after the
program is started (prefork). The default value is: 0.
MaxFilters – maximum number of filtering processes that may be started by
the master process. The default value is: 50.
The MaxFilters parameter must be setup so that to avoid intensive
swapping in the system, even at the maximum load. A typical value for
a server with 1 GB memory – 50; if the major part of the traffic is made
up by short messages (and therefore the filtering processes consume
only an insignificant part of the memory resources), this value can be
increased.
MinSpareFilters – the minimum number of free (spare) filtering processes.
If this number is less than the specified value, the master process will
start additional processes. The default value is: 0.
The MinSpareFilters parameter can be used for leveling load peaks
when the load increases abruptly: if required, the MinSpareFilters
parameter should be set at the level of 10-20% of the MaxFilters
parameter.
Page 95

Appendix A 95
PidFile – full path to the pid file. The default value is: /var/tmp/ap-process-
server.pid.
LogLevel – a numeric value that determines the level of detail for records
entered into the system log (syslog); see para A.1.3, page 95. The
default value is: 3.
SysLogFacility – facility parameter value, used for entering records in the
system log. The default value is: mail.
Listen – the address of a socket used to establish connection with the client.
This parameter may be set in one of the following formats:
tcp::port – a network socket associated with INADDR_ANY
(connections with any of the server addresses are accepted);
tcp:hostname:port – a network socket associated with (hostname may
be specified as IP address or computer name; if the computer
name specified is associated with several addresses, an error
message will be displayed);
unix:/path/to/socket – a local socket. The default value is:
unix:/var/tmp/ap-process-server-socket.
A.1.3. System log (syslog) records detail
levels
When writing to the system log (syslog), the master process uses the following
levels of detail:
Level Type of messages entered Priority
0 No messages are entered into the system
log
1 Error messages: filtering process completed
with an error or was stopped by a signal
other than SIGHUP, unable to start the
filtering process, filtering processes
restarting too often, etc.
2 Messages notifying that the limit of the
started filtering processes number is
reached
3 Messages notifying of the start and
completion of the master process, receipt of
signals, re-reading the configuration.
—
error
info
info
Page 96

96 Kaspersky Anti-Spam 2.0 Enterprise Edition / ISP Edition
Level Type of messages entered Priority
4 Messages notifying of the start and
completion of filtering processes.
5 Data on the resources consumption by the
child processes.
A.2. The
ap-mailfilter
program
info
info
(filtering process) command
line parameters
The ap-mailfilter program (filtering process) is launched by the master process.
When launching a filtering process the master process supplies to such process
the command line parameters set by the FilterParam parameter in the master
process configuration file.
The ap-mailfilter program supports the following command line switches:
General parameters
–a – operation in the client-server mode. The use of this switch is mandatory
for working with all Kaspersky Anti-Spam 2.0 client modules.
–b /path/to/ap-mailfilter/conf/data – full path to the folder with data
(filtering database, compiled profiles). The default value is: /usr/local/ap-
mailfilter/conf/data.
–k /path/to/ap-mailfilter/run/kas-license – full path to the socket file used
for connection to the kas-licence licensing service. The default value is:
/usr/local/ap-mailfilter/run/kas-license.
Timeout values
–i <number_of_seconds> – maximum allowable time (in seconds) for the
–I <number_of_seconds> – maximum allowable waiting time (in seconds)
spare filtering process to remain in the idle mode: if the process has not
received a new message to process within the specified time, it will be
stopped. The default value is: 300.
for receiving data from the client while processing a message: if not a
byte of data has been received within this time, the processing of the
current message will be stopped. The default value is: 30.
Page 97

Appendix A 97
Working with RBL
–r <number_of_seconds> – maximum allowable time for the execution of a
single filtering rule, associated with calling DNS (checking against RBL
services list, looking for a particular IP address in the DNS). The default
value is: 6.
–k <number> – the level of detail when analyzing headers Received for
extracting IP addresses (with the consequent check of such addresses
against the RBL lists). If K = 0, then the analysis will not be performed
altogether, if K = n, then IP addresses will be extracted only from n
upper Received headers.
Safety
–r /path/to – mode used to work with chroot in folder /path/to.
–g user:group, –g userid:groupid – user and group on whose behalf the
filtering process is running. It is recommended to use -g mailflt:mailflt
for all cases.
Working with the system log (syslog)
–V <number> – level of system log records detail:
0 – minimum level of detail, no records made on the DoSyslog action;
1 – displaying error messages and execution of the DoSyslog action;
2 – displaying warnings;
3 and above – displaying debugging messages.
–L /path/to/logfile – file to which messages are forwarded when the
DoSyslog action is executed.
Server load management
The parameters described below shall be altered only at very high loads
(hundreds of thousands or millions messages per day for one server).
–m <number> – maximum number of messages that can be processed by a
single filtering process. Once this limit is reached, the filtering process
will quit (if required, a new filtering process will be launched by the
master process). The default value is: 300.
–M <number> – a randomization indicator for the maximum number of
messages processed by a single filtering process. The default value is:
30.
The limit on the number of messages processed by each filtering
process is set as m + random number in the range from 0 to M-1; if
default values are used, each filtering process will process from 300 to
329 messages. Randomization must be used in order to avoid a
simultaneous start of a large number of filtering processes at peak loads
on the server.
Page 98

98 Kaspersky Anti-Spam 2.0 Enterprise Edition / ISP Edition
–H <number_of_seconds> – a randomization indicator for the filtering
process work completion after receiving the SIGHUP signal. The default
value is: 0.
If the value of H is non-zero, then the filtering process completes upon
the receipt of the signal with a random delay from 0 to H-1 seconds.
This parameter is used in order to avoid the development of peak loads
at the times when all filtering processes simultaneous restart (for
example when the filter configuration is recompiled or the filtering
database is updated).
A.3. Client modules for mail systems
Client modules included in the Kaspersky Anti-Spam software package are used
for the program integration into the mail systems installed on the user's
computer.
The following modules are used for the supported mail systems:
• kas-milter – for the Sendmail mail system.
• kas-pipe – for the Postfix mail system.
• kas-pipe (standard setup) – for the Exim mail system.
• kas-exim (alternative setup) – for the Exim mail system.
• kas-qmail – for the Qmail mail system.
• kas-cgpro – for the Communigate Pro mail system.
The integration operations required are performed during the installation of
Kaspersky Anti-Spam using mail system configuration scripts.
This section contains a detailed description of the operation of the client
modules, their configuration files and the peculiarities of the mail systems
configuration.
A.3.1. Interaction of the client modules
with the filtering service
All client modules interact with the filtering service using one common procedure:
• the client receives a message from the mail system;
• the client sends a request to connect with the filtering process;
Page 99

Appendix A 99
• the master process monitors the running filtering processes (if required,
the master process launches new processes) and establishes a
connection between the client and a free filtering process;
• when the connection has been obtained, the client submits the
message for processing and receives the message processing results
from the filtering process;
• based on the processing results, the client modifies the message and
returns it to the mail system.
Client modules interact with the master process and the filtering process using
an internal protocol via a TCP (network) socket or a unix (local) socket.
If a TCP socket is used to connect the client with the filtering service, there is a
possibility to install a mail system with the client module integrated into it on one
server while the filtering service (and all other Kaspersky Anti-Spam
components) will be installed on a different (dedicated) server. In this case, if the
volume of the mail traffic being processed allows this, the dedicated server may
service several mail servers. This configuration cannot be arranged by the
standard installer and requires manual setup.
The procedures of clients' interaction with mail systems are described in the
following sections below:
A.3.2.
kas-milter
(client module for
Sendmail)
A.3.2.1. Operation of the
The kas-milter program is designed for the integration of Kaspersky Anti-Spam
with the Sendmail mail system.
Connection to Sendmail is ensured using the libmilter library.
The diagram of modules interaction with Sendmail during Kaspersky Anti-Spam
operation is presented below:
kas-milter
program
Page 100

100 Kaspersky Anti-Spam 2.0 Enterprise Edition / ISP Edition
Figure 38. The kas-milter program operation diagram
A.3.2.2. The
kas-milter
program configuration file
Parameters used for kas-milter operation are stored in configuration file
/usr/local/ap-mailfilter/etc/kas-milter.conf.
Example of kas-milter configuration file:
SpamtestAddr tcp:127.0.0.1:2255
ConnectTimeout 10000
RWTimeout 30000
ClientAddr local:/usr/local/ap-mailfilter/run/kas-
milter.sock
PidFile /usr/local/ap-mailfilter/run/kas-milter.pid
OnError ignore
FilteringSizeLimit 500
DefaultDomain localhost
LogFacility mail
LogLevel error
Description of the program's parameters:
SpamtestAddr – the address of a socket used for the communication and
interaction with the filtering process. Format: tcp:host:port or
unix:/path/to/socket.
ConnectTimeout – maximum allowable waiting time (in milliseconds) when
establishing connection with the filtering process.
RWTimeout – maximum allowable waiting time (in milliseconds) when
exchanging data with the filtering process.
ClientAddr – the address of a socket used for communication and
interaction between the kasp-milter program and the Sendmail system.
 Loading...