

Page 1
KASPERSKY LAB
Kaspersky Anti-Hacker 1.7
USER GUIDE
Page 2

KASPERSKY ANTI-HACKER 1.7
User Guide
© Kaspersky Lab
http://www.kaspersky.com
Revision date: November, 2004
Page 3

Contents
CHAPTER 1. KASPERSKY ANTI-HACKER.................................................................. 6
1.1. What’s new in v. 1.7 .............................................................................................. 7
1.2. Distribution Kit........................................................................................................ 7
1.3. Conventions........................................................................................................... 8
1.4. Help Desk for Registered Users ........................................................................... 9
CHAPTER 2. INSTALLING AND REMOVING THE SOFTWARE.............................. 10
2.1. System Hardware and Software Requirements................................................. 10
2.2. Installing ............................................................................................................... 11
2.3. License key installation........................................................................................ 13
2.4. Removing the Program ....................................................................................... 14
CHAPTER 3. STARTING WORK .................................................................................16
CHAPTER 4. PREVENTING HACKER ATTACKS WHEN WORKING IN THE
INTERNET AND LOCAL AREA NETWORKS ......................................................... 19
4.1. Kaspersky Anti-Hacker Operating Principles ..................................................... 19
4.2. Security Levels .................................................................................................... 20
4.3. Recommended Settings...................................................................................... 21
CHAPTER 5. RUNNING THE PROGRAM .................................................................. 24
5.1. Starting the Program ...........................................................................................24
5.2. System Menu....................................................................................................... 24
5.3. Main Window ....................................................................................................... 25
5.3.1. Menus ........................................................................................................... 26
5.3.2. Toolbar .......................................................................................................... 28
5.3.3. Workspace.................................................................................................... 30
5.3.4. Status Bar ..................................................................................................... 31
Page 4

4 Kaspersky Anti-Hacker
5.4. Dialog Boxes' Shortcut Menu.............................................................................. 31
5.5. Rule Wizards ....................................................................................................... 31
5.6. Changing and Saving Interface Settings ............................................................ 32
5.7. Exiting the Program............................................................................................. 34
CHAPTER 6. ENABLING THE SECURITY SYSTEM AND DEFINING ITS
SETTINGS.................................................................................................................. 35
6.1. Enabling the Security System and Selecting the Security Level ....................... 35
6.1.1. Enabling the Security System ...................................................................... 35
6.1.2. Selecting the Security Level ......................................................................... 37
6.1.3. Network Event Warning................................................................................ 38
6.1.4. Training Window (Medium Level) ................................................................ 39
6.1.5. The Executable Module Substitution Warning ............................................ 40
6.2. How the Program Responds to Attack ............................................................... 41
6.3. Customizing Application Rules ........................................................................... 43
6.3.1. Managing the Rule List................................................................................. 43
6.3.2. Adding a New Application Rule.................................................................... 46
6.3.2.1. Step 1. Customizing the Rule................................................................ 46
6.3.2.2. Step 2. Rule Conditions ......................................................................... 51
6.3.2.3. Step 3. Additional Actions...................................................................... 57
6.4. Customizing Packet Filtering Rules .................................................................... 57
6.4.1. Managing the Rule List................................................................................. 57
6.4.2. Adding a New Rule....................................................................................... 60
6.4.2.1. Step 1. Rule Conditions ......................................................................... 60
6.4.2.2. Step 2. Rule Name and Additional Actions........................................... 65
6.5. Intrusion Detection System ................................................................................. 66
6.5.1. Intrusion Detector Settings ........................................................................... 66
6.5.2. The List of Detectable Attacks...................................................................... 67
CHAPTER 7. VIEWING PERFORMANCE RESULTS................................................ 70
7.1. Viewing the Current Status ................................................................................. 70
7.1.1. Active Applications........................................................................................ 70
Page 5

Contents 5
7.1.2. Established Connections.............................................................................. 73
7.1.3. Open Ports.................................................................................................... 76
7.2. Using the Logs..................................................................................................... 78
7.2.1. Displaying the Logs Window........................................................................ 79
7.2.2. The Logs Window Layout............................................................................. 79
7.2.2.1. Menus..................................................................................................... 80
7.2.2.2. Report Table .......................................................................................... 80
7.2.2.3. Tabs........................................................................................................ 81
7.2.3. Selecting the Log .......................................................................................... 81
7.2.3.1. Security Log ...........................................................................................81
7.2.3.2. Application Activity ................................................................................. 82
7.2.3.3. Packet Filtering ...................................................................................... 83
7.2.4. Defining Log Settings ................................................................................... 84
7.2.5. Saving the Log to a File................................................................................ 85
APPENDIX A. INDEX .................................................................................................... 86
APPENDIX B. FREQUENTLY ASKED QUESTIONS ................................................. 87
APPENDIX C. KASPERSKY LAB................................................................................. 88
C.1. Other Kaspersky Lab Products .......................................................................... 89
C.2. Contact Information............................................................................................. 93
APPENDIX D. LICENSE AGREEMENT ...................................................................... 96
Page 6

CHAPTER 1. KASPERSKY ANTI-
HACKER
Kaspersky Anti-Hacker is a personal firewall that is designed to safeguard a
computer running a Windows operating system. It protects the computer against
unauthorized access to its data and external hacker attacks from the Internet or
an adjacent local network.
Kaspersky Anti-Hacker performs the following functions:
• Monitors the TCP/IP network activity of all applications running on your
machine. If it detects any suspicious actions, the program notifies you and
if required, blocks the suspect application from accessing the network.
This allows you to preserve confidential data on your machine. For example, if a Trojan tries to transmit any data from your computer, Kaspersky
Anti-Hacker will block this malware from accessing the Internet.
• The SmartStealth™ technique makes it difficult to detect your computer
from outside. As a result, hackers will lose the target and all their attempts
to access your computer will be doomed to fail. Besides, this allows for
prevention of the DoS (Denial of Service) attack of all types. At the same
time you will not feel any negative influence of this mode while working on
the Web: the program provides conventional transparency and accessibility of the data.
• Blocks the most common hacker network attacks by permanently filtering
the incoming and outgoing traffic, and also notifies the user about any
such attacks.
• Monitors for attempts to scan your ports (these attempts are usually followed by attacks), and prohibits any further communication with the attacking machine.
• Allows you to review the list of all established connections, open ports,
and active network applications, and if required, lets you terminate unwanted connections.
• Allows you to secure your machine from hacker attacks without special
configuration of program settings. The program allows simplified management by choosing one of five security levels: Block all, High, Medium,
Page 7

Kaspersky Anti-Hacker 7
Low, Allow all. By default the program starts with the Medium level, which
is a training mode that will automatically configure your security system
depending on your responses to various events.
• Allows flexibility of security system configuration. In particular, you can set
the program to filter network operations into wanted and unwanted, and
you can configure the Intrusion Detection System.
• Allows you to log certain security-related network events to various special-purpose logs. If required, you can define the detail level of the log entries.
The program may be used as a separate software product or as an integral
component of various Kaspersky Lab's solutions.
Attention!!! Kaspersky Anti-Hacker does not protect your computer from
viruses and malicious programs that can destroy and/or corrupt your
data. It is advised that you use Kaspersky Anti-Virus Personal for this
purpose.
1.1. What’s new in v. 1.7
Unlike version 1.5, the new version of the program supports operation under
Windows XP with Service Pack 2 installed.
1.2. Distribution Kit
The distribution kit includes:
• A sealed envelope containing installation CD with software files for the
product
• This user guide
• A license key included into the distribution package or written on a special
diskette
• License agreement
Page 8
8 Kaspersky Anti-Hacker
Before you unseal the CD envelope, be sure to review the license
agreement thoroughly.
The License Agreement (LA) is a legal agreement between you (either an
individual or a single entity) and the manufacturer (Kaspersky Lab) describing the
terms on which you may employ the anti-virus product which you have
purchased.
Please ensure you read all the terms of the LA!
If you do not agree to the terms of this LA, Kaspersky Lab is not willing to license
the software product to you and you should return the unused product to your
Kaspersky Anti-Virus dealer for a full refund, making sure the envelope
containing the CD (or diskettes) is sealed.
By unsealing the envelope containing the CD (or the diskettes) you agree to all
the terms of the LA.
1.3. Conventions
In this book we use a number of conventions to emphasize various important
parts of the document. The table below details the conventions used.
Bold font
Note.
Attention!
Convention Meaning
Menu titles, menu commands, window
titles, dialog elements, etc.
Additional information, notes.
Critical information.
Page 9
Kaspersky Anti-Hacker 9
Convention Meaning
Actions that must be taken.
To start the program, follow
these steps:
1. Step 1.
2. …
Example of a user defined task to be
Task:
Solution
accomplished using this program.
Solution of the task.
1.4. Help Desk for Registered Users
Kaspersky Lab offers a large service package enabling its registered customers
to employ Kaspersky Anti-Hacker more efficiently.
If you register and purchase a subscription you will be provided with the following
services for the period of your subscription:
• New versions of this software product, provided free
• Phone and e-mail support advising on matters related to installation, con-
figuration and management of this software product
• Information about new products from Kaspersky Lab and about new computer viruses (for those who subscribe to the Kaspersky Lab newsletter)
Kaspersky Lab does not provide information related to management
and use of your operating system, and associated technologies.
Page 10

CHAPTER 2. INSTALLING AND
REMOVING THE SOFTWARE
2.1. System Hardware and Software
Requirements
In order to run Kaspersky Anti-Hacker your system must meet the following
hardware and software requirements:
General requirements:
• computer with Microsoft Windows 98/ME/NT 4.0/2000/XP installed;
• to install under Microsoft Windows NT 4.0/2000/XP, you must have ad-
ministrator's rights;
• TCP/IP protocol support;
• local network (Ethernet) or modem connection (standard or ADSL-
modem)
• Microsoft Internet Explorer 5.0 or higher
• at least 50 MB of free space for the program files and extra space for the
program logs
• To run under Windows® 98/Me/NT 4.0, you must have:
• Intel Pentium® processor of 133MHz or higher under Windows
98 or Windows NT 4.0
• Intel Pentium® processor of 150MHz or higher under Windows
Me
• 32 MB RAM
Page 11

Installing and Removing the Software 11
• Service Pack v. 6.0 or higher for Windows NT 4.0 Workstation
• To run under Windows 2000, you must have:
• Intel Pentium® processor of 133MHz or higher
• 64 MB RAM
• To run under Windows XP, you must have:
• Intel Pentium® processor of 300MHz or higher
• 128 MB RAM
2.2. Installing
In order to install the program run Setup.exe from the CD. The setup wizard
operates in dialog mode. Every dialog box contains a certain set of buttons
allowing management of the setup. The main buttons are:
• OK – to accept actions
• Cancel – to cancel action(s)
• Next – to move one step forward
• Back – to move one step backward
Before installing Kaspersky Anti-Hacker please quit all programs
running on your computer.
Step 1. Read general information
Immediately after you the click setup.exe file, the first dialog box with information
about launching the Kaspersky Anti-Hacker setup wizard will be displayed
In order to proceed with the installation, press the Next> button. Pressing the
Cancel button will cancel the installation.
Page 12

12 Kaspersky Anti-Hacker
Step 2. Read the license agreement
Next dialog box of the setup wizard contains the text of a License Agreement
between the user and Kaspersky Lab. Read it carefully and press Yes if you
agree to its terms and conditions.
Step 3. Input user information
Use this step of the program setup process is used to enter your user name and
your Company name. By default the setup wizard will use information stored in
the OS registry. You can then modify this information.
Press Next> to proceed with the installation process.
Step 4. License key installation
During this step of the product setup the Kaspersky Anti-Hacker license key will
be installed. The License key is your personal "key" containing all service
information required for the proper operation of the program, namely the license
name, number and expiry date.
The program will not work without the license key.
Specify the license key file in the standard Windows Select File dialog and press
the Next > button to proceed with the program setup.
If you do not have the license key by the time you are installing the program (for
example, you ordered it from Kaspersky Lab via internet, but have not received it
yet), you can install the license key later. Remember that without the license key
you cannot start running Kaspersky Anti-Hacker.
Step 5. Selecting the destination folder
During this step Kaspersky Anti-Hacker will determine the folder in your
computer where the program will be installed. The default path is: Program
Files\Kaspersky Lab\Kaspersky Anti-Hacker.
If you wish to change the default path, press the Browse button, specify the
destination folder in the standard Select dialog box and press the Next> button.
Page 13
Installing and Removing the Software 13
After this Kaspersky Anti-Hacker program files will be copied to your computer.
Step 6. Copying files to your hard drive
The Copying files dialog box will display the process of copying files to your
computer's hard drive.
Step 7. Completing the setup
The Completing Setup Wizard dialog box contains information about completing
the Kaspersky Anti-Hacker setup process.
If the system needs to register some services in order to complete the program
setup, you will be offered to restart your computer. This is required for the correct
completion of the product installation.
In order to complete the program setup:
1. Select one of the options to complete the setup:
Yes, restart my computer now
No, I will restart my computer later
2. Press the Finish button.
2.3. License key installation
If you have not installed the license key during the Kaspersky Anti-Hacker setup,
the program will not work.
In order to use the product, you must install the license key.
In order to install the license key, perform the following:
left double-click the corresponding license key file. It will be automatically installed.
or
Page 14

14 Kaspersky Anti-Hacker
copy the license key file to folder Program Files\Common
Files\Kaspersky Lab
2.4. Removing the Program
To remove the Kaspersky Anti-Hacker program follow these steps:
press the Start button on the Windows taskbar and select Programs
Kaspersky Anti-Hacker Remove Kaspersky Anti-Hacker.
This will open the program uninstallation wizard.
Step 1. First uninstallation wizard dialog box
This dialog box will warn you that you are about to remove Kaspersky AntiHacker from your computer. In order to proceed press the Next> button.
Step 2. Removing the program from your computer
This dialog box contains the indication of the path to the folder from which the
program will be removed. Press the Remove button to remove Kaspersky AntiHacker from your computer. The process of files removal will be reflected in the
uninstallation wizard dialog box.
Step 3. Completing the removal process
The Complete removal dialog box contains information about the completion of
the Kaspersky Anti-Hacker uninstallation process. In order to correctly complete
this process, your computer must be restarted.
In order to complete the removal of the program,
1. Select one of the option to complete the wizard:
Yes. Restart my computer now
No. I will restart my computer later
Page 15

Installing and Removing the Software 15
2. Press the Finish button.
You can remove the program from the Add or Remove Programs
dialog box that can be accessed via the standard Windows Control
Panel.
Page 16

CHAPTER 3. STARTING WORK
As soon as you install the program and restart your computer the security system
is activated. In fact, from this very moment, Kaspersky Anti-Hacker is monitoring
for attacks against your machine and attempts by your applications to interact via
a local network or the Internet.
After you enter the system you begin to work as usual. When no network
connection is established, the security system on your machine is indicated only
by the
appear on your screen. In this window, you may review information about the
current security level and change this level if required (for details of the program
main window refer to subchapter 5.3 on page 25). By default the Medium level is
enabled. This level allows you to configure your security system conversationally.
In most cases you will not have to configure the system yourself: the most
frequently used applications are allowed by default to establish network
connections strictly according to their type. However sometimes you will have to
configure your security system manually. Let’s review the corresponding
example:
icon in the system tray. If you click on it, the program main window will
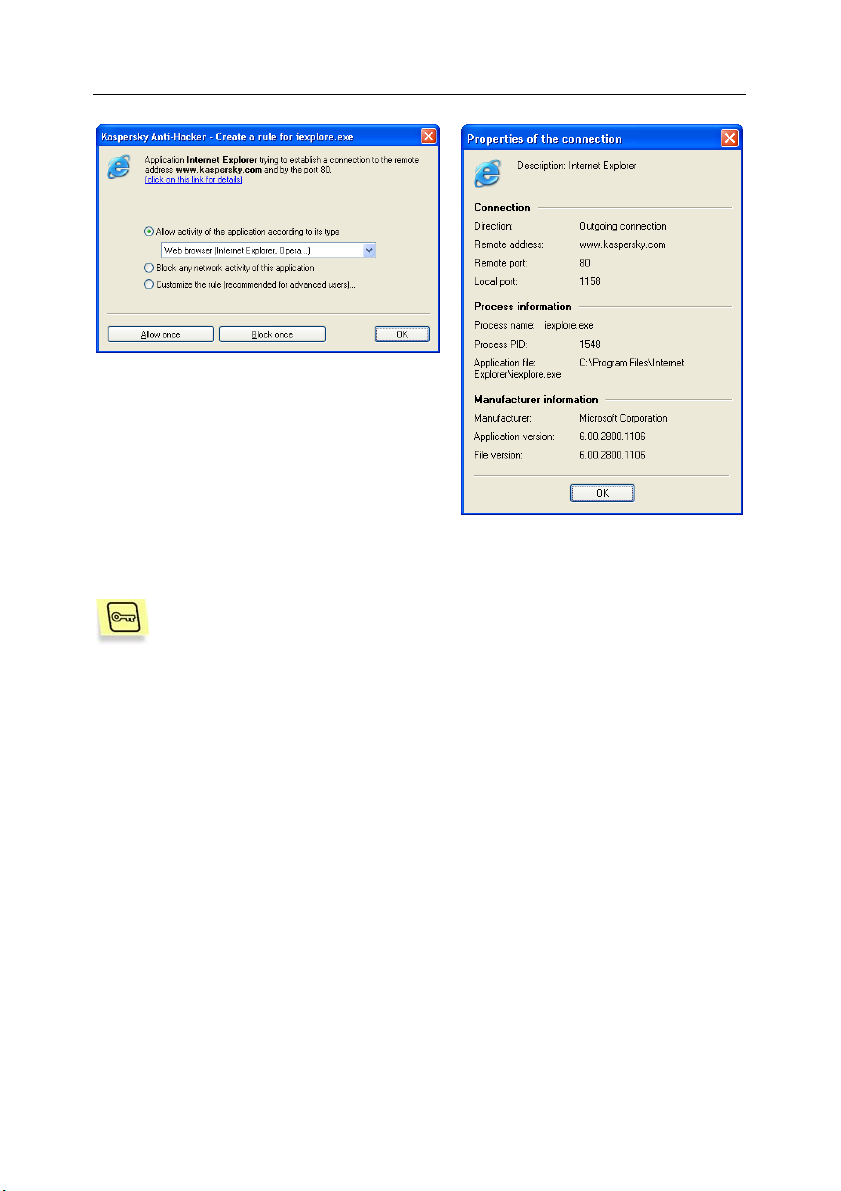
Task: Suppose your computer is connected to the Internet, and
you start Microsoft Internet Explorer and enter
www.kaspersky.com in the address field. The following message
will appear on your screen: Create a rule for IEXPLORER.EXE
(see fig. 1).
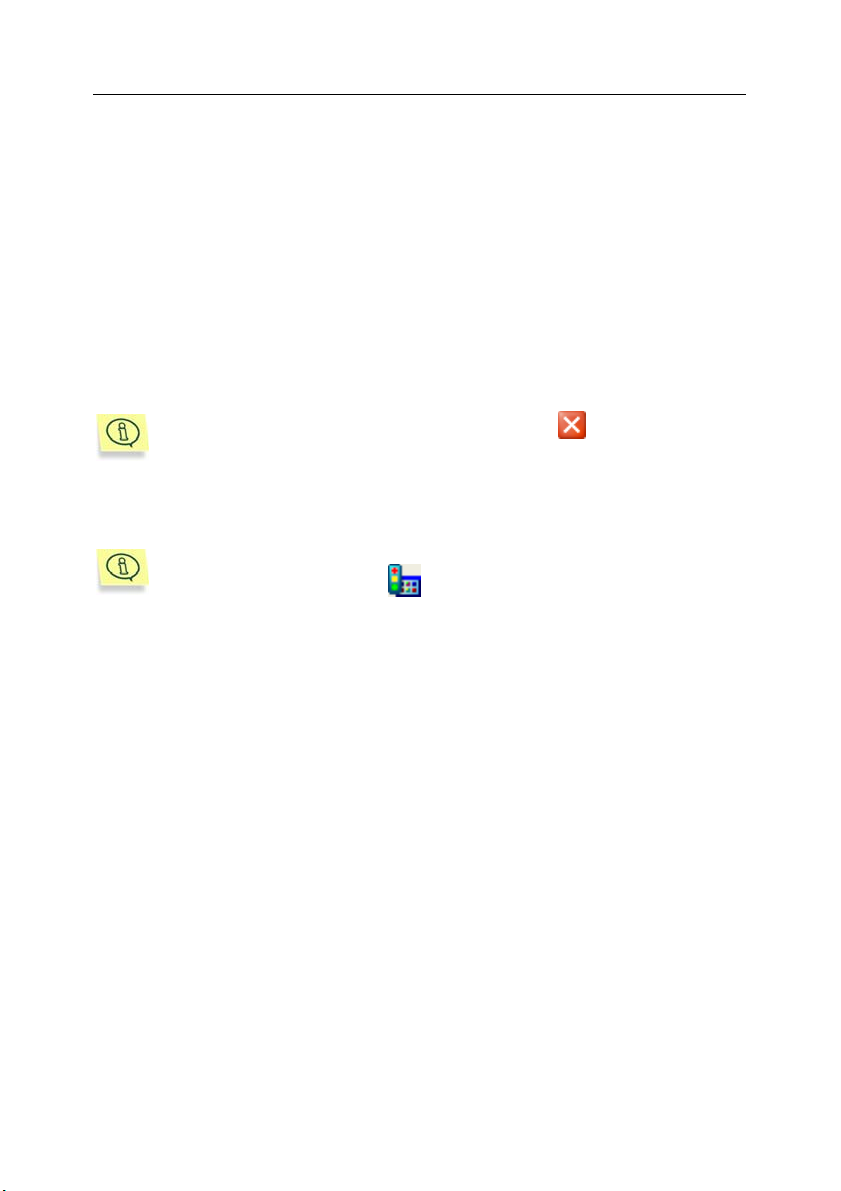
In the upper area of this dialog box you will see the icon for the
application concerned, its name (in this case Microsoft Internet
Explorer), the site address
used to establish the connection. To review more details about
this application, you just have to click on the underlined link (see
fig. 2).
The required network connection will not be established until you
select how to handle this application activity. To do this, you must
respond to the message on your screen.
www.kaspersky,com, and the port to be
Page 17
Starting Work 17
Fig. 1. Self-training dialog box of the security
system
Fig. 2. Information about the
connection to be established
Follow these steps:
1. Select the Allow activity of this application according to its
type option button and Web browser (IE, Netscape...) from the
drop-down list.
2. Press ОК.
After this, Kaspersky Anti-Hacker will allow Microsoft Internet Explorer
to establish the connection. In addition, the application will be allowed to
establish other connections in accordance with its type.
As you have probably noticed, there are three options in the Create a rule for
IEXPLORER.EXE dialog box:
• Allow activity of this application according to its type (the option you
selected in the example above) – allows only network communication that
is compliant with the specified application category. Select the required
category from the drop-down list below the option button. You can allow
any activity of this application by selecting Allow all from the drop-down
list.
Page 18
18 Kaspersky Anti-Hacker
• Block any network activity of this application – blocks the specified
application from any kind of network activity including the described operation.
• Customize the rule – allows you to specify the operations that will be al-
lowed for this application. If you select this option button and click ОК, the
rule wizard window will appear on your screen. Use the rule wizard to define requirements for the operations to be allowed for this application (for
details of the rule wizard see subchapter 6.3.2 on page 46).
If you are not sure which option to select, use the Allow once or the Block once
buttons at the bottom of the dialog box. Later on you will be able to monitor the
application behavior and decide which option to select.
If you close the training window by pressing the
right corner, the operation at issue will be blocked this time.
button in its upper-
In this way you can conversationally configure your computer security system in
an appropriate way.
To review the list of defined rules, select Application rules from the
Service menu or press the
button in the main window toolbar.
We recommend that you use the Medium level for the first few weeks after
program installation. This will allow the program to automatically configure your
security system depending on your responses to various network events. Create
the rules allowing standard network operations.
When the training period is over, you can switch the program to the High level,
and secure your computer against any unauthorized network events and hacker
attacks. However, remember the newly installed applications will by default be
disabled from accessing the local network and/or the Internet. To teach your
Kaspersky Anti-Hacker to handle these new applications you will have to switch it
back to Medium or manually define the appropriate rule for these applications.
Page 19

CHAPTER 4. PREVENTING
HACKER ATTACKS WHEN
WORKING IN THE
INTERNET AND LOCAL
AREA NETWORKS
4.1. Kaspersky Anti-Hacker
Operating Principles
Kaspersky Anti-Hacker protects your computer from network attacks and
preserves your confidential data. To do this, Kaspersky Anti-Hacker monitors all
network operations on your computer. There are two types of network operation:
• Operations on the application level (high-level). At this level, Kaspersky
Anti-Hacker analyses activity of network applications, including web
browsers, mail programs, file transferring programs and others.
• Operations on the packet level (low-level). At this level, Kaspersky AntiHacker analyses data packet sent/received by your netcard or modem.
You work with Kaspersky Anti-Hacker by creating special filtering rules for
network operations. Some filtering is performed automatically by the Intrusion
Detection System, which can detect port scanning, DoS attacks, etc., and can
then block the assaulter. In addition, you can define your own filtering rules to
reinforce protection of your machine.
For every type of network operation there are separate lists of Kaspersky AntiHacker rules.
• Application rules. Here you can select the required application and allow
an activity that is compliant with the application type. You can define any
number of rules for every application, as required. If any network activity
not meeting conditions of the rule is detected on your machine, the pro-
Page 20
20 Kaspersky Anti-Hacker
gram will notify you and allow you to block the unwanted action (if Medium level is enabled). In order to define the simplest rule for an applica-
tion, you can simply select its type from the drop-down list (for details see
subchapter 6.3.2.1 on page 46). To define a more complicated rule, you
can specify the remote services and addresses allowed for this application.
• Packet filtering rules allow or block network packets sent or received by
your machine. These rules review the packet header (the protocol used,
the port numbers, the IP addresses etc.), and take decisions on the basis
of this data. These rules are applied to all network applications running on
your machine. For example, if you create a rule to block a certain IP address, all network communications to this address will be prohibited.
Packet filtering rules have a higher priority than application rules, i.e.
these rules are instigated first. For example, if you create a rule to block
all incoming and outgoing data packets, then the program will apply no
application rules while filtering data packets.
4.2. Security Levels
The program allows you to select one of the following security levels:
• Allow all – disables the security system on your machine. When this level
of security is selected, any network activity is allowed on your machine.
• Low – allows network activity of all applications except those explicitly
prohibited by user defined application rules.
• Medium – notifies you about network events related to your applications
and allows you to configure your security system for optimal performance.
If a network application on your computer tries to connect to the local
network or the Internet, the training mode will be activated. The application and the network operation details will be displayed on your screen.
On the basis of this data the program will prompt you to select one of the
following courses of action: to allow or to block this event once, to completely block activity of this application, to allow the application activity according to its type, or to define additional network communication settings.
Depending on your answer, the program will create a rule for this application that will subsequently be applied by the program automatically.
• High – prohibits network activity for all applications except for those ex-
plicitly allowed by user defined application rules. When this security level
Page 21
Preventing Hacker Attacks 21
is enabled, the program training dialog box does not appear on your
screen, and all attempts to establish connections not defined in the user
rules are blocked.
Remember that all applications installed after you switch to this
security level are by default disabled from accessing the Internet
or the local network.
• Block all – disables your computer from accessing the Internet or the lo-
cal network. This level creates a situation in which all attempts to establish connection via the Internet or the local network are blocked as if your
computer is physically disconnected.
With the High, Medium or Low level enabled you can set the
supplementary security tool – Stealth mode (see subchapter 5.3.3 on
page 30). This mode allows only the network activity initiated by you, all
other types of activity (remote access to your machine, checking of your
machine using the ping utility and so on) are prohibited, if not explicitly
allowed by the user rules.
Actually it means that you computer becomes "invisible" from the
external environment. Hackers lose the target and all their attempts to
access your computer are doomed to fail. Besides, this allows for
prevention of the DoS (Denial of Service) attack of all types.
At the same time you will not feel any negative influence of this mode
while working on the Web: Kaspersky Anti-Hacker allows the network
activity initiated from your machine.
Attention! The intrusion detection system is enabled for all security
levels except for Allow all. However, if required, you can manually
disable it (see subchapter 6.5.1 on page 66).
4.3. Recommended Settings
What components of Kaspersky Anti-Hacker should be used and what security
level should be selected? The answer depends on the task you want to
accomplish.
Task 1. How to protect your data from external attacks via the
Internet?
The following are two of the main methods used by hackers to steal
or corrupt user data via the Internet: penetration into a target computer system using computer software errors, and infection of a target
computer by Trojans.
Page 22

22 Kaspersky Anti-Hacker
If you learn about an error in one of the programs installed on your
machine, be sure to create a blocking rule for this application. It is
advised that you create a complex blocking rule (see
subchapter 6.3.2.1 on page 46) that will take into account features of
this error.
Suppose your computer is infected by a Trojan via a diskette or by
email, and the malicious program attempts to send some data via the
Internet. Kaspersky Anti-Hacker will easily preserve your data by
blocking this operation (at the High level), or by issuing an
appropriate notification (at the Medium level).
Attention!!! Kaspersky Anti-Hacker does not protect your computer
from viruses and malicious programs.
For example, a Trojan may use a standard mail program on your
computer to send out your confidential data. In this case Kaspersky
Anti-Hacker will not be able to prevent the action. Moreover, if your
computer is infected by a virus or a malicious program, your data may
simply be destroyed and the computer may become a virus source. In
this case Kaspersky Anti-Hacker may only partially eliminate consequences of the infection. To effectively protect your system from viruses and malicious programs it is advisable that you use the
Kaspersky Anti-Virus Personal/Personal anti-virus program in combination with Kaspersky Anti-Hacker. Also, we recommend that you
create application rules allowing your computer applications to engage in activity strictly according to their type. It is also advisable that
you use the list of application rules to assign those types of activities
to the applications that strictly correspond to operations allowed for
these applications. This way, the risk of unauthorized network operations performed on your machine will be minimized.
Suppose, you learn that your computer is constantly attacked by a
remote machine.
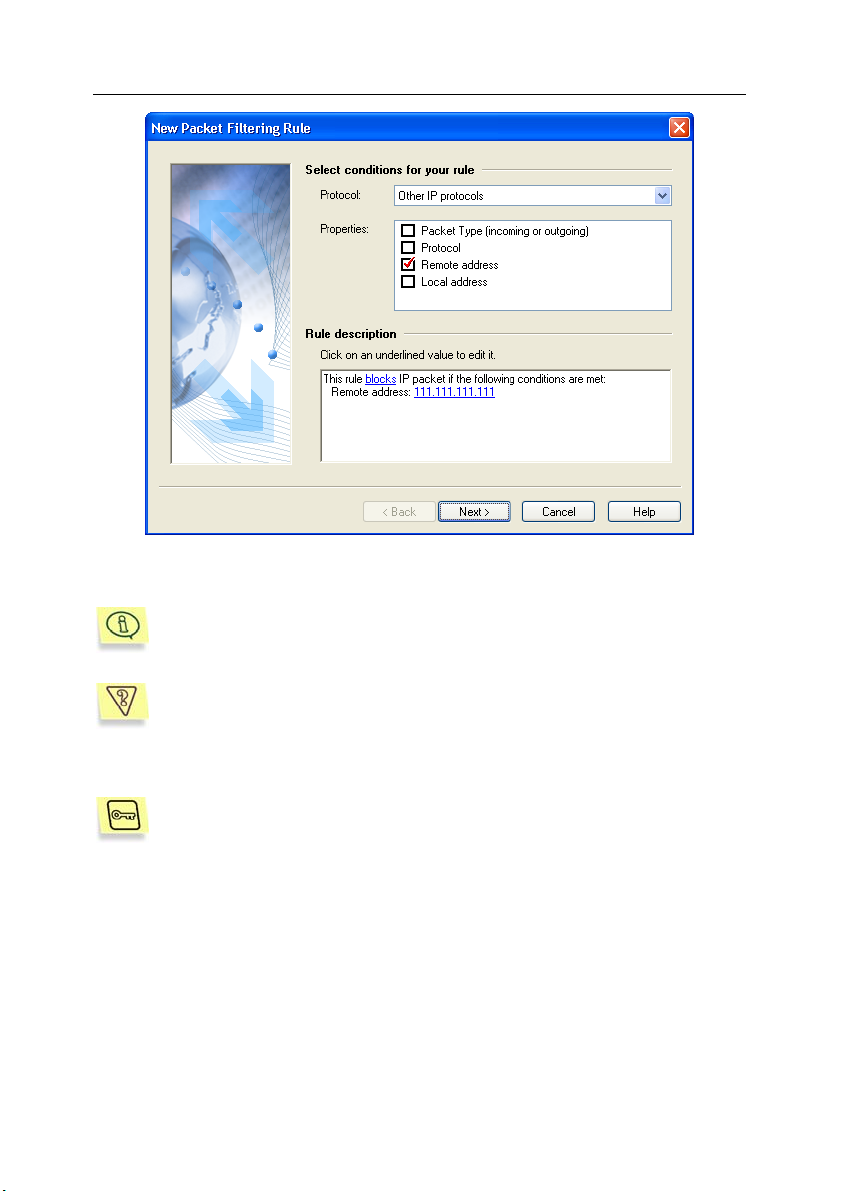
Task 2. How to block attacks from certain Internet addresses?
You may prohibit your computer from communication with certain
remote addresses by configuring appropriate packet filtering rules.
For example, in figure 3 you can see a rule blocking communication
with the 111.111.111.111 address.
To prevent from such situations, it is advisable that you keep your
Intrusion Detection System enabled.
Page 23
Preventing Hacker Attacks 23
Fig. 3. The rule blocking communication with certain unreliable addresses
For example, you may use Kaspersky Anti-Hacker to block banner
display on web pages. To do this, create a packet filtering rule to block
communication with web sites from where the banners are usually
downloaded (for example, linkexchange.ru).
Suppose you are afraid of attacks from the local network or want to
protect your personal data from thieves.
Task 3. You must monitor operations on the local network
The computer communicates with a local network at the operating system level, therefore it is not always possible to identify the application
involved. In this case you must create an appropriate packet filtering
rule to secure your data.
In order to simplify configuration of the security system, Kaspersky AntiHacker preinstalls some packet filtering rules allowing communication
via the local network. By default the local network is allowed. However,
you can redefine the default packet filtering rules to completely block
access to the local network, or allow it only for certain computers.
Page 24

CHAPTER 5. RUNNING THE
PROGRAM
5.1. Starting the Program
Kaspersky Anti-Hacker is started automatically as soon as you enter your
operating system. If you close the program, you can manually start it again.
To start Kaspersky Anti-Hacker, follow these steps:
1. Press the Start button in the bottom left corner of your Windows
desktop and select Programs Kaspersky Anti-Hacker
Kaspersky Anti-Hacker.
2. Left click on the
and select Open Kaspersky Anti-Hacker from the program's shortcut
menu.
The Kaspersky Anti-Hacker main window will appear on your screen (see
subchapter 5.3 on page 25).
You may also start the program directly from its directory. To do this,
open the Kaspersky Anti-Hacker folder in the Windows Explorer (the
default program directory is C:\Program Files\Kaspersky
Lab\Kaspersky Anti-Hacker). Double-click on the KAVPF.exe file
located in this directory.
icon that appears in your system tray, or right click it
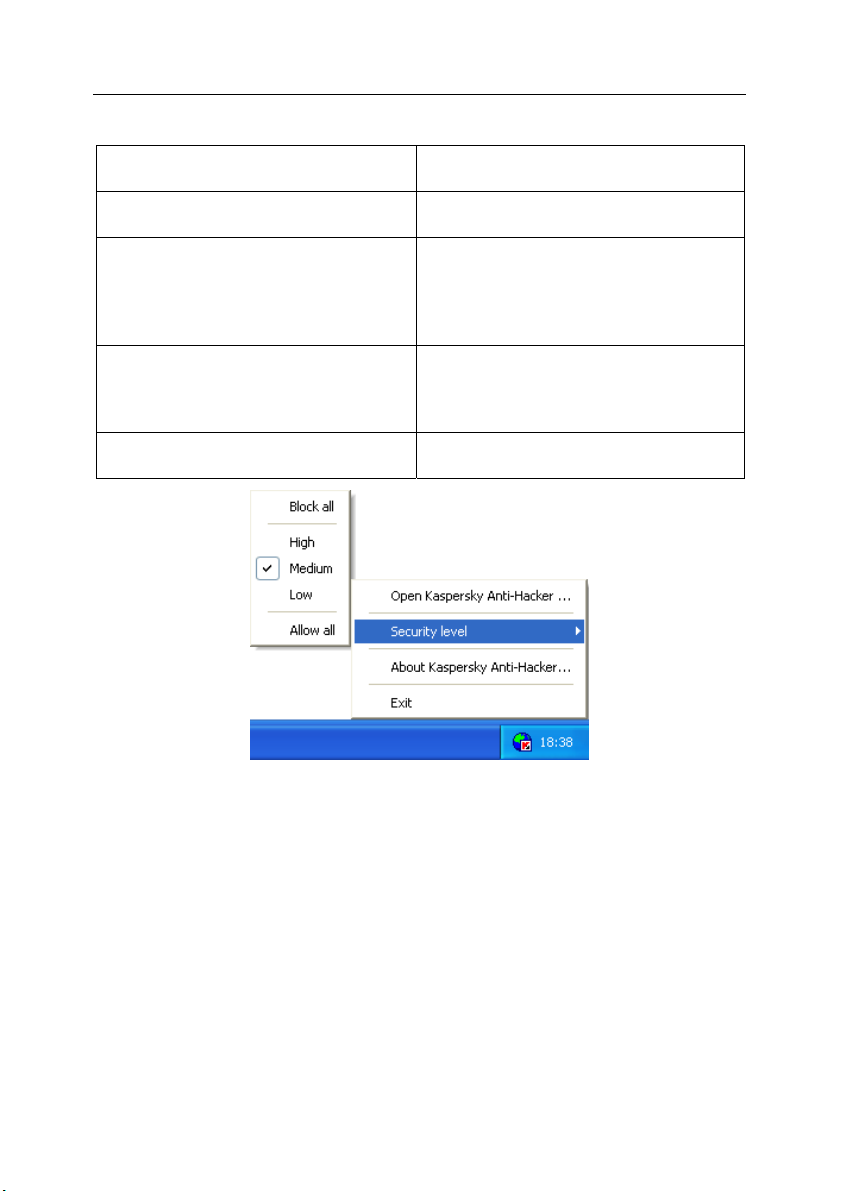
5.2. System Menu
After the program is started, the icon appears in the system tray.
By right clicking this icon you can open the shortcut menu (see fig. 4). The
shortcut menu includes the following commands:
Page 25
Running the Program 25
Table 1
Menu item Function
Open Kaspersky Anti-Hacker…
Security level Select a security level: Block all,
About Kaspersky Anti-Hacker ...
Exit
Fig. 4. Shortcut menu
Open the main application window.
High, Medium, Low, Allow all. For
details about the security levels see
subchapter 4.2 on page 20.
Open a dialog box with information
about the version of the program and
the keys used.
Close the program.
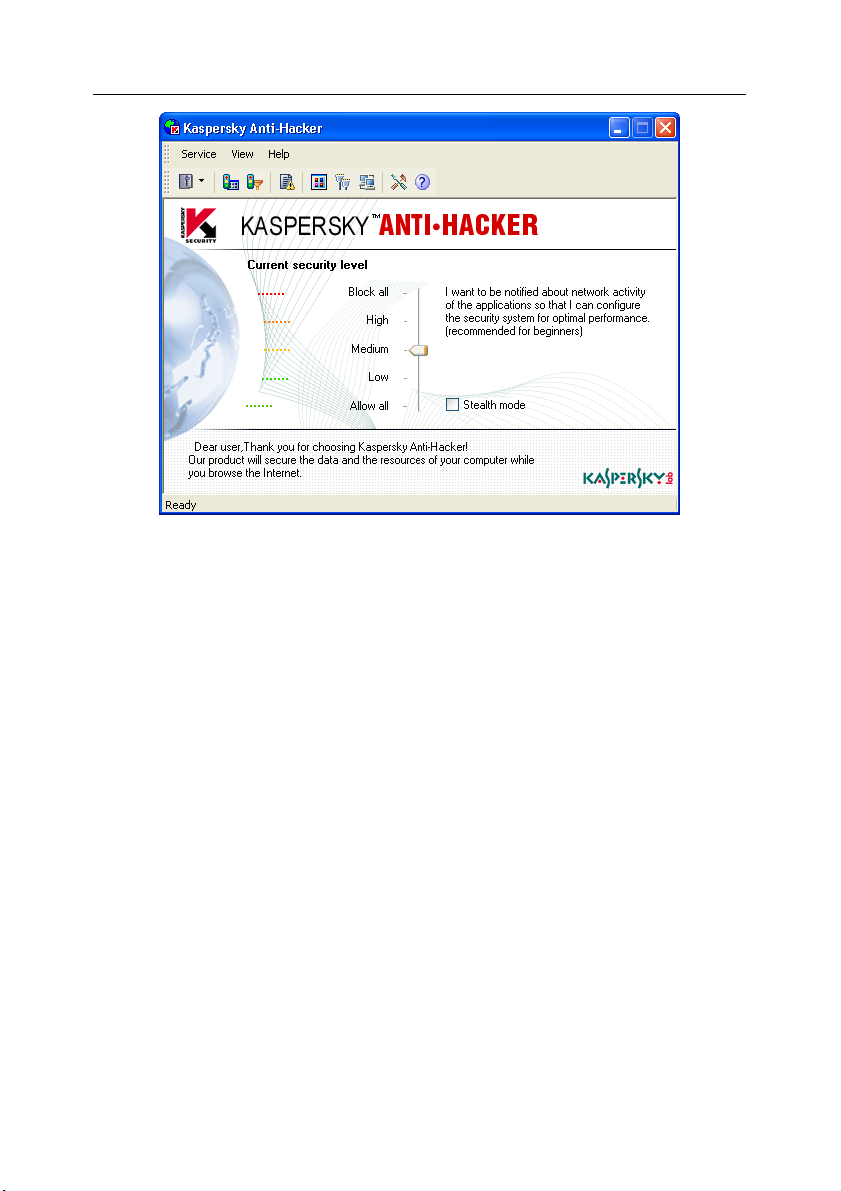
5.3. Main Window
When the program is started, the main application window appears on your
screen (see fig. 5). The Kaspersky Anti-Hacker main window allows you to select
the current security level, to review the current status of your security system, to
change the packet filtering settings, and to review/configure the program logs.
Page 26
26 Kaspersky Anti-Hacker
Fig. 5. Kaspersky Anti-Hacker main application window
The Kaspersky Anti-Hacker main window includes the following items:
• Menu
• Toolbar
• Workspace
• Status bar
5.3.1. Menus
At the top of the main window you can see a menu bar. You can drag it with your
mouse to any position within or outside the main window.
Some menu commands can also be activated using appropriate buttons in the
toolbar. For details of the matching functions of toolbar buttons and menu
commands see subchapter 5.3.2 on page 28.
Page 27
Running the Program 27
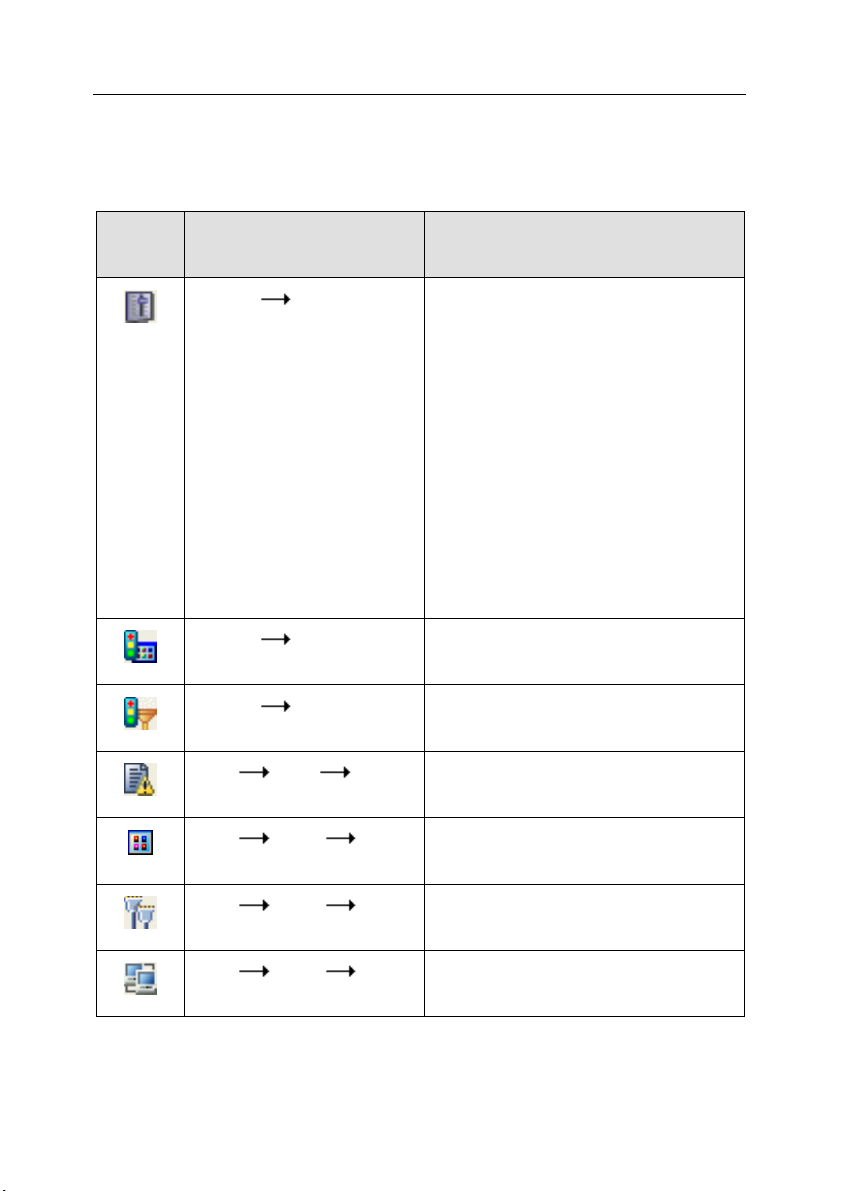
Table 2
Menu command Function
Service Application rules Open the application rule window.
Service Packet filtering rules Open the packet filtering rule window.
Service Security level Select the required security level:
• Block all
• High
• Medium
• Low
• Allow all
You can also select the required security
level from options in the window
workspace. For details see subchapter 4.2
on page 20.
Service Settings Open a window where you can configure
your security logs, security system
startup, and attack detection settings.
Service Exit Close the program.
View Toolbars Choose from the following program
graphic interface options:
• Standard toolbar – displays/hides
the standard toolbar
• Customize – displays a dialog box
where you can customize the program graphic interface
View Status Bar Display / hide the status bar.
Page 28
28 Kaspersky Anti-Hacker
Menu command Function
View Logs Open the log window for:
• Security
• Application activity
• Packet filtering
View Show Open information boxes with system
details.
• Active applications is the list of
active network applications
• Open ports is the list of open ports
on your machine
• Established connections is the
list of established connections
Help Contents ... Open Help topics.
Help About Kaspersky AntiHacker...
Help Kaspersky Anti-Hacker
on the Web
Open an information box with program
details and information about the keys
used.
Open the Kaspersky Lab's web site
5.3.2. Toolbar
The program toolbar is located under the menu bar. If required, you can drag it
with your mouse to any position within or outside the main window.
The toolbar includes buttons. By pressing them you can initiate various commands. You can also hide and display the toolbar by selecting the Standard command from the Toolbars submenu of the View menu.
Page 29
Running the Program 29
You can add or remove buttons from the toolbar (see subchapter 5.6 on
page 32).
Table 3
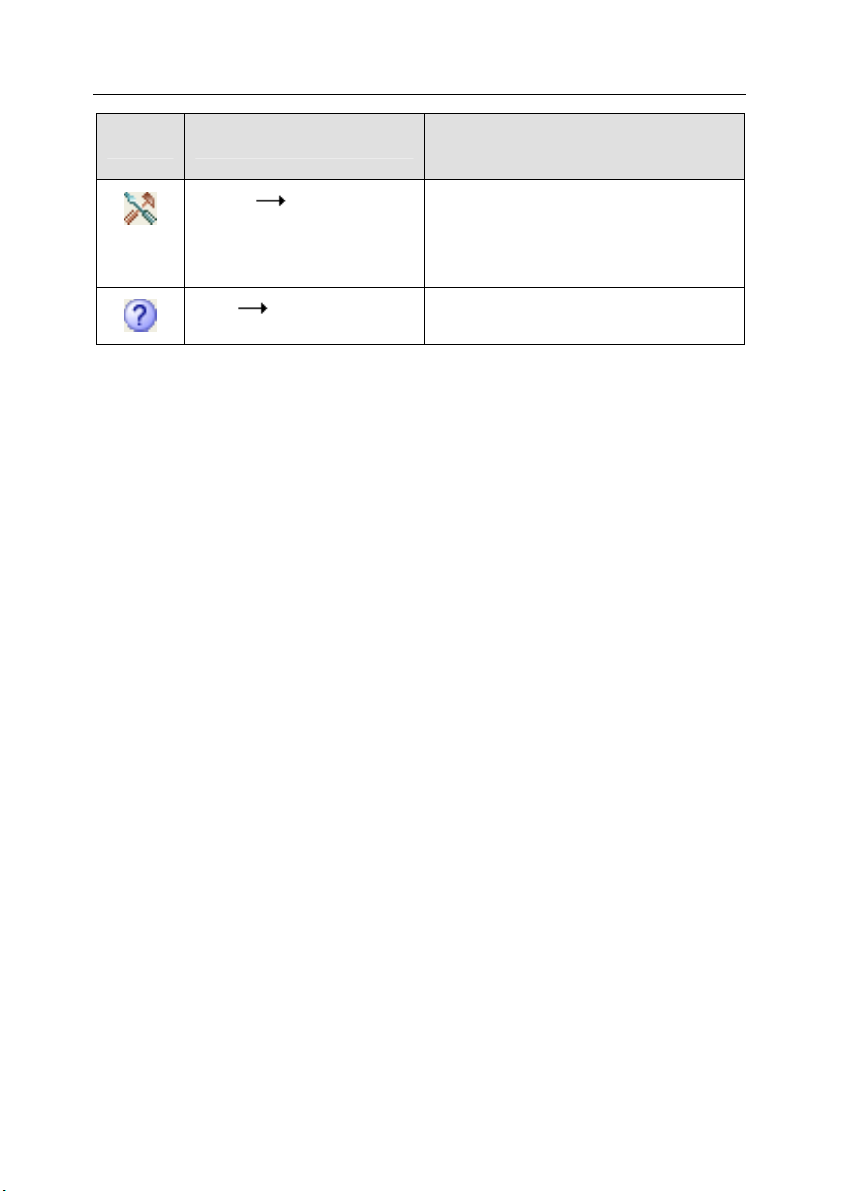
Button Menu Command Function
(The button allows you to)
Service
Service
Application rules
Service
Packet filtering rules
View
Security
View
Active applications
Security level Select the required security level:
• Block all
• High
• Medium
• Low
• Allow all
For details see subchapter 4.2 on
page 20.
Logs
Show
Open the application rule window.
Open the packet filtering rule
window.
Open the log window for Security
Log.
Show the list of active network
applications.
View
Open ports
View
Established connections
Show
Show
Show the list of open ports on your
machine.
Show the list of established
connections.
Page 30
30 Kaspersky Anti-Hacker
Button Menu Command Function
(The button allows you to)
Service
Help
Settings Open a window where you can
configure your security logs, security
system startup, and attack detection
settings.
Contents ... Open the Help topics.
5.3.3. Workspace
The main window workspace includes the security scale and information about
the current status of your security system.
The security scale allows you to select one of the following security levels:
• Block all
• High
• Medium
• Low
• Allow all
You can switch to another security level by dragging the slider along the scale. If
you do this, a detailed description of the new current security level will appear to
the right of the new slider position (for details see subchapter 4.2 on page 20).
and the new mode will be applied immediately.
With the High, Medium or Low level enabled you can set the supplementary
security tool – Stealth mode (see subchapter 4.2 on page 20).
Below the scale you can see details of the last hacker attack detected by the
program. Information includes the attack date and time, the attack type, and the
source computer address.
Page 31

Running the Program 31
5.3.4. Status Bar
At the bottom of the main window you can see the status bar. It displays tips for the user about the main window item currently selected. You can also hide and display the bar by selecting the Status Bar command from the View menu.
5.4. Dialog Boxes' Shortcut Menu
Shortcut menus in the program dialog boxes allow you to initiate commands that
are applicable to the particular dialog box.
To display the dialog box context menu, right click within it.
5.5. Rule Wizards
The program wizard allowing creation/editing of the user rules includes several
dialog boxes. Each dialog box contains a set of buttons allowing the user to
manage the process of rule creation/modification. These buttons are:
• Finish – applies the defined settings and creates the rule.
• Cancel – cancels the procedure.
• Next > – takes you to the next wizard box.
• < Back – takes you to the previous wizard box.
• Help – displays the Help topics.
Page 32

32 Kaspersky Anti-Hacker
5.6. Changing and Saving Interface
Settings
To change the interface settings, select Customize from the Toolbars
submenu of the View menu.
The Customize dialog box will appear on your screen (see fig. 6).
Fig. 6. The Customize dialog box
While changing the interface it is advisable that you arrange your screen so that
the Customize dialog box does not overlay the main window menu bar and
toolbar.
You can use the Commands page to change the main window menu and toolbar
layouts. To add new commands you should drag the required command from the
list to the menu bar or the toolbar. To remove a command from the menu bar or
the toolbar you should drag it outside of the main window.
The Toolbars and Menu pages allow you to restore the original appearance of
your toolbars and menus.
Page 33

Running the Program 33
The Settings page allows you to enable/disable screen tips for the toolbar
buttons, to select their size, and to define the layout of your menu bar.
If required, you may change the titles of menu commands and buttons, and
display toolbar buttons as images or as text.
To change the title and/or other properties of a command or a button,
follow these steps:
1. Display the Customize dialog box and select the required
command or button within the main window.
2. Press the right mouse button. Select the required command from
the context menu on your screen:
• Delete – removes the selected menu command or button.
• Button Appearance – allows you to change the title. A dialog
box with the same name will appear on your screen. Change
the button/menu command title in the Button text field (see
fig. 7). Press the OK button.
• Image – displays the selected menu command/button as an
image.
• Text – displays the selected menu command/button as an im-
age.
• Image and Text – displays the selected menu command/button
as an image with text.
• Start Group – inserts a separator before the selected menu
command/button.
Page 34

34 Kaspersky Anti-Hacker
Fig. 7. Changing command properties
The new interface settings are saved automatically and applied immediately after
the changes are made. These changes will be preserved during all subsequent
program sessions.
5.7. Exiting the Program
To close the program select Exit from the program's shortcut menu or from the
Service menu in the main application window. You can also close the main
window by clicking on the
However, closing the main program window does not unload the
program from computer memory if the Minimize the program main
window to the system tray on closing checkbox is checked. By
default, this box is checked, but you may uncheck it if required (see
subchapter 6.1.1 on page 35). By placing the icon in the system tray the
program indicates that it is loaded into your computer memory.
button in the right upper corner of the window.
Page 35

CHAPTER 6. ENABLING THE
SECURITY SYSTEM AND
DEFINING ITS SETTINGS
6.1. Enabling the Security System
and Selecting the Security
Level
6.1.1. Enabling the Security System
Your security system is enabled as soon as you install Kaspersky Anti-Hacker on
your computer and reboot the operating system. After the program is started, the
icon appears in the system tray. By default, the program implements the
Medium level and if a network application on your computer attempts to connect
to a local network or the Internet, the training mode is activated. The application
and the network operation details are displayed on your screen. On the basis of
this data the program will prompt you to choose one of the following courses of
action: to allow or to block this event once, to completely block activity of this
application, to allow the application activity according to type, or to define a
complex rule for this event. Depending on your answer, the program will create a
rule for this application that will subsequently be applied by the program
automatically.
Kaspersky Anti-Hacker starts protecting your computer after user's logon.
However, you may set the program to enable security as soon as the Windows
operating system starts.
To enable/disable Kaspersky Anti-Hacker automatic startup immediately after the operating system is started, follow these steps:
1. Select Settings from the Service menu.
Page 36

36 Kaspersky Anti-Hacker
2. On the General page of the Settings dialog box (see fig. 8), check
the
Launch the security system when the operating system
starts checkbox. In this case, the program will start with the user
settings immediately after the operating system is booted, but the
logs will be disabled. If the program implements the Medium level,
all network communications will automatically be permitted until you
enter the operating system because the training window cannot be
displayed without a user in the system. At the Low or the Allow all
level the program will permit unknown network communications for
this time period, and at the other security levels all unknown network
communications will be blocked.
Suppose your computer is connected to a local network and you enable
the program to launch the security system as soon as the operating
system starts. Suppose also that you block all network traffic by selecting the Block all security level, or by creating an appropriate packet
filtering rule at any security level (except for Allow all). In this case, you
will have to wait longer than usual before entering the system and after
entering you will find that the local network is not available.
Fig. 8. The Settings dialog box
You can change the assignment of the button in the upper right corner of the
main window. By default, this button minimizes the main window to the system
tray while the program remains in your computer memory.
Page 37

Enabling the Security System and Defining its Settings 37
To change the assignment of the
gram from computer memory when the main window closes, follow
these steps:
1. Select Settings from the Service menu.
2. On the General page of the Settings dialog box (see fig. 8)
uncheck the
system tray on closing checkbox.
By default, if the program detects an attack on your machine, the main window
appears on your screen with an appropriate message.
To disable the main window display every time an intrusion is detected,
follow these steps:
1. Select Settings from the Service menu.
2. On the General page of the Settings dialog box (see fig. 8)
uncheck the
detected checkbox.
Minimize the program main window to the
Show main window when an intrusion is
button so that it unloads the pro-
6.1.2. Selecting the Security Level
You can change the security level by dragging the slider along the security scale
within the program main window or by selecting the Security level command
from the Service menu. Alternatively, you can select the appropriate command
from the system menu.
You can switch to one of the following security levels:
• Block all
• High
• Medium
• Low
• Allow all
Page 38

38 Kaspersky Anti-Hacker
With the High, or the Medium, or the Low level enabled you can enable a
supplementary security tool by checking the
Security levels are applied right after the user selects them.
For details of the available security levels see subchapter 4.2 on page 20.
Stealth mode checkbox.
6.1.3. Network Event Warning
If you created a rule and checked the Display warning checkbox (see
subchapter 6.3.2.3 on page 57, subchapter 6.4.2.2 on page 65), when the
program applies this rule, an appropriate message will appear on your screen
(see fig. 9).
See figure 9 for an example of such a message, which appears after an
appropriate packet filtering rule is applied. The message describes the related
remote and local addresses, and also the ports used.
You can review the corresponding packet filtering rule by clicking on the
hyperlink.
You can also disable subsequent warnings for this event by checking the
not show this warning checkbox.
Fig. 9. Displaying a warning about an event
Do
Page 39

Enabling the Security System and Defining its Settings 39
When creating a rule you can check the
the corresponding event.
Log event checkbox to log
6.1.4. Training Window (Medium Level)
The program displays its training window (see fig. 10) when it detects an
unknown event while running with the Medium level selected.
Fig. 10. An example of a training window
At the top of this box you can see the name of the application requesting
connection with a remote machine, the remote machine address, and the port
numbers. If required, you can display more details of the requested connection
by clicking on the … details
You can allow or block this specific operation by clicking on the Allow once or
Block once buttons, respectively.
If you close the training window by pressing the
right corner, the operation at issue will be blocked this time.
To define a rule that will later handle events initiated by this application, select
one of the actions listed below and click on the ОК button. After this, the new rule
will be added to your list of application rules.
hyperlink.
button in its upper-
Page 40

40 Kaspersky Anti-Hacker
• Allow activity of the application according to its type – allows only
network communication that is compliant with the specified application
type. Select the required type from the drop-down list below the option
button (for details see subchapter 6.3.2.1 on page 46).
• Disable all activities of the application – blocks the specified applica-
tion from any kind of network activity including the described operation.
• Customize the rule ... – allows you to specify the operations that will be
allowed for this application. If you select this option button and click ОК,
the Rule Wizard box will appear on your screen (for details of the wizard
see subchapter 6.3.2 on page 46).
If you create a rule that does not correspond to the described event, an
appropriate message will appear on your screen (see fig. 11). Then you
may press the Yes button to add the created rule to the list, or the No
button if this rule was created by mistake. In both cases you will be
prompted to select another option from the list in the training window.
Fig. 11. The rule you created does not correspond to the current event
Note that if several programs on your computer within a short period of
time will attempt to perform network operations that are not described
by the user rules, the queue of requests for rule creation will be generated. These requests will be successively displayed within the training
window: first you will have to define the program response to actions of
the first network application, then the second and so on. All the programs in this queue will be waiting for your reaction.
6.1.5. The Executable Module Substitution
Warning
Kaspersky Anti-Hacker protects your network applications from unauthorized
attempts to substitute their original executable files. If this kind of substitution is
detected Kaspersky Anti-Hacker displays the appropriate warning (see
figure 12).
Page 41

Enabling the Security System and Defining its Settings 41
You can select one of the following options:
• Block any further network activity of this application – all the further
network operations of this application will be prohibited: the appropriate
blocking rule will be added to the beginning of the application rule list and
all other rules in this list will be disabled. It is advisable that you start your
anti-virus program to check for viruses in this application
, or restore this
application from the archive, or reinstall it. After you did this,
please delete the blocking rule from the application rule list and
enable all other rules in this list.
If Kaspersky Anti-Hacker display
the “executable module substituted” message again, please select
the below option.
• I know that the file was modified, and continue to trust to this appli-
cation – all the user rules available currently for this application will be
also valid for the modified file.
Press the ОК button.
Fig. 12. The Executable Module Substitution Warning
6.2. How the Program Responds to
Attack
If your security system detects a hacker attack on your machine, the program
main window appears on your screen (as long as you have not unchecked the
Page 42

42 Kaspersky Anti-Hacker
Show main window when an intrusion is detected checkbox – see
subchapter 6.1.1 on page 35). If this happens, be sure to read thoroughly the
attack details at the bottom of the window workspace; the program displays the
date, the time and the attack type (see fig. 15).
This attack will be blocked. The program will also block the assaulting machine
for the time period defined by settings (see subchapter 6.5 on page 66).
Fig. 13. A message about a detected hacker attack
Suppose you discover that your computer is constantly being attacked from
some remote machine. You may prohibit your computer from communication
with certain remote addresses by configuring appropriate packet filtering rules
(see subchapter 6.4 on page 57).
If attacks from a certain remote address are frequent, it is advisable that you
switch to the Block all security level and refer to your system administrator or IP.
Page 43

Enabling the Security System and Defining its Settings 43
6.3. Customizing Application Rules
6.3.1. Managing the Rule List
To display the application rule list on your screen,
select Application rules from the Service menu.
The Application rules dialog box will appear on your screen (see fig. 14).
Fig. 14. The Application rules dialog box
Page 44

44 Kaspersky Anti-Hacker
In the upper section of the dialog box, you will find the list of application rules.
The Application column includes the related application icons, their names, and
the checkboxes allowing you to enable/disable these rules. The Action column
includes details of the action performed by the corresponding rule; Allow, for
rules permitting some events, and Block, for rules blocking some events.
The rules are listed according to their priority. The rule at the top of the list will be
applied first, and only then will the program apply the second rule etc. If an
application attempts to perform some network operation, the program compares
this activity against the list of rules, looking through the list from its top to the
bottom until it finds the rule corresponding to this operation or until it looks the
entire list through. If the corresponding rule is not detected, the default action is
applied (see subchapter 4.2 on page 20). Thus, if you want to block only some
operations for an application, you should create two rules for this application: the
first rule should allow the desired operations for this application while the second
rule should block all the operations for this application. Besides, the first rule
must be located above the second in the rules’ list. If you do so and the
application will attempt to perform an allowed operation, Kaspersky Anti-Hacker
will search the list of rules and detect the rule allowing this operation. If the
operation is unwanted, Kaspersky Anti-Hacker will use the second rule blocking
all the operations for this application.
For example, as you can see in figure 14, the third application rule blocks MS
Internet Explorer from accessing the Internet, but the second rule allows this
program to communicate via the Internet by using the HTTP protocol. Since the
second rule is higher priority than the third one, MS Internet Explorer is allowed
to communicate with remote HTTP servers (but only these).
Remember that only the rules with checked boxes are applied. For example, in
figure 14 the fourth and the fifth rule boxes are disabled.
To enable/disable an application rule,
check/uncheck the corresponding checkbox in the list of application
rules.
To the right of the rule list you can see the following buttons:
• New... – allows you to create a new rule. If you press this button, the ap-
plication rule wizard box will appear on your screen.
• Modify – allows you to edit the selected rule. If you press this button, the
application rule wizard box will appear on your screen.
Page 45

Enabling the Security System and Defining its Settings 45
• Remove – removes the selected rule from the list.
• Move up – moves the selected rule up one line, i.e. increases the rule
priority.
• Move down – moves the selected rule down one line, i.e. reduces the
rule priority.
To modify a rule selected from the list, you can also press the <E
double-click on it; to remove the selected rule from the list - the <D
to add a new rule to the list - the <I
NS> key.
NTER> key or
EL> key; and
You can also modify the list from the context menu, which includes the following
commands:
• Modify… – allows you to edit the selected rule.
• Remove – removes the selected rule from the list.
• Duplicate rule – creates a copy of the selected rule. The created copy
will be placed right below the selected rule.
Below the list, you can see the Rule description section displaying details of the
rule selected from the upper frame list. The same section is located in the rule
wizard boxes so we shall describe this frame in detail.
The rule description includes black text that cannot be modified, and blue text
that must be substituted with appropriate values. If a setting is written in a bold
font it means that its value is critical for this rule.
To enter or modify the required value in the rule description,
1. Click on the appropriate underlined link in the Rule description
frame.
2. Select the required value in the dialog box on your screen (for
details see the subchapters below).
At the bottom of the Application rules dialog box you will see the following
buttons:
• ОК – closes the dialog box and saves the changes you made.
Page 46

46 Kaspersky Anti-Hacker
• Cancel – closes the dialog box without saving the changes.
All the changes you made to the list will be applied immediately after
these are saved.
6.3.2. Adding a New Application Rule
To launch the application rule wizard:
Press the New... button in the Application rules dialog box (see
fig. 14).
6.3.2.1. Step 1. Customizing the Rule
When you start the wizard, a dialog box similar to that in fig. 15 will appear on
your screen.
Page 47

Enabling the Security System and Defining its Settings 47
Fig. 15. The first dialog box of the application rule wizard
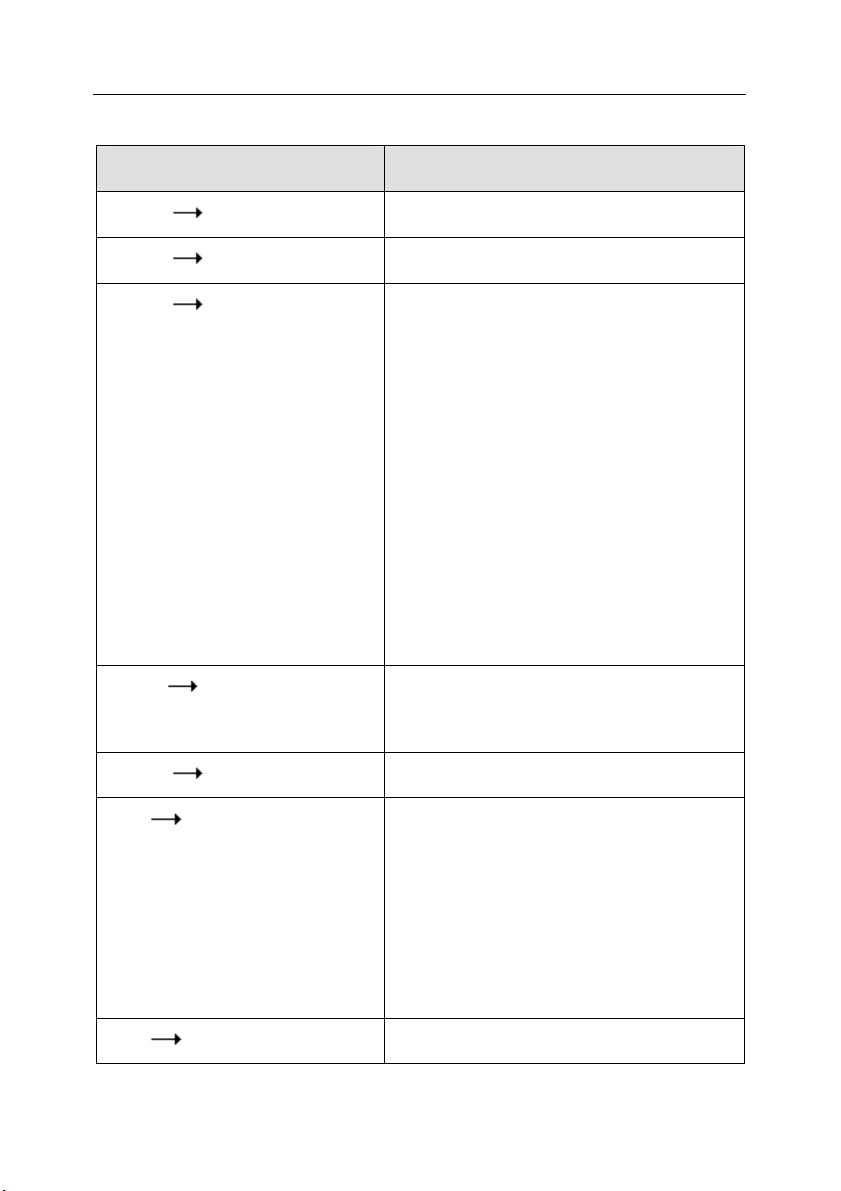
The Action options list allows you to select one of the following three options:
Action Rule description
• Allow activity of the
application
according to its
type.
• Disable all activities
of the application.
• Customize the rule.
If you select Customize the rule, the next wizard box may prompt you
to define additional settings.
Page 48

48 Kaspersky Anti-Hacker
• Internet-application type (client or server)
• Protocol
• Remote address
• Remote port
• Local port
To create a rule allowing activity of the application according to its type:
1. Select Allow activity of the application according to its type
from the list of options in the Action section.
2. Click on the specify the application name
hyperlink in the Rule
description section. Specify the required application name in the
Select the application dialog box on your screen.
3. Define the application type by clicking on the appropriate hyperlink
in the Rule description section. The default value is Allow all
which does not limit the application rights in any way. To change it,
click on it and select another value from the drop-down list within the
Specify the application type dialog box (see fig. 16). Then press
the ОК button.
• Web browser – for Internet browsers such as Netscape Naviga-
tor and others. Communication via HTTP, HTTPS, FTP protocols, and proxy servers is allowed.
• File transferring – for Reget, Gozilla and similar programs.
Communication via HTTP, HTTPS, FTP, TFTP protocols, and
standard proxy servers is allowed.
• Mail – for MS Outlook, MS Outlook Express, the Bat, and other
mail programs. Communication via SMTP, NNTP, POP3, and
IMAP4 protocols is allowed.
• News – for Forte Agent and other news programs. Communica-
tion via SMTP and NNTP protocols is allowed.
,
Page 49

Enabling the Security System and Defining its Settings 49
• Instant messaging – for ICQ, AIM, and other chat programs.
Communication via standard proxy server and direct computerto-computer link is allowed.
• Internet Rely Chat – for mIRC and similar programs. Standard
user authentication for IRC networks and access to IRC server
ports is allowed.
• Business Conferences – for MS NetMeeting and similar pro-
grams. Communication via HTTP and HTTPS protocols, and
also via standard proxy servers is allowed. The type also supports communication within the local network (LDAP and others).
• Remote Management – for Telnet, etc. Communication via Tel-
net and SSH protocols is allowed.
• Time Synchronization – for Timehook and similar programs.
Connection to time and daytime servers is allowed.
Fig. 16. Selecting the application type
To block the application from any network communication,
1. Select Disable all activities of the application from the list of
options in the Action section.
2. Click on the specify the application name hyperlink in the Rule
description section. Specify the required application name in the
Select the application dialog box on your screen.
Page 50

50 Kaspersky Anti-Hacker
If the settings described above do not allow you to create the required rule (for
example, if you want to allow communication to a certain IP address), you can
configure a more complicated rule.
To configure a more complicated rule, follow these steps:
1. Select Customize the rule from the list of options in the Action
section.
2. Click on the specify the application name
hyperlink in the Rule
description section. Specify the required application name in the
Select the application dialog box on your screen.
3. Click on the Allow
hyperlink in the Rule description section. Select
the required action from the following list of options in the Specify
Action dialog box (see fig. 17) and press the ОК button:
• Block all
• Allow all
4. Select the application activity to be monitored and regulated by this
rule; establishment (default) or receipt of connection. To change the
default activity, click on the establish connections
hyperlink in the
Rule description section. Select the Receiving an incoming
network connection from a remote machine option in the Select
the application activity type dialog box (see fig. 18) and press the
ОК button.
When you have finished selecting options in the first wizard box, press the
Next > button.
Page 51

Enabling the Security System and Defining its Settings 51
Fig. 17. Selecting the action
Fig. 18. Selecting the application activity type
If you press Next > without selecting an application, a message
prompting you to do so will appear on your screen.
6.3.2.2. Step 2. Rule Conditions
The rule conditions wizard box appears on your screen only if you selected the
Customize the rule option button in the first wizard box.
In this wizard box you can specify the protocol, the remote machine address, and
the ports.
The Protocol: a drop-down list on this dialog box includes the following
predefined protocols and the corresponding port numbers:
• HTTP
• SMTP
• POP3
• IMAP
• NNTP
• DNS
If you want to define another port number, select one of the following items from
this drop-down list:
• Other TCP based protocol – for services based on the TCP protocol
• Other UDP based protocol – for services based on the UDP protocol
Page 52

52 Kaspersky Anti-Hacker
The Settings list includes additional settings and its content fully depends on the
protocol selected from the above drop-down list.
Remote address – the address of the remote computer involved in the
communication. To define the address, click on the corresponding specify
the address hyperlink in the Rule description section. To specify more than
one address hold down the <C
TRL> key and click on the hyperlink. For de-
tails see subchapter 6.3.2.2.1 on page 53.
Remote port – the remote port number. To specify the port click on the cor-
responding specify the port
specify more than one port, hold down the <C
hyperlink in the Rule description section. To
TRL> key and click on the hy-
perlink. For details see number. To specify the port click on the corresponding specify the port
hyperlink subchapter 6.3.2.2.2 on page 55.
Local port – the local port in the Rule description section. To specify more
than one port hold down the <C
TRL> key and click on the hyperlink. For de-
tails see number. To specify the port click on the corresponding specify the
port hyperlink subchapter 6.3.2.2.2 on page 55.
Fig. 19. Defining the rule conditions
Page 53

Enabling the Security System and Defining its Settings 53
6.3.2.2.1. Defining the Address or the Address Range
To define the required addresses you must use two dialog boxes.
The Specify the address or the address range dialog box (see fig. 20) appears
on your screen when you hold down the <CTRL> key and click on specify the
address hyperlink in the second rule wizard box.
Fig. 20. The Specify the address or the address range dialog box
Here you can use the Add and Remove buttons to add the required number of
computer addresses, address ranges, and subnet addresses. When you have
finished configuring the address list, press the OK button and return to the rule
wizard box.
When you press Add in the Specify the address or the address range dialog
box, the Specify the address dialog box (see fig. 21) will appear on your screen.
The same dialog box appears on your screen when you click on specify the
address hyperlink in the second rule wizard box without holding down the
<CTRL> key.
The Specify the address dialog box allows you to specify the address, the
address range, or the subnet address to be used in your rule (see fig. 21).
Page 54

54 Kaspersky Anti-Hacker
Fig. 21. Entering the computer address in the Specify address dialog box.
Here you can select one of the following options:
• The computer address – allows you to specify the computer by its sym-
bolic (e.g. www.kaspersky.com) or by its IP-address (e.g. 192.168.1.1).
• The range of IP-addresses – allows you to specify the address range by
using the Begins from: and the Ends by: fields (see fig. 22).
• The subnet address – allows you to specify the subnet address in the
Subnet address: field, and/or the subnet mask in the Subnet mask: field
(see fig. 23).
When you have specified the required address, press the ОК button.
Page 55

Enabling the Security System and Defining its Settings 55
Fig. 22. Entering the range of IP addresses
Fig. 23. Entering the subnet address
6.3.2.2.2. Defining the Port or the Port Range
To define the required port(s) you must use two dialog boxes.
The Specify the port or the port range dialog box (see fig. 24) appears on your
screen when you hold down the <C
hyperlink in the second rule wizard box.
TRL> key and click on specify the port
Fig. 24. The Specify the port or the port range dialog box
Page 56

56 Kaspersky Anti-Hacker
Here you can use the Add and Remove buttons to add the required number of
computer ports and port ranges. When you have finished configuring the port list,
press the OK button and return to the rule wizard box.
When you press Add in the Specify the port or the port range dialog box, the
Port dialog box (see fig. 21) appears on your screen. The same dialog box
appears on your screen when you click on specify the port
second rule wizard box without holding down the <C
TRL> key.
hyperlink in the
The Port dialog box allows you to specify the port or the port to be used in your
rule (see fig. 25).
Here you can select one of the following two options:
• Specify the port number – allows you to select one of the predefined
values from the drop-down list or to enter the port number from your keyboard.
• Specify the port range – allows you to specify the required port range by
entering the starting port in the first text field, and the last port in the second text field (see fig. 26).
Fig. 25. The Port dialog box
Fig. 26. Defining the port range
When you have specified the required port(s), press the OK button.
Page 57

Enabling the Security System and Defining its Settings 57
6.3.2.3. Step 3. Additional Actions
As additional actions you can check the: Log event checkbox to log events
happened and the
the detected event (see fig. 27).
Display warning checkbox to display a message about
Fig. 27. Additional actions
6.4. Customizing Packet Filtering
Rules
6.4.1. Managing the Rule List
Management of the packet filtering rule list is similar in many respects to
management of the application rule list.
Page 58

58 Kaspersky Anti-Hacker
To display the packet filtering rule list on your screen,
select Packet filtering rules from the Service menu.
The Packet filtering rules dialog box will appear on your screen (see fig. 28).
Fig. 28. The Packet filtering rules dialog box
In the upper section of the dialog box, you will find the list of packet filtering rules.
Checkboxes to the right of each rule allow you to enable/disable these rules.
The rules are listed according to their priority; the rule at the top of the list will be
applied first, then the program will apply the second rule etc. Remember that only
rules with checked boxes are applied.
Page 59

Enabling the Security System and Defining its Settings 59
To enable/disable a packet filtering rule,
check/uncheck the corresponding checkbox in the list of packet filtering
rules.
To the right of the rule list you can see the following buttons:
• New... – allows you to create a new rule. If you press this button the
packet filtering rule wizard box will appear on your screen.
• Modify – allows you to edit the selected rule. If you press this button the
packet filtering rule wizard box will appear on your screen.
• Remove – removes the selected rule from the list.
• Move up – moves the selected rule up one line, i.e. increases the rule
priority.
• Move down – moves the selected rule down one line, i.e. reduces the
rule priority.
To modify a rule selected from the list, you can also press the <E
double-click on it; to remove the selected rule from the list - the <D
to add a new rule to the list - the <I
NS> key.
NTER> key or
EL> key; and
You can also modify the list from the context menu, which includes the following
commands:
• Modify – allows you to edit the selected rule.
• Remove – removes the selected rule from the list.
• Duplicate rule – creates a copy of the selected rule. The copy will be
placed right below the selected rule.
Below the list, you can see the Rule description section displaying details of the
rule selected from the upper frame list. The same section is located in the rule
wizard boxes so we shall describe this frame in detail.
The rule description includes black text that cannot be modified, and blue text
that must be substituted with appropriate values. If a setting is written in a bold
font it means that its value is critical for this rule.
Page 60

60 Kaspersky Anti-Hacker
To enter or modify the required value in the rule description,
1. Click on the appropriate underlined link in the Rule description
section.
2. Select the required value in the dialog box on your screen (for
details see the subchapters below).
At the bottom of the Packet filtering rules dialog box you will see the following
buttons:
• ОК – closes the dialog box and saves the changes you made.
• Cancel – closes the dialog box without saving the changes.
All the changes you made to the list will be applied immediately after
they are saved.
The packet filtering rules are of higher priority than the application rules and
therefore will be executed first.
6.4.2. Adding a New Rule
The packet filtering rule wizard is in many respects similar to the application rule
wizard. However it includes only two wizard boxes.
6.4.2.1. Step 1. Rule Conditions
The first rule wizard box allows you to specify:
• The protocol used (TCP, UDP, ICMP, other IP protocols)
• The packet destination address
• The traffic direction (outgoing, incoming)
Page 61

Enabling the Security System and Defining its Settings 61
• The protocol-dependent settings (the ports for the TCP and UDP protocols, the message types for the ICMP protocol, the protocol number for
other IP protocols)
• The action (allow/block)
Fig. 29. The first wizard box for packet filtering rules
To configure a packet filtering rule, follow these steps:
1. Select the protocol to be filtered from the Protocol drop-down list.
The available values are TCP (Transmission Control Protocol), UDP
(User Datagram Protocol), ICMP (Internet Control Message
Protocol), and Other IP protocols. The default value is TCP.
2. Check the following checkboxes in the Properties section:
Packet Type (incoming or outgoing) – this concerns traffic direc-
tion. By default the checkbox is unchecked, which allows filtering of
both the incoming and outgoing traffic. If you want to control only
the incoming or the outgoing traffic check this checkbox and specify
Page 62

62 Kaspersky Anti-Hacker
the required packet type in the Rule description section. To enter
the required value click on the packet type
hyperlink and select the
required option in the Specify the direction of the packet dialog
box, then click the ОК button.
Fig. 30. The Specify the direction of the packet dialog box
3. Some checkboxes in the Properties section are protocol
dependent.
• For the TCP and UDP protocols you must specify the Remote
port and the Local port.
• For the ICMP protocol you must specify the ICMP message
type.
• For other IP based protocols you can specify the Protocol.
Remote address – the remote machine address (for all the proto-
cols).
Local address – the local machine address (for all protocols).
To define the address (whether local or remote), click on the corresponding specify the address
section. To specify more than one address, hold down the <C
hyperlink in the Rule description
TRL>
key and click on the hyperlink. For details see subchapter 6.3.2.2.1
on page 53.
Remote port – the remote port number (for the TCP and UDP pro-
tocols).
Page 63

Enabling the Security System and Defining its Settings 63
Local port – the local port number (for the TCP and UDP proto-
cols).
To define the port (whether local or remote), click on the corresponding specify the address hyperlink in the Rule description
section. To specify more than one address, hold down the <C
TRL>
key and click on the hyperlink. For details see number. To specify
the port click on the corresponding specify the port
hyperlink sub-
chapter 6.3.2.2.2 on page 55.
ICMP message type – the ICMP message type (only for the ICMP
protocol). To specify the message type, click on the corresponding
specify the ICMP message type hyperlink in the Rule description
section and select the required value from the Specify the ICMP
message type dialog box drop-down list (see fig. 31), then click on
the ОК button.
Echo request
Echo reply
Trace route (TTL exceed)
Net unreachable
Host unreachable
Protocol unreachable
Port unreachable
Redirect for host
Redirect for net
Redirect for TOS and net
Redirect for TOS and host
Fig. 31. The Specify the ICMP message type dialog box
Protocol – the protocol name or number (only for IP protocols). If
you leave this checkbox unchecked, the program handles all the IP
protocols. To specify the required protocol name or number, click
Page 64

64 Kaspersky Anti-Hacker
on the specify the protocol hyperlink in the Rule description section and select the required value from the Specify the protocol
dialog box drop-down list (see fig. 32) then press the ОК button. In
the list of available protocols below you can see the protocol numbers enclosed with brackets.
• IGMP,RGMP(2)
• GGP(3)
• IP in IP encapsulation(4)
• TCP(6)
• IGRP(9)
• UDP(17)
Fig. 32. The Specify the protocol dialog box
• GRE(47)
• ESP(50)
• AH(51)
• IP with encryption(53)
4. Specify the action to be applied to packets meeting the above
defined conditions - block or allow. By default, the Block option is
selected. To change the value, click on the corresponding hyperlink
in the Rule description section and select the required value in the
Specify Action dialog box, then press the ОК button (see fig. 33).
Fig. 33. The Specify Action dialog box
Page 65

Enabling the Security System and Defining its Settings 65
6.4.2.2. Step 2. Rule Name and Additional
Actions
You must specify the packet filtering rule name in the Name of the rule text field
of the second wizard box. By default, the program suggests a unique name, such
as Packet filtering rule #<serial number of the rule>. However, it is advisable that
you specify a meaningful name that will make it easy for you to identify the
required rule in the list.
You can also enable additional actions for your rule. The wizard contains the
following two checkboxes: Log event - if checked, this logs detected events, and
Display warning – if checked, this displays a message about the detected event
(see fig. 9).
Fig. 34. Defining the rule name and additional actions
Page 66

66 Kaspersky Anti-Hacker
6.5. Intrusion Detection System
6.5.1. Intrusion Detector Settings
To display the intrusion detector settings,
select Settings from the Service menu and switch to the Intrusion
Detection System page (see fig. 35).
It is advisable that you always keep the checkbox located on the Intrusion Detection System page checked. This checkbox allows you to enable/disable detection of external intrusions on your machine.
Below this checkbox you can see the Assaulter blocking time (min.) spin box,
which allows you to define the time period for the assaulter machine to be
blocked when a remote address is detected. This setting is applied to all attack
types.
If you change the Assaulter blocking time parameter, it will be applied
for all new attacks immediately after pressing the OK button in the
Settings window. As regards computers which were blocked due to
previous attacks their blocking time period won't be changed.
The set of fields located at the bottom of this page depends on the attack type
selected from the Attack type drop-down list.
Check the Enable detection of this attack checkbox if you want the program to
detect the selected type of attack. Below the checkbox you can see information
on attack types, which may be useful if you are not sure which option to choose.
Enable Intrusion Detection System
Page 67

Enabling the Security System and Defining its Settings 67
Fig. 35. The Intrusion Detection System page of the Settings dialog box
6.5.2. The List of Detectable Attacks
Kaspersky Anti-Hacker is able to detect the most commonly used DoS attacks
(SYN Flood, UDP Flood, ICMP Flood), the Ping of death, Land, Helkern,
SmbDie, and Lovesan attacks, and also to detect port scanning operations,
which are usually followed by a more powerful attack:
• The Ping of death attack involves sending of an ICMP packet exceeding
64 KB (threshold value) to your computer. It may result in emergency
shutdown of some operating systems.
Page 68

68 Kaspersky Anti-Hacker
• The Land attack involves transmission of a self-connection request (when
a computer is requested to connect to itself) to your computer. It results in
an endless loop as your computer attempts to connect to itself. Consequently, the CPU load and the probability of emergency shutdown increase drastically.
• The Scanning TCP ports attack involves detection of open TCP ports on
your computer. This type of attack is used to search a computer for weak
points and is usually followed by more dangerous attack types. You can
define the following settings for this attack type: Port count: – the number
of ports the remote machine attempts to open, and Time (sec): – the time
it takes.
• The Scanning UDP ports attack involves detection of open UDP ports on
your computer. The attack is detected by the quantity of UDP packets
sent to various computer ports over a certain time period. This type of attack is used to search a computer for weak points and is usually followed
by more dangerous attack types. You can define the following settings for
this attack type: Port count: – the number of ports the remote machine
attempts to open, и Time (sec): – the time it takes.
• The SYN Flood attack involves sending of a false connection request set
to your computer. The system reserves certain resources for every connection request. As a result the computer does not respond to connection
requests from other sources. You can define the following settings for this
attack type: Connection count: – the number of connections the remote
machine attempts to establish, and Time (sec): – the time it takes.
• The UDP Flood attack involves sending of special UDP packets to your
computer. These packets are endlessly transmitted between the affected
machines. Consequently, this attack consumes substantial resources and
overloads the communication link. You can define the following settings
for this attack type: UDP packet count: – the number of incoming UDP
packets, and Time (sec): – the time it takes.
• The ICMP Flood attack involves sending of ICMP packets to your com-
puter. It results in an increase in the CPU load of the affected machine as
it responds to every packet. You can define the following settings for this
attack type: ICMP packet count: – the number of incoming ICMP pack-
ets, and Time (sec): – the time it takes.
• The
Helkern attack involves sending of special UDP packets (able to execute a malicious code) to an attacked machine. This attack results in
slowdown of the Internet connection.
Page 69

Enabling the Security System and Defining its Settings 69
• The SmbDie attack involves an attempt to establish an SMB connection;
if the attack is successful, a special packet overflowing the machine buffer
is delivered to an attacked machine. As a result the user will have to restart the operating system. Windows 2k/XP/NT operating systems are
susceptible to this kind of attack.
• The Lovesan attack attacks a vulnerability in the DCOM RPC service of
Windows NT 4.0/NT 4.0 Terminal Services Edition/2000/XP/Server (tm)
2003 operating systems of your computer. When the vulnerability is detected, the worm, which includes malware allowing the sender to perform
any desired manipulations on your computer, is downloaded to the victim
machine.
Page 70

CHAPTER 7. VIEWING
PERFORMANCE RESULTS
7.1. Viewing the Current Status
Performance of all network applications running on your machine is permanently
monitored and recorded by Kaspersky Anti-Hacker. You can review the following
network activity statistics:
• Active applications. Network operations are classified on the basis of in-
volved applications. For every application on your machine you can review the ports and connections that are handled by this application.
• Established connections. Displays all incoming and outgoing connec-
tions, remote computer addresses, and port numbers.
• Open ports. Displays all ports that are open on your machine.
7.1.1. Active Applications
To review the list of network applications that are currently active,
select Active applications from the Show submenu of the View menu
(see fig. 36). You can also press the button in the toolbar.
The Active network applications dialog box will appear on your screen.
Page 71

Viewing Performance Results 71
Fig. 36. The Active network applications dialog box
This dialog box allows you to review the list of active network applications and
the network resources used by them. The application names are sorted
alphabetically, which allows you to navigate easily through the list. To the left of
every application name in the list you can see the application icon.
By expanding the required application joint you can display the list of
corresponding ports open on your machine and the connections established by
this application. Indicators are as follows:
• Open ports are indicated by the TCP or the UDP icon, depending on the
port type. To the right of every port you can see its number.
• Established connections are indicated by the
icon, if established by
your machine, or by the icon, if received from outside. The connection
settings are described to the right of the icon:
<source address>:<source port>
<destination address>:<destination port>
Page 72

72 Kaspersky Anti-Hacker
The list of active network applications is refreshed automatically twice a second.
The list has a context menu that includes the following commands:
• Refresh – refreshes the active applications list on user demand.
• Create rule – allows you to create a rule for a selected port or connec-
tion. The program launches the application rule wizard, and automatically
enters the selected port or connection details in the appropriate fields.
• Break connection – breaks the connection selected (this command is
available only if you have selected a connection from the list).
Attention! If you force a connection to break, the related application may
function incorrectly.
• Properties – displays more details of the item selected from the list,
namely, application (see fig. 37), connection (see fig. 39) or port (see
fig. 41).
The list may contain more than one string for the same application. This
means that more than one copy of this application is running. When you
expand joints of the application copies, you may see different lists of
open ports and established connections.
Fig. 37. The Properties of the application dialog box
Page 73

Viewing Performance Results 73
In the application properties dialog box you will see the Application information
section, which includes the following items:
• Application name – the executable file name
• Application ID – the application identifier
• Application file – the full path to the executable file
Below the Application information section you will find another section called
Manufacturer information, which includes the following items:
• Manufacturer – the manufacturer name
• Application version – the program version
• File version – the executable file version
7.1.2. Established Connections
To review the list of network connections currently established,
select Established connections from the Show submenu of the View
menu (see fig. 38). You can also press the
The Established Connections dialog box will appear on your screen.
Each line on this list includes details of a single established connection. These
connections are indicated by the
icon, if received from outside.
the
The list also includes the following connection details:
• Remote address – the address and the port of a remote machine with
which a connection is established.
• Local address – your computer address and port.
• Application – the application that established this connection.
icon, if established by your machine, or by
button in the toolbar.
Page 74

74 Kaspersky Anti-Hacker
You may sort the list by any of the titles described above.
Fig. 38. The Established Connections dialog box
The list of established connections is refreshed automatically twice a second.
If required, you may break unwanted connections and/or create appropriate rules
to inhibit this activity in future. To do this, use appropriate commands in the
dialog box context menu:
• Refresh – refreshes the established connections list on user demand.
• Create rule – allows you to create a rule for a selected connection. The
program launches the application rule wizard, and automatically enters
the selected connection details in the appropriate fields.
• Break connection – breaks the connection selected from the list.
Page 75

Viewing Performance Results 75
Attention! If you force a connection to break, the related application may
function incorrectly.
• Properties – displays more details of the connection selected from the list
(see fig. 39).
Fig. 39. The Properties of the connection dialog box
The Connection section of the Properties of the connection dialog box
includes the following items:
• Direction – the connection type: outgoing or incoming
• Remote address – the remote machine symbolic name or IP address
• Remote port – the remote port number
Page 76

76 Kaspersky Anti-Hacker
• Local port – the local port number
Below the Connection section you can see the Application information and
the Manufacturer information sections (see subchapter 7.1.1 on page 70).
7.1.3. Open Ports
To review the list of ports that are currently open,
select Open ports from the Show submenu of the View menu (see
fig. 40). You can also press the
The Open ports dialog box will appear on your screen.
Each line of this list includes details of a single open port. Open ports are
indicated by the TCP or the UDP icon, depending on the port type.
The list also includes the following port details:
• Local port – the port number
• Application – the involved application
• Application location – the full path to the executable file
You may sort the list by any of the titles described above.
button in the toolbar.
Page 77

Viewing Performance Results 77
Fig. 40. The Open ports dialog box
The list of open ports is refreshed automatically twice a second.
If required, you can create a rule inhibiting connection at the selected port. To do
this, use appropriate commands in the dialog box context menu:
• Refresh – refreshes the open ports list on user demand.
• Create rule – allows you to create a rule for the selected port. The pro-
gram launches the application rule wizard, and automatically enters the
selected port details in the appropriate fields.
• Properties – displays more details of the port selected from the list (see
fig. 41).
Page 78

78 Kaspersky Anti-Hacker
Fig. 41. The Properties of the port dialog box
The Port section of the Properties of the port dialog box includes the following
items:
• Protocol – the name of the protocol used
• Local port – the local port number
Below the Port section you can see the Application information and the
Manufacturer information sections (see subchapter 7.1.1 on page 70).
7.2. Using the Logs
Network events that occur on your machine are monitored and saved to the logs.
Different event types are saved to different logs:
Page 79

Viewing Performance Results 79
• The Security log contains details of the latest attacks on your machine
(see subchapter 6.5 on page 66).
• The Application activity log contains details of the events to be logged,
as defined by the application rule wizard (see subchapter 6.3.2.3 on
page 57).
• The Packet filtering log contains details of the events to be logged, as
defined by the packet filtering rule wizard (see subchapter 6.4.2.2 on
page 65).
All logs can be reviewed and configured in a single window (the Logs window).
You can use this window to limit log sizes, to set the logs to be cleared every
time the program starts, or to store results of more then one session (see
subchapter 7.2.4 on page 84).
If required, you can clear the logs on demand.
You can also save these logs to files on your hard drive.
7.2.1. Displaying the Logs Window
To display the Logs window,
select the required log type from the Logs submenu of the View menu.
The Logs window will appear on your screen (see fig. 42).
7.2.2. The Logs Window Layout
The Logs window includes the following three items:
• Menus
• Report table
• Tabs allowing you to switch between various types of log.
Page 80

80 Kaspersky Anti-Hacker
7.2.2.1. Menus
At the top of the Logs window you will find the menu bar.
Table 4
Menu item Function
File Save to file Save the current log to a file
File Close Close the window with the log
Help Contents ... Open Help topics
Help Kaspersky Anti-Hacker
on the Web
Help About Kaspersky AntiHacker
Open the Kaspersky Lab's website
Display a box with the program details and
information about the keys used
7.2.2.2. Report Table
The report table displays information saved to the selected log type. You can
review this log by using the scroll bar to the right.
The report table has a context menu that includes by default the following two
commands and can be extended depending on the selected log type:
• Clear the log – clears the selected log.
• Auto-scroll the log – always displays the last event record at the bottom
of the report table.
• Don't log this event – disables further logging of the selected event. This
command is available in all logs except the hacker attacks log.
• Create rule – allows you to create a rule for a selected event. The newly
created rule is placed at the beginning of the rule list, with the highest priority.
Page 81

Viewing Performance Results 81
7.2.2.3. Tabs
The following tabs at the bottom of the Logs window allow you to switch between
log types:
• Security
• Application activity
• Packet filtering
7.2.3. Selecting the Log
7.2.3.1. Security Log
The Security log allows you to review the list of all detected attacks on your
machine (see subchapter 6.5 on page 66).
To display the Security log,
select Security from the Logs submenu of the View menu.
The Logs window switched to Security tab mode will appear on your screen
(see fig. 42). The log includes the following data:
• Date and time – the date and the time when your computer was at-
tacked.
• Event description – the attack description including attack type and ad-
dress of the assaulter, if detected.
The list of events can be sorted only by date and time.
Page 82

82 Kaspersky Anti-Hacker
Fig. 42. The Security log page
7.2.3.2. Application Activity
The Application Activity log allows you to review details of applications with the logging option enabled by the application rule wizard (see subchapter 6.3.2.3 on page 57).
To display the Application activity log,
select Application activity from the Logs submenu of the View menu.
The Logs window switched to Application activity tab mode will appear on your
screen (see fig. 43). The log includes the following data:
• Date and time – the date and the time the event occurred.
• Application – the related application name and the full path to its execu-
table file.
• Activity description – the activity details.
• Local address – the local address.
• Remote address – the remote address.
The list of events can be sorted only by date and time.
Page 83

Viewing Performance Results 83
Fig. 43. The Application Activity log page
7.2.3.3. Packet Filtering
The Packet filtering log allows you to review details of packet filtering events for which the logging option was enabled by the packet filtering rule wizard (see subchapter 6.4.2.2 on page 65).
To display the Packet filtering log,
select Packet filtering from the Logs submenu of the View menu.
The Logs window switched to Packet filtering tab mode will appear on your
screen (see fig. 44). The log includes the following data:
• Date and time – the date and the time the event occurred.
• Direction – the packet type: incoming or outgoing.
• Protocol – the protocol name.
• Local address – the local address.
• Remote address – the remote address.
• Rule used – the name of the rule employed.
Page 84

84 Kaspersky Anti-Hacker
Entries for allowed packets are colored black, while entries for blocked packets
are red.
The list of events can be sorted only by date and time.
Fig. 44. The Packet filtering log page
7.2.4. Defining Log Settings
To define the log settings,
select Settings from the Service menu and switch to the Logs tab (see
fig. 45).
You can define values for the following two options:
Clear logs when the program starts – if checked, this clears all program
logs when the program starts.
Limit the log size to (Kb) – if checked, this allows log file size to be limited.
Specify the maximum size for your log file in the text field. When the log size
reaches its maximum, the program will start removing the oldest entries as
new entries are added.
Note that the above checkbox allows you to define the size of a
SINGLE log file only. When calculating the hard disk space required for
normal performance of the program, remember that this figure must be
multiplied by three.
Page 85

Viewing Performance Results 85
Fig. 45. The Settings dialog box switched to the Logs tab mode
7.2.5. Saving the Log to a File
To save the log selected in the Logs window to a file,
select Save to file from the File menu. Specify the file name in the
dialog box on your screen. The log will be saved as plain text.
Page 86

APPENDIX A. INDEX
Application rules ...........................................................................................18, 41
Event warning..................................................................................................... 37
Installation CD ......................................................................................................7
Intrusion Detection System................................................................. 7, 20, 21, 64
License agreement ............................................................................................... 7
Packet filtering rules .....................................................................................19, 55
Security levels ........................................................................6, 15, 19, 20, 34, 36
Security scale ...............................................................................................29, 36
Technical support service .....................................................................................9
Technical Support Service..................................................................................92
Training window...................................................................................... 19, 35, 37
Page 87

APPENDIX B. FREQUENTLY
ASKED QUESTIONS
When performing a task your computer displays an error, and you
would like to check whether the error is caused by Kaspersky AntiHacker.
Temporarily select the Allow all security level or unload Kaspersky
Anti-Hacker from computer memory. Check whether the situation
changes. If the same error occurs again, it is not related to Kaspersky
Anti-Hacker. If you computer does not display any error, contact
Kaspersky Lab Technical Support Department.
Page 88

APPENDIX C. KASPERSKY LAB
Founded in 1997, Kaspersky Lab has become a recognized leader in information
security technologies. It produces a wide range of data security software and
delivers high-performance, comprehensive solutions to protect computers and
networks against all types of malicious programs, unsolicited and unwanted
email messages, and hacker attacks.
Kaspersky Lab is an international company. Headquartered in the Russian
Federation, the company has representative offices in the United Kingdom,
France, Germany, Japan, USA (CA), the Benelux countries, China and Poland. A
new company department, the European Anti-Virus Research Centre, has
recently been established in France. Kaspersky Lab's partner network
incorporates more than 500 companies worldwide.
Today, Kaspersky Lab employs more than 250 specialists, each of whom is
proficient in anti-virus technologies, with 9 of them holding M.B.A. degrees, 15
holding Ph.Ds, and two experts holding membership in the Computer Anti-Virus
Researchers Organization (CARO).
Kaspersky Lab offers best-of-breed security solutions, based on its unique
experience and knowledge, gained in over 14 years of fighting computer viruses.
A thorough analysis of computer virus activities enables the company to deliver
comprehensive protection from current and future threats. Resistance to future
attacks is the basic policy implemented in all Kaspersky Lab's products. At all
times, the company’s products remain at least one step ahead of many other
vendors in delivering extensive anti-virus coverage for home users and corporate
customers alike.
Years of hard work have made the company one of the top security software
manufacturers. Kaspersky Lab was one of the first businesses of its kind to
develop the highest standards for anti-virus defense. The company’s flagship
product, Kaspersky Anti-Virus, provides full-scale protection for all tiers of a
network, including workstations, file servers, mail systems, firewalls and Internetgateways, hand-held computers. Its convenient and easy-to-use management
tools ensure advanced automation for rapid virus protection across an enterprise.
Many well-known manufacturers use the Kaspersky Anti-Virus kernel, including
Nokia ICG (USA), F-Secure (Finland), Aladdin (Israel), Sybari (USA), G Data
(Germany), Deerfield (USA), Alt-N (USA), Microworld (India) and BorderWare
(Canada).
Kaspersky Lab's customers benefit from a wide range of additional services that
ensure both stable operation of the company's products, and compliance with
Page 89

Appendix C. 89
specific business requirements. Kaspersky Lab's anti-virus database is updated
every 3 hours. The company provides its customers with a 24-hour technical
support service, which is available in several languages to accommodate its
international clientele.
C.1. Other Kaspersky Lab Products
Kaspersky Anti-Virus® Personal
Kaspersky Anti-Virus Personal protects home computers running Windows
98/ME/2000/NT/XP from all types of known viruses, including Riskware. The
application constantly monitors all possible sources of virus penetration,
including email, Internet, floppy disks, and CDs. Unknown viruses are efficiently
detected and processed by a unique heuristic data analysis system. The two
distinct modes of the application's operation (that can be used either separately
or jointly) are:
• Real-Time Protection – anti-virus scan of all files being run, opened or
saved on the protected computer.
• On-Demand Scan – scanning and disinfection of the entire computer or
individual disks, files or folders. You can launch such a scan manually using the graphical interface, or schedule a regular automated scan.
Kaspersky Anti-Virus Personal does not scan objects which have not been
modified since their previous scan. This rule now applies both to real-time
protection and to the on-demand scan. This feature greatly improves the speed
and performance of the program.
Kaspersky Anti-Virus Personal provides reliable protection against viruses that
attempt to penetrate computers via email messages. The application
automatically scans and disinfects all incoming (POP3) and outgoing (SMTP)
email messages and efficiently detects viruses in email databases.
Kaspersky Anti-Virus Personal supports over 700 formats of archived and
compressed files and ensures automatic anti-virus scanning of their content, and
removal of malicious code from files within ZIP, CAB, RAR and ARJ archives.
The application's settings can easily be adjusted by selecting one of three predefined levels: Maximum Protection, Recommended Protection and
Maximum Speed.
Page 90

90 Kaspersky Anti-Hacker
The anti-virus database is updated every three hours. Database delivery is
guaranteed even if the internet connection is interrupted or switched during the
download process.
Kaspersky Anti-Virus
®
Personal Pro
This package has been designed to deliver comprehensive anti-virus protection
to home computers running Windows 98/ME/2000/NT/XP as well as MS Office
2000 applications. Kaspersky Anti-Virus Personal Pro includes an easy-to-use
application for automatic retrieval of daily updates for the anti-virus database and
the program modules. A second-generation heuristic analyzer efficiently detects
unknown viruses. Kaspersky Anti-Virus Personal includes many interface
enhancements, making it easier than ever to use the program.
Kaspersky Anti-Virus
®
Personal Pro has the following features:
• On-demand scan of local disks;
• Real-time automatic protection of all accessed files from viruses;
• Mail filter automatically scans and disinfects all incoming and outgoing
mail traffic (POP3 and SMTP) and effectively detects viruses in mail databases;
• Behavior blocker that provides maximum protection of MS Office appli-
cations from viruses;
• Archive scans – Kaspersky Anti-Virus recognizes over 700 formats of
archived and compressed files and ensures automatic anti-virus scanning
of their content and removal of malicious code from files within ZIP, CAB,
RAR and ARJ archives.
®
Kaspersky
Anti-Hacker
Kaspersky Anti-Hacker is a personal firewall that is designed to safeguard a
computer running any Windows operating system. It protects your computer
against unauthorized access and external hacker attacks from either the Internet
or the local network.
Kaspersky Anti-Hacker monitors the TCP/IP network activity of all applications
running on your machine. When it detects a suspicious action, it prevents the
suspicious application from accessing the network. This enhances your privacy
and provides 100% security for confidential data stored on your computer.
The product’s SmartStealth™ technology prevents hackers from detecting your
computer from the outside. In this stealthy mode, the application works
Page 91

Appendix C. 91
seamlessly to keep your computer protected while you are on the Web. The
application provides conventional transparency and accessibility of information.
• Kaspersky Anti-Hacker also blocks most common network hacker attacks
and monitors for attempts to scan computer ports.
• Configuration of the application is simply a matter of choosing one of five
security levels. By default, the application starts in self-learning mode,
which will automatically configure your security system depending on your
responses to various events. This makes the firewall adjustable to your
specific preferences and your particular needs.
®
Kaspersky
Security for PDA
Kaspersky Security for PDA provides reliable anti-virus protection of data stored
on PDAs running Palm OS or Windows CE. It also offers anti-virus protection
from corrupted files transferred from a PC or an extension card, from ROM files,
or from databases. This software package includes an optimal combination of the
following anti-virus tools:
• anti-virus scanner to scan the data stored on both the PDA and exten-
sion card on demand;
• anti-virus monitor to intercept viruses in files that are either copied from
other handhelds or are transferred using HotSync™ technology.
Kaspersky Security for PDA protects your
intrusion by
cards
Kaspersky Anti-Virus
encrypting both access to the device and data stored on memory
.
®
Business Optimal
handheld (PDA) from unauthorized
This package provides a configurable security solution for small- and mediumsized corporate networks.
Kaspersky Anti-Virus Business Optimal includes full-scale anti-virus protection
for:
• Workstations running Windows 98/ME/NT/2000/XP Workstation, and
Linux;
1
Depending on the type of distribution kit.
1
Page 92

92 Kaspersky Anti-Hacker
• File and application servers running Windows NT 4.0 Server, Windows
2000, 2003 Server/Advanced Server, Windows 2003 Server, Novell Netware, FreeBSD and OpenBSD, and Linux;
• Email clients, namely Microsoft Exchange 5.5/2000/2003, Lotus
Notes/Domino, Postfix, Exim, Sendmail, and Qmail;
• Internet-gateways: CheckPoint Firewall –1; Microsoft ISA Server.
The Kaspersky Anti-Virus Business Optimal distribution kit includes Kaspersky
Administration Kit, a unique tool for automated deployment and administration.
All of these components are interoperable so that any of them can be selected,
according to the operating systems and applications you use.
®
Kaspersky
Corporate Suite
This package provides corporate networks of any size and complexity with
comprehensive, scalable anti-virus protection. The package components have
been developed to protect every tier of a corporate network, even in mixed
computer environments. Kaspersky Corporate Suite supports the majority of
operating systems and applications installed across an enterprise. All package
components are managed from one console and have a unified user interface.
Kaspersky Corporate Suite delivers a reliable, high-performance protection
system that is fully compatible with the specific needs of your network
configuration.
Kaspersky Corporate Suite provides comprehensive anti-virus protection for:
• Workstations running Windows 98/ME/NT/2000/XP, and Linux;
• File and application servers running Windows NT 4.0 Server, Windows
2000, 2003 Server/Advanced Server, Novell Netware, FreeBSD,
OpenBSD and Linux;
• Email clients, including Microsoft Exchange Server 5.5/2000/2003, Lotus
Notes/Domino, Sendmail, Postfix, Exim and Qmail;
• Internet-gateways: CheckPoint Firewall –1; Microsoft ISA Server;
• Hand-held computers (PDAs), running Windows CE and Palm OS.
The Kaspersky Corporate Suite distribution kit includes Kaspersky Administration
Kit, a unique tool for automated deployment and administration.
All of these components are fully interoperable so that any of them can be
chosen, according to the operating systems and applications you use.
Page 93

Appendix C. 93
Kaspersky® Anti-Spam
Kaspersky Anti-Spam is a cutting-edge software suite that is designed to help
organizations with small- and medium-sized networks wage war against the
onslaught of undesired email (spam). The product combines the revolutionary
technology of linguistic analysis with all modern methods of email filtration
(including RBL lists and formal letter features). Its unique combination of services
allows users to identify and wipe out up to 95% of unwanted traffic.
Installed at the entrance to a network, Kaspersky Anti-Spam monitors incoming
email and acts as a barrier to unsolicited email. The product is compatible with
any mail system and can be installed on either an existing mail server or a
dedicated one.
Kaspersky Anti-Spam’s high performance is ensured by daily updating of the
content filtration database with samples provided by Kaspersky Lab’s linguistic
laboratory.
Kaspersky
Kaspersky Anti-Spam Personal is designed to protect users of mail client
programs Microsoft Outlook and Microsoft Outlook Express against unwanted
email messages (spam).
Kaspersky Anti-Spam Personal software package is a powerful tool that detects
spam in incoming email messages received via the POP3 or IMAP4 protocols
(only for Microsoft Outlook).
The filtering process involves the analysis of all attributes of the letter (sender's
and recipient's addresses and headers), content filtration (analysis of the content
of the letter, both the subject and any attached files), using unique linguistic and
heuristic algorithms.
The application's performance is enhanced by daily updating of the content
filtration database with samples provided by Kaspersky Lab’s linguistic
laboratory.
®
Anti-Spam Personal
C.2. Contact Information
If you have any questions, comments, or suggestions, please refer them to one
of our distributors or directly to Kaspersky Lab. We will be glad to assist you in
Page 94

94 Kaspersky Anti-Hacker
any matters related to our product by phone or via email. All of your
recommendations and suggestions will be thoroughly reviewed and considered.
Technical
support
General
information
Please find the technical support information at
http://www.kaspersky.com/supportinter.html
WWW: http://www.kaspersky.com
http://www.viruslist.com
Email: sales@kaspersky.com
Page 95

APPENDIX D. LICENSE
AGREEMENT
Standard End User Licence Agreement
NOTICE TO ALL USERS: CAREFULLY READ THE FOLLOWING
LEGAL AGREEMENT ("AGREEMENT") FOR THE LICENCE OF
SPECIFIED SOFTWARE ("SOFTWARE") PRODUCED BY KASPERSKY
LABS. ("KASPERSKY LABS").
IF YOU HAVE PURCHASED THIS SOFTWARE VIA THE INTERNET BY
CLICKING THE ACCEPT BUTTON, YOU (EITHER AN INDIVIDUAL OR
A SINGLE LEGAL ENTITY) CONSENT TO BE BOUND BY AND
BECOME PARTY TO THIS AGREEMENT. IF YOU DO NOT AGREE TO
ALL OF THE TERMS OF THIS AGREEMENT, CLICK THE BUTTON
THAT INDICATES THAT YOU DO NOT ACCEPT THE TERMS OF THIS
AGREEMENT, AND DO NOT INSTALL THE SOFTWARE.
IF YOU HAVE PURCHASED THIS SOFTWARE ON A PHYSICAL
MEDIUM, HAVING BROKEN THE CD SLEEVE, YOU (EITHER AN
INDIVIDUAL OR A SINGLE LEGAL ENTITY) HAVE CONSENTED TO
BE BOUND BY THIS AGREEMENT. IF YOU DO NOT AGREE TO ALL
OF THE TERMS OF THIS AGREEMENT, DO NOT BREAK THE CD
SLEEVE, DOWNLOAD, INSTALL, OR USE THIS SOFTWARE. YOU
MAY RETURN THIS SOFTWARE FOR A FULL REFUND. YOUR RIGHT
TO RETURN AND REFUND EXPIRES 30 DAYS AFTER PURCHASE
FROM AN AUTHORISED KASPERSKY LABS DISTRIBUTOR OR
RESELLER. THE RIGHT TO RETURN AND REFUND EXTENDS ONLY
TO THE ORIGINAL PURCHASER.
All references to "Software" herein shall be deemed to include the software
activation key ("Key Identification File") with which you will be provided by
Kaspersky Lab as part of the Software.
1. Licence Grant. Subject to the payment of the applicable licence fees, and
subject to the terms and conditions of this Agreement, Kaspersky Lab hereby
grants you the non-exclusive, non-transferable right to use one copy of the
specified version of the Software and the accompanying documentation (the
"Documentation") for the term of this Agreement solely for your own internal
business purposes. You may install one copy of the Software on one computer,
workstation, personal digital assistant, or other electronic device for which the
Software was designed (each a "Client Device"). If the Software is licensed as a
Page 96

96 Kaspersky Anti-Hacker
suite or bundle with more than one specified Software product, this licence
applies to all such specified Software products, subject to any restrictions or
usage terms specified on the applicable price list or product packaging that apply
to any such Software products individually.
1.1 Use. The Software is licensed as a single product; it may not be used on
more than one Client Device or by more than one user at a time, except as set
forth in this Section.
1.1.1 The Software is "in use" on a Client Device when it is loaded into the
temporary memory (i.e., random-access memory or RAM) or installed into the
permanent memory (e.g., hard disk, CD-ROM, or other storage device) of that
Client Device. This licence authorizes you to make only as many back-up copies
of the Software as are necessary for its lawful use and solely for back-up
purposes, provided that all such copies contain all of the Software's proprietary
notices. You shall maintain records of the number and location of all copies of
the Software and Documentation and will take all reasonable precautions to
protect the Software from unauthorised copying or use.
1.1.2 If you sell the Client Device on which the Software is installed, you will
ensure that all copies of the Software have been previously deleted.
1.1.3 You shall not decompile, reverse engineer, disassemble or otherwise
reduce any part of this Software to a humanly readable form nor permit any third
party to do so. The interface information necessary to achieve interoperability of
the Software with independently created computer programs will be provided by
Kaspersky Lab by request on payment of its reasonable costs and expenses for
procuring and supplying such information. In the event that Kaspersky Lab
notifies you that it does not intend to make such information available for any
reason, including (without limitation) costs, you shall be permitted to take such
steps to achieve interoperability, provided that you only reverse engineer or
decompile the Software to the extent permitted by law.
1.1.4 You shall not make error corrections to, or otherwise modify, adapt, or
translate the Software, nor create derivative works of the Software, nor permit
any third party to copy the Software (other than as expressly permitted herein).
1.1.5 You shall not rent, lease or lend the Software to any other person, nor
transfer or sub-licence your licence rights to any other person.
1.1.6 You shall not use this Software in automatic, semi-automatic or manual
tools designed to create virus signatures, virus detection routines, any other data
or code for detecting malicious code or data.
Page 97

Appendix D. 97
1.2 Server-Mode Use. You may use the Software on a Client Device or on a
server ("Server") within a multi-user or networked environment ("Server-Mode")
only if such use is permitted in the applicable price list or product packaging for
the Software. A separate licence is required for each Client Device or "seat" that
may connect to the Server at any time, regardless of whether such licenced
Client Devices or seats are concurrently connected to or actually accessing or
using the Software. Use of software or hardware that reduces the number of
Client Devices or seats directly accessing or utilizing the Software (e.g.,
"multiplexing" or "pooling" software or hardware) does not reduce the number of
licences required (i.e., the required number of licences would equal the number
of distinct inputs to the multiplexing or pooling software or hardware "front end").
If the number of Client Devices or seats that can connect to the Software
exceeds the number of licences you have obtained, then you must have a
reasonable mechanism in place to ensure that your use of the Software does not
exceed the use limits specified for the licence you have obtained. This licence
authorises you to make or download such copies of the Documentation for each
Client Device or seat that is licensed as are necessary for its lawful use, provided
that each such copy contains all of the Documentation’s proprietary notices.
1.3 Volume Licences. If the Software is licensed with volume licence terms
specified in the applicable product invoicing or packaging for the Software, you
may make, use or install as many additional copies of the Software on the
number of Client Devices as the volume licence terms specify. You must have
reasonable mechanisms in place to ensure that the number of Client Devices on
which the Software has been installed does not exceed the number of licences
you have obtained. This licence authorizes you to make or download one copy of
the Documentation for each additional copy authorized by the volume licence,
provided that each such copy contains all of the Document's proprietary notices.
2. Duration. This Agreement is effective for one (1) year unless and until earlier
terminated as set forth herein. This Agreement will terminate automatically if you
fail to comply with any of the conditions, limitations or other requirements
described herein. Upon any termination or expiration of this Agreement, you
must immediately destroy all copies of the Software and the Documentation. You
may terminate this Agreement at any point by destroying all copies of the
Software and the Documentation.
3. Support.
(i) Kaspersky Lab will provide you with the support services ("Support Services")
as defined below for a period of one year following:
(a) Payment of its then current support charge, and:
Page 98

98 Kaspersky Anti-Hacker
(b) Successful completion of the Support Services Subscription Form as
provided to you with this Agreement or as available on the Kaspersky Lab
website, which will require you to produce the Key Identification File which will
have been provided to you by Kaspersky Lab with this Agreement. It shall be at
the absolute discretion of Kaspersky Lab whether or not you have satisfied this
condition for the provision of Support Services.
(ii) Support Services will terminate unless renewed annually by payment of the
then-current annual support charge and by successful completion of the Support
Services Subscription Form again.
(iii) By completion of the Support Services Subscription Form you consent to the
terms of the Kaspersky Lab Privacy Policy, which is attached to this Agreement,
and you explicitly consent to the transfer of data to other countries outside your
own as set out in the Privacy Policy.
(iv) "Support Services" means
(a) Daily updates of the anti-virus database;
(b) Free software updates, including version upgrades;
(c) Extended technical support via e-mail and phone hotline provided by Vendor
and/or Reseller;
(d) Virus detection and disinfection updates 24 hours per day.
4. Ownership Rights. The Software is protected by copyright laws. Kaspersky
Lab and its suppliers own and retain all rights, titles and interests in and to the
Software, including all copyrights, patents, trademarks and other intellectual
property rights therein. Your possession, installation, or use of the Software does
not transfer any title to the intellectual property in the Software to you, and you
will not acquire any rights to the Software except as expressly set forth in this
Agreement.
5. Confidentiality. You agree that the Software and the Documentation, including
the specific design and structure of individual programs and the Key Identification
File, constitute confidential proprietary information of Kaspersky Lab. You shall
not disclose, provide, or otherwise make available such confidential information
in any form to any third party without the prior written consent of Kaspersky Lab.
You shall implement reasonable security measures to protect such confidential
information, but without limitation to the foregoing shall use best endeavours to
maintain the security of the Key Identification File.
6. Limited Warranty
Page 99

Appendix D. 99
(i) Kaspersky Lab warrants that for 90 days from first download or installation the
Software will perform substantially in accordance with the functionality described
in the Documentation when operated properly and in the manner specified in the
Documentation.
(ii) You accept all responsibility for the selection of this Software to meet your
requirements. Kaspersky Lab does not warrant that the Software and/or the
Documentation will be suitable for such requirements nor that any use will be
uninterrupted or error free;
(iii) Kaspersky Lab does not warrant that this Software identifies all known
viruses, nor that the Software will not occasionally erroneously report a virus in a
title not infected by that virus;
(iv) Your sole remedy and the entire liability of Kaspersky Lab for breach of the
warranty at paragraph (i) will be at Kaspersky Lab option, to repair, replace or
refund of the Software if reported to Kaspersky Lab or its designee during the
warranty period. You shall provide all information as may be reasonably
necessary to assist the Supplier in resolving the defective item;
(v) The warranty in (i) shall not apply if you (a) make or cause to be made any
modifications to this Software without the consent of Kaspersky Lab, (b) use the
Software in a manner for which it was not intended or (c) use the Software other
than as permitted under this Agreement;
(vi) The warranties and conditions stated in this Agreement are in lieu of all other
conditions, warranties or other terms concerning the supply or purported supply
of, failure to supply or delay in supplying the Software or the Documentation
which might but for this paragraph (v) have effect between the Kaspersky Lab
and you or would otherwise be implied into or incorporated into this Agreement
or any collateral contract, whether by statute, common law or otherwise, all of
which are hereby excluded (including, without limitation, the implied conditions,
warranties or other terms as to satisfactory quality, fitness for purpose or as to
the use of reasonable skill and care).
7. Liability
(i) Nothing in this Agreement shall exclude or limit Kaspersky Lab's liability for (i)
the tort of deceit, (ii) death or personal injury caused by its breach of a common
law duty of care or any negligent breach of a term of this Agreement, (iii) any
breach of the obligations implied by s.12 Sale of Goods Act 1979 or s.2 Supply of
Goods and Services Act 1982 or (iv) any liability which cannot be excluded by
law.
Page 100

100 Kaspersky Anti-Hacker
(ii) Subject to paragraph (i), the Supplier shall bear no liability (whether in
contract, tort, restitution or otherwise) for any of the following losses or damage
(whether such losses or damage were foreseen, foreseeable, known or
otherwise):
(a) Loss of revenue;
(b) Loss of actual or anticipated profits (including for loss of profits on contracts);
(c) Loss of the use of money;
(d) Loss of anticipated savings;
(e) Loss of business;
(f) Loss of opportunity;
(g) Loss of goodwill;
(h) Loss of reputation;
(i) Loss of, damage to or corruption of data, or:
(j) Any indirect or consequential loss or damage howsoever caused (including,
for the avoidance of doubt, where such loss or damage is of the type specified in
paragraph (ii), (a) to (ii), (i).
(iii) Subject to paragraph (i), the liability of Kaspersky Lab (whether in contract,
tort, restitution or otherwise) arising out of or in connection with the supply of the
Software shall in no circumstances exceed a sum equal to the amount equally
paid by you for the Software.
8. The construction and interpretation of this Agreement shall be governed in
accordance with the laws of England and Wales. The parties hereby submit to
the jurisdiction of the courts of England and Wales save that Kaspersky Lab as
claimant shall be entitled to initiate proceedings in any court of competent
jurisdiction.
9. (i) This Agreement contains the entire understanding between the parties
with respect to the subject matter hereof and supersedes all and any prior
understandings, undertakings and promises between you and Kaspersky Lab,
whether oral or in writing, which have been given or may be implied from
anything written or said in negotiations between us or our representatives prior to
this Agreement and all prior agreements between the parties relating to the
 Loading...