

Page 1

KASPERSKY LAB
Kaspersky Security for PDA 4.5
USER GUIDE
Page 2

KASPERSKY SECURITY FOR PDA 4.5
User Guide
Kaspersky Labs Ltd.
http://www.kaspersky.com
Revision date: June 2003
Page 3

Contents
CHAPTER 1. KASPERSKY SECURITY FOR PDA................................................ 7
1.1. Purpose and main functions........................................................................... 7
1.2. Distribution kit.................................................................................................. 8
1.3. Information in the book ................................................................................... 8
1.4. Conventions .................................................................................................... 9
CHAPTER 2. INSTALLING AND REMOVING THE PROGRAM......................... 10
2.1. System requirements.................................................................................... 10
2.1.1. PDA running Windows CE ..................................................................... 10
2.1.2. PDA running Palm OS............................................................................ 10
2.2. Installation ..................................................................................................... 11
2.2.1. Installing the software onto the desktop................................................. 11
2.2.2. Transferring the package components to a PDA running Windows CE17
2.2.3. Transferring the package components to a PDA running Palm OS...... 21
2.3. Removing the program................................................................................. 24
2.3.1. Removing the program from your PDA running Windows CE ............. 24
2.3.2. Removing the program from your PDA running Palm OS.................... 26
2.3.3. Removing the program from your desktop ............................................ 27
2.4. Updating the program to a new version....................................................... 29
CHAPTER 3. KASPERSKY ANTI-VIRUS FOR WINDOWS CE.......................... 30
3.1. Purpose and main functions......................................................................... 30
3.2. Starting the program ..................................................................................... 31
3.3. License key management ............................................................................ 32
3.3.1. Key file installation .................................................................................. 32
3.3.2. License renewal...................................................................................... 34
3.4. Interface 36
3.4.1. Main screen ............................................................................................ 36
Page 4

Kaspersky Security for PDA 3
3.4.2. Menu ....................................................................................................... 36
3.4.3. Start/stop check buttons ......................................................................... 37
3.4.4. Work area and tab-page switching buttons ........................................... 37
3.4.5. Control elements..................................................................................... 38
3.5. Checking for viruses on PDA running Windows.......................................... 38
3.5.1. Step 1. How to check for viruses …....................................................... 38
3.5.1.1. … in files ........................................................................................... 39
3.5.1.2. … in ROM files.................................................................................. 40
3.5.1.3. … in databases................................................................................. 40
3.5.1.4. … on memory expansion cards and in network folders.................. 40
3.5.2. Step 2. Defining reporting settings and actions to be taken if a virus is
detected .................................................................................................. 41
3.5.3. Step 3. Starting/stopping to search for and delete infected objects...... 42
3.5.4. Step 4. Actions taken if a virus is detected ............................................ 43
3.5.5. Step 5. Reviewing the performance statistics........................................ 45
3.5.5.1. Working with the report .................................................................... 46
3.5.5.2. Viewing the program and the license details................................... 46
3.6. Updating anti-virus databases...................................................................... 47
3.6.1. Purpose................................................................................................... 47
3.6.2. Starting the program and the program interface.................................... 48
3.6.3. Updating the databases manually or as scheduled .............................. 49
CHAPTER 4. KASPERSKY SECURITY FOR WINDOWS CE ............................ 51
4.1. Purpose and main functions......................................................................... 51
4.2. Starting Kaspersky Security for Windows CE.............................................. 52
4.3. License key management ............................................................................ 52
4.3.1. Key file installation .................................................................................. 52
4.3.2. License renewal...................................................................................... 54
4.4. Interface 57
4.4.1. Main screen ............................................................................................ 57
4.4.1.1. Items on the program main screen.................................................. 57
4.4.1.2. The list of confidential files................................................................ 58
Page 5

4 Kaspersky Security for PDA
4.4.1.3. Menubar............................................................................................ 59
4.4.1.4. Taskbar ............................................................................................. 61
4.4.1.5. Contextual menu .............................................................................. 62
4.4.2. The confidential file creation screen....................................................... 63
4.4.3. The confidential file-mount screen ......................................................... 66
4.4.4. The confidential file-open screen ........................................................... 67
4.4.5. The file-access password redefine screen ............................................ 69
4.4.6. The confidential file properties screen ................................................... 70
4.5. Running Kaspersky Security for Windows CE ............................................ 71
4.5.1. Creating a confidential file ...................................................................... 71
4.5.2. Mounting a file as a confidential folder................................................... 74
4.5.3. Opening a confidential file ...................................................................... 77
4.5.4. Unmounting a confidential folder............................................................ 79
4.5.5. Deleting a confidential file....................................................................... 80
4.5.6. Changing the settings of a confidential file............................................. 80
4.5.7. Changing the access-password to a confidential file ............................ 82
CHAPTER 5. KASPERSKY ANTI-VIRUS FOR PALM OS................................... 84
5.1. Purpose and main functions......................................................................... 84
5.2. Starting the program ..................................................................................... 85
5.3. Interface 85
5.3.1. Main screen ............................................................................................ 85
5.3.2. Menu ....................................................................................................... 85
5.3.3. Dialogs and controls ............................................................................... 87
5.4. Managing the anti-virus ................................................................................ 88
5.4.1. Configuring the program......................................................................... 88
5.4.2. Searching for and deleting viruses......................................................... 89
5.4.2.1. Starting to search for and delete viruses ......................................... 89
5.4.2.2. Monitoring HotSynced or Beamed data .......................................... 90
5.4.2.3. Scanning for viruses on demand ..................................................... 91
5.4.2.4. Working with the disinfect dialog...................................................... 92
5.4.2.5. Performance statistics ...................................................................... 93
Page 6

Kaspersky Security for PDA 5
5.4.3. Working with your log file........................................................................ 94
5.4.3.1. Displaying the log file........................................................................ 94
5.4.3.2. Clearing the log file ........................................................................... 94
5.4.3.3. Beaming a log file ............................................................................. 95
5.4.4. Displaying the list of known viruses ....................................................... 95
5.4.5. Updating your anti-virus databases ....................................................... 96
5.4.5.1. … by beaming an update from another Palm device ..................... 96
5.4.5.2. … by using the HotSync utility ......................................................... 97
5.4.6. Displaying program details and the license ........................................... 99
5.5. Anti-virus databases auto-updating utility .................................................. 100
5.5.1. Purpose and main functions................................................................. 100
5.5.2. Configuring the updating utility .............................................................100
5.5.2.1. Running the configuration program ............................................... 100
5.5.2.2. The Conduit page ........................................................................... 101
5.5.2.3. The URLs page .............................................................................. 102
5.5.2.4. The Paths page .............................................................................. 103
5.5.3. Updating virus definition databases on your Palm device .................. 104
5.5.3.1. Retrieving updates via the Internet on demand or as scheduled . 104
5.5.3.2. Updating virus definition databases on your Palm device ............ 105
CHAPTER 6. KASPERSKY SECURITY FOR PALM OS................................... 110
6.1. Purpose and main functions....................................................................... 110
6.2. Interface 110
6.2.1. Main controls......................................................................................... 110
6.2.2. Starting Kaspersky Security for Palm OS............................................ 112
6.2.3. Main screen .......................................................................................... 112
6.2.4. The menu.............................................................................................. 114
6.2.5. The Configuration screen ..................................................................... 114
6.2.6. The Password Input screen ................................................................. 116
6.2.7. The Lock Handheld screen ..................................................................117
6.2.8. The Application List screen .................................................................. 118
6.2.9. Displaying your program details and the license................................. 119
Page 7

6 Kaspersky Security for PDA
6.3. License details ............................................................................................ 121
6.4. Running Kaspersky Security for Palm OS................................................. 122
6.4.1. Enabling/disabling the password protection ........................................ 122
6.4.2. Locking the PDA. Selecting an event for locking................................. 124
6.4.3. Encryption of applications..................................................................... 126
6.4.3.1. Enabling/disabling the encryption ..................................................126
6.4.3.2. Selecting applications to be encrypted .......................................... 127
6.4.3.3. Selecting an encryption algorithm.................................................. 127
6.4.4. Extra protection mode .......................................................................... 128
6.5. Known problems ......................................................................................... 128
APPENDIX A. RUNNING AND CONFIGURING THE PROGRAM CONDUIT FROM
KASPERSKY ANTI-VIRUS CONTROL CENTER ............................................129
A.1. The Task window ........................................................................................ 130
A.2. The Schedule window ................................................................................ 130
A.2.1. Launching on event ................................................................................. 132
A.2.2. Launching hourly...................................................................................... 132
A.2.3. Launching daily ........................................................................................133
A.2.4. Launching weekly .................................................................................... 134
A.2.5. Launching monthly................................................................................... 135
A.3. The Alerts window....................................................................................... 136
A.4. The User account window .......................................................................... 136
A.5. Configuring the conduit properties ............................................................. 137
APPENDIX B. KASPERSKY LABS LTD............................................................... 139
B.1. Other Kaspersky Labs Products ................................................................ 140
B.2. Contact Information..................................................................................... 143
APPENDIX C. INDEX............................................................................................. 144
Page 8

CChhaapptteerr 11.. KKaassppeerrsskkyy SSeeccuurriittyy ffoorr PPDDAA
11..11.. PPuurrppoossee aanndd mmaaiinn ffuunnccttiioonnss
Purpose, main features and components of
Kaspersky Security for the PDA software
package
Kaspersky Security for the PDA software package is developed to protect PDA of
various types from viruses and unauthorized access .
Kaspersky Security for PDA allows the user to:
• secure from computer viruses on various types of PDA: with the Palm OS
and the Pocket PC operating systems (i.e. PDA running Palm OS and
PDA running Windows CE).
• protect pocket devices from viruses entering the device system during
synchronization with a desktop, during data communication with another
PDA via the IRD port, or with mail messages. The program checks for viruses in network folders and on memory expansion cards.
• upload the latest anti-virus databases via the Internet.
• encrypt and password your PDA data.
Kaspersky Security for the PDA software package includes the following
components :
• Kaspersky Anti-Virus for Windows CE is developed to protect from vi-
ruses on PDA running Windows CE. The anti-virus scanner checks for viruses in data storage locations and also on expansion cards and in network folders mounted under. The anti-virus database updating utility allows you to keep your protection system at peak functionality.
• Kaspersky Security for Windows CE is developed to protect confiden-
tial data on PDA running Windows CE from unauthorized access. The
program allows you to create confidential folders containing encrypted
and passworded data. The data can be saved using the PDA applications within the confidential folders in the same way as they are usually
saved onto memory expansion cards.
Page 9

8 Kaspersky Security for PDA
• Kaspersky Anti-Virus for Palm OS is developed to protect from viruses
on PDA running Palm OS. The program monitors all the data traffic that
can be used by viruses to enter your PDA. The anti-virus scanner checks
for viruses in data storage locations: main memory and expansion cards.
The anti-virus monitor intercepts viruses in data transferred to PDA using
the HotSync or the Beam technology. The anti-virus database updating
utility allows you to keep your protection system at peak functionality.
• Kaspersky Security for Palm OS is developed to protect confidential
data on PDA running Palm OS from unauthorized access. The program
allows you to lock the PDA at a certain timestamp manually or at the time
the computer is turned off. To unlock the PDA, the user is required to enter a password. Encryption of data stored on the PDA and the locking are
performed simultaneously. Therefore, even if a violator accesses the
memory contents of the locked PDA, he/she cannot extract information
without the password.
Installation of the program and updating of the anti-virus databases are
performed using a desktop connected to the PDA via a cord and the
PDA-to-desktop connecting programs supplied with your PDA.
11..22.. DDiissttrriibbuuttiioonn kkiitt
What is included in the distribution kit?
Kaspersky Security for the PDA software product is supplied via the Internet (the
program installation files and the documentation). The key-file is supplied by
email to the address defined by the customer at the online-shop or at the
Kaspersky Lab partner.
11..33.. IInnffoorrmmaattiioonn iinn tthhee bbooookk
The issues described in this book
This book contains information on how to install, customize and manage the
Kaspersky Security for PDA software products.
Basic operation concepts of the PDA are not discussed in this book.
Page 10
Kaspersky Security for PDA 9
11..44.. CCoonnvveennttiioonnss
Conventions in this book
In this book, we use various conventions to emphasize different meaningful parts
of the documentation.
Convention Meaning
Bold font
1. Step 1.
2. …
Note.
Attention!
To start the program,
follow these steps:
Menu titles, commands, window titles,
dialog elements, etc.
Additional information, notes.
Critical information.
Actions that must be taken.
Control element name – Control ele-
ment function.
Screen messages text
Description of the settings’ tree.
Text of the configuration files and
program messages.
Page 11

CChhaapptteerr 22.. IInnssttaalllliinngg aanndd rreemmoovviinngg tthhee
pprrooggrraamm
22..11.. SSyysstteemm rreeqquuiirreemmeennttss
System requirements for running the
programs
22..11..11.. PPDDAA rruunnnniinngg WWiinnddoowwss CCEE
In order to run Kaspersky Security for PDA, your PDA running Windows CE must
meet the following requirements :
• CPU: MIPS or StrongARM. For example, Cassiopeia E-125, EM-500, E200, Compaq iPAQ 31xx, 36xx, 37xx, 38xx, HP Jornada 56x, etc.
• OS: Pocket PC 2000/2002 (Windows CE 3.0) .
• Available memory on PDA: at least 150 Kb.
In order to install Kaspersky Security for PDA and update anti-virus databases
you need a desktop that meets the following requirements:
• OS: Windows 98, ME, NT 4, 2000, XP.
• Preinstalled Microsoft ActiveSync.
• Attached cradle to synchronize the PDA with the desktop.
22..11..22.. PPDDAA rruunnnniinngg PPaallmm OOSS
In order to run Kaspersky Security for PDA, your PDA running Palm OS must
meet the following requirements :
• OS: Palm OS 3.x, 4.x. For example: Palm III, Palm m10x, Palm m50x.
• Available memory on PDA: at least 100 Kb.
Page 12

Installing and removing the program 11
In order to install Kaspersky Security for PDA and update anti-virus databases
you need a desktop that meets the following requirements:
• OS: Windows 98, ME, NT 4, 2000, XP.
• Preinstalled Palm Desktop, Microsoft HotSync.
• Attached cradle to synchronize the PDA with the desktop.
22..22.. IInnssttaallllaattiioonn
In order to install Kaspersky Security for PDA, you need a Palm/Pocket PC
device and a desktop with preinstalled Palm Desktop, Microsoft
HotSync/Microsoft ActiveSync and an attached cradle for Palm or Pocket PC,
respectively. You also need the program distribution package. Program
installation must be performed by a user with administrator rights for on the
computer. The installation includes two stages. In the first stage the program
components are copied from the program distribution package onto the user
desktop. In the second stage the software is transferred onto the PDA.
22..22..11.. IInnssttaalllliinngg tthhee ssooffttwwaarree oonnttoo tthhee
ddeesskkttoopp
Call up the installation wizard setup.exe file. The installation wizard will register
the required libraries and create the appropriate program group with icons for the
program executable files. The installation wizard will display various dialog boxes
with instructions that must be followed by the user. You can manage the
installation procedure by using the appropriate buttons located at the bottom of
every dialog box of the installation wizard. Various dialog boxes of the installation
wizard contain different sets of buttons. The main buttons are:
• OK – accepts actions;
• Cancel – cancels action(s);
• Next – moves one step forward;
• Back – moves one-step backward.
When started the installation wizard verifies the user rights. If the user
does not have administration rights on the machine employed, the program displays the appropriate message and aborts the installation.
Page 13
12 Kaspersky Security for PDA
If the computer already has some preinstalled components of Kaspersky Security for PDA, the installation wizard will suggest you remove
these components. Remove the components (see subchapter 2.3 on
page 24) and start setup.exe again. You will be prompted to install
Kaspersky Security for PDA.
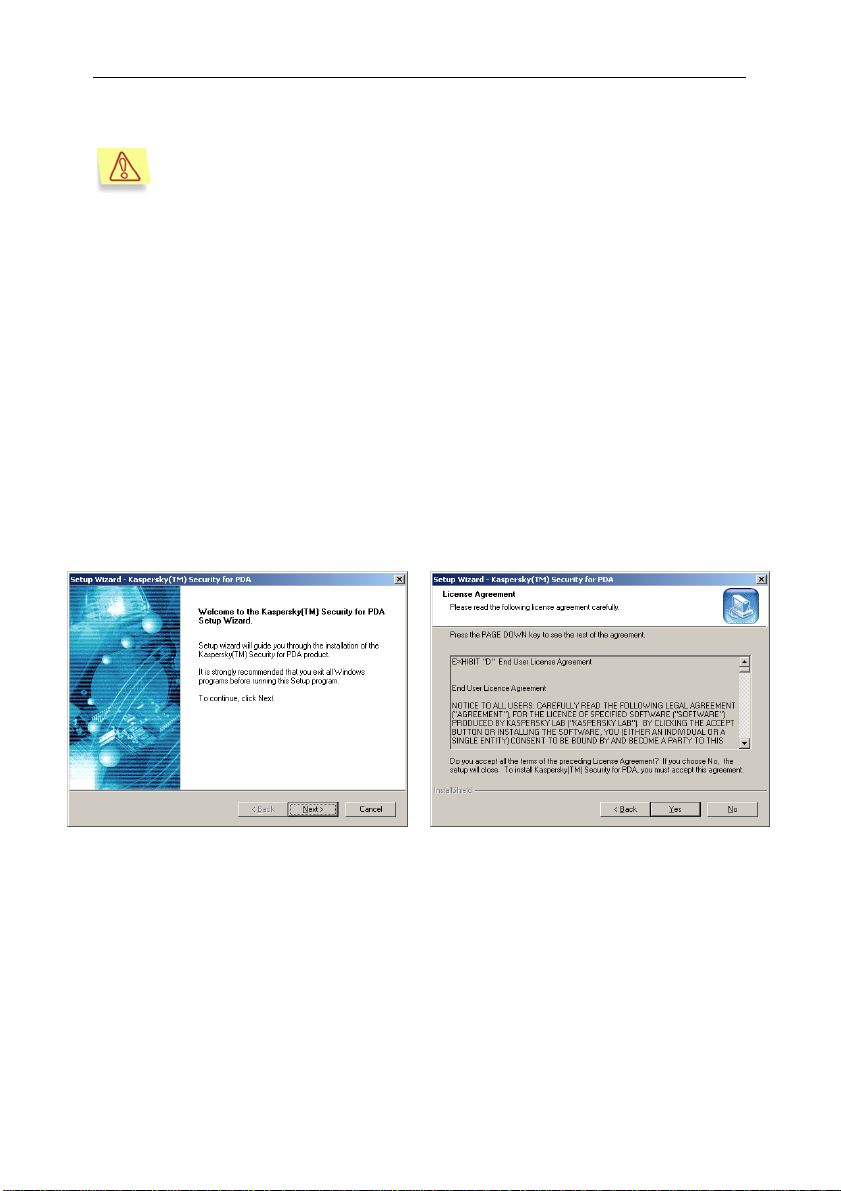
Step 1. Read general information
The Welcome … dialog box of the setup wizard (see Figure 1) contains general
information about Kaspersky Security for PDA. Press the Next > button to
proceed with the setup.
Step 2. Read the license agreement
The License Agreement dialog box (see Figure 2) contains the license
agreement. Read it carefully and press Yes, if you agree to the license
agreement terms. Otherwise, press No to abort the setup.
Figure 1. The Welcome… dialog box of the
setup wizard
Figure 2. The License Agreement dialog box
Page 14
Installing and removing the program 13
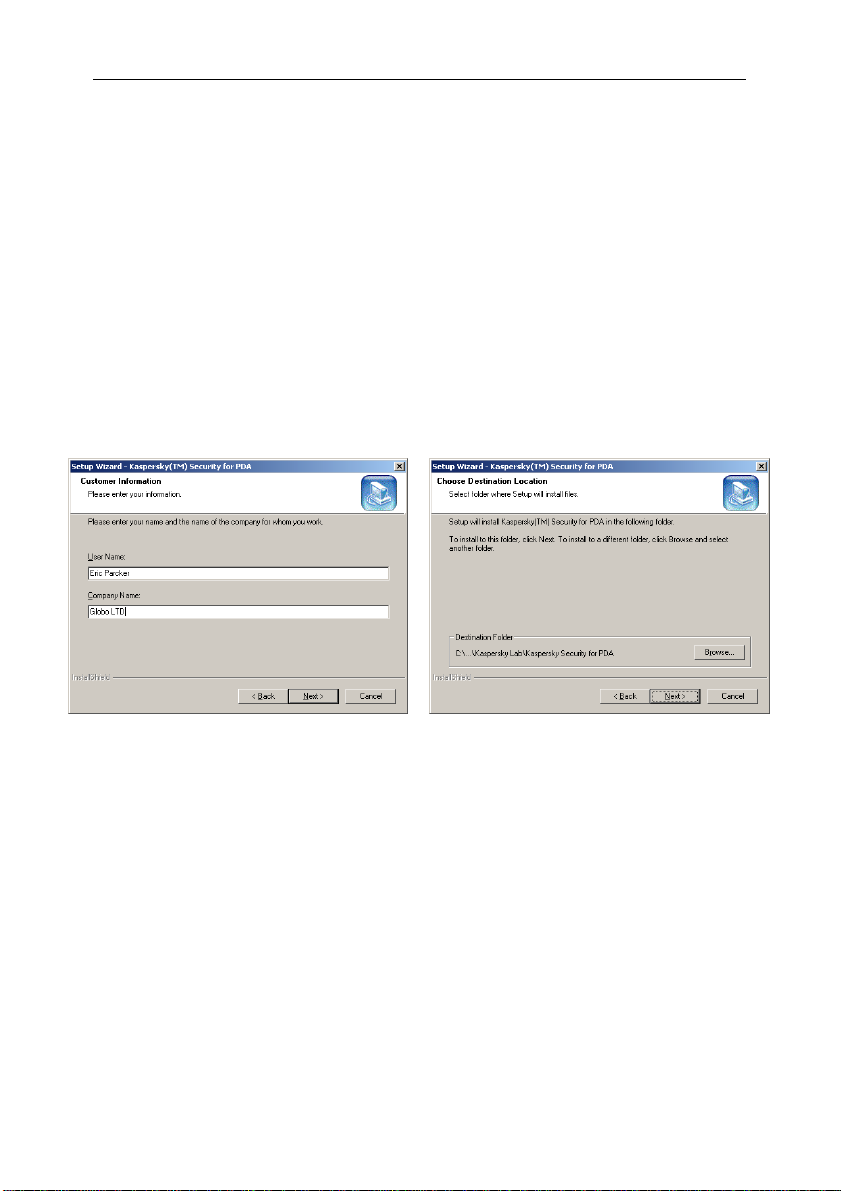
Step 3. Input user information
In the Customer Information dialog box (see Figure 3), specify your user details.
Enter the appropriate data in the User Name field and the Company Name field.
By default the information for these fields is taken from the Windows registry.
Step 4. Select the folder where the program will be installed
In the Choose Destination Location dialog box (see Figure 4), select the
installation folder where the Kaspersky Security for PDA components will be
installed. The default directory is Program Files\Kaspersky Lab\Kaspersky
Anti-Virus for PDA. If the folder does not exist, it will be created. You may
redefine the folder by using the Browse… button. When done, press the Next >
button to proceed with the setup.
Figure 3. The Customer Information dialog
box
Figure 4. The Choose Destination Location
dialog box
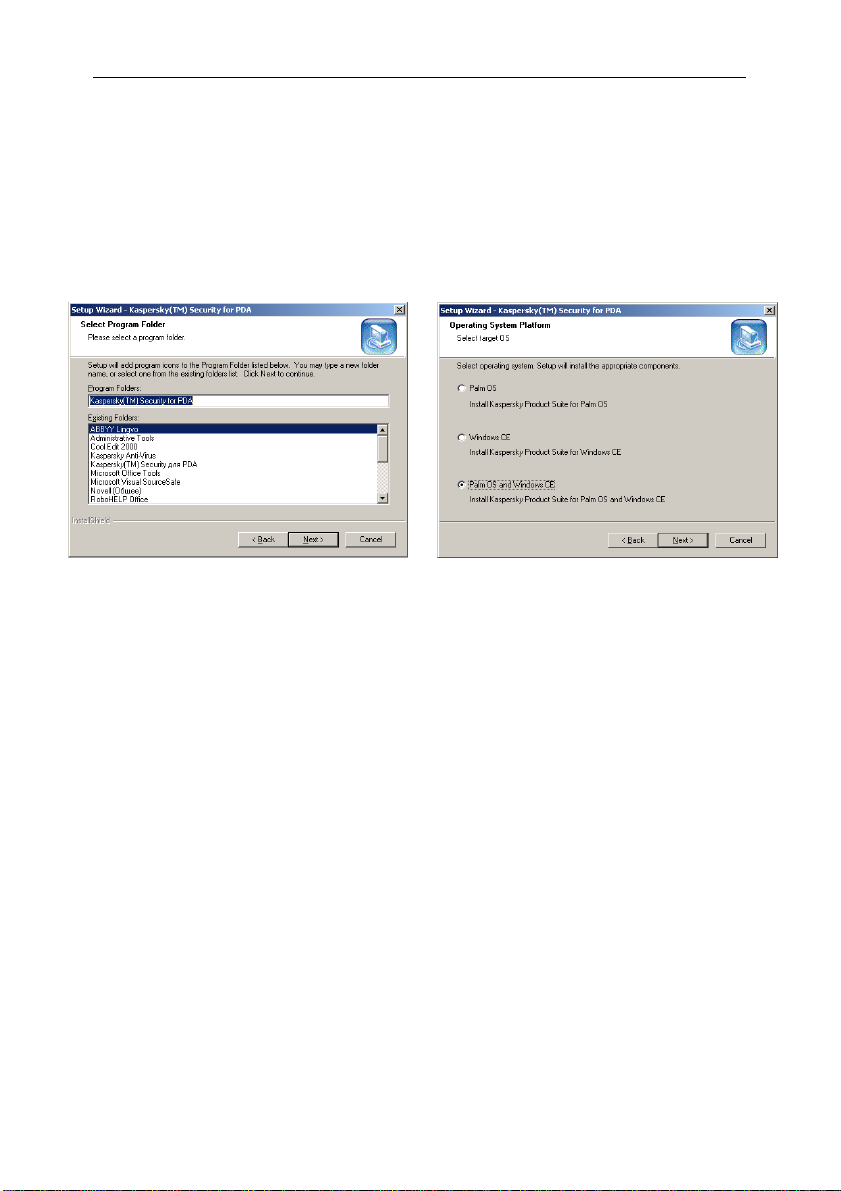
Step 5. Select the program group
Define the program group name in the Select Program Folder dialog box (see
Figure 5) for the Kaspersky Anti-Virus for PDA icon to appear in the standard
Program menu. This group will contain the component icons for Kaspersky AntiVirus for PDA. You may select the program group from the list below or define
the new one. To create the group, enter its name in the Program Folders text
field. By default, the program group created by the setup wizard is called
Kaspersky Security for PDA. When done, press the Next > button to proceed
with the setup.
Page 15
14 Kaspersky Security for PDA
Step 6. Selecting the operating system of your PDA
In the Operating System Platform dialog box (see Figure 6), select the
operating system of your PDA where you want to install Kaspersky Security for
PDA: Palm OS for Palm, Windows CE for Pocket PC, or Palm OS and
Windows CE if you are running the setup for two devices at once. When done,
press the Next > button to proceed with the setup.
Figure 5. The Select Program Folder dialog box
Figure 6. The Operating System Platform
dialog box
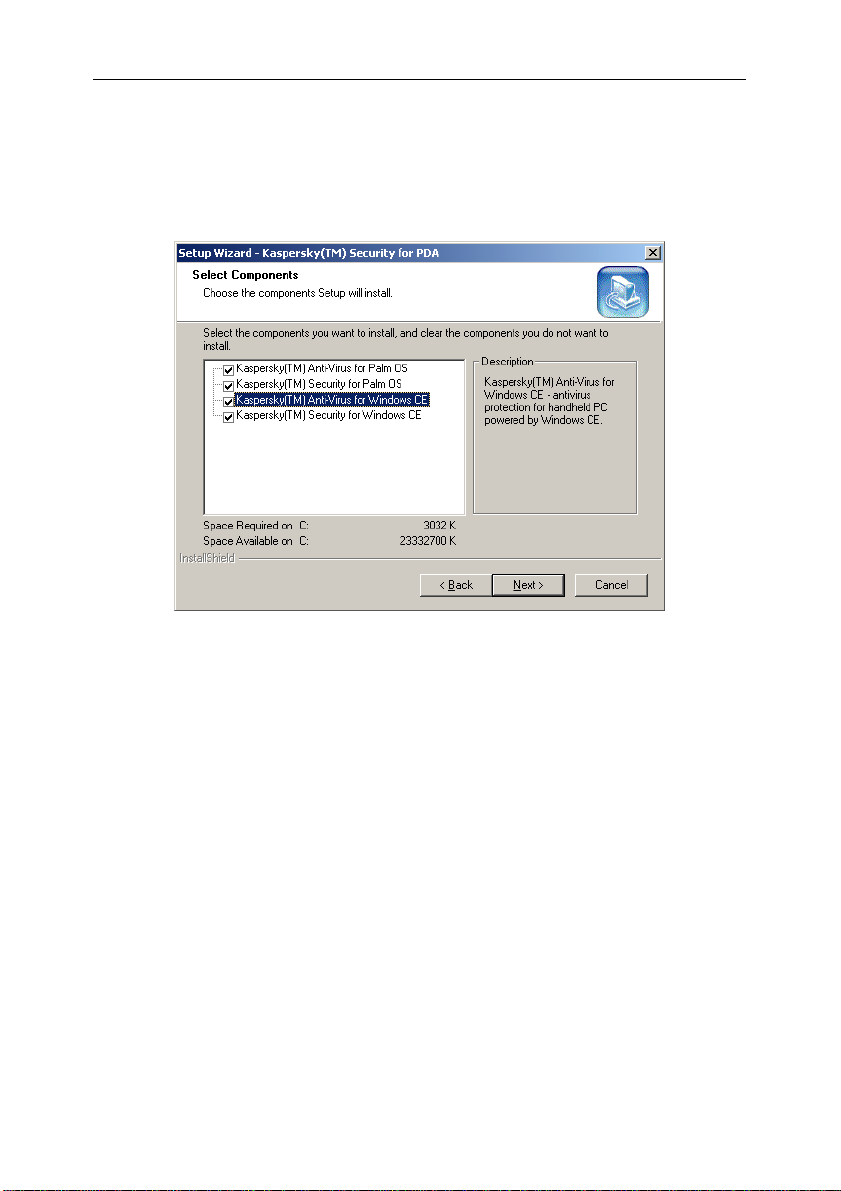
Step 7. Selecting the package components to be installed
In the Select Components dialog box (see Figure 7), you must select the
Kaspersky Security for PDA software package components to be installed on
your PDA.
At the left side of the dialog box, you will find the list of package components
available for the operating system that you selected in the previous dialog box of
the setup wizard. If you are going to install software components for both types of
devices, the complete list of Kaspersky Security for PDA package components
will be displayed in this dialog box.
Select the required components by checking the checkboxes at the left of their
names, and uncheck the checkboxes of those components that you do not want
to be installed. Below the list you will see two indicators: Space Required on…
- for the amount of Kbs required for the selected components, and Space
Available on… - for the amount of Kbs available on your target drive.
Page 16
Installing and removing the program 15
By default, the setup wizard installs all the software components available in the
components’ list.
When done, press the Next > button to proceed with the setup.
Figure 7. The Select Components dialog box
Step 8. Copying files to the hard disk
Read the setup information in the Start Copying Files dialog box (see Figure 8).
If the defined settings are correct, proceed with the setup by pressing the Next >
button. The program will start copying files to the hard disk; this process is
indicated by the progress bar in the Setup Status dialog box (see Figure 9). If an
error occurs during the copying procedure the wizard will display the appropriate
message and abort the installation.
Page 17

16 Kaspersky Security for PDA
Figure 8. The Start Copying Files dialog box
Figure 9. The Setup Status dialog box
Step 9. Completing installation on the desktop
If the installation was successful the Setup Wizard Complete dialog box (see
Figure 10) will appear on your screen. Press the Finish button to complete the
installation.
If after the installation the computer must be restarted the Setup Wizard
Complete dialog box (see Figure 11) will suggest you to restart the computer
immediately or postpone the restart for later. Select the required option and
press the Finish button to complete the installation.
Figure 10. The Setup Wizard Complete dialog
box
Figure 11. The Setup Wizard Complete dialog
box, the computer restarting options
Page 18

Installing and removing the program 17
As a result, the Kaspersky Anti-Virus for Palm OS Conduit and/or Kaspersky
(TM) Anti-Virus Updater for Windows CE program(s) will be installed on your
computer, the program icons will appear in the Start\Programs menu, and the
program components to be transferred to your PDA will be prepared.
If you are installing Kaspersky Security for PDA on a Pocket PC, the program
transfer onto your PDA will be performed by the Microsoft ActiveSync program.
This program will be automatically started by the setup wizard right after you
install the package components on your desktop (see subchapter 2.2.2 on
page 17).
If you are installing Kaspersky Security or Kaspersky Anti-Virus for Palm OS, the
program transfer onto your PDA has to be performed with the Palm Desktop
program. This program must be started manually (see subchapter 2.2.2 on
page Error! Bookmark not defined.).
22..22..22.. TTrraannssffeerrrriinngg tthhee ppaacckkaaggee
ccoommppoonneennttss ttoo aa PPDDAA rruunnnniinngg
WWiinnddoowwss CCEE
Immediately following installation of the software package components on your
computer, the Microsoft ActiveSync program will start. If your PDA is inserted
into the cradle, you will be given the option to transfer the software package
components to the PDA. Otherwise, the Pending Application Install window
(see Figure Error! Reference source not found.) will appear. Click OK. As a
result, during the PDA’s first synchronization with the PC, the program will
suggest that you run the following procedure.
Step 1. Defining the location of the program on your PDA
running Windows CE
The next step in Kaspersky Security’s PDA setup procedure is to define the
location of the program on your PDA.
To do this, follow these steps:
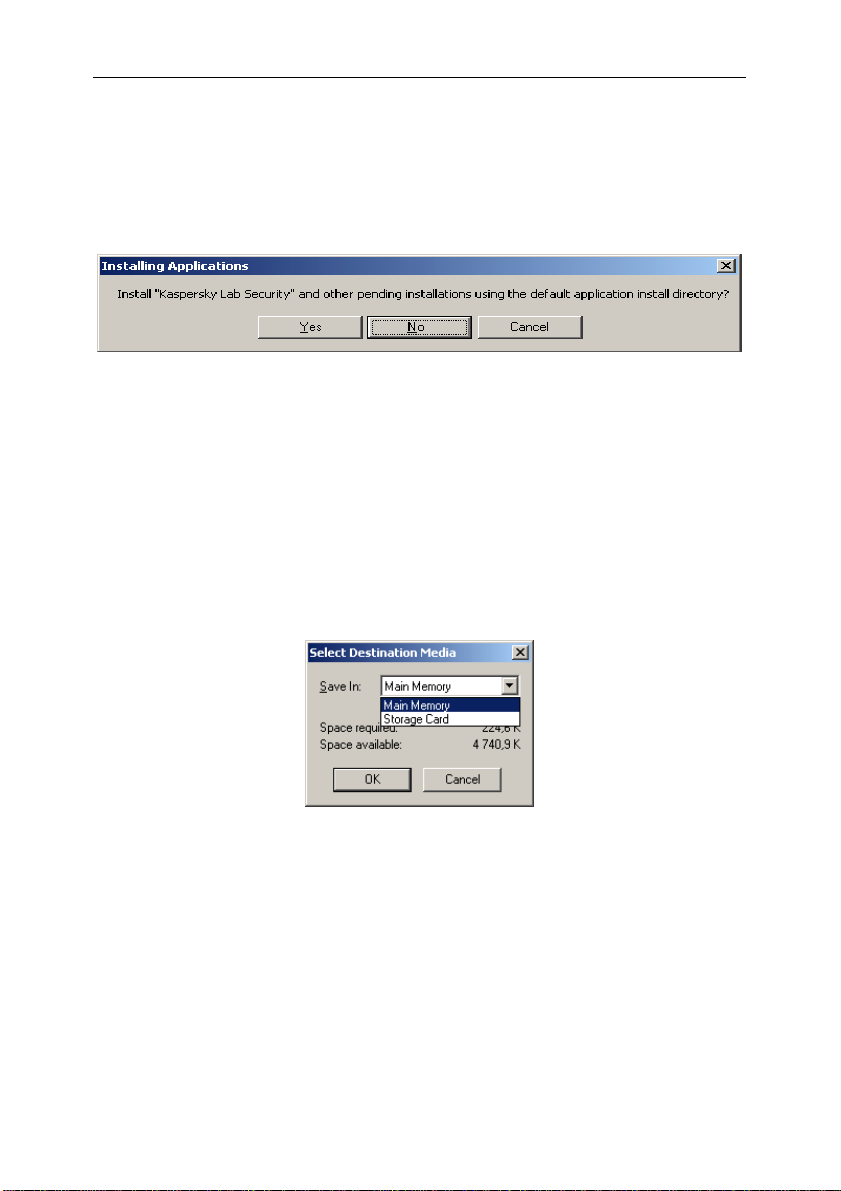
1. If you decided to install Kaspersky Security for Windows CE , the
setup utility will suggest that you define the target location for its
Page 19
18 Kaspersky Security for PDA
installation. Press the Yes button in your screen’s Installing
Applications dialog box (see Figure 12) to install Kaspersky Anti-
Virus into the \ProgramFiles\Kaspersky Lab\Kaspersky Security
directory, or the No button, if you want to define an alternate
location.
Figure 12. The Installing Applications dialog box
2. If you refused to install Kaspersky Anti-Virus into the default
directory, the Select Destination Media dialog box (see Figure 13)
will now appear on your screen. In this dialog box, you can define
Kaspersky Anti-Virus’s target location on your PDA. By default, the
setup utility suggests that you install the product into the Main
memory. Press OK if you want to do so. However, if your Pocket
PC has a memory expansion card, you can also install the product
there. To install the product on the memory card, select Memory
Card from the Save In drop-down list and then press ОК.
Figure 13. The Select Destination Media dialog box
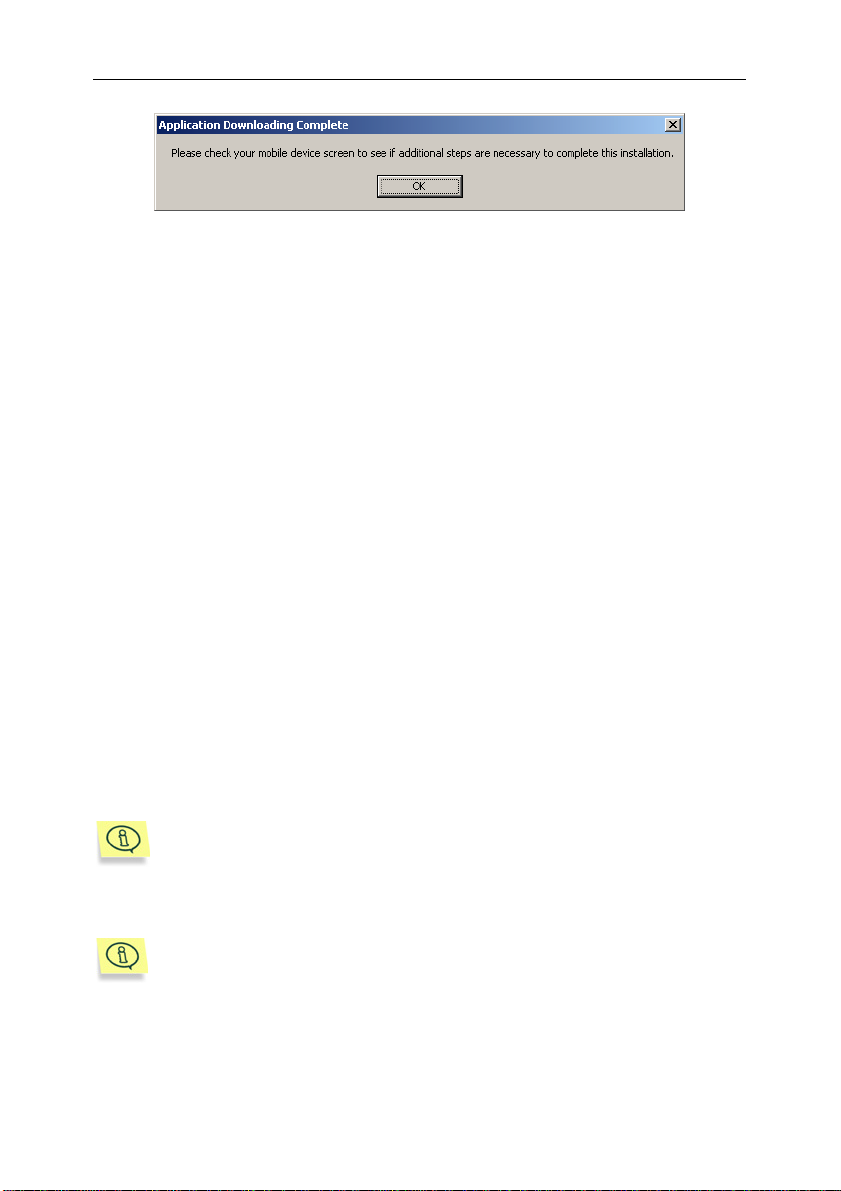
3. Press OK in your screen’s Application Downloading Complete
dialog box (see Figure 14).
Page 20
Installing and removing the program 19
Figure 14. The Application Downloading Complete dialog box
4. If you decided to install Kaspersky Anti-Virus for Windows CE , the
setup utility will suggest you define the target location for its
installation. Press the Yes button in your screen’s Installing
Applications dialog box to install Kaspersky Security into the
\ProgramFiles\Kaspersky Lab\Kaspersky Anti-Virus directory,
or the No button, if you want to define an alternate location. The
Select Destination Media dialog box (see Figure 13) will now
appear on you screen. Use this dialog box to define the target
location for your Pocket PC’s software component (see
subchapter 3).
Step 2. Copying the key file onto your PDA running
Windows CE
The option to use Kaspersky Security for PDA is provided according to the
licensing agreement concluded when the user purchases the program.
Conclusion of the licensing agreement and its expiration date are determined
based on the key file. In addition, this file contains overhead information required
for the program’s full-service operation.
Kaspersky Anti-Virus and Kaspersky Security for Windows CE share the same
key file, which can be provided with the distribution package or e-mailed to you
after the program is purchased.
Kaspersky Security and Kaspersky Anti-Virus for Windows CE cannot
be started without the key.
You can obtain a free trial key for evaluation purposes. This key allows
you to use all of the Kaspersky Security for PDA functions for a limited
time period.
Page 21
20 Kaspersky Security for PDA
Please copy your key file to the My Documents directory of your portable device.
To copy the key files for the package software components transferred
to your PDA running Windows CE, follow these steps:
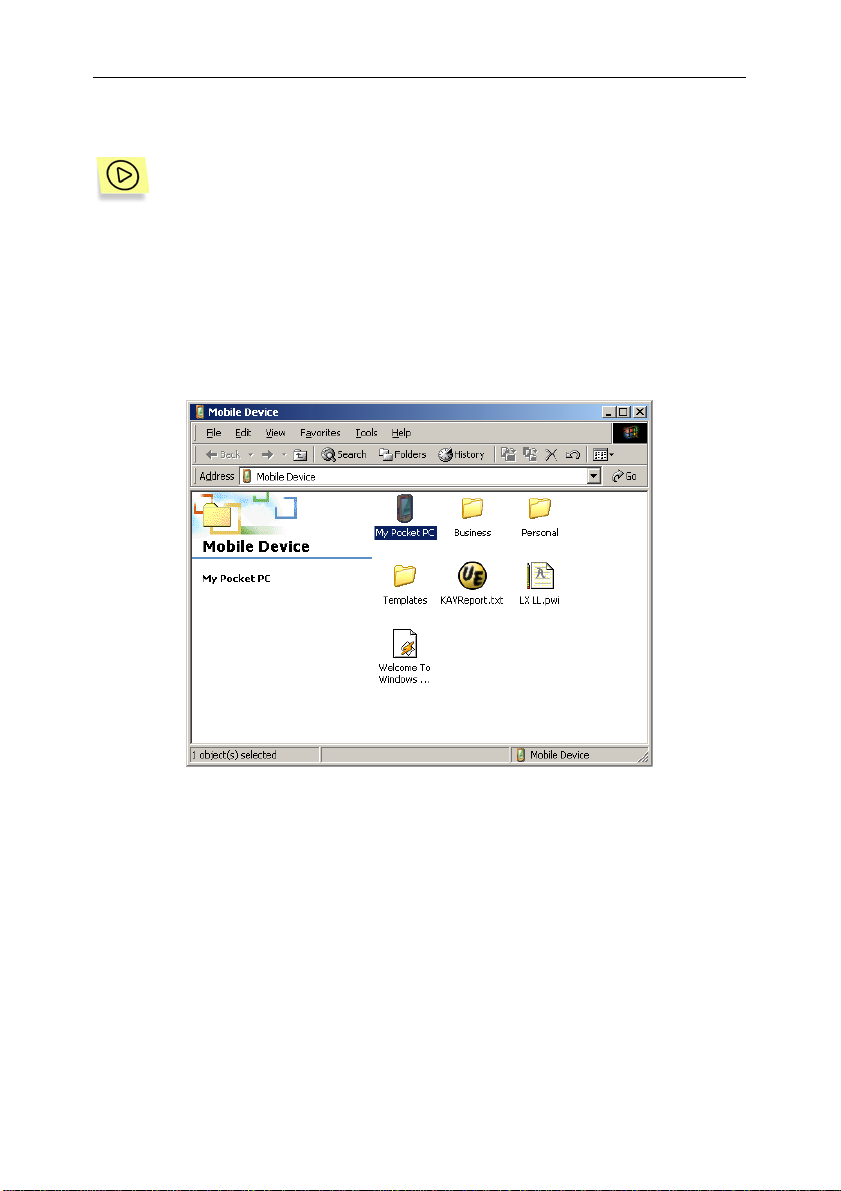
1. Start Microsoft ActiveSync on your desktop and press the main
window toolbar’s Explore button, or select the same command
from the main window menu (File → Explore). The Explorer
installed on your desktop will be started and the Mobile Device
window with your PDA’s file system will appear on your screen (see
Figure 15).
Figure 15. The Mobile Device window
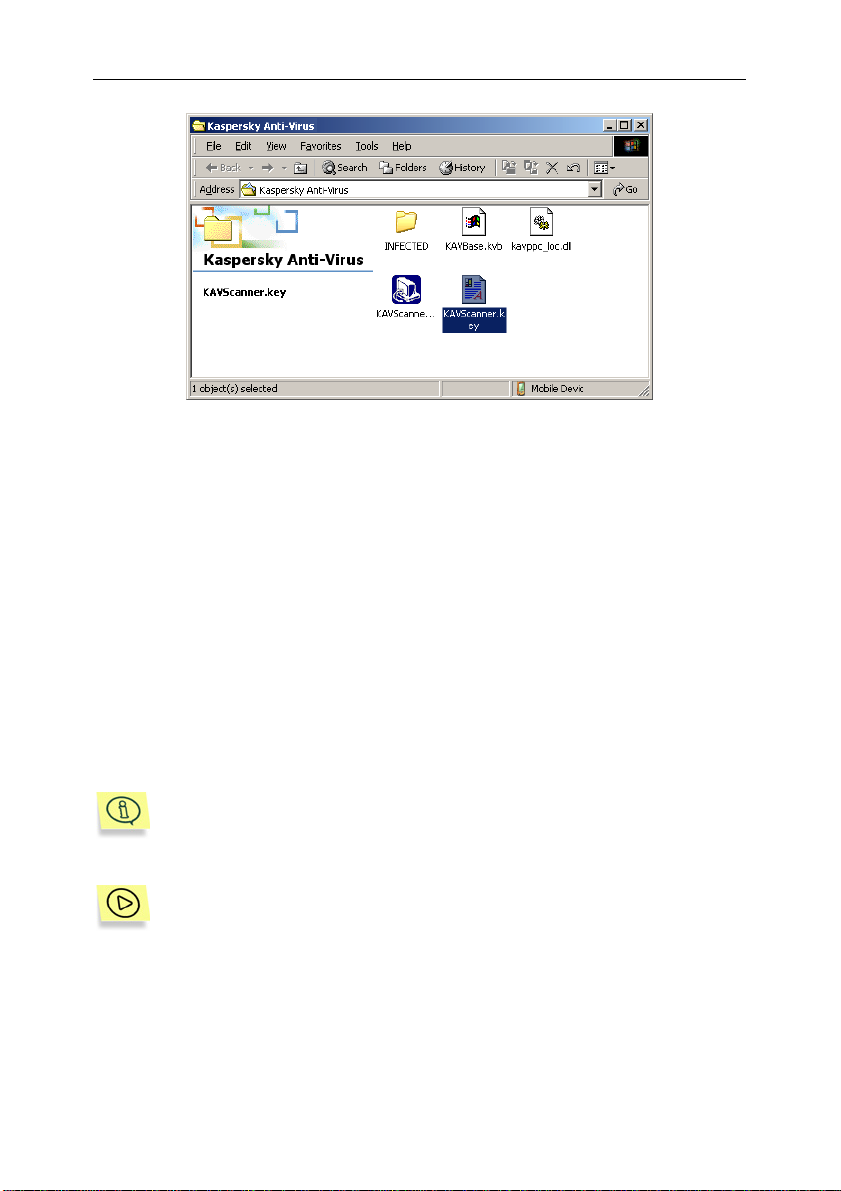
2. Start Explorer on your desktop and, using Windows standard tools,
copy the required key file with the .key extension from your
desktop’s directory into the My computer directory of your PDA
(see Figure 15). When any Kaspersky Security for PDA component
is started on your PDA running Windows PC, you will be given the
option to install the license key (see subchapter Error! Reference
source not found.on page Error! Bookmark not defined. and
subchapter Error! Reference source not found.on page Error!
Bookmark not defined.).
Page 22
Installing and removing the program 21
Figure 15. Copying the package software components’
key file to your PDA running Windows CE
22..22..33.. TTrraannssffeerrrriinngg tthhee ppaacckkaaggee ccoommppoonneennttss
ttoo aa PPDDAA rruunnnniinngg PPaallmm OOSS
Step 3. Copy the key file(s) onto your PDA running Palm OS
For the selected Kaspersky Security for PDA components to utilize all their
features, you need to copy key files for each of the installed components onto the
Palm device into their installation directory.
Kaspersky Security for Palm OS cannot be started without the appropriate and Kaspersky Anti-Virus for Palm OS will run as a demo version;
i.e. the program will be able to detect any virus on your Palm device but
it will be disabled to remove the viruses detected. The monitoring functions will also be unavailable.
To install the key files for the package software components transferred
to your Palm device, follow these steps:
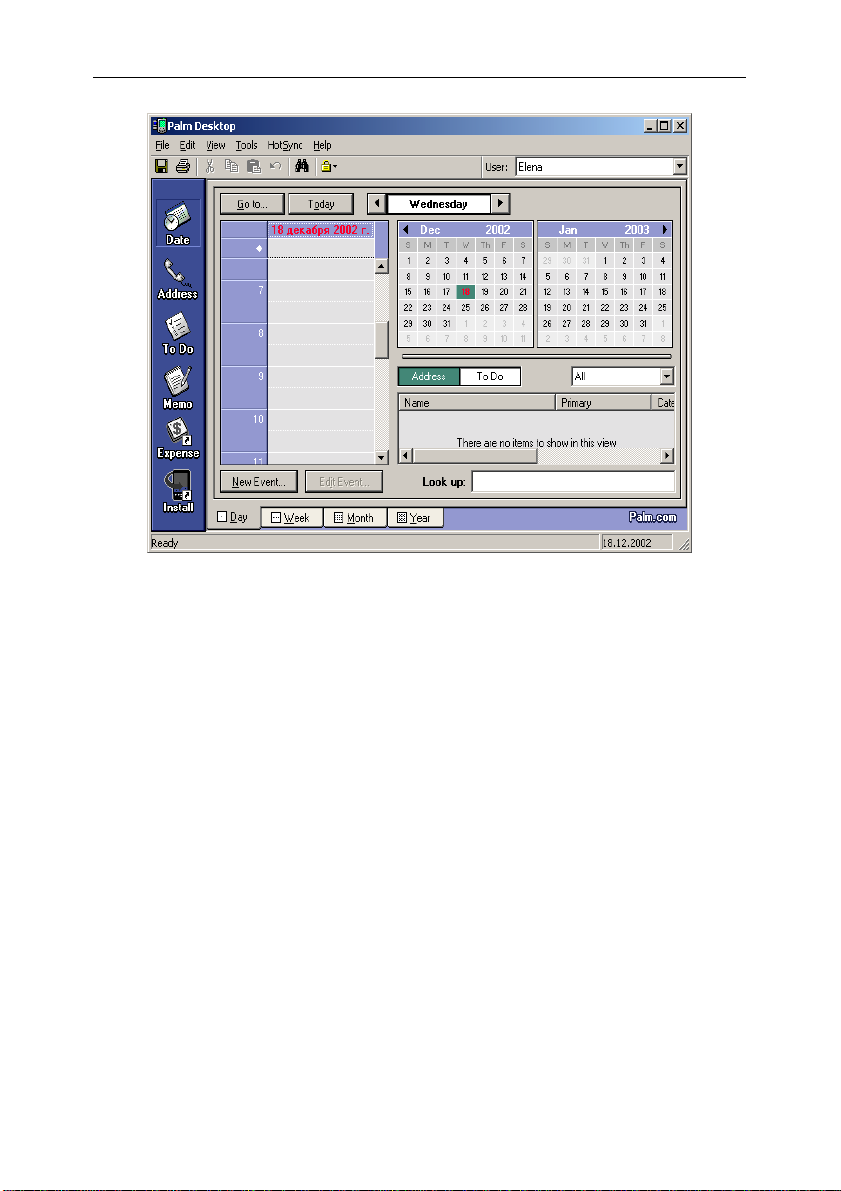
1. Start Palm Desktop on your desktop and press the Install button in
the main window (see Figure 16).
Page 23
22 Kaspersky Security for PDA
Figure 16. The Palm Desktop main window
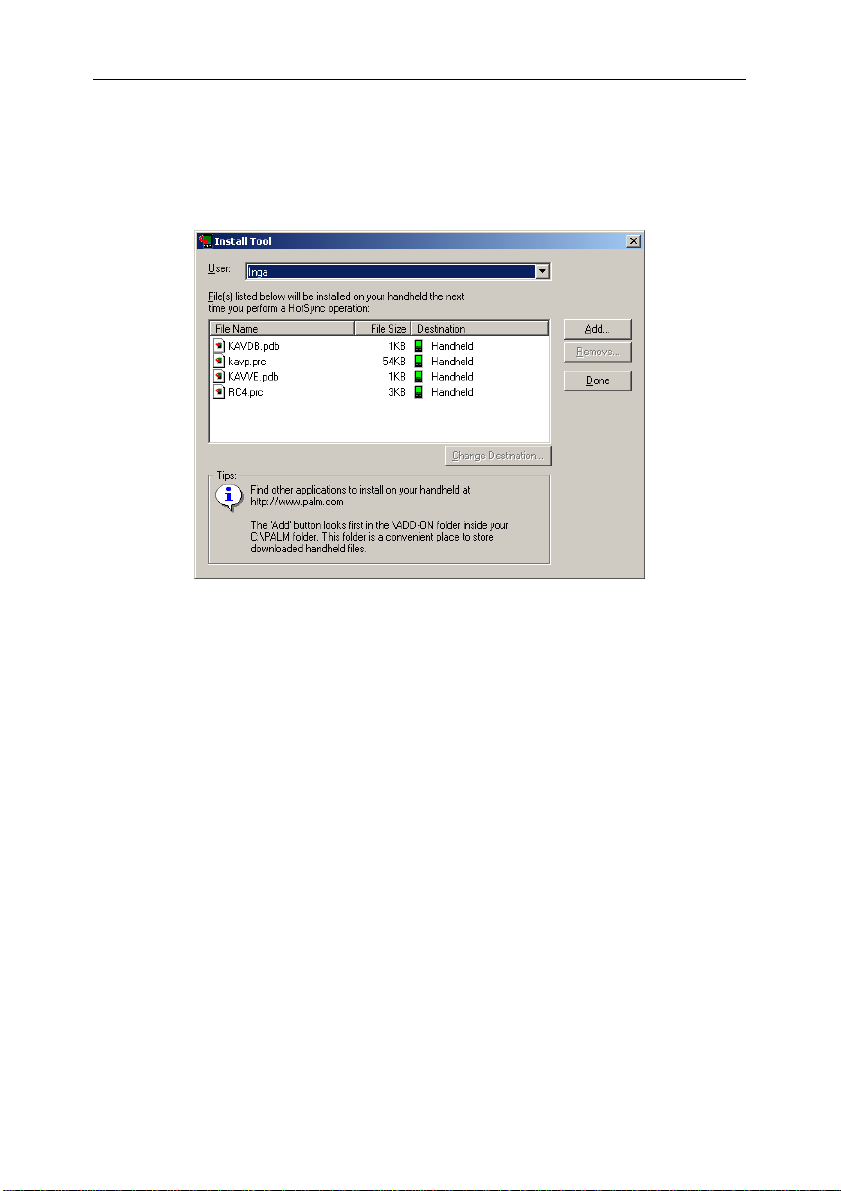
2. The Install Tool dialog box (see Figure 17) will appear on your
screen. At the top of the window you will se the User drop-down list
that allows you to select the required user profile from the list of
user names registered in the Palm Desktop. Select the required
user name for the destination Palm device from the drop down list.
Below the User drop-down list you will find the table listing the
software components to be transferred onto the Palm device. This
list is defined during the installation of the package onto the
desktop (see subchapter 2.2.1 on page 11). This table may include
the following files :
• KAVDB.pdb is the anti-virus database;
• kavp.prc is the executable module of Kaspersky Anti-Virus for
Palm OS;
• KAVVE.pdb is the virus encyclopedia;
• RC4.prc is the cryptographic library;
Page 24
Installing and removing the program 23
• KSP.prc is the executable module of Kaspersky Security for
Palm OS.
Press the Add button.
Figure 17. The Install Tool dialog box
3. Define the location of your key files (the pdb extension files) using
the standard file-search dialog box. Press the ОК button. The
selected files will be added to the list of components to be
transferred onto your Palm device.
4. In the Install Tool dialog box, press the Done button.
Step 4. Transferring the data onto your PDA running Palm
OS
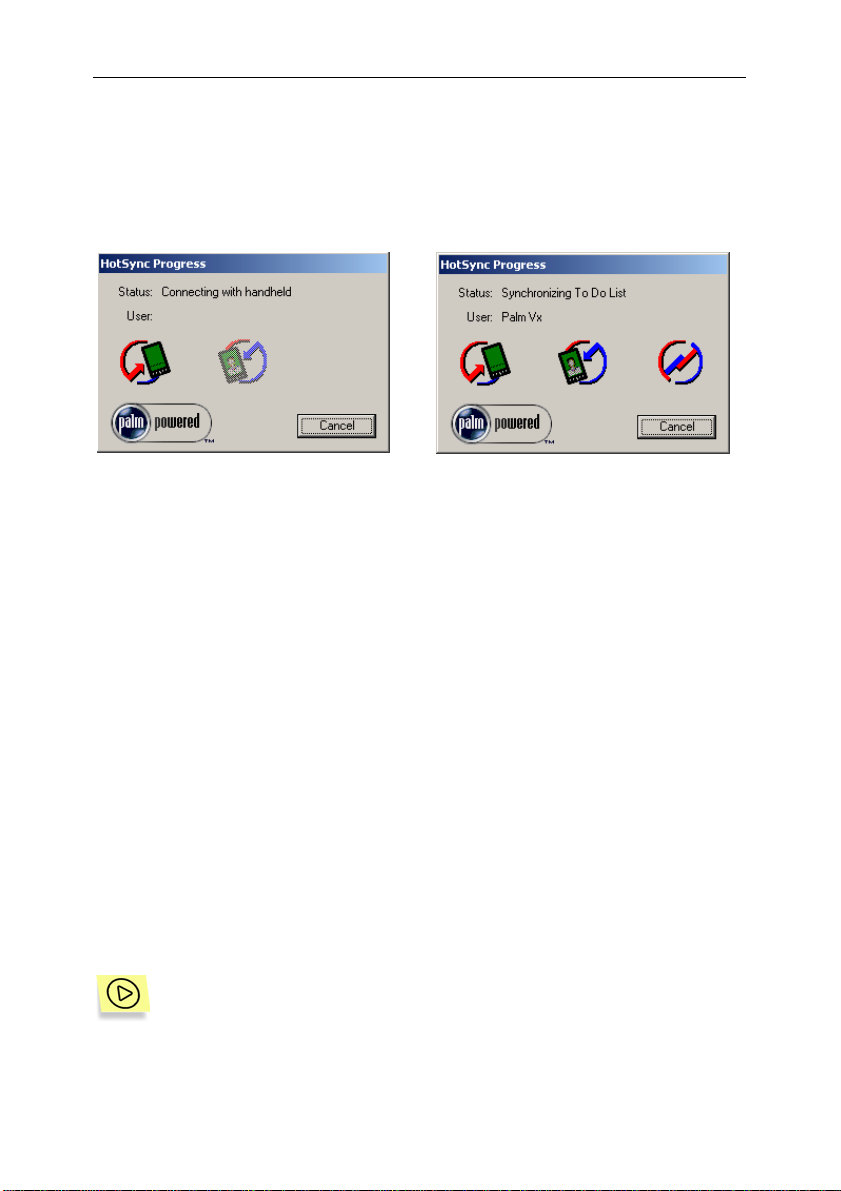
Start HotSync on your desktop, or restart it if the program is running. Insert the
Palm desktop into the cradle and press the synch button. The Palm device will
start connecting to the desktop (see Figure 18).
When the connection is established, the synchronization process will begin and
all the program files will be copied to the Palm device:
Page 25
24 Kaspersky Security for PDA
• the program, the anti-virus bases, the virus encyclopedia and the key file
(see Figure 19) – if you are installing Kaspersky Anti-Virus for Palm OS;
• the program, the cryptographic library and the key file – if you are installing Kaspersky Security for Palm OS.
Figure 18. Connecting to the desktop
The installation procedure is complete. Now you may remove the device from the
desktop cradle.
22..33.. RReemmoovviinngg tthhee pprrooggrraamm
Removal of the Kaspersky Security for PDA components, like their installation
includes, two stages. At the first stage you need to remove the program
components from your pocket device, and at the second stage you need to
remove them from your desktop.
Figure 19. Uploading the data onto the Palm
device
22..33..11.. RReemmoovviinngg tthhee pprrooggrraamm ffrroomm yyoouurr
PPDDAA rruunnnniinngg WWiinnddoowwss CCEE
The removal and installation of Kaspersky Security for PDA components from a
PDA running Windows CE are performed with the ActiveSync program.
To remove the software package components from your PDA running
Windows CE, follow these steps:
Page 26

Installing and removing the program 25
1. If your PDA has the installed copy of Kaspersky Security for
Windows CE, disable all the attached confidential folders (for
details see subchapter 4.5.4 on page 79).
2. Restart the operating system of your PDA.
3. Start the ActiveSync program on your desktop.
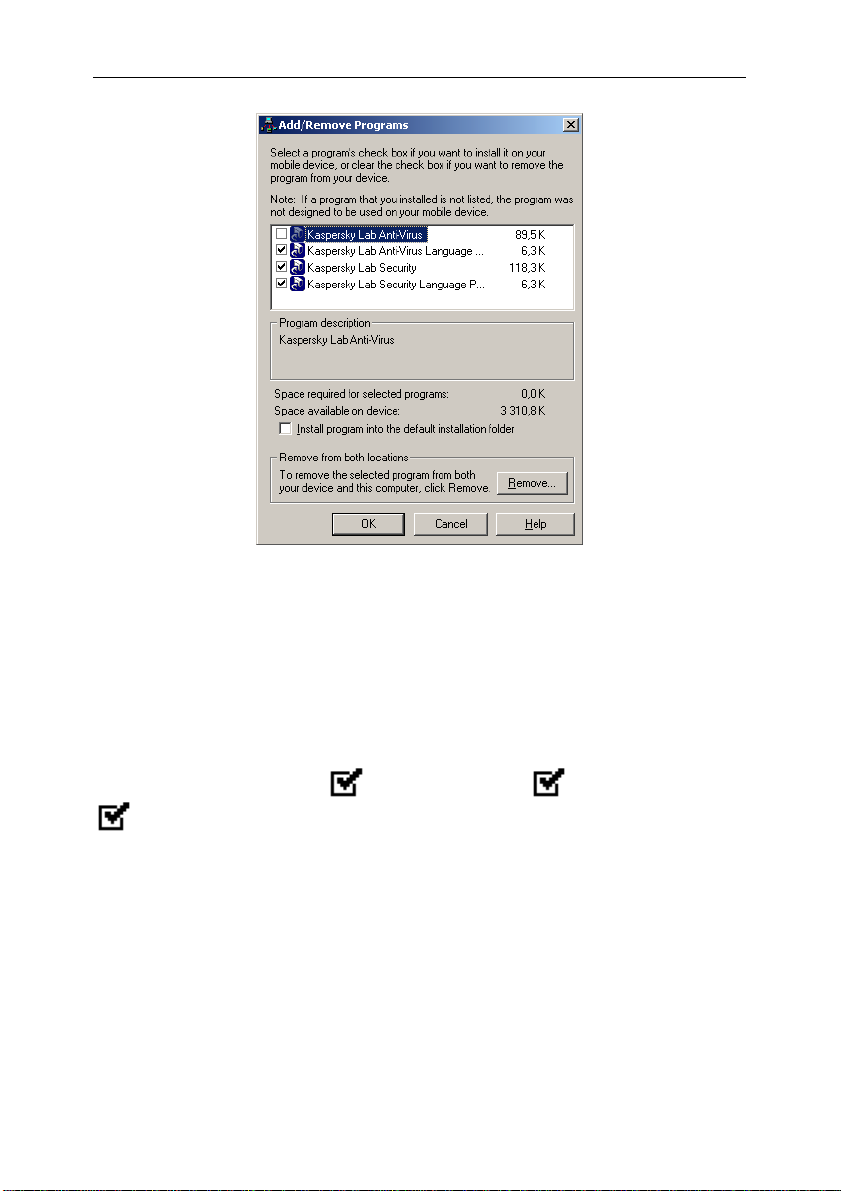
4. Uncheck the checkboxes
beside the Kaspersky Lab
Kaspersky Security and/or the Kaspersky Lab Kaspersky AntiVirus components to be removed (see Figure 20).
5. If you want to remove the selected components only from the
pocket device, press the ОК button. If you want to remove the
selected components from both the pocket device and the desktop
press the Remove button.
If you removed the selected components by pressing the OK button,
these can be restored from your desktop using the ActiveSync program
(see subchapter 2.2.2 on page 17).
If you removed the software package components by pressing the
Remove button, these cannot be restored. In this case, to install them,
you have to perform complete installation of the software package from
the software installation files.
Page 27
26 Kaspersky Security for PDA
Figure 20. Removing the Kaspersky Security for PDA components from a Pocket PC
22..33..22.. RReemmoovviinngg tthhee pprrooggrraamm ffrroomm yyoouurr
PPDDAA rruunnnniinngg PPaallmm OOSS
Before you start removal of the installed software package components uncheck
the following checkboxes:
Scan cards on insertion (see subchapter 5.4.1 on page 88).
After this you can remove the Anti-Virus program from your PDA using the
conventional tools of Palm OS.
Scan after Sync, Scan beamed files,
Page 28
Installing and removing the program 27
22..33..33.. RReemmoovviinngg tthhee pprrooggrraamm ffrroomm yyoouurr
ddeesskkttoopp
You can remove the Kaspersky Security for PDA software components from your
desktop using the conventional Windows tools (Start → Settings → Control
Panel → Add/Remove Programs), or the original installation files of the
software package.
For Pocket PC the program removal from the desktop is performed only
if you did not remove them before (see subchapter 2.3.1 on page 24).
To remove the program components using the original installation files
of the software package, follow these steps:
1. Start setup.exe.
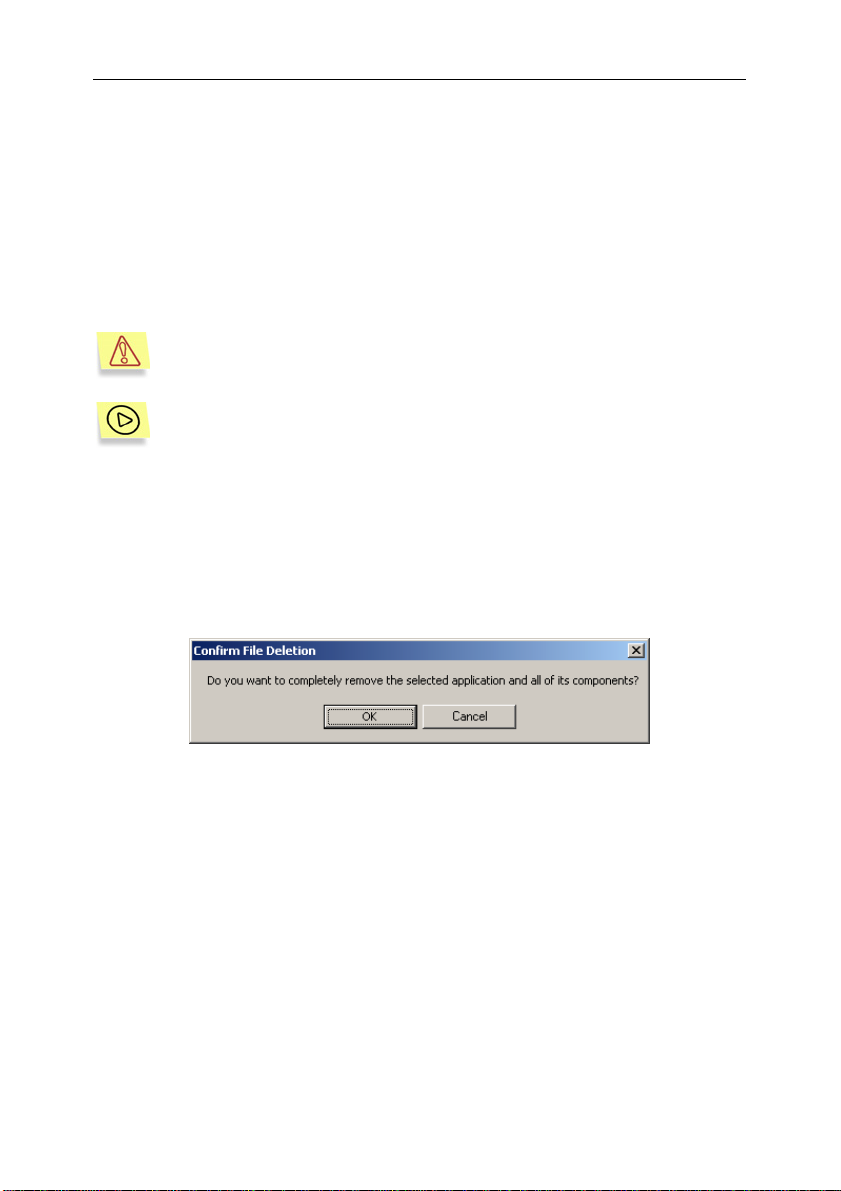
2. The Confirm File Deletion dialog box (see Figure 21) will appear
on your screen. Press the ОК button. The program removal
procedure will start (see Figure 22).
Figure 21. The Confirm File Deletion dialog box
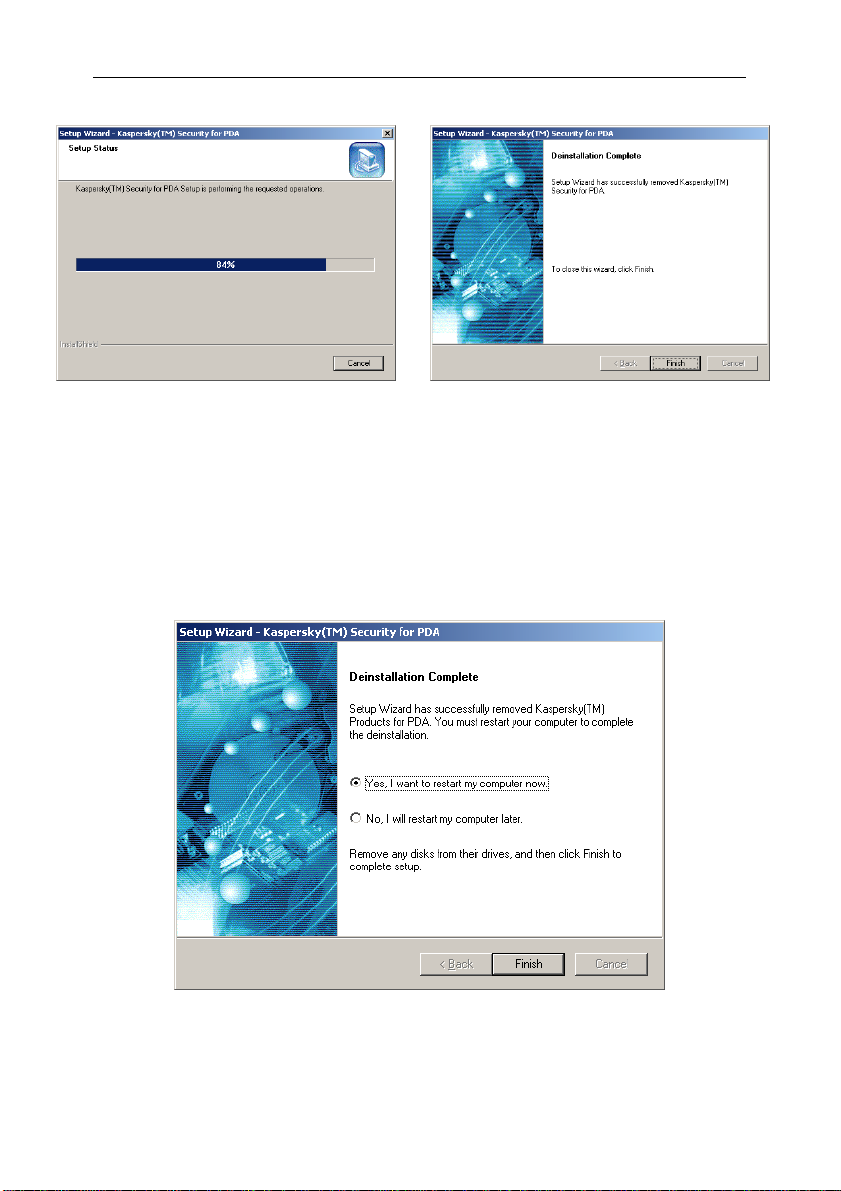
3. To finish the removal, press the Finish button in the Deinstallation
Complete dialog box (see Figure 23).
Page 29
28 Kaspersky Security for PDA
Figure 22. The Setup Status dialog box
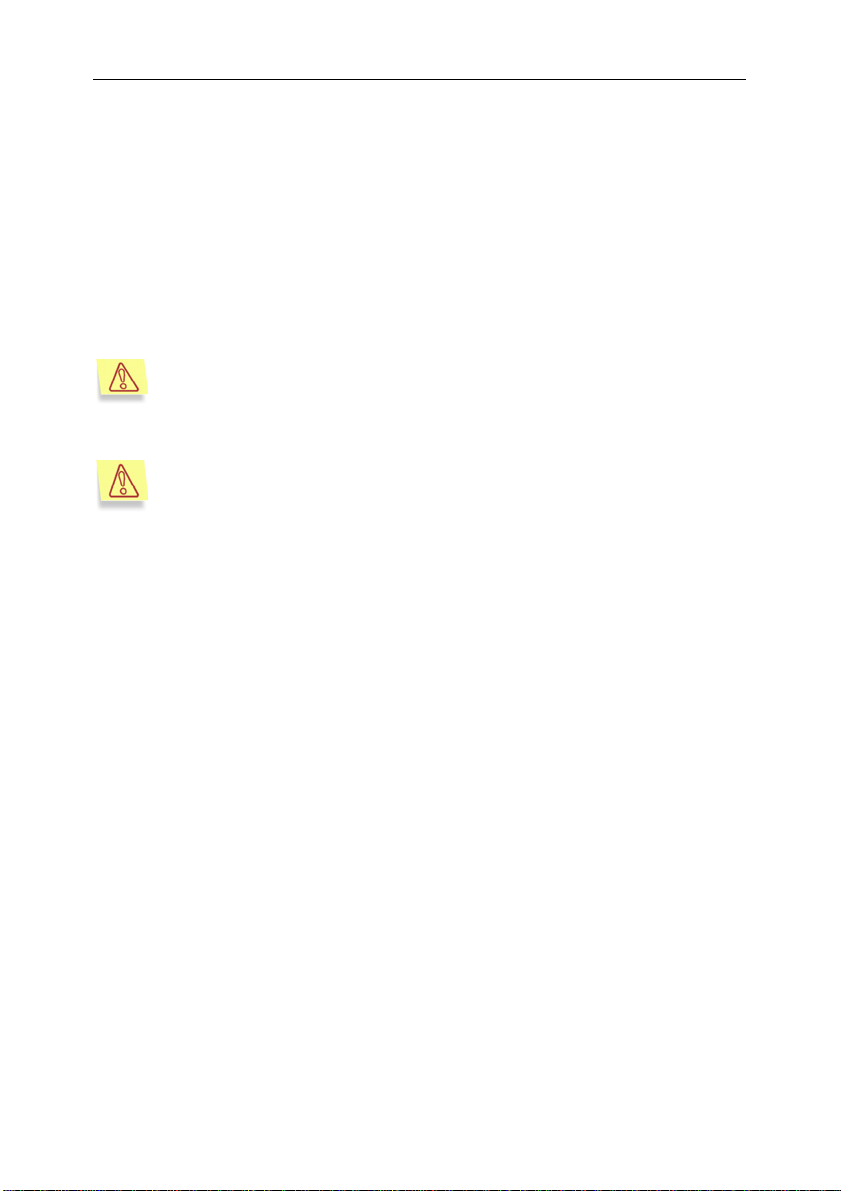
If after the removal the computer must be restarted, the Deinstallation
Complete dialog box will suggest you to restart the computer immediately or later (see Figure 24). Select the required option and press the
Finish button to complete the removal.
Figure 23. The Deinstallation Complete dialog
box
Figure 24. The Deinstallation Complete dialog box, restarting the desktop
Page 30
Installing and removing the program 29
22..44.. UUppddaattiinngg tthhee pprrooggrraamm ttoo aa nneeww
vveerrssiioonn
In order to update Kaspersky Security for PDA to a new version, you must first
uninstall the previous version and then install the new one according to the
procedure provided in this document (see subchapter Error! Reference source
not found.on page Error! Bookmark not defined. and subchapter 2.3on
page 24).
Kaspersky Security for PDA 4.5.1 supports the anti-virus database and
secret file formats used by the previous version of the program.
PLEASE NOTE that if an earlier version of Kaspersky Anti-Virus for
Windows CE was installed on your PDA and its key file has not expired,
you can also use it as the key file for Kaspersky Security for PDA running Windows CE program package components. (For more details on
the licensing key management, please refer to subchapter Error! Ref-
erence source not found. on page Error! Bookmark not defined..)
Page 31

CChhaapptteerr 33.. KKaassppeerrsskkyy AAnnttii--VViirruuss ffoorr
WWiinnddoowwss CCEE
33..11.. PPuurrppoossee aanndd mmaaiinn ffuunnccttiioonnss
r What is Kaspersky Anti-Virus fo Windows CE?
Kaspersky Anti-Virus for Windows CE provides anti-virus protection for PDA
running Windows CE. Kaspersky Anti-Virus for Windows CE includes the
following components :
• an anti-virus scanner providing on-demand checking for viruses in data
storage locations and on expansion cards;
• an updating utility allowing automatic updating of the anti-virus databases.
The program utilizes a menu system and flexible configuration, generates an
operation log describing all the actions taken, and supports a color userinterface.
If the program detects a virus attack, it can delete the infected object (the
program does not disinfect infected objects!).
Kaspersky Anti-Virus for Windows CE is able to detect only those viruses developed specially for the PDA running Windows CE. Files infected with Windows viruses and viruses developed for other operating
systems cannot affect your PDA. If you copy a file infected with a Windows virus to your PDA, or if you move a message infected by a Windows virus into your pocket device email program, Kaspersky Anti-Virus
for Windows CE will not detect it .
To provide full-scale protection for home computers Kaspersky Lab
recommends to use Kaspersky Anti-Virus Personal/Personal Pro (for
details see Appendix B on page 139).
The program and its internal architecture are divided into two main parts: an antivirus kernel and an anti-virus (or virus definition) database. This makes the
program more efficient, flexible and user-friendly, since you do not have to load
the entire program to acquire protection from a new virus; it is enough to update
(load) the anti-virus database.
Page 32

Kaspersky Anti-Virus for Windows CE 31
33..22.. SSttaarrttiinngg tthhee pprrooggrraamm
Starting Kaspersky Anti-Virus for Windows CE
To start Kaspersky Anti-Virus for Windows CE,
click on your PDA screen’s Anti-Virus icon
file is installed on your PDA, the program’s main screen will be
displayed (see Figure 25).
. After that, if a valid key
Figure 25. The program’s main screen
If the program is the first one started after installing the Kaspersky Security for
PDA components or after expiration of the licensing agreement, the user will be
given the option to install the key file (see subchapter Error! Reference source
not found. on page Error! Bookmark not defined.).
Page 33
32 Kaspersky Security for PDA
33..33.. LLiicceennssee kkeeyy mmaannaaggeemmeenntt
Installing the license key file. Renewing
the license.
33..33..11.. KKeeyy ffiillee iinnssttaallllaattiioonn
Following installation, whenever you launch any Kaspersky Security for PDA
running Windows CE component for the first time, you will be requested to install
the key file. In such instances, the respective dialog window will be displayed
(see Figure Figure 26). During the installation, the key file will be copied from
your My Documents directory to the component installation directory.
If the first application you launch after installation is Kaspersky Security
for Windows CE, you will be requested to install the key (see subchapter Error! Reference source not found.on page Error! Bookmark not
defined.).
Figure 26. Licensing key installation
Page 34

Kaspersky Anti-Virus for Windows CE 33
In order to install the key file for the Kaspersky Security for PDA running
Windows CE program components, do the following:
Using your mouse, click on the Key Selection button in the dialog window Registration. In the standard Windows CE dialog that will be displayed, specify the key file copied during the program components’
transfer (it must be located in you My Documents directory). This will
copy the file to the Kaspersky Anti-Virus for Windows CE installation directory (the default directory is \ProgramFiles\Kaspersky
Lab\Kaspersky Anti-Virus). If the installation is successful, the system
message will be displayed (see Figure Figure 27). Click OK and restart
the program.
Figure 27. The key is successfully installed on the PDA
If an earlier version of Kaspersky Anti-Virus for Windows CE was installed on your PDA and its key file has not expired, you can also use it
as the key file for the Kaspersky Security for PDA running Windows CE
program package components.
To do so, you will have to move the file KAVScanner.key from the directory in which the earlier version of Kaspersky Anti-Virus installed it
(\ProgramFiles\Kaspersky Lab\Kaspersky Anti-Virus) to your My
Documents directory. After that, install the key file as described above.
Page 35

34 Kaspersky Security for PDA
33..33..22.. LLiicceennssee rreenneewwaall
When less than 15 days remain before the licensing agreement’s expiration date,
Kaspersky Anti-Virus will begin informing you about this every day.
The licensing agreement renewal means you must purchase and install a new
key file.
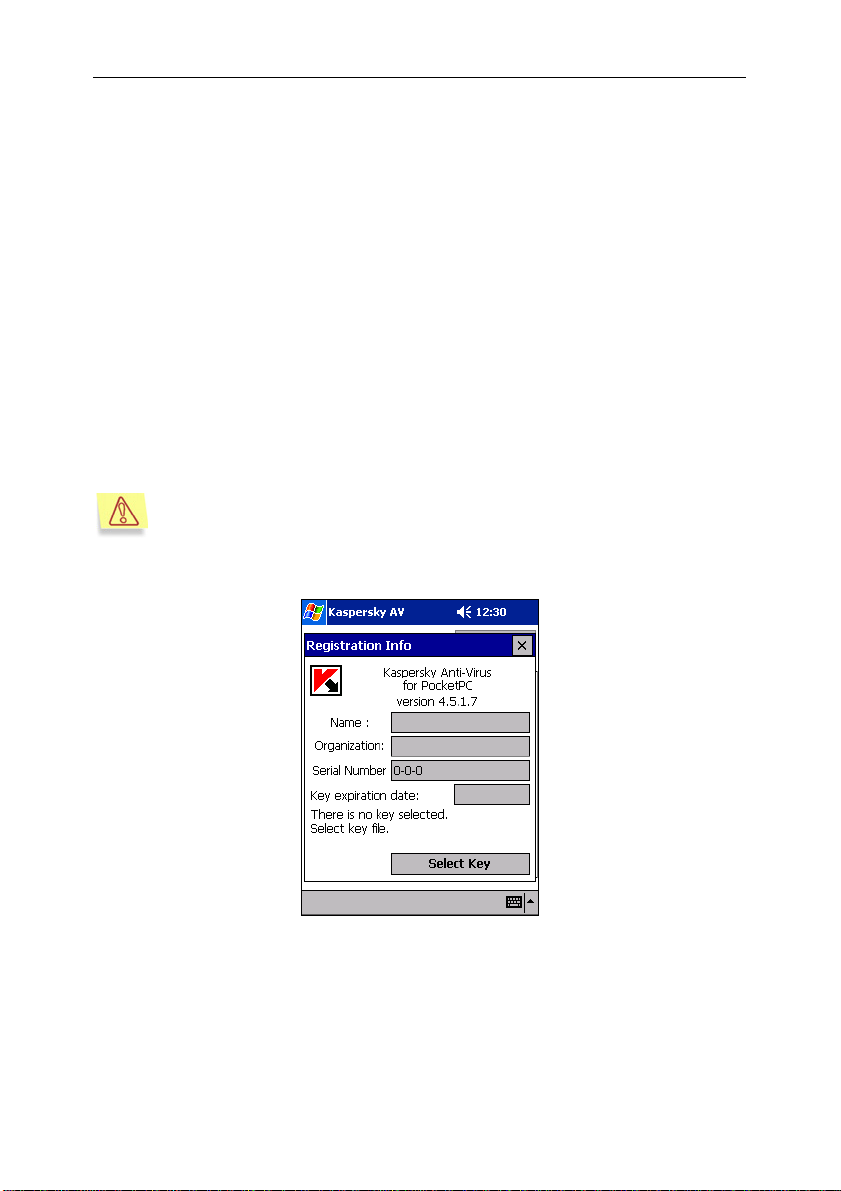
After the licensing agreement expires, the program will display the Registration
window each time it starts. This window (see Figure Figure 28) contains a
notification and a suggestion to install a new key file. The program will no longer
function if the user does not install the new key file.
Since Kaspersky Anti-Virus and Kaspersky Security for Windows CE
share the same key file, the user can renew the license in any of these
software products.
Figure 28. License renewal
In order to renew the license, the user has to purchase and install the
new license key for the Kaspersky Security for PDA running Windows
CE program components. To do so, please take the following steps:
1. In order to purchase the new key, please contact the company from
which you originally purchased this software product and request
Page 36

Kaspersky Anti-Virus for Windows CE 35
the license key for Kaspersky Security for PDA 4.5.1 running
Windows CE.
or:
purchase the license key directly from Kaspersky Lab. To do so,
please email our sales department (sales@kaspersky.com) or fill in
the respective form on our website (www.kaspersky.ru) in the
section Purchase online ! For home users. After your payment is
received, the new key file will be emailed to the address you
specified in the order form.
Kaspersky Lab carries out periodic actions that will allow you to receive
a considerable discount on the license renewal. Watch for information
about forthcoming actions in the section Information ! Actions of
Kaspersky Lab’s website.
2. Copy the key file you have received to the My Documents
directory of your PDA (see Step 2 on page Error! Bookmark not
defined.).
3. Start Kaspersky Anti-Virus for Windows CE. If the license key has
expired, the license renewal window will be displayed automatically
(see Figure Figure 28). Otherwise, select Registration from the ?
menu in the program’s main window to open the Registration dialog
window (see Figure 37).
4. Using your mouse, click on the Key Selection button. In the
standard Windows CE dialog that will now be displayed, specify the
key file copied during the program components’ transfer (it must be
located in your My Documents directory). This will copy the file to
the Kaspersky Anti-Virus for Windows CE installation directory (the
default directory is \Program Files\Kaspersky Lab\Kaspersky
Anti-Virus). If the installation is successful, the system message
will be displayed (see Figure Figure 27). Click OK and restart the
program.
As a result of this procedure, the license key will be renewed for the duration of
the newly installed key’s period of validity.
If the new key is installed prior to the expiration date of the current key,
you will be given the option to set the current key’s expiration date as
the beginning of the new key’s period of validity.
Page 37

36 Kaspersky Security for PDA
33..44.. IInntteerrffaaccee
How to display the program main screen?
What is located in the program main
screen? Working area, menu, start/stop
checking buttons.
33..44..11.. MMaaiinn ssccrreeeenn
The program main screen contains:
• work area;
• menu;
• start/stop checking buttons;
• work area tab-page switching buttons;
• conventional buttons allowing screening of the keyboard, the character
manual input screen and the character input settings.
33..44..22.. MMeennuu
The program has a menubar (see Figure 29) located in the left bottom corner of
the program main screen (conventional location of program menus developed for
Pocket PC). To select the required command, tap on the corresponding menu
with your stylo.
Figure 29. The Kaspersky Anti-Virus menu
Page 38

Kaspersky Anti-Virus for Windows CE 37
Command What does it do…
File ! Exit
Help ! About
Help ! Registration
33..44..33.. SSttaarrtt//ssttoopp cchheecckk bbuuttttoonnss
At the right side of the menu you can see the start/stop check buttons:
– start searching for infected objects;
– pause searching for infected objects;
– stop the search.
33..44..44.. WWoorrkk aarreeaa aanndd ttaabb--ppaaggee sswwiittcchhiinngg
bbuuttttoonnss
At the right of the start/stop check buttons you can see the three tab-page
switching buttons.
Allows you to exit the program.
Displays the program details
Displays the license details
Depending on which button you tapped the work area will display the following
information:
– options allowing you to define the location and the objects to be checked;
– options allowing you to define the reporting settings and actions to be
taken if a virus is detected;
– the statistics of the last check session and a table with a report on the last
check session.
Page 39

38 Kaspersky Security for PDA
33..44..55.. CCoonnttrrooll eelleemmeennttss
The work area tab-pages may contain control elements of the following types:
— the option button.
— the checkbox. You can check/uncheck the box by tapping with your
stylo on it.
required value in this field from the keyboard or from the character manual input
screen that is displayed if you tap on the button located at the right bottom
corner of the main screen. To switch between the keyboard and the manual input
screen use the button. If you tap on it, the drop-down menu with the following
command will appear on your screen: Keyboard, Character Recognizer and
Options.
— the button. To press the button, tap on it with your stylo.
33..55.. CChheecckkiinngg ffoorr vviirruusseess oonn PPDDAA
rruunnnniinngg WWiinnddoowwss
— the text field. You can enter the
Configuring the anti-virus security system.
Searching for and removing infected
objects.
33..55..11.. SStteepp 11.. HHooww ttoo cchheecckk ffoorr vviirruusseess ……
To define the objects to be checked , you should use the appropriate main
screen tab-page displayed when you tap on the
After you have selected the location and the objects to be checked, tap on the
Apply button located at the right upper corner of the screen. The main memory
on your PDA is checked for viruses every time you start the search, regardless of
what settings you defined on this screen.
button (see Figure 30).
Page 40
Kaspersky Anti-Virus for Windows CE 39
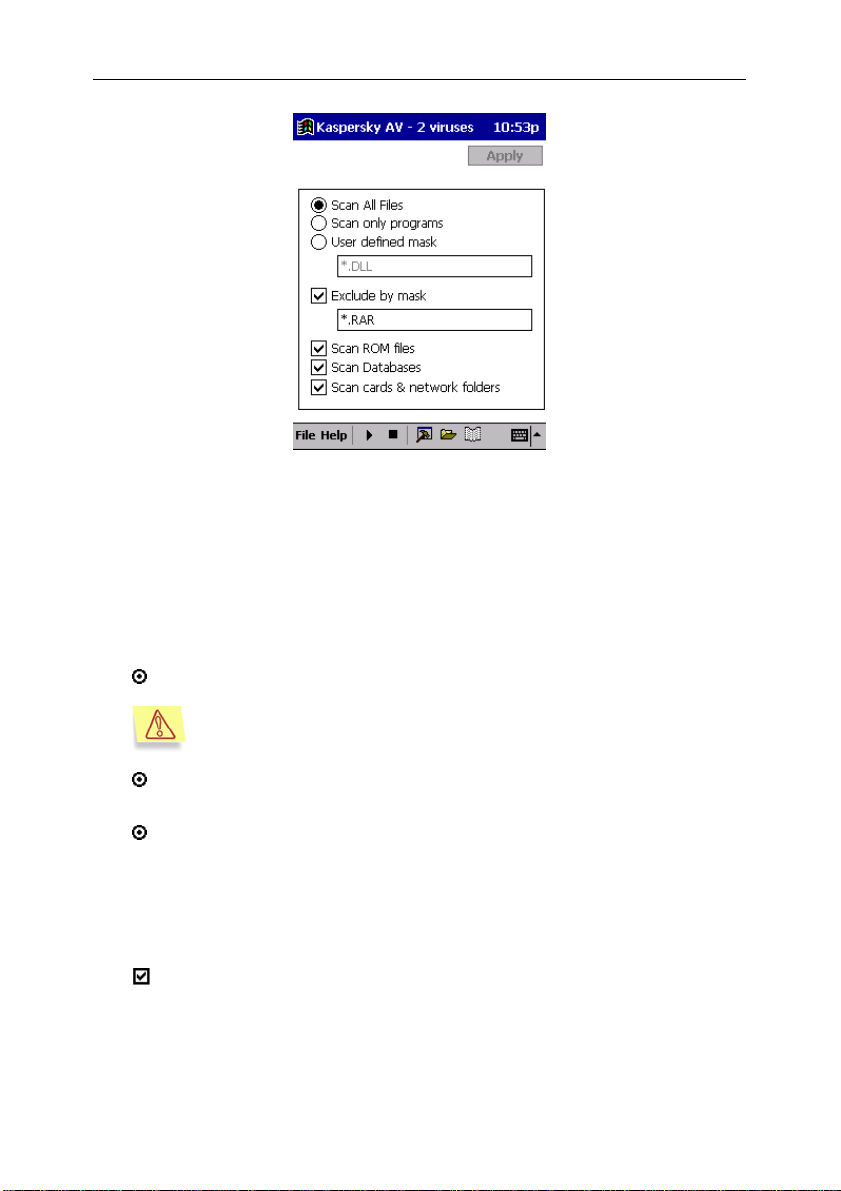
Figure 30. Selecting the location and the object to be checked for viruses
33..55..11..11.. …… iinn ffiilleess
You can set the program to check for viruses in all the files or some of them by
selecting one of the following three options:
Scan All Files – allows you to check for viruses in all the files.
Note that viruses within archived files cannot be detected.
Scan only programs – scans only the programs, i.e. files with the pro-
gram's format.
User defined mask – scans files with the user defined mask. The mask
should be defined in the below text field. Note that you cannot specify
more than one mask.
If you want to exclude some files from the objects to be checked, you can also do
this by defining the following setting:
Exclude by mask – excludes from the scanning operation the files with
the user-defined mask. The mask should be defined in the below text
field. Note that you cannot specify more than one mask.
Page 41

40 Kaspersky Security for PDA
33..55..11..22.. …… iinn RROOMM ffiilleess
By checking the following checkbox on the screen you can check for viruses
in files that are stored within the permanent memory:
Scan ROM files – scans the files stored within the permanent memory :
OS files and embedded applications.
The program is not able to open some ROM files. Therefore, if you
check this checkbox, your log may contain error-opening messages for
these files.
33..55..11..33.. …… iinn ddaattaabbaasseess
Some PDA programs running under Windows CE store their data in databases
(not in files with special format). For example, Mail program, Notepad and
Contacts store their data in databases.
You can set the Kaspersky Anti-Virus program to check for viruses in databases
by checking the following checkbox on the
Scan Databases – scans PDA databases.
33..55..11..44.. …… oonn mmeemmoorryy eexxppaannssiioonn ccaarrddss aanndd iinn
nneettwwoorrkk ffoollddeerrss
screen :
You can set the program to check for viruses on expansion cards and in network
folders by checking the following checkbox on the
Scan cards & network folders – scans for viruses on expansion cards
and in network folders (if you have any). If you PDA file system includes
confidential folders that were created by Kaspersky Security for Windows CE, these will also be checked.
screen :
Page 42
Kaspersky Anti-Virus for Windows CE 41
33..55..22.. SStteepp 22.. DDeeffiinniinngg rreeppoorrttiinngg sseettttiinnggss
aanndd aaccttiioonnss ttoo bbee ttaakkeenn iiff aa vviirruuss iiss
ddeetteecctteedd
After you selected the objects to be checked, you should define the reporting
settings and the actions to be taken if a virus is detected. These settings can be
defined on the main screen tab-page that appears when you tap on the
button (see Figure 31).
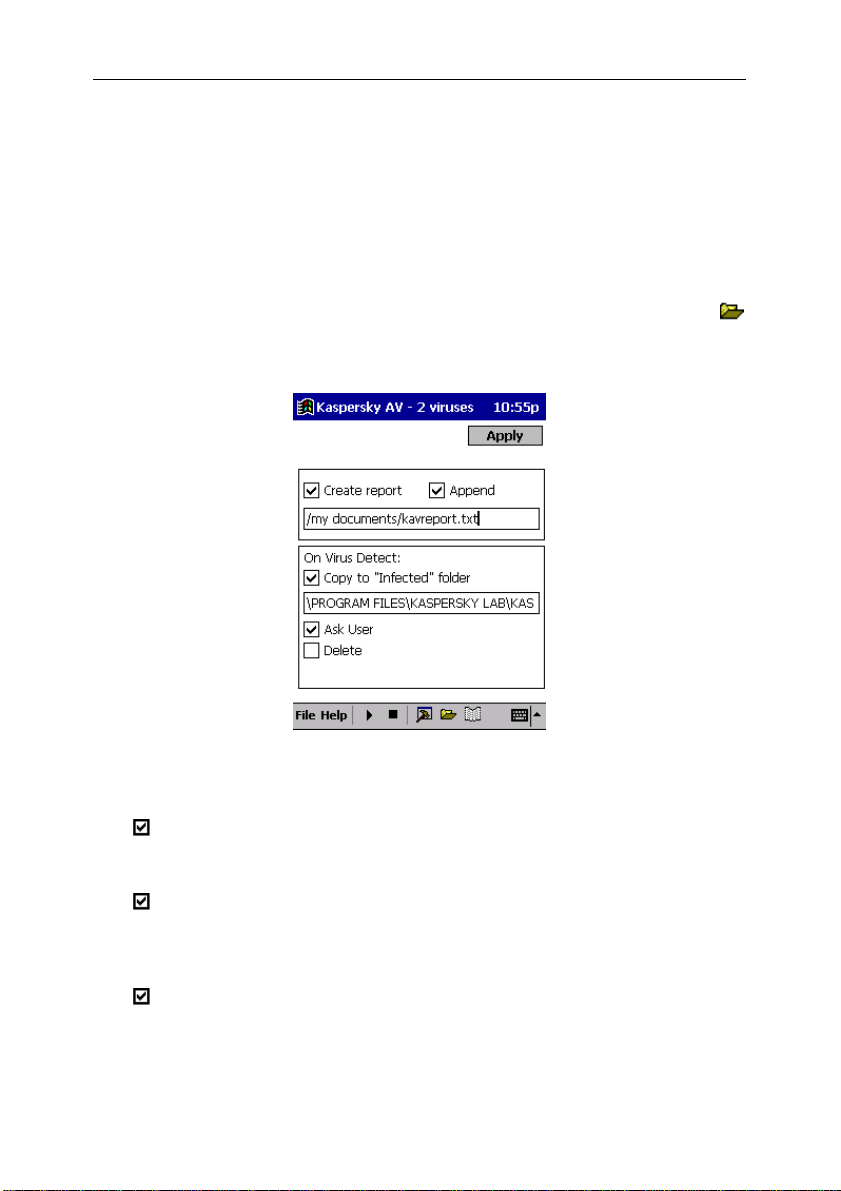
Figure 31. Defining reporting settings and
actions to be taken if a virus is detected
Create report – enables the program to generate the report file. The
report file name should be defined in the below text field. The default
value is \My Documents\KAVReport.txt.
Append – appends the new check results to the existing report file. If
you check this checkbox, results of all the previous scanning sessions
will be stored in the report file. If you uncheck the box, the report file will
be cleared every time you start to check for viruses.
Copy to the "Infected" folder – allows you to create a copy of the in-
fected object within the quarantine folder. The folder name is defined in
Page 43

42 Kaspersky Security for PDA
the text field below the checkbox. The default value is /Program Files/
Kaspersky Lab/Kaspersky Anti-Virus/Infected. The Infected folder is
automatically excluded from the scanning procedure.
Ask User – if a virus is detected, the program will display the corre-
sponding dialog box (see subchapter 3.5.4 on page 43). This dialog box
will contain the infected file name or the infected database name with
the infected record ID, and also the virus name and options allowing
you to choose the corresponding actions.
Delete – deletes all the infected objects detected without asking first. If
you checked both the checkboxes (Delete and Ask User), every time a
virus is detected the program will display the Ask User dialog box suggesting to delete the infected object by default (see subchapter 3.5.4 on
page 43).
After you have defined all the required settings on this tab-page, tap on the
Apply button in the right upper corner of the main screen.
When you use the Apply button settings on both the tab-pages (
) are saved. If you did not change any settings the button will not be
available.
33..55..33.. SStteepp 33.. SSttaarrttiinngg//ssttooppppiinngg ttoo sseeaarrcchh
ffoorr aanndd ddeelleettee iinnffeecctteedd oobbjjeeccttss
To start searching for and deleting infected objects tap on the button at the
bottom of the main screen.
If you did not save the changes made to the program settings, the program will suggest you do so. Press the Yes button to save the settings
you defined. If you refuse to save the changes the program will start
searching for viruses following the settings defined before.
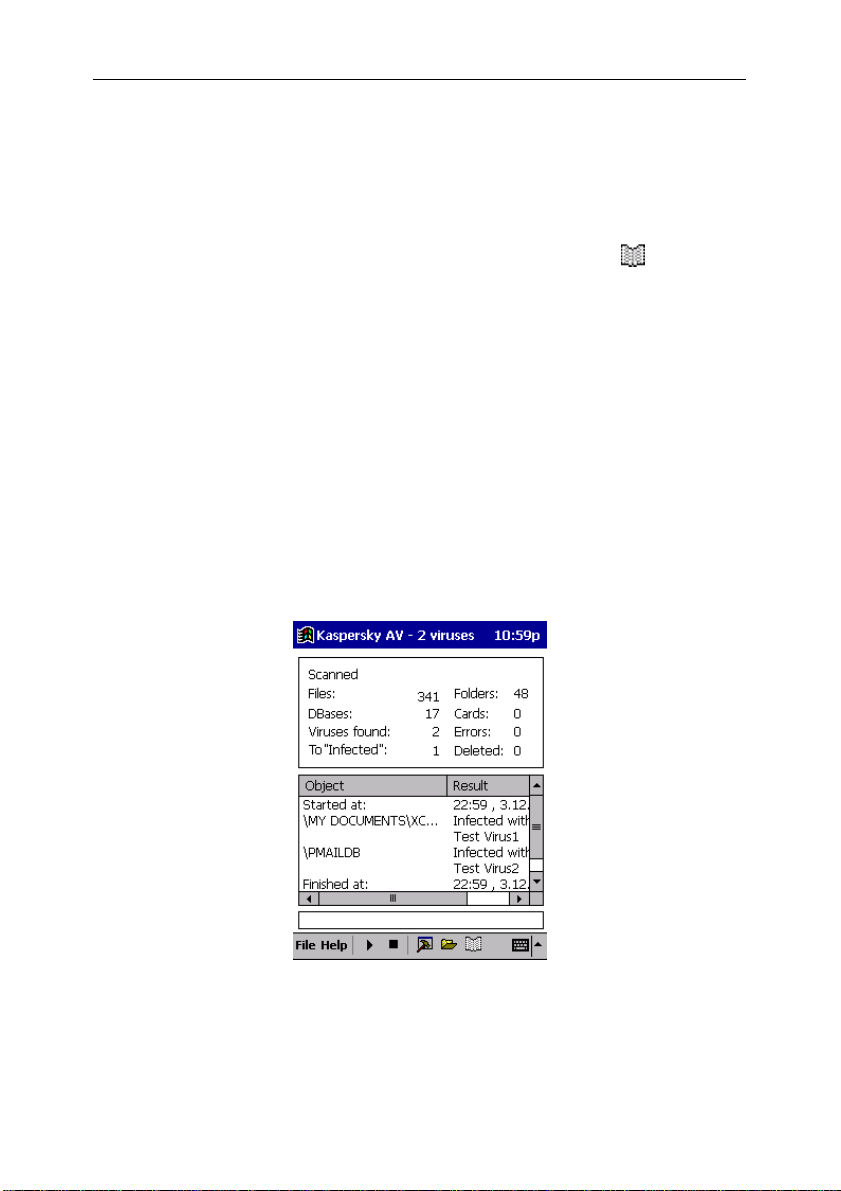
After you have started the search, the program will automatically switch to the
report tab-page, add the current time to the report table and start to check for
viruses (see Figure 32). During the search procedure the program will add details
of all infected objects detected and errors occurring to the report table.
The status bar always displays the name of the file being scanned by the
program. If you wish, you can pause the search procedure (the button), or
abort it (the
button).
and
Page 44

Kaspersky Anti-Virus for Windows CE 43
Figure 32. Starting the search for viruses
33..55..44.. SStteepp 44.. AAccttiioonnss ttaakkeenn iiff aa vviirruuss iiss
ddeetteecctteedd
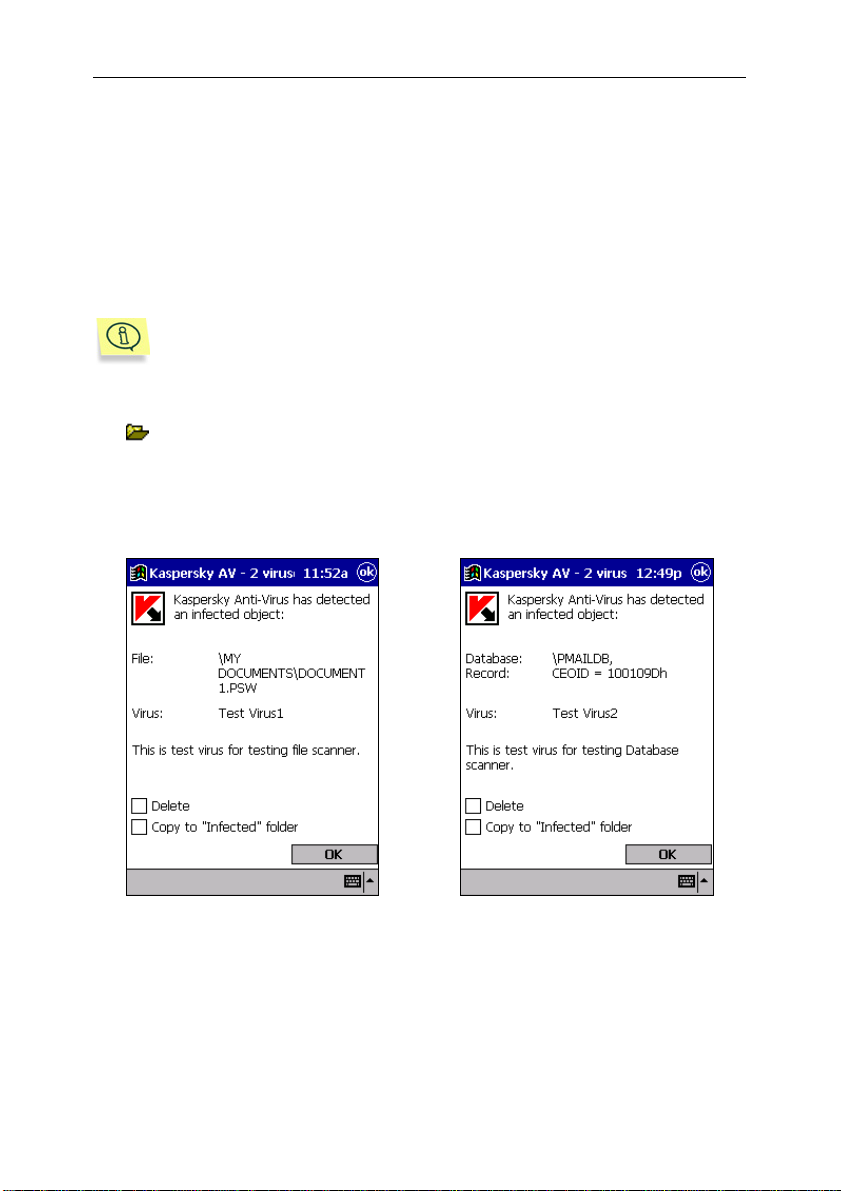
If the program detected a virus and while setting it you checked the Ask User
checkbox on the tab-page, the Ask User dialog box will appear on your
screen (see Figure 33).
The dialog box contains the following details on the infected object:
• Files: <file name> – if an infected file is detected (see Figure 33 а);
• Database: <database name> and Record: CEOID=<record ID> – if
an infected database record is detected (see Figure 33 б).
• Virus: <virus name> – the name of the virus detected.
Below the details on the infected object you will see the following options:
Delete – deletes the object detected (infected file or record).
Copy to "Infected" folder – copies the infected object to the "Infected"
folder.
Page 45
44 Kaspersky Security for PDA
If an infected file is detected, its copy with the same name will be placed
into the Infected folder. Later on, the files within the Infected folder can
be studied and returned to their original folders, or these can be deleted
from your PDA using the File Explorer program.
If an infected database record is detected, the file with this record will be
placed into the Infected folder. The file name will consist of the database
title and the record ID number.
If you set the program to copy the infected database record to the "Infected" folder, the file containing this record will be copied to the folder.
The file name will consist of the corresponding database name and the
record ID.
By default, the Ask User dialog box will suggest the actions defined by you on
tab-page before the start of the check (see subchapter 3.5.2 on page 41).
the
Once you have selected the required actions press the ОК button. The program
will perform the actions you defined and proceed with the checking.
a. The infected file is detected
Figure 33. The Ask User dialog box
b. The infected database record is detected
Page 46
Kaspersky Anti-Virus for Windows CE 45
33..55..55.. SStteepp 55.. RReevviieewwiinngg tthhee ppeerrffoorrmmaannccee
ssttaattiissttiiccss
The statistics and performance results of the last check can be found on the
main screen tab-page, which can be displayed by pressing the
Figure 34).
• Files – files checked;
• DBases – databases checked;
• Viruses found – infected objects detected;
• To "Infected" – infected objects copied to the Infected folder;
• Folders – network folders checked;
• Cards – expansion cards checked;
• Errors – errors occurred;
• Deleted – objects deleted.
button (see
Figure 34. The performance statistics
Page 47
46 Kaspersky Security for PDA
33..55..55..11.. WWoorrkkiinngg wwiitthh tthhee rreeppoorrtt
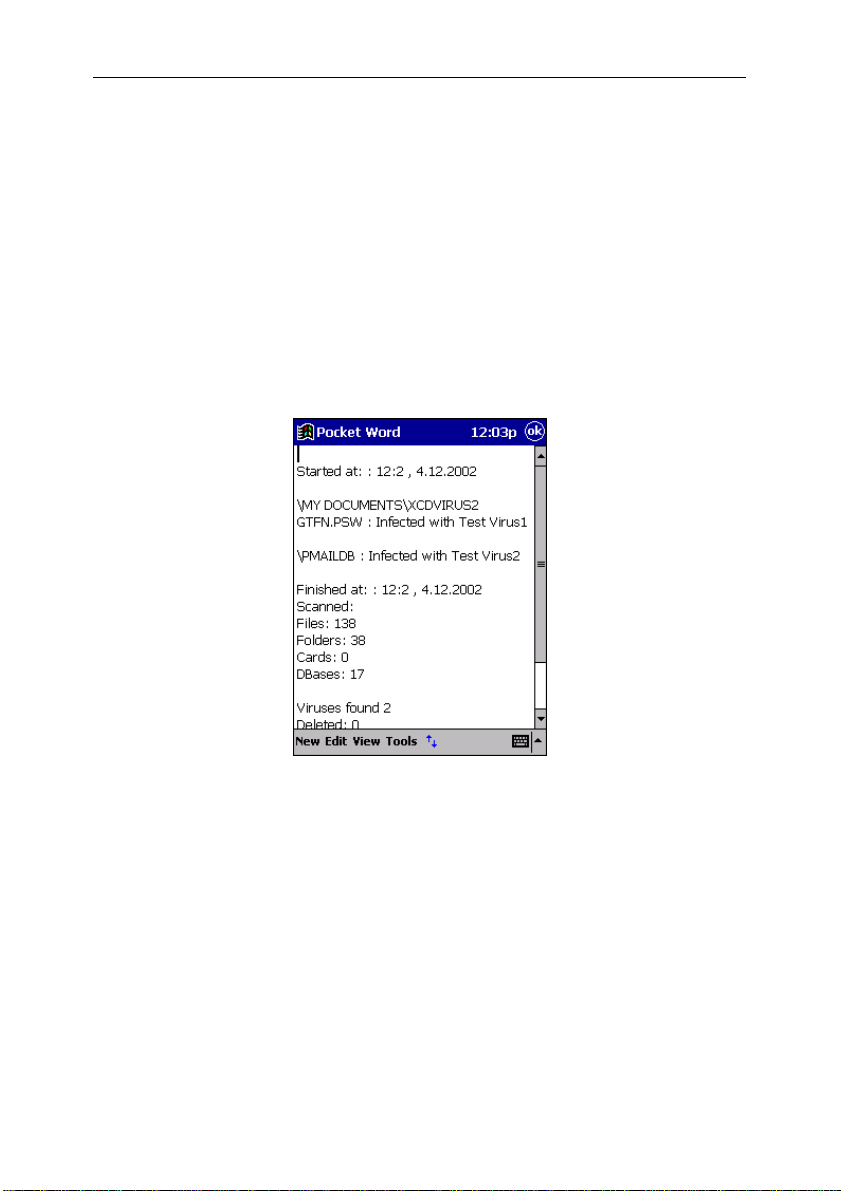
If you set the program to generate the report file, you can review the program
performance results.
The report can be viewed from any text editor, for example, from Microsoft
PocketWord.
The report includes the date and the time the scanning procedure began and
was finished, the check statistics and the messages about infected objects
detected, etc.
Figure 35. The check report
33..55..55..22.. VViieewwiinngg tthhee pprrooggrraamm aanndd tthhee lliicceennssee
ddeettaaiillss
To display the program details, select About from the Help menu. The About
Kaspersky Anti-Virus screen with program details will then be displayed (see
Figure 36). You can exit this screen by pressing the OK button. To review the
license expiration date or to renew the license , select Registration Info from the
Page 48

Kaspersky Anti-Virus for Windows CE 47
Help menu. The Registration Info screen with your license details will then be
displayed (see Figure 37).
Figure 36. The About Kaspersky Anti-
Virus screen
If your key file has expired , the program will no longer work.
Figure 37. The Registration Info screen
33..66.. UUppddaattiinngg aannttii--vviirruuss ddaattaabbaasseess
The anti-virus database updating utility.
33..66..11.. PPuurrppoossee
The anti-virus database auto-updating utility is developed to retrieve updates via
the Internet to your desktop and to install these updates on your PDA running
Windows CE during its synchronization with the desktop.
Page 49
48 Kaspersky Security for PDA
33..66..22.. SSttaarrttiinngg tthhee pprrooggrraamm aanndd tthhee
pprrooggrraamm iinntteerrffaaccee
To start the updating utility,
press the Start button, point to Programs, point to Kaspersky Security
for PDA and select Kaspersky Anti-Virus Updater for Windows CE.
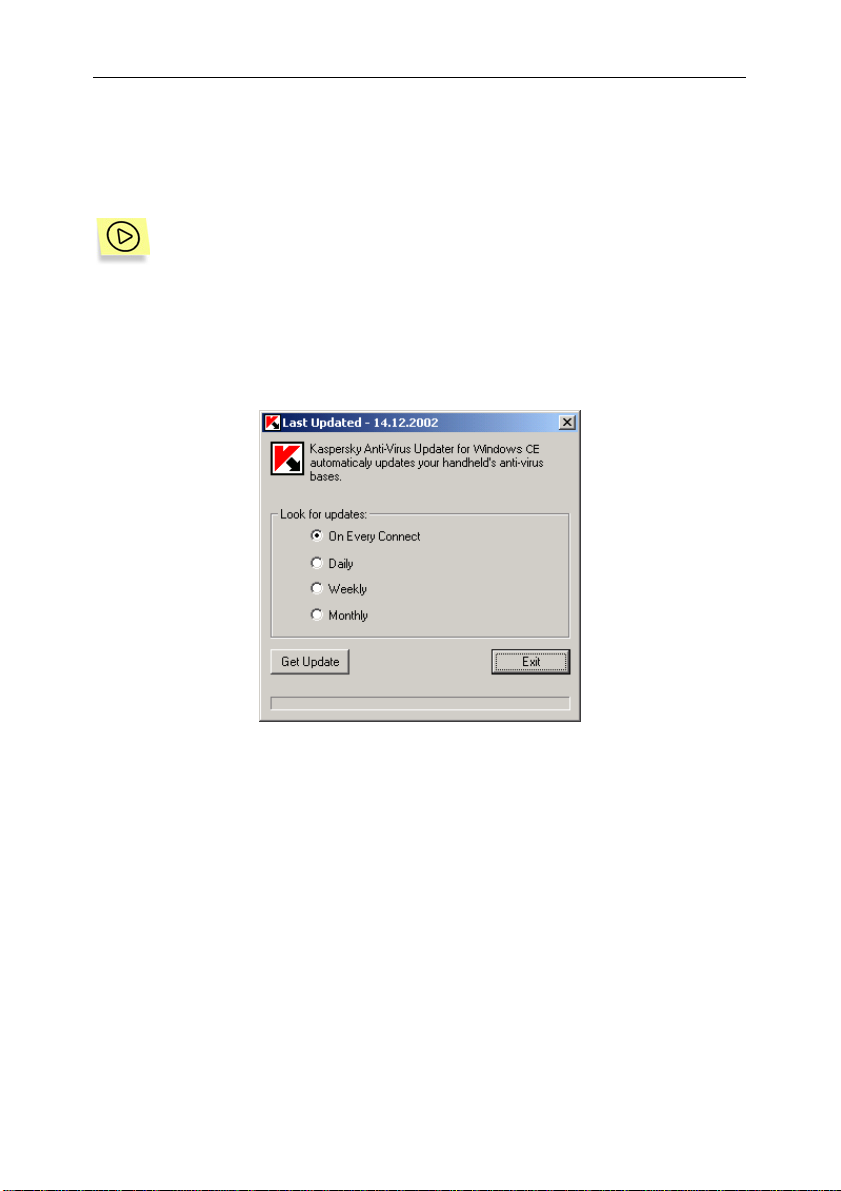
The program main window will appear on your screen (see Figure 38).
Figure 38. The updating utility main window
The main window title indicates the last date you updated your anti-virus
databases.
You can use the Look for updates options to define the mode of updating your
anti-virus databases via the Internet and of copying them to your pocket device :
• On Every Connect – allows you to retrieve updates via the Internet and
copy them to your Pocket PC device every time the device is connected
to the desktop.
• Daily – allows you to retrieve updates via the Internet and copy them to
your Pocket PC device daily.
Page 50

Kaspersky Anti-Virus for Windows CE 49
• Weekly – allows you to retrieve updates via the Internet and copy them to
your Pocket PC device weekly.
• Monthly – allows you to retrieve updates via the Internet and copy them
to your Pocket PC device monthly.
Use the Get Update/Stop button to start/stop manual updating of your anti-virus
databases via the Internet and to start/stop copying them to your pocket device.
The ОК button allows you to save the changes you made and exit the program.
Below the buttons you can see the status bar, which before the updating begins,
indicates whether your PDA is connected to the desktop. If the connection is
established, you can perform the updating of your anti-virus databases via the
Internet and onto your PDA. Otherwise, you will be able to perform updating only
via the Internet.
Below the status bar you see the updating procedure progress bar.
33..66..33.. UUppddaattiinngg tthhee ddaattaabbaasseess mmaannuuaallllyy oorr
aass sscchheedduulleedd
To update anti-virus databases on your Pocket PC device,
insert your Pocket PC device into the cradle. After you have done this,
the connection between your pocket device and the desktop will be
established automatically.
The updating utility retrieves new anti-virus databases via the Internet and copies
them onto your PDA on-demand (when you tap on the Get Update button),
every time the PDA is connected to your desktop (the On Every Connect mode)
or as scheduled. In the last case the time before the next updating procedure is
calculated and if the day, week, month (the Daily, the Weekly, the Monthly
modes respectively) is passed, the program automatically starts updating antivirus databases.
The updating procedure does not depend on whether you have selected to set
up a partnership between ActiveSync and your PDA or not. The updating utility
starts once the connection between ActiveSync and your PDA is established and
does not screen any messages during the operation.
Page 51

50 Kaspersky Security for PDA
The anti-virus databases are located within a single file (KAVBase.kvb);
when these are updated a new file is substituted for the old one.
The updates are downloaded from one of the anti-virus database-updating
servers. The list of URLs is saved by the installation program in the system
registry and cannot be edited from the updating utility . The list of servers may
include up to 10 URLs. The program attempts to update anti-virus databases
from the first server in the list. If it fails, the program attempts to connect to the
second URL and so on, until the updating procedure is successfully performed.
The current URL of the updating server is indicated by the status bar in the
program main window, and the updating progress is indicated by the progress
bar.
If the updating utility fails to update the anti-virus databases from all the
servers in the list, or if the updating operation was not completed, the
program will continue to use the current anti-virus databases. If this
happens, the date of the last updating operation performed will remain
unchanged, and the corresponding information will be displayed in the
status bar: "Failed to retrieve the updates".
If the updating procedure is successful and the updates are downloaded to the
desktop, the updating utility compares the anti-virus database date with those
located on the PDA. If the database release date on the PDA is earlier than that
on the desktop, the new anti-virus database is copied from the desktop onto the
PDA.
If the time has come to download a new database, the program automatically attempts to retrieve it via the Internet and install it on the
pocket device. However, this is not the case with the updating program
for Palm OS; with the program for Palm OS, the retrieved database is
copied to the pocket device only during the next synchronization procedure. This happens because a PDA running Palm OS breaks the connection with the desktop immediately after the synchronization is implemented, while а PDA running Windows CE always remains connected to ActiveSync.
Page 52

CChhaapptteerr 44.. KKaassppeerrsskkyy SSeeccuurriittyy ffoorr
WWiinnddoowwss CCEE
44..11.. PPuurrppoossee aanndd mmaaiinn ffuunnccttiioonnss
Kaspersky Security for Windows CE is developed to protect the confidential data
on a PDA running Windows CE from unauthorized access by encrypting this
data.
Kaspersky Security for Windows CE allows you to:
• Create special confidential files on your PDA that allow you to store
confidential data. The placement of data to a confidential file and access
to this data is implemented by using a special mounting procedure, which
results in the creation of a special confidential folder.
• Open confidential files that were created on other PDAs using the
Kaspersky Security for Windows CE program. If you have copied a confidential file from another PDA and you know the password for the data located within the file, you can open it and use it the same way as you do
with confidential files created on your PDA.
• Mount confidential folders. Confidential folders can be mounted only if
you use the appropriate password. The mounted confidential folders are
listed by the PDA file system as expansion cards or network folders. You
can use these folders the same way as you use any conventional folder;
i.e. you can save data within them and edit it.
• Unmount confidential folders. After you have completed working with
confidential data, you can unmount the confidential folder. All the data is
stored in a confidential file in encrypted form and cannot be accessed
without entering the appropriate password.
All the data within your confidential folders is encrypted. Encryption and
decryption of the data is performed by the program "on-the-fly", i.e. the
user (and the applications on his/her PDA) sees the contents of the
folder and the open text of the files located within it, but the data is
stored within the PDA memory only in encrypted form.
Page 53

52 Kaspersky Security for PDA
For details on how to work with your expansion cards refer to your PDA
documentation.
44..22.. SSttaarrttiinngg KKaassppeerrsskkyy SSeeccuurriittyy ffoorr
WWiinnddoowwss CCEE
To start Kaspersky Security for Windows CE,
press the Start button in your PDA taskbar. Point your cursor to Pro-
grams and select Kaspersky Security from the program list. Af-
ter that, if a valid key file is installed on your PDA, the program’s main
window will be displayed (see Figure 42).
If the program is the first one to be started after the installation of the Kaspersky
Security for PDA program components or if it is launched after the license key’s
expiration, the user will be requested to install the key file (see subchapter Error!
Reference source not found.on page Error! Bookmark not defined.).
44..33.. LLiicceennssee kkeeyy mmaannaaggeemmeenntt
Installing the license key file. Renewing
the license.
44..33..11.. KKeeyy ffiillee iinnssttaallllaattiioonn
Following installation, whenever you launch any component of Kaspersky
Security for PDA running Windows CE for the first time, you will be requested to
install the key file. The respective dialog window will also be displayed (see
Figure 39). During installation, the key file will be copied from your My
Documents directory to the component installation directory.
Page 54

Kaspersky Security for Windows CE 53
If the first application you launch after installation is Kaspersky AntiVirus for Windows CE, you will be requested to install its key (see subchapter Error! Reference source not found.on page Error!
Bookmark not defined.).
Figure 39. License key installation
In order to install the key file for the Kaspersky Security for PDA running
Windows CE program components, do the following:
Using your mouse, click on the Key Selection button in the dialog window Registration. In the standard Windows CE dialog that will be displayed, specify the key file copied during the program components’
transfer (it must be located in your My Documents directory). This will
copy the file to the Kaspersky Anti-Virus for Windows CE installation directory (the default directory is \ProgramFiles\Kaspersky
Lab\Kaspersky Security). If the installation is successful, the system
message will be displayed (see Figure 40). Click OK and restart the
program).
Page 55

54 Kaspersky Security for PDA
Figure 40. The key is successfully installed on the PDA
If an earlier version of Kaspersky Anti-Virus for Windows CE was installed on your PDA and its key file has not expired, you can also use it
as the key file for the Kaspersky Security for PDA running Windows CE
program package components.
To do so, you will have to move the file KAVScanner.key from the directory in which the earlier version of Kaspersky Anti-Virus installed it
(\ProgramFiles\Kaspersky Lab\Kaspersky Anti-Virus) to your My
Documents directory. After that, install the key file as described above.
44..33..22.. LLiicceennssee rreenneewwaall
When less than 15 days remain before the license agreement’s expiration date,
Kaspersky Anti-Virus will begin informing you about this every day.
After the license agreement expires, the information stored in secret
files becomes unavailable. If you do not intend to renew the license, you
should save the necessary information to an unencrypted location prior
to the license’s expiration date.
The licensing agreement renewal means you must purchase and install a new
key file.
Page 56

Kaspersky Security for Windows CE 55
After the licensing agreement expires, the program will display the Registration
window each time it starts. This window (see Figure 41) contains a notification
and a suggestion to install a new key file. The program will no longer function if
the user does not install the new key file.
Since Kaspersky Anti-Virus and Kaspersky Security for Windows CE
share the same key file, the user can renew the license in any of these
software products.
Figure 41. License renewal
In order to renew the license, the user must purchase and install the
new license key for the Kaspersky Security for PDA running Windows
CE program components. To do so, please take the following steps:
1. In order to purchase the new key, please contact the company from
which you originally purchased this software product and request
the license key for Kaspersky Security for PDA 4.5.1 running
Windows CE.
or:
purchase the license key directly from Kaspersky Lab. To do so,
please email our sales department (sales@kaspersky.com) or fill in
the respective form on our website (www.kaspersky.ru) in the section Purchase online ! For home users. After your payment is re-
Page 57

56 Kaspersky Security for PDA
ceived, the new key file will be emailed to the address you specified in the order form.
Kaspersky Lab carries out periodic actions that will allow you to receive
considerable discount on your license renewal. Watch for information
about forthcoming actions in the section Information ! Actions of
Kaspersky Lab’s website.
5. Copy the key file you have received to the My Documents
directory of your PDA (see Step 2 on page Error! Bookmark not
defined.).
6. Start Kaspersky Security for Windows CE. If the license key has
expired, the license renewal window will be displayed automatically
(see Figure 41). Otherwise, select Registration from the ? menu in
the program’s main window to open the Registration dialog window
(see Figure 46).
7. Using your mouse, click on the Key Selection button. In the
standard Windows CE dialog that will be displayed, specify the key
file copied during the program components’ transfer (it must be
located in your My Documents directory). This will copy the file to
the Kaspersky Anti-Virus for Windows CE installation directory (the
default directory is \ProgramFiles\Kaspersky Lab\Kaspersky
Security). If the installation is successful, the system message will
be displayed (see Figure 40). Click OK and restart the program.
As a result of this procedure, the license key will be renewed for the duration of
the newly installed key’s period of validity.
If the new key is installed prior to the current key’s expiration date, you
will be given the option to set the current key’s expiration date as the
beginning of the new key’s period of validity.
Page 58

Kaspersky Security for Windows CE 57
44..44.. IInntteerrffaaccee
Starting the program. Details of the main
screen and the dialog box items.
The program main screen will be displayed (see Figure 42).
44..44..11.. MMaaiinn ssccrreeeenn
44..44..11..11.. IItteemmss oonn tthhee pprrooggrraamm mmaaiinn ssccrreeeenn
The program main screen (see Figure 42) will be displayed. The screen contains:
• the list of confidential files (for details see subchapter 4.4.1.2).
When you start Kaspersky Security for Pocket PC for the first
time this list is blank.
• the menubar (for details see subchapter 4.4.1.3 on page 59).
• the taskbar (for details see subchapter 4.4.1.4 on page 61).
• the contextual menu (for details see subchapter 4.4.1.5 on page 62).
Page 59

58 Kaspersky Security for PDA
Figure 42. Main screen
44..44..11..22.. TThhee lliisstt ooff ccoonnffiiddeennttiiaall ffiilleess
The major area of the main screen is occupied by the list of confidential files
(see Figure 43) created using Kaspersky Security for Pocket PC. The Volume
column lists the file names and their mounting statuses (for details see
subchapter 4.5.2 on page 74), the Size(KB) column indicates the file sizes (in
Kb) and the Encrypt column shows the algorithm that was applied during the
encryption procedure.
When you start Kaspersky Security for Pocket PC for the first time this
list is blank.
A confidential file may be mounted to the folder tree of your PDA operating
system as a folder. In this case you will see the
name. If a file is not mounted to the folder tree, you will see the
of the file name. If the file is not available for mounting (located within another not
mounted confidential file) it is indicated with the icon.
icon at the left of this file
icon at the left
Page 60
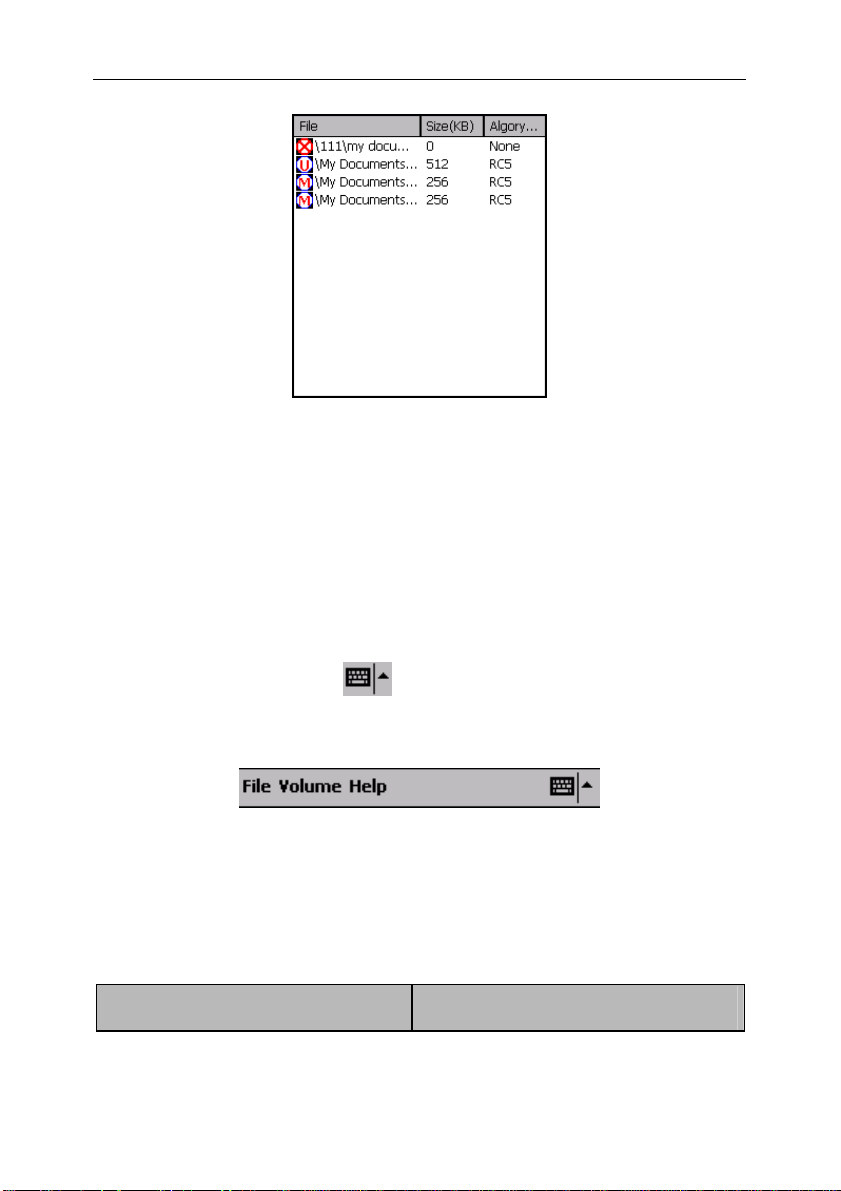
Kaspersky Security for Windows CE 59
Figure 43. The list of confidential files
You may edit the list by using the contextual menu (see subchapter 4.4.1.5) or
the main screen menubar (see subchapter 4.4.1.3) commands.
44..44..11..33.. MMeennuubbaarr
At the bottom of the Kaspersky Security for Pocket PC main screen you will find a
menubar (see Figure 44) that contains the File, Volume and Help menus, and also
the keyboard managing buttons
the list of confidential files, and also define properties for each separate file.
Below we explain commands for every menu in the menubar.
The File menu contains the following commands allowing you to edit the list of
confidential files:
Command What does it do…
. By using the menus you may create and edit
Figure 44. The menubar
Page 61
60 Kaspersky Security for PDA
Command What does it do…
File ! New
Allows you to create a confidential file
(see subchapter 4.5.1).
File ! Open
Opens a confidential file (see subchapter 4.5.3).
File ! Delete
Deletes the selected confidential file.
These operations may be performed with appropriate contextual menu
commands (for details see subchapter 4.4.1.5 on page 62).
The Volume menu contains the following commands allowing you to
define/change properties of the selected confidential file:
Command What does it do…
Volume ! Mount
Mounts the selected confidential file as
a folder (see subchapter 4.5.2 on
page 74.
Volume ! Unmount
Unmounts the selected confidential
folder (see subchapter 4.5.4 on
page 79).
Volume ! Properties
Displays the selected confidential file
property screen (see subchapter 4.5.6
on page 80).
Volume ! Change password
Allows you to change an access
password to the selected confidential
file (see subchapter 4.5.7 on page 82).
These operations may be performed with appropriate contextual menu
commands (for details see subchapter 4.4.1.5).
The Help menu contains the About command allowing you to display the
program details screen (see Figure 45) and the Registration info command
allowing you to display the screen with your license details or renew the license
(see Figure 46).
Page 62

Kaspersky Security for Windows CE 61
Figure 45. The program details screen
44..44..11..44.. TTaasskkbbaarr
At the top of the Kaspersky Security for Pocket PC main screen you will find the
program taskbar (see Figure. 47).
In the left corner of the taskbar you will see the program logo. The bar also
contains a volume control, a clock indicator and the
confirm any action performed within the program main screen.
Figure 47. Taskbar
Figure 46. The license details screen
button allowing you to
Page 63

62 Kaspersky Security for PDA
44..44..11..55.. CCoonntteexxttuuaall mmeennuu
You may display a contextual menu by using your stylo at any point within the
confidential file list area. There are two types of the contextual menu:
• the confidential file management menu, which is displayed by tapping with
your stylo on any listed confidential file (see Figure 48);
• the list management menu, which is displayed by tapping with your stylo
in any point aside from the listed files (see Figure 49).
Figure 48. The confidential file management
menu
The confidential file management menu contains the following commands:
Command What does it do…
Mount
Unmount
Figure 49. The list management menu
Mounts the selected confidential file as
a folder (see subchapter 4.5.2).
Unmounts the selected confidential
folder (see subchapter 4.5.4).
Page 64
Kaspersky Security for Windows CE 63
Command What does it do…
Properties
Change password
Delete
The Unmount command is not available for not-mounted confidential
files. At the same time it is the only command available for mounted
confidential files!
The list management menu contains the following commands:
Command What does it do…
New
Open
Displays the selected confidential file
property screen (see subchapter 4.5.6
on page 80).
Allows you to change an access
password to the selected confidential
file (see subchapter 4.5.7).
Deletes the selected confidential file
(see subchapter 4.5.5).
Allows you to create a new confidential
file (see subchapter 4.5.1 on page 71).
Opens the selected confidential file
(see subchapter 4.5.3 on page 77).
44..44..22.. TThhee ccoonnffiiddeennttiiaall ffiillee ccrreeaattiioonn ssccrreeeenn
The confidential file creation screen contains the file (to be created or existing)
properties and may be displayed by using:
• a command from the main screen File menu (File ! New);
• a command from the list management contextual menu (New);
The screen contains the following two tabs:
• Folder – this tab-page contains main properties of the confidential file
(see Figure 50):
• Name – the file name.
Page 65

64 Kaspersky Security for PDA
• Folder – the folder to which the created confidential file will be
added. Select one of the folders from the corresponding dropdown list. The list includes subfolders of the My documents
folder. For example, if there are two folders labeled as My
documents on your PDA, and one of them includes the Personal, Business and Templates subfolders, and the other in-
cludes the TopSecret and LowSecret subfolders, the Folder
list will include all five folders. Note that other folders are not
listed here. The default setting is the My Documents folder.
• Location – the location where the created file will be placed .
The default setting is the main memory of your PDA. However,
you may change this setting by selecting another location from
the drop-down list. The list includes the main memory and
mounted expansion cards. Note that the list will include all the
mounted confidential folders, since your PDA considers them as
expansion cards.
Figure 50. The confidential file creation screen:
The Folder page
• Size – the confidential file size. The maximum size of the data
that can be saved to this confidential file. Enter the required value
in the corresponding numeric field by using the keyboard numeric
or arrow keys and select the required unit (Kb or Mb) from the
corresponding drop-down list. The default value is
256 Kb.
Page 66

Kaspersky Security for Windows CE 65
• Encryption – this tab-page contains access-restriction options of the file
(see Figure 51):
• Password – the password allowing/prohibiting from accessing
the file. The password may include letters (including the italic),
digits and other characters.
• Confirm – the password confirmation field. Enter the string
similar to the Password field value in this field.
Figure 51. The confidential file creation screen:
The Encryption page
• Encryption – the algorithm to be used when encrypting the file
data. You may select one of the following values from the dropdown list:
o RC5 – the quick encryption algorithm. This is the default
setting .
o RC6 – the reliable encryption algorithm. This option allows
you to protect your data more reliably .
In future versions of the product we are planning to add
more options to the encryption algorithm setting.
• TimeOut – the all user access time period. To enable the time-
out setting check the corresponding check box, enter the required value in the corresponding numeric field and select the
Page 67

66 Kaspersky Security for PDA
required unit (seconds, minutes or hours) from the correspond-
ing drop-down list. If the TimeOut value is 0, access to this
confidential file will not be automatically blocked. By default the
timeout is disabled.
If the TimeOut mode is activated and if during the defined time period
nobody has accessed the corresponding confidential folder data the confidential folder is automatically unmounted.
44..44..33.. TThhee ccoonnffiiddeennttiiaall ffiillee--mmoouunntt ssccrreeeenn
The confidential file-mount screen (see Figure 52) allows you to create a
confidential folder on the file basis and add it to the My Device folder.
The confidential file mount screen may be displayed by using:
• a command from the main screen Volume menu (Volume ! Mount);
• a command from the confidential file management contextual menu
(Mount).
The screen contains the following items:
• File – the full path to the confidential file. This setting can only be re-
viewed.
• Mount as – the file-based confidential folder name. The default value is
the confidential file name.
• Password – the access password for the confidential file. The password
is defined in the confidential file creation screen (see Figure 51) and may
include letters (including italic), digits, punctuation marks or other characters.
• Size – the confidential folder size in Kb. This value is defined in the con-
fidential file creation screen (see Figure 50) as the confidential file size
and cannot be changed.
• Algorithm – the data encryption algorithm used for this folder when it was
created. This value is defined in the confidential file creation screen (see
Figure 50) and cannot be changed.
Page 68

Kaspersky Security for Windows CE 67
Figure 52. The confidential file-mount screen
44..44..44.. TThhee ccoonnffiiddeennttiiaall ffiillee--ooppeenn ssccrreeeenn
The file-open screen allows you to select and mount any confidential file created
by Kaspersky Security for Windows CE and located within one of the My
documents folders on your PDA. If the file was created on another PDA, it will
be added to the list of confidential files on the main screen and will be mounted.
Suppose that you have mounted a memory expansion card with a confidential
file. You cannot mount it from the program main screen until the file is opened.
The confidential file to be opened must be located within a My documents
folder; otherwise the program will not be able to detect it.
The screen may be displayed by using:
• a command from the main screen File menu (File ! Open);
• a command from the list management contextual menu (Open).
This screen contains:
• Toolbar
following items:
(see Figure 53) that is located at the screen top and contains the
• Folder – the drop-down list allowing you to define the folder(s)
whose file(s) will be displayed in the list below. Select All Folders
Page 69

68 Kaspersky Security for PDA
or the required My documents subdirectory from this dropdown list. The list includes all subfolders in the My documents
folders on your PDA.
• Type – the drop-down list allowing you to define the file type to
be displayed in the list below. Select one of the following options from this drop-down list:
o Kaspersky Security files – this value allows you to display
only the Kaspersky Security for Pocket PC confidential files
in the list below.
o All files – this value allows you to display all the confiden-
tial file types located in the folder selected above.
• List area
(see Figure 54) that is located below the screen toolbar and arranged as a table. This list contains the files that correspond to the settings defined in the screen toolbar. The table contains the following columns:
• Name – the file name.
• Folder – the corresponding directory name.
• Date – the file creation date and time.
Figure 53. The file open screen:
The toolbar
Figure 54. The file open screen:
The file list
If you select a file from the list, the program will verify its format. If the file was
created by Kaspersky Security for Windows CE, the file mount screen will be
Page 70

Kaspersky Security for Windows CE 69
displayed (see subchapter 4.4.3 on page 66). Otherwise, the appropriate
message will be displayed on your screen and the file will not be mounted.
44..44..55.. TThhee ffiillee--aacccceessss ppaasssswwoorrdd rreeddeeffiinnee
ssccrreeeenn
By using options in the password redefine screen (see Figure 55) you may
change the access password to an existing confidential file data. However, it is
impossible to change the file access password, if you do not know it. This way
the program protects your confidential file from the unauthorized access.
Figure 55. The access-password redefine screen
for the selected confidential file
The password redefine screen may be displayed by using:
• a command from the main screen Volume menu (Volume ! Change
password);
• a command from the confidential file management contextual menu
(Change password).
The screen contains the following items:
• Old password – the current access password to the selected confidential
file. Enter the password defined for this file in the confidential file creation
screen Password text field.
Page 71

70 Kaspersky Security for PDA
• New password – the required password for the selected confidential file.
The password may include letters (including the italic), digits and other
characters.
• Re-type – the password confirmation field. Enter the string similar to the
New Password field value in this field.
• Size – the confidential file size in Kb used for this file when it was created.
This value is defined in the confidential file creation screen and cannot be
changed.
• Algorithm – the data encryption algorithm used for this file when it was
created. This value is defined in the confidential file creation screen and
cannot be changed.
44..44..66.. TThhee ccoonnffiiddeennttiiaall ffiillee pprrooppeerrttiieess
ssccrreeeenn
On the confidential file property screen, you can review settings of the selected
mounted file (see Figure 56) and edit settings of the selected not-mounted file
(see Figure 57).
Figure 56. The mounted confidential file
properties screen
Figure 57. The not-mounted confidential file
properties screen
The confidential file property screen may be displayed by using:
Page 72

Kaspersky Security for Windows CE 71
• a command from the list management contextual menu (Properties);
• a command from the main screen Volume menu (Volume ! Proper-
ties).
The screen contains the following file properties:
• The file size and the data encryption algorithm used for this file. These
values are displayed in the read-only mode.
• Name – the full path to the confidential file.
• Mount folder – the file-based confidential folder name.
• TimeOut – the all user access time period.
44..55.. RRuunnnniinngg KKaassppeerrsskkyy SSeeccuurriittyy ffoorr
WWiinnddoowwss CCEE
Creating a confidential file. Mounting a
confidential file as a folder. Opening an
imported confidential file. Unmounting a
confidential folder. Redefining the settings
of a confidential file. Redefining the access
password to a confidential file
44..55..11.. CCrreeaattiinngg aa ccoonnffiiddeennttiiaall ffiillee
Kaspersky Security for Windows CE allows you to create confidential files and
store data within them. Confidential files have the .kst extension .ksf, and data
within them is automatically encrypted. The data encryption algorithm and other
settings are defined when you create the file.
To create a confidential file, follow these steps,
1. Select the New command from the main screen File menu.
Page 73

72 Kaspersky Security for PDA
To perform this action you can also use the New com-
mand from the list management contextual menu.
2. In the confidential file creation screen displayed, switch to the
Folder tab (see Figure 58) and follow these steps:
Figure 58. The Folder page
• Define the required confidential file name in the Name text field.
• Select the location of the confidential file to be created from the
Location drop-down list . By default, the program suggests the
main memory of your PDA (Main Memory). The drop-down list
also includes the available expansion cards (Storage Card)
and mounted confidential folders.
You can place the confidential file in a confidential
folder. However you should remember that the confidential folder will be created on the basis of this file in
the My Device directory of the main memory of your
PDA.
While working with the embedded confidential files you
will observe a slow down of your PDA's performance;
therefore it is not advisable to create these.
• Select the folder to which the new confidential file must be
added from the Folder drop-down list. You can change the lo-
Page 74

Kaspersky Security for Windows CE 73
cation of your confidential file. The default value is the My
Documents folder in the main memory of your PDA or the root
folder of the selected expansion card.
The contents of the Folder drop-down list depends on
the value selected for the Location option!
The list includes subdirectories of all the My docu-
ments folders in the main memory of your PDA or on
the selected expansion card.
• Use the Size option to define the confidential file size – the
maximum amount of data that can be saved to this confidential
file. The default value is
value in the corresponding numeric field by using the keyboard
256 Kb. To change it, enter the required
numeric or arrow (
) keys and select the required unit (Kb or
Mb) from the corresponding drop-down list.
It is not advisable to create confidential files smaller
than
256 Kb.
3. Switch to the Encryption tab (see Figure 59) and follow these
steps:
Figure 59. The Encryption page
Page 75

74 Kaspersky Security for PDA
• Define the password allowing/prohibiting from accessing the file
in the Password text field. The password may include letters
(including the italic), digits and other characters.
• Confirm the password in the Confirm text field.
• Select the required algorithm to be used when encrypting the
file data from the Encryption algorythm drop-down list. The
default setting is
more reliable algorithm
encryption proceed much slower.
• There is an option that allows you to unmount a confidential file if
nobody has accessed it within the defined time period . To enable
the timeout setting check the TimeOut check box, enter the required value in the corresponding numeric field and select the
required unit (
ing drop-down list.
4. To save the changes you made on the Folder and Encryption
RC5, which is more quick. You may specify the
RC6; this, however, makes data
seconds, minutes or hours) from the correspond-
pages press the
taskbar.
As a result, the defined confidential file with the .ksf extension and the
be added to the confidential file list.
Now, you can redefine the file-access password (see subchapter 4.5.7 on
page 82), create a confidential folder on the file basis and mount it as an expansion
card of your pocket PC (for details see subchapter 4.5.2 on page 74).
44..55..22.. MMoouunnttiinngg aa ffiillee aass aa ccoonnffiiddeennttiiaall
ffoollddeerr
The confidential file mounting procedure allows you to create a confidential
folder on the file basis. The folder will be arranged as an expansion card on your
PDA. Confidential folders are placed into the My Device directory without regard
to where the corresponding confidential file is located. The confidential folder
allows access to encrypted data stored within the confidential file.
button in the Kaspersky Security for Windows
icon will
Page 76

Kaspersky Security for Windows CE 75
The not-mounted confidential files are marked by the icon within the
confidential file list. The
icon corresponds to mounted confidential files.
Confidential files located within the not-mounted confidential files cannot be
mounted and are marked with the icon. To access these files, you must first
mount the confidential file where these files are hosted.
To mount a confidential file as a folder, follow these steps:
1. Select the required file using your stylo from the list of confidential
files on the main screen.
2. Select the Mount command from the file management contextual
menu or from the main screen menu.
You can also start the required confidential file from File Explorer.
3. On the confidential file mount screen displayed (see Figure 60),
follow these steps:
Figure 60. The file mount screen
• Enter the file-based confidential folder name in the Mount as
text field. The default value is the confidential file name.
Page 77

76 Kaspersky Security for PDA
• In the Password text field enter the folder-access password for
the file on which basis the folder is created (the file value is de-
fined in the confidential file creation screen Password text
field).
4. To complete the file mounting operation press the button in the
Kaspersky Security for Pocket PC taskbar.
5. If the program mounts this file the first time, you will be prompted to
format the folder to be created (see Figure 61). Press the Yes
button. If you refuse to format the folder, the program will be disabled
from saving data to the confidential folder.
6. When the folder-created notification (see Figure 62), will appear on
your screen, press the
button to proceed.
Figure 61. The folder formatting notification
Figure 62. The folder-created notification
The mounting results in the confidential folder being added to the list of folders
within the My Device directory. The confidential folder name will be added to the
confidential file creation screen Location text field (see Figure 58). The file on
Page 78

Kaspersky Security for Windows CE 77
which basis this folder was created will be marked with the icon in the list of
confidential files of the Kaspersky Security program.
You can save any file within the confidential folder and work with them using
other applications on your pocket PC. All the files within the folder will be
encrypted. The data encryption is performed "on-the-fly" meaning that Kaspersky
Security for Pocket PC decodes data every time it is addressed and encrypts this
data again when saving it. At that, you will not observe any slow-down in your
pocket PC performance - however, it depends on the selected encryption
algorithm.
The only operation that can be applied to a confidential folder is its’ unmounting
(for details see subchapter 4.5.4 on page 79). You will not be able to work with a
confidential folder from your Kaspersky Security for Windows CE (redefine
access passwords, review its settings, or remove it from the list).
44..55..33.. OOppeenniinngg aa ccoonnffiiddeennttiiaall ffiillee
You can use this feature of Kaspersky Security for Windows CE to open and
mount confidential files created on the other PDAs.
You can open and work with an existing confidential file located in one of the My
documents folders within the main memory of your PDA or on the mounted
expansion cards:
• define the file settings (see subchapter 4.5.6 on page 80).
• change the file access-password (see subchapter 4.5.7 on page 82)
• mount this file as a confidential folder (see subchapter 4.5.2 on page 74).
• unmount the file-based confidential folder (see subchapter 4.5.4 on
page 79).
You can mount a confidential file located within any of the folders on
your PDA by starting it from File Explorer.
To open and mount a confidential file created on the other PDA, follow
these steps,
1. Select the Open command from the File menu in the main screen
menubar.
Page 79

78 Kaspersky Security for PDA
To perform this action you can also use the Open com-
mand from the list management contextual menu.
2. On the file-open screen (see Figure 63), select the file location from
the Folder drop-down list. By default, the All directories option is
selected. The list includes all the subfolders of the My document
folders on your PDA.
Figure 63. The confidential file opening screen
3. Select the required file type from the Type drop-down list. By
default, the conventional confidential file type is selected
(Kaspersky Security file – the .dat extension file). However, you
may define the setting allowing listing of all the file types (All files),
since a secured file may have any extension.
4. The files corresponding to the settings selected in the screen
toolbar will appear in the file list on the file-open screen. Select the
required file from the list.
5. If a file was created by the Kaspersky Security for Windows CE
program the file mounting screen will be displayed (see subchapter
4.4.3 on page 66), further actions are the same as those described
for mounting a file as a confidential folder (see subchapter 4.5.2 on
page 74).
Page 80

Kaspersky Security for Windows CE 79
As a result the selected confidential file will be mounted and added to the list of
confidential files on the Kaspersky Security for Windows CE screen and marked
with the
on the program main screen.
icon. When unmounted the file remains in the list of confidential files
If the file does not correspond to a confidential one, the appropriate
message will appear on your screen. This file cannot be accessed using
Kaspersky Security for Windows CE!
44..55..44.. UUnnmmoouunnttiinngg aa ccoonnffiiddeennttiiaall ffoollddeerr
In order to keep the confidential data within the confidential file protected, when
you finish working with this data you should unmount the corresponding
confidential folder . When unmounted the confidential folder disappears from the
PDA file system; i.e., all the data that is stored within the folder becomes
unavailable.
To unmount a confidential folder, follow these steps
1. Select the required folder from the Kaspersky Security for Windows
CE confidential file list.
2. Select the Unmount command from the file management
contextual menu or from the main screen menu.
As a result the confidential folder is excluded from the list of folders of your PDA
file system and from the confidential file creation screen Location drop-down list
(see Figure 58). The corresponding file within the list of confidential files on the
Kaspersky Security main screen is marked with the
stored within this confidential file can be acquired only after the folder is
mounted.
The name of confidential file resulting from the folder when it is unmounted will
not be modified (see Figure 60).
icon. Access to the data
Page 81

80 Kaspersky Security for PDA
44..55..55.. DDeelleettiinngg aa ccoonnffiiddeennttiiaall ffiillee
You can delete confidential files, that are not mounted as confidential folders.
Confidential files can only be deleted together with the confidential data
encrypted within.
To delete a confidential file from the main memory of your PDA or from
the expansion card, follow these steps:
1. If the confidential file to be deleted is mounted as a confidential
folder unmount it (see subchapter 4.5.4 on page 79).
2. Select with your stylo the required confidential file from the
Kaspersky Security for Windows CE list of confidential files.
3. Select the Delete command from the File menu in the confidential
file management contextual menu or the main screen menubar.
If the file is mounted as a confidential folder the Delete
command in the File menu will be unavailable.
4. If the file deletion confirmation dialog box appears on your screen,
press the Yes button to delete the confidential file. To keep the file,
press the No button.
44..55..66.. CChhaannggiinngg tthhee sseettttiinnggss ooff aa
ccoonnffiiddeennttiiaall ffiillee
You can edit some of settings of the existing confidential files which are not
mounted as folders .
If the file is mounted you can only review its settings. To change the settings of a mounted confidential file you have to first unmount it.
To change the settings of a confidential file, follow these steps:
1. Select the required confidential file from the list of files on the
Kaspersky Security for Windows CE main screen.
Page 82

Kaspersky Security for Windows CE 81
2. Select the Properties command from the confidential file
management contextual menu.
To perform this action you can also use the Properties
command from the Volume menu.
3. On the confidential file properties screen displayed (see Figure 64),
follow these steps:
• In the Name text field, enter or redefine the confidential file
path.
• In the Mount folder text field, change the folder name to be
created on the file basis.
• Enable\disable the all user access time period option by check-
ing/unchecking the TimeOut check box, defining the required
time period.
4. To save the changes you made, press the
taskbar.
Figure 64. The confidential file settings screen
button in the screen
Page 83

82 Kaspersky Security for PDA
44..55..77.. CChhaannggiinngg tthhee aacccceessss--ppaasssswwoorrdd ttoo aa
ccoonnffiiddeennttiiaall ffiillee
You can redefine the access-password to an existing not-mounted confidential file and therefore to the file data. To do this:
1. Use your stylo to select the required not-mounted file from the list.
2. Select the Change password command from the confidential file
management contextual menu.
To perform this action you can also use the Change
password command from the main screen Volume
menu.
If the file is mounted as a confidential folder, the Change
password command in the Volume menu will come up.
3. On the password redefine screen displayed (see Figure 65), follow
these steps:
Figure 65. The password redefine screen
Page 84

Kaspersky Security for Windows CE 83
• Enter the current access password to the selected confidential
file in the Old pass text field. This is the password defined for
this file in the confidential file creation screen Password text
field.
• Enter the required password to the selected confidential file in
the New pass text field. The password may include letters (including the italic), digits and other characters.
• Confirm the new password in the Confirm text field.
4. To save the changes you made to the file-access password press the
button in the Kaspersky Security for Windows CE taskbar.
Page 85

CChhaapptteerr 55.. KKaassppeerrsskkyy AAnnttii--VViirruuss ffoorr
PPaallmm OOSS
What is Kaspersky Anti-Virus for Palm OS?
Defining anti-virus settings. Sea ching o
r f r
and deleting viruses. Updating anti-virus
databases. Configuring the updating utility
55..11.. PPuurrppoossee aanndd mmaaiinn ffuunnccttiioonnss
Kaspersky Anti-Virus for Palm OS provides anti-virus protection for PDAs
running Palm OS. The program monitors all the data streams that might be used
by a virus to penetrate your Palm device.
Kaspersky Anti-Virus for Palm OS includes:
• an anti-virus scanner providing on-demand checking for viruses in data
storage locations and on expansion cards;
• an anti-virus monitor that intercepts viruses in data that is transferred using the HotSync utility;
• an anti-virus monitor that intercepts viruses in data that is beamed from
another Palm device.
• an updating utility allowing automatic updating of the anti-virus databases.
The program utilizes a multilevel menu system and flexible configuration,
generates an operation log describing all the actions taken, and supports a color
user-interface. Kaspersky Anti-Virus also contains a built-in encyclopaedia that
describes all the known malware for Palm OS.
If the program detects a virus attack, it can delete the infected file on your Palm,
disinfect it or pass it – the choice depends on the user-defined settings.
The program and its internal architecture are divided into two main parts: an antivirus kernel and an anti-virus (or virus definition) database. This makes the
program more efficient, flexible and user-friendly, since you do not have to load
Page 86

Kaspersky Anti-Virus for Palm OS 85
the entire program to acquire protection from a new virus; it is enough to update
(load) the anti-virus database.
55..22.. SSttaarrttiinngg tthhee pprrooggrraamm
To start Kaspersky Anti-Virus for Palm OS,
tap on the Anti-Virus icon
will be displayed (see Figure 66).
55..33.. IInntteerrffaaccee
55..33..11.. MMaaiinn ssccrreeeenn
The program main screen (see Figure 66) contains:
• the program name;
• the date and the time when you last scanned for viruses on your Palm;
• the date and the time when you last updated the virus definition database
on your Palm;
• the Exit button to exit the program;
• the Scan button to start scanning for viruses;
on your Palm’s screen. The main screen
• a drop-down list allowing selection of the location to be checked.
55..33..22.. MMeennuu
The program interface is powered by a menu bar (see Figure 67), You can
display it by tapping on the
(the standard method when working with Palm devices) or by tapping on the
program title.
button at the bottom of your Palm’s screen
Page 87

86 Kaspersky Security for PDA
Figure 67. The Kaspersky Anti-Virus
menubar
Figure 66. The main screen of Kaspersky
Anti-Virus for Palm OS
Menu item Hot key What it does…
Options !
Configuration
С
Displays the program
configuration screen (see
subchapter 5.4.1 on page 88).
Options ! Virus List V
Displays the list of known
viruses (see subchapter 5.4.4
on page 95).
Options ! Beam virus
base
—
Allows you to beam the virus
definition database via the IR
port to another Palm device (for
Palm OS 3.x and 4.x only) (see
subchapter 5.4.5.1 on page 96).
Log ! View log file L
Displays the operation log file
(see subchapter 5.4.3.1 on
page 94).
Page 88

Kaspersky Anti-Virus for Palm OS 87
Menu item Hot key What it does…
Log ! Clear log file
Log ! Beam log file B
Help ! About H
55..33..33.. DDiiaallooggss aanndd ccoonnttrroollss
While managing and configuring the program you use various screens and
dialogs (e.g. see Figure 68) that contain the following three types of controls:
— a drop-down list. To select the
required value from the list, tap on
required item in the list.
Clears the log file (erases all the
log entries see
subchapter 5.4.3.2 on page 94).
Allows you to beam the log file
via the IR port to another Palm
device (for Palm OS 3.x and 4.x
only) (see subchapter 5.4.3.3
on page 95).
Displays information about the
program (see subchapter 5.4.6
on page 99).
with your stylus, and then tap on the
with your stylus.
— a button. To press the button, tap on it with your stylus.
— a check box. To check/uncheck the box, tap on it
Page 89

88 Kaspersky Security for PDA
55..44.. MMaannaaggiinngg tthhee aannttii--vviirruuss
55..44..11.. CCoonnffiigguurriinngg tthhee pprrooggrraamm
To configure Kaspersky Anti-Virus, you must select the Configuration command
from the Options menu and define the required settings in the Configuration
screen (see Fig 68).
The Configuration screen contains the following items:
Infected objects. - this drop-down list allows you to define how your anti-
virus program will handle infected files actions to be taken to a virus detected(see Figure 69):
• Display disinfect dialog – displays a dialog box allowing you to choose
what you want to do with the infected object;
• Report only – logs the infected object, and the virus it is infected with;
• Disinfect automatically – disinfects the object automatically, without
asking first. If the object cannot be disinfected, it is automatically deleted;
• Delete automatically – deletes the infected object without asking first.
Save log file – check this box to save the performance results to a log file.
Save clean object info – check this box to include information about virus-
free files in the log file. This check box is available only if you checked the
above Save log file box.
Scan after Sync – check this box to scan for viruses in all files after a Hot-
Sync operation is performed.
Scan beamed files – check this box to scan for viruses in files right after
they are beamed into your Palm device (via the IR port).
Scan cards on insertion – check this box to scan expansion cards right
after they are inserted into your Palm device.
Page 90

Kaspersky Anti-Virus for Palm OS 89
Figure 69. Values in the Infected
Objects drop-down list
Figure 68. The Configuration screen
55..44..22.. SSeeaarrcchhiinngg ffoorr aanndd ddeelleettiinngg vviirruusseess
55..44..22..11.. SSttaarrttiinngg ttoo sseeaarrcchh ffoorr aanndd ddeelleettee
vviirruusseess
After it is installed, Kaspersky Anti-Virus, just like any other program on your
Palm, permanently resides in the memory of your Palm device, regardless of
whether you open the program main screen or not.
The program starts searching for and deleting viruses in one of the following
three cases:
• The process is started automatically right after you load data into your
Palm device using the HotSync utility (see subchapter 5.4.2.2 on
page 90).
• The process is started automatically right after data is beamed data into
your Palm device (see subchapter 5.4.2.2 on page 90).
• The process is started automatically right after you insert an expansion
card into your Palm device (see subchapter 5.4.2.2 on page 90).
• You can start scanning for viruses on demand (see subchapter 5.4.2.3
on page 91)
Page 91

90 Kaspersky Security for PDA
When Kaspersky Anti-Virus detects a virus, the program handles it as you have
defined in the Configuration screen (see subchapter 5.4.1 on page 88). If you
selected to display the disinfect dialog, the Infected Object dialog box will
appear on your screen (see subchapter 5.4.2.4 on page 92).
Right after your Kaspersky Anti-Virus completes checking for viruses,
performance statistics appears on your screen (see subchapter 5.4.2.5 on
page 93).
55..44..22..22.. MMoonniittoorriinngg HHoottSSyynncceedd oorr BBeeaammeedd ddaattaa
Kaspersky Anti-Virus can automatically scan for viruses in files that have been
beamed into your Palm device or loaded using the HotSync utility. The program
will monitor these files if you pre-define the corresponding settings in the
Configuration screen (see subchapter 88) .
By default, when you install Kaspersky
Anti-Virus the Scan after Sync mode is
enabled. When you start your anti-virus
the first time, the program asks whether
you want to enable the Scan beamed
files mode (see Figure 70).
Figure 70. A dialog box asking whether
you want to enable the Scan beamed files
The program monitors for viruses in data that is uploaded to the Palm using the
HotSync utility only if the Scan after Sync box in the Configuration screen is
checked. The program checks for viruses only in new and modified data.
mode
If during a HotSync operation a new virus definition database is loaded
into your Palm, this database will replace the old one and other loaded
data will be checked for viruses using this new virus definition database.
If during a HotSync operation the new executable module KAVP.PRC is
loaded into your Palm, the program will not check for viruses in the
module or in any other data that was loaded together with it. If the module is infected, the program will detect the virus when it starts to scan
for viruses the next time. However, it will not be able to disinfect or delete itself. In this case, to delete the module you must use the conventional tools on your Palm.
Page 92

Kaspersky Anti-Virus for Palm OS 91
The program monitors for viruses in data that is beamed into the Palm only if the
Scan beamed files box in the Configuration screen is checked. These files are
checked right after you load them from another Palm device.
55..44..22..33.. SSccaannnniinngg ffoorr vviirruusseess oonn ddeemmaanndd
To start scanning for viruses on demand, follow these steps:
1. Select the required location to be checked from the main screen
drop-down list:
• Main memory only – scans for viruses in the main memory of
your Palm device.
• Memory card only – scans for viruses on all expansion cards.
• Main memory & card – scans for viruses in the main memory
of your Palm device as well as on all the expansion cards.
2. Tap on the Scan button in the program main screen.
When started, the program scans all the data located on your Palm device and
the screen shows the number, the check progress bar and the name of the
object that is being checked right at this moment (see Figure 72). The list below
shows names of viruses detected by the program so far.
You can abort scanning by tapping on the Cancel button.
Page 93

92 Kaspersky Security for PDA
Figure 71. Selecting the location to be
checked
55..44..22..44.. WWoorrkkiinngg wwiitthh tthhee ddiissiinnffeecctt ddiiaalloogg
Figure 73. The Infected object dialog box
Select action. This drop-down list allows you to select how your anti-virus
program should handle the infected object:
• Report only – logs the infected objects and the virus it is infected with;
• Delete – deletes the infected object;
Figure 72. Scanning is in progress
If you pre-set the program to display
the disinfect dialog and it detects a
virus while scanning data on your Palm,
the Infected object dialog box will
appear on your screen (see Figure 73).
The box shows the name of the
infected object, the name of the virus
and the list of available choices as to
how this object can be handled:
Page 94

Kaspersky Anti-Virus for Palm OS 93
• Disinfect – disinfects the object (only for those files that can be disin-
fected).
Apply to all infected objects – check this box for your Kaspersky Anti-Virus
to automatically handle all infected objects it detects according to the
choices you’ve just made in the disinfect dialog box.
Tap on the OK button to resume scanning, or tap on the Stop button to abort the
operation.
55..44..22..55.. PPeerrffoorrmmaannccee ssttaattiissttiiccss
When the scanning operation is
completed performance statistics are
displayed on your Palm’s screen (see
Figure 74). You should know that the
term "object" is used here to describe a
base with executable code.
Figure 74. Kaspersky Anti-Virus
performance statistics
To go back to the main screen of Kaspersky Anti-Virus, tap on the Done button,
or use the View Log button to view the log file.
• Object scanned – objects
checked for viruses.
• Infected – infected objects de-
tected.
• Cured – objects disinfected.
• Deleted – infected objects de-
leted
Page 95

94 Kaspersky Security for PDA
55..44..33.. WWoorrkkiinngg wwiitthh yyoouurr lloogg ffiillee
55..44..33..11.. DDiissppllaayyiinngg tthhee lloogg ffiillee
If you pre-set your Kaspersky Anti-Virus to create a log file, you can display this
file and study the program operation log. To do this, select the View log file
command from the Log menu. The program operation log will appear on your
screen (see Figure 75) .
The Clear log button allows you to erase all entries from your log file, and the
Done button allows you to go back to the main screen.
55..44..33..22.. CClleeaarriinngg tthhee lloogg ffiillee
You can clear your Kaspersky Anti-Virus log file as described above or by
selecting the Clear log file command from the Log menu. Before actually
erasing all the entries from your log file the program displays the corresponding
confirmation box (see Figure 76).
Figure 75. The program operation log on
your screen
Figure 76. The clear log confirmation box
Page 96

Kaspersky Anti-Virus for Palm OS 95
55..44..33..33.. BBeeaammiinngg aa lloogg ffiillee
Figure 77. The beam-into confirmation
box
You can beam a log file from one Palm
device to another (this feature is
available in Palm OS 3.x and 4.x only).
To do this, select the Beam log file
command from the Log menu on the
source Palm. On the destination Palm’s
screen you will see the corresponding
Beam dialog box (see Figure 77) .
By tapping on the Yes button in the
dialog box you choose to accept the log
file and the file is beamed into the
destination Palm.
55..44..44.. DDiissppllaayyiinngg tthhee lliisstt ooff kknnoowwnn vviirruusseess
To view a list of currently known computer viruses,
select the Virus List command from the Options menu. A list of viruses
that are described in your virus definition database and that therefore
can be detected will appear on your screen. In addition, you will see the
date when your virus definition database was last updated (see
Figure 78).
To view details on a virus from the list,
highlight it and tap on the Threat Info button (see Figure 79). To scroll
up and down the info page use the buttons .
To exit any of these screens tap on the corresponding Done button.
Page 97
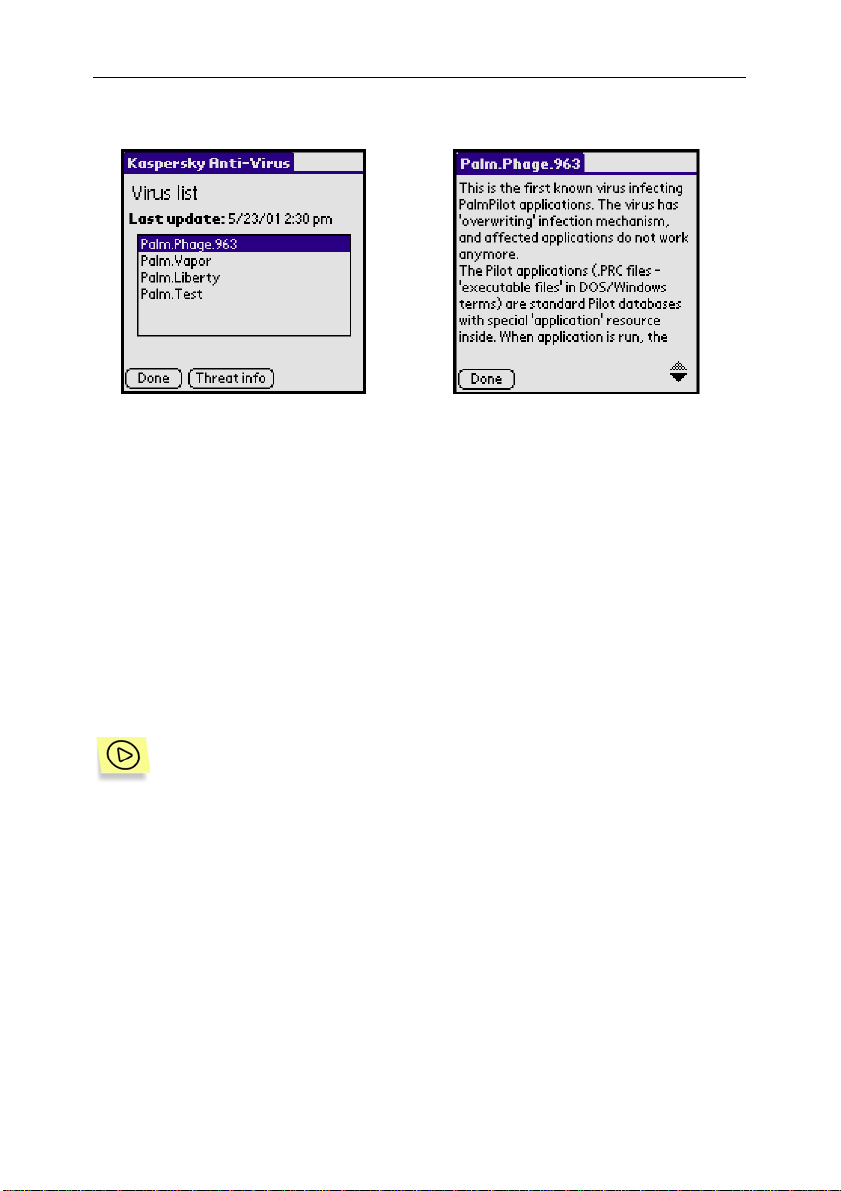
96 Kaspersky Security for PDA
Figure 78. The list of known viruses
Figure 79. Details on the virus
55..44..55.. UUppddaattiinngg yyoouurr aannttii--vviirruuss ddaattaabbaasseess
55..44..55..11.. …… bbyy bbeeaammiinngg aann uuppddaattee ffrroomm aannootthheerr
PPaallmm ddeevviiccee
You can update your virus definition database by loading the new database from
another Palm device.
To beam an anti-virus database from one Palm device to another, select the Beam virus base command from the Options menu on the
source Palm.
On the destination Palm’s screen you will see the corresponding Beam dialog
box (see Figure 80). By tapping on the Yes button in the dialog box you choose
to accept the virus definition database and the file is beamed into the destination
Palm.
If the databases you accepted are older than those on the destination Palm
device, the program displays the corresponding warning (see Figure 81).
Page 98

Kaspersky Anti-Virus for Palm OS 97
Figure 80. The beam-into confirmation box
55..44..55..22.. …… bbyy uussiinngg tthhee HHoottSSyynncc uuttiilliittyy
You can update your virus definition database by loading the new database from
a desktop computer. To do this you need a computer with the pre-installed Palm
Desktop software (see Figure 82) and a Palm cradle:
Figure 81. The program warning
Figure 82. The Palm Desktop main window
Page 99

98 Kaspersky Security for PDA
To update anti-virus databases,
1. Start the Palm Desktop program on your desktop computer and
press the Install button in the program main screen (see Figure 82).
2. Press the Add button in the Install Tool dialog box that appears on
your screen (see Figure 83).
3. A standard file-search dialog will appear on your screen. Select the
location of the new virus definition database and press ОК.
4. Press the Done button in the Install Tool dialog box.
5. Connect the Palm cradle to your desktop computer, place your
Palm device into the cradle and tap on the HotSync button.
Figure 83. The Install Tool dialog box
The data synchronization between your Palm device and the desktop will begin
(see Figure 84). After the data transfer is complete you may remove your Palm
device from the cradle.
To check the date when you last updated your anti-virus database, go to the
Kaspersky Anti-Virus main screen (see subchapter 5.3.1 on page 85).
Page 100

Kaspersky Anti-Virus for Palm OS 99
Figure 84. Uploading data from the desktop to your Palm device
55..44..66.. DDiissppllaayyiinngg pprrooggrraamm ddeettaaiillss aanndd tthhee
lliicceennssee
To review information about your copy of Kaspersky Anti-Virus, select the About
command from the Help menu. You Palm device will display the About
Kaspersky Anti-Virus information box (see Figure 85) containing details of your
program copy. By tapping on the OK button you may return to the main screen. If
you tap on the Info button, the license information box with the license expiration
date will appear on the screen (see Figure 86).
Figure 85. The About Kaspersky Anti-
Virus info box
Figure 86. The License Information box
 Loading...