

Page 1

THE ADMINISTRATOR'S GUIDE
KASPERSKY SECURITY 6.0
FOR MICROSOFT
EXCHANGE SERVER 2007
Page 2

2
Dear User!
Thank you for choosing our product. We hope that this documentation helps you in your work and answers your
questions about this software product.
Attention! This document is the property of Kaspersky Lab: all rights to this document are reserved by the copyright laws
of the Russian Federation, and by international treaties. Illegal reproduction and distribution of this document or parts
thereof will result in civil, administrative or criminal liability in accordance with the laws of the Russian Federation.
Any type of reproduction or distribution of any materials, including in translated form, is allowed only with the written
permission of Kaspersky Lab.
This document and the graphic images it contains may be used exclusively for information, non-commercial or personal
purposes.
This document may be amended without prior notification. For the latest version, please refer to Kaspersky Lab’s website
at http://www.kaspersky.com/docs.
Kaspersky Lab assumes no liability for the content, quality, relevance or accuracy of any materials used in this document
for which the rights are held by third parties, or for the potential damages associated with using such documents.
This document includes registered and non-registered trademarks. All trademarks are the property of their owners.
© Kaspersky Lab 1997-2009
+7 (495) 645-7939,
Tel., fax: +7 (495) 797-8700,
+7 (495) 956-7000
http://www.kaspersky.com
http://support.kaspersky.com
Revision date: 4/23/09
Page 3

3
TABLE OF CONTENTS
INTRODUCTION ........................................................................................................................................................... 6
Overview of the application ...................................................................................................................................... 6
Threats to computer security ................................................................................................................................... 7
Application structure ................................................................................................................................................ 9
Software system requirements ................................................................................................................................ 9
Hardware system requirements ............................................................................................................................... 9
Distribution Kit ........................................................................................................................................................ 10
The end-user license agreement (EULA) ......................................................................................................... 10
Services for registered users ................................................................................................................................. 10
Obtaining information about the application ........................................................................................................... 11
Data sources for independent search .............................................................................................................. 11
Contacting the Sales Department .................................................................................................................... 12
Contacting the Technical Support Service ....................................................................................................... 12
Discussion of Kaspersky Lab applications on the web forum ........................................................................... 13
OPERATION OF THE APPLICATION ......................................................................................................................... 14
Microsoft Exchange Server 2007 roles and corresponding anti-virus configurations ............................................. 14
Security Server architecture ................................................................................................................................... 15
Server protection deployment ................................................................................................................................ 15
Server protection system maintenance .................................................................................................................. 16
Application operation on a cluster of servers ......................................................................................................... 16
INSTALLING, UPDATING AND REMOVING THE APPLICATION ............................................................................. 18
Application installation ........................................................................................................................................... 18
First-time installation ........................................................................................................................................ 19
Step 1. Greeting and License Agreement ................................................................................................... 19
Step 2. Selecting the type of the installation ............................................................................................... 19
Step 3. Selecting application components to be installed ........................................................................... 19
Step 4. Enabling server protection .............................................................................................................. 20
Step 5. Restarting Microsoft Exchange Server services ............................................................................. 20
Step 6. Additional information about the application ................................................................................... 21
Step 7. Copying files ................................................................................................................................... 21
Step 8. Installing the license and completing the setup .............................................................................. 21
Reinstalling the application ............................................................................................................................... 21
Initial Configuration Wizard .................................................................................................................................... 21
Modification of the Security Server settings ........................................................................................................... 24
Removing the application ....................................................................................................................................... 25
GETTING STARTED ................................................................................................................................................... 26
Starting the application .......................................................................................................................................... 26
Application interface............................................................................................................................................... 26
Main window .................................................................................................................................................... 27
Context menu ................................................................................................................................................... 28
Creating the list of managed servers ..................................................................................................................... 29
Connecting the Management Console to the server .............................................................................................. 30
Minimum required configuration ............................................................................................................................. 31
Mail server protection without additional configuration........................................................................................... 31
Page 4

K A S P E R S K Y S E C U R I T Y 6.0 F O R M I C R O S O F T EX C H A N G E S E R V E R 20 0 7
4
Checking application functioning ........................................................................................................................... 32
UPDATING THE KASPERSKY SECURITY DATABASES .......................................................................................... 34
Manual update ....................................................................................................................................................... 35
Automatic database updating ................................................................................................................................ 35
Selecting the updates source ................................................................................................................................. 36
Editing the connection settings .............................................................................................................................. 38
Running updates under a different user account ................................................................................................... 39
ANTI-VIRUS PROTECTION ........................................................................................................................................ 40
Anti-virus protection levels ..................................................................................................................................... 41
Enabling and disabling anti-virus server protection. Selecting the anti-virus protection level ................................ 42
Scanning attachments ........................................................................................................................................... 44
Disabling the scanning of outgoing email............................................................................................................... 46
Selecting actions to be performed on objects ........................................................................................................ 47
Background scan ................................................................................................................................................... 51
Configuring anti-virus protection performance ....................................................................................................... 53
BACKUP STORAGE ................................................................................................................................ ................... 56
Viewing the backup storage ................................................................................................................................... 57
Viewing properties of a backed-up object ................................................................................................ .............. 59
Quick filtering of objects ......................................................................................................................................... 59
Backup storage filters ............................................................................................................................................ 60
Restoring objects from backup storage.................................................................................................................. 63
Sending objects for analysis .................................................................................................................................. 63
Deleting objects from backup storage .................................................................................................................... 64
Configuring the backup storage settings ................................................................................................................ 64
NOTIFICATIONS ......................................................................................................................................................... 66
Creating a notification template ............................................................................................................................. 67
Viewing and editing notification parameters ........................................................................................................... 70
Customizing general notification settings ............................................................................................................... 71
PREVENTING VIRUS OUTBREAKS .......................................................................................................................... 73
Enabling and disabling the virus outbreak prevention rules ................................................................................... 74
Setting the virus activity level threshold ................................................................................................................. 75
Configuring the response to a virus outbreak ........................................................................................................ 76
Configuring notifications about virus outbreaks ..................................................................................................... 77
REPORTS ................................................................................................................................................................... 79
Generating reports ................................................................ ................................................................ ................. 81
Creating a report generation task ..................................................................................................................... 82
Viewing and configuring a report generation task ............................................................................................ 86
Viewing reports ...................................................................................................................................................... 88
APPLICATION EVENT LOGS ................................................................ ..................................................................... 90
Configuring the diagnostics level ........................................................................................................................... 91
Editing log settings ................................................................................................................................................. 92
MANAGING KASPERSKY SECURITY LICENSES .................................................................................................... 93
License information ................................................................................................................................................ 95
Installing a license ................................................................................................................................................. 96
Removing a license ............................................................................................................................................... 96
License-related notifications .................................................................................................................................. 97
Page 5

T A B L E O F C O N T E N T S
5
Unprotected storage areas .................................................................................................................................... 97
FREQUENTLY ASKED QUESTIONS ................................................................................................ ......................... 99
TABLE OF MACRO SUBSTITUTION ........................................................................................................................ 101
GLOSSARY ............................................................................................................................................................... 103
KASPERSKY LAB ..................................................................................................................................................... 107
INDEX ....................................................................................................................................................................... 108
LICENSE AGREEMENT ........................................................................................................................................... 112
Page 6

6
IN THIS SECTION
Overview of the application ............................................................................................................................................... 6
Threats to computer security ............................................................................................................................................. 7
Application structure .......................................................................................................................................................... 9
Software system requirements .......................................................................................................................................... 9
Hardware system requirements ......................................................................................................................................... 9
Distribution Kit ................................................................................................................................................................. 10
Services for registered users ........................................................................................................................................... 10
Obtaining information about the application .................................................................................................................... 11
INTRODUCTION
The main source of viruses today is the global Internet, and the majority of virus infections occur via email attachments.
The overwhelming majority of computers have an email client program installed, with an address book which malicious
programs can potentially use to find new victims. As a result, the user of an infected computer will send infected email
messages to his or her contacts. If infected files, due to someone's negligence, enter the commercial mailing lists of large
companies, the virus can affect hundreds or even thousands of direct recipients, who infect their contacts in turn.
It is acknowledged that information has become an important asset, to be guarded and protected. At the same time, to
gain profit through the use of the information, it must be available to the company's employees, clients and partners. This
raises the issue of data security, and in particular: the protection of corporate mail servers against external threats; the
prevention of virus outbreaks within corporate networks, and the filtering out of unsolicited email.
OVERVIEW OF THE APPLICATION
Kaspersky Security 6.0 for Microsoft Exchange Server 2007 (hereinafter referred to as Kaspersky Security or the
application) protects mailboxes, public folders and relayed email located on Microsoft Exchange Server 2007 (hereinafter
Microsoft Exchange Server) against malicious programs. The application scans all email traffic passing through the
protected Microsoft Exchange Server.
Kaspersky Security performs the following functions:
Scanning and analysis of incoming and outgoing email messages for the presence of malicious objects. This
analysis processes the body and attachments of the email message. The application can be configured to
disinfect or delete a malicious object, or to add a warning message to the email message.
Saving backup copies of scanned objects. Before attempting to disinfect or delete an object, a copy is stored in
a special storage to enable subsequent restoration if required. Configurable filters allow the easy location of
stored objects.
Notifying the sender, the recipient and the system administrator about messages that contain malicious objects.
Maintaining event logs, and creating regular reports about the application’s operation and the status of anti-virus
protection. The application allows the creation of reports with a user-specified level of detail, either at a specified
interval or upon request.
Page 7
I N T R O D U C T I O N
7
Some application features are only available when the protected Microsoft Exchange Server functions in
certain roles (see section «Microsoft Exchange Server 2007 roles and corresponding anti-virus
configurations» on page 14).
Henceforth in the text of this Administrator's Guide the term "virus" will be used as a generic term to include
viruses, Trojan Horses, and worms. A particular type of malware will be mentioned only when it is required.
Detecting virus outbreaks as they emerge, automatically taking emergency steps and sending notifications. The
application identifies attempts to mass-mail infected messages, either from the Internet or from computers within
the corporate network.
Configuring application settings depending on the intensity and the nature of the traffic, as well as the
characteristics of the server’s installed hardware, including the amount of RAM, CPU speed, and number of
processors.
Updating the Kaspersky Security databases, either automatically or in manual mode. The anti-virus databases
can be updated from the Kaspersky Lab's ftp and http servers, or from a local/network folder that contains the
latest set of updates.
Re-scanning messages for the presence of new viruses, using a schedule. This task is performed as a
background scan, and has only a small effect on the mail server’s performance.
Creating the list of protected storage areas, which offers additional flexibility in regards to license restrictions on
the number of protected mail boxes.
Managing licenses.
THREATS TO COMPUTER SECURITY
There are many different types of threats that can affect your computer. This section gives you a general overview of
them.
Worms
This category of malicious programs propagates by exploiting vulnerabilities in the operating system. This group was
named because of their ability to tunnel from one computer to another, using networks, email, and other channels.
This ability allows worms to spread extremely quickly.
When a worm penetrates a computer, it calculates the IP addresses of other locally accessible computers, and
sends copies of itself to these computers. In addition, worms also utilize data from email client program’s address
books. Some of these malicious programs occasionally create work files on system disks, but they can run without
using any system resources at all, except for RAM.
Viruses
Viruses are programs which infect other files, adding their own code to them to gain control of the infected files when
they are opened. This simple definition explains the fundamental action performed by a virus, which is infection.
Trojans
Trojans are programs which perform unauthorized actions on infected computers, such as erasing information on
hard drives, making the system “freeze”, and stealing confidential information. Trojan Horses are not strictly viruses
as they do not infect programs or data, and are unable to propagate independently into computers. They are
distributed by malicious users as "useful" software. However, the damage inflicted by Trojans can greatly exceed
that from a traditional virus attack.
Recently, worms have become the commonest type of malware, followed by viruses and Trojans. Some malicious
computer programs have characteristics of two or even all three of the above categories.
Page 8

K A S P E R S K Y S E C U R I T Y 6.0 F O R M I C R O S O F T EX C H A N G E S E R V E R 20 0 7
8
The following potentially dangerous types of malware have also become widespread:
Adware
Adware comprises programs which are secretly included in a program, usually freeware, to display advertising
messages. The advertising component is situated in the program’s interface. Frequently, adware programs take
other actions: for instance, they can gather the users' personal information and send it back to the developer; they
can change the web browser's settings (browser's home page, search page, security levels, and so on); they can
create traffic that is not controlled by the user. This activity may lead to a security breach and to direct financial
losses.
Riskware
Riskware is potentially dangerous software which does not itself perform any malicious functions, but which, since it
contains security breaches and errors, can be used by intruders as an auxiliary component of a malicious program.
Under some conditions, having such programs on your computer can put your data at risk. These programs include,
for instance, some remote administration utilities, keyboard layout toggles, IRC client programs, FTP servers, and
some utilities used for stopping or hiding running processes.
Spyware
Spyware obtains unauthorized access to the user's computer, and secretly gathers information about an individual
user or organization. It usually provides no clue to its existence, and often escapes detection. As a rule, the goal of
spyware is to:
keep track of a user's actions;
gather information about the contents of the hard drive; this usually involves scanning some folders and the
system registry to compile a list of software installed on the computer;
gather information on the quality of the internet connection, such as the bandwidth and modem speed.
Jokes
Joke software does not inflict direct damage to the computer, but displays messages stating that the damage has
already been done, or will be done under certain conditions. These programs often warn the user of non-existent
dangers, such as imminent hard disk formatting (although no formatting is actually taking place) or the detection of
viruses in uninfected files.
Automatic dialers (PornWare)
Pornware programs make modem connections to various pay-per-visit Internet resources, generally pornographic in
nature.
Hack Tools
Hacker tools are programs used by hackers to obtain unauthorized access to your computer. They include illegal
vulnerability scanners, password cracking programs, and other types of programs for cracking network resources or
penetrating a system.
Other malicious programs
This category includes programs created to implement Denial of Service attacks on remote servers, to hack other
computers, and programs that are part of the development environment for malicious programs. These programs
include hack tools, virus builders, vulnerability scanners, password cracking programs, and other types of software
used for obtaining unauthorized access to the system under attack.
Page 9

I N T R O D U C T I O N
9
Malware is distributed mainly via email and the Internet, although a memory stick, floppy disk or CD can also be a source
of infection. Therefore, the comprehensive anti-virus protection extends beyond simple regular scans for viruses, and
includes the more complex task of real-time computer protection from malicious software.
APPLICATION STRUCTURE
Kaspersky Security comprises these components:
The Security Server which scans email traffic for viruses, performs anti-virus database updates, ensures the
integrity of the application and its data storage, and enables administrative services for remote management and
configuration.
The Management Console which provides the user interface for managing the application’s administrative
services, and enables configuration of the application and management of the server component. The
management module is implemented as an extension of the Microsoft Management Console (MMC).
SOFTWARE SYSTEM REQUIREMENTS
The Security Server requirements:
Microsoft Small Business Server 2008 Standard / Microsoft Small Business Server 2008 Premium / Microsoft
Essential Business Server 2008 Standard / Microsoft Essential Business Server 2008 Premium / Microsoft
Windows Server 2008 x64 Enterprise Edition / Microsoft Windows Server 2008 x64 Standard Edition / Microsoft
Windows Server 2003 x64 R2 Enterprise Edition / Microsoft Windows Server 2003 x64 R2 Standard Edition /
Microsoft Windows Server 2003 x64 Enterprise Edition / Microsoft Windows Server 2003 x64 Standard Edition.
Microsoft Exchange Server 2007 x64 or Microsoft Exchange Server 2007 x64 Service Pack 1, should be
deployed in one of the appropriate Microsoft Exchange Server 2007 configurations (see section «Microsoft
Exchange Server 2007 roles and corresponding anti-virus configurations» on page 14).
Microsoft Core XML Services (MSXML) 6.0.
Management Console requirements:
Microsoft Small Business Server 2008 Standard / Microsoft Small Business Server 2008 Premium / Microsoft
Essential Business Server 2008 Standard / Microsoft Essential Business Server 2008 Premium / Microsoft
Windows Server 2008 / Microsoft Windows Server 2003 x64 (with Service Pack 2 installed) / Microsoft Windows
Server 2003 x64 R2 Standard Edition / Microsoft Windows Server 2003 x64 R2 Enterprise Edition / Microsoft
Windows XP x64 (with Service Pack 2 installed) / Microsoft Windows Vista x64 / Microsoft Windows Server 2003
R2 Standard Edition / Microsoft Windows Server 2003 R2 Enterprise Edition / Microsoft Windows Vista /
Microsoft Windows Server 2003 (with Service Pack 2 installed) / Microsoft Windows XP (with Service Pack 3
installed).
Microsoft Management Console 3.0.
HARDWARE SYSTEM REQUIREMENTS
The hardware requirements of the Security Server are identical to the requirements of Microsoft Exchange Server 2007.
Depending upon the application settings and its mode of operation, considerable disk space may be required for backup
storage and other service folders - for instance, the default size of the backup storage folder can be up to 1024 MB.
Management Console hardware requirements:
Intel Pentium 300 MHz or higher;
256 MB free RAM (recommended);
Page 10

K A S P E R S K Y S E C U R I T Y 6.0 F O R M I C R O S O F T EX C H A N G E S E R V E R 20 0 7
10
Before breaking the seal on the installation disk envelope, carefully read through the EULA.
100 MB disk space for the application files.
DISTRIBUTION KIT
You can purchase the boxed version of Kaspersky Anti-Virus from our resellers, or purchase it online from Internet shops,
such as the eStore section of http://www.kaspersky.com.
If you buy the boxed version of the program, the package will include:
A sealed envelope with the installation CD containing the program files and documentation in PDF format.
A User Guide in printed form (if this item was included in the order) or a Product Guide.
The program activation code, attached to the installation CD envelope.
The end-user license agreement (EULA).
If you buy Kaspersky Anti-Virus from an online store, you will download the product from the Kaspersky Lab website
(Downloads Product Downloads). You can download the User Guide from the Downloads Documentation section. You
will be sent an activation code by email after your payment has been received.
THE END-USER LICENSE AGREEMENT (EULA)
The End-User License Agreement is a legal agreement between you and Kaspersky Lab that specifies the terms on
which you may use the software you have purchased.
Read the EULA through carefully!
If you do not agree with the terms of the EULA, you can return your boxed product to the reseller from whom you
purchased it and be reimbursed the amount you paid for the program, provided that the envelope containing the
installation disk is still sealed.
By opening the sealed installation disk, you accept all the terms of the EULA.
SERVICES FOR REGISTERED USERS
Kaspersky Lab Ltd. offers an extensive service package to all legally registered users of Kaspersky Security, enabling
them to boost the application's performance.
After purchasing a license, you become a registered user and, during the period of your license, you will be provided with
these services:
hourly updates to the application databases and updates to the software package;
support on issues related to the installation, configuration and use of the purchased software product. Services
will be provided by phone or via email;
information about new Kaspersky Lab products and about new viruses appearing worldwide. This service is
available to users who subscribe to Kaspersky Lab's newsletter on the Technical Support Service web site.
Page 11

I N T R O D U C T I O N
11
Support on issues related to the performance and the use of operating systems, or other non-Kaspersky
technologies, is not provided.
IN THIS SECTION
Data sources for independent search .............................................................................................................................. 11
Contacting the Sales Department .................................................................................................................................... 12
Contacting the Technical Support Service ....................................................................................................................... 12
Discussion of Kaspersky Lab applications on the web forum. ......................................................................................... 13
OBTAINING INFORMATION ABOUT THE APPLICATION
If you have any questions regarding purchasing, installing or using the application, answers are readily available.
Kaspersky Lab provides many sources of information about the application, from which you can select the most
convenient source, depending on the urgency or importance of your question.
DATA SOURCES FOR INDEPENDENT SEARCH
Information about the application is available at these locations, which are discussed below:
application page at Kaspersky Lab's web site;
application page at the Technical Support web site (in the Knowledge Base);
online help system;
documentation.
Application page at Kaspersky Lab's web site
http://www.kaspersky.com/security_ms_exchange_07
On this page you can find general information about the application and its features. You can purchase the
application or renew your license in our online store.
Application page at the Technical Support web site (in the Knowledge Base)
http://support.kaspersky.com/exchange/security6.0
This page contains articles published by the Technical Support experts.
These articles contain useful information, guidelines, and answers to frequently asked questions about the purchase,
installation, and use of the application. They are grouped in topics, such as “Work with key files”, “Database
updates”, or “Troubleshooting”. The articles provide information not only about this application, but also about other
Kaspersky Lab's products, and contain news from the Technical Support Service in general.
Online help system
The application package includes a complete help file which describes all aspects of working with the application,
including: application setup; configuring protection for email accounts, public folders and transit mail on Microsoft
Exchange Server 2007; scanning email for the presence of malware; configuring notifications, and other tasks.
Page 12

K A S P E R S K Y S E C U R I T Y 6.0 F O R M I C R O S O F T EX C H A N G E S E R V E R 20 0 7
12
If you are not yet a registered user of Kaspersky Lab's applications you can fill out a registration form on
page (https://support.kaspersky.com/en/personalcabinet/registration/form/). During registration enter the
activation code for your application or the key file name.
To open the help file, select Help in the Help menu of the product console.
If you have a question about a specific application window, you can use the context help.
To open the context help, open the window or the tab that interests you, and press the <F1> button.
Documentation
The Administrator's Guide describes how to work with the application, prevent virus outbreaks, generate reports,
and many other aspects.
The PDF file containing this document is included in the application package (installation CD).
You can download the documentation file from the application page at Kaspersky Lab's web site.
CONTACTING THE SALES DEPARTMENT
If you have any questions regarding selecting or purchasing the application, or extending your license, please phone the
Sales Department in our Central Office in Moscow at:
+7 (495) 797-87-00, +7 (495) 645-79-39, +7 (495) 956-70-00
The service is provided in English or Russian.
Alternatively, you can forward your question to our Sales Department by email at sales@kaspersky.com.
CONTACTING THE TECHNICAL SUPPORT SERVICE
If you have encounter problems while using Kaspersky Security, first check if the solution to your problem can be found in
this documentation, particularly in the section Frequently asked questions (see section «Frequently asked questions»
on page 99).
If you cannot find the solution to your problem and you have already purchased the application, please contact Kaspersky
Lab's Technical Support Service by phone or via the Internet.
Technical Support Service specialists will answer your questions regarding the installation and use of the application, and
will assist you in neutralizing the consequences of malware activity if your computer has already become infected.
Before contacting the Technical Support Service, please read the Technical Support Terms and Conditions
(http://support.kaspersky.com/support/rules).
Email request to the Technical Support Service (for registered users)
You can send your question to the Technical Support Service specialists by filling out a Helpdesk web form at
(http://support.kaspersky.com/helpdesk.html).
You can send your question in Russian, English, German, French, or Spanish.
To send an email request, you should specify in it your customer ID, received during registration at the Technical
Support Service web site, and your password.
You will receive a Technical Support service specialist's response to your emailed question, at the email address you
have specified in your question and in your Personal Cabinet (https://support.kaspersky.com/en/PersonalCabinet).
Describe the problem you have encountered in the request web form in as much detail as possible. In the mandatory
fields specify the following:
Page 13

I N T R O D U C T I O N
13
Request type. Questions most frequently asked by users are grouped into special topics, for example "Product
installation/removal problem" or "Virus scan/removal problem". If you have not found an appropriate topic, select
"General Question".
Application name and version number.
Request text. Please describe your problem with all necessary detail.
Customer ID and password. Enter the client number and the password which you received during registration
at the Technical Support service website.
E-mail address. The Technical Support service specialists will use this email address to reply to your request.
Technical support by phone
If you have an urgent problem, you can always call the Technical Support Service in your city. While asking for
English (http://support.kaspersky.com/support/support_local) or international
(http://support.kaspersky.com/support/international) technical support, please remember to provide the necessary
information (http://support.kaspersky.com/support/details). This will help our specialists assist you with maximum
efficiency.
DISCUSSION OF KASPERSKY LAB APPLICATIONS ON THE WEB
FORUM
If your question does not require an urgent answer, you can discuss it with Kaspersky Lab's specialists and other users in
our forum located at http://forum.kaspersky.com.
In this forum you can view existing topics, leave your comments, create new topics, and use the search engine.
For example, you can discuss strategies for using the application in a corporate context, or configuration options.
Page 14

14
IN THIS SECTION
Microsoft Exchange Server 2007 roles and corresponding anti-virus configurations ...................................................... 14
Security Server architecture ............................................................................................................................................ 15
Server protection deployment .......................................................................................................................................... 15
Server protection system maintenance ........................................................................................................................... 16
Application operation on a cluster of servers ................................................................................................................... 16
OPERATION OF THE APPLICATION
Kaspersky Security scans and, if possible, disinfects all incoming and outgoing email messages, as well as messages
stored on the server. The application analyzes the message body and attached files in any format.
The detection of malicious programs is based on records contained in Kaspersky Security's databases. These databases
are regularly updated by Kaspersky Lab, and uploaded to Kaspersky Lab's update servers. Additionally, the application
uses a special analysis facility called a heuristic analyzer which can detect previously unknown viruses.
The application scans objects received by the server in real time. The user cannot open and view a new message before
it is scanned.
The application processes each object using the rules specified by the administrator for each type of object. For instance,
an infected object can be disinfected, deleted, or replaced by a notification text. The administrator may also specify that
the application will deliver messages to the user containing infected objects, although it will change the object name (by
adding information about the virus) and the object extension.
Prior to modifying an object, the application can save a copy of it in a special backup location to allow subsequent
restoration, or for forwarding to Kaspersky Lab for analysis.
The application sends notifications about events as they occur to the anti-virus security administrator, the recipient, and
the sender of the infected message, and also places a record of the event in the application log file and in the Microsoft
Windows event log.
If the virus outbreak detection facility is enabled, the application will register the virus activity level, and will automatically
take emergency measures to prevent the outbreak. It can also send notifications about the threat of a virus outbreak, or
record the event in the Microsoft Windows event log and the Kaspersky Security application log files.
MICROSOFT EXCHANGE SERVER 2007 ROLES AND
CORRESPONDING ANTI-VIRUS CONFIGURATIONS
Successful operation of Kaspersky Security requires that the protected Microsoft Exchange Server 2007 should be
deployed at least in one of the following roles:
Mailbox.
Hub Transport.
Edge Transport.
If Microsoft Exchange Server is deployed as a Mailbox, Kaspersky Security interacts with it using the VSAPI 2.6
standard. In other cases the Transport Agents technology is used. Please note that in the Hub Transport role, objects
are first scanned by Kaspersky Security and then processed by Microsoft Exchange Transport Agents. In the Edge
Page 15

O P E R A T I O N O F T H E A P P L I C A T I O N
15
Transport role, the procedure is reversed - the objects are first processed by Microsoft Exchange Transport Agents and
then by Kaspersky Security.
To avoid object rescanning on each role, check the Optimize performance (see the section «Configuring anti-virus
protection performance» on page 53).
SECURITY SERVER ARCHITECTURE
The server component of the application, the Security Server, consists of the following main subsystems:
The E-mail Interceptor intercepts objects arriving at the Microsoft Exchange Server and forwards them to the
anti-virus scan subsystem. It is integrated into the Microsoft Exchange Server processes using either VSAPI 2.6
or Transport Agents, according to the configuration selected during Microsoft Exchange Server deployment (see
section «Microsoft Exchange Server 2007 roles and corresponding anti-virus configurations» on page 14).
The Anti-Virus performs anti-virus scans of objects. This component includes several processes, with one anti-
virus kernel per process. The anti-virus scan subsystem also includes storage for temporary objects while
scanning objects in RAM. The storage is located in the working folder Store in the installation folder, and must
be excluded from the scan scope of any anti-virus applications installed in the corporate network.
The Internal Application Management and Integrity Control Module is launched in a separate process and is
a Microsoft Windows service. The service is called Kaspersky Security 6.0 for Microsoft Exchange Server 2007,
and is launched automatically when either the first message is being transferred, when the Management
Console attempts to connect to the Security Server and after the initial configuration wizard has completed. This
service does not depend on the state of the Microsoft Exchange Server (that is, whether it is started or stopped),
so that he application can be configured even if the Microsoft Exchange Server is stopped. For correct operation
of the application, the Internal Application Management Module must always be running; stopping this service
manually is not recommended.
SERVER PROTECTION DEPLOYMENT
To create a system using Kaspersky Security to protect email servers against malicious software:
1. Install the Security Server component on all protected Microsoft Exchange servers. The installation must be
performed from the distribution kit individually for each server.
Management console is installed together with Security server. It provides centralized access to all Security
servers of Kaspersky Security from the single administrator's workplace. If necessary, Management console can
be installed separately on a computer, belonging to the enterprise network. If several administrators are working
jointly, the Management Console can be installed on each administrator's computer.
2. Create a list of managed servers (see section «Creating the list of managed servers» on page 29).
3. Connect the Management Console to the servers (see section «Connecting the Management Console to the
server» on page 30).
4. Configure the anti-virus protection system for each server:
Configure the anti-virus update settings (see section «Updating the Kaspersky Security databases» on page
34).
Verify the correctness of the settings and of the application operation using the EICAR test "virus" (see
section «Checking application functioning» on page 32).
Configure the notification system which issues notifications about registered events during the application's
operation (see section «Notifications» on page 66).
Configure the event logs (see section «Editing log settings» on page 92).
Edit the report parameters (see section «Generating reports» on page 81).
Page 16
K A S P E R S K Y S E C U R I T Y 6.0 F O R M I C R O S O F T EX C H A N G E S E R V E R 2 0 0 7
16
The anti-virus protection of the server will be enabled automatically when Microsoft Exchange Server is
started.
The procedure for installing Kaspersky Security on a cluster of servers differs from the usual procedure in
that:
Before installation of Kaspersky Security is completed on all cluster nodes, the clustered mailbox
servers (CMS) must not be moved between different cluster nodes.
In the course of installation of Kaspersky Security to all cluster nodes, all installation folders must
have the same location.
The user under whose account installation is performed, should have write permissions to the Active
Directory configuration.
The Data Migration Wizard is installed on a cluster of servers, but does not allow migration of the application
data.
Edit the settings for detecting virus outbreaks and sending corresponding notifications (see section
«Preventing Virus outbreaks» on page 73).
SERVER PROTECTION SYSTEM MAINTENANCE
Keeping the server protection system up-to-date involves:
periodic updating of the anti-virus databases;
receiving and processing notifications about the detection of objects containing malware, and about threats of
virus outbreaks;
regular review of reports about the application’s operation, and about the state of mail server anti-virus
protection;
processing and cleaning backup storage.
APPLICATION OPERATION ON A CLUSTER OF SERVERS
Kaspersky Security 6.0 for Microsoft Exchange Server 2007 supports the following types of clusters:
single copy cluster (SCC);
cluster continuous replication (CCR).
The application automatically identifies the server cluster during installation. This means that the order in which the
application is installed to different cluster nodes does not matter.
After installation to a cluster of servers, all application settings are stored in the Active Directory, and all cluster nodes use
those parameters. However, parameters which refer to the physical server are set for each cluster node manually. These
parameters are edited in the Anti-virus protection window on the Performance tab (see section «Configuring anti-virus
protection performance» on page 53).
Kaspersky Security automatically defines active cluster nodes, and applies the Active Directory settings to them. When a
cluster node moves from active to passive mode, a notification about disconnection from the server will appear (the
notification will appear only if the Management Console is open and connected to the server).
The scan results for each cluster node will be displayed only for those messages which were forwarded by the Microsoft
Exchange virtual server to this cluster node. The scan results include:
Page 17

O P E R A T I O N O F T H E A P P L I C A T I O N
17
the backup storage content;
information presented in reports;
the set of events registered in the application log.
the values of the virus outbreak counters.
The procedure for uninstalling Kaspersky Security from a cluster of servers differs from the usual procedure in that:
Clustered mailbox servers (CMS) must not be moved between nodes before application removal is completed.
In the process of uninstalling the application from the active cluster node, the cluster resource of the Microsoft
Exchange Information Store, and all resources of the Microsoft Exchange Database Instance which depend
upon it, are stopped. Once the removal procedure is complete, the original status of these services will be
automatically restored.
Page 18

18
To install, update and remove Kaspersky Security, the user must have local administrator's rights on the
server. To use Microsoft Windows Vista and Microsoft Windows Server 2008 with the User Account Control
function (UAC) enabled, the user must have extended local administrator's rights.
IN THIS SECTION
Application installation ..................................................................................................................................................... 18
Initial Configuration Wizard .............................................................................................................................................. 21
Modification of the Security Server settings ..................................................................................................................... 24
Removing the application ................................................................................................................................................ 25
Information about installing Kaspersky Security on a cluster of servers can be found in the corresponding
section (see section «Application operation on a cluster of servers» on page 16).
INSTALLING, UPDATING AND REMOVING
THE APPLICATION
Before starting installation of the application, make sure that your computer’s software and hardware meet the
requirements (see section «Hardware system requirements» on page 9 and section «Software system requirements» on
page 9).
APPLICATION INSTALLATION
The application installation program is designed similarly to the standard Microsoft Windows Setup Wizard, which will
guide you through the steps, and which can be navigated using the Back and Next buttons. The setup wizard will
complete its work after the Finish button is clicked. The Cancel button can be used at any time to exit the wizard.
The setup wizard will allow you to install some or all of Kaspersky Security’s program components, including interceptors
for the different Microsoft Exchange Server roles, and the Management Console. The installed interceptors together
comprise the Security Server. This configuration is recommended while initial creating the Exchange server’s anti-virus
protection system. You can select either complete or custom installation of the application, or to repair an existing
Kaspersky Security installation.
After the Management Console is installed, a group Kaspersky Security 6.0 for Microsoft Exchange Server 2007 and
an application icon will appear in the Run/Programs menu in your computer.
The Security Server will be installed on your computer as a service, with the following attributes:
name – Kaspersky Security 6.0 for Microsoft Exchange Server 2007;
startup type - manual;
account - Local system.
The Security Server’s properties can be viewed using standard Microsoft Windows administration tools. Information about
the operation of the Security Server is registered in the Microsoft Windows event log on the computer on which the
Security Server is installed.
Page 19
I N S T A L L I N G , U P D A T I N G A N D R E M O V I N G T H E A P P L I C A T I O N
19
The procedure used to install the application from the distribution kit downloaded from the Internet is identical
to the procedure used to install the application from the installation CD.
FIRST-TIME INSTALLATION
To install Kaspersky Security on your computer, run the executable file on the installation CD included in the distribution
package. There follows a detailed discussion of each step of the application installation.
STEP 1. GREETING AND LICENSE AGREEMENT
The installation process begins with a greeting window, followed by a window containing the License Agreement.
Please, read the License Agreement carefully, and accept the terms and conditions contained therein to proceed with the
installation.
STEP 2. SELECTING THE TYPE OF THE INSTALLATION
During this step you must choose the type of installation. You can choose either Typical or Custom installation. Custom
installation allows you to select the specific components you want to install.
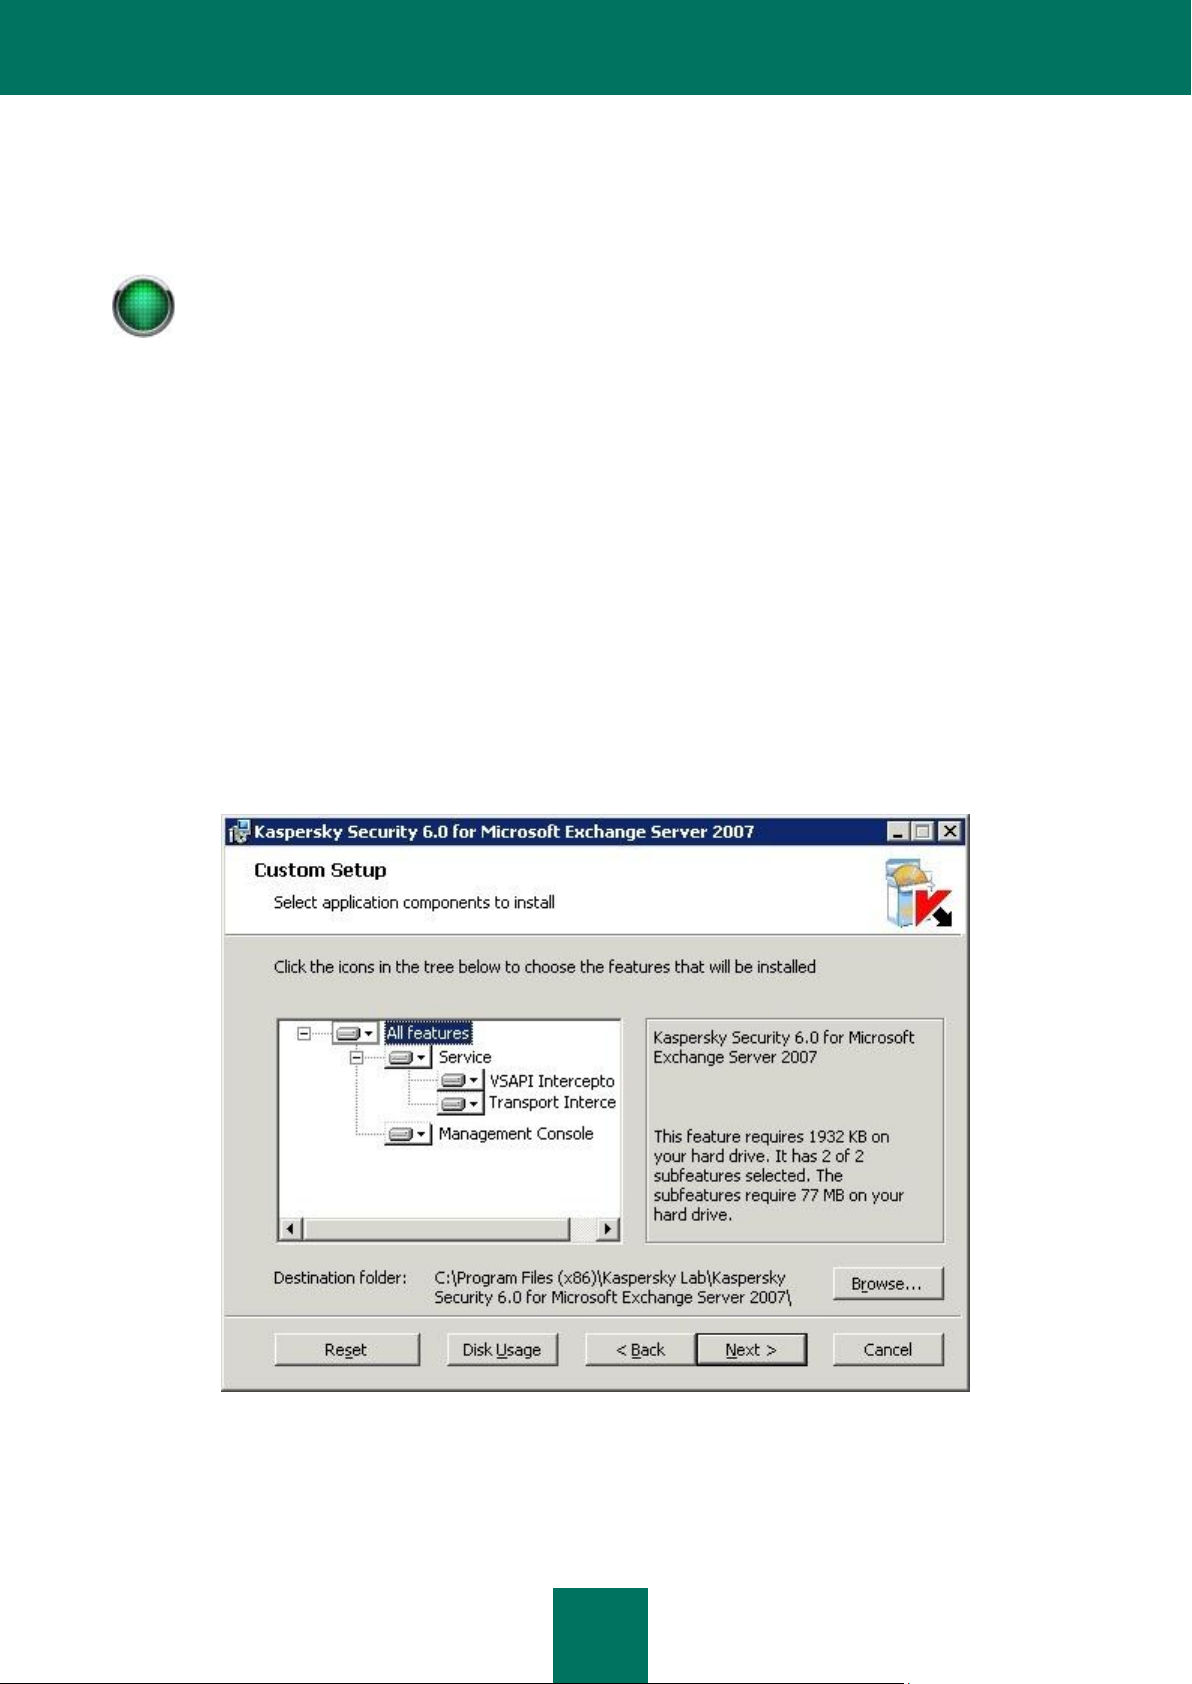
STEP 3. SELECTING APPLICATION COMPONENTS TO BE INSTALLED
If you selected custom installation in the previous step, you must specify which application components will be installed
on your computer in the dialog box shown (see figure below).
Figure 1: Selecting components for the installation
The set of components available for installation will differ depending on whether Microsoft Exchange Server 2007 is
installed, and how it is configured.
Page 20

K A S P E R S K Y S E C U R I T Y 6.0 F O R M I C R O S O F T EX C H A N G E S E R V E R 20 0 7
20
If Microsoft Exchange Server 2007 is deployed as both Mailbox and Hub Transport, the following components will be
available for installation:
Interceptor for Mailbox role.
Interceptor for transport configurations.
Management Console.
If Microsoft Exchange Server 2007 is deployed as Edge Transport or Hub Transport only, the following components will
be available for installation:
Interceptor for transport configurations.
Management Console.
If Microsoft Exchange Server 2007 is deployed as a Mailbox only, the following components will be available for
installation:
Interceptor for Mailbox role.
Management Console.
In all other cases, only the Management Console is available for installation.
Select the components to be installed.
The full name for the default installation folder is displayed in the lower part of the window. To change the installation
folder, click the Browse button and specify another folder.
Using the Reset button, you can undo any changes, and return to the default settings.
Clicking on the Disk Usage button opens a dialog box showing the free disk space on local drives, and the disk space
required to install the selected components.
STEP 4. ENABLING SERVER PROTECTION
If you selected at least one interceptor in the previous step, you can choose to enable automatic anti-virus server
protection immediately after the wizard completes. Alternatively, you can do it later manually using the Management
Console (see section «Starting the application» on page 26).
If the application’s default parameter values (see section «Mail server protection without additional configuration » on
page 31) meet your requirements, check the Enable anti-virus protection immediately after application installation
box.
By default, all mailbox storage areas and public folders on the server will be selected as protected storage areas. If the
maximum number of protected email boxes quoted by your license is less than the number of storage areas created on
the server, some of the mailboxes should be moved to unprotected storage areas before protection is enabled (see
section «Unprotected storage areas» on page 97).
If you wish to edit the default settings, disable automatic activation of anti-virus protection.
STEP 5. RESTARTING MICROSOFT EXCHANGE SERVER SERVICES
If earlier in the installation you selected the installation of at least one interceptor, during this step you will see a
notification about restarting the Microsoft Exchange Transport service and the Microsoft Exchange Information Store.
During the installation procedure these services will be automatically stopped, and then restarted.
Page 21
I N S T A L L I N G , U P D A T I N G A N D R E M O V I N G T H E A P P L I C A T I O N
21
Email messages will not be scanned for the presence of malicious objects and database updates will not be
available, before the license is installed.
The Initial Configuration Wizard will be launched immediately after application installation is complete (see
section «Initial Configuration Wizard» on page 21).
All parameters will return to the default settings when the application is repaired!
STEP 6. ADDITIONAL INFORMATION ABOUT THE APPLICATION
This step displays information about using third-party anti-virus software with this application. Press the Next button to
continue.
STEP 7. COPYING FILES
To proceed with the installation, press the Install button in the wizard window. This will start the process of copying the
application files to your computer.
STEP 8. INSTALLING THE LICENSE AND COMPLETING THE SETUP
After the installation is complete, the license installation window will appear.
The license is a file in special format which confirms your right to use the application. The license contains all service
information required for the full-featured functionality of the application, and reference data for the user, namely:
support information (who is providing support and how you can get help);
restriction on the number of mail boxes which can be protected;
the license name, number, and expiration date.
You must install the key to ensure the application’s full functionality. To do this, press the Add button and select the key
file in the standard Microsoft Windows file selection window.
If, at the time of application installation, you do not have a key (for example, you ordered it from Kaspersky Lab via the
Internet but have not received it yet), you can install it later using the Management Console when you run the application
for the first time.
REINSTALLING THE APPLICATION
Reinstallation of Kaspersky Security may be required if the initial installation of the application was cancelled or incorrect,
or if during program operation the integrity of executable files was compromised.
To reinstall the application, run the executable file from the distribution package and select the Restore option in the
wizard window that will open. This will reinstall Kaspersky Security using the same set of installation components as in
the previous installation.
INITIAL CONFIGURATION WIZARD
The Initial Configuration Wizard starts immediately after application installation. It allows modification of the basic
notification parameters and the connection settings required for application updates.
Page 22
K A S P E R S K Y S E C U R I T Y 6.0 F O R M I C R O S O F T EX C H A N G E S E R V E R 20 0 7
22
The Initial Configuration Wizard only starts up after installation of the Security Server.
The first wizard window contains a brief introduction to the application. Press the Next button to begin configuring the
application.
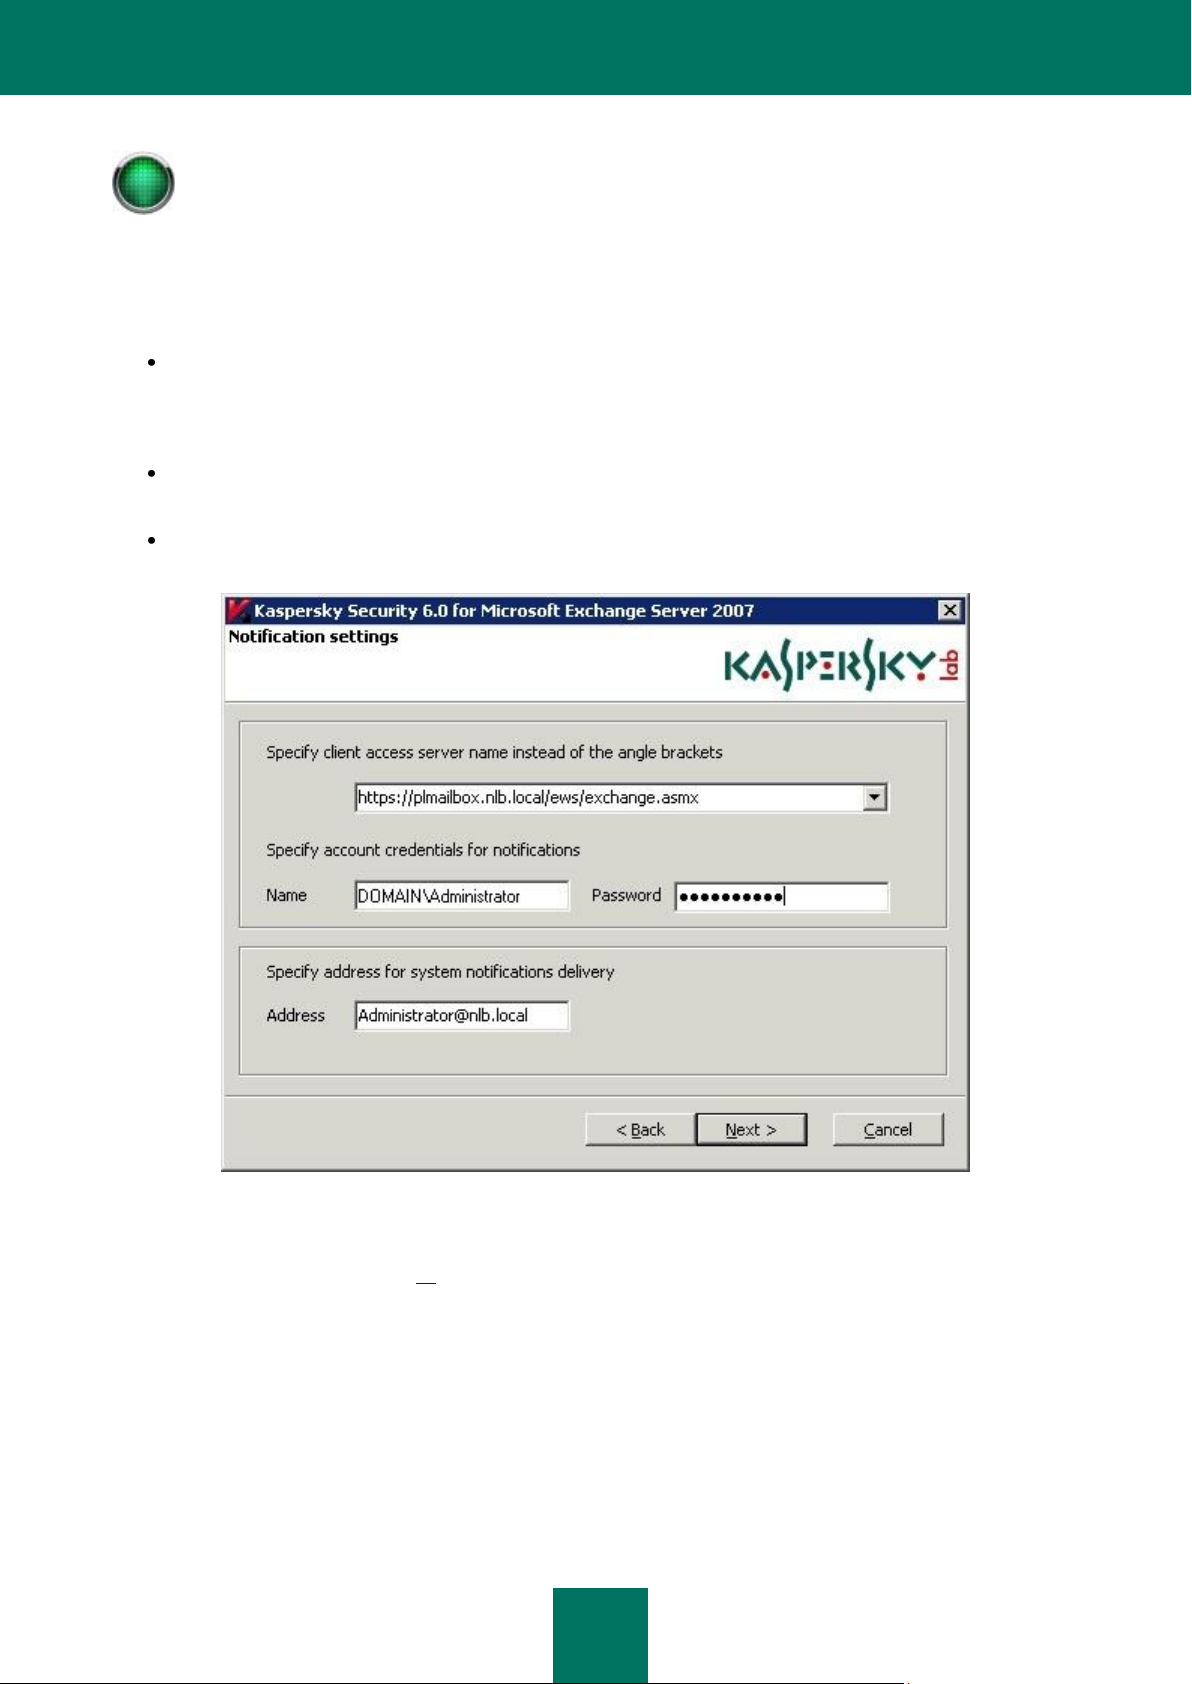
Use the Notifications settings (see figure below) to specify:
The address of the web service that will be used to send notifications. By default, in the Microsoft Exchange
Server it is the following address:
https://<client_access_server>/ews/exchange.asmx
The name and password of the account that will be used to send notifications. The user must have a mailbox on
the Microsoft Exchange Organization, and be able to access it via Outlook Web Access (OWA).
The email address(es) to which the application will send any notifications not related to detection of dangerous
objects.
Figure 2: Initial Configuration Wizard. Configuring notification settings.
You can modify these settings later in the General settings window on the Notifications tab (see section «Customizing
general notification settings» on page 71). To continue, press the Next button.
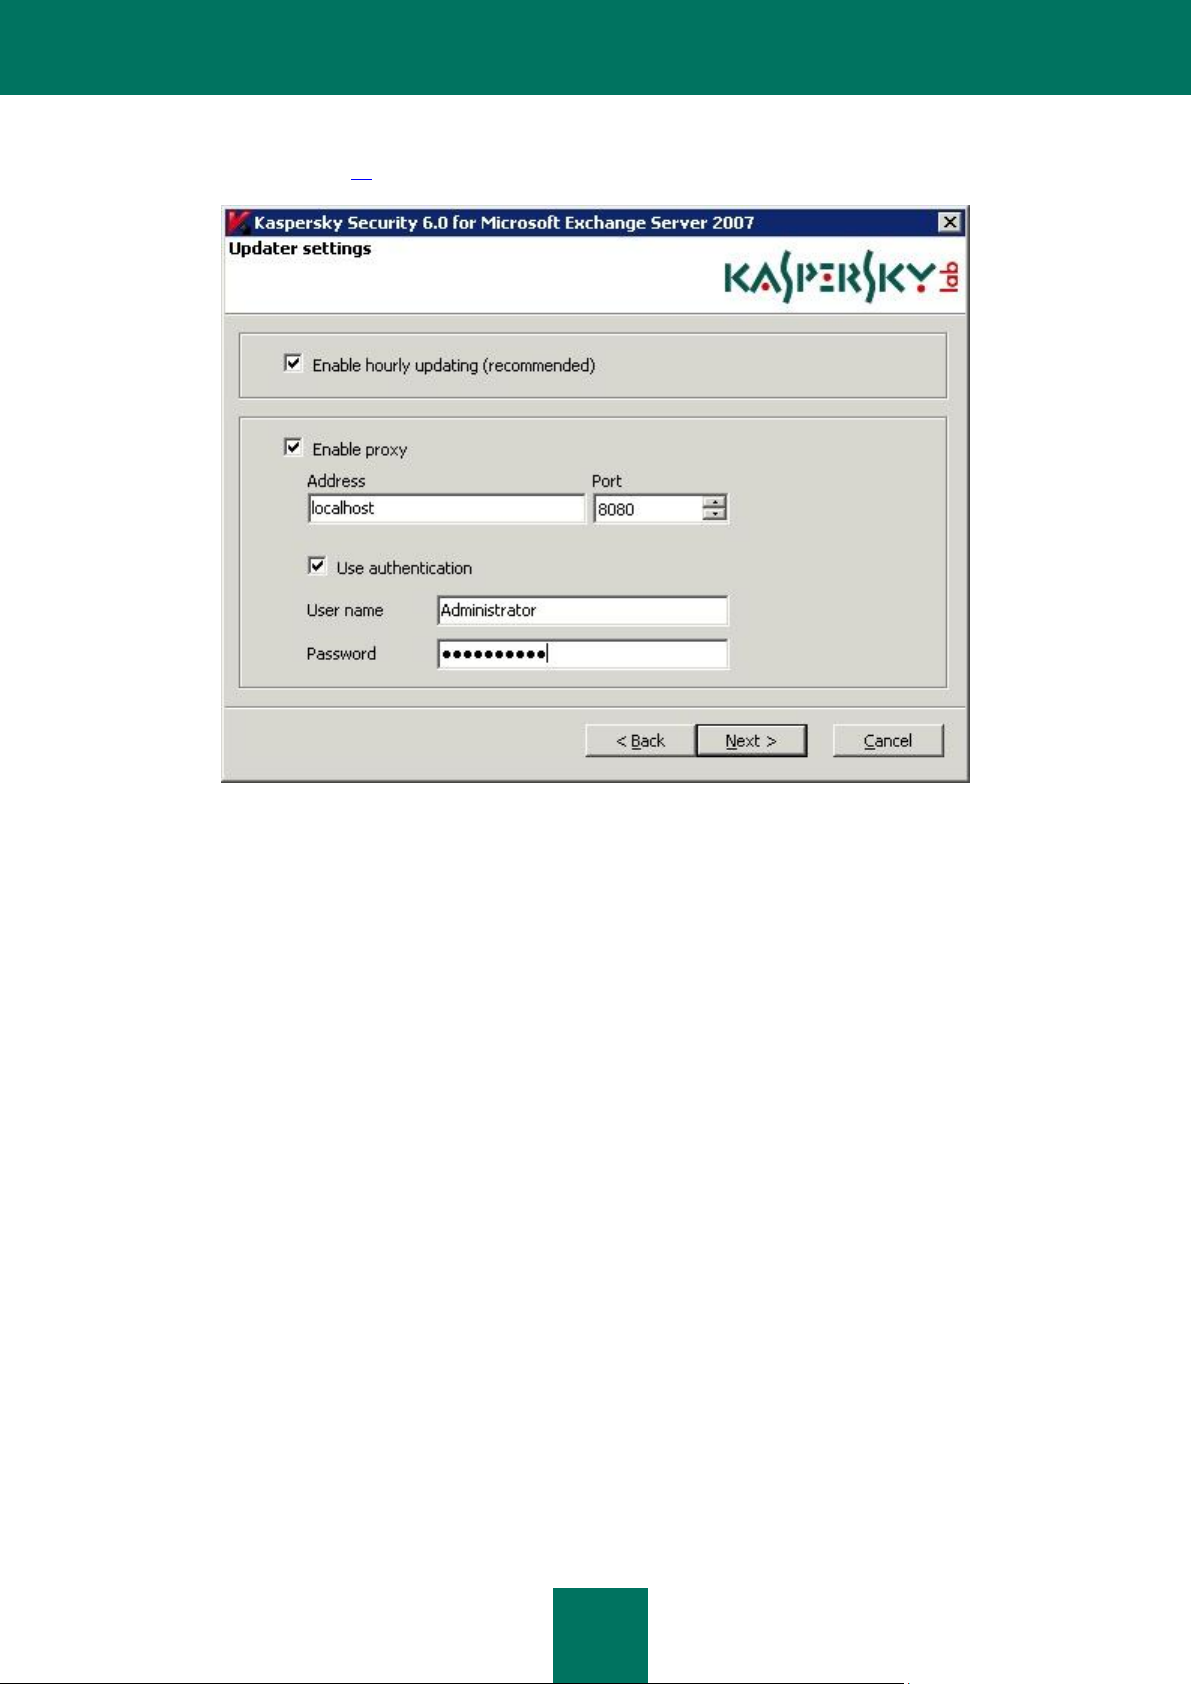
In the Updater settings window (see the figure below) the Enable hourly updating (recommended) box is checked by
default. If you wish to disable hourly updates, uncheck this box.
If you connect to the Internet using a proxy server, define its address and port and the user authentication parameters, if
necessary.
Page 23
I N S T A L L I N G , U P D A T I N G A N D R E M O V I N G T H E A P P L I C A T I O N
23
You can modify these settings later in the Update window, on the Connection settings tab (see section «Editing the
connection settings» on page 38). To continue, press the Next button.
Figure 3: Initial Configuration Wizard. Configuring the update settings
Press the Finish button in the last wizard window. The application will start using the specified settings.
Page 24
K A S P E R S K Y S E C U R I T Y 6.0 F O R M I C R O S O F T EX C H A N G E S E R V E R 2007
24
If the disk on which the application data folder is located has insufficient free space, the application’s
performance may be impaired. In particular, message scanning and delivery may be stopped.
The migration wizard does not work on a cluster of servers (see section «Application operation on a cluster of
servers» on page 16).
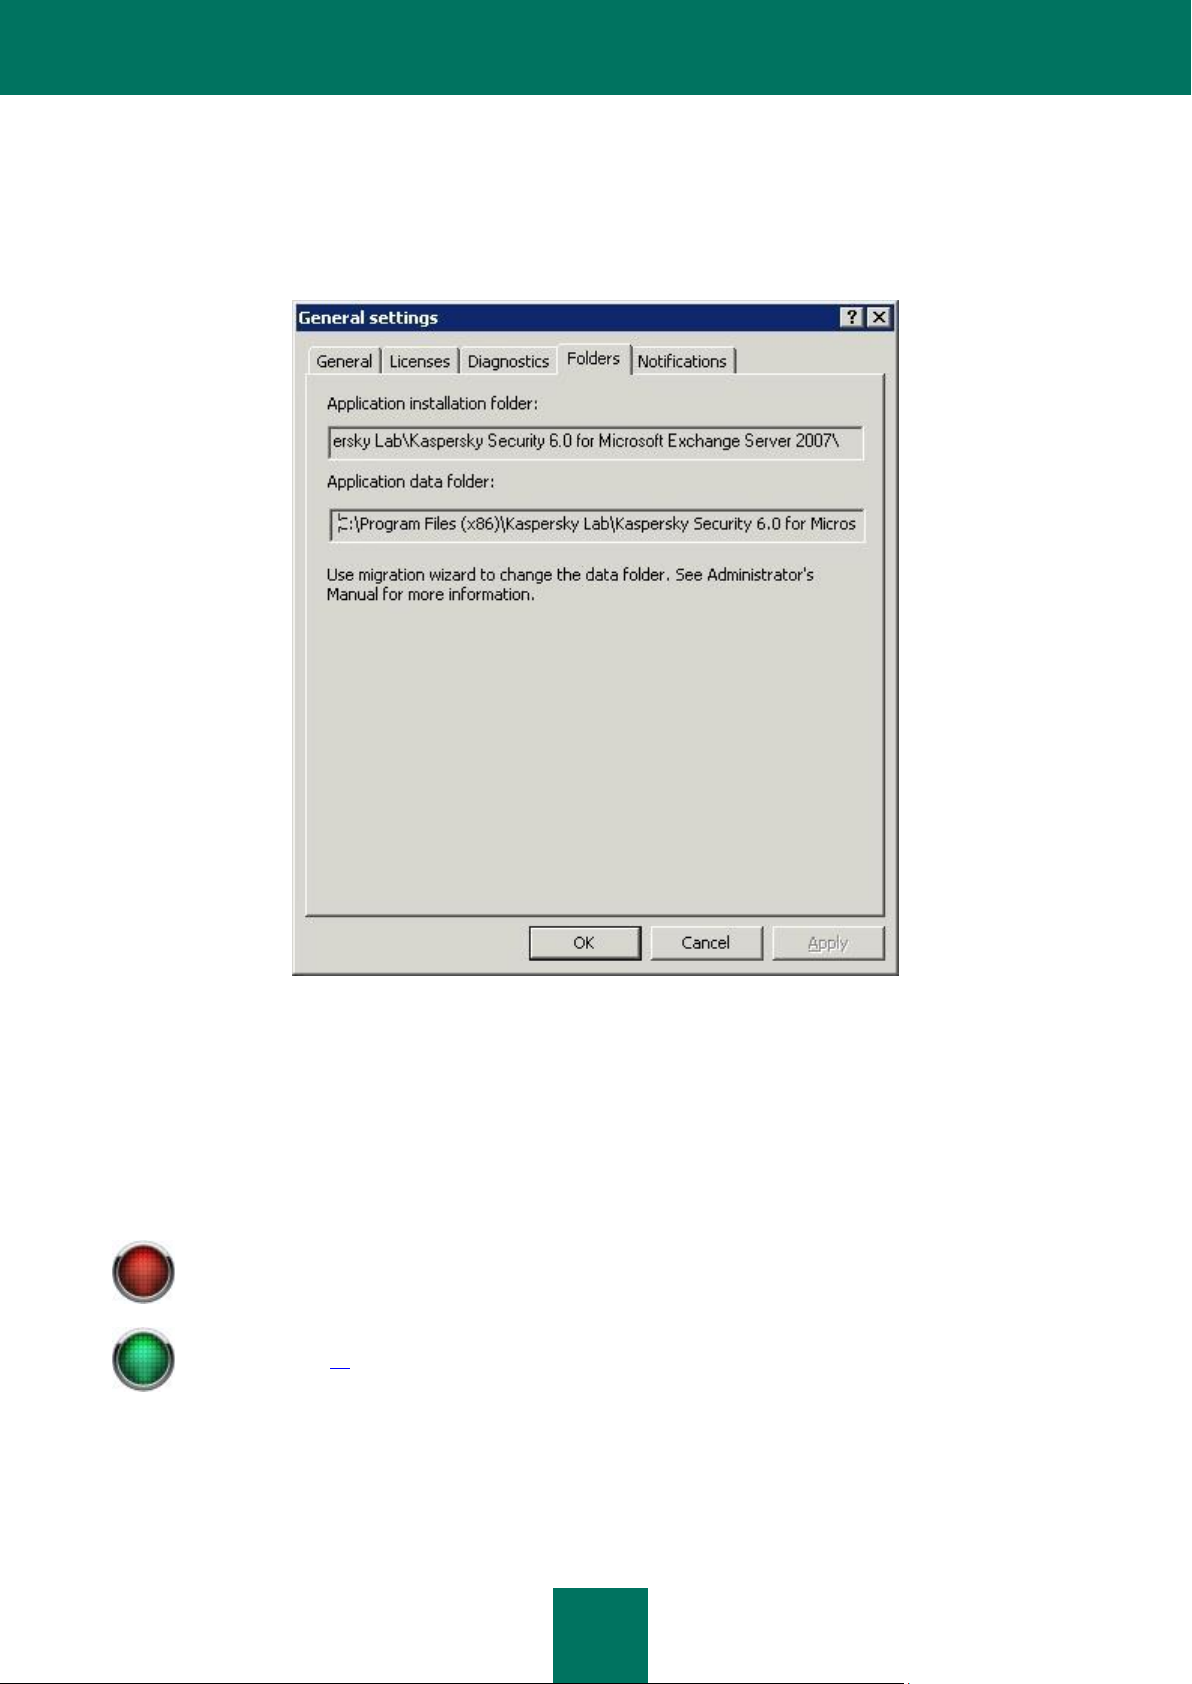
MODIFICATION OF THE SECURITY SERVER SETTINGS
By default, the folder containing the Security Server data (quarantine, log files, reports, statistics) is located within the
destination folder specified during the application installation on the server. The folder paths can be found in the Folders
tab of the General settings window (see figure below).
Figure 4: Destination folder and the application data folder
If you specify an alternative path for the application data folder, the data will be moved to that folder. To do this, select the
Kaspersky Security 6.0 for Microsoft Exchange Server 2007 program group in the Programs menu, and choose Data
Migration Wizard.
The wizard will display a warning message that Kaspersky Security, and some Microsoft Exchange 2007 services, will
have to be stopped. You will be offered to specify the new application data folder, which must be an empty folder on a
local hard drive, and cannot be a subfolder of the current folder. The hard drive should provide enough disk space for the
backup storage (the default size of this folder is up to 1024 MB) and other service folders.
Page 25

I N S T A L L I N G , U P D A T I N G A N D R E M O V I N G T H E A P P L I C A T I O N
25
Information about removing the application from a cluster of servers can be viewed in the correspondent
section (see section «Application operation on a cluster of servers» on page 16).
REMOVING THE APPLICATION
You can remove the application from your computer using the standard Windows Add/Remove Programs tool, or using
the application distribution kit. This will remove all installed components (i.e. both the Security Server and the
Management Console) from your computer.
Page 26

26
IN THIS SECTION
Starting the application .................................................................................................................................................... 26
Application interface ........................................................................................................................................................ 26
Creating the list of managed servers ............................................................................................................................... 29
Connecting the Management Console to the server ....................................................................................................... 30
Minimum required configuration ...................................................................................................................................... 31
Mail server protection without additional configuration .................................................................................................... 31
Checking application functioning ..................................................................................................................................... 32
GETTING STARTED
This chapter contains the necessary information about starting the components of Kaspersky Security and the
Management Console interface.
STARTING THE APPLICATION
The application’s server component is started automatically when Microsoft Exchange Server loads. If anti-virus
protection of the server is enabled, it will start immediately after the Microsoft Exchange Server is launched.
The application’s operation can be controlled from the administrator's workstation, through Management Console.
To start Management Console,
select the Management Console item in the program group menu Kaspersky Security 6.0 for Microsoft
Exchange Server 2007, from the standard Start / Programs Microsoft Windows menu.
APPLICATION INTERFACE
The user interface of the application is provided by the Microsoft Management Console (MMC) component. The
Management Console is a dedicated isolated facility integrated into MMC.
Page 27
G E T T I N G S T A R T E D
27
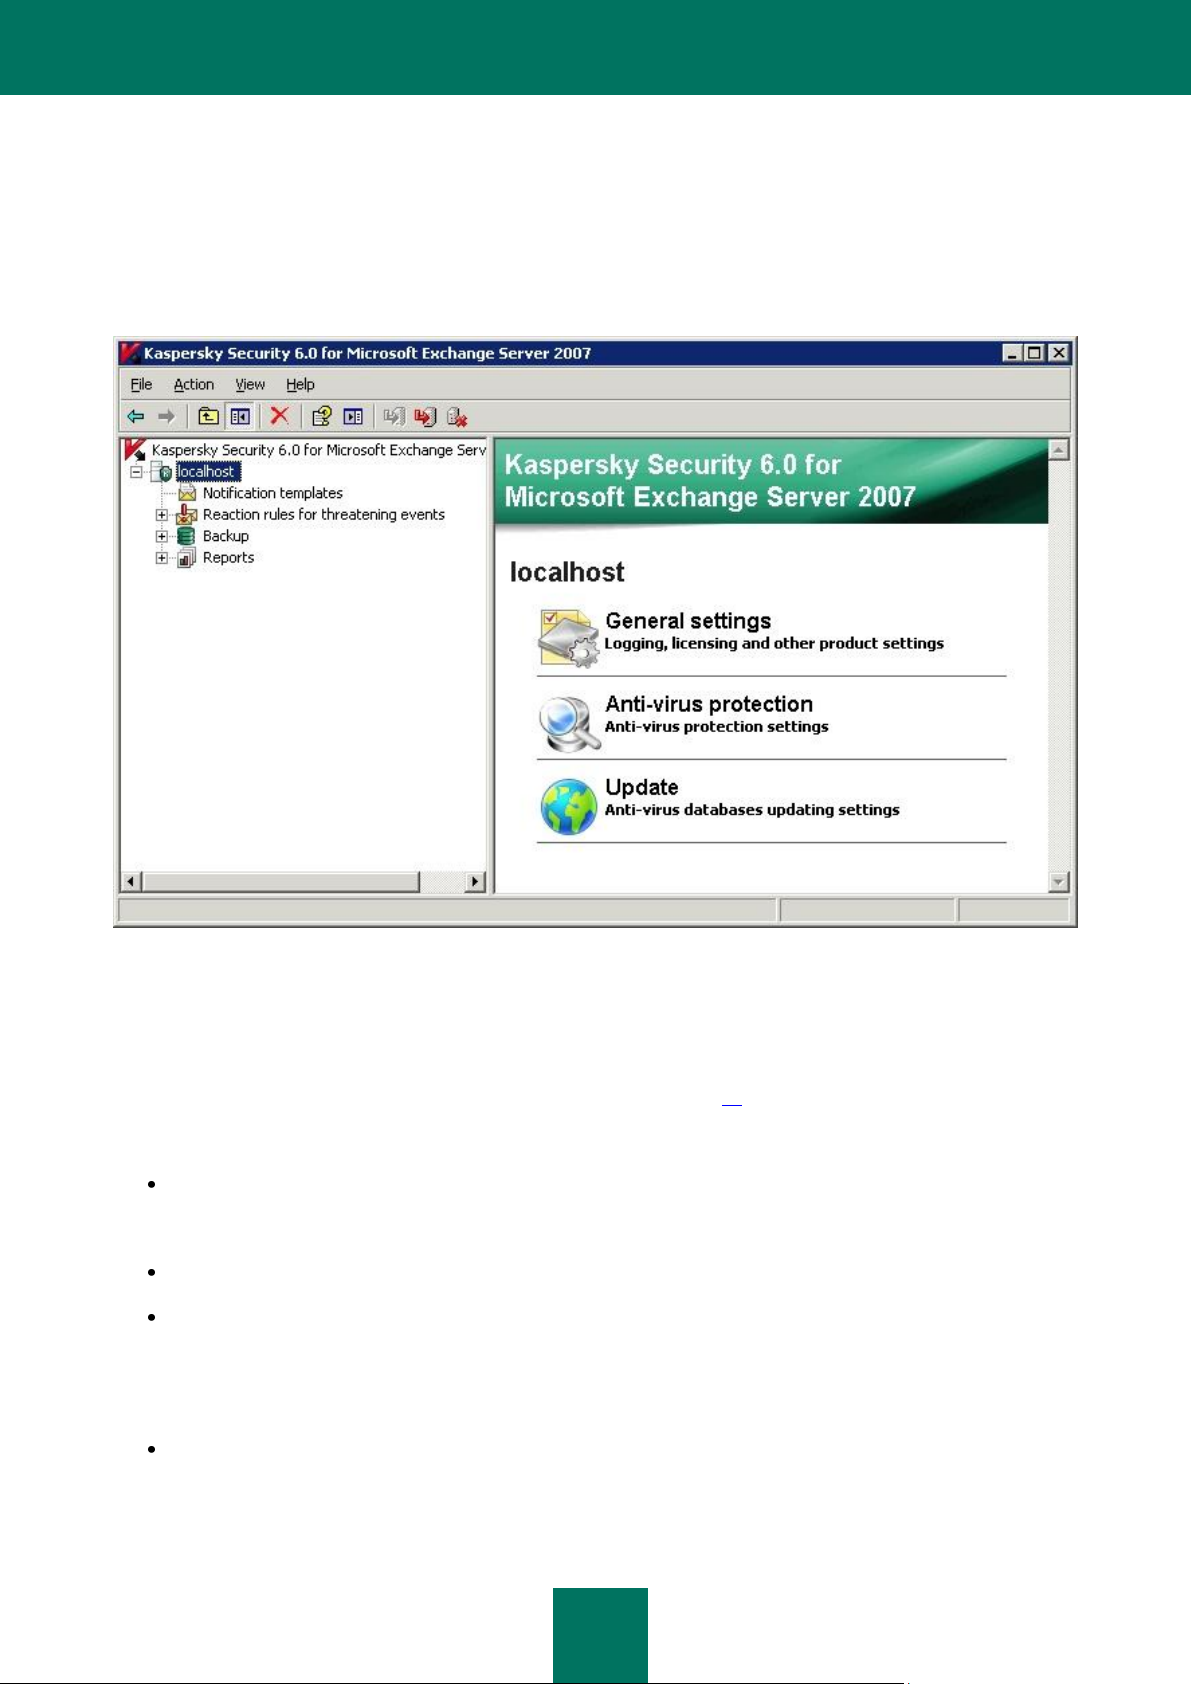
MAIN WINDOW
The main Management Console window (see figure below) contains a menu, a toolbar, a view pane and a results pane.
The menu provides management functions for files and windows, as well as access to the help system. The buttons on
the toolbar allow direct access to some frequently accessed items of the main menu. The view pane displays the
Kaspersky Security 6.0 for Microsoft Exchange Server 2007 namespace in the form of a console tree, while the
results pane lists the elements of the selected object in the console tree.
Figure 5: Main application window
The Kaspersky Security 6.0 for Microsoft Exchange Server 2007 namespace will contain a node for each of the
servers managed via the console. The namespace does not contain any elements immediately after the installation of the
Management Console.
A newly added (see section «Creating the list of managed servers» on page 29) server will appear in the console tree as
a <Server name> node. When the server is selected in the console tree (see figure above) the results pane will display
hyperlinks which can be used to control and configure the application on that server.
General settings - used for viewing general application settings, including license details and information about
the licenses and installed key files, and for actions including renewing the license, configuring the application
operation diagnostics, and also editing the server settings related to sending notifications.
Anti-virus protection - used for viewing and editing the settings for managed server anti-virus protection.
Update - used to edit the settings for the Kaspersky Security database update service, to set up an automatic
update schedule and to update the databases manually.
The <Server name> node will include nested folders, each of which is used for managing a particular function of the
application:
Notification templates - for configuring notifications about infected or suspicious objects detected during an
anti-virus scan.
Page 28
K A S P E R S K Y S E C U R I T Y 6.0 F O R M I C R O S O F T EX C H A N G E S E R V E R 20 0 7
28
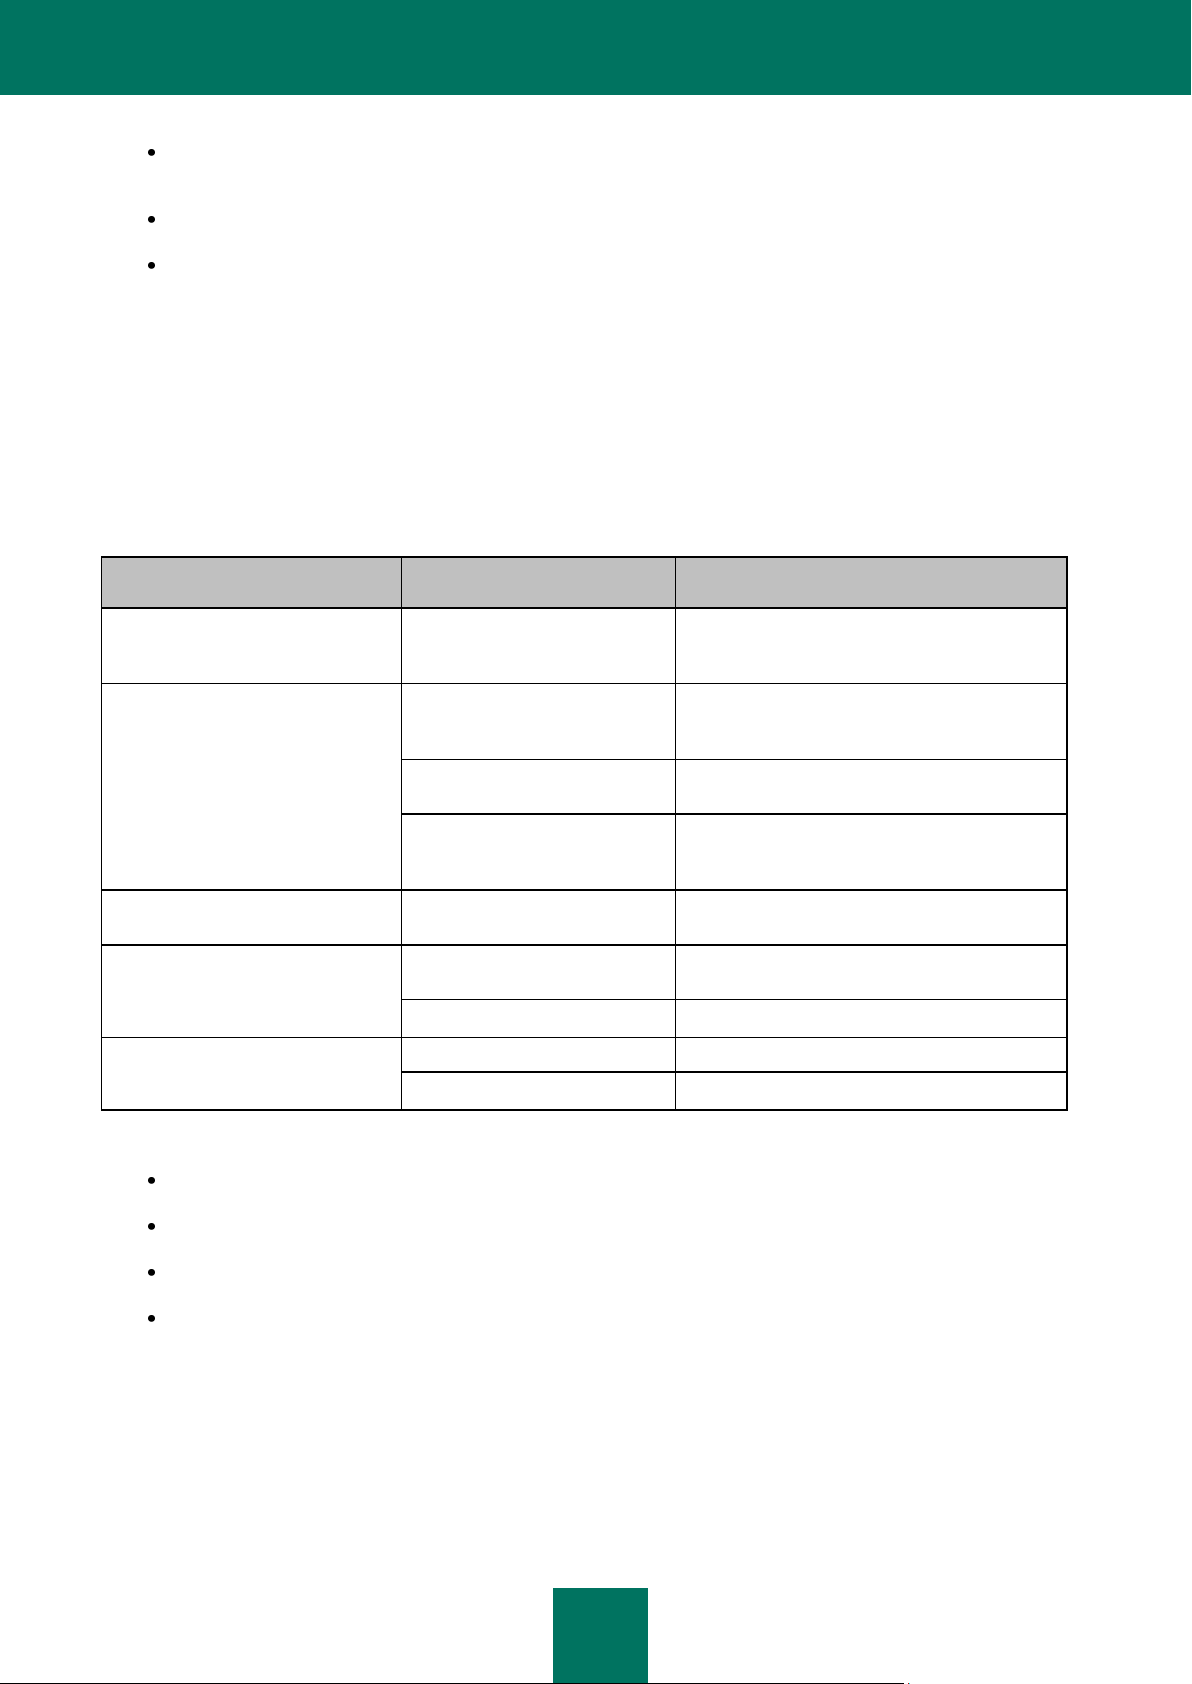
OBJECT
COMMAND
PURPOSE
Kaspersky Security 6.0 for
Microsoft Exchange Server 2007
Add server
Add a new Exchange server with Security
Server installed to the list of servers managed
via the console.
<Server name>
Disconnect from server
Disconnect an Exchange server with Security
server installed from the Management
Console.
Connect to server
Connect an Exchange server with Security
server installed to the Management Console.
Delete
Remove an Exchange server from the list of
servers that have their Security servers
managed via the Management Console.
Notification templates
New notification
Create and configure a new notification
template.
Backup storage
New filter
Create and configure a new filter used to
search for objects in backup storage.
Properties
Edit the general settings for backup storage.
Reports
New task
Creating a new task of report generation.
Properties
Configuring the statistics parameters.
Reaction rules for threatening events - for specifying criteria used to identify virus outbreaks, editing settings
for related notifications, and specifying the application's automatic responses.
Backup - for working with the backup storage of objects; includes the list of objects currently stored.
Reports - for managing reports, through a list of templates used to create reports about application operation
and about email traffic scanned by the application.
CONTEXT MENU
Each category of objects in the console tree has its own context menu, which opens by right-clicking on the object.
In addition to the standard Microsoft Management Console (MMC) commands, this context menu contains commands
used for handling particular objects. The list of objects and the corresponding set of commands which are accessible via
the context menu are provided in the table below.
Table 1. Context menu commands
Additional context menu commands are provided for:
notification templates;
virus outbreak detection rules;
backup copy storage objects;
report generation tasks.
The Enable command allows you to enable creation of notifications for objects in the Notification templates folder
based on a template. You can disable notification creation, using the Disable command.
You can enable the virus outbreaks detection rule in the Reaction rules for threatening events folder, using the Enable
command. You can disable notification creation, using the Disable command.
Page 29

G E T T I N G S T A R T E D
29
The Save to disk command allows you to obtain the original copy of an object from the Backup folder that was saved
before processing by the application. Additionally, the Send file for analysis command is available for objects with the
status suspicious, which sends an object from backup storage for analysis to Kaspersky Lab's specialists.
A report for the selected task is created for objects in the Reports folder using the Create report command, which can
be opened using the View report command.
CREATING THE LIST OF MANAGED SERVERS
To control the application via the console, the Microsoft Exchange server on which the Security Server component is
installed must be added to the list of managed servers. You can add either the local computer or any Exchange server
within the network to this list. A connection between the Management Console and the Kaspersky Security application
can also be established immediately after adding a server.
To add a server to the list of managed servers:
1. Select the Kaspersky Security 6.0 for Microsoft Exchange Server 2007 node in the console tree, and select
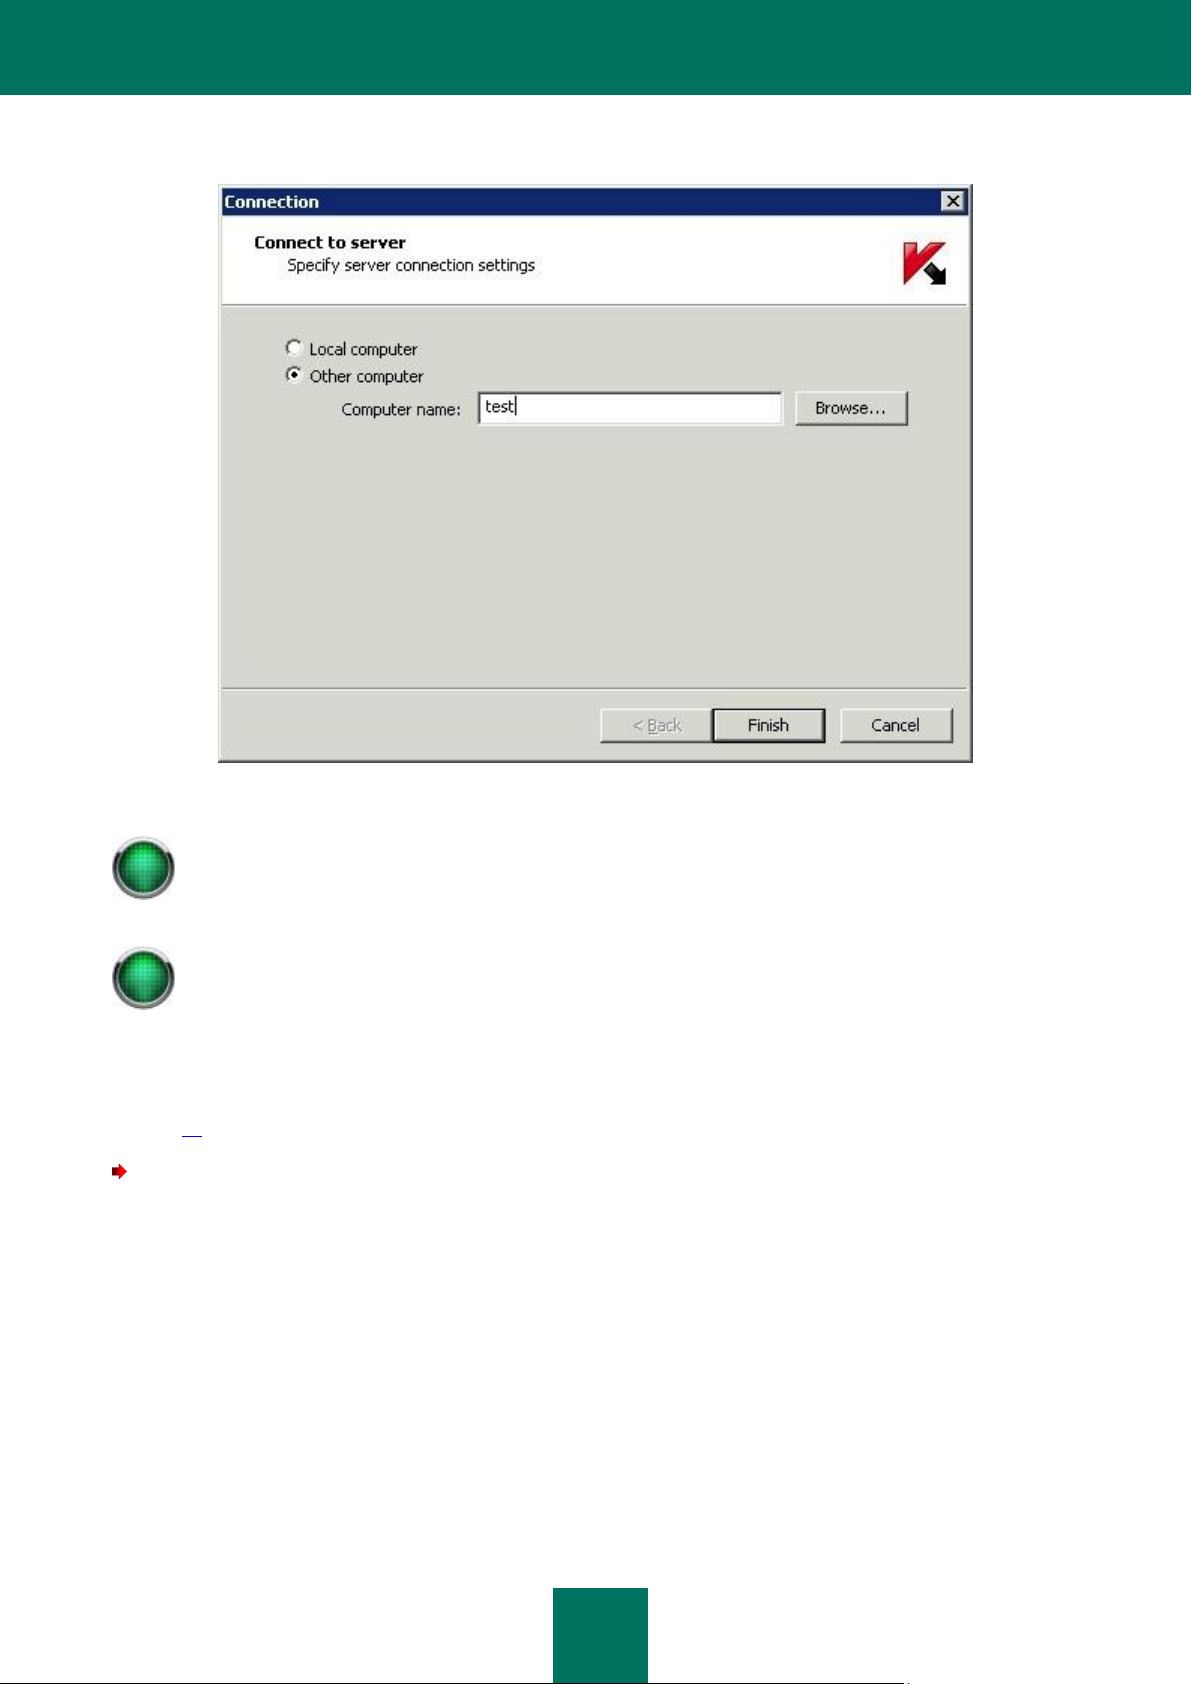
the Add server command from the context menu or the Action menu. This will open the Connection window
(see figure below).
2. Specify the computer on which the Security Server component is installed. If the server component is installed
on the same computer as the Management Console, select Local computer (localhost). To add an Exchange
server from the computers installed in the network, select Other computer and specify the computer name in
the entry field. You can enter the name manually, by specifying one of the following:
IP address;
fully-qualified domain name (FQDN) in the format <Computer name>.<DNS-domain name>;
the computer name in the Microsoft Windows network (NetBIOS name);
or select the computer using the Browse button.
Page 30
K A S P E R S K Y S E C U R I T Y 6.0 F O R M I C R O S O F T EX C H A N G E S E R V E R 20 0 7
30
When the application is connecting the Management Console to the Security Server, this name will be used
to establish the connection.
The connection is established using the DCOM protocol.
The server you select must have the Security Server component installed.
The connection is established using the current account.
Figure 6: Connect to server window
As a result, the selected server will be displayed as a <Server name> node in the console tree. The local computer is
displayed as localhost. The node structure will include the following nested folders: Notification templates, Reaction
rules for threatening events, Backup and Reports. If the connection has not been established, or could not be
established, you can connect to the server manually (see section «Connecting the Management Console to the server»
on page 30).
To remove a server from the list of managed servers,
in the console tree, select the node that corresponds to the server you wish to remove. Open the context menu, and
select the Delete command from the console tree, or use the corresponding item from the Action menu.
As a result, the selected node will be removed from the console tree.
CONNECTING THE MANAGEMENT CONSOLE TO THE
SERVER
To configure and manage Kaspersky Security using the Management Console, you must connect to the Security Server
component installed on the Microsoft Exchange server. The application will then receive information from the server and
display it in the console tree.
Page 31

G E T T I N G S T A R T E D
31
To connect to the Security Server, the local administrator's rights are required for the computer to which the
connection is attempted.
The rights verification uses the standard Microsoft Windows network user authentication process.
If you connect to the Internet using a proxy server, you will have to configure your connection settings to
receive updates (see section «Editing the connection settings» on page 38).
To connect to the Security Server:
in the console tree, select the node that corresponds to the server to which you wish to connect. Open the context
menu and select the Connect to server command, or use the corresponding item from the Action menu.
If the connection with the server was successfully established, the following nested folders will be displayed in the main
application window: Notification templates, Reaction rules for threatening events, Backup and Reports.
One Security Server can have several Management Consoles connected to it. In this case, while working with the same
server from several consoles, you should regularly update information on each console. To do this, use the Refresh
command, available via the context menu or the Action menu. Notice that if several administrators are working
simultaneously with a server, it is the last saved settings that will be used.
MINIMUM REQUIRED CONFIGURATION
After its installation, the application will start working with the minimum set of parameters, most of which are the default
settings as recommended by Kaspersky Lab. If necessary, depending on the network properties and the characteristics
of the computer on which Microsoft Exchange Server is installed, you can change the settings.
To ensure that the mail server is fully protected, it is necessary to edit the following:
parameters related to notifying the administrator, or other users, about application events (see section
«Notifications» on page 66);
parameters related to notifications about the threat of a virus outbreak (see section «Configuring notifications
about virus outbreaks» on page 77).
The application settings are configured from the administrator's workstation using Management Console. The operation
can be performed irrespective of whether the Microsoft Exchange Server application is running on the server.
MAIL SERVER PROTECTION WITHOUT ADDITIONAL
CONFIGURATION
The anti-virus protection of the Exchange server starts immediately after the Security Server component is installed. The
default operation mode of the application in this case is as follows:
The application will scan objects for the presence of currently known malicious software, using the standard anti-
virus protection level;
the body of the message, and attached objects in any format, will be scanned, except for container objects
with a nesting level above 32.
the maximum time for scanning an object is 180 seconds;
when an infected object is detected, the application saves a copy of it (attachment or message body) in
backup storage, and attempts to disinfect the object. If disinfection is impossible, the application deletes the
object and replaces it with text (message body) or a text file (attachment) containing a notification in the
following format:
Page 32

K A S P E R S K Y S E C U R I T Y 6.0 F O R M I C R O S O F T EX C H A N G E S E R V E R 20 0 7
32
PREFIX
OBJECT TYPE
No prefix, standard test "virus"
Infected. An error occurs during an attempt to disinfect the object; apply an
action set for objects that cannot be disinfected.
Malicious object <VIRUS_NAME> has been detected. The file (<OBJECT_NAME>) was
deleted by Kaspersky Security 6.0 for Microsoft Exchange Server 2007. Server
name: <server_name>.
when a suspicious object is detected, the application will save a copy of it (attachment or message body) in
backup storage.
Suspicious objects are replaced with text (message body) or a text file (attachment) containing the following
information:
A suspicious object (possibly <VIRUS_NAME>) has been detected. The file
(<OBJECT_NAME>) was deleted by Kaspersky Security 6.0 for Microsoft Exchange
Server 2007. Server name: <server_name>.
when a protected or corrupted object is detected, the application will save a copy of it (attachment or
message body) in backup storage.
Protected or corrupted objects detected in messages are replaced with text (message body) or a text file
(attachment) containing the following information:
The file (<OBJECT_NAME>) was deleted by Kaspersky Security 6.0 for Microsoft
Exchange Server 2007. The file was password-protected or corrupted. Server
name: <server_name>.
The application protects the content of public folders and email messages stored on the server.
If during installation the update process for Kaspersky Security databases was enabled, updates are performed
on an hourly basis using Kaspersky Lab’s update servers as the source, with the settings specified in the Initial
Configuration Wizard (see section «Initial Configuration Wizard» on page 21).
Administrators will not be notified about infected and suspicious objects.
The rules for control of virus outbreaks are disabled.
Report about anti-virus scans are not generated.
CHECKING APPLICATION FUNCTIONING
After Kaspersky Security is installed and configured, you are advised to verify its settings and operation using a test
"virus".
The test “virus” was specifically designed by EICAR (European Institute for Computer Antivirus Research) to test antivirus products.
The test "virus" IS NOT A VIRUS because it does not contain code that can harm your computer. However, most antivirus products identify this file as a virus.
You can download the test "virus" from the official web site of EICAR, at: http://www.eicar.org/anti_virus_test_file.htm.
The file downloaded from the EICAR website contains the body of a standard test "virus". Kaspersky Security will detect
it, assign it the Infected status and apply the action defined by the administrator for processing objects with this status.
To test the application's response to other types of object, modify the content of this standard test "virus" by adding one
of the prefixes (see the table below). Any text or hypertext editor can be used to create test "virus" modifications.
Table 2. Prefixes for the test “virus”
Page 33

G E T T I N G S T A R T E D
33
CORR-
Corrupted.
SUSP-
Suspicious (unknown virus code).
WARN-
Suspicious (modified code of a known virus).
ERRO-
Object causes a scan error which corresponds to the detection of a corrupted
object.
CURE-
Infected (curable). The object will be disinfected; the text of the "virus" body will
be replaced with the word CURED.
DELE-
Infected (incurable). The application uses the action set for objects that cannot
be disinfected.
Please note that if Microsoft Exchange Server is deployed as a Mailbox only, the application will
not scan outgoing email sent using the SMTP client (for example, Microsoft Outlook Express, or
The Bat!.
Check the application response upon detection of viruses in the message body using the SMTP
client only!
The first table column lists the prefixes to be added at the beginning of the string of the standard test "virus".
After a prefix is added to the contents of the test "virus", save it as a file named, for example, eicar_dele.com. Rename all
the modified "viruses" in the same manner.
The second table column indicates how the modified files will be identified by the anti-virus application. The actions taken
by the application for each type of object are defined by the application settings as set by the administrator (see section
«Selecting actions to be performed on objects» on page 47).
After the application is installed, you are advised to test its operation:
To check incoming email protection, send a message containing the test "virus" from a mailbox in unprotected
storage area to a mailbox within the protected storage area. The test “virus” can be sent in the message body,
or as an attachment.
To check outgoing email protection, send a message containing the test "virus" from a mailbox in a protected
storage area to any address. The test "virus" can be sent in the message body, or as an attachment.
To check the protection of public folders, place the test "virus" in a public folder within a protected storage area.
The list of protected storage areas can be found on the Protected Mail tab of the Anti-virus protection window
(see the section «Unprotected storage areas» on page 97).
After each of the steps described above, check that the application has processed the test "virus" in accordance with the
action specified in the Actions tab of the Anti-virus protection window (see section «Selecting actions to be performed
on objects» on page 47).
Page 34

34
It is extremely important to keep your databases up-to-date. You are advised to update your databases
immediately after your application is installed, because the databases included in the distribution kit will be
out of date by the time you install your application.
The databases on Kaspersky Lab's update servers are updated every hour. You are advised to set up
automatic updates to run with the same frequency (see section «Automatic database updating» on page 35).
IN THIS SECTION
Manual update ................................................................................................................................................................. 35
Automatic database updating .......................................................................................................................................... 35
Selecting the updates source .......................................................................................................................................... 36
Editing the connection settings ........................................................................................................................................ 38
Running updates under a different user account ............................................................................................................. 39
UPDATING THE KASPERSKY SECURITY
DATABASES
Kaspersky Lab provides all its users with the opportunity to update Kaspersky Security databases, which are used to
detect malicious programs, and to disinfect infected objects. The database files contain a description of all currently
known malware and methods of disinfection of infected objects, and also a description of potentially dangerous software.
The Kaspersky Security databases can be updated from the following sources:
from Kaspersky Lab's update servers on the Internet;
from a local updates source, such as a local or a network folder;
from another HTTP or FTP server, such as your Intranet server.
The updating is performed either manually or automatically, according to a schedule. After the files are copied from the
specified update source, the application automatically connects to the new databases, and uses them to scan mail for
viruses and spam.
To review the status of the databases, and modify the update settings,
Open the Kaspersky Security 6.0 for Microsoft Exchange Server 2007 node in the console tree, select the node
corresponding to the required server, and follow the Update link in the results pane.
The database update settings window allows you to:
review the database status and launch the update manually (see section «Manual update» on page 35);
set the schedule for automatic updates (see section «Automatic database updating» on page 35);
specify the source of database updates «Selecting the updates source» on page 36);
edit the network connection settings (see section «Editing the connection settings» on page 38).
Page 35

U P D A T I N G T H E K A S P E R S K Y S E C U R I T Y D A T A B A S E S
35
MANUAL UPDATE
To update the databases in the manual mode,
Open the Kaspersky Security 6.0 for Microsoft Exchange Server 2007 node in the console tree, select the node
corresponding to the required server, and follow the Update link in the results pane.
The General tab in the Update window (see figure below) gives information about the current database version and the
result of the last update.
Figure 7: Configuring the update settings. The General tab
To update the anti-virus database immediately, press the Update now button in the corresponding section. The
application will launch the update process using the current settings.
AUTOMATIC DATABASE UPDATING
To update the databases automatically:
1. Open the Kaspersky Security 6.0 for Microsoft Exchange Server 2007 node in the console tree, select the
node corresponding to the required server, and follow the Update link in the results pane.
2. Switch to the Schedule tab in the Update window that will open (see figure below).
3. To enable automatic database updates, select one of the following options:
Page 36

K A S P E R S K Y S E C U R I T Y 6.0 F O R M I C R O S O F T EX C H A N G E S E R V E R 20 0 7
36
If you enable regular updating, the first update will be performed immediately after this option is applied, and
also each time the Kaspersky Security service starts.
Update regularly. If you select this option, you should enter the time interval between updates in the fields
below.
Daily at. If you select this option, you should enter the time for daily updates.
If you select Disable automatic updating, automatic database updating will not be performed, but you will still
be able to update the databases manually (see section «Manual update» on page 35).
Figure 8: Configuring the update settings. The Schedule tab
SELECTING THE UPDATES SOURCE
By default, the databases are updated from Kaspersky Lab's update servers on the Internet.
You can configure the updates to be downloaded from a HTTP or FTP server, or from a network folder.
To select a different source of database updates,
1. Open the Kaspersky Security 6.0 for Microsoft Exchange Server 2007 node in the console tree, select the
node corresponding to the required server, and follow the Update link in the results pane.
2. Switch to the Updates source tab in the Update window that will open (see figure below) and specify the
required source of updates:
Page 37

U P D A T I N G T H E K A S P E R S K Y S E C U R I T Y D A T A B A S E S
37
If the log is inaccessible for writing during a database update (for example, it has been opened by the
administrator for editing), the update process will complete with an error.
Updates servers of Kaspersky Lab (default option) – Kaspersky Lab's HTTP and FTP servers, to which
new updates are uploaded every hour. You can reduce the time necessary to download updates by
specifying your current location from the drop-down list, which will identify your geographically-nearest
update server.
HTTP or FTP server, local or network folder – an HTTP or FTP-server, or network or local folder in which
the updates are stored after being downloaded from the Internet. If you select this option, you should either
specify the folder's path in the entry field, or select the folder in the Browse for folders window that opens
by pressing the Browse button.
Figure 9: Configuring the update settings. Updates source tab
To keep an update log, check the Log debug information box in the Diagnostics section. The application will maintain
a separate file for the update component log, which contains debug information.
The update component log file is saved as _upd.log in the Logs folder within the application data folder (see section
«Modification of the Security Server settings» on page 24). The application appends new information to the file after each
update. The file’s maximum size is 50 MB. Once the specified limit is exceeded, all previously recorded information is
erased, and the file starts filling up again.
Page 38

K A S P E R S K Y S E C U R I T Y 6.0 F O R M I C R O S O F T EX C H A N G E S E R V E R 20 0 7
38
EDITING THE CONNECTION SETTINGS
To view or modify the network connection settings:
1. Open the Kaspersky Security 6.0 for Microsoft Exchange Server 2007 node in the console tree, select the
node corresponding to the required server, and follow the Update link in the results pane.
2. Switch to the Connection settings tab in the Update window that will open (see figure below) and configure the
network connection settings:
If you connect to the internet using a proxy server, check the Use proxy server box and specify the proxy
server address and number of the port used for connection. If you use a password to access the proxy
server, specify the proxy user authentication settings. To do this, check the Proxy server authentication
box and fill in the User name and Password fields.
Specify the time limit for establishing connection with the update server in the Connection timeout (sec.)
field. If no connection was established within the specified time limit, the application will attempt to connect
to the next update server. This progression continues until a connection is successfully established, or until
all available update servers have been attempted.
Check the Use passive FTP mode box if your server has a firewall installed and you cannot connect to the
required FTP server in active mode.
Figure 10: Configuring the update settings. The Connection settings tab
You can restore the default settings by pressing the Restore the default settings button.
Page 39

U P D A T I N G T H E K A S P E R S K Y S E C U R I T Y D A T A B A S E S
39
RUNNING UPDATES UNDER A DIFFERENT USER ACCOUNT
The updates for Kaspersky Security can be run under different user accounts. By default, this feature is disabled, and the
tasks are run under the system account.
This feature is useful if, for example, you are updating from a source that the computer’s system account does not have
access to, such as a network update folder. You can use this feature to launch the updates under a user account that has
those rights.
To configure an update to run under a different user account:
1. Open the Kaspersky Security 6.0 for Microsoft Exchange Server 2007 node in the console tree, select the
node corresponding to the required server, and follow the Update link in the results pane.
2. Switch to the Startup options tab in the Update window that will open (see figure below), specify the account
that will be used to perform updates. You can enter the username manually, or add an account in the window
that will open when you click the Browse button.
Figure 11: Configuring the update settings. The Startup options tab
Page 40

40
Operation of the application in background scan mode may slow down the operation of Microsoft Exchange
Server: therefore it is best to use it during periods of minimum load on mail servers, for example at night.
ANTI-VIRUS PROTECTION
The main purpose of Kaspersky Security 6.0 for Microsoft Exchange Server 2007 is to provide protection against viruses
transmitted by email. It does this by anti-virus scans of email traffic, messages in mailboxes and public folders, and by
disinfecting infected objects using information in the current version of its databases.
Depending on the anti-virus protection level selected by the administrator (see section «Anti-virus protection levels» on
page 41), the application can detect:
malicious objects;
potentially dangerous objects.
All email messages arriving at the Microsoft Exchange server are scanned in real time. Both incoming and outgoing email
traffic are processed, as are all transit email messages. To decrease the load on the server, you can disable scanning for
outgoing email traffic in the Mailbox role (see section «Disabling the scanning of outgoing email» on page 46).
When traffic scan mode is enabled, the application remains loaded in the computer's RAM, and the E-mail Interceptor
analyzes email traffic received from the Microsoft Exchange server and transfers it to the Anti-Virus Scan Subsystem.
The Anti-Virus Scan Subsystem processes each email message based on its current settings:
it scans and analyzes the message using the anti-virus database;
if an email message or its part is infected, the application processes the detected object in accordance with the
selected settings (see section «Selecting actions to be performed on objects» on page 47);
before processing, a copy of the object can be saved in the backup storage.
If anti-virus protection of the server is enabled (see section «Enabling and disabling anti-virus server protection. Selecting
the anti-virus protection level» on page 42), traffic scans will start and stop simultaneously with the startup and stopping
of the Microsoft Exchange Server.
Kaspersky Security does not scan messages created by protected users in the Public folders of unprotected Microsoft
Exchange servers. If messages are transferred from the Public folders of an unprotected area to a protected one, the
application will scan them. During data replication between protected and unprotected storages, any changes made by
the application as a result of the anti-virus scan are not synchronized.
Email messages which are stored on the server, and the contents of public folders, are also rescanned on a regular basis
using the latest version of the anti-virus database (if the background storage scan is enabled). Using background scan
mode decreases the load on the servers during busy hours, and increases the security level of the email infrastructure in
general. Background scans can be launched either automatically (using a schedule), or manually (see section
«Background scan» on page 51).
When background scan mode is enabled, the Internal Application Management Module will receive all email messages
located in public folders and protected storage areas from the Microsoft Exchange server, in accordance with the current
settings. If a message has not been analyzed using the latest anti-virus database, it will be sent to the anti-virus
component for processing. Objects are processed in background mode in the same way as in traffic scan mode.
The application analyzes the message body and attached files in any format.
It must be remembered that Kaspersky Security differentiates simple objects, such as executable files, or messages with
a simple attachment, from containers, which consist of several objects (such as an archive, or a message with an
attachment).
Page 41

A N T I -V I R U S P R O T E C T I O N
41
When scanning multiple-volume archives, Kaspersky Security treats and processes each volume as a
separate object. In this case, the application can detect malicious code only if the code is fully located in one
of the volumes. If a virus is also divided into parts between volumes, it cannot be detected when only part of
the data is loaded. In this situation, the malicious code may propagate after the object is restored as one
entity.
Multiple-volume archives can be scanned after they are saved to the hard drive by the anti-virus application
installed on the user's computer.
Files over 1 MB will be saved to the working folder Store for processing. The Store folder is located in the
data folder of the application. The Store folder and the temporary file storage folder TMP must be excluded
from the scan scope of any anti-virus applications operating in the enterprise local network.
IN THIS SECTION
Anti-virus protection levels ............................................................................................................................................... 41
Enabling and disabling anti-virus server protection. Selecting the anti-virus protection level .......................................... 42
Scanning attachments ..................................................................................................................................................... 44
Disabling the scanning of outgoing email ........................................................................................................................ 46
Selecting actions to be performed on objects .................................................................................................................. 47
Background scan ............................................................................................................................................................. 51
Configuring anti-virus protection performance ................................................................................................................. 53
If necessary, you can define a list of objects that should not be scanned for viruses. The following types of objects can be
excluded from the scan scope: archives; all containers above a specified nesting level; files with names specified by
mask; or files specified by type (see section «Scanning attachments» on page 44).
Kaspersky Security supports the simultaneous scanning of multiple objects. The number of objects that can be
simultaneously processed depends on the number of started instances of the anti-virus kernel running. By scanning
objects in RAM, the application can avoid saving them to a temporary folder on the hard drive, which improves
performance. Depending on the value of the Number of the anti-virus engine instances parameter (see section
«Configuring anti-virus protection performance» on page 53) the program can simultaneously analyze up to 33 objects of
up to 1 MB each in RAM without using the disk subsystem.
ANTI-VIRUS PROTECTION LEVELS
Kaspersky Security detects and prevents the propagation through the protected mail server of the following types of
objects:
a. All currently known malicious programs.
b. Programs that do not contain malicious code as it is commonly understood, but may pose a moral threat, inflict
financial damage, or facilitate theft of confidential information. This software category includes:
adware;
various utilities that can be used by malicious software and intruders;
automatic dial-up programs that connect the user's computer to commercial Internet sites (including porn
websites);
programs that automatically download porn files;
Page 42

K A S P E R S K Y S E C U R I T Y 6.0 F O R M I C R O S O F T EX C H A N G E S E R V E R 20 0 7
42
Please note that disabling the anti-virus server protection considerably increases the risk of malware
penetrating the email system. You are advised not to disable anti-virus protection for long periods of time.
keyboard loggers;
password hacking programs;
backdoor programs.
c. Joke programs and programs with "bizarre" content or form that affect the system in a prejudicial way. This
category includes:
programs that cause unexpected video or sound effects;
programs that cause problems in the system operation;
virus simulators.
d. Programs that do not contain malicious code and do not inflict damage on the user, but can be a part of the
environment used for developing malicious software. This software category includes:
1. licensed software hacking programs, key generators, and credit card number generators;
2. certain Java classes;
3. programs that gather information about the system security (including anti-virus software installed, and
firewalls);
4. network utilities, such as scanners.
Apart from the programs listed above, each of these categories may include legal software that works in a way which the
application views as being characteristic of malicious or potentially dangerous software. Such software includes, for
example, backdoor and remote surveillance software.
The categories of objects detected by Kaspersky Security in protected server email traffic are determined by the antivirus protection level selected. The application provides the following protection levels:
Standard - protection against all currently known malicious programs. This level is applied by default.
Extended - protection against all currently known malicious programs and potentially dangerous software listed
in paragraph b of the above list.
Redundant - protection against all currently known malicious and potentially dangerous programs included
under paragraphs b, c and d in the list above.
ENABLING AND DISABLING ANTI-VIRUS SERVER
PROTECTION. SELECTING THE ANTI-VIRUS PROTECTION
LEVEL
If the anti-virus server protection is enabled, anti-virus scanning of the email traffic will be started or stopped at the same
time as Microsoft Exchange Server. If the anti-virus protection settings specify background scanning of storage areas,
scanning can be launched manually or according to the schedule (see section «Background scan» on page 51).
Objects are scanned according to the specified anti-virus protection level.
If anti-virus server protection is disabled, then neither anti-virus traffic scanning nor background storage scanning will be
performed.
Page 43

A N T I -V I R U S P R O T E C T I O N
43
The use of extended or redundant anti-virus protection level may affect the application’s performance.
Additionally, some programs may be treated as potentially dangerous programs when transferred by email,
and may be deleted, depending upon the anti-virus protection settings (see section «Anti-virus protection
levels» on page 41).
To enable or disable the anti-virus protection, or change the anti-virus protection level:
1. Open the Kaspersky Security 6.0 for Microsoft Exchange Server 2007 node in the console tree, select the
node corresponding to the required server, and follow the Anti-virus protection link in the results pane.
2. Go to the General tab in the Anti-virus protection window that will open (see figure below).
3. To enable anti-virus protection, check the appropriate boxes:
Enable anti-virus protection for Mailbox role;
Enable anti-virus protection for Hub Transport or Edge Transport roles.
To disable anti-virus protection, uncheck the corresponding boxes.
The initial status of anti-virus protection, whether active or inactive, is specified during application setup (see
section «Step 4. Enabling server protection» on page 20).
4. In the Security level group of fields, select the required level of anti-virus protection: Standard, Extended or
Redundant (see section «Anti-virus protection levels» on page 41).
Figure 12: Enabling the anti-virus protection
You can restore the default settings by pressing the Restore the default settings button.
Page 44

K A S P E R S K Y S E C U R I T Y 6.0 F O R M I C R O S O F T EX C H A N G E S E R V E R 20 0 7
44
You are advised not to disable anti-virus server protection by disabling the Kaspersky Security 6.0 for
Microsoft Exchange Server 2007 service manually using the Computer Management > Services snap-in.
Please note that the message body will always be scanned: the restrictions apply only to the scanning of
attachments.
To apply the changes, press the Apply or OK button. The anti-virus protection will then be enabled (or disabled) when
current scanning tasks finish.
If you need to disable the Kaspersky Security 6.0 for Microsoft Exchange Server 2007 service manually, perform the
following actions:
1. Disable the anti-virus email protection using the Management Console (see above).
2. Stop the Microsoft Exchange Transport and Microsoft Exchange Information Store services.
3. Stop the Kaspersky Security 6.0 for Microsoft Exchange Server 2007 service and specify the Disabled startup
type for it.
4. Start the Microsoft Exchange Transport and Microsoft Exchange Information Store services.
To start the application after automatic startup has been disabled for the Kaspersky Security 6.0 for Microsoft
Exchange Server 2007 service, do the following:
1. Specify Manual startup for the Kaspersky Security 6.0 for Microsoft Exchange Server 2007 service.
2. Enable anti-virus email protection using the Management Console (see above).
SCANNING ATTACHMENTS
To decrease the load on the server imposed by anti-virus scanning, you can limit the list of objects to be scanned. These
scanning restrictions will apply both to the email traffic scan, and to the background storage scan.
To define which objects will not be scanned:
1. Open the Kaspersky Security 6.0 for Microsoft Exchange Server 2007 node in the console tree, select the
node corresponding to the required server, and follow the Anti-virus protection link in the results pane.
Page 45

A N T I -V I R U S P R O T E C T I O N
45
Since archives are a type of container, restrictions applied to scans of archives and of
containers are interrelated.
If you impose a restriction on scans of containers, archives will be scanned only to the
specified nesting level, if they are not explicitly excluded from scanning.
However, excluding archives from the scan scope will not affect the scan of other types of
containers.
2. Go to the Attachment Scan tab in the Anti-virus protection window that will open (see figure below).
Figure 13: Configuring restrictions for attachment scanning
3. In the Exclude from the scan scope group, specify objects to be excluded from the anti-virus scan scope:
Archives - select this option to exclude archives from scanning.
Objects-containers with nesting level above - select this option to exclude from scanning containers with
a nesting level greater than the value specified in the field to the right.
There are some types of objects that cannot be infected. To reduce the load on the server imposed by the antivirus scanning of email traffic, you can exclude these types and/or names of attachments from the scan scope.
To do that, specify exclusions by mask or type:
Files defined by mask - using the Add and Delete buttons, edit the list of exclusion masks. In the dialog
box Adding a mask (see figure below), enter the exclusion mask in the corresponding field.
Examples of allowed masks:
*.txt - all files with the *.txt extension, for example, readme.txt or notes.txt.
Page 46

K A S P E R S K Y S E C U R I T Y 6.0 F O R M I C R O S O F T EX C H A N G E S E R V E R 20 0 7
46
readme.??? – all files named readme with an extension of three characters, for example, readme.txt or
readme.doc;
test - all files without extension named test.
Figure 14: Specifying the type of files to be excluded from the scan scope
Files defined by type - using the Add and Delete buttons, edit the list of object types which the application
will not scan. In the dialog box Adding a type (see figure below), select a type from the drop-down list.
Figure 15: Specifying the type of files to be excluded from the scan scope
You can restore the default settings by pressing the Restore the default settings button.
DISABLING THE SCANNING OF OUTGOING EMAIL
To reduce the load on the server deployed in Mailbox mode, you can disable the scanning of outgoing mail.
To disable the scanning of outgoing email:
1. Open the Kaspersky Security 6.0 for Microsoft Exchange Server 2007 node in the console tree, select the
node corresponding to the required server, and follow the Anti-virus protection link in the results pane.
2. Go to the Protected Mail tab in the Anti-virus protection window that will open (see figure below).
It should be noted that the tab is only available when the Microsoft Exchange Server is deployed as a Mailbox,
or as a Mailbox and Hub Transport simultaneously.
Page 47

A N T I -V I R U S P R O T E C T I O N
47
If the Microsoft Exchange Server is deployed as a Mailbox only and this checkbox is enabled, the outgoing
email message will not be scanned!
In the event of delayed message sending (if the Kaspersky Security database has been updated) the
message will be scanned twice on the Mailbox role.
3. Select the Do not check outgoing messages on Mailbox role box.
Figure 16: The Protected Mail tab
SELECTING ACTIONS TO BE PERFORMED ON OBJECTS
Following an anti-virus scan, each object is assigned a status which can take the following values:
Not infected - object does not contain viruses.
Infected - object contains at least one known virus.
Suspicious - object code is similar to the code of a known virus, or conforms to the general principles of
malware structure.
Protected - the object is password-protected.
Corrupted - object is corrupted.
The actions will be applied to the object depending on its status.
Page 48

K A S P E R S K Y S E C U R I T Y 6.0 F O R M I C R O S O F T EX C H A N G E S E R V E R 20 0 7
48
Infected objects found in the message body are processed using the action assigned to non-treatable
objects.
If the infected attachments are disinfected, replaced with text or renamed, a separate copy of the message
for each recipient is saved in the Microsoft Exchange server database. To reduce the size of the Microsoft
Exchange database, you are advised to defragment it regularly.
A very important function of the application is the disinfection of infected objects, which uses information contained in the
anti-virus database. Following the disinfection process, an object is assigned a status which can have one of two values:
Disinfected - object was successfully disinfected.
Non-treatable - object disinfection failed.
A special processing procedure can be used for non-treatable objects.
The following actions can be applied to objects with one of these statuses: infected, non-treatable, suspicious, protected
and corrupted.
Allow object to pass without processing - pass the object to the recipient with no changes.
Rename infected attachments, replace message body with text - replace the message body with text created
using the corresponding replacement template, and change the name and extension of the attached objects.
The renamed files will have a .txt extension.
Replace any infected part of message with text - delete the detected object and replace it with text (message
body) or a text-file (attachments), created using the replacement template.
Delete entire message with object - delete the message along with all attachments.
Before processing, a copy of the object can be saved in backup storage (see section «Backup storage» on page 56) for
subsequent restoring, or for forwarding to Kaspersky Lab for analysis.
The application can send a notification about the detected object to the message sender, message recipients, the
administrator or to other users, and register this event in the Microsoft Windows event log (see section «Notifications» on
page 66).
By default, the application attempts to disinfect infected objects which it detects, and if disinfection is not possible, the
application replaces the object with a text file. The action Replace infected objects with text is assigned to objects with
any other status. The text of the informative message will include the name of the detected virus, and the name of the
infected object.
To define the rules for processing objects detected during an anti-virus scan:
1. Open the Kaspersky Security 6.0 for Microsoft Exchange Server 2007 node in the console tree, select the
node corresponding to the required server, and follow the Anti-virus protection link in the results pane.
2. Go to the Actions tab, and in the Anti-virus protection window that will open (see figure below).
Page 49

A N T I -V I R U S P R O T E C T I O N
49
The tab displays the rules for processing objects with the following statuses: infected, suspicious and
protected / corrupted.
Figure 17: Configuring actions to be applied to infected, suspicious and protected objects
3. To ensure that a copy of the object is saved to backup storage before the object is processed, check the box
Save a copy of the original object in the backup storage (see figure above).
4. Specify individually the rules for processing object of each status. To do this, press the Modify rule... button in
the corresponding section, which will start the Rule Wizard.
Page 50

K A S P E R S K Y S E C U R I T Y 6.0 F O R M I C R O S O F T EX C H A N G E S E R V E R 20 0 7
50
5. In the window that will open (see the figure below) select actions from the list.
Figure 18: Selecting an action to be performed on an infected object
Depending on the status of the object for which the configuration if being performed, the list may contain
different values. A detailed description of the option selected from the list is provided in the bottom part of the
window.
The next steps will depend on the selection you have made. To continue using the wizard, press the Next
button.
If no additional changes to settings are required, the Finish button will become enabled. Press it to complete the
wizard.
6. If you selected disinfection as the action to be performed on the object, during the next step you must determine
the procedure to be used to process non-treatable objects (see figure below).
Figure 19: Selecting an action to be performed on an objects that could not be disinfected
Page 51

A N T I -V I R U S P R O T E C T I O N
51
Background scanning is available only if Microsoft Exchange Server deployed as in Mailbox mode.
The application scans public folders and email boxes only in protected storage areas (see section
«Unprotected storage areas» on page 97).
Select the required option from the list in the wizard window and press the Finish or the Next button.
7. The informational message created using this template will be copied to the message body and into the
replacement text file (see figure below).
Figure 20: Creating a replacement template
To create a replacement template, enter the message text in the wizard window. The text of this notification may
include information about the virus detected and about the infected object. To include this information, add
corresponding substitution macros to the template, selecting them from the dropdown list accessible via the
Macros button (see section «Table of macro substitution» on page 101).
To complete the wizard, press the Finish button.
You can restore the default settings by pressing the Restore the default settings button.
BACKGROUND SCAN
Kaspersky Security scans email messages stored on the server and the content of public folders, including all protected
public folders and mailbox storages. Only those messages which have not been scanned using the current version of the
Kaspersky Security database will be scanned. The application scans message bodies and attached files using the
general anti-virus scan settings.
To ensure that Kaspersky Security scans the email messages stored on the server and the content of public folders:
1. Open the Kaspersky Security 6.0 for Microsoft Exchange Server 2007 node in the console tree, select the
node corresponding to the required server, and follow the Anti-virus protection link in the results pane.
Page 52

K A S P E R S K Y S E C U R I T Y 6.0 F O R M I C R O S O F T EX C H A N G E S E R V E R 20 0 7
52
2. Go to the Background scan tab in the Anti-virus protection window that will open (see figure below).
Figure 21: Configuring background scan settings
To launch the scan immediately, press the Start now button.
Check the Start background scan automatically box (unchecked by default). Press the Configure
schedule... button, and use the window that will open (see the figure below) to define the run mode and start
time for background scans.
Figure 22: Scheduling background scan start
Page 53

A N T I -V I R U S P R O T E C T I O N
53
Please note that background scan will run until it is stopped manually by the user or until the time, specified
in Stop background scan in ... hours setting elapses.
If some background scan settings are modified while a scan is running, they will be applied at the next scan
start only.
If the background scan is done periodically, you can restrict the duration of scanning. To do this, check the Stop
background scan in … hours box, and specify the interval in hours after which scanning will be stopped.
3. You can restrict background scanning to messages from a specific range of dates. To do this, select one of the
following options in the Scan messages group :
All messages - scans all messages, with no date filtering.
Arrived … before scan beginning - the option defines the interval so that the application scans messages
dated within the specified interval.
You can restore the default settings by pressing the Restore the default settings button.
To apply the changes, press the Apply or OK button.
CONFIGURING ANTI-VIRUS PROTECTION PERFORMANCE
The performance of Kaspersky Security can be optimized to take account of both the volume and type of email traffic
transferred through Microsoft Exchange server, and the system characteristics.
To configure the anti-virus protection efficiency:
1. Open the Kaspersky Security 6.0 for Microsoft Exchange Server 2007 node in the console tree, select the
node corresponding to the required server, and follow the Anti-virus protection link in the results pane.
Page 54
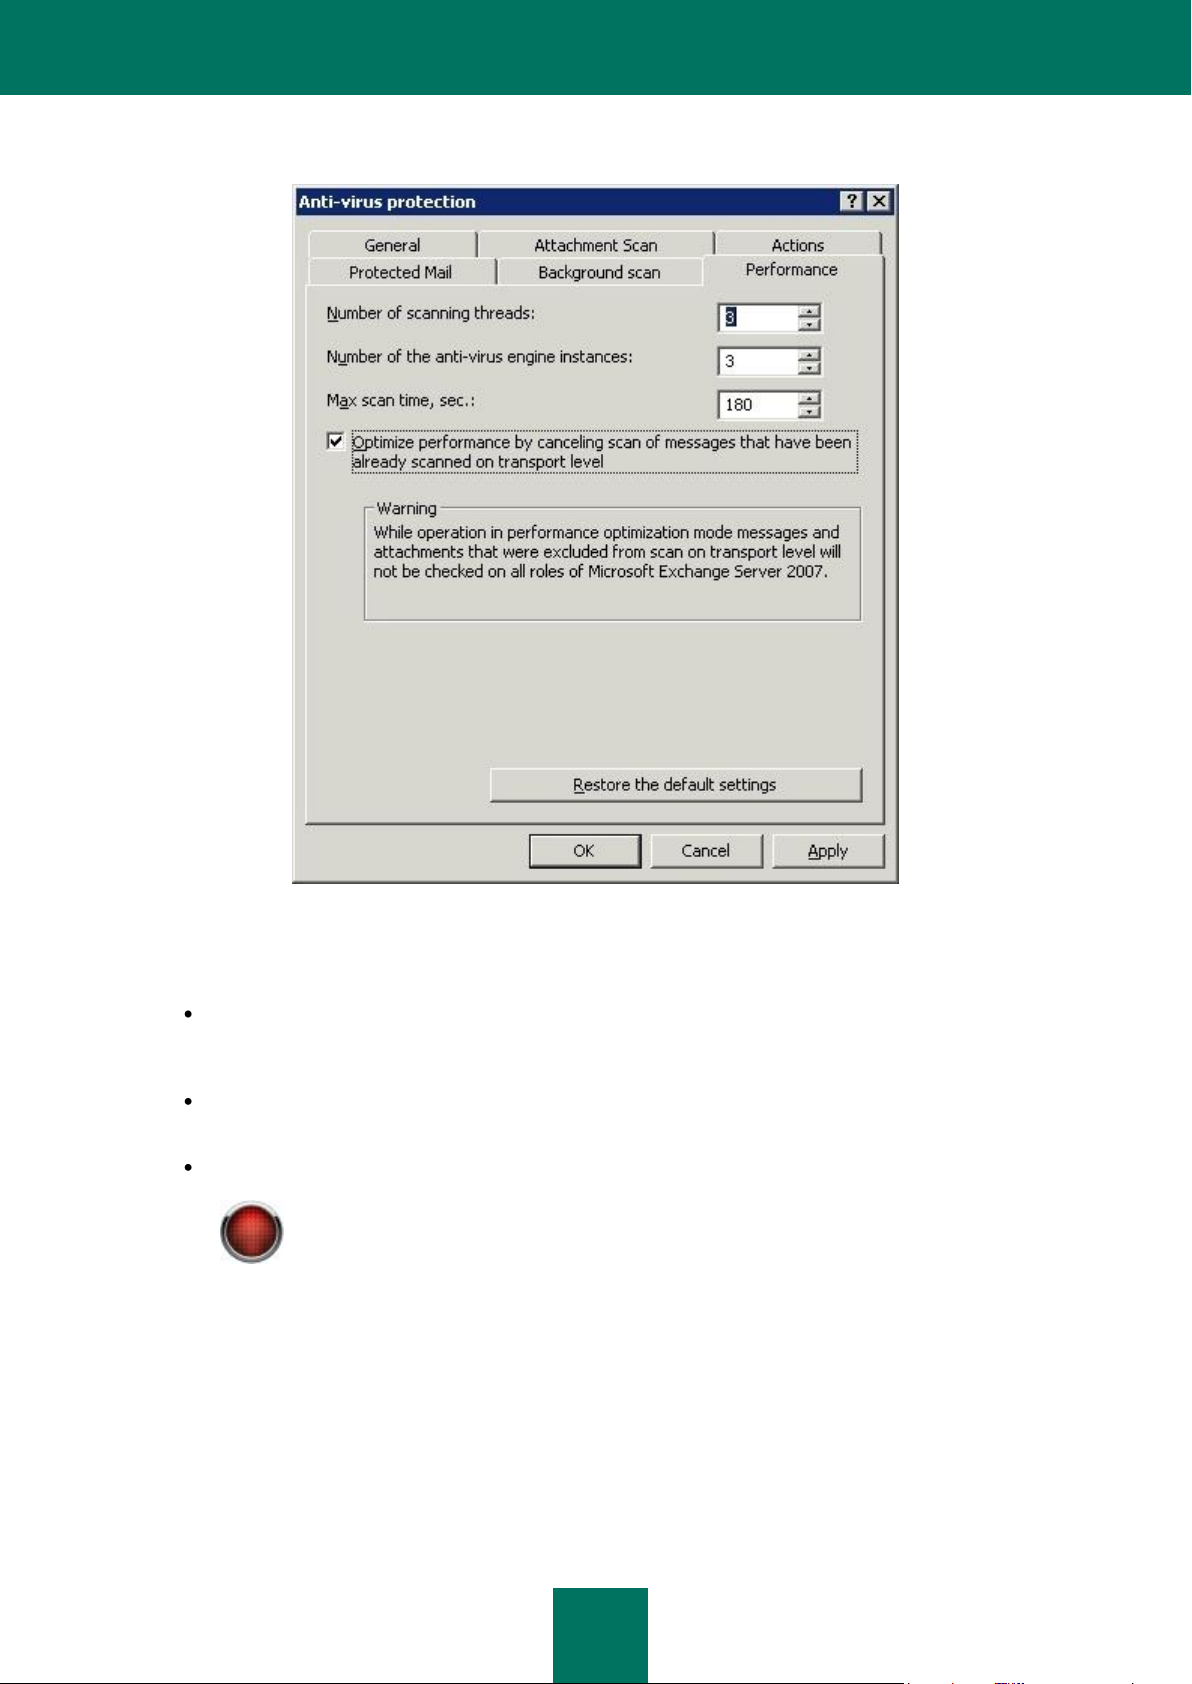
K A S P E R S K Y S E C U R I T Y 6.0 F O R M I C R O S O F T EX C H A N G E S E R V E R 20 0 7
54
If the object scanning requires more time than is specified, the object will be excluded from the
scan scope and delivered unscanned!
Later, if the database version is updated and the object is accessed again, the application will
attempt to re-scan it.
2. Go to the Performance tab, in the Anti-virus protection window that will open (see figure below).
Figure 23: Configuring anti-virus protection efficiency
3. Specify the settings that determine the level of anti-virus protection efficiency:
The number of threads used to scan objects, which is useful in the presence of interceptors for the Mailbox
configuration. The default setting is the value recommended by Microsoft, equal to (2*
number_of_processors+1). The number of instances of the anti-virus kernels running simultaneously.
The default value is 3. Using the instances of the anti-virus engine running simultaneously, the program can
simultaneously analyze in RAM up to 33 objects of up to 1 MB each, without using the disk subsystem.
The maximum scanning duration for a single object in seconds. The default value is 180 seconds.
4. Edit the settings for anti-virus scanning optimization.
Checking the box Optimize performance by canceling scan of messages that have been already scanned
on transport level avoids rescanning the message when it is transferred through Microsoft Exchange servers
(this parameter should be enabled on all servers). The optimization is enabled when different servers use the
same database version (the easiest way to achieve this is to configure the database update schedule
identically). Unchecking this box means that all messages transferred through this server is scanned.
Page 55

A N T I -V I R U S P R O T E C T I O N
55
If the Microsoft Exchange server is deployed as a Mailbox, then the Optimize performance by
canceling scan of messages that have been already scanned on transport level parameter is
always enabled.
You can restore the default settings by pressing the Restore the default settings button.
Page 56

56
A backup copy of the object is created only if in the anti-virus protection settings (see section «Selecting
actions to be performed on objects» on page 47) the box Save a copy of the original object in the backup
storage is checked.
BACKUP STORAGE
Kaspersky Security allows duplicates of untreated objects to be placed in backup storage before the object is processed.
Subsequently, objects located in backup storage may be:
restored - to obtain information contained in the object (see section «Restoring objects from backup storage»
on page 63). Additionally, you can restore the infected object and have the application re-scan it using an
updated anti-virus database;
deleted (see section «Deleting objects from backup storage» on page 64);
sent for analysis to Kaspersky Lab - only for suspicious files containing a modification of a known virus, or an
unknown virus. Our specialists will analyze the file, attempt to recover the data, and if the file is infected with
malicious code, make an entry in the anti-virus database. Then, when you re-scan this file using the updated
database, you can disinfect it and recover the data intact.
The object is stored in backup storage in encrypted form, which ensures:
no risk of infection, as the object is not accessible without decoding;
better performance for the anti-virus application, as encrypted files stored in backup storage are not identified as
infected and are not rescanned.
The data volume that can be stored in the backup storage may be restricted by one of the two following parameters:
The total number of objects in the backup storage should not exceed one million. This restriction cannot be
lifted.
The user can additionally specify restrictions on the backup storage size, and the length of an object’s storage
period (see section «Configuring the backup storage settings» on page 64).
Compliance with these restrictions is checked when a new object copy is saved to backup storage, and also as a regular
background task (once per minute). The application performs the following actions:
if the allowed number of objects in the backup storage is exceeded, the application will remove the required
number of the "oldest" objects;
if the backup storage size is limited and there is not enough free disk space to save the new object, the
application will free the required space by again deleting the “oldest” objects;
if the object storage period is limited, the application will remove objects which have been stored for longer than
the limit.
The Backup folder allows you to:
Viewing the backup storage (see section «Viewing the backup storage» on page 57);
edit the backup settings (see section «Viewing the backup storage» on page 57);
manage backed-up objects: view their properties (see section «Viewing properties of a backed-up object» on
page 59), restore them (see section «Restoring objects from backup storage» on page 63), send them for
analysis (see section «Sending objects for analysis» on page 63) and remove them (see section «Deleting
objects from backup storage» on page 64).
This child node is included in each node representing a managed Kaspersky Security server.
Page 57

B A C K U P S T O R A G E
57
IN THIS SECTION
Viewing the backup storage ............................................................................................................................................ 57
Viewing properties of a backed-up object ........................................................................................................................ 59
Quick filtering of objects .................................................................................................................................................. 59
Backup storage filters ...................................................................................................................................................... 60
Restoring objects from backup storage ........................................................................................................................... 63
Sending objects for analysis ............................................................................................................................................ 63
Deleting objects from backup storage ............................................................................................................................. 64
Configuring the backup storage settings ......................................................................................................................... 64
Quick filtering and custom filters can be configured to enable convenient viewing and searching of the backup storage
area (see the section «Quick filtering of objects» on page 59), and the section on custom filters (see section «Backup
storage filters» on page 60). Filters created for backup storage are displayed in the Backup folder as subfolders, with the
names assigned by the administrator when the filters were created.
VIEWING THE BACKUP STORAGE
To view backup storage:
Open the Kaspersky Security 6.0 for Microsoft Exchange Server 2007 node in the console tree, select the node
corresponding to the required server, and open the Backup folder in the console tree.
Page 58

K A S P E R S K Y S E C U R I T Y 6.0 F O R M I C R O S O F T EX C H A N G E S E R V E R 20 0 7
58
If the application rescans an object stored in backup storage using new databases and its status changes,
the object’s status in backup storage will be updated.
The results pane contains the full list of all objects in backup storage (see the figure below).
Figure 24: Viewing the backup storage
In addition to the standard email message attributes (Sender, Recipients, Cc, Subject, Sent time, Delivery time), this
table displays the following information for each object:
Name - attachments will retain their original names, while the body of the message will be saved as <message
body>.
Type - the type of object saved in the backup storage (Message body or Attachment) indicates where the
infected object was detected.
Status – the status assigned to the object following the anti-virus scan (see section «Selecting actions to be
performed on objects» on page 47).
Please note that backup storage contains the object copy created before the application modified it. For a
disinfected object, the Status field displays its status after the change.
Size - the size of the corresponding object in bytes.
Virus - the name of the virus found in the object.
Detected in folder - the path to the server folder in which the infected object was found (applicable only for
servers acting in Mailbox mode).
You can perform ascending and descending sorting of the data contained in the table by any column. The sorting can
also be performed using quick filtering (see section «Quick filtering of objects» on page 59).
Page 59

B A C K U P S T O R A G E
59
VIEWING PROPERTIES OF A BACKED-UP OBJECT
To view the properties of an object in backup storage,
1. Open the Kaspersky Security 6.0 for Microsoft Exchange Server 2007 node in the console tree, select the
node corresponding to the required server, and open the Backup folder in the console tree.
2. Select the object in the table displayed in the results pane, and use the Properties command of the context
menu.
The object properties window will appear (see figure below). The information contained in this window is identical to the
information for the Backup folder displayed in the table in the results pane.
Figure 25: Viewing properties of an object placed in the backup storage
QUICK FILTERING OF OBJECTS
The table containing the list of objects in backup storage can be used for quick filtering of the displayed records, using the
fields in the top line. Quick filtering is supported for the following field types:
text field, for example, Name;
numeric field, for example, Size;
field with a limited set of options, for example, Type.
Page 60

K A S P E R S K Y S E C U R I T Y 6.0 F O R M I C R O S O F T EX C H A N G E S E R V E R 20 0 7
60
For text fields you can enter a text value into the quick filtering field. You can use the standard wildcards * (arbitrary string
of characters) and ? (any single character). Examples:
ei*ar all values beginning with ei and ending with ar;
eica? – all values of five letters beginning with eica;
eicar - all values beginning with eicar.
For numeric fields, a number, a range of numbers, or an upper or lower range value can be entered into the quick filtering
field. Examples:
59 – all values matching 59;
10–12 – all values within the range from 10 to 12.
For fields with a limited set of values, a list of accessible values is opened in the quick filtering field by clicking the button
. To apply the filter, select the required value from the list.
Once the quick filter has been created, the table will display all lines matching the entered criteria. To disable the quick
filter, remove all values from the filter field.
BACKUP STORAGE FILTERS
The use of filters allows searching and structuring of the data contained in backup storage, as only the information
complying with the filtering parameters becomes available. This feature becomes very important as the number of objects
in the backup storage increases. The filter can be used, for example, to search for objects that must be restored.
To create a backup storage filter:
1. Open the Kaspersky Security 6.0 for Microsoft Exchange Server 2007 node in the console tree, select the
node corresponding to the required server, and open the Backup folder in the console tree.
2. Use the New Filter command in the context menu or the corresponding item in the Action menu.
3. In the filter settings window that will open (see the figure below), edit the email filtration settings:
the filter’s name, under which it will be included in the Backup folder;
Page 61

B A C K U P S T O R A G E
61
the possible values of the object status (several values can be selected).
Figure 26: Creating a new filter. The Filter tab
4. Press Next and on the Additional tab (see figure below) specify values for the filter settings that will be used to
search for objects in backup storage. To edit the settings, use the following file attributes:
Object type - email messages can be filtered by type: message body, attachment or all types together.
Name - only available if you select attachment filtering in the Type field.
Sender.
Recipients - a list of recipients delimited with semicolon.
CC - list of carbon copy recipients delimited with semicolon.
Subject - the Subject message header.
Sent time - the time interval during which the email was sent.
Page 62
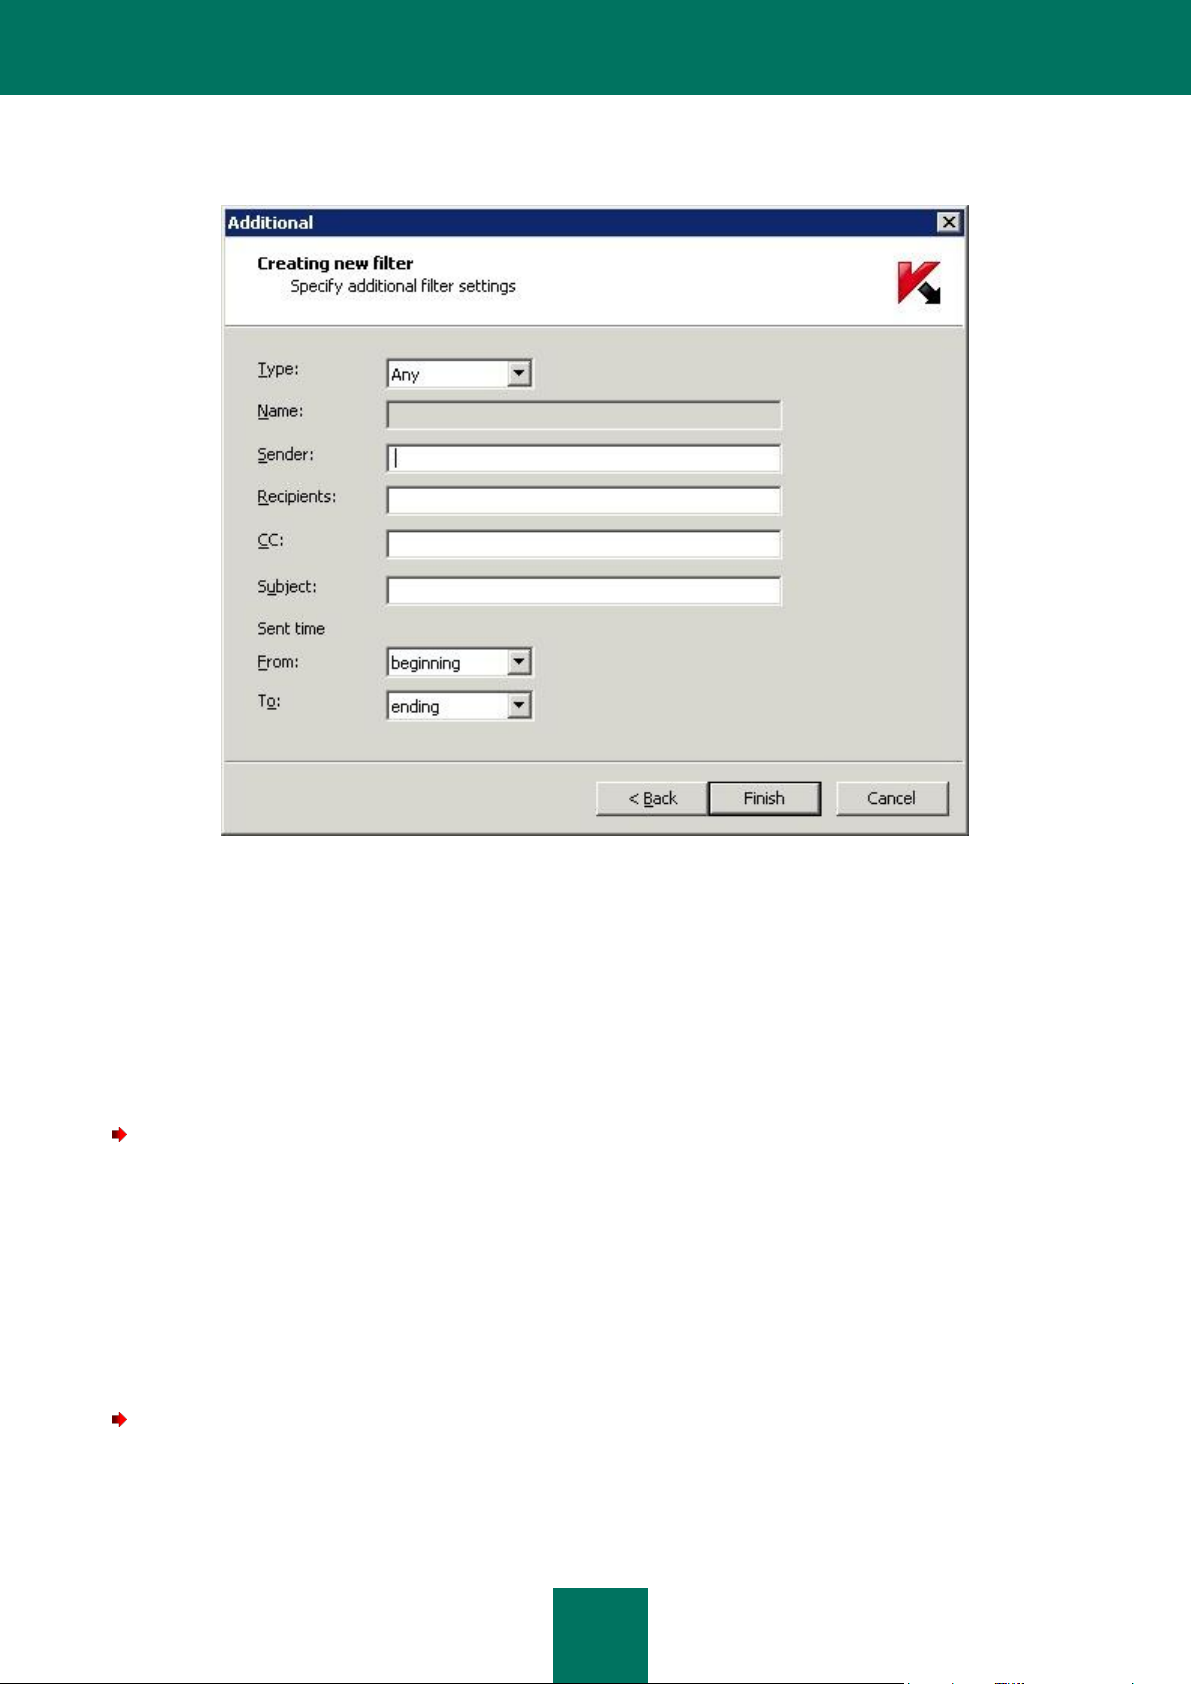
K A S P E R S K Y S E C U R I T Y 6.0 F O R M I C R O S O F T EX C H A N G E S E R V E R 20 0 7
62
When completing the filter fields, you can use the standard wildcards * (any combination of characters) and
? (any single character).
Figure 27: Creating a new filter. The Additional window
5. After you have specified the filter settings, press the Finish button to create the filter. If you wish to cancel the
creation of the filter, press the Cancel button.
When the filter is created, a subfolder with the filter's name will be created in the console tree in the Backup folder. When
the filter is selected in the console tree, only the data that complies with the filter criteria will be displayed in the results
pane.
Later, you can alter the filter parameters values, or delete the filter, using the context menu commands or the Action
menu.
To change the filter parameters:
1. Select the filter you want to modify in the Backup folder in the console tree, and select either the Properties
command in the context menu, or the corresponding item in the Action menu. This will open the filter settings’
configuration window, which contains the same settings as the new filter creation wizard.
2. Modify the filter parameter values as required.
3. To apply the changes, press the Apply or OK button. To exit without saving the changes, press the Cancel
button.
As a result, the information displayed in the results pane will be updated according to the new filter settings.
To remove a filter:
Select the name of the filter in the Backup folder, and use the Delete command from the context menu or the
corresponding item in the Action menu.
As a result of these actions, the filter will be removed from the Backup folder.
Page 63

B A C K U P S T O R A G E
63
When the filter is deleted, no objects are removed from backup storage. The objects that conformed to the
filter parameters will still be available in the Backup folder.
Restoring objects may result in your computer becoming infected!
RESTORING OBJECTS FROM BACKUP STORAGE
To restore an object from backup storage:
1. Open the Kaspersky Security 6.0 for Microsoft Exchange Server 2007 node in the console tree, select the
node corresponding to the required server, and open the Backup folder in the console tree.
2. Select the object you wish to restore in the table displaying the backup storage contents (see section «Viewing
the backup storage» on page 57). You can use a filter to search for objects (see section «Backup storage
filters» on page 60).
3. Open the context menu and use the Save to disk command or the corresponding in the Action menu.
4. In the warning dialog box that will open, confirm the restoration of the object by pressing the Yes button.
5. In the window that will open, specify the folder to which you wish to save the restored object, and if necessary,
enter or modify the object name.
6. Click the Save button.
The application will decode the encrypted object, move it to the specified folder and save it with the specified name. The
restored file will be identical to its original state before it was first processed by the application. After the object is
successfully restored, a corresponding notification is displayed on the screen.
SENDING OBJECTS FOR ANALYSIS
Before you send objects for analysis, you should configure the general notification settings (see section «Customizing
general notification settings» on page 71).
Objects can only be sent for analysis by Kaspersky Lab's specialists if they have the status suspicious.
Note that sending large-sized objects may take a while and will slow down internet traffic.
To send a suspicious object to Kaspersky lab for analysis:
1. Open the Kaspersky Security 6.0 for Microsoft Exchange Server 2007 node in the console tree, select the
node corresponding to the required server, and open the Backup folder in the console tree.
2. In the table displaying backup storage contents, select the object with status suspicious which you wish to send
for analysis (see section «Viewing the backup storage» on page 57). You can use a filter to search for objects
(see section «Backup storage filters» on page 60).
3. Select the Send for analysis command.
As a result, the application will create an email message, with the selected object as an attachment, on the computer
where the managed Microsoft Exchange Server is installed and send it to Kaspersky Lab. The object is sent in encrypted
form, and therefore will not be detected by Kaspersky Security again.
Page 64

K A S P E R S K Y S E C U R I T Y 6.0 F O R M I C R O S O F T EX C H A N G E S E R V E R 20 0 7
64
After the message is sent, a notification confirming that the file has been sent will be displayed by the computer from
which the administration is run.
DELETING OBJECTS FROM BACKUP STORAGE
The following objects are automatically deleted from backup storage:
The “oldest” object, if adding a new object will exceed the restriction imposed on the total number of objects in
backup storage. The maximum number of files in this version is limited to one million.
"Older" objects if there is a restriction imposed on the backup storage size, and if there is not enough space to
store a new object.
Objects whose storage period has expired, if there is a restriction imposed on the storage period.
Objects may also be manually removed from backup storage. This feature may prove useful to delete objects that have
been successfully restored or sent for analysis, and to create free space in the backup storage if automatic object
removal methods did not help.
To delete objects from backup storage manually:
1. Open the Kaspersky Security 6.0 for Microsoft Exchange Server 2007 node in the console tree, select the
node corresponding to the required server, and open the Backup folder in the console tree.
2. Select the object you wish to restore in the table displaying the backup storage contents (see section «Viewing
the backup storage» on page 57). You can use a filter to search for objects (see section «Backup storage
filters» on page 60).
3. Open the context menu and use the Delete command, or use the corresponding item in the Action menu.
As a result of these actions, the object will be deleted from backup storage.
CONFIGURING THE BACKUP STORAGE SETTINGS
The backup storage is created during installation of the Security Server component. The backup storage settings have
default values that can be altered by the administrator.
To modify the backup storage settings:
1. Open the Kaspersky Security 6.0 for Microsoft Exchange Server 2007 node in the console tree, select the
node corresponding to the required server, and open the Backup folder in the console tree.
2. Open the context menu and use the Properties command, or use the corresponding item in the Action menu.
Page 65

B A C K U P S T O R A G E
65
3. In the Backup Properties window (see figure below), specify the necessary parameter values.
Figure 28: Editing the backup storage settings
To restrict the size of backup storage, or the length of time for which objects can be stored, check the boxes for the
restrictions you wish to impose, and enter the required value for the selected setting, as follows:
Maximum storage size - to restrict the total size of objects located in the backup storage, specify the required
volume in the entry text field (the default value is 1024 MB).
Maximum objects storing time - to restrict objects' storage time in backup storage, specify the number of days
in the entry field (the default value is 30 days).
If none of the options is enabled, the backup storage size will only be restricted by the number of objects stored. The limit
in this application version is one million objects.
You can restore the default parameter values by pressing the Restore the default settings button.
To apply the changes, press the Apply or OK button. To exit without saving the changes, press the Cancel button.
Page 66

66
If the infected object was disinfected by the Kaspersky Security application, by default an email notification
about the event is not created.
NOTIFICATIONS
Kaspersky Security can send notification messages about infected objects that it discovers during scans.
Notifications can be delivered using the following methods:
by sending email messages, which requires you to edit the general settings that will be used to send
notifications (see section «Customizing general notification settings» on page 71).
by registering the event in the Microsoft Windows system log on the computer where the Security Server
component is installed. In this case, the information is accessible through the use of Events viewer, a standard
Microsoft Windows logs viewing and management tool.
Emails can be sent to notify the sender and the message recipient about the infected object. This allows the sending of
notification messages to additional recipients, such as the administrator or a security officer.
The procedure used for notification, the method of distribution and the text of notification messages are created by the
administrator in the form of notification template.
When a specified event occurs, an automatic notification of the corresponding type is issued based on the created
template.
Multiple notification templates of the same type with different parameter values can be created. This allows the sending of
notification messages that are different by content and form to the message sender or recipient, and to additional
recipients, such as the administrator or a security officer.
Notification templates informing about infected, suspicious, protected or corrupted objects are generated by default
during the Security Server installation. These templates can be used to send notifications by email and to register events
in the Microsoft Windows event log. By default, registration of these events in the Microsoft Windows event log and their
email delivery are not performed.
Notification templates are accessible using the Notification templates folder. This child node is included in each node
representing a managed Kaspersky Security server.
Page 67
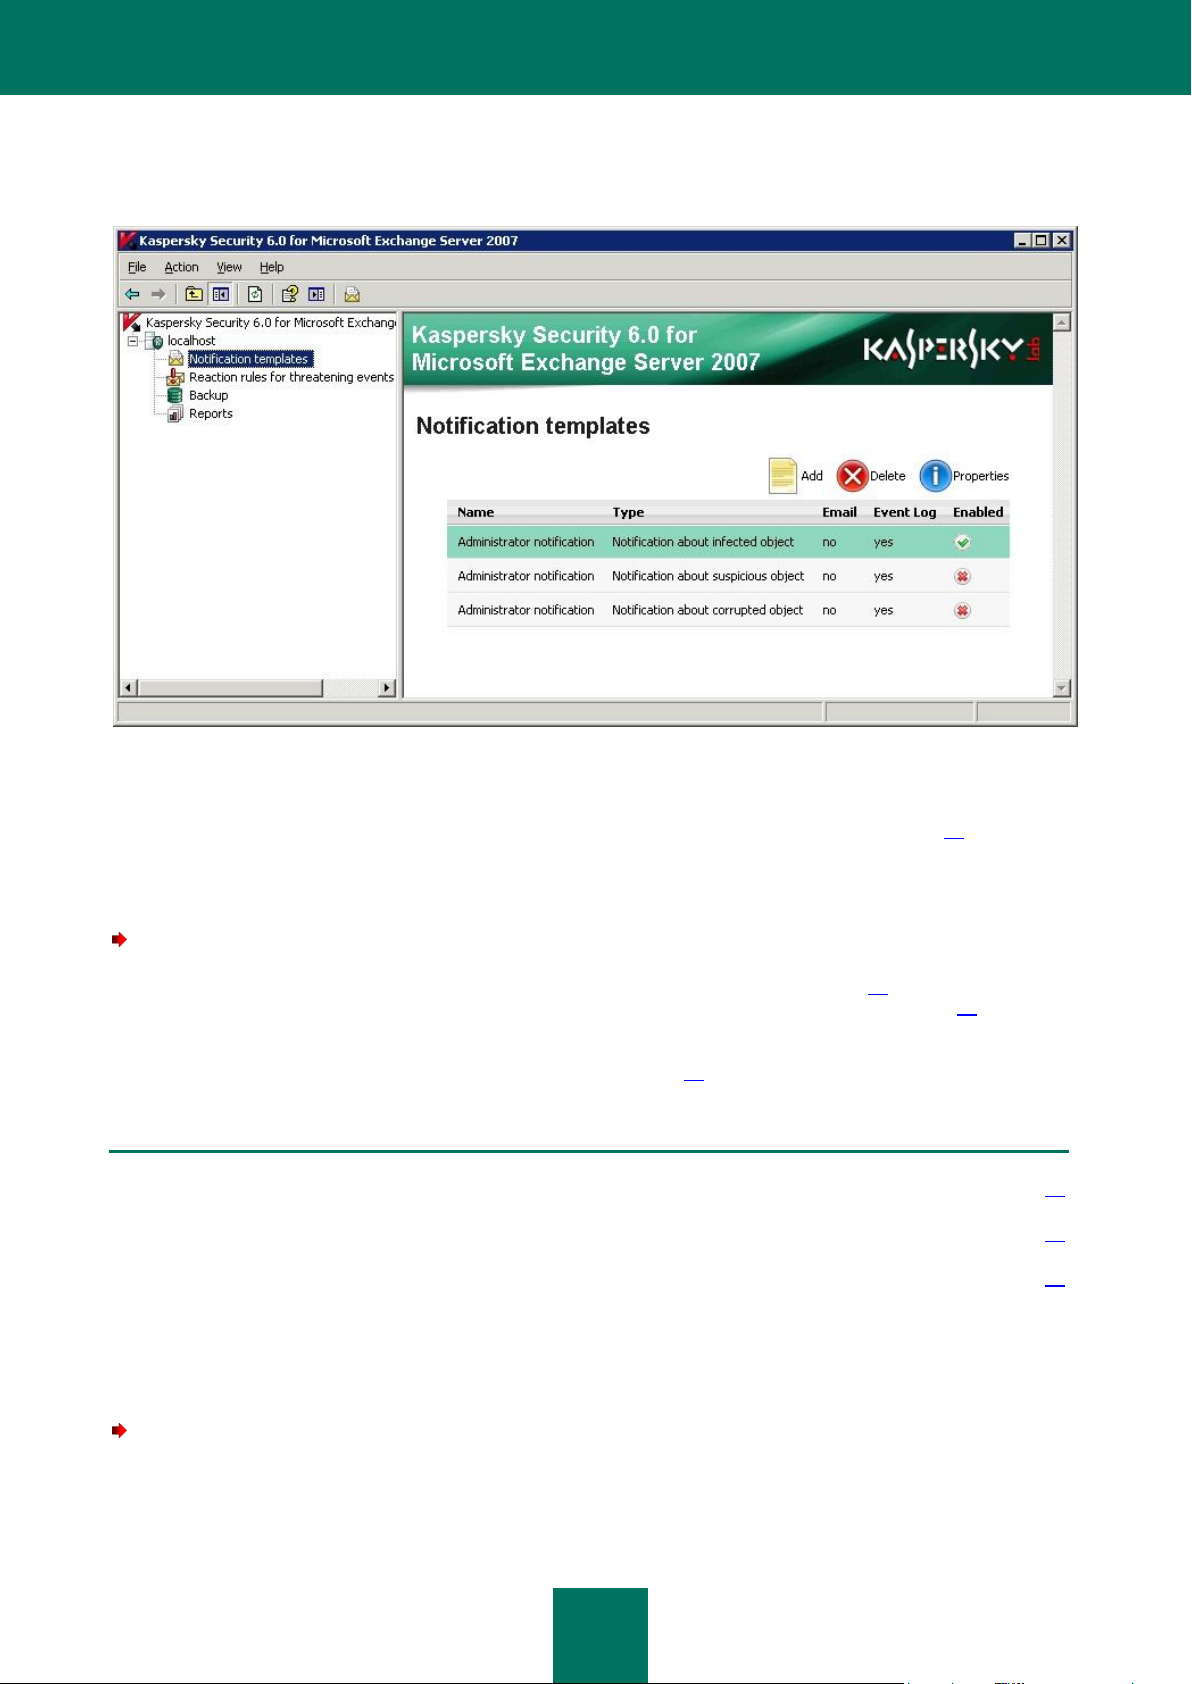
N O T I F I C A T I O N S
67
IN THIS SECTION
Creating a notification template ....................................................................................................................................... 67
Viewing and editing notification parameters .................................................................................................................... 70
Customizing general notification settings ........................................................................................................................ 71
The list of notification templates is displayed in the results pane as a table (see the figure below). For each template there
is listed its name, notification type and status (enabled or disabled), the email address to receive notifications, and
whether the events should be registered in the event log.
Figure 29: Notification templates folder
More detailed information about notification templates is provided using the settings window accessible through the
Properties context menu command (see section «Viewing and editing notification parameters» on page 70).
The administrator can create new templates, view and edit parameters of existing templates, and delete templates, using
the context menu commands.
To enable notifications about objects detected during a scan:
1. Create a notification template (see section «Creating a notification template» on page 67) or select an existing
template and edit its settings (see section «Viewing and editing notification parameters» on page 70).
2. Check the Enable notification box in the General tab of the notification template settings dialog box (see
section «Viewing and editing notification parameters» on page 70).
CREATING A NOTIFICATION TEMPLATE
To create a new notification template:
1. Open the Kaspersky Security 6.0 for Microsoft Exchange Server 2007 node in the console tree, select the
node corresponding to the required server, and select the Notification templates folder.
Page 68

K A S P E R S K Y S E C U R I T Y 6.0 F O R M I C R O S O F T EX C H A N G E S E R V E R 20 0 7
68
2. Press the Add button.
3. The new notification template wizard, which allows the configuration of a new notification template, will open
(see figure below). Specify the required parameter values in the tabs of the wizard window.
Figure 30: Notification template. The General tab
Use the General dialog (see figure above) to perform the following:
Enter the template name in the Name field.
Select the notification type. It must match the event which would trigger the notification to be created. To specify
the type, select the required value from the Type field in the dropdown list.
If necessary, enter a more detailed description for the notification in the Description field.
Determine whether notifications will be created based on this template. To do this, check or uncheck the Enable
notification box.
Press the Next button and use the Text window that will open (see figure below) to create a template for the text that will
be sent as notification:
Enter a brief description of the notification in the Subject field. This line will be used as the message header.
Page 69

N O T I F I C A T I O N S
69
No notifications are sent to the recipients of blind carbon copies (Bcc).
Create the message text in the Complete notification text field. Information about registered events may be
included by adding the corresponding substitution macros to the template. Select these macros from the
dropdown list accessible via the Macros button (see section «Table of macro substitution» on page 101).
Figure 31: Notification template. The Text tab
Press the Next button and use the Actions window that will open (see figure below) to select the notification methods
and specify the corresponding parameter values. The application provides for several methods to be used:
To send messages via the mail server, check the Notify by email box and specify the recipients' addresses for
the mailing.
To notify recipients and senders of the infected message about the event occurrence, check the Recipients
and Sender boxes.
To notify other users (for example, the administrator), enter their addresses in the Additional email
addresses field. Multiple addresses may be entered as a semicolon-delimited list.
You can verify the list of recipients' addresses by using the Test button. A test message will be sent to each
valid address specified.
Page 70

K A S P E R S K Y S E C U R I T Y 6.0 F O R M I C R O S O F T EX C H A N G E S E R V E R 20 0 7
70
To record the event in the Microsoft Windows system log, enable the checkbox Register in Windows event
log.
Figure 32: Notification template. The Actions tab
After you have finished editing the settings, press the Finish button.
As a result of these actions, the notification template will be added to the Notification templates folder, and will be
included in the table displayed in the results pane. If the Enable notifications box on the General tab is checked,
notifications will be issued using this template.
VIEWING AND EDITING NOTIFICATION PARAMETERS
To view or modify notification parameters,
1. Open the Kaspersky Security 6.0 for Microsoft Exchange Server 2007 node in the console tree, select the
node corresponding to the required server, and select the Notification templates folder.
2. Select the required notification template in the table containing the list of created templates.
3. Open the context menu and use the Properties command.
Page 71

N O T I F I C A T I O N S
71
As a result of these actions, a notification template Properties window will open (see figure below). This window contains
the General, Text, Actions tabs, and is identical to the notification template settings window (see section «Creating a
notification template» on page 67). The parameters are specified in the same way they were specified when the
notification was created.
Figure 33: Notification template settings window
After you have made the changes, press the Apply or OK button to apply the changes. To exit without saving the
changes, press the Cancel button.
CUSTOMIZING GENERAL NOTIFICATION SETTINGS
To configure the general notification settings:
1. Open the Kaspersky Security 6.0 for Microsoft Exchange Server 2007 node in the console tree, select the
node corresponding to the required server, and follow the General settings link in the results pane.
Page 72

K A S P E R S K Y S E C U R I T Y 6.0 F O R M I C R O S O F T EX C H A N G E S E R V E R 20 0 7
72
If the Microsoft Exchange server deployed as an Edge Transport is located in a demilitarized zone
(DMZ), and the firewall is configured in accordance with Microsoft recommendations, the
Kaspersky Security application installed on this server will be unable to send notifications because
the required https port will be blocked.
2. The General settings window will open, in which you should select the Notifications tab (see figure below).
Figure 34: Customizing general notification settings
3. Specify the Web-services address that will be used to send notifications. By default, in the Microsoft Exchange
Server it is the following address:
https://<client_access_server>/ews/exchange.asmx
4. In the Account field, specify the user whose account will be used to send Kaspersky Security notifications. The
user must have a mailbox on the Microsoft Exchange Organization, and be able to access it via Outlook Web
Access (OWA). You can enter the username manually, or add an account in the window that will open when you
click the Browse button.
Enter the account password in the Password and Confirm password fields.
5. Use the System notifications settings section to specify the email address(es) to which notifications about
other application events, not related to threat detection, will be sent. Multiple email addresses can be entered as
a semicolon-delimited list.You can verify the list of recipients' addresses by using the Test button. A test
message will be sent to each valid address specified.
Page 73

73
PREVENTING VIRUS OUTBREAKS
Kaspersky Security can detect increases in the level of virus activity on the protected Microsoft Exchange server,
automatically perform the specified responses and notify the administrator and other users accordingly. This feature is
very useful during virus outbreaks, as it helps the administrator to react in a timely fashion to an emerging virus attack.
The virus activity level is determined using the server anti-virus protection data, and can register events of the following
types:
An infected object detected.
A suspicious object detected.
A corrupted object detected.
The same virus detected several times.
The administrator specifies the threshold for virus activity, which is the maximum allowable number of events of the
specified type within a certain specified time interval. If the virus activity level reaches the specified threshold, a
notification will be issued.
The application's response to a virus outbreak can combine the following actions:
Enforcement of a higher protection level.
Urgent and immediate database update.
Notifications can be delivered using the following methods:
by sending email messages;
by registering the event in the Microsoft Windows system log on the computer where the Security Server
component is installed. In this case, the information is accessible through the use of Events viewer, a standard
Microsoft Windows logs viewing and management tool.
The virus activity level threshold, the application’s reaction, notification procedures, the delivery method and the text of
notification messages are determined by the administrator in the Virus outbreak prevention rules settings.
The rules for preventing virus outbreaks can be viewed in the folder Reaction rules for threatening events. This child
node is included in each node representing a managed Kaspersky Security server.
Page 74

K A S P E R S K Y S E C U R I T Y 6.0 F O R M I C R O S O F T EX C H A N G E S E R V E R 20 0 7
74
The user cannot create new rules or delete the existing rules.
IN THIS SECTION
Enabling and disabling the virus outbreak prevention rules............................................................................................. 74
Setting the virus activity level threshold ........................................................................................................................... 75
Configuring the response to a virus outbreak .................................................................................................................. 76
Configuring notifications about virus outbreaks ............................................................................................................... 77
The list of virus outbreak prevention rules is displayed in the results pane as a table (see figure below). For each rule the
table displays its status, type, trigger threshold, the action of the application, and notification recipients.
Figure 35: The Reaction rules for threatening events folder
You can access detailed information about the virus outbreak prevention rules, and, if necessary, edit them by opening
the settings window using the Properties command in the context menu.
ENABLING AND DISABLING THE VIRUS OUTBREAK
PREVENTION RULES
To enable or disable a virus outbreak prevention rule:
1. In the main application window, in the console tree open the Kaspersky Security 6.0 for Microsoft Exchange
Server 2007 node, select the node corresponding to the required server and choose the Reaction rules for
threatening events folder. A table listing the virus outbreak prevention rules will appear in the results pane (see
section «Preventing Virus outbreaks» on page 73).
2. Select the required rule, open its context menu and select the Properties command.
Page 75

P R E V E N T I N G V I R U S O U T B R E A K S
75
You can also enable or disable a rule directly from the context menu of that rule.
3. The General tab of the displayed window (see figure below) contains a detailed description of the rule. The rule
is activated by selecting the Enable rule checkbox, and deactivated by deselecting the box.
Figure 36: Virus outbreak prevention rule properties. The General tab
SETTING THE VIRUS ACTIVITY LEVEL THRESHOLD
To specify the virus activity level threshold:
1. In the main application window, in the console tree open the Kaspersky Security 6.0 for Microsoft Exchange
Server 2007 node, select the node corresponding to the required server and choose the Reaction rules for
threatening events folder. A table listing the virus outbreak prevention rules will appear in the results pane (see
section «Preventing Virus outbreaks» on page 73).
2. Select the required rule, open its context menu and select the Properties command.
Page 76

K A S P E R S K Y S E C U R I T Y 6.0 F O R M I C R O S O F T EX C H A N G E S E R V E R 20 0 7
76
The first time interval begins when the application is started on the server, and completes after the
specified time. Each new interval immediately follows the previous one. When each new interval
begins, the application resets the number of objects described by the corresponding rule and
updates the total number of scanned objects.
3. Select the Activation tab in the displayed window (see figure below).
Figure 37: Virus outbreak prevention rule properties. The Activation tab
4. Use the Activate rule, if an infected object is found field to enter the number of detected objects that would
constitute a virus outbreak.
5. Specify the length of the time interval used to count events. To do that, select from the dropdown list the time
unit (seconds, minutes or hours) and enter the duration of the interval in the Within the following time interval
field.
CONFIGURING THE RESPONSE TO A VIRUS OUTBREAK
To define the application’s response to a detected virus outbreak:
1. In the main application window, in the console tree open the Kaspersky Security 6.0 for Microsoft Exchange
Server 2007 node, select the node corresponding to the required server and choose the Reaction rules for
threatening events folder. A table listing the virus outbreak prevention rules will appear in the results pane (see
section «Preventing Virus outbreaks» on page 73).
2. Select the required rule, open its context menu and select the Properties command.
Page 77

P R E V E N T I N G V I R U S O U T B R E A K S
77
3. Select the Actions tab in the window that will open (see figure below).
Figure 38: Virus outbreak prevention rule properties. The Actions tab
4. Check the boxes corresponding to the required application response when the virus outbreak threshold has
been reached:
Set the security level. The application will set the specified protection level irrespective of other server
settings. Choose the required protection level from the dropdown list to the right. You can select the
Extended or Redundant protection level.
Update databases. The application will immediately update the Kaspersky Security anti-virus databases.
CONFIGURING NOTIFICATIONS ABOUT VIRUS OUTBREAKS
To configure notifications about virus outbreaks:
1. In the main application window, in the console tree open the Kaspersky Security 6.0 for Microsoft Exchange
Server 2007 node, select the node corresponding to the required server and choose the Reaction rules for
threatening events folder. A table listing the virus outbreak prevention rules will appear in the results pane (see
section «Preventing Virus outbreaks» on page 73).
2. Select the required rule, open its context menu and select the Properties command.
Page 78

K A S P E R S K Y S E C U R I T Y 6.0 F O R M I C R O S O F T EX C H A N G E S E R V E R 20 0 7
78
3. Select the Notifications tab in the window that will open (see figure below).
Figure 39: Virus outbreak prevention rule properties. The Notifications tab
4. Enable the Notify by email checkbox if you wish to send email notifications about outbreaks. Configure the
required parameters for email notifications:
Enter email addresses of the people who should be notified, entering multiple addresses as a semicolon-
delimited list. You can verify the address validity by pressing the Test button, which will send a test
message to each valid address specified.
Define the message topic in the Subject field.
Enter the message text in the Text field. Information about events that have resulted in the virus outbreak
threshold being exceeded may be included in the message. Select these macros from the dropdown list
accessible via the Macros button (see section «Table of macro substitution» on page 101).
5. To record the event in the Microsoft Windows system log, enable the checkbox Register in Windows event
log. The application will also add information from the Subject and Text fields to the Microsoft Windows event
log.
After you have finished configuring the settings, press the Apply or OK button.
Page 79

79
REPORTS
Kaspersky Security can generate reports on the status of Microsoft Exchange Server anti-virus protection.
The reports are generated automatically according to the schedule, or manually by request, and can be saved on disk
and sent by email. The information contained in the reports saved on disk and those sent by email is identical, although
the format, structure, and viewing method are different.
Reports saved on disk are created in HTML page format, and are stored in the Reports subfolder within the application
data folder (see section «Modification of the Security Server settings» on page 24).
Emailed reports are created as an HTML file sent as a message attachment. The message contains explanatory text as
follows:
The message is created by Kaspersky Security 6.0 for Microsoft Exchange Server 2007.
The attached file contains a standard/detailed report on the anti-virus scan of email
messages during the period from <YYYY.MM.DD> until <YYYY.MM.DD> on the server <name of
the Security Server>, generated using the task "<name of the task>".
Reports can be viewed using the default web browser.
Reports are generated by tasks created by the administrator. You can configure: report period, schedule and level of
report detail.
By default, during the Security Server installation, multiple anti-virus scan report tasks are generated, which differ in the
level of detail and the time interval for which the report will contain information.
The report generation tasks are accessible via the Reports folder. This child node is included in each node representing
a managed Kaspersky Security server.
Page 80

K A S P E R S K Y S E C U R I T Y 6.0 F O R M I C R O S O F T EX C H A N G E S E R V E R 20 0 7
80
The list of report generation tasks is displayed in the results pane (see figure below).
Figure 40: The Reports folder
In addition to the task names, this table contains information about each task’s status and the reports generated by each
task.
Depending on the current stage of report creation, the task status may have one of the following values:
being created - the report is currently being created (according to the schedule or by request).
expected – creation of the next report is expected based on the schedule. The time of the next report creation is
specified in the <Date> and <Time> fields.
disabled – the report generation schedule is not active, it can be enabled manually.
no data – the Management Console cannot, for some reason, obtain information about the task’s status.
The result of the last task’s execution is displayed in the Execution results column. The following results may be
obtained:
Report has been created [<date> <time>] – the report has been successfully created. The time of the report
creation is specified in the <Date> and <Time> fields.
Error [<date> <time>] – report creation completed with an error. The time of the report creation is specified in
the<Date> and <Time> fields. The error’s description can be viewed in the application event logs (see section
«Application event logs» on page 90).
No available reports – no report has been created using this task so far, or the administrator has deleted all
previously created reports.
No data - the Management Console cannot obtain information about the task’s execution.
Page 81

R E P O R T S
81
IN THIS SECTION
Generating reports........................................................................................................................................................... 81
Viewing reports ................................................................................................................................................................ 88
Detailed information about the report generation task is provided in the settings window, accessible through the
Properties command of the context menu (see section «Viewing and configuring a report generation task» on page 86).
The administrator can create new report tasks, view and edit the settings of the existing tasks, delete tasks, and create
and view the generated reports using the Reports folder and the commands of the context menu commands in the
results pane.
GENERATING REPORTS
To generate a report about an anti-virus server scan:
either create a report generation task of the appropriate type (see section «Creating a report generation task» on
page 82), or select an existing one and edit its settings (see section «Viewing and configuring a report generation
task» on page 86).
As a result, a report will be created at the frequency specified in the schedule.
Reports can be created request, irrespective of the scheduled time, which can be useful when you need current
information about the status of server protection, for example, during virus outbreaks.
To receive a report upon request:
1. Open the Kaspersky Security 6.0 for Microsoft Exchange Server 2007 node in the console tree, select the
node corresponding to the required server and select the Reports folder in the console tree.
2. Select the required report generation task from the list of created tasks (see section «Reports» on page 79).
3. Press the Create report button.
Reports will be created based on the information about anti-virus server scans saved by the application. All results
related to traffic scanning (incoming, outgoing and transit), and the scanning of mail-boxes and common folders are
saved. To reduce the amount of information stored, restrictions can be placed on how long the reports are stored.
To restrict the period of report saving:
1. Open the Kaspersky Security 6.0 for Microsoft Exchange Server 2007 node in the console tree, select the
node corresponding to the required server and select the Reports folder in the console tree.
2. Open the context menu of the Reports folder, and use either the Properties command or the corresponding
item in the Action menu.
3. In the displayed Properties: Reports (see figure below):
check the box Store statistics to limit the storage period for reports, and indicate the storage period for
preserving the statistics. The default storage period is twelve months.
Page 82
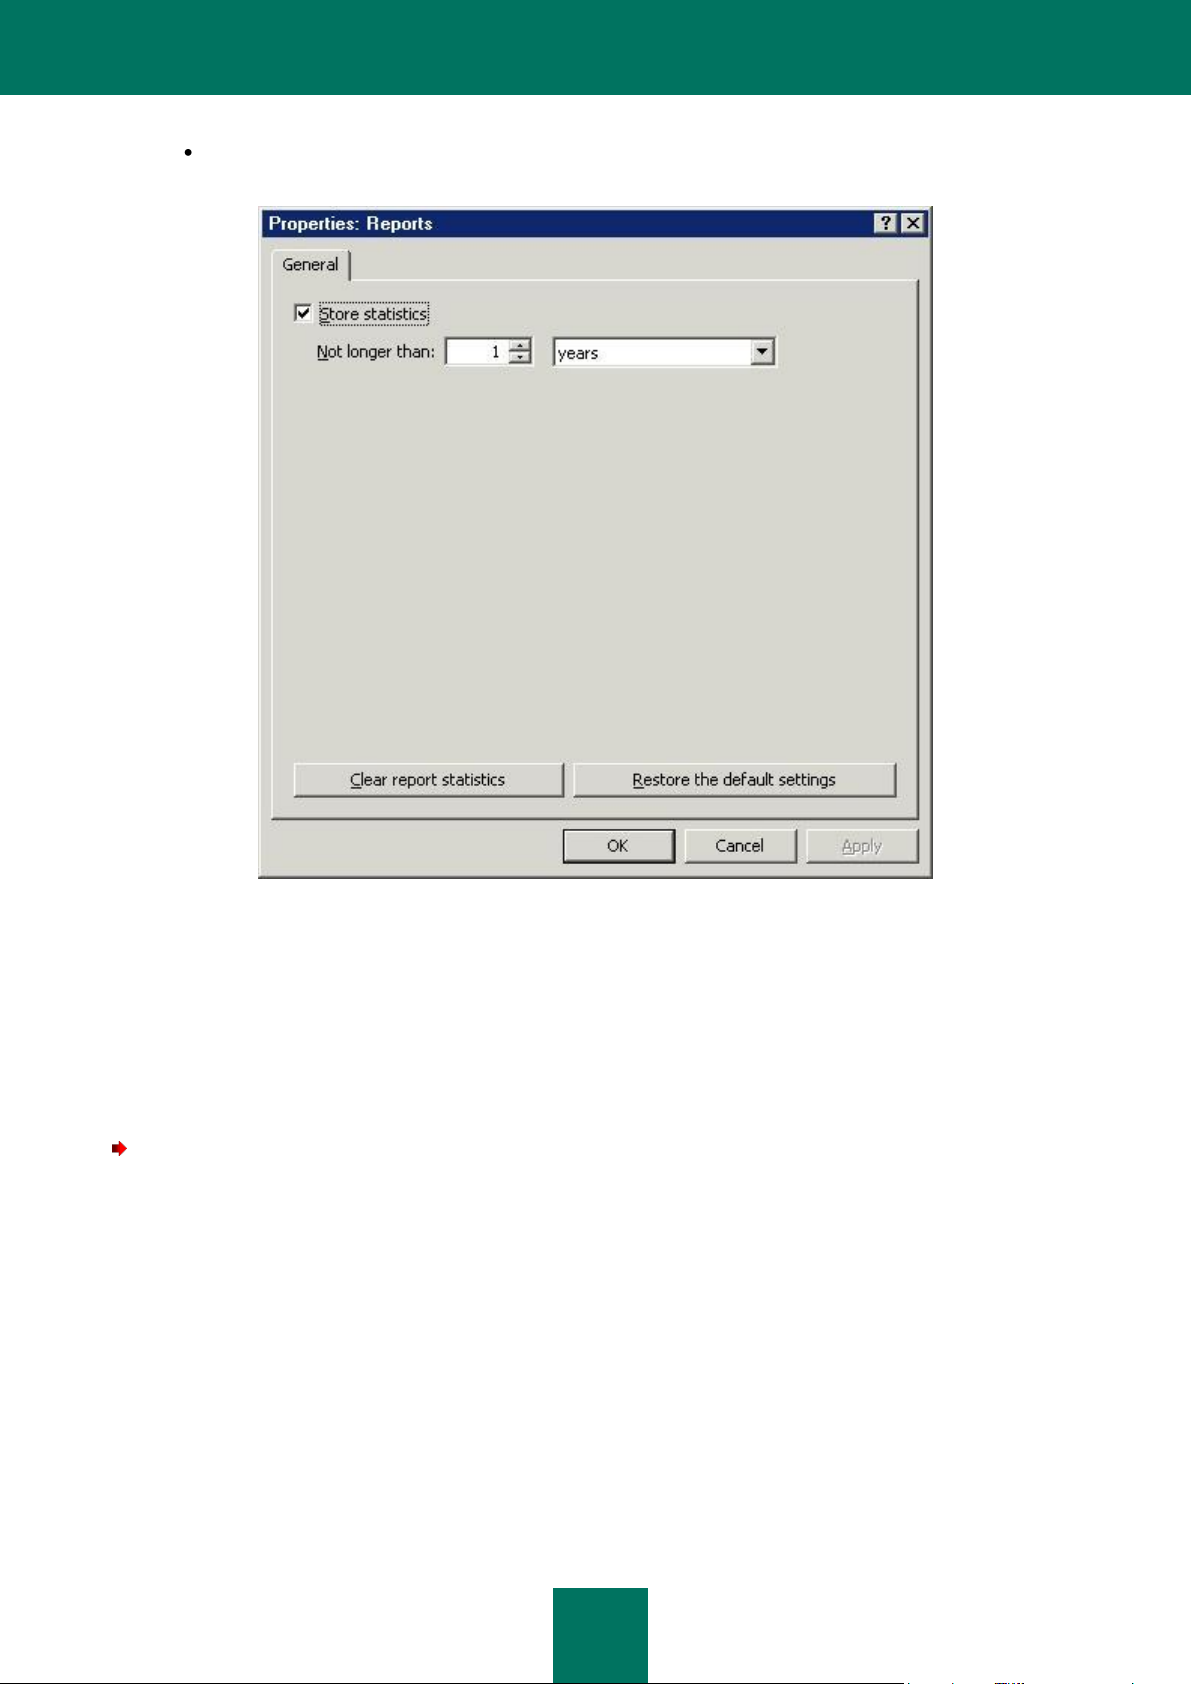
K A S P E R S K Y S E C U R I T Y 6.0 F O R M I C R O S O F T EX C H A N G E S E R V E R 20 0 7
82
To delete the contents of the statistical database used for generating reports, click the Clear report
statistics button.
Figure 41: Configuring the statistics parameters.
After you have made the changes, press the Apply or OK button to apply the new settings. To exit without saving the
changes, press the Cancel button.
You can restore the default settings by pressing the Restore the default settings button.
CREATING A REPORT GENERATION TASK
To create a new report generation task,
1. Open the Kaspersky Security 6.0 for Microsoft Exchange Server 2007 node in the console tree, select the
node corresponding to the required server and select the Reports folder in the console tree.
2. Open the context menu and use the New task command, or use the corresponding item in the Action menu.
Page 83

R E P O R T S
83
3. Use the task configuration wizard (see figure below) to specify the necessary settings.
Figure 42: A report generation task. Entering the name and description
On the first page (see figure above) you should:
Enter the task’s name in the Task name field.
If necessary, enter a more detailed description for the report in the Description field.
Click the Next button. On the next page (see figure below) specify:
Report type: Standard or Detailed. The report type affects how frequently the report will be generated (see the
table below).
The time interval for which the information will be provided, starting with the date and time of report generation.
The following options are available:
for the last day / week / month / year;
for one day / week / month / year, starting with the specified date.
Page 84

K A S P E R S K Y S E C U R I T Y 6.0 F O R M I C R O S O F T EX C H A N G E S E R V E R 20 0 7
84
TYPE OF REPORT
REPORTING PERIOD
THE REPORT FREQUENCY
Standard
day
six hours
week
one day
month
one day
year
three months
Detailed
day
one hour
week
twelve hours
month
one day
year
one month
Figure 43: A report generation task. Data configuration
Table 3. The report frequency table
Click the Next button. On the next page (see figure below) define a schedule for automatic report creation, and specify
delivery addresses:
To create a report according to the schedule specified below, check the Generate report automatically box.
Page 85

R E P O R T S
85
To create a report schedule:
Select the report creation frequency, Daily, On specified days of the week or Monthly, on specified day.
Edit the schedule settings in accordance with the selected frequency.
Specify the time when reports will be created in the Create at field.
To send the created report via email, check the Send each report by email box and enter the email addresses
in the To field. Multiple email addresses can be entered as a semicolon-delimited list.
You can verify the list of recipients' addresses by using the Test button. A test message will be sent to each
valid address specified.
Figure 44: A report generation task. Configuring the schedule and delivery addresses
After you have finished editing the settings, press the Finish button.
As a result:
The report creation task will be added to the Reports folder, and will appear in the results pane.
The application will create reports according to the time specified in the schedule and with the specified
frequency, based on the task. The report can also be generated manually, at the administrator's request.
Page 86

K A S P E R S K Y S E C U R I T Y 6.0 F O R M I C R O S O F T EXCH A N G E S E R V E R 2 0 0 7
86
VIEWING AND CONFIGURING A REPORT GENERATION TASK
To view or modify the report generation task settings,
1. Open the Kaspersky Security 6.0 for Microsoft Exchange Server 2007 node in the console tree, select the
node corresponding to the required server and select the Reports folder in the console tree.
2. Select the required report generation task from the list of created tasks (see section «Reports» on page 79).
3. Press the Properties button.
As a result, the Properties window of the report generation task settings will be displayed (see the figure below).
Figure 45: Viewing and configuring a report generation task
The window contains the following tabs: General, Data, Generate reports and Reports.
The General and Data tabs are identical to the corresponding windows of the report generation task creation wizard (see
section «Creating a report generation task» on page 82). The report generation task settings can be modified in the same
way as when the template was created.
Page 87

R E P O R T S
87
The Generate reports tab (see the figure below), displays the settings specified in the report generation task wizard, and
also allows you to create a report manually. To do this, press the Generate now button. The field to the right of the
button indicates the task’s current status.
Figure 46: A report generation task settings. The Generate reports tab
The Reports tab in the table shows all reports created based on the selected task. For each report, the list shows its
creation time and the period which it covers. The following actions are available:
Save file using the Save button. In this case, specify the reports storage folder in the window that will open. The
report will be saved in html format. By default, the file name indicated will be in the following format:<task
name> - <YYYY.MM.DD HH-MM-SS>.html.
Open the report for viewing using the View button.
Delete a report using the Delete button.
Page 88

K A S P E R S K Y S E C U R I T Y 6.0 F O R M I C R O S O F T EX C H A N G E S E R V E R 20 0 7
88
The path of the reports storage folder on the Security server is specified under the table. You can change this folder only
using the Data Migration Wizard (see section «Modification of the Security Server settings» on page 24).
Figure 47: A report generation task settings. The Reports tab
VIEWING REPORTS
Depending on the template settings assigned, created reports can be:
saved in a specified folder;
sent by email.
To view a report saved as a folder:
1. Open the Kaspersky Security 6.0 for Microsoft Exchange Server 2007 node in the console tree, and select
the node corresponding to the required server.
2. Select the Reports folder.
3. Select the required report generation task from the list of created tasks (see section «Reports» on page 79).
4. Click on the Report has been created [<date> <time>] link located in the Execution results column, or use
the View report button located above the table.
Page 89

R E P O R T S
89
You can view the list of previously created reports in the task settings window on the Reports (see section
«Viewing and configuring a report generation task» on page 86).
As a result, the system’s default web browser will display. The last created report about anti-virus server scans (see the
figure below). Immediately after loading, the report displays the general scan results. The title contains the following
information:
reporting period;
the report name;
the server on which the report was generated;
the time of report creation.
Figure 48: Viewing a report saved as a folder
The upper part of the report lists the heading and report sections as a table of contents;
the content of the selected section is displayed in the lower part of the report.
The report is sent by email as an html-file in the message attachment.
Page 90

90
The method used to maintain the updater component log differs from the methods used for other
logs (see section «Selecting the updates source» on page 36).
The update process will complete with an error if the _upd.log file is inaccessible while databases are being
updated.
IN THIS SECTION
Configuring the diagnostics level ................................................................................................ ..................................... 91
Editing log settings .......................................................................................................................................................... 92
APPLICATION EVENT LOGS
Kaspersky Security can register application events in both the Microsoft Windows application event logs and the
Kaspersky Security application log file.
The level of detail entered into the logs depends on the diagnostics levels specified in the application settings (see
section «Configuring the diagnostics level» on page 91).
Events registered in the Microsoft Windows events log can be viewed using the Events Viewer, a standard Microsoft
Windows component. For events originated by Kaspersky Security, the Source column will contain the text Kaspersky
Security for Exchange.
The Kaspersky Security events logs are maintained in several formats, with file names which depend on the format, as
follows:
KSCM4E<Date>.log - general application event logs containing information about events that do not fit other
logs.
Virus<Date>.log – anti-virus protection event logs.
_upd.log – log of the updater component containing debug information. Its presence can be configured on the
Updates source tab (see section «Selecting the updates source» on page 36) information box by clicking the
button Log debug information. By default, the log file is not generated.
where <Date> in the file name stands for the date of file creation, in the format YYYYMMDD. For example:
KSCM4E20070910.log.
By default, a new log is created on a monthly basis. The log storage period is not restricted; however, the maximum
number of logs having the same format is limited (the default limit is 5 logs of the same type). If, when a new log is being
created, this limit is exceeded, the oldest log of the same format will be deleted. The frequency for creating new logs, and
the maximum number of logs, can be modified (see section «Editing log settings» on page 92).
New records recorded in application event logs are added to the end of the newest file. The log size is not restricted.
The application logs can be viewed using a standard program associated with text files (for example, Notepad).
Logs are stored in the Logs folder, which is created within the application data folder (see section «Modification of the
Security Server settings» on page 24).
Logs can be configured in the Diagnostics tab of the application's General settings window, which is accessible via the
General settings link (see section «Configuring the diagnostics level» on page 91).
Page 91

A P P L I C A T I O N E V E N T L O G S
91
CONFIGURING THE DIAGNOSTICS LEVEL
The amount and completeness of information entered in the logs depend on the selected diagnostics levels.
The following diagnostics levels are provided:
None: do not register any information in the logs.
Minimum - log only major events.
Medium - in addition to major events, log some additional events that describe the application operation in more
detail.
Maximum - log full information about the operation of the module, except the debug messages.
Debug - log all information, including debug messages.
Custom: selecting this option activates the Advanced Settings, which can be used to configure the diagnostics
levels for individual application components. This level is available only for the general events log.
To configure the diagnostics level:
1. In the main application window open the Kaspersky Security 6.0 for Microsoft Exchange Server 2007 node
in the console tree, select the node corresponding to the required server, and follow the General settings link in
the results pane.
2. Select the Diagnostics tab in the General settings window that will open (see figure below).
Figure 49: The Diagnostics tab
Page 92

K A S P E R S K Y S E C U R I T Y 6.0 F O R M I C R O S O F T EX C H A N G E S E R V E R 20 0 7
92
The tab allows you to define separately the diagnostics level for the general application log, and for the anti-virus log
which contains the results of anti-virus scans.
Select the required log and specify the required diagnostics level using the drop-down list.
After you have finished changing the settings, press the Apply or OK button.
You can restore the default settings by pressing the Restore the default settings button.
EDITING LOG SETTINGS
To alter logs settings:
1. In the main application window open the Kaspersky Security 6.0 for Microsoft Exchange Server 2007 node
in the console tree, select the node corresponding to the required server, and follow the General settings link in
the results pane.
2. Select the Diagnostics tab in the General settings window that will open (see section «Configuring the
diagnostics level» on page 91) and edit the necessary settings:
Select the frequency for creating logs in the field Write to new log file once a, by selecting the required
value from the drop-down list.
Specify the number of log files of the same format that can be stored by the application, in the field Store
no more than [NN] log files.
After you have finished changing the settings, press the Apply or OK button.
You can restore the default settings by pressing the Restore the default settings button.
Page 93

93
The anti-virus protection covers both mailboxes and public folders. Therefore, no additional license is needed
to protect public folders when working in the Microsoft Exchange environment.
When using the application on a cluster of servers, the license is valid for the whole cluster.
Kaspersky Security 6.0 for Microsoft Exchange Server 2007 will not work without a license!
MANAGING KASPERSKY SECURITY
LICENSES
When you purchase Kaspersky Security, you enter into a license agreement with Kaspersky Lab. This agreement grants
you the right to use the software you purchased to protect the specified number of mailboxes, and to have access to the
attendant services, for a defined period.
The following features will be available to you during the license period:
using the anti-virus functionality of the application;
regular database updates;
receiving upgrades to the application modules;
support on issues related to the installation, configuration and the use of the purchased software product,
provided 24 hours a day, by phone or email.
The application verifies the validity of the license agreement through the Kaspersky Security key file, which is an integral
part of any Kaspersky Lab product.
The application can use only one active license. This license contains restrictions imposed on the use of Kaspersky
Security, which the application verifies using its internal algorithms. If a violation of the terms and conditions of the license
agreement is detected:
the functionality of the application will be limited;
a record of the detected violation will be entered into the event logs;
if the notification settings are configured, a notification about the violation will be issued and sent by email (see
section «License-related notifications» on page 97).
You can reduce the number of protected mailboxes by excluding some of them from the storage scan scope (see section
«Unprotected storage areas» on page 97).
You are advised to purchase a license able to protect all your mailboxes, as any unprotected storage areas increase the
possibility of penetration and propagation of viruses via the email system.
When a commercial license expires, the application continues to provide anti-virus protection, but database updates, new
application versions and access to the Technical Support service, are no longer available. The application will continue
anti-virus scanning of email traffic, and background scanning of storage areas, but will use outdated database versions.
In this case, it is difficult to guarantee comprehensive protection against new viruses, which may appear after the license
expires.
If a trial license has been used, upon its expiration the anti-virus functionality of the application will also be disabled in
addition to the above limitations.
Page 94

K A S P E R S K Y S E C U R I T Y 6.0 F O R M I C R O S O F T EX C H A N G E S E R V E R 20 0 7
94
Note that the validity period of a trial key starts from the moment when the first trial key is added. The validity
period of all the subsequent trial keys will be adjusted in accordance with the validity period of the first key.
Kaspersky Lab regularly has promotions during which license extension for our products are offered at a
considerable discount. Please visit the Products / Actions and special offers section of our web site for
information about current offers.
You can install two licenses: an active license and a reserve license. The active license is the
license that is in use. The application cannot use more than one active license. The reserve
license will be automatically activated when the active license expires.
IN THIS SECTION
License information ......................................................................................................................................................... 95
Installing a license ........................................................................................................................................................... 96
Removing a license ......................................................................................................................................................... 96
License-related notifications ............................................................................................................................................ 97
Unprotected storage areas .............................................................................................................................................. 97
By default, a notification is sent when the application is running, two weeks prior to the license expiration date. This
message indicates when the currently installed license will expire, and gives information about renewing a license. The
date of the notification and the email delivery address can be changed (see section «License-related notifications» on
page 97).
You are advised to renew your application license in a timely manner.
To renew your license:
1. Contact the dealer from whom you originally purchased the product, and buy a new license for the use of
Kaspersky Security 6.0 for Microsoft Exchange Server 2007.
or
Purchase a new key file directly from Kaspersky Lab. To do so, click the Licenses tab (see section «License
information» on page 95) and click the link Renew license located on the Licenses tab. Alternately, if there is no
installed trial key, click on the link Buy license key. You will be redirected to Kaspersky Lab's web site, where
you will receive full information about the terms and conditions of the license purchase or renewal.
2. Install the key file (see section «Installing a license» on page 96).
In some cases (for example, if the sales contract was terminated or if the license agreement restrictions were changed),
Kaspersky Lab terminates the license agreement with the user. In this case, the serial number of the license will be
added to the list of cancelled license, the so-called black list.
If your active license is found in the black list, the reserve license will not be activated and the application will be disabled
except for the management and anti-virus database updating services. When such an event occurs, a notification is sent
by email using the general notification settings (see section «Customizing general notification settings» on page 71).
If your key is in the black list, you are advised to update your databases and, if the error persists, contact the Technical
Support Service.
Page 95

M A N A G I N G K A S P E R S K Y S E C U R I T Y L I C E N S E S
95
LICENSE INFORMATION
To view the license:
1. Open the Kaspersky Security 6.0 for Microsoft Exchange Server 2007 node in the console tree, select the
node corresponding to the required server, and follow the General settings link in the results pane.
2. Select the Licenses tab in the General settings window that will open (see figure below).
Figure 50: Viewing license information
The tab contains the following information:
the status of the active license;
the active license’s type;
license owner information;
the supported number of user accounts (mailboxes);
license expiration date;
the license serial number.
If you have a reserve key installed, the tab will also display information about the number of user accounts supported by
this reserve key, its serial number, and expiration date.
Page 96

K A S P E R S K Y S E C U R I T Y 6.0 F O R M I C R O S O F T EX C H A N G E S E R V E R 20 0 7
96
If the active license is found in the black list, the reserve license will not be activated. In this case, you must
replace the active license. You can manually install the reserve license as the active license.
A reserve key cannot be installed if it expires before the active license!
Once the trial key validity period has expired, you will not be able to install another trial license.
INSTALLING A LICENSE
Two license can be installed for one application: an active license and a reserve license. The reserve license
automatically becomes active when the active license expires.
There is a provision for replacing the active license, which prevents restrictions on the application’s functionality during
the procedure of consecutively removing the active license and installing a new license.
If no license is installed for the application, only the active license can be installed.
To install or replace a license:
1. Open the Kaspersky Security 6.0 for Microsoft Exchange Server 2007 node in the console tree, select the
node corresponding to the required server, and follow the General settings link in the results pane.
2. Select the Licenses tab in the General settings window that will open (see section «License information» on
page 95).
if you are installing or replacing the active license, press the Add/Replace button in the Current license
section.
if you are installing the backup license, press the Add button in the Backup license section.
3. Specify the key file (*.key) to be installed in the file selection window that will open.
As a result, information about the installed license will be displayed in the fields of the corresponding section.
Close the General settings window by pressing the OK or Apply button.
REMOVING A LICENSE
When you remove your license using the Kaspersky Security interface, you only remove the registration of the key.
Physically, the key file will remain untouched on the media from which it was added to the application.
To remove a key file,
1. Open the Kaspersky Security 6.0 for Microsoft Exchange Server 2007 node in the console tree, select the
node corresponding to the required server, and follow the General settings link in the results pane.
2. Select the Licenses tab in the General settings window that will open (see section «License information» on
page 95).
if you are removing the backup license, press the Remove button in the Backup license section.
if you are removing the active license, press the Remove button in the Current license section.
3. Confirm the removal of the key file in the warning message that will be displayed on your screen.
Page 97

M A N A G I N G K A S P E R S K Y S E C U R I T Y L I C E N S E S
97
If you remove the active license, any installed reserve license will also be automatically removed.
If the number of protected mailboxes exceeds the limit specified in the license, all mail accounts will remain
unprotected!
As a result, the information in the corresponding sections will be updated.
Close the General settings window by pressing the OK or Apply button.
LICENSE-RELATED NOTIFICATIONS
The application verifies compliance with the license agreement after every database update.
If the check reveals that any of the following applies:
the active key expires within the next few days;
the license has expired;
the active license was found in the black list;
the number of protected mailboxes exceeds the maximum number specified in the license;
a record will be entered in the application logs and, if the notification parameters are configured, a message will be sent
by email to the specified email address.
By default, a notification will be issued 14 days prior to the expiration of your license period. You can set up an earlier or
a later notification date.
To configure license-related notifications:
1. Open the Kaspersky Security 6.0 for Microsoft Exchange Server 2007 node in the console tree, select the
node corresponding to the required server, and follow the General settings link in the results pane.
2. Select the Licenses tab in the General settings window that will open (see section «License information» on
page 95) and in the Notify about license expiration section, specify the number of days before the license
expiry date you want the license notification to be issued.
3. Go to the Notifications tab (see section «Customizing general notification settings» on page 71) and specify the
email addresses of notification recipients in the System notifications settings section. Multiple addresses can
be entered as a semicolon-delimited list.
To verify the correctness of recipients' email addresses, send an email message to them by pressing the Test
button.
After you have entered and verified the addresses, press the Apply or OK button.
UNPROTECTED STORAGE AREAS
The application will protect the number of mail boxes specified in the active license. If this number is not sufficient, you
must decide which mailboxes should be left unprotected and moved into storage areas not covered by anti-virus
protection.
By default, the application protects all public folders created on the protected mail server. You can remove protection
from public folders if you think that their scan would be redundant.
Page 98

K A S P E R S K Y S E C U R I T Y 6.0 F O R M I C R O S O F T EX C H A N G E S E R V E R 20 0 7
98
To remove protection from the mailbox storage or public folders storage:
1. Open the Kaspersky Security 6.0 for Microsoft Exchange Server 2007 node in the console tree, select the
node corresponding to the required server, and follow the Anti-virus protection link in the results pane.
2. Go to the Protected Mail tab in the Anti-virus protection window that will open (see figure below).
In the Protected mailbox storages section uncheck boxes next to the names of storage areas containing
mailboxes which will not be scanned.
In the Protected public folder storages section uncheck the boxes next to the names of public folders
which will not be scanned.
The list includes all mailbox storage areas created on the protected Microsoft Exchange server. By default, the
application protects the storages that already existed when the application was installed. Protection of more
recent storages must be enabled manually.
Figure 51: The Protected Mail tab
To apply the changes, press the Apply or OK button.
As a result, any mailboxes located in unprotected storage areas will not be counted when the application verifies
compliance with the license restrictions.
Page 99

99
FREQUENTLY ASKED QUESTIONS
This chapter is devoted to questions most frequently asked by users regarding the installation, configuration, and
operation of Kaspersky Security 6.0 for Microsoft Exchange Server 2007.
Question: Can the application be used with other vendors' anti-virus software?
Kaspersky Security 6.0 for Microsoft Exchange Server 2007 is an anti-virus email application designed to be used in
corporate networks. Therefore, it can be used with Kaspersky Open Space Security applications (such as
Kaspersky Anti-Virus 6.0 for Windows Workstations or Kaspersky Anti-Virus 6.0 for Windows Servers), deployed on
the network.
Anti-virus products of other vendors can run on a Microsoft Exchange server deployed as a Hub Transport or Edge
Transport together with Kaspersky Security interceptors for those configurations. The system load in this case
increases, and the requirements to the administrator who must coordinate the settings of the anti-virus products, will
also increase. Therefore, it is recommended to remove third-party anti-virus products before installing the Kaspersky
Security application.
Kaspersky Security does not work with anti-virus products of other vendors on a Microsoft Exchange server
deployed as a Mailbox!
Question: Why does the application decrease my computer performance and impose a considerable load on the
processor?
The process of virus detection is a purely computational task which involves the analysis of structures, checksum
calculation, and mathematical data transformation. Therefore, the main resource consumed by the anti-virus
application is processor time. Moreover, each new virus added into the anti-virus database adds to the overall
scanning time.
Some other anti-virus software vendors speed up the scan process by excluding viruses from their databases, such
as: viruses that are less easily detectable; viruses which occur less frequently in the geographic location of the antivirus vendor, and file formats that require complicated analysis (e.g. PDF files). By contrast, Kaspersky Lab believes
that the purpose of an anti-virus application is to provide genuine anti-virus security.
Kaspersky Security allows experienced users to accelerate the anti-virus scan process by disabling the scanning of
various file types. However, note that this leads to lowering the security level of your computer.
Kaspersky Security recognizes over 700 formats of archived and packed files. That is very important for anti-virus
security because each recognized format can contain executable malicious code that activates only after
decompression / unpacking.
Question: Why do I need a Kaspersky Security license? Will my Kaspersky Security application work without it?
Kaspersky Security 6.0 for Microsoft Exchange Server 2007 will not work without a license!
If you are still undecided about whether or not to purchase the application, we can provide you with a temporary key
file (trial key), which will only work for either two weeks or for a month. When this period expires, the key will be
blocked.
Question: What happens when my Kaspersky Security license expires?
After the license expires, Kaspersky Security will continue operating, but the database updating feature will be
disabled. Kaspersky Security will continue performing the anti-virus email traffic and background storage scan, but it
will be using outdated databases.
When this happens, contact either the dealer from whom you purchased your copy of Kaspersky Security, or
Kaspersky Lab directly.
Page 100

K A S P E R S K Y S E C U R I T Y 6.0 F O R M I C R O S O F T EX C H A N G E S E R V E R 20 0 7
100
Question: How often the updates should be performed?
Several years ago viruses were distributed via floppy disks and at that time it was sufficient for computer protection
to update the anti-virus database from time to time. However recent virus outbreaks spread over the world in a
matter of hours, and an anti-virus application using old anti-virus databases may not be able to protect you against a
new threat. Therefore, to ensure protection against new viruses you should update your anti-virus databases on at
least a daily basis, and more frequently if possible.
The appearance of viruses that use new technologies to hide their modification of infected objects requires updating
not only of the anti-virus databases, but also of the application modules.
Question: Can an intruder replace my Kaspersky Security database?
All anti-virus databases are supplied with a unique signature which the application verifies before it uses them. If the
signature does not match the signature assigned by Kaspersky Lab, or if the database is issued on a more recent
date than your license's expiry date, the application will not use this database.
Question: I use a proxy server and cannot perform updates. What should I do?
The possible reason for this is that your proxy server is not supported by the Kaspersky Security update service. For
instance, the update service is not compatible with Kerio WinRoute proxy server as WinRoute does not fully support
the http 1.0 protocol. In this case you are advised to use a different proxy server.
Question: After adding new storages to the Microsoft Exchange Server they do not appear in the list of protected storage
areas. What should I do?
The storages will appear after the Kaspersky Security service is restarted.
After the restart, to enable protection for them, you should check the boxes next to the names of the corresponding
storage areas on the Protected Mail tab within the Anti-virus protection window in manual mode (see section
«Disabling the scanning of outgoing email» on page 46).
Question: Sometimes email files in msg format attached to a message become corrupted during delivery so that they
cannot be opened. Is this caused by a Kaspersky Security scan?
The situation has been reproduced during application testing. As a result, it has been found that files in this format
can be damaged during delivery by Microsoft Exchange server.
 Loading...