

Page 1

Kaspersky Mobile Security 9
USER GUIDE
P R O GR A M V ER S IO N : 9 . 0
for Microsoft Windows Mobile
Page 2

2
Dear User!
Thank you for choosing our product. We hope that this documentation will help you in your work and will provide answers
regarding this software product.
Note! This document is the property of Kaspersky Lab ZAO (herein also referred to as Kaspersky Lab): all rights to this
document are reserved by the copyright laws of the Russian Federation, and by international treaties. Illegal reproduction
and distribution of this document or parts hereof will result in civil, administrative or criminal liability by the applicable law.
Reproduction or distribution of any materials in any format, including translations, is only allowed with the written
permission of Kaspersky Lab.
This document, and graphic images related to it, may be used exclusively for informational, non-commercial, and
personal purposes.
Kaspersky Lab reserves the right to amend this document without additional notification. You can find the latest version
of this document at the Kaspersky Lab website, at http://www.kaspersky.com/docs.
Kaspersky Lab shall not be liable for the content, quality, relevance, or accuracy of any materials used in this document
for which the rights are held by third parties, or for any potential or actual losses associated with the use of these
materials.
In this document, registered trademarks and service trademarks are used which are the property of the corresponding
rights holders.
Revision date: 20.01.2011
© 1997-2011 Kaspersky Lab ZAO. All Rights Reserved.
http://www.kaspersky.com
http://support.kaspersky.com
Page 3

3
KASPERSKY LAB END USER LICENSE AGREEMENT
IMPORTANT LEGAL NOTICE TO ALL USERS: CAREFULLY READ THE FOLLOWING LEGAL AGREEMENT BEFORE
YOU START USING THE SOFTWARE.
BY CLICKING THE ACCEPT BUTTON IN THE LICENSE AGREEMENT WINDOW OR BY ENTERING
CORRESPONDING SYMBOL(-S) YOU CONSENT TO BE BOUND BY THE TERMS AND CONDITIONS OF THIS
AGREEMENT. SUCH ACTION IS A SYMBOL OF YOUR SIGNATURE AND YOU ARE CONSENTING TO BE BOUND
BY AND ARE BECOMING A PARTY TO THIS AGREEMENT AND AGREE THAT THIS AGREEMENT IS
ENFORCEABLE LIKE ANY WRITTEN NEGOTIATED AGREEMENT SIGNED BY YOU. IF YOU DO NOT AGREE TO
ALL OF THE TERMS AND CONDITIONS OF THIS AGREEMENT, CANCEL THE INSTALLATION OF THE SOFTWARE
AND DO NOT INSTALL THE SOFTWARE.
AFTER CLICKING THE ACCEPT BUTTON IN THE LICENSE AGREEMENT WINDOW OR AFTER ENTERING
CORRESPONDING SYMBOL(-S) YOU HAVE THE RIGHT TO USE THE SOFTWARE IN ACCORDANCE WITH THE
TERMS AND CONDITIONS OF THIS AGREEMENT.
1. Definitions
1.1. Software means software including any Updates and related materials.
1.2. Rightholder (owner of all rights, whether exclusive or otherwise to the Software) means Kaspersky Lab ZAO, a
company incorporated according to the laws of the Russian Federation.
1.3. Computer(s) means hardware(s), including personal computers, laptops, workstations, personal digital
assistants, ‗smart phones‘, hand-held devices, or other electronic devices for which the Software was designed
where the Software will be installed and/or used.
1.4. End User (You/Your) means individual(s) installing or using the Software on his or her own behalf or who is
legally using a copy of the Software; or, if the Software is being downloaded or installed on behalf of an
organization, such as an employer, “You” further means the organization for which the Software is downloaded
or installed and it is represented hereby that such organization has authorized the person accepting this
agreement to do so on its behalf. For purposes hereof the term “organization,” without limitation, includes any
partnership, limited liability company, corporation, association, joint stock company, trust, joint venture, labor
organization, unincorporated organization, or governmental authority.
1.5. Partner(s) means organizations or individual(s), who distributes the Software based on an agreement and
license with the Rightholder.
1.6. Update(s) means all upgrades, revisions, patches, enhancements, fixes, modifications, copies, additions or
maintenance packs etc.
1.7. User Manual means user manual, administrator guide, reference book and related explanatory or other
materials.
2. Grant of License
2.1. The Rightholder hereby grants You a non-exclusive license to store, load, install, execute, and display (to ―use‖)
the Software on a specified number of Computers in order to assist in protecting Your Computer on which the
Software is installed, from threats described in the User Manual, according to the all technical requirements
described in the User Manual and according to the terms and conditions of this Agreement (the ―License‖) and
you accept this License:
Trial Version. If you have received, downloaded and/or installed a trial version of the Software and are hereby
granted an evaluation license for the Software, you may use the Software only for evaluation purposes and only
during the single applicable evaluation period, unless otherwise indicated, from the date of the initial installation.
Any use of the Software for other purposes or beyond the applicable evaluation period is strictly prohibited.
Multiple Environment Software; Multiple Language Software; Dual Media Software; Multiple Copies; Bundles. If
you use different versions of the Software or different language editions of the Software, if you receive the
Software on multiple media, if you otherwise receive multiple copies of the Software, or if you received the
Software bundled with other software, the total permitted number of your Computers on which all versions of the
Software are installed shall correspond to the number of computers specified in licenses you have obtained
from the Rightholder provided that unless the licensing terms provide otherwise, each acquired license entitles
you to install and use the Software on such a number of Computer(s) as is specified in Clauses 2.2 and 2.3.
2.2. If the Software was acquired on a physical medium You have the right to use the Software for protection of such
a number of Computer(s) as is specified on the Software package or as specified in additional agreement.
2.3. If the Software was acquired via the Internet You have the right to use the Software for protection of such a
number of Computers that was specified when You acquired the License to the Software or as specified in
additional agreement.
2.4. You have the right to make a copy of the Software solely for back-up purposes and only to replace the legally
owned copy if such copy is lost, destroyed or becomes unusable. This back-up copy cannot be used for other
purposes and must be destroyed when you lose the right to use the Software or when Your license expires or is
Page 4

U S E R G U I D E
4
terminated for any other reason according to the legislation in force in the country of your principal residence or
in the country where You are using the Software.
2.5. From the time of the Software activation or after license key file installation (with the exception of a trial version
of the Software) You have the right to receive the following services for the defined period specified on the
Software package (if the Software was acquired on a physical medium) or specified during acquisition (if the
Software was acquired via the Internet):
- Updates of the Software via the Internet when and as the Rightholder publishes them on its website or
through other online services. Аny Updates that you may receive become part of the Software and the
terms and conditions of this Agreement apply to them;
- Technical Support via the Internet and Technical Support telephone hotline.
3. Activation and Term
3.1. If You modify Your Computer or make changes to other vendors‘ software installed on it, You may be required
by the Rightholder to repeat activation of the Software or license key file installation. The Rightholder reserves
the right to use any means and verification procedures to verify the validity of the License and/or legality of a
copy of the Software installed and/or used on Your Computer.
3.2. If the Software was acquired on a physical medium, the Software can be used, upon your acceptance of this
Agreement, for the period that is specified on the package commencing upon acceptance of this Agreement or
as specified in additional agreement.
3.3. If the Software was acquired via the Internet, the Software can be used, upon your acceptance of this
Agreement, for the period that was specified during acquisition or as specified in additional agreement.
3.4. You have the right to use a trial version of the Software as provided in Clause 2.1 without any charge for the
single applicable evaluation period (7 days) from the time of the Software activation according to this Agreement
provided that the trial version does not entitle You Updates and Technical support via the Internet and Technical
support telephone hotline. If Rightholder sets another duration for the single applicable evaluation period You
will be informed via notification.
3.5. Your License to Use the Software is limited to the period of time as specified in Clauses 3.2 or 3.3 (as
applicable) and the remaining period can be viewed via means described in User Manual.
3.6. If You have acquired the Software that is intended to be used on more than one Computer then Your License to
Use the Software is limited to the period of time starting from the date of activation of the Software or license
key file installation on the first Computer.
3.7. Without prejudice to any other remedy in law or in equity that the Rightholder may have, in the event of any
breach by You of any of the terms and conditions of this Agreement, the Rightholder shall at any time without
notice to You be entitled to terminate this License to use the Software without refunding the purchase price or
any part thereof.
3.8. You agree that in using the Software and in using any report or information derived as a result of using this
Software, you will comply with all applicable international, national, state, regional and local laws and
regulations, including, without limitation, privacy, copyright, export control and obscenity law.
3.9. Except as otherwise specifically provided herein, you may not transfer or assign any of the rights granted to you
under this Agreement or any of your obligations pursuant hereto.
3.10. If You have acquired the Software with activation code valid for language localization of the Software of that
region in which it was acquired from the Rightholder or its Partners, You cannot activate the Software with
applying the activation code intended for other language localization.
3.11. If You have acquired the Software intended for operation with particular telecoms operator such the Software
may be used only for operation with operator specified during acquisition.
3.12. In case of limitations specified in Clauses 3.10 and 3.11 information about these limitations is stated on package
and/or website of the Rightholder and/or its Partners.
4. Technical Support
The Technical Support described in Clause 2.5 of this Agreement is provided to You when the latest Update of the
Software is installed (except for a trial version of the Software).
Technical support service: http://support.kaspersky.com
5. Limitations
5.1. You shall not emulate, clone, rent, lend, lease, sell, modify, decompile, or reverse engineer the Software or
disassemble or create derivative works based on the Software or any portion thereof with the sole exception of
a non-waivable right granted to You by applicable legislation, and you shall not otherwise reduce any part of the
Software to human readable form or transfer the licensed Software, or any subset of the licensed Software, nor
permit any third party to do so, except to the extent the foregoing restriction is expressly prohibited by applicable
law. Neither Software‘s binary code nor source may be used or reverse engineered to re-create the program
algorithm, which is proprietary. All rights not expressly granted herein are reserved by Rightholder and/or its
suppliers, as applicable. Any such unauthorized use of the Software shall result in immediate and automatic
termination of this Agreement and the License granted hereunder and may result in criminal and/or civil
prosecution against You.
Page 5

A B O U T T H I S G U I D E
5
5.2. You shall not transfer the rights to use the Software to any third party except as set forth in additional
agreement.
5.3. You shall not provide the activation code and/or license key file to third parties or allow third parties access to
the activation code and/or license key which are deemed confidential data of Rightholder and you shall exercise
reasonable care in protecting the activation code and/or license key in confidence provided that you can transfer
the activation code and/or license key to third parties as set forth in additional agreement.
5.4. You shall not rent, lease or lend the Software to any third party.
5.5. You shall not use the Software in the creation of data or software used for detection, blocking or treating threats
described in the User Manual.
5.6. The Rightholder has the right to block the key file or to terminate Your License to use the Software in the event
You breach any of the terms and conditions of this Agreement and without any refund to You.
5.7. If You are using the trial version of the Software You do not have the right to receive the Technical Support
specified in Clause 4 of this Agreement and You don‘t have the right to transfer the license or the rights to use
the Software to any third party.
6. Limited Warranty and Disclaimer
6.1. The Rightholder guarantees that the Software will substantially perform according to the specifications and
descriptions set forth in the User Manual provided however that such limited warranty shall not apply to the
following: (w) Your Computer‘s deficiencies and related infringement for which Rightholder‘s expressly disclaims
any warranty responsibility; (x) malfunctions, defects, or failures resulting from misuse; abuse; accident; neglect;
improper installation, operation or maintenance; theft; vandalism; acts of God; acts of terrorism; power failures
or surges; casualty; alteration, non-permitted modification, or repairs by any party other than Rightholder; or any
other third parties‘ or Your actions or causes beyond Rightholder‘s reasonable control; (y) any defect not made
known by You to Rightholder as soon as practical after the defect first appears; and (z) incompatibility caused
by hardware and/or software components installed on Your Computer.
6.2. You acknowledge, accept and agree that no software is error free and You are advised to back-up the
Computer, with frequency and reliability suitable for You.
6.3. You acknowledge, accept and agree that Rightholder is not responsible or liable for data deletion authorized by
You. The mentioned data may include any personal or confidential information.
6.4. The Rightholder does not provide any guarantee that the Software will work correctly in case of violations of the
terms described in the User Manual or in this Agreement.
6.5. The Rightholder does not guarantee that the Software will work correctly if You do not regularly download
Updates specified in Clause 2.5 of this Agreement.
6.6. The Rightholder does not guarantee protection from the threats described in the User Manual after the
expiration of the period specified in Clauses 3.2 or 3.3 of this Agreement or after the License to use the
Software is terminated for any reason.
6.7. THE SOFTWARE IS PROVIDED "AS IS" AND THE RIGHTHOLDER MAKES NO REPRESENTATION AND
GIVES NO WARRANTY AS TO ITS USE OR PERFORMANCE. EXCEPT FOR ANY WARRANTY,
CONDITION, REPRESENTATION OR TERM THE EXTENT TO WHICH CANNOT BE EXCLUDED OR
LIMITED BY APPLICABLE LAW THE RIGHTHOLDER AND ITS PARTNERS MAKE NO WARRANTY,
CONDITION, REPRESENTATION, OR TERM (EXPRESSED OR IMPLIED, WHETHER BY STATUTE,
COMMON LAW, CUSTOM, USAGE OR OTHERWISE) AS TO ANY MATTER INCLUDING, WITHOUT
LIMITATION, NONINFRINGEMENT OF THIRD PARTY RIGHTS, MERCHANTABILITY, SATISFACTORY
QUALITY, INTEGRATION, OR APPLICABILITY FOR A PARTICULAR PURPOSE. YOU ASSUME ALL
FAULTS, AND THE ENTIRE RISK AS TO PERFORMANCE AND RESPONSIBILITY FOR SELECTING THE
SOFTWARE TO ACHIEVE YOUR INTENDED RESULTS, AND FOR THE INSTALLATION OF, USE OF, AND
RESULTS OBTAINED FROM THE SOFTWARE. WITHOUT LIMITING THE FOREGOING PROVISIONS, THE
RIGHTHOLDER MAKES NO REPRESENTATION AND GIVES NO WARRANTY THAT THE SOFTWARE WILL
BE ERROR-FREE OR FREE FROM INTERRUPTIONS OR OTHER FAILURES OR THAT THE SOFTWARE
WILL MEET ANY OR ALL YOUR REQUIREMENTS WHETHER OR NOT DISCLOSED TO THE
RIGHTHOLDER .
7. Exclusion and Limitation of Liability
TO THE MAXIMUM EXTENT PERMITTED BY APPLICABLE LAW, IN NO EVENT SHALL THE RIGHTHOLDER OR ITS
PARTNERS BE LIABLE FOR ANY SPECIAL, INCIDENTAL, PUNITIVE, INDIRECT, OR CONSEQUENTIAL DAMAGES
WHATSOEVER (INCLUDING, BUT NOT LIMITED TO, DAMAGES FOR LOSS OF PROFITS OR CONFIDENTIAL OR
OTHER INFORMATION, FOR BUSINESS INTERRUPTION, FOR LOSS OF PRIVACY, FOR CORRUPTION, DAMAGE
AND LOSS OF DATA OR PROGRAMS, FOR FAILURE TO MEET ANY DUTY INCLUDING ANY STATUTORY DUTY,
DUTY OF GOOD FAITH OR DUTY OF REASONABLE CARE, FOR NEGLIGENCE, FOR ECONOMIC LOSS, AND FOR
ANY OTHER PECUNIARY OR OTHER LOSS WHATSOEVER) ARISING OUT OF OR IN ANY WAY RELATED TO THE
USE OF OR INABILITY TO USE THE SOFTWARE, THE PROVISION OF OR FAILURE TO PROVIDE SUPPORT OR
OTHER SERVICES, INFORMATON, SOFTWARE, AND RELATED CONTENT THROUGH THE SOFTWARE OR
OTHERWISE ARISING OUT OF THE USE OF THE SOFTWARE, OR OTHERWISE UNDER OR IN CONNECTION
WITH ANY PROVISION OF THIS AGREEMENT, OR ARISING OUT OF ANY BREACH OF CONTRACT OR ANY TORT
(INCLUDING NEGLIGENCE, MISREPRESENTATION, ANY STRICT LIABILITY OBLIGATION OR DUTY), OR ANY
Page 6

U S E R G U I D E
6
BREACH OF STATUTORY DUTY, OR ANY BREACH OF WARRANTY OF THE RIGHTHOLDER OR ANY OF ITS
PARTNERS, EVEN IF THE RIGHTHOLDER OR ANY PARTNER HAS BEEN ADVISED OF THE POSSIBILITY OF
SUCH DAMAGES.
YOU AGREE THAT IN THE EVENT THE RIGHTHOLDER AND/OR ITS PARTNERS ARE FOUND LIABILE, THE
LIABILITY OF THE RIGHTHOLDER AND/OR ITS PARTNERS SHALL BE LIMITED BY THE COSTS OF THE
SOFTWARE. IN NO CASE SHALL THE LIABILITY OF THE RIGHTHOLDER AND/OR ITS PARTNERS EXCEED THE
FEES PAID FOR THE SOFTWARE TO THE RIGHTHOLDER OR THE PARTNER (AS MAY BE APPLICABLE).
NOTHING IN THIS AGREEMENT EXCLUDES OR LIMITS ANY CLAIM FOR DEATH AND PERSONAL INJURY.
FURTHER IN THE EVENT ANY DISCLAIMER, EXCLUSION OR LIMITATION IN THIS AGREEMENT CANNOT BE
EXLUDED OR LIMITED ACCORDING TO APPLICABLE LAW THEN ONLY SUCH DISCLAIMER, EXCLUSION OR
LIMITATION SHALL NOT APPLY TO YOU AND YOU CONTINUE TO BE BOUND BY ALL THE REMAINING
DISCLAIMERS, EXCLUSIONS AND LIMITATIONS.
8. GNU and Other Third Party Licenses
The Software may include some software programs that are licensed (or sublicensed) to the user under the GNU
General Public License (GPL) or other similar free software licenses which, among other rights, permit the user to copy,
modify and redistribute certain programs, or portions thereof, and have access to the source code (―Open Source
Software‖). If such licenses require that for any software, which is distributed to someone in an executable binary format,
that the source code also be made available to those users, then the source code should be made available by sending
the request to source@kaspersky.com or the source code is supplied with the Software. If any Open Source Software
licenses require that the Rightholder provide rights to use, copy or modify an Open Source Software program that are
broader than the rights granted in this Agreement, then such rights shall take precedence over the rights and restrictions
herein.
9. Intellectual Property Ownership
9.1 You agree that the Software and the authorship, systems, ideas, methods of operation, documentation and
other information contained in the Software, are proprietary intellectual property and/or the valuable trade
secrets of the Rightholder or its partners and that the Rightholder and its partners, as applicable, are protected
by civil and criminal law, and by the law of copyright, trade secret, trademark and patent of the Russian
Federation, European Union and the United States, as well as other countries and international treaties. This
Agreement does not grant to You any rights to the intellectual property including any the Trademarks or Service
Marks of the Rightholder and/or its partners (―Trademarks‖). You may use the Trademarks only insofar as to
identify printed output produced by the Software in accordance with accepted trademark practice, including
identification of the Trademark owner‘s name. Such use of any Trademark does not give you any rights of
ownership in that Trademark. The Rightholder and/or its partners own and retain all right, title, and interest in
and to the Software, including without limitation any error corrections, enhancements, Updates or other
modifications to the Software, whether made by the Rightholder or any third party, and all copyrights, patents,
trade secret rights, trademarks, and other intellectual property rights therein. Your possession, installation or
use of the Software does not transfer to you any title to the intellectual property in the Software, and you will not
acquire any rights to the Software except as expressly set forth in this Agreement. All copies of the Software
made hereunder must contain the same proprietary notices that appear on and in the Software. Except as
stated herein, this Agreement does not grant you any intellectual property rights in the Software and you
acknowledge that the License, as further defined herein, granted under this Agreement only provides you with a
right of limited use under the terms and conditions of this Agreement. Rightholder reserves all rights not
expressly granted to you in this Agreement.
9.2 You acknowledge that the source code, activation code and/or license key file for the Software are proprietary
to the Rightholder and constitutes trade secrets of the Rightholder. You agree not to modify, adapt, translate,
reverse engineer, decompile, disassemble or otherwise attempt to discover the source code of the Software in
any way.
9.3 You agree not to modify or alter the Software in any way. You may not remove or alter any copyright notices or
other proprietary notices on any copies of the Software.
10. Governing Law; Arbitration
This Agreement will be governed by and construed in accordance with the laws of the Russian Federation without
reference to conflicts of law rules and principles. This Agreement shall not be governed by the United Nations
Convention on Contracts for the International Sale of Goods, the application of which is expressly excluded. Any dispute
arising out of the interpretation or application of the terms of this Agreement or any breach thereof shall, unless it is
settled by direct negotiation, be settled by in the International Commercial Arbitration Court at the Russian Federation
Chamber of Commerce and Industry in Moscow, the Russian Federation. Any award rendered by the arbitrator shall be
final and binding on the parties and any judgment on such arbitration award may be enforced in any court of competent
jurisdiction. Nothing in this Section 10 shall prevent a Party from seeking or obtaining equitable relief from a court of
competent jurisdiction, whether before, during or after arbitration proceedings.
Page 7

A B O U T T H I S G U I D E
7
11. Period for Bringing Actions
No action, regardless of form, arising out of the transactions under this Agreement, may be brought by either party hereto
more than one (1) year after the cause of action has occurred, or was discovered to have occurred, except that an action
for infringement of intellectual property rights may be brought within the maximum applicable statutory period.
12. Entire Agreement; Severability; No Waiver
This Agreement is the entire agreement between you and Rightholder and supersedes any other prior agreements,
proposals, communications or advertising, oral or written, with respect to the Software or to subject matter of this
Agreement. You acknowledge that you have read this Agreement, understand it and agree to be bound by its terms. If
any provision of this Agreement is found by a court of competent jurisdiction to be invalid, void, or unenforceable for any
reason, in whole or in part, such provision will be more narrowly construed so that it becomes legal and enforceable, and
the entire Agreement will not fail on account thereof and the balance of the Agreement will continue in full force and
effect to the maximum extent permitted by law or equity while preserving, to the fullest extent possible, its original intent.
No waiver of any provision or condition herein shall be valid unless in writing and signed by you and an authorized
representative of Rightholder provided that no waiver of any breach of any provisions of this Agreement will constitute a
waiver of any prior, concurrent or subsequent breach. Rightholder‘s failure to insist upon or enforce strict performance of
any provision of this Agreement or any right shall not be construed as a waiver of any such provision or right.
13. Rightholder Contact Information
Should you have any questions concerning this Agreement, or if you desire to contact the Rightholder for any reason,
please contact our Customer Service Department at:
Kaspersky Lab ZAO, 10 build. 1, 1st Volokolamsky Proezd
Moscow, 123060
Russian Federation
Tel: +7-495-797-8700
Fax: +7-495-645-7939
E-mail: info@kaspersky.com
Web site: www.kaspersky.com
© 1997-2011 Kaspersky Lab ZAO. All Rights Reserved. The Software and any accompanying documentation are
copyrighted and protected by copyright laws and international copyright treaties, as well as other intellectual property
laws and treaties.
Page 8

8
TABLE OF CONTENTS
ABOUT THIS GUIDE ................................................................................................................................................... 12
In this document ..................................................................................................................................................... 12
Document conventions ........................................................................................................................................... 14
ADDITIONAL DATA SOURCES .................................................................................................................................. 16
Information sources for further research ................................................................................................................. 16
Contacting the Sales Department ........................................................................................................................... 17
Discussion of Kaspersky Lab applications on the Web forum ................................................................................ 17
Contacting the Documentation Development Group .............................................................................................. 17
KASPERSKY MOBILE SECURITY 9 ........................................................................................................................... 18
What's new in Kaspersky Mobile Security 9 ........................................................................................................... 19
Distribution kit ......................................................................................................................................................... 19
Hardware and software requirements ..................................................................................................................... 19
INSTALLING KASPERSKY MOBILE SECURITY 9 ..................................................................................................... 20
UNINSTALLING THE APPLICATION .......................................................................................................................... 20
UPDATING THE APPLICATION .................................................................................................................................. 22
GETTING STARTED.................................................................................................................................................... 24
Activating the application ........................................................................................................................................ 24
Activating the commercial version ..................................................................................................................... 25
Activating the subscription for Kaspersky Mobile Security 9 ............................................................................. 26
Purchasing an activation code online ................................................................................................................ 27
Activating the trial version ................................................................................................................................. 27
Setting the secret code ........................................................................................................................................... 28
Enabling the option to recover the secret code ....................................................................................................... 28
Recovering the secret code .................................................................................................................................... 29
Starting the application ........................................................................................................................................... 30
Updating the application's databases ..................................................................................................................... 30
Scanning the device for viruses .............................................................................................................................. 30
Viewing information about the application .............................................................................................................. 31
MANAGING THE LICENSE ......................................................................................................................................... 32
About the License Agreement ................................................................................................................................ 32
About Kaspersky Mobile Security 9 licenses .......................................................................................................... 32
View License Information........................................................................................................................................ 33
Renewing the license ............................................................................................................................................. 34
Renewing the license with the activation code ................................ .................................................................. 34
Renewing the license online ............................................................................................................................. 35
Renewing the license by activating the subscription ......................................................................................... 36
Unsubscribing ................................................................................................................................................... 37
Renewing the subscription ................................................................................................................................ 38
APPLICATION INTERFACE ........................................................................................................................................ 39
Protection status window ........................................................................................................................................ 39
Application menu .................................................................................................................................................... 41
Page 9

T A B L E O F C O N T E N T S
9
FILE SYSTEM PROTECTION ..................................................................................................................................... 43
About Protection ..................................................................................................................................................... 43
Enabling and disabling the Protection .................................................................................................................... 43
Selecting the action to be performed on detected objects ...................................................................................... 45
SCANNING THE DEVICE ............................................................................................................................................ 47
About on-demand scans ......................................................................................................................................... 47
Starting a scan manually ........................................................................................................................................ 47
Starting a scheduled scan ...................................................................................................................................... 49
Selection of object type to be scanned ................................................................................................................... 50
Configuring archive scans ...................................................................................................................................... 51
Selecting the action to be performed on detected objects ...................................................................................... 52
QUARANTINING MALWARE OBJECTS ..................................................................................................................... 54
About Quarantine ................................................................................................................................................... 54
Viewing quarantined objects ................................................................................................................................... 54
Restoring objects from Quarantine ......................................................................................................................... 55
Deleting objects from Quarantine ........................................................................................................................... 55
FILTERING OF INCOMING CALLS AND SMS ............................................................................................................ 57
About Call/SMS Filter ............................................................................................................................................. 57
About Call/SMS Filter modes .................................................................................................................................. 58
Changing the Call/SMS Filter mode ....................................................................................................................... 58
Creating the Black List ............................................................................................................................................ 59
Adding entries to the Black List ......................................................................................................................... 59
Editing entries in the Black List ......................................................................................................................... 60
Deleting entries from the Black List ................................................................................................................... 61
Creating a White List .............................................................................................................................................. 62
Adding entries to the White List ........................................................................................................................ 62
Editing entries in the White List ......................................................................................................................... 63
Deleting entries from the White List .................................................................................................................. 64
Responding to SMS messages and calls from contacts not in the phone book...................................................... 65
Responding to SMS messages from non-numeric numbers................................................................................... 66
Selecting a response to incoming SMS .................................................................................................................. 67
Selecting response to incoming calls ...................................................................................................................... 67
RESTRICTING OUTGOING CALLS AND SMS MESSAGES. PARENTAL CONTROL .............................................. 68
About Parental Control ........................................................................................................................................... 69
Parental Control modes .......................................................................................................................................... 69
Enabling/disabling Parental Control ........................................................................................................................ 69
Creating the Black List ............................................................................................................................................ 70
Adding entries to the Black List ......................................................................................................................... 70
Editing entries in the Black List ......................................................................................................................... 71
Deleting entries from the Black List ................................................................................................................... 72
Creating a White List .............................................................................................................................................. 73
Adding entries to the White List ........................................................................................................................ 73
Editing entries in the White List ......................................................................................................................... 74
Deleting entries from the White List .................................................................................................................. 75
DATA PROTECTION IN THE EVENT OF LOSS OR THEFT OF THE DEVICE .......................................................... 76
About Anti-Theft ...................................................................................................................................................... 76
Blocking the device ................................................................................................................................................. 77
Page 10

U S E R G U I D E
10
Deleting personal data ............................................................................................................................................ 79
Creating a list of folders to delete ........................................................................................................................... 81
Monitoring the replacement of a SIM card on the device ........................................................................................ 82
Determining the device's geographical coordinates................................................................................................ 83
Starting Anti-Theft functions remotely ..................................................................................................................... 86
PRIVACY PROTECTION ............................................................................................................................................. 87
Privacy Protection ................................................................................................................................................... 87
Privacy Protection modes ....................................................................................................................................... 87
Enabling/disabling Privacy Protection ..................................................................................................................... 88
Enabling Privacy Protection automatically .............................................................................................................. 89
Enabling Privacy Protection remotely ..................................................................................................................... 90
Creating a list of private numbers ........................................................................................................................... 91
Adding a number to the list of private numbers ................................................................................................. 92
Editing a number in the list of private numbers ................................................................................................. 93
Deleting a number from the list of private numbers ........................................................................................... 94
Selecting data to hide: Privacy Protection .............................................................................................................. 94
FILTERING NETWORK ACTIVITY. FIREWALL .......................................................................................................... 95
About Firewall ......................................................................................................................................................... 96
Enabling/disabling the Firewall ............................................................................................................................... 96
Selecting Firewall security level .............................................................................................................................. 96
Notifications of blocking .......................................................................................................................................... 97
ENCRYPTING PERSONAL DATA ............................................................................................................................... 99
About Encryption .................................................................................................................................................... 99
Encrypting data ....................................................................................................................................................... 99
Data decryption .................................................................................................................................................... 101
Blocking access to encrypted data ....................................................................................................................... 102
UPDATING THE APPLICATION'S DATABASES ...................................................................................................... 104
About updating the application's databases ......................................................................................................... 104
Viewing database information ............................................................................................................................... 105
Manual updating ................................................................................................................................................... 105
Scheduled updating .............................................................................................................................................. 106
Updating while roaming ........................................................................................................................................ 107
APPLICATION LOGS................................................................................................................................................. 108
About logs ............................................................................................................................................................. 108
Viewing Log records ............................................................................................................................................. 108
Deleting Log records ............................................................................................................................................ 108
CONFIGURING ADDITIONAL SETTINGS ................................................................................................................ 109
Changing the secret code ..................................................................................................................................... 110
Displaying prompts ............................................................................................................................................... 110
Configuring sound notifications ............................................................................................................................. 110
CONTACTING THE TECHNICAL SUPPORT SERVICE ................................ ................................ ........................... 112
GLOSSARY ............................................................................................................................................................... 113
KASPERSKY LAB ...................................................................................................................................................... 116
INFORMATION ABOUT THIRD PARTY CODE ......................................................................................................... 117
Distributed program code ..................................................................................................................................... 117
Page 11

T A B L E O F C O N T E N T S
11
ADB ................................................................................................................................................................ 117
ADBWINAPI.DLL ............................................................................................................................................ 117
ADBWINUSBAPI.DLL ..................................................................................................................................... 117
Other information .................................................................................................................................................. 119
INDEX ................................................................................................................................................................ ........ 120
Page 12

12
ABOUT THIS GUIDE
IN THIS SECTION
In this document .............................................................................................................................................................. 12
Document conventions .................................................................................................................................................... 14
This document is the Guide for the installation, configuration and use of Kaspersky Mobile Security 9. The document is
designed for a wide audience.
Objectives of the document:
help the user independently set up the application on a mobile device, activate it and optimize the application for
their needs;
provide a rapid information search on issues connected with the application;
give information on alternative sources of information about the application and possibilities of receiving
technical support.
IN THIS DOCUMENT
The following sections are included in the document:
Additional data sources
This section describes additional sources of information about the application and Internet resources, on which users can
discuss the application, ask questions, and get answers.
Kaspersky Mobile Security 9
This section describes the application's features and provides a brief overview of its components and main functions.
This section provides information about the purpose of the distribution kit. This section lists hardware and software
requirements that a mobile device should meet to allow installation of Kaspersky Mobile Security 9.
Installing Kaspersky Mobile Security 9
This section contains instructions that can help you install the application on a mobile device.
Uninstalling the application
This section contains instructions that can help you uninstall the application from a mobile device.
Updating the application
This section contains instructions that can help you update the previous version of the application.
Page 13

A B O U T T H I S G U I D E
13
Getting started
This section provides information about how to start working with Kaspersky Mobile Security 9: activate it, set a secret
code for the application, enable the option of secret code recovery, recover the secret code, start the application, update
anti-virus databases, and scan a device for viruses.
Managing the license
This section contains information about common terms used in the framework of the application licensing. Furthermore,
the section presents information about how to find information on the Kaspersky Mobile Security 9 license and extend the
term of its validity.
Application interface
This section includes information on the main elements of the Kaspersky Mobile Security 9 interface.
File system protection
This section provides information on the Protection component which enables avoidance of infections of your device's file
system. The section also describes how to activate/stop the Protection and adjust its operation settings.
Scanning the device
This section gives information about scanning the device on demand, which can detect and remove threats on your
device. The section also describes how to launch a scan of the device, set up an automatic scheduled file system scan,
select files for scanning, and set the action that the application will take when a malicious object is detected.
Quarantining malware objects
This section provides information on the quarantine, a special folder where potential malicious objects are placed. This
section also describes how to view, restore or delete malicious objects found in the folder.
Filtering of incoming calls and SMS
This section gives information about Call/SMS Filter which prevents unwanted calls and SMS according to the Black and
White Lists you create. The section also describes how to select the mode in which Call/SMS Filter scans incoming calls
and SMS, how to configure additional filtering settings for incoming SMS and calls and also how to create Black and
White Lists.
Restricting outgoing calls and SMS messages. Parental Control
The section presents information on the Parental Control component, which allows limiting outgoing calls and SMS
messages to defined numbers. Furthermore, the section describes how to create a list of allowed and banned numbers
and set the Parental Control settings.
Data protection in the event of loss or theft of the device
This section gives information about Anti-Theft which, in the case of theft or loss, blocks unauthorized access to data
saved on your mobile device and makes it easy to find the device.
This section also specifies how to enable/disable the Anti-Theft function, set the parameters of its operation and start
Anti-Theft from another mobile device remotely.
Privacy Protection
The section presents information about Privacy Protection, which can hide the user's confidential information.
Page 14

U S E R G U I D E
14
Filtering network activity. Firewall
This section gives information about the Firewall which controls network connections on your device. This section
describes how to enable/disable the Firewall and select the required mode for it.
Encrypting personal data
This section gives information about Encryption, which can encrypt folders on the device. It also describes how to
encrypt and decrypt selected folders.
Updating the application's databases
This section provides information on updating the application databases, which ensures up-to-date protection of your
device. Furthermore, this section describes how to view information on the installed anti-virus databases, run the update
manually, and configure automatic update of anti-virus databases.
Application logs
This section presents information on logs which register the operation of every component and the execution of every
task (e.g. application database updates, virus scans).
Configuring additional settings
This section provides information on additional options of Kaspersky Mobile Security 9: how to manage the application's
sound notification and screen backlight and how to enable/disable the display of the hints, protection icon and protection
status window.
Contacting the Technical Support Service
This section contains recommendations for contacting Kaspersky Lab for help from your Personal Cabinet on the
Technical Support Service website or by phone.
Glossary
This section contains a list of terms used within the document and their respective definitions.
Kaspersky Lab
The section provides information on Kaspersky Lab ZAO.
Information about third party code
This section gives you information on third-party code used in the application.
Index
This section enables you to quickly find the required information in the document.
DOCUMENT CONVENTIONS
Conventions described in the table below, are used in this document.
Page 15
A B O U T T H I S G U I D E
15
SAMPLE TEXT
DOCUMENT CONVENTIONS DESCRIPTION
Note that...
Warnings are highlighted in red and enclosed in frames. Warnings contain
important information, for example, on safety-critical computer operations.
It is recommended to use...
Notes are enclosed in frames. Notes contain additional and reference
information.
Example:
...
Examples are given by section, on a yellow background, and under the heading
"Example".
Update means...
New terms are marked by italics.
ALT+F4
Names of keyboard keys appear in a bold typeface and are capitalized.
Names of the keys followed by a "plus" sign indicate the use of a key
combination.
Enable
Names of interface elements, for example, input fields, menu commands,
buttons, etc., are marked in a bold typeface.
To configure a task schedule:
Instruction introductory phrases are marked in italics.
help
Texts in the command line or texts of messages displayed on the screen have a
special font.
<IP address of your computer>
Variables are enclosed in angle brackets. Instead of variables, the corresponding
values are placed in each case (angle brackets are omitted).
Table 1. Document conventions
Page 16

16
ADDITIONAL DATA SOURCES
IN THIS SECTION
Information sources for further research ......................................................................................................................... 16
Contacting the Sales Department ................................................................................................................................... 17
Discussion of Kaspersky Lab applications on the Web forum ......................................................................................... 17
Contacting the Documentation Development Group ....................................................................................................... 17
If you have questions about setting up or using Kaspersky Mobile Security 9, you can find answers from them, using
various sources of information. You can choose the most suitable source according to how important or urgent your
request is.
INFORMATION SOURCES FOR FURTHER RESEARCH
You can view the following sources of information about the application:
the Kaspersky Lab application website;
the application's Knowledge Base page at the Technical Support Service website;
the installed Help system and hints;
the installed application documentation.
Page on Kaspersky Lab website
http://www.kaspersky.com/kaspersky_mobile_security
This page will provide you with general information about Kaspersky Mobile Security 9 and its features and options.
You can also purchase Kaspersky Mobile Security 9 at our E-Store.
The application's page at the Technical Support Service website (Knowledge Base).
http://support.kaspersky.com
This page contains articles written by experts from the Technical Support Service.
These articles contain useful information, recommendations and Frequently Asked Questions (FAQs) relating to the
purchase, installation and use of Kaspersky Mobile Security 9. They are arranged in topics, such as "Database
updates" and "Troubleshooting". The articles may answer questions about not only Kaspersky Mobile Security 9, but
other Kaspersky Lab products too. They may also contain news from the Technical Support Service.
The installed Help system
If you have any questions about specific windows or tabs in Kaspersky Mobile Security 9, you can view the context
help.
To open the context help, open the required screen and select Help.
Page 17

A D D I T I O N A L D A T A S O U R C E S
17
The installed Documentation
The User Guide contains detailed information about the application's functions and how to use Kaspersky Mobile
Security 9, together with advice and recommendations about configuring the application.
The documents are included in PDF format in the Kaspersky Mobile Security 9 distribution package.
You can also download these documents in electronic format from Kaspersky Lab's website.
CONTACTING THE SALES DEPARTMENT
If you have questions about selecting or purchasing Kaspersky Mobile Security, or extending your license, please phone
the Sales Department specialists in our Central Office in Moscow, at:
+7 (495) 797-87-00, +7 (495) 645-79-39, +7 (495) 956-70-00
The service is provided in Russian or English.
You can also send your questions to the Sales Department by email, at sales@kaspersky.com.
DISCUSSION OF KASPERSKY LAB APPLICATIONS ON THE WEB FORUM
If your question does not require an urgent answer, you can discuss it with Kaspersky Lab's specialists and other users
of Kaspersky Lab's anti-virus applications in our forum at http://forum.kaspersky.com.
In the forum you can view existing discussions, leave your comments, and create new topics, or use the search engine
for specific enquiries.
CONTACTING THE DOCUMENTATION DEVELOPMENT GROUP
If you have any questions about the documentation, or you have found an error in it, or would like to leave a comment,
please contact our User documentation development group. To contact the Documentation Development Group send an
email to docfeedback@kaspersky.com. Use the subject line: "Kaspersky Help Feedback: Kaspersky Mobile Security 9".
Page 18

18
KASPERSKY MOBILE SECURITY 9
Kaspersky Mobile Security 9 protects mobile devices (hereafter "devices") running Microsoft Windows Mobile operating
system. The application can protect information on the device from infection by known threats, prevent unwanted SMS
messages and calls, control the network connection on the device, encrypt information, hide it for confidential contacts
and also protect information if the device is lost or stolen. Every type of threat is processed in separate components of
the program. This enables flexible configuration of the application settings.
Kaspersky Mobile Security 9 includes the following protection components:
Anti-Virus folder. It protects the file system of the mobile device from viruses and other malicious applications.
Anti-Virus can detect and neutralize malicious objects on your device and update the application's anti-virus
databases.
Call/SMS Filter. Scans all incoming SMS messages and calls for spam. The component allows the flexible
blocking of text messages and calls considered undesirable.
Anti-Theft. This protects information on the device from unauthorized access when it is lost or stolen and also
makes it easier to find. Anti-Theft enables you to lock your device remotely, delete any information stored there,
and pinpoint its geographic location (if your mobile device has a GPS receiver) using SMS commands from
another device. Furthermore, Anti-Theft allows you to lock your device if the SIM card is replaced or if the
device is activated without a SIM card.
Parental Control. All outgoing SMS messages and calls are checked. The component allows flexible
configuration of the filtering of outgoing SMS and calls.
Privacy Protection. It hides information related to confidential numbers from the contact list. For these
numbers, Privacy Protection hides entries in Contacts, SMS messages in the call log and new SMS messages
received and incoming calls.
Firewall. Checks the network connections on your mobile device. Firewall sets the connections which will be
permitted or prohibited.
Encryption. This protects information in encrypted mode. The component encrypts any amount of non-system
folders which are in the device memory or on storage cards. Access to files from encrypted folders is only
possible after entering the secret application code.
Furthermore, the application contains a series of service functions which allow the application to be kept up to date,
increase options during use of the application and support you in your use of the application:
Protection status. The status of the program's components is displayed on screen. Based on the information
presented, you can evaluate the current information protection status on your device.
Update the application's anti-virus databases. This function keeps Kaspersky Mobile Security 9 anti-virus
databases up to date.
Events log. Each of the application's components has its own events log, which contains information on the
component's operation (for instance, completed operation, data on a blocked object, scan report, updates).
License. When you purchase Kaspersky Mobile Security 9, a license agreement is made between you and
Kaspersky Lab, according to which you can use the application and access anti-virus database updates and the
Technical Support Service for a certain period. The license period and other information required for the
application to operate in full-functionality mode are indicated in the license.
Using the License option, you can get a detailed report on the current license as well as renew it.
Kaspersky Mobile Security 9 is not intended for backup and restore.
Page 19

K A S P E R S K Y M O B I L E S E C U R I T Y 9
19
IN THIS SECTION
What's new in Kaspersky Mobile Security 9 .................................................................................................................... 19
Distribution kit .................................................................................................................................................................. 19
Hardware and software requirements ............................................................................................................................. 19
WHAT'S NEW IN KASPERSKY MOBILE SECURITY 9
Below is a detailed view of the novelties with Kaspersky Mobile Security 9.
Kaspersky Mobile Security 9 includes the following new options:
Access to the application is protected by a secret code.
The Privacy Protection component allows you to hide the following information for confidential contacts from the
Contact list: entries in Contacts, SMS messages, call log, and new incoming SMS messages and incoming
calls. Confidential information is accessible for viewing for hiding is disabled.
Encryption allows the encryption of folders saved in the device memory or on a memory card. The component
protects confidential data in encrypted mode and allows access to encrypted information only when the
application secret code is entered.
A new service function has been added, called Display prompts: Kaspersky Mobile Security 9 for Smartphone
shows a short description of a component before configuration of its settings.
You can buy an activation code or extend your license validity period either directly from your mobile device
through the subscription option or online.
DISTRIBUTION KIT
You can purchase Kaspersky Mobile Security 9 online, in which case the application's distribution kit and documentation
are provided in electronic form. Kaspersky Mobile Security 9 can be also purchased from all good phone and technology
retail stores. For detailed information about purchasing the application and receiving the distribution kit, please contact
our sales department at sales@kaspersky.com.
HARDWARE AND SOFTWARE REQUIREMENTS
Kaspersky Mobile Security 9 is designed for installation on mobile devices running one of the following operating
systems:
Microsoft Windows Mobile 5.0;
Microsoft Windows Mobile 6.0, 6.1, 6.5.
Page 20

20
INSTALLING KASPERSKY MOBILE SECURITY 9
The application is installed on a mobile device in several steps.
Before starting the installation, it is recommended to close all other applications running.
To install Kaspersky Mobile Security 9:
1. Connect the mobile device to the computer using the Microsoft ActiveSync application.
2. Perform one of the following actions:
If you have purchased the program on a CD, run the automatic Kaspersky Mobile Security 9 installation on
the CD purchased.
If you have purchased the distribution package on the Internet, copy it to the mobile device, using one of
these methods:
from the Kaspersky Lab website;
using the Microsoft ActiveSync application;
using a memory card.
Run the installation, by opening the cab archive containing the distribution package on your mobile device.
3. Read the License Agreement text, which is concluded between you and Kaspersky Lab. If you agree to all terms
of the agreement, press OK. Kaspersky Mobile Security 9 will then be installed on the device. If you do not
agree to the terms of the License Agreement, press Cancel.
4. Select the interface language for Kaspersky Mobile Security 9 and press OK.
5. In order to complete the installation, restart the device. To do it, press Reboot.
The application is installed with the parameters recommended by the experts of Kaspersky Lab.
UNINSTALLING THE APPLICATION
To uninstall Kaspersky Mobile Security 9:
1. Decrypt the data on your device if it was encrypted with Kaspersky Mobile Security 9 (see the "Data decryption"
section on page 101).
2. Disable Privacy Protection (see section "Enabling/disabling Privacy Protection" on page 88).
3. Close Kaspersky Mobile Security 9. To do this, press Menu Exit.
4. Uninstall Kaspersky Mobile Security 9. To do this, perform the following actions:
a. Press Start Settings.
Page 21
U N I N S T A L L I N G T H E A P P L I C A T I O N
21
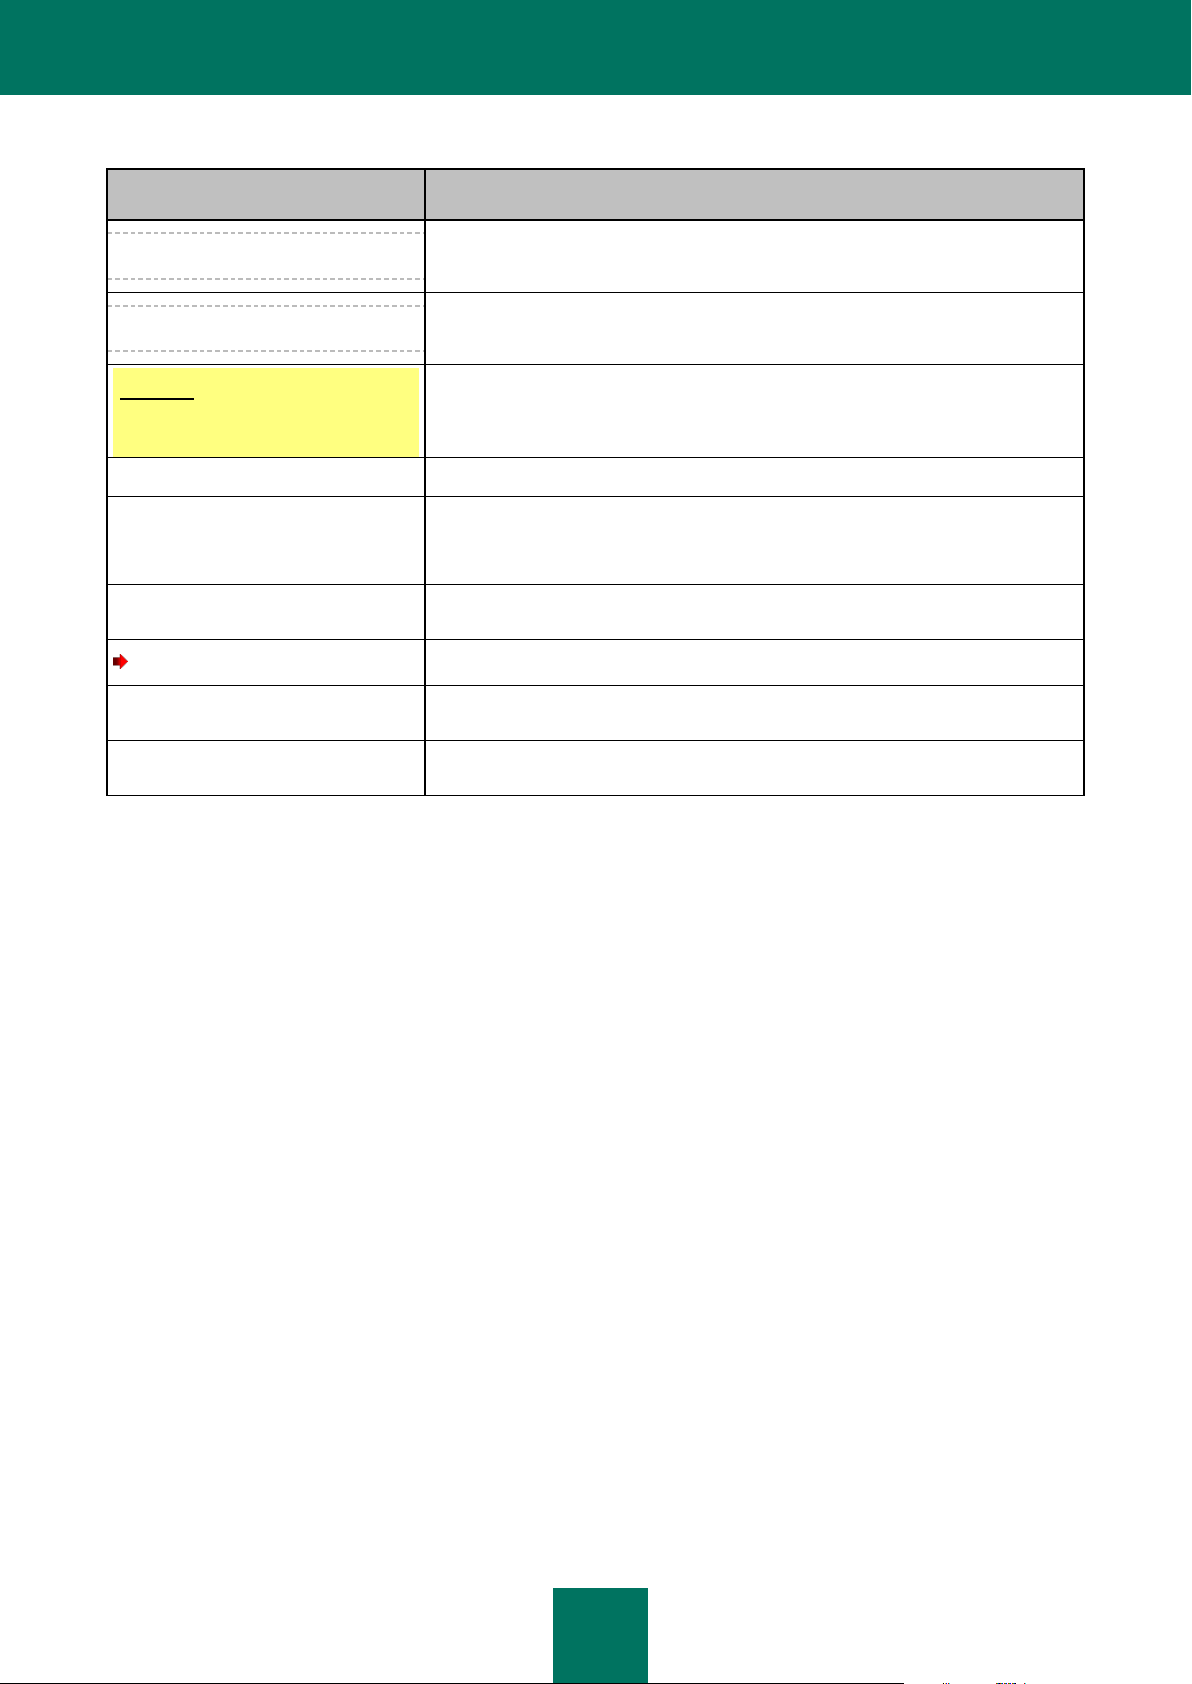
b. Select Remove Programs on the System tab (see Figure below).
Figure 1: The System tab
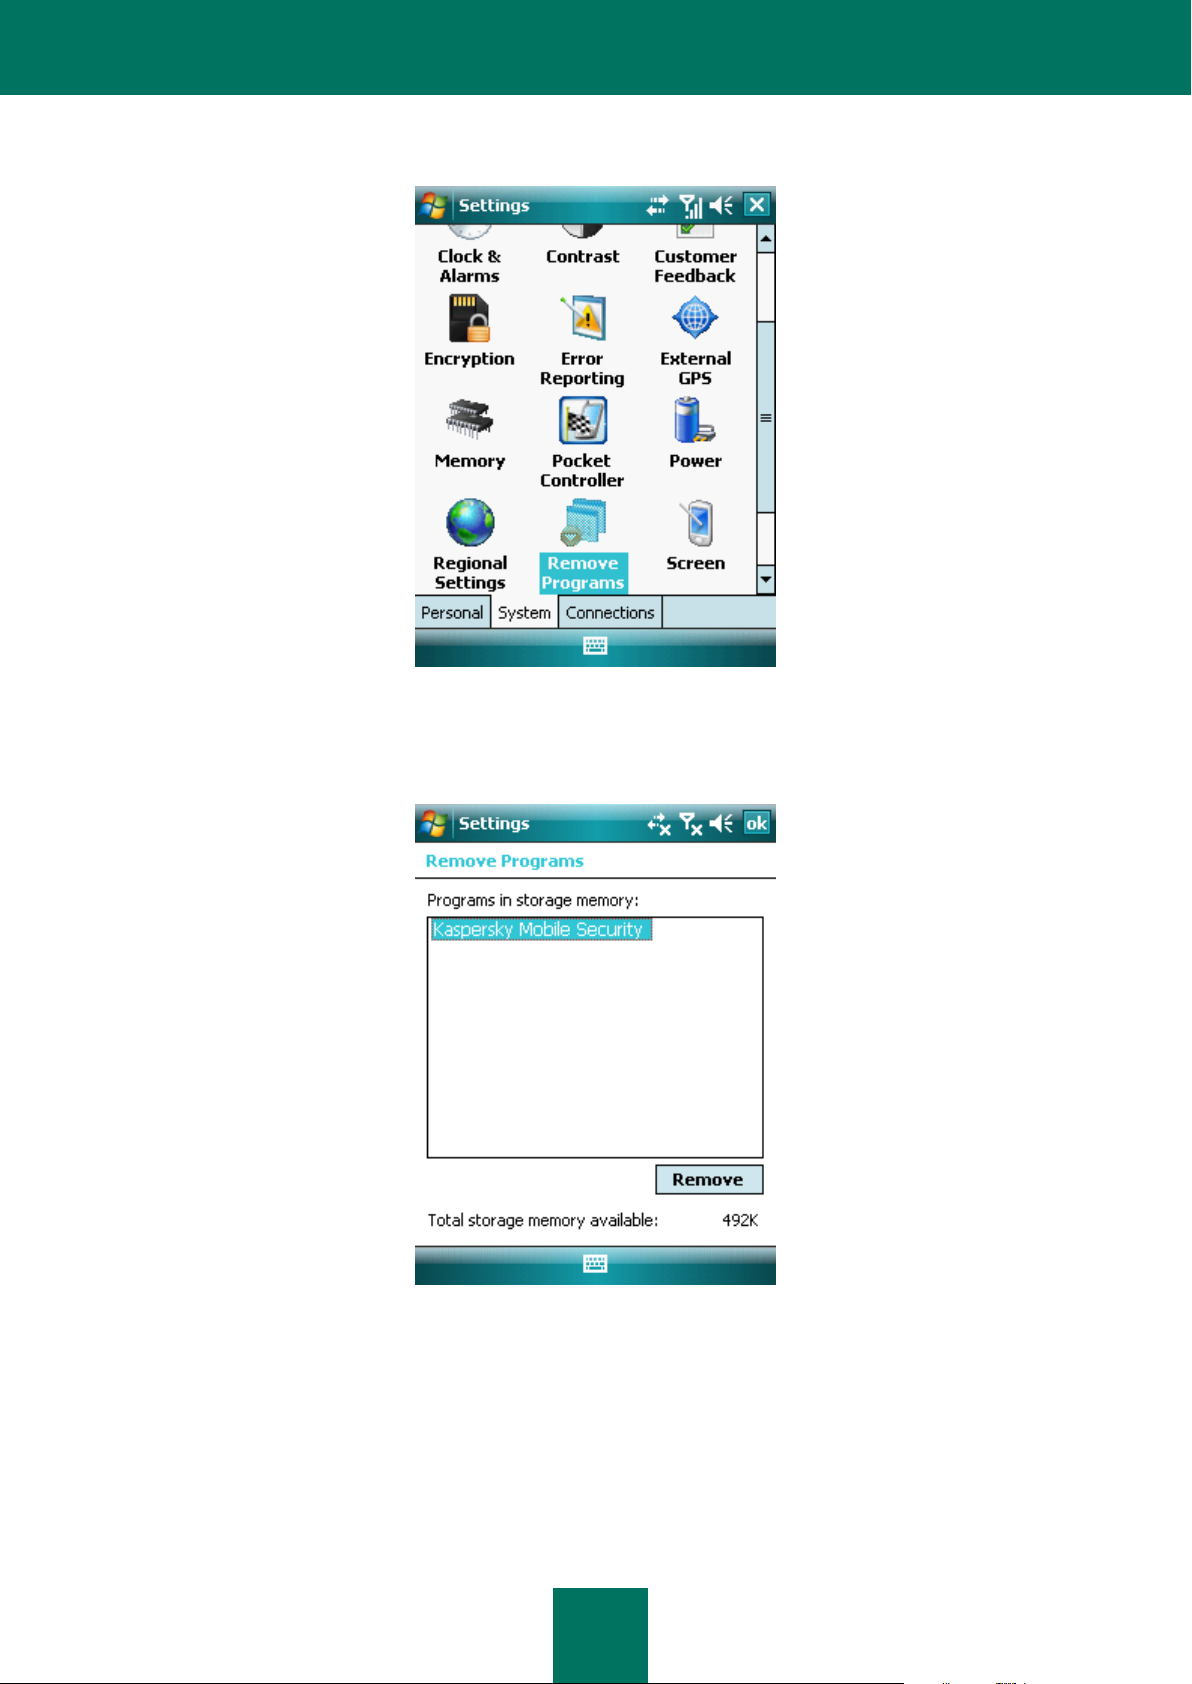
c. Select Kaspersky Mobile Security from the list of installed programs, and press the Remove button (see
Figure below).
Figure 2: Selecting the application to be uninstalled
d. Confirm deletion of the application by clicking Yes in the window that opens.
e. Enter the secret code and press OK.
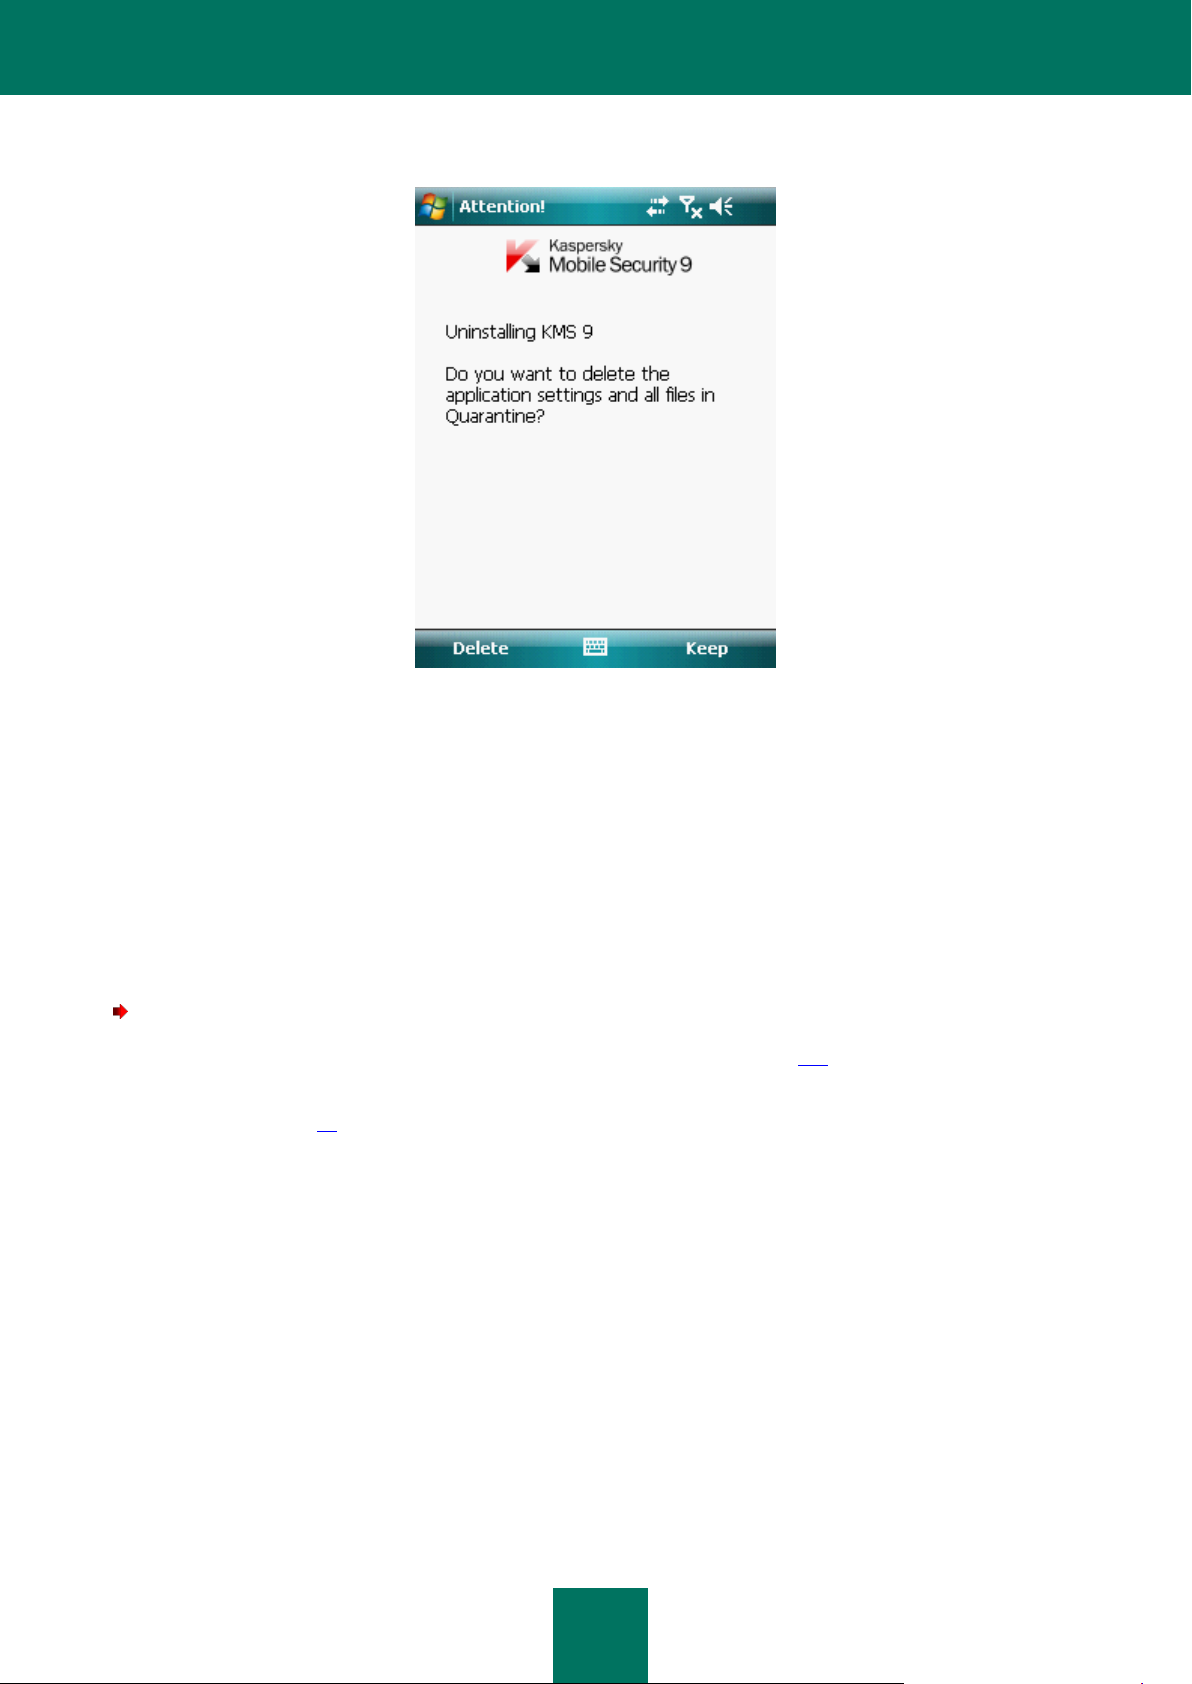
f. Specify whether or not to keep the program settings and objects in quarantine (see Figure below):
To keep the application settings and the quarantined objects, press Keep (see Figure below).
Page 22
U S E R G U I D E
22
In order to uninstall the application in full, press Delete.
Figure 3: Removal of the application settings
5. Restart the device in order to complete the uninstalling of the application.
UPDATING THE APPLICATION
You can update Kaspersky Mobile Security 9 by installing the most recent version of the application in this generation
(for example, update the version 9.0 for the version 9.2).
If you use Kaspersky Mobile Security 8.0, you can switch to Kaspersky Mobile Security 9.
To update the program version:
1. Disable Encryption – decrypt all data (see section "Data decryption" on page 101).
2. Disable the Privacy Protection component (see the "Enabling/disabling the Privacy Protection component"
section on page 88).
3. Close the current version of Kaspersky Mobile Security. To do this, press Menu Exit.
4. Copy the application's distribution package to your device. using one of these methods:
from the Kaspersky Lab website;
using the Microsoft ActiveSync application;
using a memory expansion card.
5. Start the Kaspersky Mobile Security 9 distribution package on the device.
6. Read the license agreement carefully. If you agree to its terms, press OK. You will first be offered to uninstall
the current application version.
7. Confirm uninstallation of the previous application version by pressing ОК.
Page 23

U P D A T I N G T H E A P P L I C A T I O N
23
8. Enter the secret code.
9. Specify whether or not to keep the application settings and objects in Quarantine:
To keep the application settings and the quarantined objects, press Keep (see Figure below).
In order to uninstall the application in full, press Uninstall.
10. In order to complete the removal process, restart the device. To do it, press Reboot.
11. After restarting the device, run the Kaspersky Mobile Security 9 installation (see section "Installation of
Kaspersky Mobile Security 9" on page 20).
If the current license is still valid, the application will be activated automatically. If the license has expired,
perform the application activation (see section "Activating the application" on page 24).
To switch from Kaspersky Mobile Security 8.0 to the version 9:
1. Decrypt all data if they have been encrypted using Kaspersky Mobile Security 8.0.
2. Close Kaspersky Mobile Security 9. To do this, press Menu Exit.
3. Uninstall Kaspersky Mobile Security 9. To do this, perform the following actions:
a. Press Start Settings.
b. Select Remove Programs on the System tab
c. Select Kaspersky Mobile Security from the list of installed programs, and press the Uninstall button.
d. Confirm deletion of the application by clicking Yes in the window that opens.
e. Enter the secret code set in the previous application version and press OK.
f. Delete the settings of Kaspersky Mobile Security 8.0 completely since they are incompatible with those of
the version 9. To do this, press Delete.
4. Restart the device to complete the uninstallation of Kaspersky Mobile Security 8.0.
5. Start installing Kaspersky Mobile Security 9 (see section "Installing Kaspersky Mobile Security 9" on page 20).
6. Start activating the application (see section "Activating the application" on page 24).
If the validity period of the Kaspersky Mobile Security 8.0 license has not expired, activate program version 9
using the activation code of version 8.0.
Page 24
24
GETTING STARTED
IN THIS SECTION
Activating the application................................................................................................................................................. 24
Setting the secret code.................................................................................................................................................... 28
Enabling the option to recover the secret code ............................................................................................................... 28
Recovering the secret code ............................................................................................................................................. 29
Starting the application .................................................................................................................................................... 30
Updating the application's databases .............................................................................................................................. 30
Scanning the device for viruses ...................................................................................................................................... 30
Viewing information about the application ....................................................................................................................... 31
This section provides information about how to start working with Kaspersky Mobile Security 9: activate it, set a secret
code for the application, enable the option of secret code recovery, recover the secret code, start the application, update
anti-virus databases, and scan a device for viruses.
ACTIVATING THE APPLICATION
Before starting to use Kaspersky Mobile Security 9, it needs to be activated.
To activate Kaspersky Mobile Security 9 on your device, you must have an Internet connection configured.
Before activating the application, make sure that the device's system date and time settings are correct.
You can activate the application as follows:
Activate trial license. When you activate the trial version, the application receives a free trial license. The
validity period of the trial license is displayed on the screen after the activation is complete. Once the validity
period of the trial license expires, the application's functions will be limited. The following features will only be
available:
Activating the application;
managing the application license;
Kaspersky Mobile Security 9 Help system;
disabling Encryption;
disabling Privacy Protection.
It is impossible to reactivate a trial version.
Activate commercial license. To activate the commercial version, you should use the activation code that you
have received when purchasing the application. When activating the commercial version, the application
Page 25

G E T T I N G S T A R T E D
25
IN THIS SECTION
Activating the commercial version ................................................................................................................................... 25
Activating the subscription for Kaspersky Mobile Security 9 ........................................................................................... 26
Purchasing an activation code online .............................................................................................................................. 27
Activating the trial version ............................................................................................................................................... 27
receives a commercial license, which grants you access to all the application's functions. The license validity
period is displayed on the screen of the device. Once the validity period of the trial license expires, the
application's functions will be limited, and it cannot be updated.
You can obtain an activation code as follows:
online, by going from the Kaspersky Mobile Security 9 application to the special Kaspersky Lab website for
mobile devices;
at Kaspersky Lab eStore (http://www.kaspersky.com/globalstore);
from Kaspersky Lab distributors.
Activate subscription. When activating the subscription, the application receives a commercial license with
subscription. The validity period of the commercial license with subscription is limited to 30 days. When the
subscription is activated, the application renews the license each 30 days. When the license is renewed, a fixed
payment for application use specified at the subscription activation, is written off from your personal account.
The funds are debited by sending a payable SMS message. Once the funds are debited, the application
receives a new license from the activation server, with a subscription which grants access to all functions of the
application. You can cancel the subscription for Kaspersky Mobile Security 9. In this case, when the current
license expires, the application's functionality becomes limited, and the application databases are no longer
updated.
ACTIVATING THE COMMERCIAL VERSION
To activate the commercial version of the application with the activation code:
1. Select Start Applications.
2. Select KMS 9 and start the application, using your stylus or the central button of your joystick.
This will open the Activation window.
3. Select Enter code.
This will open a Kaspersky Mobile Security 9 activation window (see Figure below).
Page 26
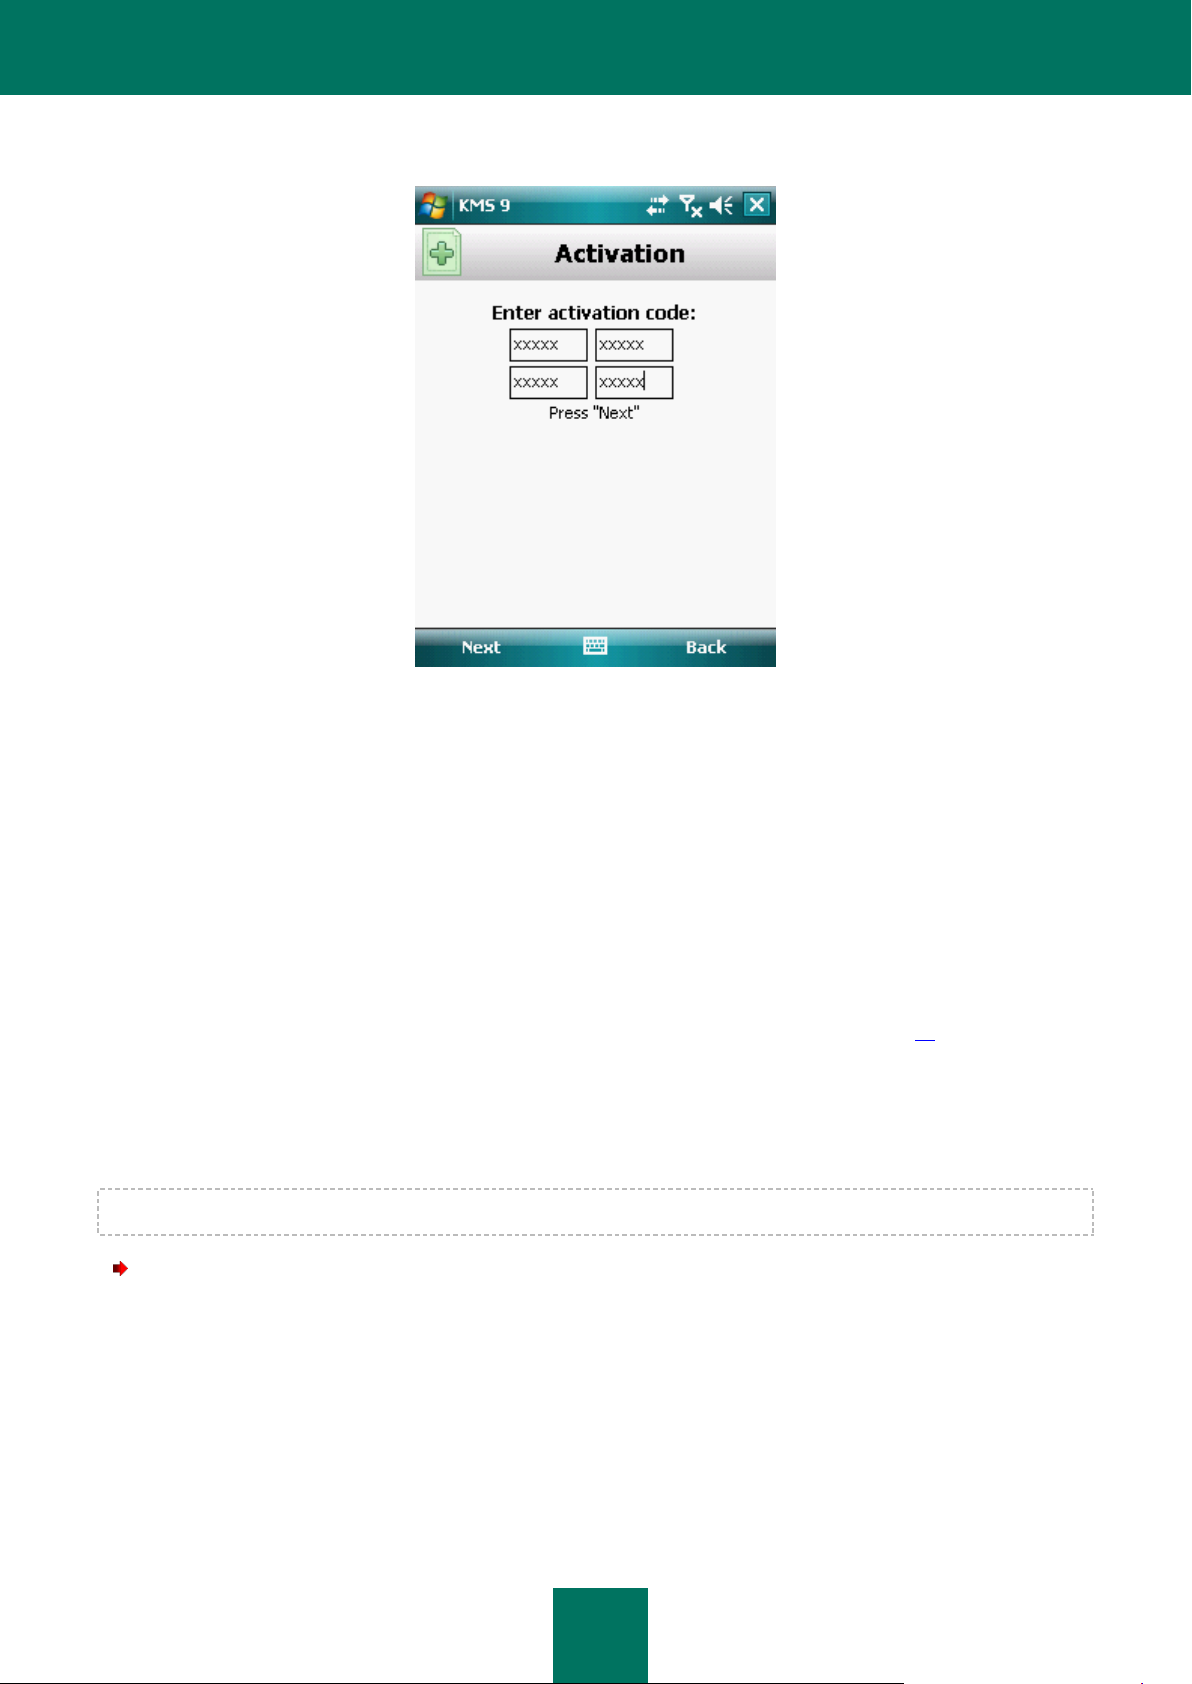
U S E R G U I D E
26
4. Enter the activation code obtained in four fields and then select Next.
Figure 4: Activating a commercial version
5. Confirm the connection to the Internet by pressing Yes.
The application will send a request to the Kaspersky Lab activation server and receive a license. When the
license is successfully received, information about it will be displayed on the screen.
If the activation code you entered is invalid for any reason, an information message is displayed on the screen.
In such a case, we recommend checking that the entered activation code is correct and contact the software
vendor you have purchased Kaspersky Mobile Security 9 from.
If any errors have occurred when connecting to the server and no license has been received, the activation is
canceled. In this event, it is recommended verifying the parameters of connecting to the Internet. If it was not
possible to rectify the errors, contact Technical Support.
6. Go to setting the application secret code (see the "Setting the secret code" section on page 28).
ACTIVATING THE SUBSCRIPTION FOR KASPERSKY MOBILE SECURITY 9
To activate the subscription, an Internet connection should be established on the device.
To activate the subscription for Kaspersky Mobile Security 9:
1. Select Start Applications.
2. Select KMS 9 and start the application, using your stylus or the central button of your joystick.
This will open the Activation window.
3. Select One-Click Buy.
4. Confirm the connection to the Internet by pressing Yes.
Page 27

G E T T I N G S T A R T E D
27
The application will check if the subscription service is accessible to the mobile service provider that you use. If
the subscription service is available, the Activation screen opens, displaying information about the terms of
subscription.
If the subscription service cannot be provided, the application will notify you of this and switch back to the
screen on which you can select another way of activating the application.
5. Read through the terms of subscription and then confirm the activation of subscription for Kaspersky Mobile
Security 9 by pressing Next.
The application will send a payable SMS and then receive a license from the activation server of Kaspersky
Lab. When the subscription becomes activated, Kaspersky Mobile Security 9 will notify you of this.
If your balance has not enough funds to send a payable SMS message, the subscription activation will be
canceled.
If any errors have occurred when connecting to the server and no license has been received, the activation is
canceled. In this event, it is recommended verifying the parameters of connecting to the Internet. If it was not
possible to rectify the errors, contact Technical Support.
If you do not agree the terms of subscription, press Cancel. In this case, the application cancels the
subscription activation and goes back to the screen in which you can reselect the way of activating the
application.
6. Go to entering the secret code (see the "Setting the secret code" section on page 28).
PURCHASING AN ACTIVATION CODE ONLINE
In order to purchase an activation code for the application online, perform the following steps:
1. Select Start Applications.
2. Select KMS 9 and start the application, using your stylus or the central button of your joystick.
This will open the Activation window.
3. Select Buy online.
This will open the Buy online window.
4. Press Open.
A special Kaspersky Lab website for mobile devices opens, on which you will be offered to order the license
renewal.
5. Follow the step-by-step instructions.
6. After you are done with purchasing an activation code, proceed with activation of the commercial version of the
application (see section "Activating the commercial version" on page 25).
ACTIVATING THE TRIAL VERSION
To activate the trial version of Kaspersky Mobile Security 9:
1. Select Start Applications.
2. Select KMS 9 and start the application, using your stylus or the central button of your joystick.
This will open the Activation window.
Page 28

U S E R G U I D E
28
3. Select Trial version.
4. Confirm the connection to the Internet by pressing Yes.
The application will send a request to the Kaspersky Lab activation server and receive a license.
If any errors have occurred when connecting to the server and no license has been received, the activation is
canceled. In this event, it is recommended verifying the parameters of connecting to the Internet. If it was not
possible to rectify the errors, contact Technical Support.
5. Start entering the secret code of the application (see section "Setting the secret code" on page 28).
SETTING THE SECRET CODE
After starting the application you will be asked to enter the application secret code. Application secret code prevents any
unauthorized access to the application settings.
You can later change the secret code installed.
Kaspersky Mobile Security 9 requests the secret code in the following circumstances:
for access to the application;
for access to encrypted folders;
when sending an SMS command from another mobile device to start the following functions remotely: Block,
Data Wipe, SIM Watch, GPS Find, Privacy Protection;
when uninstalling the application.
The secret code is comprised of numerals. The minimum number of characters is four.
If you forget the application secret code, you can restore it (see the "Recovering the secret code" section on page 29).
For this purpose, the recovery of secret code option must be enabled in advance (see the "Enabling the option to recover
the secret code" section on page 28).
To set up the secret code:
1. After activating the application, enter in the in the Enter new code entry field the code's characters
2. Re-enter the same code in the Confirm code field.
The code entered is automatically verified.
3. If the code is deemed invalid according to the results of the verification, a warning message is displayed and the
application requests confirmation. To use the code, press OK. In order to create a new code, press No.
4. Press OK.
ENABLING THE OPTION TO RECOVER THE SECRET CODE
After the initial activation of the application, you can enable the option of secret code recovery. Then, in the future, you
will be able to recover the secret code if it is forgotten.
If you have canceled the option enabling during the initial activation of the application, you can enable it after
reinstallation of Kaspersky Mobile Security 9 on the device.
Page 29
G E T T I N G S T A R T E D
29
You can only recover the application secret code (see the "Recovering the secret code" section on page 29) if the
recovery of secret code option is enabled. If you forget the password, and the recovery of secret code option is disabled,
it will not be possible to manage the functions of Kaspersky Mobile Security 9, access encrypted files, or uninstall the
application.
To enable the recovery of secret code option:
1. After you have installed the secret code for the application, confirm the enabling of the option of secret code
recovery, by clicking Yes.
2. Enter your email address in the Your email address field and press Next.
The email address that you give will be used during recovery of the secret code.
The application will establish an Internet connection with the secret code recovery server, send the information
entered and enable the recovery of secret code option.
RECOVERING THE SECRET CODE
You can only recover the secret code enabling the recovery of secret code option in advance (see "Enabling the option to
recover the secret code" on page 28).
To recover the application secret code:
1. Select Start Applications.
2. Select KMS 9 and start the application, using your stylus or the central button of your joystick.
The screen for entering the secret code opens.
3. Press Cancel.
4. Go to recovery of the secret code by pressing Yes.
On the Secret code recovery screen, the following information will be displayed
Kaspersky Lab website for recovery of secret code;
device identification code.
5. Go to the website http://mobile.kaspersky.com/recover-code to recover the secret code.
6. Enter the following information in the appropriate fields:
the email address that you previously designated for recovery of the secret code;
device identification code.
As a result, the recovery code will be sent to the email address that you indicated.
7. On the Secret code recovery screen, press Continue and enter the recovery code that you have received.
8. Enter the new application secret code. To do this, enter a new application secret code in the field Enter new
code and Confirm secret code.
9. Press OK.
Page 30

U S E R G U I D E
30
STARTING THE APPLICATION
To start Kaspersky Mobile Security 9:
1. Select Start Applications.
2. Select KMS 9 and start the application, using your stylus or the central button of your joystick.
3. Enter the secret code of the application and press OK.
The application displays a window showing the current status of Kaspersky Mobile Security 9 (see the "Protection status
window" section on page 39). To go to the application's functions, press Menu.
UPDATING THE APPLICATION'S DATABASES
Kaspersky Mobile Security 9 scans for threats based on the application databases, which contain descriptions of all
malicious programs known to date, methods for neutralizing them, and descriptions of other unwanted objects. At the
time of installation, the anti-virus databases included in the Kaspersky Mobile Security 9 installation package may be out
of date.
We recommend you to update the application's anti-virus databases immediately after the application installation.
To update the application's anti-virus databases, you must have an Internet connection configured on your mobile
device.
To start the anti-virus database update process:
1. Select Menu Anti-Virus.
This will open the Anti-Virus window.
2. Select the Update item.
This will open the Update window.
3. Select the Update item.
The application starts the process of updating the databases from the Kaspersky Lab server. Information on the update
process is displayed on the screen.
SCANNING THE DEVICE FOR VIRUSES
After installing the application, it is recommended to immediately run a scan of your mobile device for malware objects.
The first scan is performed with the settings previously set by the Kaspersky Lab experts.
To run a full scan of the device:
1. Select Menu Anti-Virus.
This will open the Anti-Virus window.
2. Select the Scan item.
This will open the Anti-Virus window.
3. Select Full scan.
Page 31

G E T T I N G S T A R T E D
31
VIEWING INFORMATION ABOUT THE APPLICATION
You can view general information about Kaspersky Mobile Security 9 and its version.
To view information about the license:
1. Select Menu Additional.
This will open the Additional window.
2. Select the About tab.
Page 32

32
MANAGING THE LICENSE
IN THIS SECTION
About the License Agreement ......................................................................................................................................... 32
About Kaspersky Mobile Security 9 licenses ................................................................................................................... 32
View License Information ................................ ................................ ................................................................................ 33
Renewing the license ...................................................................................................................................................... 34
In the context of licensing Kaspersky Lab applications, it is important to know these terms below:
License Agreement;
license.
These terms are inseparably interlinked and constitute a single licensing pattern. Let us have a closer look at every term.
Furthermore, the section presents information about how to find information on the Kaspersky Mobile Security 9 license
and extend the term of its validity.
ABOUT THE LICENSE AGREEMENT
The License Agreement is an agreement between a private individual or a legal entity which legally owns a copy of
Kaspersky Mobile Security 9 and Kaspersky Lab. The agreement is included in every Kaspersky Lab application. It
stated detailed information on the rights and limitations on using Kaspersky Mobile Security.
In accordance with the License Agreement, when purchasing and installing a Kaspersky Lab application, you obtain the
unlimited right to owning its copy.
Kaspersky Lab also provides you with additional services:
technical support;
updating of Kaspersky Mobile Security 9 anti-virus databases;
updating of Kaspersky Mobile Security 9 program modules.
In order to benefit, you must purchase and activate a license (see the "About Kaspersky Mobile Security 9 licenses"
section on page 32).
ABOUT KASPERSKY MOBILE SECURITY 9 LICENSES
A license is the right to use Kaspersky Mobile Security 9 and the additional services (see the "About the License
Agreement" section on page 32) associated with it as provided by Kaspersky Lab or its partners.
Every license has a validity period and type.
License term – a period during which the additional services are offered:
technical support;
Page 33

M A N A G I N G T H E L I C E N S E
33
updating of Kaspersky Mobile Security 9 anti-virus databases;
updating of Kaspersky Mobile Security 9 program modules.
The scope of services provided depends on the license type.
The following license types are available:
Trial—free license with a limited validity period, for example, 30 days, offered to get acquainted with Kaspersky
Mobile Security 9.
The trial license can only be used once.
If you have a trial license, you can only contact Technical Support Service if your question is about activating
the product or purchasing a commercial license. As soon as the Kaspersky Mobile Security 9 trial license
expires, all features become disabled. To proceed with the application, you should activate it (see section
"Activating the commercial version" on page 25).
Commercial—paid license with a limited validity period (for example, one year), provided upon purchase of
Kaspersky Mobile Security 9.
If a commercial license is activated, all application features and additional services are available.
On termination of the validity period of the commercial license, some functions of Kaspersky Mobile Security 9
become inaccessible, and the application databases will not be updated. One week before the license expiration
date, the application will notify you of this event so you could renew the license in advance.
Commercial with subscription – paid license with an option to renew it in automatic or manual mode. A license
with subscription is distributed by service providers.
The subscription is valid for a limited period (30 days). After the subscription expires, it can be renewed
manually or automatically. Method of renewing the subscription depends on the legislation and mobile service
provider. The subscription is renewed automatically subject to timely prepayment to the provider.
In this case, the fixed amount specified in the terms of subscription is debited from your personal account.
Funds are debited from your personal account after you send a payable SMS message to the number of the
service provider.
If the subscription is not renewed, Kaspersky Mobile Security 9 stops updating the application databases, and
the application's functionality becomes limited.
When using the subscription, you can activate the commercial license with an activation code. In this case, the
subscription will be canceled automatically.
When using the commercial license, you can activate the subscription. If already have an activated license with
a limited term at the time of subscription activation, it is substituted with the subscription license.
VIEW LICENSE INFORMATION
You can view the following license information: license number, type, number of days until expiry, activation date, and
device serial number.
To view the license information:
1. Select Menu Additional.
This will open the Additional window.
2. Select the License item.
Page 34

U S E R G U I D E
34
This will open the License window.
IN THIS SECTION
Renewing the license with the activation code ................................................................................................................ 34
Renewing the license online ............................................................................................................................................ 35
Renewing the license by activating the subscription ....................................................................................................... 36
Unsubscribing ................................................................................................................................................................. 37
Renewing the subscription .............................................................................................................................................. 38
3. Select About license.
RENEWING THE LICENSE
Kaspersky Mobile Security 9 allows you to renew the application license.
The license can be extended in one of the following ways:
Enter activation code - activate the application with the activation code. You can purchase the activation code at
http://www.kaspersky.com/globalstore, or from your local Kaspersky Lab distributor.
Buy activation code online – go to the website visited from your mobile device, and purchase an activation code
online.
Subscribe for Kaspersky Mobile Security 9 – activate the subscription in order to renew the license each 30
days.
To activate the application on your mobile device, you must have an Internet connection configured.
RENEWING THE LICENSE WITH THE ACTIVATION CODE
To renew the license with the activation code:
1. Select Menu Additional.
This will open the Additional window.
2. Select the License item.
This will open the License window.
3. Select the Renewal item.
The Renewal window opens.
Page 35

M A N A G I N G T H E L I C E N S E
35
4. Enter the activation code obtained in four fields and then select Next (see Figure below).
Figure 5: Renewing the license with the activation code
5. Confirm establishing Internet connection by pressing Yes.
The application will send a request to the Kaspersky Lab activation server and receive a license. When the
license is successfully received, information about it will be displayed on the screen.
If the activation code you entered is invalid for any reason, an information message is displayed on the screen.
In such a case, we recommend checking that the entered activation code is correct and contact the software
vendor you have purchased Kaspersky Mobile Security 9 from.
If any errors have occurred when connecting to the server and no license has been received, the activation is
canceled. In this event, it is recommended verifying the parameters of connecting to the Internet. If it was not
possible to rectify the errors, contact Technical Support.
6. On completion, press OK.
RENEWING THE LICENSE ONLINE
To renew your license online:
1. Select Menu Additional.
This will open the Additional window.
2. Select the License item.
This will open the License window.
3. Select the Renew online item. If the validity period has expired, the menu item changes to Buy online.
The Renew online window opens.
Page 36

U S E R G U I D E
36
4. Press Open (see Figure below).
Figure 6: Renewing the license online
A website opens, which offers you to order the license renewal.
If the license has expired, a special Kaspersky Lab website for mobile devices opens on which you can buy an
activation code online.
5. Follow the step-by-step instructions.
6. When the order to renew the license is processed, enter the activation code obtained (see the "License renewal
with activation code" section on page 34).
RENEWING THE LICENSE BY ACTIVATING THE SUBSCRIPTION
In the Additional menu, you can extend the license validity term by activating the subscription (see the "About Kaspersky
Mobile Security 9 licenses" section on page 32) for Kaspersky Mobile Security 9. When the subscription is activated,
Kaspersky Mobile Security 9 renews the license each 30 days. Every time the license is renewed, the fixed amount
specified in the terms of subscription is debited from your personal account.
To activate the subscription for Kaspersky Mobile Security 9 on your device, you should have an Internet connection
established.
To activate the subscription for Kaspersky Mobile Security 9:
1. Select Menu Additional.
This will open the Additional window.
2. Select the License item.
This will open the License window.
Page 37

M A N A G I N G T H E L I C E N S E
37
Select the One-Click Buy tab (see figure below).
Figure 7: Activation of subscription
3. Confirm the connection to the Internet by pressing Yes.
The application will check if the subscription service is accessible to the mobile service provider that you use.
If the subscription service is available, the Activation screen opens, displaying information about the terms of
subscription.
If the subscription service cannot be provided, the application will inform you of this event and switch back to the
screen on which you can select another method of renewing the license. The subscription activation will be
canceled.
4. Read through the terms of subscription and then confirm the activation of subscription for Kaspersky Mobile
Security 9 by pressing Next.
The application will send a payable SMS and then receive a license from the activation server of Kaspersky
Lab. When the subscription becomes activated, Kaspersky Mobile Security 9 will notify you of this.
If your balance has not enough funds to send a payable SMS message, the subscription activation will be
canceled.
If any errors have occurred when connecting to the server and no license has been received, the activation is
canceled. In this event, it is recommended verifying the parameters of connecting to the Internet. If it was not
possible to rectify the errors, contact Technical Support.
If you do not agree the terms of subscription, press Cancel. In this case, the application will cancel the
subscription activation and switch back to the screen on which you can select another method of renewing the
license.
5. On completion, press OK.
UNSUBSCRIBING
You can cancel the subscription for Kaspersky Mobile Security 9. In this case, Kaspersky Mobile Security 9 will not
renew the license each 30 days. When the current license expires, the application's functionality becomes limited, and
the application databases are no longer updated.
Page 38

U S E R G U I D E
38
If you have canceled your subscription, you can resume it (see section "Renewing the subscription" on page 38).
To cancel a subscription to Kaspersky Mobile Security 9:
1. Select Menu Additional.
This will open the Additional window.
2. Select the License item.
This will open the License window.
3. Select Unsubscribe (see fig. below).
Figure 8: Unsubscribing
4. Confirm the subscription cancellation by pressing Yes.
Kaspersky Mobile Security 9 will notify you of cancellation of the subscription.
RENEWING THE SUBSCRIPTION
If you have canceled the subscription (see section "Unsubscribing" on page 37), you can resume it. In this case,
Kaspersky Mobile Security 9 will renew the license every 30 days.
When resuming the subscription, funds are only debited from your personal account if the current license expires sooner
than in three days.
To resume the subscription:
1. Select Menu Additional.
This will open the Additional window.
2. Select the License item.
This will open the License window.
Page 39

A P P L I C A T I O N I N T E R F A C E
39
IN THIS SECTION
Protection status window................................................................................................................................................. 39
Application menu ............................................................................................................................................................. 41
3. Select the One-Click Buy tab.
If your current license has expired, Kaspersky Mobile Security 9 will offer you to activate the subscription again (see
section "Renewing the license" on page 34).
If the current license has not expired yet, Kaspersky Mobile Security 9 resumes the subscription and renews it each 30
days after the current license expires.
APPLICATION INTERFACE
This section includes information on the main elements of the Kaspersky Mobile Security 9 interface.
PROTECTION STATUS WINDOW
The status of the application's main components is displayed in the current status window.
There are three possible statuses for every component, each is displayed with a color similar to the code of traffic lights.
The green light means that the protection of your device is provided at the necessary level. Yellow and red indicate
various types of threats. Threats do not only include outdated anti-virus application databases, but also, for instance,
disabled protection components or minimum application operation settings.
The status window is immediately accessible after starting the application and contains the following information:
Protection is the protection status in real-time protection mode (see "File system protection" section on page
43).
The green status icon displays that protection is active and set at the correct level, and that the application's
anti-virus databases are up to date.
The yellow icon indicates that the databases have not been updated for several days.
The red icon color indicates problems which could result in a loss of information or infection of the device. For
instance, protection is switched off. Perhaps the application databases have not been updated for more than 15
days.
Firewall is the level of protection of the device from unwanted network activity (see "Filtering network activity.
Firewall" section on page 95).
The green status icon shows that the component is active. Protection level of the Firewall is selected.
The red icon indicates that network activity is not being filtered.
Anti-Theft – status of data protection in case the device is lost or stolen (see "Data protection in the event of
loss or theft of the device" section on page 76).
The green status icon means that the Anti-Theft function is active; its name is displayed under the component's
status.
The red icon shows that all Anti-Theft functions are disabled.
Page 40

U S E R G U I D E
40
Privacy Protection is the status of protection of confidential data (see section "Hiding personal data" on
page 87).
The green status icon shows that the component is active. Confidential data hidden.
The yellow colored icon warns that the component is disabled. Personal data are displayed and accessible for
viewing.
License is the license's validity period (see the section "Managing the license" on page 32).
The green status icon means that the license's validity period ends within more than 14 days.
The yellow status icon means that the license's validity period ends within less than 14 days.
The red icon indicates that your license has expired.
Figure 9: The application component status window
You can also go to the status window by selecting Menu Protection status.
Page 41

A P P L I C A T I O N I N T E R F A C E
41
APPLICATION MENU
The application components are logically grouped and accessible in the application menu. Every menu item allows going
to the parameters of the selected component and protection tasks (see Figure below).
Figure 10: Application menu
The Kaspersky Mobile Security 9 menu contains the following items:
Anti-Virus: protection of the file system from viruses, on-demand scan and updating the application's anti-virus
databases.
Anti-Theft: blocking the device and erasing information from it, if it is lost or stolen.
Privacy Protection: hiding of confidential data on the device.
Encryption: protecting information on the device using encryption.
Call/SMS Filter: filtering of unwanted incoming calls and SMS.
Parental Control: control of outgoing calls and SMS messages.
Firewall: protecting the device when it is connected to a network.
Additional: general application settings, information about the application, databases in use and license.
Protection status: information on the protection status of the device.
Exit: exiting the application.
In order to open the application menu,
select Menu.
To navigate through the application menu, use the device's joystick or stylus.
Page 42

U S E R G U I D E
42
To return to the application:
select Menu Protection status.
To exit the application:
select Menu Exit.
Page 43

43
FILE SYSTEM PROTECTION
IN THIS SECTION
About Protection .............................................................................................................................................................. 43
Enabling and disabling the Protection ............................................................................................................................. 43
Selecting the action to be performed on detected objects ............................................................................................... 45
This section provides information on the Protection component which enables avoidance of infections of your device's file
system. The section also describes how to activate/stop the Protection and adjust its operation settings.
ABOUT PROTECTION
Protection starts when operation system starts up and is always found in the device's memory. Protection scans all files
that are opened, saved or run. Files are scanned according to the following algorithm:
1. Protection scans every file when the user accesses it.
2. Protection analyses the file for the presence of malicious objects. Malicious objects are detected by comparison
with the application's anti-virus databases. The anti-virus databases contain descriptions of all currently known
malicious objects, and methods for neutralizing them.
3. According to the analysis results, the following types of Protection are possible:
If malicious code was detected in the file, the Protection blocks access to the file and performs the action
specified in the settings;
If no malicious code is discovered in the file, it will be immediately restored. Information about the scan's results is saved
in the application's log (see the "Application logs" section on page 108).
ENABLING AND DISABLING THE PROTECTION
When activating the Protection, all actions in the system are under permanent control.
Device resources are expended to ensure protection against viruses and other threats. In order to reduce the load on the
device when executing several tasks, you can temporarily stop Protection.
The Kaspersky Lab specialists recommend that you do not disable Protection, since this could lead to the infection of
your computer and data loss.
Disabling Protection does not affect running virus scan tasks and updating application anti-virus databases.
The current Protection status is displayed on the Anti-Virus window next to the Protection item.
You can enable/disable the Protection as follows:
from the component settings menu;
from the Anti-Virus menu.
Page 44

U S E R G U I D E
44
To modify the values of the settings, use the device's joystick or stylus.
To enable Protection:
1. Select Menu Anti-Virus.
This will open the Anti-Virus window.
2. Select the Protection item.
This will open the Settings window.
3. Check the Enable Protection box (see Figure below).
4. Press OK to save the changes.
To disable Protection:
1. Select Menu Anti-Virus.
This will open the Anti-Virus window.
2. Select the Protection item.
This will open the Settings window.
3. Uncheck the Enable Protection box.
4. Press OK to save the changes.
To quickly enable / disable Protection:
1. Select Menu Anti-Virus.
2. This will open the Anti-Virus window.
Figure 11: Enabling Protection
Page 45

F I L E S Y S T E M P R O T E C T I O N
45
3. Press the Enable / Disable. The name of the button will change to the opposite depending on the Protection
current status.
SELECTING THE ACTION TO BE PERFORMED ON DETECTED
OBJECTS
Kaspersky Mobile Security 9 places by default the malicious objects found in the quarantine. You can choose the action
that Kaspersky Mobile Security 9 performs when it detects a malicious object.
To modify the values of the settings, use the device's joystick or stylus.
In order to change the values settings of the Protection, ensure that it is activated.
To configure the program's response when it detects a malware object:
1. Select Menu Anti-Virus.
This will open the Anti-Virus window.
2. Select the Protection item.
This will open the Settings window.
3. Set an action which the application takes if it finds a malicious object. To do this, select a value for the If a virus
is detected setting (see Figure below):
Quarantine: quarantine malware objects.
Delete: delete malware objects without notifying the user.
Log event: do not process malware objects and record information about their detection in the application's
log; block the object when attempts are made to use it (for instance, copy or open).
Page 46

46
4. Press OK to save the changes.
Figure 12: Selecting the action to be performed on malicious objects
Page 47

47
SCANNING THE DEVICE
IN THIS SECTION
About on-demand scans ................................................................................................................................................. 47
Starting a scan manually ................................................................................................................................................. 47
Starting a scheduled scan ............................................................................................................................................... 49
Selection of object type to be scanned ............................................................................................................................ 50
Configuring archive scans ............................................................................................................................................... 51
Selecting the action to be performed on detected objects ............................................................................................... 52
This section gives information about scanning the device on demand, which can detect and remove threats on your
device. The section also describes how to launch a scan of the device, set up an automatic scheduled file system scan,
select files for scanning, and set the action that the application will take when a malicious object is detected.
ABOUT ON-DEMAND SCANS
Scanning the device helps to detect and neutralize malicious objects. Kaspersky Mobile Security 9 allows performing a
full or partial scan of the device included – i.e. scan only the content of the device's built-in memory or a specific folder
(including that located on the storage card).
The device is scanned as follows:
1. Kaspersky Mobile Security 9 scans the file types set (see the "Selecting the object types to be scanned" section
2. Each file is scanned for the presence of malicious objects (malware). Malicious objects are detected by
A scan task is started manually or automatically in accordance with a previously set schedule (see the "Starting a
scheduled scan" section on page 49).
Information about the on-demand scan's results is saved in the application's log (see the "Application logs" section on
page 108).
on page 50).
comparison with the application's anti-virus databases. Anti-Virus databases contain descriptions of all known
malicious objects, and methods for neutralizing them.
After the analysis, Kaspersky Mobile Security 9 may take the following courses of action:
If malicious code was detected in the file, Kaspersky Mobile Security 9 blocks access to the file, and
performs the action specified in the settings (see "Selecting actions to be performed on objects" section on
page 52).
if no malicious code is detected, the file immediately becomes accessible for operation.
STARTING A SCAN MANUALLY
You can launch an on-demand scan manually at any time: the best time is when the device's processor is not occupied
performing other tasks.
Page 48

U S E R G U I D E
48
To start an anti-virus scan manually:
1. Select Menu Anti-Virus.
This will open the Anti-Virus window.
2. Select the Scan item.
This will open the Anti-Virus window.
3. Select the device scan area (see figure below):
Full scan: scan the device's entire file system. The following objects are scanned by default: device
memory and storage card.
Memory scan: scan the processes started in the system memory and its corresponding files.
Folder scan: scan a separate object in the device's file system or on the storage card. When Folder scan
is selected, a window displaying the device‘s file system will open. Use the joystick buttons or the stylus to
navigate through the file system. In order to start the folder scan, select the necessary folder and select
Scan.
Figure 13: Selecting of scan area
When the scan is started, the scan process window opens and displays the scan's status, including the number
of scanned objects, the path to the object currently being scanned and an indicator giving the scan's percentage
completion.
If Kaspersky Mobile Security 9 detects an infected object, it performs an action in accordance with the scan
parameters set (see the "Selecting an action to be performed on objects" section on page 52).
By default, if Kaspersky Mobile Security 9 detects a threat, it places it in quarantine.
When the scan is completed, overall statistics are displayed on the screen with the following information:
number of objects scanned;
number of viruses detected, placed in the quarantine or deleted;
Page 49

S C A N N I N G T H E D E V I C E
49
number of objects skipped (for instance, when a file is blocked by the operating system, or if a file is not
executable when scanning only executable program files);
scan time.
4. On completion, press OK.
STARTING A SCHEDULED SCAN
Kaspersky Mobile Security 9 allows you to create a schedule of times at which scans will be automatically started. Scans
are performed in background mode. When an infected object is detected, the action selected in the scan settings will be
performed on it (see the "Selecting an action to be performed on objects" section on page 52).
By default, scheduled scans are disabled.
To configure a scheduled scan:
1. Select Menu Anti-Virus.
This will open the Anti-Virus window.
2. Select the Scan item.
This will open the Anti-Virus window.
3. Select the Scan schedule item.
This will open the Schedule screen.
4. Check the box Scan by schedule (see Figure below).
5. Select one of the values for the Frequency setting:
Daily: perform the scan every day. Specify the Time in the entry field to set the time of day at which the
scan will start.
Page 50

U S E R G U I D E
50
Weekly: perform the scan once a week. Specify the Time and Day of the week.
Figure 14: Configuring an automatic scan schedule
6. Press OK to save the changes.
SELECTION OF OBJECT TYPE TO BE SCANNED
You can specify what type of objects is scanned for malicious code.
To modify the values of the settings, use the device's joystick or stylus.
To select objects to be scanned:
1. Select Menu Anti-Virus.
This will open the Anti-Virus window.
2. Select the Scan item.
This will open the Anti-Virus window.
3. Select the Objects and actions item.
This will open the Objects and actions window.
4. Select the objects to be scanned in the Objects to be scanned block (see Figure below).
All files - scan all types of files.
Executables only – checks only executable application files for the following formats: EXE, DLL, MDL,
APP, RDL, PRT, PXT, LDD, PDD, CLASS.
Page 51

S C A N N I N G T H E D E V I C E
51
Figure 15: Selecting protection objects
5. Press OK to save the changes.
CONFIGURING ARCHIVE SCANS
Viruses often hide in archives. The program scans the following archive formats: ZIP, JAR, JAD and CAB. Archives are
unpacked during scanning which may significantly reduce the speed of the Scan on Demand.
You can enable / disable the scan of archive for malicious code during the Scan on Demand.
To modify the values of the settings, use the device's joystick or stylus.
To enable scan of archives:
1. Select Menu Anti-Virus.
This will open the Anti-Virus window.
2. Select the Scan item.
This will open the Anti-Virus window.
3. Select the Objects and actions item.
This will open the Objects and actions window.
4. Check the Archives box in the Objects to be scanned block.
5. Press OK to save the changes.
Page 52

U S E R G U I D E
52
SELECTING THE ACTION TO BE PERFORMED ON DETECTED
OBJECTS
By default, Kaspersky Mobile Security 9 places infected objects detected in quarantine. You can change the action the
application will take when it detects a malicious object.
To modify the values of the settings, use the device's joystick or stylus.
To configure the program's response when it detects a malware object:
1. Select Menu Anti-Virus.
This will open the Anti-Virus window.
2. Select the Scan item.
This will open the Anti-Virus window.
3. Select the Objects and actions item.
This will open the Objects and actions window.
4. If you want the application to attempt to disinfect infected objects, check the Try to disinfect box beside the If a
virus is detected setting.
5. Set an action in respect of a detected malicious object. To do this, select a value for the Perform action setting:
If the Try to disinfect box was checked earlier, the title of this setting becomes If disinfection fails. This
setting determines the action of the program, even if rectifying the object is not successful.
Quarantine: quarantine objects.
Ask user: prompt the user for actions when a malicious object is detected.
Delete: delete malware objects without notifying the user.
Page 53

S C A N N I N G T H E D E V I C E
53
Log event: do not process malware objects and record information about their detection in the application's
log; block the object when attempts are made to use it (for instance, copy or open).
6. Press OK to save the changes.
Figure 16: Selecting the action to be performed on malicious objects
Page 54

54
QUARANTINING MALWARE OBJECTS
IN THIS SECTION
About Quarantine ............................................................................................................................................................ 54
Viewing quarantined objects ........................................................................................................................................... 54
Restoring objects from Quarantine .................................................................................................................................. 55
Deleting objects from Quarantine .................................................................................................................................... 55
This section provides information on the quarantine, a special folder where potential malicious objects are placed. This
section also describes how to view, restore or delete malicious objects found in the folder.
ABOUT QUARANTINE
While a device is being scanned or if Protection is enabled, the application places any malicious objects detected in
quarantine, in a special isolated folder. Quarantined objects are stored in a packed format which prevents their activation,
and thus they pose no threat to the device.
You can view files placed in quarantine, delete or restore them.
VIEWING QUARANTINED OBJECTS
You can view the list of objects that the application has moved to Quarantine. For every object, its full name and date of
detection are specified on the list.
You can also view additional information about the infected object that you have selected: the path to the object on the
device before the application moved it to quarantine, and the name of the threat.
To view the list of objects in quarantine:
1. Select Menu Anti-Virus.
This will open the Anti-Virus window.
2. Select the Quarantine item.
The Quarantine screen opens displaying the list of objects that have been moved to Quarantine (see figure
below).
Page 55

Q U A R A N T I N I N G M A L W A R E O B J E C T S
55
Figure 17: List of objects in Quarantine
To view information about an infected object,
press Details.
On the Details screen, the following information about the object will be displayed: path to the file on the device before it
has been detected by the application, and the name of the virus.
The Object info screen opens.
RESTORING OBJECTS FROM QUARANTINE
If you are sure that the object detected does not represent a threat to the device, you can restore it from quarantine. The
restored object is placed in the original folder.
To restore an object from quarantine:
1. Select Menu Anti-Virus.
This will open the Anti-Virus window.
2. Select the Quarantine item.
This will open the Quarantine window.
3. Select an object to restore and then press Menu Restore.
The selected object will be restored from Quarantine into its original folder.
DELETING OBJECTS FROM QUARANTINE
You can delete a single object or all the objects in quarantine.
Page 56

U S E R G U I D E
56
To delete an object from Quarantine:
1. Select Menu Anti-Virus.
This will open the Anti-Virus window.
2. Select the Quarantine item.
This will open the Quarantine window.
3. Select an object to be deleted and then press Menu Delete.
The selected object will be deleted from Quarantine.
To delete all quarantined objects:
1. Select Menu Anti-Virus.
This will open the Anti-Virus window.
2. Select the Quarantine item.
This will open the Quarantine window.
3. Press Menu Delete all.
All quarantined objects will be deleted.
Page 57

57
FILTERING OF INCOMING CALLS AND SMS
IN THIS SECTION
About Call/SMS Filter ...................................................................................................................................................... 57
About Call/SMS Filter modes .......................................................................................................................................... 58
Changing the Call/SMS Filter mode ................................................................................................................................ 58
Creating the Black List .................................................................................................................................................... 59
Creating a White List ....................................................................................................................................................... 62
Responding to SMS messages and calls from contacts not in the phone book .............................................................. 65
Responding to SMS messages from non-numeric numbers ........................................................................................... 66
Selecting a response to incoming SMS ........................................................................................................................... 67
Selecting response to incoming calls .............................................................................................................................. 67
This section gives information about Call/SMS Filter which prevents unwanted calls and SMS according to the Black and
White Lists you create. The section also describes how to select the mode in which Call/SMS Filter scans incoming calls
and SMS, how to configure additional filtering settings for incoming SMS and calls and also how to create Black and
White Lists.
ABOUT CALL/SMS FILTER
Call/SMS Filter prevents unwanted calls and SMS to be delivered based on the Black List and White List that you have
compiled.
The lists consist of entries. An entry in either list contains the following information:
The telephone number, from which Call/SMS Filter blocks any information if the number is on the Black List and
delivers any information if the number is on the White List.
The type of event that Call/SMS Filter blocks if it is on the Black List and delivers if it is on the White List. The
following types of communications are available: calls and SMS, calls only, and SMS only.
The key phrase used by Call/SMS Filter to identify wanted and unwanted SMS. For the Black List, Call/SMS
Filter blocks SMS, which contain this phrase, while delivering the ones, which do not contain it. For the White
Call/SMS Filter filters incoming SMS and calls as prescribed by the selected mode (see the "About Call/SMS Filter
modes" section on page 58). According to the mode, Call/SMS Filter scans every incoming SMS or call and then
determines whether this SMS or call is wanted or unwanted (spam). As soon as Call/SMS Filter assigns the wanted or
unwanted status to an SMS or call, the scan is finished.
Information about blocked SMS and calls is registered in the application's log (see section "Application logs" on
page 108).
List, Call/SMS Filter delivers SMS, which contain this phrase, while blocking the ones, which do not contain it.
Page 58

U S E R G U I D E
58
ABOUT CALL/SMS FILTER MODES
The mode defines the rules according to which Call/SMS Filter filters incoming calls and SMS.
The following Call/SMS Filter modes are available:
Off – all incoming calls and SMS are allowed.
Allow White list - only calls and SMS originating from numbers on the White List are allowed.
Block Black list - all calls and SMS are allowed except those originating from numbers on the Black List.
Both lists – incoming calls and SMS from White List numbers are allowed while those from Black List numbers
are blocked. Following a conversation with or the reading of an SMS from a number on neither list, Call/SMS
Filter will prompt you to enter the number in either one of the lists.
You can change the Call/SMS Filter mode (see the "Changing the Call/SMS Filter mode" section on page 58). The
current Call/SMS Filter mode is displayed on the Call/SMS Filter screen next to the menu item Mode.
CHANGING THE CALL/SMS FILTER MODE
To change the mode of Call/SMS Filter:
1. Select Меnu Call/SMS Filter.
The Call/SMS Filter opens.
2. Select the Mode item.
This will open the Mode window.
3. Select the value for the setting Call/SMS Filter mode (see figure above).
Figure 18: Changing the Call/SMS Filter mode
4. Press OK to save the changes.
Page 59

F I L T E R I N G O F I N C O M I N G C A L L S A N D SM S
59
IN THIS SECTION
Adding entries to the Black List ....................................................................................................................................... 59
Editing entries in the Black List ....................................................................................................................................... 60
Deleting entries from the Black List ................................................................................................................................. 61
CREATING THE BLACK LIST
The Black List contains entries of banned numbers, i.e., the numbers from which Call/SMS Filter blocks calls and SMS.
Each entry contain the following information:
Telephone number from which Call/SMS Filter blocks calls and / or SMS.
Types of events that Call/SMS Filter blocks from this number. The following types of events are available: calls
and SMS, calls only, and SMS only.
Key phrase that Call/SMS Filter uses to classify an SMS as unsolicited (spam). Call/SMS Filter only blocks SMS
containing the key phrase, while delivering all other SMS.
Call/SMS Filter blocks calls and SMS that comply with all the criteria of an entry on the Black List. Calls and SMS that fail
to comply with even one of the criteria of an entry on the Black List will be allowed by Call/SMS Filter.
You cannot add a phone number with identical filtering criteria to both the Black List and the White List.
Information about blocked SMS and calls is registered in the application's log (see section "Application logs" on
page 108).
ADDING ENTRIES TO THE BLACK LIST
Bear in mind that the same number with identical filtering criteria cannot be included in the Black and White Lists of
Call/SMS Filter numbers at the same time. If a number with such filtering criteria is already saved on either of the lists,
Kaspersky Mobile Security 9 will notify you of this event, and a relevant message will appear on the screen.
To add an entry to the Call/SMS Filter Black List:
1. Select Menu Call/SMS Filter.
The Call/SMS Filter opens.
2. Select the Black List item.
This will open the Black List window.
3. Select Menu Add.
This will open the New entry window.
4. Set values for the following settings (see Figure below).
Block incoming – type of event from a telephone number which Call/SMS Filter blocks for Black List
numbers:
Page 60

U S E R G U I D E
60
Calls and SMS: block incoming calls and SMS messages.
Calls only: block incoming calls only.
SMS only: block incoming SMS messages only.
Phone number – telephone number for which Call/SMS Filter blocks incoming information. The phone
number should comprise only alphanumeric characters; it may begin with a digit, a letter, or be preceded by
the "+" symbol. As a number, it is also possible to use the masks "*" or "?" (where "*" is any amount of
symbols, and "?" any one symbol). For example, *1234? on the Black List. Call/SMS Filter blocks calls or
SMS from a number in which any symbol follows the figure 1234.
Containing text – key phrase indicating that the received SMS message is unwanted (spam). Call/SMS
Filter only blocks SMS containing the key phrase, while delivering all other SMS.
If you want all incoming SMS from a specific number on the Black List to be blocked, leave this entry‘s
Containing text field blank.
Press OK to save the changes.
EDITING ENTRIES IN THE BLACK LIST
For an entry from the Black list of banned numbers, you can change the values of all settings.
Figure 19: Entry settings
To edit an entry in the Call/SMS Filter Black List:
1. Select Menu Call/SMS Filter.
The Call/SMS Filter opens.
2. Select the Black List item.
This will open the Black List window.
3. Select the element from the list which you wish to edit and then select Menu Edit.
Page 61

F I L T E R I N G O F I N C O M I N G C A L L S A N D SM S
61
This will open the Edit entry window.
4. Change the necessary settings:
Block incoming – type of event from a telephone number which Call/SMS Filter blocks for Black List
numbers:
Calls and SMS: block incoming calls and SMS messages.
Calls only: block incoming calls only.
SMS only: block incoming SMS messages only.
Phone number – telephone number for which Call/SMS Filter blocks incoming information. The phone
number should comprise only alphanumeric characters; it may begin with a digit, a letter, or be preceded by
the "+" symbol. As a number, it is also possible to use the masks "*" or "?" (where "*" is any amount of
symbols, and "?" any one symbol). For example, *1234? on the Black List. Call/SMS Filter blocks calls or
SMS from a number in which any symbol follows the figure 1234.
Containing text – key phrase indicating that the received SMS message is unwanted (spam). Call/SMS
Filter only blocks SMS containing the key phrase, while delivering all other SMS.
If you want all incoming SMS from a specific number on the Black List to be blocked, leave this entry‘s
Containing text field blank.
5. Press OK to save the changes.
DELETING ENTRIES FROM THE BLACK LIST
You can delete a number from the Black list. Furthermore, you can clear the Call/SMS Filter Black List by removing all
the entries from it.
To delete an entry from the Call/SMS Filter Black List:
1. Select Menu Call/SMS Filter.
The Call/SMS Filter opens.
2. Select the Black List item.
This will open the Black List window.
3. Select an entry to be deleted from the list and then select Menu Delete.
4. Confirm the deletion of the entry. To do this, press Yes.
To clear the Call/SMS Filter Black List:
1. Select Menu Call/SMS Filter.
The Call/SMS Filter opens.
2. Select the Black List item.
This will open the Black List window.
3. Select Menu Delete all.
The list is emptied.
Page 62

U S E R G U I D E
62
CREATING A WHITE LIST
IN THIS SECTION
Adding entries to the White List ....................................................................................................................................... 62
Editing entries in the White List ....................................................................................................................................... 63
Deleting entries from the White List ................................................................................................................................ 64
The White List contains entries of allowed numbers, i.e., numbers from which Call/SMS Filter delivers calls and SMS to
the user. Each entry contain the following information:
Telephone number from which Call/SMS Filter delivers calls and / or SMS.
Types of events that Call/SMS Filter delivers from this number. The following types of events are available: calls
and SMS, calls only, and SMS only.
Key phrase used by Call/SMS Filter to classify an SMS as solicited (not spam). Call/SMS Filter only delivers
SMS containing the key phrase, while blocking all other SMS.
Call/SMS Filter allows only calls and SMS that comply with all the criteria of an entry on the White List. Calls and SMS
that fail to comply with even one of the criteria of an entry on the White List will be blocked by Call/SMS Filter.
ADDING ENTRIES TO THE WHITE LIST
Bear in mind that the same number with identical filtering criteria cannot be included in the Black and White Lists of
Call/SMS Filter numbers at the same time. If a number with such filtering criteria is already saved on either of the lists,
Kaspersky Mobile Security 9 will notify you of this event, and a relevant message will appear on the screen.
To add an entry to the Call/SMS Filter White List:
1. Select Menu Call/SMS Filter.
The Call/SMS Filter opens.
2. Select the White List item.
This will open the White List window.
3. Select Menu Add.
This will open the New entry window.
4. Set values for the following settings (see Figure below).
Allow incoming – type of event from a telephone number which Call/SMS Filter allows for Black List
numbers:
Calls and SMS: allow incoming calls and SMS messages.
Calls only: allow incoming calls only.
SMS only: allow incoming SMS messages only.
Page 63

F I L T E R I N G O F I N C O M I N G C A L L S A N D SM S
63
Phone number – telephone number for which Call/SMS Filter blocks incoming information.. The phone
number should comprise only alphanumeric characters; it may begin with a digit, a letter, or be preceded by
the "+" symbol. As a number, it is also possible to use the masks "*" or "?" (where "*" is any amount of
symbols, and "?" any one symbol). For example, *1234? in the White List. Call/SMS Filter delivers calls or
SMS from a number in which any symbol follows the figure 1234.
Containing text – key phrase indicating that the received SMS message is wanted. For numbers on the
White List, Call/SMS Filter only delivers SMS messages containing the key phrase and blocks all others.
If you want all incoming SMS from a specific number on the White List to be delivered, leave this entry‘s
Containing text field blank.
Figure 20: Entry settings
5. Press OK to save the changes.
EDITING ENTRIES IN THE WHITE LIST
For an entry from the White list of allowed numbers, you can change the values of all settings.
To edit an entry in the Call/SMS Filter White List:
1. Select Menu Call/SMS Filter.
The Call/SMS Filter opens.
2. Select the White List item.
This will open the White List window.
3. Select the element from the list which you wish to edit and then select Menu Edit.
This will open the Edit entry window.
4. Change the necessary settings:
Page 64

U S E R G U I D E
64
Allow incoming – type of event from a telephone number which Call/SMS Filter allows for Black List
numbers:
Calls and SMS: allow incoming calls and SMS messages.
Calls only: allow incoming calls only.
SMS only: allow incoming SMS messages only.
Phone number – telephone number for which Call/SMS Filter blocks incoming information.. The phone
number should comprise only alphanumeric characters; it may begin with a digit, a letter, or be preceded by
the "+" symbol. As a number, it is also possible to use the masks "*" or "?" (where "*" is any amount of
symbols, and "?" any one symbol). For example, *1234? in the White List. Call/SMS Filter delivers calls or
SMS from a number in which any symbol follows the figure 1234.
Containing text – key phrase indicating that the received SMS message is wanted. For numbers on the
White List, Call/SMS Filter only delivers SMS messages containing the key phrase and blocks all others.
If you want all incoming SMS from a specific number on the White List to be delivered, leave this entry‘s
Containing text field blank.
5. Press OK to save the changes.
DELETING ENTRIES FROM THE WHITE LIST
You can delete one entry from the White List as well as completely clear it.
To delete an entry from the Call/SMS Filter White List:
1. Select Menu Call/SMS Filter.
The Call/SMS Filter opens.
2. Select the White List item.
This will open the White List window.
3. Select an entry to be deleted from the list and then select Menu Delete.
4. Confirm the deletion of the entry. To do this, press Yes.
To clear the Call/SMS Filter White List:
1. Select Menu Call/SMS Filter.
The Call/SMS Filter opens.
2. Select the White List item.
This will open the White List window.
The list is emptied.
3. Select Menu Delete all.
Page 65

F I L T E R I N G O F I N C O M I N G C A L L S A N D SM S
65
RESPONDING TO SMS MESSAGES AND CALLS FROM
CONTACTS NOT IN THE PHONE BOOK
If the Both lists or White List modes (see the "About Call/SMS Filter modes" section on page 58) are selected for
Call/SMS Filter, you can additionally set a response from Call/SMS Filter to SMS and calls from subscribers, whose
numbers are not saved in Contacts. In addition, Call/SMS Filter allows expansion of the White List by adding numbers
from the list of contacts to it.
To modify the values of the settings, use the device's joystick or stylus.
To select Call/SMS Filter's response to a number not included in the phonebook:
1. Select Menu Call/SMS Filter.
The Call/SMS Filter opens.
2. Select the Mode item.
3. This will open the Mode window.
4. Select the required value for setting Allow Contacts (see Figure below):
if you want Call/SMS Filter to regard numbers from the phone book as an additional White List and to block
the receipt of SMS and calls from senders not listed in the phonebook, check the Allow Contacts box;
in order for Call/SMS Filter to filter SMS messages and calls based on the Call/SMS Filter mode set,
uncheck the Allow contacts box.
Figure 21: Call/SMS Filter response to numbers not included in the device's phone book
5. Press OK to save the changes.
Page 66

U S E R G U I D E
66
RESPONDING TO SMS MESSAGES FROM NON-NUMERIC
NUMBERS
If the Call/SMS Filter mode Both lists or Black List is selected (see the "Changing the Call/SMS Filter mode" section
on page 58), you can also expand the Black List by including all non-numeric numbers (including letters). Then Call/SMS
Filter will block SMS messages from non-numeric numbers.
To modify the values of the settings, use the device's joystick or stylus.
To set Call/SMS Filter's response when receiving messages from non-numeric numbers:
1. Select Menu Call/SMS Filter.
The Call/SMS Filter opens.
2. Select the Mode item.
This will open the Mode window.
3. Select a value for the Block non-numeric numbers setting (see Figure below):
in order for Call/SMS Filter to automatically delete messages from non-numeric numbers, check the Block
non-numeric numbers box;
In order for Call/SMS Filter to filter SMS messages from non-numeric numbers only on the basis of the Anti-
Spam mode set, uncheck the Block non-numeric numbers box.
Figure 22: Configuring Call/SMS Filter action when receiving SMS from non-numeric numbers
4. Press OK to save the changes.
Page 67

F I L T E R I N G O F I N C O M I N G C A L L S A N D SM S
67
SELECTING A RESPONSE TO INCOMING SMS
In Both lists mode (see the "About Call/SMS Filter modes" section on page 58), Call/SMS Filter checks incoming SMS
against the Black and White lists.
If the sender's number is not contained either in the Black or White lists, Call/SMS Filter notifies you of this. You are
asked to select one of the Call/SMS Filter actions in respect of the incoming SMS message (see figure below).
Figure 23: Call/SMS Filter notification about the receipt of a message
You can select one of the following actions to be performed in respect of the SMS:
to block an SMS message and add the sender's telephone number to the Black List, select Menu Add to
Black List;
to deliver an SMS message and add the sender's telephone number to the White List, select Menu Add to
White List;
to deliver an SMS message without adding the sender's telephone number to either list, press Skip.
Information about blocked SMS messages is entered in the application log (see the "Application logs" section on
page 108).
SELECTING RESPONSE TO INCOMING CALLS
In Both lists mode (see the "About Call/SMS Filter modes" section on page 58), Call/SMS Filter checks incoming calls
according to the Black and White lists.
Page 68

U S E R G U I D E
68
If the sender's number is not contained in the Black or White lists, Call/SMS Filter notifies you of this after completing the
IN THIS SECTION
About Parental Control .................................................................................................................................................... 69
Parental Control modes................................................................................................................................................... 69
Enabling/disabling Parental Control ................................................................................................................................ 69
Creating the Black List .................................................................................................................................................... 70
Creating a White List ....................................................................................................................................................... 73
scan and requests an action in respect of the incoming call (see Figure below).
Figure 24: Call/SMS Filter notification about an accepted call
You can select one of the following actions for the number from which the call was made:
to add the caller's telephone number to the Black List, select Menu Add to Black List;
to add the caller's telephone number to the White List, select Menu Add to White List;
to not add the caller's telephone number to either list, press Skip.
Information on blocked calls is entered in the application's log.
RESTRICTING OUTGOING CALLS AND SMS MESSAGES. PARENTAL CONTROL
The section provides information about the Parental Control component, which allows limiting outgoing calls and SMS
messages to specified phone numbers. Furthermore, the section describes how to create a list of allowed and banned
numbers and set the Parental Control settings.
Page 69

R E S T R I C T I N G O U T G O I N G C A L L S A N D SM S M E S S A G E S . P A R E N T A L C O N T R O L
69
ABOUT PARENTAL CONTROL
Parental Control enables the control of outgoing SMS messages and calls based on the Black and White Lists of
subscribers' numbers. The component's operation is ruled by the mode.
In Black List mode, Parental Control blocks outgoing SMS messages or calls to numbers on the Black List, while
allowing outgoing SMS messages and calls to any other numbers. In White List mode, Parental Control only allows
outgoing SMS messages and calls to numbers on the White List, while blocking outgoing SMS messages and calls to
any other numbers. In "Off" mode, Parental Control does not monitor outgoing SMS messages and calls.
Parental Control blocks outgoing SMS messages if they are sent using the device‘s standard features only. Parental
Control allows outgoing SMS messages if they are sent using third-party applications.
Information about the component's operation is entered in the application's log (see the "Application Logs" section on
page 108).
PARENTAL CONTROL MODES
The Parental Control mode determines the rule, which defines the control of outgoing SMS messages and calls.
The following Parental Control modes are available:
Off: disable Parental Control. Do not control outgoing SMS messages and calls.
This mode is selected by default.
White List: allow the sending of SMS messages and / or calls to numbers on the White List only (see section
"Creating a White List" on page 73). All other messages and calls are blocked.
Black List: block the sending of SMS messages and / or calls to numbers on the Black List only (see section
"Creating a Black list" on page 70). All other messages and calls are allowed.
You can change the Parental Control mode (see "Enabling/disabling Parental Control" section on page 69). The current
Parental Control mode is displayed in the Parental Control window next to the Mode item.
ENABLING/DISABLING PARENTAL CONTROL
To change the Parental Control mode:
1. Select Menu Parental Control.
2. This will open the Parental Control window.
3. Select the Mode item.
This will open the Mode window.
Page 70

U S E R G U I D E
70
4. Select one of the Parental Control modes suggested (see Figure below).
IN THIS SECTION
Adding entries to the Black List ....................................................................................................................................... 70
Editing entries in the Black List ....................................................................................................................................... 71
Deleting entries from the Black List ................................................................................................................................. 72
Figure 25: Changing the Parental Control mode
5. Press OK to save the changes.
CREATING THE BLACK LIST
You can create a Black List that Parental Control should use to block outgoing SMS messages and calls. The list
contains telephone numbers to which the sending of SMS and calls is not blocked.
Information about blocked SMS messages and calls is registered in the application's log (see the "Application logs"
section on page 108).
ADDING ENTRIES TO THE BLACK LIST
Bear in mind that the same number with identical filtering criteria cannot be included in the Black and White Lists of
Parental Control numbers at the same time. If a number with such criteria is already saved on either of the lists,
Kaspersky Mobile Security 9 will notify you of this event, and the relevant message will appear on the screen.
To add an entry to the Parental Control Black List:
1. Select Menu Parental Control.
2. This will open the Parental Control window.
Page 71

R E S T R I C T I N G O U T G O I N G C A L L S A N D SM S M E S S A G E S . P A R E N T A L C O N T R O L
71
3. Select the Black List item.
This will open the Black List window.
4. Select Menu Add.
This will open the New entry window.
5. Set values for the following settings (see figure below).
Block outgoing: type of outgoing information from a subscriber number which Parental Control blocks:
SMS and calls - block outgoing calls and SMS messages.
Calls only - block outgoing calls only.
SMS only: block outgoing SMS messages only.
Phone number: the phone number which will be blocked for outgoing SMS messages and/or calls. The
phone number should comprise only alphanumeric characters; it may begin with a digit, a letter, or be
preceded by the "+" symbol. As a number, it is also possible to use the masks "*" or "?" (where "*" is any
amount of symbols, and "?" any one symbol).
Figure 26: Entry settings
6. Press OK to save the changes.
EDITING ENTRIES IN THE BLACK LIST
For an entry from the Black list of banned numbers, you can change the values of all settings.
To edit an entry in the Parental Control Black list:
1. Select Menu Parental Control.
2. This will open the Parental Control window.
3. Select the Black List item.
Page 72

U S E R G U I D E
72
This will open the Black List window.
4. Select the element from the list which you wish to edit and then select Menu Edit.
This will open the Edit entry window.
5. Change the necessary settings:
Block outgoing: type of outgoing information from a subscriber number which Parental Control blocks:
SMS and calls - block outgoing calls and SMS messages.
Calls only - block outgoing calls only.
SMS only: block outgoing SMS messages only.
Phone number: the phone number which will be blocked for outgoing SMS messages and/or calls. The
phone number should comprise only alphanumeric characters; it may begin with a digit, a letter, or be
preceded by the "+" symbol. As a number, it is also possible to use the masks "*" or "?" (where "*" is any
amount of symbols, and "?" any one symbol).
6. Press OK to save the changes.
DELETING ENTRIES FROM THE BLACK LIST
It is possible that a number is accidentally added to the Black list of blocked numbers list. You can delete such a number
from the list. Furthermore, you can clear the Parental Control Black List by removing all the entries from it.
To delete an entry from the Parental Control Black List, perform the following steps:
1. Select Menu Parental Control.
2. This will open the Parental Control window.
3. Select the Black List item.
This will open the Black List window.
4. Select an entry to be deleted from the list and then select Menu Delete.
5. Confirm deletion. To do this, press Yes.
To clear the Parental Control Black List:
1. Select Menu Parental Control.
2. This will open the Parental Control window.
3. Select the Black List item.
This will open the Black List window.
The list is emptied.
4. Select Menu Delete all.
Page 73

R E S T R I C T I N G O U T G O I N G C A L L S A N D SM S M E S S A G E S . P A R E N T A L C O N T R O L
73
IN THIS SECTION
Adding entries to the White List ....................................................................................................................................... 73
Editing entries in the White List ....................................................................................................................................... 74
Deleting entries from the White List ................................................................................................................................ 75
CREATING A WHITE LIST
You can create a White List that Call/SMS Filter should use to allow incoming calls and SMS.
ADDING ENTRIES TO THE WHITE LIST
Bear in mind that the same number with identical filtering criteria cannot be included in the Black and White Lists of
Parental Control numbers at the same time. If a number with such criteria is already saved on either of the lists,
Kaspersky Mobile Security 9 will notify you of this event, and the relevant message will appear on the screen.
To add an entry to the Parental Control White List:
1. Select Menu Parental Control.
2. This will open the Parental Control window.
3. Select the White List item.
4. This will open the White List window.
5. Select Menu Add.
This will open the New entry window.
6. Set values for the following settings (see figure below).
Allow outgoing: type of outgoing information which Parental Control allows to be sent to a subscriber
number:
SMS and calls: allow outgoing calls and SMS messages.
Calls only: allow outgoing calls only.
SMS only: allow outgoing SMS messages only.
Page 74

U S E R G U I D E
74
Phone number: phone number to which Parental Control allows outgoing SMS messages and / or calls to
be delivered. The phone number should comprise only alphanumeric characters; it may begin with a digit, a
letter, or be preceded by the "+" symbol. As a number, it is also possible to use the masks "*" or "?" (where
"*" is any amount of symbols, and "?" any one symbol).
Figure 27: Entry settings
7. Press OK to save the changes.
EDITING ENTRIES IN THE WHITE LIST
For an entry from the White list of allowed numbers, you can change the values of all settings.
To edit an entry in the Parental Control White list:
1. Select Menu Parental Control.
2. This will open the Parental Control window.
3. Select the White List item.
4. This will open the White List window.
5. Select the element from the list which you wish to edit and then select Menu Edit.
This will open the Edit entry window.
6. Change the necessary settings:
Allow outgoing: type of outgoing information which Parental Control allows to be sent to a subscriber
number:
SMS and calls: allow outgoing calls and SMS messages.
Calls only: allow outgoing calls only.
SMS only: allow outgoing SMS messages only.
Page 75

R E S T R I C T I N G O U T G O I N G C A L L S A N D SM S M E S S A G E S . P A R E N T A L C O N T R O L
75
Phone number: phone number to which Parental Control allows outgoing SMS messages and / or calls to
be delivered. The phone number should comprise only alphanumeric characters; it may begin with a digit, a
letter, or be preceded by the "+" symbol. As a number, it is also possible to use the masks "*" or "?" (where
"*" is any amount of symbols, and "?" any one symbol).
7. Press OK to save the changes.
DELETING ENTRIES FROM THE WHITE LIST
You can remove one entry or clear the White List completely.
To delete an entry from the Parental Control White List:
1. Select Menu Parental Control.
2. This will open the Parental Control window.
3. Select the White List item.
4. This will open the White List window.
5. Select an entry to be deleted from the list and then select Menu Delete.
6. Confirm deletion. To do this, press Yes.
To clear the Parental Control White List:
1. Select Menu Parental Control.
2. This will open the Parental Control window.
3. Select the White List item.
4. This will open the White List window.
5. Select Menu Delete all.
The list is emptied.
Page 76

76
DATA PROTECTION IN THE EVENT OF
IN THIS SECTION
About Anti-Theft .............................................................................................................................................................. 76
Blocking the device ......................................................................................................................................................... 77
Deleting personal data .................................................................................................................................................... 79
Creating a list of folders to delete .................................................................................................................................... 81
Monitoring the replacement of a SIM card on the device ................................................................................................ 82
Determining the device's geographical coordinates ........................................................................................................ 83
Starting Anti-Theft functions remotely ............................................................................................................................. 86
LOSS OR THEFT OF THE DEVICE
This section gives information about Anti-Theft which, in the case of theft or loss, blocks unauthorized access to data
saved on your mobile device and makes it easy to find the device.
This section also specifies how to enable/disable the Anti-Theft function, set the parameters of its operation and start
Anti-Theft from another mobile device remotely.
ABOUT ANTI-THEFT
Anti-Theft protects information stored on your mobile device from unauthorized access.
Anti-Theft includes the following functions:
Block – allows blocking the device remotely and gives the text to be displayed on the screen of the blocked
device.
Data Wipe – can remotely delete the user's personal data from the device (entries in Contacts, SMS, picture
gallery, calendar, logs, Internet connection settings) and information from the storage cards, folders from list for
deletion.
SIM Watch allows obtaining the current phone number in the event that the SIM card is replaced, as well as
locking the device in the event the SIM card is replaced or the device is activated without a SIM card.
Information about a new telephone number is sent as a message to a phone number and / or email that you
specified.
The GPS Find functionality enables you to locate a device. The geographical coordinates of the device are sent
After installing Kaspersky Mobile Security 9, all Anti-Theft functions are disabled.
Kaspersky Mobile Security 9 can remotely start Anti-Theft by the sending of an SMS command (see "Remote start of the
Anti-Theft functions" on page 86) from another mobile device.
as a message to the phone number from which a special SMS command was sent, and to an email address.
To start Anti-Theft remotely, you have to know the secret code that was set when Kaspersky Mobile Security 9 was first
started.
Page 77

D A T A P R O T E C T I O N I N T H E E V E N T O F L O S S O R T H E F T O F T H E D E V I C E
77
The current status of every function is displayed in the Anti-Theft screen next to the name of the function.
Information about the component's operation is entered in the application's log (see "Application Logs" on page 108).
BLOCKING THE DEVICE
After a special SMS command is received, the Block function allows you to remotely block access to the device and data
stored on it. The device can only be unblocked by entering the secret code.
This function does not block the device but simply enables the remote blocking option.
To enable the Block function:
1. Select Menu Anti-Theft.
This will open the Anti-Theft window.
2. Select the Block item.
This will open the Block window.
3. Check the Enable Block box.
4. Enter the message which is displayed on the device's screen in blocked mode in the Text when blocked field
(see Figure below). By default, the standard text in which you can add the owner's telephone is used for the
message.
Figure 28: Block function settings
5. Press OK to save the changes.
If the Block function is enabled on another device, you can block it using any of the following methods:
Use a Kaspersky Lab mobile application, such as Kaspersky Mobile Security 9, on another mobile device to
create and send an SMS command to your device. To create a special SMS command, use the Send
command function. As a result, your device will receive a covert SMS, and the device will be blocked.
Page 78

U S E R G U I D E
78
On another mobile device, create and send an SMS with the special text and the secret code previously set for
the receiving device. As a result, your device will receive a covert SMS, and the device will be blocked.
Outgoing SMS messages will be billed at the rates set by the other mobile device‘s mobile service provider.
To block the device remotely, it is advised that you use the secure method with the Sending a command function. The
application secret code is then sent in encrypted form.
To block the device remotely, it is advised to use the secure method with the Send command function. Here, the
command and secret code are sent with encryption.
To send an SMS command to another device using the Send command function:
1. Select Menu Additional.
This will open the Additional window.
2. Select Send command.
This will open the Send command window.
3. Select the Block value for the SMS command option (see figure below).
4. In the Phone number field, enter the phone number of the device that receives the SMS command.
5. In the Code of remote device field, enter the secret code set on the device that receives the SMS command.
Figure 29: Remote start of Blocking the device
6. Press Send.
To create an SMS message with the phone's standard SMS creation functions,
send an SMS message to the device that you want to block. The SMS message should contain the text
block:<code> where <code> is the secret code set on the device to be blocked. The message is not case
sensitive, and spaces before or after the colon are ignored.
Page 79

D A T A P R O T E C T I O N I N T H E E V E N T O F L O S S O R T H E F T O F T H E D E V I C E
79
DELETING PERSONAL DATA
After a special SMS command is received, the Data Wipe function allows deleting the following information stored in the
device:
user's personal data (entries in Contacts and on SIM card, SMS messages, gallery, calendar, Internet
connection settings);
information on storage card;
files from the My Documents folder and other folders on the Folders to be deleted list.
This function does not delete the data saved on the device, but includes the option to delete them.
To enable the Data Wipe function:
1. Select Menu Anti-Theft.
This will open the Anti-Theft window.
2. Select the Data Wipe item.
This will open the Data Wipe screen.
3. Select the Mode item.
This will open the Data Wipe screen.
4. Check the Enable Data Wipe box.
5. Select information that you want to delete. To do this, check the boxes next to the required settings in the
Delete section (see figure below).
to delete personal data, check the Personal data box;
Page 80

U S E R G U I D E
80
to delete files from the My Documents folder and the Folders to be deleted list, check the Folders box.
Figure 30: Selecting the type of data to be deleted
6. Press OK to save the changes.
7. Proceed with creating the Folders to be deleted list (see section "Creating a list of folders to delete" on
page 81).
You can delete personal data from the device with the function enabled by using the following methods:
Use a Kaspersky Lab mobile application, such as Kaspersky Mobile Security 9, on another mobile device to
create and send an SMS command to your device. To create a special SMS command, use the Sending a
command function. As a result, your device will receive a covert SMS message, and the information will be
deleted.
On another mobile device, create and send an SMS with the special text and the secret code previously set for
the receiving device.
To delete information from the device remotely, you are advised to use the secure method with the Send command
function. Here, the command and secret code are sent with encryption.
To send a command to another device:
1. Select Menu Additional.
This will open the Additional window.
2. Select Send command.
This will open the Send command window.
3. Select the Data Wipe value for the SMS command setting (see figure below).
4. In the Phone number field, enter the phone number of the device that receives the SMS command.
Page 81

D A T A P R O T E C T I O N I N T H E E V E N T O F L O S S O R T H E F T O F T H E D E V I C E
81
5. In the Code of remote device field, enter the secret code set on the device that receives the SMS command.
Figure 31: Remote start of Deleting personal data
6. Press Send.
To create an SMS message with the phone's standard SMS creation functions,
send a standard SMS message to another device; it should contain the text wipe:<code> where <code> is the
secret code set on another device. The message is not case sensitive, and spaces before or after the colon are
ignored.
CREATING A LIST OF FOLDERS TO DELETE
The Data Wipe function allows creating a list of folders to be deleted after a special SMS message is received.
To enable Anti-Theft to delete all folders from the list after a special SMS message is received, make sure that the
Folders box is checked in the Mode item.
To add a folder to the list of folders to be deleted:
1. Select Menu Anti-Theft.
This will open the Anti-Theft window.
2. Select the Data Wipe item.
This will open the Data Wipe screen.
3. Select the Folders to be deleted item.
This will open the Folders to be deleted screen.
Page 82

U S E R G U I D E
82
4. Select Menu Add folder (see Figure below).
Figure 32: Selection of folders to be deleted
5. Select the necessary folder from the folder tree and press Select.
The folder is added to the list.
To remove a folder from the list:
1. Select Menu Anti-Theft.
This will open the Anti-Theft window.
2. Select the Data Wipe item.
This will open the Data Wipe screen.
3. Select the Folders to be deleted item.
This will open the Folders to be deleted screen.
4. Select a folder from the list and press Menu Delete.
MONITORING THE REPLACEMENT OF A SIM CARD ON THE
DEVICE
If the SIM card is replaced, SIM Watch allows you to send a message with the new number to your phone number
and / or email, or lock the device.
To enable the SIM Watch function and monitor the replacement of the SIM card:
1. Select Menu Anti-Theft.
This will open the Anti-Theft window.
Page 83

D A T A P R O T E C T I O N I N T H E E V E N T O F L O S S O R T H E F T O F T H E D E V I C E
83
2. Select the SIM Watch item.
This will open the SIM Watch window.
3. Check the Enable SIM Watch box.
4. To check the replacement of the SIM card on the device, make the following settings (see Figure below):
To automatically send a message about a new telephone number , enter the phone number which the
message is sent to in the Phone number field in the Send new number block.
The phone number may begin with a digit or with a "+", and must contain digits only.
To receive an email message about the new number of your phone, enter an email address in the E-mail
address field of the Send new number section.
To block the device when the SIM card is replaced or when the device is switched on without a card, for the
If SIM card replaced setting, check the Block device box. You can unblock the device only by entering the
secret code.
To display a message on the screen in blocked mode, enter it in the Text when blocked field. By default,
the standard text in which you can add the owner's number is used for the message.
Figure 33: SIM Watch function settings
5. Press OK to save the changes.
DETERMINING THE DEVICE'S GEOGRAPHICAL
COORDINATES
After a special SMS command is received, GPS Find allows detecting the device's geographical coordinates and sending
them by SMS and email to the requesting device and an email address.
Outgoing SMS messages are billed at your mobile service provider‘s current rate.
Page 84

U S E R G U I D E
84
This function only works with devices with in-built GPS receiver. The GPS receiver is enabled automatically after the
device receives a special SMS command. If the device is within the area reached by satellites, the GPS Find function
receives and sends the geographical coordinates of the device. If the satellites are unavailable at the time of the query,
GPS Find will periodically re-attempt to find them and send device location results.
To enable the GPS Find function:
1. Select Menu Anti-Theft.
This will open the Anti-Theft window.
2. Select the GPS Find item.
This will open the GPS Find window.
3. Check the Enable GPS Find box.
By default, Kaspersky Mobile Security 9 sends the device's coordinates in a return SMS message.
4. To receive the device's coordinates by e-mail too, for the Send coordinates setting enter the e-mail address
(see Figure below).
You can request the coordinates of a device on which GPS Find is enabled, using the following methods:
Outgoing SMS messages will be billed at the rates set by the other mobile device‘s mobile service provider.
Figure 34: GPS Find function settings
5. Press OK to save the changes.
Use a Kaspersky Lab mobile application, such as Kaspersky Mobile Security 9, on another mobile device to
create and send an SMS command to your device. As a result, your device will receive a covert SMS, and the
application will send the device's coordinates. To create a special SMS command, use the Sending a command
function.
On another mobile device, create and send an SMS with the special text and the secret code previously set for
the receiving device. As a result, your device will receive a covert SMS, and the application will send the
device's coordinates.
Page 85

D A T A P R O T E C T I O N I N T H E E V E N T O F L O S S O R T H E F T O F T H E D E V I C E
85
To receive the device's location, you are advised to use the secure method with the Send command function. The
application secret code is then sent in encrypted mode.
To determine the device's location remotely, you are advised to use the secure method—the Send command function.
Here, the command and secret code are sent with encryption.
To send a command to another device:
1. Select Menu Additional.
This will open the Additional window.
2. Select Send command.
This will open the Send command window.
3. Select the GPS-Find value for the SMS command setting (see figure below).
4. In the Phone number field, enter the phone number of the device that receives the SMS command.
5. In the Code of remote device field, enter the secret code set on the device that receives the SMS command.
Figure 35: Determine the location of the device
6. Press Send.
To create an SMS message with the phone's standard SMS creation functions,
send a standard SMS to another device; it should contain the text find:<code>, where <code> is the secret code
set on another device. The message is not case sensitive, and spaces before or after the colon are ignored.
An SMS message with the device's coordinates will be sent to the phone number from which the SMS command has
been sent and to an email address if you have previously specified one in the options of GPS Find.
Page 86

U S E R G U I D E
86
STARTING ANTI-THEFT FUNCTIONS REMOTELY
The application allows sending a special SMS command to run Anti-Theft functions remotely on another device with
Kaspersky Mobile Security installed on it. An SMS command is sent as an encrypted SMS and contains the application
secret code set on the other device. Reception of the SMS command will not be noticed.
SMS is billed at your mobile service provider‘s current rate.
To send a command to another device:
1. Select Menu Additional.
This will open the Additional window.
2. Select Send command.
3. This will open the Send command window.
4. Select one of the available values for the SMS command setting (see figure below):
Block.
Data Wipe.
GPS-Find.
Privacy Protection (see section "Hiding personal data" on page 87).
5. In the Phone number field, enter the phone number of the device that receives the SMS command.
6. In the Code of remote device field, enter the secret code set on the device that receives the SMS command.
Figure 36: Remote start of Anti-theft functions
7. Press Send.
Page 87

87
PRIVACY PROTECTION
IN THIS SECTION
Privacy Protection ........................................................................................................................................................... 87
Privacy Protection modes ................................................................................................................................................ 87
Enabling/disabling Privacy Protection ............................................................................................................................. 88
Enabling Privacy Protection automatically ....................................................................................................................... 89
Enabling Privacy Protection remotely .............................................................................................................................. 90
Creating a list of private numbers .................................................................................................................................... 91
Selecting data to hide: Privacy Protection ....................................................................................................................... 94
The section presents information about Privacy Protection, which can hide the user's confidential information.
PRIVACY PROTECTION
Privacy Protection hides private data on the basis of your Contact List, which lists private numbers. For confidential
numbers, Privacy Protection hides Contacts entries, incoming, drafts, and sent SMS as well as call history entries.
Privacy Protection suppresses the new SMS signal and hides the message itself in the inbox. Privacy Protection blocks
incoming calls from private numbers and does not display incoming call information on the screen. As a result, the caller
receives a busy signal. To view incoming calls and SMS for the period of time when Privacy Protection was enabled,
disable Privacy Protection. On the repeat enabling of Privacy Protection, the information is not displayed.
You can enable Privacy Protection from Kaspersky Mobile Security 9 or remotely from another mobile device. However,
Privacy Protection can only be disabled from within the application.
Information about the operation of Privacy Protection is stored in the log (see "Application logs" section on page 108).
PRIVACY PROTECTION MODES
You can manage the operation mode of Privacy Protection. The mode defines whether Privacy Protection is enabled or
disabled.
By default, Privacy Protection is disabled.
The following modes of Privacy Protection are available:
Normal – private data are displayed. The Privacy Protection settings are accessible for modification.
Private – private data are hidden. The Privacy Protection settings cannot be changed.
You can set Privacy Protection to start automatically (see section "Enabling Privacy Protection automatically" on
page 89) or start remotely from another device (see section "Enabling Privacy Protection remotely" on page 90).
The component's current status is displayed on the Privacy Protection tab next to the Mode item.
Page 88

U SER G U I D E
88
Changing the mode of Privacy Protection can take some time.
ENABLING/DISABLING PRIVACY PROTECTION
The Privacy Protection mode can be changed as follows:
from the component settings menu;
from the Privacy Protection menu.
To change the Privacy Protection mode:
1. Select Menu Privacy Protection.
This will open the Privacy Protection window.
2. Select the Mode item.
This will open the Mode window.
3. Select a value for the Mode setting (see Figure below).
4. Press OK.
Figure 37: Changing Privacy Protection mode
5. Confirm changing the mode of Privacy Protection. To do this, press Yes.
To quickly change the Privacy Protection mode:
1. Select Menu Privacy Protection.
This will open the Privacy Protection window.
2. Press Private / Normal. The name of the button will change to the opposite depending on the Privacy
Protection current status.
Page 89

P R I V A C Y P R O T E C T I O N
89
3. Confirm changing the mode of Privacy Protection. To do this, press Yes.
ENABLING PRIVACY PROTECTION AUTOMATICALLY
You can configure automatic enabling of hiding confidential information after a specified time interval. The function
becomes activated after the device switches to power-saving mode.
Disable Privacy Protection prior to editing Privacy Protection settings.
To enable Privacy Protection automatically after a specified time interval elapses:
1. Select Menu Privacy Protection.
This will open the Privacy Protection window.
2. Select the Mode item.
3. This will open the Mode window.
4. Check the Block access box {see Figure below}.
5. Select a value for the time interval, which should enable Privacy Protection, when elapsed. To do this, set one
of the available values for the Time setting:
No delay.
After 1 minute.
After 5 minutes.
After 15 minutes.
After 1 hour.
Figure 38: Automatic start of Privacy Protection
Page 90

U S E R G U I D E
90
6. Press OK.
ENABLING PRIVACY PROTECTION REMOTELY
Kaspersky Mobile Security 9 allows you to enable Privacy Protection remotely from another mobile device. To
accomplish this, first activate the Hide on SMS command option on your device.
To allow remote enabling of Privacy Protection:
1. Select Menu Privacy Protection.
This will open the Privacy Protection window.
2. Select the Mode item.
This will open the Mode window.
3. Check the Hide on SMS command box (see figure below).
You can enable Privacy Protection remotely using any of the following methods:
Outgoing SMS will be billed at the rates set by the mobile provider for the phone where the SMS command originates.
Figure 39: Privacy Protection remote enabling settings
4. Press OK.
Use a Kaspersky Lab mobile application, such as Kaspersky Mobile Security 9, on another mobile device to
create and send an SMS command to your device. As a result, your device unnoticeably receives an SMS, and
confidential information is hidden. To create a special SMS command, use the Sending a command function.
On another mobile device, create and send an SMS message with a special text and the secret code of the
application specified on your device. As a result, the device receives an SMS, and confidential information is
hidden.
Page 91

P R I V A C Y P R O T E C T I O N
91
To enable Privacy Protection remotely using a special SMS command:
1. Select Menu Additional.
This will open the Additional window.
2. Select Send command.
This will open the Send command window.
3. Select the Privacy Protection value for the SMS command setting (see figure below).
4. In the Phone number field, enter the phone number of the device that receives the SMS command.
5. In the Code of remote device field, enter the secret code set on the device that receives the SMS command.
Figure 40: Privacy Protection remote start
6. Press Send.
When the device receives the SMS command, it enables Privacy Protection automatically.
To enable Privacy Protection remotely using a telephone's standard tools for creating an SMS:
send an SMS to the device you need to lock; it message should contain the text hide:<code> where <code> is
the secret code of the application set on the device to be locked. The message is not case sensitive, and spaces
before or after the colon are ignored.
CREATING A LIST OF PRIVATE NUMBERS
The Contact List contains private numbers for which Privacy Protection hides information and events. You can extend
the list by adding a number manually, or importing one from Contacts or the SIM card.
Before making the Contact List, disable hiding confidential information.
Page 92

U S E R G U I D E
92
IN THIS SECTION
Adding a number to the list of private numbers ............................................................................................................... 92
Editing a number in the list of private numbers ............................................................................................................... 93
Deleting a number from the list of private numbers ......................................................................................................... 94
ADDING A NUMBER TO THE LIST OF PRIVATE NUMBERS
You can add a number manually (for example, +12345678), import a number from Contacts or SIM card.
Disable Privacy Protection prior to editing Privacy Protection settings.
To add a phone number to the Contact list:
1. Select Menu Privacy Protection.
This will open the Privacy Protection window.
2. Select the Contact list item.
The Contact list window will open.
3. Perform one of the following actions (see Figure below):
To add a number from Contacts, select Menu Add Outlook contact. On the Outlook contact screen
that opens, specify the required entry and then press Select.
To add a number saved on the SIM card, select Menu Add Contact from SIM. In the Contact from
SIM window that opens, select the necessary entry and then pressOK.
Page 93

P R I V A C Y P R O T E C T I O N
93
To add a number manually, select Menu Add Number. In the Add entry window that opens, fill in the
Phone number field and press OK.
Figure 41: Adding entries to the list of protected contacts
The number will be added to the Contact list.
EDITING A NUMBER IN THE LIST OF PRIVATE NUMBERS
Before making the Contact List, disable hiding confidential information.
Phone numbers added manually are only available for editing on the Contact List. It is not possible to edit numbers which
are selected from the phone book or numbers list on the SIM card.
To edit a phone number on the Contact List:
1. Select Menu Privacy Protection.
This will open the Privacy Protection window.
2. Select the Contact list item.
The Contact list window will open.
3. Select a number to edit on the Contact list and then select Menu Edit.
The Edit screen opens.
4. Change the data in the Phone number field.
5. When completing the editing, press OK.
The number is changed.
Page 94

U S E R G U I D E
94
DELETING A NUMBER FROM THE LIST OF PRIVATE NUMBERS
You can delete a single number from the list of confidential contacts or delete the whole Contact List.
Before making the Contact List, disable hiding confidential information.
To remove a number from the Contact List:
1. Select Menu Privacy Protection.
This will open the Privacy Protection window.
2. Select the Contact list item.
The Contact list window will open.
3. Select a number to be deleted and then select Menu Delete.
4. Confirm deletion. To do this, press Yes.
To clear the Contact List:
1. Select Menu Privacy Protection.
This will open the Privacy Protection window.
2. Select the Contact list item.
The Contact list window will open.
3. Select Menu Delete all.
4. Confirm deletion. To do this, press Yes.
The Contact List becomes empty.
SELECTING DATA TO HIDE: PRIVACY PROTECTION
Privacy Protection can hide the following info for numbers in the Contact List: contacts, SMS correspondence, call log
entries, incoming calls and SMS messages. You can select information and events that Privacy Protection should hide
for private numbers.
Disable Privacy Protection prior to editing Privacy Protection settings.
To select information and events that should be hidden for private numbers:
1. Select Menu Privacy Protection.
This will open the Privacy Protection window.
2. Select the Hidden objects item.
The window Hidden objects opens (see Figure below).
3. In the Hide entries section, select information that should be hidden for private numbers. The following settings
are available:
Page 95

F I L T E R I N G N E T W O R K A C T I V I T Y . FI R E W A L L
95
Contacts – hide all information about confidential numbers in the Contacts.
SMS — hide SMS messages in the Incoming, Outgoing and Sent folders for confidential numbers.
Calls – accept calls from confidential numbers, while not determining the caller's number and not displaying
information about confidential numbers in the list of calls (incoming, outgoing, and missed).
4. In the Hide events section, select events that should be hidden for private numbers. The following settings are
available:
Incoming SMS – do not display the delivery of incoming SMS messages (there is no message of receipt of
a new SMS message from a confidential number). All SMS messages received from private numbers will
be displayed for viewing when Privacy Protection is disabled.
Incoming calls – block calls from private numbers (caller will hear the engaged tone in this case).
Information about a received call will be displayed when Privacy Protection is disabled.
Figure 42: Selecting hidden objects
5. Press OK.
FILTERING NETWORK ACTIVITY. FIREWALL
This section gives information about the Firewall which controls network connections on your device. This section
describes how to enable/disable the Firewall and select the required mode for it.
Page 96

U S E R G U I D E
96
IN THIS SECTION
About Firewall ................................................................................................................................................................. 96
Enabling/disabling the Firewall ........................................................................................................................................ 96
Selecting Firewall security level ...................................................................................................................................... 96
Notifications of blocking................................................................................................................................................... 97
ABOUT FIREWALL
Firewall monitors your device's network connections based on the selected mode. Firewall allows you to set permitted
connections (for example, to perform synchronization with the remote administration system) and blocked connections
(for example, Internet search, file download).
After installation, Kaspersky Mobile Security 9 Firewall is disabled.
Firewall enables the setting of notifications about blocked connections (see "Enabling/disabling the Firewall" on page 96).
Information about the operation of the Firewall is entered in the application's log (see "Application logs" on page 108).
ENABLING/DISABLING THE FIREWALL
You can select the mode in accordance with which the Firewall determines the permitted and blocked connections. The
following Firewall modes are available:
Off any network activity is permitted. This security level is selected by default.
Minimum protection: incoming connections only are blocked. Outgoing connections are allowed.
Maximum protection: all incoming connections are blocked. Checking e-mails, viewing websites and
downloading files is accessible Outgoing connections can only be established using SSH, HTTP, HTTPS, IMAP,
SMTP, POP3 ports.
Block all: block all network activity, except for updating of the application's databases and renewing its license.
You can change the Firewall's security level (see "Selecting the Firewall's security level" section on page 96).The current
mode is displayed in the Firewall window next to the Mode menu item.
SELECTING FIREWALL SECURITY LEVEL
To modify the values of the settings, use the device's joystick or stylus.
To set the Firewall's security level:
1. Select Menu Firewall.
This will open the Firewall window.
2. Select the Mode item.
This will open the Settings window.
Page 97

F I L T E R I N G N E T W O R K A C T I V I T Y . FI R E W A L L
97
3. Select one of the security levels suggested (see Figure below).
Figure 43: Firewall security level selection
4. Press OK.
NOTIFICATIONS OF BLOCKING
Firewall allows receiving notifications of blocked connections. You can manage Firewall notifications.
By default, delivery of blocking notifications is disabled.
To manage blocking notifications:
1. Select Menu Firewall.
This will open the Firewall window.
2. Select Notifications.
Page 98

U S E R G U I D E
98
The Notifications screen opens (see figure below).
Figure 44: Configuring delivery of blocking notifications
3. In the Blocking notifications section, select one of the available actions:
Show – enable delivery of notifications. Firewall notifies of a blocked connection.
Do not show – disable delivery of notifications. Firewall does not notify you of a blocked connection.
4. Press OK.
Page 99

99
ENCRYPTING PERSONAL DATA
IN THIS SECTION
About Encryption ............................................................................................................................................................. 99
Encrypting data ............................................................................................................................................................... 99
Data decryption ............................................................................................................................................................. 101
Blocking access to encrypted data ................................................................................................................................ 102
This section gives information about Encryption, which can encrypt folders on the device. It also describes how to
encrypt and decrypt selected folders.
ABOUT ENCRYPTION
Encryption encrypts data in your list of folders to encrypt. The Encryption function operation is based on the action of the
function of the same name that is built into the operating system of your device. The Encryption function allows
encrypting any type of folder with the exception of system folders. You can select folders to be encrypted in the device's
memory or on a storage card. To gain access to encrypted data, enter the application PIN code set when the application
was first run.
To run executables out of an encrypted folder, you must first decrypt the folder. This requires that the application PIN
code be entered first.
To access encrypted folders, enter the application secret code (see the "Setting the secret code" section on page 28).
When, after the device switches to the energy-saving mode, the set time expires (see the "Protecting access to
encrypted data" section on page 102), access to data is automatically blocked.
Files in the folder will be encrypted once the command Encrypt is executed. Subsequently, files will be encrypted and
decrypted "on the fly" when they are moved into the folder, removed from it, or accessed.
To run executables out of an encrypted folder, you must first decrypt the folder.
After installing Kaspersky Mobile Security 9, the Encryption component is disabled.
Information about the component's operation is entered in the application's log (see the "Application Logs" section on
page 108).
ENCRYPTING DATA
Encryption allows encrypting any number of non-system folders which are in the device memory or on a storage card.
The list of all previously encrypted and decrypted files is accessible in the Encryption window from the Folders list.
You can also encrypt one or all of the folders in the folders list immediately.
To encrypt data:
1. Select Menu Encryption.
Page 100

U S E R G U I D E
100
This will open the Encryption window.
2. Select the Folders list item.
This will open the Folders list window.
3. Press Menu Add folder.
A screen will open with the system file tree of your device.
4. Select the folder to be encrypted and then press Encrypt (see Figure below).
To move around the file system use the device's stylus or joystick buttons.
Figure 45: Data encryption
When the encryption procedure is completed, Kaspersky Mobile Security 9 notifies you of this. The notification
window will appear.
5. Press OK.
For an encrypted folder, the name of the Encrypt item changes to Decrypt in the Menu.
After the encryption process, the data are automatically decrypted and encrypted when you work with data from the
encrypted folder, move them out of the encrypted folder or place new data in the latter.
To encrypt all folders from the list at the same time, perform the following steps:
1. Select Menu Encryption.
This will open the Encryption window.
2. Select the Folders list item.
This will open the Folders list window.
3. Select Menu Add. actions Encrypt all.
When the encryption procedure is completed, Kaspersky Mobile Security 9 notifies you of this. The notification
window will appear.
 Loading...