

Page 1

Kaspersky Endpoint Security 8 for Smartphone
for BlackBerry
®
OS
User Guide
PROGRAM VERSION: 8.0
Page 2

2
Dear User!
Thank you for choosing our product. We hope that this documentation will help you in your work and will provide answers
regarding this software product.
Note! This document is the property of Kaspersky Lab ZAO (herein also referred to as Kaspersky Lab): all rights to this
document are reserved by the copyright laws of the Russian Federation, and by international treaties. Illegal reproduction
and distribution of this document or parts hereof will result in civil, administrative or criminal liability by applicable law.
Reproduction or distribution of any materials in any format, including translations, is only allowed with the written
permission of Kaspersky Lab.
This document, and graphic images related to it, may be used exclusively for informational, non-commercial, and
personal purposes.
Kaspersky Lab reserves the right to amend this document without additional notification. You can find the latest version
of this document at the Kaspersky Lab website, at http://www.kaspersky.com/docs.
Kaspersky Lab shall not be liable for the content, quality, relevance, or accuracy of any materials used in this document
for which the rights are held by third parties, or for any potential or actual losses associated with the use of these
materials.
Document last revised on: February 9, 2012
© 2012 Kaspersky Lab ZAO. All Rights Reserved.
http://www.kaspersky.com
http://support.kaspersky.com
Page 3

3
TABLE OF CONTENTS
ABOUT THIS HELP ....................................................................................................................................................... 5
ADDITIONAL DATA SOURCES .................................................................................................................................... 6
Information sources for further research ................................................................................................................... 6
Discussion of Kaspersky Lab applications on the Web forum .................................................................................. 7
Contacting the Documentation Development Group ................................................................................................ 7
KASPERSKY ENDPOINT SECURITY 8 FOR SMARTPHONE ..................................................................................... 8
HARDWARE AND SOFTWARE REQUIREMENTS ....................................................................................................... 8
INSTALLING KASPERSKY ENDPOINT SECURITY 8 FOR SMARTPHONE ............................................................... 9
About installing the application via the computer ...................................................................................................... 9
Installing the application via the computer ................................................................................................................ 9
About installing the application after receiving a email message ............................................................................ 11
Installing the application after receiving email ........................................................................................................ 11
MANAGING APPLICATION SETTINGS ...................................................................................................................... 13
UNINSTALLING THE APPLICATION .......................................................................................................................... 14
MANAGING THE LICENSE ......................................................................................................................................... 15
About Kaspersky Endpoint Security 8 for Smartphone licenses ............................................................................. 15
Installing a license .................................................................................................................................................. 16
Viewing license information .................................................................................................................................... 16
SYNCHRONIZING THE DEVICE WITH THE REMOTE ADMINISTRATION SYSTEM ............................................... 17
Start synchronization manually ............................................................................................................................... 17
Changing the synchronization settings ................................................................................................................... 18
GETTING STARTED.................................................................................................................................................... 19
Starting the application ........................................................................................................................................... 19
Setting the secret code ........................................................................................................................................... 19
Viewing information about the application .............................................................................................................. 20
APPLICATION INTERFACE ........................................................................................................................................ 21
Application tabs ...................................................................................................................................................... 21
Protection status window ........................................................................................................................................ 22
FILTERING OF INCOMING CALLS AND SMS ............................................................................................................ 23
About Anti-Spam .................................................................................................................................................... 23
About Anti-Spam modes ......................................................................................................................................... 24
Changing the Anti-Spam mode ............................................................................................................................... 24
Creating a Black List ............................................................................................................................................... 25
Adding entries to the Black List ......................................................................................................................... 25
Editing entries in the Black List ......................................................................................................................... 26
Deleting entries from the Black List ................................................................................................................... 27
Creating a White List. ............................................................................................................................................. 28
Adding entries to the White List ........................................................................................................................ 28
Editing entries in the White List ......................................................................................................................... 29
Deleting entries from the White List .................................................................................................................. 30
Responding to SMS messages and calls from contacts not in the phone book...................................................... 31
Page 4

U S E R G U I D E
4
Responding to SMS messages from non-numeric numbers................................................................................... 32
Selecting a response to incoming SMS .................................................................................................................. 33
Selecting a response to incoming calls ................................ ................................................................................... 34
DATA PROTECTION IN THE EVENT OF DEVICE LOSS OR THEFT ........................................................................ 35
About Anti-Theft ...................................................................................................................................................... 35
Blocking the device ................................................................................................................................................. 36
Deleting personal data ................................ ................................ ............................................................................ 37
Creating a list of folders to delete ........................................................................................................................... 39
Monitoring the replacement of a SIM card on the device ................................ ........................................................ 40
Determining the device geographical coordinates .................................................................................................. 41
Remote start of the Anti-Theft functions ................................................................................................................. 43
APPLICATION LOGS................................................................................................................................................... 44
About logs ............................................................................................................................................................... 44
Viewing Log records ............................................................................................................................................... 44
Deleting Log records .............................................................................................................................................. 44
CONFIGURING ADDITIONAL SETTINGS .................................................................................................................. 45
Changing the secret code ....................................................................................................................................... 45
Displaying hints ...................................................................................................................................................... 45
GLOSSARY ................................................................................................................................................................. 46
KASPERSKY LAB ZAO ............................................................................................................................................... 48
INFORMATION ABOUT THIRD-PARTY CODE .......................................................................................................... 49
TRADEMARK NOTICE ................................................................................................................................................ 50
INDEX .......................................................................................................................................................................... 51
Page 5

5
ABOUT THIS HELP
This document is the Guide for the installation, configuration and use of Endpoint Security 8 for Smartphone. The
document is designed for a wide audience.
Objectives of the document:
help the users independently set up the application on a mobile device, activate it and optimize the application
for their needs;
provide a rapid information search on issues connected with the application;
give information on alternative sources of information about the application and possibilities of receiving
technical support.
Page 6

6
ADDITIONAL DATA SOURCES
IN THIS SECTION
Information sources for further research ........................................................................................................................... 6
Discussion of Kaspersky Lab applications on the Web forum ........................................................................................... 7
Contacting the Documentation Development Group ......................................................................................................... 7
If you have questions about setting up or using Kaspersky Endpoint Security 8 for Smartphone, you can find answers
from them, using various sources of information. You can choose the most suitable source according to how important or
urgent your request is.
INFORMATION SOURCES FOR FURTHER RESEARCH
You can view the following sources of information about the application:
the Kaspersky Lab application website;
the application Knowledge Base page at the Technical Support Service website;
the Help system;
documentation.
Page on Kaspersky Lab website
http://www.kaspersky.com/endpoint-security-smartphone
Use this page to obtain general information about Kaspersky Endpoint Security 8 for Smartphone features and
options.
The application page at the Technical Support Service website (Knowledge Base).
http://support.kaspersky.com/kes8m
This page contains articles written by experts from the Technical Support Service.
These articles contain useful information, recommendations, and the Frequently Asked Questions (FAQ) page, and
cover purchasing, installing and using Kaspersky Endpoint Security 8 for Smartphone. They are arranged in topics,
such as "Working with key files", "Database updates" and "Troubleshooting". The articles aim to answer questions
about this Kaspersky Endpoint Security 8 for Smartphone, as well as other Kaspersky Lab products. They may also
contain news from the Technical Support Service.
The Help system
If you have any questions about the Kaspersky Endpoint Security 8 for Smartphone separate screen or tab, you can
view the context help.
To open the context help, open the right application screen and press Help or choose Menu Help.
Page 7

A D D I T I O N A L D A T A S O U R C E S
7
Documentation
The Kaspersky Endpoint Security 8 for Smartphone distribution kit includes the User Guide document (in PDF
format). This document describes how to install and uninstall the application, manage its settings, start working with
the application, configure the settings of its components. The document describes the application interface and the
capabilities offered for typical application tasks.
DISCUSSION OF KASPERSKY LAB APPLICATIONS ON THE WEB FORUM
If your question does not require an immediate answer, you can discuss it with Kaspersky Lab experts and other users in
our forum at http://forum.kaspersky.com.
In the forum you can view existing discussions, leave your comments, and create new topics, or use the search engine
for specific enquiries.
CONTACTING THE DOCUMENTATION DEVELOPMENT GROUP
If you have any questions about the documentation, or you have found an error in it, or would like to leave a comment,
please contact our User documentation development group. To contact the Documentation Development Group send an
email to docfeedback@kaspersky.com. Use the subject line: "Kaspersky Help Feedback: Kaspersky Endpoint Security 8
for Smartphone".
Page 8

8
KASPERSKY ENDPOINT SECURITY 8 FOR SMARTPHONE
Kaspersky Endpoint Security 8 for Smartphone protects mobile devices running BlackBerry OS. The application
controls incoming SMS and calls, protects information on the device in case of its theft or loss, and hides information
related to confidential contacts. Every type of threat is processed in separate components of the program. This allows to
fine-tune the application settings depending on user needs. The administrator installs the application and configures and
updates settings using the remote administration system.
Kaspersky Endpoint Security 8 for Smartphone includes the following protection components:
Anti-Spam. Scans all incoming SMS messages and calls for spam. The component allows the flexible blocking
of text messages and calls considered undesirable.
Anti-Theft folder. This protects information on the device from unauthorized access when it is lost or stolen and
also makes it easier to find. Anti-Theft enables you to lock your device remotely, delete any information stored
there, and pinpoint its geographic location (if your mobile device has a GPS receiver) using SMS commands
from another device. Furthermore, Anti-Theft allows you to lock your device if the SIM card is replaced or if the
device is activated without a SIM card.
Besides, the application contains a set of service features. These enhance the capabilities of using the application, as
well as help users in their work:
Protection status. The status of the program components is displayed on screen. Based on the information
presented, you can evaluate the current information protection status on your device.
Events log. Each of the program components has its own event log, which contains information about the
component operation (e.g. remote launch of the Anti-Theft function, status of the program's license validity
period). Reports on the operation of components are given in the remote administration system and remain in it.
Uninstalling the application. To prevent access to protected information, Kaspersky Endpoint Security 8 for
Smartphone can only be uninstalled from the application interface.
Kaspersky Endpoint Security 8 for Smartphone does not back up and subsequently restore data.
HARDWARE AND SOFTWARE REQUIREMENTS
Kaspersky Endpoint Security 8 for Smartphone can be installed on mobile devices using the BlackBerry OS 4.5, 4.6, 4.7,
5.0 and 6.0 operating systems.
Page 9

9
INSTALLING KASPERSKY ENDPOINT
IN THIS SECTION
About installing the application via the computer .............................................................................................................. 9
Installing the application via the computer......................................................................................................................... 9
About installing the application after receiving a email message .................................................................................... 11
Installing the application after receiving email ................................................................................................................. 11
SECURITY 8 FOR SMARTPHONE
The administrator installs Kaspersky Endpoint Security 8 for Smartphone using remote administration tools. Application
installation requires additional steps made by the user.
The application is installed according to one of the following procedures:
The similar-named for installing the Kaspersky Endpoint Security 8 for Smartphone application installed on your
computer. With this utility, you can install Kaspersky Endpoint Security 8 for Smartphone on your mobile device.
You receive the email from the administrator with the distribution package or an indication to download it. You
install Kaspersky Endpoint Security 8 for Smartphone on your mobile device using information from the email.
This section contains the preparatory steps to be completed before installing Kaspersky Endpoint Security 8 for
Smartphone and describes different ways of installing the application to a mobile device.
ABOUT INSTALLING THE APPLICATION VIA THE
COMPUTER
If the administrator installed the Kaspersky Endpoint Security 8 for Smartphone supply utility on your computer, you can
install Kaspersky Endpoint Security 8 for Smartphone to mobile devices connected to this computer. The Kaspersky
Endpoint Security 8 for Smartphone supply utility contains the application distribution package and sends it to the mobile
device. After it is installed on the workstation, the utility automatically launches and monitors the connection of mobile
devices to the computer. Each time the mobile device connects to the workstation, the utility checks whether the device
satisfies the requirements of Kaspersky Endpoint Security 8 for Smartphone, and offers to install the application on it.
Installation is only possible if BlackBerry Desktop Manager is installed on the computer.
INSTALLING THE APPLICATION VIA THE COMPUTER
If the Kaspersky Endpoint Security 8 for Smartphone supply utility is installed on your computer, whenever mobile
devices are connected that meet the system requirements you are prompted to install Kaspersky Endpoint Security 8 for
Smartphone on them.
You can stop Kaspersky Endpoint Security 8 for Smartphone being installed on subsequent connections of the devices
to the computer.
Page 10

U S E R G U I D E
10
To install the application on a mobile device through a workstation, perform the following:
1. Connect the mobile device to the workstation using BlackBerry Desktop Manager.
If the device meets the system requirements to install the application, the KES 8 window opens with information
on the utility (see figure below).
Figure 1: Kaspersky Endpoint Security 8 for Smartphone installation application
2. Press the Continue button.
The KES 8 window opens with a list of connected devices found.
If more than one device which satisfies the system requirements is connected to the computer, they are shown
in the KES 8 window in the list of detected connected devices.
3. Select one or several devices from the list of detected connected devices on which the application needs to be
installed. To do this, check the boxes next to the desired objects (see Figure below).
Figure 2: Selection of devices for installation of Kaspersky Endpoint Security 8 for Smartphone
Page 11

I NST A L L I N G K A S P E R S K Y E N D P O I N T S E C U R I T Y 8 F O R S M A R T P H O N E
11
4. Press Install button.
The Application Download Wizard window opens on the computer. After the distribution package is
transferred onto the chosen devices, application installation starts automatically. After the installation has
completed, press Close on the Application Download Wizard window.
The KES 8 window on the computer also shows the status of the transfer of the distribution package.
Contact the administrator, if any errors occur during the installation process.
To prevent Kaspersky Endpoint Security 8 for Smartphone from installation to the connected devices,
In the KES 8 window, check the box Disable automatic start of Kaspersky Endpoint Security 8 for Smartphone
Installation Wizard.
ABOUT INSTALLING THE APPLICATION AFTER RECEIVING
A EMAIL MESSAGE
You will receive an email message from the administrator with the distribution package or an indication to download it.
The message contains the following information:
an attachment with the distribution package or a link to download it;
information about the application connection settings to the remote administration system.
Save this message until Kaspersky Endpoint Security 8 for Smartphone is installed on the device.
INSTALLING THE APPLICATION AFTER RECEIVING EMAIL
If you have received an email message with application settings, you can only install the application through the mobile
device itself. In this case, installation of Kaspersky Endpoint Security 8 for Smartphone through a computer is not
supported.
To install Kaspersky Endpoint Security 8 for Smartphone:
1. Open the message containing the application installation settings from the administrator on the mobile device.
2. Perform one of the following actions:
if the message has a link, follow it to download the distribution package;
if the distribution package is in an attachment to the message, download the distribution package.
Installation starts automatically and the application will be installed on the device.
Page 12

U S E R G U I D E
12
3. Run the application (see "Starting the application" on page 19). To do this, select Menu Download KES 8
and launch the application by using the scroll bar or selecting Menu Open.
4. Set the application secret code (see "Setting the secret code" on page. 19). To this end, fill in the Enter new
code and Confirm code fields and press ENTER.
This opens Synchronization settings screen.
Figure 3: Synchronization settings
5. Show the values for the settings to connect to the remote administration system if they were given when you
received the message from the administrator. Enter the values for the following settings:
Server;
Port;
Group.
If it is not necessary to configure the settings for connection to the remote administration system, this step will
not be present.
6. In the Your email address field, enter your business email address and press OK.
The email address is used for registering the device in the remote administration system. Please keep in mind
that the email address specified during application installation cannot be changed.
Contact the administrator, if any errors occur during the installation process.
Page 13

13
MANAGING APPLICATION SETTINGS
All Kaspersky Endpoint Security 8 for Smartphone settings including the license are configured by the administrator
through the remote administration system. The administrator can set the user permission to change the values of these
settings.
You can change the application settings on your mobile device if the administrator has not disabled the capability to
change these parameters.
If the component settings screen has a lock icon and a warning message at the top, the component settings cannot be
changed on the mobile device.
If the administrator changed the application settings, they are transferred to the device via the remote administration
system. In this case the values of the application settings blocked by the administrator will change. Settings that were not
blocked by the administrator will remain unchanged.
If the application settings have not been received on the device, or if you want to restore the values set by the
administrator, use synchronization of the device with the remote administration system (see section "Start
synchronization manually" on page 17).
Page 14
14
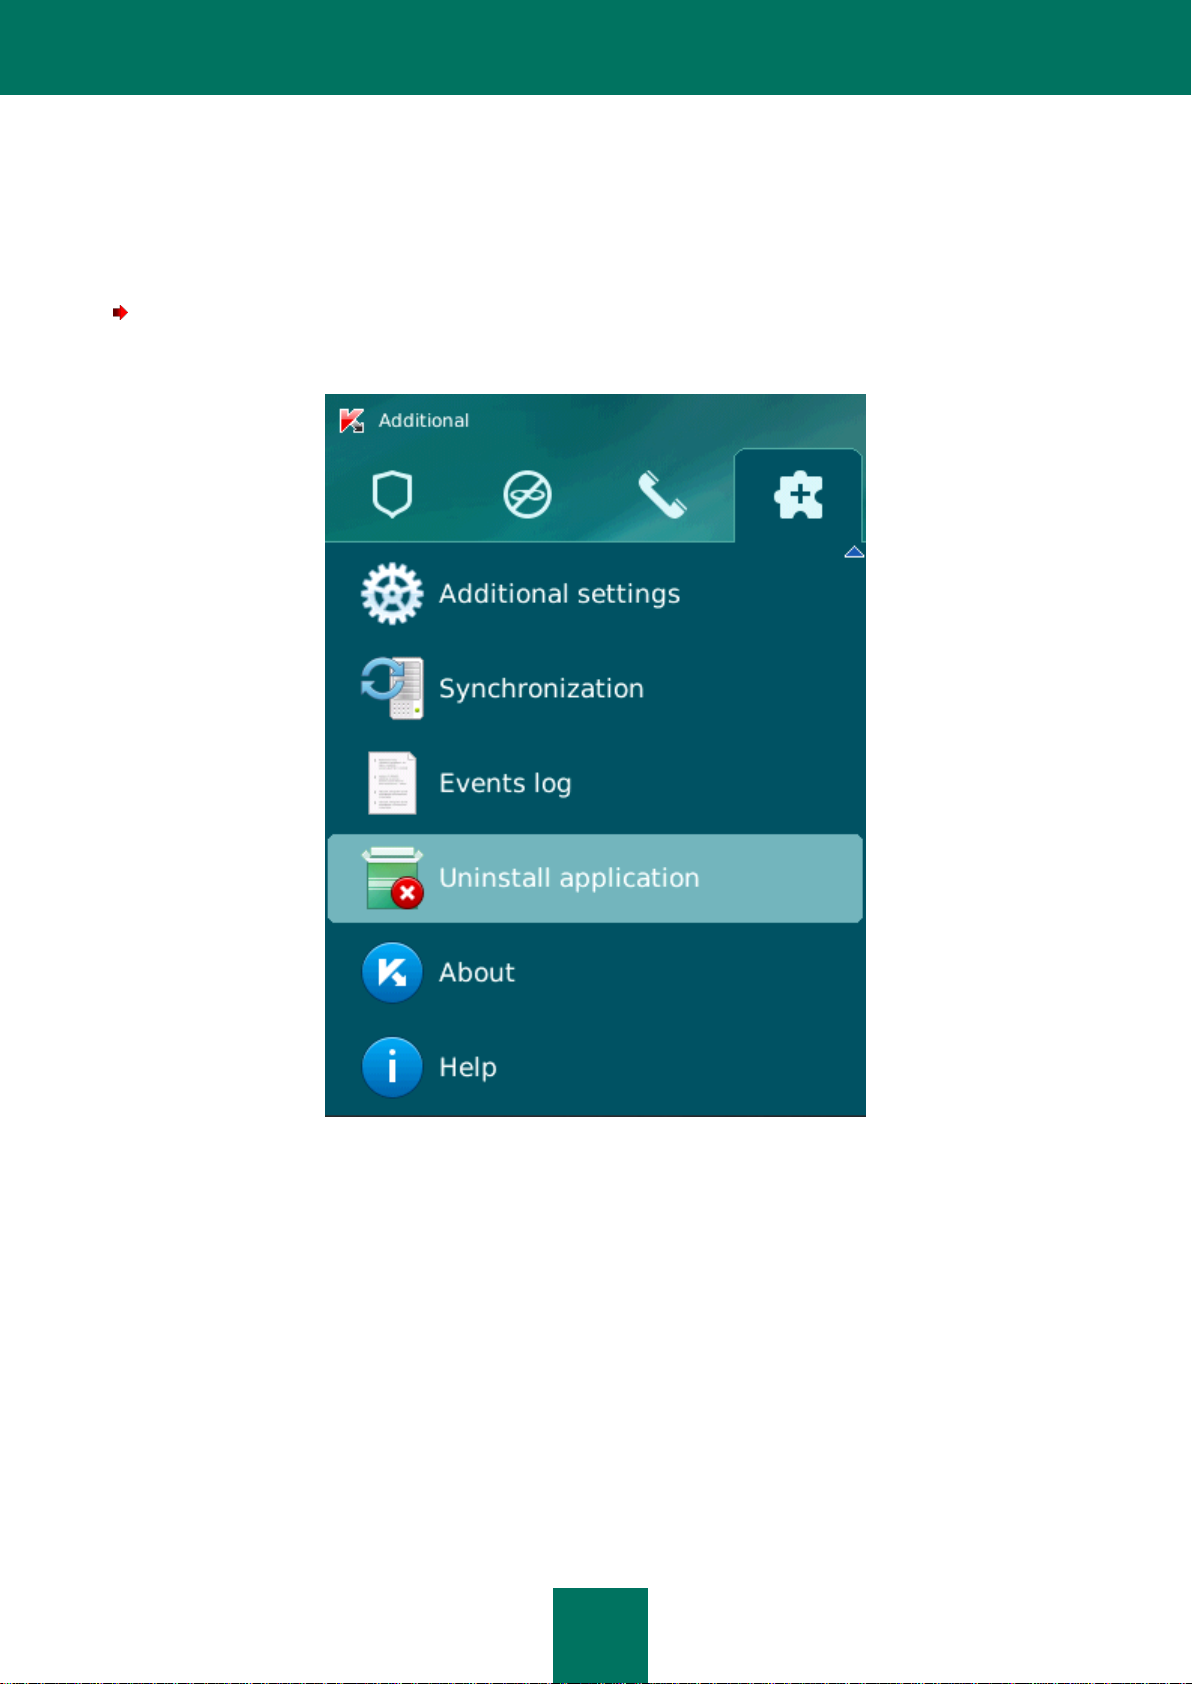
UNINSTALLING THE APPLICATION
The application can only be uninstalled from the device manually by the user.
To uninstall Kaspersky Endpoint Security 8 for Smartphone manually:
1. On the Additional tab, select Uninstall application (see Figure below).
Figure 4: Application removal
A confirm deletion window opens.
2. Confirm the deletion of Kaspersky Endpoint Security 8 for Smartphone by clicking Yes.
The deletion of the application begins.
3. Restart the device in order to complete the uninstalling of the application.
Page 15

15
MANAGING THE LICENSE
IN THIS SECTION
About Kaspersky Endpoint Security 8 for Smartphone licenses ...................................................................................... 15
Installing a license ........................................................................................................................................................... 16
Viewing license information ............................................................................................................................................. 16
This section gives information about the application license, how to activate it and view information about it.
ABOUT KASPERSKY ENDPOINT SECURITY 8 FOR SMARTPHONE LICENSES
A license is the right to use Kaspersky Endpoint Security 8 for Smartphone and the additional services associated with it
as provided by Kaspersky Lab or its partners.
The license must be installed to be able to use the application.
Every license has a validity period and type.
The license validity period is the period for which you are provided with technical support.
The scope of services provided depends on the license type.
The following license types are available:
Trial – a free license with a limited validity period, e.g. 30 days, offered to allow you to get acquainted with
Kaspersky Endpoint Security 8 for Smartphone.
During the trial license period of validity, all application functions are accessible. Upon expiration of its validity
period, Kaspersky Endpoint Security 8 for Smartphone stops performing all of its functions. When this happens,
only the following actions are available:
viewing the application's help system;
synchronizing with the remote administration system.
Commercial – paid license with a limited validity period (for example, one year), provided upon purchase of
Kaspersky Endpoint Security 8 for Smartphone.
If a commercial license is activated, all application features and additional services are available.
After commercial license expiration, Kaspersky Endpoint Security 8 for Smartphone switches to the limited
functionality mode. The following are accessible in this mode:
disabling Anti-Theft;
viewing the application's help system;
synchronizing with the remote administration system.
Page 16

U S E R G U I D E
16
INSTALLING A LICENSE
The administrator installs the license through the remote administration system.
Kaspersky Endpoint Security 8 for Smartphone works without a license with full functionality for three days after it is
installed. During this time, the administrator installs the license through the remote administration system and the
application is activated.
If the license was not installed during the three days, the application works in a limited function mode. The following are
accessible in this mode:
disabling all components;
viewing application help system.
If the license was not installed within three days, install it using synchronization of the device with the remote
administration system (see "Start synchronization manually" on page 17).
VIEWING LICENSE INFORMATION
You can view the following license information: license number, type, activation date, expiration date, number of days to
expiration and device PIN.
To view the license information:
1. Select the Additional tab.
2. Select About license.
This opens the About license screen.
Page 17

17
SYNCHRONIZING THE DEVICE WITH THE
IN THIS SECTION
Start synchronization manually ....................................................................................................................................... 17
Changing the synchronization settings ............................................................................................................................ 18
REMOTE ADMINISTRATION SYSTEM
During synchronization, the application settings configured by the administrator are transferred to the device. Operational
reports on the application components are transferred from the device to the remote administration system.
The device is automatically synchronized with the remote administration system.
If synchronization does not perform automatically, you can start it manually.
Manual synchronization is required, if the license was not installed within three days after application installation.
According to the remote administration system chosen by the administrator to manage the application, the user may be
asked to enter connection settings to the remote administration system. In this case, the values set by the user manually
are accessible for changes in the application (see "Changing the synchronization settings" on page 18).
START SYNCHRONIZATION MANUALLY
To manually synchronize the device with the remote administration system:
1. Open the Additional tab.
2. Select the Synchronization item (see Figure below).
Figure 5: Manual synchronization
If the user was not asked to enter the settings for connection to the remote administration system when
installing the application, a window appears with confirmation of the Internet connection setting. Allow
connection by pressing Yes. Internet connection with the remote administration system will be set.
If the user was asked to enter settings for connection to the remote administration system when installing the
application, the Synchronization screen opens. Select Start synchronization. Internet connection with the
remote administration system will be set.
Page 18

U S E R G U I D E
18
CHANGING THE SYNCHRONIZATION SETTINGS
Change the settings of connection to the remote administration system only if directed by the administrator.
To change settings for connection to the remote administration:
1. Open the Additional tab.
2. Select Synchronization.
This opens the Synchronization screen.
3. Select Synchronization settings.
4. Change the following settings (see Figure below):
Server;
Port;
Group.
5. Select Menu Save.
Figure 6: Changing synchronization settings
Page 19

19
GETTING STARTED
IN THIS SECTION
Starting the application .................................................................................................................................................... 19
Setting the secret code.................................................................................................................................................... 19
Viewing information about the application ....................................................................................................................... 20
This section contains information about getting started with Kaspersky Endpoint Security 8 for Smartphone: how to set a
secret code for the application, start the application and view information about it.
STARTING THE APPLICATION
To start Kaspersky Endpoint Security 8 for Smartphone:
1. Open the device main menu.
2. Select the folder Download KES 8.
The application installation folder may vary depending on the mobile device model.
3. Start the application. To do this, use the scroll bar or select Menu Open.
4. Enter the application secret code (see Section "Setting the secret code" on page 19) and press ENTER on the
keyboard.
The way of entering the secret may vary depending on the mobile device model.
A window opens showing the protection status of Kaspersky Endpoint Security 8 for Smartphone (see the "Protection
status window" on page 21).
SETTING THE SECRET CODE
After launching the application, you will be prompted to enter a secret code. The secret code prevents unauthorized
access to the application settings. You can later change the secret code installed.
The secret code is requested in the following instances:
for access to the application;
when sending an SMS command from another mobile device to start the following functions remotely: Block,
Data Wipe, SIM Watch, GPS Find, Privacy Protection.
Keep the secret code in mind. If you forget it, you will not be able to manage the functions of Kaspersky Endpoint
Security 8 for Smartphone or uninstall the application.
The secret code is comprised of numerals. The minimum number of characters is four.
Page 20

U S E R G U I D E
20
To set the secret code:
1. Confirm that you wish to create an application secret code. To do this, after the application first launches, click
OK in the Notifications window.
The screen for entering the application secret code opens.
2. Enter the figures that will form your code in the Enter new code field.
3. Re-enter the same code in the Confirm code field.
4. Press ENTER on the keyboard.
The code entered is automatically verified.
If the secret code entered is valid, the protection status window opens.
If the code is deemed invalid according to the results of the verification, a warning message is displayed and the
application requests confirmation. To use the code, press Yes.
In order to create a new code, press No. The Enter new code and Confirm code fields will empty. Enter a new
application secret code.
VIEWING INFORMATION ABOUT THE APPLICATION
You can view general information about Kaspersky Endpoint Security 8 for Smartphone and its version.
To view information on the application,
select the Additional, select About.
Page 21

21
APPLICATION INTERFACE
IN THIS SECTION
Application tabs ............................................................................................................................................................... 21
Protection status window................................................................................................................................................. 21
This section provides information on the basic elements of Kaspersky Endpoint Security 8 for Smartphone interface.
APPLICATION TABS
The application components are arranged logically and are accessible on the application tabs. Every tab ensures access
to the settings of the component selected and its tasks.
The Kaspersky Endpoint Security 8 for Smartphone menu contains the following tabs:
Protection status – shows the status of all application components.
Anti-Theft – protection of information on the device in the event of theft or loss.
Anti-Spam – filtering of unwanted incoming calls and SMS.
Additional – general application settings, start of synchronization of the device with the remote administration
system, uninstalling the application, information about application and license.
You can switch between tabs by using the scroll bar.
Page 22

U S E R G U I D E
22
PROTECTION STATUS WINDOW
The status of the main application components is displayed in the protection status window (see Figure below).
Figure 7: Protection status window
The status window is immediately accessible after starting the application and contains the following information:
Anti-Spam is the SMS and call filtering mode (see "Filtering of incoming calls and SMS" on page 23).
Block, Data Wipe, SIM Watch, GPS Find represent the Anti-Theft status (see Section "Data protection in the
event of loss or theft of the device" on page 35).
The Enabled status means that the Anti-Theft function is enabled. The Off status means that the Anti-Theft
function is disabled.
The protection status window is displayed when the application launches. You can also go to the protection status
window by selecting the Protection status tab.
Page 23

23
FILTERING OF INCOMING CALLS AND SMS
IN THIS SECTION
About Anti-Spam ............................................................................................................................................................. 23
About Anti-Spam modes ................................................................................................................................................. 23
Changing the Anti-Spam mode ....................................................................................................................................... 24
Creating a Black List ....................................................................................................................................................... 24
Creating a White List. ...................................................................................................................................................... 27
Responding to SMS messages and calls from contacts not in the phone book .............................................................. 30
Responding to SMS messages from non-numeric numbers ........................................................................................... 31
Selecting a response to incoming SMS ........................................................................................................................... 32
Selecting a response to incoming calls ........................................................................................................................... 33
This section contains information about Anti-Spam, which prevents unwanted calls and SMS according to the Black and
White Lists you create. The section also describes how to select the mode, which Anti-Spam uses to check incoming
calls and SMS messages, how to configure additional filtering settings for incoming SMS messages and calls and also
how to create Black and White Lists.
ABOUT ANTI-SPAM
Anti-Spam blocks unwanted calls and SMS based on the user-defined White and Black Lists.
The lists consist of entries. An entry in either list contains the following information:
The phone number, information from which Anti-Spam blocks for the Black List and delivers for the White List.
The type of events that Anti-Spam blocks for the Black List and allows for the White List. The following types of
communications are available: calls and SMS, calls only, and SMS only.
Key phrase used by Anti-Spam to recognize wanted and unwanted SMS. For the Black List, Anti-Spam blocks
SMS messages, which contain this phrase, while delivering the ones, which do not contain it. For the White List,
Anti-Spam allows SMS, where this phrase is found and blocks SMS, which do not contain it.
Anti-Spam filters incoming SMS messages and calls in accordance with the selected mode (see section "About AntiSpam modes" on page 23). According to the mode, Anti-Spam checks every incoming SMS or call and then determines
whether this SMS or call is wanted or unwanted (spam). As soon as Anti-Spam assigns the wanted or unwanted status
to an SMS or call, the scan is finished.
Information about blocked SMS and calls is registered in the application log (see section "Application logs" on page 44).
Page 24

U S E R G U I D E
24
ABOUT ANTI-SPAM MODES
The selected mode defines the rules according to which Anti-Spam filters incoming calls and SMS messages.
The following Anti-Spam modes are available:
Off – all incoming calls and SMS are allowed.
Black List – all calls and SMS are allowed in except for those originating from numbers on the Black List.
White List – only calls and SMS originating from numbers on the White List are allowed in.
Both lists – incoming calls and SMS from White List numbers are allowed while those from Black List numbers
are blocked. Following a conversation or arrival of an SMS message from a number on neither list, Anti-Spam
will prompt the user to add the number to one of the lists.
You can change the current Anti-Spam mode (see section "Changing the Anti-Spam mode" on page 24). Current AntiSpam mode is indicated on the Anti-Spam tab next to the Mode menu item.
CHANGING THE ANTI-SPAM MODE
To change the Anti-Spam mode:
1. On the Anti-Spam tab, select the Mode item.
The Anti-Spam screen will open.
2. Select the appropriate value for the Anti-Spam settings (see figure below).
Figure 8: Changing the Anti-Spam mode
3. Select Menu Save to save the changes.
Page 25

F I L T E R I N G O F I N C O M I N G C A L L S A N D S M S
25
IN THIS SECTION
Adding entries to the Black List ....................................................................................................................................... 25
Editing entries in the Black List ....................................................................................................................................... 26
Deleting entries from the Black List ................................................................................................................................. 27
CREATING A BLACK LIST
The Black List contains entries of banned numbers, i.e., the numbers, from which Anti-Spam blocks calls and SMS. Each
entry contain the following information:
Phone number from which Anti-Spam blocks calls and (or) SMS.
Type of events invoked from that number that Anti-Spam blocks. The following types of events are available:
calls and SMS, calls only, and SMS only.
Key phrase that Anti-Spam uses to classify an SMS message as unsolicited (spam). Anti-Spam blocks only the
SMS containing the key phrase and delivers all the rest.
Anti-Spam will block those calls and SMS that satisfy all the criteria of a Black List entry. Calls and SMS that fail to satisfy
even one of the criteria in a Black List entry will be allowed in by Anti-Spam.
It is impossible to add the same phone number with the same filter criteria to the Black and White lists.
Information about blocked SMS and calls is registered in the application log (see section "Application logs" on page 44).
ADDING ENTRIES TO THE BLACK LIST
Bear in mind that the same number with identical filtering criteria cannot be included in the Black and White lists of AntiSpam numbers at the same time. If a number with such filtering criteria is already saved on either of the lists, Kaspersky
Endpoint Security 8 for Smartphone notifies you of this event, and a relevant message appears on the screen.
To add an entry to the Anti-Spam Black List:
1. On the Anti-Spam tab, select the Black List item.
This opens the Black List screen.
2. Select Menu Add.
This opens the New entry screen.
3. Set values for the following settings (see Figure below):
Block incoming – type of events from a phone number, which Anti-Spam blocks for the numbers from
Black List:
Calls and SMS: block incoming calls and SMS messages.
Calls only: block incoming calls only.
SMS only: block incoming SMS messages only.
Page 26

U SER G U I D E
26
Phone number – telephone number, for which Anti-Spam blocks incoming information. The phone number
should comprise only alphanumeric characters; it may begin with a digit, a letter, or be preceded by the "+"
symbol. As a number, it is also possible to use the masks "*" or "?" (where "*" is any number of symbols,
and "?" any symbol). For example, *1234? is in the Black List. Anti-Spam blocks calls or SMS from a
number, in which any symbol follows the digits 1234.
Containing text – key phrase indicating that the received SMS message is unwanted (spam). Anti-Spam
only blocks SMS messages containing the key phrase and delivers all others.
If you want all incoming SMS from a specific number on the Black List to be blocked, leave the Containing
text field of this entry blank.
Figure 9: Settings for entries in the Black List
4. Select Menu Save to save the changes.
EDITING ENTRIES IN THE BLACK LIST
You can change the values of all settings for entries from the Black List.
To edit an entry in the Anti-Spam Black List:
1. On the Anti-Spam tab, select the Black List item.
This opens the Black List screen.
2. Select the element from the list which you wish to edit and then select Menu Edit.
The Changing an entry screen opens.
3. Change the necessary settings:
Block incoming – type of events invoked from a phone number, which Anti-Spam blocks for the numbers
from Black List:
Calls and SMS: block incoming calls and SMS messages.
Calls only: block incoming calls only.
SMS only: block incoming SMS messages only.
Page 27

F I L T E R I N G O F I N C O M I N G C A L L S A N D S M S
27
Phone number – telephone number, for which Anti-Spam blocks incoming information. The phone number
should comprise only alphanumeric characters; it may begin with a digit, a letter, or be preceded by the "+"
symbol. As a number, it is also possible to use the masks "*" or "?" (where "*" is any number of symbols,
and "?" any symbol). For example, *1234? is in the Black List. Anti-Spam blocks calls or SMS from a
number, in which any symbol follows the digits 1234.
Containing text – key phrase indicating that the received SMS message is unwanted (spam). Anti-Spam
only blocks SMS messages containing the key phrase and delivers all others.
If you want all incoming SMS from a specific number on the Black List to be blocked, leave the Containing
text field of this entry blank.
4. Select Menu Save to save the changes.
DELETING ENTRIES FROM THE BLACK LIST
You can delete a number from the Black list. Furthermore, you can clear the Anti-Spam Black List by removing all the
entries from it.
To delete an entry from the Anti-Spam Black List:
1. On the Anti-Spam tab, select the Black List item.
This opens the Black List screen.
2. Select the entry to be deleted on the list and then select Menu Delete.
The confirmation window opens.
3. Confirm the uninstalling by pressing the Yes button.
To clear Anti-Spam Black List:
1. On the Anti-Spam tab, select the Black List item.
This opens the Black List screen.
2. Select Menu Delete all.
The confirmation window opens.
3. Confirm the uninstalling by pressing the Yes button.
The list is emptied.
Page 28

U S E R G U I D E
28
CREATING A WHITE LIST
IN THIS SECTION
Adding entries to the White List ....................................................................................................................................... 28
Editing entries in the White List ....................................................................................................................................... 29
Deleting entries from the White List ................................................................................................................................ 30
The White List contains entries of allowed numbers, i.e., numbers from which Anti-Spam delivers calls and SMS to the
user. Each entry contain the following information:
Phone number, from which Anti-Spam delivers calls and (or) SMS.
Type of events invoked from that number that Anti-Spam allows. The following types of events are available:
calls and SMS, calls only, and SMS only.
Key phrase used by Anti-Spam to classify an SMS message as solicited (not spam). Anti-Spam only delivers
SMS messages containing the key phrase and blocks all others.
Anti-Spam allows only calls and SMS that satisfy all the criteria of an entry in the White List. Calls and SMS that fail to
satisfy even one of the criteria in a White List entry will be blocked by Anti-Spam.
ADDING ENTRIES TO THE WHITE LIST
Bear in mind that the same number with identical filtering criteria cannot be included in the Black and White lists of AntiSpam numbers at the same time. If a number with such filtering criteria is already saved on either of the lists, Kaspersky
Endpoint Security 8 for Smartphone notifies you of this event, and a relevant message appears on the screen.
To add an entry to the Anti-Spam Black List:
1. On the Anti-Spam tab, select the White List item.
This opens the White List screen.
2. Select the Menu Add.
3. Make the following settings for the new entry (see Figure below):
Allow incoming – type of events invoked from a phone number, which Anti-Spam allows for White List
numbers:
Calls and SMS: allow incoming calls and SMS.
Calls only: allow incoming calls only.
SMS only: allow incoming SMS only.
Phone number – telephone number, from which Anti-Spam delivers incoming information. The phone
number should comprise only alphanumeric characters; it may begin with a digit, a letter, or be preceded by
the "+" symbol. As a number, it is also possible to use the masks "*" or "?" (where "*" is any number of
symbols, and "?" any symbol). For example, *1234? is in the White List. Anti-Spam allows in calls or SMS
from a number, in which any symbol follows the digits 1234.
Page 29

F I L T E R I N G O F I N C O M I N G C A L L S A N D S M S
29
Containing text – key phrase indicating that the received SMS message is wanted. For numbers on the
White List, Anti-Spam only delivers SMS messages containing the key phrase and blocks all others.
If you want all incoming SMS from a specific number on the White List to be delivered, leave the
Containing text field of this entry blank.
Figure 10: Settings for entries in the White List
4. Select Menu Save to save the changes.
EDITING ENTRIES IN THE WHITE LIST
For an entry from the White List of allowed numbers, you can change the values of all settings.
To edit an entry in the Anti-Spam White List:
1. On the Anti-Spam tab, select the White List item.
This opens the White List screen.
2. Select the element from the list which you wish to edit and then select Menu Edit.
The Changing an entry screen opens.
3. Change the necessary settings:
Allow incoming – type of events invoked from a phone number, which Anti-Spam allows for White List
numbers:
Calls and SMS: allow incoming calls and SMS.
Calls only: allow incoming calls only.
SMS only: allow incoming SMS only.
Phone number – telephone number, from which Anti-Spam delivers incoming information. The phone
number should comprise only alphanumeric characters; it may begin with a digit, a letter, or be preceded by
the "+" symbol. As a number, it is also possible to use the masks "*" or "?" (where "*" is any number of
symbols, and "?" any symbol). For example, *1234? is in the White List. Anti-Spam allows in calls or SMS
from a number, in which any symbol follows the digits 1234.
Page 30

U S E R G U I D E
30
Containing text – key phrase indicating that the received SMS message is wanted. For numbers on the
White List, Anti-Spam only delivers SMS messages containing the key phrase and blocks all others.
If you want all incoming SMS from a specific number on the White List to be delivered, leave the
Containing text field of this entry blank.
4. Select Menu Save to save the changes.
DELETING ENTRIES FROM THE WHITE LIST
You can delete one entry from the White List as well as completely clear it.
To delete an entry from the Anti-Spam White List:
1. On the Anti-Spam tab, select the White List item.
This opens the White List screen.
2. Select the entry to be deleted on the list and then select Menu Delete.
The confirmation window opens.
3. Confirm the uninstalling by pressing the Yes button.
To clear the Anti-Spam White List:
1. On the Anti-Spam tab, select the White List item.
This opens the White List screen.
2. Press Menu Delete all.
The confirmation window opens.
3. Confirm the uninstalling by pressing the Yes button.
The White List becomes empty.
Page 31

F I L T E R I N G O F I N C O M I N G C A L L S A N D S M S
31
RESPONDING TO SMS MESSAGES AND CALLS FROM
CONTACTS NOT IN THE PHONE BOOK
For the Both lists or White List mode (see section "About Anti-Spam modes" on page 23) you can additionally set up
Anti-Spam response to SMS messages and calls from senders whose numbers are not present in Contacts. In addition,
Anti-Spam allows expansion of the White List by adding numbers from the Contacts to it.
To select Anti-Spam response to a number not included in the phonebook:
1. Select the Anti-Spam tab, select the Mode item.
The Anti-Spam screen will open.
2. Select the required value for setting Allow Contacts (see Figure below):
to make Anti-Spam consider numbers from Contacts as an additional White List and block SMS messages
and calls from senders not in Contacts, check the Allow Contacts box;
to make Anti-Spam filter SMS messages and calls based on the selected mode only, uncheck the Allow
Contacts box.
Figure 11: Anti-Spam response to numbers not found in Contacts
3. Select Menu Save to save the changes.
Page 32

U S E R G U I D E
32
RESPONDING TO SMS MESSAGES FROM NON-NUMERIC
NUMBERS
For the Both lists or Black List (see section "About Anti-Spam modes" on page 23) Anti-Spam mode you can
additionally extend the Black List by including in it non-numeric numbers (numbers containing letters). In this case, AntiSpam treats SMS messages from non-numeric numbers in the same way as from numbers on the Black List.
To configure Anti-Spam response upon arrival of SMS messages from non-numeric numbers:
1. Select the Anti-Spam tab, select the Mode item.
The Anti-Spam screen will open.
2. Select a value for the Block non-numeric numbers setting (see Figure below):
in order for Anti-Spam to automatically block SMS from non-numeric numbers, check the Block non-
numeric numbers box;
to make Anti-Spam check SMS from non-numeric numbers based on the selected mode only, uncheck the
Block non-numeric numbers box.
Figure 12: Selecting Anti-Spam response upon arrival of SMS from a non-numeric number
3. Select Menu Save to save the changes.
Page 33

F I L T E R I N G O F I N C O M I N G C A L L S A N D S M S
33
SELECTING A RESPONSE TO INCOMING SMS
In the Both lists (see section "About Anti-Spam modes" on page 23) Anti-Spam mode, Anti-Spam checks incoming
SMS for compliance with both its Black and White lists.
Following arrival of an SMS message from a number on neither list, Anti-Spam will prompt the user to add the number to
one of the lists (see figure below).
You can select one of the following actions for an SMS:
To block an SMS and add a sender's phone number to the Black List click Add to Black List.
To receive an SMS and add a sender's phone number to the White List click Add to White List.
To deliver the SMS message without adding the sender's telephone number to either list, press Skip.
Figure 13: Anti-Spam notification about received SMS
Information about blocked SMS is registered in the application log (see the "Application logs" section on page 44).
Page 34

U S E R G U I D E
34
SELECTING A RESPONSE TO INCOMING CALLS
In the Both lists (see section "About Anti-Spam modes" on page 23) Anti-Spam mode, Anti-Spam checks incoming
SMS for compliance with both its Black and White lists. Following a call from a number on neither list, Anti-Spam will
prompt the user to add the number to one of the lists (see figure below).
You can select one of the following actions for the caller's number:
To add the caller's telephone number to the Black List, click Add to Black List.
To add the caller's telephone number to the White List, click Add to White List.
If you don't want to add the caller's number to either list, press Skip.
Figure 14: Anti-Spam notification about received SMS
Information about blocked calls is registered in the application log (see the "Application logs" section on page 44).
Page 35

35
DATA PROTECTION IN THE EVENT OF
IN THIS SECTION
About Anti-Theft .............................................................................................................................................................. 35
Blocking the device ......................................................................................................................................................... 36
Deleting personal data .................................................................................................................................................... 37
Creating a list of folders to delete .................................................................................................................................... 39
Monitoring the replacement of a SIM card on the device ................................................................................................ 40
Determining the device geographical coordinates ........................................................................................................... 41
Remote start of the Anti-Theft functions .......................................................................................................................... 42
DEVICE LOSS OR THEFT
This section gives information about Anti-Theft which, in the case of theft or loss, blocks unauthorized access to data
saved on your mobile device and makes it easy to find the device.
This section also specifies how to enable/disable the Anti-Theft function, set its parameters and start Anti-Theft from
another mobile device remotely.
ABOUT ANTI-THEFT
Anti-Theft protects information stored on your mobile device from unauthorized access.
Anti-Theft includes the following functions:
Block – allows blocking the device remotely and gives the text to be displayed on the screen of the blocked
device.
Data Wipe – allows deleting the user's personal data remotely from the device (entries in Contacts, messages,
picture gallery, calendar, logs, Internet connection settings) and information from the storage cards, folders from
list for deletion.
SIM Watch allows obtaining the current phone number or locking the device, if the SIM card is replaced or the
device is activated without a SIM card. Information about a new phone number is sent as a message to the
phone number and / or email that you specified.
The GPS Find functionality enables you to locate a device. The geographical coordinates of the device are sent
as a message to the phone number from which a special SMS command was sent, and to an email address.
Kaspersky Endpoint Security 8 for Smartphone can remotely start Anti-Theft with sending SMS commands from another
mobile device (see "Remote start of the Anti-Theft functions" on page 42).
To start Anti-Theft remotely, you must know the application secret code that was set when Kaspersky Endpoint
Security 8 for Smartphone was first started.
The current status of every feature is displayed on the Anti-Theft screen next to the corresponding feature name.
Information about the component operation is entered in the application log (see "Application Logs" on page 44).
Page 36

U S E R G U I D E
36
BLOCKING THE DEVICE
After a special SMS command is received, the Block function allows you to remotely block access to the device and data
stored on it. The device can only be unblocked by entering the secret code.
This function does not block the device but simply enables the remote blocking option.
To enable the Block function:
1. Select the Block item on the Anti-Theft tab.
This opens the Block screen.
2. Check the Enable Block box.
3. Enter the message which is displayed on the device screen in blocked mode in the Text when blocked field
(see Figure below).. By default, the standard text in which you can add the owner's phone number is used for
the message.
Figure 15: Block feature settings
4. Select Menu Save to save the changes.
If the Block function is enabled on another device, you can block it using any of the following methods:
Use a Kaspersky Lab mobile application, such as Kaspersky Endpoint Security 8 for Smartphone, on another
mobile device to create and send an SMS command to your device. To create a special SMS command, use
the Send command function. As a result, your device will receive a covert SMS, and the device will be blocked.
On another mobile device, create and send an SMS with the special text and the secret code previously set for
the receiving device.
Outgoing SMS messages are billed according to the rates set by the mobile service provider of the other mobile device.
To block the device remotely, it is advised that you use the secure method with the Sending a command function. The
application secret code is then sent in encrypted form.
Page 37

D A T A P R O T E C T I O N I N T H E E V E N T O F D E V I C E L O S S O R T H E F T
37
To send an SMS command to another device using the Send command function:
1. Select Send command on the Additional tab.
This opens the Send command screen.
2. For the Select SMS command setting, select Block.
3. In the Phone number field, enter the phone number of the device that receives the SMS command.
4. In the Remote device code field, enter the application secret code set on the device that receives the SMS
command.
5. Select Menu Send.
To create an SMS with the phone standard SMS creation functions,
send an SMS message from the other device containing the text block:<code>, where <code> is the secret code
set on the device to be blocked. The message is not case sensitive, and spaces before or after the colon are
ignored.
DELETING PERSONAL DATA
After a special SMS command is received, the Data Wipe function allows deleting the following information stored in the
device:
the user's personal data (entries in Contacts, calendar, email messages, call log);
information on storage card;
files from the list of folders for deletion (see the "Creating a list of folders to delete" section on page 39).
This function does not delete the data saved on the device, but includes the option to delete them.
To enable the Data Wipe function:
1. Select the Data Wipe item on the Anti-Theft tab.
This opens the Data Wipe screen.
2. Select the Mode item.
This opens the Data Wipe screen.
3. Check the Enable Data Wipe box.
Page 38

U S E R G U I D E
38
4. Select information that you want to delete. To do this, check the boxes next to the required settings in the
Delete section (see the figure below).
to delete personal data, check the Personal data box;
to delete files from folders on the memory card and from the list of folders for deletion, check the
box Selected folders.
Figure 16: Data Wipe settings
5. Go to creation of a list of folders for deletion (see the "Creating a list of folders to delete" section on page 39).
6. Select Menu Save to save the changes.
You can delete personal data from the device with the function enabled by using the following methods:
Use a Kaspersky Lab mobile application, such as Kaspersky Endpoint Security 8 for Smartphone, on another
mobile device to create and send an SMS command to your device. As a result, your device receives a covert
SMS message and the information is deleted. To create a special SMS command, use the Send command
function.
On another mobile device, create and send an SMS with the special text and the secret code previously set for
the receiving device. As a result, your device receives a covert SMS message and the information is deleted.
Outgoing SMS messages are billed according to the rates set by the mobile service provider of the other mobile device.
To delete information from the device remotely, you are advised to use the secure method with the Sending a command
function. The application secret code is then sent in encrypted form.
To send an SMS command to another device using the Send command function:
1. Select the Send command menu item on the Additional tab.
This opens the Send command screen.
2. For the Select SMS command setting, select Data Wipe.
3. In the Phone number field, enter the phone number of the device that receives the SMS command.
4. In the Remote device code field, enter the application secret code set on the device that receives the SMS
command.
5. Select Menu Send.
Page 39

D A T A P R O T E C T I O N I N T H E E V E N T O F D E V I C E L O S S O R T H E F T
39
To create an SMS with the phone standard SMS creation functions:
Send a standard SMS to another device; it should contain the text wipe:<code> where <code> is the secret code
of the application set on another device. The message is not case sensitive, and spaces before or after the colon are
ignored.
CREATING A LIST OF FOLDERS TO DELETE
The Data Wipe function allows creating a list of folders to be deleted after a special SMS command is received.
For Anti-Theft to delete the objects from the list after receiving a special SMS command, ensure that Selected folders is
checked on the Anti-Theft Data Wipe tab.
The administrator may add to the list of folders to be deleted. These folders cannot be deleted from the list.
To add a folder to the list of folders to be deleted:
1. Select the Data Wipe item on the Anti-Theft tab.
This opens the Data Wipe screen.
2. Go to the list of objects for deletion.
3. Select Menu Add folder (see Figure below).
Figure 17: Adding a folder
4. Select the necessary folder from the folder tree and press Menu Select.
The folder is added to the Selected folders list.
5. Select Menu Save.
To remove a folder from the list:
1. Select the Data Wipe item on the Anti-Theft tab.
This opens the Data Wipe screen.
2. Go to the list of objects for deletion.
Page 40

U S E R G U I D E
40
3. Select the folder from the list and then select Menu Delete folder.
The confirmation window opens.
4. Confirm the deleting of the folder by pressing Yes.
The folder will be deleted from the Selected folders list.
5. Select Menu Save.
MONITORING THE REPLACEMENT OF A SIM CARD ON THE
DEVICE
If the SIM card is replaced, SIM Watch allows you to send a message with the new number to your phone number
and / or email, or lock the device.
To enable the SIM Watch function and monitor the replacement of the SIM card:
1. On the Anti-Theft tab, select the SIM Watch item.
This opens the SIM Watch screen.
2. Check the Enable SIM Watch box.
3. To check the replacement of the SIM card on the device, make the following settings (see Figure below):
To automatically receive an SMS with the new number used in your phone, enter the phone number, to
which the SMS should be sent in the SMS to telephone number field within the Send new number when
replacing the SIM card box.
The phone number may start with a digit or with a "+", and must contain digits only.
To receive an email with the new phone number, in the When the SIM card is replaced, send the new
number block in the Send to email address field, enter the email address.
To block the device if the SIM card is replaced, or if the device is turned on with the SIM card removed,
check the Block device box in the Additional block. You can unblock the device only by entering the
application secret code.
To display a message on the screen in blocked mode, enter it in the Text when blocked field. By default,
the standard text in which you can add the owner's number is used for the message.
Figure 18: SIM Watch settings
4. Select Menu Save to save the changes.
Page 41

D A T A P R O T E C T I O N I N T H E E V E N T O F D E V I C E L O S S O R T H E F T
41
DETERMINING THE DEVICE GEOGRAPHICAL COORDINATES
After a special SMS command is received, GPS Find allows detecting the device geographical coordinates and sending
them by SMS and email to the requesting device and an email address.
Outgoing SMS messages are billed according to your mobile service provider’s current rate.
This function only works with devices with in-built GPS receiver. The GPS receiver is enabled automatically after the
device receives a special SMS command. If the device is within satellite signal coverage, the GPS Find function receives
and sends the geographical coordinates of the device. If the satellites are unavailable at the time of the query, GPS Find
periodically attempts to find them and send device location results.
To enable the GPS Find function:
1. Select the GPS Find item on the Anti-Theft tab.
This opens the GPS Find screen.
2. Check the Enable GPS Find box.
After receiving a special SMS command, Kaspersky Endpoint Security 8 for Smartphone sends the device
coordinates in the response SMS.
3. To receive the coordinates of the device by email in the Send device coordinates block for the setting
Message to email address enter email address (see Figure below).
Figure 19: GPS Find settings
4. Select Menu Save to save the changes.
You can request the coordinates of a device on which GPS Find is enabled, using the following methods:
Use a Kaspersky Lab mobile application, such as Kaspersky Endpoint Security 8 for Smartphone, on another
mobile device to create and send an SMS command to your device. As a result, your device will receive a
covert SMS, and the application will send the device coordinates. To create a special SMS command, use the
Send command function.
On another mobile device, create and send an SMS with the special text and the secret code previously set for
the receiving device. As a result, your device will receive the SMS, and the application will send the coordinates
of the device.
Page 42

U S E R G U I D E
42
Outgoing SMS messages are billed according to the rates set by the mobile service provider of the other mobile device.
To receive the device coordinates, you are advised to use the secure method with the Send command function. The
application secret code is then sent in encrypted mode.
To send a command to another device using the Send command function:
1. Select Send command on the Additional tab.
This opens the Send command screen.
2. Select the GPS Find value for the Select SMS command setting.
3. In the Phone number field, enter the phone number of the device that receives the SMS command.
4. In the Remote device code field, enter the application secret code set on the device that receives the SMS
command.
5. Select Menu Send.
To create an SMS with the phone standard SMS creation functions:
send an SMS to the other device; the message should contain the text find:<code> where <code> is the secret
code of the application set on the target device. The message is not case sensitive, and spaces before or after the
colon are ignored.
An SMS with the device coordinates will be sent to the phone number from which the SMS command was sent and to
the email address if you have specified one in the GPS Find options.
Page 43

D A T A P R O T E C T I O N I N T H E E V E N T O F D E V I C E L O S S O R T H E F T
43
REMOTE START OF THE ANTI-THEFT FUNCTIONS
The application allows sending a special SMS command to run Anti-Theft functions remotely on another device with
Kaspersky Endpoint Security 8 for Smartphone installed on it. An SMS command is sent as an encrypted SMS and
contains the application secret code set on the other device. Reception of the SMS command will not be noticed.
SMS is billed according to your mobile service provider’s current rate.
To send an SMS command to another device:
1. Select the Send command menu item on the Additional tab.
This opens the Send command screen.
2. Select the function for remote launch on another mobile device. Select one of the proposed values for the
Select SMS command setting (see Figure below):
Block device (on page 36);
Data Wipe (see "Deleting personal data" section on page 37);
GPS Find device (see the "Determining the device geographical coordinates" section on page 41);
Privacy Protection.
Figure 20: Remote start of Anti-Theft functionality
3. In the Phone number field, enter the phone number of the device that receives the SMS command.
4. In the Remote device code field, enter the application secret code set on the device that receives the SMS
command.
5. Select Menu Send.
Page 44

44
APPLICATION LOGS
IN THIS SECTION
About logs ....................................................................................................................................................................... 44
Viewing Log records ........................................................................................................................................................ 44
Deleting Log records ....................................................................................................................................................... 44
This section gives information about logs, in which each component operations are recorded, as well as each task that is
completed (e.g. synchronization with the remote administrative system, receipt of an SMS command from another
device).
ABOUT LOGS
The log stores reports about events occurring when Kaspersky Endpoint Security 8 for Smartphone is running. For every
component, a separate events log is used. You are able to select and review a report of activity in the time the
component has been running. Entries in the report are sorted in reverse chronological order.
VIEWING LOG RECORDS
To view the entries in a component log,
on the tab of the necessary component, select the item Events log.
The selected component log opens.
Use the scroll bar to scroll through the log.
To view detailed log record information,
select the necessary entry and press on the keyboard ENTER.
DELETING LOG RECORDS
You can clear all logs. This deletes information about the operation of all Endpoint Security 8 for Smartphone
components.
To clear all logs:
1. On the tab of any component, select the Events log.
The Events log screen opens.
2. Select Menu Clear Log.
3. Confirm the uninstalling by pressing the Yes button.
All entries from all components' logs will be deleted.
Page 45

45
CONFIGURING ADDITIONAL SETTINGS
IN THIS SECTION
Changing the secret code ............................................................................................................................................... 45
Displaying hints ............................................................................................................................................................... 45
This section gives information about additional features of Kaspersky Endpoint Security 8 for Smartphone: how to
change the application secret code and show/hide hints when configuring the settings for each component.
CHANGING THE SECRET CODE
You can change the secret code set after the first start up of the application.
To change the secret code:
1. Select the Additional settings menu item on the Additional tab.
The Additional settings screen opens.
2. Select Code change.
3. Enter the current secret code of the application in the Enter secret code entry field.
4. Enter the new secret code in the Enter new code and Confirm code fields.
The code entered is automatically verified.
If the secret code entered is valid, it will be saved.
If the code is deemed invalid according to the results of the verification, a warning message is displayed and the
application requests confirmation. To use the code, press Yes.
In order to create a new code, press No. The Enter new code and Confirm code fields will empty. Enter a new
application secret code.
DISPLAYING HINTS
When you configure the settings of components, Kaspersky Endpoint Security 8 for Smartphone displays by default a
hint containing a brief description of the function selected. You can select to show/hide hints for Kaspersky Endpoint
Security 8 for Smartphone.
To show/hide hints:
1. Select the Additional settings menu item on the Additional tab.
The Additional settings screen opens.
2. Select to show / hide hints. To do this, select Hints.
The status of hints will be shown next to the Hints menu item. The radio button icon to the right changes
according to the status of hints.
Page 46

46
GLOSSARY
A
A C T I V A T I N G T H E A P P L I C A T I O N
Switching the application into full-function mode. Activation is carried out by the user during application installation or
afterwards. To activate the application, a user needs an activation code or a key file.
A P P L I C A T I O N S E C R E T C O D E
The secret code prevents unauthorized access to the application settings and to blocked information on the device. The
user sets it on first starting the application and it consists of at least four characters. The secret code is requested in the
following instances:
for access to application settings;
when sending an SMS command from another mobile device to invoke remotely the following features: Block,
Data Wipe, SIM Watch, GPS Find, and Privacy Protection.
B
B L A C K L I S T
The list entries contain the following information:
Phone number, from which Anti-Spam blocks calls and (or) SMS.
Type of events invoked from the number that Anti-Spam blocks. The following types of events are available:
calls and SMS, calls only, and SMS only.
Key phrase that Anti-Spam uses to classify an SMS message as unsolicited (spam). Anti-Spam only blocks
SMS messages containing this key phrase while delivering all the rest.
D
D E L E T I N G S M S M E SS A G E S
A method of processing an SMS message containing SPAM features, by deleting it. You are advised to use this method
with SMS messages which definitely contain spam.
N
N ON- N U M E R I C N U M B E R
A phone number that includes letters or consists only of letters.
P
P H O N E N U M B E R M A S K
Including a phone number in the Black or White List using wildcards. The two basic wildcards used in phone number
masks are "*" and "?", (where "*" represents any number of characters and "?" stands for any single character). For
example, *1234? is in the Black List. Anti-Spam blocks calls or SMS from a number, in which any symbol follows the
digits 1234.
Page 47

G L O S S A R Y
47
R
R E M O T E A D M I N I S T R A T I O N S Y S T E M
The system which remotely manages settings and administers them in real time.
S
S Y N C H R O N I Z A T I O N
Process to connect the mobile device with the remote administration system and transfer data. During synchronization,
the application settings configured by the administrator are transferred to the device. Operational reports on the
application components are transferred from the device to the remote administration system.
W
W H I T E L I S T
The entries in this list contain the following information:
Phone number, from which Anti-Spam delivers calls and (or) SMS.
Type of events invoked from the number that Anti-Spam allows. The following types of events are available:
calls and SMS, calls only, and SMS only.
Key phrase used by Anti-Spam to classify an SMS message as solicited (not spam). Anti-Spam only delivers
SMS containing this key phrase while blocking all the rest.
Page 48

48
KASPERSKY LAB ZAO
Kaspersky Lab website:
http://www.kaspersky.com
Virus Encyclopedia:
http://www.securelist.com
Anti-virus laboratory:
newvirus@kaspersky.com (only for sending probably infected files
in archive format)
http://support.kaspersky.com/virlab/helpdesk.html
(for sending requests to virus analysts)
Kaspersky Lab’s web forum:
http://forum.kaspersky.com
Kaspersky Lab software is internationally renowned for its protection against viruses, malware, spam, network and
hacker attacks, and other threats.
In 2008, Kaspersky Lab was rated among the world’s top four leading vendors of information security software solutions
for end users (IDC Worldwide Endpoint Security Revenue by Vendor). Kaspersky Lab is the preferred developer of
computer protection systems among home users in Russia, according to the COMCON survey "TGI-Russia 2009".
Kaspersky Lab was founded in Russia in 1997. Today, it is an international group of companies headquartered in
Moscow with five regional divisions that manage the company's activity in Russia, Western and Eastern Europe, the
Middle East, Africa, North and South America, Japan, China, and other countries in the Asia-Pacific region. The
company employs more than 2000 qualified specialists.
Products. Kaspersky Lab’s products provide protection for all systems — from home computers to large corporate
networks.
The personal product range includes anti-virus applications for desktop, laptop, and pocket computers, and for
smartphones and other mobile devices.
Kaspersky Lab delivers applications and services to protect workstations, file and web servers, mail gateways, and
firewalls. Used in conjunction with Kaspersky Lab’s centralized management system, these solutions ensure effective
automated protection for companies and organizations against computer threats. Kaspersky Lab's products are certified
by the major test laboratories, are compatible with the software of many suppliers of computer applications, and are
optimized to run on many hardware platforms.
Kaspersky Lab’s virus analysts work around the clock. Every day they uncover hundreds of new computer threats, create
tools to detect and disinfect them, and include them in the databases used by Kaspersky Lab applications. Kaspersky
Lab's Anti-Virus database is updated hourly; and the Anti-Spam database every five minutes.
Technologies. Many technologies that are now part and parcel of modern anti-virus tools were originally developed by
Kaspersky Lab. It is no coincidence that many other developers use the Kaspersky Anti-Virus kernel in their products,
including: SafeNet (USA), Alt-N Technologies (USA), Blue Coat Systems (USA), Check Point Software Technologies
(Israel), Clearswift (UK), CommuniGate Systems (USA), Critical Path (Ireland), D-Link (Taiwan), M86 Security (USA),
GFI (Malta), IBM (USA), Juniper Networks (USA), LANDesk (USA), Microsoft (USA), NETASQ (France), NETGEAR
(USA), Parallels (Russia), SonicWALL (USA), WatchGuard Technologies (USA), ZyXEL Communications (Taiwan).
Many of the company’s innovative technologies are patented.
Achievements. Over the years, Kaspersky Lab has won hundreds of awards for its services in combating computer
threats. For example, in 2010 Kaspersky Anti-Virus received several top Advanced+ awards in a test administered by
AV-Comparatives, a respected Austrian anti-virus laboratory. But Kaspersky Lab's main achievement is the loyalty of its
users worldwide. The company’s products and technologies protect more than 300 million users, and its corporate clients
number more than 200,000.
Page 49

49
INFORMATION ABOUT THIRD-PARTY CODE
Third party code is used to create the application.
To create and verify digital signatures, Kaspersky Endpoint Security 8 for Smartphone uses security software library by
CryptoEx LLC.
CryptoEx LLC corporate website: http://www.cryptoex.ru.
Page 50

50
TRADEMARK NOTICE
Registered trade and service marks are the property of their respective owners.
The Blackberry trademark belongs to Research In Motion Limited, it is registered in the USA and can be submitted for
registration or registered in other countries.
Page 51

51
INDEX
A
Adding
Anti-Spam Black List .............................................................................................................................................. 25
Anti-Spam White List .............................................................................................................................................. 28
Allowing
incoming calls ......................................................................................................................................................... 28
incoming SMS ........................................................................................................................................................ 28
Anti-Spam .................................................................................................................................................................... 23
Black List ................................................................................................................................................................ 25
modes ..................................................................................................................................................................... 24
non-numeric numbers ............................................................................................................................................. 32
numbers that are not in Contacts ............................................................................................................................ 31
operation with a call ................................................................................................................................................ 34
operation with an SMS message ............................................................................................................................ 33
White List ................................................................................................................................................................ 28
Anti-Theft ...................................................................................................................................................................... 35
Block ................................................................ ................................ ....................................................................... 36
Data Wipe ......................................................................................................................................................... 37, 39
GPS Find ................................................................................................................................................................ 41
SIM Watch ................................................................................................ ................................ .............................. 40
Application hints ........................................................................................................................................................... 45
APPLICATION INTERFACE ........................................................................................................................................ 21
Application secret code .......................................................................................................................................... 19, 45
Application tabs ............................................................................................................................................................ 21
B
Black List
Anti-Spam ............................................................................................................................................................... 25
Blocking
device ..................................................................................................................................................................... 36
incoming calls ................................................................................................................................................... 25, 28
incoming SMS ........................................................................................................................................................ 25
C
Code
application secret code ........................................................................................................................................... 19
D
Data
remote delete .......................................................................................................................................................... 37
Deleting
Log records ............................................................................................................................................................. 44
Deletion
Anti-Spam Black List .............................................................................................................................................. 27
Anti-Spam White List .............................................................................................................................................. 30
Determining the device location ................................................................................................................................... 41
Disabling
Anti-Spam ............................................................................................................................................................... 24
Display
Protection status window ........................................................................................................................................ 22
Page 52

U S E R G U I D E
52
E
Editing
Anti-Spam Black List .............................................................................................................................................. 26
Anti-Spam White List .............................................................................................................................................. 29
Enabling
Anti-Spam ............................................................................................................................................................... 24
Entry
Anti-Spam Black List .............................................................................................................................................. 25
Anti-Spam White List .............................................................................................................................................. 28
Events log
deleting entries ....................................................................................................................................................... 44
viewing entries ........................................................................................................................................................ 44
F
FILTERING
INCOMING CALLS ................................................................................................................................................. 23
INCOMING SMS .................................................................................................................................................... 23
H
HARDWARE REQUIREMENTS .................................................................................................................................... 8
I
INSTALLING THE APPLICATION ................................................................................................................................. 9
K
KASPERSKY LAB ........................................................................................................................................................ 48
KASPERSKY LAB ZAO ............................................................................................................................................... 48
Key
installation ............................................................................................................................................................... 16
L
License
information .............................................................................................................................................................. 16
M
Modes
Anti-Spam ............................................................................................................................................................... 24
P
Protection status. ......................................................................................................................................................... 22
S
Send SMS command ................................................................................................................................................... 43
Starting
application .............................................................................................................................................................. 19
U
UNINSTALLING
W
White List
Wipe
APPLICATION ........................................................................................................................................................ 14
Anti-Spam ............................................................................................................................................................... 28
information saved on the device ............................................................................................................................. 37
 Loading...