

Page 1

Kaspersky Endpoint Security 8 for Windows®
Administrator Guide
APPLICATION VERSION: 8.0
Page 2

2
Dear User,
Thank you for choosing our product! We hope that you will find this documentation useful and that it will provide answers
to most questions that may arise.
Warning: This document is the property of Kaspersky Lab ZAO (herein also referred to as Kaspersky Lab): all rights to
this document are reserved by the copyright laws of the Russian Federation and by international treaties. Illegal
reproduction or distribution of this document or parts hereof will result in civil, administrative, or criminal liability under
applicable law.
Any type of reproduction or distribution of any materials, including translations, may be allowed only with written
permission from Kaspersky Lab.
This document and related graphic images can be used exclusively for informational, non-commercial, or personal use.
This document may be amended without prior notice. The latest version of this document can be found on the Kaspersky
Lab website, at http://www.kaspersky.com/docs.
Kaspersky Lab assumes no liability for the content, quality, relevance, or accuracy of any third-party materials used
herein, or for any potential harm that may arise out of using such materials.
Document revision date: 9/30/11
© 2011 Kaspersky Lab ZAO. All Rights Reserved.
http://www.kaspersky.com
http://support.kaspersky.com/
Page 3

3
CONTENTS
ABOUT THIS GUIDE ................................................................................................................................................... 10
In this Guide ........................................................................................................................................................... 10
Document conventions ........................................................................................................................................... 11
SOURCES OF INFORMATION ABOUT THE APPLICATION ..................................................................................... 13
Sources of information for independent research ................................................................................................... 13
Discussing Kaspersky Lab applications on the Forum ........................................................................................... 14
Contacting the Documentation Development Team by email ................................................................................. 14
KASPERSKY ENDPOINT SECURITY 8 FOR WINDOWS .......................................................................................... 15
What's new ............................................................................................................................................................. 15
Distribution kit ......................................................................................................................................................... 16
Organizing computer protection .............................................................................................................................. 17
Service for registered users .................................................................................................................................... 19
Hardware and software requirements ..................................................................................................................... 19
INSTALLING AND REMOVING THE APPLICATION .................................................................................................. 21
Installing the application ......................................................................................................................................... 21
About ways to install the application ................................................................................................................. 21
Installing the application by using the Setup Wizard ......................................................................................... 22
Installing the application from the command line .............................................................................................. 25
Installing the application through the Group Policy Object Editor snap-in ......................................................... 27
Description of setup.ini file settings ................................................................................................................... 27
Initial configuration of the application ................................................................................................ ................ 30
Upgrading from a previous version of the application ............................................................................................. 33
About ways to upgrade an old application version ............................................................................................ 33
Upgrading an old application version through the Group Policy Object Editor snap-in ..................................... 34
Removing the application ....................................................................................................................................... 35
About ways to remove the application .............................................................................................................. 35
Removing the application by using the Setup Wizard ....................................................................................... 35
Removing the application from the command line ............................................................................................ 37
Removing the application through the Group Policy Object Editor snap-in ....................................................... 37
APPLICATION LICENSING ......................................................................................................................................... 38
About the End User License Agreement ................................................................................................................ 38
About data submission ........................................................................................................................................... 38
About the License ................................................................................................................................................... 39
About activation code ............................................................................................................................................. 39
About the key file .................................................................................................................................................... 40
About application activation methods ..................................................................................................................... 40
Managing the license .............................................................................................................................................. 41
Using the Activation Wizard to activate the application ..................................................................................... 41
Buying a license ................................................................................................................................................ 41
Renewing a license ........................................................................................................................................... 42
Viewing license information............................................................................................................................... 42
Activation Wizard .............................................................................................................................................. 42
APPLICATION INTERFACE ........................................................................................................................................ 45
Application icon in the taskbar notification area ...................................................................................................... 45
Page 4

A D M I N I S T R A T O R G U I D E
4
Application icon context menu ................................................................................................................................ 46
Main application window ......................................................................................................................................... 46
Application settings window .................................................................................................................................... 48
STARTING AND STOPPING THE APPLICATION ...................................................................................................... 49
Enabling and disabling automatic startup of the application ................................................................................... 49
Starting and stopping the application manually ...................................................................................................... 49
Pausing and resuming computer protection and control ......................................................................................... 50
PROTECTING THE COMPUTER FILE SYSTEM. FILE ANTI-VIRUS ......................................................................... 51
About File Anti-Virus ............................................................................................................................................... 51
Enabling and disabling File Anti-Virus .................................................................................................................... 51
Automatically pausing File Anti-Virus ..................................................................................................................... 52
Configuring File Anti-Virus ...................................................................................................................................... 53
Changing the file security level ......................................................................................................................... 54
Changing the action to take on infected files..................................................................................................... 55
Editing the protection scope of File Anti-Virus................................................................................................... 55
Using Heuristic Analyzer with File Anti-Virus .................................................................................................... 56
Using scan technologies in the operation of File Anti-Virus .............................................................................. 57
Optimizing file scanning .................................................................................................................................... 58
Scanning compound files .................................................................................................................................. 58
Changing the scan mode .................................................................................................................................. 59
SYSTEM WATCHER ................................................................................................................................................... 61
About System Watcher ........................................................................................................................................... 61
Enabling and disabling System Watcher ................................................................................................................ 62
Using behavior stream signatures (BSS) ................................................................................................................ 63
Rolling back malware actions during disinfection ................................................................................................... 63
EMAIL PROTECTION. MAIL ANTI-VIRUS .................................................................................................................. 64
About Mail Anti-Virus .............................................................................................................................................. 64
Enabling and disabling Mail Anti-Virus ................................................................................................................... 64
Configuring Mail Anti-Virus ..................................................................................................................................... 65
Changing the mail security level ....................................................................................................................... 67
Changing the action to take on infected email messages ................................................................................. 67
Editing the protection scope of Mail Anti-Virus .................................................................................................. 67
Scanning compound files that are attached to email messages ....................................................................... 69
Filtering attachments in email messages .......................................................................................................... 69
Using heuristic analysis .................................................................................................................................... 70
Scanning emails in Microsoft Office Outlook ................................................................ ..................................... 70
Scanning emails in The Bat! ............................................................................................................................. 71
COMPUTER PROTECTION ON THE INTERNET. WEB ANTI-VIRUS........................................................................ 73
About Web Anti-Virus ............................................................................................................................................. 73
Enabling and disabling Web Anti-Virus ................................................................................................................... 73
Configuring Web Anti-Virus .................................................................................................................................... 74
Changing the web traffic security level .............................................................................................................. 75
Changing the action to take on malicious web traffic objects ............................................................................ 76
Scanning URLs against databases of suspicious and phishing web addresses ............................................... 76
Using Heuristic Analyzer with Web Anti-Virus ................................................................................................... 77
Configuring the duration of caching web traffic ................................................................................................. 78
Editing the list of trusted URLs .......................................................................................................................... 78
Page 5

C O N T E N T S
5
PROTECTION OF INSTANT MESSAGING CLIENT TRAFFIC. IM ANTI-VIRUS ........................................................ 80
About IM Anti-Virus ................................................................................................................................................. 80
Enabling and disabling IM Anti-Virus ...................................................................................................................... 80
Configuring IM Anti-Virus ........................................................................................................................................ 81
Creating the protection scope of IM Anti-Virus .................................................................................................. 82
Scanning URLs against databases of suspicious and phishing URLs with IM Anti-Virus ................................. 82
Using Heuristic Analyzer with IM Anti-Virus ...................................................................................................... 83
NETWORK PROTECTION .......................................................................................................................................... 84
Firewall ................................................................................................................................................................... 84
About Firewall ................................................................................................................................................... 84
Enabling or disabling Firewall ........................................................................................................................... 85
About network rules .......................................................................................................................................... 85
About the network connection status ................................................................................................................ 86
Changing the network connection status .......................................................................................................... 86
Managing network packet rules ........................................................................................................................ 87
Managing network rules for application groups ................................................................................................. 91
Managing network rules for applications ........................................................................................................... 98
Configuring advanced Firewall settings .......................................................................................................... 103
Network Attack Blocker......................................................................................................................................... 104
About Network Attack Blocker ......................................................................................................................... 104
Enabling and disabling Network Attack Blocker .............................................................................................. 105
Editing the settings used in blocking an attacking computer ........................................................................... 106
Monitoring network traffic...................................................................................................................................... 106
About network traffic monitoring ...................................................................................................................... 106
Configuring the settings of network traffic monitoring ..................................................................................... 107
Network Monitor ................................................................................................................................................... 110
About Network Monitor ................................................................................................................................... 110
Starting Network Monitor................................................................................................................................. 110
APPLICATION STARTUP CONTROL ....................................................................................................................... 111
About Application Startup Control ......................................................................................................................... 111
Enabling and disabling Application Startup Control .............................................................................................. 111
About Application Startup Control rules ................................................................................................................ 113
Managing Application Startup Control rules.......................................................................................................... 115
Adding and editing an Application Startup Control rule ................................................................................... 115
Adding a trigger condition for an Application Startup Control rule ................................................................... 116
Editing the status of an Application Startup Control rule ................................................................................. 118
Editing Application Startup Control message templates ....................................................................................... 119
About Application Startup Control operation modes ............................................................................................. 120
Switching from Black List mode to White List mode ............................................................................................. 120
Stage 1. Gathering information about applications that are installed on user computers ................................ 121
Stage 2. Creating application categories ........................................................................................................ 121
Stage 3. Creating allow rules of Application Startup Control ........................................................................... 122
Stage 4. Testing allow rules of Application Startup Control ............................................................................ 123
Stage 5. Switching to White List mode ............................................................................................................ 123
Changing the status of an Application Startup Control rule on the Kaspersky Security Center side ............... 124
APPLICATION PRIVILEGE CONTROL ..................................................................................................................... 125
About Application Privilege Control ...................................................................................................................... 125
Page 6

A D M I N I S T R A T O R G U I D E
6
Enabling and disabling Application Privilege Control ............................................................................................ 126
Placing applications into groups ........................................................................................................................... 127
Modifying a trust group ......................................................................................................................................... 128
Managing Application Control rules ................................................................ ................................ ...................... 129
Editing control rules for trust groups and application groups........................................................................... 129
Editing an application control rule ................................................................................................................... 130
Downloading and updating application control rules from the Kaspersky Security Network database ............ 131
Disabling the inheritance of restrictions from the parent process .................................................................... 132
Excluding specific application actions from application control rules .............................................................. 133
Configuring storage settings for control rules that govern unused applications .............................................. 133
Protecting operating system resources and identity data ..................................................................................... 134
Adding a category of protected resources ...................................................................................................... 134
Adding a protected resource ........................................................................................................................... 135
Disabling resource protection .......................................................................................................................... 136
DEVICE CONTROL ................................................................................................................................................... 137
About Device Control ............................................................................................................................................ 137
Enabling and disabling Device Control ................................................................................................................. 138
About device and connection bus access rules .................................................................................................... 139
About trusted devices ........................................................................................................................................... 139
Standard decisions on access to devices ............................................................................................................. 139
Editing a device access rule ................................................................................................................................. 140
Editing a connection bus access rule ................................................................................................................... 141
Actions with trusted devices ................................................................................................................................. 142
Adding a device to the list of trusted devices .................................................................................................. 142
Editing the Users setting of a trusted device ................................................................................................... 143
Removing a device from the list of trusted devices ......................................................................................... 143
Editing templates of Device Control messages .................................................................................................... 144
Obtaining access to a blocked device .................................................................................................................. 144
Creating a device access code ............................................................................................................................. 146
WEB CONTROL ........................................................................................................................................................ 148
About Web Control ............................................................................................................................................... 148
Enabling and disabling Web Control ..................................................................................................................... 149
About web resource access rules ......................................................................................................................... 150
Actions with web resource access rules ............................................................................................................... 150
Adding and editing a web resource access rule .............................................................................................. 151
Assigning priorities to web resource access rules ........................................................................................... 152
Testing web resource access rules ................................................................................................................. 153
Enabling and disabling a web resource access rule ....................................................................................... 154
Exporting and importing the list of web resource addresses................................................................................. 154
Editing masks for web resource addresses .......................................................................................................... 155
Editing templates of Web Control messages ........................................................................................................ 157
UPDATING DATABASES AND APPLICATION SOFTWARE MODULES ................................................................. 159
About database and application module updates ................................................................................................. 159
About update sources ........................................................................................................................................... 160
Update settings configuration ............................................................................................................................... 160
Adding an update source ................................................................................................................................ 161
Selecting the update server region ................................................................................................................. 162
Configuring updates from a shared folder ....................................................................................................... 162
Page 7

C O N T E N T S
7
Selecting the update task run mode ................................................................................................................ 164
Starting an update task under the rights of a different user account ............................................................... 165
Starting and stopping an update task ................................................................................................................... 165
Rolling back the last update .................................................................................................................................. 166
Configuring proxy server settings ......................................................................................................................... 166
Enabling and disabling scanning of files in Quarantine after an update ............................................................... 167
SCANNING THE COMPUTER ................................................................................................................................... 168
About scan tasks .................................................................................................................................................. 168
Starting or stopping a scan task ........................................................................................................................... 169
Configuring scan task settings .............................................................................................................................. 169
Changing the file security level ....................................................................................................................... 171
Changing the action to take on infected files................................................................................................... 171
Editing the scan scope .................................................................................................................................... 172
Optimizing file scanning .................................................................................................................................. 173
Scanning compound files ................................................................................................................................ 174
Selecting the scan method .............................................................................................................................. 175
Using scan technologies ................................................................................................................................. 175
Selecting the scan task run mode ................................................................................................................... 175
Starting a scan task under the account of a different user .............................................................................. 176
Scanning removable drives when they are connected to the computer .......................................................... 177
Handling unprocessed files................................................................................................................................... 178
About unprocessed files .................................................................................................................................. 178
Managing the list of unprocessed files ............................................................................................................ 178
VULNERABILITY SCAN ............................................................................................................................................ 182
About Vulnerability Monitor ................................................................ ................................................................... 182
Enabling and disabling Vulnerability Monitor ........................................................................................................ 182
Viewing information about vulnerabilities of running applications ......................................................................... 183
About the Vulnerability Scan task ......................................................................................................................... 184
Starting or stopping the Vulnerability Scan task ................................................................................................... 184
Creating the vulnerability scan scope ................................................................................................................... 185
Selecting the Vulnerability Scan task run mode .................................................................................................... 185
Configuring the launch of the Vulnerability Scan task under a different user account .......................................... 186
Handling detected vulnerabilities .......................................................................................................................... 188
About vulnerabilities ........................................................................................................................................ 188
Managing the list of vulnerabilities .................................................................................................................. 189
MANAGING REPORTS ............................................................................................................................................. 193
Principles of managing reports ............................................................................................................................. 193
Configuring report settings.................................................................................................................................... 194
Configuring the maximum report storage term ................................................................................................ 195
Configuring the maximum size of the report file .............................................................................................. 195
Generating reports ................................................................................................................................................ 195
Viewing reported event information in a separate section .................................................................................... 196
Saving a report to file ............................................................................................................................................ 196
Removing information from reports ...................................................................................................................... 197
NOTIFICATION SERVICE ......................................................................................................................................... 199
About Kaspersky Endpoint Security notifications .................................................................................................. 199
Configuring the notification service ....................................................................................................................... 199
Page 8

A D M I N I S T R A T O R G U I D E
8
Configuring event log settings ......................................................................................................................... 200
Configuring delivery of on-screen and email notifications ............................................................................... 200
Viewing Microsoft Windows Event Log ................................................................................................................. 201
MANAGING QUARANTINE AND BACKUP ............................................................................................................... 202
About Quarantine and Backup .............................................................................................................................. 202
Configuring Quarantine and Backup settings ....................................................................................................... 203
Configuring the maximum storage term for files in Quarantine and file copies in Backup ............................... 203
Configuring the maximum size of Quarantine and Backup ............................................................................. 204
Managing Quarantine ........................................................................................................................................... 204
Moving a file to Quarantine ............................................................................................................................. 205
Starting a Custom Scan task for files in Quarantine ........................................................................................ 206
Restoring files from Quarantine ...................................................................................................................... 206
Deleting files from Quarantine ......................................................................................................................... 207
Sending probably infected files to Kaspersky Lab for examination ................................................................. 207
Managing Backup ................................................................................................................................................. 208
Restoring files from Backup ............................................................................................................................ 208
Deleting backup copies of files from Backup................................................................................................... 209
ADVANCED APPLICATION SETTINGS ................................................................ ................................ .................... 210
Trusted zone ......................................................................................................................................................... 210
About the trusted zone .................................................................................................................................... 210
Configuring the trusted zone ........................................................................................................................... 212
Kaspersky Endpoint Security Self-Defense .......................................................................................................... 217
About Kaspersky Endpoint Security Self-Defense .......................................................................................... 217
Enabling or disabling Self-Defense ................................................................................................................. 217
Enabling or disabling Remote Control Defense .............................................................................................. 218
Supporting remote administration applications ............................................................................................... 218
Performance of Kaspersky Endpoint Security and compatibility with other applications ...................................... 219
About the performance of Kaspersky Endpoint Security and compatibility with other applications ................. 219
Selecting types of detectable threats .............................................................................................................. 220
Enabling or disabling Advanced Disinfection technology ................................................................................ 221
Enabling or disabling energy-saving mode ..................................................................................................... 221
Enabling or disabling conceding of resources to other applications ................................................................ 222
Password protection ............................................................................................................................................. 223
About restricting access to Kaspersky Endpoint Security ............................................................................... 223
Enabling and disabling password protection ................................................................................................... 223
Modifying the Kaspersky Endpoint Security access password........................................................................ 225
REMOTE ADMINISTRATION THROUGH KASPERSKY SECURITY CENTER ........................................................ 226
Managing Kaspersky Endpoint Security ............................................................................................................... 226
Starting and stopping Kaspersky Endpoint Security on a client computer ...................................................... 226
Configuring Kaspersky Endpoint Security settings .......................................................................................... 227
Managing tasks .................................................................................................................................................... 228
About tasks for Kaspersky Endpoint Security ................................................................................................. 228
Creating a local task ....................................................................................................................................... 229
Creating a group task ...................................................................................................................................... 230
Creating a task for a set of computers ............................................................................................................ 230
Starting, stopping, suspending, and resuming a task ...................................................................................... 230
Editing task settings ................................................................ ................................................................ ........ 232
Managing policies ................................................................................................................................................. 233
Page 9

C O N T E N T S
9
About policies .................................................................................................................................................. 234
Creating a policy ............................................................................................................................................. 234
Editing policy settings ..................................................................................................................................... 235
Viewing user complaints in the Kaspersky Security Center event storage ........................................................... 235
PARTICIPATING IN KASPERSKY SECURITY NETWORK ...................................................................................... 237
About participation in Kaspersky Security Network .............................................................................................. 237
Enabling and disabling use of Kaspersky Security Network ................................................................................. 238
Checking the connection to Kaspersky Security Network ..................................................................................... 238
CONTACTING TECHNICAL SUPPORT .................................................................................................................... 240
How to obtain technical support ............................................................................................................................ 240
Collecting information for Technical Support ........................................................................................................ 240
Creating a trace file ......................................................................................................................................... 241
Sending data files to the Technical Support server ......................................................................................... 241
Saving data files on the hard drive .................................................................................................................. 242
Technical support by phone .................................................................................................................................. 242
Obtaining technical support via Personal Cabinet ................................................................................................ 243
GLOSSARY ............................................................................................................................................................... 245
KASPERSKY LAB ZAO ............................................................................................................................................. 249
INFORMATION ABOUT THIRD-PARTY CODE ........................................................................................................ 250
TRADEMARK NOTICES ............................................................................................................................................ 251
INDEX ........................................................................................................................................................................ 252
Page 10

10
ABOUT THIS GUIDE
IN THIS SECTION:
In this Guide .................................................................................................................................................................... 10
Document conventions .................................................................................................................................................... 11
This document is the Administrator Guide for Kaspersky Endpoint Security 8 for Windows (hereafter referred to
as Kaspersky Endpoint Security).
This Guide is designed for administrators of local corporate networks and for specialists who are responsible for antivirus protection of enterprise computers. For regular users whose workplace computers have Kaspersky Endpoint
Security installed, this Guide can help to solve to solve certain tasks.
This Guide is intended to do the following:
Help to install the application on the computer, and to activate and configure it with regard to the user's required
tasks.
Provide a readily searchable source of information for questions related to operation of the application.
Describe additional sources of information about the application and ways of receiving technical support.
IN THIS GUIDE
This Guide comprises the following sections.
Sources of information about the application (see page 13)
This section describes sources of information about the application and lists websites that you can use to discuss
application operation.
Kaspersky Endpoint Security 8 for Windows (see page 15)
This section describes the features of the application and provides brief information about application functions and
components. You will learn what items are included in the distribution kit and what services are available for registered
users of the application. This section provides information about the software and hardware requirements that a
computer must meet to allow installation.
Installing and removing the application (see page 21)
This section guides you through installing Kaspersky Endpoint Security on your computer, completing initial
configuration, upgrading from a previous version of the application, and removing the application from the computer.
Application licensing (see page 38)
This section contains information about the basic concepts of application activation. This section describes the purpose
of the End User License Agreement, the types of licenses, the ways to activate the application, and renew your license.
Page 11

A B O U T T H I S G U I D E
11
Application interface (see page 45)
This section describes the basic elements of the graphical interface of the application: the application icon and its context
menu, main application window, and application settings window.
Starting and stopping the application (see page 49)
This section describes how you can configure automatic startup of the application, start or stop the application manually,
and pause or resume protection and control components.
Typical tasks (see the section "Protecting the computer file system. File Anti-Virus" on page 51)
A group of sections that describe typical tasks and application components. Those sections provide detailed information
about how to configure tasks and application components.
Remote administration through Kaspersky Security Center (see page 226)
This section describes Kaspersky Endpoint Security administration through Kaspersky Security Center.
Participating in Kaspersky Security Network (see page 237)
This section contains information about participation in Kaspersky Security Network and instructions on how to enable or
disable use of Kaspersky Security Network.
Contacting Technical Support (see page 240)
This section provides information about how to obtain technical support and the requirements for receiving help from
Technical Support.
Glossary (see page 245)
This section contains a list of terms that are mentioned in the document and their definitions.
Kaspersky Lab ZAO (see page 249)
This section provides information about Kaspersky Lab ZAO.
Index
This section allows you to quickly find required information within the document.
DOCUMENT CONVENTIONS
The document text is accompanied by semantic elements to which we recommend paying particular attention: warnings,
hints, and examples.
Document conventions are used to highlight semantic elements. The following table shows document conventions and
examples of their use.
Page 12
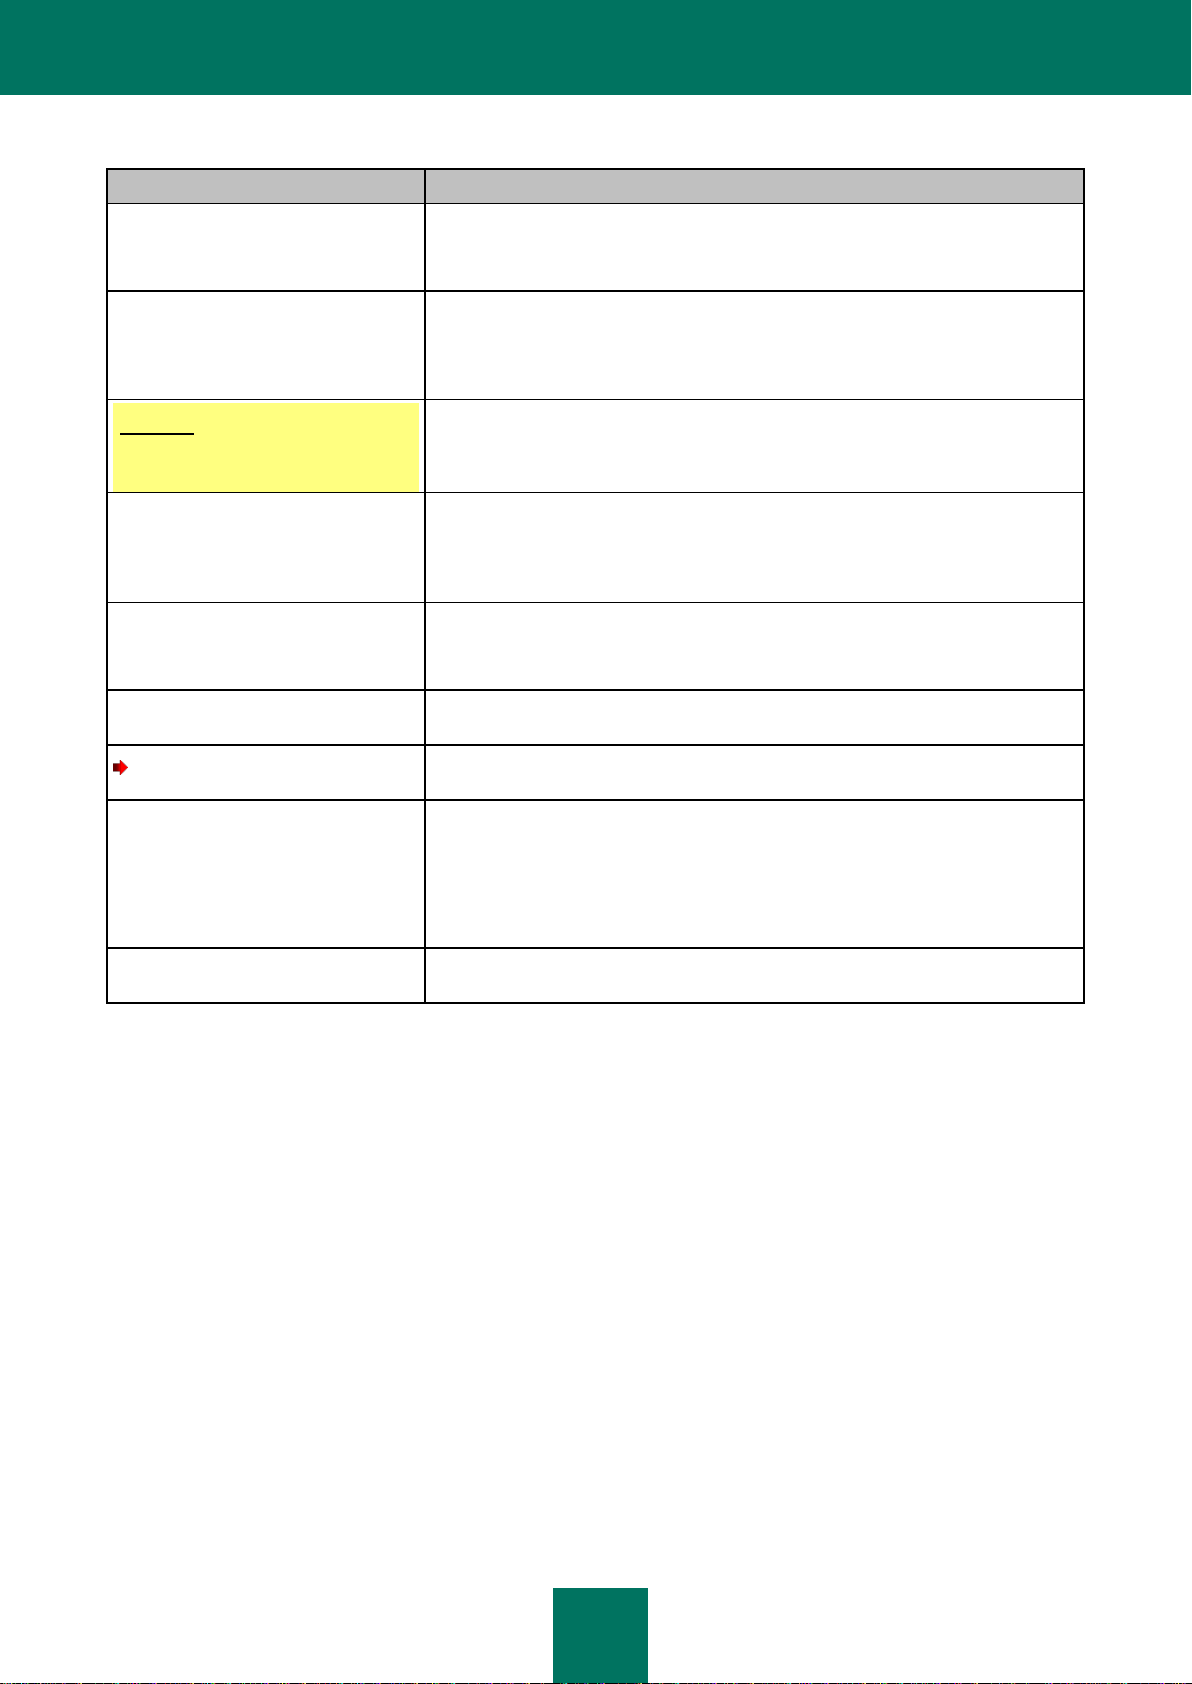
A D M I N I S T R A T O R G U I D E
12
Sample text
Description of document convention
Note that ...
Warnings are highlighted in red and boxed.
Warnings provide information about possible unwanted actions that may lead to
data loss or failures in computer operation.
It is recommended to use...
Notes are boxed.
Notes provide auxiliary and reference information. Notes may contain useful
hints, recommendations, specific values, or important special cases in operation
of the application.
Example:
...
Examples are listed in respective sections under the heading "Example".
Update means...
The Databases are out of date event
occurs.
The following semantic elements are italicized in the text:
New terms
Names of application statuses and events
Press ENTER.
Press Option+N.
Names of keyboard keys appear in bold and are capitalized.
Names of keys that are connected by a + (plus) sign indicate the use of a key
combination. Those keys must be pressed simultaneously.
Click the Enable button.
Names of application interface elements, such as entry fields, menu items, and
buttons, are set off in bold.
To create a trace file:
Introductory phrases of instructions are italicized and are accompanied by the
arrow sign.
In the command line, enter the
following text: kav update
The following message then appears:
Specify the date in dd:mm:yy
format.
The following types of text content are set off with a special font (Courier):
Text in the command line
Text of messages that the application displays on screen
Data that the user must enter.
<IP address of your
computer>
Variables are enclosed in angle brackets. Each of the variables should be
replaced by the corresponding value, omitting angle brackets.
Table 1. Document conventions
Page 13

13
SOURCES OF INFORMATION ABOUT THE
IN THIS SECTION:
Sources of information for independent research ............................................................................................................ 13
Discussing Kaspersky Lab applications on the Forum .................................................................................................... 14
Contacting the Documentation Development Team by email .......................................................................................... 14
APPLICATION
This section describes sources of information about the application and lists websites that you can use to discuss
application operation.
You can select the most suitable information source, depending on the level of importance and urgency of the issue.
SOURCES OF INFORMATION FOR INDEPENDENT RESEARCH
You can use the following sources to independently find information about the application:
Application page on the Kaspersky Lab website
Page on the Kaspersky Lab Technical Support (hereafter also "Technical Support") website (Knowledge Base)
Online help
Documentation
If you cannot find a solution for your issue, we recommend that you contact Kaspersky Lab Technical Support (see the
section "Technical support by phone" on page 242).
An Internet connection is required to use information sources on the Kaspersky Lab website.
Application page on the Kaspersky Lab website
The Kaspersky Lab website features an individual page for each application.
On the page http://www.kaspersky.com/endpoint-security-windows, you can view general information about the
application, its functions, and its features.
The page http://www.kaspersky.com contains a link to the eStore. There you can purchase or renew the application.
Application page on the Technical Support website (Knowledge Base)
Knowledge Base is a section on the Technical Support website that provides advice on using Kaspersky Lab
applications. Knowledge Base comprises reference articles that are grouped by topic.
On the page of the application in the Knowledge Base, you can read articles that provide useful information,
recommendations, and answers to frequently asked questions on how to purchase, install, and use Kaspersky Endpoint
Security for workstations http://support.kaspersky.com/kes8wks and for file servers http://support.kaspersky.com/kes8fs.
Page 14

A D M I N I S T R A T O R G U I D E
14
Articles may provide answers to questions relating not just to Kaspersky Endpoint Security, but also to other Kaspersky
Lab applications. They also may contain news from Technical Support.
Online help
The online help of the application comprises help files.
Context help provides information about each window of the application, listing and describing the corresponding settings
and a list of tasks.
Full help provides detailed information about how to manage computer protection by using the application.
Administrator's Guide
You can download the Administrator Guide in PDF format from the Download section on the Kaspersky Lab website.
Consult this document for help with installing and activating the application on the computers of a local area network and
with configuring application settings. The document provides detailed information about how to manage computer
protection by using the application.
DISCUSSING KASPERSKY LAB APPLICATIONS ON THE FORUM
If your question does not require an urgent answer, you can discuss it with Kaspersky Lab specialists and other users on
our Forum (http://forum.kaspersky.com/index.php?showforum=5).
In this forum you can view existing topics, leave your comments, and create new discussion topics.
CONTACTING THE DOCUMENTATION DEVELOPMENT TEAM BY EMAIL
To contact the Documentation Development Team, send an email. In the email subject line, type "Kaspersky Help
Feedback: Kaspersky Endpoint Security 8 for Windows".
Page 15

15
KASPERSKY ENDPOINT SECURITY 8 FOR
IN THIS SECTION:
What's new ...................................................................................................................................................................... 15
Distribution kit .................................................................................................................................................................. 16
Organizing computer protection ...................................................................................................................................... 16
Service for registered users ............................................................................................................................................ 19
Hardware and software requirements ............................................................................................................................. 19
WINDOWS
This section describes the features of the application and provides brief information about application functions and
components. You will learn what items are included in the distribution kit and what services are available for registered
users of the application. This section provides information about the software and hardware requirements that a
computer must meet to allow installation.
WHAT'S NEW
Kaspersky Endpoint Security 8 for Windows offers the following new features:
The Application Control functionality has been added, which lets you allow or block startup of individual
applications depending on the policy of the IT department of your company. Application Control comprises the
following components:
Application Startup Control, which operates on the basis of allow and block rules that are specified by the
administrator of the local area network. Rules can be created on the basis of software categories that are
provided by Kaspersky Lab or conditions that are specified by the administrator of the local area network.
Thanks to integration with Active Directory®, the rules that allow or block startup of applications are
specified for Active Directory users and user groups.
Application Privilege Control, which blocks application activity depending on the level of application
danger and reputation information. Information on the reputation of applications is provided by Kaspersky
Lab.
Vulnerability Monitor, which detects vulnerabilities both in applications that are started on the computer
and in all applications that are installed on the computer.
The Web Control component has been added, which lets you restrict or block user access to web resources
according to rules. Categories of web content, data types, and individual web addresses or their groups can be
specified as rule parameters. Thanks to integration with Active Directory, web access rules are defined for
Active Directory users and user groups.
New main application window interface: the main window shows statistics about the operation of control and
protection components and the performance of update and scan tasks.
Improvements:
Enhanced anti-virus protection, including through integration with Kaspersky Security Network. Integration with
Kaspersky Security Network provides information about file and web address reputations.
Page 16

A D M I N I S T R A T O R G U I D E
16
Improved advanced disinfection technology.
Improved self-defense technology against changes to application files, memory processes, and system registry
values.
Improved proactive defense technology:
The System Watcher component logs application activity.
The BSS (Behavior Stream Signatures) proactive defense technology detects malicious behavior based on
regularly updated signatures.
You can now roll back malicious actions of applications during disinfection.
The Firewall component has been improved, letting you monitor inbound and outbound traffic across ports, IP
addresses, and applications that generate traffic.
The Intrusion Detection System (IDS) technology has been improved, with the addition of support for exclusions
that are specified by using IP addresses.
The Device Control component has been improved:
Sets of supported buses and device types have been expanded.
Device serial numbers can now be used as criteria.
It is now possible to restrict access to devices with file systems at the level of reading / writing.
It is now possible to set a schedule for users' access to devices.
Integration with Active Directory has been added.
Scanning of traffic over the IRC, Mail.ru, and AIM® protocols has been added.
DISTRIBUTION KIT
Kaspersky Endpoint Security is distributed through online stores of Kaspersky Lab (for example,
http://www.kaspersky.com, in the eStore section) or partner companies.
The distribution kit contains the following items:
Files that are required for installing the application in any of the available ways (see the section "About ways to
install the application" on page 21).
The file ksn.txt, in which you can read through the terms of participation in Kaspersky Security Network (see the
section "Participating in Kaspersky Security Network" on page 237).
The file license.txt, which you can view to look through the License Agreement. The License Agreement
specifies the terms of use of the application.
Information that is required for application activation is sent to you by email after payment.
For more details on purchase methods and the distribution kit, contact the Sales Department.
Page 17

K A S P E R S K Y E N D P O I N T S E C U R I T Y 8 F O R W I N D O W S
17
ORGANIZING COMPUTER PROTECTION
Kaspersky Endpoint Security provides comprehensive computer protection against known and new threats, network and
phishing attacks, and other unwanted content.
Each type of threat is handled by a dedicated component. Components can be enabled or disabled independently of one
another, and their settings can be configured.
In addition to the real-time protection that the application components provide, we recommend that you regularly scan
the computer for viruses and other threats. This helps to rule out the possibility of spreading malware that is undetected
by protection components due to a low security level setting or for other reasons.
To keep Kaspersky Endpoint Security up to date, you must update the databases and modules that the application uses.
The application is updated automatically by default, but if necessary, you can update the databases and application
modules manually.
The following application components are control components:
Application Startup Control. This component keeps track of user attempts to start applications and regulates
the startup of applications.
Application Privilege Control. This component registers the actions of applications in the operating system
and regulates application activity depending on the trust group of a particular application. A set of rules is
specified for each group of applications. These rules regulate the access of applications to user data and to
resources of the operating system. Such data includes user files (My Documents folder, cookies, user activity
information) and files, folders, and registry keys that contain settings and important information from the most
frequently used applications.
Vulnerability Monitor. The Vulnerability Monitor component runs a real-time vulnerability scan of applications
that are started or are running on the user's computer.
Device Control. This component lets you set flexible restrictions on access to data storage devices (such as
hard drives, removable media, tape drives, and CDs and DVDs), data transmission equipment (such as
modems), equipment that converts information into hard copies (such as printers), or interfaces for connecting
devices to computers (such as USB, Bluetooth, and Infrared).
Web Control. This component lets you set flexible restrictions on access to web resources for different user
groups.
The operation of control components is based on the following rules:
Application Startup Control uses application startup control rules (see the section "About Application Startup
Control rules" on page 113).
Application Privilege Control uses application control rules (see the section "About Application Privilege Control"
on page 125).
Device Control uses device access rules and connection bus access rules (see the section "About device and
connection bus access rules" on page 139).
Web Control uses web resource access rules (see the section "About web resource access rules" on page 150).
The following application components are protection components:
File Anti-Virus. This component protects the file system of the computer from infection. File Anti-Virus starts
together with Kaspersky Endpoint Security, continuously remains active in computer memory, and scans all files
that are opened, saved, or started on the computer and on all connected drives. File Anti-Virus intercepts every
attempt to access a file and scans the file for viruses and other threats.
System Watcher. This component keeps a record of application activity on the computer and provides this
information to other components to ensure more effective protection.
Page 18

A D M I N I S T R A T O R G U I D E
18
Mail Anti-Virus. This component scans incoming and outgoing email messages for viruses and other threats.
Web Anti-Virus. This component scans traffic that arrives on the user's computer via the HTTP and FTP
protocols, and checks whether URLs are listed as suspicious or phishing web addresses.
IM Anti-Virus. This component scans traffic that arrives on the computer via instant messaging protocols. It
ensures the safe operation of numerous instant messaging applications.
Firewall. This component protects personal data that is stored on the computer and blocks all kinds of threats to
the operating system while the computer is connected to the Internet or to a local area network. The component
filters all network activity according to two types of rules: application network rules and network packet rules
(see the section "About network rules" on page 85).
Network Monitor. This component lets you view network activity of the computer in real time.
Network Attack Blocker. This component inspects inbound network traffic for activity that is typical of network
attacks. On detecting an attempted network attack that targets your computer, Kaspersky Endpoint Security
blocks network activity from the attacking computer.
The following tasks are provided in Kaspersky Endpoint Security:
Full Scan. Kaspersky Endpoint Security thoroughly scans the operating system, including RAM, objects that are
loaded at startup, backup storage of the operating system, and all hard drives and removable drives.
Custom Scan. Kaspersky Endpoint Security scans the objects that are selected by the user.
Critical Areas Scan. Kaspersky Endpoint Security scans objects that are loaded at operating system startup,
RAM, and objects that are targeted by rootkits.
Update. Kaspersky Endpoint Security downloads updated application databases and modules. Updating keeps
the computer protected against new viruses and other threats at all times.
Vulnerability Scan. Kaspersky Endpoint Security scans the operating system and installed software for
vulnerabilities. This scanning ensures timely detection and removal of potential problems that intruders can
exploit.
Remote administration through Kaspersky Security Center
Kaspersky Security Center makes it possible to remotely start and stop Kaspersky Endpoint Security on a client
computer, and to remotely manage and configure application settings.
Service functions and applications
Kaspersky Endpoint Security comes with a number of service functions. Service functions are meant to keep the
application up to date, expand its functionality, and assist the user with operating it.
Reports. In the course of its operation, the application keeps a report on each application component and task.
The report contains a list of Kaspersky Endpoint Security events and all operations that the application
performs. In case of an incident, you can send reports to Kaspersky Lab, where Technical Support specialists
can look into the issue in more detail.
Data storage. If the application detects infected or probably infected files while scanning the computer for
viruses and other threats, it blocks those files. Kaspersky Endpoint Security moves probably infected files to a
special storage called Quarantine. Kaspersky Endpoint Security stores copies of disinfected and deleted files in
Backup. Kaspersky Endpoint Security moves files that are not processed for any reason to the list of
unprocessed files. You can scan files, restore files to their original folders, manually move files to Quarantine,
and empty the data storage.
Notification service. The notification service keeps the user informed about the current protection status of the
computer and the operation of Kaspersky Endpoint Security. Notifications can be displayed on the screen or
sent by email.
Page 19

K A S P E R S K Y E N D P O I N T S E C U R I T Y 8 F O R W I N D O W S
19
Kaspersky Security Network. User participation in Kaspersky Security Network enhances the effectiveness of
computer protection through real-time collection of information on the reputation of files, web resources, and
software from users worldwide.
License. Using a license unlocks full application functionality, provides access to application database and
module updates, detailed information about the application, and assistance from Kaspersky Lab Technical
Support.
Support. All registered users of Kaspersky Endpoint Security can contact Technical Support specialists for
assistance. You can send a request from Personal Cabinet on the Technical Support website or receive
assistance from support personnel over the phone.
SERVICE FOR REGISTERED USERS
By purchasing a user license for the application, you become a registered user of Kaspersky Lab applications and can
benefit from the following services during the entire validity term of the license:
Database updates and access to new versions of the application
Consultations by phone and by email on issues that are related to installation, configuration, and use of the
application
Notifications about the release of new applications by Kaspersky Lab and of new viruses. To use this service,
subscribe to news delivery from Kaspersky Lab on the Technical Support website.
No consultations are provided on issues that are related to the functioning of operating systems or third-party
software and technologies.
HARDWARE AND SOFTWARE REQUIREMENTS
To ensure proper operation of Kaspersky Endpoint Security, your computer must meet the following requirements:
General requirements:
1 GB of free disk space on the hard drive
CD/DVD-ROM (for installing the application from a retail installation CD)
Microsoft® Internet Explorer® 7.0 or later
Microsoft Windows Installer 3.0 or later
An Internet connection for activating the application and updating application databases and modules
Hardware requirements for computers with workstation operating systems installed:
Microsoft Windows XP Professional SP3, Microsoft Windows XP Professional x64 Edition SP2:
Intel® Pentium® 1 GHz or faster processor (or compatible equivalent)
256 MB of free RAM
Microsoft Windows 7 Professional / Enterprise / Ultimate (SP0 or later), Microsoft Windows 7 Professional /
Enterprise / Ultimate (x64 Edition SP0 or later), Microsoft Windows Vista® SP2, Microsoft Windows Vista x64
Edition SP2:
Intel Pentium 2 GHz processor or faster (or compatible equivalent)
Page 20

A D M I N I S T R A T O R G U I D E
20
512 MB of free RAM
Microsoft Windows Embedded Standard 7 SP1, Microsoft Windows Embedded Standard 7 x64 Edition SP1,
Microsoft Windows Embedded POSReady 2009 latest SP:
Intel Pentium 800 GHz processor or faster (or compatible equivalent)
256 MB of free RAM
Hardware requirements for computers with file server operating systems installed:
Microsoft Windows Small Business Server 2008 Standard x64 Edition, Microsoft Windows Small Business Server
2011 Essentials / Standard (x64 Edition), Microsoft Windows Server® 2008 R2 Standard / Enterprise (x64 Edition
SP1), Microsoft Windows Server 2008 Standard / Enterprise SP2, Microsoft Windows Server 2008 Standard /
Enterprise SP2 (x64 Edition), Microsoft Windows Server 2003 R2 Standard / Enterprise SP2, Microsoft Windows
Server 2003 R2 Standard x64 Edition SP2, Microsoft Windows Server 2003 Standard SP2, Microsoft Windows
Server 2003 Standard x64 Edition SP2:
Intel Pentium 2 GHz processor or faster (or compatible equivalent)
512 MB of free RAM
Page 21

21
INSTALLING AND REMOVING THE
IN THIS SECTION:
Installing the application .................................................................................................................................................. 21
Upgrading from a previous version of the application ..................................................................................................... 33
Removing the application ................................................................................................................................................ 35
IN THIS SECTION:
About ways to install the application ............................................................................................................................... 21
Installing the application by using the Setup Wizard ....................................................................................................... 22
Installing the application from the command line ............................................................................................................. 25
Installing the application through the Group Policy Object Editor snap-in ....................................................................... 27
Description of setup.ini file settings ................................................................................................................................. 27
Initial configuration of the application .............................................................................................................................. 30
APPLICATION
This section guides you through installing Kaspersky Endpoint Security on your computer, completing initial
configuration, upgrading from a previous version of the application, and removing the application from the computer.
INSTALLING THE APPLICATION
This section describes how to install Kaspersky Endpoint Security on your computer and complete initial configuration of
the application.
ABOUT WAYS TO INSTALL THE APPLICATION
There are several ways to install Kaspersky Endpoint Security 8 for Windows on a computer:
Local installation – the application is installed on an individual computer. Starting and completing a local
installation requires direct access to the computer. A local installation can be performed in one of two modes:
Interactive, by using the Setup Wizard (see the section "Installing the application by using the Setup
Wizard" on page 22). This mode requires your involvement in the setup process.
Silent, in which case application installation is started from the command line and does not require your
involvement in the setup process (see the section "Installing the application from the command line" on
page 25).
Remote installation – installation on a computer within a network, performed remotely from the administrator's
workstation by using:
Page 22

A D M I N I S T R A T O R G U I D E
22
Kaspersky Security Center software complex (see "Kaspersky Security Center Deployment Guide")
IN THIS SECTION:
Step 1. Making sure that the computer meets installation requirements ......................................................................... 22
Step 2. Welcome page of the installation procedure ....................................................................................................... 23
Step 3. Reviewing the License Agreement...................................................................................................................... 23
Step 4. Kaspersky Security Network Data Collection Statement ..................................................................................... 23
Step 5. Selecting the installation type ............................................................................................................................. 23
Step 6. Selecting application components to install ........................................................................................................ 24
Step 7. Selecting the destination folder ........................................................................................................................... 24
Step 8. Adding exclusions from virus scanning ............................................................................................................... 24
Step 9. Preparing for application installation ................................................................................................................... 25
Step 10. Installing the application .................................................................................................................................... 25
group domain policies of Microsoft Windows Server (see the section "Installing the application through the
Group Policy Object Editor snap-in" on page 27).
We recommend closing all active applications before starting the installation of Kaspersky Endpoint Security (including
remote installation).
INSTALLING THE APPLICATION BY USING THE SETUP WIZARD
The interface of the Setup Wizard consists of a sequence of pages (steps). You can navigate between the Setup Wizard
pages by using the Back and Next buttons. To close the Setup Wizard after it completes its task, click the Finish button.
To stop the Setup Wizard at any stage, click the Cancel button.
To install the application or upgrade the application from a previous version by using the Setup Wizard:
1. Start the setup.exe file.
The Setup Wizard starts.
2. Follow the instructions of the Setup Wizard.
STEP 1. MAKING SURE THAT THE COMPUTER MEETS INSTALLATION
REQUIREMENTS
Before installing Kaspersky Endpoint Security 8 for Windows on a computer or updating a previous version of the
application, the following conditions are checked:
Whether the operating system and the Service Pack meet the software requirements for installation (see the
section "Hardware and software requirements" on page 19).
Whether the hardware and software requirements are met (see the section "Hardware and software
requirements" on page 19).
Page 23

I N S T A L L I N G A N D R E M O V I N G T H E A P P L I C A T I O N
23
Whether the user has the rights to install the software product
If any one of the previous requirements is not met, a relevant notification is displayed on the screen.
If the computer meets the above-listed requirements, the Setup Wizard searches for Kaspersky Lab applications that
may lead to conflicts when running at the same time as Kaspersky Endpoint Security. If such applications are found, you
are prompted to remove them manually.
If the detected applications include Kaspersky Anti-Virus 6.0 for Windows Workstations® MP3 / MP4 or Kaspersky AntiVirus 6.0 for Windows Servers MP3 / MP4, all data that can be migrated (such as activation details and application
settings) is preserved and used during the installation of Kaspersky Endpoint Security 8 for Windows. However,
Kaspersky Anti-Virus 6.0 for Windows Workstations MP3 / MP4 or Kaspersky Anti-Virus 6.0 for Windows Servers
MP3 / MP4 is removed automatically.
STEP 2. WELCOME PAGE OF THE INSTALLATION PROCEDURE
If the operating system on which you are installing Kaspersky Endpoint Security 8 for Windows fully meets the
requirements, a welcome page appears after you start the installation package. The welcome page notifies you of the
beginning of installation of Kaspersky Endpoint Security 8 for Windows on the computer.
To proceed with the Setup Wizard, click the Next button. To stop the Setup Wizard, click the Cancel button.
STEP 3. REVIEWING THE LICENSE AGREEMENT
During this step, you are advised to review the license agreement between you and Kaspersky Lab.
Carefully review the agreement and, if you agree with all of its terms, select the I accept the terms of the License
Agreement check box.
To return to the previous step of the Setup Wizard, click the Back button. To proceed with the Setup Wizard, click the
Next button. To stop the Setup Wizard, click the Cancel button.
STEP 4. KASPERSKY SECURITY NETWORK DATA COLLECTION STATEMENT
During this step, you are invited to participate in Kaspersky Security Network.
Review the Kaspersky Security Network Data Collection Statement:
If you accept all of the terms, on the Setup Wizard page, select the option I agree to participate in Kaspersky
Security Network.
If you do not accept the conditions of participation in Kaspersky Security Network, on the Setup Wizard page,
select the option I do not agree to participate in Kaspersky Security Network.
To return to the previous step of the Setup Wizard, click the Back button. To proceed with the Setup Wizard, click the
Next button. To stop the Setup Wizard, click the Cancel button.
STEP 5. SELECTING THE INSTALLATION TYPE
During this step, you can select the most suitable installation type of Kaspersky Endpoint Security 8 for Windows:
Full installation. If you select this type of installation, the application is installed in its entirety, with the protection
settings that are recommended by Kaspersky Lab.
Custom installation. If you select this type of installation, you are offered to select the components to be installed
(see the section "Step 6. Selecting application components to install" on page 24) and specify the destination
folder for installing the application (see the section "Step 7. Selecting the destination folder" on page 24).
Page 24

A D M I N I S T R A T O R G U I D E
24
To return to the previous step of the Setup Wizard, click the Back button. To proceed with the Setup Wizard, click the
Next button. To stop the Setup Wizard, click the Cancel button.
STEP 6. SELECTING APPLICATION COMPONENTS TO INSTALL
This step is performed if you select Custom installation of the application.
During this step, you can select the Kaspersky Endpoint Security 8 for Windows components that you want to install. All
application components are selected for installation by default.
To select a component that you want to install, click the icon next to the component name to bring up the context menu.
Then select Component will be installed on the local hard drive. For more details on what tasks are performed by the
selected component and how much disk space is required to install the component, refer to the lower part of the current
Setup Wizard page.
To view detailed information about the available space on local hard drives, click the Disk button. Information is shown in
the Available disk space window that opens.
To cancel component installation, in the context menu, select the Component will be unavailable option.
To return to the list of default components, click the Reset button.
To return to the previous step of the Setup Wizard, click the Back button. To proceed with the Setup Wizard, click the
Next button. To stop the Setup Wizard, click the Cancel button.
STEP 7. SELECTING THE DESTINATION FOLDER
This step is available if you select Custom installation of the application.
During this step, you can specify the path to the destination folder where the application will be installed. To select the
destination folder for the application, click the Browse button.
To view information about available space on local hard drives, click the Disk button. Information is shown in the
Available disk space window that opens.
To return to the previous step of the Setup Wizard, click the Back button. To proceed with the Setup Wizard, click the
Next button. To stop the Setup Wizard, click the Cancel button.
STEP 8. ADDING EXCLUSIONS FROM VIRUS SCANNING
This step is available if you select Custom installation of the application.
At this stage you can specify which exclusions from virus scanning you want to add to the application settings.
The Exclude areas that are recommended by Microsoft from virus scan scope / Exclude areas that are
recommended by Kaspersky Lab from virus scan scope check boxes exclude, respectively, areas that are
recommended by Microsoft or Kaspersky Lab from the trusted zone or includes them.
If one of these check boxes is selected, Kaspersky Endpoint Security includes, respectively, the areas that
Microsoft or Kaspersky Lab recommends in the trusted zone. Kaspersky Endpoint Security does not scan such areas for
viruses and other threats.
The Exclude areas recommended by Microsoft / Kaspersky Lab from virus scanning check box is available when
Kaspersky Endpoint Security is installed on a computer that runs on Microsoft Windows for file servers.
Page 25

I N S T A L L I N G A N D R E M O V I N G T H E A P P L I C A T I O N
25
To return to the previous step of the Setup Wizard, click the Back button. To proceed with the Setup Wizard, click the
Next button. To stop the Setup Wizard, click the Cancel button.
STEP 9. PREPARING FOR APPLICATION INSTALLATION
Because your computer may be infected with malicious programs that could interfere with installation of Kaspersky
Endpoint Security 8 for Windows, you are advised to protect the installation process.
Installation process protection is enabled by default.
If the application cannot be installed (for example, when performing remote installation with the help of Windows Remote
Desktop), you are advised to disable protection of the installation process. The inability to install may be because
protection of application installation is enabled. If this happens, abort the installation, and quit and start the Setup Wizard
from the beginning. At step 8 (Preparing for application installation), clear the Secure installation process check box.
The Add path to avp.com file to %PATH% system variable check box enables / disables an option that adds the path
to the avp.com file to the %PATH% system variable.
If the check box is selected, starting Kaspersky Endpoint Security or any of its tasks from the command line does not
require entering the path to the executable file. It is enough to enter the name of the executable file and the command to
start a particular task.
To return to the previous step of the Setup Wizard, click the Back button. To install the program, click the Install button.
To stop the Setup Wizard, click the Cancel button.
Current network connections may be terminated while the application is being installed on the computer. Most terminated
connections are restored after a short time.
STEP 10. INSTALLING THE APPLICATION
Installation of the application can take some time. Wait for it to complete.
If you are updating a previous version of the application, this step also includes settings migration and removal of the
previous version of the application.
After installation of Kaspersky Endpoint Security 8 for Windows is completed, the Initial Configuration Wizard starts (see
the section "Initial configuration of the application" on page 30).
INSTALLING THE APPLICATION FROM THE COMMAND LINE
To start the Setup Wizard from the command line,
type the following string in the command line: setup.exe or msiexec /i <installation package name>.
To install the application or upgrade from a previous version of the application in non-interactive mode (without
starting the Setup Wizard),
type the following string in the command line: setup.exe /pEULA=1 /pKSN=1|0 /pALLOWREBOOT=1|0 /s or
msiexec /i <installation package name> EULA=1 KSN=1|0 ALLOWREBOOT=1|0 /qn,
where:
EULA=1 means that you accept the terms of the license agreement. The text of the License Agreement is
included in the distribution kit of Kaspersky Endpoint Security 8 for Windows (see the section "Distribution kit"
on page 16). Accepting the terms of the License Agreement is necessary for installing the application or
updating a previous version of the application.
Page 26

A D M I N I S T R A T O R G U I D E
26
KSN=1|0 signifies agreement or refusal to participate in Kaspersky Security Network (also referred to as KSN).
This parameter is not required. If the value of the KSN parameter is not specified in the command string, it is
assumed by default that you refuse to participate in KSN. The text of the KSN participation policy is included in
the distribution kit of Kaspersky Endpoint Security 8 for Windows (see the section "Distribution kit" on page 16).
ALLOWREBOOT=1|0 signifies agreement or refusal to allow an automatic restart of the computer, if this is
required, after installation of the application or an upgrade from a previous version of the application. This
parameter is not required. If no value of the ALLOWREBOOT parameter is specified in the command string, it is
assumed by default that you do not allow automatic restart of the computer after installation of the application or
an upgrade from a previous version of the application.
A restart of the computer may be required after an upgrade from a previous version of the application, or when
Kaspersky Endpoint Security detects and removes third-party anti-virus software during installation.
The computer can be restarted automatically only in non-interactive installation mode (with the /qn key).
To install the application or upgrade from a previous version of the application with a password that authorizes
changes to application settings and operations with the application,
type the following string in the command line:
setup.exe /pKLPASSWD=***** /pKLPASSWDAREA=<password scope> or
msiexec /i <installation package name> KLPASSWD=***** KLPASSWDAREA=<password
scope> to install the application or upgrade from a previous version of the application in interactive mode.
setup.exe /pEULA=1 /pKSN=1|0 /pKLPASSWD=***** /pKLPASSWDAREA=<password scope> /s or
msiexec /i <installer package name> EULA=1 KSN=1|0 KLPASSWD=*****
KLPASSWDAREA=<password scope> ALLOWREBOOT=1|0/qn to install the application or upgrade from a
previous version of the application in non-interactive mode.
In this command string, one or more of the following values of the KLPASSWDAREA parameter can be specified
instead of <password area>, separated with a ";":
SET. Set a password for editing application settings.
EXIT. Set a password for exiting the application.
DISPROTECT. Set a password for disabling protection components and stopping scan tasks.
DISPOLICY. Set a password for disabling the Kaspersky Security Center policy.
UNINST. Set a password for removing the application from the computer.
DISCTRL. Set a password for disabling control components (Application Startup Control, Application Privilege
Control, Vulnerability Monitor, Device Control, Web Control).
REMOVELIC. Set a password for deleting the application license.
The use of the following files is supported when you install the application or upgrade from a previous version of the
application:
setup.ini (see the section "Description of setup.ini file settings" on page 27), which contains general application
setup settings
install.cfg configuration file
setup.reg
Page 27

I N S T A L L I N G A N D R E M O V I N G T H E A P P L I C A T I O N
27
The setup.ini, install.cfg, and setup.reg files must be located in the same folder as the Kaspersky Endpoint Security 8 for
Windows installation package.
INSTALLING THE APPLICATION THROUGH THE GROUP POLICY OBJECT EDITOR SNAP-IN
The Group Policy Object Editor snap-in lets you install Kaspersky Endpoint Security on enterprise workstations that
belong to a domain, without using Kaspersky Security Center.
To install Kaspersky Endpoint Security through the Group Policy Object Editor snap-in:
1. Create a shared network folder on a computer that acts as domain controller.
2. Place the MSI installation package for the new version of Kaspersky Endpoint Security in the shared network
folder that you created during the previous step.
In addition, you can copy the setup.ini file to this shared network folder (see the section "Description of setup.ini
file settings" on page 27), which contains general Kaspersky Endpoint Security setup settings, along with the
install.cfg configuration file and the key file.
3. Open the Group Policy Object Editor snap-in through the ММС console (see the Microsoft Windows Server help
files for detailed instructions on using the Editor).
4. Create a new installation package of the Group Policy Object Editor snap-in. To do so:
a. In the console tree, select Group Policy Object Computer Configuration Software
Settings Software installation.
b. Right-click to bring up the context menu of the Software installation node.
c. In the context menu, select New Package.
The standard Open window of Microsoft Windows Server opens.
d. In the standard Open window of Microsoft Windows Server, specify the path to the MSI installation package
of Kaspersky Endpoint Security.
e. In the Deploy Software window, select Assigned.
f. Click OK.
The group policy is enforced on each workstation the next time that the computer is registered in the domain.
Kaspersky Endpoint Security is then installed on all computers within the domain.
DESCRIPTION OF SETUP.INI FILE SETTINGS
The setup.ini file is used when installing the application from the command line or from the Group Policy Object Editor
snap-in. The setup.ini file is located in the folder of the Kaspersky Endpoint Security installation package.
The setup.ini file contains the following settings:
[Setup] – general application installation settings:
InstallDir – path to the application installation folder
ActivationCode – Kaspersky Endpoint Security activation code
Page 28

A D M I N I S T R A T O R G U I D E
28
Eula – acceptance or rejection of the terms of the End User License Agreement. Possible values of the Eula
parameter:
1. Specifying this value signifies acceptance of the terms of the License Agreement.
0. Specifying this value signifies rejection of the terms of the License Agreement.
KSN – agreement or refusal to participate in Kaspersky Security Network. Possible values of the KSN
parameter:
1. Specifying this value signifies agreement to participate in Kaspersky Security Network.
0. Specifying this value signifies refusal to participate in Kaspersky Security Network.
Password – set password for accessing the administration of Kaspersky Endpoint Security options and
settings
PasswordArea – specify the area that is covered by the password for accessing the administration of
Kaspersky Endpoint Security options and settings Possible values of the PasswordArea parameter:
SET. Set a password for editing application settings.
EXIT. Set a password for exiting the application.
DISPROTECT. Set a password for disabling protection components and stopping scan tasks.
DISPOLICY. Set a password for disabling the Kaspersky Security Center policy.
UNINST. Set a password for removing the application from the computer.
DISCTRL. Set a password for disabling control components (Application Startup Control, Application
Privilege Control, Vulnerability Monitor, Device Control, Web Control).
REMOVELIC. Set a password for deleting the application license.
SelfProtection – enable or disable Kaspersky Endpoint Security Self-Defense during installation. Possible
values of the SelfProtection parameter:
1. Specifying this value signifies that Self-Defense will be enabled.
0. Specifying this value signifies that Self-Defense will be disabled.
Reboot – whether to restart the computer after installation of the application, if a restart is required. Possible
values of the Reboot parameter:
1. Specifying this value signifies that the computer will be restarted, if necessary, after the application is
installed.
0. Specifying this value signifies that the computer will not be restarted after the application is installed.
MSExclusions – add applications recommended by Microsoft to exclusions from scanning. This setting is
available only for file servers that run on Microsoft Windows Server (see the section "Hardware and software
requirements" on page 19). Possible values of the MSExclusions parameter:
1. Specifying this value signifies that applications recommended by Microsoft will be added to exclusions
from scanning.
0. Specifying this value signifies that applications recommended by Microsoft will not be added to
exclusions from scanning.
Page 29

I N S T A L L I N G A N D R E M O V I N G T H E A P P L I C A T I O N
29
KLExclusions – add applications recommended by Kaspersky Lab to exclusions from scanning. Possible
values of the KLExclusions parameter:
1. Specifying this value signifies that applications recommended by Kaspersky Lab will be added to
exclusions from scanning.
0. Specifying this value signifies that applications recommended by Kaspersky Lab will not be added to
exclusions from scanning.
NoKLIM5 – whether to enable the installation of Kaspersky Endpoint Security network drivers during installation
of the application. The network drivers are installed by default. Kaspersky Endpoint Security network drivers,
which belong to the group of NDIS drivers and are responsible for intercepting network traffic for such
application components as Device Control, Web Control, Mail Anti-Virus, Web Anti-Virus, Firewall, and Network
Attack Blocker, may cause conflicts with other applications or equipment that is installed on the computer. To
prevent possible conflicts, you may choose not to install network drivers on computers that run on Microsoft
Windows XP Professional x86 or on Microsoft Windows Server 2003 x86. Possible values of the NoKLIM5
parameter:
1. Specifying this value disables installation of Kaspersky Endpoint Security network drivers during
application installation.
0. Specifying this value enables installation of Kaspersky Endpoint Security network drivers during
application installation.
AddEnviroment – whether to supplement the %PATH% system variable with the path to executable files that
are located in the Kaspersky Endpoint Security setup folder. Possible values of the AddEnviroment
parameter:
1. Specifying this value signifies that the %PATH% system variable will be supplemented with the path to
executable files that are located in the Kaspersky Endpoint Security setup folder.
0. Specifying this value signifies that the %PATH% system variable will not be supplemented with the path
to executable files that are located in the Kaspersky Endpoint Security setup folder.
[Components] – selection of application components to be installed. If none of the components are specified, all
components that are available for the operating system are installed.
ALL – installation of all components.
MailAntiVirus – installation of the Mail Anti-Virus component.
FileAntiVirus – installation of the File Anti-Virus component.
IMAntiVirus – installation of the IM Anti-Virus component.
WebAntiVirus – installation of the Web Anti-Virus component.
ApplicationPrivilegeControl – installation of the Application Privilege Control component.
SystemWatcher – installation of the System Watcher component.
Firewall – installation of the Firewall component.
NetworkAttackBlocker – installation of the Network Attack Blocker component.
WebControl – installation of the Web Control component.
DeviceControl – installation of the Device Control component.
ApplicationStartupControl – installation of the Application Startup Control component.
Page 30

A D M I N I S T R A T O R G U I D E
30
VulnerabilityAssessment – installation of vulnerability scan functionality.
AdminKitConnector – installation of Administration Kit Connector for remote administration of the application
through Kaspersky Security Center.
Possible parameter values:
1. Specifying this value signifies that the component will be installed.
0. Specifying this value signifies that the component will not be installed.
[Tasks] – selection of tasks to be included in the list of Kaspersky Endpoint Security tasks. If no task is specified, all tasks
are included in the task list of Kaspersky Endpoint Security.
ScanMyComputer – Full Scan task.
ScanCritical – Critical Areas Scan task.
Updater – Update task.
Possible parameter values:
1. Specifying this value signifies that the update task will be included in the list of Kaspersky Endpoint Security
tasks.
0. Specifying this value signifies that the update task will not be included in the list of Kaspersky Endpoint
Security tasks.
The alternatives to the value 1 are the values yes, on, enable, and enabled. The alternatives to the value 0 are the
values no, off, disable, and disabled.
INITIAL CONFIGURATION OF THE APPLICATION
The Initial Configuration Wizard of Kaspersky Endpoint Security starts at the end of the application setup procedure. The
Initial Configuration Wizard lets you activate the application and gather information about the applications that are
included in the operating system. These applications are added to the list of trusted applications whose actions within the
operating system are not subject to any restrictions.
The interface of the Initial Configuration Wizard consists of a sequence of pages (steps). You can navigate between the
Initial Configuration Wizard pages by using the Back and Next buttons. To complete the Initial Configuration Wizard
procedure, click the Finish button. To stop the Initial Configuration Wizard procedure at any stage, click Cancel.
If the Initial Configuration Wizard is interrupted for some reason, the already specified settings are not saved. When you
start using the application the next time, the Initial Configuration Wizard starts again, and you need to configure the
settings again.
Page 31

I N S T A L L I N G A N D R E M O V I N G T H E A P P L I C A T I O N
31
IN THIS SECTION:
Completing the update to Kaspersky Endpoint Security 8 for Windows .......................................................................... 31
Activating the application................................................................................................................................................. 31
Activating online ................................................................................................ .............................................................. 32
Activating by using a key file ........................................................................................................................................... 32
Completing activation ...................................................................................................................................................... 32
Analyzing the operating system ...................................................................................................................................... 32
Finishing the Initial Configuration Wizard ........................................................................................................................ 33
COMPLETING THE UPDATE TO KASPERSKY ENDPOINT SECURITY 8 FOR WINDOWS
This step is available if you are upgrading a previous version of the application (see the section "About ways to upgrade
an old application version" on page 33) to Kaspersky Endpoint Security 8 for Windows.
At this step, you are offered to restart your computer. To complete the update of the previous version of the application
and proceed to the initial setup of Kaspersky Endpoint Security 8 for Windows, click the Finish button.
ACTIVATING THE APPLICATION
Activating the application requires an Internet connection.
During this step, you can select one of the following Kaspersky Endpoint Security activation options:
Activate by using activation code. To activate the application by using an activation code, select this option
and enter the activation code (see the section "About activation code" on page 39).
Activate by using a key file. To activate the application by using a key file, select this option.
Activate trial version. To activate the trial version of the application, select this option. You will be able to use
the fully-functional version of the application for the duration of the term that is limited by the license for the trial
version of the application. After the license expires, the application functionality is blocked and you cannot
activate the trial version again.
Activate later. Select this option if you want to skip the stage of Kaspersky Endpoint Security activation. The
user will be able to work with the File Anti-Virus and Firewall components only. The user will be able to update
anti-virus databases and modules of Kaspersky Endpoint Security only once after installation. The Activate
later option is available only at the first start of the Initial Configuration Wizard, immediately after installing the
To proceed with the Initial Configuration Wizard, select an activation option and click the Next button. To stop the Initial
Configuration Wizard, click the Cancel button.
application.
Page 32

A D M I N I S T R A T O R G U I D E
32
ONLINE ACTIVATION
This step is available only when you activate the application by using an activation code. This step is skipped when you
activate the trial version of the application or when you activate the application by using a key file.
During this step, Kaspersky Endpoint Security sends data to the activation server to verify the entered activation code:
If the activation code verification is successful, the Initial Configuration Wizard receives a key file that is installed
automatically. The Initial Configuration Wizard then proceeds to the next window.
If the activation code verification fails, a corresponding message appears. In this case, you are advised to seek
advice from the software vendor that sold your license to Kaspersky Endpoint Security.
If the number of activations with the activation code is exceeded, a corresponding notification appears. The
Initial Configuration Wizard is interrupted, and the application suggests that you contact Kaspersky Lab
Technical Support.
To return to the previous step of the Initial Configuration Wizard, click the Back button. To stop the Initial Configuration
Wizard, click the Cancel button.
ACTIVATING BY USING A KEY FILE
This step is available only when you activate the commercial version of the application by using a key file.
During this step, you must specify the key file. To do so, click the View button and select a file with the .key extension.
After you select a key file, the following license information is displayed in the lower part of the window:
License number.
License type and number of computers that are covered by this license
Application activation date.
License expiration date
To return to the previous step of the Initial Configuration Wizard, click the Back button. To proceed with the Initial
Configuration Wizard, click the Next button. To stop the Initial Configuration Wizard, click the Cancel button.
COMPLETING ACTIVATION
During this step, the Initial Configuration Wizard informs you about successful activation of Kaspersky Endpoint Security.
License information is also provided:
License type (commercial or trial) and the number of computers that are covered by the license
License expiration date
To proceed with the Initial Configuration Wizard, click the Next button. To stop the Initial Configuration Wizard, click the
Cancel button.
ANALYZING THE OPERATING SYSTEM
During this step, information is collected about applications that are included in the operating system These applications
are added to the list of trusted applications whose actions within the operating system are not subject to any restrictions.
Page 33

I N S T A L L I N G A N D R E M O V I N G T H E A P P L I C A T I O N
33
IN THIS SECTION:
About ways to upgrade an old application version .......................................................................................................... 33
Upgrading an old application version through the Group Policy Object Editor snap-in ................................................... 34
Other applications are analyzed after they are started for the first time following Kaspersky Endpoint Security installation.
To stop the Initial Configuration Wizard, click the Cancel button.
FINISHING THE INITIAL CONFIGURATION WIZARD
The Initial Configuration Wizard completion window contains information about the completion of the Kaspersky Endpoint
Security installation process.
If you want to start Kaspersky Endpoint Security, click the Finish button.
If you want to exit the Initial Configuration Wizard without starting Kaspersky Endpoint Security, clear the Start
Kaspersky Endpoint Security 8 for Windows check box and click Finish.
UPGRADING FROM A PREVIOUS VERSION OF THE
APPLICATION
This section describes how you can upgrade from a previous version of the application.
ABOUT WAYS TO UPGRADE AN OLD APPLICATION VERSION
You can upgrade the following applications to Kaspersky Endpoint Security 8 for Windows:
Kaspersky Anti-Virus 6.0 for Windows Workstations MP3
Kaspersky Anti-Virus 6.0 for Windows Workstations MP4
Kaspersky Anti-Virus 6.0 for Windows Servers MP3
Kaspersky Anti-Virus 6.0 for Windows Servers MP4
You can upgrade the old version of the application as follows:
Locally in interactive mode, by using the Setup Wizard (see the section "Installing the application by using the
Setup Wizard" on page 22)
Locally in silent mode, from the command line (see the section "Installing the application from the command
line" on page 25)
Remotely, with the help of the Kaspersky Security Center software complex (see the Kaspersky Security Center
Deployment Guide for details)
Remotely, by using the Group Policy Object Editor snap-in (see the section "Upgrading an old application
version through the Group Policy Object Editor snap-in" on page 34)
Page 34

A D M I N I S T R A T O R G U I D E
34
When updating a previous version of the application to Kaspersky Endpoint Security 8 for Windows, there is no need to
remove the previous version of the application. We recommend quitting all active applications before upgrading a
previous application version.
When any of the previously listed applications is upgraded to Kaspersky Endpoint Security 8 for Windows, the contents
of Quarantine and Backup are not transferred.
UPGRADING AN OLD APPLICATION VERSION THROUGH THE GROUP POLICY OBJECT EDITOR SNAP-IN
The Group Policy Object Editor snap-in lets you update a previous version of Kaspersky Endpoint Security on enterprise
workstations that belong to a domain, without using Kaspersky Security Center.
To update a previous version of Kaspersky Endpoint Security through the Group Policy Object Editor snap-in:
1. Create a shared network folder on a computer that acts as domain controller.
2. Place the installation package in MSI format for the new version of Kaspersky Endpoint Security in the shared
network folder that you created during the previous step.
In addition, you can copy the setup.ini file to this shared network folder (see the section "Description of setup.ini
file settings" on page 27), which contains general Kaspersky Endpoint Security setup settings, along with the
install.cfg configuration file and the key file.
3. Open the Group Policy Object Editor snap-in through the ММС console (see the Microsoft Windows Server help
files for detailed instructions on using the Editor).
4. Create a new installation package of the Group Policy Object Editor snap-in. To do so:
a. In the console tree, select Group Policy Object Computer Configuration Software
Settings Software installation.
b. Right-click to bring up the context menu of the Software installation node.
c. In the context menu, select New Packet.
The standard Open window of Microsoft Windows Server opens.
d. In the standard Open window of Microsoft Windows Server, specify the path to the MSI installation package
of the new version of Kaspersky Endpoint Security.
e. In the Deploy Software window, select Assigned.
f. Click OK.
5. In the list of installation packages of the Group Policy Object Editor snap-in, select the installation package that
was created during the previous step.
6. Right-click to bring up the context menu of the Group Policy Object Editor snap-in installation package.
7. In the context menu, select Properties.
The properties window of the installation package of the Group Policy Object Editor snap-in opens.
8. In the properties window of the installation package of the Group Policy Object Editor snap-in, select the Update
tab.
Page 35

I N S T A L L I N G A N D R E M O V I N G T H E A P P L I C A T I O N
35
IN THIS SECTION:
About ways to remove the application ............................................................................................................................. 35
Removing the application by using the Setup Wizard ..................................................................................................... 35
Removing the application from the command line ........................................................................................................... 37
Removing the application through the Group Policy Object Editor snap-in ..................................................................... 37
9. On the Updates tab, add the installation package of the Group Policy Object Editor snap-in that contains the
distribution file for the previous version of Kaspersky Endpoint Security.
10. To install the updated version of Kaspersky Endpoint Security while preserving the settings of the previous
version, select the option to write over the existing installation package of the Group Policy Object Editor snapin.
The group policy is enforced on each workstation the next time that the computer is registered in the domain. As a
result, the application version is updated on all computers within the domain.
REMOVING THE APPLICATION
This section describes how you can remove Kaspersky Endpoint Security from your computer.
ABOUT WAYS TO REMOVE THE APPLICATION
Removing Kaspersky Endpoint Security 8 for Windows leaves the computer and user data unprotected against threats.
There are several ways to remove Kaspersky Endpoint Security 8 for Windows from a computer:
Locally in interactive mode, by using the Setup Wizard (see the section "Removing the application by using the
Setup Wizard" on page 35);
Locally in non-interactive mode, from the command line
Remotely, with the help of the Kaspersky Security Center software complex (see the Kaspersky Security Center
Deployment Guide for details)
Remotely, by using the Group Policy Object Editor snap-in of Microsoft Windows Server (see the section
"Removing the application through the Group Policy Object Editor snap-in" on page 37).
REMOVING THE APPLICATION BY USING THE SETUP WIZARD
To remove Kaspersky Endpoint Security by using the Setup Wizard:
1. In the Start menu, select Programs → Kaspersky Endpoint Security 8 for Windows → Modify, Repair or
Remove.
The Setup Wizard starts.
2. In the Modify, Repair or Remove window of the Setup Wizard, click the Remove button.
3. Follow the instructions of the Setup Wizard.
Page 36

A D M I N I S T R A T O R G U I D E
36
IN THIS SECTION:
Step 1. Saving application data for future use ................................................................................................................. 36
Step 2. Confirming application removal ........................................................................................................................... 36
Step 3. Removing the application. Completing removal .................................................................................................. 36
STEP 1. SAVING APPLICATION DATA FOR FUTURE USE
During this step, you are offered either to remove the application entirely or to preserve application objects. You can
specify which of the data that is used by the application you want to save for future use, during the next installation of the
application (such as when upgrading to a newer version of the application).
The option Remove the application entirely is selected by default. In this case the application settings, information
about the activation of the application, and Backup and Quarantine objects are deleted and are no longer available to the
user.
To save application data for future use:
1. Select Save application objects.
2. Select check boxes next to the data types that you want to save:
Activation data – data that eliminates the need to activate the application in the future by automatically
using the current license, as long as the license does not expire before the next installation.
Backup and Quarantine files – files that are scanned by the application and placed in Backup or
Quarantine.
Backup and Quarantine files that are saved after removal of the application can be accessed only from the
same version of the application that was used to save the files.
If you plan to use Backup and Quarantine files after application removal, you must restore the files from
their storages before removing the application. However, Kaspersky Lab experts do not recommend
restoring files from Backup and Quarantine, because this may harm the computer.
Operating settings of the application – application settings values that are selected during configuration.
To proceed with the Setup Wizard, click the Next button. To stop the Setup Wizard, click the Cancel button.
STEP 2. CONFIRMING APPLICATION REMOVAL
Because removing the application jeopardizes the security of your computer, you are asked to confirm that you want to
remove the application. To do so, click the Remove button.
To stop removal of the application at any time, you can cancel this operation by clicking the Cancel button.
STEP 3. REMOVING THE APPLICATION. COMPLETING REMOVAL
During this step, the Setup Wizard removes the application from the computer. Wait until application removal is
complete.
Page 37

I N S T A L L I N G A N D R E M O V I N G T H E A P P L I C A T I O N
37
When removing the application, your operating system may require a restart. If you decide to not restart immediately,
completion of the application removal procedure is postponed until the operating system is restarted, or until the
computer is turned off and then turned on again.
REMOVING THE APPLICATION FROM THE COMMAND LINE
To remove the application from the command line, do one of the following:
In the command line type the following string: setup.exe /x, or
msiexec.exe /x {D72DD679-A3EC-4FCF-AFAF-12E2552450B6} to remove the application in interactive
mode.
The Setup Wizard starts. Follow the instructions of the Setup Wizard (see the section "Removing the application
by using the Setup Wizard" on page 35).
In the command line, type setup.exe /s /x or
msiexec.exe /x {D72DD679-A3EC-4FCF-AFAF-12E2552450B6} /qn to remove the application in non-
interactive mode (without starting the Setup Wizard).
REMOVING THE APPLICATION THROUGH THE GROUP POLICY OBJECT EDITOR SNAP-IN
To remove Kaspersky Endpoint Security through the Group Policy Object Editor snap-in:
1. Open the Group Policy Object Editor snap-in through the ММС console (see the Microsoft Windows Server help
files for detailed instructions on using the Editor).
2. In the console tree, select Group Policy Object Computer Configuration Software
Settings Software installation.
3. In the list of installation packages, select Kaspersky Endpoint Security 8 for Windows.
4. Right-click to bring up the context menu of the installation package and select All tasks Remove.
The Remove Software window opens.
5. In the Remove Software window, select the setting Immediately remove this application from the
computers of all users.
The group policy is enforced on each workstation the next time that the computer is registered in the domain. As a result,
the application is removed on all computers within the domain.
Page 38

38
APPLICATION LICENSING
IN THIS SECTION:
About the End User License Agreement ......................................................................................................................... 38
About data submission .................................................................................................................................................... 38
About the License ........................................................................................................................................................... 39
About activation code ...................................................................................................................................................... 39
About the key file ............................................................................................................................................................. 40
About application activation methods .............................................................................................................................. 40
Managing the license ...................................................................................................................................................... 41
This section contains information about the basic concepts of application activation. This section describes the purpose
of the End User License Agreement, the types of licenses, the ways to activate the application, and renew your license.
ABOUT THE END USER LICENSE AGREEMENT
The End User License Agreement is a binding agreement between you and Kaspersky Lab ZAO, stipulating the terms on
which you may use the application.
We recommend carefully reviewing the terms of the End User License Agreement before using the application.
You can review the terms of the End User License Agreement in the following ways:
When installing a Kaspersky Lab application in interactive mode (see the section "About ways to install the
application" on page 21).
By reading the license.txt file. The document is included in the application distribution kit (see the section
"Distribution kit" on page 16).
You are deemed to have accepted the terms of the License Agreement after confirming your agreement to the License
Agreement when installing the application.
If you do not accept the terms of the End User License Agreement, you must abort the installation.
ABOUT DATA SUBMISSION
By accepting the End User License Agreement, you agree to automatically submit the checksum data (MD5) of
processed files and information that is used in determining website reputations. This information does not contain any
personal data or other confidential information. Kaspersky Lab protects the information that is received in accordance
with requirements as established by law. You may visit the website http://support.kaspersky.com for more details.
Page 39

A P P L I C A T I O N L I C E N S I N G
39
ABOUT THE LICENSE
A license is a time-limited right to use the application, granted under the End User License Agreement. A license
contains a unique activation code for your copy of Kaspersky Endpoint Security.
A valid license entitles you to the following kinds of services:
The right to use the application on one or several devices.
The number of devices on which you may use the application is specified in the End User License Agreement.
Assistance from Kaspersky Lab Technical Support.
The benefits of the complete set of services that Kaspersky Lab or its partners provide during the license validity
term (see the section "Service for registered users" on page 19).
The scope of services and application usage term depend on the type of license that is used to activate the application.
The following license types are provided:
Trial – A free license effective for a limited term and intended for trying out the application.
When the trial license expires, all Kaspersky Endpoint Security features become disabled. To continue using the
application, you need to buy a commercial license.
Commercial is a paid license that is valid for a limited term and provided when you buy the application.
When the commercial license expires, the application continues to work in limited functionality mode. You can
still scan the computer for viruses and use other application components, but only with databases that are
installed before the expiration of the license. To continue using Kaspersky Endpoint Security in fully functional
mode, you must extend your commercial license.
We recommend renewing the license before the expiration of the current license to ensure that your computer
stays fully protected.
Commercial with subscription – paid license with the option of automatic license renewal and the option of
pausing automatic license renewal for a specified time period.
ABOUT ACTIVATION CODE
An activation code is a code that you receive when buying a commercial license for Kaspersky Endpoint Security. You
need this code to obtain the key file and to activate the application by installing the key file.
The activation code is a sequence of twenty digits and Latin letters in the format ххххх-ххххх-ххххх-ххххх.
The license period countdown starts from the moment when you activate the application. When you buy a Kaspersky
Endpoint Security license that covers several computers, the license period countdown starts from the moment when you
activate the application on the first computer.
If you lose or accidentally delete the activation code after activation, send a request to Kaspersky Lab Technical Support
from Personal Cabinet to restore the code (see the section "Obtaining technical support via Personal Cabinet" on
page 243).
Page 40

A D M I N I S T R A T O R G U I D E
40
ABOUT THE KEY FILE
A key file is a file of the form хххххххх.key, which enables the user to use Kaspersky Lab applications on the terms of a
trial or commercial license. Kaspersky Lab provides a key file based on the activation code when the application is
activated by using an activation code, or when Kaspersky Endpoint Security is purchased. You may use the application
only when you have a key file.
If the key file is accidentally deleted, you can restore it in one of the following ways:
Send a request to Technical Support (see the section "Contacting Technical Support" on page 240).
Obtain a key file on the website (https://activation.kaspersky.com) based on your existing activation code.
A trial key file is a key file that enables users to try out the application for a limited period of time. A trial key file gives you
the right to use the application starting on the day that the application is activated. Kaspersky Lab provides trial key files
free of charge upon activation of a trial version of the application.
A commercial key file is a key file that contains data that is needed to use the application on the terms of a commercial
license. A commercial key file gives you the right to use the application starting on the day that the application is
activated. Kaspersky Lab provides a commercial key file based on the activation code that is obtained when buying the
application.
A key file contains the following license data:
License number – a unique number that is needed for a number of purposes, such as to receive technical
support from Kaspersky Lab.
Limit on number of computers – the maximum number of computers on which the application can be activated
with the given key file.
Key file validity term – a specific amount of time that begins at the moment of key file creation. It is determined
by the application, depending on the validity term of the license (see the section "About the license" on
page 39).
Key file creation date – the date of creation of the key file that is based on the activation code, marking the start
of the countdown of the key file validity term.
License storage term – a set term that begins at the moment of license creation by Kaspersky Lab specialists.
The license storage term may last several years. The application may be activated only before the expiration of
this term.
expiration date of the key file validity term – a date after which the key file cannot be used to activate the
application. The expiration date of the key file validity term is calculated from the date when the key file is used
for the first time plus the key file validity term, but may not come later than the expiration of the license storage
term.
When the expiration date of the key file validity term comes before the expiration of the license storage term, the
license storage term is limited by the expiration date of the key file validity term.
Technical support information.
ABOUT APPLICATION ACTIVATION METHODS
Activation is the procedure of activating a license that allows you to use a fully-functional version of the application until
the license expires.
Page 41

A P P L I C A T I O N L I C E N S I N G
41
IN THIS SECTION:
Using the Activation Wizard to activate the application ................................................................................................... 41
Buying a license ................................................................................................ .............................................................. 41
Renewing a license ......................................................................................................................................................... 42
Viewing license information ............................................................................................................................................. 42
Activation Wizard ............................................................................................................................................................ 42
You can activate the application in one of the following ways:
When installing the application, by using the Initial Configuration Wizard (see the section "Initial configuration of
the application" on page 30).
Locally from the application interface, by using the Activation Wizard (see the section "Activation Wizard" on
page 42)
Remotely, by using the Kaspersky Security Center software complex by creating the key file installation task
(see the section "Managing tasks" on page 228)
Remotely by automatically distributing licenses that are stored in the license storage on Administration Server of
Kaspersky Security Center to client computers (see the Kaspersky Security Center Administrator Guide for
details).
MANAGING THE LICENSE
This section describes the available application licensing options.
USING THE ACTIVATION WIZARD TO ACTIVATE THE APPLICATION
To activate Kaspersky Endpoint Security by using the Activation Wizard:
1. Do one of the following:
2. Follow the instructions of the Activation Wizard.
BUYING A LICENSE
You may buy a license after installing the application. After buying a license, you receive an activation code or key file
with which you must activate the application (see the section "Using the Activation Wizard to activate the application" on
page 41).
In the Kaspersky Endpoint Security notice window that appears in the taskbar notification area, click the
Please activate the application link.
In the lower part of the main application window, click the License link. In the License management
window that opens, click the Activate the application with a new license button.
The Activation Wizard (on page 42) starts.
Page 42

A D M I N I S T R A T O R G U I D E
42
To purchase a license:
IN THIS SECTION:
Activating the application................................................................................................................................................. 43
Activating online ................................................................................................ .............................................................. 43
Activating by using a key file ........................................................................................................................................... 43
Completing activation ...................................................................................................................................................... 44
1. Open the main application window (on page 46).
2. In the lower part of the main application window, click the License link to open the License management
window.
3. Do one of the following in the License management window:
Click the Buy license button if no license has been installed or you have a trial license.
If you have a commercial license installed, click the Renew license button.
A window will open with the website of the Kaspersky Lab online store, where you can buy a license.
RENEWING A LICENSE
When your license approaches expiration, you can renew it. This ensures that your computer remains protected after
expiration of the existing license and before you activate the application with a new license.
To renew a license:
1. Purchase (see the section "Buying a license" on page 41) a new activation code or key file.
2. Activate the application (see the section "Using the Activation Wizard to activate the application" on page 41) by
using the activation code or key file that you have purchased.
This causes an additional license to be added, which is applied automatically upon expiration of the current
Kaspersky Endpoint Security license.
VIEWING LICENSE INFORMATION
To view license information:
1. Open the main application window (on page 46).
2. In the lower part of the main application window, click the License link.
The License management window opens. License information is displayed in the section that is located in the
upper part of the License management window.
ACTIVATION WIZARD
The interface of the Activation Wizard consists of a sequence of pages (steps). You can navigate between Activation
Wizard pages by using the Back and Next buttons. To exit the Activation Wizard, click the Finish button. To stop the
Activation Wizard at any stage, click the Cancel button.
Page 43

A P P L I C A T I O N L I C E N S I N G
43
ACTIVATING THE APPLICATION
Activating the application requires an Internet connection.
During this step, you can select one of the following Kaspersky Endpoint Security activation options:
Activate by using activation code. To activate the application by using an activation code, select this option
and enter the activation code (see the section "About activation code" on page 39).
Activate by using a key file. To activate the application by using a key file, select this option.
Activate trial version. To activate the trial version of the application, select this option. You will be able to use
the fully-functional version of the application for the duration of the term that is limited by the license for the trial
version of the application. After the license expires, the application functionality is blocked and you cannot
activate the trial version again.
To proceed with the Activation Wizard, select an application activation option and click Next. To stop the Activation
Wizard, click the Cancel button.
ACTIVATING ONLINE
This step is available only when you activate the application by using an activation code. This step is skipped when you
activate the trial version of the application or when you activate the application by using a key file.
During this step, Kaspersky Endpoint Security sends data to the activation server to verify the entered activation code:
If the activation code is successfully verified, the Activation Wizard receives a key file. The key file is installed
automatically. The Activation Wizard automatically proceeds to the following step.
If the activation code verification fails, a corresponding message appears. In this case, you are advised to seek
advice from the software vendor that sold your license to Kaspersky Endpoint Security.
If the number of activations with the activation code is exceeded, a corresponding notification appears. The
Activation Wizard is interrupted, and the application suggests that you contact Kaspersky Lab Technical
Support.
To return to the previous step of the Activation Wizard, click the Back button. To stop the Activation Wizard, click the
Cancel button.
Page 44

A D M I N I S T R A T O R G U I D E
44
ACTIVATING BY USING A KEY FILE
This step is available only when you activate the commercial version of the application by using a key file.
During this step, you must specify the key file. To do so, click the View button and select a file with the .key extension.
After you select a key file, the following license information is displayed in the lower part of the window:
License number.
License type and number of computers that are covered by this license
Application activation date.
License expiration date
To return to the previous step of the Activation Wizard, click the Back button. To proceed with the Activation Wizard,
click the Next button. To stop the Activation Wizard, click the Cancel button.
COMPLETING ACTIVATION
During this step, the Activation Wizard informs you about successful activation of Kaspersky Endpoint Security. License
information is also provided:
License type (commercial or trial) and the number of computers that are covered by the license
License expiration date
To exit the Activation Wizard, click the Finish button.
Page 45

45
APPLICATION INTERFACE
IN THIS SECTION:
Application icon in the taskbar notification area .............................................................................................................. 45
Application icon context menu ......................................................................................................................................... 46
Main application window ................................................................................................................................................. 46
Application settings window ............................................................................................................................................ 48
This section describes the basic elements of the graphical interface of the application: the application icon and its context
menu, main application window, and application settings window.
APPLICATION ICON IN THE TASKBAR NOTIFICATION AREA
Immediately after installation of Kaspersky Endpoint Security, the application icon appears in the Microsoft Windows
taskbar notification area.
The icon serves the following purposes:
It indicates application activity.
It acts as a shortcut to the context menu and main window of the application.
Indication of application activity
The application icon serves as an indicator of application activity. It reflects the status of computer protection and shows
the operations that the application is currently performing:
The icon signifies that all protection components of the application are enabled.
The icon signifies that Kaspersky Endpoint Security is scanning an email message.
The icon signifies that Kaspersky Endpoint Security is scanning incoming and outgoing network traffic.
The icon signifies that Kaspersky Endpoint Security is updating application databases and modules.
The icon signifies that important events that require your attention have occurred in the operation of
Kaspersky Endpoint Security. For example, File Anti-Virus is disabled or the application databases are out of
date.
The icon signifies that critical events have occurred in the operation of Kaspersky Endpoint Security. For
example, a failure in the operation of one or more components, or corruption of the application databases.
The icon is animated by default: for example, when Kaspersky Endpoint Security scans an email message, a small
envelope symbol pulsates against the background of the application icon; when Kaspersky Endpoint Security updates its
databases and modules, a globe symbol revolves against the background of the application icon.
Page 46

A D M I N I S T R A T O R G U I D E
46
APPLICATION ICON CONTEXT MENU
The context menu of the application icon contains the following items:
Kaspersky Endpoint Security. Opens the Protection and Control tab in the main application
window. The Protection and Control tab lets you adjust the operation of application components and tasks,
and view the statistics of processed files and detected threats.
Settings. Opens the Settings tab in the main application window. The Settings tab lets you change the default
application settings.
Pause protection and control / Resume protection and control. Temporarily pauses / resumes the operation
of protection and control components. This context menu item does not affect the update task or scan tasks.
Disable policy / Enable policy. Disables / enables the Kaspersky Security Center policy. This menu item is
available when <PRODUCT_NAME> operates under a policy and a password for disabling the Kaspersky
Security Center policy has been set.
About. This item opens an information window with application details.
Exit. This item quits Kaspersky Endpoint Security. Clicking this context menu item causes the application to be
unloaded from the computer RAM.
Figure 1. Application icon context menu
You can open the context menu of the application icon by resting the pointer on the application icon in the taskbar
notification area of Microsoft Windows and right-clicking.
MAIN APPLICATION WINDOW
The main window of Kaspersky Endpoint Security contains interface elements that provide access to the main functions
of the application.
The main window is divided into three parts (see the following image):
Located in the upper part of the window are interface elements that let you view the following information:
Application details
Reputation database statistics
List of unprocessed files
List of detected vulnerabilities
List of quarantined files
Backup storage of copies of infected files that the application has deleted
Reports on events that have occurred during operation of the application in general or its separate
components, or during the performance of tasks
Page 47

A P P L I C A T I O N I N T E R F A C E
47
The Protection and Control tab allows you to adjust the operation of application components and tasks. The
Protection and Control tab is displayed when you open the main application window.
The Settings tab allows you to edit the default application settings.
Figure 2. Main application window
You can use the following links:
Help. Clicking this link takes you to the help system of Kaspersky Endpoint Security.
Support. Clicking this link opens the Support window, which contains information on the operating system, the
current version of Kaspersky Endpoint Security, and links to Kaspersky Lab information resources.
License. Clicking this link opens the License management window, which contains the details of the currently
active license.
You can open the main window of Kaspersky Endpoint Security in one of the following ways:
Rest the mouse pointer over the application icon in the taskbar notification area of Microsoft Windows and click.
Select Kaspersky Endpoint Security from the application icon context menu (see the section "Application icon
context menu" on page 46).
Page 48

A D M I N I S T R A T O R G U I D E
48
APPLICATION SETTINGS WINDOW
The Kaspersky Endpoint Security settings window lets you configure overall application settings, individual components,
reports and storages, scan tasks, update tasks, vulnerability scan tasks, and interaction with Kaspersky Security
Network.
The application settings window consists of two parts (see the following figure).
The left part of the window contains application components, tasks, and other configurable items.
The right part of the window contains controls that you can use to configure the item that is selected in the left
part of the window.
As in the main window, you can use the following links:
Help. Clicking this link takes you to the help system of Kaspersky Endpoint Security.
Support. Clicking this link opens the Support window, which contains information on the operating system, the
current version of Kaspersky Endpoint Security, and links to Kaspersky Lab information resources.
License. Clicking this link opens the License management window, which contains the details of the currently
active license.
You can open the application settings window in one of the following ways:
Select the Settings tab in the main application window (see the section "Main application window" on page 46).
Select Settings from the application context menu (see the section "Application icon context menu" on
page 46).
Figure 3. Application settings window
Page 49

49
STARTING AND STOPPING THE
IN THIS SECTION:
Enabling and disabling automatic startup of the application ............................................................................................ 49
Starting and stopping the application manually ............................................................................................................... 49
Pausing and resuming computer protection and control ................................................................................................. 50
APPLICATION
This section describes how you can configure automatic startup of the application, start or stop the application manually,
and pause or resume protection and control components.
ENABLING AND DISABLING AUTOMATIC STARTUP OF THE
APPLICATION
Automatic startup means that Kaspersky Endpoint Security starts immediately after operating system startup, without
user intervention. This application startup option is enabled by default.
After installation, Kaspersky Endpoint Security starts automatically for the first time. Subsequently the application starts
automatically after operating system startup.
To enable or disable automatic startup of the application:
1. Open the application settings window (on page 48).
2. In the left part of the window, select the Anti-Virus protection section.
The anti-virus protection settings are shown in the right part of the window.
3. Do one of the following:
To enable automatic application startup, select the Start Kaspersky Endpoint Security on computer
startup check box.
To disable automatic application startup, clear the Start Kaspersky Endpoint Security on computer
startup check box.
4. To save changes, click the Save button.
STARTING AND STOPPING THE APPLICATION MANUALLY
Kaspersky Lab specialists do not recommend stopping Kaspersky Endpoint Security manually, because doing so
exposes the computer and your personal data to threats. If necessary, you can pause computer protection (see the
section "Pausing and resuming computer protection and control" on page 50) for as long as you need to, without
stopping the application.
Kaspersky Endpoint Security needs to be started manually if you have previously disabled automatic startup of the
application (see the section "Enabling and disabling automatic startup of the application" on page 49).
Page 50

A D M I N I S T R A T O R G U I D E
50
To start the application manually,
in the Start menu, select Programs Kaspersky Endpoint Security 8 for Windows.
To stop the application manually:
1. Right-click to bring up the context menu of the application icon that is in the taskbar notification area.
2. In the context menu, select Exit.
PAUSING AND RESUMING COMPUTER PROTECTION AND
CONTROL
Pausing computer protection and control means disabling all protection and control components of Kaspersky Endpoint
Security for a time.
The application status is indicated by the application icon in the taskbar notification area (see the section "Application
icon in the taskbar notification area" on page 45).
The icon signifies that computer protection and control are paused.
The icon signifies that computer protection and control have been resumed.
Pausing or resuming computer protection and control does not affect scan or update tasks.
If any network connections are already established when you pause or resume computer protection and control, a
notification about the termination of these network connections is displayed.
To pause or resume computer protection and control:
1. To pause computer protection and control:
a. Right-click to bring up the context menu of the application icon that is in the taskbar notification area.
b. In the context menu, select Pause protection and control.
The Pause protection and control window opens.
c. Select one of the following options:
Pause for the specified time – Computer protection and control resume after the amount of time that
is specified in the drop-down list below has elapsed. You can select the necessary amount of time in
the drop-down list.
Pause until restart – Computer protection and control resume after you quit and reopen the
application or restart the operating system. Automatic startup of the application must be enabled to use
this option.
Pause – Computer protection and control resume when you decide to re-enable them.
2. If you decide to resume computer protection and control, you can do so at any time, regardless of the protection
and control pause option that you selected previously. To resume computer protection and control:
a. Right-click to bring up the context menu of the application icon that is in the taskbar notification area.
b. In the context menu, select Resume protection and control.
Page 51

51
PROTECTING THE COMPUTER FILE
IN THIS SECTION:
About File Anti-Virus ....................................................................................................................................................... 51
Enabling and disabling File Anti-Virus ............................................................................................................................. 51
Automatically pausing File Anti-Virus .............................................................................................................................. 52
Configuring File Anti-Virus ............................................................................................................................................... 53
SYSTEM. FILE ANTI-VIRUS
This section contains information about File Anti-Virus and instructions on how to configure the component settings.
ABOUT FILE ANTI-VIRUS
File Anti-Virus prevents infection of the computer's file system. By default, File Anti-Virus starts together with Kaspersky
Endpoint Security, continuously remains active in computer memory, and scans all files that are opened, saved, or
started on your computer and on all drives that are attached to it for the presence of viruses and other malware.
File Anti-Virus uses the signature and heuristic analysis methods and the iChecker and iSwift technologies.
When the user or an application attempts to access a protected file, File Anti-Virus checks whether the iChecker and
iSwift databases contain information about this file, and uses this information to decide whether it is necessary to scan
the file.
If Kaspersky Endpoint Security detects a threat in the file, it assigns one of the following statuses to this file:
A status that indicates the type of malicious program that is detected (for example, virus or Trojan).
Potentially infected status, if the scan cannot determine whether or not the file is infected. The file may contain a
code sequence that is typical of viruses and other malware, or modified code from a known virus.
The application then displays a notification (see page 199) of the threat detected within the file and takes the action on
the file that is specified in the settings of File Anti-Virus (see the section "Changing the action to take on infected files" on
page 55).
ENABLING AND DISABLING FILE ANTI-VIRUS
By default, File Anti-Virus is enabled, running in the mode that is recommended by Kaspersky Lab's experts. You can
disable File Anti-Virus, if necessary.
There are two ways to enable or disable the component:
On the Protection and Control tab of the main application window (see the section "Main application window"
on page 46)
From the application settings window (see the section "Application settings window" on page 48)
Page 52

A D M I N I S T R A T O R G U I D E
52
To enable or disable File Anti-Virus on the Protection and Control tab of the main application window:
1. Open the main application window.
2. Select the Protection and Control tab.
3. Click the Protection section.
The Protection section opens.
4. Right-click to bring up the context menu of the line with information about the File Anti-Virus component.
A menu for selecting actions on the component opens.
5. Do one of the following:
To enable File Anti-Virus, select Enable in the menu.
The component status icon , which is displayed on the left in the File Anti-Virus line, changes to the
icon .
To disable File Anti-Virus, select Disable in the menu.
The component status icon , which is displayed on the left in the File Anti-Virus line, changes to the
icon .
To enable or disable File Anti-Virus from the application settings window:
1. Open the application settings window.
2. In the left part of the window, in the Anti-Virus protection section, select File Anti-Virus.
In the right part of the window, the settings of the File Anti-Virus component are displayed.
3. Do one of the following:
If you want to enable File Anti-Virus, select the Enable File Anti-Virus check box.
If you want to disable File Anti-Virus, clear the Enable File Anti-Virus check box.
4. To save changes, click the Save button.
AUTOMATICALLY PAUSING FILE ANTI-VIRUS
You can configure the component to automatically pause at a specified time or when handling specified programs.
Pausing File Anti-Virus when it conflicts with some programs is an emergency measure. In case of any conflicts during
the operation of a component, we recommend contacting Kaspersky Lab Technical Support
(http://support.kaspersky.com/helpdesk.html). The support specialists will help you to set up Kaspersky Endpoint
Security to run simultaneously with other programs on your computer.
To configure automatic pausing of File Anti-Virus:
1. Open the application settings window (on page 48).
2. In the left part of the window, in the Anti-Virus protection section, select File Anti-Virus.
In the right part of the window, the settings of the File Anti-Virus component are displayed.
Page 53

P R O T E C T I N G T H E C O M P U T E R F I L E S Y S T E M . F I L E A N T I - V I R U S
53
3. In the Security level section, click the Settings button.
The File Anti-Virus window opens.
4. In the File Anti-Virus window, select the Additional tab.
5. In the Pause task section:
To configure automatic pausing of File Anti-Virus at a specified time, select the By schedule check box
and click the Schedule button.
The Pause task window opens.
To configure automatic pausing of File Anti-Virus at startup of specified applications, select the At
application startup check box and click the Select button.
The Applications window opens.
6. Do one of the following:
If you are configuring automatic pausing of File Anti-Virus at a specified time, in the Pause task window,
use the Pause task at and Resume task at fields to specify the time period (in HH:MM format) during
which File Anti-Virus is to be paused. Then click OK.
If you are configuring automatic pausing of File Anti-Virus at startup of specified applications, use the Add,
Edit, and Delete buttons in the Applications window to create a list of applications during whose operation
File Anti-Virus is to be paused. Then click OK.
7. In the File Anti-Virus window, click OK.
8. To save changes, click the Save button.
CONFIGURING FILE ANTI-VIRUS
You can do the following to configure File Anti-Virus:
Change the file security level.
You can select one of the preset file security levels or configure security level settings on your own. If you have
changed the file security level settings, you can always revert to the recommended file security level settings.
Change the action that is performed by File Anti-Virus on detection of an infected file.
Edit the protection scope of File Anti-Virus.
You can expand or restrict the protection scope by adding or removing scan objects, or by changing the type of
files to be scanned.
Configure Heuristic Analyzer.
File Anti-Virus uses a technique that is called signature analysis. During signature analysis, File Anti-Virus
matches the detected object with records in its databases. Following the recommendations of Kaspersky Lab's
experts, signature analysis is always enabled.
To increase the effectiveness of protection, you can use heuristic analysis. During heuristic analysis, File AntiVirus analyzes the activity of objects in the operating system. Heuristic analysis allows detecting new malicious
objects for which no records are currently available in the databases.
Select the scan technologies.
Page 54

A D M I N I S T R A T O R G U I D E
54
You can enable the use of the iChecker and iSwift technologies, which optimize the speed of file scanning by
IN THIS SECTION:
Changing the file security level ........................................................................................................................................ 54
Changing the action to take on infected files ................................................................................................................... 55
Editing the protection scope of File Anti-Virus ................................................................................................................. 55
Using Heuristic Analyzer with File Anti-Virus ................................................................................................................... 56
Using scan technologies in the operation of File Anti-Virus............................................................................................. 57
Optimizing file scanning .................................................................................................................................................. 58
Scanning compound files ................................................................................................................................................ 58
Changing the scan mode ................................................................................................................................................ 59
excluding files that have not been modified since the most recent scan.
Optimize scanning.
You can optimize the file scanning that is performed by File Anti-Virus, reducing the scan time and increasing
the operating speed of Kaspersky Endpoint Security. This can be achieved by scanning only new files and those
files that have been modified since the previous scan. This mode applies both to simple and to compound files.
Configure scanning of compound files.
Change the file scan mode.
CHANGING THE FILE SECURITY LEVEL
To protect the computer's file system, File Anti-Virus applies various groups of settings. These groups of settings are
called file security levels. There are three pre-installed file security levels: High, Recommended, and Low. The
Recommended file security level is considered the optimal group of settings, and is recommended by Kaspersky Lab.
To change the file security level:
1. Open the application settings window (on page 48).
2. In the left part of the window, in the Anti-Virus protection section, select File Anti-Virus.
In the right part of the window, the settings of the File Anti-Virus component are displayed.
3. In the Security level section, do one of the following:
If you want to install one of the pre-installed file security levels (High, Recommended, or Low), use the
slider to select one.
Page 55

P R O T E C T I N G T H E C O M P U T E R F I L E S Y S T E M . F I L E A N T I - V I R U S
55
If you want to configure a custom file security level, click the Settings button and, in the File Anti-Virus
window that opens, enter settings.
After you configure a custom file security level, the name of the file security level in the Security level
section changes to Custom.
If you want to change the file security level to Recommended, click the Default button.
4. To save changes, click the Save button.
CHANGING THE ACTION TO TAKE ON INFECTED FILES
To change the action to take on infected files:
1. Open the application settings window (on page 48).
2. In the left part of the window, in the Anti-Virus protection section, select File Anti-Virus.
In the right part of the window, the settings of the File Anti-Virus component are displayed.
3. In the Action on threat detection section, select the required option:
Select action automatically.
Perform action: Disinfect. Delete if disinfection fails.
Perform action: Disinfect.
Perform action: Delete.
Perform action: Block.
4. To save changes, click the Save button.
EDITING THE PROTECTION SCOPE OF FILE ANTI-VIRUS
The protection scope refers to the objects that the component scans when enabled. The protection scopes of different
components have different properties. The location and type of files to be scanned are properties of the protection scope
of File Anti-Virus. By default, File Anti-Virus scans only infectable files that are stored on hard drives, network drives, or
removable media.
To create the protection scope:
1. Open the application settings window (on page 48).
2. In the left part of the window, in the Anti-Virus protection section, select File Anti-Virus.
In the right part of the window, the settings of the File Anti-Virus component are displayed.
3. In the Security level section, click the Settings button.
The File Anti-Virus window opens.
4. In the File Anti-Virus window, on the General tab, in the File types section, specify the type of files that you
want to scan with File Anti-Virus:
If you want to scan all files, select All files.
Page 56

A D M I N I S T R A T O R G U I D E
56
If you want to scan files of formats which are the most vulnerable to infection, select Files scanned by
format.
If you want to scan files with extensions that are the most vulnerable to infection, select Files scanned by
extension.
When selecting the type of files to scan, remember the following information:
There are some file formats (such as .txt) for which the probability of intrusion of malicious code and its
subsequent activation is quite low. At the same time, there are file formats that contain or may contain
executable code (such as .exe, .dll, and .doc). The risk of intrusion and activation of malicious code in such
files is quite high.
An intruder may send a virus or another malicious program to your computer in an executable file that has
been renamed with the .txt extension. If you select scanning of files by extension, such a file is skipped by
the scan. If scanning of files by format is selected, then regardless of the extension, File Anti-Virus analyzes
the file header. This analysis may reveal that the file is in .exe format. Such a file is thoroughly scanned for
viruses and other malware.
5. In the Protection scope list, do one of the following:
If you want to add a new object to the list of objects to be scanned, click the Add button.
If you want to change the location of an object, select one from the list of objects to be scanned and click
the Edit button.
The Select object to scan window opens.
If you want to remove an object from the list of objects to be scanned, select one from the list of objects to
be scanned and click the Remove button.
A window for confirming deletion opens.
6. Do one of the following:
If you want to add a new object or change the location of an object from the list of objects to be scanned,
select one in the Select object to scan window and click the Add button.
All objects that are selected in the Select object to scan window are displayed in the File Anti-Virus
window, in the Protection scope list.
Then click OK.
If you want to remove an object, click the Yes button in the window for confirming removal.
7. If necessary, repeat steps 5–6 for adding, moving, or removing objects from the list of objects to be scanned.
8. To exclude an object from the list of objects to be scanned, clear the check box next to the object in the
Protection scope list. However, the object remains on the list of objects to be scanned, though it is excluded
from scanning by File Anti-Virus.
9. In the File Anti-Virus window, click OK.
10. To save changes, click the Save button.
USING HEURISTIC ANALYZER WITH FILE ANTI-VIRUS
To configure the use of Heuristic Analyzer in the operation of File Anti-Virus:
1. Open the application settings window (on page 48).
Page 57

P R O T E C T I N G T H E C O M P U T E R F I L E S Y S T E M . F I L E A N T I - V I R U S
57
2. In the left part of the window, in the Anti-Virus protection section, select File Anti-Virus.
In the right part of the window, the settings of the File Anti-Virus component are displayed.
3. In the Security level section, click the Settings button.
The File Anti-Virus window opens.
4. In the File Anti-Virus window, select the Performance tab.
5. In the Scan methods section:
If you want File Anti-Virus to use heuristic analysis, select the Heuristic Analysis check box and use the
slider to set the level of heuristic analysis detail: Light scan, Medium scan, or Deep scan.
If you do not want File Anti-Virus to use heuristic analysis, clear the Heuristic Analysis check box.
6. Click OK.
7. To save changes, click the Save button.
USING SCAN TECHNOLOGIES IN THE OPERATION OF FILE ANTI- VIRUS
To configure the use of scan technologies in the operation of File Anti-Virus:
1. Open the application settings window (on page 48).
2. In the left part of the window, in the Anti-Virus protection section, select File Anti-Virus.
In the right part of the window, the settings of the File Anti-Virus component are displayed.
3. In the Security level section, click the Settings button.
The File Anti-Virus window opens.
4. In the File Anti-Virus window, select the Additional tab.
5. In the Scan technologies section:
Select the check boxes opposite the names of technologies that you want to use in the operation of File
Anti-Virus.
Clear the check boxes opposite the names of technologies that you do not want to use in the operation of
File Anti-Virus.
Page 58

A D M I N I S T R A T O R G U I D E
58
6. Click OK.
7. To save changes, click the Save button.
OPTIMIZING FILE SCANNING
To optimize file scanning:
1. Open the application settings window (on page 48).
2. In the left part of the window, in the Anti-Virus protection section, select File Anti-Virus.
In the right part of the window, the settings of the File Anti-Virus component are displayed.
3. Click the Settings button.
The File Anti-Virus window opens.
4. In the File Anti-Virus window, select the Performance tab.
5. In the Scan optimization section, select the Scan only new and changed files check box.
6. Click OK.
7. To save changes, click the Save button.
SCANNING COMPOUND FILES
A common technique of concealing viruses and other malware is to implant them in compound files, such as archives or
databases. To detect viruses and other malware that are hidden in this way, the compound file must be unpacked, which
may slow down scanning. You can limit the set of compound files to be scanned, thus speeding up scanning.
To configure scanning of compound files:
1. Open the application settings window (on page 48).
2. In the left part of the window, in the Anti-Virus protection section, select File Anti-Virus.
In the right part of the window, the settings of the File Anti-Virus component are displayed.
3. In the Security level section, click the Settings button.
The File Anti-Virus window opens.
4. In the File Anti-Virus window, select the Performance tab.
5. In the Scanning of compound files section, specify the types of compound files that you want to scan:
archives, installation packages, or embedded OLE objects.
6. If the Scan only new and changed files check box is cleared in the Scan optimization section, you can
specify for each type of compound file whether to scan all files of this type or new ones only. To make your
choice, click the all / new link next to the name of a type of compound file. This link changes its value after you
click it.
If the Scan only new and changed files check box is selected, only new files are scanned.
7. Click the Additional button.
The Compound files window opens.
Page 59

P R O T E C T I N G T H E C O M P U T E R F I L E S Y S T E M . F I L E A N T I - V I R U S
59
8. In the Background scan section, do one of the following:
If you do not want File Anti-Virus to unpack compound files in background mode, clear the Extract
compound files in the background check box.
If you want File Anti-Virus to unpack large-sized compound files in background mode, select the Extract
compound files in the background check box and specify the required value in the Minimum file size
field.
9. In the Size limit section, do one of the following:
If you do not want File Anti-Virus to unpack large-sized compound files, select the Do not unpack large
compound files check box and specify the required value in the Maximum file size field.
If you want File Anti-Virus to unpack large-sized compound files, clear the Do not unpack large
compound files check box.
A file is considered large if its size exceeds the value in the Maximum file size field.
File Anti-Virus scans large-sized files that are extracted from archives, regardless of whether or not the Do not
unpack large compound files check box is selected.
10. Click OK.
11. In the File Anti-Virus window, click OK.
12. To save changes, click the Save button.
CHANGING THE SCAN MODE
Scan mode means the condition under which File Anti-Virus starts to scan files. By default, Kaspersky Endpoint Security
scans files in smart mode. In this file scan mode, File Anti-Virus decides whether or not to scan files after analyzing
operations that are performed with the file by the user, by an application on behalf of the user (under the account that
was used to log in or a different user account), or by the operating system. For example, when working with a Microsoft
Office Word document, Kaspersky Endpoint Security scans the file when it is first opened and last closed. Intermediate
operations that overwrite the file do not cause it to be scanned.
To change the file scan mode:
1. Open the application settings window (on page 48).
2. In the left part of the window, in the Anti-Virus protection section, select File Anti-Virus.
In the right part of the window, the settings of the File Anti-Virus component are displayed.
3. In the Security level section, click the Settings button.
The File Anti-Virus window opens.
4. In the File Anti-Virus window, select the Additional tab.
Page 60

A D M I N I S T R A T O R G U I D E
60
5. In the Scan mode section, select the required mode:
Smart mode.
On access and modification.
On access.
On execution.
6. Click OK.
7. To save changes, click the Save button.
Page 61

61
SYSTEM WATCHER
IN THIS SECTION:
About System Watcher.................................................................................................................................................... 61
Enabling and disabling System Watcher ......................................................................................................................... 61
Using behavior stream signatures (BSS) ........................................................................................................................ 63
Rolling back malware actions during disinfection ................................................................................................ ............ 63
This component is available if Kaspersky Endpoint Security is installed on a computer that runs on Microsoft Windows for
workstations. This component is not available if Kaspersky Endpoint Security is installed on a computer that runs on
Microsoft Windows for file servers (see the section "Hardware and software requirements" on page 19).
This section contains information about System Watcher and instructions on how to configure the component settings.
ABOUT SYSTEM WATCHER
System Watcher collects data on the actions of applications on your computer and passes this information to other
components for more reliable protection.
Behavior stream signatures
Behavior Stream Signatures (BSS) (also called "behavior stream signatures") contain sequences of application actions
that Kaspersky Endpoint Security classifies as dangerous. If application activity matches a behavior stream signature,
Kaspersky Endpoint Security performs the specified action. Kaspersky Endpoint Security functionality based on behavior
stream signatures provides proactive defense for the computer.
By default, if the activity of an application matches a behavior stream signature, System Watcher moves the executable
file of the application to Quarantine (see the section "Managing Quarantine and Backup" on page 202).
Rolling back actions that have been performed by malware
Based on information that System Watcher collects, Kaspersky Endpoint Security can roll back actions that have been
performed by malware in the operating system while performing disinfection.
A rollback of malware actions can be initiated by Proactive Defense, File Anti-Virus (see the section "Protecting the
computer file system. File Anti-Virus" on page 51), or during a virus scan (see the section "Scan" on page 168).
Rolling back malware operations affects a strictly defined set of data. It causes no negative consequences for the
operating system or the integrity of data on your computer.
Page 62

A D M I N I S T R A T O R G U I D E
62
ENABLING AND DISABLING SYSTEM WATCHER
By default, System Watcher is enabled and runs in the mode that Kaspersky Lab specialists recommend. You can
disable System Watcher, if necessary.
It is not recommended to disable System Watcher unnecessarily, because doing so reduces the performance of
protection components that may require data from System Watcher to classify potential threats that they detect.
There are two ways to enable or disable the component:
On the Protection and Control tab of the main application window (see the section "Main application window"
on page 46)
From the application settings window (see the section "Application settings window" on page 48)
To enable or disable System Watcher on the Protection and Control tab of the main application window:
1. Open the main application window.
2. Select the Protection and Control tab.
3. Click the Protection section.
The Protection section opens.
4. Right-click to display the context menu of the line with information about the System Watcher component.
A menu for selecting actions on the component opens.
5. Do one of the following:
To enable System Watcher, select Enable.
The component status icon , which is displayed on the left in the System Watcher line, changes to the
icon.
To disable System Watcher, select Disable.
The component status icon , which is displayed on the left in the System Watcher line, changes to the
icon.
To enable or disable System Watcher from the application settings window:
1. Open the application settings window (on page 48).
2. In the left part of the window, in the Anti-Virus protection section, select System Watcher.
In the right part of the window, the settings of the System Watcher component are displayed.
3. Do one of the following:
To enable System Watcher, select the Enable System Watcher check box
To disable System Watcher, clear the Enable System Watcher check box.
4. To save changes, click the Save button.
Page 63

S Y S T E M W A T C H E R
63
USING BEHAVIOR STREAM SIGNATURES (BSS)
To use behavior stream signatures (BSS):
1. Open the application settings window (on page 48).
2. In the left part of the window, in the Anti-Virus protection section, select System Watcher.
In the right part of the window, the settings of the System Watcher component are displayed.
3. In the Proactive Defense section, select the Use updatable patterns of dangerous activity (BSS) check box.
4. Select the required action from the On detecting malware activity list:
Select action automatically. If this item is selected, on detecting malicious activity Kaspersky Endpoint
Security performs the default action that is specified by Kaspersky Lab specialists. By default, Kaspersky
Endpoint Security moves the executable file of the malicious application to Quarantine.
Move file to Quarantine. If this item is selected, on detecting malicious activity Kaspersky Endpoint
Security moves the executable file of this application to Quarantine.
Terminate the malicious program. If this item is selected, on detecting malicious activity Kaspersky
Endpoint Security terminates the relevant application.
Skip. If this item is selected, on detecting malicious activity Kaspersky Endpoint Security does not take any
action on the executable file of this application.
5. To save changes, click the Save button.
ROLLING BACK MALWARE ACTIONS DURING
DISINFECTION
To enable or disable the rollback of malware actions during disinfection:
1. Open the application settings window (on page 48).
2. In the left part of the window, in the Anti-Virus protection section, select System Watcher.
In the right part of the window, the settings of the System Watcher component are displayed.
3. Do one of the following:
If you want Kaspersky Endpoint Security to roll back actions that were performed by malware in the
operating system while performing disinfection, select the Roll back malware actions during disinfection
check box.
If you want Kaspersky Endpoint Security to ignore actions that were performed by malware in the operating
system while performing disinfection, clear the Roll back malware actions during disinfection check box.
4. To save changes, click the Save button.
Page 64

64
EMAIL PROTECTION. MAIL ANTI-VIRUS
IN THIS SECTION:
About Mail Anti-Virus ....................................................................................................................................................... 64
Enabling and disabling Mail Anti-Virus ............................................................................................................................ 64
Configuring Mail Anti-Virus .............................................................................................................................................. 65
This component is available if Kaspersky Endpoint Security is installed on a computer that runs on Microsoft Windows for
workstations. This component is not available if Kaspersky Endpoint Security is installed on a computer that runs on
Microsoft Windows for file servers (see the section "Hardware and software requirements" on page 19).
This section contains information about Mail Anti-Virus and instructions on how to configure the component settings.
ABOUT MAIL ANTI-VIRUS
Mail Anti-Virus scans incoming and outgoing email messages for viruses and other malware. It starts together with
Kaspersky Endpoint Security, continuously remains active in computer memory, and scans all email messages that are
sent or received via the POP3, SMTP, IMAP, MAPI, and NNTP protocols.
The Mail Anti-Virus icon in the taskbar notification area indicates that the application is running. The icon appears as
every time that an email message is scanned.
Mail Anti-Virus intercepts each email message that is received or sent by the user. If no threats are detected in the
message, it becomes available to the user.
If a threat is detected in the file, Kaspersky Endpoint Security assigns one of the following statuses to this file:
A status that indicates the type of malicious program that is detected (for example, virus or Trojan).
Potentially infected status if the scan cannot determine whether or not the email message is infected. The email
message may possibly contain a code sequence that is typical of viruses or other malware, or the modified code
of a known virus.
The application then blocks the email message, displays a notification (see page 199) (if this is specified by the
notification settings) about the detected threat, and takes the action on the message that is specified in the settings of
Mail Anti-Virus (see the section "Changing the action to take on infected email messages" on page 67).
For the Microsoft Office Outlook and The Bat! email clients, extension modules (plug-ins) allow you to fine-tune the mail
scanning settings. The Mail Anti-Virus plug-in is embedded in the Microsoft Office Outlook and The Bat! mail programs
during installation of Kaspersky Endpoint Security.
Mail Anti-Virus does not support protocols that ensure encrypted data transfer.
ENABLING AND DISABLING MAIL ANTI-VIRUS
By default, Mail Anti-Virus is enabled, running in a mode that is recommended by Kaspersky Lab's experts. You can
disable Mail Anti-Virus, if necessary.
Page 65

E M A I L P R O T E C T I O N . M A I L A N T I - V I R U S
65
There are two ways to enable or disable the component:
On the Protection and Control tab of the main application window (see the section "Main application window"
on page 46)
From the application settings window (see the section "Application settings window" on page 48)
To enable or disable Mail Anti-Virus on the Protection and Control tab of the main application window:
1. Open the main application window.
2. Select the Protection and Control tab.
3. Click the Protection section.
The Protection section opens.
4. Right-click to bring up the context menu of the line with information about the Mail Anti-Virus component.
A menu for selecting actions on the component opens.
5. Do one of the following:
To enable Mail Anti-Virus, select Enable in the menu.
The component status icon , which is displayed on the left in the Mail Anti-Virus line, changes to the
icon .
To disable Mail Anti-Virus, select Disable in the menu.
The component status icon , which is displayed on the left in the Mail Anti-Virus line, changes to the
icon .
To enable or disable Mail Anti-Virus from the application settings window:
1. Open the application settings w indow.
2. In the left part of the window, in the Anti-Virus protection section, select Mail Anti-Virus.
In the right part of the window, the settings of the Mail Anti-Virus component are displayed.
3. Do one of the following:
If you want to enable Mail Anti-Virus, select the Enable Mail Anti-Virus check box.
If you want to disable Mail Anti-Virus, clear the Enable Mail Anti-Virus check box.
4. To save changes, click the Save button.
CONFIGURING MAIL ANTI-VIRUS
You can do the following to configure Mail Anti-Virus:
Change the security level.
You can select one of the pre-installed email security levels or configure a custom email security level.
If you have changed the email security level settings, you can always revert to the recommended email security
level settings.
Page 66

A D M I N I S T R A T O R G U I D E
66
Change the action that Kaspersky Endpoint Security performs on infected email messages.
IN THIS SECTION:
Changing the mail security level ...................................................................................................................................... 67
Changing the action to take on infected email messages ............................................................................................... 67
Editing the protection scope of Mail Anti-Virus ................................................................................................................ 67
Scanning compound files that are attached to email messages ...................................................................................... 69
Filtering attachments in email messages ........................................................................................................................ 69
Using heuristic analysis ................................................................................................................................................... 70
Scanning emails in Microsoft Office Outlook ................................................................................................................... 70
Scanning emails in The Bat! ............................................................................................................................................ 71
Edit the protection scope of Mail Anti-Virus.
Configure scanning of compound file attachments in email messages.
You can enable or disable the scanning of archives that are attached to email messages and limit the maximum
size of email attachments to be scanned and the maximum attachment scan duration.
Configure filtering of email attachments by type.
Filtering of email attachments by type allows files of the specified types to be automatically renamed or deleted.
Configure Heuristic Analyzer.
To increase the effectiveness of protection, you can use heuristic analysis. During heuristic analysis, Kaspersky
Endpoint Security analyzes the activity of applications in the operating system. Heuristic analysis can detect
new threats in email messages for which there are currently no records in the Kaspersky Endpoint Security
databases.
Configure email scanning in Microsoft Office Outlook.
A plug-in is designed for Microsoft Office Outlook, which allows comfortably adjusting email scan settings.
Configure email scanning in The Bat!.
A plug-in is designed for The Bat!, which allows comfortably adjusting email scan settings.
When working with other email clients, including Microsoft Outlook Express®, Windows Mail, and Mozilla™
Thunderbird™, the Mail Anti-Virus component scans emails sent via the SMTP, POP3, IMAP, and NNTP
protocols.
When working with Mozilla Thunderbird, Mail Anti-Virus does not scan email messages that are transmitted via
the IMAP protocol for viruses and other threats if filters are used to move email messages from the Inbox
folder.
Page 67

E M A I L P R O T E C T I O N . M A I L A N T I - V I R U S
67
CHANGING THE MAIL SECURITY LEVEL
Mail Anti-Virus applies various groups of settings to protect mail. The settings groups are called email security levels.
There are three pre-installed email security levels: High, Recommended, and Low. The Recommended file security
level is considered the optimal setting, and is recommended by Kaspersky Lab.
To change the email security level:
1. Open the application settings window (on page 48).
2. In the left part of the window, in the Anti-Virus protection section, select Mail Anti-Virus.
In the right part of the window, the settings of the Mail Anti-Virus component are displayed.
3. In the Security level section, do one of the following:
If you want to install one of the pre-installed email security levels (High, Recommended, or Low), use the
slider to select one.
If you want to configure a custom email security level, click the Settings button and specify settings in the
Mail Anti-Virus window.
After you configure a custom email security level, the name of the security level in the Security level
section changes to Custom.
If you want to change the email security level to Recommended, click the Default button.
4. To save changes, click the Save button.
CHANGING THE ACTION TO TAKE ON INFECTED EMAIL MESSAGES
To change the action to take on infected email messages:
1. Open the application settings window (on page 48).
2. In the left part of the window, in the Anti-Virus protection section, select Mail Anti-Virus.
In the right part of the window, the settings of the Mail Anti-Virus component are displayed.
3. In the Action on threat detection section, select the action that Kaspersky Endpoint Security performs on
detection of an infected email message:
Select action automatically.
Perform action: Disinfect. Delete if disinfection fails.
Perform action: Disinfect.
Perform action: Delete.
Perform action: Block.
4. To save changes, click the Save button.
EDITING THE PROTECTION SCOPE OF MAIL ANTI-VIRUS
The protection scope refers to the objects that the component scans when enabled. The protection scopes of different
components have different properties. The properties of the protection scope of Mail Anti-Virus include the settings to
Page 68

A D M I N I S T R A T O R G U I D E
68
integrate Mail Anti-Virus into email clients, and the type of email messages and the email protocols whose traffic is
scanned by Mail Anti-Virus. By default, Kaspersky Endpoint Security scans incoming and outgoing email messages and
traffic via the POP3, SMTP, NNTP, and IMAP protocols, and is integrated into the Microsoft Office Outlook and The Bat!
email clients.
To create the protection scope of Mail Anti-Virus:
1. Open the application settings window (on page 48).
2. In the left part of the window, in the Anti-Virus protection section, select Mail Anti-Virus.
In the right part of the window, the settings of the Mail Anti-Virus component are displayed.
3. Click the Settings button.
The General tab opens in the Mail Anti-Virus window.
4. In the Protection scope section, do one of the following:
If you want Mail Anti-Virus to scan all incoming and outgoing email messages on your computer, select the
Incoming and outgoing messages option.
If you want Mail Anti-Virus to scan only incoming email messages on your computer, select the Incoming
messages only option.
If you choose to scan only incoming email messages, we recommend that you perform a one-time scan of
all outgoing email messages, because there is a chance of email worms on your computer that spread over
electronic mail. This helps to avoid unpleasant situations that result from unmonitored mass emailing of
infected messages from your computer.
5. In the Connectivity section, do the following:
If you want Mail Anti-Virus to scan email messages that are transmitted via the POP3, SMTP, NNTP and
IMAP protocols before they arrive on your computer, select the POP3 / SMTP / NNTP / IMAP traffic check
box.
If you do not want Mail Anti-Virus to scan email messages that are transmitted via the POP3, SMTP, NNTP
and IMAP protocols before they arrive on your computer, clear the POP3 / SMTP / NNTP / IMAP traffic
check box. In this case, messages are scanned by Mail Anti-Virus plug-ins that are embedded in Microsoft
Office Outlook and The Bat! after messages arrive on your computer.
If you use an email client other than Microsoft Office Outlook or The Bat!, email messages that are
transmitted via the POP3, SMTP, NNTP and IMAP protocols are not scanned when the
POP3 / SMTP / NNTP / IMAP traffic check box is cleared.
If the Additional: Microsoft Office Outlook plug-in check box and the Additional: The Bat! plug-in
check box are cleared, Mail Anti-Virus does not scan email messages that are transmitted via the POP3,
SMTP, NNTP and IMAP protocols either.
If you want to open access to Mail Anti-Virus settings from Microsoft Office Outlook and enable scanning of
email messages that are transmitted via the POP3, SMTP, NNTP, IMAP, and MAPI protocols after they
arrive on the computer by a plug-in that is embedded into Microsoft Office Outlook, select the Additional:
Microsoft Office Outlook plug-in check box.
If you want to enable the scanning of email messages that are transmitted via the POP3, SMTP, NNTP,
IMAP, and MAPI protocols after they arrive on the computer by a plug-in embedded into The Bat!, select
the Additional: The Bat! plug-in check box.
Page 69

E M A I L P R O T E C T I O N . M A I L A NTI - V I R U S
69
If you want to disable the scanning of email messages that are transmitted via the POP3, SMTP, NNTP,
IMAP, and MAPI protocols after they arrive on the computer by a plug-in embedded into The Bat!, clear the
Additional: The Bat! plug-in check box.
The Mail Anti-Virus plug-in is embedded in the Microsoft Office Outlook and The Bat! mail programs during
installation of Kaspersky Endpoint Security.
6. Click OK.
7. To save changes, click the Save button.
SCANNING COMPOUND FILES THAT ARE ATTACHED TO EMAIL
MESSAGES
To configure the scanning of compound files that are attached to email messages:
1. Open the application settings window (on page 48).
2. In the left part of the window, in the Anti-Virus protection section, select Mail Anti-Virus.
In the right part of the window, the settings of the Mail Anti-Virus component are displayed.
3. Click the Settings button.
The Mail Anti-Virus window opens.
4. On the General tab, in the Scan of compound files section, do the following:
If you want Mail Anti-Virus to skip archives that are attached to email messages, clear the Scan attached
archives check box.
If you want Mail Anti-Virus to skip email attachments that are larger than N megabytes in size, select the Do
not scan archives larger than N MB check box. If you select this check box, specify the maximum archive
size in the field that is opposite the name of the check box.
If you want Mail Anti-Virus to scan email attachments that take more than N seconds to scan, clear the Do
not scan archives for more than N s check box.
5. Click OK.
6. To save changes, click the Save button.
FILTERING ATTACHMENTS IN EMAIL MESSAGES
Malicious programs can be distributed in the form of email attachments. You can configure filtering of email attachments
by type, so that files of such types are automatically renamed or deleted.
To configure filtering of attachments:
1. Open the application settings window (on page 48).
2. In the left part of the window, in the Anti-Virus protection section, select Mail Anti-Virus.
In the right part of the window, the settings of the Mail Anti-Virus component are displayed.
3. In the Security level section, click the Settings button.
Page 70

A D M I N I S T R A T O R G U I D E
70
The Mail Anti-Virus window opens.
4. In the Mail Anti-Virus window, select the Attachment filter tab.
5. Do one of the following:
If you do not want Mail Anti-Virus to filter email attachments, select the Disable filtering setting.
If you want Mail Anti-Virus to rename email attachments of the specified types, select the Rename
selected attachment types setting.
If you want Mail Anti-Virus to delete email attachments of the specified types, select the Delete selected
attachment types setting.
6. Do one of the following:
If in step 5 of these instructions you have selected the Disable filtering setting, then go to step 7.
If in step 5 of these instructions you have selected the Rename selected attachment types or the Delete
selected attachment types setting, the list of file types becomes active. Select the check boxes next to the
required file types.
You can change the list of file types by using the Add, Edit, and Delete buttons.
7. Click OK.
8. To save changes, click the Save button.
USING HEURISTIC ANALYSIS
To use heuristic analysis:
1. Open the application settings window (on page 48).
2. In the left part of the window, in the Anti-Virus protection section, select Mail Anti-Virus.
In the right part of the window, the settings of the Mail Anti-Virus component are displayed.
3. In the Security level section, click the Settings button.
The Mail Anti-Virus window opens.
4. In the Mail Anti-Virus window, select the Additional tab.
5. On the Additional tab, in the Scan methods section, select the Heuristic Analysis check box.
6. Use the slider to set the level of detail of the scan during heuristic analysis: Light scan, Medium scan, or Deep
scan.
7. Click OK.
8. To save changes, click the Save button.
SCANNING EMAILS IN MICROSOFT OFFICE OUTLOOK
During installation of Kaspersky Endpoint Security, a special plug-in is embedded into Microsoft Office Outlook. It allows
you to open the Mail Anti-Virus settings quickly from inside Microsoft Office Outlook, and to specify at what moment
email messages are to be scanned for viruses and other malware. The mail plug-in that is embedded into Microsoft
Page 71

E M A I L P R O T E C T I O N . M A I L A N T I - V I R U S
71
SEE ALSO:
Editing the protection scope of Mail Anti-Virus ................................................................................................................ 67
Office Outlook can scan incoming and outgoing messages that are transmitted via the POP3, SMTP, NNTP, IMAP, and
MAPI protocols.
Mail Anti-Virus settings can be configured directly in Microsoft Office Outlook if the Additional: Microsoft Office
Outlook plug-in check box is selected in the interface of Kaspersky Endpoint Security.
In Microsoft Office Outlook, incoming email messages are first scanned by Mail Anti-Virus (when the
POP3 / SMTP / NNTP / IMAP traffic check box is selected) and then by the mail plug-in that is embedded into Microsoft
Office Outlook. If Mail Anti-Virus detects a malicious object in an email message, it alerts you to this event.
Your choice of action in the notification window determines the component that eliminates the threat in the email
message: Mail Anti-Virus or the mail plug-in that is embedded into Microsoft Office Outlook.
If you select Disinfect or Delete in the notification window of Mail Anti-Virus, threat elimination is performed by
Mail Anti-Virus.
If you select Skip in the notification window of Mail Anti-Virus, the mail plug-in that is embedded into Microsoft
Office Outlook eliminates the threat.
Outgoing email messages are first scanned by the email plug-in that is embedded into Microsoft Office Outlook, and then
by Mail Anti-Virus.
To adjust the email scan settings in Microsoft Office Outlook:
1. Open the main Microsoft Outlook application window.
2. Select Tools Options from the menu bar.
The Options window opens.
3. In the Options window, select the Email protection tab.
SCANNING EMAILS IN THE BAT!
During installation of Kaspersky Endpoint Security, a special plug-in is embedded into The Bat!. It allows you to open
Mail Anti-Virus settings quickly from inside The Bat!, and to specify at what moment email messages are to be scanned
for viruses and other malware. The mail plug-in that is embedded into The Bat! email client can scan incoming and
outgoing messages that are transmitted via the POP3, SMTP, NNTP, IMAP, and MAPI protocols.
Mail Anti-Virus settings can be configured directly in The Bat! email client if the Additional: The Bat! plug-in check box
is selected in the interface of Kaspersky Endpoint Security.
In The Bat!, incoming email messages are first scanned by Mail Anti-Virus (when the POP3 / SMTP / NNTP / IMAP
traffic check box is selected in the interface of Kaspersky Endpoint Security) and then by the mail plug-in that is
embedded into The Bat!. If Mail Anti-Virus detects a malicious object in an email message, it alerts you to this event.
Your choice of action in the notification window determines which component eliminates the threat in the email message:
Mail Anti-Virus or the mail plug-in that is embedded into The Bat!.
If you select Disinfect or Delete in the notification window, threat elimination will be performed by Mail Anti-
Virus.
Page 72

A D M I N I S T R A T O R G U I D E
72
If you select Skip in the notification window, the email plug-in that is embedded in The Bat! eliminates the
SEE ALSO:
Editing the protection scope of Mail Anti-Virus ................................................................................................................ 67
threat.
Outgoing email messages are first scanned by the email plug-in that is embedded in The Bat!, and then by Mail AntiVirus.
The actions that The Bat! performs on infected email messages are defined in the application itself. You can specify the
following settings:
Select the stream of email messages (incoming or outgoing) that is to be scanned.
Specify the stage when email messages are scanned (before opening an email message, before saving an
email message to disk).
Select the action that The Bat! performs on detection of an infected email message:
Attempt to disinfect infected parts. If you have selected this option, The Bat! attempts to disinfect
infected email messages. If they cannot be disinfected, The Bat! leaves those email messages intact.
Delete infected parts. If you have selected this option, The Bat! deletes infected or potentially infected
email messages.
By default, The Bat! moves all infected email messages to Quarantine without disinfecting them.
The Bat! does not mark infected email messages with a special header.
To adjust email scan settings in The Bat!:
1. Open the main The Bat! window.
2. In the Properties menu, select Settings.
3. Select the Virus protection object from the settings tree.
Page 73

73
COMPUTER PROTECTION ON THE
IN THIS SECTION:
About Web Anti-Virus ...................................................................................................................................................... 73
Enabling and disabling Web Anti-Virus ........................................................................................................................... 73
Configuring Web Anti-Virus ............................................................................................................................................. 74
INTERNET. WEB ANTI-VIRUS
This component is available if Kaspersky Endpoint Security is installed on a computer that runs on Microsoft Windows for
workstations. This component is not available if Kaspersky Endpoint Security is installed on a computer that runs on
Microsoft Windows for file servers (see the section "Hardware and software requirements" on page 19).
This section contains information about Web Anti-Virus and instructions on how to configure the component settings.
ABOUT WEB ANTI-VIRUS
Every time you go online, you expose information that is stored on your computer to viruses and other malware. They
can infiltrate your computer while you are downloading free software or browsing websites that are compromised by
hacker attacks. Network worms can find a way onto your computer as soon as you establish an Internet connection,
even before you open a web page or download a file.
Web Anti-Virus protects incoming and outgoing data that is sent to and from the computer over the HTTP and FTP
protocols and checks URLs against the list of suspicious or phishing web addresses.
Web Anti-Virus intercepts and analyzes for viruses and other malware every web page or file that is accessed by the
user or an application via the HTTP or FTP protocol:
If the page or file is found not to contain malicious code, the user gains immediate access to them.
If the web page or the file which the user attempts to access contains malicious code, the application takes the
action on the object that is specified in the settings of Web Anti-Virus (see the section "Changing the action to
take on malicious web traffic objects" on page 76).
Web Anti-Virus does not support protocols that ensure encrypted data transfer.
ENABLING AND DISABLING WEB ANTI-VIRUS
By default, Web Anti-Virus is enabled, running in a mode that is recommended by Kaspersky Lab's experts. You can
disable Web Anti-Virus, if necessary.
There are two ways to enable or disable the component:
On the Protection and Control tab of the main application window (see the section "Main application window"
on page 46)
From the application settings window (see the section "Application settings window" on page 48)
Page 74

A D M I N I S T R A T O R G U I D E
74
To enable or disable Web Anti-Virus on the Protection and Control tab of the main application window:
1. Open the main application window.
2. Select the Protection and Control tab.
3. Click the Protection section.
The Protection section opens.
4. Right-click to bring up the context menu of the line with information about the Web Anti-Virus component.
A menu for selecting actions on the component opens.
5. Do one of the following:
To enable Web Anti-Virus, select Enable in the menu.
The component status icon , which is displayed on the left in the Web Anti-Virus line, changes to the
icon .
To disable Web Anti-Virus, select Disable in the menu.
The component status icon , which is displayed on the left in the Web Anti-Virus line, changes to the
icon .
To enable or disable Web Anti-Virus from the application settings window:
1. Open the application settings window.
2. In the left part of the window, in the Anti-Virus protection section, select Web Anti-Virus.
In the right part of the window, the settings of the Web Anti-Virus component are displayed.
3. Do one of the following:
If you want to enable Web Anti-Virus, select the Enable Web Anti-Virus check box.
If you want to disable Web Anti-Virus, clear the Enable Web Anti-Virus check box.
4. To save changes, click the Save button.
CONFIGURING WEB ANTI-VIRUS
You can do the following to configure Web Anti-Virus:
Change web traffic security level.
You can select one of the pre-installed security levels for web traffic that is received or transmitted via the HTTP
and FTP protocols, or configure a custom web traffic security level.
If you change the web traffic security level settings, you can always revert to the recommended web traffic
security level settings.
Change the action that Kaspersky Endpoint Security performs on infected web traffic objects.
If analysis of an HTTP object shows that it contains malicious code, the response by Web Anti-Virus depends
on the action that you have specified.
Page 75

C O M P U T E R P R O T E C T I O N O N T H E I N T E R N E T . W E B A N T I - V I R U S
75
IN THIS SECTION:
Changing the web traffic security level ............................................................................................................................ 75
Changing the action to take on malicious web traffic objects .......................................................................................... 76
Scanning URLs against databases of suspicious and phishing web addresses ............................................................. 76
Using Heuristic Analyzer with Web Anti-Virus ................................................................................................................. 77
Configuring the duration of caching web traffic ............................................................................................................... 77
Editing the list of trusted URLs ........................................................................................................................................ 78
Configure Web Anti-Virus scanning of links against databases of phishing and suspicious URLs.
Configure use of heuristic analysis when scanning web traffic for viruses and other malicious programs.
To increase the effectiveness of protection, you can use heuristic analysis. During heuristic analysis, Kaspersky
Endpoint Security analyzes the activity of applications in the operating system. Heuristic analysis can detect
new threats for which there are currently no records in the Kaspersky Endpoint Security databases.
Configure use of heuristic analysis when scanning web pages for phishing links.
Optimize Web Anti-Virus scanning of web traffic that is sent and received via the HTTP and FTP protocols.
Create a list of trusted URLs.
You can create a list of URLs whose content you trust. Web Anti-Virus does not analyze information from
trusted URLs for viruses or other threats. This option may be useful, for example, when Web Anti-Virus
interferes with downloading a file from a known website.
A URL may be the address of a specific web page or the address of a website.
CHANGING THE WEB TRAFFIC SECURITY LEVEL
To protect data that is received and transmitted via the HTTP and FTP protocols, Web Anti-Virus applies various settings
groups. Such settings groups are called web traffic security levels. There are three pre-installed web traffic security
levels: High, Recommended, and Low. The Recommended web traffic security level is considered the optimal setting,
and is recommended by Kaspersky Lab.
To change the web traffic security level:
1. Open the application settings window (on page 48).
2. In the left part of the window, in the Anti-Virus protection section, select Web Anti-Virus.
In the right part of the window, the settings of the Web Anti-Virus component are displayed.
3. In the Security level section, do one of the following:
If you want to install one of the pre-installed web traffic security levels (High, Recommended, or Low), use
the slider to select one.
If you want to configure a custom web traffic security level, click the Settings button and specify settings in
the Web Anti-Virus window.
Page 76

A D M I N I S T R A T O R G U I D E
76
When you have configured a custom web traffic security level, the name of the security level in the
Security level section changes to Custom.
If you want to change the web traffic security level to Recommended, click the Default button.
4. To save changes, click the Save button.
CHANGING THE ACTION TO TAKE ON MALICIOUS WEB TRAFFIC
OBJECTS
To change the action to take on malicious web traffic objects:
1. Open the application settings window (on page 48).
2. In the left part of the window, in the Anti-Virus protection section, select Web Anti-Virus.
In the right part of the window, the settings of the Web Anti-Virus component are displayed.
3. In the Action on threat detection section, select the action that Kaspersky Endpoint Security performs on
malicious web traffic objects:
Select action automatically.
Block download.
Allow download.
4. To save changes, click the Save button.
SCANNING URLS AGAINST DATABASES OF SUSPICIOUS AND
PHISHING WEB ADDRESSES
Scanning links to see if they are included in the list of phishing web addresses allows avoiding phishing attacks. A
phishing attack can be disguised, for example, as an email message from your bank with a link to the official website of
the bank. By clicking the link, you go to an exact copy of the bank's website and can even see its real web address in the
browser, even though you are on a counterfeit site. From this point forward, all of your actions on the site are tracked and
can be used to steal your money.
Because links to phishing websites may be received not only in an email message, but also from other sources such as
ICQ messages, Web Anti-Virus monitors attempts to access a phishing website on the level of web traffic and blocks
access to such sites. Lists of phishing URLs are included with the Kaspersky Endpoint Security distribution kit.
To configure Web Anti-Virus to check URLs against the databases of suspicious and phishing web addresses:
1. Open the application settings window (on page 48).
2. In the left part of the window, in the Anti-Virus protection section, select Web Anti-Virus.
In the right part of the window, the settings of the Web Anti-Virus component are displayed.
3. Click the Settings button.
The Web Anti-Virus window opens.
4. In the Web Anti-Virus window, select the General tab.
5. In the Scan methods section:
Page 77

C O M P U T E R P R O T E C T I O N O N T H E I N T E R N E T . W E B A N T I - V I R U S
77
If you want Web Anti-Virus to check URLs against the databases of suspicious web addresses, select the
Check if URLs are listed in the database of suspicious URLs check box.
If you want Web Anti-Virus to check URLs against the databases of phishing web addresses, select the
Check if URLs are listed in the database of phishing URLs check box.
You can also check URLs against the reputation databases of Kaspersky Security Network (see the section
"Participating in Kaspersky Security Network" on page 237).
6. Click OK.
7. To save changes, click the Save button.
USING HEURISTIC ANALYZER WITH WEB ANTI-VIRUS
To configure the use of heuristic analysis:
1. Open the application settings window (on page 48).
2. In the left part of the window, in the Anti-Virus protection section, select Web Anti-Virus.
In the right part of the window, the settings of the Web Anti-Virus component are displayed.
3. In the Security level section, click the Settings button.
The Web Anti-Virus window opens.
4. In the Web Anti-Virus window, select the General tab.
5. In the Scan methods section:
If you want Web Anti-Virus to use heuristic analysis to scan web traffic for viruses and other malicious
programs, select the Heuristic analysis for detecting viruses check box and use the slider to set the
level of detail of heuristic analysis: light scan, medium scan, or deep scan.
If you want Web Anti-Virus to use heuristic analysis to scan web pages for phishing links, select the
Heuristic analysis for detecting phishing links check box and use the slider to set the level of detail of
heuristic analysis: light scan, medium scan, or deep scan.
6. Click OK.
7. To save changes, click the Save button.
Page 78

A D M I N I S T R A T O R G U I D E
78
CONFIGURING THE DURATION OF CACHING WEB TRAFFIC
To detect malicious code more efficiently, Web Anti-Virus caches fragments of objects that are downloaded from the
Internet. Web Anti-Virus uses caching to scan objects only after they arrive on the computer in full.
Caching objects increases object processing time, and therefore the time before the application delivers the object to the
user. Caching can cause problems when downloading or processing large objects, because the connection with the
HTTP client may time out.
To solve this problem, you can limit the duration for which fragments of objects that are downloaded from the Internet are
cached. When the specified period of time expires, the user receives the downloaded part of the object without scanning,
and after the object is fully copied, the object is scanned in full. This allows reducing the time that is needed to deliver
objects to the user and eliminating the disconnection problem. The Internet security level is not reduced in that case.
Removing the limit on caching time makes anti-virus scanning more efficient, but slightly slows down access to objects.
To configure web traffic caching time:
1. Open the application settings window (on page 48).
2. In the left part of the window, in the Anti-Virus protection section, select Web Anti-Virus.
In the right part of the window, the settings of the Web Anti-Virus component are displayed.
3. Click the Settings button.
The Web Anti-Virus window opens.
4. In the Web Anti-Virus window, select the General tab.
5. In the Additional section, do one of the following:
If you want to limit the time for which web traffic is cached and speed up its scanning, select the Limit web
traffic caching time check box.
If you want to cancel the time limit on caching web traffic, clear the Limit web traffic caching time check
box.
6. Click OK.
7. To save changes, click the Save button.
EDITING THE LIST OF TRUSTED URLS
To create a list of trusted URLs:
1. Open the application settings window (on page 48).
2. In the left part of the window, in the Anti-Virus protection section, select Web Anti-Virus.
In the right part of the window, the settings of the Web Anti-Virus component are displayed.
3. Click the Settings button.
The Web Anti-Virus window opens.
4. Select the Trusted URLs tab.
5. Select the Do not scan web traffic from trusted URLs check box.
Page 79

C O M P U T E R P R O T E C T I O N O N T H E I N T E R N E T . W E B A N T I - V I R U S
79
6. Create a list of URLs / web pages whose content you trust. To do so:
a. Click the Add button.
The Address / Address mask window opens.
b. Enter the address of the website / web page or the address mask of the website / web page.
c. Click OK.
A new record appears in the list of trusted URLs.
d. If necessary, repeat steps a–c of the instructions.
7. Click OK.
8. To save changes, click the Save button.
Page 80

80
PROTECTION OF INSTANT MESSAGING
IN THIS SECTION:
About IM Anti-Virus ......................................................................................................................................................... 80
Enabling and disabling IM Anti-Virus ............................................................................................................................... 80
Configuring IM Anti-Virus ................................................................................................................................................ 81
CLIENT TRAFFIC. IM ANTI-VIRUS
This component is available if Kaspersky Endpoint Security is installed on a computer that runs on Microsoft Windows for
workstations. This component is not available if Kaspersky Endpoint Security is installed on a computer that runs on
Microsoft Windows for file servers (see the section "Hardware and software requirements" on page 19).
This section contains information about IM Anti-Virus and instructions on how to configure the component settings.
ABOUT IM ANTI-VIRUS
IM Anti-Virus scans the traffic of instant messaging clients (so-called Internet pagers).
Messages that are sent through IM clients can contain the following kinds of security threats:
URLs that attempt to download a malicious program to the computer
URLs to malicious programs and websites that intruders use for phishing attacks
Phishing attacks aim to steal personal user data, such as credit card numbers, passport details, passwords for
bank payment systems and other online services (such as social networking sites or email accounts).
Files can be transmitted through IM clients. When you attempt to save such files, they are scanned by the File Anti-Virus
component (see the section "About File Anti-Virus" on page 51).
IM Anti-Virus intercepts every message that the user sends or receives through an IM client and scans it for objects that
may threaten computer security:
If no threats are detected in the message, it becomes available to the user.
If threats are detected in the message, IM Anti-Virus replaces the message with information about the threat in
the message window of the active instant messenger.
IM Anti-Virus does not support protocols that provide encrypted data transfer. IM Anti-Virus does not scan traffic of IM
messengers that use a secure connection.
ENABLING AND DISABLING IM ANTI-VIRUS
By default, IM Anti-Virus is enabled, running in a mode that is recommended by Kaspersky Lab's experts. You can
disable IM Anti-Virus, if necessary.
Page 81

P R O T E C T I O N O F I N S T A N T M E S S A G I N G C L I E N T T R A F F I C . IM A N T I - V I R U S
81
There are two ways to enable or disable the component:
On the Protection and Control tab of the main application window
From the application settings window (see the section "Application settings window" on page 48)
To enable or disable IM Anti-Virus on the Protection and Control tab of the main application window:
1. Open the main application window.
2. Select the Protection and Control tab.
3. Click the Protection section.
The Protection section opens.
4. Right-click the IM Anti-Virus line to display the context menu of component actions.
5. Do one of the following:
To enable IM Anti-Virus, select Enable in the context menu.
The component status icon , which is displayed on the left in the IM Anti-Virus line, changes to the
icon .
To disable IM Anti-Virus, select Disable in the context menu.
The component status icon , which is displayed on the left in the IM Anti-Virus line, changes to the
icon .
To enable or disable IM Anti-Virus from the application settings window:
1. Open the application settings window (on page 48).
2. In the left part of the window, in the Anti-Virus protection section, select IM Anti-Virus.
In the right part of the window, the settings of the IM Anti-Virus component are displayed.
3. Do one of the following:
If you want to enable IM Anti-Virus, select the Enable IM Anti-Virus check box.
If you want to disable IM Anti-Virus, clear the Enable IM Anti-Virus check box.
4. To save changes, click the Save button.
CONFIGURING IM ANTI-VIRUS
You can perform the following actions to configure IM Anti-Virus:
Create the protection scope.
You can expand or narrow the protection scope by modifying the type of IM client messages that are scanned.
Configure IM Anti-Virus scanning of URLs in IM client messages against databases of suspicious and phishing
URLs.
Configure Heuristic Analyzer.
Page 82

A D M I N I S T R A T O R G U I D E
82
To increase the effectiveness of protection, you can use heuristic analysis. During heuristic analysis, Kaspersky
IN THIS SECTION:
Creating the protection scope of IM Anti-Virus ................................................................................................................ 82
Scanning URLs against databases of suspicious and phishing URLs with IM Anti-Virus ................................................ 82
Using Heuristic Analyzer with IM Anti-Virus .................................................................................................................... 83
Endpoint Security analyzes the activity of applications in the operating system. Heuristic analysis can detect
new threats in IM client messages for which there are currently no records in the Kaspersky Endpoint Security
databases.
CREATING THE PROTECTION SCOPE OF IM ANTI-VIRUS
The protection scope refers to the objects that the component scans when enabled. The protection scopes of different
components have different properties. The type of scanned IM client messages, incoming or outgoing, is a property of
the IM Anti-Virus protection scope. By default, IM Anti-Virus scans both incoming and outgoing messages. You may
disable scanning of outgoing traffic.
To create the protection scope:
1. Open the application settings window (on page 48).
2. In the left part of the window, in the Anti-Virus protection section, select IM Anti-Virus.
In the right part of the window, the settings of the IM Anti-Virus component are displayed.
3. In the Protection scope section, do one of the following:
If you want IM Anti-Virus to scan all incoming and outgoing IM client messages, select the Incoming and
outgoing messages option.
If you want IM Anti-Virus to check only incoming IM client messages, select the Incoming messages only
option.
4. To save changes, click the Save button.
SCANNING URLS AGAINST DATABASES OF SUSPICIOUS AND
PHISHING URLS WITH IM ANTI-VIRUS
To configure IM Anti-Virus to check URLs against the databases of suspicious and phishing web addresses:
1. Open the application settings window (on page 48).
2. In the left part of the window, in the Anti-Virus protection section, select IM Anti-Virus.
In the right part of the window, the settings of the IM Anti-Virus component are displayed.
3. In the Scan methods section, select the methods that you want IM Anti-Virus to use:
If you want to check URLs in IM client messages against the database of suspicious URLs, select the
Check if URLs are listed in the database of suspicious URLs check box.
If you want to check URLs in IM client messages against the database of phishing URLs, select the Check
if URLs are listed in the database of phishing URLs check box.
Page 83

P R O T E C T I O N O F I N S T A N T M E S S A G I N G C L I E N T T R A F F I C . IM A N T I - V I R U S
83
4. To save changes, click the Save button.
USING HEURISTIC ANALYZER WITH IM ANTI-VIRUS
To configure the use of Heuristic Analyzer in the operation of IM Anti-Virus:
1. Open the application settings window (on page 48).
2. In the left part of the window, in the Anti-Virus protection section, select IM Anti-Virus.
In the right part of the window, the settings of the IM Anti-Virus component are displayed.
3. In the Scan methods section:
a. Select the Heuristic analysis check box.
b. Use the slider the set the level of detail of Heuristic Analysis: Light scan, Medium scan or Deep scan.
4. To save changes, click the Save button.
Page 84

84
NETWORK PROTECTION
IN THIS SECTION:
Firewall ................................................................ ................................ ................................................................ ............ 84
Network Attack Blocker ................................................................................................................................................. 104
Monitoring network traffic .............................................................................................................................................. 106
Network Monitor ................................ ................................................................ ............................................................ 110
IN THIS SECTION:
About Firewall ................................................................................................................................................................. 84
Enabling or disabling Firewall .......................................................................................................................................... 85
About network rules ........................................................................................................................................................ 85
About the network connection status .............................................................................................................................. 86
Changing the network connection status......................................................................................................................... 86
Managing network packet rules ....................................................................................................................................... 87
Managing network rules for application groups ............................................................................................................... 91
Managing network rules for applications ......................................................................................................................... 98
Configuring advanced Firewall settings ......................................................................................................................... 103
This section describes the operating principles and configuration of the Firewall and Network Attack Blocker components,
and of network traffic control.
FIREWALL
This section contains information about Firewall and instructions on how to configure the component settings.
ABOUT FIREWALL
During use on LANs and the Internet, a computer is exposed to viruses, other malware, and a variety of attacks that
exploit vulnerabilities in operating systems and software.
Firewall protects personal data that is stored on the user's computer, blocking all kinds of threats to the operating system
while the computer is connected to the Internet or a local area network. Firewall detects all network connections of the
user's computer and provides a list of IP addresses, with an indication of the status of the default network connection.
The Firewall component filters all network activity according to network rules (see the section "About network rules" on
page 85). Configuring network rules lets you specify the desired level of computer protection, from blocking Internet
access for all applications to allowing unlimited access.
Page 85

N E T W O R K P R O T E C T I O N
85
ENABLING OR DISABLING FIREWALL
By default, Firewall is enabled and functions in the optimal mode. If needed, you can disable Firewall.
There are two ways to enable or disable the component:
On the Protection and Control tab of the main application window (see the section "Main application window"
on page 46)
From the application settings window (see the section "Application settings window" on page 48)
To enable or disable Firewall on the Protection and Control tab of the main application window:
1. Open the main application window.
2. Select the Protection and Control tab.
3. Click the Protection section.
The Protection section opens.
4. Right-click the Firewall line to open the context menu of Firewall actions.
5. Do one of the following:
To enable Firewall, in the context menu, select Enable.
The component status icon , which is displayed on the left in the Firewall line, changes to the icon .
To disable Firewall, select Disable in the context menu.
The component status icon , which is displayed on the left in the Firewall line, changes to the icon .
To enable or disable Firewall, in the application settings window:
1. Open the application settings window (on page 48).
2. In the left part of the window, in the Anti-Virus protection section, select Firewall.
In the right part of the window, the settings of the Firewall component are displayed.
3. Do one of the following:
To enable Firewall, select the Enable Firewall check box.
To disable Firewall, select the Disable Firewall check box.
4. To save changes, click the Save button.
ABOUT NETWORK RULES
Network rules are allowed or blocked actions that are performed by Firewall on detecting a network connection attempt.
Firewall provides protection against network attacks of different kinds at two levels: the network level and the program
level. Protection at the network level is provided by applying network packet rules. Protection at the program level is
provided by applying rules by which installed applications can access network resources.
Page 86

A D M I N I S T R A T O R G U I D E
86
Based on the two levels of Firewall protection, you can create:
Network packet rules: Network packet rules impose restrictions on network packets, regardless of the
program. Such rules restrict inbound and outbound network traffic through specific ports of the selected data
protocol. Firewall specifies certain network packet rules by default.
Application network rules: Application network rules impose restrictions on the network activity of a specific
application. They factor in not only the characteristics of the network packet, but also the specific application to
which this network packet is addressed or which issued this network packet. Such rules make it possible to finetune network activity filtering: for example, when a certain type of network connection is blocked for some
applications but is allowed for others.
Network packet rules have a higher priority than network rules for applications. If both network packet rules and network
rules for applications are specified for the same type of network activity, the network activity is handled according to the
network packet rules.
You can specify an execution priority for each network packet rule and each network rule for applications.
ABOUT THE NETWORK CONNECTION STATUS
Firewall controls all network connections on the user's computer and automatically assigns a status to each detected
network connection.
The network connection can have one of the following status types:
Public network: This status is for networks that are not protected by any anti-virus applications, firewalls, or
filters (for example, for Internet cafe networks). When the user operates a computer that is connected to such a
network, Firewall blocks access to files and printers of this computer. External users are also unable to access
data through shared folders and remote access to the desktop of this computer. Firewall filters the network
activity of each application according to the network rules that are set for it.
Firewall assigns Public network status to the Internet by default. You cannot change the status of the Internet.
Local network: This status is assigned to networks whose users are trusted to access files and printers on this
computer (for example, a LAN or home network).
Trusted network: This status is intended for a safe network in which the computer is not exposed to attacks or
unauthorized data access attempts. Firewall permits any network activity within networks with this status.
CHANGING THE NETWORK CONNECTION STATUS
To change the network connection status:
1. Open the application settings window (on page 48).
2. In the left part of the window, in the Anti-Virus protection section, select Firewall.
In the right part of the window, the settings of the Firewall component are displayed.
3. Click the Available networks button.
The Firewall window opens under the Networks tab.
4. On the Networks tab, select a network connection whose status you want to change.
5. Right-click to display the context menu of the network connection.
6. In the context menu, select network connection status (see the section "About the network connection status"
on page 86):
Page 87

N E T W O R K P R O T E C T I O N
87
IN THIS SECTION:
Creating and editing a network packet rule ..................................................................................................................... 88
Enabling or disabling a network packet rule .................................................................................................................... 90
Changing the Firewall action for a network packet rule ................................................................................................... 90
Changing the priority of a network packet rule ................................................................................................................ 91
Public network
Local network
Trusted network
7. In the Firewall window, click OK.
8. To save changes, click the Save button.
MANAGING NETWORK PACKET RULES
You can perform the following actions while managing network packet rules:
Create a new network packet rule.
You can create a new network packet rule by creating a set of conditions and actions that is applied to network
packets and data streams.
Enable or disable a network packet rule.
All network packet rules that are created by Firewall by default have Enabled status. When a network packet
rule is enabled, Firewall applies this rule.
You can disable any network packet rule that is selected in the list of network packet rules. When a network
packet rule is disabled, Firewall temporarily does not apply this rule.
A new custom network packet rule is added to the list of network packet rules by default with Enabled status.
Edit the settings of an existing network packet rule.
After you create a new network packet rule, you can always return to editing its settings and modify them as
needed.
Change the Firewall action for a network packet rule.
In the list of network packet rules, you can edit the action that is taken by Firewall on detecting network activity
that matches a specific network packet rule.
Change the priority of a network packet rule.
You can raise or lower the priority of a network packet rule that is selected in the list.
Remove a network packet rule.
You can remove a network packet rule to stop Firewall from applying this rule on detecting network activity
and to stop this rule from showing in the list of network packet rules with Disabled status.
Page 88

A D M I N I S T R A T O R G U I D E
88
CREATING AND EDITING A NETWORK PACKET RULE
When creating network packet rules, remember that they have priority over network rules for applications.
To create or edit a network packet rule:
1. Open the application settings window (on page 48).
2. In the left part of the window, in the Anti-Virus protection section, select Firewall.
In the right part of the window, the settings of the Firewall component are displayed.
3. Click the Network packet rules button.
The Firewall window opens to the Network packet rules tab.
This tab shows a list of default network packet rules that are set by Firewall.
4. Do one of the following:
To create a new network packet rule, click the Add button.
To edit a network packet rule, select it in the list of network packet rules and click the Edit button.
5. The Network rule window opens.
6. In the Action drop-down list, select the action to be performed by Firewall on detecting this kind of network
activity:
Allow
Block
By application rules.
7. In the Name field, specify the name of the network service in one of the following ways:
Click the icon to the right of the Name field and select the name of the network service in the drop-
down list.
Kaspersky Endpoint Security includes network services that match the most frequently used network
connections.
Type the name of the network service in the Name field manually.
A network service is a collection of settings that describe the network activity for which you create a
network rule.
8. Specify the data transfer protocol:
a. Select the Protocol check box.
b. In the drop-down list, select the type of protocol for which network activity is to be monitored.
Firewall monitors network connections that use the TCP, UDP, ICMP, ICMPv6, IGMP, and GRE protocols.
By default, the Protocol check box is cleared.
Page 89

N E T W O R K P R O T E C T I O N
89
If you select a network service from the Name drop-down list, the Protocol check box is selected
automatically and the drop-down list next to the check box is filled with a protocol type that corresponds to
the selected network service.
9. In the Direction drop-down list, select the direction of the monitored network activity.
Firewall monitors network connections with the following directions:
Inbound
Inbound (stream)
Inbound / Outbound
Outbound
Outbound (stream)
10. If ICMP or ICMPv6 is selected as the protocol, you can specify the ICMP packet type and code:
a. Select the ICMP type check box and select the ICMP packet type in the drop-down list.
b. Select the ICMP code check box and select the ICMP packet code in the drop-down list.
11. If TCP or UDP is selected as the protocol, you can specify the ports of the local and remote computers between
which the connection is to be monitored:
a. Type the ports of the remote computer in the Remote ports field.
b. Type the ports of the local computer in the Local ports field.
12. Specify the network address in the Address field, if necessary.
You can use an IP address as a network address or specify the status of the network connection. In the latter
case, network addresses are obtained from all active network connections that have the selected status.
You can select one of the following network address categories:
Any address
Subnet address
Addresses from the list
13. If you want the allow or block actions of the network rule to be reflected in the report, select the Log event
check box (see the section "Managing reports" on page 193).
Page 90

A D M I N I S T R A T O R G U I D E
90
14. In the Network rule window, click OK.
If you create a new network rule, the rule is displayed on the Network packet rules tab of the Firewall window.
By default, the new network rule is placed at the end of the list of network packet rules.
15. In the Firewall window, click OK.
16. To save changes, click the Save button.
ENABLING OR DISABLING A NETWORK PACKET RULE
To enable or disable a network packet rule:
1. Open the application settings window (on page 48).
2. In the left part of the window, in the Anti-Virus protection section, select Firewall.
In the right part of the window, the settings of the Firewall component are displayed.
3. Click the Network packet rules button.
The Firewall window opens to the Network packet rules tab.
4. In the list of network packet rules, select the desired network packet rule.
5. Do one of the following:
To enable the rule, select the check box next to the name of the network packet rule.
To disable the rule, clear the check box next to the name of the network packet rule.
6. Click OK.
The Firewall window closes.
7. To save changes, click the Save button.
CHANGING THE FIREWALL ACTION FOR A NETWORK PACKET RULE
To change the Firewall action that is applied to a network packet rule:
1. Open the application settings window (on page 48).
2. In the left part of the window, in the Anti-Virus protection section, select Firewall.
In the right part of the window, the settings of the Firewall component are displayed.
3. Click the Network packet rules button.
The Firewall window opens to the Network packet rules tab.
4. In the list of network packet rules, select the network packet rule whose action you want to change.
5. In the Permission column, right-click to bring up the context menu and select the action that you want to
assign:
Allow
Block
Page 91

N E T W O R K P R O T E C T I O N
91
According to the application rule.
Log events.
6. In the Firewall window, click OK.
The Firewall window closes.
7. To save changes, click the Save button.
CHANGING THE PRIORITY OF A NETWORK PACKET RULE
The priority of a network packet rule is determined by its position in the list of network packet rules. The topmost network
packet rule in the list of network packet rules has the highest priority.
Every manually created network packet rule is added to the end of the list of network packet rules and is of the lowest
priority.
Firewall executes rules in the order in which they appear in the list of network packet rules, from top to bottom. According
to each processed network packet rule that applies to a particular network connection, Firewall either allows or blocks
network access to the address and port that are specified in the settings of this network connection.
To change the network packet rule priority:
1. Open the application settings window (on page 48).
2. In the left part of the window, in the Anti-Virus protection section, select Firewall.
In the right part of the window, the settings of the Firewall component are displayed.
3. Click the Network packet rules button.
The Firewall window opens to the Network packet rules tab.
4. In the list of network packet rules, select the network packet rule whose priority you want to change.
5. Use the Up and Down buttons to move the network packet rule to the desired spot in the list of network packet
rules.
6. Click OK.
7. The Firewall window closes.
8. To save changes, click the Save button.
MANAGING NETWORK RULES FOR APPLICATION GROUPS
By default, Kaspersky Endpoint Security groups all applications that are installed on the computer by the name of the
vendor of the software whose file or network activity it monitors. Application groups are in turn categorized into trust
groups. All applications and application groups inherit properties from their parent group: application control rules,
application network rules, and their execution priority.
Kaspersky Endpoint Security categorizes all applications that are started on the computer into trust groups. Applications
are categorized into trust groups depending on the level of danger that the applications pose to the operating system.
Page 92

A D M I N I S T R A T O R G U I D E
92
The trust groups are as follows:
Trusted. This group includes applications for which one or more of the following conditions are met:
applications are digitally signed by trusted vendors,
applications are recorded in the trusted applications database of Kaspersky Security Network,
the user has placed applications in the Trusted group.
No operations are prohibited for these applications.
Low Restricted. This group includes applications for which the following conditions are met:
applications are not digitally signed by trusted vendors,
applications are not recorded in the trusted applications database of Kaspersky Security Network,
the threat index of applications is lower than 50,
the user has placed applications in the Trusted group.
Such applications are subject to minimal restrictions on access to operating system resources.
High Restricted. This group includes applications for which the following conditions are met:
applications are not digitally signed by trusted vendors,
applications are not recorded in the trusted applications database of Kaspersky Security Network,
the threat index of applications is in the 51-71 range,
the user has placed applications in the High Restricted group.
Such applications are subject to high restrictions on access to operating system resources.
Untrusted. This group includes applications for which the following conditions are met:
applications are not digitally signed by trusted vendors,
applications are not recorded in the trusted applications database of Kaspersky Security Network,
the threat index of applications is in the 71-100 range,
the user has placed applications in the Untrusted group.
Such applications are subject to high restrictions on access to operating system resources.
By default, the Firewall component applies the network rules for an application group when filtering the network activity of
all applications within the group, similarly to the Application Privilege Control component (see page 125). The application
group network rules define the rights of applications within the group to access different network connections.
By default, Firewall creates a set of network rules for each application group that is detected by Kaspersky Endpoint
Security on the computer. You can change the Firewall action that is applied to the application group network rules that
are created by default. You cannot edit, remove, disable, or change the priority of application group network rules that
are created by default.
Page 93

N E T W O R K P R O T E C T I O N
93
IN THIS SECTION:
Creating and editing an application group network rule .................................................................................................. 93
Enabling or disabling an application group network rule ................................................................................................. 95
Changing the Firewall action for an application group network rule ................................................................................ 96
Changing the priority of an application group network rule.............................................................................................. 97
You can perform the following actions while managing the application group network rules:
Create a new application group network rule.
You can create a new network rule for an application group, according to which Firewall regulates the network
activity of applications that belong to this group.
Enable or disable an application group network rule.
All network rules for an application group are added to the list of network rules for the application group with
Enabled status. When an application group network rule is enabled, Firewall applies this rule.
You can disable a custom network rule for an application group. When a network rule for an application group is
disabled, Firewall does not apply this rule temporarily.
Edit the settings of an application group network rule.
After you create a new application group network rule, you can always return to editing its settings and modify
them as needed.
Change the Firewall action that is applied to an application group network rule.
In the list of network rules for an application group, you can edit the action that Firewall applies for the
application group network rule on detecting network activity in this application group.
Change the priority of an application group network rule.
You can raise or lower the priority of a custom network rule for an application group.
Remove an application group network rule.
You can remove a custom rule for an application group to stop Firewall from applying this network rule to the
selected application group on detecting network activity, and to stop this rule from appearing in the list of
network rules for the application group.
CREATING AND EDITING AN APPLICATION GROUP NETWORK RULE
To create or edit a network rule for an application group:
1. Open the application settings window (on page 48).
2. In the left part of the window, in the Anti-Virus protection section, select Firewall.
In the right part of the window, the settings of the Firewall component are displayed.
3. Click the Application network rules button.
The Firewall window opens to the Application control rules tab.
Page 94

A D M I N I S T R A T O R G U I D E
94
4. In the list of applications, select the group of applications for which you want to create or edit a network rule.
5. Right-click to bring up the context menu and select the Group rules item.
The Application group control rules window opens.
6. In the Application group control rules window that opens, select the Network rules tab.
7. Do one of the following:
To create a new network rule for an application group, click the Add button.
To edit a network rule for an application group, select it in the list of network rules and click the Edit button.
8. The Network rule window opens.
9. In the Action drop-down list, select the action to be performed by Firewall on detecting this kind of network
activity:
Allow
Block
10. In the Name field, specify the name of the network service in one of the following ways:
Click the icon to the right of the Name field and select the name of the network service in the drop-
down list.
Kaspersky Endpoint Security includes network services that match the most frequently used network
connections.
Type the name of the network service in the Name field manually.
A network service is a collection of settings that describe the network activity for which you create a
network rule.
11. Specify the data transfer protocol:
a. Select the Protocol check box.
b. In the drop-down list, select the type of protocol on which to monitor network activity.
Firewall monitors network connections that use the TCP, UDP, ICMP, ICMPv6, IGMP, and GRE protocols.
By default, the Protocol check box is cleared.
If you select a network service from the Name drop-down list, the Protocol check box is selected
automatically and the drop-down list next to the check box is filled with a protocol type that corresponds to
the selected network service.
12. In the Direction drop-down list, select the direction of the monitored network activity.
Firewall monitors network connections with the following directions:
Inbound
Inbound (stream)
Inbound / Outbound
Page 95

N E T W O R K P R O T E C T I O N
95
Outbound
Outbound (stream)
13. If ICMP or ICMPv6 is selected as the protocol, you can specify the ICMP packet type and code:
a. Select the ICMP type check box and select the ICMP packet type in the drop-down list.
b. Select the ICMP code check box and select the ICMP packet code in the drop-down list.
14. If TCP or UDP is selected as the protocol type, you can specify the ports of the local and remote computers
between which the connection is to be monitored:
a. Type the ports of the remote computer in the Remote ports field.
b. Type the ports of the local computer in the Local ports field.
15. Specify the network address in the Address field, if necessary.
You can use an IP address as a network address or specify the status of the network connection. In the latter
case, network addresses are obtained from all active network connections that have the selected status.
You can select one of the following network address categories:
Any address
Subnet address
Addresses from the list
16. If you want the allow or block actions of the network rule to be reflected in the report, select the Log event
check box (see the section "Managing reports" on page 193).
17. In the Network rule window, click OK.
If you create a new network rule for an application group, the rule is displayed on the Network rules tab of the
Application group control rules window.
18. In the Application group control rules window, click OK.
19. In the Firewall window, click OK.
20. To save changes, click the Save button.
ENABLING OR DISABLING AN APPLICATION GROUP NETWORK RULE
To enable or disable an application group network rule:
1. Open the application settings window (on page 48).
2. In the left part of the window, in the Anti-Virus protection section, select Firewall.
In the right part of the window, the settings of the Firewall component are displayed.
3. Click the Application network rules button.
The Firewall window opens to the Application control rules tab.
4. In the list of applications, select the desired application group.
5. Right-click to bring up the context menu and select the Group rules item.
Page 96

A D M I N I S T R A T O R G U I D E
96
The Application group control rules window opens.
6. Select the Network rules tab.
7. In the list of network rules for application groups, select the desired network rule.
8. Do one of the following:
To enable the rule, select the check box next to the name of the application group network rule.
To disable the rule, clear the check box next to the application group network rule name.
You cannot disable an application group network rule that is created by Firewall by default.
9. In the Application group control rules window, click OK.
10. In the Firewall window, click OK.
11. To save changes, click the Save button.
CHANGING THE FIREWALL ACTION FOR AN APPLICATION GROUP NETWORK
RULE
You can change the Firewall action that is applied to network rules for an entire application group that were created by
default, and change the Firewall action for a single custom application group network rule.
To modify the Firewall response for network rules for an entire application group:
1. Open the application settings window (on page 48).
2. In the left part of the window, in the Anti-Virus protection section, select Firewall.
In the right part of the window, the settings of the Firewall component are displayed.
3. Click the Application network rules button.
The Firewall window opens to the Application control rules tab.
4. To change the Firewall action that is applied to all network rules that are created by default, in the list of
applications, select an application group. The custom network rules for an application group remain unchanged.
5. In the Network column, click to display the context menu and select the action that you want to assign:
Inherit.
Allow
Block
6. Click OK.
7. To save changes, click the Save button.
To modify the Firewall response for one application group network rule:
1. Open the application settings window (on page 48).
2. In the left part of the window, in the Anti-Virus protection section, select Firewall.
Page 97

N E T W O R K P R O T E C T I O N
97
In the right part of the window, the settings of the Firewall component are displayed.
3. Click the Application network rules button.
The Firewall window opens to the Application control rules tab.
4. In the list of applications, select the desired application group.
5. Right-click to bring up the context menu and select the Group rules item.
The Application group control rules window opens.
6. In the Application group control rules window that opens, select the Network rules tab.
7. In the list of application group network rules, select the network rule for which you want to change the Firewall
action.
8. In the Permission column, right-click to bring up the context menu and select the action that you want to
assign:
Allow
Block
Log events.
9. In the Application group control rules window, click OK.
10. In the Firewall window, click OK.
11. To save changes, click the Save button.
CHANGING THE PRIORITY OF AN APPLICATION GROUP NETWORK RULE
The priority of an application group network rule is determined by its position in the list of network rules. Firewall
executes the rules in the order in which they appear in the list of network rules, from top to bottom. According to each
processed network rule that applies to a particular network connection, Firewall either allows or blocks network access to
the address and port that are indicated in the settings of this network connection.
Custom application group network rules have a higher priority than default application group network rules.
You cannot change the priority of default application group network rules. To change the priority of an application
group network rule:
1. Open the application settings window (on page 48).
2. In the left part of the window, in the Anti-Virus protection section, select Firewall.
In the right part of the window, the settings of the Firewall component are displayed.
3. Click the Application network rules button.
The Firewall window opens to the Application control rules tab.
4. In the list of applications, select the desired application group.
5. Right-click to bring up the context menu and select the Group rules item.
The Application group control rules window opens.
6. In the Application group control rules window that opens, select the Network rules tab.
Page 98

A D M I N I S T R A T O R G U I D E
98
7. In the list of application group network rules, select the network rule whose priority you want to change.
8. Use the Up and Down buttons to move the application group network rule to the desired spot in the list of
application group network rules.
9. In the Application group control rules window, click OK.
10. In the Firewall window, click OK.
11. To save changes, click the Save button.
MANAGING NETWORK RULES FOR APPLICATIONS
Firewall uses the application network rules to regulate the access of applications to different network connections.
By default, Firewall creates a set of network rules for each application group that Kaspersky Endpoint Security detects on
the computer. Applications that belong to this application group inherit these network rules. You can change the Firewall
action for inherited application network rules. You cannot edit, remove, disable, or change the priority of the application
network rules that are inherited from the parent group of applications.
You can perform the following actions while managing application network rules:
Create a new application network rule.
You can create a new application network rule that Firewall uses in regulating the network activity of the given
application.
Enable or disable an application network rule.
All application network rules are added to the list of application network rules with Enabled status. When an
application network rule is enabled, Firewall applies this rule.
You can disable any custom application network rule. When an application network rule is disabled, Firewall
temporarily does not apply this rule.
Edit the settings of an application network rule.
After you create a new application network rule, you can always return to editing its settings and modify them as
needed.
Change the Firewall action for an application network rule.
In the list of application network rules, you can change the Firewall action that is applied on detecting network
activity of the given application.
Change the priority of an application network rule.
You can raise or lower the priority of a custom application network rule.
Remove an application network rule.
You can remove a custom application network rule to stop Firewall from applying this network rule to the
selected application on detecting network activity and to stop this rule from showing in the list of application
network rules.
Page 99

N E T W O R K P R O T E C T I O N
99
IN THIS SECTION:
Creating and editing an application network rule ............................................................................................................. 99
Enabling or disabling an application network rule ......................................................................................................... 101
Changing the Firewall action for an application network rule ........................................................................................ 101
Changing the priority of an application network rule ...................................................................................................... 103
CREATING AND EDITING AN APPLICATION NETWORK RULE
To create or edit a network rule for an application:
1. Open the application settings window (on page 48).
2. In the left part of the window, in the Anti-Virus protection section, select Firewall.
In the right part of the window, the settings of the Firewall component are displayed.
3. Click the Application network rules button.
The Firewall window opens to the Application control rules tab.
4. In the list of applications, select the application for which you want to create or edit a network rule.
5. Right-click to bring up the context menu and select Application rules.
The Application control rules window opens.
6. In the Application control rules window that opens, select the Network rules tab.
7. Do one of the following:
To create a new network rule for an application, click the Add button.
To edit a network rule for an application, select it in the list of network rules and click the Edit button.
8. The Network rule window opens.
9. In the Action drop-down list, select the action to be performed by Firewall on detecting this kind of network
activity:
Allow
Block
10. In the Name field, specify the name of the network service in one of the following ways:
Click the icon to the right of the Name field and select the name of the network service in the drop-
down list.
Kaspersky Endpoint Security includes network services that match the most frequently used network
connections.
Type the name of the network service in the Name field manually.
Page 100

A D M I N I S T R A T O R G U I D E
100
A network service is a collection of settings that describe the network activity for which you create a
network rule.
11. Specify the data transfer protocol:
a. Select the Protocol check box.
b. In the drop-down list, select the type of protocol on which to monitor network activity.
Firewall monitors network connections that use the TCP, UDP, ICMP, ICMPv6, IGMP, and GRE protocols.
By default, the Protocol check box is cleared.
If you select a network service from the Name drop-down list, the Protocol check box is selected
automatically and the drop-down list next to the check box is filled with a protocol type that corresponds to
the selected network service.
12. In the Direction drop-down list, select the direction of the monitored network activity.
Firewall monitors network connections with the following directions:
Inbound
Inbound (stream)
Inbound / Outbound
Outbound
Outbound (stream)
13. If ICMP or ICMPv6 is selected as the protocol, you can specify the ICMP packet type and code:
a. Select the ICMP type check box and select the ICMP packet type in the drop-down list.
b. Select the ICMP code check box and select the ICMP packet code in the drop-down list.
14. If TCP or UDP is selected as the protocol, you can specify the ports of the local and remote computers between
which the connection is to be monitored:
a. Type the ports of the remote computer in the Remote ports field.
b. Type the ports of the local computer in the Local ports field.
15. Specify the network address in the Address field, if necessary.
You can use an IP address as a network address or specify the status of the network connection. In the latter
case, network addresses are obtained from all active network connections that have the selected status.
You can select one of the following network address categories:
Any address
Subnet address
Addresses from the list
16. If you want the allow or block actions of the network rule to be reflected in the report, select the Log event
check box (see the section "Managing reports" on page 193).
17. In the Network rule window, click OK.
 Loading...