

Page 1

Kaspersky Endpoint Security 8 for Smartphone
for Microsoft
®
Windows® Mobile
User Guide
PROGRAM VERSION: 8.0
Page 2

2
Dear User!
Thank you for choosing our product. We hope that this documentation will help you in your work and will provide answers
regarding this software product.
Warning! This document is the property of Kaspersky Lab ZAO (herein also referred to as Kaspersky Lab): all rights to
this document are reserved by the copyright laws of the Russian Federation, and by international treaties. Illegal
reproduction and distribution of this document or parts hereof will result in civil, administrative or criminal liability by
applicable law.
Reproduction or distribution of any materials in any format, including translations, is only allowed with the written
permission of Kaspersky Lab.
This document, and graphic images related to it, may be used exclusively for informational, non-commercial, and
personal purposes.
Kaspersky Lab reserves the right to amend this document without additional notification. You can find the latest version
of this document at the Kaspersky Lab website, at http://www.kaspersky.com/docs.
Kaspersky Lab shall not be liable for the content, quality, relevance, or accuracy of any materials used in this document
for which the rights are held by third parties, or for any potential or actual losses associated with the use of these
materials.
In this document, registered trademarks and service trademarks are used which are the property of the corresponding
rights holders.
Revision date: 10.20.2010
© 1997-2010 Kaspersky Lab ZAO. All Rights Reserved.
http://www.kaspersky.com
http://support.kaspersky.com
Page 3

3
TABLE OF CONTENTS
ABOUT THIS HELP ....................................................................................................................................................... 6
ADDITIONAL DATA SOURCES .................................................................................................................................... 7
Information sources for further research ................................................................................................................... 7
Discussion of Kaspersky Lab applications on the Web forum .................................................................................. 8
Contacting the Documentation Development Group ................................................................................................ 8
KASPERSKY ENDPOINT SECURITY 8 FOR SMARTPHONE ..................................................................................... 9
What's new in Kaspersky Endpoint Security 8 for Smartphone .............................................................................. 10
Hardware and software requirements ..................................................................................................................... 10
INSTALLING KASPERSKY ENDPOINT SECURITY 8 FOR SMARTPHONE ............................................................. 11
Automatic installation of the application .................................................................................................................. 11
About installing the application through the computer ............................................................................................ 11
Installing the application through the computer ...................................................................................................... 12
About installing the application after receiving a message by email ....................................................................... 14
Installing the application after receiving a message by email ................................................................................. 14
UNINSTALLING THE APPLICATION .......................................................................................................................... 15
Manual deletion of the application .......................................................................................................................... 16
Automatic deletion of the application ...................................................................................................................... 17
MANAGING APPLICATION SETTINGS ...................................................................................................................... 17
MANAGING THE LICENSE ......................................................................................................................................... 18
About Kaspersky Endpoint Security 8 for Smartphone licenses ............................................................................. 18
Installing a license .................................................................................................................................................. 19
Viewing license information .................................................................................................................................... 19
SYNCHRONIZATION WITH THE REMOTE ADMINISTRATION SYSTEM ................................................................. 20
Start synchronization manually ............................................................................................................................... 20
Changing the synchronization settings ................................................................................................................... 21
GETTING STARTED.................................................................................................................................................... 21
Starting the application ........................................................................................................................................... 21
Entering the secret code ......................................................................................................................................... 22
Updating the application's databases ..................................................................................................................... 23
Scanning the device for viruses .............................................................................................................................. 23
Viewing information about the application .............................................................................................................. 24
APPLICATION INTERFACE ........................................................................................................................................ 25
Protection status window ........................................................................................................................................ 25
Application menu .................................................................................................................................................... 27
FILE SYSTEM PROTECTION ..................................................................................................................................... 28
About Protection ..................................................................................................................................................... 28
Activate/Deactivate Protection ................................................................................................................................ 29
Selecting the action to be performed on malicious objects ..................................................................................... 30
SCANNING THE DEVICE ............................................................................................................................................ 32
About on-demand scans ......................................................................................................................................... 32
Starting a scan manually ........................................................................................................................................ 33
Page 4

U S E R GU I D E
4
Starting a scheduled scan ...................................................................................................................................... 35
Selection of object type to be scanned ................................................................................................................... 36
Configuring archive scans ...................................................................................................................................... 37
Selecting the action to be performed on detected objects ...................................................................................... 37
QUARANTINING MALWARE OBJECTS ..................................................................................................................... 39
About Quarantine ................................................................................................................................................... 39
Viewing quarantined objects ................................................................................................................................... 40
Restoring objects from Quarantine ......................................................................................................................... 41
Deleting objects from Quarantine ........................................................................................................................... 41
FILTERING OF INCOMING CALLS AND SMS ............................................................................................................ 42
About Anti-Spam .................................................................................................................................................... 42
Anti-Spam modes ................................................................................................................................................... 43
Changing the Anti-Spam mode ............................................................................................................................... 44
Creating a Black List ............................................................................................................................................... 44
Adding entries to the Black List ......................................................................................................................... 45
Editing entries in the Black List ......................................................................................................................... 47
Deleting entries from the Black List ................................................................................................................... 47
Creating a White List .............................................................................................................................................. 48
Adding entries to the White List ........................................................................................................................ 48
Editing entries in the White List ......................................................................................................................... 50
Deleting entries from the White List .................................................................................................................. 51
Response to SMS messages and calls from numbers not in Contacts .................................................................. 51
Responding to SMS messages from non-numeric numbers................................................................................... 53
Selecting a response to incoming SMS .................................................................................................................. 54
Selecting a response to incoming calls ................................ ................................................................................... 55
DATA PROTECTION IN THE EVENT OF LOSS OR THEFT OF THE DEVICE .......................................................... 56
About Anti-Theft ...................................................................................................................................................... 57
Blocking the device ................................................................................................................................................. 58
Deleting personal data ................................ ................................ ............................................................................ 60
Creating a list of folders to delete ........................................................................................................................... 63
Monitoring the replacement of a SIM card on the device ................................ ........................................................ 64
Determining the device's geographical coordinates................................................................................................ 65
Remote start of the Anti-Theft functions ................................................................................................................. 68
PRIVACY PROTECTION ............................................................................................................................................. 69
Privacy Protection ................................................................................................................................................... 69
Privacy Protection modes ....................................................................................................................................... 69
Enabling/disabling Privacy Protection ................................................................................................ ..................... 70
Enabling Privacy Protection automatically .............................................................................................................. 71
Enabling Privacy Protection remotely ..................................................................................................................... 72
Creating a list of private numbers ........................................................................................................................... 74
Adding a number to the list of private numbers ................................................................................................. 75
Editing a number in the list of private numbers ................................................................................................. 76
Deleting a number from the list of private numbers ........................................................................................... 76
Selecting data to hide: Privacy Protection .............................................................................................................. 77
FILTERING NETWORK ACTIVITY. FIREWALL .......................................................................................................... 79
About Firewall ......................................................................................................................................................... 79
Firewall modes ....................................................................................................................................................... 79
Page 5

T A B L E O F C O N T E N T S
5
Selecting the Firewall mode .................................................................................................................................... 80
Notifications about blocked connections ................................................................................................................. 81
ENCRYPTING PERSONAL DATA ............................................................................................................................... 82
About Encryption .................................................................................................................................................... 82
Data encryption ...................................................................................................................................................... 82
Data decryption ...................................................................................................................................................... 84
Blocking access to encrypted data ......................................................................................................................... 86
UPDATING THE APPLICATION'S DATABASES ........................................................................................................ 87
About updating the application's databases ........................................................................................................... 88
Viewing database information ................................................................................................................................. 89
Updating Manually .................................................................................................................................................. 90
Starting scheduled updates .................................................................................................................................... 90
Updating while roaming .......................................................................................................................................... 91
APPLICATION LOGS................................................................................................................................................... 92
About logs ............................................................................................................................................................... 92
Viewing Log records ............................................................................................................................................... 93
Deleting Log records .............................................................................................................................................. 94
CONFIGURING ADDITIONAL SETTINGS .................................................................................................................. 94
Changing the secret code ................................................................ ....................................................................... 94
Displaying prompts ................................................................................................................................................. 95
Configuring sound notifications ............................................................................................................................... 96
GLOSSARY ................................................................................................................................................................. 97
KASPERSKY LAB ...................................................................................................................................................... 100
INFORMATION ABOUT THIRD-PARTY CODE ........................................................................................................ 101
INDEX ........................................................................................................................................................................ 102
Page 6

6
ABOUT THIS HELP
This document is the Guide for the installation, configuration and use of Endpoint Security 8 for Smartphone. The
document is designed for a wide audience.
Objectives of the document:
help the user independently set up the application on on a mobile device, activate it and optimize the application
for their needs;
provide a rapid information search on issues connected with the application;
give information on alternative sources of information about the application and possibilities of receiving
technical support.
Page 7

7
ADDITIONAL DATA SOURCES
IN THIS SECTION
Information sources for further research ........................................................................................................................... 7
Discussion of Kaspersky Lab applications on the Web forum ........................................................................................... 8
Contacting the Documentation Development Group ......................................................................................................... 8
If you have questions about setting up or using Kaspersky Endpoint Security 8 for Smartphone, you can find answers
from them, using various sources of information. You can choose the most suitable source according to how important or
urgent your request is.
INFORMATION SOURCES FOR FURTHER RESEARCH
You can view the following sources of information about the application:
the Kaspersky Lab application website;
the application's Knowledge Base page at the Technical Support Service website;
the installed Help system;
the installed application documentation.
Page on Kaspersky Lab website
www.kaspersky.com/endpoint-security-smartphone
Use this page to obtain general information about Kaspersky Endpoint Security 8 for Smartphone features and
options.
The application's page at the Technical Support Service website (Knowledge Base).
http://support.kaspersky.com/kes8m
This page contains articles written by experts from the Technical Support Service.
These articles contain useful information, recommendations, and the Frequently Asked Questions (FAQ) page, and
cover purchasing, installing and using Kaspersky Endpoint Security 8 for Smartphone. They are arranged in topics,
such as "Work with key files", "Database updates" and "Troubleshooting". The articles aim to answer questions
about this Kaspersky Endpoint Security 8 for Smartphone, as well as other Kaspersky Lab products. They may also
contain news from the Technical Support Service.
The installed Help system
If you have any questions about the Kaspersky Endpoint Security 8 for Smartphone separate screen or tab, you can
view the context help.
To open the context help, open the right application screen and press Help or choose Menu Help.
Page 8

U S E R GU I D E
8
The installed Documentation
The Kaspersky Endpoint Security 8 for Smartphone distribution kit includes the User Guide document (in PDF
format). This document describes how to install and uninstall the application, manage its settings, start working with
the application, configure the settings of its components. The document describes the application interface and the
capabilities offered for typical application tasks.
DISCUSSION OF KASPERSKY LAB APPLICATIONS ON THE WEB FORUM
If your question does not require an immediate answer, you can discuss it with Kaspersky Lab experts and other users in
our forum at http://forum.kaspersky.com.
In the forum you can view existing discussions, leave your comments, and create new topics, or use the search engine
for specific enquiries.
CONTACTING THE DOCUMENTATION DEVELOPMENT GROUP
If you have any questions about the documentation, or you have found an error in it, or would like to leave a comment,
please contact our User documentation development group. To contact the Documentation Development Group send an
email to docfeedback@kaspersky.com. Use the subject line: "Kaspersky Help Feedback: Kaspersky Endpoint Security 8
for Smartphone".
Page 9

9
KASPERSKY ENDPOINT SECURITY 8 FOR SMARTPHONE
Kaspersky Endpoint Security 8 for Smartphone protects mobile devices working on the Microsoft® Windows® Mobile
platform. The application can protect information on the device from infection by known threats, prevent unwanted SMS
messages and calls, control the network connection on the device, encrypt information, hide it for confidential contacts
and also protect information if the device is lost or stolen. Every type of threat is processed in separate components of
the program. This allows to fine-tune the application settings depending on user needs. The administrator installs the
application and configures settings using the remote administration system.
Kaspersky Endpoint Security 8 for Smartphone includes the following protection components:
Anti-Virus folder. It protects the file system of the mobile device from viruses and other malicious applications.
Anti-Virus can detect and neutralize malicious objects on your device and update the application's anti-virus
databases.
Anti-Spam. Scans all incoming SMS messages and calls for spam. The component allows the flexible blocking
of text messages and calls considered undesirable.
Anti-Theft folder. This protects information on the device from unauthorized access when it is lost or stolen and
also makes it easier to find. Anti-Theft enables you to lock your device remotely, delete any information stored
there, and pinpoint its geographic location (if your mobile device has a GPS receiver) using SMS commands
from another device. Furthermore, Anti-Theft allows you to lock your device if the SIM card is replaced or if the
device is activated without a SIM card.
Privacy Protection. It hides information related to confidential numbers from the contact list. For these
numbers, Privacy Protection hides entries in Contacts, SMS messages in the call log and new SMS messages
received and incoming calls.
Firewall folder. Checks the network connections on your mobile device. Firewall sets the connections which will
be permitted or prohibited.
Encryption folder. This protects information in encrypted mode. The component encrypts any amount of non-
system folders which are in the device memory or on storage cards. Access to files from encrypted folders is
only possible after entering the secret application code.
Furthermore, the application contains a series of service functions which allow maintaining the application in up-to-date
condition, expanding the application's options of use and supporting the user in his operations:
Protection status. The status of the program's components is displayed on screen. Based on the information
presented, you can evaluate the current information protection status on your device.
Update the application's anti-virus databases. The function allows you to keep Kaspersky Endpoint Security 8
for Smartphone databases up to date.
Events log. The application for each component has its own Events log with information on the operation of the
component (e.g. scan report, update of anti-virus databases, information about blocked files). Reports on the
operation of components are given in the remote administration system and remain in it.
Kaspersky Endpoint Security 8 for Smartphone does not back up and then restore data.
Page 10
U S E R GU I D E
10
IN THIS SECTION
What's new in Kaspersky Endpoint Security 8 for Smartphone ....................................................................................... 10
Hardware and software requirements ............................................................................................................................. 10
WHAT'S NEW IN KASPERSKY ENDPOINT SECURITY 8 FOR SMARTPHONE
Let's take a closer look at the innovations in Kaspersky Endpoint Security 8 for Smartphone.
New protection:
Access to the application is protected by a secret code.
The list of executable files scanned by Protection and Scan in the event of the type of executable files being
limited is expanded. The application's executable files of the following formats are scanned: EXE, DLL, MDL,
APP, RDL, PRT, PXT, LDD, PDD, CLASS. The list of scanned archives is also expanded. The application
unpacks and scans the archives of the following formats: ZIP, JAR, JAD, RAR and CAB.
Privacy Protection can hide the following information for confidential contacts: entries in Contacts, SMS
correspondence and new incoming SMS messages and incoming calls. Confidential information is accessible
for viewing for hiding is disabled.
Encryption allows encrypting folders saved in the device's memory or on a memory card. The component
protects confidential data in encrypted mode and allows access to encrypted information only when the
application secret code is entered.
A new function GPS Find is enabled in the updated Anti-Theft: if the device is lost or stolen, its geographical
coordinates can be picked up on a telephone number or indicated email address. Also, in Anti-Theft, an updated
function Data Wipe can remotely delete not just the user's personal information kept in the memory of the
telephone or on the storage card, but also files from the list of folders to be deleted.
To economize on traffic, an option has been added to automatically disable application database updates when
the mobile device is in a roaming zone.
A new service function has been added, called Display prompts: Kaspersky Endpoint Security 8 for Smartphone
shows a short description of a component before configuration of its settings.
HARDWARE AND SOFTWARE REQUIREMENTS
Kaspersky Endpoint Security 8 for Smartphone is designed for installation on mobile devices running one of the following
operating systems:
Microsoft Windows Mobile 5.0;
Microsoft Windows Mobile 6.0, 6.1, 6.5.
For some remote administration systems, devices with Microsoft Windows Mobile 5.0 are not supported. Check with the
administrator which operating systems are supported.
Page 11
I N S T A L L I N G K A S P E R S K Y E N D P O I N T S E C U R I T Y 8 F O R S M A R T P H O N E
11
INSTALLING KASPERSKY ENDPOINT SECURITY 8 FOR SMARTPHONE
The administrator installs Kaspersky Endpoint Security 8 for Smartphone using remote administration. According to the
user's means of administration, installation can be automatic or require further input from the user.
If the user's further input is needed to install the application, the installation will proceed in one of the following ways:
The Kaspersky Endpoint Security 8 for Smartphone application installation utility of the same name is installed
on your computer. With its help, you can install Kaspersky Endpoint Security 8 for Smartphone on your mobile
device.
A message from the administrator with the distribution package or an indication to download it comes to your
email address. You install Kaspersky Endpoint Security 8 for Smartphone on your mobile device using
information from the message.
This section gives the preparatory actions for installing Kaspersky Endpoint Security 8 for Smartphone, it describes the
different ways of installing applications on the mobile device and what the user has to do for each of them.
AUTOMATIC INSTALLATION OF THE APPLICATION
The Administrator installs the application on the device using remote administration.
As a result, the Kaspersky Endpoint Security 8 for Smartphone distribution package is sent to your device and the
application is automatically installed.
Installation is by one of the following means:
The application automatically installs on the device without the user's intervention. The application's installation
status is not given.
The application shows the installation status. At the end of installation, an installation successful message will
appear on the screen of the device.
The automatic installation process depends on the remote administration with which the administrator performs remote
installation of the application.
Contact the administrator if any errors occur during the installation process.
ABOUT INSTALLING THE APPLICATION THROUGH THE
COMPUTER
If the administrator installed the Kaspersky Endpoint Security 8 for Smartphone supply utility on your computer, you can
install Kaspersky Endpoint Security 8 for Smartphone on the mobile devices connected to this computer. The Kaspersky
Endpoint Security 8 for Smartphone supply utility contains the application distribution package and provides it to the
mobile device. After it is installed on the workstation, the utility automatically launches and monitors the connection of
mobile devices to the computer. Each time the mobile device connects to the workstation, the utility checks whether the
device satisfies the requirements of Kaspersky Endpoint Security 8 for Smartphone, and offers to install the application
on it.
Installation is only possible if Microsoft ActiveSync® is installed on the computer.
Page 12
U S E R GU I D E
12
INSTALLING THE APPLICATION THROUGH THE COMPUTER
If the Kaspersky Endpoint Security 8 for Smartphone supply utility is installed on your computer, whenever mobile
devices are connected that meet the system requirements you are prompted to install Kaspersky Endpoint Security 8 for
Smartphone on them.
You can stop Kaspersky Endpoint Security 8 for Smartphone being installed on subsequent connections of the devices
to the computer.
To install the application on a mobile device:
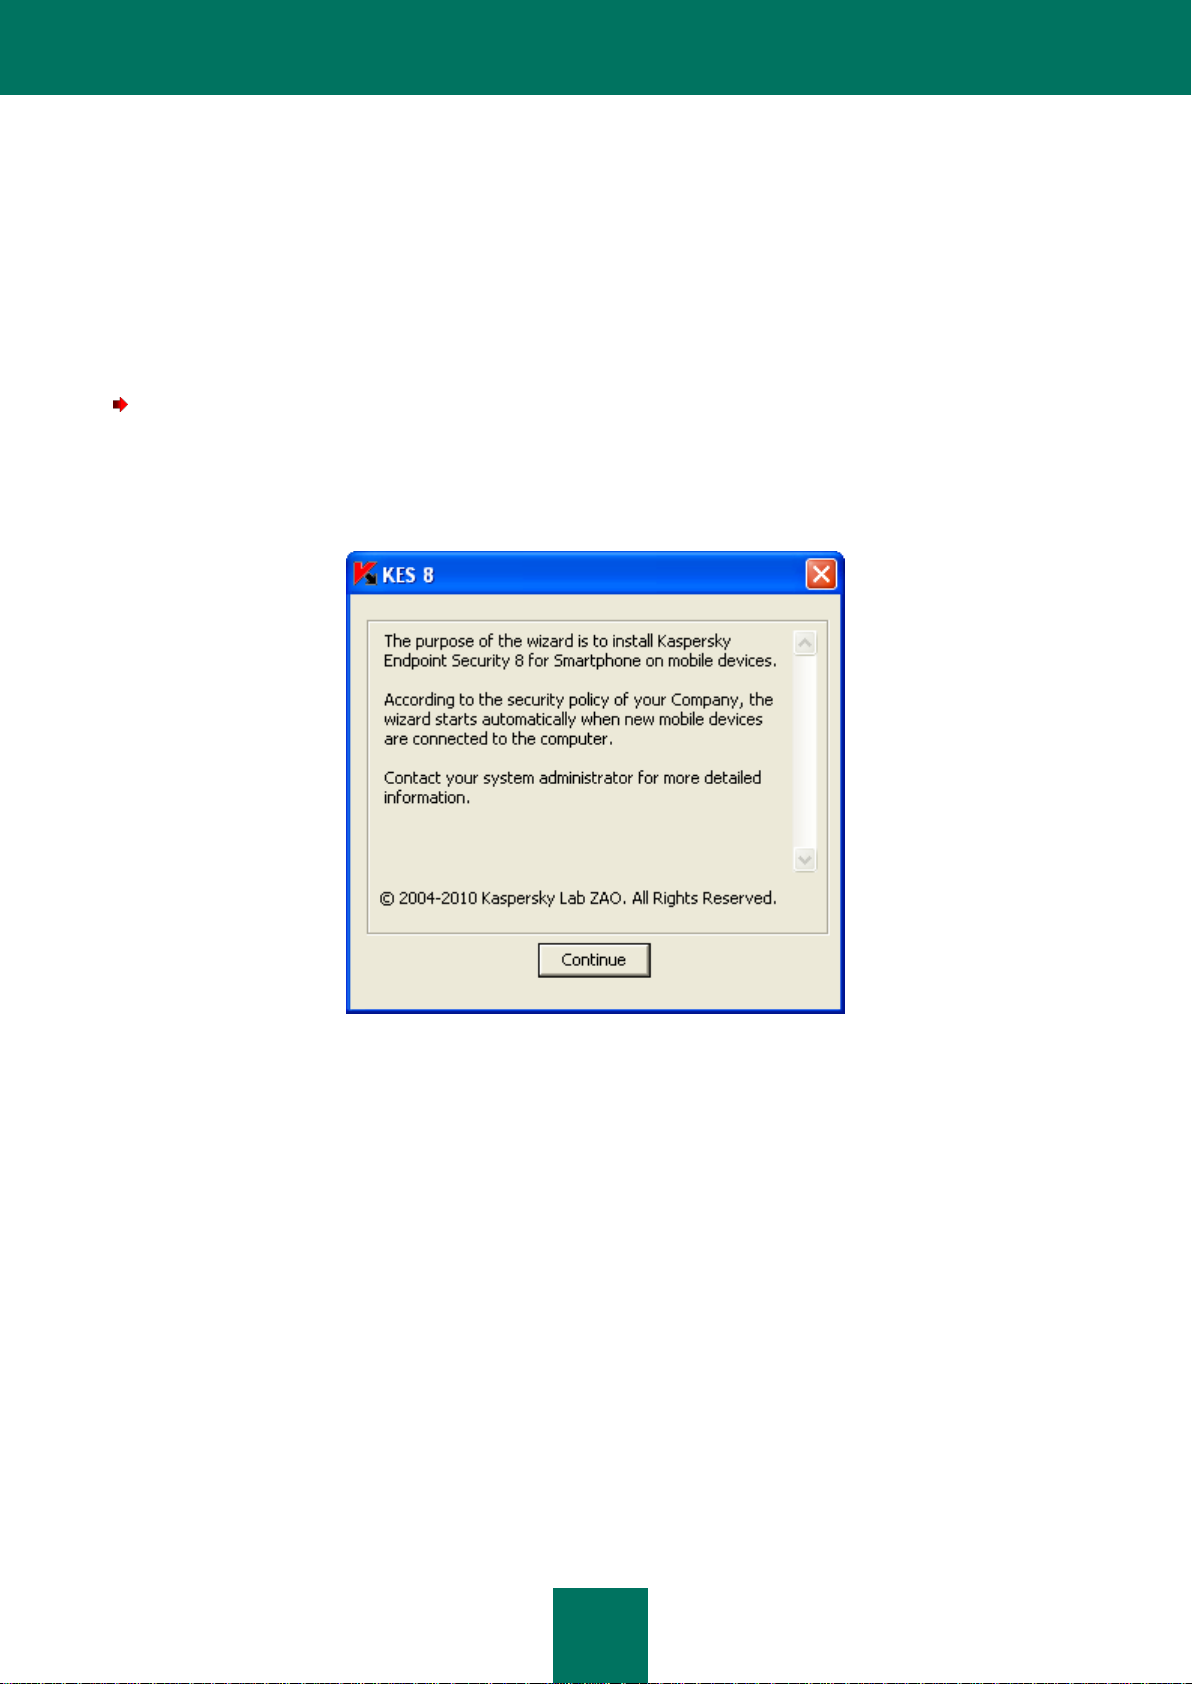
1. Connect the mobile device to the computer using Microsoft ActiveSync.
If the device meets the system requirements to install the application, the KES 8 window opens with information
on the utility (see figure below).
Figure 1: Kaspersky Endpoint Security 8 for Smartphone installation application
Page 13
I N S T A L L I N G K A S P E R S K Y E N D P O I N T S E C U R I T Y 8 F O R S M A R T P H O N E
13
2. Press the Continue button.
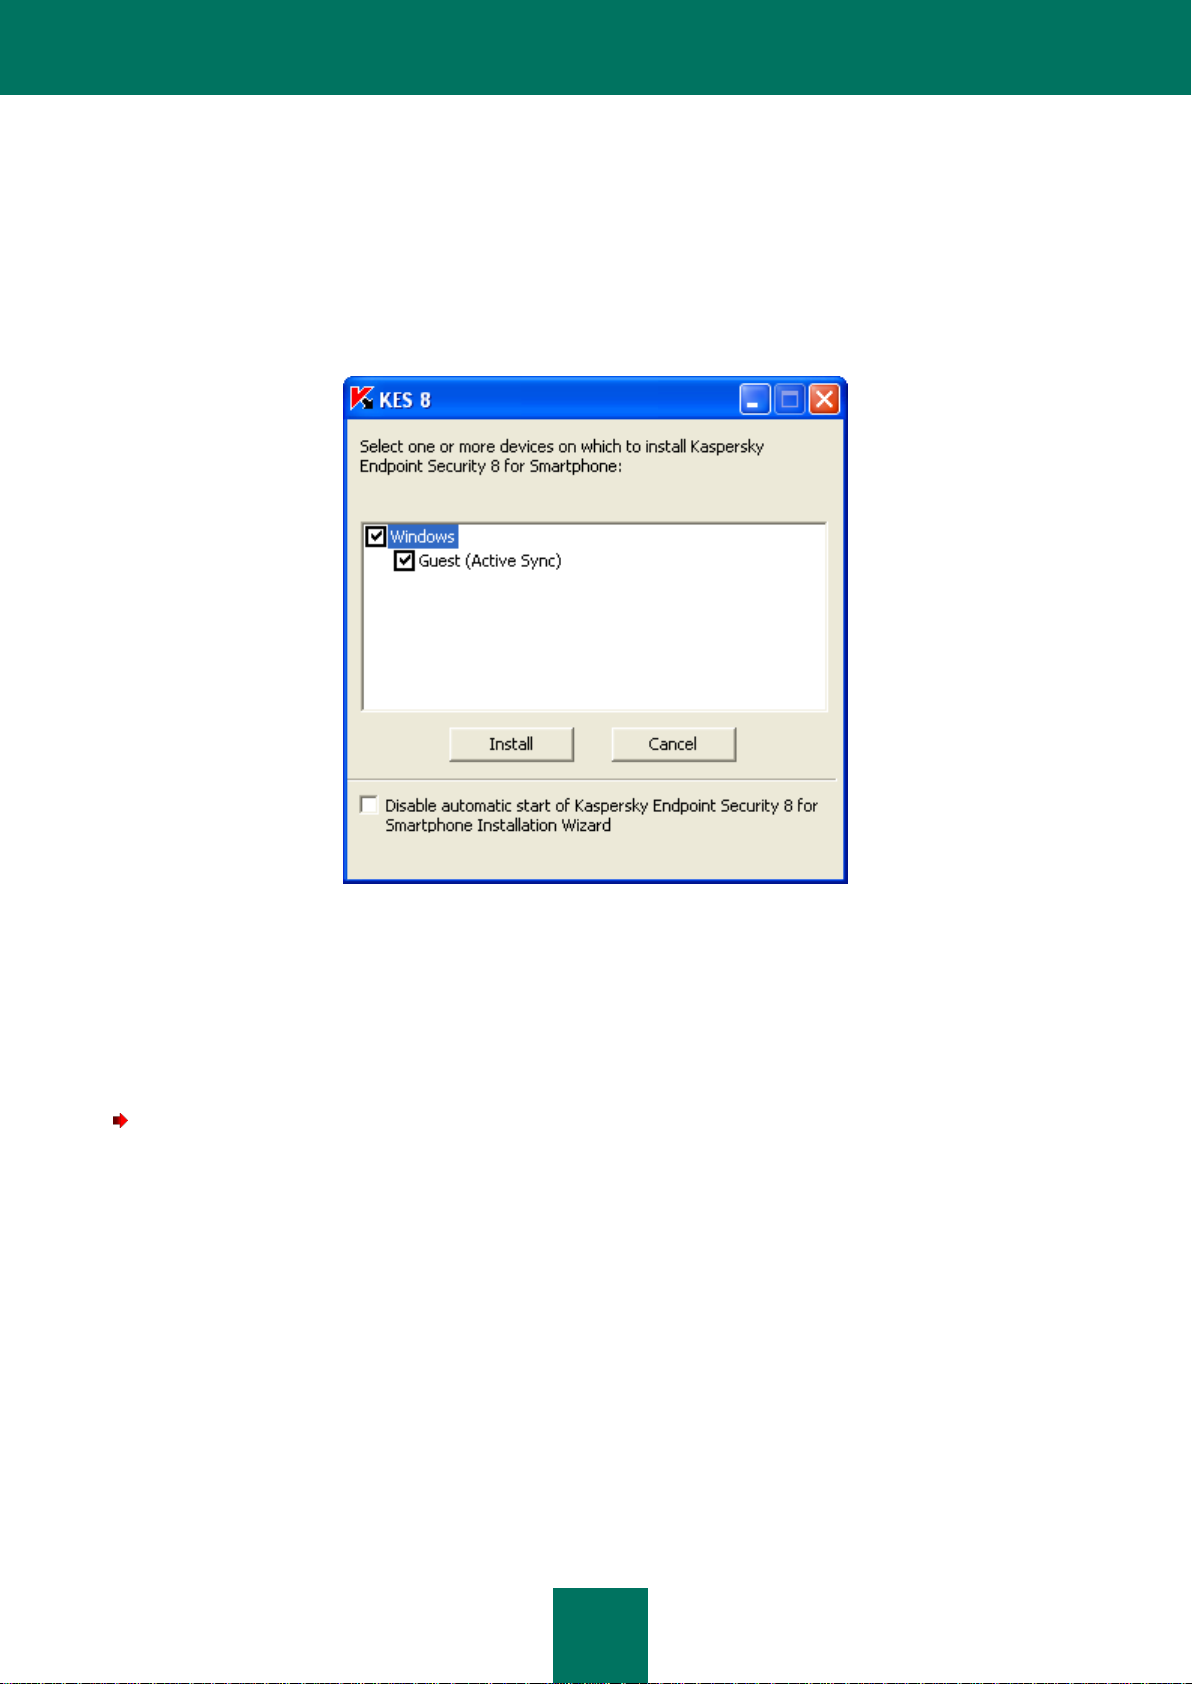
The KES 8 window opens with a list of connected devices found.
If more than one device which satisfies the system requirements is connected to the computer, they are shown
in the KES 8 window in the list of detected connected devices.
3. Select one or several devices from the list of detected connected devices on which the application needs to be
installed. Do this by checking the boxes next to the names of the devices.
Figure 2: Selection of devices for installation of Kaspersky Endpoint Security 8 for Smartphone
4. Press Install button.
The utility puts the distribution package on the selected devices. The KES 8 window on the computer shows the
status of the transfer of the distribution package.
After the distribution package is transferred onto the chosen devices, application installation starts automatically.
If during the application installation process errors occurred, contact the administrator. To block the installation of
Kaspersky Endpoint Security 8 for Smartphone with the following devices connected to the computer,
check in the KES 8 window the box Disable automatic start of Kaspersky Endpoint Security 8 for Smartphone
Installation Wizard.
Page 14

U S E R GU I D E
14
ABOUT INSTALLING THE APPLICATION AFTER RECEIVING
A MESSAGE BY EMAIL
You will receive an email message from the administrator with the distribution package or an indication to download it.
The message contains the following information:
an attachment with the distribution package or a link to download it;
information about the application's connection settings to the remote administration system.
Save this message until Kaspersky Endpoint Security 8 for Smartphone is installed on the device.
INSTALLING THE APPLICATION AFTER RECEIVING A
MESSAGE BY EMAIL
To install Kaspersky Endpoint Security 8 for Smartphone:
1. On the mobile device or the workstation, open the message from the administrator which contains the
application installation settings.
2. Perform one of the following actions:
if the message has a link, follow it to download the distribution package;
if the distribution package is in an attachment to the message, download the distribution package.
If you download the distribution package to a mobile device, it will be saved by default into My documents.
3. Perform one of the following actions:
if you downloaded the distribution package to the mobile device, open it;
if you downloaded the distribution package to the workstation connect the device to it with Microsoft
ActiveSync, copy the distribution package to the device and open it.
Installation starts automatically and the application will be installed on the device.
4. Run the application (see "Starting the application" on page 21). Select Start Applications KES 8 and
launch the application using the stylus or the central button on your joystick.
5. Set the application secret code (see "Entering the secret code" on page. 22). To do this you have to fill in the
Enter new code and Confirm code fields and press OK.
This will open Synchronization settings window.
Page 15

U N I N S T A L L I N G T H E A P P L I C A T I O N
15
6. Show the values for the settings to connect to the remote administration system if they were given when you
received the message from the administrator. Enter the values for the following settings:
Server;
Port;
Group.
If it is not necessary to configure the settings for connection to the remote administration system, this step will
not be present.
7. In the Your email address field, enter your business email address and press OK.
Enter the email address correctly since it is used to register the device on the remote administration system.
Contact the administrator if any errors occur during the installation process.
UNINSTALLING THE APPLICATION
The application can be deleted from the device in one of the following ways:
manually by the user (see section "Manual deletion of the application" on page. 15);
remotely by the administrator with the remote administration system.
The following actions are performed automatically when deleting:
Hiding of information is automatically disabled.
Data on the device is decrypted if it was encrypted by Kaspersky Endpoint Security 8 for Smartphone.
On automatic deletion (see Section "Automatic deletion of the application" on page 17), if the secret code was set for the
application, the user may have to take additional action in the following cases.
If the application did not start and the secret code was not set, then automatic deletion will occur without input from the
user.
Page 16

U S E R GU I D E
16
MANUAL DELETION OF THE APPLICATION
To manually delete the application:
1. Close Kaspersky Endpoint Security 8 for Smartphone. To do this, press Menu Exit.
2. Uninstall Kaspersky Endpoint Security 8 for Smartphone. To do this, perform the following actions:
a. Press Start Settings.
b. Select Remove Programs on the System tab (see Figure below).
Figure 3: The System tab
c. Select KES 8 from the list of installed applications and press Delete.
d. Confirm deletion of the application by clicking Yes in the window that opens.
e. Enter the secret code and press OK.
f. Specify whether it is necessary to keep the application settings and objects in Quarantine:
to save the application settings and the quarantined objects, press Save;
in order to delete the application in full, press Delete.
The deletion of the application begins.
If hiding confidential information is enabled on your device and / or just one folder is encrypted by Kaspersky
Endpoint Security 8 for Smartphone, the application invites you to disable hiding confidential data and / or
decrypt all folders.
3. Restart the device in order to complete the uninstalling of the application.
Page 17

M A N A G I N G A P P L I C A T I O N S E T T I N G S
17
AUTOMATIC DELETION OF THE APPLICATION
If the administrator deletes the application through remote administration and you have given the secret application code,
the Kaspersky Endpoint Security 8 for Smartphone screen automatically opens, where you will be asked to take the
necessary actions to delete the application.
To delete the application,
enter the secret code and click OK on the Kaspersky Endpoint Security 8 for Smartphone screen.
A window opens with confirmation of the application being deleted. Confirm the uninstalling of the application by
pressing the Yes button.
If hiding confidential information is enabled on your device and / or just one folder is encrypted by Kaspersky
Endpoint Security 8 for Smartphone, the application invites you to disable hiding confidential data and / or decrypt all
folders.
The application is deleted from the device and no notification of the deletion of the application is shown.
If you refuse to delete the application, deletion is canceled. In this case, a second attempt at deletion will be made on the
next synchronization with the remote administration system. You will then be asked to delete the application again.
MANAGING APPLICATION SETTINGS
All the operation settings for Kaspersky Endpoint Security 8 for Smartphone, including the license, are configured by the
administrator through the remote administration system. The administrator can then allow or block the user changing the
values of these settings.
You can change the operating settings of the application on your mobile device if the administrator has not blocked the
changing of these parameters.
The administrator can block changing all or some components. If the component settings screen has a lock icon and a
warning message, the settings of the component cannot be accessed to be changed on the mobile device.
If the administrator changed the application settings, they will be transferred to the device through the remote
administration system. In this case the values of the application settings which the administrator has blocked will change.
Settings which the administrator has not blocked remain unchanged with the values that were configured earlier.
If the application settings were not received on the device or if you want to configure the values set by the administrator,
use synchronization of the device with the remote administration system (see Section "Start synchronization manually"
on page 20).
Only use the synchronization function under the administrator's guidance.
Page 18

U S E R GU I D E
18
MANAGING THE LICENSE
IN THIS SECTION
About Kaspersky Endpoint Security 8 for Smartphone licenses ...................................................................................... 18
Installing a license ........................................................................................................................................................... 19
Viewing license information ............................................................................................................................................. 19
This section gives information about the application license, how to activate it and view information about it.
ABOUT KASPERSKY ENDPOINT SECURITY 8 FOR SMARTPHONE LICENSES
A license is the right to use Kaspersky Endpoint Security 8 for Smartphone and the additional services associated with it
as provided by Kaspersky Lab or its partners.
The license must be installed to be able to use the application.
Every license has a validity period and type.
License term – a period during which the additional services are offered:
technical support;
update the application's anti-virus databases.
The scope of services provided depends on the license type.
The following license types are available:
Trial – a free license with a limited validity period, e.g. 30 days, offered to allow you to get acquainted with
Kaspersky Endpoint Security 8 for Smartphone.
During the trial license's period of validity, all application functions are accessible. Upon expiration of its validity period,
Kaspersky Endpoint Security 8 for Smartphone stops performing all of its functions. When this happens, only the
following actions are available:
disabling the Encryption and Privacy Protection components;
users can decrypt folders previously selected by them for encryption;
disabling hiding of personal data;
viewing the application's help system;
synchronization with the remote administration system.
Commercial – paid license with a limited validity period (for example, one year), provided upon purchase of
Kaspersky Endpoint Security 8 for Smartphone.
If a commercial license is activated, all application features and additional services are available.
Page 19

M A N A G I N G T H E L I C E N S E
19
On termination of its commercial license's validity, Kaspersky Endpoint Security 8 for Smartphone limits the
application's functionality. You can continue to use the Anti-Spam and Firewall components, perform an antivirus scan and use the protection components, but only using the anti-virus databases last updated on the date
of terminating the license's term of validity. For other application components, only the following actions are
available:
disabling Encryption, Anti-Theft, Privacy Protection components;
decryption of folders selected by the user for encryption;
disabling hiding of personal data;
viewing the application's help system;
INSTALLING A LICENSE
The administrator installs the license through the remote administration system.
Kaspersky Endpoint Security 8 for Smartphone works without a license with full functionality for three days after it is
installed. During this time, the administrator installs the license through the remote administration system and the
application is activated.
If the license was not installed during the three days, the application works in a limited function mode. The following are
accessible in this mode:
disabling all components;
encryption of one or several folders;
disabling hiding of personal data;
viewing application's help system.
If the license was not installed within three days, install it using synchronization of the device with the remote
administration system (see "Start synchronization manually" on page 20).
synchronization with the remote administration system.
VIEWING LICENSE INFORMATION
You can view the following license information: license number, type, activation date, expiration date, number of days to
expiration and device serial number.
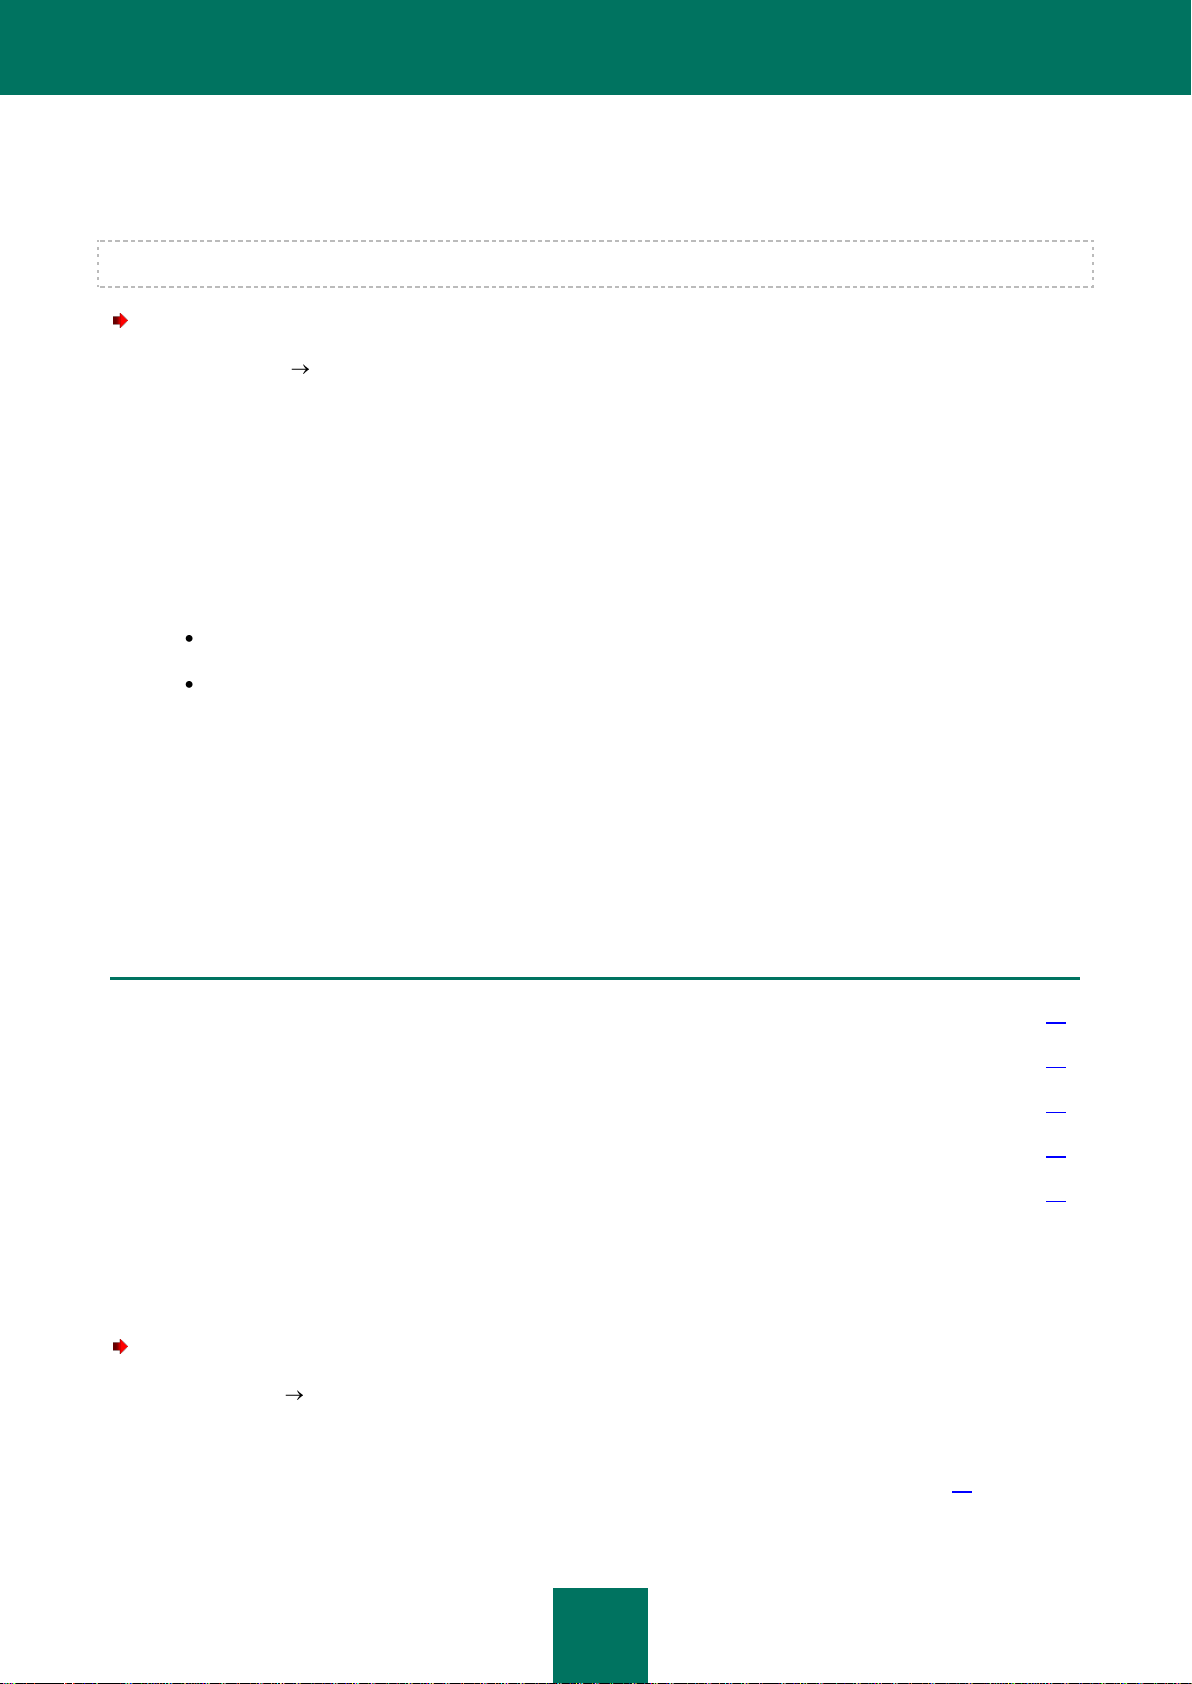
To view the license information:
1. Select Menu Additional.
This will open the Additional window.
2. Select About license.
Page 20

U S E R GU I D E
20
SYNCHRONIZATION WITH THE REMOTE ADMINISTRATION SYSTEM
During synchronization, the application settings configured by the administrator are transferred to the device. Operational
reports on the application components are transferred from the device to the remote administration system.
The device is automatically synchronized with the remote administration system.
If synchronization does not perform automatically, you can start it manually.
Manual synchronization is required in the following situations:
if the license was not installed within three days of the application being installed;
if the application settings given by the administrator were not received by the device.
According to the remote administration system chosen by the administrator to manage the application, the user may be
asked to enter connection settings to the remote administration system. In this case, the values set by the user manually
are accessible for changes from the application (see "Changing the synchronization settings" on page 20).
Change the settings for connection to the remote administration system only under the administrator's guidance.
START SYNCHRONIZATION MANUALLY
To manually synchronize the device with the remote administration system:
1. Select Menu Additional.
This will open the Additional window.
2. Select Start synchronization.
If the user was not asked to enter the settings for connection to the remote administration system when
installing the application, a window appears with confirmation of the Internet connection setting. Allow
connection by pressing Yes. Internet connection with the remote administration system will be set.
If the user was asked to enter settings for connection to the remote administration system when installing the
application, the Synchronization screen opens. Select Start synchronization. Allow connection to the Internet
by pressing Yes. Internet connection with the remote administration system will be set.
Page 21
G E T T I N G S T A R T E D
21
IN THIS SECTION
Starting the application .................................................................................................................................................... 21
Entering the secret code ................................................................................................................................................. 22
Updating the application's databases .............................................................................................................................. 22
Scanning the device for viruses ...................................................................................................................................... 23
Viewing information about the application ....................................................................................................................... 23
CHANGING THE SYNCHRONIZATION SETTINGS
Change the settings for connection to the remote administration system only under the administrator's guidance.
To change settings for connection to the remote administration:
1. Select Menu Additional.
This will open the Additional window.
2. Select Synchronization.
This will open the Synchronization window.
3. Select Server settings.
4. Change the following settings:
Server;
Port.
5. Press OK.
GETTING STARTED
This section contains information about how to start working with Kaspersky Endpoint Security 8 for Smartphone: set the
application secret code, start the application, update anti-virus databases and scan the device for viruses.
STARTING THE APPLICATION
To start Kaspersky Endpoint Security 8 for Smartphone:
1. Select Start Applications.
2. Select KES 8 and start the application, using your stylus or the central button of your joystick.
3. Start entering the secret code of the application (see section "Entering the secret code" on page 22).
Page 22

U S E R GU I D E
22
ENTERING THE SECRET CODE
After starting the application you will be asked to enter the application secret code. The secret code prevents
unauthorized access to the application settings. You can later change the secret code installed.
The secret code is requested in the following instances:
for access to the application;
for access to encrypted folders;
when sending an SMS command from another mobile device to start the following functions remotely: Block,
Data Wipe, SIM Watch, GPS Find, Privacy Protection;
when uninstalling the application.
Keep the secret code in mind. If you forget it, it will be impossible to manage the functions of Kaspersky Mobile
Security 8 or to obtain access to encrypted files and uninstall the application.
The secret code is comprised of numerals. It must contain at least four characters.
To enter the secret code:
1. After start for the first time, in the Enter new code field the figures which will be your code.
2. Re-enter the same code in the Confirm code field.
The code entered is automatically verified.
3. If the scan shows that the code is not reliable, a warning message appears and the application prompts for
confirmation. To use the code, press OK. In order to create a new code, press No.
4. On completion, press OK.
Page 23

G E T T I N G S T A R T E D
23
UPDATING THE APPLICATION'S DATABASES
Kaspersky Endpoint Security 8 for Smartphone scans for threats based on the application's anti-virus databases, which
contain descriptions of all the malicious programs known to date and methods for neutralizing them and descriptions of
other unwanted objects. When installing the application, the anti-virus databases in the Kaspersky Endpoint Security 8
for Smartphone distribution package may be out of date.
We recommend you to update the application's anti-virus databases immediately after the application installation.
To update the application's anti-virus databases, you must have an Internet connection configured on your mobile
device.
To start the anti-virus database update process:
1. Select Menu Anti-Virus.
This will open the Anti-Virus window.
2. Select the Update item.
This will open the Update window.
3. Select the Update item.
The application starts the database updating process from the server indicated by the administrator. Information on the
update process is displayed on the screen.
SCANNING THE DEVICE FOR VIRUSES
After installing the application, it is recommended to immediately run a scan of your mobile device for malware objects.
You can start the scan with the current settings or set them in advance (see "Scan settings" on page 31).
To run a full scan of the device:
1. Select Menu Anti-Virus.
This will open the Anti-Virus window.
2. Select the Scan item.
This will open the Scan window.
3. Select Full scan.
Page 24
U S E R GU I D E
24
VIEWING INFORMATION ABOUT THE APPLICATION
You can view general information about Kaspersky Endpoint Security 8 for Smartphone and its version.
To view information about the application:
1. Select Menu Additional.
This will open the Additional window.
2. Select the About tab (see Figure below).
Figure 4: Information about the application
Page 25

A P P L I C A T I O N I N T E R F A C E
25
IN THIS SECTION
Protection status window................................................................................................................................................. 25
Application menu ............................................................................................................................................................. 27
APPLICATION INTERFACE
The Kaspersky Endpoint Security 8 for Smartphone interface is simple and convenient. This section provides information
on its main elements.
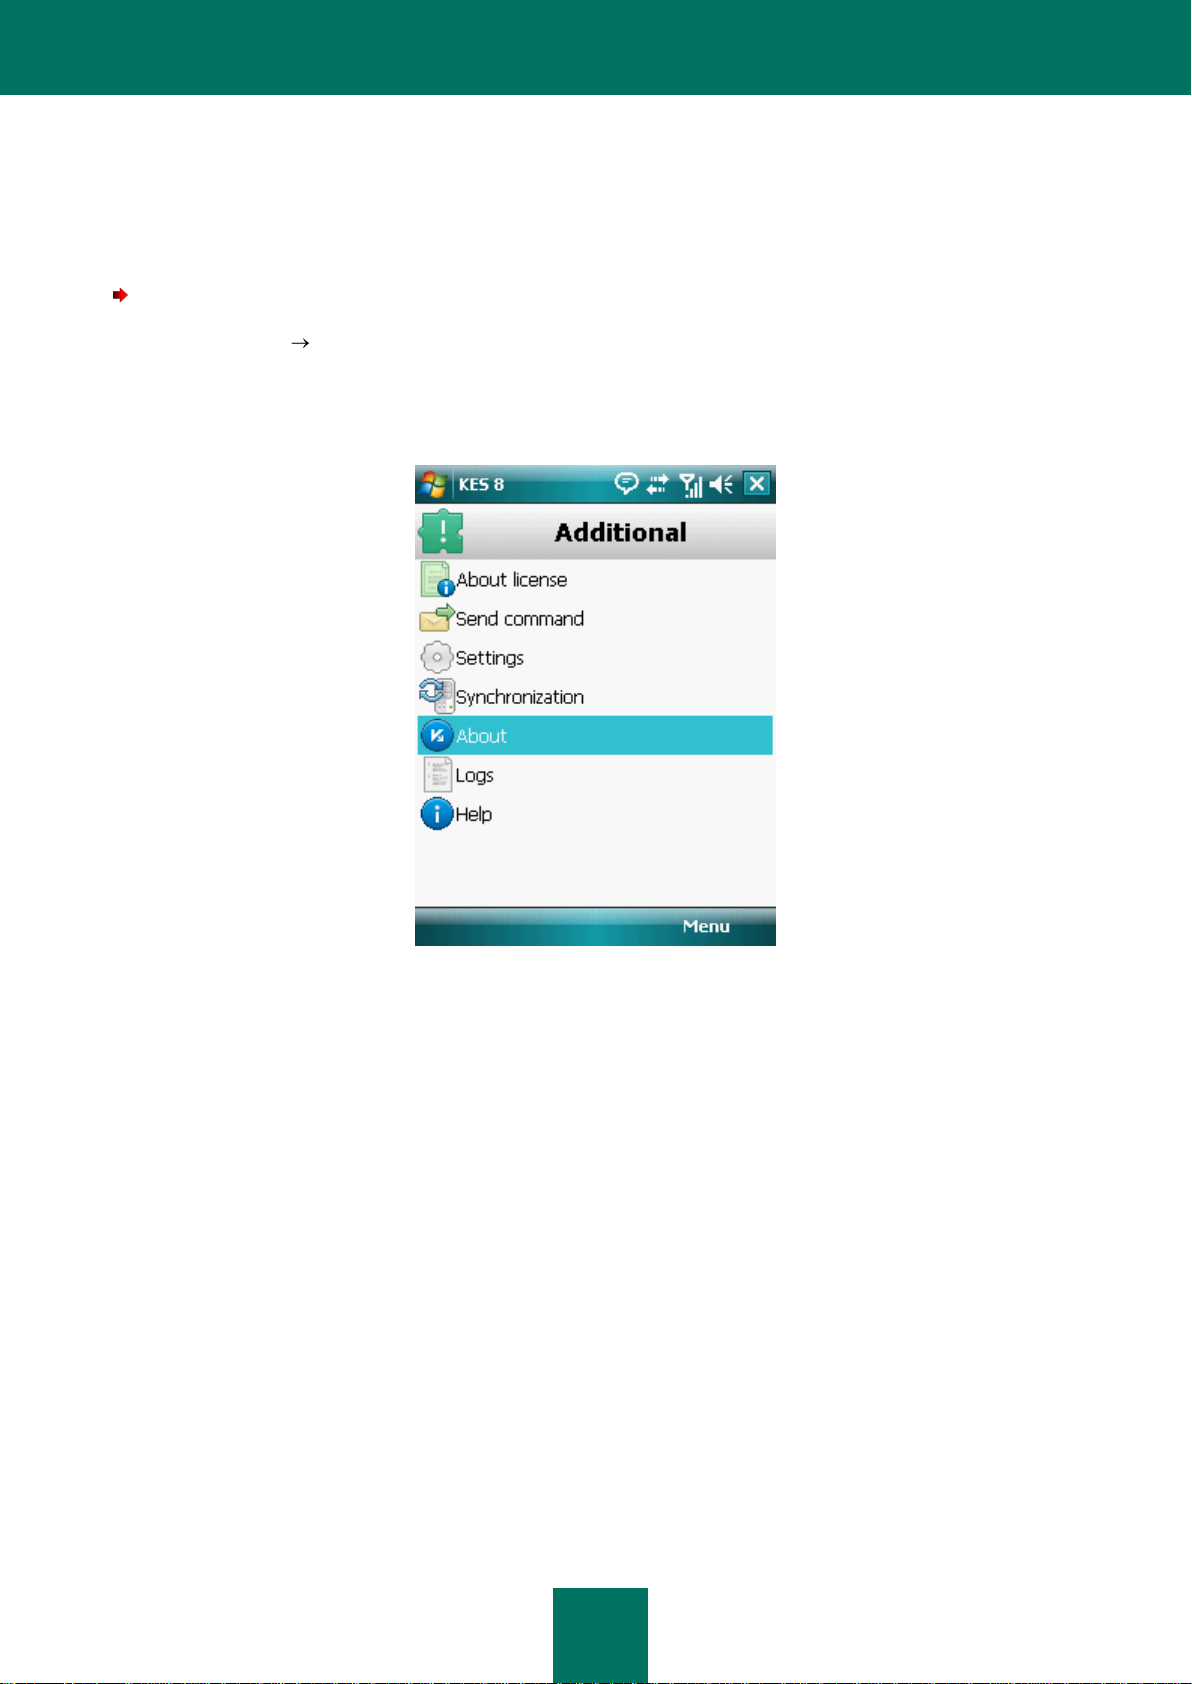
PROTECTION STATUS WINDOW
The status of the application's main components is displayed in the current status window.
There are three possible statuses for every component, each is displayed with a color similar to the code of traffic lights.
The green light means that the protection of your device is provided at the necessary level. Yellow and red indicate
various types of threats. Threats do not only include outdated anti-virus application databases, but also, for instance,
disabled protection components or minimum application operation settings.
The status window is immediately accessible after starting the application and contains the following information:
Protection is the protection status in real-time mode (see "File system protection" section on page 28).
The green status icon displays that the Protection is active and ensured at the required level, and the
application's anti-virus databases are up to date.
The yellow icon indicates that the databases have not been updated for several days.
The red icon indicates problems that might lead to loss of data or infection of the device: for example, protection
is disabled or the application has not updated for more than two weeks.
Firewall is the level of protection of the device from unwanted network activity (see "Filtering network activity.
Firewall" section on page 78).
The green status icon shows that the component is active. Firewall mode is selected.
The red icon indicates that the firewall is disabled.
Anti-Theft – status of data protection in case the device is lost or stolen (see "Data protection in the event of
loss or theft of the device" section on page 55).
The green status icon means that the Anti-Theft function is active; its name is displayed under the component's
status.
The red colored icon shows that all Anti-Theft functions are disabled.
Privacy Protection is the status of hiding confidential information (see "Hiding confidential information" on
page 69).
The green status icon indicates that hiding confidential information is enabled. Confidential information is
hidden.
The yellow icon warns that hiding confidential information is disabled. Confidential information can be viewed.
Page 26
U S E R GU I D E
26
License is the license's validity period (see the section "Managing the license" on page 17).
The green status icon means that the license's validity period ends within more than 14 days.
The yellow status icon means that the license's validity period ends within less than 14 days.
The red icon indicates that the license has expired or that it is not installed.
Figure 5: The application component status window
You can also go to the status window by selecting Menu Protection status.
Page 27
A P P L I C A T I O N I N T E R F A C E
27
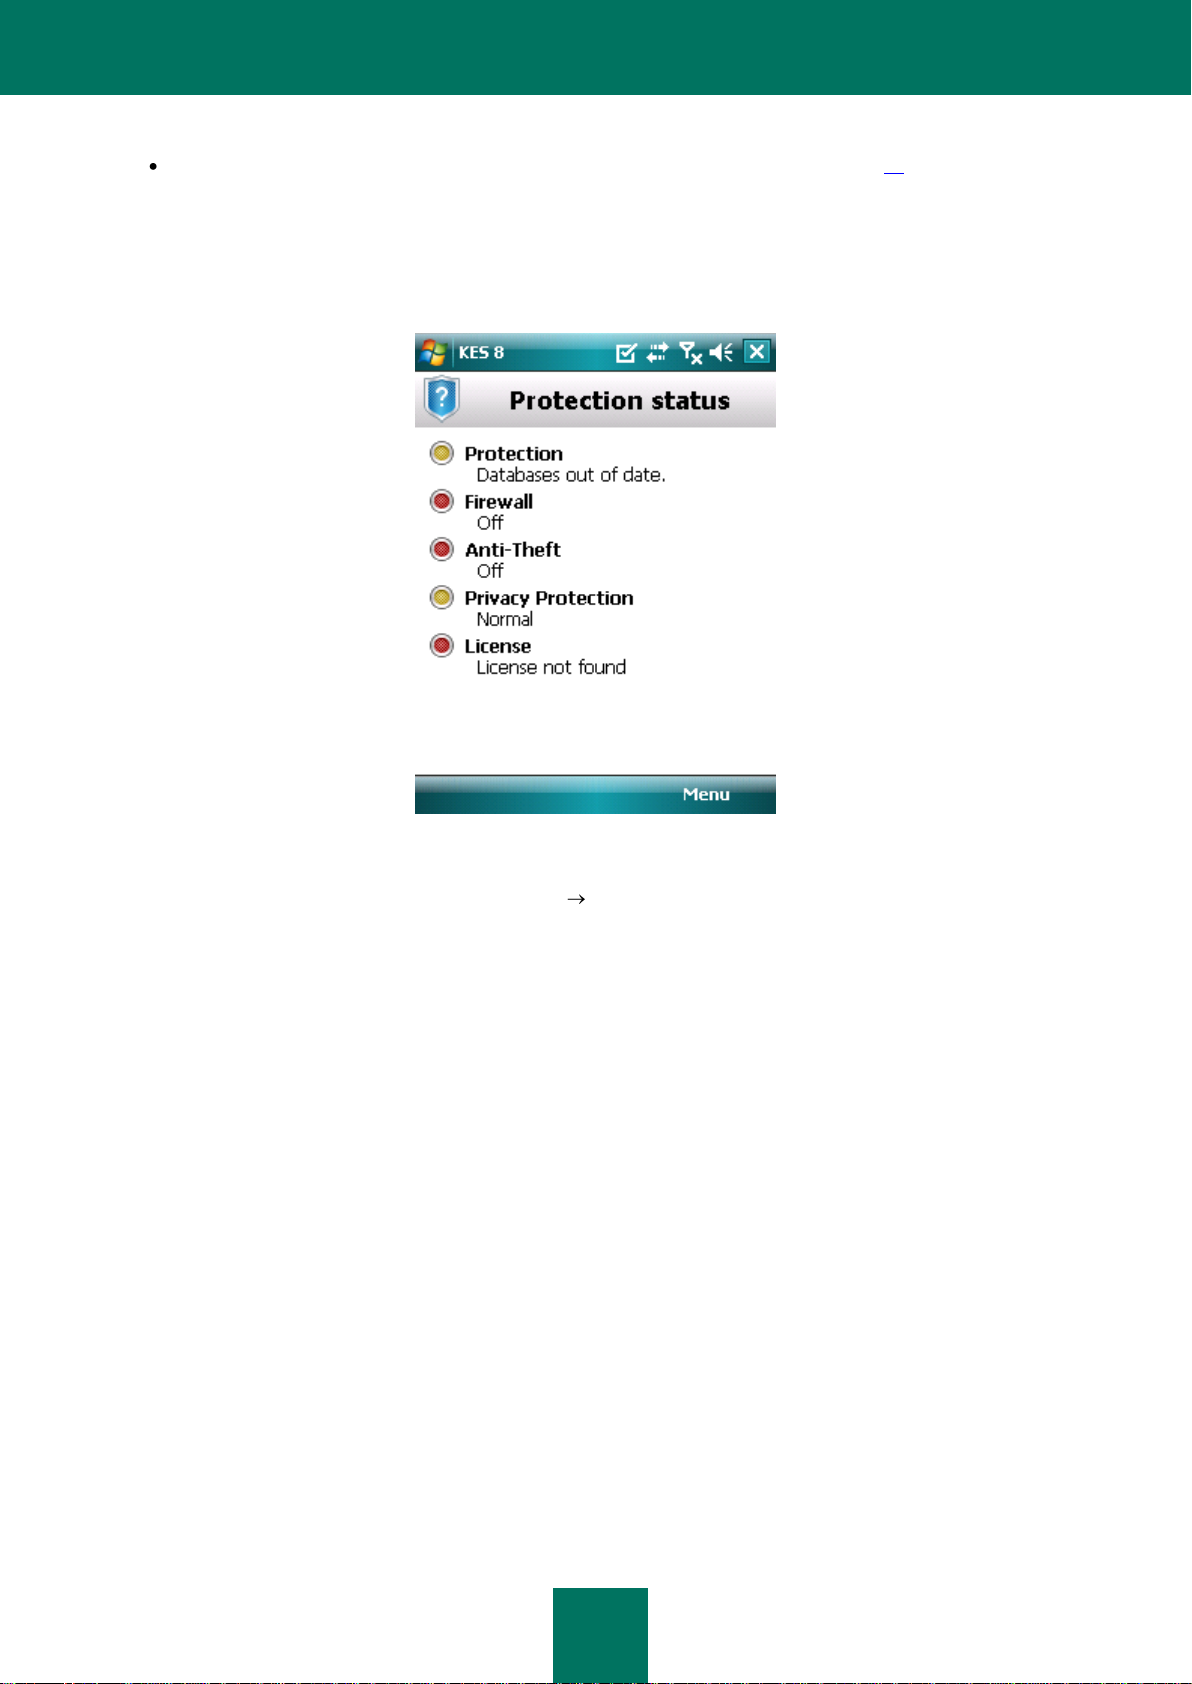
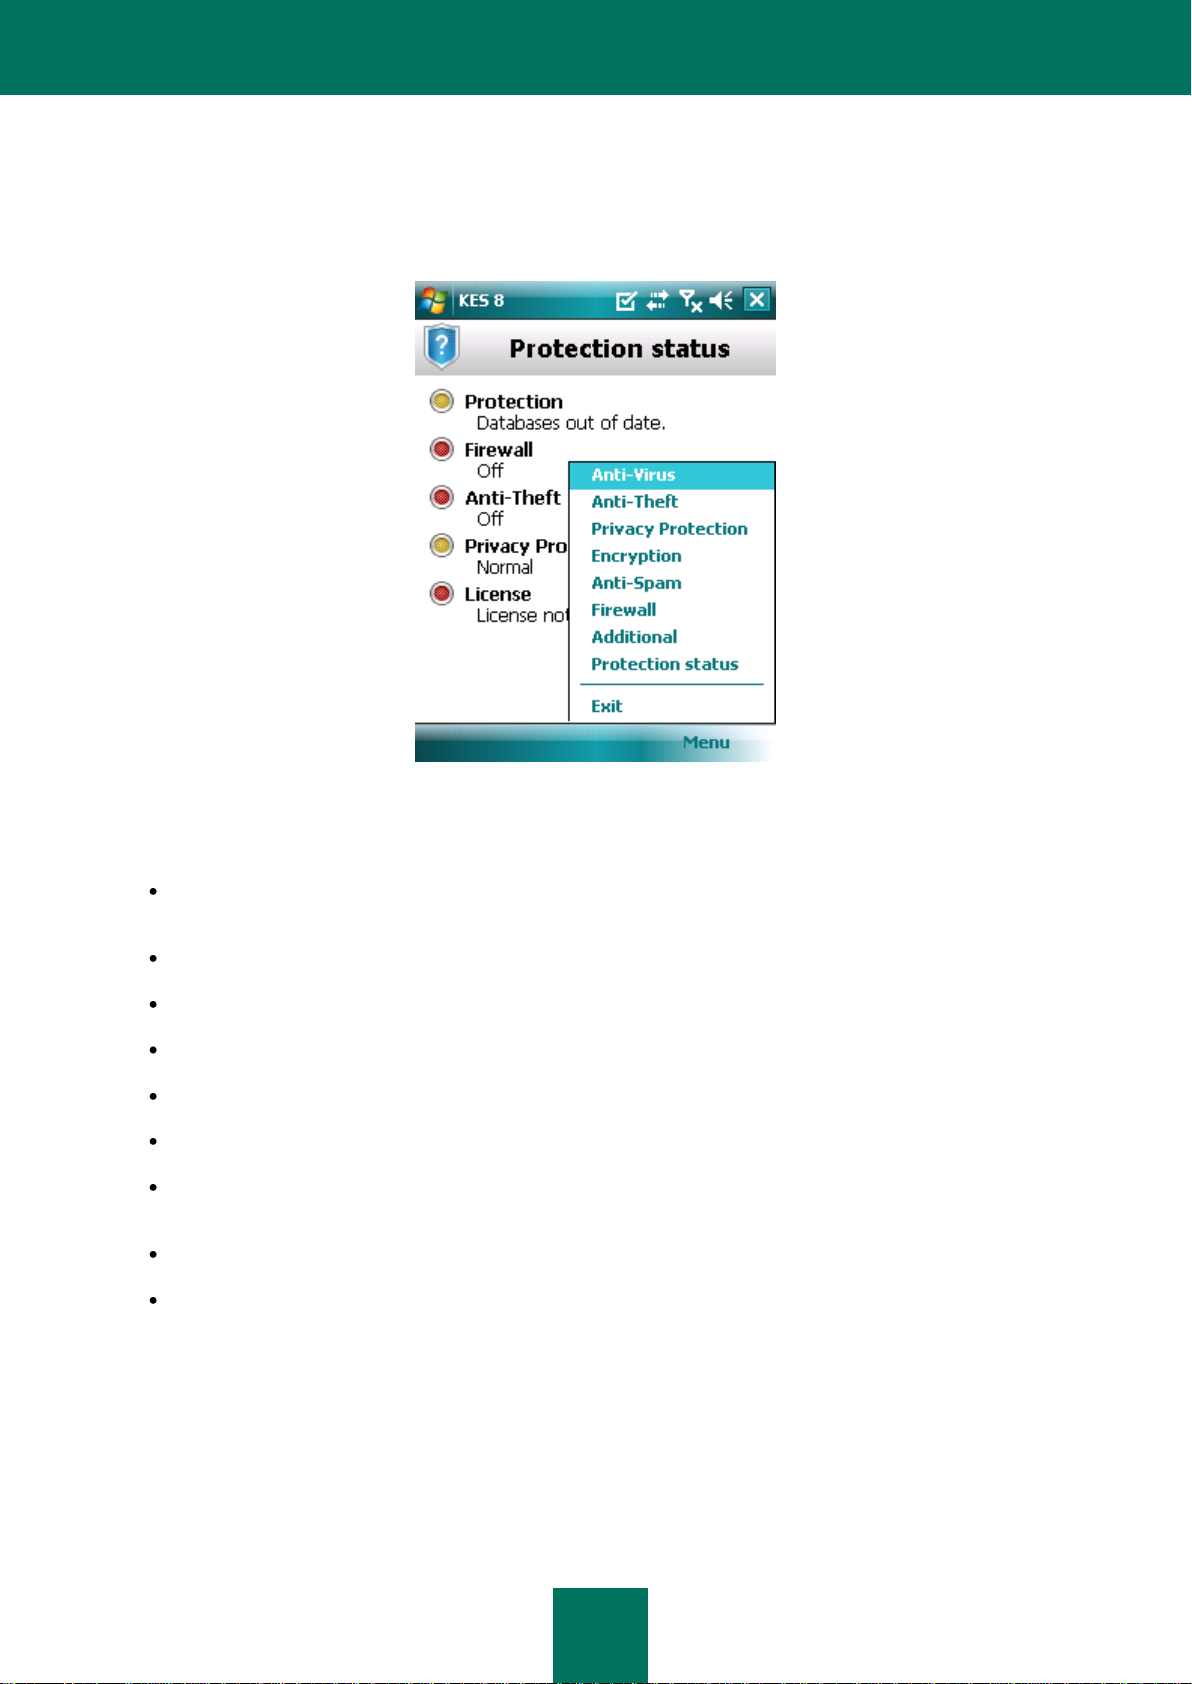
APPLICATION MENU
The application components are logically grouped and accessible in the application menu. Every menu item allows going
to the parameters of the selected component and protection tasks (see Figure below).
Figure 6: Application menu
The Kaspersky Endpoint Security 8 for Smartphone menu contains the following:
Anti-Virus: protection of the file system from viruses, on-demand scan and updating the application's anti-virus
databases.
Anti-Theft – protection of information on the device in the event of theft or loss.
Privacy Protection – hiding confidential information on the device.
Encryption – encryption of data on the device.
Anti-Spam: filtering of unwanted incoming calls and SMS.
Firewall – control of network activity.
Additional – general settings, start of synchronization of the device with the remote administration system,
information about application and license.
Protection status – information about the main application components.
Exit – exit from application settings configuration.
Page 28

U S E R GU I D E
28
In order to open the application menu,
IN THIS SECTION
About Protection .............................................................................................................................................................. 28
Activate/Deactivate Protection ........................................................................................................................................ 28
Selecting the action to be performed on malicious objects.............................................................................................. 30
select Меnu.
To navigate through the application menu, use the device's joystick or stylus.
To return to the application:
select Menu Protection status.
To exit the application:
select Menu Exit.
FILE SYSTEM PROTECTION
This section provides information on the Protection component which enables avoidance of infections of your device's file
system. The section also describes how to activate/stop the Protection and adjust its operation settings.
ABOUT PROTECTION
Protection starts when operation system starts up and is always found in the device's memory. Protection is used to
monitor changes in file system the background mode and scans files for the malicious objects. Files are scanned
according to the following algorithm:
1. Protection scans every file when the user accesses it.
2. Protection analyses the file for the presence of malicious objects. Malicious objects are detected by comparison
with the application's anti-virus databases. Anti-virus databases contain descriptions of all currently known
malicious objects, and methods for neutralizing them.
3. According to the analysis results, the following types of Protection are possible:
If malicious code was detected in the file, the Protection blocks access to the file and performs the action
specified in the settings;
If no malicious code is discovered in the file, it will be immediately restored.
Information on results from the operation of Protection is saved in the application's log (see "Application logs" on page
92).
Page 29
F I L E S Y S T E M P R O T E C T I O N
29
ACTIVATE/DEACTIVATE PROTECTION
When activating the Protection, all actions in the system are under permanent control.
To ensure the protection from malicious objects, the resources of the device are used. In order to reduce the load on the
device when executing several tasks, you can temporarily stop Protection.
The Kaspersky Lab specialists strongly recommend that you do not disable Protection, since this could lead to the
infection of your computer and data loss.
The current Protection status is displayed on the Anti-Virus tab next to the Protection menu item.
You can enable/disable the Protection as follows:
from the component settings menu;
from the Anti-Virus menu.
To modify the values of the settings, use the device's joystick or stylus.
To enable Protection:
1. Select Menu Anti-Virus.
This will open the Anti-Virus window.
2. Select the Protection item.
This will open the Settings window.
3. Check the Enable Protection box (see Figure below).
Figure 7: Enabling Protection
4. Press OK to save the changes.
Page 30
U S E R GU I D E
30
To disable Protection:
1. Select Menu Anti-Virus.
This will open the Anti-Virus window.
2. Select the Protection item.
This will open the Settings window.
3. Uncheck the Enable Protection box.
4. Press OK to save the changes.
To quickly enable/disable the Protection:
1. Select Menu Anti-Virus.
2. This will open the Anti-Virus window.
3. Press the Enable / Disable. The name of the menu item will change to the opposite depending on the current
Protection status.
SELECTING THE ACTION TO BE PERFORMED ON
MALICIOUS OBJECTS
You can choose the activity which Kaspersky Endpoint Security 8 for Smartphone fulfills on the detected malicious
object.
To modify the values of the settings, use the device's joystick or stylus.
In order to change the values settings of the Protection, ensure that it is activated.
Page 31

F I L E S Y S T E M P R O T E C T I O N
31
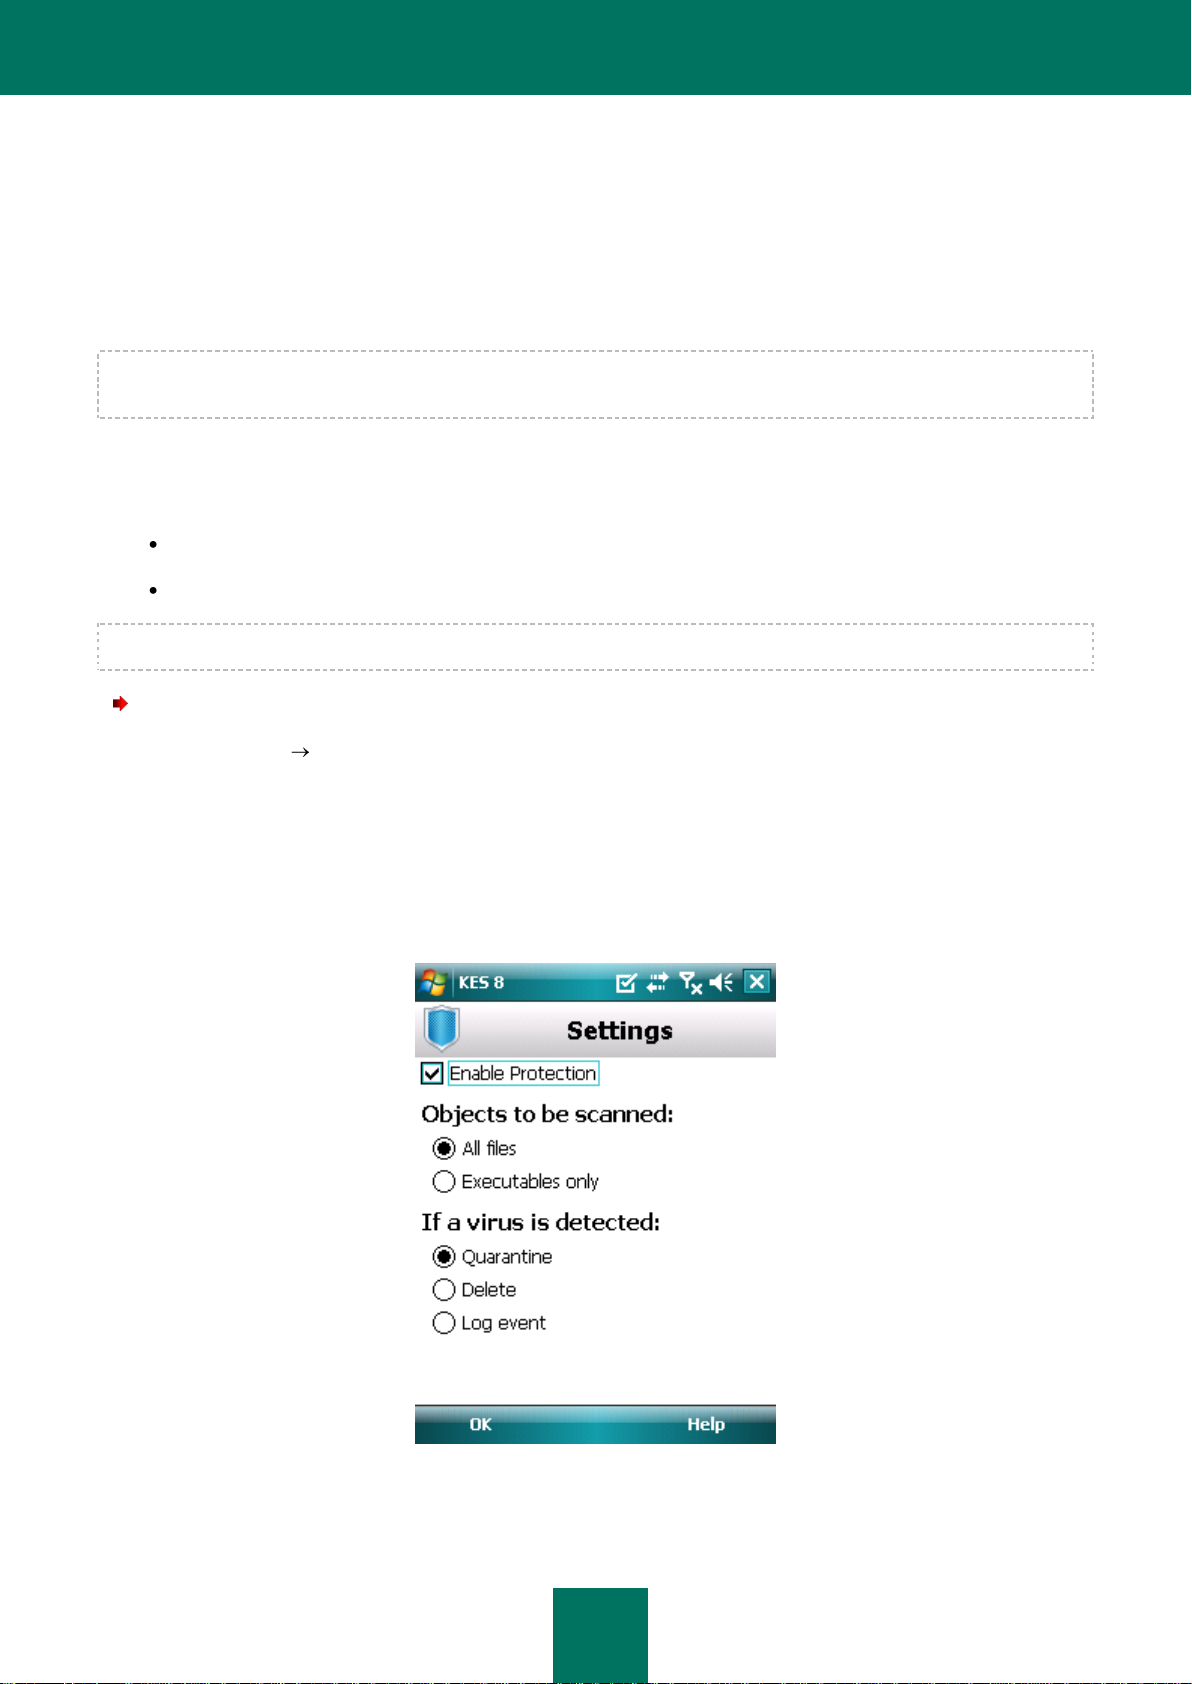
To set how the application acts on the detected malicious object:
1. Select Menu Anti-Virus.
This will open the Anti-Virus window.
2. Select the Protection item.
This will open the Settings window.
3. Set an action which the application takes on a detected malicious object. To do this, select a value for the If a
virus is detected setting (see Figure below):
Quarantine: quarantine malware objects.
Delete: delete malware objects without notifying the user.
Log event – skip malicious objects while recording their information in the application log; block attempts to
access these objects (such as copy or open).
Figure 8: Selecting the action to be performed on malicious objects
4. Press OK to save the changes.
Page 32

U S E R GU I D E
32
SCANNING THE DEVICE
IN THIS SECTION
About on-demand scans ................................................................................................................................................. 32
Starting a scan manually ................................................................................................................................ ................. 32
Starting a scheduled scan ................................................................ ............................................................................... 34
Selection of object type to be scanned ............................................................................................................................ 36
Configuring archive scans ............................................................................................................................................... 36
Selecting the action to be performed on detected objects ............................................................................................... 37
The section gives information about scanning the device on demand, which can identify and neutralize threats on your
device. The section also describes how to start scannig the device, set up an automatic file system scan by schedule,
how to choose files for scanning and set the action the application will take when a threat is detected.
ABOUT ON-DEMAND SCANS
Scanning on demand helps to detect and neutralize malicious objects. Kaspersky Endpoint Security 8 for Smartphone
can perform either a full scan of the device's content or a partial scan – i.e. scan only the content of the device's built-in
memory or a specific folder (including those located on the storage card).
The device is scanned as follows:
1. Kaspersky Endpoint Security 8 for Smartphone scans files, which are defined in the scan settings (see
2. During the scan, each file is analyzed for the presence of malicious objects (malware). Malicious objects are
3. Kaspersky Endpoint Security 8 for Smartphone can act in the following ways according to the results of the
A scan is started manually or automatically in accordance with a schedule (see "Starting a scheduled scan" on page 34).
Information about the on-demand scan's results is saved in the application's log (see the "Application logs" section on
page 92).
"Selection of object type to be scanned" on page 36).
detected by comparison with the application's anti-virus databases. Anti-Virus databases contain descriptions of
all known malicious objects, and methods for neutralizing them.
scan:
If malicious code was detected in the file, Kaspersky Endpoint Security 8 for Smartphone blocks access to
the file, and performs the action specified in the settings (see "Selecting actions to be performed on
objects" section on page 37);
if no malicious code is detected, the file immediately becomes accessible for operation.
Page 33

S C A N N I N G T H E D E V I C E
33
STARTING A SCAN MANUALLY
You can start a full or partial scan on demand manually, for example when the device's process is not busy with other
tasks.
To start a scan manually:
1. Select Menu Anti-Virus.
This will open the Anti-Virus window.
2. Select the Scan item.
This will open the Scan window.
3. Select the device scan area (see figure below):
Full scan – scan the device's entire file system. By default, the application scans files saved to the device's
onboard memory and memory cards.
Memory scan: scan the processes started in the system memory and its corresponding files.
Folder scan: scan a separate folder in the device's file system or on the storage card. When selecting this
item, the folder for scanning selection window opens showing the device's file system tree. Use the joystick
buttons or the stylus to navigate through the file system. In order to start the folder scan, select the
necessary folder and select Scan.
Figure 9: Selecting of scan area
Page 34

U S E R GU I D E
34
When the scan is started, the scan process window opens and displays the task current status: the number of
scanned files and the path to the file currently being scanned.
If Kaspersky Endpoint Security 8 for Smartphone detects an infected object the application performs the action
set in the scan parameters (see "Selecting an action to be performed on detected objects" on page 37).
When the scan finishes, the following information is displayed:
number of scanned files;
number of viruses detected, placed in the quarantine or deleted malicious objects;
number of files passed through (for instance, a file is blocked by the operating system or a file is not
executable, when scanning only executable program files);
scan time.
4. On completion, press OK.
Page 35

S C A N N I N G T H E D E V I C E
35
STARTING A SCHEDULED SCAN
Kaspersky Endpoint Security 8 for Smartphone lets you set a schedule for automatically starting the scan of the file
system. A scheduled scan is carried out in background mode. When an infected object is detected, the action selected in
the scan settings will be performed on it (see "Selecting an action to be performed on objects" section on page 37).
To perform the scheduled scan, the device should remain turned on for the entire scan period.
To automatically start a scan by schedule and create a schedule:
1. Select Menu Anti-Virus.
This will open the Anti-Virus window.
2. Select the Scan item.
This will open the Scan window.
3. Select the Scan schedule item.
This will open the Schedule screen.
4. Check the box Scan by schedule. (see Figure below).
5. Select scan start interval. To do this, select one of the values for the Frequency setting:
Daily: perform the scan every day. In the Time field, show the start time.
Weekly: perform the scan once a week. Indicate time and day of scan. To do this, indicate the value of the
settings Time and Day of Week.
Figure 10: Configuring an automatic scan schedule
6. Press OK to save the changes.
Page 36

U S E R GU I D E
36
SELECTION OF OBJECT TYPE TO BE SCANNED
You can set the type of files which the application analyses during the Scan on Demand.
To modify the values of the settings, use the device's joystick or stylus.
To select the type of files to be scanned:
1. Select Menu Anti-Virus.
This will open the Anti-Virus window.
2. Select the Scan item.
This will open the Scan window.
3. Select the Objects and actions item.
This will open the Objects and actions window.
4. Select the type of files to be scanned in the Objects to be scanned block (see Figure below):
All files: scan all file types.
Executables only – checks only executable application files for the following formats: EXE, DLL, MDL,
APP, RDL, PRT, PXT, LDD, PDD, CLASS.
Figure 11: Selecting protection objects
5. Press OK to save the changes.
Page 37

S C A N N I N G T H E D E V I C E
37
CONFIGURING ARCHIVE SCANS
Viruses often hide in archives. The program scans the following archive formats: ZIP, JAR, JAD and CAB. Archives are
unpacked during scanning which may significantly reduce the speed of the Scan on Demand.
You can enable / disable the scan of archive for malicious code during the Scan on Demand.
To modify the values of the settings, use the device's joystick or stylus.
To enable scan of archives:
1. Select Menu Anti-Virus.
This will open the Anti-Virus window.
2. Select the Scan item.
This will open the Scan window.
3. Select the Objects and actions item.
This will open the Objects and actions window.
4. Check the Archives box in the Objects to be scanned block.
5. Press OK to save the changes.
SELECTING THE ACTION TO BE PERFORMED ON DETECTED
OBJECTS
If malicious code was detected in the file, Kaspersky Endpoint Security 8 for Smartphone blocks access to the file, and
performs the action specified in the settings.
You can change the action of the application on the detected malicious object.
To modify the values of the settings, use the device's joystick or stylus.
To change how the application acts on the detected malicious object:
1. Select Menu Anti-Virus.
This will open the Anti-Virus window.
2. Select the Scan item.
This will open the Scan window.
3. Select the Objects and actions item.
This will open the Objects and actions window.
4. If you want the application to attempt to disinfect infected objects, check the Try to disinfect box beside the If a
virus is detected setting.
Page 38

U S E R GU I D E
38
5. Set an action in respect of a detected malicious object. To do this, select a value for the Perform action setting:
If the Try to disinfect box was checked earlier, the title of this setting becomes If disinfection fails. This
setting determines the action of the program, even if rectifying the object is not successful.
Quarantine: quarantine objects.
Ask user: prompt the user for actions when a malicious object is detected.
Delete: delete malware objects without notifying the user.
Log event: do not process malware objects and record information about their detection in the application's
log.
6. Press OK to save the changes.
Figure 12: Selecting the action to be performed on malicious objects
Page 39

Q U A R A N T I N I N G M A L W A R E O B J E C T S
39
IN THIS SECTION
About Quarantine ............................................................................................................................................................ 39
Viewing quarantined objects ........................................................................................................................................... 39
Restoring objects from Quarantine ................................................................................................ .................................. 40
Deleting objects from Quarantine .................................................................................................................................... 41
QUARANTINING MALWARE OBJECTS
This section provides information on the quarantine, a special folder where potential malicious objects are placed. This
section also describes how to view, restore or delete malicious objects found in the folder.
ABOUT QUARANTINE
While a device is being scanned or if Protection is enabled, the application places any malicious objects detected in
quarantine, in a special isolated folder. Quarantined objects are stored in a packed format which prevents their activation,
and thus they pose no threat to the device.
You can view files placed in quarantine, delete or restore them.
Page 40

U S E R GU I D E
40
VIEWING QUARANTINED OBJECTS
You can view the list of malicious objects that the application has moved to Quarantine. For every object, its full name
and date of detection are specified on the list.
You can also view additional information about the malicious object that you have selected: path to the object in the
device before the application moved it to quarantine and name of the threat.
To view the list of objects in quarantine:
1. Select Menu Anti-Virus.
This will open the Anti-Virus window.
2. Select the Quarantine item.
The Quarantine screen opens displaying the list of objects that have been moved to Quarantine (see figure
below).
On the Details screen, the following information about the object is displayed: path to the file on the device before it has
been detected by the application, and the name of the virus.
The Object info screen opens.
Figure 13: List of objects in Quarantine
To view information about an infected object,
press Details.
Page 41

Q U A R A N T I N I N G M A L W A R E O B J E C T S
41
RESTORING OBJECTS FROM QUARANTINE
If you are sure that the object detected does not represent a threat to the device, you can restore it from quarantine. The
restored object is placed in the original folder.
To restore an object from quarantine:
1. Select Menu Anti-Virus.
This will open the Anti-Virus window.
2. Select the Quarantine item.
This will open the Quarantine window.
3. Select an object to restore and then press Menu Restore.
The selected object will be restored from Quarantine into its original folder.
DELETING OBJECTS FROM QUARANTINE
You can delete a single object or all the objects in quarantine.
To delete an object from Quarantine:
1. Select Menu Anti-Virus.
This will open the Anti-Virus window.
2. Select the Quarantine item.
This will open the Quarantine window.
3. Select an object to be deleted and then press Menu Delete.
The selected object will be deleted from Quarantine.
To delete all quarantined objects:
1. Select Menu Anti-Virus.
This will open the Anti-Virus window.
2. Select the Quarantine item.
This will open the Quarantine window.
3. Press Menu Delete all.
All quarantined objects will be deleted.
Page 42

U S E R GU I D E
42
FILTERING OF INCOMING CALLS AND SMS
IN THIS SECTION
About Anti-Spam ............................................................................................................................................................. 42
Anti-Spam modes ................................................................................................................................ ............................ 42
Changing the Anti-Spam mode ....................................................................................................................................... 43
Creating a Black List ....................................................................................................................................................... 44
Creating a White List ....................................................................................................................................................... 48
Response to SMS messages and calls from numbers not in Contacts ........................................................................... 51
Responding to SMS from non-numeric numbers ............................................................................................................ 52
Selecting a response to incoming SMS ........................................................................................................................... 54
Selecting a response to incoming calls ........................................................................................................................... 55
This section gives information about Anti-Spam which prevents unwanted calls and messages according to the Black
and White Lists you create. The section also describes how to select the mode in which Anti-Spam filters incoming calls
and SMS messages, how to configure additional filtering settings for incoming SMS messages and calls and also how to
create Black and White Lists.
ABOUT ANTI-SPAM
Anti-Spam blocks unwanted calls and messages based on a White and a Black list you compile.
The lists consist of entries. An entry in either list contains the following information:
The telephone number information from which Anti-Spam blocks for the Black List and delivers for the White
List.
The type of event that Anti-Spam blocks for the Black List and allows for the White List. The following types of
communications are available: calls and SMS, calls only, and SMS only.
Key phrase used by Anti-Spam to identify wanted and unwanted SMS. For the Black List, Anti-Spam blocks
SMS messages, which contain this phrase, while delivering the ones, which do not contain it. For the White List,
Anti-Spam delivers SMS messages, which contain this phrase, while blocking the ones, which do not contain it.
Anti-Spam filters incoming SMS messages and calls according to the chosen mode (see "Anti-Spam modes" on
page 42). According to the mode, Anti-Spam scans every incoming SMS or call and then determines whether this SMS
or call is wanted or unwanted (spam). As soon as Anti-Spam assigns the wanted or unwanted status to an SMS or call,
the scan is finished.
Information about blocked SMS and calls is registered in the application's log (see section "Application logs" on page 92).
Page 43

F I L T E R I N G O F I N C O M I N G C A L L S A N D S M S
43
ANTI-SPAM MODES
The mode defines the rules according to which Anti-Spam filters incoming calls and SMS messages.
The following Anti-Spam modes are available:
Off – all incoming calls and SMS are allowed.
Block "Black" list - all calls and SMS are allowed except those originating from numbers on the Black List.
Allow "White" list - only calls and SMS originating from numbers on the White List are allowed.
Both lists – incoming calls and SMS from White List numbers are allowed while those from Black List numbers
are blocked. Following a conversation with or the reading of an SMS message from a number on neither list,
Anti-Spam will prompt you to enter the number in either one of the lists.
You can edit the Anti-spam mode (see the "Changing the Anti-Spam mode" section on page 43). The current Anti-Spam
mode is displayed in the Anti-Spam tab next to the Mode menu item.
Page 44

U S E R GU I D E
44
CHANGING THE ANTI-SPAM MODE
To select an Anti-Spam operation mode:
1. Select Menu Anti-Spam.
This will open the Anti-Spam window.
2. Select the Mode item.
This will open the Mode window.
3. Select a value for the Anti-Spam mode setting (see Figure below).
Figure 14: Changing the Anti-Spam mode
4. Press OK to save the changes.
CREATING A BLACK LIST
The Black List contains entries of banned numbers, i.e., the numbers from which Anti-Spam blocks calls and SMS. Each
entry contain the following information:
Phone number from which Anti-Spam blocks calls and / or SMS.
Types of events from this number that Anti-Spam blocks. The following types of events are available: calls and
SMS, calls only, and SMS only.
Key phrase that Anti-Spam uses to classify an SMS as unsolicited (spam). Anti-Spam only blocks SMS that
contain this key phrase, while delivering all other ones.
Anti-Spam will block those calls and SMS that satisfy all the criteria of a Black List entry. Calls and SMS that fail to satisfy
even one of the criteria in a Black List entry will be allowed in by Anti-Spam.
Page 45

F I L T E R I N G O F I N C O M I N G C A L L S A N D S M S
45
IN THIS SECTION
Adding entries to the Black List ....................................................................................................................................... 45
Editing entries in the Black List ....................................................................................................................................... 46
Deleting entries from the Black List ................................................................................................................................. 47
You cannot add a phone number with identical filtering criteria to both the Black List and the White List.
Information about blocked SMS and calls is registered in the application's log (see section "Application logs" on page 92).
ADDING ENTRIES TO THE BLACK LIST
Bear in mind that the same number with identical filtering criteria cannot be included in the Black and White lists of AntiSpam numbers at the same time. If a number with such filtering criteria is already saved on either of the lists, Kaspersky
Endpoint Security 8 for Smartphone will notify you of this event, and a relevant message will appear on the screen.
To add an entry to the Anti-Spam Black List:
1. Select Menu Anti-Spam.
This will open the Anti-Spam window.
2. Select the Black List item.
This will open the Black List window.
3. Select Menu Add (see Figure below).
This will open the New entry window.
Figure 15: Adding entries to the Black List
Page 46

U S E R GU I D E
46
4. Set values for the following settings (see figure below).
Block incoming – type of event from a telephone number which Anti-Spam blocks for Black List numbers:
Calls and SMS: block incoming calls and SMS messages.
Calls only: block incoming calls only.
SMS only: block incoming SMS messages only.
Phone number – telephone number for which Anti-Spam blocks incoming information. The phone number
should comprise only alphanumeric characters; it may begin with a digit, a letter, or be preceded by the "+"
symbol. As a number, it is also possible to use the masks "*" or "?" (where "*" is any amount of symbols,
and "?" any one symbol). For example, *1234? on the Black List. Anti-Spam blocks calls or SMS from a
number in which any symbol follows the figure 1234.
Containing text – key phrase indicating that the received SMS message is unwanted (spam). Anti-Spam
only blocks those messages that have the key phrase, it allows all other SMS messages.
If you want all incoming SMS from a specific number on the Black List to be blocked, leave this entry’s
Containing Text field blank.
Figure 16: Entry settings
5. Press OK to save the changes.
Page 47

F I L T E R I N G O F I N C O M I N G C A L L S A N D S M S
47
EDITING ENTRIES IN THE BLACK LIST
For an entry from the Black list, you can change the values of all settings.
To edit an entry in the Anti-Spam Black List:
1. Select Menu Anti-Spam.
This will open the Anti-Spam window.
2. Select the Black List item.
This will open the Black List window.
3. Select the element from the list which you wish to edit and then select Menu Edit.
This will open the Edit entry window.
4. Change the necessary settings:
Block incoming – type of event from a telephone number which Anti-Spam blocks for Black List numbers:
Calls and SMS: block incoming calls and SMS messages.
Calls only: block incoming calls only.
SMS only: block incoming SMS messages only.
Phone number – telephone number for which Anti-Spam blocks incoming information. The phone number
should comprise only alphanumeric characters; it may begin with a digit, a letter, or be preceded by the "+"
symbol. As a number, it is also possible to use the masks "*" or "?" (where "*" is any amount of symbols,
and "?" any one symbol). For example, *1234? on the Black List. Anti-Spam blocks calls or SMS from a
number in which any symbol follows the figure 1234.
Containing text – key phrase indicating that the received SMS message is unwanted (spam). Anti-Spam
only blocks those messages that have the key phrase, it allows all other SMS messages.
If you want all incoming SMS from a specific number on the Black List to be blocked, leave this entry’s
Containing Text field blank.
5. Press OK to save the changes.
DELETING ENTRIES FROM THE BLACK LIST
You can delete a number from the Black list. Furthermore, you can clear the Anti-Spam Black List by removing all the
entries from it.
To delete an entry from thethe Parental Control Black List:
1. Select Menu Anti-Spam.
This will open the Anti-Spam window.
2. Select the Black List item.
This will open the Black List window.
3. Select an entry to be deleted from the list and then select Menu Delete.
Page 48

U S E R GU I D E
48
4. Confirm the deletion of the entry. To do this, press Yes.
IN THIS SECTION
Adding entries to the White List ....................................................................................................................................... 48
Editing entries in the White List ....................................................................................................................................... 50
Deleting entries from the White List ................................................................................................................................ 51
To clear theAnti-Spam Black List:
1. Select Menu Anti-Spam.
This will open the Anti-Spam window.
2. Select the Black List item.
This will open the Black List window.
3. Select Menu Delete all.
The list is emptied.
CREATING A WHITE LIST
The White List contains entries of allowed numbers, i.e., numbers from which Anti-Spam delivers calls and SMS to the
user. Each entry contain the following information:
Phone number from which Anti-Spam delivers calls and / or SMS.
Type of events that Anti-Spam delivers from this number. The following types of events are available: calls and
SMS, calls only, and SMS only.
Key phrase used by Anti-Spam to classify an SMS as solicited (not spam). Anti-Spam only delivers SMS that
contain this key phrase, while blocking all other ones.
Anti-Spam allows only calls and SMS that satisfy all the criteria of an entry in the White List. Calls and SMS that fail to
satisfy even one of the criteria in a White List entry will be blocked by Anti-Spam.
ADDING ENTRIES TO THE WHITE LIST
Bear in mind that the same number with identical filtering criteria cannot be included in the Black and White lists of AntiSpam numbers at the same time. If a number with such filtering criteria is already saved on either of the lists, Kaspersky
Endpoint Security 8 for Smartphone will notify you of this event, and a relevant message will appear on the screen.
To add an entry to the Anti-Spam White List:
1. Select Menu Anti-Spam.
This will open the Anti-Spam window.
2. Select the White List item.
This will open the White List window.
Page 49

F I L T E R I N G O F I N C O M I N G C A L L S A N D S M S
49
3. Select Menu Add (see Figure below).
This will open the New entry window.
Figure 17: Adding entries to the White List
4. Set values for the following settings (see Figure below).
Allow incoming – type of event from a telephone number which Anti-Spam allows for Black List numbers:
Calls and SMS: allow incoming calls and SMS messages.
Calls only: allow incoming calls only.
SMS only: allow incoming SMS messages only.
Phone number – telephone number for which Anti-Spam allows incoming information. The phone number
should comprise only alphanumeric characters; it may begin with a digit, a letter, or be preceded by the "+"
symbol. As a number, it is also possible to use the masks "*" or "?" (where "*" is any amount of symbols,
and "?" any one symbol). For example, *1234? in the White List. Anti-Spam delivers calls or SMS from a
number in which any symbol follows the figure 1234.
Containing text – key phrase indicating that the received SMS message is wanted. For numbers on the
White List, Anti-Spam only delivers SMS messages containing the key phrase and blocks all others.
Page 50

U S E R GU I D E
50
If you want all incoming SMS from a specific number on the White List to be delivered, leave this entry’s
Containing Text field blank.
Figure 18: Entry settings
5. Press OK to save the changes.
EDITING ENTRIES IN THE WHITE LIST
For an entry from the White list of allowed numbers, you can change the values of all settings.
To edit an entry in the Anti-Spam White List:
1. Select Menu Anti-Spam.
This will open the Anti-Spam window.
2. Select the White List item.
This will open the White List window.
3. Select the element from the list which you wish to edit and then select Menu Edit.
This will open the Edit entry window.
4. Change the necessary settings:
Allow incoming – type of event from a telephone number which Anti-Spam allows for Black List numbers:
Calls and SMS: allow incoming calls and SMS messages.
Calls only: allow incoming calls only.
SMS only: allow incoming SMS messages only.
Phone number – telephone number for which Anti-Spam allows incoming information. The phone number
should comprise only alphanumeric characters; it may begin with a digit, a letter, or be preceded by the "+"
Page 51

F I L T E R I N G O F I N C O M I N G C A L L S A N D S M S
51
symbol. As a number, it is also possible to use the masks "*" or "?" (where "*" is any amount of symbols,
and "?" any one symbol). For example, *1234? in the White List. Anti-Spam delivers calls or SMS from a
number in which any symbol follows the figure 1234.
Containing text – key phrase indicating that the received SMS message is wanted. For numbers on the
White List, Anti-Spam only delivers SMS messages containing the key phrase and blocks all others.
If you want all incoming SMS from a specific number on the White List to be delivered, leave this entry’s
Containing Text field blank.
5. Press OK to save the changes.
DELETING ENTRIES FROM THE WHITE LIST
You can delete one entry from the White List as well as completely clear it.
To delete an entry from theAnti-Spam White List:
1. Select Menu Anti-Spam.
This will open the Anti-Spam window.
2. Select the White List item.
This will open the White List window.
3. Select an entry to be deleted from the list and then select Menu Delete.
4. Confirm the deletion of the entry. To do this, press Yes.
To clear the Anti-Spam White List:
1. Select Menu Anti-Spam.
This will open the Anti-Spam window.
2. Select the White List item.
This will open the White List window.
3. Select Menu Delete all.
The list is emptied.
RESPONSE TO SMS MESSAGES AND CALLS FROM
NUMBERS NOT IN CONTACTS
If Anti-Spam Both lists or White List mode is selected (see "Anti-Spam modes" on page 42), you can additionally
expand the White List. In this case, Anti-Spam processes calls and SMS messages from Contacts the same way as from
numbers on the White List.
To modify the values of the settings, use the device's joystick or stylus.
Page 52

U S E R GU I D E
52
To additionally expand theWhite List including numbers from Contacts:
1. Select Menu Anti-Spam.
This will open the Anti-Spam window.
2. Select the Mode item.
3. This will open the Mode window.
4. Select the required value for setting Allow Contacts (see Figure below):
for Anti-Spam to count numbers from Contacts as additional White List and block SMS messages and calls
from subscribers not in Contacts, check the Allow Contacts box;
to enable Anti-Spam to filter SMS messages and calls based on the Anti-Spam mode, uncheck the Allow
Contacts box.
Figure 19: Anti-Spam response to numbers not included in the device's phone book
5. Press OK to save the changes.
Page 53

F I L T E R I N G O F I N C O M I N G C A L L S A N D S M S
53
RESPONDING TO SMS MESSAGES FROM NON-NUMERIC
NUMBERS
If the Anti-Spam mode Both lists or Black List is selected (see the "Changing the Anti-Spam mode" section on page
43), you can additionally expand the Black List by adding non-numeric numbers to it (including letters). In this case, Anti-
Spam processes calls and SMS messages from non-numeric numbers the same way as from numbers on the Black List.
To modify the values of the settings, use the device's joystick or stylus.
To additionally expand theBlack List by adding non-numeric numbers:
1. Select Menu Anti-Spam.
This will open the Anti-Spam window.
2. Select the Mode item.
This will open the Mode window.
3. Select a value for the Block non-numeric numbers setting (see Figure below):
in order for Anti-Spam to automatically block SMS from non-numeric numbers, check the Block non-
numeric numbers box;
if you want Anti-Spam to filter SMS from non-numeric numbers on the basis of the Anti-Spam mode set,
uncheck the Block non-numeric numbers box.
Figure 20: Configuring Anti-Spam action when receiving SMS messages from non-numeric numbers
4. Press OK to save the changes.
Page 54

U S E R GU I D E
54
SELECTING A RESPONSE TO INCOMING SMS
If the Both lists mode is set (see "Anti-Spam Modes" on page 42), Anti-Spam scans incoming SMS messages
according to the Black and White Lists.
Following receipt of an SMS message from a number not on either list, Anti-Spam will prompt you to enter the number in
one of the lists (see Figure below).
Figure 21: Anti-Spam notification on message received
You can select one of the following actions to be performed in respect of the SMS:
To block an SMS message and add the sender's telephone number to the Black List, select Menu Add to
Black List.
To deliver an SMS message and add the sender's telephone number to the White List, select Menu Add to
White List.
To deliver the SMS message without adding the sender's telephone number to either list, press Skip.
Information about blocked SMS is registered in the application's log (see the "Application logs" section on page 92).
Page 55

F I L T E R I N G O F I N C O M I N G C A L L S A N D S M S
55
SELECTING A RESPONSE TO INCOMING CALLS
If Both lists mode is set (see "Anti-Spam modes" on page 42), Anti-Spam checks incoming calls according to the Black
and White Lists. Following a call from a number not on either list, Anti-Spam will prompt you to enter the number in either
one of the lists (see Figure below).
Figure 22: Anti-Spam notification on call accepted
You can select one of the following actions for the number from which the call was made:
To add the caller's telephone number to the Black List, select Menu Add to Black List.
To add the caller's telephone number to the White List, select Menu Add to White List.
If you don't want to add the caller's number to either list, press Skip.
Information about blocked calls is entered in the application's log.
Page 56

U S E R GU I D E
56
DATA PROTECTION IN THE EVENT OF
IN THIS SECTION
About Anti-Theft .............................................................................................................................................................. 56
Blocking the device ......................................................................................................................................................... 57
Deleting personal data .................................................................................................................................................... 59
Creating a list of folders to delete .................................................................................................................................... 62
Monitoring the replacement of a SIM card on the device ................................................................................................ 64
Determining the device's geographical coordinates ........................................................................................................ 65
Remote start of the Anti-Theft functions .......................................................................................................................... 67
LOSS OR THEFT OF THE DEVICE
This section gives information about Anti-Theft which, in the case of theft or loss, blocks unauthorized access to data
saved on your mobile device and makes it easy to find the device.
This section also specifies how to enable/disable the Anti-Theft function, set the parameters of its operation and start
Anti-Theft from another mobile device remotely.
Page 57

D A T A P R O T E C T I O N I N T H E E V E N T O F L O S S O R T H E F T O F T H E D E V I C E
57
ABOUT ANTI-THEFT
Anti-Theft protects information stored on your mobile device from unauthorized access.
Anti-Theft includes the following functions:
Block – allows blocking the device remotely and gives the text to be displayed on the screen of the blocked
device.
Data Wipe – allows deleting the user's personal data remotely from the device (entries in Contacts, messages,
picture gallery, calendar, logs, Internet connection settings) and information from the storage cards, folders from
list for deletion.
SIM Watch allows obtaining the current phone number in the event that the SIM card is replaced, as well as
locking the device in the event the SIM card is replaced or the device is activated without a SIM card.
Information about a new telephone number is sent as a message to a phone number and / or email that you
specified.
The GPS Find functionality enables you to locate a device. The geographical coordinates of the device are sent
as a message to the phone number from which a special SMS command was sent, and to an email address.
Kaspersky Endpoint Security 8 for Smartphone can remotely start Anti-Theft with sending SMS commands (see "Remote
start of the Anti-Theft functions" on page 67) from another mobile device.
To start Anti-Theft remotely, you have to know the secret code that was set when Kaspersky Endpoint Security 8 for
Smartphone was first started.
The current status of every function is displayed in the Anti-Theft screen next to the name of the function.
Information about the component's operation is entered in the application's log (see "Application Logs" on page 92).
Page 58

U S E R GU I D E
58
BLOCKING THE DEVICE
After a special SMS command is received, the Block function allows you to remotely block access to the device and data
stored on it. The device can only be unblocked by entering the secret code.
This function does not block the device but simply enables the remote blocking option.
To enable the Block function:
1. Select Menu Anti-Theft.
This will open the Anti-Theft window.
2. Select the Block item.
This will open the Block window.
3. Check the Enable Block box.
4. Enter the message which is displayed on the blocked device's screen in the Text when blocked field (see
Figure below). By default, the standard text in which you can add the owner's telephone is used for the
message.
If the Block function is enabled on another device, you can block it using any of the following methods:
Figure 23: Block function settings
5. Press OK to save the changes.
Use a Kaspersky Lab mobile application, such as Kaspersky Endpoint Security 8 for Smartphone, on another
mobile device to create and send an SMS command to your device. To create a special SMS command, use
the Send command function. As a result, your device will receive a covert SMS, and the device will be blocked.
On another mobile device, create and send an SMS with the special text and the secret code previously set for
the receiving device.
Page 59

D A T A P R O T E C T I O N I N T H E E V E N T O F L O S S O R T H E F T O F T H E D E V I C E
59
Outgoing SMS messages will be billed at the rates set by the other mobile device’s mobile service provider.
To block the device remotely, it is advised that you use the secure method with the Sending a command function. The
application secret code is then sent in encrypted form.
To send an SMS command to another device using the Sending a command function:
1. Select Menu Additional.
This will open the Additional window.
2. Select Send command.
This will open the Send command window.
3. Select the Block device value for the Select SMS command option (see Figure below).
4. In the Phone number field, enter the phone number of the device that receives the SMS command.
5. In the Code of remote device field, enter the secret code set on the device that receives the SMS command.
Figure 24: Remote start of Blocking the device
6. Press Send.
To create an SMS with the phone's standard SMS creation functions,
send an SMS message from the other device containing the text block:<code>, where <code> is the secret code
set on the device to be blocked. The message is not case sensitive, and spaces before or after the colon are
ignored.
Page 60

U S E R GU I D E
60
DELETING PERSONAL DATA
After a special SMS command is received, the Data Wipe function allows deleting the following information stored in the
device:
user's personal data (entries in Contacts and on SIM card, SMS messages, gallery, calendar, Internet
connection settings);
information on storage card;
files from the My Documents folder and other folders on the Folders to be deleted list.
This function does not delete data stored on the device, but it simply enables the option to delete it after a special SMS
command is received.
To enable the Data Wipe function:
1. Select Menu Anti-Theft.
This will open the Anti-Theft window.
2. Select the Data Wipe item.
This will open the Data Wipe screen.
3. Select the Mode item.
This will open the Data Wipe screen.
4. Check the Enable Data Wipe box.
Page 61

D A T A P R O T E C T I O N I N T H E E V E N T O F L O S S O R T H E F T O F T H E D E V I C E
61
5. Select the information to be deleted after the special SMS command is received. To do this, check the boxes
next to the required settings in the Delete section (see figure below).
to delete personal data, check the Personal data box;
to delete files from the My Documents folder and the Folders to be deleted list, check the Folders to be
deleted box.
Figure 25: Selecting the type of data to be deleted
6. Press OK to save the changes.
7. Proceed with creating the Folders to be deleted list (see section "Creating a list of folders to delete" on
page 62).
You can delete personal data from the device with the function enabled by using the following methods:
Use a Kaspersky Lab mobile application, such as Kaspersky Endpoint Security 8 for Smartphone, on another
mobile device to create and send an SMS command to your device. As a result, your device receives a covert
SMS message after which the information is deleted. To create a special SMS command, use the Sending a
command function.
On another mobile device, create and send an SMS with the special text and the secret code previously set for
the receiving device. As a result, your device receives an SMS message after which the information is deleted.
Outgoing SMS messages will be billed at the rates set by the other mobile device’s mobile service provider.
To delete information from the device remotely, you are advised to use the secure method with the Sending a command
function. The application secret code is then sent in encrypted form.
Page 62

U S E R GU I D E
62
To send an SMS command to another device using the Send command function:
1. Select Menu Additional.
This will open the Additional window.
2. Select Send command.
This will open the Send command window.
3. Select the Data Wipe value for the Select SMS command setting (see Figure below).
4. In the Phone number field, enter the phone number of the device that receives the SMS command.
5. In the Remote device code field, enter the secret code set on the device that receives the SMS command.
Figure 26: Remote start of Deleting personal data
6. Press Send.
To create an SMS with the phone's standard SMS creation functions,
send a standard SMS to another device; it should contain the text wipe:<code> where <code> is the secret code
set on another device. The message is not case sensitive, and spaces before or after the colon are ignored.
Page 63

D A T A P R O T E C T I O N I N T H E E V E N T O F L O S S O R T H E F T O F T H E D E V I C E
63
CREATING A LIST OF FOLDERS TO DELETE
The Data Wipe function allows creating a list of folders to be deleted after a special SMS command is received.
To enable Anti-Theft to delete all folders from the list after a special SMS message is received, make sure that the
Folders to be deleted box is checked in the Mode item.
The administrator may add to the list of folders to be deleted. These folders cannot be deleted from the list.
To add a folder to the list of folders to be deleted:
1. Select Menu Anti-Theft.
This will open the Anti-Theft window.
2. Select the Data Wipe item.
This will open the Data Wipe screen.
3. Select the Folders to be deleted item.
This will open the Folders to be deleted screen.
4. Select Menu Add folder (see Figure below).
Figure 27: Selection of folders to be deleted
5. Select the necessary folder from the folder tree and press Select.
The folder is added to the list.
To remove a folder from the list:
1. Select Menu Anti-Theft.
This will open the Anti-Theft window.
Page 64

U S E R GU I D E
64
2. Select the Data Wipe item.
This will open the Data Wipe screen.
3. Select the Folders to be deleted item.
This will open the Folders to be deleted screen.
4. Select a folder from the list and press Menu Delete.
MONITORING THE REPLACEMENT OF A SIM CARD ON THE
DEVICE
If the SIM card is replaced, SIM Watch allows you to send a message with the new number to your phone number
and / or email, or lock the device.
To enable the SIM Watch function and monitor the replacement of the SIM card:
1. Select Menu Anti-Theft.
This will open the Anti-Theft window.
2. Select the SIM Watch item.
This will open the SIM Watch window.
3. Check the Enable SIM Watch box.
Page 65

D A T A P R O T E C T I O N I N T H E E V E N T O F L O S S O R T H E F T O F T H E D E V I C E
65
4. To check the replacement of the SIM card on the device, make the following settings (see Figure below):
To automatically receive an SMS message with your new telephone number in When replacing the SIM
card in the SMS to phone number field, enter the telephone number to which the SMS message will be
sent.
The phone number may begin with a digit or with a "+", and must contain digits only.
To receive an email with the new telephone number in When replacing the SIM card in the Message to
email address field, enter email address.
To block the device if the SIM card is replaced, or if the device is turned on with the SIM card removed,
check the Block device box in the Additional block. You can unblock the device only by entering the
application secret code.
To display a message on the screen in blocked mode, enter it in the Text when blocked field. By default,
the standard text in which you can add the owner's number is used for the message.
Figure 28: SIM Watch function settings
5. Press OK to save the changes.
DETERMINING THE DEVICE'S GEOGRAPHICAL
COORDINATES
After a special SMS command is received, GPS Find allows detecting the device's geographical coordinates and sending
them by SMS and email to the requesting device and an email address.
Outgoing SMS messages are billed at your mobile service provider’s current rate.
This function only works with devices with in-built GPS receiver. The GPS receiver is enabled automatically after the
device receives a special SMS command. If the device is within the area reached by satellites, the GPS Find function
receives and sends the geographical coordinates of the device. If the satellites are unavailable at the time of the query,
GPS Find will periodically re-attempt to find them and send device location results.
Page 66

U S E R GU I D E
66
To enable the GPS Find function:
1. Select Menu Anti-Theft.
This will open the Anti-Theft window.
2. Select the GPS Find item.
This will open the GPS Find window.
3. Check the Enable GPS Find box.
Kaspersky Endpoint Security 8 for Smartphone sends the coordinates of the device by SMS message in reply.
4. To also obtain the device's coordinates by email, in the Send device coordinates block for the setting
Message to email address enter email address (see Figure below).
Figure 29: GPS Find function settings
5. Press OK to save the changes.
You can request the coordinates of a device on which GPS Find is enabled, using the following methods:
Use a Kaspersky Lab mobile application, such as Kaspersky Endpoint Security 8, on another mobile device to
create and send an SMS command to your device. As a result, your device will receive a covert SMS, and the
application will send the device's coordinates. To create a special SMS command, use the Sending a command
function.
On another mobile device, create and send an SMS with the special text and the secret code previously set for
the receiving device. As a result, your device will receive the SMS, and the application will send the coordinates
of the device.
Outgoing SMS messages will be billed at the rates set by the other mobile device’s mobile service provider.
To receive the device's location, you are advised to use the secure method with the Send command function. The
application secret code is then sent in encrypted mode.
Page 67

D A T A P R O T E C T I O N I N T H E E V E N T O F L O S S O R T H E F T O F T H E D E V I C E
67
To send a command to another device using the Send command function:
1. Select Menu Additional.
This will open the Additional window.
2. Select Send command.
This will open the Send command window.
3. Select the GPS-Find value for the Select SMS Command setting (see figure below).
4. In the Phone number field, enter the phone number of the device that receives the SMS command.
5. In the field, enter the Remote device code set on the device receiving the SMS command.
Figure 30: Determine the location of the device
6. Press Send.
To create an SMS with the phone's standard SMS creation functions,
send an SMS to the device that you want to block. The SMS should contain the text find:<code> where <code>
is the secret code set on the other device. The message is not case sensitive, and spaces before or after the colon
are ignored.
An SMS with the device's coordinates will be sent to the phone number from which the SMS command has been sent
and to an email address if you have previously specified one in the options of GPS Find.
Page 68

U S E R GU I D E
68
REMOTE START OF THE ANTI-THEFT FUNCTIONS
The application allows sending a special SMS command to run Anti-Theft functions remotely on another device with
Kaspersky Endpoint Security 8 for Smartphone installed on it. An SMS command is sent as an encrypted SMS and
contains the application secret code set on the other device. Reception of the SMS command will not be noticed.
SMS is billed at your mobile service provider’s current rate.
To send an SMS command to another device:
1. Select Menu Additional.
This will open the Additional window.
2. Select Send command.
This will open the Send command window.
3. Select the function which needs to be remotely started. Select one of the proposed values for the Select SMS
command setting (see Figure below):
Block.
Data Wipe.
GPS-Find.
Privacy Protection (see section "Hiding personal data" on page 69).
4. In the Phone number field, enter the phone number of the device that receives the SMS command.
5. In the Remote device code field, enter the secret code set on the device that receives the SMS command.
Figure 31: Remote start of Anti-theft functions
6. Press Send.
Page 69

P R I V A C Y P R O T E C T I O N
69
IN THIS SECTION
Privacy Protection ........................................................................................................................................................... 69
Privacy Protection modes ................................................................................................................................................ 69
Enabling/disabling Privacy Protection ............................................................................................................................. 70
Enabling Privacy Protection automatically ....................................................................................................................... 71
Enabling Privacy Protection remotely .............................................................................................................................. 72
Creating a list of private numbers .................................................................................................................................... 73
Selecting data to hide: Privacy Protection ....................................................................................................................... 77
PRIVACY PROTECTION
The section presents information about Privacy Protection, which can hide the user's confidential information.
PRIVACY PROTECTION
Privacy Protection hides private data on the basis of your Contact List, which lists private numbers. For confidential
numbers, Privacy Protection hides Contacts entries, incoming, drafts, and sent SMS as well as call history entries.
Privacy Protection suppresses the new SMS signal and hides the message itself in the inbox. Privacy Protection blocks
incoming calls from private numbers and does not display incoming call information on the screen. As a result, the caller
receives a busy signal. To view incoming calls and SMS for the period of time when Privacy Protection was enabled,
disable Privacy Protection. On the repeat enabling of Privacy Protection, the information is not displayed.
You are able to activate Privacy Protection from Kaspersky Endpoint Security 8 for Smartphone or remotely from another
mobile device. However, Privacy Protection can only be disabled from within the application.
Information about the operation of Privacy Protection is stored in the log (see "Application logs" section on page 92).
PRIVACY PROTECTION MODES
You can manage the operation mode of Privacy Protection. The mode defines whether Privacy Protection is enabled or
disabled.
The following modes of Privacy Protection are available:
Normal – private data are displayed. The Privacy Protection settings are accessible for modification.
Private – private data are hidden. The Privacy Protection settings cannot be changed.
You can configure automatic enabling of hiding confidential data (see section. 71) Enabling Privacy Protection
automatically on page or remote enabling of hiding confidential data Enabling Privact Protection remotely on page. 72).
The component's current status is displayed on the Privacy Protection tab next to the Mode item.
Changing the mode of Privacy Protection can take some time.
Page 70

U S E R GU I D E
70
ENABLING/DISABLING PRIVACY PROTECTION
The Privacy Protection mode can be changed as follows:
from the Privacy Protection settings menu;
from the Privacy Protection menu.
To change the Privacy Protection mode:
1. Select Menu Privacy Protection.
This will open the Privacy Protection window.
2. Select the Mode item.
This will open the Mode window.
3. Select a value for the setting Privacy Protection mode Section (see Figure below).
4. Press OK.
Figure 32: Changing Privacy Protection mode
5. Confirm changing the mode of Privacy Protection. To do this, press Yes.
To quickly change the Privacy Protection mode:
1. Select Menu Privacy Protection.
This will open the Privacy Protection window.
2. Press Hide / Show. The name of the item will change to the opposite depending on the Privacy Protection
current mode.
3. Confirm changing the mode of Privacy Protection. To do this, press Yes.
Page 71

P R I V A C Y P R O T E C T I O N
71
ENABLING PRIVACY PROTECTION AUTOMATICALLY
You can configure automatic enabling of hiding confidential information after a specified time interval. The function
becomes activated after the device switches to power-saving mode.
Disable Privacy Protection prior to editing Privacy Protection settings.
To enable Privacy Protection automatically after a specified time interval elapses:
1. Select Menu Privacy Protection.
This will open the Privacy Protection window.
2. Select the Mode item.
3. This will open the Mode window.
4. Check the Hide automatically box(see Figure below).
5. Select the time during which the hiding confidential information is automatically enabled. To do this, set one of
the available values for the Time setting:
No delay;
After 1 minute;
After 5 minutes;
After 15 minutes;
After 1 hour.
Figure 33: Automatic start of Privacy Protection
6. Press OK.
Page 72

U S E R GU I D E
72
ENABLING PRIVACY PROTECTION REMOTELY
Kaspersky Endpoint Security 8 for Smartphone can start hiding confidential information remotely from another remote
device. To accomplish this, first activate the Hide on SMS command option on your device.
To allow remote enabling of Privacy Protection:
1. Select Menu Privacy Protection.
This will open the Privacy Protection window.
2. Select the Mode item.
This will open the Mode window.
3. Check the Hide on SMS command box (see figure below).
You can enable Privacy Protection remotely using any of the following methods:
Outgoing SMS will be billed at the rates set by the mobile provider for the phone where the SMS command originates.
Figure 34: Privacy Protection remote enabling settings
4. Press OK.
Use a Kaspersky Lab mobile application, such as Kaspersky Endpoint Security 8 for Smartphone, on another
mobile device to create and send an SMS command to your device. As a result, your device unnoticeably
receives an SMS, and confidential information is hidden. To create a special SMS command, use the Sending a
command function.
On another mobile device, create and send an SMS message with a special text and the secret code of the
application specified on your device. As a result, the device receives an SMS, and confidential information is
hidden.
To start hiding confidential information remotely from another mobile device with the special SMS command:
1. Select Menu Additional.
Page 73

P R I V A C Y P R O T E C T I O N
73
This will open the Additional window.
2. Select Send command.
This will open the Send command window.
3. Select the Privacy Protection value for the Select SMS Command setting (see figure below).
4. In the Phone number field, enter the phone number of the device that receives the SMS command.
5. In the Remote device code field, enter the application secret code set on the device that receives the SMS
command.
Figure 35: Privacy Protection remote start
6. Press Send.
When the device receives the SMS command, hiding confidential information starts automatically.
To enable Privacy Protection remotely using a telephone's standard tools for creating an SMS:
sendan SMS to the other device; the message should contain the text hide:<code> where <code> is the secret
code of the application set on the other device. The message is not case sensitive, and spaces before or after the
colon are ignored.
Page 74

U S E R GU I D E
74
CREATING A LIST OF PRIVATE NUMBERS
IN THIS SECTION
Adding a number to the list of private numbers ............................................................................................................... 74
Editing a number in the list of private numbers ............................................................................................................... 75
Deleting a number from the list of private numbers ......................................................................................................... 76
The Contact List contains private numbers for which Privacy Protection hides information and events. You can extend
the list by adding a number manually, or importing one from Contacts or the SIM card.
Before making the Contact List, disable hiding confidential information.
Page 75

P R I V A C Y P R O T E C T I O N
75
ADDING A NUMBER TO THE LIST OF PRIVATE NUMBERS
You can add a number manually (for example, +12345678), import a number from Contacts or SIM card.
Before making the Contact List, disable hiding confidential information.
To add a phone number to the Contact list:
1. Select Menu Privacy Protection.
This will open the Privacy Protection window.
2. Select the Contact list item.
The Contact list window will open.
3. Perform one of the following actions (see Figure below):
To add a number from Contacts, select Menu Add Outlook contact. On the Outlook contact screen
that opens, specify the required entry and then press Select.
To add a number saved on the SIM card, select Menu Add Contact from SIM. In the Contact from
SIM window that opens, select the necessary entry and pressOK.
To add a number manually, select Menu Add Number. In the Add entry window that opens, fill in the
Phone number field and press OK.
Figure 36: Adding entries to the list of protected contacts
The number will be added to the Contact list.
Page 76

U S E R GU I D E
76
EDITING A NUMBER IN THE LIST OF PRIVATE NUMBERS
Before making the Contact List, disable hiding confidential information.
Phone numbers added manually are only available for editing on the Contact List. It is not possible to edit numbers which
are selected from the phone book or numbers list on the SIM card.
To edit a phone number on the Contact List:
1. Select Menu Privacy Protection.
This will open the Privacy Protection window.
2. Select the Contact list item.
The Contact list window will open.
3. Select a number to edit on the Contact list and then select Menu Edit.
This will open the Edit entry window.
4. Change the data in the Phone number field.
5. When completing the editing, press OK.
The number is changed.
DELETING A NUMBER FROM THE LIST OF PRIVATE NUMBERS
You can delete a single number from the list of confidential contacts or delete the whole Contact List.
Before making the Contact List, disable hiding confidential information.
To remove a number from the Contact List:
1. Select Menu Privacy Protection.
This will open the Privacy Protection window.
2. Select the Contact list item.
The Contact list window will open.
3. Select a number to be deleted and then select Menu Delete.
4. Confirm deletion. To do this, press Yes.
To clear the Contact List:
1. Select Menu Privacy Protection.
This will open the Privacy Protection window.
2. Select the Contact list item.
The Contact list window will open.
Page 77

P R I V A C Y P R O T E C T I O N
77
3. Select Menu Delete all.
4. Confirm deletion. To do this, press Yes.
The Contact List becomes empty.
SELECTING DATA TO HIDE: PRIVACY PROTECTION
Privacy Protection can hide the following info for numbers in the Contact List: contacts, SMS correspondence, call log
entries, incoming calls and SMS messages. You can select information and events that Privacy Protection should hide
for private numbers.
Disable Privacy Protection prior to editing Privacy Protection settings.
To select information and events that should be hidden for private numbers:
1. Select Menu Privacy Protection.
This will open the Privacy Protection window.
2. Select the Hidden objects item.
The window Hidden objects opens (see Figure below).
3. In the Hide entries section, select information that should be hidden for private numbers. The following settings
are available:
Contacts – hide all information about confidential numbers in the Contacts.
SMS – hide SMS messages in the Incoming, Outgoing, Drafts folders for confidential numbers.
Calls – accept calls from confidential numbers, while not determining the caller's number and not displaying
information about confidential numbers in the list of calls (incoming, outgoing, and missed).
Page 78

U S E R GU I D E
78
4. In the Hide events section, select events that should be hidden for private numbers. The following settings are
available:
Incoming SMS – do not display the delivery of incoming SMS messages (there is no message of receipt of
a new SMS message from a confidential number). All SMS messages received from private numbers will
be displayed for viewing when Privacy Protection is disabled.
Incoming calls – block calls from private numbers (caller will hear the engaged tone in this case).
Information about a received call will be displayed when Privacy Protection is disabled.
5. Press OK.
Figure 37: Selecting hidden objects
Page 79

F I L T E R I N G N E T W O R K A C T I V I T Y . F I R E W A L L
79
IN THIS SECTION
About Firewall ................................................................................................................................................................. 79
Firewall modes ................................................................................................................................................................ 79
Selecting the Firewall mode ............................................................................................................................................ 79
Notifications about blocked connections ......................................................................................................................... 80
FILTERING NETWORK ACTIVITY. FIREWALL
This section gives information about the Firewall which controls network connections on your device. This section
describes how to enable/disable the Firewall and select the required mode for it.
ABOUT FIREWALL
The Firewall controls network connections on your device in the selected mode. The Firewall can define permitted
connections (e.g. for synchronization with the remote administration system) and blocked connections (e.g. Internet
search, file download).
The Firewall can configure notifications about blocked connections (see "Firewall modes" on page 79).
Information about the operation of the Firewall is entered in the application's log (see "Application logs" on page 92).
FIREWALL MODES
You can select the mode in accordance with which the Firewall determines the permitted and blocked connections. The
following Firewall modes are available:
Off any network activity is permitted.
Minimum protection: incoming connections only are blocked. Outgoing connections are allowed.
Maximum protection: all incoming connections are blocked. Checking e-mails, viewing websites and
downloading files is accessible Outgoing connections can only be established using SSH, HTTP, HTTPS, IMAP,
SMTP, POP3 ports.
Block all – block any network activity except anti-virus database update and connection to the remote
administration system.
You can change the Firewall mode (see Section "Selecting the Firewall mode" on page 79).The current mode is
displayed in the Firewall screen next to the Mode menu item.
Page 80

U S E R GU I D E
80
SELECTING THE FIREWALL MODE
To modify the values of the settings, use the device's joystick or stylus.
To set Firewall mode:
1. Select Menu Firewall.
This will open the Firewall window.
2. Select the Mode item.
This will open the Firewall window.
3. Select Firewall mode (see Figure below).
Figure 38: Firewall security level selection
4. and press OK.
Page 81

F I L T E R I N G N E T W O R K A C T I V I T Y . F I R E W A L L
81
NOTIFICATIONS ABOUT BLOCKED CONNECTIONS
Firewall allows receiving notifications of blocked connections. You can configure the receipt of Firewall notifications.
To manage blocking notifications:
1. Select Menu Firewall.
This will open the Firewall window.
2. Select Notifications.
The Notifications screen opens (see figure below).
Figure 39: Configuring delivery of blocking notifications
3. In the Blocking notifications section, select one of the available actions:
Show – enable delivery of notifications. Firewall notifies of a blocked connection.
Do not show – disable delivery of notifications. Firewall does not notify you of a blocked connection.
4. Press OK.
Page 82

U S E R GU I D E
82
ENCRYPTING PERSONAL DATA
IN THIS SECTION
About Encryption ............................................................................................................................................................. 82
Data encryption ............................................................................................................................................................... 82
Data decryption ............................................................................................................................................................... 84
Blocking access to encrypted data .................................................................................................................................. 85
This section gives information about Encryption which can encrypt folders on the device. It also describes how to encrypt
and decrypt selected folders.
ABOUT ENCRYPTION
Encryption encrypts data in your list of folders to encrypt. The Encryption function operation is based on the action of the
function of the same name that is built into the operating system of your device. The Encryption function allows
encrypting any type of folder with the exception of system folders. You can select folders to be encrypted in the device's
memory or on a storage card. To gain access to encrypted data, enter the application PIN code set when the application
was first run.
To run executables out of an encrypted folder, you must first decrypt the folder. This requires that the application PIN
code be entered first.
To access encrypted information enter the application secret code (see "Entering the secret code" on page 22). You can
create a time interval (see "Blocking access to encrypted data" on page 85), in which access to encrypted folders is
blocked and which require the secret code to be entered. The function becomes activated after the device switches to
power-saving mode.
Information about Encryption is entered in the application's log (see the "Application Logs" on page 92).
DATA ENCRYPTION
Encryption allows encrypting any number of non-system folders which are in the device memory or on a storage card.
The list of all previously encrypted and decrypted files is accessible in the Encryption window from the Folders list
menu item.
You can also encrypt one or all of the folders in the folders list immediately.
To add a folder to the list of folders for encryption and encrypt it:
1. Select Menu Encryption.
This will open the Encryption window.
2. Select the Folders list item.
This will open the Folders list window.
Page 83

E N C R Y P T I N G P E R S O N A L D A T A
83
3. Press Menu Add folder.
A screen will open with the system file tree of your device.
4. Select the folder to be encrypted and press Encrypt (see Figure below).
To move around the file system use the device's stylus or joystick buttons.
Figure 40: Data encryption
Kaspersky Endpoint Security 8 for Smartphone notifies when encryption is complete. The notification window
will appear.
5. Press OK.
For an encrypted folder, the name of the Encrypt item changes to Decrypt in the Menu.
After encryption, files are automatically decrypted and encrypted when you work with files from the encrypted folder,
move them out of the encrypted folder or place new files in the latter.
To encrypt all folders from the list at the same time, perform the following steps:
1. Select Menu Encryption.
This will open the Encryption window.
2. Select the Folders list item.
This will open the Folders list window.
3. Select Menu Add. actions Encrypt all.
Kaspersky Endpoint Security 8 for Smartphone notifies when encryption is complete. The notification window
will appear.
4. Press OK.
Page 84

U S E R GU I D E
84
DATA DECRYPTION
You can decrypt previously encrypted data (see "Data encryption" section on page 82). You can decrypt one or all the
folders you have encrypted on the device.
If in the list of folders to be encrypted there are folders which the administrator has encrypted, these cannot be decrypted
and deleted from the list.
To decrypt a previously encrypted folder:
1. Select Menu Encryption.
This will open the Encryption window.
2. Select the Folders list item.
The Folders list window will open, which contains a list of all previously decrypted and encrypted folders.
3. Select the encrypted folder from the list and press Menu Decrypt (see Figure below).
For an decrypted folder, the name of the Decrypt item changes to Encrypt in the Menu. You can encrypt the folder
again (see "Data encryption" on page 82).
Figure 41: Enabling the option
Kaspersky Endpoint Security 8 for Smartphone notifies when decryption is complete. The notification window
will appear.
4. Press OK.
Page 85

E N C R Y P T I N G P E R S O N A L D A T A
85
To decrypt all the folders immediately from the encryption folder list:
1. Select Menu Encryption.
This will open the Encryption window.
2. Select the Folders list item.
This will open the Folders list window.
3. Select Menu Add. actions Decrypt all.
Kaspersky Endpoint Security 8 for Smartphone notifies you when decryption is complete: a window with the
notification appears on screen.
4. Press OK.
Page 86

U S E R GU I D E
86
BLOCKING ACCESS TO ENCRYPTED DATA
Encryption can set the time by when blocking access to encrypted folders starts. This functionality is activated when your
device goes to power save mode. To manipulate encrypted data, enter the application PIN code.
To block access to an encrypted folder during this time:
1. Select Menu Encryption.
This will open the Encryption window.
2. Select the Block access item.
This will open the Block access window.
3. Set the time on expiry of which access to encrypted folders is blocked. To do this, select for the setting Block
access one of the values suggested {see Figure below}:
No delay;
After 1 minute;
After 5 minutes;
After 15 minutes;
After 1 hour.
Figure 42: Blocking access to encrypted data
4. Press OK to save the changes.
Page 87

U P D A T I N G T H E A P P L I C A T I O N ' S D A T A B A S E S
87
IN THIS SECTION
About updating the application's databases .................................................................................................................... 87
Viewing database information ......................................................................................................................................... 88
Manual updating .............................................................................................................................................................. 89
Starting scheduled updates ............................................................................................................................................. 90
Updating while roaming ................................................................................................................................................... 91
To block access to encrypted folders after they are opened,
press the Kaspersky Endpoint Security 8 icon in the application's notifications bar and select the item Block data
(see Figure below). Access to the encrypted information will be blocked.
Figure 43: Application context menu in the device notification area
UPDATING THE APPLICATION'S DATABASES
This section provides information on updating the application databases, which ensures up-to-date protection of your
device. Furthermore, this section describes how to view information on the installed anti-virus databases, run the update
manually, and configure automatic update of anti-virus databases.
Page 88

U S E R GU I D E
88
ABOUT UPDATING THE APPLICATION'S DATABASES
The application scans the device for malware programs using the application's anti-virus database, which contains
descriptions of all currently known malware and other undesirable programs, and methods for their treatment. It is
extremely important to keep your anti-virus databases up-to-date.
It is recommended to regularly update the application databases. If more than 15 days have passed since the last
update, the databases are regarded as obsolete. Protection will then be less reliable.
Kaspersky Endpoint Security 8 for Smartphone updates the application's database from the update servers set by the
administrator.
To update the application's anti-virus databases, you must have an Internet connection configured on your mobile
device.
Application anti-virus databases are updated according to the following algorithm:
1. The application databases installed on your mobile device are compared with those located on the special
update server.
2. Kaspersky Endpoint Security 8 for Smartphone performs one of the following:
If you have the current application's databases installed, the update will be canceled. A notification appears
on the screen.
If the installed databases differ, a new update package is downloaded and installed.
When the update process is completed, the connection is automatically closed. If the connection was
established before the update started, it will remain open for further use.
You can start the update task manually at any time when the device is not busy with other tasks or configure scheduled
automatic updates.
Detailed information on the databases used is accessible in the Update window from the Database info item.
Information about updates to anti-virus databases is recorded in the application's log (see "Application logs" on page 92).
Page 89

U P D A T I N G T H E A P P L I C A T I O N ' S D A T A B A S E S
89
VIEWING DATABASE INFORMATION
You can view the following information about the application's installed anti-virus databases: last update, date of release
of the database, database size and number of entries in them.
To view information about current anti-virus databases:
1. Select Menu Anti-Virus.
This will open the Anti-Virus window.
2. Select the Update item.
This will open the Update window.
3. Select the Database info tab.
The Database info window opens with information about the installed program's anti-virus databases (see
Figure below).
Figure 44: Information on installed application databases
Page 90

U S E R GU I D E
90
UPDATING MANUALLY
You can start the application anti-virus databases update manually.
To manually update application's anti-virus databases:
1. Select Menu Anti-Virus.
This will open the Anti-Virus window.
2. Select the Update item.
This will open the Update window.
3. Select the Update item (see Figure below).
The application starts the update of anti-virus databases from the server set by the administrator. Information on the
update process is displayed on the screen.
STARTING SCHEDULED UPDATES
Regular updates are a prerequisite of effectively protecting your device against infection by malware objects. For your
convenience, you can configure automatic database updates and create an update schedule.
To run an update, the device should remain turned on for the entire scan period.
Figure 45: Starting the update manually
To configure a scheduled update start:
1. Select Menu Anti-Virus.
This will open the Anti-Virus window.
Page 91

U P D A T I N G T H E A P P L I C A T I O N ' S D A T A B A S E S
91
2. Select the Update item.
This will open the Update window.
3. Select the Update schedule item.
This will open the Schedule screen.
4. Check the Update by schedule box (see Figure below).
5. Create a schedule to run updates. To do this, select a value for the Frequency setting:
Daily: update application database every day. Enter the value for the Time setting.
Weekly: perform the update once a week. Select the value for the Time and Day of week settings.
Figure 46: Automatic update settings
6. Press OK to save the changes.
UPDATING WHILE ROAMING
You can control the start of a scheduled update when the device is in a roaming zone, because Internet traffic will be
priced at roaming rates.
If the start of a scheduled update is blocked in roaming, manual updating will still be available in regular mode.
To disable scheduled updates when in a roaming zone:
1. Select Menu Anti-Virus.
This will open the Anti-Virus window.
2. Select the Update item.
This will open the Update window.
Page 92

U S E R GU I D E
92
3. Select the Update schedule item.
IN THIS SECTION
About logs ....................................................................................................................................................................... 92
Viewing Log records ........................................................................................................................................................ 93
Deleting Log records ....................................................................................................................................................... 93
This will open the Schedule screen.
4. In the Update in roaming block, uncheck the Update in roaming box.
Figure 47: Configuring updates in roaming
5. Press OK to save the changes.
APPLICATION LOGS
This section presents information on logs which register the operation of every component and the execution of every
task (e.g. application database updates, virus scans).
ABOUT LOGS
The log stores reports about events occurring when Kaspersky Endpoint Security 8 for Smartphone is running. For every
component, a separate events log is used. You are able to select and review a report of activity in the time the
component has been running. Entries in the report are sorted in reverse chronological order.
Page 93

A P P L I C A T I O N L O G S
93
VIEWING LOG RECORDS
To view all records stored in the Log:
1. Select Menu Additional.
This will open the Additional window.
2. Select the Logs item.
This will open the Logs window.
3. Select a component for which you wish to view the events log.
The events Log of the component selected opens (see Figure below).
Figure 48: Viewing records in the logs
To view detailed log record information,
select the desired record and press Details.
The Details screen displays information about the application's action and its details. For example, for the "Object
quarantined" action, the path to the infected file on the device is also displayed.
To return to the logs,
press Menu Back.
Page 94

U S E R GU I D E
94
DELETING LOG RECORDS
IN THIS SECTION
Changing the secret code ............................................................................................................................................... 94
Displaying prompts ................................ ................................................................ .......................................................... 95
Configuring sound notifications ....................................................................................................................................... 96
You can clear all logs. This deletes information about the operation of all Endpoint Security 8 for Smartphone
components.
To clear all logs:
1. Select Menu Additional.
This will open the Additional window.
2. Select the Logs item.
This will open the Log window.
3. Open the log of any component.
4. Select Menu Delete all (see Figure below).
5. Confirm the uninstalling by pressing the Yes button.
All records from all component logs will be deleted.
CONFIGURING ADDITIONAL SETTINGS
This section gives information about additional features of Kaspersky Endpoint Security 8 for Smartphone: how to
change the secret code, manage the application's sound notifications, how to enable/disable the display of prompts on
configuring the settings for each component.
CHANGING THE SECRET CODE
You can change the secret code set after the first start up of the application.
To change the secret code:
1. Select Menu Additional.
This will open the Additional window.
2. Select the Settings item.
This will open the Settings window.
Page 95

C O N F I G U R I N G A D D I T I O N A L S E T T I N G S
95
3. Select Code change.
4. Enter the current secret code of the application in the Enter code entry field.
5. Enter the new secret code of the application in the Enter new code field and Confirm code, then press OK to
save the changes.
DISPLAYING PROMPTS
When you configure the settings of components, Kaspersky Endpoint Security 8 for Smartphone displays by default a
prompt with a short description of the function selected. You can set the display of the program's prompts for Kaspersky
Endpoint Security 8 for Smartphone.
To configure the display of prompts, perform the following steps:
1. Select Menu Additional.
This will open the Additional window.
2. Select the Settings item.
This will open the Settings window.
3. Select the Hints item.
This will open the Hints window.
4. Select one of the values suggested for the Hints setting:
Show: display hints before configuring the settings of the function selected.
Hide: do not display hints.
Figure 49: Prompts display settings
5. Press OK.
Page 96

U S E R GU I D E
96
CONFIGURING SOUND NOTIFICATIONS
As a result of the application's operation, specific events occur: for instance an infected object or virus is found, the
license term is coming to an end. For the application to inform you in every such event, you can enable sound notification
of the occurring event.
Kaspersky Endpoint Security 8 for Smartphone includes sound notification only according to the device's set mode.
To modify the values of the settings, use the device's joystick or stylus.
To manage the sound notification of the application, perform the following steps:
1. Select Menu Additional.
This will open the Additional window.
2. Select the Settings item.
This will open the Settings window.
3. Select the Sound item.
This will open the Sound window.
4. Select one of the values suggested for the Sound notifications setting (see Figure below):
Enable: notify with sound regardless of the device's selected profile.
Disable: do not use sound notification.
Figure 50: Sound notification management
5. Press OK to save the changes.
Page 97

97
GLOSSARY
A
A C T I V A T I N G T H E A P P L I C A T I O N
Switching the application into full-function mode. The user needs a license to activate the application.
A N T I - V I R U S D A T A B AS E S
Databases created by Kaspersky Lab's experts and containing detailed description of all currently existing threats to
computer security as well as methods used for their detection and disinfection. These databases are constantly updated
by Kaspersky Lab as new threats appear.
A P P L I C A T I O N S E C R E T C O DE
The secret code prevents unauthorized access to the application settings and to blocked information on the device. The
user sets it on first starting the application and it consists of at least four characters. The secret code is requested in the
following instances:
for access to application settings;
for access to encrypted folders;
when sending an SMS command from another mobile device to start the following functions remotely: Block,
Data Wipe, SIM Watch, GPS Find, Privacy Protection;
when uninstalling the application.
A R C H I V E
File "containing" one or several other objects which can also be archives.
B
B L A C K L I S T
The entries in this list contain the following information:
Phone number from which Anti-Spam blocks calls and / or SMS.
Types of events from this number that Anti-Spam blocks. The following types of events are available: calls and
SMS, calls only, and SMS only.
Key phrase that Anti-Spam uses to classify an SMS as unsolicited (spam). Anti-Spam only blocks SMS that
contain this key phrase, while delivering all other ones.
B L O C K I N G A N O B J E C T
Denying access to an object from external applications. A blocked object cannot be read, executed, modified or deleted.
D
D E L E T I N G S M S M E S S A G E S
A method of processing an SMS message containing SPAM features, by deleting it. You are advised to use this method
with SMS messages which definitely contain spam.
Page 98

U S E R GU I D E
98
D E L E T I O N O F A N O B J E C T
The method of processing objects which ends in it being physically deleted from its original location (hard drive, folder,
network resource). You are advised to apply this processing method to any malicious objects which cannot be
disinfected.
D I S I N F E C T I N G O B J E C T S
A method used for processing infected objects, resulting in complete or partial recovery of data, or a decision that the
objects cannot be disinfected. Disinfection of objects is performed based on the application database. Part of a file's
legitimate data may be lost during the disinfection process.
I
I N F E C T E D O BJ E C T
Object containing malicious code. The application detected infected objects by scanning their binary code, and finding
that a section of the object's code is identical to a section of the code of a known threat. Kaspersky Lab specialists do not
recommend using such objects since they may cause your device to be infected.
N
N ON- N U M E R I C N U M B E R
A phone number that includes letters or consists only of letters.
O
O N - D E M A N D S C A N S
An operation mode of the Kaspersky Lab application, which is initiated by the user and intended for scanning of any files.
P
P L A C I N G O B J E C T S I N T O Q U A R A N T I N E
A method used to process a possibly infected object, by blocking access to the object and moving it from its original
location to the Quarantine folder. In Quarantine the object is stored in encrypted form, which prevents it from infecting the
device.
Q
Q U A R A N T I N E
A special folder created by the application, into which it moves all possibly infected objects detected by device scans or
by the Protection.
R
R E M O T E A D M I N I S T R A T I O N S Y S T E M
The system which remotely manages settings and administers them in real time.
R E S T O R A T I O N
The restoration of an object means relocating the original object from Quarantine to its original folder, (where it was
before it was quarantined or disinfected), or to a user-defined folder.
Page 99

G L O S S A R Y
99
S
S Y N C H RO N I Z A T I O N
Process to connect the mobile device with the remote administration system and transfer data. During synchronization,
the application settings configured by the administrator are transferred to the device. Operational reports on the
application components are transferred from the device to the remote administration system.
T
T E L E P H O N E N U M B E R M A S K
Putting a telephone number in the Black or White List using wildcards. The two basic wildcards used in telephone
number masks are "*" and "?", (where "*" represents any number of characters and "?" stands for any single character).
For example, *1234? on the Black List. Anti-Spam blocks calls or SMS from a number in which any symbol follows the
figure 1234.
U
U P D A T I N G D A T A B A S E S
One of the functions that Kaspersky Lab application performs which keeps protection up to date. Anti-virus databases
are copied from Kaspersky Lab update servers onto the device and the application is automatically connected to them.
W
W H I T E L I S T
The entries in this list contain the following information:
Phone number from which Anti-Spam delivers calls and / or SMS.
Type of events that Anti-Spam delivers from this number. The following types of events are available: calls and
SMS, calls only, and SMS only.
Key phrase used by Anti-Spam to classify an SMS as solicited (not spam). Anti-Spam only delivers SMS that
contain this key phrase, while blocking all other ones.
Page 100

100
KASPERSKY LAB
Kaspersky Lab website
http://www.kaspersky.com
Virus Encyclopedia:
http://www.securelist.com/
Anti-virus laboratory:
newvirus@kaspersky.com
(only for sending suspicious objects in archives)
http://support.kaspersky.com/virlab/helpdesk.html
(for sending requests to virus analysts)
Kaspersky Lab was founded in 1997. Today it is the leading developer of a wide range of high-performance information
security software products, including anti-virus, anti-spam and anti-hacking systems.
Kaspersky Lab is an international company. Headquartered in the Russian Federation, the company has offices in the
United Kingdom, France, Germany, Japan, the Benelux countries, China, Poland, Romania and the USA (California). A
new company department, the European Anti-Virus Research Centre, has recently been established in France.
Kaspersky Lab's partner network includes over 500 companies worldwide.
Today, Kaspersky Lab employs over a thousand highly qualified specialists, including 10 MBA degree holders and 16
PhD degree holders. All the Kaspersky Lab's senior anti-virus experts are members of the Computer Anti-Virus
Researchers Organization (CARO).
Kaspersky Lab offers best-of-breed security solutions, based on its unique experience and knowledge, and gained in
over 14 years of fighting computer viruses. A thorough analysis of computer virus activities enables the company's
specialists to foresee trends in the development of malware and to provide our users with timely protection against new
types of attacks. This advantage is the basis of Kaspersky Lab's products and services. At all times, the company’s
products remain at least one step ahead of many other vendors in delivering extensive anti-virus coverage for home
users and corporate customers alike.
Years of hard work have made the company one of the top anti-virus software developers. Kaspersky Lab was the first to
develop many of the modern standards for anti-virus software. The company's flagship product, Kaspersky Anti-Virus,
reliably protects all types of computer systems against virus attacks, including workstations, file servers, mail systems,
firewalls, Internet gateways and hand-held computers. Kaspersky Lab's customers benefit from a wide range of
additional services that ensure both stable operation of the company's products, and compliance with specific business
requirements. Many well-known manufacturers use the Kaspersky Anti-Virus ®kernel in their products, including: Nokia
ICG (USA), Aladdin (Israel), Sybari (USA), G Data (Germany), Deerfield (USA), Alt-N (USA), Microworld (India), and
BorderWare (Canada).
Kaspersky Lab's customers enjoy a wide range of additional services that ensure both stable operation of the company's
products, and full compliance with the customer’s specific business requirements. We plan, install, and support corporate
anti-virus suites. Kaspersky Lab's anti-virus database is updated hourly. The company provides its customers with 24hour technical support service in several languages.
If you have any questions, comments, or suggestions, you can contact us through our dealers, or at Kaspersky Lab
directly. Detailed consultations are provided by phone or email. You will receive full answers to all of your questions.
 Loading...