

Page 1

Kaspersky Anti-Virus 8.0 for Microsoft ISA Server and
Forefront TMG Standard Edition
ADMINISTRATOR'S GUIDE
PROGRAM VERSION: 8.0
Page 2

2
Dear User!
Thank you for choosing our product. We hope that this document will help you in your work and provide answers to the
majority of your questions.
Attention! This document is the property of Kaspersky Lab: all rights to this document are reserved by the copyright laws
of the Russian Federation, and by international treaties. Illegal reproduction and distribution of this document or parts
thereof will result in civil, administrative or criminal liability in accordance with the laws of the Russian Federation.
Any type of reproduction or distribution of any materials, including in translated form, is allowed only with the written
permission of Kaspersky Lab.
This document and the graphic images it contains may be used exclusively for information, non-commercial or personal
purposes.
This document may be amended without additional notification. For the latest version, please refer to Kaspersky Lab’s
website at http://www.kaspersky.com/docs.
Kaspersky Lab assumes no liability for the content, quality, relevance or accuracy of any materials used in this document
for which the rights are held by third parties, or for the potential damages associated with using such documents.
The document contains registered trademarks and service marks belonging to their respective owners.
Revision date: 15.10.2010
© 1997-2010 Kaspersky Lab ZAO. All Rights Reserved.
http://www.kaspersky.com
http://support.kaspersky.com/
Page 3

3
TABLE OF CONTENTS
DISTRIBUTION KIT ....................................................................................................................................................... 6
The license agreement ............................................................................................................................................. 6
Services for registered users .................................................................................................................................... 6
KASPERSKY ANTI-VIRUS 8.0 FOR MICROSOFT ISA SERVER AND FOREFRONT TMG STANDARD EDITION .... 7
Main features of the application ................................................................................................................................ 7
Hardware and software requirements ................................................................................................ ....................... 7
APPLICATION ARCHITECTURE ................................................................................................................................ 10
DEPLOYMENT OF THE PROTECTION SYSTEM FOR CLIENT COMPUTERS ........................................................ 12
APPLICATION SETUP................................................................................................................................................. 13
Preparing installation .............................................................................................................................................. 13
Upgrading an earlier version ................................................................................................................................... 13
Application setup procedure ................................................................................................................................... 13
Step 1. Verifying that the system meets the installation requirements .............................................................. 14
Step 2. Setup wizard welcome screen ................................ .............................................................................. 14
Step 3. Viewing the License Agreement ........................................................................................................... 14
Step 4. Selecting the type of the installation ..................................................................................................... 15
Step 5. Custom Installation ............................................................................................................................... 15
Step 6. Selecting a data storage folder ................................ ............................................................................. 16
Step 7. Configuring the remote administration rule ........................................................................................... 16
Step 8. Copying of the application files and registration of its components ...................................................... 17
Step 9. Completing the installation .................................................................................................................... 17
Activating the application. Information about activation options available for the application ................................. 17
Changes in the system after installation ................................................................................................................. 18
Getting started ........................................................................................................................................................ 18
Restoring the application ........................................................................................................................................ 19
Removing the application ....................................................................................................................................... 19
Final Configuration Wizard ..................................................................................................................................... 19
MANAGING LICENSES ............................................................................................................................................... 21
Activating the application ........................................................................................................................................ 21
Reserve key adding ................................................................................................................................................ 22
The Notify about license expiration configuring ...................................................................................................... 23
APPLICATION INTERFACE ........................................................................................................................................ 24
Main application window ......................................................................................................................................... 24
Application configuration windows .......................................................................................................................... 25
STARTING AND STOPPING THE APPLICATION ...................................................................................................... 27
CONNECTING THE ADMINISTRATION CONSOLE TO THE SECURITY SERVER .................................................. 28
CHECKING THE CONSISTENCY OF THE APPLICATION SETTINGS ...................................................................... 29
Testing the HTTP traffic protection ......................................................................................................................... 30
Testing the FTP traffic protection ............................................................................................................................ 30
Testing the SMTP / POP3 traffic protection ............................................................................................................ 30
Page 4

A D M I N I S T R A T O R ' S G U I D E
4
DEFAULT TRAFFIC PROTECTION ............................................................................................................................ 31
DATABASE UPDATE................................................................................................................................................... 32
Reviewing the database status ............................................................................................................................... 32
Updating the database manually ............................................................................................................................ 33
Automatic database updates .................................................................................................................................. 33
Selecting the updates source ................................................................................................................................. 33
Configuring updates via the Internet ....................................................................................................................... 34
Updating the database from a network folder ......................................................................................................... 35
Updating from a network folder: Kaspersky Anti-Virus within a domain ................................ ............................ 35
Updating from a network folder: Kaspersky Anti-Virus in a workgroup ............................................................. 36
ANTI-VIRUS SCAN ...................................................................................................................................................... 37
Configuring the anti-virus scanning performance ................................................................................................... 37
Configuring the HTTP traffic scan settings ............................................................................................................. 38
Configuring the FTP traffic scan settings ................................................................................................................ 39
Configuring the SMTP traffic scan settings ............................................................................................................. 39
Configuring the POP3 traffic scan settings ............................................................................................................. 40
USING THE ANTI-VIRUS POLICIES ........................................................................................................................... 41
Protocol policy ........................................................................................................................................................ 42
Anti-Virus exclusion policy ...................................................................................................................................... 42
Anti-Virus policy ...................................................................................................................................................... 43
Adding policy rules ................................................................................................................................................. 43
Changing rule priority ............................................................................................................................................. 45
Changing rule settings ............................................................................................................................................ 45
Disabling a policy rule ................................ ................................ ............................................................................. 45
Deleting a policy rule .............................................................................................................................................. 46
NETWORK OBJECTS ................................................................................................................................................. 47
Network objects creation ........................................................................................................................................ 47
Changing the network object properties ................................................................................................................. 49
Removing network objects...................................................................................................................................... 49
REPORTS .................................................................................................................................................................... 50
Creating a report generation task ........................................................................................................................... 51
Viewing a report ...................................................................................................................................................... 51
Clearing report ........................................................................................................................................................ 52
Clearing a report generation task ........................................................................................................................... 52
Changing the report generation settings ................................................................................................................. 52
Changing the general reporting settings ................................................................................................................. 52
Clearing the statistical data for reports ................................................................................................................... 53
MONITORING THE APPLICATION ACTIVITY ............................................................................................................ 54
Kaspersky Anti-Virus runtime status ....................................................................................................................... 55
Statistics on the Kaspersky Anti-Virus activity ........................................................................................................ 55
BACKUP NODE ................................................................................................ ........................................................... 56
Backup settings ...................................................................................................................................................... 56
Review the information about stored objects .......................................................................................................... 57
Configuring the Backup appearance ...................................................................................................................... 57
Dynamic filtering of the objects list ......................................................................................................................... 58
Filter creation in Backup ......................................................................................................................................... 58
Page 5

T A B L E O F C O N T E N T S
5
Saving an object from Backup to disk ..................................................................................................................... 59
Saving the list of objects in Backup ........................................................................................................................ 59
Deleting objects from Backup ................................................................................................................................. 59
DIAGNOSTICS ............................................................................................................................................................ 61
CHANGING THE APPLICATION DATA FOLDER LOCATION .................................................................................... 63
ENABLING HTTPS TRAFFIC INSPECTION ............................................................................................................... 64
APPENDIX 1. CHANGES TO THE MICROSOFT WINDOWS REGISTRY .................................................................. 65
INFORMATION ABOUT THIRD-PARTY CODE .......................................................................................................... 68
Software code ......................................................................................................................................................... 68
A C# IP ADDRESS CONTROL ......................................................................................................................... 68
BOOST 1.36.0, 1.39.0 ...................................................................................................................................... 69
EXPAT 1.2 ........................................................................................................................................................ 69
LOKI 0.1.3 ......................................................................................................................................................... 69
LZMALIB 4.43 ................................................................................................................................................... 70
MICROSOFT CABINET SOFTWARE DEVELOPMENT KIT ............................................................................ 70
SQLITE 3.6.18 .................................................................................................................................................. 70
WIX 3.0 ............................................................................................................................................................. 70
ZLIB 1.0.8, 1.2, 1.2.3 ........................................................................................................................................ 72
Other information .................................................................................................................................................... 73
KASPERSKY LAB END USER LICENSE AGREEMENT ............................................................................................ 74
GLOSSARY ................................................................................................................................................................. 79
KASPERSKY LAB ................................................................................................................................ ........................ 83
INDEX .......................................................................................................................................................................... 84
Page 6

6
DISTRIBUTION KIT
IN THIS SECTION
The license agreement ...................................................................................................................................................... 6
Services for registered users ............................................................................................................................................. 6
You can purchase Kaspersky Anti-Virus 8.0 for Microsoft ISA Server and Forefront TMG Standard Edition (further
referred to as Kaspersky Anti-Virus) from our partners or buy it online at an Internet shop, such as the eStore section of
http://www.kaspersky.com. Kaspersky Anti-Virus is provided as a part of Kaspersky Total Space Security
(http://www.kaspersky.com/total_space_security) and Kaspersky Security for Internet Gateway
(http://www.kaspersky.com/kaspersky_security_internet_gateway). After purchasing a license for Kaspersky Anti-Virus,
you will receive an e-mail containing a link to download the application from the web site of Kaspersky Lab and a key file
for license activation.
THE LICENSE AGREEMENT
The License Agreement is a legal agreement between you and Kaspersky Lab that specifies the terms on which you may
use the software you have purchased.
Read the License Agreement through carefully.
If you do not accept the terms and conditions of the license agreement, you can decline the product offer and receive a
refund.
SERVICES FOR REGISTERED USERS
Kaspersky Lab Ltd. offers an extensive service package to all legally registered users of Kaspersky Security, enabling
them to boost the application's performance.
After purchasing a license, you become a registered user and, during the period of your license, you will be provided with
these services:
Regular updates to the application databases and updates to the software package;
Support on issues related to the installation, configuration and use of the purchased software product. Services
will be provided by phone or email;
Information about new Kaspersky Lab products and about new viruses appearing worldwide. This service is
available to users who subscribe to Kaspersky Lab's newsletter on the Technical Support Service web site
(http://support.kaspersky.com/subscribe/).
Support on issues related to the performance and use of operating systems, or other non-Kaspersky technologies, is not
provided.
Page 7

7
KASPERSKY ANTI-VIRUS 8.0 FOR
IN THIS SECTION
Main features of the application ........................................................................................................................................ 7
Hardware and software requirements ............................................................................................................................... 7
MICROSOFT ISA SERVER AND FOREFRONT
TMG STANDARD EDITION
Kaspersky Anti-Virus 8.0 for Microsoft ISA Server and Forefront TMG Standard Edition (hereinafter referred to as
Kaspersky Anti-Virus) provides secure interaction with the traffic passing the firewall for all corporate employees
automatically blocking malware and riskware from incoming HTTP, FTP, SMTP and POP3 data streams.
MAIN FEATURES OF THE APPLICATION
Kaspersky Anti-Virus offers the following functionality:
Real-time scanning of HTTP, FTP, SMTP, and POP3 traffic.
Scanning of inbound HTTPS traffic (for Forefront TMG only).
Wide choice of traffic filtering settings including support for groups of network objects and scanning rules.
Current maintenance of protection using regular updates to the Anti-Virus database.
Riskware detection.
Real-time monitoring of the Kaspersky Anti-Virus activity.
Complete information about the operation of Kaspersky Anti-Virus obtained using configurable reports.
Protected Backup storage for copies of blocked objects.
Precise configuration of anti-virus scanning performance, depending upon the server capability and the Internet
connection bandwidth.
Load distribution among server processors.
Remote management of Kaspersky Anti-Virus using Administration Console implemented as a standard MMC
snap-in.
HARDWARE AND SOFTWARE REQUIREMENTS
Software requirements for the Kaspersky Anti-Virus host computer:
1. Any of the following operating systems:
To use Kaspersky Anti-Virus with Microsoft ISA Server 2006 Standard Edition:
Page 8

A D M I N I S T R A T O R ' S G U I D E
8
Microsoft Windows Server 2003 SP2
Microsoft Windows Server 2003 R2
To use Kaspersky Anti-Virus with Forefront TMG Standard Edition:
Microsoft Windows Server x64 2008 SP2
Microsoft Windows Server x64 2008 R2
2. Microsoft Management Console 3.0.
3. Microsoft .NET Framework 3.5 SP1.
4. Microsoft ISA Server 2006 Standard Edition/ Forefront TMG Standard Edition Console.
To use Kaspersky Anti-Virus with Microsoft ISA Server 2006 Enterprise Edition or Forefront TMG Enterprise Edition, the
following requirements should be met:
The corporate configuration includes one array only.
The array includes one server only.
The configuration storage is installed on the same server as Kaspersky Anti-Virus.
If an caused by isolated Forefront TMG Enterprise Edition server is connected to a stand-alone or EMS-managed array,
Kaspersky Anti-Virus loses its operability; in this case, Anti-Virus cannot be removed by means of any standard tools of
the operating system. Removing the server from the array will neither help restore Kaspersky Anti-Virus nor remove it
correctly.
This behavior is caused by the technical features of Forefront TMG Enterprise Edition.
Hardware requirements for the Kaspersky Anti-Virus host computer:
1. For Kaspersky Anti-Virus with Microsoft ISA Server 2006 Standard Edition:
1 GHz processor
1 GB RAM
2.5 GB of available hard disk drive space
2. For Kaspersky Anti-Virus with Forefront TMG Standard Edition:
64-bit dual-core processor
2 GB RAM
2.5 GB of available hard disk drive space
Software requirements for Administration Console host computer:
1. Any of the following operating systems:
Microsoft Windows 7 x64 Professional / Enterprise / Ultimate Edition
Microsoft Windows 7 Professional / Enterprise / Ultimate Edition
Microsoft Windows Server 2008 x64 Enterprise / Standard Edition
Page 9

K A S P E R S K Y A N T I - V I R U S 8 . 0 F O R M I C R O S O F T ISA S E R V E R A N D F O R E F R O N T T M G
9
Microsoft Windows Server 2008
Microsoft Windows Server 2003 x64 R2 Enterprise / Standard Edition
Microsoft Windows Server 2003 x64 Enterprise / Standard Edition
Microsoft Windows Server 2003 x64 SP2
Microsoft Windows Server 2003 SP2
Microsoft Windows Vista x64
Microsoft Windows Vista
2. Microsoft Management Console 3.0.
3. Microsoft .NET Framework 3.5 SP1.
4. Microsoft ISA Server 2006 Standard Edition/ Forefront TMG Standard Edition Console.
Hardware requirements for the Administration Console host computer:
1 GHz processor
1 GB RAM.
Page 10

10
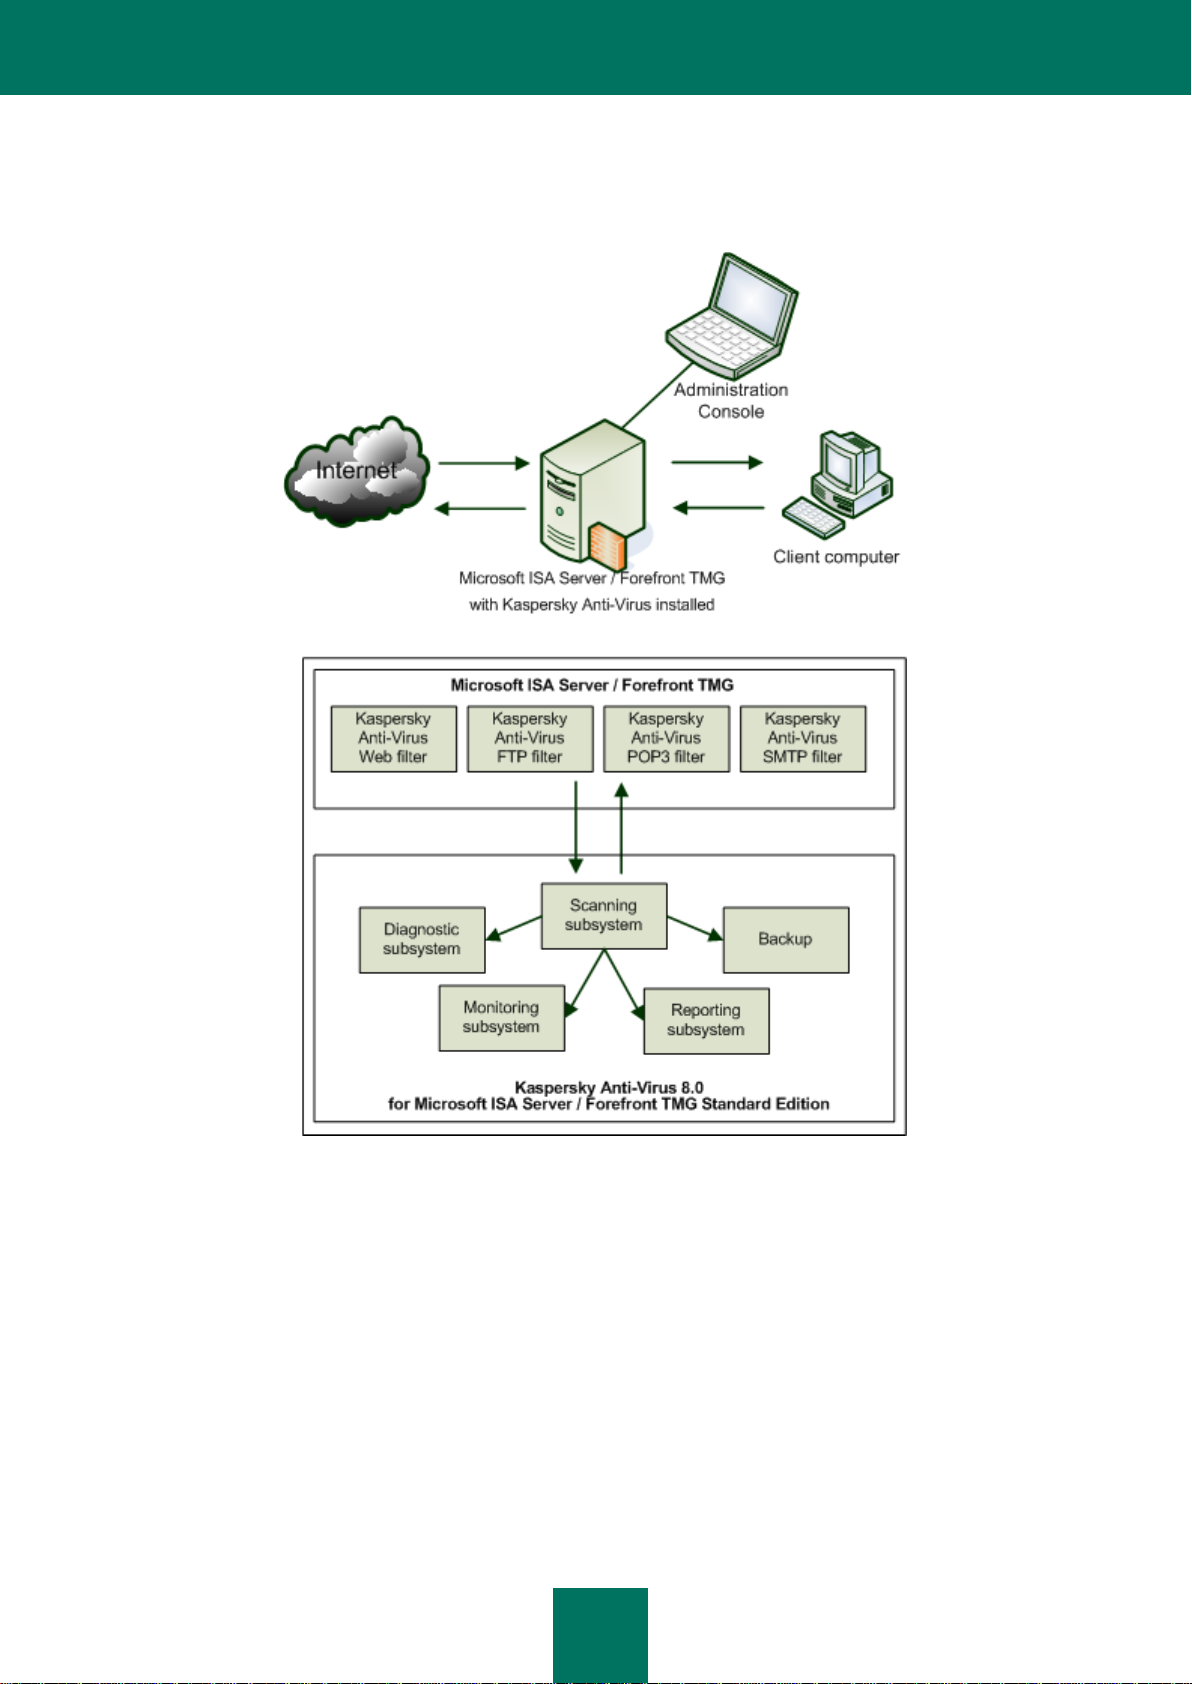
APPLICATION ARCHITECTURE
Kaspersky Anti-Virus is supposed to be installed on a server running Microsoft ISA Server / Forefront TMG to protect
client computers against malware intercepting HTTP, FTP, SMTP and POP3 traffic relayed through Microsoft ISA Server
/ Forefront TMG.
The product also scans incoming HTTPS traffic for Forefront TMG. No additional scanning configuration is required for
HTTPS; the application uses the settings defined for HTTP. To allow Kaspersky Anti-Virus to scan HTTPS traffic, you
have to enable traffic inspection in the management console of Forefront TMG (see section "Enabling HTTPS traffic
inspection" on page 64).
Kaspersky Anti-Virus includes the following components:
Anti-Virus filters – these components are integrated with Microsoft ISA Server / Forefront TMG during
installation. The following filter types exist:
Web – intercepts incoming HTTP traffic;
FTP – intercepts incoming FTP traffic;
SMTP – intercepts incoming and outgoing SMTP traffic;
POP3 – intercepts incoming and outgoing POP3 traffic.
Filters intercept traffic using the corresponding protocols, download objects requested by client computers and
feed completely downloaded objects to the scanning subsystem. Filters return requested objects to client
computers or generate notifications about blocked objects when scan process completes.
Scanning subsystem – the component designed for anti-virus scanning of inspected objects. The scanning
subsystem receives downloaded objects from the Anti-Virus filters and checks them for the presence of threats.
The subsystem compares the signatures of the objects being inspected to the records in the Anti-Virus
database; it also uses a heuristic analyzer capable of detecting the viruses that are as yet unknown. After
scanning the application assigns to each object a certain status that determines how the object will be handled
further. Before the application blocks or modifies an object, the latter can be saved in Backup storage to allow
its complete restoration later, if necessary. Information about scanned objects is preserved in a database where
it remains available for the reporting and monitoring subsystems.
Update service – component that updates the Kaspersky Anti-Virus database downloading new data from the
update servers of Kaspersky Lab or other specified sources. The application checks the availability of database
updates and downloads them automatically according to the defined schedule; the procedure can be invoked
manually.
Backup – database on the computer where all Kaspersky Anti-Virus components are installed that contains
copies of dangerous objects made before their processing and collected information about the objects. Objects
are stored in a special format posing no danger for the involved computers. Objects in Backup can be restored
or deleted later.
Reporting subsystem – the component reports the results of anti-virus activity. Information is collected in
accordance with the specified schedule or upon request (manual report generation).
Monitoring subsystem – the component displays the product status in real time: description of the application
functionality, runtime status of the filters and the scanning subsystem. Monitoring also allows visual control of
statistical information pertaining to the objects being scanned.
Diagnostic subsystem – the activity logger for all application components. Information is recorded to text files.
Administration Console – separate program providing access necessary for the control over Kaspersky Anti-
Virus and management of its operation. Administration Console can be installed on the computer running
Page 11
A P P L I C A T I O N A R C H I T E C T U R E
11
Microsoft ISA Server / Forefront TMG or on another machine that has access to the server. If several
administrators are working jointly, the Management Console can be installed on each administrator's computer.
The work of the application is represented in the following schematic (see figure below).
Figure 1. Operation algorithm of the application
Page 12

12
DEPLOYMENT OF THE PROTECTION SYSTEM FOR CLIENT COMPUTERS
To create a system guarding client computers within a network against malware, perform the following steps:
1. Install Kaspersky Anti-Virus on the Microsoft ISA Server / Forefront TMG server.
2. Connect Administration Console to the Security Server (see section "Connecting Administration Console to the
Security Server" on page 28).
3. Install the license key (see section "Activating the application" on page 21).
4. Configure the anti-virus protection system:
Define the database updating settings (on page 32).
Configure the anti-virus scanning settings (see section "Anti-virus scan" on page 37).
Configure the policies, which the application will use to process objects (see section "Using the Anti-Virus
policies" on page 41).
Configure the event logs (see section "Diagnostics" on page 61).
5. Verify the application settings and test their operation using the EICAR test "virus" (see section "Checking the
consistency of the application settings" on page 29).
The anti-virus protection of the server will be enabled automatically when Microsoft ISA Server / Forefront TMG is
started.
Keeping system up to date for traffic protection implies the following:
Regular updates of Anti-Virus database' (see section "Database update" on page 32).
Monitoring Kaspersky Anti-Virus activity (see section "Monitoring application activity" on page 54).
Regular reviews of application activity reports (see section "Reports" on page 50).
Processing notifications.
Processing and purging Backup storage (see section "Backup storage" on page 56).
Page 13

13
APPLICATION SETUP
IN THIS SECTION
Preparing for installation.................................................................................................................................................. 13
Upgrading an earlier version ........................................................................................................................................... 13
Application setup procedure ............................................................................................................................................ 13
Activating the application. Information about activation options available for the application .......................................... 17
Changes in the system after installation .......................................................................................................................... 18
Getting started ................................................................................................................................................................. 18
Restoring the application ................................................................................................................................................. 19
Removing the application ................................................................................................................................................ 19
Final Configuration Wizard .............................................................................................................................................. 19
Kaspersky Anti-Virus is installed using the product Setup Wizard (see section "Application setup procedure" on page 13).
First, read the information pertaining to setup preparation (see section "Preparing for installation" on page 13).
PREPARING FOR INSTALLATION
Prior to the installation of Kaspersky Anti-Virus, make sure that your system meets all hardware and software
requirements of the product (see section "Hardware and software requirements" on page 7). Furthermore, check the
account used to log on the system to make sure it has sufficient privileges to write data to the configuration of Microsoft
ISA Server / Forefront TMG.
UPGRADING AN EARLIER VERSION
You cannot update an earlier version of the program. If your computer has an earlier version installed, you have to
remove it before installing the new version.
APPLICATION SETUP PROCEDURE
To install Kaspersky Anti-Virus on your computer, run the executable file included in the distribution package. If the
product is being deployed in an operating system with the User Account Control (UAC) functionality enabled, you should
start the executable file as administrator.
The application installation program is designed similarly to the standard Microsoft Windows Setup Wizard. Each window
contains a set of buttons to control the installation process:
Next – accepts the action and goes to the next step in the installation procedure;
Back – returns to the previous setup step;
Cancel – cancels application installation;
Page 14

A D M I N I S T R A T O R ' S G U I D E
14
Install – initiates copying of product files to the hard drive and registration of the application components;
IN THIS SECTION
Step 1. Verifying that the system meets the installation requirements ............................................................................ 14
Step 2. Setup wizard Welcome screen ........................................................................................................................... 14
Step 3. Viewing the License Agreement ......................................................................................................................... 14
Step 4. Selecting the type of installation.......................................................................................................................... 15
Step 5. Custom Installation ............................................................................................................................................. 15
Step 6. Selecting a data storage folder ........................................................................................................................... 16
Step 7. Configuring the remote administration rule ......................................................................................................... 16
Step 8. Copying of the application files and registration of feature components ............................................................. 17
Step 9. Completing the installation .................................................................................................................................. 17
Finish – completes the application installation procedure.
The following are detailed discussions of each step of the application installation.
STEP 1. VERIFYING THAT THE SYSTEM MEETS THE INSTALLATION
REQUIREMENTS
During the first step of the installation procedure the wizard checks whether the operating system and service packs
meet the software requirements for Kaspersky Anti-Virus setup. In addition, it checks if the computer has the software
packages necessary for Kaspersky Anti-Virus operation installed. Setup Wizard also checks whether Microsoft ISA
Server / Forefront TMG is installed on the computer and starts the Microsoft ISA Server Control (isactrl) and Microsoft
ISA Server Storage (isastg) services, if they are installed but not running.
If any of the requirements is not met, the corresponding notice will be displayed on the screen. You are advised to use
the Windows Update service to install the required service packs and necessary software before Kaspersky Anti-Virus
setup.
STEP 2. SETUP WIZARD WELCOME SCREEN
If your system meets all the requirements, starting the installer file will display the Welcome screen informing you that
installation of Kaspersky Anti-Virus on the computer has begun. To continue installation, press the Next button. Click the
Cancel button to exit the installer.
STEP 3. VIEWING THE LICENSE AGREEMENT
The application's next dialog box contains the license agreement between you and Kaspersky Lab. Read it carefully. If
you agree to all the conditions, select the check box I accept the terms and conditions of this Agreement and click
Next. The installation will proceed.
To discontinue installation, click Cancel.
Page 15

A P P L I C A T I O N S E T U P
15
STEP 4. SELECTING THE TYPE OF INSTALLATION
During this step you have to define the installation type for the application. Two installation options are available:
Complete. Select this option, if all application components should be installed. In that case the wizard will install
the components of Kaspersky Anti-Virus that should be integrated with Microsoft ISA Server / Forefront TMG
and Administration Console. This option is only available if the computer where the Setup Wizard is started, has
Microsoft ISA Server / Forefront TMG installed.
Administration Console. Select this option if you need to install just Administration Console without the
components of Kaspersky Anti-Virus that are supposed to be integrated with Microsoft ISA Server / Forefront
TMG. This setup method is convenient if you need to install on a local computer a management tool for
Kaspersky Anti-Virus running on a remote host.
To select the installation type, click the corresponding button.
STEP 5. CUSTOM INSTALLATION
If Complete setup type has been selected during the previous step, all application components in the Custom
Installation window will be selected for installation to the local hard drive.
The components tree contains the following nodes:
Service – the node containing information about the components of Kaspersky Anti-Virus actually protecting the
data transferred through Microsoft ISA Server / Forefront TMG. To enable protection, you have to integrate with
Microsoft ISA Server / Forefront TMG the filters, which will intercept the data transferred via corresponding
protocols. Select one or several filters included into the Service component.
Filters – the node allows you to select installation of Kaspersky Anti-Virus filters. The following filters are
available:
Web – web filter intercepting HTTP traffic;
FTP – filter intercepting FTP traffic;
SMTP – filter intercepting SMTP traffic;
POP3 – filter intercepting POP3 traffic.
Administration Console – the node for installation of the Administration Console snap-in that is used to
manage Kaspersky Anti-Virus.
Administration Console is an essential part of the application; it will be installed no matter which setup type is
selected. There is no way to install Kaspersky Anti-Virus without Administration Console.
To specify the destination folder where the selected components will be installed, perform the following steps:
1. Select the root node of the components tree All components.
2. Click Browse to open the dialog box for modification of the destination folder.
3. In the Folder name field enter the path to the folder where the selected components should be installed. The
application must be installed on the same drive as Microsoft ISA Server / Forefront TMG.
4. Click the OK button.
You can view the information about disk space necessary for each individual component by clicking the component in the
tree. The right part of the Setup Wizard window will display information about the space required and brief description of
the component's purpose.
Page 16

A D M I N I S T R A T O R ' S G U I D E
16
To view detailed information about the space available on the logical drives of your computer, perform the following
steps:
1. Click the Drives button.
2. Information will be displayed in the Disk Space Requirements window.
3. To close the window, click OK button.
To select a component for further installation, perform the following steps:
1. Open the menu of the node corresponding to a component by clicking it with the mouse.
2. Select the option Will be installed on local hard drive or All features.
Selecting All features will prepare for installation of the component and all the features it includes.
To cancel the component installation, select the Entire feature will become unavailable option from the context menu.
To continue installation, press the Next button. If you have selected installation of Administration Console only during the
previous step, description of further operation will proceed with Step 9.
STEP 6. SELECTING A DATA STORAGE FOLDER
During this step you have to specify folder on hard drive where the application will store the data that it generates during
operation. The folder contains the following data:
Runtime and anti-virus protection logs.
Service data and temporary data necessary for normal application functioning and reliable non-stop protection.
Anti-virus database used for detection of known malware and viruses.
Reports.
Statistics database.
File storage database.
Backup database.
Other data necessary for integration with Microsoft ISA Server / Forefront TMG.
The Data Folder field contains the path to the default application data folder.
To change the path to the data folder of Kaspersky Anti-Virus.
Enter the path in the Data Folder field or select the necessary folder in the Change destination folder window
displayed after clicking the Change button.
You can change the data folder location after Kaspersky Anti-Virus setup, if necessary (see section "Changing the
application data folder location" on page 63).
To continue installation, press the Next button.
STEP 7. CONFIGURING THE REMOTE ADMINISTRATION RULE
During this step you have to specify the port for connection to Kaspersky Anti-Virus, which will be used to manage the
application via the Administration Console installed on a remote host.
Page 17

A P P L I C A T I O N S E T U P
17
You can enter the port number in the TCP port field. The default value is 5000.
A selected Activate rule checkbox means that the Setup Wizard will create a custom rule for the Microsoft ISA Server /
Forefront TMG firewall permitting incoming connections to the specified port of the local server. Remote management of
Kaspersky Anti-Virus will be enabled automatically. Clear the check box if you do not plan to allow remote administration
immediately after application setup.
To continue installation, press the Next button.
STEP 8. COPYING OF THE APPLICATION FILES AND REGISTRATION
OF FEATURE COMPONENTS
During this step the installer copies the application files to the program folder specified in the functionality selection dialog
box (see section "Step 5. Custom Installation" on page 15), registers the installed application features in the operating
system, and integrates them with Microsoft ISA Server / Forefront TMG.
To continue installation, click the Next button. The wizard will begin installing the application. Click the Back button if you
need to change the settings selected in the previous screens of the wizard.
Installation and registration of the filters will require a restart of Microsoft ISA Server / Forefront TMG services. Click OK
in the corresponding notification window to restart the services automatically, ensuring proper integration of Kaspersky
Anti-Virus with Microsoft ISA Server / Forefront TMG.
Certain services of Microsoft ISA Server / Forefront TMG will be restarted during Kaspersky Anti-Virus setup. That may
terminate the existing connections established by the client computers.
Clicking the Cancel button in the window requesting service restart will complete the installation procedure and roll back
the installer operations performed for deployment of Kaspersky Anti-Virus. Application setup will be terminated.
STEP 9. COMPLETING THE INSTALLATION
The Setup completion window indicates that the installation of Kaspersky Anti-Virus has been finished.
Select the check box Run Final Configuration Wizard to start the Final Configuration Wizard as soon as the Setup
Wizard window is closed (see section "Final Configuration Wizard" on page 19). The Final Configuration Wizard is
intended for the addition of license key files for the application immediately after setup. Launching the wizard is not
mandatory; the settings specified in the wizard can be modified later in the Administration Console.
Click Finish to close the Setup Wizard window.
Program group Kaspersky Anti-Virus 8.0 for Microsoft ISA Server and Forefront TMG SE will appear in the main
menu; you can start the application Administration Console or open the help system right from that group.
ACTIVATING THE APPLICATION. INFORMATION ABOUT
ACTIVATION OPTIONS AVAILABLE FOR THE APPLICATION
To enable Kaspersky Anti-Virus to use the current Anti-Virus database for protection of the client computers, you have to
activate the application. Application activation means the addition of a license key file to the application.
There are two available activation methods:
Using the Final Configuration Wizard (see section "Final Configuration Wizard" on page 19)
Using the Administration Console (see section "Managing licenses" on page 21)
Page 18

A D M I N I S T R A T O R ' S G U I D E
18
CHANGES IN THE SYSTEM AFTER INSTALLATION
The installer creates the following folders during the setup procedure:
Installation folder: <ProgramFiles>\Kaspersky Lab\Kaspersky Anti-Virus 8.0 for Microsoft ISA Server and
Forefront TMG Standard Edition, where <ProgramFiles> can take the following values:
If Microsoft ISA / Forefront TMG is installed on the same drive with Microsoft Windows, <ProgramFiles> is
the standard Program Files folder; its location is stored in the environment variable %ProgramFiles% for
32-bit systems or in %ProgramFiles(x86)% for 64-systems.
If Microsoft ISA / Forefront TMG is installed on a drive other than the Microsoft Windows system drive,
<ProgramFiles> stands for <Microsoft ISA / Forefront TMG drive>:\Program Files.
Data folder: <CommonAppDataFolder>\Kaspersky Anti-Virus 8.0 for Microsoft ISA Server and Forefront TMG
Standard Edition\data, where <CommonAppDataFolder> is the standard Common AppData folder for program
data shared among all users. The Common AppData value can be checked in the registry key:
[HKEY_LOCAL_MACHINE\SOFTWARE\Microsoft\Windows\CurrentVersion\Explorer\User Shell Folders]
Common Files Folder (ISD): <CommonFilesFolder>\Kaspersky Lab\ISD>, where <CommonFilesFolder> is the
standard Common Files folder for 32-bit programs of the current user. Path to the folder is stored in the
%CommonProgramFiles% environment variable in 32-bit systems, or in the %CommonProgramFiles(x86)%
variable for 64-bit systems.
Program Menu Folder: <ProgramMenuFolder>\Kaspersky Anti-Virus 8.0 for Microsoft ISA Server and
Forefront TMG Standard Edition, where <ProgramMenuFolder> stands for the Common Programs folder
containing the Start menu items for all users. The Common Programs value can be checked in the registry
key: [HKEY_LOCAL_MACHINE\SOFTWARE\Microsoft\Windows\CurrentVersion\Explorer\User Shell
Folders].
Downloaded Installations Folder: <DownloadedInstallationsFolder>\{0D40E22B-2FB4-4237-AB63-
3FFA9A4CE2EA}, where <DownloadedInstallationsFolder> stands for the standard Downloaded Installations
folder for setup files located at %WinDir%\Downloaded, where %WinDir% is the system folder of Microsoft
Windows.
The installer also performs the following operations:
Installs the following additional software: Microsoft Windows Installer 3.1, Microsoft Visual C++ 2005
Redistributable Package (x86).
Registers the service of Kaspersky Anti-Virus 8.0 for Microsoft ISA Server and Forefront TMG SE
(kavisasrv.exe).
Creates on Microsoft ISA Server / Forefront TMG a firewall rule permitting remote access from Administration
Console to a computer running the installed Kaspersky Anti-Virus.
Adds two groups of performance counters: Kaspersky Anti-Virus for ISA and TMG Filters and Kaspersky
Anti-Virus for ISA and TMG Service.
Registers the subsystem for notification about Kaspersky Anti-Virus events in Microsoft ISA Server / Forefront
TMG.
Changes to the registry of Microsoft Windows for 32- and 64-bit OS versions are listed in the Appendix 1.
GETTING STARTED
After its installation, Kaspersky Anti-Virus will start working using the default minimum configuration based on the
settings recommended by the experts of Kaspersky Lab. If necessary, depending on the network properties and the
characteristics of the computer on which Microsoft Exchange Server / Forefront TMG is installed, you can change the
settings.
Page 19

A P P L I C A T I O N S E T U P
19
The application settings are configured from the administrator's workstation using Management Console.
You are advised to configure hourly automatic database updates (see section "Automatic database updates" on
page 33).
You can use test "viruses" to make sure that the application functions properly (see section "Checking the consistency of
the application settings" on page 29).
To control whatever Kaspersky Anti-Virus is doing, use the Monitoring node (see section "Monitoring application
activity" on page 54).
RESTORING THE APPLICATION
Kaspersky Anti-Virus may have to be restored if the initial installation has completed incorrectly, or if the executable files
or registration of application features have been disrupted during operation.
To reinstall the application, start the executable file included in the distribution kit. You may also use the software
installation and removal wizard in Microsoft Windows.
To use the software installation and removal wizard in Microsoft Windows, perform the following steps:
1. Open the Open the Uninstall or change a program window. To open the window, you can use the following
method:
a. Use the following key combination WINDOWS KEY + R.
b. Type in the displayed Run dialog box the command appwiz.cpl and press ENTER.
2. Find in the Uninstall or change a program window the record corresponding to Kaspersky Anti-Virus and
highlight it.
3. Click the Uninstall / Change button.
4. In the wizard window click the Next button.
5. Click the Restore button in the next wizard window.
6. Click the Change button in the next window of Kaspersky Anti-Virus setup wizard and wait until the repeated
setup procedure completes. The wizard will automatically overwrite the installed application files, register again
the components of Kaspersky Anti-Virus and integrate them with Microsoft ISA Server / Forefront TMG.
REMOVING THE APPLICATION
You can remove the application from your computer using the standard Windows Add/Remove Programs tool, or using
the application distribution kit. This will remove all installed components from your computer.
FINAL CONFIGURATION WIZARD
The Final Configuration Wizard is intended for addition of license key files for the application immediately after setup.
The Final Configuration Wizard starts automatically once the installation procedure completes, if you have checked the
box Start the Final Configuration Wizard on the last screen of the Setup Wizard.
Each wizard window contains a set of buttons to control the installation process:
Next – accepts the action and goes to the next step in the wizard.
Back – returns to the previous wizard step.
Page 20

A D M I N I S T R A T O R ' S G U I D E
20
Cancel – closes the wizard discarding changes.
Finish – completes the wizard saving the changes and closing its window.
The first screen of the Final Configuration Wizard, Adding the main license key, can be used to add the current license
key for the application.
To add the main license key for the application, perform the following steps:
1. Click the Add/Replace button and use the displayed window to specify a valid license key file (with the *.key
extension).
2. Once the key is added, the following information will be displayed on the screen:
Key type.
Owner.
User count.
Expiration date.
Serial number.
The second screen of the Final Configuration Wizard, Adding the reserve license key, can be used to add a backup
license key for the application.
To add the main license key for the application, perform the following steps:
1. Click the Add/Replace button and use the displayed window to specify a valid license key file (with the *.key
extension).
2. Once the key is added, the following information will be displayed on the screen:
User count.
Expiration date.
Serial number.
3. A reserve key automatically becomes active when the current license key expires.
Page 21

21
MANAGING LICENSES
IN THIS SECTION
Activating the application................................................................................................................................................. 21
Adding a reserve key ...................................................................................................................................................... 22
Configuring notification of license expiration ................................................................................................................... 23
To enable Kaspersky Anti-Virus to protect client computers using the latest anti-virus database, a valid license key is
required (see section "Activating the application" on page 21).
If the license is missing, Microsoft ISA Server / Forefront TMG traffic will not be scanned and the Anti-Virus will not
update its database.
If the license key is expired, Kaspersky Anti-Virus scans the traffic using the existing anti-virus database but does not
update it. You are advised to configure a notification about license expiry (see section "Configuring notification of license
expiration" on page 23).
If a license is blacklisted, Microsoft ISA Server / Forefront TMG traffic will not be scanned but Kaspersky Anti-Virus will
update its database.
The application may have two license keys installed at the same time: the current and the reserve key. The reserve key
automatically becomes active once the current active key expires (see section "Adding a reserve key" on page 22).
ACTIVATING THE APPLICATION
To activate the application, that is to enable Kaspersky Anti-Virus to protect the client computers, you need to add its
license key.
If the license is missing, Microsoft ISA Server / Forefront TMG traffic will not be scanned and the Anti-Virus will not
update its database.
If the license key is expired, Kaspersky Anti-Virus scans the traffic using the existing anti-virus database but does not
update it. You are advised to configure a notification about license expiration (see section "Configuring notification of
license expiration" on page 23).
If a license is blacklisted, Microsoft ISA Server / Forefront TMG traffic will not be scanned but Kaspersky Anti-Virus will
update its database.
To activate the application, perform the following steps:
1. Select in the Administration Console tree the node corresponding to the server.
2. Click the General settings button.
3. Select the Licenses tab in the General settings window that will open (see figure below).
4. Click the Add/Replace button and use the displayed window to specify a valid license key file (with the *.key
extension).
5. Once the key is added, the following information will be displayed on the screen:
Key type.
Page 22

A D M I N I S T R A T O R ' S G U I D E
22
Owner.
User count.
Expiration date.
Serial number.
Figure 2. The License keys tab
ADDING A RESERVE KEY
To add a reserve key, perform the following steps:
1. Select in the Administration Console tree the node corresponding to the server.
2. Click the General settings button.
3. Select the Licenses tab in the General settings window that will open.
4. Click the Add button and use the displayed window to specify the reserve license key file (with the *.key
extension).
5. Once the key is added, the following information will be displayed on the screen:
User count.
Expiration date.
Page 23

M A N A G I N G L I C E N S E S
23
Serial number.
6. A reserve key automatically becomes active when the current license key expires.
CONFIGURING NOTIFICATION OF LICENSE EXPIRATION
To configure notifications about license expiration, perform the following steps:
1. Select in the Administration Console tree the node corresponding to the necessary server.
2. Click the General settings button.
3. Select the Licenses tab in the General settings window that will open.
4. Enter the necessary number of days in the Notify about license expiration N days before field.
5. Click OK to save the changes and close the window.
Page 24
24
APPLICATION INTERFACE
IN THIS SECTION
Main application window ................................................................................................................................................. 24
Application configuration windows .................................................................................................................................. 25
The application administration console is a standard Microsoft Windows MMC snap-in (see section "Main application
window" on page 24).
Kaspersky Anti-Virus runtime settings are defined in special configuration windows (see section "Application
configuration windows" on page 25).
MAIN APPLICATION WINDOW
Main application window is an MMC snap-in (see the figure below). To open the application window, click the
Administration Console desktop shortcut.
Figure 3. Main application window
Page 25

A P P L I C A T I O N I N T E R F A C E
25
The window consists of two parts: the console tree and the details pane.
The Console tree is a hierarchic structure in the left part of the MMC window. The console tree contains the nodes
associated with the main features of the application. You can hide or display the console tree.
A node – is any item of the console tree holding inside child objects. Double-clicking the plus sign (+) of a node with the
mouse can open that node and display its content, and double-clicking the minus sign (-) hides the node contents.
The details pane is the right part of the snap-in console. It displays the items or information about the current item
selected in the console tree. The details pane is always visible irrespective of the settings.
You can configure the snap-in appearance by configuring it to hide or display certain window areas.
To configure the snap-in console appearance, perform the following steps:
1. Open Administration Console.
2. In the View menu select the Configure item.
3. Use the displayed Customize View dialog box to show or hide the necessary items checking or unchecking
their corresponding boxes.
To view more detailed information about the interface, perform the following steps:
1. Open Administration Console.
2. Select the Help item from the drop-down menu.
APPLICATION CONFIGURATION WINDOWS
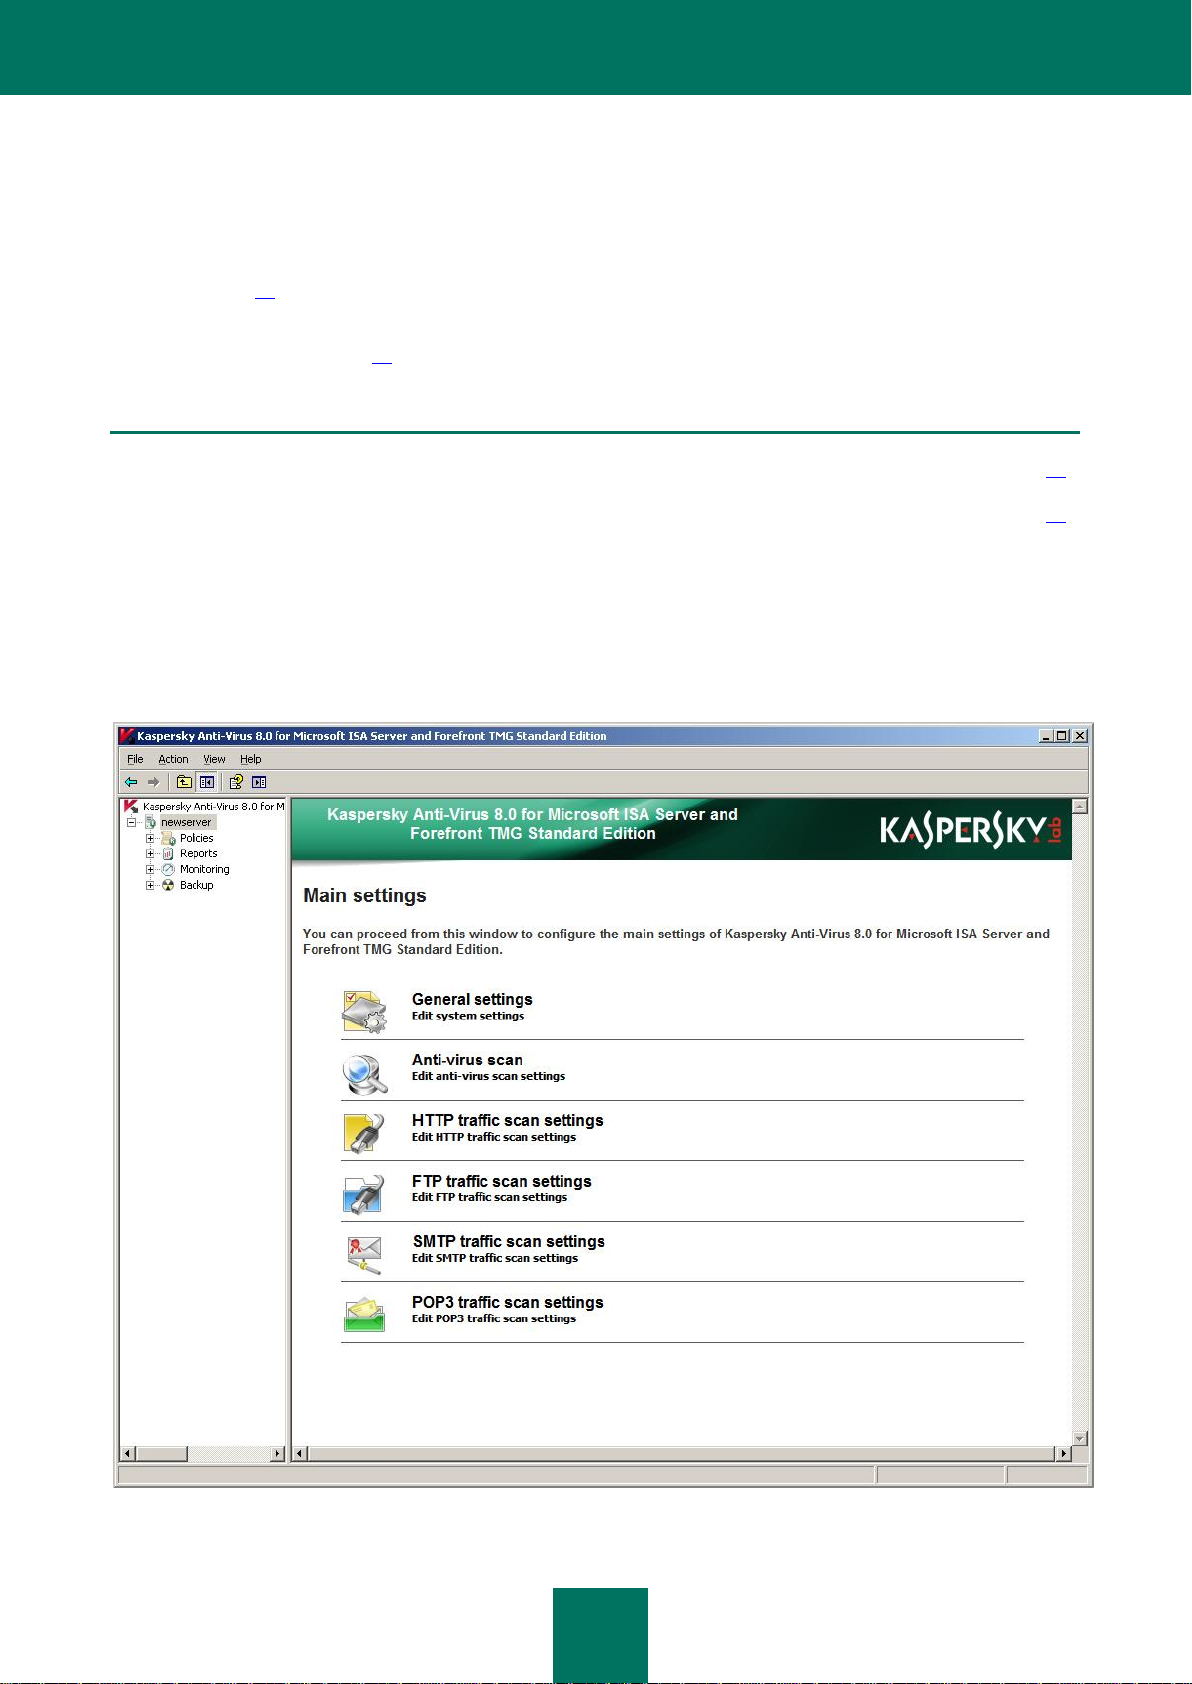
Main settings of Kaspersky Anti-Virus are specified in the configuration windows. To access these windows, select in the
console tree the node corresponding to a certain server and the details pane will display the buttons opening the
following configuration windows (see the figure below):
General settings – the settings for the application activity logs (see section "Diagnostics" on page 61)
and license parameters (see section "Managing licenses" on page 21).
Anti-virus scan – the settings used to update Kaspersky Anti-Virus databases and the anti-virus engine
performance settings (see section "Anti-virus scan" on page 37).
HTTP traffic scan settings – editing of the replacement templates for blocked objects, configuration of the
settings used to scan HTTP traffic:
Maximum time left until the transfer of data to the client starts.
Data not sent to the client before scan completes.
The speed at which an unscanned object will be transferred to the client.
FTP traffic scan settings – maximum timeout before startup of data transfer to the client and share of data
preserved from being sent to the client until scan is complete.
SMTP traffic scan settings – editing of the replacement templates for blocked objects and message subject.
Page 26

A D M I N I S T R A T O R ' S G U I D E
26
POP3 traffic scan settings – editing of the replacement templates for blocked objects and message subjects.
Figure 4. Application settings window
Page 27

27
STARTING AND STOPPING THE APPLICATION
After application setup, the service of Kaspersky Anti-Virus 8.0 for Microsoft ISA Server and Forefront TMG SE
(kavisasrv.exe) starts automatically.
To pause Kaspersky Anti-Virus, do the following:
1. Open the Management console of Microsoft ISA Server / Forefront TMG.
2. Select in the Administration Console tree the necessary server node, then the – Configuration node, then the
Add-ins node for Microsoft ISA Server or the System node for Forefront TMG. The list of installed filters will
appear in the right part of the window.
3. On the Web Filters tab disable the Kaspersky Anti-Virus Web filter.
4. On the Application Filters tab disable the following filters: Kaspersky Anti-Virus FTP filter, Kaspersky Anti-
Virus POP3 filter, Kaspersky Anti-Virus SMTP filter.
5. Click Apply to save the changes. Select in the displayed dialog box the option to save the changes to restart
the services.
6. Stop the service Kaspersky Anti-Virus 8.0 for Microsoft ISA Server and Forefront TMG SE in the Windows
services manager.
Kaspersky Anti-Virus will be stopped.
If you stop the service of Kaspersky Anti-Virus while the filters in Microsoft ISA Server / Forefront TMG are still
running, the service will restart automatically after it is stopped.
To start Kaspersky Anti-Virus after it has been stopped, perform the following steps:
1. Open the management console of Microsoft ISA Server / Forefront TMG.
2. Select in the administration console tree the necessary server node, then Configuration node, then the Add-
ins node for Microsoft ISA Server or the System node for Forefront TMG. The list of installed filters will appear
in the right part of the window.
3. On the Application Filters tab enable the following filters: Kaspersky Anti-Virus FTP filter, Kaspersky Anti-
Virus POP3 filter, Kaspersky Anti-Virus SMTP filter.
4. On the Web Filters tab enable the Kaspersky Anti-Virus Web filter.
5. Once filters are enabled, the service of Kaspersky Anti-Virus 8.0 for Microsoft ISA Server and Forefront
TMG starts automatically.
Page 28

28
CONNECTING THE ADMINISTRATION CONSOLE TO THE SECURITY SERVER
To connect the Administration Console to a server, perform the following steps:
1. Start Administration Console. The window for connection to the server will appear (see the figure below).
2. Check the box Local computer, if the console is started on the computer running Kaspersky Anti-Virus. Or,
select the option Another computer and enter in the Computer name field the name in Microsoft Windows
network, IP address, or domain name of a computer where Kaspersky Anti-Virus is installed. You may also click
the Browse button to select a remote computer.
3. Check the box Use credentials of currently logged-in user if the server should be accessed using the current
account, or check the box Use different credentials and enter the user name, domain and password in the
corresponding fields. This opportunity is available for remote connections only.
To establish a fully functional remote connection of the Administration Console to the server, use the default
Administrator account integrated into the operating system installed on the server, or disable User Account
Control (UAC) on the server. Otherwise, the application operation monitoring and license management become
unavailable.
4. Click the Finish button to connect to the server.
Figure 5. This will open the connection to server window
Page 29

29
CHECKING THE CONSISTENCY OF THE
PREFIX
OBJECT TYPE
No prefix, standard test "virus"
Infected. An error occurs during an attempt to disinfect the
object; apply an action set for objects that cannot be
disinfected.
CORR-
Corrupted.
SUSP-
Suspicious (unknown virus code).
WARN-
Suspicious (modified code of a known virus).
ERRO-
Object causes a scan error which corresponds to the
detection of a corrupted object.
CURE-
Infected (curable). The object will be disinfected; the text of
the "virus" body will be replaced with the word CURED.
DELE-
Infected (incurable). The application uses the action set for
objects that cannot be disinfected.
IN THIS SECTION
Testing the HTTP traffic protection .................................................................................................................................. 30
Testing the FTP traffic protection .................................................................................................................................... 30
Testing the SMTP / POP3 traffic protection ..................................................................................................................... 30
APPLICATION SETTINGS
After Kaspersky Anti-Virus is installed and configured, you are advised to verify its settings and operation using a test
"virus" and its modifications.
The test "virus" was specifically designed by European Institute for Computer Antivirus Research (EICAR) to test antivirus products. The test "virus" is not a virus, because it does not contain code that can harm your computer. However,
most anti-virus products identify this file as a virus.
You can download the test "virus" from the official web site of EICAR, at: http://www.eicar.org/anti_virus_test_file.htm.
The file downloaded from the EICAR website contains the body of a standard test "virus". Kaspersky Anti-Virus detects it,
recognizes it as the infected type and processes it as defined by the administrator for the objects of that type.
To test the application's response to other types of object, modify the content of this standard test "virus" by adding one
of the prefixes (see the table below). Any text or hypertext editor can be used to create test "virus" modifications.
The first table column lists the prefixes to be added at the beginning of the string of the standard test "virus".
After a prefix is added to the contents of the test "virus", save it as a file named, for example, eicar_dele.com. Rename
all the modified "viruses" in the same manner.
The second table column indicates how the modified files will be identified by the anti-virus application. The actions taken
by the application for each type of object are defined by the application settings as set by the administrator.
Table 1. Prefixes for the test "virus"
Page 30

A D M I N I S T R A T O R ' S G U I D E
30
TESTING THE HTTP TRAFFIC PROTECTION
To test protection of HTTP traffic, perform the following steps:
1. Open in a browser the link to the test "virus" at http://www.eicar.org/download/eicar.com. If Kaspersky Anti-Virus
is configured properly, the test "virus" will not be loaded and the browser will display a notification of a malicious
object on the page specified by the link.
2. You can use the Monitoring window of Kaspersky Anti-Virus Administration Console to view the statistics
including scanned objects; the test "virus" must be added in the HTTP column counter. Make sure that the
application has processed the test "virus" as defined in the HTTP traffic scan settings window of Kaspersky
Anti-Virus Administration Console.
TESTING THE FTP TRAFFIC PROTECTION
To test protection of FTP traffic, perform the following steps:
1. Attempt to download the test "virus" file using any FTP client program. If Kaspersky Anti-Virus is configured
properly, the test "virus" will be blocked.
2. You can use the Monitoring window of Kaspersky Anti-Virus Administration Console to view the statistics
including scanned objects; the test "virus" must be added in the FTP column counter.
TESTING THE SMTP / POP3 TRAFFIC PROTECTION
To test protection of SMTP traffic you have to send a message with attached test "virus" from an e-mail client using
SMTP. The test virus will be replaced as defined in the SMTP traffic scan settings window of Kaspersky Anti-Virus
Administration Console. You can use the Monitoring window of Kaspersky Anti-Virus Administration Console to view the
statistics including scanned objects; the test "virus" must be added in the SMTP / POP3 column counter.
To test protection of POP3 traffic you have to receive a message with attached test "virus" with an e-mail client using
POP3. To do that, you can, for example, send a message containing the test "virus" to your own address, having
disabled SMTP traffic scanning first. The test virus will be replaced as defined in the POP3 traffic scan settings window
of Kaspersky Anti-Virus Administration Console. You can use the Monitoring window of Kaspersky Anti-Virus
Administration Console to view the statistics, including scanned objects; the test "virus" must be added in the SMTP /
POP3 column counter.
Page 31

31
DEFAULT TRAFFIC PROTECTION
SEE ALSO
Anti-virus scan ................................................................................................................................................................. 37
Using the Anti-Virus policies ............................................................................................................................................ 41
After installation Kaspersky Anti-Virus enables server protection using the default settings. It scans HTTP, FTP, POP3,
and SMTP traffic. Kaspersky Anti-Virus blocks found malware and suspicious objects, replacing them with a templatebased message informing about discovered threat.
Anti-virus scan policies are defined for all computers.
Page 32

32
DATABASE UPDATE
IN THIS SECTION
Reviewing the database status ....................................................................................................................................... 32
Updating the database manually ..................................................................................................................................... 33
Automatic database updates ........................................................................................................................................... 33
Selecting the update source ............................................................................................................................................ 33
Configuring updates via the Internet ............................................................................................................................... 34
Updating the database from a network folder .................................................................................................................. 35
New viruses and other types of malware appear worldwide on a daily basis. Reliable traffic protection requires current
information about existing threats and the methods of their neutralization. The information is stored in the anti-virus
database, which the application uses for protection. Regular database updates are required to maintain a high level of
protection.
You are advised to update your databases immediately after the application is installed, because the anti-virus database
included in the distribution kit will be out of date by the time you install the application.
The anti-virus databases on Kaspersky Lab's update servers are updated every hour. You are advised to set up
automatic updates to run with the same frequency (see section "Automatic database updates" on page 33).
Anti-virus databases can be updated from the following sources:
Update servers of Kaspersky Lab in the Internet (see section "Configuring updates via the Internet" on page 34).
A local source of updates – a local or network folder (see section "Selecting the update source" on page 33).
During the procedure the updater compares the existing database with the one offered by the update source. If the
databases differ, the updater retrieves and installs the missing portions. The fact that not all the databases are
downloaded significantly increases the speed of copying files and saves Internet traffic.
The updating is performed either manually or automatically, according to a schedule. After the files are copied from the
specified update source, the application automatically connects to the new databases, and uses them to scan mail for
viruses and spam.
You may check whether an automatic database updating is functioning correctly by reviewing the database status at any
time (see section "Reviewing the database status" on page 32).
REVIEWING THE DATABASE STATUS
To view information about the active license:
1. Select in the Administration Console tree the node corresponding to the server.
2. Click the Anti-virus scan button. The Anti-virus scan window will open on the Update tab.
Information about the database in use is provided in the Information about the database in use field. You can
check the database creation date and the number of records.
Page 33

D A T A B A S E U P D A T E
33
UPDATING THE DATABASE MANUALLY
Manual updating is used to update the database immediately.
To update the Anti-Virus database manually, perform the following steps:
1. Select in the Administration Console tree the node corresponding to the server.
2. Click the Anti-virus scan button. The Anti-virus scan window will open on the Update tab.
3. Click the Update now button. Database update will be started. The task progress will be reflected in the field to
the right from the button.
AUTOMATIC DATABASE UPDATES
The anti-virus databases on Kaspersky Lab's update servers are updated every hour. You are advised to set up
automatic updates with the same frequency. It is the default value.
To define the settings to update databases automatically, perform the following steps:
1. Select in the Administration Console tree the node corresponding to the server.
2. Click the Anti-virus scan button. The Anti-virus scan window will open on the Update tab.
3. Make sure that the box Update bases automatically is checked (if it is off, automatic updates will not be
performed).
4. Select one of the following options to define the frequency of updates:
every N day at T1 and T2, where N is the number of days between the launches of the database updater,
while T1 and T2 stand for the time when the update procedure will be performed. For example, if you
specify N = 3, T1 = 11:15 PM, T2 = 05:00 AM, the database will be updated twice on that day at the
specified time and then the procedure will be repeated with the interval of 3 days. T2 is an optional setting.
You can uncheck the corresponding box to disable it;
every T3, where T3 stands for the time interval that will pass between database updates. For example, if
you set T3 = 4 hours, the database will be updated every 4 hours.
5. Click Apply to save the changed settings, or OK to save the changes and close the window.
6. Select the source of updates (see section "Selecting the update source" on page 33).
7. Define the settings for web-based updates (see section "Configuring updates via the Internet" on page 34) or
updating from a network folder (see section "Updating the database from a network folder" on page 35).
SELECTING THE UPDATE SOURCE
Update source – resource containing updates for databases of Kaspersky Anti-Virus. By default, the databases are
updated from Kaspersky Lab's update servers. These are special Internet sites that contain updates for databases and
application modules for all Kaspersky Lab products. You can configure the updates to be downloaded from an HTTP or
FTP server, or from a local or network folder. The selected source will be used during manual and automatic updating.
To choose a source of updates, perform the following steps:
1. In the Administration Console tree, select the node corresponding to the server.
2. Click the Anti-virus scan button. The Anti-virus scan window will open on the Update tab (see the figure
below).
Page 34

A D M I N I S T R A T O R ' S G U I D E
34
3. Select one of the following options from the Updates source group of settings:
Updates servers of Kaspersky Lab (default option) – Kaspersky Lab's HTTP and FTP servers, to which
new updates are uploaded every hour;
Local or network shared folder – a local or network folder containing updates downloaded from the
Internet. If you select this option, you should either specify the folder's path in the entry field, or select the
folder in the standard Microsoft Windows dialog box. Click the Browse button to open the Browse window.
If necessary, configure the remaining update settings (see section "Updating the database from a network
folder" on page 35).
4. Click Apply to save the changed settings, or OK to save the changes and close the window.
CONFIGURING UPDATES VIA THE INTERNET
Selected settings will be used for automatic and manual updating of the anti-virus database.
In order to edit the settings of updating from the Internet, please do the following:
1. Select in the Administration Console tree the node corresponding to the server.
2. Click the Anti-virus scan button. The Anti-virus scan window will open on the Update tab.
3. Click the Options button to open the Configure Updating from the Internet window.
4. Specify the settings that will be used to select the update servers of Kaspersky Lab:
Figure 6. The Update tab
Page 35

D A T A B A S E U P D A T E
35
IN THIS SECTION
Updating from a network folder: Kaspersky Anti-Virus within a domain .......................................................................... 35
Updating from a network folder: Kaspersky Anti-Virus in a workgroup ............................................................................ 36
Select update server automatically – if you pick this option, the most suitable update server will be
selected automatically.
Use specified server – select this option if you need to use a specific server, and enter its address in the
corresponding field.
5. Configure the settings for access to the proxy server:
If you connect to the Internet using a proxy server, check the Use proxy server box and specify the proxy
server address and number of the port used for connection;
If connection to the Internet is established through a proxy of Microsoft ISA Server / Forefront TMG where
Kaspersky Anti-Virus is installed, check the box Use local proxy;
If you use a password to access the proxy server, specify the proxy user authentication settings. To do this,
check the Proxy server authentication box and fill in the User name and Password fields. If the proxy
server uses NTLM authentication, User name should include the domain in <Domain>\<User name>
format. If a local account is used, the User name format is as follows: <Computer name>\<User name> or
.\<User name>.
6. Check the box Use passive FTP, if you need passive FTP mode to establish connection to the source FTP
server containing updates.
7. Click the OK button to save the changes and close the window.
UPDATING THE DATABASE FROM A NETWORK FOLDER
The methods that are used to arrange public access (assign the access rights) to a network folder for update purposes
will differ depending upon the application deployment scheme. Kaspersky Anti-Virus can be deployed within a domain or
in a workgroup.
UPDATING FROM A NETWORK FOLDER: KASPERSKY ANTI-VIRUS
WITHIN A DOMAIN
Any computer in a domain has a unique account with the name matching the machine name. Processes started on a
computer on behalf of the System account will be authenticated upon access to other computers of the domain under
the account of the machine where these processes are running.
To arrange access to a network location used to distribute updates within a domain, perform the following steps:
1. Specify network rights: Grant the rights of viewing this resource to the account of the computer belonging to the
domain on which Kaspersky Anti-Virus is run.
2. Define the local access rights for the same account for which you have configured the network access.
Local access privileges must be at least as broad as the network access rights.
Page 36

A D M I N I S T R A T O R ' S G U I D E
36
UPDATING FROM A NETWORK FOLDER: KASPERSKY ANTI-VIRUS IN A
WORKGROUP
System accounts of computers combined in a workgroup cannot be distinguished on a network. There is no way to
grant individual access rights to the processes running on behalf of the System account on another computer of a
workgroup. Therefore, when centralized updates within a workgroup are performed, the following steps are required:
Grant to the anonymous users the right to access the network location (ANONYMOUS LOGON).
Provide special anonymous access rights for the network location.
Let us discuss the guidelines that are used to assign the access rights.
Assigning the network access rights
The right to access the network location for reading should be provided to the ANONYMOUS LOGON account.
Assigning the local access rights
The local access rights should be provided to the same accounts that have been granted the network access rights; they
should be at least as broad as the network access rights.
To allow anonymous access to a network location in the security policy editor of Microsoft Windows Server 2003 /
2008, perform the following steps:
1. Start the local policy editor (Start → Control Panel → Administrative Tools → Local Security Policy).
2. Select the section Security Settings → Local Policies → Security Options.
3. Select in the details pane the setting Network access: Shares that can be accessed anonymously and open
its properties using the context menu. On the Local PolicySetting tab enter the name of the network location,
for which access should be allowed.
4. To apply the changes to the setting, select in the context menu of the Security Settings the command to
Reload them.
Page 37

37
ANTI-VIRUS SCAN
IN THIS SECTION
Configuring the anti-virus scan performance ................................................................................................................... 37
Configuring the HTTP traffic scan settings ...................................................................................................................... 38
Configuring the FTP traffic scan settings......................................................................................................................... 39
Configuring the SMTP traffic scan settings ..................................................................................................................... 39
Configuring the POP3 traffic scan settings ...................................................................................................................... 40
You can configure the anti-virus scan settings for optimal performance and security. To access the windows containing
necessary settings, select in the console tree the node corresponding to a particular server; the details pane will display
then the buttons opening the anti-virus scan settings.
CONFIGURING THE ANTI-VIRUS SCANNING PERFORMANCE
To open the anti-virus scan performance configuration window, perform the following steps:
1. Select in the Administration Console tree the node corresponding to the server.
2. Click the Anti-virus scan button in the right part of the details pane.
3. In the window that will open, select the Performance tab.
The following settings are defined by default:
Number of instances of the anti-virus engine. To increase the throughput of Kaspersky Anti-Virus while
processing intensive data streams, the application supports creating multiple instances of the anti-virus engine
running simultaneously. The value of this setting is calculated by default as 2n+1, where n is the number of
Microsoft ISA Server / Forefront TMG logic processors.
Including those for "fast" objects scan only. The anti-virus engine can work with a single object at a time. To
avoid cases when all engines are busy scanning large objects while smaller objects get stuck in the queue, you
are advised to reserve at least one engine instance for quick scanning of such smaller ("fast") objects. "Fast"
traffic objects only include the items pertaining to HTTP traffic matching the following criteria:
Text files smaller than 2 MB.
Image files smaller than 2 MB.
All other objects (except for programs) smaller than 256 KB.
Maximum number of objects scanned in the RAM – 128.
Size limit for object scanned in the RAM – 128 KB.
Kaspersky Anti-Virus filters can transfer objects for scanning directly to the anti-virus engine without prior saving to the
hard drive. If an object exceeds the value defined for the Size limit for object scanned in the RAM setting or the
memory already holds the number of objects specified in the Size limit for object scanned in the RAM setting, the
object will be saved to disk first.
Page 38

A D M I N I S T R A T O R ' S G U I D E
38
Maximum number of objects in scan queue – 1024. If a new object appears when the queue already
contains the specified number of objects, the new object will be conveyed to the client without scanning.
Information about the object skipped without scanning will be recorded in the application virus log (see section
"Diagnostics" on page 61).
Scanning timeout – 1800 sec. If a scanning duration exceeds the specified value, the object will be transferred
to the client without scanning. Information about the object skipped without scanning will be recorded to the
application virus log (see section "Diagnostics" on page 61).
Do not scan containers with nesting level above – 32 (inclusive). Maximum nesting level is 128.
You can modify the settings to improve performance. All the settings described above affect scanning of all protocols
monitored by the application. To return to the default values, click the button Restore default settings.
If download managers are used in multistream download mode, the Internet connection traffic may be increased. This
event also increases the risk for the client to receive a malicious object that has not been scanned. This may occur due
to the technical features of download managers and Kaspersky Anti-Virus. To reduce the risk, it is recommended that
you not use your download manager in multistream download mode.
CONFIGURING THE HTTP TRAFFIC SCAN SETTINGS
To open the configuration window, select in the console tree the node corresponding to the necessary server.
Click the HTTP traffic scan settings button in the details pane to the right.
The following settings are defined by default:
Maximum timeout before startup of data transfer to the client – 30 s. If scanning duration for the first data
portion exceeds the specified value and the object is not scanned entirely by that time or even not downloaded,
the object will be transferred to the client without scanning it.
Share of data preserved from being sent to the client until scan is complete - 30 percent. Kaspersky Anti-
Virus scans completely downloaded objects only. To accelerate object delivery to the client computer, the
application starts its transfer before the object scanning is complete, but the transfer will only be completed after
its scanning (provided it contains no threats). This setting controls the amount of data that will be held back until
scanning completion.
Transfer rate for objects still left unscanned. Editing this setting allows you to configure how quickly
unscanned HTTP traffic objects are received. Optimal value for this setting can only be identified by practical
considerable because it depends both on the anti-virus scan performance and the communication channel
based on your hardware.
In this window you can also edit the replacement templates for blocked files.
To edit a replacement template, perform the following steps:
1. Open the HTTP traffic scan settings window.
2. Click the Replacement templates button.
3. Select in the displayed window the type of blocked files:
Infected objects.
Suspicious objects.
Password-protected objects.
4. Click the Replacement template button next to the selected type.
Page 39

A N T I - V I R U S S C A N
39
Templates are stored in HTML format. You can edit a template using standard HTML tags. Macros supported in the
templates:
%URL% – variable containing the link of the detected object;
%VIRUSNAME% – variable containing the virus name. You can click the Macros button to view all available
macros.
%AV_SERVER% - name of the server running Kaspersky Anti-Virus.
To return to the default settings, perform the following steps:
1. Open the HTTP traffic scan settings window.
2. Click the Restore default settings button.
Clicking the Restore default settings button will restore the default values of the settings and replacement templates.
CONFIGURING THE FTP TRAFFIC SCAN SETTINGS
To open the configuration window, perform the following steps:
1. Select in the console tree the node corresponding to the necessary server.
2. Click the button FTP traffic scan settings in the details pane to the right.
The following settings are defined by default:
Maximum timeout before startup of data transfer to the client – 15 sec. If scanning duration for the first data
portion exceeds the specified value and the object is not downloaded or scanned entirely by that time, the object
will be transferred to the client without scanning.
Share of data preserved from being sent to the client until scan is complete - 10 percent. Kaspersky Anti-
Virus scans completely downloaded objects only. To accelerate object delivery to the client computer, the
application starts its transfer before the object scanning is complete, but the transfer will only be completed after
its scanning (provided it contains no threats). This setting controls the amount of data that will be held back until
scanning completion.
To return to the default settings, perform the following steps:
1. Open the FTP traffic scan settings window.
2. Click the Restore default settings button.
CONFIGURING THE SMTP TRAFFIC SCAN SETTINGS
To open the configuration window, perform the following steps:
1. Select in the console tree the node corresponding to the necessary server.
2. Click the button FTP traffic scan settings in the details pane to the right.
By default the option to Change subject of the infected mail is enabled.
To edit the message subject template.
Click the Replacement template button.
Page 40

A D M I N I S T R A T O R ' S G U I D E
40
To edit the replacement templates for blocked files in the same window, perform the following steps:
1. Click the Replacement templates button.
2. Select in the displayed window the type of blocked files:
Infected objects.
Suspicious objects.
Password-protected objects.
3. Click the Replacement template button for the selected type.
Templates are stored in HTML format. You can edit a template using standard HTML tags. Macros supported in the
templates:
%VIRUSNAME% – variable containing the virus name.
You can click the Macros button to view all available macros.
To return to the default settings, perform the following steps:
1. Open the SMTP traffic scan settings window.
2. Click the Restore default settings button.
Clicking the Restore default settings button will restore the default values of the settings and replacement templates.
CONFIGURING THE POP3 TRAFFIC SCAN SETTINGS
To open the configuration window, perform the following steps:
1. Select in the console tree the node corresponding to the necessary server.
2. Click the button HTTP traffic scan settings in the details pane to the right.
Scanning settings and replacement templates for POP3 traffic are identical to those for SMTP (see section "Configuring
the SMTP traffic scan settings" on page 39).
Page 41

41
USING THE ANTI-VIRUS POLICIES
You can use the anti-virus scanning policies to define – for various network objects and protocols – different protocol
handling rules, scan exclusions, and certain operations that are performed in response to threats (see section "Network
objects" on page 47). For example, you may specify the addresses of trusted traffic sources or exclude from scanning
certain file types. Policies allow you to configure the scanning settings in order to achieve the optimal ratio between the
protection level and performance.
There are three types of policies:
Protocol policy – the settings that are used to process FTP and HTTP traffic.
Scan exclusion policy – the settings that define objects excluded from scanning.
Virus scan policy – the settings that are used to process infected and password-protected objects.
Each policy is associated with a corresponding default rule, which cannot be deleted or modified. Any new rule will have
a priority higher than the default rule.
Policy rules are applied as follows: Original data (protocol, client and server addresses) is used to check the prioritybased list of rules until the application finds a matching protocol, group of client addresses and group of server
addresses that the existing client address fits into. The rule thus identified will be applied. The procedure is repeated for
the rules of each policy type.
To review the list of policies and rules, click the Policies node (see the figure below).
Figure 7. The Policies window
Page 42

A D M I N I S T R A T O R ' S G U I D E
42
IN THIS SECTION
Protocol policy ................................................................................................................................................................. 42
Anti-Virus exclusion policy ............................................................................................................................................... 42
Anti-Virus policy .............................................................................................................................................................. 43
Adding policy rules .......................................................................................................................................................... 43
Changing policy rule priority ............................................................................................................................................ 45
Changing policy rule settings .......................................................................................................................................... 45
Disabling a policy rule ..................................................................................................................................................... 45
Deleting a policy rule ....................................................................................................................................................... 46
PROTOCOL POLICY
The protocol policy defines the settings that are used to process FTP and HTTP traffic of the specified network objects.
By default the application uses the Default rule applied to all computers.
The rule for FTP is configured as follows:
Resumed downloads are not supported.
Unknown FTP client commands are not supported.
The rule for HTTP is configured as follows:
Resumed downloads are not supported.
HTTP version 0.9 is not supported.
ANTI-VIRUS EXCLUSION POLICY
Anti-Virus exclusion policy is used to configure the objects, which should be excluded from the scanning scope for the
specified network objects and protocols.
The application uses the following default rules applied to all computers and protocols:
Exclude trusted sites. The rule excludes from the scan scope objects received from the web sites trusted by
default (for example, kaspersky.com, microsoft.com).
Exclude streaming video. The rule excludes from the scan scope streaming video.
Default rule. The rule enforces the following settings:
Scan all file types
Scan archived files
Page 43

U S I N G T H E A N T I - V I R U S P O L I C I E S
43
ANTI-VIRUS POLICY
Anti-Virus policy defines the settings that are used to process malicious, suspicious objects and password-protected
archives for the specified network objects and protocols.
By default the application uses the Default rule applied to all computers. The rule enforces the following settings:
Block all revealed malicious files.
Skip password-protected objects.
Do not disinfect blocked objects.
Block suspicious objects.
Do not delete infected portions of compound objects.
ADDING POLICY RULES
You can add a rule for any of the existing policies.
To create a new protocol handling rule, please do the following:
1. Select in the Administration Console tree the node corresponding to the server. Select the Policies node.
2. Click the Add policy rule button.
3. Select Add protocol policy rule in the displayed menu. The new rule creation wizard will start.
4. Enter the Rule name in the corresponding field of the displayed dialog box. The rule name must be unique.
After you have entered name, click the Next button.
5. Use the next window to configure traffic processing for each of the protocols:
Support partial content download – check the box to enable resumed file downloads.
Allow unknown commands – check the box to enable support for unknown commands sent from the FTP
client.
Support HTTP 0.9 – check the box to enable support for HTTP version 0.9.
6. Click the Next button.
7. Use the next window to select the protocols to which the rule will be applied, by checking the corresponding
boxes. Click the Next button.
8. Specify in the next window the network objects whose outgoing traffic will be handled using the rule. To add a
network object, click the Add button. Click the Next button. Specify in the next window the network objects
whose incoming traffic will be handled using the rule. To add a network object, click the Add button. The rule
will only be applied to the traffic between the specified client computers and servers.
9. Click Finish to complete rule creation or use the Back and Next buttons to navigate between the wizard
screens.
10. To apply the changes to the antivirus policy, click the Apply button in the lower part of the window.
To create a new scanning exclusion rule, perform the following steps:
1. Select the node corresponding to the server in the Administration Console tree. Select the Policies node.
Page 44

A D M I N I S T R A T O R ' S G U I D E
44
2. Click the Add policy rule button.
3. Select Add exclusion policy rule in the displayed menu. The new rule creation wizard will start.
4. Enter the Rule name in the corresponding field of the displayed dialog box. The rule name must be unique.
After you have entered a name, press the Next button.
5. In the next window select from the dropdown list one of the values:
Exclude all objects – all objects from the list will be excluded from scanning.
Exclude selected objects types – only selected file types in the list will be excluded from scanning. To
select the necessary file type, check the box next to its name.
Scan all objects – scanning exclusions based on file types are not used.
6. Check or uncheck the box Scan containers to define the rule that will be used to process archives. Click the
Next button.
7. Use the next window to select the protocols to which the rule will be applied, by checking the corresponding
boxes. Click the Next button.
8. Specify in the next window the network objects whose outgoing traffic will be handled using the rule. To add a
network object, click the Add button. Click the Next button. Specify in the next window the network objects
whose incoming traffic will be handled using the rule. To add a network object, click the Add button. The rule
will only be applied to the traffic between the specified client computers and servers.
9. Click Finish to complete rule creation or use the Back and Next buttons to navigate between the wizard
screens.
10. To apply the changes to the anti-virus policy, click the Apply button in the lower part of the window.
To create a new Anti-Virus scanning rule, perform the following steps:
1. Select in the Administration Console tree the node corresponding to the server. Select the Policies node.
2. Click the Add policy rule button.
3. Select Add virus scan policy rule in the displayed menu. The new rule creation wizard will start.
4. Enter the Rule name in the corresponding field of the displayed dialog box. The rule name must be unique.
After you have entered name, click the Next button.
5. Click the Edit button to select the types of threats, which the application will block. In the displayed window
check the boxes next to the selected threat types and click OK. You can also select additional settings for
processing of the inspected objects:
Block suspicious objects – check the box to block suspicious objects.
Try to cure objects – check the box to make Kaspersky Anti-Virus disinfect malicious objects whenever
possible.
Delete infected parts from containers – check the box to make the Kaspersky Anti-Virus delete infected
portions of compound objects whenever possible. The checkbox becomes accessible if the Attempt
disinfection box is checked.
Backup blocked objects – check the box to save objects in the Backup storage prior to their blocking,
disinfection or removal.
6. Click the Next button.
7. In the next window define the settings that will be used to process password-protected objects:
Page 45

U S I N G T H E A N T I - V I R U S P O L I C I E S
45
Block password-protected objects – check the box to block password-protected objects.
Backup blocked objects – check the box to save blocked password-protected objects in the Backup
storage. The checkbox is accessible if the option to Block password-protected objects is enabled.
8. Click the Next button.
9. Use the next window to select the protocols to which the rule will be applied, by checking the corresponding
boxes. Click the Next button.
10. Specify in the next window the network objects whose outgoing traffic will be handled using the rule. To add a
network object, click the Add button. Click the Next button. Specify in the next window the network objects
whose incoming traffic will be handled using the rule. To add a network object, click the Add button. The rule
will only be applied to the traffic between the specified client computers and servers.
11. Click Finish to complete rule creation or use the Back and Next buttons to navigate between the wizard
screens.
12. To apply the changes to the antivirus policy, click the Apply button in the lower part of the window.
CHANGING POLICY RULE PRIORITY
To change policy rule priority, please do the following:
1. Select in the Administration Console tree the node corresponding to the server. Select the Policies node.
2. Highlight a rule in the table and click the Up button to increase the priority of that rule or the Down button to
decrease it.
3. To apply the changes to the antivirus policy, click the Apply button in the lower part of the window.
CHANGING POLICY RULE SETTINGS
To change policy rule priority, please do the following:
1. Select in the Administration Console tree the node corresponding to the server. Select the Policies node.
2. Highlight a rule in the table and click the Properties button to open its properties window. You can also doubleclick the rule to open the window.
3. Edit the rule settings.
4. Click OK to save your changes.
5. To apply the changes to the antivirus policy, click the Apply button in the lower part of the window.
DISABLING A POLICY RULE
To disable a policy rule, perform the following steps:
1. Select in the Administration Console tree the node corresponding to the server. Select the Policies node.
2. Highlight a rule in the table and click the Properties button.
3. In the displayed window use the General tab to uncheck the Enable box.
4. Click OK to save your changes.
Page 46

A D M I N I S T R A T O R ' S G U I D E
46
5. To apply the changes to the antivirus policy, click the Apply button in the lower part of the window.
To enable a policy rule, perform the same procedure in the reverse order.
DELETING A POLICY RULE
To delete a policy rule, perform the following steps:
1. Select in the Administration Console tree the node corresponding to the server. Select the Policies node.
2. Highlight a rule in the table and click the Properties button.
3. Confirm rule removal in the displayed dialog box.
4. To apply the changes to the antivirus policy, click the Apply button in the lower part of the window.
Page 47

47
NETWORK OBJECTS
IN THIS SECTION
Network object creation ................................................................................................................................................... 47
Changing network object properties ................................................................................................................................ 49
Removing network objects .............................................................................................................................................. 49
Network objects are used in the Anti-Virus policies. Four types of network objects exist:
Computer – IP address of the computer.
Subnet – several computers with the addresses included into the specified subnet.
Address ranges – several computers with the addresses within the specified range.
Domain name sets – one or several computers with the domain names matching the specified values.
To review the network objects summary table (see the figure below), click the Network objects node.
Figure 8. The Network objects window
NETWORK OBJECT CREATION
To create a network object of the "Computer" type, perform the following steps:
1. Select in the Administration Console tree the node corresponding to the server. Then select the Policies node
and Network objects.
2. Click the Add network object button.
3. Select in the displayed menu the command to Add computer.
4. Use the displayed window to specify the properties of the network object:
Name – unique name of the network object.
IP – IP address of object.
Page 48

A D M I N I S T R A T O R ' S G U I D E
48
Description – detailed description of the network object.
5. Click the OK button to save the changes and close the window.
6. To apply the changes to the network objects, click the Apply button in the lower part of the window.
To create a network object of the "Subnet" type, perform the following steps:
1. Select in the Administration Console tree the node corresponding to the server. Then select the Policies node
and Network objects.
2. Click the Create an object button.
3. Select in the displayed menu the command to Add subnet.
4. Use the displayed window to specify the properties of the network object:
Name – unique name of the network object.
IP – IP address of object.
Mask – subnet mask.
Description – detailed description of the network object.
5. Click the OK button to save the changes and close the window.
6. To apply the changes to the network objects, click the Apply button in the lower part of the window.
To create a network object of the "Address range" type, perform the following steps:
1. Select in the Administration Console tree the node corresponding to the server. Then select the Policies node
and Network objects.
2. Click the Add network object button.
3. Select in the displayed menu the command to Add address range.
4. Use the displayed window to specify the properties of the network object:
Name – unique name of the network object.
Start IP – initial IP address of the range.
End IP – final IP address of the range.
Description – detailed description of the network object.
5. Click the OK button to save the changes and close the window.
6. To apply the changes to the network objects, click the Apply button in the lower part of the window.
To create a network object of the "Domain names" type, perform the following steps:
1. Select in the Administration Console tree the node corresponding to the server. Then select the Policies node
and Network objects.
2. Click the Add network object button.
3. Select in the displayed menu the command to Add domain names.
4. Use the displayed window to specify the properties of the network object:
Page 49

N E T W O R K O B J E C T S
49
Name – unique name of the network object.
Description – detailed description of the network object.
5. Click the Add button and enter in the displayed window the domain name to add it to the Domain names list.
You can use the Remove button to remove an object from the list. The domain name must contain the name in
regular notation, for example, microsoft.com or msdn.microsoft.com. A domain name may also contain the
wildcard character (*) standing for an arbitrary number of subdomains. For example, the *.microsoft.com domain
name will include the domain names of microsoft.com, www.microsoft.com, files.download.microsoft.com, etc.
The * may only be used once in a name. Domain names may not contain the protocol prefixes (templates like
http://*.microsoft.com, ://microsoft.com, etc.); such templates are incorrect and will be ignored in policies.
6. Click the OK button to save the changes and close the window.
7. To apply the changes to the network objects, click the Apply button in the lower part of the window.
CHANGING NETWORK OBJECT PROPERTIES
To modify the properties of a network object belonging to any type, perform the following steps:
1. Select in the Administration Console tree the node corresponding to the server. Then select the Policies node
and navigate to Network objects.
2. Highlight a rule in the table and click the Properties button to open its properties window. You can also doubleclick the rule to open the window.
3. Edit the network object properties and click OK to save the changes.
4. To apply the changes to the network objects, click the Apply button in the lower part of the window.
REMOVING NETWORK OBJECTS
To remove network object, please do the following:
1. In the Administration Console tree, select the node corresponding to the server. Then select the Policies node
and Network objects.
2. Highlight an object in the table and click the Remove button.
3. Confirm the object removal in the displayed dialog box.
The selected object will be removed.
A network object can only be removed if it does not participate in the existing Anti-Virus policies.
Page 50

50
REPORTS
Kaspersky Anti-Virus provides an opportunity to generate reports on anti-virus protection of the server categorized by all
the protected protocols. Each report is a table listing the events and operations that took place while the application was
running.
The reports are generated automatically according to the schedule, or manually by request, and can be saved on a disk.
Reports saved on a disk are created in HTML page format, and are stored in the Reports subfolder within the application
data folder. Internet Explorer is used to view the reports.
You can work with the reports in the Reports window (see figure below), where you may create, view, delete or
configure the application reports. Reporting settings are determined by the report generation task.
To open the Reports window, select in the console tree to the left the node corresponding to the necessary server, and
then its Reports node. The Reports window will open in the details pane in the right part of the screen. The Reports
window lists the report generation tasks, which you can configure, view or delete. The dropdown list contains the
following items:
Task name – name of a report generation task.
Task status – current status of a report generation task.
Execution results – latest result of a report generation task.
If necessary, you may add other tasks with custom settings including the report period duration, name, description and
the amount of reported details.
Figure 9. The Reports window
Page 51

R E P O R T S
51
IN THIS SECTION
Creating a report generation task .................................................................................................................................... 51
Viewing a report .............................................................................................................................................................. 51
Clearing a report ............................................................................................................................................................. 52
Clearing a report generation task ................................................................................................ .................................... 52
Changing the report generation settings ......................................................................................................................... 52
Changing the general reporting settings.......................................................................................................................... 52
Clearing the statistical data for reports ............................................................................................................................ 53
CREATING A REPORT GENERATION TASK
To create a report generation task, perform the following steps:
1. Select in the console tree the node corresponding to the necessary server, and then navigate to the Reports
node. The Reports window will open in the details pane in the right part of the screen.
2. Click the Add button. The new report task wizard will start.
3. Use the first window of the new report wizard (Information for task) to enter the task name in the Task name
field and task description in the Description field. Click the Next button.
4. Use the next Report settings screen to specify the amount of details in the report: standard or detailed. Select
the time interval to be covered in the report. Click the Next button.
5. You can use the next Report settings screen to enable automatic report generation. To do that, check the box
Generate report automatically and define the time when the report should be generated. If you leave the
option disabled, you will have to start report generation manually. Click the Finish button.
The new report generation task will be created; it will appear in the list with the specified settings. If automatic
report generation has been configured, the report will be generated when the specified time is reached. If
manual start is selected, the report will be generated after pressing the Create report button.
The progress of a report generation task is reflected in the Task status column of the general reports table.
Cleared information will be missing in the report if the statistics clearing date is within the reported interval. Statistical
data for reports can be deleted manually; the application also deletes it automatically when the specified storage duration
is exceeded (1 year by default).
VIEWING A REPORT
To view a report, perform the following steps:
1. In the console tree,select the node corresponding to the server, then navigate to the Reports node. The
Reports window will open in the details pane in the right part of the screen.
2. Select in the list a report generation task that is used to produce the required report.
Page 52

A D M I N I S T R A T O R ' S G U I D E
52
3. Click the View report button. The last generated report will be displayed. You can review the list of all reports in
the properties of the report generation task, on the Reports tab.
4. In the window that opens create the required report and click the View button. The contents of the selected
report will be displayed in a new window.
CLEARING A REPORT
To remove a created report, please do the following:
1. Select in the console tree the node corresponding to the necessary server, and then navigate to the Reports
node. The Reports window will open in the details pane in the right part of the screen.
2. Select Properties in the shortcut menu of the report generation task where a generated report has to be
cleared. The task properties window will be displayed.
3. In the window that will open, select the Reports tab.
4. Highlight the report and click the Delete button.
CLEARING A REPORT GENERATION TASK
To delete a report generation task, perform the following steps:
1. Select in the console tree the node corresponding to the necessary server, then navigate to the Reports node.
The Reports window will open in the details pane in the right part of the screen.
2. Select the Delete command in the shortcut menu of the report generation task.
CHANGING THE REPORT GENERATION SETTINGS
To modify the properties of a report generation task, perform the following steps:
1. In the console tree, select the nodecorresponding to the server, and then navigate to the Reports node. The
Reports window will open in the details pane in the right part of the screen.
2. Select the Properties command in the shortcut menu of the report generation task. The task properties window
will be displayed.
3. Edit the task properties (see section "Creating a report generation task" on page 51).
CHANGING THE GENERAL REPORTING SETTINGS
To modify the general report properties, perform the following steps:
1. In the console tree, select the node correspondingto the server, and then navigate to the Reports node. Open
the shortcut menu and choose the Properties command. The general reporting settings will be displayed.
2. You can use the window to enable or disable reporting by selecting or deselecting the box Store statistics.
3. To configure the duration of statistics data storage, select the necessary time in the field Not longer than.
4. To return to the default settings, click the Restore default settings button.
Page 53

R E P O R T S
53
CLEARING THE STATISTICAL DATA FOR REPORTS
Statistical information that is used to generate reports is preserved in a special database. The data is purged
automatically when their age exceeds the threshold specified in the general reporting settings (the default value is 1
year). If the database accumulates a lot of data, the performance of data processing may decline. You can delete
statistical data manually, if necessary.
To delete statistical data, perform the following steps:
1. Open the general reporting settings window (see section "Changing the general reporting settings" on page 52).
2. Click the Delete statistics button.
Page 54

54
MONITORING THE APPLICATION ACTIVITY
IN THIS SECTION
Kaspersky Anti-Virus runtime status ............................................................................................................................... 55
Statistics on Kaspersky Anti-Virus activity ....................................................................................................................... 55
Kaspersky Anti-Virus activity can be supervised using the Monitoring window (see figure below), where you can view
the information about the application settings and the statistics of scanned objects. The data allows you to monitor
efficiently Kaspersky Anti-Virus operations, quickly check the functioning of all filters, the status of the Anti-Virus
database updates, and the license.
To open the Monitoring, window, select in the console tree the node corresponding to the necessary server and then
navigate to its Monitoring node. The Monitoring window will open in the details pane in the right part of the screen.
Figure 10. The Monitoring window
Page 55

M O N I T O R I N G T H E A P P L I C A T I O N A C T I V I T Y
55
KASPERSKY ANTI-VIRUS RUNTIME STATUS
The Status pane provides the following information about Kaspersky Anti-Virus parameters:
Application status – description of available application functionality. The following values are possible:
Protection disabled, database updates are not available.
Only database updates are available.
The application functions except for the database update feature.
Complete functionality.
Anti-virus protection – current status of the anti-virus protection. If protection is disabled, the traffic of client
computers will not be scanned. The following values are possible:
Disabled.
Enabled.
Internal error. Protection not available.
License-based restriction.
Web, FTP, SMTP, POP3 filters – current status of the filters (enabled or disabled). Protection of the traffic
associated with a certain protocol is only performed if the corresponding filter is enabled.
License type – license type. The following license types exist:
Commercial – such keys are intended for activation of lawfully purchased software products of Kaspersky
Lab. A commercial license key allows you to use the corresponding product for its designated purposes for
the time period determined at purchase.
Trial key is intended to provide an opportunity to learn more about the functionality of Kaspersky Lab
products for the specified time period. Kaspersky Lab provides trial keys without charge.
If the license is not installed, the field will contain an error notification indicating the problem cause.
License validity period – date until which the current license remains valid.
Anti-Virus bases release date – date and time when the current Anti-Virus database was released.
Last update result – result of the last Anti-Virus database update.
Objects in Backup – total number of objects placed in Backup and occupied disk space (KB).
STATISTICS ON KASPERSKY ANTI-VIRUS ACTIVITY
The Statistics pane displays statistical information about scanned objects. The table indicates the number of scanned
objects, infected objects, timeouts while scanning and scanner errors. All the data are summarized and also provided
separately for HTTP, FTP, SMTP / POP3 traffic. You can review the information for the last day or last week. To switch
the view, click the corresponding links.
Below the table you can see graphically the detected infected objects arranged in time (with an hourly scale for the daily
graph and with a daily scale for the weekly graph). The color blue indicates the objects received via HTTP, green is for
objects received via FTP, and red is for objects that arrived via SMTP and POP3.
Page 56

56
BACKUP NODE
IN THIS SECTION
Backup settings ............................................................................................................................................................... 56
Review information about stored objects......................................................................................................................... 57
Configuring the Backup appearance ............................................................................................................................... 57
Dynamic filtering of the object list .................................................................................................................................... 58
Filter creation in Backup .................................................................................................................................................. 58
Saving an object from Backup to disk ............................................................................................................................. 59
Saving the list of objects in Backup ................................................................................................................................. 59
Deleting objects from Backup. ......................................................................................................................................... 59
Backup is the storage where the application preserves unchanged copies of dangerous or password-protected objects
made before their processing. Later objects in Backup can be restored or deleted. The opportunity to restore an object
may be useful, for example, if its disinfection resulted in data loss. Objects are stored in Backup in special format posing
no danger.
The window (see figure below) displays the list of objects in Backup. You can perform the following operations with the
objects:
Review information about stored objects.
Save objects to disk.
Delete objects.
Save the list of objects to disk.
Figure 11. The Backup storage window
You may use dynamic filters (see section "Dynamic filtering of the object list" on page 58) and static filters (see section
"Filter creation in Backup" on page 58) to search conveniently the list of objects.
BACKUP SETTINGS
To open the Backup settings window, select in the console tree the node corresponding to the necessary server, and
then proceed to its Backup node. Right click the details pane to the right to display its shortcut menu and select
Properties in it.
Page 57

B A C K U P N O D E
57
The following settings are defined by default:
Backup size limit - 1024 MB. If the size of an object being placed in the Backup exceeds the maximum storage
size when added to the objects already stored there, the oldest object in storage will be deleted.
Store objects in Backup for – 30 days. A stored object will be deleted automatically once the specified time
elapses.
Maximum number of objects in Backup – 1 mln. When this number is exceeded, the application will delete
from the storage the oldest object.
To return to the default values, click the button Restore default settings.
REVIEW INFORMATION ABOUT STORED OBJECTS
To review information about an object in Backup, perform the following steps:
1. Select in the console tree the node corresponding to the necessary server, and then proceed to its Backup
node. The Backup window will open in the details pane to the right as a table listing all the objects stored
inside.
2. Find the required object in the table and view its properties. If necessary, you may use a filter (see section
"Dynamic filtering of the object list" on page 58).
You can view more detailed information about each object using the Properties command in its shortcut menu. The
displayed window will provide the following information:
Name – file name.
Description – link to the object description.
Virus – name of the virus.
Protocol – the protocol that was used to transfer the object.
Source server – server from which the file was received.
Destination server – server that received the file.
Status – object status.
Moved to Backup – date and time when the object was placed in the backup storage.
Size – object size.
Database released on – release date and time of the Anti-Virus database that is used to detect the object.
CONFIGURING THE BACKUP APPEARANCE
You can configure the type of the backup storage filter by adding or deleting some table columns.
To add or delete columns in the Backup table, perform the following steps:
1. Select in the console tree the node corresponding to the necessary server, and then proceed to its Backup
node. The Backup window will be displayed in the details pane to the right.
Page 58

A D M I N I S T R A T O R ' S G U I D E
58
2. Select in the shortcut menu of the window View, then Add/Remove Columns.
3. In the displayed Add/Remove Columns dialog box use the Add and Remove button to move columns from the
available list to the list of items displayed in the details pane and move them back.
4. Click the OK button to save the changes.
Column width can be automatically adjusted to its content by pressing the Ctrl+NumPlus keyboard shortcut.
DYNAMIC FILTERING OF THE OBJECT LIST
The use of filters allows searching and structuring of the data contained in backup storage, as only the information
complying with the filtering parameters becomes available. Filtering can be performed using the contents of any list
column.
To filter objects using a dynamic filter with selected conditions, perform the following steps:
1. Select in the console tree the node corresponding to the necessary server, and then proceed to its Backup
node. The Backup window will open in the details pane to the right as a table listing all the objects stored
inside.
2. Upper part of the table contains entry fields for the filter conditions. Define the filtering conditions by entering the
appropriate values in each necessary column (you can filter objects by one or several columns).
3. The filter will be applied automatically in a few seconds after you complete entering it or after pressing the
ENTER key in the entry field. The filter will also be applied immediately after you select an item from the dropdown menu or after clicking OK in the appropriate entry dialog box for the feature. A filter can also be applied by
clicking the button next to the condition entry field (if you need to filter data using one condition), or the Refresh
button on the toolbar of Kaspersky Anti-Virus.
You can also immediately refresh the Backup table view by pressing the F5 key. The functionality allows you to monitor
in real time information about the objects placed in the Backup storage.
To reset a dynamic filter and display all records in the table, delete all characters in the entry field and apply the filter or
select All from the drop-down menu in the appropriate column of the table.
FILTER CREATION IN BACKUP
To reuse the selected filter settings in the Backup object of the console tree, you can create a filter object.
To create a filter object, perform the following steps:
1. Select in the Administration Console tree the Backup node.
2. Open the context menu and select the item New filter. The new filter wizard will start.
3. Perform the steps suggested by the wizard during the procedure.
To apply the created filter, click the button next to the field in the filter table and select the filter name in the shortcut
menu.
Page 59

B A C K U P N O D E
59
SAVING AN OBJECT FROM BACKUP TO DISK
To save an object from the Backup storage to disk, perform the following steps:
1. Select in the console tree a node Backup node.
2. Select the object you wish to restore in the table displaying the backup storage contents. You can use a filter to
search for objects (see section "Dynamic filtering of the object list" on page 58).
3. Open the context menu and use the Save to disk command or the corresponding command in the Action
menu.
4. In the warning dialog box that will open, confirm the restoration of the object by pressing the Yes button.
5. In the window that will open, specify the folder to which you wish to save the restored object, and if necessary,
enter or modify the object name.
6. Click the Save button.
The application will decode the encrypted object, move it to the specified folder and save it with the specified name. The
restored file will be identical to its original. After the object is successfully restored, a corresponding notification is
displayed on the screen.
SAVING THE LIST OF OBJECTS IN BACKUP
You can save the list of objects in Backup storage to a text file. Information about the objects will be summarized in a
table.
To save the list of objects in Backup to a text file, perform the following steps:
1. Select in the console tree the node corresponding to the server, and then navigate to the Backup node.
2. Select in the shortcut menu of the Backup node the command to Export List.
3. In the displayed dialog box specify the destination folder and the name of the file where the list of objects will be
exported.
4. Click the Save button to save the file.
DELETING OBJECTS FROM BACKUP
The following objects are automatically deleted from backup storage:
The oldest object, if adding a new object will exceed the restriction imposed on the total number of objects in
backup storage. The maximum number of files in this version is limited to one million.
"Older" objects, if there is a restriction imposed on the backup storage size, and if there is not enough space to
store a new object.
Objects whose storage period has expired, if there is a restriction imposed on the storage period.
Objects may also be manually removed from backup storage. This feature may prove useful for deleting objects that
have been successfully restored, and for creating free space in the Backup storage if automatic object removal methods
did not help.
To delete objects from backup storage manually:
1. Select in the console tree the Backup node.
Page 60

A D M I N I S T R A T O R ' S G U I D E
60
2. Select the objects you wish to delete in the table listing the Backup storage contents. You can use a filter to
search for objects (see section "Dynamic filtering of the object list" on page 58). You can delete several or all
objects at once. To do that, select all the objects you plan to delete.
3. Open the context menu and use the Delete command, or use the corresponding item in the Action menu.
4. Confirm the object removal in the displayed dialog box.
As a result of these actions, the object will be deleted from backup storage.
Page 61

61
DIAGNOSTICS
You can set up logging in Kaspersky Anti-Virus so that its activity can be easily checked during all stages of traffic
screening.
To open the diagnostics configuration window, perform the following steps:
1. Select in the console tree the node corresponding to the necessary server.
2. Click the Anti-virus scan button in the right part of the details pane.
3. Select the Diagnostics tab (see the figure below).
The following log types exist:
Text log – the log contains specified details of the application activity on the specified date. Log file name
format: kavisaYYYYMMDD.log, where DD stands for the current day, MM for the month, and YYYY for the year.
Text log – the log contains specified details of the filters activity on the specified date. Log file name format:
kavfltYYYYMMDD.log, where DD stand for the current day, MM for the month, and YYYY for the year.
Anti-Virus log – the log contains specified details about the malicious objects detected on the specified date.
Log file name format: viruslogYYYYMMDD.log, where DD stands for the current day, MM for the month, and
YYYY for the year.
Log files are stored in the folder specified in the Log folder on server field. You can change the following logging
settings:
Diagnostics level. The details can be selected for both logs:
Custom – configurable logging level. It is only available for text logs. To configure logging, click the
Advanced Settings button and select the details that will be logged for every component of the application.
None – log no data.
Minimum – log only major events. The default value.
Medium – in addition to major events, log some events that describe the application operation in more
detail.
Maximum - log full information about the operation of the module, except the debug messages.
Debug - log all information, including debug messages. This level of diagnostics displays a large number of
messages, which can lead to reduced server productivity and take up large amounts of hard disk space.
This mode is recommended only when diagnosing errors in the program's functions.
Register events in. Timestamp format: Coordinated Universal Time (UTC) or local time of the server. The
default value is UTC.
Store no more than N log files. The number of logs preserved on disk. The N value may range from 1 to 365.
The default value is 5.
Page 62

A D M I N I S T R A T O R ' S G U I D E
62
Create new log once a T. T is the frequency that determines how often new log files are created. New files can
be created once a day, week, or month. The default value is month.
Figure 12. The Diagnostics tab
Page 63

63
CHANGING THE APPLICATION DATA FOLDER LOCATION
You can change the location of the application data folder, using the DataMigrationTool.exe migration utility.
To change the location of the application data folder, perform the following steps:
1. Open the console window in Microsoft Windows. To open the window, you can use the following method:
Use the following key combination WINDOWS KEY + R.
Type in the displayed Run dialog box the command cmd and press ENTER.
2. Change the current folder of the Microsoft Windows console to the folder where Kaspersky Anti-Virus is installed
using the command cd [path to the application directory]. For example, cd C:\Program
Files\Kaspersky Lab\Kaspersky Anti-Virus 8.0 for Microsoft ISA Server and
Forefront TMG Standard Edition\. You can check the path to the installation folder of Kaspersky Anti-
Virus in the General settings window on the Administration Console folders tab in the Application
installation folder field.
3. Run in Microsoft Windows console the command DataMigrationTool.exe [path to the new
application data folder]. For example, DataMigrationTool.exe c:\data\KAV4ISA. If the new
folder for Kaspersky Anti-Virus data exists already, it must be empty.
4. Press the SPACE key to confirm the data folder migration.
5. Then the utility will stop the services of Microsoft Firewall and Kaspersky Anti-Virus, check all conditions
required for successful migration and begin copying files. After successful copying of the files and recording of
the changes to the configuration, the utility will start the stopped services automatically.
6. Once the utility completes its work, it will display the notification: Data migration to the folder [path to the new
application data folder] completed successfully.
You can check the path to the application data folder in the General settings window, on the Administration Console
folders tab in the Data folder field.
Page 64

64
ENABLING HTTPS TRAFFIC INSPECTION
The product also scans incoming HTTPS traffic for Forefront TMG. No additional scanning configuration is required for
HTTPS, the application uses the settings defined for HTTP. To allow Kaspersky Anti-Virus to scan HTTPS traffic, you
have to enable traffic inspection in the Management console of Forefront TMG.
To enable inspection of HTTP traffic, perform the following steps:
1. Open the Management console of Forefront TMG.
2. Select in the Management console the necessary server node, then the Web Access Policy node.
3. On the Tasks tab click the button Configure HTTPS Inspection.
4. In the displayed HTTPS Outbound Inspection window, on the General tab check the box Enable HTTPS
Inspection.
5. Click OK to close the window.
6. Click Apply to save the changes and update configuration.
Page 65

65
APPENDIX 1. CHANGES TO THE MICROSOFT WINDOWS REGISTRY
When Kaspersky Anti-Virus is installed on a 32-bit platform, the following records are added to the Microsoft Windows
registry:
HKEY_CLASSES_ROOT\AppID\{9F99C160-A3C7-438d-9BF8-76BE4D65370B}
HKEY_CLASSES_ROOT\AppID\{BE11C033-F253-400D-A7DC-931F193CDC9F}
HKEY_CLASSES_ROOT\AppID\kavisasrv.exe
HKEY_CLASSES_ROOT\AppID\KavHost.exe
HKEY_CLASSES_ROOT\CLSID\{162D6D1C-BEE9-4ae0-9E63-AA5E451A9985}
HKEY_CLASSES_ROOT\CLSID\{372C6E94-BA70-4493-893E-44A86EFA5FBA}
HKEY_CLASSES_ROOT\CLSID\{583F03A3-E02B-46D7-839D-4CBC63F82D59}
HKEY_CLASSES_ROOT\CLSID\{5CCFC1A2-A174-4A6C-9F84-B33C5FE14BF1}
HKEY_CLASSES_ROOT\CLSID\{620FF8BD-4798-4807-A2AB-F625B0EB3B44}
HKEY_CLASSES_ROOT\CLSID\{7A78B705-8CA4-4301-AADF-55F54E6A01AE}
HKEY_CLASSES_ROOT\CLSID\{84C221B0-73E9-4885-A044-30192B4DBC36}
HKEY_CLASSES_ROOT\CLSID\{92C67CDB-A762-43a7-A96D-E1A9D15686A5}
HKEY_CLASSES_ROOT\CLSID\{948600BB-5D4E-4808-B338-312257496A69}
HKEY_CLASSES_ROOT\CLSID\{9F3FD649-0012-4245-A443-CC23CFF9F713}
HKEY_CLASSES_ROOT\CLSID\{CFC47218-E213-405a-859E-2CEE0367ED6F}
HKEY_CLASSES_ROOT\CLSID\{D6E53EF2-B6B2-4A1A-ACF4-0F7B5C656D98}
HKEY_CLASSES_ROOT\CLSID\{D8CF93DF-788A-4699-9071-F3A854E5957C}
HKEY_CLASSES_ROOT\CLSID\{D8EE0CCE-F573-47cb-856B-37540B0DB34F}
HKEY_CLASSES_ROOT\CLSID\{DACDDD16-3454-49cc-B758-693FA413BB64}
HKEY_CLASSES_ROOT\CLSID\{E1F068E0-0FC0-4B8B-BE9A-6BDE3F496080}
HKEY_CLASSES_ROOT\CLSID\{F7CA6538-BCB6-44b0-A266-54C7C921F7C5}
HKEY_CLASSES_ROOT\Interface\{448D32AF-54D0-4BBD-8A81-C368E2C6E533}
HKEY_CLASSES_ROOT\Interface\{B620A5D5-8551-4887-B304-9800387A24CA}
HKEY_CLASSES_ROOT\KAV.ISD.IsaMmc.IsaAdmAbout
HKEY_CLASSES_ROOT\KAV.ISD.IsaMmc.IsaAdmAbout.1
HKEY_CLASSES_ROOT\KAV.ISD.IsaMmc.IsaAdmComponentData
HKEY_CLASSES_ROOT\KAV.ISD.IsaMmc.IsaAdmComponentData.1
HKEY_CLASSES_ROOT\KAV.ISD.ISAV.FtpFilter
HKEY_CLASSES_ROOT\KAV.ISD.ISAV.FtpFilter.1
HKEY_CLASSES_ROOT\KAV.ISD.ISAV.isavpop3.Pop3Filter
HKEY_CLASSES_ROOT\KAV.ISD.ISAV.isavpop3.Pop3Filter.1
HKEY_CLASSES_ROOT\KAV.ISD.ISAV.isavsmtp.SmtpFilter
HKEY_CLASSES_ROOT\KAV.ISD.ISAV.isavsmtp.SmtpFilter.1
HKEY_CLASSES_ROOT\KAV.ISD.ISAV.Watchdog3
HKEY_CLASSES_ROOT\KAV.ISD.ISAV.Watchdog3.1
HKEY_CLASSES_ROOT\KavHost.KavHost
HKEY_CLASSES_ROOT\KavHost.KavHost.1
HKEY_CLASSES_ROOT\TypeLib\{7FCD1648-8A7B-41AF-B76C-0699922B8770}
HKEY_LOCAL_MACHINE\SOFTWARE\KasperskyLab
HKEY_LOCAL_MACHINE\SOFTWARE\Microsoft\MMC\SnapIns\FX:{AA517B36-9B43-4246-9122-1AB672E4A6E1}
HKEY_LOCAL_MACHINE\SOFTWARE\Microsoft\MMC\NodeTypes\{2F8FE3D1-9A16-4ED3-B6C6-F912D99E99FD}
HKEY_LOCAL_MACHINE\SOFTWARE\Microsoft\MMC\SnapIns\{162D6D1C-BEE9-4ae0-9E63-AA5E451A9985}
HKEY_LOCAL_MACHINE\SOFTWARE\Microsoft\MMC\SnapIns\{372C6E94-BA70-4493-893E-44A86EFA5FBA}
HKEY_LOCAL_MACHINE\SOFTWARE\Microsoft\MMC\SnapIns\{620FF8BD-4798-4807-A2AB-F625B0EB3B44}
HKEY_LOCAL_MACHINE\SOFTWARE\Microsoft\MMC\SnapIns\{92C67CDB-A762-43a7-A96D-E1A9D15686A5}
HKEY_LOCAL_MACHINE\SOFTWARE\Microsoft\MMC\SnapIns\{948600BB-5D4E-4808-B338-312257496A69}
HKEY_LOCAL_MACHINE\SOFTWARE\Microsoft\MMC\SnapIns\{CFC47218-E213-405a-859E-2CEE0367ED6F}
HKEY_LOCAL_MACHINE\SOFTWARE\Microsoft\MMC\SnapIns\{D8CF93DF-788A-4699-9071-F3A854E5957C}
HKEY_LOCAL_MACHINE\SOFTWARE\Microsoft\MMC\SnapIns\{D8EE0CCE-F573-47cb-856B-37540B0DB34F}
HKEY_LOCAL_MACHINE\SOFTWARE\Microsoft\MMC\SnapIns\{F7CA6538-BCB6-44b0-A266-54C7C921F7C5}
Page 66

A D M I N I S T R A T O R ' S G U I D E
66
HKEY_LOCAL_MACHINE\SOFTWARE\Microsoft\Windows\CurrentVersion\SharedDlls
HKEY_LOCAL_MACHINE\SOFTWARE\Microsoft\Windows\CurrentVersion\Uninstall\{0D40E22B-2FB4-4237-AB633FFA9A4CE2EA}
HKEY_LOCAL_MACHINE\SOFTWARE\Wow6432Node\Microsoft\Windows\CurrentVersion\Uninstall\Kaspersky AntiVirus 8.0 for ISA Server and Forefront TMG SE
HKEY_LOCAL_MACHINE\SOFTWARE\Microsoft\Windows NT\CurrentVersion\Perflib
HKEY_LOCAL_MACHINE\SYSTEM\CurrentControlSet\Services\Eventlog\Application\ISAV
HKEY_LOCAL_MACHINE\SYSTEM\CurrentControlSet\Services\Eventlog\Application\KAV
HKEY_LOCAL_MACHINE\SYSTEM\CurrentControlSet\Services\Kavisasrv
When Kaspersky Anti-Virus is installed on a 64-bit platform, the following records are added to the Microsoft Windows
registry:
HKEY_CLASSES_ROOT\AppID\{9F99C160-A3C7-438d-9BF8-76BE4D65370B}
HKEY_CLASSES_ROOT\AppID\{BE11C033-F253-400D-A7DC-931F193CDC9F}
HKEY_CLASSES_ROOT\AppID\kavisasrv.exe
HKEY_CLASSES_ROOT\AppID\KavHost.exe
HKEY_CLASSES_ROOT\CLSID\{583F03A3-E02B-46D7-839D-4CBC63F82D59}
HKEY_CLASSES_ROOT\CLSID\{5CCFC1A2-A174-4A6C-9F84-B33C5FE14BF1}
HKEY_CLASSES_ROOT\CLSID\{7A78B705-8CA4-4301-AADF-55F54E6A01AE}
HKEY_CLASSES_ROOT\CLSID\{7CBB6809-47B8-48D5-8ACD-8085935CCF6E}
HKEY_CLASSES_ROOT\CLSID\{84C221B0-73E9-4885-A044-30192B4DBC36}
HKEY_CLASSES_ROOT\CLSID\{9F3FD649-0012-4245-A443-CC23CFF9F713}
HKEY_CLASSES_ROOT\CLSID\{D6E53EF2-B6B2-4A1A-ACF4-0F7B5C656D98}
HKEY_CLASSES_ROOT\Interface\{448D32AF-54D0-4BBD-8A81-C368E2C6E533}
HKEY_CLASSES_ROOT\Interface\{B620A5D5-8551-4887-B304-9800387A24CA}
HKEY_CLASSES_ROOT\KAV.ISD.IsaMmc.IsaAdmAbout
HKEY_CLASSES_ROOT\KAV.ISD.IsaMmc.IsaAdmAbout.1
HKEY_CLASSES_ROOT\KAV.ISD.IsaMmc.IsaAdmComponentData
HKEY_CLASSES_ROOT\KAV.ISD.IsaMmc.IsaAdmComponentData.1
HKEY_CLASSES_ROOT\KAV.ISD.ISAV.FtpFilter
HKEY_CLASSES_ROOT\KAV.ISD.ISAV.FtpFilter.1
HKEY_CLASSES_ROOT\KAV.ISD.ISAV.isavpop3.Pop3Filter
HKEY_CLASSES_ROOT\KAV.ISD.ISAV.isavpop3.Pop3Filter.1
HKEY_CLASSES_ROOT\KAV.ISD.ISAV.isavsmtp.SmtpFilter
HKEY_CLASSES_ROOT\KAV.ISD.ISAV.isavsmtp.SmtpFilter.1
HKEY_CLASSES_ROOT\KAV.ISD.ISAV.Watchdog3
HKEY_CLASSES_ROOT\KAV.ISD.ISAV.Watchdog3.1
HKEY_CLASSES_ROOT\KavHost.KavHost
HKEY_CLASSES_ROOT\KavHost.KavHost.1
HKEY_CLASSES_ROOT\TypeLib\{7FCD1648-8A7B-41AF-B76C-0699922B8770}
HKEY_CLASSES_ROOT\Wow6432Node\AppID\{9F99C160-A3C7-438d-9BF8-76BE4D65370B}
HKEY_CLASSES_ROOT\Wow6432Node\AppID\{BE11C033-F253-400D-A7DC-931F193CDC9F}
HKEY_CLASSES_ROOT\Wow6432Node\AppID\KavHost.exe
HKEY_CLASSES_ROOT\Wow6432Node\AppID\kavisasrv.exe
HKEY_CLASSES_ROOT\Wow6432Node\CLSID\{162D6D1C-BEE9-4ae0-9E63-AA5E451A9985}
HKEY_CLASSES_ROOT\Wow6432Node\CLSID\{372C6E94-BA70-4493-893E-44A86EFA5FBA}
HKEY_CLASSES_ROOT\Wow6432Node\CLSID\{5CCFC1A2-A174-4A6C-9F84-B33C5FE14BF1}
HKEY_CLASSES_ROOT\Wow6432Node\CLSID\{620FF8BD-4798-4807-A2AB-F625B0EB3B44}
HKEY_CLASSES_ROOT\Wow6432Node\CLSID\{7A78B705-8CA4-4301-AADF-55F54E6A01AE}
HKEY_CLASSES_ROOT\Wow6432Node\CLSID\{7CBB6809-47B8-48D5-8ACD-8085935CCF6E}
HKEY_CLASSES_ROOT\Wow6432Node\CLSID\{92C67CDB-A762-43a7-A96D-E1A9D15686A5}
HKEY_CLASSES_ROOT\Wow6432Node\CLSID\{948600BB-5D4E-4808-B338-312257496A69}
HKEY_CLASSES_ROOT\Wow6432Node\CLSID\{9F3FD649-0012-4245-A443-CC23CFF9F713}
HKEY_CLASSES_ROOT\Wow6432Node\CLSID\{CFC47218-E213-405a-859E-2CEE0367ED6F}
HKEY_CLASSES_ROOT\Wow6432Node\CLSID\{D8CF93DF-788A-4699-9071-F3A854E5957C}
HKEY_CLASSES_ROOT\Wow6432Node\CLSID\{D8EE0CCE-F573-47cb-856B-37540B0DB34F}
Page 67

A P P E N D I X 1. C H A N G E S T O T H E M I C R O S O F T W I N D O W S R E G I S T R Y
67
HKEY_CLASSES_ROOT\Wow6432Node\CLSID\{DACDDD16-3454-49cc-B758-693FA413BB64}
HKEY_CLASSES_ROOT\Wow6432Node\CLSID\{E1F068E0-0FC0-4B8B-BE9A-6BDE3F496080}
HKEY_CLASSES_ROOT\Wow6432Node\CLSID\{F7CA6538-BCB6-44b0-A266-54C7C921F7C5}
HKEY_CLASSES_ROOT\Wow6432Node\Interface\{448D32AF-54D0-4BBD-8A81-C368E2C6E533}
HKEY_CLASSES_ROOT\Wow6432Node\Interface\{B620A5D5-8551-4887-B304-9800387A24CA}
HKEY_CLASSES_ROOT\Wow6432Node\KAV.ISD.IsaMmc.IsaAdmAbout
HKEY_CLASSES_ROOT\Wow6432Node\KAV.ISD.IsaMmc.IsaAdmAbout.1
HKEY_CLASSES_ROOT\Wow6432Node\KAV.ISD.IsaMmc.IsaAdmComponentData
HKEY_CLASSES_ROOT\Wow6432Node\KAV.ISD.IsaMmc.IsaAdmComponentData.1
HKEY_CLASSES_ROOT\Wow6432Node\KAV.ISD.ISAV.FtpFilter
HKEY_CLASSES_ROOT\Wow6432Node\KAV.ISD.ISAV.FtpFilter.1
HKEY_CLASSES_ROOT\Wow6432Node\KAV.ISD.ISAV.isavpop3.Pop3Filter
HKEY_CLASSES_ROOT\Wow6432Node\KAV.ISD.ISAV.isavpop3.Pop3Filter.1
HKEY_CLASSES_ROOT\Wow6432Node\KAV.ISD.ISAV.isavsmtp.SmtpFilter
HKEY_CLASSES_ROOT\Wow6432Node\KAV.ISD.ISAV.isavsmtp.SmtpFilter.1
HKEY_CLASSES_ROOT\Wow6432Node\KAV.ISD.ISAV.Watchdog3
HKEY_CLASSES_ROOT\Wow6432Node\KAV.ISD.ISAV.Watchdog3.1
HKEY_CLASSES_ROOT\Wow6432Node\KavHost.KavHost
HKEY_CLASSES_ROOT\Wow6432Node\KavHost.KavHost.1
HKEY_CLASSES_ROOT\Wow6432Node\TypeLib\{7FCD1648-8A7B-41AF-B76C-0699922B8770}
HKEY_LOCAL_MACHINE\SOFTWARE\Wow6432Node\KasperskyLab
HKEY_LOCAL_MACHINE\SOFTWARE\Wow6432Node\Microsoft\MMC\SnapIns\FX:{AA517B36-9B43-4246-91221AB672E4A6E1}
HKEY_LOCAL_MACHINE\SOFTWARE\Wow6432Node\Microsoft\MMC\NodeTypes\{2F8FE3D1-9A16-4ED3-B6C6F912D99E99FD}
HKEY_LOCAL_MACHINE\SOFTWARE\Wow6432Node\Microsoft\MMC\SnapIns\{162D6D1C-BEE9-4ae0-9E63AA5E451A9985}
HKEY_LOCAL_MACHINE\SOFTWARE\Wow6432Node\Microsoft\MMC\SnapIns\{372C6E94-BA70-4493-893E44A86EFA5FBA}
HKEY_LOCAL_MACHINE\SOFTWARE\Wow6432Node\Microsoft\MMC\SnapIns\{620FF8BD-4798-4807-A2ABF625B0EB3B44}
HKEY_LOCAL_MACHINE\SOFTWARE\Wow6432Node\Microsoft\MMC\SnapIns\{92C67CDB-A762-43a7-A96DE1A9D15686A5}
HKEY_LOCAL_MACHINE\SOFTWARE\Wow6432Node\Microsoft\MMC\SnapIns\{948600BB-5D4E-4808-B338312257496A69}
HKEY_LOCAL_MACHINE\SOFTWARE\Wow6432Node\Microsoft\MMC\SnapIns\{CFC47218-E213-405a-859E2CEE0367ED6F}
HKEY_LOCAL_MACHINE\SOFTWARE\Wow6432Node\Microsoft\MMC\SnapIns\{D8CF93DF-788A-4699-9071F3A854E5957C}
HKEY_LOCAL_MACHINE\SOFTWARE\Wow6432Node\Microsoft\MMC\SnapIns\{D8EE0CCE-F573-47cb-856B37540B0DB34F}
HKEY_LOCAL_MACHINE\SOFTWARE\Wow6432Node\Microsoft\MMC\SnapIns\{F7CA6538-BCB6-44b0-A26654C7C921F7C5}
HKEY_LOCAL_MACHINE\SOFTWARE\Wow6432Node\Microsoft\Windows\CurrentVersion\SharedDLLs
HKEY_LOCAL_MACHINE\SOFTWARE\Wow6432Node\Microsoft\Windows\CurrentVersion\Uninstall\{0D40E22B-2FB44237-AB63-3FFA9A4CE2EA}
HKEY_LOCAL_MACHINE\SOFTWARE\Wow6432Node\Microsoft\Windows\CurrentVersion\Uninstall\Kaspersky AntiVirus 8.0 for ISA Server and Forefront TMG SE
HKEY_LOCAL_MACHINE\SOFTWARE\Microsoft\Windows NT\CurrentVersion\Perflib
HKEY_LOCAL_MACHINE\SYSTEM\CurrentControlSet\Services\EventLog\Application\ISAV
HKEY_LOCAL_MACHINE\SYSTEM\CurrentControlSet\Services\EventLog\Application\KAV
HKEY_LOCAL_MACHINE\SYSTEM\CurrentControlSet\Services\Kavisasrv
Page 68

68
INFORMATION ABOUT THIRD-PARTY CODE
IN THIS SECTION
Software code ................................................................................................................................................................. 68
Other information ............................................................................................................................................................ 73
IN THIS SECTION
A C# IP ADDRESS CONTROL ....................................................................................................................................... 68
BOOST 1.36.0, 1.39.0 ..................................................................................................................................................... 69
EXPAT 1.2 ...................................................................................................................................................................... 69
LOKI 0.1.3 ....................................................................................................................................................................... 69
LZMALIB 4.43 ................................................................................................................................................................. 70
MICROSOFT CABINET SOFTWARE DEVELOPMENT KIT .......................................................................................... 70
SQLITE 3.6.18 ................................................................................................................................................................ 70
WIX 3.0 ........................................................................................................................................................................... 70
ZLIB 1.0.8, 1.2, 1.2.3 ................................ ................................ ....................................................................................... 72
SOFTWARE CODE
Information about third-party software code used in the development of the application.
A C# IP ADDRESS CONTROL
Copyright (C) 2007, Michael Chapman
Permission is hereby granted, free of charge, to any person obtaining a copy of this software and associated
documentation files (the "Software"), to deal in the Software without restriction, including without limitation the rights to
use, copy, modify, merge, publish, distribute, sublicense, and/or sell copies of the Software, and to permit persons to
whom the Software is furnished to do so, subject to the following conditions:
The above copyright notice and this permission notice shall be included in all copies or substantial portions of the
Software.
THE SOFTWARE IS PROVIDED "AS IS", WITHOUT WARRANTY OF ANY KIND, EXPRESS OR IMPLIED, INCLUDING
BUT NOT LIMITED TO THE WARRANTIES OF MERCHANTABILITY, FITNESS FOR A PARTICULAR PURPOSE AND
NONINFRINGEMENT. IN NO EVENT SHALL THE AUTHORS OR COPYRIGHT HOLDERS BE LIABLE FOR ANY
CLAIM, DAMAGES OR OTHER LIABILITY, WHETHER IN AN ACTION OF CONTRACT, TORT OR OTHERWISE,
ARISING FROM, OUT OF OR IN CONNECTION WITH THE SOFTWARE OR THE USE OR OTHER DEALINGS IN
THE SOFTWARE.
Page 69

I N F O R M A T I O N A B O U T T H I R D - P A R T Y C O D E
69
BOOST 1.36.0, 1.39.0
Copyright (C) 2008, Beman Dawes
Boost Software License - Version 1.0 - August 17th, 2003
Permission is hereby granted, free of charge, to any person or organization obtaining a copy of the software and
accompanying documentation covered by this license (the "Software") to use, reproduce, display, distribute, execute,
and transmit the Software, and to prepare derivative works of the Software, and to permit third-parties to whom the
Software is furnished to do so, all subject to the following:
The copyright notices in the Software and this entire statement, including the above license grant, this restriction and the
following disclaimer, must be included in all copies of the Software, in whole or in part, and all derivative works of the
Software, unless such copies or derivative works are solely in the form of machine-executable object code generated by
a source language processor.
THE SOFTWARE IS PROVIDED "AS IS", WITHOUT WARRANTY OF ANY KIND, EXPRESS OR IMPLIED, INCLUDING
BUT NOT LIMITED TO THE WARRANTIES OF MERCHANTABILITY, FITNESS FOR A PARTICULAR PURPOSE,
TITLE AND NON-INFRINGEMENT. IN NO EVENT SHALL THE COPYRIGHT HOLDERS OR ANYONE DISTRIBUTING
THE SOFTWARE BE LIABLE FOR ANY DAMAGES OR OTHER LIABILITY, WHETHER IN CONTRACT, TORT OR
OTHERWISE, ARISING FROM, OUT OF OR IN CONNECTION WITH THE SOFTWARE OR THE USE OR OTHER
DEALINGS IN THE SOFTWARE.
EXPAT 1.2
Copyright (C) 1998, 1999, 2000, Thai Open Source Software Center Ltd
Permission is hereby granted, free of charge, to any person obtaining a copy of this software and associated
documentation files (the "Software"), to deal in the Software without restriction, including without limitation the rights to
use, copy, modify, merge, publish, distribute, sublicense, and/or sell copies of the Software, and to permit persons to
whom the Software is furnished to do so, subject to the following conditions:
The above copyright notice and this permission notice shall be included in all copies or substantial portions of the
Software.
THE SOFTWARE IS PROVIDED "AS IS", WITHOUT WARRANTY OF ANY KIND, EXPRESS OR IMPLIED, INCLUDING
BUT NOT LIMITED TO THE WARRANTIES OF MERCHANTABILITY, FITNESS FOR A PARTICULAR PURPOSE AND
NONINFRINGEMENT. IN NO EVENT SHALL THE AUTHORS OR COPYRIGHT HOLDERS BE LIABLE FOR ANY
CLAIM, DAMAGES OR OTHER LIABILITY, WHETHER IN AN ACTION OF CONTRACT, TORT OR OTHERWISE,
ARISING FROM, OUT OF OR IN CONNECTION WITH THE SOFTWARE OR THE USE OR OTHER DEALINGS IN
THE SOFTWARE.
LOKI 0.1.3
Copyright (C) 2001, Andrei Alexandrescu
Permission is hereby granted, free of charge, to any person obtaining a copy of this software and associated
documentation files (the "Software"), to deal in the Software without restriction, including without limitation the rights to
use, copy, modify, merge, publish, distribute, sublicense, and/or sell copies of the Software, and to permit persons to
whom the Software is furnished to do so, subject to the following conditions:
The above copyright notice and this permission notice shall be included in all copies or substantial portions of the
Software.
THE SOFTWARE IS PROVIDED "AS IS", WITHOUT WARRANTY OF ANY KIND, EXPRESS OR IMPLIED, INCLUDING
BUT NOT LIMITED TO THE WARRANTIES OF MERCHANTABILITY, FITNESS FOR A PARTICULAR PURPOSE AND
NONINFRINGEMENT. IN NO EVENT SHALL THE AUTHORS OR COPYRIGHT HOLDERS BE LIABLE FOR ANY
CLAIM, DAMAGES OR OTHER LIABILITY, WHETHER IN AN ACTION OF CONTRACT, TORT OR OTHERWISE,
ARISING FROM, OUT OF OR IN CONNECTION WITH THE SOFTWARE OR THE USE OR OTHER DEALINGS IN
THE SOFTWARE.
Page 70

A D M I N I S T R A T O R ' S G U I D E
70
LZMALIB 4.43
MICROSOFT CABINET SOFTWARE DEVELOPMENT KIT
Copyright (C) 1993-1997, Microsoft Corporation
SQLITE 3.6.18
WIX 3.0
Copyright (C) Microsoft Corporation
Common Public License Version 1.0
THE ACCOMPANYING PROGRAM IS PROVIDED UNDER THE TERMS OF THIS COMMON PUBLIC LICENSE
("AGREEMENT"). ANY USE, REPRODUCTION OR DISTRIBUTION OF THE PROGRAM CONSTITUTES
RECIPIENT'S ACCEPTANCE OF THIS AGREEMENT.
1. DEFINITIONS
"Contribution" means:
a) in the case of the initial Contributor, the initial code and documentation distributed under this Agreement, and
b) in the case of each subsequent Contributor:
i) changes to the Program, and
ii) additions to the Program;
where such changes and/or additions to the Program originate from and are distributed by that particular Contributor. A
Contribution 'originates' from a Contributor if it was added to the Program by such Contributor itself or anyone acting on
such Contributor's behalf. Contributions do not include additions to the Program which: (i) are separate modules of
software distributed in conjunction with the Program under their own license agreement, and (ii) are not derivative works
of the Program.
"Contributor" means any person or entity that distributes the Program.
"Licensed Patents " mean patent claims licensable by a Contributor which are necessarily infringed by the use or sale of
its Contribution alone or when combined with the Program.
"Program" means the Contributions distributed in accordance with this Agreement.
"Recipient" means anyone who receives the Program under this Agreement, including all Contributors.
2. GRANT OF RIGHTS
a) Subject to the terms of this Agreement, each Contributor hereby grants Recipient a non-exclusive, worldwide, royaltyfree copyright license to reproduce, prepare derivative works of, publicly display, publicly perform, distribute and
sublicense the Contribution of such Contributor, if any, and such derivative works, in source code and object code form.
b) Subject to the terms of this Agreement, each Contributor hereby grants Recipient a non-exclusive, worldwide, royaltyfree patent license under Licensed Patents to make, use, sell, offer to sell, import and otherwise transfer the Contribution
of such Contributor, if any, in source code and object code form. This patent license shall apply to the combination of the
Contribution and the Program if, at the time the Contribution is added by the Contributor, such addition of the
Contribution causes such combination to be covered by the Licensed Patents. The patent license shall not apply to any
other combinations which include the Contribution. No hardware per se is licensed hereunder.
Page 71

I N F O R M A T I O N A B O U T T H I R D - P A R T Y C O D E
71
c) Recipient understands that although each Contributor grants the licenses to its Contributions set forth herein, no
assurances are provided by any Contributor that the Program does not infringe the patent or other intellectual property
rights of any other entity. Each Contributor disclaims any liability to Recipient for claims brought by any other entity based
on infringement of intellectual property rights or otherwise. As a condition to exercising the rights and licenses granted
hereunder, each Recipient hereby assumes sole responsibility to secure any other intellectual property rights needed, if
any. For example, if a third party patent license is required to allow Recipient to distribute the Program, it is Recipient's
responsibility to acquire that license before distributing the Program.
d) Each Contributor represents that to its knowledge it has sufficient copyright rights in its Contribution, if any, to grant
the copyright license set forth in this Agreement.
3. REQUIREMENTS
A Contributor may choose to distribute the Program in object code form under its own license agreement, provided that:
a) it complies with the terms and conditions of this Agreement; and
b) its license agreement:
i) effectively disclaims on behalf of all Contributors all warranties and conditions, express and implied, including
warranties or conditions of title and non-infringement, and implied warranties or conditions of merchantability and fitness
for a particular purpose;
ii) effectively excludes on behalf of all Contributors all liability for damages, including direct, indirect, special, incidental
and consequential damages, such as lost profits;
iii) states that any provisions which differ from this Agreement are offered by that Contributor alone and not by any other
party; and
iv) states that source code for the Program is available from such Contributor, and informs licensees how to obtain it in a
reasonable manner on or through a medium customarily used for software exchange.
When the Program is made available in source code form:
a) it must be made available under this Agreement; and
b) a copy of this Agreement must be included with each copy of the Program.
Contributors may not remove or alter any copyright notices contained within the Program.
Each Contributor must identify itself as the originator of its Contribution, if any, in a manner that reasonably allows
subsequent Recipients to identify the originator of the Contribution.
4. COMMERCIAL DISTRIBUTION Commercial distributors of software may accept certain responsibilities with respect to
end users, business partners and the like. While this license is intended to facilitate the commercial use of the Program,
the Contributor who includes the Program in a commercial product offering should do so in a manner which does not
create potential liability for other Contributors. Therefore, if a Contributor includes the Program in a commercial product
offering, such Contributor ("Commercial Contributor") hereby agrees to defend and indemnify every other Contributor
("Indemnified Contributor") against any losses, damages and costs (collectively "Losses") arising from claims, lawsuits
and other legal actions brought by a third party against the Indemnified Contributor to the extent caused by the acts or
omissions of such Commercial Contributor in connection with its distribution of the Program in a commercial product
offering. The obligations in this section do not apply to any claims or Losses relating to any actual or alleged intellectual
property infringement. In order to qualify, an Indemnified Contributor must: a) promptly notify the Commercial Contributor
in writing of such claim, and b) allow the Commercial Contributor to control, and cooperate with the Commercial
Contributor in, the defense and any related settlement negotiations. The Indemnified Contributor may participate in any
such claim at its own expense.
For example, a Contributor might include the Program in a commercial product offering, Product X. That Contributor is
then a Commercial Contributor. If that Commercial Contributor then makes performance claims, or offers warranties
related to Product X, those performance claims and warranties are such Commercial Contributor's responsibility alone.
Under this section, the Commercial Contributor would have to defend claims against the other Contributors related to
those performance claims and warranties, and if a court requires any other Contributor to pay any damages as a result,
the Commercial Contributor must pay those damages.
Page 72

A D M I N I S T R A T O R ' S G U I D E
72
5. NO WARRANTY
EXCEPT AS EXPRESSLY SET FORTH IN THIS AGREEMENT, THE PROGRAM IS PROVIDED ON AN "AS IS" BASIS,
WITHOUT WARRANTIES OR CONDITIONS OF ANY KIND, EITHER EXPRESS OR IMPLIED INCLUDING, WITHOUT
LIMITATION, ANY WARRANTIES OR CONDITIONS OF TITLE, NON-INFRINGEMENT, MERCHANTABILITY OR
FITNESS FOR A PARTICULAR PURPOSE. Each Recipient is solely responsible for determining the appropriateness of
using and distributing the Program and assumes all risks associated with its exercise of rights under this Agreement,
including but not limited to the risks and costs of program errors, compliance with applicable laws, damage to or loss of
data, programs or equipment, and unavailability or interruption of operations.
6. DISCLAIMER OF LIABILITY
EXCEPT AS EXPRESSLY SET FORTH IN THIS AGREEMENT, NEITHER RECIPIENT NOR ANY CONTRIBUTORS
SHALL HAVE ANY LIABILITY FOR ANY DIRECT, INDIRECT, INCIDENTAL, SPECIAL, EXEMPLARY, OR
CONSEQUENTIAL DAMAGES (INCLUDING WITHOUT LIMITATION LOST PROFITS), HOWEVER CAUSED AND ON
ANY THEORY OF LIABILITY, WHETHER IN CONTRACT, STRICT LIABILITY, OR TORT (INCLUDING NEGLIGENCE
OR OTHERWISE) ARISING IN ANY WAY OUT OF THE USE OR DISTRIBUTION OF THE PROGRAM OR THE
EXERCISE OF ANY RIGHTS GRANTED HEREUNDER, EVEN IF ADVISED OF THE POSSIBILITY OF SUCH
DAMAGES.
7. GENERAL
If any provision of this Agreement is invalid or unenforceable under applicable law, it shall not affect the validity or
enforceability of the remainder of the terms of this Agreement, and without further action by the parties hereto, such
provision shall be reformed to the minimum extent necessary to make such provision valid and enforceable.
If Recipient institutes patent litigation against a Contributor with respect to a patent applicable to software (including a
cross-claim or counterclaim in a lawsuit), then any patent licenses granted by that Contributor to such Recipient under
this Agreement shall terminate as of the date such litigation is filed. In addition, if Recipient institutes patent litigation
against any entity (including a cross-claim or counterclaim in a lawsuit) alleging that the Program itself (excluding
combinations of the Program with other software or hardware) infringes such Recipient's patent(s), then such Recipient's
rights granted under Section 2(b) shall terminate as of the date such litigation is filed.
All Recipient's rights under this Agreement shall terminate if it fails to comply with any of the material terms or conditions
of this Agreement and does not cure such failure in a reasonable period of time after becoming aware of such
noncompliance. If all Recipient's rights under this Agreement terminate, Recipient agrees to cease use and distribution of
the Program as soon as reasonably practicable. However, Recipient's obligations under this Agreement and any licenses
granted by Recipient relating to the Program shall continue and survive.
Everyone is permitted to copy and distribute copies of this Agreement, but in order to avoid inconsistency the Agreement
is copyrighted and may only be modified in the following manner. The Agreement Steward reserves the right to publish
new versions (including revisions) of this Agreement from time to time. No one other than the Agreement Steward has
the right to modify this Agreement. IBM is the initial Agreement Steward. IBM may assign the responsibility to serve as
the Agreement Steward to a suitable separate entity. Each new version of the Agreement will be given a distinguishing
version number. The Program (including Contributions) may always be distributed subject to the version of the
Agreement under which it was received. In addition, after a new version of the Agreement is published, Contributor may
elect to distribute the Program (including its Contributions) under the new version. Except as expressly stated in Sections
2(a) and 2(b) above, Recipient receives no rights or licenses to the intellectual property of any Contributor under this
Agreement, whether expressly, by implication, estoppel or otherwise. All rights in the Program not expressly granted
under this Agreement are reserved.
This Agreement is governed by the laws of the State of New York and the intellectual property laws of the United States
of America. No party to this Agreement will bring a legal action under this Agreement more than one year after the cause
of action arose. Each party waives its rights to a jury trial in any resulting litigation.
ZLIB 1.0.8, 1.2, 1.2.3
Copyright (C) 1995-1998, Jean-loup Gailly and Mark Adler
This software is provided 'as-is', without any express or implied warranty. In no event will the authors be held liable for
any damages arising from the use of this software.
Page 73

I N F O R M A T I O N A B O U T T H I R D - P A R T Y C O D E
73
Permission is granted to anyone to use this software for any purpose, including commercial applications, and to alter it
and redistribute it freely, subject to the following restrictions:
1. The origin of this software must not be misrepresented; you must not claim that you wrote the original software. If you
use this software in a product, an acknowledgment in the product documentation would be appreciated but is not
required.
2. Altered source versions must be plainly marked as such, and must not be misrepresented as being the original
software.
3. This notice may not be removed or altered from any source distribution.
Jean-loup Gailly jloup@gzip.org
Mark Adler madler@alumni.caltech.edu
OTHER INFORMATION
The Software may include some software programs that are licensed (or sublicensed) to the user under the GNU
General Public License (GPL) or other similar free software licenses which, among other rights, permit the user to copy
modify and redistribute certain programs, or portions thereof, and have access to the source code ("Open Source
Software"). If such licenses require that for any software, which is distributed to someone in an executable binary format,
that the source code also be made available to those users, then the source code should be made available by sending
the request to source@kaspersky.com or the source code is supplied with the Software.
Digital signature verification is performed using the "Agava-C" software data protection library developed by R-Alpha
LLC.
Page 74

74
KASPERSKY LAB END USER LICENSE AGREEMENT
IMPORTANT LEGAL NOTICE TO ALL USERS: CAREFULLY READ THE FOLLOWING LEGAL AGREEMENT BEFORE
YOU START USING THE SOFTWARE.
BY CLICKING THE ACCEPT BUTTON IN THE LICENSE AGREEMENT WINDOW OR BY ENTERING
CORRESPONDING SYMBOL(-S) YOU CONSENT TO BE BOUND BY THE TERMS AND CONDITIONS OF THIS
AGREEMENT. SUCH ACTION IS A SYMBOL OF YOUR SIGNATURE AND YOU ARE CONSENTING TO BE BOUND
BY AND ARE BECOMING A PARTY TO THIS AGREEMENT AND AGREE THAT THIS AGREEMENT IS
ENFORCEABLE LIKE ANY WRITTEN NEGOTIATED AGREEMENT SIGNED BY YOU. IF YOU DO NOT AGREE TO
ALL OF THE TERMS AND CONDITIONS OF THIS AGREEMENT, CANCEL THE INSTALLATION OF THE SOFTWARE
AND DO NOT INSTALL THE SOFTWARE.
IF LICENSE CONTRACT OR SIMILAR DOCUMENT ACCOMPANIES SOFTWARE, TERMS OF THE SOFTWARE USE
DEFINED IN SUCH DOCUMENT PREVAIL OVER CURRENT END USER LICENSE AGREEMENT.
AFTER CLICKING THE ACCEPT BUTTON IN THE LICENSE AGREEMENT WINDOW OR AFTER ENTERING
CORRESPONDING SYMBOL(-S) YOU HAVE THE RIGHT TO USE THE SOFTWARE IN ACCORDANCE WITH THE
TERMS AND CONDITIONS OF THIS AGREEMENT.
1. Definitions
1.1. Software means software including any Updates and related materials.
1.2. Rightholder (owner of all rights, whether exclusive or otherwise to the Software) means Kaspersky Lab ZAO, a
company incorporated according to the laws of the Russian Federation.
1.3. Computer(s) means hardware(s), including personal computers, laptops, workstations, personal digital
assistants, ‘smart phones’, hand-held devices, or other electronic devices for which the Software was designed
where the Software will be installed and/or used.
1.4. End User (You/Your) means individual(s) installing or using the Software on his or her own behalf or who is
legally using a copy of the Software; or, if the Software is being downloaded or installed on behalf of an
organization, such as an employer, "You" further means the organization for which the Software is downloaded
or installed and it is represented hereby that such organization has authorized the person accepting this
agreement to do so on its behalf. For purposes hereof the term "organization," without limitation, includes any
partnership, limited liability company, corporation, association, joint stock company, trust, joint venture, labor
organization, unincorporated organization, or governmental authority.
1.5. Partner(s) means organizations or individual(s), who distributes the Software based on an agreement and
license with the Rightholder.
1.6. Update(s) means all upgrades, revisions, patches, enhancements, fixes, modifications, copies, additions or
maintenance packs etc.
1.7. User Manual means user manual, administrator guide, reference book and related explanatory or other
materials.
2. Grant of License
2.1. You are given a non-exclusive license to store, load, install, execute, and display (to "use") the Software on a
specified number of Computers in order to assist in protecting Your Computer on which the Software is
installed, from threats described in the User Manual, according to the all technical requirements described in the
User Manual and according to the terms and conditions of this Agreement (the "License") and you accept this
License:
Trial Version. If you have received, downloaded and/or installed a trial version of the Software and are hereby
granted an evaluation license for the Software, you may use the Software only for evaluation purposes and only
during the single applicable evaluation period, unless otherwise indicated, from the date of the initial installation.
Any use of the Software for other purposes or beyond the applicable evaluation period is strictly prohibited.
Multiple Environment Software; Multiple Language Software; Dual Media Software; Multiple Copies; Bundles. If
you use different versions of the Software or different language editions of the Software, if you receive the
Software on multiple media, if you otherwise receive multiple copies of the Software, or if you received the
Software bundled with other software, the total permitted number of your Computers on which all versions of the
Software are installed shall correspond to the number of computers specified in licenses you have obtained
Page 75

K A S P E R S K Y L A B E N D U S E R LI C E N S E A G R E E M E N T
75
provided that unless the licensing terms provide otherwise, each acquired license entitles you to install and use
the Software on such a number of Computer(s) as is specified in Clauses 2.2 and 2.3.
2.2. If the Software was acquired on a physical medium You have the right to use the Software for protection of such
a number of Computer(s) as is specified on the Software package.
2.3. If the Software was acquired via the Internet You have the right to use the Software for protection of such a
number of Computers that was specified when You acquired the License to the Software.
2.4. You have the right to make a copy of the Software solely for back-up purposes and only to replace the legally
owned copy if such copy is lost, destroyed or becomes unusable. This back-up copy cannot be used for other
purposes and must be destroyed when you lose the right to use the Software or when Your license expires or is
terminated for any other reason according to the legislation in force in the country of your principal residence or
in the country where You are using the Software.
2.5. From the time of the Software activation or after license key file installation (with the exception of a trial version
of the Software) You have the right to receive the following services for the defined period specified on the
Software package (if the Software was acquired on a physical medium) or specified during acquisition (if the
Software was acquired via the Internet):
- Updates of the Software via the Internet when and as the Rightholder publishes them on its website or
through other online services. Аny Updates that you may receive become part of the Software and the
terms and conditions of this Agreement apply to them;
- Technical Support via the Internet and Technical Support telephone hotline.
3. Activation and Term
3.1. If You modify Your Computer or make changes to other vendors’ software installed on it, You may be required
by the Rightholder to repeat activation of the Software or license key file installation. The Rightholder reserves
the right to use any means and verification procedures to verify the validity of the License and/or legality of a
copy of the Software installed and/or used on Your Computer.
3.2. If the Software was acquired on a physical medium, the Software can be used, upon your acceptance of this
Agreement, for the period that is specified on the package commencing upon acceptance of this Agreement.
3.3. If the Software was acquired via the Internet, the Software can be used, upon your acceptance of this
Agreement, for the period that was specified during acquisition.
3.4. You have the right to use a trial version of the Software as provided in Clause 2.1 without any charge for the
single applicable evaluation period (30 days) from the time of the Software activation according to this
Agreement provided that the trial version does not entitle You Updates and Technical support via the Internet
and Technical support telephone hotline.
3.5. Your License to Use the Software is limited to the period of time as specified in Clauses 3.2 or 3.3 (as
applicable) and the remaining period can be viewed via means described in User Manual.
3.6. If You have acquired the Software that is intended to be used on more than one Computer then Your License to
Use the Software is limited to the period of time starting from the date of activation of the Software or license
key file installation on the first Computer.
3.7. Without prejudice to any other remedy in law or in equity that the Rightholder may have, in the event of any
breach by You of any of the terms and conditions of this Agreement, the Rightholder shall at any time without
notice to You be entitled to terminate this License without refunding the purchase price or any part thereof.
3.8. You agree that in using the Software and in using any report or information derived as a result of using this
Software, you will comply with all applicable international, national, state, regional and local laws and
regulations, including, without limitation, privacy, copyright, export control and obscenity law.
3.9. Except as otherwise specifically provided herein, you may not transfer or assign any of the rights granted to you
under this Agreement or any of your obligations pursuant hereto.
4. Technical Support
4.1. The Technical Support described in Clause 2.5 of this Agreement is provided to You when the latest Update of
the Software is installed (except for a trial version of the Software).
Technical support service: http://support.kaspersky.com
4.2. User’s Data, specified in Personal Cabinet/My Kaspersky Account, can be used by Technical Support
specialists only during processing User’s request.
5. Limitations
5.1. You shall not emulate, clone, rent, lend, lease, sell, modify, decompile, or reverse engineer the Software or
disassemble or create derivative works based on the Software or any portion thereof with the sole exception of
a non-waivable right granted to You by applicable legislation, and you shall not otherwise reduce any part of the
Software to human readable form or transfer the licensed Software, or any subset of the licensed Software, nor
permit any third party to do so, except to the extent the foregoing restriction is expressly prohibited by applicable
law. Neither Software’s binary code nor source may be used or reverse engineered to re-create the program
algorithm, which is proprietary. All rights not expressly granted herein are reserved by Rightholder and/or its
suppliers, as applicable. Any such unauthorized use of the Software shall result in immediate and automatic
Page 76

A D M I N I S T R A T O R ' S G U I D E
76
termination of this Agreement and the License granted hereunder and may result in criminal and/or civil
prosecution against You.
5.2. You shall not transfer the rights to use the Software to any third party.
5.3. You shall not provide the activation code and/or license key file to third parties or allow third parties access to
the activation code and/or license key which are deemed confidential data of Rightholder.
5.4. You shall not rent, lease or lend the Software to any third party.
5.5. You shall not use the Software in the creation of data or software used for detection, blocking or treating threats
described in the User Manual.
5.6. Your key file can be blocked in case You breach any of the terms and conditions of this Agreement.
5.7. If You are using the trial version of the Software You do not have the right to receive the Technical Support
specified in Clause 4 of this Agreement and You don’t have the right to transfer the license or the rights to use
the Software to any third party.
6. Limited Warranty and Disclaimer
6.1. The Rightholder guarantees that the Software will substantially perform according to the specifications and
descriptions set forth in the User Manual provided however that such limited warranty shall not apply to the
following: (w) Your Computer’s deficiencies and related infringement for which Rightholder’s expressly disclaims
any warranty responsibility; (x) malfunctions, defects, or failures resulting from misuse; abuse; accident; neglect;
improper installation, operation or maintenance; theft; vandalism; acts of God; acts of terrorism; power failures
or surges; casualty; alteration, non-permitted modification, or repairs by any party other than Rightholder; or any
other third parties’ or Your actions or causes beyond Rightholder’s reasonable control; (y) any defect not made
known by You to Rightholder as soon as practical after the defect first appears; and (z) incompatibility caused
by hardware and/or software components installed on Your Computer.
6.2. You acknowledge, accept and agree that no software is error free and You are advised to back-up the
Computer, with frequency and reliability suitable for You.
6.3. The Rightholder does not provide any guarantee that the Software will work correctly in case of violations of the
terms described in the User Manual or in this Agreement.
6.4. The Rightholder does not guarantee that the Software will work correctly if You do not regularly download
Updates specified in Clause 2.5 of this Agreement.
6.5. The Rightholder does not guarantee protection from the threats described in the User Manual after the
expiration of the period specified in Clauses 3.2 or 3.3 of this Agreement or after the License to use the
Software is terminated for any reason.
6.6. THE SOFTWARE IS PROVIDED "AS IS" AND THE RIGHTHOLDER MAKES NO REPRESENTATION AND
GIVES NO WARRANTY AS TO ITS USE OR PERFORMANCE. EXCEPT FOR ANY WARRANTY,
CONDITION, REPRESENTATION OR TERM THE EXTENT TO WHICH CANNOT BE EXCLUDED OR
LIMITED BY APPLICABLE LAW THE RIGHTHOLDER AND ITS PARTNERS MAKE NO WARRANTY,
CONDITION, REPRESENTATION, OR TERM (EXPRESSED OR IMPLIED, WHETHER BY STATUTE,
COMMON LAW, CUSTOM, USAGE OR OTHERWISE) AS TO ANY MATTER INCLUDING, WITHOUT
LIMITATION, NONINFRINGEMENT OF THIRD PARTY RIGHTS, MERCHANTABILITY, SATISFACTORY
QUALITY, INTEGRATION, OR APPLICABILITY FOR A PARTICULAR PURPOSE. YOU ASSUME ALL
FAULTS, AND THE ENTIRE RISK AS TO PERFORMANCE AND RESPONSIBILITY FOR SELECTING THE
SOFTWARE TO ACHIEVE YOUR INTENDED RESULTS, AND FOR THE INSTALLATION OF, USE OF, AND
RESULTS OBTAINED FROM THE SOFTWARE. WITHOUT LIMITING THE FOREGOING PROVISIONS, THE
RIGHTHOLDER MAKES NO REPRESENTATION AND GIVES NO WARRANTY THAT THE SOFTWARE WILL
BE ERROR-FREE OR FREE FROM INTERRUPTIONS OR OTHER FAILURES OR THAT THE SOFTWARE
WILL MEET ANY OR ALL YOUR REQUIREMENTS WHETHER OR NOT DISCLOSED TO THE
RIGHTHOLDER .
7. Exclusion and Limitation of Liability
7.1. TO THE MAXIMUM EXTENT PERMITTED BY APPLICABLE LAW, IN NO EVENT SHALL THE
RIGHTHOLDER OR ITS PARTNERS BE LIABLE FOR ANY SPECIAL, INCIDENTAL, PUNITIVE, INDIRECT,
OR CONSEQUENTIAL DAMAGES WHATSOEVER (INCLUDING, BUT NOT LIMITED TO, DAMAGES FOR
LOSS OF PROFITS OR CONFIDENTIAL OR OTHER INFORMATION, FOR BUSINESS INTERRUPTION,
FOR LOSS OF PRIVACY, FOR CORRUPTION, DAMAGE AND LOSS OF DATA OR PROGRAMS, FOR
FAILURE TO MEET ANY DUTY INCLUDING ANY STATUTORY DUTY, DUTY OF GOOD FAITH OR DUTY
OF REASONABLE CARE, FOR NEGLIGENCE, FOR ECONOMIC LOSS, AND FOR ANY OTHER
PECUNIARY OR OTHER LOSS WHATSOEVER) ARISING OUT OF OR IN ANY WAY RELATED TO THE
USE OF OR INABILITY TO USE THE SOFTWARE, THE PROVISION OF OR FAILURE TO PROVIDE
SUPPORT OR OTHER SERVICES, INFORMATON, SOFTWARE, AND RELATED CONTENT THROUGH THE
SOFTWARE OR OTHERWISE ARISING OUT OF THE USE OF THE SOFTWARE, OR OTHERWISE UNDER
OR IN CONNECTION WITH ANY PROVISION OF THIS AGREEMENT, OR ARISING OUT OF ANY BREACH
OF CONTRACT OR ANY TORT (INCLUDING NEGLIGENCE, MISREPRESENTATION, ANY STRICT
LIABILITY OBLIGATION OR DUTY), OR ANY BREACH OF STATUTORY DUTY, OR ANY BREACH OF
WARRANTY OF THE RIGHTHOLDER AND/OR ANY OF ITS PARTNERS, EVEN IF THE RIGHTHOLDER
AND/OR ANY PARTNER HAS BEEN ADVISED OF THE POSSIBILITY OF SUCH DAMAGES.
Page 77

K A S P E R S K Y L A B E N D U S E R LI C E N S E A G R E E M E N T
77
YOU AGREE THAT IN THE EVENT THE RIGHTHOLDER AND/OR ITS PARTNERS ARE FOUND LIABILE,
THE LIABILITY OF THE RIGHTHOLDER AND/OR ITS PARTNERS SHALL BE LIMITED BY THE COSTS OF
THE SOFTWARE. IN NO CASE SHALL THE LIABILITY OF THE RIGHTHOLDER AND/OR ITS PARTNERS
EXCEED THE FEES PAID FOR THE SOFTWARE TO THE RIGHTHOLDER OR THE PARTNER (AS MAY BE
APPLICABLE).
NOTHING IN THIS AGREEMENT EXCLUDES OR LIMITS ANY CLAIM FOR DEATH AND PERSONAL
INJURY. FURTHER IN THE EVENT ANY DISCLAIMER, EXCLUSION OR LIMITATION IN THIS AGREEMENT
CANNOT BE EXLUDED OR LIMITED ACCORDING TO APPLICABLE LAW THEN ONLY SUCH DISCLAIMER,
EXCLUSION OR LIMITATION SHALL NOT APPLY TO YOU AND YOU CONTINUE TO BE BOUND BY ALL
THE REMAINING DISCLAIMERS, EXCLUSIONS AND LIMITATIONS.
8. GNU and Other Third Party Licenses
8.1. The Software may include some software programs that are licensed (or sublicensed) to the user under the
GNU General Public License (GPL) or other similar free software licenses which, among other rights, permit the
user to copy, modify and redistribute certain programs, or portions thereof, and have access to the source code
("Open Source Software"). If such licenses require that for any software, which is distributed to someone in an
executable binary format, that the source code also be made available to those users, then the source code
should be made available by sending the request to source@kaspersky.com or the source code is supplied with
the Software. If any Open Source Software licenses require that the Rightholder provide rights to use, copy or
modify an Open Source Software program that are broader than the rights granted in this Agreement, then such
rights shall take precedence over the rights and restrictions herein.
9. Intellectual Property Ownership
9.1. You agree that the Software and the authorship, systems, ideas, methods of operation, documentation and
other information contained in the Software, are proprietary intellectual property and/or the valuable trade
secrets of the Rightholder or its partners and that the Rightholder and its partners, as applicable, are protected
by civil and criminal law, and by the law of copyright, trade secret, trademark and patent of the Russian
Federation, European Union and the United States, as well as other countries and international treaties. This
Agreement does not grant to You any rights to the intellectual property including any the Trademarks or Service
Marks of the Rightholder and/or its partners ("Trademarks"). You may use the Trademarks only insofar as to
identify printed output produced by the Software in accordance with accepted trademark practice, including
identification of the Trademark owner’s name. Such use of any Trademark does not give you any rights of
ownership in that Trademark. The Rightholder and/or its partners own and retain all right, title, and interest in
and to the Software, including without limitation any error corrections, enhancements, Updates or other
modifications to the Software, whether made by the Rightholder or any third party, and all copyrights, patents,
trade secret rights, trademarks, and other intellectual property rights therein. Your possession, installation or
use of the Software does not transfer to you any title to the intellectual property in the Software, and you will not
acquire any rights to the Software except as expressly set forth in this Agreement. All copies of the Software
made hereunder must contain the same proprietary notices that appear on and in the Software. Except as
stated herein, this Agreement does not grant you any intellectual property rights in the Software and you
acknowledge that the License, as further defined herein, granted under this Agreement only provides you with a
right of limited use under the terms and conditions of this Agreement. Rightholder reserves all rights not
expressly granted to you in this Agreement.
9.2. You agree not to modify or alter the Software in any way. You may not remove or alter any copyright notices or
other proprietary notices on any copies of the Software.
10. Governing Law; Arbitration
10.1. This Agreement will be governed by and construed in accordance with the laws of the Russian Federation
without reference to conflicts of law rules and principles. This Agreement shall not be governed by the United
Nations Convention on Contracts for the International Sale of Goods, the application of which is expressly
excluded. Any dispute arising out of the interpretation or application of the terms of this Agreement or any
breach thereof shall, unless it is settled by direct negotiation, be settled by in the Tribunal of International
Commercial Arbitration at the Russian Federation Chamber of Commerce and Industry in Moscow, the Russian
Federation. Any award rendered by the arbitrator shall be final and binding on the parties and any judgment on
such arbitration award may be enforced in any court of competent jurisdiction. Nothing in this Section 10 shall
prevent a Party from seeking or obtaining equitable relief from a court of competent jurisdiction, whether before,
during or after arbitration proceedings.
11. Period for Bringing Actions
Page 78

A D M I N I S T R A T O R ' S G U I D E
78
11.1. No action, regardless of form, arising out of the transactions under this Agreement, may be brought by either
party hereto more than one (1) year after the cause of action has occurred, or was discovered to have occurred,
except that an action for infringement of intellectual property rights may be brought within the maximum
applicable statutory period.
12. Entire Agreement; Severability; No Waiver
12.1. This Agreement is the entire agreement between you and Rightholder and supersedes any other prior
agreements, proposals, communications or advertising, oral or written, with respect to the Software or to subject
matter of this Agreement. You acknowledge that you have read this Agreement, understand it and agree to be
bound by its terms. If any provision of this Agreement is found by a court of competent jurisdiction to be invalid,
void, or unenforceable for any reason, in whole or in part, such provision will be more narrowly construed so
that it becomes legal and enforceable, and the entire Agreement will not fail on account thereof and the balance
of the Agreement will continue in full force and effect to the maximum extent permitted by law or equity while
preserving, to the fullest extent possible, its original intent. No waiver of any provision or condition herein shall
be valid unless in writing and signed by you and an authorized representative of Rightholder provided that no
waiver of any breach of any provisions of this Agreement will constitute a waiver of any prior, concurrent or
subsequent breach. Rightholder’s failure to insist upon or enforce strict performance of any provision of this
Agreement or any right shall not be construed as a waiver of any such provision or right.
13. Rightholder Contact Information
Should you have any questions concerning this Agreement, or if you desire to contact the Rightholder for any reason,
please contact our Customer Service Department at:
Kaspersky Lab ZAO, 10 build. 1, 1st Volokolamsky Proezd
Moscow, 123060
Russian Federation
Tel: +7-495-797-8700
Fax: +7-495-645-7939
E-mail: info@kaspersky.com
Web site: www.kaspersky.com
© 1997-2010 Kaspersky Lab ZAO. All Rights Reserved. The Software and any accompanying documentation are
copyrighted and protected by copyright laws and international copyright treaties, as well as other intellectual property
laws and treaties.
Page 79

79
GLOSSARY
A
A C T I V AT I N G T H E A P P L I C A T I ON
The procedure switching the application to the full functionality mode. To activate the application, users need a license.
A C T I V E L I C E N S E
The license installed and used at the moment to run a Kaspersky Lab application. The license determines the duration of
full product functionality and the applicable license policy. An application cannot have more than one current license.
A D M I N I S T R A T I O N C O N S O L E
Kaspersky Anti-Virus component that provides user interface for the management services of Administration Server and
Network Agent.
A D M I N I S T R A T I O N G R O U P
A set of computers grouped together in accordance with the performed functions and the Kaspersky Lab applications
installed on those machines. Computers are grouped for the convenience of management as a single entity. A group can
include other groups. A group can contain group policies for each application installed in it and appropriate group tasks.
A V A I L A BL E U P D A T E
A package of updates for the modules of a Kaspersky Lab application, including a set of urgent patches released during
a certain time interval, and modifications to the application architecture.
B
B ACK U P
Special folder for storage of Administration Server data copies created using the backup utility.
B L A C K L I S T O F K EY F I L E S
Database containing information about the keys blocked by Kaspersky Lab. The blacklist file content is updated along
with the product databases.
B L O C K IN G T H E O BJ E C T
Denying access to an object from external applications. A blocked object cannot be read, executed, modified, or deleted.
C
C O N T A I NE R O B J E C T
An object consisting of several objects, for example, an archive, a message with an attached letter. Please see also
simple object.
D
D A N G E R OU S O B J EC T
An object containing a virus. You are advised to avoid accessing such objects, because it may result in infection of your
computer. Once an infected object is detected, we recommend that you disinfect it using one of Kaspersky Lab's
applications, or delete it if disinfection is not possible.
Page 80

A D M I N I S T R A T O R ' S G U I D E
80
D A T A B AS E S
Database maintained by the experts at Kaspersky Lab and containing detailed descriptions of all existing threats to
computer security, methods of their detection and neutralization. The database is constantly updated at Kaspersky Lab
as new threats emerge.
D I S I N F EC T I O N
The method for handling of infected objects, which allows the processing application to perform complete or partial data
recovery, or to conclude that objects cannot be disinfected. Disinfection is based on the records in product databases. If
disinfection is the primary action to be performed with an object (that is, the first operation to be performed with an object
as soon as it is detected), a backup copy of the object is created before disinfection is attempted. Some data can be lost
during disinfection. This backup copy can be used to restore the object to its original state.
E
E X C L U S IO N
Exclusion is an object excluded from the scan scope by a Kaspersky Lab application. You can exclude files of certain
formats from the scan, use a file mask, or exclude a certain area (for example, a folder or a program), program
processes, or objects by threat type, according to the Virus Encyclopedia classification. Each task can be assigned an
individual set of exclusions.
F
F I L E M A SK
Representation of a file name and extension using wildcards. The two standard wildcard characters used in file masks
are an asterisk (*) and a question mark (?), where * represents any number of characters and ? stands for any single
character. You can represent any file using these wildcards. Note that the name and extension are always separated by
a period.
F I R E W A L L
Hardware and/or software suite that controls and filters the network packets passing through it, in accordance with the
defined rules. The main purpose of firewalls is protection of computer networks or individual nodes from unauthorized
access. Firewalls are often referred to as screens because their main task is to prevent from passing (screen out) those
packets that do not match the criteria specified in the firewall configuration.
G
G R O U P PO L I C Y
see Policy
G R O U P TA S K
A task defined for an administration group and performed on all client computers within this group.
H
H O S T
Computer running server software. A single host may run several server programs, that is, an FTP server, mail server,
and web server may function on the same host. Users access hosts through client programs, for example, a web
browser. The term server also is often used to refer to the computers running server software, thus blurring the practical
difference between a server and a host.
In telecommunications a host is a computer providing data (such as FTP files, news or web pages). On the Internet,
hosts are often referred to as nodes.
Page 81

G L O S S A R Y
81
I
I N F E C TE D O B J E C T
An object containing malicious code. It is detected when a section of the object's code completely matches a section of
the code of a known threat. Kaspersky Lab does not recommend using such objects since they may infect your
computer.
K
K E Y F I L E
File with the *.key extension, which contains your personal product key necessary for work with a Kaspersky Lab
application. The key file is included into the distribution kit (if you purchased it from distributors of Kaspersky Lab) or it
arrives in email, if you bought the product online.
M
M A X I M U M P R O T E C TI O N
Security status of your computer corresponding to the highest security level that the application can provide. On that
level the application performs anti-virus scanning of all local files, removable media, and network drives connected to the
computer.
M A X I M U M S P E E D
Security level that implies scanning of potentially infectable objects only. That approach decreases the scanning time
considerably.
P
P R O T E C TI O N
The application operating mode, in which objects are scanned for the presence of malicious code in real time.
The application intercepts all attempts to open any object (read, write, or execute) and scans the object for the presence
of threats inside. Uninfected objects are passed on to the user; objects containing threats, or suspected of containing
them, are processed in accordance with the task settings (they are disinfected, deleted or quarantined).
P R O T E C TI O N S T AT U S
Current protection status, which defines the level of computer security.
R
R E P L A C E ME N T T E MP L A T E
A template for the informational message that is used to replace the message body if infected or suspicious objects are
found in a message or its attachments.
R E P O R T T E M P L A T E
A template that is used to generate reports on the results of application activity. Report template contains a set of
parameters that define the reporting period, schedule, and report format.
R E S T O RA T I O N
Relocation of the original object from Quarantine or Backup to its original folder where the object had been stored before
it was quarantined, disinfected or deleted, or to a user-defined folder.
Page 82

A D M I N I S T R A T O R ' S G U I D E
82
S
S U B N E T MA S K
Subnet mask (also known as netmask) and the network address determine the addresses of computers on a network.
T
T A S K
Functions performed by a Kaspersky Lab application are implemented as tasks, for example: Real-time protection of
files, Full computer scan and Database update.
T A S K F OR A S E T O F C O M P U T E RS
A task assigned for a set of client computers from arbitrary administration groups within a logical network and performed
on those hosts.
T A S K S E T T I N G S
Task-specific application settings.
T R U S T E D P R O C E S S
Application process whose file operations are not monitored by Kaspersky Lab's application in real-time protection mode.
In other words, no objects run, opened, or saved by the trusted process are scanned.
U
U P D A T E
The procedure of replacing/adding new files (databases or application modules) retrieved from the update servers of
Kaspersky Lab.
U P D A T I NG T H E D A T A B A S E
One of the functions performed by a Kaspersky Lab application that enables it to keep protection current. In doing so, the
databases are downloaded from the Kaspersky Lab update servers onto the computer and are automatically connected
to the application.
Page 83

83
KASPERSKY LAB
Kaspersky Lab’s web site:
http://www.kaspersky.com
Virus Encyclopedia:
http://www.viruslist.com
Anti-Virus Lab:
newvirus@kaspersky.com
(only for sending suspicious objects in archives)
http://support.kaspersky.ru/virlab/helpdesk.html?LANG=en
(for queries to virus analysts)
Kaspersky Lab was founded in 1997. Today it is the leading Russian developer of a wide range of high-performance
information security software products, including anti-virus, anti-spam and anti-hacking systems.
Kaspersky Lab is an international company. Headquartered in the Russian Federation, the company has offices in the
United Kingdom, France, Germany, Japan, the Benelux countries, China, Poland, Romania and the USA (California). A
new company office, the European Anti-Virus Research Centre, has recently been established in France. Kaspersky
Lab's partner network includes over 500 companies worldwide.
Today, Kaspersky Lab employs over a thousand highly qualified specialists, including 10 MBA degree holders and 16
PhD degree holders. Senior experts holding membership in the Computer Anti-Virus Researchers Organization (CARO).
The company's most valuable assets are the unique knowledge and collective expertise accumulated during fourteen
years of continuous fighting against computer viruses. A thorough analysis of computer viruses activity enables the
company's specialists to anticipate trends in the development of malware, and to provide our users with timely protection
against new types of attacks. Resistance to future attacks is the basic policy implemented in all Kaspersky Lab's
products. The company's products always remain one step ahead of other vendors in delivering anti-virus coverage to
our clients.
Years of hard work have made the company one of the top anti-virus software developers. Kaspersky Lab was one of the
first businesses of its kind to develop the highest standards for anti-virus defense. The company's flagship product,
Kaspersky Anti-Virus®, provides full-scale protection for all tiers of a network, including workstations, file servers, mail
systems, firewalls, Internet gateways, and hand-held computers. Its convenient and easy-to-use management tools
maximize the degree of automation of anti-virus protection of computers and corporate networks. Many well-known
manufacturers use the Kaspersky Anti-Virus kernel in their products, including: Nokia ICG (USA), Aladdin (Israel), Sybari
(USA), G Data (Germany), Deerfield (USA), Alt-N (USA), Microworld (India), and BorderWare (Canada).
Kaspersky Lab's customers benefit from a wide range of additional services that ensure both stable operation of the
company's products, and compliance with specific business requirements. We design, implement and support corporate
anti-virus systems. Kaspersky Lab's anti-virus database is updated every hour. The company provides its customers with
24-hour technical support service in several languages.
If you have any questions, comments, or suggestions, please refer them to one of our distributors or directly to
Kaspersky Lab. We will be glad to assist you in any matters related to our product by phone or via email. Rest assured
that all of your recommendations and suggestions will be thoroughly reviewed and considered.
Page 84

84
INDEX
A
Action to be performed with objects ............................................................................................................................. 43
Administration Console ................................................................................................................................................ 24
ADMINISTRATION CONSOLE
LAUNCHING .......................................................................................................................................................... 27
Anti-virus engine .......................................................................................................................................................... 37
Anti-virus traffic scanning ........................................................................................................................... 37, 38, 39, 40
APPLICATION INTERFACE ........................................................................................................................................ 24
Application purpose ................................................................................................ ........................................................ 7
B
Backup storage ............................................................................................................................................................ 57
C
Checking functioning .................................................................................................................................................... 29
Complete installation .................................................................................................................................................... 15
Console tree. ................................................................................................................................................................ 24
Creating reports ........................................................................................................................................................... 51
Custom Installation ................................................................................................ ....................................................... 15
D
Databases
automatic update .................................................................................................................................................... 33
creation date ........................................................................................................................................................... 32
manual update ........................................................................................................................................................ 33
number of records .................................................................................................................................................. 32
DEFAULT SETTINGS .................................................................................................................................................. 31
Deleting
a policy ................................................................................................................................................................... 46
a task ...................................................................................................................................................................... 52
an object ................................................................................................................................................................. 60
Deleting policies ................................................................................................ ................................ ........................... 46
DIAGNOSTICS LEVEL ................................................................................................................................................ 61
E
EVENT LOG ................................................................................................................................................................. 61
H
Hardware requirements .................................................................................................................................................. 7
I
Installation
custom installation .................................................................................................................................................. 15
wizard ..................................................................................................................................................................... 13
Installation folder ................................................................................................ .......................................................... 15
Installation method ....................................................................................................................................................... 15
Installing the application ............................................................................................................................................... 13
K
Kaspersky lab ............................................................................................................................................................... 83
Page 85

I N D E X
85
L
Launching
the update task ....................................................................................................................................................... 33
License
replacing ................................................................................................................................................................. 21
reserve.................................................................................................................................................................... 22
LOG FOLDER .............................................................................................................................................................. 61
M
Main application window .............................................................................................................................................. 24
MANAGEMENT
LICENSES .............................................................................................................................................................. 21
Maximum object scan time ........................................................................................................................................... 37
Maximum size
Quarantine .............................................................................................................................................................. 57
scanned object ....................................................................................................................................................... 37
MMC............................................................................................................................................................................. 24
P
Policies
creation ................................................................................................................................................................... 43
Policies node. ............................................................................................................................................................... 41
Q
Quarantine
deleting objects ....................................................................................................................................................... 60
viewing objects ....................................................................................................................................................... 58
R
Reports
viewing.................................................................................................................................................................... 51
REPORTS .................................................................................................................................................................... 50
Repositories
Backup.................................................................................................................................................................... 57
S
Server adding ............................................................................................................................................................... 28
Software requirements ................................................................................................................................................... 7
U
Update
according to schedule ................................................................ ............................................................................. 33
Update source .............................................................................................................................................................. 33
Updating
run mode ................................................................................................................................................................ 34
update source ......................................................................................................................................................... 33
Upgrading the application............................................................................................................................................. 13
 Loading...