

Page 1

KASPERSKY LAB
Kaspersky Anti-Virus® 5.5
for Check PointTM Firewall-1®
Administrator's Guide
Page 2

KASPERSKY ANTI-VIRUS ® 5.5 FOR CHECK POINTTM
FIREWALL-1
®
Administrator's Guide
© Kaspersky Lab Ltd
http://www.kaspersky.com
Revision date: November, 2006
Page 3

Table of Contents
CHAPTER 1. INTRODUCTION......................................................................................6
1.1. Computer viruses and malicious software............................................................6
1.2. Purpose, main functions and structure of Kaspersky Anti-Virus..........................8
1.3. What's new in version 5.5?.................................................................................10
1.4. Software and hardware requirements................................................................11
1.5. Distribution kit ...................................................................................................... 12
1.5.1. License Agreement.......................................................................................13
1.6. Services provided for registered users...............................................................13
1.7. Formatting conventions.......................................................................................13
CHAPTER 2. OPERATION OF KASPERSKY ANTI-VIRUS.......................................15
2.1. Deploying the application....................................................................................15
2.2. Deployment of anti-virus protection....................................................................15
2.3. Anti-virus protection system maintenance..........................................................17
CHAPTER 3. INSTALLING AND REMOVING THE APPLICATION..........................18
3.1. Installing the application......................................................................................18
3.1.1. First-time installation.....................................................................................19
3.1.2. Reinstalling the application...........................................................................22
3.2. Removing the application....................................................................................22
CHAPTER 4. INTEGRATION OF KASPERSKY ANTI-VIRUS WITH CHECK
CHAPTER 5. STARTING USING THE APPLICATION...............................................34
TM
POINT
4.1. Registering Security Server with Check PointTM Firewall-1®.............................23
4.2. Obtaining a Security Server certificate................................................................32
5.1. Starting the application........................................................................................ 34
5.2. Application interface............................................................................................34
5.3. Creating the list of monitored servers................................................................. 37
5.4. Connecting the Management Console to the server.........................................38
5.5. Connecting the Security Server to Check PointTM Firewall-1®...........................39
5.6. Minimum required settings.................................................................................. 46
FIREWALL-1®............................................................................................23
5.2.1. Main application window .............................................................................. 34
5.2.2. Shortcut menu .............................................................................................. 36
Page 4

4 Kaspersky Anti-Virus 5.5 for Check Point
TM
Firewall-1®
5.7. Protection without additional configuration......................................................... 47
5.8. Verifying the application performance ................................................................ 48
5.8.1. Test “virus” EICAR and its modifications.....................................................48
5.8.2. Testing the HTTP traffic protection..............................................................49
5.8.3. Testing the SMTP traffic protection.............................................................. 49
5.8.4. Testing the FTP traffic protection................................................................. 50
CHAPTER 6. UPDATING THE ANTI-VIRUS DATABASE..........................................51
6.1. Downloading updates from the internet.............................................................. 54
6.2. Installing updates from a network folder.............................................................55
6.3. Automatic updates...............................................................................................56
6.4. Updating the anti-virus database in the manual mode.......................................57
CHAPTER 7. ANTI-VIRUS PROTECTION.................................................................. 58
7.1. Anti-virus objects processing .............................................................................. 60
7.1.1. Actions performed with objects transferred via HTTP protocol...................61
7.1.2. Actions performed with objects transferred via FTP protocol.....................62
7.1.3. Actions performed with objects transferred via SMTP protocol..................62
7.2. Anti-Virus protection level.................................................................................... 63
7.3. Enabling and disabling the anti-virus protection. Selecting the anti-virus
protection level...................................................................................................63
7.4. Scanning HTTP traffic......................................................................................... 65
7.5. Scanning FTP traffic............................................................................................70
7.6. Scanning SMTP traffic.........................................................................................73
7.7. Anti-virus scan efficiency.....................................................................................75
CHAPTER 8. BACKUP STORAGE.............................................................................. 79
8.1. Viewing the backup storage................................................................................ 80
8.2. Backup storage filter............................................................................................81
8.3. Restoring objects from the backup storage........................................................ 84
8.4. Deleting objects from the backup storage..........................................................86
8.5. Configuring the backup storage settings............................................................87
CHAPTER 9. REPORTS...............................................................................................89
9.1. Creating reports...................................................................................................91
9.2. Creating the report template ............................................................................... 92
9.3. Viewing reports....................................................................................................95
CHAPTER 10. APPLICATION EVENT LOG................................................................98
Page 5

Table of Contents 5
10.1. Configuring the diagnostics level......................................................................99
10.2. Configuring log files settings ...........................................................................101
CHAPTER 11. LICENSE KEYS..................................................................................102
11.1. License information.........................................................................................104
11.2. License key details..........................................................................................105
11.3. License-related notifications............................................................................ 107
11.4. Installing the license key ................................................................................. 107
11.5. Removing a license key..................................................................................108
CHAPTER 12. NOTIFICATIONS................................................................................110
CHAPTER 13. FREQUENTLY ASKED QUESTIONS...............................................114
A.1.1.1. NOTIFICATION SETTINGS.......................................................................... 118
A.1.1.2. GLOSSARY.................................................................................................... 122
A.1.1.3. KASPERSKY LAB..........................................................................................126
A.2. Other Kaspersky Lab Products ........................................................................ 127
A.3. Contact Us.........................................................................................................134
A.3.1.1. LICENSE AGREEMENT................................................................................136
Page 6

CHAPTER 1. INTRODUCTION
The main source of viruses today is the global Internet. Most virus infections
happen via e-mail. The facts that almost every computer has e-mail client
applications installed and that malicious programs are able to take a full
advantage of software address books in order to find new victims are favorable
factors for the distribution of malware. Without even suspecting it, the user of an
infected computer is sending infected e-mail messages to his or her contacts,
who, in turn, send new waves of infected messages and so on. It is not
uncommon when infected files, due to someone's negli gence, enter commercial
mailing lists of large companies. In this case, the virus will affect not just five, but
hundreds or even thousands recipients of such mailings who then will send
infected files to dozens thousands of their contacts.
It is now acknowledged that for some companies information has become a more
important asset than their physical property or cash. At the same time, in order to
gain profit through the use of the information, it has to be available to the
company's employees, clients and partners. This raises the issue of data security
and, as its important element, the issue of protection of the corporate mail
servers against the external threats, preventing virus outbreaks within the
corporate networks.
1.1. Computer viruses and malicious
software
The constant growth in the number of computer users and new possibilities of
data exchange between them via e-mail or internet result in the increased threat
of virus infections and data corruption or theft by malicious computer programs.
In order to be aware of the potential threats to your computer, it is helpful to know
what the types of malicious software (“malware”) are and how they work. In
general, malicious programs fall into one of the following three categories:
• Worms – malicious programs that belong to this category use network
resources for distribution. These programs were called "worms" due to
their ability to tunnel from one computer to another, using networks, email
and other channels. Due to this ability, worms can prolif erate extremely
fast.
Worms penetrate a computer, determine IP addresses of other computers, and send copies of themselves to these computers. Apart from the
network addresses, worms often use data contained in the address books
of e-mail client applications installed on the infected machine. Sometimes
worms create work files on disks, but they also can function without utilizing any resources of the infected computer except RAM.
Page 7

Introduction 7
• Viruses –programs that infect other program s by adding their c ode to the
infected program's code in order to gain control when infected files ar e
run. This simple definition helps determine that the major action a virus
performs is infecting computer programs. Viruses spread somewhat
slower than worms.
• Trojan horses – perform unauthorized actions on infected computers,
for instance, depending on the particular conditions, they can erase information on hard drives, "freeze" the system, steal confidential information, etc. In the strict sense, Trojan Horses are not viruses as they do not
infect programs or data, and are unable to sneak independently into computers and are distributed by malicious users as some "useful" software.
However, Trojans may inflict far greater damages compared to a regular
virus attack.
Recently, worms have become the most widespread type of malware, followed
by viruses and Trojans. Some malicious computer programs have characteristics
of two or even all three of the above categories.
The following potentially dangerous types of malware have also become
widespread:
• Adware - code that, without the user's knowledge, is included into a
program's code in order to display advertising messages. As a rule,
adware is integrated into freeware programs. The advertising component
is located in the interface. Adware programs are often used to gather
users' personal information and send it to the developer, change
browser's settings (browser's home page, search page, security levels,
etc.) and create traffic that is not controlled by the user. All this may lead
to the infringement of the security policies and further to direct financial
losses.
• Riskware - programs that are not supposed to perform any malicious
functions, but contain security breaches and errors and therefore can be
used by intruders as auxiliary components of malicious programs. This
type of software includes, for example remote administration programs,
IRC client programs, FTP programs and various utilities used for e nding
or hiding running processes.
• Spyware - software used to obtain unauthorized access to user's data,
for tracking actions performed on this computer or gathering information
about the contents of the hard drive. Such programs help t he intruder not
only gather information, but also gain control over the user's computer.
Spyware programs are often distributed along with freeware and installed
on the user's computer without the user's knowledge. This type of
software includes keyboard spies, password hacking programs and
software used for gathering confidential information (for example credit
card numbers).
Page 8

8 Kaspersky Anti-Virus 5.5 for Check Point
• Automatic dialers (Pornware) - programs that establish modem
connection with various pay-per-visit internet (as a rule, pornographic)
websites.
• Hacking tools - tools used by hackers to obtain access to the user's
computer. This type of software includes various illegal vulnerability
scanners, password hacking programs and other types of soft ware used
to hack network resources or to obtain unauthoriz ed access to th e s ystem
under attack.
Although malicious programs are distributed mainly via ema il and the Internet, a
floppy disk or a CD can also be a source of infection. Therefore, the task of
comprehensive protection against potential threats now extends far beyond
simple regular scans for viruses, and includes the more co mplex task of real-time
anti-virus protection.
Henceforth in the text of this Guide the term "virus" will be used to refer
to viruses, Trojan Horses and worms. A particular type of malware will
be mentioned only when it is required.
TM
Firewall-1®
1.2. Purpose, main functions and
structure of Kaspersky AntiVirus
Kaspersky Anti-Virus® for Check PointTM Firewall-1
as Kaspersky Anti-Virus) is a system that provi des anti-virus monitoring of files
transmitted over HTTP, FTP and SMTP protocols via Check PointTM Firewall-1®
firewall that ensures high quality protection of corporate networks against
malware.
Kaspersky Anti-Virus is controlled using special user interface incorporat ed into
Microsoft Management Console (hereinafter - MMC).
The application performs the following functions:
• performs anti-virus scan and processing of data streams transmitted via
HTTP and FTP protocols. Depending on the settings, the application will
skip or attempt to disinfect a malicious object, block acces s to it and notif y
about detection of such objects.
• passes over disinfected files to the client that requested this HTT P or FT P
stream.
• scans incoming and outgoing e-mail messages transmitted via SMTP protocol and all attached files for the presence of malic ious code in the realtime format. Depending on the settings selected, the application will pass
infected messages, delete them or attach to them a warning message.
®
(hereinafter referred to
Page 9

Introduction 9
• creates list of objects that will not be scanned for viruses.
• saves backup copies of objects to a special storage before disinfecting,
deleting or blocking the object for the consequent restoring which prevents the loss of data. Configurable filters allow to easily locate the original copies of objects.
• notifies user requesting an object that contains malicious code.
• notifies a bout the results of the anti-virus object scan, anti-virus database
updates, report creation, forthcoming expiration of the license and change
of the application status by launching external progr ams including scripts
written by the administrator. This feature allows the administrator to setup
notifications about the above events in a most convenient way.
• updates the anti-virus database from internet or from the l ocal folder either in the manual or automatic mode. Internet updates can be performed
from the Kaspersky Lab's FTP and HTTP internet servers.
Anti-virus scan and disinfection of infected objects are performed based on the records of the anti-virus database that
contains description of all currently known viruses, methods
used for the disinfection of objects infected with these viruses
and description of potentially dangerous programs (riskware).
As new viruses are created daily, it is extremely important
that you maintain your anti-virus database up-to-date.
The anti-virus database at the Kaspersky Lab's servers is
updated on an hourly basis. We recommend that you upd ate
your anti-virus database with the same frequency (see
Chapter 6, page 51).
• Maintains events log and creates reports about the results of the antivirus scan on a regular basis. The application allows creat ing reports using built-in templates at the required time interval.
• Allows configuring application settings depending on the intensity and the
nature of the traffic as well as the characteristics of the hardware installed
(amount of RAM, speed, number of processors, etc.).
• Manages license keys
Kaspersky Anti-Virus 5.5 for Check Point
TM
Firewall-1® includes the following
components:
• Security server that provides the anti-virus functionalit y and updating of
the anti-virus database and includes administrative services for remote
management, configuring and ensuring the integrity of the app lication and
of the data stored.
• Management Console that provides the user interface for managing the
administrative services of the application and allows installing the application, configuring settings and managing the server component. T he man-
Page 10

10 Kaspersky Anti-Virus 5.5 for Check Point
TM
Firewall-1®
agement module is implemented as the extension of the Microsoft Management Console (MMC).
1.3. What's new in version 5.5?
Kaspersky Anti-Virus 5.5 for Check PointTM Firewall-1® has the following
distinctions from the previous version:
• Completel y revised intuitive graphical interfac e implemented according to
the Microsoft Management Console standards. Using the new interface,
the administrator can start using the application without the need to configure any preliminary settings. Additionally, this interface offers a wide
range of options for configuring the customized application management
environment that can be adapted to the conditions of any particular corporate network to the maximum possible extent.
• The use of extended set of the anti-virus database for scanning objects
helps protect traffic not only against malware, but also against potentiall y
dangerous programs (riskware), such as spyware, adware, automatic dialing programs, hacking software and joke programs.
• The possibility to select anti-virus protection levels has been implemented
which enables the administrator to adjust the security level of the stream
passing through the firewall and the Anti-Virus load during the scan.
• Configura ble filters allow to easily locate the origin al copies of objects for
example for their subsequent restoration.
• A new feature has been added that allows user to scale the a pplication
based on the number of processors installed on the computer on which
the application is residing. In order to enhance the efficiency of the application (increasing the number of objects that can be analyzed at the same
time) several instances of the anti-virus kernel can be launched and r un
simultaneously.
• The possibility to control the size of the queue of the objects to be
scanned allows a more precise control of the Anti-Virus load depending
on the amount of data being scanned.
• A possibility to scan objects in RAM without using the disk subsystem has
been added, which considerably incr eases the efficiency of the application.
• Due to the support of AMON and ELA protocols a deeper level of K aspersky Anti-Virus integration with Check Point
achieved, which allows transferring information about Kaspersky AntiVirus operation and viewing it using standard Check Point
tools.
• The logging capability has been drastically improved. T he application n o w
allows logging registered events into the Microsoft Windows application
TM
Firewall-1® has been
TM
Firewall-1®
Page 11

Introduction 11
log and in the application's logs. An ability to configure the degree of information completeness and the extent of detail has been added. Logs
can be viewed using the Microsoft Windows Events Viewer tool and
standard text editors, such as Notepad.
• An abilit y to create regular extended reports about the anti -virus scan results. Reports can be created either in the automatic mode or by the administrator's request. The reports maintaining system ensures fast, convenient and consistent method of accessing information using standard
tools, such as for example, Microsoft Internet Explorer.
• Controlling the application from the command line is not supported.
1.4. Software and hardware
requirements
Kaspersky Anti-Virus is used with Check PointTM Firewall-1® (versions NG, NG
AI and NGX).
For the installation and operation of the ap plication c omp onents the s oft ware an d
hardware of your computer must comply with the following minimum
requirements:
Management server:
• Hardware requirements:
• processor Intel Pentium 300 MHz or higher;
• about 512 MB free RAM;
• about 20 MB of free disk space for the application installation
(not counting the size of the backup storage and other service
folders);
• at least 1 GB of free disk space for t emporary storage of data
copied from the internet before the anti-virus scan and for the
backup files storage.
• Software requirements:
• Microsoft Windows 2000 Professional with Service Pack 4 or
higher installed;
• Microsoft Windows XP Professional Edition with Service Pack 2
or higher installed;
• Microsoft Windows 2000 Server with Service Pack 4 or higher
installed;
• Microsoft Windows 2000 Advanced Server with Service Pack 4
or higher installed;
• Microsoft Windows Server 2003 Standard Edition or higher;
Page 12

12 Kaspersky Anti-Virus 5.5 for Check Point
TM
Firewall-1®
• Microsoft Windows Server 2003 Enterprise Edition or higher.
Management console:
• Hardware requirements:
• processor Intel Pentium II 300 MHz or higher;
• 256 MB RAM;
• 10 MB free disk space.
• Software requirements:
• Microsoft Windows 2000 Professional with Service Pack 4 or
higher installed;
• Microsoft Windows XP Professional Edition with Service Pack 2
or higher installed;
• Microsoft Windows 2000 Server with Service Pack 4 or higher
installed;
• Microsoft Windows 2000 Advanced Server with Service Pack 4
or higher installed;
• Microsoft Windows Server 2003 Standard Edition or higher;
• Microsoft Windows Server 2003 Enterprise Edition or higher.
1.5. Distribution kit
You can purchase Kaspersky Anti-Virus either from our dealers (retail box) or
online (for example, visit http://www.kaspersky.com and follow the E-Store link).
The retail box package includes:
• a sealed envelope with the installation CD containing the application files;
• User's Guide
• a license key on the installation CD or on a special diskette;
• License Agreement
Before you open the envelope with the CD make sure that you have
carefully read the license agreement..
If you buy Kaspersky Anti-Virus online, you will have to download the applicatio n
from the Kaspersky Lab's website. In this case, the distribution kit will include this
Guide along with the application. The license key will be e-mailed to you upon
the receipt of your payment.
Page 13
Introduction 13
1.5.1. License Agreement
License Agreement is a legal contract between you and Kaspersky Lab Ltd.,
which contains the terms and conditions, on which you may us e the anti-virus
product you have purchased.
Read the License Agreement carefully!
If you do not agree with the terms of the license agreement, you can return
Kaspersky Anti-Virus to your dealer for a full refund. In this case, the envelope
with the installation CD must remain sealed.
By opening the sealed envelope containing the i nstallatio n CD or b y installing th e
product on your computer you accept all terms and conditions of the License
Agreement.
1.6. Services provided for registered
users
Kaspersky Lab Ltd. offers to all legally registered users an extensive service
package enabling them to use Kaspersky Anti-Virus more efficiently .
After purchasing a subscription, you become a registered user and, dur ing the
period of your subscription, you will be provided with the following services:
• you will be receiving new versions of the purchased software product;
• support on issues related to the installation, configuration and use of the
purchased software product. Services will be provided by phone or via
email;
• information about new Kaspersky Lab products and about new viruses
appearing worldwide (this service is provided to users who subscribe to
the Kaspersky Lab's newsletter).
Support on issues related to the performance and the use of oper ating
systems or other technologies is not provided.
1.7. Formatting conventions
Various formatting features and icons are used throughout this document
depending on the purpose and the meaning of the text. The table below lists the
conventions used in the text.
Page 14

14 Kaspersky Anti-Virus 5.5 for Check Point
Format feature Meaning/Usage
TM
Firewall-1®
Bold font
Note
Attention!
In order to perform,
Step 1.
…
Task, example
Solution
[key] – modifier name.
Information messages
and command line text
Titles of menus, menu items, windows,
dialog boxes and their elements, etc.
Additional information, notes
Information requiring special attention
Description of the successive user's
steps and possible actions
Statement of a problem, example of the
demonstration of the application's
capabilities
Implementation of the task
Command line modifier
Text of configuration files, information
messages and command line
Page 15

CHAPTER 2. OPERATION OF
KASPERSKY ANTI-VIRUS
Kaspersky Anti-Virus 5.5 for Check PointTM Firewall-1® acts as a filter: processes
data, transferred over HTTP, FTP and SMTP protocols, identifies monitored
objects, analyzes them for the presence of malicious code and bl ocks attempts
of infected files and web documents to penetrate the local network.
2.1. Deploying the application
The structure of Kaspersky Anti-Virus 5.5 for Check PointTM Firewall-1® includes
two components. The anti-virus functionality is performed by the server
component, called the Security Server. The user interface is provided by the
Management Console.
The process of Kaspersky Anti-Virus deployment is identic al for the local and the
distributed Check Point
The Security Server component is a CVP server. It is integrated into the Check
TM
Firewall-1® application in accordance with OPSECTM standards and by
Point
default supports protected data transfer protocol.
The Security Server can be installed either on one com puter with Check Point
Firewall-1® or on any other computer connected via a TCP/IP protocol with th e
computer where Check Point
The Security Server installation option depends on the operating system installe d
on the computer with Check Point
system complies with the server component installation requir ements or on the
traffic transferred via Check Point
It should be noted that when processing a large amount of data traffic, Kaspersky
Anti-Virus may somewhat slow down the computer and this may affect the
throughput of Check Point
Security Server on a dedicated computer for networks with large amount of
traffic.
TM
Firewall-1® configuration.
TM
Firewall-1® is installed.
TM
Firewall-1®, on whether this computer
TM
Firewall-1®.
TM
Firewall-1®. Therefore we recommend installing the
TM
2.2. Deployment of anti-virus
protection
In order to create anti-virus protection system using Kaspersky AntiVirus 5.5 for Check Point
TM
Firewall-1®:
Page 16
16 Kaspersky Anti-Virus 5.5 for Check Point
TM
Firewall-1®
1. Install the Security Server component on the computer that has a
TCP/IP connection to the computer where the Check Point
Firewall-1
®
application is installed. The installation is performed
TM
from the installation CD.
If there are several Check PointTM Firewall-1® servers installed in
the network, each server shall have its own Security Server component installed.
It is also possible to install several Security Server components to
scan data received from a single Check PointTM Firewall-1® application. In this case, data distribution between the anti-virus servers
will be performed by the firewall. The anti-virus scan results for
each Security Server , namely,
• backup storage content;
• information included into the reports;
• the group of events registered in the Windows logs and in the
application’s logs;
will be provided only for objects forwarded to this Security Server
by Check Point
TM
Firewall-1®.
The number of instances of Kaspersky Anti-Virus installed in
the network will be determined by the number of installed Security Servers.
2. Perform integration of Kaspersky Anti-Virus and Check Point
TM
Firewall-1® (see Chapter 4, page 23) for each of the installed
Security Servers.
3. Install the Management Cons ole on the com puter that h as a TCP/IP
network connection with the computer on which the Securit y Server
is installed. The Management Console provides a centralized
access to all network resources from a single administrator’s
workstation; therefore, it is sufficient to install this component on
one computer only. However, if several administrators are working
together, the Management Console can be installed on each
administrator’s computer.
4. Create the list of monitored servers (see section 5.3, page 37).
5. Connect the Management Console to the servers (see section 5.4,
page 38).
6. Configure settings for connecting to Check Point
TM
Firewall-1® (see
section 5.5, page 39) for each server.
7. Configure the anti-virus protection system for each server:
Page 17

Operation of Kaspersky Anti-Virus 17
• Fine-tune the anti-virus database update settings (see Chapter
6, page 51).
• Verify the correctness of the settings and of the Anti-Virus
operation using a test "virus" EICAR (see section 5.8, page 48).
• Configure the event logs and reports settings (see Chapter 10,
page 98 and Chapter 9, page 89).
• Configure notifications about the results of anti-virus object
scan, anti-virus database updates, report creation, forthcoming
expiration of the license, change of the application status (see
Chapter 12 on page 110).
2.3. Anti-virus protection system
maintenance
Maintaining the server anti-virus protection in the up-to-date state involves:
• updating the anti-virus database on a regular basis;
• reviewing the application work logs and anti-virus scan result reports.
Page 18

CHAPTER 3. INSTALLING AND
REMOVING THE
APPLICATION
Before the installation of Kaspersky Anti-Virus, make sure that the software and
hardware of the computers used meet the installation requirements. The
minimum allowable configuration is described in section 1.4, page 2.
TM
For installation of Kaspersky Anti-Virus 5.5 for Check Point
1® the local administrator's rights are required for the computer on
which the installation is performed.
Updating from previous versions of Kaspersky Anti-Virus for Check
TM
Firewall to version 5.5 is not available.
Point
3.1. Installing the application
The setup wizard will offer you to install the application components of Kaspersky
Anti-Virus 5.5 for Check PointTM Firewall-1®, Security Server and Management
Console, on the computer on which the setup wizard is ru n. You can select either
complete or custom installation of the application or repair an invalid installatio n
of Kaspersky Anti-Virus.
After the Management Console is installed, Kaspersky Anti-Virus group and a
shortcut icon to run it will appear in the Run/Programs menu in your computer.
The Security Server will be installed on your computer as a service with a set of
attributes as follows:
• name - Kaspersky Anti-Virus 5.5 for Check Point
• launch – automatic;
• profile - Local system.
You can review the properties of the Security Server and monitor its operation
using standard Microsoft Windows administration tool - Computer
Management/Services. Information about the operation of the Security Server
is registered and saved in the Windows application log on th e computer on whi c h
the Security Server is installed and in the Kaspersky Anti-Virus application logs.
TM
Firewall-1
Firewall-
®
;
Page 19

Installing and removing the application 19
3.1.1. First-time installation
In order to install Kaspersky Anti-Virus, run the executable file from the
installation CD. The installation process will be fac ilitated by the setup wizard.
Setup wizard will offer you to configure the installation settings and start the
installation. Following below is a detailed discussion of each step of the
application installation.
The process of installation from the installation package received via
internet is completely analogous to the installation from the installation
CD.
Step 1. Verifying the version of the installed operating
system
Before the installation begins, the setup wizard will verify whether your computer
complies with the minimum hardware and software requirements. If these
requirements are not met, the installation will not be performed.
If you system does not comply with the software requirements, update your
operating system to the required version, install all required Service Packs and
start the installation of Kaspersky Anti-Virus one more time.
Step 2. Greeting and License Agreement
First steps of the installation process are standard and involve unpacking the
required files from the distribution kit and copying them to the hard drive of your
computer. After this, a greeting window and a window containing the License
Agreement will open. Read the text of the License Agreement and accept terms
and conditions contained therein to proceed with the installation.
Step 3. Selecting the type of the installation
During this step, select the installation type: complete or custom.
In order to install on your computer both the Security Server and the
Management Console, select the Complete option. The application will be
installed into the default folder (Program files\Kaspersky Lab\Kaspersky AntiVirus for Check Point
If you wish to install only one component of the application or to change the
default installation folder, use the custom type of the installation. In this case, you
will be offered to select the required component and specify path to the
installation folder.
TM
Firewall).
Page 20
20 Kaspersky Anti-Virus 5.5 for Check Point
TM
Firewall-1®
Step 4. Selecting application components to be installed
If you selected the custom installation option, specify application components to
be installed on your computer. You can also change the default fold er into which
they will be installed.
You can select either both components or only the Admini stration console to be
installed. The Security server will not be installed without the Console.
By default, you will be offered to install both components (the Security Server
and the Management Console) into the Program files\Kaspersk y Lab\Kaspersky
Anti-Virus for Check Point
TM
Firewall folder. If this folder does not exist, it will be
created automatically. You can change the installation folder using the Bro wse
button.
If your system does not comply with the minimum hardware or software
requirements for the installation of the Security Server, you will be offered to install only the Management Console.
Note that the setup wizard will display reference information about the selected
component and the disk space required for its installation.
Step 5. Selecting the data folder
During the installation of the Security Server, the setup wizard will create service
folders and databases required for the application to work. These folders and
databases include:
• temporary files and backup storage folders;
• folder to store the anti-virus database used by the application;
• reports storage folder;
• logs storage folders;
• backup storage database;
• report statistics database.
The data folder must be excluded from the scan scope of any anti-virus
applications installed on your computer.
Specify the folder to store the service data. By default you will be offered to
create folder Program files\Kaspersky Lab\Kaspersky Anti-Virus for Check
TM
Point
Firewall\DataFolder. You can change the path to the folder using the
Browse button.
After the application is installed, you will be abl e to change the path to the data
folder using the Kaspersky Anti-Virus Management Console, in the anti-virus
protection settings window (the General tab of the Anti-Virus protection
window). The new value will apply at the Security Server restart.
Page 21
Installing and removing the application 21
Note that databases used by the application are created only once,
during the installation of the Security Server.
If you decide change the application data folder, then i n order to ensur e
the correct data transfer into the new folder, the entire content of the old
folder shall be copied, including the subfolders structure a nd the names
of the subfolders shall remain intact.
If the integrity of the data folder structure has been affected, the Security Server will not run and, consequently, Kaspersky Anti-Virus will not
work.
Step 6. Launching the installation
After the settings are configured, launch the installation process. In order to do
this, press the Install button. This will start the process of copying the application
files to your computer.
Step 7. Installing license key
During the installation of the Security Server, you will be offered to install the
license key for Kaspersky Anti-Virus 5.5 for Check PointTM Firewall-1®.
You can also install the license key later using the Management Console,
however, note that without the license key the anti-virus functionality of the
application will not be available and you will only be able to launch the
Management Console.
During this step, Kaspersky Anti-Virus 5.5 for Check PointTM Firewall-1® license
key will be installed. The license key is your personal "key" that contains all
service information required for the full-featured functionality of the application
and additional reference information, namely:
• support information (who is providing support and how you can get help);
• restriction on the number of workstations;
• the license name, number and expiration date.
Install the current license key in the window that will open. In order to do this,
press the add button in the corresponding section. Specify the license key file
(*.key) to be installed using the standard Windows Select file dialog box. As a
result, the selected license key will be installed as the current license key for
Kaspersky Anti-Virus.
You can use your license key used with the previous application vers ion
- Kaspersky Anti-Virus 4.0 as the license key for Kaspersky Anti-Virus
5.5 for Check Point
TM
Firewall-1® if it is still valid.
You can also install a backup license key that will be activated automatically
upon the expiry of the current license key.
Page 22
22 Kaspersky Anti-Virus 5.5 for Check Point
If, at the time of the installation, you still do not have the license key (for example
you ordered it from Kaspersky Lab via inter net but have not received it yet), you
can install it later when you run the application for the first time using the
Management Console. Note that without the license key you cannot start using
Kaspersky Anti-Virus.
TM
Firewall-1®
Step 8. Completing the installation
After the installation is complete, press the Finish button in the final window of
the setup wizard.
3.1.2. Reinstalling the application
You have to reinstall Kaspersky Anti-Virus if the first-time ins tallati on appea red to
be incorrect or if the executable files were corrupted during the operation.
In order to reinstall the application select the Repair option in the window that will open.
This will start reinstallation of Kaspersky Anti-Virus, which will use the same
settings as the previous installation. For example, if the previous installation was
a custom installation, then the reinstallation initiated by the Repair button will
also be a custom type installation.
3.2. Removing the application
You can remove Kaspersky Anti-Virus for Check PointTM Firewall-1® from your
computer using standard Windows Add/Remove Programs tool or the application
distribution kit. This will remove all installed Kaspersky An ti-Virus components,
namely the Security Server and the Management Console, from your computer.
TM
In order to remove Kaspersky Anti-Virus for Check Point
using the distribution kit:
run the executable file from the installation CD and select the Remove
option in the window that will open.
Firewall-1®
Page 23

CHAPTER 4. INTEGRATION OF
KASPERSKY ANTI-VIRUS
WITH CHECK POINTTM
FIREWALL-1®
The process of integration of Kaspersky Anti-Virus with Check PointTM Firewall-
®
is a standard procedure for OPSECTM applications and involves two steps:
1
TM
1. Registration of the Security Server with Check Point
as an OPSEC
2. Obtaining the Security Server certificate.
After Kaspersky Anti-Virus is integrated with Check Point
the Security Server to Check Point
If traffic passing through the firewall is sent to several servers, each
server must be integrated with Security Check PointTM Firewall-1®.
TM
application.
TM
TM
Firewall-1®, connect
Firewall (see section 5.5, page 39).
4.1. Registering Security Ser ver
with Check Point
TM
Firewall-1®
Firewall-1®
Registering OPSECTM applications is described in detail in the Check PointTM
Guides. Provided below is the procedure of configuring the settings that are
specific to Kaspersky Anti-Virus. The configuration process must be perf ormed
from the Check PointTM Firewall-1® management console (Check Point
SmartDashboard
In order to register the Security Server with Check PointTM Firewall-1®
as an OPSEC
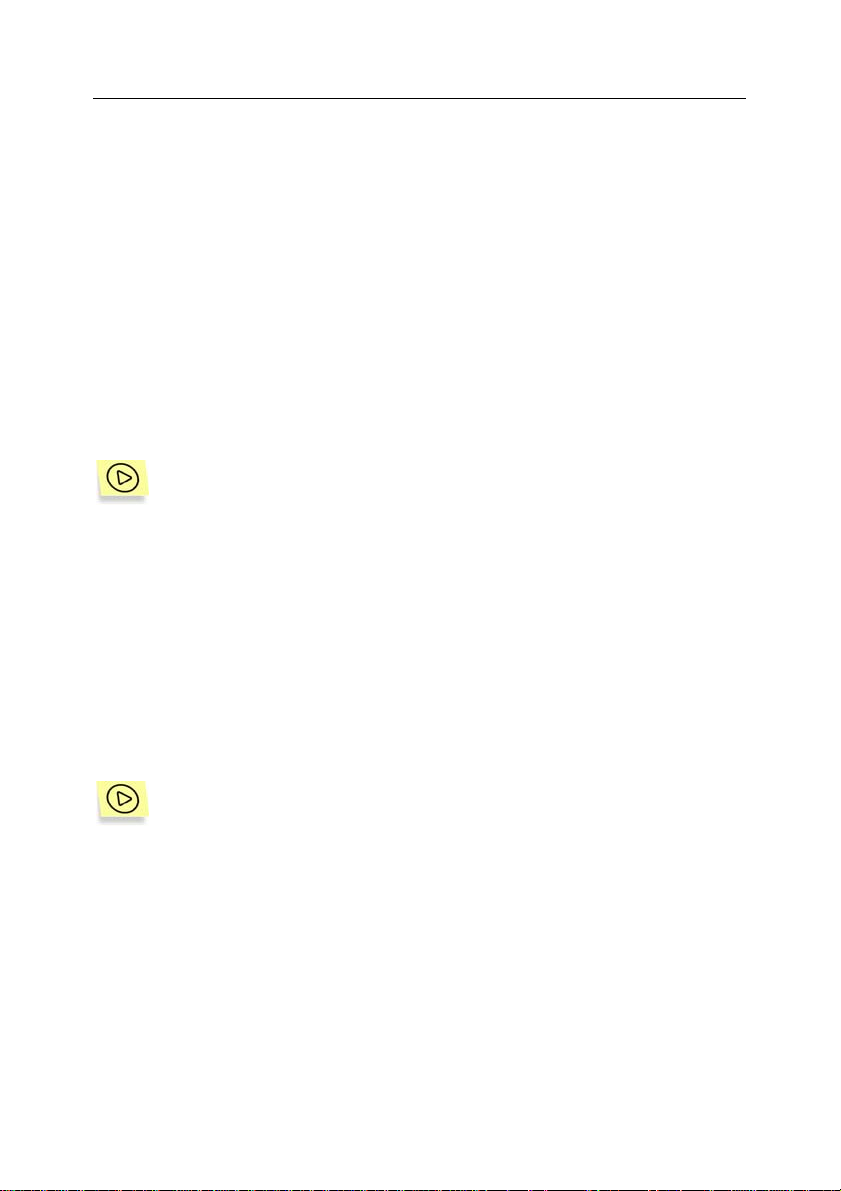
1. Create a new network object (Network Objects/New Nodes/Host)
TM
).
TM
application:
for the computer on which the Security Server is installed. Specify
the network name and the IP address of this computer in the
window that will open (see Figure 1)
TM
Page 24
24 Kaspersky Anti-Virus 5.5 for Check Point
TM
Firewall-1®
Figure 1. Creating a Security Server network object
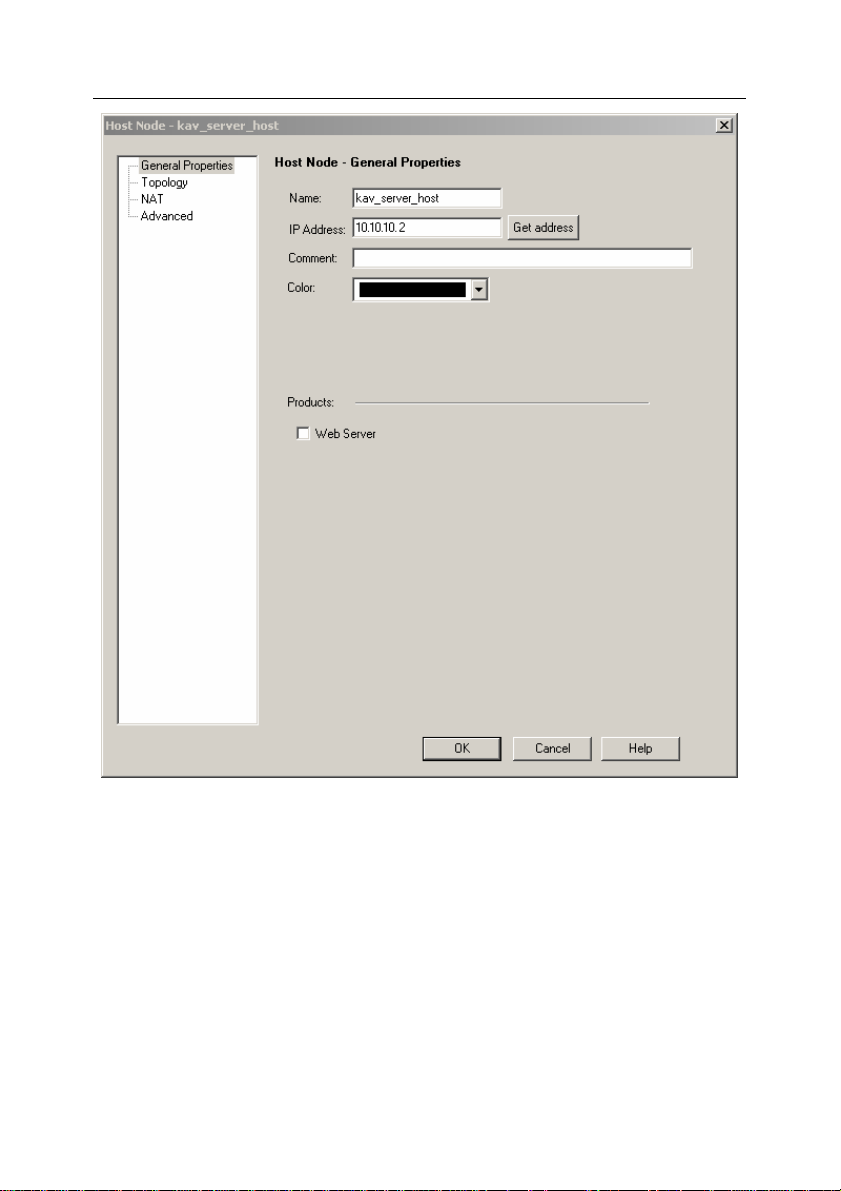
2. When creating a new object, that is an OPSECTM application
(OPSEC
TM
Application/New) in the General tab of the OPSECTM
Application Properties settings configuration window (see Figure 2),
perform the following:
• Using the Name entry field, enter the name of the OPSEC
application that will be used for addressing to the Security
Server of the Check Point
TM
Firewall-1® services.
TM
• Select the Security Server network object created earlier from
Host the drop-down list;
Page 25
Integration of Kaspersky Anti-Virus with Check PointTM 25
• In the Server Entities and Client Entities sections, select
CVP, AMON and ELA as protocols supported by the
application.
Configuring the protocols settings is not required.
Kaspersky Anti-Virus uses the default Check Point
Firewall-1
If the configuration of Check PointTM Firewall-1® interaction with OPSEC
®
settings.
TM
applications is different from
TM
the standard configuration, setup the settings as required.
Figure 2. Creating an OPSECTM application
Page 26

26 Kaspersky Anti-Virus 5.5 for Check Point
3. Setup a secure connection of the Security Server to Chec k PointTM
Firewall-1® (Secure Internal Communications). The following will be
created as the result:
• key to obtain a Security Server certificate;
• a Security Server certificate;
TM
• a Security Server SIC name (OPSEC
application’s SIC
name).
The Security Server SIC name will be displayed in the OP-
TM
Application Properties window, in the DN field (sec-
SEC
tion Secure Internal Communication).
4. Describe protocols that will be subject to the anti-virus scan.
Kaspersky Anti-Virus scans the data passing through the firewall
via HTTP, FTP and SMTP protocols. Create the following:
• a URI resource for transferring the HTTP protocol data for
scanning;
• an FTP resource for transferring the FTP protocol data for
scanning;
• an SMTP resource for transferring the SMTP protocol data for
scanning;
When describing the resources, specify the follo wing parameters in
order to enable Check Point
TM
to transfer data to the Anti-Virus to
perform the scan:
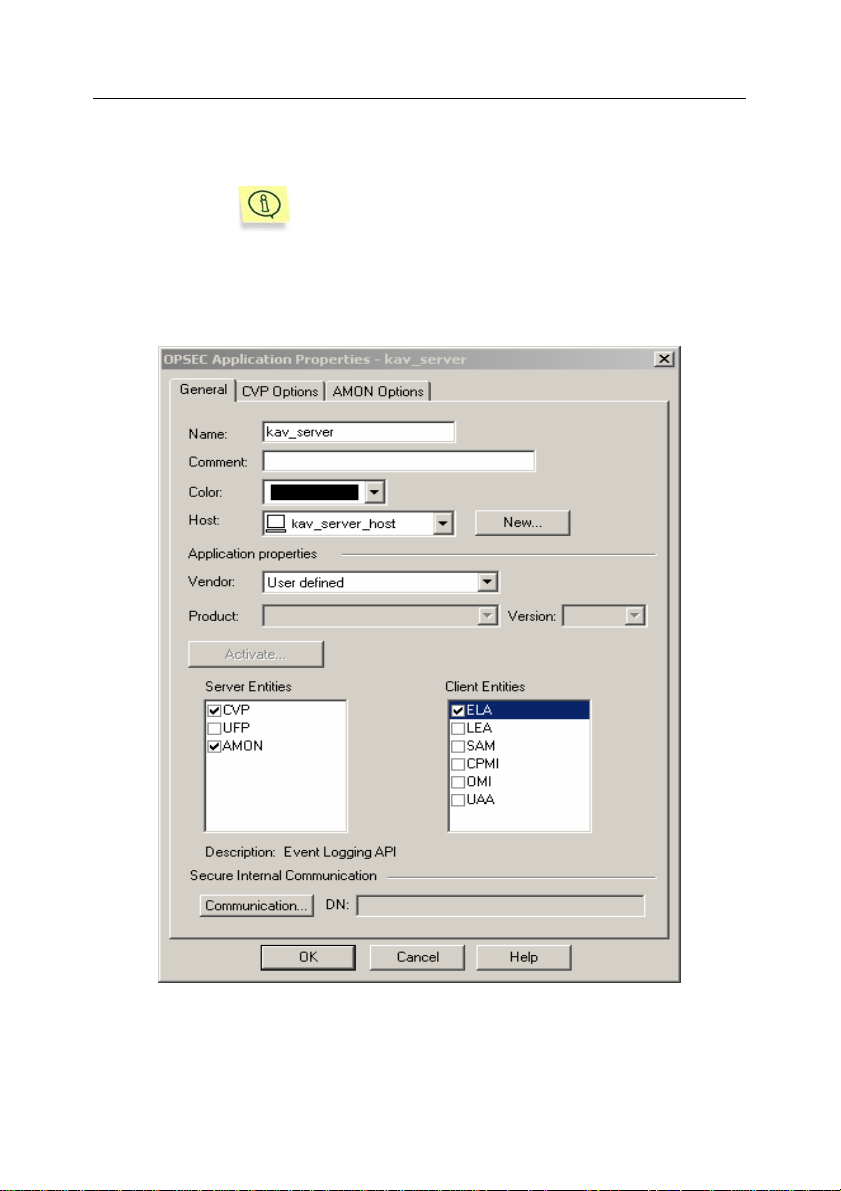
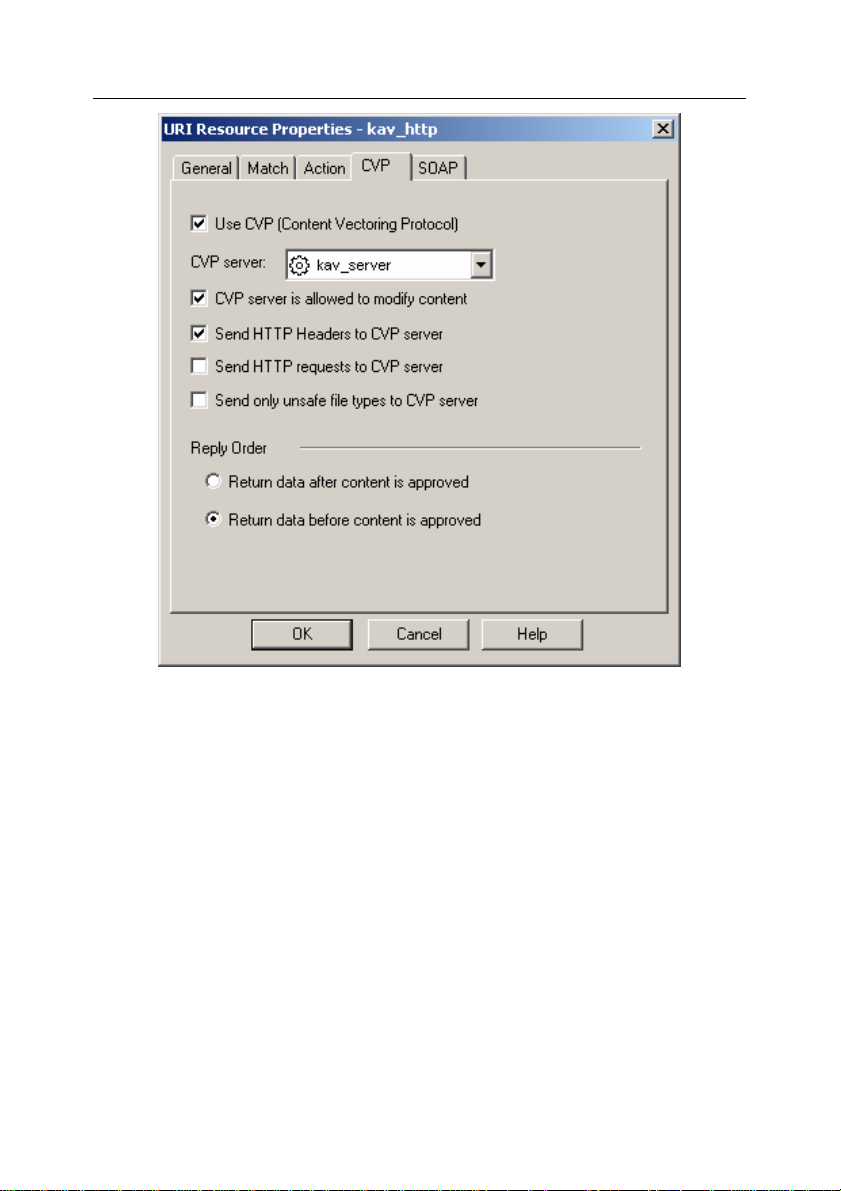
• to create URI, FTP and SMTP resources check the Use CVP
(Content Vectoring Protocol) box on the CVP tab (see Figure
3) and select the name of the OPSEC
TM
application
corresponding to the Security Server in the CVP server field;
TM
Firewall-1®
Page 27
Integration of Kaspersky Anti-Virus with Check PointTM 27
Figure 3. Creating a URI-resource.
The CVP tab
• to create an FTP resource check the GET and the PUT boxes
in the Methods section on the Match tab (see Figure 4);
Page 28

28 Kaspersky Anti-Virus 5.5 for Check Point
Figure 4. Creating an FTP resource.
The Match tab
• to create a URI resource, select the Enforce URI capabilities
option in the Use this resource to section on the General tab
(see Figure 5).
TM
Firewall-1®
Page 29

Integration of Kaspersky Anti-Virus with Check PointTM 29
Figure 5. Creating a URI resource.
The General tab
In order to increase the efficiency of the anti-virus scan, specify the
following settings values on the CVP tab (see Figure 3):
• Check the CVP server is allowed to modify content box for
URI-, SMTP- and FTP-resources.
This parameter controls the possibility of disinfection and replacement of objects detected during the anti-virus scan (see
section 7.1, page 60).
If the box is not checked, disinfection (as well as replacement
for HTTP and SMTP objects) will not be performed. Such objects will be identified as infected and blocked by Check
TM
Point
Firewall-1®.
• Check the Send HTTP Headers to CVP server box for the URI
resource and the Send SMTP Headers to CVP server box - for
the SMTP resource.
Page 30
30 Kaspersky Anti-Virus 5.5 for Check Point
• Select the Return data before content is approved option in
the Reply Order section for URI, SMTP and FTP resource.
This parameter determines the possibility of early data transfer
to the user before this data is scanned (see section 7.4, page
65).
If this option is not selected for the URI and FTP resources,
then early data transfer will not be performed during the scan
of objects transferred over HTTP and FTP protocols.
Please take into account the following restrictions when creating a SMPT resource:
• the size of messages redirected by Check Point
®
wall-1
for the anti-virus scan displayed in the Do not
send mail larger than field on the Action2 tab (see
Figure 6);
• the size of messages passing through Check Point
Firewall-1
®
(Network Objects/ Check PointTM
/Advanced/SMTP) displayed in the Don’t accept mail
larger than field (see Figure 7).
The specified values must match the traffic parameters. Messages with the size exceeding the restrictions will not be processed by Check Point
TM
Firewall-1® and, therefore, will not be
submitted to the anti-virus scan and will not delivered to the
user.
TM
Firewall-1®
TM
Fire-
TM
Page 31

Integration of Kaspersky Anti-Virus with Check PointTM 31
Figure 6. Configuring the SMTP resource settings.
The Action2 tab
Page 32

32 Kaspersky Anti-Virus 5.5 for Check Point
TM
Firewall-1®
Figure 7. Configuring the settings of Check PointTM Firewall-1®.
Restricting the message size
4.2. Obtaining a Security Server
certificate
Obtaining the certificate is a standard procedure f or applications integrated with
Check Point
opsec_pull_cert.exe designed for obtaining certificates and included into the
Kaspersky Anti-Virus distribution kit. After installation of the Security server this
utility will be located in the component installation folder, subfolder OpsecTools.
TM
Firewall-1®. This procedure is performed using special utility
Page 33

Integration of Kaspersky Anti-Virus with Check PointTM 33
The settings will be assigned values set during the registr ation of the Security
Server with Check PointTM Firewall-1® (see section 4.1, page 23).
In order to obtain the Security Server certificate:
run executable file opsec_pull_cert.exe included into the Kaspersky
Anti-Virus distribution kit on the computer on which the Security Server is
installed using the command line with the following keys:
opsec_pull_cert.exe –h <IP address> -n <OPSEC
TM
application
name> -p <modifier> -o <path to the certificate file >
where:
TM
<IP address> - IP address of the computer on which Check Point
®
wall-1
is installed;
TM
< OPSEC
assigned for the Security Server during the registration with Check
Point
application name> - the name of the OPSECTM application,
TM
Firewall-1®;
<modifier> - the modifier used for obtaining the Security Server certificate specified when the settings for secure connection to Check Point
Firewall-1
<path to the certificate file> - full path to the file where the Security
Server certificate received from Check Point
®
were configured;
TM
Firewall-1® will be saved.
Fire-
TM
This file must be saved in a local folder on the computer on which the Security Server is installed. According to the default Anti-Virus settings the
certificate file will be stored as file opsec.p12 in the application data
folder in service folder OpsecDir. We recommend using this value for t his
setting.
If setting -o <path to the certificate file> is not used, the certificate file will be saved as opsec.p12 in the folder from which
opsec_pull_cert.exe utility was run.
We recommend to move the certificate file to the application
data folder in service folder OpsecDir as this will allow to
avoid additional configuration when connecting the Security
server to Check Point
TM
Firewall-1® (see section 5.5 on page
39).
After the action performed by this utility is completed successfull y, the full path to
the certificate file and the SIC name of the Security Server will be displayed on
the screen.
Page 34

CHAPTER 5. STARTING USING
THE APPLICATION
5.1. Starting the application
The server part of the application, the Security Server, is launched automatically
at the startup of the operating system on the computer on which the Security
System is installed. If the settings used for the interaction of the Security Server
with Check Point
and the anti-virus protection has been enabled (see section 7.1, page 60), it will
start functioning immediately after the server component is started.
The operation of Kaspersky Anti-Virus is controlled from the administrator's
workstation – a computer on which the Management Console is installed.
In order to start the Management Console:
select the Management Console item in the programs group Kaspersky
Anti-Virus 5.5 for Check Point
grams Windows m enu. This programs group is created only on the ad-
ministrator's workstations when the Management Console is installed.
5.2. Application interface
TM
Firewall-1® have been configured (see section 5.5, page 39)
TM
Firewall from the standard Start / Pro-
The user interface of Kaspersky Anti-Virus is provided by the Management
Console component. The Management Console is a dedicated isolated facility
integrated into MMC, therefore the application interface is a standard MMC
interface.
5.2.1. Main application window
The main application window (see Figure 8) contains a me nu, a toolbar, a view
pane and a results pane. The menu provides the window management func tions
as well as the access to the help system. The set of buttons on the toolbar
ensures the direct access to some frequently accessed item s of the main menu.
The display pane presents the Kaspersky Anti-Virus 5.5 for Check Point
Firewall-1
the list of elements of the object selected in the tree.
®
namespace in the form of the console tree, the results pane displ ays
TM
Page 35

Starting using the application 35
Figure 8. Main application window
The Kaspersky Anti-Virus 5.5 for Check PointTM Firewall-1® namespace contains
the list of monitored servers (that is, computers that are monitored by Kaspersky
Anti-Virus via this console) in the form of nodes.
Immediately after the installation of the Management Console the namespace
does not contain any elements.
After being added to the console tree, the monitored server will be displayed as a
node with name <Computer Name>. The settings configuration and controlling
Kaspersky Anti-Virus application is performed using hyperlinks in the results
pane.
• General settings
– used for viewing general settings of Kaspersky AntiVirus operation, license details and information about installed license
keys, renewing the license and the configuring the application operatio n
diagnostics settings and notification settings.
• OPSECTM settings – used for viewing and configuring Check PointTM
Firewall-1® interaction settings.
• Anti-virus scan
– used to control the anti-virus protection, configure the reception settings, anti-virus database updates settings, manually update
the database, create automatic the updating schedule, c onfigure the efficiency of the Kaspersky Anti-Virus operation.
• HTTP traffic scan settings– used to configure the HTTP traffic scan set-
tings.
• FTP traffic scan settings– used to configure the FTP traffic scan settings.
• SMTP traffic scan settings
– used to configure the SMTP traffic scan set-
tings.
Page 36

36 Kaspersky Anti-Virus 5.5 for Check Point
TM
Firewall-1®
If the connection to the monitored server was established, th e <Computer name>
node will include nested folders; each of these folders will be used for managing
a particular function of the application.
• Backup storage - for working with the backup storage where backup cop-
ies of objects are stored; includes the list of objects stored in th e backup
storage.
• Report templates - for working with reports; contains templates used to
create the anti-virus scan reports.
5.2.2. Shortcut menu
Each category of objects in the console tree has its own shortcut menu. In
addition to standard MMC commands, this shortcut menu contains commands
used for handling a particular object. The lis t of objects and the corresponding
set of commands accessible via the context menu are provided in the table
below.
Object Command Purpose
Kaspersky
Anti-Virus 5.5
for Check
TM
Point
Fire-
®
wall-1
Add a server
Add to the console tree a computer
where Kaspersky Anti-Virus will be
controlled using the console.
<Computer
name>
Backup storage
Report templates
Disconnect from
the server
Connect to the
server
Remove the
server from the
console tree
New filter
New report template
Disconnect the computer with the
Security Server installed from the
Management Console.
Connect the computer with the Security
Server installed to the Management
Console.
Remove the computer from the list of
servers on which Kaspersky Anti-Virus
is controlled using the Management
Console.
Create and configure a new filter used
to search for objects located in the
backup storage.
Create a new report template.
Page 37

Starting using the application 37
Additional shortcut menu commands are also provided for report template s and
for the backup storage:
• using the Create a report command you can create a report based on the
selected template and save it as a file;
• using the View report command you can display the last report created
based on the selected template;
• the Get file command is used to obtain the or iginal c opy of t he obj ect that
had been saved before this object was processed by the Anti-Virus.
5.3. Creating the list of monitored
servers
In order to be able to control Kaspersky Anti-Virus vi a the conso le, the computer,
on which the Security Server component is install ed, must be added to the list of
monitored servers. You can add to this list either a local computer or any other
compute within the network. Adding a computer may be accompanied by
establishing a connection between the Management Console and the Security
Server.
In order to add a new server to the list of monitored servers,
1. Select the Kaspersky Anti-Virus 5.5 for Check Point
node in the console tree, open the shortcut menu and select the
Add a server command or use the analogous item from the Action
menu. This will open an Adding a server window (see Figure 9).
2. Specify a computer with the Security Server component in stalled. If
the server component is installed on the same computer as the
Management Console, select Local computer. In order to add one
of the computers installed in the network, select Remote computer
and specify the name computer's name in the entry field. You can
enter the name manually (select IP address, full domain name
(FQDN in the following format <domain name>.<Computer
name>), the computer's name in the MS Windows network
(NetBIOS name) or select the computer using the Browse button.
TM
Firewall-1®
When the application is connecting the Management Cons ole
to the Security Server, the program will use this name to establish connection with the computer.
The connection is established using DCOM protocol.
Page 38

38 Kaspersky Anti-Virus 5.5 for Check Point
In order to establish connection between the Management Console
and the Security Server when adding the server, check the Con-
nect now box (details see section 5.4. page 38).
The Security Server component must be installed on the selected computer in order to ensure connection.
Figure 9. The Adding a server dialog box
As a result, the computer that you selected will be displ ayed as a <Computer
name> node in the console tree. The local computer will be displayed as the
localhost.
TM
Firewall-1®
If the connection with the Security Server was successfully established, t he
icon will appear next to the monitored an d the node structure will includ e nested
folders: Backup Storage and Report Templates. If the connection hav e not been
established or could not be established, the server will be flagged with the
icon. You can connect to such server only manually (details see section 5.4.
page 38).
In order to remove a server from the list of monitored servers,
select the node that corresponds to the server you wish to remove in the
console tree, open the shortcut menu and select the Remove server
from the console tree command or use the corresponding item in the
Action menu.
As a result, the selected node will be removed from the console tree.
5.4. Connecting the Management
Console to the server
In order to be able to configure and manage Kaspersk y Anti-Virus 5.5 for Check
TM
Firewall-1® using the console, you have to connect to the Security Server
Point
Page 39

Starting using the application 39
component installed on the monitored server. T he application will then receive
information from the server and display it as the console tree.
In order to connect to the Security Server
select the node that corresponds to the server you need in the console tree,
open the shortcut menu and select the Connect to the server command
or use the corresponding item in the Action menu.
If the connection with the server was successfully established, the settings of this server will be displayed in the main application window: the
node will be flagged with the icon and the node structure will include
folders Backup storage and Report templates.
If the connection could not be established, the application will display a
warning with the indication of the problem and a su ggestion to connect
next time the Management Console is started. Select the required option.
In order to connect to the Security Server, the user must have the local
administrator's right on the computer to which the connection is attempted.
The rights verification is performed based on the standard Windows
network user authentication process.
5.5. Connecting the Security Server
to Check Point
TM
Firewall-1®
On order to ensure that Kaspersky Anti-Virus scans data transferred via Check
TM
Firewall-1®, the settings for the interaction between the two applications
Point
shall be configured.
If the settings for the interaction between Kaspersky Anti-Virus and
Check Point
will not be performed.
The interaction between Check Point
integrated with it, is maintained by the Secure Internal Communications (SIC)
system. Applications are connected to Check Point
protocol. Applications authentication is performed based on the certificate and
the SIC name of the application (OPSEC
settings are configured during the integration of Kaspersky Anti-Virus with Check
TM
Point
Firewall-1® (see section 4.1, page 23).
TM
Firewall-1® are not configured, the anti-virus traffic scan
TM
Firewall-1® and application being
TM
Firewall-1® using a secure
TM
application’s SIC name). These
Page 40

40 Kaspersky Anti-Virus 5.5 for Check Point
TM
Firewall-1®
Connecting applications using a secured protocol is recommend ed by
Check Point
By default, Kaspersky Anti-Virus uses a secured connection protocol
and the default Check Point
TM
company.
TM
Firewall-1®settings.
The interaction between the applications is provided using three pr otocols. CVP
and AMON protocols are used by the Security Server when it is expec ting the
incoming connection from Check Point
the Security Server to initiate a connection to Check Point
TM
Firewall-1® and ELA protocol is used by
TM
Firewall-1®.
CVP and AMON protocols are supported by the Security Server, while
ELA protocol support is provided by Check PointTM Firewall-1®.
The interaction settings are configured from the administrator's workstation using
the Kaspersky Anti-Virus Management Console.
The configuration process is not affected by the computer on which the Security
Server is installed (dedicated computer or the computer with Check Point
Firewall-1
®
). The steps you will have to perform in order to configure the setting s
TM
will be the same:
In order to configure the settings for interaction between the Security
Server and Check Point
1. Select the node corresponding to the requir ed server in the conso le
tree and follow the OPSEC
2. In the Connection tab of the OPSEC
TM
Firewall-1®:
TM
settings link in the results pane.
TM
settings window that will
open (see Figure 10) specify the values for the settings used for
connection via CVP, AMON and ELA protocols.
By default the Secure server is connected to Check PointTM
Firewall-1
you will have to specify values for the settings used for con-
®
using a secure connection. In order to configure it
nection using protocols CVP and AMON and the path to the
certificate file.
In order to ensure that the Secure server transfers to Check
TM
Point
Firewall-1® information about its operation, for example, events registered in the operation of the Anti-Virus, you
will have to configure the settings for data transmission using
the ELA protocol.
The default secure connection type for each protocol corresponds to the default settings used by Check Point
1® starting with version NG. We recommend that you change
TM
these settings only in case of necessity.
For CVP and AMON protocols specify the following:
Firewall-
Page 41

Starting using the application 41
• the port number on the Security Server that will be used to
receive requests for connection from Check Point
TM
Firewall-1®.
By default, these are port 18181 for CVP protocol and port
18193 for AMON protocol.
• the type of authentication used for connection. Select the
required value from the drop-down list:
o none - non-secure ("clear") connectio n;
o sslca – a protocol based on cryptographic certificates is
used, the data will be encrypted.
o sslca clear – a protoco l based on cr ypt ograph ic certificates
is used, the data will not be encrypted.
o auth_opsec – an internal Check PointTM protocol is used,
the data will not be encrypted;
o ssl_opsec – a SSL-bas ed protocol is used, the data will be
encrypted.
o ssl_clear_ops ec – a SSL-based protocol is used, the data
will not be encrypted.
If the list does not contain the required value, enter it manually.
If protocols that require keys for encryption are used for authentication, the key files must be located in the application
data folder in the OPSEC
• SIC-Security server name, specified during the registration of
the Security Server with Check Point
TM
service folder.
TM
Firewall-1® (see section
4.1 on page 23).
You can view the SIC name of the Security Server using the
Check Point
displayed in the OPSEC
TM
Firewall-1® Management Console. It will be
TM
Application Properties window, in
the DN field (section Secure Internal Communication).
If a non-secure connection is used, the SIC-Security Server
name does not have to be specified.
For ELA protocol specify the following:
• the number of the port that will be used by Check PointTM
Firewall-1
®
to receive information from Kaspersky Anti-Virus (by
default it is port 18187);
• the type of authentication used for connection (see above);
Page 42

42 Kaspersky Anti-Virus 5.5 for Check Point
• ELA Server: NetBIOS name or the full domain name (FQDN)
or the IP address of the computer, on which Check PointTM
Firewall-1® is installed,
• ELA SIC-Server name. the internal SIC name of Check
TM
Firewall-1® to which the Security Server will be
Point
connected;
You can view the internal Check PointTM Firewall-1® SIC name
using the Check PointTM Firewall-1® management console. It is
displayed in the settings configuration window of Check
TM
Point
Firewall-1® (Network Objects/ Check PointTM
/ GeneralProperties) in the DN field, section Secure Internal
Communication.
TM
Firewall-1®
Specify the full path to the Security Server certificate file receiv ed
from Check Point
TM
Firewall-1® (see section 4.2 on page 32) in the
Path to the SSLCA certificate file field. By default the certificate
file will be saved on the server in the application data folder in the
OpsecDir service folder with filename opsec.p12. Therefore if the
path to the file specified is a relative path, the applicati on will searc h
for it in <Data folder>\OpsecDir.
Page 43

Starting using the application 43
Figure 10. Configuring OPSECTM settings
The Connection tab
In order to specify settings required to configure connection between
Kaspersky Anti-Virus and Check PointTM Firewall-1® that are not included
in the Connection tab, press the Advanced button.
TM
This will open the Configuring additional OPSEC
settings window
(see Figure 11). Enter the description of the required settings and press
the OK button.
An example of such settings for CVP and AMON protocols is the IP address on which the Security Server is expecting connection with Check
TM
Point
Firewall-1®. If this setting is not specified, the Security Server will
await connection on all IP addresses available on it.
Example:
cvp_server ip 10.10.10.2
amon_server ip 10.10.10.2
Page 44

44 Kaspersky Anti-Virus 5.5 for Check Point
TM
Firewall-1®
For detailed information about secure connection types and
default values for various versions of Check Point
®
visit the Check PointTM corporate website at:
1
http://www.opsec.com/developer/gw_comm_mode.html
TM
Firewall-
Figure 11. Configuring additional OPSECTM settings
3. Select the Parameters tab (see Figure 12). This tab displays
settings used to control the data exchange between the Security
Server and Check PointTM Firewall-1®. Specify the required values.
• Specify the maximum time (in seconds) the Security Server will
wait for the data to be received from Check Point
TM
Firewall-1®
in the Connection timeout field in the General section. If no
information has been received within this period of time, the
Security Server will disconnect from Check Point
The connection will be established later when Check Point
TM
Firewall-1®.
TM
Firewall-1® transfers data subject to anti-virus processing. The
default value is 120 seconds.
• Establish the frequency (in se conds) for the Security Server to
issue the confirmation signal used to maintain the connection
with Check Point
TM
Firewall-1® in the Confirm connection
every field of the General section. The suggested default value
is 5 seconds.
• In order to ensure the output of registered A nti-Virus operation
events into the Check Point
ensure notification about such events using Check Point
Firewall-1
®
tools, check the Notify about events via ELA
TM
Firewall-1® event logs and to
TM
protocol box. After this:
o Select the option to determin e the way notifications will be
made from the Notification type drop-down list. Select the
Page 45

Starting using the application 45
Do not notify option if you do not want notifications to be
issued.
o Specify the fre quency for the Security Server to attempt to
restore the connection with Check PointTM Firewall-1® if the
connection fails, in the Try to connection every field.
Information about the events that happened while the connection was out, will be transferred to Check Point
®
immediately after the connection is restored.
wall-1
TM
Fire-
Information about the following events will be sent to the
Check PointTM Firewall-1® application:
• updating of anti-virus database,
• forthcoming expiration of the license;
• change of the application status (start/stop of the Security
server, changes in the application functionality).
By default the Notify about events via ELA protocols box is
not checked.
Page 46

46 Kaspersky Anti-Virus 5.5 for Check Point
Figure 12. OPSECTM setting configuration.
The Parameters tab
TM
Firewall-1®
4. After you are done with the settings, press the Apply or the OK
button.
You can restore the default settings by pressing t he Restore the default
settings button.
5.6. Minimum required settings
After the settings for the interaction with Check PointTM Firewall-1® are
configured, Kaspersky Anti-Virus will start working with the minimum set of
settings, most of which are default optimum settings recommended by the
Kaspersky Lab's experts. If necessary, depending on the network prop erties and
the characteristics of the computer on which the Security Server is installe d, you
can make all required changes and additions.
If you connect to the internet using a proxy s erver, you will have to configure connection settings in order to receive updates.
The application is configured from the administrator's workplace. It can be
performed irrespective of whether Check Point
TM
Firewall-1® is running.
Page 47

Starting using the application 47
5.7. Protection without additional
configuration
The anti-virus protection will start operating immediately after the parameters for
the interaction between Kaspersky Anti-Virus and Check Point
configured. The default operation mode of the Anti-Virus is as follows:
• The application scans objects for the presence of all malware kno wn by
the moment (with standard anti-virus protection level selected).
• The anti-virus protection will cover all data transferred via HTTP, FTP and
SMTP protocols.
• The scan scope will include objects of all formats, except container objects with the level of nesting above 32.
• The maximum time allowed for scanning one object is 1800 seconds;
• If an infected object is detecte d when scanning HTTP traffic, the applica-
tion will attempt to disinfect this object and will pass it if the object was
disinfected and if it can not be disinfected, the application will block access to it and display an information message of the following format:
TM
Kaspersky Anti-Virus 5.5 for Check Point
Requested address "<path to the resource>" contains an infected object
<virus name>. Access to the resource has been blocked.
Suspicious, protected and corrupted objects detected will be delivered to
the user intact.
• If an infected object is detected when scanning FTP traffic, the application
will attempt to disinfect this object and will pass if the object was disinfected and if it can not be disinfected, the application will bl ock access to
it and displays an FTP client connection error message:
Suspicious, protected and corrupted objects detected will be delivered to
the user intact.
• If an infected object is detected while scanning SMTP traffic, the appl ication will:
• save a copy of the original message along with all attached files
in the backup storage;
• delete all files attached to the message;
• replace the body of the message with an information message
of the following format:
Kaspersky Anti-Virus 5.5 for Check PointTM Firewall-1®
Firewall-1®
TM
Fiewall-1 are
Page 48

48 Kaspersky Anti-Virus 5.5 for Check Point
The message sent by you contains an infected object
<virus name>. The message has been blocked.
Suspicious, protected and corrupted objects will be
delivered to the user intact.
• The anti-virus database is updated hourly via internet from the Kaspersky
Lab's HTTP and FTP updates servers.
• The anti-virus protection report will not be created.
TM
Firewall-1®
5.8. Verifying the application
performance
After Kaspersky Anti-Virus is installed and configured, we recommend that you
verify the correctness of its settings and operation using a test "virus" and its
modifications. A separate test shall be performed for each protocol.
5.8.1. Test “virus” EICAR and its
modifications
This test "virus" was designed by (The European Institute for Computer
Antivirus Research) specifically for testing anti-virus products.
The test “virus” IS NOT A VIRUS because it does not contain code that can harm
your computer. However, most anti-virus products ma nufacturers identify this file
as a virus.
Never use real viruses for testing the operation of an anti-virus product!
You can download this test “virus” from the official website of the EICAR
organization at http://www.eicar.org/anti_virus_test_file.htm
Before you download the test "virus", you must disable the anti-virus
protection (see section 7.3, page 63), because otherwise
anti_virus_test_file.htm will be identified by the Anti-Virus as an infected
object received via HTTP protocol and processed accordingly.
Do not forget to enable the anti-virus protection immediately after you
download the test "virus".
If you have no internet connection, you can create your own test "virus". To
create a test “virus,” type the following in any text editor and save the file as
eicar.com:
.
Page 49

Starting using the application 49
X5O!P%@AP[4\PZX54(P^)7CC)7}$EICAR-STANDARD-ANTIVIRUSTEST-FILE!$H+H*
The file downloaded from the EICAR website or created as described above
contains the body of a standard test “virus”. Kaspersky Anti-Virus will detect it,
assign it the Infected category and apply the action defined by the admin istrator
for processing objects of this type.
5.8.2. Testing the HTTP traffic protection
In order to detect viruses in the data stream transferred via HTTP protocol:
download the test “virus” from the official website of the EICAR organiza-
tion at http://www.eicar.org/anti_virus_test_file.htm.
When attempting to download the test "virus", Kaspersky Anti-Virus will detect
this object, identify it as an infected object that cannot be disinfected, and will
perform an action specified in the HTTP traffic settings for this type of obj ects.
By default, (see section 5.7, page 47), if you attempt to download the test "virus"
connection with the website will be terminated and the browser will display a
message informing the use that this object is infected with virus EICAR-Test-File.
5.8.3. Testing the SMTP traffic protection
In order to detect viruses in the data streams transferred using SMT P protocol,
you can use the mail system that uses this protocol to transfer data.
In order to do this:
1. Create a plain text message using a mail client installed on your
computer.
Message that contains a test virus will not be scanned if it is
created in the RTF or HTML format!
2. Copy the text of the standard or modified "virus" in the beginni ng of
the message or attach a file containing the test "virus" to the
message.
3. Send the message to the administrator.
4. Read the message received a t this address.
Page 50

50 Kaspersky Anti-Virus 5.5 for Check Point
TM
Firewall-1®
Kaspersky Anti-Virus will detect this object, identify it as infected and will perform
an action specified in the SMTP traffic scan settings as the default action for this
type of objects (see section 5.7, page 47):
• all attached objects will be deleted;
• the body of the message will be replaced with an information message
about the detected virus EICAR-Test-File;
• a copy of the original message al ong with all attached files will be saved
in the backup storage;
5.8.4. Testing the FTP traffic protection
In order to detect viruses in the data stream transferred via FTP protocol:
1. Copy the test "virus" to a location that you can access using FTP
protocol.
2. Try to download eicar "virus" from this location.
Kaspersky Anti-Virus will detect this object, identify it as an infected object that
cannot be disinfected, and will perform an action specified in the FTP traffic
settings for this type of objects. Thus, if you are using the default settings (see
section 5.7, page 47), the Anti-Virus will disconnect from this location when the
test "virus" is attempted to be downloaded and a connection error message will
be displayed.
Page 51

CHAPTER 6. UPDATING THE
ANTI-VIRUS DATABASE
Users of Kaspersky Lab's products can update the anti-virus database used by
Kaspersky Anti-Virus to detect malware and to disinfect infected objects.
Kaspersky Lab's anti-virus database contains the description of the following
objects categories:
a. All currently known malicious programs.
b. Programs that do not contain malicious code as it is commonly under-
stood, but may impose a moral threat, inflict financial damage or facil itate
the theft of confidential information. This software category includes:
• adware;
• various harmless utilities that can be used by malicious
software and intruders;
• automatic dialing programs that connect the user's computer to
commercial internet sites;
• automatic dialing programs that connect the user's computer to
porn websites;
• automatic porn files downloading programs;
• keyboard spies;
• password hacking programs;
• backdoor programs,
c. Joke programs and progr ams with "bizarre " content or form programs that
affect the system in a way that cannot be qualified as beneficial. This
type of software include:
• programs that cause unexpected video or sound effects;
• programs that cause problems in the system operation;
• virus simulators.
d. Programs that do not contain malicious code and do not inflict any dam-
age to the computer, but can be a part of the environment used for development of malicious software. This software category includes:
• software hacking programs, key generators, credit card
numbers generators;
• Java classes;
• programs that collect information about the system security
(anti-virus software installed, firewalls, etc.)
• network utilities (scanners, etc.)
Page 52

52 Kaspersky Anti-Virus 5.5 for Check Point
TM
Firewall-1®
Categories of objects that will be detected by the Anti-Virus in the traffic passing
through the firewall will be determined by the selected level of the anti-virus
protection (see section 7.2, page 63).
As new malicious programs are created daily, it is extremely important t hat you
maintain your anti-virus database up-to-date. We recommend that you update
your anti-virus database immediately after your application is i nstalled because
the database included into the distribution kit will be out-of-date by the moment
when you install your application.
The application copies anti-virus database updates via internet from the
Kaspersky Lab's updates servers or from a network updat es folder specified by
the server administrator. The use of the particular resource depends on the
settings. The updates folder can be set up as a public acc ess folder that will be
used to store downloaded updates for the following Kaspersky Lab's
applications: Kaspersky Administration Kit 5.0, Kaspersky Anti-Virus 5.0 for
Windows Workstations and Kaspersky Anti-Virus 5.0 for File Servers (see
section 6.2, page 55).
Updates are downloaded either according to the schedule or manually. In order
to download the anti-virus database from the internet, your computer must be
connected to the internet. Kaspersky Anti-Virus downloads updates from the
dedicated update servers and then installs the required file on your computer.
Kaspersky Anti-Virus allows configuring the notification about the r esults of the
anti-virus database update (see Chapter 12 on page 110).
Information about the anti-virus database used by the application can be vie wed
by following the General settings
link on the General tab in the General settings
window (see Figure 40). The following information is provided:
• number of records in the anti-virus database;
• date and time of the anti-virus database creation.
In order to update the Kaspersky Anti-virus database:
1. Select the node corresponding to the requir ed server in the conso le
tree and follow the Anti-virus scan
link in the results pane.
2. Specify the source of updates in the Updates tab of the Anti-virus
scan window (see Figure 13) that will open. You can select up date
from the internet and configure the connection settings or select
update from the network folder (details see section 6.1, page 54
and section 6.2, page 55).
Page 53

Updating the anti-virus database 53
Figure 13. Anti-virus database updates settings window.
Configuring internet updates downloading
3. For automatic updates, create an updates downloading schedule
(details see section 6.3, page 56). If updates are required
immediately, press the Update now button (details see section 6.4,
page 57) to download the updates manually.
Before performing manual updating, make sure that all settings
are configured correctly.
4. After you are done with the settings, press the Apply or the OK
button.
You can restore the default settings by pressing t he Restore the default
settings button.
Page 54

54 Kaspersky Anti-Virus 5.5 for Check Point
TM
Firewall-1®
6.1. Downloading updates from the
internet
In order to ensure that Kaspersky Anti-Virus receives the anti-virus database updates from the internet,
1. Select the node corresponding to the requir ed server in the conso le
tree and follow the Anti-virus scan link in the results pane.
2. Go to the Updates tab in the Anti-virus scan windo w that will open
(see Figure 13) and select Kaspersky Lab's updating servers
(default option) as the source of updates.
3. After this press the Configure settings button and specify the
network connection settings in the Internet updating setting window
that will open (see Figure 14):
Figure 14. Network connection settings
• Specify the s erver from which the updates will be download ed.
Select the Automatically select the update server option to
ensure that the application selects a server from those
recommended by Kaspersky Lab or select the Use the
specified server and enter the address of an HTTP or an FTP
updates server.
Page 55

Updating the anti-virus database 55
• If you connect to the internet using a proxy server, check the
Use proxy server box and specify the connection settings:
address and number of the port used for connection.
If you use a password in order to access the proxy server,
specify the proxy user's authentication settings. In order to do
this check the Proxy server authentication box and fill i n the
User Name and the Password fields.
• If you would like to use the passive mode for updating from an
FTP server, check the Use the passive FTP mode box, if you
need to use the active mode – uncheck this box. We
recommend using the passive mode.
4. After you are done with the settings, press the OK button in the
Internet update settings in order to apply the changes.
5. Press the Apply or the OK button on the Updates tab.
You can restore the default settings by pressing t he Restore the default
settings button.
6.2. Installing updates from a
network folder
If you use the Kaspersky Administration Kit 5.0 centralized man agement system
to control Kaspersky Lab's applications installed on your network computers,
then the anti-virus updates received by the Administration Server will be copied
into a dedicated public folder (details see Kaspersky Administration Kit 5.0
Guide). You can use this folder as the updates source for the Kaspersky AntiVirus database.
Kaspersky Anti-Virus 5.0 for Windows Workstations and Kaspersky Anti-Virus
5.0 for File Servers also allow users to save updates downloaded from the
internet into a public folder and to use this folder as the local updates source.
In order to ensure successful updates, the computer on which the Security Server is installed, shall have the rights for reading from this public folder.
In order to ensure that Kaspersky Anti-Virus receives the anti-virus database updates from the network folder,
1. Select the node corresponding to the requir ed server in the conso le
tree and follow the Anti-virus scan link in the results pane.
2. Go to the Updates tab in the Anti-virus scan windo w that will open
(see Figure 15), select the Local or network folder option as the
Page 56

56 Kaspersky Anti-Virus 5.5 for Check Point
updates source and enter the path to the required folder in the
corresponding field manually or using the Browse button.
3. After you are done with the settings, press the Apply or the OK
button.
You can restore the default settings by pressing t he Restore the default
settings button.
TM
Firewall-1®
Figure 15. Configuring updates from the local folder
6.3. Automatic updates
In order to update the anti-virus database in the automatic mode,
1. Select the node corresponding to the requir ed server in the conso le
tree and follow the Anti-virus scan link in the results pane.
2. Check the Update the anti-virus data base automatically box in the
General tab of the Anti-virus updates window (see Figure 13) that
will open and create a schedule for receiving the updates. I n order
to do this select the required schedule option and specify the
required frequency, the updates interval unit and the update time.
Page 57

Updating the anti-virus database 57
3. After you are done with the settings, press the Apply or the OK
button.
You can restore the default settings by pressing t he Restore the default
settings button.
As a result, the application will be automatically updating the anti-virus database
at the specified interval and in accordance with the specified settings.
6.4. Updating the anti-virus database
in the manual mode
In order to update the anti-virus database in the manual mode:
1. Select the node corresponding to the requir ed server in the conso le
tree and follow the Anti-virus scan
2. Press the Update now button on the Updates tab of the Anti-virus
scan window (see Figure 13) that will open.
The Update now button is not available if the anti-virus is
being updated at the moment or if this function of your application has been disabled due to the violatio n of the license
terms (see Chapter 11, page 102).
As a result, the application will immediately update the a nti-virus database in accordance with the specified settings.
link in the results pane.
Page 58

CHAPTER 7. ANTI-VIRUS
PROTECTION
The main task of Kaspersky Anti-Virus is scann ing mail traffic passing through
Check Point
the information contained in the current (latest) version of the anti-virus
database.
Depending on the anti-virus protection level (see section 7.1, page 60) the
application can detect:
• malicious objects;
• potentially dangerous objects;
• objects that are not potentially dangero us, but may be a part of software
Apart from the programs listed above, each of the abov e categories ma y include
legal software that may work in a way that can be viewed by the Anti-V irus as a
behavior characteristic of malicious or potentially dangerous software. An
example of such software is backdoor and remote surveillance software.
If the anti-virus server protection is enabled (details s ee section 7.3, page 63),
then starting and stopping of the traffic scan will be performed simultaneously
with the startup and shutdown of the computer on which the Security Server is
installed.
All objects transferred through the firewall will be scanned in the real-time mode.
By default HTTP, FTP and SMTP traffic will be processed. If required (for
example, if the traffic arriving to Check Point
scanned by another anti-virus application) the scan of an y of the above protocol s
can be disabled.
Depending on the settings specified for each protocol in the a nti-virus settings,
the application will:
• select objects to be scanned;
• scan and analyze the object using the anti-virus database;
• pass clean objects to the user and process other objects in accordance in
TM
Firewall-1® and disinfecting or blocking e-mail messages using
used for developing potentially dangerous objects.
If you transfer software through the firewall, you have to exclude such
software category from the objects subject to be scanned.
TM
Firewall-1® has already been
accordance with the current settings; a copy of the object can be saved in
the backup storage before it is processed.
Page 59

Anti-virus protection 59
Kaspersky Anti-Virus allows the user to configure notifications a bout the results
of the anti-virus scan of objects (see Chapter 12 on page 110).
When scanning e-mail messages transferred via SMTP protocol the program
scans the body of the message and all attached files of any format.
It is to be noted that Kaspersky Anti-Virus distinguishes between simple o bjects
(the message body, simple attachment, for example an executable file) and
containers (consisting of several objects, for example an archive, a message with
another message attached to it or an MS Word file that contains macros). In
order to decrease the load on the server, containers with the n esting level above
a specified value can be excluded from the anti-virus scan.
An additional list of objects to be excluded from the anti-virus scan can be
created for data transferred via HTTP and FTP protocols. Such list can include
archives, packed executable files and some other types of files.
When scanning multi-volume archives downloaded from the source in parts,
Kaspersky Anti-Virus will treat and process each volume and each part as an
individual object. In this case, the application can detect malicious code only if
such code if fully located in one of the volumes. Malicious objects s plit into parts
can not be detected. In this situation, the malicious code may propagate after the
object is restored as one entity.
Multi-volume archives and objects downloaded in parts can be
scanned after they are saved to the hard drive using, for example,
Kaspersky Anti-Virus for Windows Workstations.
For HTTP protocol Kaspersky Anti-Virus provides an option of bl ocking ac cess to
objects that are transferred in parts (see section 7.4, page 65). This o ption is not
provided for FTP protocol and in order to minimize the possibility of infection
using the method described above, we recommend disabling the ability to
download information by parts in the settings of Check Point
TM
Firewall-1®.
For data requested via HTTP protocol, Kaspersky Anti-Virus blocks access to
objects that do not satisfy the requirements of this protocol (for example, no
headings). Such objects will not be sent for anti-virus proc essing nor will they b e
delivered to the user. However, if required, there is a provision for a transfer of
data that does not include service information to the user. In this case the object
will be sent for anti-virus processing, processed and delivered to the user
according to the anti-virus scan settings selected for HTTP traffic.
Anti-virus scan increases the time required to deliver the information to the user.
Therefore, there is a provision for transferring unscanned data that still can rule
out the possibility of the delivery of infected objects when processing objects
transferred via HPPT and FTP protocols (see section 7.4, page 65), This method
involves transferring of unscanned data in parts at maxi mum allowed intervals
that make it possible to hold parts of downloaded information before the obj ect
has been scanned. If, as the result of the anti-virus scan, it appears that the
Page 60

60 Kaspersky Anti-Virus 5.5 for Check Point
TM
Firewall-1®
object is not infected, the rest of the information will be transferred to the user.
Otherwise, the application will break the connection with the source and display a
message informing the user that the information can not be downloaded. The
object will be processed using the anti-virus scan s ettings and information about
such objects will be logged in the events log and in the report.
The results of the scan are cached during a certain period of time that allows
reducing the number of repeated scans of the object (see section 7.4, page 65).
Kaspersky Anti-Virus allows simultaneous scan of several objects. The number
of objects that can be processed at the same time depends on the nu mber of
started instances of the anti-virus kernel running simultaneo usly (see s ection 7.7,
page 75).
The mode of scanning objects in RAM allows scanning objects without saving
them to a work folder on the hard drive. Depending on the scan settings, the
application can simultaneously scan up to 1000 objects up to 1024 KB each in
the RAM without using the disk subsystem (see section 7.7, page 75).
The use of objects queue (see section 7.7, page 75) allows increasing or
decreasing the throughput of Kaspersky Anti-Virus and thus - adjusting the load
depending on the traffic passing through the firewall.
7.1. Anti-virus objects processing
As a result of an anti-virus scan each object will be assigned a status as listed
below:
• Clean – the object does not contain malicious or potentially dangerous
code.
• Infected – the object contains at least one malicious or potentially dan-
gerous object.
• Suspicious – object's code is similar to the code of a known malicious or
potentially dangerous object.
• Protected – object is password-protected.
• Corrupted– object is corrupted.
The application can disinfect, block objects detected during an anti-virus scan or
pass them to the user without making changes to them.
Page 61

Anti-virus protection 61
You can configure notifications about the detection of infected, suspicious,
protected and corrupted objects (see Chapter 12 on page 110). No notification is
made about objects that are not infected.
Before the processing, a copy of the object can be saved i n the backup storage
to be restored or deleted later.
The disinfection option is provided only for infected objects transferred via HTT P
or FTP protocols. A special processing procedure can be used for non-
disinfectable objects.
7.1.1. Actions performed with objects
transferred via HTTP protocol
The following actions can be performed to disinfect infected objects detected
during the scan of data transferred via HTTP protocol.
• Disinfect – disinfect and pass the object to the user, once disinfected. If
the object cannot be disinfected, apply the action specified for objects that
cannot be disinfected.
• Disinfect, save a copy - disinfect, pass the object to the use once disin-
fected, save a copy of the original object in the backup storage. If the object cannot be disinfected, apply the action specified for objects th at cannot be disinfected.
The following actions can be performed to process infected, non-disinfectable,
suspicious, protected and corrupted objects.
• Skip, make no changes – pass the object to the user without making
changes to it;
• Replace with text – block access to the object, display in the browser win-
dow an informational message generated based on a replacement template.
• Replace with text, save a copy – block access to the object, display in the
browser window an informational message generated based on a replacement template, save a copy of the original object in the backup storage.
Copies of clean and skipped objects can also be saved in the backup stor age.
Page 62

62 Kaspersky Anti-Virus 5.5 for Check Point
TM
Firewall-1®
7.1.2. Actions performed with objects
transferred via FTP protocol
The following actions can be performed to disinfect infected objects detected
during the scan of data transferred via FTP protocol.
• Disinfect – disinfect and pass the object to the user, once disinfected. If
the object cannot be disinfected, apply the action specified for objects that
cannot be disinfected.
• Disinfect, save a copy - disinfect, pass the object to the use once disin-
fected, save a copy of the original object in the backup storage. If the object cannot be disinfected, apply the action specified for objects th at cannot be disinfected.
The following actions can be applied to process objects with one of the following
statuses: infected, non-disinfectable, suspicious, protected and corrupted.
• Skip, make no changes – pass the object to the user without making
changes to it;
• Block – block access to the object; as a result, a data transfer error mes-
sage will be displayed in the FTP client window.
• Block, save a copy - block access to the object, save a copy of the origi-
nal object in the backup storage. As a result, a data transfer error message will be displayed in the FTP client window.
Copies of clean and skipped objects can also be saved in the backup stor age.
7.1.3. Actions performed with objects
transferred via SMTP protocol
The following actions can be applied to process infected, suspicious,
protected and corrupted objects detected as the result of an anti-virus scan of
information transferred via SMTP protocol.
• Skip, make no changes – pass the object to the user without making
changes to it.
• Replace with text – replace all files attached to the messag e, replace the
message body with the informational message generated base d on a replacement template.
• Replace with text, save a copy - delete all files attached to the message,
replace the message body with an informational message generated
based on the replacement template, save a copy of the original message
(the message body and all attached files) in the backup storage.
Page 63

Anti-virus protection 63
The selected action will be applied to the ent ire message irrespectiv e of whether
an infected, suspicious, protected or corrupted object is detected in the message
body or in one of the attached files.
Copies of clean and skipped objects can also be saved in the backup stor age.
7.2. Anti-Virus protection level
Kaspersky Anti-Virus allows detecting all currently known at the moment
malicious and potentially dangerous programs in the traffic passing through the
firewall. Description of these programs and methods used for disinfection of
infected objects are contained in the Kaspersky Lab's anti -virus database (see
Chapter 6, page 51). Categories of objects detected by Kaspersky Anti-Virus a re
determined by the anti-virus protection level selected.
The application provides for the following protection levels:
• Standard anti-virus protection level: protection against all currently
known malicious programs. This level is applied by default.
• Extended anti-virus protection level: protection against all currently
known malicious and potentially dangerous progr ams inc lu ded un der ' b' in
the Updating the anti-virus database list on page 51.
• Redundant anti-virus protection level: protection against all currently
known malicious and potentially dangerous programs include d under 'b',
'c' and 'd' in the Updating the anti-virus database list on page 51.
7.3. Enabling and disabling the antivirus protection. Selecting the
anti-virus protection level
If the anti-virus protection is enabled, the anti-virus scan of the traffic passing
through the firewall will be commenced and stopped at the startup a nd shutdo wn
of the operating system on the computer with the Securit y Server installed. By
default scan is provided for HTTP, FTP and SMTP protocols. In order t o lower
the load on the server you can disable scannin g of a s pecif ic traffic individually in
the settings for each protocol.
The objects will be scanned in accordance with the anti-virus protection level
selected.
If anti-virus protection is disabled, no scan will be performed for the traffic
transferred via any of the protocols.
Page 64

64 Kaspersky Anti-Virus 5.5 for Check Point
It is to be noted that disabling the anti-virus server protection considerably increases the risk of malware penetration via the f irewall. We
do not recommend disabling the anti-virus protection for a long time.
In order to enable or disable the anti-virus protection or to change its
level,
1. Select the node corresponding to the requir ed server in the conso le
tree and follow the Anti-virus protection link in the results pane.
2. Select one of the following options in the Anti-Virus protection
group on the General tab (see Figure 16) in the Anti-Virus
protection window that will open:
• Disabled in order to disable the anti-virus scan of information
passing through the firewall.
• Standard anti-virus protection, Extended anti-virus protection or Redundant anti-virus protection in order to enable
anti-virus protection and apply the required protection level.
The use of the extended or the redundant anti-virus pr otection
level may affect the speed of your Anti-Virus operation. Besides, some programs that you use may be treated as riskware.
3. In order to apply the changes, press the Apply or the OK button.
The anti-virus protection will then be enabled/disabled within a
couple of minutes.
TM
Firewall-1®
Page 65

Anti-virus protection 65
Figure 16. Enabling anti-virus protection
7.4. Scanning HTTP traffic
In order to configure the settings for scanning data transferred via HTTP
protocol:
1. Select the node corresponding to the requir ed server in the conso le
tree and follow the HTTP traffic settings link in the results pane.
Configure the anti-virus operation settings for scanning HTTP traffic on
the tabs of the HTTP traffic scan settings window that will open (see
Figure 17).
2. On the Settings tab (see Figure 17) check the Scan HTT P traffic in
order to enable scanning. After this specify the values of the
settings that control:
• transfer of unscanned data to the user if the object scan takes a
long time;
• object scan when the object is accessed again;
Page 66

66 Kaspersky Anti-Virus 5.5 for Check Point
• transfer of information, downloaded from the source in parts, to
the user.
• Transfer of data that does not include service information to the
user.
TM
Firewall-1®
Figure 17. HTTP traffic scan settings
The Settings tab
• In order to minimize the number of repeated scans of the
object, check the Cache the scan result for box and specify
time (in seconds) during which the program will hold the result
of the scan in memory. When the user tries to access the object
again within the specified interval, the access to the object will
be granted or the user will receive a notification about th e result
of the last scan of this object. By default the box is checked an d
the interval value is 60 seconds.
• In order to ensure that the client program that requested the
stream does not break connection with the source and does not
display a connection error message, Kaspersky Anti-Virus,
during the entire time of the scan, transfers the service
information (as a rule, HTTP protocol headers) and sma ll data
packets at a specified interval. Specify (in seconds) the time
interval for sending next data packet in the Maximum header
Page 67

Anti-virus protection 67
sending interval field. The value of this setting is set based on
the parameters of the client program and shall not exceed t he
time period after which the client displays a message about th e
failed attempt to connect to the specified address. The
suggested default value is 10 seconds.
• Specif y the maximum allowed timeout for the user to wait for
the next data packet in the Maximum data sending interval
field (the default value is 30 seconds). This setting determines
the speed with which the real data will be delivered to the user.
• Specify the percentage of the total volume of the unscanned
data that will be held until the scan is complete in the Amount
of data to be held until the scan is complete field. The
greater the value of this setting, the less will be the possibi lit y of
infection when passing unscanned data to the user. The
suggested default value is 10%.
• In order to allow delivery of files downloaded in parts to the
user, check the Allow partial files downloading box. If this
box is not checked, the application will break the connection
with the source and display a message informing the user that
the information can not be downloaded. By default this box is
checked.
• In order to ensure that objects that do not include standard
HTTP protocol serviceinformation are scanned for viruses and
delivered to the user, uncheck the Block non-compliant HTTP
responses box. Objects will be processed in acc ordance with
the scan settings selected for HTTP traffic. If the box is checked
(default option), non-standard HTTP responses will be blo cked,
will not be sent for anti-virus scanning and therefore will not be
delivered to the user.
Page 68

68 Kaspersky Anti-Virus 5.5 for Check Point
TM
Firewall-1®
Figure 18. HTTP traffic scan settings.
The Actions tab
3. Specify which actions will be performed upon detection of i nfected,
suspicious, protected and corrupted objects on the Actions tab
(see Figure 18). Determine the order of processing for each status
individually. In order to do this, select the required action from the
drop-down list in the corresponding section.
If you select an action that involves replacement of the object, you
must create a replacement template. In order to do this, press the
Notification template button and enter the notification text in the
window that will open (see Figure 19The text of the notification ma y
include information about the virus detected, HTTP address of the
infected object and information about the connection error occurred. To include this information add corresponding su bstitution
macros to the template selecting them from the drop-down list accessible via the Macros button.
To save copies of clean objects and unchanged files, select the
Save copies of clean and passed objects check box.
Page 69

Anti-virus protection 69
When the Save copies of clean and passed objects check box is
selected, the Disinfect, save a copy action will be applied to all infected objects instead of the Disinfect action. The original copies of
disinfected objects and the objects that cannot be disinfected will also
be saved if the Skip, make no changes action is selected for such objects.
Figure 19. Creating the replacement template
4. On the Exclusions tab (see Figure 20) provide the list of objects
that will not be scanned for the presence of malicious code. In
order to do this, check boxes next to the corresponding types of
objects in the list.
Page 70

70 Kaspersky Anti-Virus 5.5 for Check Point
Figure 20. HTTP traffic scan settings
The Exclusions tab
TM
Firewall-1®
5. In order to apply the changes, press the Apply or the OK button.
You can restore the default settings by pressing t he Restore the default
settings button.
In order to disable scanning data transferred via HTTP protocol:
uncheck the Scan HTTP traffic box on the Settings tab of the HTTP
scan settings window (see Figure 17) and press the Apply or the OK
button.
7.5. Scanning FTP traffic
In order to configure the settings for scanning data transferred via FTP
protocol:
1. Select the node corresponding to the requir ed server in the conso le
tree and follow the FTP traffic settings
link in the results pane.
Page 71

Anti-virus protection 71
This will open the FTP scan settings window (see Figure 21).
Configure the anti-virus operation settings for scanning FTP traffic
on the tabs of this window.
The settings are configured similarly to the s ettings used for HTTP
traffic. (see section 7.4, page 65).
Figure 21. FTP traffic scan settings
The Settings tab
2. In order to ensure that the scan will be performed, check the Scan
FTP traffic box (see Figure 21). After this specify values for the
settings controlling the transfer of unscanned data to the user if the
object scan takes a long time.
3. Specify which actions will be performed upon detection of i nfected,
suspicious, protected and corrupted objects on the Actions tab
(see Figure 21).
Page 72

72 Kaspersky Anti-Virus 5.5 for Check Point
Figure 22. FTP traffic scan settings.
The Actions tab
TM
Firewall-1®
4. On the Exclusions tab (see Figure 23) provide the list of objects
that will not be scanned for the presence of malicious code. In
order to do this, check boxes next to the corresponding types of
objects in the list
Page 73

Anti-virus protection 73
Figure 23. FTP traffic scan settings.
The Exclusions tab
5. In order to apply the changes, press the Apply or the OK button.
You can restore the default settings by pressing t he Restore the default
settings button.
In order to disable scanning data transferred via FTP protocol:
uncheck the Scan FTP traffic box on the Settings tab of the FTP scan
settings window (see Figure 21) and press the Apply or the OK button.
7.6. Scanning SMTP traffic
In order to configure the settings for scanning data transferred via
SMTP protocol:
1. Select the node corresponding to the requir ed server in the conso le
tree and follow the SMTP traffic settings
This will open the SMTP scan settings window (see Figure 25).
link in the results pane.
Page 74

74 Kaspersky Anti-Virus 5.5 for Check Point
2. In order to ensure that traffic will be scanned, check the Scan
SMTP traffic box (see Figure 24) on the Settings tab.
Figure 24 SMTP traffic scan settings
The Settings tab
TM
Firewall-1®
3. Specify which actions will be performed upon detection of i nfected,
suspicious, protected and corrupted objects on the Actions tab (see
Figure 25). The settings are configured similarly to the settings
used for HTTP traffic (see section 7.4, page 65).
Page 75

Anti-virus protection 75
Figure 25 SMTP traffic scan settings
The Actions tab
4. In order to apply the changes, press the Apply or the OK button.
You can restore the default settings by pressing the Restore the
default settings button.
In order to disable scanning data transferred via SMTP protocol:
uncheck the Scan SMTP traffic box on the Settings tab of the SMTP
scan settings window (see Figure 24) and press the Apply or the OK
button.
7.7. Anti-virus scan efficiency
In order to configure the application's operation efficiency settings:
1. Select the node corresponding to the requir ed server in the conso le
tree and follow the Anti-virus protection link in the results pane.
Page 76

76 Kaspersky Anti-Virus 5.5 for Check Point
2. Select the Performance tab in the Anti-virus protection window that
will open (see Figure 26) and specify the values for the settings
displayed on this tab.
Figure 26. Kaspersky Anti-Virus Performance settings
TM
Firewall-1®
• Number of instances of the anti-virus kernel running
simultaneously. By default 4 instances will be created and will
be running simultaneously. You can set this value in the r ange
between 1 to 32. Microsoft recommends that you set up a value
that is not greater then 4 multiplied by the number of the
processors on the computer on which the Security Server is
installed.
• The number of anti-virus kernel instances reserved for
processing working ("fast") traffic. This setting allows to reduce
the effect the scan of larger objects has on the Kaspersky AntiVirus throughput. The suggested default value is 1.
"Fast" objects are only HTTP traffic objects that comply with the
following criteria:
o text objects less than 2 MB;
o html files less than 2 MB;
Page 77

Anti-virus protection 77
o graphic objects less than 2 MB;
o all other objects (except applications) less than 256 KB.
• The maximum number of objects scanned in RAM without
saving to the working folder on the hard drive. You can set this
value in the range between 1 to 1000. The su ggested default
value is 128.
• The maximum number of objects being scanned in RAM in KB.
Select the required value from the drop-down list.
If the queue is full or if the size of the object is above the
specified limit, the object will be saved and scanned in the
work folder located n the application data folder.
All files over 1024 KB are saved to be processed in the working folder.
The values of the settings used for scanning objects in RAM
shall be determined based on the characteristics of the hardware of the computer on which the Security Server is installed.
The total volume of the objects being scanned shall not exceed the amount of free RAM.
• The size of the queue of objects to be scanned - the maximum
number of objects being scanned and waiting to be scanned in
the working folder on the hard drive. You can set this value in
the range between 1 to 16383. The suggested default value is
1024.
If the queue is full, an object will not be scanned, but will be
classified as clean and sent to the client that requested this
object.
• The maximum time for scanning one object (in seconds).
Specify the value within the range from 0 to 86400 seconds
(inclusive). The default value is 1800 seconds.
If the object could not be scanned within the specified time
period, it will be classified as clean and sent to the client that
requested this object.
In order to exclude containers from the scan scope, check the Do not
scan containers with nesting level above box and enter the desired
value (the default value is 32). The applicatio n will scan al l nested objects
within the container including the specified level.
Page 78

78 Kaspersky Anti-Virus 5.5 for Check Point
As archives are a type of containers, the restrictions to scanning containers apply to archives as well.
If you impose a restriction on scanning containers, the same
nesting level restrictions will be applied to archives (if archives have not been explicitly excluded from the scan ).
Exclusion of archives from the scan scope does not affect
settings used to scan other types of containers.
3. In order to apply the changes, press the Apply or the OK button.
The settings for scanning objects in RAM will be applied o nly
after the restart of the operating system of the computer on
which the Security server is installed or after stopping and
starting of Kaspersky Anti-Virus 5.5 for Check PointTM Firewall-1® service manually via the Computer Manage-
ment/Services Windows utility.
You can restore the default settings by pressing t he Restore the default
settings button.
TM
Firewall-1®
Page 79

CHAPTER 8. BACKUP STORAGE
Kaspersky Anti-Virus allows saving a backup copy of an infected object before
processing. A copy of such object is created in the backup storage. Later suc h
object stored in the backup storage can be restored (see section 8.3, page 84) or
deleted (see section 8.4, page 86). The ability to restore objects may prove ver y
useful, for example, if during the disinfection process some data was lost, if the
object was deleted by mistake or if another disinf ection attempt is required usin g
an updated anti-virus database, for example, by Kaspersky Anti-Virus for
Windows Workstations.
A backup copy of the object will be created only if it is pr ovided for by
the selected anti-virus protection settings:
When a backup copy of an object transferred via HTTP protocol or FTP protocol
is created, the application will place the object that was attempted to be
accessed into the backup storage. For objects transferred via SMTP protocol, the
application will save the message body and all attachments irrespective of where
the malicious object was detected.
The backup storage is a service folder. It is created in the application's data
folder during the installation of the Security Server.
The amount of information that can be stored in the backup storage may be
restricted by the following parameters: backup storage size or objects storage
period. By default the maximum storage size is 1024 MB an d the ob jects storag e
period equals 30 days. The administrator can alter the values of these rest riction
parameters (details see section 8.5, page 87)
The compliance with the restrictions is checked when a new backup copy is
saved to the backup storage. The application performs the following actions:
• deletes objects for which the storage period has expired;
• if the available space is still insufficient to place the object in the backup
storage, the application will free the required space by deleting "older" objects;
The object can stay in the backup storage longer than the
established storage period if no new objects are added to the
storage.
Viewing the backup storage (see section 8.1, page 80), configuring its settings (see section 8.5, page 87) and managing backup copies of objects (see section 8.3, page 84 and section 8.4, page 86) functions are available via the Backup storage folder (see F igure 27). This folder is included into the structure of each node reflecting the monitored server.
Page 80

80 Kaspersky Anti-Virus 5.5 for Check Point
TM
Firewall-1®
For convenient viewing, search for information in the backup storage and for
structuring the storage the application includes configurable user filters (see
section 8.2, page 81). Filters, created for the backup stora ge, can be viewed in
the Backup Storage folder as subfolders under names assigned by the
administrator when the filters were created.
8.1. Viewing the backup storage
In order to view the backup storage:
select the Backup Storage folder in the console tree.
After this a table containing the full list of all objects contained in the
backup storage will appear in the results pane (see Figure 27).
Figure 27. Viewing the backup storage
The following information is provided for each object in the tabl e:
• Protocol. The type of protocol that was scanned when the
object was detected.
• Description. HTTP, FTP address of the source of the subject
of the message for objects transferred via SMTP protocol.
• From. IP address of the source where the object is located or
e-mail address of the sender for objects transferred via SMTP
protocol.
Page 81

Backup storage 81
• To. IP address of the computer from which the object was
requested or e-mail address of the recipient for objects
transferred via SMTP protocol.
• Size. Object’s size in bytes.
• Status. Status assigned to the object as a result of the anti-
virus scan: infected, disinfected, suspicious,
protected/corrupted (see section 7.1, page 60).
The application places into the backup storage a
copy of an object before this object is processed by
the Anti-Virus. The Status field displays the object's
status after processing.
• Virus. The name of the detected virus or suspicious software
(will be displayed only for objects with the infected, disinfected
or suspicious status).
• Time detected. Exact date and time when the object was
detected by Kaspersky Anti-Virus.
You can perform ascending and descending sorting of the data co ntained
in the table by any column.
8.2. Backup storage filter
The use of filters allows performing search and data structuring tasks on the data
contained in the backup storage as after applying the filter only information
complying with the filtering parameters becomes available. T his feature becomes
very important as the number of objects stored in the backup storage increases.
The filter can be used, for example, to search for objects that must be restored.
In order to create a backup storage filter:
1. Select the Backup Storage folder in the console tree and use the
New Filter command in the shortcut menu or the analogous item
under the Action menu. This will open a f ilter settings configuration
window (see Figure 28).
Page 82

82 Kaspersky Anti-Virus 5.5 for Check Point
Figure 28. Creating a filter
2. Specify a name under which the filter will be saved i n the Backup
Storage folder.
3. Specify the parameter values that will be used to perform the
search for (filtering of) objects stored in the backup storage. You
can specify any number of parameters. The only mandatory
parameter is the filter name.
The following information about the object can be used to config ure
the parameters:
• object status (multiple values can be selected);
• the type of protocol that was scanned when the object was
detected. In order to view information for all protocols, select the
Any option from the drop-down list;
• IP address of the source where the object is located or e- mail
address of the sender for objects transferred via SMTP
protocol;
• IP address of the computer from which the object was
requested or e-mail address of the recipient for objects
transferred via SMTP protocol;
TM
Firewall-1®
Page 83

Backup storage 83
• HTTP, FTP address of the source of the subject of the
message for objects transferred via SMTP protocol;
• time interval during which the object was detected.
4. After you are done with the settings press the Apply or the OK
button. If you wish to cancel creation of the filter, press the Cancel
button.
As a result of this action, a subfolder with the filter's name will be created
in the console tree inside the Backup Storage folder. When the filter is
selected in the console tree, only data that complies with the filter criteria
will be displayed in the results pane.
Later you can alter values of the filter's parameters or delete the filter using the
shortcut menu commands or the Action menu commands.
In order to change the filter parameters:
1. Select the filter you wish to modify in the Backup Storage folder in
the console tree and use the Properties command in the shortcut
menu or the analogous item under the Action menu. This will open
a filter settings configuration window (see Figure 29).
Page 84

84 Kaspersky Anti-Virus 5.5 for Check Point
Figure 29. Configuring filter
2. Change the values of the filter's parameters as required.
3. In order to apply the changes, press the Apply or the OK button.
For exit without saving the changes made, press the Cancel button.
As a result, the information displayed in the results pane will be updated
according to the new values of the filter's parameters.
In order to delete a filter:
select the Backup Storage folder in the console tree and use the Filter
command in the shortcut menu or the analogous item under the Action
menu.
As a result of these actions the filter will be removed from the Backup
Storage folder.
As the filter is deleted, no objects are removed from the backup storage. Objects that meet the filter parameters will still be available in the
Backup Storage folder.
8.3. Restoring objects from the
backup storage
TM
Firewall-1®
In order to restore an object from the backup storage:
1. Select the Backup Storage fol der in the console tree.
2. Select the object you wish to restore in the table displaying the
content of the backup storage (see Figure 27). You can use filters
for searching for the object (see section 8.2, page 81).
3. Open the shortcut menu and use the Get file or the analogous
command under the Action menu.
4. As the result a warning mess age will be displayed (see Figure 30)
prompting you to confirm that you wish to proceed with the
restoring. Press the Yes button to restore the object.
5. In a window that will open (see Figure 31) specify the folder to
which you wish to save the object restored, and if required, enter or
modify the object's name.
Page 85

Backup storage 85
As a result of these actions the object will be moved from the backup
storage into the specified folder and saved with the specified name. T he
restored object will have the same format as it had when it first processed
by Kaspersky Anti-Virus. After successful restoration of the object, a corresponding notification will be displayed.
We recommend that you restore only objects with the suspi-
cious or protected/corrupted status. During the next scan,
for example with Kaspersky Anti-Virus for Windows Workstations using the updated version of the anti-virus database,
you may be able to disinfect this object or detect in it a new
virus not known before.
Restoring other objects may result in infecting your computer!
Figure 30. Confirming object restoring
Page 86

86 Kaspersky Anti-Virus 5.5 for Check Point
Figure 31. Restoring an object from the backup storage
TM
Firewall-1®
8.4. Deleting objects from the
backup storage
The following objects are automatically deleted from the backup storage:
• objects for which the storage period has expired;
• "older" objects if there is the maximum size of the backup storage has
been reached and there is not enough space for storing a new object. The
application will then delete the number of older objects required to fre e
the space needed.
A possibility to manually remove objects from the backup storage is also
provided. This feature may prove very useful to delete objects that have been
successfully restored and to free space in the backup storage if the automatic
object removal methods did not help.
In order to manually delete an object from the backup storage,
1. Select the Backup Storage fol der in the console tree.
Page 87

Backup storage 87
2. Select the object you wish to delete in the table displaying the
content of the backup storage (see Figure 27). You can use filters
for searching for the object (see section 8.2, page 81).
3. Open the shortcut menu and use the Delete command or the
analogous command under the Action menu.
As a result of these actions, the object will be deleted from the table r eflecting the content of the backup storage.
8.5. Configuring the backup storage
settings
The backup storage is created during installation of the Security Server
component. The settings of the backup storage are determined b y default
and can be altered by the administrator.
In order to modify the settings of the backup storage,
1. Select the Backup Storage fol der in the console tree.
2. Open the shortcut menu and use the Properties command or the
analogous command under the Action menu.
3. In the Properties:Backup storage window that will open (see Figure
32) specify the values for the settings.
Specify in the Maximum storage size field the total ma ximum size
of objects that can be stored in the backup storage T he def ault this
value is 1024 MB.
In the Maximum object storage period field specify the maximum
number of days the objects will be stored in the backup storage.
The suggested default value is 30 days.
Page 88

88 Kaspersky Anti-Virus 5.5 for Check Point
Figure 32. Configuring the backup storage settings
4. In order to apply the changes, press the Apply or the OK button.
For exit without saving the changes made, press the Cancel
button.
You can restore the default settings by pressing t he Restore the default
settings button.
TM
Firewall-1®
Page 89

CHAPTER 9. REPORTS
Kaspersky Anti-Virus allows receiving reports about the results of the anti-virus
traffic scan.
Reports contain information registered during a certain period of time and
provide information about:
• general scan results
• the total number of scanned objects:
• the total size of all scanned objects (in bytes);
• malicious objects detected;
• sources of infected objects;
• performance data of the anti-virus scan:
• average processing speed (number of objects per second);
• average processing speed (bytes per second);
• the maximum scan speed achieved.
Reports are created automatically in accordance with the schedule or b y request
and are saved as html pages in the reports storage folder. The filename reflects
the date and the time when the report was created in the following format
<DD.MM.YYYY_HH-MM-SS>. Kaspersky Anti-Virus provides a possibility to
configure notifications about the results of report creation (see Chapter 12 on
page 110).
The default storage location for the reports is the Reports folder. T his folder is located in the application's data folder. Any other folder selected by the administrator can be used to store reports (see section 9.2, page 92). The perio d for the reports storage on the server and the reports storage folder size are not limited. Reports are deleted manually using the file system.
Reports are viewed using the default system browser (see section 9.3, page 95).
Reports are created based on the report templates created by the
administrator. The following is specified in the template: the reporting period,
report creation schedule and the folder to store the report.
Report templates are stored in the Report templates service folder. This folder
is included into the structure of each node reflecting the monitored server.
The list of the report templates created is displayed in the form of a table in the
results pane (see Figure 33).
Page 90

90 Kaspersky Anti-Virus 5.5 for Check Point
Figure 33. The Report templates folder
TM
Firewall-1®
Apart from the template name the table contains the following information for
each template:
• Status: status of the report created based on the template.
• Expected: date and time of creation of the next report according to the
schedule or on-demand, if the automatic report creation is disabled.
Depending on current stage of the report creation, the report status may have
one of the following values:
• being created since <time and date for scheduled report genera-
tion>;
• created <date and time of the report creation>;
• was not created;
• error;
• creation error at <date and time of the error >.
Detailed information about report template settings is provided in the settings
window accessible through the Properties shortcut menu command (details see
section 9.2, page 92).
The administrator can create new templates, view and edit the settings of the
existing templates, rename and delete templates using the shortcut menu
commands.
Page 91

Reports 91
9.1. Creating reports
In order to create an anti-virus scan report:
1. Create a report template (see section 9.2, page 92) or select an
existing template.
2. Check the Create report box on the General tab of the report
template configuration window (see Figure 35).
As a result, a new report will be created within intervals specified in the schedule.
In order to view the results of the anti-virus scan, open the report for the
corresponding reporting period (see section 9.3, page 95).
There is a possibility to receive reports by r equest, irrespective of the scheduled
time, which can be useful when you need updated information a bout the current
information, for example, during virus outbreaks.
In order to create anti-virus server scan report on-demand,
1. Select the Report templates folder in the console tree.
2. Select the report template you need in the tabl e displaying the list
of created templates (see Figure 33).
3. Open the short cut menu and use the Create a report command or
the analogous command under the Action menu.
A report will be created only if creation of reports based on this
template is enabled, i.e. if the Create reports box in the Gen-
eral tab of the report template settings window (see Fig ure 35)
is checked.
The report will be created based on the information about the anti-vir us
scans results, saved by the application. In order to reduce the amount of
the information stored, a restriction can be imposed on its storage period.
By default the information is stored for a period of one year.
The information about the sources of infected objects and malicious objects detected displayed in reports is limited by 10 lines. You ca n vie w ten
most infected sources and top ten types of detected malicious objects.
In order to restrict the storage period for the anti-virus scan results,
1. Select the Report templates folder in the console tree.
Page 92

92 Kaspersky Anti-Virus 5.5 for Check Point
2. Open the shortcut menu and use the Properties command or the
analogous command under the Action menu.
3. In the Properties: Report templates window that will open (see
Figure 34):
TM
Firewall-1®
Figure 34. Configuring the reports settings
• Check the Store statistics box.
• Specify the information storage period and select the time unit.
4. After you have made the changes, press the Apply or the OK
button to apply the new settings. The settings will change within
one hour after the changes have been applied. For exit without
saving the changes made, press the Cancel button.
9.2. Creating the report template
In order to create a new report template.
1. Select the Report templates folder in the console tree.
Page 93

Reports 93
2. Open the shortcut menu and use the Create a report template or
the analogous command under the Action menu.
3. As a result, a report template settings window <New report
template> will open (see Figure 35); this window consists of the
following tabs: General and Parameters. Specify the required v alue
for the settings in the tabs as follows:
Perform the following in the General tab (see Figure 35):
• Enter the template name in the Name field.
• Specify whether reports will be automatically created based on
this template. In order to do this, check (or uncheck) the Create
reports box.
• If required, enter a more detailed description of the report to be
created based on this template in the Description field.
• After this, specify the folder into which reports will be saved. By
default, it is the Reports folder located on the server in the
application's data folder. You also manually select a different
folder. If a folder with such name does not exist, it will be
created by the application.
Figure 35. Report template.
The General tab
Page 94

94 Kaspersky Anti-Virus 5.5 for Check Point
TM
Firewall-1®
Specify the reporting period and the report creation schedule settings in the Settings tab (see Figure 36).
• The following options are available when specifying the
reporting period:
o specify the time interval. In this case, the report will contain
information for the specified period starting with the repor t
creation date and time. In order to set up the reporting period, select For the last option in the Reporting period
group and specify the interval and the time unit (hours,
days, weeks, months).
o specify the exact date for the beginning and the end of the
reporting period. In order to do this, select the For the pe-
riod option in the Reporting period group and specify the
desired date in the From and To fields.
• In order to create a schedule, perform the following in the
Frequency section:
o Select the report creation frequency: Daily, On selected
weekdays or Monthly, on the specified day. Configure
the schedule settings in accordance with the selected frequency.
o Specify the time when reports will be created in the Gener-
ate report at field.
4. After you are done with the settings press the Apply or the OK
button.
As a result:
• The report template will be added to the Report templates folder and will
be displayed as a table in the results pane.
• If the Create reports box in the General tab is checked, the application
will create reports according to the time specified in the sc hedu le and with
the specified frequency. Reports can also be created by the administrator’s request.
Page 95

Reports 95
Figure 36. Report template.
The Settings tab
9.3. Viewing reports
In order to view a report using the file system:
1. Enter the folder where the logs are stored. By default, it is the
Reports folder located on the server in the application's data folder.
2. Select and open an html file with the name corresponding to the
date and time of report creation in the following format
<DD.MM.YYYY_HH-MM-SS>.
As a result the system default browser will be loaded. The required r eport about
the anti-virus scan results will be displayed in the main window of the browser
(see Figure 37). Immediately after loading, the report displays general results of
the scan. The reporting period will be specified in the heading.
Page 96

96 Kaspersky Anti-Virus 5.5 for Check Point
TM
Firewall-1®
Figure 37. Viewing reports General scan results
The left frame of the report contains the list of the report’s sections (table of
contents); the heading and the content of the selected se ction are displayed in
the right frame.
In order to view a particular section, select this section's name in the table of
contents and the content of the section will be loaded in the right frame.
In order to view a report using the Management Console:
1. Select the Report templates folder in the console tree.
2. Select the report template you need in the tabl e displaying the list
of created templates (see Figure 33).
Page 97

Reports 97
3. Open the shortcut menu and use the View report or the analogous
command under the Action menu.
4. As the result the last report created based on the s elected templat e
will be displayed. Reports are viewed using the default system
browser.
5. If no reports were created based on the selected template an
information message will be displayed (see Figure 38). In this case
create a report and try to view it again using the console.
Figure 38. Notification that no report based on the selected template were created
Page 98

CHAPTER 10. APPLICATION
EVENT LOG
Kaspersky Anti-Virus allows the user to perform full diagnostic of its operation
and to register events in the Microsoft Windows application log in the Kaspersky
Anti-Virus application's log.
The degree of the completeness of the information enter ed into the logs d epe nds
on the diagnostics levels selected in the application’s s ettings (see section 10.1,
page 99).
Events registered in the Windows application log can be vie wed using standard
Microsoft Windows tool Events viewer. For Kaspersky Anti-Virus the Source
column contains line Kav4Cpf1.
In order to ensure that the events registered in the logs are dis played
correctly, you must select a language that matches the langu age version of the Anti-Virus in the Language for non-Unicode programs section of the Regional and Language Options standard Microsoft Windows tool.
The application provides for two types of logs: the applicat ion operation log and
the anti-virus scan results log.
Depending on the type, the log files have the following naming convention:
Kav4Cpf1_DATE.log – Kaspersky Anti-Virus log that contains information
about the application's operation provided with the e xtent of detail that
was specified by the date the information was logged. The DATE part i n
the filename shall be replaced with the date the log was created on i n
the YYYYMMDD format. For example, Kav4Cpf1_20050410.log.
If, by the time when new data must be entered into the log, the log is not
accessible for writing, for example, if it is opened for editi ng by the administrator, Kaspersky Anti-Virus will create a new file with a postfix
added to the filename. For example, Kav4Cpf1_20050410_1.log.
virusDATE.log – Kaspersky Anti-Virus log that includes information about
the results of the anti-virus scan.
By default, a new log is created on a monthly basis. The file storage perio d is not
restricted, but the number of files of the same type is limited (maximum three by
default). If this maximum allowable number is exceeded at the time a new log fi le
is created, the oldest log file of the same format will be deleted. The frequency
for creating new log files and the maximum number of lo gs can be modified (s ee
section 10.2, page 101).
Page 99

Application event log 99
New records entered into Kaspersky Anti-Virus logs are appended to the end of
the newest file. The log size is not restricted.
Kaspersky Anti-Virus logs can be viewed by using the file system.
By default, logs are stored in the Logs folder. This folder is created in the
application's data folder during the installation of the Sec urity Server component.
Any other folder selected by the administrator can be used to store logs (see
section 10.2, page 101).
Kaspersky Anti-Virus logs' settings can be modified in the Diagnostics tab of the
application settings window General parameters (see Figure 3 9). This window is
accessible via the General parameters link.
10.1. Configuring the diagnostics
level
For each component of the program, there is a set of diagnostic messa ges that
will be entered into the logs. The information volume and the extent of detail will
be determined by the diagnostics level selected for the particular group of
messages.
For following diagnostics level are provided:
• None- do not log any information.
• Minimum - log only major events.
• Medium - in addition to major events, log some additional events that de-
scribe the Anti-Virus operation in more detail.
• Maximum - log full information about the operation of the module, e xcept
the debug messages.
• Debug - log all information, including debug messages.
In order to configure the diagnostics level,
1. Select the node corresponding to the requir ed server in the conso le
tree and follow the General settings link in the results pane.
2. Go to the Diagnostics tab in the General settings window that will
open (see Figure 39).
Page 100

100 Kaspersky Anti-Virus 5.5 for Check Point
Figure 39. The Diagnostics tab
3. The Diagnostics level for system components section located in
the tab contains a table. The left part of the table contains the list of
all components included into the structure of the program. The right
section of the table displays the groups of the di agnostic messages
for the selected component and the diagnostics level for each of
the groups.
TM
Firewall-1®
Only diagnostic messages of group Scan Results for the Filters component will be entered into the results log.
Messages of this group are not registered in the application's
operation log.
Select the component in the left part of the table and then select
the required group of diagnostic messages in the rig ht part of the
table. Select the desired diagnostics level using the drop-down list.
Specify the required diagnostics level for each program component.
You can select the diagnostics level for all or several com ponents
at the same time selecting components using the <Shift> and
<Ctrl+Shift> keys or using the mouse.
 Loading...