

Page 1

USER GUIDE
P R O GR A M V ER S IO N : 8 . 0 C R I T I CA L F I X 2
Kaspersky Anti-Virus
for Mac
Page 2

Dear User!
Thank you for choosing our product. We hope that this documentation will help you in your work and will provide answers
regarding this software product.
Any type of reproduction and distribution of any materials, including translation thereof, is allowed only by a written
permission of Kaspersky Lab.
This document and graphic images related to it can be used exclusively for information, non-commercial or personal
purposes.
Kaspersky Lab reserves the right to change the document at any time without notice. For the latest version of this
document refer to Kaspersky Lab's website at http://www.kaspersky.com/docs.
Kaspersky Lab assumes no liability for the content, quality, relevance or accuracy of any materials used in this document
for which the rights are held by third parties, or for the potential damages associated with using such documents.
This document involves the registered trademarks and service marks which are the property of their respective owners.
Revision date: 11/30/09
© 1997-2009 Kaspersky Lab ZAO. All Rights Reserved.
http://www.kaspersky.com
http://support.kaspersky.com
Page 3

3
TABLE OF CONTENTS
KASPERSKY ANTI-VIRUS ........................................................................................................................................... 6
Hardware and software system requirements .......................................................................................................... 6
Distribution kit .......................................................................................................................................................... 7
Service for registered users ..................................................................................................................................... 7
Obtaining information about the application ............................................................................................................. 7
Sources of information to research on your own ................................................................................................ 8
Contacting Technical Support ............................................................................................................................ 9
Contacting Sales Department .......................................................................................................................... 10
INSTALLING AND REMOVING KASPERSKY ANTI-VIRUS ....................................................................................... 11
APPLICATION INTERFACE ....................................................................................................................................... 13
Main application window ........................................................................................................................................ 13
Application settings window ................................................................................................................................... 15
Kaspersky Anti-Virus icon ...................................................................................................................................... 15
Configuring the Kaspersky Anti-Virus interface ...................................................................................................... 16
QUICK START ............................................................................................................................................................ 18
What is the protection status of your computer? .................................................................................................... 18
How to Scan Your Computer for Viruses ............................................................................................................... 20
How to Perform a Quick Scan of Your Computer .................................................................................................. 20
How to Scan a File, Folder or Disk for Viruses ...................................................................................................... 21
How to update the application ................................................................................................................................ 21
MULTI-TASKED PROTECTION MANAGEMENT ....................................................................................................... 22
Disabling computer protection ............................................................................................................................... 22
Restoring protection on your computer .................................................................................................................. 23
Exporting and importing Kaspersky Anti-Virus settings.......................................................................................... 24
Exiting Kaspersky Anti-Virus .................................................................................................................................. 25
CREATING A PROTECTION SCOPE......................................................................................................................... 26
Selecting malicious programs to be monitored ...................................................................................................... 26
Trusted zone creation ............................................................................................................................................ 27
ANTI-VIRUS PROTECTION OF YOUR COMPUTER'S FILE SYSTEM ...................................................................... 30
Pausing / disabling file protection .......................................................................................................................... 30
Configuring file protection ...................................................................................................................................... 31
Selecting the file security level ................................................................ ......................................................... 32
Specifying the types of files to scan ................................................................................................................. 33
Creating a protection scope ............................................................................................................................. 35
Configuring additional settings ................................................................ ................................ ......................... 37
Selecting actions on objects ............................................................................................................................. 40
Restoring default file protection settings........................................................................................................... 41
File protection statistics.......................................................................................................................................... 42
SCANNING FOR VIRUSES ........................................................................................................................................ 43
Managing virus scan tasks ..................................................................................................................................... 43
Creating the list of objects to scan ......................................................................................................................... 45
Creating virus scan tasks ....................................................................................................................................... 46
Configuring virus scan tasks .................................................................................................................................. 48
Page 4

K A S P E R S K Y AN T I - VI R U S
4
Selecting a security level .................................................................................................................................. 48
Specifying the types of objects to be scanned ................................................................................................. 50
Selecting actions on objects ............................................................................................................................. 52
Configuring the scan task schedule ................................................................................................................. 54
Running scan tasks under the user account .................................................................................................... 55
Assigning uniform scan settings to all tasks ..................................................................................................... 57
Restoring default scan settings ........................................................................................................................ 58
Virus scan statistics ............................................................................................................................................... 59
UPDATING THE APPLICATION ................................................................................................................................. 61
Starting the update ................................................................................................................................................ 62
Rolling back the latest update ................................................................................................................................ 62
Configuring the update........................................................................................................................................... 63
Selecting an update source .............................................................................................................................. 64
Selecting the update mode and objects ........................................................................................................... 65
Configuring the update task schedule .............................................................................................................. 66
Update distribution ........................................................................................................................................... 67
Actions after update ......................................................................................................................................... 68
Configuring proxy server settings .......................................................................................................................... 69
Update statistics .................................................................................................................................................... 71
LICENSE MANAGEMENT .......................................................................................................................................... 72
QUARANTINE ................................ ................................................................ ............................................................. 75
Actions on quarantined objects .............................................................................................................................. 75
Configuring quarantine settings ............................................................................................................................. 77
BACKUP ...................................................................................................................................................................... 78
Actions on backup copies ...................................................................................................................................... 78
Configuring the backup settings ............................................................................................................................. 79
REPORTS ................................................................................................................................................................... 81
Configuring the report settings ............................................................................................................................... 82
The Detected tab ................................................................................................................................................... 83
The Events tab ....................................................................................................................................................... 84
The Statistics tab ................................................................................................................................................... 84
The Preferences tab .............................................................................................................................................. 86
NOTIFICATIONS ......................................................................................................................................................... 87
HELP INFORMATION ................................................................................................................................................. 89
List of objects to scan by extension ....................................................................................................................... 89
Allowed file exclusion masks ................................................................................................................................. 91
Allowed exclusion masks according to the Virus Encyclopedia classification ........................................................ 92
USING THIRD-PARTY CODE ..................................................................................................................................... 93
CryptoEx LLC ........................................................................................................................................................ 93
Boost 1.30.0 library ................................................................................................................................................ 93
Libcurl 7.19.3 library............................................................................................................................................... 94
Libpng 1.2.8 library ................................................................................................................................................ 94
Libc library ............................................................................................................................................................. 95
Libstdc++ library .................................................................................................................................................. 105
Expat 1.2 library ................................................................................................................................ ................... 113
Growl 1/1/05 ........................................................................................................................................................ 114
Page 5

T A B L E O F C O N T E N T S
5
Info-ZIP 5.51 library ............................................................................................................................................. 114
LZMA SDK 4.43 library ........................................................................................................................................ 115
RFC1321-based (RSA-free) MD5 LIBRARY library ............................................................................................. 115
Zlib 1.2 library ...................................................................................................................................................... 115
GCC 4.0.1 library ................................................................................................................................................. 116
Sound effects library ............................................................................................................................................ 125
KASPERSKY LAB ..................................................................................................................................................... 126
Page 6

6
IN THIS SECTION:
Hardware and software system requirements ................................................................................................................... 6
Distribution kit ................................................................................................ ................................ .................................... 7
Service for registered users ............................................................................................................................................... 7
Obtaining information about the application ...................................................................................................................... 7
KASPERSKY ANTI-VIRUS
Kaspersky Anti-Virus for Mac (hereinafter referred to as Kaspersky Anti-Virus) is the new generation of information
protection solutions. It is designed to protect computers managed by Mac OS against viruses and malware. The following
functions are implemented in the application:
Real-time protection of your computer's file system, through: interception and analysis of attempts to access the
file system; disinfection, deletion and isolation of potentially infected objects for further analysis.
Searching and deactivating malicious code at the user's request: search and analysis of infected and potentially
infected objects in the designated scan areas; disinfection, deletion, or isolation of objects for further analysis.
The most useful virus scan tasks are included in the Kaspersky Anti-Virus package: full computer scan and
quick scan of critical areas.
Updating the databases and modules of Anti-Virus from Kaspersky Lab's update servers, creating backup
copies of all the updated files to allow a future roll back; copying the updates into a local source to allow other
networked computers to access them so as to reduce Internet traffic.
Quarantining potentially infected objects: saving potentially infected objects in the quarantine folder, re-scanning
them with updated databases, restoring objects from quarantine at the user's request.
Creating a copy of each infected object to store in the backup area before disinfecting or deleting it, so that it
can later be restored, preserving your valuable information.
Creating a detailed report on the performance of each Kaspersky Anti-Virus component.
Notifying the user about certain events which occur when Kaspersky Anti-Virus runs. You can select the
notification type for each event type: sound or pop-up message.
Kaspersky Anti-Virus boasts an easy-to-use interface, which ensures convenient access to any of the application's
features. You can change the appearance of Kaspersky Anti-Virus by using various graphic elements and selected color
schemes.
When working with Kaspersky Anti-Virus, you will be provided with complete information support: the application returns
messages on the protection status and offers detailed guidance. Security Assistant (see section "What is the protection
status of your computer?" on page 18) included in the application package can present a broad picture of current status
of computer's protection, and proceed to the immediate elimination of problems.
HARDWARE AND SOFTWARE SYSTEM REQUIREMENTS
Your computer should meet the following minimum requirements for Kaspersky Anti-Virus to run properly:
Intel-based Macintosh computer (PowerPC processor not supported);
512 MB free RAM;
Page 7

K A S P E R S K Y AN T I - V I R U S
7
80 MB free hard drive space;
Mac OS X 10.4.11 operating system, or higher.
DISTRIBUTION KIT
You may purchase Kaspersky Anti-Virus (box edition) from our distributors or at an online store (such as
www.kaspersky.com, eStore section).
If you are purchasing the product in a box, the following will be included in the software product distribution kit:
sealed envelope with the Installation CD that stores product files and documentation in PDF format;
license agreement, which specifies the conditions of using the software product you have purchased.
Before breaking the seal on the installation disk envelope, carefully read through the EULA. If you cannot accept the
provisions of the License Agreement, you may return the box with the product to the distributor you have purchased it
from, and you will be refunded the sum you have paid for the product. In this case, the envelope with the installation CD
should remain sealed. Opening the envelope with the installation CD means acceptance of all the provisions of the
License Agreement.
When purchasing Kaspersky Anti-Virus online, you download the product from Kaspersky Lab website, which includes
this documentation. You will be sent a key file or activation code by email once payment has been made.
SERVICE FOR REGISTERED USERS
Kaspersky Lab offers a broad range of services allowing legal users to increase the efficiency of the application.
After purchasing the license you become a registered application user, so you can be provided the following services until
the license key expiration date:
Hourly update of application databases and provision of new versions of the software.
Consultation on issues regarding installation, configuration and use of the software product provided by phone
and email.
Notification of new software products release by Kaspersky Lab and of new viruses emerging all around the
world. This service is provided to users who have subscribed to Kaspersky Lab's news mail delivery at the
Technical Support Service website http://support.kaspersky.com/subscribe/.
Support on issues related to the performance and use of operating systems, third-party software and the operation of
other technology is not provided.
OBTAINING INFORMATION ABOUT THE APPLICATION
If you have any questions concerning the purchase, installation or use of Kaspersky Anti-Virus, answers are readily
available.
Kaspersky Lab provides a variety of information sources about the application. You can choose the most suitable,
according to the importance and urgency of your question.
Page 8

K A S P E R S K Y AN T I - VI R U S
8
IN THIS SECTION:
Sources of information to research on your own ............................................................................................................... 8
Contacting Technical Support ........................................................................................................................................... 9
Contacting Sales Department .......................................................................................................................................... 10
SOURCES OF INFORMATION TO RESEARCH ON YOUR OWN
You can refer to the following sources of information about the application:
Page at the Kaspersky Lab website.
Page at the Technical Support Service website (Knowledge Base).
Kaspersky Lab products users forum.
Help system.
Documentation.
Page on the Kaspersky Lab website
This page (http://www.kaspersky.com/kaspersky-anti-virus-for-mac) will provide you with general information on the
application, its features and options. You can purchase Kaspersky Anti-Virus or extend your license in our eStore.
Application page on the Technical Support Service website (Knowledge Base)
Knowledge Base is a separate section of the Technical Support Service website
(http://www.kaspersky.com/support/kavmac), which provides recommendations for working with Kaspersky Lab's
products. This page contains articles published by Technical Support service specialists.
These articles provide useful information, recommendations and answers to frequently asked questions related to
the purchase, installation and use of Kaspersky Anti-Virus. These answers are grouped by topics, for example,
"Working with key files", "Updating the databases", or "Troubleshooting". The articles may answer questions, which
are related not only to Kaspersky Anti-Virus but also to other Kaspersky Lab products; they also may contain
Technical Support service news.
To switch to Knowledge Base, open the main application window (on page 13), click the button and in the
window that opens, use the Technical Support Service button.
Users forum
If your question does not require an urgent answer, you can discuss it with Kaspersky Lab's specialists and other
users in our forum (http://forum.kaspersky.com). It is also made into a separate section at the Technical Support
service website and contains Kaspersky Anti-Virus users' questions, feedback, and requests.
In this forum you can view existing topics, leave your comments, create new topics, and use the search engine.
To go to this resource, open the main application window (on page 13), click the button and in the window that
opens, use the Forum button.
Help system
Page 9
K A S P E R S K Y AN T I - V I R U S
9
The complete Help system contains information on how to manage computer protection: view protection status, scan
various areas of the computer for viruses, and execute other tasks. To open the help file, select the
Help Kaspersky Anti-Virus Help System command in the Kaspersky Anti-Virus main menu, or click the
button in the main application window (on page 13).
If you have any questions regarding a separate window or tab of Kaspersky Anti-Virus, you can refer to the context
help. To open the context help, open the window or the tab you want, and press the button.
Documentation
The user guide for Kaspersky Anti-Virus contains detailed information on installing and using the application.
If you do not find a solution to your problem in the Knowledge Base, the Users forum, the help system or
documentation, we recommend that you contact Kaspersky Lab Technical Support (see section "Contacting
Technical Support" on page 9).
CONTACTING TECHNICAL SUPPORT
If you have already purchased Kaspersky Anti-Virus, you can obtain information about it from the Technical Support
Service, either by phone or through the Internet. Technical Support Service specialists will answer your questions on
installing and using the application, and if your computer has been infected, they will help you overcome the effects of
malware.
To view information on ways of receiving support for Kaspersky Anti-Virus, open the main application window (on
page 13) and click the button. Before contacting Technical Support Service, please read the support rules
(http://support.kaspersky.com/support/rules).
If problems occur when using Kaspersky Anti-Virus, first check if troubleshooting instructions for the problem are provided
in this documentation, help system, in the Knowledge Base on the Kaspersky Lab Technical Support website or on the
Users Forum (see section "Sources of information to research on your own" on page 8). If you do not find a solution to
your problem, we recommend that you contact Kaspersky Lab Technical Support.
Please note that you have to be a registered user of the commercial version of Kaspersky Anti-Virus to obtain technical
support. No support is provided to users of trial versions.
A new user is registered using the Activation assistant (see section "License management" on page 72), if you are
activating Kaspersky Anti-Virus using the activation code. Under this option, once registration is complete, a customer ID
will be assigned to you. Customer ID is a personal user ID, which is required for phone or web form-based technical
support.
If you are activating the Kaspersky Anti-Virus using a key file, you have to pass the registration procedure at the
Technical Support Service website.
The customer ID and password received when registering are needed to access your Personal Cabinet, your own section
at the Technical Support service website. In the Personal Cabinet you can:
Send requests to the Technical Support without prior registering.
Exchange messages with the Technical Support without using email.
Monitor requests in real time.
View the complete history of your requests to the Technical Support service.
Obtain a backup copy of the key file.
Requesting the Technical Support service by email
Page 10

K A S P E R S K Y AN T I - VI R U S
10
To contact Technical Support Service, open the web form of the customer request processing system Helpdesk
(http://support.kaspersky.com/helpdesk.html). On the Technical Support Service page that opens, enter your Personal
Cabinet and fill in the request form.
You can send your question in Russian, English, German, French, or Spanish.
In order to send your question by email, specify the Customer ID obtained when registering at the Technical Support
service website, along with your password.
A Technical Support service specialist will reply to your request in your Personal Cabinet and at the email address you
have specified in your request.
Describe the problem you have encountered in the request web form providing as much detail as possible. Specify the
following in the required fields:
Request type. Select the subject that best matches the problem you have encountered, such as "Product
installation/uninstallation problem" or "Virus scan/removal problem". If you have not found an appropriate topic,
select "General question".
Application name and version number.
Request text. Describe the problem in as much detail as possible.
Customer ID and password. Enter the customer ID and the password you received when registering at the
Technical Support service website.
Email address. The Technical Support service will send an answer to your question at this email address.
Phone technical support
If you encounter an urgent problem, you can always call your local Technical Support service. Before contacting
specialists of the Russian (http://support.kaspersky.ru/support/support_local) or international
(http://support.kaspersky.com/support/international) Technical Support, please, collect information
(http://support.kaspersky.com/support/details) about your computer and anti-virus application installed on it. This will help
our support specialists solve your problem more quickly.
CONTACTING SALES DEPARTMENT
If you have questions about selecting or purchasing the application or extending your license, contact the Sales
Department specialists by email at sales@kaspersky.com.
Page 11

11
INSTALLING AND REMOVING KASPERSKY ANTI-VIRUS
The Kaspersky Anti-Virus installation package includes the installation assistant and the uninstallation assistant.
To install Kaspersky Anti-Virus on your computer,
run the installation file (*.dmg) and select Anti-Virus Installation.
The installation assistant is a sequence of steps. You can switch between them using the Continue (go to the next
step of installation) and Go Back (go one step back) buttons. Let us take a closer look at the steps of installation:
1. Reading important information.
Please read the information about the application you are installing and make sure that your computer
meets the system requirements specified. To print the information, click the Print button. To save the
information as a text file, click the Save button.
2. Reading License Agreement.
Please thoroughly read through the License Agreement for using Kaspersky Anti-Virus between you and
Kaspersky Lab. The text of the agreement is available in several languages.
To print the text of the agreement, click the Print button. To save the agreement as a text file, click
the Save button.
If you accept all the terms of the agreement, click the Continue button and confirm that you accept the
terms of license agreement in the window that opens. Kaspersky Anti-Virus installation will continue.
To return to the text of the license agreement, click the Read license button.
If the Disagree option is selected, installation will be interrupted.
3. Change install location.
This window contains the information about the disk, on which the application is to be installed, and the free
disk space needed for the installation.
If default settings of the installation meet your requirements, click the Install button and enter the
administrator's password to confirm the installation.
You can edit the default installation settings. To do this, click the Edit installation folder button and specify
another disk. To switch to custom installation of Kaspersky Anti-Virus, click the Preferences button.
4. Selecting installation type.
This step of the installation assistant will appear if the custom installation option is selected. You will be
offered to specify which application components should be installed on your computer.
Virus scan. Scan of objects from the user defined scan scopes. Please note that this component will
be unconditionally installed.
File Anti-Virus. Real-time scan of all objects being opened, executed or saved.
Finder Contextual Menu. Scan of objects displayed in Finder. Scan is started from the object
contextual menu.
Page 12

K A S P E R S K Y AN T I - VI R U S
12
Once the components are selected, please click the Install button and enter the administrator's password to
confirm the installation.
To restore the default installation settings, click the Standard installation button.
5. Completing the installation.
The last window of the installation assistant displays information about the successful completion of the
installation process. To exit the installation assistant, click the Close button.
When the installation assistant is closed, Kaspersky Anti-Virus runs automatically. The computer does not
need to be restarted.
To remove Kaspersky Anti-Virus from your computer,
run the installation file (*.dmg) and select the Kaspersky Anti-Virus Uninstaller assistant.
The uninstallation assistant is a sequence of steps. You can switch between them using the Continue (go to the
next step of installation) and Go Back (go one step back) buttons. Let us take a closer look at the application
uninstallation procedure:
1. Reading important information.
Note that removing Kaspersky Anti-Virus exposes your computer to the risk of infection.
It is recommended that you process all objects stored in quarantine and backup, before starting the
uninstallation procedure. All stored objects that have not been processed will be deleted without any
opportunity to restore them in the future.
To start the uninstallation procedure, click the Delete button and enter the administrator's password to
confirm. The application will then be uninstalled.
2. Completing the uninstallation procedure.
The last window of the uninstallation assistant displays the information about the successful completion of
the uninstallation process. To exit the uninstallation assistant, click the Finish button. The computer does
not have to be restarted after the uninstallation.
Page 13
13
IN THIS SECTION:
Main application window .................................................................................................................................................. 13
Application settings window ............................................................................................................................................. 15
Kaspersky Anti-Virus icon ................................................................................................................................................ 15
Configuring the Kaspersky Anti-Virus interface ............................................................................................................... 16
APPLICATION INTERFACE
Kaspersky Anti-Virus has a simple and easy-to-use interface. In this section we will take a closer look at its basic
elements: main application window, application settings window and the Kaspersky Anti-Virus icon.
You can change the appearance of the application by using various graphic elements and selected color schemes.
MAIN APPLICATION WINDOW
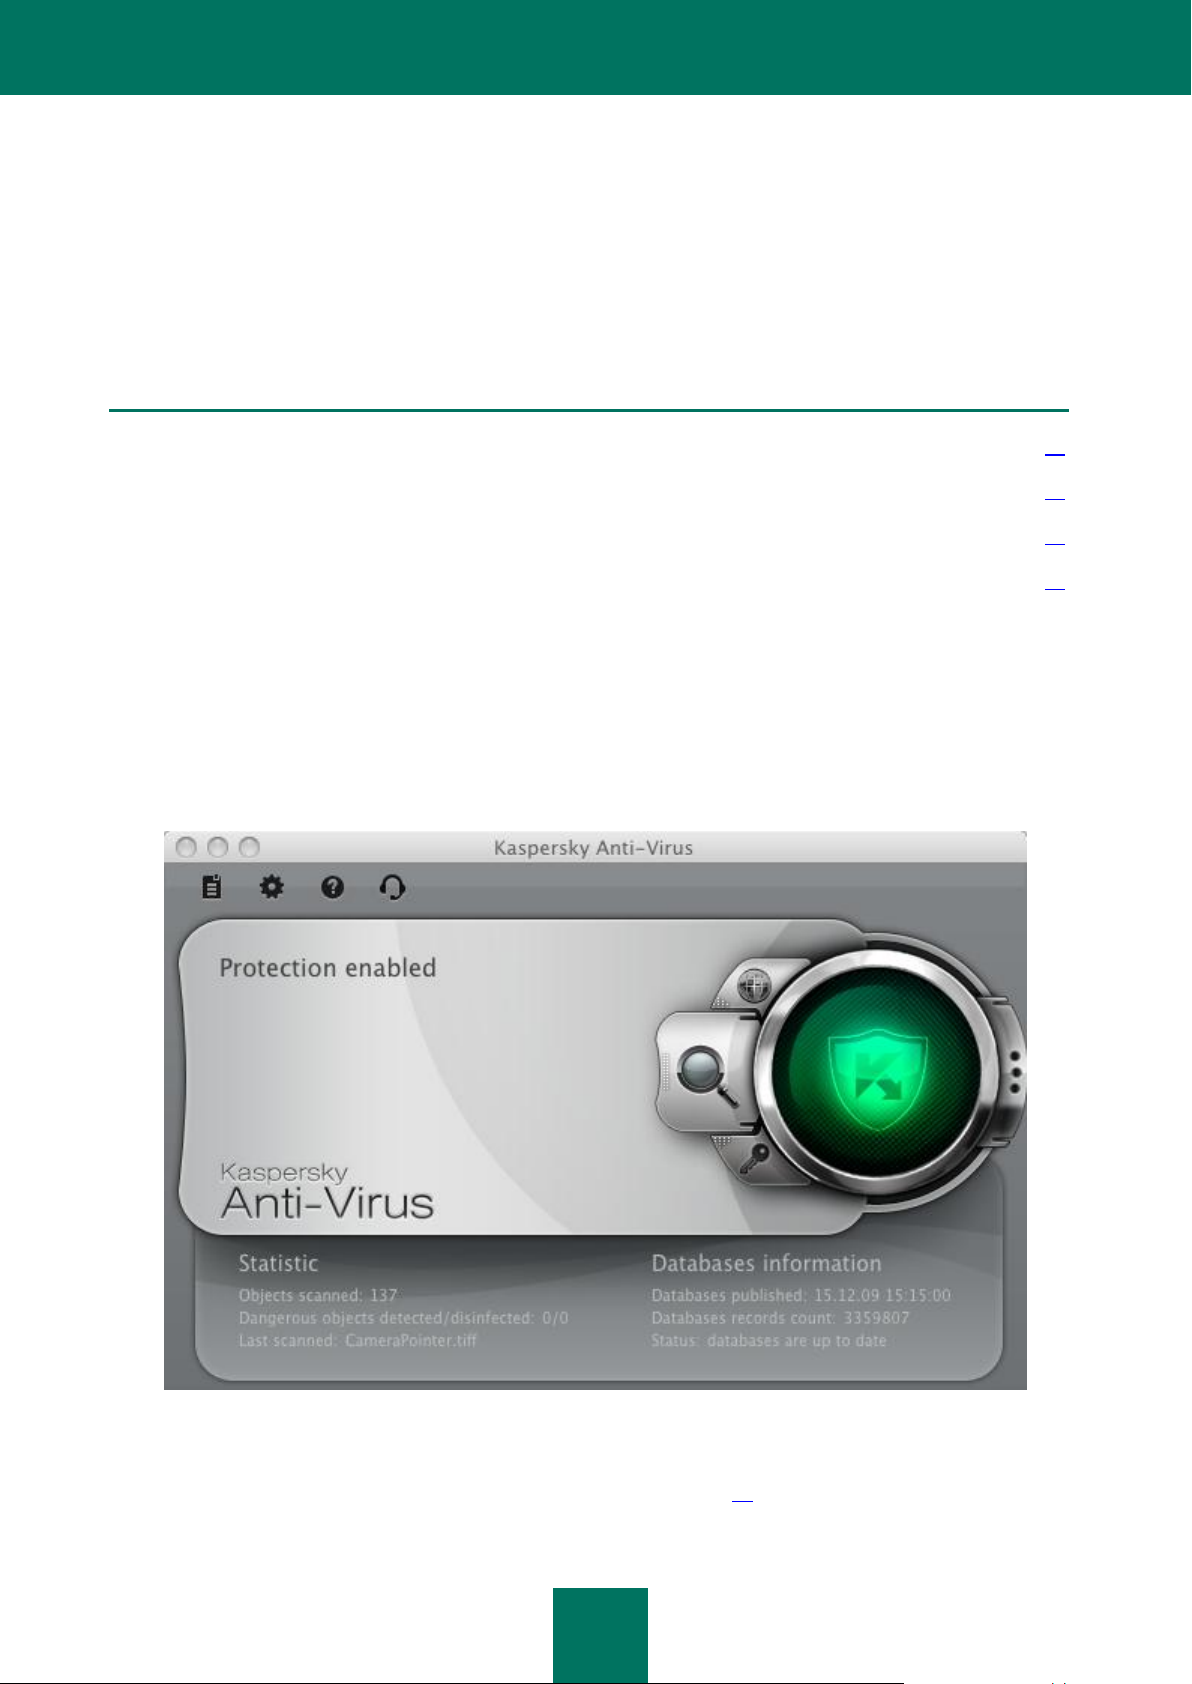
The basic functions of the main window (see the figure below) are: to inform the user of the computer's protection status
and of possible problems with protection, to provide information about the operation of Kaspersky Anti-Virus' components
(File Anti-Virus, virus scan and update tasks), and to provide access to the main tasks and the application settings
window.
Figure 1: Kaspersky Anti-Virus main window
The color of the main window indicates the current protection status. There are three possible values of the protection
status (see section "What is the protection status of your computer?" on page 18), each of which is associated with a stop
light color. Green indicates that your computer's protection is at an optimal level, while yellow and red warn of the
Page 14
K A S P E R S K Y AN T I - VI R U S
14
Run Kaspersky Anti-Virus updater. This opens a report window with detailed information about the
task's execution.
Go to virus scan tasks: quick scan, full scan and scan for viruses in the user defined scope.
Switch to managing the licenses, needed to enable Kaspersky Anti-Virus. You can view information on
the current license key files, delete keys, and install new ones.
Open the window which displays the report about the operation of Kaspersky Anti-Virus, to access
quarantine and Backup.
Open the application settings window (on page 15).
Open the Kaspersky Anti-Virus built-in help.
Open the window with information on ways of obtaining technical support.
presence of various problems in the operation or configuration of the application. For more detailed information on these
problems and their quick elimination, use the Security Assistant (see section "What is the protection status of your
computer?" on page 18) that opens when you click on the color indicator.
In addition to the color indicator, the left part of the main window contains a block of text which describes the protection
status, and lists any security threats logged by the Security Assistant. If you have virus scan or update tasks running at
this time, information on their progress (as percentage completion) will also be displayed in the left part of the main
window.
The lower part of the window displays summary statistics on the operation of File Anti-Virus, and information about the
databases being used by the application.
From the main window you can start the Kaspersky Anti-Virus update, modify settings for virus scan tasks in specified
areas and run them, and manage the licenses. To do this, use these buttons:
The navigation bar is located in the upper part of the main window, and contains the following buttons:
Page 15
A PPL I C A T I O N I N T E R F A C E
15
APPLICATION SETTINGS WINDOW
Kaspersky Anti-Virus settings window (see the figure below) may be accessed from the main window (see section "Main
application window" on page 13), by clicking the button, or by selecting Preferences from the application menu,
which will open if you click the Kaspersky Anti-Virus icon (on page 15) in Dock or Mac OS Menu Bar.
Figure 2: Application settings window. File Anti-Virus
The buttons in the upper part of the settings window give you quick access to the settings of File Anti-Virus, of virus scan
tasks, of updates, and of Kaspersky Anti-Virus tools. To fine-tune certain settings, you will need to open the second- and
third-level settings windows.
To prevent users without administrator privileges from editing Kaspersky Anti-Virus settings, click on the lock icon in the
lower part of the window. You will need to enter the administrator's username and password to access the settings.
The button provides access to Kaspersky Anti-Virus help system with the description of settings for the current
application window.
KASPERSKY ANTI-VIRUS ICON
Immediately after Kaspersky Anti-Virus is installed, its icon appears in the Mac OS Menu Bar. The icon is in itself an
indicator for the application's operation mode. If the icon is active, this means that the computer protection against
malware in real-time mode is enabled. The inactive icon indicates that the protection is disabled. Additionally, the icon
provides access to the commands in Kaspersky Anti-Virus' main menu.
By default, the icon is located on the Mac OS Menu Bar. You can change the icon's location by replacing it onto the
Dock.
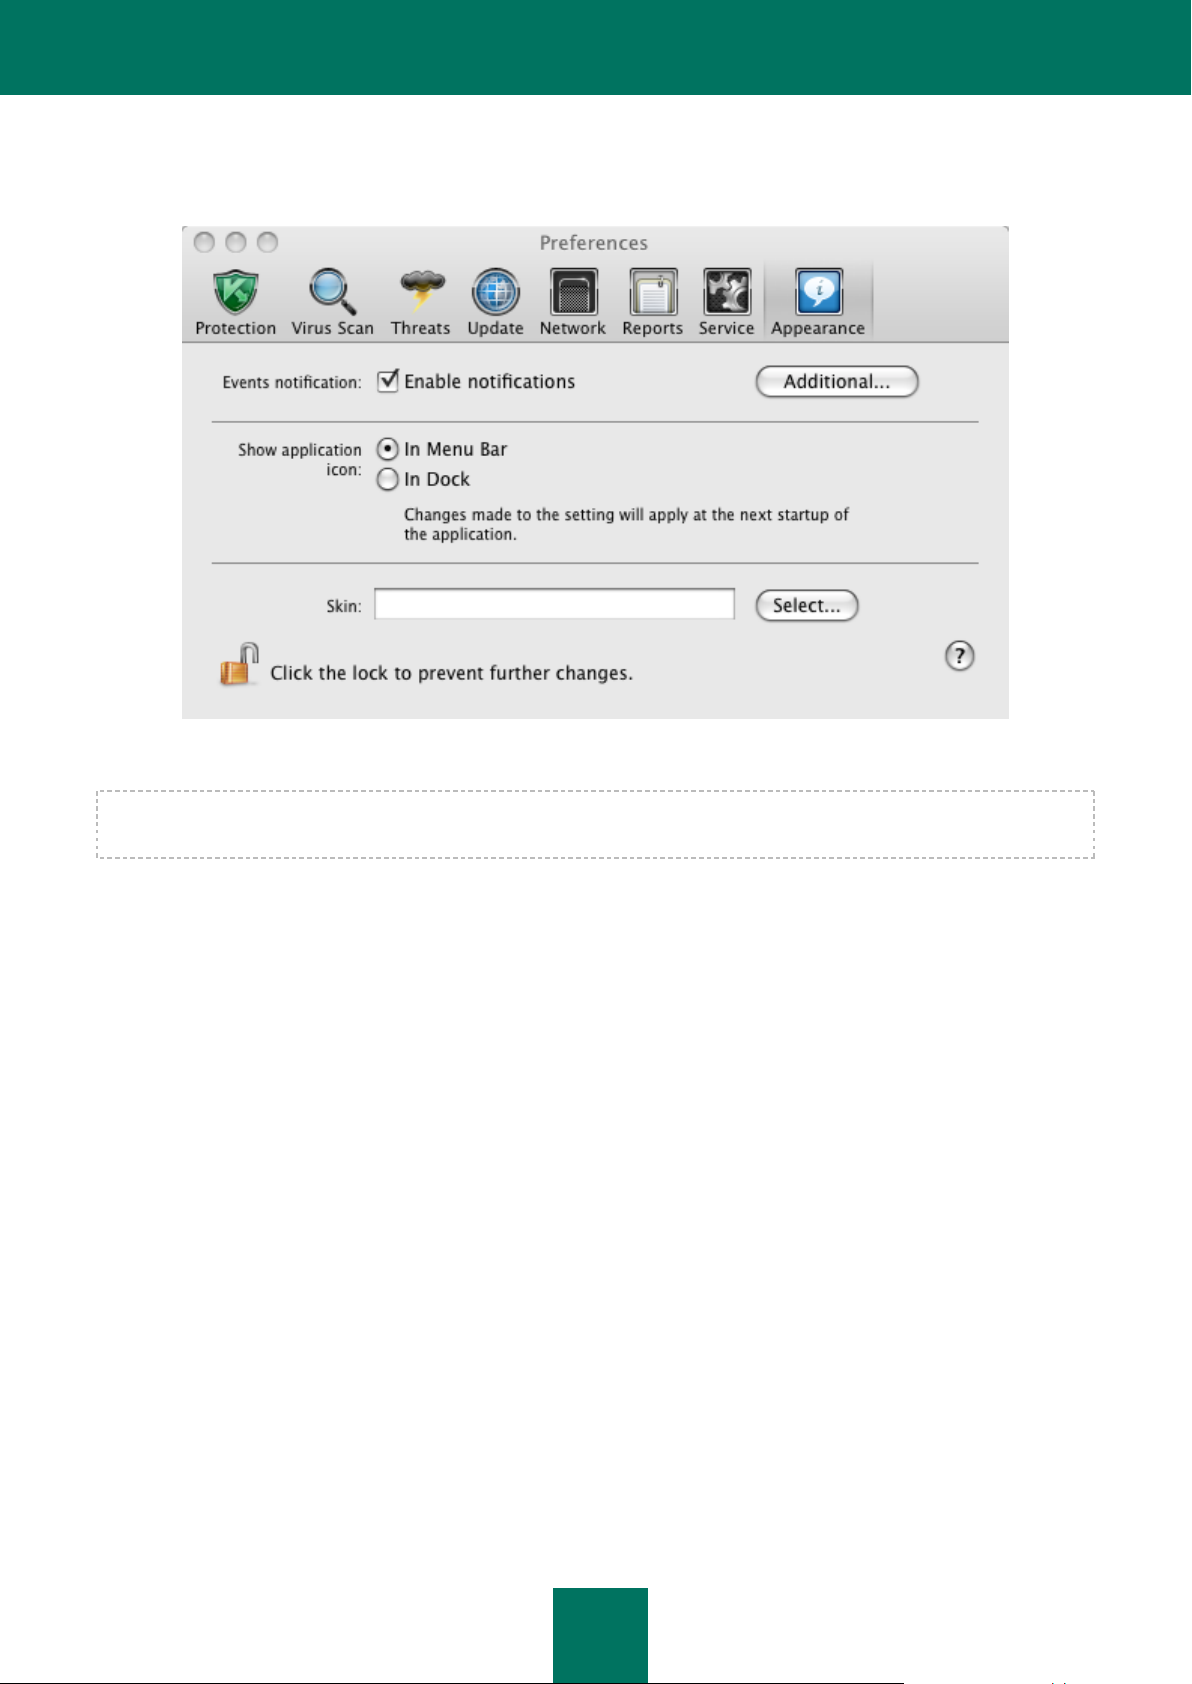
To move the application icon onto the Dock:
1. Open the application settings window (on page 15) and select the Appearance section (see figure below).
Page 16
K A S P E R S K Y AN T I - VI R U S
16
2. In the Show application icon section select the In Dock option. Note that this modification will take place only
after Kaspersky Anti-Virus is restarted.
Figure 3: Application settings window. Appearance
If you selected the option of displaying application icon in MAC OS menu bar, the icon will not appear in Dock when the
application is started or main window is opened.
CONFIGURING THE KASPERSKY ANTI-VIRUS INTERFACE
Kaspersky Anti-Virus gives you the option of changing the appearance of the program by creating and using various
graphic elements and selected color schemes.
To configure Kaspersky Anti-Virus
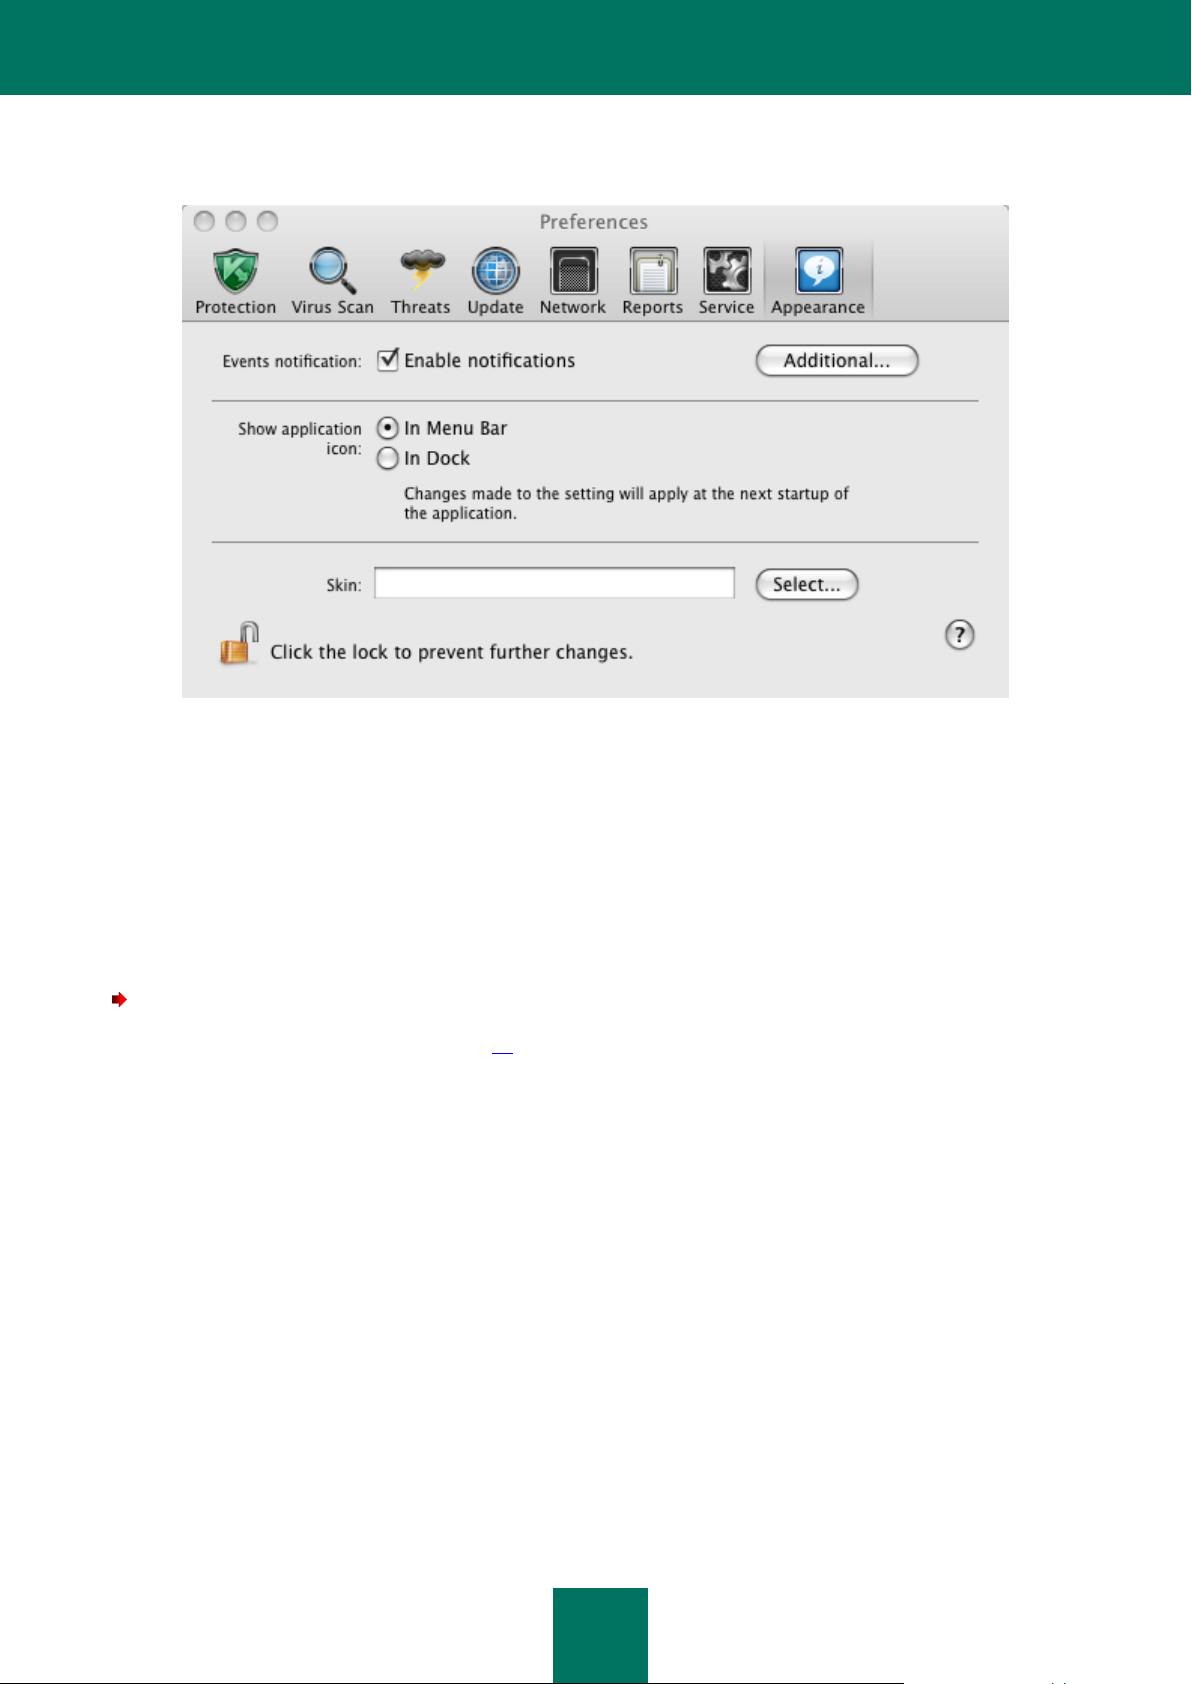
open application settings window (on page 15) and select the Appearance tab (see figure below).
Page 17
A PPL I C A T I O N I N T E R F A C E
17
All the colors, fonts, icons and texts used in the Kaspersky Anti-Virus interface can be changed. You can create your own
skins for the application, or localize it in another language. To activate a skin, specify the path to the folder in the Skin
field. To select a folder, use the Select button.
Figure 4: Application settings window. Appearance
Modifications applied to the Kaspersky Anti-Virus interface settings are not saved if you restore default settings or
uninstall the application.
Page 18

18
IN THIS SECTION:
What is the protection status of your computer? ............................................................................................................. 18
How to Scan Your Computer for Viruses ......................................................................................................................... 20
How to Perform a Quick Scan of Your Computer ............................................................................................................ 20
How to Scan a File, Folder or Disk for Viruses ................................................................................................................ 21
How to update the application ......................................................................................................................................... 21
QUICK START
One of the main goals of Kaspersky Lab specialists when they designed the application was to ensure optimum
configuration of Kaspersky Anti-Virus to provide your computer with protection immediately after the installation.
You are advised to perform the following actions after completing the installation and starting the application on your
computer:
Activate your copy of Kaspersky Anti-Virus (see section "License management" on page 72). Using a licensed
version will let you update the application's databases on a regular basis, and access the Technical Support
Service.
Evaluate the current protection status (see section "What is the protection status of your computer?" on
page 18), to make sure that Kaspersky Anti-Virus ensures the appropriate level of protection.
Update Kaspersky Anti-Virus (see section "How to update the application" on page 21). Kaspersky Anti-Virus
databases should be kept up to date so that they are always ready to help detect and eliminate viruses or other
malware.
Scan your entire computer (see section "How to Scan Your Computer for Viruses" on page 20) for viruses.
If problems or errors occur in the application's operation, please view the report (see section "Reports" on page 81),
which may indicate the cause of failure. If you cannot solve the problem on your own, please contact Kaspersky Lab's
Technical Support Service (see section "Contacting Technical Support" on page 9).
WHAT IS THE PROTECTION STATUS OF YOUR COMPUTER?
Your computer's protection status gives you a summary of your computer's overall security level. These threats include
malicious programs detected and outdated application databases, disabled File Anti-Virus, using minimum settings for
the Kaspersky Anti-Virus operation, etc.
Protection status is displayed in the main application window (see section "Main application window" on page 13) and is
depicted by the corresponding stop light color. Depending on the situation, the color scheme of the window will change,
and if any security threats are detected the color will be supplemented by informative messages.
The Traffic Light Colour can be:
Green. This status indicates that your computer is properly protected.
This means that the databases are updated, File Anti-Virus is enabled, Kaspersky Anti-Virus is running with the
settings recommended by Kaspersky Lab, and either no malicious objects have been discovered by a virus
scan, or all detected malicious objects have been disinfected.
Page 19
Q U I C K S T A R T
19
Yellow. Your computer's protection is below the previous level. This protection status indicates that there are
problems in the performance or settings of Kaspersky Anti-Virus.
Such problems include, for example: slight deviations from the recommended operation settings, or the
Kaspersky Anti-Virus databases have not been updated for several days.
Red. Your computer is at serious risk of infection. This status indicates that there are problems which may lead
to the infection of your computer and the loss of data.
Such problems include, for example: a failure in File Anti-Virus' operation; the Kaspersky Anti-Virus databases
have not been updated for a long time; malicious objects have been detected and urgently need to be
disinfected, or the application has not been activated.
If there are problems in the protection system, you are advised to fix them immediately. To do this, use the Security
Assistant (see the figure below), which opens if you click on the color indicator in the main window. The Security
Assistant lets you review all the current threats and begin to eliminate them.
Figure 5: Security Assistant interface
To browse the list of existing threats, click the Continue or Go Back buttons. A detailed description is provided for each
threat, and the following actions are available:
Eliminate threat immediately.
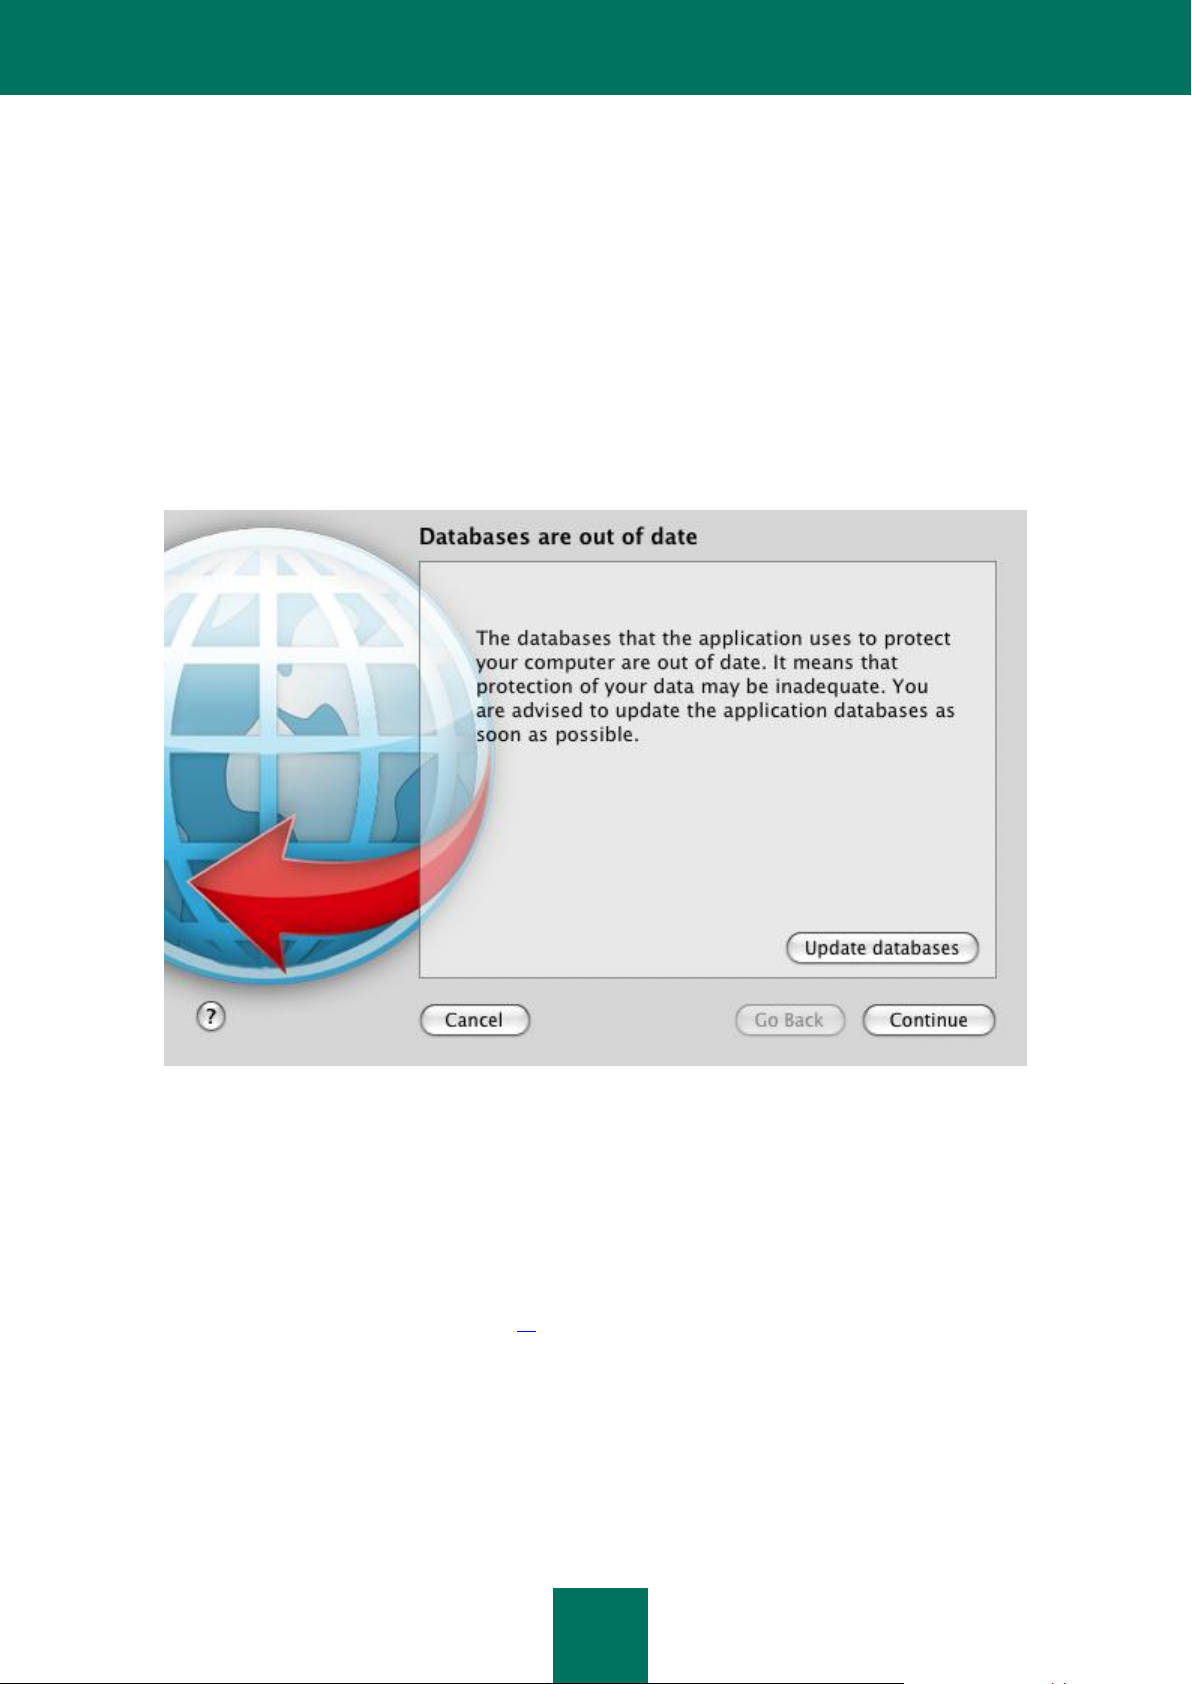
To eliminate the threat, click the button with the recommended action. For example, if infected objects were
detected, the recommended action will be Disinfect infected objects, if databases are obsolete, the
recommended action will be Update databases. To obtain detailed information on this threat, you can view the
report file (see section "Reports" on page 81).
Postpone threat elimination.
If for any reason you cannot immediately eliminate the threat, you can postpone this action and return to it later.
To do this, use the Postpone button. Note that the second option is not available for serious threats. Such
threats include, for example, malicious objects not yet disinfected, File Anti-Virus operation failure, or corrupted
Kaspersky Anti-Virus database files.
Page 20
K A S P E R S K Y AN T I - VI R U S
20
If you still have threats left after you have finished using the Security Assistant, the main window color will indicate
security problems. If you postpone the elimination of some threats, they will not be present in the list of active threats the
next time Security Assistant is opened. However, you can still return to view and eliminate postponed threats by clicking
the View postponed threats button in the last window of the Security Assistant.
HOW TO SCAN YOUR COMPUTER FOR VIRUSES
When installation is complete, Kaspersky Anti-Virus will notify you that the full computer scan has not yet been
performed, and will advise you to run the Full computer scan task immediately.
To open the Full computer scan task:
1. Open the main application window (on page 13) and click the button.
2. Run the Full Scan task. To view task execution results, open report window (see section "Virus scan
statistics" on page 59).
To view or edit current task settings:
1. Open the application settings window (on page 15) and select the Virus Scan tab.
2. Select the Full Scan task in the dropdown list on the left. In the right-hand part of the window edit the list of
objects to scan (see section "Creating the list of objects to scan" on page 45), view the settings that will be used
for a task: security level (see section "Selecting a security level" on page 48) and action (see section "Selecting
actions on objects" on page 52), that will be taken on dangerous objects. If required, configure a task launch
schedule (see section "Configuring the scan task schedule" on page 54).
HOW TO PERFORM A QUICK SCAN OF YOUR COMPUTER
Some areas on your computer are critical for security, such as the folders that contain operating system files and system
libraries. These areas are the main targets for malware which aims to damage your computer.
It is extremely important to protect these critical areas of your computer to ensure that it keeps running. For your
convenience, we have created a dedicated virus scan task for these areas.
To open the quick computer scan task:
1. Open the main application window (on page 13) and click the button.
2. Start the Quick Scan task. To view task execution results, open report window (see section "Virus scan
statistics" on page 59).
To view or edit current task settings:
1. Open the application settings window (on page 15) and select the Virus Scan tab.
2. In the list on the left, select the Quick Scan task. In the right-hand part of the window edit the list of objects to
scan (see section "Creating the list of objects to scan" on page 45), view the settings that will be used for a task:
security level (see section "Selecting a security level" on page 48) and action (see section "Selecting actions on
objects" on page 52), that will be taken on dangerous objects. If required, configure a task launch schedule (see
section "Configuring the scan task schedule" on page 54).
Page 21
Q U I C K S T A R T
21
HOW TO SCAN A FILE, FOLDER OR DISK FOR VIRUSES
It is useful to be able to scan a part of your computer for viruses rather than the entire computer: for example, the hard
drive containing applications, games, or email databases which have been transferred from work.
To scan an individual object for viruses:
1. Open the main application window (on page 13) and click the button.
2. Select the Virus Scan task and in the window that opens, create the list of objects to scan (see section
"Creating the list of objects to scan" on page 45). To add the object to the scan scope, drag-n-drop it to the
window. To start the task, click the Start button. To view task execution results, open report window (see section
"Virus scan statistics" on page 59).
To view or edit current task settings:
1. Open the application settings window (on page 15) and select the Virus Scan tab.
2. In the list on the left, select the Virus Scan task. In the right-hand part of the window view the settings that will
be used for a task: security level (see section "Selecting a security level" on page 48) and action (see section
"Selecting actions on objects" on page 52) that will be taken on dangerous objects.
If you install an add-in module for the Finder context menu, you can start scan of any object from its contextual menu
directly. To do this, select Scan for viruses from the menu.
HOW TO UPDATE THE APPLICATION
Kaspersky Lab updates Kaspersky Anti-Virus databases and modules using dedicated update servers. Kaspersky Lab's
update servers are Kaspersky Lab's Internet sites to which the Kaspersky Anti-Virus updates are uploaded.
You will need an Internet connection to update Kaspersky Anti-Virus from these servers.
By default, Kaspersky Anti-Virus automatically checks for updates on Kaspersky Lab's servers. If a server contains a new
set of updates, Kaspersky Anti-Virus will download and install them in the background.
To update Kaspersky Anti-Virus,
open the main application window (on page 13) and click the button. As a result, Kaspersky Anti-Virus will start
updating.
Page 22

22
IN THIS SECTION:
Disabling computer protection ......................................................................................................................................... 22
Restoring the protection on your computer ...................................................................................................................... 23
Exporting and importing Kaspersky Anti-Virus settings ................................................................................................... 24
Exiting Kaspersky Anti-Virus ........................................................................................................................................... 25
MULTI-TASKED PROTECTION MANAGEMENT
By default, Kaspersky Anti-Virus starts when the operating system starts and protects your computer during the entire
session. File-Anti-Virus' activity is indicated by the Kaspersky Anti-Virus icon (on page 15) in the Dock or in the Mac OS
Menu Bar. If the icon is active, your computer's protection is enabled, if the icon is inactive, the protection is disabled.
Kaspersky Lab specialists strongly recommend that you do not disable real-time protection provided by Anti-Virus since
this could lead to an infection of your computer and loss of data.
Note that the icon indicates the status of protection provided by File Anti-Virus (see section "Anti-virus protection of your
computer's file system" on page 30). Disabling or pausing File Anti-Virus does not impact the execution of virus scan
tasks (see section "Scanning for viruses" on page 43) or application updates (see section "Updating the application" on
page 61).
DISABLING COMPUTER PROTECTION
Disabling protection means stopping File Anti-Virus (see section "Anti-virus protection of your computer's file system" on
page 30). Virus scan (on page 43) and update (see section "Updating the application" on page 61) tasks will continue to
run.
If protection is fully disabled, it can only be re-enabled manually by the user. In this case, File Anti-Virus will not be
automatically enabled after the system or Kaspersky Anti-Virus restarts. Note that if Kaspersky Anti-Virus conflicts with
other program(s) installed on your computer, you can pause File Anti-Virus or create an exclusion list (see section
"Trusted zone creation" on page 27).
Page 23
M U L T I - T A S K E D P R O T E C T I O N M A N A G E M E N T
23
There are several ways to disable computer protection:
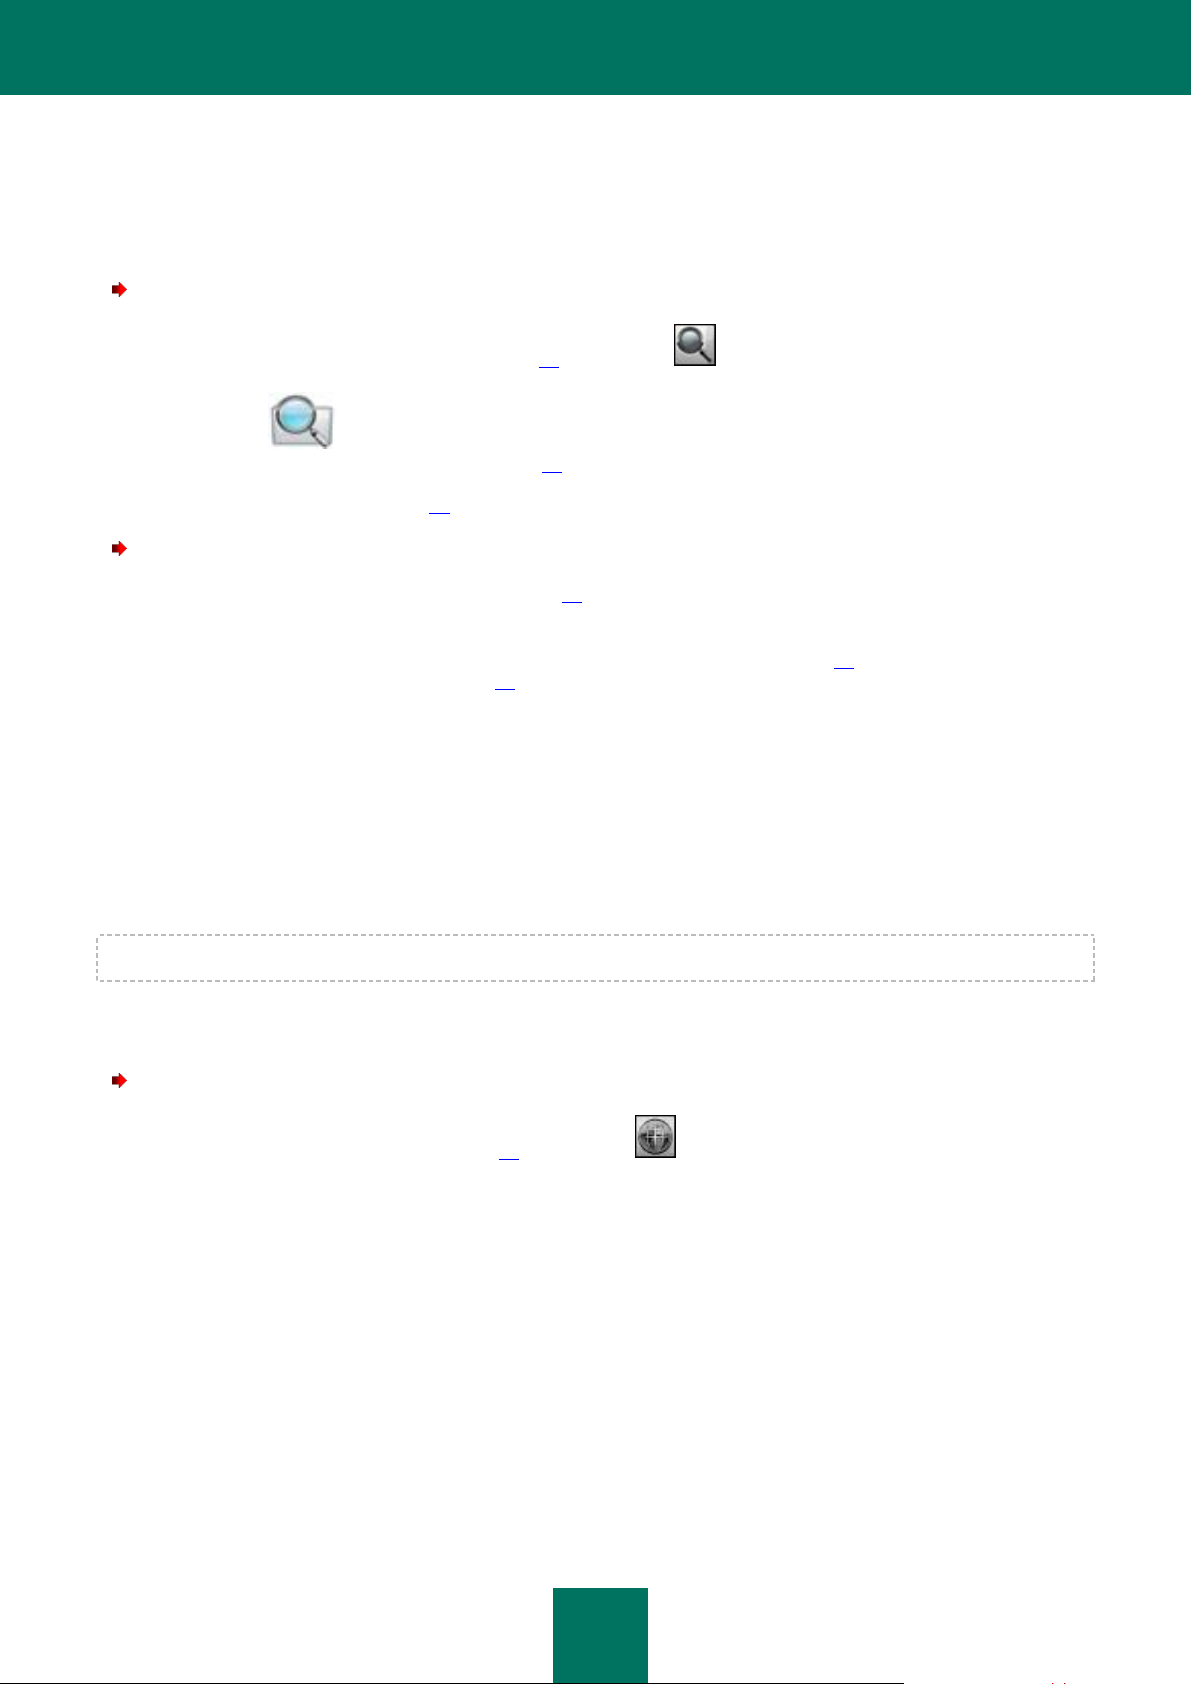
Click the Kaspersky Anti-Virus icon (on page 15) in the Dock or in the Mac OS Menu Bar and select the Turn
Protection Off command from the menu that opens.
Figure 6: Disabling protection from the contextual menu
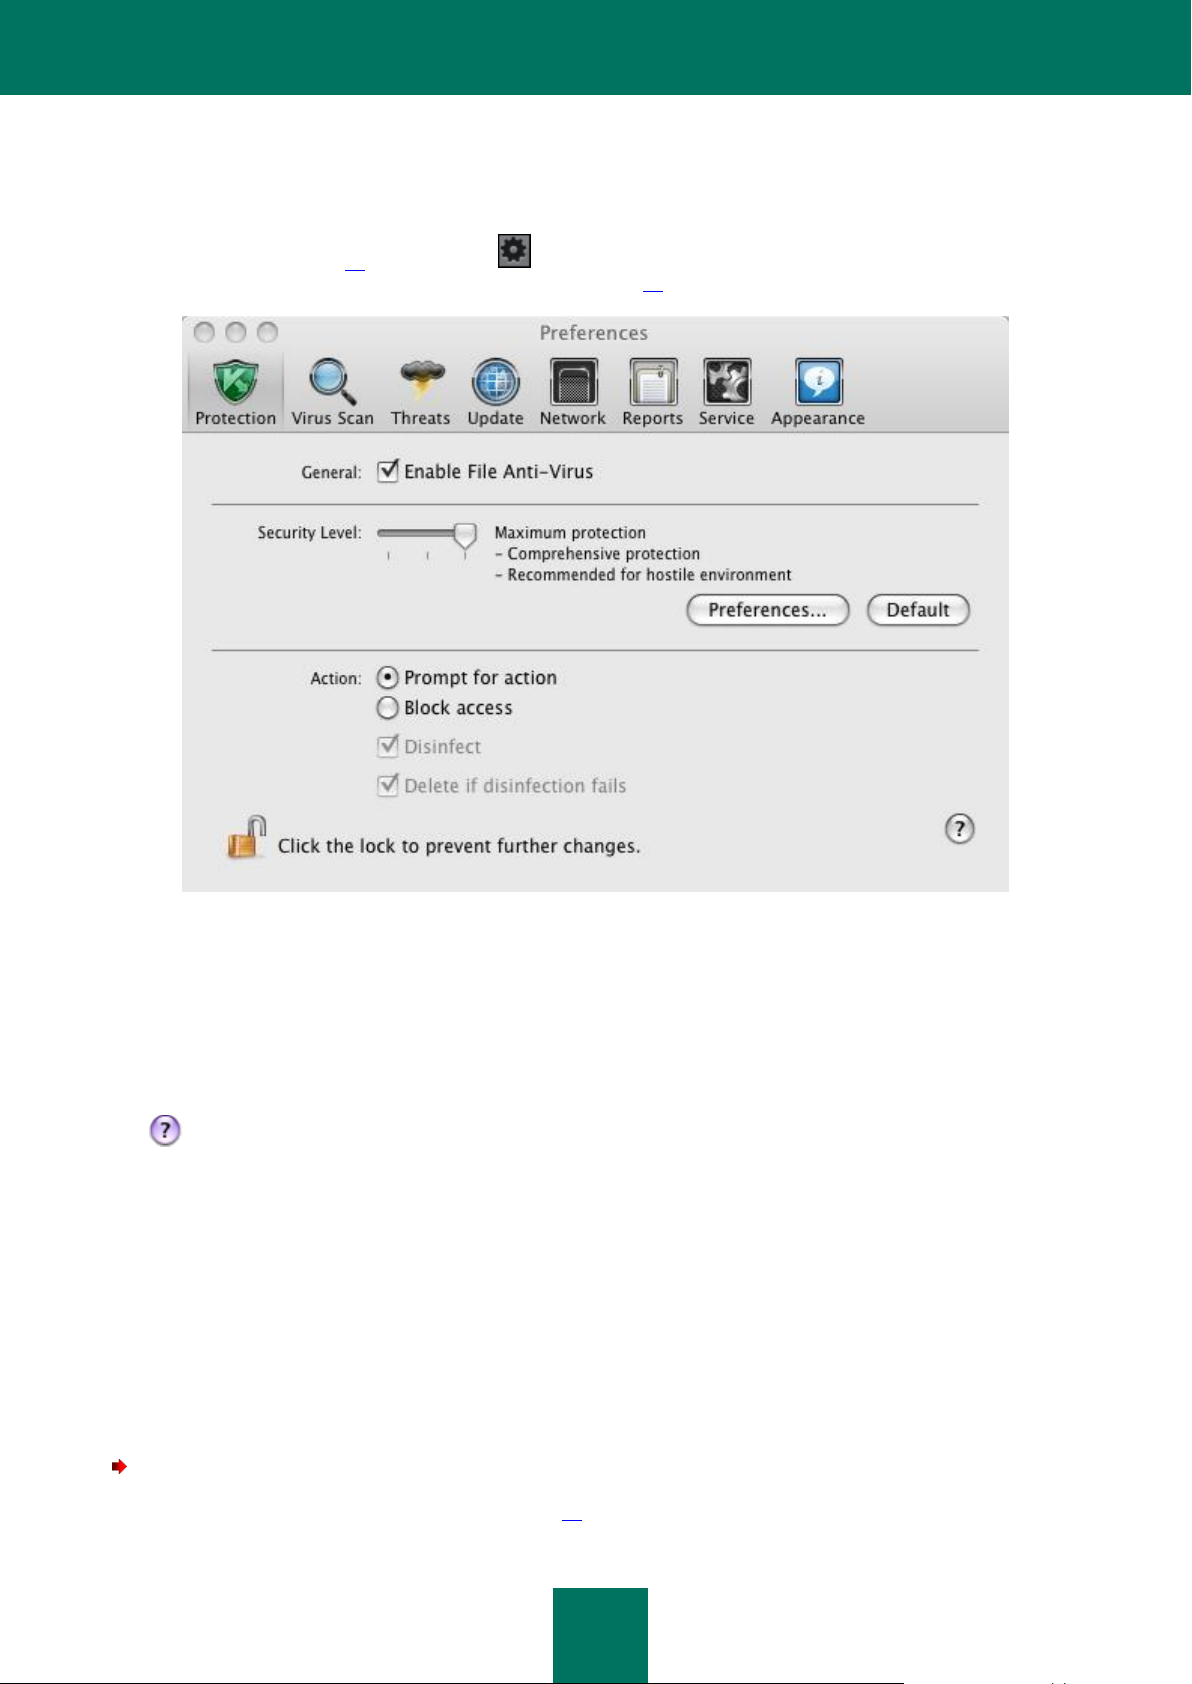
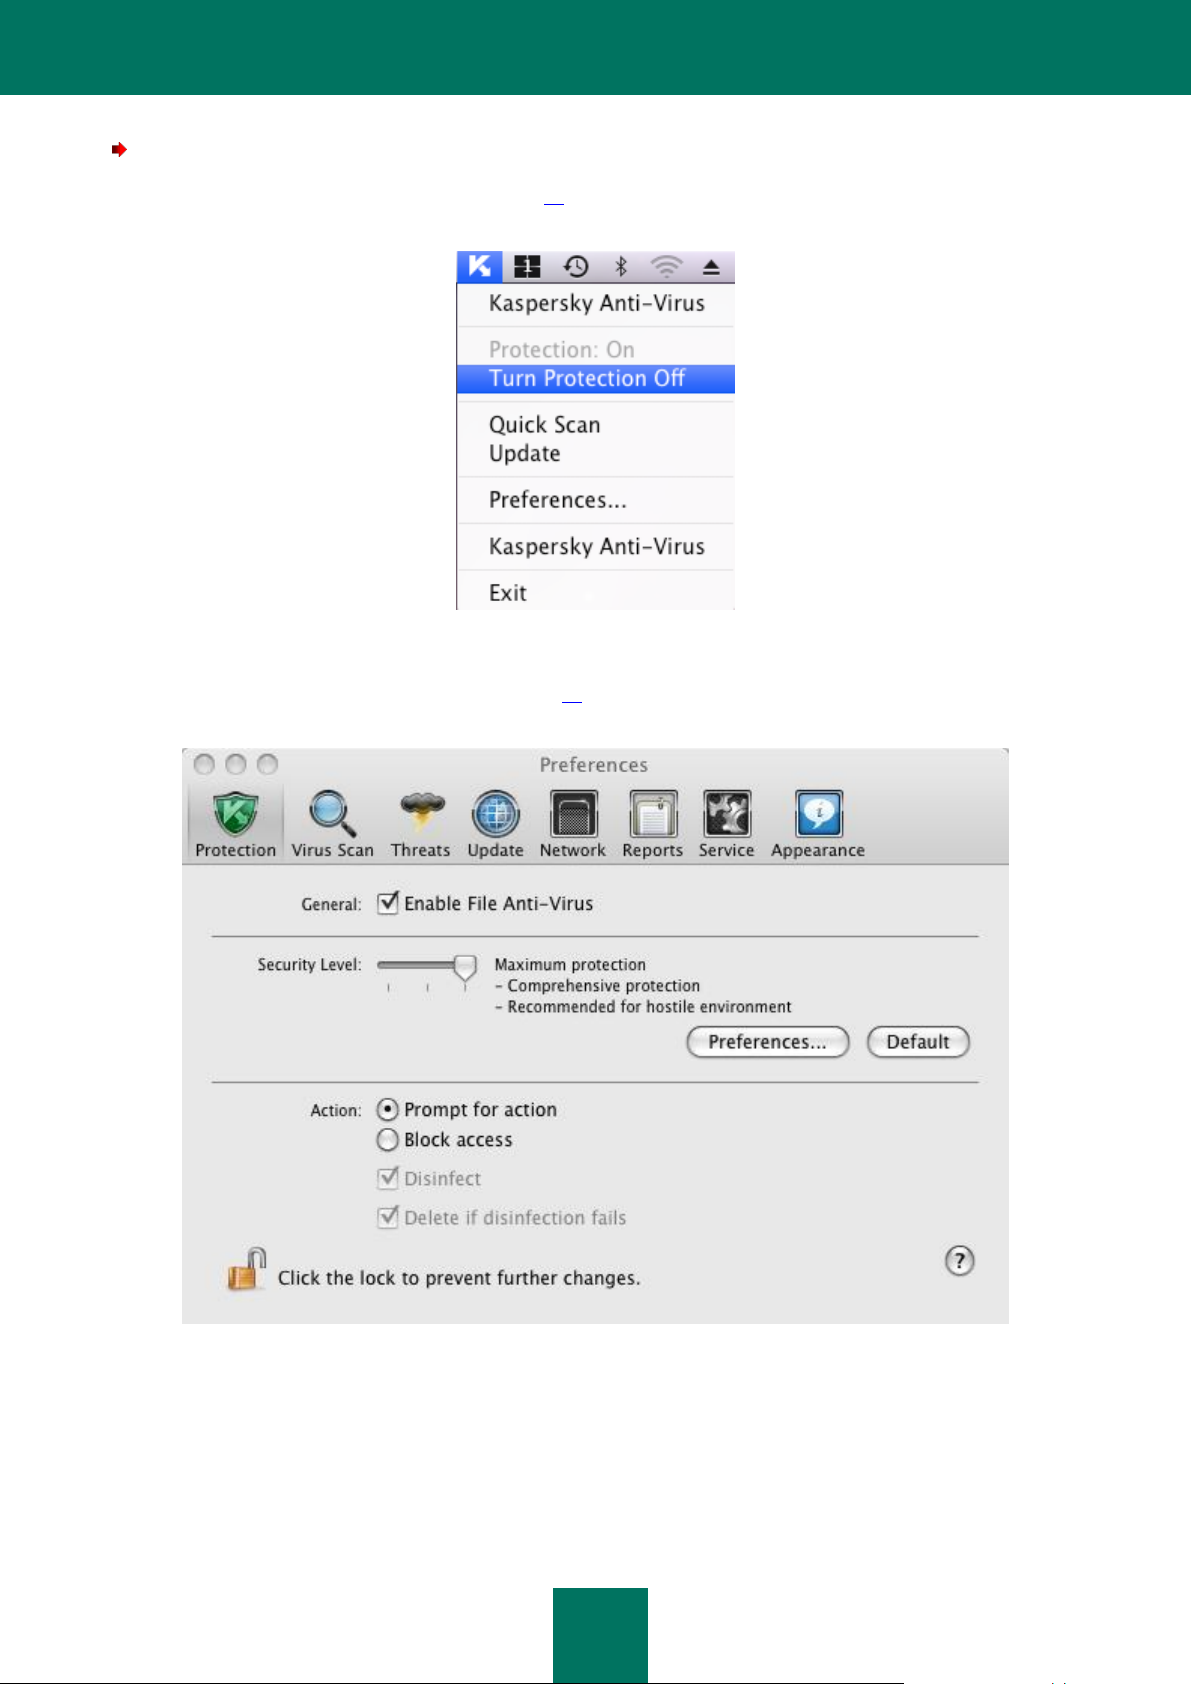
Open the application settings window (on page 15), select the Protection tab and uncheck the Enable File
Anti-Virus box.
Figure 7: Application settings window. File Anti-Virus
RESTORING PROTECTION ON YOUR COMPUTER
If you have paused or fully disabled your computer's protection, you can re-enable it in the following ways:
Page 24
K A S P E R S K Y AN T I - VI R U S
24
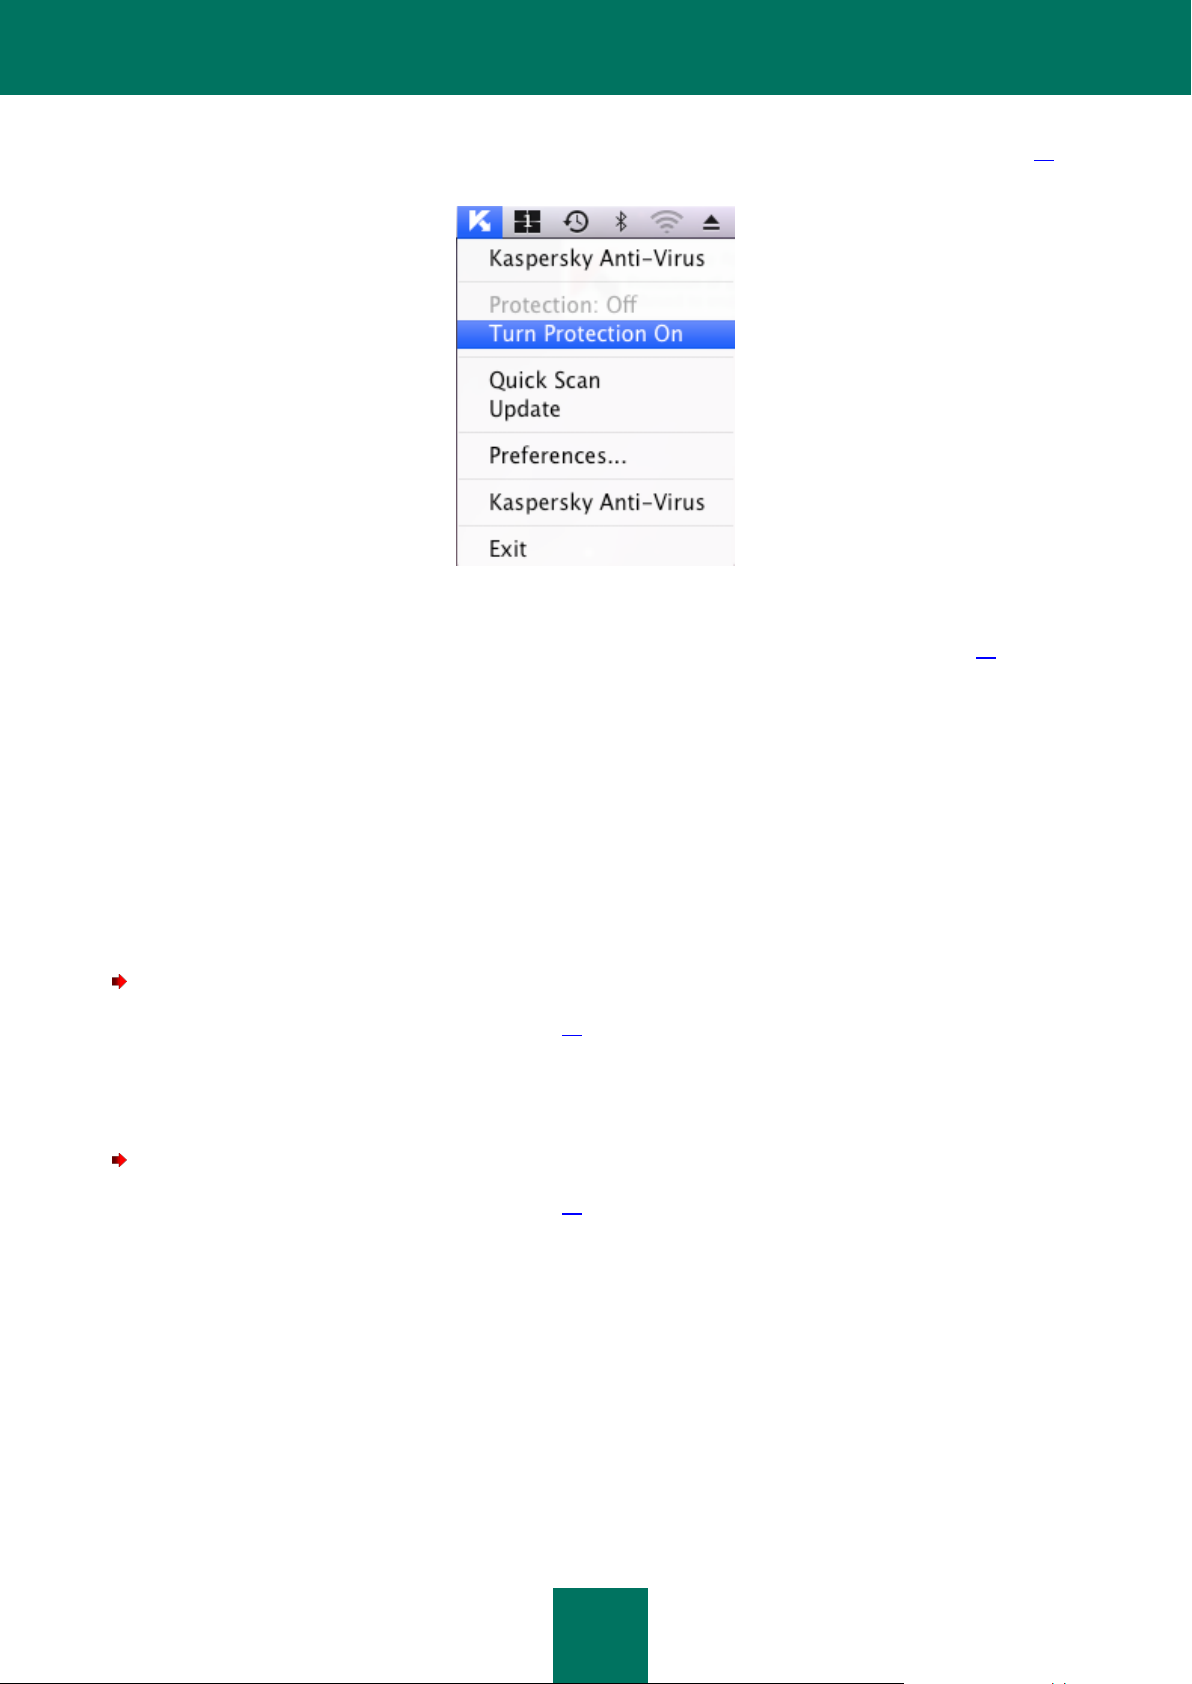
From the menu that opens by clicking the Anti-Virus icon (see section "Kaspersky Anti-Virus icon" on page 15) in
the Mac OS Menu Bar or in the Dock. To do this, select the Turn Protection On item.
Figure 8: Enabling protection from the contextual menu
From the Security Assistant (see section "What is the protection status of your computer?" on page 18)
interface. You significantly increase the risk of infecting your computer if you pause or stop protection, so this
threat is immediately logged by the Security Assistant.
EXPORTING AND IMPORTING KASPERSKY ANTI-VIRUS
SETTINGS
Kaspersky Anti-Virus allows you to export and import its settings. This is useful if, for example, the application is installed
both on your home and office computers. You can configure the application to a convenient mode, save those settings in
a special configuration file on a disk, and then import them quickly onto your office workstation. Settings are stored in a
special configuration file.
To export current application settings:
1. Open the application settings window (on page 15) and select the Service section (see figure below).
2. In the Configuration manager section, click the Save button.
3. Enter the name of the configuration file and specify a location to save it.
To import settings from a configuration file:
1. Open the application settings window (on page 15) and select the Service tab (see figure below).
Page 25
M U L T I - T A S K E D P R O T E C T I O N M A N A G E M E N T
25
2. In the Configuration manager section click the Load button and select the file you want to import Kaspersky
Anti-Virus settings from.
Figure 9: Application settings window. Service
EXITING KASPERSKY ANTI-VIRUS
If, for any reason, you need to close Kaspersky Anti-Virus, click the Kaspersky Anti-Virus icon (on page 15) in the Mac
OS Menu Bar or in the Dock, and select the Exit command in the menu that opens. The application will close, which
means that your computer will be running unprotected.
If you have closed Kaspersky Anti-Virus, you can enable the protection of your computer by loading the application
manually.
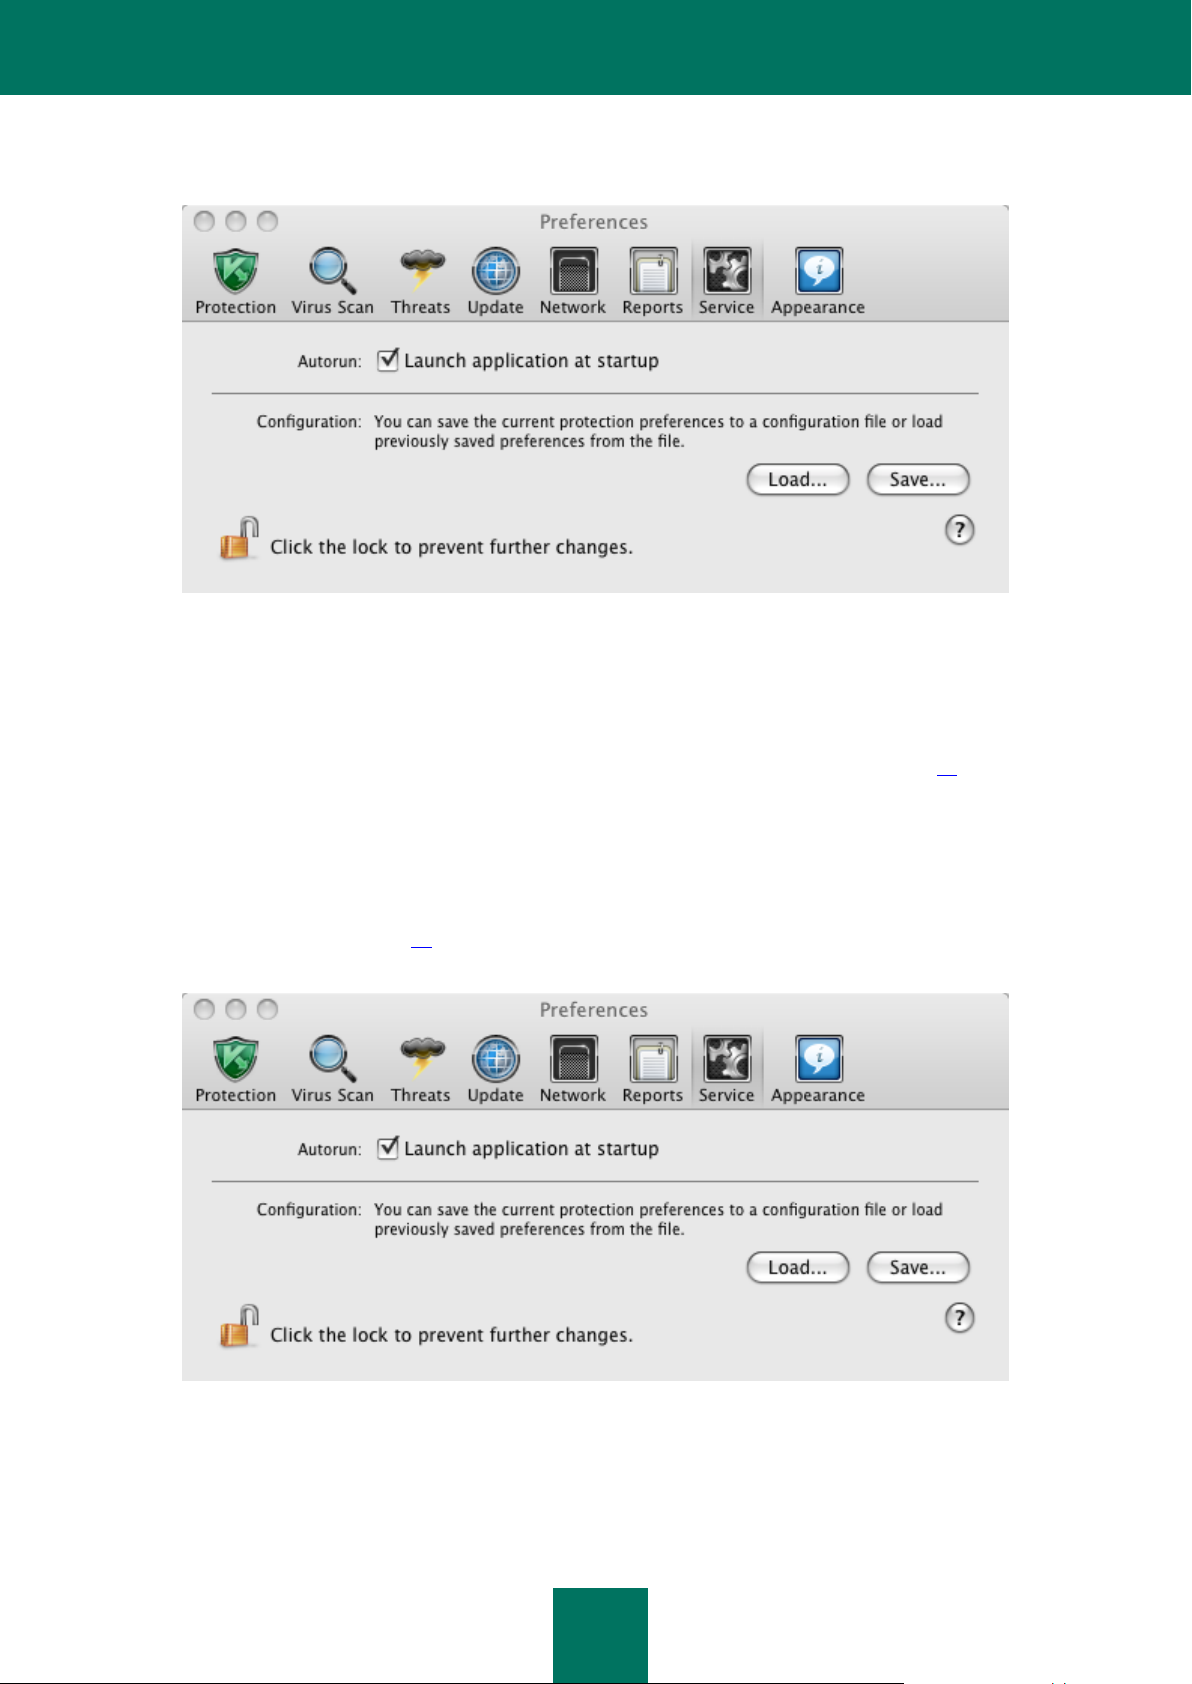
Protection can also be started automatically after restarting your operating system. To enable this mode, open the
application settings window (on page 15), select the Service section (see figure below) and check the Launch
application at startup box in the Autorun section.
Figure 10: Application settings window. Service
Page 26

26
IN THIS SECTION:
Selecting malicious programs to be monitored ................................................................................................................ 26
Trusted zone creation ...................................................................................................................................................... 27
CREATING A PROTECTION SCOPE
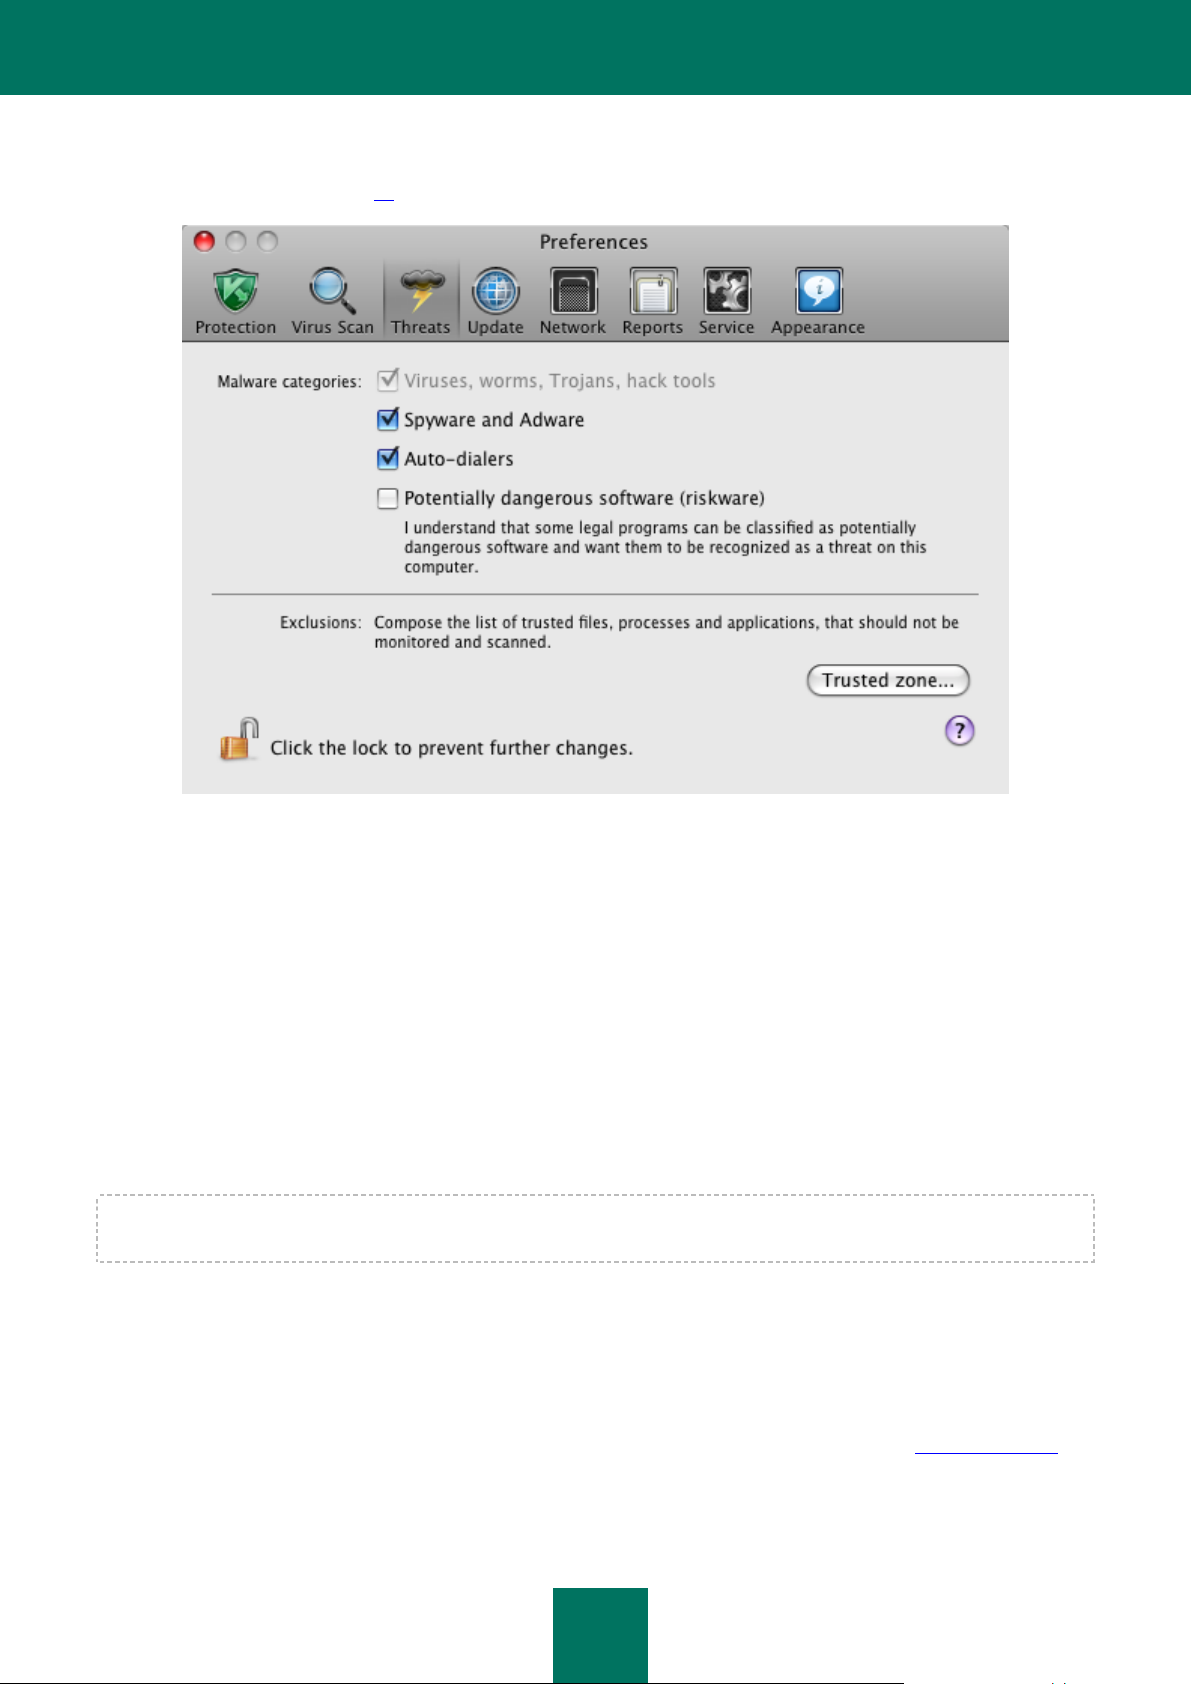
Kaspersky Anti-Virus protection scope is defined on the Threats tab of the application settings window (see section
"Application settings window" on page 15). They include:
list of threats against which Kaspersky Anti-Virus will ensure the protection;
list of objects in the trusted area, which will be excluded from protection.
SELECTING MALICIOUS PROGRAMS TO BE MONITORED
Kaspersky Anti-Virus protects against various types of malware. Regardless of your settings, the application always
protects your computer against the most dangerous types of malware such as viruses, Trojans, and hack tools. These
programs may cause significant damage to your computer. To achieve a greater level of security for your computer, you
can expand the list of threats that the application will detect, so that it will monitor additional types of potentially
dangerous programs.
To select which malware types Kaspersky Anti-Virus will protect from, open the application settings window (on page 15)
and select the Threats tab (see the figure below).
The Malware categories section lists threat types, grouped by severity of threat:
Viruses, worms, Trojans, hack tools. This group contains the most common and dangerous categories of
malware. This is the minimum admissible security level. In accordance with the recommendations of Kaspersky
Lab experts, Kaspersky Anti-Virus always monitors this category of malware.
Spyware and Adware. This group includes potentially dangerous software that could cause inconvenience or
significant damage to a user.
Auto-dialers. This group includes programs, which set up hidden dial-up connections, such as adult services
auto-dialers.
Potentially dangerous software (riskware). This group includes programs that are not malicious or
dangerous, but which under certain circumstances could be used to cause harm to your computer.
The groups listed above govern the complete use of the Kaspersky Anti-Virus databases when scanning objects with File
Anti-Virus (see section "Anti-virus protection of your computer's file system" on page 30) and when scanning for viruses
(see section "Scanning for viruses" on page 43) on your computer.
If all groups are selected, Kaspersky Anti-Virus provides the maximum possible anti-virus protection for your computer. If
the first group is selected, the application will disregard riskware and other programs, which could be installed on your
computer, and which could cause you data loss or material damage.
Page 27
C R E A T I N G A P R O T E C T I O N S C O P E
27
Kaspersky Lab does not recommend disabling monitoring of Spyware, Adware and Auto-dialers. If Kaspersky Anti-Virus
classifies a program as riskware which you do not consider dangerous, you can configure an exclusion for it (see section
"Trusted zone creation" on page 27).
Figure 11: Application settings window. Threats
TRUSTED ZONE CREATION
Trusted zone is a user-created list of objects which Kaspersky Anti-Virus does not monitor. In other words, it is a set of
exclusions from protection.
The user creates a trusted zone based on the features of the objects he or she uses and the programs installed on his or
her computer. You might need to create such an exclusion list if, for example, Kaspersky Anti-Virus blocks access to an
object or program which you know is safe.
Exclusion rules are sets of conditions under which Kaspersky Anti-Virus does not scan objects. You can exclude files
using several criteria: file format, file name using a file mask, location (for example, a folder or a program), program
processes, or using the Virus Encyclopedia threat type classification.
An excluded object will not be scanned when the disk or folder where it is located is being scanned. However, if you
select to scan this object specifically, the exclusion rule will not be applied.
Threat type is the status that Kaspersky Anti-Virus assigns to an object during the scan. The status is based on the
classification of malware and riskware listed in Kaspersky Lab's Virus Encyclopedia.
Riskware does not have any malicious function but can be used as an auxiliary component by malicious software, since
such programs contain holes and errors. This category includes, for example, remote administration programs, IRC
clients, FTP servers, various utilities for stopping processes or hiding them, keyloggers, password macros, and autodialers. Such programs are classified as not-a-virus. They can be divided into several types such as Adware, Joke, and
Riskware. (For more information about potentially dangerous programs, see the Virus Encyclopedia (www.viruslist.com)).
Based on the scan results, such programs may be blocked. Since several of them are widely used by users, you have the
option of excluding them from the scan. To do this, add the threat name or threat name mask as defined in the Virus
Encyclopedia to a trusted zone.
Page 28
K A S P E R S K Y AN T I - VI R U S
28
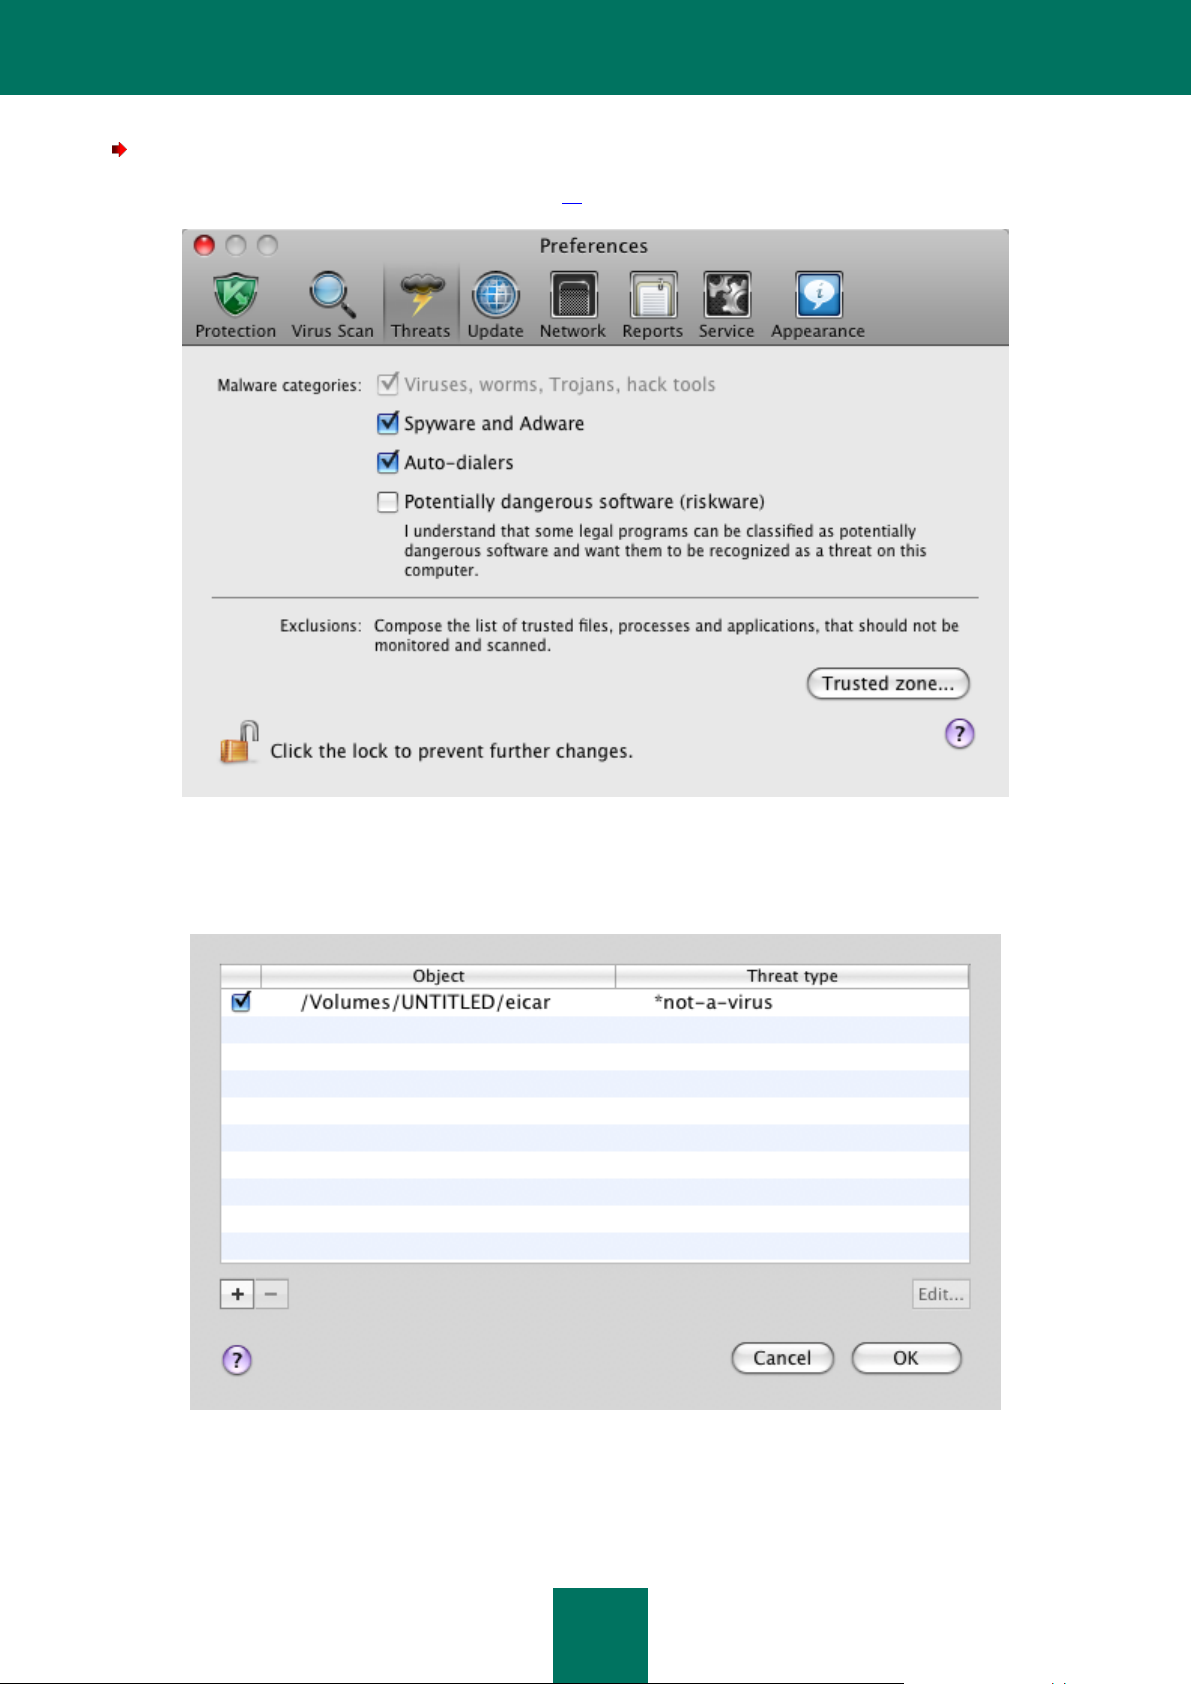
To create an exclusion list:
1. Open the application settings window (on page 15) and select the Threats section (see figure below).
Figure 12: Application settings window. Threats
2. Click the Trusted zone button in the Exclusions section (see figure above). This will open the window
containing a list of objects excluded from protection (see figure below).
Figure 13: The list of exclusion objects
Page 29
C R E A T I N G A P R O T E C T I O N S C O P E
29
To edit the exclusion rule you are using, select it from the list and click the Edit button. To delete a rule, click
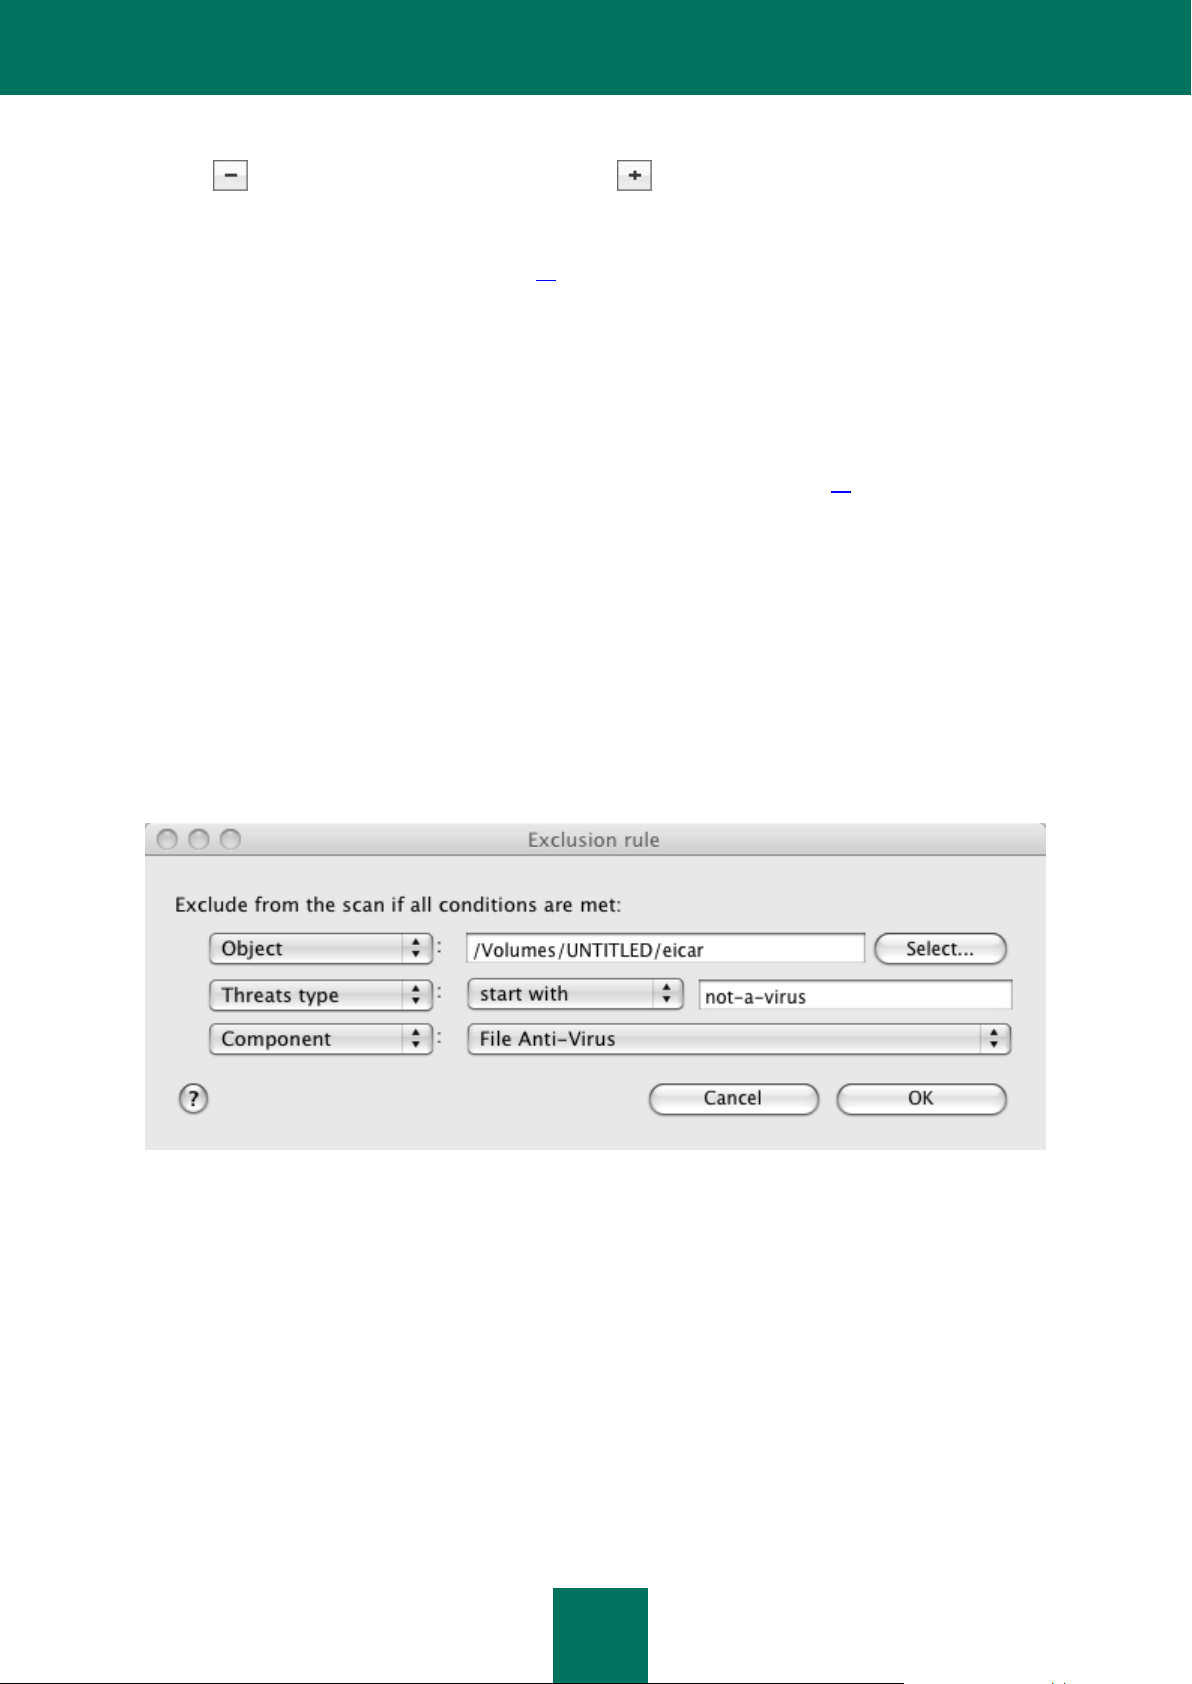
the button. To add a new exclusion rule, click the button and specify the exclusion conditions in the
rule creation window (see figure below).
Object / All objects. Specify the exclusion object, which may be a file, a folder, or a file mask (see section
"Allowed file exclusion masks" on page 91). You can manually enter the object's name or the name mask in
the field, or browse for the object in the window that opens by clicking the Select button. If the All objects
option is selected, all objects on your computer which are of the threat type specified in the field below, will
be excluded from the scan.
Threat type / All threats. Exclude objects from scan based on the threat type assigned according to the
Virus Encyclopedia classification. To enter the name of the threat, use the values of the dropdown list: start
with, contain, end with, and specify the corresponding fragment of the name in the field to the right of the
list. For example, if the start with not-a-virus value is selected, then legal but potentially dangerous
programs will be excluded from scan. Specifying the name of the threat by mask (see section "Allowed
exclusion masks according to the Virus Encyclopedia classification" on page 92) is also admissible. If
the All threats value is selected, then all objects specified in the field above will be excluded from the scan,
regardless of the threat type assigned to them.
If both the exclusion object and the threat type are selected, the rule will apply as follows:
If you specify a certain file as the object and a certain status as the threat type, the specified file will
only be excluded if during the scan it is assigned the selected threat status.
If you select an area or folder as the object and a status (or a mask) as the threat type, objects with that
status will be excluded from the scan only in that area or folder.
Component / All components. Specify which Kaspersky Anti-Virus components should use the rule you
are creating: File Anti-Virus or Virus scan. If the All components option is selected, then all virus scan
tasks and File Anti-Virus will use this rule.
Figure 14: Creating an exclusion rule
Page 30

30
IN THIS SECTION:
Pausing / disabling file protection .................................................................................................................................... 30
Configuring file protection ................................................................................................................................................ 31
File protection statistics ................................................................................................................................................... 42
ANTI-VIRUS PROTECTION OF YOUR COMPUTER'S FILE SYSTEM
Your computer's file system may contain viruses and other malicious programs that persist for years, having initially
penetrated the computer from a removable disk drive or from the Internet, and never causing any trouble. But once the
infected file is opened, the virus will be activated immediately.
File Anti-Virus is the component that monitors the computer's file system in real-time mode. By default, it launches on
operating system startup, stays in RAM, and scans all files that are opened, started or saved on your computer and all
associated disk drives.
The scan process comprises the following steps:
1. Each attempt by a user or a program to access any file is intercepted by the component.
2. File Anti-Virus scans the iSwift (see section "Configuring additional settings" on page 37) database for
information about the file. A decision whether to scan the file is made based on the information retrieved.
3. The file is analyzed for viruses. Malicious objects are recognized based on the Kaspersky Anti-Virus databases.
These databases contain descriptions of all the currently known malicious programs and the means to neutralize
them.
4. Following the analysis, one of the following Kaspersky Anti-Virus operation modes may be applied:
a. If a malicious code is detected in a file, File Anti-Virus blocks the file and attempts to disinfect it. After
successful disinfection, the file will become accessible. If disinfection fails, the file will be deleted. When the
file is disinfected or deleted, a copy of it is placed into the backup storage (on page 78).
b. If a code that is similar to a malicious one is detected in the file but cannot be proved to be definitely
malicious, the file will be placed into a special storage area called quarantine (on page 75). The application
will attempt to disinfect it later using updated databases.
c. If no malicious code is detected in the file, it will immediately become accessible.
PAUSING / DISABLING FILE PROTECTION
You can disable File Anti-Virus and file protection on your computer using one of the methods described below. However,
before doing so you should determine why you want to disable the component. It may be possible to solve your problem
in another way, such as by changing the security level (see section "Selecting the file security level" on page 32) or by
disabling protection only for certain files.
For example, if you are working with a database that you know to be free from viruses, just specify the folder containing
its files as an exclusion (see section "Trusted zone creation" on page 27).
Page 31

A N T I - V I R U S P R O T E C T I O N O F Y O U R C O M P U T E R ' S F I L E S Y S T E M
31
To disable File Anti-Virus,
click the Kaspersky Anti-Virus icon (see page 15) in the Dock or in the Mac OS Menu Bar and select the Turn
Protection Off command.
You also can disable file protection from the application settings window (see section "Application settings window" on
page 15). To do this, select the Protection tab and uncheck the Enable File Anti-Virus box (see the figure below).
Figure 15: Application settings window. File Anti-Virus
If you disable File Anti-Virus in the application settings window, it will not be started automatically when Kaspersky AntiVirus restarts. To restore file system protection, you will need to check the Enable File Anti-Virus box.
CONFIGURING FILE PROTECTION
The way of protecting files on your computer is determined by the following settings:
Security level.
The security level is a set of parameters that define the balance between thoroughness and speed of scanning
of objects. There are three preset security levels (see section "Selecting the file security level" on page 32) with
settings developed by Kaspersky Lab specialists.
Action on detected object.
An action (see section "Selecting actions on objects" on page 40) defines how Kaspersky Anti-Virus will react
when an infected or potentially infected object is detected.
Page 32

K A S P E R S K Y AN T I - VI R U S
32
IN THIS SECTION:
Selecting the file security level ........................................................................................................................................ 32
Specifying the types of files to scan................................................................................................................................. 33
Creating a protection scope ............................................................................................................................................. 35
Configuring additional settings ........................................................................................................................................ 37
Selecting actions on objects ............................................................................................................................................ 40
Restoring default file protection settings .......................................................................................................................... 41
SELECTING THE FILE SECURITY LEVEL
File Anti-Virus uses a security level to determine which objects to scan. There are three preset levels (see the figure
below):
Maximum protection is the most complete scan of the files you open, save, or start.
Recommended. This is the level with the settings recommended by Kaspersky Lab experts.
Maximum speed - this level enables you to comfortably use other applications that require significant system
resources, since the range of files scanned is smaller.
The default setting for file protection is the Recommended level. You can raise or lower the scan's security level by
selecting a new level, or by modifying the settings for the current level.
To change the security level,
adjust the slider bar. Changing the security level changes the balance between scan speed and the total number of
files scanned: the fewer the files scanned for viruses, the higher the scan speed.
If none of the preset security levels meets your needs, you can customize the protection settings. You are advised to
select as a basis the level closest to your requirements, and edit its settings. This will change the name of the security
level to Custom.
To modify the settings for the current security level:
1. Open the application settings window (on page 15) and select the Protection tab (see figure below).
2. Click the Preferences button in the Security level section.
Page 33

A N T I - V I R U S P R O T E C T I O N O F Y O U R C O M P U T E R ' S F I L E S Y S T E M
33
3. Edit the file protection settings in the window that opens, and click the OK button.
Figure 16: Application settings window. File Anti-Virus
SPECIFYING THE TYPES OF FILES TO SCAN
You can specify which types of files will be scanned by File Anti-Virus, using the criteria of file size, file format, or location,
whenever they are opened, executed, or saved.
The types of files to be scanned for viruses are determined in the File types section (see the figure below). Select one of
the three options:
Scan all files. In this case, all file system objects being opened, launched, or saved will be subject to the scan.
Scan programs and documents (by content). File Anti-Virus will only scan potentially infected files, i.e. files
which can host and activate a virus.
Before scanning a file for viruses, its internal header is analyzed for file format (txt, doc, exe, etc.). If the analysis
reveals that the file format is uninfectable, the file will not be scanned for viruses and will immediately be
accessible. If the file format is at risk of infection, the file will be scanned for viruses.
Scan programs and documents (by extension). File Anti-Virus will only scan potentially infected files, but the
file format will be determined based on the filename's extension (see section "List of objects to scan by
extension" on page 89).
Do not forget that someone could send a virus to your computer with the .txt extension, although it might actually
be an executable file renamed as a .txt file. If you select the Scan programs and documents (by extension)
option, such a file will be skipped by the scan. If the Scan programs and documents (by content) option is
selected, ignoring extensions, File Anti-Virus will analyze the file header, which will discover that the file is an
.exe file. This file will be thoroughly scanned for viruses.
To shorten the duration of scans and increase the operating speed of the application, you can opt to scan only new files
and files modified since the last scan. To enable this mode, check the Scan only new and changed files box in
the Optimization section. This mode extends to simple and compound files.
Page 34

K A S P E R S K Y AN T I - VI R U S
34
In the Compound files section, specify which compound files should be scanned for viruses:
Scan archives - scan archives in ZIP, CAB, RAR, ARJ formats;
Scan installation packages - scan self-unpacking archives for viruses;
Scan attachments - scan objects embedded in files, such as Excel spreadsheets or a macro embedded in a
Microsoft Office Word file, or email attachments.
To specify which files should not be scanned for viruses, use the following settings:
Extract archive in background if larger than ... MB. If the size of the compound object exceeds this limit, it will
be scanned by Kaspersky Anti-Virus as a single object (header scanned) and become operable for the user.
The objects it contains will be scanned later. If the box is not checked, access to files larger than the specified
value will be blocked until the object scan is complete.
Do not process archives larger than ... MB. Any file larger than the specified value will be skipped without
being scanned for viruses.
To specify types of objects to be scanned by File Anti-Virus:
1. Open the application settings window (on page 15) and select the Protection tab.
2. Click the Preferences button in the Security level section (see the figure below).
Figure 17: Application settings window. File Anti-Virus
Page 35

A N T I - V I R U S P R O T E C T I O N O F Y O U R C O M P U T E R ' S F I L E S Y S T E M
35
3. Select the General tab in the window that opens (see the figure below).
Figure 18: File Anti-Virus. Configuring scan settings
CREATING A PROTECTION SCOPE
By default, File Anti-Virus scans all files the moment they are accessed, regardless of the media they are stored on,
whether it is a hard disk drive, a CD/DVD-ROM, or a flash card.
Page 36

K A S P E R S K Y AN T I - VI R U S
36
To restrict the protection scope:
1. Open the application settings window (on page 15) and select the Protection section (see figure below).
Figure 19: Application settings window. File Anti-Virus
2. Click the Preferences button in the Security level section.
3. In the window that opens, select the Protection scope tab (see the figure below).
The tab contains the list of objects which will be scanned by File Anti-Virus. By default, all objects located on hard,
removable and network disk drives connected to your computer, are protected. You can fill in or edit the list using the
buttons located under the list.
To limit the number of objects subject to protection, you can:
1. Specify folders, drives or files that should be protected.
2. Create a list of objects, which do not need protection.
Page 37

A N T I - V I R U S P R O T E C T I O N O F Y O U R C O M P U T E R ' S F I L E S Y S T E M
37
3. Combine the first and second ways, i.e. create a protection scope and exclude a number of objects from it.
Figure 20: File Anti-Virus. Creating a protection scope
CONFIGURING ADDITIONAL SETTINGS
You can configure the following additional settings for File Anti-Virus: scan mode for the file system objects, use of iSwift
technology, which increases performance of objects processing, and conditions for temporarily pausing the component.
Page 38

K A S P E R S K Y AN T I - VI R U S
38
To configure additional settings of File Anti-Virus:
1. Open the application settings window (on page 15) and select the Protection section (see figure below).
Figure 21: Application settings window. File Anti-Virus
2. Click the Preferences button in the Security level section.
3. In the window that opens, select the Additional tab (see the figure below).
The object scanning mode determines File Anti-Virus processing conditions. You have the following options:
Smart mode. This mode is aimed at speeding up the processing of objects and returning them to the user.
When it is selected, a decision to scan is made based on analyzing the operations performed with the object.
For example, when using a Microsoft Office file, Kaspersky Anti-Virus scans the file when it is first opened and
last closed. All operations in between that overwrite the file are not scanned.
Smart mode of scanning the objects is used by default.
On access and modification – File Anti-Virus scans objects as they are opened or edited.
On access – only scans objects when an attempt is made to open them.
On execution – only scans objects when an attempt is made to run them.
Page 39

A N T I - V I R U S P R O T E C T I O N O F Y O U R C O M P U T E R ' S F I L E S Y S T E M
39
Note that the files being opened will be intercepted and scanned by File Anti-Virus, regardless of the mode you have
selected.
Figure 22: File Anti-Virus. Configuring additional settings
iSwift technology can increase the speed of the File Anti-Virus by excluding certain objects from the scan. An object is
excluded from the scan using a special algorithm that takes into account the release date of the database, the date the
object was last scanned and any modifications to the scan settings. This technology works with objects of any format,
size and type. There are limitations to iSwift: it is bound to a specific file location in the file system and can apply only to
objects in HFS. To enable ISwift during the scan, check the Use iSwift technology box in the Performance section.
You might need to pause File Anti-Virus when performing tasks that require significant resources from the operating
system. To lower the load and ensure that the user obtains access to files quickly, we recommend configuring the
component to disable at a certain time.
To pause the functioning of the component for a while, in the window that opens, check the On schedule box and set the
time limits for disabling the component by clicking the Schedule button (see the figure below). To do this, enter a value in
the HH:MM format in corresponding fields.
Figure 23: Pausing File Anti-Virus
Page 40

K A S P E R S K Y AN T I - VI R U S
40
If the action you have selected is…
… when an infected or potentially infected object is detected:
Prompt for action
Kaspersky Anti-Virus will display a warning message with the information
about which malicious code has infected (potentially infected) the file, and
offers you the choice of the following actions. These actions may vary
depending on the object's status.
Block access
Kaspersky Anti-Virus blocks access to the object, but its location will not be
changed. Relevant information is logged in the report. To gain access to an
object, objects in the report should be processed (see section "The Detected
tab" on page 83).
SELECTING ACTIONS ON OBJECTS
If an anti-virus scan shows that a file is infected or suspicious, File Anti-Virus' subsequent actions depend on the object's
status and the action selected.
When the scan is complete, the object may be identified as:
malicious, for example, virus, Trojan;
potentially infected when the scan cannot determine whether the object is infected or not. The application has
probably found in the file a sequence of code from an unknown virus, or of modified code from a known virus.
By default, all infected objects undergo disinfection, and all potentially infected files are quarantined.
To change the action on an object,
open the application settings window (on page 15) and select the Protection tab (see figure below). In the table
below you can find descriptions of all available File Anti-Virus actions on objects.
Figure 24: Application settings window. File Anti-Virus
Table 1. Descriptions of all available actions on objects
Page 41

A N T I - V I R U S P R O T E C T I O N O F Y O U R C O M P U T E R ' S F I L E S Y S T E M
41
If the action you have selected is…
… when an infected or potentially infected object is detected:
Block access
Disinfect
Kaspersky Anti-Virus blocks access to the infected object and attempts to
disinfect it. If the object is successfully disinfected, it becomes available for
use. If the object cannot be disinfected, its location is not be changed. To
gain access to an object, objects in the report should be processed
(see section "The Detected tab" on page 83). When a potentially infected
object is detected, the application blocks access to this object and
quarantines it (on page 75).
Block access
Disinfect
Delete if disinfection fails
Application blocks access to the object and attempts to disinfect it. If the
object is successfully disinfected, it becomes accessible to the user. If the
object cannot be disinfected, it will be deleted.
Block access
Delete
Application blocks access to the object and deletes it.
Before disinfecting the object or deleting it, Kaspersky Anti-Virus creates a backup copy and places it to the backup (on
page 78) in case the object will need to be restored, or it becomes possible to disinfect it.
RESTORING DEFAULT FILE PROTECTION SETTINGS
When modifying the File Anti-Virus settings, it is always possible to restore the default settings. Kaspersky Lab considers
these settings to be optimal and have collected them in the Recommended protection level.
To restore default protection settings:
1. Open the application settings window (on page 15) and select the Protection tab (see figure below).
2. Click the Default button in the Security level section.
Figure 25: Application settings window. File Anti-Virus
Page 42

K A S P E R S K Y AN T I - VI R U S
42
FILE PROTECTION STATISTICS
The main application window displays summary statistics related to the current performance of File Anti-Virus, including:
the number of objects scanned during File Anti-Virus' current session; the number of dangerous objects detected, and the
name of the file currently being scanned (see section "Main application window" on page 13).
To view the detailed report of the component's performance, click the button in the main application window and
select File Anti-Virus from the Running tasks section in the report window that opens. If File Anti-Virus is currently
disabled for some reason, you may view the detailed report on its performance during its previous startup in the
Completed tasks area of the report window.
If File Anti-Virus returns an error when closing, view the report and try to restart the component. If you cannot solve the
problem on your own, please contact Kaspersky Lab's Technical Support Service (see section "Contacting Technical
Support" on page 9).
General information about the component's performance is grouped on the following tabs:
All dangerous objects detected when protecting the file system are listed on the Detected tab (see section "The
Detected tab" on page 83). The tab contains the full path to the location of each object and the status assigned
to the object by the File Anti-Virus. If the malicious program that has infected the object is revealed, this object is
assigned the corresponding status (for example, virus, Trojan etc.). If the type of malicious effect cannot be
exactly established, the object is assigned the status of suspicious. Next to the status, the action taken on the
object is specified (detected, not found, disinfected).
The Events tab shows the complete list of events that have occurred during File Anti-Virus' operation (see
section "The Events tab" on page 84). The events can have the following statuses:
information event - for example, object not processed: skipped by type;
warning - for example, a virus is detected;
note - for example: archive is password-protected.
Statistics appear on the corresponding tab (see section "The Statistics tab" on page 84). Here you will find the
total number of scanned objects, and further columns show how many archives, dangerous objects, disinfected
objects, quarantined objects etc have been processed out of the total number of objects scanned.
Preferences enabled for File Anti-Virus are displayed on the tab with the same name (see section "The
Preferences tab" on page 86). To switch to editing the component settings, use the Change preferences
button.
Page 43

43
IN THIS SECTION:
Managing virus scan tasks ................................ ................................ ................................................................ .............. 43
Creating the list of objects to scan ................................................................................................................................... 45
Creating virus scan tasks ................................................................................................................................................ 46
Configuring virus scan tasks ............................................................................................................................................ 48
Virus scan statistics ......................................................................................................................................................... 59
SCANNING FOR VIRUSES
In addition to the computer protection (see section "Anti-virus protection of your computer's file system" on page 30)
provided by the File Anti-Virus, it is critical to periodically scan the computer for viruses. This is required to stop the
spread of malicious programs not detected by File Anti-Virus, because, for instance, a low protection level has been
selected.
The following tasks are executed by Kaspersky Anti-Virus to perform virus scans:
Virus Scan
Scan individual items for viruses, such as files, folders, disks, plug-and-play devices.
Full Scan
Search for viruses on your computer with a thorough scan of all disk drives.
Quick Scan
Scans only critical areas of the computer for viruses, including folders with operating system files (/System) and
system libraries (/Library).
By default, these tasks are executed using recommended settings. You can edit these settings (see section "Configuring
virus scan tasks" on page 48), or create a schedule for running tasks (see section "Configuring the scan task schedule"
on page 54). You also have the option of creating users virus scan tasks (see section "Creating virus scan tasks" on
page 46).
MANAGING VIRUS SCAN TASKS
You can run a virus scan task either manually, or automatically using a schedule (see section "Configuring the scan task
schedule" on page 54).
To start a virus scan task manually:
1. Open the main application window (on page 13) and click the button.
Page 44

K A S P E R S K Y AN T I - VI R U S
44
2. In the menu (see figure below) that opens, select the required task Full Scan, Quick Scan or Virus Scan. If you
select the latter, the application will ask to select the object / objects for scan (see section "Creating the list of
objects to scan" on page 45). Apart from the above listed tasks, included in the application package, the menu
can also display users scan tasks (see section "Creating virus scan tasks" on page 46), if such tasks were
created.
Figure 26: Virus scan tasks
Information on currently running tasks is displayed in the left part of the main window, and also in the Running tasks
section of the reports window (see section "Reports" on page 81). Information on the performed tasks displayed in
the Completed tasks section of the report window.
To pause a virus scan task:
1. Open the Kaspersky Anti-Virus report window. To do this, click the globe icon in the main window (see
section "Main application window" on page 13).
Page 45

S C A N N I N G F O R V I R U S E S
45
2. In the list on the left, select the name of the virus scan task (see figure below) and click the Pause button. This
will pause the scan until you start the task again manually or it starts again automatically according to the
schedule. To start the scan manually, click the Start button.
Figure 27: Managing virus scan tasks from the report
To stop a virus scan task, please do the following:
1. Open the Kaspersky Anti-Virus report window. To do so, click the globe icon in the main window (see
section "Main application window" on page 13).
2. In the list on the left, select the name of the virus scan task (see figure above) and click the Stop button. This
will pause the scan until you start the task again manually or it starts again automatically according to the
schedule. Next time you run the task, the application will ask whether you want to continue the task where it
stopped, or start again.
CREATING THE LIST OF OBJECTS TO SCAN
The application package includes two virus scan tasks with already created lists of objects to scan: Full Scan and Quick
Scan. The first task allows you to scan your computer and all connected devices for viruses. The second task only scans
vulnerable objects: system folders and libraries, boot folder.
To browse the list of scan objects or edit the list:
1. Open the application settings window (on page 15) and select the Virus Scan tab.
2. In the list on the left, select the task name: Full Scan or Quick Scan. In the right part of the window, in the
Objects to scan section, press the Edit button. This will open the window, containing a list of objects
(see figure below). Edit the list of objects, if you need it.
To add the object to the list, drag-n-drop it to the window or click the button. In the latter case the standard
file selection dialog will be opened. If the object being added contains embedded items that should also be
scanned (for example, subfolders), check the Include subfolders box in the file selection window.
Page 46

K A S P E R S K Y AN T I - VI R U S
46
To delete an object, select it from the list and click the button. You can temporarily disable scanning of
individual objects for any task without deleting them from the list. To do this, uncheck the box beside the object
that you do not want to scan.
You can create / edit a list of objects to scan for users task (see section "Creating virus scan tasks" on page 46)
in the same way.
Figure 28: Creating a list of objects to scan
In addition to full and quick scan, Kaspersky Anti-Virus includes the file / folder scan task: Virus Scan. This task does not
have a predefined list of objects to scan. You will be invited to create a list of objects to scan every time you run the task.
To select one or several objects to scan:
1. Open the main application window (on page 13) and click the button.
2. In the menu that opens, select the Virus Scan task. This will open the window, containing a list of objects
(see figure above). Edit the list using the algorithm described above.
CREATING VIRUS SCAN TASKS
To scan objects on your computer for viruses, you can use the scan tasks which are installed with Kaspersky Anti-Virus,
or create your own tasks. New tasks are created by modifying existing ones.
Page 47

S C A N N I N G F O R V I R U S E S
47
To create a new virus scan task:
1. Open the application settings window (on page 15), select the Virus Scan tab and select the task with the
settings closest to your needs in the dropdown list on the left (see figure below).
Figure 29: Application settings window. Full scan task
2. Click the button located under the virus scan task list and select Copy.
3. Enter a name for the task in the window that opens and click the OK button. A task with the name you have
specified will appear in the task list.
The new task inherits all the properties of the task from which it was created. You need to carry out an additional
configuration by creating a list of objects to scan (see section "Creating the list of objects to scan" on page 45), specifying
the preferences (see section "Configuring virus scan tasks" on page 48), which will define the task execution, and
configuring a schedule for the task autorun (see section "Configuring the scan task schedule" on page 54).
The application limits a maximum number of tasks, created by the user, to six.
To rename a created task, please do the following
1. Select the task from the list, click the button under the scan task list, and select the Rename button.
Page 48

K A S P E R S K Y AN T I - VI R U S
48
IN THIS SECTION:
Selecting a security level ................................................................................................................................................. 48
Specifying the types of objects to be scanned ................................................................................................................. 50
Selecting actions on objects ............................................................................................................................................ 52
Configuring the scan task schedule ................................................................................................................................. 54
Running scan tasks under the user account .................................................................................................................... 55
Assigning uniform scan settings to all tasks ................................ .................................................................................... 57
Restoring default scan settings ....................................................................................................................................... 58
2. Enter a new name for the task in the window that will open and click the OK button. The task name will change.
To delete a created task, please do the following
1. Select the task from the list, click the button under the scan task list, and select Delete.
2. Confirm the task deletion in the window that will prompt you for confirmation. The task will be deleted from the
task list.
You can only rename and delete tasks that you have created.
CONFIGURING VIRUS SCAN TASKS
The following settings determine how objects are scanned on your computer:
Security level.
The security level is a set of parameters that define the balance between thoroughness and speed of scanning
of objects. There are three preset security levels (see section "Selecting the file security level" on page 32) with
settings developed by Kaspersky Lab specialists.
Action on detected object.
An action defines how Kaspersky Anti-Virus (see section "Selecting actions on objects" on page 40) will react
when an infected or potentially infected object is detected.
Schedule.
Automatically running tasks by a schedule (see section "Configuring the scan task schedule" on page 54)
enables you to scan your computer for viruses at a time convenient for you.
Additionally, you can specify uniform settings for running all tasks.
SELECTING A SECURITY LEVEL
Virus scan task uses a security level to determine which objects to scan (see the figure below). There are three preset
levels:
Page 49

S C A N N I N G F O R V I R U S E S
49
Maximum protection. The most complete scan of the entire computer or individual disks, folders, or files. We
recommend using this level if you suspect that a virus has infected your computer.
Recommended. This is the level with the settings recommended by Kaspersky Lab experts.
Maximum speed. This level enables you to comfortably use other applications that require significant system
resources, since the range of files scanned is smaller.
Figure 30: Application settings window. Scanning for viruses
The default setting for object scan is the Recommended level. You can raise or lower the scan's security level by
selecting a new level, or by modifying the settings for the current level.
To change the security level,
adjust the slider bar. Changing the security level changes the balance between scan speed and the total number of
files scanned: the fewer the files scanned for viruses, the higher the scan speed.
If none of the preset security levels meets your needs, customize the scan settings. You are advised to select as a basis
the level which is the closest to your requirements, and edit its settings. This will change the name of the security level to
Custom.
To modify the settings for the current security level:
1. Open the application settings window (on page 15) and select the Virus Scan tab (see figure above).
Page 50

K A S P E R S K Y AN T I - VI R U S
50
2. Click the Preferences button in the Security level section.
3. Edit the file protection settings in the window that opens, and click the OK button.
SPECIFYING THE TYPES OF OBJECTS TO BE SCANNED
You can specify which types of objects will be scanned, by specifying which file formats, file sizes, and drives will be
scanned for viruses when this task runs.
The types of files to be scanned for viruses are determined in the File types section (see the figure below). Select one of
the three options:
Scan all files. With this option, all files will be scanned.
Scan programs and documents (by content). If you select this group, only potentially infected files will be
scanned, i.e. files which can host and activate a virus.
Before scanning a file for viruses, its internal header is analyzed for file format (txt, doc, exe, etc.).
Scan programs and documents (by extension). Kaspersky Anti-Virus will only scan potentially infected files,
but the file format will be determined based on the filename's extension (see section "List of objects to scan by
extension" on page 89).
Do not forget that someone could send a virus to your computer with the .txt extension, although it might actually
be an executable file renamed as a .txt file. If you select the Scan programs and documents (by extension)
option, such a file will be skipped by the scan. If the Scan programs and documents (by content) option is
selected, ignoring extensions, Kaspersky Anti-Virus will analyze the file header, which will reveal that the file is
an .exe file. This file will be thoroughly scanned for viruses.
You can set time and file size limits for scanning an object and enable iChecker technology in the Optimization section.
Skip if scan takes longer than... sec. Check this box to set a limit on the scan of a single object and enter the
maximum scan time for an object in the field to the right. If this value is exceeded, the object will be excluded
from the scan.
Do not scan archives larger than ... MB. Check this box to set a limit on the scan of a single object by its size,
and enter the maximum size for an object in the field to the right. If this value is exceeded, the object will be
excluded from the scan.
Scan only new and changed files. If the box is checked, only new files and files that were modified since the
time of the last scan will be scanned. This operation mode can significantly shorten the duration of scans.
Use iSwift technology. Check iSwift technology box which increases performance of the objects processing by
excluding certain objects from the scan. An object is excluded from the scan using a special algorithm that takes
into account the release date of the database, the date the object was last scanned and any modifications to the
scan settings. This technology works with objects of any format, size and type. There are limitations to iSwift: it
is bound to a specific file location in the file system and can apply only to objects in HFS.
In the Compound files section, specify which compound files should be scanned for viruses:
Scan archives – scan .RAR, .ARJ, .ZIP, .CAB, .LHA, .JAR, and .ICE archives.
Certain archive files (such as .ha, .uue, .tar) cannot be deleted automatically since Kaspersky Anti-Virus does
not support their disinfection, even if you select the Disinfect and Delete if disinfection fails options.
To delete such archives, click the Delete archive button in the dangerous object detection notification window.
This notification is displayed after the program has started processing objects detected during the scan. You can
also delete infected archives manually.
Page 51

S C A N N I N G F O R V I R U S E S
51
Scan attachments - scan objects embedded in files (for example, Excel spreadsheets or a macro embedded in
a Microsoft Word file, email attachments, etc.).
Scan email format files - scan email format files and email databases. If this box is checked, Kaspersky Anti-
Virus scans each component of the email message (body and any attachments). If this box is not checked, the
email file will be scanned as a single object.
Scan password-protected archives - enable scanning of password-protected archives. With this feature
enabled, a password will be requested before scanning archived objects. If this box is not checked, passwordprotected archives will be skipped when scanning.
To configure the settings for objects to scan, please do the following:
1. Open the application settings window (on page 15) and select the Virus Scan tab.
2. Click the Preferences button in the Security level section (see the figure below).
Figure 31: Application settings window. Scanning for viruses
Page 52

K A S P E R S K Y AN T I - VI R U S
52
3. Select the General tab in the window that will open (see the figure below).
Figure 32: Scanning for viruses. Configuring scan settings
SELECTING ACTIONS ON OBJECTS
If an anti-virus scan shows that a file is infected or suspected of being infected, Kaspersky Anti-Virus' subsequent actions
depend on the object's status and the action selected.
One of the following statuses can be assigned to the object after the scan:
status of a malicious program (for example, virus, Trojan).
potentially infected when the scan cannot determine whether the object is infected or not. The program has
probably found in the file a sequence of code from an unknown virus, or of modified code from a known virus.
By default, all infected files are subject to disinfection, and all potentially infected files are sent to quarantine (on
page 75).
Page 53

S C A N N I N G F O R V I R U S E S
53
If the action you have selected is…
… when an infected or potentially infected object is detected:
Prompt for action when the scan is complete
The application postpones the processing of objects to the end of
the scan. When the scan is complete, the reports window
(see section "The Detected tab" on page 83) will be displayed on
screen with a list of infected and potentially infected objects
detected, and you will be asked if you want to process the objects.
Prompt for action during scan
After each detection of a dangerous object Kaspersky Anti-Virus
will display a warning message with the information about which
malicious code has infected (potentially infected) the file, and offers
you the choice of the following actions. These actions may vary
depending on the object's status.
To change the action on an object,
open the application settings window (on page 15), open the Virus Scan tab, and select the name of the required
task. In the table below you can find descriptions of all available actions on objects.
Figure 33: Application settings window. Full scan task
Table 2. Descriptions of all available actions on objects
Page 54

K A S P E R S K Y AN T I - VI R U S
54
If the action you have selected is…
… when an infected or potentially infected object is detected:
Do not prompt for action
Kaspersky Anti-Virus records information about detected objects in
the report without processing them. We do not recommend
enabling this operation mode since infected and potentially infected
objects persist on your computer and it is practically impossible to
avoid infection.
Do not prompt for action
Disinfect
Kaspersky Anti-Virus attempts to disinfect infected objects without
prompting the user for confirmation. If the object is successfully
disinfected, it becomes accessible to the user. If the object cannot
be disinfected, its location will not be changed. If the object cannot
be disinfected, its location will not be changed. Relevant
information is logged in the report (see section "Reports" on
page 81). To gain access to an object, objects in the report should
be processed. When a potentially infected object is detected, the
application blocks access to it and quarantines it (on page 75).
Do not prompt for action
Disinfect
Delete if disinfection fails
Kaspersky Anti-Virus attempts to disinfect detected objects without
prompting the user for confirmation. If the object is successfully
disinfected, it becomes accessible to the user. If the object cannot
be disinfected, it will be deleted.
Do not prompt for action
Delete
Kaspersky Anti-Virus deletes the object.
Before disinfecting the object or deleting it, Kaspersky Anti-Virus creates a backup copy and places it to the backup (on
page 78) in case the object will need to be restored, or it becomes possible to disinfect it.
CONFIGURING THE SCAN TASK SCHEDULE
You can run any virus scan task manually or automatically using a schedule (see section "Managing virus scan tasks" on
page 43). To run a scheduled task, check the box with the description of task autorun conditions in the Run mode
section. Task run settings can be edited in the Schedule window accessible using the Edit button.
Figure 34: Configuring the task schedule
The most important step is to determine the startup frequency set for the virus scan task. You can select one of the
following options:
Page 55

S C A N N I N G F O R V I R U S E S
55
Minutes. The interval between scan task startups is measured in minutes. Enter the number of minutes
between scan startups in the schedule settings (the value should be specified in range from 5 to 59 minutes).
Hours. The interval between scan startups is measured in hours. Specify the interval in the schedule settings as
Every N-th hour and specify the value of N. For example, to run the task every hour, enter Every 1 hour.
Days. The time between scan startups is measured in days. In the schedule settings, specify the update start
frequency. Also, in the Time field, specify what time of day or night the task will run.
Weeks. The task will run on certain days of week. If this option is selected, in the schedule settings check the
boxes for the days of the week on which you want the scan task to run. Specify the start time in the Time field.
Months. The task will run once a month at the specified time.
At a specified time. The task will run once at the date and time that you have specified.
At application startup. The task starts every time that Kaspersky Anti-Virus starts. You can also set an interval
between the application startup and the task startup.
After every update. The task starts after each update of the application databases.
If a scan update did not start for any reason (for example, the computer was shut down at that time), you can configure
the missed task to start automatically as soon as it becomes possible. To do this, check the Run task if skipped box in
the schedule window.
RUNNING SCAN TASKS UNDER THE USER ACCOUNT
The option of running tasks under different user account is implemented in the application. This service is disabled by
default and tasks are started under the current account, with which you are registered in OS.
For example, running the scan task can require access rights to the object being scanned. Using this service you can
configure running a task under the account of the user, possessing the necessary privileges.
Page 56

K A S P E R S K Y AN T I - VI R U S
56
To specify an account, please do the following:
1. Open the application settings window (on page 15), open the Virus Scan tab, and select the Virus Scan task in
the list (see figure below).
2. Enable task running by the schedule in the Run mode section and click the Edit button.
Figure 35: Application settings window. Full scan task
Page 57

S C A N N I N G F O R V I R U S E S
57
3. In the schedule configuring window (see figure below) in the Start from the user's account select the account
under which the task will be started from the Drop-down menu.
Figure 36: Configuring the task schedule
ASSIGNING UNIFORM SCAN SETTINGS TO ALL TASKS
Each scan task is performed according to its own settings. By default, all tasks created when installing Kaspersky AntiVirus on your computer use the settings recommended by Kaspersky Lab.
You can specify uniform scan settings for all tasks, by starting with the Virus Scan task settings, used to scan an
individual object.
Page 58

K A S P E R S K Y AN T I - VI R U S
58
To assign uniform scan settings for all tasks:
1. Open the application settings window (on page 15), open the Virus Scan tab, and select the Virus Scan task in
the list (see figure below).
2. To modify the scan settings, select the security level (see section "Selecting a security level" on page 48),
configure advanced level settings, and select an action on objects (see section "Selecting actions on objects" on
page 52).
3. To apply these settings to all tasks, click the Apply button in the Other task preferences section. Confirm the
uniform settings that you have modified in the confirmation request window.
RESTORING DEFAULT SCAN SETTINGS
When modifying task settings, it is always possible to return to the default settings. Kaspersky Lab experts consider these
settings to be optimal and have collected them in the Recommended protection level.
To restore default scan settings:
1. Open the application settings window (on page 15), select the Virus Scan tab, and then select the required
task.
Figure 37: Application settings window. Scanning for viruses
Page 59

S C A N N I N G F O R V I R U S E S
59
2. Click the Default button in the Security level section (see the figure below).
Figure 38: Application settings window. Scanning for viruses
VIRUS SCAN STATISTICS
You can view the information on results of Virus Scan in the Completed tasks section of the report (see section
"Reports" on page 81) on application operation. If the task is being executed at the present moment, brief information
about it is displayed in the main window (see section "Main application window" on page 13). To view a detailed report on
current task performance, open the report window and select the necessary task from the Running tasks section.
Information about the progress of the task is displayed in the lower part of the window. If everything is successful, the
summary statistics of task execution results will be displayed. These statistics contain the information on the number of
objects scanned, number of malicious objects detected and objects needing to be processed. Scan start time, estimated
completion time, and duration are also displayed.
If any errors occur during the scan, run the task again. If the attempt returns an error, contact the Technical Support
Service (see section "Contacting Technical Support" on page 9).
General information on the scan results is grouped on the following tabs:
All dangerous objects detected during the task are listed on the Detected tab (see section "The Detected
tab" on page 83). The tab contains the full path to the location of each object and the status assigned to the
Page 60

K A S P E R S K Y AN T I - VI R U S
60
object by Kaspersky Anti-Virus: if the malicious program that has infected the object is revealed, this object is
assigned the corresponding status. For example, virus, Trojan, etc. If the type of malicious effect cannot be
exactly established, the object is assigned the status of suspicious. Next to the status, the action taken on the
object is specified (detected, not found, disinfected).
The Events tab shows the complete list of events that have occurred during task execution (see section "The
Events tab" on page 84). The events can have the following statuses:
information event - for example, object not processed: skipped by type;
warning - for example, a virus is detected;
note - for example: archive is password-protected.
Statistics appear on the corresponding tab (see section "The Statistics tab" on page 84). Here you will find the
total number of scanned objects, and further columns show how many archives, dangerous objects, disinfected
objects, quarantined objects etc have been processed out of the total number of objects scanned.
Preferences of task execution are displayed on the tab with the same name (see section "The Preferences tab"
on page 86). To switch to task settings quickly, click the Change preferences button.
Page 61

61
UPDATING THE APPLICATION
Keeping protection up-to-date is a key to reliably protecting your computer. As new viruses, Trojans, and malicious
software emerge daily, it is extremely important to update the application regularly to keep your data permanently
protected.
Kaspersky Anti-Virus update implies that the following components will be downloaded and installed on your computer:
Application databases
Protection of information stored on the computer is ensured thanks to databases. File Anti-Virus and virus scan
tasks use databases when they scan for dangerous objects on your computer and disinfect them. The
databases are hourly renewed with records of new threats and methods of fighting them. Therefore, it is
recommended to update them on a regular basis.
Application modules
In addition to the databases, you can update the internal modules of Kaspersky Anti-Virus. Update packages are
regularly released by Kaspersky Lab.
Special Kaspersky Lab update servers are the primary update source for Kaspersky Anti-Virus.
Your computer should be connected to the Internet to successfully download updates from servers. If the Internet
connection is ensured by a proxy server, you will need to configure connection settings (see section "Configuring proxy
server settings" on page 69).
Updates can be downloaded in one of the following modes:
Automatically. Kaspersky Anti-Virus checks for an update package in the update source at time intervals you
have set. During virus outbreaks, the check frequency may increase, and decrease when they are gone. If
Kaspersky Anti-Virus detects new updates, it downloads and installs them on the computer. This is the default
mode.
By schedule. Kaspersky Anti-Virus is updated according to a specified schedule.
Manually. You launch the updating procedure manually.
When the update is in progress, the application modules and databases on your computer are compared against those at
the update source. If your computer has the most recent version of databases and application modules installed, you will
see a message confirming that the protection of your computer is up-to-date. If databases and modules on your computer
and those on the update server differ, the application downloads only the missing part of the updates. Databases and
modules are not downloaded in their entirety; this significantly increases the speed of updating and reduces Internet
traffic.
Before updating the application databases, Kaspersky Anti-Virus creates backup copies of them; these backup copies
can be used if you want to use them again for any reason. You might need the rollback (see section "Rolling back the
latest update" on page 62) option, for example, if you have updated the databases and they have been corrupted during
the operation. You can easily roll back to the previous version of databases and try to update them again.
You can distribute downloaded updates to a local source while updating Kaspersky Anti-Virus (see section "Update
distribution" on page 67). This feature enables you to update databases and modules used by the application on
networked computers to reduce internet traffic.
Page 62

K A S P E R S K Y AN T I - VI R U S
62
IN THIS SECTION:
Starting the update .......................................................................................................................................................... 62
Rolling back the latest update ......................................................................................................................................... 62
Configuring the update .................................................................................................................................................... 63
Configuring proxy server settings .................................................................................................................................... 69
Update statistics .............................................................................................................................................................. 71
STARTING THE UPDATE
Application updates keep your computer's protection up-to-date. If you do not perform updates for some time, the
protection of your data becomes out of date.
The main application window displays summary information on the application update (see section "Main application
window" on page 13). Here you can see the database release date and the number of records in the databases installed
on your computer. The number of records is the number of threats from which your computer is now protected. You will
also see a status that informs you if the databases in use are up-to-date.
You can start Kaspersky Anti-Virus updates at any time. To do this, click the globe icon in the main window. To
view a detailed report on current task performance, open the report window.
Updates will also be distributed to the local source during the update process (see section "Update distribution" on
page 67), provided that this service is enabled.
ROLLING BACK THE LATEST UPDATE
Every time you run the application update, Kaspersky Anti-Virus first creates a backup copy of the databases and
application modules in use, and only after that starts updating them. This allows you to roll back to the previous version of
databases if the update fails.
To roll back to the previous database version:
1. Open the application settings window (on page 15) and select the Update section (see figure below).
Page 63

UP D A T I N G T H E A P P L I C A T I O N
63
2. Click the Roll back update button.
Figure 39: Application settings window. Update
CONFIGURING THE UPDATE
Kaspersky Anti-Virus will only be updated in accord with the following settings:
Update source.
Update source is a resource that contains the latest database and module files for Kaspersky Anti-Virus. Update
sources (see section "Selecting an update source" on page 64) can be HTTP and FTP servers, local or network
folders.
Update objects.
Update objects are the components that will be updated: applications databases, application modules.
Application databases are always updated, and the application modules are only updated if the corresponding
mode is enabled (see section "Selecting the update mode and objects" on page 65).
Update mode.
Update mode determines whether the update will be launched automatically (recommended by Kaspersky Lab
specialists), manually, or according to a schedule. If you select the latter (see section "Selecting the update
mode and objects" on page 65) you will have to assign schedule settings for the launch.
Update distribution.
The update distribution option (see section "Update distribution" on page 67) allows you to save the updates you
have downloaded from the Internet in a local folder and grant access to them to other computers on your
network to save Internet traffic.
Page 64

K A S P E R S K Y AN T I - VI R U S
64
IN THIS SECTION:
Selecting an update source ............................................................................................................................................. 64
Selecting the update mode and objects........................................................................................................................... 65
Configuring the update task schedule ............................................................................................................................. 66
Update distribution........................................................................................................................................................... 67
Actions after update......................................................................................................................................................... 68
SELECTING AN UPDATE SOURCE
Update source is a resource that contains the updates for databases and internal modules of Kaspersky Anti-Virus.
Update sources can be HTTP and FTP servers, local or network folders.
Kaspersky Lab update servers are the main source of updates. These are special websites where updates for databases
and internal modules of all Kaspersky Lab products are stored.
Figure 40: Selecting an update source
To assign an update source:
1. Open the application settings window (on page 15) and select the Update tab.
2. Click the Preferences button in the Update section.
3. In the window that opens, go to the Update source tab (see figure above).
Page 65

UP D A T I N G T H E A P P L I C A T I O N
65
By default, the list contains only Kaspersky Lab update servers. When the update is in progress, Kaspersky Anti-Virus
accesses this list, selects the address of the first server, and tries to download updates from this server. If updates cannot
be downloaded from the selected server, the application tries to connect and retrieve the updates from the next server.
You can edit the source list using the button to add a new source and the button to remove a source from the
list. When adding a new source, it is admissible to specify the path to a folder that contains the set of updates, or the
address of an FTP/HTTP site. Kaspersky Anti-Virus adds a new update source to the top of the list and automatically
marks this source as enabled by checking the box next to it.
Click the Edit button to edit a source that you have selected from the list. The only type of sources you cannot edit or
delete are Kaspersky Lab update servers.
If you select a resource outside the LAN as an update source, you should have an Internet connection established to
perform an update.
SELECTING THE UPDATE MODE AND OBJECTS
When configuring Kaspersky Anti-Virus update settings, it is important to define the update mode and objects.
Update objects are the components that will be updated: applications databases, application modules. Databases are
always updated, and the application modules are only updated if the corresponding mode is enabled.
If you want to download and install updates for Kaspersky Anti-Virus modules on your computer when the update is
in progress,
open the application settings window (on page 15), select the Update tab (see figure below), and check the Update
application modules box in the Update section.
Figure 41: Application settings window. Update
If there are currently module updates on the update source, Kaspersky Anti-Virus will download the required updates
and apply them after the computer restarts. The downloaded module updates will not be installed until the computer
restarts.
Page 66

K A S P E R S K Y AN T I - VI R U S
66
If the next application update occurs before the computer restarts and the program module updates downloaded
earlier are installed, only the databases will be updated.
Update mode determines how the update is launched. One of the following modes can be selected in the Run mode
section (see the figure above):
Automatically. Kaspersky Anti-Virus checks for an update package in the update source at the set time
intervals (see section "Selecting an update source" on page 64). If Kaspersky Anti-Virus detects new updates, it
downloads and installs them on the computer. This update mode is used by default.
The next attempt to update will be performed by Kaspersky Anti-Virus after the interval specified in the previous
update package has elapsed. This option can regulate the update frequency in case of virus outbreaks and
other potentially dangerous situations. Kaspersky Anti-Virus will receive the latest updates for the databases and
modules in timely fashion, so malware cannot penetrate your computer.
On schedule. Kaspersky Anti-Virus is updated according to a specified schedule. If you would like to switch to
this update mode, you will be offered to run the update on a daily basis by default. To create a custom schedule
(see section "Configuring the update task schedule" on page 66), click the Edit button next to the mode title and
make the required changes in the window that opens.
Manually. You launch the updating procedure manually. Kaspersky Anti-Virus notifies you when an update is
required.
CONFIGURING THE UPDATE TASK SCHEDULE
Kaspersky Anti-Virus is automatically updated by default. If this schedule does not suit you, set the update start settings
manually.
Figure 42: Configuring the update task schedule
The most important step is to determine the frequency of running the update task. You can select one of the following
options:
Minutes. The application is updated every few minutes. Enter the number of minutes between scan startups in
the schedule settings (the value should be specified in range from 5 to 59 minutes).
Hours. Update frequency is calculated in hours. Specify the interval in the schedule settings as Every N-th
hour and specify the value of N. For example, to download updates every hour, select Every 1 hour.
Days. The time between scan startups is measured in days. In the schedule settings, specify the update start
frequency. Also, in the Time field, specify what time of day or night the task will run.
Weeks. The application is updated on certain days of the week. If this option is selected, in the schedule
settings check the boxes for the days of the week on which you want the scan task to run. Specify the time in
the Time field.
Page 67

UP D A T I N G T H E A P P L I C A T I O N
67
Months. The task will run once a month at the specified time.
At a specified time. The task will run once at the date and time that you have specified.
At application startup. The task starts every time that Kaspersky Anti-Virus starts. You can also set an interval
between the application startup and the task startup.
If a scan update did not start for any reason (for example, the computer was shut down at that time), you can configure
the missed task to start automatically as soon as it becomes possible. To do this, check the Run task if skipped box in
the schedule window.
UPDATE DISTRIBUTION
If your computers are linked in a LAN, updates do not need to be downloaded and installed on each of them individually
since this will increase network traffic. Use the update distribution service to save Internet traffic. To do this, set up
update distribution as follows:
1. One of the computers on the network retrieves the Kaspersky Anti-Virus update package from the Kaspersky
Lab web servers or from another web resource hosting the current set of updates. The updates retrieved are
placed in a shared folder.
2. Other networked computers access the shared folder to retrieve updates.
To connect to the update distribution service:
1. Open the application settings window (on page 15) and select the Update section (see figure below).
Figure 43: Application settings window. Update
2. Click the Preferences button in the Update section.
3. In the window that opens, select the Additional tab (see the figure below). Check the Copy updates to folder
box, and specify the shared folder where retrieved updates will be placed, in the field below. You can enter the
path manually or select it in the window that opens by clicking the Select button. If the box is checked, updates
will automatically be copied to this folder when they are retrieved.
Page 68

K A S P E R S K Y AN T I - VI R U S
68
Kaspersky Anti-Virus only retrieves its own update package from Kaspersky Lab's servers.
Figure 44: Configuring update distribution service
If you want other computers on the network to update from the folder containing updates copied from the Internet,
you should do the following:
1. Grant public access to this folder.
2. Specify the shared folder as the update source on the networked computers in the update service settings.
ACTIONS AFTER UPDATE
Every Kaspersky Anti-Virus database update contains new records that protect your computer from the most recent
threats. Kaspersky Lab experts recommend that you scan the quarantined objects each time after the database is
updated (on page 75). Why should these objects be scanned?
Quarantine contains objects for which the malware that had caused the infection has not been identified. It is possible
that after the database update Kaspersky Anti-Virus may be able to identify the threat and eliminate it.
Kaspersky Anti-Virus scans quarantined objects after each update by default. If an object still has the potentially infected
status, it will remain in the storage. If the status changes to infected, the object will be processed according to the action
selected; it will be removed from quarantine, and a copy of it will be placed into the backup storage (see page 78). If the
scan proves that an object is not infected and the databases have been updated within the last three days, the object will
be restored from the storage to its current location. If more than three days have passed since the most recent database
update, the object will remain in the storage.
To cancel the scan of objects in quarantine:
1. Open the application settings window (on page 15) and select the Update section (see figure below).
Page 69

UP D A T I N G T H E A P P L I C A T I O N
69
2. Uncheck the Rescan quarantine box in the Action after update section.
Figure 45: Application settings window. Update
CONFIGURING PROXY SERVER SETTINGS
If you use a proxy server to establish the Internet connection, you will need to configure connection settings. Kaspersky
Anti-Virus uses these settings to update the databases and modules.
Page 70

K A S P E R S K Y AN T I - VI R U S
70
To configure the proxy server settings:
1. Open the application settings window (on page 15) and select the Network tab (see figure below).
Figure 46: Application settings window. Network
2. Check the Use proxy server box and specify which proxy server settings you need to use:
Use system proxy server preferences - if this option is selected, Kaspersky Anti-Virus uses the proxy
server settings specified in the MAC OS settings.
Use specified proxy server preferences - use a proxy server different from that specified in the Mac OS
settings. In the Address field, enter either the IP address or the character name of a proxy server, and
specify the proxy server port in the Port field.
To exclude the use of a proxy server when updating from a local or network folder, check the Bypass proxy
server for local addresses box.
3. Specify if authentication is required on the proxy server. Authentication is the procedure of verifying user
registration data for access control purposes.
If the authentication is required to connect to the proxy server, check the Use authentication box and specify
the username and password in the fields below.
If the proxy server requires authentication and you did not enter a username and password or the data specified
was not accepted by the proxy server for some reason, a window will open, asking for a username and
password for authentication. If the authentication has been successful, the specified username and password
will be remembered for subsequent use (if you check the Remember this password box). Otherwise, the
authentication settings will be requested again.
When you click the Cancel button, the current update source in the authentication settings request window will
be replaced with the following one on the list. Authentication settings specified in the current window or
mentioned in the application interface will be ignored.
Page 71

UP D A T I N G T H E A P P L I C A T I O N
71
If you are downloading the update from an FTP server, the server is connected to in passive mode by default. If this
connection fails, it will attempt to connect in active mode.
By default, the time assigned to connect to an update server is one minute. If the connection fails, once this time has
elapsed, the application will attempt to connect to the next update server. This continues until a connection is
successfully established, or until all the available update servers are attempted.
UPDATE STATISTICS
Some statistics regarding current performance of the update service (release date for the databases used by the
application, number of records in the databases, update status) are displayed in the main application window (see section
"Main application window" on page 13).
If you have never updated Kaspersky Anti-Virus, there will be no information about the most recent update.
You can view the information on results of previous updates in the Completed tasks section of the report on application
operation (see section "Reports" on page 81). If an update is being executed at the present moment, brief information
about it is displayed in the main window. To view a detailed report on current task performance, open the report window
and select the Update task from the Running tasks section.
The lower part of the update task report window contains the information on whether the procedure has been completed
successfully or not. If the update is completed successfully, the window will display brief statistics giving information
about the size of updates distributed and installed, the speed of update execution, the length of procedure, and other
information.
If the operation fails, make sure that the settings for the update service are correct and that the update source is
available. Restart the update. If the attempt returns an error, contact the Technical Support Service (see section
"Contacting Technical Support" on page 9).
The description of all operations performed during updating is displayed in the main part of the report on the Events tab
(see section "The Events tab" on page 84). There you can view which files have been distributed and which ones have
been replaced.
The settings used to manage the update are listed on the tab with the same name (see section "The Preferences tab" on
page 86). To switch to editing the component settings, use the Change preferences button.
Page 72

72
LICENSE MANAGEMENT
Ability to use Kaspersky Anti-Virus is determined by a license obtained by purchasing the product and granting you the
right to use the application as soon as you install your license.
Without a license, unless a trial version has been activated, Kaspersky Anti-Virus will run in one-update mode. The
application will not download any new updates. If a trial version has been activated, after the trial period expires,
Kaspersky Anti-Virus will not run.
When the license expires, the program will continue working but you will not be able to update application databases. As
before, you will be able to scan your computer for viruses and use File Anti-Virus but using only the databases that you
had when the license expired. We cannot guarantee that you will be protected from viruses that appear after your
program license expires.
To protect your computer from infection from new viruses, we recommend that you renew your application license.
Kaspersky Anti-Virus will notify you in advance of the impending expiration date of your license. The corresponding
message will be displayed every time the application starts.
To view information on the license in use, open the main window of Kaspersky Anti-Virus (on page 13) and click the
button. License number and type (commercial or trial), maximum number of hosts, expiration date and time, and days
remaining until the expiration are all displayed in the window that opens (see the figure below).
Figure 47: License management
To purchase a new license, click the Purchase button. The web page that opens contains all the information on
purchasing a key through Kaspersky Lab eStore or corporate partners.
Kaspersky Lab regularly organizes special pricing offers on license renewals for our products. Check for special offers at
the Kaspersky Lab website, in the eStore section.
If you purchase online, a key file or an activation code will be mailed to you at the address specified in the purchase order
once payment has been made.
To activate Kaspersky Anti-Virus using the activation code you have obtained or a key file, click the Activate button.
Before activating Kaspersky Anti-Virus, make sure that the computer's time and date settings are correct.
Activating the application requires you to install a key file, which is used to verify the license to use Kaspersky Anti-Virus.
The key contains the service information required for the application to be fully functional, and some additional data:
support information (who provides the support, where it can be obtained);
Page 73

L I C E N S E M A N A G E M E N T
73
key name and number, and its expiration date.
The application is activated using the Activation assistant. Let us take a closer look at its steps.
SELECTING APPLICATION ACTIVATION TYPE
There are several options for activating the application, depending on whether you have a key for Kaspersky Anti-Virus or
need to obtain one from a Kaspersky Lab server:
Activate using activation code. Select this activation option if you purchased the full commercial version and
the activation code has been sent to you. Using this activation code, you will obtain a key file which provides
access to Kaspersky Anti-Virus full functionality throughout the effective term of the license agreement.
Use existing key file. Activate the application using the key file obtained earlier.
Activate trial version. Select this activation option if you want to install the trial version before deciding whether
you will purchase the commercial version. You will be given a free license key, which will expire as stated in the
license agreement for the trial version.
An Internet connection will be required if you try to activate the application with an activation code, or activate a trial
version. If at the time of installation an Internet connection is unavailable, you can perform the activation later, or connect
to the Internet from a different computer and obtain a key using an activation code by registering on the Kaspersky Lab
Technical Support Service website.
You may postpone the product activation. To do this, click the Cancel button. In this case, activation will be skipped.
Kaspersky Anti-Virus will be installed on your computer, and all its functions will be accessible to you, except for the
update (you will be able to update the application once, after installation).
ENTERING THE ACTIVATION CODE
To activate the application, you should enter the activation code. If Kaspersky Anti-Virus was purchased via the Internet,
the activation code will be sent to you by email. If you purchase a retail, boxed version of the application, the activation
code will be printed on the envelope containing the installation disk.
The activation code is a sequence of numbers and letters delimited with hyphens in four groups of five symbols without
spaces, for example: 11AA1-11AAA-1AA11-1A111. Please note that the activation code should only be entered in Latin
characters.
RECEIVING KEY FILE
The Activation assistant connects to Kaspersky Lab's servers and sends them registration data (activation code and
contact information), to be verified by the server.
If the activation code is verified, the Assistant will receive a key from the server. If you are installing a trial version of the
application, the Activation assistant will receive a trial key file without needing an activation code. The file will be
automatically installed to ensure the application's operability, and the activation completion window will open, showing
detailed information about the key.
When this activation method is selected, Kaspersky Anti-Virus does not download a physical key file (with .key extension)
from the server, but receives the relevant information to save in the operating system. To obtain a real key file, you must
complete the user registration at Kaspersky Lab's website.
If the activation code is not verified, the Assistant will display this information on the screen. In this case, contact the
software vendor you purchased Kaspersky Anti-Virus from, for information.
SELECTING THE KEY FILE
If you have a key file for Kaspersky Anti-Virus, the Assistant window will ask if you want to install it. To do this, use the
Select button and select the path for the file (with the .key extension) in the standard file selection window.
Page 74

K A S P E R S K Y AN T I - VI R U S
74
Information about the current key will be displayed in the bottom part of the window, including the key number, the key
type (commercial, trial, etc.), and the license key expiration date.
COMPLETING ACTIVATION
The Activation assistant will inform you that the application has been successfully activated. In addition, information about
the installed key is displayed, including key number, key type (for instance, commercial or trial), and the license key's
expiration date.
Page 75

75
IN THIS SECTION:
Actions on quarantined objects ....................................................................................................................................... 75
Configuring quarantine settings ....................................................................................................................................... 77
QUARANTINE
Quarantine is a special repository containing the objects that could have been infected with viruses.
Potentially infected objects are objects that are suspected of being infected with viruses or modifications of them.
Why are objects detected as potentially infected? It is not always possible to exactly determine whether an object is
infected or not. This could be for the following reasons:
The code of the object being analyzed resembles a known threat but is partially altered.
Kaspersky Anti-Virus databases contain the information on the threats investigated to date by Kaspersky Lab
specialists. If a malicious program is modified and these changes are not yet entered into the databases,
Kaspersky Anti-Virus classifies the object infected with the modified malicious program as a potentially infected
object and will indicate without fail what threat this infection resembles.
The code of the object detected resembles a malicious program by its structure; however, nothing similar is
recorded in the Kaspersky Anti-Virus databases.
It is quite possible that this is a new type of threat, so Kaspersky Anti-Virus classifies that object as a potentially
infected object.
A potentially infected object can be detected and quarantined in the course of Virus Scan (see section "Scanning for
viruses" on page 43), or by File Anti-Virus (see section "Anti-virus protection of your computer's file system" on page 30).
You can quarantine an object by yourself by clicking the Quarantine button in the special notification window (see
section "Notifications" on page 87) that pops up when a potentially infected object is detected.
When you move an object to quarantine, it is moved, not copied: the object is deleted from its original location on a disk
and saved in the quarantine folder. Files in quarantine are stored in a special format and are not dangerous.
ACTIONS ON QUARANTINED OBJECTS
The total number of quarantined objects is displayed in the Quarantine section of the main report window (see the figure
below).
To view the storage areas:
1. Open the main application window (on page 13) and click the button.
2. In the left part of the window that opens, select Quarantine (see figure below). Content of the storage will be
displayed in the right-hand part of the window.
You can perform the following actions on objects in quarantine:
Quarantine files that you suspect of being infected but not detected by Kaspersky Anti-Virus. To do this, click the
Add button and select the required file in the standard selection window. It will be added to the list with the
added by user status.
Page 76

K A S P E R S K Y AN T I - VI R U S
76
A file moved to quarantine manually may change its status if it had been scanned using the updated databases
not earlier than three days after it was scanned for the first time after being placed in quarantine. Later, the file
will be restored if it is assigned the false positive status, or removed with a copy placed in the backup if it is
considered infected.
Figure 48: Quarantine storage
Scan and disinfect all potentially infected objects in quarantine using the current Kaspersky Anti-Virus
databases. To do this, click the Scan all button.
After scanning and disinfecting any quarantined object, its status can change to infected, potentially infected,
false operation, OK, etc.
Quarantined objects' status only can change if they are scanned using the databases released not more than
three days after the file has been quarantined.
The infected status means that the object has been identified as infected but the application did not manage to
treat it. The application will remove such an object from quarantine, saving a copy of it in the backup storage
(see section "Backup" on page 78).
All the objects with the false positive status will be restored to their original locations.
Restore files in the folder specified by the user, or in the folders from which the files were moved to quarantine
(default option). To restore an object, select it from the list and click the Restore button. When restoring objects
quarantined from archives, mail databases, and mail format files, you should also specify the directory in which
they will be restored.
We recommend that you only restore objects with the false operation, OK, and disinfected statuses since
restoring other objects may infect your computer!
Delete any quarantined object or group of selected objects. Only delete objects that cannot be disinfected. In
order to delete objects, select them in the list and click the Delete button. To clear the quarantine storage
completely, click the Clear all button.
Page 77

Q U A R A N T I N E
77
CONFIGURING QUARANTINE SETTINGS
You can configure the settings for the composition and operation of quarantine, specifically:
Set the automatic scan mode for quarantined objects after each application database update (see section
"Actions after update" on page 68).
Kaspersky Anti-Virus will not be able to scan quarantined objects immediately after updating the databases if
you are working with quarantine.
Set the maximum duration for storing objects in quarantine.
By default, the term for storing objects in quarantine is 30 days; at the end of which the objects will be deleted.
You can change the maximum period for storing potentially infected objects or cancel this restriction.
To configure the settings for storing objects in quarantine:
1. Open the application settings window (on page 15) and select the Reports tab (see figure below).
2. In the Quarantine and Backup check Delete objects after box and set the term for keeping objects in the
storage after which they will be automatically deleted. Please note that this setting value will also apply to
backup (on page 78).
Figure 49: Application settings window. Reports
Page 78

78
IN THIS SECTION:
Actions on backup copies ................................................................................................................................................ 78
Configuring the backup settings ...................................................................................................................................... 79
BACKUP
Sometimes, when disinfecting the objects, their integrity cannot be saved. If the disinfected file contained important
information, and after disinfection it became partly or completely inaccessible, you can attempt to restore the original
object from its backup copy.
Backup copy is a copy of the original dangerous object that is created when first disinfecting or deleting the object, and
saved in backup.
Backup is a special repository that contains backup copies of dangerous objects subject to processing or deletion. The
main function of backup is the ability to restore an original object at any time. Files in backup are saved in a special
format and are not dangerous.
ACTIONS ON BACKUP COPIES
The list of backup copies of stored objects is displayed in the Backup section of the report window (see the figure below).
To view the backup areas:
1. Open the main application window (on page 13) and click the button.
2. In the left part of the window that will open, select the Backup item (see the figure below). Content of the
storage will be displayed in the right-hand part of the window.
A list of backup copies is displayed in the storage. The following information is provided for each copy: the full name of
the object with the path to its original location, time when the object was moved to the storage, the status of the object
assigned after the scan, and its size.
You can restore selected copies using the Restore button. An object is restored from the backup with the same name
that it had prior to disinfection.
If there is an object with the same name in the original location (this situation is possible when restoring an object with a
copy created prior to disinfection), a corresponding warning will pop up on screen. You can change the location of the
object being restored, or rename it.
We recommend that you scan the object for viruses immediately after restoring it. It is possible that you will manage to
disinfect it without losing its integrity using the updated databases.
We do not recommend that you restore backup copies of objects unless absolutely necessary. This could lead to an
infection on your computer!
Page 79

B A C K U P
79
We recommend that you periodically view the repository content and clear it using the Delete button. To clear the backup
storage completely, click the Clear all button. You can also set up the application so that it independently deletes the
oldest copies from backup (see section "Configuring the backup settings" on page 79).
Figure 50: Backup storage
CONFIGURING THE BACKUP SETTINGS
You can determine the maximum period for storing copies in backup. By default, the term for storing copies of dangerous
objects in quarantine is 30 days. At the end of which the copies will be deleted. You can change the maximum term for
storing copies, or remove this restriction.
Page 80

K A S P E R S K Y AN T I - VI R U S
80
To configure the settings for storing objects in the backup, please do the following:
1. Open the application settings window (on page 15) and select the Reports section (see figure below).
Figure 51: Application settings window. Reports
2. In the Quarantine and Backup check Delete objects after box and set the term for keeping objects in the
storage after which objects in the storage will be automatically deleted. Please note that this setting value will
also apply to quarantine (on page 75).
Page 81

81
REPORTS
Kaspersky Anti-Virus allows you to view detailed statistics of its results as well as for any events arising when the
program runs. A detailed report will also be created for each application component: File Anti-Virus (see section "Antivirus protection of your computer's file system" on page 30), virus scan (see section "Scanning for viruses" on page 43)
and update (see section "Updating the application" on page 61).
To view reports,
open the main application window (on page 13) and click the button.
Figure 52: Kaspersky Anti-Virus report window
Report window contains the following sections:
Reports. Contain statistics on dangerous objects detected, on objects placed in quarantine and backup, and the
list of events logged during the application operation. All statistics are divided into subsections:
Detected. The list of all dangerous and suspicious objects detected by File Anti-Virus or Virus Scan tasks.
To disinfect the dangerous objects immediately, click the Disinfect all button. Click the Show disinfected
objects button for the information about disinfected objects to be displayed on the list. To remove records
about detected objects from the report, click the Clear button. Note that all the dangerous objects you have
detected will then stay on your computer.
Events. List of all events logged during operation of Kaspersky Anti-Virus. To delete information from the
list, click the Clear button.
Quarantine. List of objects placed to Quarantine (on page 75).
Backup. List of objects placed to the Backup storage (on page 78).
Running tasks. List of tasks being performed at the moment. If no task is active and File Anti-Virus is disabled,
the list will be empty.
Page 82

K A S P E R S K Y AN T I - VI R U S
82
IN THIS SECTION:
Configuring the report settings ........................................................................................................................................ 82
The Detected tab ............................................................................................................................................................. 83
The Events tab ................................................................................................................................................................ 84
The Statistics tab ............................................................................................................................................................. 84
The Preferences tab ........................................................................................................................................................ 86
Completed tasks. List of completed tasks. You may view all completed tasks or the last twenty ones. To clear
the list, click the button in the lower-left corner of the report window and select the Delete all completed
tasks command.
From the report window you can manage the operation of File Anti-Virus, virus scan and update tasks: start, stop and
pause them. To do this, use the buttons with the same name in the report window of the specific task.
You can export the whole report to a text file. This option can be useful if, for example, an error occurred during File AntiVirus operation, and which you cannot fix yourself, and you require help from the Technical Support Service. In this case,
you need to send a report in text format to the Support service so our specialists can study the situation in greater depth
and help you as quickly as possible.
To export a report to a text file,
open the report window and select the Export command, using the menu that opens by clicking the button.
CONFIGURING THE REPORT SETTINGS
To configure the settings for creating and saving reports:
1. Open the application settings window (on page 15) and select the Reports section (see figure below).
2. Carry out the necessary configuration in the Reports section as follows:
Figure 53: Application settings window. Reports
Page 83

R E P O R T S
83
Allow or block logging information events. As a rule, these events are not important for security. To detect
these events in the report, check Log non-critical events box.
Allow storing in the report only for the important events occurring since the last time the task was run. This
saves disk space by reducing the report size. If the Keep only recent events box is checked, the
information in the report will be updated every time you restart the task: in this case important information
(such as records about detected malicious objects) will be saved, and non-critical information will be
overwritten.
Set the storage term for reports. By default, the term for storing reports is 30 days, at the end of which the
copies will be deleted. You can change the maximum term for storing copies, or remove this restriction.
THE DETECTED TAB
This tab (see figure below) contains the list of dangerous objects detected by File Anti-Virus (see section "Anti-virus
protection of your computer's file system" on page 30) or virus scan task (see section "Scanning for viruses" on page 43).
The full name is indicated for each object, and also the status assigned to it by Kaspersky Anti-Virus when it was
scanned or processed.
The dangerous objects can be processed by clicking the Disinfect all button. After each object is processed, a
notification will appear on screen, which lets you decide how to proceed. If you check the Apply to all box in the
notification window, the selected action will be applied to all objects with the same status in the list before processing
starts.
Click the Clear button to remove a record about a detected object from the report. Note that the dangerous objects you
have detected will then stay on your computer.
Figure 54: List of dangerous object detected
Page 84

K A S P E R S K Y AN T I - VI R U S
84
THE EVENTS TAB
The Events tab (see figure below) logs all important events which occur during File Anti-Virus's (see section "Anti-virus
protection of your computer's file system" on page 30) operation, including virus scan tasks (see section "Scanning for
viruses" on page 43) and update tasks (see section "Updating the application" on page 61).
There are three main types of events:
Critical events are events of a critical importance that indicate the problems in Kaspersky Anti-Virus
performance or gaps in protection of your computer, for example, virus detected, operation failure.
Important events are events that should be attented to, since they reflect important situations while the
application is running, for example, processing error.
Informational events are reference-type messages, which as a rule do not contain important information: for
example, ok, not processed. If it is not necessary to log such events in the report, uncheck the Log non-critical
events box in the report settings window (see section "Configuring the report settings" on page 82).
THE STATISTICS TAB
Detailed statistics of File Anti-Virus (see section "Anti-virus protection of your computer's file system" on page 30)
operation or virus scan (see section "Scanning for viruses" on page 43) task execution are logged on this tab (see figure
below). Here you can learn:
how many objects were scanned for viruses in this session by File Anti-Virus, or by the scan task (the number of
scanned archives, compressed files, and password-protected and corrupted objects is also shown);
Figure 55: Events occurred in component's operation
Page 85

R E P O R T S
85
how many dangerous objects were detected, and how many of them were deleted, quarantined, or not
disinfected.
Figure 56: Component statistics
Page 86

K A S P E R S K Y AN T I - VI R U S
86
THE PREFERENCES TAB
The Preferences tab (see the figure below) gives a complete overview of the settings for File Anti-Virus's operation (see
section "Anti-virus protection of your computer's file system" on page 30), including virus scan (see section "Scanning for
viruses" on page 43) tasks and application updates (see section "Updating the application" on page 61). The tab also
shows File Anti-Virus' general security level, what level virus scans are running at, and what actions are being taken on
dangerous objects. To go to settings modification, click the Change preferences button.
Figure 57: Component settings
Page 87

87
NOTIFICATIONS
Various types of events occur when Kaspersky Anti-Virus runs. They may be of an informative nature or contain
important information. For example, an event can inform you on the successful completion of an update or can detect an
error in the operation of File Anti-Virus that should be eliminated immediately.
During Kaspersky Anti-Virus operation, the following types of events occur:
Critical events are events of a critical importance, about which it is highly recommended to receive
notifications, since they indicate problems with Kaspersky Anti-Virus or vulnerabilities in protection of your
computer: for example, application databases corrupted or the license has expired.
Failure – events that make Kaspersky Anti-Virus non-operable: for example, no license key and no application
databases.
Important events are events that should be attented to, since they reflect important situations in Kaspersky
Anti-Virus operation: for example, protection disabled or computer has not been scanned for viruses for a long
time.
Informational events are reference-type messages, which as a rule do not contain important information: for
example, all dangerous objects disinfected.
In order to keep up with the events in Kaspersky Anti-Virus operation, you can use the notification service.
Notices can be delivered in one of the following ways:
pop-up messages on screen;
audio message.
To use this service:
1. Open the application settings window (on page 15) and select the Appearance tab (see figure below).
Figure 58: Application settings window. Appearance
Page 88

K A S P E R S K Y AN T I - VI R U S
88
2. Check the Enable notifications in the Events notification section and switch to advanced settings. To do this,
click the Additional button.
In the window that opens (see the figure below), you may configure the following types of notices about events listed
above:
Pop-up message on screen, which contains information about an event that has occurred.
To use this type of notification, check the box in the Balloon field next to the event you want to be notified of.
Audio message.
If you want this notice to be accompanied by a sound file, check the box in the Sound field next to the event
name.
Figure 59: Configuring notifications receiving service
Page 89

89
IN THIS SECTION:
List of objects to scan by extension ................................................................................................................................. 89
Allowed file exclusion masks ........................................................................................................................................... 91
Allowed exclusion masks according to the Virus Encyclopedia classification .................................................................. 92
HELP INFORMATION
This manual section contains help information about the formats of files being scanned and allowed masks being used
when configuring Kaspersky Anti-Virus settings.
LIST OF OBJECTS TO SCAN BY EXTENSION
If you have selected Scan programs and documents (by extension) in the settings of File Anti-Virus or Virus scan,
objects with the following extensions will be scanned for viruses:
com - Microsoft Windows executable file of no larger than 64 KB.
exe - executable file, Microsoft Windows self-unpacking archive.
sys - Microsoft Windows system file.
prg - dBase, Clipper or Microsoft Visual FoxPro text, WAVmaker package program.
bin - Microsoft Windows binary file.
bat - Microsoft Windows batch file.
cmd - Microsoft Windows NT command file (as bat file for DOS), OS/2.
dpl - Borland Delphi packed library.
dll - Microsoft Windows dynamic-link library.
scr - Microsoft Windows screen-saver file.
cpl - Microsoft Windows control panel module.
ocx - Microsoft OLE (Object Linking and Embedding) object.
tsp - Microsoft Windows program that works in time-share mode.
drv - driver for a Microsoft Windows device.
vxd - driver for a Microsoft Windows virtual device.
pif - Microsoft Windows file with information about a program.
lnk - Microsoft Windows link file.
reg - Microsoft Windows system registry key file.
ini - Microsoft Windows initialization file.
Page 90

K A S P E R S K Y AN T I - VI R U S
90
cla – Java class.
vbs - Visual Basic script.
vbe – BIOS video extension.
js, jse - JavaScript source text.
htm – hypertext document.
htt - Microsoft Windows hypertext template.
hta - hypertext program for Microsoft Internet Explorer.
asp - Active Server Pages script.
chm - compiled HTML file.
pht - HTML file with embedded PHP scripts.
php - script embedded in HTML files.
wsh - Microsoft Windows Script Host file.
wsf - Microsoft Windows script.
the - Microsoft Windows 95 desktop theme file.
hlp - help file in Win Help format.
eml - Microsoft Outlook Express email message.
nws - new Microsoft Outlook Express email message.
msg - Microsoft Mail email message.
plg – email message.
mbx - extension for saved Microsoft Office Outlook message.
doc* – Microsoft Office Word document, including: doc – Microsoft Office Word document, docx – Microsoft
Office Word 2007 document supporting XML language, docm – Microsoft Office Word 2007 document
supporting macros.
dot* – Microsoft Office Word document template, including: dot – Microsoft Office Word document template,
dotx – Microsoft Office Word 2007 document template, dotm – Microsoft Office Word 2007 document template
supporting macros.
fpm - database program, Microsoft Visual FoxPro start file.
rtf - document in Rich Text Format.
shs - Shell Scrap Object Handler object.
dwg - AutoCAD drawing database.
msi - Microsoft Windows Installer package.
otm - VBA project for Microsoft Office Outlook.
pdf - Adobe Acrobat document.
swf - Shockwave Flash package object.
Page 91

H E L P I N F O R M A TI O N
91
jpg, jpeg, png - file in format for storing compressed images.
emf - file in Enhanced Metafile format. Next generation of Microsoft Windows metafile.
ico - object icon file.
ov? - MS DOS executable files.
xl* – Microsoft Office Excel documents and files, including: xla – Microsoft Office Excel extension, xlc – chart, xlt
– document template, xlsx – Microsoft Office Excel 2007 workbook, xltm – Microsoft Office Excel 2007 workbook
supporting macros, xlsb – Microsoft Office Excel 2007 workbook in binary (not XML) format, xltx – Microsoft
Office Excel 2007 template, xlsm – Microsoft Office Excel 2007 template supporting macros, xlam – Microsoft
Office Excel 2007 add-in supporting macros.
pp* – Microsoft Office PowerPoint documents and files, including: pps – Microsoft Office PowerPoint slide, ppt –
presentation, pptx – Microsoft Office PowerPoint 2007 presentation, pptm – Microsoft Office PowerPoint 2007
presentation supporting macros, potx – Microsoft Office PowerPoint 2007 presentation template, potm –
Microsoft Office PowerPoint 2007 presentation template supporting macros, ppsx – Microsoft Office PowerPoint
2007 slide show, ppsm – Microsoft Office PowerPoint 2007 slide show supporting macros, ppam – Microsoft
Office PowerPoint 2007 add-in supporting macros.
md* - Microsoft Office Access documents and files, including: mda - Microsoft Office Access workgroup, mdb database, etc.
sldx – Microsoft Office PowerPoint 2007 slide.
sldm – Microsoft Office PowerPoint 2007 slide supporting macros.
thmx – Microsoft Office 2007 theme.
The actual file format may differ from that indicated in the file extension.
ALLOWED FILE EXCLUSION MASKS
There are several ways to create file masks when creating file exclusion lists:
1. Masks without file paths:
*.zip - all files with the .zip extension
*.zi? - all files with the zi? extension where ? can represent any single character
test - all files named test
2. Masks with absolute file paths:
/dir/* or /dir/ - all files in the /dir/ folder
/dir/*.zip - all files with the .zip extension in /dir/ folder
/dir/*.zi? - all files with the zi? extension in the /dir/ folder where ? can represent any single character
/dir/test - only the single file /dir/test
3. Masks with relative file paths:
dir/* or dir/ - all files in all folders called dir/
dir/test - all test files in dir/ folders
Page 92

K A S P E R S K Y AN T I - VI R U S
92
dir/*.zip – all files with the zip extension in all dir/ folders
dir/*.zi? - all files with the zi? extension in all dir/ folders where ? can represent any single character
The * exclusion mask can only be used if you also assign a threat type to exclude, using the nomenclature of the Virus
Encyclopedia. In this case the application will not look for the specified threat in any objects. Using this mask without
selecting a threat type essentially disables monitoring.
ALLOWED EXCLUSION MASKS ACCORDING TO THE VIRUS ENCYCLOPEDIA CLASSIFICATION
When adding a new threat exclusion using the Virus Encyclopedia classification, you can specify:
full name of the threat as stated in the Virus Encyclopedia at www.viruslist.com (www.viruslist.com) (e.g., not-a-
virus:RiskWare.RemoteAdmin.RA.311 or Flooder.Win32.Fuxx).
The threat name by mask. For example:
not-a-virus* - exclude legal but potentially dangerous programs from the scan, as well as joke programs.
*Riskware.* - exclude all potential dangerous programs such as riskware from the scan.
*RemoteAdmin.* - exclude all remote administration programs from the scan.
Examples of threat names may be viewed in the report window, on the Detected tab (see section "The Detected tab" on
page 83), in the quarantine (see section "Quarantine" on page 75) and in the backup (see section "Backup" on page 78),
and in the windows of notification (see section "Notifications" on page 87) of dangerous objects detection.
Page 93

93
IN THIS SECTION:
CryptoEx LLC .................................................................................................................................................................. 93
Boost 1.30.0 library.......................................................................................................................................................... 93
Libcurl 7.19.3 library ........................................................................................................................................................ 94
Libpng 1.2.8 library .......................................................................................................................................................... 94
Libc library ....................................................................................................................................................................... 95
Libstdc++ library ............................................................................................................................................................ 105
Expat 1.2 library ............................................................................................................................................................ 113
Growl 1.1.5 .................................................................................................................................................................... 114
Info-ZIP 5.51 library ....................................................................................................................................................... 114
LZMA SDK 4.43 library .................................................................................................................................................. 115
RFC1321-based (RSA-free) MD5 LIBRARY library ...................................................................................................... 115
Zlib 1.2 library ................................................................................................ ................................ ................................ 115
GCC 4.0.1 library ........................................................................................................................................................... 116
Sound effects library ...................................................................................................................................................... 125
USING THIRD-PARTY CODE
Third-party code was used during Kaspersky Anti-Virus development.
CRYPTOEX LLC
To create and verify digital signatures, Kaspersky Anti-Virus uses Crypto Ex LLC's data security software library, Crypto
C. CryptoEx LLC holds a license from the Federal Agency for Government Communications and Information (a branch of
the Federal Security Service) and the Crypto C data security software library certificate.
CryptoEx LLC corporate website: http://www.cryptoex.ru
Exclusive rights for data security software library are reserved by CryptoEx LLC.
BOOST 1.30.0 LIBRARY
The boost 1.30.0 copyright © 2003-2004, Beman Dawes, Daniel Frey, David Abrahams, copyright © 2004-2005, Rene
Rivera. Boost Software License – Version 1.0 – August 17th, 2003.
Permission is hereby granted, free of charge, to any person or organization obtaining a copy of the software and
accompanying documentation covered by this license (the "Software") to use, reproduce, display, distribute, execute, and
transmit the Software, and to prepare derivative works of the Software, and to permit third-parties to whom the Software
is furnished to do so, all subject to the following:
Page 94

K A S P E R S K Y AN T I - VI R U S
94
The copyright notices in the Software and this entire statement, including the above license grant, this restriction and the
following disclaimer, must be included in all copies of the Software, in whole or in part, and all derivative works of the
Software, unless such copies or derivative works are solely in the form of machine-executable object code generated by
a source language processor.
THE SOFTWARE IS PROVIDED "AS IS", WITHOUT WARRANTY OF ANY KIND, EXPRESS OR IMPLIED, INCLUDING
BUT NOT LIMITED TO THE WARRANTIES OF MERCHANTABILITY, FITNESS FOR A PARTICULAR PURPOSE,
TITLE AND NON-INFRINGEMENT. IN NO EVENT SHALL THE COPYRIGHT HOLDERS OR ANYONE DISTRIBUTING
THE SOFTWARE BE LIABLE FOR ANY DAMAGES OR OTHER LIABILITY, WHETHER IN CONTRACT, TORT OR
OTHERWISE, ARISING FROM, OUT OF OR IN CONNECTION WITH THE SOFTWARE OR THE USE OR OTHER
DEALINGS IN THE SOFTWARE.
LIBCURL 7.19.3 LIBRARY
The libcurl 7.19.3 copyright © 1996-2009, Daniel Stenberg, daniel@haxx.se mailto:daniel@haxx.se library was used
when developing the application. All rights reserved.
Permission to use, copy, modify, and distribute this software for any purpose with or without fee is hereby granted,
provided that the above copyright notice and this permission notice appear in all copies.
THE SOFTWARE IS PROVIDED "AS IS", WITHOUT WARRANTY OF ANY KIND, EXPRESS OR IMPLIED, INCLUDING
BUT NOT LIMITED TO THE WARRANTIES OF MERCHANTABILITY, FITNESS FOR A PARTICULAR PURPOSE AND
NONINFRINGEMENT OF THIRD PARTY RIGHTS. IN NO EVENT SHALL THE AUTHORS OR COPYRIGHT HOLDERS
BE LIABLE FOR ANY CLAIM, DAMAGES OR OTHER LIABILITY, WHETHER IN AN ACTION OF CONTRACT, TORT
OR OTHERWISE, ARISING FROM, OUT OF OR IN CONNECTION WITH THE SOFTWARE OR THE USE OR OTHER
DEALINGS IN THE SOFTWARE.
Except as contained in this notice, the name of a copyright holder shall not be used in advertising or otherwise to promote
the sale, use or other dealings in this Software without prior written authorization of the copyright holder.
LIBPNG 1.2.8 LIBRARY
The libpng 1.2.8 copyright © 2004, 2006-2008 Glenn Randers-Pehrson library was used when developing the
application. All rights reserved, under zlib/libpng license.
This copy of the libpng notices is provided for your convenience. In case of any discrepancy between this copy and the
notices in the file png.h that is included in the libpng distribution, the latter shall prevail.
COPYRIGHT NOTICE, DISCLAIMER, and LICENSE:
If you modify libpng you may insert additional notices immediately following this sentence.
libpng version 2/1/06, December 3, 2004, is Copyright © 2004 Glenn Randers-Pehrson, and is distributed according to
the same disclaimer and license as libpng-2/1/05 with the following individual added to the list of Contributing Authors:
Cosmin Truta
libpng versions 1.0.7, July 1, 2000, through 2/1/05 - October 3, 2002, are Copyright © 2000-2002 Glenn RandersPehrson, and are distributed according to the same disclaimer and license as libpng-1.0.6 with the following individuals
added to the list of Contributing Authors: Simon-Pierre Cadieux, Eric S. Raymond, Gilles Vollant and with the following
additions to the disclaimer:
There is no warranty against interference with your enjoyment of the library or against infringement. There is no warranty
that our efforts or the library will fulfill any of your particular purposes or needs. This library is provided with all faults, and
the entire risk of satisfactory quality, performance, accuracy, and effort is with the user.
libpng versions 0.97, January 1998, through 1.0.6, March 20, 2000, are Copyright © 1998, 1999 Glenn Randers-Pehrson,
and are distributed according to the same disclaimer and license as libpng-0.96, with the following individuals added to
the list of Contributing Authors: Tom Lane, Glenn Randers-Pehrson, Willem van Schaik.
Page 95

U S I N G T H I R D -P A R T Y C O D E
95
libpng versions 0.89, June 1996, through 0.96, May 1997, are Copyright © 1996, 1997 Andreas Dilger Distributed
according to the same disclaimer and license as libpng-0.88, with the following individuals added to the list of
Contributing Authors: John Bowler, Kevin Bracey, Sam Bushell, Magnus Holmgren, Greg Roelofs, Tom Tanner.
libpng versions 0.5, May 1995, through 0.88, January 1996, are Copyright © 1995, 1996 Guy Eric Schalnat, Group 42,
Inc. For the purposes of this copyright and license, "Contributing Authors" is defined as the following set of individuals:
Andreas Dilger, Dave Martindale, Guy Eric Schalnat, Paul Schmidt, Tim Wegner.
The PNG Reference Library is supplied "AS IS". The Contributing Authors and Group 42, Inc. disclaim all warranties,
expressed or implied, including, without limitation, the warranties of merchantability and of fitness for any purpose. The
Contributing Authors and Group 42, Inc. assume no liability for direct, indirect, incidental, special, exemplary, or
consequential damages, which may result from the use of the PNG Reference Library, even if advised of the possibility of
such damage.
Permission is hereby granted to use, copy, modify, and distribute this source code, or portions hereof, for any purpose,
without fee, subject to the following restrictions:
1. The origin of this source code must not be misrepresented.
2. Altered versions must be plainlymarked as such and must not be misrepresented as being the original source.
3. This Copyright notice may not be removed or altered from any source or altered source distribution.
The Contributing Authors and Group 42, Inc. specifically permit, without fee, and encourage the use of this source code
as a component to supporting the PNG file format in commercial products. If you use this source code in a product,
acknowledgment is not required but would be appreciated.
A "png_get_copyright" function is available, for convenient use in "about" boxes and the like:
printf("%s",png_get_copyright(NULL));
Also, the PNG logo (in PNG format, of course) is supplied in the files "pngbar.png" and "pngbar.jpg" (88x31) and
"pngnow.png" (98x31).
Libpng is OSI Certified Open Source Software. OSI Certified Open Source is a certification mark of the Open Source
Initiative.
Glenn Randers-Pehrson, glennrp@users.sourceforge.net December 3, 2004
LIBC LIBRARY
The libс copyright © 2009 Free Software Foundation, Inc library was used when developing the application.
GNU GENERAL PUBLIC LICENSE
Version 2, June 1991
Copyright © 1989, 1991 Free Software Foundation, Inc.
51 Franklin St, Fifth Floor, Boston, MA 02110-1301 USA
Everyone is permitted to copy and distribute verbatim copies of this license document, but changing it is not allowed.
Preamble
The licenses for most software are designed to take away your freedom to share and change it. By contrast, the GNU
General Public License is intended to guarantee your freedom to share and change free software--to make sure the
software is free for all its users. This General Public License applies to most of the Free Software Foundation's software
and to any other program whose authors commit to using it. (Some other Free Software Foundation software is covered
by the GNU Library General Public License instead.) You can apply it to your programs, too.
When we speak of free software, we are referring to freedom, not price. Our General Public Licenses are designed to
make sure that you have the freedom to distribute copies of free software (and charge for this service if you wish), that
you receive source code or can get it if you want it, that you can change the software or use pieces of it in new free
programs; and that you know you can do these things.
Page 96

K A S P E R S K Y AN T I - VI R U S
96
To protect your rights, we need to make restrictions that forbid anyone to deny you these rights or to ask you to surrender
the rights. These restrictions translate to certain responsibilities for you if you distribute copies of the software, or if you
modify it.
For example, if you distribute copies of such a program, whether gratis or for a fee, you must give the recipients all the
rights that you have. You must make sure that they, too, receive or can get the source code. And you must show them
these terms so they know their rights.
We protect your rights with two steps: (1) copyright the software, and (2) offer you this license which gives you legal
permission to copy, distribute and/or modify the software.
Also, for each author's protection and ours, we want to make certain that everyone understands that there is no warranty
for this free software. If the software is modified by someone else and passed on, we want its recipients to know that
what they have is not the original, so that any problems introduced by others will not reflect on the original authors'
reputations.
Finally, any free program is threatened constantly by software patents. We wish to avoid the danger that redistributors of
a free program will individually obtain patent licenses, in effect making the program proprietary. To prevent this, we have
made it clear that any patent must be licensed for everyone's free use or not licensed at all.
The precise terms and conditions for copying, distribution and modification follow.
GNU GENERAL PUBLIC LICENSE
TERMS AND CONDITIONS FOR COPYING, DISTRIBUTION AND MODIFICATION
0. This License applies to any program or other work which contains a notice placed by the copyright holder saying
it may be distributed under the terms of this General Public License. The "Program", below, refers to any such
program or work, and a "work based on the Program" means either the Program or any derivative work under
copyright law: that is to say, a work containing the Program or a portion of it, either verbatim or with
modifications and/or translated into another language. (Hereinafter, translation is included without limitation in
the term "modification".) Each licensee is addressed as "you".
Activities other than copying, distribution and modification are not covered by this License; they are outside its
scope. The act of running the Program is not restricted, and the output from the Program is covered only if its
contents constitute a work based on the Program (independent of having been made by running the Program).
Whether that is true depends on what the Program does.
1. You may copy and distribute verbatim copies of the Program's source code as you receive it, in any medium,
provided that you conspicuously and appropriately publish on each copy an appropriate copyright notice and
disclaimer of warranty; keep intact all the notices that refer to this License and to the absence of any warranty;
and give any other recipients of the Program a copy of this License along with the Program.
You may charge a fee for the physical act of transferring a copy, and you may at your option offer warranty
protection in exchange for a fee.
2. You may modify your copy or copies of the Program or any portion of it, thus forming a work based on the
Program, and copy and distribute such modifications or work under the terms of Section 1 above, provided that
you also meet all of these conditions:
a. You must cause the modified files to carry prominent notices stating that you changed the files and the date
of any change.
b. You must cause any work that you distribute or publish, that in whole or in part contains or is derived from
the Program or any part thereof, to be licensed as a whole at no charge to all third parties under the terms
of this License.
c. If the modified program normally reads commands interactively when run, you must cause it, when started
running for such interactive use in the most ordinary way, to print or display an announcement including an
appropriate copyright notice and a notice that there is no warranty (or else, saying that you provide a
warranty) and that users may redistribute the program under these conditions, and telling the user how to
view a copy of this License. (Exception: if the Program itself is interactive but does not normally print such
an announcement, your work based on the Program is not required to print an announcement.)
Page 97

U S I N G T H I R D -P A R T Y C O D E
97
These requirements apply to the modified work as a whole. If identifiable sections of that work are not derived
from the Program, and can be reasonably considered independent and separate works in themselves, then this
License, and its terms, do not apply to those sections when you distribute them as separate works. But when
you distribute the same sections as part of a whole which is a work based on the Program, the distribution of the
whole must be on the terms of this License, whose permissions for other licensees extend to the entire whole,
and thus to each and every part regardless of who wrote it.
Thus, it is not the intent of this section to claim rights or contest your rights to work written entirely by you; rather,
the intent is to exercise the right to control the distribution of derivative or collective works based on the
Program.
In addition, mere aggregation of another work not based on the Program with the Program (or with a work based
on the Program) on a volume of a storage or distribution medium does not bring the other work under the scope
of this License.
3. You may copy and distribute the Program (or a work based on it, under Section 2) in object code or executable
form under the terms of Sections 1 and 2 above provided that you also do one of the following:
a. Accompany it with the complete corresponding machine-readable source code, which must be distributed
under the terms of Sections 1 and 2 above on a medium customarily used for software interchange; or,
b. Accompany it with a written offer, valid for at least three years, to give any third party, for a charge no more
than your cost of physically performing source distribution, a complete machine-readable copy of the
corresponding source code, to be distributed under the terms of Sections 1 and 2 above on a medium
customarily used for software interchange; or,
c. Accompany it with the information you received as to the offer to distribute corresponding source code.
(This alternative is allowed only for noncommercial distribution and only if you received the program in
object code or executable form with such an offer, in accord with Subsection b above.)
The source code for a work means the preferred form of the work for making modifications to it. For an
executable work, complete source code means all the source code for all modules it contains, plus any
associated interface definition files, plus the scripts used to control compilation and installation of the
executable. However, as a special exception, the source code distributed need not include anything that is
normally distributed (in either source or binary form) with the major components (compiler, kernel, and so on) of
the operating system on which the executable runs, unless that component itself accompanies the executable.
If distribution of executable or object code is made by offering access to copy from a designated place, then
offering equivalent access to copy the source code from the same place counts as distribution of the source
code, even though third parties are not compelled to copy the source along with the object code.
4. You may not copy, modify, sublicense, or distribute the Program except as expressly provided under this
License. Any attempt otherwise to copy, modify, sublicense or distribute the Program is void, and will
automatically terminate your rights under this License.
However, parties who have received copies, or rights, from you under this License will not have their licenses
terminated so long as such parties remain in full compliance.
5. You are not required to accept this License, since you have not signed it. However, nothing else grants you
permission to modify or distribute the Program or its derivative works. These actions are prohibited by law if you
do not accept this License. Therefore, by modifying or distributing the Program (or any work based on the
Program), you indicate your acceptance of this License to do so, and all its terms and conditions for copying,
distributing or modifying the Program or works based on it.
6. Each time you redistribute the Program (or any work based on the Program), the recipient automatically
receives a license from the original licensor to copy, distribute or modify the Program subject to these terms and
conditions. You may not impose any further restrictions on the recipients' exercise of the rights granted herein.
You are not responsible for enforcing compliance by third parties to this License.
7. If, as a consequence of a court judgment or allegation of patent infringement or for any other reason (not limited
to patent issues), conditions are imposed on you (whether by court order, agreement or otherwise) that
contradict the conditions of this License, they do not excuse you from the conditions of this License. If you
cannot distribute so as to satisfy simultaneously your obligations under this License and any other pertinent
obligations, then as a consequence you may not distribute the Program at all. For example, if a patent license
Page 98

K A S P E R S K Y AN T I - VI R U S
98
would not permit royalty-free redistribution of the Program by all those who receive copies directly or indirectly
through you, then the only way you could satisfy both it and this License would be to refrain entirely from
distribution of the Program.
If any portion of this section is held invalid or unenforceable under any particular circumstance, the balance of
the section is intended to apply and the section as a whole is intended to apply in other circumstances. It is not
the purpose of this section to induce you to infringe any patents or other property right claims or to contest
validity of any such claims; this section has the sole purpose of protecting the integrity of the free software
distribution system, which is implemented by public license practices. Many people have made generous
contributions to the wide range of software distributed through that system in reliance on consistent application
of that system; it is up to the author/donor to decide if he or she is willing to distribute software through any other
system and a licensee cannot impose that choice.
This section is intended to make thoroughly clear what is believed to be a consequence of the rest of this
License.
8. If the distribution and/or use of the Program is restricted in certain countries either by patents or by copyrighted
interfaces, the original copyright holder who places the Program under this License may add an explicit
geographical distribution limitation excluding those countries, so that distribution is permitted only in or among
countries not thus excluded. In such case, this License incorporates the limitation as if written in the body of this
License.
9. The Free Software Foundation may publish revised and/or new versions of the General Public License from time
to time. Such new versions will be similar in spirit to the present version, but may differ in detail to address new
problems or concerns.
Each version is given a distinguishing version number. If the Program specifies a version number of this License
which applies to it and "any later version", you have the option of following the terms and conditions either of that
version or of any later version published by the Free Software Foundation. If the Program does not specify a
version number of this License, you may choose any version ever published by the Free Software Foundation.
10. If you wish to incorporate parts of the Program into other free programs whose distribution conditions are
different, write to the author to ask for permission. For software which is copyrighted by the Free Software
Foundation, write to the Free Software Foundation; we sometimes make exceptions for this. Our decision will be
guided by the two goals of preserving the free status of all derivatives of our free software and of promoting the
sharing and reuse of software generally.
NO WARRANTY
11. BECAUSE THE PROGRAM IS LICENSED FREE OF CHARGE, THERE IS NO WARRANTY FOR THE
PROGRAM, TO THE EXTENT PERMITTED BY APPLICABLE LAW. EXCEPT WHEN OTHERWISE STATED
IN WRITING THE COPYRIGHT HOLDERS AND/OR OTHER PARTIES PROVIDE THE PROGRAM "AS IS"
WITHOUT WARRANTY OF ANY KIND, EITHER EXPRESSED OR IMPLIED, INCLUDING, BUT NOT LIMITED
TO, THE IMPLIED WARRANTIES OF MERCHANTABILITY AND FITNESS FOR A PARTICULAR PURPOSE.
THE ENTIRE RISK AS TO THE QUALITY AND PERFORMANCE OF THE PROGRAM IS WITH YOU. SHOULD
THE PROGRAM PROVE DEFECTIVE, YOU ASSUME THE COST OF ALL NECESSARY SERVICING,
REPAIR OR CORRECTION.
12. IN NO EVENT UNLESS REQUIRED BY APPLICABLE LAW OR AGREED TO IN WRITING WILL ANY
COPYRIGHT HOLDER, OR ANY OTHER PARTY WHO MAY MODIFY AND/OR REDISTRIBUTE THE
PROGRAM AS PERMITTED ABOVE, BE LIABLE TO YOU FOR DAMAGES, INCLUDING ANY GENERAL,
SPECIAL, INCIDENTAL OR CONSEQUENTIAL DAMAGES ARISING OUT OF THE USE OR INABILITY TO
USE THE PROGRAM (INCLUDING BUT NOT LIMITED TO LOSS OF DATA OR DATA BEING RENDERED
INACCURATE OR LOSSES SUSTAINED BY YOU OR THIRD PARTIES OR A FAILURE OF THE PROGRAM
TO OPERATE WITH ANY OTHER PROGRAMS), EVEN IF SUCH HOLDER OR OTHER PARTY HAS BEEN
ADVISED OF THE POSSIBILITY OF SUCH DAMAGES.
If you develop a new program, and you want it to be of the greatest possible use to the public, the best way to achieve
this is to make it free software which everyone can redistribute and change under these terms.
END OF TERMS AND CONDITIONS
How to Apply These Terms to Your New Programs
Page 99

U S I N G T H I R D -P A R T Y C O D E
99
To do so, attach the following notices to the program. It is safest to attach them to the start of each source file to most
effectively convey the exclusion of warranty; and each file should have at least the "copyright" line and a pointer to where
the full notice is found.
<one line to give the program's name and a brief idea of what it does.>
Copyright © <year> <name of author>
This program is free software; you can redistribute it and/or modify it under the terms of the GNU General Public
License as published by the Free Software Foundation; either version 2 of the License, or (at your option) any later
version.
This program is distributed in the hope that it will be useful, but WITHOUT ANY WARRANTY; without even the
implied warranty of MERCHANTABILITY or FITNESS FOR A PARTICULAR PURPOSE. See the GNU General
Public License for more details.
You should have received a copy of the GNU General Public License along with this program; if not, write to the Free
Software Foundation, Inc., 51 Franklin St, Fifth Floor, Boston, MA 02110-1301 USA
Also add information on how to contact you by electronic and paper mail.
If the program is interactive, make it output a short notice like this when it starts in an interactive mode:
Gnomovision version 69, Copyright © year name of author Gnomovision comes with ABSOLUTELY NO
WARRANTY; for details type `show w'. This is free software, and you are welcome to redistribute it under certain
conditions; type `show c' for details.
The hypothetical commands `show w' and `show c' should show the appropriate parts of the General Public License. Of
course, the commands you use may be called something other than `show w' and `show c'; they could even be mouseclicks or menu items--whatever suits your program.
You should also get your employer (if you work as a programmer) or your school, if any, to sign a "copyright disclaimer"
for the program, if necessary. Here is a sample; alter the names:
Yoyodyne, Inc., hereby disclaims all copyright interest in the program `Gnomovision' (which makes passes at
compilers) written by James Hacker.
<signature of Ty Coon>, 1 April 1989
Ty Coon, President of Vice
This General Public License does not permit incorporating your program into proprietary programs. If your program is a
subroutine library, you may consider it more useful to permit linking proprietary applications with the library. If this is what
you want to do, use the GNU Library General Public License instead of this License.
GNU LESSER GENERAL PUBLIC LICENSE
Version 2.1, February 1999
Copyright © 1991, 1999 Free Software Foundation, Inc.
59 Temple Place, Suite 330, Boston, MA 02111-1307 USA
Everyone is permitted to copy and distribute verbatim copies of this license document, but changing it is not allowed.
[This is the first released version of the Lesser GPL. It also counts as the successor of the GNU Library Public License,
version 2, hence the version number 2.1.]
Preamble
The licenses for most software are designed to take away your freedom to share and change it. By contrast, the GNU
General Public Licenses are intended to guarantee your freedom to share and change free software--to make sure the
software is free for all its users.
This license, the Lesser General Public License, applies to some specially designated software packages--typically
libraries--of the Free Software Foundation and other authors who decide to use it. You can use it too, but we suggest you
Page 100

K A S P E R S K Y AN T I - VI R U S
100
first think carefully about whether this license or the ordinary General Public License is the better strategy to use in any
particular case, based on the explanations below.
When we speak of free software, we are referring to freedom of use, not price. Our General Public Licenses are designed
to make sure that you have the freedom to distribute copies of free software (and charge for this service if you wish); that
you receive source code or can get it if you want it; that you can change the software and use pieces of it in new free
programs; and that you are informed that you can do these things.
To protect your rights, we need to make restrictions that forbid distributors to deny you these rights or to ask you to
surrender these rights. These restrictions translate to certain responsibilities for you if you distribute copies of the library
or if you modify it.
For example, if you distribute copies of the library, whether gratis or for a fee, you must give the recipients all the rights
that we gave you. You must make sure that they, too, receive or can get the source code. If you link other code with the
library, you must provide complete object files to the recipients, so that they can relink them with the library after making
changes to the library and recompiling it. And you must show them these terms so they know their rights.
We protect your rights with a two-step method: (1) we copyright the library, and (2) we offer you this license, which gives
you legal permission to copy, distribute and/or modify the library.
To protect each distributor, we want to make it very clear that there is no warranty for the free library. Also, if the library is
modified by someone else and passed on, the recipients should know that what they have is not the original version, so
that the original author's reputation will not be affected by problems that might be introduced by others.
Finally, software patents pose a constant threat to the existence of any free program. We wish to make sure that a
company cannot effectively restrict the users of a free program by obtaining a restrictive license from a patent holder.
Therefore, we insist that any patent license obtained for a version of the library must be consistent with the full freedom of
use specified in this license.
Most GNU software, including some libraries, is covered by the ordinary GNU General Public License. This license, the
GNU Lesser General Public License, applies to certain designated libraries, and is quite different from the ordinary
General Public License. We use this license for certain libraries in order to permit linking those libraries into non-free
programs.
When a program is linked with a library, whether statically or using a shared library, the combination of the two is legally
speaking a combined work, a derivative of the original library. The ordinary General Public License therefore permits
such linking only if the entire combination fits its criteria of freedom. The Lesser General Public License permits more lax
criteria for linking other code with the library.
We call this license the "Lesser" General Public License because it does Less to protect the user's freedom than the
ordinary General Public License. It also provides other free software developers Less of an advantage over competing
non-free programs. These disadvantages are the reason we use the ordinary General Public License for many libraries.
However, the Lesser license provides advantages in certain special circumstances.
For example, on rare occasions, there may be a special need to encourage the widest possible use of a certain library, so
that it becomes a de-facto standard. To achieve this, non-free programs must be allowed to use the library. A more
frequent case is that a free library does the same job as widely used non-free libraries. In this case, there is little to gain
by limiting the free library to free software only, so we use the Lesser General Public License.
In other cases, permission to use a particular library in non-free programs enables a greater number of people to use a
large body of free software. For example, permission to use the GNU C Library in non-free programs enables many more
people to use the whole GNU operating system, as well as its variant, the GNU/Linux operating system.
Although the Lesser General Public License is Less protective of the users' freedom, it does ensure that the user of a
program that is linked with the Library has the freedom and the wherewithal to run that program using a modified version
of the Library.
The precise terms and conditions for copying, distribution and modification follow. Pay close attention to the difference
between a "work based on the library" and a "work that uses the library". The former contains code derived from the
library, whereas the latter must be combined with the library in order to run.
GNU LESSER GENERAL PUBLIC LICENSE
TERMS AND CONDITIONS FOR COPYING, DISTRIBUTION AND MODIFICATION
 Loading...