

Page 1
KASPERSKY LABS
Kaspersky Anti-Virus® 4.5
for Microsoft Exchange Server
USER’S GUIDE
Page 2

KASPERSKY ANTI-VIRUS® 4.5
FOR MICROSOFT EXCHANGE SERVER
User’s Guide
Kaspersky Labs Ltd.
http://www.kaspersky.com
Edition date: December 2003
Page 3

Contents
CHAPTER 1. KASPERSKY ANTI-VIRUS® 4.5 FOR MS EXCHANGE SERVER........ 7
1.1. What is new in version 4.5 .................................................................................... 9
1.2. Hardware and software requirements .................................................................. 9
1.2.1. Protected server is MS Exchange Server 5.5 ............................................... 9
1.2.2. Protected server is MS Exchange Server 2000/2003................................... 9
1.2.3. Requirements for the computer from which Anti-Virus Engine will be
controlled....................................................................................................... 10
1.3. Distribution Kit...................................................................................................... 10
1.4. Help desk for registered users ............................................................................ 11
1.5. Conventions......................................................................................................... 12
CHAPTER 2. INSTALLATION ...................................................................................... 13
2.1. Installing and uninstalling Kaspersky Anti-Virus® for MS Exchange Server...... 13
2.1.1. Step-by-step installation ............................................................................... 13
2.1.2. Enabling protection of mail bodies under MS Exchange Server 5.5 .......... 21
2.1.3. Updating version 4.2 to 4.5........................................................................... 24
2.1.4. Uninstalling.................................................................................................... 25
2.2. Selecting protected storages............................................................................... 25
2.3. Anti-virus features to support clustering facilities................................................ 28
CHAPTER 3. PROTECTION OF MS EXCHANGE SERVER MESSAGES .............. 29
3.1. Operating principles of the program. Message queue for anti-virus scan......... 29
3.2. Working Procedure.............................................................................................. 31
3.3. Anti-Virus Engine Control by means of Kaspersky AV MMC Snap-In.............. 32
3.3.1. Starting Kaspersky AV MMC Snap-In ......................................................... 32
3.3.2. Kaspersky AV MMC Snap-In Interface........................................................ 34
3.3.3. Adding/deleting server for control................................................................. 35
3.3.4. Setting/removing anti-virus protection. Disconnecting/connecting to
server. License. Importing/exporting settings .............................................. 37
3.3.5. Changing settings using Kaspersky AV MMC Snap-In............................... 40
3.3.6. Table of controlled servers. Customizing warning modes .......................... 41
3.4. Customizing Anti-Virus Engine settings.............................................................. 42
Page 4

4 Kaspersky Anti-Virus 4.5 for MS Exchange Server
3.4.1. Categories: General and Settings............................................................... 42
3.4.2. Basic Settings for Anti-Virus Protection ....................................................... 43
3.4.2.1. Check Mode........................................................................................... 43
3.4.2.2. Advanced Scanning Modes .................................................................. 44
3.4.2.3. Objects to be scanned ........................................................................... 45
3.4.2.4. Scanning Methods ................................................................................. 46
3.4.3. Rules for scanned objects ............................................................................ 46
3.4.4. Virus Messages and Reports....................................................................... 50
3.4.4.1. Report Types.......................................................................................... 50
3.4.4.2. Sending report to administrator ............................................................. 51
3.4.4.3. Sending Report to Recipient and Sender ............................................. 53
3.4.4.4. Report File.............................................................................................. 54
3.4.4.5. Application Log....................................................................................... 55
3.4.5. Quarantine .................................................................................................... 58
3.4.6. Advanced: parameters of Anti-Virus Engine and MS Exchange Server
joint operation................................................................................................ 61
3.4.7. Advanced: Service Parameters ................................................................... 61
3.4.8. Advanced: Template Editing ........................................................................ 62
3.4.8.1. List of Templates.................................................................................... 62
3.4.8.2. Template Editor...................................................................................... 63
3.4.8.3. Macros and Conditional Clauses .......................................................... 66
3.5. Testing the program ............................................................................................ 72
3.6. System Performance Chart. System Monitor..................................................... 73
3.7. Operating in demo mode. Extending your license. Editing a list of
unprotected objects............................................................................................ 77
CHAPTER 4. KASPERSKY ANTI-VIRUS® CONTROL CENTRE .............................. 78
4.1. Launching Kaspersky AV Control Centre........................................................... 78
4.2. Kaspersky AV Control Centre Interface.............................................................. 80
4.2.1. Tasks tab....................................................................................................... 81
4.2.1.1. Properties window.................................................................................. 86
4.2.2. Components Tab.......................................................................................... 87
4.2.3. Settings Tab.................................................................................................. 88
4.2.3.1. Security Category .................................................................................. 90
4.2.3.2. Alerts Category ...................................................................................... 92
4.2.3.3. Customize Category .............................................................................. 95
4.3. New Task Wizard ................................................................................................ 97
Page 5

Contents 5
4.3.1. Task Window ................................................................................................ 98
4.3.2. Schedule Window for Kaspersky AV Updater Task.................................... 99
4.3.2.1. Launching on Event ............................................................................. 100
4.3.2.2. Launching by Condition ....................................................................... 101
4.3.2.3. Launching Hourly................................................................................. 102
4.3.2.4. Launching Daily ................................................................................... 102
4.3.2.5. Launching Weekly ............................................................................... 103
4.3.2.6. Launching Monthly............................................................................... 104
4.3.3. Alerts Window............................................................................................. 105
4.3.4. User Account Window................................................................................ 105
4.3.5. Task Setting ................................................................................................ 106
CHAPTER 5. KASPERSKY ANTI-VIRUS® UPDATER ............................................. 107
5.1. How to Start Kaspersky AV Updater ................................................................ 107
5.2. Kaspersky AV Updater interface....................................................................... 108
5.2.1. Step 1. Kaspersky AV Updater Welcome Wizard Box.............................. 108
5.2.2. Step 2. Connection dialog box ................................................................... 109
5.2.2.1. Setting Kaspersky Anti-Virus® Update from the Internet.................... 110
5.2.2.2. Updating from local folder.................................................................... 115
5.2.2.3. Choosing objects to be updated.......................................................... 116
5.2.3. Step 3. Options box .................................................................................... 116
5.2.4. Step 4. Retrieving Updates window........................................................... 117
5.2.5. Step 5. Finishing Wizard box...................................................................... 118
CHAPTER 6. KASPERSKY ANTI-VIRUS® REPORT VIEWER................................ 119
CHAPTER 7. TREE CHART ....................................................................................... 122
7.1. Tree Chart.......................................................................................................... 122
7.2. Controls.............................................................................................................. 123
7.2.1. Check Box................................................................................................... 123
7.2.2. Option Button.............................................................................................. 124
7.2.3. Text Field .................................................................................................... 124
7.2.4. Path Field.................................................................................................... 125
7.2.5. Number Field .............................................................................................. 125
7.2.6. Drop-Down List........................................................................................... 126
APPENDIX A. REGISTRY SETTINGS....................................................................... 127
Page 6

6 Kaspersky Anti-Virus 4.5 for MS Exchange Server
APPENDIX B. KASPERSKY LABS LTD. ................................................................... 134
B.1. Other Kaspersky Labs Products....................................................................... 135
B.2. Contact Information........................................................................................... 138
APPENDIX C. INDEX .................................................................................................. 139
APPENDIX D. LICENSE AGREEMENT .................................................................... 140
Page 7

CHAPTER 1. KASPERSKY ANTI-
VIRUS® 4.5 FOR MS
EXCHANGE SERVER
Kaspersky Anti-Virus® 4.5 for MS Exchange Server (hereinafter referred to as
Kaspersky Anti-Virus
®
) software package is designed to protect mailboxes and
public folders from viruses on MS Exchange Server 5.5/2000/2003 (hereinafter
referred to as MS Exchange Server).
Kaspersky Anti-Virus
®
performs the following functions on MS Exchange Server:
• Checking and disinfecting mail messages "on-the-fly". The program
scans all MS Exchange Server 5.5/2000 incoming and outgoing
messages as well as objects stored on it, and disinfects infected objects if
possible. Such objects can include message texts, attached messages
and files, and OLE objects.
During scanning the program uses anti-virus databases that
allow detection and deletion of all known virus types. Antivirus databases are continuously growing and updated.
• User protection from infected messages. The program prevents user
access to the infected objects. Depending on the settings, it blocks a
message with an infected object, deletes the infected object from the
message, or replaces this object by a file containing information on the
virus detected. The administrator can also customize the mode when the
program skips a message with an infected object. In this case, the
program changes the name of the infected object, adds information about
the detected virus to it, and changes the object extension. As a result, the
user will not be able to launch the infected file and infect his/her computer
by accident.
• Quarantine. The program renames suspicious and infected files, and
saves them to the quarantine directory on the hard disk.
• Background scanning on demand. This option allows you to detect and
delete viruses in old messages received before Kaspersky Anti-Virus
®
installation, as well as in messages checked after anti-virus database
updating.
• Scanning in several threads. Checking mail messages in several
threads accelerates the program’s performance.
Page 8

8 Kaspersky Anti-Virus 4.5 for MS Exchange Server
• Self-descriptive reporting. The program sends virus alerts to
administrator, recipient or sender of the infected messages and places
corresponding entries in the Application Log and program log file. Such
thorough supervision of the program’s performance helps to quickly
prevent infection of the server and other computers in your office.
• Template Editor. You can set notifications and reports by means of a
special program.
The following software products are included in the package:
• Kaspersky Anti-Virus
®
Engine for MS Exchange Server (Anti-Virus
Engine) – is a program component designed for anti-virus protection of
the mail messages passing through MS Exchange Server. It is installed
and operates on the server.
Anti-Virus Engine 5.5 includes Kaspersky AV AVAPI (1.0) Interceptor for
MS Exchange Server (AVAPI Interceptor) and Kaspersky Anti-Virus
®
MAPI Interceptor for MS Exchange Server (MAPI-service).
Anti-Virus Engine 2000/2003 includes Kaspersky AV VSAPI (2.0)
Interceptor for MS Exchange Server (VSAPI Interceptor).
In addition, Anti-Virus Engine includes Kaspersky AV LDAP Notification
Service, which keeps track of a list of unprotected mailboxes defined in
Active Directory (MS Exchange Server 2000/2003) or Exchange Directory
(MS Exchange Server 5.5).
• Kaspersky Anti-Virus
®
MMC Snap-In – is a program component
designed for settings control and for launching Kaspersky Anti-Virus
®
Engine from Microsoft Management Console (MMC), a standard Microsoft
Windows 2000 utility.
• Kaspersky Anti-Virus
®
Updater – is a virus-definition database-updating
utility. Anti-virus databases are used when searching for viruses in mail
messages. Kaspersky Labs regularly updates these databases by adding
new virus details to them; database updates are placed on Kaspersky
Labs web sites and later retrieved by the updating utility.
• Kaspersky Anti-Virus
®
Control Centre — is a control shell for other
components. In this software package, Kaspersky Anti-Virus® Control
Centre is used to control only Kaspersky Anti-Virus
®
Updater. Using
Kaspersky AV Control Centre, you can manage updating of anti-virus
databases, schedule automatic updating, and review the Anti-Virus
Updater performance statistics.
Page 9

Kaspersky Anti-Virus® 4.5 for MS Exchange Server 9
1.1. What is new in version 4.5
• MS Exchange Server 2003 assistance is provided with version 4.5.
• For version 4.5, purchase of a special license for protecting public folders
is not required. The license is issued only for MS Exchange Server
mailboxes. In this case, the protection is delivered to both MS Exchange
Server mailboxes and public folders.
• An option to disable protection of mailboxes has been introduced. Note
that if you want to protect more mailboxes than specified in your license,
you should either buy a new license or limit the number of protected
mailboxes. Otherwise, the program will operate in demo mode.
• A new feature has been added to the Kaspersky Anti-Virus
®
to support
the clustering facilities in MS Exchange Server 2000/2003.
• In version 4.5, the Kaspersky AV Сontrol Centre Plug-In component is not
installed. The Kaspersky Anti-Virus
®
will be managed only through the
MMC Snap-In component. The Kaspersky AV Сontrol Centre Plug-In is
uninstalled in case of the updating of program version from 4.x to 4.5.
1.2. Hardware and software
requirements
1.2.1. Protected server is MS Exchange
Server 5.5
Requirements for protected server on which Anti-Virus Engine is installed:
• Microsoft Windows NT 4.0 Service Pack 6;
• MS Exchange Server 5.5 with Service Pack 4;
• Active Directory Service Interfaces (ADSI) 2.5 or Active Directory Client
Extensions.
1.2.2. Protected server is MS Exchange
Server 2000/2003
Requirements for protected server on which Anti-Virus Engine is installed:
Page 10

10 Kaspersky Anti-Virus 4.5 for MS Exchange Server
• Microsoft Windows Server 2000 with Service Pack 2;
• MS Exchange Server 2000 with Service Pack 2.
Requirements for the protected MS Exchange Server 2003 on which Anti-Virus
Engine is installed:
• MS Windows Server 2000 with Service Pack 3 or MS Windows Server
2003;
• MS Exchange Server 2003.
You can install Anti-Virus Engine onto different cluster nodes using the
Active/Active mode and then control Anti-Virus Engine on each of these nodes
separately.
1.2.3. Requirements for the computer from
which Anti-Virus Engine will be
controlled
The computer from which Anti-Virus Engine will be controlled must meet the
following requirements:
• If you intend to control your Anti-Virus Engine locally, install Kaspersky
Anti-Virus
®
Control Centre and/or Kaspersky Anti-Virus® MMC Snap-In on
your computer.
• If you intend to control your Anti-Virus Engine from a remote computer:
• Kaspersky Anti-Virus
®
MMC Snap-In.
• MS Windows 2000 operating system or higher or MS Windows
NT 4.0 with ММС version 1.2 or higher.
• Active Directory Service Interfaces (ADSI) 2.5 or Active
Directory Client Extensions (MS Windows 2000 and higher
automatically meets these requirements).
1.3. Distribution Kit
Kaspersky Anti-Virus® for MS Exchange Server is part of the series of Kaspersky
Anti-Virus
®
corporate products. You can purchase the corporate products either
from our distributors (retail box) or online at one of our Internet shops (for
example, www.kaspersky.com
, the Buy online link).
The retail box includes:
Page 11
Kaspersky Anti-Virus® 4.5 for MS Exchange Server 11
• A sealed envelope with the installation CD containing files for the software
product.
• User’s Guide.
• A license key written on the installation CD.
• License agreement.
Before you unseal the envelope containing the CD, be sure to
thoroughly review the license agreement.
If you buy Kaspersky Anti-Virus
®
for MS Exchange Server online, you download
the installation file of the product from the Kaspersky Labs website. This
installation file includes this User Guide and the license key. The license key can
also be sent to you by e-mail after receiving your payment.
The License Agreement is a legal agreement between you and the manufacturer
(Kaspersky Labs Ltd.) describing the terms on which you may employ the antivirus product which you have purchased.
Make sure you read this License Agreement!
If you do not agree to the terms of this LA, you can return the unused product to
your Kaspersky Anti-Virus
®
dealer for a full refund, making sure the envelope
with the CD is sealed.
By unsealing the envelope, you agree to all the terms of the LA.
1.4. Help desk for registered users
Kaspersky Labs Ltd. offers a large service package enabling its legal
customers to efficiently employ Kaspersky Anti-Virus®.
If you register and purchase a subscription you will be provided with the following
services for the period of your subscription:
• new versions of this Kaspersky Anti-Virus
®
software.
• phone or e-mail advising on matters related to the installation, setup, and
operation of our anti-virus software.
• information about new Kaspersky Labs products and about new computer
viruses (for those who subscribe to the Kaspersky Labs newsletter).
Kaspersky Labs does not provide any information related to the
operation and use of your operating system or various technologies.
Page 12
12 Kaspersky Anti-Virus 4.5 for MS Exchange Server
1.5. Conventions
In this book we use various conventions to emphasize different meaningful parts
of the documentation. The Table below lists the conventions used in this User
Guide.
Convention Meaning
Bold font
Menu titles, commands, window titles, dialog
elements, etc.
Note.
Additional information, notes.
Attention!
Critical information.
To do this,
1. Step 1.
2. …
Actions that must be taken.
Task or example
Formulation of the problem or an example of
how to use the product.
Solution
•
A solution of the problem formulated.
[key]— Function of the key.
Command line keys.
Text of information
messages and the
command line
Text of configuration files, information
messages, and the command line.
Page 13
CHAPTER 2. INSTALLATION
2.1. Installing and uninstalling
Kaspersky Anti-Virus
®
for MS
Exchange Server
You can launch the installation program:
• on MS Exchange Server 5.5 SP4 / 2000 SP2/2003. In this case you may
install all package components on the server.
• on the computer from which the settings of server anti-virus protection will
be controlled. You will not be able to install the Kaspersky Anti-Virus
®
Engine for MS Exchange Server component there as it is designed for
operation on the server only.
Launch the setup.exe program from the CD to start the package installation. The
setup wizard operates in dialog mode. Each dialog box contains a certain set of
buttons to manage the setup process. The main buttons are:
• OK— accept actions;
• Cancel – cancel actions;
• Next – move one step forward;
• Back – move one step backward.
Before you install Kaspersky Anti-Virus® 4.5, make sure to quit all
programs running on your computer.
Before installing Kaspersky Anti-Virus
®
, remove all anti-virus software
for MS Exchange Server provided by other developers that use the
VirusScan API or Anti-Virus API technologies.
2.1.1. Step-by-step installation
Step 1. Read general information
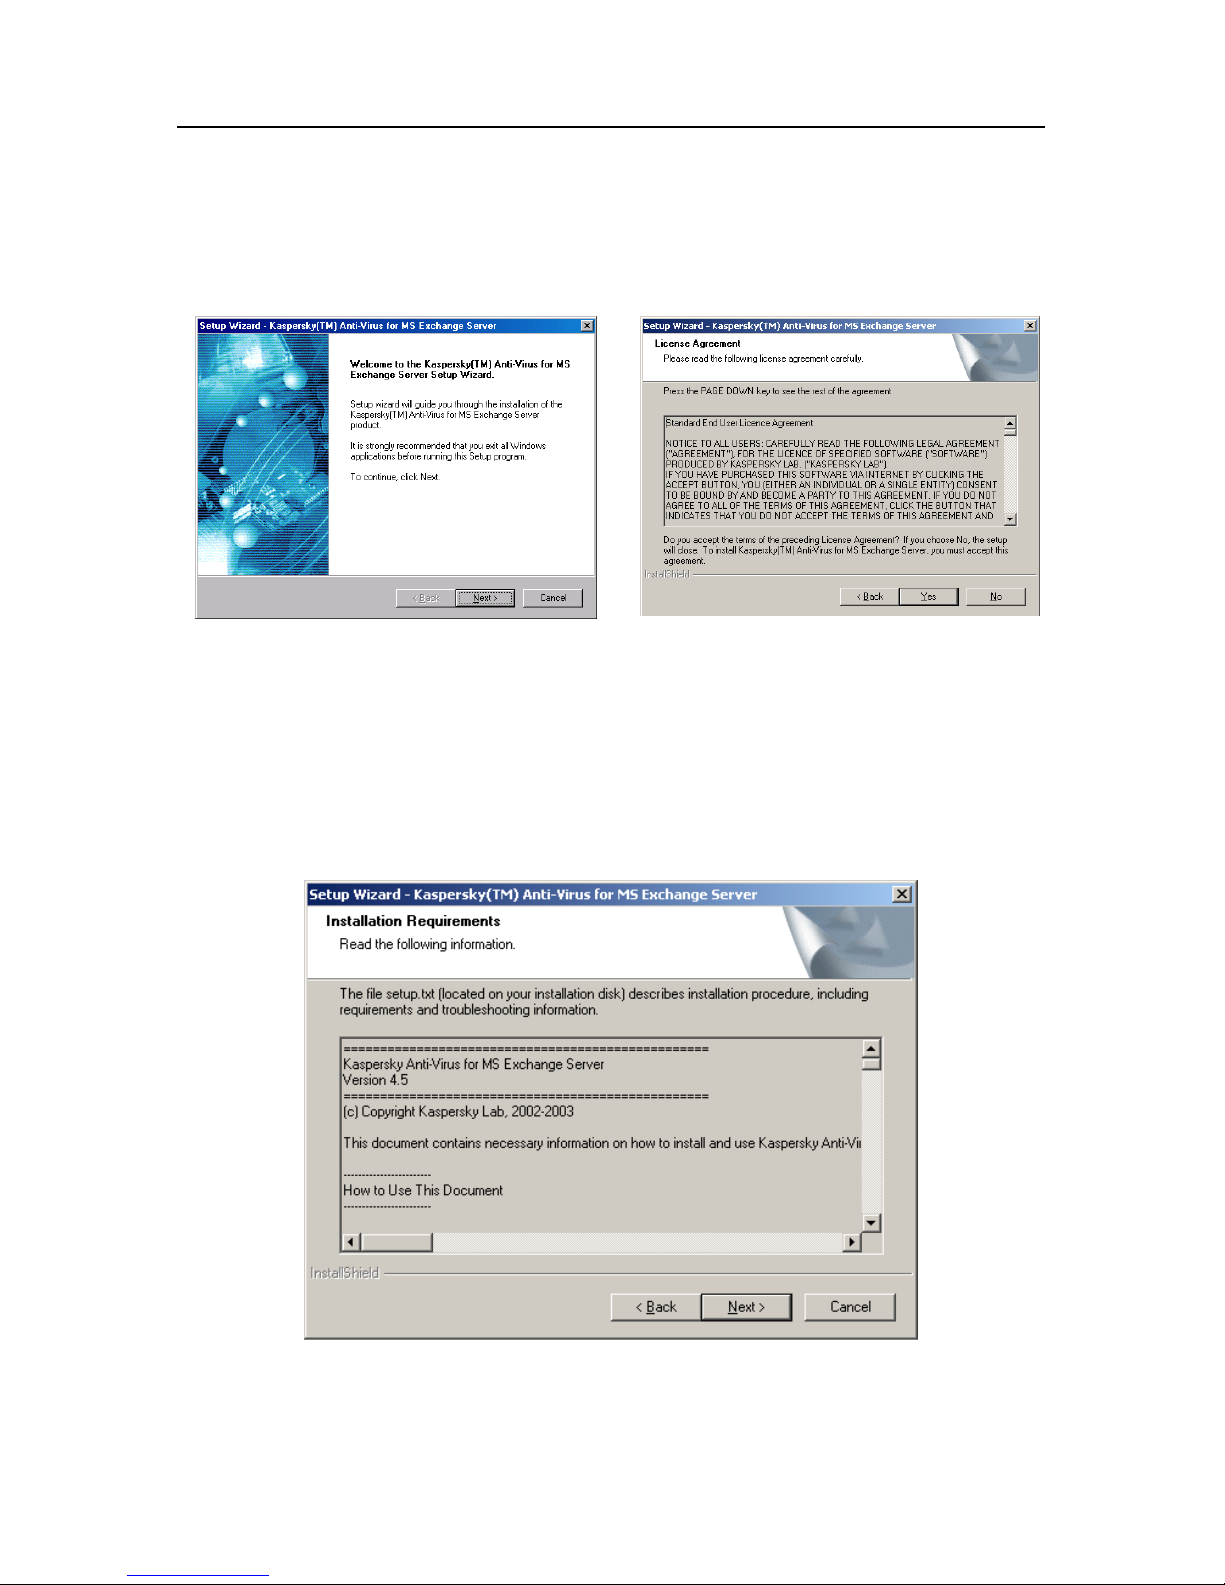
The first dialog of the Setup Wizard (see Figure 1) contains general information
on Kaspersky Anti-Virus
®
4.5.
Page 14
14 Kaspersky Anti-Virus 4.5 for MS Exchange Server
Step 2. Read the license agreement
The License Agreement dialog box (Figure 2) contains the Agreement text.
Read it and click Yes if you accept the license agreement terms. Otherwise, click
No to abort the setup.
Figure 1. First dialog box of Setup Wizard
Figure 2. The License Agreement
dialog box
Step 3. Installation requirements
Read the information on how to install and use the program in the Installation
requirements dialog box (see Figure 3).
Figure 3. The Installation Requirements dialog box
Page 15
Installation 15
Step 4. Enter customer information
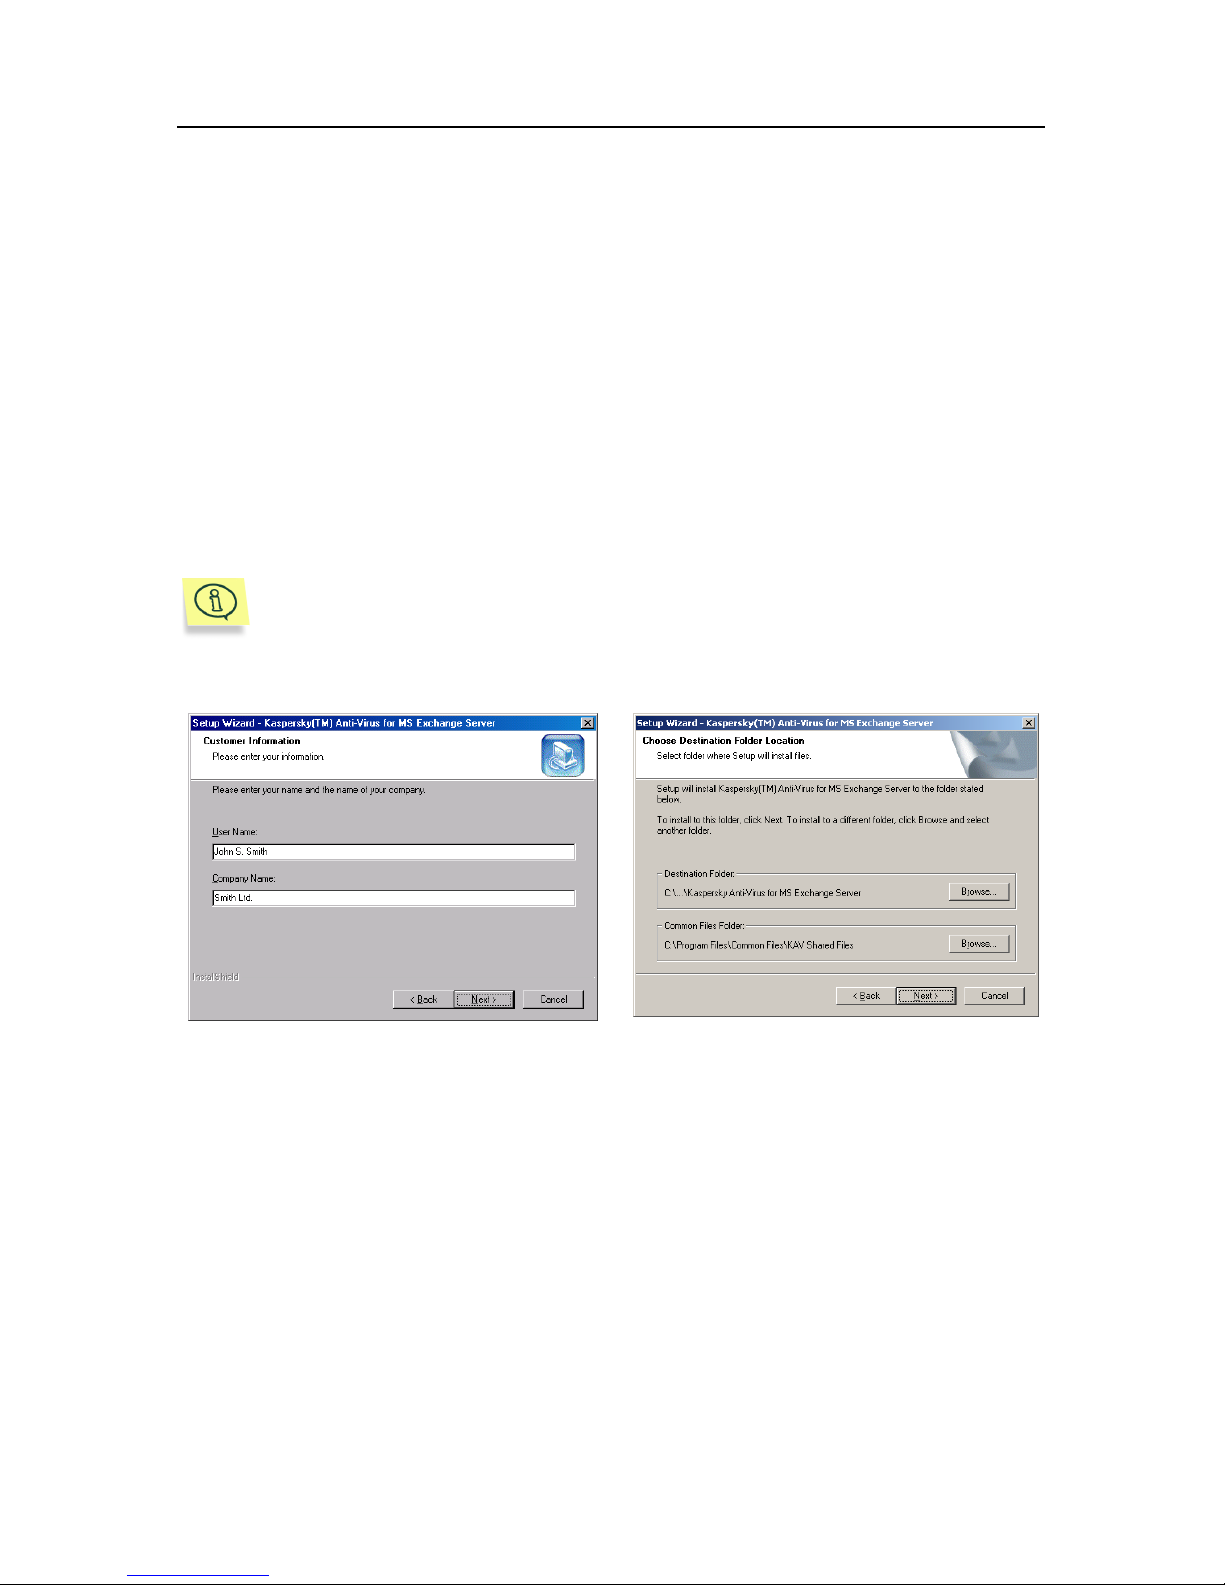
Enter customer information in the Customer Information dialog box (see Figure
4). Enter the appropriate data in the User Name field and the Company Name
field. By default the information for these fields is taken from the Windows
registry.
Step 5. Select the program installation folder
Select the directories for installation of Kaspersky Anti-Virus® 4.5 components in
the Choose Destination Folder Location dialog box (see Figure 5). The
directory for components will be indicated in the Destination Folder group. The
general files folder path will be indicated in the Common Files Folder group.
Click on Browse to choose the directory.
The Common Files Folder field is hidden if a Kaspersky Labs server
product is installed on the server.
Figure 4. The Customer Information dialog
box
Figure 5. The Choose Destination Folder
Location dialog box
Page 16
16 Kaspersky Anti-Virus 4.5 for MS Exchange Server
Step 6. Add the program group name to the
Start\Programs menu
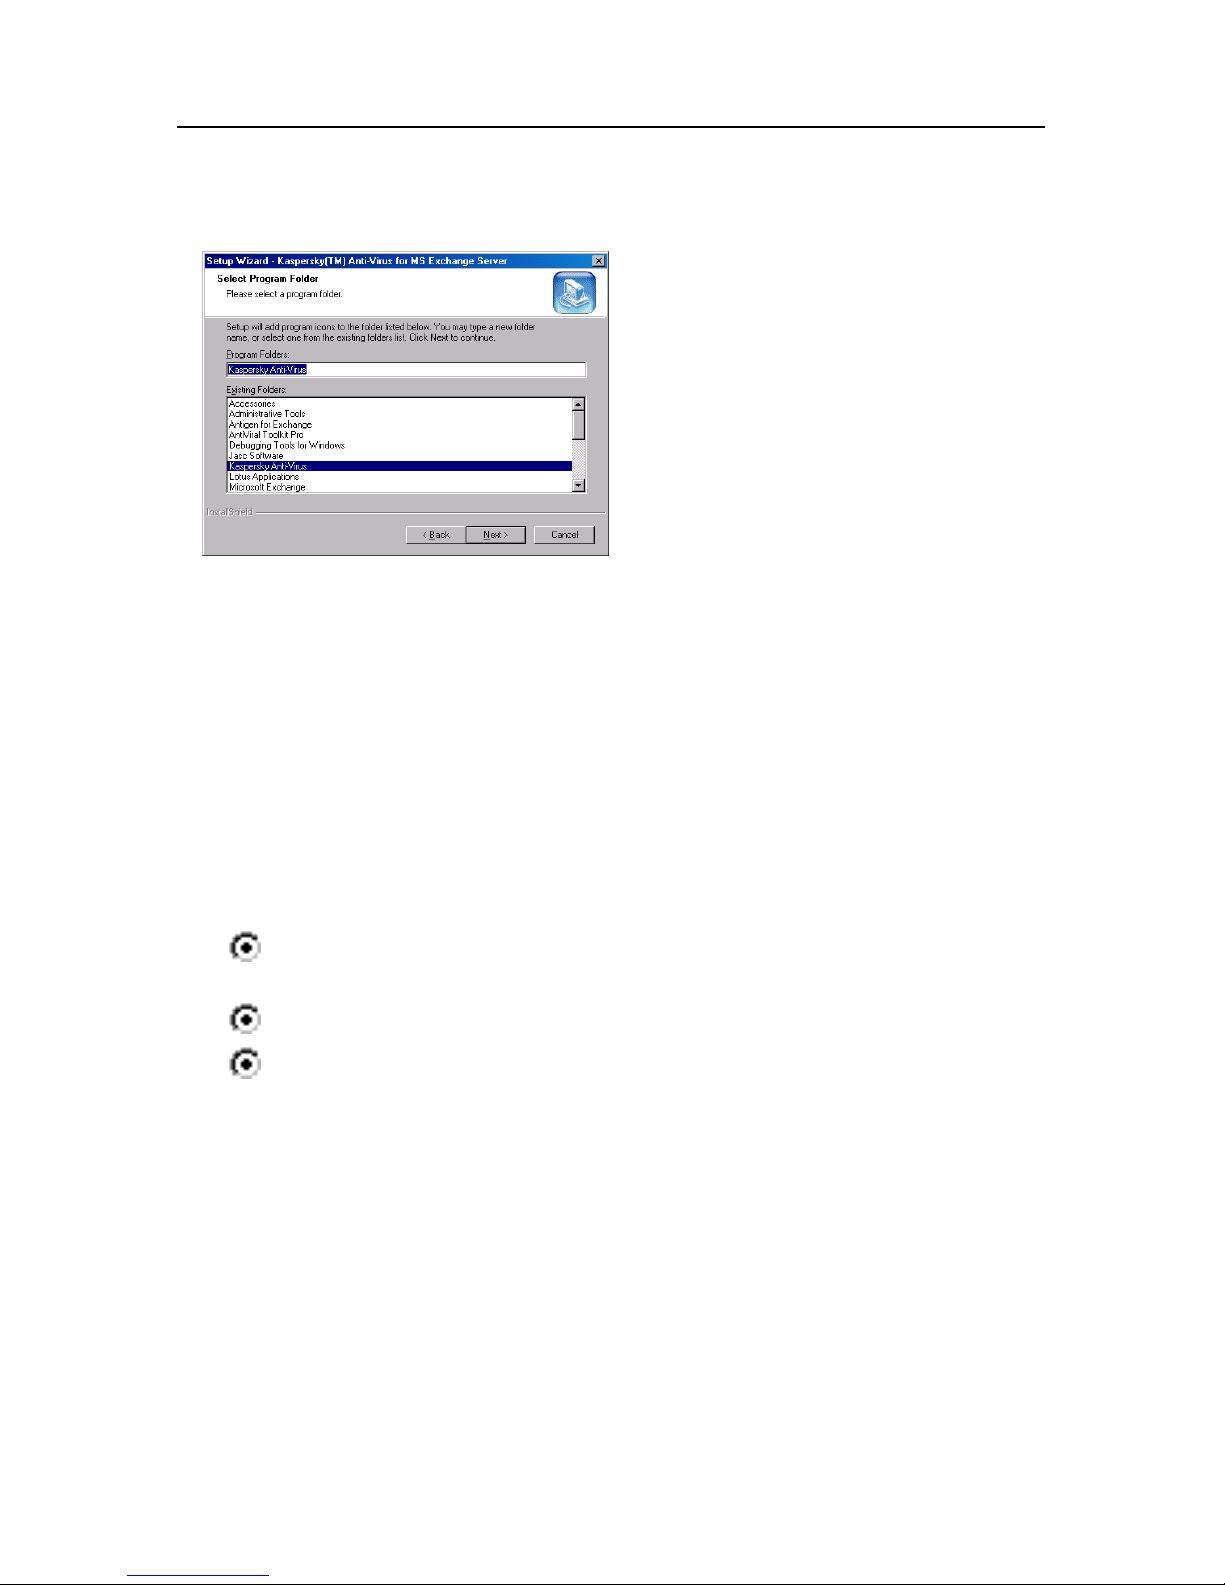
Figure 6. The Select Program Folder dialog
box
Define the folder name in the
Select Program Folder dialog
box (see Figure 6) to display the
Kaspersky Anti-Virus
®
4.5 icon in
the standard Program menu.
Click Next.
Step 7. Installation Requirements
The program defines the installation configuration according to availabsility of MS
Exchange Server 2000 Service Pack 2, MS Exchange Server 2003, or MS
Exchange Server 5.5 Service Pack 4 on the computer. If none of these products
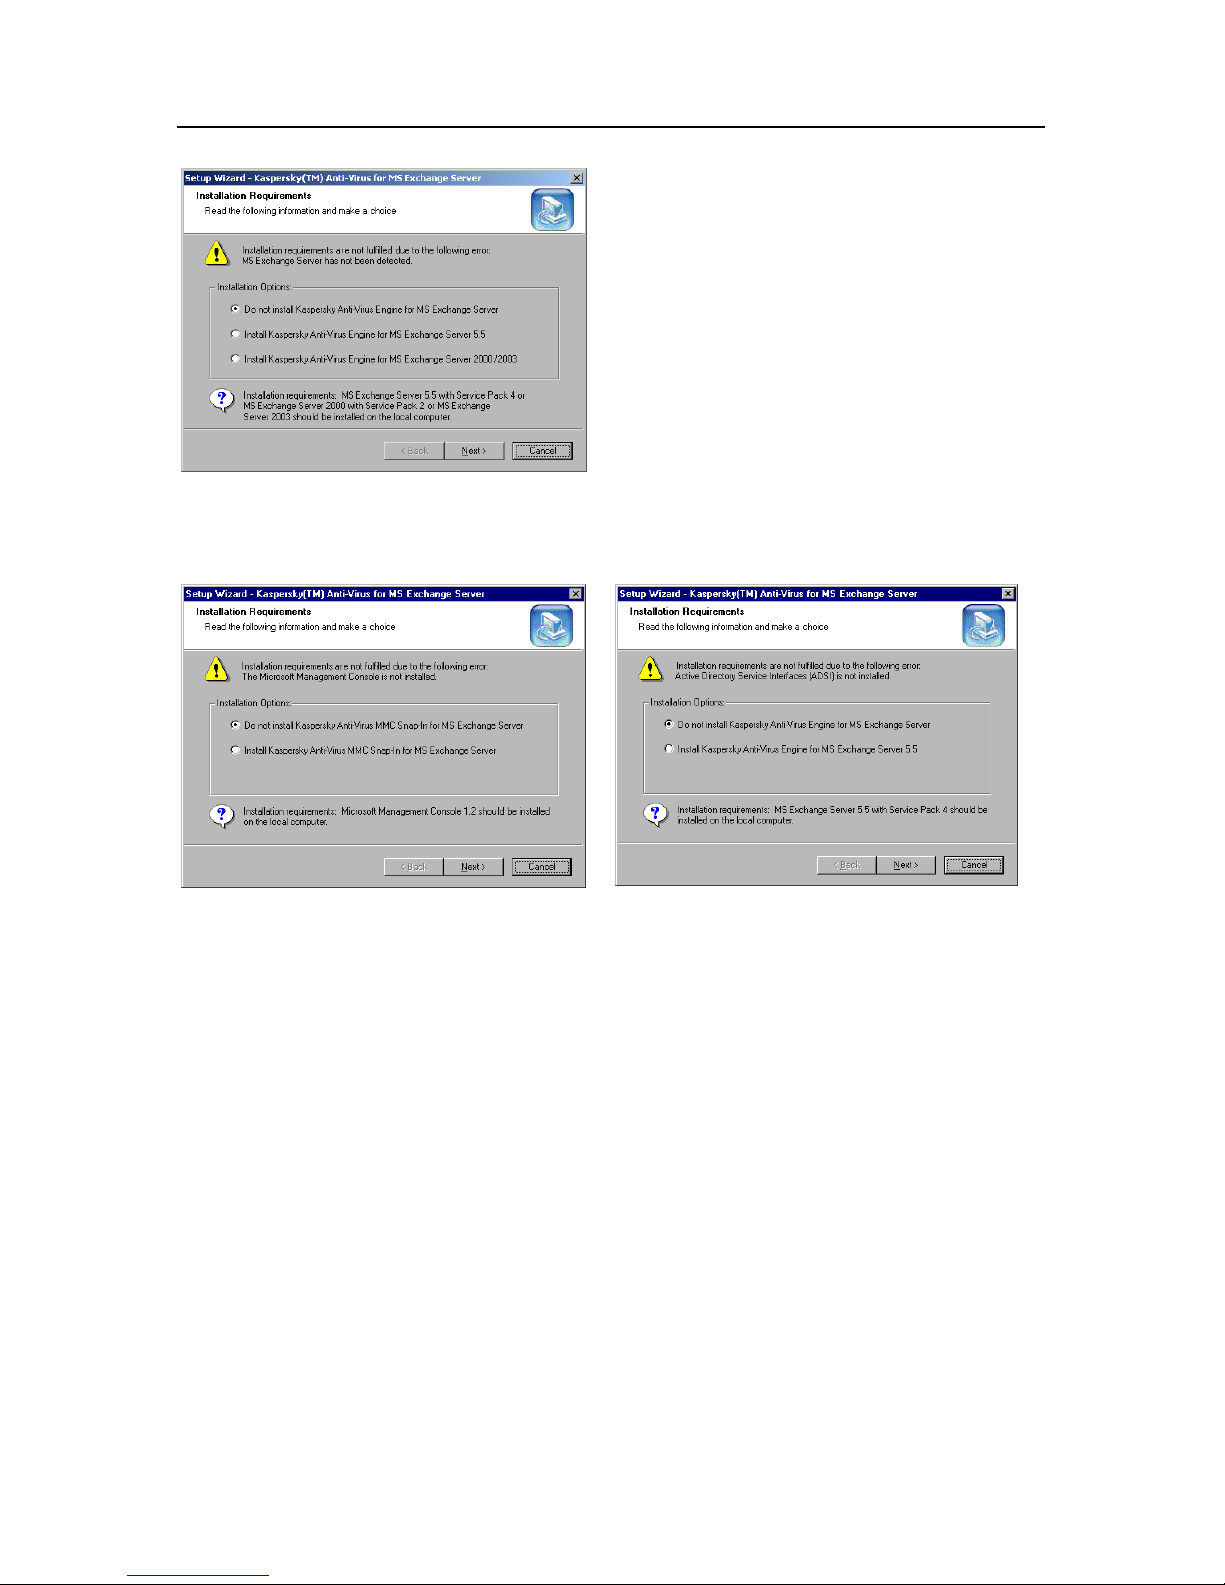
is installed, the Installation Requirements dialog box (see Figure 7) will appear
on the display. In the lower part of the box you will see the Installation Options
option buttons.
Do not install Kaspersky Anti-Virus® Engine for MS Exchange
Server ( default)
Install Kaspersky Anti-Virus® Engine for MS Exchange Server 5.5
Install Kaspersky Anti-Virus® Engine for MS Exchange
Server 2000/2003.
Choose the option button needed. By default, the installation program will
resume but Anti-Virus Engine for MS Exchange Server will not be installed. If you
choose to install Anti-Virus Engine for MS Exchange Server despite the fact that
the server does not fulfill the installation requirements, the program will install all
package components but the above-mentioned component will not operate at
full-range.
Page 17
Installation 17
a. If MS Exchange Server has not been
detected
If you install Kaspersky Anti-Virus®
4.5 on a server under Microsoft
Windows NT 4.0 in which MMC
and/or ADSI are absent, you will see
the appropriate notifications with
actions you can choose (see Figure
7).
You can interrupt the process, install
applications needed, and repeat the
Kaspersky Anti-Virus
®
installation
when messages appear warning that
the installation program requirements
have not been satisfied.
b. If MMC has not been detected
c. If ADSI has not been detected
Figure 7. The Installation Requirements dialog box
Page 18
18 Kaspersky Anti-Virus 4.5 for MS Exchange Server
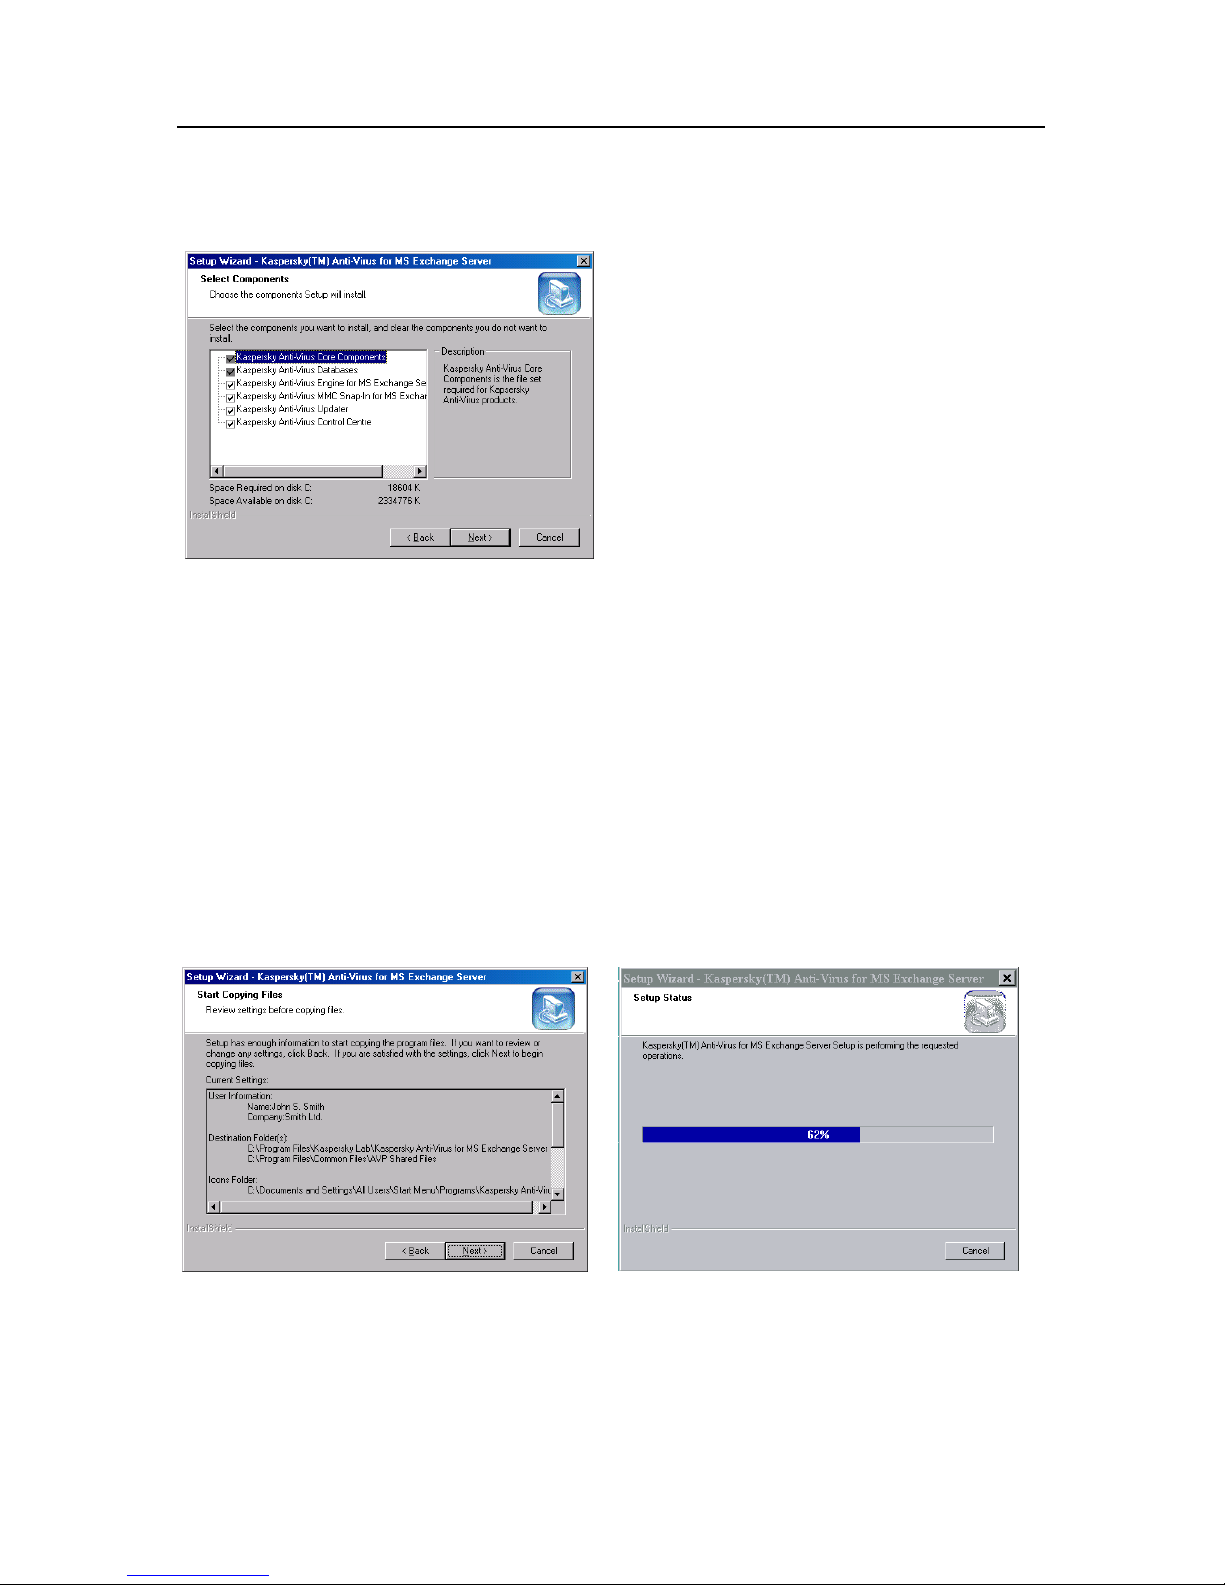
Step 8. Choose Kaspersky Anti-Virus® components to be
installed
Figure 8. The Select Components
dialog box
In the Select Components dialog box
(see Figure 8) check the components to
install.
If you select Custom setup, you will
have to choose the required
components from the Select
Components dialog box (see Figure 8).
The component list is conditioned by
the installation pattern: if you install the
program on a server, the list will contain
all the components; otherwise, it will
contain two components less.
To choose the components to be
installed check the appropriate boxes at
the left of the component names.
Step 9. Copying files to the hard disk
Read the setup information in the Start Copying Files dialog box (see Figure 9).
Click Next to resume the installation. The program will start copying files to the
hard disk. Percentage of completion is indicated by the progress bar in the Setup
Status dialog box (see Figure 10).
Figure 9. The Start Copying Files dialog
box
Figure 10. The Setup Status dialog box
Page 19
Installation 19
Step 10. Choose the report storage directory
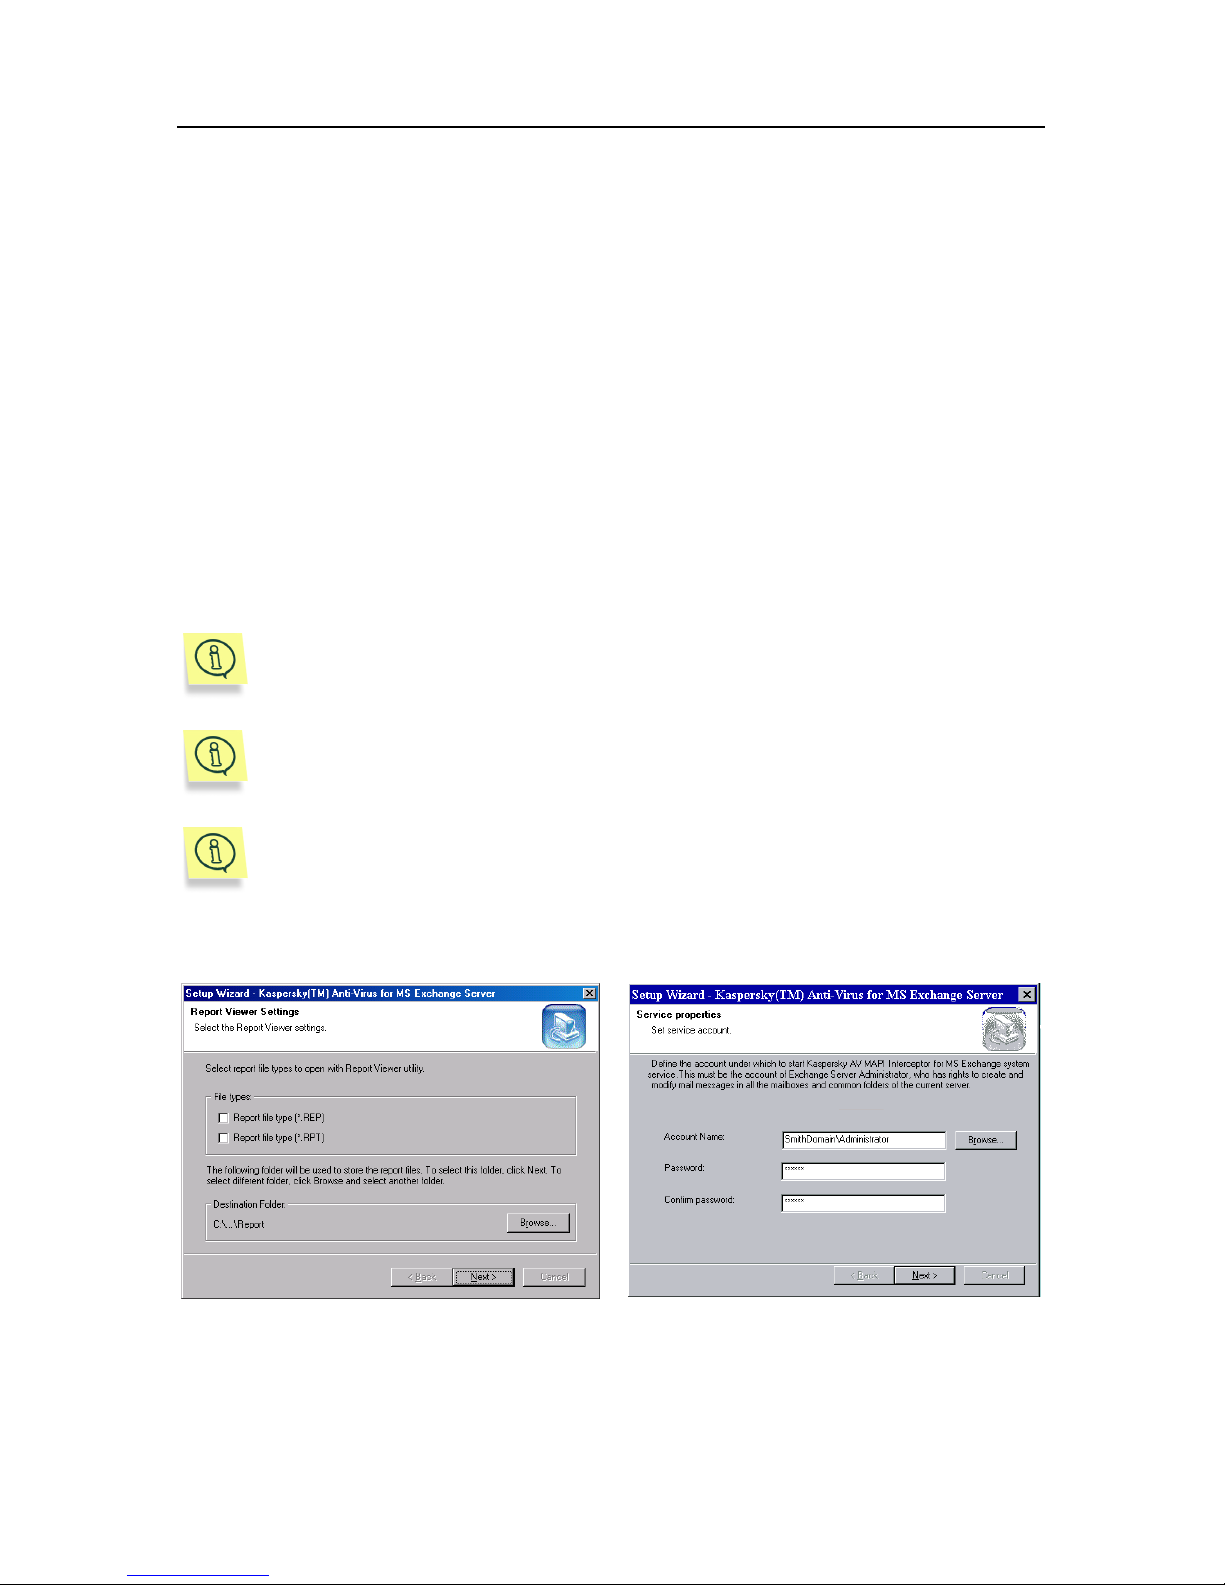
In the Report Viewer Settings dialog box (see Figure 11), you should specify
the folder in which to save the reports generated by Anti-Virus Updater and
Kaspersky Anti-Virus
®
Control Centre. Reports generated by Anti-Virus Engine
are saved to the folder specified from MMC.
Step 11. Choosing service properties
While installing Anti-Virus Engine for MS Exchange Server 5.5, you should set
the service account for the Kaspersky Anti-Virus
®
MAPI Interceptor for MS
Exchange Server service in the Service properties dialog box (see Figure 12).
This service account must have MS Exchange Server administrator rights to
change any messages in the mailboxes stored on this server (Service Account
Admin rights). Enter the account name in the Account Name field. Enter the
appropriate password in the Password field and the Confirm password field.
Note that the setup wizard does not check the validity of your
information. If you enter incorrect information, the service will be
unavailabsle (or will operate incorrectly).
The data you enter in the Service properties dialog box will be used to
register Kaspersky AV LDAP Notification Service.
Under MS Exchange Server 2000/2003, Kaspersky AV LDAP
Notification Service runs under the system account.
Figure 11. The Report Viewer Settings
dialog box
Figure 12. The Service properties dialog
box
Page 20
20 Kaspersky Anti-Virus 4.5 for MS Exchange Server
Step 12. Remote administration password
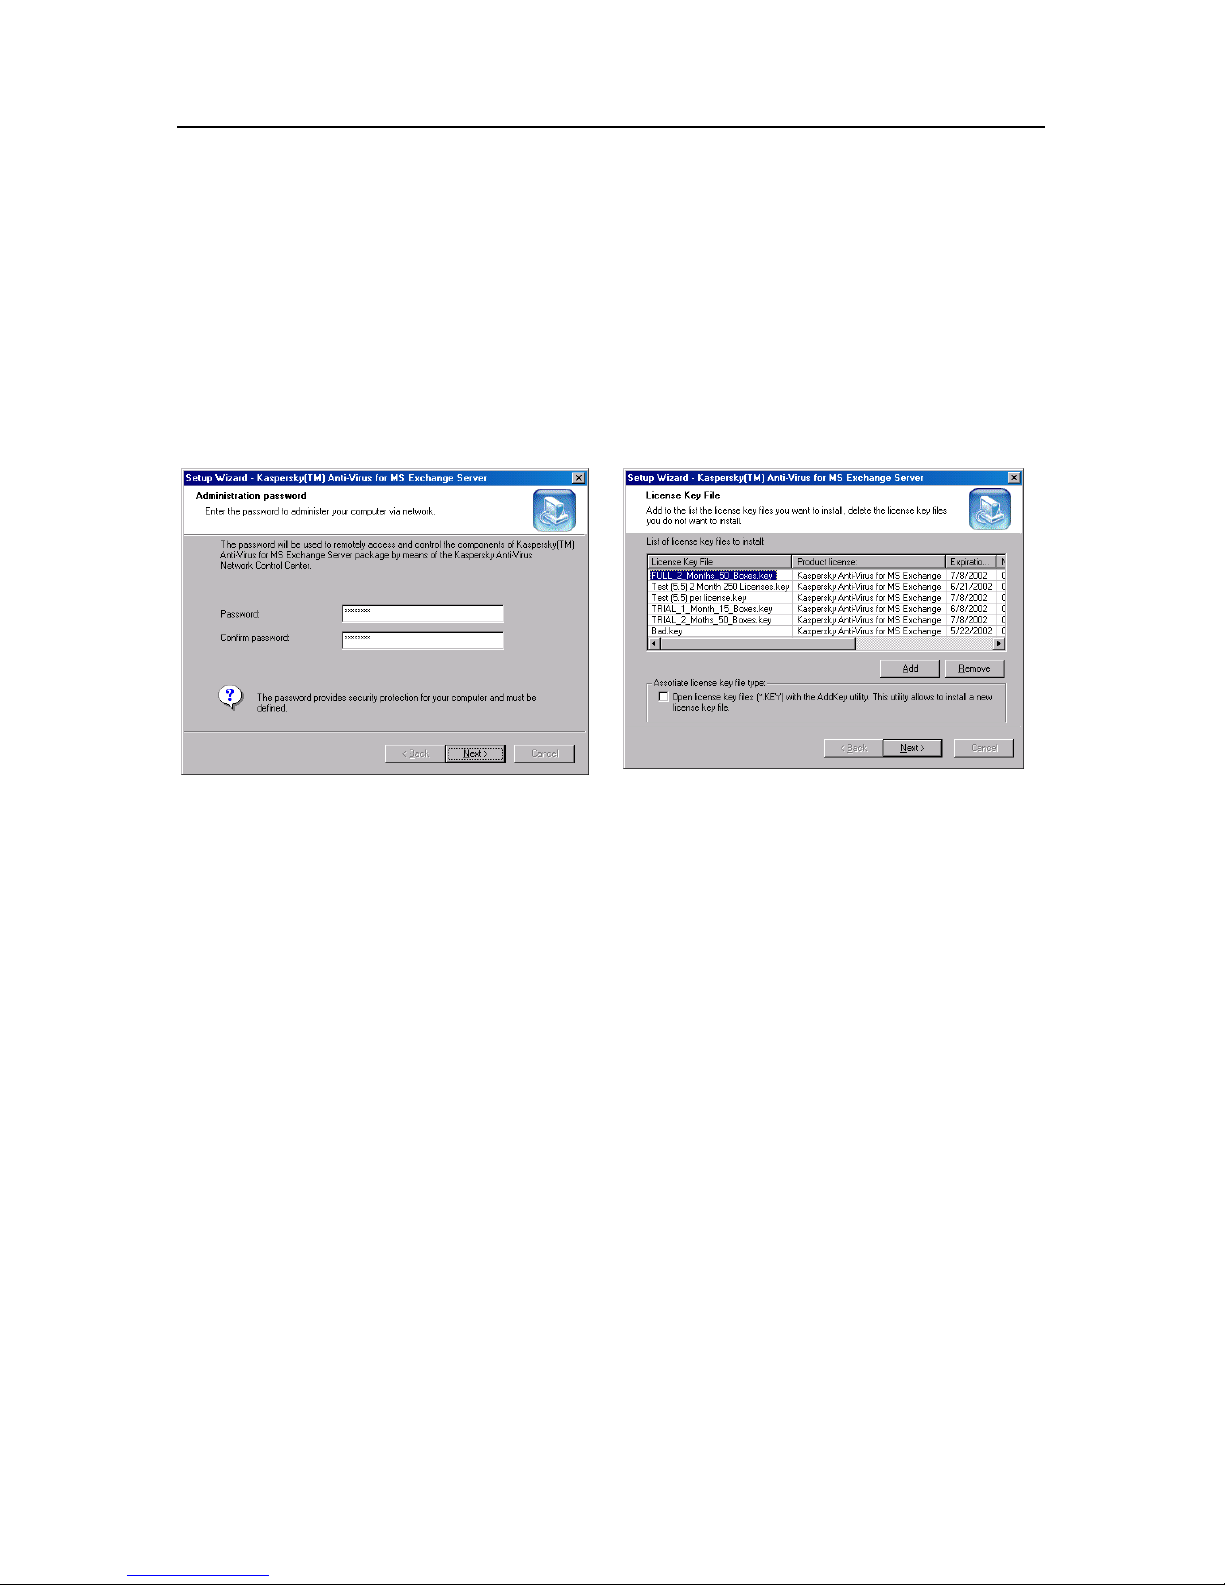
In the Administration Password dialog box (see Figure 13), enter the remote
administration password that will be used by Kaspersky
®
Network Control Centre
to connect to the protected server.
Step 13. Define paths to the license key files
In the License Key File dialog box (see Figure 14), define the license key file
name and the path.
Figure 13. The Administration Password
dialog box
Figure 14. The License Key File dialog
box
If the file is located in the setup folder, its name will be displayed in the List of
license key files to install.
If the license key file is located in a different folder, click Add and define the
license key file name and path in the Select License Key File standard dialog
box. If required, the program can use several license key files simultaneously.
Check the box in the Associate license key file types group if you want to
activate the AddKey utility. After the AddKey utility is activated, you can install
new license key files by double-clicking them.
The license key file is your personal "key" that contains all the housekeeping
data essential for Kaspersky Anti-Virus
®
to apply all its features:
• vendor information for this version (company name, addresses, telephone
numbers);
• support information (who provides the support and where);
• product release date;
• license name and number;
Page 21
Installation 21
• functionality table for various components;
• validity term of this license.
Step 14. To complete the setup
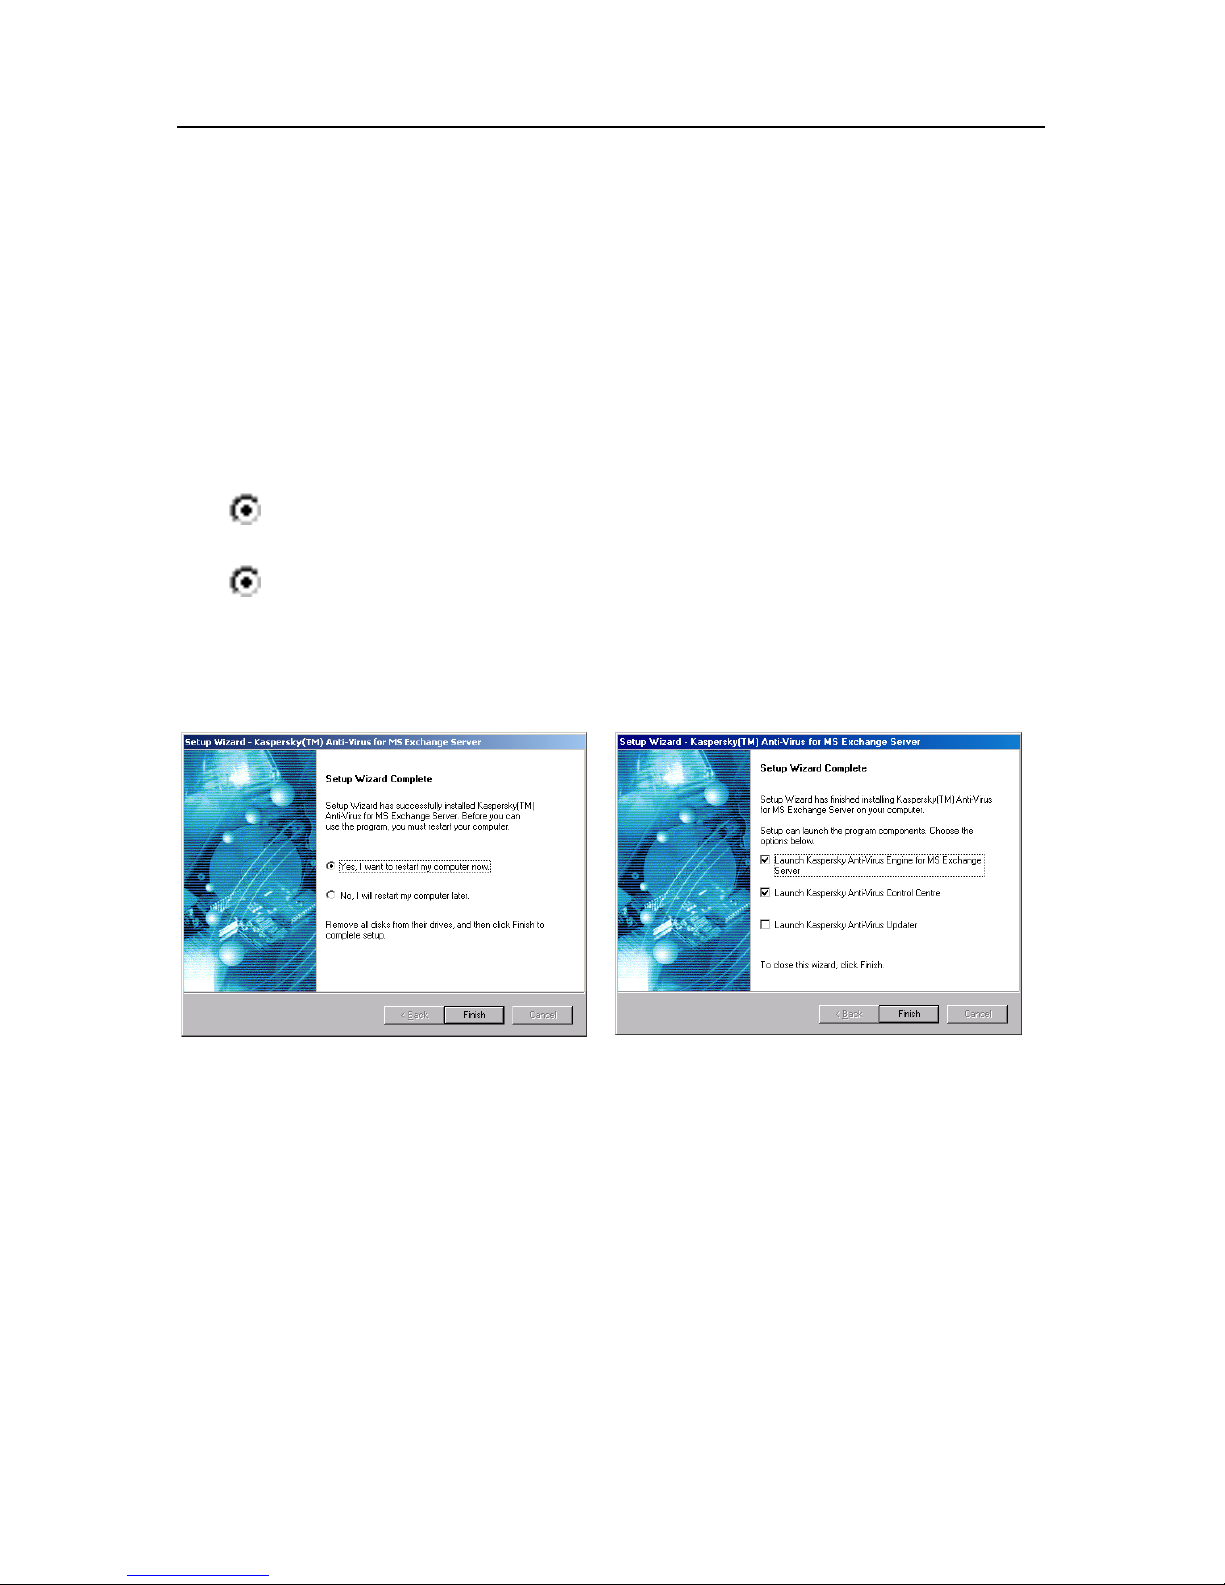
Upon completion of Kaspersky Anti-Virus® 4.5 for MS Exchange Server package
installation, the Setup Wizard Complete dialog box will appear on the screen
(see Figure 15a).
If your computer needs restarting, the installation program will inform you about
this (see Figure 15a). Choose one of the following actions:
Yes, I want to restart my computer now – if you want to restart your
computer immediately.
No, I will restart my computer later – if you want to postpone
restarting.
If your computer does not need restarting, the installation program will offer to
launch one or several of the installed components (see Figure 15b). Click Finish.
a. Variant 1
b. Variant 2
Figure 15. The Setup Wizard Complete dialog box
2.1.2. Enabling protection of mail bodies
under MS Exchange Server 5.5
AVAPI Interceptor protects message attachments in all protected mailboxes and
public folders of MS Exchange Server 5.5 but it cannot protect message bodies
due to restrictions in AVAPI 1.0 technology.
Page 22
22 Kaspersky Anti-Virus 4.5 for MS Exchange Server
If you want the program to protect message bodies, run the MAPI
service on your server. You can find the MAPI service in the list of
installed services under the name "Kaspersky Anti-Virus
®
MAPI
Interceptor for MS Exchange Server."
You should start the MAPI service under a user's account which has
rights to read the
HKLM\SYSTEM\CurrentControlSet\Services\MSExchangeIS\VirusScan
registry key. This account must have rights of an MS Exchange Server
administrator to be able to change any messages in mailboxes located
on this server (Service Account Admin rights).
To force the program protect message bodies for new mailboxes and/or
public folders, you should restart the MAPI service.
The MAPI service protects only those mailboxes that already contain a
message store. Such a message store will be generated after receiving
the first message in the mailbox or after first logon with Microsoft
Outlook to that mailbox.
To force the program to protect mail bodies of all messages stored in
protected public folders, run MAPI on your server and configure these
public folders as described below:
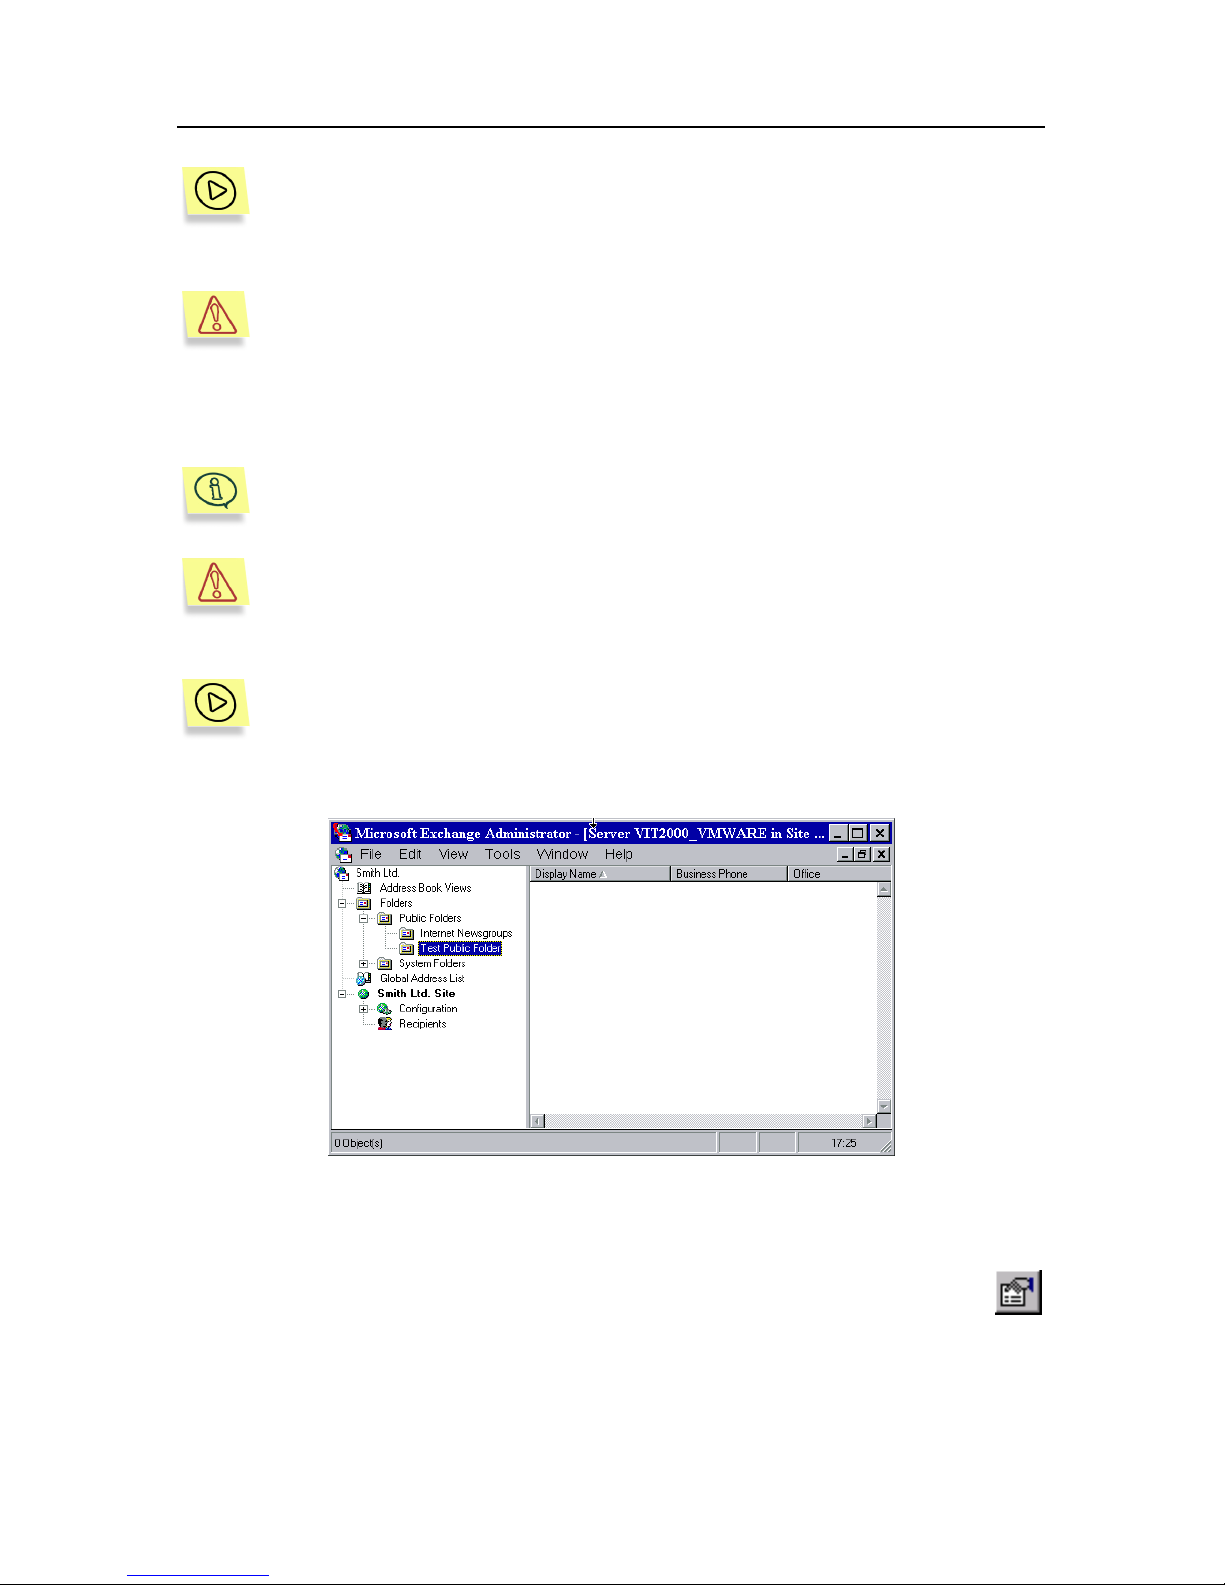
1. Launch Microsoft Exchange Administrator (see Figure 16).
Figure 16. The Microsoft Exchange Administrator main window
2. Choose the public folder to be protected.
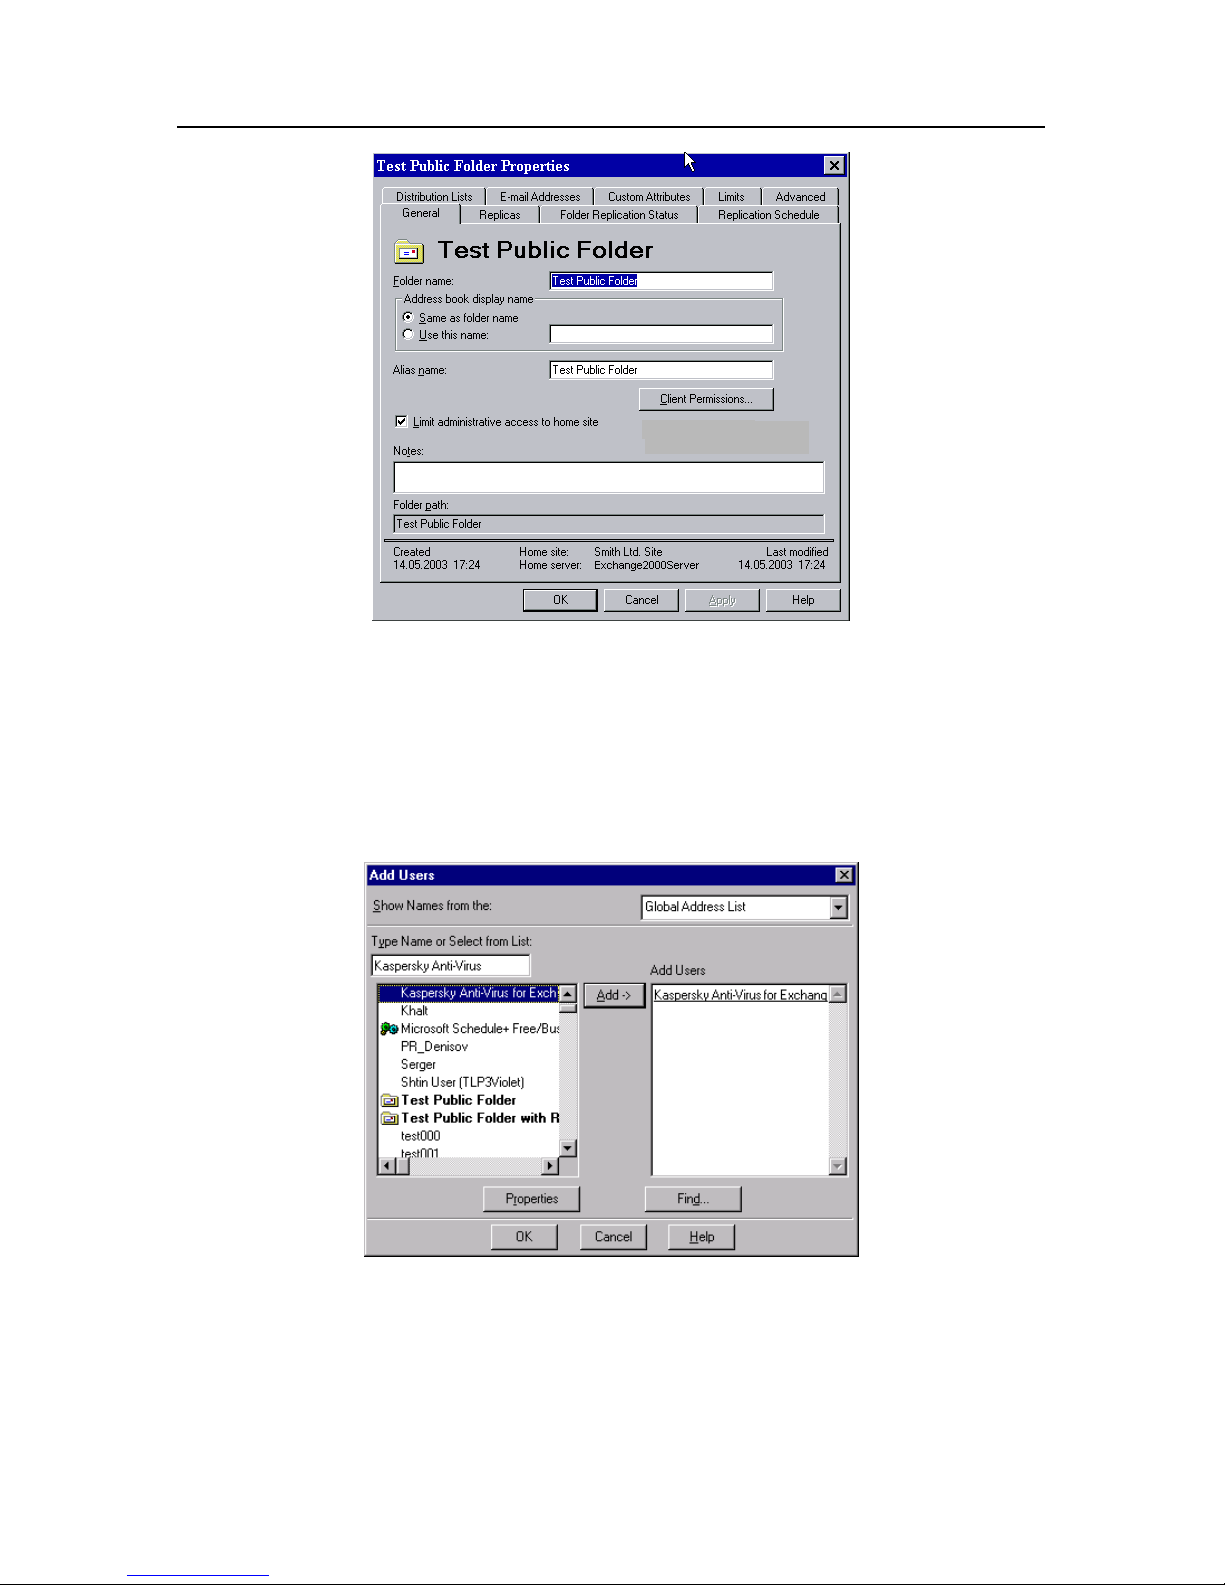
3. Choose the Properties item from the File menu or press the
button. The Properties window will appear on the screen (see
Figure 17).
Page 23
Installation 23
Figure 17. The Properties dialog box
4. On the General tab press the Client Permissions button. The
Client Permissions dialog box will appear on the screen (see
Figure 19).
5. In the Client Permissions dialog box press the Add button (see
Figure 18). The Add users dialog box will appear on the screen.
Figure 18. The Add Users dialog box
6. In the Add users dialog box in the address list choose the
Kaspersky Anti-Virus
®
for MS Exchange Server… address and
press the Add button. The program will use this address to check
message bodies. If you find several mailboxes with similar names,
Page 24
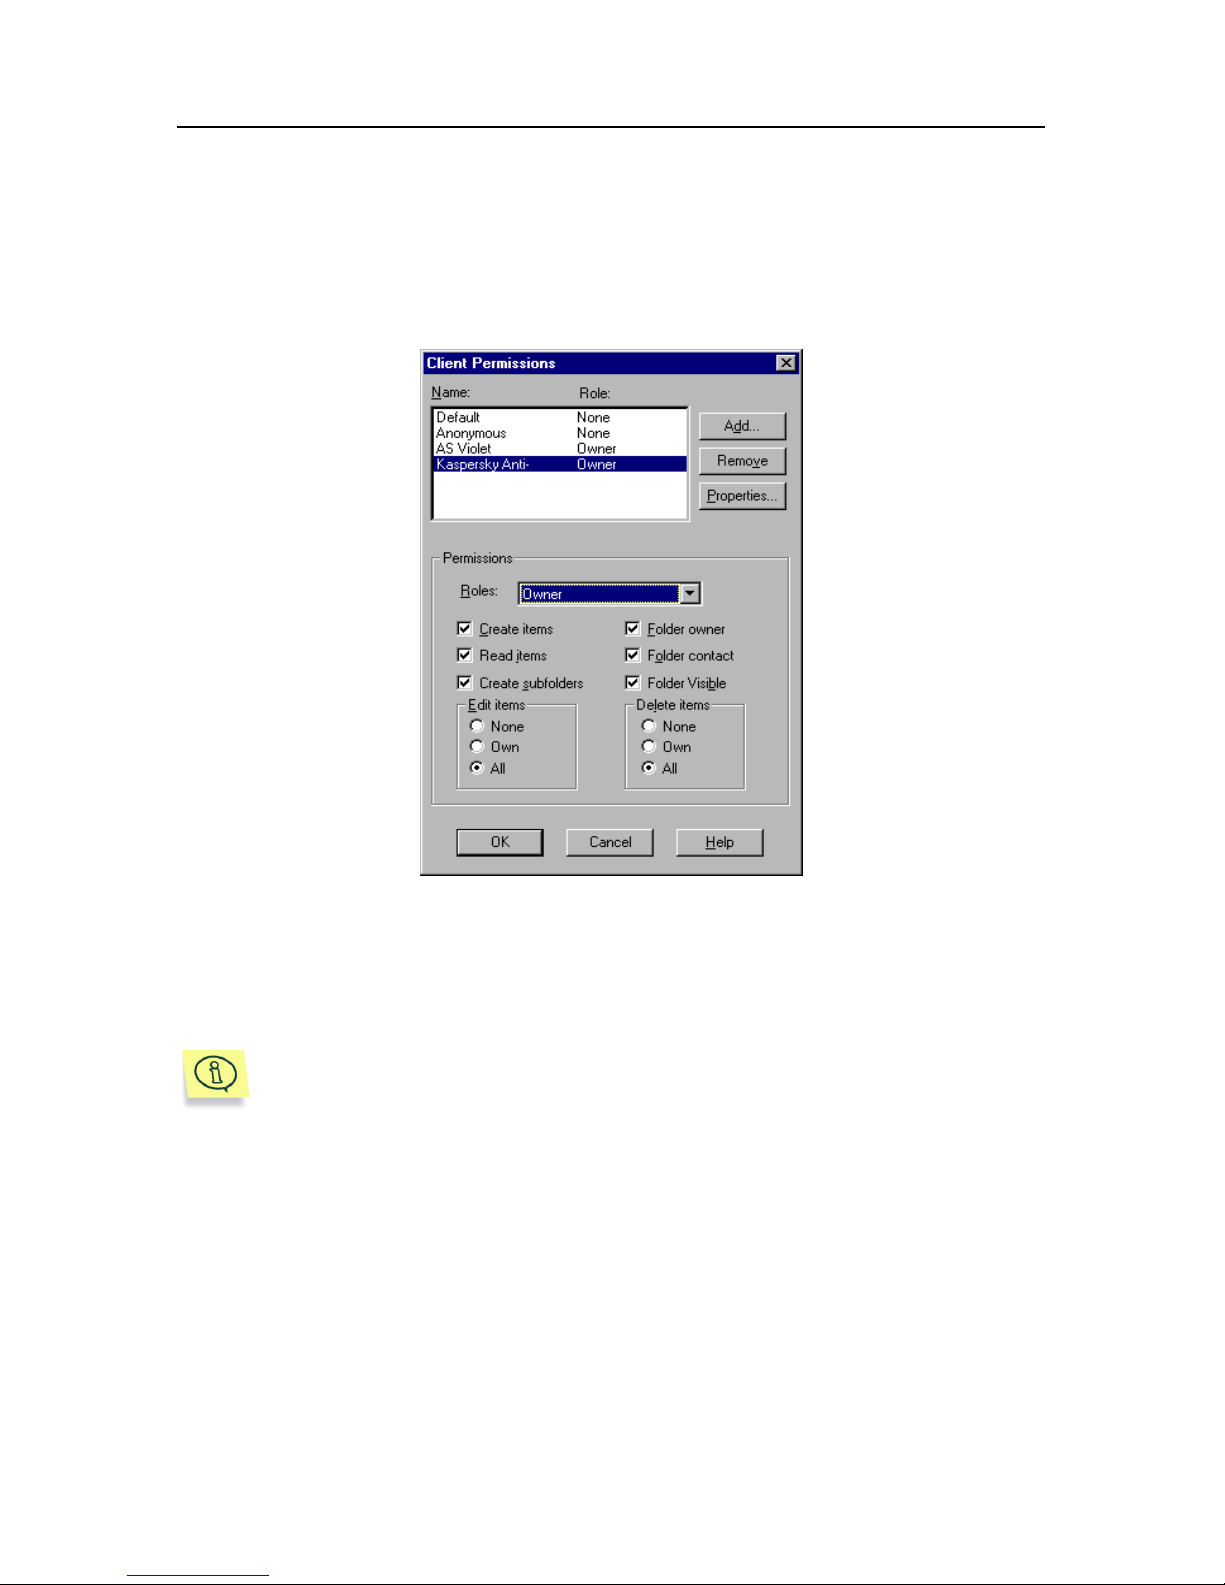
24 Kaspersky Anti-Virus 4.5 for MS Exchange Server
choose the one that is placed on the protecting server. Then press
the OK button.
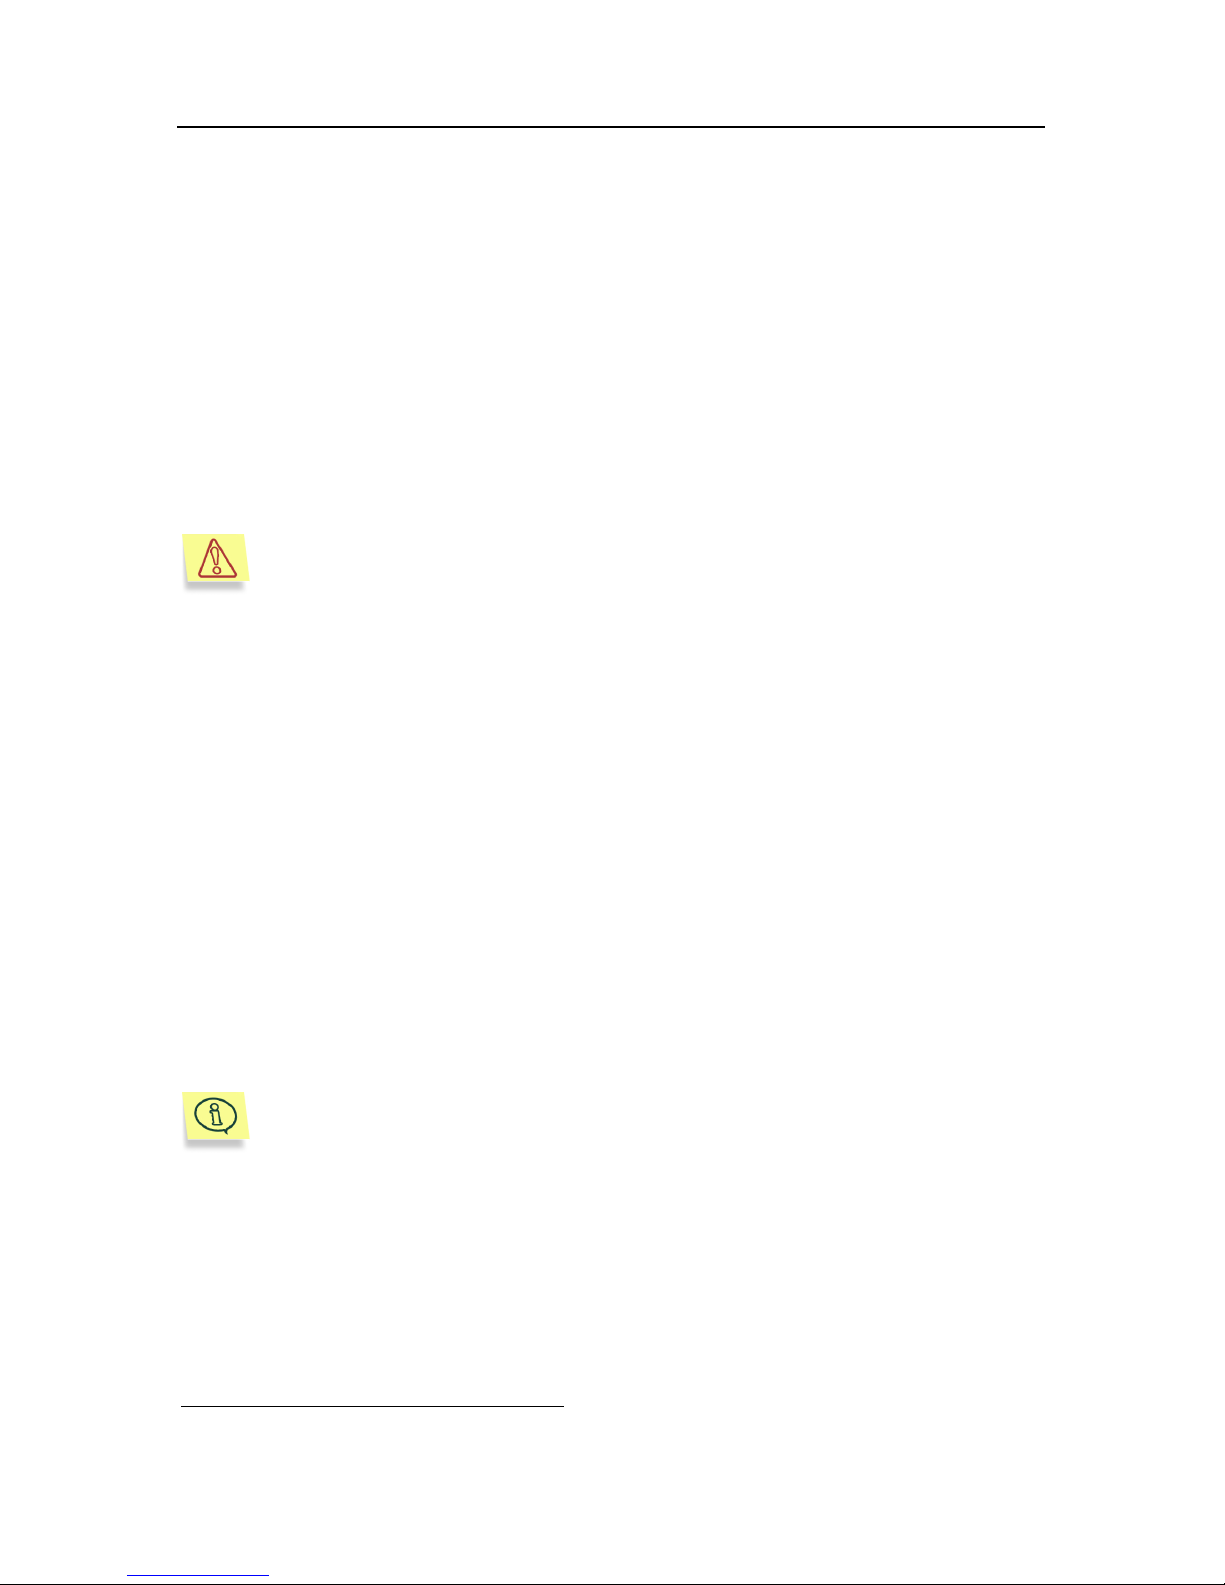
7. In the Client Permissions dialog box in the string-table, choose the
Kaspersky Anti-Virus
®
for MS Exchange Server string. Make
sure that the Owner value is selected in the Roles drop-down list.
Press the OK button.
Figure 19. The Client Permissions dialog box
8. In the Properties dialog box click the OK button.
9. Repeat all above steps for public folders to be protected.
You can make these settings not only using MS Exchange
Administrator but also using Microsoft Outlook. The only difference is
that you should choose the Properties item from the right-click menu of
the public folder (see step 3) and then choose the Permissions tab in
the Properties dialog box (see step 4).
10. Start or restart the MAPI service in order to force the program to
check bodies of all messages stored in public folders.
2.1.3. Updating version 4.2 to 4.5
The above section describes the installation of Kaspersky Anti-Virus® on a
computer on which no Kaspersky Labs products have been installed (see
Page 25

Installation 25
subchapter 2.1 on page 6). This subchapter explains how to install and upgrade
Kaspersky Anti-Virus
®
for MS Exchange Server from version 4.2 to 4.5.
After you run setup.exe, a dialog box with a message that the program is about
to update the current version of Kaspersky Anti-Virus
®
for MS Exchange Server
to version 4.5 will appear on your screen. After searching for installed
components, the program will offer to set the parameters for the Report Viewer
component (see Step 10 on page 19) and prompt you to enter a password for
remote administration of Kaspersky Anti-Virus® 4.5 for MS Exchange Server (see
Step 12 on page 20).
Previous or current versions of Kaspersky AV Control Centre may have been
installed on your computer, for example, together with another software package.
In this case, the Component: Kaspersky Anti-Virus® Control Centre dialog
box will appear on your screen, offering you several options on how to install the
standard settings file.
Select one of the following options on how to install the settings file:
• Combine – Add the standard settings file to the existing settings.
• Overwrite – Write a new settings file over the existing settings file.
• Skip – Leave the existing file without changes.
If Kaspersky AV Updater has been installed on your computer (together with
Kaspersky Anti-Virus
®
for MS Exchange Server or other Kaspersky Labs
products), a dialog box with several options will appear on your screen. However,
the Combine option will be unavailabsle in this dialog box. You will be offered
the opportunity to overwrite the existing settings file or save the existing settings.
2.1.4. Uninstalling
Should you for any reason wish to uninstall Kaspersky Anti-Virus®, launch
setup.exe for the second time from the folder into which you installed the product
or use the Add or Remove Programs tool in the Windows Control Panel.
A removal confirmation dialog box will appear on your screen. Click OK to start
the removal procedure. The program files will be removed from the computer.
If the removal program detects files that may be in use by other
programs, the file removal confirmation dialog box will appear on your
screen. Press Yes to remove the files.
2.2. Selecting protected storages
The program protects the number of mailboxes as specified in your license.
Page 26
26 Kaspersky Anti-Virus 4.5 for MS Exchange Server
Both mailboxes and public folders on both versions of MS Exchange Server can
be protected. Thus, you do not have to purchase a license for protecting public
folders under MS Exchange Server.
If you have many licenses, the program can protect all storages
1
located on the
protected server.
If the number of protected mailboxes specified in your license is insufficient, you
should exclude some of them from the list of protected mailboxes.
A list of unprotected mailboxes is formed in a similar way to the mailing list or the
security group (for MS Exchange Server 2000/2003). The list is stored in
Exchange Directory (for MS Exchange Server 5.5) or in Active Directory (for MS
Exchange Server 2000/2003).
To form a list of unprotected mailboxes, the objects excluded from
protection must be specified explicitly. If the list of unprotected
mailboxes contains a mailing list group that, in turn, includes other
mailing lists, these nested objects will be protected, too.
The list of unprotected mailboxes is managed (i.e. adding and deleting objects
from the list) using the standard control tools: MS Exchange Administrator (for
MS Exchange Server 5.5) or Active Directory Users & Computers (for MS
Exchange Server 2000/2003).
The program interface displays only the name of this mailing list and the
frequency of checking of its update status (see subchapter 3.4.2.3 on page 45).
The Kaspersky AV LDAP Notification Service, a special service included in the
distribution kit, tracks changes in the list and restarts Anti-Virus Engine if
necessary.
Anti-Virus Engine analyzes the From, To, and Copy fields and the name of the
storage in which it scans messages. If any of the above fields or the storage
name contains an address to be protected, the program scans the message for
viruses.
While working with MS Exchange Server 2000/2003, incoming
messages are scanned for any mail client or mail protocol. Outgoing
messages are scanned only if an MS Exchange-compatible client (for
example, MS Outlook) and the MAPI protocol are used to send mail. In
other cases, outgoing messages are not scanned because they do not
enter the storage on the protected server.
1
Hereafter, ‘ message storages’ denote mailboxes and public folders.
Page 27
Installation 27
While working with MS Exchange Server 5.5, the program scans bodies
of incoming messages only in protected storages and does not scan
bodies of outgoing messages because of certain limitations of the
AVAPI and MAPI technologies. Attached files are scanned in all
storages: incoming messages are scanned without any limitations and
outgoing messages are scanned only when an MS Exchangecompatible client and the MAPI protocol are used.
However, an unchecked message can get into the mailbox of a protected MS
Exchange Server 2000 user even if Anti-Virus is enabled. This is possible when:
• A message has false or unprotected addresses. There are protected and
unprotected addresses among the real recipient addresses. The program
might not scan this message because the protected address is absent
from availabsle message attributes handled by VSAPI Interceptor.
• The message sent to check is not searched again in the other storages of
the same database due to internal optimization of MS Exchange Server.
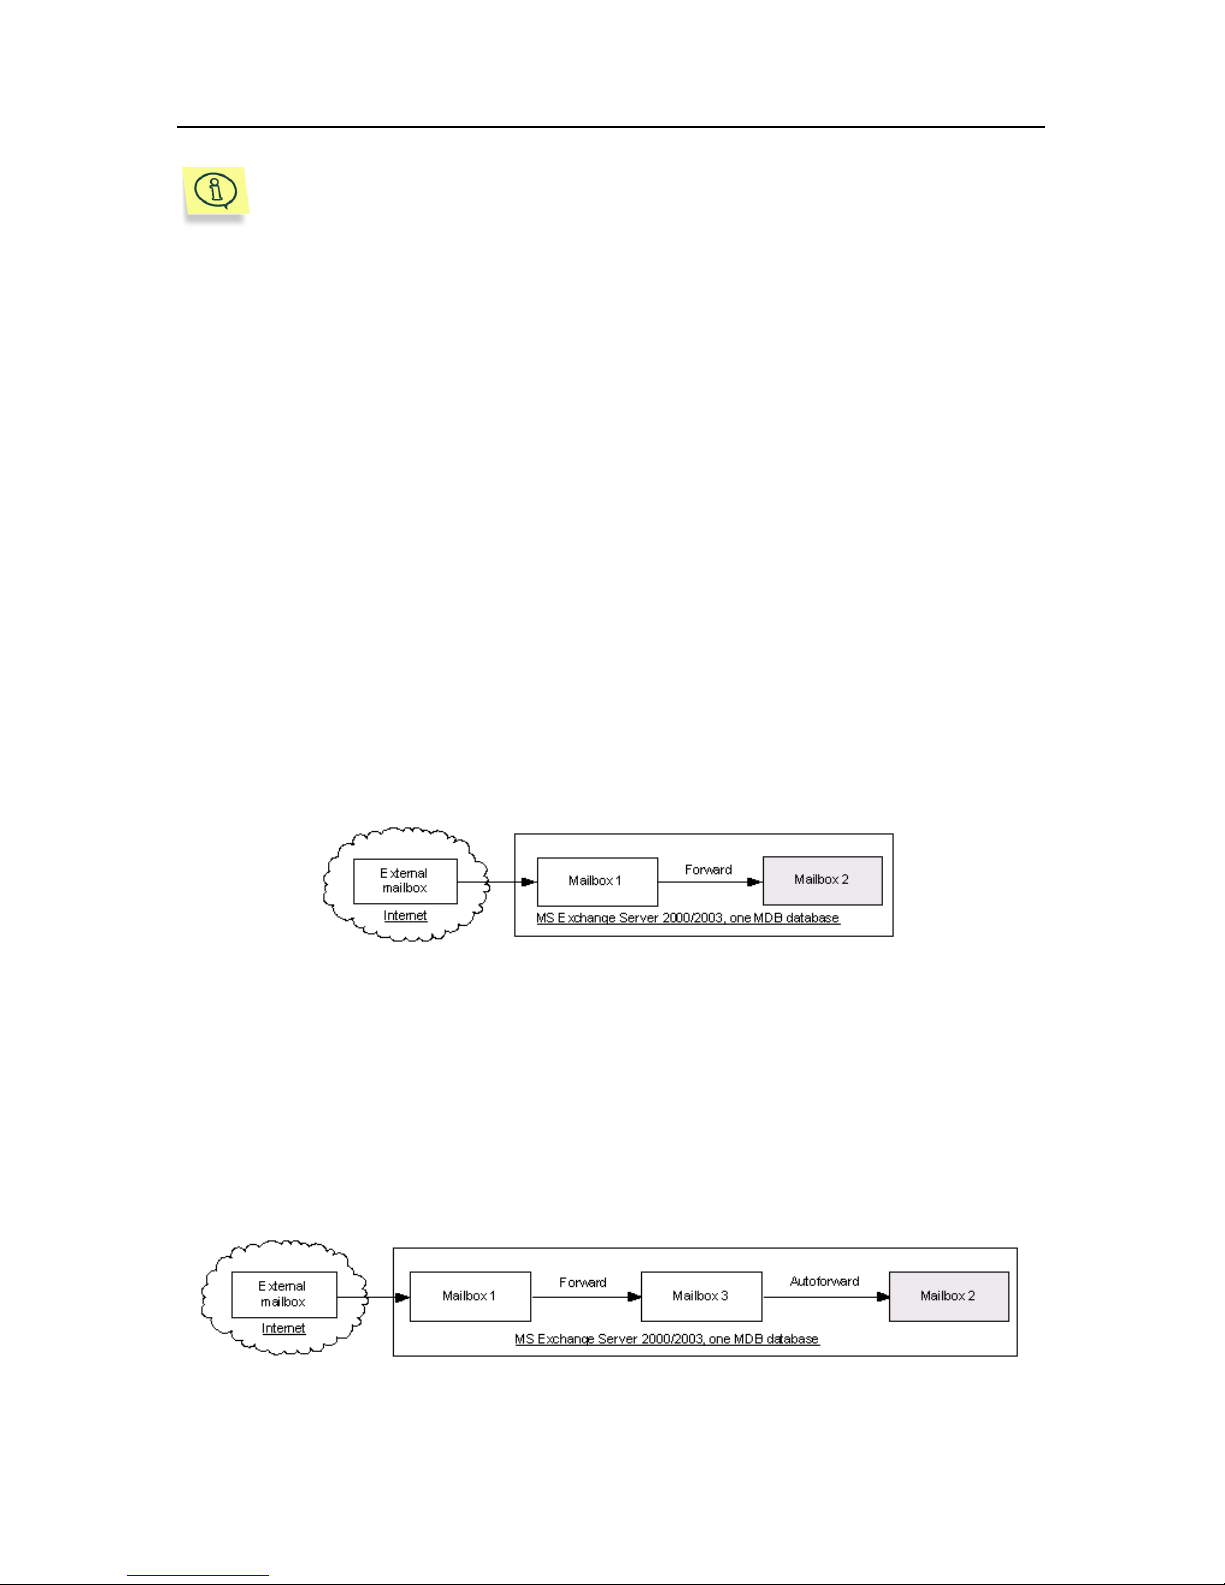
• A message sent to the address of an unprotected user (mailbox 1) from a
remote mailbox and forwarded to the protected mailbox (mailbox 2) via
the MAPI protocol in Plain text and HTML (see Figure 20) is not checked
by Anti-Virus VSAPI Interceptor if those two mailboxes are physically
located in the same database.
Figure 20. Scheme of how an unchecked forwarded message gets into a protected mailbox
• A message sent from a remote mailbox to the address of an unprotected
user (mailbox 1), and then forwarded to an unprotected mailbox (mailbox
3), and auto-forwarded (if set by an according MS Outlook rule) to a
protected mailbox (mailbox 2) via the MAPI protocol in Plain text, HTML,
and RTF formats (see Figure 21) is not checked by Anti-Virus VSAPI
Interceptor if the mailboxes listed are included in the same database.
Figure 21. Scheme of how an unchecked auto-forwarded message gets into a protected
mailbox (if set by an MS Outlook rule)
Page 28

28 Kaspersky Anti-Virus 4.5 for MS Exchange Server
• A message created by user in an unprotected mailbox with the help of
Outlook Web Access (OWA) and forwarded to the protected user's
mailbox is not checked if those two mailboxes are physically located in
the same database.
• A message created by user in an unprotected mailbox with the help of MS
Outlook, temporarily saved in the "Drafts" folder and subsequently
forwarded to the protected user's mailbox is not checked if those two
mailboxes are physically located in the same database.
To avoid such situations, we recommend that you keep the protected
and unprotected storages in different MS Exchange Server 2000/2003
databases.
2.3. Anti-virus features to support
clustering facilities
Usage of the independent group servers run by the Cluster Service as a single
Network element is referred to as Cluster technology. It provides a higher level of
resource and application safety and management.
The Kaspersky Anti-Virus
®
, version 4.5 for MS Exchange Server supports MS
Exchange Server 2000/2003 clustering facilities.
To ensure the Kaspersky Anti-Virus
®
operation on cluster, perform the following:
• Install the Kaspersky Anti-Virus
®
on each cluster node.
• Do not use virtual Exchange-server’s name to adjust the Kaspersky AV
MMC Snap-In interface (see chapter 3.3 on page 32) for anti-virus
protection management.
• Add all cluster nodes as servers.
• The Anti-Virus protection settings on all cluster nodes should be
identical. Make any changes of anti-virus protection settings for all
clusters simultaneously.
• Enter the virtual Exchange-server name as an SMTP server, adjusting
report parameters to perform report delivery correctly (see chapter 4.2.3.2
on page 92).
Page 29

CHAPTER 3. PROTECTION OF
MS EXCHANGE SERVER
MESSAGES
3.1. Operating principles of the
program. Message queue for
anti-virus scan
Anti-Virus Engine checks and disinfects (if possible) all incoming and outgoing
mail messages, as well as those stored on the server. The program checks the
message body and attachments, searching for viruses in archives, self-extracting
executable modules, mail databases, plain mail files, and OLE objects. The
running program uses anti-virus databases – special files with descriptions of a
number of known viruses. These databases are updated by Kaspersky Labs on a
daily basis. The program can use a special detection tool - Code Analyzer - that
allows detection of unknown viruses in the files.
Anti-Virus Engine uses the AVAPI 1.0 and MAPI technologies (under MS
Exchange Server 5.5) and the VS API 2.0 technology (under MS Exchange
Server 2000/2003). The program checks all new incoming messages "on-the-fly".
The user will not be able to view a new message until it is checked. Old
messages, i.e. those unchecked by the program after the last anti-virus database
update, are checked when a user requests their contents. In some cases, the
user will have to wait for a while until the queue reaches the required message.
Then he/she will be able to view its contents on the screen.
The program is able to check the old messages in the background scanning
mode. Processor load increases when operating in background scanning mode
but later the users will not have to wait. In the case of a request for an old
message, MS Exchange Server will display it on the screen right away. In
addition, under MS Exchange Server 2000/2003 the proactive scanning mode
can be selected when the program first checks the requested messages (see
subchapter 3.4.2.4 on page 46).
The message queue for Anti-Virus Engine consists of several sections. The
queue for new messages that have just arrived on the server and those that
have not been checked yet is at the beginning of the common queue. It is
followed by a queue of old messages that have been requested by users and
Page 30

30 Kaspersky Anti-Virus 4.5 for MS Exchange Server
scanned by the program in background mode. Under MS Exchange Server
2000/2003 there can be two more segments in the queue if you enable the
proactive scanning mode. Both at the beginning of the new messages queue and
at the beginning of the old messages queue there will appear the queues
requested for review by users.
Table 1. Message queue for anti-virus check
Queue
segment
Kind of message When it is displayed
Urgent
New
New messages
requested by user for
review.
Under MS Exchange Server 2000/2003
only and if proactive scanning mode is
enabled. Otherwise, the messages
requested by user are checked in the
common queue of new messages.
New
New messages Always.
Urgent Old
Old messages
requested by user for
review.
Under MS Exchange Server 2000/2003
and if proactive scanning mode is
enabled, this queue segment is
distinguished from the common queue
of old messages. Otherwise, the
messages requested by user are
checked in the common queue of old
messages.
Old
Old messages Always. If background scanning mode
is enabled, this queue segment
includes old messages that were not
checked after the last update of the
anti-virus database. Otherwise, there
will only be messages requested by the
user in the old message list.
The program checks all message objects. It can scan them in several threads
simultaneously (see subchapter 3.4.6 on page 61). The program treats each
object in accordance with the selected settings (see subchapter 3.4.3 on page
46): it blocks out a message with an infected object, deletes the infected object
from the message, or changes this object with a file containing information on the
virus detected. The administrator can also customize the mode when the
program skips the message with an infected object. However, it changes the
name of this object, adds the information on the virus to it, and changes the
object extension. As a result, the user will not be able to accidentally launch the
infected file and infect his/her computer.
Page 31

Protection of MS Exchange Server Messages 31
If you set the appropriate mode, the program will rename the infected,
suspicious, or cured objects and save them to the quarantine directory (see
subchapter 3.4.5 on page 58).
The program sends virus alerts to the administrator, recipient, or sender of the
infected messages and places corresponding entries in the Application Log and
the program log file (see subchapter 3.4.4 on page 50).
3.2. Working Procedure
In order to create an efficient MS Exchange Server anti-virus protection
system, the administrator should do the following:
1. Install Anti-Virus Engine, Anti-Virus Control Centre, and Anti-Virus
Updater on the protected server.
2. If Anti-Virus Engine is controlled locally, install Kaspersky AntiVirus
®
MMC Snap-In on the server.
3. If Anti-Virus Engine is controlled from a remote computer, install the
following components on the remote computer:
• Kaspersky Anti-Virus
®
MMC Snap-In.
• If the remote computer is running under Microsoft Windows NT
4.0, install additionally Active Directory Service Interfaces
(ADSI) 2.5 or Active Directory Client Extensions, MMC version
1.2.
4. Customize Anti-Virus Engine by means of MMC Snap-In.
5. Set up the launch schedule on the Kaspersky AV Updater server by
means of Kaspersky AV Control Centre or Kaspersky
®
Network
Control Centre. Kaspersky AV Updater is designed for updating
anti-virus databases.
6. Exclude the quarantine directory and temporary files directory from
the scanning area if Kaspersky AV Scanner or Monitor is installed
on the server. When working under MS Exchange Server 2000,
you should also exclude a logical drive created on the server during
the installation of MS Exchange Server 2000 (by default, the letter
M is used for this disk).
7. Enable mail protection using Kaspersky AV MMC Snap-In (see
subchapter 3.3 on page 32).
8. Test the settings and operation of Kaspersky Anti-Virus
®
using the
EICAR testing "virus" (see subchapter 3.5 on page 72).
Page 32
32 Kaspersky Anti-Virus 4.5 for MS Exchange Server
Support of the created server anti-virus protection in actual operation takes the
following form:
• getting and processing virus-detection messages.
• regular checks of the reports on receiving and sending updates.
• quarantine directory management and cleaning.
If many files are stored in the quarantine folder (more than 30000), this
will noticeably slow the operation of Anti-Virus Engine.
3.3. Anti-Virus Engine Control by
means of Kaspersky AV MMC
Snap-In
3.3.1. Starting Kaspersky AV MMC Snap-In
A special Kaspersky AV MMC Snap-In module, integrated into MS Management
Console (MMC), can be used for remote Anti-Virus Engine control.
To get access to Kaspersky AV MMC Snap-In:
1. Click the Start button on the Windows taskbar and select
Programs from the menu.
2. Select either the Kaspersky Anti-Virus
®
or Microsoft Exchange
Server items.
3. Select Kaspersky AV MMC Snap-In from the menu.
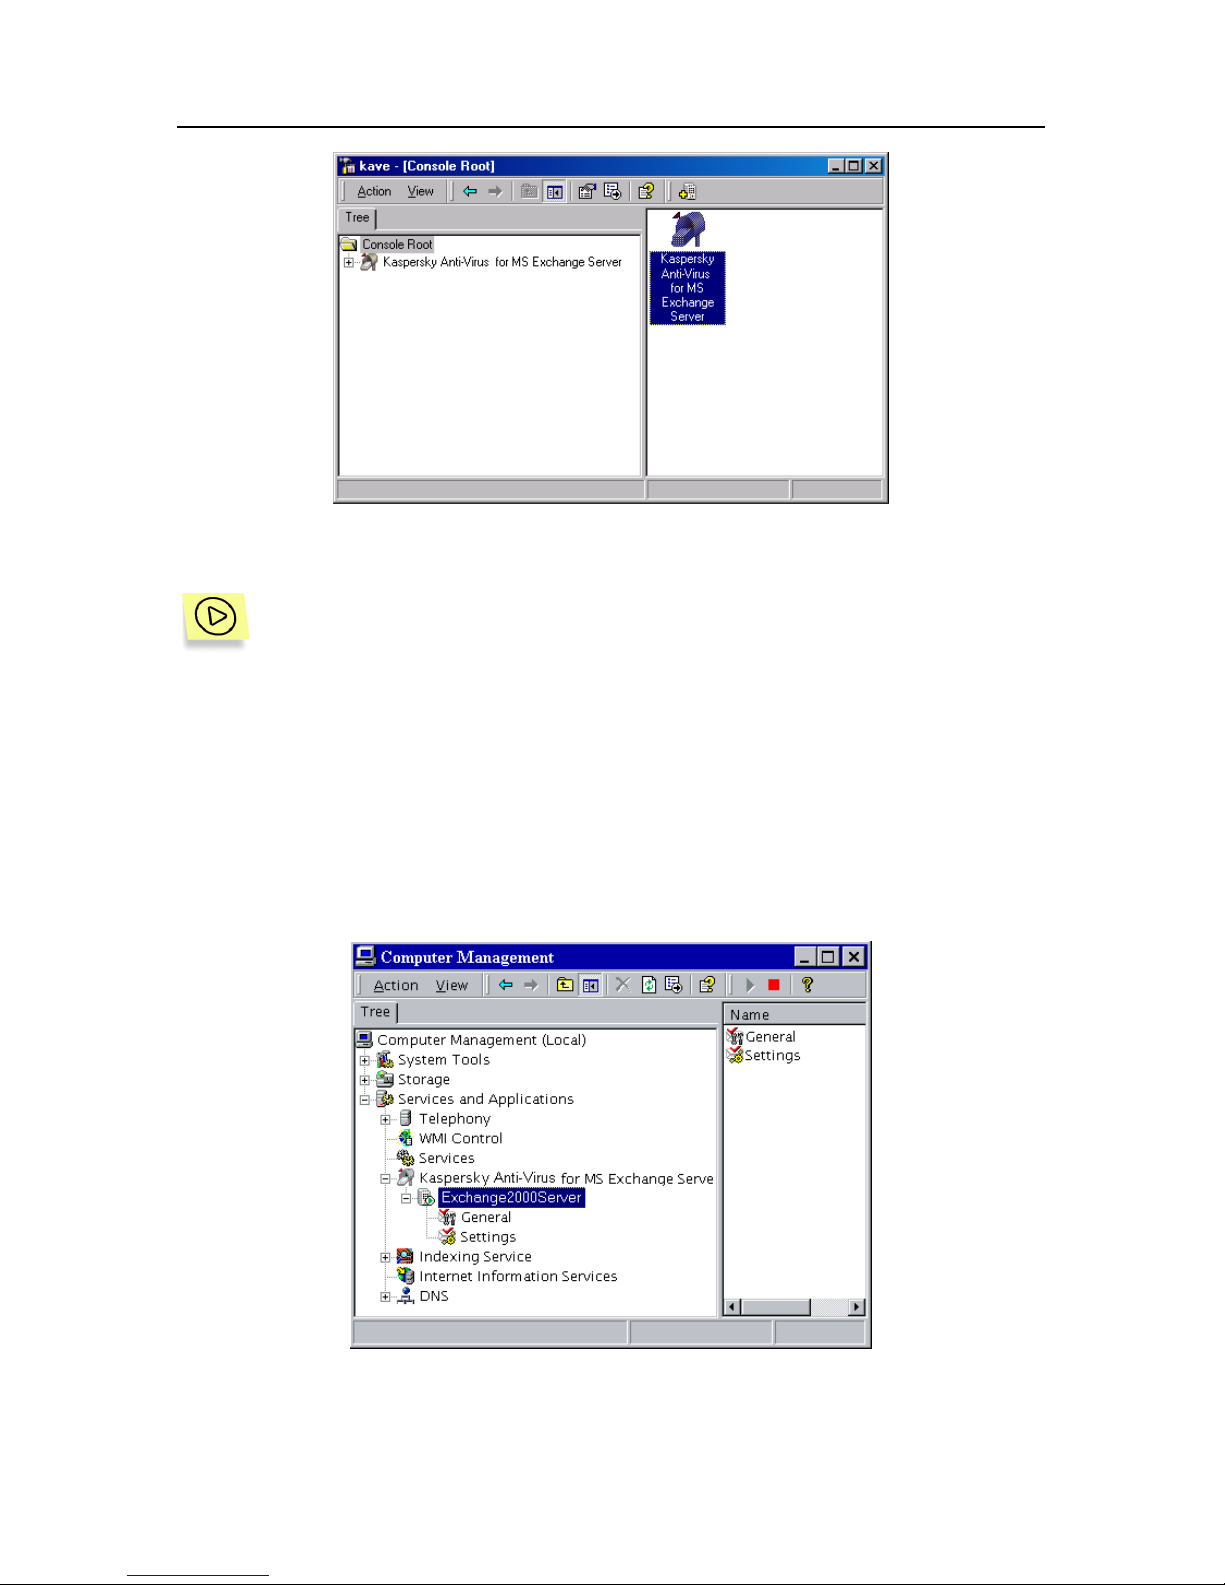
The main MS Management Console window (see Figure 22) will open. You will
see Kaspersky Anti-Virus
®
for MS Exchange Server and the corresponding
icon
on the Tree tab in the list of tree nodes.
Page 33
Protection of MS Exchange Server Messages 33
Figure 22. The MS Management Console main window
If MS Exchange Server is running under Microsoft Windows 2000 and
higher, you can run the program for Kaspersky Anti-Virus® control by
following these steps:
1. In Control Panel, choose the Administrative Tools folder and
then Computer Management icon. The Computer Management
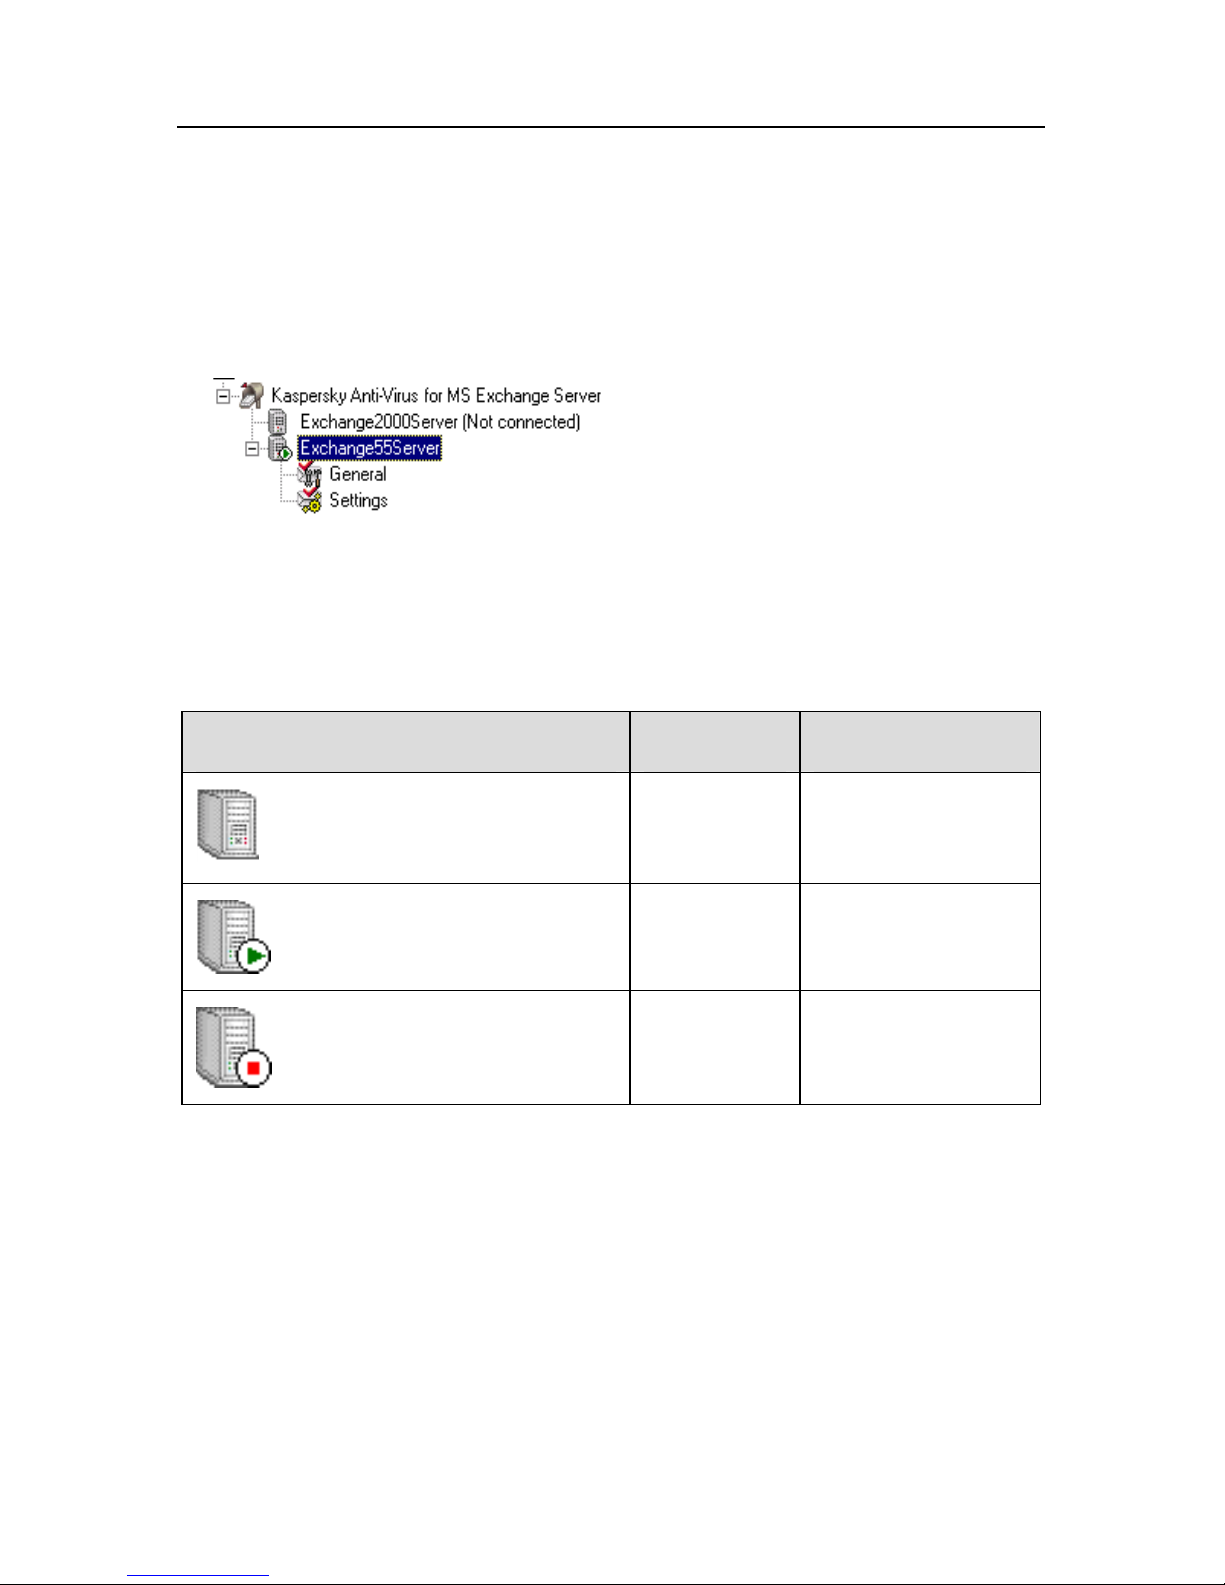
dialog box will appear on the screen (see Figure 23). To display
this dialog box, you can also select Management from the My
Computer right-click menu.
2. Open the contents of the Services and Applications tree node.
There you will find the Kaspersky Anti-Virus® for MS Exchange
Server option.
Figure 23. The Computer Management window
Page 34
34 Kaspersky Anti-Virus 4.5 for MS Exchange Server
3.3.2. Kaspersky AV MMC Snap-In Interface
The Kaspersky Anti-Virus® for MS Exchange Server container includes a list
of servers. Each server included in the container has right-click menus. Using the
container’s right-click menu, you can add new servers subject to protection (if
you work with local and remote servers).
The container includes a list of
protected servers.
Using the right-click menus, you can remove servers from the list of protected
servers, connect and disconnect them, enable and disable anti-virus protection,
and display information about the current license. Table 2 shows icons
corresponding to different states of the protected servers.
Table 2. Icons corresponding to states of the protected servers
Icon Connection Protection
(No connection)
No Unknown
Yes Yes
Yes No
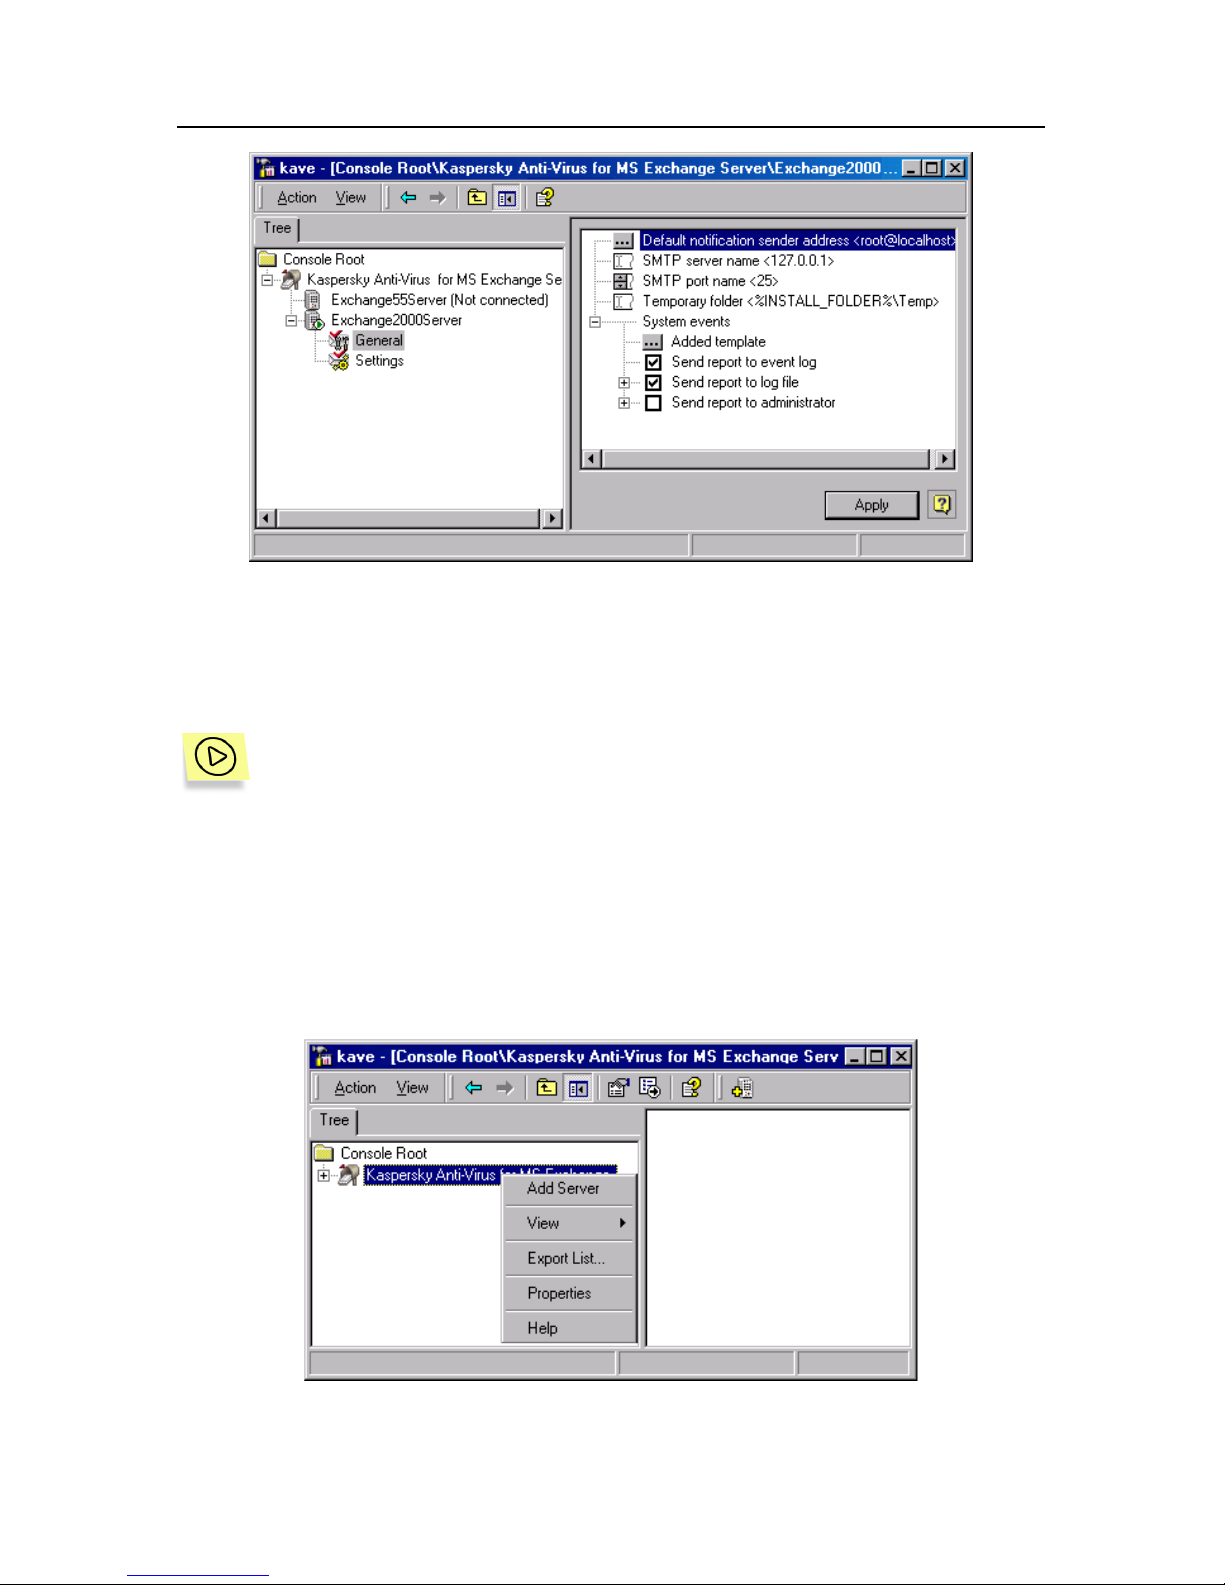
Each server corresponds to a branch with two settings categories: General and
Settings. You can edit the protection settings for each server by switching
between the tree nodes and working with the tree elements in the right pane (see
Figure 24).
Page 35
Protection of MS Exchange Server Messages 35
Figure 24. A control for changing anti-virus server protection settings
3.3.3. Adding/deleting server for control
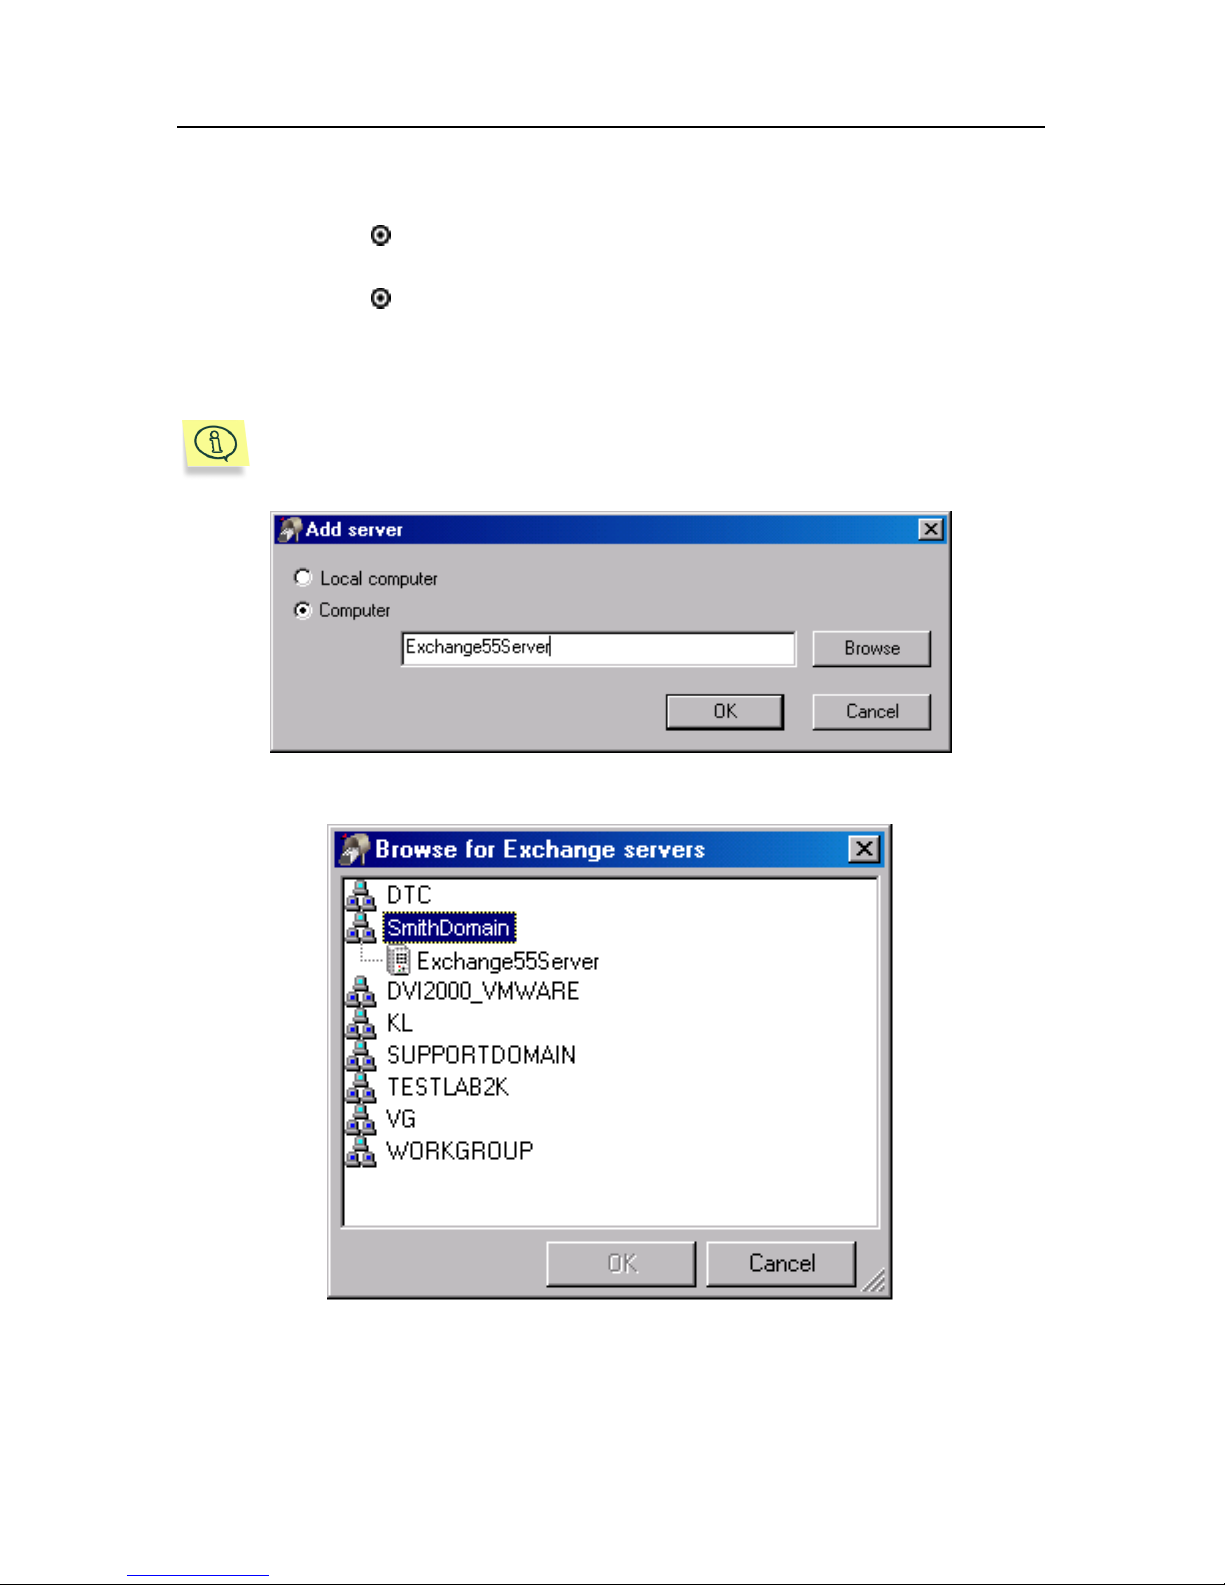
To add a server to the list of controlled servers:
1. Launch MMC (see subchapter 3.3.1 on page 32).
2. Use the Structure tab in the left pane to choose Kaspersky Anti-
Virus
®
for MS Exchange Server. After this, you will see a list of
servers added for control.
3. Choose Add Server from the right-click menu of the Kaspersky
Anti-Virus® for MS Exchange Server node.
Figure 25. Adding new control server
Page 36
36 Kaspersky Anti-Virus 4.5 for MS Exchange Server
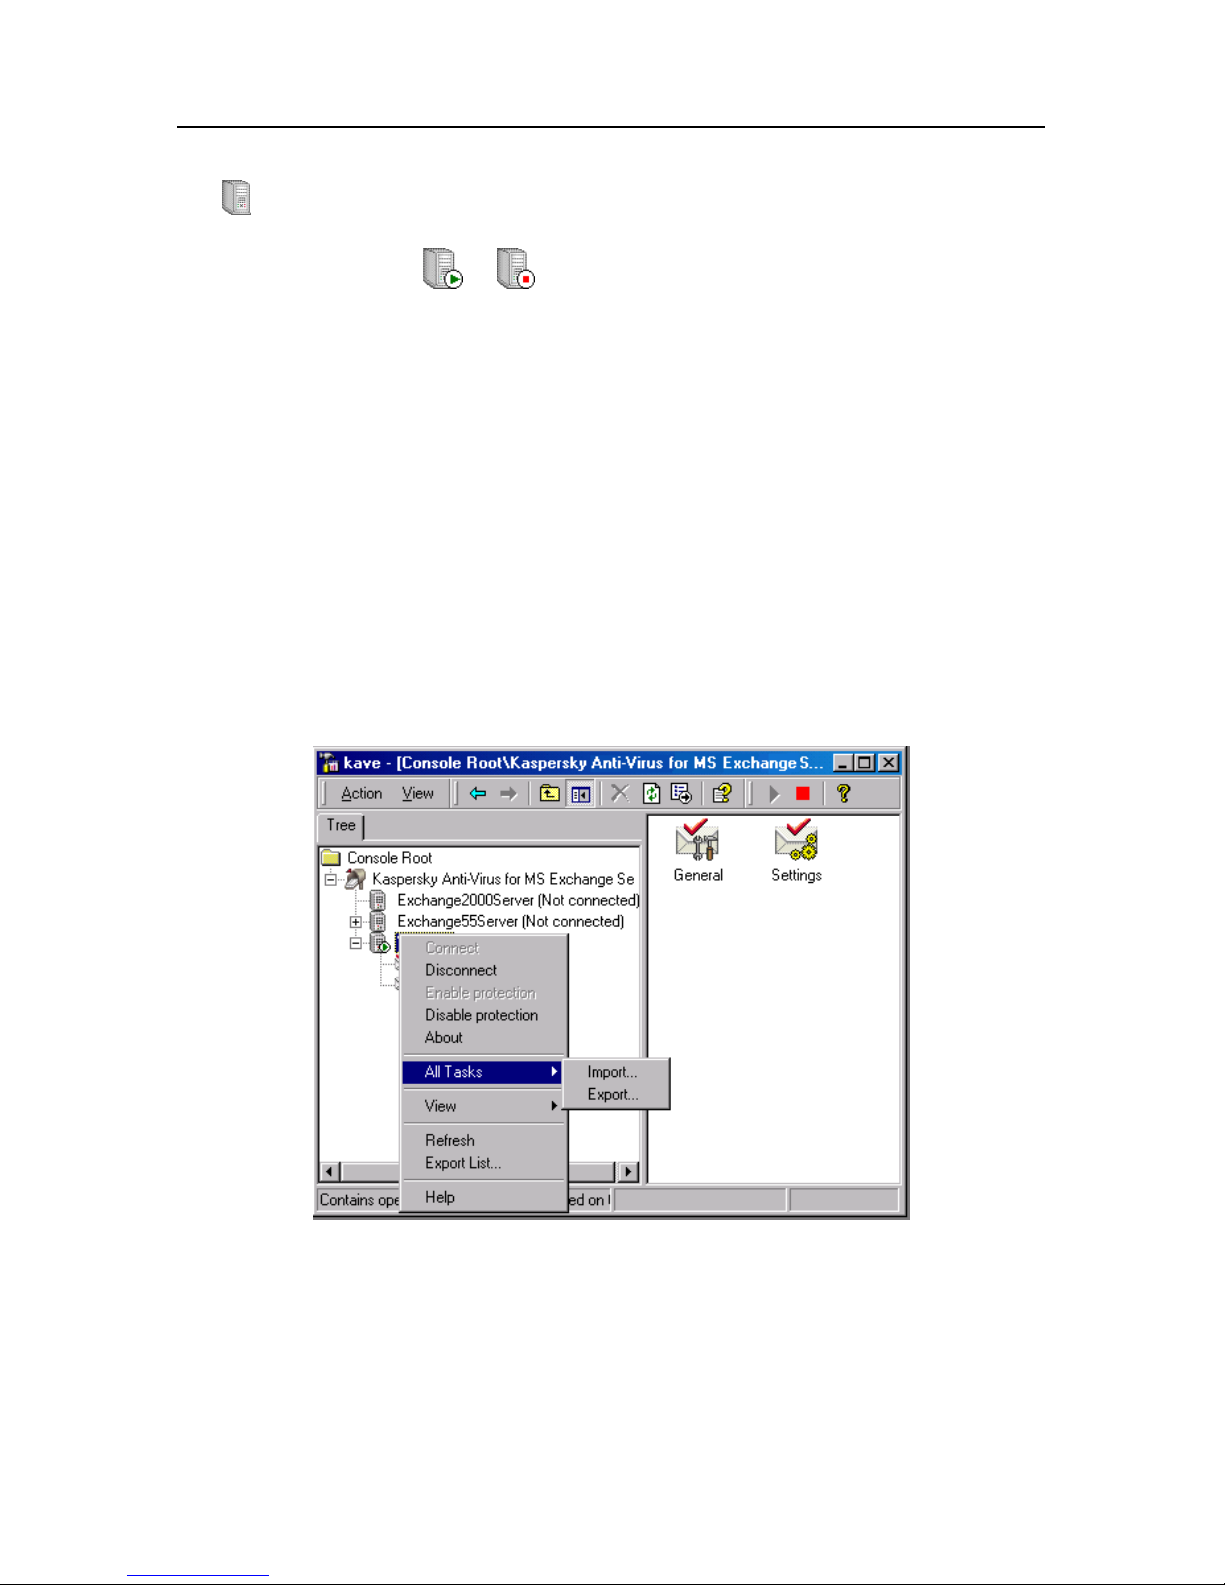
4. In the Add Server dialog box (see Figure 25), select one of the
following buttons:
Local computer – if you wish to add the server you are
currently working with.
Computer – if you wish to add a new server from LAN.
Enter the server address in the text field below or click Browse
and choose the server from the list of all Exchange servers
(see Figure 26).
Anti-Virus Engine for MS Exchange Server must be installed on the
server you have chosen.
Figure 26. The Add Server dialog box
Figure 27. The Browse for Exchange servers dialog box
Page 37
Protection of MS Exchange Server Messages 37
After this, the server name will be displayed in the list of protected servers with
the
icon and the Not Connected mark. Right after you click the server name,
the program will try to connect to server. If the program connects to the server,
the icon will change to or and the Not Connected mark will be removed.
3.3.4. Setting/removing anti-virus
protection.
Disconnecting/connecting to server.
License. Importing/exporting
settings
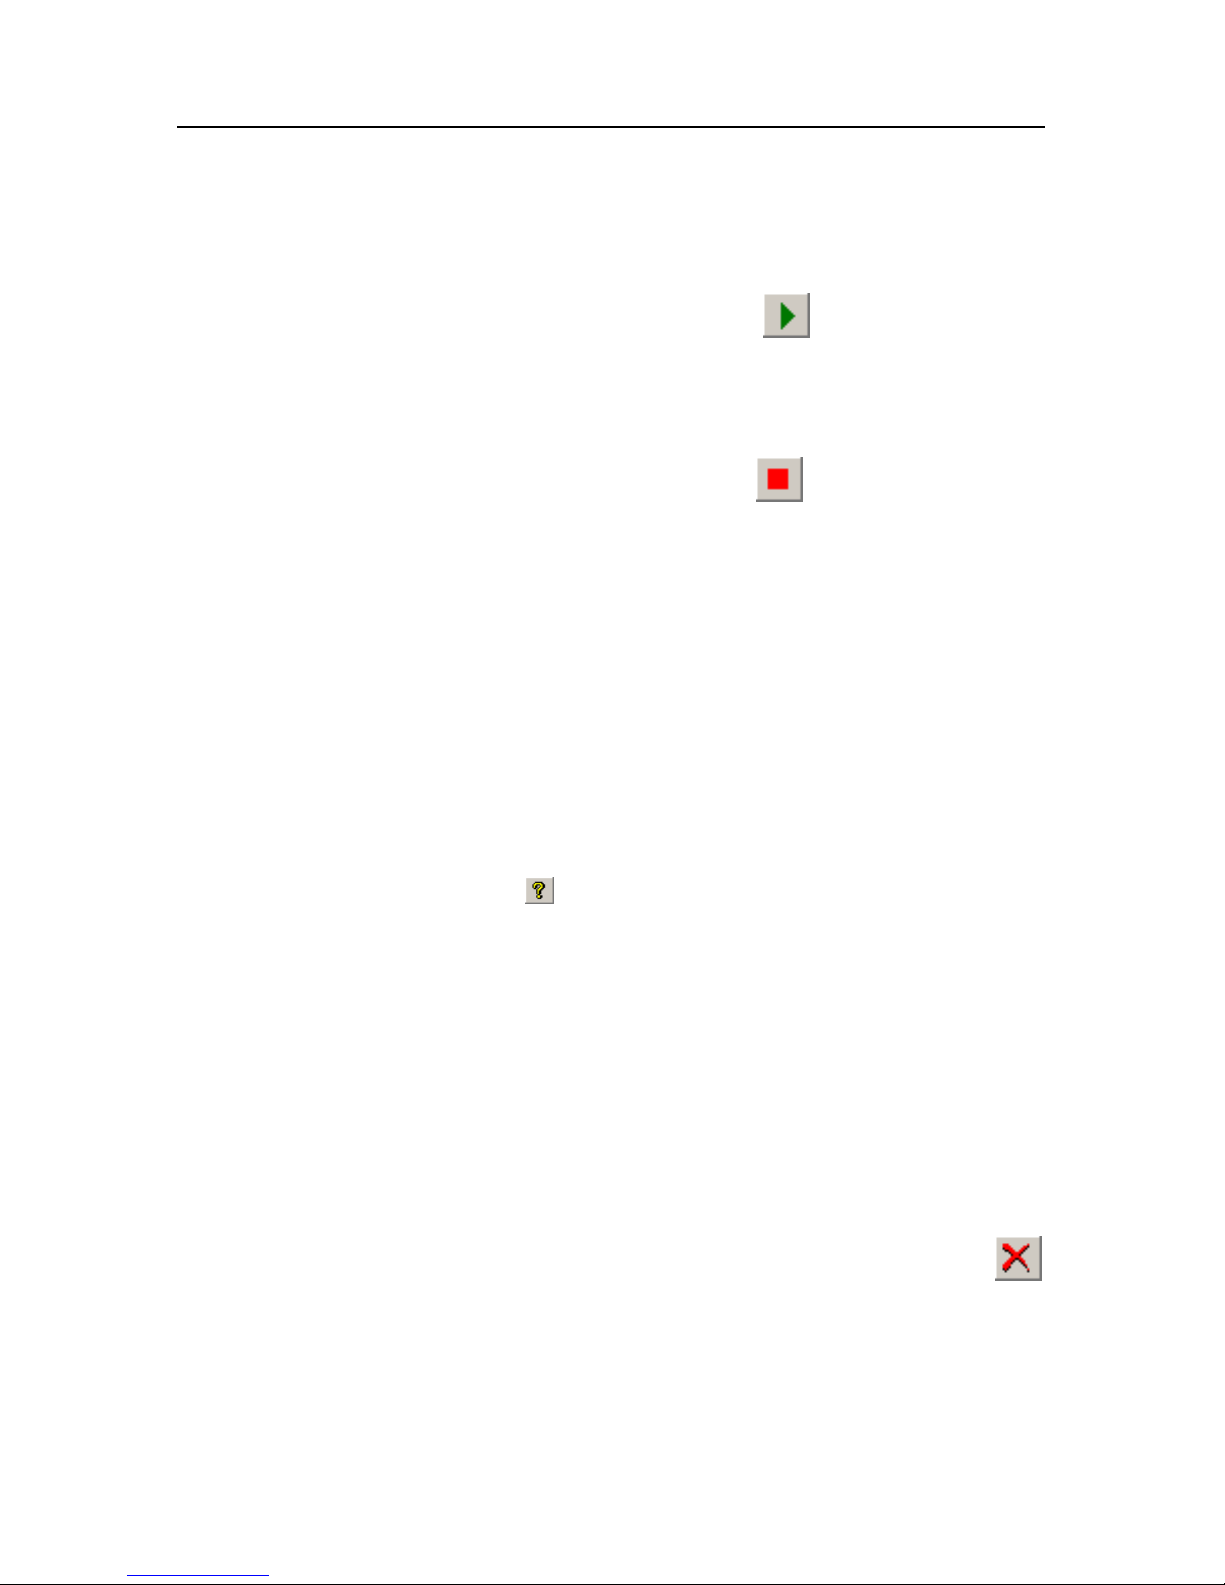
Using the right-click menu, you can remove servers from the list of protected
servers, connect and disconnect them, install and remove anti-virus protection,
import/export anti-virus settings, and display information about the license validity
term (see Figure 28).
Figure 28. Setting anti-virus server protection
Page 38
38 Kaspersky Anti-Virus 4.5 for MS Exchange Server
The right-click menu has the following items:
Enable protection
Enable protection on a server. This operation
can take up to 2 minutes. This option is
availabsle only when connected to the server.
You can also click the
toolbar button.
Disable protection
Disable protection on a server. This operation
can take up to 2 minutes. This option is
availabsle only when connected to the server.
You can also click the
toolbar button.
Connect
Connect to the selected server.
Disconnect
Disconnect from a server. Anti-virus protection
settings are inaccessible from this console after
disconnection. However, if anti-virus protection
has been enabled before disconnection, it will
remain active after disconnection from the
server.
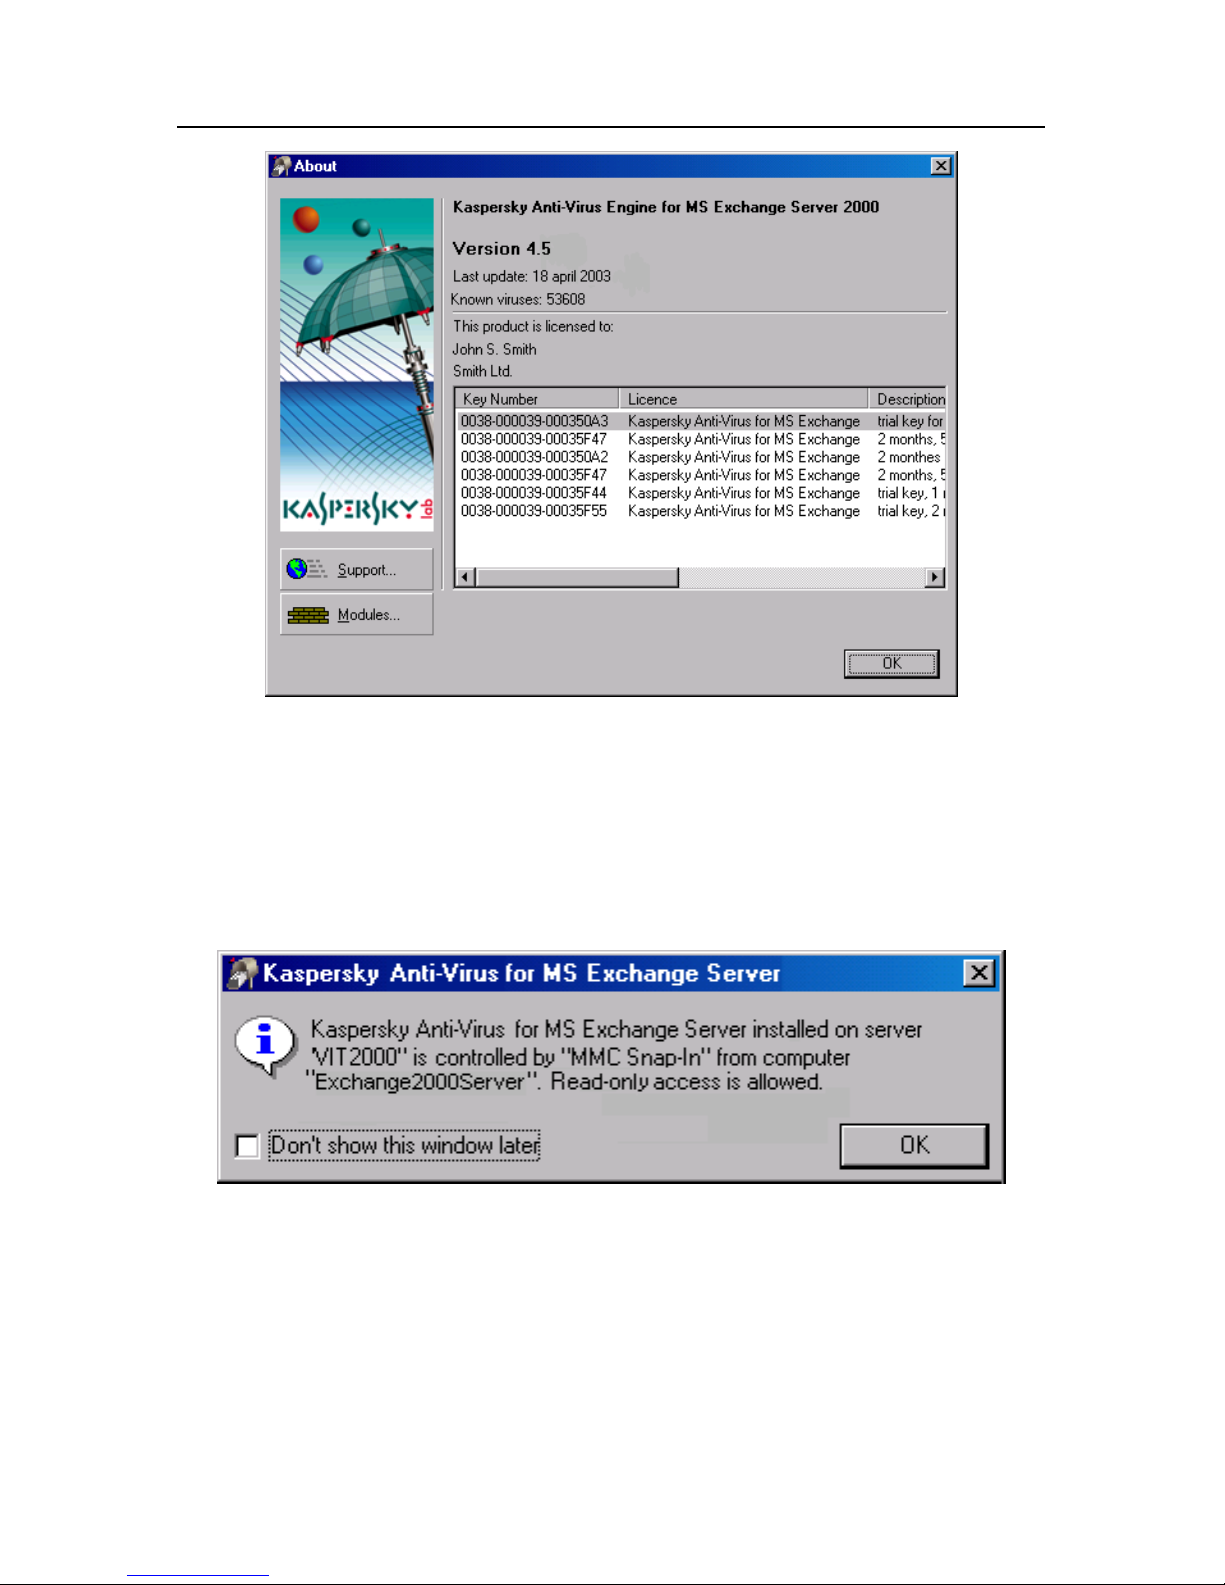
About …
Display a box containing information on the keys
availabsle for this server and the program
version (see Figure 29). You can also click the
toolbar button. This option is availabsle only
when connected to the server.
All tasks:
Import…
Export…
Import anti-virus settings from a file. To apply
the imported settings, click the Apply button in
the bottom of the right pane.
Export anti-virus settings to a file.
Delete
Delete the selected server from the list of
protected servers. You can also click the
toolbar button.
Page 39
Protection of MS Exchange Server Messages 39
Figure 29. Information about the license and program version
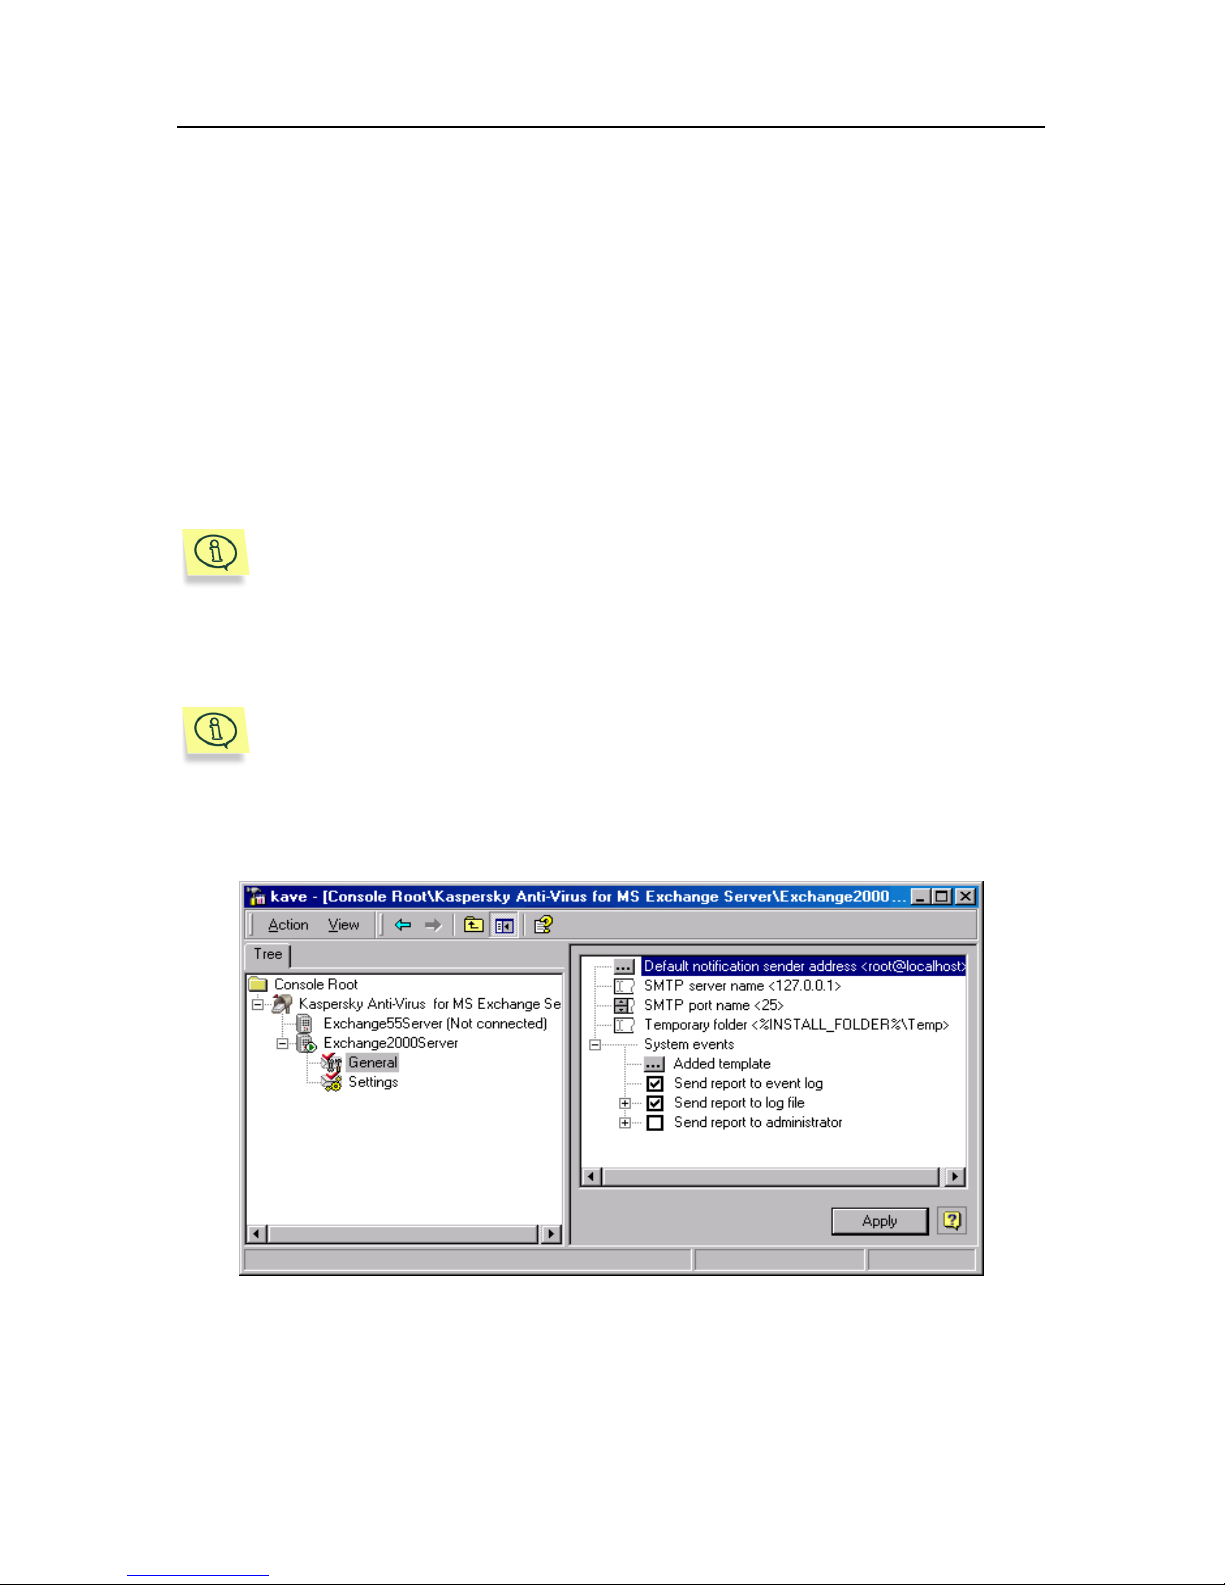
Server anti-virus protection settings are stored in its registry. Two or more
administrators cannot edit them simultaneously. One of the administrators is
allowed to edit settings, whereas other administrators are allowed to work with
them in read-only mode. An appropriate message will be displayed on your
screen if you choose a server whose anti-virus settings are currently edited by
another administrator (see Figure 30).
Figure 30. A warning about read-only access
Page 40
40 Kaspersky Anti-Virus 4.5 for MS Exchange Server
3.3.5. Changing settings using Kaspersky
AV MMC Snap-In
You can customize server anti-virus protection settings using Kaspersky AV
MMC Snap-In (see Figure 31). Each server has two categories of setting:
General and Settings. You can edit the protection settings for each server by
switching between the tree nodes and working with the tree elements in the right
pane (see Figure 31).
To apply new settings, click the Apply button. Some settings take two minutes to
be applied after you click the Apply button.
When the new settings are applied, Anti-Virus Engine is restarted. You
will see the following message: "Kaspersky AV VS API (2.0) Interceptor
for MS Exchange Server was reloaded" – if the program operates under
MS Exchange Server 2000/2003 and "Kaspersky AV AVAPI (1.0)
Interceptor for MS Exchange Server was reloaded" – if the program
operates under MS Exchange Server 5.5.
The MAPI service does not require restarting even if most anti-virus
protection settings were changed. It automatically accepts them.
However, if you change the Scanning threads and Group of
unprotected mailboxes parameters, the MAPI service must be
restarted.
Figure 31. MS Management Console
Page 41
Protection of MS Exchange Server Messages 41
3.3.6. Table of controlled servers.
Customizing warning modes
To open a table of controlled servers:
Click the Kaspersky Anti-Virus® for MS Exchange Server node on
the Tree tab.
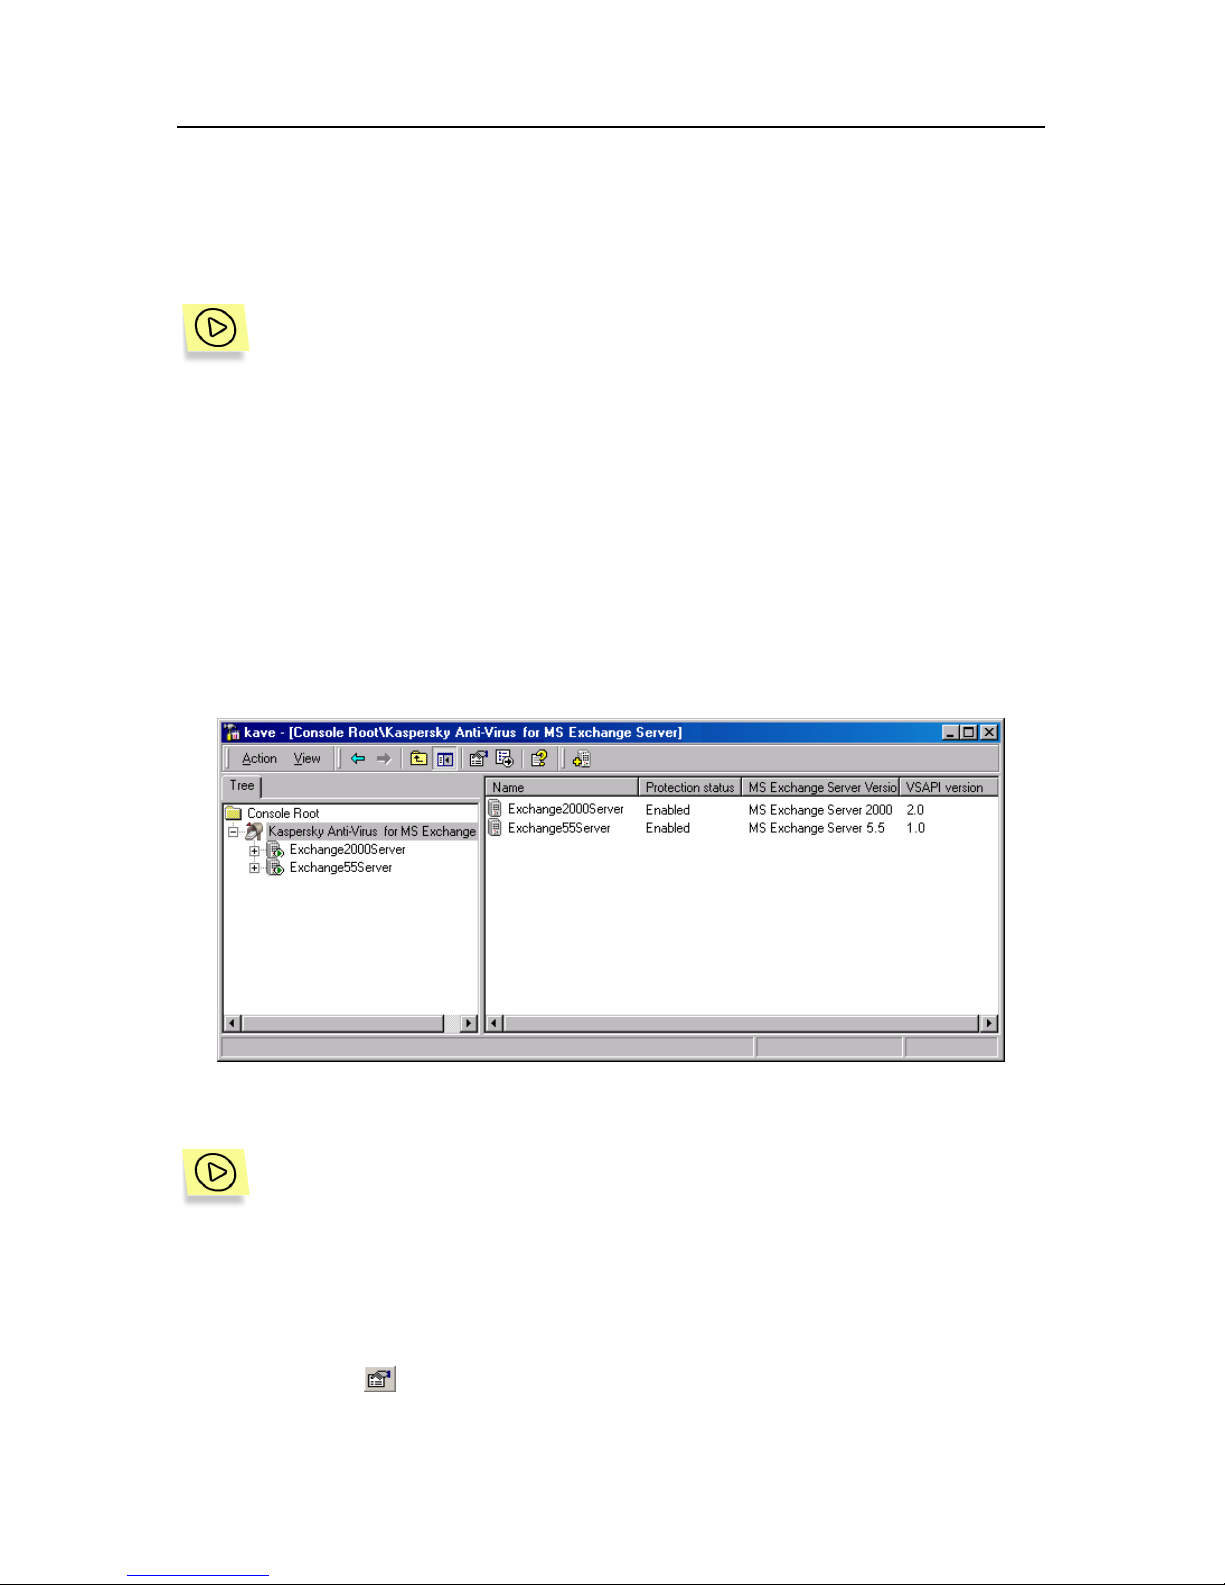
In the right pane, you will see the table of controlled servers (see Figure 32):
• Name – controlled server name;
• Protection Status – current protection status;
• MS Exchange Server Version – version of MS Exchange Server
installed;
• VSAPI version – Anti-Virus API version used.
Figure 32. Table of controlled servers
To enable/disable warning messages:
1. Click the Kaspersky Anti-Virus® for MS Exchange Server node
on the Tree tab.
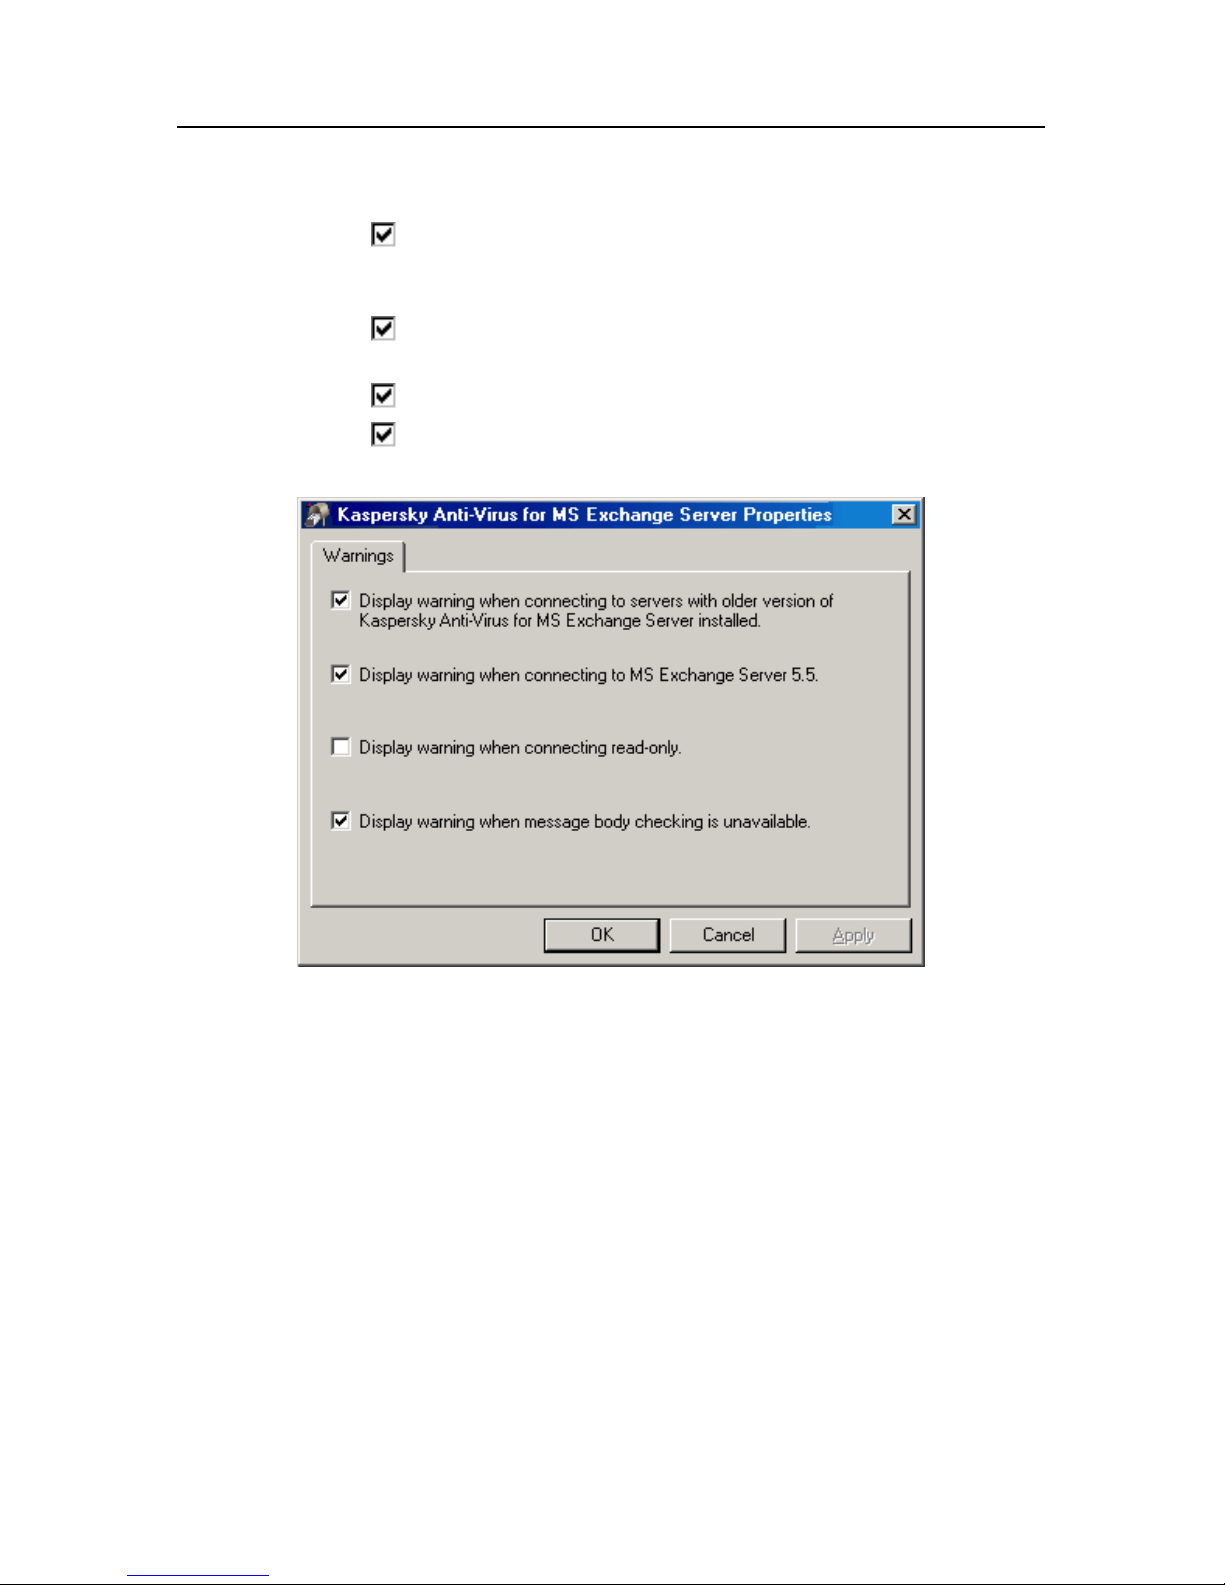
2. Select Properties from the right-click menu. The Properties dialog
box will appear on the screen (see Figure 33). You can also click
the button or press <ALT+ENTER>.
Page 42
42 Kaspersky Anti-Virus 4.5 for MS Exchange Server
3. You can enable/disable warning messages by checking the
appropriate boxes:
Display warning when connecting to servers with
older version of Kaspersky Anti-Virus
®
for MS Exchange
Server installed.
Display warning when connecting to MS Exchange
Server 5.5.
Display warning when connecting read-only.
Display warning when message body checking is
unavailabsle.
Figure 33. The Properties window
3.4. Customizing Anti-Virus Engine
settings
3.4.1. Categories:
General
and
Settings
Anti-Virus Engine settings can be customized both from a remote location and on
the server, using Kaspersky AV MMC Snap-In.
The Anti-Virus Engine settings are organized in two categories, General and
Settings. You can customize anti-virus settings in the Settings category and
system parameters in the General category.
Page 43

Protection of MS Exchange Server Messages 43
In each category, the settings are introduced as a hierarchical settings tree (see
Chapter 7 on page 122). Below, the name of each setting appears together with
an appropriate icon and the relevant category, e.g.:
Settings ! Cure type – main check mode set from a drop-down list.
In the documentation, Anti-Virus Engine settings are grouped as follows:
• Anti-virus protection – check mode, advanced scanning modes, objects
to be checked, message queue processing methods (see subchapter
3.4.2 on page 43).
• Scanned object rules – object types, scanning rules (see subchapter
3.4.3 on page 46).
• Virus messages and reports - settings for sending alerts to the
administrator, receiver, and sender, a format for saving reports to the
report file and Application Log (see subchapter 3.4.4 on page 50).
• Quarantine – settings for saving objects to a special quarantine directory
(see subchapter 3.4.5 on page 58).
• Advanced setting options – connection settings for Anti-Virus Engine
and MS Exchange Server, service parameters, flexible report setting via
Template Editor (see subchapter 3.4.6 – 3.4.8 on page 61).
3.4.2. Basic Settings for Anti-Virus
Protection
3.4.2.1. Check Mode
The main check mode for mail messages is defined in a drop-down list (see
Figure 34):
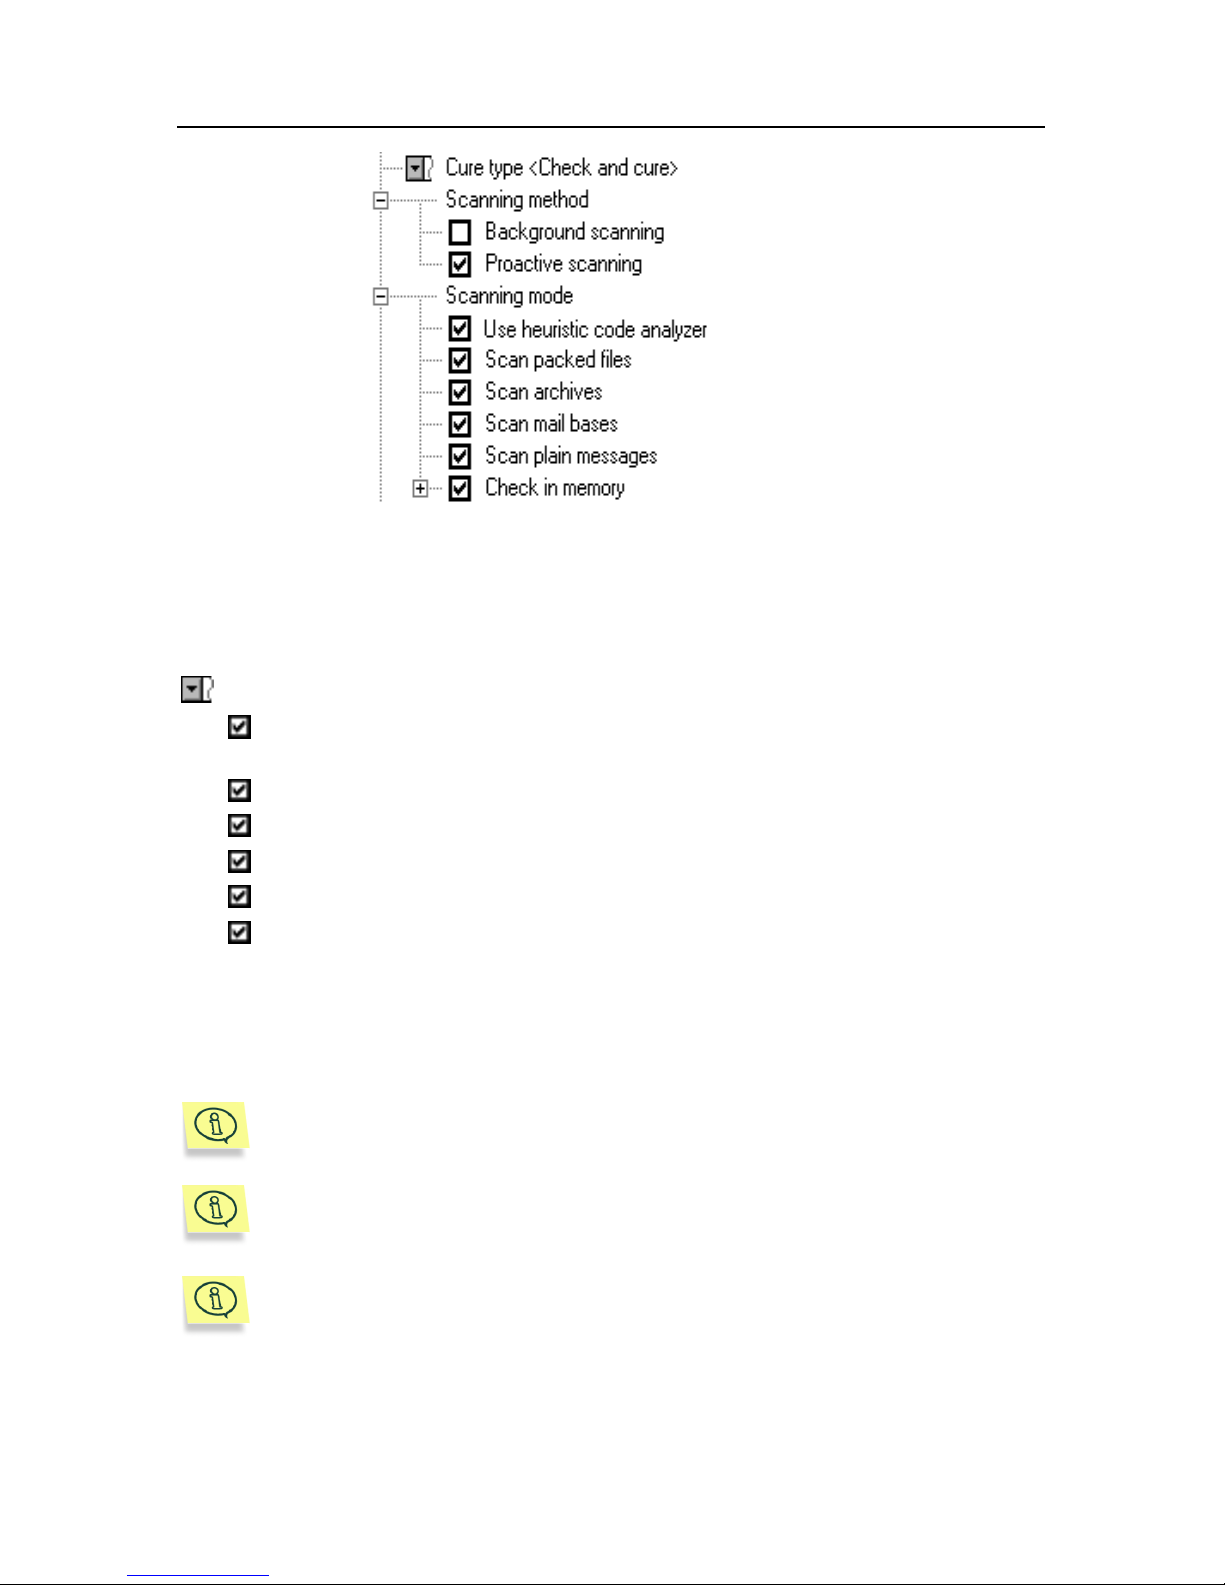
Settings ! Cure Type:
• Check only – scan objects but do not try to cure them. If a virus or
suspicious object is detected, the program will perform deletion,
renaming, blocking of e-mails, and sending of notifications to receiver,
sender and administrator (as for the Check and cure option).
• Check and cure – scan and try to cure the objects.
Page 44
44 Kaspersky Anti-Virus 4.5 for MS Exchange Server
Figure 34. Basic settings for anti-virus protection.
The Settings object
3.4.2.2. Advanced Scanning Modes
Settings ! Scanning modes- advanced scanning modes (see Figure 34).
Use heuristic code analyzer — check mail for viruses using Code
Analyzer.
Scan packed files – check self-extracting executable modules.
Scan archives – check archives.
Scan mail bases – check mail databases.
Scan plain messages – check plain mail files.
Check in memory – check objects in RAM. In the Maximum object
size to scan in memory, Kb field, define the size in kilobytes for a
maximum object to be scanned in memory (the largest size you can set
is 100Mb). If you disable this mode, the program will check all objects in
the temporary folder on your hard drive (see subchapter 3.4.7 on page
61).
Checking the Check in memory box allows you to speed up the scan
of numerous small-size objects.
Note that the program will reserve for the Check-in-memory mode the
following memory size: Maximum object size to scan in memory, Kb
* Scanning threads.
Viruses will be detected but not deleted from archives, self-extracting
executable modules, some OLE objects, mail databases, and plain mail
files.
Page 45
Protection of MS Exchange Server Messages 45
3.4.2.3. Objects to be scanned
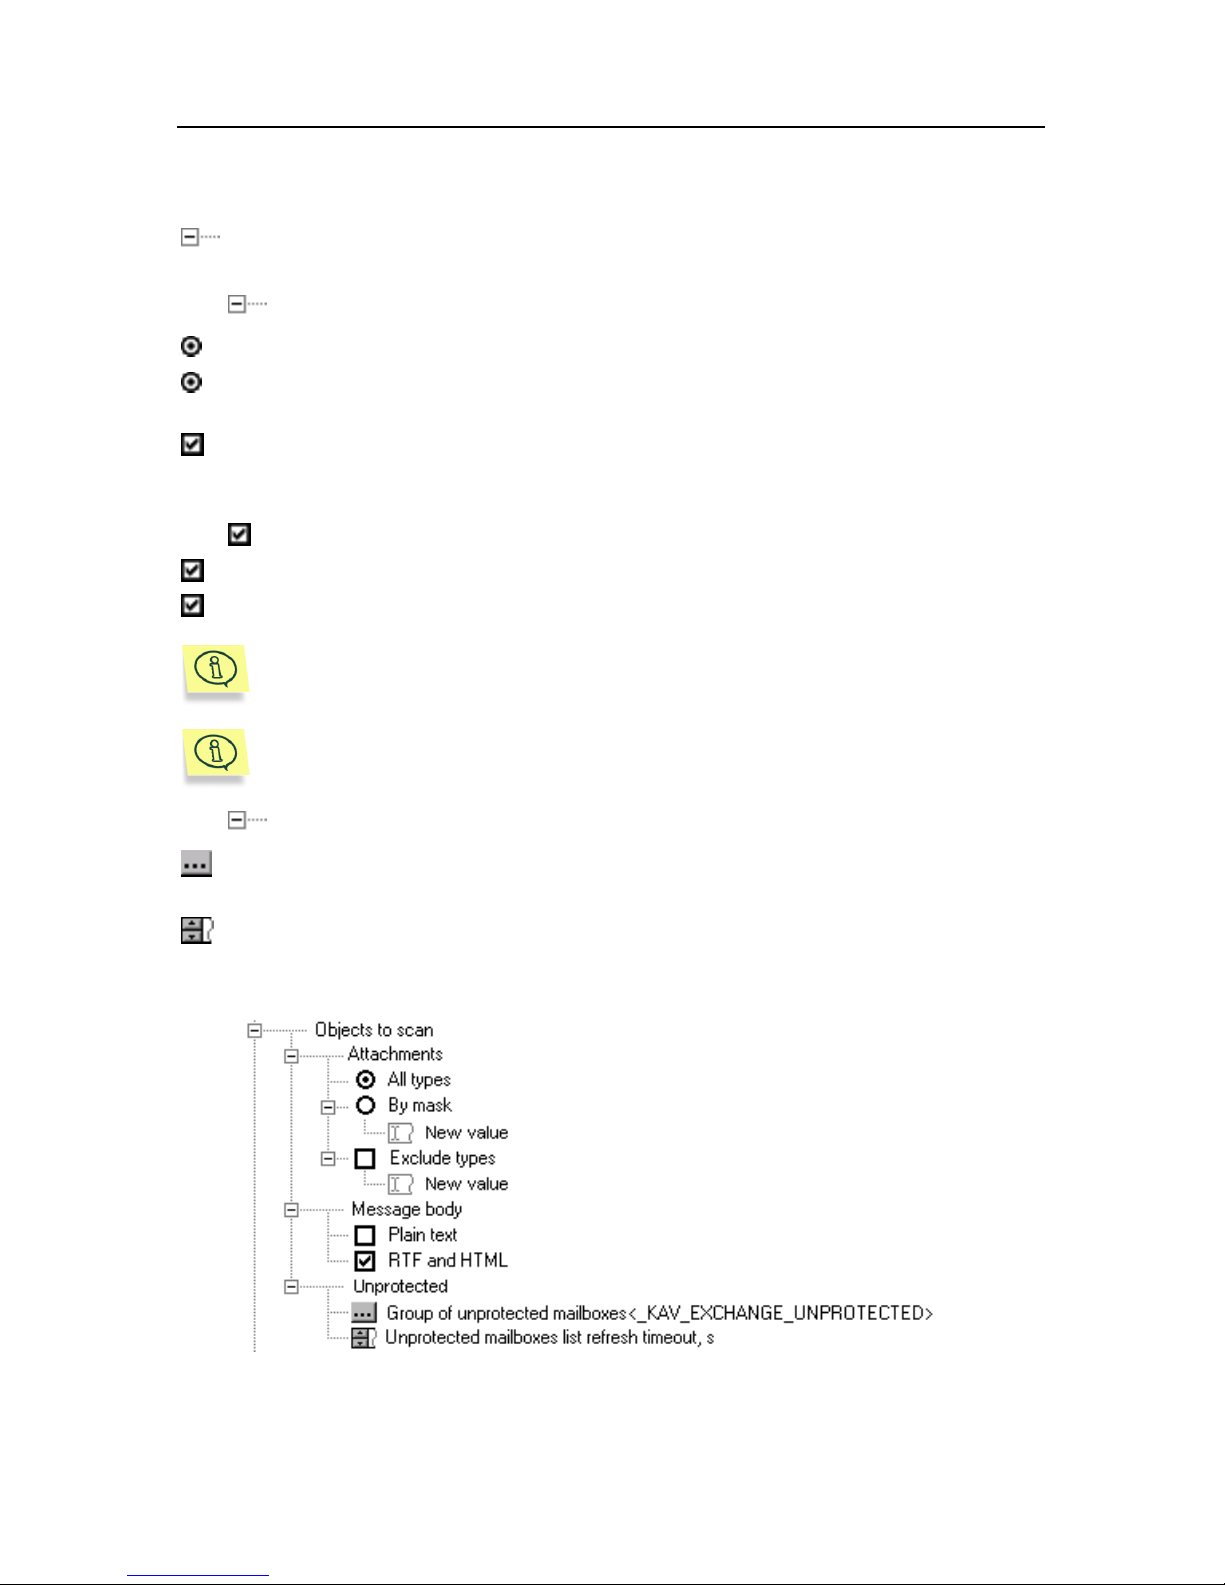
Settings ! Objects to scan – set the objects to be scanned (see Figure
35).
Attachments – check attached files.
All types – check all types of attached files.
By mask – check attached files corresponding to the masks listed
below.
Exclude types – not to check attached files corresponding to the masks
listed below. You cannot define masks as "*" or "*.*". If a file fits both By mask
and Exclude types restrictions, the program does not check it.
Message body – check message body.
Plain text – check message body in TXT format.
RTF and HTML – check message body in RTF or HTML formats.
When operating under MS Exchange Server 5.5, the program protects
message bodies only if the MAPI service is running.
If you want the program to check bodies of messages (which were
created after an application start) in new mailboxes, restart the MAPI
service.
Unprotected – specify a list of unprotected mailboxes.
Group of unprotected mailboxes – name of a mailing list or security
group, containing a list of mailboxes excluded from protection.
Unprotected mailboxes list refresh timeout, s – a time interval in
seconds for the program to check whether the mailing list has been changed. If
the list has been changed, this information will be sent to Anti-Virus Engine.
Figure 35. Objects to be scanned. The Settings category
Page 46
46 Kaspersky Anti-Virus 4.5 for MS Exchange Server
3.4.2.4. Scanning Methods
Settings !Scanning methods – Kaspersky Anti-Virus® operation methods
(see Figure 34). These methods influence the message check order and
delays in delivering messages to protected mailboxes. The modes are
enabled and disabled after a two-minute delay.
You can choose one or both of the following options:
Background scanning – background scanning mode. After you click
the Apply button, the program will start scanning all messages stored
on the server in public folders and mailboxes that have not been
checked since the last anti-virus database update. It is recommended
that you disable this mode during standard operation of the program
and enable it to check all server messages only. Otherwise, the scan
will be started after each update on the anti-virus database server.
When the program is working in background scanning mode under MS
Exchange Server 5.5, it scans attached files of messages stored on the
server and which remain unchecked after the last anti-virus database
upload, but it does not scan message bodies. However, attached files of
new messages as well as new message bodies are scanned.
Proactive scanning – sets the scanning mode with dynamic priorities.
This option is unavailabsle under MS Exchange Server 5.5! In this
mode, if a user wants to open an old message at the end of a message
queue, the message will be moved to the beginning of the queue. Thus,
the user will see the requested message right after his/her request. If
this mode is disabled, the user will have to wait until all messages in the
queue have been processed before the requested one is checked. Then
he/she will be able to see the desired message contents on the screen.
If both modes are disabled, the program keeps checking messages
opened by the user. In this case, the old messages are checked right
before the user sees them, and the new ones are checked in the
common order of their entry on server.
It is recommended that you disable background scanning and enable
proactive scanning.
3.4.3. Rules for scanned objects
In the Settings category of the Scanned object rules tree, you can set rules for
processing scanned objects.
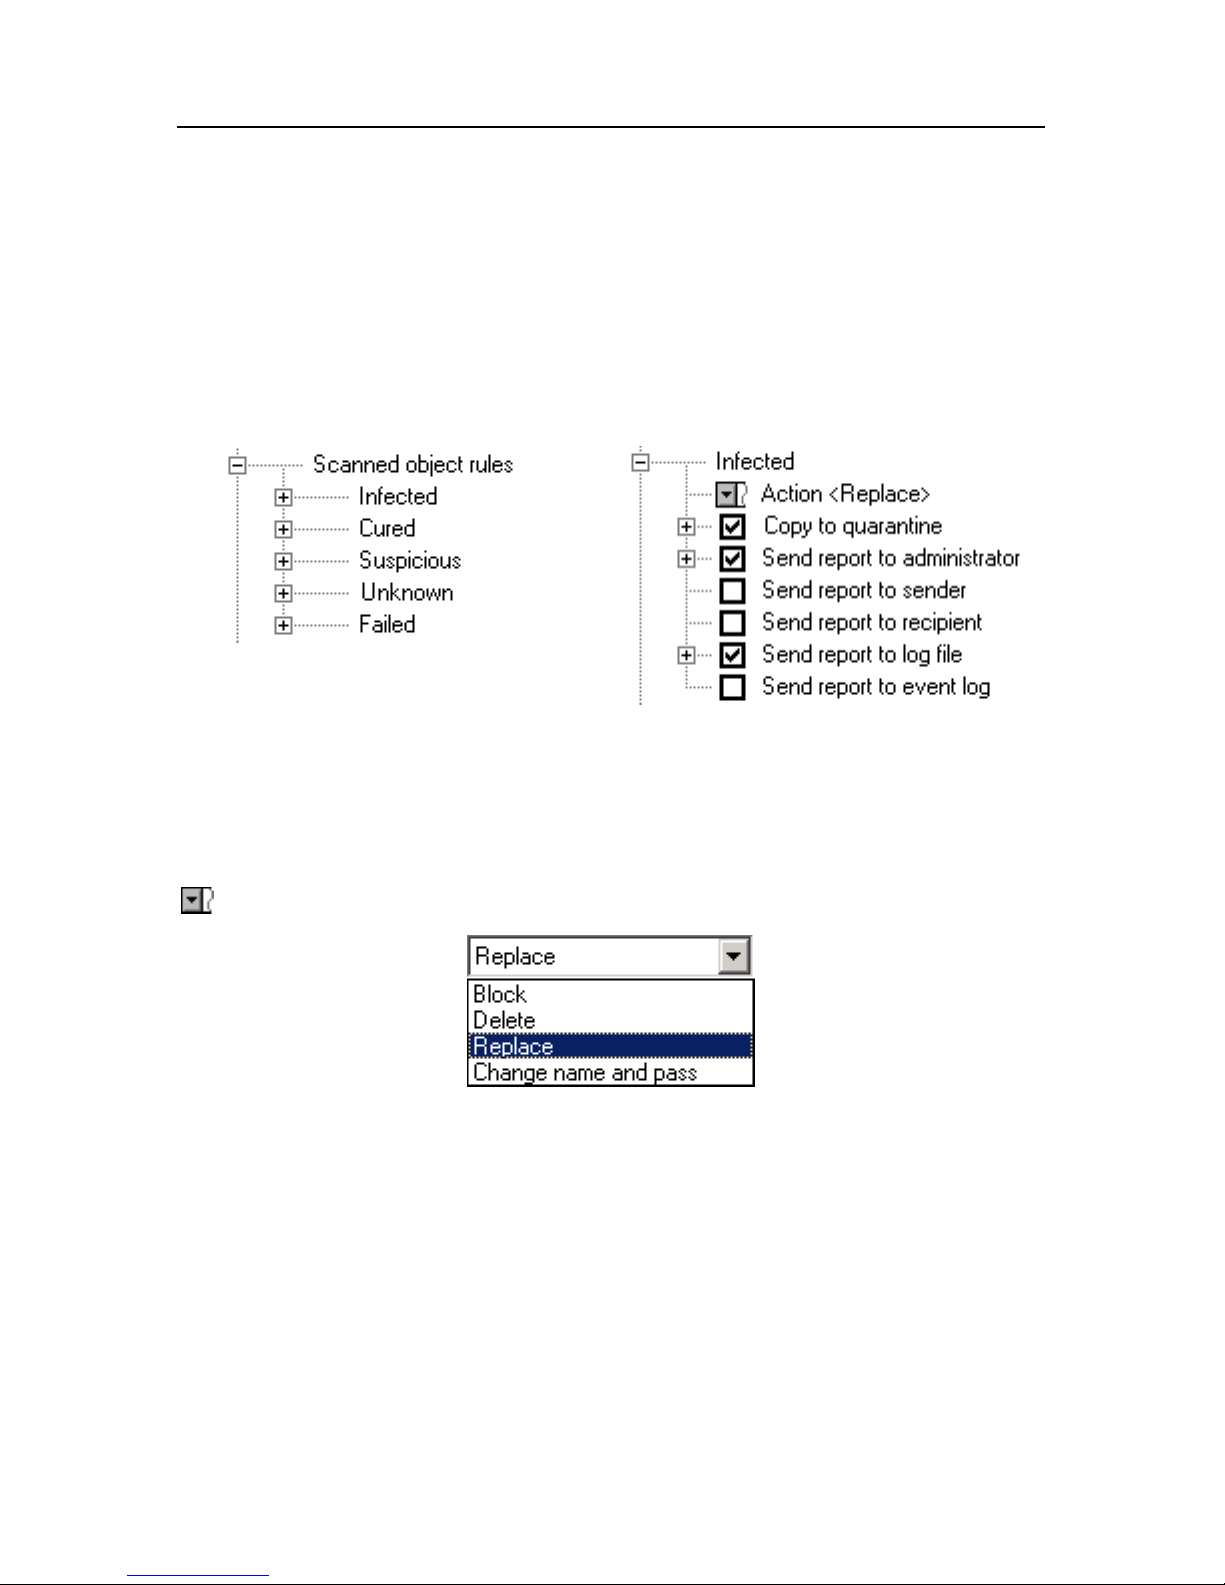
According to the scan results, the objects are divided into:
• Infected– infected objects;
Page 47
Protection of MS Exchange Server Messages 47
• Cured – cured objects;
• Suspicious – suspicious objects;
• Unknown – an error occurred when scanning these objects, or their
format is unknown;
• Failed – a failure occurred while trying to open these objects.
You can set your scanning and reporting settings for each type of object
described above (see Figure 37).
Figure 36. Types of scanned objects
Figure 37. Settings for scanned objects of the
same type
You can define the message scanning method taking into account message
type:
Scanned object rules ! OBJECT_TYPE ! Action
Figure 38. Scanned object rules
• Block – block a message with the OBJECT_TYPE object. If anti-virus
protection is enabled on the server, the following items will not be
displayed:
• contents of these messages – under MS Exchange Server
2000 (see Figure 39) for mail clients using MAPI (MS Outlook)
protocol.
• attachments – under MS Exchange Server 5.5.
Page 48
48 Kaspersky Anti-Virus 4.5 for MS Exchange Server
• the blocked message – under MS Exchange Server 2000 for
mail clients using POP3, IMAP4 (MS Outlook Express)
protocols.
If the protection is disabled, blocking fails.
Figure 39. Blocking a message under MS Exchange Server 2000
In MS Exchange Server terminology, this action (blocking) is called
"quarantine". In Kaspersky Anti-Virus
®
terminology, "quarantine" means
saving an object to a file in a special directory on the hard disk.
• Delete – delete object. The object is deleted from the message. If you
choose this mode, it is recommended that you enable copying the object
to the quarantine and sending a report to the administrator to prevent
losing important information.
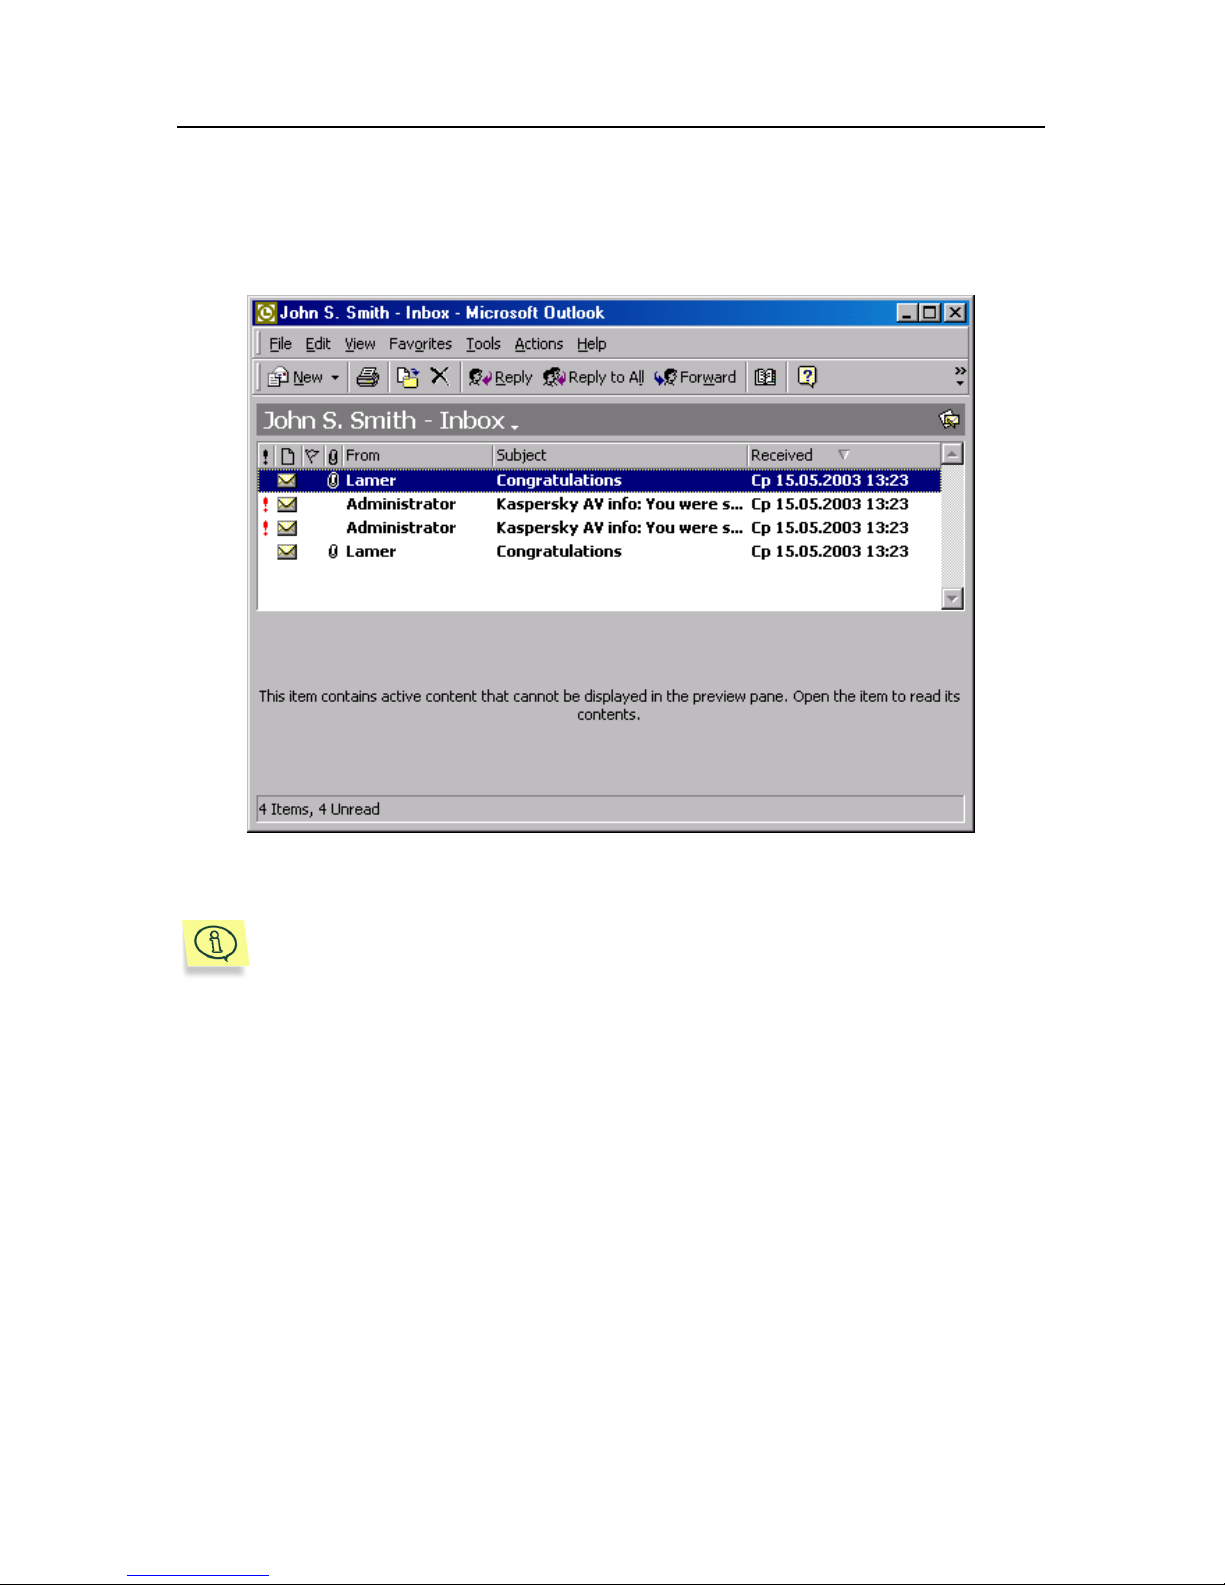
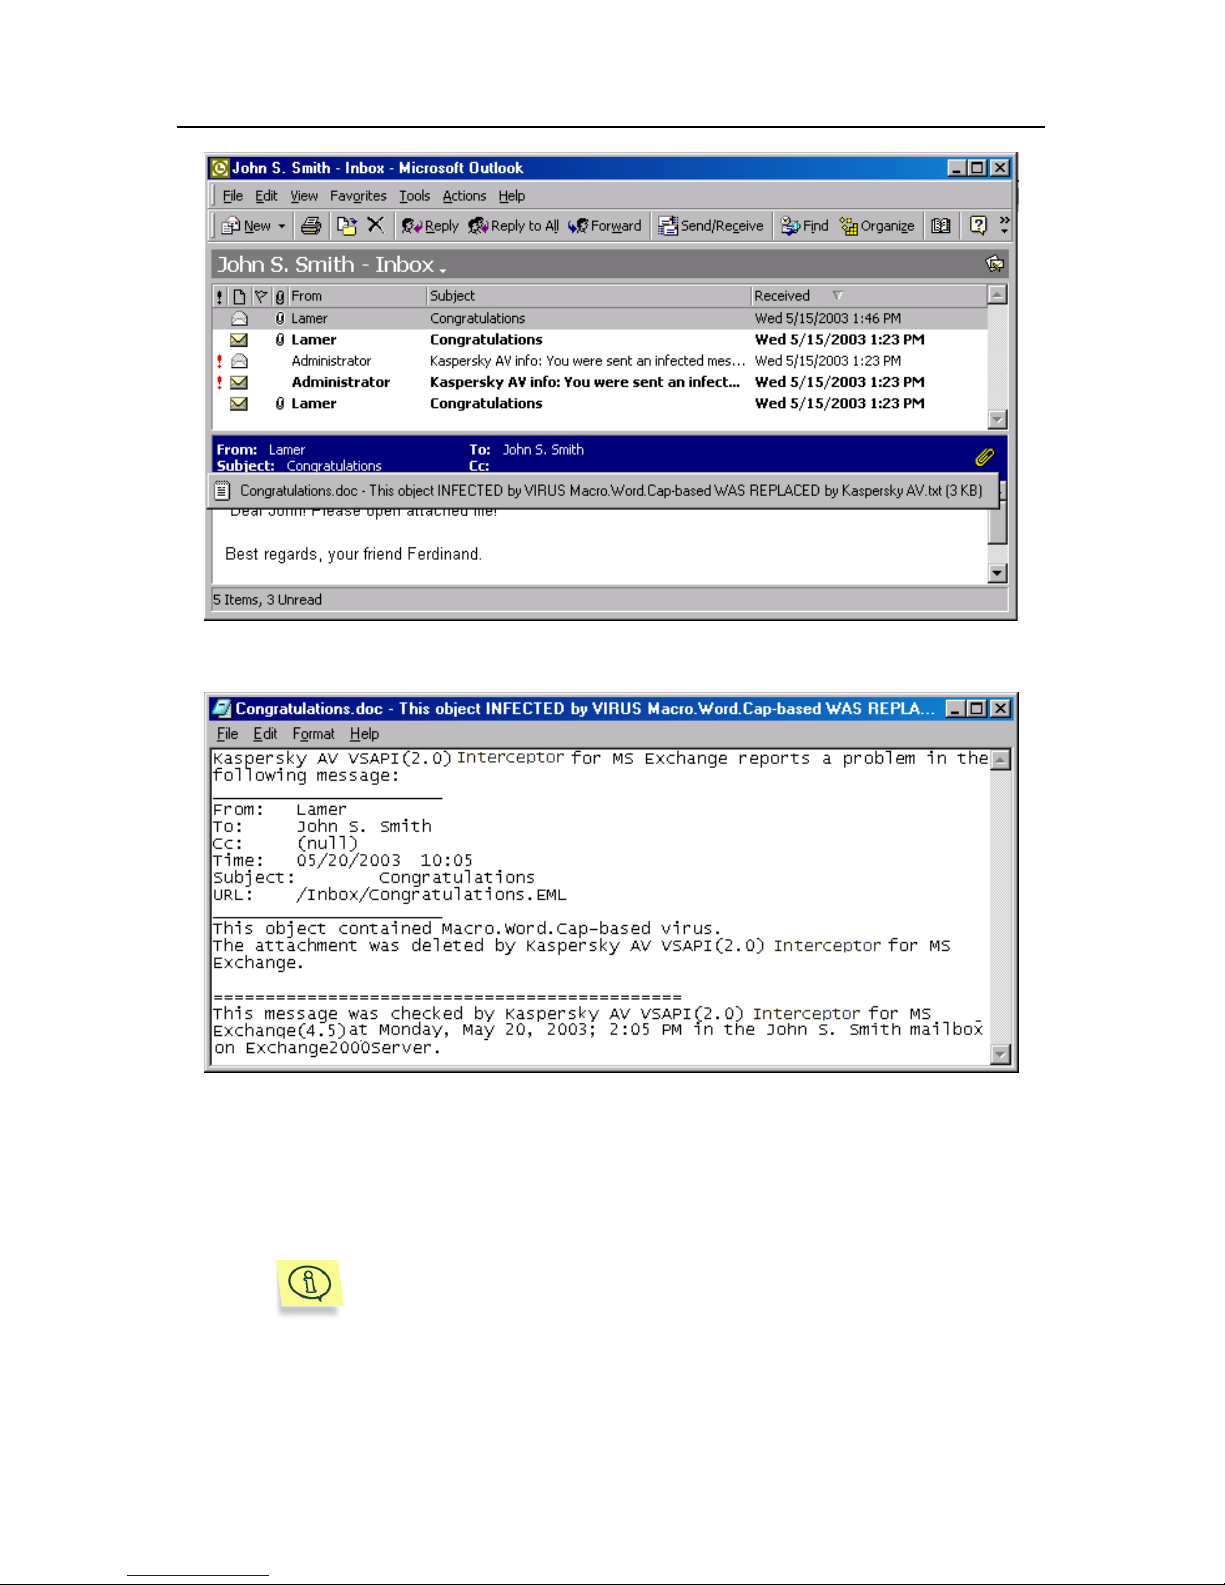
• Replace – replace an object (see Figure 40). An infected object is
replaced with a *.txt file created by the Instead message template.
Page 49
Protection of MS Exchange Server Messages 49
Figure 40. Replacement of an infected object
Figure 41. Message generated according to the Instead message template
• Change name and pass – skip a message after modifying the names of
infected attachments. The extensions of the infected messages are also
changed to "Checked by Kaspersky AV".
Note that only infected attachments will be renamed; if a
message body is infected with a virus, the message will not
be renamed.
Page 50
50 Kaspersky Anti-Virus 4.5 for MS Exchange Server
3.4.4. Virus Messages and Reports
3.4.4.1. Report Types
• Detection of infected or suspicious objects.
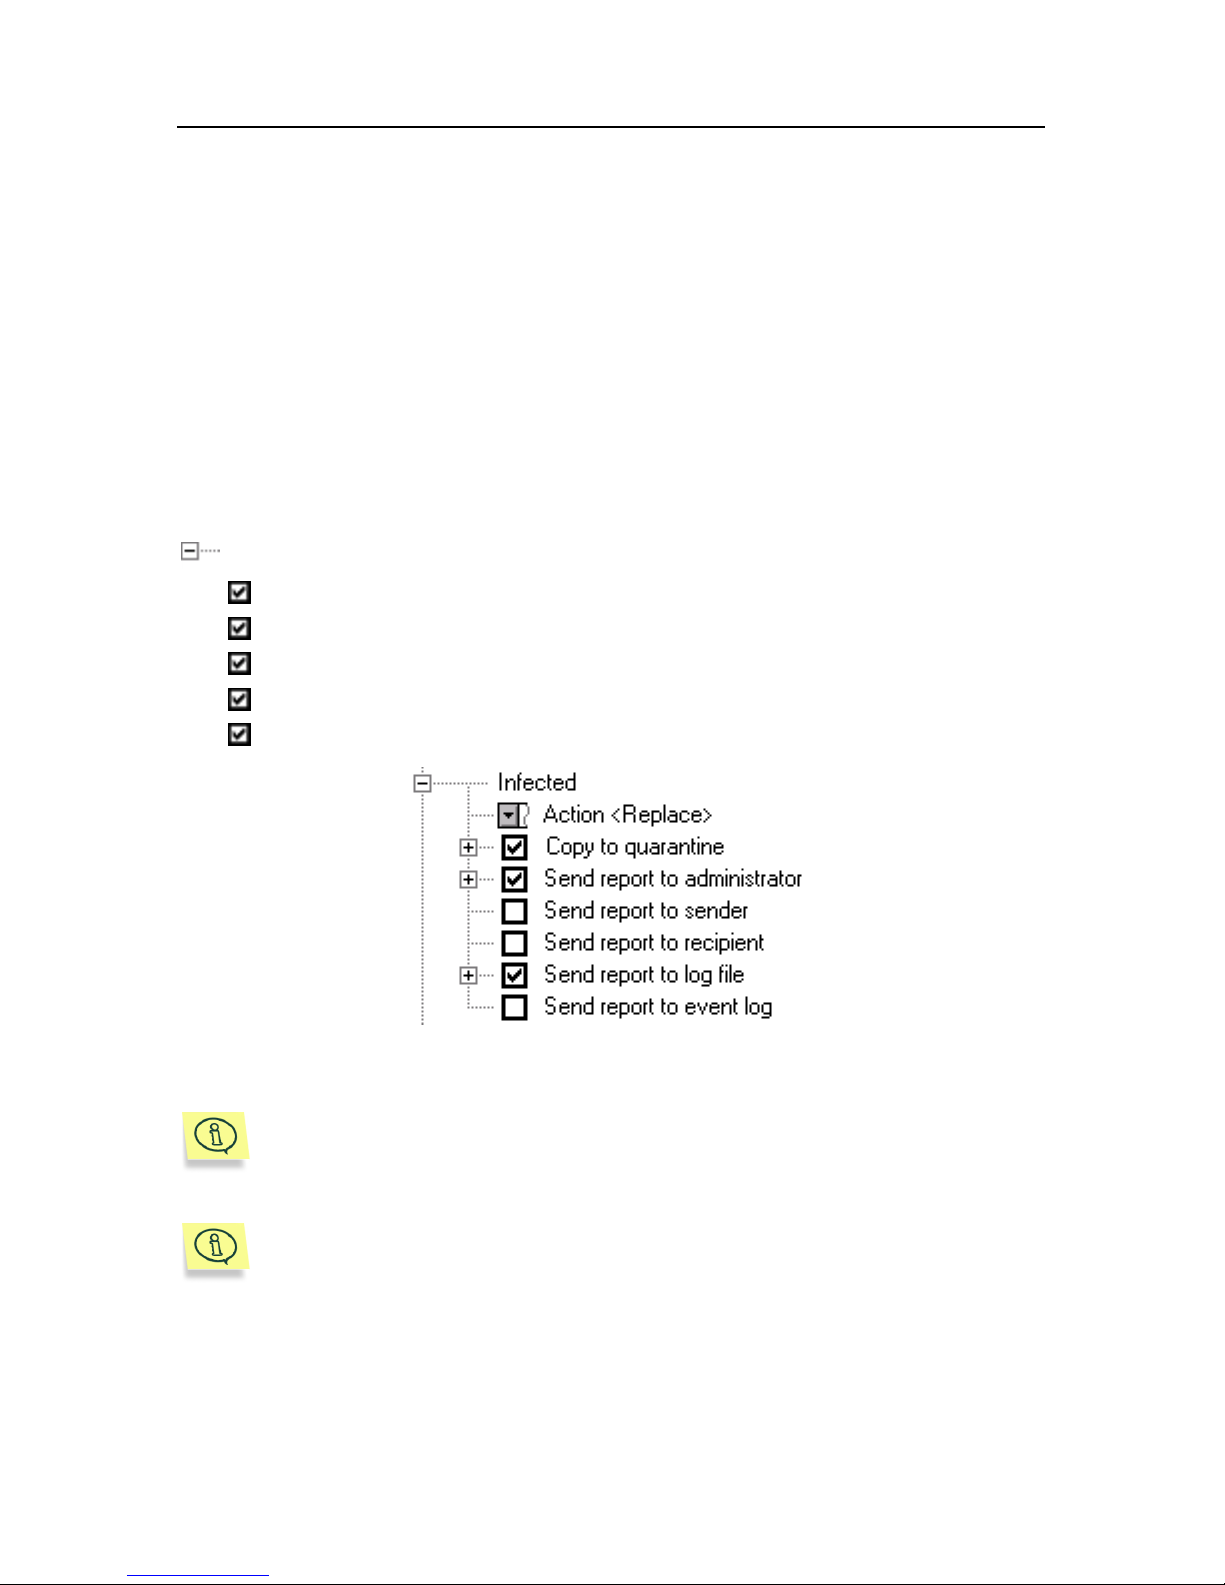
The program can send a report on scanned objects of each type – Infected,
Cured, Suspicious, Unknown, or Failed – to the administrator or save the
report to the log file. If your program runs under MS Exchange Server
2000/2003, it can also send reports to senders and recipients. You can set the
program mode in the Settings category, in the Scanned object rules settings
tree, and in the branch corresponding to the message type.
Settings!Scanned object rules!OBJECT_TYPE
Send report to administrator – send report to the administrator.
Send report to sender – send report to the sender.
Send report to recipient– send report to the recipient.
Send report to event log – write a record to the Application Log.
Send report to log file – write a record to log file.
Figure 42. Reports on the detected viruses
Anti-virus notifies you only about the first virus detected in the object,
even though the object may contain several viruses. To obtain a full list
of viruses in the object, run Kaspersky Anti-Virus
®
Scanner to scan
copies of the objects in the Quarantine folder.
If messages generated by the program contain characters of national
alphabets, incorrect encoding by mailing clients may occur. Change the
"MessageCharset" parameter in the registry if you come across this
problem. The parameter is located in the
"HKLM\SOFTWARE\KasperskyLabs\Components\125\3.0" key and
may contain the values "windows-1251", "koi8-r", etc. "Windows-1251"
8-bit encoding is used by default.
Page 51
Protection of MS Exchange Server Messages 51
• System events.
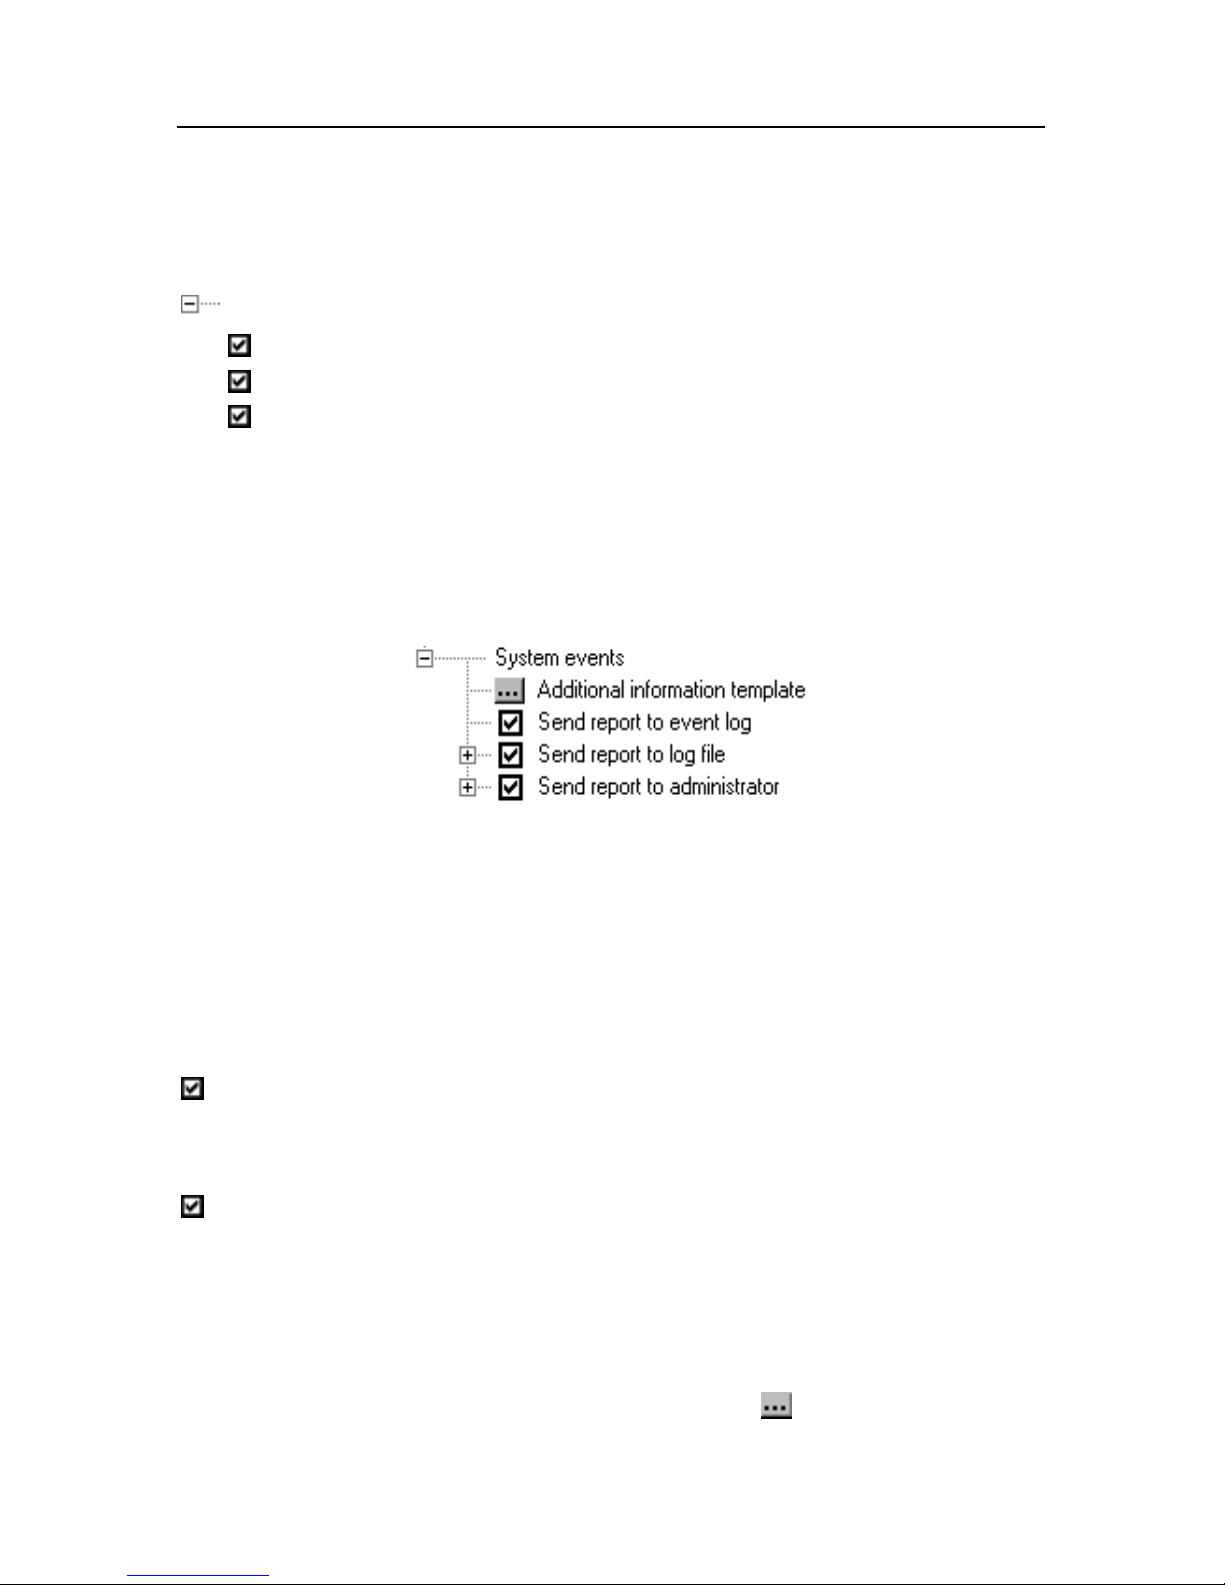
The program can generate system events notifications: start, shutdown, program
restart, databases reload, and system errors. These modes can be selected from
the System events tree of the General category,
General!System events
Send report to event log – place account to the Application Log.
Send report to log file – save account to the log file.
Send report to administrator – send the report to the administrator.
The name of the event, as well as the information from the Additional
information template, is always included in a notification on the system event.
Choose General ! System Events !Additional information template to view
and change the template (see subchapter 3.4.8 on page 62).
When the program starts operating in demo mode, this information is added to
the end of notifications and system messages (see subchapter 3.7 on page 77).
Figure 43. System event reports
3.4.4.2. Sending report to administrator
The program can send reports to the administrator’s address regarding infected
or suspicious objects, as well as system events. In addition, the reports can be
sent to different addresses, depending on the object type (Infected, Suspicious,
Unknown and Failed).
Settings ! OBJECT_TYPE ! Send report to administrator – send
OBJECT_TYPE notification to the administrator. Enter the administrator
address in the text field Settings !OBJECT_TYPE !System
events!Send report to administrator !Administrator mailbox.
General ! System events ! Send report to administrator – send
system event notification to administrator. The administrator address is set
by the General !System events!Send report to administrator text field.
The sender of these messages is set by the General ! Default notification
sender address text field.
Administrator and sender addresses can be entered manually or chosen from the
Browse for Name dialog box displayed on clicking
(see Figure 44). User
Page 52
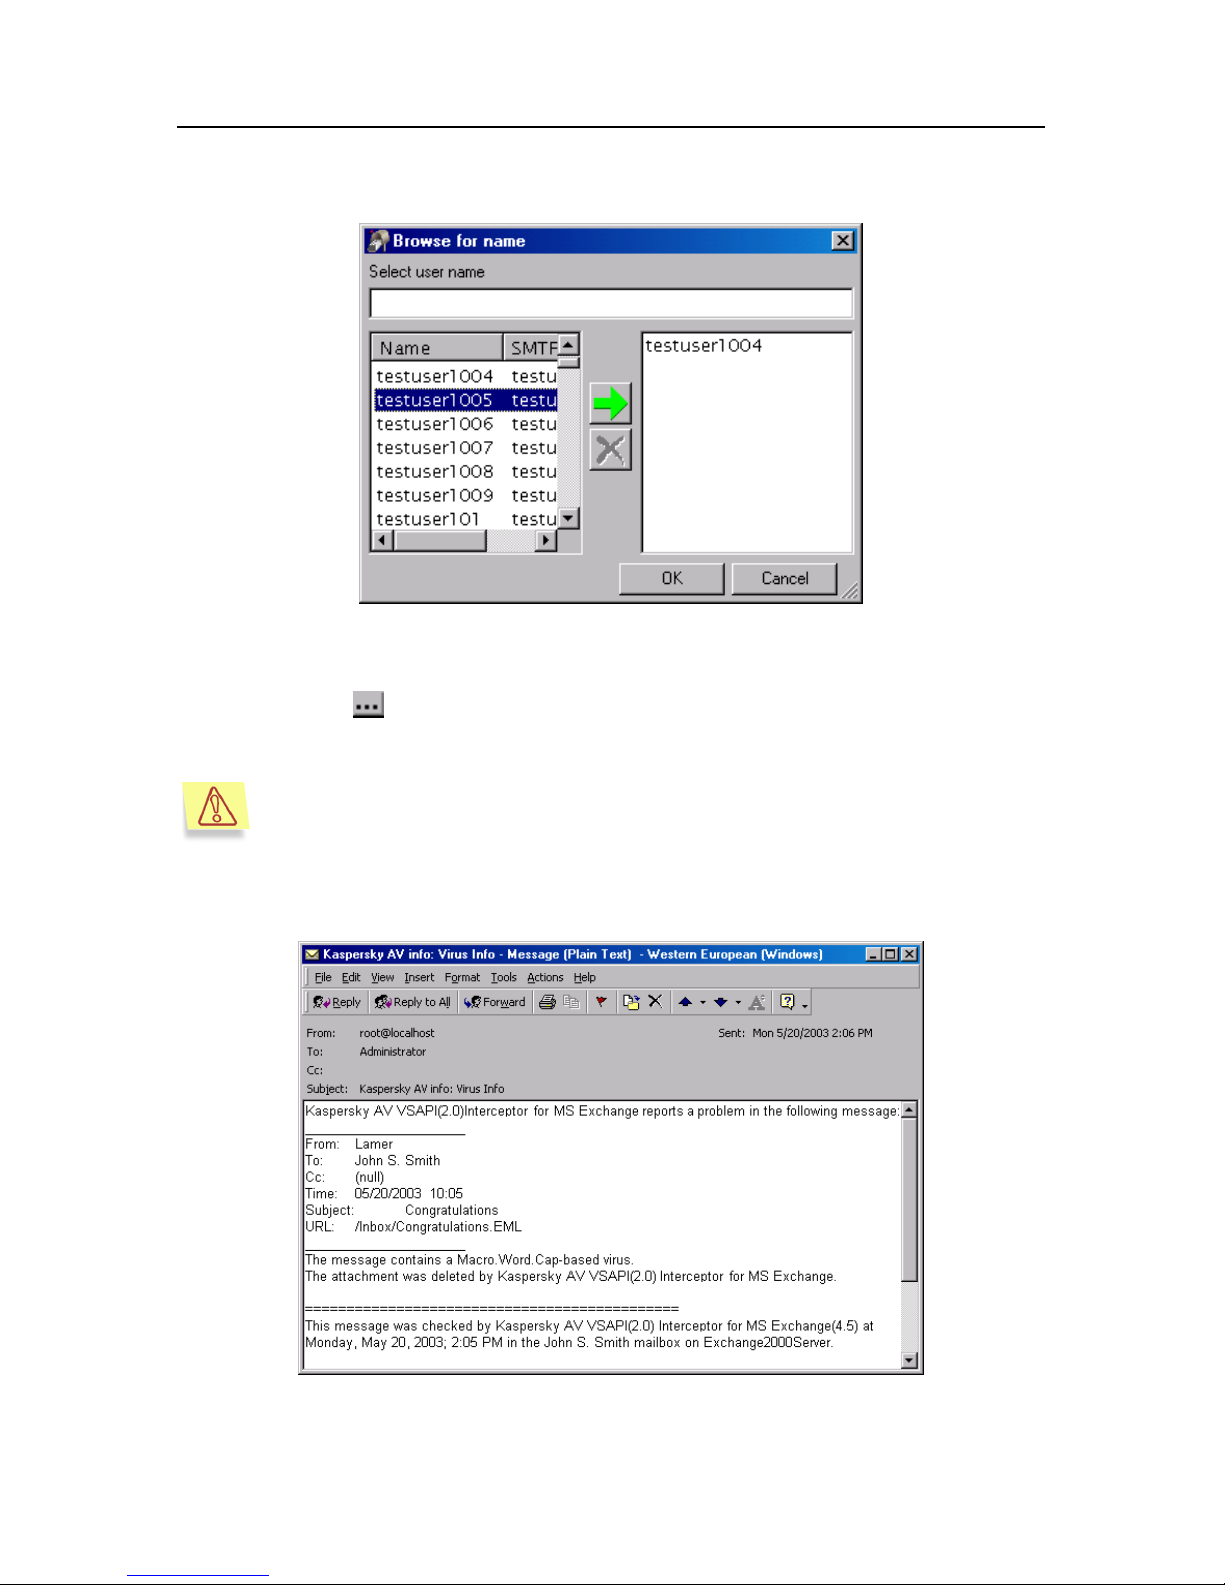
52 Kaspersky Anti-Virus 4.5 for MS Exchange Server
names are displayed in the Name column. Their SMTP addresses, which the
program uses for sending reports, are located in the SMTP address column.
Figure 44. Address selection
The template Templates ! Admin message template is used for
notification. The template contains the information shown in Figure 45.
If the application fails, sending reports via e-mail to the mailbox of a
protected user (administrator) can cycle the report delivery procedure.
If this situation occurs, we recommend that you exclude the
administrator mailbox from anti-virus protection or disable sending
reports by mail.
Figure 45. Sending virus report to administrator
Page 53
Protection of MS Exchange Server Messages 53
3.4.4.3. Sending Report to Recipient and Sender
When the program operates under MS Exchange Server 2000/2003, it can send
reports on infected or suspicious objects to both the sender and the recipient of
an infected message.
Settings !OBJECT_TYPE !Send report to sender – send
OBJECT_TYPE notification to sender.
Settings !OBJECT_TYPE !Send report to recepient – send
OBJECT_TYPE notification to recepient.
In fact, it is the program that generates such messages, but formally they are
sent by the administrator if you have enabled the mode of sending messages to
the administrator and entered his address into the field Settings ! Scanned
object rules ! OBJECT_TYPE ! Send report to administrator !
Administrator mailbox. The message will be sent from General ! Default
notification sender address if the above address has not been specified. The
sender and the recipient may possibly wish to reply to the received notification,
so it is recommended that you set the existing e-mail address.
You can choose to set different administrator addresses for each object type, or
not to set them at all.
Attention! If the program cannot find the sender and recipient addresses
in the Active Directory path (e.g., these are external addresses for
your company and are not entered into your Active Directory path), it
will not be able to send reports to such addresses.
The program sends notifications only to users who have SMTP
addresses.
The template
Templates ! Sender report template is used for sender
notification. By default the information shown in Figure 46 is contained in the
message generated according to the template.
Page 54
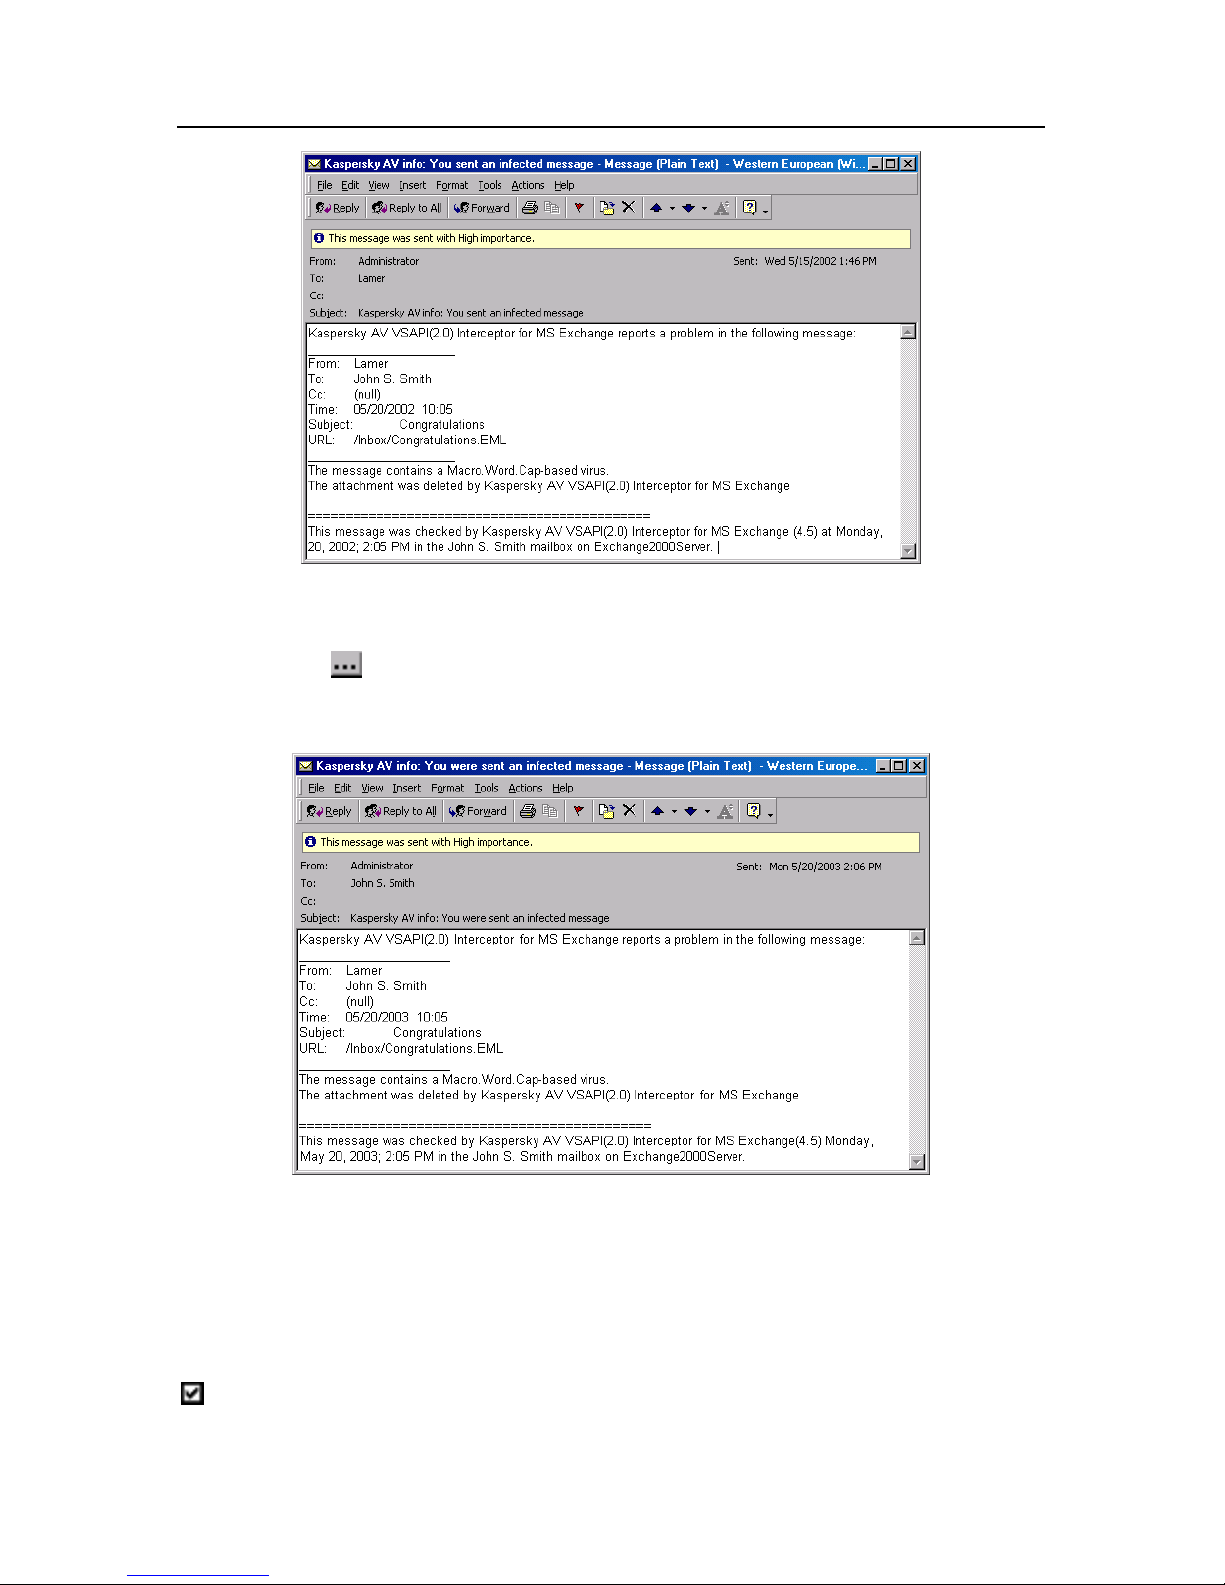
54 Kaspersky Anti-Virus 4.5 for MS Exchange Server
Figure 46. Sending report to the infected message sender
The template Templates ! Recipient report template is used for recipient
notification. The following information is contained in the message generated
according to the default template:
Figure 47. Sending report to the infected message recipient
3.4.4.4. Report File
A report is compiled on each infected object of the message.
General ! System events ! Send report to log file – save system event
messages to log file.
Page 55
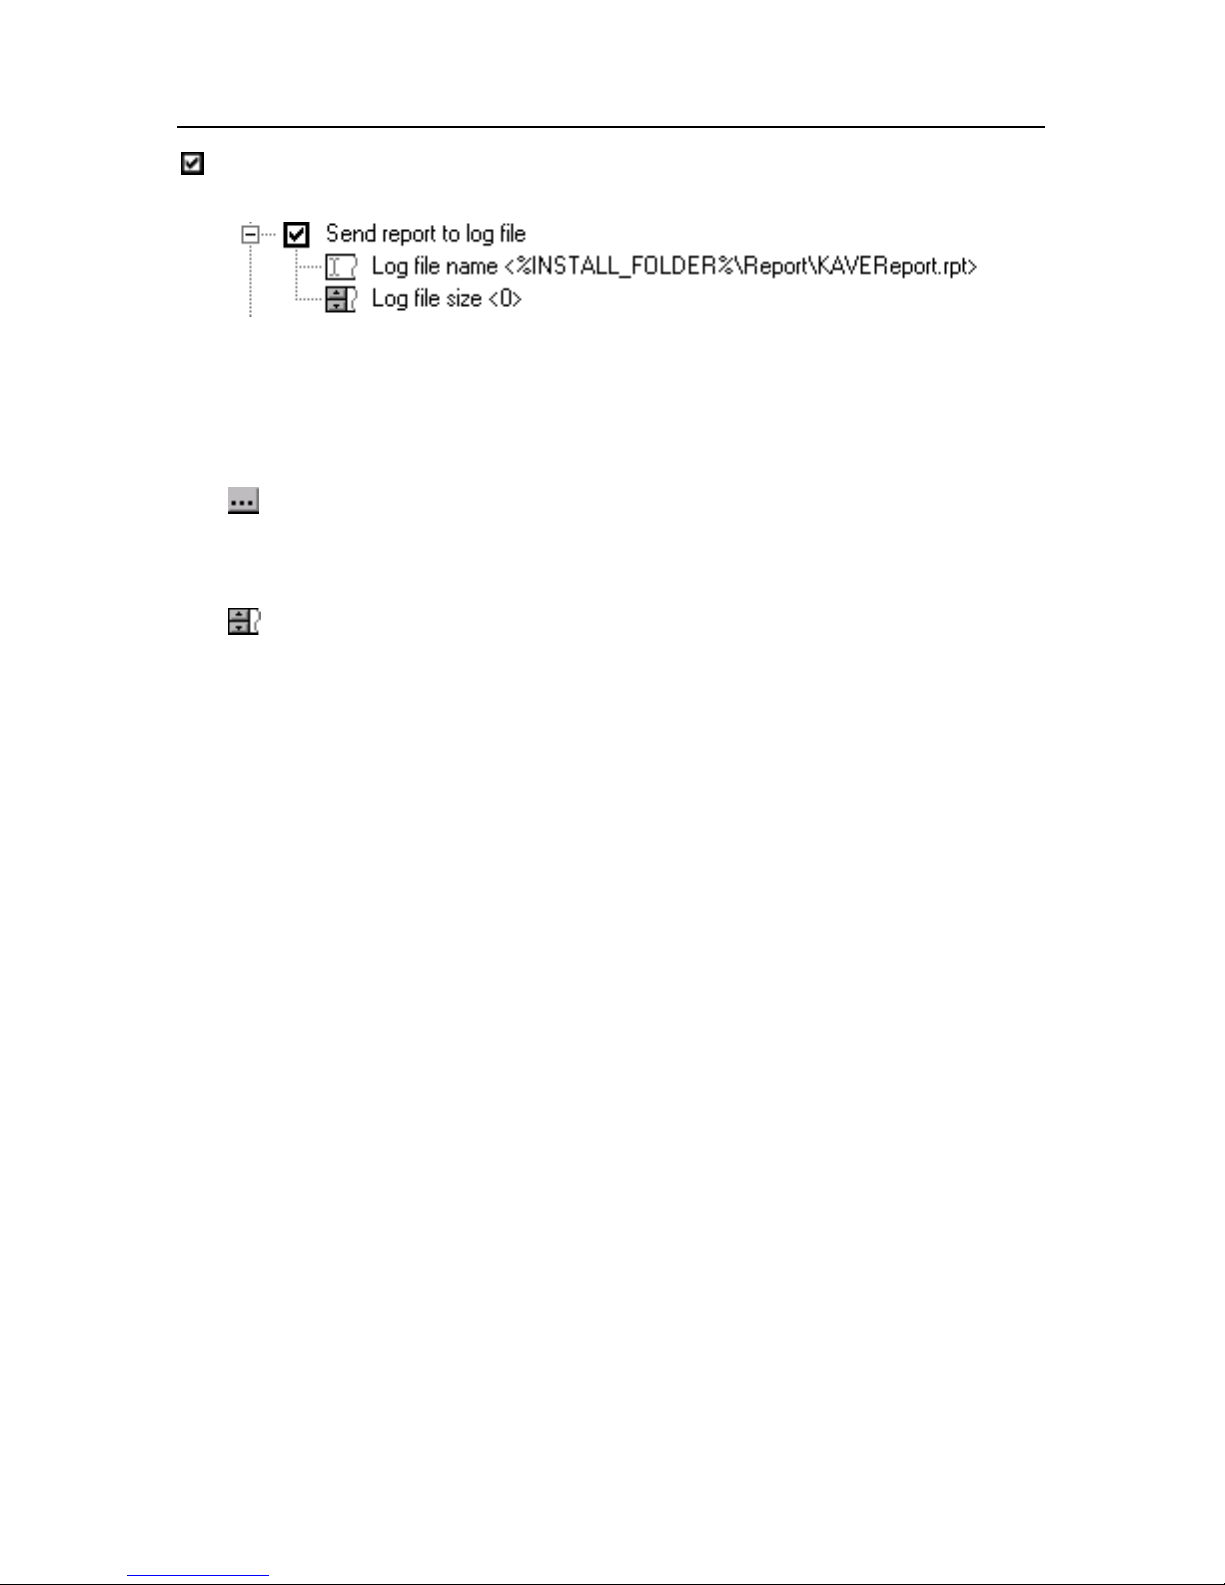
Protection of MS Exchange Server Messages 55
Settings ! Scanned object rules ! OBJECT_TYPE ! Send report to
log file – save messages on detected OBJECT_TYPE objects to log file.
Figure 48. Log file settings
You can use various reports for system event messages and for messages about
objects of different types. To do this, open the Send report to log file branch
and change the default settings.
Log file name – log file name. If the located file is impossible to create
the program will use %INSTALL_FOLDER%\Report\KAVEReport.rpt. If
that fails too, the program will create file
%TEMP%\Report\KAVEReport.rpt.
Log file size – defines maximum length of the log file in kilobytes. The
length is unlimited if the value is zero. If the size is limited, the file will be
renamed as soon as it reaches the maximum size, and a new log file
will be created. The old log file name will be generated according to the
format: [day.month.year;time]. e.g.: [1.11.2001;9-56-50]. The default log
file size is unlimited.
Log files can be viewed by means of Kaspersky
®
Report Viewer included in the
distribution kit (see Chapter 6 on page 119).
3.4.4.5. Application Log
The program places messages in the Application Log. These can be viewed
through Event Viewer (see Figure 49).
Page 56
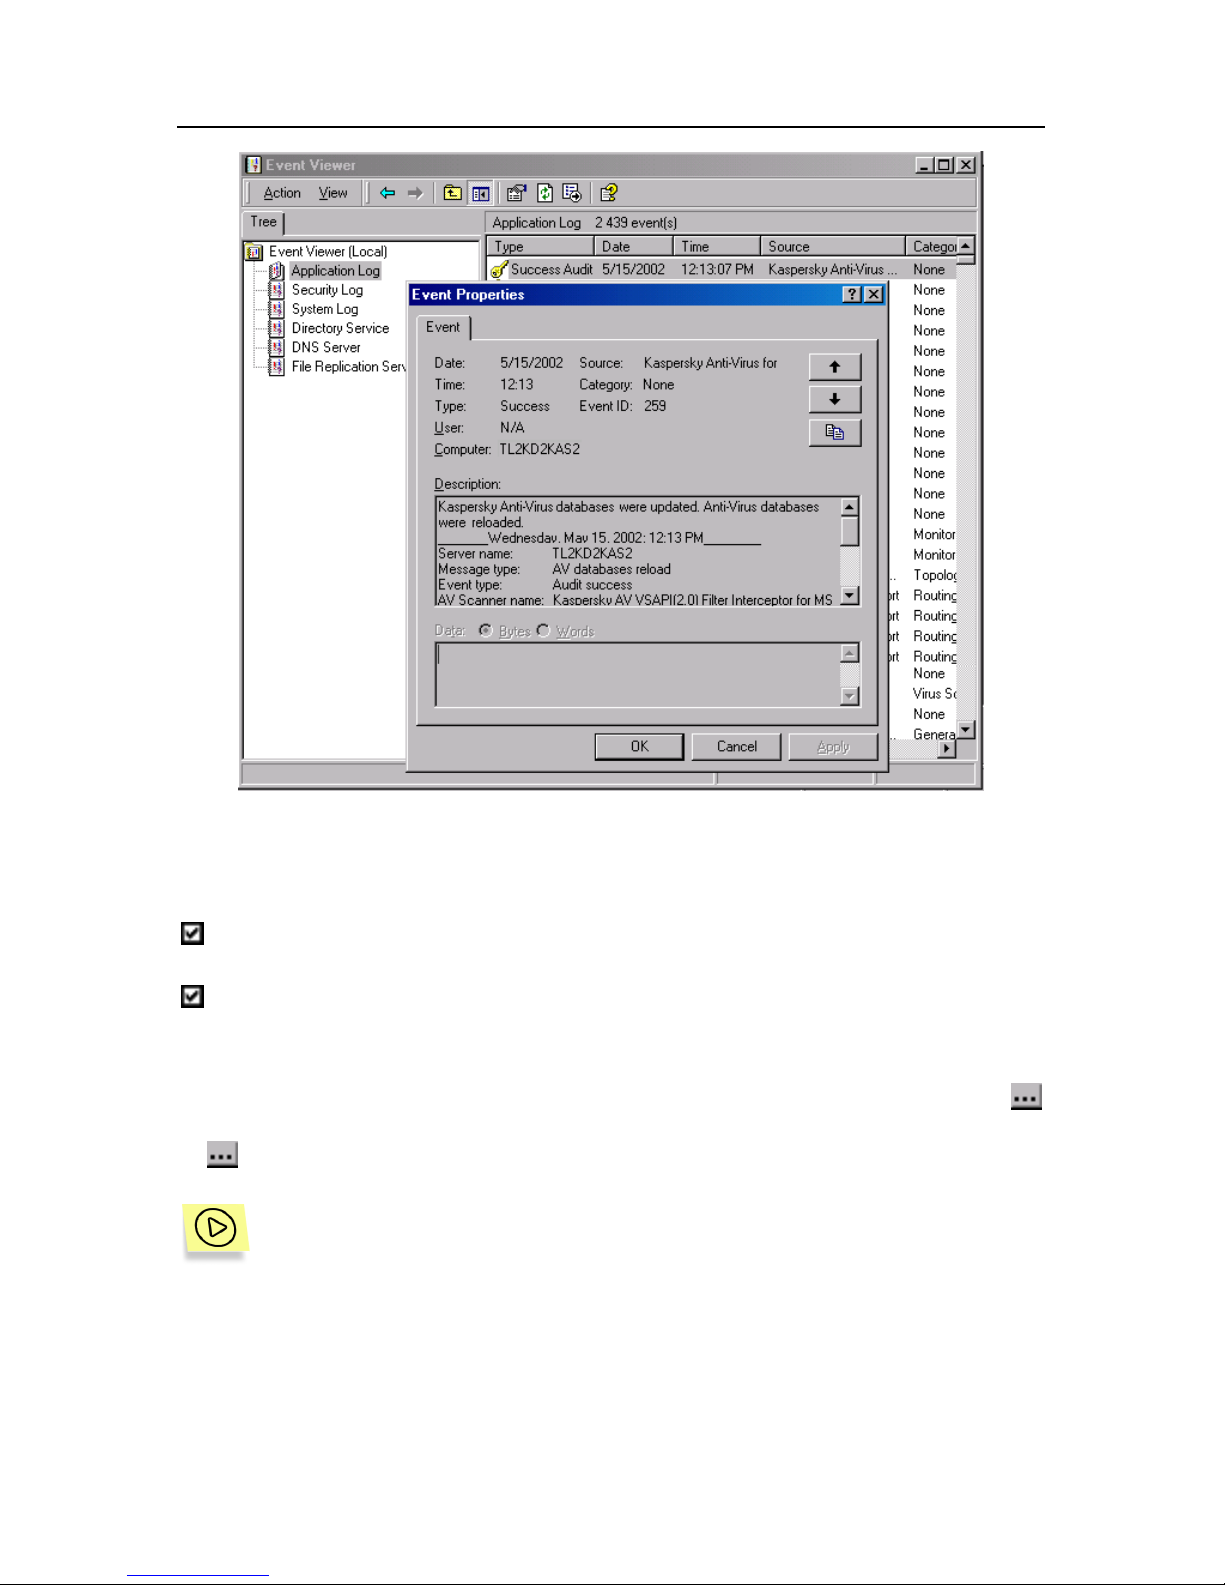
56 Kaspersky Anti-Virus 4.5 for MS Exchange Server
Figure 49. Program messages in the Application Log
You can set the mode of adding messages to the Application Log as follows:
General ! System events ! Send report to event log – save system
event report to Application Log.
Settings ! Scanned object rules ! OBJECT_TYPE ! Send report to
event log – save report on the detected OBJECT_TYPE messages to
Application Log.
The following template is used for the messages saved to the Application Log
Templates ! Event log template. By default, the report template corresponds
to Templates ! Admin message template.
You can set the mode when MS Exchange Server 2000/2003 will add
its own event messages to the Application Log. To do this:
1. Click on Programs in the Start menu. Choose Microsoft
Exchange, and then System Manager. The Exchange System
Manager dialog box will be displayed (see Figure 50).
Page 57
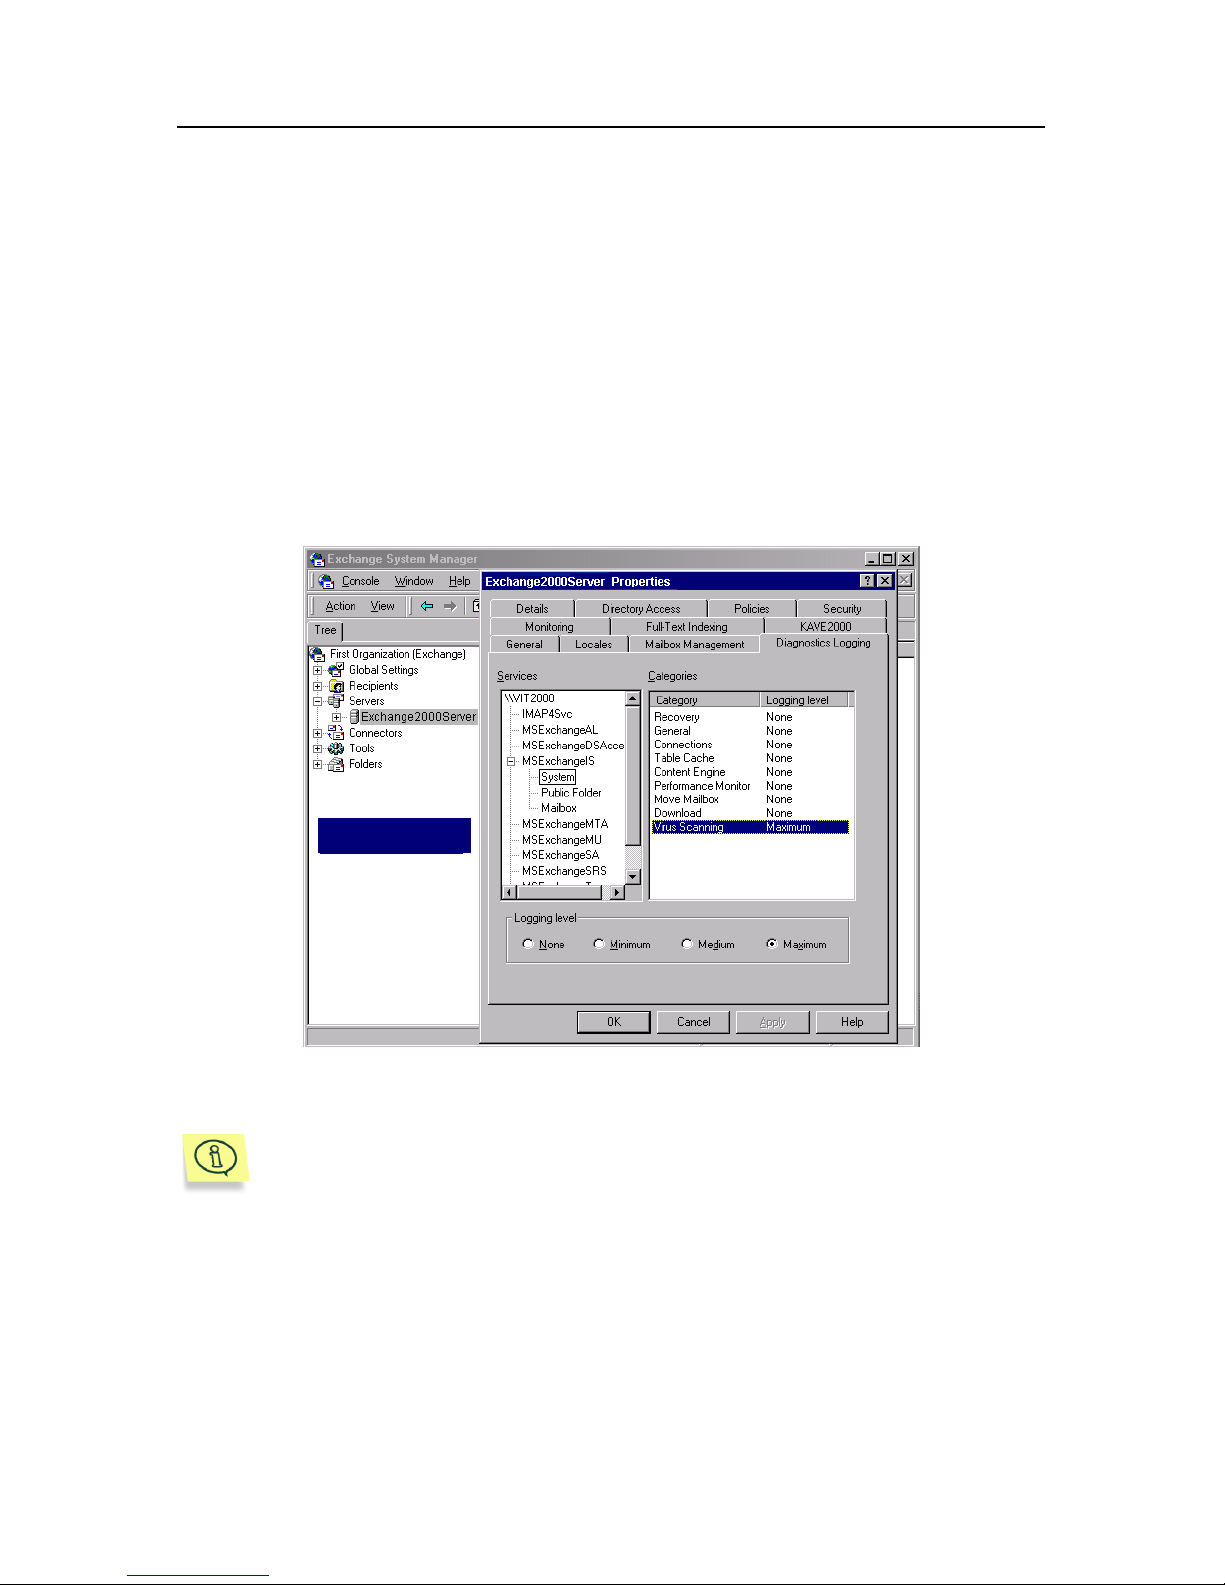
Protection of MS Exchange Server Messages 57
2. Open the Servers branch in the hierarchical tree located in the left
pane and choose the server name.
3. Select Properties from the right-click menu. A dialog box with the
chosen server properties will open.
4. Select the Diagnostic Logging tab and open MSExchangeIS in
the left pane with the hierarchical tree. Then open System.
5. A table will be displayed in the right frame of the dialog box. Find
the Virus Scanning line in it. A set of the Logging Level buttons
will be displayed in the lower part of the dialog box. Set the
Maximum value. Then maximum information on the events taking
place as a result of the Anti-Virus Engine operation will be saved to
the Application Log.
Figure 50. The Exchange System Manager dialog box
Please note a terminological difference! The program saves the
information about blocking to the Application Log, whereas MS
Exchange Server sends the message: "Message was put into
quarantine". Despite the word "quarantine", the operation is just the
same as in the message generated by the program.
Page 58
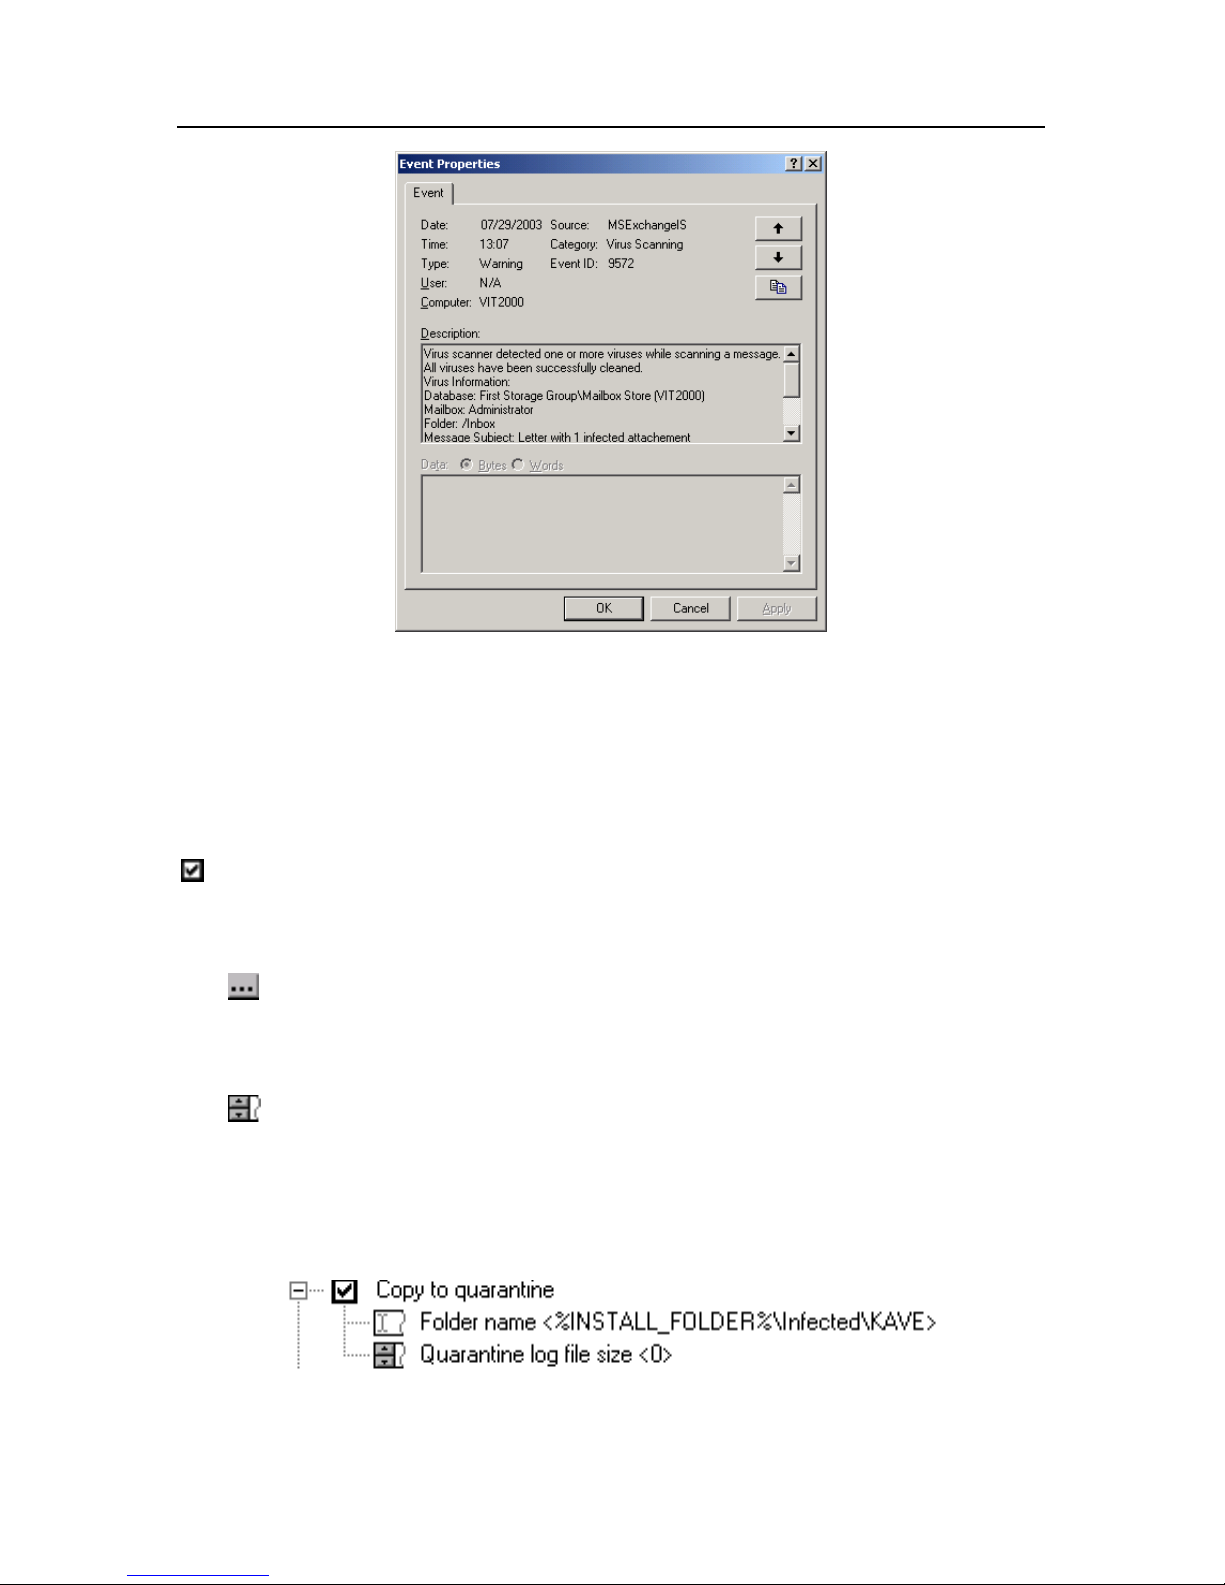
58 Kaspersky Anti-Virus 4.5 for MS Exchange Server
Figure 51. Message generated by MS Exchange Server
3.4.5. Quarantine
The program can save infected, suspicious and other objects to the quarantine,
which is a special directory on your hard disk.
Settings!Scanned object rules!OBJECT_TYPE ! Copy to quarantine
You can use various quarantine folders for different type objects. To do this,
open the Copy to quarantine branch and change default settings.
Folder name – name of the quarantine folder for the objects of a given
type. If the specified folder is impossible to find or create, the program
will use %INSTALL_FOLDER%\KAVE_Quarantine\OBJECT_TYPE,
otherwise, the program will create folder %TEMP%\Quarantine.
Quarantine log file size – defines maximum length of the quarantine
log file (Quarantine.rpt file). The length is unlimited if the value is zero. If
the size is limited, the file will be renamed as soon as it reaches the
maximum size and a new log file will be created. The old log file name
will be generated according to the format: [day.month.year;time]. e.g.:
[1.11.2001;9-56-50]. The default log file size is unlimited.
Figure 52. Quarantine folder settings
Page 59
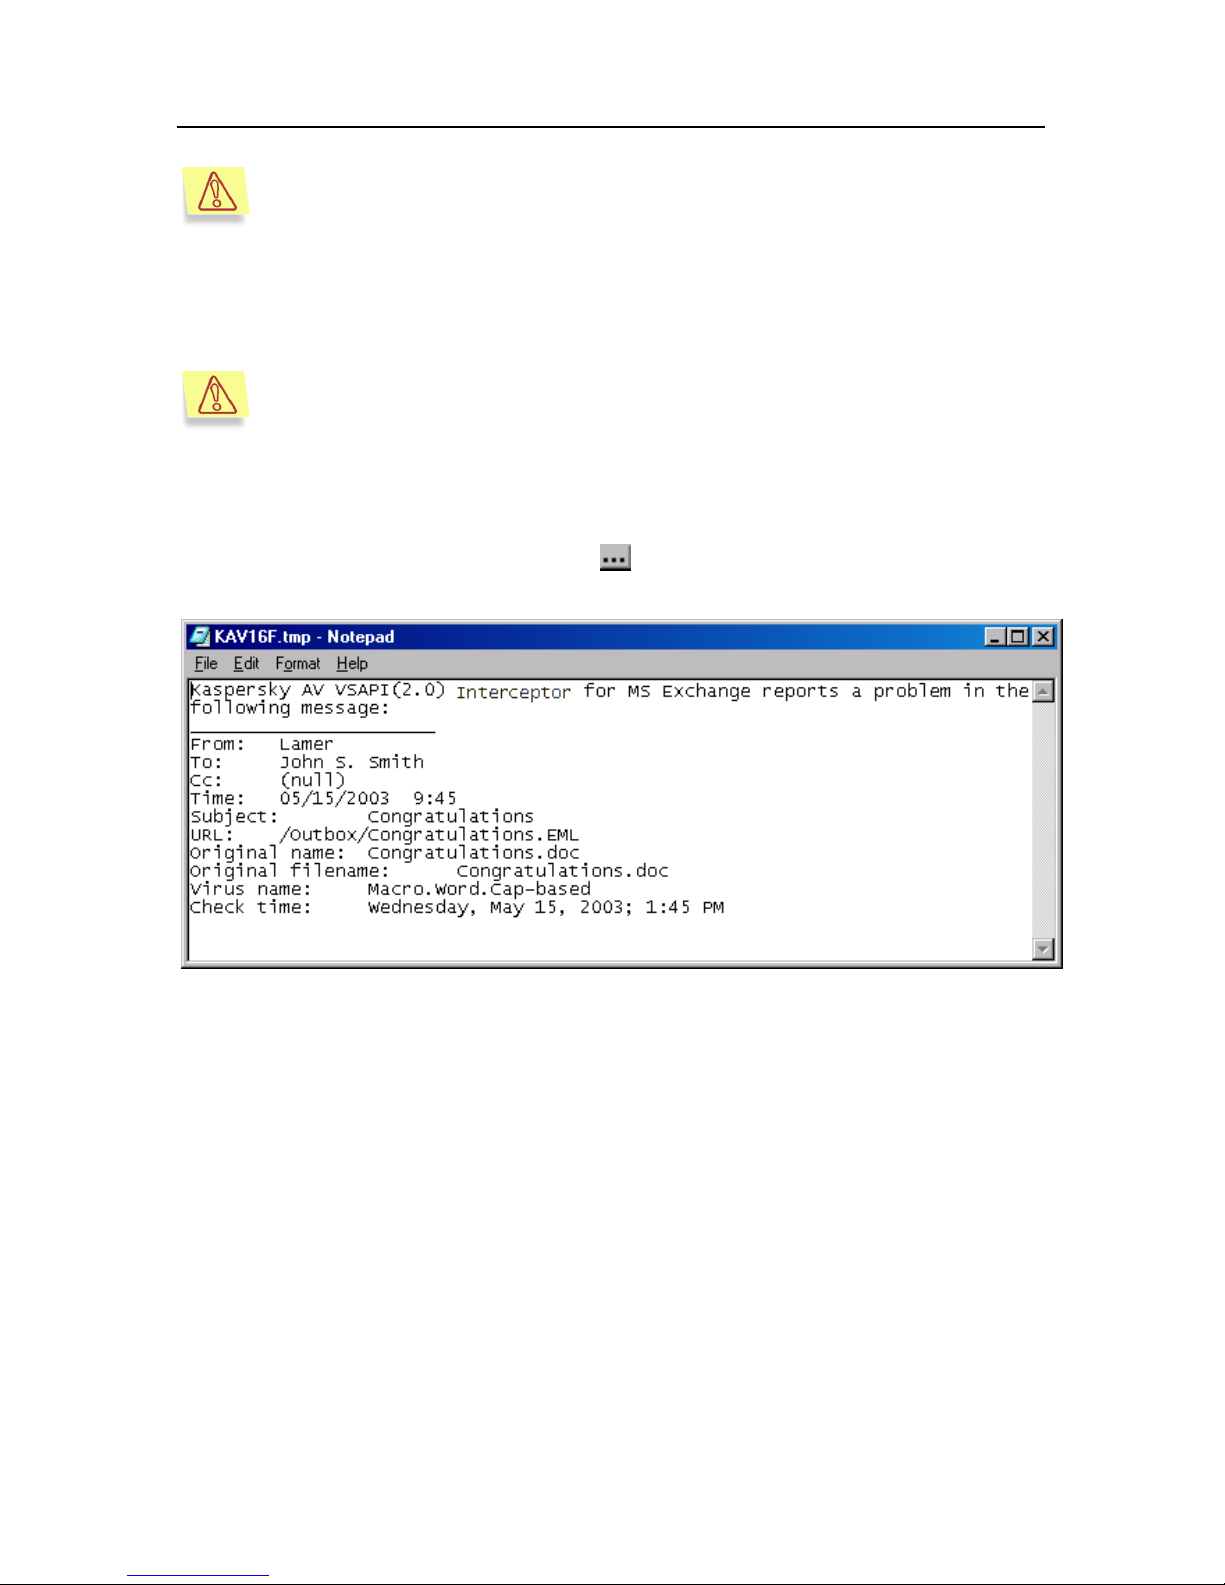
Protection of MS Exchange Server Messages 59
The program will not be able to save files to the quarantine folder if the
limit for the number of files in this quarantine folder is exceeded (only if
the file system has limitations for the number of files stored in the same
folder). A system event "Kaspersky Anti-Virus® cannot save object to
quarantine because it's full" will be generated. To avoid this situation, it
is recommended that you create the quarantine directory on a disk with
the NTFS file system.
If a large number of files are stored in the quarantine folder (more than
30000), performance of the Anti-Virus Engine will slow down.
The program renames an original infected object and assigns a unique service
name and *.tmp extension to it. In addition, the program saves a report with the
same name and extension *.tmp.txt together with every file of this kind. This file
is created according to the template
Templates ! Quarantine template
(see Figure 53).
Figure 53. A file created according to the Quarantine Template
The program keeps the quarantine placement log: quarantine.rpt. This log can be
viewed by the Kaspersky
®
Report Viewer utility. The log template is weaved into
the program code. The log contains the following information:
• Object – original object name (under MS Exchange Server 5.5, this name
does not contain message parameters).
• Result – file name in the quarantine.
• Description – virus description.
Thus, the following information is stored in the quarantine (see Figure 54):
• <name>.tmp – object;
• <name>.tmp.txt – object information;
Page 60
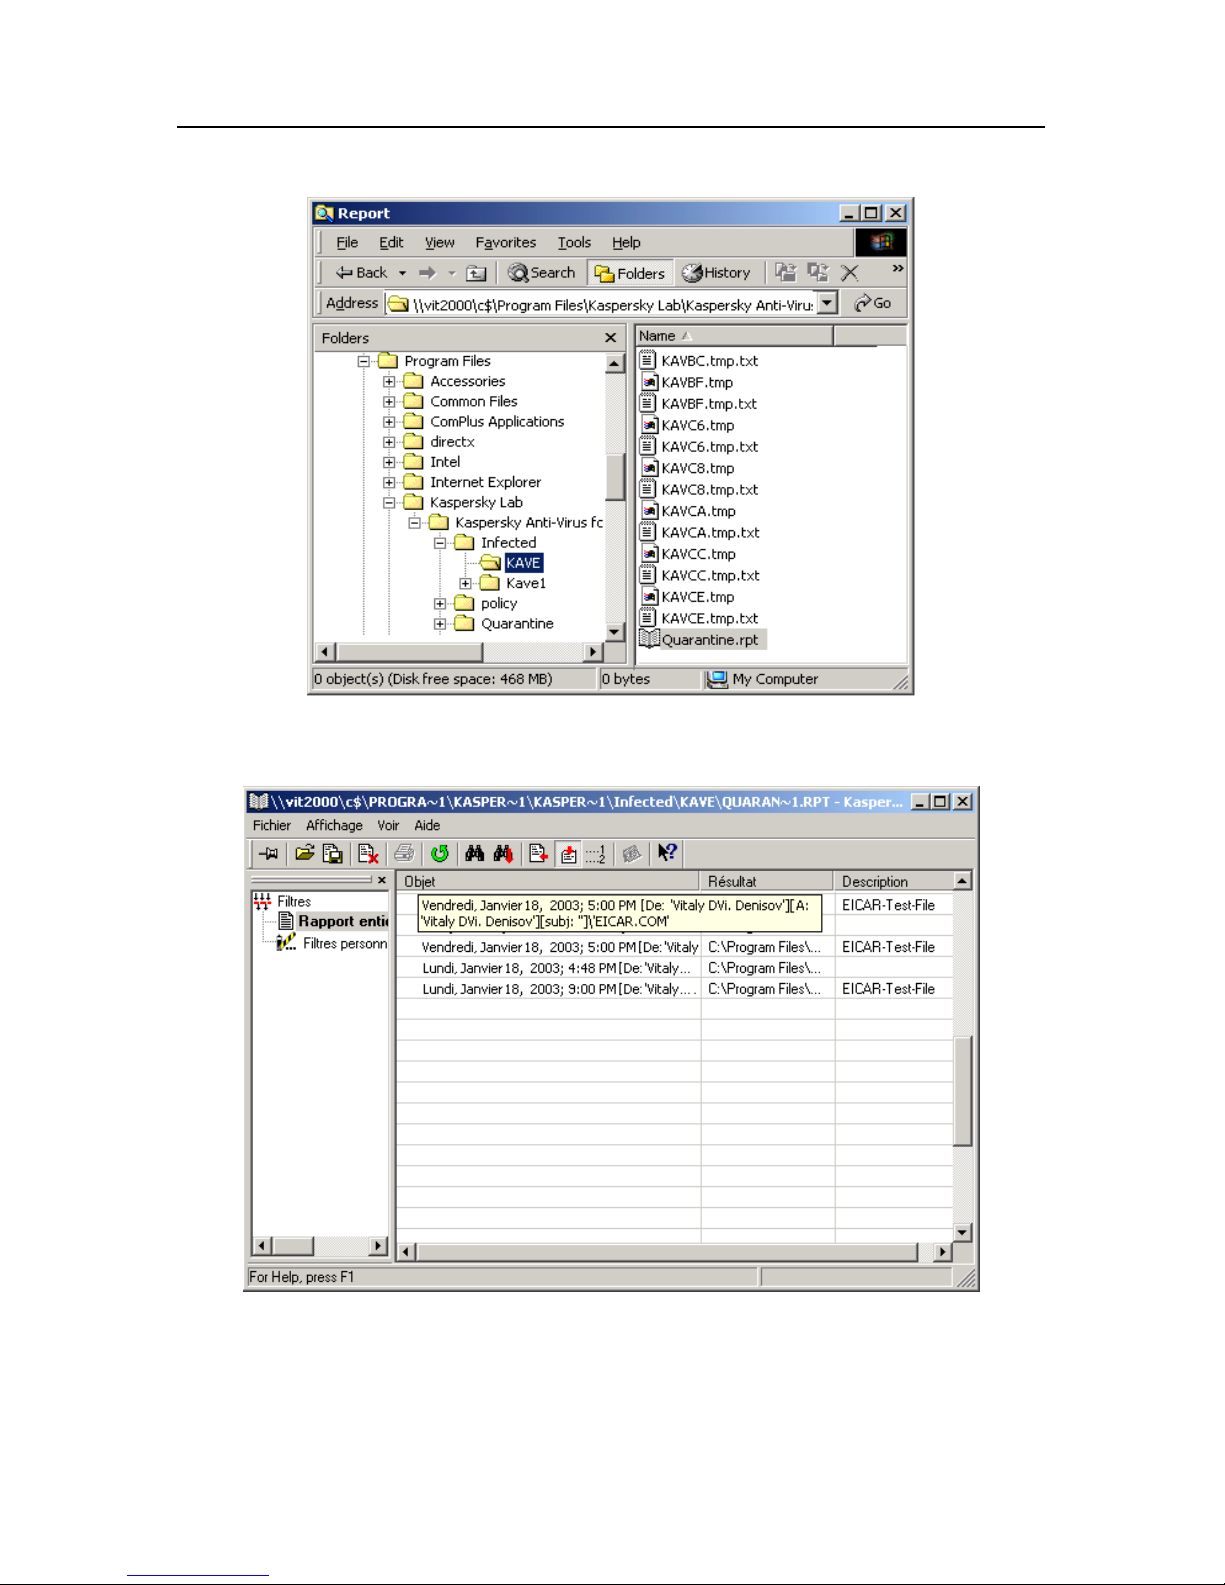
60 Kaspersky Anti-Virus 4.5 for MS Exchange Server
• quarantine.rpt – log file with the report on all objects.
Figure 54. Quarantine folder
Figure 55. Log file with the report on all objects moved to the quarantine directory
Page 61
Protection of MS Exchange Server Messages 61
3.4.6. Advanced: parameters of Anti-Virus
Engine and MS Exchange Server
joint operation
The program allows the user to set some joint operation parameters for AntiVirus Engine and MS Exchange Server.
Settings ! Scan timeout, s – the time MS Exchange Server waits for
completion of a message scan. If Anti-Virus Interceptor freezes during
scanning, MS Exchange Server will return the "ccVirusScanInProgress"
error code in a specified period of time. This default time is 180 seconds.
MS Exchange Server 5.5 does not support the Scan timeout, s
parameter.
Settings ! Scanning threads – number of threads in which the objects are
scanned. Microsoft recommends setting the value that increases the
doubled number of processors by 1: (2* number_of_processors+1).
When the program operates under MS Exchange Server 5.5, it uses the
Scanning threads parameter for MAPI service only. As for Anti-Virus
Interceptor 5.5, the program always assigns "2" for the number of
threads used during attachment scanning.
3.4.7. Advanced: Service Parameters
If necessary you can reset the program service parameters.
General ! Default notification sender address – address from where the
reports are sent to the administrator. The messages will be sent to the
recipient and sender if the administrator’s address is not set;
"root@localhost" address is used by default.
General ! SMTP server name – SMTP server address that is used for
sending reports and notifications by the program; 127.0.0.1. address is used
by default.
General ! SMTP port name – SMTP port number. The default value is 25.
The SMTP server should not require authorization. The program will not
be able to send mail notifications if you improperly set one of the abovementioned parameters, or the SMTP server requires authorization.
General ! Temporary folder – a directory in which the program saves files
during checkup. The files are saved in *.tmp format. The program uses
Page 62
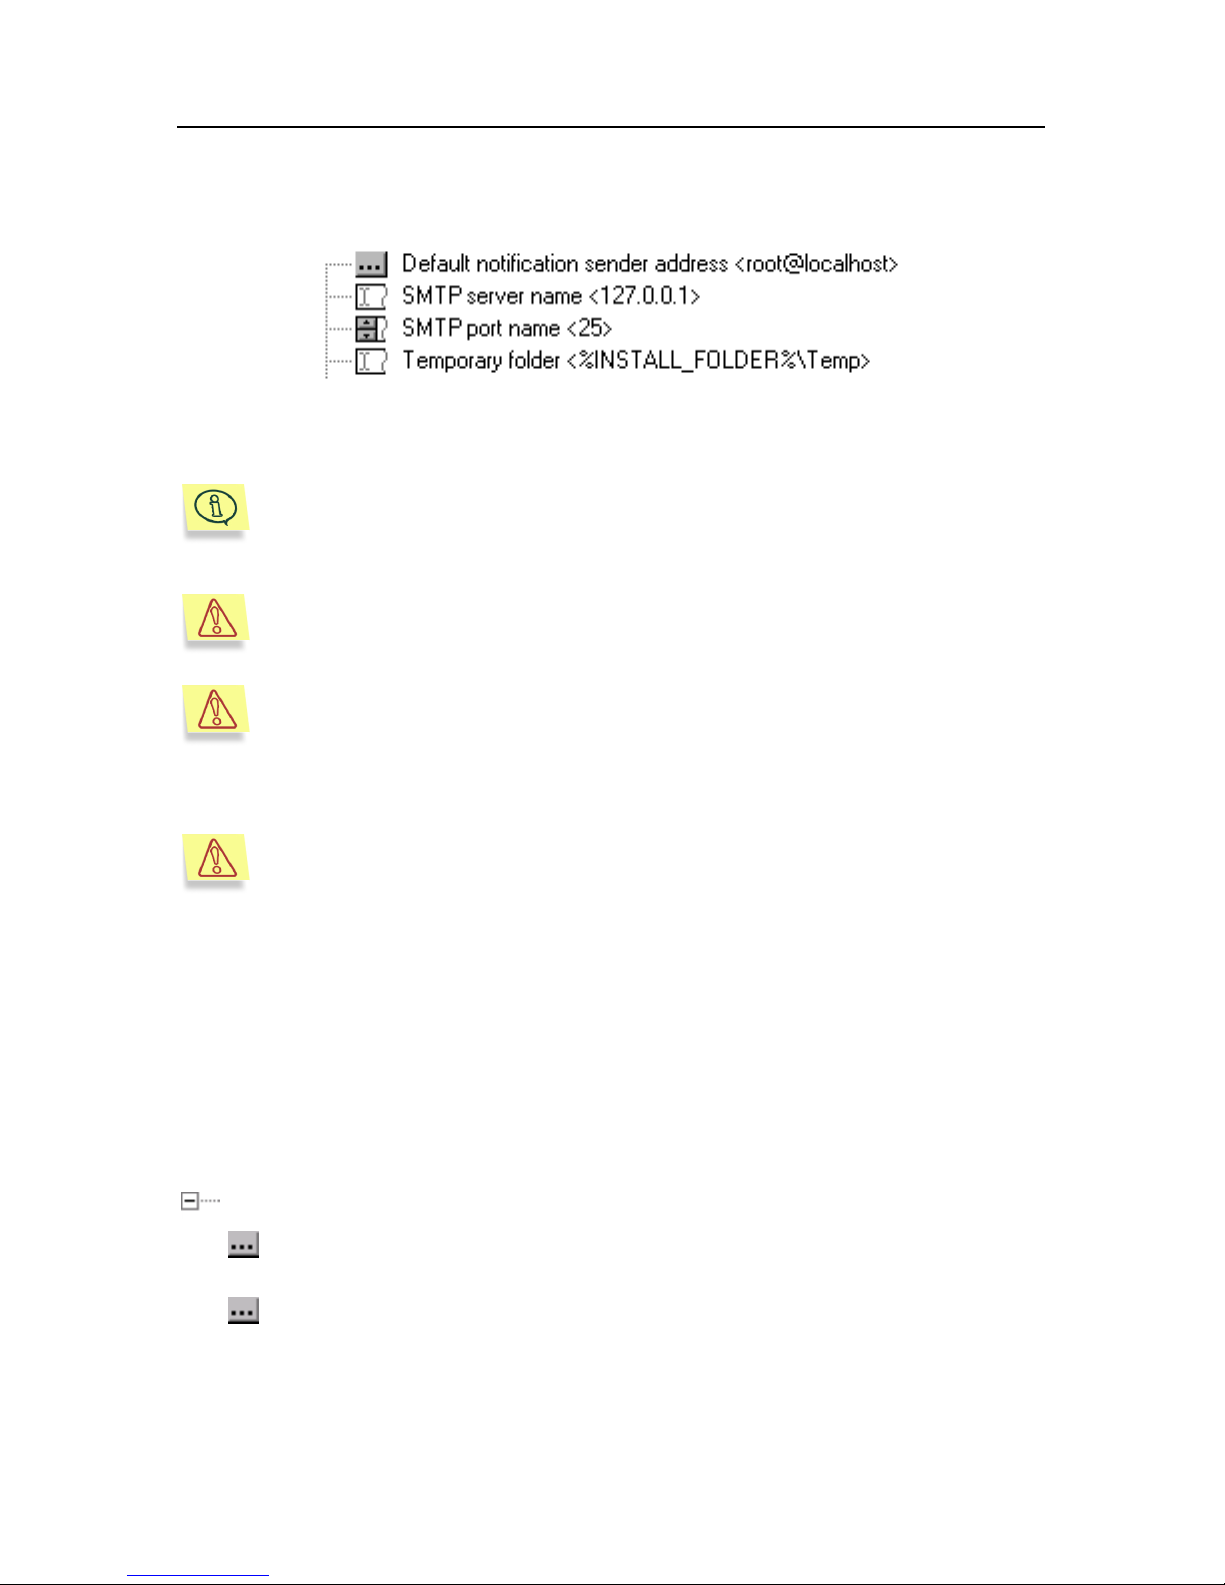
62 Kaspersky Anti-Virus 4.5 for MS Exchange Server
%INSTALL_FOLDER%\TEMP directory by default. The editing process
does not require deleting the value from the beginning of
"%INSTALL_FOLDER%" string.
Figure 56. Service Parameters
The program will create the \Temp folder in the
("%INSTALL_FOLDER%\TEMP") directory if the folder path is specified
improperly. If this folder is impossible to create, the program will run in
the %TEMP%\TEMP folder.
Attention! Infected files can be stored in both the temporary folder and
the quarantine directory. Be careful!
Be sure to exclude the quarantine directory and the temporary folder
from the scanning area if Anti-Virus Monitor, incompatible with the given
version of Anti-Virus, is installed on your computer! Otherwise, AntiVirus Monitor will prohibit saving infected files on disk. Kaspersky AntiVirus
®
will scan the infected objects according to the Failed rule.
All objects to be saved on the hard drive will be treated according to the
Failed rule if there is not enough space in the temporary folder. These
are compound objects and infected objects if the Check and cure
mode is set for them, and objects whose size exceeds that defined in
the Maximum object size to scan in memory, Kb.
3.4.8. Advanced: Template Editing
3.4.8.1. List of Templates
The program allows editing the templates listed below (see Figure 57):
Settings ! Templates
Quarantine template is a *.txt file template that is quarantined together
with the infected file.
Admin message template is a template for a message sent to the
administrator in case of a system event or if the program detects
infected or suspicious objects.
Page 63
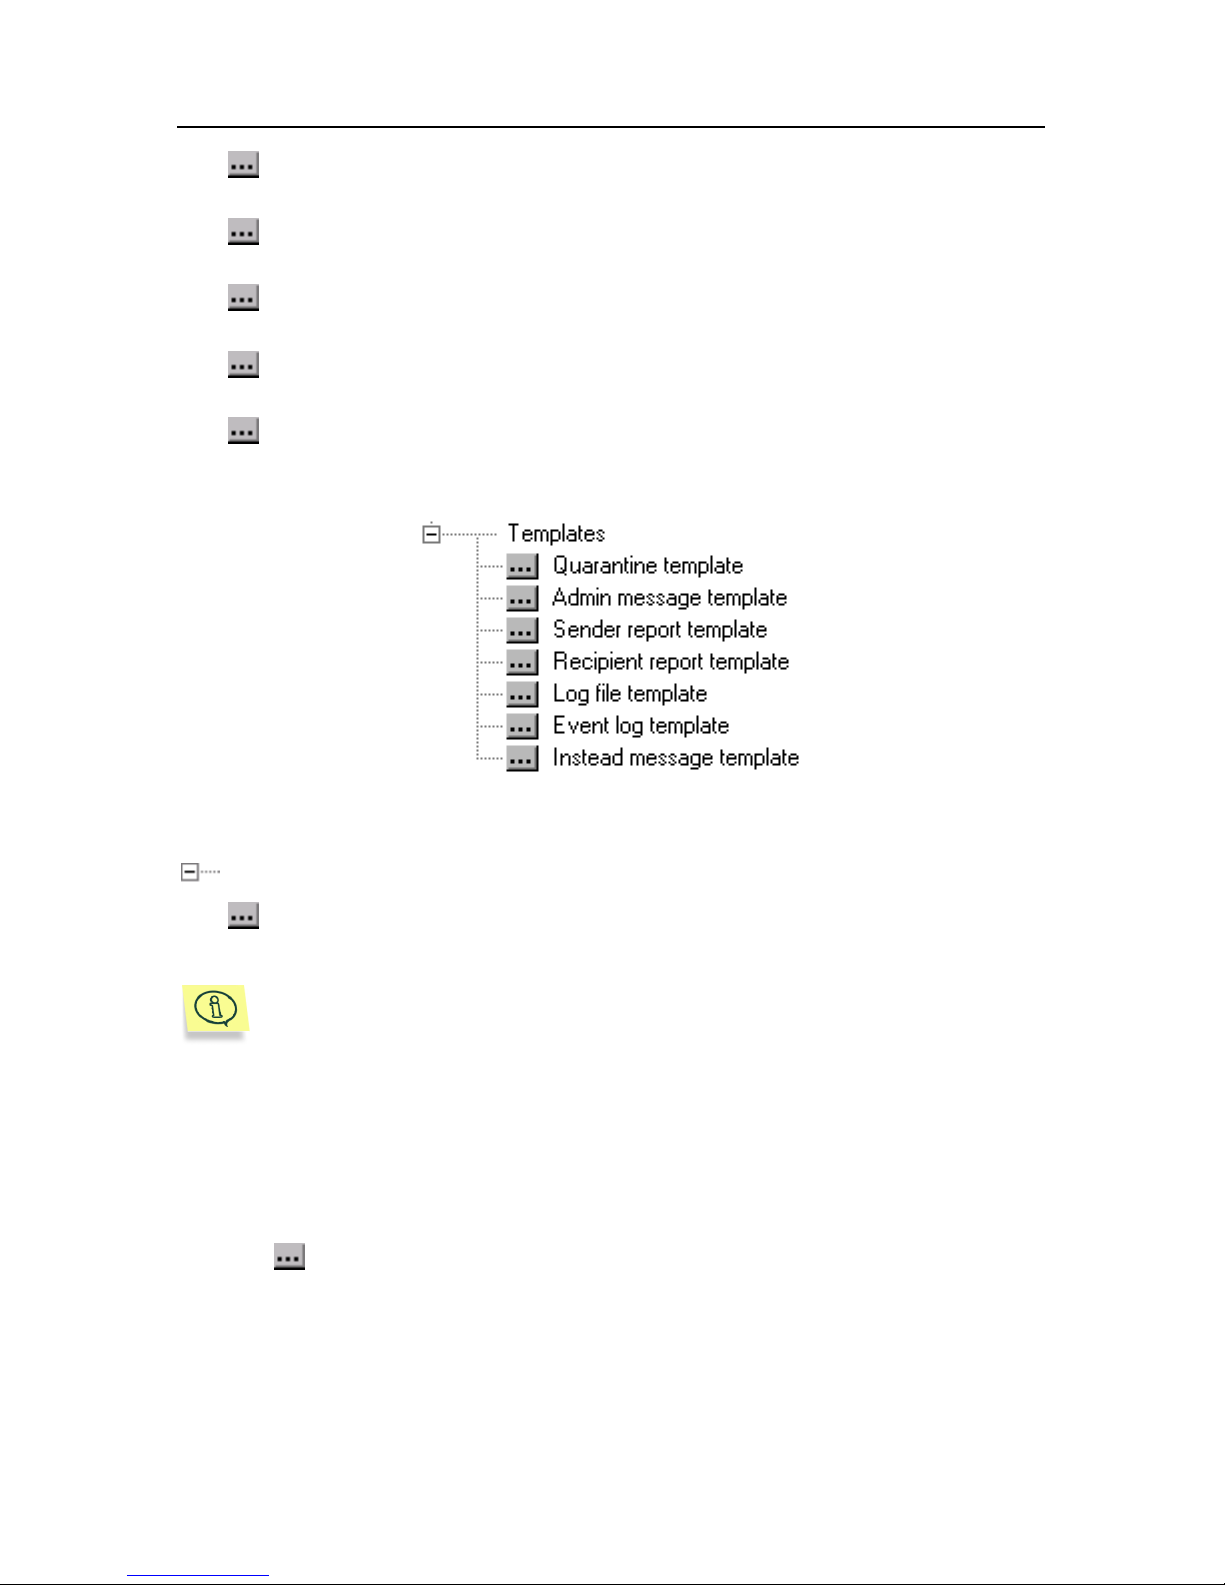
Protection of MS Exchange Server Messages 63
Sender report template is a template for a message sent to the sender
of an infected or suspicious object.
Recipient report template is a template for a message sent to the
recipient of an infected or suspicious object.
Log file template is a template for a message moved to the log file in
case of detection by the program of any infected or suspicious object.
Event log template is a template for a message moved to the
Application Log if the program detects an infected or suspicious object.
Instead message template is a template for a file that is inserted
instead of an infected or suspicious object, if the Replace mode is set
for scanning of this object type.
Figure 57. List of templates
General ! System events
Additional information template is a template for a system event
report.
Under MS Exchange Server 5.5 due to certain limitations of the AVAPI
1.0 technology, message parameters are unavailabsle for Anti-Virus
Engine. For that reason, the templates and reports generated under MS
Exchange Server 5.5 contain less information than is the case under
MS Exchange Server 2000/2003.
3.4.8.2. Template Editor
You can edit the templates by means of Template Editor. To start the program
click the button to the left of the template name (see Figure 58).
Page 64
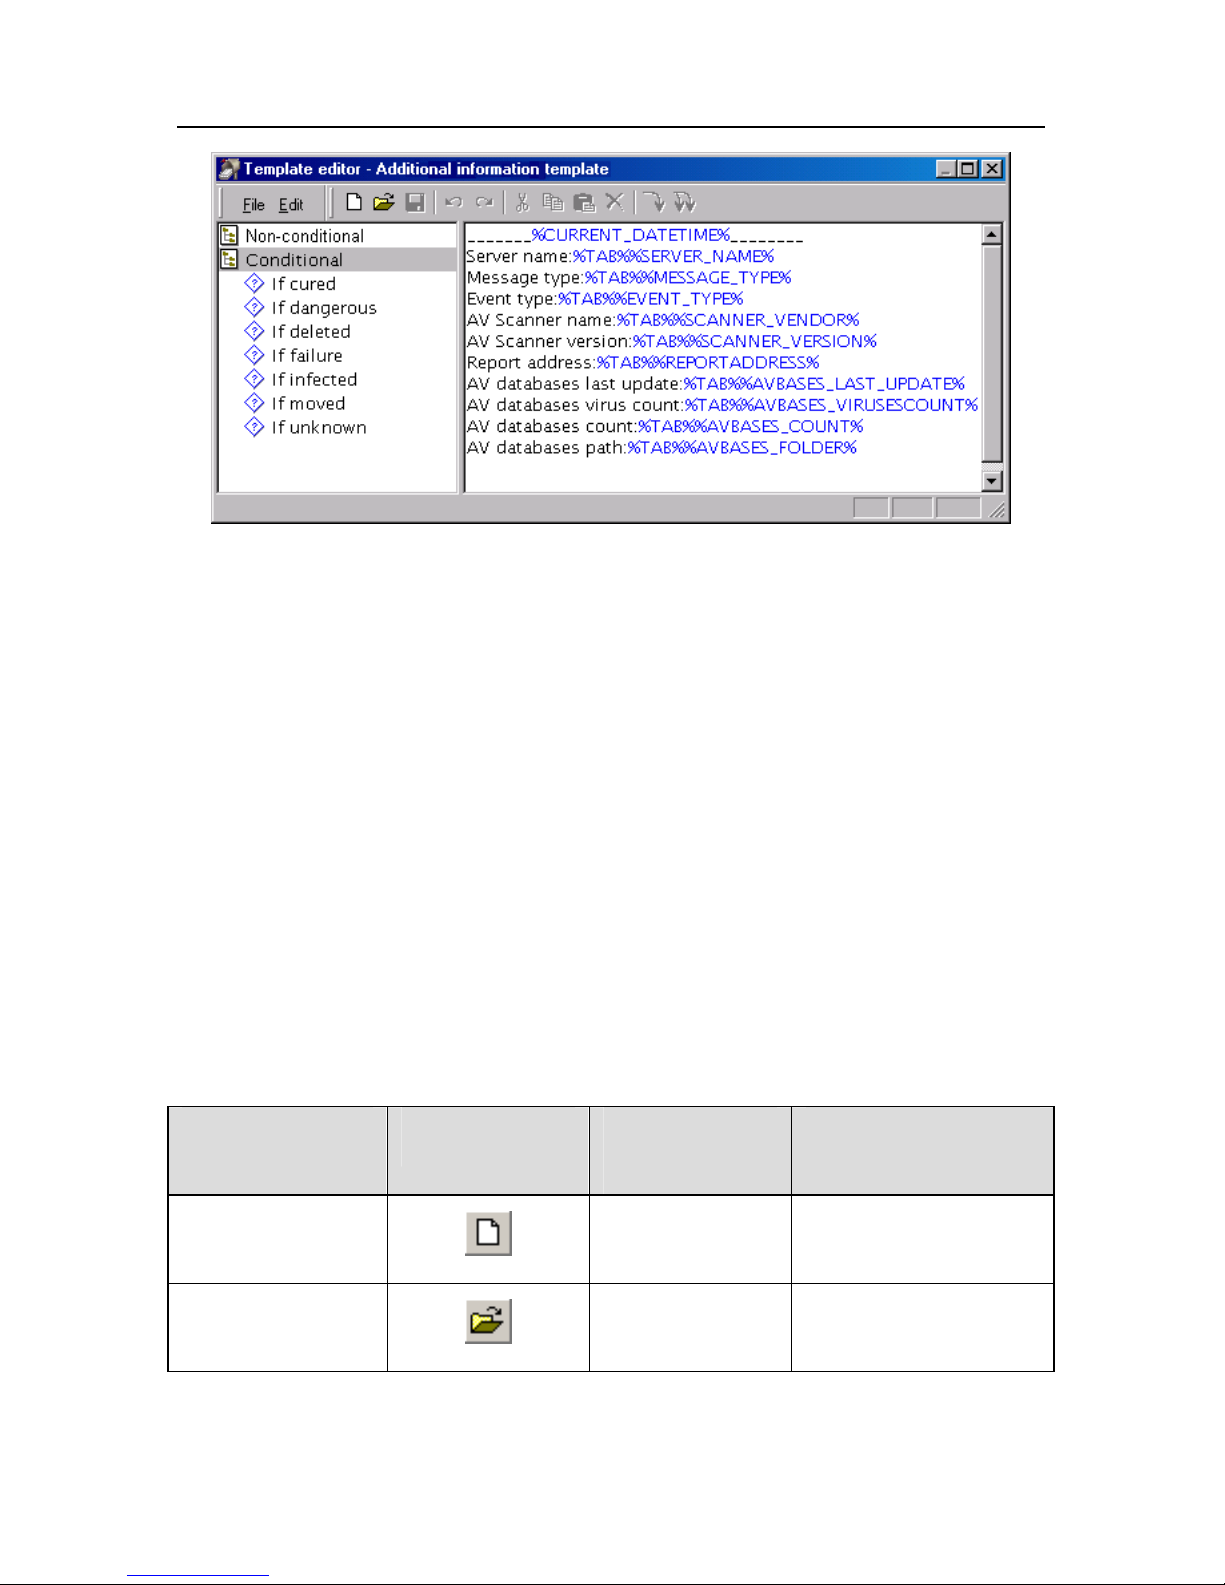
64 Kaspersky Anti-Virus 4.5 for MS Exchange Server
Figure 58. The Template Editor main window
You will find the following items in the Template Editor main window:
• menu;
• toolbar;
• macros and conditional clauses bar;
• template text;
• status bar;
At the top of the main window you can see a menu bar. Some menu options can
also be enabled by means of key combinations or toolbar buttons. Key
combinations are given in the menu next to the corresponding options. See the
Table for the list of key combinations and toolbar buttons corresponding to the
menu options.
Table 3. Key combinations and toolbar buttons corresponding to the menu
options in Template Editor
Menu option Toolbar button Key
Combination
Function
File!New
<C
TRL>+<N>
Create default value
template.
File!Open
<C
TRL>+<O>
Open template from
disk.
Page 65
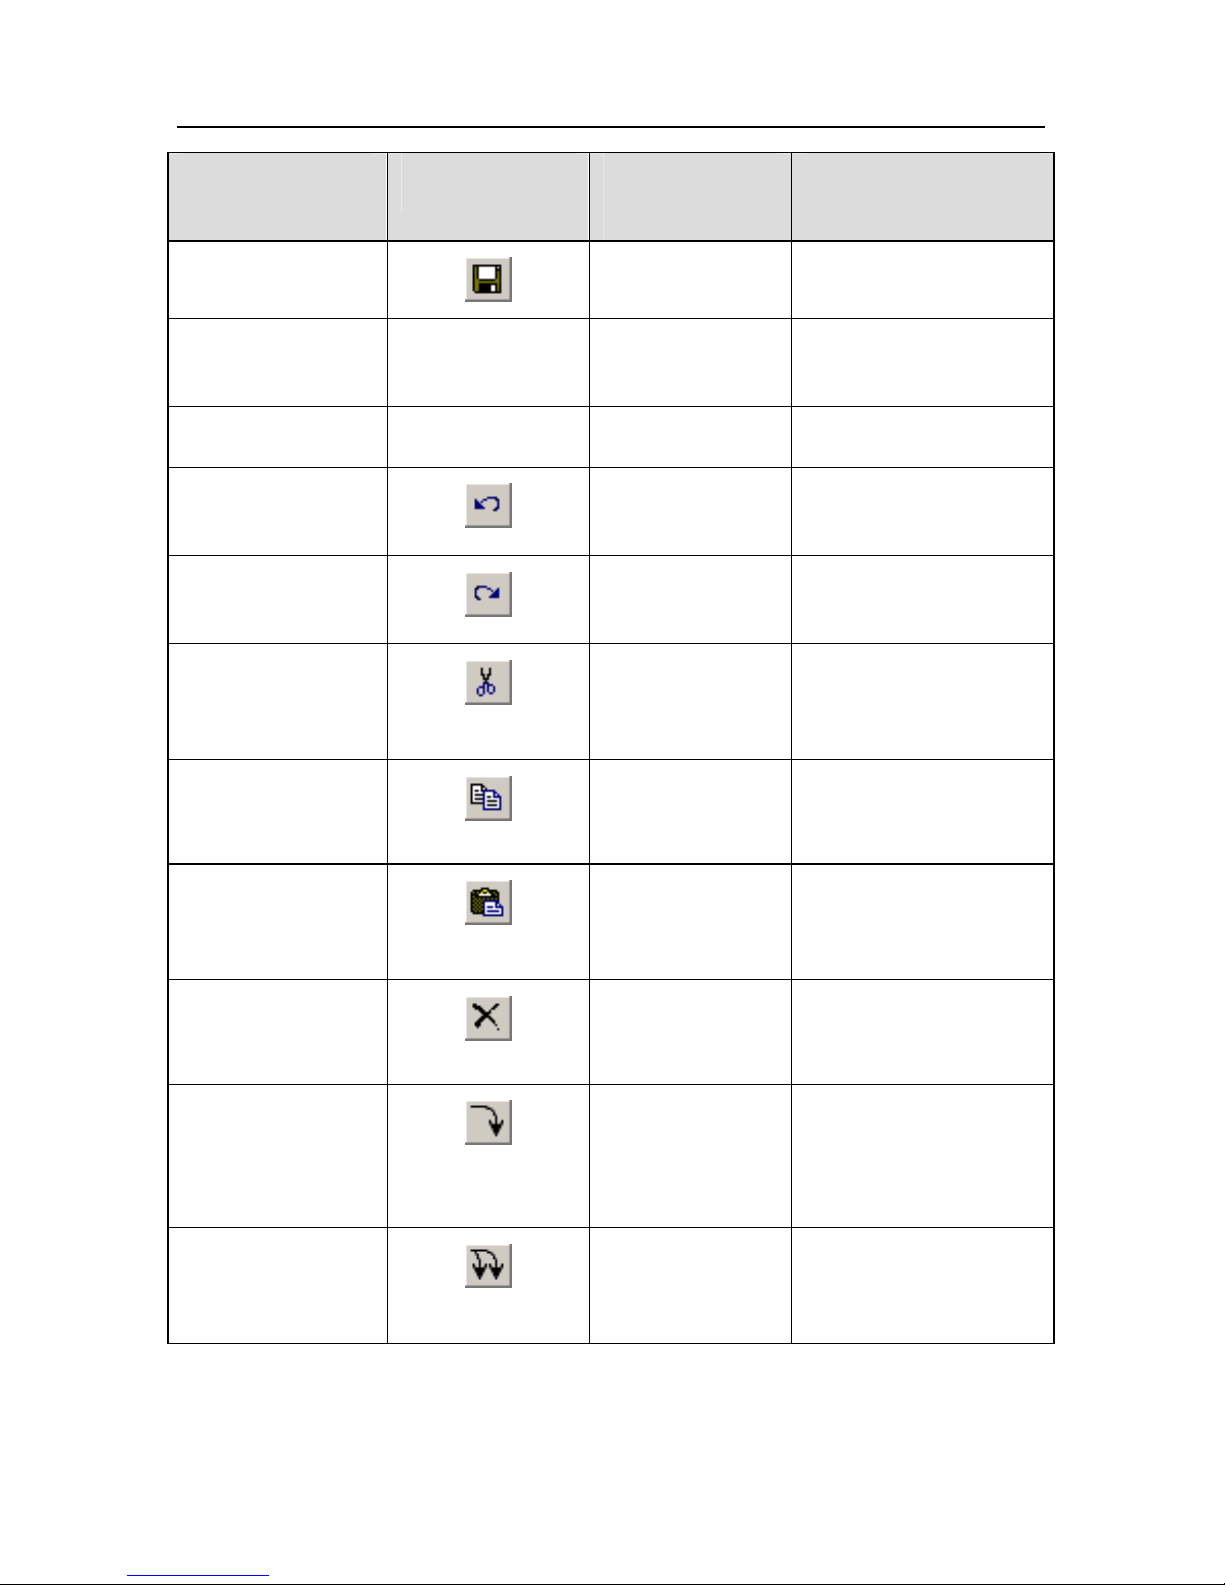
Protection of MS Exchange Server Messages 65
Menu option Toolbar button Key
Combination
Function
File!Save
<C
TRL>+<S>
Save template.
File ! Save copy —
—
Save template on
disk.
File ! Exit —
<A
LT>+<F4>
Quit the program.
Edit!Undo
<C
TRL>+<Z>
Undo the latest text
entry.
Edit!Redo
<C
TRL>+<Y>
Redo the latest text
entry.
Edit!Cut
<S
HIFT>+<DEL>
<CTRL>+<X>
Cut marked text from
the template and
place it on clipboard.
Edit!Copy
<C
TRL>+<INS>
<CTRL>+<C>
Copy marked text to
clipboard.
Edit!Paste
<S
HIFT>+<INS>
<CTRL>+<V>
Paste text from
clipboard to the
template.
Edit!Delete
<D
EL>
<CTRL>+<DEL>
Delete marked text
from the template.
Edit!Insert
macro
<C
TRL>+<I>,
double click on
macro name in
the bar
Insert macro into
template text.
—
— Insert macro and its
name into template
text.
The macro and conditional clauses pane (on the left) and the template text field
(on the right) occupy the major part of the main window. The template text can
Page 66
66 Kaspersky Anti-Virus 4.5 for MS Exchange Server
be edited manually, as well as by means of menu, keyboard and toolbar buttons.
You can also copy, paste, and delete text from the clipboard, add macros and
conditionals to it from the corresponding bar, and save and open the template
from disk.
The macro and conditional clauses bar is designed as a hierarchical tree. You
can open and close the tree branches by clicking on them. You can insert
macros and conditionals into template text by clicking the
and buttons.
The macros are marked in blue and the conditionals in red. The full list of macros
and conditionals is given in subchapter 3.4.8.3, p. 66.
At the bottom of the main window you can see a status line. The status line
displays the following information:
• context-sensitive prompt;
• indicators of the CAPS LOCK, SCROLL LOCK and NUM LOCK modes.
3.4.8.3. Macros and Conditional Clauses
Macros and conditional clauses can be used in the template text. Below you can
find a full list of them in accordance with their location on the macros and
conditional clauses bar.
3.4.8.3.1. Macros
Macros are contained in the Non-conditional group.
You should keep to the following syntax when inserting macros into templates:
%MACRO_NAME%
e. g., if you insert the following phrase when creating a template for an infected
message:
Attention! An infected message arrived from user %FROM%.
When the Anti-Virus Engine component detects a virus in a message from a
sender named "Ivanov", the user (or administrator, depending on anti-virus
protection settings) will see the following alert in the first line of the received
message:
Attention! An infected message arrived from user Ivanov.
Page 67
Protection of MS Exchange Server Messages 67
One should pay attention to syntax when using macros. For instance, if
the end symbol % is omitted when using macro %FROM%, the user will
see %FROM instead of the user’s name:
An infected message arrived
from user %FROM.
The Non-conditional group contains two folders: Message and Anti-Virus.
Message – contains a list of macros that allow the parameters related to the
scanned message to be added to text.
Table 4. Macros in Message folder.
Macro name Macro
and its meaning
Attachment-name
%ATTACH_FILENAME%
File name.
Submission time*
%SUBMIT_TIME%
Time of message submission.
Arrival time*
%TIME%
Time message was received.
Recipient names (Cc:):*
%CC%
List of message copy recipients.
Recipient names (To:):
*
%TO%
List of message recipients.
MS Exchange Server
database name
*
%DATABASE_NAME%
Name of MS Exchange Server 2000 database
in which the message has been detected.
Server name
%SERVER_NAME%
Name of server on which the message has
been detected.
Code page*
%CONTENT_CODEPAGE%
Object code page.
Sender – claimed name:*
%SENT_REPRESENTING_NAME%
Name displayed for message exchange user
provided by the sender.
Sender – name:
*
%FROM%
Displayed sender name.
*
All macros marked with "*" can be used under MS Exchange Server 2000/2003 only.
Page 68
68 Kaspersky Anti-Virus 4.5 for MS Exchange Server
Macro name Macro
and its meaning
Folder*
%FOLDER_NAME%
Name of the folder in which the message was
located during checkup.
URL name*
%MESSAGE_URL_NAME%
URL name of the detected message.
Mailbox*
%MAILBOX_NAME%
Name of the mailbox in which the message
was detected.
Size
%CONTENT_LENGTH%
Approximate file size.
Subject*
%SUBJECT%
Message subject.
Content type*
%CONTENT_TYPE%
Content type of MIME object.
Anti-Virus
The list of macros that allow inserting anti-virus parameters into a template is
located in the Anti-Virus folder.
Table 5. Macros in the Anti-Virus folder
Macro name Macro
and its meaning
Report address
%REPORTADDRESS%
Administrator report address.
Virus - databases
%AVBASES_VIRUSESCOUNT%
Number of records in anti-virus databases. With
this parameter you will be able to check whether
the message has been checked with the latest
anti-virus database.
Databases – number
%AVBASES_COUNT%
Number of anti-virus database files (AVC
extension files).
Databases – folder
%AVBASES_FOLDER%
Anti-virus database directory.
Page 69
Protection of MS Exchange Server Messages 69
Macro name Macro
and its meaning
Virus – name
%VIRUSNAME%
Name of the virus detected.
Virus – information
%VIRUS_INFO%
Virus information.
Check time
%FULLCHECKEDTIME%
Scanning and object disinfection time in
milliseconds. This value does not include the
time spent for further object treatment: report
removal, replacement, generating or delivery.
Date and time
%CURRENT_DATETIME%
Current date/time in full format set on server by
default.
Quarantine – folder
%QUARANTINEFOLDER%
Quarantine folder.
Quarantine – file
%QUARANTINEFILENAME%
Quarantine file name.
End of check
%CHECKEDTIMEEND%
Date/time of object scan completion (in full
format set on the server by default).
Start of check
%CHECKEDTIME%
Date/time of object scan start (in full format set
on the server by default).
Database updating
%AVBASES_LAST_UPDATE%
Date of anti-virus database update in full format
set on the server by default.
Object – name
%OBJECTNAME%
Displayed name of the scanned object.
Installation folder
%INSTALL_FOLDER%
Name of the folder in which Kaspersky AntiVirus
®
4.5 for MS Exchange Server is installed.
This macro can be used when specifying the
paths to the temporary folder, quarantine folders,
and log files.
Scanner – version
%SCANNER_VERSION%
Anti-virus Interceptor version.
Page 70

70 Kaspersky Anti-Virus 4.5 for MS Exchange Server
Macro name Macro
and its meaning
Scanner – name
%SCANNER_VERSION%
Anti-virus Interceptor name.
Report type
%MESSAGE_TYPE%
Report type. Takes the following values:
• Start/Stop service
• Critical errors
• Config updates
• Anti-Virus Databases reload
• Virus info
Event type
%EVENT_TYPE%
Type of event for which the report was
generated. It takes the following values:
• Error type
• Warning type
• Information type
• Audit success
• Audit failure
In addition, two auxiliary macros are used:
%CRLF%
Move to the next line. This is not displayed on the screen when working in
Template Editor but can be displayed when viewed with a standard text
editor.
%TAB%
To mark tabulation symbol. This is displayed in Template Editor. This
symbol is necessary in report templates for joint work with Kaspersky
®
Report Viewer.
3.4.8.3.2. Conditional Clauses
Conditional clauses are contained in the Conditional group.
Page 71
Protection of MS Exchange Server Messages 71
You should keep to the following syntax when inserting conditionals into the
templates:
<CONDITIONAL_CLAUSE>Text that will be included into message when meeting
the set condition</CONDITIONAL CLAUSE>
In their syntax conditional clauses are similar to HTML tags. However, you must
not use another conditional in the conditional clause text.
For example, if you insert the following phrase when creating a template for a
disinfected message:
<DISINFECTED>Virus %VIRUSNAME% has been deleted from this message
attachment %OBJECTNAME%. </DISINFECTED>
then, after Anti-Virus Engine detects and deletes the W97M/Media virus in a
test.doc file, the user will see the following message:
Virus W97M/Media has been deleted from this message attachment test.doc.
One should pay attention to syntax when using conditional clauses. If
some of the elements were omitted when using a conditional clause,
the user will see the set text regardless of whether or not the condition
has been met.
Table 6. Conditional Clauses
Conditional Clause Meaning
<DISINFECTED>
If the object has been disinfected.
<ISWARNING>
If the object is potentially dangerous.
<DELETEDOBJ>
If the object has been deleted.
<ENGINEFAILED>
If the object could not be checked due to an error in
the anti-virus program kernel.
<ISINFECTED>
If the object has been infected.
<QUARANTINED>
If the object has been quarantined.
<OBJECTUNKNOWN>
If the object could not be checked because it had
been encrypted or password-protected or is part of
an archive.
Page 72
72 Kaspersky Anti-Virus 4.5 for MS Exchange Server
3.5. Testing the program
After installing and adjusting Kaspersky Anti-Virus®, we recommend that you test
the correctness of its settings and operation of the program using a test "virus" or
its modifications.
The test virus was specially designed by the
organization (The
European Institute for Computer Antivirus Research) for testing anti-virus
products.
The test "virus" IS NOT ACTUALLY A VIRUS because it does not contain code
that can harm your computer. However, most anti-virus products identify this file
as a virus
Never use real viruses for testing the operation of an anti-virus product!
You can download the test "virus" from the official website of the EICAR
organization at http://www.eicar.org/anti_virus_test_file.htm. If you have no
Internet connection, you can create your own test "virus". To create a test "virus",
type the following string in any text editor and save the file as eicar.com:
X5O!P%@AP[4\PZX54(P^)7CC)7}$EICAR-STANDARD-ANTIVIRUS-TESTFILE!$H+H*
The file downloaded from the EICAR website or created as described above
contains the body of a standard test "virus". The anti-virus program will detect it,
labsel it as Infected, fail to disinfect it, and apply the action defined by the
administrator for handling similar objects.
To test the response of your anti-virus program to other types of object, modify
the body of this standard test "virus" by adding one of the prefixes listed in
Table Table 7.
You can test the correctness of Kaspersky Anti-Virus
®
operation using
the modified EICAR "virus" only if your anti-virus database was last
updated on October 24, 2003 at the earliest (cumulative updates –
October, 2003).
Table 7. Test "virus" modifications
Prefix Object Status
No prefix,
standard test
"virus"
Infected object. This object cannot be disinfected.
Page 73
Protection of MS Exchange Server Messages 73
Prefix Object Status
CORP–
Unknown.
SUSP–
Suspicious (unknown viral code).
WARN–
Suspicious (modified code of a known virus).
ERRO–
Error when scanning the object.
CURE–
Disinfected. The object is disinfected by Anti-Virus engine;
the text of the "virus" body is changed to CURED.
DELE–
Infected object. This object cannot be disinfected.
The first column of Table Table 7 lists prefixes to be added at the beginning of
the string of the standard test "virus" (for example, CORP–
X5O!P%@AP[4\PZX54(P^)7CC)7}$EICAR-STANDARD-ANTIVIRUS-TESTFILE!$H+H*). The second column of this table contains the types of objects
identified by an anti-virus program after you have added a prefix. The actions for
each type of object are defined by anti-virus program settings customized by the
administrator.
It is recommended that you test the operation of your anti-virus program
for both incoming and outgoing mail in message bodies and
attachments. To test the detection of viruses in message bodies, paste
the text of either the standard or modified "virus" into a message body.
3.6. System Performance Chart.
System Monitor
You can view Kaspersky Anti-Virus® 4.5 performance charts using the System
Monitor standard utility.
When Anti-Virus Engine operates under MS Exchange Server 5.5, the
performance chart cannot be displayed.
Page 74
74 Kaspersky Anti-Virus 4.5 for MS Exchange Server
To run the System Monitor utility:
1. Click on Programs in the Start menu.
2. Choose Administrative Tools from the submenu, and then
System Monitor. After this, the Performance dialog box (see
Figure 59) will be displayed.
3. Click the
button located on the right of the toolbar.
4. Click the Select counters from computer button in the Add
Counter window and choose the server name from the drop-down
list.
5. Select the MSExchangeIS line from the Performance object drop-
down list.
6. Select the necessary counter names from the following list:
• Virus Scan Bytes Scanned;
• Virus Scan Files Cleaned;
• Virus Scan Cleaned/sec;
• Virus Scan Files Quarantined;
• Virus Scan Files Quarantined/sec;
• Virus Scan Files Scanned;
• Virus Scan Files Scanned/sec;
• Virus Scan Files Scanned in Background;
• Virus Scan Messages Cleaned;
• Virus Scan Messages Cleaned/sec;
• Virus Scan Messages Processed;
• Virus Scan Messages Processed/sec;
• Virus Scan Messages Quarantined;
• Virus Scan Messages Quarantined/sec;
• Virus Scan Messages Scanned in Background;
• Virus Scan Queue Length.
Pay attention to the term "Quarantine". This means an object is blocked
but not saved to a special folder.
7. Click Add. After you add all necessary counters, click Close.
Page 75
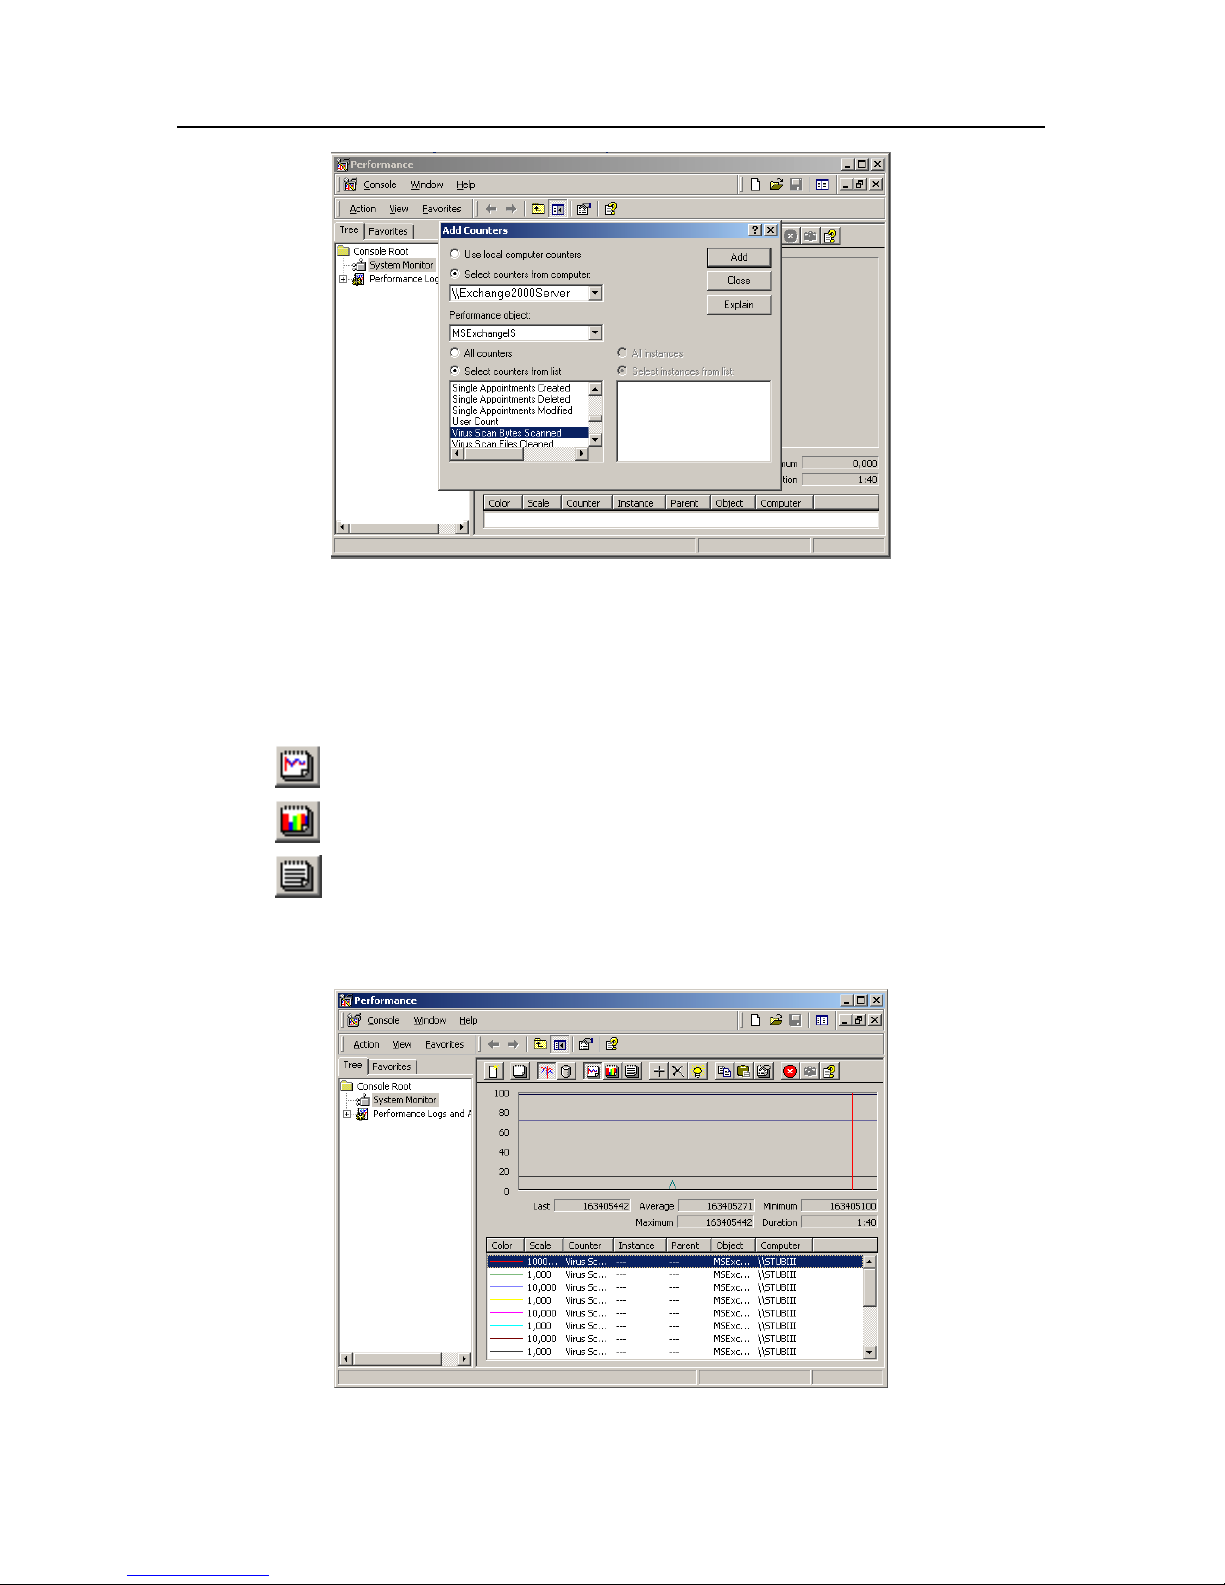
Protection of MS Exchange Server Messages 75
Figure 59. The Performance dialog box. Adding counters
The values of the selected counters will be displayed in the right pane of the
Performance dialog box. You can view them in one of the three modes by
clicking the corresponding buttons:
— as a chart;
— as a bar chart;
— as a table of values.
You can find additional information about System Monitor in the Microsoft
Windows 2000 documentation.
Figure 60. The Performance dialog box. Viewing counter values as a chart
Page 76
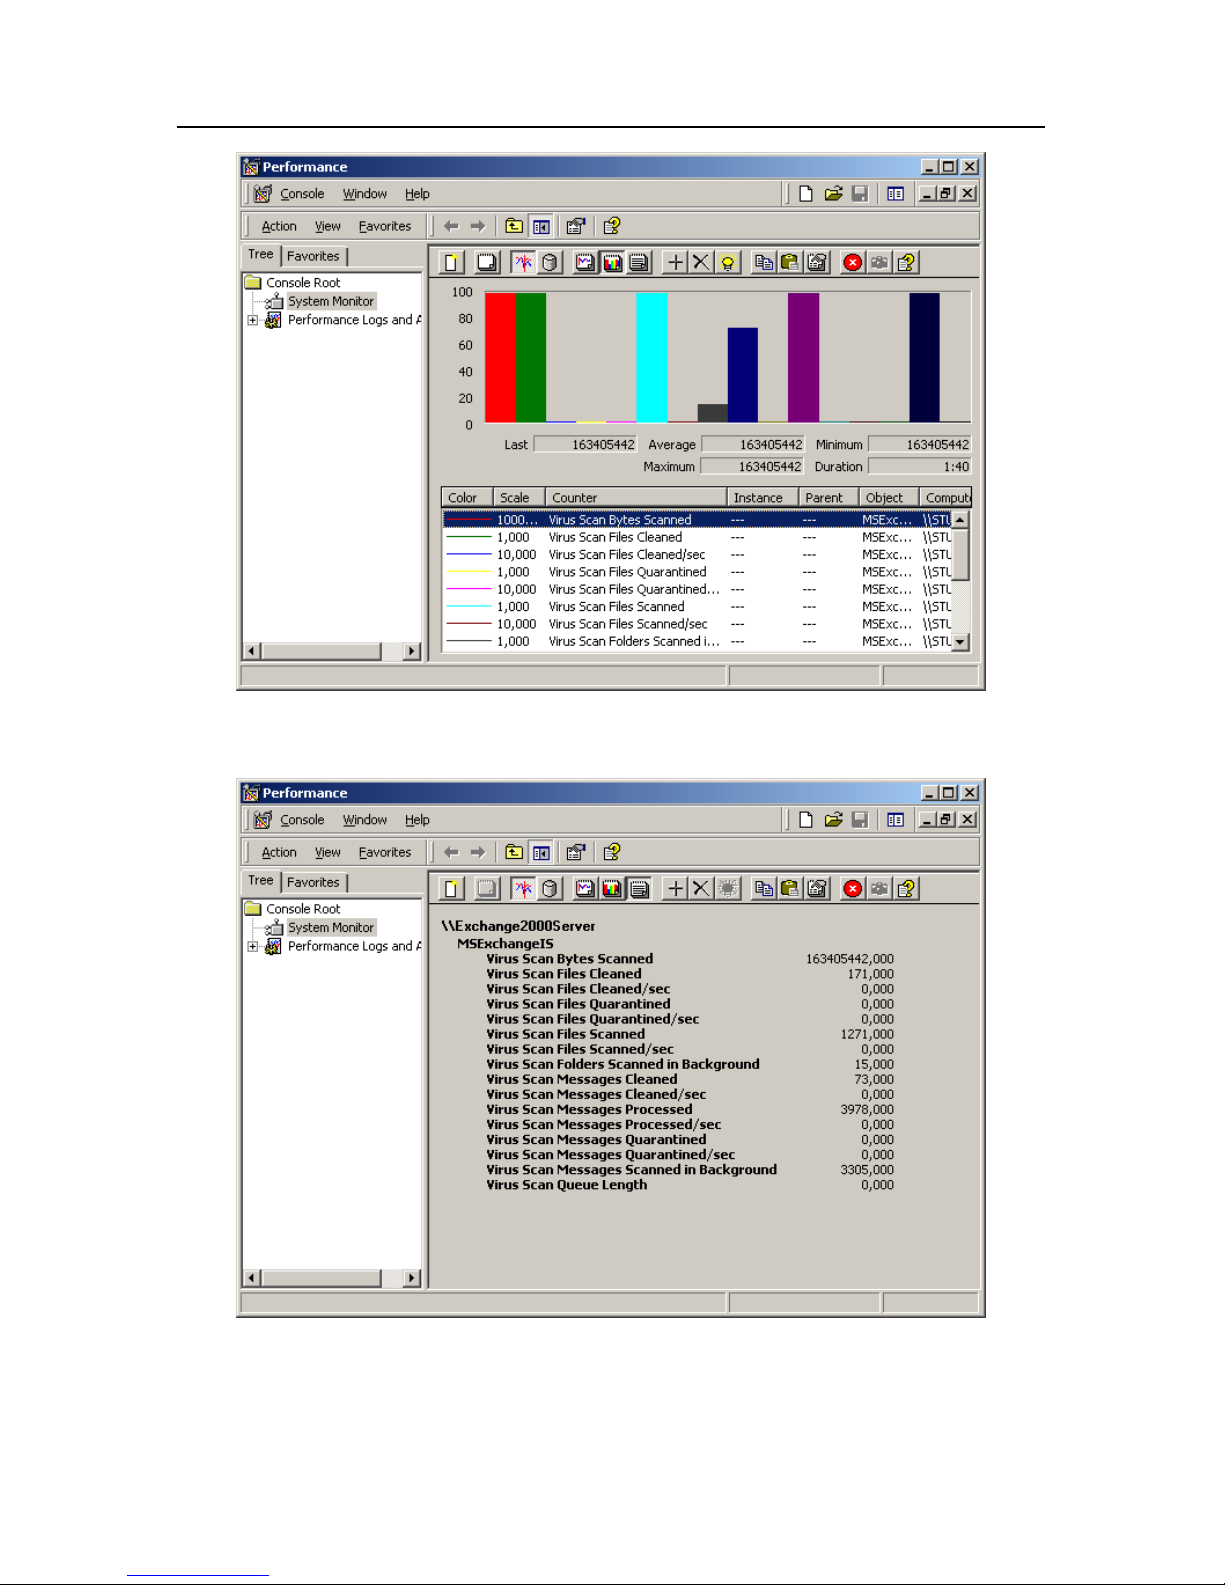
76 Kaspersky Anti-Virus 4.5 for MS Exchange Server
Figure 61. The Performance dialog box. Viewing counter values as a bar chart
Figure 62. The Performance dialog box. Viewing counter values as a table
Page 77

Protection of MS Exchange Server Messages 77
3.7. Operating in demo mode.
Extending your license. Editing
a list of unprotected objects
The program starts operating in demo mode if the number of protected
mailboxes exceeds the number specified in the license for the protected server.
To start working in full-featured mode, edit the list of unprotected mailboxes (see
subchapter 2.2 on page 25).
In demo mode, the functions are limited and the program will not:
• disinfect infected attachments.
• move files to the quarantine.
• send reports about viruses detected to the sender and recipient of the
infected messages.
Information about operating in demo mode is added to the end of notifications
sent to the administrator (see subchapter 3.4.4.1 on page 50):
Kaspersky Anti-Virus works in DEMO mode:
CureType = Check Only;
MoveToQuarantine = FALSE;
SendMessageToSender = FALSE;
SendMessageToRecipient = FALSE
If your license has expired, the program continues operating in full-featured
mode but it stops updating anti-virus databases. In this case, a corresponding
system alarm is generated to inform the administrator.
Page 78

CHAPTER 4. KASPERSKY ANTI-
VIRUS® CONTROL CENTRE
Kaspersky Anti-Virus® Control Centre (Kaspersky AV Control Centre) operates
as a management shell. You can use it to install and update the package
components, define and schedule tasks to be started at appropriate times and
review the task performance results.
The program allows you to keep track of what Kaspersky Anti-Virus
®
components are installed on a computer, which makes it easy for you to
communicate with the Kaspersky Labs technical support service and update
your anti-virus databases and components in a timely fashion.
Automated launch of the external programs allows you to use Kaspersky AV
Control Centre as a conventional task scheduler. Usually, there is no need to use
any other automated launch tools, which leads to more effective use of your
computer resources. Additionally, the exact mutual synchronization of your
processors is ensured, provided that the processors are connected to the
system’s anti-virus protection system and other tasks, thus excluding the
possibility of conflicts.
4.1. Launching Kaspersky AV
Control Centre
There are several ways to launch Kaspersky AV Control Centre:
• from the Windows main menu;
• automated launch at Windows startup;
• manual start from the command line.
To launch Kaspersky AV Control Centre from the Windows main menu, click the
Start button, then go to the Programs submenu and click Kaspersky Anti-Virus
®
Control Centre in the Kaspersky Anti-Virus® folder.
After Kaspersky Anti-Virus
®
installation, Kaspersky AV Control Centre will launch
automatically at Windows startup and before the logon procedure.
Page 79
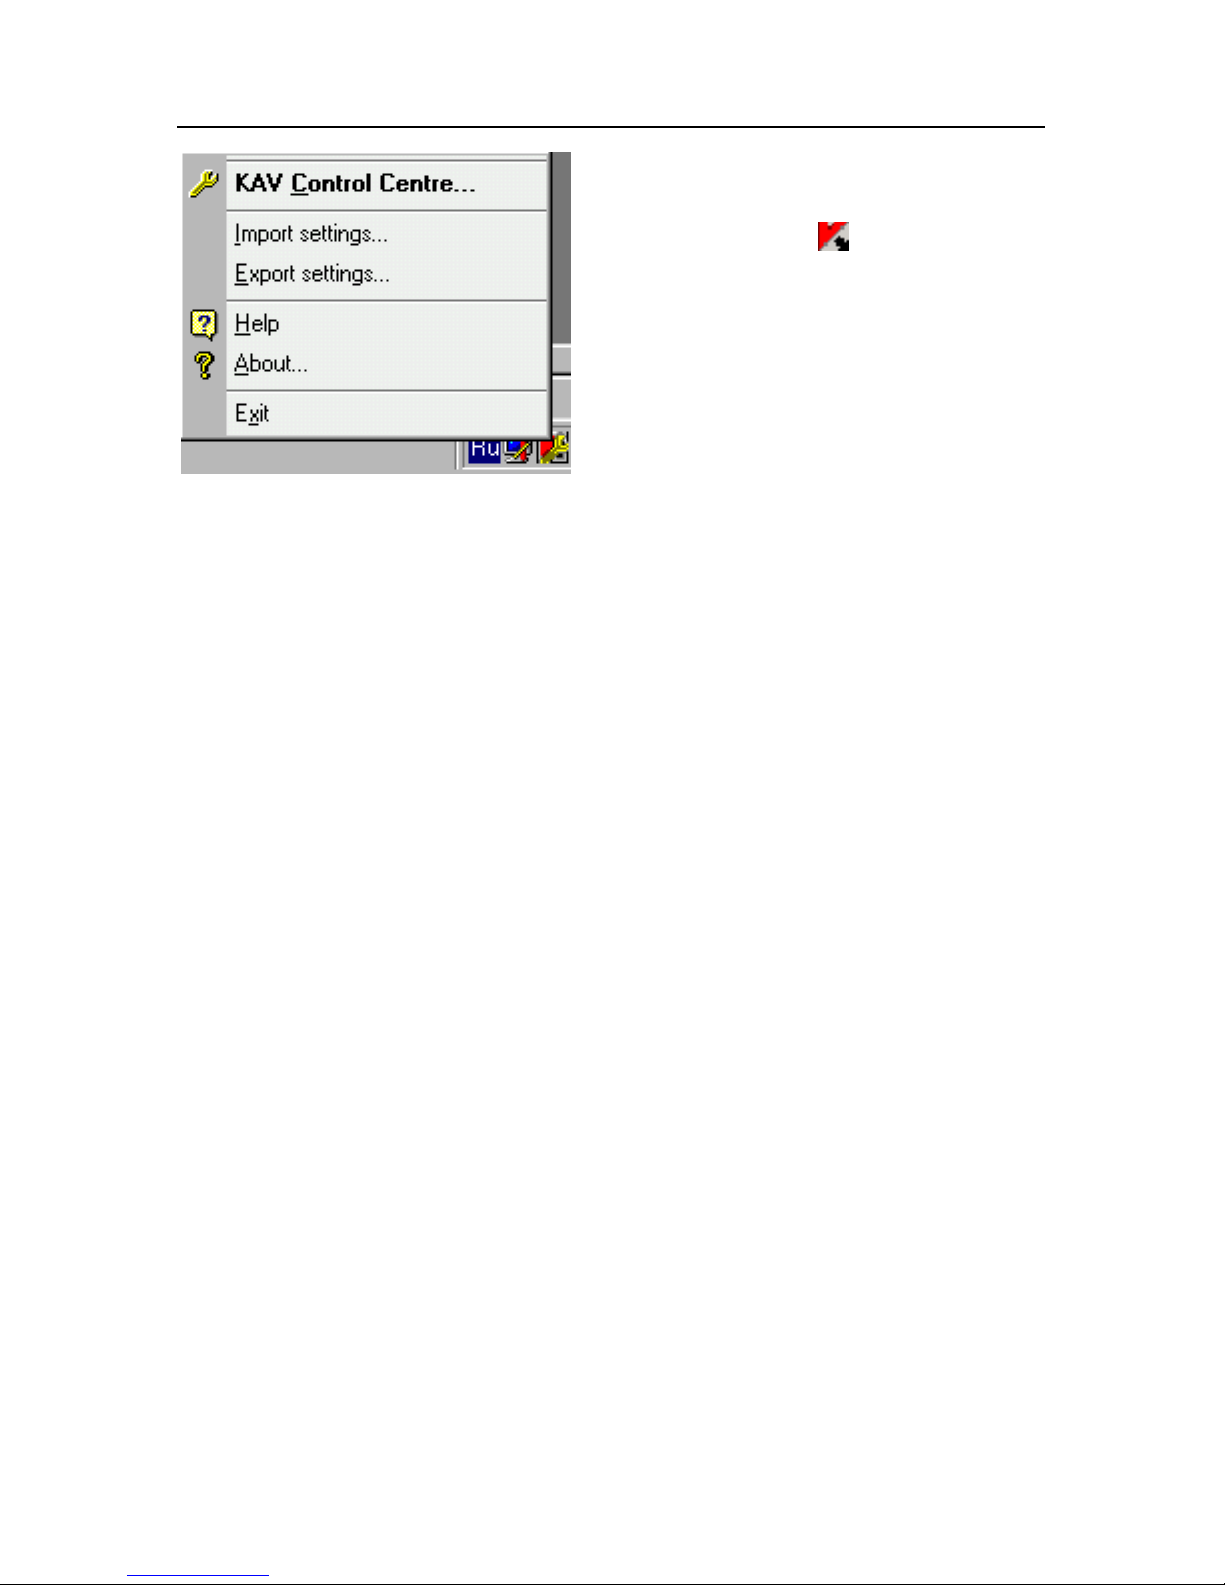
Kaspersky Anti-Virus® Control Centre 79
Figure 63. The Kaspersky AV Control
Centre menu in the taskbar
When Kaspersky AV Control Centre is
successfully launched, in the taskbar
you will see the
icon. Place your
mouse cursor on it, right-click, and you
will see the user menu (see Figure 63),
which includes the following
commands:
• Kaspersky AV Control Centre… – open the main program window.
• Import settings… – allows you to import program settings from a user-
defined file (see below).
• Export settings… – saves the program settings to a *.dat file. Later you
will be able to import the settings from this file (see above).
• Help – displays the Help topics window.
• About … – displays information about the product version, license name,
license expiration date, etc. (see Figure 64).
• Exit – exits the program.
The Export settings and Import settings commands allow you to copy
Kaspersky AV Control Centre settings from one computer to another, i.e. you
can set up the program on a computer, then save the program settings to a file in
a shared folder on a server, and later download these settings onto another
computer.
At the top of the user menu above the line you can find a list of tasks that can be
started manually. To start these tasks you do not have to display the Kaspersky
AV Control Centre main window; you can simply select the required command
from the menu.
Page 80
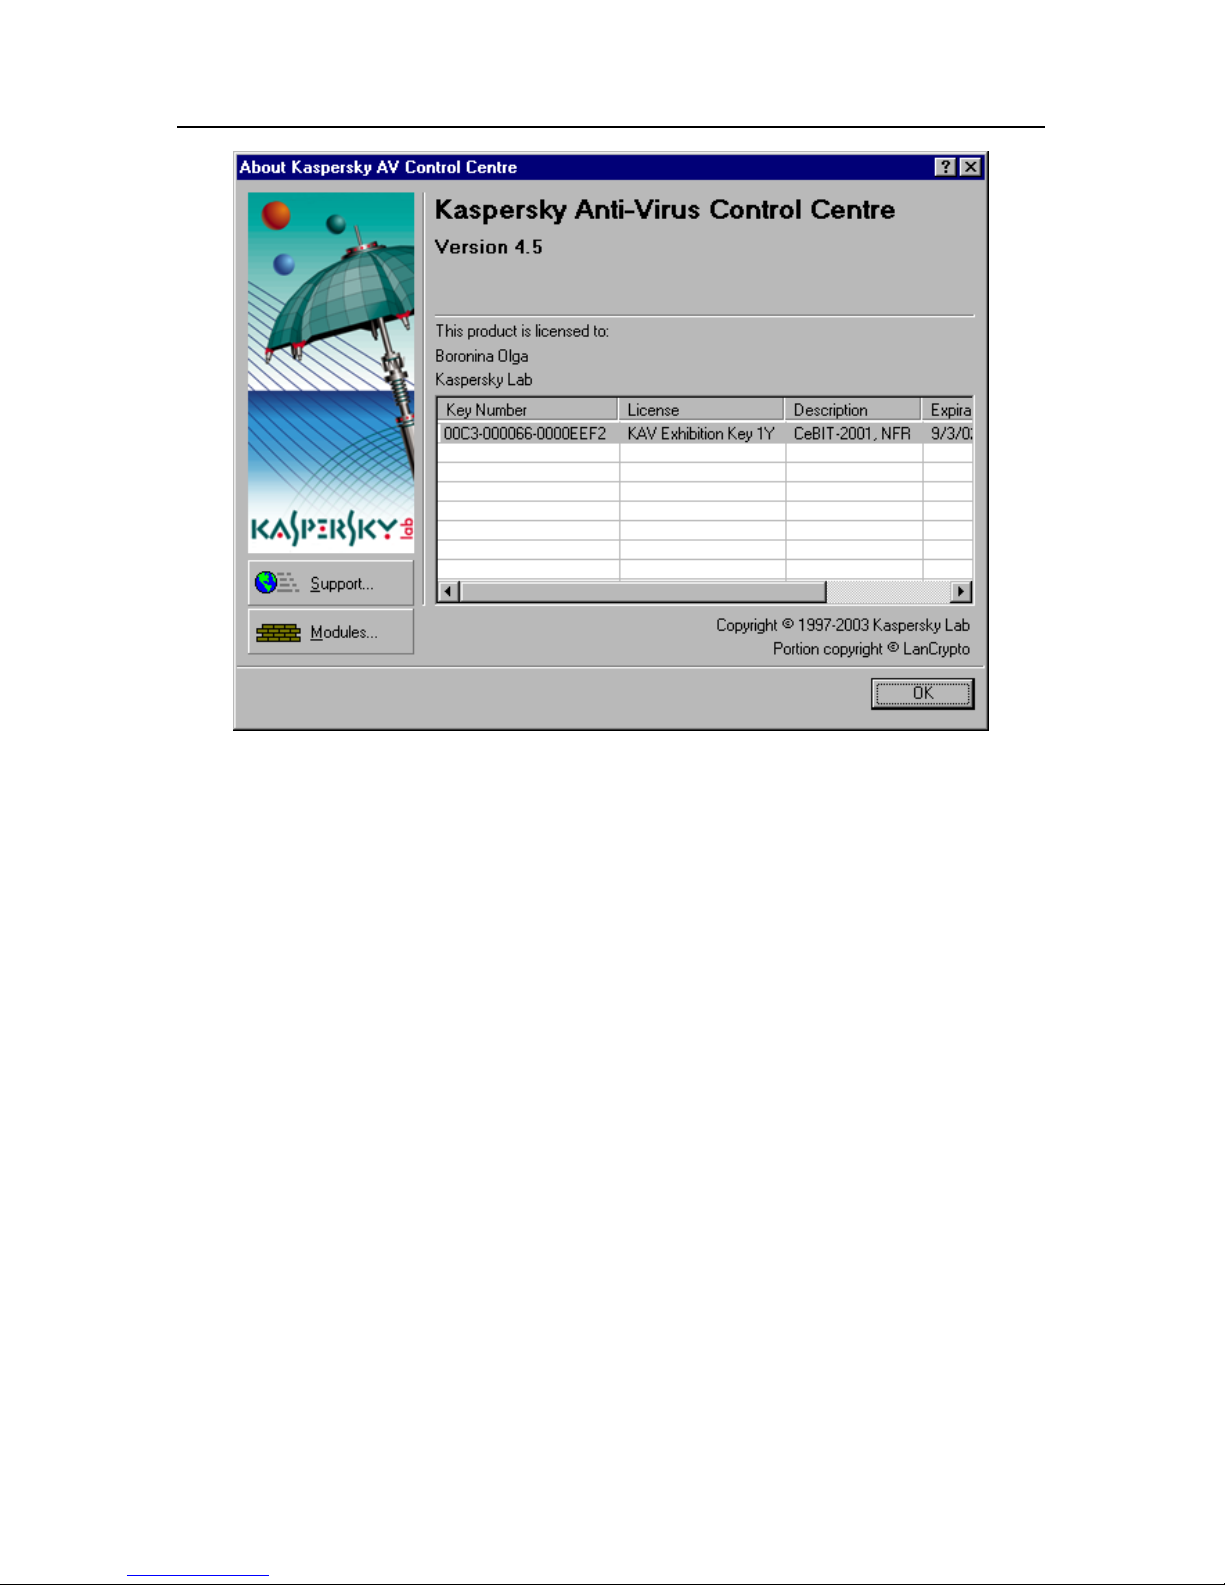
80 Kaspersky Anti-Virus 4.5 for MS Exchange Server
Figure 64. About Kaspersky AV Control Centre
Select Exit from the menu in the taskbar to exit Kaspersky AV Control Centre.
Here we would like to explain some special features of the program. Kaspersky
AV Control Centre is divided into the following two sub-programs: a service subprogram that is started as a system service even before the logon procedure,
and an interface sub-program that provides the program’s graphic interface and
supports communication between a user and the program. If you unload only the
interface subprogram, the tasks defined in Kaspersky AV Control Centre
settings, will still be performed, but a user will not be able to edit the settings and
create new tasks. If you unload the service sub-program as well, Kaspersky AV
Control Centre will abort the defined tasks.
4.2. Kaspersky AV Control Centre
Interface
The main window contains the following four tabs: Tasks, Components,
Settings, and Quarantine.
Page 81
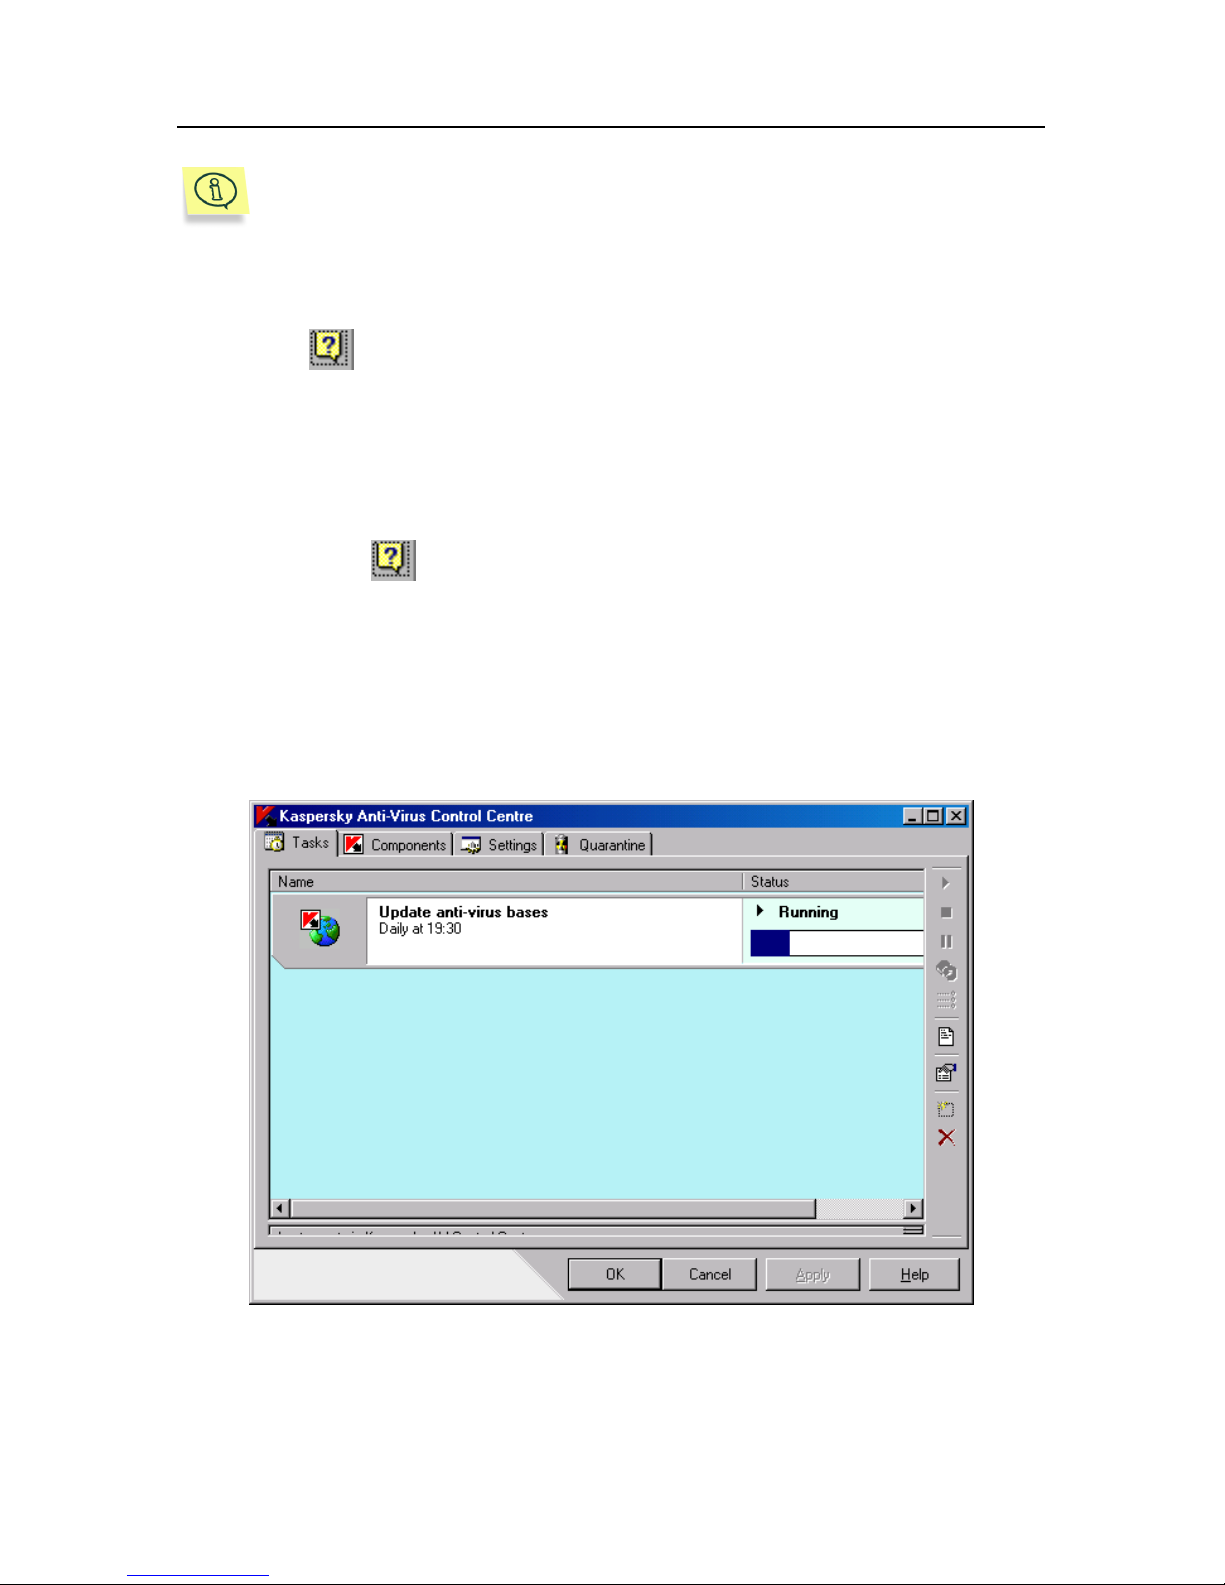
Kaspersky Anti-Virus® Control Centre 81
A description of the first three tabs is given below. The Quarantine tab
is not used by Kaspersky Anti-Virus
®
4.5 for MS Exchange Server
components, so it is not described here.
To perform various actions you can use the right-click menu or the control panel.
At the bottom of the window you can see the following buttons: OK, Cancel,
Apply, and . If you press the OK button, the changes you have made to the
program settings will be saved; if you press the Cancel button, the changes will
be cancelled. In both cases the main window will be closed. If you press the
Apply button, the changes you have made will be applied and the main window
will remain on your screen; in this case you can continue to change settings. For
the resident tasks currently being performed the applied settings will be
immediately loaded into the executable module. To display the Help topics
window press the
button.
4.2.1.
Tasks
tab
This tab (see Figure 65) allows you to manage tasks. A task is understood as a
program with predefined settings that is scheduled to start at some certain time,
or upon some event, or as required by the user.
Figure 65. The Tasks tab
Page 82

82 Kaspersky Anti-Virus 4.5 for MS Exchange Server
The tab contains three frames:
• in the left upper frame you can see each task listed with its corresponding
status.
• in the right upper frame you can see the current task performance
statistics
2
.
• in the lower frame you can see a list of events (errors, warnings,
notifications).
Let’s have a look at each frame in detail. The task list is divided into two
columns: Name and Status. In the Name column you will see a list of tasks, and
in the Status column, the corresponding task execution status. There are several
status variants:
• Running – the task is being executed.
• Finished – the task has been successfully executed.
• Fail – a failure occurred during execution of the task.
• Interrupted by user – the task was interrupted by the user.
• Pause – the task is suspended.
• Start – the task is launched.
• Stop – the task is stopped.
• Start fail – task launch error.
• Restart – the task is restarted.
In the right part of the window you will see the statistics bar. The content of the
statistics bar depends on the task type.
Thus, for example, the automated update task has the following lines in the
statistics bar: Date, Time, Action, Result, and Object, which respectively
display the date and time of the task launch, the actions undertaken and their
results, and the object to which the action was applied.
At the bottom of the main window you will see a list of events with the date and
time when they occurred, and the components that generated the corresponding
alert. All running package components deliver events to Kaspersky AV Control
Centre. This list displays only critical events. You can sort the list lines by any
column, alphabetically or numerically, in ascending or descending order. When
you select an event from the list, the task that generated the corresponding alert
will be highlighted.
2
‘ Program performance statistics is a short report on the program performance.
Page 83
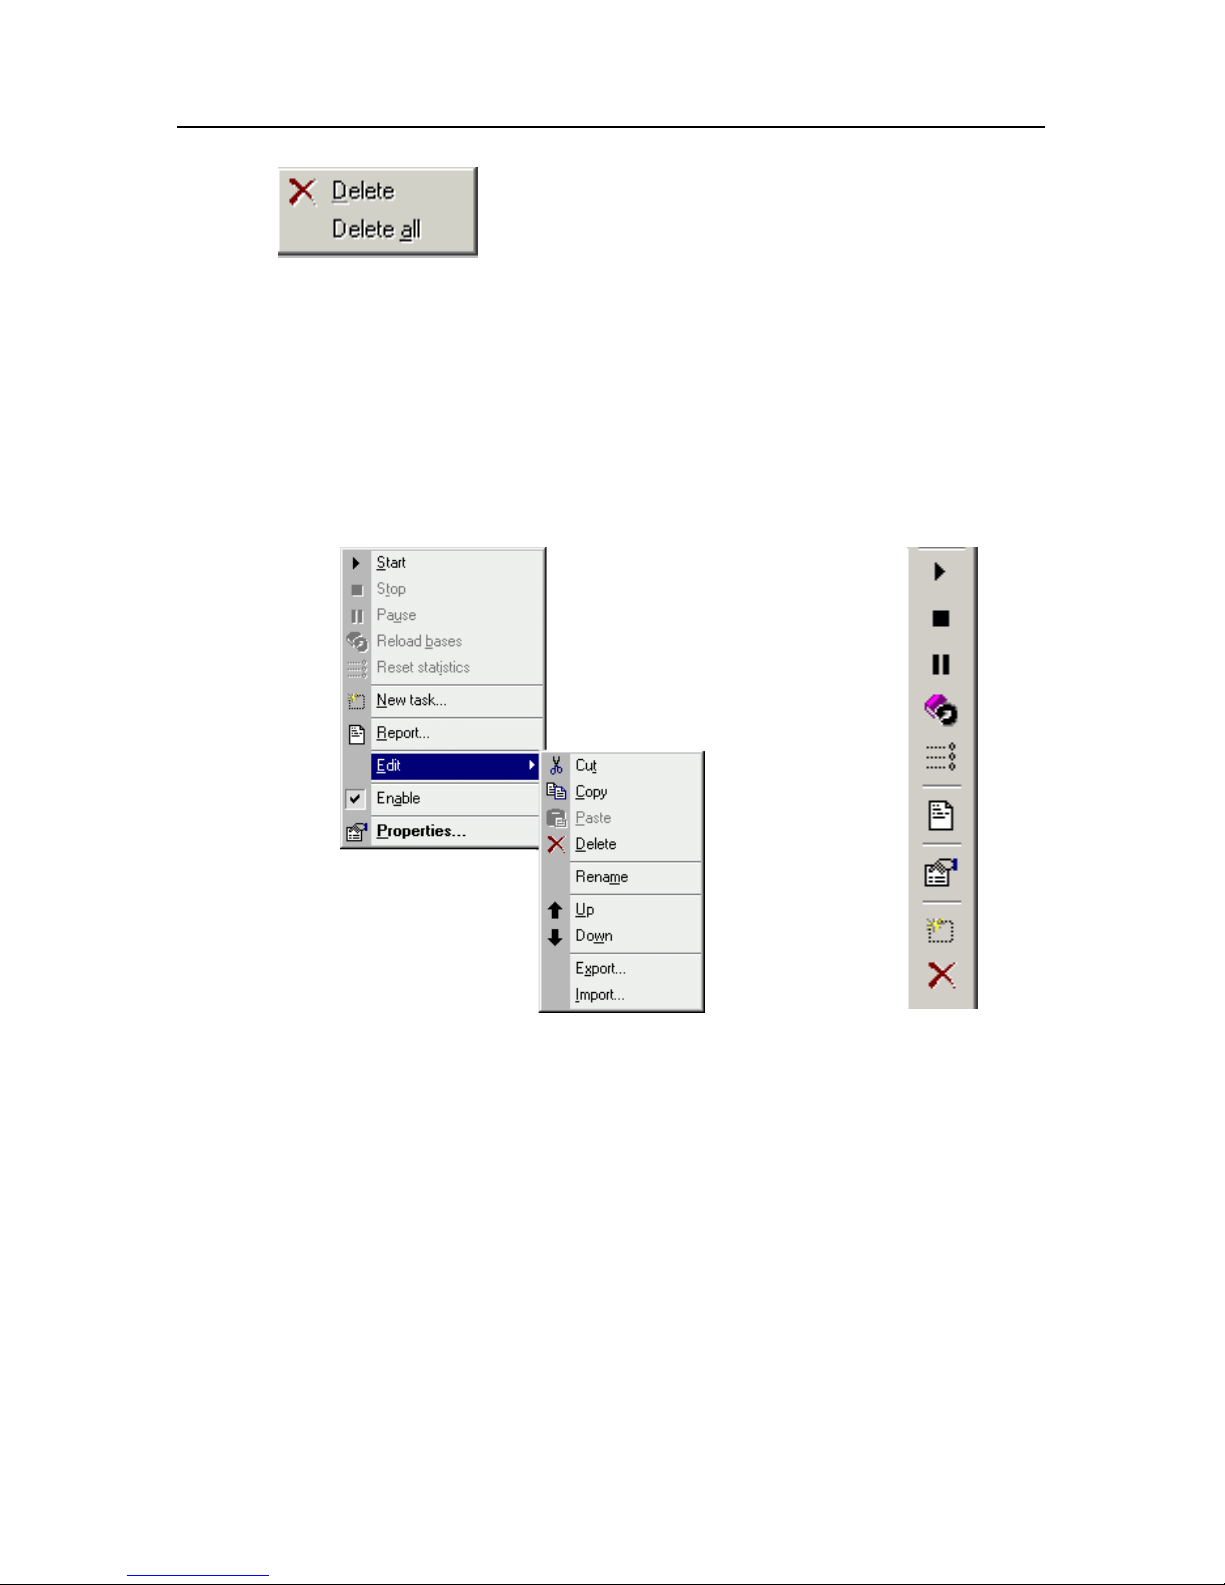
Kaspersky Anti-Virus® Control Centre 83
Figure 66. Right-click menu in the
event list
The list has a right-click menu (see
Figure 66). The right-click menu items
are used for the following actions:
• Delete – deletes the selected event (with confirmation).
• Delete all – deletes all events from the list (with confirmation).
To carry out task management (such as creation, configuration, removal, launch,
and termination) use the context menu, and the toolbar buttons (see Figure 67).
Figure 67. Right-click menu and toolbar on the Tasks tab
To open the right-click menu, right-click the left part of the window in which the
tasks list and the status bar are located. The right-click menu commands allow
you to…
• Start – launch the selected task.
• Stop – terminate and unload the selected task that is running.
• Pause – pause the selected task. In this case the task is retained in
memory but its performance is suspended.
Page 84

84 Kaspersky Anti-Virus 4.5 for MS Exchange Server
• Reload databases – reload the anti-virus databases. This command is
used when you wish to load the updated anti-virus databases into
memory-resident tasks without restarting them.
• Reset statistics – clear the selected task performance statistics (only for
memory-resident tasks).
• Report – display the selected task performance report in the Kaspersky
®
Report Viewer program (see Chapter 6 on page 119).
• Enable – enable/disable the selected task to be started as scheduled. If
you disable the task, it will still be listed but the task planner will not
launch it.
• New Task – create a new task. If you select this command, the New Task
Wizard will be launched (see subchapter 4.3 on page 97).
• Properties – display the selected task settings.
• Edit – change the selected task settings. This option contains a sub-
menu with the following commands:
• Rename – rename the selected task.
• Cut – cut the selected task from the list and place it on the
internal clipboard of Kaspersky AV Control Centre. The task
name, settings, and the appropriate schedule will be saved.
• Copy – copy the selected task into the internal clipboard.
• Paste – paste a task from the clipboard into the program task
list.
• Delete – delete the selected task from the list.
• Up – move the selected task one line up.
• Down – move the selected task one line down.
• Export – save the selected task to a file. If you select this
command, a window asking you to save the task settings in a
file with the .tsk extension will appear on your screen.
• Import – download a task from a file.
The Export and Import commands allow you to copy the required task settings
from one computer to another, i.e. you can create a task on a computer, then
save these task settings to a file in a shared folder on the server, and later
download this settings file onto another computer.
Some commands may be unavailabsle for certain task types.
The tasks are launched in the order they are listed.
Page 85
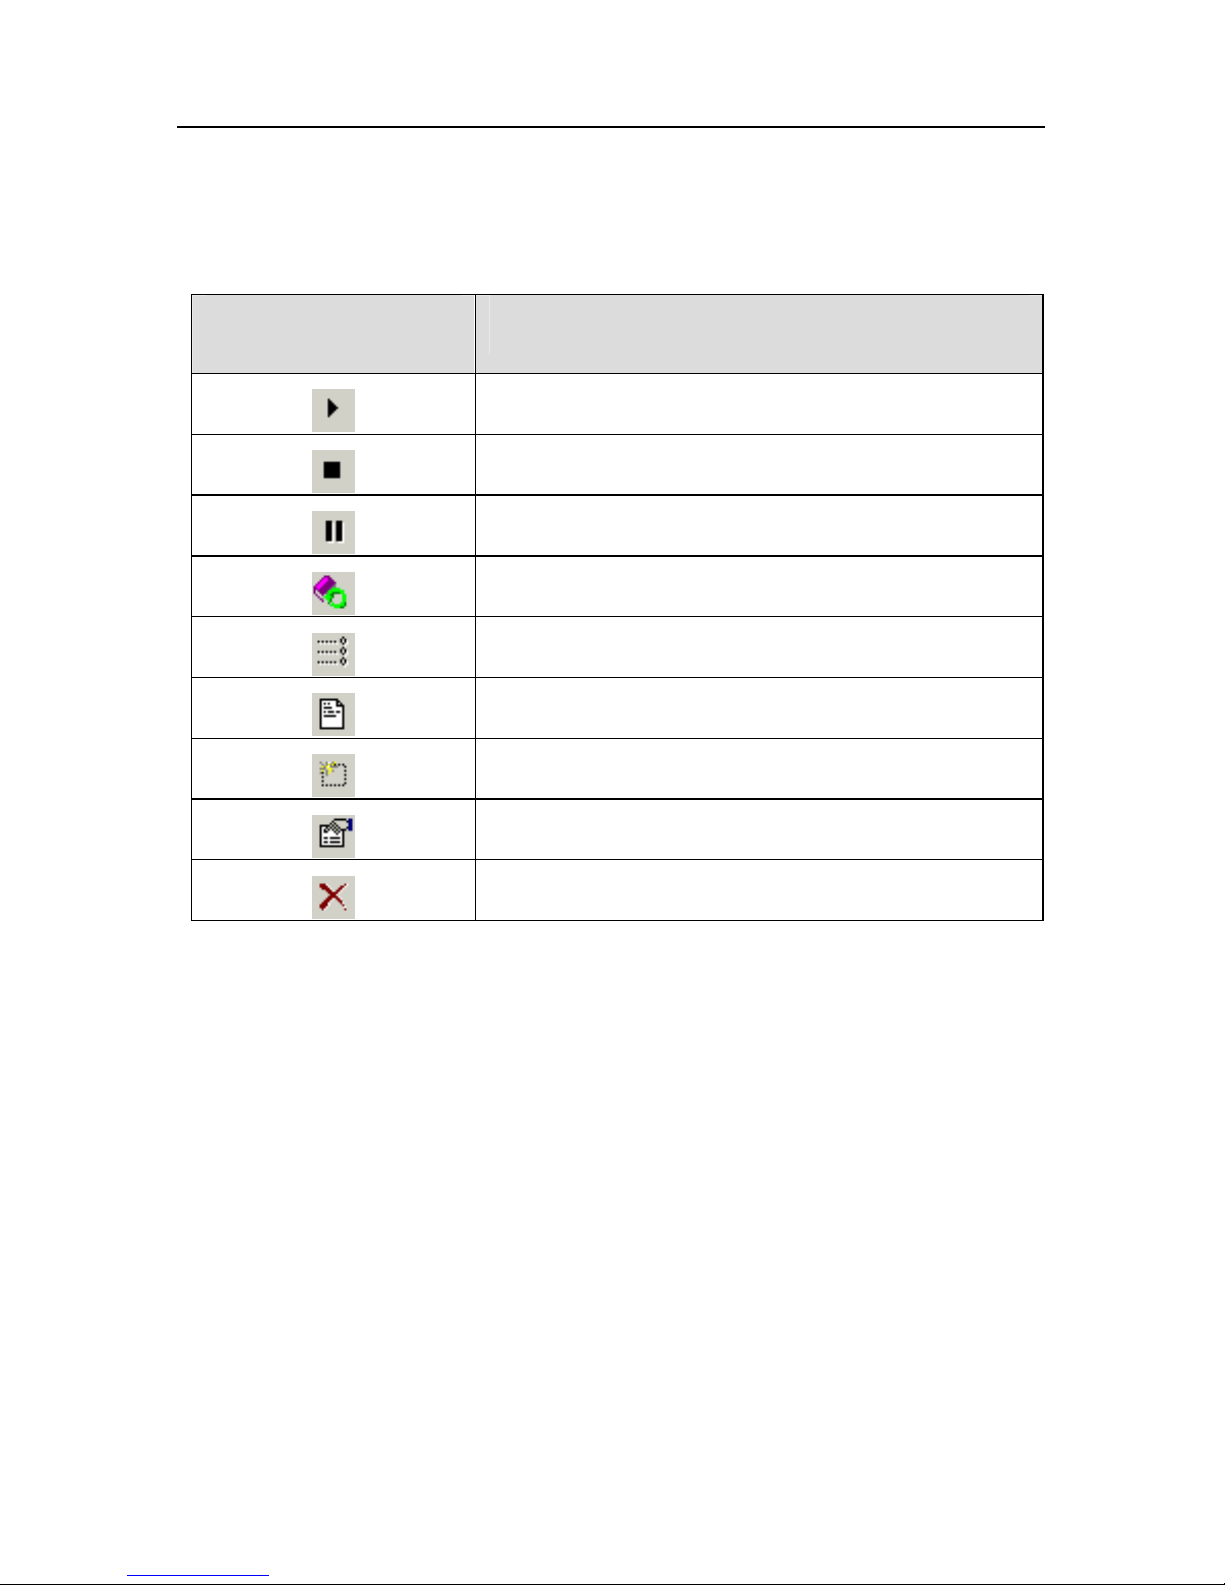
Kaspersky Anti-Virus® Control Centre 85
Task management, as we have mentioned above, can also be accomplished
using tool bar buttons. The following buttons correspond to the right-click menu
commands:
Table 8. Tasks tab toolbar
Button Right-click menu command
Start
Stop
Pause
Reload databases
Reset statistics
Report
Create task
Properties
Delete
When you place your mouse cursor on a button, a tip describing the button
function will pop-up near this button.
You can use the following methods to manipulate tasks:
You can switch between the list items by pressing the key corresponding to the
letter the target item name begins with.
There are some other hot keys:
• Insert – create a new task. If you press this key, the New Task window
will appear on your screen (for details refer to subchapter 4.3 p. 97).
• Delete – remove task from the list (with confirmation).
• Space – show the selected task properties. If you press this key, the
Properties window will appear on your screen (see subchapter 4.2.1.1 on
page 86).
Page 86
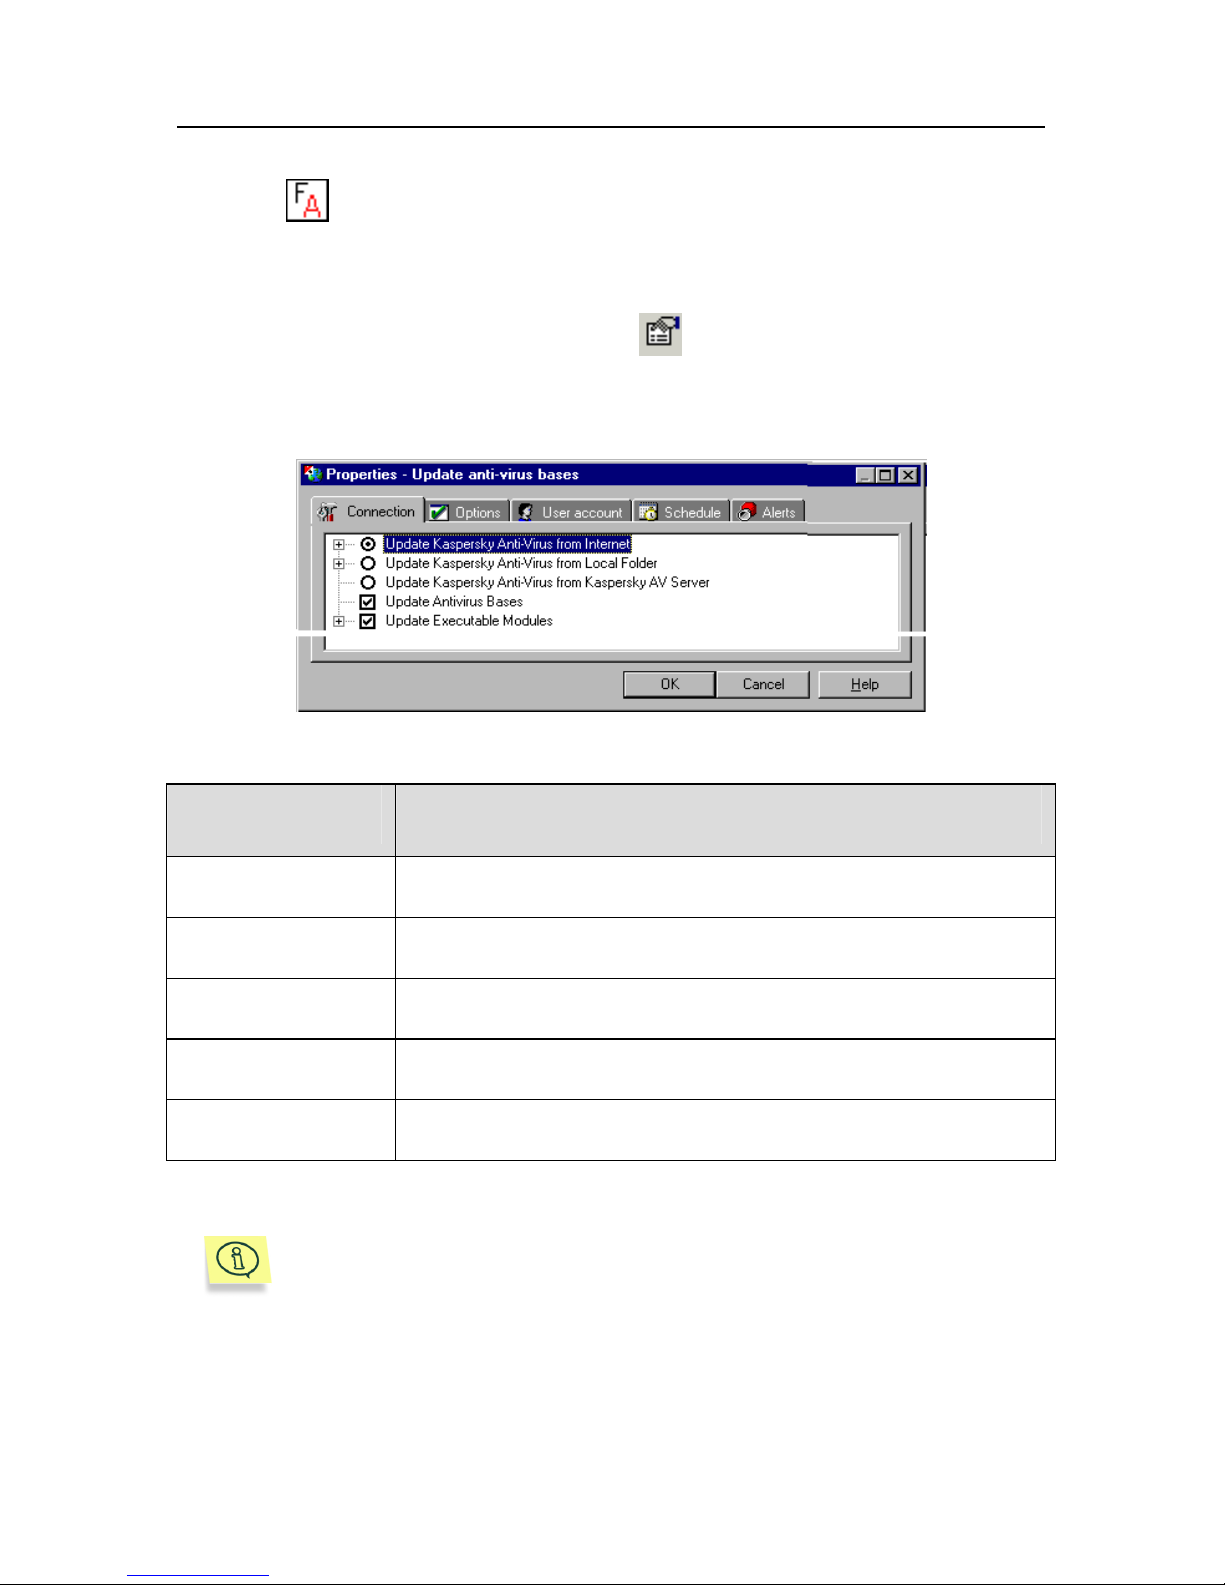
86 Kaspersky Anti-Virus 4.5 for MS Exchange Server
For example, if there is a task called Automated update in the list, and you
press the
key on the keyboard, the list pointer will move to this task.
4.2.1.1.
Properties
window
This window appears when you press the button or select Properties from
the right-click menu. After this, you will see the properties window of the
Updating Anti-Virus Databases and Modules task (Kaspersky AV Updater),
which includes a number of tabs with task settings (see Figure 68).
Figure 68. Kaspersky Anti-Virus® Updater Properties window
Tab Description
Connection See subchapter 5.2.2 on page 109
Options See subchapter 5.2.3 on page 116
User account See subchapter 4.3.4 on page 105
Schedule See subchapter 4.3.2 on page 99
Alerts See subchapter 4.3.3 on page 105
The Connection tab in the Properties window contains an
additional option that allows updating your anti-virus databases and
executable modules in Kaspersky AV Server folder. This is the
Update Kaspersky Anti-Virus
®
from Kaspersky AV Server
option button.
Page 87
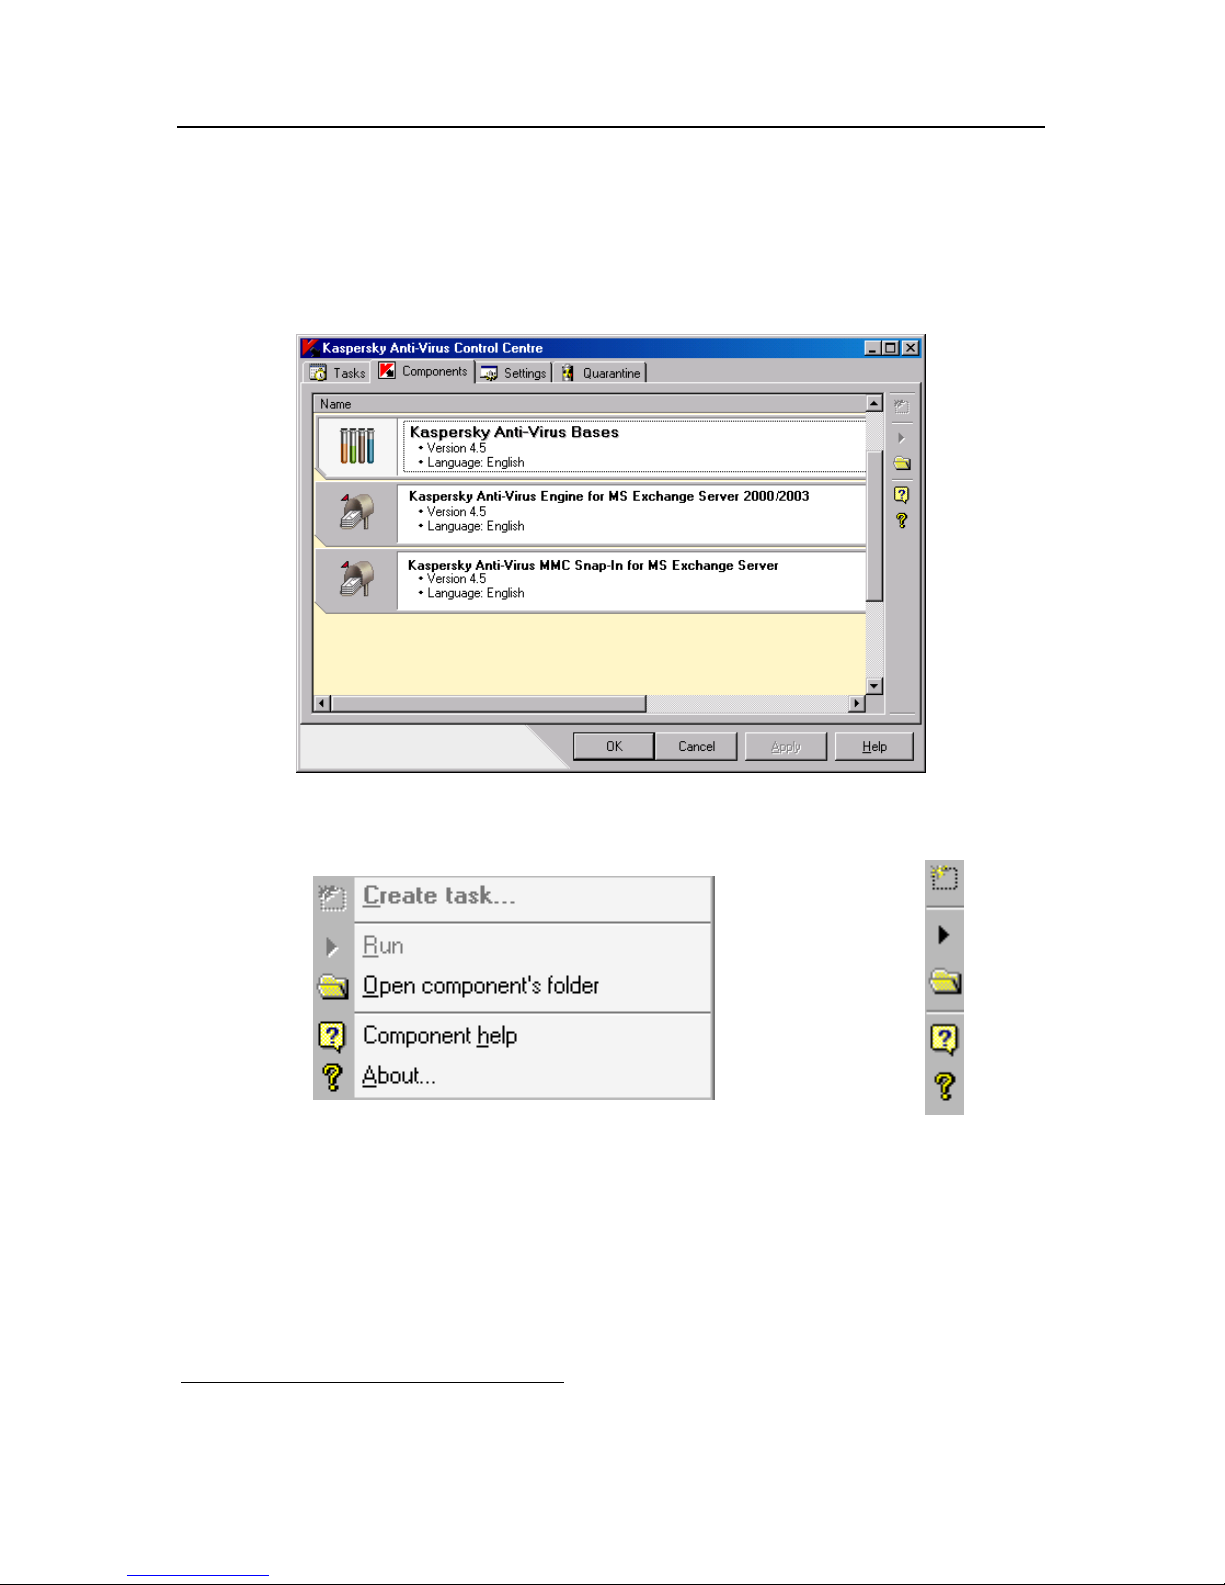
Kaspersky Anti-Virus® Control Centre 87
4.2.2.
Components
Tab
The Components tab (see Figure 69) contains a list of Kaspersky Anti-Virus®
package components3. The toolbar is located on the right of the tab. When you
right-click it, the right-click menu appears (see Figure 70).
Figure 69. The Components tab
Figure 70. Right-click menu and toolbar on the Components tab
The toolbar buttons correspondent to the items of the context menu (see below).
3
A ‘Component’ is a program, utility, library or database included in the Kaspersky Anti-
Virus package, which is responsible for a strictly limited number of tasks.
Page 88
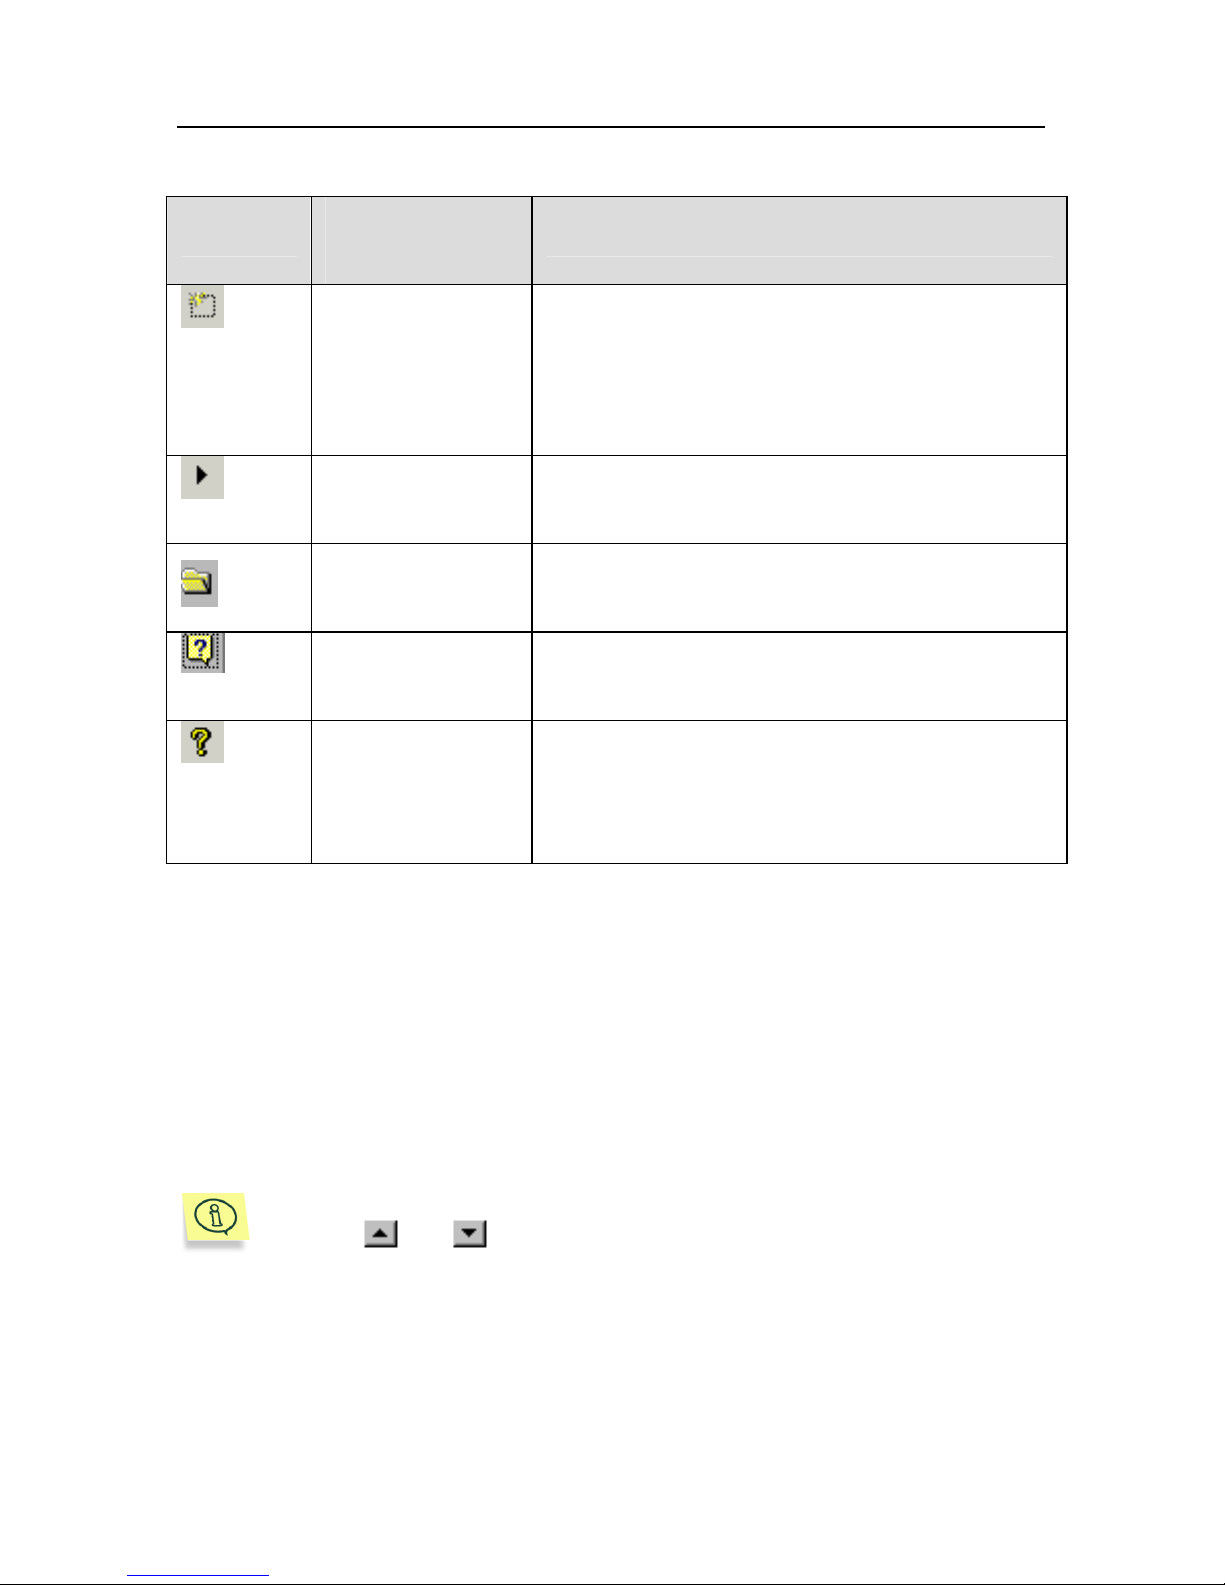
88 Kaspersky Anti-Virus 4.5 for MS Exchange Server
Table 9. Components tab toolbar
Button Context menu
option
Description
New task Creates a new task based on the selected
component. If you click on this button or select
this menu entry, the New task window will
open (see subchapter 4.3 on page 97 for
details)
Run Launches a task based on the selected
component
Open component
folder
Shows the component folder in a standard
window.
Component help Launches the help system for the selected
component
About Displays information about the product version,
date of the last anti-virus database update, etc.
If you click this button or select this menu entry,
the About window will open.
4.2.3.
Settings
Tab
The Settings tab (see Figure 71) allows a user to define Kaspersky AV Control
Centre settings. The settings are divided into four categories. Each category
combines settings with well-defined functionality.
The list of categories (icons) is located in the left pane of the window. When you
select a category, the appropriate tree chart appears in the left pane (see
Chapter 7 on page 122 for details).
If the window size is insufficient to display all the categories, you can
use the
and buttons to scroll the category list.
Page 89
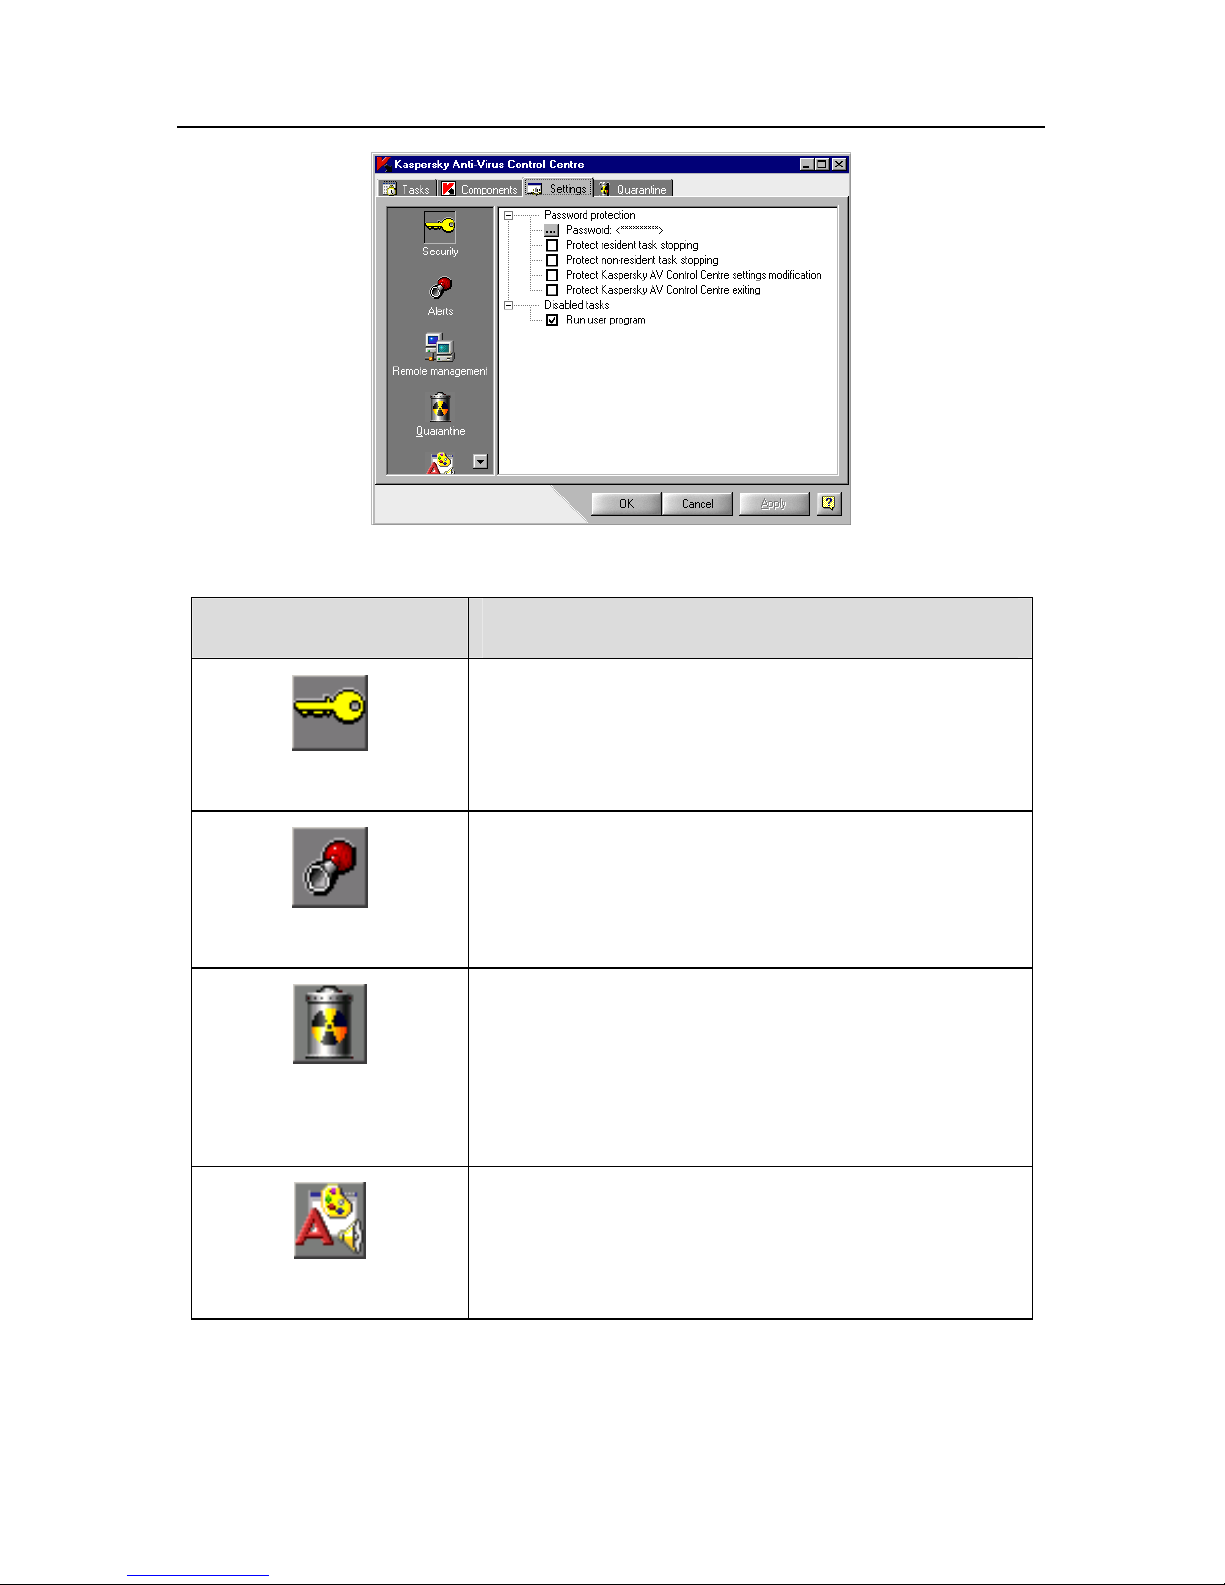
Kaspersky Anti-Virus® Control Centre 89
Figure 71. The Settings tab
Icon Function
Security
This category contains the parameters
responsible for ensuring system safety and
limiting access to Kaspersky AV Control Centre
components.
Alerts
This category contains the parameters
responsible for processing the alerts on critical
events in Kaspersky AV Control Centre task
performance.
Quarantine
As this category contains Kaspersky Anti-Virus®
Personal, Kaspersky Anti-Virus
®
for workstations
and servers quarantine settings it is not described
in this document. Kaspersky Anti-Virus® 4.5 for
MS Exchange Server uses its own quarantine
tools (see subchapter 3.4.5 on page 58).
Customize
This category contains user-defined interface
settings for Kaspersky AV Control Centre.
Page 90
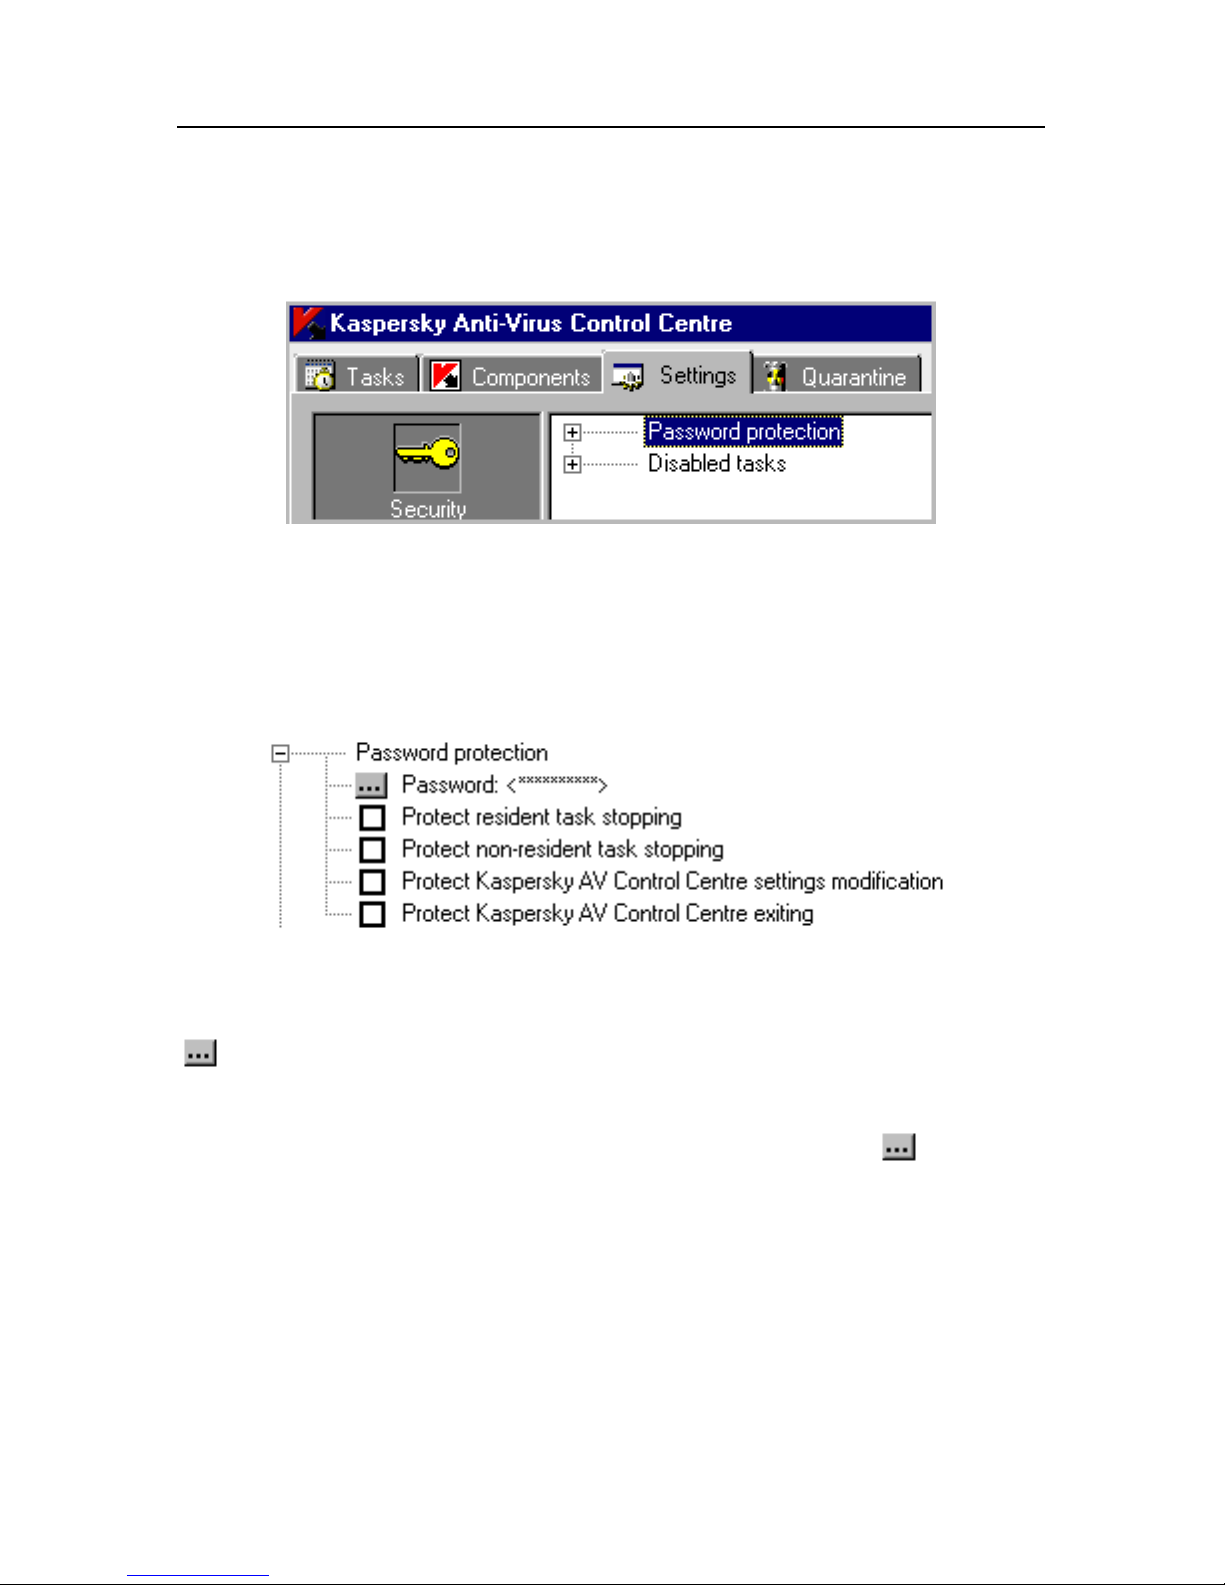
90 Kaspersky Anti-Virus 4.5 for MS Exchange Server
4.2.3.1.
Security
Category
This category (see Figure 72) is used to set up the system safety features. It is
responsible for password setup and access, and denial of some task types.
Figure 72. The Settings tab. The Security category.
Kaspersky AV Control Centre allows you to protect some running actions with a
password. In this way, user access to the specified commands is limited.
These features, as mentioned above, are regulated in the tree section for
Password protection (see Figure 73).
Figure 73. The Password protection section
This section contains the following options:
Password – enter an administration password for Kaspersky Anti-Virus®
using Kaspersky Anti-Virus
®
Control Centre. This password will prohibit
users from accessing some program functions (the list of corresponding
functions is located below in the tree chart). If you press the button, the
Change password dialog box will appear on your screen.
Page 91
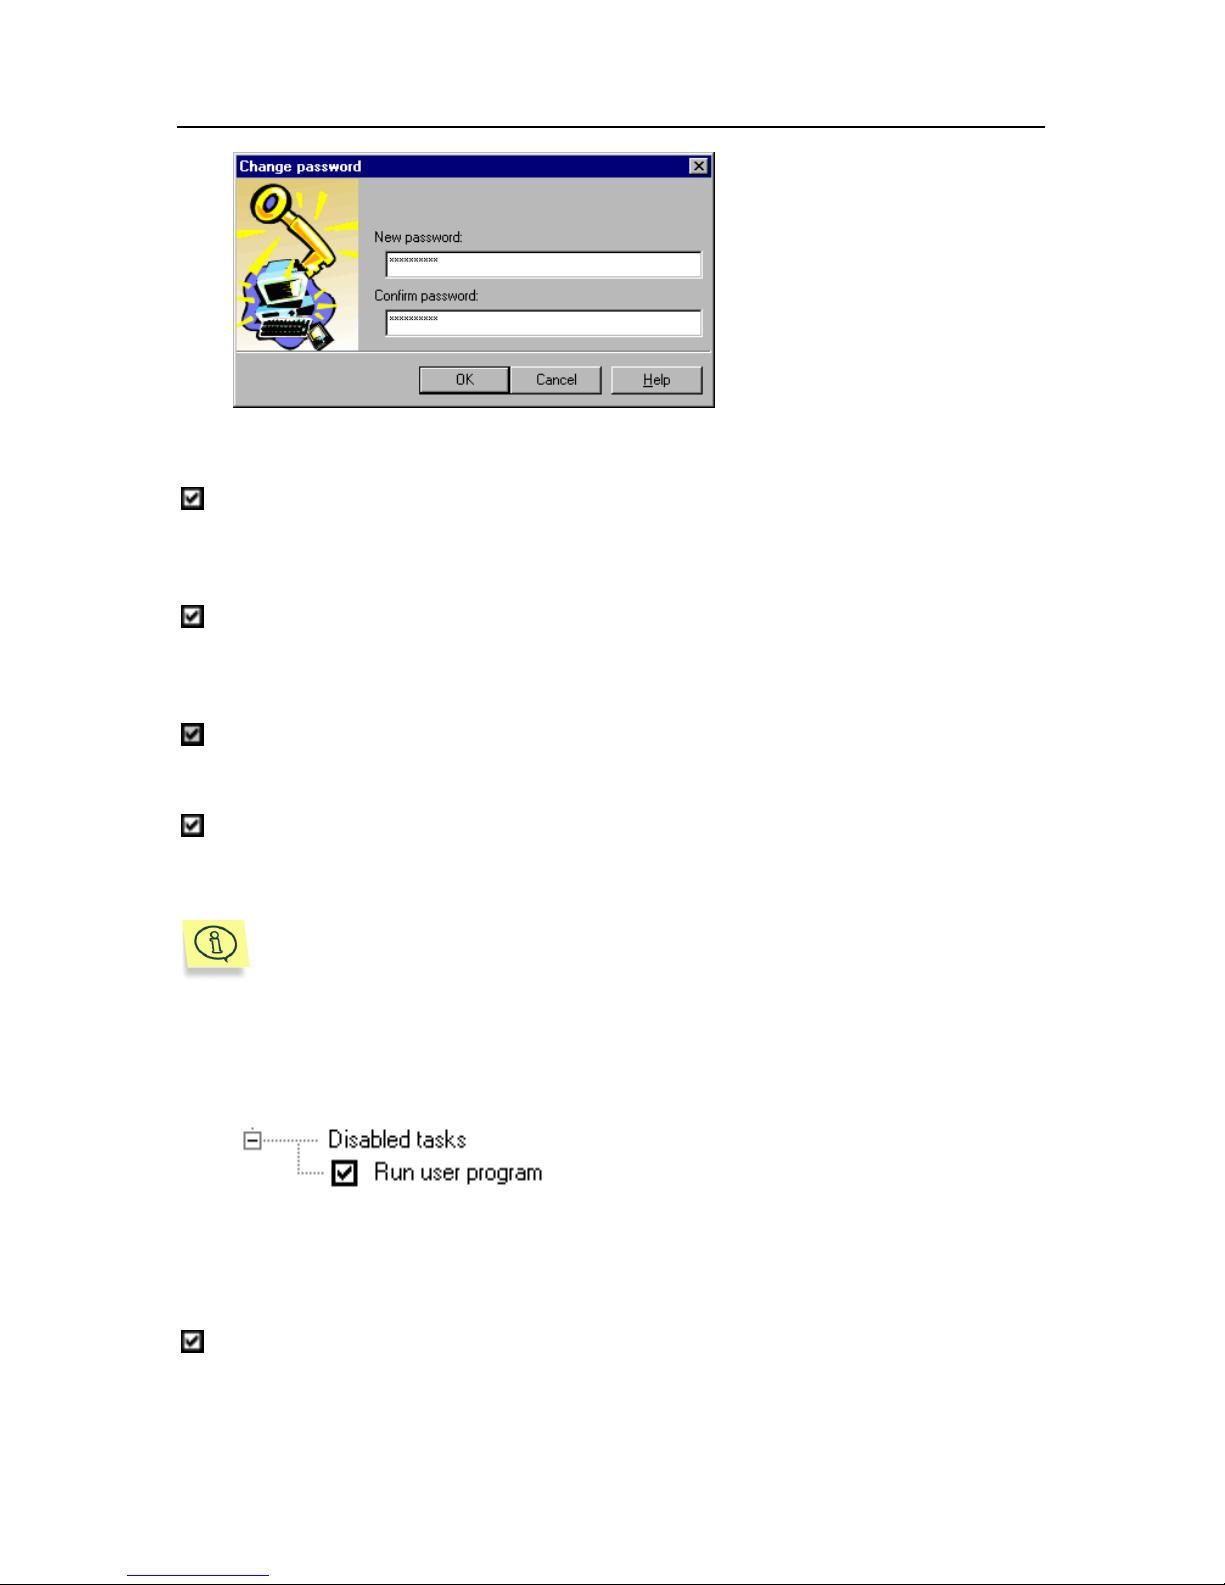
Kaspersky Anti-Virus® Control Centre 91
Figure 74. The Change password dialog box
This box (see Figure 74)
allows you to define and
change the password. Enter
your password in the New
password text field and
confirm it in the Confirm
password text field.
Protect resident task stopping – password setup for resident task
stopping. If you check this box, the program will prompt for the password
when somebody tries to stop resident tasks (for example, AV Monitor)
running on the computer.
Protect non-resident task stopping – password setup for non-resident
task stopping. If you check this box, the program will prompt for the
password when somebody tries to stop non-resident tasks (such as AntiVirus Scanner or Kaspersky AV Updater) running on the computer.
Protect Kaspersky AV Control Centre settings modification – password
setup for opening Kaspersky AV Control Centre window and changing
settings.
Protect Kaspersky AV Control Centre exiting – If you check this box, the
program will prompt for the password when somebody tries to unload
Kaspersky AV Control Centre from the memory.
When selecting a password-protected action, make sure to enter your
password in the Password text field!
In addition, this tab allows you to disable some task types that can be dangerous
if somebody tries to remotely administer the package without any authorization
(system crack).
Figure 75. The Disabled tasks branch
This feature can be enabled on the
Disabled tasks branch (see Figure
75).
This current version of the product has only one option availabsle:
Run user program – If you check this box, the user programs will be
prohibited from starting as Kaspersky AV Control Centre tasks.
Page 92
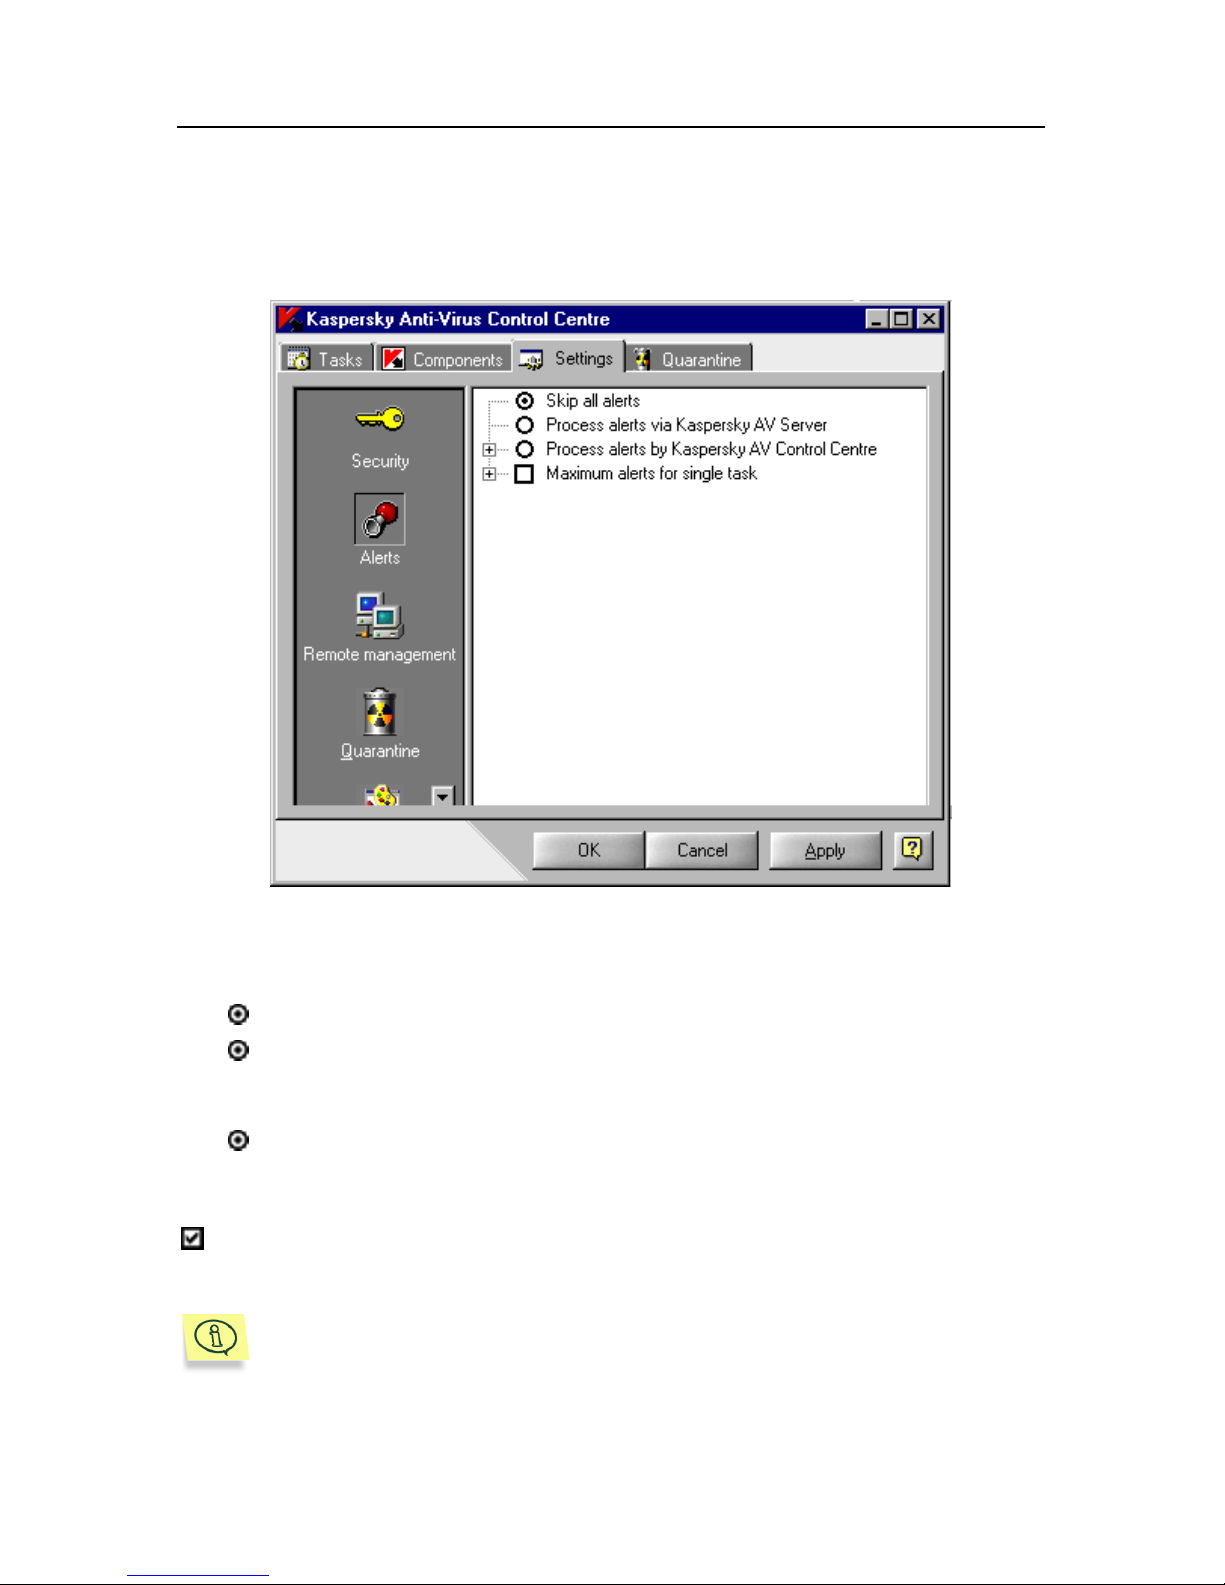
92 Kaspersky Anti-Virus 4.5 for MS Exchange Server
4.2.3.2.
Alerts
Category
The Alerts category (see Figure 76) allows you to remotely process alerts
generated by tasks currently running.
Figure 76. The Settings tab. The Alerts category
The tree chart contains the following options for alerts processing:
Skip all alerts – Disable alerts sending.
Process alerts via Kaspersky AV Server – Send alerts using
Kaspersky AV Server, a server component of Kaspersky Anti-Virus
®
remote management system.
Process alerts by Kaspersky AV Control Centre – send alerts using
Kaspersky AV Control Centre.
To limit the number of alerts to be generated by a single task, check the
Maximum alerts for single task box and specify the maximum value in the
corresponding field.
For example, Figure 77 illustrates a situation when the maximum
number of alerts is limited to 10. This means that when Kaspersky AV
Control Centre receives the eleventh alert from a task, the received
alert list will be automatically cleared.
Page 93
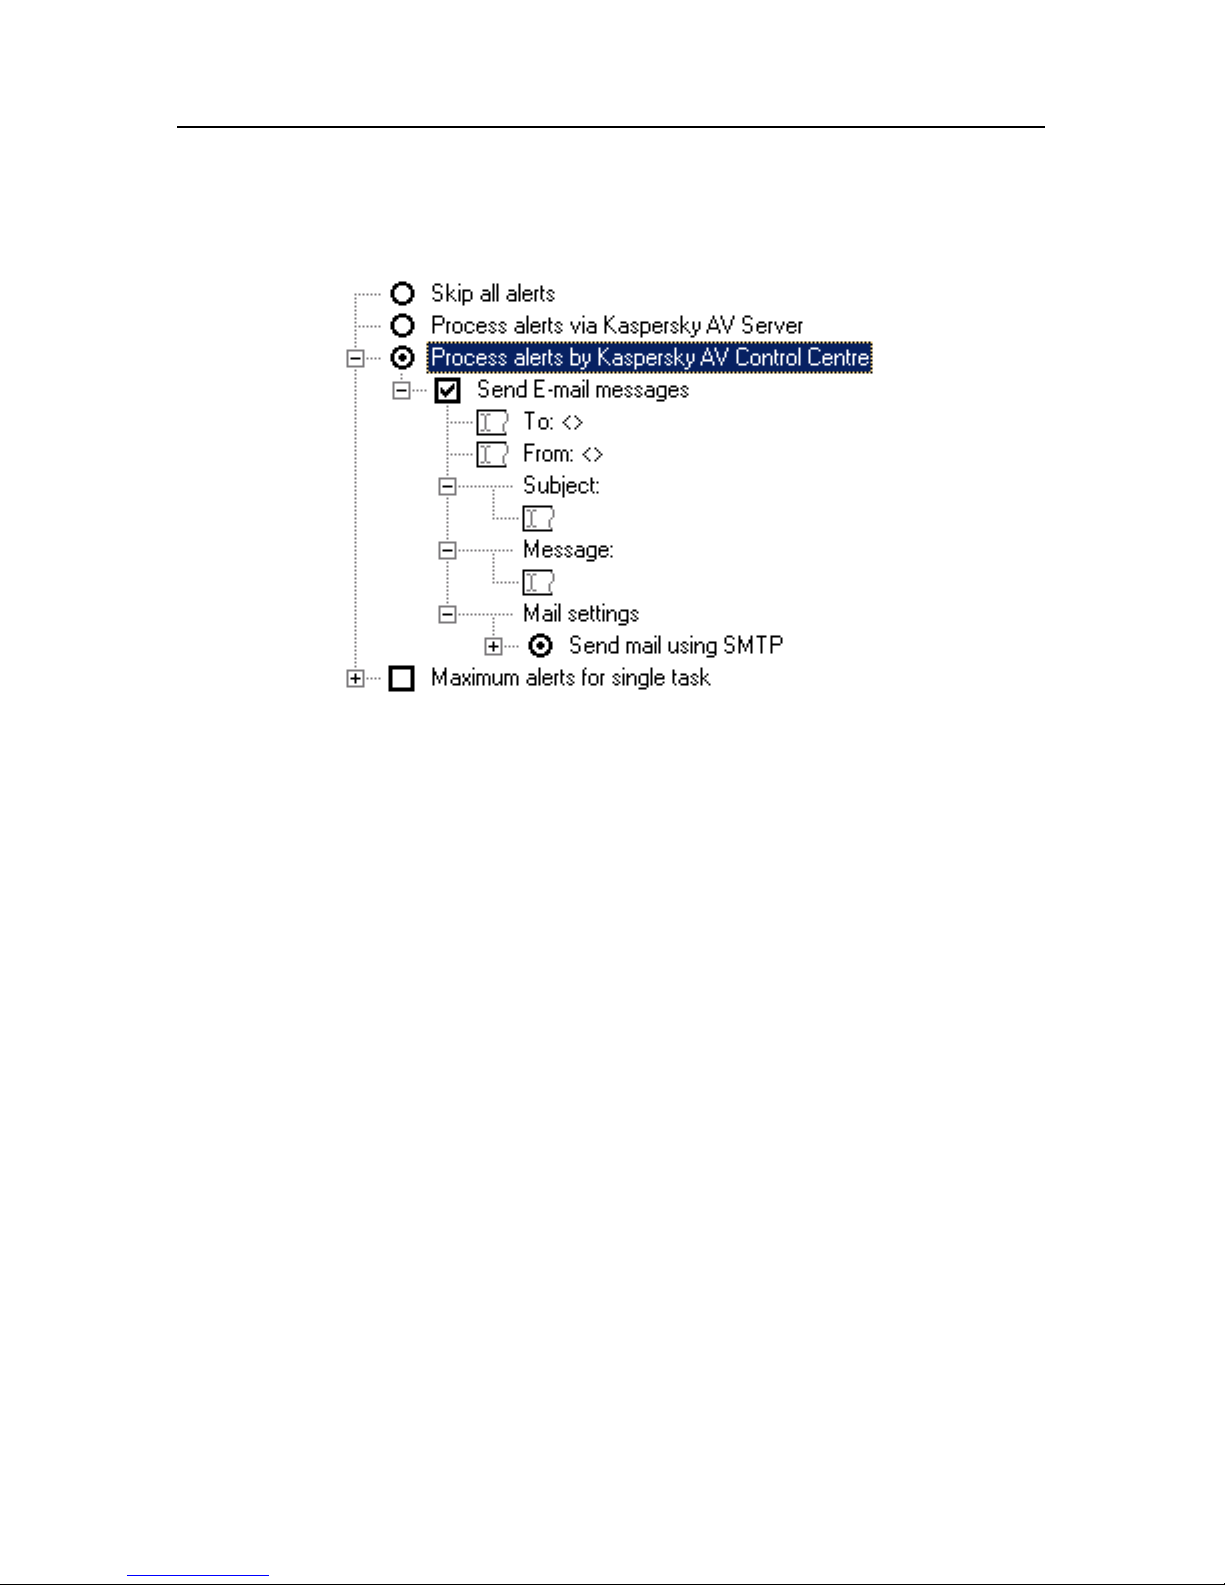
Kaspersky Anti-Virus® Control Centre 93
If the Process alerts by Kaspersky AV Control Centre option is selected, you
should customize the settings for sending alerts. To enable the program to send
alerts via e-mail check the Send E-mail messages box. Then define the
following settings:
Figure 77. Process alerts by Kaspersky AV Control Centre
To:
Type the recipient’s e-mail address in this line
From: Type the name or address to be displayed in the From
line of e-mail message. Any string can be entered as the
value of this line. This setting is required for working with
some SMTP servers and is used for user authentication
Subject:
E-mail message subject
Message:
The message text to be sent with the e-mail
Mail settings
Specify the e-mail system settings for alert sending
methods. There are two methods of sending:
• using SMTP;
• using MAPI (availabsle only for Windows 9x ОS
where Kaspersky Anti-Virus
®
4.5 for MS Exchange
Server is not installed).
Page 94
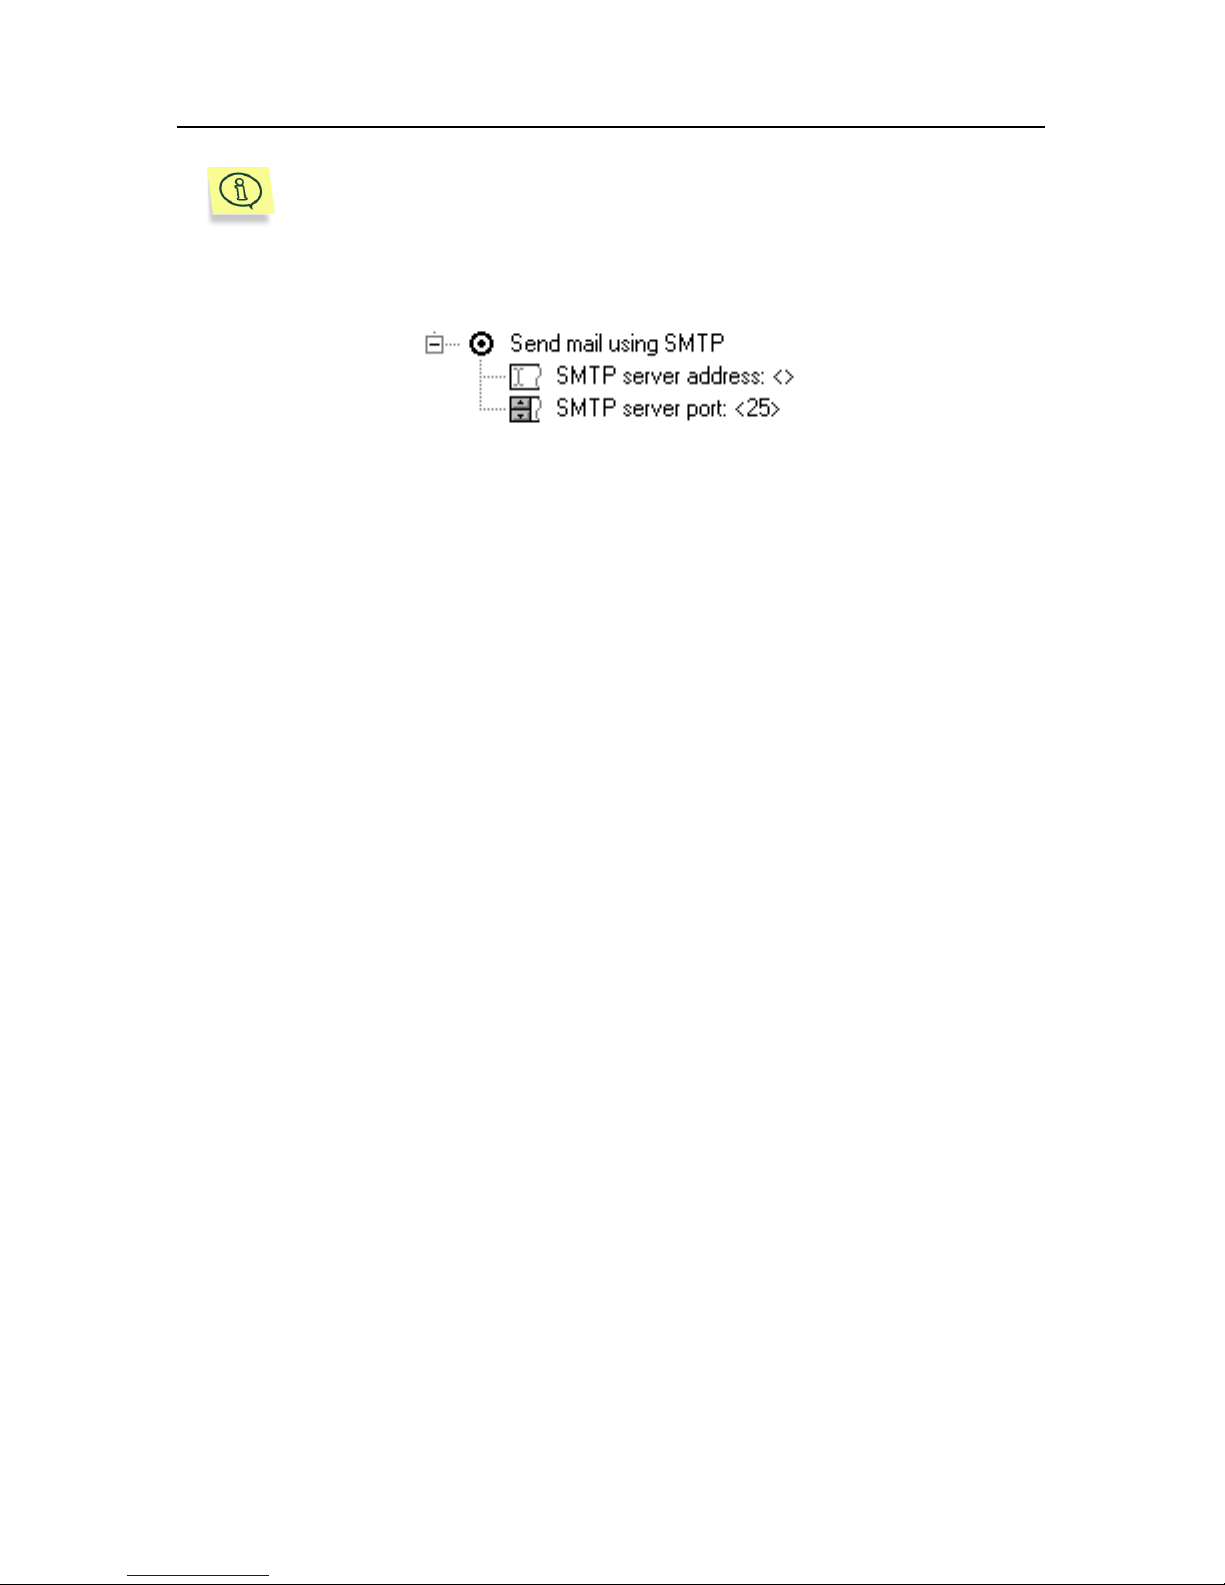
94 Kaspersky Anti-Virus 4.5 for MS Exchange Server
Contact your network system administrator for more information on
SMTP and MAPI.
To send alerts using SMTP, select the Send mail using SMTP option
(see Figure 78) and then select the following parameters:
Figure 78. SMTP settings
SMTP Server address
Contains SMTP server address that can be
entered as a decimal notation (e.g.
125.5.29.1), or as a full domain notation
(e.g. test.mail.ru), or a short notation (e.g.
test)
SMTP server port
Contains SMTP server port address. The
default value is 25.
Let’s study an example of Alerts tab settings usage. Suppose we need to set up
SMS-messages sending about critical network events to the mobile phone of a
system administrator via an e-mail gate.
Input data:
• administrator’s mobile phone number – 1234567 (direct number);
• telephone connection provider – for example Beeline GSM (i.e. the
access code to direct phone numbers is 7 901);
• SMTP server address – mysmtp.home.com;
• SMTP server port – 25.
Make sure that:
• the message has been sent from Control Centre;
• the message had the Alert subject;
• the message body contained the following text: Attention! A critical
event has taken place!
Page 95
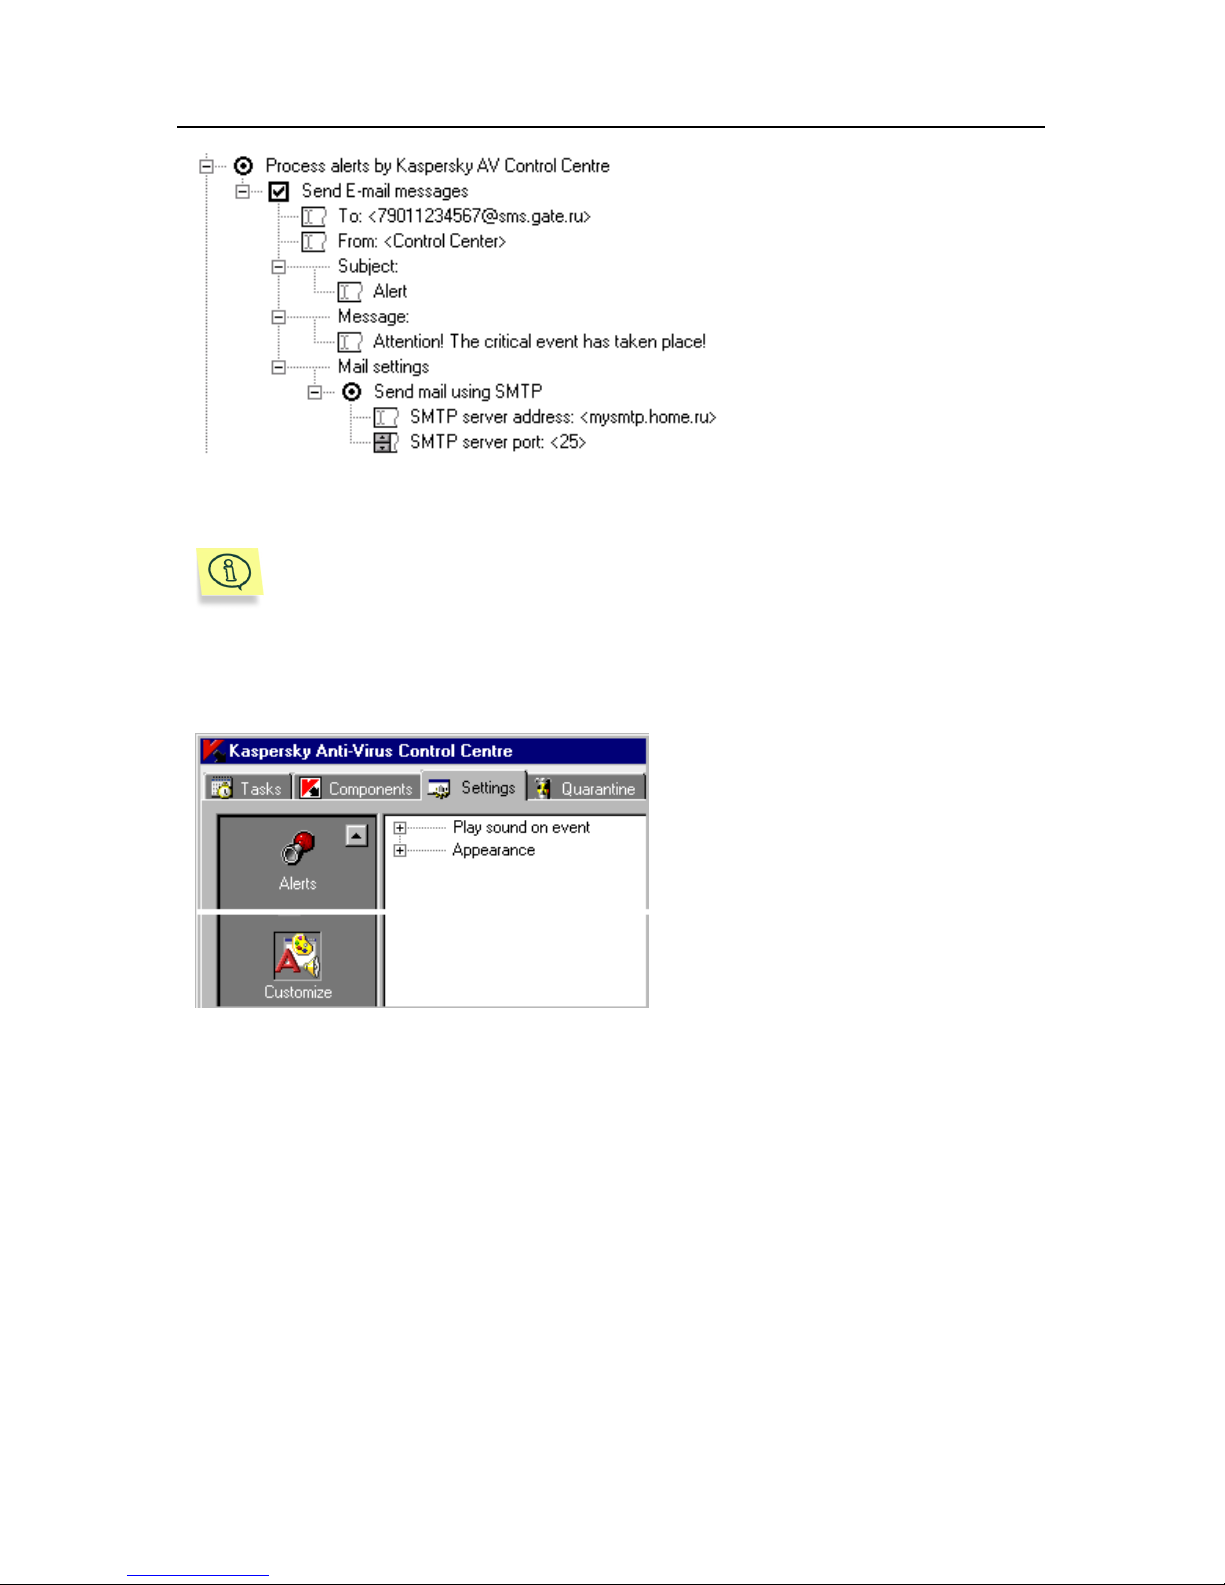
Kaspersky Anti-Virus® Control Centre 95
Figure 79. Settings for sending critical event SMS messages
To do this, define the
following settings
(see Figure 79).
The e-mail gate address, as well as the access code to the cellular
network provider, can vary depending on the region.
4.2.3.3. Customize Category
Figure 80. The Settings tab. The Customize
category
The Customize category
(see Figure 80) contains the
program interface settings. In
this category you can set up
sound effects following the
execution of specified
operations, as well as the color
mode of your program.
The Customize category includes two sections: Play sound on event and
Appearance. A short description of these appears below:
Play sound on event
Setting sound effects following the
execution (or completion) of specified
operations (see subchapter 4.2.3.3.1 on
page 96)
Appearance
Setup the color mode of your program (see
subchapter 4.2.3.3.2 on page 96).
Page 96
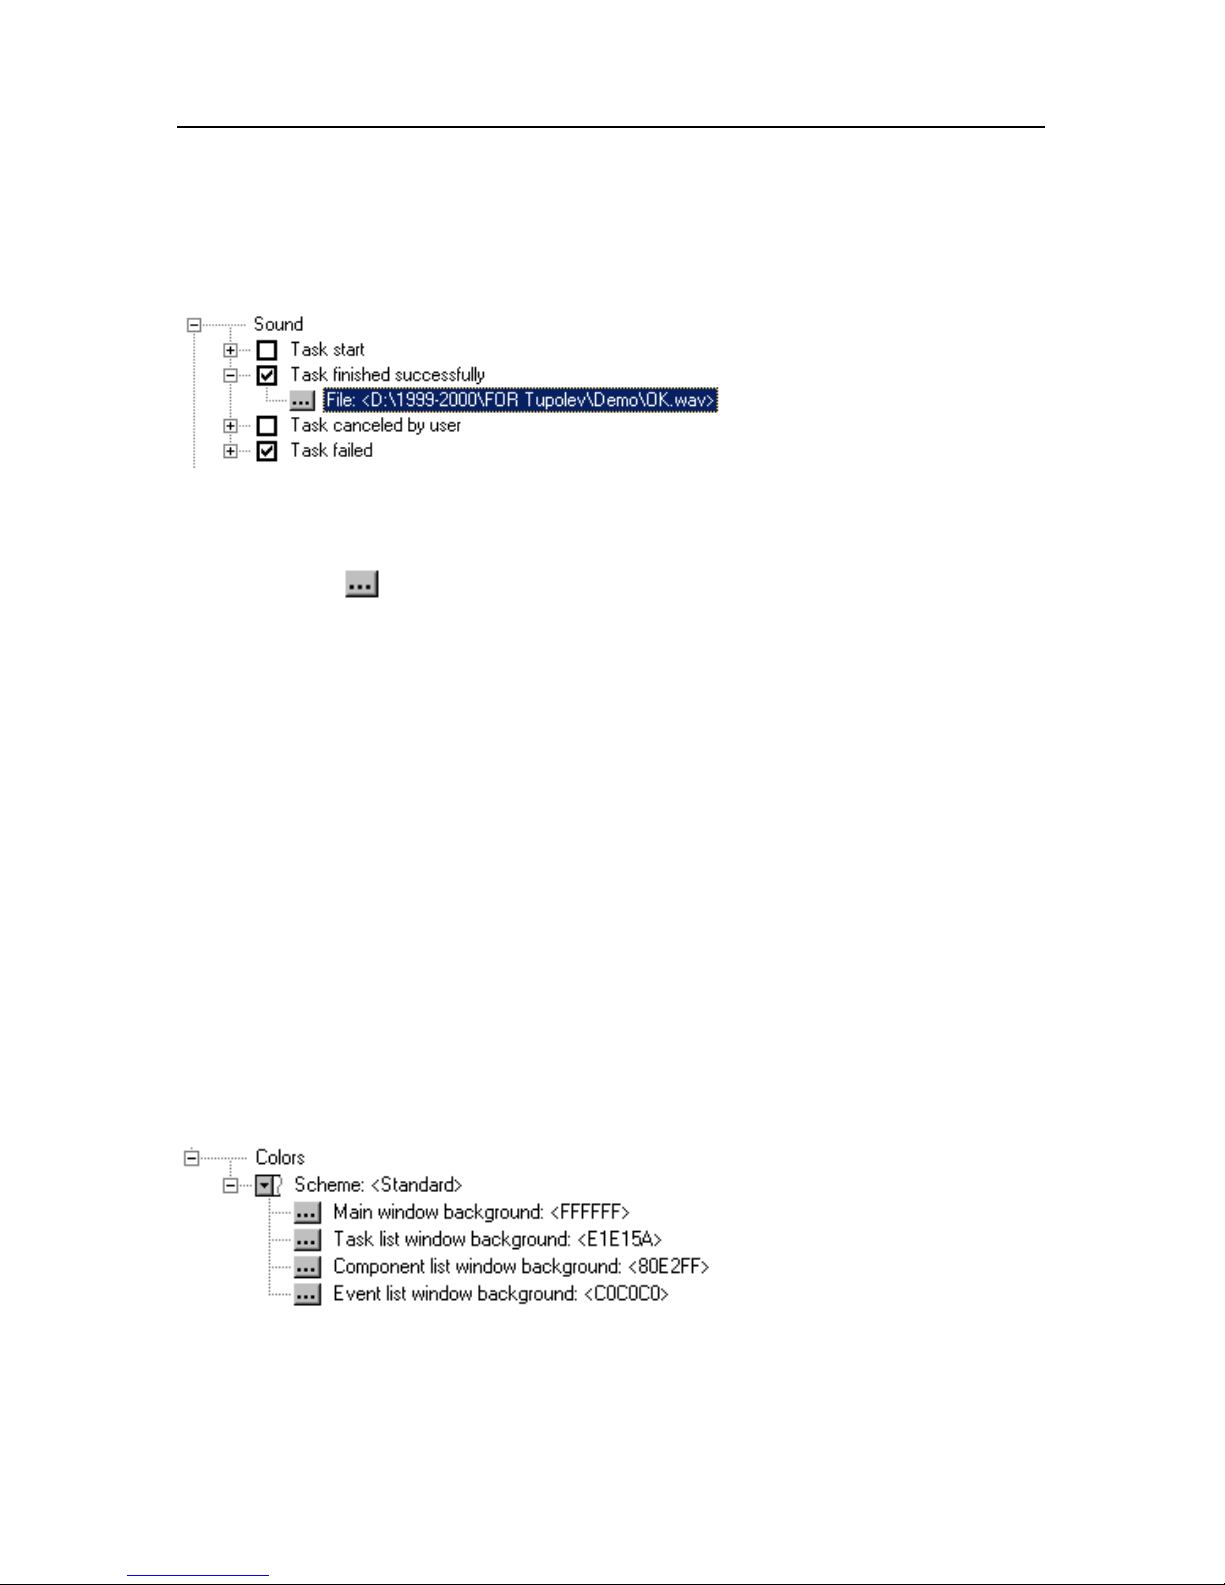
96 Kaspersky Anti-Virus 4.5 for MS Exchange Server
4.2.3.3.1. Sound Setup
Kaspersky AV Control Centre allows you to assign sound effects to specified
events. This gives your program some additional service features.
Figure 81. Sound setup
The sound setup, as
mentioned above, is
carried out on the Sound
branch (see Figure 81).
To enable the sound, check the appropriate check box and click the
corresponding
button to display the window from which you want to select
the audio file. This file should be saved in WAV format. Let’s explain each sound
purpose:
Task start
Play the sound immediately after the task launch
(regardless of its type)
Task finished
successfully
Play the sound at successful task completion, i.e.
if the task has not been canceled by the user or
terminated with errors
Task canceled by user
Play the sound if the task is cancelled by the user
Task failed
Play the sound at emergency task close-down
4.2.3.3.2. Color Setup
Kaspersky AV Control Centre allows you to change the interface color setting.
Figure 82. Colors setup
You can change the colors
of the interface elements in
the Colors setup
(see Figure 82).
Page 97
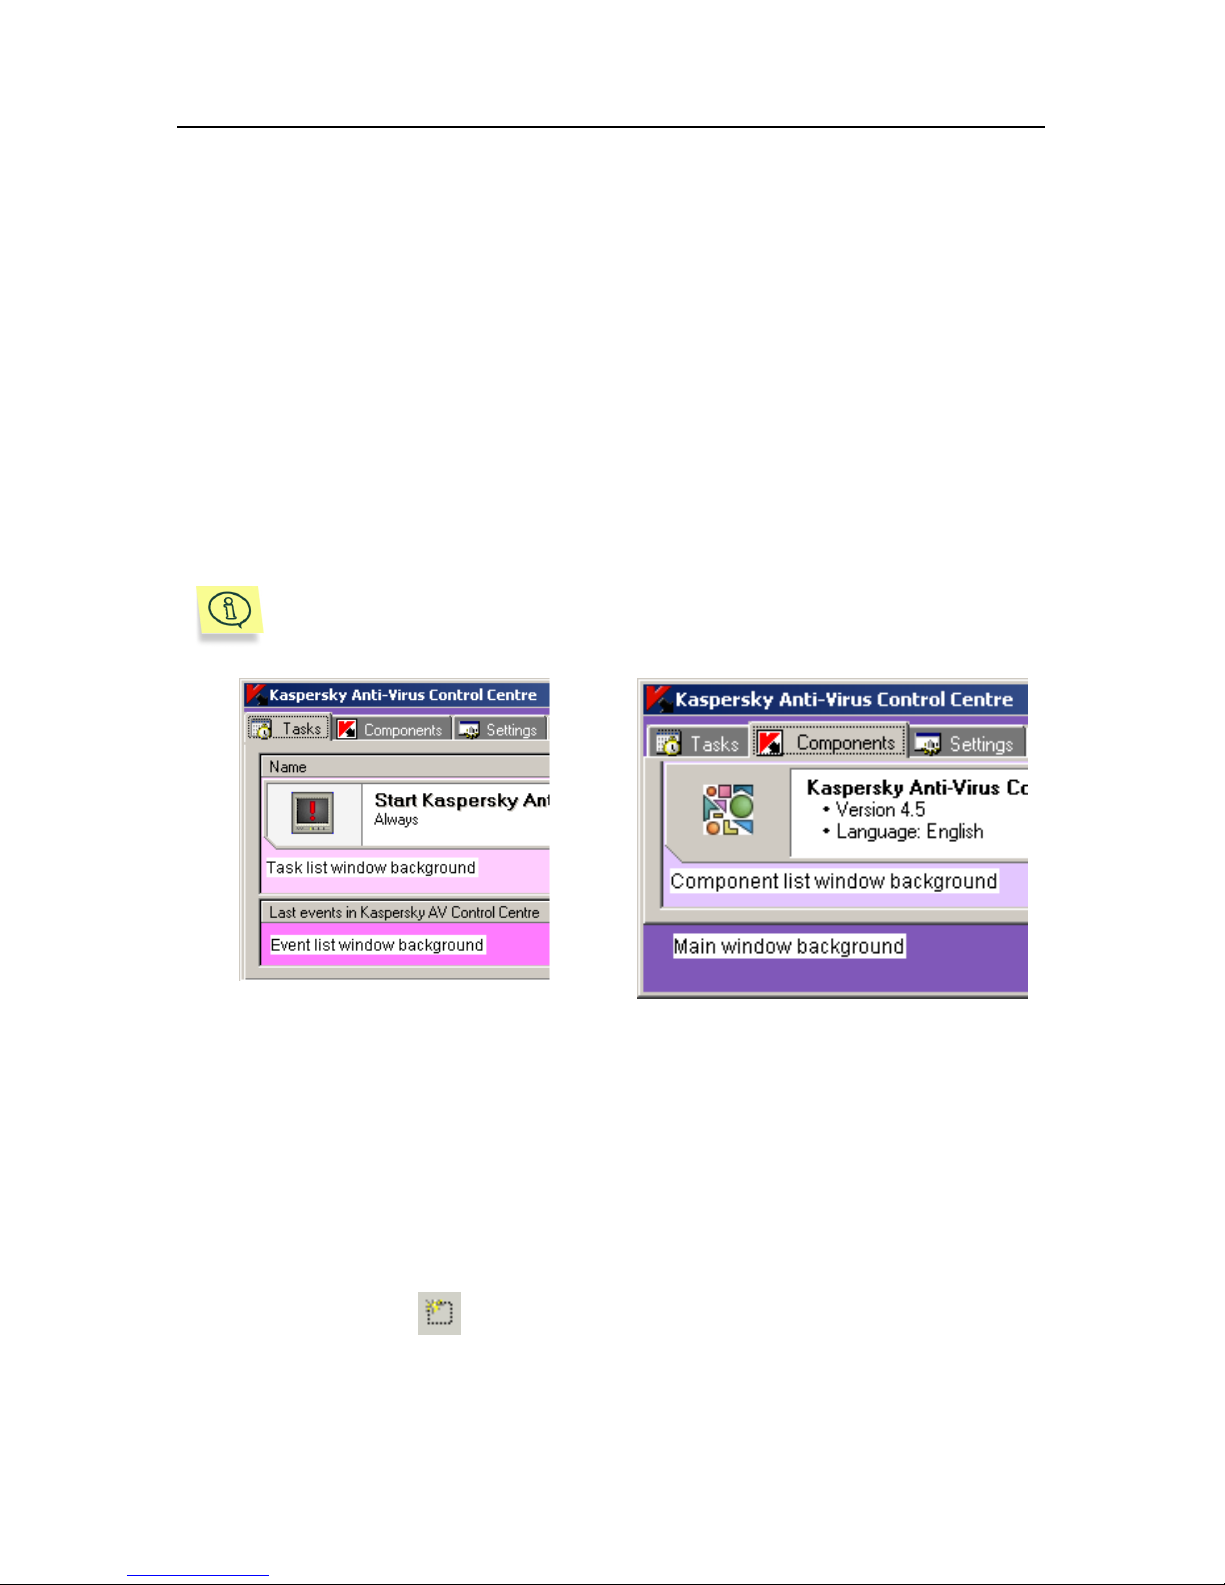
Kaspersky Anti-Virus® Control Centre 97
To make it easy for a user to set up the colors, the application provides a
selection of standard color schemes. To choose a color scheme, go to the
Scheme list. Each scheme is characterized by the following settings:
Main window background
The application main window background
color
Task list window background
The background color of the task list
window of the Tasks tab
Component list window
background
The Components tab background color
Event list window background The Tasks tab background color
In Figure 83 below, an example of the color scheme is shown and its
settings are given.
Figure 83. Color scheme settings
4.3. New Task Wizard
The scheduled execution of a specified application with predefined settings can
be defined as a separate task of the task planner.
The New Task Wizard is activated when you select New Task in the right-click
menu or click on the button in the taskbar on the Tasks or Components
tabs.
Page 98
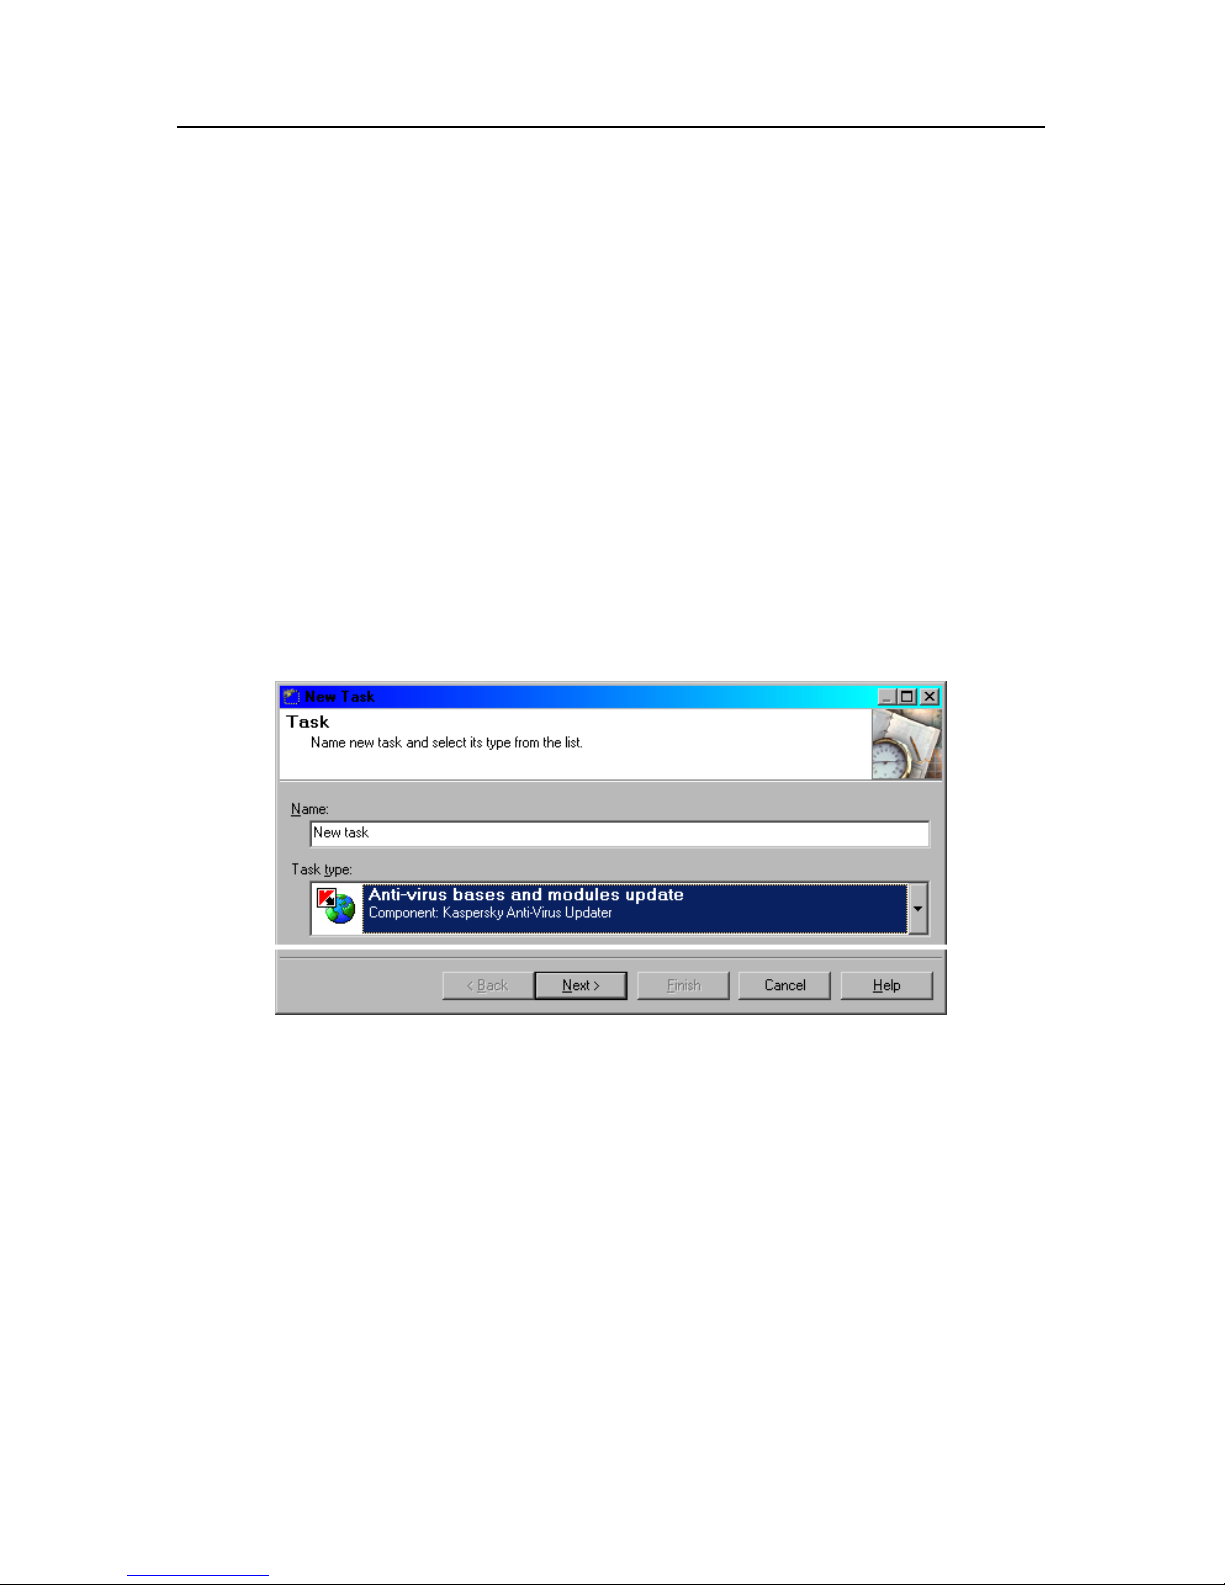
98 Kaspersky Anti-Virus 4.5 for MS Exchange Server
Creation of a new task in Kaspersky AV Control Centre is designed as a
Windows Wizard with a sequence of windows (steps), in each of which it is
required to execute a specified action.
Click Next (one step forward) and Back (one step backward) to switch between
the windows. To terminate the process, click the Finish button. To cancel the
new task creation, click Cancel. To get context-sensitive help, click Help.
4.3.1. Task Window
Depending on the task type, running applications, or settings features, all tasks
can be divided into two groups:
• tasks launching applications included in the Kaspersky Anti-Virus
®
package.
• other tasks.
Enter the task name and type in the Task window (see Figure 84).
Figure 84. The Task window
The following task types exist:
• Updating anti-virus databases and modules – automated update of the
database with information on new viruses. You can update from the
Internet as well as from a LAN, thus reducing connection expenditure,
speeding up the updating process, and making it easy to administer your
package.
• Run user program – any application that can be launched from
Kaspersky AV Control Centre.
• New product installation – Windows Application Setup Wizard start-up.
Page 99
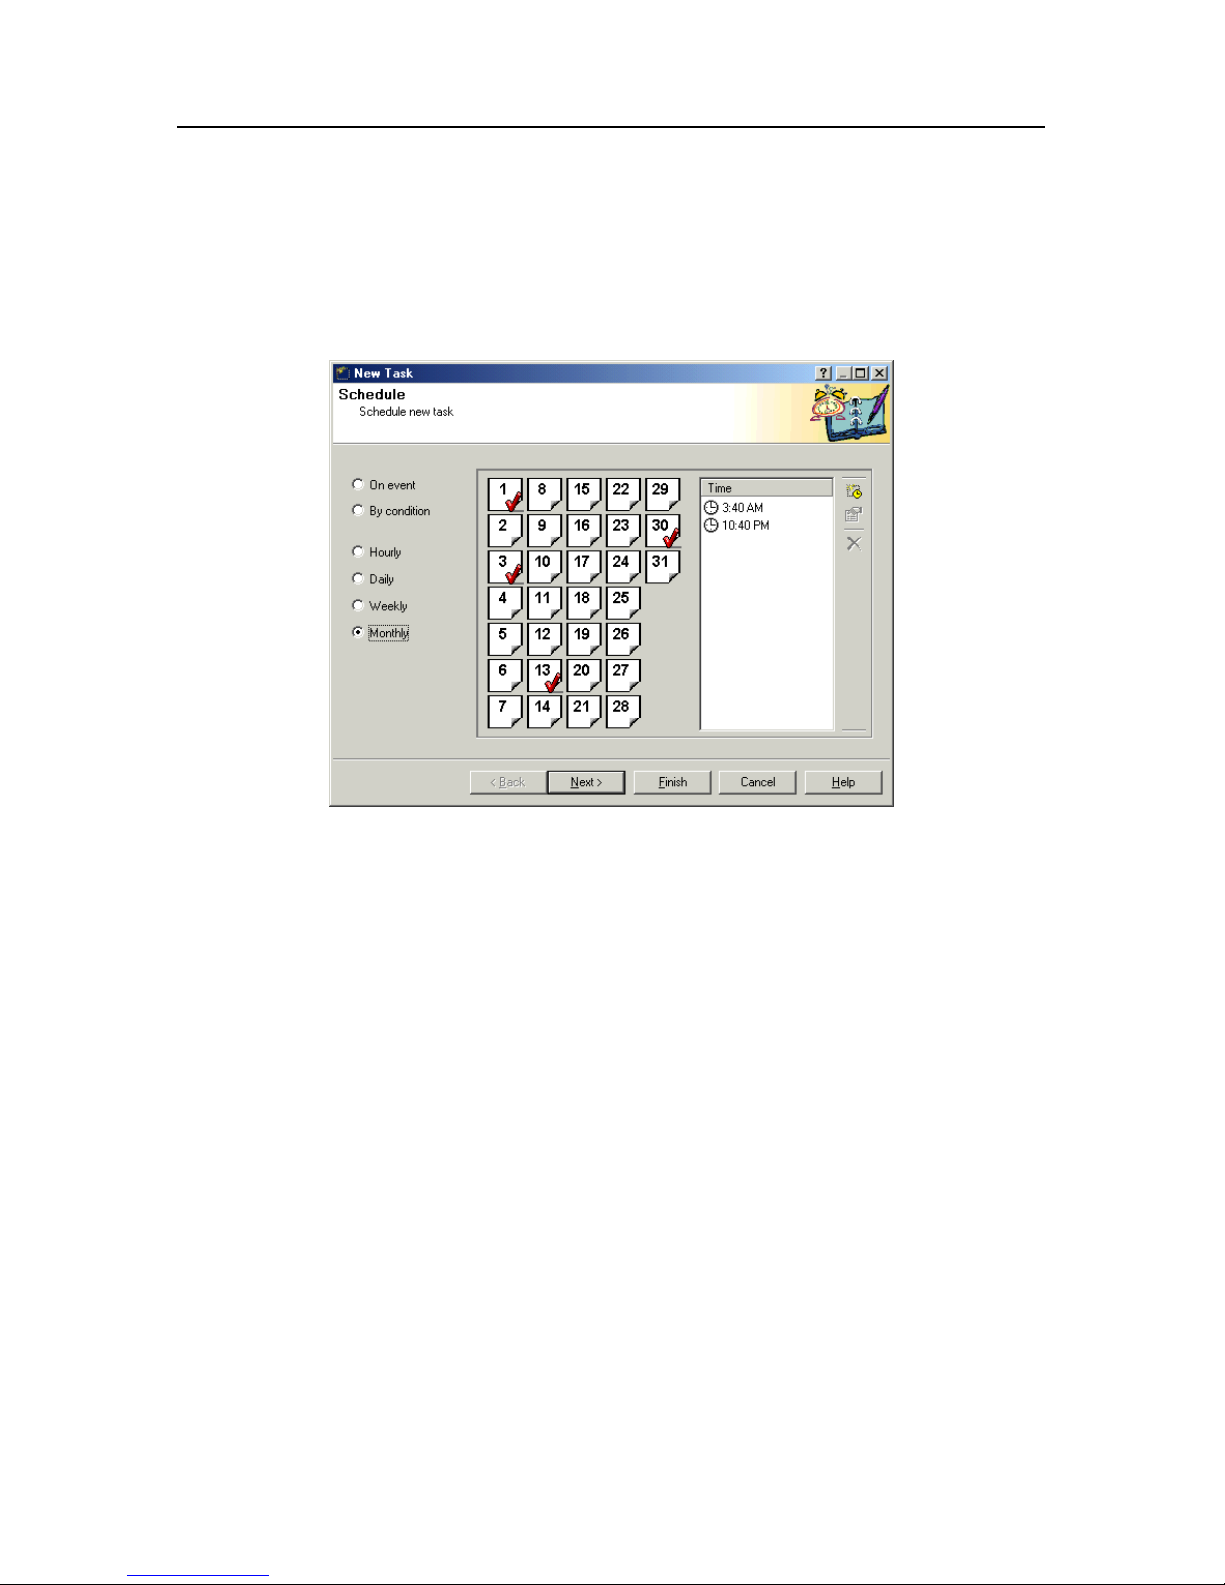
Kaspersky Anti-Virus® Control Centre 99
4.3.2.
Schedule
Window for Kaspersky AV
Updater Task
When creating a Kaspersky Anti-Virus® task in the Schedule window, you should
set the conditions and frequency of the launch (see Figure 85).
Figure 85. Schedule window for Kaspersky AV Updater task
The following launch options exist:
On event
The task launches on an event or by user command
(see subchapter 4.3.2.1 on page 100).
By condition
The task launches at the occurrence of a certain task
type close-down condition (see subchapter 4.3.2.2 on
page 101)
Hourly
The task launches at a scheduled time with an hourly
interval (see subchapter 4.3.2.3 on page 102).
Daily
The task launches every day at a scheduled time (see
subchapter 4.3.2.4 on page 102).
Weekly
The task launches weekly on a scheduled day and time
(see subchapter 4.3.2.5 on page 103).
Page 100
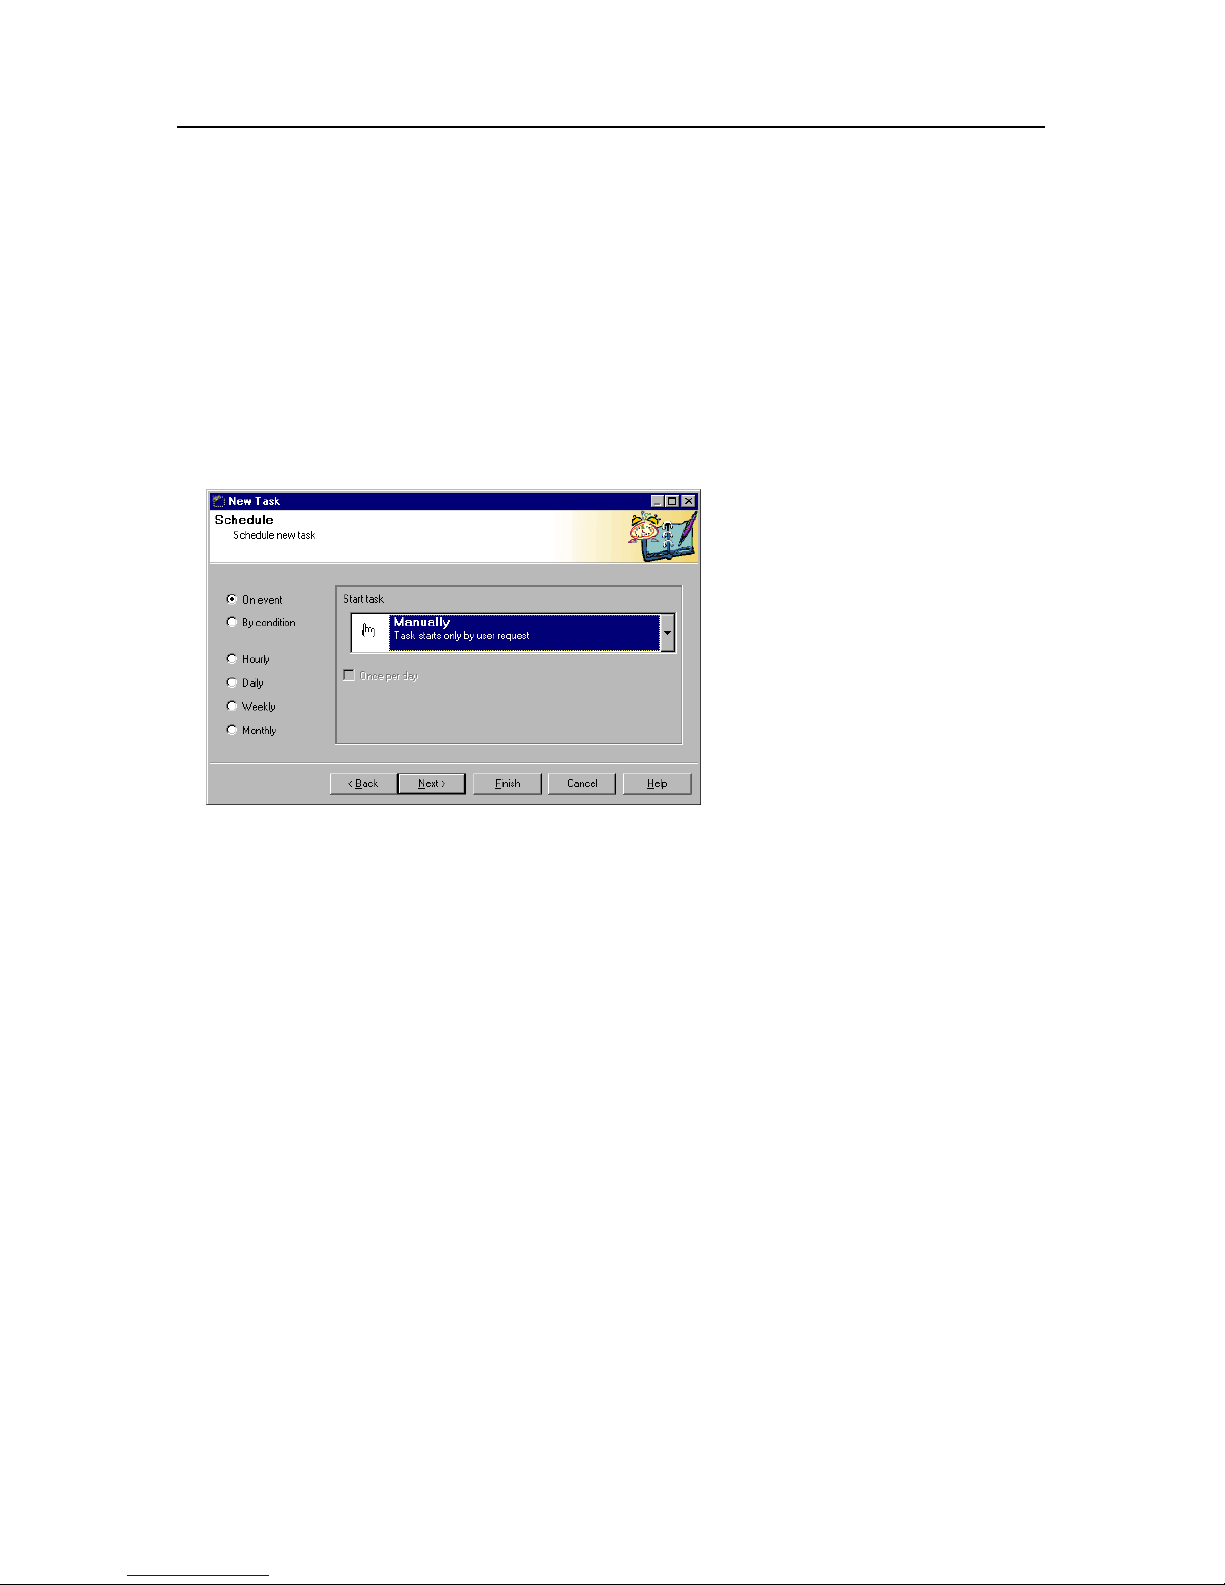
100 Kaspersky Anti-Virus 4.5 for MS Exchange Server
Monthly
The task launches on scheduled days and times (see
subchapter 4.3.2.6 on page 104).
Select the required start option in the left pane of the window, then set up the
schedule according to details described in the subchapters below.
4.3.2.1. Launching on Event
Kaspersky AV Control Centre allows you to set the task launch on the
occurrence of certain system events, or by user command.
Figure 86. Launching on event
To select this launch option,
check On event, then in the
right part of the Schedule
window you will see the
condition list (see Figure 86).
Select the launch condition from the list. There are several options availabsle:
Manually
The task is launched manually from
Kaspersky AV Control Centre by user
command.
At Kaspersky AV Control
Center start
The task is launched at Kaspersky AV
Control Centre start, i.e. when the user logs
in.
At screensaver start
The task is launched at the application
(screensaver) start-up.
At Kaspersky AV Control
Center system service start
The task is launched at Kaspersky AV
Control Centre System Service start-up, i.e.
at system boot.
You can schedule any of your task types to be launched once a day or on each
occurrence of the event.
 Loading...