

Page 1

KASPERSKY LAB
Kaspersky® Anti-Spam 3.0
ADMINISTRATOR'S
GUIDE
Page 2

KASPERSKY® ANTI-SPAM 3.0
Administrator's Guide
© Kaspersky Lab
http://www.kaspersky.com
Revision date: May 2007
Page 3

Contents
CHAPTER 1. KASPERSKY ANTI-SPAM 3.0................................................................. 6
1.1. What's new in version 3.0 ..................................................................................... 7
1.2. Licensing policy ..................................................................................................... 9
1.3. Hardware and software requirements .................................................................. 9
1.4. Distribution kit ...................................................................................................... 10
1.5. Help desk for registered users ............................................................................ 11
CHAPTER 2. ARCHITECTURE OF KASPERSKY ANTI-SPAM AND
PRINCIPLES OF SPAM FILTERING........................................................................ 12
2.1. Product structure ................................................................................................. 12
2.2. Recognition technology....................................................................................... 16
2.2.1. Analysis of formal signs................................................................................ 16
2.2.2. Content filtration............................................................................................ 17
2.2.3. Checks using external services.................................................................... 18
2.2.4. Urgent Detection System ............................................................................. 18
2.3. Recognition results and actions over messages................................................ 19
2.4. Content filtration databases................................................................................. 20
2.5. Filtration policies .................................................................................................. 21
2.6. Control Center ..................................................................................................... 21
2.7. Monitoring ............................................................................................................ 22
CHAPTER 3. INSTALLING KASPERSKY ANTI-SPAM.............................................. 23
3.1. Preparing for installation...................................................................................... 23
3.2. Installing Kaspersky Anti-Spam distribution package ........................................ 24
3.3. Configuring access to the Control Center........................................................... 25
3.4. Installing the license key...................................................................................... 26
3.5. Integrating Kaspersky Anti-Spam with your mail server ................................... 27
3.6. Configuring updates of content filtration databases and UDS use.................... 29
CHAPTER 4. MANAGING THE SPAM FILTRATION SERVER................................. 30
4.1. Starting and managing Kaspersky Anti-Spam components.............................. 30
4.2. Kaspersky Anti-Spam Control Center................................................................. 31
Page 4

4 Kaspersky Anti-Spam 3.0
4.3. Filtration policy management .............................................................................. 32
4.3.1. General filtration policy ................................................................................. 33
4.3.1.1. The General section .............................................................................. 34
4.3.1.2. The DNS & SPF Checks section .......................................................... 36
4.3.1.3. The Headers Checks section ................................................................ 37
4.3.1.4. The Eastern Encodings section ............................................................ 39
4.3.1.5. The Obscene Content section............................................................... 39
4.3.2. Managing the white and black lists .............................................................. 40
4.3.3. Managing the lists of employed DNSBL services ....................................... 42
4.3.4. Managing the list of protected domains ....................................................... 44
4.3.5. Group management ..................................................................................... 45
4.3.6. Managing the group filtration policy ............................................................. 48
4.3.7. Actions over messages ................................................................................ 49
4.4. Updating the content filtration databases ........................................................... 51
4.4.1. Configuring the update parameters ............................................................. 51
4.4.2. Initiating an update........................................................................................ 54
4.5. Configuring the spam filtration server ................................................................. 55
4.5.1. Common filtration server parameters........................................................... 56
4.5.2. Parameters of the filtration master process................................................. 57
4.5.3. Parameters of the filtering processes .......................................................... 58
4.5.4. Spam recognition parameters...................................................................... 59
4.5.5. Client module settings ..................................................................................61
4.5.6. Notifications about rejected messages ........................................................ 62
4.6. Control Center settings........................................................................................ 63
4.7. Managing the license keys.................................................................................. 64
4.7.1. Viewing the license information.................................................................... 65
4.7.2. Installing a new license key.......................................................................... 66
4.7.3. License key removal..................................................................................... 67
4.8. Monitoring the filtration server activity................................................................. 67
4.8.1. General product status information.............................................................. 67
4.8.1.1. Detailed information about the Anti-Spam Engine ............................... 69
4.8.1.2. Detailed information about the updater module.................................... 70
4.8.1.3. Detailed information about the licensing module.................................. 71
4.8.2. Monitoring system messages and reports................................................... 72
4.9. Kaspersky Anti-Spam statistics........................................................................... 73
CHAPTER 5. UNISTALLING KASPERSKY ANTI-SPAM........................................... 76
Page 5

Contents 5
CHAPTER 6. FREQUENTLY ASKED QUESTIONS................................................... 78
APPENDIX A. ADDITIONAL INFORMATION ON KASPERSKY ANTI-SPAM.......... 82
A.1. Location of product files in the file system.......................................................... 82
A.2. Client modules for mail servers .......................................................................... 83
A.2.1. Interaction of client modules with the filtering server ................................... 83
A.2.2. Global settings of client modules.................................................................. 84
A.2.3. kas-milter – a client module for the Sendmail mail server........................... 85
A.2.4. kas-pipe – a client module for the Postfix and Exim mail servers............... 87
A.2.5. kas-exim – a client module for the Exim mail server ................................... 94
A.2.6. kas-qmail – client module for the Qmail mail server.................................... 96
A.2.7. kas-cgpro – a client module for the Communigate Pro mail server............ 97
A.3. Kaspersky Anti-Spam configuration files............................................................ 99
A.3.1. Main configuration file filter.conf .................................................................100
A.3.2. Configuration file kas-thttpd.conf ................................................................ 104
A.4. Kaspersky Anti-Spam utilities ........................................................................... 105
A.4.1. kas-htpasswd .............................................................................................. 105
A.4.2. kas-show-license ........................................................................................ 106
A.4.3. install-key..................................................................................................... 106
A.4.4. remove-key ................................................................................................. 107
A.4.5. kas-restart.................................................................................................... 108
A.4.6. mkprofiles .................................................................................................... 109
A.4.7. sfmonitoring................................................................................................. 110
A.4.8. sfupdates.....................................................................................................110
A.5. Special headers of the filtering module ............................................................ 112
A.6. Configuration using cron service ...................................................................... 115
APPENDIX B. HOW TO SEND SPAM MESSAGES TO SPAM ANALYSTS ..........118
APPENDIX C. KASPERSKY LAB............................................................................... 120
C.1. Other Kaspersky Lab Products ........................................................................ 121
C.2. Contact Us ........................................................................................................ 131
APPENDIX D. THIRD PARTY SOFTWARE.............................................................. 132
APPENDIX E. LICENSE AGREEMENT..................................................................... 148
Page 6
CHAPTER 1. KASPERSKY ANTI-
SPAM 3.0
Kaspersky® Anti-Spam 3.0 (hereinafter also referred to as Kaspersky AntiSpam or the product) is a software suite filtering e-mail in order to protect mail
system users from unsolicited mass mail (spam).
Kaspersky Anti-Spam uses administrator-defined rules to process received
messages accordingly. Namely, it delivers a message without modifications,
blocks it, generates a notification informing that a message could not be
received, adds or modifies message header and performs other actions specified
by the administrator.
The application checks every e-mail message for the presence of signs typical
for unwanted mass mail (spam).
First, it checks various message parameters: the sender's and recipient's
addresses (envelope), message size and its various headers (including From
and To). In addition, Kaspersky Anti-Spam runs the following checks as a part of
its analysis procedure:
• a check of message sender's address (e-mail and / or IP address) using
black and white lists;
• the presence of the sender's IP address in a DNS-based real time black
hole list (DNSBL);
DNSBL (DNS based black hole list) is a database that lists IP
addresses of mail servers used for uncontrolled mass mailing. Such
servers receive mail from anyone and deliver it further to arbitrary
recipients. Using of DNSBL will allow automatic blocking of mail receipt
from that mail server. Various services use different policies for
generation of such lists. Please examine carefully the policy of each
service before you start using it for mail filtration.
• availability of a DNS record for the sending server (reverse DNS lookup);
• a check of the sender's IP address for compliance with the list of
addresses allowed for a domain based on the Sender Policy Framework
(SPF);
• a check of addresses and links to sites in message text using the Spam
URL Realtime Blocklists (SURBL) service.
Page 7

Kaspersky Anti-Spam 3.0 7
Second, the application employs content filtration, i.e. it analyzes the actual
message contents (including the Subject header) and attached files
1
. The
product uses to that effect linguistic algorithms based on comparison with
sample messages and search for typical terms (words and word combinations).
Kaspersky Anti-Spam also scans attached images comparing them to the
signatures of known spam messages. Comparison results are also taken into
account when the application decides whether a message should be identified as
spam.
Messages with certain signs of unsolicited mail will be processed in accordance
with the defined filtration policy (see section 2.3 on page 19).
The administrator can configure the applicable filtration policy using the Control
Center interface (see section 2.6 on page 21).
1.1. What's new in version 3.0
Kaspersky Anti-Spam 3.0 preserves all advantages of the previous version
featuring also a number of improvements and additions:
1. New version of the Spamtest filtering engine.
The new filtering engine included into Kaspersky
Anti-Spam 3.0 offers the following benefits:
• Higher performance and stability.
• Low RAM requirements.
• Low volume of web traffic (updates to the content filtration
databases).
2. Improved filtration methods.
Practically all the spam detection methods employed in earlier versions
have been enhanced, including:
• Improved algorithms used for parsing of HTML objects in mail
messages (increasing the efficiency of detecting various
spammer tricks meant to circumvent filtration systems).
• Extended and improved subsystem that analyzes the headers of
mail messages.
1
The application scans attachments in plain text, HTML, Microsoft Word, and RTF
formats (see section 2.2.2 on page 17 for details).
Page 8

8 Kaspersky Anti-Spam 3.0
• Enhanced subsystem analyzing graphic attachments (GSG),
• Added support for the use of Sender Policy Framework (SPF)
and Spam URL Realtime Blocklists (SURBL) services.
• Included internal Urgent Detection System (UDS), which allows
the user to receive information about certain types of spam in
real time.
3. An absolutely new user interface.
Kaspersky Anti-Spam 3.0 uses Control Center, which allows you to
perform the following operations:
• Configure the product: filtering rules, actions over messages,
performance parameters, etc.
• Manage the licenses to use the product: install license keys, view
the information about the current license.
• Monitor product activity and view statistical data.
4. Convenient configuration of filtration-related settings.
Version 3.0 of the application uses the intuitively understandable Control
Center interface to customize the filtration policies. Its benefits include:
• Easy administration: convenient interface offers the minimum
toolset necessary for system administration while providing a lot
of ways to customize the system for a specific environment.
• Individual settings for user groups: certain scanning methods can
be enabled/disabled individually for every group; you can also
define the actions to be performed over e-mail messages.
5. Enhanced tools for integration of the product and customization of its
infrastructure:
• Redesigned and improved modules for interaction with such email servers as Sendmail and Communigate Pro.
• A new system has been designed for the delivery of updates to
the content filtration databases.
• All settings are combined into a single configuration file making it
easier to configure and administer the system.
Page 9
Kaspersky Anti-Spam 3.0 9
1.2. Licensing policy
The licensing policy for Kaspersky Anti-Spam 3.0 implies a system of product
use limitations based on the following criteria:
• Mail traffic volume.
• The number of protected mail accounts.
• The number of mail systems users.
The said limitations will only apply to the messages addressed to the senders
within protected domains. The list of protected domains receiving the traffic that
the product will filter can be customized in the Control Center (see section 4.3.4
on page 44). E-mail sent to recipients in domains that are not included into the
list will not be filtered.
Please specify the list of protected domains before you start using Kaspersky
Anti-Spam.
1.3. Hardware and software
requirements
Minimum system requirements for normal operation of Kaspersky Anti-Spam are
as follows:
• Intel Pentium III 500 MHz processor or higher.
• At least 512 МB of available RAM.
• One of the following operating systems:
• RedHat Linux 9.0.
• Fedora Core 3.
• RedHat Enterprise Linux Advanced Server 3.
• SuSe Linux Enterprise Server 9.0.
• SuSe Linux Professional 9.2.
• Mandrake Linux version 10.1.
• Debian GNU/Linux 3.1.
• FreeBSD 5.4.
Page 10
10 Kaspersky Anti-Spam 3.0
• FreeBSD 6.2.
• One of the following mail servers:
• Sendmail 8.13.5 with Milter API support.
• Postfix 2.2.2.
• Qmail 1.03.
• Exim 4.50.
• Communigate Pro 4.3.7.
• Installed bzip2 and which utilities.
• Perl interpreter.
1.4. Distribution kit
You can purchase Kaspersky Anti-Spam either from our dealers (retail box) or
online (for example, you may visit http://www.kaspersky.com
section).
The contents of the retail box package include:
• Sealed envelope with an installation CD, or set of floppy disks, containing
the application files.
• Administrator's Guide.
• License key written on a special floppy disk.
• License Agreement.
, and go to E-Store
Before you open the envelope with the CD (or a set of floppy disks) make sure
that you have carefully read the license agreement.
If you buy Kaspersky Anti-Spam online, you will download the application from
the Kaspersky Lab website. In this case, the distribution kit will include this
User's Guide along with the application. The license key will be emailed to you
upon the receipt of your payment.
The License Agreement is a legal contract between you and Kaspersky Lab that
describes the terms and conditions under which you may use the product that
you have purchased.
Please read the License Agreement carefully!
If you do not agree with the terms and conditions of the License Agreement,
return the retail box to the Kaspersky Anti-Spam dealer you purchased it from
Page 11
Kaspersky Anti-Spam 3.0 11
and the money you paid for the product will be refunded to you on the condition
that the envelope with the installation CD (or set of floppy disks) is still sealed.
By opening the sealed envelope with the installation CD (or set of floppy disks),
you confirm that you agree with all the terms and conditions of the License
Agreement.
1.5. Help desk for registered users
Kaspersky Lab offers all registered users an extensive service package enabling
them to use Kaspersky Anti-Spam more efficiently.
After purchasing a license you become a registered user and during the license
period you can enjoy the following services:
• Application module and anti-virus database updates.
• Support on issues related to the installation, configuration and use of the
application. You can use the services by selecting one of the following
methods:
• Make a phone call to contact the Technical Support service.
• Create and submit your request using the web site of the
Technical Support service at (http://www.kaspersky.com/
helpdesk) or your personal cabinet.
• Information about new Kaspersky Lab products. You can also subscribe
to the Kaspersky Lab newsletter, which provides information about new
computer viruses as they appear.
Kaspersky Lab does not provide support on issues related to the performance
and the use of operating systems or other technologies.
Page 12

CHAPTER 2. ARCHITECTURE OF
KASPERSKY ANTI-SPAM
AND PRINCIPLES OF SPAM
FILTERING
This section contains descriptions of the main product components and the
principles of filtering as well as the Control Center, the main tool for Kaspersky
Anti-Spam administration and configuration.
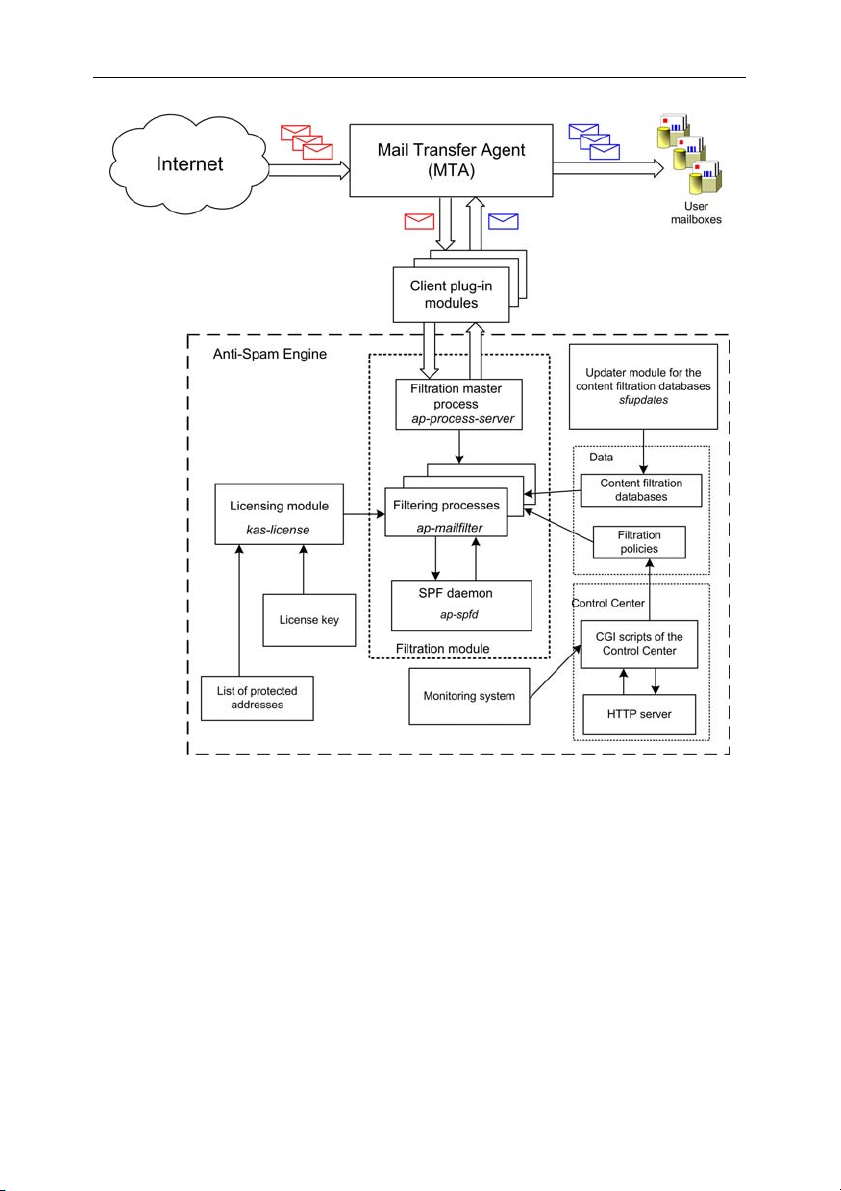
2.1. Product structure
Kaspersky Anti-Spam 3.0 is a spam recognition and filtering system functioning
as an integral part of an appropriate mail server. Kaspersky Anti-Spam 3.0 is not
a full-featured mail server able to receive mail, relay it or deliver e-mail to the
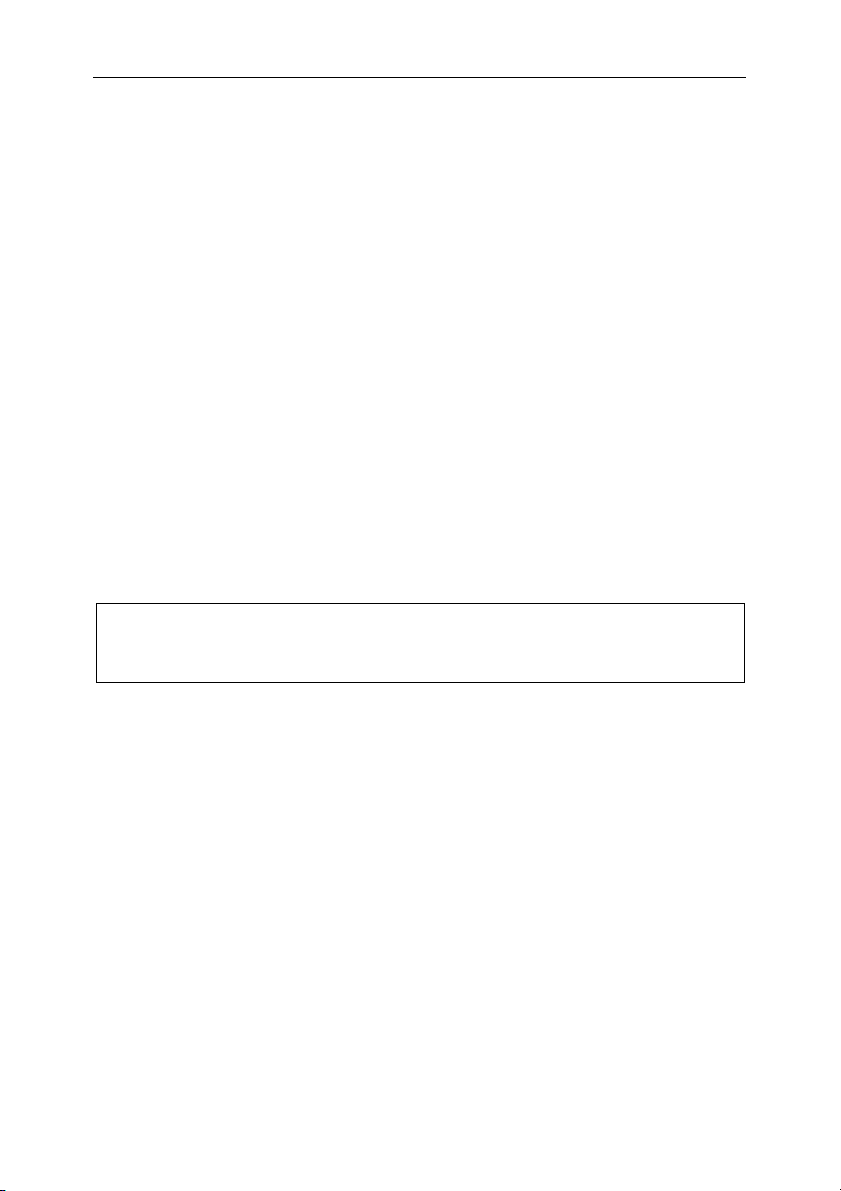
mailboxes of end recipients. The architecture of Kaspersky Anti-Spam is shown
in Fig. 1.
Kaspersky Anti-Spam consists of the following components:
• Client plug-in modules intended for product integration with mail server.
• Anti-Spam Engine – the filtration server component that analyzes e-mail
messages rating and processing them. Filtration server includes a
number of auxiliary modules, which provide for its functioning and
integration with mail servers:
• Filtration module – the module filtering spam.
• Licensing module – the module that manages product licenses
and the list of protected domains.
• Content filtration databases – a corpus of data that the filtration
server uses to rate messages; updates to the content filtration
databases are published on the servers of Kaspersky Lab every
20 minutes.
• Updater module for the content filtration databases – a system
that provides for automatic downloading of new content filtration
databases from updating servers and their installation for further
use by the anti-spam engine.
Page 13
Architecture of Kaspersky Anti-Spam and principles of spam filtering 13
Figure 1. The architecture of Kaspersky Anti-Spam
• Control Center – web-based interface that administrators can
use to configure the product, analyze its status and
functionality.
• Monitoring system – a system that tracks the status of
Kaspersky Anti-Spam and its individual components and
notifies system administrator about various problems in product
operation.
Client plug-in modules are designed for Kaspersky Anti-Spam integration with
various mail servers. Every client plug-in takes into account the peculiarities of a
specific mail server and the selected integration method.
Page 14

14 Kaspersky Anti-Spam 3.0
The distribution package of Kaspersky Anti-Spam includes client plug-ins for
Sendmail, Postfix, Exim, Qmail and Communigate Pro.
As a rule, a client plug-in must be installed as a filter providing for receipt of
messages to be analyzed from the mail server and for the subsequent return of
modified e-mail.
Client plug-in modules are started by their respective mail servers. The sole
exception is Sendmail, which does not launch a client plug-in. Mail server can
start several client plug-ins for parallel processing of several letters. Please refer
to Appendix A.2 on page 83 for details on client plug-in modules and the
methods of their integration.
Irrespectively of the individual peculiarities of client modules, each module
interacts with the filtration server via a network or a local socket using internal
data exchange protocol.
Anti-Spam Engine responds to the requests of clients accessing it, receives
from them messages for analysis and returns the results.
The standard installation procedure assumes that the mail server with an
integrated client plug-in and the filtration server are installed on the same
computer.
However, the anti-spam engine of Kaspersky Anti-Spam can also be installed to
a separate server. In that case client modules running on another computer
(server) will exchange data with the filtration server through local network using
TCP.
Anti-Spam Engine running on a dedicated computer can serve several mail
servers at once provided that the performance of the computer it uses is
sufficient to process all that e-mail traffic.
Anti-Spam Engine consists of the following components:
• filtration module that performs message analysis;
• licensing module, which checks the availability of a valid license key file
and compliance with the limitations specified in the purchased license;
• daemon processing SPF requests;
• script, which performs automatic downloads of content filtration databases
and compiles them;
• Control Center;
• Auxiliary programs and scripts.
Filtration master process (ap-process-server) is the main component of the
filtering module; it performs the following tasks:
Page 15

Architecture of Kaspersky Anti-Spam and principles of spam filtering 15
• monitoring of requests from client modules for connection to the filtering
process;
• initiation of new filtering processes when there are no available processes
left;
• monitoring the status of running processes;
• termination of child processes upon an appropriate signal (e.g., SIGHUP).
If traffic volume is considerable, the number of running filtration processes can
reach several dozens. When the mail server load becomes lower, idle filtering
processes will terminate. Maximum and minimum number of running filtration
processes are defined by the anti-spam engine settings (see Appendix A.3.1 on
page 100).
When the filtering process (ap-mailfilter) starts, it loads the existing filtration
policies and the content filtration databases. As soon as a connection to a client
module is established, the filtering process receives from the module message
headers and body, performs their analysis and returns the results to client
module.
If message sender has to be checked for compliance with the SPF policy, the
filtering process transmits a request to the SPF daemon (ap-spfd), which sends
necessary queries to a DNS server and returns the results to the filtering
process.
The application analyzes messages and applies to them rules defined in the
filtration policies only if there is a valid license key available.
All licensing checks are performed by the licensing module (kas-license) upon a
request from a filtration process.
Having finished processing a message, the filtering process does not terminate.
Instead, it keeps waiting for a new request. A filtering process terminates after it
processes the maximum number of messages specified for a single process (as
a rule, 300) or remains idle for a long time.
The script for automated downloading of updates (sfupdates) runs according
to its schedule (using the cron service) and provides for downloads of the latest
version of the content filtration databases from the update servers, it also builds
the current database version and installs it for further use by the filtration server.
Control Center is a web-based interface, which allows the administrator to
configure the product and spam filtration policies.
Monitoring system controls the status of Kaspersky Anti-Spam components
and notifies system administrator about problems occurring in the operation of
the filtration server and other product components.
Page 16

16 Kaspersky Anti-Spam 3.0
Kaspersky Anti-Spam 3.0 processes e-mail traffic using the following algorithm:
1. Client plug-in module integrates with an installed mail server.
2. Mail server transfers to the client module messages for analysis by the
filtration server.
3. Filtration server checks messages scanning them for signs of spam
and, depending upon the result, modifies them in accordance with the
existing rules.
4. Client plug-in module returns processed messages to the mail server for
delivery.
2.2. Recognition technology
Kaspersky Anti-Spam offers powerful tools for spam detection in e-mail traffic.
This section contains a brief overview of spam recognition technologies
implemented in the product.
2.2.1. Analysis of formal signs
The method uses a set of rules based on examination of certain message
headers and their comparison with sets of headers typical of spam messages. In
addition to header analysis, the application takes into account message
structure, size, presence of attachments and other similar signs.
The method also provides for analysis of data transmitted by the sender during
an SMTP session. In particular, the following information is estimated:
• IP address of the server that has sent the message, and whether it is
included into white or black lists of recipients;
• IP addresses of intermediate relay servers obtained from the Received
headers;
• e-mail address of message sender and recipients transmitted in SMTP
session commands;
• presence of the sender's and recipients' addresses in white or black lists;
• conformity of the addresses transmitted during SMTP session to the set
of addresses specified in message headers and a number of other
checks.
Page 17
Architecture of Kaspersky Anti-Spam and principles of spam filtering 17
2.2.2. Content filtration
Message analysis employs the algorithms of content filtering: the application
uses artificial intelligence technologies to analyze the actual message content
(including the Subject header), and its attachments (attached files) in the
following formats:
• plain text (ASCII, non-multibyte);
• HTML (2.0, 3.0, 3.2, 4.0, XHTML 1.0);
• Microsoft Word (versions 6.0, 95/97/2000/XP);
• RTF.
The purpose of spam filtering is to decrease the volume of unwanted
messages in the mailboxes of your users. It is impossible to guarantee
detection of all spam messages because too strict criteria would inevitably
cause filtering of some normal messages as well.
The application uses three main methods to detect messages with suspicious
content:
• Text comparison with semantic samples of various categories (based
on the search for key terms (words and word combinations) in message
body and their subsequent probabilistic analysis). The method provides
for heuristic search for typical phrases and expressions in text.
• Fuzzy comparison of a message being examined with a collection of
sample messages based on comparison of their signatures. The method
helps detect modified spam messages.
• Analysis of attached images.
All the data employed by Kaspersky Anti-Spam for content filtering: classification
index (a hierarchical list of categories), typical terms, etc. are stored in its content
filtration databases.
The group of spam analysts at Kaspersky Lab works nonstop to supplement
and improve the content filtration databases. Therefore, you are advised to
update the databases regularly (see section 4.4 on page 51).
You can also send to Kaspersky Lab samples of spam messages, which
Kaspersky Anti-Spam has failed to recognize as well as the samples of
messages erroneously classified as spam. The data will help us improve the
content filtration databases and react in a timely manner to new types of
spam. Please refer to Appendix B for details on forwarding sample
messages.
Page 18
18 Kaspersky Anti-Spam 3.0
2.2.3. Checks using external services
In addition to the analysis of message text and headers, Kaspersky Anti-Spam
allows a number of the following checks involving external network services:
• availability of a DNS record for message sender's IP (reverse DNS
lookup);
• the presence of the sender's IP address in a DNS-based real time black
hole list or lists (DNSBL);
• a check of the sender's address for compliance with SPF (Sender Policy
Framework) policy for the domain containing the server used to send the
message;
• a check of addresses and links to sites in message text for the presence
in the Spam URL Realtime Blocklists database – www.surbl.org
• recognition of e-mail messages using the UDS (Urgent Detection System)
technology.
All the checks listed above, except for UDS, are based on the use of the DNS
protocol and as a rule they require no additional network configuration.
.
2.2.4. Urgent Detection System
Urgent Detection System is an original technology of spam detection developed
and supported by Kaspersky Lab. It is based on the following principles:
• A message being analyzed is used to select a collection of properties,
which can be used to identify the message. The set of properties may
include header information, text fragments and other information about
the message being processed.
• Filtration server uses the properties thus collected to generate a small
UDS request and sends it to one of UDS servers of Kaspersky Lab.
Since the product does not transmit to external servers any data that
could allow viewing the recipients or the text of the processed mail, the
use of this method does not pose any risk to the safety or confidentiality
of your information.
• The UDS server checks the received request against a database of
known spam. If the request matches a known spam sample, a message
will be sent to the filtration server informing that the e-mail is very likely
to be spam. The information will be taken into account during
assignment of a certain status to e-mail.
Page 19
Architecture of Kaspersky Anti-Spam and principles of spam filtering 19
The UDS technology allows filtering of known spam before updates to
the content filtration databases become available.
A filtration server interacts with UDS servers of Kaspersky Lab via UDP using
port 7060 for communication. In order to use UDS, a filtration server must be
able to establish outgoing connections through that port.
Information about available UDS servers is added to the content filtration
databases. The choice of an individual UDS to be used for message analysis is
performed automatically on the basis of the response time of accessible UDS
servers.
2.3. Recognition results and actions
over messages
The analysis procedure results in assignment of one of the following statuses to
a message:
• Spam – message recognized as spam with a high degree of reliability.
• Probable Spam – message contains some spam signs; however, it
cannot be unambiguously identified as spam.
• Formal – message is formal. E.g., it is a mail server notification informing
about mail delivery or inability to deliver it or about message infection with
a virus. The category includes messages sent automatically by mail
clients. Such messages are usually not considered to be spam.
• Trusted – message received from trusted sources, for example, from
internal mail servers. The administrator must create a list of trusted
sources (a white list of senders). Trusted status is also assigned to
messages addressed to users whose mail the product does not scan in
accordance with the corresponding group policy settings.
• Blacklisted – message received from an address present in a black list.
The administrator must create the black list.
• Not detected – a message that has not been recognized as spam.
Each e-mail message can be assigned just one of the above statuses. The
application records the status assigned to a message after analysis to a special
X-Spamtest-Status-Extended header. Please refer to section A.5 on page 112
for details about the headers added to mail messages after filtering.
Page 20
20 Kaspersky Anti-Spam 3.0
After recognition, the application may perform one of the following actions over a
message:
• accept the message;
• relay the message or a copy thereof to another address;
• add a text mark in the message subject field;
• append a special header to the message;
• delete message;
• reject message.
System administrator can define which of the listed actions will be performed
over messages with a specific status.
Preservation of all useful mail must be the top priority for the system
administrator because the loss of a single important message may cause
more trouble for the end user than receipt of a dozen of spam messages. To
avoid the loss of necessary mail, you are advised to use only non-destructive
actions with mail identified after content analysis as spam or probable spam.
E.g., append to the Subject header labels, such as [!! SPAM].
2.4. Content filtration databases
The application recognizes spam messages using the records of its regularly
updated content filtration databases. These databases contain the sets of rules,
terms and message signatures used in the process of filtering.
Content filtration databases can be downloaded from the updating servers of
Kaspersky Lab using the updater module. During the procedure, the system
reduces the volume of downloaded data loading only those files, which have
changed.
Since new samples of spam messages appear every day, normal product
functioning requires regular updates to its content filtration databases.
Recommended updating frequency: every twenty minutes.
Be sure to update the content filtration databases immediately after product
setup on your computer!
Page 21

Architecture of Kaspersky Anti-Spam and principles of spam filtering 21
2.5. Filtration policies
Kaspersky Anti-Spam employs filtration policies to determine the methods
applicable for spam recognition, the actions to be performed over messages and
the black and white lists of senders.
The product uses a double-layered system of filtration policies, which consists of
a default general filtration policy and group filtration policies. The default filtration
policy contains settings common for all groups: methods applicable for spam
recognition, and the black and white lists of senders. Group policies, in addition
to the mentioned settings, also define the actions performed over messages
depending upon their status.
Before configuring group policies, the administrator must create groups
described by the lists of addresses of message recipients.
The product applies its policies in accordance with the following rule: general
filtration policy defines the default settings for all groups while group settings may
either inherit those values or redefine them. Thus, for instance, the product may
employ more sophisticated methods of spam recognition and stricter actions can
be specified for a group of users that requires more thorough filtration of
messages.
The combination of recognition settings is closely connected with the properties
of the content filtration databases; it can be extended and modified as new types
of spam and rules of their recognition appear. Together with the updates to the
content filtration databases, the appropriate settings will be added to the
interface provided by the Kaspersky Anti-Spam Control Center.
2.6. Control Center
Control Center is a web-based application, which allows the administrator to configure Kaspersky Anti-Spam and control its activity.
Control Center allows performance of the following tasks:
• Monitoring of the current status of the product and its individual
components.
• Installation of license keys and management of the protected domains list.
• Output and export of statistics on processed messages.
• Managing the default and group policies of spam filtering.
• Configuring the filtration server and other product components.
Page 22
22 Kaspersky Anti-Spam 3.0
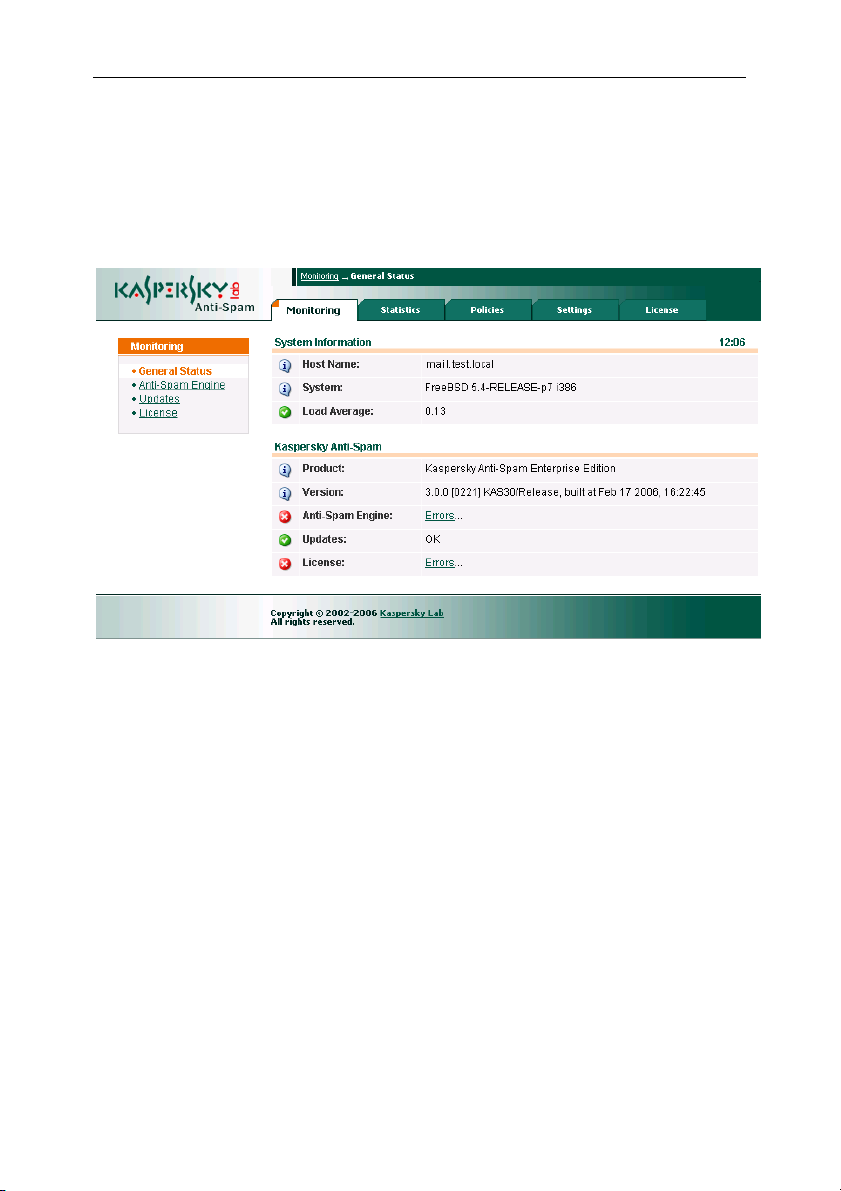
2.7. Monitoring
Kaspersky Anti-Spam includes a monitoring module for control of the filtration
server status.
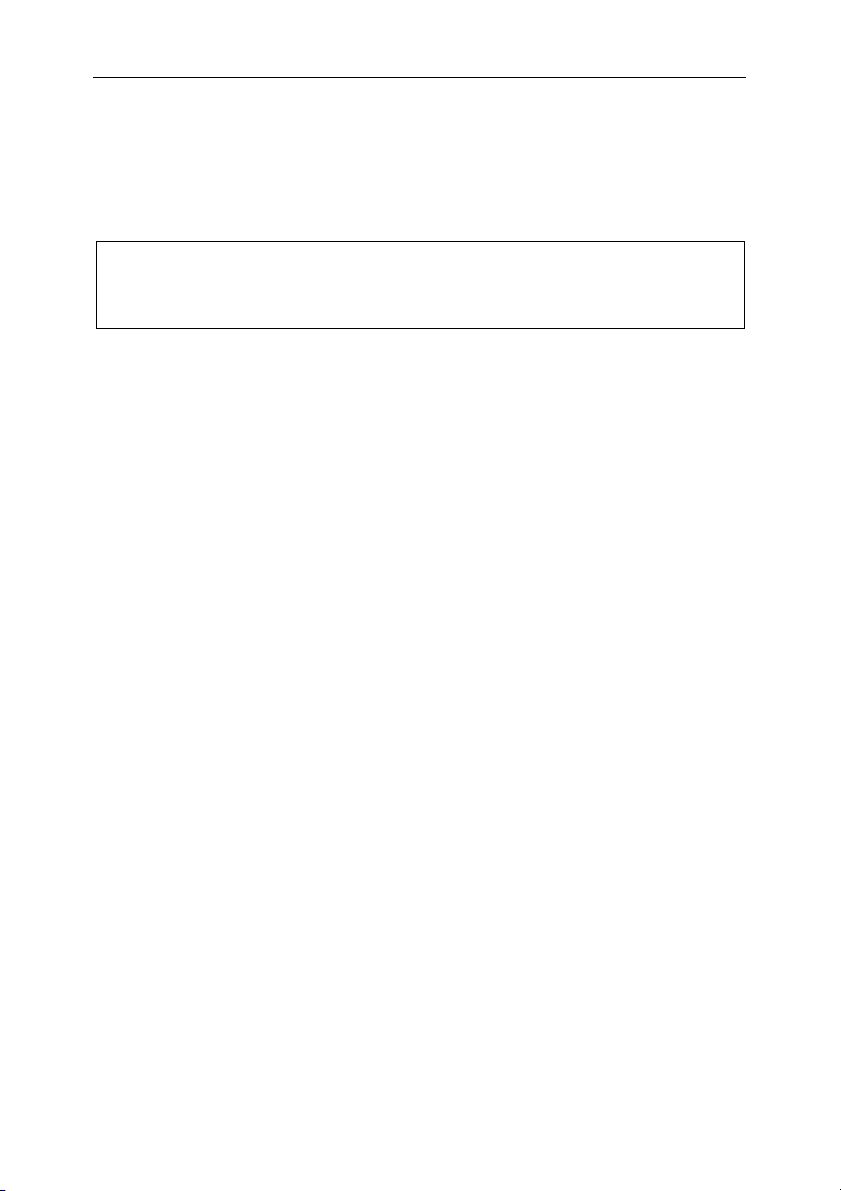
System status information appears in the Monitoring tab of the Control Center.
Figure 2. The Monitoring tab of the Control Center
The section contains parameters tracked by the monitoring system and the
messages from product modules, which you can use to analyze the current
status of Kaspersky Anti-Spam components.
The monitoring system also generates notifications and reports while running.
The monitoring script starts regularly and sends to system administrator a
message informing about detected problems whenever it finds any issues. The
messages are sent once at the moment of problem detection thus ensuring
timely notification about situations, which require administrator's intervention.
Later, if a problem is not resolved, the monitoring will keep sending daily reports
with a summary of all detected pending issues.
The e-mail address where the monitoring system will send its notifications has to
be specified in the Control Center.
Page 23
CHAPTER 3. INSTALLING
KASPERSKY ANTI-SPAM
This section contains information about the procedure of program installation,
integration of client plug-in modules with the host mail server and configuring
access to the Control Center, the main product management tool.
3.1. Preparing for installation
Before you proceed with Kaspersky Anti-Spam installation, it is necessary to:
• Make sure that your system meets the hardware and software
requirements for Kaspersky Anti-Spam (see section 1.3 on page 9).
• Make sure that you have a license key for Kaspersky Anti-Spam 3.0.
• Ensure that bzip2, perl, and which programs are installed.
• Make sure that the mail server installed in your system functions properly.
• Make backup copies of the mail server configuration file.
• Log on to the system as root.
You are advised to install the product during a period when the mail server
load is lowest.
Kaspersky Anti-Spam installation consists of five steps:
1. Installation of Kaspersky Anti-Spam distribution package.
2. License key installation.
3. Integration of the client plug-in modules with the mail server.
4. Configuration of a HTTP server for access to the Control Center.
5. Configuration of content filtration databases update and UDS service
use.
The sections further contain detailed descriptions of these steps.
Page 24

24 Kaspersky Anti-Spam 3.0
3.2. Installing Kaspersky Anti-Spam
distribution package
Kaspersky Anti-Spam 3.0 is distributed in several installation packages:
• .rpm package for most distributions of the Linux operating system
(RedHat, SuSe, Mandrake, Fedora, etc.);
• .deb package for Debian Linux distribution;
• .tbz packages for different FreeBSD versions.
The choice of a specific installation package depends upon the operating system
installed on your computer:
To initiate installation of Kaspersky Anti-Spam from the .rpm package, enter the
following in the command line:
# rpm –i kas-3-<package version>.i386.rpm
To initiate installation of Kaspersky Anti-Spam from the .deb package, enter the
following in the command line:
# dpkg –i kas-3-<package version>.i386.deb
To initiate installation of Kaspersky Anti-Spam from the .tbz package, enter the
following in the command line:
# pkg_add kas-3-<package version>.tbz
The installer performs the following actions during the procedure:
• Creation of the mailflt3 user account and group with appropriate
privileges that will be used to run Kaspersky Anti-Spam.
• Installation of all programs included into the Kaspersky Anti-Spam suite to
the /usr/local/ap-mailfilter3 directory.
• Creation and installation of a script, which will perform automatic launch
of the filtration master process (ap-process-server), SPF daemon (ap-
spfd), licensing module (kas-license) and HTTP server (kas-thttpd) at the
operating system start-up.
• Launch of necessary programs and services.
• Creation of a сron task for the mailflt3 account to run automatically the
script downloading updates to the content filtration databases and the
script monitoring the filtration server activity.
Having completed the filtration server setup, install the license key and integrate
the host mail server with Kaspersky Anti-Spam.
Page 25
Installing Kaspersky Anti-Spam 25
3.3. Configuring access to the
Control Center
Upon completion of product setup, the installer runs the kas-thttpd service, which
provides local access to the Control Center. The following settings are used by
default:
• Address: http://127.0.0.1:3080/
• User name: admin.
• Password: admin.
Be sure to change the user name and password for access to the Control
Center after Kaspersky Anti-Spam installation. Use of default values may pose
a threat to the security of your system.
You are also advised to change the port used to connect to the Control
Center.
User name and password are preserved in the .htpasswd file of the /usr/local/ap-
mailfilter3/control/www/ Control Center directory for CGI scripts.
You can create a new user or change an existing password using the kas-
htpasswd utility included into Kaspersky Anti-Spam. At the utility start, you should
specify the path to the file containing passwords and the name of the user being
created or an existing user whose password must be modified:
# /usr/local/ap-mailfilter3/bin/kas-htpasswd /usr/local/\
ap-mailfilter3/control/www/.htpasswd <user name>
After execution of the command above you will be offered to enter the password
for the specified user.
In order to create a new file where the password of the specified user will be
stored, use the –c command line option:
# /usr/local/ap-mailfilter3/bin/kas-htpasswd –с \
/usr/local/ap-mailfilter3/control/www/.htpasswd \
<user name>
Password changes become effective immediately after modification of the
.htpasswd file.
Passwords for access to the Control Center are stored in the .htpasswd file in
an encrypted form.
Page 26
26 Kaspersky Anti-Spam 3.0
The interface and port number to be used for connection to the Control Center
are specified in the /usr/local/ap-mailfilter3/etc/kas-thttpd.conf file using the host
and port parameters respectively. E.g., the following values:
host=0.0.0.0
port=3080
mean that the Control Center will listen on port 3080 of all server interfaces
expecting incoming connections. By default, the Control Center can only be
accessed from the server where Kaspersky Anti-Spam is installed (the host
parameter is set to 127.0.0.1).
After modification of port number, reload the Control Center configuration. In
Linux distributions, run the following command:
# /etc/init.d/kas3-control-center restart
In FreeBSD, run the following command:
/usr/local/etc/rc.d/kas3-control-center.sh restart
3.4. Installing the license key
Your license key corresponding to the purchased license is bundled with the
distribution package of Kaspersky Anti-Spam.
If for some reason you have no license key, contact the Technical Support
service of Kaspersky Lab (see section Services/Technical Support site of
Kaspersky Lab website).
In order to install a new license key using the Control Center, perform the
following steps:
1. Use your web browser to connect to the Control Center by entering
http://localhost:3080/ in its address line. Enter admin as the user
name for connection, and admin as the password.
2. Open the license keys management page at
License → License Keys.
3. Use the field in the lower part of the page under the Install a New
License Key section to specify the path to a license key file or press
the Choose button to select the necessary file.
4. Press the Apply button.
In order to install a new license key locally using the command line, run the
following command:
# /usr/local/ap-mailfilter3/bin/install-key <key>
where key stands for a path to the file containing the license key.
Page 27
Installing Kaspersky Anti-Spam 27
If a license key has not been installed or the installed key is invalid, Kaspersky
Anti-Spam will not filter mail. Mail server performance will not be affected; its email traffic will just be transferred without analysis.
Please keep in mind that the product will only filter mail for those recipients,
whose accounts are added into the list of protected domains.
Before you start using Kaspersky Anti-Spam, be sure to create the list of
protected domains.
Please refer to section 4.3.4 on page 44 for details.
3.5. Integrating Kaspersky
Anti-Spam with your mail server
Kaspersky Anti-Spam integration with the host mail server is accomplished
through installation of a client plug-in module and addition of necessary changes
to the configuration files.
These actions are carried out automatically by the universal configuration script.
If integration using the universal script is impossible (e.g., when the mail server
has a non-standard configuration) you can use to that effect configuration scripts
of that specific e-mail server.
Please refer to the Appendix A.2 on page 83 for details about applicable
methods for integration of client plug-in modules into each of the supported mail
servers and about the changes introduced into their configuration files.
In order to integrate Kaspersky Anti-Spam with the mail server installed on your
server, run the universal configuration script:
# /usr/local/ap-mailfilter3/bin/MTA-config.pl
The script will identify the type of the mail server and add necessary changes to
its configuration files.
However, if your mail server is installed in a non-standard location or uses a
configuration different from the default, the MTA-config.pl script may fail to find its
configuration files. In such case, use the individual configuration script for your
specific mail server:
• To integrate Kaspersky Anti-Spam with Sendmail, run the following
command as root:
# /usr/local/ap-mailfilter3/bin/config-sendmail.pl
<path>
where path stands for the path to the Sendmail configuration file.
Page 28
28 Kaspersky Anti-Spam 3.0
• To integrate Kaspersky Anti-Spam with Postfix, run the following
command as root:
# /usr/local/ap-mailfilter3/bin/config-postfix.pl
<path>
where path stands for the path to the master.cf Postfix configuration file.
• To integrate Kaspersky Anti-Spam with Exim, run the following command
as root:
# /usr/local/ap-mailfilter3/bin/config-exim.pl <path>
where path stands for the path to the Exim configuration file.
Integration of Kaspersky Anti-Spam with Exim mail server has a few
peculiarities in Debian Linux distribution. For correct integration, use the
/usr/local/ap-mailfilter3/bin/config-exim-debian.pl script. Please refer to
section A.2.4.2 on page 91 for details.
• To integrate Kaspersky Anti-Spam with Qmail, run the following command
as root:
# /usr/local/ap-mailfilter3/bin/config-qmail.pl <path>
where path stands for the path to the Qmail configuration file.
Correct integration with Qmail by running the config-qmail.pl script is
possible only if Qmail uses the qmailq account and the qmail group
(used by default).
Kaspersky Anti-Spam integration with Exim (using the kas-exim client plug-in
module) and with Communigate Pro has to be performed by the administrator
manually.
Detailed descriptions of peculiarities for each of the client modules and available
integration methods can be found in section A.2 on page 83.
Please refer to Chapter 5 on page 76 for details on rolling back the integration
and restoring the original mail server settings.
Page 29

Installing Kaspersky Anti-Spam 29
3.6. Configuring updates of content
filtration databases and UDS
use
By default after installation of Kaspersky Anti-Spam updates to the content
filtration databases and UDS are disabled. In order to allow updating of the
databases and activate UDS, run the enable-updates.sh script:
# /usr/local/ap-mailfilter3/bin/enable-updates.sh
Restarting as mailflt3
Enabling UDS...
uds-rtts finished successfully
Enabling automatic updates...
Install crontab for user mailflt3 - ok
===========================================================
You can adjust automatic updates settings via control
center.
===========================================================
Automatic updates and UDS are now enabled.
You can also use the Control Center interface to enable updates of the content
filtration databases (see section 4.4 on page 51) and activate the UDS service
(see section 4.5.4 on page 59).
In order to check proper operation of a UDS service (thus testing the availability of
UDS servers) run the uds-rtts.sh script with the –a option:
# usr/local/ap-mailfilter3/bin/uds-rtts.sh –a
Restarting as mailflt3
uds-rtts: OK, updated 1 records.
uds-rtts: uds.kaspersky-labs.com available rtt=4103
uds-rtts finished successfully.
Page 30

CHAPTER 4. MANAGING THE
SPAM FILTRATION SERVER
You can use Kaspersky Anti-Spam to protect e-mail traffic from unwanted spam
mail. The system of protection is based on performance of tasks representing the
main features of the application. The tasks performed by Kaspersky
Anti-Spam can be subdivided into three main groups:
• Mail traffic protection against spam.
• Updates of the content filtration databases used for spam detection.
• Monitoring of the anti-spam engine activity.
Each group includes smaller tasks. In this chapter we shall describe in detail the
most typical of them. Administrators can then combine these tasks and enhance
them in accordance with the needs of their specific organizations.
This document describes configuration and task performance locally from the
command line as well as product management using the Control Center.
4.1. Starting and managing
Kaspersky Anti-Spam
components
The main components of the filtration server including the filtering master
process (ap-process-server), licensing module (kas-license) and the SPF
daemon (ap-spfd) are launched at the operating system start-up by a special
script, which is named and located differently in Linux and FreeBSD operating
systems. The Linux operating system uses the kas3 script located in the
/etc/init.d directory while the FreeBSD operating system employs the kas3.sh
script in the /usr/local/etc/rc.d directory.
The administrator can use the said scripts with the command line parameters
described below to start, stop or restart the main components of the filtration
server:
• start – start the main components of the filtration server.
• stop – stop operation of the main components of the filtration server.
Page 31

Managing the spam filtration server 31
• restart – restart the main components of the filtration server; the action is
identical to running the stop and start actions one after another.
The kas-thttpd service providing access to the Control Center of Kaspersky AntiSpam is started by the kas3-control-center script (in Linux) and kas3-control-
center.sh script (in FreeBSD).
To start, stop or restart the kas-thttpd service, use the script with the command
line parameters described above for the kas3 script.
4.2. Kaspersky Anti-Spam Control
Center
Control Center is the main administration tool for Kaspersky Anti-Spam. Control
Center is a web-based application, which allows you to configure remotely the
parameters used by the filtration server for its operation. This section contains a
detailed description of all interface components of the application.
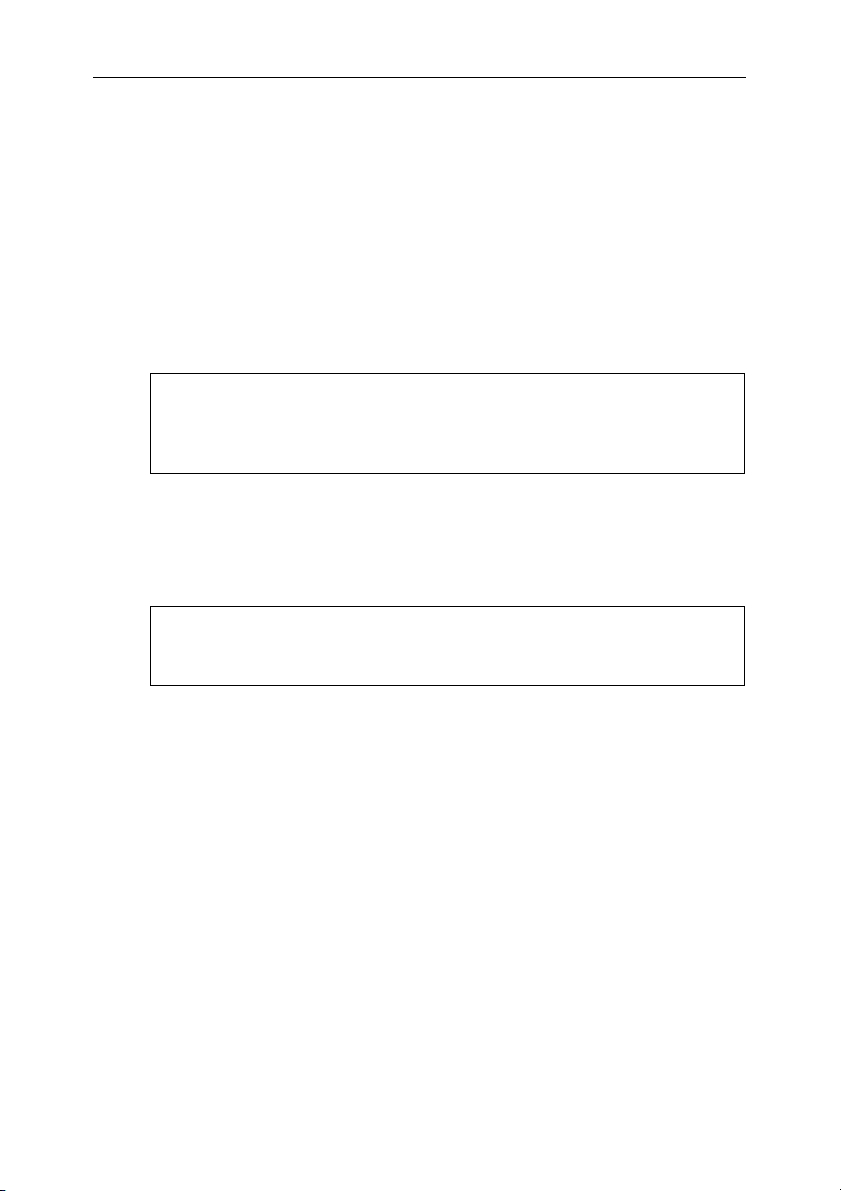
Figure 3. Kaspersky Anti-Spam Control Center
The upper part of the main window contains a number of tabs used for quick
access to the following functional sections of the Control Center:
• Monitoring – the section containing information about the status of the
filtration server's components; the information can be used to identify
occurring problems.
Page 32

32 Kaspersky Anti-Spam 3.0
• Statistics – the function containing statistical reports, which allow you to
analyze the number of messages processed by the system.
• Policies – the section used for customization of spam filtering policy.
• Settings – the section containing the settings of the anti-spam engine,
Control Center, and the subsystem updating the content filtration
databases.
• License – the section used to manage the licenses for Kaspersky Anti-
Spam and register users authorized to administer the product.
The left part of the main window displays a menu containing the list of pages in
the current section. Menu content will change depending upon the currently
selected section.
In addition to the mentioned means of navigation, the upper part of the main
window contains an address line, which indicates the path to the current page in
the hierarchy of Control Center sections.
Further we shall examine the main tasks pertaining to the administration of the
filtration server and its individual components.
4.3. Filtration policy management
Detection and filtration of unsolicited mail is the main function of Kaspersky AntiSpam. The administration system provides a powerful combination of settings for
the spam recognition process and further processing of messages.
The settings of message filtration policy are located in the Policies section of the
Control Center.
The Policies menu consists of the following subsections:
• Common – settings of the general filtration policy. This subsection
includes:
• Default Rules – the section for management of spam recognition
rules.
• Black List – the section for management of the list of addresses
mail receipt from which is blocked.
• White List – the section for managing the list of trusted
addresses. Messages from these addresses are not checked for
the presence of spam signs.
• DNS Black Lists – the section for managing the list of used
DNSBL services.
Page 33

Managing the spam filtration server 33
• Groups – the settings of user groups, recognition policies applicable to
individual groups and the sets of actions over messages:
• Group list – the section for managing user groups: creation,
deletion of groups, and launching the editor of group properties.
The parameters of group policies can be configured in the group policy editor.
You can launch the editor from the Group list window.
The Rebuild All Policies
compilation of filtering policies (reading and application of configuration settings).
A forced compilation may be necessary, for example, to update the settings of a
filtration policy if the application has read them incorrectly.
link in the Build menu can be used to force the
4.3.1. General filtration policy
The Default Rules (see Fig. 4) section contains the settings of the default
filtration policy common for all groups. To switch to that section, use the Default
Rules link in the Common menu of the Policies section.
Figure 4. Default filtration policy settings
The settings of spam recognition rules are grouped into sections according to
their functional proximity. The main page displays a list of these sections.
The combination of settings and functional sections is determined by the
content filtration databases. The set of available sections and parameters may
change after a database update.
Page 34

34 Kaspersky Anti-Spam 3.0
In addition to the section titles, the list contains the following information:
• brief section description;
• total number of rules in a section;
• the number of modified rules compared with the original settings of the
content filtration databases.
To the right of the description of each section there is a button opening the editor
for the rules of that section:
sections containing modified rules. Clicking the button opens a page where you
can edit the filtration policy. Policy editor can also be invoked by clicking the
functional section's title. Click the
section.
. The button is highlighted in orange for the
button to cancel the changes made within a
4.3.1.1. The
You can switch to configuring the rules of the General section by clicking the
section's title in the list of the default filtration policy rules (see Fig. 5).
Figure 5. The General rules section of the default filtration policy
General
section
Page 35

Managing the spam filtration server 35
In the General section you can configure the following parameters:
• Detection defines whether the product checks messages for spam signs.
If spam recognition is disabled, all messages will be assigned the
Trusted status (please refer to section 2.3 on page 19 for details on
statuses).
You are not advised to disable spam recognition on the common policy
level. The feature may be useful during product testing and in cases,
when you need to filter spam for a few user groups only.
• Detection Level defines how strictly the application approaches spam
recognition. It decides whether a message contains spam on the basis of
several signs detected in a message by the filtration module. This setting
determines how the filter will interpret these signs before it sets a
message status. Filtration policy provides for four detection levels:
Minimum, Standard, High, and Maximum. The higher is the level, the
less spam signs the application will need to recognize a message as
spam. When lower detection levels are used, the same set of signs will
only result in message recognition as a suspicious (the Probable Spam
status) or a message may be not recognized as spam altogether.
You are advised to use the Standard detection level.
Higher detection level can be used in cases, when Kaspersky Anti-Spam
does not detect spam messages or recognizes them as suspicious (with
the Probable Spam status). However, doing so will increase the
probability of false alarms, when a normal message may be recognized
as spam.
Lower detection level will decrease the probability of false alarms.
However, it may increase the chances of spam messages to bypass the
filter.
Besides the detection level, filtration result depends upon the used
methods of spam recognition. In case of false alarms you should also
pay attention to the methods employed for spam recognition.
• Assignment of the 'Probable Spam' status – enables / disables
assignment of the Probable Spam status. If the parameter is set to
Disable, Kaspersky Anti-Spam will not assign the Probable Spam status
to e-mail messages.
• DNS & SPF Checks – checks of the sender's information in DNS and
using DNS-based services: DNSBL, SPF, etc.
Page 36

36 Kaspersky Anti-Spam 3.0
DNS and DNS-based checks may result in considerably slower
message processing. Disable the method if its use reduces filter
performance noticeably.
This parameter determines the use of DNS services by the filtration
server. Individual services can be enabled / disabled in the DNS & SPF
Checks section (see section 4.3.1.2 on page 36).
Please see section 4.3.3 on page 42 for details on the configuration of
DNSBL services and their use.
• SURBL Check – use of the SURBL service.
• Use of White and Black Lists – use of white and black lists containing IP
addresses and e-mail addresses of trusted and blocked sources. For
details about the use of white and black lists please refer to section 4.3.2
on page 40).
The Apply button saves the settings. Clicking it makes the application save,
compile filtration policies and restart the filtration module. Thus, the entered
changes become effective immediately.
The Reset button returns the parameters to their initial values (i.e. it cancels
unsaved changes).
The Default button returns the settings to the default values specified for the
content filtration databases. You can also use the
title in the list of default filtration policy rules to restore the default values.
In order to return to the list of general default policy rules, click the Apply button
(saving the current changes) or use the Default Rules
(discarding the changes).
button opposite a section
link in the Common menu
4.3.1.2. The DNS & SPF Checks section
The DNS & SPF Checks section (see Fig. 6) contains the settings that define
external services used for spam recognition.
Parameters of that section allow you to enable / disable the use of the following
methods:
• Use of DNSBL services – checks of the sender's IP address using a set
of DNSBL services. The list of services to use for the checks can be
customized on the Policies → Common → DNS Black Lists page.
Please see section 4.3.3 on page 42 for details.
• Check ip addresses in DNS – instruction to check the presence of
sender's IP address in DNS (reverse DNS lookup).
Page 37

Managing the spam filtration server 37
• Check SPF Records – sender's IP address check using SPF.
Figure 6. The DNS & SPF Checks section
4.3.1.3. The Headers Checks section
The Headers Checks section (see Fig. 7) allows you to configure the
parameters of rules used to analyze e-mail message headers.
Figure 7. The Headers Checks section of the default filtration policy rules
This section does not contain a complete list of all rules that Kaspersky AntiSpam uses for analysis of message headers. Instead, it contains just the rules,
Page 38

38 Kaspersky Anti-Spam 3.0
which, being applied, may filter out useful mail with certain known signs of spam.
These signs include:
• Undisclosed list of recipients in TO – the presence of an undisclosed
list of recipients in the TO header.
• Digits mixed with letters in TO or FROM headers. Programs used for
spam distribution frequently use as a sender's or recipient's address
automatically generated addresses containing groups of digits. If mail
server users do not have addresses containing digits, you are advised to
enable the rule.
• Address with no domain name. Spammers frequently use incomplete
addresses (omitting the mail domain), while e-mail programs usually
specify a complete e-mail address including domain, for example,
user@domain.com. You are advised to disable the rule for recipients that
actually allow delivery of messages with incomplete addresses.
• SUBJECT is longer than 250 symbols. Programs used for spam
distribution frequently insert into the Subject field long (over 250 symbols)
random sequences of characters or words to circumvent mail filters.
Disable the use of this rule, if delivery of such messages is allowed in
your mail system.
• SUBJECT contains lots of white space or dots. Programs used for
spam distribution also frequently insert into the message header long
groups of spaces or dots. Disable the use of this rule, if delivery of such
messages is allowed in your mail system.
• SUBJECT contains DIGIT ID or Timestamp (like 'Time: 14:30:35').
Addition of a digit-based identifier or timestamp to message subject is
another method employed by automatic spammer software in an attempt
to bypass antispam filters.
The drop-down list to the right of each rule allows you to activate a rule
(Enabled) or deactivate it (Disabled).
The application takes the final decision about assignment of a certain status to
a message using multiple various signs. Therefore, enabling or disabling a
separate rule or a group of rules does not mean that processed messages will
be recognized strictly as spam or, on the contrary, they will be allowed by the
filtration server. Configuring the rules helps decrease the probability of errors
during recognition of message type.
You can enable or disable the rules mentioned above for all users in the default
filtration policy or for individual user groups in their respective group policies.
Page 39

Managing the spam filtration server 39
4.3.1.4. The Eastern Encodings section
The Eastern Encodings section (see Fig. 8) allows you to specify the languages
and encodings of messages allowed for delivery to the recipients within your mail
system without being considered spam.
Figure 8. The Eastern Encodings section of the default filtration policy rules
This product version recognizes a group of oriental languages for the purpose of
spam control: Chinese, Korean, Thai, and Japanese.
If users of your mail system use any of these languages for correspondence,
select the is allowed option from the drop-down list for that language. If certain
languages are not used by the users of your mail system, set the is treated as
suspicious value for them.
4.3.1.5. The Obscene Content section
The Obscene Content section (see Fig. 9) allows you to define whether the
application should mark messages containing obscene language. Kaspersky
Anti-Spam recognizes obscenities in the Russian and English languages.
If the Message with obscene words and phrases parameter is set to mark in
Subject, then all messages containing obscene language will be marked with the
[--Obscene--] record in the message subject.
Page 40

40 Kaspersky Anti-Spam 3.0
Figure 9. The Obscene Content section of the default filtration policy rules
4.3.2. Managing the white and black lists
The list of trusted senders (White List) is used to specify explicitly the addresses
acting as a reliable source of messages, which do not need a spam check. You
can add to such lists, for example, IP addresses of e-mail servers used for mail
redirection within your company or the addresses of internal mailing lists.
Correspondence from the senders included into a white list will receive the
Trusted status.
The list of blocked senders (Black List) has an opposite meaning. The
administrator of a filtration server can add to that list addresses used by
spammers for mass mailing. Messages sent from an address found in a black list
will be assigned the Blacklisted status.
These lists can be managed in a similar manner. In this section we shall examine
configuring the white list as an example (see Fig. 10).
You can access the form for editing the white list of trusted senders by following
the Policies → Common → White List menu sequence (for the list of blocked
senders it will be – Policies → Common → Black List).
Page 41

Managing the spam filtration server 41
Figure 10. Configuration page for the white list
A list of trusted senders consists of a list of e-mail addresses and a list of IP
addresses. You can enter the addresses in a text field in the central part of the
page. The e-mails | ip addresses hyperlinks are used to select the type of
records in a white list.
The Apply button saves entered information. To cancel unsaved changes, use
the Reset button.
Save your changes before using the e-mails | ip addresses toggle. All
unsaved changes will be lost after a switch.
The following formats can be used for entry of e-mail addresses:
• user@domain – indicates a specific address;
• @domain – indicates all e-mail addresses within the domain domain.
The following wildcards can be used in e-mail addresses:
• * (star) – a line of characters, which may have arbitrary length;
• ? (question mark) – any single character.
E.g., the user*@mycompany.com record means all addresses, which begin with
the user word within the mycompany.com mail domain.
Page 42

42 Kaspersky Anti-Spam 3.0
IP addresses are recorded in the CIDR notation, which allows the following
variations:
• aaa.bbb.ccc.ddd – a specific IP address, for example, 192.168.0.17;
• aaa.bbb.ccc.ddd/mm – subnet address with a specified number and
mask, for example, 192.168.0.0/16.
Addresses in lists can be delimited by spaces, line feed symbols, commas or
semicolons.
4.3.3. Managing the lists of employed
DNSBL services
Use the DNS Black Lists link in the Common menu of the Policies section (see
Fig. 11) to open the page where you can manage the lists of DNSBL services.
Configuration of the list of DNSBL being used applies to the default filtration
policy. Later you can specify for every user group whether it should use the
results of DNSBL-based checks. The list of employed services is common for all
user groups.
Figure 11. Configuration page for the lists of DNSBL services
The central part of the page displays a list of used services. For every DNSBL
service you will have to specify the address used to access that server and its
rating.
Page 43

Managing the spam filtration server 43
Service rating means the service reliability from the viewpoint of filtration server
administrator. While checking a sender's IP address in DNSBL, Kaspersky AntiSpam sends a request to all services included in the list. As soon as the results
arrive, it sums up the ratings of services, which have recognized the specified IP
address as one used for dispatch of unsolicited mail.
If the sum of ratings of the triggered DNSBL services exceeds 100, the sender is
considered to be in a black list, and such message will be assigned the
blacklisted status irrespectively of the results of checks performed using other
methods. At certain detection levels, the application can also analyze situations
when the sum of ratings of the services, which have discovered the sender in
their black lists, is less than 100. In that case the information about sender's
presence in black lists is used as an additional sign and the message will be
recognized as spam if only there are more spam signs revealed by other analysis
methods.
You can perform the following operations with the list of DNSBL services:
• Add a new service.
• Change service rating.
• Delete a service.
Let us examine closely each of these operations:
• In order to add a new service to the list:
1. Specify the address of that service in the lower empty line of
the list marked with the
sign.
2. Enter the rating of the service.
3. Save the result by clicking Apply.
• In order to change the rating of an existing DNSBL service:
1. Specify the new rating value in the Rate column of the
corresponding service.
2. Save the result by clicking Apply.
• In order to remove a service from list:
Click the
button to the right of the address line of that service.
You are advised to exercise caution while selecting the DNSBL services to be
used. Various services use different policies for generation of such lists.
Please examine carefully the policy of each service before you start using it for
mail filtration.
Page 44

44 Kaspersky Anti-Spam 3.0
4.3.4. Managing the list of protected
domains
The list of protected domains contains the names of domains receiving traffic,
which will be filtered from spam that may appear in the stream of incoming
messages. You can manage the list using the page at
Policies → Common → Protected Domains (see Fig. 12).
Figure 12. The list of protected domains
You can use wildcards while entering domain names:
• * stands for any number of characters,
• ? stands for any single character.
E.g., to add the example.com domain and all its subdomains into the list of
protected domains, you will only have to add the following record:
*example.com
To configure the product to filter all incoming mail, you should either leave the list
empty or add the following record to it:
*
As soon as you finish editing the list, click the Apply button to confirm the
changes or Reset to cancel them.
Page 45

Managing the spam filtration server 45
For domains added to the protected list the product will control compliance
with the license limitations (e.g., control of mail traffic volume if the license
uses a restriction of that parameter).
You can also enter changes to the list of protected domains locally from the
command line. The original list of domains is stored in the protected_domains
text file located in the /usr/local/ap-mailfilter3/conf directory.
After editing the file, run the following command as root:
# /usr/local/ap-mailfilter3/bin/kas-restart –f
Kaspersky Anti-Spam adds the following header to all messages addressed to
users within domains that are not included into the protected list:
X-SpamTest-Info: Not protected
Please refer to section A.5 on page 112 for details about special headers.
4.3.5. Group management
Filtration server administrator can define various spam recognition settings for
different users. This can be accomplished using the group policies of spam
filtration.
Before you start configuring the rules of a group policy, you have to define the list
of e-mail addresses that the group policy will apply to.
In addition to the groups created by the administrator, the product also uses the
All group created by default during setup. The group defines the rules for
processing mail messages, which do not belong to any other group. All is a
system group, it cannot be deleted.
You can access group settings from the Groups menu in the left part of the
Policies section window.
The Group List
Fig. 13).
You can perform the following operations over groups:
• Edit group properties.
• Create a new group.
• Delete an existing group.
• Change the order of group listing.
link opens the page containing a list of all existing groups (see
Page 46

46 Kaspersky Anti-Spam 3.0
Let us examine closely each of these tasks:
In order to open the group properties' editor,
Click the
button to the right of the title indicating the group, which
you wish to modify.
Figure 13. The list of groups used by Kaspersky Anti-Spam
The group properties' editor allows you to configure:
• General group parameters, such as group name, comments and a list of
mail addresses for which group rules will apply.
• Rules of spam recognition.
• Actions over mail messages.
• Black and white lists of senders.
The title and the list of mail addresses of the All group cannot be edited since
this group defines the rules used to process messages whose senders and
recipients are not included into any of the groups created by the administrator.
In order to create a new group, perform the following actions:
1. Click the button about the group list.
2. Use the window that opens next (see Fig. 14) to specify the group
name, enter comments (if necessary) and a list of e-mail
addresses.
Page 47

Managing the spam filtration server 47
The Group Id field contains group identifier assigned to it at creation. That
parameter cannot be changed.
Text entered in the Comments field will be displayed in the group list under the
name of the created group.
E-mail addresses are recorded in format identical to the format of addresses in
black and white lists of senders (see section 4.3.2 on page 40).
In order to delete an existing group,
Click the
button to the right of the group name.
Figure 14. The page for creation of a new group
In order to change the order of group listing,
Click the
button to the left of group name. The selected group will be
moved up then.
During message processing, the filtration module reviews groups in the order
defined in their list (from the list beginning to end). A message will be processed
using the rules of the first group including the address of its recipient. If the
recipient is not included into any group, the application will process such
message using the rules of the All group.
Page 48

48 Kaspersky Anti-Spam 3.0
4.3.6. Managing the group filtration policy
You can specify individual settings of spam recognition parameters and black
and white lists of senders for each of the groups, including All. Thus, the
administrator can define various recognition rules for different user groups.
By default, the settings of the recognition rules for every group inherit the values
specified in the default filtration policy. However, these values can be redefined.
You can use the Rules
editor to configure the recognition rules of a group filtration policy. The structure
of rules is identical to that of the default filtration policy (see section 4.3.1 on
page 33).
The only difference in the configuration of a group policy is manifested in the fact
that the list of parameter values possible in a policy contains the by default
value meaning that such parameter will inherit the value specified in the default
filtration policy.
Fig. 15 demonstrates the Rules window of the group filtration policy.
link in the Group Policy menu of the group properties'
Figure 15. The Rules page of a group filtration policy
Page 49

Managing the spam filtration server 49
As you can see in the image, the group inherits all default policy settings (set to
by default) except for the DNS & SPF Checks parameter. The said method is
disabled.
You can create black and white lists of senders using the White List
List links in the Group Policy menu. Configuration of these lists for individual
groups is identical to that for the default filtration policy (see section 4.3.1 on
page 33).
and Black
4.3.7. Actions over messages
A group policy also contains a set of actions pertaining to the redirection and
modification of mail messages recognized by the filtration module. Use the
Actions
link in the Group Policy menu of the group properties' editor to configure
these actions.
Specific action performed over a message is identified by the status assigned to
it as a result of its processing by the filtration module. The Actions page (see
Fig. 16) contains a form where you can specify an action for every possible
message status.
You can define the necessary action using the drop-down list under the header
that describes message status.
The administrator can select the following actions:
• Accept this message – mail server accepts a message and delivers it to
the recipient.
• Send a copy of this message to other recipient(s) – mail server
accepts a message, delivers it to the recipient and sends a copy thereof
to the address specified in the Send message to field.
• Redirect this message to other recipient(s) – mail server accepts a
message and redirects it to the address specified in the Send message
to field. The message will not be delivered to the original recipient. That
opportunity can be used to forward messages to a mailbox used for
storage of spam archive.
• Reject this message – mail server rejects a message and returns to the
sender a notification informing that delivery is impossible. If message
delivery is rejected for all recipients, the server returns a notification of
delivery denial immediately during the corresponding SMTP session
(reject message). If message delivery is allowed for at least one recipient,
the sender will receive a notification informing that the message could not
be delivered to some recipients (bounce message). You can customize
the text of notifications in the Settings → Reject Messages section (see
section 4.5.4 on page 59 for details).
Page 50

50 Kaspersky Anti-Spam 3.0
• Delete this message – mail server accepts a message and deletes it
without redirection to the recipient. Message sender then will receive no
notifications informing that the delivery was impossible.
Figure 16. The Actions page of a group filtration policy
Messages with the Not detected status (i.e. messages not recognized as spam)
or with the Trusted status (i.e. messages received from reliable sources or
addressed to a recipient whose mail is not scanned according to a group policy)
are always routed to the specified recipient.
Page 51

Managing the spam filtration server 51
Although the product is being constantly developed in order to improve spam
recognition and decrease the number of false alarms from the filter, it is not
possible to eliminate altogether the probability of recognizing normal
messages as spam. Therefore, you are advised to use with caution the actions
deleting messages.
In addition to the actions forwarding messages, the administrator can define
certain actions for message modification, which may be helpful both for
visualizing the results of recognition and for subsequent use in combination with
the filters in users' e-mail client software.
Kaspersky Anti-Spam allows the following message modifications:
• Addition of a label to the message subject field (at the beginning of
subject text). The Prepend to the Subject field defines the label text.
• Addition of a special X-Spamtest-Header containing text specified by the
administrator. The header may be used then for automatic processing of
such messages in e-mail software employed by end users. The Set X-
Spamtest-Header field defines the header text. Please refer to
section A.5 on page 112 for details about the headers added to a mail
message as a result of filtration procedure.
4.4. Updating the content filtration
databases
Content filtration databases used during analysis of mail message contents are
updated by sfupdates, a special updater module.
It can use the Internet (an update server of Kaspersky Lab) or a network
directory as the source of updates to the content filtration databases.
The procedure can be initiated manually by running the updating script from the
command line or it can be scheduled to run automatically using cron.
4.4.1. Configuring the update parameters
In order to customize the update parameters, use the
Settings → Maintenance → Updater page of the Control Center (see Fig. 17).
Page 52

52 Kaspersky Anti-Spam 3.0
Figure 17. The settings of Kaspersky Anti-Spam updater module
The Updater Settings sections contains general updating parameters:
• Run updater automatically – the interval between downloads of updates
to the content filtration databases from update servers. The interval can
be specified within the range from 20 minutes to 3 hours.
You are advised to set as short updating interval as possible. Frequent
updates to the content filtration databases provide for better server
response speed to new spam. The interval recommended for database
updates: 20 minutes.
Parameter value determines the interval between the starts of a cron task
updating the product. If necessary, you can configure the cron task
manually. Please see section 4.4.2 on page 54 for details on manual
configuration.
Page 53

Managing the spam filtration server 53
• Updater log level – parameter that defines the level of details logged to a
report file during an update. The following levels of details are available:
• fatal – the program logs messages about fatal errors only;
• error – the program logs messages about all errors (fatal and
non-fatal);
• warning – the program logs warnings and error messages;
• info – in addition to warnings and error messages, the program
logs informational records (information about the start of the
updating module, about the results of an update, etc.);
• activity – the program logs all data matching the info level and
additional information pertaining to the update process
(connection to an update server, downloading files from server,
etc.);
• debug – the program logs all data corresponding to the activity
level as well as debug messages.
• Network timeout – timeout (seconds) specified for network operations
while updating the content filtration databases. Recommended value: 30.
• Use passive FTP mode – instruction to use passive connection mode
(recommended) when an update server is contacted via FTP.
The Updates Server section contains parameters of the server used as the
source of updates:
• Region – region where the user is located. The product uses this
parameter value to select an update server with the most suitable
geographical location.
• Updates server URL address of the server acting as the source of
updates. It is used in combination with the following parameters: Use
updates server URL and Use updates server URL only. By default, the
list of servers used for updating of the content filtration databases is
defined in the updcfg.xml file included into the product package. During
update Kaspersky Anti-Spam automatically selects a server from that list.
You can employ the Use updates server URL option to indicate the
address defined by the Updates server URL parameter should be
preferred as the source of updates. If the Use updates server URL only
option is used, then Kaspersky Anti-Spam will only update its content
filtration databases from the specified server; it will not attempt to use any
other addresses.
This parameter can be set to any of the following as a source of updates:
• a HTTP server. Record format: http://<server address>;
Page 54

54 Kaspersky Anti-Spam 3.0
• an FTP server. Record format: ftp://<server address>;
• a local directory. Record format: /<directory path>/.
The use of a local directory as a source of updates allows you to
arrange updating of several servers in a large network from a single
source.
The Proxy Server section contains parameters necessary for access to a proxy
server:
• Proxy address – address of the proxy server used for access to the
Internet. This parameter is specified in the following notation: http://
url:port, where url and port mean the address and port to use for
connection to that proxy. If the address is not specified, the updater will
use the value from the http_proxy environment variable.
• User – user name for access to the proxy server.
• Password – user password for access to the proxy server.
• Use proxy – instruction to use a HTTP proxy server for connection to an
update server.
4.4.2. Initiating an update
There are two methods to start an update of the content filtration databases:
• Automatic scheduled start;
• Manual launch from the command line.
You are advised to configure automatic scheduled updates as it will allow you to
maintain the up-to-date status of your content filtration databases ensuring most
efficient spam filtering.
In order to initiate an update manually, enter the following in the command line:
# /usr/local/ap–mailfilter3/bin/sfupdates [key]
where [key] is the command line option used to start the updating
script. Please refer to Appendix A.4.8 on page 110 for a complete list of
all parameters of the sfupdates script.
If the script starts without command line keys, new updates will be downloaded
from an update server; the application will verify their integrity, install new
databases and restart the filtration module to make it work with the new
databases.
During setup of Kaspersky Anti-Spam the installer by default configures cron to
run the updating script every 20 minutes for the mailflt3 user. If for some reason
Page 55

Managing the spam filtration server 55
you need to configure the task running the update script manually, perform the
following steps:
1. Use the following command to edit the cron task file for the
mailflt3 user:
# crontab –u mailflt3 –e
2. Add to the task file, for example, the following line:
*/20 * * * * /usr/local/ap-mailfilter3/bin/ \
sfupdates -q
Before you configure automatic launch of updates, make sure that the mailflt3
user has sufficient privileges to write to the following directories: /usr/local/ap-
mailfilter3/cfdata and /usr/local/ap-mailfilter3/conf.
4.5. Configuring the spam filtration
server
Pages of the Settings section contain the settings for the components of the
spam filtering server. You can switch between the pages using the links in the
Anti-Spam Engine menu:
• Common
• Process Server
master process during operation.
• Filtration Process
processes during operation.
• Check Options
• MTA Clients
• Reject Messages
case, when a message is rejected.
Parameters of the filtration server components can also be specified manually by
editing the filter.conf configuration file. Please refer to Appendix A.3.1 on
page 100 for a detailed description of the filter.conf configuration file.
– general parameters of the filtration server.
– parameters used by the ap-process-server filtration
– parameters used by the ap-mailfilter filtering
– spam recognition parameters.
– parameters of client plug-in modules.
– texts of notifications returned to message senders in
Page 56

56 Kaspersky Anti-Spam 3.0
4.5.1. Common filtration server parameters
Common parameters of the filtration server can be found in the Settings → Anti-
Spam Engine → Common page (see Fig. 18) that includes:
• Syslog facility – system log facility that will be used to record the
messages from the components of Kaspersky Anti-Spam. By default, the
product writes messages using the mail facility. However, if necessary,
the filtration server's administrator can select logging to one of the
following facilities: mail, user, local0 – local7.
After modification of the Syslog facility parameters configure the syslog
daemon to record the messages of the specified facility. This
configuration step has to be performed manually by editing the
/etc/syslog.conf file. Please refer to manual pages for syslogd and
syslog.conf for details.
The monitoring system uses the system log to display the messages
about the activity of the filtering server and its components. In order to
identify the directory where the necessary files are located, it uses the
parameter values from the /etc/syslog.conf configuration file.
Figure 18. Common settings of the filtration server
• Verbose level – the level of details recorded to the activity log generated
by the modules of Kaspersky Anti-Spam. This parameter may take the
following values: minimum, low, normal, high, debug, and more
debug. When setting the parameter value, please keep in mind that the
settings in the /etc/syslog.conf configuration file may impose additional
restrictions on the level of information details depending upon its facility
(syslog facility). In particular, the mail.info level specified by default in
Page 57

Managing the spam filtration server 57
FreeBSD for the mail facility decreases the level of details even if the
Verbose level parameter has been assigned the more debug value.
The more debug level of details causes additional load on the server
and may decrease its performance. Please use that level only for
debugging of application operation.
After modification of common parameters for the filtration server, click the Apply
button and restart the filtration server using the following command:
# /etc/init.d/kas3 restart
in Linux distributions;
# /usr/local/etc/rc.d/kas3.sh restart
in FreeBSD.
4.5.2. Parameters of the filtration master
process
The Settings → Anti-Spam Engine → Process Server page contains the
following settings for the filtration master process (see Fig. 19):
• Max. number of filtration processes – maximum number of filtering
processes running simultaneously. Default value: 10.
• Number of filtration processes at server start-up – the number of
filtration processes initiated when the filtering process starts. By default,
the parameter is set to 0. It means that the processes of the filtration
module will be initiated only when messages arrive.
• Number of spare filtration processes – maximum number of running
filtration processes expecting a request for analysis. If the number of
processes exceeds the specified limit, the application terminates unused
processes. Default value: 0.
After modification of common parameters for the master process, click the Apply
button and restart the filtration server using the following command:
# /etc/init.d/kas3 restart
in Linux distributions;
# /usr/local/etc/rc.d/kas3.sh restart
in FreeBSD.
Page 58

58 Kaspersky Anti-Spam 3.0
Figure 19. Parameters of the filtration master process
4.5.3. Parameters of the filtering processes
The Settings → Anti-Spam Engine → Filtration Process page (see Fig. 20)
contains the parameters of the ap-mailfilter filtering processes:
• Max. number of mail messages to be processed – maximum number
of mail messages that a single filtering process can serve. After
processing of a specified number of messages the filtering process
terminates and the application initiates a new process instead. The value
of that parameter may be adjusted depending upon the load on the
filtration server. Recommended value: 300.
• Max. number of mail messages randomization – value used by
Kaspersky Anti-Spam to define the maximum number of messages that a
single filtering process can serve. This value is selected at random from a
range with the smallest number defined by the Max. number of mail
messages to be processed parameter and the largest number
determined by a sum of the Max. number of mail messages to be
processed and Max. number of mail messages randomization
parameters. Thus, if the values of these parameters are 300 and 30
respectively, then each filtering process will serve from 300 to 330
messages. The setting allows you to avoid simultaneous completion and
subsequent start of a large number of new filtering processes during the
periods of peak load on server.
• Max. idle time (in seconds) – maximum time (seconds) during which a
filtering process may remain idle. If a filtering process receives no mail
messages for analysis within the specified interval, it discontinues its
activity. Default value: 300.
Page 59

Managing the spam filtration server 59
• Exit delay (in seconds) – maximum duration (seconds) of the delay
before termination of a filtering process after it receives a command to
stop. By default, the parameter is set to 0. It means that after arrival of a
respective command all filtering processes terminate immediately after
processing of the current message.
Figure 20. Parameters of the filtering processes
4.5.4. Spam recognition parameters
The Settings → Anti-Spam Engine → Check Options page (see Fig. 21)
contains the recognition parameters for the ap-mailfilter filtering processes:
• Number of 'Received' headers to be parsed while retrieving ip
address (for use in DNSBL checks) – parameter indicating that the
application must check intermediate servers using DNSBL. As a rule,
when the filter checks the sender's IP address, it uses for that purpose
the IP of the server, from which the message arrived at the filtering
server. However, if the message in transit passes one or several
intermediate servers, the original sender's IP turns out to be hidden. To
check the IP addresses of intermediate servers as well as the final one,
use this parameter to specify the number of relay servers to check.
Analysis will use the Received headers. The 0 value means that the
application will not analyze the Received headers.
A higher value tells the filtration server to check a greater number of
intermediate servers increasing the probability of recognizing spam
messages that arrive via several intermediate mail servers. At the same
time, it also generates additional load on the filtration server and can
lead to filter false positives.
Page 60

60 Kaspersky Anti-Spam 3.0
• Overall timeout of all DNS requests (in seconds) – time interval
(seconds) during which the application will wait for a response from DNS
server while running its DNS-based checks. Default value: 10.
• Check MS Word and RTF files – parameter that enables / disables the
analysis of text attachments in Word Document (doc) and RTF formats.
• UDS enabled – parameter that enables / disables the mode of UDS-
based scanning of messages. The check allows timely blocking of spam
mail before updates to the content filtration databases are downloaded.
You are advised to disable UDS-based checks only in case when that
method considerably decreases the filtering server performance or when
there is no way to organize the interaction between your filtration server
and UDS servers of Kaspersky Lab.
For details about UDS please see section 2.2.4 on page. 18.
• Timeout for receiving response from UDS server (in seconds) –
timeout for establishment of a connection between the filtering server
and a UDS server. If the filtration server does not receive response from
UDS within the specified time interval, it will attempt to connect to
another UDS server of Kaspersky Lab.
Figure 21. Spam recognition parameters
Page 61

Managing the spam filtration server 61
4.5.5. Client module settings
The Settings → Anti-Spam Engine → MTA Clients page (see Fig. 22) contains
the settings for the client plug-in modules responsible for interaction between the
e-mail server and the anti-spam engine:
• Filtering size limit (KB) – maximum size of messages (KB) to be
processed by the filtration server. If a message exceeds the specified
size, the filtration server will not process it. Default value: 500.
• On filtering error – client module response to errors occurring in the
interaction with the filtration server. The parameter can take the following
values:
• accept message – in case of an error, the message will be
transmitted to the recipient without processing by the filtration
server.
• reject message – message that has caused an error during
processing will not be delivered.
• generate temporary error – the message will not be delivered.
The application will return to the sender a notification about a
temporary mail server error. As a rule, in that case the sender's
mail server after some time tries again to send the message.
• Default domain – name of the mail domain to be substituted into
addresses where mail domain is omitted. E.g., if mycompany.com is
specified as the default domain, then the someuser address will be
interpreted as someuser@mycompany.com.
• Connection timeout (in seconds) – timeout (seconds) for establishment
of a connection to the filtration server by the client module. Default value:
40.
• Data exchange timeout (in seconds) – timeout (seconds) for
performance of network read-write operations during data exchange
between the filtration server and a client module. Default value: 30.
If regular errors occur in the operation of the anti-spam engine, please
contact the Technical Support service of Kaspersky Lab. Contact
information of the Technical Support service can be found in the
Appendix Chapter 6 on page 78.
Page 62

62 Kaspersky Anti-Spam 3.0
Figure 22. The settings of client modules
4.5.6. Notifications about rejected
messages
If the Reject this message action has been specified as the action over
messages with a specific status, filtration server will not route such messages to
their original recipients. Instead, it returns to message sender a notification
informing that mail delivery is impossible.
Filtration server uses two types of notifications. The use of messages of a certain
type is determined by the product settings and recognition results.
The first type of notifications is Reject message. Such message is transmitted to
the sender immediately during an SMTP session together with an error code
informing that the message has not been delivered. The example of an SMTP
session below contains a Reject message text:
Server: 220 mail.mycompamy.com ESMTP
Client: HELO spamhost.whatever.com
Server: 250 mail.mycompamy.com
Client: MAIL FROM: <spamer@whatever.com>
Server: 250 Ok
Client: RCPT TO: <someuser@mycompany.com>
Server: 250 Ok
Client: DATA
Server: 354 End data with <CR><LF>.<CR><LF>
Page 63

Managing the spam filtration server 63
Client: >>>
Client: >>> Message text ...
Client: >>>
Client: .
Server: 550 The message is rejected by spam filtering
engine.
Client: QUIT
Server: 221 Bye...
Anti-spam engine will only use Reject messages when message delivery to all
of the specified recipients is forbidden according to the scanning results.
If a message is meant for several recipients and the filtration policies allow its
delivery to at least one of them, then the server will respond during SMTP
session that the message has been accepted. Then it will return to the sender a
Bounce message with information about the recipients whom it did not deliver
the message.
You can edit the text of these messages on the Settings → Anti-
Spam Engine → Reject Messages page of the Control Center (see Fig. 23).
Figure 23. Reject/bounce message editing page
4.6. Control Center settings
The Settings → Maintenance → Control Center page (see Fig. 24) contains
the parameters, which you can use to:
Page 64

64 Kaspersky Anti-Spam 3.0
• Specify the address where the monitoring system will send its messages
and the messages about errors that have occurred during execution of
scripts by the cron service (the Send alerts to parameter).
• Enable / disable monitoring of the kas-thttpd HTTP server activity (the
Monitoring of kas-thttpd daemon parameter).
• Enable / disable monitoring of the activity of the
kas-milter client module used for interaction with Sendmail (the
Monitoring of kas-milter daemon parameter).
Messages generated in the process of kas-thttpd and kas-milter monitoring
appear in the Monitoring → Anti-Spam Engine page (see section 4.8.1.1 on
page 69).
Figure 24. Control Center settings
4.7. Managing the license keys
The opportunity to use Kaspersky Anti-Spam is determined by the availability of
a license key. The key is included into the product package and entitles you to
use the application since the date of key purchase and installation.
Kaspersky Anti-Spam DOES NOT FUNCTION without a license key! All e-mail
messages will be transmitted without filtering.
A license key contains all necessary information pertaining to the product that
you have purchased, such as key type, its expiry date, information about
distributors, etc.
In addition to the right to use the application during the licensed period, you
receive the following benefits:
• Technical support available 24 hours a day.
Page 65

Managing the spam filtration server 65
• Updates to Kaspersky Anti-Spam databases.
After the license expires, the functionality of the application will still be preserved
except for the possibility to update content filtration databases. You will still be
able to filter spam, but you will be unable to use the databases issued after your
license expiration date. Consequently, you may be unable to filter new spam
types efficiently.
Therefore, it is essential to renew your license to use Kaspersky Anti-Spam in a
timely manner. You can also install a backup key, which the application will start
using as soon as the current key expires.
Control Center can be used to perform all operations related to the management
of installed license keys.
4.7.1. Viewing the license information
You can view the license information and manage the license keys on the
License → License Keys page (see Fig. 25).
Figure 25. Information about Kaspersky Anti-Spam license
The upper part of the page contains an Active License Information section,
which displays the following information:
• Name of the installed product.
• Type of the currently active license.
• License validity period.
Page 66

66 Kaspersky Anti-Spam 3.0
Information in the last two lines allows system administrators to control the
compliance with the terms of the purchased license (validity period, specified
restrictions).
Depending upon the current status, the icon in the left part of the line may look
as follows:
– License terms are observed.
– The product functions in close proximity to the restrictions specified
in the license or the license will expire within two weeks.
– The license has expired or the limitations specified in the license
(e.g., the volume of processed mail traffic) have been exceeded.
In two latter cases the line will also contain an explanation.
Below the informational block you can see a list of installed license keys for
Kaspersky Anti-Spam with brief information about each of them.
4.7.2. Installing a new license key
To install a new license key, the administrator can either use the Control Center
or install the key locally from the command line.
In order to install a new license key using the Control Center, perform the
following steps:
1. Open the license keys management page
License → License Keys.
2. Use the field in the lower part of the page under the Install a New
License Key section to specify the path to your license key file or
click the button to the right of the entry field to navigate the file
system and select the necessary file.
3. Click Apply.
In order to install a new license key locally using the command line, run the
following command:
# /usr/local/ap-mailfilter3/bin/install-key <key>
where key stands for a path to the file containing the license key.
If you wish to install a new license key before the current key expires, you can
add the new key as a reserve one. Reserve key starts working when the current
key expires. The license period of a backup key starts from the moment of its
activation. Only a single reserve key can be installed.
Page 67

Managing the spam filtration server 67
4.7.3. License key removal
In order to remove the current and reserve license keys, enter the following in the
command line:
# /usr/local/ap-mailfilter3/bin/remove-key -a
To remove your reserve license key, enter the following in the command line:
# /usr/local/ap-mailfilter3/bin/remove-key -r
License keys cannot be removed using the interface of Control Center.
4.8. Monitoring the filtration server
activity
Kaspersky Anti-Spam includes a system monitoring the status of its individual
components, which allows efficient control of product operation and administrator
notification via the interface of the Control Center about troubles occurring in
system functioning.
4.8.1. General product status information
The Monitoring → General Status page provides brief information about
Kaspersky Anti-Spam and its main components for the system administrator (see
Fig. 26).
For each of the monitored components, in addition to the status data, the page
may contain information about occurrence of certain events pertaining to that
component.
Icons next to the title of each parameter serve as additional indicators. Icon view
reflects the status of the monitored component:
– Error: component failure or an exceeded value specified for the
monitored parameter.
– Warning: certain issues in component operation, which are not fatal for
the product functioning as a whole or parameter value close to its
specified limit value.
– Normal status: component functions correctly or monitored parameter
has an allowed value.
Page 68

68 Kaspersky Anti-Spam 3.0
Figure 26. General information about the status of Kaspersky Anti-Spam components
The System Information section contains the following information about the
server where Kaspersky Anti-Spam is installed:
• Host Name – server's name.
• System – name, version and architecture type of the operating system
being used.
• Load Average – numeric parameter reflecting the load on the server.
Please refer to the manual pages for the top and uptime utilities for details
on that parameter.
Kaspersky Anti-Spam section contains a summary on the product and the
status of its key components. The section consists of the following fields:
• Product – full name of the installed product.
• Version – version and build number of the filtration module being used.
• Anti-Spam Engine – current status of the filtration server.
• Updates – the status of the content filtration databases and the updating
system.
• License – status of the licensing module.
Page 69

Managing the spam filtration server 69
4.8.1.1. Detailed information about the Anti-
Spam Engine
Clicking the Anti-Spam Engine link in the Monitoring menu opens a
corresponding page containing detailed information about the status of the
filtration server's components (see Fig. 27).
Figure 27. The page for monitoring of the filtration server's core
The Anti-Spam Engine section consists of the following fields:
• Version – version and build number of the filtration module being used.
• ap-process-server – status of filtration master process. During normal
process operation the line contains information about process identifier
(pid).
• ap-mailfilter – status of the filtering processes. During normal operation
the line also contains information about the number of currently running
processes.
• ap-spfd – SPF daemon status. During normal daemon operation the field
displays the number of currently running filtering processes.
• kas-thttpd – status of the HTTP server used by the Control Center.
• Monitoring & Statistics – information about the operation of scripts
pertaining to statistics monitoring and processing. In addition, the product
Page 70

70 Kaspersky Anti-Spam 3.0
controls the cron tasks running these scripts for mailflt3 user. Please
refer to Appendix A.6 on page 115 for details.
The Last Anti-Spam Engine Events section contains a log of messages from
the filtration server components appended to the system log (syslog). The
messages are arranged in the descending order according to their date; they are
supplemented by respective icons indicating the level of message importance.
The administrator can use the View drop-down list to define the category of
messages, which will be displayed in the log. The drop-down list contains the
following values:
• All messages – all possible messages will be displayed.
• Notices, Warnings and Errors – the page will display all messages
except for informational ones.
• Warnings and Errors – the page will only display messages about fatal
errors and warnings.
• Errors only – only messages about fatal errors will be displayed.
4.8.1.2. Detailed information about the updater
module
In order to open the page containing information about the updating module and
the status of the content filtration databases, use the Updates
Monitoring menu (see Fig. 28).
link in the
Figure 28. Updater module monitoring page
Page 71

Managing the spam filtration server 71
The Anti-Spam Updates section in the upper part of the page consists of the
following fields:
• Automatic Updates – field indicating whether automatic updating of the
content filtration databases is enabled. Please see section 4.4.1 on
page 51 and Appendix A.6 on page 115 for details about configuration of
the script updating the content filtration databases.
• Anti-Spam Database Id – information about installed content filtration
databases: date and time of database release and the time of recent
updates.
• Last Update – date and time of the last update to the content filtration
databases. The monitoring system displays a warning if the databases
have not been updated for a long time.
The Last Updater Events section contains a log of messages returned by the
product updating system and appended to the system log (syslog). The
messages are arranged in the descending order according to their date; they are
supplemented by respective icons indicating the level of message importance.
The administrator can use the View drop-down list to define the category of
messages, which will be displayed in the log. The values in the drop-down list
and their meaning are identical to the ones described in the section about the
filtration server monitoring page (see section 4.8.1.1 on page 69).
4.8.1.3. Detailed information about the licensing
module
The Monitoring → License page provides to the administrators information
about the current license and offers a log of messages returned by the licensing
module (see Fig. 29).
The Monitoring:License section in the upper part of the page consists of the
following fields:
• Product – name of the installed product.
• License – current license and information about its limitations.
• Valid till – date when the license will expire. The monitoring system will
begin to produce warnings for the administrator one month before the
license validity period expires.
• License Daemon – status of the licensing service. During normal service
operation the field also contains its process identifier (pid).
Page 72

72 Kaspersky Anti-Spam 3.0
Figure 29. The page for monitoring of the licensing module
The Last License Daemon Events section contains a log of messages returned
by the product licensing module and appended to the system log (syslog). The
messages are arranged in the descending order according to their date; they are
supplemented by respective icons indicating the level of message importance.
The administrator can use the View drop-down list to define the category of
messages, which will be displayed in the log. The values in the drop-down list
and their meaning are identical to the ones described in the section about the
filtration server monitoring page (see section 4.8.1.1 on page 69).
4.8.2. Monitoring system messages and
reports
In addition to the monitoring tools available within the Control Center, Kaspersky
Anti-Spam also includes the sfmonitoring script that provides for constant
monitoring of the anti-spam engine status. The start of that script is performed
automatically using the cron service. After launch, sfmonitoring checks the
filtration server status and sends appropriate notifications to the administrator
whenever it detects any problems.
The monitoring script sends to the administrator messages of two types:
• Messages about new detected errors – a message about detection of a
problem in the operation of the filtration server including a description of
the situation that has occurred. The error message will be sent once. If
Page 73

Managing the spam filtration server 73
the problem is not resolved, it will also be included into the report on
known issues sent once a day.
• Daily reports of known problems – a list of all errors and warnings
known at the moment when the report was sent. The product includes
into the report both new errors and known issues, which have not been
resolved before report generation. The report will be sent once a day at
midnight (in accordance with the server clock settings). In order to force
report delivery, run the following command as root:
# su –m mailflt3 -c '/usr/local/ap-ailfilter3/control/
bin/sfmonitoring –m'
To output the report to server's console:
# su –m mailflt3 -c '/usr/local/ap-ailfilter3/control/
bin/sfmonitoring –p'
If Kaspersky Anti-Spam is installed on a server running RedHat, use the
following command to start the sfmonitoring, utility:
# su – –m mailflt3 -c '/usr/local/ap-mailfilter3/ \
control/bin/sfmonitoring -<parameters>'
The messages generated by the monitoring system will be sent to the address
specified on the Settings → Maintenance → Control Center page (see
section 4.6 on page 63).
4.9. Kaspersky Anti-Spam statistics
In order to perform quantitative analysis of product operation results, the Control
Center includes a module that collects statistical data about processed
messages and displays the obtained information within the interface of the
Control Center.
Statistical data are collected and processed by special scripts started by the cron
service (please refer to Appendix A.6 on page 115 for details about the scripts).
Processed results will be displayed as diagrams on the pages of the Statistics
section (see Fig. 30).
Page 74

74 Kaspersky Anti-Spam 3.0
Figure 30. The Statistics page
Each of the pages in the Statistics section contains statistical information for a
specific period of time. Links to available pages are located in the Period menu
in the right part of the Statistics window:
• Last Day – statistics of processed messages for the last 24 hours.
• Last Week – statistics of processed messages for the last 7 days.
• Last Month
• Last Year
The upper part of the page contains a table with a summary of the number and
size of processed messages of various types.
Below the table the product displays a graph demonstrating the distribution of
volume between detected messages of various types (for the selected period),
and a pie chart that illustrates the shares (in percents) of the volume made up by
various message types.
– statistics of processed messages for the last 30 days.
– statistics of processed messages for the last 365 days.
Page 75

Managing the spam filtration server 75
On the circular graph the volume of email messages, that have received a
similar status as a result of spam recognition, is represented by a segment of
a certain color. For the purpose of visualization the segments, which size is
insignificant comparing to another segments, are combined in a single
segment Other.
The Messages and Bytes links in the lower left corner allow you to select the
measurement units used for output of statistics for the processed e-mail traffic,
i.e. messages or bytes respectively.
The Export data CSV | Html links in the lower right corner are used to export the
statistical data in CSV (comma-separated values) format or as a HTML table.
Page 76

CHAPTER 5. UNISTALLING
KASPERSKY ANTI-SPAM
To uninstall Kaspersky Anti-Spam, you must be a privileged (root) user. If you
are currently logged under a user account with lesser privileges, log on as root.
The uninstallation process will automatically stop all the services of
Kaspersky Anti-Spam!
When you are uninstalling Kaspersky Anti-Spam, the application services will be
stopped, and all files and directories created during installation will be deleted.
However, files and directories created or modified by the administrator, such as
the configuration file, content filtration databases, license key file, will remain.
The uninstaller will also restore the mail server parameters used before
installation of Kaspersky Anti-Spam.
If the configuration file of the mail server has been modified after Kaspersky
Anti-Spam installation, automatic restoration of earlier settings will be
impossible and the administrator will have to remove manually the changes
introduced by the installer during product setup.
The mailflt3 user account and the mailflt3 group corresponding to it will not be
deleted. The administrator can remove them manually.
There are several ways to run the uninstall procedure, depending on the
package manager you used:
• If you installed the application from the .rpm package, type the following in
the command line to uninstall Kaspersky Anti-Spam:
# rpm –e kas-3-<package version>
• If you installed the application from the .deb package, type the following in
the command line to uninstall Kaspersky Anti-Spam:
# dpkg –P kas-3
• If you installed the application from a .tbz package, type the following in
the command line to uninstall Kaspersky Anti-Spam:
# pkg_delete kas-3-<package version>
Page 77

Unistalling Kaspersky Anti-Spam 77
Since product integration with Communigate Pro mail server is performed
manually, delete from Communigate Pro configuration the settings pertaining
to Kaspersky Anti-Spam before you uninstall the product (see section A.2.7 on
page 97).
If you wish to return the original mail server settings used before Kaspersky AntiSpam installation without removing it, use the MTA-unconfig.pl script located in
the /usr/local/ap-mailfilter3/bin directory. After launch, the script will restore the
original parameters of the mail server used before Kaspersky Anti-Spam has
been installed.
However, the said script cannot be used to restore the original mail server
configuration in the following cases:
• If the mail server configuration file has been modified after Kaspersky
Anti-Spam setup.
• If the server uses Exim with kas-exim client plug-in module.
• If the server uses Communigate Pro.
In the above cases the administrator will have to delete manually the changes
added to the mail server configuration. Please refer to A.2 on page 83 for a more
detailed description of the changes to the configurations of mail servers during
Kaspersky Anti-Spam installation.
Page 78

CHAPTER 6. FREQUENTLY
ASKED QUESTIONS
This chapter is devoted to questions most frequently asked by users regarding
the installation, setup, and operation of the application.
A regularly updated Knowledge Database containing answers to most frequent
questions is available at the web site of Kaspersky Lab at
http://support.kaspersky.com/anti_spam3. You can also use it to find answers
to questions that are not mentioned below. In addition, you can contact the
Technical Support service using the HelpDesk web form at
http://www.kaspersky.com/helpdesk.
Question: Why do I need a license key? Will my application work without it?
Kaspersky Anti-Spam will not function without a license key.
If you are still undecided whether or not to purchase a licensed copy of
the application, we can provide you with a temporary key file (trial key),
which will only work for two weeks or for a month. When this period
expires, the key will be blocked.
Question
Question: Why regular updates are required?
: What happens when my license expires?
After the expiration of the license, Kaspersky Anti-Spam will continue
operating, but its database-updating feature will be disabled. The
product will continue filtering of mail traffic, but it will be unable to filter
new spam types.
When this happens, inform your system administrator or contact for
license extension the dealer you purchased your copy of Kaspersky
Anti-Spam from or Kaspersky Lab Ltd. directly.
Spam is a serious problem for all network users being a direct and
obvious threat to businesses. According to the latest data, the volume of
spam in the Internet is about 75-80 percents of the total mail volume
and new types of spam appear constantly. Fast response to
appearance of such unwanted message types and blocking of their
spreading requires timely updates to the content filtration databases
employed for spam filtering. New updates to the content filtration
databases are made available on the update servers of Kaspersky Lab
every 20 minutes.
Page 79

Frequently asked questions 79
Question: The application does not work. What should I do?
If you have encountered a problem while using the application, first of
all, please make sure that the solution to this problem is not described in
this document (in particular, in this section) or at the
Services/Knowledge base section of the Kaspersky Lab's web site
(http://support.kaspersky.com/anti_spam3
).
If you have not found the solution to your problem in the relevant
documentation and the Knowledge base on the web site, we
recommend that you contact Kaspersky Lab's Technical Support.
For solution of urgent issues please call us using the phone numbers in
the Contact Us part of this document (see section C.2 on page 131).
User support is available 24 hours a day in the Russian, English, French
and German languages. Please note that you have to be a registered
user to be to receive assistance and you must provide to the support
technician your registration number (received with a retail box) or
information about your purchase (in case if you have bought the product
online).
In addition, you can contact the Technical Support service by filling a
special form (http://www.kaspersky.com/helpdesk)
.
Please fill in the web form carefully. Enter precise information about the
product of Kaspersky Lab that you are using, your registration data and
try to describe your problem clearly. Specify the following information in
mandatory fields:
• Request type. Select the category to which your request
belongs.
• Name of the product of Kaspersky Lab that you are using (e.g.,
Kaspersky Anti-Spam 3.0).
• Request text. Describe the problem that you have encountered
while using the product of Kaspersky Lab.
• Registration information. Specify the registration type: license
key (if you have purchased a retail box) or online order (in
case if you have bought the product online). Depending upon
the selected registration type, use the field below to specify the
serial number of your license or the number of your Internet
order.
Information about the serial number of Kaspersky Anti-Spam
can be found on the License page of the Control Center (see
section 4.7.1 on page 65).
• E-mail address that the specialists of our Technical Support
service can use to contact you.
Page 80

80 Kaspersky Anti-Spam 3.0
In the next window of the web form enter your contact information, type
the code of protection against automatic registration and click the
Submit button. Experts at the Technical Support service will carefully
examine your problem and help you as soon as possible.
Question
: How can I make sure that Kaspersky Anti-Spam actually filters spam
messages?
In order to check filtering, you can use the GTUBE (Generic Test for
Unsolicited Bulk Email) special template. The test of spam filtration
using GTUBE is similar to the validation of anti-virus functionality using
EICAR test virus.
Create a mail message containing the following string (without spaces
or hyphenation):
XJS*C4JDBQADN1.NSBN3*2IDNEN*GTUBE-STANDARD-ANTI-UBETEST-EMAIL*C.34X
and send it to an address protected by Kaspersky Anti-Spam. As a
result of spam recognition, the message will be assigned the SPAM
status and the product will apply to it the action defined in the policy
assigned to the recipient's group.
Question
: When the load on server is high, Kaspersky Anti-Spam does not filter
spam. Processed messages include the following header: X-SpamTest-Info: Not
processed
One of the most likely causes of this problem is the fact that during
intensive processing of large traffic volume the filtering processes of the
application fail to connect to the licensing module (kas-license) within a
specified timeout period to verify request compliance with license
conditions.
To eliminate the problem, you are advised to increase the values of
timeouts for connection and data exchange with the kas-license module
defined by the FilterLicenseConnectTimeout and
FilterLicenseDataTimeout parameters respectively. If the described
actions have not resolved your problem, please contact the Technical
Support service of Kaspersky Lab (see above).
Page 81

Frequently asked questions 81
Question: Kaspersky Anti-Spam does not filter spam. Processed messages
contain the following header: X-SpamTest-Info: No License
This problem is caused by expired license or absence of an installed
license key. Make sure that the license key is installed and it has not
expired. Please refer to section 4.7 on page 64 for details on
management of license keys.
Question
: Kaspersky Anti-Spam does not check IPv6 IP addresses obtained
from Received headers.
Kaspersky Anti-Virus 3.0 does not support checking of IP addresses
corresponding to the IPv6 standard.
Question
: An attempt to integrate the product with Exim using the MTA-config.pl
script fails. The following message appears on the server's console:
Your Exim configuration file /usr/local/etc/exim/configure
already contains kas-exim local_scan configuration
parameters. If your Exim hasn't been integrated with kasexim, remove all local_scan parameters and try again.
This message means that integration with Exim has already been
performed using the kas-exim plug-in module. The MTA-config.pl script
attempts to install the kas-pipe plug-in module. Remove the settings
pertaining to interaction with the kas-exim module (please refer to
section A.2.5 on page 94 for details on using kas-exim) from Exim
configuration and repeat your integration attempt.
Page 82

APPENDIX A. ADDITIONAL
INFORMATION ON
KASPERSKY ANTI-SPAM
A.1. Location of product files in the
file system
After the installation of Kaspersky Anti-Spam, the distribution files will be saved
to the following locations:
/usr/local/ap-mailfilter3/ – the main directory where the product is installed. It
includes:
• bin/ – the directory where executable files and scripts are stored.
• cfdata/ – the directory where content filtering databases and updates for
Kaspersky Anti-Spam modules are stored.
• conf/ – the directory where configuration files are stored. This directory
includes the following subdirectories:
• def/ – the directory that contains files required for compiling
message filtering policies, including source files of content
filtering databases and files containing the information on
filtering policies;
• data/ – the directory where configuration binary files are stored;
• src/ – the directory containing temporary representation of
filtering rules used in compilation of rules;
• tmp/ – the directory that stores temporary files used when
working with configuration data.
• control/ – the directory that contains Control Center’s files. It includes the
following subdirectories:
• bin/ – the directory containing executable files and scripts of the
Control Center;
• lib/ – the directory containing library files used by the Control
Center;
Page 83

Appendix A 83
• stat/ – the directory containing data files of log processing and
statistics gathering system;
• tmp/ – the directory that stores temporary files of the Control
Center;
• www/ – cgi-scripts and graphic files used by the Control
Center’s web interface.
• etc/ – the directory containing Kaspersky Anti-Spam configuration files;
• lib/ – the runtime libraries;
• log/ – the directory for storing filtering server’s log, which is used for
processing statistics;
• run/ – the product’s working directory. This directory is also used for
storing pid-files of running processes of filtering server;
• src/ – the directory containing source files of the kas-exim module.
A.2. Client modules for mail servers
Kaspersky Anti-Spam includes the following client modules used to integrate the
product with different mail servers:
• kas-milter – a client module for Sendmail mail server;
• kas-pipe – a universal client module; used for Postfix and Exim mail
servers by default;
• kas-exim – a client module for the Exim mail server (alternative version);
• kas-qmail – a client module for the Qmail mail server;
• kas-cgpro – a client module for the Communigate Pro mail server.
Integration of the product with a mail server is performed by running special
configuration scripts during the installation of Kaspersky Anti-Spam.
This appendix provides detailed information on operation of client modules, their
configuration files, and configuration specifics of mail servers.
A.2.1. Interaction of client modules with
the filtering server
A client module interacts with the filtering server according to the following
algorithm:
Page 84

84 Kaspersky Anti-Spam 3.0
1. The client module receives a mail message from the mail server and
sends a request for connection to the filtering server.
2. The master process selects an already running filtering process or creates
a new one, and establishes a connection between the client module and
the given filtering process.
3. The client module sends a message for checking over the established
connection and receives the message processing results from the filtering
process.
4. In accordance with the received processing result the client module
modifies the message – if required – and returns it to the mail server.
Interaction between the client module, filtering master process and filtering
process is done through a network or local socket using an internal protocol.
The use of a network socket allows placing the filtering server and the mail
server with integrated client module on different servers. And when there is not
much mail traffic to process, the dedicated filtering server can serve a number of
mail servers. This configuration requires manual adjustment of settings that
control interaction of Kaspersky Anti-Spam and mail server components.
A.2.2. Global settings of client modules
Kaspersky Anti-Spam version 3.0 keeps client module settings in the filtering
server’s global configuration file – filter.conf - which is located in the /usr/local/ap-
mailfilter3/etc/ directory.
The following settings are common for all client modules:
• ClientConnectTo – the socket address for interaction with the filtering
server. An entry in the format tcp:<host>:<port>, where <host> is IP
address of the filtering server, <port> is the connection port—points to
the network socket, and an entry in the format unix:<path_to_file>,
where <path_to_file> is the path to file—points to a local socket.
• ClientConnectTimeout – the maximum waiting time (in seconds) when
attempting to connect to the filtering server.
• ClientDataTimeout – the maximum waiting time (in seconds) when
exchanging data with filtering server.
• ClientOnError – the error handling mode (impossible to establish a
connection to the filtering server, timeout during data exchange, etc.).
Possible values:
• reject – do not accept message and return the error code 5xx
during SMTP session;
Page 85

Appendix A 85
• tempfail – temporarily reject a message and return the error
code 4xx during SMTP session (used by default);
• accept – accept the message.
When using Sendmail mail server, accept denotes that a
message should be accepted without further processing by
other Milter-filters employed by the server after Kaspersky
Anti-Spam.
• ClientDefaultDomain – the mail domain name set-up to addresses which
have no mail domain specified. Example: if you specify the domain
mycompany.com as the default mail domain, then the address someuser
will be interpreted as someuser@mycompany.com. If you did not define
this parameter, then the domain name substitution is not performed (by
default this parameter is not defined).
• ClientFilteringSizeLimit – maximum message size (in kilobytes) that can
be passed to the filtering server. The e-mail messages of a greater size
are allowed to pass without processing by filtering server. The default
value is: 500.
• ClientMessageStoreMem – minimum message size (in kilobytes), at
which storing temporary data on disk is allowed. This mode allows
controlling the amount of used RAM. To store all data in RAM, set this
parameter to 0 (the default value).
• ClientTempDir – path to the temporary files storage directory.
A.2.3.
kas-milter
– a client module for
the Sendmail mail server
For integration with Sendmail mail server, Kaspersky Anti-Spam uses the kasmilter module. Interaction of the client module with the mail server is done by
means of the libmilter library.
The Figure 31 illustrates the modules interaction scheme when Kaspersky AntiSpam is used with Sendmail.
Figure 31. Interaction of Kaspersky Anti-Spam with the Sendmail mail server
Configuration of interaction between a client module and mail server can be
performed either using special scripts (see item 3.5 on page 27), or manually.
Page 86

86 Kaspersky Anti-Spam 3.0
Manual configuration of the client module is done by editing the filter.conf
configuration file located in the /usr/local/ap-mailfilter3/etc/ directory. The
following is a fragment of this file containing the client module settings:
ClientConnectTo tcp:127.0.0.1:2277
ClientConnectTimeout 10
ClientDataTimeout 30
SendMailAddress unix:/var/run/kas-milter.socket
ClientOnError accept
ClientFilteringSizeLimit 500
ClientDefaultDomain localhost
In addition to the settings described earlier in the appendix A.2.2, for the kasmilter module you can set the SendMailAddress parameter in the filter.conf file,
which defines the socket for interaction with Sendmail.
To set up Sendmail for interaction with kas-milter, add the following lines to the
sendmail.cf configuration file:
Xkasfilter,S=local:/var/run/kas-milter.socket,
T=C:10s,S:20s, R:30s
O InputMailFilters=kasfilter
The detailed information on configuring sendmail.cf filters is available in the
Sendmail documentation.
Generally, when operating system is loading, Sendmail starts before
Kaspersky Anti-Spam. Because of this, Sendmail cannot find the interaction
socket and writes the following warning message to the system log:
WARNING: Xkas: local socket name <socket_file> missing
This warning does not indicate a failure because the missing socket file is
created by the kas-milter module after execution of Kaspersky Anti-Spam.
The specifics of using kas-milter module with the Sendmail mail server:
• kas-milter does not create copies of messages during processing; which
means that if the message is sent to a number of recipients belonging to
different groups with different processing rules, then the message is
processed according to the settings defined in all groups. Example:
A message is sent to the alice@mycompany.com and
bob@mycompany.com
e-mail addresses. These e-mail addresses belong
to the sales and managers groups respectively. According to the filtering
results, the message received the Spam status for the sales group and
Not detected for the managers group. According to the rules defined for
the sales group, the subject line of each message recognized as spam
(having the Spam status assigned) is modified with the tag [!! SPAM],
Page 87

Appendix A 87
and the rules defined for the managers group state that all messages
with Not Detected status should be accepted. As a result, the mail
message with [!! SPAM] tag in the subject line is delivered to the both
recipients. The message contains the following headers:
X-Spamtest-Status-Extended: SPAM
X-Spamtest-Status-Extended: Not detected
X-Spamtest-Group-ID: 00000002
X-Spamtest-Group-ID: 00000001
Which indicate that the message was processed in accordance with the
rules defined for groups with identifiers 1 and 2 (identifiers of sales and
managers groups), and the message was assigned SPAM and
Not Detected statuses. For detailed information on the headers, see the
item A.5 on page 112.
• If the message is addressed to several recipients and delivery is
prohibited for some of them (reject message action selected), and for
others is allowed (accept message action selected), then the bounce
message is not sent to the individual recipients;
• Since there is no way to limit the number of simultaneous connections to
the port 25 in Sendmail, then the number of running ap-mailfilter filtering
processes depends on the number of incoming connections, which can
cause additional server load.
A.2.4.
kas-pipe
– a client module for the
Postfix and Exim mail servers
The kas-pipe module is a universal client module of Kaspersky Anti-Spam and it
can be used for integration with any of the supported mail servers.
In the default installation, kas-pipe is used for integration with Postfix and Exim.
The kas-pipe module accepts mail, and returns it to the mail server after filtering
through the SMTP or LMTP protocols.
Execution of kas-pipe module is initiated by an external application (for example,
mail server). For mail transfer a network or local socket is used. Also, it is
possible to run the accepting application with the fork and exec commands.
The Figure 32 illustrates the module interaction scheme when Kaspersky AntiSpam is used with kas-pipe.
Page 88

88 Kaspersky Anti-Spam 3.0
Figure 32. The kas-pipe module usage scheme
This scheme can be implemented with any mail server that either supports
running a second instance with different settings, or delivers via LMTP protocol,
or delivers all mail to the specified mail server through SMTP.
Configuration of client module interaction with mail server can be performed with
special scripts (see the item 3.5 on page 27), and manually.
Manual configuration for a client module is done by modifying the filter.conf
configuration file located in the /usr/local/ap-mailfilter3/etc/ directory. The
following is a fragment of that file listing the client module settings:
ClientConnectTo tcp:127.0.0.1:2277
ClientConnectTimeout 10
ClientDataTimeout 30
PipeInProtocol lmtp
PipeOutProtocol lmtp
PipeOutgoingAddr exec:/usr/sbin/sendmail –bs
PipeMultipleMessagesAllowed yes
ClientDefaultDomain localhost
ClientOnError accept
ClientFilteringSizeLimit 500
In addition to the settings described earlier in the appendix A.2.2, for the kasmilter module you can set the following parameters in the filter.conf file:
• PipeInProtocol – the protocol used for receiving mail messages. The
possible values are smtp, lmtp.
• PipeOutProtocol – the protocol used for sending processed mail
messages. The possible values are smtp, lmtp.
• PipeHELOGreeting – the domain name used by the
kas-pipe module for a greeting during SMTP session. The default value is
kas30pipe.+ <server domain name>.
Page 89

Appendix A 89
• PipeOutgoingAddr – socket address used for transfer of processed
messages. An entry in the format tcp:<host>:<port>, where <host> –
filtering server’s IP address, <port> – connection port, points to a network
socket. and entry in format unix:<path_to_file>, where <path_to_file> –
the path to socket file, points to a local socket. An entry in exec:/<path to
the program executable> – <parameters> format points to the program
that will be run for transferring messages.
• PipeOutConnectTimeout=5...600 – timeout for establishment of
connection to a socket or program used for transfer of processed
messages (defined by the PipeOutgoingAddr parameter).
• PipeOutDataTimeout=5...600 – timeout for transfer of data through a
socket or program defined by the PipeOutgoingAddr parameter.
• PipeMultipleMessagesAllowed – creation of message copies in cases
when filtering results are different for different users. The possible values
are yes, no.
• PipeUseXForward – support for the XForward command that allows
retrieving the IP address of the server from which a message came (only
when Postfix is used). Possible values are yes, no.
• Pipe8BitHack – use of 8BITMIME extension. Possible values are yes,
no. Specify yes if your mail server is configured for support of 8BITMIME
extension.
• PipeBufferedIO – use of buffering during processing of mail messages.
Buffering allows you to speed up message processing by using additional
volumes of RAM. Possible values are yes, no.
The specifics of using kas-pipe client module:
• Since mail messages are sent to kas-pipe over SMTP or LMTP, it is
impossible (for all mail servers except for Postfix) to define the IP address
of the server from which a message came. All DNS checks can be
performed only on addresses contained within the Received headers. If
you are using Postfix mail server, set the PipeUseXForward to yes so
that kas-pipe can retrieve the IP address of the server from which a
message came.
• Since kas-pipe is integrated with the mail server after the incoming
message queue, the client module cannot perform the reject action
during SMTP session. If the reject this message action is chosen for a
message, then the sender will receive a bounce message.
Page 90

90 Kaspersky Anti-Spam 3.0
A.2.4.1. Configuring Postfix to work with kas-
pipe
This section provides an example of the kas-pipe configuration for the Postfix
mail server that implements the following operational scheme:
• kas-pipe acts as a content filter (content_filter);
• kas-pipe receives mail through the localhost:9026 network socket and the
kas3scan service defined manually in the Postfix configuration file;
• kas-pipe transfers processed mail to Kaspersky Anti-Spam to the
localhost:9025 socket, via the SMTP protocol.
The kas3scan service limits the number of simultaneous connections and uses
the smtp_send_xforward_command option to transfer the IP-address of the
sender server to the kas-pipe module.
To implement this scheme, do the following:
1. In the filter.conf configuration file, specify the following values:
ClientConnectTo tcp:127.0.0.1:2277
PipeMultipleMessagesAllowed yes
PipeInProtocol smtp
PipeOutProtocol smtp
PipeOutgoingAddr tcp:127.0.0.1:9025
PipeUseXForward yes
2. Modify the Postfix configuration file (master.cf) as follows:
smtp inet n - n - - smtpd
### KASPERSKY ANTI-SPAM BEGIN ###
-o content_filter=kas3scan:127.0.0.1:9026
### KASPERSKY ANTI-SPAM END ###
pickup fifo n - n 60 1 pickup
### KASPERSKY ANTI-SPAM BEGIN ###
-o content_filter=kas3scan:127.0.0.1:9026
### KASPERSKY ANTI-SPAM END ###
### KASPERSKY ANTI-SPAM BEGIN ###
127.0.0.1:9026 inet n n n - 20 spawn
Page 91

Appendix A 91
user=mailflt3 argv=/usr/local/ap-mailfilter3/bin/
kas-pipe
127.0.0.1:9025 inet n - n - 25 smtpd
-o smtpd_authorized_xforward_hosts=127.0.0.0/8
-o local_recipient_maps=
-o relay_recipient_maps=
-o smtpd_restriction_classes=
-o smtpd_client_restrictions=
-o smtpd_helo_restrictions=
-o smtpd_sender_restrictions=
-o smtpd_recipient_restrictions=
permit_mynetworks,reject
-o mynetworks=127.0.0.0/8
-o strict_rfc821_envelopes=no
-o smtpd_error_sleep_time=0
-o smtpd_soft_error_limit=1001
-o smtpd_hard_error_limit=1000
-o receive_override_options=
no_address_mappings
kas3scan unix - - n - 10 smtp
-o smtp_send_xforward_command=yes
### KASPERSKY ANTI-SPAM END ###
For Postfix version 2.1 and higher, you can configure kas-pipe to act as a
proxy filter (smtpd_proxy_filter). In this case, the reject action is used during
SMTP sessions, which speeds up message processing. However, such a
configuration is recommended only when a mail server is not heavily loaded.
To configure kas-pipe to act as a proxy filter, replace the first two lines in the
example above with the following:
smtp inet n - n - - smtpd
-o smtpd_proxy_filter=127.0.0.1:9026
A.2.4.2. Configuring Exim to work with kas-pipe
You can integrate kas-pipe into the Exim mail server by adding a new router at
the beginning of the router list in the Exim configuration file and adding the
transport for this router that will be used to start kas-pipe. This router is of a
conditional type because it will not be used to process main sent locally using the
ESMTP protocol.
Page 92

92 Kaspersky Anti-Spam 3.0
The kas-pipe client module integrated into Exim processes mail messages
according to the following scheme:
1. Exim receives incoming messages at port 25 and places them to a queue.
2. Exim selects a message from the queue and tries each router in the list to
determine the exact router for the selected message. As the router
pointing to kas-pipe is the first in this list, all messages are sent using the
corresponding transport to the kas-pipe client module.
3. Having processed the message, kas-pipe returns it using the exim –bs
command. The message again is queued in the Exim queue. However,
the router for the kas-pipe module will be skipped because the mail was
sent locally.
4. Exim delivers the message to the recipient.
To implement this scheme, do the following:
1. In the filter.conf configuration file, specify the following values:
PipeInProtocol lmtp
PipeOutProtocol smtp
PipeOutgoingAddr exec:/usr/local/sbin/exim -bs
2. Modify the Exim configuration file as follows:
• Add the following lines in the ROUTERS section:
begin routers
# ROUTER ADDED BY KAS 3.0 INSTALLER
kas30router:
driver = accept
local_parts = passwd;$local_part : lsearch
condition = "${if !eq {$received_protocol}
{local-esmtp}{yes}}"
transport = kas30transport
• Add the following lines in the TRANSPORTS section:
begin transports
# TRANSPORT ADDED BY KAS 3.0 INSTALLER
kas30transport:
driver = lmtp
batch_max = 100
command = /usr/local/ap-mailfilter3/bin/kas-pipe
return_path_add = false
Page 93

Appendix A 93
For the Debian distribution package, the integration with Exim has a number of
specific features because the configuration of the mail server is generated by a
special script update-exim4.conf from the template
/etc/exim4/exim4.conf.template or from several templates located in the
/etc/exim4/conf.d/ directory. The number of the templates (one or several) is
defined by the use_split_files option of the exim4-update.conf.conf
configuration file of Exim. The resulting configuration is stored in the
/var/lib/exim4/config.autogenerated file.
For the Debian distribution package, Kaspersky Anti-Spam can be integrated
with the Exim mail server either manually or automatically, using a special
script(see. section. 3.5 on page 27).
To configure the Exim mail server to work with the kas-pipe module, do the
following:
• If the exim4.conf.template template is used for the Exim
configuration, add the above-provided strings to the corresponding
ROUTERS and TRANSPORTS sections.
• If the templates from the /etc/exim4/conf.d/ directory are used for
the Exim configuration:
1. In the /etc/exim4/conf.d/router/ directory, create a new file
099_exim4-config_kas30router and add the following strings to
this file:
kas30router:
driver = accept
local_parts = passwd;$local_part : lsearch
condition = "${if !eq {$received_protocol}
{local-esmtp}{yes}}"
transport = kas30transport
2. In the /etc/exim4/conf.d/transport/ directory, create a new file
30_exim4-config_kas30transport and add the following strings
to this file:
kas30transport:
driver = lmtp
batch_max = 100
command = /usr/local/ap-mailfilter3/bin/kas-pipe
return_path_add = false
After making changes, run the update-exim4.conf script to apply the new values
to be used in the system.
Page 94

94 Kaspersky Anti-Spam 3.0
A.2.5.
kas-exim
– a client module for the
Exim mail server
The kas-exim module provides integration of Kaspersky Anti-Spam with the Exim
mail server version 4.xx using localscan API.
The kas-exim module is used as an alternative solution. For a standard
installation, integration with Exim is implemented using the kas-pipe client
module. In contrast to kas-pipe, the kas-exim module does not require that the
second copy of the mail server be started for transmitting mail messages.
To use localscan API, you should recompile Exim. Therefore, the kas-exim
module is shipped as a source code written in C and it should be manually
installed.
To recompile the Exim mail server with the integrated kas-exim module, do the
following:
1. Save the kas_exim.c file located at /usr/local/ap-mailfilter3/src/ to
the Local directory in the tree of Exim source files.
2. Modify the Makefile file in the Local directory as follows:
CFLAGS= -I/usr/local/ap-mailfilter3/include
EXTRALIBS_EXIM=-L/usr/local/ap-mailfilter3/lib
-lspamtest
LOCAL_SCAN_SOURCE=Local/kas_exim.c
LOCAL_SCAN_HAS_OPTIONS=yes
3. Compile Exim.
All values required for the kas-exim operation are specified in the Exim
configuration file, not in filter.conf.
The example below is a fragment of the Exim configuration file that contains
options for the kas-exim module:
begin local_scan
kas_connect_to = tcp:127.0.0.1:2277
kas_connect_timeout = 40
kas_data_timeout = 30
kas_default_domain = localhost
kas_filtering_size_limit = 500
kas_on_error=accept
kas_log_level=3
Page 95

Appendix A 95
This fragment contains the following options:
• kas_connect_to – address of the socket for interacting with the filtering
server. The address format is tcp:<host>:<port>, where <host> is the
IP-address of the filtering server, <port> is a port specifying the network
socket; the record in the format unix:<path_to_file>, where
<path_to_file> is the path to the socket file (specifies a local socket).
• kas_connect_timeout – maximum time (sec) for establishing a
connection with the filtering server.
• kas_data_timeout – maximum time (sec) for data exchange sessions
with the filtering server.
• kas_default_domain – name of the mail domain used in the address if
the original domain is not specified.
• kas_filtering_size_limit – maximum size (in KB) of a message that can
be transferred to the filtering server. Messages of larger sizes are
bypassed without processing.
• kas_on_error – mode of handing errors (unable to establish connection
with the filtering process, data exchange timeout is exceeded, etc.).
Possible values:
• reject – reject an incoming message, return the 5xx code
during an SMTP session;
• tempfail – temporarily reject an incoming message, return the
4xx code during an SMTP session (default value);
• accept – accept a message;
• kas_log_level – detalization level of the log file. The data is recorded in
the Exim debugging mode.
Note the following specifics of using the kas-exim module with the Exim mail
server:
• kas-exim, as well as kas-milter, does not create message copies during
processing. This means that if a message is destined to several recipients
that belong to different groups with various processing rules, the message
is processed in accordance with the rules defined for each of these
groups.
• If a message is destined to several recipients and for some of these
recipients message delivery is prohibited (reject message action),
whereas for other recipients messages are accepted (accept message
action), the sender is not notified (i.e. a bounce message is not sent) that
the message could not be delivered to some of the recipient.
Page 96

96 Kaspersky Anti-Spam 3.0
A.2.6.
kas-qmail
– client module for the
Qmail mail server
The kas-qmail module provides integration of Kaspersky Anti-Spam with the
Qmail mail server. When this module is used, the mail traffic is processed using
the following algorithm:
1. The qmail-queue module of Qmail is replaced with the kas-qmail client
module, which transfers incoming mail to the filtering server for further
processing.
2. Processed mail traffic is returned to the kas-qmail module and then it is
passed to qmail-queue.
Figure 33 shows interaction of modules when Kaspersky Anti-Spam uses the
kas-qmail module.
Figure 33. Interaction of Kaspersky Anti-Spam with the Qmail mail server
The client module can be integrated into the Qmail mail server either manually or
automatically, using special scripts (see section 3.5 on page 27).
Manual configuration of the client module options is performed by modifying the
configuration file filter.conf located at /usr/local/ap-mailfilter3/etc/.
The example below is a fragment of the filter.conf file that contains configuration
options for kas-qmail:
ClientConnectTo tcp:127.0.0.1:2277
ClientConnectTimeout 10
ClientDataTimeout 30
QMailOriginalQueue /var/qmail/bin/qmail-queue.kas
ClientOnError accept
ClientFilteringSizeLimit 500
ClientDefaultDomain localhost
Page 97

Appendix A 97
In addition to the options provided in Appendix A.2.2, this file contains the
QmailOriginalQueue option that specified the full path to the original qmailqueue module.
To configure Qmail to work with the kas-qmail client module, do the following:
1. Rename the original file of the qmail-queue module using the
following command:
# mv /var/qmail/bin/qmail-queue
/var/qmail/bin/qmail-queue.kas
2. Install kas-qmail instead of qmail-queue using the following
commands:
# cp /usr/local/ap-mailfilter3/bin/kas-qmail
/var/qmail/bin/qmail-queue
# chown qmailq /var/qmail/bin/qmail-queue
# chgrp qmail /var/qmail/bin/qmail-queue
# chmod 04755 /var/qmail/bin/qmail-queue
A.2.7.
kas-cgpro
– a client module for the
Communigate Pro mail server
The kas-cgpro module provides integration of Kaspersky Anti-Spam with the
Communigate Pro mail server. The mail traffic is processed using the following
algorithm:
1. Communigate Pro passes all incoming mail to the kas-cgpro client
module.
2. The kas-cgpro module processes message, modifies them (inserts a
special header into each message), and places processed mail to the
Submitted directory. The DISCARD response is returned to Communigate
Pro.
3. The PIPE driver passes the messages from the Submitted directory to the
Communigate Pro mail server, which, in turn, passes the messages back
to the kas-cgpro module.
4. As the kas-cgpro module does not handle already processed messages
(messages with special headers), Communigate Pro receives OK and the
message is delivered to the recipient.
Integration with the Communigate Pro can be performed only manually. The
interaction options for the client module are specified in the filter.conf file, and the
options for the Communigate Pro mail server are modified through using the mail
server web interface.
Page 98

98 Kaspersky Anti-Spam 3.0
Below is a fragment of the filter.conf file that contains settings of the client
module:
ClientConnectTo tcp:127.0.0.1:2277
ClientConnectTimeout 10
ClientDataTimeout 30
CGProSubmittedFolder Submitted
CGProMaxThreadCount 50
CGProLoopHeader X-Proceed_240578_by_spamtest
CGProAllTransports No
ClientFilteringSizeLimit 500
ClientDefaultDomain localhost
In addition to the options described in Appendix A.2.2, the following additional
options are used to configure kas-cgpro:
• CGProSubmittedFolder – name of the directory where the processed
messages are placed.
• CGProMaxThreadCount – maximum number of simultaneously
processed messages.
• CGProLoopHeader – header added to the processed messages.
• CGProAllTransports – allows / prohibits processing of mail received
using all kinds of transport. Possible values: yes – all mail is processed,
no – only SMTP mail traffic is processed (default value).
To configure Communigate Pro to work with the kas-cgpro module, do the
following steps using the web interface of the mail server:
1. To the Settings→General→Helpers menu, add a new content-
filter with the following parameters (in brackets parameters are
listed for Communigate Pro version 5.1 and higher):
Use filter (Enable): kas-cgpro
Log (Log Level): Problems
Path (Program Path): /usr/local/apmailfilter3/bin/kas-cgpro
Time-Out: 5 minutes
Auto-Restart: 15 seconds
2. In the Settings→Rules (Settings→Mail→Rules for
Communigate Pro version 5.1 and higher) menu, create a new rule,
according to which all messages whose size does not exceed 500
KB will be checked for being spam messages:
Page 99

Appendix A 99
Data: Message Size
Operation: less than
Parameter: 512000
Action: external filter
Parameters: kas-cgpro
Specific features of using kas-cgpro with Communigate Pro:
• During an SMTP session, the kas-cgpro client module cannot reject an
incoming message for which the reject this message action is specified.
Instead, Communigate Pro sends a bounce message to the sender that
the message cannot be delivered to the recipient.
• The bounce message text is defined by the mail server rather than the
value of the Bounce message parameter specified by the web interface
of the Management Center (see section 4.5.4 on page 59).
• The filtering server sends messages from the monitoring system and error
messages using the mailflt3 user account. Since Communigate Pro by
default does not add to its database the accounts of system users, you
will have to create manually a mailflt3 user account in the user database
of Communigate Pro.
• When the Drop Root option is used in Communigate Pro, the mail server
is switched to using the privileges of user nobody. The switch does not
affect the kas-cgpro module resulting in a loss of connection between the
mail server and its client module. Perform the following steps to restore
their connection:
1. Use the Settings→General→Helpers menu of Communigate
Pro to disable the use of the kas-cgpro filter unchecking the
Use Filter box. Click the Update button to update the
configuration.
2. Add the kas-cgpro filter again. Filter parameters are listed
above in the description of Communigate Pro configuration for
work with the kas-cgpro client module.
A.3. Kaspersky Anti-Spam
configuration files
This section describes Kaspersky Anti-Spam configuration files that contain the
parameters for the main components of the filtering server.
Page 100

100 Kaspersky Anti-Spam 3.0
A.3.1. Main configuration file
The configuration file /usr/local/ap-mailfilter3/etc/filter.conf contains that regulate
operation of all Kaspersky Anti-Spam components (excluding the updating
module).
General settings:
• RootPath – path to the Kaspersky Anti-Spam installation directory. The
default value is /usr/local/ap-mailfilter3.
• LogFacility=mail|user|local0|local1|local2|local3|local4|local5|local6|
local7 – a category, according to which records are logged in the syslog
facility. The default value is mail.
• LogLevel=0|1|2|3|4|5 – level of detail of records in the syslog facility.
The default value is 2.
• User – the rights of this user are used to start filtering server processes.
As a value, you can use either the user name or user uid.
• Group – the rights of this group are used to start filtering server
processes. As a value, you can use either the group name or gid.
Filtering server settings:
• ServerListen – socket using which the filtering server interacts with the
module integrated into the mail server. The format of the value is
tcp:<host>:<port>, where <host> is the IP-address (or name) of the
mail server, <port> is the port number that specifies a network socket,
and the record unix:<path_to_file>, where <path_to_file> is the path to
the socket file, specifies a local socket. Set the <host> parameter to
0.0.0.0 in order to bind the filtering server to any interface.
filter.conf
For compatibility purposes, local socket created for interaction between
mail server and the filtration server allows any user that has logged on
to write to that socket.
• FilterPath – path to the executable file of the ap-mailfilter filtering
process.
• ServerStartFilters – number of ap-mailfilter filtering processes started
when the filtering module is launched. The default value is 0. The
ServerStartFilters value must not exceed the ServerMaxFilters
parameter.
• ServerMaxFilters=1...200 – maximum number of simultaneously
running filtering processes ap-mailfilter. The default value is 10.
 Loading...