

Page 1

DEPLOYMENT GUIDE
P R O GR A M V ER S IO N : 8 . 0 C R I T I CA L F I X 1
Kaspersky Administration
Kit 8.0
Page 2

2
Dear User!
Thank you for choosing our product. We hope that this documentation will help you in your work and will provide answers
regarding this software product.
Reproduction or distribution of any materials in any format, including translations, is allowed only with the written
permission of Kaspersky Lab.
This document, and graphic images related to it, may only be used for informational, non-commercial, and personal
purposes.
Kaspersky Lab reserves the right to amend this document without additional notification. You can find the latest version of
this document at the Kaspersky Lab website, at http://www.kaspersky.com/docs.
Kaspersky Lab shall not be liable for the content, quality, relevance, or accuracy of any materials used in this document
for which the rights are held by third parties, or for any potential or actual losses associated with the use of these
materials.
This document uses registered trademarks and service marks which are the property of their respective owners.
Revision date: 2/2/10
© 1997-2010 Kaspersky Lab ZAO. All Rights Reserved.
http://www.kaspersky.com
http://support.kaspersky.com
Page 3

3
CONTENTS
KASPERSKY ADMINISTRATION KIT ........................................................................................................................... 5
Distribution package ................................................................................................................................................ 5
Services for registered users ................................................................................................................................... 5
Obtaining information about the application ............................................................................................................. 6
Information sources for further research ............................................................................................................ 6
Contacting the Technical Support Service ......................................................................................................... 7
Discussing Kaspersky Lab's applications on the web forum .............................................................................. 8
Purpose of the document ......................................................................................................................................... 8
Application features ................................................................................................................................................. 8
Application structure ................................................................................................................................................ 9
Hardware and software requirements ...................................................................................................................... 9
TYPICAL SCHEMES FOR DEPLOYMENT OF ANTI-VIRUS PROTECTION ............................................................. 12
RECOMMENDATIONS FOR CREATION OF CENTRALIZED MANAGEMENT OF ANTI-VIRUS PROTECTION ..... 13
INSTALLING KASPERSKY ADMINISTRATION KIT ................................................................................................... 15
Installation of Kaspersky Administration Kit components on a local computer....................................................... 16
Standard installation ......................................................................................................................................... 16
Custom installation ........................................................................................................................................... 17
Removal of Kaspersky Administration Kit components .......................................................................................... 31
Upgrading the application ...................................................................................................................................... 31
REMOTE DEPLOYMENT AND REMOVAL OF APPLICATIONS ............................................................................... 33
Creating a deployment task ................................................................................................................................... 35
Push install ....................................................................................................................................................... 36
Login script-based installation .......................................................................................................................... 49
Installing using Active Directory group policies ...................................................................................................... 54
Installing applications on slave Administration Servers.......................................................................................... 55
Step 1. Defining the task name ........................................................................................................................ 56
Step 2. Selecting the task type ................................................................................................ ......................... 56
Step 3. Selecting the installation package ........................................................................................................ 56
Step 4. Configuring the installation settings ..................................................................................................... 57
Step 5. Creating a set of Administration Servers .............................................................................................. 58
Step 6. Scheduling the task launch .................................................................................................................. 58
Step 7. Competing task creation ...................................................................................................................... 58
Configuring a remote deployment task .................................................................................................................. 58
Remote Installation Wizard .................................................................................................................................... 61
Step 1. Selecting the application to be installed ............................................................................................... 62
Step 2. Selecting the target computers ............................................................................................................ 63
Step 3. Selecting the group .............................................................................................................................. 64
Step 4. Selecting the method of loading the installation package .................................................................... 64
Step 5. Selecting the license ............................................................................................................................ 66
Step 6. Configuring the restart settings ............................................................................................................ 66
Step 7. Configuring removal of incompatible applications ................................................................................ 67
Step 8. Selecting account................................................................................................................................. 67
Step 9. Completing set up ................................................................................................................................ 68
Deployment report ................................................................................................................................................. 68
Page 4

D E P L O Y M E N T G U I D E
4
Remote software removal ...................................................................................................................................... 69
Work with installation packages ............................................................................................................................. 70
Creating an installation package ...................................................................................................................... 71
Configuring the application description file manually ........................................................................................ 73
Viewing and configuring the properties of an installation package ................................................................... 74
Creating and configuring an installation package for the Network Agent ......................................................... 79
Creating and configuring an installation package for the Administration Server............................................... 82
Creating a task for installation package distribution to slave Administration Servers ....................................... 83
Distribution of installation packages within a group using Update Agents ........................................................ 84
Computer preparation for remote installation. The riprep utility ............................................................................. 87
Interactive mode ............................................................................................................................................... 88
Non-interactive mode ....................................................................................................................................... 89
LOCAL INSTALLATION OF SOFTWARE ................................................................................................................... 90
Local installation of the Network Agent .................................................................................................................. 91
Local installation of the application management plug-in ....................................................................................... 95
Installing applications in non-interactive mode ....................................................................................................... 96
Installation using a standalone package ................................................................................................................ 97
Step 1. Selecting the license ............................................................................................................................ 98
Step 2. Selecting the action .............................................................................................................................. 98
Step 3. Selecting the Network Agent installation package ............................................................................... 99
Step 4. Configuring computer relocation ........................................................................................................ 100
Step 5. Completion of creation of a standalone installation package ............................................................. 100
INFORMATION ABOUT STRESS TESTING ............................................................................................................ 102
Stress testing results............................................................................................................................................ 102
Connection of client to Administration Server without synchronization .......................................................... 103
Connection of client to Administration Server with synchronization ............................................................... 103
Regular database updates ............................................................................................................................. 104
Processing of events on client computers by the Administration Server ........................................................ 105
Network load ................................ ................................................................ ........................................................ 105
Initial deployment of anti-virus protection ....................................................................................................... 106
Initial update of the anti-virus databases ........................................................................................................ 107
Connection of client to Administration Server without synchronization .......................................................... 107
Connection of client to Administration Server with synchronization ............................................................... 107
Regular database updates ............................................................................................................................. 108
Processing of events from clients by Administration Server ........................................................................... 108
GLOSSARY ............................................................................................................................................................... 109
KASPERSKY LAB ..................................................................................................................................................... 114
INDEX ....................................................................................................................................................................... 115
Page 5

5
IN THIS SECTION
Distribution package .......................................................................................................................................................... 5
Services for registered users ............................................................................................................................................. 5
Obtaining information about the application ...................................................................................................................... 6
Purpose of the document .................................................................................................................................................. 8
Application features ........................................................................................................................................................... 8
Application structure .......................................................................................................................................................... 9
Hardware and software requirements................................................................................................................................ 9
KASPERSKY ADMINISTRATION KIT
Kaspersky Administration Kit provides a centralized solution for managing corporate network anti-virus security
systems based on Kaspersky Lab applications included in Kaspersky Open Space Security products. Kaspersky
Administration Kit supports all network configurations that use the TCP/IP protocol.
The application is a tool for corporate network administrators and anti-virus security officers.
DISTRIBUTION PACKAGE
The product is provided free of charge with all Kaspersky Lab applications included in the Kaspersky Open Space
Security kit (retail). It is also available for download from the Kaspersky Lab website (http://www.kaspersky.com).
SERVICES FOR REGISTERED USERS
Kaspersky Lab offers a large service package, enabling its legal users to enjoy all available features of the application.
If you purchase licenses for a Kaspersky Lab product included in Kaspersky Open Space Security, you become a
registered user of Kaspersky Administration Kit. During the license validity period, you are entitled to:
hourly updates of the application database and program modules of that software product;
phone or email consultation on matters related to the installation, configuration and operation of the anti-virus
application;
When you contact the Technical Support Service, please provide information about your license for the
Kaspersky Lab application with which Kaspersky Administration Kit is being used.
notifications about releases of new Kaspersky Lab software products and about new viruses that appear
worldwide. This service is provided to users who subscribe to the Kaspersky Lab newsletter at the web site of
the Technical Support Service at http://support.kaspersky.com/subscribe/.
Kaspersky Lab does not provide support on issues related to the operation and use of your operating system or
other technologies.
Page 6

D E P L O Y M E N T G U I D E
6
IN THIS SECTION
Information sources for further research............................................................................................................................ 6
Contacting the Technical Support Service ......................................................................................................................... 7
Discussing Kaspersky Lab's applications on the web forum ............................................................................................. 8
OBTAINING INFORMATION ABOUT THE APPLICATION
If you have any questions regarding purchasing, installing or using Kaspersky Administration Kit, answers are readily
available.
Kaspersky Lab provides various sources of information about the application. You can choose the most suitable,
according to the importance and urgency of your question.
INFORMATION SOURCES FOR FURTHER RESEARCH
You can view the following sources of information about the application:
the application's page on Kaspersky Lab's website;
the application's Knowledge Base page on the Technical Support Service website;
electronic help system;
documentation.
The application's page at the Kaspersky Lab website
http://www.kaspersky.com/administration_kit
This page will provide you with general information about the application's features and options.
The application's Knowledge Base page at the Technical Support Service website
http://support.kaspersky.com/remote_adm
This page contains articles by the Technical Support Service.
These articles contain useful information, recommendations, and the Frequently Asked Questions (FAQ) page, and
cover purchasing, installing and using the application. The articles are sorted by subject, such as "License
management", "Database updates", and "Troubleshooting". The articles aim to answer questions about not only this
application but other Kaspersky Lab products as well. They may also contain news from the Technical Support
Service.
The electronic help system
The application installation package includes full help files, which contain step by step descriptions of the
application's features.
To open the help file, select Kaspersky Administration Kit help system in the console Help menu.
If you have a question about a specific application window, you can use context-sensitive help.
To open context-sensitive help, in the corresponding window, press the Help button or the F1 key.
Documentation
Page 7

K A S P E R S K Y AD MI N I S T R A T I ON KIT
7
The documentation supplied with the application aims to provide all the information you will require. It includes the
following documents:
Administrator's Guide describes the purpose, basic concepts, features and general schemes for using
Kaspersky Administration Kit.
Deployment Guide contains a description of the installation procedures for the components of Kaspersky
Administration Kit as well as remote installation of applications in computer networks using simple configuration.
Getting Started guide gives a step by step guide to anti-virus security administrators, enabling them to start
using Kaspersky Administration Kit quickly, and to deploy Kaspersky Lab's anti-virus applications across a
managed network.
Reference Guide contains an overview of Kaspersky Administration Kit, and step by step descriptions of its
features.
The documents are supplied in PDF format in Kaspersky Administration Kit's distribution package (installation CD).
You can download the documentation files from the application's page at Kaspersky Lab's website.
CONTACTING THE TECHNICAL SUPPORT SERVICE
You can obtain information about the application from the Technical Support Service, by phone or on the Internet. When
contacting the Technical Support Service, you will need to provide information about the license for the Kaspersky Lab
product with which you are using the application.
The Technical Support Service will answer any questions related to the installation and use of the application that are not
covered in help topics. If your computer has been infected, they will help you to neutralize the consequences of malware
activity.
Before contacting the Technical Support Service, please read the support rules for Kaspersky Lab's products
http://support.kaspersky.com/support/rules.
Technical Support by email
You can send your question to the Technical Support Service by filling out a Helpdesk web form for client questions
at http://support.kaspersky.com/helpdesk.html.
You can ask your question in Russian, English, German, French or Spanish.
To send an email request, you should specify your customer ID, which you received while registering at the
Technical Support Service's website, and the corresponding password.
If you are not yet a registered user of Kaspersky Lab's applications, you can fill out a registration form
(https://support.kaspersky.com/en/personalcabinet/registration/form/). During registration you will need to enter either
your application's activation code, or the key file.
The Technical Support service will respond to your request in your Personal Cabinet
https://support.kaspersky.com/en/PersonalCabinet), and to the email address you specified in your request.
In the website's request form, please describe the problem you have encountered. In the mandatory fields, specify:
Request type. Questions which users often ask divided into separate topics, for example: "Problems with
Setup / Remove application" or "Virus disinfection". If you do not find an appropriate topic, select "General
question".
Application name and version number.
Request description. Describe the problem you encountered in as much detail as possible.
Page 8

D E P L O Y M E N T G U I D E
8
Customer ID and password. Enter the client number and the password you received when you registered at
the Technical Support Service's website.
Email address. The Technical Support Service will reply to your question at this email address.
Technical support by phone
If you have an urgent problem, you can call your local Technical Support Service. Before contacting Russianspeaking (http://support.kaspersky.ru/support/support_local) or international
(http://support.kaspersky.com/support/international) Technical Support, please have the necessary information
(listed at http://support.kaspersky.com/support/details) about your computer to hand. This will let our specialists help
you more quickly.
DISCUSSING KASPERSKY LAB'S APPLICATIONS ON THE WEB FORUM
If your question does not require an immediate answer, you can discuss it with Kaspersky Lab's experts and other users
in our forum at http://forum.kaspersky.com.
In this forum you can view existing topics, leave your comments, create new topics and use the search engine.
PURPOSE OF THE DOCUMENT
This Guide contains a description of installation procedures for the components of Kaspersky Administration Kit and
remote installation of applications in computer networks using simple configuration.
APPLICATION FEATURES
The application enables the corporate network administrator to:
Perform remote installation and removal of Kaspersky Lab applications across the network in a centralized
manner. This feature enables the administrator to copy the required set of Kaspersky Lab applications to a
selected computer, and then install these applications remotely on the network computers.
Remotely manage Kaspersky Lab applications in a centralized manner. The administrator can create a multi-
level anti-virus protection system, and manage the operation of all applications from his workstation. This is
particularly important for larger companies whose local network consists of a large number of computers that
may be located in several separate buildings or offices. This feature includes:
creating the hierarchy of Administration Servers;
joining hosts into administration groups based on the functions performed by the computers and on the set
of applications installed on them;
configuring the application settings in a centralized way by creating and applying policies;
configuring the application settings for particular individual computers;
managing the operation of applications in a centralized manner by creating and running group tasks and
building individual schemes for the application's operation by creating and running tasks for a set of
Automatically update the anti-virus database and application modules on computers. This feature can update
the anti-virus databases for all installed Kaspersky Lab applications in a centralized manner, rather than each
computer accessing Kaspersky Lab's Internet updates server for each individual update. Updating can be
tasks for sets of computers and the Administration Server;
computers from different administration groups.
Page 9

K A S P E R S K Y AD MI N I S T R A T I O N K IT
9
performed automatically according to the schedule set up by the administrator. The administrator can monitor
distribution of updates to client computers.
Receive reports using a dedicated system. This feature can collect statistics about the operation of all installed
Kaspersky Lab applications in a centralized manner, and create reports based on the statistics. The
administrator can create a cumulative network report about application operation, or reports about the operation
of all applications installed on individual computers.
Use events notification system. Delivery of notifications. The administrator can create a list of events which
occur when applications are running about which he or she wants to be notified. The list of such events may
include, for example, detection of a new virus, an error that occurred due to incorrect termination of the
database updating on a computer, or detection of a new computer on the network.
Manage licenses. This feature allows the administrator to install licenses for all installed Kaspersky Lab
applications in a centralized manner, to monitor the observance of the license agreement (that is, that the
number of applications operating in the network is less than or equal to the number of licenses) and the
expiration date.
APPLICATION STRUCTURE
Kaspersky Administration Kit includes three major components:
Administration Server (hereinafter also referred to as the Server) performs the functions of centralized storage of
information about Kaspersky Lab applications installed in the corporate network and about the management of
these applications.
Network Agent (hereinafter also referred to as the Agent) coordinates interaction between the Administration
Server and Kaspersky Lab applications installed on a specific network node (a workstation or a server). This
component supports all Windows applications included in Kaspersky Open Space Security products. Separate
versions of Network Agent exist for Kaspersky Lab's Novell and Unix applications.
Administration Console (hereinafter also referred to as the Console) provides a user interface to the
administration services of the Administration Server and Network Agent. The management module is
implemented as a snap-in for the Microsoft Management Console (MMC). The Administration Console allows
connection to the remote Administration Server via Internet.
HARDWARE AND SOFTWARE REQUIREMENTS
Administration Server
Software requirements:
Microsoft Data Access Components (MDAC) 2.8 or higher.
MSDE 2000 with installed Service Pack 3, or Microsoft SQL Server 2000 with installed Service Pack 3 or
higher, or MySQL Enterprise 5.0.32 and 5.0.70, or Microsoft SQL 2005 or higher; or Microsoft SQL Express
2005 or higher, Microsoft SQL Express 2008, Microsoft SQL 2008.
It is recommended to use Microsoft SQL 2005 with Service Pack 2, Microsoft SQL Express 2005 with
Service Pack 2 and later versions.
Microsoft Windows 2000 with installed Service Pack 4 or higher; Microsoft Windows XP Professional with
installed Service Pack 2 or higher; Microsoft Windows XP Professional x64 or higher; Microsoft Windows
Server 2003 or higher; Microsoft Windows Server 2003 x64 or higher; Microsoft Windows Vista with
installed Service Pack 1 or higher, Microsoft Windows Vista x64 with installed Service Pack 1 and all current
updates, for Microsoft Windows Vista x64 the Microsoft Windows Installer 4.5 should be installed; Microsoft
Windows Server 2008; Microsoft Windows Server 2008 deployed in the Server Core mode; Microsoft
Page 10

D E P L O Y M E N T G U I D E
10
Windows Server 2008 x64 with installed Service Pack 1 and all current updates, for Microsoft Windows
Server 2008 x64 the Microsoft Windows Installer 4.5 should be installed; Microsoft Windows 7.
When using Microsoft Windows 2000 with Service Pack 4 installed, it is necessary to install the following
updates for Microsoft Windows before deploying Administration Server: 1) Update Rollup 1 for Windows
2000 SP4 (KB891861); 2) Security Update for Windows 2000 (KB835732).
Hardware requirements:
Intel Pentium III 800 MHz or higher;
256 MB RAM;
1GB of available disk space.
Administration Console
Software requirements:
Microsoft Windows 2000 with installed Service Pack 4 or higher; Microsoft Windows XP Professional with
installed Service Pack 2 or higher; Microsoft Windows XP Home Edition with installed Service Pack 2 or
higher; Microsoft Windows XP Professional x64 or higher; Microsoft Windows Server 2003 or higher;
Microsoft Windows Server 2003 x64 or higher; Microsoft Windows Vista with installed Service Pack 1 or
higher, Microsoft Windows Vista x64, Microsoft Windows Vista x64 with installed Service Pack 1 and all
current updates, for Microsoft Windows Vista x64 the Microsoft Windows Installer 4.5 should be installed;
Microsoft Windows Server 2008; Microsoft Windows Server 2008 x64 with installed Service Pack 1 and all
current updates, for Microsoft Windows Server 2008 x64 the Microsoft Windows Installer 4.5 should be
installed; Microsoft Windows 7.
Microsoft Management Console 1.2 or higher.
Work with Microsoft Windows 2000 requires Microsoft Internet Explorer 6.0.
Work with Microsoft Windows 7 E Edition and Microsoft Windows 7 N Edition requires Microsoft Internet
Explorer 8.0 or higher.
Hardware requirements:
Intel Pentium III 800 MHz or higher;
256 MB RAM;
70 MB of available disk space.
Network Agent
Software requirements:
For Windows systems:
Microsoft Windows 2000 with installed Service Pack 4 or higher; Microsoft Windows XP Professional with
installed Service Pack 2 or higher; Microsoft Windows XP Professional x64 or higher; Microsoft Windows
Server 2003 or higher; Microsoft Windows Server 2003 x64 or higher; Microsoft Windows Vista with
installed Service Pack 1 or higher, Microsoft Windows Vista x64 with installed Service Pack 1 and all current
updates, for Microsoft Windows Vista x64 the Microsoft Windows Installer 4.5 should be installed; Microsoft
Windows Server 2008; Microsoft Windows Server 2008 deployed in the Server Core mode; Microsoft
Windows Server 2008 x64 with installed Service Pack 1 and all current updates, for Microsoft Windows
Server 2008 x64 the Microsoft Windows Installer 4.5 should be installed; Microsoft Windows 7.
For Novell systems:
Page 11

K A S P E R S K Y AD MI N I S T R A T I O N K IT
11
Novell NetWare 6 SP5 or higher; Novell NetWare 6.5 SP7 or higher.
For Linux systems:
The supported version of the operating system is determined by the requirement of the compatible
Kaspersky Lab application installed on the client computer.
Hardware requirements:
For Windows systems:
Intel Pentium 233 MHz or higher;
RAM size - 32 MB;
20 MB of available disk space.
For Novell systems:
Intel Pentium 233 MHz or higher;
RAM size - 32 MB;
Available disk space - 32 MB.
For Linux systems:
Intel Pentium® 133 MHz or higher;
RAM size - 64 MB;
100 MB of available disk space.
Update Agent
Software requirements for Windows systems:
Microsoft Windows 2000 with installed Service Pack 4 or higher; Microsoft Windows XP Professional with
installed Service Pack 2 or higher; Microsoft Windows XP Professional x64 or higher; Microsoft Windows Server
2003 or higher; Microsoft Windows Server 2003 x64 or higher; Microsoft Windows Vista with installed Service
Pack 1 or higher, Microsoft Windows Vista x64 with installed Service Pack 1 and all current updates, for
Microsoft Windows Vista x64 the Microsoft Windows Installer 4.5 should be installed; Microsoft Windows Server
2008; Microsoft Windows Server 2008 x64 with installed Service Pack 1 and all current updates, for Microsoft
Windows Server 2008 x64 the Microsoft Windows Installer 4.5 should be installed; Microsoft Windows 7.
Hardware requirements for Windows systems:
Intel Pentium III 800 MHz or higher;
256 MB RAM;
500 MB of available disk space.
Page 12

12
TYPICAL SCHEMES FOR DEPLOYMENT OF ANTI-VIRUS PROTECTION
There are several options available for deployment of anti-virus protection system managed by Kaspersky Administration
Kit on network computers:
Centralized remote installation of applications on client computers. In that case installation of applications and
connection to the centralized remote management system are performed automatically, requiring no
administrator participation, and allow deployment of anti-virus software on any number of client computers.
By means of local installation of applications on each client computer. In that case the necessary components
are installed on client computers and the administrator's workstation manually, and the settings for client
connection to the Server are defined during Network Agent setup. This installation method may be
recommended for cases when centralized remote deployment is impossible.
Remote deployment can be used to install any administrator-defined applications. However, remember that
Kaspersky Administration Kit only supports management of Kaspersky Lab's applications installed from
distribution packages including a specialized component – the application management plug-in.
Kaspersky Lab applications can also be installed on computers as part of drive images. The Network Agent
recognizes such installation type properly using the identifiers of hard disk drives and MAC addresses and
connects correctly to the Administration Server.
Page 13

13
RECOMMENDATIONS FOR CREATION OF
CENTRALIZED MANAGEMENT OF ANTIVIRUS PROTECTION
Selection of a deployment scheme is determined by the following main factors:
Corporate network structure: the speed of communication channels in various segments of the network and the
number of client computers in each segment.
Organizational corporate structure.
Number of employees in the IT department who will provide for the maintenance of anti-virus protection and the
tasks of division of responsibility between employees.
Existing hardware resources which can be allocated for the installation of components of anti-virus protection
management (Administration Servers, Update Agents).
Capacity of communication channels which is allocated for the functionality of components of anti-virus
protection within the corporate network.
Maximum allowed time for the execution of key administrative operations within the corporate network, such as
distribution of database updates and changes in policies for client computers.
The schemes for deployment of anti-virus protection most often resolve into one of the following options:
One Administration Server.
One Administration Server with Update Agents.
Administration Server Hierarchy.
Administration Server Hierarchy with Update Agents.
When selecting the optimal anti-virus protection scheme, it is recommended first to determine the existing network and
hardware resources which can be used for the operation of a centralized anti-virus protection system. This analysis can
determine the set of possible deployment schemes and exclude those of them which cannot be implemented within
existing hardware resources and network infrastructure.
To analyze the network and hardware infrastructure, the following procedure is recommended:
1. Determine the settings of the network in which anti-virus protection will be deployed. The main settings among
which are:
number of segments in the network;
number of managed computers in each network segment;
the speed of communication channels between individual network segments;
capacity of each communication channel which is used for the functionality of anti-virus protection.
2. Determine the maximum allowed time for the execution of key administrative operations for all managed
computers.
3. Using collected information and the data of administration system stress testing (see section "Information about
stress testing" on page 102) make a decision on the following issues:
Page 14

D E P L O Y M E N T G U I D E
14
How many Administration Servers are required for work with all client computers? Is the Administration
Server Hierarchy required?
What hardware requirements must the Administration Servers comply with for maintenance of all client
computers within the allowed time?
Are intermediate centers for distributing updates and installation packages (Update Agents) required to
reduce the load on communication channels?
After answering the questions listed above, the administrator can create a set of allowed deployment schemes and select
the most optimal one from them.
During the next step the administrator must create a centralized management of anti-virus protection by installing the
corresponding Kaspersky Administration Kit components to the network computers, namely:
1. Install the Administration Server on a computer included into the corporate network.
2. Install Kaspersky Administration Console on computers that will be used for management purposes.
3. Using the Quick Start Wizard configure the centralized management of anti-virus protection.
4. Decide who the network administrators will be, determine other categories of users allowed to work with the
system and assign a list of performed functions to each category.
5. Create user groups and provide to each group the access rights needed by its users for performance of their
responsibilities.
6. If necessary, create the Administration Server Hierarchy.
7. For each Administration Server create the structure of administration groups and distribute computers into
appropriate groups.
8. Install the required Kaspersky Lab applications on the client computers.
9. If necessary, create customized settings for the installed applications using policies and tasks.
Page 15

15
PORT NUMBER
PROTOCOL
DESCRIPTION
Computer on which the Administration Server is installed
13000
TCP
It is used to:
retrieve data from client computers;
connect to Update Agents;
connect to slave Administration Servers.
SSL protection is used for these connections.
14000
TCP
It is used to:
retrieve data from client computers;
connect to Update Agents;
connect to slave Administration Servers.
SSL protection is not used for these connections.
13000
UDP
SSL connection is used to transmit information about computer shutdown.
13292
TCP
The port is used for connection of mobile devices.
(A mobile device here means a device with the Kaspersky Mobile Security
Enterprise Edition installed.)
18000
HTTP
The Administration Server uses this port to receive data from the Cisco NAC
authentication server.
Computer assigned to function as Update Agent
13000
TCP
The port is used by client computers to connect to the Update Agent.
13001
TCP
The port is used by client computers to connect to the Update Agent if a
computer with the installed Administration Server functions as an Update Agent.
14000
TCP
The port is used by client computers to connect to the Update Agent.
14001
TCP
The port is used by client computers to connect to the Update Agent if a
INSTALLING KASPERSKY ADMINISTRATION KIT
Before starting the setup process, make sure that the hardware and software of the host computer meet the requirements
for the Administration Server and Administration Console (see section "Hardware and software requirements" on page 9).
Kaspersky Administration Kit stores its information in an SQL server database. Microsoft SQL Server 2005 Express
Edition is installed for that purpose by default together with Kaspersky Administration Kit. Other SQL servers can also be
used for data storage (see section "Hardware and software requirements" on page 9). In that case they must be installed
on the network before Kaspersky Administration Kit setup.
Installation of Kaspersky Administration Kit requires administrator's privileges on the computer where the installation is
performed.
To ensure that application components function correctly after setup, all the required ports must be open on the host
computers. The ports that Kaspersky Administration Kit uses by default are listed in the table below.
Table 1. Ports used by Kaspersky Administration Kit
Page 16

D E P L O Y M E N T G U I D E
16
PORT NUMBER
PROTOCOL
DESCRIPTION
computer with the installed Administration Server functions as an Update Agent.
Client computer with installed Network Agent.
15000
UDP
The port is used to receive requests for connection to the Administration Server,
which can collect information about a host in real time.
60000
UDP
The port is used by the Wake On LAN feature.
IN THIS SECTION
Installation of Kaspersky Administration Kit components on a local computer ................................................................ 16
Removal of Kaspersky Administration Kit components ................................................................................................... 31
Upgrading the application ................................................................................................................................................ 31
For outbound connections of client computers to the Administration Server and Update Agents, the range of ports 1024–
5000 (TCP) is used. In Windows Vista and Windows Server 2008 the default range of ports for outbound connections is
49152–65535 (TCP).
INSTALLATION OF KASPERSKY ADMINISTRATION KIT
COMPONENTS ON A LOCAL COMPUTER
This section contains a description of local installation of the Kaspersky Administration Kit components. Two setup
options are available:
Standard installation (see section "Standard installation" on page 16). A minimum required set of components
will be installed in that case. This type of installation is recommended for networks which include up to 200
computers.
Custom installation (see section "Custom installation" on page 17). In that case you can select individual
components for installation and configure additional settings. This installation type is recommended for
experienced users.
Standard installation of the application is recommended. You can modify all application settings and install additional
components later, if necessary.
If at least one Administration Server is installed in the network, additional Servers can be deployed remotely using push
install (see section "Creating a deployment task" on page 35). During task creation, use the Administration Server
installation package (see section "Creating and configuring an installation package for Administration Server" on
page 82).
STANDARD INSTALLATION
To install Kaspersky Administration Kit locally on a computer:
1. Run the setup.exe. The Setup Wizard will invite you to configure the settings. Follow the wizard's instructions.
2. Select Standard installation.
3. During the next step of the wizard, select the size of the network in which the application is being installed.
Page 17

I N S T A L L I N G KA S PE R S K Y A D M I N I S T R A T I O N KIT
17
4. Then the wizard extracts the necessary files from the distribution package and writes them to the hard drive of
the computer.
In the last window the wizard invites you to start the Administration Console. The first time the Console is launched, you
can perform the initial configuration of the application (for more details please see the Reference Guide).
When the wizard completes, the following application components will be installed on the system drive:
Administration Server (together with the server version of the Network Agent);
Administration Console;
All available management plug-ins for applications.
The following applications required for application operation will also be installed, if they were not installed earlier:
Microsoft Windows Installer 3.1;
Microsoft Data Access Component 2.8;
Microsoft .NET Framework 2.0;
During installation of Microsoft .NET Framework to Microsoft Windows 2000, an error may occur. This can be
avoided by installing Security Update for Windows 2000 (KB835732).
Microsoft SQL Server 2005 Express Edition.
CUSTOM INSTALLATION
To perform custom installation of Kaspersky Administration Kit locally on a computer, run the setup.exe file from the CD
containing the distribution package. The Setup Wizard will invite you to configure the settings. Follow the wizard's
instructions.
Page 18

D E P L O Y M E N T G U I D E
18
THE WIZARD'S STEPS
Step 1. Selecting the destination folder ........................................................................................................................... 18
Step 2. Selecting the components to be installed ............................................................................................................ 18
Step 3. Selecting the network size .................................................................................................................................. 20
Step 4. Selecting account ................................................................................................................................................ 21
Step 5. Selecting database .............................................................................................................................................. 22
Step 6. Configuring SQL server ....................................................................................................................................... 22
Step 7. Selecting the authentication mode ...................................................................................................................... 24
Step 8. Selecting a shared folder .................................................................................................................................... 26
Step 9. Configuring connection to Administration Server ................................................................................................ 27
Step 10. Defining the Administration Server address ...................................................................................................... 28
Step 11. Configuring the settings for mobile devices ....................................................................................................... 30
Step 12. Completing set up ............................................................................................................................................. 30
STEP 1. SELECTING THE DESTINATION FOLDER
Define the folder where product components will be installed. By default, it will be <Drive>:\Program Files\Kaspersky
Lab\Kaspersky Administration Kit. If this folder does not exist, it will be created automatically. You can change the
destination folder using the Browse button.
STEP 2. SELECTING THE COMPONENTS TO BE INSTALLED
In the next wizard window, select the components of Kaspersky Administration Kit, which you wish to install
(see the figure below):
Administration Server. The Administration Agent component is installed automatically.
You can also indicate if any additional components should be installed:
Kaspersky Lab Cisco NAC Posture Validation Server. This is a standard Kaspersky Lab component
authorizing a set of credentials for common operation with Cisco NAC. The settings of interaction with Cisco
NAC can be configured in the Administration Server properties or policy (for details please refer to
Kaspersky Administration Kit Reference Guide).
SNMP agent. This component supports collection of statistical information for the Administration Server via
SNMP. It is only available when the application is installed on a computer with SNMP installed.
After Kaspersky Administration Kit installation, the mib-files required for monitoring will be located in the
SNMP nested folder of the application installation folder.
Mobile devices support. This component provides for common product operation with Kaspersky Mobile
Security Enterprise Edition.
Page 19

I N S T A L L I N G KA S PE R S K Y A D M I N I S T R A T I O N KIT
19
Kaspersky Lab System Health Validator. It is a Kaspersky Lab tool checking normal system functioning
(System Health Validator) and interacting with Microsoft NAP. This component is only available during setup on
a computer with the Microsoft Windows Server 2008 installed.
Administration Console.
Figure 1. Selecting the components to be installed
Network Agent setup cannot be cancelled, the component is always installed.
Server version of the Network Agent will be installed on the computer together with the Administration Server.
Administration Server cannot be installed together with the regular version of the Network Agent. If that component is
already installed on the target computer, remove it and run the Administration Server installation again.
Please note that the wizard dialog contains reference information:
on the selected component in the Description field in the right part of the window;
on the disk space required to install the selected components and available free space on the selected
destination drive, in the lower part of the window.
If you have selected the Administration Console only, there will be no further configuration steps; the wizard will proceed
to the list of setup settings and the actual installation start.
If you have selected the Administration Server installation, proceed to the next step.
Page 20
D E P L O Y M E N T G U I D E
20
SETTINGS
1–100 COMPUTERS
100–1000 COMPUTERS
MORE THAN 1000
COMPUTERS
Display of the slave
Administration Servers
node and all corresponding
settings
– – +
Display of the security
settings
– – +
Display of the applications
registry and all
corresponding settings
– + +
Creation of a Network
Agent policy using the
Quick Start Wizard
– – +
Enable randomization of
the update task launch
time on client computers
–
5 minutes
10 minutes
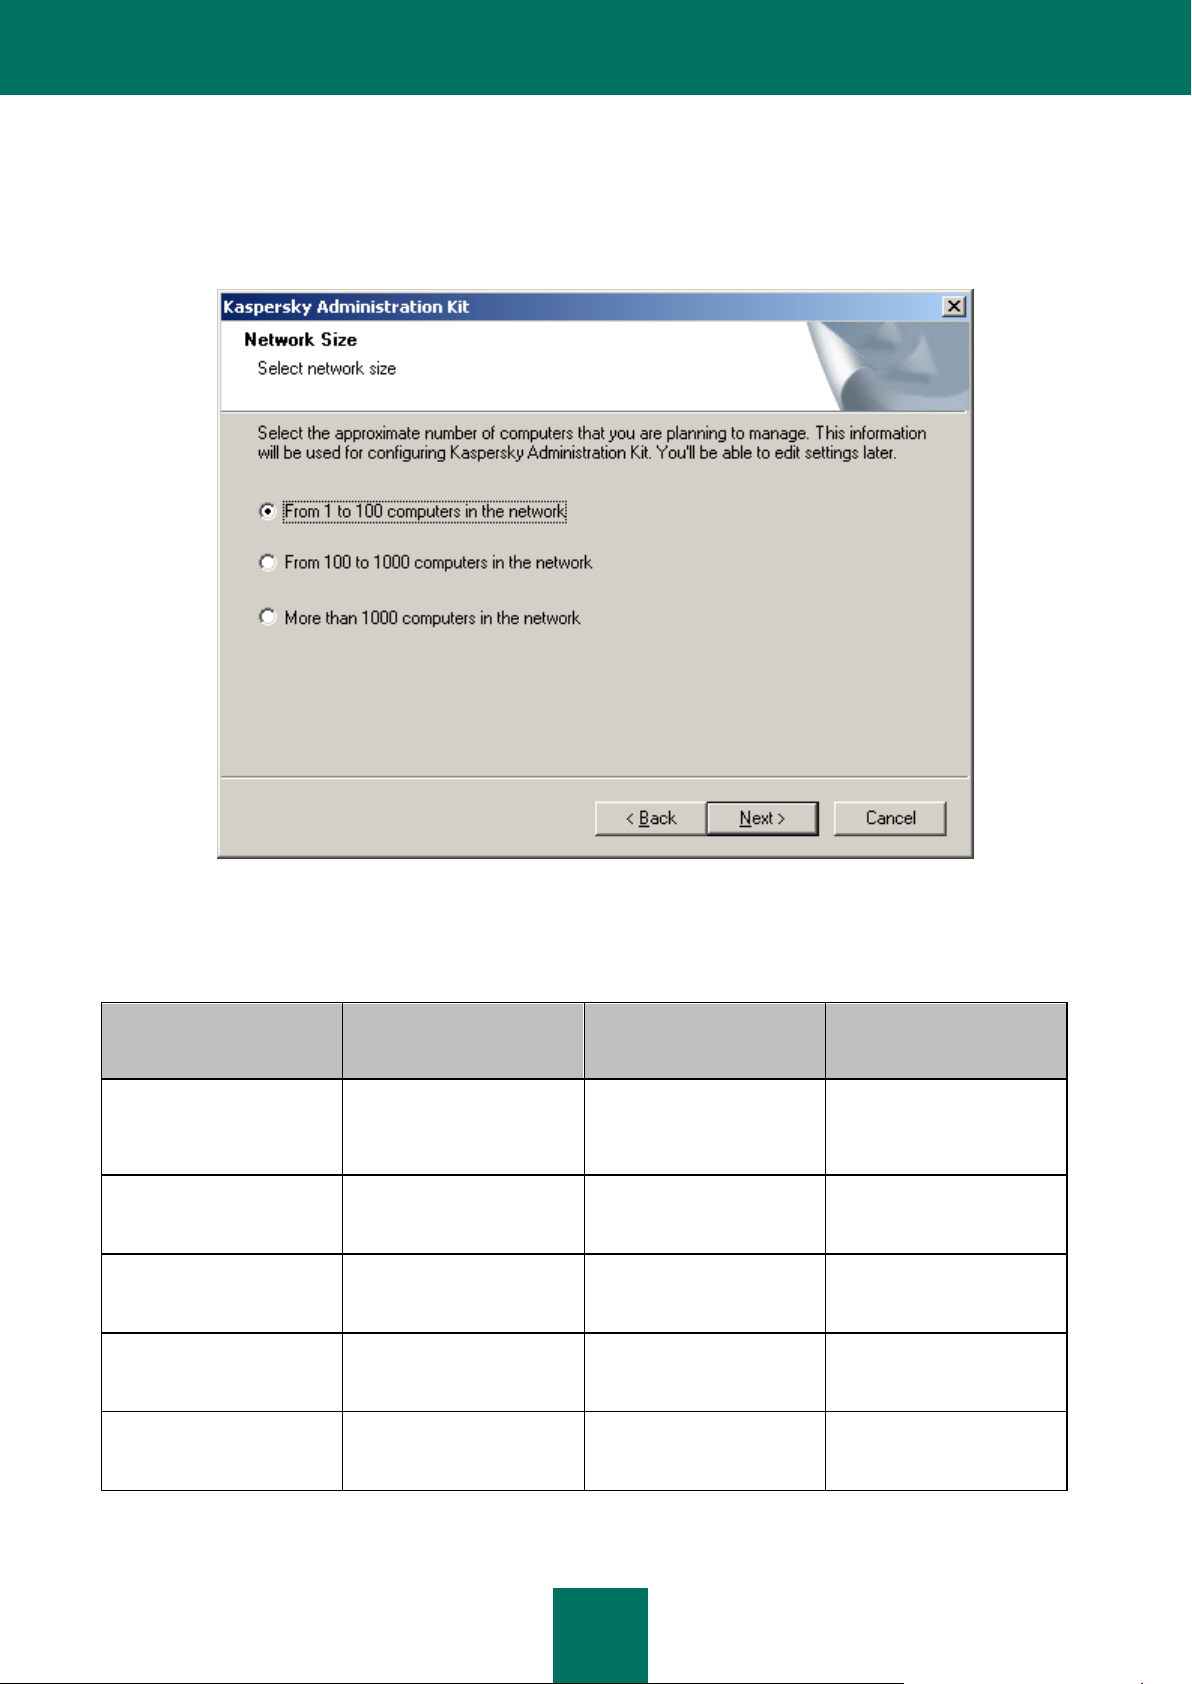
STEP 3. SELECTING THE NETWORK SIZE
Specify the size of the network where you are installing Kaspersky Administration Kit (see the figure below). This
information will help to ensure optimal configuration of the application interface and settings. You can modify these
settings later (for details please refer to the Kaspersky Administration Kit Administrator's Guide).
Figure 2. Selecting the network size
The table below contains the main differences in the setup depending upon various selected network sizes.
Table 2. Relation between the setup settings and the network size
Page 21
I N S T A L L I N G KA S PE R S K Y A D M I N I S T R A T I O N KIT
21
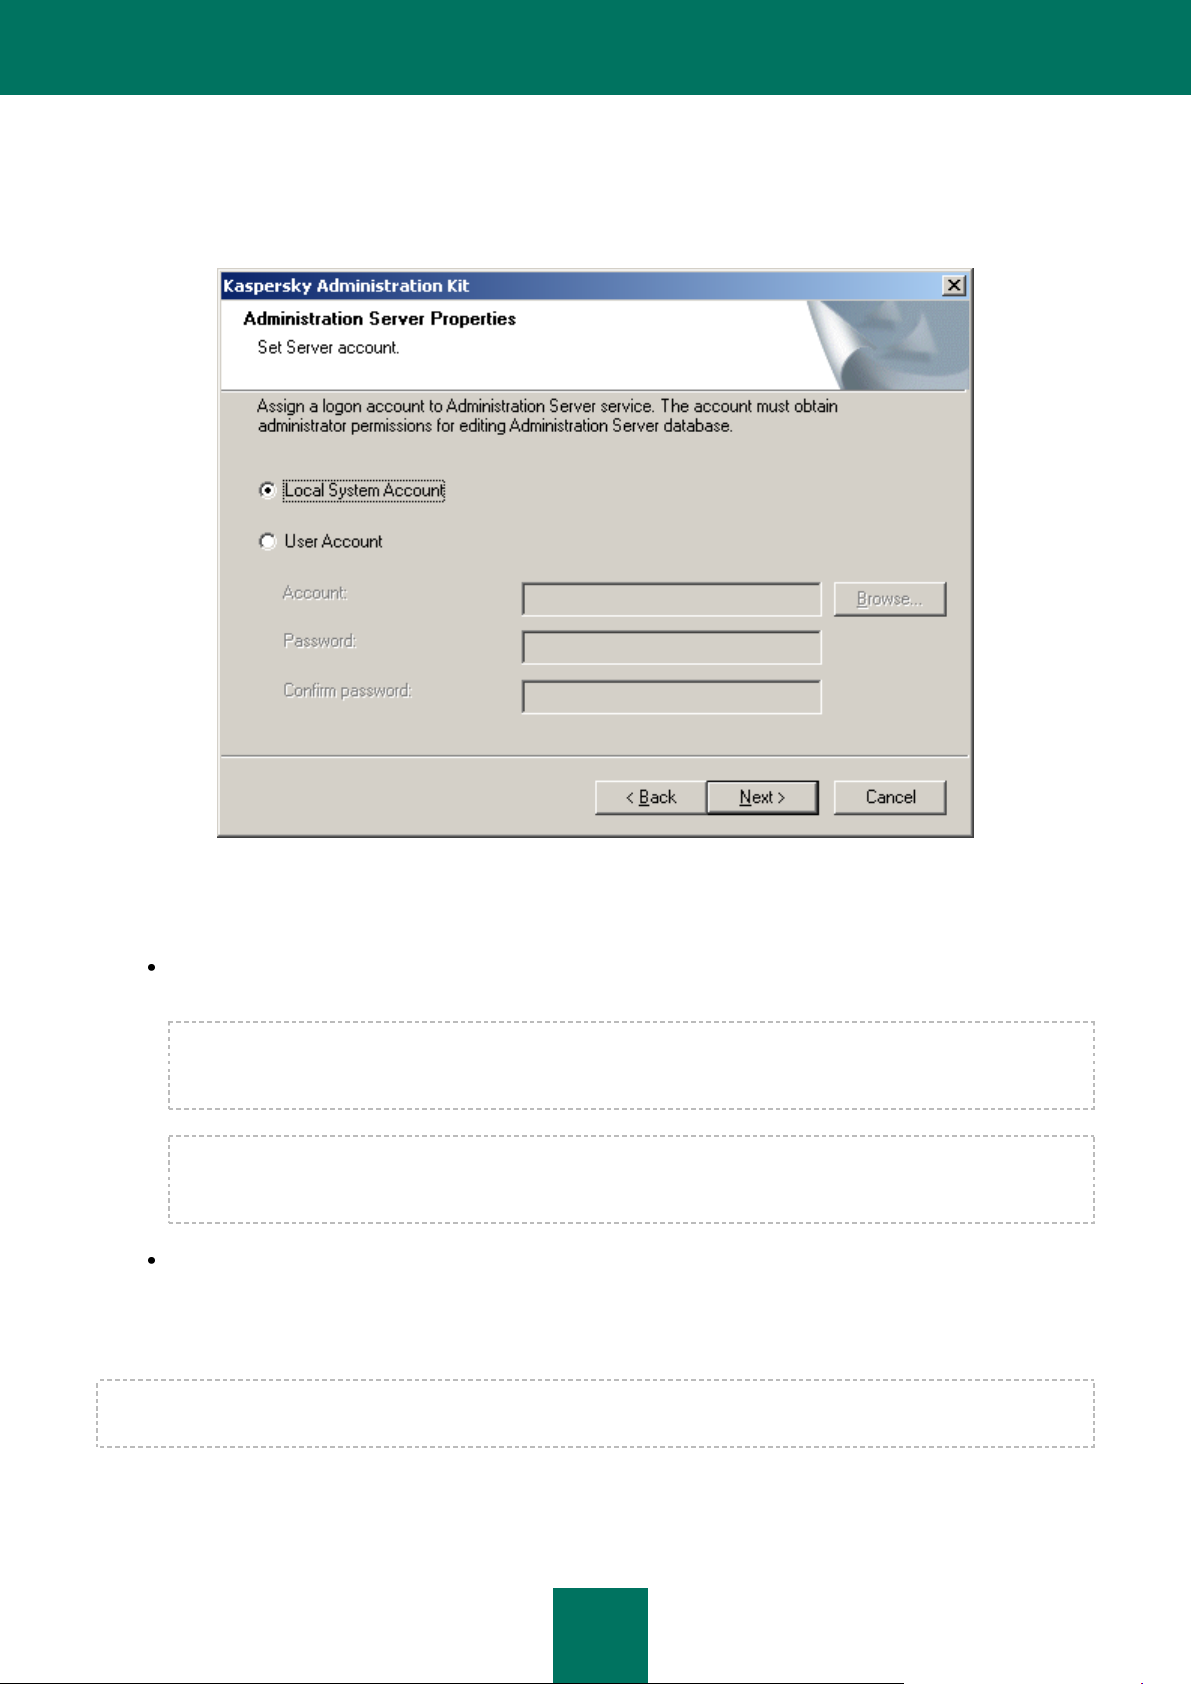
STEP 4. SELECTING ACCOUNT
Define the account that will be used to start the Administration Server as a service on a given computer
(see the figure below).
Figure 3. Selecting account
The two following options are available:
Local System account – the Administration Server will start using the Local System account and its
credentials.
Correct operation of Kaspersky Administration Kit requires that the account used to start the Administration
Server should have the administrator's rights on the resource where the Administration Server database is
hosted.
In Microsoft Windows Vista and later versions of Windows, the Administration Server cannot be configured to
use the local system account. Therefore, the Automatically created account (<Name of account>) option is
available on computers running the specified operating systems.
Specified account – the Administration Server will start using the account included into a domain. In this case
the Administration Server will initiate all operations using the credentials of that account. Use the Browse button
to select the user whose account will be used and enter the password.
If you have selected a specified user account to launch the Administration Server, you will be offered to specify that user.
If later you decide to change the Administration Server account, you will need to use the utility for Administration Server
account switching (klsrvswch). For details please see the Kaspersky Administration Kit Reference Guide.
Page 22
D E P L O Y M E N T G U I D E
22
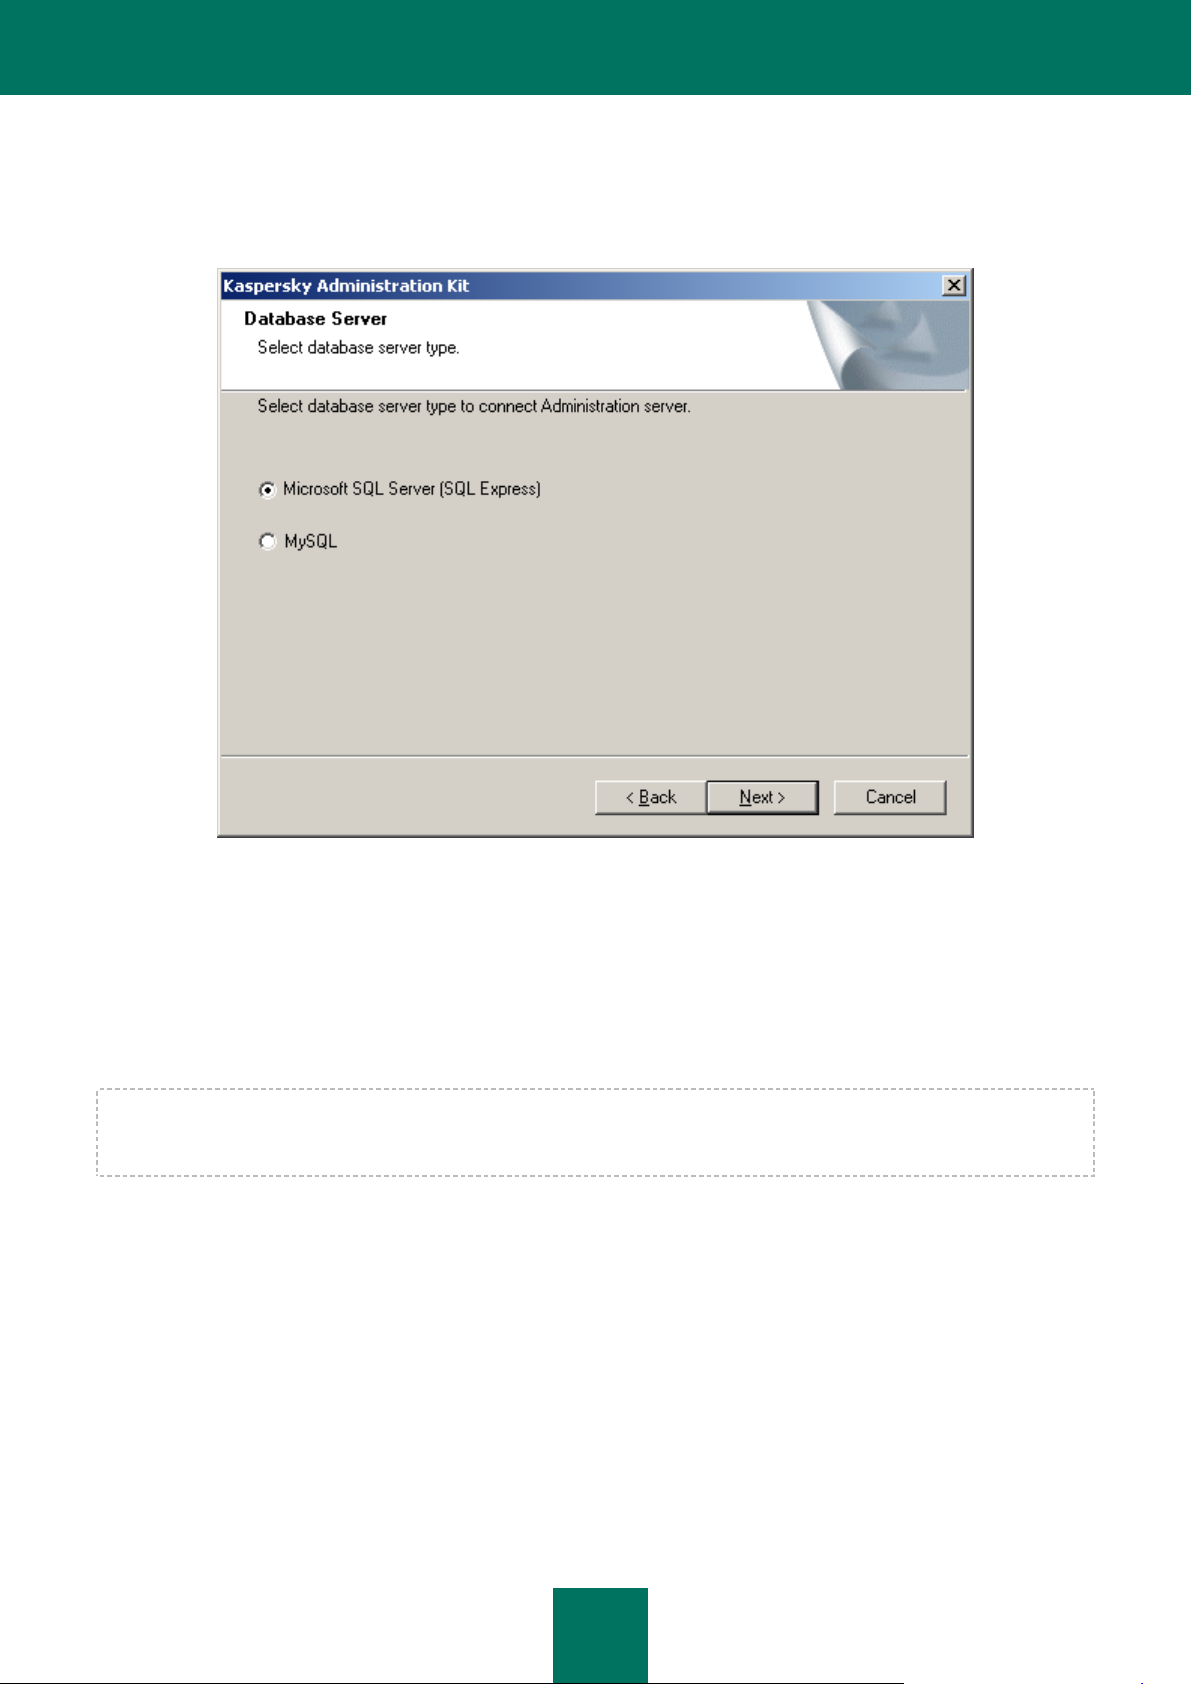
STEP 5. SELECTING DATABASE
During the next step you will be offered to select the resource: Microsoft SQL Server (SQL Express) or MySQL
(see the figure below), which will be used for storage of the Administration Server information database.
Figure 4. Selecting database
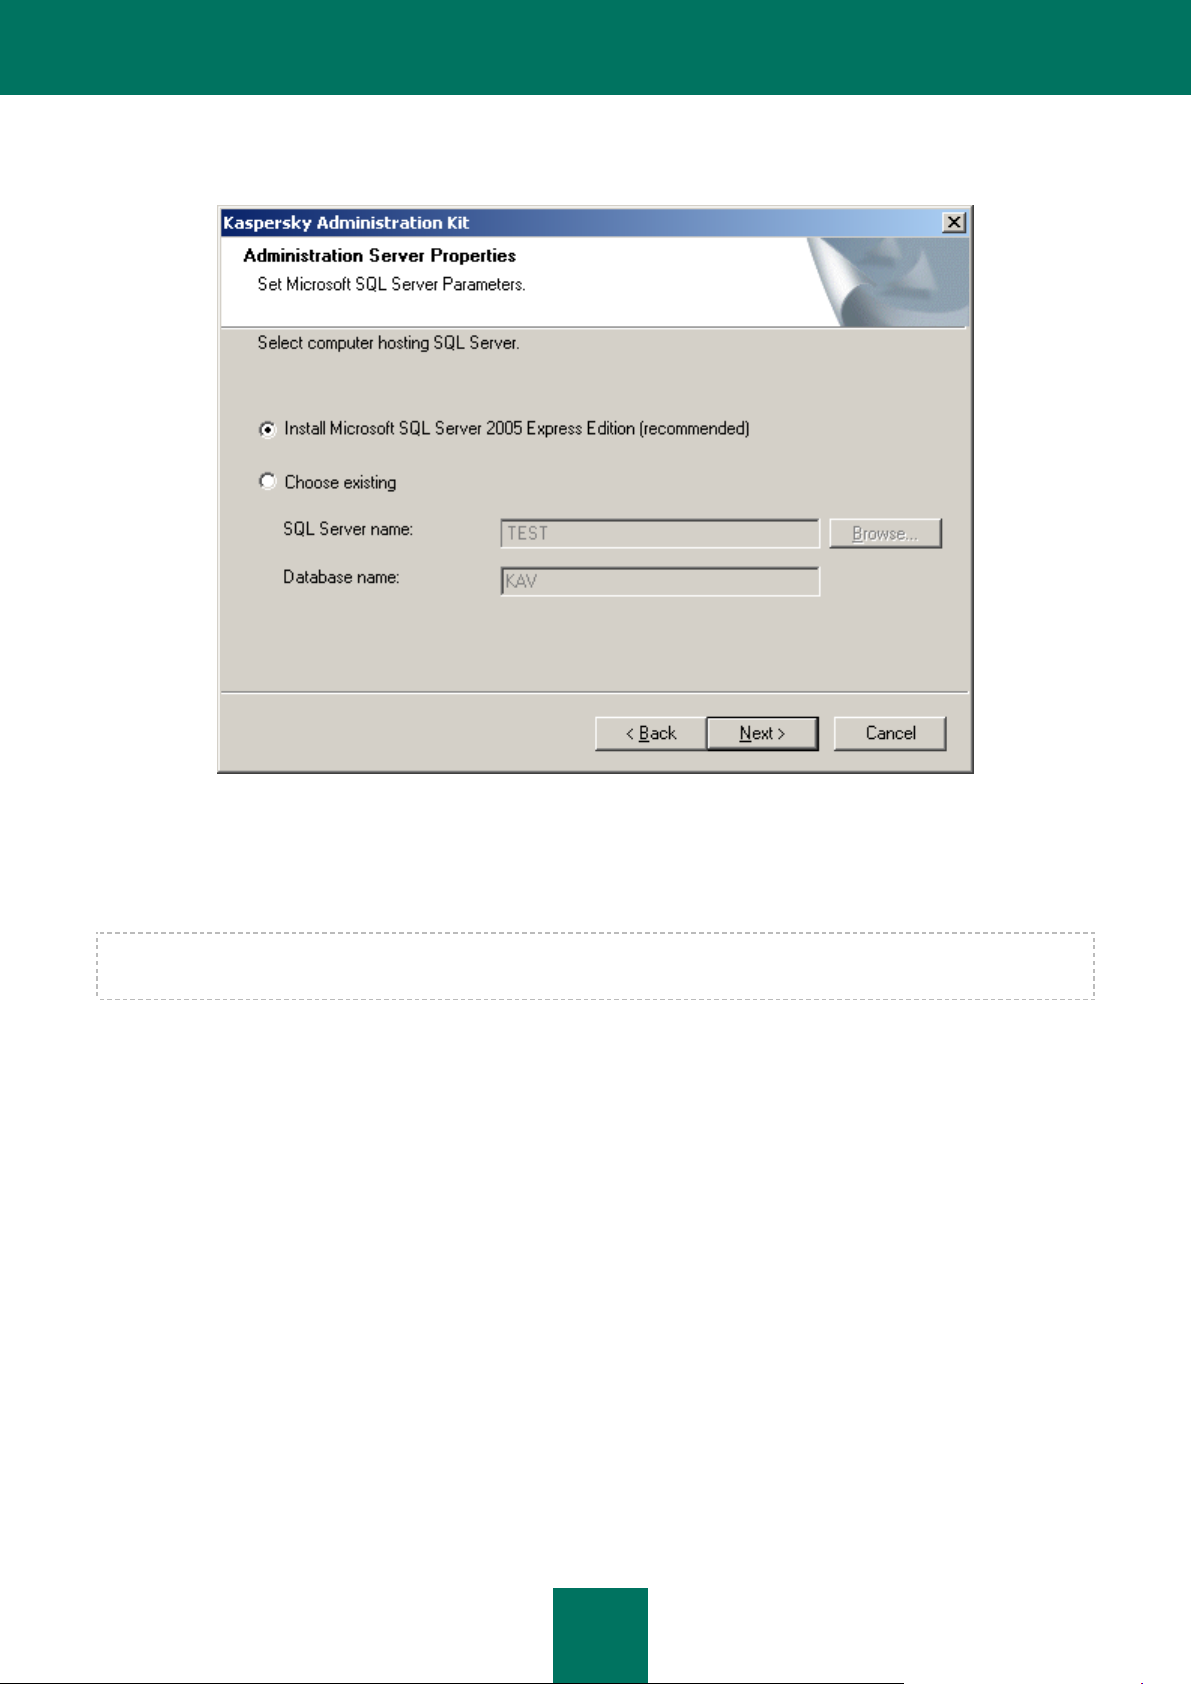
STEP 6. CONFIGURING SQL SERVER
If you have selected SQL Express or Microsoft SQL Server during the previous step, and you plan to use Kaspersky
Administration Kit with a server installed in the corporate network, enter its name in the SQL Server name field. In the
Database name field (see the figure below), specify the name of the database, which will be created for the
Administration Server information. The default name for the database will be KAV.
If you plan to manage fewer than 5,000 computers with Kaspersky Administration Kit, Microsoft SQL Express 2005 / 2008
can be used. If the planned number of computers managed with Kaspersky Administration Kit exceeds 5, 000, Microsoft
SQL 2005 / 2008 is recommended.
Page 23
I N S T A L L I N G KA S PE R S K Y A D M I N I S T R A T I O N KIT
23
If no SQL server is installed in the network yet, select the option to Install Microsoft SQL Server 2005 Express Edition.
All the necessary settings will be configured automatically.
Figure 5. Selecting database
The name of an SQL server will appear in the SQL Server name field automatically, if the installer finds it on the
computer where Kaspersky Administration Kit is being installed. The Browse button displays the list of all Microsoft SQL
servers installed in the network.
If the Administration Server will start using the local administrator or local system account, the Browse button is not
available.
Page 24
D E P L O Y M E N T G U I D E
24
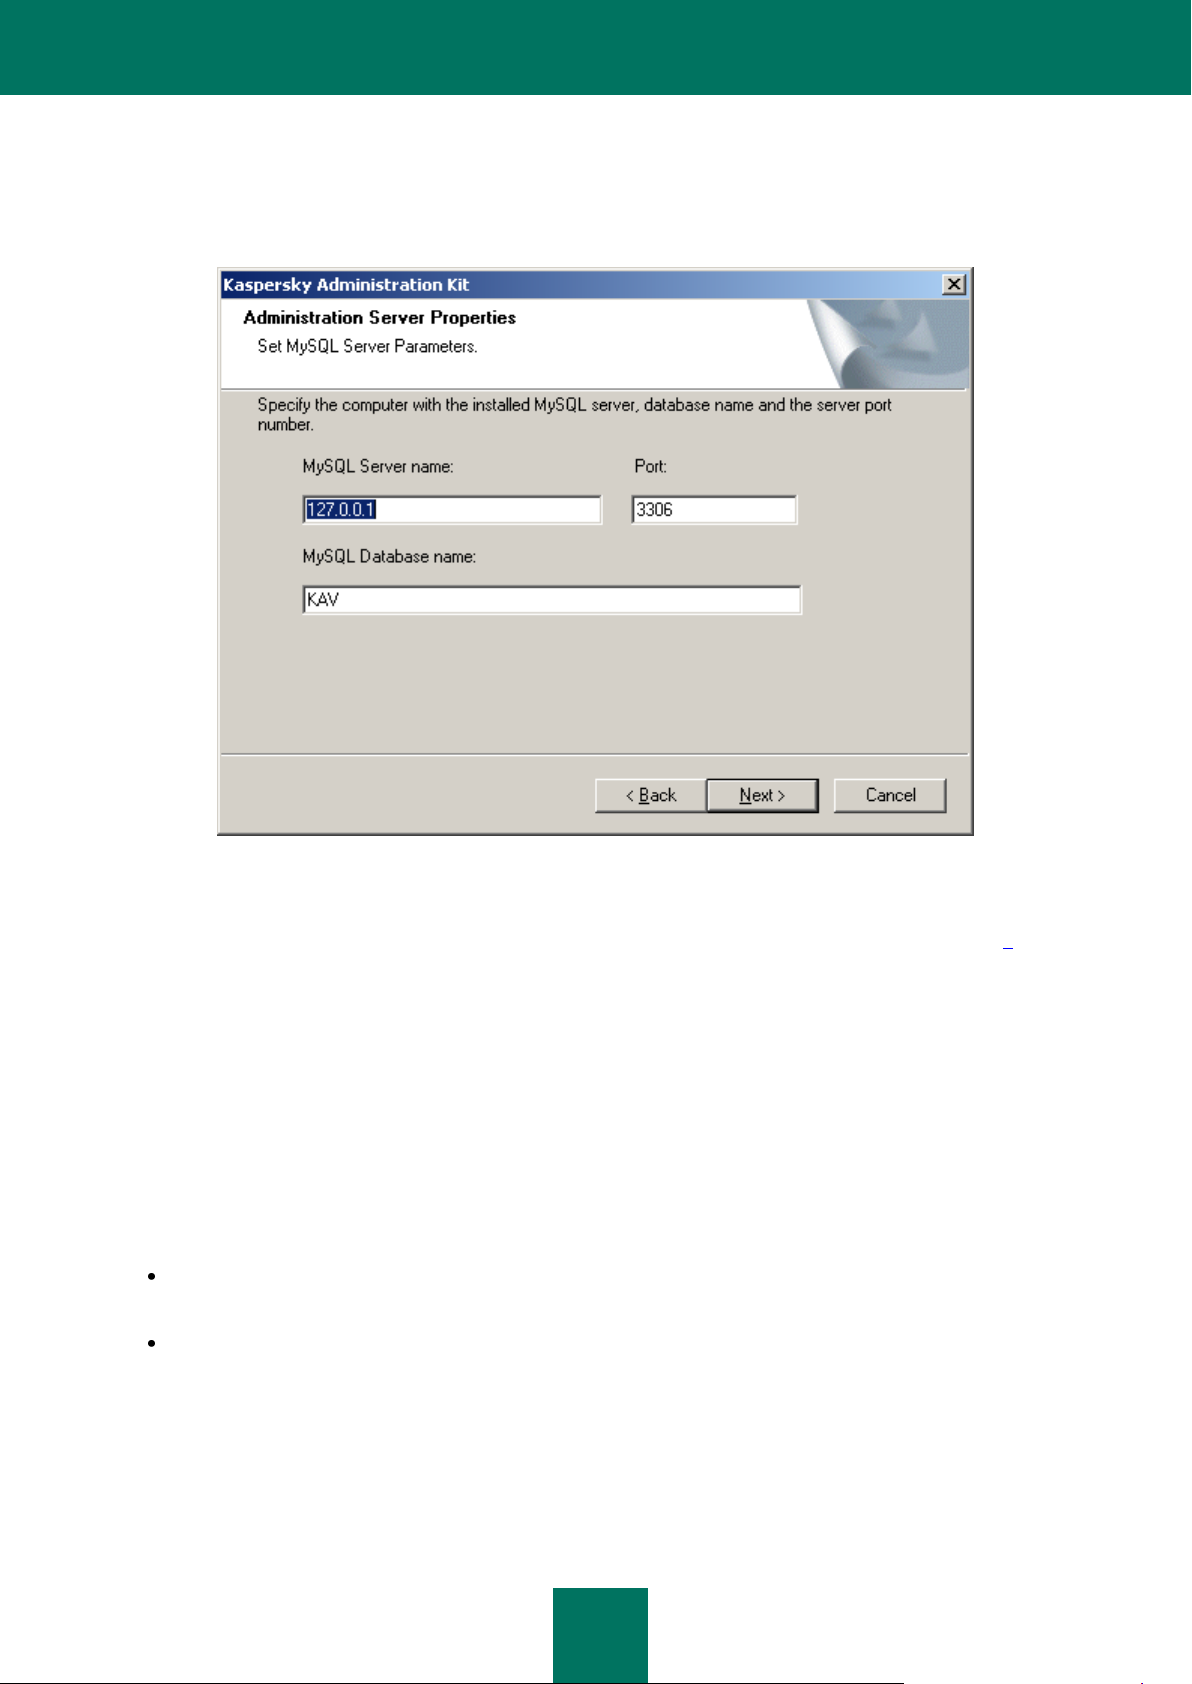
If a MySQL Enterprise server has been selected during the previous step, use this window (see the figure below) to
specify its name in the MySQL Server name field (by default, the system uses the IP address of the computer where
Kaspersky Administration Kit is being installed) and the port for connection in the Port field (the default port number is
3306). In the MySQL Database name field enter the name of the database, which will be created for storage of the
Administration Server data (the default database name is KAV).
Figure 6. Selecting MySQL Enterprise server
If the network contains no SQL servers or you cannot use the existing servers, you should install a server. The supported
SQL servers are listed in the system requirements (see section "Hardware and software requirements" on page 9).
If you wish to install an SQL server on the computer from which you have initiated installation of the Kaspersky
Administration Kit, you will need to abort the installation procedure and restart it after the SQL server is installed.
If you are installing the server on a remote computer, there is no need to interrupt the setup wizard of the Kaspersky
Administration Kit. Install an SQL server and return to the Kaspersky Administration Kit setup.
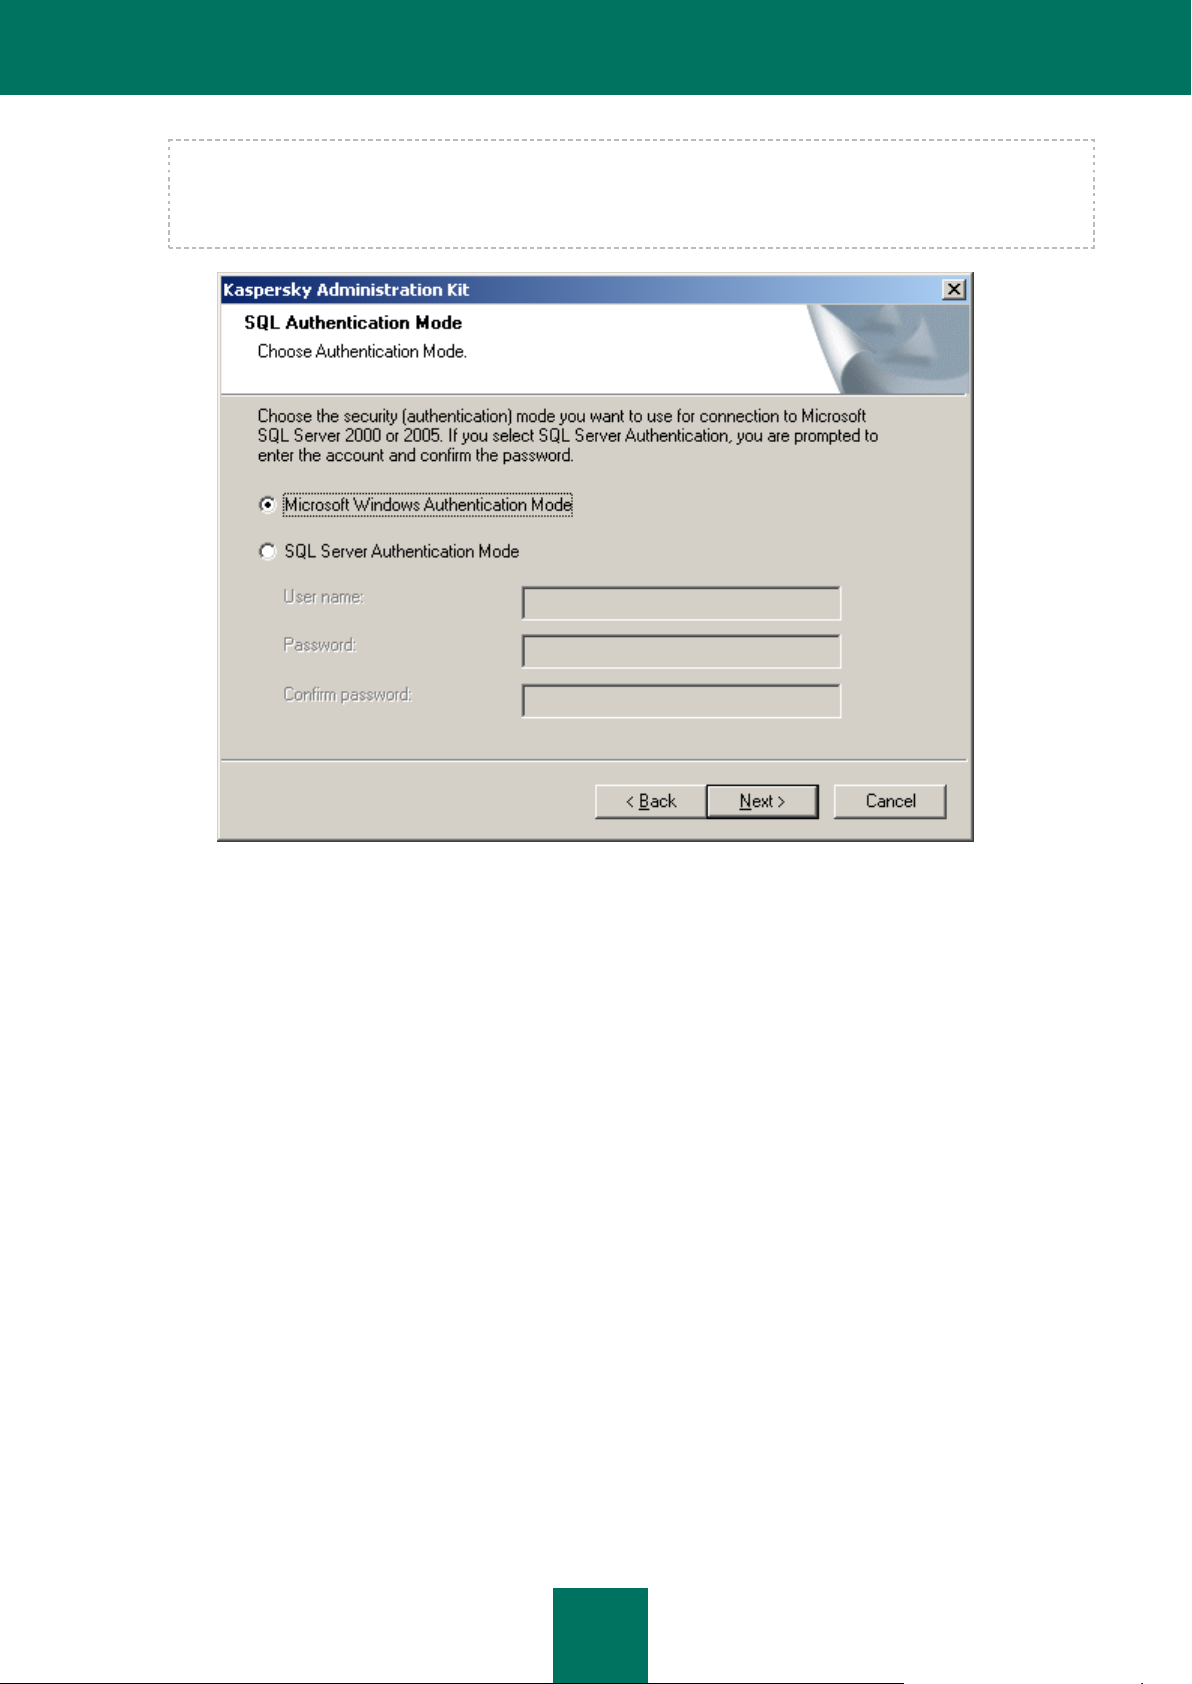
STEP 7. SELECTING THE AUTHENTICATION MODE
Determine the authentication mode that will be used during the Administration Server connection to the SQL server.
For SQL Express or Microsoft SQL Server you can select one of the following two options (see the figure below):
Microsoft Windows Authentication Mode – in that case the account used to start the Administration Server
will be employed to verify the credentials;
SQL Server Authentication Mode – if you select that option, the account specified below will be used to verify
the credentials. Fill in the Account, Password and Confirm password fields.
Page 25
I N S T A L L I N G KA S PE R S K Y A D M I N I S T R A T I O N KIT
25
If the Administration Server database is stored on another computer, then, during installation or upgrade of the
Administration Server, you should use the SQL server authentication mode for cases when the Administration
Server account has no access to the database server. That is possible if one of the computers is outside the
domain or the Administration Server is configured to use the Local system account.
Figure 7. SQL Server Authentication Mode
Page 26
D E P L O Y M E N T G U I D E
26
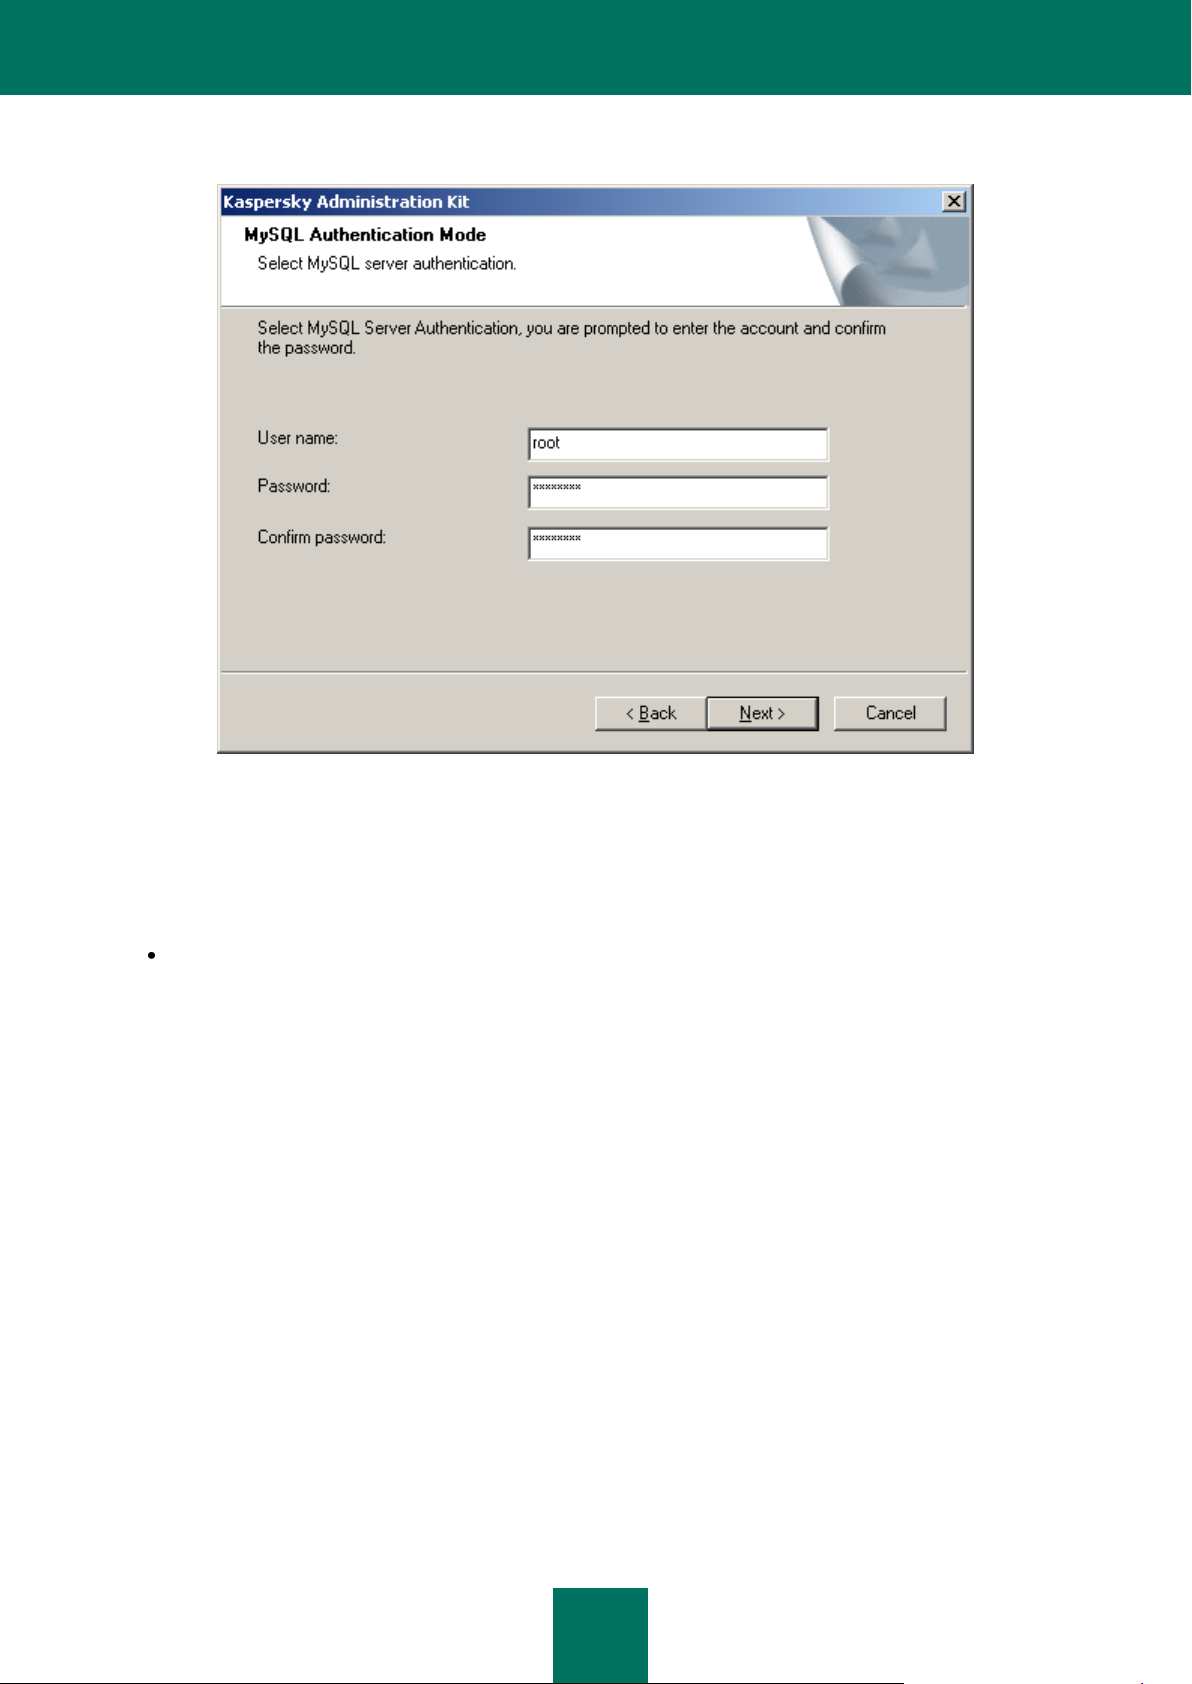
Specify the user account and password for MySQL Enterprise server (see the figure below).
Figure 8. Authentication mode on MySQL Enterprise server
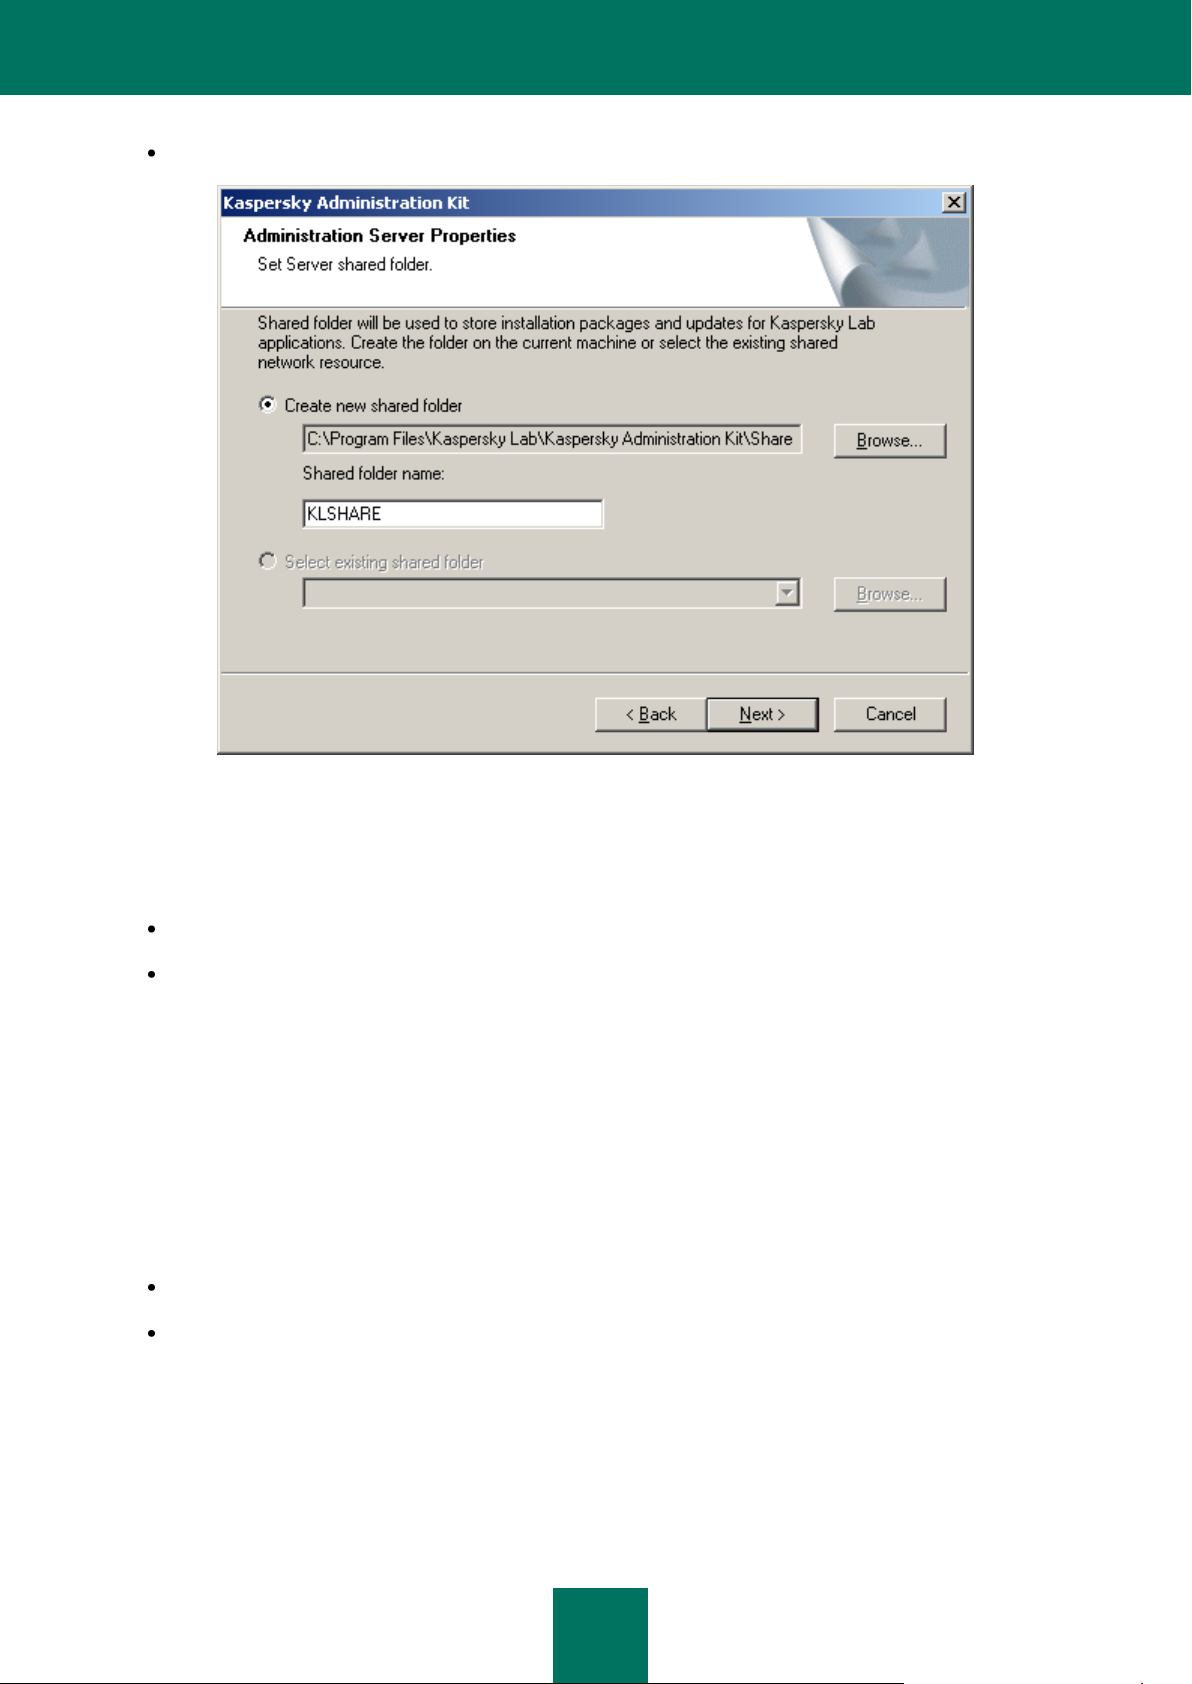
STEP 8. SELECTING A SHARED FOLDER
Define the location and name of the shared folder (see the figure below) that will be used to:
store the files necessary for remote deployment of applications (the files are copied to the Administration Server
during creation of installation packages);
Page 27
I N S T A L L I N G KA S PE R S K Y A D M I N I S T R A T I O N KIT
27
store updates downloaded from an updates source to the Administration Server.
Figure 9. Creating a shared folder
File sharing (read only) will be enabled for all users.
The two following options are available:
Create new shared folder to make a new folder; specify the folder path in the field below in that case.
Select existing shared folder to choose a shared folder among the directories that already exist.
The shared folder can be a local folder on the computer running the installer or remote directory on any computer within
the corporate LAN. You can use the Browse button to select the shared folder or specify it manually by entering its UNC
path (for example, \\server\KLShare) in the corresponding field.
By default, the installer creates a local KLShare subfolder in the program folder containing the components of Kaspersky
Administration Kit.
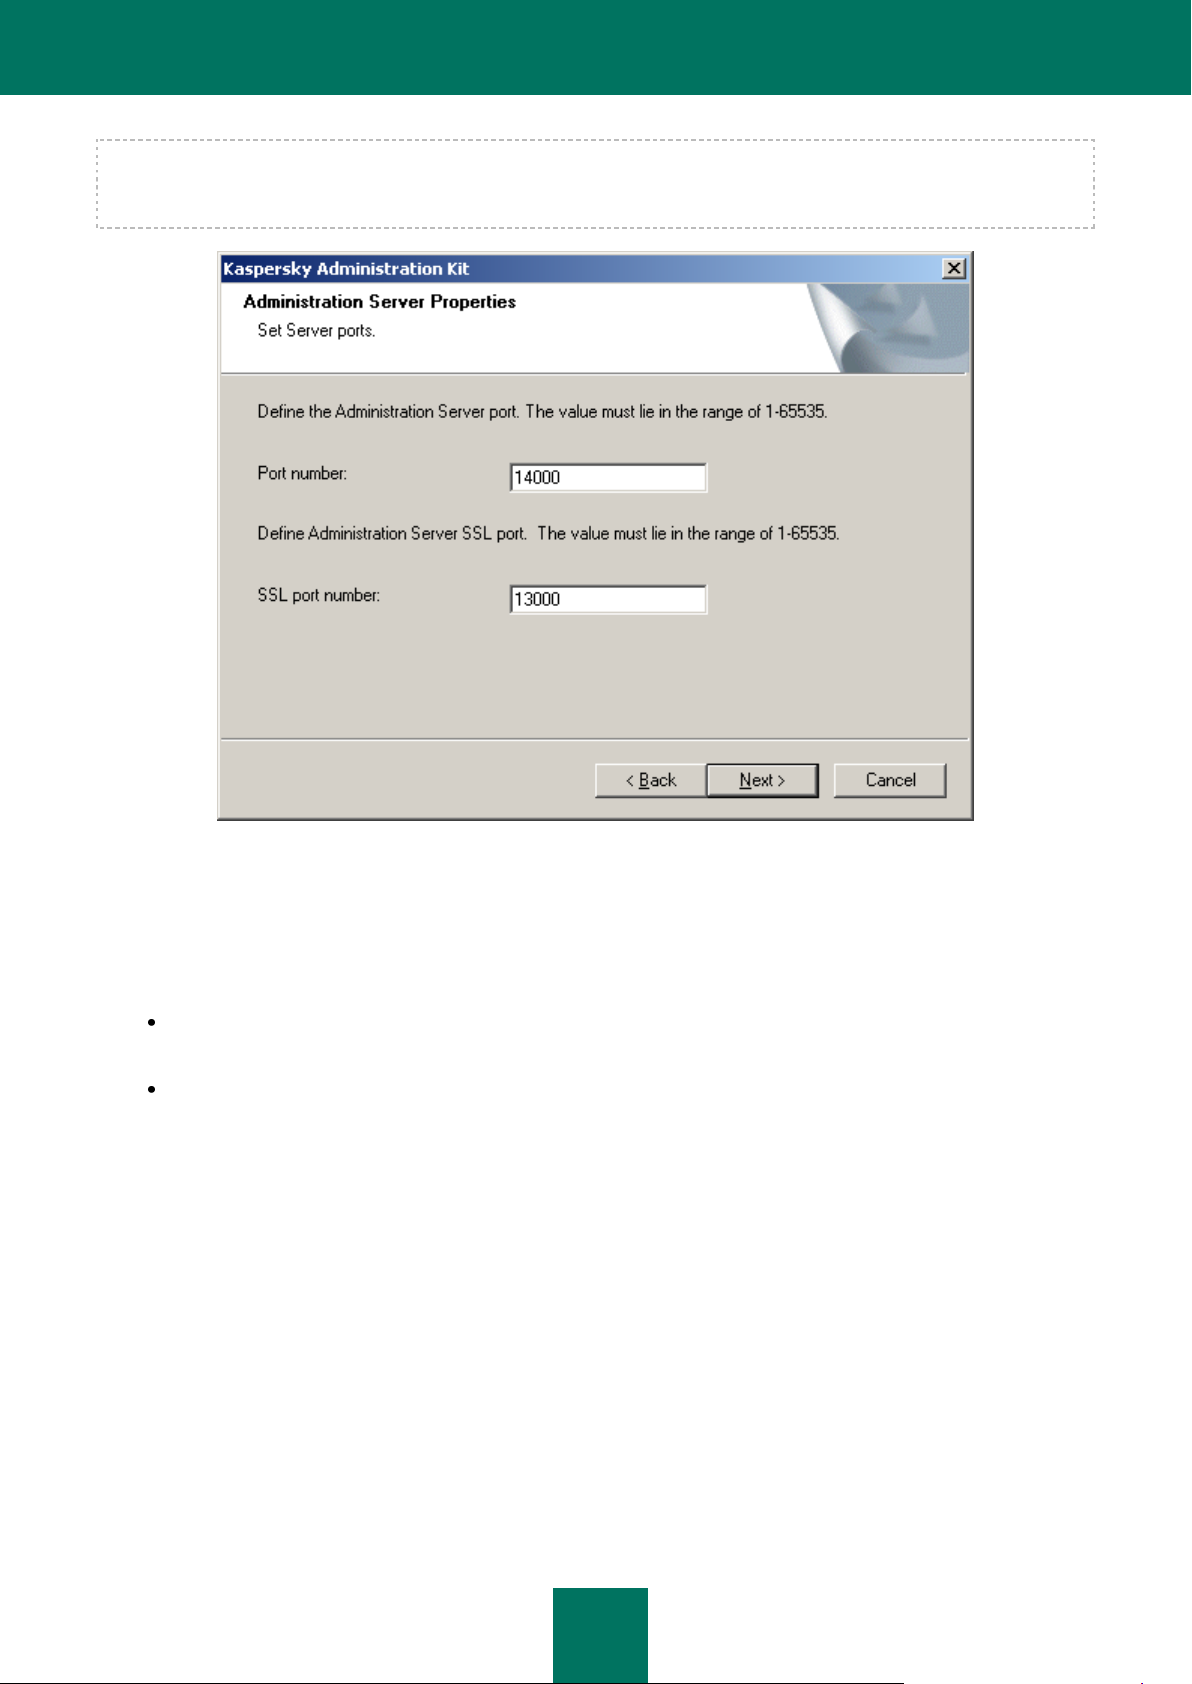
STEP 9. CONFIGURING CONNECTION TO ADMINISTRATION SERVER
Define the settings for connection to the Administration Server (see the figure below):
The number of the port used to connect to the Administration Server. By default, port 14000 will be used.
SSL port number that will be used for secure connection to the Administration Server. By default, port 13000 will
be used.
Page 28
D E P L O Y M E N T G U I D E
28
If the Administration Server is installed on a computer running Microsoft Windows XP with Service Pack 2, then the builtin system firewall blocks TCP ports 13000 and 14000. Therefore, to allow access to the computer with the installed
Administration Server, these ports must be opened manually.
Figure 10. Settings for connection to the Administration Server
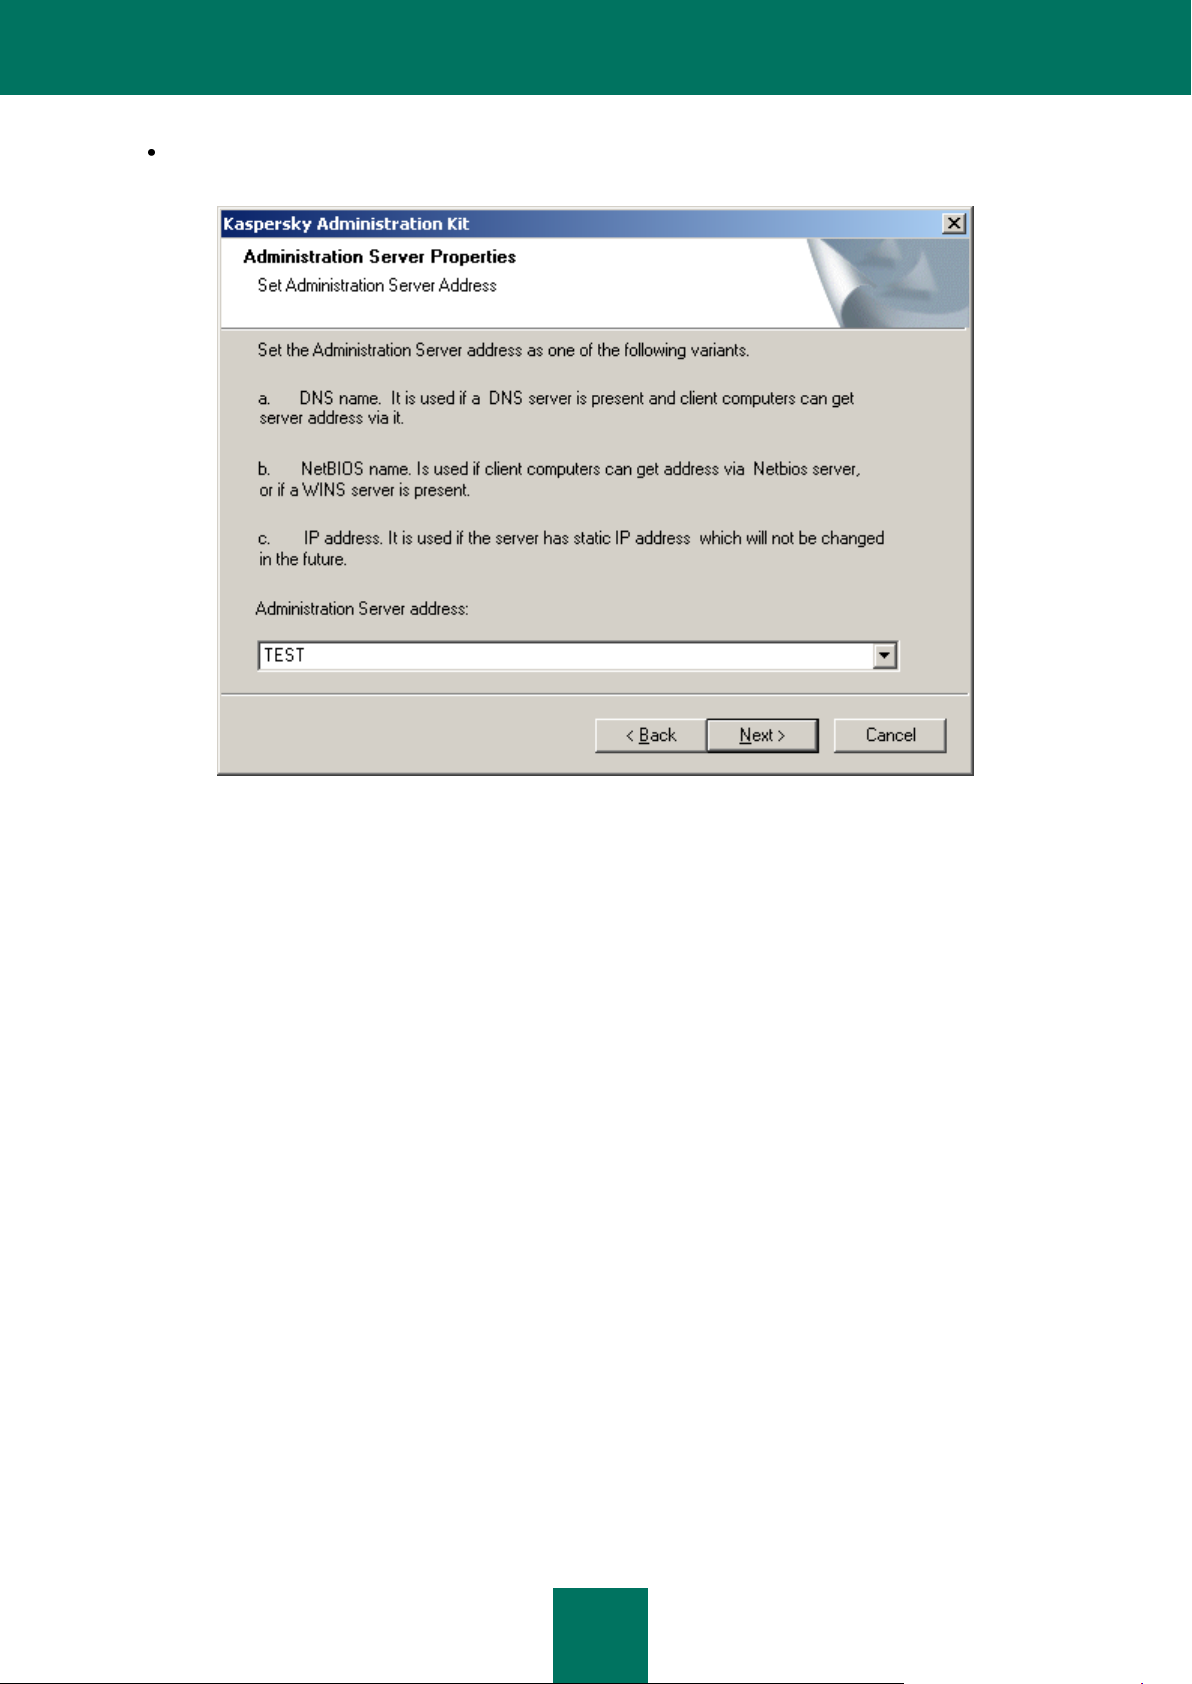
STEP 10. DEFINING THE ADMINISTRATION SERVER ADDRESS
Specify the Administration Server address (see the figure below) using:
DNS name. This method is helpful in cases when the network includes a DNS server and client computers can
use it to obtain the Administration Server address.
NetBIOS name. This method is used when client computers obtain the Administration Server address via the
NetBIOS protocol or there is an available WINS server in the network.
Page 29
I N S T A L L I N G KA S PE R S K Y A D M I N I S T R A T I O N KIT
29
IP address. This option is used if the Administration Server has a static IP address, which will not be changed in
the future.
Figure 11. Administration Server address
Page 30
D E P L O Y M E N T G U I D E
30
PROPERTY
ADMINISTRATION SERVER
KASPERSKY LAB CISCO
NAC POSTURE
VALIDATION SERVER
NETWORK AGENT
Service name
CSAdminServer
nacserver
klnagent
Displayed service name
Kaspersky Administration
Server
Kaspersky Lab Cisco NAC
Posture Validation Server
Kaspersky Network Agent
Startup type
Automatic at the operating system start.
Account
Local System or user-defined.
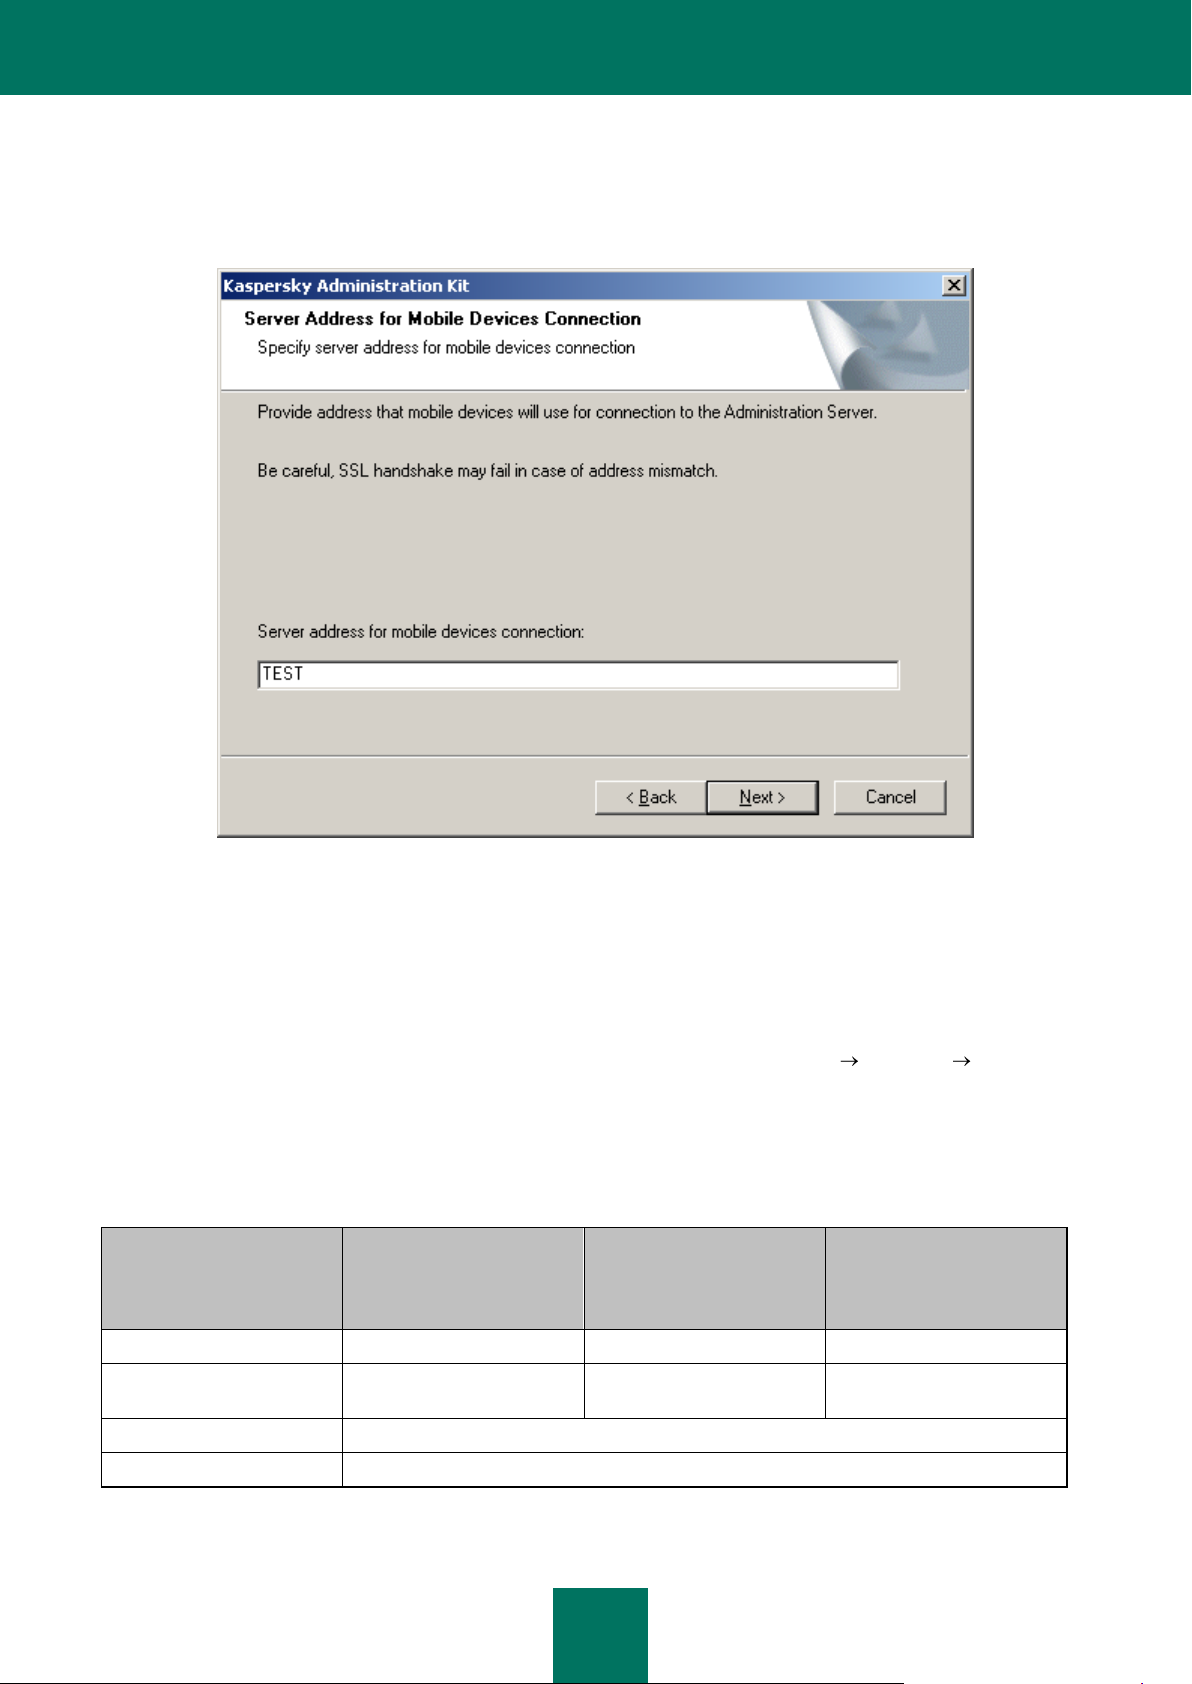
STEP 11. CONFIGURING THE SETTINGS FOR MOBILE DEVICES
If the Mobile devices support component was selected for installation, specify the Administration Server name for
connection of mobile devices (see the figure below).
Figure 12. Administration Server address for connection of mobile devices
STEP 12. COMPLETING SET UP
Once the installation settings for the components of Kaspersky Administration Kit are defined, you can check them and
begin actual installation.
After the Administration Console is installed on your computer, its icon appears in the Start Programs Kaspersky
Administration Kit menu and can be used to start the Console.
The Administration Server and Network Agent will be installed on the computer as services with the properties listed
below. The table also contains the properties of the Kaspersky Lab Posture Validation Server for Cisco NAC, which will
be running on the computer if the corresponding component has been installed together with the Administration Server.
Table 3. Administration Server and Network Agent properties
The server version of the Network Agent will be installed on the computer together with the Administration Server. It is
part of the Administration Server which is installed and removed together with the server; it can only interact with a locally
Page 31

I N S T A L L I N G KA S PE R S K Y A D M I N I S T R A T I O N KIT
31
installed Administration Server. You do not have to configure settings for connecting the Agent to the Administration
Server; these settings are programmed in because the components are installed on the same computer. These
parameters will also not be available in the local settings of the Network Agent on that computer. Such a configuration
helps avoid additional configuration and potential conflicts in the operation of these components when they are installed
separately.
The server version of the Network Agent is installed with the same properties as the standard Network Agent and
performs the same application management functions. It will use the group policy including the Administration Server
computer as a client, create and run all the Network Agent tasks except the task of changing the Server.
Individual installation of the Network Agent on the Administration Server computer is not required. Its functions are
performed by the server version of the Agent.
You can view the properties of the Kaspersky Administration Server, and Kaspersky Lab
Cisco NAC Posture Validation Server services and monitor their activity using the standard Windows administration
tools – Computer management ® Services. Information about the activity of Kaspersky Administration Server is
registered and stored in the Microsoft Windows system log in a separate Kaspersky Event Log branch on the computer
where the Administration Server is installed.
Local user groups KLAdmins and KLOperators will also be created on the computer with the Administration Server
installed. If the Administration Server starts using an account included in the domain, then the KLAdmins and
KLOperators groups are added to the list of domain user groups. The groups can be modified using the standard
Windows administration tools.
REMOVAL OF KASPERSKY ADMINISTRATION KIT
COMPONENTS
You can remove Kaspersky Administration Kit using the Kaspersky Administration Kit Uninstall command in the
Start Programs Kaspersky Administration Kit menu or using the standard Microsoft Windows tools for program
installation and removal. This will start the wizard which removes all application components from the computer (including
plug-ins). If you have not selected removal of the shared folder (KLShare) during the wizard's operation, delete it
manually after completion of all the tasks accessing it.
When removing the application you will be offered to save a backup copy of the Administration Server.
When removing the application from Microsoft Windows 7 and Microsoft Windows 2008, early termination of the removal
wizard is possible. This can be avoided by disabling User Account Control (UAC) in the operating system and restarting
application removal.
UPGRADING THE APPLICATION
During upgrade of versions 6.х to version 8.0 the product supports data restoration from backup copies created in an
earlier application version. The following procedure is recommended in that case:
1. Use the klbackup.exe utility to create a backup copy of the installed Administration Server data. This utility is
included in Kaspersky Administration Kit distribution package, and after the Administration Server installation it
is located in the root of the installation folder. Please note that complete restoration of the Administration Server
data requires saving the server certificate. This parameter is mandatory for the klbackup.exe utility.
You can find more detailed information on the operation of the data backup and restoration utility in the
Kaspersky Administration Kit Reference Guide.
2. Launch the setup of Kaspersky Administration Kit 8.0 on the computer with the earlier version of the
Administration Server and / or Console installed. Upgrade the component. In the process of upgrade, all data
Page 32

D E P L O Y M E N T G U I D E
32
and settings of the previous version of the Server and / or Administration Console will be saved and available in
the new version.
3. To upgrade the Network Agent installed on network computers, create a group or a global task for deployment
of the newer version of this component. Run the task manually or according to the schedule. After its successful
completion the Network Agent will be upgraded.
If problems occur during installation, you can restore the previous version of Kaspersky Administration Kit using the
backup copy of the Administration Server data created before upgrade.
If at least one Administration Server is installed, other Servers can be upgraded using a remote deployment task based
on an Administration Server installation package (see section "Creating and configuring an installation package for
Administration Server" on page 82).
Page 33

33
REMOTE DEPLOYMENT AND REMOVAL OF APPLICATIONS
Before you begin the installation, make sure that the hardware and software on target computers meet the system
requirements (see section "Hardware and software requirements" on page 9).
Kaspersky Administration Kit supports the following methods for installation and removal of Kaspersky Lab applications:
centralized installation and remote deployment via the Administration Console (as described in this section);
local installation individually on each computer (see section "Local installation of software" on page 90).
Besides, you can remove incompatible applications, which may cause conflicts in the operation of Kaspersky Lab's
software managed via Kaspersky Administration Kit. (see section "Remote removal of software" on page 69)
Network Agent is a component that provides for Administration Console connection with client computers. That is why it
must be installed on each computer, which will be connected to the remote centralized management system before
deployment of the anti-virus applications. The Network Agent is installed together with the applications during centralized
software installation with the Administration Console.
The computer on which the Administration Server is installed can only use the server version of the Network Agent. It is
included into the Administration Server as a part which is installed and removed together with it. There is no need to
install the Network Agent on that computer.
The Network Agent can be installed remotely or locally like any application.
Network Agents can differ depending upon the Kaspersky Lab applications that they are installed to support and control.
In some cases the Network Agent can be installed locally only (for details please refer to the documentation for the
corresponding applications). The Network Agent is installed on a client computer once.
The interface necessary to manage applications via Kaspersky Administration Kit is provided by the corresponding
management plug-ins. Therefore, to access the application management interface, the corresponding plug-in must be
installed on the administrator's workstation. During remote deployment it is installed automatically when the first
installation package is created for a corresponding application. In case of local installation on a client computer, the
administrator has to install the management plug-in manually.
Remote deployment can be performed from the administrator's workstation in the main program window of Kaspersky
Administration Kit.
Some Kaspersky Lab applications can be installed on client computers only locally (for details, please refer to the
documentation for the corresponding applications). However, remote management via Kaspersky Administration Kit will
be available for those applications.
For remote software installation, create a deployment task (see section "Creating a deployment task" on page 35) of the
following types:
task for selection of computers – to install an application on all managed computers, on computers of several
administration groups or on individual computers from different groups;
group task – to install software on all client computers of a certain administration group (all its child groups and
slave Servers).
To create a group task or global task, you can use the Remote Installation Wizard (see section "Remote Installation
Wizard" on page 61).
Page 34

D E P L O Y M E N T G U I D E
34
The created task will start in accordance with its schedule. The application settings on each client computer are defined
in accordance with the group policy and the default configuration of that application. You can interrupt the installation
procedure by stopping the task manually.
To install applications, you can also use:
Active Directory tools (see section "Installation using Active Directory tools" on page 54) if the corresponding
service is used in the corporate network;
non-interactive mode (see section "Installing applications in non-interactive mode" on page 96);
a standalone package (see section "Installation using a standalone package" on page 97).
If remote application deployment ends with an error, you can check the cause of the problem and fix it. To do this, use
the utility for computer preparation for remote deployment (see section "Computer preparation for remote deployment.
The riprep utility" on page 87).
The progress of deployment of Kaspersky Lab anti-virus applications within a network can be tracked in the deployment
report (see section "Deployment report" on page 68).
The Administration Kit supports remote management of the following Kaspersky Lab applications:
Protection of workstations and file servers:
Kaspersky Anti-Virus 6.0 for Windows Servers;
Kaspersky Anti-Virus 6.0 for Windows Servers MP4;
Kaspersky Anti-Virus 6.0 for Windows Workstations;
Kaspersky Anti-Virus 6.0 for Windows Workstations MP4;
Kaspersky Anti-Virus 5.7 for Novell NetWare;
Kaspersky Anti-Virus Mobile 6.0 Enterprise Edition;
Kaspersky Mobile Security Enterprise Edition 7.0;
Kaspersky Anti-Virus 6.0 for Windows Servers Enterprise Edition.
Perimeter defense:
Kaspersky Anti-Virus 5.6 for Microsoft ISA Server 2000 Enterprise Edition.
Protection for mail systems:
Kaspersky Anti-Virus 5.5 for Microsoft Exchange Server 2000 / 2003, Maintenance Pack 1;
Kaspersky Security 5.5 for Microsoft Exchange Server 2003, Maintenance Pack 1.
For details about management of the listed applications in Kaspersky Administration Kit, please refer to the
documentation for the corresponding applications.
Page 35

R E M O T E D E P L O Y M E N T A N D R E M O V A L O F A P P L I C A T I O N S
35
IN THIS SECTION
Creating a deployment task ............................................................................................................................................. 35
Installing using Active Directory group policies ................................................................................................................ 54
Installing applications on slave Administration Servers ................................................................................................... 55
Configuring a remote deployment task ............................................................................................................................ 58
Remote Installation Wizard .............................................................................................................................................. 61
Deployment report ........................................................................................................................................................... 68
Remote software removal ................................................................................................................................................ 69
Work with installation packages ...................................................................................................................................... 70
Computer preparation for remote installation. The riprep utility ....................................................................................... 87
CREATING A DEPLOYMENT TASK
When a task is performed, software is installed on client computers using one of the two methods: push install (see
section "Push install" on page 36) or login script-based installation (see section "Login script-based installation" on
page 49).
Push install allows you to remotely install applications on specific client computers on your logical network. While starting
the task, the Administration Server copies installation files from the shared folder to a temporary folder on each client
computer, and runs the setup program on these computers. This method of installation can only be used for computers
running Microsoft Windows 98 / Me, if the Network Agent was previously installed on those computers.
Please note that if push install is performed on computers, on which the Network Agent has not been installed yet, the
Administration Server must have local administrator's rights on those computers to successfully complete the task.
If the Administration Server and a client interact via Internet channels or if the connection is protected by a firewall,
shared folders cannot be used to transfer data. In this case, the Network Agent may be used to copy installation files to
the client computer. The Network Agent must be installed locally on such computers.
The second method, Login script-based installation, allows you to start the application deployment task when specific
user(s) logs on to the domain. As a result of task execution, the start scripts are modified for the specified users to launch
the installer located in the shared folder of the Administration Server. For successful task execution, the account used to
run it or the Administration Server must have the right to modify the startup scripts in the database of the domain
controller. Such right belongs to the domain administrator, therefore the task or entire Administration Server must start
using the credentials of this user. When the user registers with the domain, an attempt will be made to install the
application to the client computer from which the user has been registered. This method is recommended for deployment
of the company's applications to computers running Microsoft Windows 98 / Me operating systems.
Successful performance of the login script based installation task requires that the accounts associated with such script
have local administrator's rights on their computers.
Group tasks for software deployment on client computers are performed using push install only. While creating a task for
selected computers, you can select the method you need: push install or installation using a startup script.
Page 36

D E P L O Y M E N T G U I D E
36
THE WIZARD'S STEPS
Step 1. Defining the task name ....................................................................................................................................... 36
Step 2. Selecting the task type ........................................................................................................................................ 37
Step 3. Selecting the installation package ....................................................................................................................... 37
Step 4. Selecting the installation method ......................................................................................................................... 39
Step 5. Selecting the method of loading the installation package .................................................................................... 39
Step 6. Selecting the Network Agent ............................................................................................................................... 40
Step 7. Configuring the restart settings ........................................................................................................................... 41
Step 8. Configuring computer relocation ......................................................................................................................... 42
Step 9. Defining the method for selection of computers .................................................................................................. 43
Step 10. Selecting the client computers .......................................................................................................................... 45
Step 11. Selecting account ................................................................................................................................ .............. 46
Step 12. Scheduling the task launch ............................................................................................................................... 47
Step 13. Competing task creation ................................................................................................................................... 48
PUSH INSTALL
To create a deployment task for selected computers using push install:
1. Connect to the necessary Administration Server.
2. Select the Tasks for specific computers or Group tasks node in the console tree.
3. Open the context menu and use the Create Task command or select a corresponding item from the Action
menu.
This will launch the task creation wizard. Follow the wizard's instructions.
For correct remote installation on the client computer, on which the Network Agent has not been installed, the following
ports must be opened: a) TCP 139 and 445; b) UDP 137 and 138. By default, these ports are open for all computers of
the domain. They come up automatically using the utility for computer preparation for remote deployment (see section
"Computer preparation for remote deployment. The riprep utility" on page 87).
STEP 1. DEFINING THE TASK NAME
Enter the task name in the Name field.
Page 37

R E M O T E D E P L O Y M E N T A N D R E M O V A L O F A P P L I C A T I O N S
37
STEP 2. SELECTING THE TASK TYPE
In the Kaspersky Administration Kit node select the Application deployment task type (see the figure below).
Figure 13. Defining the task type
STEP 3. SELECTING THE INSTALLATION PACKAGE
Specify the installation package that will be installed when the task is performed (see the figure below). Select the
necessary package from the list of packages created for the Administration Server or use the New button to create a new
installation package. A new installation package is created using the corresponding wizard (see section "Creating an
installation package" on page 71).
Page 38

D E P L O Y M E N T G U I D E
38
Some applications, which could be managed via Kaspersky Administration Kit, can be only locally installed on computers.
For details please refer to the documentation for the corresponding applications.
Figure 14. Selecting the installation package for deployment
Page 39

R E M O T E D E P L O Y M E N T A N D R E M O V A L O F A P P L I C A T I O N S
39
STEP 4. SELECTING THE INSTALLATION METHOD
Select the Push install option (see the figure below).
Figure 15. Selecting the installation method
STEP 5. SELECTING THE METHOD OF LOADING THE INSTALLATION PACKAGE
In this window (see the figure below), specify the method of delivery of files required for application setup to client
computers. In the Force uploading installation package section, check the following boxes:
Using Network Agent: files will be delivered to client computers by the corresponding Network Agent installed
on each particular computer.
Page 40

D E P L O Y M E N T G U I D E
40
Using Microsoft Windows resources from shared folder: the files required to uninstall the application will be
delivered to client computers using the Microsoft Windows tools through shared folders.
Figure 16. Selecting the method of loading the installation package
Specify whether or not to reinstall the application if it is already installed on the client computer. To do this, check the Do
not install application if it is already installed box, if you do not want the application to be re-installed on the computer
(by default, the box is checked).
Check the Assign the package installation in the Active Directory group policies, if you wish to install the application
on network computers using Active Directory group policies.
On simultaneous installation of any application and the Network Agent using Active Directory group policies, only the
Network Agent is installed, and the application is installed later using the Network Agent tools. In this case, you will be
offered to check the Assign Network Agent installation in the Active Directory group policies box in this window.
STEP 6. SELECTING THE NETWORK AGENT
If you wish to install the Network Agent together with the application, enable the option to Install Network Agent along
with this application (see the figure below), and then select the required installation package.
Page 41

R E M O T E D E P L O Y M E N T A N D R E M O V A L O F A P P L I C A T I O N S
41
To create a new installation package of the Network Agent, press the Create button. As a result, the corresponding
wizard will start (see section "Creating an installation package" on page 71). Follow the wizard's instructions.
Figure 17. Selecting the Network Agent installation package
STEP 7. CONFIGURING THE RESTART SETTINGS
Define the operations that should be performed if computer restart is required after application setup. You can select one
of the following options (see the figure below):
Do not restart the computer;
Restart the computer – if you select this option, the operating system will only be restarted if necessary;
Prompt user for action – if you select this option, you should configure the settings for user notification about
the restart. To do that, click the Modify link. You can edit the message text in the window that will open and
change the time for a new request as well as the time for a forced computer restart.
Page 42

D E P L O Y M E N T G U I D E
42
If you wish to ensure restarting of locked computers, check the Force closing the applications in blocked sessions
option. By default, this box is unchecked.
Figure 18. Restart settings for the computer
STEP 8. CONFIGURING COMPUTER RELOCATION
Specify whether unassigned computers should be added to administration groups after the application is installed on
those hosts (see the figure below). To do this, select one of the following options:
Do not move computers automatically – if you select this option, no automatic relocation of client computers
will be performed;
Page 43

R E M O T E D E P L O Y M E N T A N D R E M O V A L O F A P P L I C A T I O N S
43
Move unassigned computers to the group – after application installation the client computers from the
Unassigned computers folder will be added to the group specified in the entry field. If you select this option,
specify the group using the Select button.
Figure 19. Computer relocation
STEP 9. DEFINING THE METHOD FOR SELECTION OF COMPUTERS
Define the method for selection of the computers for which the task will be created (see the figure below):
I want to select computers using Windows Networking – in this case the computers for deployment will be
selected using the data collected by the Administration Server while polling the corporate Windows network;
Page 44

D E P L O Y M E N T G U I D E
44
I want to define computer addresses (IP, DNS or NETBIOS) manually – in this case the computers for
deployment will be selected manually.
Figure 20. Defining the method for selection of client computers
Page 45

R E M O T E D E P L O Y M E N T A N D R E M O V A L O F A P P L I C A T I O N S
45
STEP 10. SELECTING THE CLIENT COMPUTERS
If computers are selected using the data collected while polling the Windows network, the list will be created in the wizard
window (see the figure below) in a manner similar to the addition of computers to administration groups (for details please
see the Kaspersky Administration Kit Reference Guide). You can select both client computers (the Managed computers
folder) or computers that are not yet included in administration groups (the Unassigned computers folder).
Figure 21. Creating a task for specific computers. Defining clients on which this task will be executed
Page 46

D E P L O Y M E N T G U I D E
46
If computers are selected manually, then the list is generated by entering NetBIOS or DNS names, IP addresses (or a
range of IP addresses) of computers, or by importing the list from a txt file in which every address must be specified in a
new line (see the figure below).
Figure 22. Creating a list of hosts for deployment based on IP addresses
STEP 11. SELECTING ACCOUNT
Specify the account that will be used to run the deployment task on computers (see the figure below).
The account must have the following rights on the client computer:
the right to run applications remotely;
the right to use the Admin$ resource;
Page 47

R E M O T E D E P L O Y M E N T A N D R E M O V A L O F A P P L I C A T I O N S
47
the right to Log On As Service.
Figure 23. Selecting account
Use the Add and Remove buttons to create the list of accounts. When an account is added, enter its name and
password in the window that will open. To modify account settings, click the Properties button.
The task will use accounts in the order of their listing. To change the order, use the Move up and Move down buttons.
STEP 12. SCHEDULING THE TASK LAUNCH
Create the task launch schedule (see the figure below).
In the Scheduled start drop-down list, select the necessary mode for task launch:
Manually;
Every N hours;
Daily;
Weekly;
Monthly;
Once – in this case the deployment task will be started on computers only once, irrespective of its results;
Immediately – start the task immediately after the wizard finishes;
On completing another task – in this case the deployment task will only be started after completion of the
specified task.
Page 48

D E P L O Y M E N T G U I D E
48
Configure the task launch schedule settings in the group of fields corresponding to the selected mode (for
details please see the Kaspersky Administration Kit Reference Guide).
Figure 24. Scheduling a task to start daily
Configure additional task start settings (they depend upon the selected scheduling mode). To do this, perform the
following actions:
Define the procedure for the task startup if the client computer is unavailable (turned off, disconnected from the
network, etc.) or if the application is not running at the time specified by the schedule.
Check the Run missed tasks box to make the system attempt to start the task the next time the application is
started on this client computer. The task will be started immediately following the host's registering with the
network if the task launch schedule is set to Manually, Once, or Immediately.
If this box is not checked, only scheduled tasks will be started on the client computers, and for Manually, Once,
and Immediately – on hosts visible on the network only. By default, this box is unchecked.
Specify the deviation from the scheduled time during which the task will be started on the client computers. This
opportunity is provided to spread the load caused by simultaneous calls made to the Administration Server by
numerous client computers when the task is launched.
Check the Randomize the task start with interval (min.) box and specify the time (in minutes) so that the
client computers call the Administration Server within the specified interval after the task is started, rather than
simultaneously. By default, this box is unchecked.
STEP 13. COMPETING TASK CREATION
After the wizard completes, the task you created will be added to the Group tasks or Tasks for specific computers
folder in the console tree and displayed in the results pane. If necessary, you can modify its settings (see section
"Configuring a deployment task" on page 58).
Page 49

R E M O T E D E P L O Y M E N T A N D R E M O V A L O F A P P L I C A T I O N S
49
THE WIZARD'S STEPS
Step 1. Defining the task name ....................................................................................................................................... 49
Step 2. Selecting the task type ........................................................................................................................................ 50
Step 3. Selecting the installation package ....................................................................................................................... 50
Step 4. Selecting the installation method ......................................................................................................................... 52
Step 5. Selecting the accounts for login script-based installation .................................................................................... 52
Step 6. Configuring the restart settings ........................................................................................................................... 53
Step 7. Specifying the user account for running tasks ..................................................................................................... 53
Step 8. Scheduling the task launch ................................................................................................................................. 54
Step 9. Competing task creation ..................................................................................................................................... 54
LOGIN SCRIPT-BASED INSTALLATION
To create a global remote installation task using a login script:
1. Connect to the necessary Administration Server.
2. Select the Tasks for specific computers folder in the console tree.
3. Open the context menu and use the Create Task command or select a corresponding item from the Action
menu.
This will start the task creation wizard. Follow its instructions.
STEP 1. DEFINING THE TASK NAME
Enter the task name in the Name field.
Page 50

D E P L O Y M E N T G U I D E
50
STEP 2. SELECTING THE TASK TYPE
In the Kaspersky Administration Kit node select the Application deployment task type (see the figure below).
Figure 25. Defining the task type
STEP 3. SELECTING THE INSTALLATION PACKAGE
Specify the installation package that will be installed when the task is performed (see the figure below). Select the
necessary package from the list of packages created for the Administration Server or use the New button to create a new
installation package. A new installation package is created using the corresponding wizard (see section "Creating an
installation package" on page 71).
Page 51

R E M O T E D E P L O Y M E N T A N D R E M O V A L O F A P P L I C A T I O N S
51
Some applications, which could be managed via Kaspersky Administration Kit, can be only locally installed on computers.
For details please refer to the documentation for the corresponding applications.
Figure 26. Selecting the installation package for deployment
Page 52

D E P L O Y M E N T G U I D E
52
STEP 4. SELECTING THE INSTALLATION METHOD
Select the Login script-based installation option (see the figure below).
Figure 27. Selecting the installation method
STEP 5. SELECTING THE ACCOUNTS FOR LOGIN SCRIPT-BASED
INSTALLATION
Select the accounts whose login scripts must be modified (see the figure below).
Page 53

R E M O T E D E P L O Y M E N T A N D R E M O V A L O F A P P L I C A T I O N S
53
When a deployment task is started, Kaspersky Administration Kit checks if the corresponding login script is assigned to
other users besides the selected accounts. If yes, application deployment will not be performed, and a corresponding
error will be registered in the report.
Figure 28. Selecting accounts
STEP 6. CONFIGURING THE RESTART SETTINGS
Define the operations that should be performed if computer restart is required after application setup (see section "Step
7. Configuring the restart settings" on page 41).
STEP 7. SPECIFYING THE USER ACCOUNT FOR RUNNING TASKS
Specify the account that will be used to run the deployment task on computers (see the figure below).
Page 54

D E P L O Y M E N T G U I D E
54
The account is used to access the domain controller where the login scripts of selected accounts will be modified. In this
case the account must have the right to modify the start scripts in the domain controller database.
Figure 29. Selecting account
Use the Add and Remove buttons to create the list of accounts. When an account is added, enter its name and
password in the window that will open. To modify account settings, click the Properties button.
The task will use accounts in the order of their listing. If you wish to change the order, use the Move up and Move down
buttons.
STEP 8. SCHEDULING THE TASK LAUNCH
Create the task launch schedule (see section "Step 12. Scheduling the task launch" on page 47).
STEP 9. COMPETING TASK CREATION
After the wizard completes, the task you created will be added to the Tasks for specific computers folder in the console
tree and displayed in the results pane. If necessary, you can modify its settings (see section "Configuring a deployment
task" on page 58).
INSTALLING USING ACTIVE DIRECTORY GROUP POLICIES
The Network Agent and Kaspersky Lab anti-virus applications can be installed to computers in the network via Kaspersky
Administration Kit using Active Directory group policies. To do this, check Assign the package installation in the
Active Directory group policies (see section "Step 5. Selecting the method of loading the installation package" on
page 39) in the deployment task creation wizard.
Application deployment in this case will be as follows:
1. When the task is launched, the following items are created in each domain, to which the client computers of the
deployment task belong:
Page 55

R E M O T E D E P L O Y M E N T A N D R E M O V A L O F A P P L I C A T I O N S
55
a group policy under the name Kaspersky_AK{GUID};
a corresponding security group related to the group policy. The security group contains client computers of
the task that belong to the domain. The security group content defines the group policy area and will change
at subsequent task startups upon changing the set of client computers.
2. In this case, applications are installed to client computers directly from the Kaspersky Administration Kit shared
network folder klshare. In the Kaspersky Administration Kit installation folder, an auxiliary nested folder will be
created, which contains the mst-file for the application to be installed.
3. When new computers are added to the task area, they are only added to the security group the next time the
task launches. But if the Run missed tasks box is checked in the task schedule, computers are added to the
security group immediately.
4. When computers are deleted from the task area, only deleted to the security group the next time the task
launches.
5. When a task is deleted from Active Directory, the policy, the link to the policy and the corresponding security
group are deleted.
If you wish to apply another installation scheme using Active Directory, you can configure the required settings manually.
It may be required, for example, when the anti-virus security administrator has insufficient rights to modify the Active
Directory for some domains, or when the original distribution package has to be located on a separate network resource,
or to connect the group policy to specific organization units. The following options are available:
If installation is to be performed directly from the Kaspersky Administration Kit shared folder, in the Active
Directory group policy properties specify the msi-file located in the exec subfolder of the installation package
folder for the required application (see section "Work with installation packages" on page 70).
If the installation package should be located on another network resource, copy the whole exec folder content to
it, because in addition to the msi-file it contains configuration files generated when the package was created. To
install the license together with the application, copy the key file to this folder as well.
INSTALLING APPLICATIONS ON SLAVE ADMINISTRATION SERVERS
You can use this task to install and update software on slave Administration Servers.
Prior to task creation, make sure that the installation package corresponding to the application being installed is available
on the slave Administration Servers. If it is not there yet, distribute it using the distribution of the installation package task
(see section "Creating a task for installation package distribution to slave Administration Servers" on page 83).
To create a task for application deployment to slave Administration Servers:
1. Connect to the necessary Administration Server.
2. In the console tree select the Group tasks folder (if you wish to create a task for all slave Servers in a group) or
Tasks for specific computers (if you wish to create a task for a set of slave Servers).
3. Open the context menu and use the Create Task command or select a corresponding item from the Action
menu.
This will start the task creation wizard. Follow its instructions.
Page 56

D E P L O Y M E N T G U I D E
56
THE WIZARD'S STEPS
Step 1. Defining the task name ....................................................................................................................................... 56
Step 2. Selecting the task type ........................................................................................................................................ 56
Step 3. Selecting the installation package ....................................................................................................................... 56
Step 4. Configuring the installation settings ..................................................................................................................... 57
Step 5. Creating a set of Administration Servers ............................................................................................................. 58
Step 6. Scheduling the task launch ................................................................................................................................. 58
Step 7. Competing task creation ..................................................................................................................................... 58
STEP 1. DEFINING THE TASK NAME
Enter the task name in the Name field.
STEP 2. SELECTING THE TASK TYPE
In the Kaspersky Administration Kit node select the Deploy application to slave Administration Servers task type
(see section "Step 2. Selecting the task type" on page 37).
STEP 3. SELECTING THE INSTALLATION PACKAGE
Specify the installation package that will be installed when the task is performed (see section "Step 3. Selecting the
installation package" on page 37).
Page 57

R E M O T E D E P L O Y M E N T A N D R E M O V A L O F A P P L I C A T I O N S
57
STEP 4. CONFIGURING THE INSTALLATION SETTINGS
If necessary, check the Do not install application if it is already installed box (see the figure below). The feature uses
precise application version.
Figure 30. Configuring a task for application deployment to slave Administration Servers
Page 58

D E P L O Y M E N T G U I D E
58
STEP 5. CREATING A SET OF ADMINISTRATION SERVERS
This step is omitted for group tasks. Create the list of slave Administration Servers for the task for specific computers in
the Slave Administration Servers window (see the figure below).
Figure 31. Creating a set of slave Administration Servers
STEP 6. SCHEDULING THE TASK LAUNCH
Create the task launch schedule (see section "Step 12. Scheduling the task launch" on page 47).
STEP 7. COMPETING TASK CREATION
After the wizard completes, the task you created will be added to the Group tasks or Tasks for specific computers
folder in the console tree and displayed in the results pane. If necessary, you can modify its settings (see section
"Configuring a deployment task" on page 58).
CONFIGURING A REMOTE DEPLOYMENT TASK
Deployment tasks are configured similarly to other tasks (for details please see the Kaspersky Administration Kit
Reference Guide). Let us examine closely the settings specific for this task type on the Settings tab.
While editing a task that will perform remote push installation (see the figure below), you can determine:
method for delivery of the files necessary for application setup to client computers and specify the maximum
number of simultaneous connections;
number of installation attempts when a task is started according to the schedule;
Page 59

R E M O T E D E P L O Y M E N T A N D R E M O V A L O F A P P L I C A T I O N S
59
whether or not to reinstall the application if it is already installed on the client computer;
whether running applications should be closed before the installation starts;
whether the Network Agent installation using Active Directory group policies should be assigned;
whether the operating system version should be checked for compliance with the hardware requirements before
application installation.
Figure 32. Configuring a deployment task. Push install
Page 60

D E P L O Y M E N T G U I D E
60
When a login script-based installation task is configured, you can use the Settings tab to edit the list of user accounts,
whose login scripts will be modified (see the figure below). You can edit the list using the Add and Remove buttons.
Figure 33. Configuring a login script-based installation task
Page 61

R E M O T E D E P L O Y M E N T A N D R E M O V A L O F A P P L I C A T I O N S
61
While configuring a task for remote deployment of applications to slave Administration Servers on the Settings tab
(see the figure below), you can specify whether the application should be installed if it is already installed.
Figure 34. Configuring a task for application deployment to a slave Administration Server
REMOTE INSTALLATION WIZARD
To install Kaspersky Lab applications, you can use the Remote Installation Wizard. The wizard allows remote deployment
of applications using push install with specifically created installation packages or directly from a distribution package.
The wizard performs the following steps:
Creates an installation package for installing the application (if it was not created earlier). The package is stored
in the Repositories Installation packages folder under the name corresponding to the application name and
version; it can be used to install the application later.
Creation and launch of a global task or a group deployment task. The created task will be stored in the Tasks
for specific computers or Group tasks folder of the target group and can be started later manually. The task
name corresponds to the name of the application installation package: Deploy <Name of the selected
installation package>.
For correct remote installation on the client computer, on which the Network Agent has not been installed, the following
ports must be opened: a) TCP 139 and 445; b) UDP 137 and 138. By default, those ports are open for all computers of
the domain and come up automatically using the utility for computer preparation for remote deployment (see section
"Computer preparation for remote deployment. The riprep utility" on page 87).
Page 62

D E P L O Y M E N T G U I D E
62
THE WIZARD'S STEPS
Step 1. Selecting the application to be installed .............................................................................................................. 62
Step 2. Selecting the target computers............................................................................................................................ 63
Step 3. Selecting the group ............................................................................................................................................. 64
Step 4. Selecting the method of loading the installation package .................................................................................... 64
Step 5. Selecting the license ........................................................................................................................................... 66
Step 6. Configuring the restart settings ........................................................................................................................... 66
Step 7. Configuring removal of incompatible applications ............................................................................................... 67
Step 8. Selecting account ................................................................................................................................................ 67
Step 9. Completing set up ............................................................................................................................................... 68
STEP 1. SELECTING THE APPLICATION TO BE INSTALLED
Use the window that will open (see the figure below) to specify the installation package of the application that will be
deployed. If you are installing the application from a distribution package and / or the installation package is not created,
create a new installation package. To do this, click the New button. This will start the New Package Wizard (see section
"Creating an installation package" on page 71).
Figure 35. Selecting the installation package
The latest version of the Network Agent is always installed together with Kaspersky Anti-Virus.
Page 63

R E M O T E D E P L O Y M E N T A N D R E M O V A L O F A P P L I C A T I O N S
63
STEP 2. SELECTING THE TARGET COMPUTERS
Use the wizard window that will open (see the figure below) to determine the target computers for application
deployment. To do this, select one of the following options:
Deploy to a group of managed computers – the wizard will create a group task.
Select computers for deployment – if this option is selected, the wizard will create a task for application
deployment to specific computers.
Figure 36. Selecting the task type
Page 64

D E P L O Y M E N T G U I D E
64
STEP 3. SELECTING THE GROUP
If you are creating a group task, specify the group to the computers of which the application will be deployed
(see the figure below) or select the target computers. If the application should be installed on all client computers in a
logical network, select the Managed computers group.
Figure 37. Selecting the group
STEP 4. SELECTING THE METHOD OF LOADING THE INSTALLATION
PACKAGE
In this window (see the figure below), specify the method of delivery of files required for application setup to client
computers. In the Force uploading installation package section, check the following boxes:
Using Network Agent: files will be delivered to client computers by the corresponding Network Agent installed
on each particular computer.
Page 65

R E M O T E D E P L O Y M E N T A N D R E M O V A L O F A P P L I C A T I O N S
65
Using Microsoft Windows resources from shared folder: the files required to uninstall the application will be
delivered to client computers using the Microsoft Windows tools through shared folders.
Figure 38. Selecting the method of loading the installation package
Specify whether or not to reinstall the application if it is already installed on the client computer. To do this, check the Do
not install application if it is already installed box, if you do not want the application to be re-installed on the computer
(by default, the box is checked).
Check the Assign the package installation in the Active Directory group policies, if you wish to install the application
on network computers using Active Directory group policies.
On simultaneous installation of any application and the Network Agent using Active Directory group policies, only the
Network Agent is installed, and the application is installed later using the Network Agent tools. In this case, you will be
offered to check the Assign Network Agent installation in the Active Directory group policies box in this window.
Page 66

D E P L O Y M E N T G U I D E
66
STEP 5. SELECTING THE LICENSE
Select the license from the list to install with the application. If the list does not contain the necessary license, use the
Add button to add a new one.
You can skip license selection at this step and add a license later.
STEP 6. CONFIGURING THE RESTART SETTINGS
Define the operations that should be performed if computer restart is required after application setup (see section "Step
7. Configuring the restart settings" on page 41).
Page 67

R E M O T E D E P L O Y M E N T A N D R E M O V A L O F A P P L I C A T I O N S
67
STEP 7. CONFIGURING REMOVAL OF INCOMPATIBLE APPLICATIONS
Configure removal of incompatible software before installation of the selected anti-virus application. Removal of
incompatible applications is enabled by default. If you wish to change this option, click the Configure automatic removal
link and in the window that will open uncheck the Uninstall incompatible applications automatically box.
Figure 39. Removal of incompatible applications
STEP 8. SELECTING ACCOUNT
Specify the account that will be used to run the remote installation task on computers (see section "Step 11. Account
selection" on page 46).
Page 68

D E P L O Y M E N T G U I D E
68
STEP 9. COMPLETING SET UP
During this step the wizard displays the progress of remote installation task creation and launch on the selected
computers (see the figure below).
Figure 40. Performing a remote installation task
Pressing the Next button will take you to the element corresponding to the created task. The results pane will reflect the
task performance progress.
DEPLOYMENT REPORT
You can use the Protection coverage report to monitor the progress of network protection deployment.
To view the deployment report,
select it in the Reports and notifications node of the console tree.
As a result, the results pane will display a detailed report containing information about protection deployment on all client
computers in the network.
You can generate a new deployment report and specify the data, which it should include:
for an administration group;
for a set of client computers;
for a selection of client computers;
for all client computers.
For details about creation of a new report please see the Kaspersky Administration Kit Reference Guide.
Page 69

R E M O T E D E P L O Y M E N T A N D R E M O V A L O F A P P L I C A T I O N S
69
Kaspersky Administration Kit assumes that a computer is covered by the anti-virus protection if it has an anti-virus
application installed and its real-time protection functionality is enabled.
To update the information in the results pane, use the Update command from the context menu of the report.
REMOTE SOFTWARE REMOVAL
To perform remote software removal:
1. Create a task similarly to a deployment task (see section "Creating a deployment task" on page 35). In the Task
type window, select Kaspersky Administration Kit, open the Advanced subfolder and select Product
deinstallation task.
2. Specify the application that should be removed in the Application window. To do this, select one of the options
below:
Uninstall the application supported by Kaspersky Administration Kit (see the figure below). In this
case, select the necessary Kaspersky Lab application from the dropdown list. Please note that the list
contains the applications, for which installation packages have been created (see section "Creating an
installation package" on page 71).
Figure 41. Selecting a Kaspersky Lab application for removal
Uninstall the incompatible application (see the figure below). In this case, use the Add and Remove
buttons to create the list of applications for removal.
Page 70

D E P L O Y M E N T G U I D E
70
Please note that the window displayed after clicking the Add button lists only incompatible applications
found on network computers after installation of the Network Agent on those hosts.
Figure 42. Selecting an incompatible application for removal
3. Finish the task creation similarly to the deployment task (see section "Creating a deployment task" on page 35).
The task that you have created will start in accordance with its schedule.
During task execution, removal of each incompatible application will trigger forced restart of the host computer.
WORK WITH INSTALLATION PACKAGES
When creating remote installation tasks the system uses installation packages containing sets of parameters necessary
for software installation. The same installation package can be reused many times.
All the installation packages created for an Administration Server are located in the Repositories Installation
packages folder of the console tree. Installation packages are stored on the Administration Server in the Packages
service subfolder within the specified shared folder.
Page 71

R E M O T E D E P L O Y M E N T A N D R E M O V A L O F A P P L I C A T I O N S
71
You can view the properties of an installation package, edit its name and settings in the <Package name> Properties
dialog (see the figure below). This window can be opened using the Properties command of the context menu or a
corresponding item from the Action menu.
Figure 43. The installation package properties window. The General tab
The created installation packages can be distributed to slave Administration Servers and to computers within a group
using Update Agents (see section "Distribution of installation packages within a group via Update Agents" on page 84).
CREATING AN INSTALLATION PACKAGE
To create an installation package:
1. Connect to the necessary Administration Server.
2. Select the Repositories Installation packages folder in the console tree.
3. Open the context menu and use the Create Installation package command or select the corresponding item
from the Action menu.
A wizard will start. Follow the wizard's instructions.
Page 72

D E P L O Y M E N T G U I D E
72
THE WIZARD'S STEPS
Step 1. Defining the installation package name ............................................................................................................... 72
Step 2. Selecting the application distribution package..................................................................................................... 72
Step 3. Completing creation of an installation package ................................................................................................... 73
STEP 1. DEFINING THE INSTALLATION PACKAGE NAME
Specify the name for the installation package.
STEP 2. SELECTING THE APPLICATION DISTRIBUTION PACKAGE
Specify the application to be installed.
If you are installing an application that supports remote deployment via Kaspersky Administration Kit, select the Make
Kaspersky Lab's application package option from the dropdown list (see the figure below). Use the Select button to
select the file containing application description (this file with the .kpd or .kud extension is included in distribution
packages of all Kaspersky Lab applications, which support remote management via Kaspersky Administration Kit) or selfextracting archive of a Kaspersky Lab application (this file has the .exe extension and is included in the application
distribution package). The application name and version number fields will be populated automatically.
Figure 44. Creating an installation package. Selecting the application to be installed
Installation package settings are generated by default depending on the application to install. You can modify them after
package creation in its properties window (see section "Viewing and configuring the properties of an installation package"
on page 74).
If you are creating an installation package for other applications (see the figure below):
Page 73

R E M O T E D E P L O Y M E N T A N D R E M O V A L O F A P P L I C A T I O N S
73
from the dropdown list select: Make installation package for specified executable file;
use the Select button to specify the path to the application distribution package;
check the Copy entire folder to the package box, if the whole folder containing the distribution package file
should be added;
specify the startup options for the executable file in the provided entry line, if they are necessary for application
setup (for example, the instruction to launch in silent mode using the /s key).
To enable transfer of diagnostic information about the results of user-defined application setup to Kaspersky
Administration Kit, additional configuration of the file containing application description is necessary (see section
"Configuring the application description file manually" on page 73).
Figure 45. Creating an installation package for a user-defined application
STEP 3. COMPLETING CREATION OF AN INSTALLATION PACKAGE
As a result, the installation package will be created; it will appear in the results pane of the Repositories Installation
packages folder. You can edit its settings (see section "Viewing and configuring the properties of an installation package"
on page 74).
CONFIGURING THE APPLICATION DESCRIPTION FILE MANUALLY
To configure transfer of diagnostic information about the results of a user-defined application setup to Kaspersky
Administration Kit, perform the following actions:
1. Navigate to the folder of the installation package created for the selected application using Kaspersky
Administration Kit. The folder can be found in the shared folder specified during Kaspersky Administration Kit
installation.
Page 74

D E P L O Y M E N T G U I D E
74
2. Open the file with the .kpd or .kud extension for editing (for example, in the Microsoft Windows Notepad editor).
The file has the format of a regular configuration INI file.
3. Add the following lines to the file:
[SetupProcessResult]
Wait=1
This command configures Kaspersky Administration Kit to wait for setup completion for the application, for which
the installation package is created, and analyze the installer return code. If you need to disable transfer of
diagnostic data, set the Wait key to 0.
4. Add the description of return codes for a successful installation. To do this, add the following lines to the file:
[SetupProcessResult_SuccessCodes]
<return code>=[<description>]
<return code 1>=[<description>]
…
Square brackets contain optional keys.
Syntax for the lines:
<return code> – any number corresponding to the installer return code. The number of return codes can be
arbitrary.
<description> – text description of the installation result. Description can be omitted.
5. Add the description of return codes for a failed installation. To do this, add the following lines to the file:
[SetupProcessResult_ErrorCodes]
<return code>=[<description>]
<return code 1>=[<description>]
…
The syntax of these lines is identical to the syntax for the lines containing successful setup return codes.
6. Close the .kpd or .kud file by saving all changes.
Then, the information about the results of installation of the user-defined application will be registered in the logs of
Kaspersky Administration Kit, and it will appear in the list of relevant events, in the reports and task logs.
VIEWING AND CONFIGURING THE PROPERTIES OF AN INSTALLATION
PACKAGE
To view the properties of an installation package, edit its name and settings:
1. Select the Repositories Installation packages folder in the console tree.
2. Select the necessary installation package in the results pane and use the Properties command of the context
menu or a corresponding item from the Action menu.
Page 75

R E M O T E D E P L O Y M E N T A N D R E M O V A L O F A P P L I C A T I O N S
75
This will open the <Installation package name> Properties window which consists of the General, Settings, Licenses,
Connection and Incompatible applications tabs.
The General tab (see the figure below) contains general information about the package. It includes the following data:
Installation package name (you can modify it).
Name and version of the application for which the package was created.
Package size.
Creation date.
Path to the installation package folder.
The update date of the databases included in the installation package (for packages of those applications for
which the database update is supposed). To update the databases, click the Update databases link.
Not all databases are updated in the installation package. The set of databases to be updated is created in a
way to optimize to first application deployment. For instance, it includes the bases which updating requires
computer restart.
Figure 46. The installation package properties window. The General tab
The Settings tab (see the figure below) contains settings of the installation package corresponding to the application, for
which the package was created. These settings are generated by default during package creation. If required, they can
be changed. For detailed description of the settings please refer to the documentation for the corresponding applications.
Page 76

D E P L O Y M E N T G U I D E
76
For the Network Agent you can specify the password for application removal and the folder for application installation
(see section "Creating and configuring an installation package for the Network Agent" on page 79).
Figure 47. The installation package properties window. The Settings tab
The License tab (see the figure below) contains general information about the license for the application, for which the
package was created.
Page 77

R E M O T E D E P L O Y M E N T A N D R E M O V A L O F A P P L I C A T I O N S
77
The License tab is not displayed in the properties of the installation packages for the Network Agent and the
Administration Server.
Figure 48. The installation package properties window. The License tab
Page 78

D E P L O Y M E N T G U I D E
78
The Connection tab (see the figure below) contains the settings for connection of the Network Agent to the
Administration Server (see section "Creating and configuring an installation package for the Network Agent" on page 79).
Figure 49. The installation package properties window. The Connection tab
The Incompatible applications tab (see the figure below) contains the list of incompatible applications. You can enable
removal of incompatible applications before installation of the application from the package. To do this, check the
Uninstall incompatible applications automatically box.
Page 79

R E M O T E D E P L O Y M E N T A N D R E M O V A L O F A P P L I C A T I O N S
79
If the Uninstall incompatible applications automatically box is not checked, then on detection of such application the
installation will be interrupted with an error.
Figure 50. The installation package properties window. The Incompatible applications tab
CREATING AND CONFIGURING AN INSTALLATION PACKAGE FOR THE NETWORK AGENT
There is no need to create the installation package for deployment of the Network Agent manually. It is created
automatically during Kaspersky Administration Kit installation and stored in the Repositories Installation packages
folder.
If the package for remote installation of the Network Agent has been deleted, then to re-create it, you should select the
klnagent.kpd file in the NetAgent folder of the Kaspersky Administration Kit distribution package.
The settings of the Network Agent installation contain a minimum set of parameters required to ensure the functioning of
the component immediately following its installation. Parameter values correspond to application defaults. If necessary,
you can change them on the Settings and Connection tabs in the installation package properties window.
The Settings tab (see the figure below) contains the settings that will be used to install the Network Agent on client
computers.
You can define a password for application removal to prevent unauthorized uninstallation of the Network Agent. To do
this, check the Use uninstall password box and click the Modify button to specify it.
Page 80

D E P L O Y M E N T G U I D E
80
You can also specify the destination folder on the client computer where the Network Agent will be installed. The
application can be deployed to the default folder or to another directory.
Figure 51. The installation package properties window. The Settings tab
The Connection tab (see the figure below) contains the settings which will be used by the Network Agent after
installation to connect to the Administration Server (by default, the values for the current Server are used):
Address of the computer which is hosting the Administration Server.
Port number used for insecure connection to the Administration Server. The default port number is 14000. If this
port is in use, you can change it.
The number of the port for secure connection to the Administration Server using SSL protocol. By default, port
13000 will be used.
Only decimal notation is allowed.
Page 81

R E M O T E D E P L O Y M E N T A N D R E M O V A L O F A P P L I C A T I O N S
81
Figure 52. The installation package properties window. The Connection tab
Certificate file for authentication on the Administration Server. The value of this parameter is determined by the
Use Server certificate box.
If this box is unchecked (by default), the certificate file will be downloaded automatically from the Administration
Server when the Agent connects to it for the first time.
If the Use Server certificate box is enabled, authentication will be performed using the certificate file specified
after clicking the Select button. The file has the .cer extension; it is located in the Cert subfolder of the
Kaspersky Administration Kit program folder. You can change the certificate file by selecting it with the Select
button.
The port that will be used for connection of the Network Agent to the Server: regular or secure. The value of this
parameter is determined by the Use SSL connection box. If the box is checked, connection will be established
through a secure port using the SSL protocol; if it is off - a regular port will be used for that purpose.
Add a UDP port necessary for the Network Agent functioning to the list of Microsoft Windows Firewall
exceptions. To do this, check the Open Network Agent ports in Microsoft Windows Firewall box.
Settings for connection through a proxy server. If the Network Agent connects to the Server via proxy, click the
Configure connection via a proxy server link. In the window that will open check the Use proxy server box
and enter the proxy address, user name and password.
After the Network Agent installation you can change parameter values using a policy or application settings.
If you remotely reinstall the Network Agent on a client computer, the server connection settings and the path to the
Administration Server certificate will be overwritten.
Page 82

D E P L O Y M E N T G U I D E
82
The Network Agent is installed on the host computer as a service with the following set of attributes:
service name: KLNagent;
displayed name: Kaspersky Network Agent;
using automatic startup type when the operating system starts;
using the Local system account.
You can view the properties of the Kaspersky Network Agent service, start, stop and monitor its activity using standard
Windows tools – Computer management Services.
CREATING AND CONFIGURING AN INSTALLATION PACKAGE FOR THE ADMINISTRATION SERVER
When an installation package of the Administration Server is created, you should select the ak8.kpd file in the root folder
of the Kaspersky Administration Kit distribution package as the description file.
The properties of an installation package for the Administration Server can be found on the General (see section
"Viewing and configuring the properties of an installation package" on page 74) and Configure installation package
tabs (see the figure below).
For configuration of the Administration Server installation package settings a response file (an .iss file) is used that
determines the scenario of application setup (see section "Installing applications in non-interactive mode" on page 96).
This file should be placed in the directory which contains the .kpd file of Administration Server.
Figure 53. Configuring an installation package
Page 83

R E M O T E D E P L O Y M E N T A N D R E M O V A L O F A P P L I C A T I O N S
83
THE WIZARD'S STEPS
Step 1. Defining the task name ....................................................................................................................................... 83
Step 2. Selecting the task type ........................................................................................................................................ 83
Step 3. Selecting the installation packages ..................................................................................................................... 83
Step 4. Scheduling the task launch ................................................................................................................................. 84
Step 5. Competing task creation ..................................................................................................................................... 84
CREATING A TASK FOR INSTALLATION PACKAGE DISTRIBUTION TO
SLAVE ADMINISTRATION SERVERS
To create a task for installation package distribution to slave Administration Servers:
1. Connect to the necessary Administration Server.
2. Select the Group tasks folder in the console tree.
3. Open the context menu and use the Create Task command or select a corresponding item from the Action
menu.
A wizard will start. Follow the wizard's instructions.
STEP 1. DEFINING THE TASK NAME
Enter the task name in the Name field.
STEP 2. SELECTING THE TASK TYPE
For the Kaspersky Administration Kit application select the Packages retranslation task type in the Advanced folder
(see section "Step 2. Selecting the task type" on page 37).
STEP 3. SELECTING THE INSTALLATION PACKAGES
Select the installation packages that should be distributed:
All installer packages.
Page 84

D E P L O Y M E N T G U I D E
84
Selected installer packages. In this case, check the names of the required installation packages in the table
below.
Figure 54. Creating a set of installation packages
Use The maximum number of simultaneous downloads field to enter the necessary value.
STEP 4. SCHEDULING THE TASK LAUNCH
Create the task launch schedule (see section "Step 12. Scheduling the task launch" on page 47).
STEP 5. COMPETING TASK CREATION
Once the wizard completes, the created task will appear in the Group tasks folder.
The created task will be distributed automatically to the slave Administration Servers on the first nesting level. To
distribute the task to all slave Servers, check the Send to slave Administration Servers box on the General tab of the
task properties window.
DISTRIBUTION OF INSTALLATION PACKAGES WITHIN A GROUP USING UPDATE AGENTS
You can use Update Agents to distribute installation packages within a group. Update Agents receive installation
packages and updates from the Administration Server and store them in the folder where the corresponding Kaspersky
Lab application is installed.
Changing the location of the folder containing the updates and installation packages and restricting its size is not allowed.
The installation packages are then distributed to client computers using multicast IP delivery. New installation packages
are distributed within a group once. If a client computer has been disconnected from the corporate logical network at the
Page 85

R E M O T E D E P L O Y M E N T A N D R E M O V A L O F A P P L I C A T I O N S
85
time of distribution, the Network Agent downloads the necessary installation package from an Update Agent when the
installation task is started.
To create a list of Update Agents and configure them for distribution of installation packages to computers within a
group:
1. Connect to the necessary Administration Server.
2. Select the necessary administration group in the console tree, open the context menu and select the Properties
command, or use a corresponding item from the Action menu.
3. In the displayed group properties window, navigate to the Update Agents tab (see the figure below) and use the
Add and Remove buttons to create a list of computers, which will function as Update Agents within the group.
Figure 55. Creating the list of Update Agents
4. Edit the Update Agent settings. To do this, select the Agent in the list and click the Properties button. In the
<Update Agent name> properties window that opens, on the General tab (see the figure below):
specify the port number used by the client to connect to the Update Agent. By default, port 15001 is used; if
this port is in use, it can be changed;
specify the port number used by the client to connect securely to the Update Agent using the Secure
Sockets Layer (SSL) protocol. By default, port 13001 is used;
check the Use multicast box and fill in the Multicast IP and IP multicast port number fields;
Page 86

D E P L O Y M E N T G U I D E
86
specify the folder for storage of the files for Update Agents. To do this, click the Advanced link.
Figure 56. The Update Agent properties window. The General tab
On the Updates source tab (see the figure below) select the method, which Update Agents will use to
download updates. You can select one of the following options:
Retrieve from Administration Server – the Administration Server will transfer updates to the Update
Agents after it completes downloading updates to the repository.
Page 87

R E M O T E D E P L O Y M E N T A N D R E M O V A L O F A P P L I C A T I O N S
87
Use update download task – Update Agents will run the updates download task to retrieve updates. If you
select this option, you should select a task from the list of tasks created for a selection of computers (using
the Select button) or create a new task, using the New task button.
Figure 57. The Update Agent properties window. The Updates source tab
COMPUTER PREPARATION FOR REMOTE INSTALLATION. THE RIPREP UTILITY
Application deployment to the client computer may complete with an error for the following reasons:
The task has already been successfully performed on this computer. In that case its re-execution is not required.
When a task was started, the computer was on. In that case turn on the computer and restart the task.
There is no connection between the Administration Server and the Network Agent installed on the client
computer. To determine the cause of the problem use the remote diagnostics of client computers utility
(klactgui). For more details about the use of this utility see the Kaspersky Administration Kit Reference Guide.
If the Network Agent is not installed on the computer, the following problems may occur:
the client computer has Simple file sharing enabled.
the Server service is running on the client computer;
the required ports are closed on the client computer;
Page 88

D E P L O Y M E N T G U I D E
88
the user account, used to perform the task, has insufficient privileges.
The problems described above can be solved using the utility for computer preparation for remote deployment
(riprep).
This section contains a description of the utility for computer preparation for remote deployment (riprep.exe). It is located
in the Kaspersky Administration Kit installation folder on the computer with the Administration Server installed and can
work in one of two modes:
interactive (see section "Interactive mode" on page 88);
non-interactive (see section "Non-interactive mode" on page 89).
The utility for computer preparation for remote deployment does not run on Microsoft Windows Home Edition.
INTERACTIVE MODE
For work with the utility for computer preparation for remote deployment:
1. Launch the utility for computer preparation for remote deployment on the client computer.
2. In the window that will open (see the figure below) check one or several boxes:
Disable simple file sharing.
Start the Server service.
Open ports.
Add login.
Disable User Account Control (UAC). This step is only available for computers running Microsoft
Windows Vista, Microsoft Windows 7 and Microsoft Windows Server 2008.
3. Press the Start button.
When the utility for computer preparation for remote deployment runs, all the phases of its execution are displayed in the
lower part of the window.
Additionally, a request to enter the account name and password will be displayed when an account is created. This will
create a local account, which belongs to the local administrators' group.
Disabling of UAC will be attempted even in cases, when UAC was disabled before starting the utility. After disabling of
UAC, a prompt to restart the computer will be displayed.
Page 89

R E M O T E D E P L O Y M E N T A N D R E M O V A L O F A P P L I C A T I O N S
89
To complete work with the utility, press the Cancel button.
Figure 58. Main window of the utility for computer preparation for remote deployment
NON-INTERACTIVE MODE
To launch the utility for computer preparation for remote deployment in the non-interactive mode,
launch the riprep utility with the required set of command line options.
Utility command line syntax:
riprep.exe [-silent] [-cfg CONFIG_FILE] [-tl traceLevel]
The command line parameters are as follows:
-silent – launch the utility in the non-interactive mode.
-cfg CONFIG_FILE – defines the utility configuration, where CONFIG_FILE – path to the configuration file (a
file with the .ini extension).
-tl traceLevel – defines the trace level, where traceLevel – a number from 0 to 5. if no modifier is
specified, the value 0 is used.
As a result of launching the utility in non-interactive mode, the following tasks can be performed:
Disable simple file sharing.
Launching the Server service on the client computer.
Opening the ports.
Creating a local account.
Disabling User Account Control (UAC).
Page 90

D E P L O Y M E N T G U I D E
90
The selection of steps and account for launching the utility is defined in the configuration file specified in the -cfg
modifier. To specify those settings, add the following information to the configuration file:
in the Common section specify which tasks should be performed:
DisableSFS – disable simple file sharing (0 – the task is disabled; 1 – the task is enabled);
StartServer – launch the Server service (0 – the task is disabled; 1 – the task is enabled);
OpenFirewallPorts – open the necessary ports (0 – the task is disabled; 1 – the task is enabled).
DisableUAC – disable User Account Control (0 – the task is disabled; 1 – the task is enabled).
RebootType – define behavior if restart of computer is required when UAC is disabled (0 – never restart
the computer; 1 – restart the computer, if UAC was enabled before starting the utility; 2 – force restart, if
UAC was enabled before starting the utility; 4 – always restart the computer; 5 – always force restart).
in the UserAccount section specify the account name (user) and its password (Pwd).
Sample context of the configuration file:
[Common]
DisableSFS=0
StartServer=1
OpenFirewallPorts=1
[UserAccount]
user=Admin
Pwd=Pass123
After the utility completes, the following files will be created in the utility launch folder:
riprep.txt – operation report, in which all phases of the utility operation are listed.
riprep.log – the tracing file (it is created if the tracing level was set above 0).
LOCAL INSTALLATION OF SOFTWARE
Local installation is performed individually on every computer. To perform it, you need the administrator's rights on the
local computer.
Some applications, which could be managed through Kaspersky Administration Kit, can be installed on computers only
locally. For details please refer to the documentation for the corresponding applications.
The general procedure of software installation in case of local deployment of the anti-virus protection system can be as
follows:
install the Network Agent and configure the client computer connection to the Administration Server (see section
"Local installation of the Network Agent" on page 91);
install the necessary applications on computers, which will be included into the anti-virus protection system in
accordance with the descriptions in their corresponding Guides;
install the management plug-ins for each of the installed Kaspersky Lab applications on the administrator's
workstation (see section "Local installation of the application management plug-in" on page 95).
Page 91

L O C A L I N S T A L L A T I O N O F S O F T W A R E
91
Kaspersky Administration Kit also supports the following methods for local software installation:
silent mode (see section "Installing applications in non-interactive mode" on page 96) using the files generated
during creation of an installation package;
using a standalone package (see section "Installation using a standalone package" on page 97).
LOCAL INSTALLATION OF THE NETWORK AGENT
To install the Network Agent to a computer locally:
1. Run the setup.exe file from the CD containing the distribution package of Kaspersky Administration Kit in the
Packages\NetAgent folder. The corresponding wizard will guide you through the installation. The Setup Wizard
will invite you to configure the installation settings. Follow the wizard's instructions.
The first setup steps are quite standard, they include unpacking the necessary files from the distribution
package and their recording to the hard drive of the computer.
2. Then, define the destination folder for the Network Agent installation. By default, it will be <Drive>:\Program
Files\Kaspersky Lab\NetworkAgent. If this folder does not exist, it will be created automatically. You can change
the destination folder using the Modify button.
3. In the next wizard window (see the figure below) you will have to configure the settings for the Network Agent
connection to the Administration Server. To do this, define:
The address of the computer where the Administration Server is installed or will be installed. You can use
either its IP address or the computer's name in the Windows network as the computer's address. You can
also click the Browse button to select the computer.
The number of the port that the Network Agent will use to connect to the Administration Server. The default
port number is 14000. If this port is in use, you can change it. Only decimal notation is allowed.
Page 92

D E P L O Y M E N T G U I D E
92
Port number for connection using the SSL protocol. The default port number is 13000. If this port is in use,
you can change it. Only decimal notation is allowed. To connect through a secure port, i.e. using SSL
protocol, check the Use SSL connection box.
Figure 59. Configuring connection to Administration Server
4. If the Network Agent connects to the Server through a proxy, configure the connection in the window that opens
(see the figure below):
Check the Use proxy to connect to Kaspersky Administration Kit Administration Server box and enter
the address and port number for connection to the proxy server. Only decimal notation is allowed (for
example, Proxy address: proxy.test.ru, Port: 8080).
Page 93

L O CAL I N S T A L L A T I O N O F S O F T W A R E
93
If a password is required to access the proxy server, fill in the Proxy server account and Proxy server
password fields.
Figure 60. Configuring connection via a proxy server
If no proxy is used, click the Next button to skip the step.
5. During the next step (see the figure below) specify the method that will be used to obtain the certificate of the
Administration Server, which the Agent will contact. Select one of the following options:
Default certificate file – the Administration Server certificate will be downloaded when the Network Agent
connects to it for the first time (this option is selected by default).
Select certificate file – Administration Server authentication will be performed using the administrator-
defined certificate. If you select this option, specify the necessary Administration Server certificate file.
Page 94

D E P L O Y M E N T G U I D E
94
The certificate file is klserver.cer; and it is located in the Cert subfolder of the Kaspersky Administration Kit
program folder. You can copy the certificate file to the shared folder or to a floppy disk, and use the copy to
install the Network Agent.
Figure 61. Selecting the method to obtain the Administration Server certificate
Page 95

L O C A L I N S T A L L A T I O N O F S O F T W A R E
95
6. In the next wizard window (see the figure below) you will be offered to start the Network Agent immediately after
the wizard completes. If you wish to start the component later, uncheck the Start application during install box
selected by default.
Figure 62. Configuring the Network Agent launch
7. Click the Install button in the next wizard window.
After the wizard completes, the Network Agent will be installed on your computer.
You can view the properties of the Kaspersky Network Agent service, start, stop and monitor the Network Agent
operation using standard Windows tools – Computer management Services.
The Network Agent is always installed on the target computer together with a plug-in for work with Cisco Network
Admission Control (NAC). This plug-in is used if the computer has Cisco Trust Agent installed.
LOCAL INSTALLATION OF THE APPLICATION
MANAGEMENT PLUG-IN
To install the application management plug-in,
run the klcfginst.exe from the CD containing the distribution package of the application on the computer where
the Kaspersky Administration Console is installed. This file is included in the distribution packages of all
applications that can be managed by Kaspersky Administration Kit. This installation is performed by a wizard
and requires no configuration.
The klcfginst.exe file for installation of the management plug-in for the Network Agent can be found in the
Packages/NetAgent folder of the Kaspersky Administration Kit distribution package.
Page 96

D E P L O Y M E N T G U I D E
96
INSTALLING APPLICATIONS IN NON-INTERACTIVE MODE
To install an application in non-interactive mode:
1. Create the necessary installation package (see section "Creating an installation package" on page 71), if the
installation package for the application that you plan to deploy has not been created yet.
The installation package will be saved on the Administration Server in the Packages subfolder of the shared
folder defined during the Administration Server installation. An individual nested folder corresponds to each
installation package.
2. If necessary, configure the installation package settings (see section "Viewing and configuring the properties of
an installation package" on page 74).
3. Open the required installation package folder by one of the following ways:
Copy the entire folder corresponding to the necessary installation package from the Administration Server to
the client computer. Then, open the copied folder on the client computer.
Use the client computer to open the shared folder corresponding to the necessary installation package on
the Administration Server.
If the shared folder is located on a computer running Microsoft Windows Vista, you should set to Disabled the
parameter User Account Control: Run all administrators in Admin Approval Mode (Start Control
Panel Administrative Tools Local Security Policy Security options).
4. Depending on the selected application, do the following:
for Kaspersky Anti-Virus for Windows Workstations, Kaspersky Anti-Virus for Windows Servers and
Kaspersky Administration Kit navigate to the exec subfolder and run the executable file (a file with the .exe
extension) with the /s key.
for other Kaspersky Lab applications run the executable file (a file with the .exe extension) with the /s key
from the open folder.
During Kaspersky Administration Kit installation in non-interactive mode you can use a response file. This file contains all
the settings for application installation and can perform multiple installations of an application with the same settings.
To create a response file for Kaspersky Administration Kit:
1. Use the command line to navigate to the folder containing the distribution package of Kaspersky Administration
Kit, and run the executable file with the /r key.
As a result, the application setup wizard will be started on the computer in the writing mode, and a response file
setup.iss will be created in the same folder, from which the application distribution file was run.
2. Follow the wizard's instructions to configure the application installation.
Installation of Kaspersky Administration Kit will be terminated before copying files, and a response file will be created in
the specified folder. The created response file should be copied to the Kaspersky Administration Kit installation folder to
the Share\<Name of installation package>\exec subfolder. After that, silent installation of Kaspersky Administration Kit
using the above method will automatically apply the configuration defined in the response file.
The response file can be used to upgrade the versions of Kaspersky Administration Kit in non-interactive mode. However,
it can only be used to upgrade the application version used to create it.
Page 97

L O C A L I N S T A L L A T I O N O F S O F T W A R E
97
THE WIZARD'S STEPS
Step 1. Selecting the license ........................................................................................................................................... 98
Step 2. Selecting the action ................................................................ ................................................................ ............. 98
Step 3. Selecting the Network Agent installation package............................................................................................... 99
Step 4. Configuring computer relocation ....................................................................................................................... 100
Step 5. Completion of creation of a standalone installation package ............................................................................ 100
INSTALLATION USING A STANDALONE PACKAGE
Using Kaspersky Administration Kit, you can create a standalone installation package. This package is an executable file
which can be located on the web-server, sent by email or transferred in any other way. The received file is launched
locally on the computer and performs the application installation on its own, without Kaspersky Administration Kit
participation.
To create a standalone installation package:
1. Connect to the necessary Administration Server.
2. Select the Repositories Installation packages folder in the console tree.
3. Select the installation package of the required application in the results pane.
4. Open its context menu and select Create standalone installation package.
This will start the wizard. Follow its instructions.
Page 98

D E P L O Y M E N T G U I D E
98
STEP 1. SELECTING THE LICENSE
In this window (see the figure below) specify the license which will be used by the application after installation.
Figure 63. Selecting the license
The list of licenses stored in the Administration Server's repository is presented in the table. Using the Properties button,
you can view detailed information about the license.
To add a license, press the Add button. This will start a license adding wizard. Follow the wizard's instructions. After the
wizard completes, the new license will be placed into the license repository of the Administration Server and added to the
table.
This step can be skipped. You will be able to install the license later, after the application installation.
STEP 2. SELECTING THE ACTION
If earlier you have created a standalone installation package for this application, in this window (see the figure below)
select the required action:
Create a new standalone installation package.
Use existing standalone installation package. In this case select the required package in the list below.
Build an existing standalone installation package again.
Page 99

L O C A L I N S T A L L A T I O N O F S O F T W A R E
99
You can remove the package that you do not need any more using the Delete button.
Figure 64. Selecting the action
STEP 3. SELECTING THE NETWORK AGENT INSTALLATION PACKAGE
In this window (see the figure below) you can select the Network Agent installation package which will be added to the
standalone installation package. To do this, check the Install Network Agent along with this application box and
select the required installation package in the list below.
Page 100

D E P L O Y M E N T G U I D E
100
To create a new installation package (see section "Creating an installation package" on page 71), press the New button.
Figure 65. Selecting the Network Agent installation package
STEP 4. CONFIGURING COMPUTER RELOCATION
During this step, configure the settings for relocation of unassigned computers to the administration group after
application installation (see section "Step 8. Configuring computer relocation" on page 42).
After that, creation of a standalone installation package will start.
STEP 5. COMPLETION OF CREATION OF A STANDALONE
INSTALLATION PACKAGE
The created standalone package will be placed into the nested shared folder of the Administration Server. The path to
this folder is specified in the corresponding field (see the figure below).
Using the links in the Further actions section, you can perform the following actions:
Open the folder containing the created standalone installation package.
Send the link to the standalone installation package by email. In that case a message will be generated
automatically, containing the package as an attachment.
 Loading...