

Page 1

Kaspersky Administration Kit 8.0
REFERENCE GUIDE
APPLICATION VERSION: 8.0 CRITICAL FIX 2
Page 2

2
Dear User!
Thank you for choosing our product. We hope that this document will help you in your work and will provide answers
regarding this software product.
Warning! This document is the property of Kaspersky Lab ZAO (herein also referred to as Kaspersky Lab): all rights to
this document are reserved by the copyright laws of the Russian Federation, and by international treaties. Illegal
reproduction and distribution of this document or parts hereof will result in civil, administrative or criminal liability by
applicable law.
Reproduction or distribution of any materials in any format, including translations, is allowed only with the written
permission of Kaspersky Lab ZAO.
This document, and graphic images related to it, may only be used for informational, non-commercial, and personal
purposes.
Kaspersky Lab ZAO reserves the right to amend this document without additional notification. You can find the latest
version of this document at the Kaspersky Lab website, at http://www.kaspersky.com/docs.
Kaspersky Lab ZAO shall not be liable for the content, quality, relevance, or accuracy of any materials used in this
document for which the rights are held by third parties, or for any potential or actual losses associated with the use of
these materials.
This document uses registered trademarks and service marks which are the property of their respective owners.
Document revision date: 10/15/2010
© 1997-2010 Kaspersky Lab ZAO. All Rights Reserved.
http://www.kaspersky.com
http://support.kaspersky.com/
Page 3

3
CONTENTS
ABOUT THIS GUIDE ..................................................................................................................................................... 8
In this document ....................................................................................................................................................... 8
Document conventions ............................................................................................................................................. 9
ADDITIONAL DATA SOURCES .................................................................................................................................. 10
Information sources for further research ................................ ................................................................................. 10
Discussing Kaspersky Lab applications in web forum ............................................................................................ 11
Contacting the User documentation development group ........................................................................................ 11
STARTING AND STOPPING THE APPLICATION ...................................................................................................... 12
QUICK START WIZARD .............................................................................................................................................. 13
Step 1. Adding a license ......................................................................................................................................... 13
Step 2. Network Discovery ..................................................................................................................................... 16
Step 3. Configuring notification settings ................................................................................................................. 17
Step 4. Configuring anti-virus protection ................................ ................................................................................. 17
Step 5. Downloading updates ................................................................................................................................. 19
Step 6. Completing the wizard ................................................................................................................................ 20
MANAGING ADMINISTRATION SERVERS ................................................................................................................ 21
Connection to the Administration Server ................................................................................................................ 21
The utility for selecting the Administration Server service account (klsrvswch) ...................................................... 23
Disconnecting from Server ..................................................................................................................................... 24
Switching between Servers .................................................................................................................................... 25
Adding a Server to the console tree ....................................................................................................................... 25
Granting rights to use a Server ............................................................................................................................... 26
Removing a Server from the console tree .............................................................................................................. 27
Viewing and changing Administration Server settings ............................................................................................ 28
General Administration Server settings ............................................................................................................. 28
Event processing settings ................................................................................................................................. 37
Virus outbreak event parameters ...................................................................................................................... 44
General guidelines for relocation of computers ................................................................................................. 46
Configuring Integration with Cisco Network Admission Control (NAC) ............................................................. 49
Traffic limit rules ................................................................................................................................................ 51
Slave Administration Servers .................................................................................................................................. 51
Adding a slave Server ....................................................................................................................................... 51
Configuring the connection of the slave Server to the master Server ............................................................... 53
Viewing administration groups of a slave Administration Server ....................................................................... 54
Connecting to the Administration Server via Internet .............................................................................................. 55
MANAGING ADMINISTRATION GROUPS .................................................................................................................. 56
Adding, moving and deleting a group ..................................................................................................................... 56
Creating the structure of administration groups ...................................................................................................... 58
The structure of groups based on the Windows network domains and workgroups ......................................... 59
Group structure based on Active Directory ....................................................................................................... 61
Group structure based on the content of the text file ........................................................................................ 63
Viewing information about a group ......................................................................................................................... 65
Viewing and changing group settings ..................................................................................................................... 66
General settings ................................................................................................................................................ 66
Page 4

R E F E R E N C E G U I D E
4
Granting rights to work with a group ................................................................................................................. 68
Conditions that determine computer status ....................................................................................................... 69
Monitoring of client computer activity ................................................................................................................ 70
Automatic installation of applications on client computers ................................................................................ 72
Creating the list of Update Agents .................................................................................................................... 73
REMOTE MANAGEMENT OF APPLICATIONS .......................................................................................................... 74
Managing policies ................................................................................................................................................... 74
Creating a policy ............................................................................................................................................... 74
Displaying inherited policy in the nested group results pane ............................................................................ 77
Viewing and configuring policy settings ............................................................................................................ 77
Activating a policy ............................................................................................................................................. 82
Activating a policy based on an event ............................................................................................................... 83
Policy for mobile user ........................................................................................................................................ 83
Deleting a policy ................................................................................................................................................ 84
Copying a policy ................................................................................................................................................ 84
Configuring the Network Agent's policy ............................................................................................................. 84
Configuring the settings of the Administration Server policy ............................................................................. 88
Exporting a policy .............................................................................................................................................. 93
Importing a policy .............................................................................................................................................. 94
Policies conversion ........................................................................................................................................... 94
Managing tasks ...................................................................................................................................................... 96
Kaspersky Administration Kit tasks ................................................................................................................... 96
Tasks for specific computers ............................................................................................................................. 96
Creating a group task ........................................................................................................................................ 97
Creating an Administration Server task ........................................................................................................... 108
Creating a task for specific computers ............................................................................................................ 109
Creating a local task ....................................................................................................................................... 110
Viewing and changing task settings ................................................................................................................ 112
Displaying an inherited group task in the results pane of a nested group ....................................................... 118
Automatic operating system loading on the client computers before task execution ...................................... 118
Turning off the computer after the task execution ........................................................................................... 119
Restricting time for the task execution ............................................................................................................ 119
Exporting a task .............................................................................................................................................. 119
Importing a task .............................................................................................................................................. 120
Tasks conversion ............................................................................................................................................ 120
Starting and stopping tasks manually ............................................................................................................. 120
Pausing / resuming tasks manually ................................................................................................................. 121
Monitoring task execution ............................................................................................................................... 121
Viewing results of the task execution stored on the Administration Server ..................................................... 122
Configuring the event filter for a group task .................................................................................................... 123
Configuring event filter for a selected computer .............................................................................................. 126
Removing a filter ............................................................................................................................................. 128
Local application settings...................................................................................................................................... 128
Viewing application settings ............................................................................................................................ 128
Configuring Network Agent ................................................................................................ ............................. 131
CLIENT COMPUTERS............................................................................................................................................... 133
Adding computers to group................................................................................................................................... 133
Viewing information about a client computer ........................................................................................................ 134
Page 5

C O N T E N T S
5
Viewing client system information ......................................................................................................................... 138
Administration Server change task ....................................................................................................................... 145
Client computer management task ....................................................................................................................... 148
Turning on the client computer ........................................................................................................................ 148
Shutting down the client computer .................................................................................................................. 151
Restarting the client computer ........................................................................................................................ 154
Sending a message to the user of the client computer ......................................................................................... 158
Connecting the client computer to the Administration Server manually. The klmover.exe utility .......................... 161
Client-to-Administration Server connection check frequency................................................................................ 162
Verifying connection of the client computer to Administration Server manually. The klnagchk.exe utility ....... 162
Checking the connection between the client computer and the Administration Server using the
Check connection action ................................................................................................................................. 163
Remote diagnostics of client computers utility (klactgui)....................................................................................... 163
Enabling and disabling trace, downloading the trace file ................................................................................ 165
Downloading application settings .................................................................................................................... 166
Downloading event logs .................................................................................................................................. 168
Launching the diagnostics and downloading the results of its operation ......................................................... 168
Starting, restarting and stopping the applications ........................................................................................... 170
REPORTS AND NOTIFICATIONS ............................................................................................................................. 172
Creating a report template .................................................................................................................................... 172
Viewing statistics .................................................................................................................................................. 175
Creating a statistics page ................................................................................................................................ 176
Changing the set of statistics pages ............................................................................................................... 178
Creating an information panel ......................................................................................................................... 179
Changing the set of information panels ........................................................................................................... 183
Viewing and editing report templates .................................................................................................................... 184
Generating and viewing reports ............................................................................................................................ 190
Reports delivery task ............................................................................................................................................ 193
Administration Servers hierarchy reports .............................................................................................................. 197
Restricting the number of records included in reports .......................................................................................... 198
Notification limit .................................................................................................................................................... 200
Notifications .......................................................................................................................................................... 200
Email notification ............................................................................................................................................. 200
Use NET SEND .............................................................................................................................................. 203
Notification using the executable file to run ..................................................................................................... 204
EVENT AND COMPUTER SELECTIONS .................................................................................................................. 207
Event selections ................................................................................................................................................... 207
Viewing Kaspersky Administration Kit event log ............................................................................................. 207
Creating an event selection............................................................................................................................. 208
Customizing an event selection ...................................................................................................................... 209
Saving information about events to file ........................................................................................................... 213
Deleting events ............................................................................................................................................... 214
Computer selections ............................................................................................................................................. 214
Viewing a computer selection ......................................................................................................................... 215
Creating a computer selection ........................................................................................................................ 217
Configuring a computer selection .................................................................................................................... 217
UNASSIGNED COMPUTERS .................................................................................................................................... 225
Network Discovery ................................................................................................................................................ 225
Page 6

R E F E R E N C E G U I D E
6
Viewing and changing the settings for Windows network polling .................................................................... 226
Viewing and modifying Active Directory group properties ............................................................................... 228
Viewing and modifying the settings for IP subnet polling ................................................................................ 229
Viewing and changing domain settings ................................................................................................................ 230
Creating an IP subnet ........................................................................................................................................... 232
Viewing and modifying the IP subnet settings ...................................................................................................... 233
Viewing and modifying the Active Directory group properties ............................................................................... 236
UPDATE ..................................................................................................................................................................... 237
Creating the task of downloading updates to the repository ................................................................................. 237
Adding an update source ................................................................................................................................ 240
Configuring connection to the update servers ................................................................................................. 243
Determining the updates list............................................................................................................................ 245
Configuring other update task settings ............................................................................................................ 247
Verifying downloaded updates .............................................................................................................................. 249
Viewing downloaded updates ............................................................................................................................... 252
Automatic distribution of updates .......................................................................................................................... 253
Automatic distribution of updates to the client computers ............................................................................... 253
Automatic distribution of updates to the slave Servers ................................................................................... 253
Automatic installation of updates to program modules .................................................................................... 253
Creating the list of Update Agents and configuring the agents ....................................................................... 254
The task of downloading updates by the Update Agents ................................................................................ 256
MANAGING LICENSES ............................................................................................................................................. 259
Viewing information about installed licenses ........................................................................................................ 259
Installing a license ................................................................................................................................................ 262
Running the license installation task creation wizard ............................................................................................ 263
Creating and viewing report on licenses ............................................................................................................... 263
Obtaining license using activation code ................................................................................................ ................ 264
Automatic distribution of license ........................................................................................................................... 265
REPOSITORIES ........................................................................................................................................................ 266
Installation packages ............................................................................................................................................ 266
Quarantine ............................................................................................................................................................ 266
Viewing the properties of a quarantined object ............................................................................................... 267
Removing an object from Quarantine ............................................................................................................. 268
Scanning the Quarantine folder on the client computer .................................................................................. 268
Restoring an object from the Quarantine ........................................................................................................ 269
Saving an object from the Quarantine to disk ................................................................................................. 269
Backup.................................................................................................................................................................. 269
Viewing the properties of an object placed into the Backup ............................................................................ 269
Removing an object from the Backup ............................................................................................................. 270
Restoring the object from the Backup ............................................................................................................. 270
Saving an object from the Backup to disk ....................................................................................................... 271
Unprocessed files ................................................................................................................................................. 271
Disinfecting the object from the Unprocessed files folder ............................................................................... 271
Saving the object from the Unprocessed files folder to disk ............................................................................ 271
Removing the object from the Unprocessed files folder .................................................................................. 272
Application registry ............................................................................................................................................... 272
Page 7

C O N T E N T S
7
ADDITIONAL FEATURES .......................................................................................................................................... 277
Monitoring anti-virus protection status using system registry data ........................................................................ 277
Mobile users ......................................................................................................................................................... 278
Creating a profile for the mobile users ............................................................................................................ 279
Creating the Network Agent switching rule ..................................................................................................... 282
Adding a condition to the rule.......................................................................................................................... 283
Search .................................................................................................................................................................. 287
Detecting computers ....................................................................................................................................... 288
Searching for administration groups ............................................................................................................... 295
Searching for the slave Administration Servers .............................................................................................. 297
Data backup ......................................................................................................................................................... 299
Data backup task ............................................................................................................................................ 300
Data backup and restoration utility klbackup ................................................................................................... 302
Tracking virus outbreaks....................................................................................................................................... 306
Enabling virus outbreak detection ................................................................................................................... 306
Changing the application policy when a Virus outbreak event is registered .................................................... 309
Automation of the Kaspersky Administration Kit operation (klakaut) .................................................................... 311
Custom tools ......................................................................................................................................................... 311
Configuring interface ............................................................................................................................................ 311
REFERENCE INFORMATION ................................................................................................................................... 313
Context menu ....................................................................................................................................................... 313
Results pane ......................................................................................................................................................... 315
Statuses of computers, tasks and policies ............................................................................................................ 321
GLOSSARY ............................................................................................................................................................... 322
KASPERSKY LAB ZAO ............................................................................................................................................. 327
INDEX ................................................................................................ ................................................................ ........ 328
Page 8

8
ABOUT THIS GUIDE
IN THIS SECTION
In this document ................................................................................................................................................................ 8
Document conventions ...................................................................................................................................................... 9
This Guide contains the purpose of Kaspersky Administration Kit and step by step descriptions of the features it offers.
The basic concepts and general schemes for working with the application are described in the Kaspersky Administration
Kit Administrator's Guide.
IN THIS DOCUMENT
The following sections are included in the document:
Additional data sources (see page 10). The section tells you how to get information about the application apart
from the documentation included in the distribution package.
Starting and stopping the application (see page 12). The section tells you how to start Kaspersky Administration
Kit.
Quick Start Wizard (see page 13). This section describes the initial configuration steps used to build the anti-
virus protection management system using Kaspersky Administration Kit.
Managing Administration Servers (see page 21). This section contains data on operations with Administration
Server in Kaspersky Administration Kit.
Managing Administration groups (see page 56). This section presents the operating layout of Kaspersky
Administration Kit and administration groups.
Managing applications remotely (see page 74). This section describes remote application management using
Kaspersky Administration Kit.
Client computers (see page 133). The section contains information on client computer management when
working with Kaspersky Administration Kit.
Reports and notifications (see page 172). This section describes the peculiarities of managing reports and
notifications in Kaspersky Administration Kit.
Event and computer selections (see page 207). This section contains data on how to monitor anti-virus
protection system using Kaspersky Administration Kit.
Unassigned computers (see page 225). This section describes main issues related to corporate network
computers not included in administration group.
Update (see page 237). This section covers the procedures for updating the databases and program modules
managed via Kaspersky Administration Kit.
Managing licenses (see page 259). This section contains data on centralized licenses management using
Kaspersky Administration Kit services.
Repositories (see page 266). This section describes operations with objects used to monitor the status of client
computers and perform their maintenance.
Page 9
A B O U T T H I S G U I D E
9
SAMPLE TEXT
DOCUMENT CONVENTIONS DESCRIPTION
Note that...
Warnings are highlighted in red and enclosed in frames. Warnings contain
important information: for example, information related to operations critical to
computer safety.
It is recommended to use...
Notes are framed in dotted-line box. Notes contain additional detail and
reference information.
Example:
...
Example blocks have a yellow background, and the heading "Example".
Update means...
New terms are italic.
ALT+F4
Names of keyboard keys are bold and are all uppercase.
Names of the keys followed by a plus sign (+) indicate a combination of keys.
Enable
Names of interface elements are bold; for example, input fields, menu
commands, and buttons.
To configure a task schedule:
Procedure headings are italic.
help
Text in the command line and text of messages displayed on the screen have a
special font.
<IP address of your computer>
Variables are enclosed in angle brackets. Instead of a variable, the
corresponding value must be entered in each case; angle brackets are omitted.
Additional features (see page 277). This section describes some additional features of Kaspersky Administration
Kit designed to extend the opportunities for centralized management of applications in computer networks.
Reference information (see page 313). This section contains reference information about the context menu
items of the Administration Console objects, results pane objects and the meaning of statuses assigned to
network objects and administration groups.
Glossary. The section enumerates the terms used in the document.
Kaspersky Lab ZAO (see page 327). The section provides information on Kaspersky Lab ZAO.
Index. Using this section, you can easily find the required data in the document.
DOCUMENT CONVENTIONS
Document conventions used in this document are described in the following table.
Table 1. Document conventions
Page 10

10
ADDITIONAL DATA SOURCES
IN THIS SECTION
Information sources for further research ......................................................................................................................... 10
Discussing Kaspersky Lab applications in web forum ..................................................................................................... 11
Contacting the User documentation development group ................................................................................................ 11
If you have any questions regarding purchasing, installing or using Kaspersky Administration Kit, answers are readily
available.
Kaspersky Lab provides various sources of information about the application. You can choose the most suitable,
according to the importance and urgency of your question.
INFORMATION SOURCES FOR FURTHER RESEARCH
You can view the following sources of information about the application:
the application's page on Kaspersky Lab website;
the application's Knowledge Base page on the Technical Support Service website;
online help system;
documentation.
The application's page at the Kaspersky Lab website
http://www.kaspersky.com/administration_kit
This page provides you with general information about the application's features and options.
The application's Knowledge Base page at the Technical Support Service website
http://support.kaspersky.com/remote_adm
This page contains articles published by the experts of the Technical Support Service.
These articles contain useful information, recommendations, and the Frequently Asked Questions (FAQ) page, and
cover purchasing, installing and using Kaspersky Administration Kit. The articles are sorted by subject, such as
"Working with key files", "Updating databases" and "Troubleshooting". The articles aim to answer questions about
not only Kaspersky Administration Kit but other Kaspersky Lab products as well. They may also contain news from
the Technical Support Service.
Online help system
The application installation package includes full help files, which contain step by step descriptions of the
application's features.
To open the help file, select Kaspersky Administration Kit help system in the console Help menu.
Page 11

A D D I T I O N A L D A T A S O U R C E S
11
If you have a question about a specific application window, you can use context help.
To open context-sensitive help, in the corresponding window, click the Help button or the F1 key.
Documentation
The documentation supplied with the application aims to provide all the information you will require. It includes the
following documents:
Administrator's Guide describes the purpose, basic concepts, features and general schemes for using
Kaspersky Administration Kit.
Implementation Guide contains a description of the installation procedures for the components of Kaspersky
Administration Kit as well as remote installation of applications in computer networks using simple configuration.
Getting Started provides a step by step guide to anti-virus security administrators, enabling them to start using
Kaspersky Administration Kit quickly, and to deploy Kaspersky Lab anti-virus applications across a managed
network.
Reference Guide contains an overview of Kaspersky Administration Kit, and step by step descriptions of its
features.
The documents are supplied in .pdf format in Kaspersky Administration Kit's distribution package.
You can download the documentation files from the application's page on Kaspersky Lab website.
The information about an application programming interface (API) of Kaspersky Administration Kit is contained in the
klakaut.chm file. This file is located in the installation folder of the application.
DISCUSSING KASPERSKY LAB APPLICATIONS IN WEB
FORUM
If your question does not require an immediate answer, you can discuss it with Kaspersky Lab experts and other users in
our forum at http://forum.kaspersky.com.
In this forum you can view existing topics, leave your comments, create new topics and use the search engine.
CONTACTING THE USER DOCUMENTATION DEVELOPMENT
GROUP
If you have any questions about the documentation, or you have found an error in it, or would like to leave a comment,
please contact our User documentation development group.
Click the Send feedback link located in the top right part of the window to open the computer's default mail client. In the
window that opens, the email of User documentation development group will appear (docfeedback@kaspersky.com),
with the subject line – "Kaspersky Help Feedback: Kaspersky Administration Kit". Write your comment and send the
letter without changing the subject.
Page 12

12
STARTING AND STOPPING THE APPLICATION
Kaspersky Administration Kit starts automatically when launching the Administration Server.
The Kaspersky Administration Kit can be launched by selecting Kaspersky Administration Kit from the Kaspersky
Administration Kit program group in the standard Start Programs menu. This program group is created only on
administrator's workstations during the Kaspersky Administration Console installation.
To access the functionality of Kaspersky Administration Kit the Administration Server of Kaspersky Administration Kit
must be running.
Page 13
13
QUICK START WIZARD
IN THIS SECTION
Step 1. Adding a license.................................................................................................................................................. 13
Step 2. Network Discovery .............................................................................................................................................. 16
Step 3. Configuring notification settings .......................................................................................................................... 17
Step 4. Configuring anti-virus protection ......................................................................................................................... 17
Step 5. Downloading updates ......................................................................................................................................... 19
Step 6. Completing the wizard ........................................................................................................................................ 20
The Wizard configuring can configure the minimum settings for centralized management of anti-virus protection.
The wizard opens at the first connection to an Administration Server established after installation.
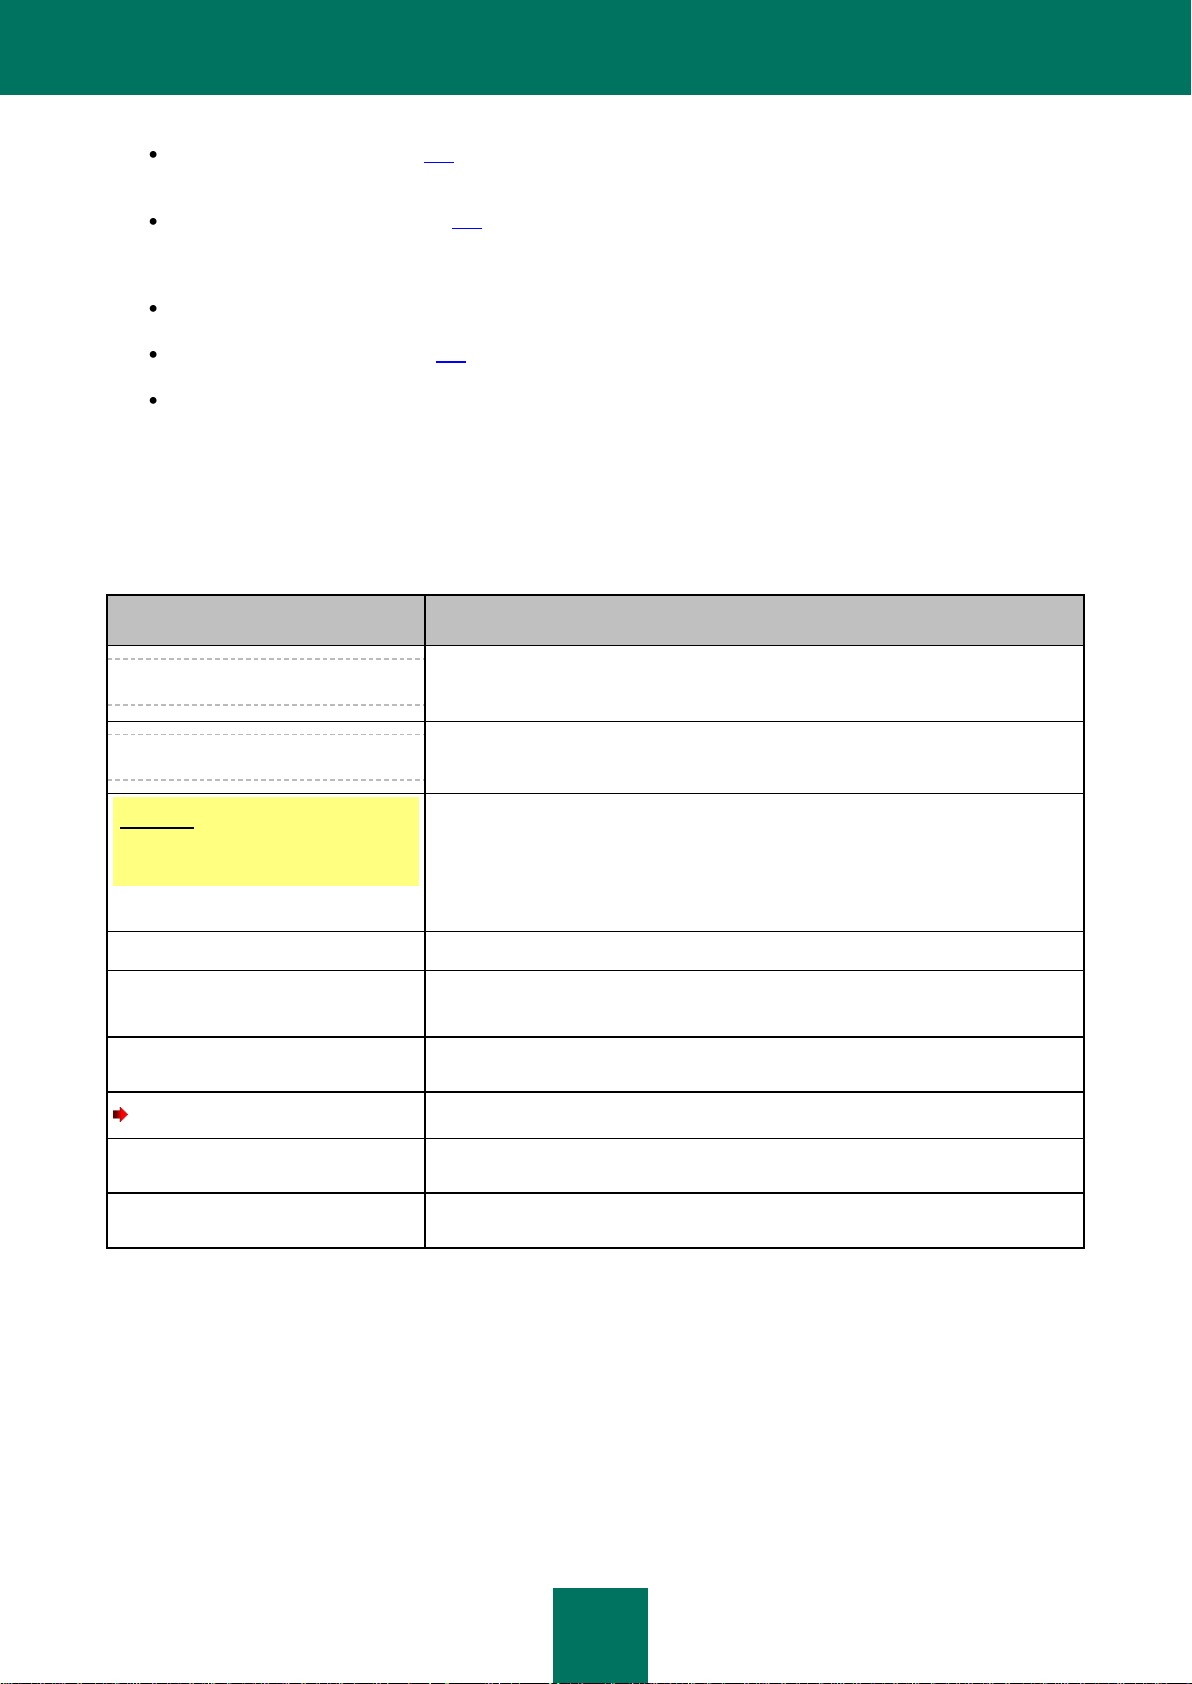
STEP 1. ADDING A LICENSE
During this stage, the method of adding a license for the applications (see the figure below) that will be managed by the
administrator using Kaspersky Administration Kit should be selected.
Figure 1. Selecting the method of adding a license
Page 14
R E F E R E N C E G U I D E
14
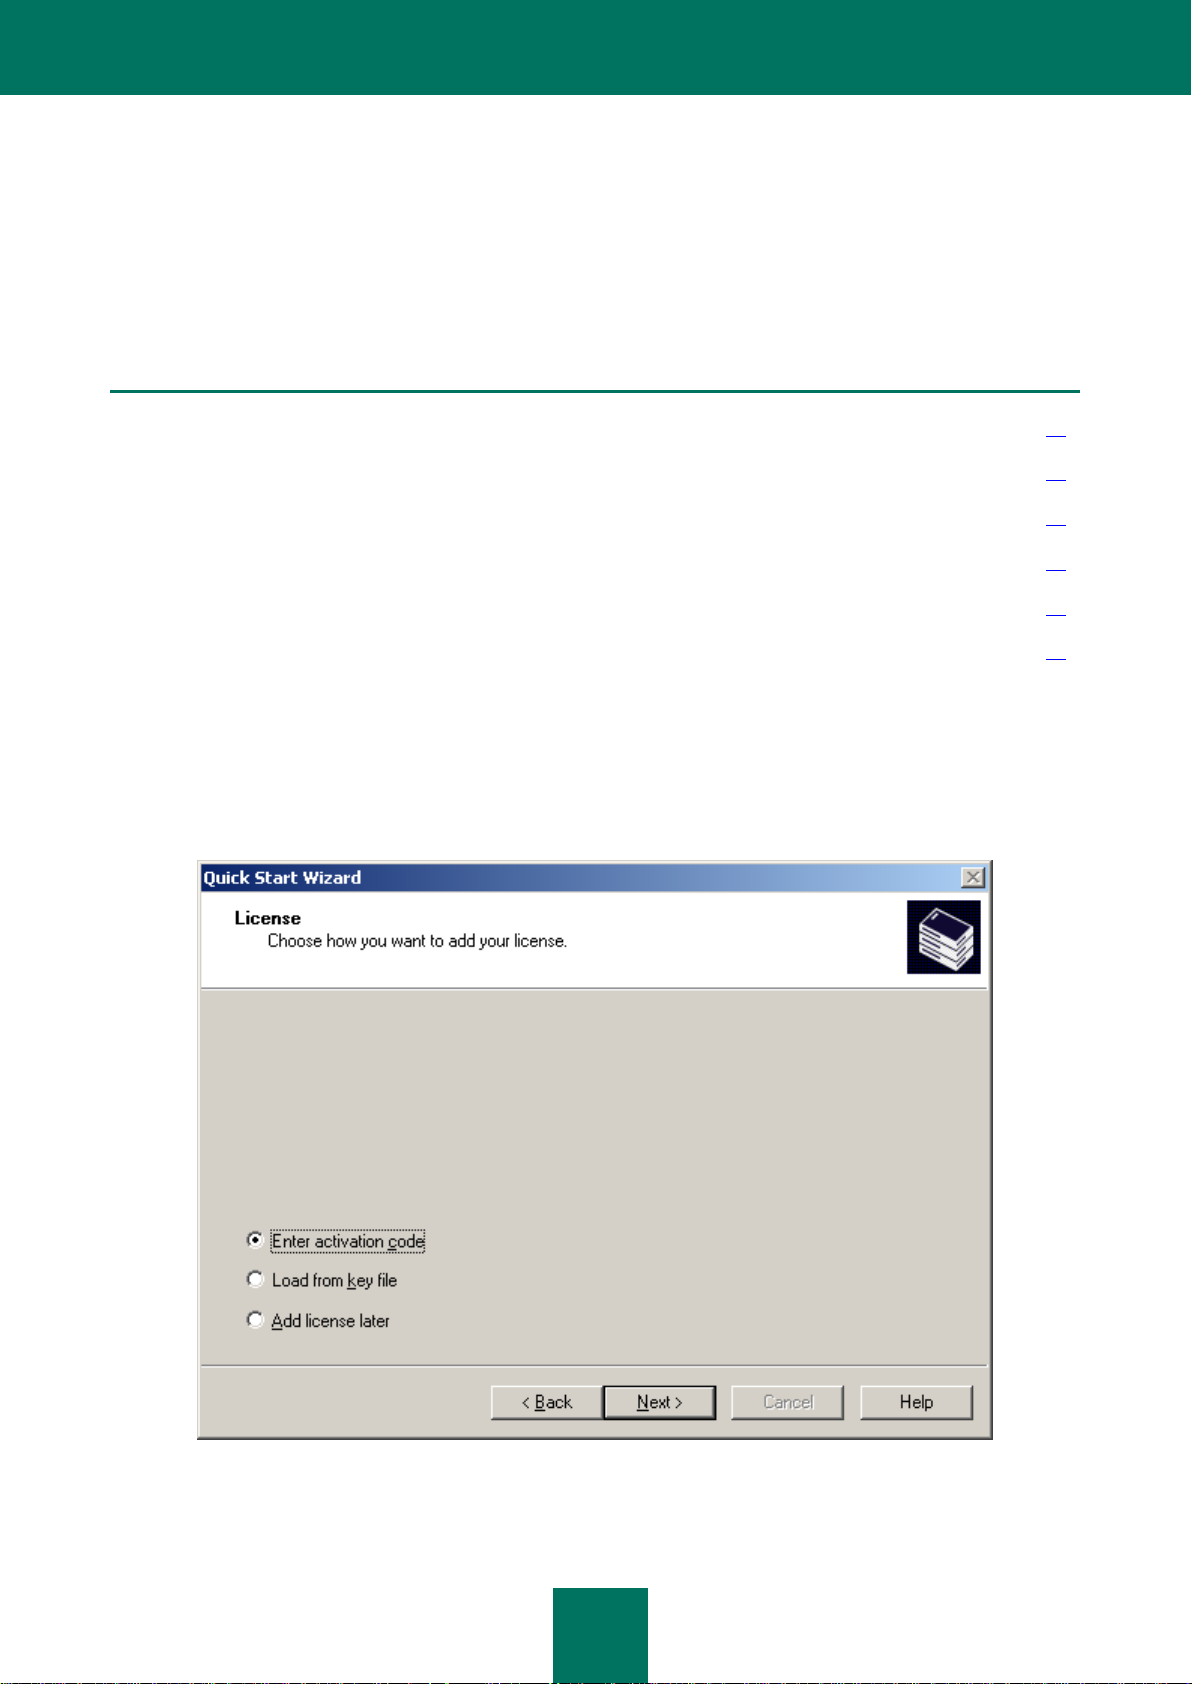
Select the method of adding a license:
Enter activation code – you will be asked to specify the code obtained when you purchased a commercial
version of the application (see the figure below).
Figure 2. Entering the activation code
If you wish to automatically apply the license to the computers in the administration groups, check the box in the
corresponding field.
Page 15
Q U I C K S T A R T W I Z A R D
15
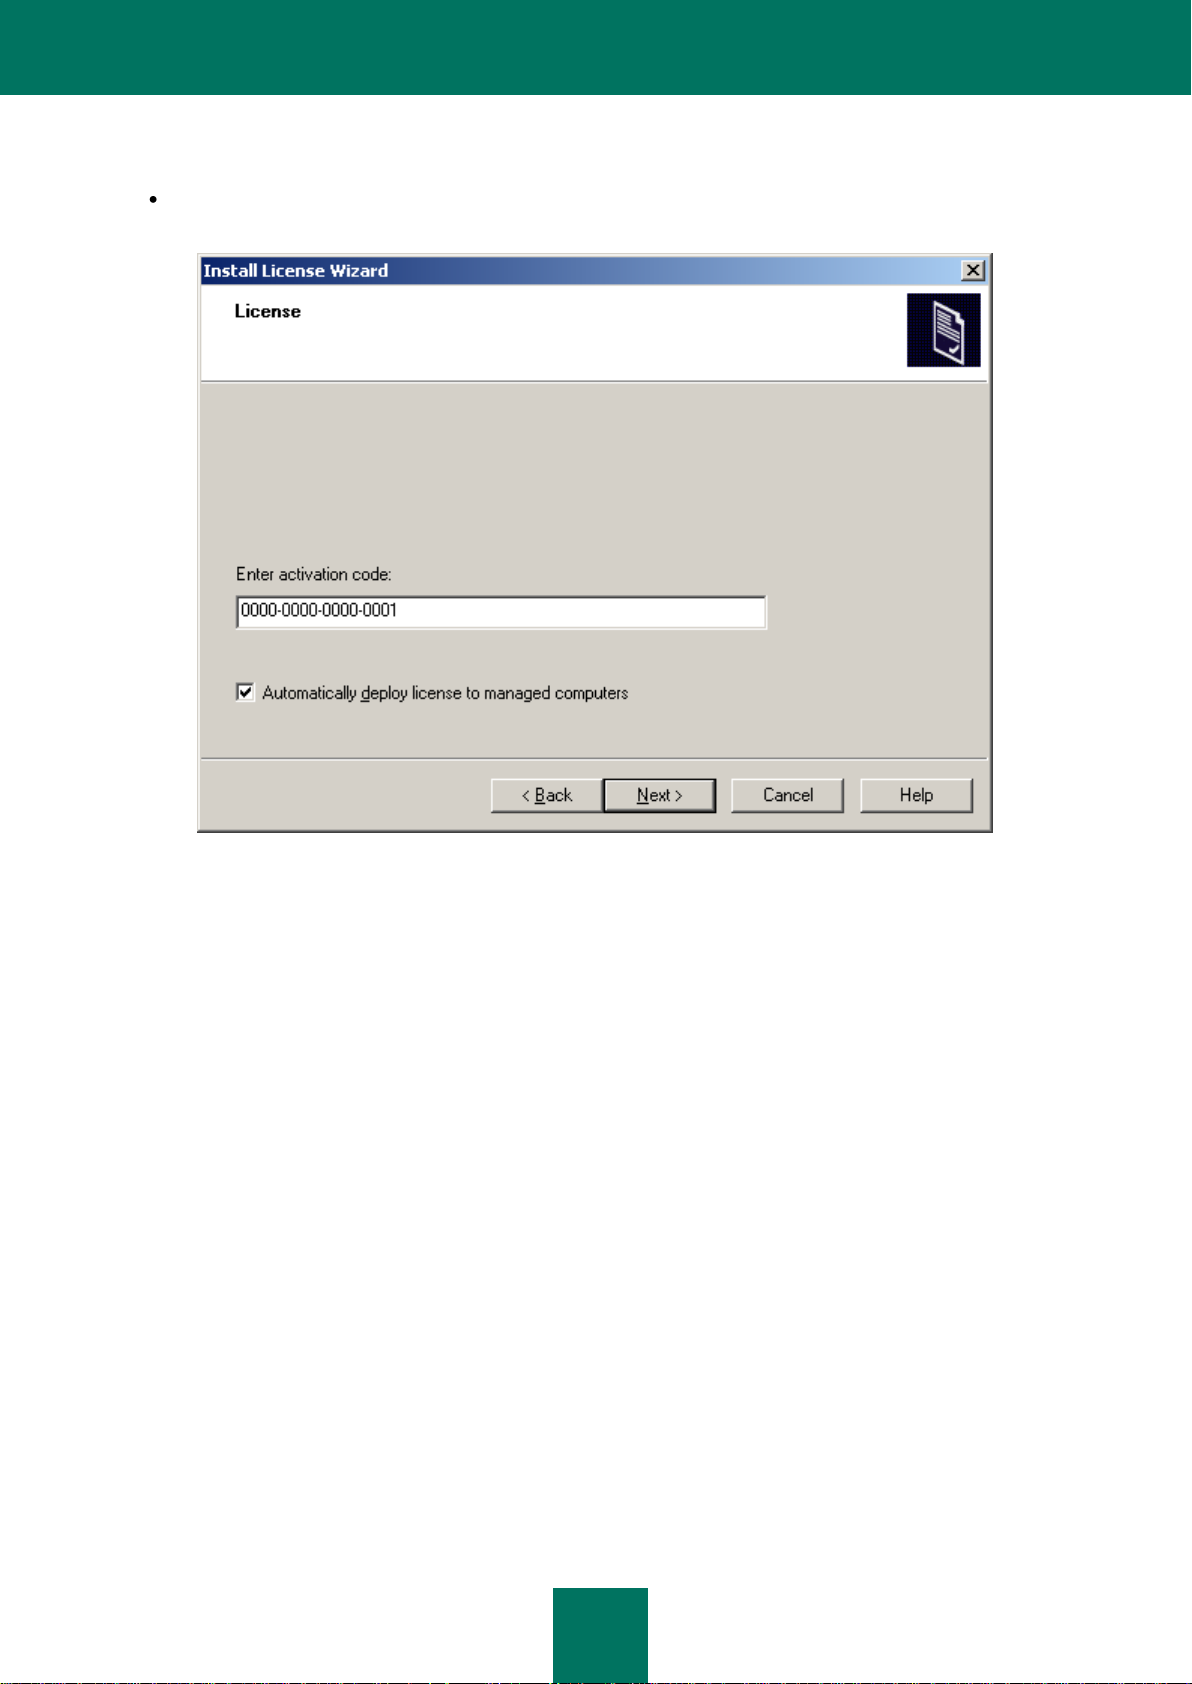
Load from key file – you will be asked to specify the key file (see the figure below).
Figure 3. Selecting the key file
If you wish to automatically apply the license to the computers in the administration groups, check the box in the
corresponding field.
Add license later. A license can be installed later using the license installation task (see section "Installing a
license" on page 262).
Page 16
R E F E R E N C E G U I D E
16
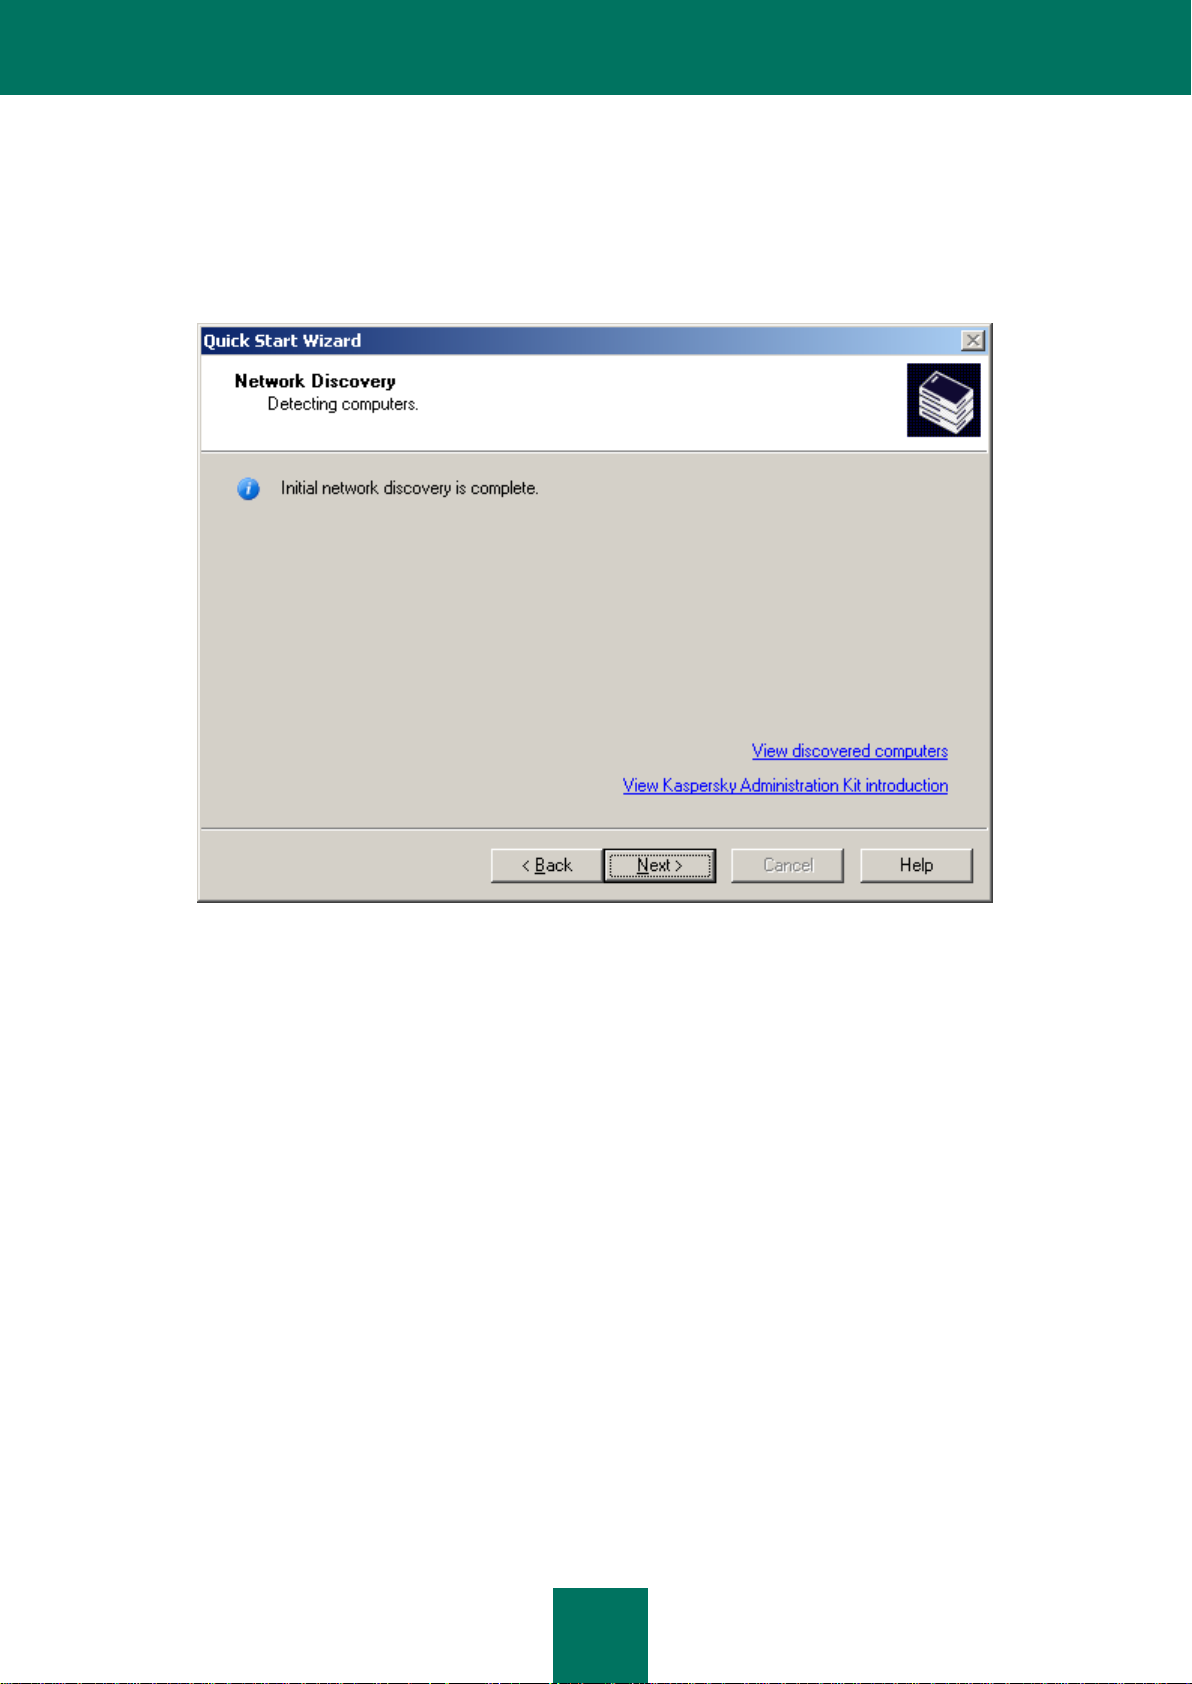
STEP 2. NETWORK DISCOVERY
During this stage the computer network is polled, and computers within this network are identified (see the figure below).
Based on the results of this scan, a service group Unassigned computers is formed together with its Domains, Active
Directory and IP subnets subfolders. The information obtained will be used to automatically create the administration
groups.
Figure 4. The Quick Start Wizard window. Network Discovery
To view the structure of the computer network, use the View discovered computers link. Click the View Kaspersky
Administration Kit introduction link to view the description of the main features offered by Kaspersky Administration
Kit.
Page 17
Q U I C K S T A R T W I Z A R D
17
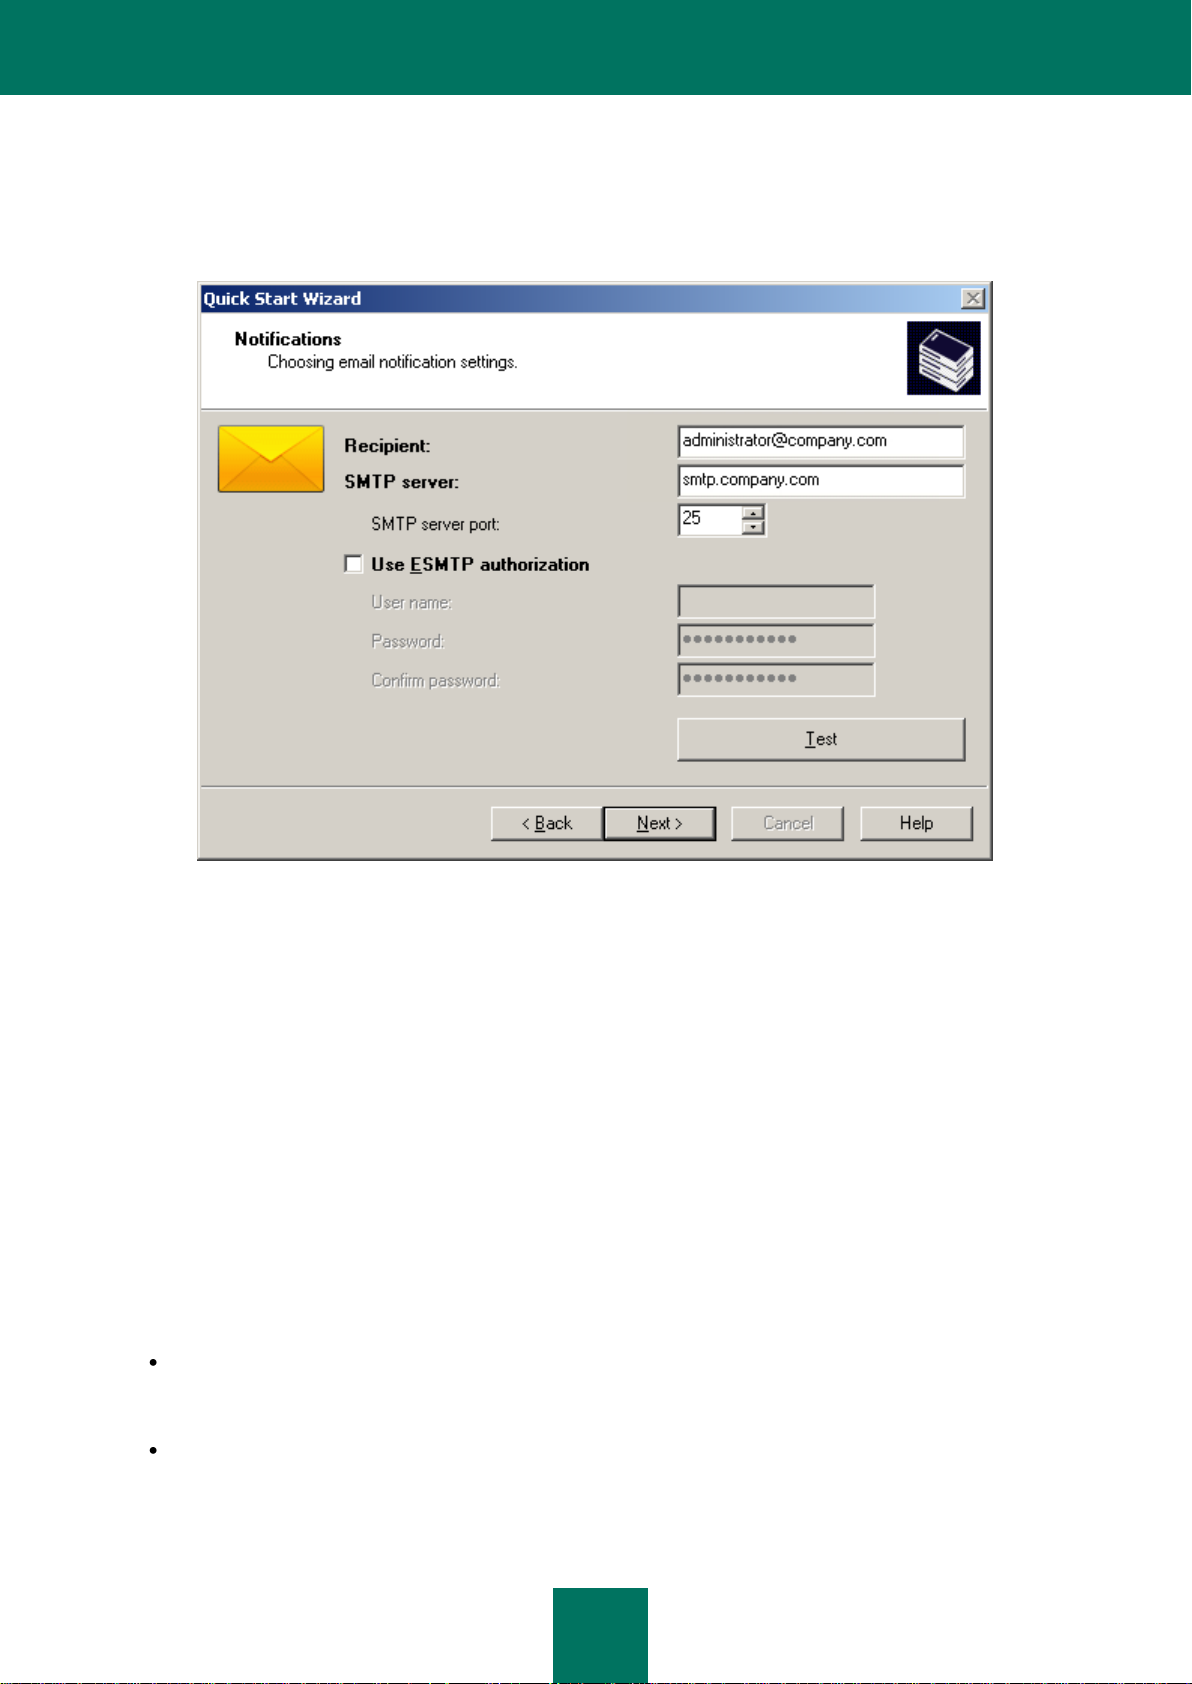
STEP 3. CONFIGURING NOTIFICATION SETTINGS
During the next stage you will have to configure the settings for delivery of email notifications generated by Kaspersky
Lab applications.
Figure 5. Configuring delivery of notifications
If the SMTP server uses authorization, check the Use ESMTP authorization box and fill in the User name, Password
and Confirm password fields. These settings will be used as the default settings for application policies.
To check the correctness of the specified settings, press the Test button. This will open a test notification sending
window. In the event of errors, detailed error information will be displayed in it.
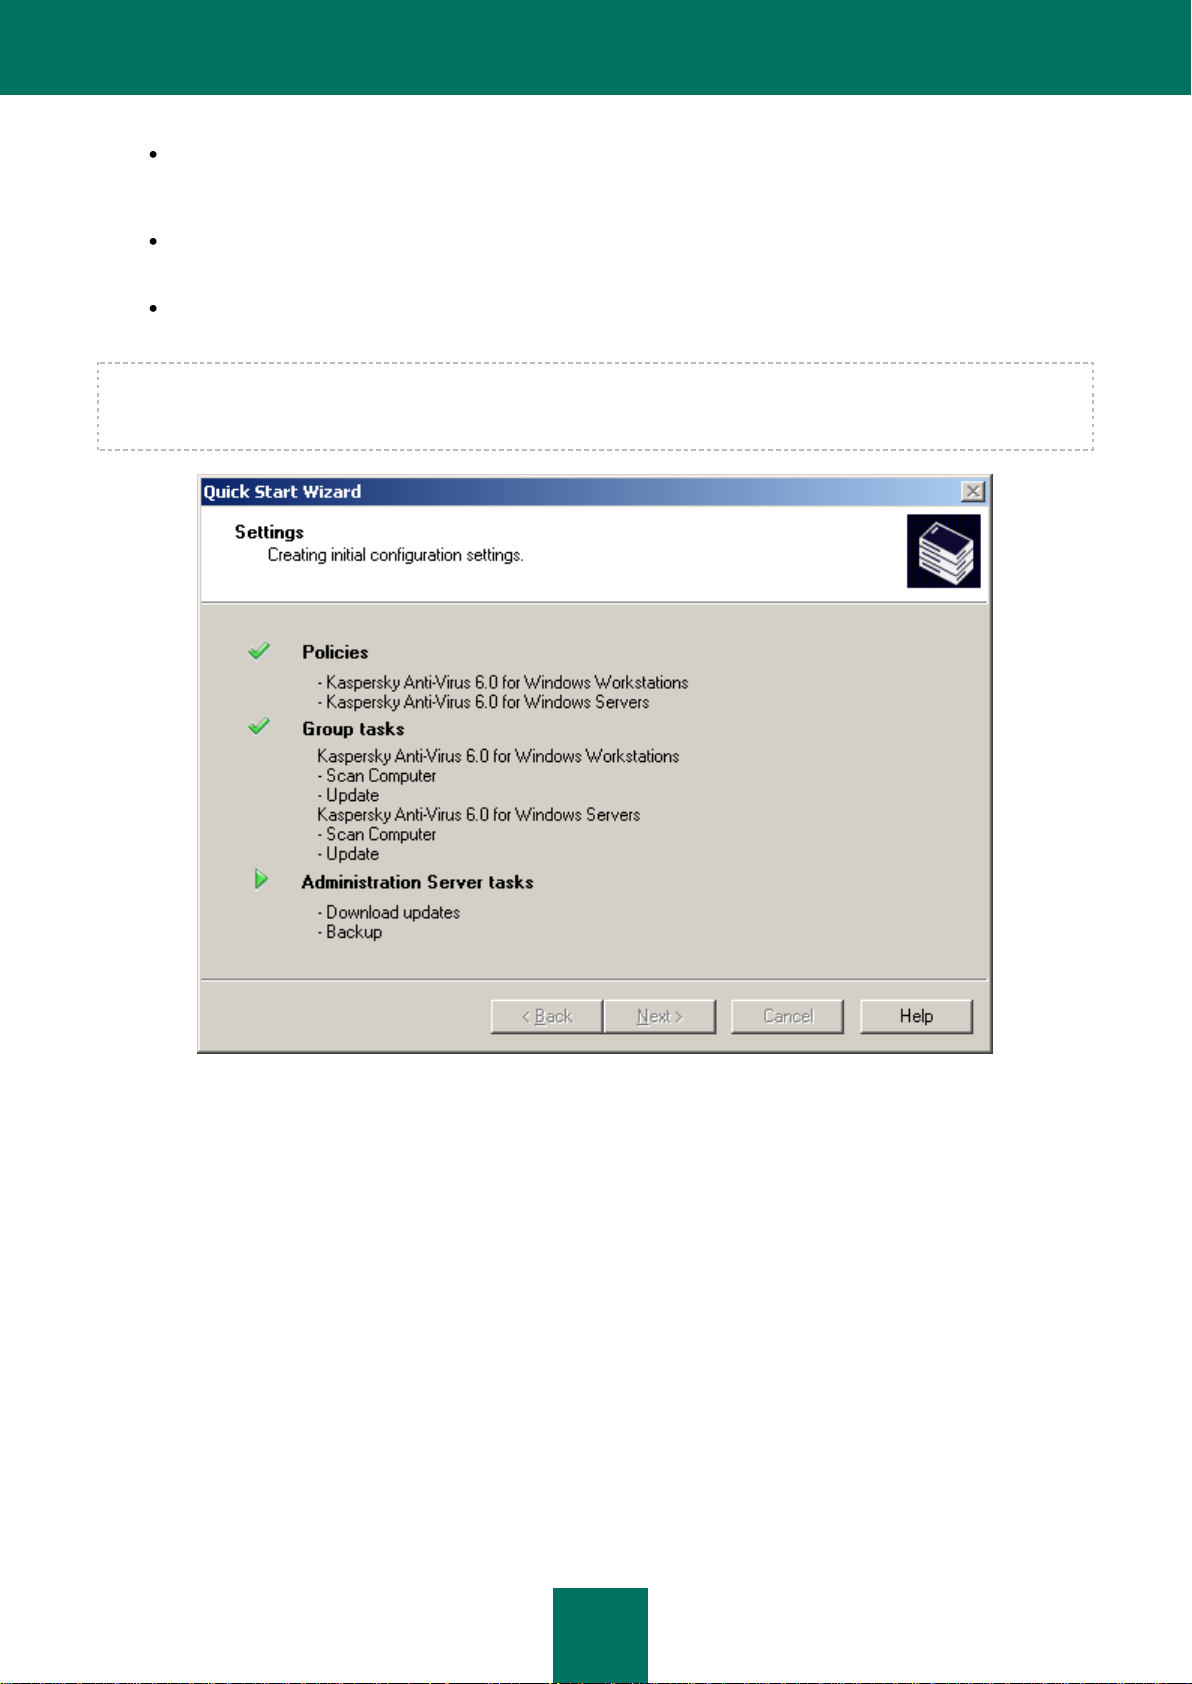
STEP 4. CONFIGURING ANTI-VIRUS PROTECTION
During this stage, you should configure the anti-virus protection system (see the figure below).
The Quick Start Wizard creates an anti-virus protection system for the client computers within administration groups,
using Kaspersky Anti-Virus 6.0 for Windows Workstations MP4. In this case, the Administration Server creates a policy
and defines a minimum set of tasks for the highest hierarchy level of Kaspersky Anti-Virus 6.0 for Windows Workstations
MP4, as well as downloading updates and data backup.
The objects created by the Wizard are displayed in the console tree:
the policies for Kaspersky Anti-Virus for Windows Workstations and Kaspersky Anti-Virus 6.0 for Windows
Servers MP4 – in the Policies folder of the Managed computers group under the names Protection policy -
Windows Workstations and Protection policy - Windows Servers, and with the default settings;
the tasks for updating the anti-virus database for Kaspersky Anti-Virus for Windows Workstations and
Kaspersky Anti-Virus 6.0 for Windows Servers MP4 – in the Group tasks folder of the Managed computers
group under the names Update – Windows Servers and Update – Windows Workstations, and with the
default settings;
Page 18
R E F E R E N C E G U I D E
18
on-demand scanning tasks for Kaspersky Anti-Virus for Windows Workstations and Kaspersky Anti-Virus 6.0 for
Windows Servers MP4 – in the Group tasks folder of the Managed computers group under the names Virus
Scan – Windows Workstations and Virus Scan – Windows Servers, and with the default settings;
downloading updates to the repository – in the Kaspersky Administration Kit tasks folder under the name
Download updates to repository, and with the default settings;
the Administration Server data backup task – in the Kaspersky Administration Kit tasks folder under the
name Administration Server data backup, and with the default settings.
A policy for Kaspersky Anti-Virus 6.0 for Windows Workstations MP4 is not created if a policy for that application already
exists in the Managed computers folder. If group tasks for the Managed computers group and the Download updates
to repository with these names already exist, they are not created either.
The wizard window displays the process of creating the tasks and the policies. If errors occur, an error message will be
displayed on the screen.
Figure 6. Configuring anti-virus protection
Page 19

Q U I C K S T A R T W I Z A R D
19
STEP 5. DOWNLOADING UPDATES
During this step the wizard downloads updates to the repository by the Administration Server: the task defines the list of
files for download and downloads them (see the figure below).
Figure 7. Configuring retrieval of updates
You don't need to wait for completion of the updates retrieval task. The downloading of updates will continue using the
Download updates to the repository task (see section "Determining the updates list" on page 245).
Page 20
R E F E R E N C E G U I D E
20
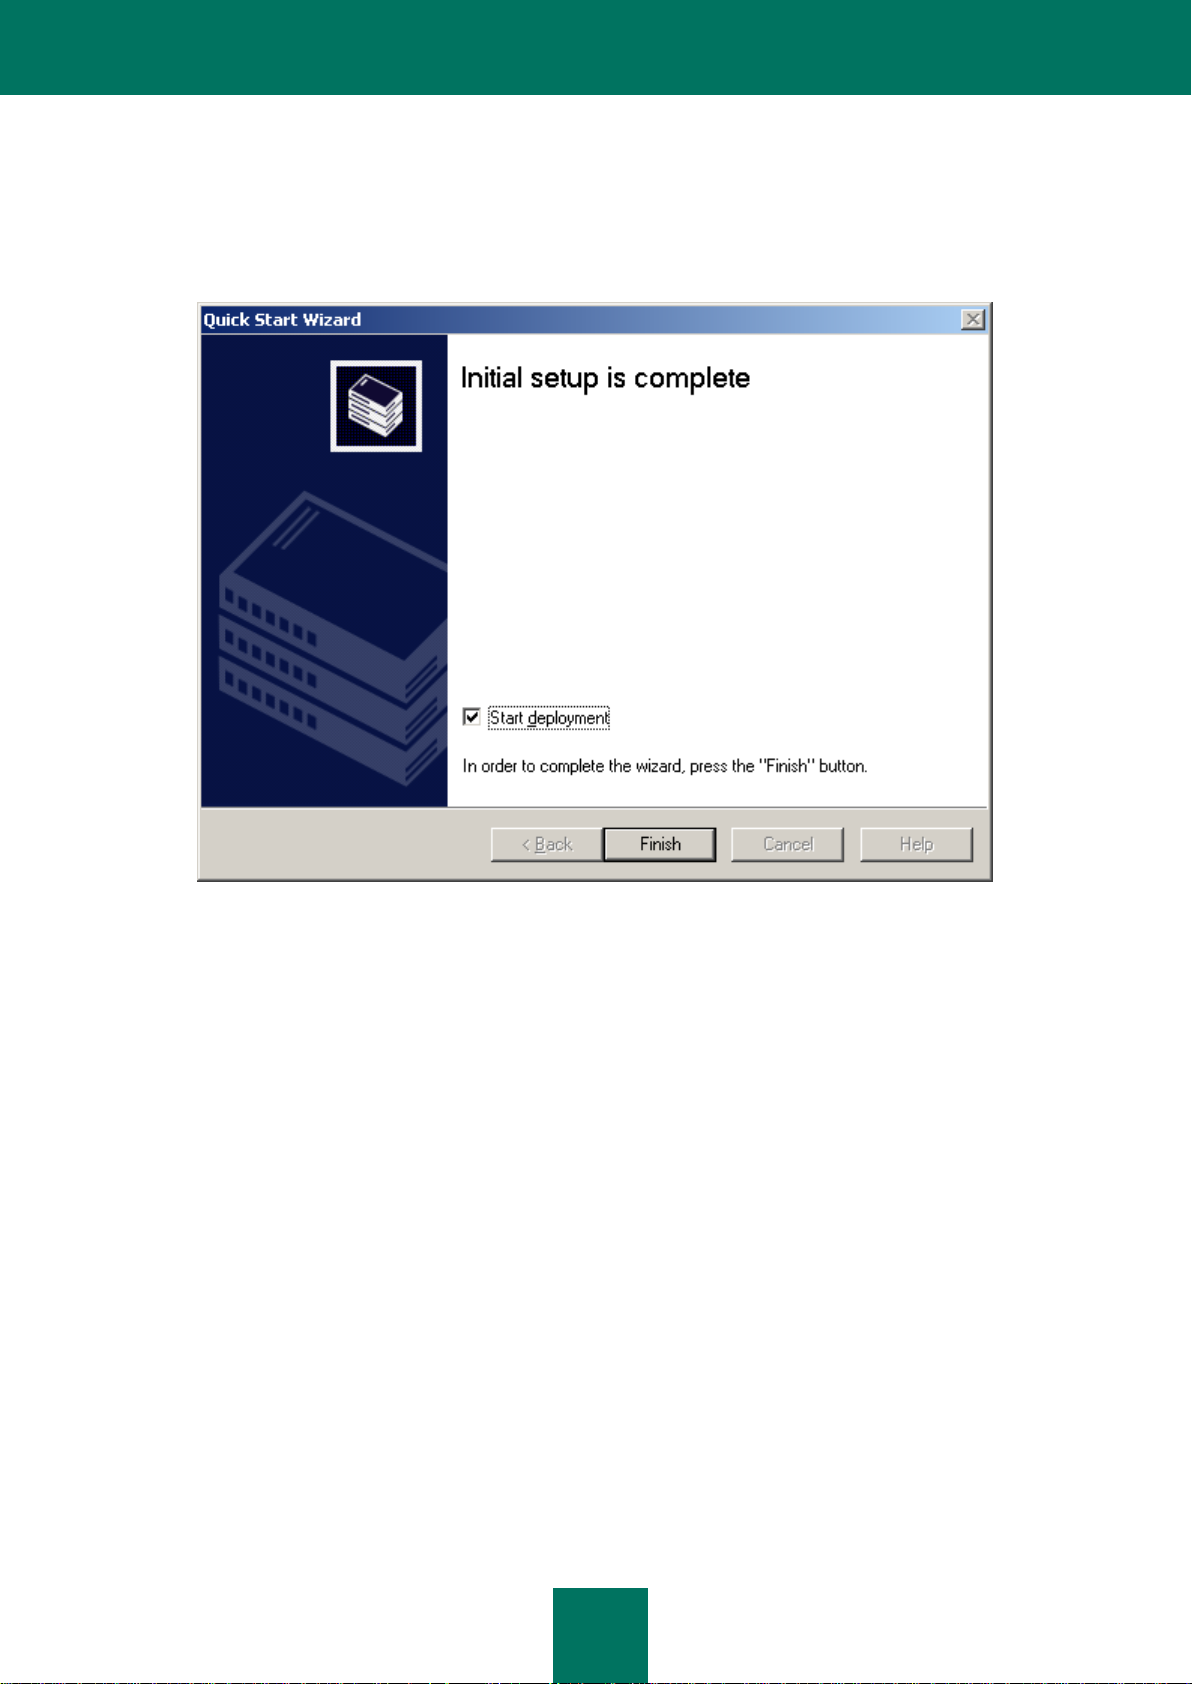
STEP 6. COMPLETING THE WIZARD
When the Quick Start Wizard completes, you will be invited to start the deployment of anti-virus protection. You can use
this wizard to install the Network Agent. If you do not wish to install applications immediately after the Quick Start Wizard
completion, uncheck the Start deployment box (see the figure below).
Figure 8. Completing the Quick Start Wizard
A detailed description of how to work with the Remote Install Wizard is provided in the Implementation Guide.
Page 21

21
MANAGING ADMINISTRATION SERVERS
IN THIS SECTION
Connection to the Administration Server ......................................................................................................................... 21
The utility for selecting the Administration Server service account (klsrvswch) ............................................................... 23
Disconnecting from Server .............................................................................................................................................. 24
Switching between Servers ............................................................................................................................................. 25
Adding a Server to the console tree ................................................................................................................................ 25
Granting rights to use a Server ....................................................................................................................................... 26
Removing a Server from the console tree ....................................................................................................................... 27
Viewing and changing Administration Server settings ................................................................ ..................................... 28
Slave Administration Servers .......................................................................................................................................... 51
Connecting to the Administration Server via Internet ...................................................................................................... 55
The Administration Server is a computer on which the Administration Server component is installed. A corporate
network can include several such Servers. The following operations are supported for the Administration Servers:
connection / disconnection;
adding / removal from the console tree;
switching between the Administration Servers;
building an Administration Servers hierarchy;
creation and configuration of tasks for delivery of reports, updating and backup copying.
CONNECTION TO THE ADMINISTRATION SERVER
To connect to an Administration Server,
select the node corresponding to the required Administration Server in the console tree.
After this, the Administration Console tries to connect to the Administration Server. If there are several Administration
Servers on your network, the Console will connect to the server it last connected to during the previous Kaspersky
Administration Kit session. When the application is launched for the first time after installation, it is assumed that the
Administration Server and Administration Console are running on the same computer. Therefore, the Administration
Console will try to detect the Administration Server on this computer.
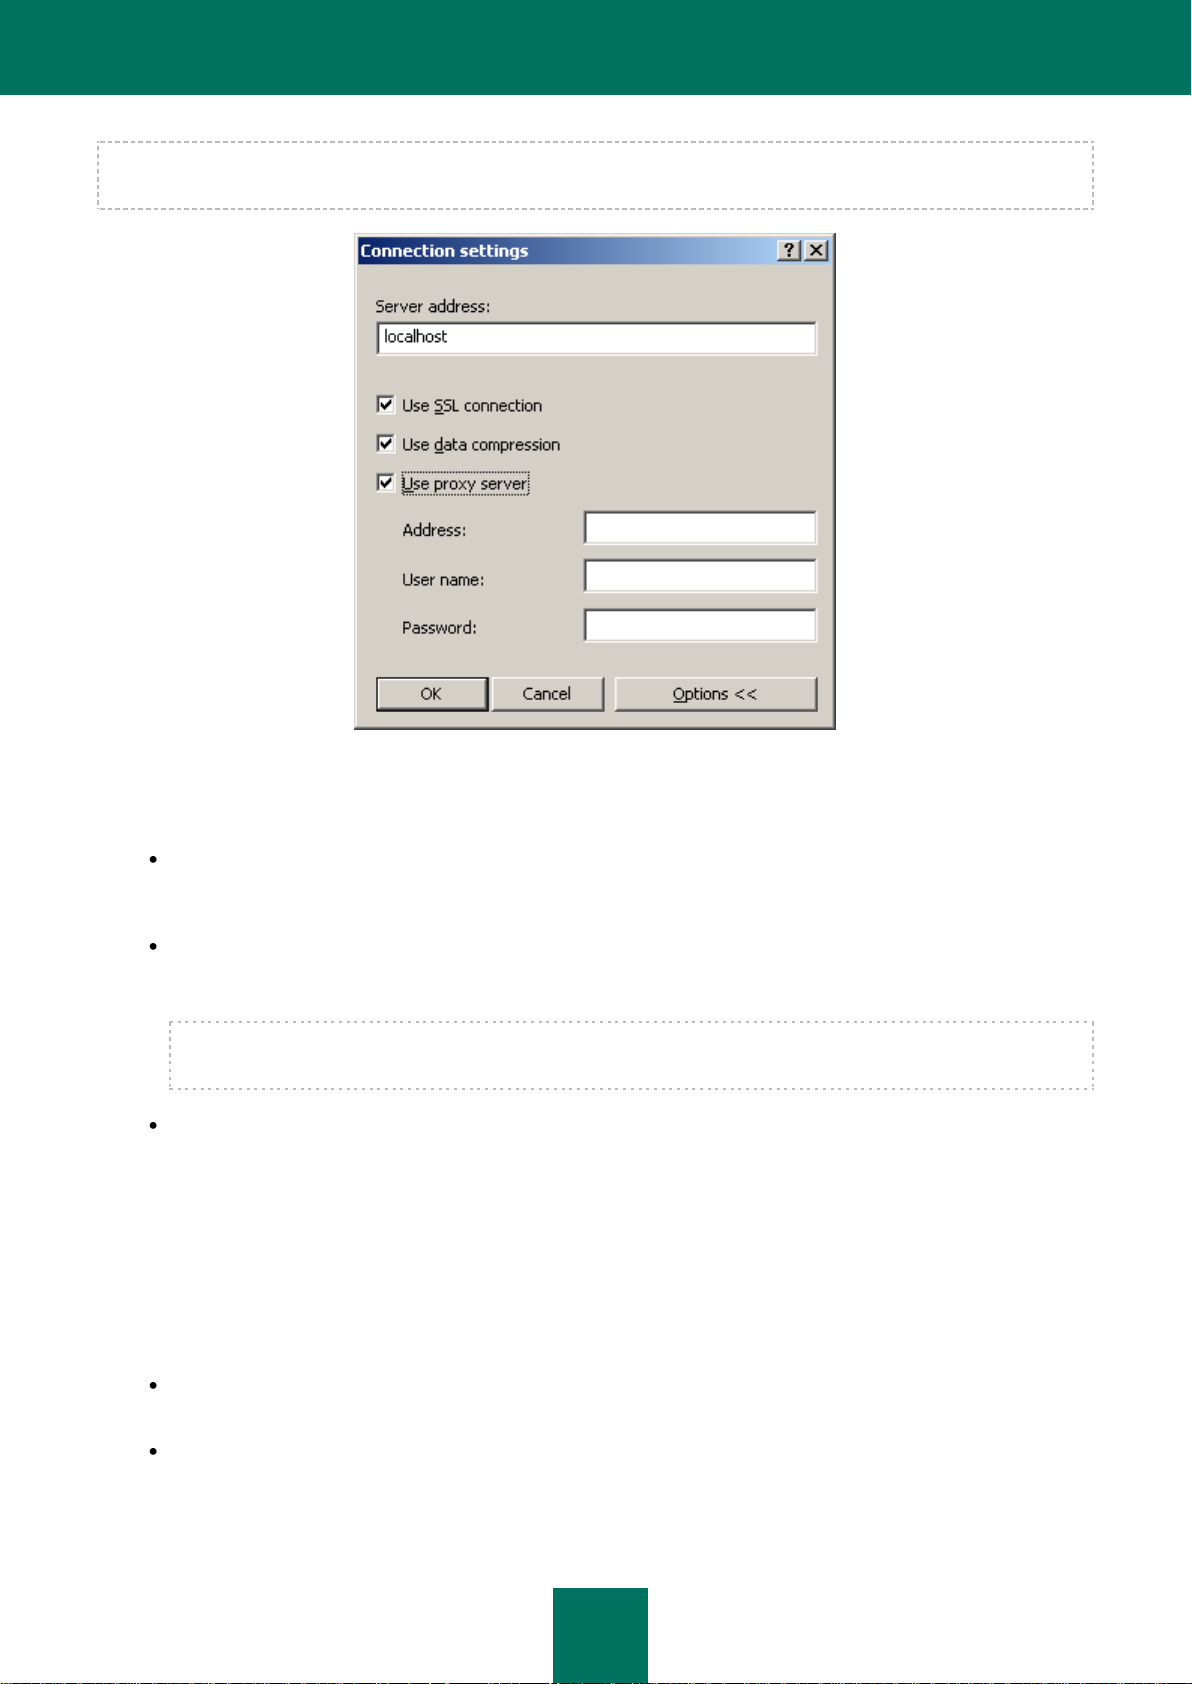
If the Server is not found, you will be asked to specify the Server address manually in the Connection settings dialog
box (see the figure below). Enter the required Server address in the Server address field. You can enter either the IP
address or the computer name in the Windows network.
Page 22
R E F E R E N C E G U I D E
22
To connect to the Administration Server through a port that differs from the default one, enter <Server name>:<Port> in
the Server address field.
Figure 9. Connecting to the Administration Server
Press the Advanced button to show or hide the following advanced connection settings:
Use SSL connection. Check this box to transmit data between the Administration Server and Administration
Console via the Secure Sockets Layer protocol (SSL). Uncheck this box if you do not want to communicate via
SSL. However, this will lower the security of data transmissions against modification or interceptions.
Use data compression. Check this box to increase the rate of data transfer between the Administration
Console and the Server, by decreasing the amount of information being transferred and hence lowering the load
on the Administration Server.
Enabling this setting will increase the load on the central processor of the computer which is hosting the
Administration Console.
Use proxy server. Check this box if you want to connect to the Administration Server via a proxy server (see
the figure above). Enter the address for connecting to the proxy server in the Address field. Fill in the User
name and Password fields if user authorization is required to access this proxy server.
When the connection settings have been confirmed, the Administration Console verifies the user's rights to connect to
the Administration Server. If the secure connection is SSL-enabled, the Administration Console authenticates the
Administration Server before verifying user rights.
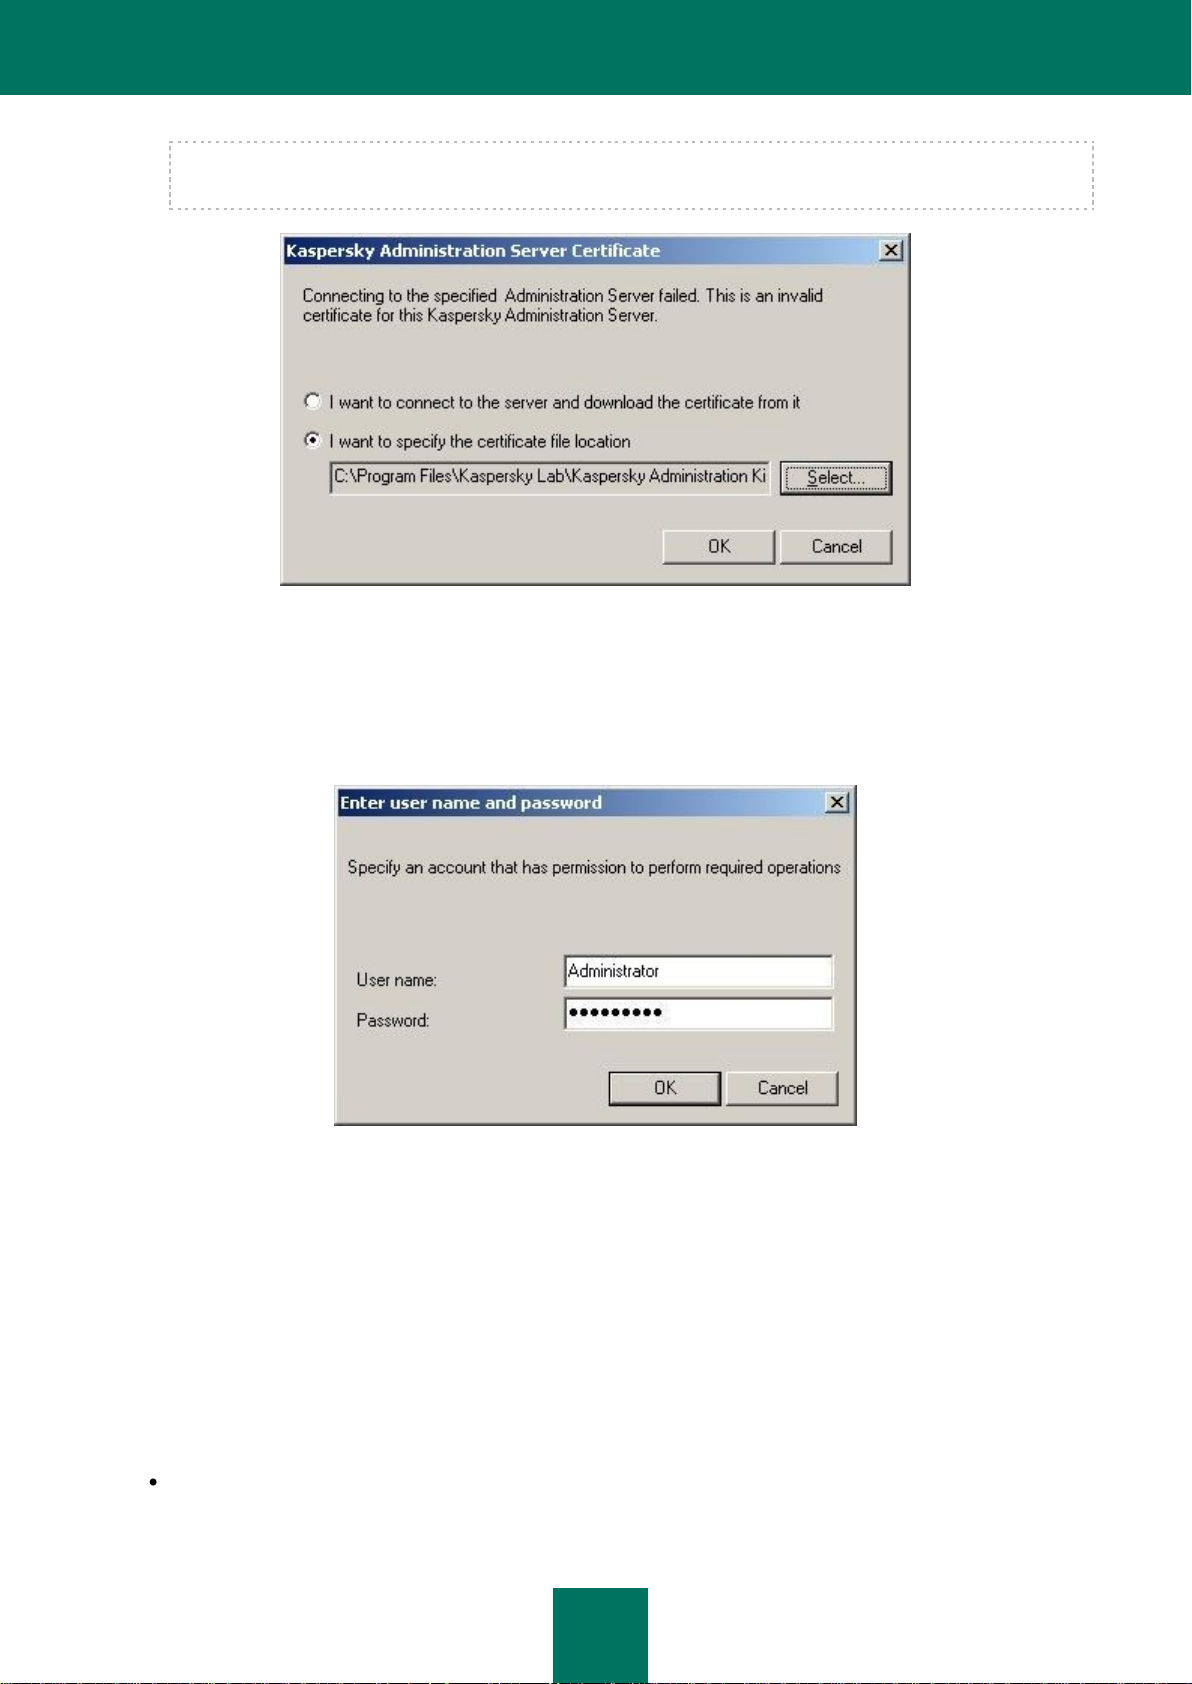
When you connect to the server for the first time, and also if the server certificate for this session differs from your local
copy, a request to connect to the server and receive a new certificate will be displayed (see the figure below). Select one
of the following:
I want to connect to the server and download the certificate from it – to connect to the Administration
Server and receive a new certificate.
I want to specify the certificate file location – specify the Server certificate manually. In this case, select the
certificate file using the Select button. The certificate file has the extension .cer, and is located in the Cert
subfolder of the Kaspersky Administration Kit program folder specified during application installation. The
Console will attempt to re-authenticate the server using the certificate you specified.
Page 23
M A N A G I N G A D M I N I S T R A T I O N S E R V E R S
23
You can copy the certificate file to a shared folder or a floppy disk. A copy of this file can be used to configure
access settings for the Server.
Figure 10. Request to connect to the Administration Server
User rights are verified using the Windows user authentication procedure. If the user is not authorized to access the
Administration Server, i.e. he/she is not an operator (KLOperators) or administrator of Kaspersky Administration Kit
(KLAdmins), he/she will be asked to register to access the Administration Server (see the figure below). In the
corresponding form, specify a user account (name and password) which has Kaspersky Administration Kit operator or
administrator rights.
Figure 11. Registering a user to access the Administration Server
If the connection to the Administration Server has been established successfully, the structure of this Server's folders and
its settings appear in the console tree.
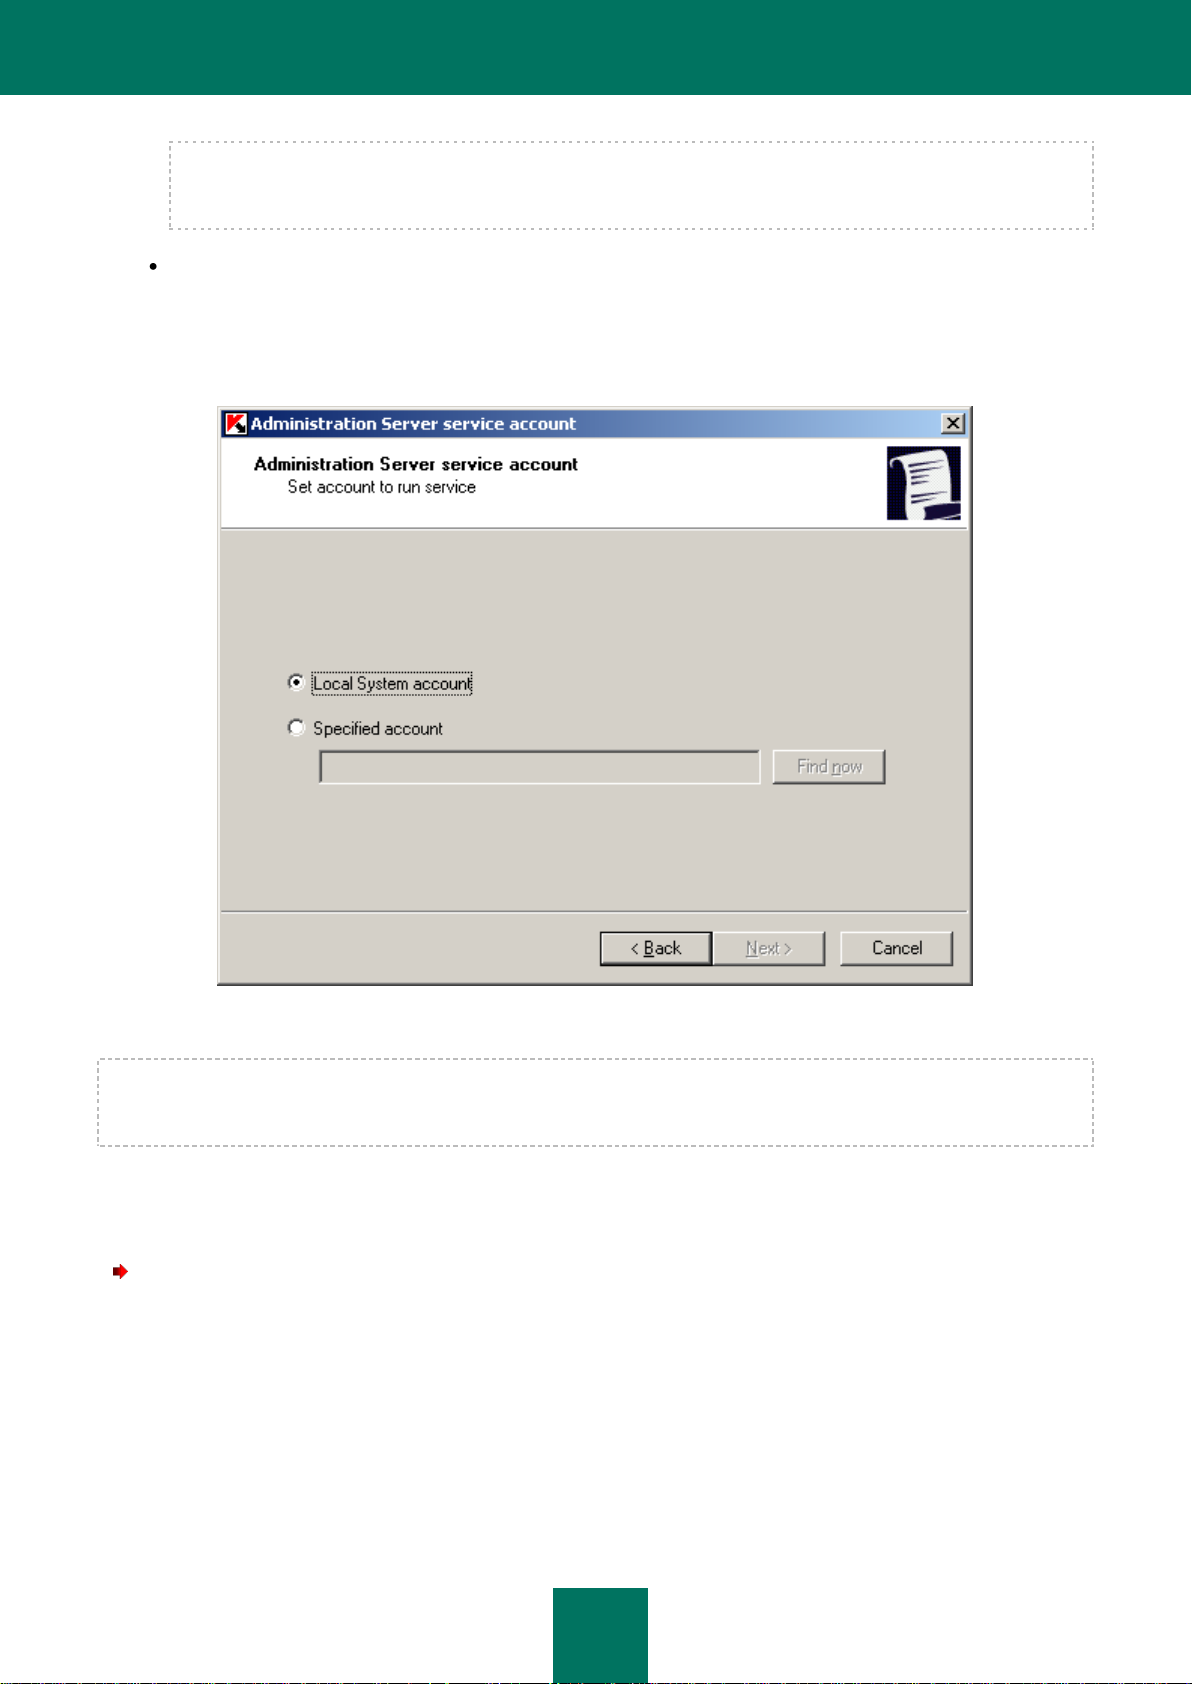
THE UTILITY FOR SELECTING THE ADMINISTRATION SERVER SERVICE ACCOUNT (KLSRVSWCH)
You can use this utility to specify an account for launching the Administration Server service on this computer (see the
figure below). Launch the utility and select one of the two following options:
Local System account – the Administration Server will start using the Local System account and its
credentials.
Page 24
R E F E R E N C E G U I D E
24
Correct operation of Kaspersky Administration Kit requires that the account used to start the Administration
Server should have the administrator's rights on the resource where the Administration Server database is
hosted.
Specified account – the Administration Server will start using the account included in a domain. In this case
the Administration Server will initiate all operations using the credentials of that account. Use the Find now
button to select the user whose account will be used and enter the password.
If the domain user account is selected as an account for launching the Administration Server, you will be asked
to define this user and specify the password for his/her account.
Figure 12. Selecting account
When using the SQL-server in the Windows authentication mode, the user account should be provided with an access to
the database. The user account should be the owner of the Kaspersky Anti-Virus database. By default, the dbo scheme
must be used.
DISCONNECTING FROM SERVER
To disconnect from an Administration Server:
1. In the console tree, select the node corresponding to the Administration Server that should be disconnected.
2. Open the context menu.
3. Select the Disconnect from Administration Server command.
Page 25
M A N A G I N G A D M I N I S T R A T I O N S E R V E R S
25
SWITCHING BETWEEN SERVERS
If several Administration Servers have been added to the console tree, you can switch between those servers while
working with them.
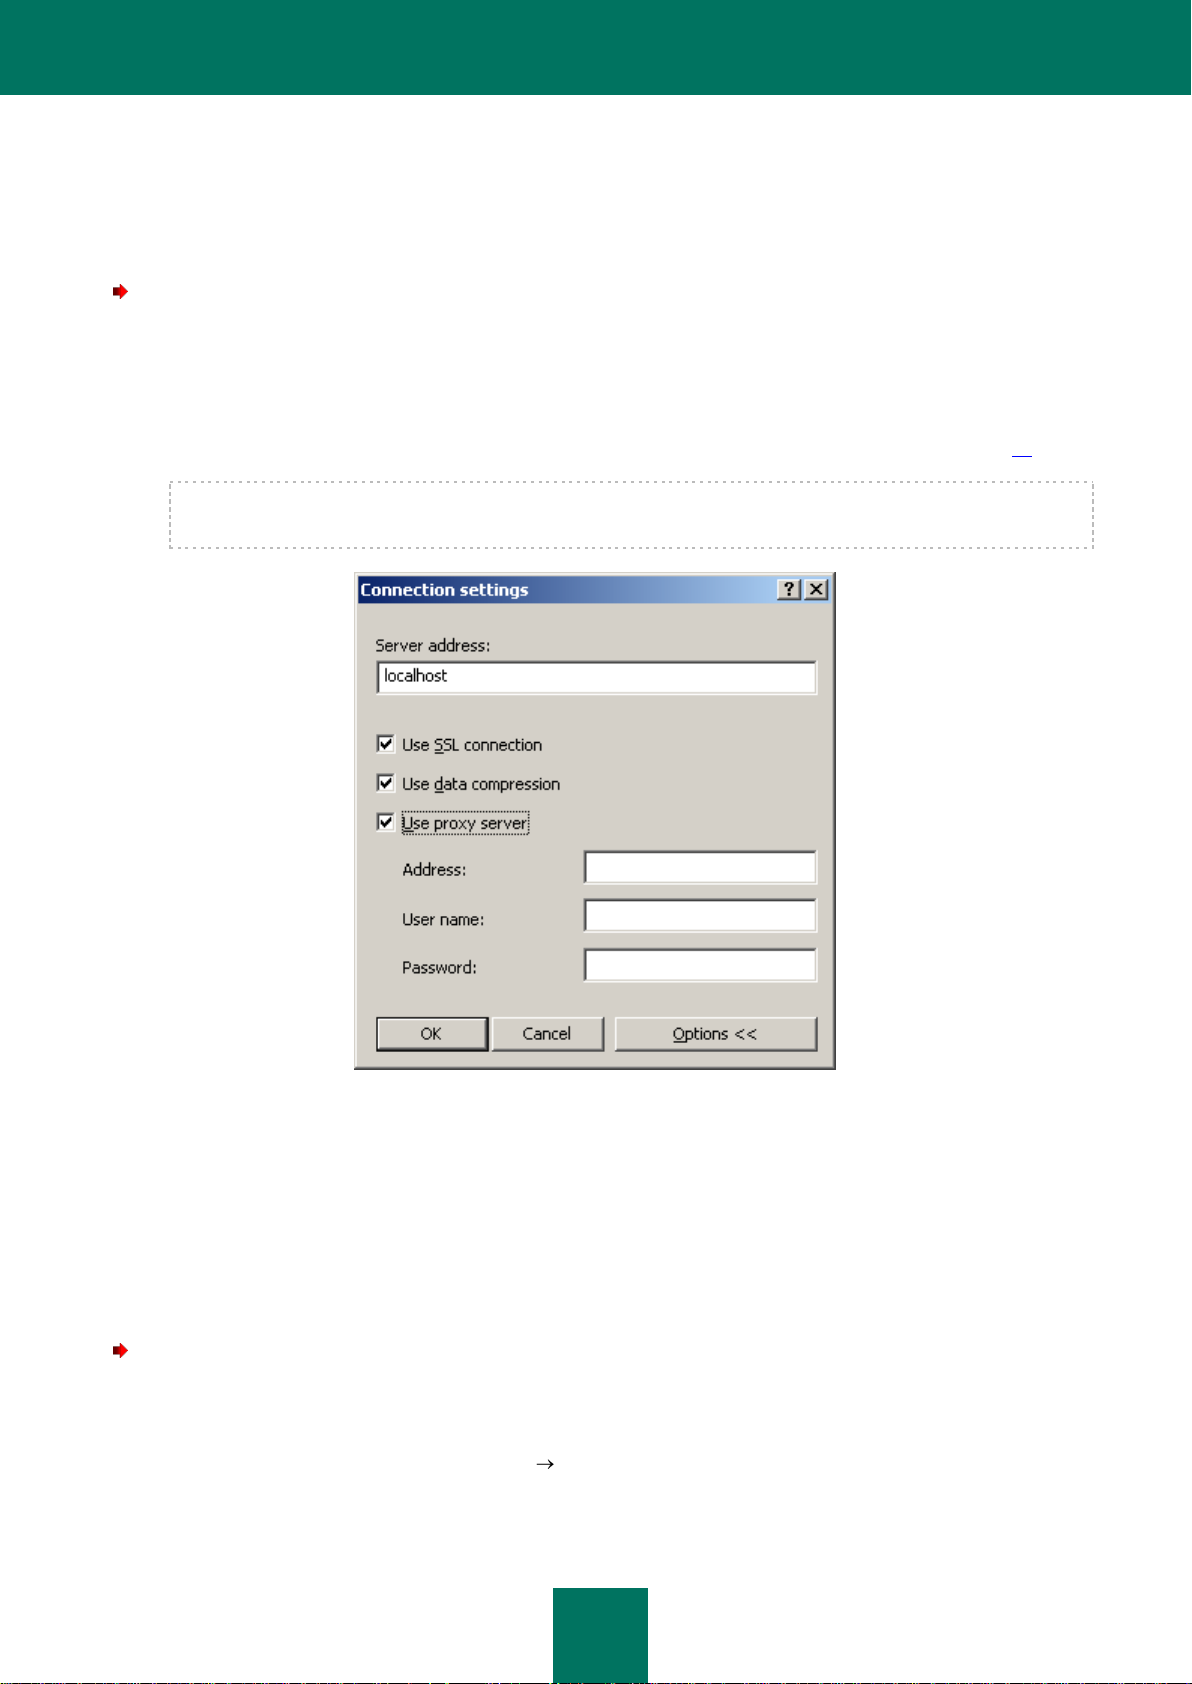
To switch to another Administration Server:
1. Select in the console tree the node under the necessary Server name.
2. Open the context menu and select the Connect to Administration Server command.
In the Connection settings window that opens, enter the name of the Server, which you intend to manage, and
specify the necessary settings for connection to the server (see section "Connecting to Server" on page 21).
If you have no Kaspersky Administration Kit operator or administrator rights, access to the Administration Server
will be denied.
Figure 13. Connecting to the Administration Server
3. Press the OK button to complete switching between the Servers.
If the connection to the Server has been established successfully, the contents of the corresponding node will be
updated.
ADDING A SERVER TO THE CONSOLE TREE
To add a new Administration Server to the console tree:
1. Select the Kaspersky Administration Kit node in the console tree within the main program window of
Kaspersky Administration Kit.
2. Open the context menu and select the New Administration Server command.
Page 26
R E F E R E N C E G U I D E
26
This will create a new node with the name Kaspersky Administration Server - <Computer name> (Not
connected) in the console tree. Use this node to connect to any other Administration Server installed on the
network.
GRANTING RIGHTS TO USE A SERVER
To grant rights to work with an Administration Server:
1. In the main Kaspersky Administration Kit application window select the node corresponding to the required
Administration Server in the console tree, open its context menu and select the Properties command.
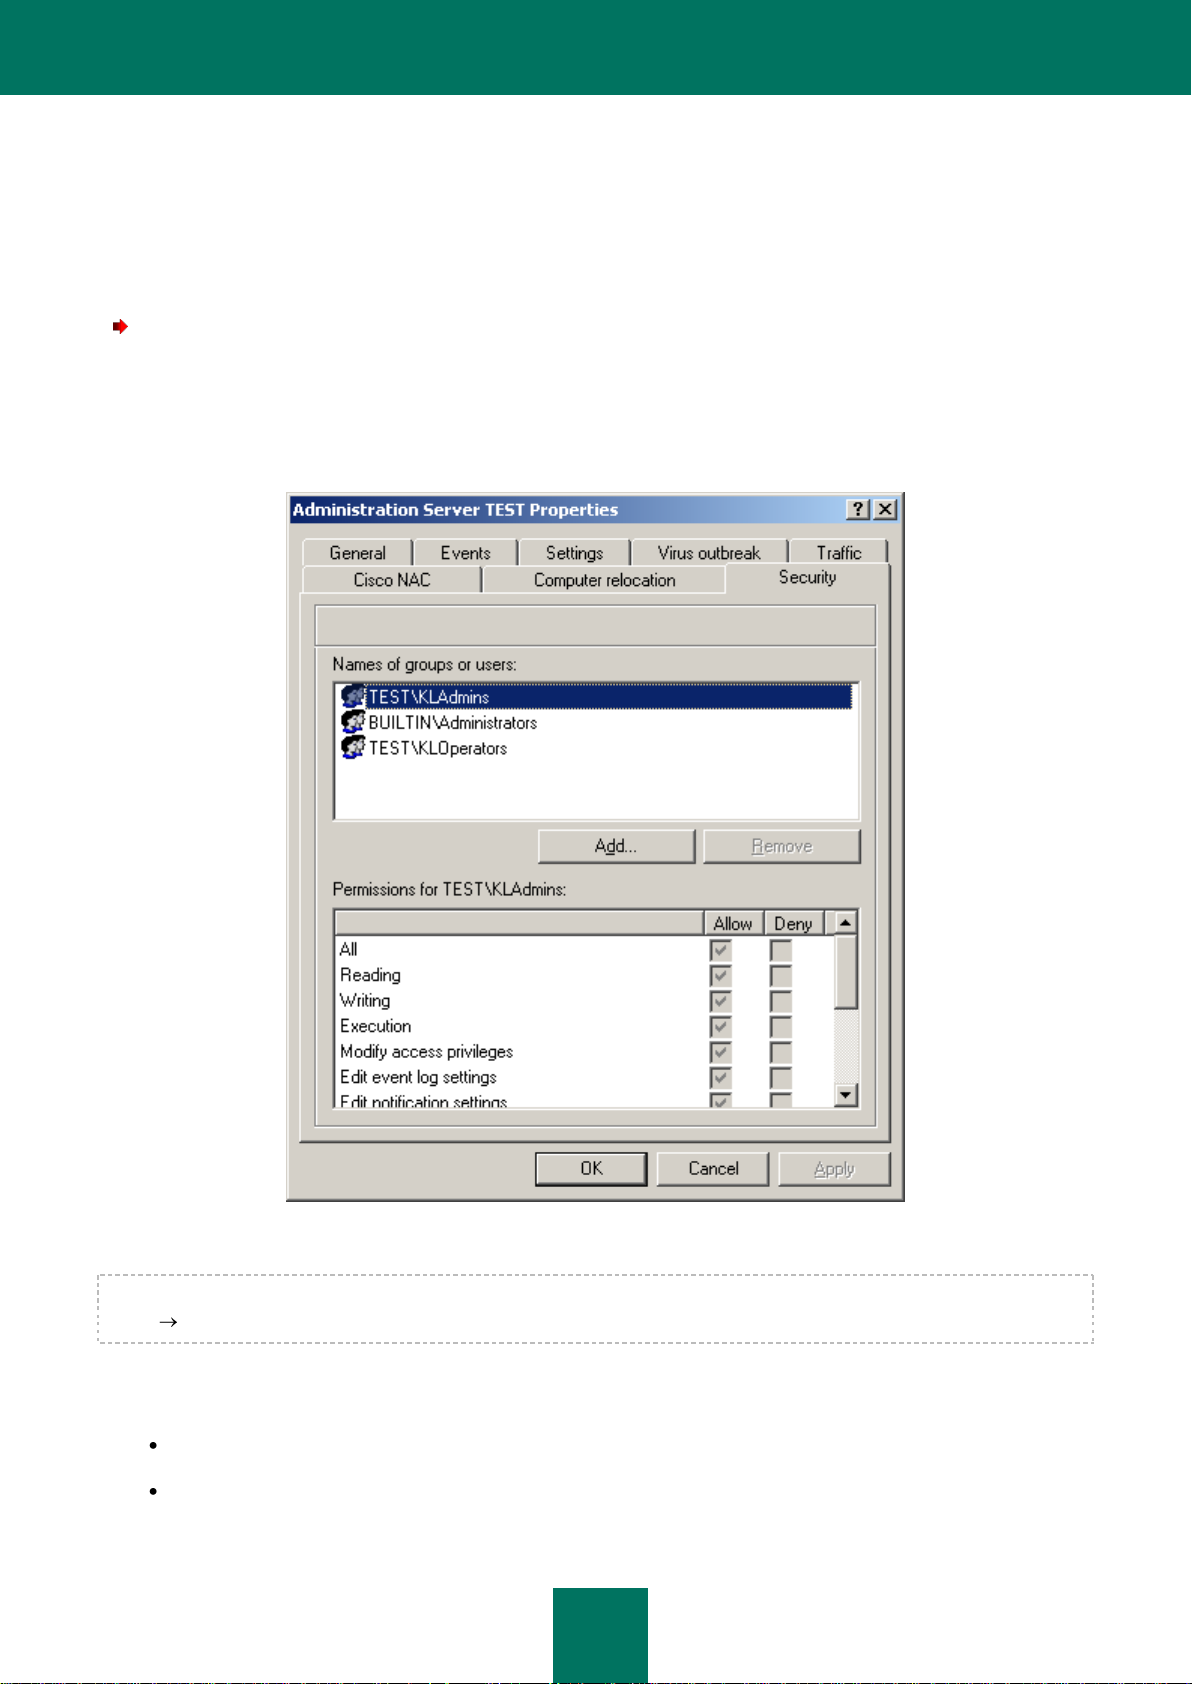
2. In the Administration Server <Computer name> properties window that opens (see the figure below), switch
to the Security tab.
Whether this tab is shown or hidden is determined by the user interface settings. To display the tab, navigate to the
View Configuring interface menu and check the box in the Display security settings tabs string.
The upper part of the tab displays a list of users and user groups that have access to the Administration Server. The
lower part contains the list of possible permissions:
All – includes all permissions (see below).
Reading – viewing Kaspersky Administration Kit objects' properties without a permission to perform operations,
create new objects or modify the existing ones.
Figure 14. Granting rights to access the Administration Server
Page 27
M A N A G I N G A D M I N I S T R A T I O N S E R V E R S
27
Writing – changing Kaspersky Administration Kit object properties, as well as creating new objects without a
right to perform operations upon objects.
Running – performing operations on Kaspersky Administration Kit objects without a right to create new objects
or modify the existing ones.
Modify access privileges – granting to users, and groups of users, access rights to the functionality of
Kaspersky Administration Kit.
Edit event log settings.
Edit notification settings.
Remote install of Kaspersky Lab applications.
Remote install of external applications – preparation of installation packages and remote install of third-party
applications and Kaspersky Lab applications to the client computers.
Edit Administration Server hierarchy settings.
Save network lists content – copy files from backup, quarantine and unprocessed files from client computers
to a computer where the Administration Console is installed.
Create tunnels – creating a tunneling connection between the computer where the Administration Console is
installed and a client computer.
To connect to the Administration Server, the user should have Read permissions.
To assign the rights for working with Server, perform the following actions:
1. Select a group of users.
2. In the Allow column check the boxes next to the permissions provided to members of that group. If you check
the All box, all the boxes in the column will automatically be checked.
3. In the Deny column check the boxes next to the permissions that must not be provided to members of that
group. If you check the All box, all the boxes in the column will automatically be checked.
You can add a new group or a new user, using the Add button. You can only add groups of users and users that are
registered on the computer with the Administration Console installed.
To remove a group or a user, select an object from the list and click the Remove button.
The group of Kaspersky Administration Kit administrators (KLAdmins) cannot be removed.
Click the Apply or OK button to apply the settings.
REMOVING A SERVER FROM THE CONSOLE TREE
To remove an Administration Server from the console tree:
1. Select the node corresponding to the required Administration Server in the console tree.
2. Open the context menu.
3. Select the Delete command.
Page 28

R E F E R E N C E G U I D E
28
VIEWING AND CHANGING ADMINISTRATION SERVER
SETTINGS
The links in the task pane of the Administration Server allow fast access to the following server features:
installation of anti-virus protection;
organization of administration groups;
configuration of update, protection and scanning settings;
viewing of statistics and configuration of notifications.
You can use the Administration Server properties window to view its parameters and modify them as necessary.
To open the Server properties window:
1. Select the necessary Server in the console tree.
2. Open the context menu and select the Properties option.
The window that opens contains a set of tabs, on which you can view and modify the following Administration
Server settings:
connection to the Administration Server (see section "General Administration Server settings" on page 28);
granting rights to access the Administration Server (see section "Granting rights to use a Server" on
page 26);
registration of events (see section "Event processing settings" on page 37);
relocation of computers (see section "General guidelines for relocation of computers" on page 46);
traffic limit for IP ranges and IP subnets (see section "Traffic limit rules" on page 51);
configuring the Virus outbreak event (see section "Virus outbreak event settings" on page 44);
configuring interaction with Cisco NAC (see section "Configuring Integration with Cisco Network Admission
Control (NAC)" on page 49).
GENERAL ADMINISTRATION SERVER SETTINGS
You can configure the general Administration Server settings on the General, Settings and Security tabs.
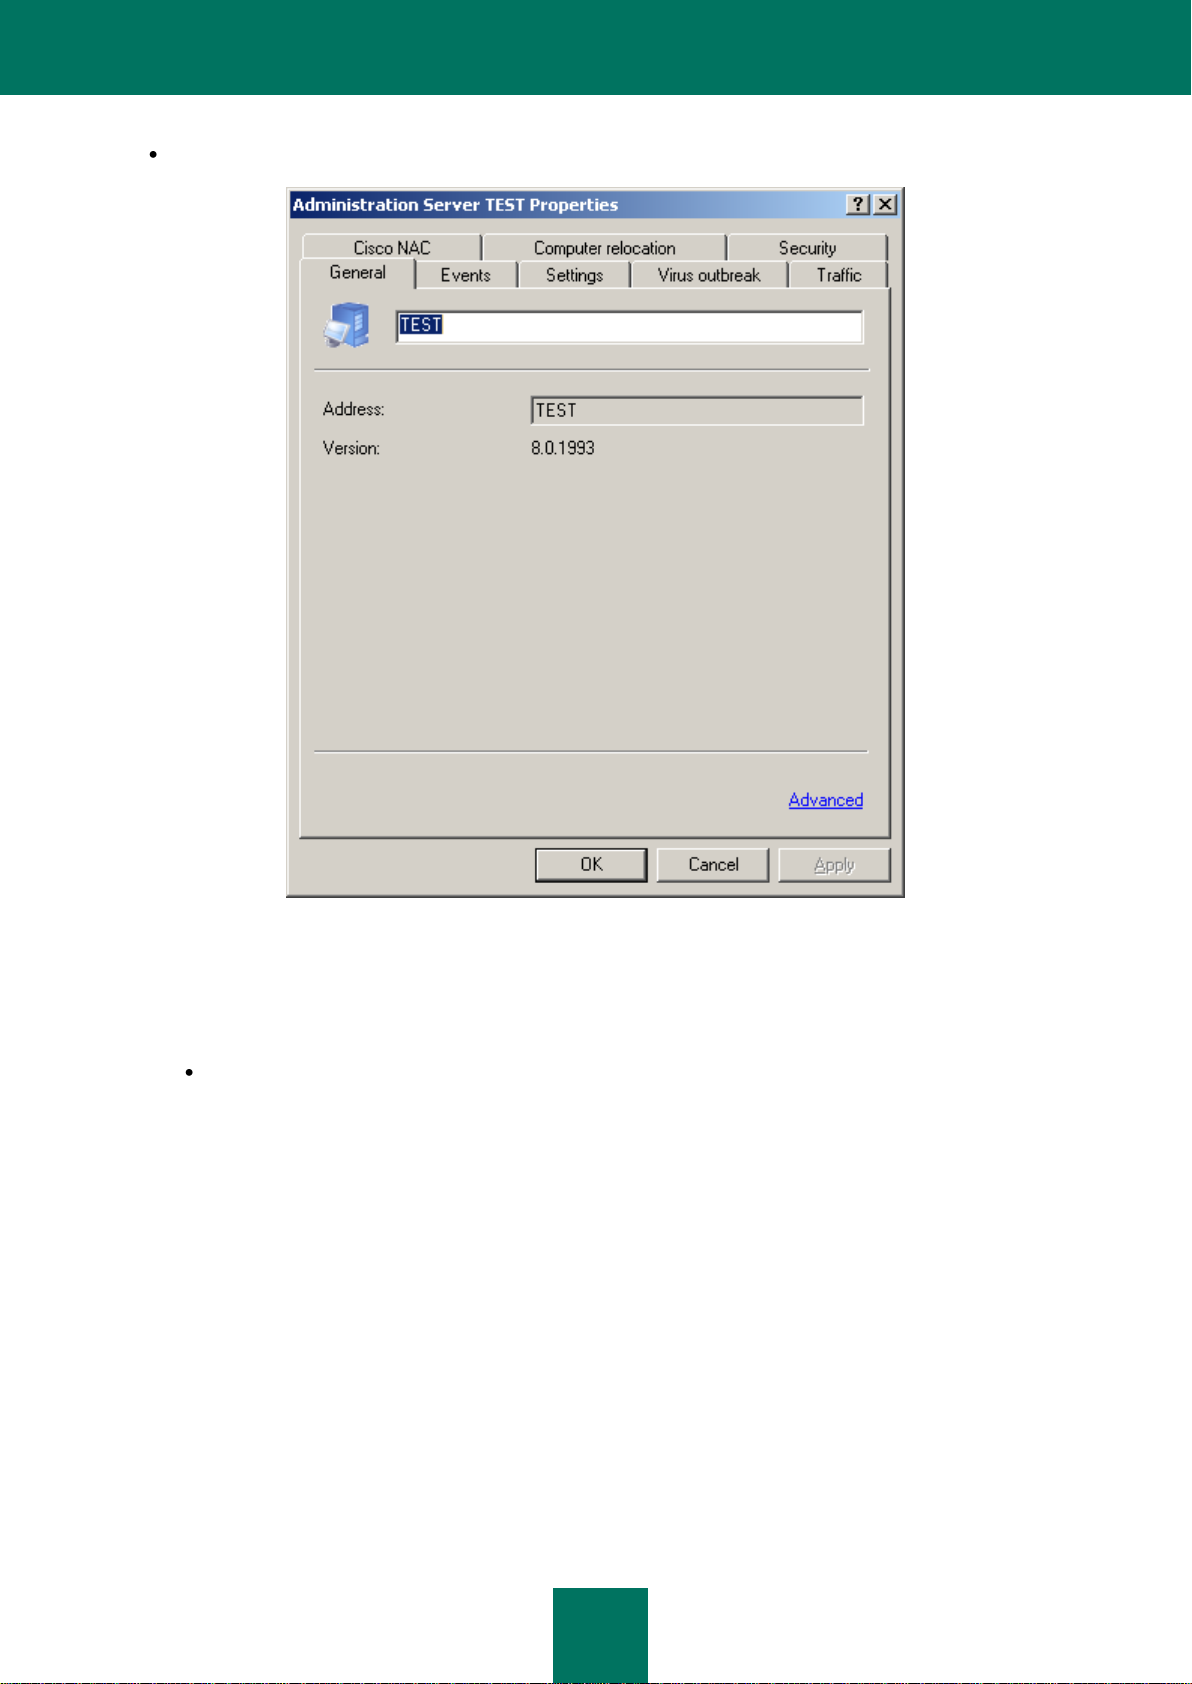
The General tab (see the figure below) contains the following information:
name of the component (Administration Server) and the computer name within the Windows network on which
this component is installed;
Page 29
M A N A G I N G A D M I N I S T R A T I O N S E R V E R S
29
version number of the installed application.
Figure 15. Viewing the Administration Server properties. The General tab
Viewing the Administration Server properties. The General tab
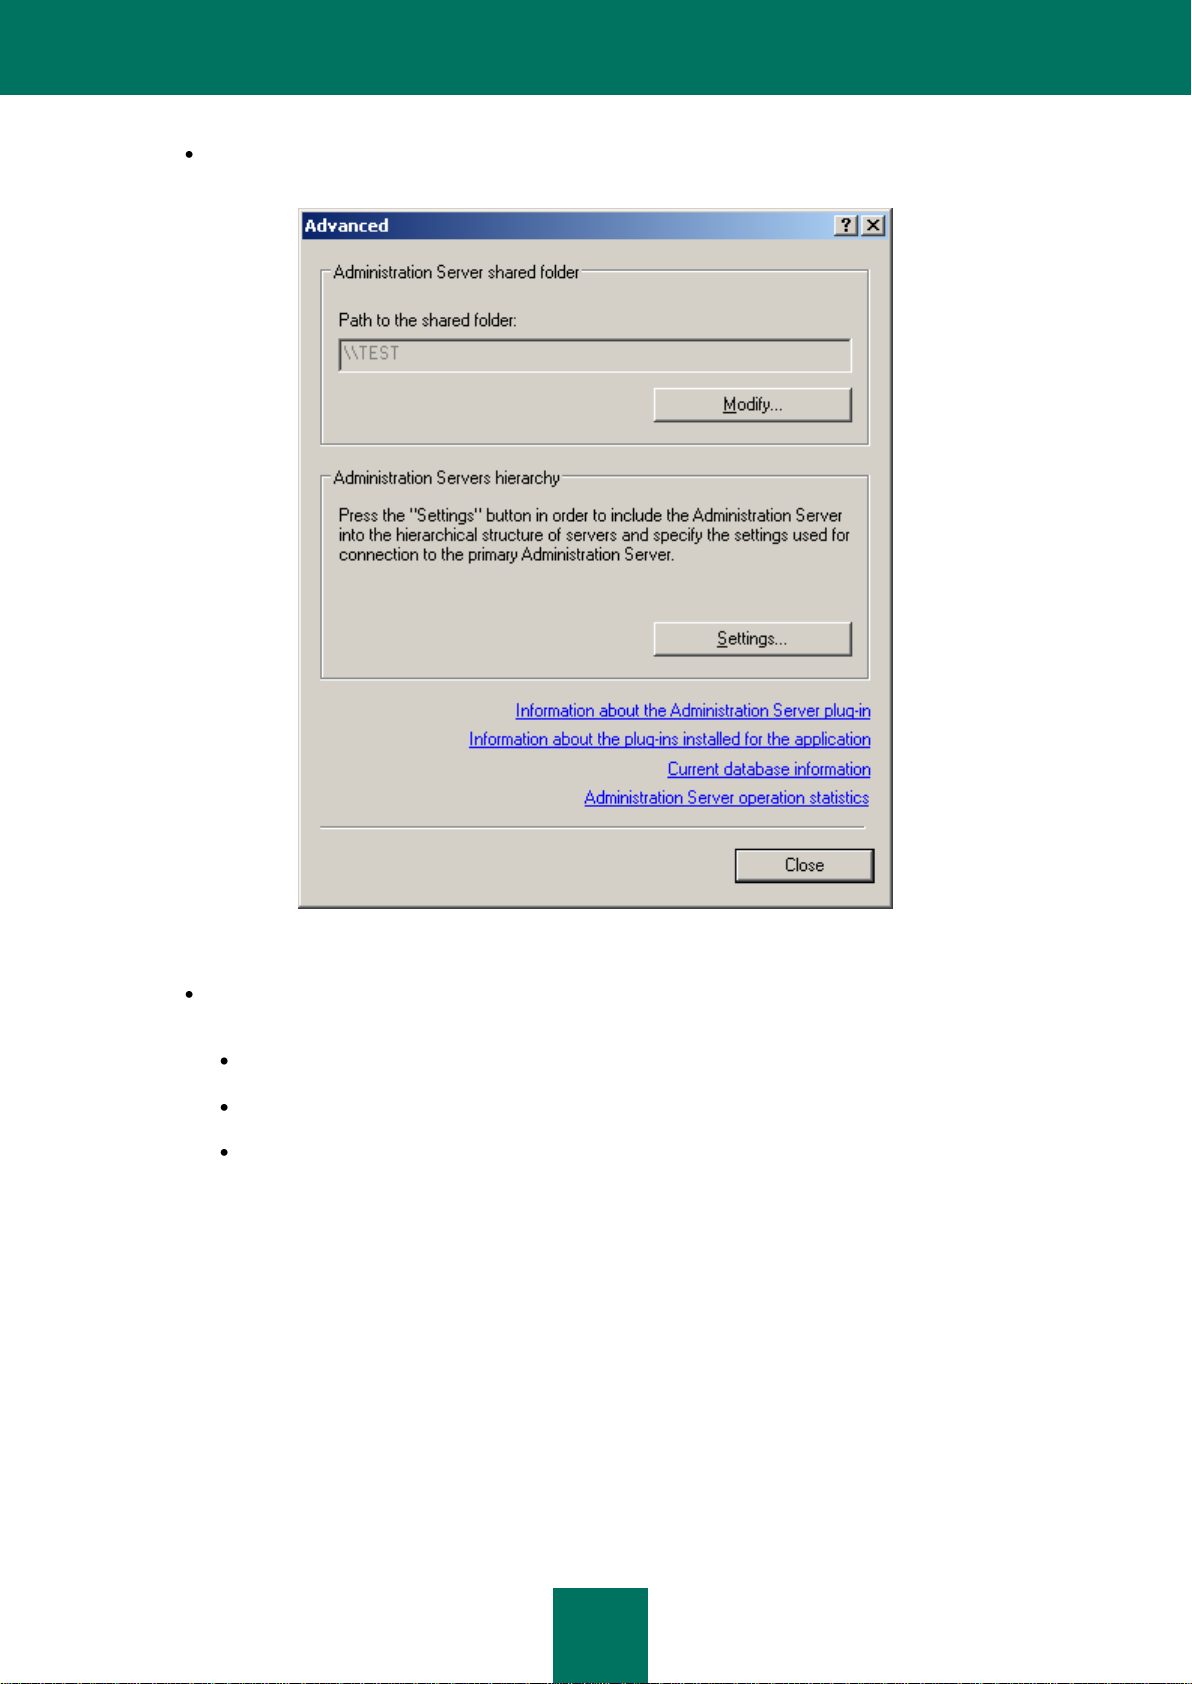
Clicking the Advanced link opens a window containing the following information (see the figure below):
Path to the shared folder used for storing application deployment files and the updates downloaded from
the update source to the Administration Server. You can edit the path to the shared folder using the Modify
button.
Page 30
R E F E R E N C E G U I D E
30
The Administration Server operation statistics hyperlink is used to open the window which displays
general statistics about the Administration Server.
Figure 16. Administration Server properties. The Advanced window
Use the Information about the Administration Server plug-in link to open the plug-in properties window
(see the figure below). This window displays the following information:
Name and full path to the plug-in file.
File version.
Information about the manufacturer (Kaspersky Lab) and copyright information.
Page 31

M A N A G I N G A D M I N I S T R A T I O N S E R V E R S
31
Date and time of the management plug-in file creation.
Figure 17. The properties of the application plug-in window
Page 32

R E F E R E N C E G U I D E
32
Using the Information about the plug-ins installed for the application link, you can open a window that
contains the list of plug-ins installed on the Administration Server (see the figure below). For each plug-in
the application name and plug-in versions are provided. In this window you can view detailed information
about the selected application management plug-in by clicking the Information button.
Figure 18. The list of application management plug-ins installed on the Administration Server
Clicking the Current database information link opens the current database properties window (see the
figure below) containing the following data:
name of the database server used;
name of the database service use occurrence;
Page 33

M A N A G I N G A D M I N I S T R A T I O N S E R V E R S
33
database name.
Figure 19. Viewing information about the database
Clicking the Settings button in the Administration Servers hierarchy section opens the Administration
Server hierarchy configuration window (see the figure below). In this window you can:
Specify whether this Administration Server is a slave server by checking This Administration Server
is a slave server in the server hierarchy box.
Specify the address and port of the master Administration Server in the Address field.
Specify or modify the path to the master Administration Server certificate using the Select button.
Set proxy server parameters to connect to the master Administration Server.
These settings cannot be modified if the current Administration Server policy does not have the option to
Allow hierarchy settings modification on slave servers checked.
Page 34

R E F E R E N C E G U I D E
34
Figure 20. Configuring the slave Administration Server's connection to the master Administration Server
The Settings tab (see the figure below) contains the Administration Server settings. The Administration Server
connection settings group of fields contains port numbers through which the following connections are established:
Connection to the Administration Server. The default port number is 14000 but if this port is in use, you can
change it.
Secure connection to the Administration Server using SSL protocol. By default, port 13000 will be used.
Connection of mobile devices to the Administration Server. The default port number is 13292. To enable this
port on the Administration Server, check the Open port for mobile devices box.
You can also use the corresponding field to specify the maximum number of events stored in the database on
the Administration Server.
In the Computer visibility timeout (min) field of the Computer visibility on the network section, you can
specify the time during which a client computer will be considered visible in the network after it was
disconnected from the Administration Server. The default interval is 60 minutes. After the specified period
expires, the Administration Server will consider the client computer inactive.
Page 35

M A N A G I N G A D M I N I S T R A T I O N S E R V E R S
35
These parameters can be redefined, if necessary.
Figure 21. Viewing the Administration Server properties. The Settings tab
Page 36

R E F E R E N C E G U I D E
36
The Security tab is used (see the figure below) to configure the rights to access the Administration Server (see section
"Granting rights to use a Server" on page 26).
Figure 22. Granting rights to access the Administration Server
Whether this tab is shown or hidden is determined by the user interface settings. To display the tab, navigate to the
View Configuring interface menu and check the box in the Display security settings tabs string.
Page 37

M A N A G I N G A D M I N I S T R A T I O N S E R V E R S
37
EVENT PROCESSING SETTINGS
The rules for handling runtime Administration Server events are displayed on the Events tab (see the figure below).
Figure 23. Viewing the Administration Server properties. The Events tab
For the Administration Server, as well as for other Kaspersky Lab applications managed via Kaspersky Administration
Kit, events can have one of the four severity levels: Critical event, Error, Warning, and Info.
According to the severity level, events are distributed in the following way:
Critical event:
The license restriction for this license has been exceeded. For example, the client computer on which the
license is installed, exceeds the restriction on the number of computers specified in it.
Virus outbreak - virus activity in administration groups exceeds the preset limit.
Connection with client computer lost ( unable to establish connection with the Network Agent installed on
the client computer).
Host status is Critical (a computer with settings matching the status Critical has been detected within the
network).
Error:
No free space on hard drive - there is no free space on the disk where the Administration Server saves
operational information.
Page 38

R E F E R E N C E G U I D E
38
The shared folder is not available - the shared folder containing updates of the anti-virus database and
application modules is unavailable.
The Administration Server information database is unavailable.
There is no space in the Administration Server information database.
An error occurred while copying updates to the specified folder.
Warning:
License restriction for the key is exceeded.
The computer has remained inactive in the network for too long.
Conflict of computer names - the uniqueness of client names within one hierarchical level is violated.
Volumes are almost full - little or no free space is left on the hard drives.
There is little free space in the Administration Server information database.
Host status is Warning (a computer with settings matching the Warning status has been detected within the
network).
Disconnected from the master Administration Server.
Disconnected from the slave Administration Server.
Incompatible application was installed.
Info.
The number of clients using the license is over 90% of the maximum number allowed in the license.
New computer is found - network polling has found a new client.
Client computer was automatically added to group - a new client has been automatically included in a group
in accordance with the Unassigned computers group settings.
This client computer has been inactive for too long and is removed from the group.
Connection to the slave Administration Server is established.
Connection to the master Administration Server is established.
Monitored application from the applications registry has been installed.
Updates are copied successfully to the specified folder.
Audit: Connection to the Administration Server.
Audit: Object modified.
Event handling rules are defined separately for each severity level.
1. Select the event importance level from the drop-down list: Critical, Error, Warning or Info.
Audit: Object status modified.
Audit: Group settings modified.
Page 39

M A N A G I N G A D M I N I S T R A T I O N S E R V E R S
39
2. Events corresponding to the selected severity level will be displayed in the table below. The list of events is
specific to each application. For more information about events, see the application documentation. Select the
types of events to be recorded using the Shift and Ctrl keys on your keyboard. Click the Select All button to
select all event types.
3. Then click the Properties button for the selected event types.
4. To record event information in event logs, check the following boxes in the Event registration section
(see the figure below):
On Administration Server for (days) box to make the Administration Server log application events that
occur on all clients in the group in a centralized manner. In the field on the right, specify the number of days
during which the server will store information. When the specified period has elapsed, the entry
corresponding to this event will be deleted.
You can view event logs stored on the Administration Server through the Administration Console on the
administrator workstation. Such information is shown in the Events folder of the console tree.
In the event log on client computer to save information about events locally in the Windows Event Log of
each client computer.
In the event log on Administration Server to enable centralized logging of all application events on all
clients in this group in the specified Administration Server's Windows Event Log.
The information in Windows event logs can be viewed using Displays client computer events, a standard
Windows event management tool.
Figure 24. Editing event properties
5. To enable notification about selected events, specify the notification methods by checking appropriate columns
in the Event notification section:
Notify by email;
Page 40

R E F E R E N C E G U I D E
40
Notify through NET SEND;
Notification using NET SEND is not available in Microsoft Windows Vista and later versions.
Notify by running executable or script;
Notify via SNMP.
Notify via SNMP is configured directly in the application working with SNMP.
To configure notifications, use the Settings link and in the window that opens (see the figure below) define the
settings.
In the upper part of the window select the notification method that you wish to modify. If the Use Administration Server
settings box is checked, the values specified on the Notification tab under the Administration Server properties are
used by default. To modify notification settings, uncheck the Use Administration Server settings box and select one of
the following items from the drop-down list:
Email (see the figure above). In this case enter the following data:
Figure 25. Configuring event notifications
In the Recipient field, specify the email address of the notification recipient. Several addresses may be
entered as a list separated by commas or semicolons.
In the SMTP server field, specify the address of the mail server connection (an IP address or a Windows
network name can be used);
Page 41

M A N A G I N G A D M I N I S T R A T I O N S E R V E R S
41
In the SMTP server port field, specify the SMTP server connection port number (the default is port 25);
the sender and subject for the message that will be delivered as a notification. To do this, press the
Properties button and in the window that opens (see the figure below), fill in the Subject field. In the lower
entry field, specify the email address which will be used as a sender's address. In the same window, enter
User name, Password, and Confirm password in the relevant fields if ESMTP authorization is being
used.
Figure 26. Configuring notification settings. Specifying the Sender and Subject
Page 42

R E F E R E N C E G U I D E
42
NET SEND (see the figure below). Under this option, use the field below to enter recipient host addresses for
network notifications. An IP address or a Windows network name may also be used. Several addresses may be
entered as a list separated by commas or semicolons. For successful notification, a messaging service
(Messenger) must be installed on the Administration Server and on all recipient computers.
Figure 27. Configuring notifications. Notification using NET SEND
Executable file to run (see the figure below). Under this option, use the Select button to select an executable
module to run when an event occurs.
Page 43

M A N A G I N G A D M I N I S T R A T I O N S E R V E R S
43
Executable environment variable names are the same as the names of placeholders used to create the
message text (see below).
Figure 28. Configuring notifications. Notification using executable files
Enter the message which will be delivered as notification in the Notification message section at the bottom of the
window (see the figure above). If the Use Administration Server settings box is checked, the message text specified
on the Notification tab of the Administration Server settings will be used by default. To modify the message, uncheck
the Use Administration Server settings box and enter a new message.
The notification text may include information about the event recorded. Enter appropriate placeholders by selecting them
from the drop-down list accessible by clicking the button .
Event severity;
From computer;
Domain;
Event;
Event description;
Time raised;
Task name;
Application;
Page 44

R E F E R E N C E G U I D E
44
Version number;
IP-address;
IP address of the connection.
To check the correctness of the settings specified on this tab, you can send a test message manually. To do this, press
the Test button. This will open a test notification sending window (see the figure below). In the event of errors, detailed
error information will be displayed in it.
Figure 29. Configuring notification settings. Sending a test notification
VIRUS OUTBREAK EVENT PARAMETERS
On the Virus outbreak tab (see the figure below) you can set the maximum number of viruses found within a certain
time interval after which new detected virus instances will be considered a Virus outbreak event. This property is
important during periods of virus outbreaks since it enables administrators to react in a timely manner to virus attack
threats.
Check the desired application types:
Anti-virus for workstations and file servers;
Perimeter defense anti-virus;
Mail system anti-virus.
Set the virus activity threshold for each application type which when exceeded will trigger a Virus outbreak event:
In the Viruses field – the number of viruses found within by the applications of that type.
Page 45

M A N A G I N G A D M I N I S T R A T I O N S E R V E R S
45
In the in (min) field – time during which the specified number of viruses was detected.
Figure 30. Viewing the Administration Server properties. The Virus outbreak tab
Page 46

R E F E R E N C E G U I D E
46
Click the Configure policies to activate on "Virus outbreak" event link to open the Policy activation window (see the
figure below), and create a list of policies to be used by applications as active policies on "Virus outbreak" event in
administration groups. To do this, use the Add or Delete buttons.
GENERAL GUIDELINES FOR RELOCATION OF COMPUTERS
You can use the Computer relocation tab (see the figure below) to specify the rules for relocation of network computers
to specified administration groups.
Figure 31. Configuring policies to activate on virus outbreak
Page 47

M A N A G I N G A D M I N I S T R A T I O N S E R V E R S
47
The order of rules in the Computer relocation rule list section determines a rule's application priority. To delete or
move a rule in the list, use the corresponding buttons to the right.
Figure 32. The Administration Server properties window. The Computer relocation tab
To review or modify the settings of an existing rule, click the Properties button.
Page 48

R E F E R E N C E G U I D E
48
To add a rule, press the Add button. Use the displayed window (see the figure below) to enter the following rule settings:
Figure 33. The properties window of a rule for computer relocation. The General tab
On the General tab specify the following settings:
name of the rule;
group to which computers will be moved in accordance with the rule;
rule application order:
Run once for each computer, if the rule must be applied to each host only once.
Run once for each computer then at every Network Agent install on computer.
Rule works permanently.
On this tab check the following boxes:
Move only computers not added to administration groups – if computers already included in administration
groups must not be relocated to other groups in accordance with the rule;
Enable rule – to apply the rule during the operation.
Use the Network tab to specify the criteria that a computer must comply with to be relocated to the selected
administration group:
Computer name in the Windows network.
Page 49

M A N A G I N G A D M I N I S T R A T I O N S E R V E R S
49
Domain.
Computer domain name.
DNS domain.
If a computer IP address must be within a certain IP range, check the IP address range box and specify the
upper and lower values of the range.
If IP address to connect to server is considered while the computer is running, check the corresponding box
and specify the upper and lower values of the range, which must include the connection IP address.
Check the Computer is in IP subnet box and press the Select button to specify the IP subnet to which the host
must belong. IP-ranges are selected from the list of ranges contained in the Unassigned computers folder of
the console tree.
Use the Active Directory tab to perform the following actions:
If a computer must belong to a specific Active Directory unit, check the Computer is located in Active
Directory organization unit box and press the Select button to select the Active Directory group. Active
Directory organization units are selected from the list of groups displayed in the Unassigned computers folder.
To process computers included in nested organization units, check the Computer is member of Active
Directory group box.
Use the Applications tab to select the following from the drop-down lists:
criteria of the presence of the Network Agent running on the computer: Installed or Not installed;
version of the operating system that must be installed on the computer.
For criteria, which should not be considered in a rule, uncheck their corresponding boxes and leave their fields empty.
A host will be moved to an administration group if it matches all the criteria defined in a rule.
To apply created rules, press OK.
If you wish to forcibly apply the rule, irrespective of the applied rules, select the necessary rule and press the Force
button.
If several rules described above apply to the same computer, the top priority will belong to the Active Directory group
rule, then the rule for IP subnets will follow, and then the domain rule.
CONFIGURING INTEGRATION WITH CISCO NETWORK ADMISSION CONTROL (NAC)
Kaspersky Administration Kit allows the administrator to associate the conditions of computer anti-virus protection and
the security statuses assigned by Cisco Network Admission Control (NAC).
To configure a mapping between Cisco NAC statuses and anti-virus protection conditions:
1. Select the Administration Server in the console tree and select Properties from its context menu. This will open
the Server settings configuration window. Switch to the Cisco NAC tab (see the figure below).
Page 50

R E F E R E N C E G U I D E
50
This tab does not appear if the Kaspersky Lab Cisco NAC Posture Validation Server component was not
installed together with the Administration Server (for details please refer to the Kaspersky Administration Kit
Implementation Guide).
Figure 34. Viewing the Administration Server properties. The Cisco NAC tab
2. Select a Cisco NAC host state from the drop-down list: Healthy, Checkup, Quarantine or Infected.
3. Check the necessary boxes in the table below to select the anti-virus protection conditions that are mapped to
the above statuses. If necessary, change the threshold values for conditions.
The Healthy status is only assigned if all the selected conditions are met; the Checkup, Quarantine or Infected
statuses apply if at least one of the selected conditions is fulfilled. Threshold values may be modified for some
conditions. Select a condition in the Condition column and use the Modify button to open an editing window
(see the figure below).
Figure 35. The Edit condition window
Page 51

M A N A G I N G A D M I N I S T R A T I O N S E R V E R S
51
4. Use the PVS port number field to set the Posture Validation Server port used for communication with the Cisco
server. The default port number is 18000.
5. Click Apply or OK to complete the configuration.
TRAFFIC LIMIT RULES
To decrease the network load, you can restrict the rate of data transfer to an Administration Server for individual IP
subnets and IP ranges. Maximum allowed data transfer rates and the interval for which they should apply are specified in
rules. The rules are listed in the Traffic tab of the Administration Server properties window.
To add a rule, press the Add button and use the displayed window to specify its parameters:
1. In the IP address range to limit traffic section select the method used to define a subnet or range:
Specify range as address and network mask and enter the subnet parameters in the Subnet address
and Subnet mask fields.
Specify IP range as start and end addresses and enter the range boundaries in the Start and End fields.
2. In the Traffic limit section specify the following data:
Borders of the time interval during which the traffic limitation will be enabled in the Time period field.
Maximum value of the data transfer rate for information upload to Administration Server in the Limit (KB/s);
the limitation will be enabled during the time interval specified in the Time period field.
Maximum value of the data transfer rate during time other than the period defined in the Traffic limit the
remainder of the time (KB/s) field, if traffic intensity must be restricted all the time.
When the rule settings have been edited, the rule appears in the list. The name of the rule is generated automatically
based on the data that defines the range of IP addresses.
If the limits of the IP range, addresses or subnet mask in the rule properties are modified, the rule name in the list
changes in accordance with the new values.
To delete a rule, select it in the list and press the Remove button.
To view or modify the settings of an existing rule, select it in the list and press the Properties button.
SLAVE ADMINISTRATION SERVERS
Administration Servers can be arranged a "master server – slave server" type hierarchy. Each Administration Server can
have several slave Servers on the same or different nesting levels of the hierarchy. The nesting level for slave servers is
not limited. The administration groups of the master Server will then include the client computers of all slave Servers.
Thus, isolated and independent sections of computer networks can be controlled by different Administration Servers
which are in turn managed by the master Server.
ADDING A SLAVE SERVER
To add a slave Administration Server:
1. Select in the administration group the Administration Servers node, open the context menu and select the
New Administration Server command. A wizard will start. Follow the wizard's instructions.
Page 52

R E F E R E N C E G U I D E
52
2. Specify the network address of the slave Administration Server. In this case, the master Administration Server
will connect to the slave Server and transfer all properties, including the network address of the Master
Administration Server and certificate of the Master Administration Server.
3. In the next window of the wizard, specify the name of the slave Administration Server. The new Administration
Server will be displayed under this name in the administration group. The name must be unique within one level
of the hierarchy.
If you specified the Server address during the previous step, the Slave Administration Server display name
field will contain the following value: Administration Server <computer name>, where <computer name>
stands for the name of the host specified in the address, which must be added as a slave Server.
4. If you have not defined the slave Administration Server address earlier, use the Select button to specify the
path to the Administration Server certificate.
5. If you have previously specified the slave Server's address, specify the settings for connecting the slave
Administration Server to the master Server.
Specify the address of the master Administration Server. You can use either its IP address or the
computer's name in the Windows network as the computer's address.
If a proxy server is used for connection, configure the connection settings in the Proxy server settings
group of fields.
Check the Use proxy server box. Enter the proxy server address in the Address field. Fill in the fields
User name, Password and Confirm password if user authentication is required to access the proxy
server.
If the address of the slave server has not been specified, this step will be skipped.
6. Please wait until the following operations have been completed:
Connection of the Administration Console to the slave Server.
Information about the slave Server is added to the master Administration Server's database.
If you have defined the slave Administration Server address earlier, enter in the displayed prompt the
information of an account (user name and password) that is authorized to connect to the computer, which
you plan to use as a slave Server.
The settings used to connect the slave Administration Server to the master Server are configured.
If the slave Server's address has not been specified, you will have to perform the following actions manually
after the wizard completes:
connect the Administration Console to the slave Server;
configure the connection between the slave Administration Server and the master Server.
7. Press the Next button. The progress of the action will be displayed in the wizard window. If errors occur, an
error message will be displayed.
8. In the last wizard window press the Finish button.
When the wizard completes, the master Administration Server will add information about the slave Server to its
database. The icon and the name of the slave Server will appear in the Administration Servers folder within the
corresponding administration group.
Page 53

M A N A G I N G A D M I N I S T R A T I O N S E R V E R S
53
CONFIGURING THE CONNECTION OF THE SLAVE SERVER TO THE
MASTER SERVER
To configure the connection of a slave Server to the master Administration Server:
1. Add the slave Administration Server to the console tree (see section "Adding a Server to the console tree" on
page 25) as a managed Administration Server.
2. Select the Administration Server and use the Properties command of the context menu to open its properties
window.
3. In the Administration Server <computer name> Properties window that opens, on the General tab, click on
the Advanced link. In the window that opens press the Settings button in the Administration Servers
hierarchy section.
4. In the next Master Administration Server settings window that opens (see the figure below), check the box
This Administration Server is a slave server in the server hierarchy.
Then in the block of parameters below specify:
Address of the master Administration Server. You can use either its IP address or the computer's name in
the Windows network as the computer's address.
Certificate of the Master Administration Server. The path to the certificate file can be specified using the
Select button.
If you are connecting via a proxy server, check the Use proxy server box. Enter the address for connecting to
the proxy server in the Address field. Fill in the fields User name, Password and Confirm password if user
authentication is required to access the proxy server.
5. To confirm the settings, press the OK or Apply button.
Page 54

R E F E R E N C E G U I D E
54
As a result, the slave Administration Server will connect to the master Server and will receive from it all the policies and
tasks for the group to which the slave Server now belongs. You can then connect to the slave Server via the master
Server from the Administration Server node.
Figure 36. Configuring the slave Administration Server's connection to the master Administration Server
VIEWING ADMINISTRATION GROUPS OF A SLAVE ADMINISTRATION SERVER
To view the administration groups of a slave Administration Server via the master Server, connect the Console to
the slave server:
1. In the console tree of the master Administration Server, select the Administration Servers node in the folder of
the required group.
2. In the Administration Servers node select the required slave Server.
3. Open the context menu and select the Connect to Administration Server command.
The Administration console will reflect the structure of the administration groups of the slave Administration Server. Then
you can view the structure of the groups (see section "Viewing information about groups" on page 65).
The slave Administration Server inherits from the master Server all the group tasks and policies of the group to which it
belongs. Inherited policies and tasks are indicated on the slave Server as follows:
The icon will be displayed next to the names of the policy inherited from the master Administration server
(the regular policy icon is ).
Page 55

M A N A G I N G A D M I N I S T R A T I O N S E R V E R S
55
The settings of the inherited policy will not be accessible for changes on the slave Server on shut down.
The settings that are specified as not modifiable in the inherited policy are indicated by the "locked" icon in
all application policies on the slave Server, and use values specified in the inherited policy.
Values of the settings that are not "locked" in the inherited policy are indicated by the "unlocked" icon ( ). If the
setting is specified as modifiable in the slave Server policy, it can be changed in the application settings (see
section "Viewing and configuring policy settings" on page 77) and task settings (see section "Viewing and
changing task settings" on page 112).
The icon will be displayed next to the names of group tasks inherited from the master Administration server
(the regular task icon is ).
The policies and tasks received by the slave Administration Server from the master Administration Server
cannot be modified.
The Administration Server tasks and the tasks for specific computers are not transferred to slave Servers.
To manage a slave Administration Server via the Console of the master Server,
add a computer on which the slave Administration Server is installed to the console tree as a new Server (see
section "Adding a slave Server" on page 51), and switch to the node corresponding to this Server.
CONNECTING TO THE ADMINISTRATION SERVER VIA INTERNET
To connect to an Administration Server via Internet, the following requirements should be satisfied:
The Administration Server in the main office should have an external IP address, and the incoming ports 13000
and 14000 should be open on it.
The external IP address of the master Administration Server should be specified during the installation of the
Network Agent to remote office computers. If an installation package is used for installation, the external IP
address is specified manually in the properties of this package on the Settings tab.
The Network Agent should be installed on remote office computers first.
To manage applications and tasks of a client computer, the administrator should go to the properties of this
computer and on the General tab check the box in the Do not disconnect from the Administration Server.
After the box is checked, wait till Administration Server syncs with a remote client computer. This box can be
checked simultaneously for up to 100 client computers.
To speed up tasks on the client computer, open the 15000 port. In such case, to start a task the Administration
Server sends a special package to the Network Agent by 15000 port. The Administration Server does not
require a syncronization with a client computer.
Page 56

56
MANAGING ADMINISTRATION GROUPS
IN THIS SECTION
Adding, moving and deleting a group .............................................................................................................................. 56
Creating the structure of administration groups ............................................................................................................... 58
Viewing information about a group .................................................................................................................................. 65
Viewing and changing group settings ................................................................................................ .............................. 66
The Administration Server and the hosts in the corporate network (client computers) interact using the Network Agent.
This component must be installed on all computers running the Kaspersky Lab applications managed via Kaspersky
Administration Kit.
Client computers may be combined into administration groups (groups) in accordance with the corporate structure. The
following settings can be defined for client computers within a single group:
common application settings (through policies);
common operation mode of the applications (through creation of group tasks).
The administrator can create a hierarchy of Servers and groups with any nesting level if that can simplify the
management of installed applications. A single hierarchy level can include slave Administration Servers, groups and
client computers.
ADDING, MOVING AND DELETING A GROUP
To create a group:
1. In the console tree, open the Managed computers folder.
2. Select the folder corresponding to the group which should include the new group. If you create a group at the
highest hierarchy level, select the Managed computers folder.
3. Open the context menu and use the New Group command or the Create a subgroup link in the task pane.
4. Enter the group name in the window that opens (see the figure below) and click the OK button.
Page 57

M A N A G I N G A D M I N I S T R A T I O N G R O U P S
57
A new subfolder with the specified name will appear in the Managed computers folder in the console tree. This new
folder will automatically contain the following nested folders: Policies, Group tasks, Administration Servers, and
Client computers. They will be filled during the definition of group policies, the creation of group tasks and the addition
of slave Administration Servers.
Figure 37. Creating a group
To change a group name,
select the required policy in the console tree, open its context menu and choose the Properties command or use
the Group properties link in the task pane. In the <Group name> Properties window that opens, rename the
group using the General tab (see the figure below).
You cannot rename the Managed computers folder because it is an in-built element of the Administration Console.
Figure 38. Viewing the group properties. The General tab
Page 58

R E F E R E N C E G U I D E
58
To move a group to another folder of the console tree:
select the folder to move and use the standard Cut or Paste commands of the context menu or drag it with the
mouse.
To delete a group:
select the group folder in the console tree and use the Delete command.
A group can only be deleted if it does not contain slave Servers, nested groups or client computers.
CREATING THE STRUCTURE OF ADMINISTRATION GROUPS
Kaspersky Administration Kit can create a structure of administration groups based on:
the Windows network domains and workgroups (see section "The structure of groups based on the Windows
network domains and workgroups" on page 59).
Active Directory (see section "Group structure based on Active Directory" on page 61).
the content of the text file (see section "Group structure based on the content of the text file" on page 63).
If for some reason a computer is not registered in the Unassigned computers group during the creation of a
group structure (if it is turned off or disconnected from the network), it will not be added to the corporate
network. You can do this later manually.
Creating a group structure using the wizard does not disturb network integrity: new groups are added, but do
not replace the existing groups. A client computer that has already been assigned to an existing group will not
be added again because the Unassigned computers group displays computers that are not included in the
network.
Page 59

M A N A G I N G A D M I N I S T R A T I O N G R O U P S
59
THE STRUCTURE OF GROUPS BASED ON THE WINDOWS NETWORK
DOMAINS AND WORKGROUPS
To create a structure of administration groups based on the Windows network domains and workgroups:
1. Open the context menu of the Managed computers folder and select All tasks ® Create groups structure. This
will open the group structure creating wizard (see the figure below). Press the Next button.
Figure 39. Group structure creation wizard
2. In the window that opens, select Microsoft Windows Domains and Workgroups (see the figure below).
Page 60

R E F E R E N C E G U I D E
60
The group structure will be created based on the information about the structure of Windows network domains
obtained during the last network polling and the Unassigned computers presented in the group. Press the Next
button.
Figure 40. Determining the group creation method
3. In the following window select the group and press the Browse button located next to the Target group field.
This will open a window that contains a hierarchy of groups created for the Administration Server. To select a
group from the existing groups, open the Managed computers folder. If such a group does not exist, click the
New group folder to create a new group. The specified group is created in the Managed computers group.
Press the Next button.
4. In the next wizard window, press the Finish button to complete the administration group task creation.
Page 61

M A N A G I N G A D M I N I S T R A T I O N G R O U P S
61
GROUP STRUCTURE BASED ON ACTIVE DIRECTORY
To create a structure of administration groups based on Active Directory:
1. Open the context menu of the Managed computers folder and select All tasks Create groups structure.
This will open the group structure creating wizard (see the figure below). Press the Next button.
Figure 41. Group structure creation wizard
2. In the window that opens, select Active Directory (see the figure below).
Page 62

R E F E R E N C E G U I D E
62
The group structure will be created based on the information about the network structure of Active Directory
units obtained during the last polling of the network and the Unassigned computers presented in the group.
Press the Next button.
Figure 42. Determining the group creation method
3. In the following window select the group and press the Browse button located next to the Target group field.
This will open a window that contains a hierarchy of groups created for the Administration Server. To select a
group from the existing groups, open the Managed computers folder. If such a group does not exist, click the
New group folder to create a new group. The specified group is created in the Managed computers group.
Select the source Active Directory organization unit by clicking the Browse button located next to the Source
Active Directory organization unit field. Press the Next button.
4. In the next wizard window, press the Finish button to complete the administration group task creation.
Page 63

M A N A G I N G A D M I N I S T R A T I O N G R O U P S
63
GROUP STRUCTURE BASED ON THE CONTENT OF THE TEXT FILE
To create a group structure based on the content of the text file:
1. Open the context menu of the Managed computers folder and select All tasks Create groups structure.
This will open the group structure creating wizard (see the figure below). Press the Next button.
Figure 43. Group structure creation wizard
2. In the window that opens, select the Text file item (see the figure below).
Page 64

R E F E R E N C E G U I D E
64
The group structure will be created in accordance with the text file created by the administrator. If you select this
Example:
Office 1
Office 2
Office 3
Three groups of the first hierarchy level will be created in the target group.
Example:
Office 1/Division 1/Department 1/Group 1
option, during the next step of the wizard select a group to which the nested subgroups would be added and
specify the text file containing the group structure.
Figure 44. Determining the group creation method
3. In the next window:
Select a group and press the Browse button located next to the Target group field. This will open a
window that contains a hierarchy of groups created for the Administration Server. To select a group from
the existing groups, open the Managed computers folder. If such a group does not exist, click the New
group folder to create a new group. The specified group is created in the Managed computers group.
Specify the file based on which the hierarchy will be created for the group specified using the Target group
field. To do this, click the Browse button located next to the Text file with group names field, and select
the text file created earlier according to the following rules:
The name of each new group must begin with a new line, using a line break as a delimiter. Blank lines
will be ignored during the creation of the file.
The name of the nested group should be entered using a slash (/).
Page 65

M A N A G I N G A D M I N I S T R A T I O N G R O U P S
65
Four subgroups nested into each other will be created in the target group.
Example:
Office 1/Division 1/Department 1
Office 1/Division 2/Department 1
Office 1/Division 3/Department 1
Office 1/Division 4/Department 1
One group of first hierarchy level Office 1 will be created in the destination group; this group will include four nested
groups of the same hierarchy level "Division 1", "Division 2", "Division 3", and "Division 4". Each of these groups will
include one more group - "Department 1".
In order to create several nested groups of the same hierarchy level, you should specify the "full path
to the group".
Press the Next button.
4. In the next wizard window, press the Finish button to complete the administration group task creation.
VIEWING INFORMATION ABOUT A GROUP
To view information about the structure of a group:
1. Open the Managed computers folder.
2. Select the folder with the name of the required group.
A list of objects included in this group will be displayed in the results pane. You can also expand the
corresponding branch of the console tree.
To view information about group policies, select the Policies folder.
If policies have been defined for the group, they will be displayed in the console tree, otherwise the folder
will be empty.
To view information about group tasks, select the Group tasks folder.
If tasks have been defined for the group, they will be displayed in the console tree, otherwise the folder will
be empty.
To work with slave Administration Servers, select the Administration Servers folder.
To work with clusters and arrays of servers, select the Clusters and server arrays folder. This folder will
be displayed in the console tree only if the cluster is included in the corporate network.
The items listed above depend on the user interface settings.
To view the list of client computers, select the Client computers folder. The list of client computers will be
Information in the Kaspersky Administration Kit results pane (for example, computer statuses, statistics or reports) is not
refreshed automatically. You can refresh information in the results pane by one of the three following methods: by
pressing the F5 key, by selecting the Refresh item from the context menu or by clicking the button on the toolbar.
displayed in the results pane.
Page 66

R E F E R E N C E G U I D E
66
VIEWING AND CHANGING GROUP SETTINGS
To view or change group settings:
1. Open the Managed computers group in the console tree.
2. Select the necessary group.
3. Open the context menu.
4. Select the Properties command.
This will open the group properties window that contains a set of tabs, which you can use to view and change the
security options and the settings for communication with client computers; establish the procedure for interaction with the
Administration Server, and specify the set of conditions determining the computer status.
To open the group properties window, you can also click the Group properties link in the task pane.
GENERAL SETTINGS
You can view and edit the group name on the General tab (see the figure below): The name must be unique within one
level of the folder or group hierarchy.
You cannot rename the Managed computers folder because it is an in-built element of the Administration Console.
This tab also displays the following information:
Parent group: the name of the group that includes this group. For the groups at the highest hierarchy level this
field contains the name of the Administration Server associated with this group.
Contains: statistics on the group structure – the number of nested groups and total number of client computers,
including client computers in nested groups.
Created: the date when the group was created.
Modified: the date when the name or attributes of the group were last modified. If the group name and group
properties have not been modified since their creation, the value is <Unknown>.
Page 67

M A N A G I N G A D M I N I S T R A T I O N G R O U P S
67
The Reset button in the Detected virus counter section allows you to clear the counter of detected viruses for all client
computers in a group.
Figure 45. Viewing the group properties. The General tab
Page 68

R E F E R E N C E G U I D E
68
GRANTING RIGHTS TO WORK WITH A GROUP
The Security tab (see the figure below) is intended for configuration of access to an administration group.
Figure 46. Granting rights to access the Administration Group
Whether this tab is shown or hidden is determined by the user interface settings. To display the tab, navigate to the
View Configuring interface menu and check the box in the Display security settings tabs string.
By default, the rights to work with a group are inherited from the Administration Server properties (see section "Granting
rights to use a Server" on page 26), where the rights to work with all objects managed by the Server are defined. To
configure individual access rights for an administration group that are different from those specified in the Administration
Server settings, uncheck the Inherit box.
The upper part of the tab displays a list of users and user groups that have access to the Administration Server. The
lower part contains the list of possible permissions:
All – includes all permissions (see below).
Reading – viewing Kaspersky Administration Kit objects' properties without a permission to perform operations,
create new objects or modify the existing ones.
Writing – changing Kaspersky Administration Kit object properties, as well as creating new objects without a
right to perform operations upon objects.
Running – performing operations on Kaspersky Administration Kit objects without a right to create new objects
or modify the existing ones.
Page 69

M A N A G I N G A D M I N I S T R A T I O N G R O U P S
69
Modify access privileges – granting to users, and groups of users, access rights to the functionality of
Kaspersky Administration Kit.
Edit event log settings.
Edit notification settings.
Remote install of Kaspersky Lab applications.
Remote install of external applications – preparation of installation packages and remote install of third-party
applications and Kaspersky Lab applications to the client computers.
Edit Administration Server hierarchy settings.
Save network lists content – copy files from backup, quarantine and unprocessed files from client computers
to a computer where the Administration Console is installed.
Create tunnels – creating a tunneling connection between the computer where the Administration Console is
installed and a client computer.
To assign the rights for working with a group:
1. Select a group of users.
2. In the Allow column check the boxes next to the permissions provided to members of that group. If you check
the All box, all the boxes in the column will automatically be checked.
3. In the Deny column check the boxes next to the permissions that must not be provided to members of that
group. If you check the All box, all the boxes in the column will automatically be checked.
You can add a new group or a new user, using the Add button. You can only add groups of users and users that are
registered on the computer with the Administration Console installed.
To remove a group or a user, select an object from the list and click the Remove button.
The group of Kaspersky Administration Kit administrators (KLAdmins) cannot be removed.
Click the Apply or OK button to apply the settings.
CONDITIONS THAT DETERMINE COMPUTER STATUS
Use the Computer status properties window of the Administration Server's policy (see the figure below) to specify
criteria for determining whether a client computer will be assigned one of the statuses, Critical or Warning. If the client
computer does not match any of the conditions listed, it will be assigned the status OK.
Threshold values may be modified for some conditions. To change the value, double click a condition in the Condition
column to open the editing window.
Page 70

R E F E R E N C E G U I D E
70
For example, you can specify the maximum number of days during which the client computer has not connected to the
Administration Server. After this period, the computer will be assigned the status Critical.
Figure 47. Configuring the client computer's status diagnostics
If the computer status is OK, then an icon will be displayed next to its name, for example in the task pane of the main
application window. If the computer has the status Warning, an amber icon will be displayed. If the computer status
has the status Critical, a red icon will be displayed.
The criteria for determining the status of the client computer are defined in the settings at the level of the parent group,
and are inherited by all administration groups. To configure individual criteria for a group, uncheck the Inherit box and
configure the settings (for the top hierarchy level the Inherit box is inactive).
Clicking the link Computer visibility on the network opens the Computer visibility window. In the Computer visibility
timeout (min) field of the window that opens, you can specify the time during which a client computer will be considered
visible in the network after it was disconnected from the Administration Server. The default interval is 60 minutes. After
the specified period expires, the Administration Server will consider the client computer inactive. If necessary, you can
modify this value in the Kaspersky Administration Kit policy settings (see section "Configuring the settings of the
Administration Server policy" on page 88).
MONITORING OF CLIENT COMPUTER ACTIVITY
Use the Client computers properties window of the administration group (see the figure below) to specify the following
parameters:
The Client computer activity in the network section specifies how the Administration Server reacts to the
inactivity of client computers of this group:
Page 71

M A N A G I N G A D M I N I S T R A T I O N G R O U P S
71
If you wish the Kaspersky Administration Kit administrator to be notified after a period of inactivity, check
the Notify the administrator if the computer is not active for longer than (days) box and specify the
number of days in the field to the right of the box. When the period expires, the Administration Server will
perform the necessary actions.
Notification shall be performed in accordance with the settings specified in the properties of the
Administration Server (see section "Viewing and changing Administration Server settings" on page 28).
If you want inactive client computers to be deleted from the group, check the Delete the computer from
the group if it is not active for longer than (days) box and specify the number of days in the field to the
right of the box. Once the specified period has expired, the client computer will be automatically deleted
from the group and moved to the Unassigned computers group.
Figure 48. The group properties window. The Client computers tab
Specify the settings for inheriting values, specified on this tab:
Inherit from parent group –to ensure that the specified values are inherited from the group of the previous
hierarchy level. If this box is checked, the settings on the tab cannot be changed.
Force inheritance in child groups – to ensure that the specified values are distributed to subgroups. If
this box is checked, in the child groups properties the settings specified on the tab will be locked for
modification.
Page 72

R E F E R E N C E G U I D E
72
AUTOMATIC INSTALLATION OF APPLICATIONS ON CLIENT
COMPUTERS
On the Automatic installation tab you can specify which installation packages should be used for automatic remote
installation of Kaspersky Lab applications to client computers that have recently been added to the group. If a package is
used, the box corresponding to its name is selected. To prevent automatic deployment of an application, uncheck its box
next to the name of the corresponding installation package. By default, no software is automatically installed. For all
installation packages for which boxes are checked, remote deployment group tasks under the name Installation <Name
of the selected installation package> will be created. You can run these tasks manually.
To automatically install Kaspersky Lab applications on new computers running the Microsoft Windows 98 / ME operating
systems, install the Network Agent on these computers in advance.
If some installation packages of one application were selected for automatic installation, the installation task will be
created for the most recent application version only.
Figure 49. The group properties window. The Automatic installation tab
Page 73

M A N A G I N G A D M I N I S T R A T I O N G R O U P S
73
CREATING THE LIST OF UPDATE AGENTS
The Update Agents tab (see the figure below) is used to create a list of computers (see section "Creating the list of
Update Agents and configuring the agents" on page 254), which are used within a group to distribute updates,
installation packages and group tasks and policies.
Figure 50. Creating the list of Update Agents
Page 74

74
REMOTE MANAGEMENT OF APPLICATIONS
IN THIS SECTION
Managing policies ........................................................................................................................................................... 74
Managing tasks ............................................................................................................................................................... 96
Local application settings ................................ .............................................................................................................. 128
Kaspersky Administration Kit enables remote management of the applications installed on the computers within
administration groups and corporate networks. The applications are managed via:
the creation of policies regulating the configuration of operation settings for the applications installed on client
computers;
creation and launch of tasks (see section "Managing tasks" on page 96), designed for administration groups, the
Administration Server or selected computers;
configuration of local settings for the applications installed on individual network computers.
MANAGING POLICIES
Application settings on client computers are centrally configured through definition of policies.
Policies created for applications within a group appear in the corresponding folder of the console tree. The name of each
policy is preceded by an icon indicating its status (see section "Statuses of computers, tasks and policies" on page 321).
CREATING A POLICY
To create a policy for a group:
1. In the console tree, select a group for which you wish to create a policy. In this group folder, select the Policies
folder and select the New Policy command on the context menu or click the Create a policy link in the task
pane. A wizard will start. Follow the wizard's instructions.
Use the links Create a policy for Kaspersky Anti-Virus for Windows Workstations and Create a policy for
Kaspersky Anti-Virus for Windows Servers in the task pane to create the policies for the corresponding
applications. You will then not have to specify the application in the policy configuration wizard.
2. You must specify the policy name and select the application for which this policy is being created.
The policy name is assigned in a standard manner. If a policy with this name already exists, the (1) suffix will be
automatically added to the end of the name of the new policy.
Page 75

R E M O T E M A N A G E M E N T O F A P P L I C A T I O N S
75
Select an application from the drop-down list (see the figure below). The drop-down list includes all applications
that have their administration plug-ins installed on the administrator's workstation.
Figure 51. Selecting an application for policy creation
3. Use the displayed window (see the figure below) to specify the policy status. Select one of the following:
Active policy. The policy being created will be used as the application's current policy.
Inactive policy. The policy will be saved in the Policies folder. If required, it can be activated (see section
"Activating a policy" on page 82).
Mobile user policy. This policy will be applied after you disconnect the computer from the corporate
network. This type of policy is available for Kaspersky Anti-Virus 6.0 for Windows Workstations MP3 and
later.
Page 76

R E F E R E N C E G U I D E
76
Several policies can be created in a group for one application, but only one policy can be active. Activating a
new policy makes the previously active policy inactive.
Figure 52. Policy creation wizard. Activating the policy
4. Then, you must specify the general settings for the policy and edit settings for the selected application
(see the figure below). You can lock policy settings for nested groups, application settings, or task settings.
Policy settings that can be locked are marked with the icon . To lock a setting, click this icon. The icon will
change to .
A policy has a higher priority compared with the local settings only if it prohibits modification of parameters (are
locked ).
When creating a policy, you can specify a minimum set of parameters required for application to run. All other
settings are set to the default values applied during the local installation of the application. You can modify the
policy by editing it (see section "Viewing and configuring policy settings" on page 77).
Page 77

R E M O T E M A N A G E M E N T O F A P P L I C A T I O N S
77
For details on configuring policy settings for the applications, please refer to their corresponding documentation.
Figure 53. Creating a policy for Kaspersky Anti-Virus for Windows Workstations
5. In the last wizard window press the Finish button.
Once a policy is created, the parameters which may not be modified are applied on clients for which the policy was
created (are "locked" ).
DISPLAYING INHERITED POLICY IN THE NESTED GROUP RESULTS
PANE
To display inherited policies in the Policies folder of a child group:
1. Select the Policies folder of a nested group in the console tree.
2. Open the context menu, select View, and check the Inherited policies box.
This will display inherited policies in the console tree with the icon . You can view the inherited policies properties.
While policy inheritance is enabled, inherited policies can only be edited within the group under which they were created.
VIEWING AND CONFIGURING POLICY SETTINGS
To view group settings or modify them:
1. In the console tree, open the Policies folder of the administration group that you wish to configure.
2. Select the necessary policy.
Page 78

R E F E R E N C E G U I D E
78
3. Open the context menu and choose the Properties command.
To navigate quickly to the policy properties, select it in the console tree and use the Edit policy link in the Actions
section of the task pane.
This will open the <Policy name> properties window with several tabs in which you can configure a policy for an
application. The contents of the tabs are specific to each application, and their description is provided in the
documentation for the applications. The General, Events policy configuration tabs are common for all applications.
The General tab (see the figure below) contains the following policy information:
policy name;
the application for which the policy is created (for example, Kaspersky Administration Kit);
policy creation date and time;
date and time of the last policy modification;
policy status;
information about the results of policy enforcement.
You can use the tab to:
change the policy name;
Figure 54. The policy properties window
Page 79

R E M O T E M A N A G E M E N T O F A P P L I C A T I O N S
79
view the results of policy enforcement;
access and configure the additional settings by clicking the Advanced link.
The Enforcing the policy on the client computers section also contains reference information about the results of
policy application on the client computers within the selected group, indicating the number of computers:
for which the policy was defined;
where the policy was enforced;
where the policy enforcement failed.
To update the information about the results of policy enforcement, press the Refresh button.
Detailed information about the results of policy enforcement on each client is available in the window (see the figure
below) accessed by pressing the Details button. The window displays a table that has the following columns:
Computer – client name.
Domain – name of the domain to which the client belongs.
Status – the policy status, which may have one of the following values:
Modified – settings for this policy have been changed on the Administration Server, but they were not yet
synchronized with the client computer;
Finished – the policy for an application on this computer has been successfully applied;
Pending – the policy for an application on this computer has not been applied yet;
Failed – the policy for an application on this computer has failed (the computer was turned off,
disconnected, the application did not run, or was not installed, etc.).
Page 80

R E F E R E N C E G U I D E
80
Date – date and time when the event occurred.
Figure 55. Information about policy enforcement on clients of one group
Local parameters are modified automatically based on the settings selected when a policy is first applied on a client
computer.
After a policy is deleted or revoked, the application will continue working with the settings specified in the policy. The
settings may subsequently be modified manually.
Applying a policy to a large number of clients will significantly increase the load on the Administration Server and the
amount of network traffic.
To access and configure the additional policy settings, click the Advanced link.
To define policy status, in the window that opens (see the figure below) in the Policy status section, select one of the
following options:
Active policy;
Mobile user policy;
Inactive policy.
To enable inheritance, i.e. prohibit modification of "locked" policy settings in the configuration of child policies, check the
Inherit settings from parent policy box. To disable inheritance, uncheck the Inherit settings from parent policy box.
To force inheritance of settings in child policies, enable the checkbox next to the corresponding item. After changes in a
policy are applied, the following steps will be performed:
specified values will be distributed to the policies of nested administration groups, i.e. to the child policies;
the Inherit settings from parent policy box will be checked in child policies;
Page 81

R E M O T E M A N A G E M E N T O F A P P L I C A T I O N S
81
the values of the settings in child policies will remain "locked" until the Force inheritance of settings in child
policies box is checked.
Figure 56. Configuring additional policy settings
The Events tab (see the figure below) represents the information on events that are fixed in the application operation.
The event types are divided into three groups according to their severity level.
Figure 57. Editing a policy. The Events tab
Page 82

R E F E R E N C E G U I D E
82
Immediately after the policy has been created, the values on the Events tab will match the default application settings.
The settings are specific to each Kaspersky Lab application, and more information about them is available in user guides
for each application. If necessary, you can change the policy settings.
Configure the Events tab properties in the policy settings similarly to the Events tab settings in the Administration Server
properties (see section "General Administration Server settings" on page 28).
ACTIVATING A POLICY
For the policy to become active:
1. Select the required policy in the console tree.
2. Open the context menu and select the Properties command or use the Edit policy link in the Actions section
of the task pane.
3. Select the General tab (see the figure below) in the <Policy name> Properties application policy configuration
window.
4. Click the Advanced link to open the advanced settings window. In the Policy status section select Active
policy.
To deactivate a policy, select Inactive policy.
To change the policy status quickly, use the Active policy and Inactive policy links in the task pane of the selected
policy.
Figure 58. The policy properties window
Page 83

R E M O T E M A N A G E M E N T O F A P P L I C A T I O N S
83
ACTIVATING A POLICY BASED ON AN EVENT
To activate a policy automatically when a Virus outbreak event occurs,
in the Administration Server settings configured on the Virus outbreak the policy must be included in the
corresponding list (see section "Changing the application policy when a Virus outbreak event is registered" on
page 309).
If you activate a policy by event, you can return to the previous policy manually only.
POLICY FOR MOBILE USER
This policy type is available for Kaspersky Anti-Virus 6.0 for Windows Workstations MP4.
To configure the enforcement of a policy when a client computer disconnects from the corporate network:
1. Select the required policy in the console tree, open its context menu and choose the Properties command.
2. Select the General tab (see the figure below) in the Properties: <Policy name> application policy
configuration window.
Figure 59. The policy properties window
Page 84

R E F E R E N C E G U I D E
84
3. Click the Advanced link to open the additional policy settings window (see the figure below).
Figure 60. Additional policy settings window
4. In the Policy status section select Mobile user policy.
DELETING A POLICY
To delete a policy:
Select the necessary policy in the Policies folder within the console tree and use the Remove command from the
context menu or the Remove policy link in the task pane.
COPYING A POLICY
To copy a policy:
1. Select the necessary policy in the Policies folder in the results pane and use the Copy command from the
context menu.
2. Go to the Policies folder of the required group (or remain in the same folder) and use the Paste command from
the context menu.
An active policy becomes inactive when copied. If required, you can make this policy active (see section "Activating a
policy" on page 82).
As a result, the policy will be copied with all its settings and applied to the computers within the group into which it was
copied. If a policy with the same name exists in the folder, the _1 ending will be automatically added to its name.
CONFIGURING THE NETWORK AGENT'S POLICY
You can define the following parameters in the Settings window (see the figure below) while creating a policy for the
Network Agent:
In the Event log group use the Maximum size of event log, MB field to define maximum disk space that the
events log will be allowed to occupy.
Page 85

R E M O T E M A N A G E M E N T O F A P P L I C A T I O N S
85
In the Application uninstallation password group press the Modify button and enter the password. This
password must be specified in the task of remote uninstallation of the Network Agent.
Figure 61. Creating a Network Agent policy. The Settings window
Page 86

R E F E R E N C E G U I D E
86
In the Repositories window specify the options for the system of collecting information about the applications installed
on computers within a group and objects in repositories. To reflect the information about applications in the applications
registry (see section "Applications registry" on page 272), check the Information about installed applications box. To
display information about objects placed in repositories by applications of version 6.0 MP3, in the corresponding folders
of the Repositories folder, check the Quarantined objects and Backup objects boxes.
Figure 62. Creating a Network Agent policy. The Repositories window
In the Network window (see the figure below) you can specify the settings for connection to an Administration Server.
In the Connect to the Administration Server field specify the following:
In the Synchronization interval (min) field specify the time interval (in minutes) between attempts to
synchronize data of the client computers and the Administration Server.
Check the Use SSL connection box if you wish the connection to be secure (using SSL protocol).
Check the Compress network traffic box to increase the rate of the data transfer by the Network Agent, by
decreasing the amount of the information transferred and hence decreasing the load on the Administration
Server.
If you enable this setting, the load on the central processor of the client computer may be increased.
Page 87

R E M O T E M A N A G E M E N T O F A P P L I C A T I O N S
87
In the Network Agent port field, allow the Administration Server connection to the client computers using a UDP port,
and define the port number. To open the connection via the UDP port, check the Use UDP port box and enter the port
number in the UDP port number field. By default, port 15000 will be used; but if required, you can change it. Only
decimal notation is allowed.
Figure 63. Creating a Network Agent policy. The Network window
When editing the policy for the Network Agent, you can make changes on the General, Events, Settings, Repositories
and Network tabs.
Page 88

R E F E R E N C E G U I D E
88
In addition to the values configured in the policy creation wizard, on the Network tab (see the figure below) you can also
check the Open Network Agent ports in Microsoft Windows Firewall box. This will cause the UDP port required to
support Network Agent to be added to the Microsoft Windows firewall exception list.
Figure 64. Editing a Network Agent policy. The Network tab
CONFIGURING THE SETTINGS OF THE ADMINISTRATION SERVER
POLICY
When creating a policy for the Administration Server, specify Kaspersky Administration Kit in the application selection
window. Then, using the Settings window (see the figure below), you can configure general settings for the
Administration Server.
In the Administration Server connection settings field:
The number of the port used to connect to the Administration Server. By default, port 14000 is used; if this port
is in use, it can be changed;
the number of the port for secure connection to the Administration Server using SSL protocol. By default, port
13000 will be used.
Page 89

R E M O T E M A N A G E M E N T O F A P P L I C A T I O N S
89
Specify the required value in the Maximum number of events stored in the database field. The default value is
400,000 records.
Figure 65. Creating an Administration Server policy. The Settings window
In the Scan network window (see the figure below) you can specify how the Administration Server updates its
information about the Windows network structure:
To enable automatic network polling, check the Allow scan box in the Windows network group.
To enable automatic polling of IP subnets, check the Allow scan box in the IP subnets group. The
Administration Server will poll the subnets with the period specified in the Scan interval (min) field. The default
interval between polls is 420 minutes.
Page 90

R E F E R E N C E G U I D E
90
To allow automatic network polling using the Active Directory structure, check the Allow scan box in the Active
Directory group.
Figure 66. Creating an Administration Server policy. The Scan network window
In addition to the values configured during policy creation, additional policy parameters may be modified.
Page 91

R E M O T E M A N A G E M E N T O F A P P L I C A T I O N S
91
Use the Computer visibility timeout (min) field on the Settings tab (see the figure below) to specify the time during
which the client computer will be considered visible to the network after the connection with the Administration Server
has been lost. The default for this interval is 60 minutes. After the specified period expires, the Administration Server will
consider the client computer inactive.
Figure 67. Editing an Administration Server policy. The Settings tab
On the Scan network tab (see the figure below) you can define the following settings:
Intervals for Windows network polling:
Full scan time (min). Complete information about computers in the network will be updated with the
specified interval. The default interval between polls is 60 minutes.
Quick scan time (min). Information about the list of computers connected to the network will be updated
with the specified frequency. The default interval between polls is 15 minutes.
IP subnet scanning period (min). To do this, use the appropriate block in the Scan interval (min) field to specify
the required value. The default interval between polls is 420 minutes.
Page 92

R E F E R E N C E G U I D E
92
Intervals for network polling in accordance with the Active Directory structure. To do this, use the appropriate
block in the Scan interval (min) field to specify the required value. The default interval between polls is
60 minutes.
Figure 68. Editing an Administration Server policy. The Scan network tab
The Virus outbreak tab is used to specify when the Virus outbreak event will be raised for each anti-virus application
type. The settings on this tab are identical to those in the corresponding tab of the Administration Server properties
window.
The Cisco NAC tab may be used to define a mapping between anti-virus protection conditions and Cisco NAC statuses.
The settings on this tab are identical to those in the corresponding tab of the Administration Server properties window.
Page 93

R E M O T E M A N A G E M E N T O F A P P L I C A T I O N S
93
You can use the Administration Servers hierarchy tab (see the figure below) to allow or prohibit editing of the server
hierarchy settings. If Allow hierarchy settings modification on slave servers is unchecked, slave Administration
Server administrators will not be able to edit hierarchy settings specified on the master Server.
Figure 69. Editing an Administration Server policy. The Administration Servers hierarchy tab
EXPORTING A POLICY
To export a policy:
1. In the console tree, select the required group.
2. Select the Policies subfolder.
In the results pane, you will see a list of all policies created for this group.
3. Select the necessary policy.
4. Open the context menu and select the Export command or use the Export policy to file link in the task pane.
5. In the displayed window specify the name and path for the destination file. Click the Save button.
Page 94

R E F E R E N C E G U I D E
94
IMPORTING A POLICY
To import a policy:
1. In the console tree, select the required group.
2. Select its Policies subfolder.
3. Open the context menu and select the All tasks Import command or use the Import policy from a file link
in the task pane of the Policies folder.
4. In the window that opens, specify the path to the source file containing the required policy. Click the Open
button.
The added policy will appear in the console tree.
POLICIES CONVERSION
Using Kaspersky Administration Kit, you can convert the policies of the previous version of Kaspersky Lab applications to
the current version. This may be useful, for example, when you install the Administration Server 8.0 on a computer with
the Administration Server 6.0 installed. This procedure is performed using the Policies and tasks conversion wizard.
To convert application policies and / or tasks:
1. In the console tree, select the Administration Server for which you wish to convert policies and / or tasks.
2. In the context menu, select All tasks Policies and tasks conversion wizard. A wizard will start. Follow the
wizard's instructions.
3. In the Application name field (see the figure below), specify the application version. After the wizard
completes, the policies and tasks will be converted for work in the specified version of the application.
Figure 70. Selecting an application for conversion
Page 95

R E M O T E M A N A G E M E N T O F A P P L I C A T I O N S
95
4. In the next wizard window (see the figure below), check boxes next to the policies, for which you wish to perform
the conversion. Pressing the Next button will perform the policies conversion.
Figure 71. Selecting policies for conversion
5. In the next wizard window (see the figure below), check boxes next to the tasks, for which you wish to perform
the conversion. Pressing the button Next will perform the tasks conversion.
Figure 72. Selecting tasks for conversion
Page 96

R E F E R E N C E G U I D E
96
The wizard will create new policies and tasks that use the policies and tasks settings of the previous version.
MANAGING TASKS
Kaspersky Administration Kit manages application installed on client computers by creating and running tasks. These
tasks implement the basic management features; for example, applications and licenses installation, file scan, database
and program modules updates. Tasks are subdivided into the following types:
group tasks (see section "Creating a group task" on page 97) – running on all client computers within an
administration group;
Administration Server tasks (see section "Creating an Administration Server task" on page 108) – running on
the Administration Server;
tasks for specific computers (see section "Creating a task for specific computers" on page 109) – running on a
small number of computers that are not put into a separate group;
local tasks (see section "Creating a local task" on page 110) – created and running on an individual client
computer.
The created tasks are displayed in the appropriate folder of the console tree. The icon indicating the task status is
displayed next to its name (see section "Statuses of computers, tasks and policies" on page 321).
KASPERSKY ADMINISTRATION KIT TASKS
The Administration Server performs the following tasks:
reports delivery (see section "Reports delivery task" on page 193).
downloading of updates to the repository (see section "Determining the updates list" on page 245).
Administration Server data backup (see section "Data backup" on page 299).
TASKS FOR SPECIFIC COMPUTERS
You can create tasks for specific computers in Kaspersky Administration Kit. Such specific computers can be included in
different administration groups. Kaspersky Administration Kit can perform the following main tasks:
Remote application installation (see the Implementation Guide for further details).
Message for users (see section "Sending message to the user of the client computer" on page 158).
Switching the Administration Server (see section "Administration Server change task" on page 145).
Managing the client computer (see section "Client computer management task" on page 148).
Updates verification (see section "Verifying downloaded updates" on page 249).
Distribution of the installation package (see the Implementation Guide for further details).
Remote application installation to the slave Administration Servers (see the Implementation Guide for further
details).
Remote application uninstallation (see the Implementation Guide for further details).
Page 97

R E M O T E M A N A G E M E N T O F A P P L I C A T I O N S
97
CREATING A GROUP TASK
To create a group task:
1. In the console tree, select the group for which you want to create the task.
2. Select its Group tasks subfolder.
3. Open the context menu and use the New Task command or the Create a task link in the task pane. This will
launch the New Task Wizard. Follow the wizard's instructions.
4. Specify the task name. If a task with the specified name already exists in the group, the _1 suffix will be
automatically added to the end of the name.
5. Then, select the application for which you want to create a task, and define the task type (see the figure below).
Figure 73. Creating a task. Selecting an application and defining task type
To select an application for which a task is to be created, select the corresponding node in the suggested tree.
The list includes all Kaspersky Lab applications that have their Console Plug-ins installed on the administrator's
workstation. To specify the task type, select one of the child nodes for the selected application.
Page 98

R E F E R E N C E G U I D E
98
6. You will then be prompted to configure the task according to the selected application (see the figure below).
Some settings are set by default. For details about task configuration, see documentation for a specific
application.
Figure 74. Task configuration
7. Then, create the task start schedule. Use the Scheduled start drop-down list to select the necessary mode for
task launch and configure the task schedule in the group of fields corresponding to the selected mode:
Every N hours;
Every N minutes;
Daily;
Weekly;
Monthly;
Once;
Manually – manual launch from the main window of Kaspersky Administration Kit using the Start command
of the context menu or the Run a task link in the task pane;
After application update – after every update of the application database;
At application start;
Immediately – start the task immediately (after the wizard finishes);
When new updates are downloaded to the repository – automatically after the Administration Server
downloads the updates;
On virus outbreak;
Page 99

R E M O T E M A N A G E M E N T O F A P P L I C A T I O N S
99
On completing another task.
This is the list of all scheduling modes available for Kaspersky Administration Kit tasks. Some of the listed
options may not be available depending on the task type.
The tasks for applications, which can be managed via Kaspersky Administration Kit, can have extra scheduling
modes. You can find more information about schedule options in the corresponding user guides.
If you set up the task to start Every N hours (see the figure below), specify the following:
The task start frequency in the Every hour field and the start date and time for the task in the Plan for field.
For example, if you entered value 2 in the Every hour field and entered August 3, 2008 3:00:00 p.m. in the
Plan for field, the task will start every two hours starting at 3 p.m. on August 3, 2008.
The default frequency value is set at 6, and the default start date and time for the task is automatically set
to the current system date and time of your computer.
The procedure for the task to start if the client computer is unavailable (turned off, disconnected from the
network, etc.) or if the application is not open at the time specified by the schedule.
Check the Run missed tasks box to make the system attempt to start the task the next time the application
is opened on this client computer. For Manually, Once, and Immediately the task will be started
immediately after the computer connects to the network.
If this box is not checked (default), only scheduled tasks will be started on the client computers, and for
Manually, Once, and Immediately - on hosts visible on the network only.
A variation of the scheduled time during which the task will be started on the client computers. This
capability is provided to spread the load caused by simultaneous calls made to the Administration Server by
numerous client computers when the task is launched.
Page 100

R E F E R E N C E G U I D E
100
Check the Randomize the task start with interval (min) box and specify the time (in minutes) so that the
client computers call the Administration Server within some interval after the task is started, rather than
simultaneously. By default, this box is unchecked.
Figure 75. Scheduling a task to start Every N hours
If you set up the task to start Every N minutes (see the figure below), specify the following:
The task start frequency in the Every minutes field and the start date and time for the task in the Plan for
field.
For example, if you entered value 10 in the Every field and entered August 3, 2008 3:00:00 p.m. in the
Plan for field, the task will start every ten minutes starting at 3 p.m. on August 3, 2008.
The default frequency value is set at 30, and the default start date and time for the task is automatically set
to the current system date and time of your computer.
An action if a client computer is temporarily unavailable at the task start.
 Loading...