

Page 1

www.kasdanet.com
Rev: 2.0.0
2017031001
Default Login Details
Login Address: www.mykasda.com
Login Password: Set up by users
Default Wi-Fi SSID: kasda xxxx KW6512
(Printed on product label)
Default Wi-Fi Password: 12345678
User Manual
Page 2

NOTICE
This document contains proprietary information protected by copyright, and this
Manual and all the accompanying hardware, software, and documentation are
copyrighted. All rights are reserved. No part of this document may be photocopied or
reproduced by mechanical, electronic, or other means in any form.
The manufacturer does not warrant that the hardware will work properly in all
environments and applications, and makes no warranty or representation, either
expressed or implied, with respect to the quality, performance, merchantability, or
fitness for a particular purpose of the software or documentation. The manufacturer
reserves the right to make changes to the hardware, software, and documentation
without obligation to notify any person or organization of the revision or change.
All brand and product names are the trademarks of their respective owners.
© Copyright 2017
All rights reserved.
Page 3

KW6512 LinkSmart Wireless Router User Manual
1
Content
1 INTRODUCTION ............................................................................................................................... 2
1.1 MAIN FEATURES ................................................................................................................. 2
1.1.1 Wireless................................................................................................................................... 2
1.1.2 Network Protocol and Features .............................................................................................. 2
1.1.3 Firewall ................................................................................................................................... 2
1.1.4 Management Support ............................................................................................................. 3
1.1.5 Operating System Support ...................................................................................................... 3
1.1.6 Environmental ......................................................................................................................... 3
1.2 PACKET CONTENTS ........................................................................................................ 3
1.3 SYSTEM REQUIREMENTS .................................................................................................. 3
1.4 FACTORY DEFAULTS ....................................................................................................... 4
1.5 WARNINGS AND CAUTIONS .............................................................................................. 4
2 HARDWARE DESCRIPTION ............................................................................................................... 5
3 HARDWARE INSTALLATION ......................................................................................................... 7
4 PC CONFIGURATION GUIDE ........................................................................................................ 7
4.1 FOR WINDOWS 7 ................................................................................................................. 7
4.2 FOR WINDOWS 8 ................................................................................................................ 7
4.3 FOR WINDOWS XP .............................................................................................................. 8
4.4 FOR MAC OS X .................................................................................................................. 8
5 QUICK SETUP OF THE ROUTER ......................................................................................................... 8
6 WEB-BASED ADVANCE MANAGEMENT GUIDE .............................................................................. 16
APPENDIX: FREQUENT ASKED QUESTIONS .................................................................................... 27
1. POWER, HARDWARE CONNECTIONS, AND LEDS .................................................................. 27
2. DEVICE ACCESS AND LOGIN ................................................................................................ 27
3. INTERNET ACCESS .............................................................................................................. 28
Page 4

KW6512 LinkSmart Wireless Router User Manual
2
1 Introduction
Thank you for choosing our product. The KW6512 Wireless Router uses Open-WRT
solution that fully complies with IEEE802.11b/g/n/ac standards. It will provide your
SOHO with convenient Internet.
1.1 Main Features
1.1.1 Wireless
Fully IEEE 802.11b /g /n & IEEE 802.11ac compatible
Wireless data rate up to 750 Mbps
Operating in the unlicensed 2.4 GHz &5GHz ISM band
Supports 64/128 bits WEP, WPA, WPA2, WPA/WPA2-PSK, 802.1x
1.1.2 Network Protocol and Features
Ethernet to modem Self-Learning Transparent Bridging
Internet Control Message Protocol (ICMP)
IP Static Routing
Routing Information Protocol (RIP, RIPv2)
Network Address Translation (NAT)
Virtual Server, Port Forwarding
Dynamic Host Configuration Protocol (DHCP)
DDNS
Simple Network Time Protocol (SNTP)
1.1.3 Firewall
Built-in NAT
MAC Filtering
Packet Filtering
Stateful Packet Inspection (SPI)
Page 5

KW6512 LinkSmart Wireless Router User Manual
3
Denial of Service Prevention (DoS)
1.1.4 Management Support
Web Based GUI
Upgrade or update via FTP/HTTP
Command Line Interface via Telnet
Diagnostic Test
Firmware upgrade-able for future feature enhancement
1.1.5 Operating System Support
WINDOWS 98/SE/ME/2000/XP/VISTA/7/8/8.1/10
Macintosh
LINUX
1.1.6 Environmental
Operating humidity: 10%-90% non-condensing
Non-operating storage humidity: 5%-95% non-condensing
1.2 Packet Contents
The packet contents are as the following:
Router x 1
Power Adapter .x 1
Ethernet Cable x 1
Quick Setup Guide x 1
1.3 System Requirements
Broadband Internet Access Service (modem/Ethernet)
One Modem that has an RJ45 connector (which is not necessary if the Router is
connected directly to the Ethernet)
TCP/IP protocol on each PC
Page 6

KW6512 LinkSmart Wireless Router User Manual
4
Web browser, such as Microsoft Internet Explorer, Mozilla Firefox or Apple Safari
1.4 Factory Defaults
The device is configured with the following factory defaults:
Login Address: www.mykasda.com
Login password: Set up by users
Default Wi-Fi SSID: Kasda XXXX KW6512
Default Wi-Fi Password: 12345678
1.5 Warnings and Cautions
Never use the product near water.
To prevent dangerous overloading of the power circuit, be careful about the
designed maximum power load ratings. Not to follow the rating guideline could
result in a dangerous situation.
Page 7

KW6512 LinkSmart Wireless Router User Manual
5
2 Hardware Description
Front Panel
LED
Color
Function
POWER
Blue
Off: Power Not Supplied
On: Power Supplied
WAN
Blue
On: The WAN port has detected a link with an attached device
Blinking: Data is being transmitted or received by the WAN port
Off: No WAN link via the WAN port
LAN
Blue
On: LAN link established and active via LAN port
Blinking: Data activity occurs
Off: No LAN link via LAN port
WiFi 2.4G/5G
Blue
On: The 2.4GHz or 5GHz wireless module is ready and idle
Blinking: Data transmitting or receiving over WLAN
Off: The 2.4GHz or 5GHz wireless function is off
WPS
Blue
On: WPS connection is established
Blinking: Trying to establish a WPS connection
Off: WPS function is off or no WPS connection
Page 8

KW6512 LinkSmart Wireless Router User Manual
6
Rear panel
Port
Function
WAN
Connect the device to a cable or modem
Ethernet1,2,3,4
Connect the device to your PC's Ethernet port, or to
the uplink port on your hub/switch, using a RJ-45
cable
RESET
System reboot or reset to factory defaults
WPS
Turn on/off your WPS
Power
Connect to the supplied power adapter
Page 9

KW6512 LinkSmart Wireless Router User Manual
7
3 Hardware Installation
This chapter shows you how to connect Router. Meanwhile, it introduces the
appropriate environment for the Router and installation instructions.
1. Using an Ethernet Cable to connect the WAN port of the ROUTER to a cable or
modem.
2. Using an Ethernet Cable to connect the LAN port of the ROUTER to your LAN or a
PC with network card installed.
3. Connect the power cable to the PWR connector on ROUTER, then plug in the
power adapter to the AC power outlet, and then press the on-off button.
4 PC Configuration Guide
4.1 For windows 7
1. Click “Start -> Control Panel-> Network and Internet -> View networks status ->
Change adapter settings”
2. Right-click Wireless Network Connection(or Local Area conncection), and then
click Properties.
3. Select Internet Protocol Version 4 (TCP/IPv4), and then clcik Properties.
4. Select Obtain an IP address automatically and Obtain DNS Server address
automatically. Then click OK.
4.2 For Windows 8
1. Move your mouse to the lower right corner and click the Serch icon in the popus.
2. Go to Apps, type Control Panel in the serche box and press enter.
3. Go to “Control Panel ->l View networks status-> Change adapter settings”
Page 10

KW6512 LinkSmart Wireless Router User Manual
8
4. Right-click Ethernet,select Properties, then double-click internet protocol
version 4( TCP/IPv4).
5. Select Otain an IP address automatically and Obtain DNS Server address
automatically. Then click OK.
4.3 For windows XP
1. Click “Start” -> Control Panel -> Network and Internet Connection -> Network
Connections”
2. Right-click Wireless Networks Connection (or Local Area Connection), and then
click Properties.
3. Select Internet Protocol (TCP/IP), and then click Properties.
4. Select Otain an IP address automatically and Obtain DNS Server address
automatically. Then click OK.
4.4 For Mac OS X
1. Click the Apple icon on the upper left corner of the screen.
2. Go to System Preference -> Network.
3. Select Airport on the left menu bar, and then click Advanced for wireless
configuration; or select Ethernet for wired configuration,
4. In the Configure IPv4 box under TCP/IP, select Using DHCP.
5. Click Apply to save the settings.
5 Quick Setup of the Router
In order to use the web-based management software, it will be necessary to use a
computer or mobile phone which occupies the same subnet as the Router. The
simplest way to do this for many users will be to use DHCP server that is enabled by
default on the Router. Please make sure the wan connection is ok.
Setup Wizard will guide you through step-by-step process to configure your router
and connect to the Internet.
5.1 Quick Setup of the Router via mobile phone
1. Connect your phone to router by using default WiFi network name and password,
which are printed on product label at the bottom of the router.
2. Launch a browser on your phone to log in router with www.mykasda.com. Setup
your initial login password and then click next button to continue.
Page 11

KW6512 LinkSmart Wireless Router User Manual
9
3. Select the WAN Mode
If you don’t need any Internet connection information, choose “DHCP”.
Page 12

KW6512 LinkSmart Wireless Router User Manual
10
If your ISP gives you a PPP username and password for you, choose “PPPoE” and
type in the username and password.
If you have a IP address to connect to the Internet, choose “Static IP” and type in
the IP Address, IP Subnet Mask, Gateway IP Address and DNS Server.
Page 13

KW6512 LinkSmart Wireless Router User Manual
11
4. Setup your 2.4GHz & 5GHz SSID and password. On the following page, you can
rename the SSID and change password or just let it be default. The default
password is 12345678, you can check it by clicking the eye button.
5. Click Save/Apply and wait for changes to be applied.
Page 14

KW6512 LinkSmart Wireless Router User Manual
12
When it blows up the following tips, then you can connect your wired or wireless
devices to the Internet.
Note: If you have changed your wireless network name and password, you must
sign in with new SSID/password to regain access to the Internet.
5.2 Quick Setup of router via PC
1. Connect your PC to router wired or wirelessly.
2. Launch a browser, such as Internet Explorer or Chrome, and then use
www.mykasda.com to log on the web management page. Here please setup
your initial login password. Then click next button to continue.
Page 15

KW6512 LinkSmart Wireless Router User Manual
13
3. Set up your WAN Mode
If you don’t need any Internet connection information, choose “DHCP” as your
WAN Mode.
If your IPS gives you a PPP username and password, choose “PPPoE” as your WAN
Mode and type in the username and password.
Page 16

KW6512 LinkSmart Wireless Router User Manual
14
If you have an IP address to connect to the Internet, please choose “Static IP” as
your WAN Mode and type in the IP Address, IP Subnet Mask, Gateway IP Address
and DNS Server.
4. Set up your 2.4GHz and 5GHz SSID and password. Keep it as default or rename
the SSID and change the password as you like.
Page 17

KW6512 LinkSmart Wireless Router User Manual
15
5. Click Save/Apply to continue and wait for the changes to be applied.
After finish the Wizard Setup, you will enter the following page; here you can do a
quick change to your WAN, WiFi and LAN.
Page 18

KW6512 LinkSmart Wireless Router User Manual
16
6 Web-based Advance Management Guide
This chapter will introduce how to configure your router advanced behind the
advanced menu. There are four options: Status, System, Network and Logout.
6.1. Status
Click “Status”, you will go to the device information page. The page displays the
current status about Overview, Firewall, Routers, System Log, Kernel Log, and
Real time Graphs.
6.2. System
Click “System”, you will go the system page. In this page, there are six options:
System, Administration, Software, USB, Backup / Flash Firmware and Reboot.
Page 19

KW6512 LinkSmart Wireless Router User Manual
17
6.2.1 System
Here you can configure the basic aspects of your device like its hostname, time
-zone, language and style.
6.2.2 Administration
Click “Administration”, you will go to the Router Password page, and you can
change the administrator password for accessing the device.
6.2.3 Backup / Flash Firmware
Page 20

KW6512 LinkSmart Wireless Router User Manual
18
Click “Backup / Flash Firmware”, you will go to the Flash operations page. On this
page, you can do the backup or update the firmware version of routers.
Generate archive is to download a tar archive of the current configuration files and
save it for back up. You can save it onto another place such as your computer
desktop.
Perform reset is to reset the router’s firmware to its initial state. If you forget your
router’s web management login password, you can reset the router by performing
reset.
Upload archive is to restore the configuration files by upload a previously
generated backup archive here.
Flash new firmware image is to upload or download a sys-upgrade compatible
image here to replace the current running firmware. And if you want to retain the
configuration before uploading or downloading, please check “Keep Settings”. As
for how to flash new firmware image, you need to choose the firmware you want
to flash, and then click Flash image to wait for the flash finished. During this
period, please do not power off the router.
Page 21

KW6512 LinkSmart Wireless Router User Manual
19
6.2.4 Reboot
Click “Reboot”, you will go the following page. Here is for rebooting the operating
system of your device by clicking “Perform reboot”.
When you reboot your router, the Internet connection will be lost until the process
finished.
6.3. Network
6.3.1 Interfaces
Click “Interfaces”, you can see the following page about the router’s interfaces,
such as WAN, WAN6, GUEST and LAN.
On this page, you can overview the router’s interfaces status and do some modify
actions to them, such as Connect, Stop, Edit and Delete.
Page 22

KW6512 LinkSmart Wireless Router User Manual
20
Interface—WAN
Choose the WAN interface, and you will go to the common configuration such as
General Setup, Advanced Settings, Physical Settings and Firewall Settings.
Wan Connection Protocol
1. DHCP
If you connect with a dynamic IP address or cable modem, keep the default: DHCP
Protocol.
Page 23

KW6512 LinkSmart Wireless Router User Manual
21
2. Static
To use a fixed IP Address to connect the Internet, select Static Protocol. Then click
switch protocol to type in the parameters your ISP provide.
IPv4 Address – enter the IPv4 address provided by your ISP. It is a necessity to
connect Internet.
IPv4 netmask – enter the netmask provided by you ISP. It is a necessity to connect
Internet.
IPv4 gateway – enter the gateway IP address provided by your ISP. It is a necessity
to connect Internet.
Use custom DNS servers – enter the DNS (Domain Name System) server IP
address provided by your ISP. If you have two or more DNS servers, you can click
the add button behind to add.
Page 24

KW6512 LinkSmart Wireless Router User Manual
22
3. PPPoE
If you use PPPoE connection, select PPPoE as your WAN Protocol and click Switch
Protocol to confirm.
Username – enter the username provided by your ISP. It is a necessity to connect
the Internet.
Password – enter the password provided by your ISP. It is a necessity to connect
the Internet.
Access Concentrator – enter the Access Concentrator if required by your ISP.
Service Name – enter the Service Name, if required by your ISP, or just leave it
empty to autodetect.
Page 25

KW6512 LinkSmart Wireless Router User Manual
23
Interface – LAN
IPv4 Address / Netmask: this is the router IP address and subnet mask as seen on
the Internet LAN. The default value is 192.168.1.1 for IP address and
255.255.255.0 for netmask.
Ignore interface – check it to disable the DHCP for this interface
Start IP – lowest leased address as offset from network address
Limit – enter the maximum number of PCs that you want the DHCP server to
assign IP addresses to. The absolute maximum is 253, possible if 192.168.1.2 is
your starting IP address.
Lease time – enter the length of time, in minutes, that a DHCP client will be
allowed to use a dynamic IP address. The default is 0 minute, which means one
day. After this time is up, the client will be automatically assigned a new dynamic
IP address, or the lease will be renewed.
Page 26

KW6512 LinkSmart Wireless Router User Manual
24
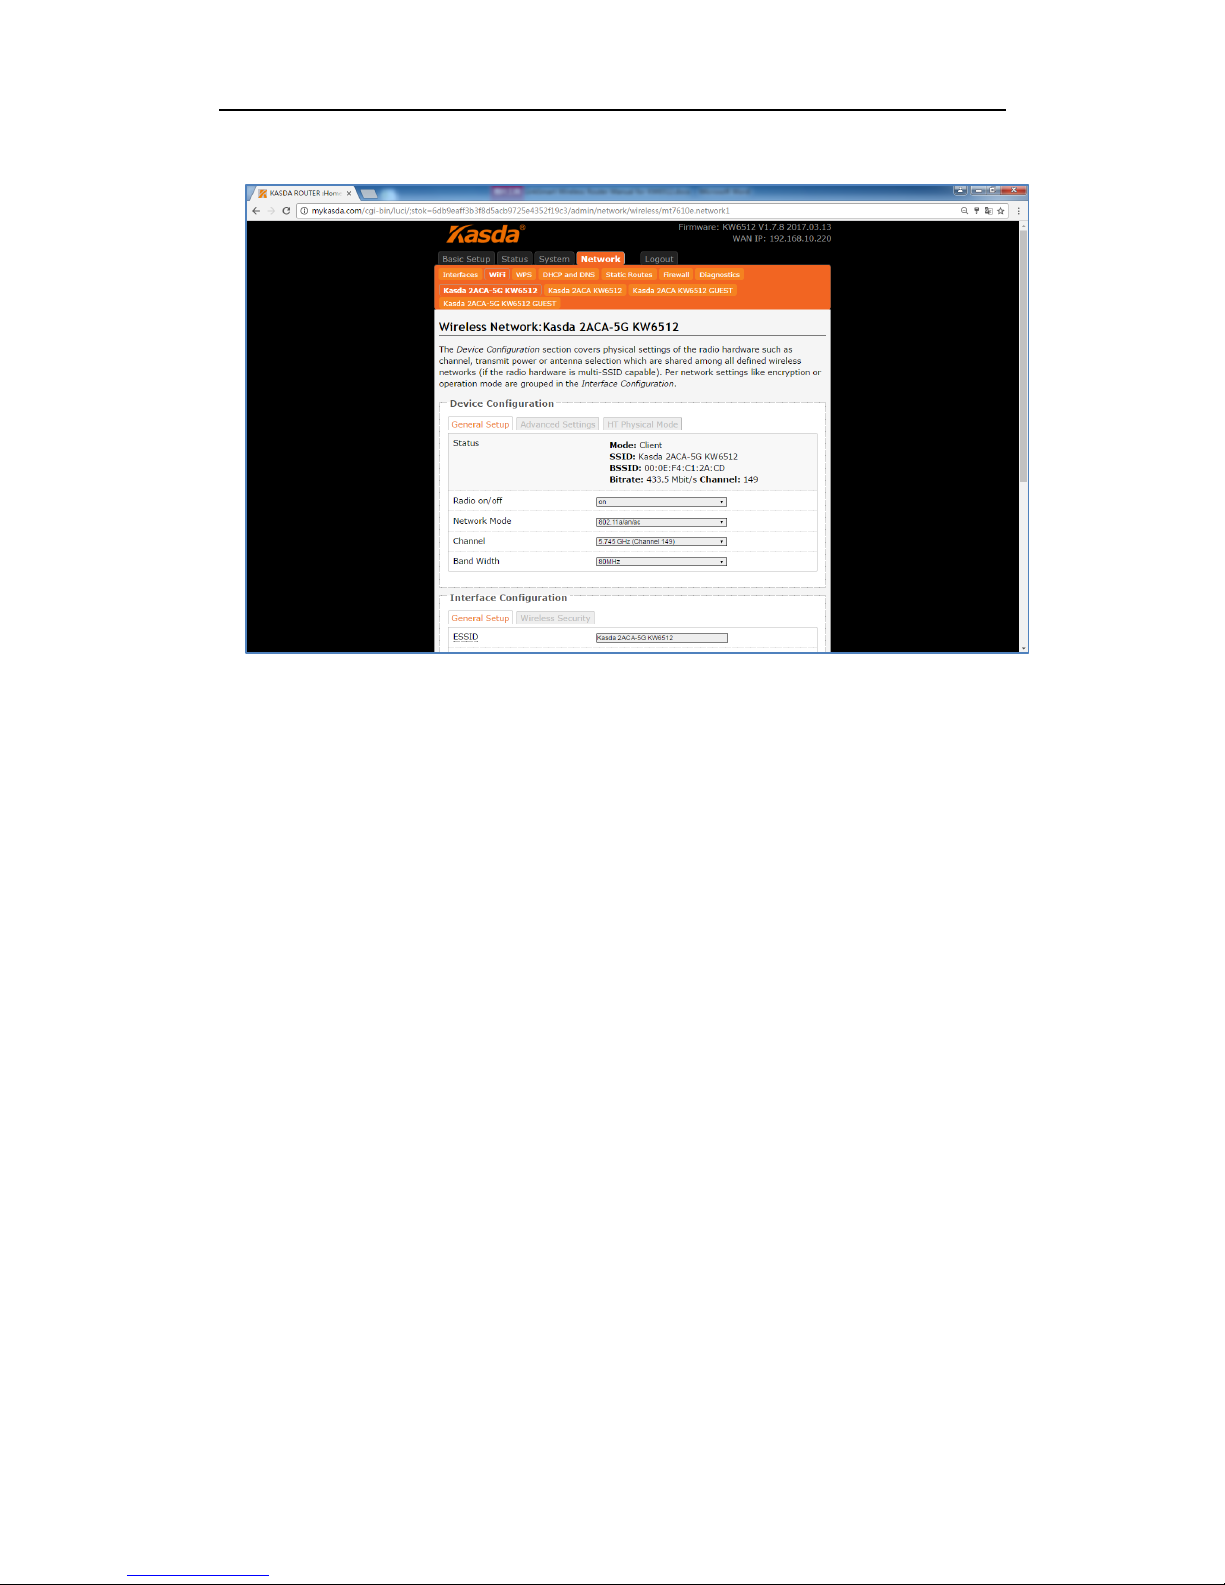
6.3.2 WiFi
Click “WiFi”, you will go to the wireless overview page. There are four wireless
SSID by default: 2.4GHz, 5GHz and Guest for 2.4GHz&5GHz. On the overview page,
you can disable/enable, edit and remove the WiFi SSID.
Click the “Edit”, and you will go the page where you can modify the parameters.
Page 27
KW6512 LinkSmart Wireless Router User Manual
25
Radio on/off – when wireless clients survey the local area for wireless networks to
associate with, they will detect the SSID radio by the router. To broadcast your
router SSID, keep the default setting—on. If you do not want to broadcast the
router SSID, then select off.
Network Mode – keep it default as 802.11b/g/n. If you have special demand, you
can select the mode as you like.
Channel – this field determines which operating frequency will be used. It is not
necessary to change the wireless channel unless you notice interference problems
with another nearby access point. If you select auto, then router will choose the
best channel automatically.
Bandwidth – the bandwidth of the wireless channel.
ESSID – it is the name of your wireless network. You can keep it default or rename
it as you like.
Mode – when you set up the wireless network via Wizard Setup, it is Client mode
by default. Most customers choose “Access Point”.
Network – Choose the network(s) you want to attach to this wireless interface or
fill out the create field to define a new network.
WMM Mode – keep it default “Enable”.
Page 28

KW6512 LinkSmart Wireless Router User Manual
26
APSDCapable – it is for power saving. Choose enable if you need or keep it
default.
6.3.3 WPS
You can start WPS (Wi-Fi Protected Setup) here by click the Enable button.
6.4 Logout
Click here for logging out your router and it will go back to the login page.
Page 29

KW6512 LinkSmart Wireless Router User Manual
27
Appendix: Frequent Asked Questions
This chapter offers some suggestions to solve problems you might encounter. The
potential problems are divided into 3 categories: Power, Hardware Connections, and LEDs;
Device Access and Login; Internet Access.
1. Power, Hardware Connections, and LEDs
None of the LEDs are on when power on the router.
Please make sure what you use is the power adaptor attached with the router package and
checks the connection between the AC power and router.
LAN LED does not turn on after connect Ethernet cable.
Please make sure Ethernet cable is connected hub/PC and router correctly. Then please
make sure the PC/hub have been power on.
Please make sure that you use parallel network cable to connect UpLink port of hub, or use
parallel network cable to connect PC. If connect normal port of hub (not UpLink port), you
must use cross-cable. Please make sure that your network cables meet the networking
requirements above.
2. Device Access and Login
I forgot the password.
1. You have to reset the device to its factory defaults and set your initial login password
and keep it in mind.
I cannot see or access the Login screen in the web configurator.
1. Make sure you are using the correct IP address.
The default login address is www.mykasda.com.
2. Check the hardware connections, and make sure the LEDs are behaving as
expected.
3. Make sure your Internet browser does not block pop-up windows.
4. Make sure your computer is in the same subnet as the Router.
If there is a DHCP server on your network, make sure your computer is using a dynamic IP
address.
If there is no DHCP server on your network, make sure your computer’s IP address is in the
same subnet as the router.
5. Reset the device to its factory defaults and reboot it again.
My PC is unable to connect to the wireless connection.
Please make sure that all devices communicating with the device must use the same channel
(and use the same SSID). Otherwise your PC will not find the wireless Router.
Page 30

KW6512 LinkSmart Wireless Router User Manual
28
3. Internet Access
My PC cannot browse Internet web page.
Please make sure DNS server appointed to the PC is correct. You can use ping application
program to test whether the PC can connect to the DNS server of the operator.
If the cause is not given above, please contact your local service provider!
 Loading...