


Shown with optional 2” receiver hitch
SURE-FEED BROADCASTER
MODEL I-44 & I-92
Instructions for Assembly,
Mounting, Broadcasting,
Operating, and Maintenance.
The Herd Model I-92 Broadcaster is designed to be mounted to farm tractors,
pickup trucks, or our #300 flotation trailer.
We do not recommend that this broadcaster be mounted to a lawn tractor, garden tractor, or ATV due to the size of the
broadcaster.
Any questions about the safe operation of
this broadcaster should be directed to the
manufacturer:
Kasco Mfg. Co., Inc.
170 W 600 N
Shelbyville, IN 46176
800-458-9129
www.kascomfg.com
1-800-458-9129
www.kascomfg.com
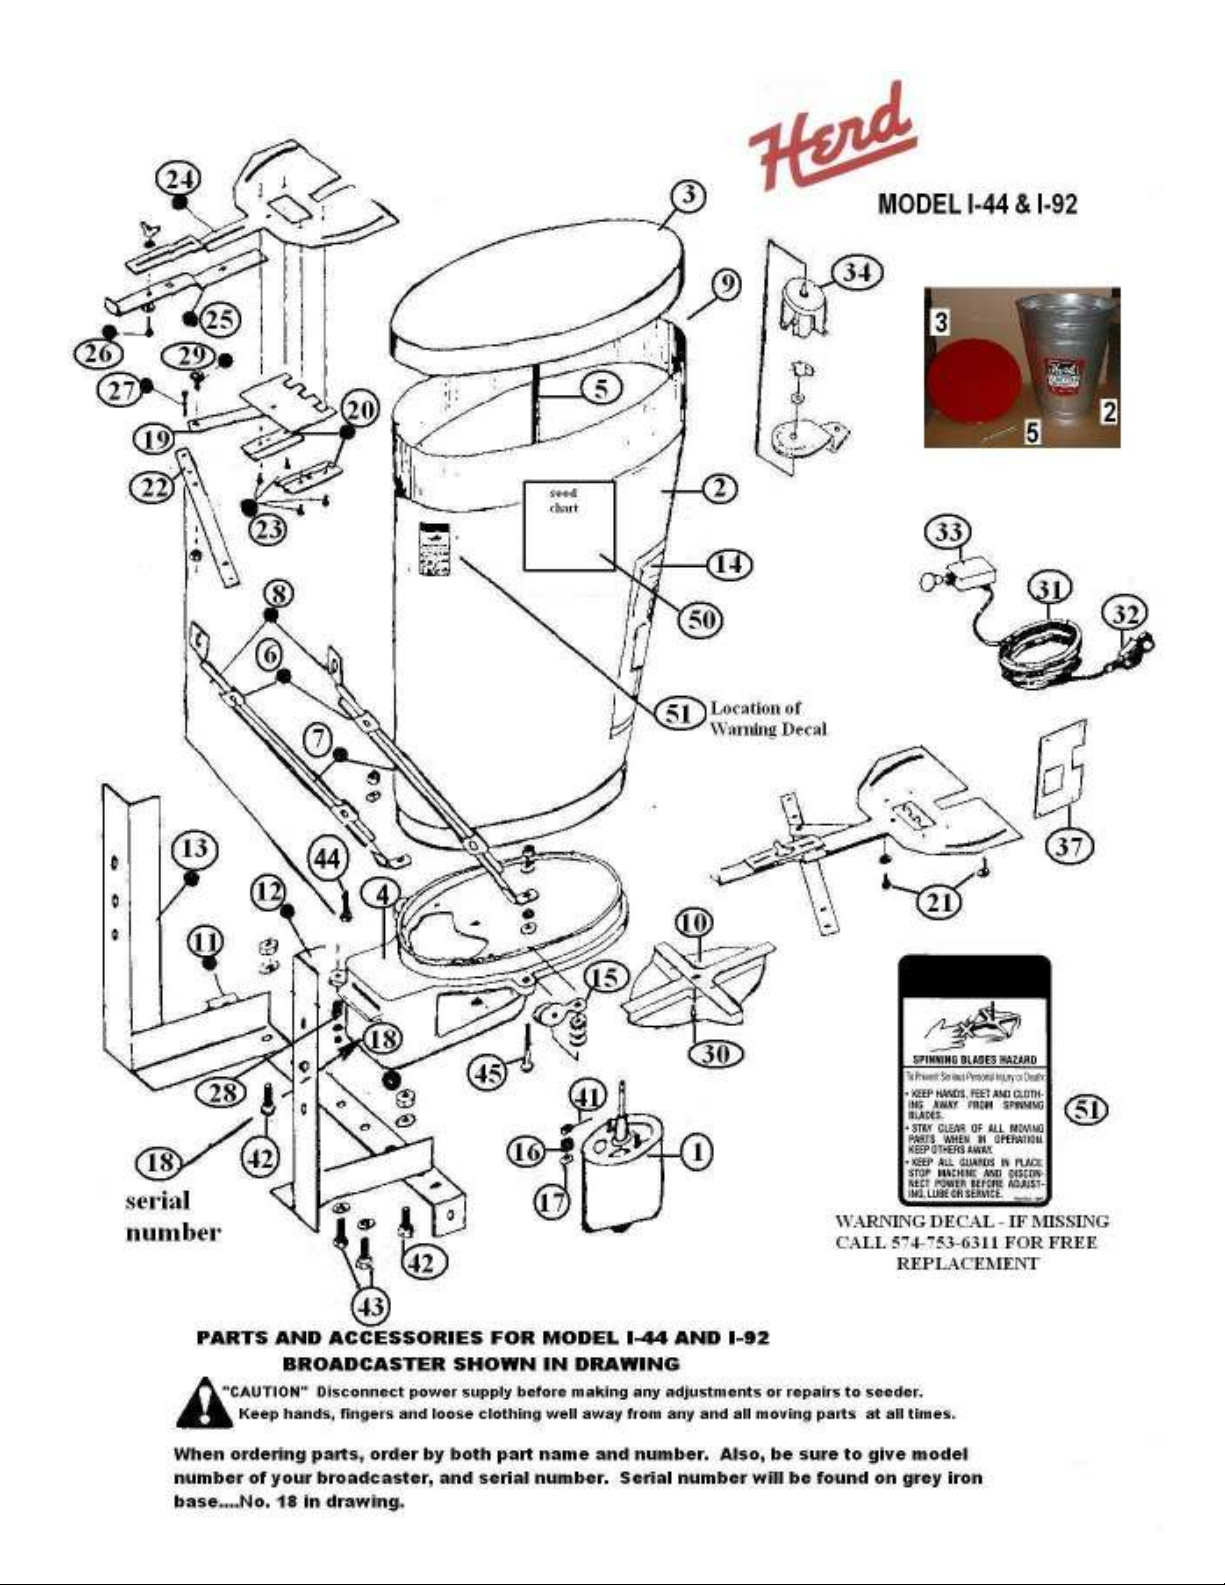

PART DESCRIPTION
Drawing Number Part Number Description Number Required
1 712 12 volt DC motor (new style—4” diameter) 1
1 600 12 volt DC motor (old style—3-1/4” diameter) 1
2 981C Hopper with decals 1
3 796 Lid for Hopper of I-92 1
4 599 Grey-Iron Base 1
5 797 Lid Spring with 3/16” x 1/2” bolt, washer, & nut 1
6 924 Brace Rod Clamps 2
7 934 Brace Rod—5/16” hole in end 2
8 936 Brace Rod—5/8” hole in end 2
10 986 Fan with 5/16” bore 1
11 767 Straight Angle with Plate welded on end 1
12 768 Right “L-Arm” for Front or Rear Mounting 1
13 769 Left “L-Arm” for Front or Rear Mounting 1
14 831 “Herd Sure-Feed” Decal 1
878 Model # Decal—I-92 1
15 756 Pulley for Remote Control 1
16 757 Spring, Stainless Steel—Used under Agitator 1
17 558 Steel Washer—Used on Fan Shaft, under #757 Spring 1
19 504 Seed Gate with Connecting Linkage (Stainless) 1
20 509 Guide for Seed Gate (set of 2) (Stainless) 2 sets
21 516 Capscrew—1/4” x 1/2” with Flatwasher (Stainless) 2
22 792 Control Handle 1
23 510 Round Head Machine Screw—3/16” x 3/8” (Stainless) 4
24 802SI Pivot Plate with Gauge Markings (Stainless) 1
25 803S Opening Gauge used on 802SI (Stainless) 1
26 804 Hex Head Capscrew—3/16” x 1-3/4” with Nut & Washer 1
27 806 Machine Screw—3/16” x 1-3/4” with Nut & Washer 1
28 807 Compression Spring—Used on Handle 1
29 505 Pan Head Machine Screw—1/4” x 1/2” with Jam Nut 1
30 502 Socket Set Screw—1/4” x 3/8”, used on 986 Fan (Stainless) 2
31 754 Electric Wire—14 gauge—12 feet 1
32 755 Heavy Duty Clamp 1
33 794 Switch, Push/Pull 1
34 813 Rheostat, complete with Bracket & Knob (OPTIONAL) 1
37 517 Blocking Plate (OPTIONAL) 1
41 559 Agitator with 5/16” Bore 1
42 410 Hex Head Bolt—1/2” x 1” with Nut & Lockwasher 2
43 410A Hex Head Bolt—1/2” x 1” with Lockwasher 2
44 407 Hex Head Bolt—5/16” x 1” with Nut & Lockwaster 1
45 422 Hex Head Bolt—5/16” x 1-3/4” with Nut

MODEL I-92 General Instructions
1. For Normal broadcasting of seeds, this model I-92 seeder requires no changes. It was
assembled at the factory for this purpose.
2. This model may be mounted via one of our mounting kits (i.e. #660 2” receiver hitch, Carton
JPH-1, etc).
3. A rheostat (part #813) may be purchased as an option to control the width of the spread of
material. This will allow the spread pattern to be narrowed by a slower fan speed.
4. To center the spread pattern, pivot plate #802SI can be rotated left or right. To do this,
loosen the two capscrews holding the pivot plate to the base of the seeder. While facing the
hopper and looking at the Herd Seeder Co. decal, if the spread pattern of the material being
spread is heavy to your right, then move the pivot plate to a lower letter. If the spread
pattern of the material is heavy to the left, move the pivot plate to a higher letter.
5. Be sure the battery charge is up and the generator/alternator is operating efficiently, so that
the broadcaster will operate at the necessary RPMs. The motor will use approximately 8 to
10 amps when spreading.
6. This unit is not recommended for fertilizer or salt as the corrosive material must be kept off
the electric motor.
ASSEMBLY INSTRUCTIONS
1. Place the broadcaster motor side up, on a level surface for assembly.
2. Turn the handle (part #729) around toward the seeder base and remove the flathead screw
and jamnut. Place flathead screw first through the hole in the seed gate linkage, then
through the hole in the handle. Tighten with the jam nut until snug. Make sure the jam nut is
up, facing you, and not too tight, as it must pivot at this point.
3. Check the opening gauge control plate (part #803S) for correct fit. It is possible the gauge
could have been bent in shipping. This gauge is used to set the seed gate opening opening
width to regulate the amount of seed flowing through the seed gate onto the spinner fan.
The seeder is now ready to be mounted.
MOUNTING #794 SWITCH OR #813 RHEOSTAT
1. The push-pull switch (part #794) or the dial rheostat (part #813) can be mounted next to the
driver’s seat, in a convenient spot. It can also be mounted next to the broadcaster on one of
the remaining holes on the cross angle iron.
2. When the rheostat is used, do not use the push-pull switch in line. The rheostat has an “Off”
position and will have longer life if the push-pull switch is not in line with it.
WIRING INSTRUCTIONS
1. Run the #754 wire from the motor terminal to the switch or rheostat, then run a wire from
the switch or rheostat to the positive (+) battery terminal. Use 14 gauge wire or heavier.
2. You can use the battery clamp #755 to connect the positive (+) wire from the switch or
rheostat to the positive (+) battery terminal for convenience.
3. A second ground must be run between the frame of the seeder and the frame of the
vehicle.

ADDITIONAL TIPS AND TROUBLE-SHOOTING
1. Causes of packing material in the bottom of hopper:
⇒
Filling unit at barn then driving to field
⇒
Using material that has collected moisture from storage, or material being used on
extremely damp days.
⇒
Use of poor grade material
⇒
Using hopper extension when material us not used at a fast rate
2. Cause of material blowing on operator during spreading:
⇒
Unit mounted too high about ground. This will cause the fan draft to pick up object
tionable odors from material, including dust, and carry them back to the operator.
⇒
Using material that is too dusty
⇒
Driving into wind. You should operate vehicle at a slight angle so that the material
blows to one side
3. Hopper extension is recommended for seeds only.
4. If the motor does not operate correctly, check connection, battery, generator, and
switch. Make sure unit is grounded securely to vehicle.
5. The opening must be opened wider for faster speeds in MPH of vehicle, and set narrower for slower speeds, to ensure proper amount of material on the ground.
6. If spread is too far to the left when facing broadcaster, move pivot plate so that the
opening aligns with a higher letter. If spread center is to the right, move pivot plate so
that the opening aligns with a lower letter. Be sure to tighten pivot plate capscrews after
adjusting.
7. The poorer grade of material, the narrower the spread and more difficulties will be encountered. Therefore, we recommend you use good, dust-free material.
MAINTENANCE
1. Store this model in a dry place so that the motor will not draw dampness. Be sure to
check motor so that it runs freely when it is to be used next. Run broadcaster empty a
few minutes before using after long periods of storage.
2. Oil the washer in hopper at the agitator pin.
3. The motor is sealed and does not require maintenance.

CHART FOR BROADCASTING SEEDS - I-92
Seed/Material Opening Size Sows per Acre Width
Alfalfa 3/16" 5-1/2# 28 feet
Ammonium
Nitrate 3/8" 80# 24 feet
Australian Pea 3/8" 1 bushel 34 feet
Bahia Grass 3/16" 19 # 18 feet
Blue Grass 1/2" 9-1/2# 14 feet
Brome Grass 1/2" 12# 28 feet
Clover 3/16" 5-1/2# 28 feet
Flax/ Millet 1/4" 10# 30 feet
Ladino Clover 1/32" 1# 28 feet
Lespedeza 3/16" 6# 28 feet
Oats 1" 64# 26 feet
Orchard Grass 3/8" 9-1/2# 18 feet
Red Top 3/16" 1-1/2# 18 feet
Rye 1/2" 42# 32 feet
Rye Grass 3/8" 1 bushel 21 feet
Sweet Sudan
Grass 1/2" 20# 28 feet
Timothy 3/16" 6# 36 feet
Turnip Seed 1/4" 10# 36 feet
Vetch 3/8" 40# 36 feet
Wheat 1/2" 45# 32 feet
The above chart is a reference only. The width of the spread varies according of the
quality and weight of the seed/material, fan speed, and wind conditions. All widths
given above are conservative. After making one run through your field, check spread
and check battery/grounding connections.
When measuring opening width, measure from the inset of tooth on the seed gate,
not from the tip of the teeth.
CAUTION:
When spreading bahia grass, teeth must be removed from seed gate for even feeding.
For every 1/16” increase in opening, the amount going through the opening will
increase approximately 100% over the last setting.

LIMITED WARRANTY
This broadcast seeder was thoroughly tested before it left the factory. We warrant
each broadcaster sold by us to be free from defects in material and workmanship
when used according to our directions. Our obligation under this warranty is limited
to making good at the factory any defective part or parts thereof, which shall within
three (3) months after delivery of such broadcaster to the original purchaser, to be
returned to us. No person or company is authorized to make further warranty.
This warranty shall not apply to any Herd Broadcaster which shall have been repaired or altered outside of our factory in any way, nor which has been subject to
misuses, negligence, or accidents, or was caused by damage while in possession of
the consumer or resulted from failure to the consumer to provide reasonable and
necessary maintenance.
170 West 600 North
Shelbyville, IN 46176
800-458-9129
www.kascomfg.com
 Loading...