

Page 1

MAGNETIC HOLE CUTTING MACHINES
GENERAL SAFETY INSTRUCTIONS
„ONLY THE BEST“
KA38 – KA40 – KAS40 – KA50 – KAS50
KATV55 – KATSV55 – KA100 – KAS100 – KATV100
KATSV100 – KALP45 – KATV140
H
C
S
M
E
T
R
E
I
T
N
E
T
A
P
T
I
M
PATENTIERT
W
I
PATENTED
T
H
P
A
T
E
N
T
E
D
T
W
E
I
N
E
N
F
Ü
H
R
U
N
G
S
S
Y
S
T
E
M
M
E
T
S
Y
S
E
D
I
L
S
L
I
A
R
I
N
FOR MORE INFORMATION PLEASE VISIT
WWW.KARNASCH.TOOLS
Page 2

GENERAL SAFETY INSTRUCTIONS FOR KARNASCH MAGNETIC HOLE CUTTING MACHINES
IMPORTANT SAFETY INSTRUCTIONS
AND INFORMATION FOR POWER TOOLS
KNOW YOUR POWER TOOL. Read and understand the safety and
1.
operating instructions, learn its application and limitations.
EARTH ALL TOOLS. Ensure that (where applicable) suitable earthed
2.
cables/cords and plugs are used and correctly connected. Always
check cable plug for any damage.
KEEP GUARD IN PLACE. Fit and keep guards in place (where appli-
3.
cable). Ensure correct adjustment and alignment.
KEEP WORK AREA CLEAN. The footprint oft he magnet must be
4.
clean (no chips, no rust, no dust).
AVOID DANGER. Don’t use power tools in damp or wet locations or
5.
expose them to rain. Keep work area well lighted. Provide adequate
surrounding work space. Keep the unit and the work place as clear
of dirt and swarf as possible.
WEAR PROPER APPAREL. Do not wear loose clothing, gloves, neck-
6.
ties or jewellery (rings, wristwatches) to get caught in moving parts.
NONSLIP footwear is recommended. Wear protective hair covering
to contain long hair, roll long sleeves above the elbow.
USE SAFTEY GOGGLES. (Head Protection). Wear approved safety
7.
goggles at all times. Everyday eyeglasses only have impact resistant
lens, they are NOT safety glasses. Also, use face or dust mask if
cutting operation is dusty, and ear protectors during extended periods of operation.
SECURE WORK. Use clamps or a vice to hold work when practical.
8.
It’s safer and frees both hands to operate tool. Secure the unit with
safety chain/carabina when working overhead or vertical.
DON’T OVERREACH. Keep proper footing and balance at all times.
9.
MAINTAIN TOOLS WITH CARE. Keep tools sharp and clean for best
10.
and safest performance. Follow instructions for lubricating and
changing accessories. Regular maintenance is essential. Check
nuts, screws, bolts for tightness.
DISCONNECT TOOLS. Before servicing; when changing accessories
11.
such as cutters, etc.
USE RECOMMENDED ACCESSORIES. Never use blunt Cutters/ Drills.
12.
CHECK DAMAGED PARTS. Before further use of the tool, a guard or
13.
other part that is damaged should be carefully checked to ensure
that it will operate properly and perform its intended function. Check
for alignment of moving parts, binding of moving parts, breakage of
parts mounting, and any other conditions that may affect operation.
A guard or other part that is damaged should be properly repaired or
replaced.
NEVER LEAVE TOOL RUNNING UNATTENDED. Turn power off. Don’t
14.
leave tool until it comes to a complete stop.
KEEP CHILDREN AWAY. Do not let visitors contact tool or extension
15.
cord. All visitors should be kept away from work area.
STORE IDLE TOOLS. When not in use, tools should be stored in dry,
16.
and high or locked-up place out of reach of children.
DON’T FORCE TOOL. It will do the job better and safer at the rate for
17.
which it was intended.
DON’T ABUSE CORD. Never carry tool by cord or yank it to discon-
18.
nect from receptacle. Keep cord from heat, oil and sharp edges
quality, high-performance and reliable tools. Karnasch Professional
Tools offers all that matters!
REMOVE ADJUSTING KEYS AND WRENCHES. Form habit of chek-
19.
king to see that keys and adjusting wrenches are removed from tool
before turning it on.
AVOID UNINTENTIONAL STARTING. Don’t carry plugged-in tool with
20.
finger on switch. Be sure switch is off when plugging in.
OUTDOOR USE EXTENSION CORDS. When tool is used outdoors, use
21.
only extension cords intended for outdoors and so marked.
STAY ALERT. Watch what you are doing. Use common sense. Do not
22.
operate tool when you are tired.
AVOID USING A POWER TOOL FOR APPLICATIONS OTHER THAN
23.
THOSE SPECIFIED. Never use a power tool for applications other
than those specified in the instruction manual.
ENSURE SAFE OPERATION THROUGH CORRECT HANDLING. Secure
24.
safe operation through correct handling by observing the instructions described herein. Do not employ accessories other than those
specified herein; otherwise, a hazardous condition may be created.
Never allow a power tool to be used by persons not familiar with
correct handling (such as children) or those who cannot handle the
tool correctly.
CONFIRM THAT NO ITEMS SUCH AS AN ELECTRIC CABLE OR
25.
CONDUIT ARE BURIED INSIDE. In places where live wiring may be
hidden behind a wall, floor, ceiling, etc. do not hold or contact any
metal parts of the tool. In such cases metal parts could become
electrically live and present a serious shock hazard.
KEEP THE RIGHT PARTS IN THE RIGHT POSITIONS. Do not remove
26.
covers and screws which have been factory-mounted. They perform
important retrospective roles. Keep them in the right positions.
SHOULD THE PLASTIC HOUSING OR HANDLE OF A POWER TOOL BE
27.
CRACKED OR DAMAGED, DO NOT USE IT. Since cracked or deformed
parts may lead to an operator receiving an electric shock, do not use
such a power tool. Immediately have it repaired.
SECURELY MOUNT ACCESSORIES AND BLADES TO THE TOOL MAIN
28.
BODY. Extra care must be taken when using tools on elevated locati-
on (such as a roof, ladder, scaffold or the like) to prevent injury to
someone on a lower level in the event of a dropping tool and / or an
accessory. Secure unit with safety chain/carabina.
ALWAYS KEEP THE MOTOR AIR VENT FULLY OPENED. A constantly
29.
open motor air vent is necessary to allow air to come in and out for
cooling the motor. Do not allow it to become clogged up, even if the
dust is blown through it.
OPERATE POWER TOOLS AT THE RATED VOLTAGE. Operate power
30.
tools at voltages specified on their nameplates.
NEVER TOUCH THE MOVING PARTS. Never touch the moving parts
31.
such as bits, cutters, drills, taps, etc.
STOP OPERATION IMMEDIATELY IF ANY ABNORMALITY IS
32.
DETECTED. Should a power tool be detected as out of order or
should other abnormalities be observed during operation, stop using
the tool immediately.
NEVER LEAVE TOOL RUNNING UNATTENDED. TURN POWER OFF.
33.
Don’t leave tool until it comes to a complete stop.
CAREFULLY HANDLE POWER TOOLS. Should a power tool be drop-
34.
ped or struck against hard materials inadvertently, it may be deformed, cracked, or damaged.
DO NOT WIPE PLASTIC PARTS WITH SOLVENT. Solvents such as
35.
gasoline, thinners, benzene, carbon tetrachloride, and alcohol may
damage and crack plastic parts. Do not wipe them with solvents.
Wipe plastic parts with a soft cloth lightly dampened with soapy
water.
REPAIRS TO MACHINE are to be carried out by qualified agent and
36.
genuine spare parts are always to be used.
WARNING: Under no circumstances try to remove turnings or swarf
37.
from the cutter when machine is in operation. NEVER introduce any
body parts to moving parts of the machine, when it is switched on.
This document is issued for general information and instruction and
as such does not constitute a specification of the equipment. Only
use faultless and sharp drilling tools and avoid that the machine
stops due to overload.
ATTENTION: When fitting drills or cutter arbors into morse taper
38.
drive shafts, ensure morse taper and cone are free of grease and
dirt.
REMOVING MORSE TAPER TOOLS FROM MACHINE DRIVE SHAFT.
39.
Always ensure power is switched off or unplug mains cable. Put the
drill drift in the opening of the gearbox collar. If you cannot insert the
drill drift through the work spindle, turn the work spindle slightly.
Remove the tool from the work spindle by a slight impact on the drill
drift.
For more information please call +49 6203-4039-0 or send a mail to [email protected].
Page 3

GENERAL SAFETY INSTRUCTIONS FOR KARNASCH MAGNETIC HOLE CUTTING MACHINES
THE MAXIMUM MAGNETIC HOLDING FORCE OF THE MACHINE IS
40.
OBTAINED FROM A MATERIAL THICKNESS OF 15 MM. Reduce feed
at thicknesses below 15mm. Below 10mm material thickness
magnetic hole cutting machines should not be used.
For more information please call +49 6203-4039-0 or send a mail to [email protected].
Page 4
GENERAL SAFETY INSTRUCTIONS FOR KARNASCH MAGNETIC HOLE CUTTING MACHINES
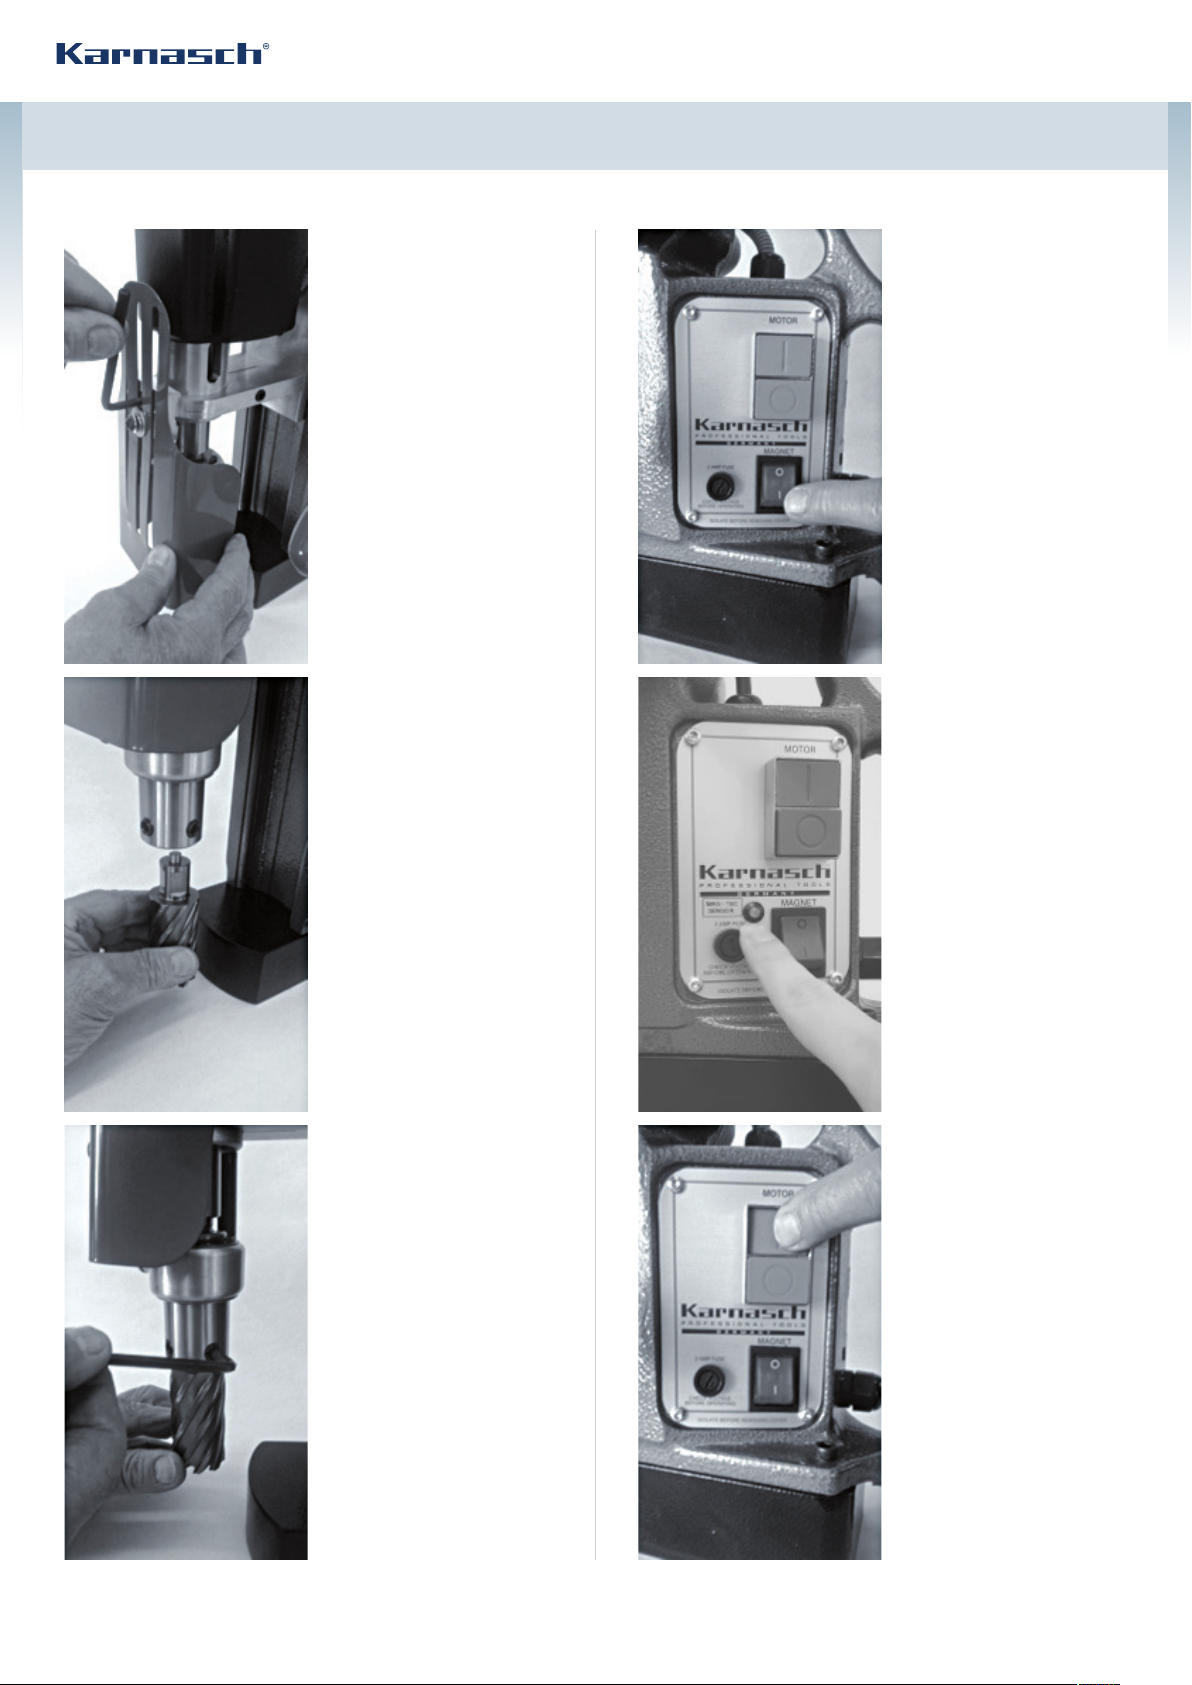
FITTING THE SAFETY
GUARD
The guard is fitted with parts supplied. The guard is fitted to the
front face of motor gear box support bracket by a single M6 Bolt
supplied with guard fixing plate.
FITTING CUTTERS INTO
MACHINE ARBOR
Always unplug the power source
to the machine before fitting or
removing cutters or drills into the
arbour. To fit cutters loosen both
screws to permit the cutter shank
to fit fully into the arbor ensuring
the flats of the cutters are in line
with the set screws.
OPERATING THE
MACHINE
Plug the power cable into suitable
power supply (using an extension
lead of the correct rating if necessary). The use of an RCD is also
highly recommended.
Select the required speed. Do NOT
attempt to change speed while the
machine is in operation.
MAG-TEC SENSOR
The sensor detects how well the
magnet keeps the machine on the
ground. It is directly connected to
the engine.
If the sensor is illuminating
„RED“, the ground is dirty (rust,
varnish residues, chips), the
material is thinner than 6mm or
the feed rate is to high. The machine does not have a safe stand. The
engine does not start or turns off.
If the sensor is illuminating
„GREEN“, the magnetic holding
force is optimal and the use of the
machine is safe.
SECURING THE CUTTER
IN ARBOR
When cutter is fully in position
with flats lined to the screws tighten screws evenly to secure cutter
in place ready for operation.
For more information please call +49 6203-4039-0 or send a mail to [email protected].
Start motor by pressing the green
button, at the end of drilling / cutting operation press red button to
stop motor.
Page 5
GENERAL SAFETY INSTRUCTIONS FOR KARNASCH MAGNETIC HOLE CUTTING MACHINES
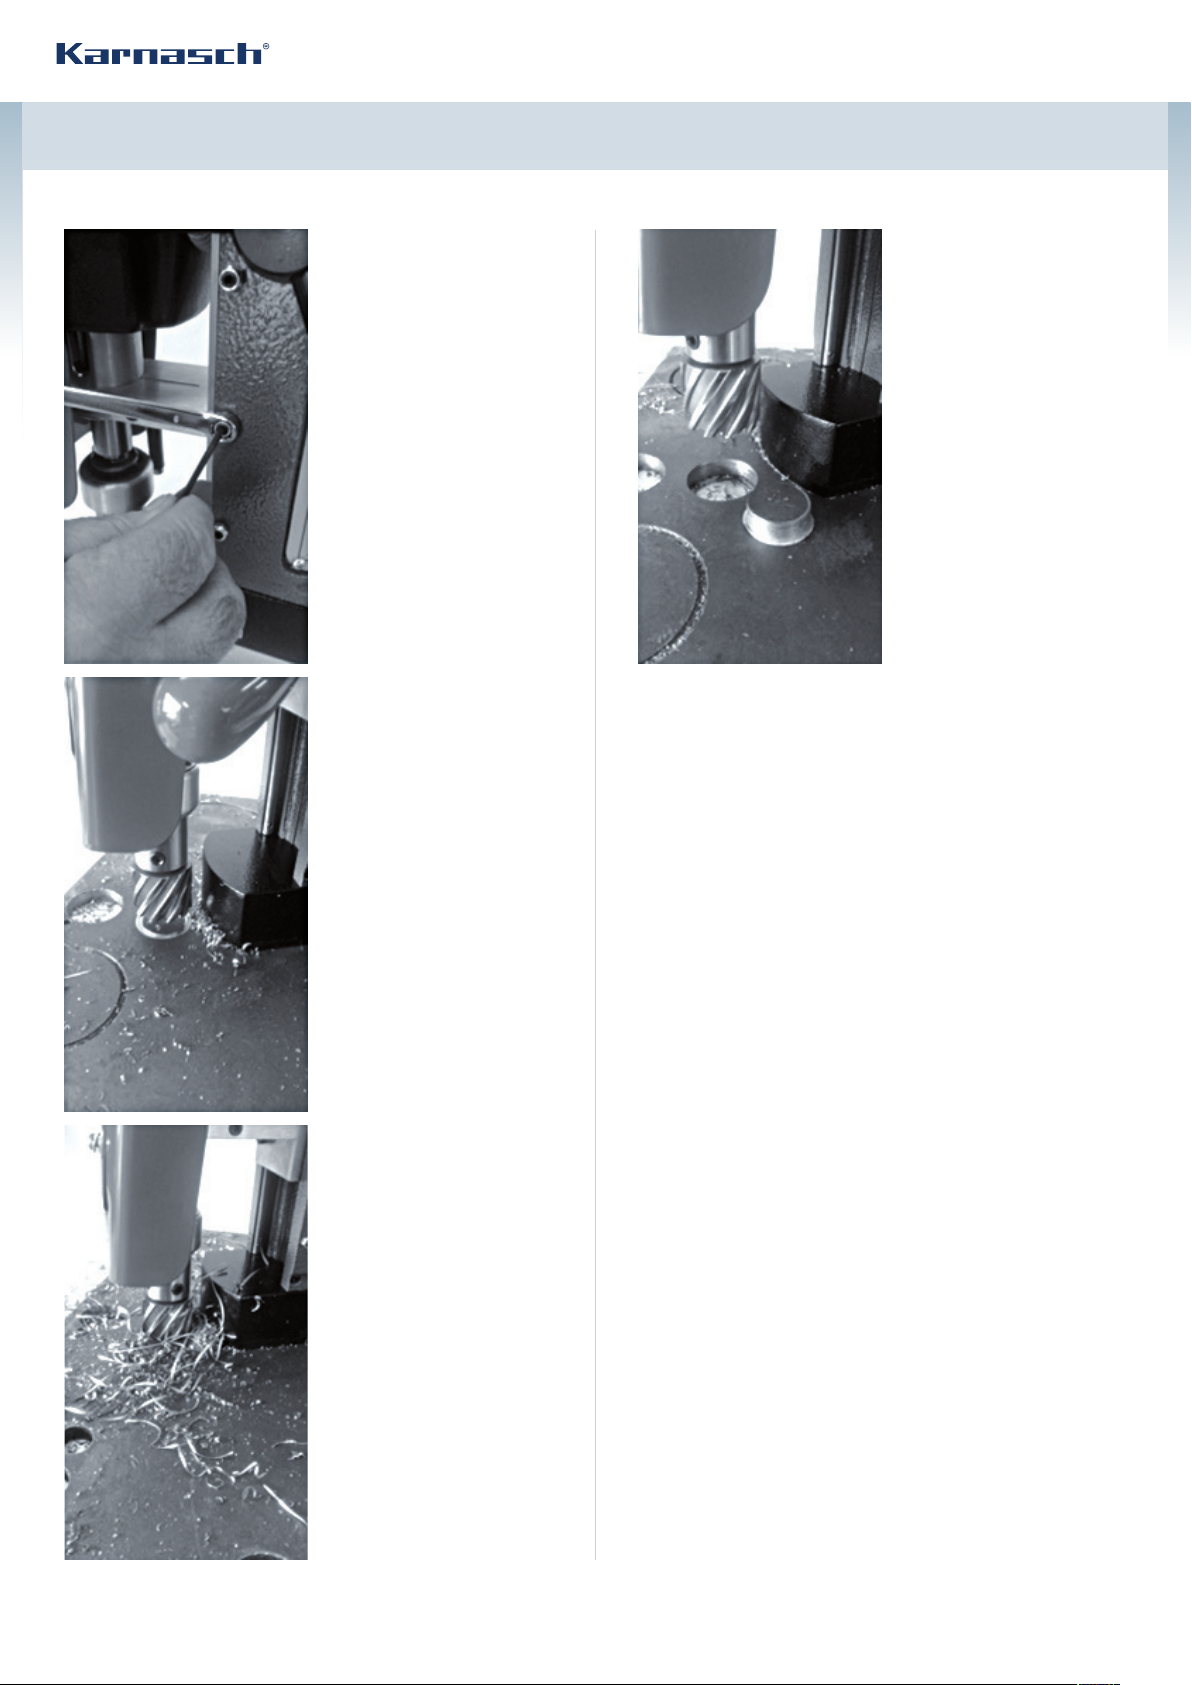
MAINTANANCE AND
ADJUSTMENTS
By using 2.5mm allen key and
8mm spanner fine adjustments
can be made to the twin rail slide
system when and if required.
Holding the adjustment screw in
position, loosen the lock nut with
8mm spanner, finger tighten the
screw hold and relock with lock
nut, always make adjustments
with slide in position with adjustment screws.
GUIDE RAIL AND GUIDE
CARRIAGE REQUIRE LIGHT
GREASE APPLYING PERIODICALLY
STARTING THE CUT
Always lower the safety guard into
position, start the motor by pressing green on the motor start button, wind the cutter gently down to
the surface of work piece and
apply light pressure until the cutter has made the initial cut in the
surface to a depth of around 2mm.
Apply coolant, increase the pressure until the motor is loaded.
Keep work area clean. The footprint oft he magnet must be clean
(no chips, no rust, no dust).
COMPLETION OF CUT
At the end of the cut the slug will
be ejected.
Withdraw the cutter from the hole
in work piece and stop the motor
by pressing the red motor stop
button. To de-energise the magnet
switch of the magnet switch.
There will be a 3/5 second delay
before the magnet disengages
from work piece.
DURING THE CUT
Maintain steady pressure throughout the rest of the cut, always
apply coolant during cutting operations.
Too much pressure will not speed
up the cut, it will reduce the life of
cutters and may cause damage to
the motor, if swarf / shaving becomes blue, add more coolant.
For more information please call +49 6203-4039-0 or send a mail to [email protected].
Page 6
GENERAL SAFETY INSTRUCTIONS FOR KARNASCH MAGNETIC HOLE CUTTING MACHINES
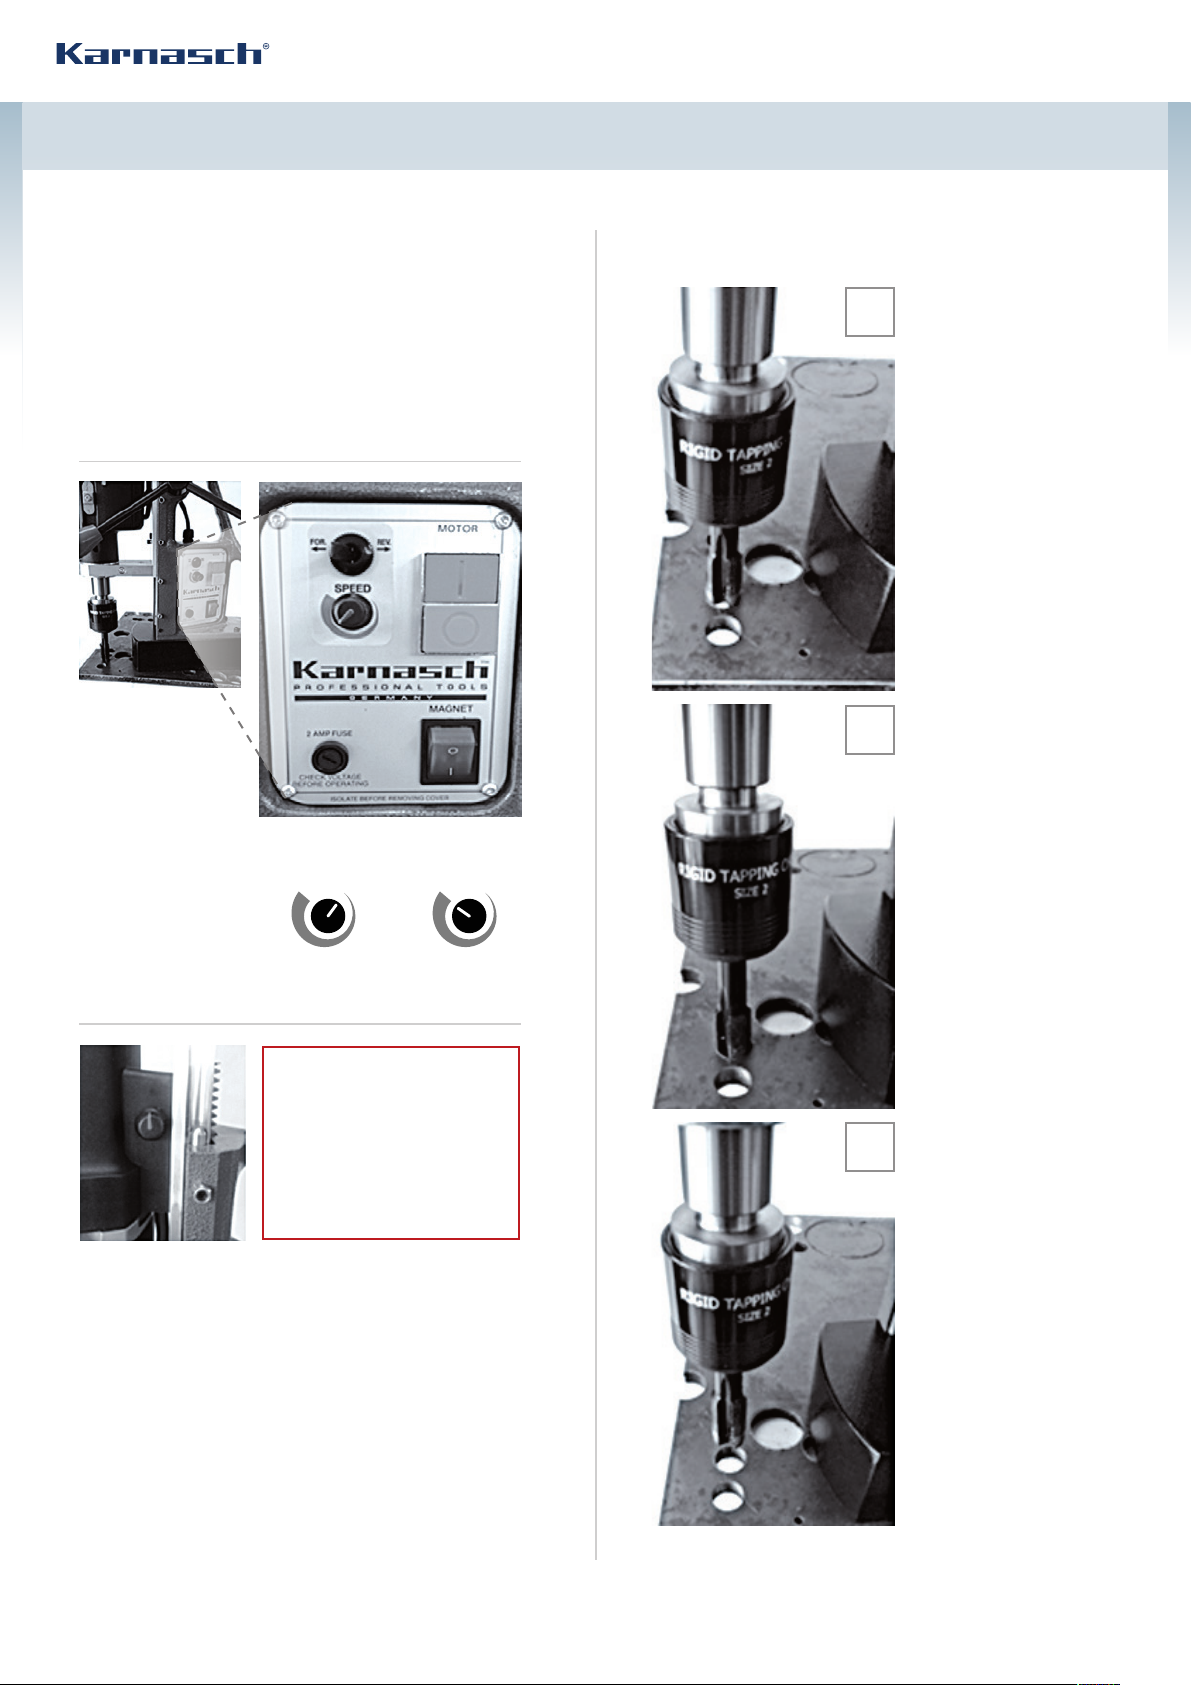
OPERATING INSTRUCTIONS FOR
KATV55 / KATSV55 / KATV100
KATSV100 / KATV140
SWITCH PANEL
SPEED
CONTROL
ON SWITCH
PANEL
Motor gear selector on
left side of gear box.
Check if work surface
is clean.
Down
for low gear
Up
for high gear
TAPPING
Fig 1
1
• Fit tapping arbor with
suitable collet and tap
into 2/3 MT socket on
machine.
• Position machine switch
on magnet.
• Select required speed/
gear/and torque.
• Select forward on for
ward/reverse switch.
• Switch. Press start but ton. Turn handles to
lower tap into pre-drilled
holes gently.
Fig 2
2
• Tap will start to cut and
screw itself into the hole.
• No pressure is required
from the operator.
• When tap reaches
required depth, switch
machine to reverse.
• Machine will stop auto matically.
NOTE:
Electronic torque
control is fitted on
motor side above
switch panel
For more information please call +49 6203-4039-0 or send a mail to [email protected].
Fig 3
3
• Press restart button,
machine will start in
reverse after a short time
and will screw the tap out.
• When completely out, stop
machine and select for ward.
• Ready for next operation.
Page 7

Page 8

KARNASCH PROFESSIONAL TOOLS®
CNC TOOLS DIVISION
Siemensstraße 1
D-68542 Heddesheim
KARNASCH PROFESSIONAL TOOLS
INDUSTRIAL TOOLS DIVISION
Straße des Friedens 10
D-15848 Tauche / OT Görsdorf
CONTACT
Phone: +49 (0) 6203 4039-0
Fax: +49 (0) 6203 41590
E-Mail: info@karnasch.tools
®
FOR MORE INFORMATION PLEASE VISIT
WWW.KARNASCH.TOOLS
 Loading...