

Karmann Ontario 580, Ontario 670, Ontario 700 Instruction Manual
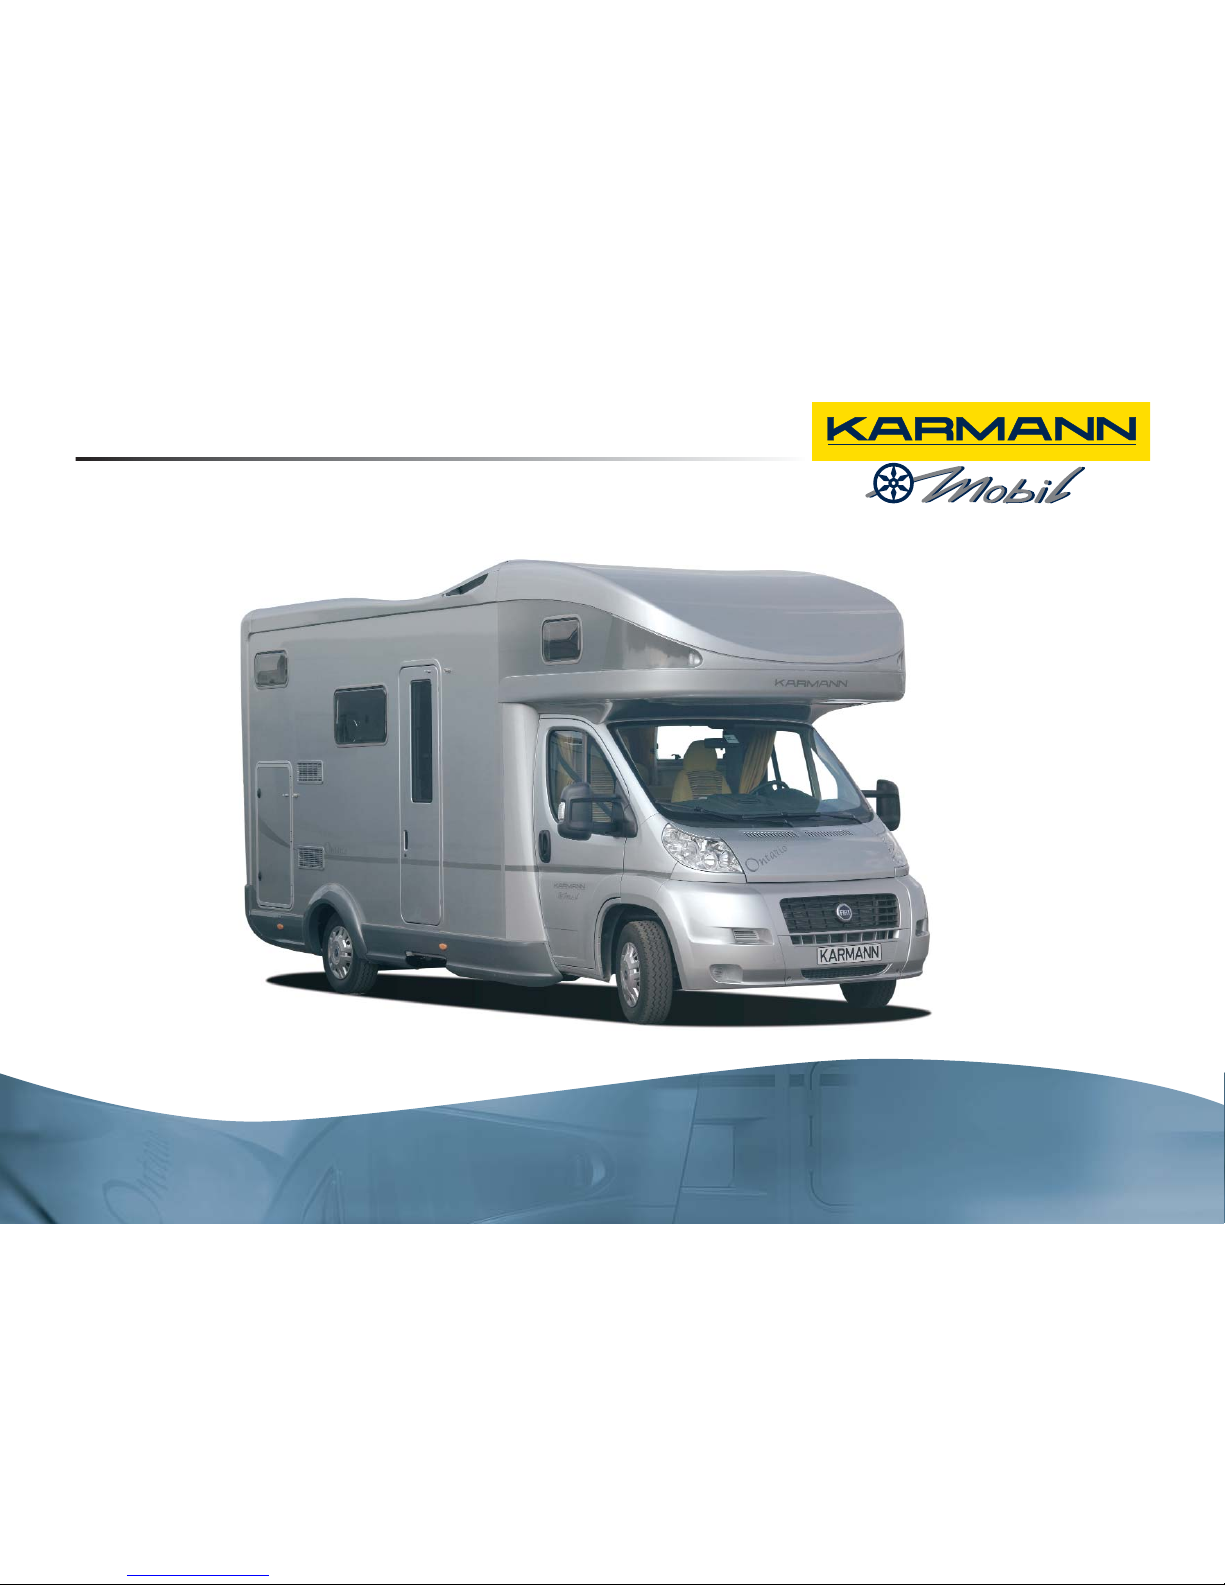
Instruction manual
Ontario
12.2006


Congratulations on your new Karmann-Mobil motorhome.
You have made the right decision, for Karmann has been building motorhomes for more than 100 years.
That means quality and reliability. And that is why Karmann is mentioned in the same breath as the
best automobile brands.
We don't simply put any body on any chassis. On the contrary: Safe handling can only be achieved if a first-class
chassis from an excellent manufacturer is given an body which is perfectly adapted to it, a body from Karmann-Mobil.
And what about service and replacement parts? Who wants to get stuck somewhere with a broken windscreen?
A network of selected partners will make sure that fast help is available everywhere.
Karmann-Mobil is synonymous with quality, reliability and pleasure for many years ahead.
We wish you a safe and happy journey.
Your Karmann-Mobil Vertriebs GmbH
If you wish to equip your motorhome with
special accessories such as bicycle, ski or
surfboard racks or awnings, you should take
advantage of the range on offer from Karmann
Mobil dealers.
These accessories have been especially
developed for your vehicle and tested for
reliability, safety and suitability - please also
note the instructions regarding the basic
chassis.
Detailed assembly and operation instructions
are of course included with these accessories.
This instruction manual contains important
notes for operation and care of your mobile
home as well as for use of its equipment.
Page 2-2 provides an overview of all instructions
and papers which accompany your motorhome.
The many practical tips included in it are
intended to make it easy for you to use your
Karmann-Mobil motorhome in the best way
possible, safely and in an environmentally
friendly way.
In the interests of safety, please read the
information regarding use of the gas equipment
and the 230 Volt vehicle electrical supply
system.
You will find all general information regarding
operation and handling of your vehicle in the
operating instructions for the basic chassis.
ON-BOARD LITERATURE
Sections with this symbol written in
italics offer important information on
environmental protection.
Sections introduced by the word "Caution"
and with a coloured background indicate
possible sources of accident, injury or
damage.
Caution
Location:
Notes that are outlined in blue indicate the
location of the described component and
are intended to provide quick orientation.

CONTENTS
Overview of equipment
Ontario 580 Exterior 1-1 Interior 1-2
Ontario 670 Exterior 1-3 Interior 1-4
Ontario 700 Exterior 1-5 Interior 1-6
General 2-1
Corresponding documents 2-2
Permit 2-3
Traffic safety equipment
Seating capacity 3-1
Three-point belts 3-2
Lap belts 3-3
Child's seats 3-3
Coupling device 3-4
Tyres 3-4
Wheel change 3-5
Brakes 3-6
Tips on commissioning 3-6
Traffic safety checklist for
your motorhome 3-7
Doors & windows, storage space
Keys 4-1
Cabin door 4-1
Locks for outside storage boxes 4-2
Entry 4-2
Opening windows 4-3
Shade and insect blinds 4-4
Roof hatches 4-5
Furniture
Dinette table 580,700 700 HS 5-1
Table L seating group 670 5-1
Sleeping in the rear seating group
700 HS 5-2
Sleeping in the Dinette 5-2
Coachbuilt 5-3
Cupboards 5-4
Gas installation
Gas supply 6-1
Heating and hot water supply 6-4
Gas cooker 6-6
Fridge 6-8
Electrical equipment 7-1
Control panel 7-2
Fuses 7-3
12 V cutout box 7-4
Fuses in the distribution module 7-4
Circuit breaker with earth leakage
protection 7-5
Body batteries 7-6
Halogen lamps 7-8
Water and sewage disposal
Freshwater supply 8-1
Sink with mixer tap 8-4
Toilet 8-4
Sewage tank 8-6
Sewage water tank 8-7
Discharge plug sewage water 8-7
Care of the vehicle
Exterior 9-1
Interior 9-2
Notes on operation
Winter operation 10-1
Immobilisation of the vehicle in winter 10-2
Faultfinding and elimination 11-1
Technical data
Weights 12-1
Dimensions 12-2
Vehicle identification number 12-4
List of terms 13-1
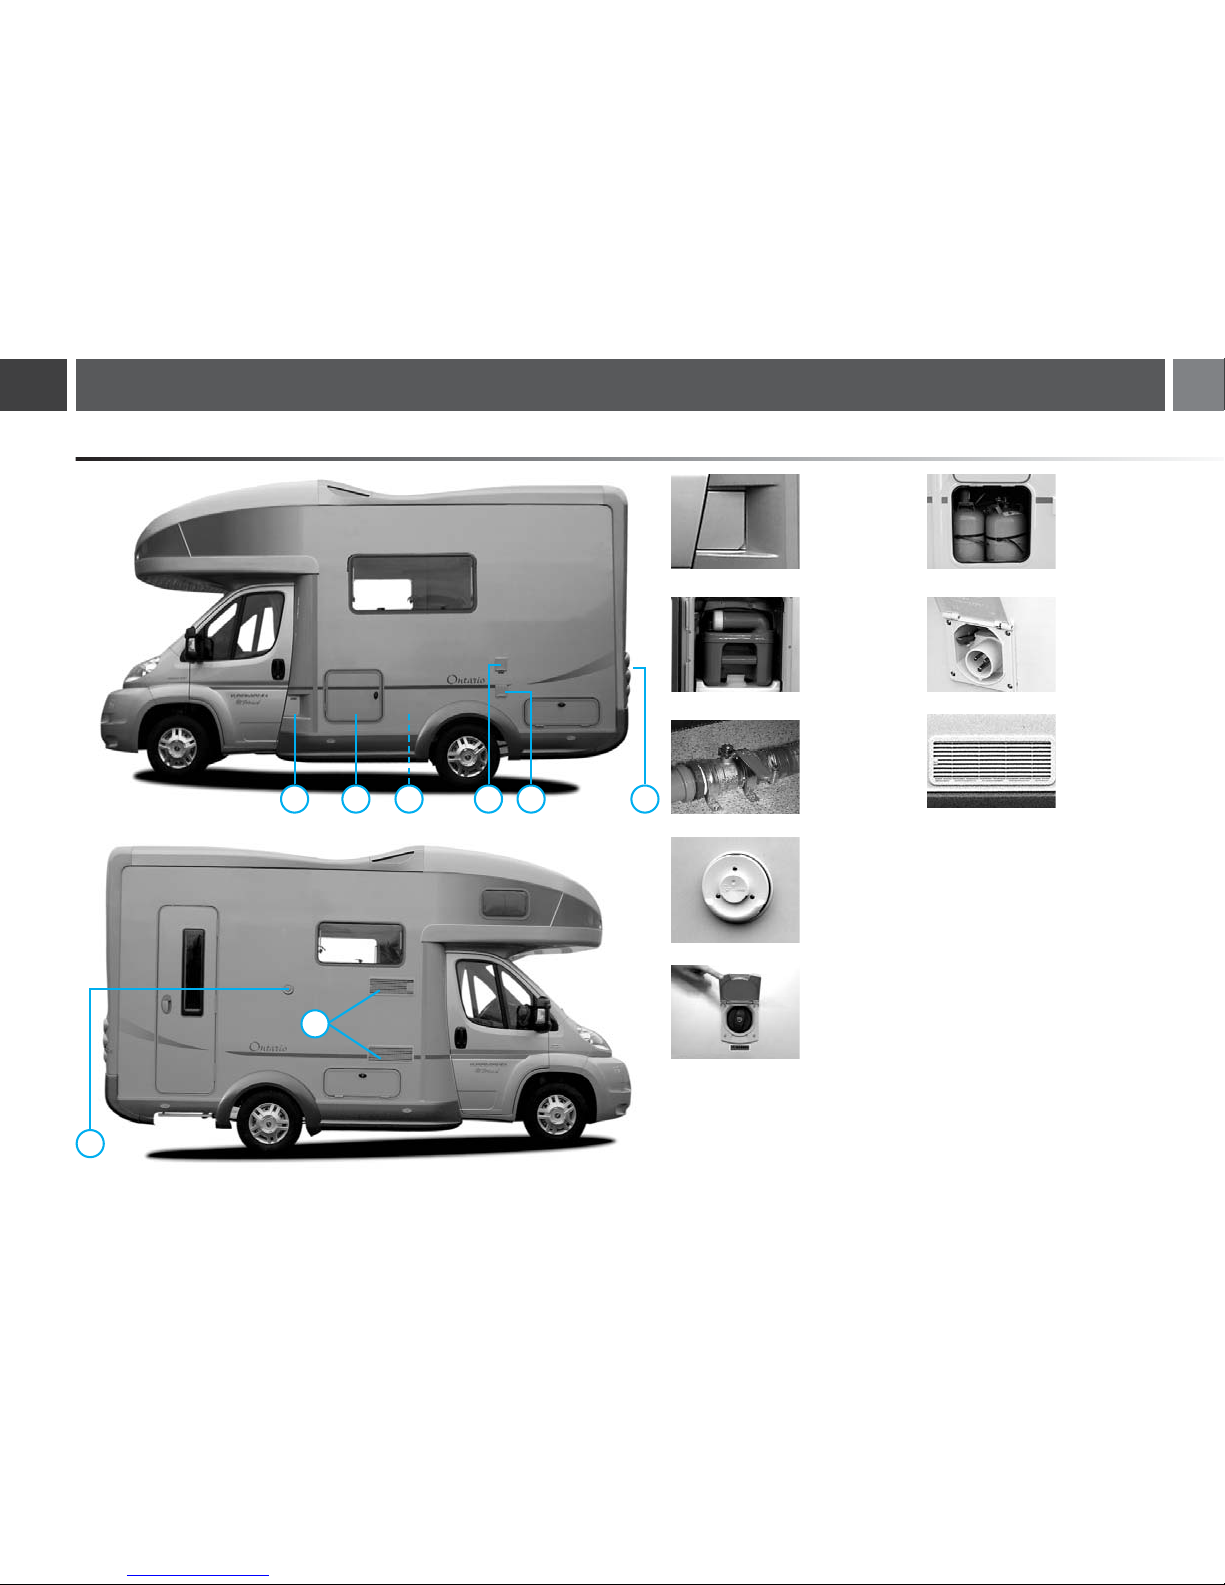
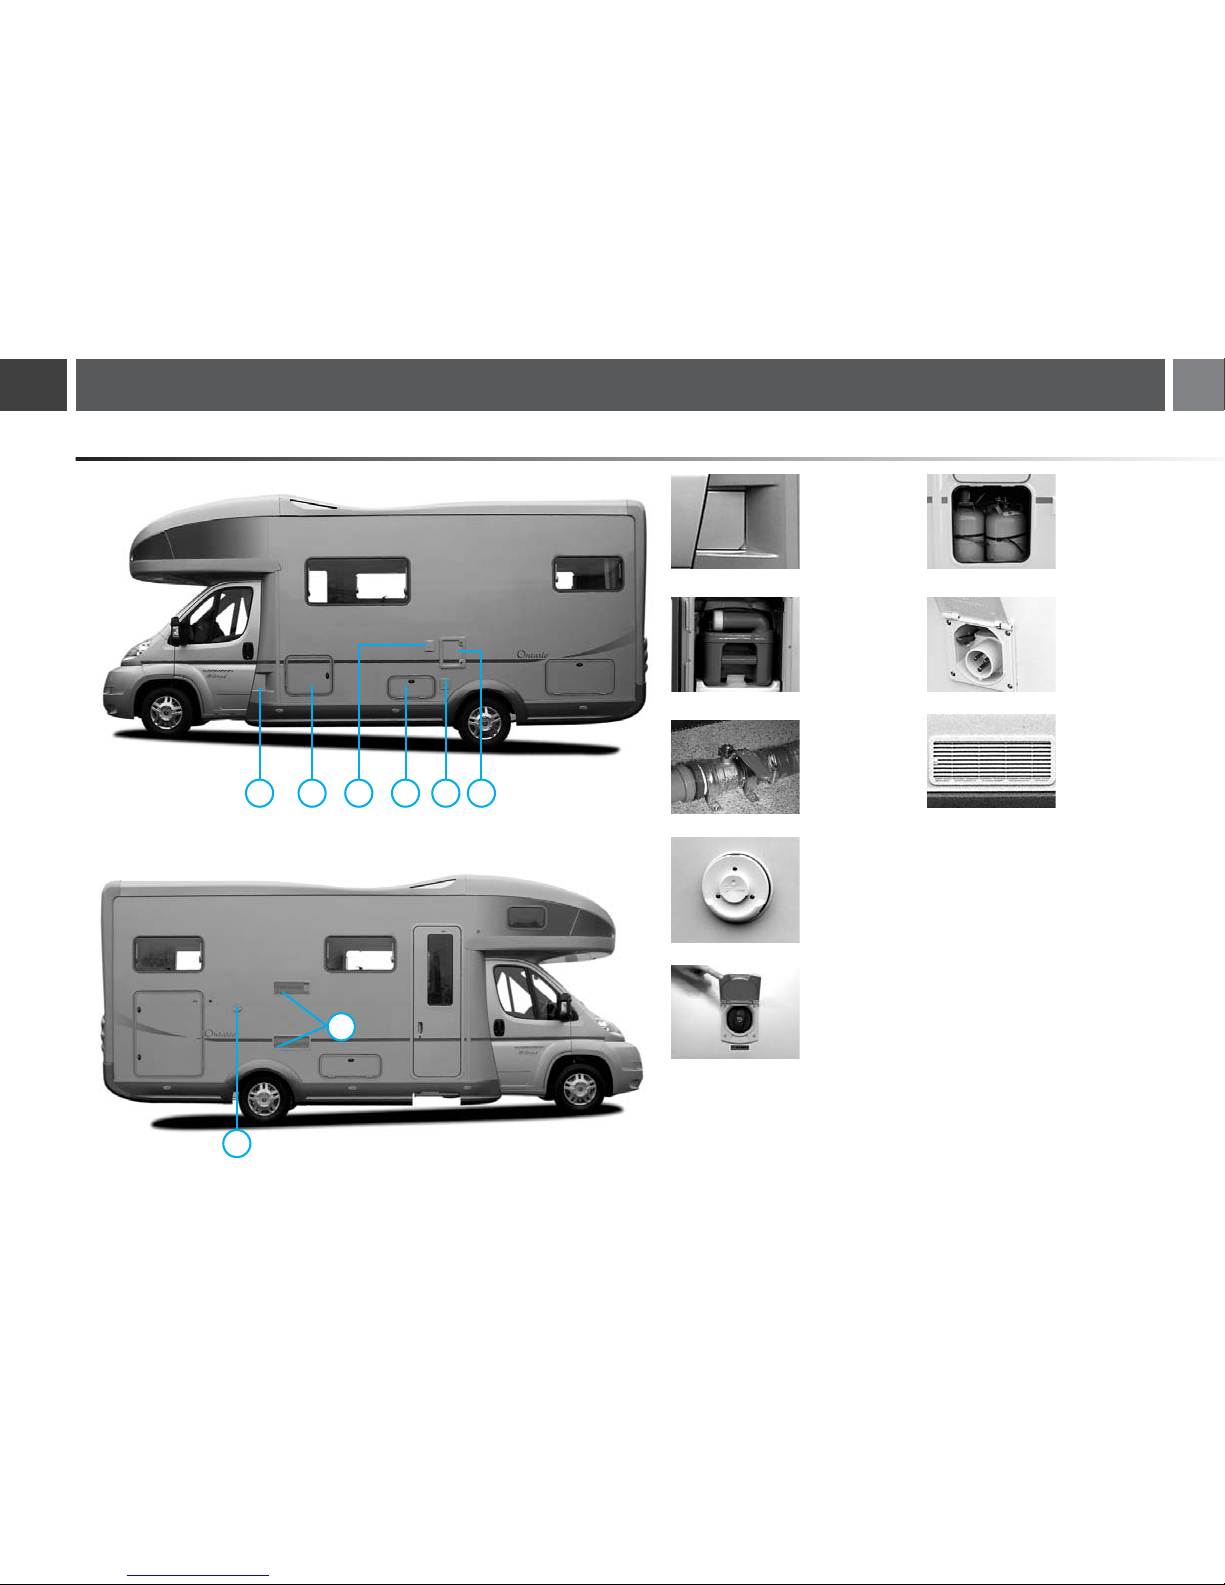
Exterior
Ontario 580 EQUIPMENT OVERVIEW
1-1
1
2
Fuel filler cap
Sewage tank
Page 8-6
4
Air outlet for
heating system
5
Freshwater
filler nozzle
Page 8-1
7
Connector for
230 V
Page 7-1
6
Gas cylinder
box
Page 6-1
3
Sewage water
discharge tap/
discharge fitting
Page 8-7
8
Fridge air vent
Page 6-9
1 6
7
5 2
8
4
3
Living area Page
13 Seating group
14 Table 5-1
15 Sleeping quarters 5-2
16 Wardrobe
17 Kitchen with
- Gas cooker 6-6
- Sink 8-4
- Fridge 6-8
Bathroom and WC
18 Toilet 8-4
19 Washbasin
20 Shower
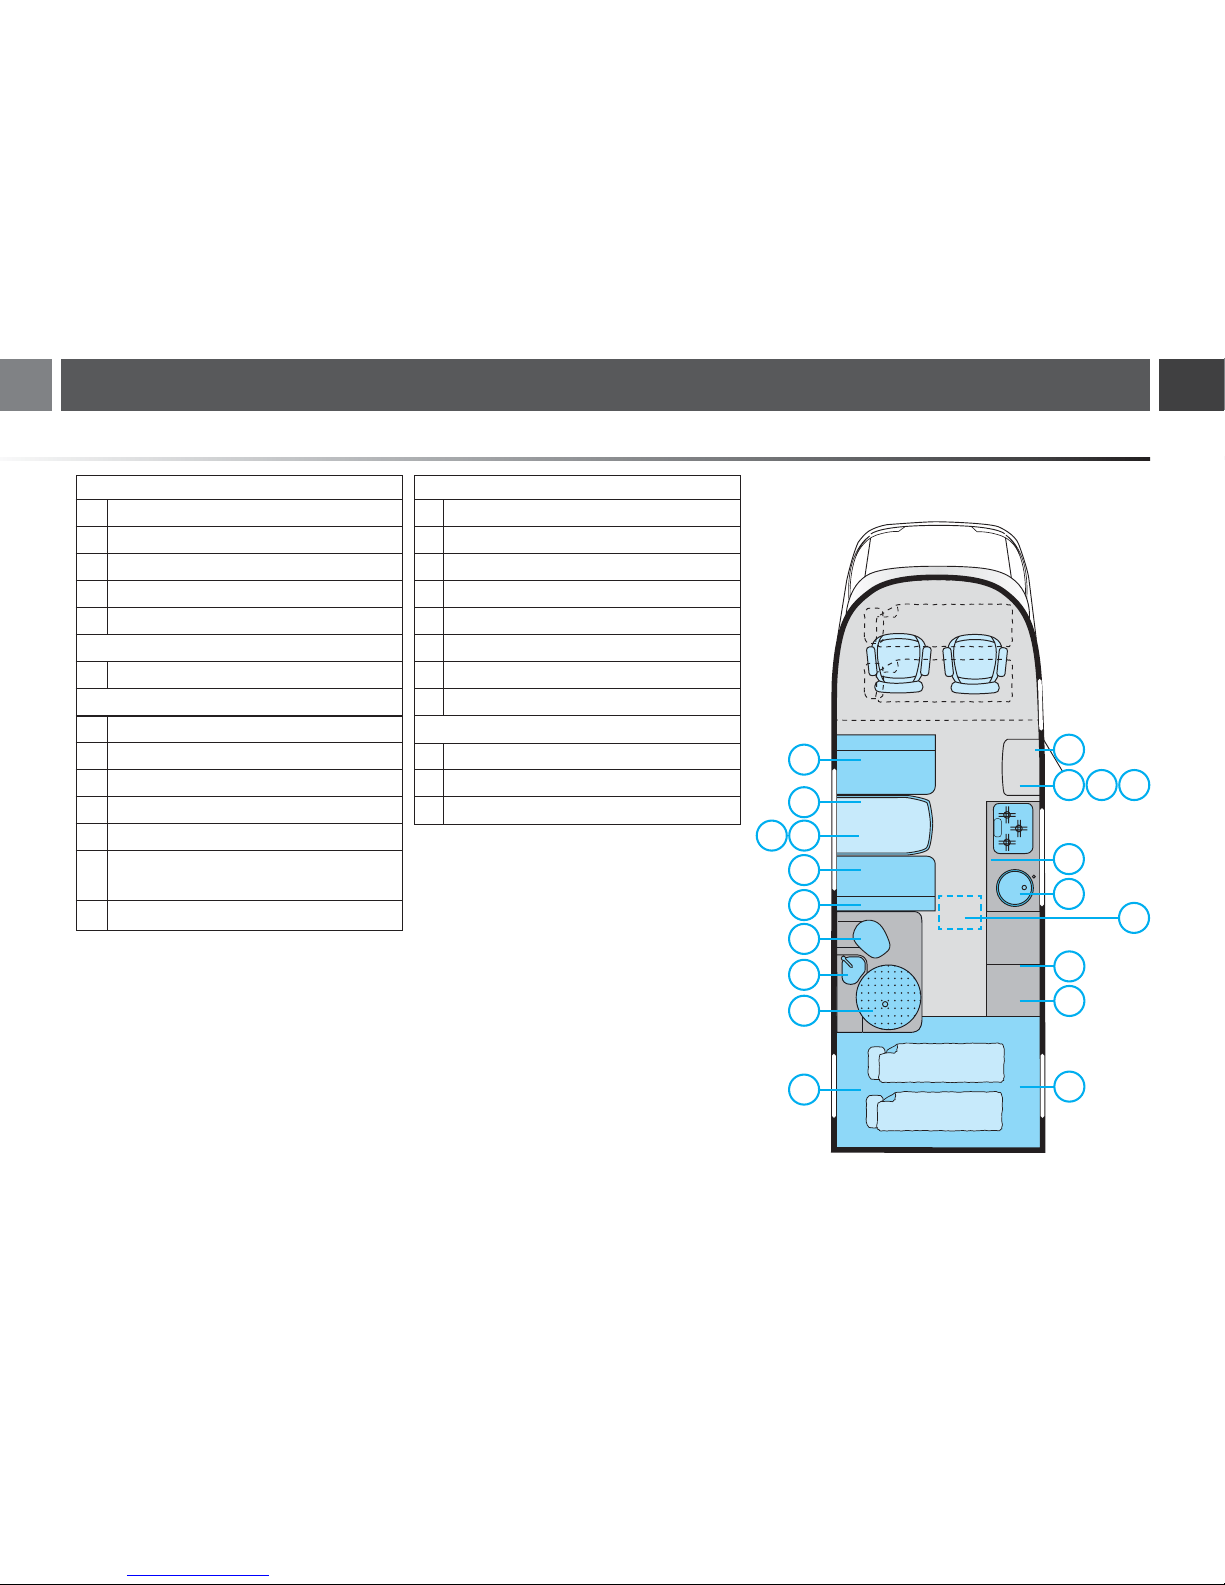
Interior
Ontario 580 EQUIPMENT OVERVIEW
1-2
This list gives you an initial overview of the important components
in your motorhome. More detailed information can be found in the
relevant chapters.
Electrical equipment Page
1 On-board control panel 7-2
2 Earth leakage circuit breaker 7-5
3 Fuses 7-3, 7-4
4 Charging device 7-3
4a Body battery 7-6
Gas installation
5 Shutoff valve 6-2
Supply and disposal
6 Water container 8-1
7 Sewage water tank 8-7
8 Gas cylinders 6-1
9 Combination device heating /
hot water 6-4
10 Truma valve, electrical 6-5
11 Water pump 8-2
12 Discharge tap, sewage water 8-7
13
14
15
17
19
20
18
9
1
5
4 4a 2
11 12
7
6
8
10
16
3

Exterior
Ontario 670 EQUIPMENT OVERVIEW
1-3
1 27 4
8
1
2
Fuel filler cap
Sewage tank
Page 8-6
4
Air outlet for
heating system
5
Freshwater
filler nozzle
Page 8-1
7
Connector for
230 V
Page 7-1
6
Gas cylinder
box
Page 6-1
3
Sewage water
discharge tap/
discharge fitting
Page 8-7
8
Fridge air vent
Page 6-9
3
5
6

Interior
Ontario 670 EQUIPMENT OVERVIEW
1-4
This list gives you an initial overview of the important components
in your motorhome. More detailed information can be found in the
relevant chapters.
Living area Page
13 Seating group
14 Table 5-1
15 Sleeping quarters 5-2
16 Wardrobe
17 Kitchen with
- Gas cooker 6-6
- Sink 8-4
- Fridge 6-8
Bathroom and WC
18 Toilet 8-4
19 Washbasin
20 Shower
Electrical equipment Page
1 On-board control panel 7-2
2 Earth leakage circuit breaker 7-5
3 Fuses 7-3, 7-4
4 Charging device 7-3
4a Body battery 7-6
Gas installation
5 Shutoff valve 6-2
Supply and disposal
6 Truma valve, electrical 6-5
7 Water container 8-1
8 Sewage water tank 8-7
9 Discharge tap, sewage water 8-7
10 Gas cylinders 6-1
11 Combination device heating /
hot water 6-4
12 Water pump 8-2
14
13
15
4a
12
6
17
19
20
18
4 2 3
7
1
10
5
8
11
9
16
Exterior
Ontario 700 EQUIPMENT OVERVIEW
1-5
1
2
Fuel filler cap
Sewage tank
Page 8-6
4
Air outlet for
heating system
5
Freshwater
filler nozzle
Page 8-1
7
Connector for
230 V
Page 7-1
6
Gas cylinder
box
Page 6-1
3
Sewage water
discharge tap/
discharge fitting
Page 8-7
8
Fridge air vent
Page 6-9
1 6 5 7 2
8
4
3
Interior
Ontario 700 EQUIPMENT OVERVIEW
1-6
This list gives you an initial overview of the important components
in your motorhome. More detailed information can be found in the
relevant chapters.
Living area Page
13 Seating group
14 Table 5-1
15 Sleeping quarters 5-2
16 Wardrobe
17 Kitchen with
- Gas cooker 6-6
- Sink 8-4
- Fridge 6-8
Bathroom and WC
18 Toilet 8-4
19 Washbasin
20 Shower
Electrical equipment Page
1 On-board control panel 7-2
2 Earth leakage circuit breaker 7-5
3 Fuses 7-3, 7-4
4 Charging device 7-3
4a Body battery 7-6
Gas installation
5 Shutoff valve 6-2
Supply and disposal
6 Truma valve, electrical 6-5
7 Water container 8-1
8 Sewage water tank 8-7
9 Discharge tap, sewage water 8-7
10 Gas cylinders 6-1
11 Combination device heating /
hot water 6-4
12 Water pump 8-2
14
13
15
16
17
19
20
18
4 2 3
1
11
7
8
5
10
12
9
4a

The owner alone shall be responsible for all
damages resulting from improper usage.
Proper usage also includes compliance with
the operating, maintenance and cleaning
instructions of the installed devices and
systems.
Owner responsibility
The owner of the motorhome is responsible
for keeping the motorhome in good condition
both technically and as regards traffic safety.
This especially includes compliance with the
operating instructions for the base vehicle
and adherence to the maintenance intervals
specified in these instructions. The owner has
to subject the motorhome to regular inspections
in time as stipulated by law. These inspections
include:
• Vehicle inspection according to legal
stipulations
• Inspection of gas equipment by an authorized
specialist shop
The owner is responsible for informing himself
or herself of current laws and regulations
on an ongoing basis, which entail further
obligations.
Scope of these instructions
These instructions are intended to serve the
purpose of quickly finding general information
associated with the use and maintenance of
your motorhome. In addition to this, it contains
important notes on safety and accident
prevention. Designations such as "front", "back",
"left" and "right" are based on the direction of
travel unless stated otherwise. All measures
and weights are approximate. Descriptions
and illustrations could vary slightly from the
actual design. The individual operating
instructions and documents pertaining to the
installed components have priority over these
instructions. In case of questions, please
contact an authorized Karmann-Mobil dealer
or Karmann-Mobil directly.
GENERAL
2-1
Proper usage
The vehicle is only to be used as a motorhome
for non-commercial transportation of persons
and personal luggage. It is suitable for use
on public roadways in compliance with
traffic safety laws and road traffic licensing
regulations. The living furnishings of the
vehicle should only be used when the vehicle
is standing still.
The motorhome should not be used for hauling
goods or for commercial transportation of
persons. The permissible number of passengers,
the permissible total weight of the vehicle
and the permissible axle loads should not be
exceeded. During travel, all passengers should
be seated in seats equipped with belts and
these belts should be fastened. The use of
the vehicle's interior furnishings, in particular
of the installed devices and systems, is not
permitted during travel.
Any other use of the vehicle is prohibited and
is considered improper usage. Neither the
manufacturer nor its officers, representatives
and dealers shall be held liable for damages
resulting from improper use of the motorhome.

Corresponding documents
GENERAL
2-2
Please also adhere to the maintenance
intervals of the individual installation devices
and the base vehicle. You will find these in
the respective operating instructions.
Although the functions of all the equipment in
your motorhome were certainly demonstrated
to you when you bought it, you should read
through the operating instructions again in
detail. They contain useful advice on what to
do when faults occur, care of the vehicle etc.
A document folder containing all documentation
for your motorhome is included with the
purchase of the vehicle.
This documentation consists of these
instructions and the operating instructions
and documents of the installed components.
Check to make sure you have obtained all of
the documents listed below. Please contact
Karmann-Mobil immediately if you are missing
and of the documents.
Karmann-Mobil documents
• These operating instructions for your
motorhome
• Superstructure and leak tightness warranty
with inspection forms and weight card
• Test certificate for gas
• The Karmann-Mobil warranty booklet
Documents pertaining to the base vehicle
and the installed devices
• Operating instructions for the base vehicle
in the glove compartment (warranty booklet
from the base vehicle manufacturer)
• Assembly and operating instructions
• Liquid gas regulator
• Installation and operation manual for the
"SHURflo" freshwater pump
• Operating instructions for the control panel
and the "cbe" distribution module
• Operating instructions for the "Thetford
Cassette" chemical toilette
• Instructions for use for the "Trumatic C"
• Warranty and information note for "Truma"
heater with boiler"
• Operating/installation instructions of "Dometic"
absorber fridge
• Installation - use - maintenance of "SMEV"
cooker
• Operating instructions for "Dometic" roof
Additional documents (optional accessories)
• Instructions for use for SecuMotion
• 12 V/230 Volt air condition unit
• Automatic speed regulator
• Rear-view video system
• Coupling device
• Manual/automatic satellite antennae with
satellite receiver
• Solar system
• Awning
• Motorbike platform
• Oven
• Micro oven
• Allow wheels
• Additional documents for special installations

GENERAL
2-3
Permit
Traffic permit
Your motorhome is a vehicle requiring a permit
according to traffic regulations. The following
documents are required to obtain a permit:
• Vehicle license
• Insurance coverage card policy
• Identity card or power of attorney for permit,
in some cases application for permit.
Identification is attached on the front and back
using the fasteners intended for this purpose.
Some federal states may require additional
state identification (520 x 115 mm), which is
also to be attached to the front and to the
back of the motorhome.
Taxation
The type of tax levied on your motorhome
currently depends on the permissible total
weight. It can be related to emissions and
cylinder capacity or to weight in connection
to pollution and noise classes. Inform yourself
of the current taxation regulations as applicable
to your motorhome.
Insurance
You have to have liability insurance on your
vehicle. Make sure that your insurance policy
matches your needs and the use of your
motorhome. Possible additional insurances
include the following for example:
• Comprehensive insurance
• Insurance for travel in foreign countries
• Passenger insurance.
Your insurance company will help you select
the appropriated insurance policies.

TRAFFIC SAFETY EQUIPMENT
3-1
Keep your motorhome in good condition both
technically and with regards to traffic safety
and adhere to all applicable traffic safety and
permit ordinances. Please also adhere to
the operating instructions provided by the
base vehicle manufacturer and the body
manufacturer. Modifications to the motorhome
have to be recorded in the vehicle documents
as otherwise the general operating license is
deemed invalid.
Seating capacity
The number of permitted seats is indicated in
the vehicle documents. The arrangement of the
permitted seats depends on the individual model.
• Permitted seats facing towards the direction
of travel are equipped with three-point belts.
• Permitted seats facing away from the direction
of travel are equipped with three-point belts
or lap belts.
It is not allowed to transport more people than
there are permitted seats in the motorhome
(see vehicle license).
Example: Seating arrangement
The illustration above shows the arrangement
of the permitted seats in a motorhome with
6 permitted seats. It is best to occupy the
seats in the order of numbering.
1 Driver's seat with three-point belt
2 Passenger's seat with three-point belt
3 Seat facing the direction of travel with
three-point belt
4 Seat facing the direction of travel with
three-point belt
5 Seat facing away from the direction of travel
with either a three-point belt or a lap belt
6 Seat facing away from the direction of travel
with either a three-point belt or a lap belt
Belts
All persons in the vehicle should be seated in
permitted seats, having fastened their belts
before the vehicle starts moving and remaining
buckled up for the entire drive.
People who do not have their belts
fastened are at risk of death in the case
of braking or accidents. During travel,
only use the permitted seats with belts
and keep these belts fastened.
Caution
Intact and properly fastened belts can
save your life in the case of accident.
Therefore please adhere to the following
instructions:
• Do not modify the belts in any way.
• Only use mild soap to cleanse the belts.
Allow the belts to dry slowly and make
sure that no moisture is allowed to enter
the retractor mechanism!
• Have frayed, damaged or severely
soiled belts replaced by an authorized
specialist repair shop.
• Make sure the seat cushions are in
the correct position so that all belts are
accessible and functioning properly
prior to commencing travel.
• Always use the belts in compliance
with the guidelines.
• Always sit in an upright position and
remain close to the backrest.
Achtung
1
2
3
4
5
6
Seating capacity
Fastening a three-point belt:
1. Sit in an upright position and lean on the
backrest.
2. Pull the three-point belt slowly out of the
retractor mechanism using the lock tongue
and guide the three-point belt across the
shoulder and hips as illustrated.
3. Push the lock tongue into the lock until you
hear and feel it click into position.
4. Pull the three-point belt taut and place the
lower part of the three-point belt down over
the hips.
• Belts always have to be taut and close
to the body.
• Belts should not be twisted when
fastened.
• Always place the shoulder belt (in
three-point belts) diagonally across
the shoulder and chest. Never place
the belt behind your back or under
your arm.
• Place the lap belt as low and tight as
possible around your hips and never
around your waist.
• Children up to the age of 12, who are
smaller than 150 cm, can only ride in
the vehicle if the appropriate children's
car seats are used. Please adhere to
the legal stipulations as well as the
installation and operating instructions
issued by the car seat manufacturer.
• Each belt can only be used by a single
person. Children should never be
allowed to sit on the lap of another
passenger and buckled in with the
same belt.
• After each collision, all belts including
the retractor mechanisms and the
accompanying installation parts have
to be inspected by an authorized
specialist repair shop and replaced if
necessary.
TRAFFIC SAFETY EQUIPMENT
3-2
Three-point beltsSeating capacity
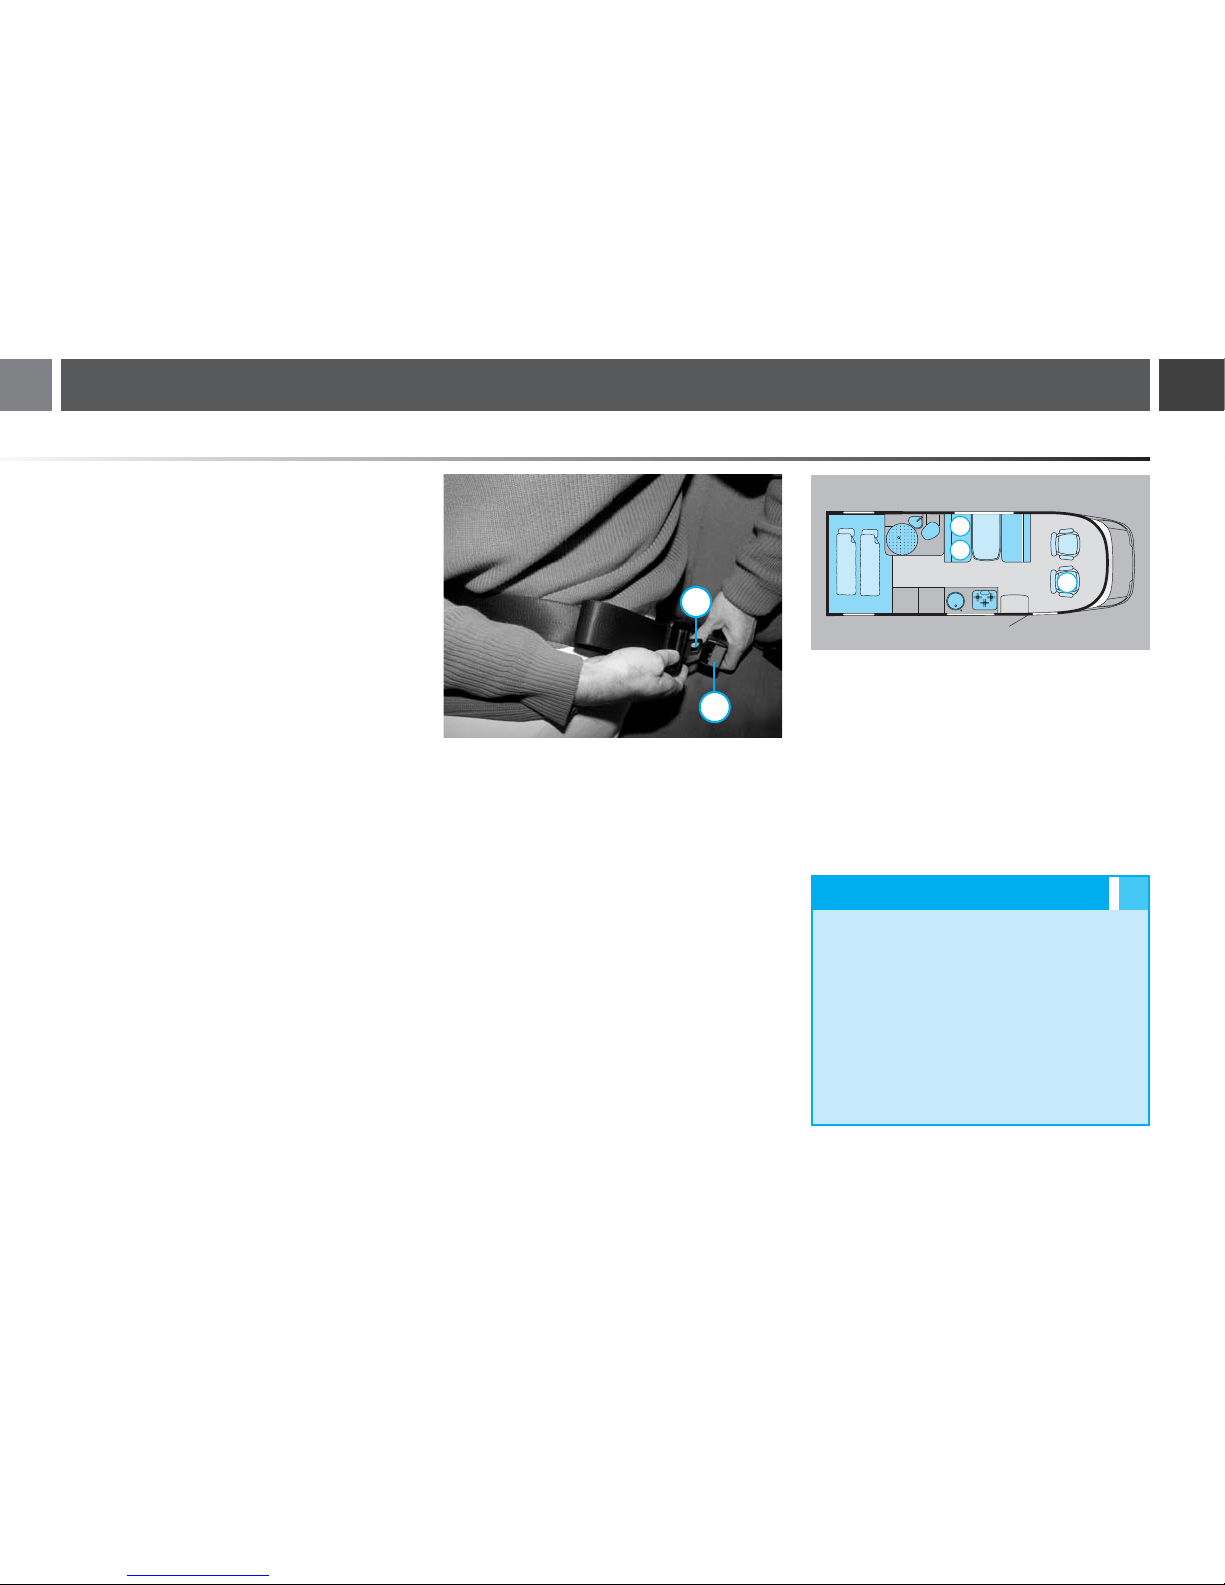
Fastening a lap belt:
1. Sit in an upright position and lean on the
backrest.
2. Guide the lock tongue (1) with the lap belt
across the pelvis as illustrated.
3. Push the lock tongue (1) into the belt lock (2)
until you hear and feel it click into position.
4. Pull the lap belt taut and place it tightly
across the hips.
Removing a lap belt:
1. Press the belt lock button until the lock
tongue is released from the belt lock.
2. Remove the lap belt.
Children's car seats
Example: Installing children's car seats
The illustration shows an example of installing
a car seat on the permissible seats (J).
Belts are intended for adults and can
therefore not protect children under a
certain weight and age.
• Children up to the age of 12, who are
smaller than 150 cm, can only ride in
the vehicle if the appropriate child's
seats are used. Please adhere to the
legal stipulations as well as the
installation and operating instructions
Caution
Removing a three-point belt:
1. Press the belt lock button (3) until the lock
tongue (1) is released from the belt lock (2).
2. Slowly guide the three-point belt towards
the retractor mechanism.
TRAFFIC SAFETY EQUIPMENT
3-3
Lap belts Children's car seats
J
J
J
Three-point belts
1
2

TRAFFIC SAFETY EQUIPMENT
3-4
In the case of subsequent installation, the
installation instructions for the towing facility
are to be adhered to.
Tyres
Worn tyre tread is a safety risk when driving
on wet or slippery surfaces or in snow slush.
The braking distance on a wet roadway is
longer the more the tread is worn down. Loss
of contact with the roadway (hydroplaning)
occurs even at low speeds if the tread is not
deep enough.
The minimum permissible tread depth is
specified by law in most countries. Inform
yourself of applicable local regulations.
Replace tyres, the tread of which is less than
the minimum permissible tread depth, in due
time. You will also find the proper tyre pressure
in the operating instructions provided by the
base vehicle manufacturer and, in some cases,
the body manufacturer.
Tyre designation
The tyres permitted for your motorhome are
indicated in the motor vehicle registration
certificate. Knowledge of the indications on
the tyres simplifies proper selection of spare
or winter tyres.
Example: Indications on the tyres
215/70 R 15 C 109/107 Q
215 = Tyre width in mm
70 = Height/width ratio in %
R = Tyre belt type – abbreviation for
radial
15 = Rim diameter in inches
C = Light truck tyres
109/107 = Load index
Q = Speed indicator
The tyre dimensions permitted for your motorhome are indicated in the vehicle registration.
Connecting or disconnecting a trailer
bears risk of injury. No persons should
be between the pulling vehicle and
the trailer while connecting or
disconnecting.
Caution
Coupling device
When using a Coupling device, it is especially
important to pay heed to the maximum tow
weight, the technically permissible noseweight
and the maximum permissible total pull
weight. The maximum permissible tow weight
is indicated in the vehicle license and the
notice pertaining to the permissible noseweight
is found on the label on the towing facility.
The maximum permissible total weight is
found in the vehicle license. These values
can not be exceeded.
issued by the car seat manufacturer.
• Car seats can only be installed on
permissible seats that are facing in the
direction of travel. Never install car
seats on seats that are facing away
from the direction of travel.
Coupling device Tyres

Changing a wheel bears risk of injury
and wheels that are mounted incorrectly
can result in serious accidents.
Therefore please adhere to the following
instructions:
• Please adhere to the operating
instructions provided by the base vehicle
manufacturer and the body manufacturer.
• Place your motorhome on level ground
according to the instructions. Switch
the engine off, put the vehicle in first
gear and pull the hand brake.
• Secure the motorhome according to the
local regulations by setting up a warning
triangle or wearing a warning vest prior
to changing the wheel.
• Secure the motorhome from rolling
away by placing the wedges under the
wheels.
• Disconnect the trailer before changing
the wheel.
• Never lift the motorhome using its
supports.
• Never jack up the motorhome by placing
the jack on the superstructure.
• Only use an approved jack with adequate
bearing strength to jack up the vehicle.
• Check the rim size, tyre size, tyre bearing
capacity and speed index of the new
wheel before placing it on the vehicle.
Only use the rim and tyre size indicated
in the registration document.
• Never lie down under the jacked up
motorhome and never start the engine
while the motorhome is jacked up.
• Check the tyre pressure as soon as
possible after changing the tyre and
have a specialist repair shop tighten
the wheel nuts after 50 km at the latest!
Caution
Incorrect tyre pressures, worn-out tyres
and overloading can result in worsened
driving conditions and braking behaviour
of the motorhome.
Therefore please adhere to the following
instructions:
• Check the tyre pressure and condition
each time you go to the filling station.
• Immediately replace defective or wornout tyres.
• Tyres should not be more than 6 years
old because the material becomes
brittle even if the tyres are not used
(spare tyres).
Caution
TRAFFIC SAFETY EQUIPMENT
3-5
Wheel changeTyres

Correct loading of your motorhome
Overloading or unbalanced loading of your
motorhome will result in worsened driving
conditions and braking behaviour of the
vehicle.
Make sure that you do not exceed the
permissible total weight of the vehicle and
the permissible axle loads when loading the
vehicle. As a basic principle, the heaviest
items should be as near the floor as possible.
Therefore store heavy objects in this area.
Make sure the load is balanced between the
left and right sides. Objects in the top cupboards
should also be protected against slipping. Do
not exceed the maximum load for the cycle
rack (special accessory) and the permissible
roof load of 150 kg.
Please make sure that cycles are well secured
and tied. After driving for a short distance,
stop and check that nothing has moved.
In the interests of safety you should have the
vehicle and passengers weighed before the
start of the journey.
Loading
The maximum technically permissible overall
weight stated in the vehicle documents may
not be exceeded by excessive loading under
any circumstances.
Please consider that any built-in accessories
may reduce the possible loading. The precise
unladen weight of your vehicle including any
special accessories and excluding weight
distribution tolerances of the vehicles can
only be determined by weighing the vehicle.
You then have the difference between the
unladen weight and the permissible total mass
to use for loading, persons, contents, bicycles
and other utensiles. The weight card with the
unladen mass of your vehicle upon delivery
from KARMANN-MOBIL is glued into the
warranty booklet. The warranty booklet will
be sent to you once you have sent the vehicle
registration to KARMANN-MOBIL.
Required additional cargo
The following items have to be included
on-board in Germany:
• First-aid kit
• Warning triangle
• Warning vest
• Flashing warning light (over 3.5 tons
permissible total weight)
Tips on commissioning
Defective brakes can result in serious
accidents.
Therefore please adhere to the following
instructions:
• Never modify brake system components.
• Only have brake system repairs carried
out by specialist repair shops!
• Only use brake fluids that are permitted
by the base vehicle manufacturer.
• Have the brake system inspected by an
authorized specialist repair shop after
not using the vehicle for long periods
(approx. 10 months).
Caution
TRAFFIC SAFETY EQUIPMENT
3-6
The components of the brake system are
included in the general operating license.
Modification of brake system components
deems the operating license invalid. Changes
shall only be made after obtaining approval
from the manufacturer.
Please adhere to the base vehicle operating
instructions.
Brakes

TRAFFIC SAFETY EQUIPMENT
3-7
Traffic safety checklist
To make sure that your Karmann motorhome
is always safe, you should check certain points
before the start of every journey. You can find
more detailed information about this in these
operating instructions:
• Retract entrance step (warning or control
signal)
• Make sure that no persons are located in
the swivel range of the entrance step when
extending or retracting the entrance step.
• Lock the swivelling driver's and passenger's
seats facing the direction of travel before
beginning the journey
• Close and lock all exterior flaps
• Close the superstructure door
• Close and lock the opening window
• Close the roof hatch
• Close drawers and cupboards
• Close door to bathroom and WC
• Close fridge door
• Switch the fridge to the 12 V system (this is
not necessary if the fridge is equipped with
automatic energy selection.)
• Secure TV aerial, if installed
• Check luggage for secure fixing
• Store away objects lying around on shelves,
tables etc.
Do not use your new motorhome immediately
for a long holiday trip. A weekend trip of
maximum 100 kilometres is enough for the
first time. Drive slowly and carefully. Observe
the rules for running in the basic vehicle.
Dimensions
Your motorhome may be a larger vehicle than
you are used to driving. Get used to the special
dimensions of the vehicle slowly (listed in the
technical data in the annex to these operating
instructions).
Take particular care when:
driving through gates, over bridges, under
arched tunnels or archways, into car parks.
You need the following for full usage of your
motorhome:
• depending on usage: two filled 11 kg (or 5 kg)
gas cylinders the 230 V supply cable with
blue CEE plug
• an extension cord (cable reel)
Make sure that the permissible axle loads
stated in the vehicle documents are not
exceeded.
Headlight levelling
Road traffic regulations require proper alignment
of the headlights to provide optimum visibility
for yourself and others. In addition to this, the
lighting is to be adjusted depending on the load
placed on the vehicle. Headlight levelling is
described in the operating instructions for the
base vehicle.
Wing mirrors
You will find large wing mirrors on both sides
of your vehicle. Before starting out on your
first journey you should adjust these and if
necessary correct them after a short distance.
Tips on commissioning

TRAFFIC SAFETY EQUIPMENT
3-8
Parking the vehicle
Not securing the motorhome from rolling away
results in danger of injury.
Therefore please adhere to the following
instructions:
• Prior to securing the motorhome with supports
or wedges, always turn off the engine, put
the vehicle in first gear and pull the hand
brake.
• If your motorhome is not equipped with
supports, place wedges in front of and
behind a wheel.
• If your motorhome has supports in the rear,
then extend these.
• Never place wedges under the wheels to
compensate for uneven ground!
• Make sure that no persons are located in
the swivel range of the entrance step when
extending or retracting the entrance step.
passenger car and requires particular care as
regards driving and handling characteristics:
• Because of its relatively long projection behind
the rear axle, the back end of the vehicle can
break away. When driving up steep slopes
or ramps make sure that the back end does
not hit the ground.
• Avoid sudden braking if possible.
• Make sure that any passengers sitting in the
rear of the vehicle are wearing their belts
and that they do not leave their seats.
• Only allow people to travel in the vehicle in the
seat provided with belts. It is not allowed to
transport more people than there are permitted
seats in the motorhome (see vehicle license).
• Remaining in the coachbuilt during travel is
not permitted!
• Even after short interruptions to the journey,
always make sure that the entrance step is
retracted.
• Never drive in reverse without a rear-view
video system (optional), without having
someone guide you.
• Adjust your driving style to the road conditions
and the actual weight of your motorhome
while driving.
• Only place heavy objects in cabinets, the
doors of which open away from the direction
of travel
• Close shutoff valves for gas equipment, if it
is not being used
• Remove leaves, snow and ice from the roof
if necessary in the autumn and the winter
• Check the battery voltage of the vehicle
and auxiliary battery at the control panel,
particularly in winter (see Page 6-1).
• Open all blinds before starting the journey
• Retract all existing supports
• Remove all additional supports and wedges
Check the following on the basis vehicle
according to the operating instructions:
• Tyre pressure (see driver's door frame)
• Vehicle lights and signalling device
• Steering and brakes
• Oil level
• Coolant level
Travelling in the Karmann mobile home
Even if you are used to driving motorhomes, you
must remember when travelling that, because
of the chassis, a motorhome is not a small
Traffic safety checklist

Positioning the motorhome
Please adhere to the following when selecting
a suitable place to position your motorhome
on vacation and for interim overnight stays:
• The ground has to be even and be able to
bear sufficient load.
• Make sure that an electrical supply outlet is
available close to the campsite and that
freshwater and sewage water connections
are available if possible.
• Make sure that the superstructure door and
all service flaps remain easily accessible.
Proceed as follows once you have found a
suitable campsite and have parked your
motorhome:
- Switch the engine off, put the vehicle in first
gear and pull the hand brake.
- If your motorhome is not equipped with
supports, place wedges in front of and
behind a wheel.
- If your motorhome has supports in the rear,
then extend these.
Prior to securing the motorhome with
supports, additional supports or wedges,
always turn off the engine, put the vehicle
in first gear and pull the hand brake.
Never place wedges under the wheels to
compensate for uneven ground!
Caution
Travelling and overnight stops
In general it is allowed to make overnight
stops in car parks in Germany - at least for
one night. However, camping tables, chairs
etc. or other items should not be placed
outside to give the impression of "camping
out". Specialist magazines and camping
guides contain useful information, or you can
contact the CIVD club to find out about districts
which welcome caravans and motorhomes,
rules for sewage water disposal etc. Different
rules apply abroad with regard to motorhomes
and overnight stops.
Find out about the following before starting
your journey:
• necessary documents
• legal regulations concerning maximum
speeds and prohibitions on overtaking
• electrical supply standard
• where to make overnight stops
The ADAC can also supply information with
regard to the relevant regulations concerning
overnight stops outside camping sites, speed
limits etc. in the country you plan to visit.
TRAFFIC SAFETY EQUIPMENT
3-9
Traffic safety checklist

3-10
 Loading...