

Page 1

84574 84573
04.01.2019
Aufbauanleitung
Building Instructions
notice de montage
montagehandleiding
Montagevejledning
Instrucciones de construcción
Istruzioni per il montaggio
Montážní návod
+49 421 38693 33
Page 2
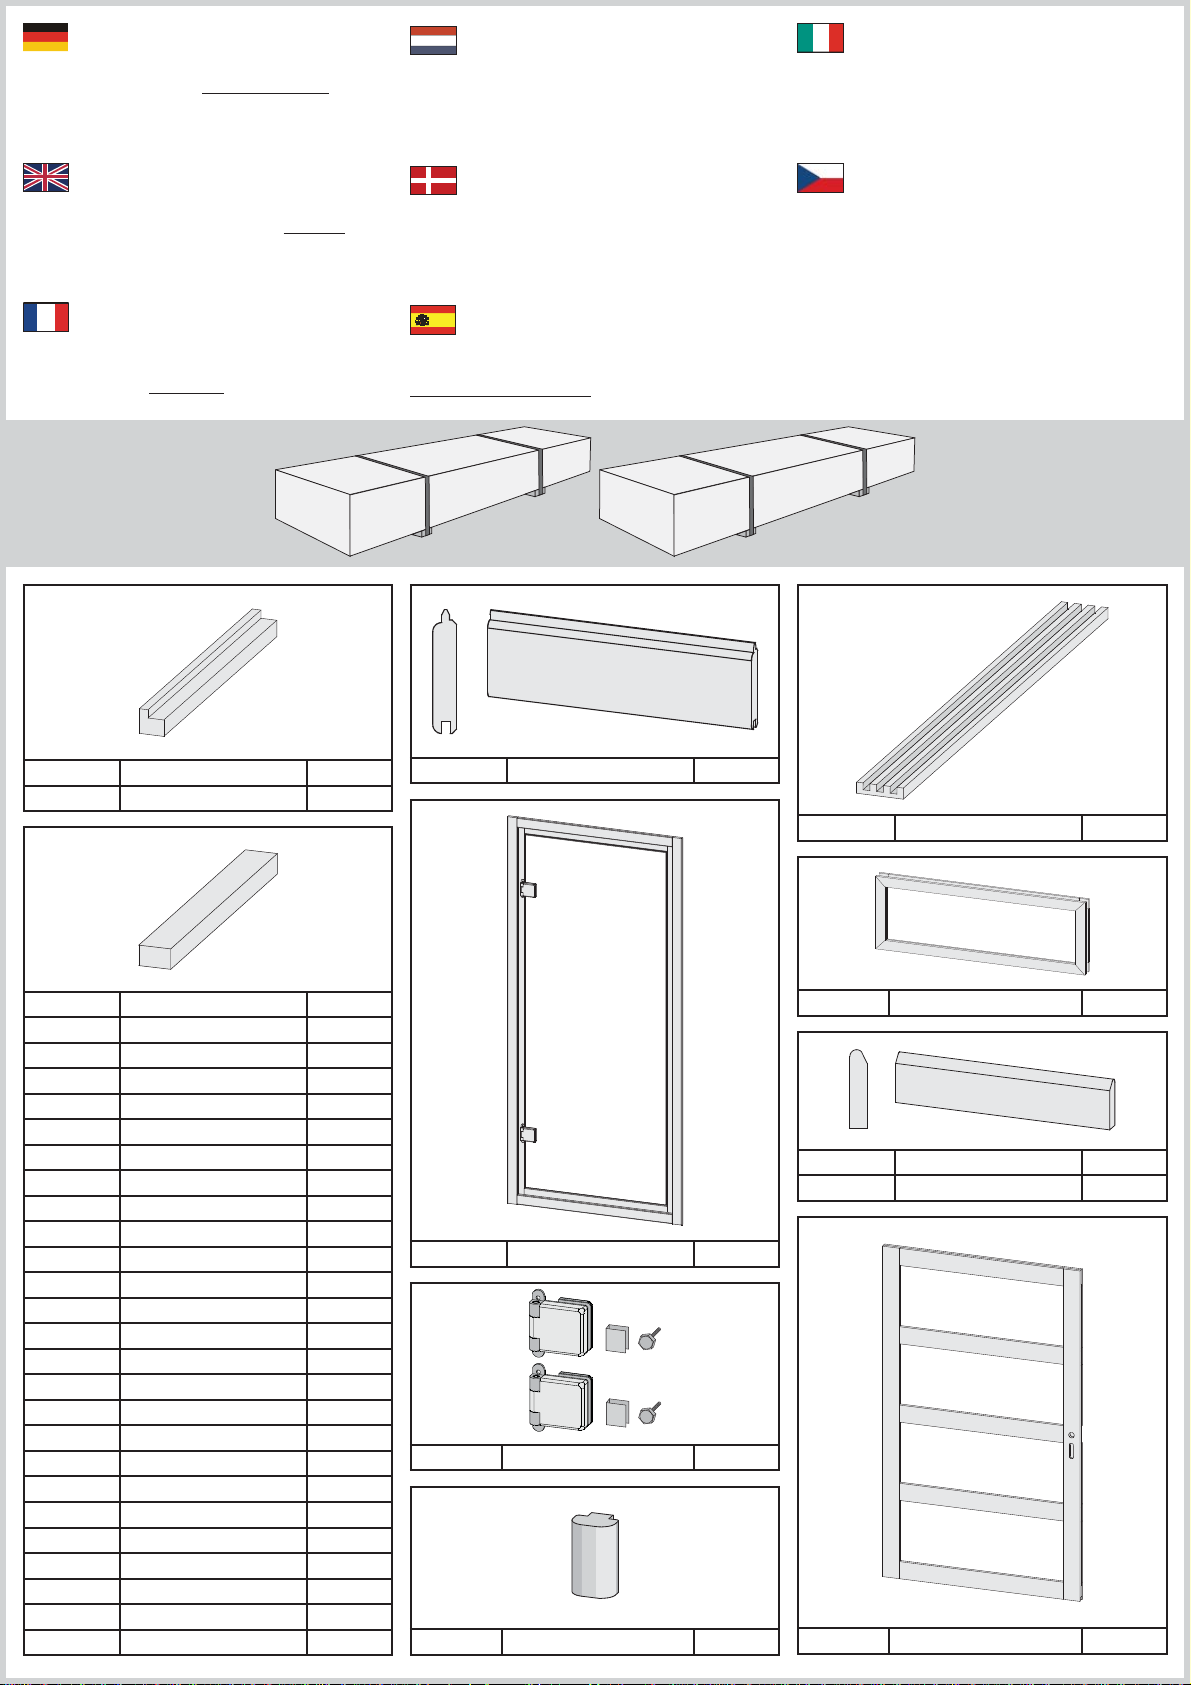
Vergleichen Sie zuerst die Material-liste mit
Ihrem Paketinhalt! Bitte haben Sie Verständnis, dass
Beanstandungen nur im nicht aufgebauten Zustand
bearbeitet werden können!
Vergelijk eerst de lijst van materialen
met de inhoud van uw pakket! Reclamaties kunnen
alleen in behandeling worden genomen zolang de
onderdelen nog niet zijn gemonteerd!
Confrontate questa distinta materiali
prima con il contenuto del pacchetto! Vi preghiamo di
comprendere che eventuali reclami possono essere
accolti solo prima del montaggio!
First compare the list of materials with
your package contents! Please understand that
complaints can be processed in the non-built status
only!
Commencez par comparer la liste du
matériel avec le contenu de votre paquet! Sachez que
nous traitons uniquement les réclamations concernant
le matériel à l’état non monté!
Start med at kontrollere materialelisten med
indholdet af den leverede pakke! Vi gør venligst
opmærksom på at reklamationer kun kan behandles
for materialer som ikke er blevet bearbejdet!
En primer lugar, compare la lista de material
con el contenido del paquete. Rogamos entienda
que las reclamaciones sólo pueden ser tramitadas
antes de montar el objeto!
84574
84573
Nejprve překontrolujte obsah balení
podle materiálového listu! Mějte pochopení pro to, že
případnou reklamací se můžeme zabývat pouze tehdy,
když díly nebudou smontované! Za pomoci tohoto
seznamu můžete jednotlivé díly přiřadit k montážnímu
návodu.
1 x
2 x
2 x
1 x
1 x
2 x
1 x
1 x
1 x
2 x
2 x
1 x
4 x
4 x
9 x
4 x
9 x
9 x
2 x
2 x
2 x
1 x
1 x
5 x
3 x
5 x
6 x
9 x
A1
A2
B1
B2
B3
B4
B5
B6
B6*
B7
B8
B9
B10
B11
B12
B13
B14
B15
B16
B17
B18
B19
B20
B21
B22
B23
B24
B25
555 x 45 x 45 mm ID 40301
1100 x 45 x 45 mm ID 40302
1920 x 20 x 4 mm ID 20799
1205 x 18 x 14 mm ID 80903
1309 x 90 x 16 mm ID 72925
2156 x 90 x 16 mm ID 71514
780 x 36 x 18 mm ID 65721
1205 x 36 x 18 mm ID 72613
1205 x 36 x 18 mm ID 80905
800 x 45 x 18 mm ID 24796
2100 x 45 x 18 mm ID 19547
300 x 95 x 18 mm ID 19130
480 x 95 x 18 mm ID 20930
565 x 95 x 18 mm ID 15498
2170 x 120 x 18 mm ID 86502
2520 x 120 x 18 mm ID 80895
1846 x 140 x 26 mm ID 40578
3086 x 140 x 26 mm ID 86501
1756 x 38 x 28 mm ID 20699
2560 x 38 x 28 mm ID 80906
800 x 58 x 28 mm ID 15493
1854 x 58 x 38 mm ID 79823
1854 x 84 x 38 mm ID 79824
1890 x 60 x 40 mm ID 28536
2790 x 60 x 40 mm ID 28251
3090 x 60 x 40 mm ID 28694
1498 x 45 x 45 mm ID 86504
2150 x 45 x 45 mm ID 86503
C1
114 x
1 x
2650 x 96 x 19 mm ID 63990
D1
1906 x 815 x 38 mm ID 26500
1 x ID 26496
1 x ID 26183
1 x
3 x
3 x
1 x
1 x
E1
1820 x 140 x 26 mm ID 26480
F1
1220 x 420 x 40 mm ID 85019
G1
2000 x 58 x 17 mm ID 48545
G2
K1
400 x 95 x 18 mm ID 27167
1833 x 1255 x 19 mm ID 86704
Page 3
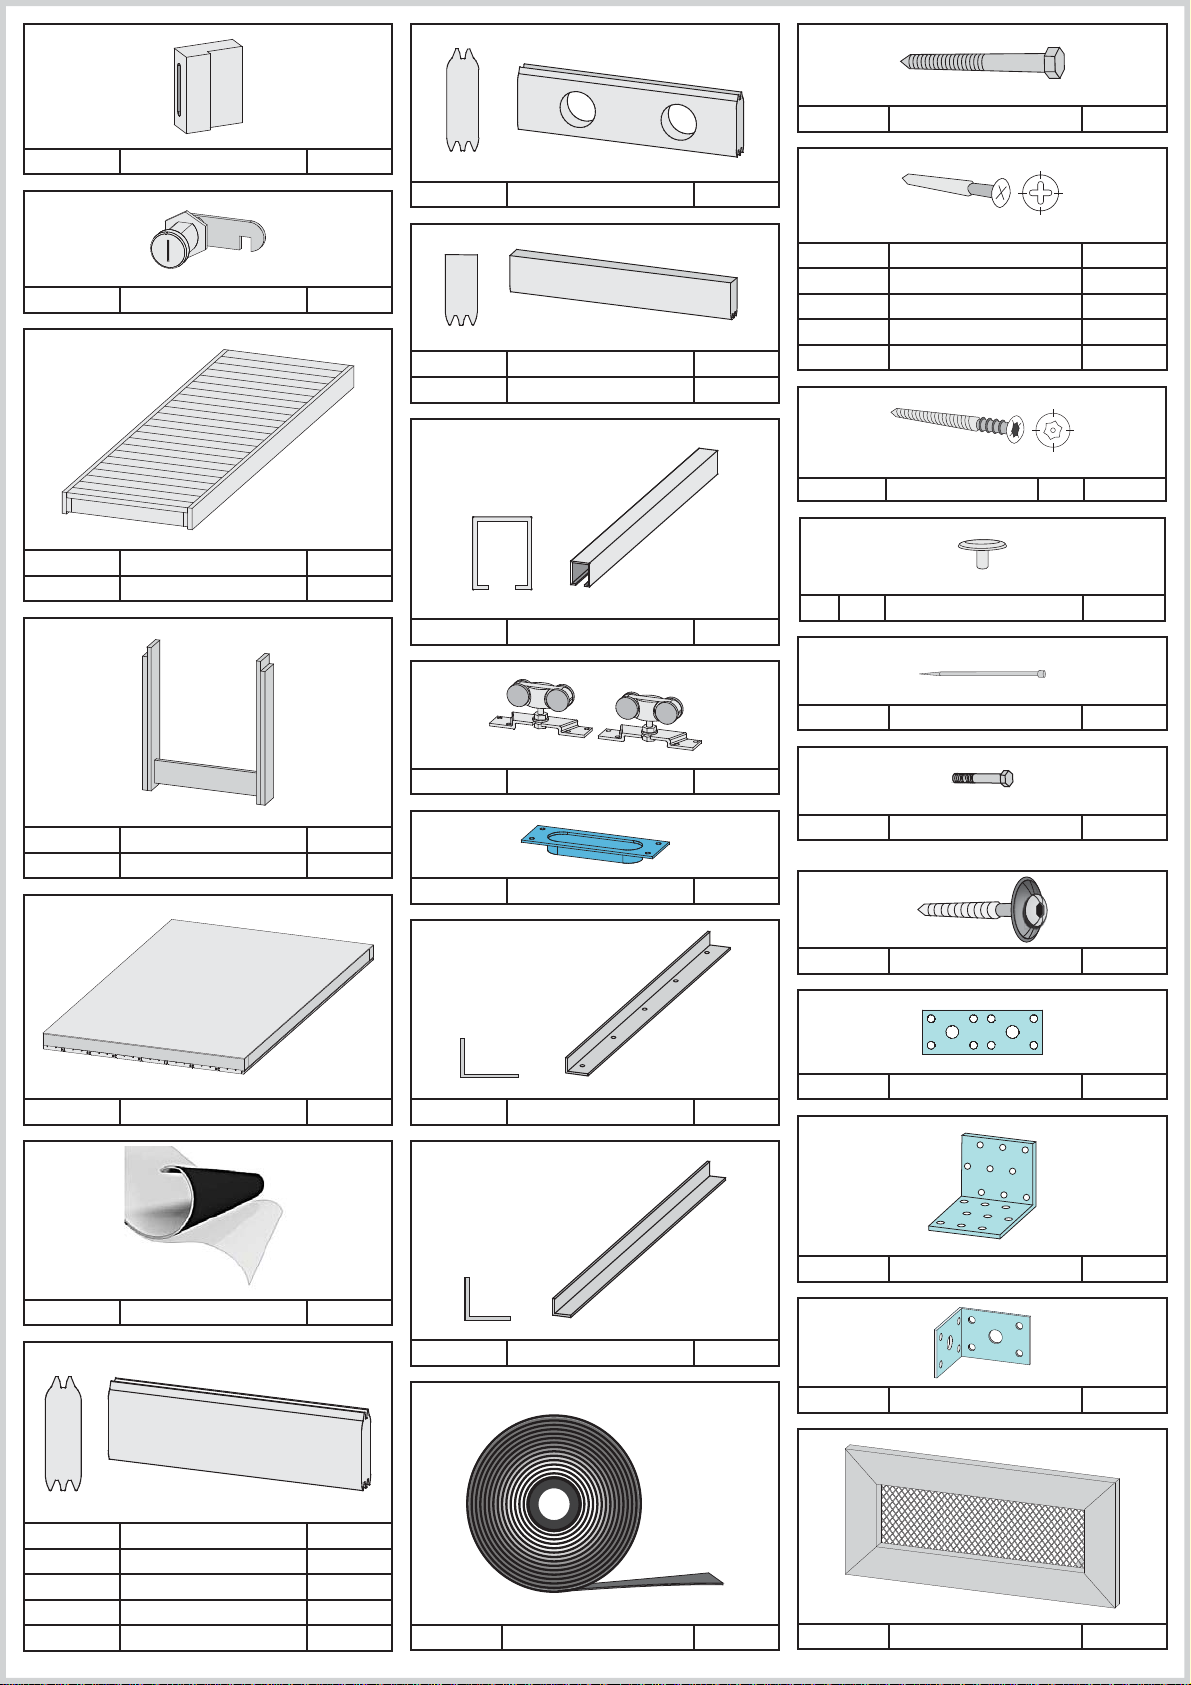
1 x
1 x
1 x
2 x
K2
K3
L1
1810 x 550 x 90 mm ID 43994
L2
2010 x 550 x 90 mm ID 80901
ID 80936
ID 61751
1 x
1 x
1 x
1 x
W6
2650 x 121 x 38 mm ID 80907
V1
2650 x 96 x 38 mm ID 80908
V2
2650 x 96 x 38 mm ID 80909
Y1
3 x ID 42172
10 x 4 x 30 mm ID 3686
100 x 4 x 35 mm ID 3687
160 x 4 x 50 mm ID 3688
800 x 4 x 70 mm ID 3689
20 x 4,5 x 80 mm ID 9204
6 x 6 x 80 mm ID 14266
6 x 12 x 18 mm ID 46403
ID 80897
2 x
1 x
3 x
L3
L4
N1
595 x 510 x 95 mm ID 62992
860 x 510 x 95 mm ID 65739
1839 x 880 x 55 mm ID 80899
1 x
1 x
1 x
Y2
Y3
Y4
ID 80334
ID 62246
ID 80898
1200 x ID 25453
1 x
40 x 4 x 40 mm ID 36178
2 x ID 62656
ID
80355
6 x ID 14041
4 x
2 x
33 x
40 x
17 x
23 x
Q1
W1
W2
W3
W4
W5
327 x 121 x 38 mm ID 16340
932 x 121 x 38 mm ID 80893
2650 x 121 x 38 mm ID 70229
3643 x 121 x 38 mm ID 70050
4970 x 121 x 38 mm ID 67158
ID 77453
Y5
7 x
1 x 10 mm ID 14025
ID 61695
2 x ID 21292
1 x ID 86726
Page 4

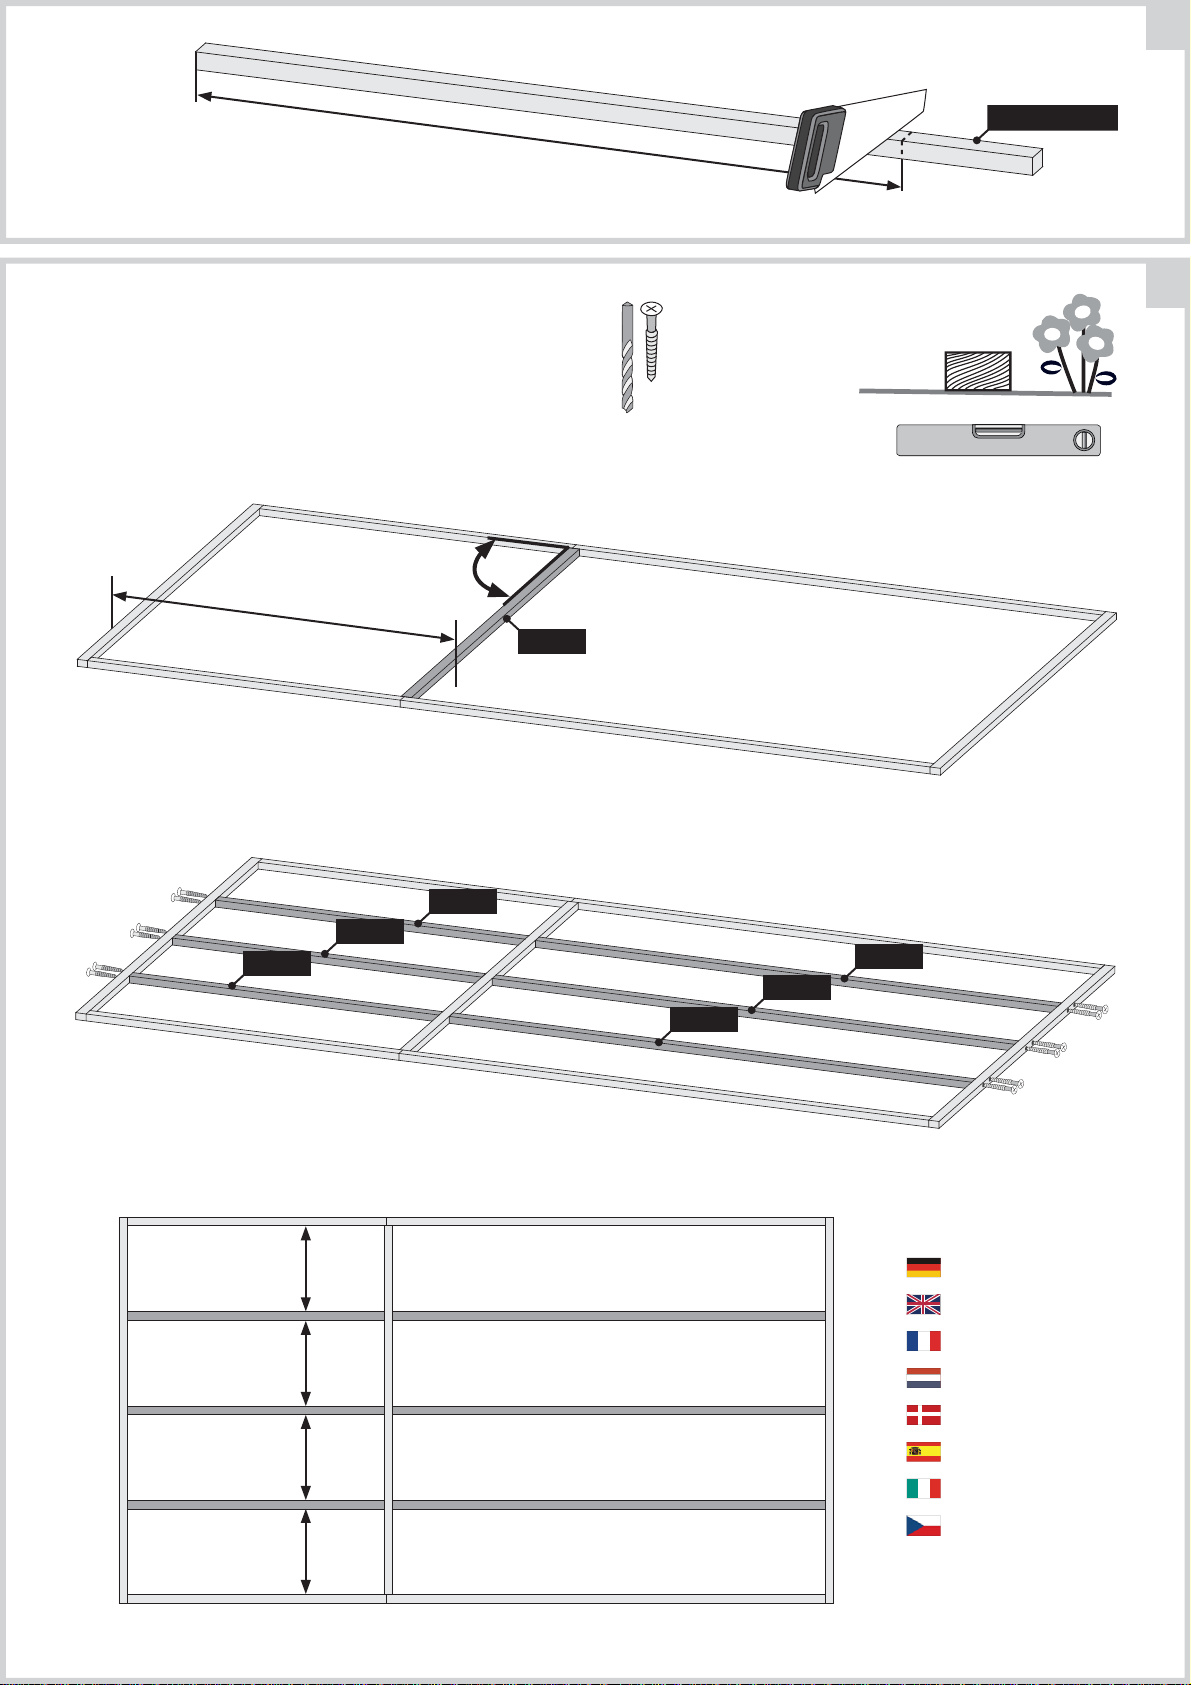
Draufsicht
bovenaanzicht
vista dall‘alto
Top view
vue de dessus
L 1
ovenfra
vista desde arriba
G 2
půdorys
W 3
L 2
L 2
D 1
W 2W 2
W 5W 4
D 1
W 3
Page 5
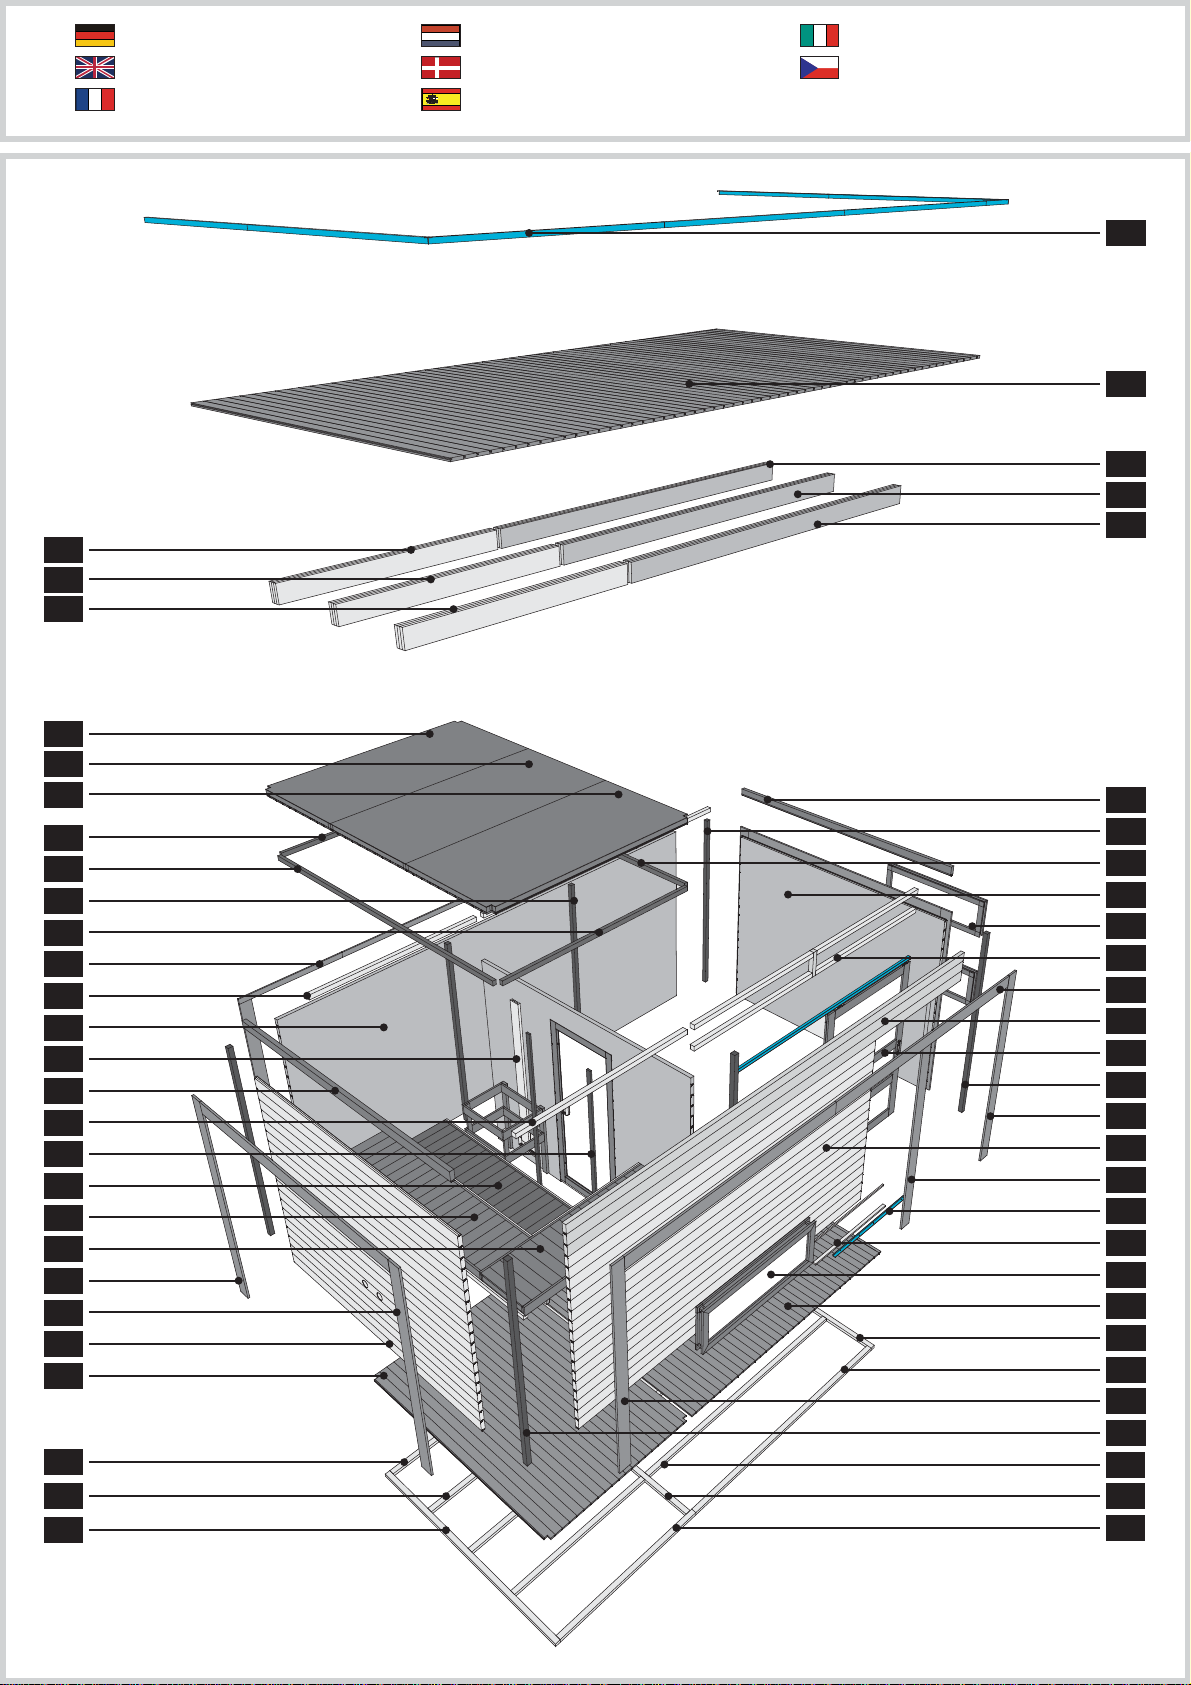
Overview
estudio
sondaggio
přehled
B 14
B 14
B 14
Übersicht
Overview
enquête
overzicht
undersøgelse
estudio
sondaggio
přehled
Y 5
C 1
B 15
B 15
B 15
N 1
N 1
N 1
B 16
B 17
B 25
B 16
G 1
B 25
W 5
E 1
V 1
B 25
B 8
L 2
L 2
L 1
B 12
B 12
W 3
C 1
B 21
B 21
B 22
V 2
B 25
B 17
W 3
F 1
B 24
B 13
W 5
K 1
B 25
B 12
W 4
B 12
Y 4
B 6*
F 1
C 1
B 22
B 23
B 12
B 25
B 23
B 22
B 21
Page 6
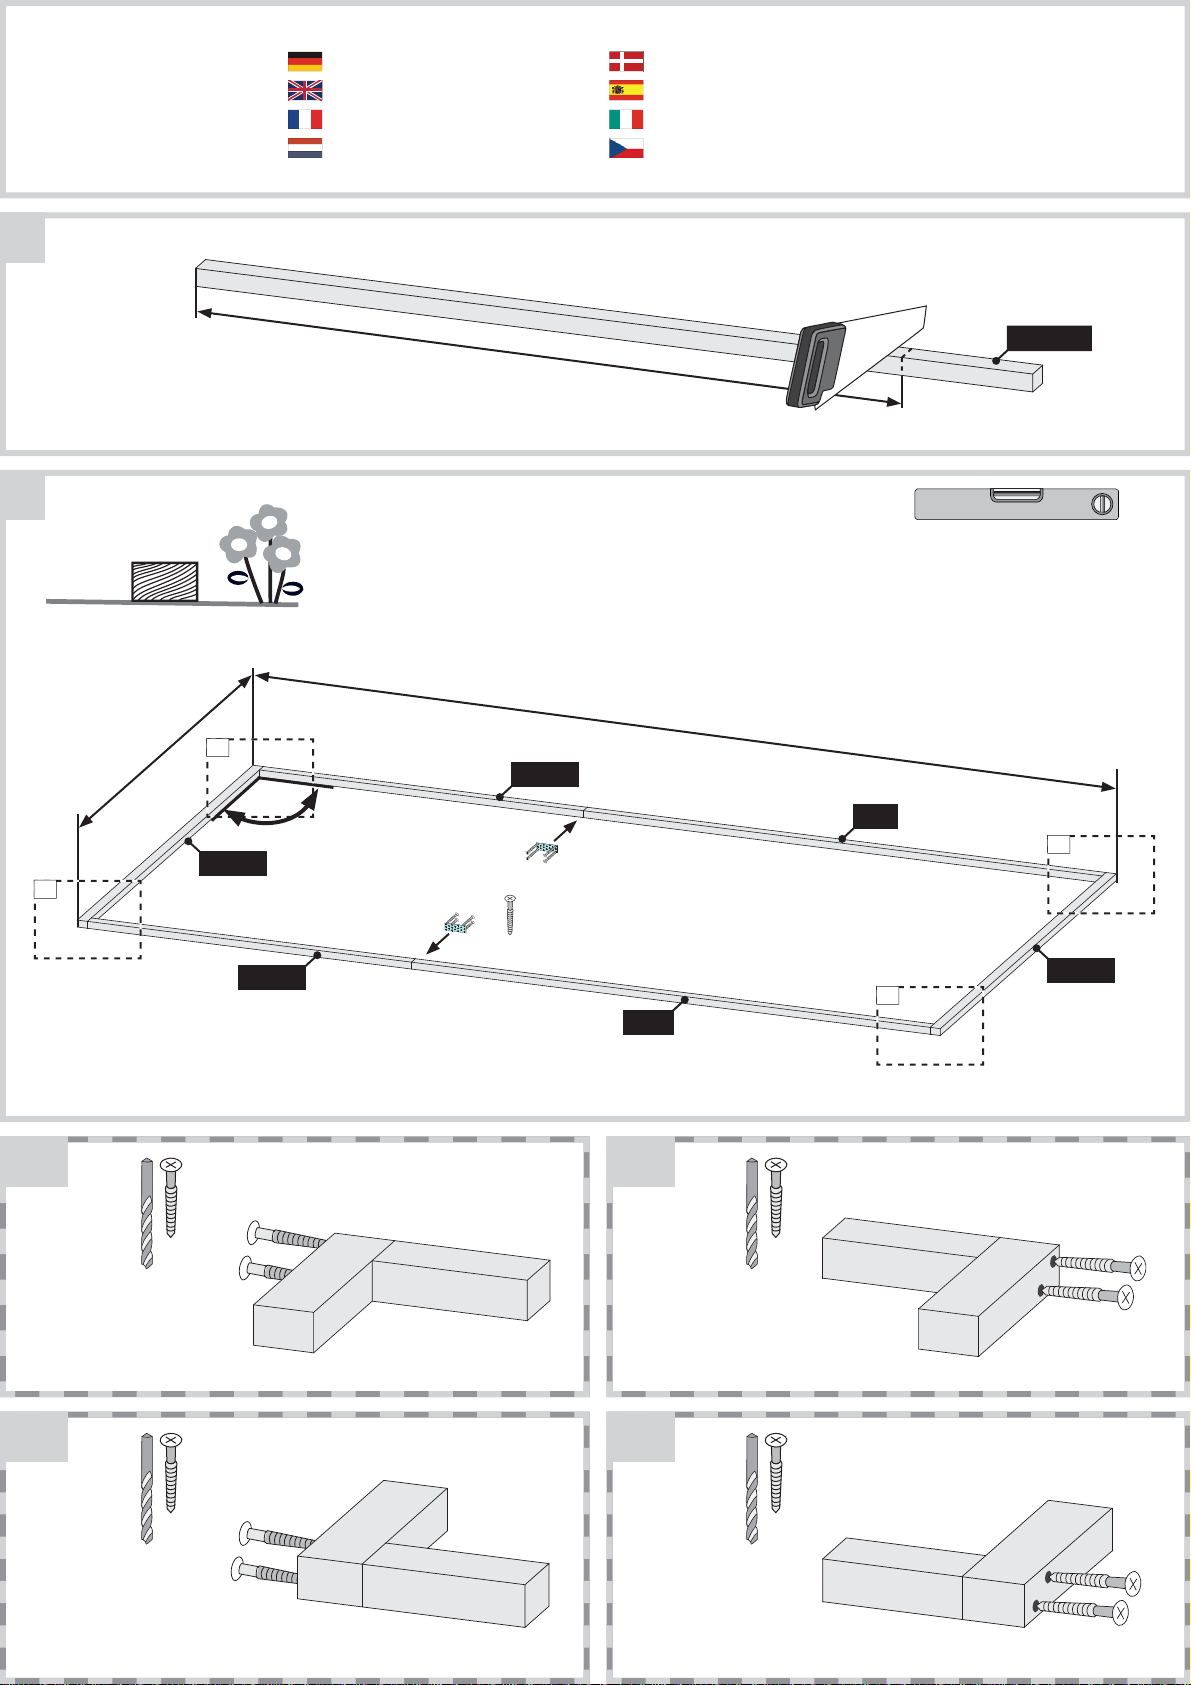
01
02
40mm
60mm
Nicht im Lieferumfang enthalten
*
Not included
Non comprises dans la livraison
Niet bijgeleverd
A/B
Ikke inkluderet
No forman parte del suministro
Non incluso
V ceně není zahrnuto
B 21 / B 22
5035mm
02.1
2715mm
90°
B 22 (A)
02.3
B 21 (B)
02.1 02.2
Ø3mm
4,5×80
B 21 (B)
4×30
B 23
Ø3mm
B 23
02.2
B 22 (A)
02.4
4,5×80
02.3 02.4
Ø3mm
4,5×80
Ø3mm
4,5×80
Page 7
A/b/C
03
B 21 / B 22 / B 23
1925mm
90°
12x
B 22 (A)
Ø3mm
4,5×80
04
60mm
40mm
B 21 (B)
604mm
604mm
604mm
B 21 (B)
B 21 (B)
B 23 (C)
B 23 (C)
B 23 (C)
Draufsicht
Top view
vue de dessus
bovenaanzicht
ovenfra
vista desde arriba
vista dall‘alto
603mm
půdorys
Page 8
05
2x
B 25
2125mm
!
4970mm
B 25 (2125)
05.1
B 25
05.3
05.1 05.2 05.3 05.4
2650mm
B 25 (2125)
05.2
B 25
05.4
32mm
Ø3mm
32mm
4×70
32mm
Ø3mm
32mm
4×70
32mm
Ø3mm
32mm
4×70
32mm
Ø3mm
32mm
4×70
Page 9

Leim! Achten Sie auf die gleiche Höhe
6
1
Glue! Look for the same height
Colle! Faites attention à la même hauteur
Lijm! Besteed aandacht aan de dezelfde hoogte
Lim! Vær opmærksom på samme højde
Pegamento! Prestar atención a la misma altura
Colla! Prestare attenzione alla stessa altezza
Klíh! Dávejte pozor na stejnou výšku
18 x
W 3
W 6
19 x
W 5
19 x
W 3
Ø3 mm
228x
90°
06.2
06.1
06.1
4×70
06.2
Ø3mm
06
90°
06.1
4×70
W 6
06.2
Ø3mm
4×70
Page 10
07
2x
B 25
2125mm
1590mm
1845mm
1845mm
B 25 (2125)
B 25 (2125)
07.1
Ø3mm
4×70
B 25 (2125)
B 25
07.2
07.1
07.2
Ø3mm
07.1
4×70
76x
2x
Page 11
Leim! Achten Sie auf die gleiche Höhe
Glue! Look for the same height
Colle! Faites attention à la même hauteur
17 x
W 4
Lijm! Besteed aandacht aan de dezelfde hoogte
Lim! Vær opmærksom på samme højde
Pegamento! Prestar atención a la misma altura
Colla! Prestare attenzione alla stessa altezza
Klíh! Dávejte pozor na stejnou výšku
08
B 25
Ø3 mm
34x
4×70
08.2
08.1
08.1 08.2
Ø3 mm
4×70
34x
B 25
!
Page 12
Leim! Achten Sie auf die gleiche Höhe
Glue! Look for the same height
Colle! Faites attention à la même hauteur
09
09.2
Lijm! Besteed aandacht aan de dezelfde hoogte
Lim! Vær opmærksom på samme højde
Pegamento! Prestar atención a la misma altura
Colla! Prestare attenzione alla stessa altezza
Klíh! Dávejte pozor na stejnou výšku
09.1
V 1
3x
W 5
W5
09.2
V 2
09.1
09.1 09.2
Ø3 mm
4×70
8x
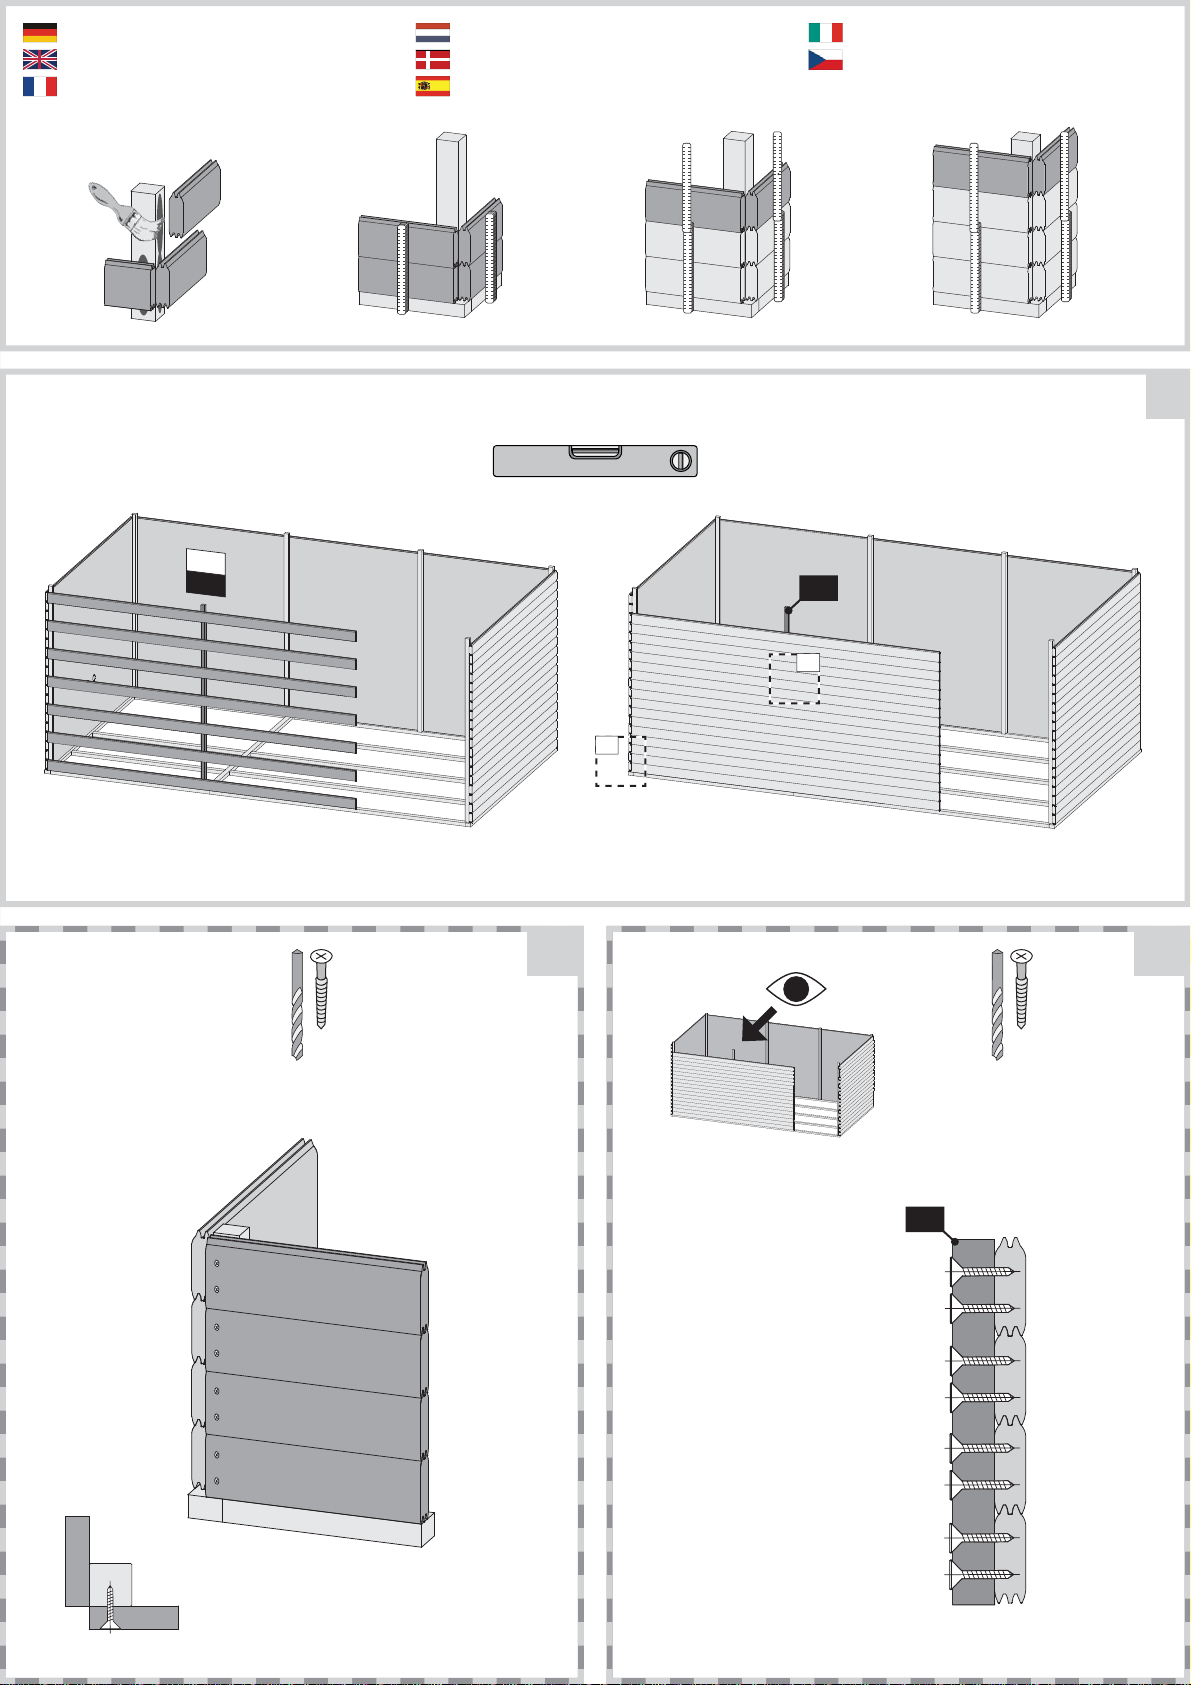
Bündig!
Flush!
Affl eurement!
Gelijk!
I fl ugt!
Aras!
Combacia!
Stejný !
Ø3 mm
4x
4×70
Page 13
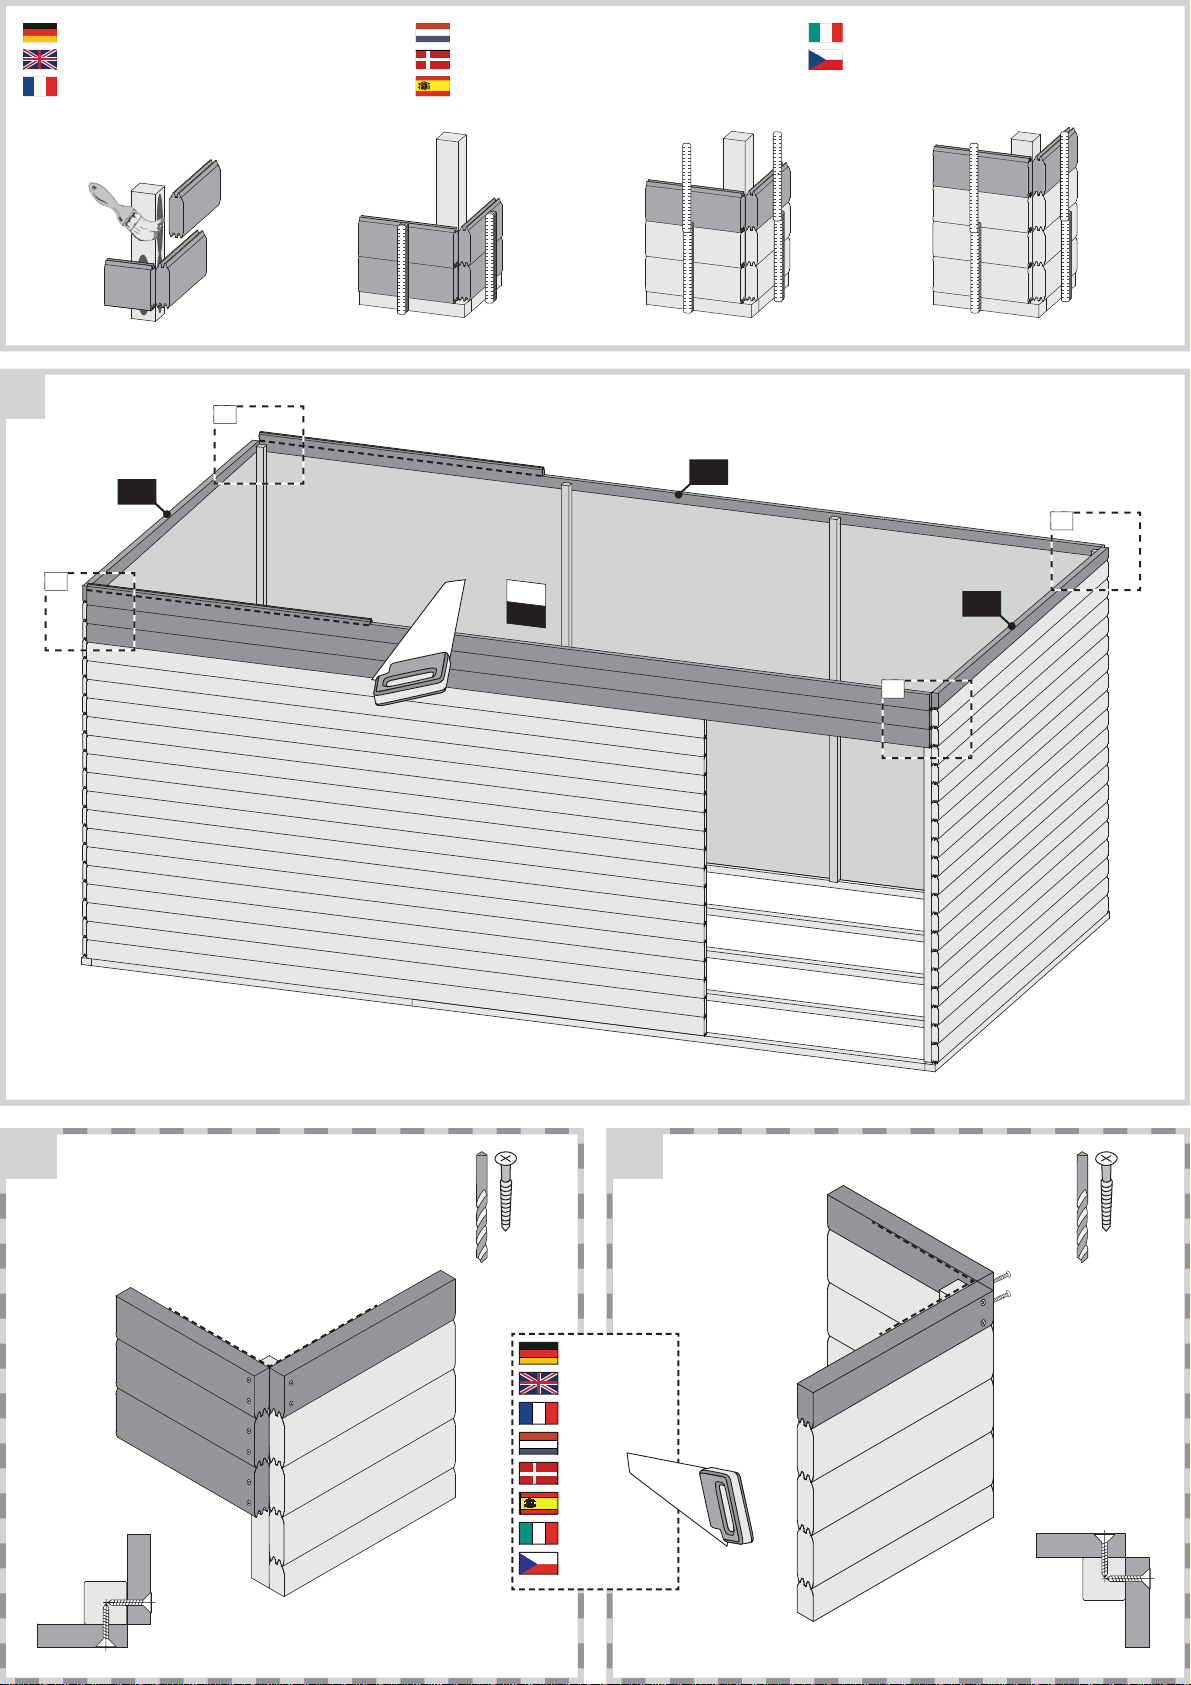
Leim! Achten Sie auf die gleiche Höhe
Glue! Look for the same height
Colle! Faites attention à la même hauteur
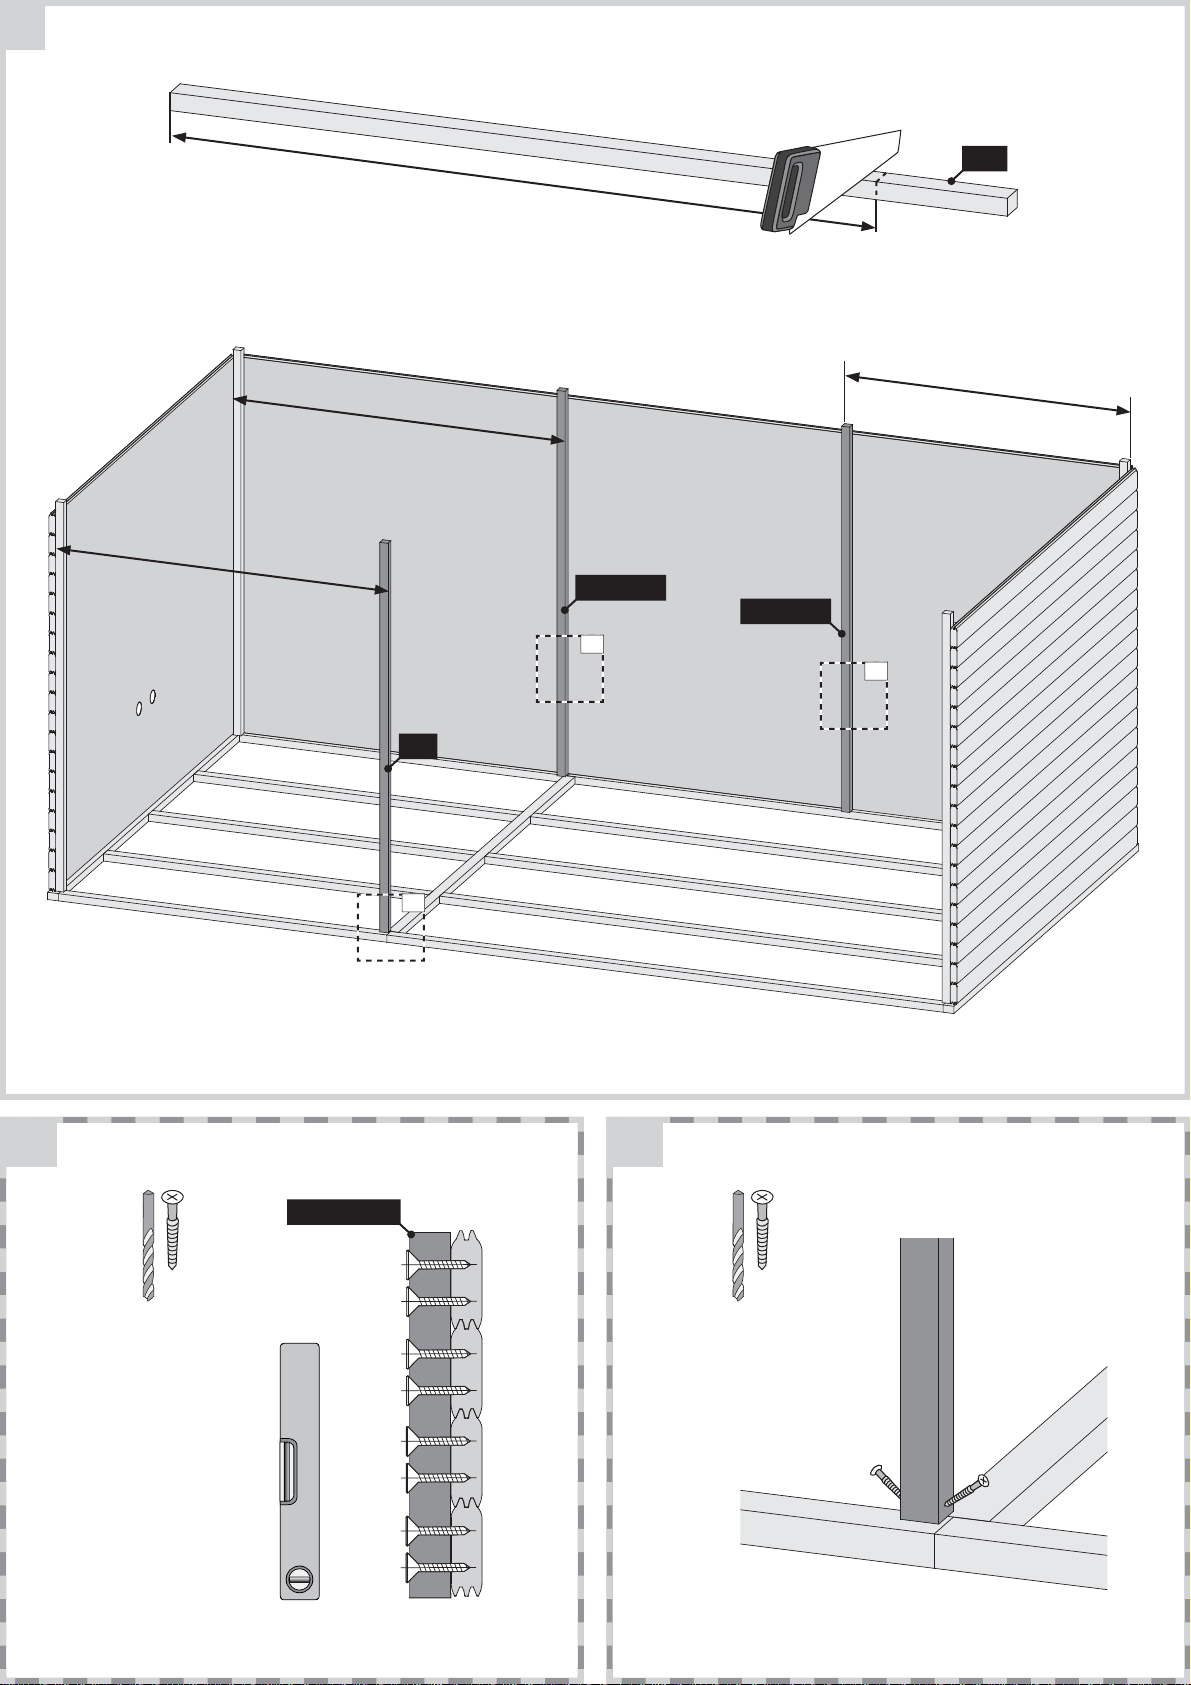
Aufbau Wand innen
Construction wall inside
Mur de construction à l‘intérieur
Lijm! Besteed aandacht aan de dezelfde hoogte
Lim! Vær opmærksom på samme højde
Pegamento! Prestar atención a la misma altura
Bouwmuur binnen
Byggemuren inde
Pared de construcción adentro
Colla! Prestare attenzione alla stessa altezza
Klíh! Dávejte pozor na stejnou výšku
10
Muro di costruzione all‘interno
Stavební stěna uvnitř
17x
W 2
3x
W 3
16x
W 2
2x
W 1
Page 14

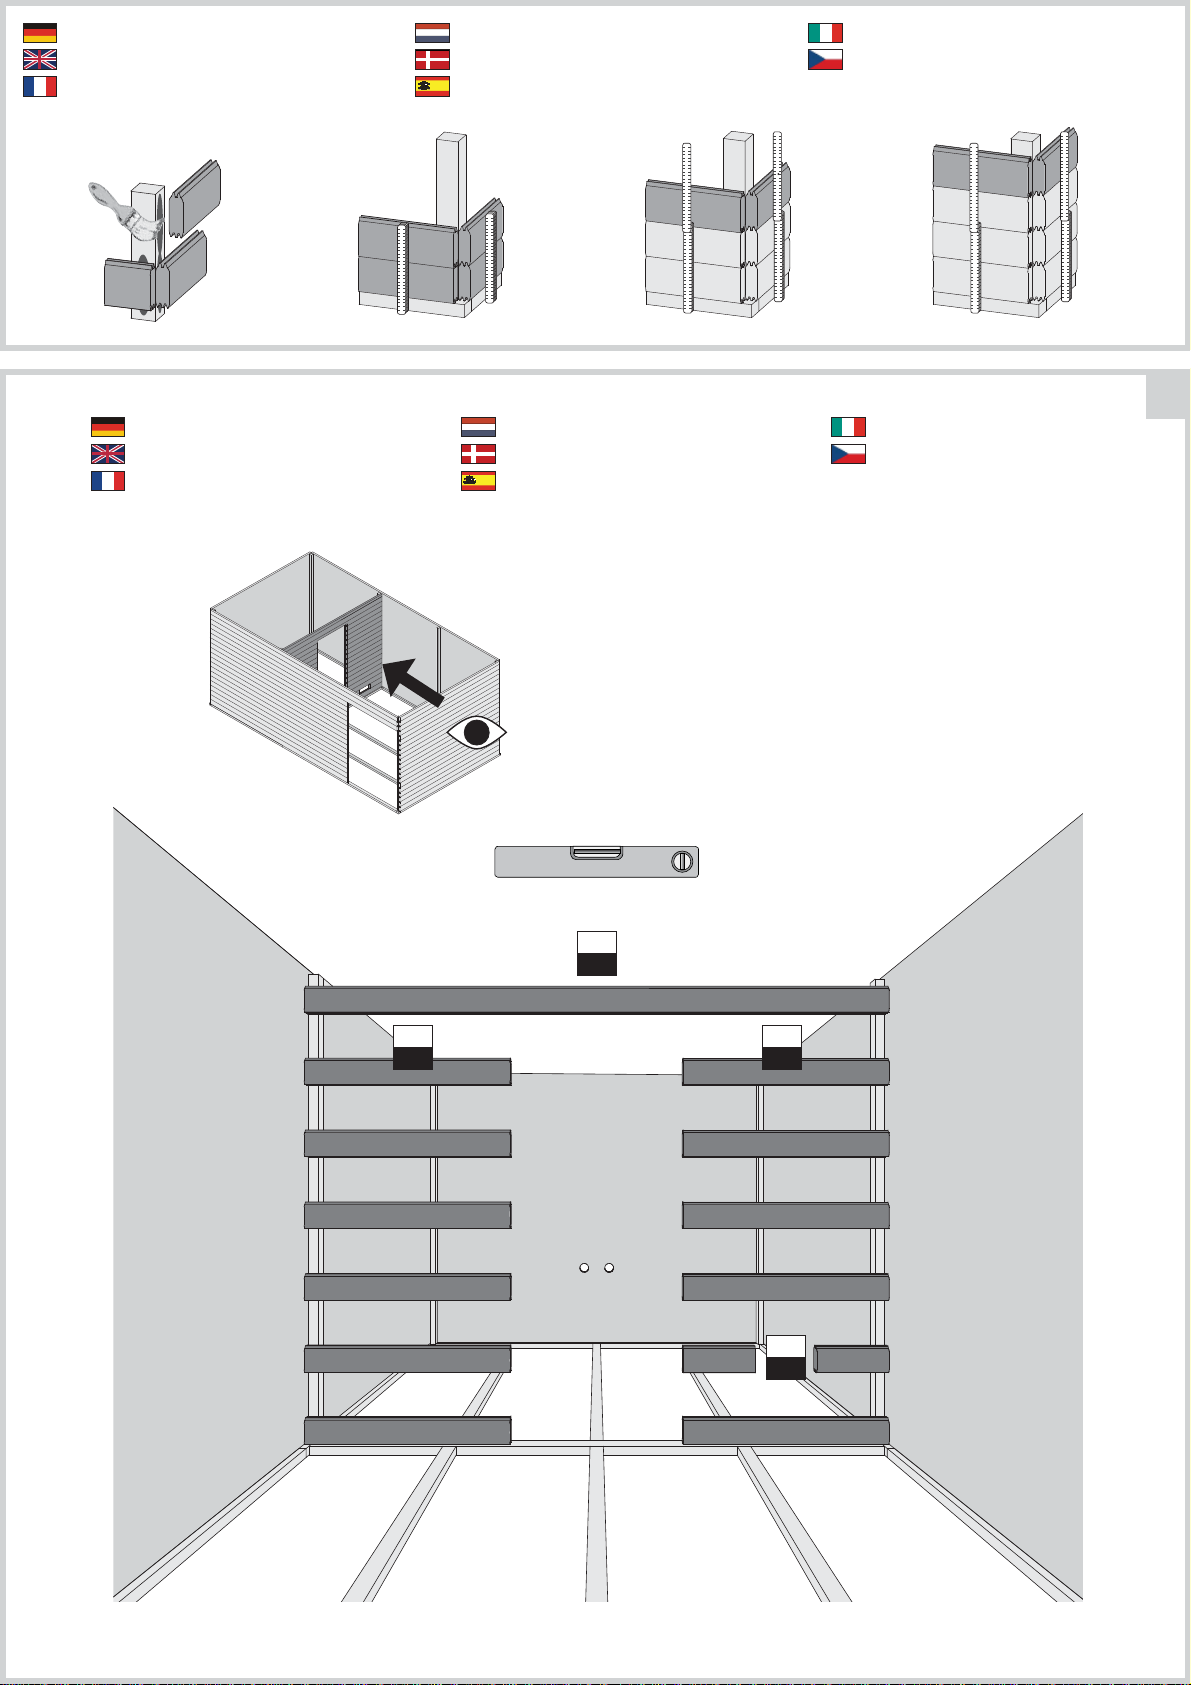
11
Aufbau Wand innen
Construction wall inside
Mur de construction à l‘intérieur
Bouwmuur binnen
Byggemuren inde
Pared de construcción adentro
Muro di costruzione all‘interno
Stavební stěna uvnitř
Ø3 mm
4×70
80x
Bündig!
Flush!
Affl eurement!
Gelijk!
I fl ugt!
Aras!
Combacia!
Stejný !
1910mm
Page 15

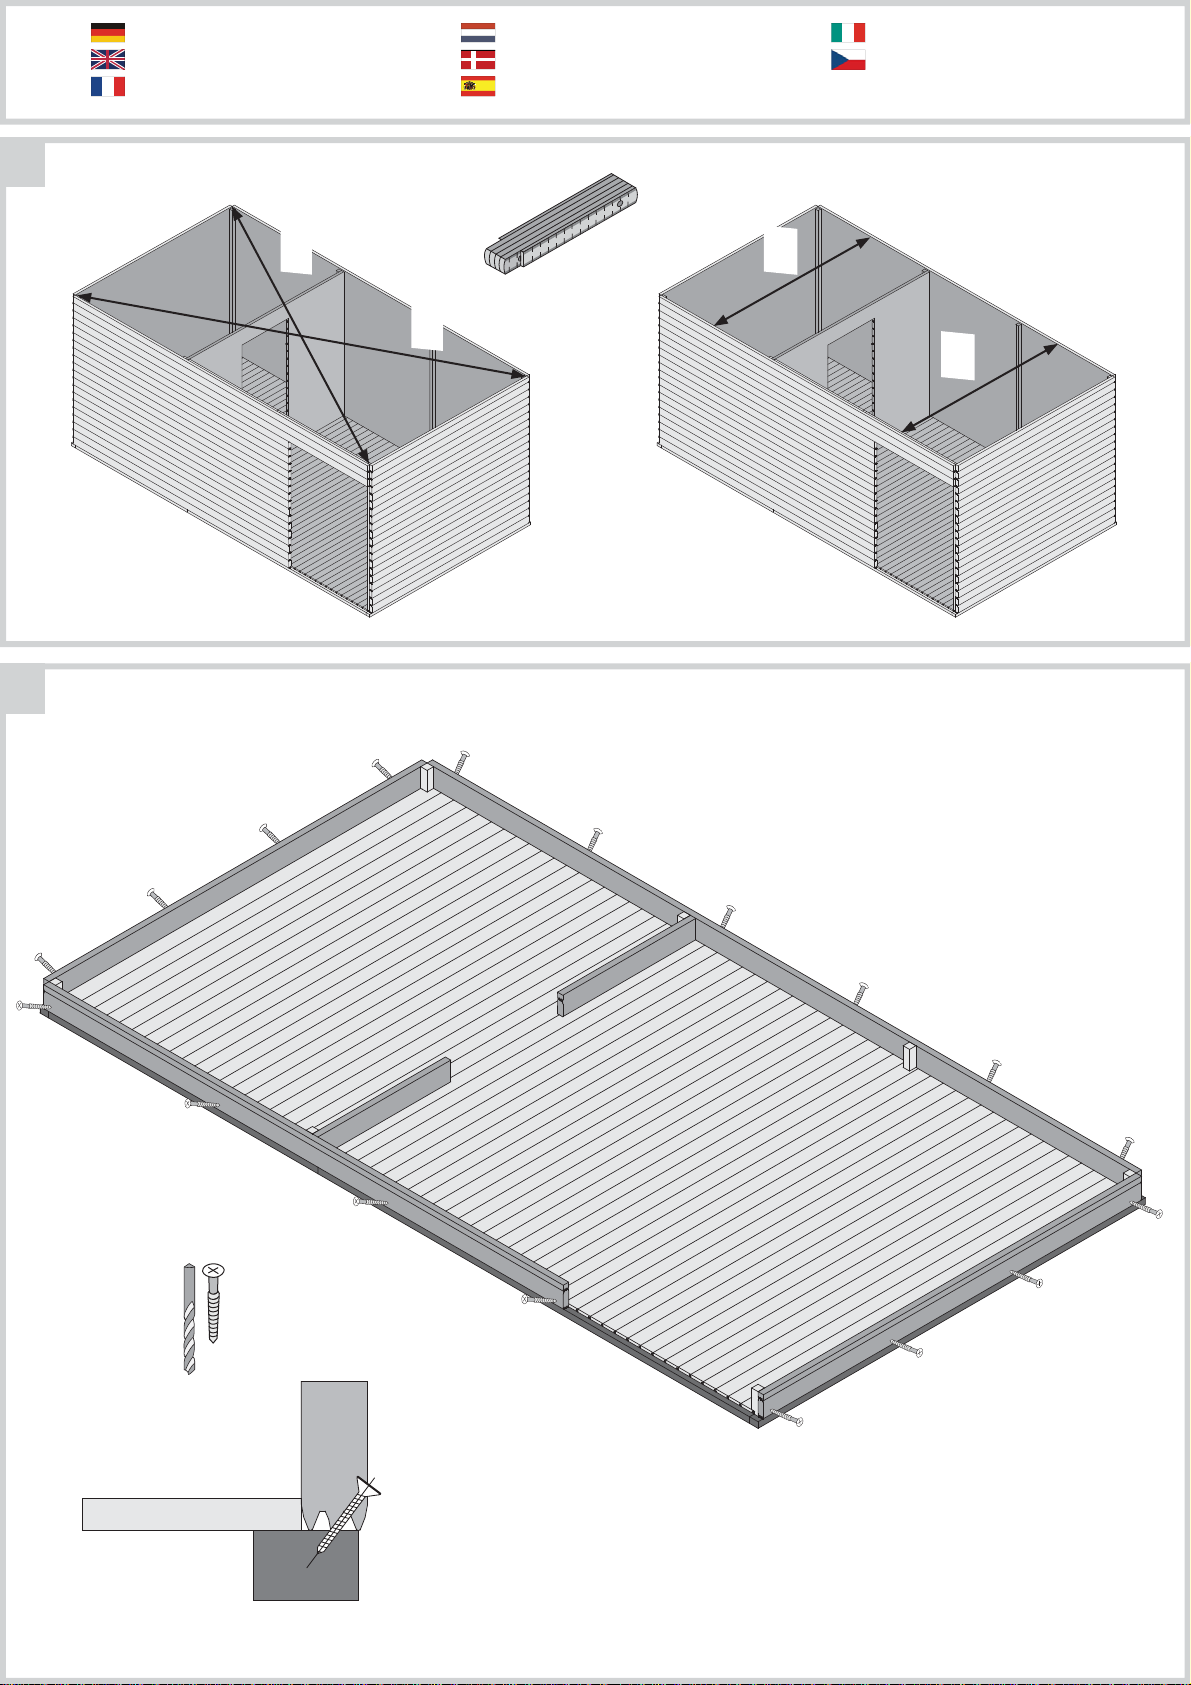
Aufbau Fußboden
Construction of fl oor
Construction du plancher
Bouw van de vloer
Byggeri af gulv
Construcción de piso
Costruzione di pavimento
Výstavba podlahy
12
1.
C 1
Breite Seite nach oben
Width side up
Largeur vers le haut
Breedte side up
2.
12.3
12.2
12.2
12.2
12.1
Ancho de banda de hasta
Larghezza verso l‘alto
Šířka stranou nahoru
12.1 12.2 12.3
Page 16
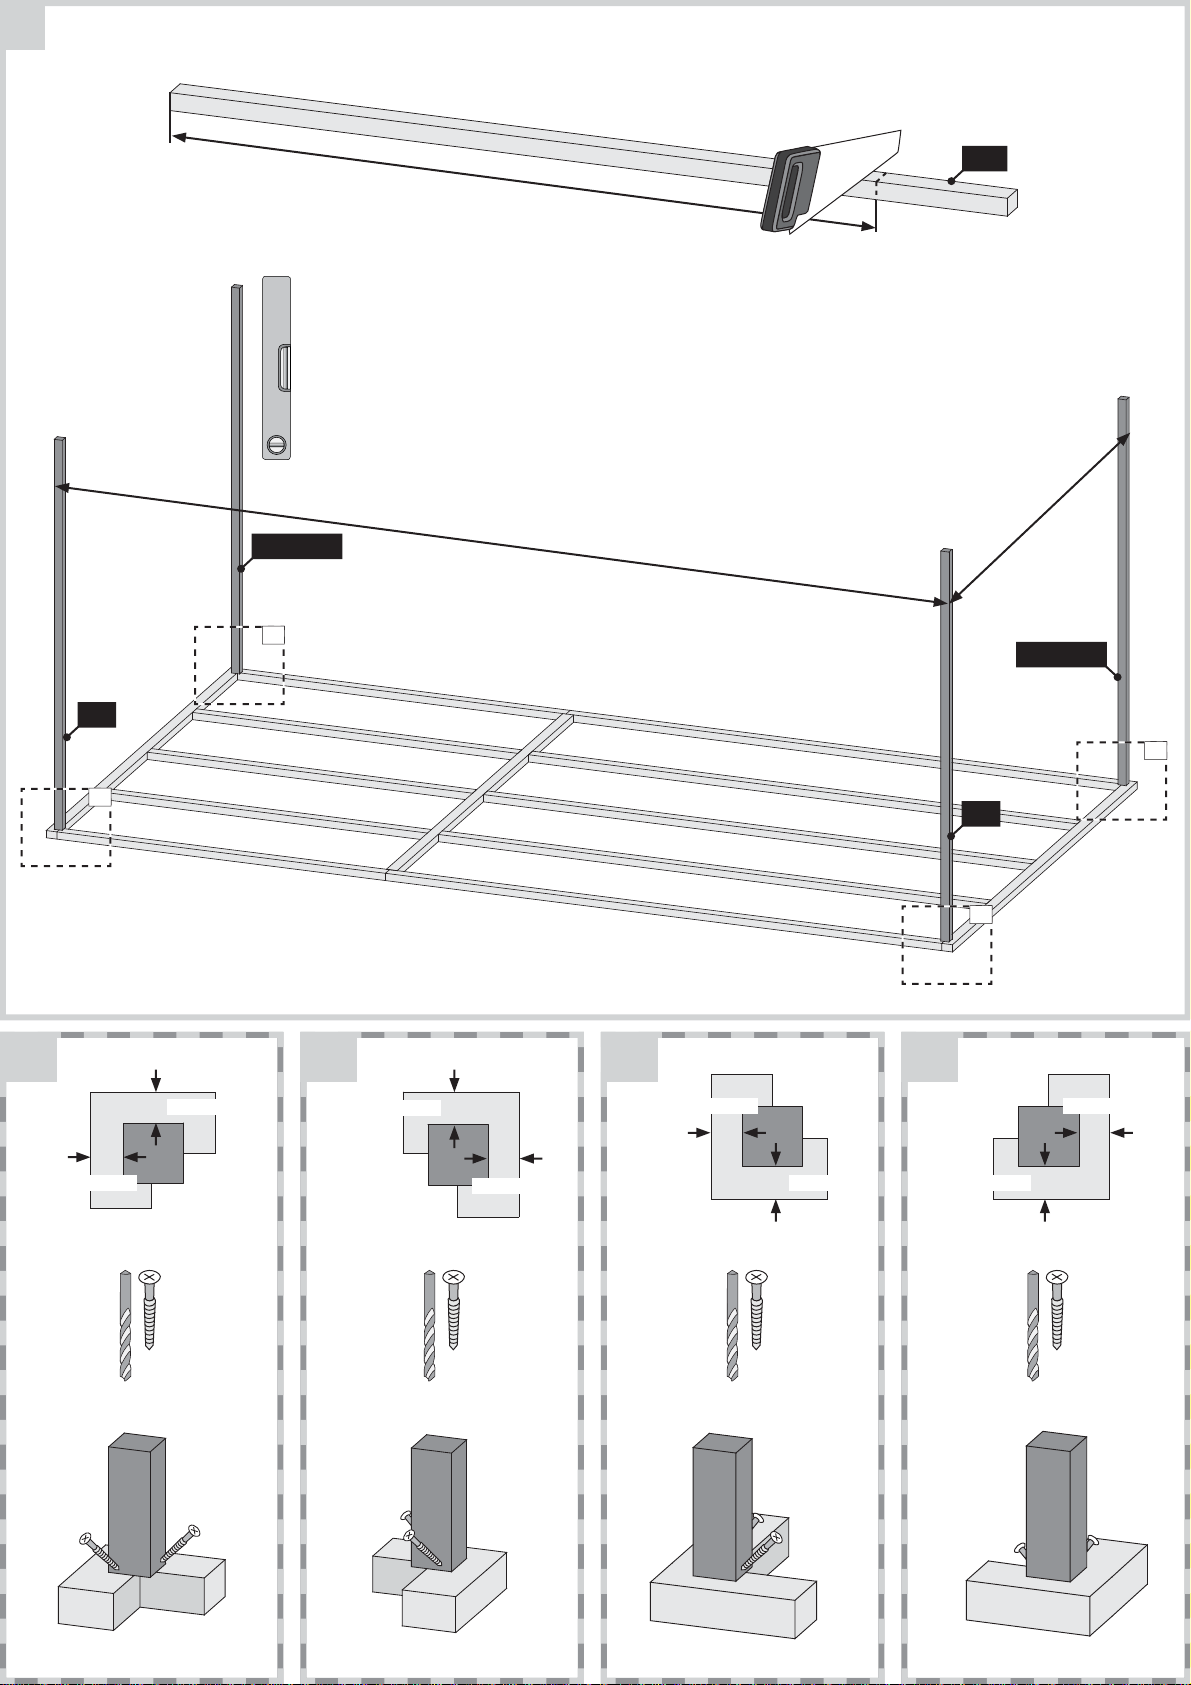
13
ausrichten
align
aligner
richten
tilpasse
alinear
allineare
seřadit
14
A
B
A
B
Ø3 mm
18x
4×70
Page 17

1870 mm
!
B 8
2x
15
16
16.1 16.2
B 8 (1870)B 8 (1870)
25mm
Ø3mm
16.1 16.2
4×50
25mm
Ø3mm
4×50
Page 18

17
B 16
Kabeldurchführung
cable inlet
entrée de câble
kabel implementering
kabelingang
entrada del cable
ingresso cavi
kabelová průchodka
B 17
B 17
!
B 16
Ø3 mm
22x
4×70
240mm
240mm
Page 19

18
Sauna Dichtband
Sauna sealing tape
Ruban d‘étanchéité pour sauna
Sauna tætningsbånd
Sauna afdichtingstape
Cinta de sellado de sauna
Nastro sigillante per sauna
Sauna těsnící páska
19
!
!
N 1
B 1
B 1
N 1
N 1
Page 20

20
N 1
N 1
N 1
9x
N 1
3x
Ø3 mm
24x
4×70
3x
9x
Page 21

2x
21
1755mm
252mm
Ø3 mm
!
4×70
!
B 25 (1755) B 24 B 24
15x
B 25
22
Ø3 mm
28x
!
B 25 (252)
B 24
B 24 B 24
4×70
!
B 25 (1755)B 24
Page 22

23
B 12
Ø3mm
10x
4×50
B 19
2050 mm
1854 mm
2170 mm
B 20
B 19
B 20
B 12
Bündig!
Flush!
Affl eurement!
Gelijk!
I fl ugt!
Aras!
Combacia!
Stejný !
24
Ø3mm
10x
4×50
Ø3mm
5x
B 12
B 12
4×70
!
4×50
B 12 + B 19
B 12 + B 20
4×50
4×70
B 12
Page 23

3 x
B 14
Bündig!
Flush!
Affl eurement!
Gelijk!
I fl ugt!
Aras!
Combacia!
Stejný !
Ø3mm
60x
24x
Ø3mm
4×70
4×70
3x
25
26
A
A
A
A
Draufsicht
Top view
bovenaanzicht
vue de dessus
ovenfra
vista desde arriba
vista dall‘alto
půdorys
Page 24

27
3x
3 x
B 15
28
Ø3mm
72x
4×70
Bündig!
Flush!
Affl eurement!
Gelijk!
I fl ugt!
Aras!
Combacia!
Stejný !
!
Ø3mm
12x
4×70
3x
Ø3mm
24x
4×35
Draufsicht
Top view
bovenaanzicht
vue de dessus
ovenfra
vista desde arriba
vista dall‘alto
A
A
A
půdorys
A
Page 25

1x
2320mm
29
B 13
Bündig!
Flush!
Affl eurement!
Gelijk!
I fl ugt!
Aras!
Combacia!
Stejný !
!
B 13 (2320)
Ø3mm
20x
4×50
B 13
B 12B 12
Page 26

30
Bündig!
Flush!
Affl eurement!
Gelijk!
I fl ugt!
Aras!
Combacia!
Stejný !
1x
2320mm
1x
2090mm
Ø3mm
15x
B 13
B 12
4×50
!
B 13 (2320)
B 12B 12 (2090)
Page 27

Ø3mm
15x
4×50
31
1x
B 13
2320mm
1x
B 12
2090mm
Bündig!
Flush!
Affl eurement!
Gelijk!
I fl ugt!
Aras!
Combacia!
Stejný !
B 13 (2320)
!
B 12 B 12 (2090)
Page 28

32
G 1
Ø3mm
13x
4×50
G 1
G 1
Bündig!
Flush!
Affl eurement!
Gelijk!
I fl ugt!
Aras!
Combacia!
Stejný !
Bündig!
Flush!
Affl eurement!
Gelijk!
I fl ugt!
Aras!
Combacia!
Stejný !
Ø3mm
10x
B 6
4×50
!
B 6 *
B 12B 12 (2090)
Page 29

B 9
Hier ist die Funktionsweise des Brettes abgebildet. Regeln Sie damit die Abluft nach Ihren eigenen Wünschen
This fi gure shows the functional principle of the board. Regulate the exhaust air according to your own wishes
Ceci représente le mode de fonctionnement de la planche. Avec elle, régulez l’écoulement de l’air selon vos désirs
Hier is de werking van het plankje afgebeeld. Regel daarmee de luchtafvoer naar eigen wens
Sådan fungerer styret. Brug den til at regulere udstødningsluften efter dine egne ønsker
Aquí está representada la forma de funcionamiento de la tabla. Regule con ello el aire de salida según sus propios deseos
Viene illustrato il principio di funzionamento della tavoletta di regolazione della ventilazione. Con essa si può regolare a piacere la ventilazione
Zde je zobrazená funkce desky. Regulujte s ní odsávací vzduch dle Vašeho přání
Ø3mm
B 9
4×50
G 2
33
Page 30

Allineare il vetro nel telaio della porta
Einb
Einb
au Glastür
Installation of glass door
Montage porte en verre
Montage van de glazen deur
Montaje de la puerta de cristal
Installazione portello di vetro
Sauna Instalace dveře
au Glastür
Installationsglasdør
34
Installation of glass door
Montage porte en verre
Montage van de glazen deur
Montaje de la puerta de cristal
Installazione portello di vetro
Sauna Instalace dveře
D 1
Saunatürglas im Türrahmen ausrichten
Center the glass in the wooden frame
Bien aligner le verre à vitre
Lijn het glas uit in het deurframe
Juster saunaens dørglas i dørkarmen
Alinee el vidrio en el marco de la puerta
Allineare il vetro nel telaio della porta
Skleněná dvířka sauna v zárubně zarovnání
D 1
Page 31

Einb
Einb
au Glastür
Installation of glass door
Montage porte en verre
Montage van de glazen deur
Montaje de la puerta de cristal
Installazione portello di vetro
Sauna Instalace dveře
au Glastür
Installationsglasdør
Installation of glass door
Montage porte en verre
Montage van de glazen deur
Montaje de la puerta de cristal
Installazione portello di vetro
Sauna Instalace dveře
Ø3mm
35
4×35
B 5
3x
D 1
6x
6×80
Page 32

36
L 1
L 2
2x
Ø3mm
16x
Ø8mm
4×35
3x
Page 33

Bündig!
Flush!
Affl eurement!
Gelijk!
I fl ugt!
Aras!
Combacia!
Stejný !
37
L 1
B 3
Ø3mm
16x
B 4
L 2
4×50
L 2
B 4
Page 34

38
A 2 A 2 A 1
770mm
Ø3mm
18x
4×70
Bündig!
Flush!
Affl eurement!
Gelijk!
I fl ugt!
Aras!
Combacia!
Stejný !
A 1
770mm
Page 35

L 2
39
L 1
L 3
L 4
L 2
L 3
Ø3mm
12x
4×50
L 3 / L 4
Page 36

40
B 10
B 10
B 11
B 11
B 11
B 11
B 10
B 10
595mm
Ø3mm
16x
B 7/18
4×35
41
B 7 (595)
210mm
B 18 (595)
B 7 (595)
B 18 (595)
Ø3mm
16x
4×35
E 1
1590mm
Page 37

E 1 (1590)
Ø3mm
12x
4×50
42
Ofenbefestigung
oven fi xing
fi xation four
oven vaststelling
ovn fastsættelse
fi jación horno
fi ssaggio forno
upevňovací trouba
43
Page 38

44
Kabeldurchführung
implementation for the cable
mise en œuvre pour le câble
implementatie voor de kabel
implementación para el cable
implementazione per il cavo
provedení kabelu
Ø15mm
Kabeldurchführung
implementation for the cable
mise en œuvre pour le câble
implementatie voor de kabel
implementering af kablet
implementación para el cable
implementazione per il cavo
provedení kabelu
Page 39

Einb
Einb
au Glastür
Installation of glass door
Montage porte en verre
Montage van de glazen deur
Montaje de la puerta de cristal
Installazione portello di vetro
Sauna Instalace dveře
šechny nastavovací podivínů musí mít stejný
základní polohy ve skle
au Glastür
Installationsglasdør
Installation of glass door
Montage porte en verre
Montage van de glazen deur
Montaje de la puerta de cristal
Installazione portello di vetro
Sauna Instalace dveře
45
Alle Verstell-Excenter müssen in der
Glasscheibe die gleiche Grundstellung haben
All adjustable eccentrics must have the same
basic adjustment in the glass panel
Tous les excentreurs de positionnement doivent
avoir la même position de base dans la vitre
Alle excentrische verstelelementen moeten in
dezelfde stand in de glasplaat worden geplaatst
Alle justeringsexcentricer skal have samme
grundlæggende position i glasruden
Todos los excéntricos regulables tienen que tener
la misma posición base en la hoja de cristal
Tutti gli eccentrici di regolazione
stessa posizione base nella lastra di vetro
šechny nastavovací podivínů musí mít stejný
základní polohy ve skle
devono avere la
Page 40

Einb
Einb
au Glastür
Installation of glass door
Montage porte en verre
Montage van de glazen deur
Montaje de la puerta de cristal
Installazione portello di vetro
Sauna Instalace dveře
au Glastür
Installationsglasdør
46
Installation of glass door
Montage porte en verre
Montage van de glazen deur
Montaje de la puerta de cristal
Installazione portello di vetro
Sauna Instalace dveře
47
Page 41

Einb
Einb
au Glastür
Installation of glass door
Montage porte en verre
Montage van de glazen deur
Montaje de la puerta de cristal
Installazione portello di vetro
Sauna Instalace dveře
Všechny nastavovací podivínů musí mít stejný základní polohy ve skle
au Glastür
Installationsglasdør
Installation of glass door
Montage porte en verre
Montage van de glazen deur
Seitenverstellung + Höhenverstellung
Alle Verstell-Excenter müssen in der Glasscheibe die gleiche Grundstellung haben
Lateral adjustment + height adjustment
All adjustable eccentrics must have the same basic adjustment in the glass panel
Positionnement latéral + positionnement hauteur
Tous les excentreurs de positionnement doivent avoir la même position de base dans la vitre
Zijverstelling + hoogteverstelling
Alle excentrische verstelelementen moeten in dezelfde stand in de glasplaat worden geplaatst
Sidejustering + højdejustering
Alle justeringseksentriske skal have samme grundlæggende position i glasruden
Regulación lateral + regulación de la altura
Todos los excéntricos regulables tienen que tener la misma posición base en la hoja de cristal
Montaje de la puerta de cristal
Installazione portello di vetro
Sauna Instalace dveře
48
Regolazione laterale + regolazione dell’altezza
Tutti gli eccentrici di regolazione
Boční nastavení + nastavení výšky
Všechny nastavovací podivínů musí mít stejný základní polohy ve skle
devono avere la stessa posizione base nella lastra di vetro
Page 42

Schmale Seite nach oben
Estrecha hacia arriba
49
Narrow side up
Narrow vers le haut
Smalle kant naar boven
Smal side op
Stretta verso l‘alto
Úzká stranou nahoru
C 1
C 1
Page 43

C 1
50
Bündig!
Flush!
Affl eurement!
Gelijk!
I fl ugt!
Aras!
Combacia!
Stejný !
Y 5
Y 5
Ø3mm
35x
Q 1
Bündig!
Flush!
Affl eurement!
Gelijk!
I fl ugt!
Aras!
Combacia!
Stejný !
Y 5
Y 5
Y 5
Y 5
Y 5
Page 44

Verlegehinweis
Verlegehinweis
Gardentop Stick Alu
Beton, Mauerwerk und Kunststoffen (ausser PVC). Klebt nicht auf Silikon.
Der Untergrund muss trocken, staub-, fettfrei und abriebfest sein.
Die Verarbeitungstemperatur sollte über 10 Grad Celsius betragen. Lagern Sie die
Bahn bei kalten Jahreszeiten vor der Verarbeitung nicht im Freien. Eine optimale
Verklebung erreichen Sie bei höheren Temperaturen. Achten Sie darauf, dass Sie
Unebenheiten vor dem Aufbringen der Bahn ausgleichen.
Vor der Verlegung sollte geprüft werden, ob das Produkt für den Einsatzbereich
geeignet ist.
Bei verschmutztem Untergrund muss ein bituminöser
Voranstrich (lösemittelhaltig oder lösemittelfrei)
aufgebracht werden.
klebt auf Holzunterkonstruktionen, Metall, Bitumen,
• Das Verlegen der Bahnen erfolgt längs oder quer mit einer Mindestüberlappung von 10 cm. Vor dem Abziehen der unterseitigen Folie, rollen Sie
die Bahn ca. 2 m aus, um die Bahn seitlich auszurichten. Dann klappen Sie
den Rollenanfang um und ziehen die Schutzfolie auf der Bahnenunterseite
ca. 20 cm ab, um die Bahn so mit der Selbstklebefläche auf dem Untergrund
zu fixieren (Bild 1).
• Anschließend rollen Sie die Bahn wieder zurück, bis zum verklebten/fixierten
Rollenanfang.
• Rollen Sie die Bahn nun durch abziehen der unterseitigen Folie gleichmäßig
aus (Bild 2) und achten Sie darauf, dass es keine Lufteinschlüsse gibt.
Lufteinschlüsse sind gleichmäßig nach außen weg zu bürsten.
• Achten Sie besonders im Überdeckungsbereich darauf, dass eine gute
Verklebung eintritt. Sie können die beste Klebewirkung mit einer
Anpresswalze erreichen (Bild 3).
Page 45

IKO Sales International nv, IZ Ravenshout 3815, B-3945 Ham
Gardentop STICK ALU 5 x 1m Edition: 18/02/2016
EINSATZBEREICH / Produkt
Kaltselbstklebende, oberseitig alukaschierte Dachbahn, zur Dacheindeckung von
untergeordneten Dächern, wie z. B. von Carports, Gartenhäusern, Geräteschuppen, usw.
ZUSAMMENSETZUNG
Oberseitige Deckschicht
und Träger: UV – beständiger Aluminiumverbund
Unterseitige Deckschicht: Thermoplastischer Bitumenklebstoff mit silikonisierter
Abziehfolie
BESCHICHTUNG
Oberseite: UV- beständiger Aluminiumverbund
Unterseite: silikonisierte Folie
ABMESSUNGEN
Länge: 5 (±1%) x 1(±1%) m
Dicke: 1,1 mm (±5%)
Gewicht / Dachbahn: ± 6 kg
VERPACKUNG
Rollen / Palette: 54 (270 m2),
jede Rolle einzeln in Kartonverpackung, mit Aufdruck der
Produktbezeichnung, -erklärung und Verlegehinweisen
TECHNISCHE INFO
Höchstzugkraft Wärmestand-
Länge Breite festigkeit bei 80°C
Minimalwerte ≥ 200N ≥ 200N < 2mm
Wasserdampf- Brandklasse
Durchlässigkeit sd
Minimalwerte >1500 m E
Sales support: Tel. ++32/11.34 01 82 – Fax ++32/11.34 01 30
Order Desk: Tel. ++32/11.34 01 34 – Fax ++ 32/11.34 13 19
Page 46

51
Y 4
B 2
B 2
50 mm
Ø3mm
9x
4×35
3 mm
Page 47

Y 1
52
Y 2
Y 2
30 mm
Ø3mm
6x
Y 1 + Y 2 + Y 2
4×30
Page 48

53
K 1
A
Ø3mm
4x
4×35
A
54
Page 49

55
K 3
Ø3mm
4×30
4x
Y 3
56
K 2
Ø3mm
2x
4×50
Page 50

Saunahaus ohne Vorraum
Sauna Sin antesala
Saunový dům bez předsíně
Saunahuis zonder voorkamer
Sauna sans antichambre
Sauna house without anteroom
Sauna senza antibagno
Ø3 mm
8x
4x35
Sauna hus uden anteroom
Saunahaus mit Vorraum
Saunahuis met voorkamer
Sauna avec antichambre
Ø3 mm
4x35
4x
Sauna con antesala
Sauna house with anteroom
Sauna con antibagno
Saunový dům s předsíní
Sauna hus med anteroom
Page 51

85269 86952 85019 85020
27.04.2018
Aufbauanleitung
Building Instructions
notice de montage
montagehandleiding
Montagevejledning
Instrucciones de construcción
Istruzioni per il montaggio
Montážní návod
+49 421 38693 33
Page 52

01
02
1195mm
90mm
400mm
03 04 05
 Loading...