

61576
24.04.2017
Aufbauanleitung
notice de montage
Building Instructions
montagehandleiding
Instrucciones de construcción
Istruzioni per il montaggio
Montážní návod
Service-Hotline:+49 421 38693 33
Vergleichen Sie zuerst die Material-
liste mit Ihrem Paketinhalt! Bitte haben Sie
Verständnis, dass Beanstandungen nur im nicht
aufgebauten Zustand bearbeitet werden können!
Vergelijk eerst de lijst van materialen
met de inhoud van uw pakket! Reclamaties kunnen alleen in behandeling worden genomen zo-
lang de onderdelen nog niet zijn gemonteerd!
En primer lugar, compare la lista de ma-
terial con el contenido del paquete. Rogamos
entienda que las reclamaciones sólo pueden ser
tramitadas antes de montar el objeto!
First compare the list of materials with
your package contents! Please understand that
complaints can be processed in the non-built
status only!
Nejprve překontrolujte obsah balení
podle materiálového listu! Mějte pochopení pro
to, že případnou reklamací se můžeme zabývat
pouze tehdy, když díly nebudou smontované!
Za pomoci tohoto seznamu můžete jednotlivé
díly přiřadit k montážnímu návodu.
Commencez par comparer la liste du
matériel avec le contenu de votre paquet! Sachez
que nous traitons uniquement les réclamations
concernant le matériel à l’état non monté!
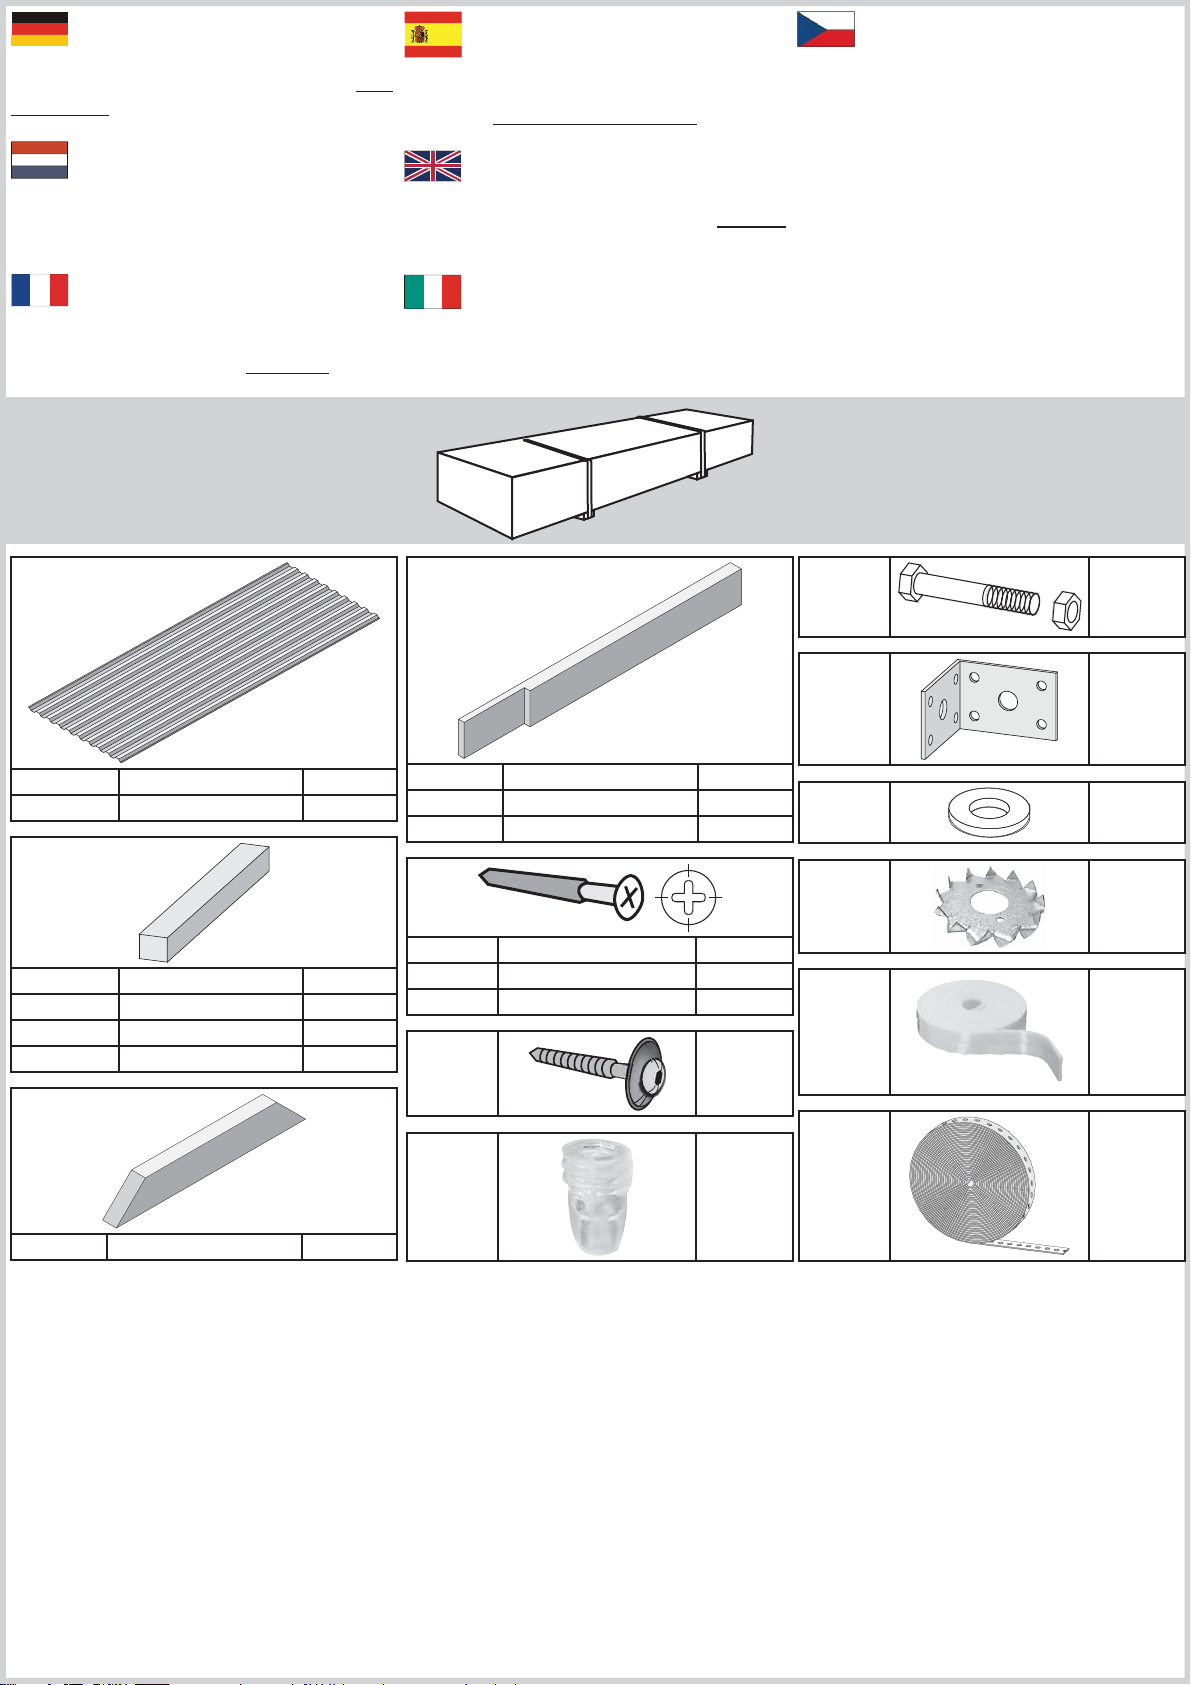
3 x D1
3 x D2
2000 x 1090 x 18mm
3000 x 1090 x 18mm
ID 61408
ID 61407
Confrontate questa distinta materiali
prima con il contenuto del pacchetto! Vi preghiamo di comprendere che eventuali reclami possono essere accolti solo prima del montaggio!
61576
2 x U1 2090 x 155 x 55mm ID 62574
2 x U2 2980 x 155 x 55mm ID 40628
6 x U3
2100 x 120 x 120mm
ID 40629
6 × ID 40787
14 × ID 21292
12 × ID 12011
6 x ID 9253
4 x B1 2100 x 95 x 18mm ID 52311
6 x B2 3300 x 95 x 18mm ID 51821
1 x B3 3140 x 60 x 40mm ID 40805
7 x B4
3140 x 155 x 55mm
ID 62575
10 x C1 750 x 115 x 55mm ID 16478
260 × 4 × 50mm ID 3688
25 × 4,5 × 80mm ID 9204
25 × 6 × 160mm ID 9252
150 × ID 73735
150 × ID 73734
3m ID 73799
20m ID 40694
B 1
B 4
B 4
D 2
B 4
B 2
B 4
D 2
D 1
B 2
B 2
D 2
D 1
B 4
B 4
B 4
B 1
D 1
B 2
B 3
B 1
B 2
U 1
U 2
C 1
C 1
U 3
C 1
C 1
C 1
U 3
U 3
C 1
U 2
C 1
C 1
C 1
U 3
C 1
U 3
U 3
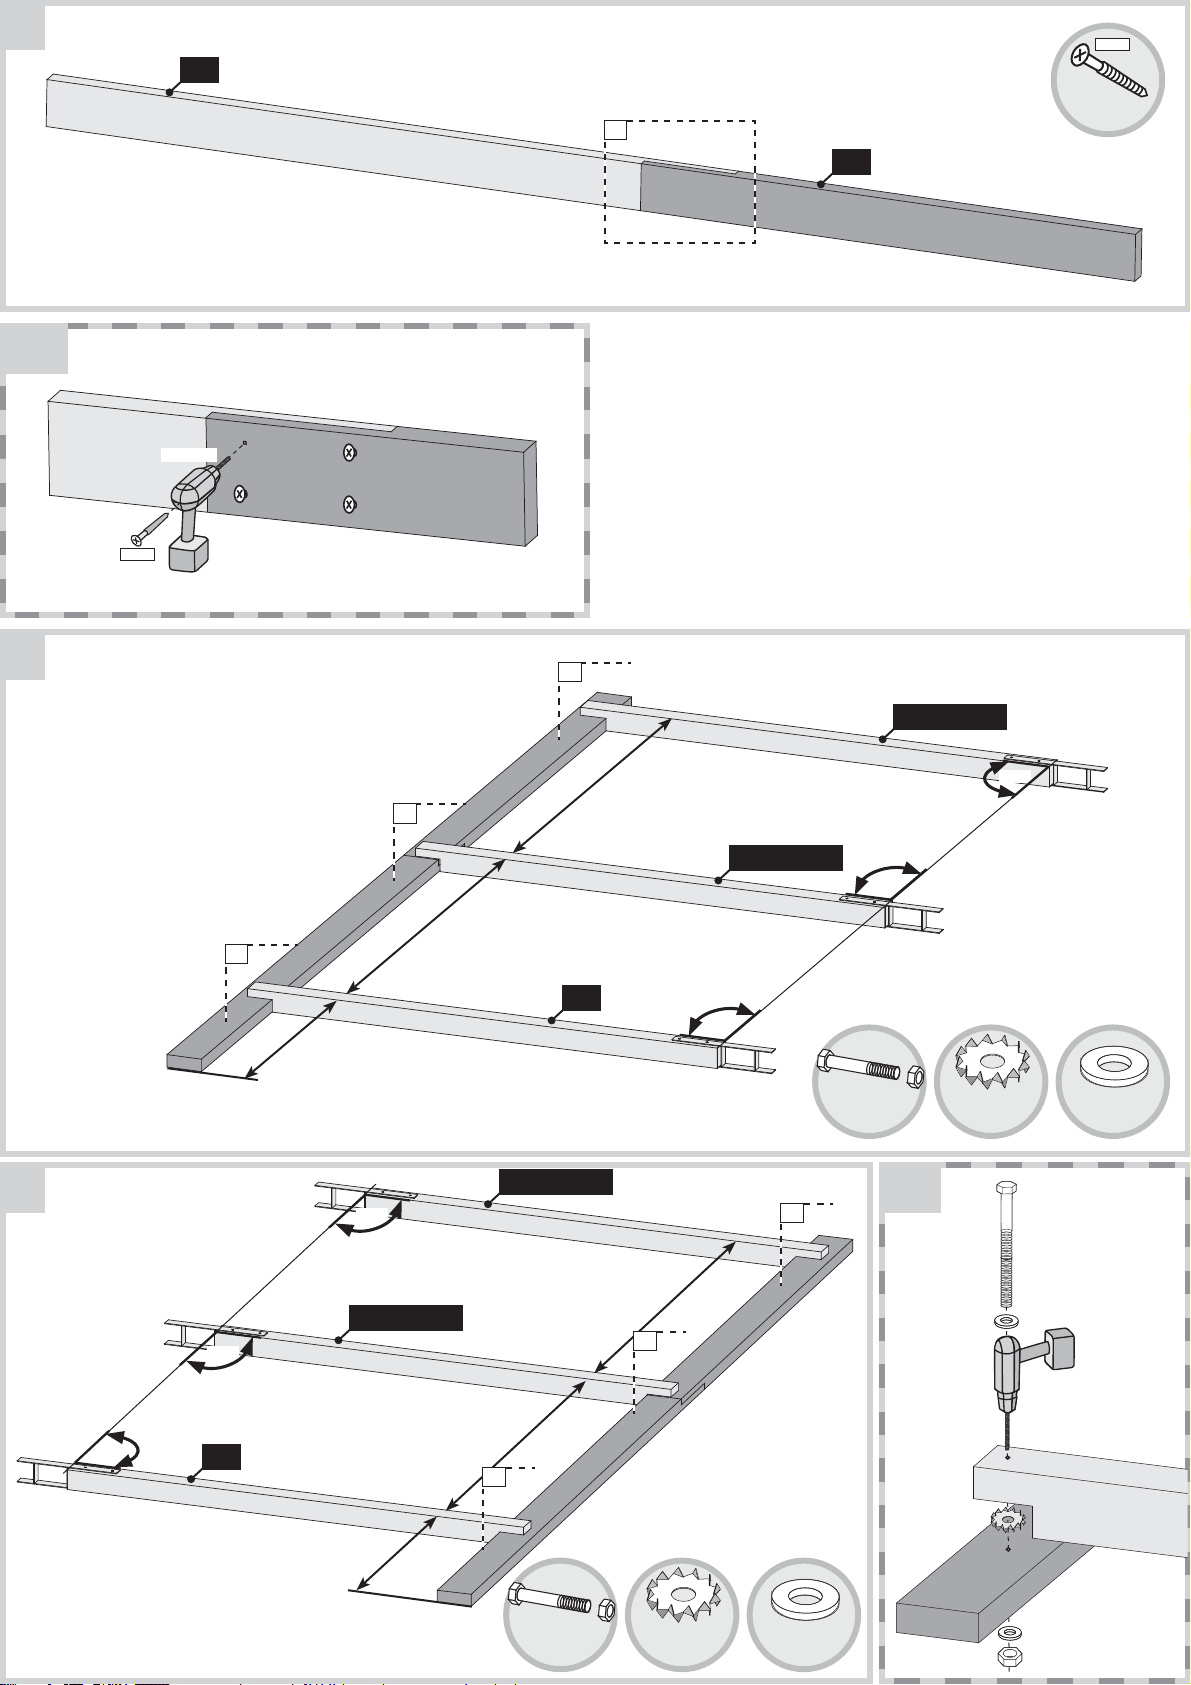
Die Pfosten dieses Produkts sollten fest mit dem Untergrund verbunden werden. Dazu empfehlen wir H-Pfostenanker. Diese sollten erst nach dem
Aufbau dieses Produkts endgültig mit Beton versehen werden. Die H-Pfostenanker und das zugehörige Befestigungsmaterial sind nicht im Liefer umfang dieses Produkts enthalten.
Les poteaux de cet article doivent être fi xés au sol. A cet effet, nous vous recommandons les systèmes d’ancrage en H (accessoires non fournis avec le
produit). Ceux-ci doivent être scellés avec du béton une fois la construction du produit terminée.
The posts of this product should be fi rmly connected to the ground. We recommend H-post anchors. These should only be fi nally provided with concrete
after the construction of this product. The H-post anchors and associated fasteners are not included with this product.
De berichten van dit product moet op de grond vastgemaakt. Wij bevelen ook het H-bericht ankers. Deze dienen echter pas na de uiteindelijke structuur
van het product met beton worden. De H-paal ankers en de bijbehorende bevestigingsmaterialen worden niet meegeleverd met dit product.
Los mensajes de este producto debe fi jarse al suelo. También te recomendamos anclas H-post. Estos deben ser proporcionados sólo después de la
estructura fi nal del producto de hormigón. Los anclajes H-correos y los materiales de fi jación asociados no están incluidos con este producto.
I messaggi di questo prodotto devono essere fi ssati al suolo. Noi raccomandiamo anche ancore H-post. Questi dovrebbero essere forniti solo dopo che la
struttura fi nale del prodotto con calcestruzzo. Le ancore H-post ed i materiali di fi ssaggio associati non sono inclusi con questo prodotto.
Sloupky tohoto produktu by měla být stanovena na zem. Doporučujeme také H-post kotvy. Ty by měly být poskytnuty pouze po konečnou strukturu
výrobku s betonem. H-post kotvy a příslušné upevňovací materiály nejsou součástí tohoto produktu.
01
02
03
2x
U 3
2067mm
2x
U 3
2034mm
6x
*
Nicht im Lieferumfang enthalten
*
Niet bijgeleverd
Not included
Non comprises dans la livraison
No forman parte del suministro
Non incluso
V ceně není zahrnuto
04
6x
05
05.1
2x
4×50
U 2
8x
05.1
U 1
Ø3mm
4×50
06
07
06.1
785mm
90°
06.1
1800mm
06.1
U 3
U 3 = 2034mm
1800mm
U 3 = 2067mm
90°
06.1
U 3 = 2034mm
90°
90°
3x 6x3x
06.1
90°
90°
U 3
U 3 = 2067mm
785mm
1800mm
1800mm
06.1
Ø12mm
06.1
3x 6x3x
08
≈1°
90°
90°
09
2500mm
!

10
10.1
Ø3mm
4,5x80
Ø5mm
10.1
C 1
C 1
10.1
C 1
C 1
C 1
10.1
C 1
C 1
10.1
C 1
C 1
4,5×80
20x
C 1
6×160
20x
11.1
4×50
11.2
6x160
Ø3mm
mm
110
11
11.3
11.2
11.2
11.2
A
11.2
A
11.2
A
11.1
B 4
A
B 4
A
B 4
A
B 4
11.3
B 4
11.2
B 4
11.2
B 4
11.2
11.2
11.2
11.1
Ø3mm
4×50
11.3
14x
4×50
112x

12
A
B
13
!!! A=B !!!
4×50
Ø3mm
4×50
13x

14
15
16
17
2x
2x
2x
2x
B 2
3175mm
B 2
3240mm
B 2
3135mm
B 1
18
19
19.1
2x
B 2 = 3175mm
B 2 = 3175mm
1580mm
1685mm
19.2
B 1
4×50
19.1
A
Ø3mm
19.2
!!! A=B !!!
Bündig!
Affl eurement!
Gelijk!
Aras!
Flush!
Combacia!
Stejný!
4×50
16x
Ø3mm
4×50
!!! A=B !!!
B

20
20.5
20.1
20.1
20.3
B 1 = 1580mm
20.1
20.2
B 2 = 3135mm
B 2 = 3240mm
20.1
B 1 = 1685mm
20.5
20.3
20.1
B 1 = 1580mm
B 2 = 3135mm
20.2
20.1
B 2 = 3240mm
20.1
20.1
B 1 = 1685mm
4×50
20.1
Ø3mm
4×50
20.2
Ø3mm
4×50
20.3
21
21.1
D 1
21.2
D 1
D 1
64x
Ø3mm
4×50
20.4
4×50
Ø3mm
20.5
21.1 21.2
Ø3mm
4×50

22
23
D 2
D 2
23.1
23.2
23.1 23.2
D 2
B 3
24
144x
24.1
24.1
24.1
144x

24.1
1
2
3
1
2
3
1
2
3
1
2
3
1
2
3
1
2
3
1
2
3
1
2
3
1
2
3
1
2
3
1
2
3
1
2
3
1
1
2
3
1
2
3
1
2
3
1
2
3
1
2
3
1
2
3
1
2
3
1
2
3
1
2
3
Ø10mm
1
2
3
1
2
3
1
2
3
1
2
3
1
2
1
2
3
1
2
3
1
2
3
1
2
3
1
2
3
1
3
2
3
1
2
3
1
1
2
3
1
2
3
1
2
3
1
2
3
2
3
2
1
3
2
3
24.1-2 24.1-424.1-3
Abstandshalter und Schrauben auf
der Bedachungsplatte ablegen
10mm Bohrloch mit Metall- oder
Holzbohrer in die Bedachungsplatte
vorbohren
24.1-5 24.1-724.1-6
Abstandshalter zB mit einem Torx
20-Bit unter die Bedachungsplatte drehen
Spenglerschraube setzen... ... und mit demselben Torx 20-Bit
einschrauben...
... und ohne Zwängung fi xieren.
Fertig!

Lagerungs- und Verarbeitungshinweise für PVC-Platten
Lagerung
Prüfen Sie genau Ihre gelieferte Ware,
spätere Reklamationen können nicht
anerkannt werden.
Bitte beachten Sie diese Lagerungsund
Verarbeitungshinweise. Bei
Nichteinhalten keine Reklamationsansprüche!
• Hitzestau und Nässe vermeiden.
• PVC-Tafeln dürfen im Stapel nicht dem Sonnenlicht und der Feuchtigkeit ausgesetzt werden. Es besteht
Gefahr der Überhitzung
(Brennglaswirkung!).
• Die maximale Lagerungstemperatur im Stapel darf 60°C nicht überschreiten. Für Brennglasschäden übernehmen
wir keine Haftung.
• Auf ebener, nicht aufgeheizter Unterlage lagern und mit licht- und wasserundurchlässigen hellen Planen
abdecken.
• Stapelhöhe max 50 cm
• Max Raumtemperatur: 40°C
• Während der Lagerung müssen PVC-Tafeln von Witterungseinüssen, Verschmutzung und mechanischen
Belastungen geschützt werden.
Montage
• Nicht bei Temperaturen unter 5°C durchführen.
• Montagebedingte manuelle Transporte einzelner Platten nicht bei Wingeschwindigkeit über 3m/s durchführen.
• Bei der Montage von Doppelstegplatten ist die Wandanschlussseite mit einer Dichtung abzuschlißen, sodass
das Eindringen von Staub und Regenwasser verhindert wird.
Aufgrund von verschiedenen Anbauoptionen ist das Dichtband nicht im Lieferumfgang enthalten.
Reinigung
• Der Reinigungszyklus ist abhängig vom Verschmutzungsgrad, sollte jedoch von außen mindestens einmal
jährlich erfolgen.
• Verschmutzungen mit Wasser oder Haushaltsreinigungsmitteln beseitigen.
• Keine scheuernden, ätzenden oder lösungsmittelhaltigen Zusätze verwenden.

Storage and processing instructions for PVC sheets
Storage
Check your delivered goods with extreme care,
as later complaints cannot be entertained.
Please observe these storage and
processing instructions. In the event of a
failure to observe these instructions, claims
relating to complaints will not be entertained!
• Avoid heat accumulation and damp.
• Stacked PVC sheets should not be exposed to sunlight and moisture. A risk of overheating exists
(risk of re through focusing of solar radiation!).
• The maximum storage temperature when stacked should not exceed 60°C. We assume no liability for
damage caused by the focusing of solar radiation in this manner.
• Store on a level, unheated surface and cover with bright tarpaulin impervious to light and water.
• Max. stack height 50 cm
• Max. room temperature: 40°C
• PVC sheets should be protected during storage against the effects of weather, dirt and mechanical loads or
stress.
Installation
• Do not install at temperatures under 5°C.
• Manual transportation of individual sheets necessary for installation should not be realised at wind speeds
exceeding 3m/s.
• When installing double-web sheets, the wall connection side should be tted with a seal to prevent the
penetration of dust and rainwater.
Sealing tape is not included in the scope of delivery, due to the different attachment options involved.
Cleaning
• The cleaning cycle depends on the level of dirt, but exterior cleaning should be realised at least once a year.
• Remove dirt with water or a household cleaning agent.
• Do not use any scouring or caustic additives or additives containing solvents.

Remarques quant au stockage et à l'utilisation des plaques PVC
Stockage
Contrôlez la marchandise reçue avec
précision, une réclamation ultérieure
ne pourra être prise en compte.
Veuillez observer ces remarques sur le
stockage et l'utilisation des plaques. Aucune
réclamation ne pourra être
acceptée en cas de non-respect !
• Éviter l'accumulation de chaleur et l'humidité.
• S'ils sont empilés, les panneaux PVC ne doivent pas être exposés à la lumière du soleil ni à l'humidité.
Risque de surchauffe
(effet de loupe) !
• La température de stockage max. à l'intérieur de la pile ne doit pas dépasser 60 °C. Nous déclinons toute
responsabilité en cas de dommages causés par un effet de loupe.
• Stocker sur une surface plane non chauffée et recouvrir de bâches claires opaques et imperméables à l'eau.
• Hauteur max. d'une pile : 50 cm
• Température ambiante max. : 40 °C
• Pendant le stockage, les panneaux PVC doivent être protégés des intempéries, de la saleté et des
contraintes mécaniques.
Montage
• Ne pas réaliser le montage si la température est inférieure à 5 °C.
• Ne pas effectuer le transport manuel de plaques individuelles nécessaire lors du montage si la vitesse du
vent est supérieure à 3m/s.
• Lors du montage de plaques alvéolaires, obturer le côté de raccordement au mur avec un joint pour empêcher la poussière et l'eau de pluie de pénétrer.
En raison des différentes options de montage existantes, le ruban d'étanchéité n'est pas inclus dans la livraison.
Nettoyage
• La fréquence de nettoyage est fonction du degré d'encrassement. Au moins un nettoyage extérieur par an
est toutefois recommandé.
• Nettoyer les plaques avec de l'eau ou des produits ménagers.
• Ne pas ajouter d'agents abrasifs, corrosifs ou à teneur en solvants.

H-Pfostenanker montieren
Ancres de béton installer
Install concrete anchors
Betonankers installeren
Anclas concretas instalan
Ancora di calcestruzzo installano
1. 2.
80cm
40cm
40cm
Instalovat betonové kotvy
Eine Grube für jeden Pfosten ausheben.
Creusez un trou pour chaque montant.
Dig a hole for each column.
Een put voor elke staander graven.
Cavar un agujero por cada poste.
Creare un foro per ogni montante.
Jáma pro každé pracovní místo dig.
3. 4.
Ø14mm
Der H-Pfostenanker kann auf dem Brett in seiner Lage noch verändert
werden.
Les parties métalliques inférieures des montants peuvent encore être
ajustées en fonction de leurs position respective sur les liteaux.
The position of the column joists can be altered due to their position on
the plank.
De staanderdragers kunnen door de positie op de plank qua positie nog
veranderd worden.
La posición de los portapostes puede variarse a su posición mediante la
posición sobre la tabla.
Le parti metalliche possono essere ancora aggiustate in funzione della
loro posizione rispettiva sopra la tavola.
H-post kotvy může být změněn na palubě na svém místě.
M14
Das Holzprodukt aufstellen. Die Pfosten in die H-Pfostenanker stellen.
Etwas Abstand zwischen Pfostenende und Metall lassen. Die Pfosten
durchbohren um sie mit den H-Pfostenankern zu verschrauben.
Positionnez le pavillon. Placez les montants dans leurs parties
métalliques inférieures. Percez les montants an de pouvoir ensuite les
xer et les visser aux parties inférieures métalliques.
Position the pavilion. Insert the columns into the joists in the process.
Drill holes in the columns in order to connect them to the joists by means
of screws.
Het paviljoen opstellen. De staanders daarbij in de staanderdragers
stellen. Om de staanders met de dragers vast te schroeven, moeten de
staanders doorgeboord worden.
Colocar el pabellón. Colocar los postes en los portapostes. Perforar los
postes para poderlos atornillar con los portapostes.
Posizionare il padiglione. Piazzare i montanti nelle loro parti metalliche. Per
collegare i montanti con le parti metalliche è necessario perforare i montanti.
Umístěte dřevěného výrobku. Sloupky v H-post kotvy zeptat. Nechá se
vzdálenost mezi sloupy a koncem kovu. Sloupky propíchnout je s H-post
kotvy, aby šroub.
Eine Maschinenschraube vorsichtig durch die Öffnung des
H-Pfostenankers einschlagen bis sie auf der anderen Seite wieder austritt.
Introduisez doucement dans le trou de la partie métallique, à l’aide
d’un marteau, une vis d’assemblage à écrou, et cela jusqu’à ce qu’elle
apparaisse de l’autre côté.
Carefully drill a drill screw through the opening in the concrete anchor
and into the wood until the screw comes out the other side.
Een machineschroef voorzichtig door de opening van het betonanker in
het hout inslaan tot ze op de andere zijde naar buiten treedt.
Introducir por percusión cuidadosamente un bulón ordinario en la madera
a través de la apertura del anclaje de hormigón hasta que salga por el
otro lado. Después aplanar el hormigón.
Introdurre, facendo attenzione, una vite d’assemblaggio nel foro
dell’ancora di calcestruzzo nel legno no a quando essa non fuoriesce
dall’altra parte.
Šroub stroj lehce otočit, až se objeví na druhé straně prostřednictvím
otvoru v H-post kotvy.

H-Pfostenanker montieren
Ancres de béton installer
Install concrete anchors
Betonankers installeren
Anclas concretas instalan
Ancora di calcestruzzo installano
5. 6.
Instalovat betonové kotvy
Die Schraube mit Mutter und 2 Unterlegscheiben xieren.
Vissez et serrez les vis à l’aide de boulons.
Attach nuts to the screws.
De schroeven met moeren xeren.
Fijar los tornillos con las tuercas.
Fissare le viti con l’aiuto dei bulloni.
Šroub s maticí nebo 2 podložkami opravit.
Fertig einbetonierter Pfosten.
7.
Montant installé et bétonné.
The posts are completely set in concrete.
Klaar ingebetonneerde staander.
Poste hormigonado acabado.
Montante installato e gettato nel calcestruzzo.
Hotovo vybetonován příspěvek.
Füllen Sie Beton in das ausgegrabene Loch. Der H-Pfostenanker bleibt
weiterhin mit der Leiste xiert. Danach den Beton glattstreichen.
Remplissez les trous creusés à l’aide de béton. Les parties inférieures
métalliques des montants doivent encore rester maintenues en place à
l’aide des liteaux. Nivelez ensuite le béton.
Fill the holes you have dug with concrete. The concrete anchor remains
attached to the slat. Then, smooth out the concrete.
Giet beton in de put. Het betonanker blijft verder met de lijst gexeerd.
Daarna de beton gladmaken.
Llene el agujero cavado con hormigón. El anclaje de hormigón continúa
jado con el listón.
Riempire il foro incavato con del calcestruzzo. L’ancora in calcestruzzo
continua a rimanere ssata con il listello. Livellare in seguito il calcestruzzo.
Vyplnit beton do vykopané díry. H-post kotvy zůstane připevněna k baru.
Poté, co beton hladké.
 Loading...