

Karibu 6017 Assembly instructions
6017
21.03.2019
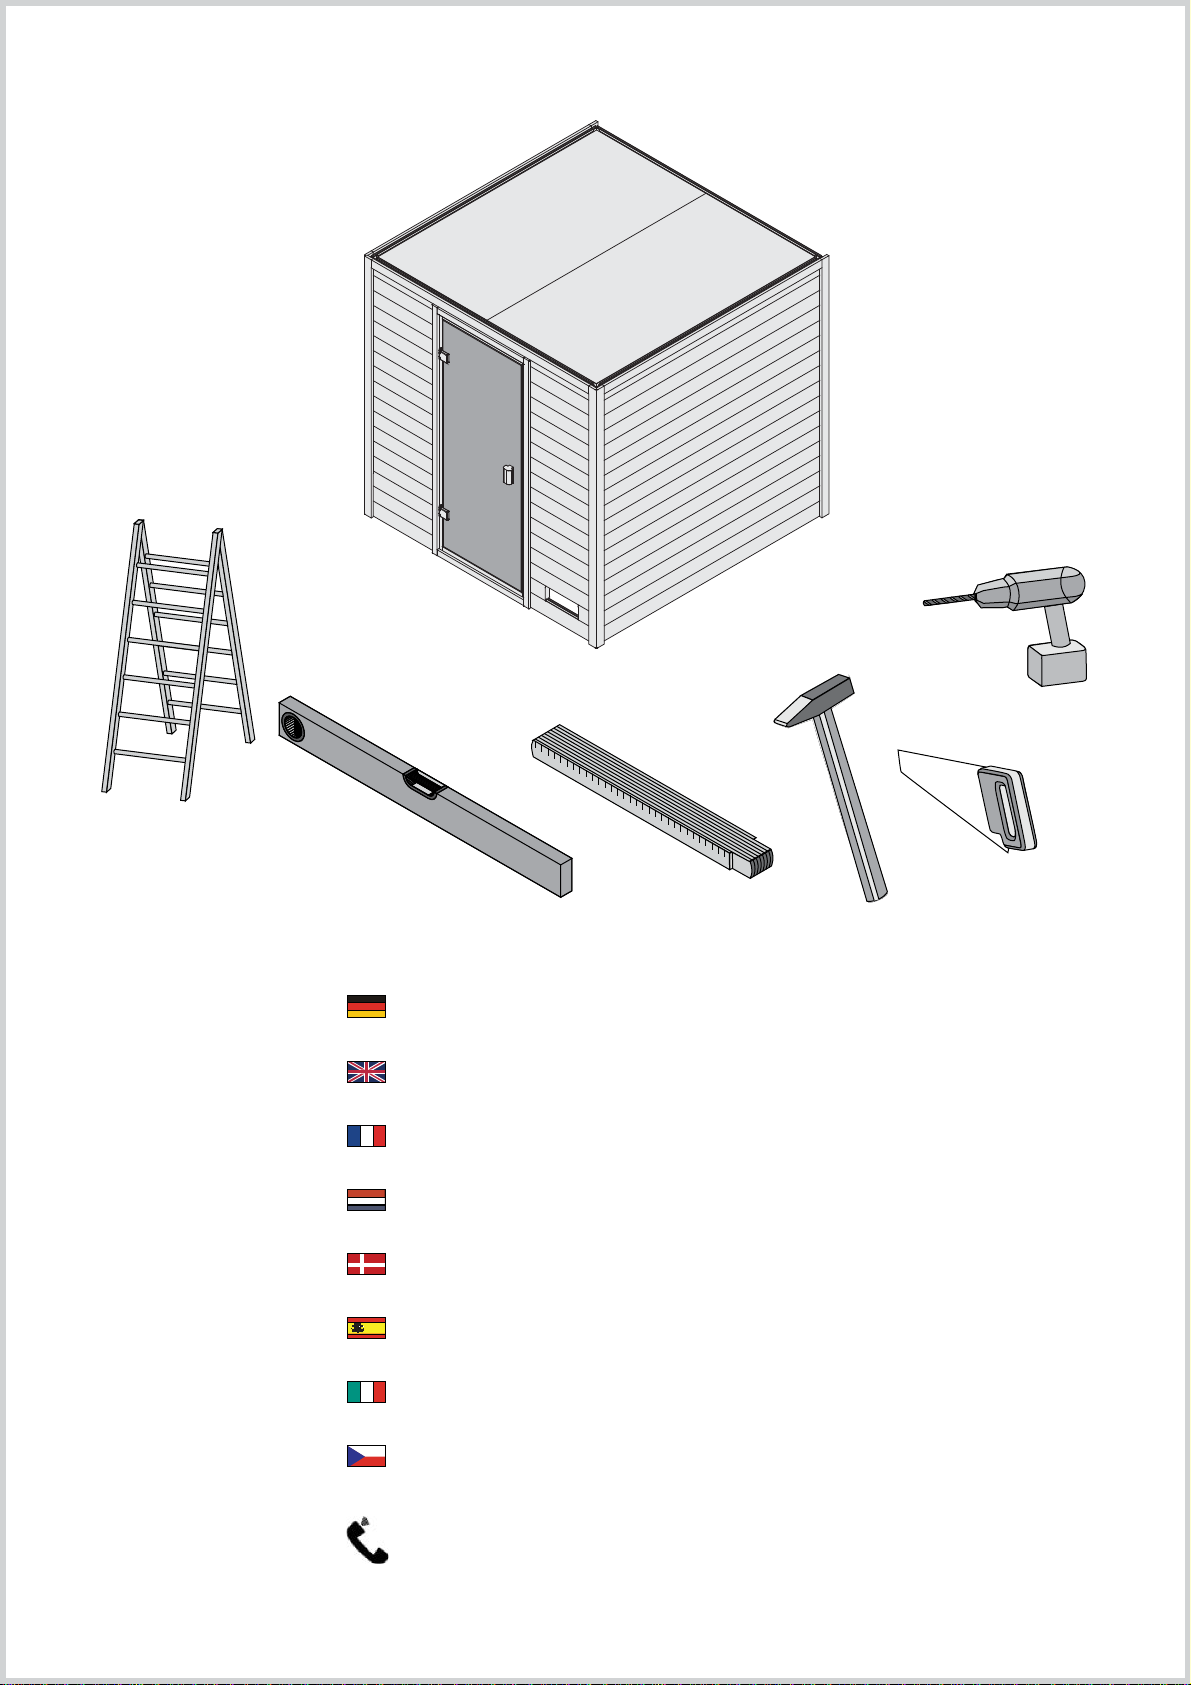
Aufbauanleitung
Building Instructions
notice de montage
montagehandleiding
Montagevejledning
Instrucciones de construcción
Istruzioni per il montaggio
Montážní návod
+49 421 38693 33
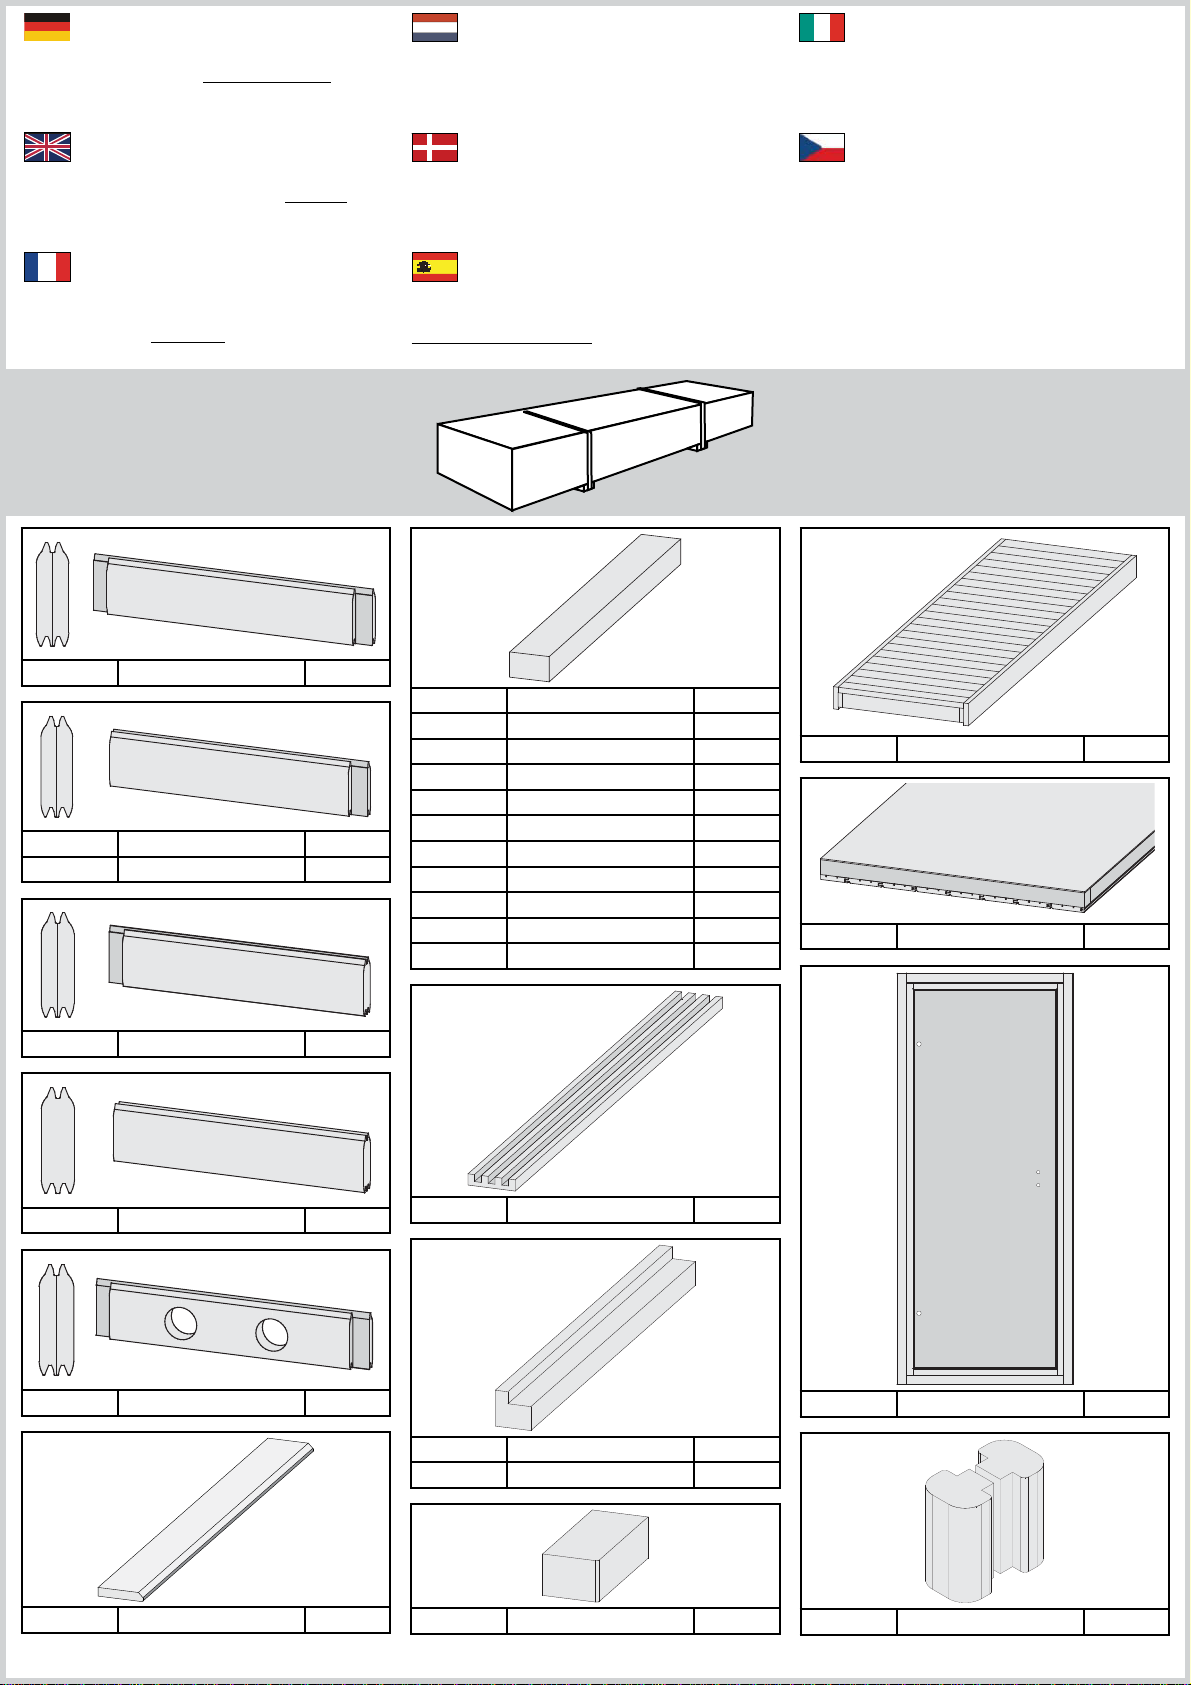
Vergleichen Sie zuerst die Material-liste mit
Ihrem Paketinhalt! Bitte haben Sie Verständnis, dass
Beanstandungen nur im nicht aufgebauten Zustand
bearbeitet werden können!
Vergelijk eerst de lijst van materialen
met de inhoud van uw pakket! Reclamaties kunnen
alleen in behandeling worden genomen zolang de
onderdelen nog niet zijn gemonteerd!
Confrontate questa distinta materiali
prima con il contenuto del pacchetto! Vi preghiamo di
comprendere che eventuali reclami possono essere
accolti solo prima del montaggio!
First compare the list of materials with
your package contents! Please understand that
complaints can be processed in the non-built status
only!
Commencez par comparer la liste du
matériel avec le contenu de votre paquet! Sachez que
nous traitons uniquement les réclamations concernant
le matériel à l’état non monté!
W1
51 x
1 x
15 x
1881 x 121 x 38 mm ID 21429
W2
W3
135 x 121 x 38 mm ID 80228
545 x 121 x 38 mm ID 21868
Start med at kontrollere materialelisten med
indholdet af den leverede pakke! Vi gør venligst
opmærksom på at reklamationer kun kan behandles
for materialer som ikke er blevet bearbejdet!
En primer lugar, compare la lista de material
con el contenido del paquete. Rogamos entienda
que las reclamaciones sólo pueden ser tramitadas
antes de montar el objeto!
6015
B1
1 x
2 x
5 x
3 x
3 x
4 x
2 x
1 x
2 x
2 x
4 x
1920 x 20 x 3 mm ID 20799
B2
1810 x 90 x 16 mm ID 71513
B3
2000 x 58 x 17 mm ID 48541
B4
B5
B6
B7
B8
B9
B10
B11
100 x 45 x 18 mm ID 19114
390 x 45 x 18 mm ID 51434
1809 x 45 x 18 mm ID 21831
1845 x 45 x 18 mm ID 18106
300 x 95 x 18 mm ID 19130
480 x 95 x 18 mm ID 20930
565 x 95 x 18 mm ID 15498
1806 x 36 x 36 mm ID 66692
Nejprve překontrolujte obsah balení
podle materiálového listu! Mějte pochopení pro to, že
případnou reklamací se můžeme zabývat pouze tehdy,
když díly nebudou smontované! Za pomoci tohoto
seznamu můžete jednotlivé díly přiřadit k montážnímu
návodu.
L1
2 x
2 x
1810 x 550 x 90 mm ID 43994
M1
1839 x 918 x 55 mm ID 21121
16 x
1 x
1 x
4 x
W4
W5
W6
F1
545 x 121 x 38 mm ID 21876
135 x 121 x 38 mm ID 80224
1881 x 121 x 38 mm ID 21864
2000 x 58 x 17 mm ID 48545
1 x
2 x
2 x
4 x
E1
1820 x 140 x 26 mm ID 26480
E2
E3
K1
555 x 45 x 45 mm ID 40301
1100 x 45 x 45 mm ID 40302
60 x 36 x 36 mm ID 5512
D1
1 x
ID 66683
1 x ID 26183
1 x ID 26496
60 x 4,5 x 40 mm ID 26285
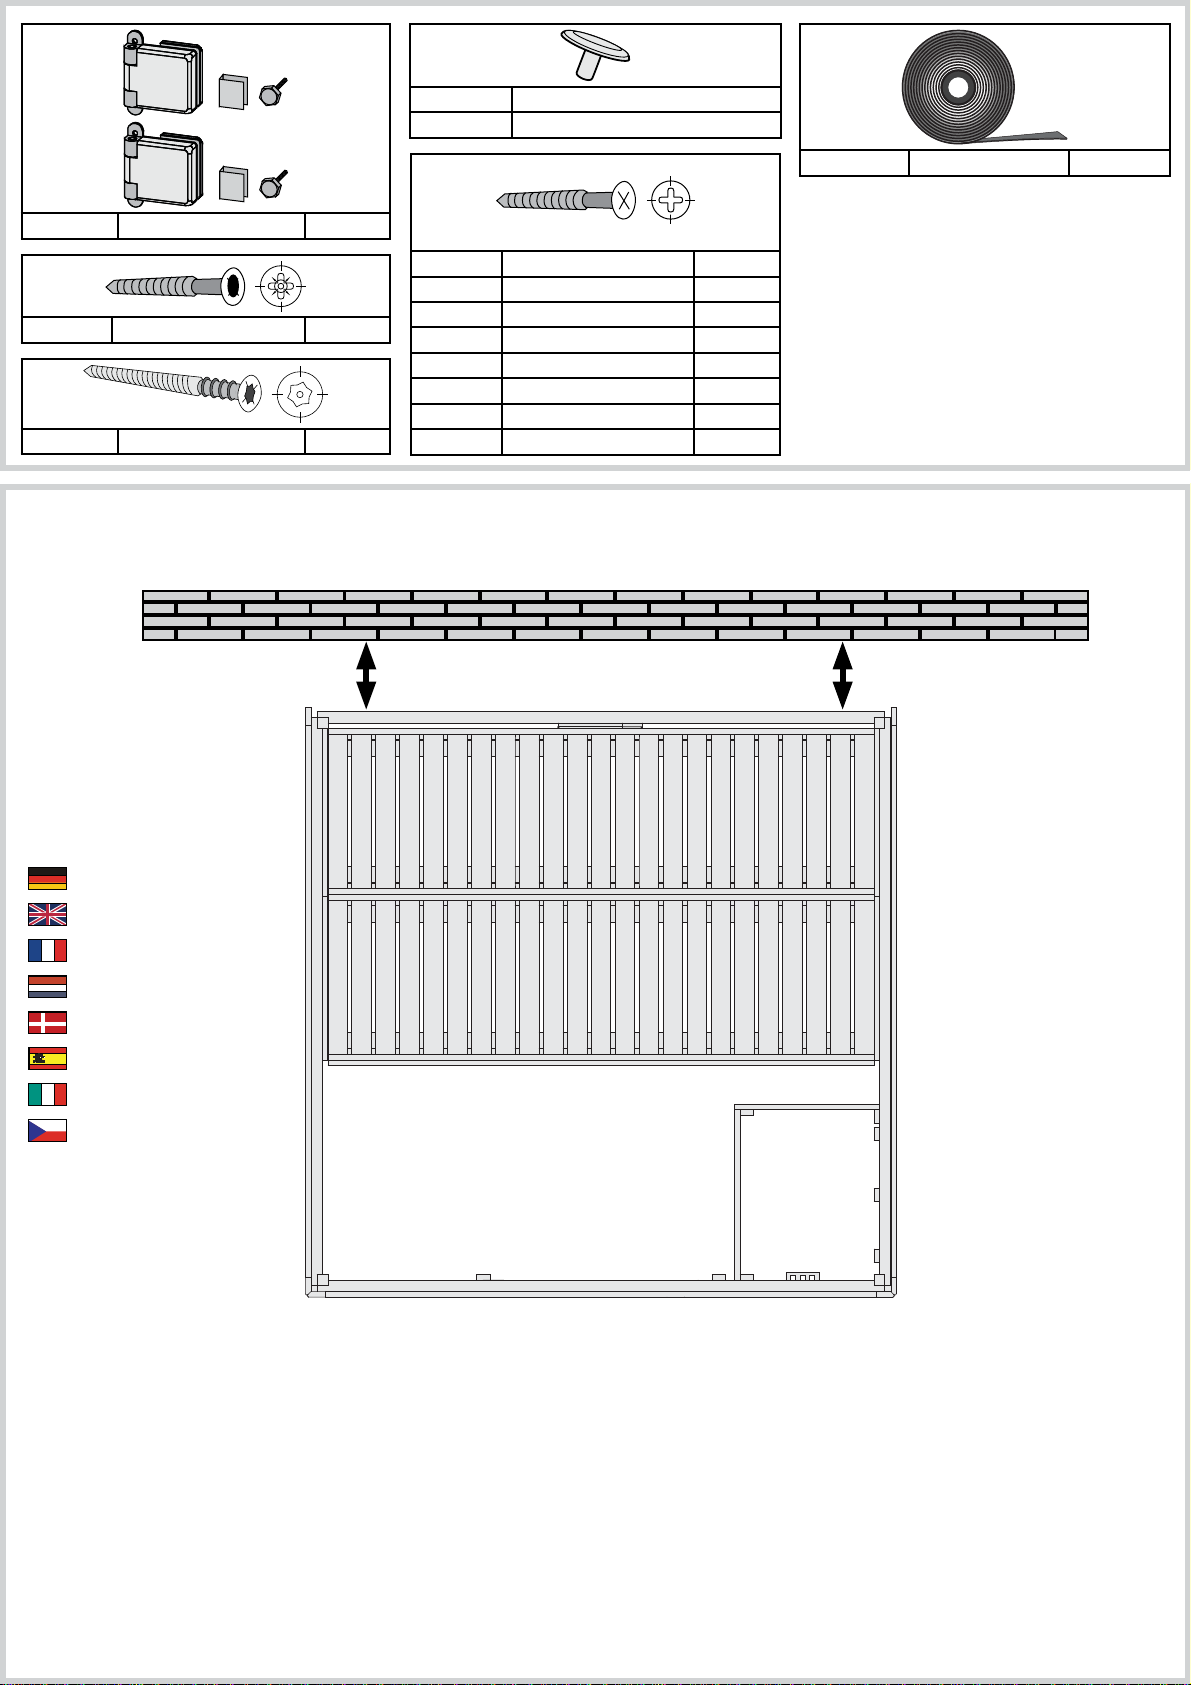
S1
6 x
ID 14266
S2
60 x
6 x
S3
4,5 x 30 mm ID 26116
12 x 18 mm ID 46403
10m ID 14025
20 x 4 x 30 mm ID 3686
60 x 4 x 35 mm ID 3687
350 x 4 x 40 mm ID 21925
30 x 4 x 50 mm ID 3688
25 x 4 x 70 mm ID 3689
25 x 4,5 x 80 mm ID 9204
20 x 6 x 60 mm ID 14014
95 x 6 x 90 mm ID 26715
>10cm >10cm
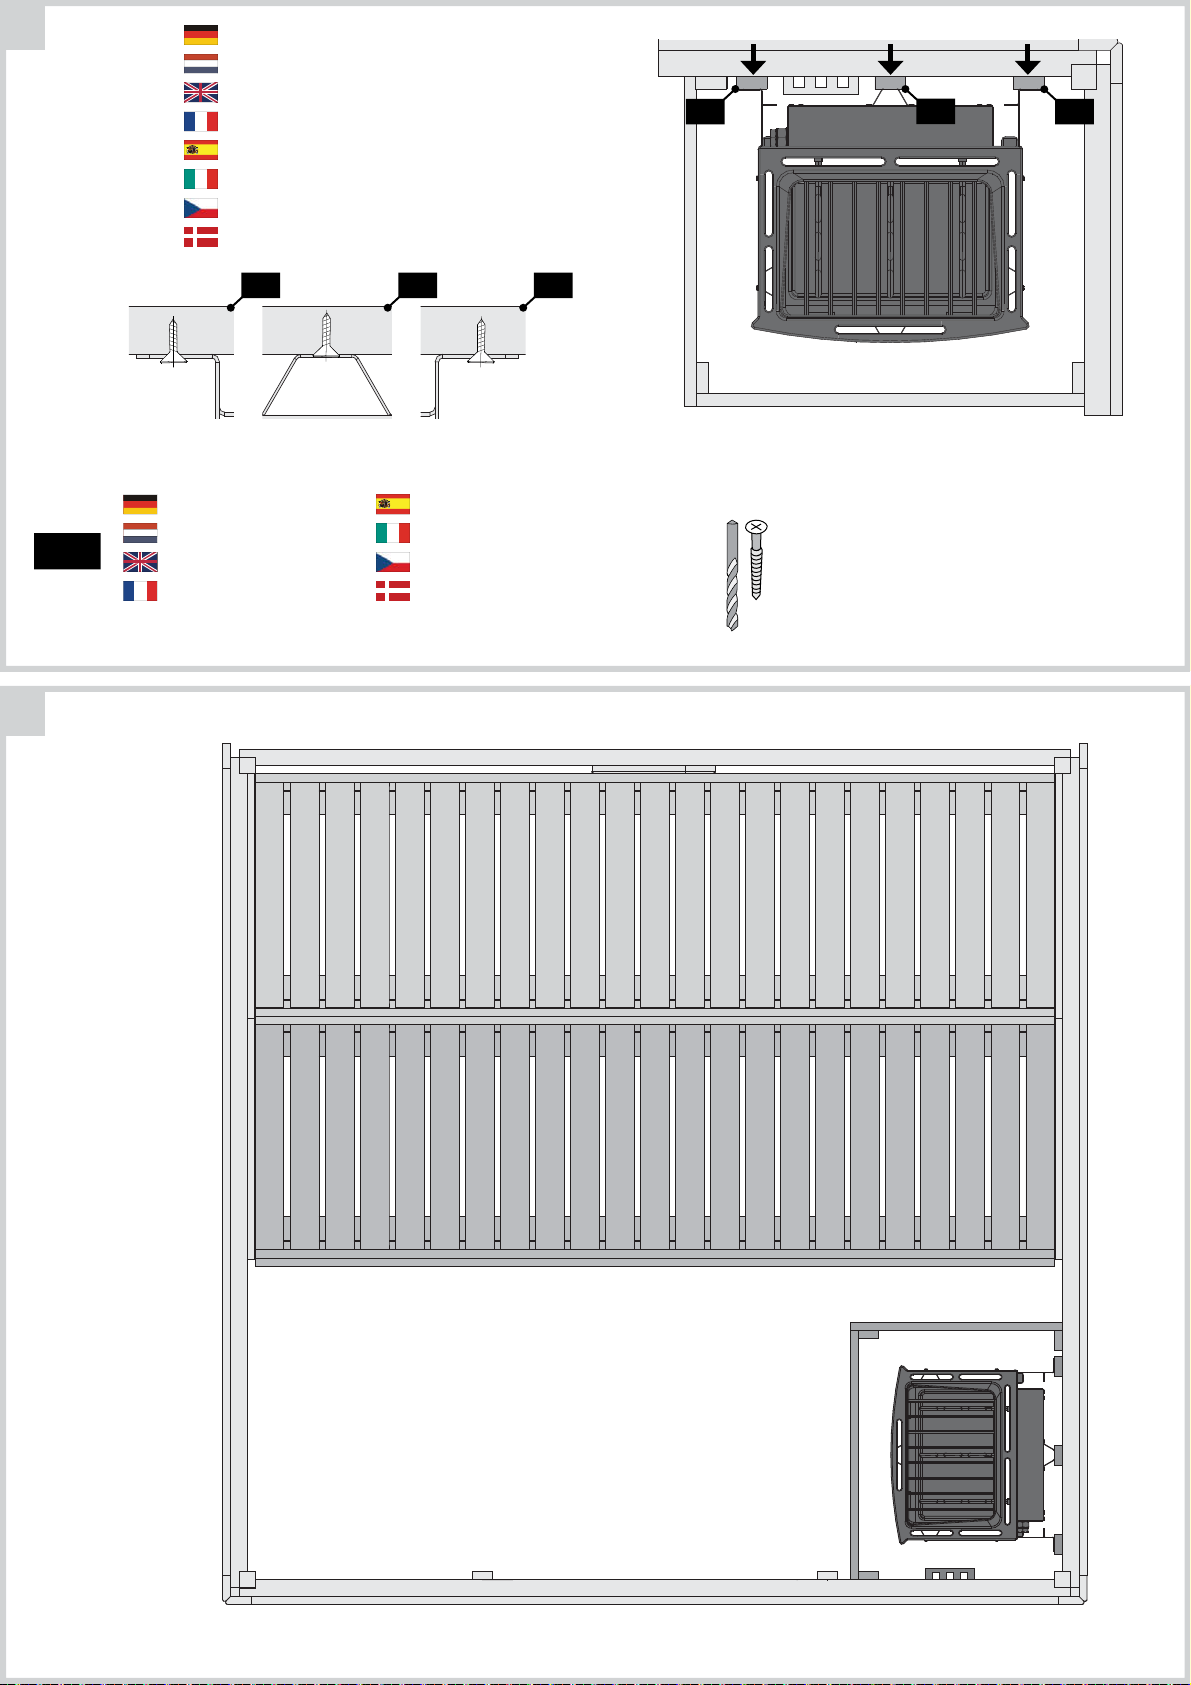
Draufsicht
Top view
vue de dessus
bovenaanzicht
vista desde arriba
vista desde arriba
vista dall‘alto
půdorys
Bitte beachten Sie, dass es sich bei einem Spontanbruch infolge von Nickelsulfi deinschlü ssen um Glasbrü che handelt, die nicht auf
Verarbeitungsfehler basieren und somit nicht durch den Hersteller und dem Verarbeiter zu vertreten sind. Der Spontanbruch ist als
hinzunehmendes Allgemeinrisiko anzusehen.
Bitte haben Sie Verstä ndnis, dass wir eine Nachlieferung nur gegen Berechnung ausfü hren kö nnen.
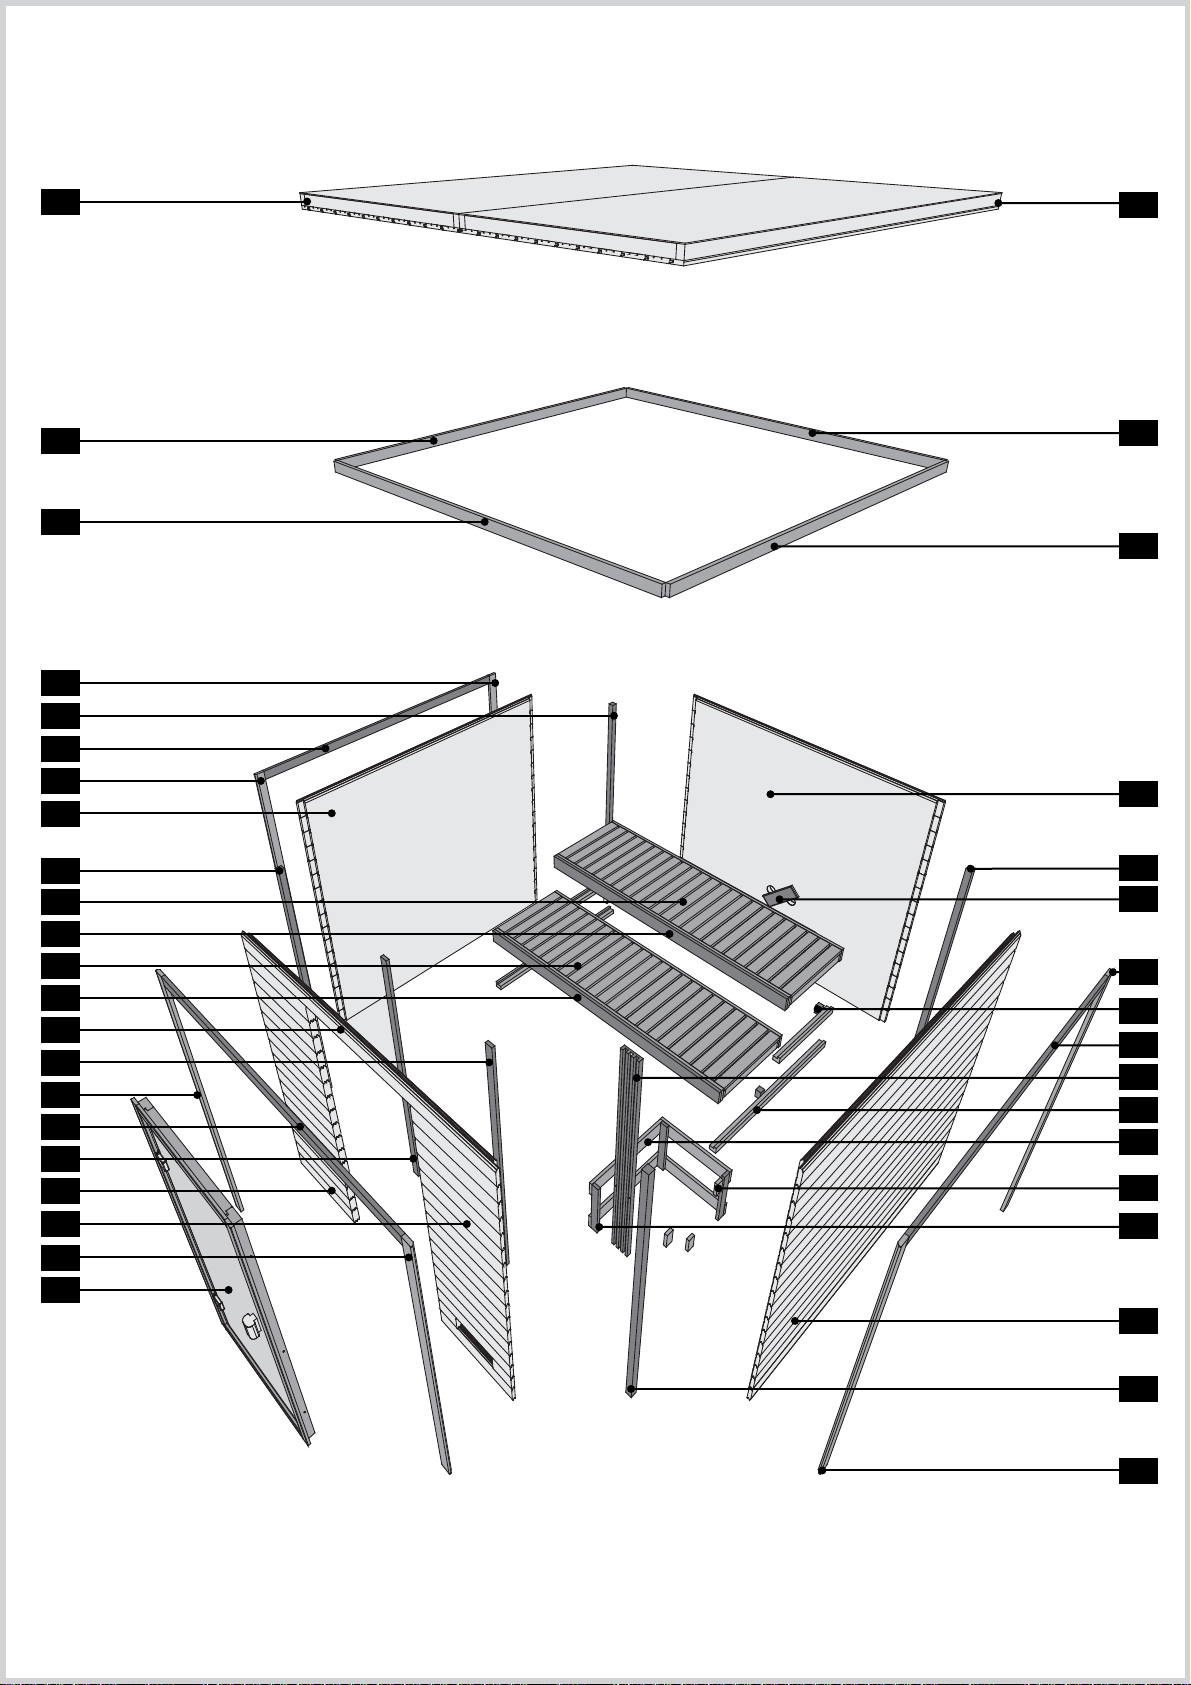
M 1
M 1
B 6
B 6
B 3
B 11
B 3
F 1
W 1
B 11
L 1
B 2
L 1
B 2
W 1
B 7
F 1
B 3
B 7
W 4
W 3
F 1
D 1
B 6
B 6
W 1
B 11
B 8
B 3
K 1
B 3
E 1
E 3
B 10
B 4
B 5
W 1
B 11
F 1
6
1
2
1
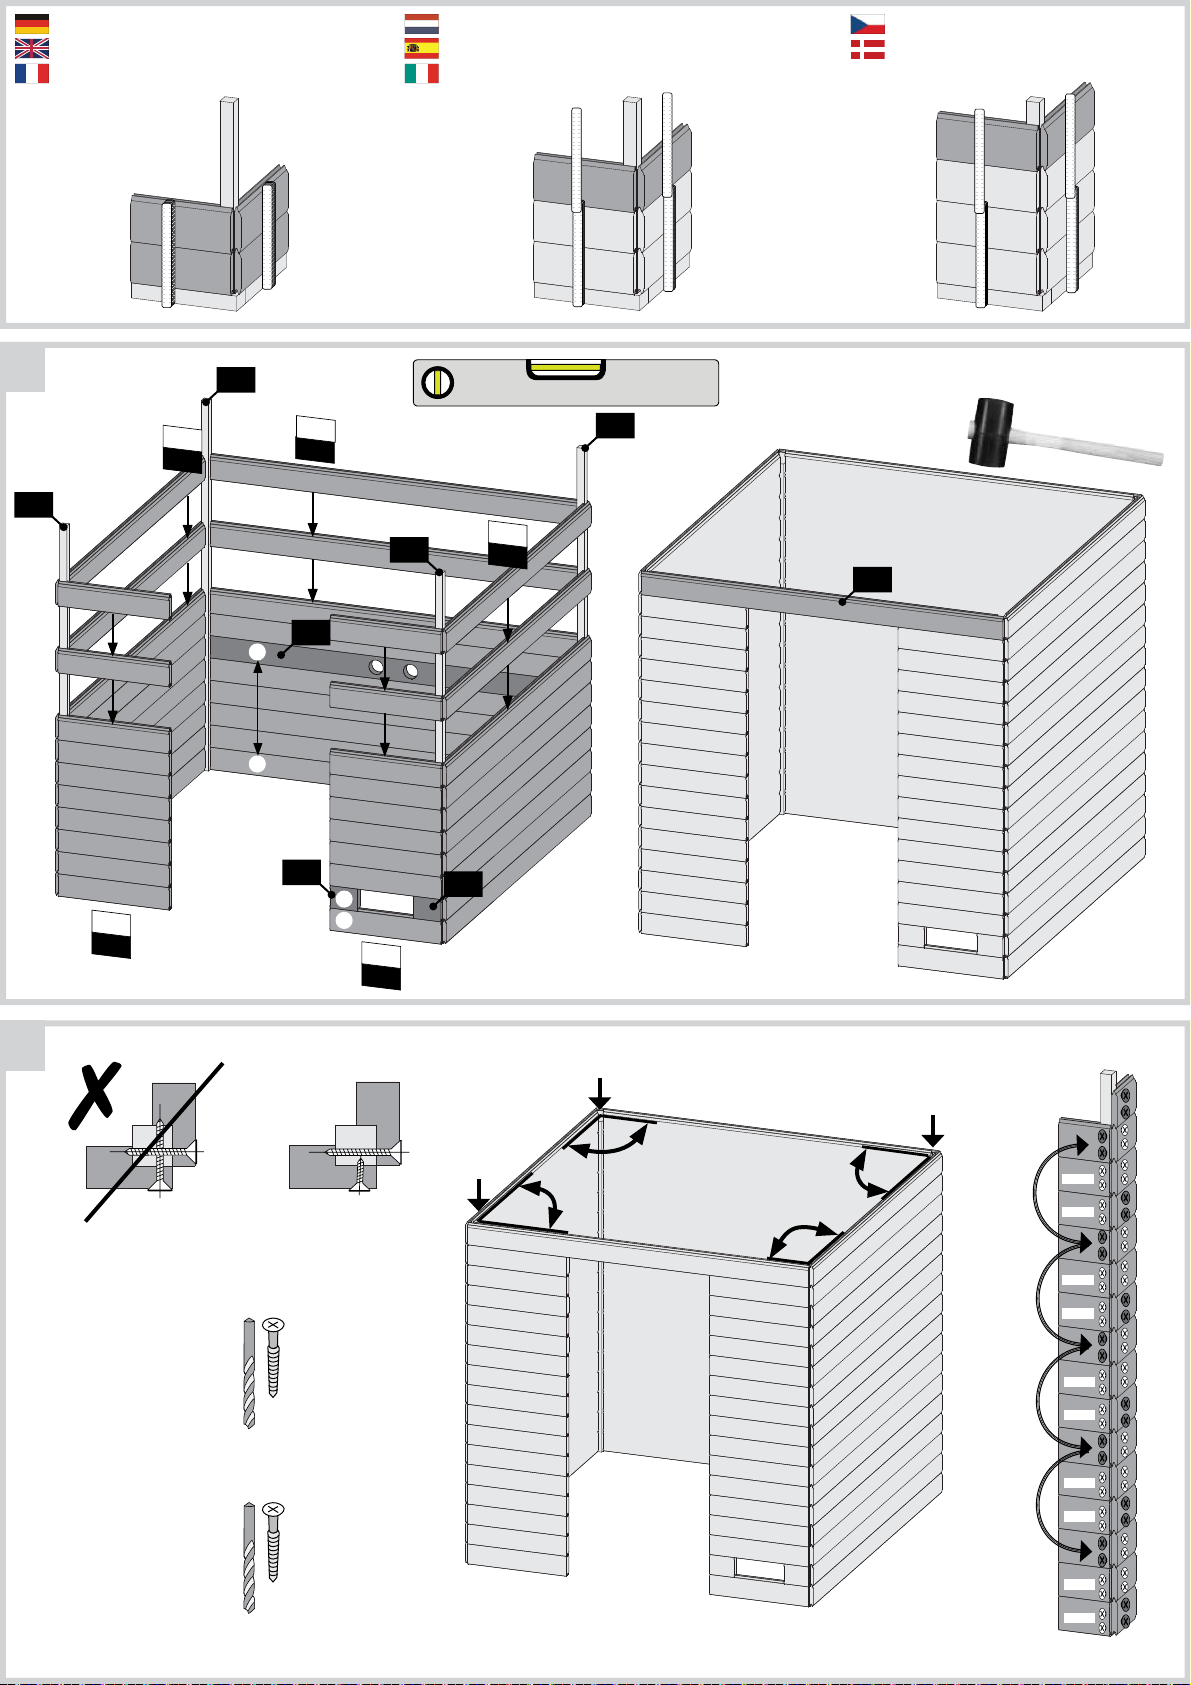
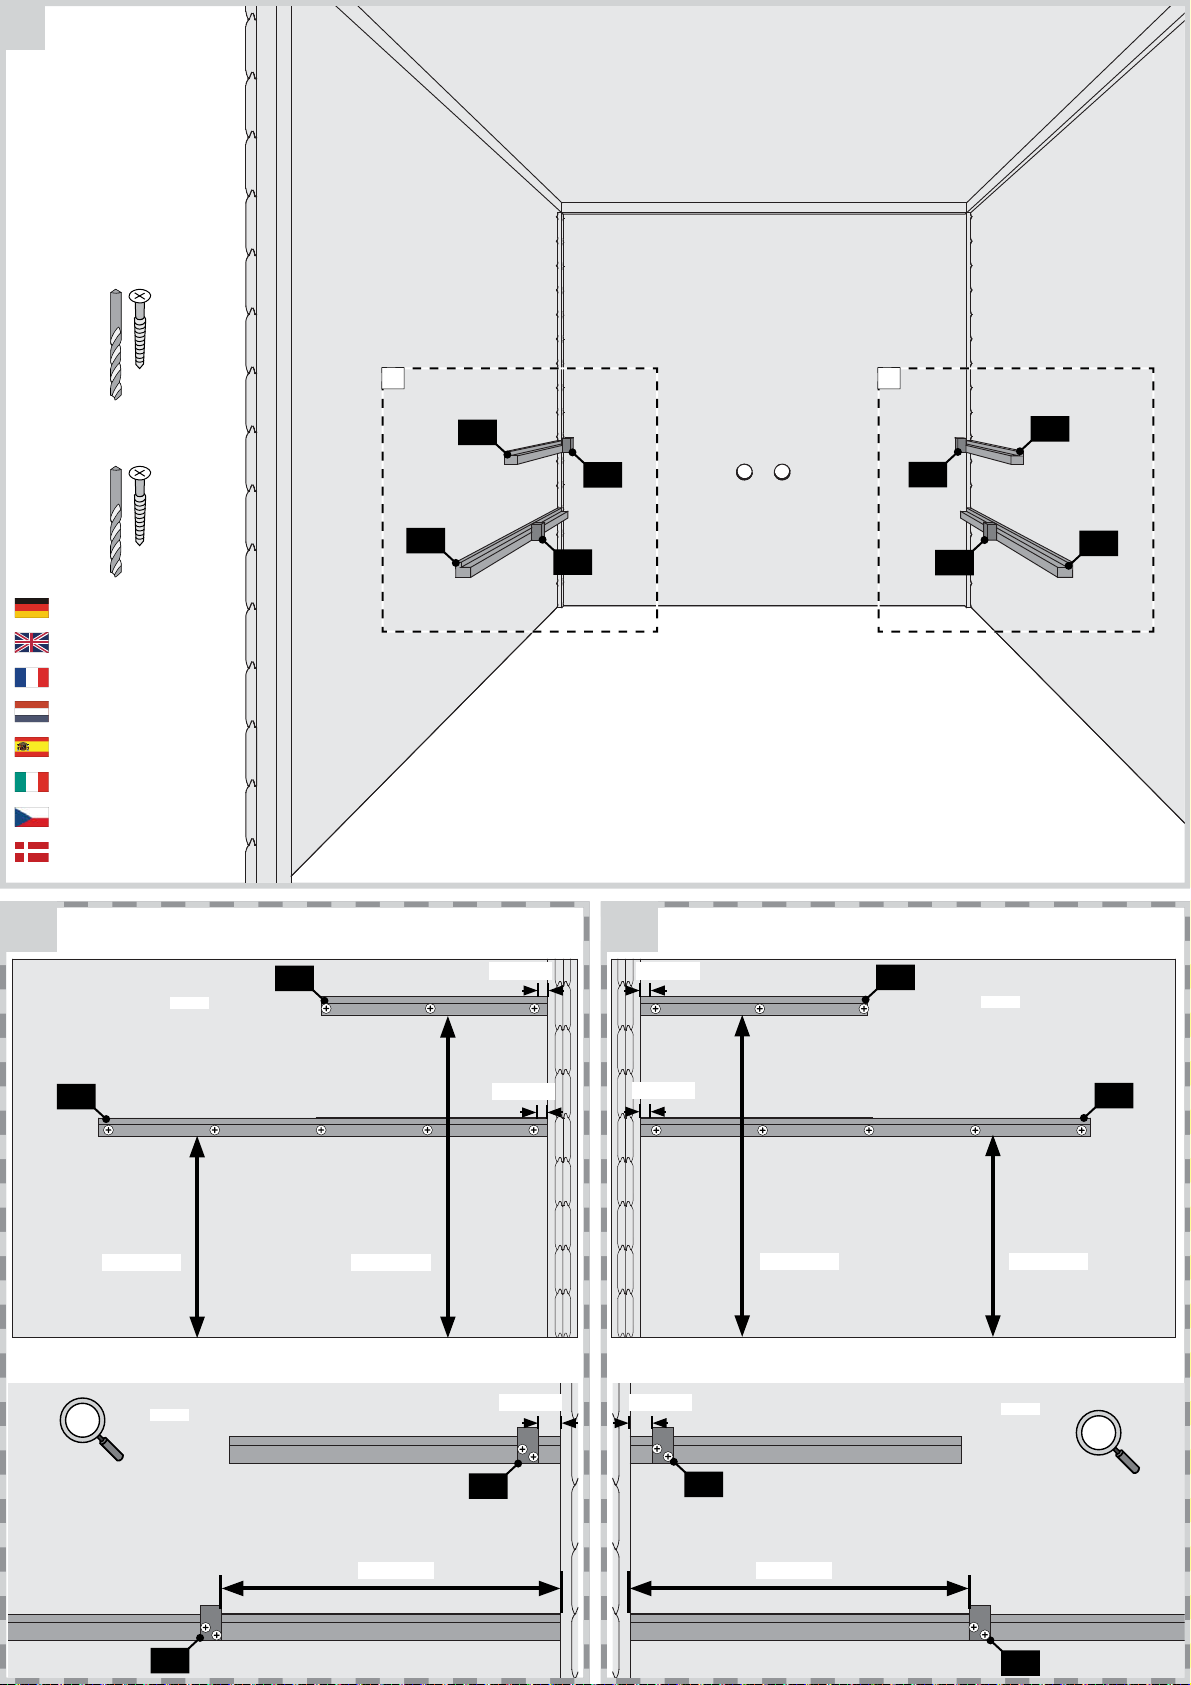
Achten Sie auf die gleiche Höhe
Look for the same height
Faites attention à la même hauteur
Besteed aandacht aan de dezelfde hoogte
Prestar atención a la misma altura
Prestare attenzione alla stessa altezza
Dávejte pozor na stejnou výšku
Vær opmærksom på samme højde
01
B 11
16 x
W 4
17 x
W 1
B 11
W 6
W 5
16 x
W 1
W 3
15 x
W 3
B 11
W 4
W 2
17 x
W 1
B 11
!
W 1
02
6×90
6×90
88x
Ø5 mm
184x
Ø3 mm
6×90
4×40
4×40
6×90
90°
90°
90°
90°
6×90
6×90
6×90
6×90
4×40
4×40
4×40
4×40
4×40
4×40
4×40
4×40
4×40
4×40

!!! A=B !!!
03
A
B
!!! C=D !!!
C
D
1780mm
04
05
2x
1760mm
B 7
Ø3 mm
10x
4×35
B 7 (1760)
20mm
20mm
B 7 (1760)
18mm
18mm
06
B 6
Bündig!
Flush!
Affl eurement !
Gelijk!
I fl ugt!
Aras!
Combacia!
Stejný !
B 6 B 6
Ø3 mm
21x
4×40
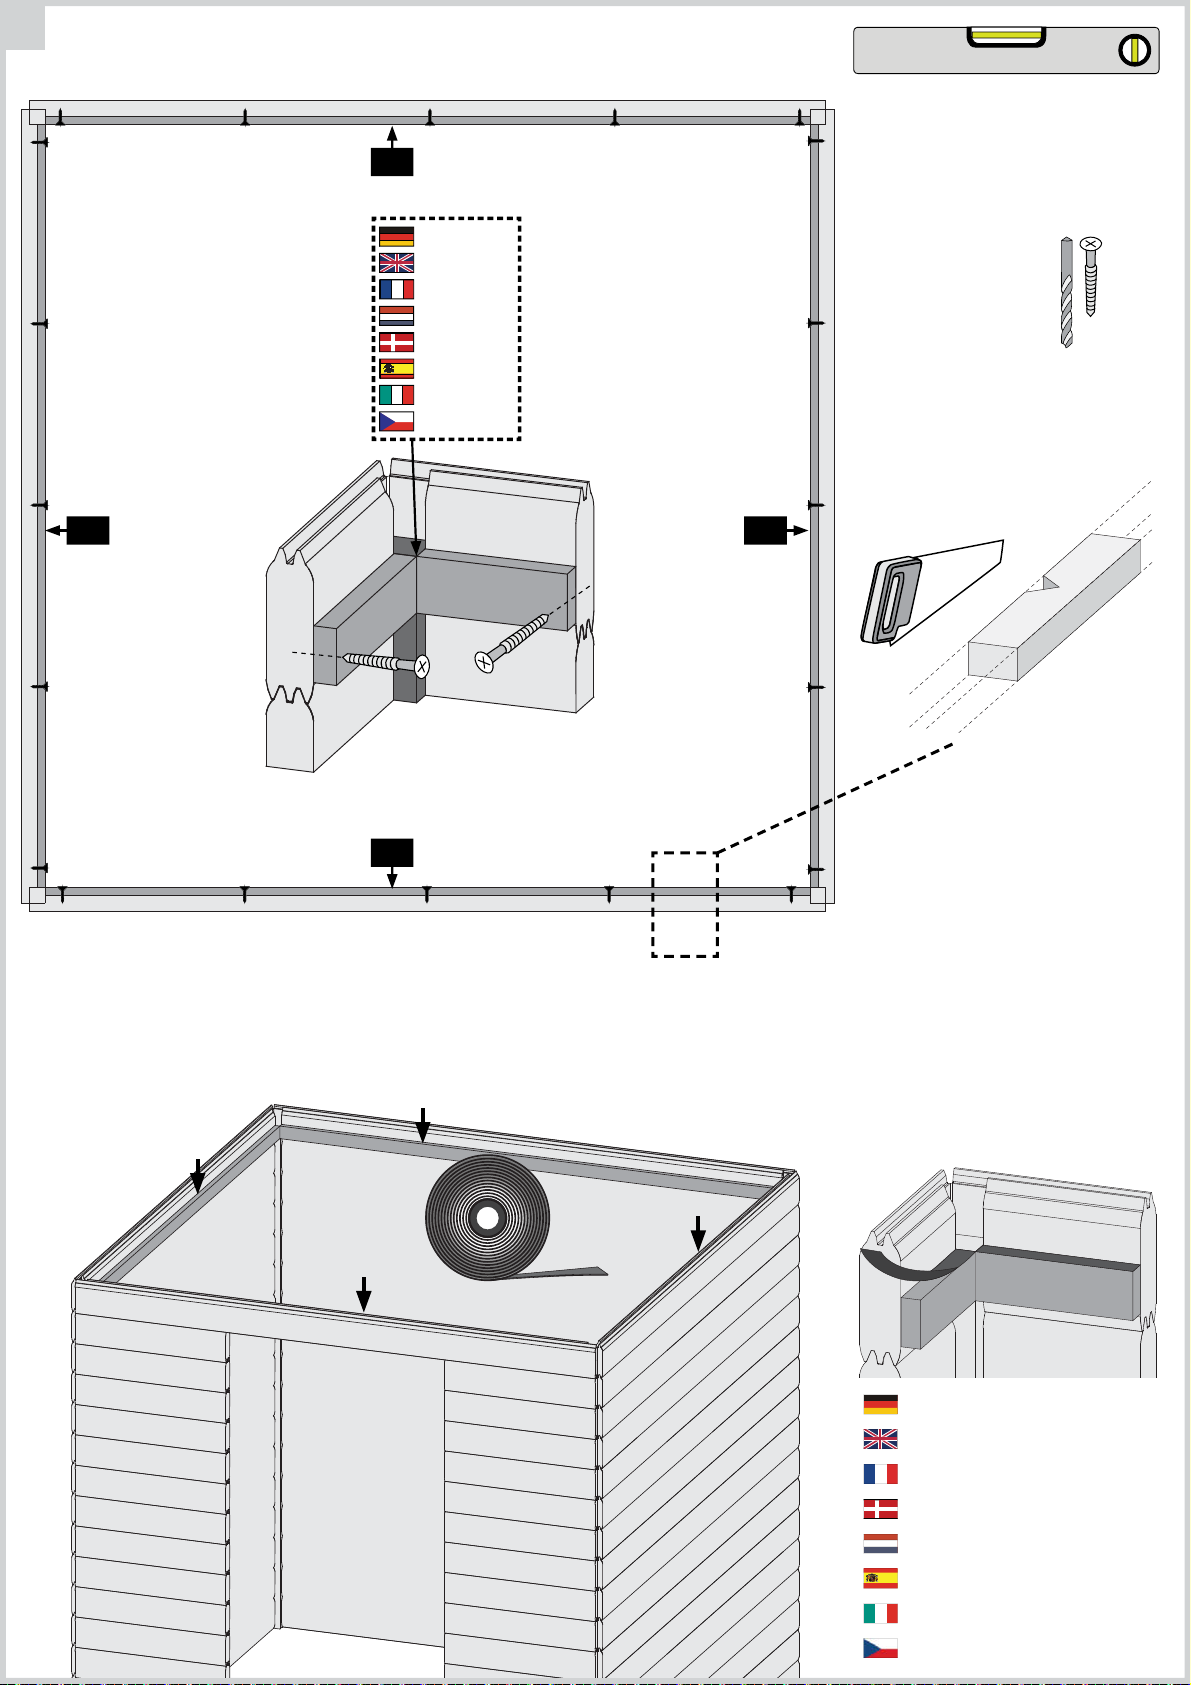
B 6
Sauna Dichtband
Sauna sealing tape
Ruban d‘étanchéité pour sauna
Sauna tætningsbånd
Sauna afdichtingstape
Cinta de sellado de sauna
Nastro sigillante per sauna
Sauna těsnící páska

Einb
au Glastür
Installation of glass door
Montage porte en verre
Montage van de glazen deur
Montaje de la puerta de cristal
Installazione portello di vetro
Sauna Instalace dveře
Allineare il vetro nel telaio della porta
Metti il vetro della porta nel telaio
Einb
au Glastür
Installation of glass door
Montage porte en verre
Montage van de glazen deur
Installationsglasdør
Montaje de la puerta de cristal
Installazione portello di vetro
Sauna Instalace dveře
07
08
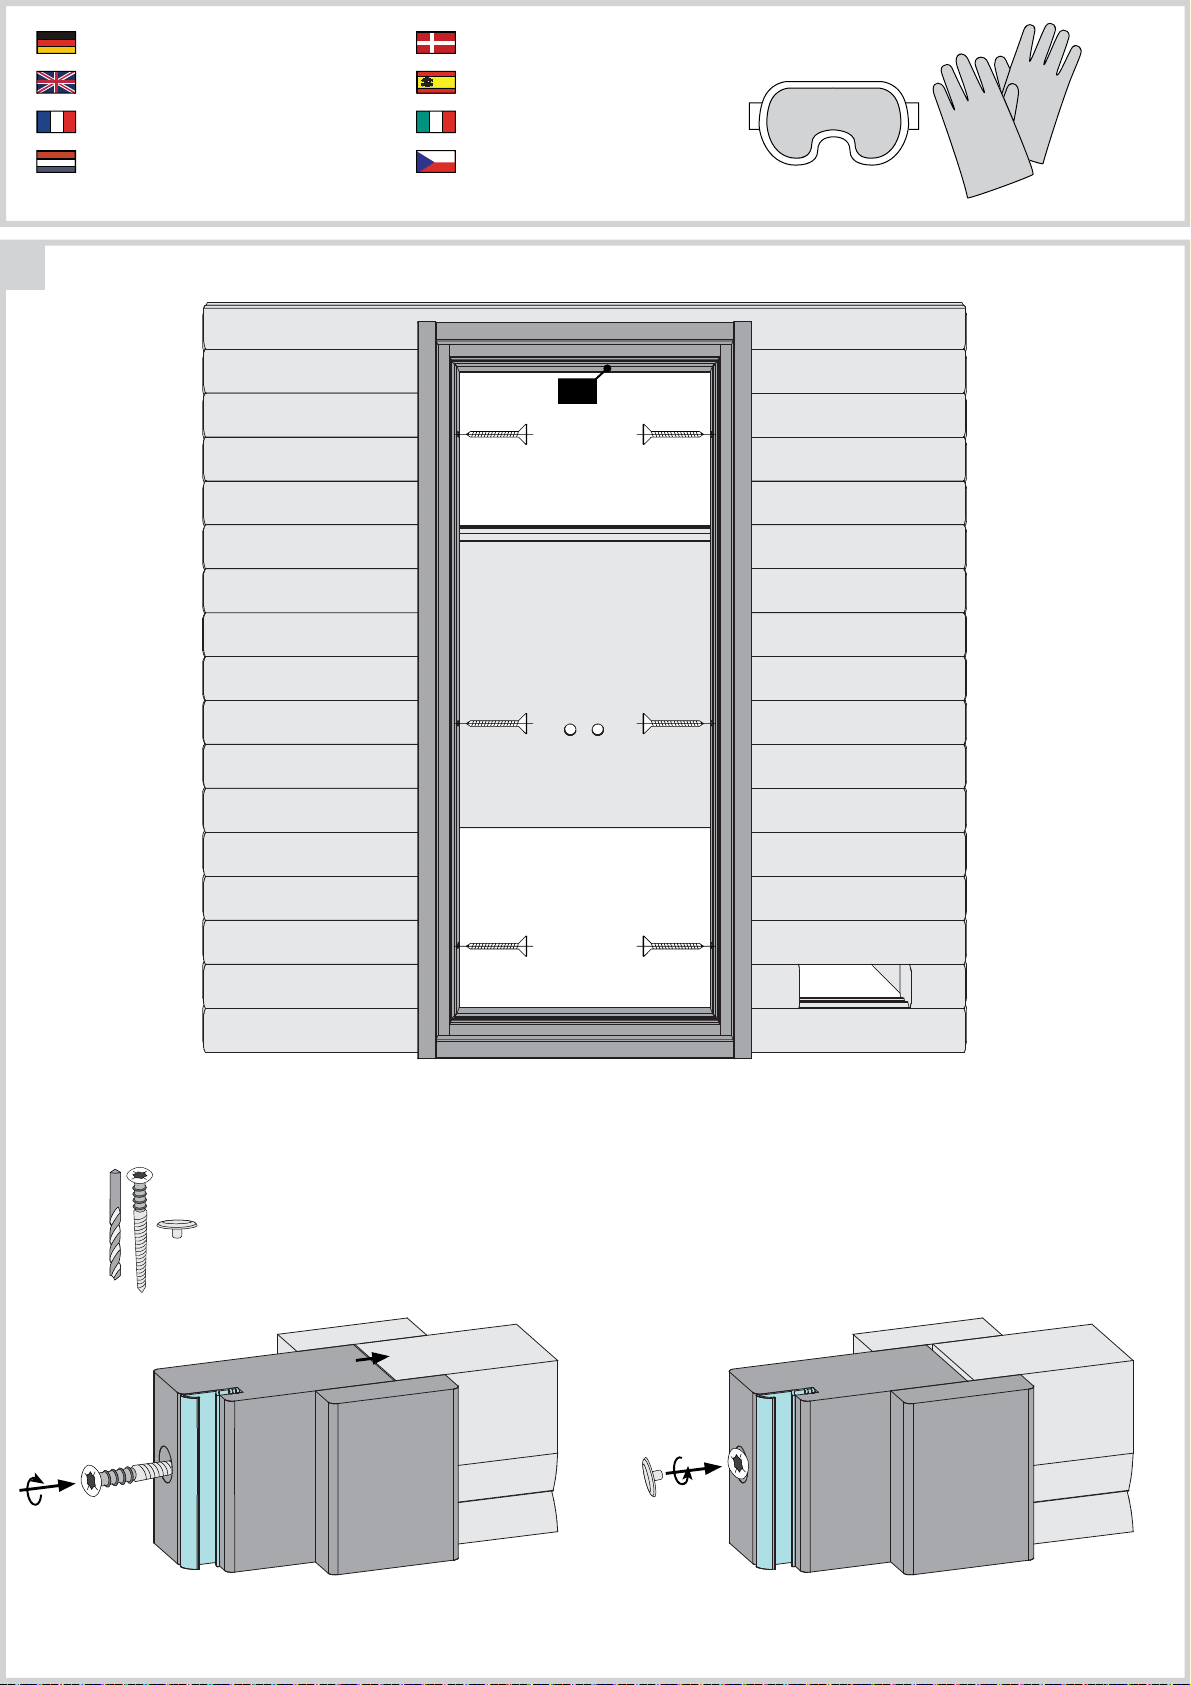
Saunatürglas in den Türrahmen legen
Put the door glass in the frame
Mettez le verre de la porte dans le cadre
Plaats het deurglas in het frame
Sæt dørglasset i rammen
Pon el vidrio de la puerta en el marco
Metti il vetro della porta nel telaio
Vložte sklo dveří do rámu
Saunatürglas in den Türrahmen ausrichten
Center the glass in the wooden frame
Bien aligner le verre à vitre
Lijn het glas uit in het deurframe
Juster saunaens dørglas i dørkarmen
Alinee el vidrio en el marco de la puerta
Allineare il vetro nel telaio della porta
Skleněná dvířka sauna v zárubně zarovnání
1. 2. 3.
09
Einb
au Glastür
Installation of glass door
Montage porte en verre
Montage van de glazen deur
Montaje de la puerta de cristal
Installazione portello di vetro
Sauna Instalace dveře
Einb
au Glastür
Installation of glass door
Montage porte en verre
Montage van de glazen deur
Installationsglasdør
Montaje de la puerta de cristal
Installazione portello di vetro
Sauna Instalace dveře
D 1
6x
Ø3 mm
S1
S3
1. 2.
!

10
Ø3 mm
M 1
B 1
M 1
20x
4×70
4x
6x
6x
4x
11
12
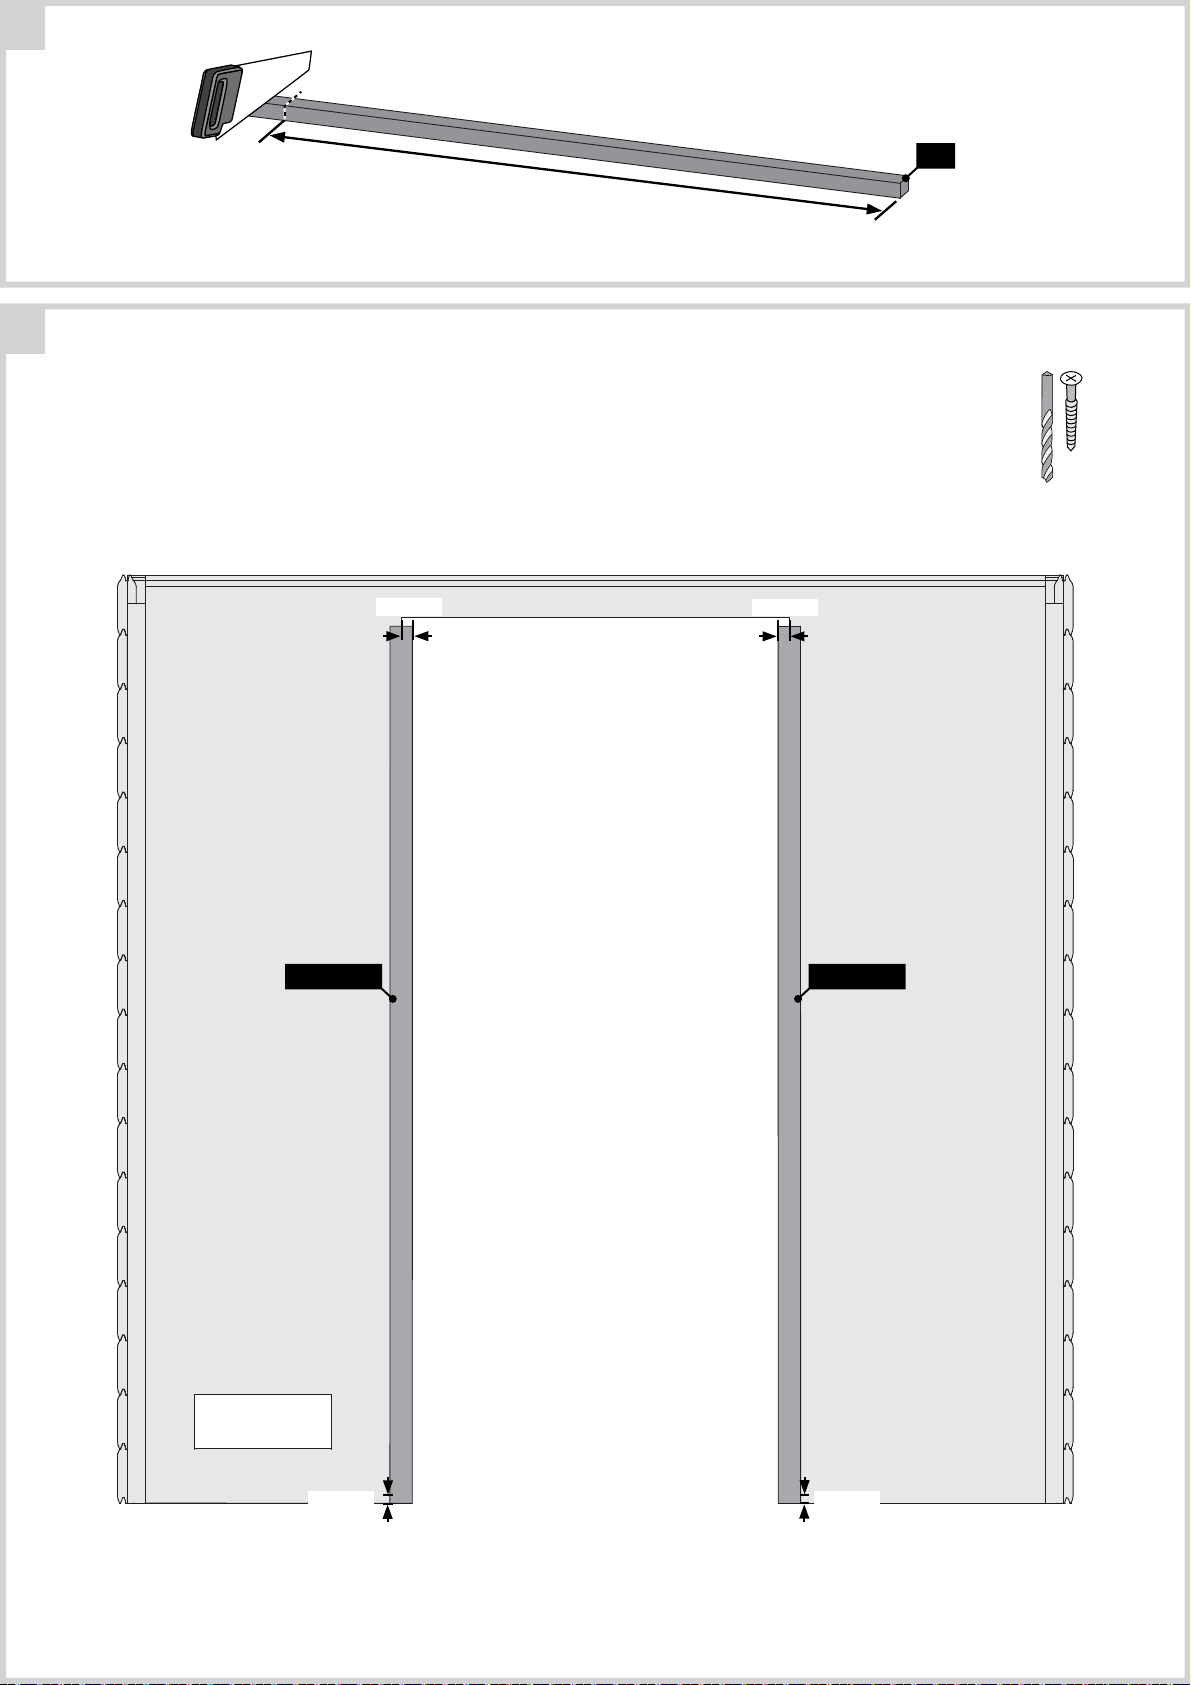
2x
B 3
1870mm
4x
F 1
1870mm

13
F 1 (1870)
F 1 (1870)
B 3
B 3 (1870)
Ø4 mm
24x
4,5×40
S2
B 3 (1870)
F 1
F 1
F 1 (1870)
F 1
F 1 (1870)
B 3
F 1

14
15
B 3 (B)
A
B
1x
2x
B 3
B 3
Ø4 mm
13x
4,5×40
S2
B 3 (A)
B 3 (B)
16
Ø3mm
8x
4x35
Ø5mm
Ansicht innen
View Inside
Voir à l‘intérieur
Bekijk binnen
Ver dentro
Visualizza dentro
Zobrazit uvnitř
Se inde
16.1
16x
6×60
6×60
E 2
16.1
E 3
E 2
10mm
K 1
K 1
16.2
10mm
16.1
E 2
E 2
K 1
E 3
K 1
6×60
6×60
E 3
4x35
K 1
700mm400mm
585mm
10mm
38mm
K 1
10mm
38mm
E 3
700mm 400mm
4x35
K 1
585mm
K 1

17
Ø3mm
4×35
B 8
18
Ø3 mm
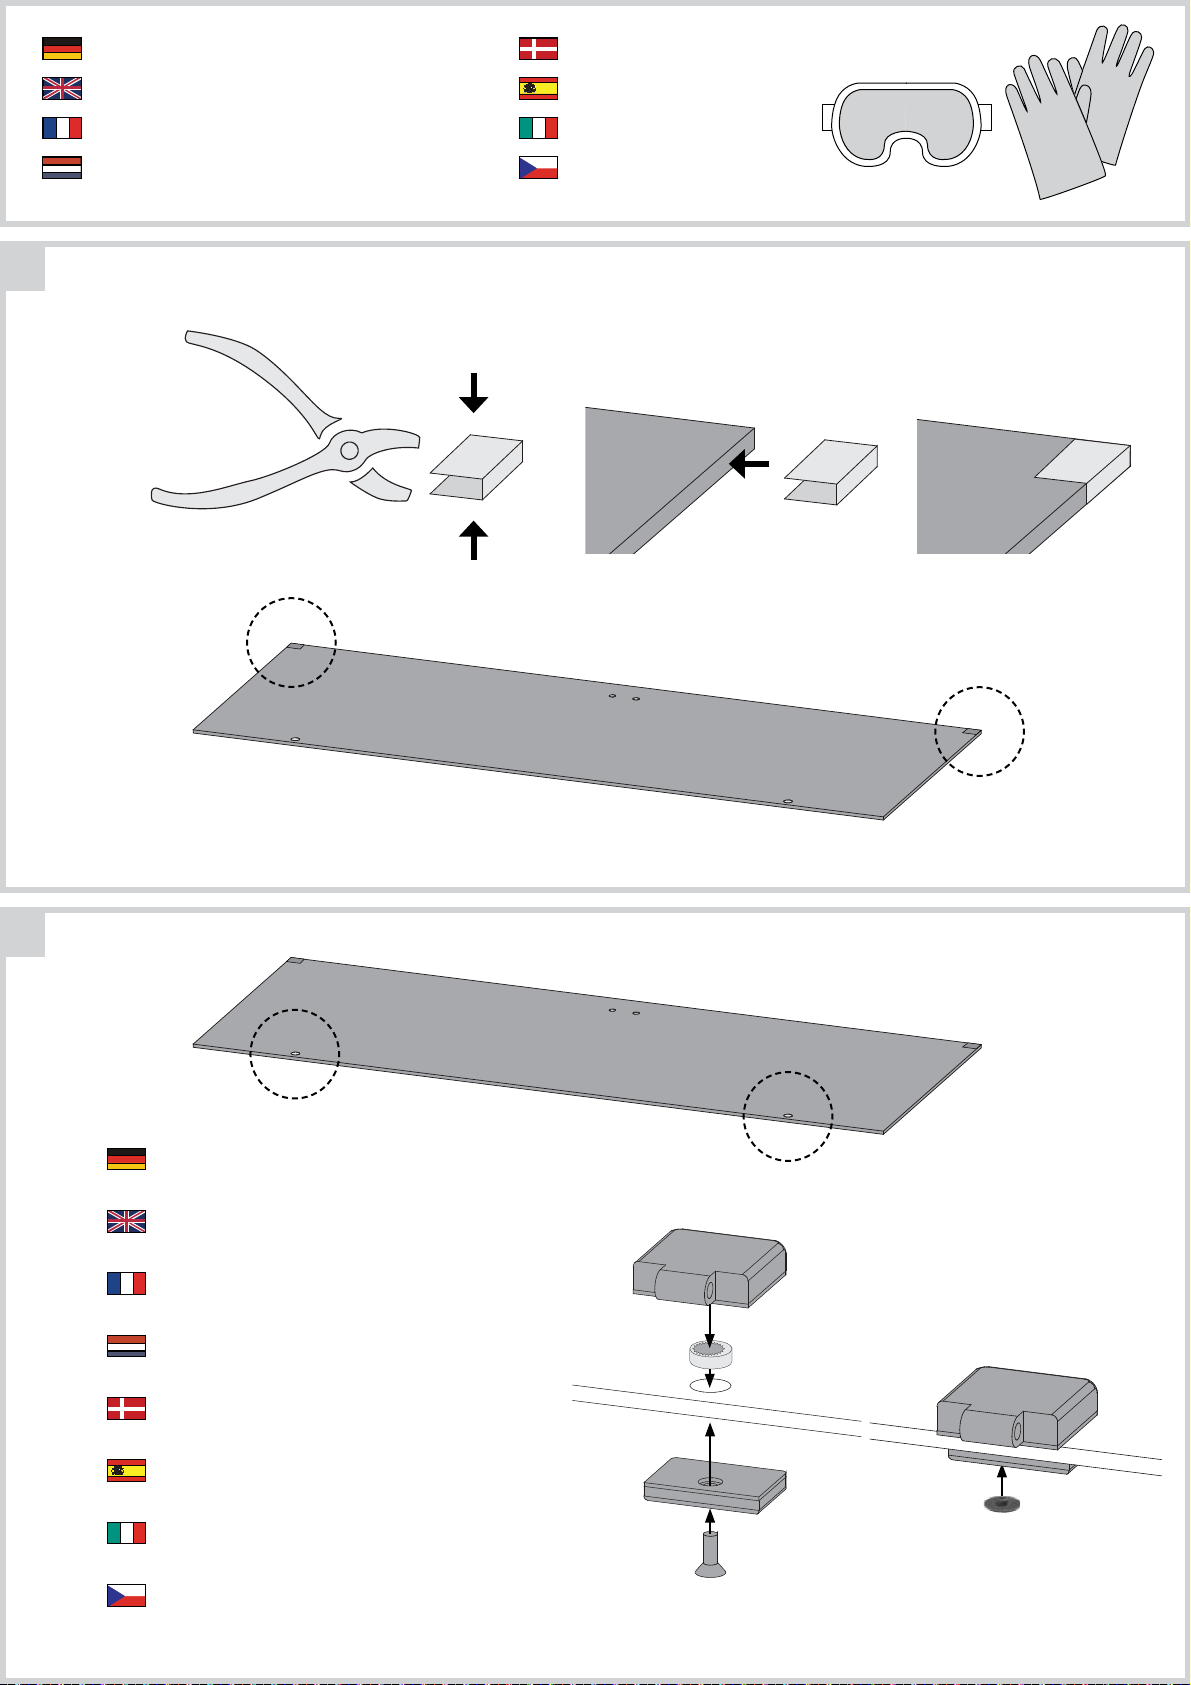
Hier ist die Funktionsweise des Brettes abgebildet. Regeln Sie damit die Abluft nach
Ceci représente le mode de fonctionnement de la planche. Avec elle, régulez l’écoulement de l’air selon vos désirs.
This fi gure shows the functional principle of the board. Regulate the exhaust air according to your own wishes.
Hier is de werking van het plankje afgebeeld. Regel daarmee de luchtafvoer naar eigen wens.
Aquí está representada la forma de funcionamiento de la tabla. Regule con ello el aire de salida según sus propios deseos.
Viene illustrato il principio di funzionamento della tavoletta di regolazione della ventilazione. Con essa si può regolare a piacere la ventilazione.
Zde je zobrazená funkce desky. Regulujte s ní odsávací vzduch dle Vašeho přání.
Sådan fungerer styret. Brug den til at regulere udstødningsluften efter dine egne ønsker.
Ihren eigenen Wünschen.
2x
10x
4x50
B 2
L 1

19
Ø3 mm
4×50
Ø3 mm
4×30
Ø3 mm
4×50
B 5
20
B 10
B 10
8x
B 5
B 9
B 9
B 5
4x
4×30
4x
21
E 1
1525mm
E 1 (1525)
L 1 + B 2
L 1 + B 2
22
Bündig!
Flush!
Affl eurement!
Gelijk!
I fl ugt!
Aras!
Combacia!
Stejný !
185mm
E 1 (1525)
Ø3 mm
8x
4×50
23
Ø3 mm
8x
4×35
205mm
24
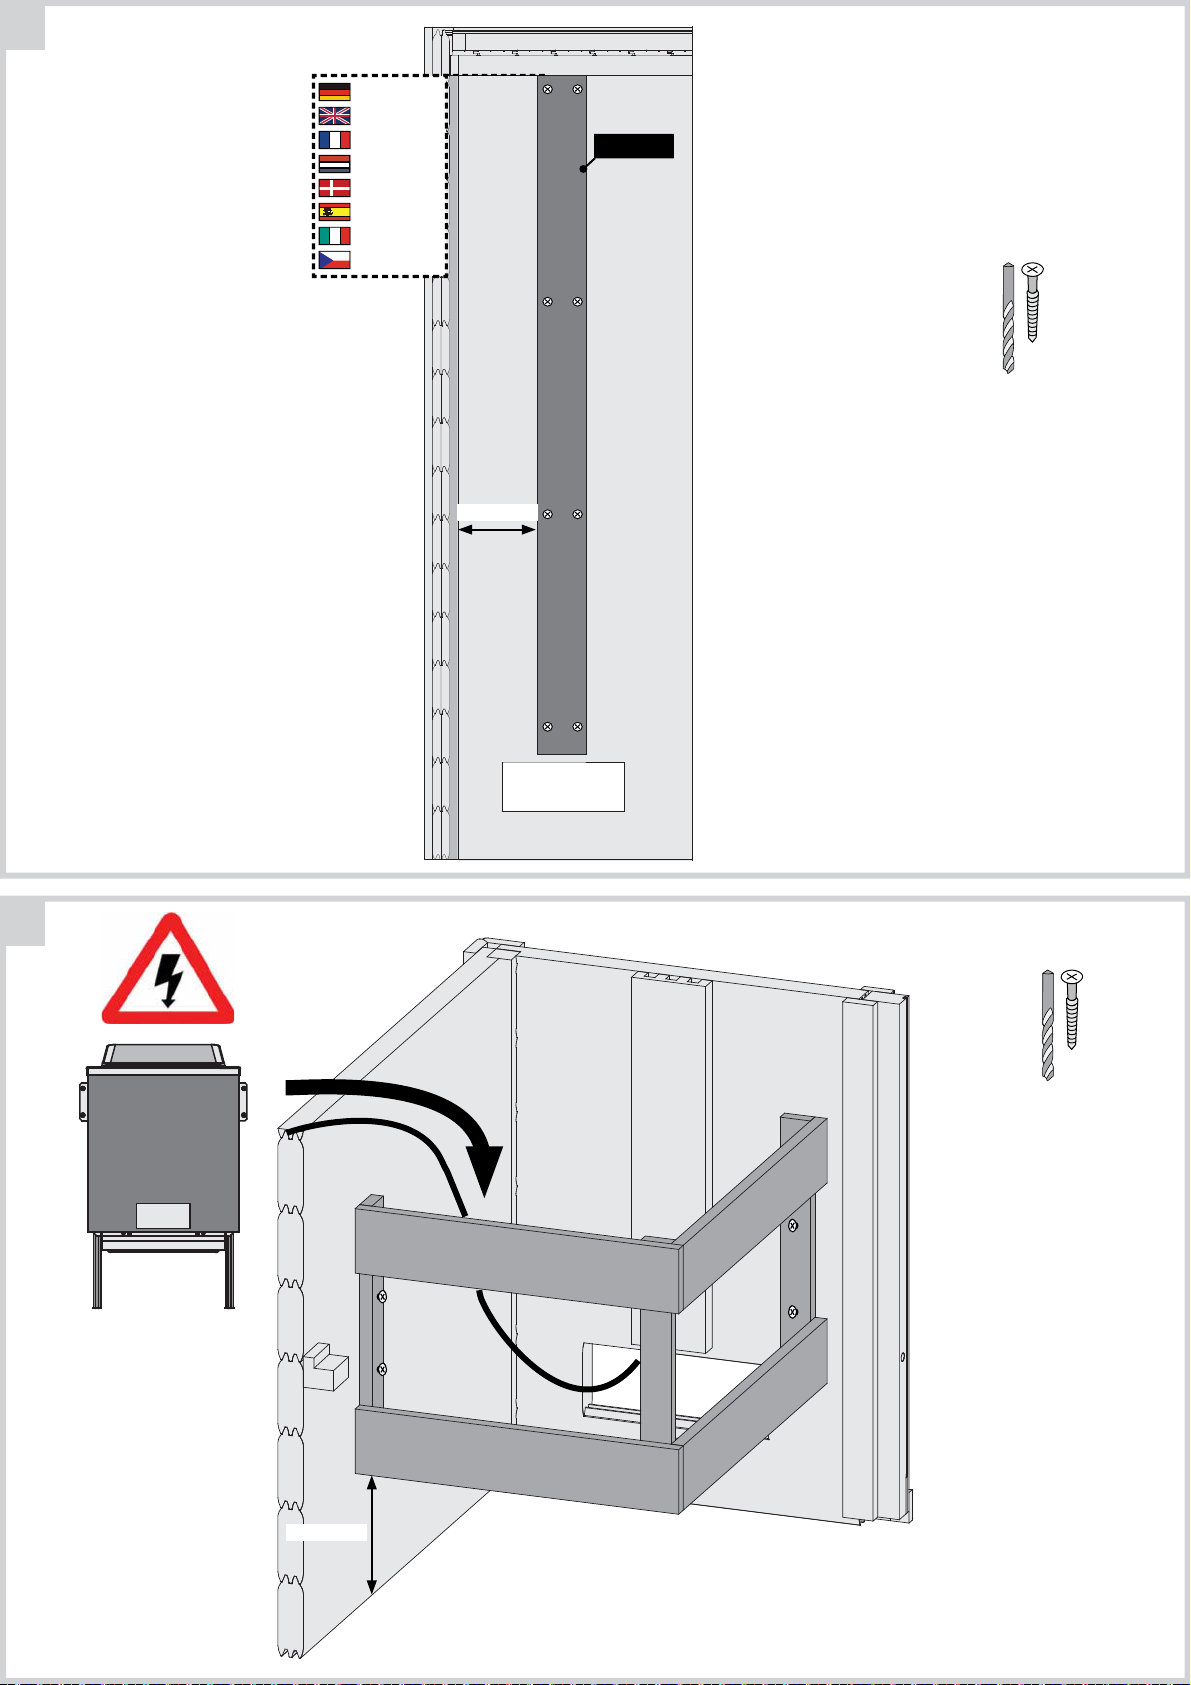
Ofenbefestigung
oven vaststelling
oven fi xing
fi xation four
fi jación horno
fi ssaggio forno
upevňovací trouba
ovn fastsættelse
B 4
B 4B 4
25
B 4
Nur bei 9 kW-Ofen
Seulement 9 kW chauffe
Only 9 kW heater
Slechts 9 kW heater
B 4B 4
Sólo calentador de 9 kW
Solo riscaldamento 9 kW
Pouze topné těleso 9 kW
Kun ved 9 kW ovn
B 4
Ø3 mm
6x
4×35
26
šechny nastavovací podivínů musí mít stejný
základní polohy ve skle
Einb
au Glastür
Installation of glass door
Montage porte en verre
Montage van de glazen deur
Montaje de la puerta de cristal
Installazione portello di vetro
Sauna Instalace dveře
Einb
au Glastür
Installation of glass door
Montage porte en verre
Montage van de glazen deur
Installationsglasdør
Montaje de la puerta de cristal
Installazione portello di vetro
Sauna Instalace dveře
27
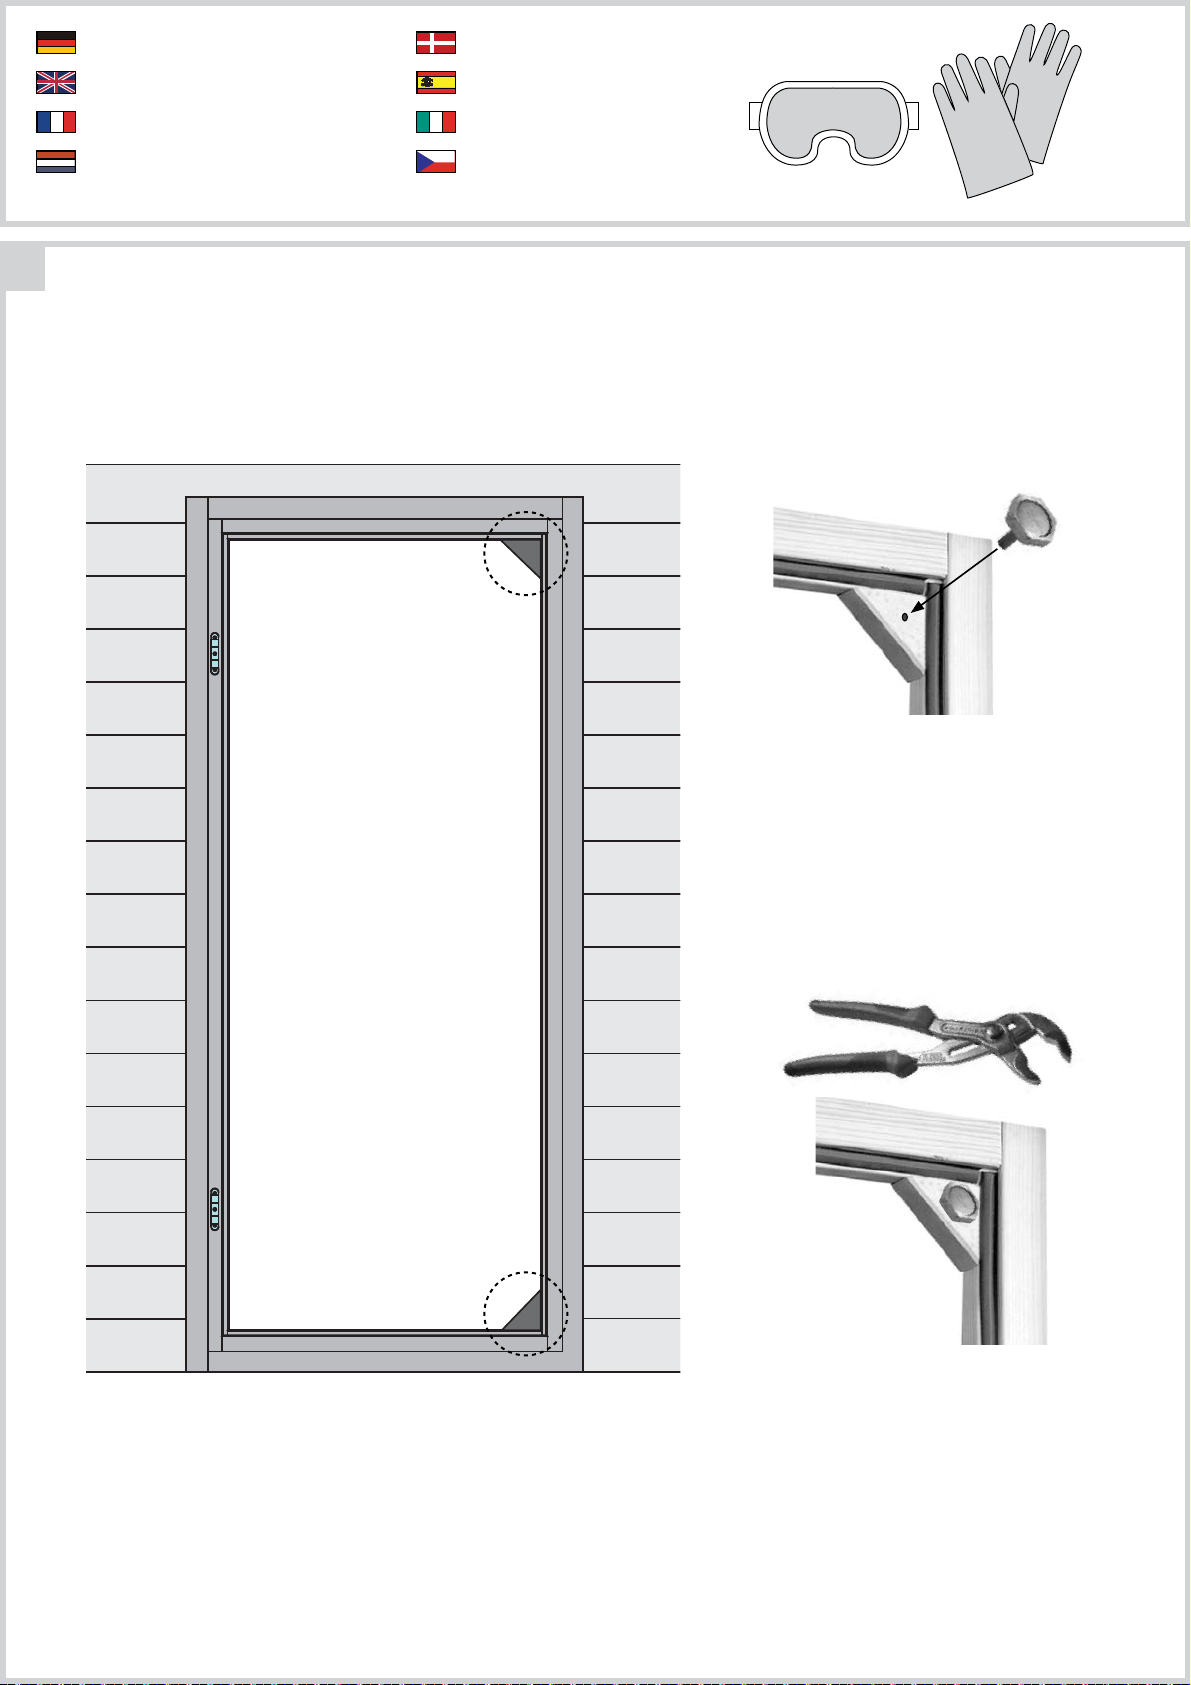
Alle Verstell-Excenter müssen in der
Glasscheibe die gleiche Grundstellung haben
All adjustable eccentrics must have the same
basic adjustment in the glass panel
Tous les excentreurs de positionnement doivent
avoir la même position de base dans la vitre
Alle excentrische verstelelementen moeten in
dezelfde stand in de glasplaat worden geplaatst
Alle justeringsexcentricer skal have samme
grundlæggende position i glasruden
Todos los excéntricos regulables tienen que tener
la misma posición base en la hoja de cristal
Tutti gli eccentrici di regolazione
stessa posizione base nella lastra di vetro
šechny nastavovací podivínů musí mít stejný
základní polohy ve skle
devono avere la
28
Einb
au Glastür
Installation of glass door
Montage porte en verre
Montage van de glazen deur
Montaje de la puerta de cristal
Installazione portello di vetro
Sauna Instalace dveře
Einb
au Glastür
Installation of glass door
Montage porte en verre
Montage van de glazen deur
Installationsglasdør
Montaje de la puerta de cristal
Installazione portello di vetro
Sauna Instalace dveře
 Loading...