

Page 1
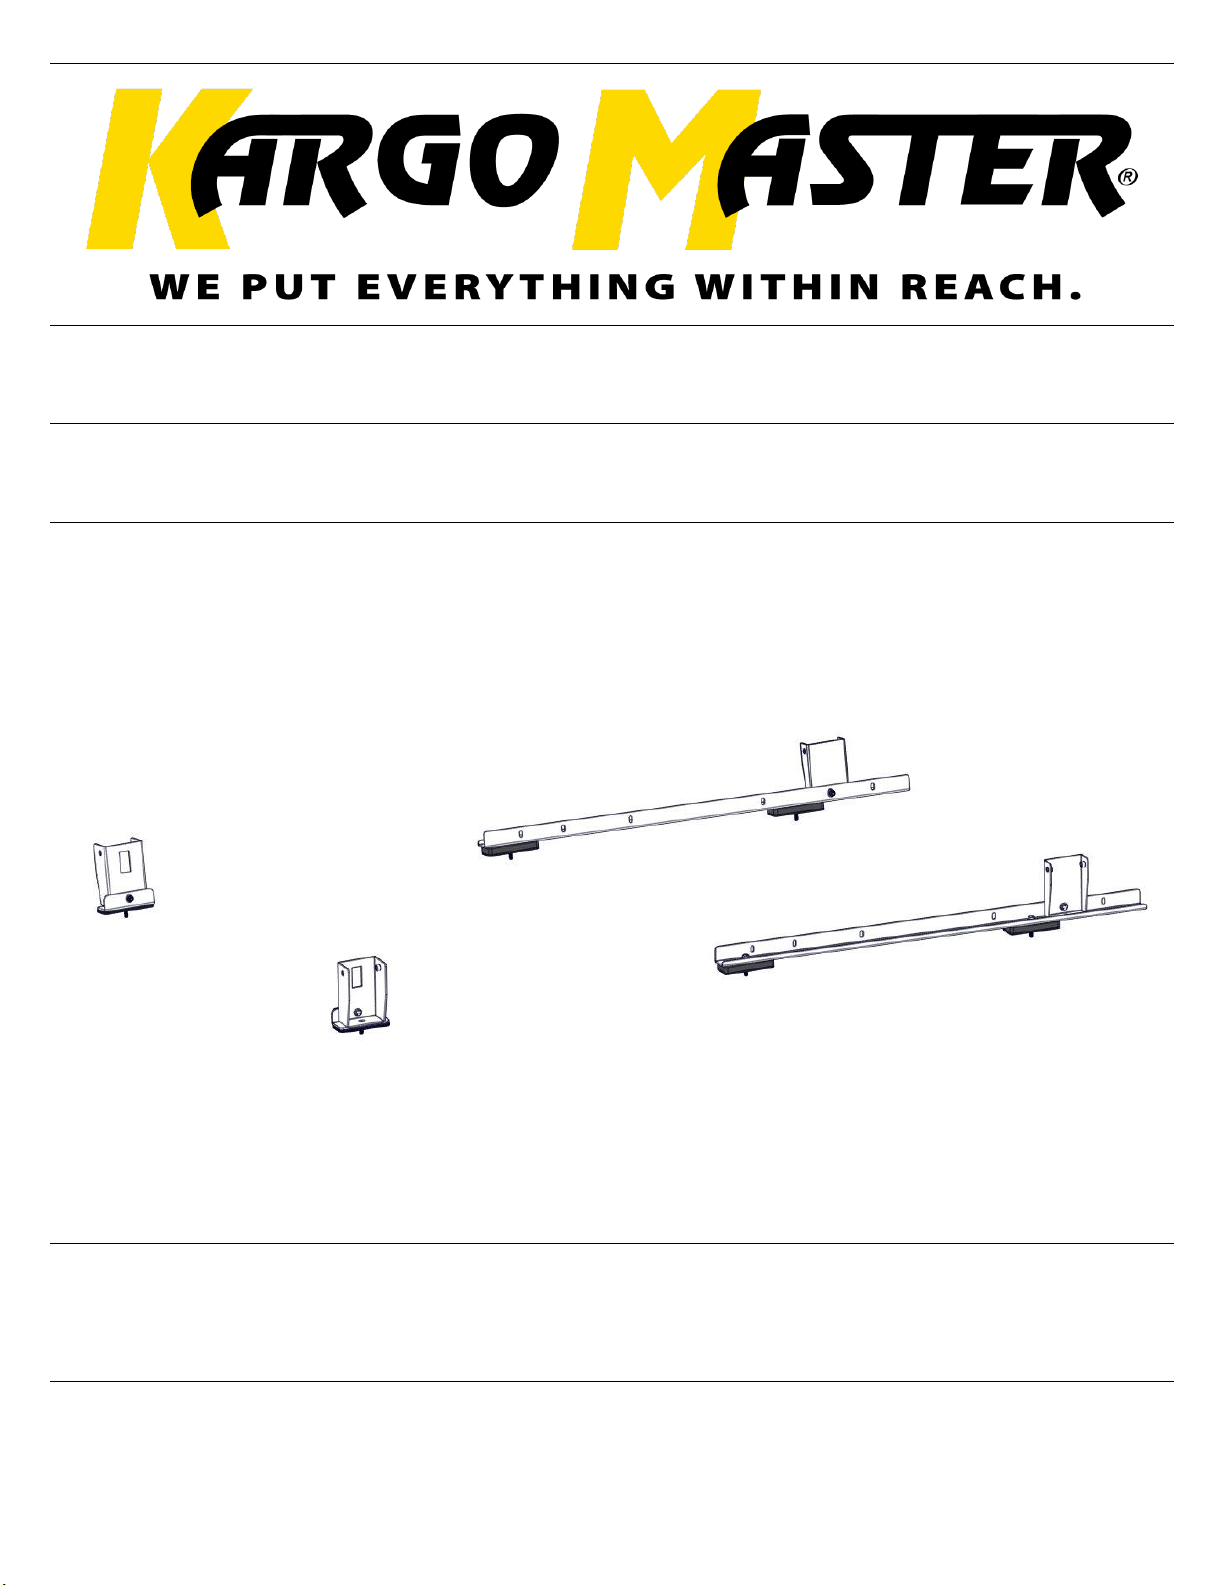
Instruction Guide
409TD
20190923R2
DATE: ______________
Page 2
Instructions – 409TD
For Technical Support Call: 800-343-7486 Monday-Friday 7AM - 4 PM (PST) Page 2
*PLEASE READ ALL INSTRUCTIONS AND WARNINGS PRIOR TO ASSEMBLING,
INSTALLING, AND USING THIS PRODUCT*
Warning
Always check for wires, fuel tanks and lines, brake lines and other important vehicle
functionality items prior to drilling and installing all products.
Tools Needed
13mm Wrench and Socket
1/2” Wrench and Socket
5mm Allen Hex
9/16” Wrench and Socket
Table of Contents
Parts List ....................................................................................................................................... 3
Hardware List ................................................................................................................................ 4
Ford Transit Installation
Step 1 - Rear Foot Mounting (excluding extended van) ................................................................ 5
130” Wheelbase
Step 2A - 130” Wheel Base - Front Mount ............................................................................... 6-7
148” Wheelbase
Step 2B - 148” Wheel Base - Front Mount ............................................................................... 8-9
Extended Installation
Step 3A - Extended - Rear Foot Mounting ..................................................................................10
Step 3B - Extended - Front Mount ..............................................................................................11
Van Installation
Install Rear Feet ..........................................................................................................................12
Install Front Feet .........................................................................................................................13
Feet to Rack ................................................................................................................................14
Before You Begin
Read ALL instructions prior to installation.
Mount locations will vary based on van.
Be sure to put sealant around exposed threads in roof. Seal between the roof and the
rubber pad. Apply some sealant on the threads of all bolts going into the roof.
Page 3
Instructions – 409TD
For Technical Support Call: 800-343-7486 Monday-Friday 7AM - 4 PM (PST) Page 3
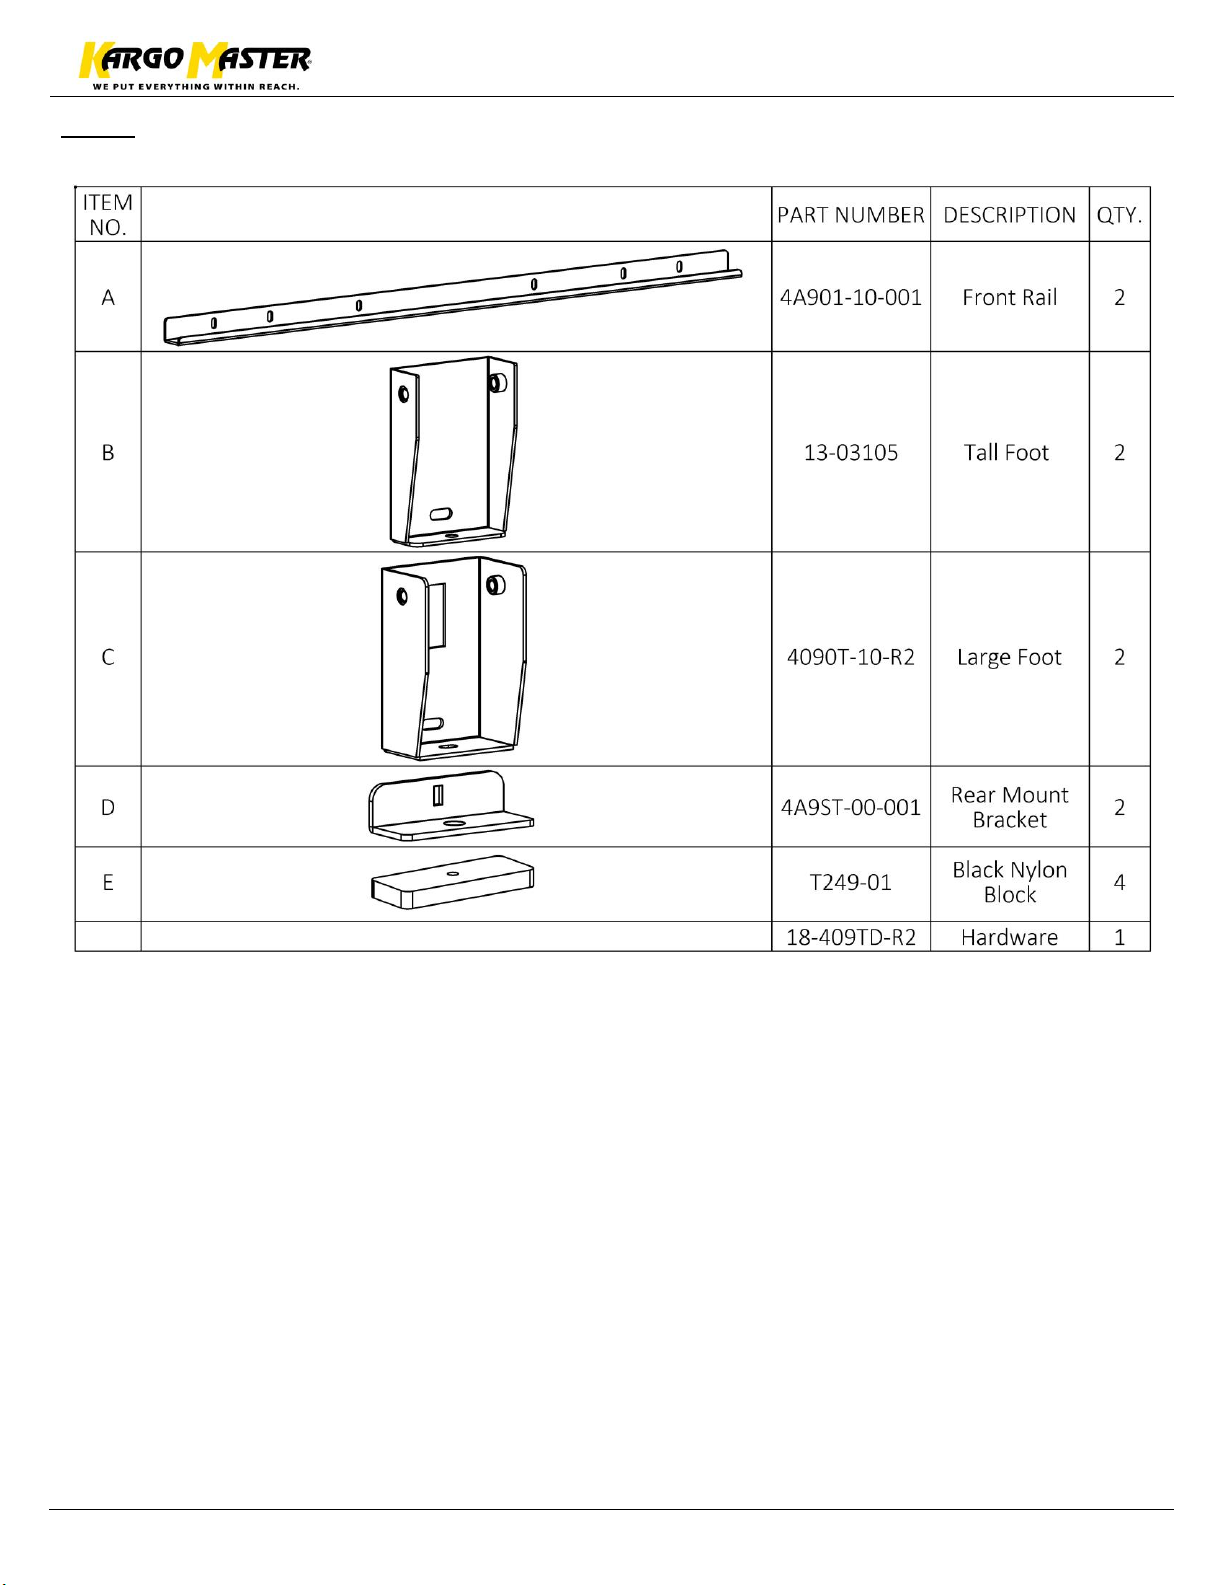
Parts
Page 4
Instructions – 409TD
For Technical Support Call: 800-343-7486 Monday-Friday 7AM - 4 PM (PST) Page 4
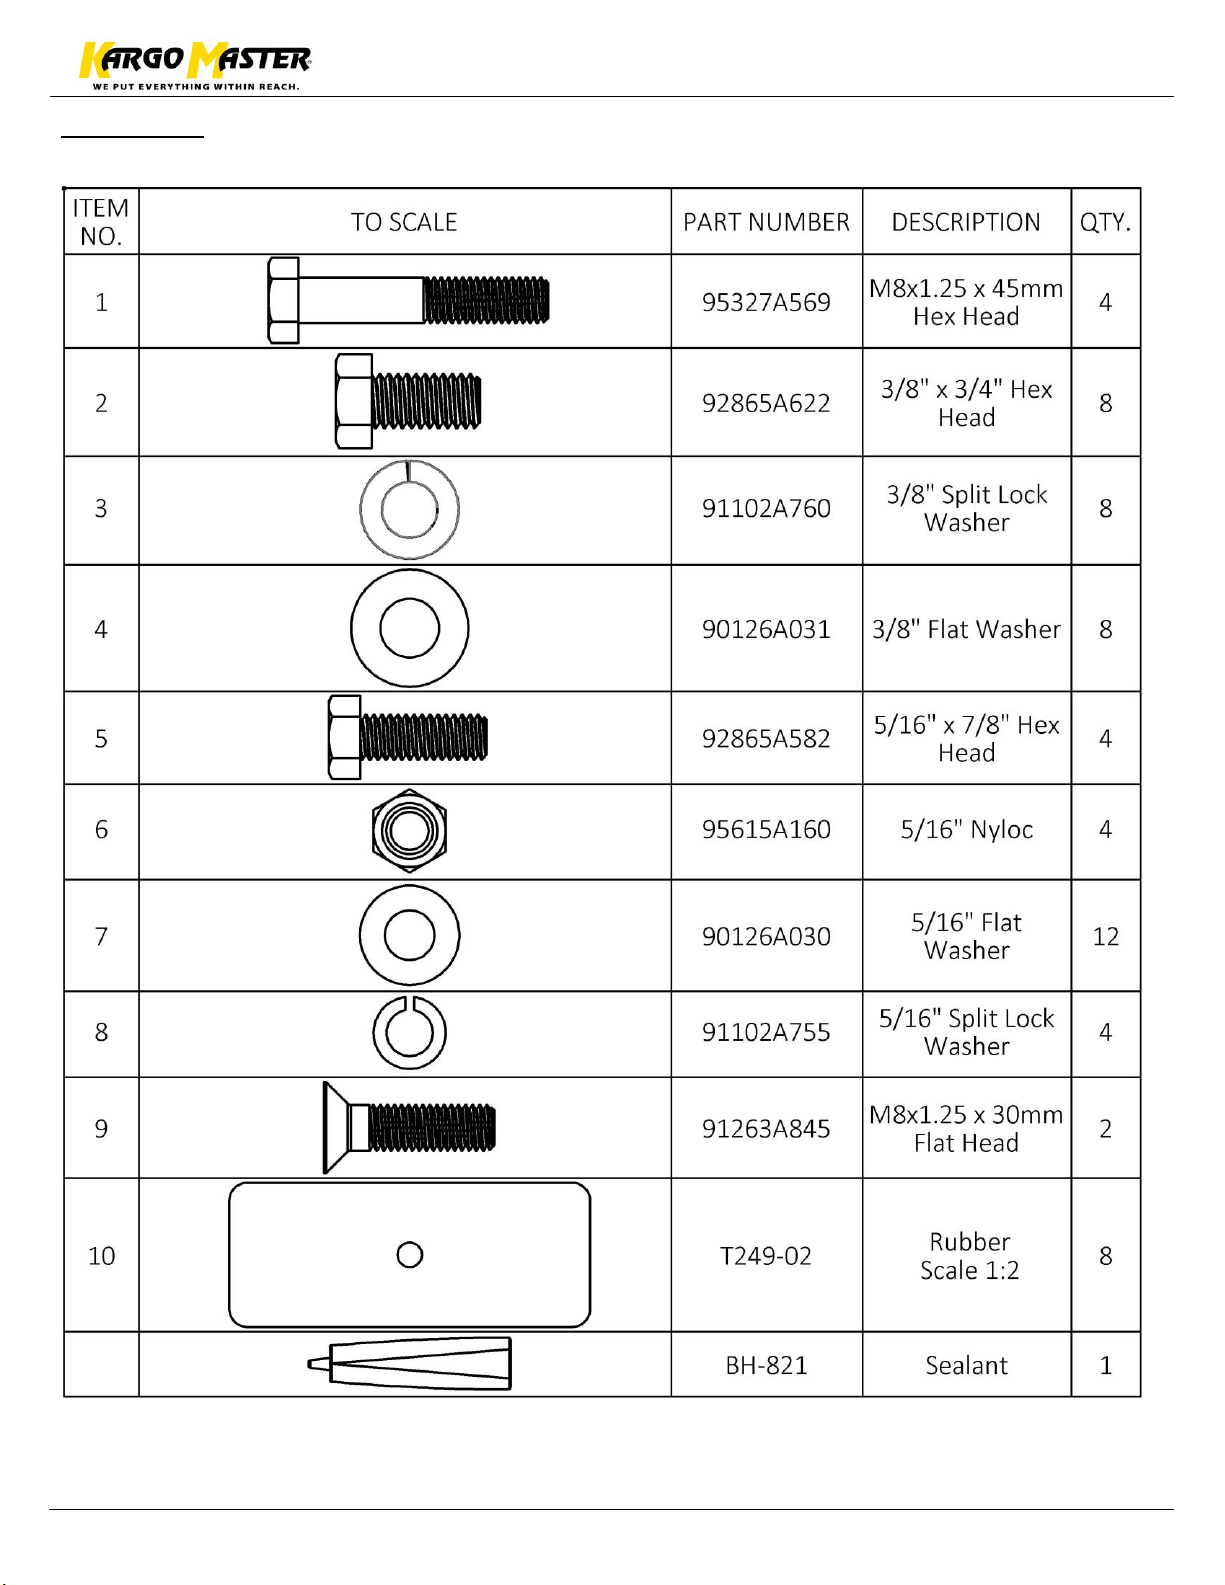
Hardware
Page 5
Instructions – 409TD
For Technical Support Call: 800-343-7486 Monday-Friday 7AM - 4 PM (PST) Page 5
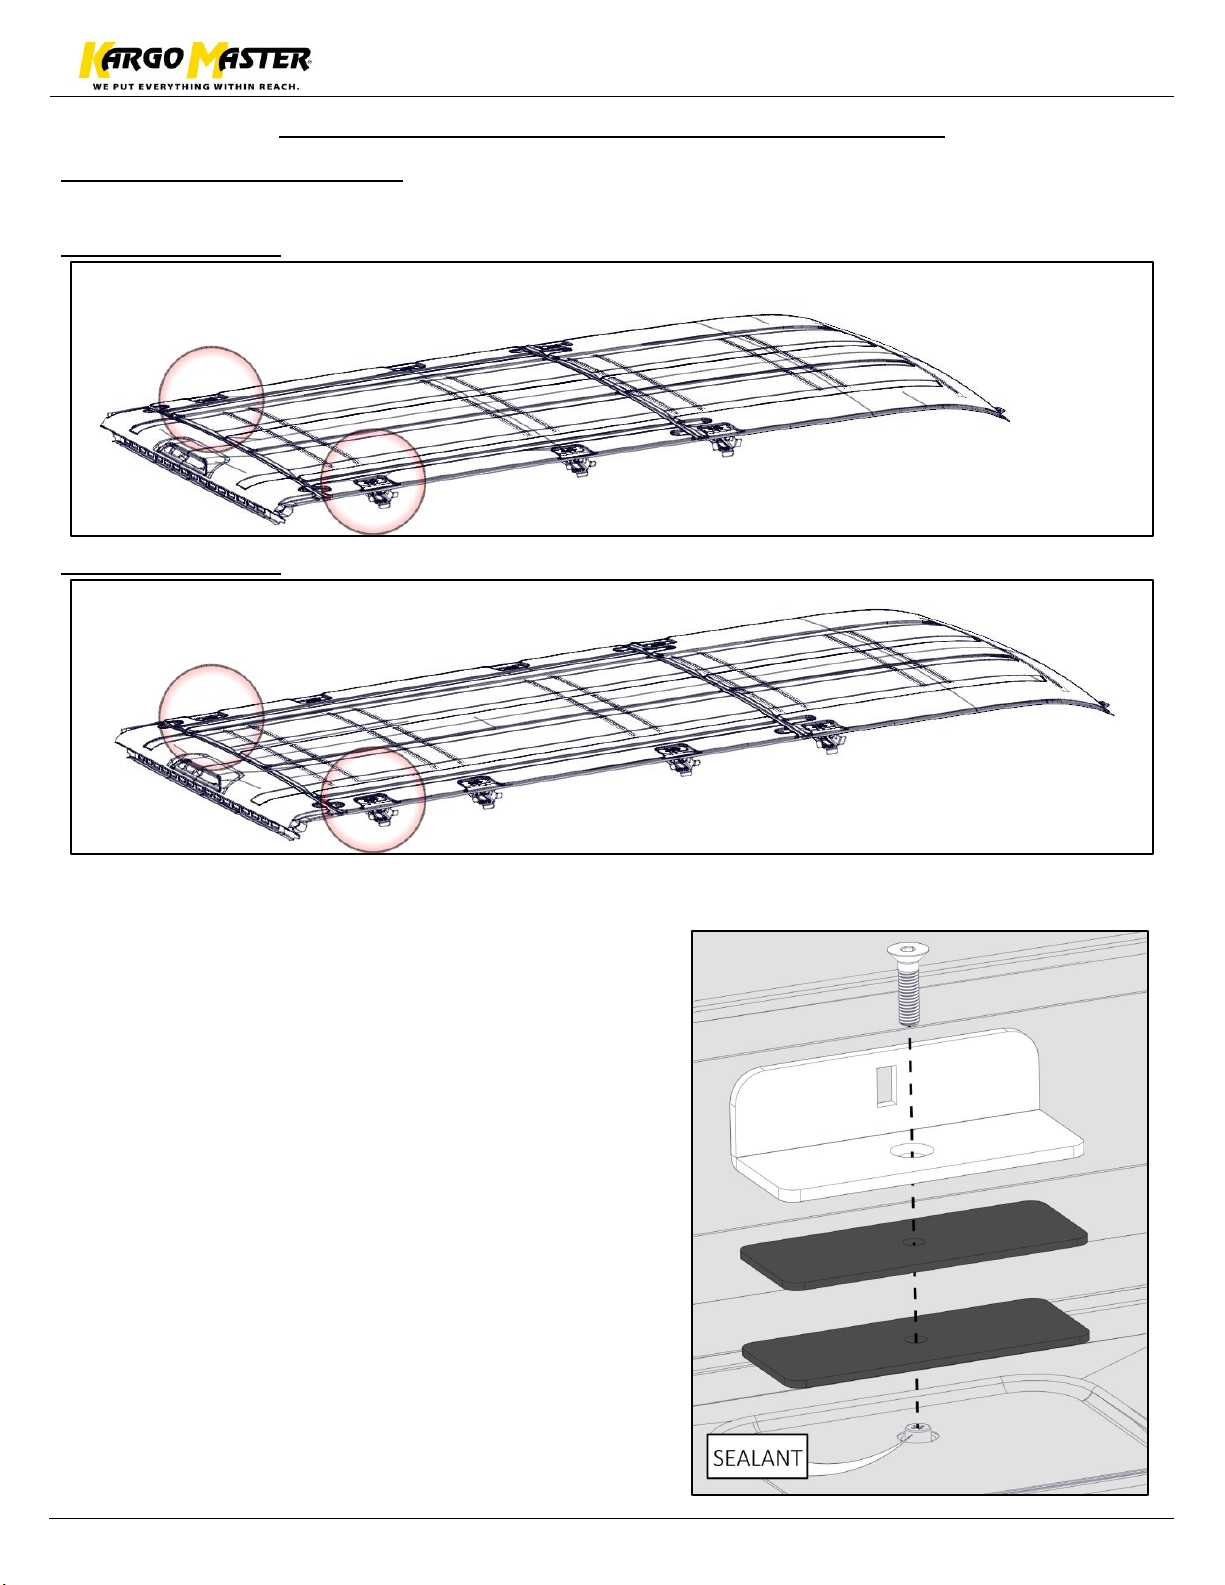
Ford Transit (EXCLUDING High Roof Extended)
Step 1 – Rear Mounting
Locate the threaded inserts at the rear of the van. Plugs will need to be removed.
130” Wheel Base
148” Wheel Base
** Place sealant around the exposed holes in the roof of the van under the rubber pads to ensure
no water can leak into the cabin of the van. **
Attach the rear mount bracket using
M8 x 30mm flat head bolts. Place two rubber
pads between the bracket and the roof of the
van. The bracket should be parallel with the
length of the van and the flange should be to
the inside.
Tighten. (Passenger side shown)
Page 6
Instructions – 409TD
For Technical Support Call: 800-343-7486 Monday-Friday 7AM - 4 PM (PST) Page 6
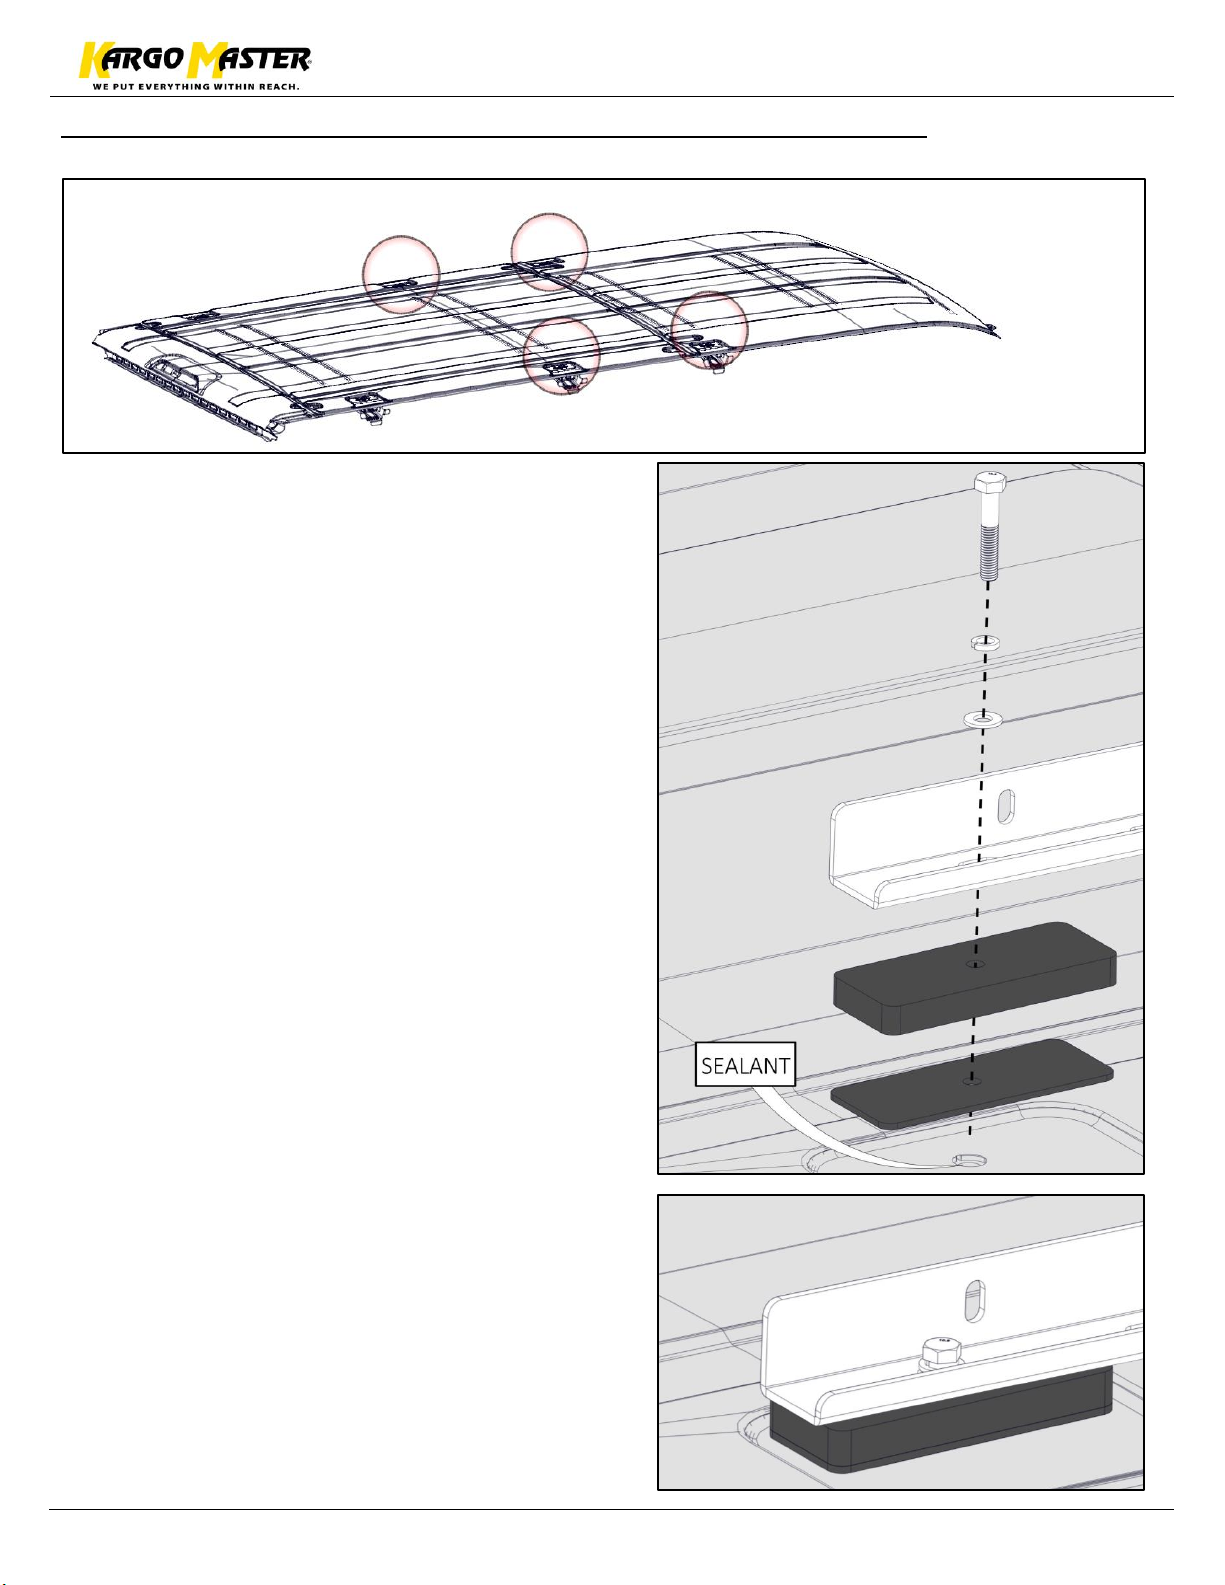
Step 2A – Front Mount on 130” Wheel Base (Low/Mid Roof)
Locate the other threaded inserts at the front of the van. Remove plugs.
** Place sealant around the exposed holes in the
roof of the van under the rubber pads to ensure no
water can leak into the cabin of the van. **
Place the long mount rail with the tall flange
towards the center of the van on top of the
rubber pad and black nylon block.
Bolt through farthest rear slot in the rail and
the corresponding front slot using M8 x
45mm bolts with lock washers and flat
washers.
The rail should be offset to the front of the
van.
(Passenger side, rear most mount on the rail shown)
Page 7
Instructions – 409TD
For Technical Support Call: 800-343-7486 Monday-Friday 7AM - 4 PM (PST) Page 7
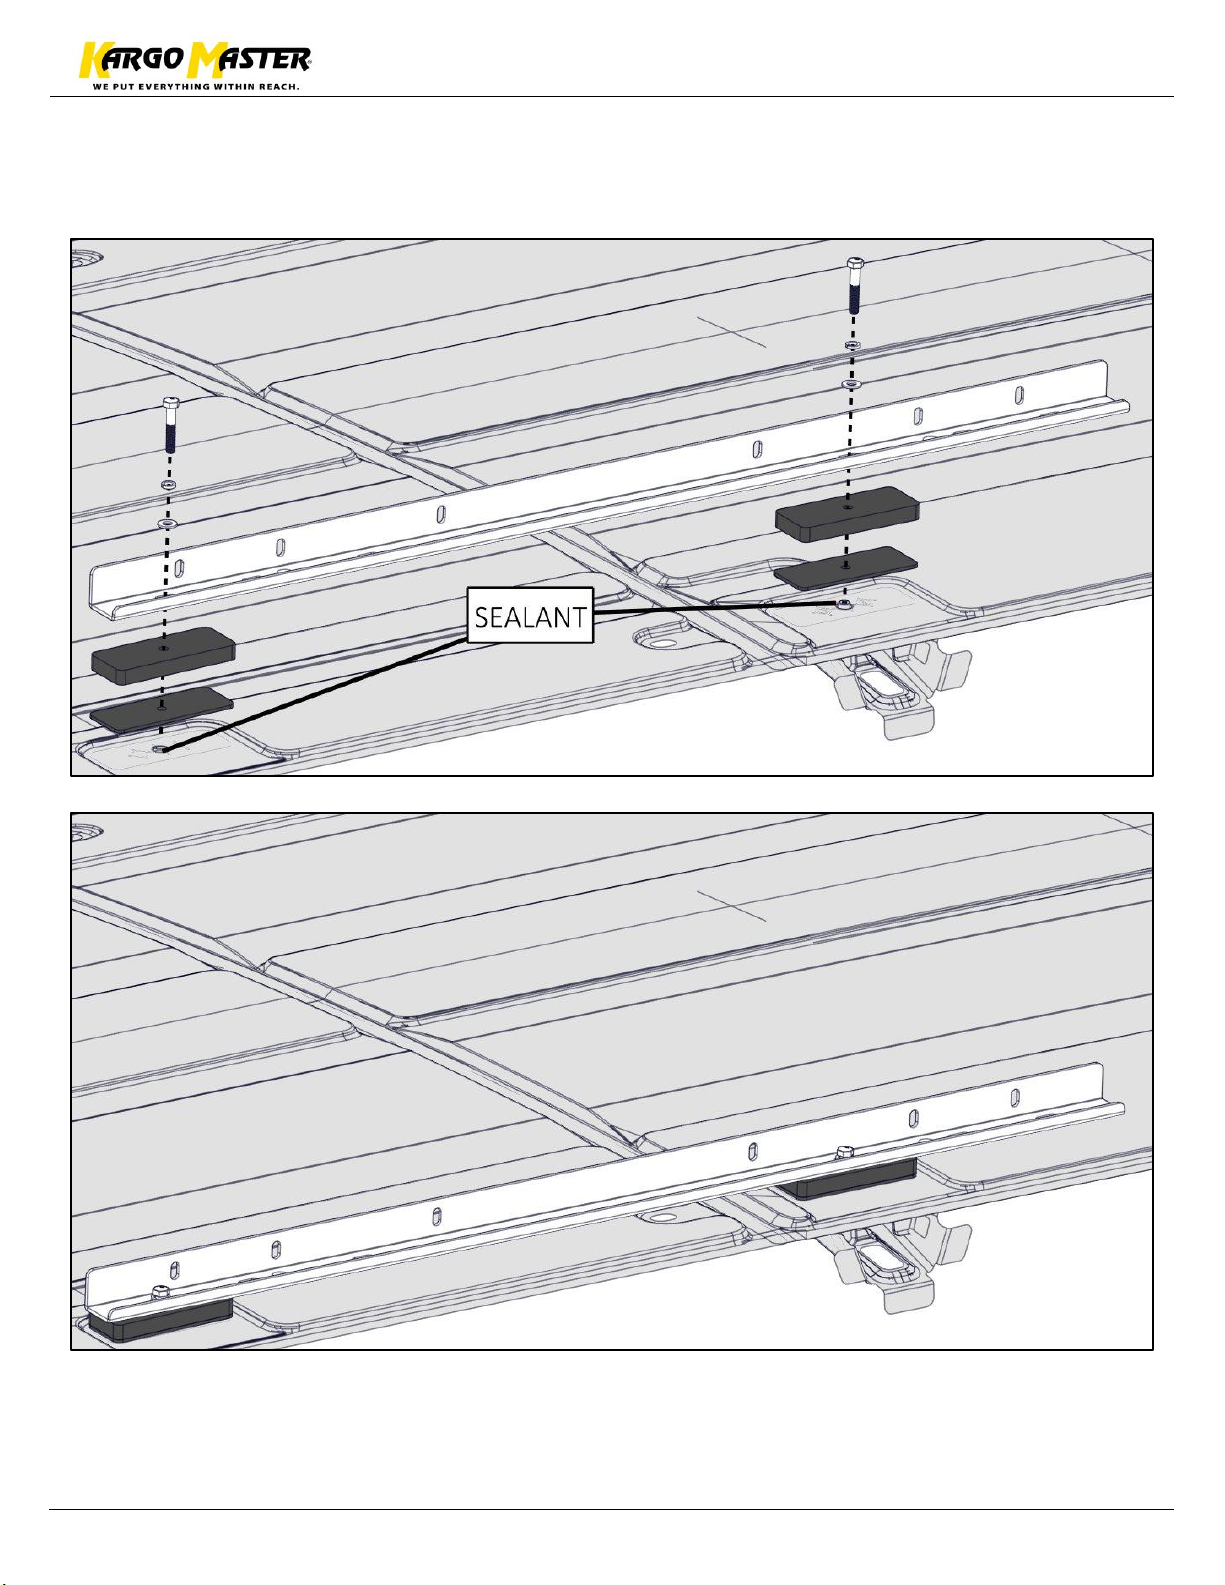
Passenger side shown, repeat on driver side.
Snug tighten.
Page 8
Instructions – 409TD
For Technical Support Call: 800-343-7486 Monday-Friday 7AM - 4 PM (PST) Page 8
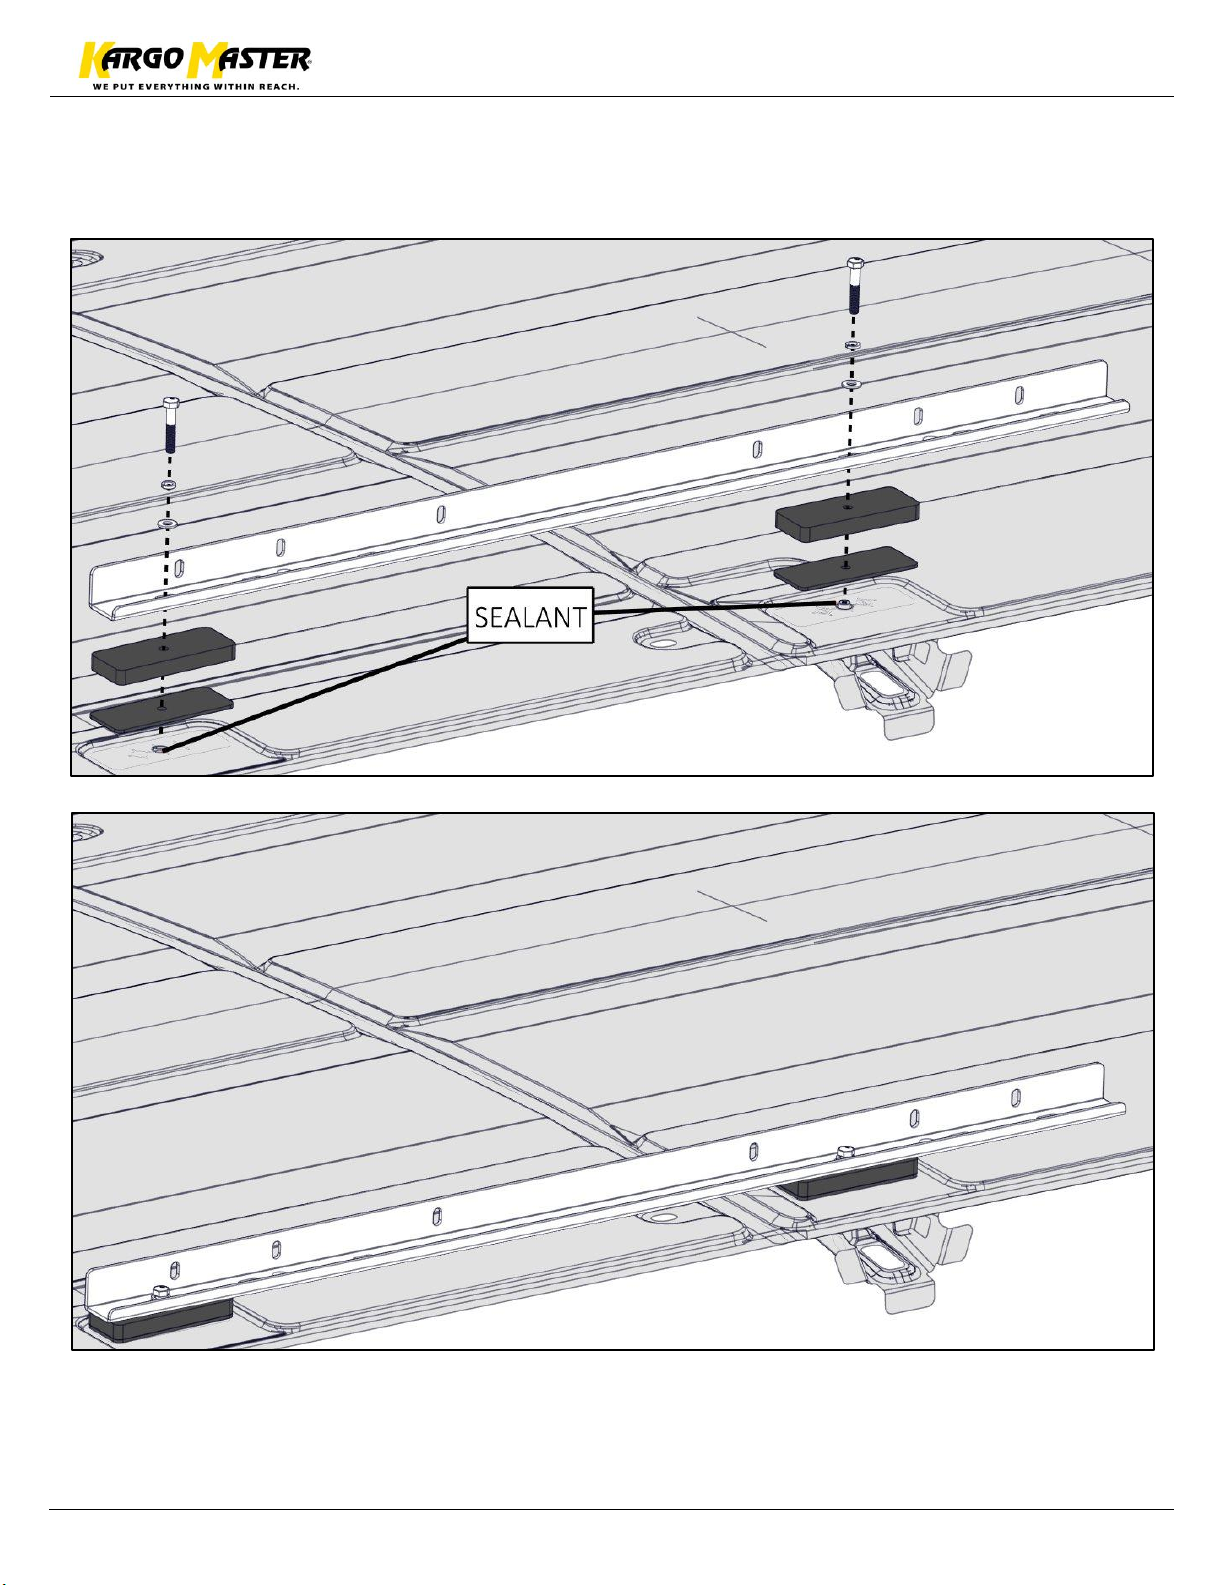
Step 2B – Front Mount on 148” Wheel Base (Low/Mid/High Roof excluding Extended)
Locate the other threaded inserts at the front of the van. Remove plugs.
** Place sealant around the exposed holes in the roof of the van under the rubber pads to ensure
no water can leak into the cabin of the van. **
Place the mount rail with the tall flange towards center of the van on top of the rubber pad
and black nylon block.
Bolt through the farthest rear slot in the mount rail and corresponding front slot in the rail
using M8 x 45mm bolts with lock washers and flat washers.
The rail should be offset to the front of the
van.
(Passenger side, rear most mount on the rail shown)
Page 9
Instructions – 409TD
For Technical Support Call: 800-343-7486 Monday-Friday 7AM - 4 PM (PST) Page 9
Passenger side shown, repeat on driver side.
Snug Tighten.
Page 10
Instructions – 409TD
For Technical Support Call: 800-343-7486 Monday-Friday 7AM - 4 PM (PST) Page 10
Transit 148”Wheelbase, High Roof, Extended
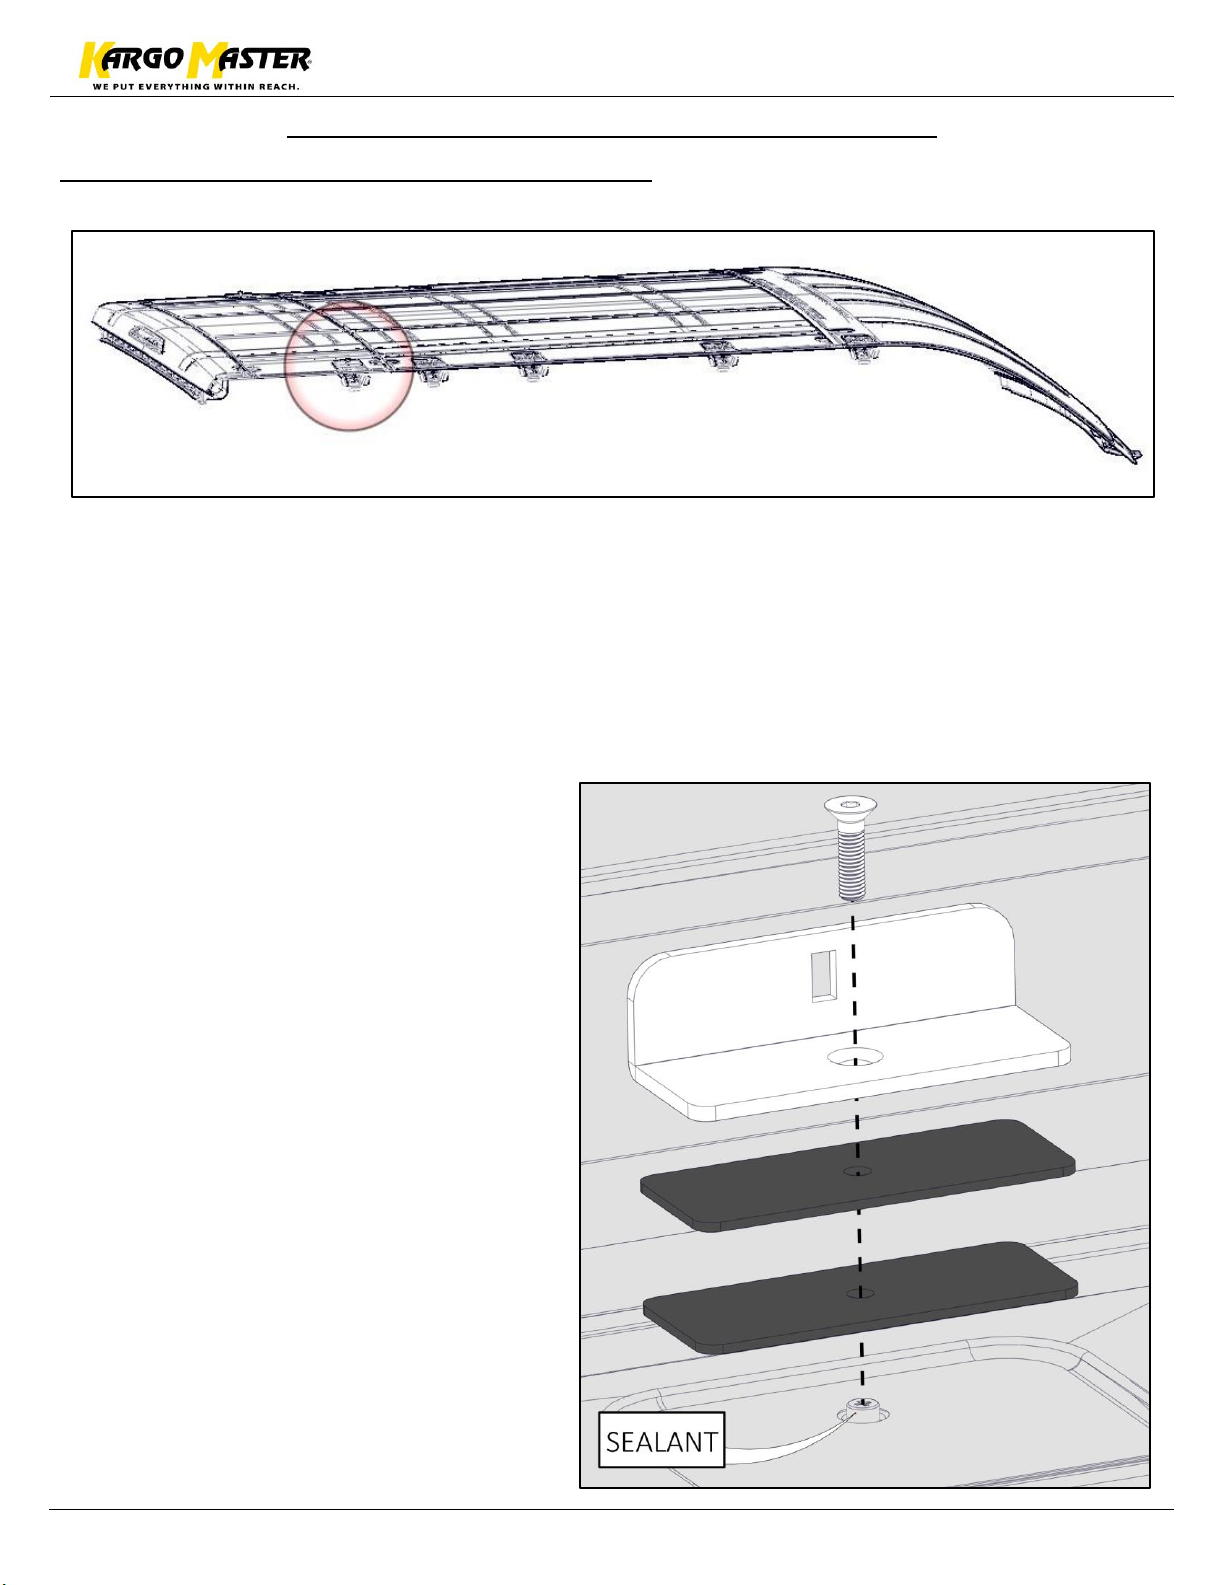
Step 3A - Extended - Rear Foot Mounting
** Place sealant around the exposed holes in the roof of the van under the rubber pads to ensure
no water can leak into the cabin of the van. **
Mount rear mount bracket using M8 x 30mm flat head bolts. Place two rubber pads
between the bracket and the roof of the van. The bracket should be parallel with the length
of the van and the flange should be towards the center as shown.
(Passenger side shown)
Page 11
Instructions – 409TD
For Technical Support Call: 800-343-7486 Monday-Friday 7AM - 4 PM (PST) Page 11
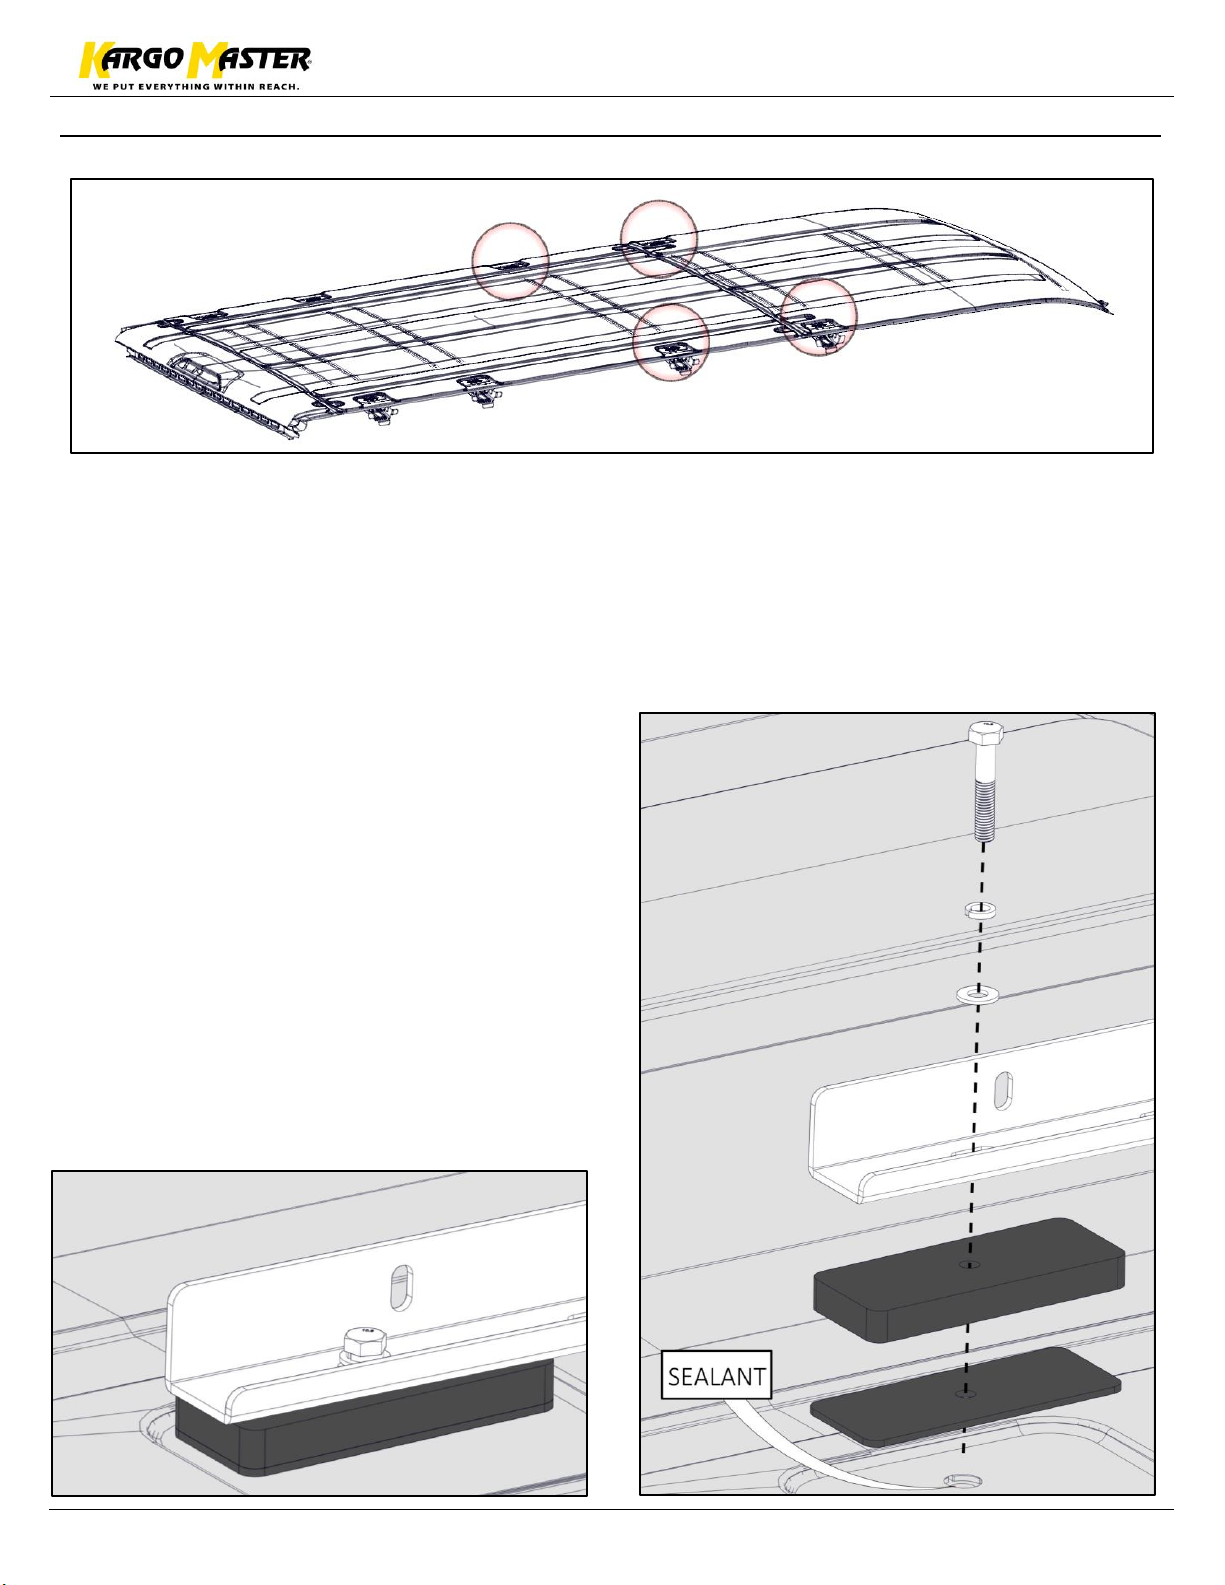
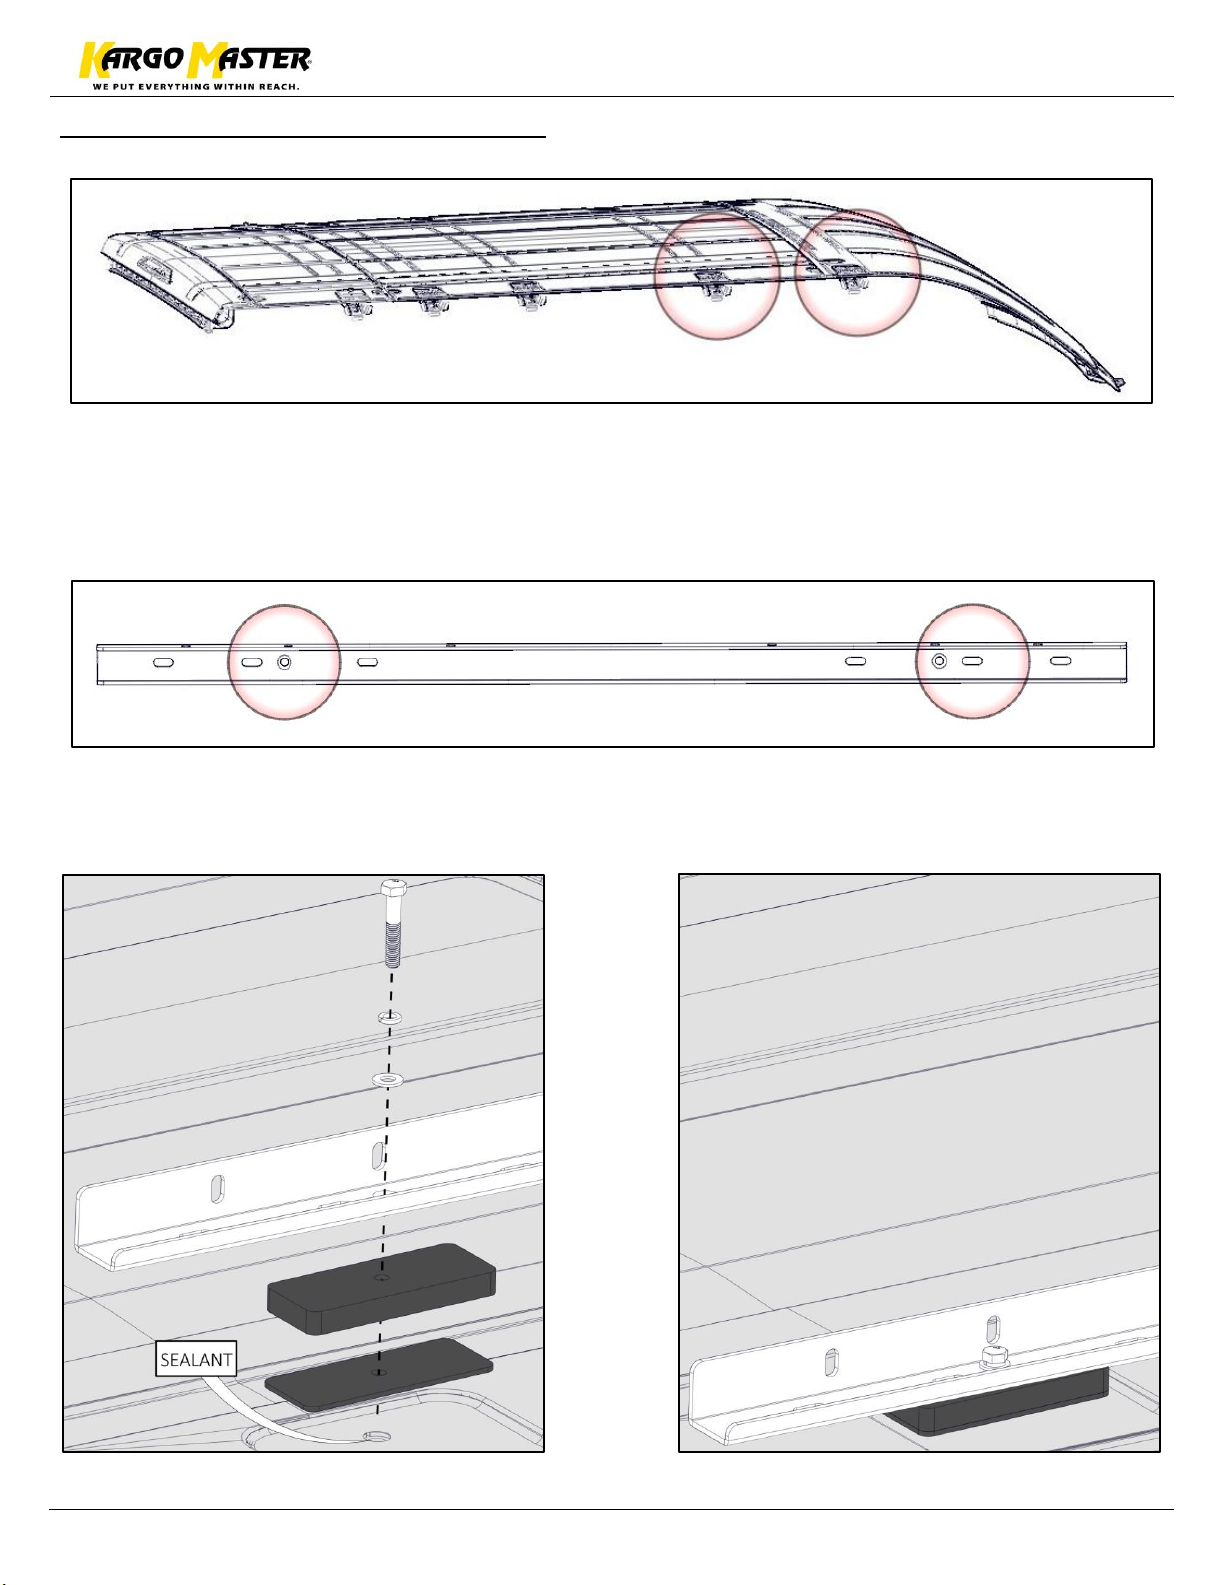
Step 3B - Extended - Front Mount
Locate the other two threaded inserts at the front of the van. Remove plugs.
** Place sealant around the exposed holes in the roof of the van under the rubber pads to ensure
no water can leak into the cabin of the van. **
Place the long mount rail with the tall flange towards the center of the van.
Bolt through the farthest rear countersunk hole and the 2nd slot from the front using
M8 x 45mm bolts with lock washers and flat washers.
The picture shown below is the rear most mount on the rail. (through the countersunk hole)
Passenger side shown, repeat on driver side.
Snug Tighten.
Page 12
Instructions – 409TD
For Technical Support Call: 800-343-7486 Monday-Friday 7AM - 4 PM (PST) Page 12
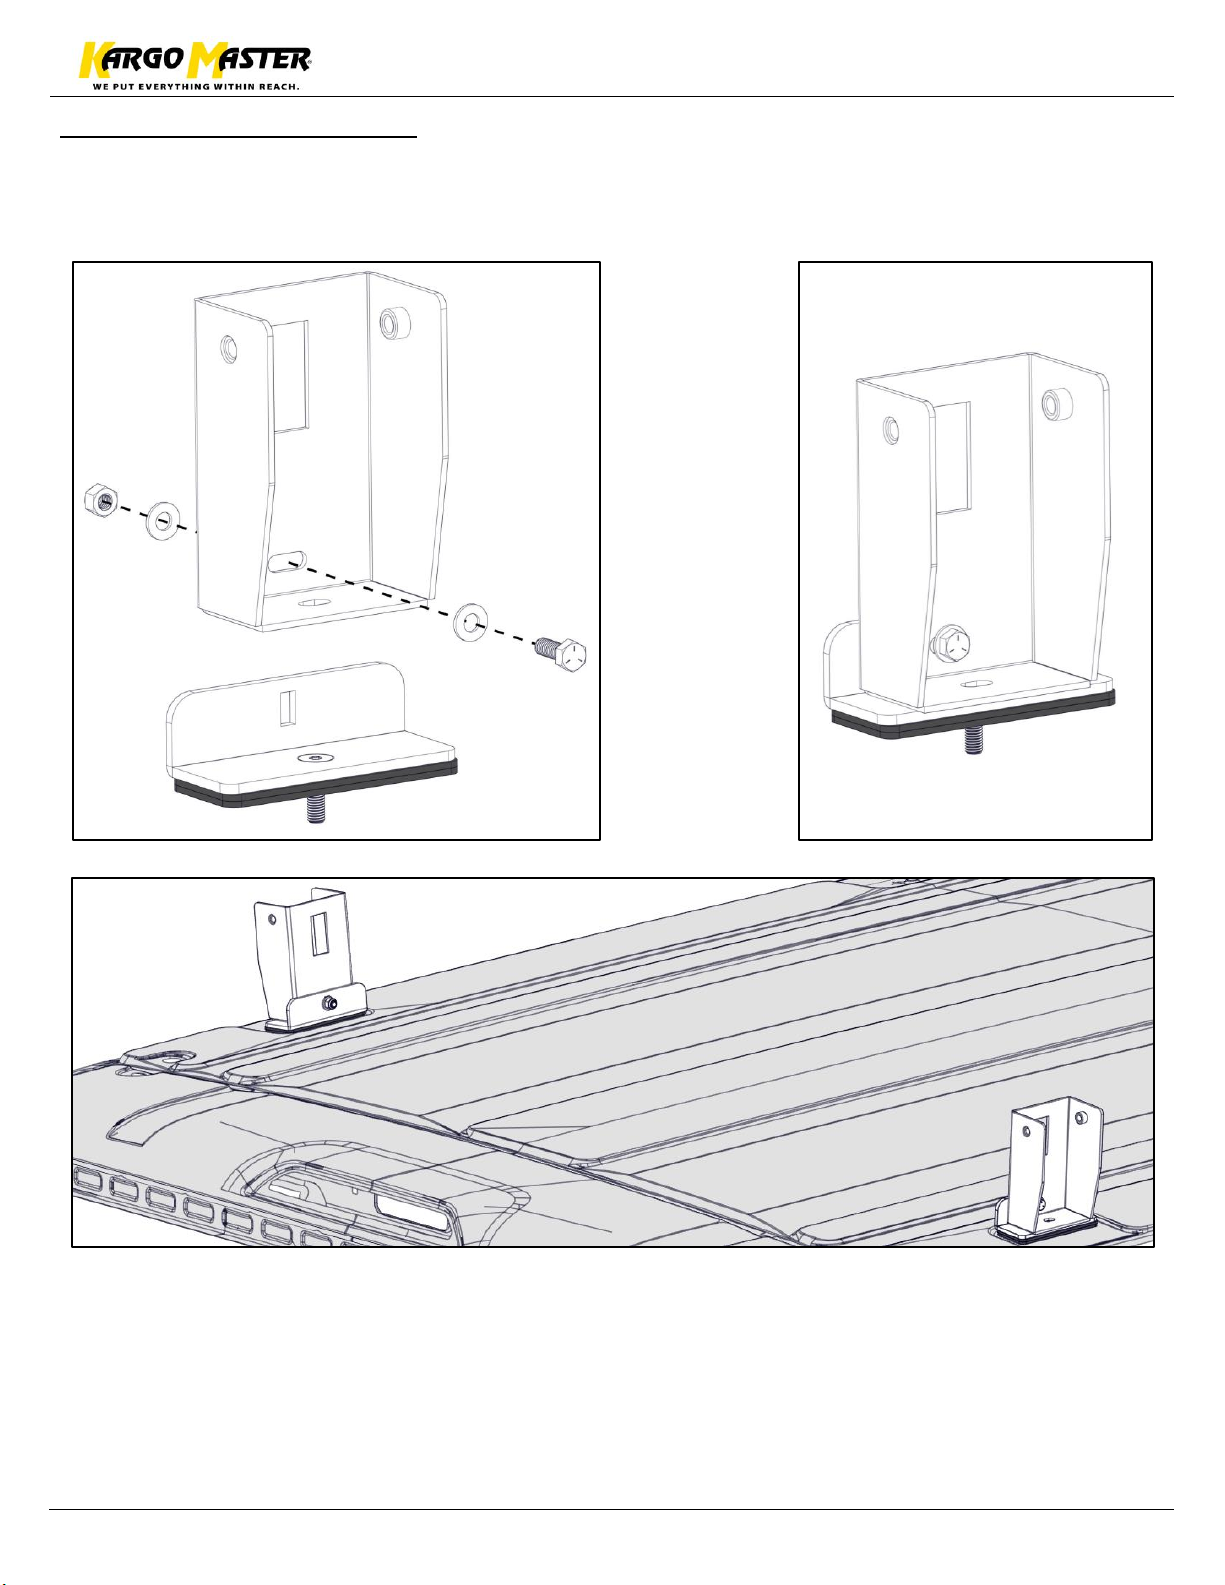
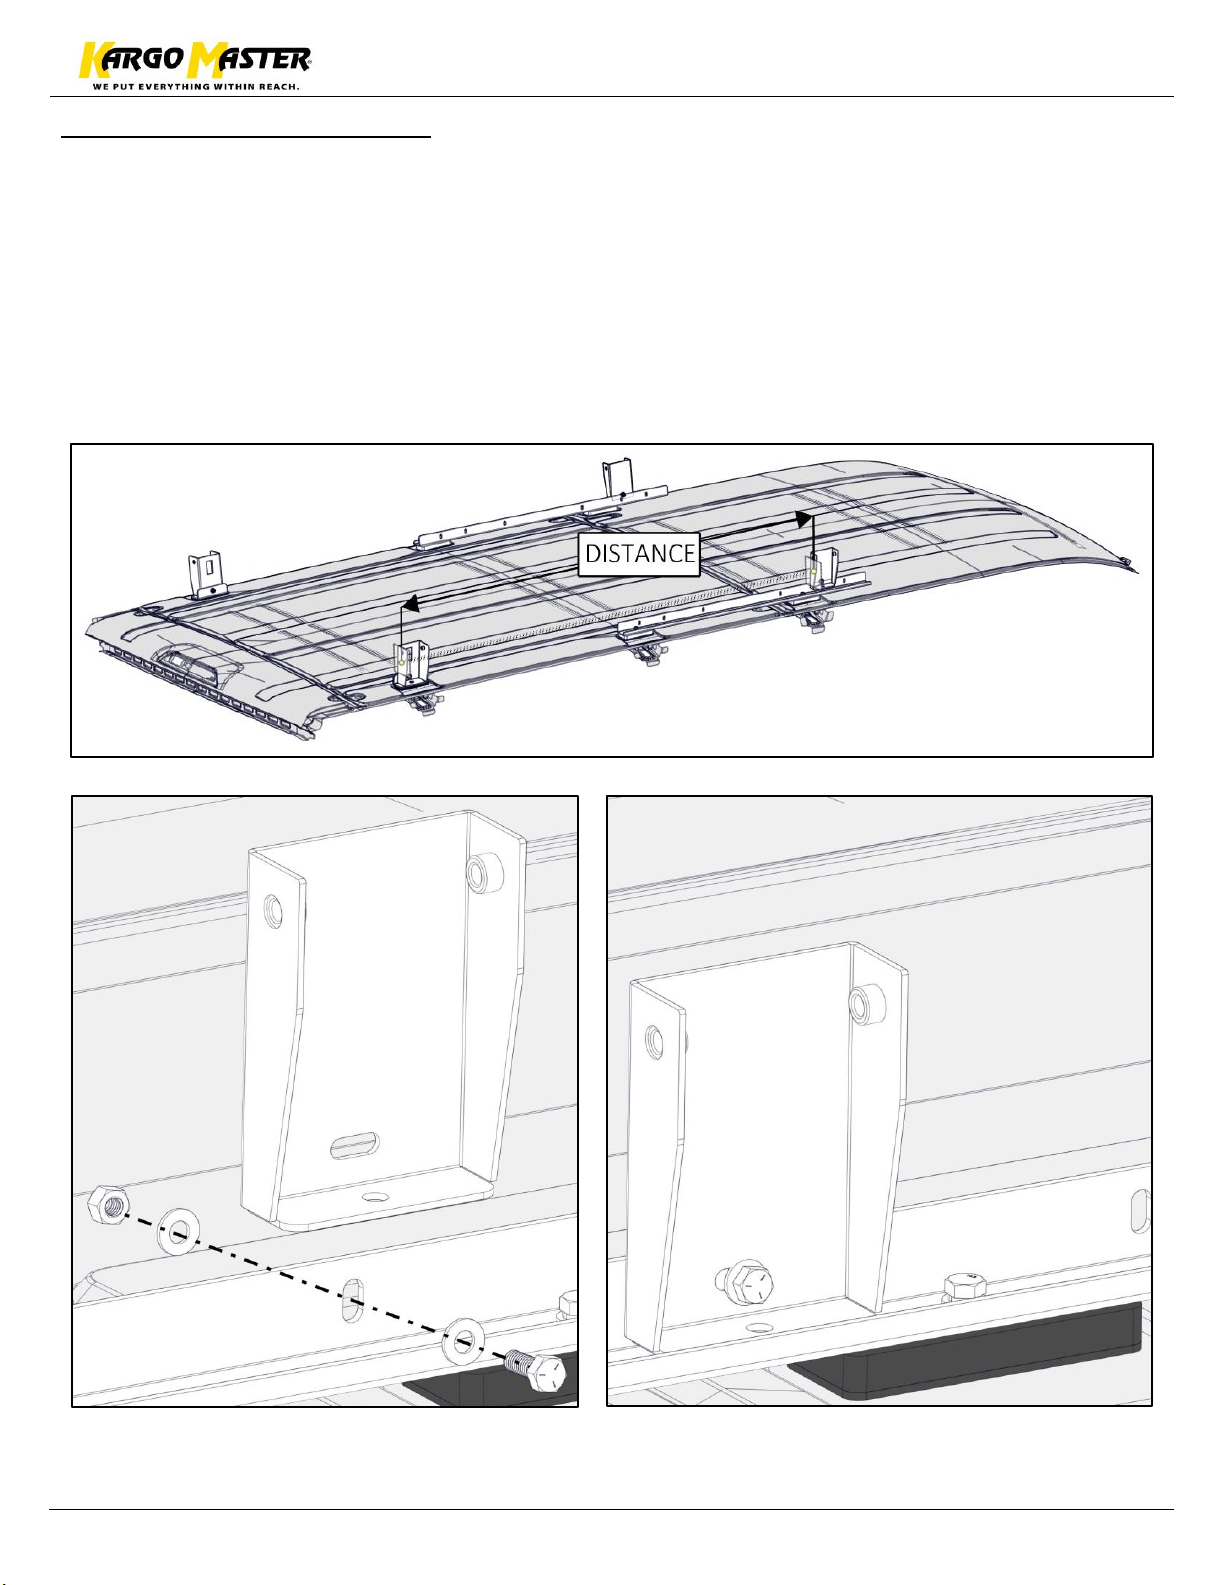
Step 4 – Install Rear Feet
Bolt large foot (has a cut out) to the rear mount previously installed using 5/16” x 7/8” hex
head bolt, two 5/16” flat washers and a 5/16” nyloc nut. (Passenger side shown without roof and
rack for clarity)
Page 13
Instructions – 409TD
For Technical Support Call: 800-343-7486 Monday-Friday 7AM - 4 PM (PST) Page 13
Step 5 – Install Front Feet
Mount the tall foot to the previously installed rail using a 5/16” x 7/8” hex head bolt, two
5/16” flat washers and a 5/16” nyloc nut.
Be sure the distance between the two feet closely matches the distance between the bows
on the ladder rack being installed. The slot used on the front rail will vary from the picture
below.
Note: One may choose to install the feet on the rack prior to installing onto the vehicle. It is the installers
preference.
Page 14
Instructions – 409TD
For Technical Support Call: 800-343-7486 Monday-Friday 7AM - 4 PM (PST) Page 14
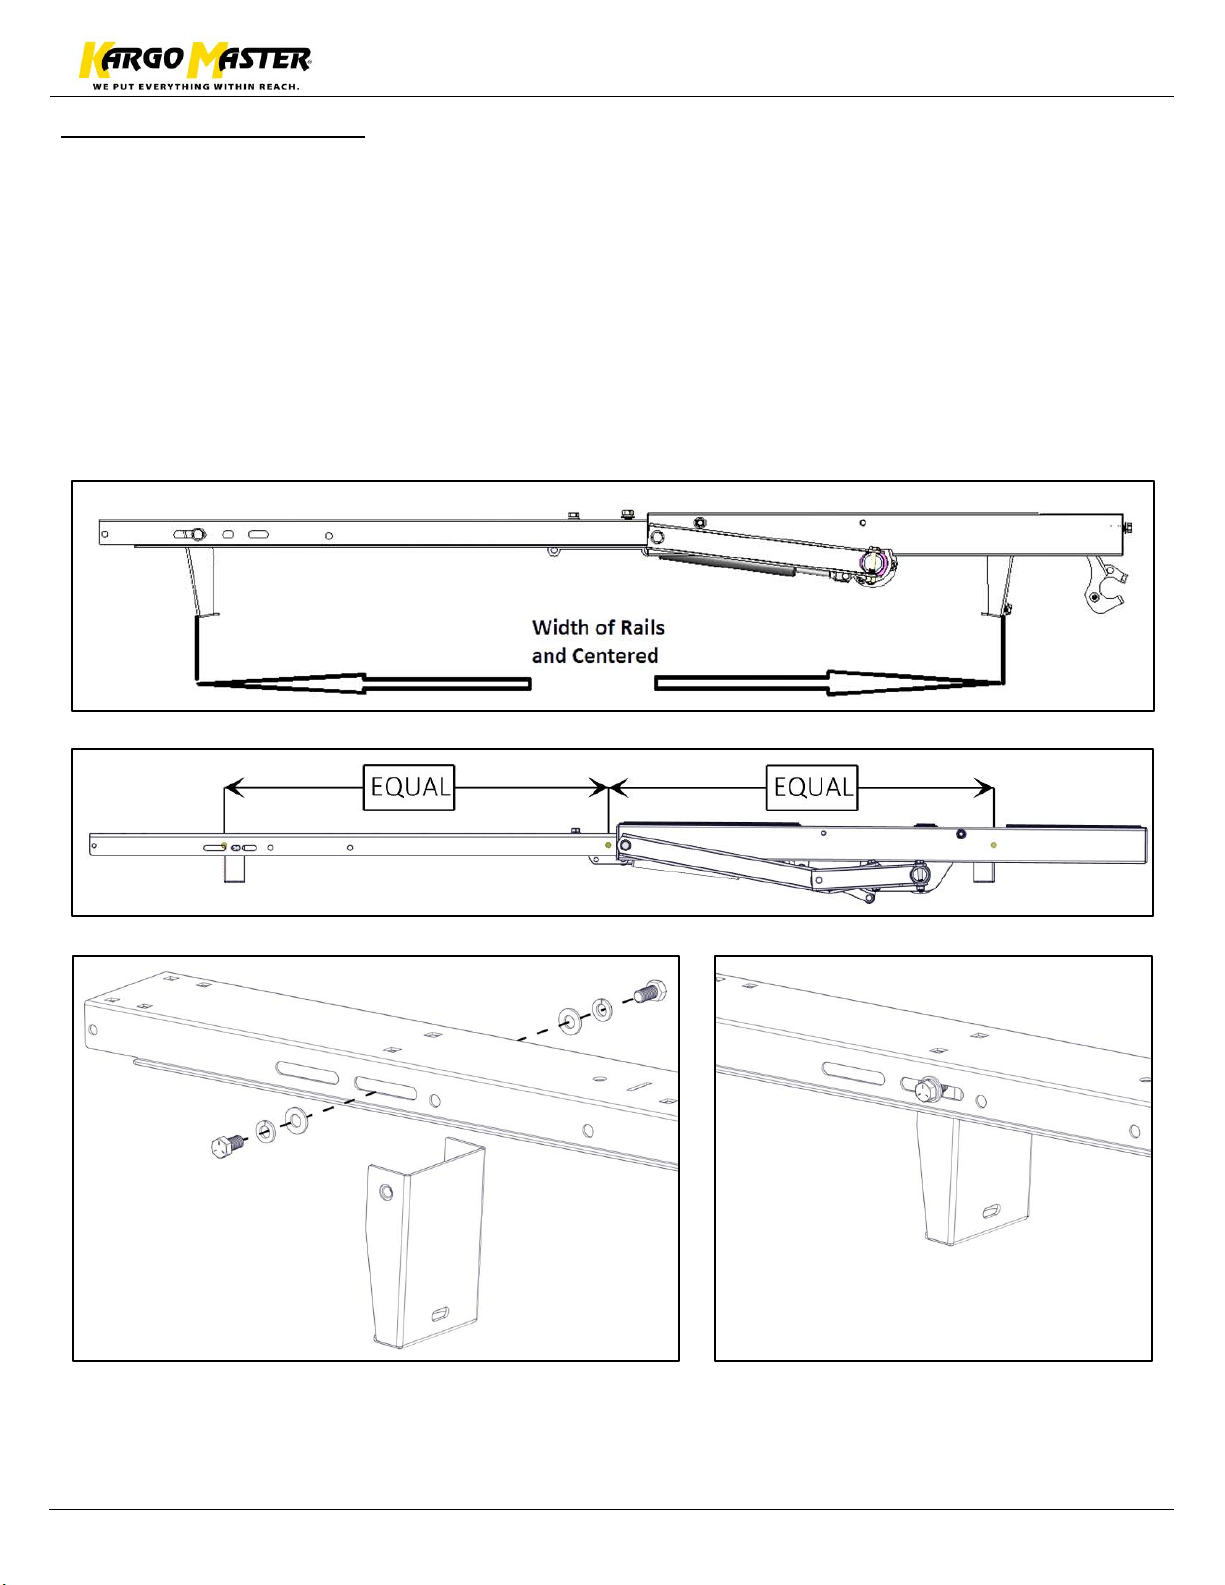
Step 6 – Feet to Rack
Place assembled ladder rack on top of the previously installed feet.
Measure width between the mounts on the van.
Center the assembled rack on top of the installed feet. Align bow with the same slot on
opposig ends.
Bolt the feet to the bows as shown using 3/8” x 3/4" hex head bolts, 3/8” lock washers and
a 3/8” flat washers.
Note: One may choose to install the feet on the rack prior to installing onto the vehicle. It is the installers
preference.
Page 15
Instructions – 409TD
For Technical Support Call: 800-343-7486 Monday-Friday 7AM - 4 PM (PST) Page 15
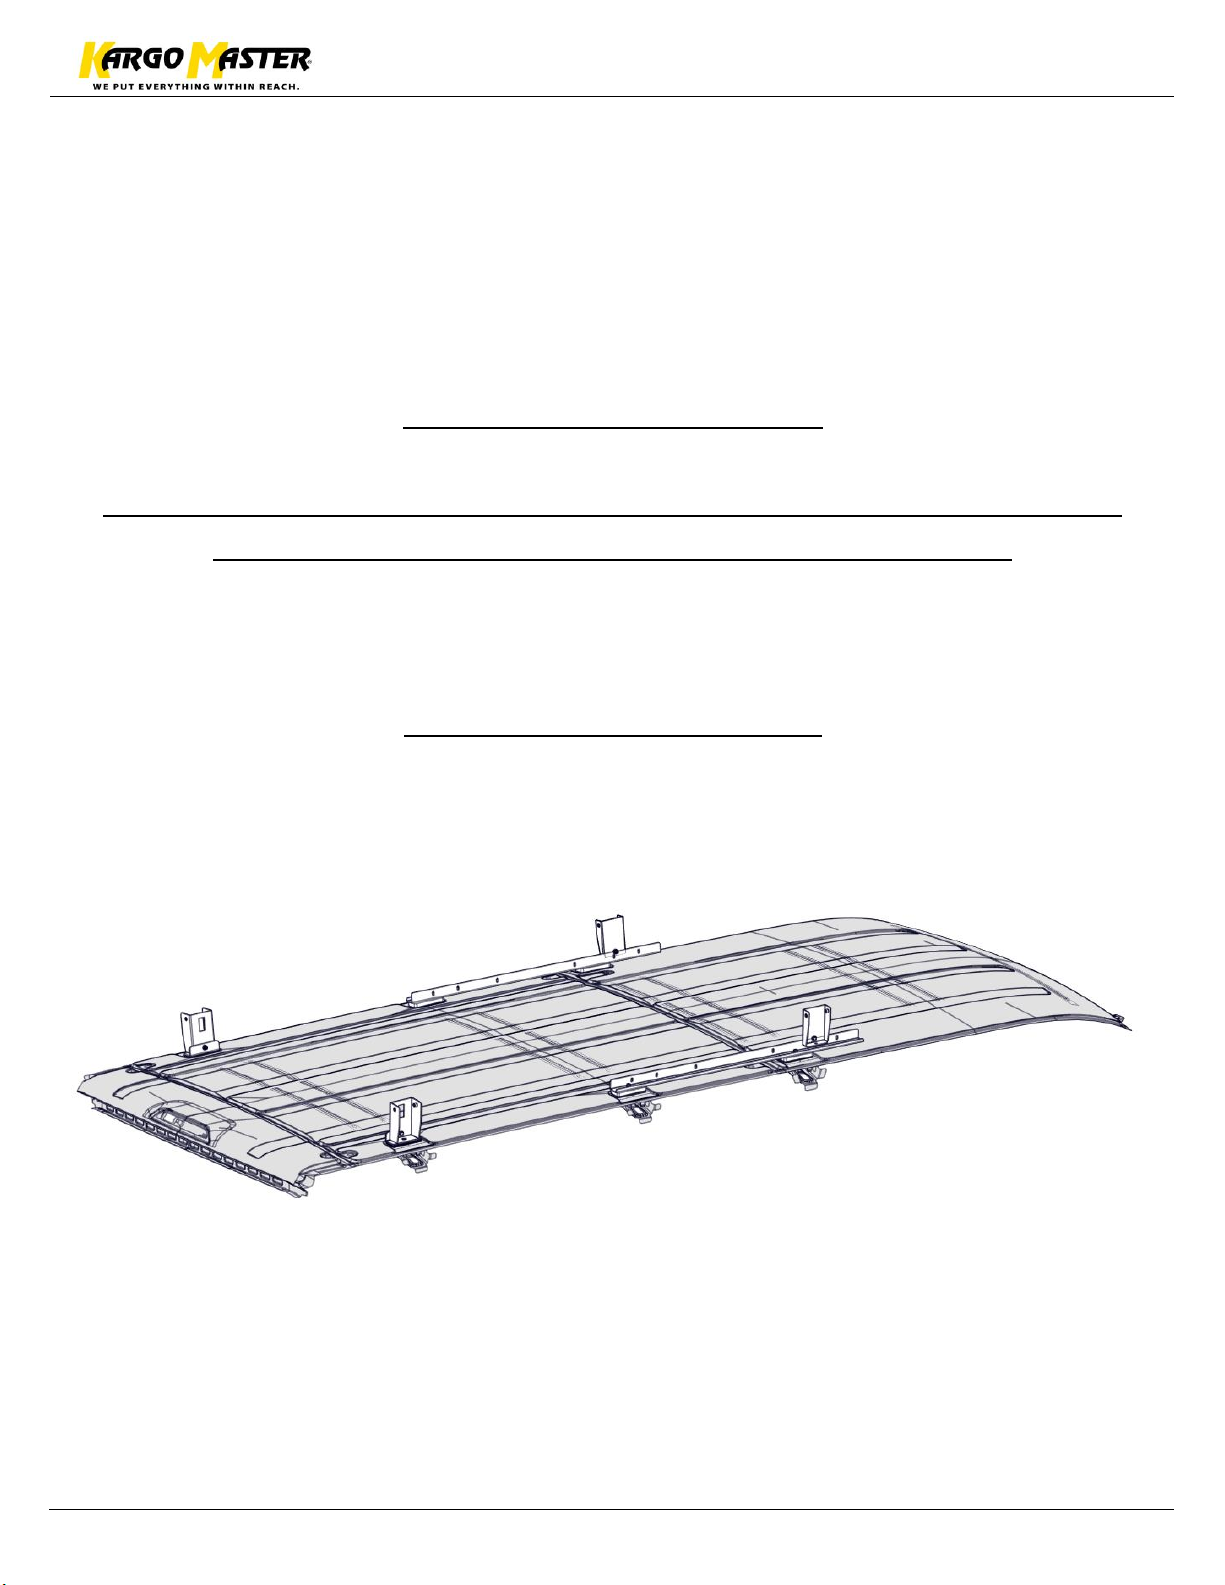
Go back and square the rack.
Ensure all hardware is tight. This includes into the roof, within the rack
assembly and the mounting of the rack to roof mounts.
Your installation is complete.
 Loading...