

Page 1
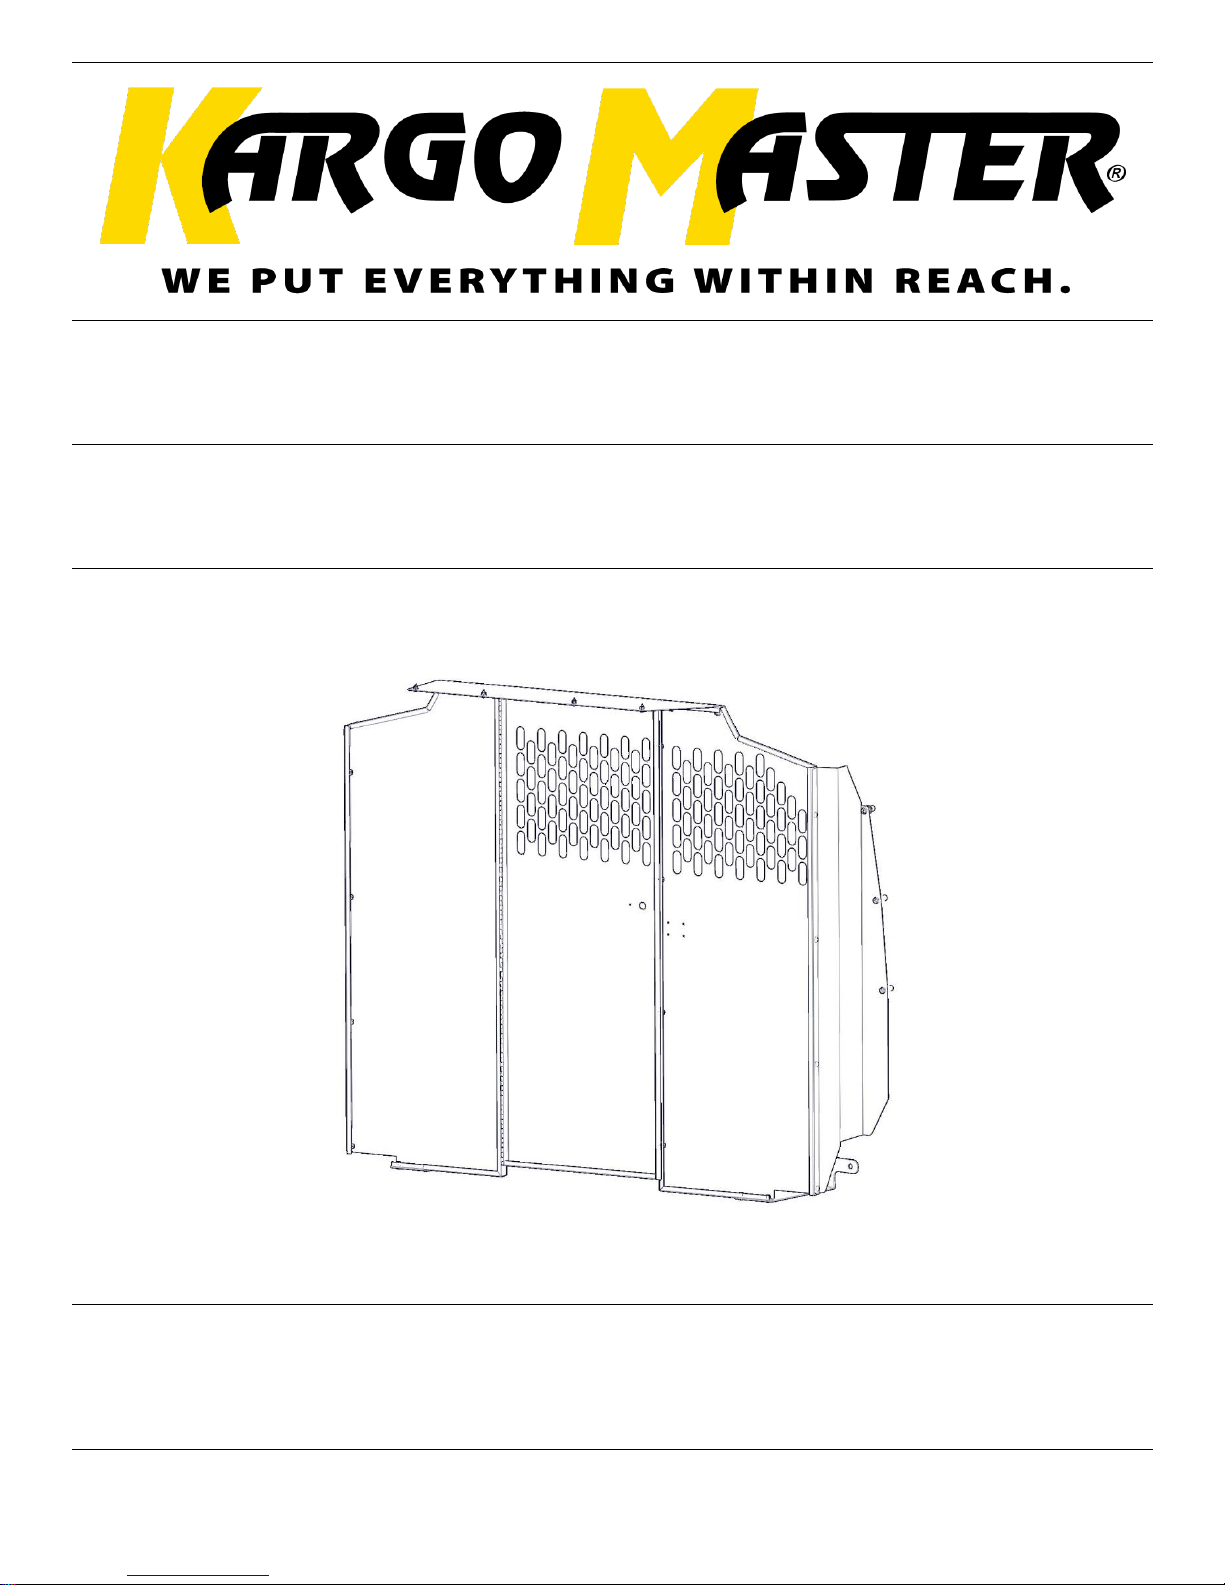
Installation Guide
4064M
DATE: ______________
Page 2
For Technical Support Call: 800-343-7486 Monday-Friday 7AM - 4 PM (PST) Page 1
Install Instructions – 4064M
*PLEASE READ ALL INSTRUCTIONS AND WARNINGS PRIOR TO ASSEMBLING,
INSTALLING, AND USING THIS PRODUCT*
Warning
Always check for wires, fuel tanks and lines, brake lines and other important vehicle
functionality items prior to drilling and installing all products.
Tools Needed
3/8” Wrench and Socket
7/16” Wrench and Socket
Phillips Driver
25/64” Drill Bit
Table of Contents
Parts List ................................................................................................................................... 2
Hardware List ........................................................................................................................... 3
Step 1 Bolt Wings to Partition .................................................................................................. 4
Step 2 Install Floor Mounts ...................................................................................................... 5
Step 3 Prepare “B” Pillar .......................................................................................................... 5
Step 4 Install Wings .................................................................................................................. 6
Step 5 Install Partition .............................................................................................................. 7
Step 6 Install Top Wing ............................................................................................................ 7
Step 7 Attach Top Wing ........................................................................................................... 8
Before You Begin
• Read all instructions
• ENSURE SAFETY BEFORE DRILLING OR CUTTING
Page 3
For Technical Support Call: 800-343-7486 Monday-Friday 7AM - 4 PM (PST) Page 2
Install Instructions – 4064M
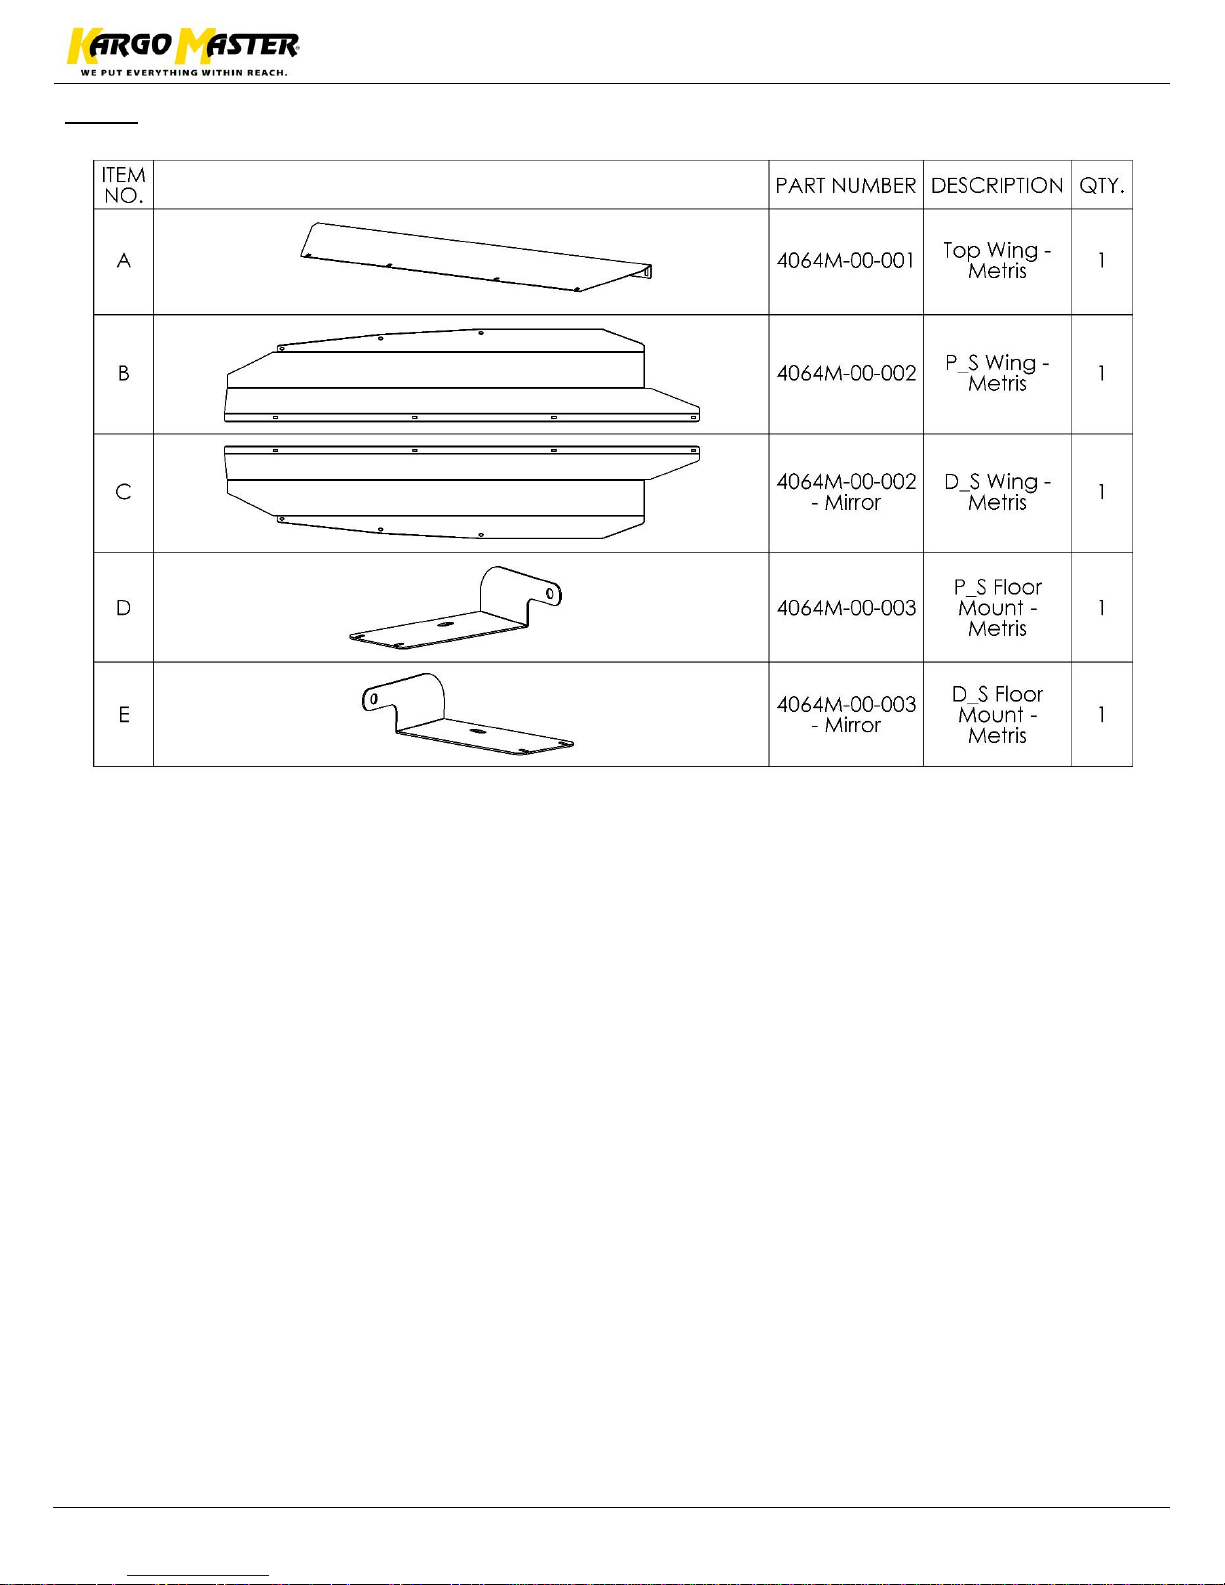
Parts
Page 4
For Technical Support Call: 800-343-7486 Monday-Friday 7AM - 4 PM (PST) Page 3
Install Instructions – 4064M
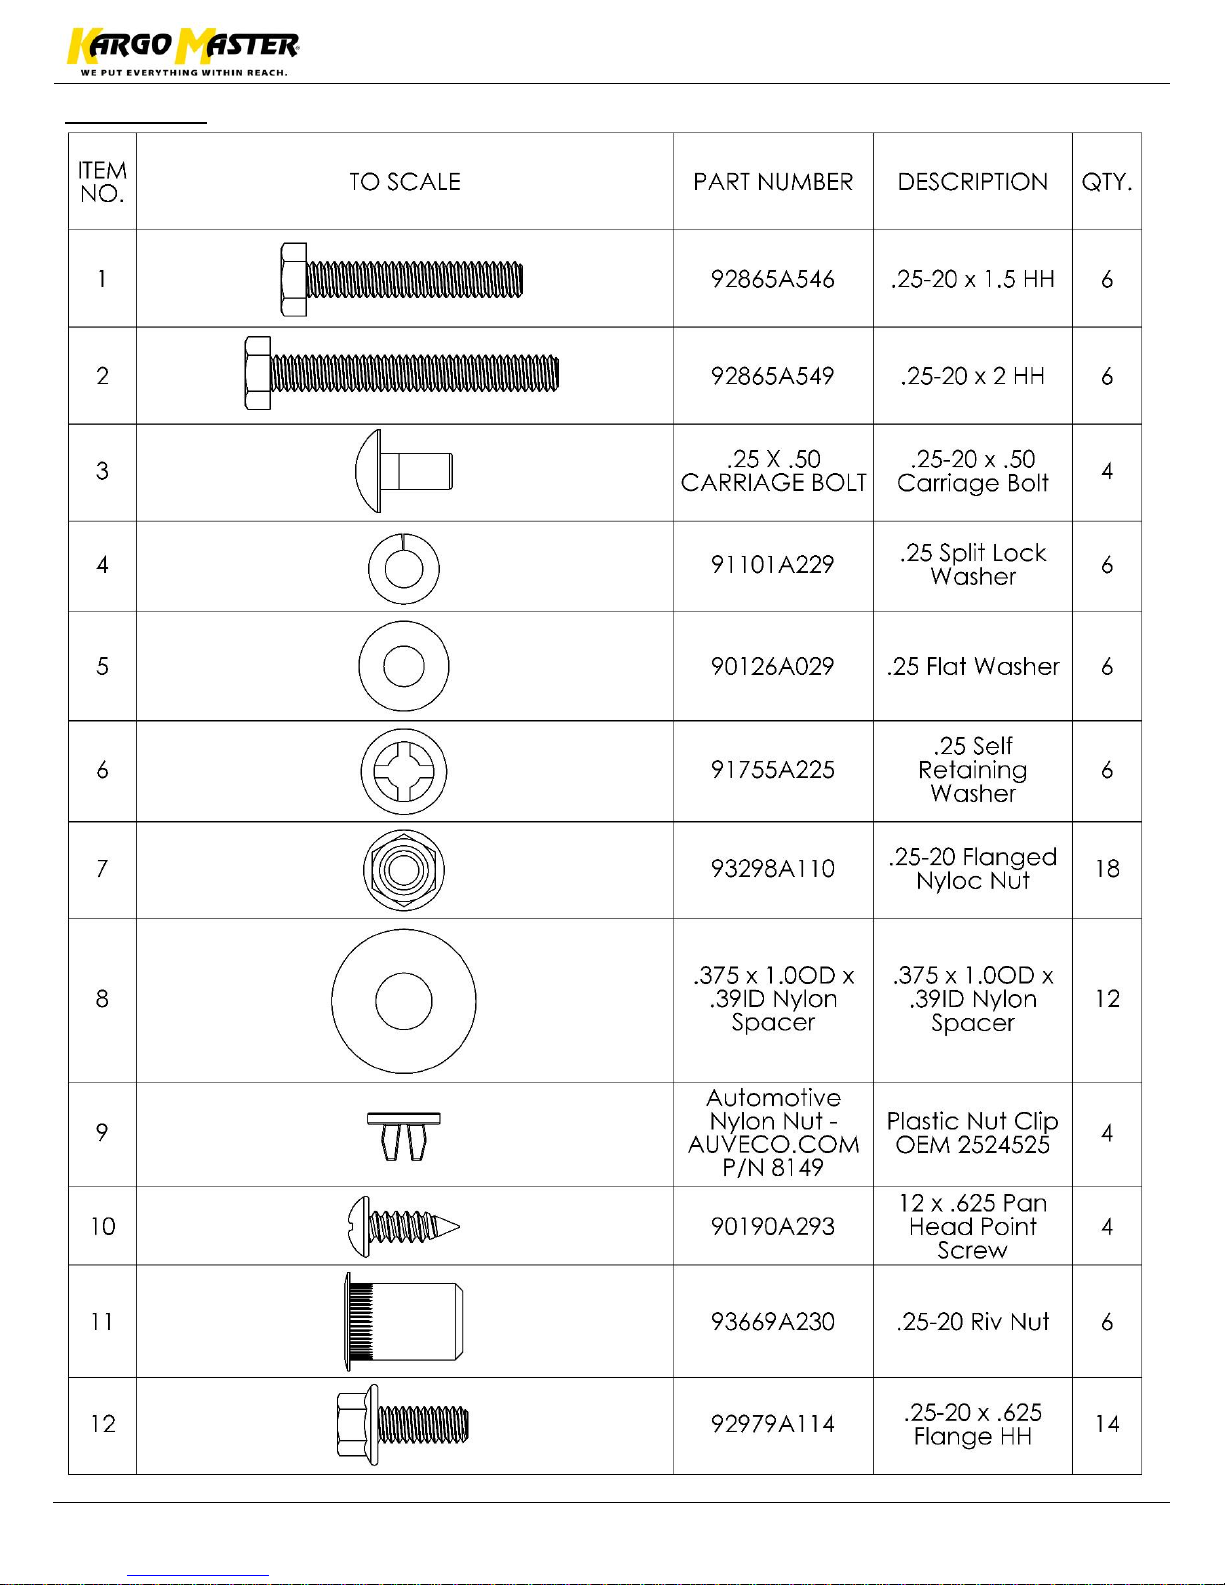
Hardware
Page 5
For Technical Support Call: 800-343-7486 Monday-Friday 7AM - 4 PM (PST) Page 4
Install Instructions – 4064M
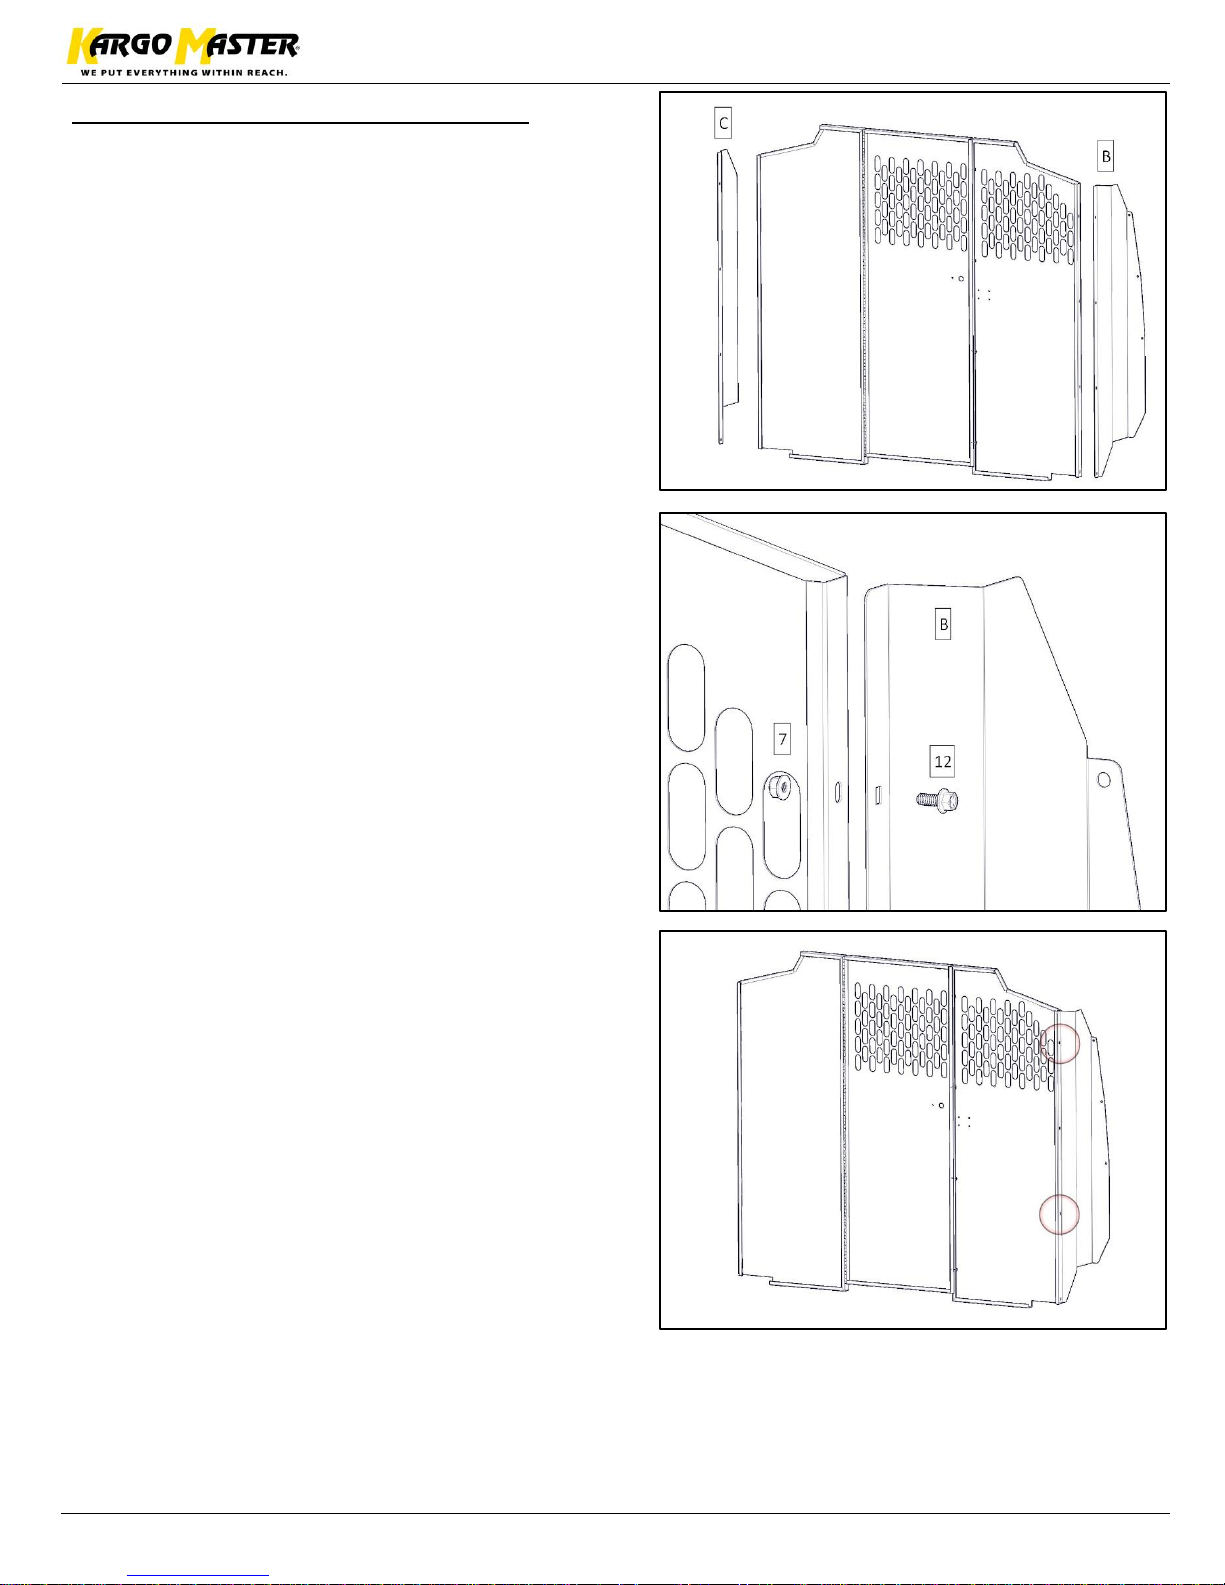
Step 1 – Bolt Wings To Partition
• Place both passenger side wing (B) and driver
side wing (C) in orientation shown with
reference to the partition.
• Bolt together using a 1/4"-20 x .625” flanged
HH (12) and a 1/4”-20 flanged nyloc nut (7).
• Repeat 1 more time as shown.
• Leave bolts snug tight to allow movement until
partition is placed into vehicle.
• The wings will be removed in order to install in
vehicle.
• Repeat on both sides.
Page 6
For Technical Support Call: 800-343-7486 Monday-Friday 7AM - 4 PM (PST) Page 5
Install Instructions – 4064M
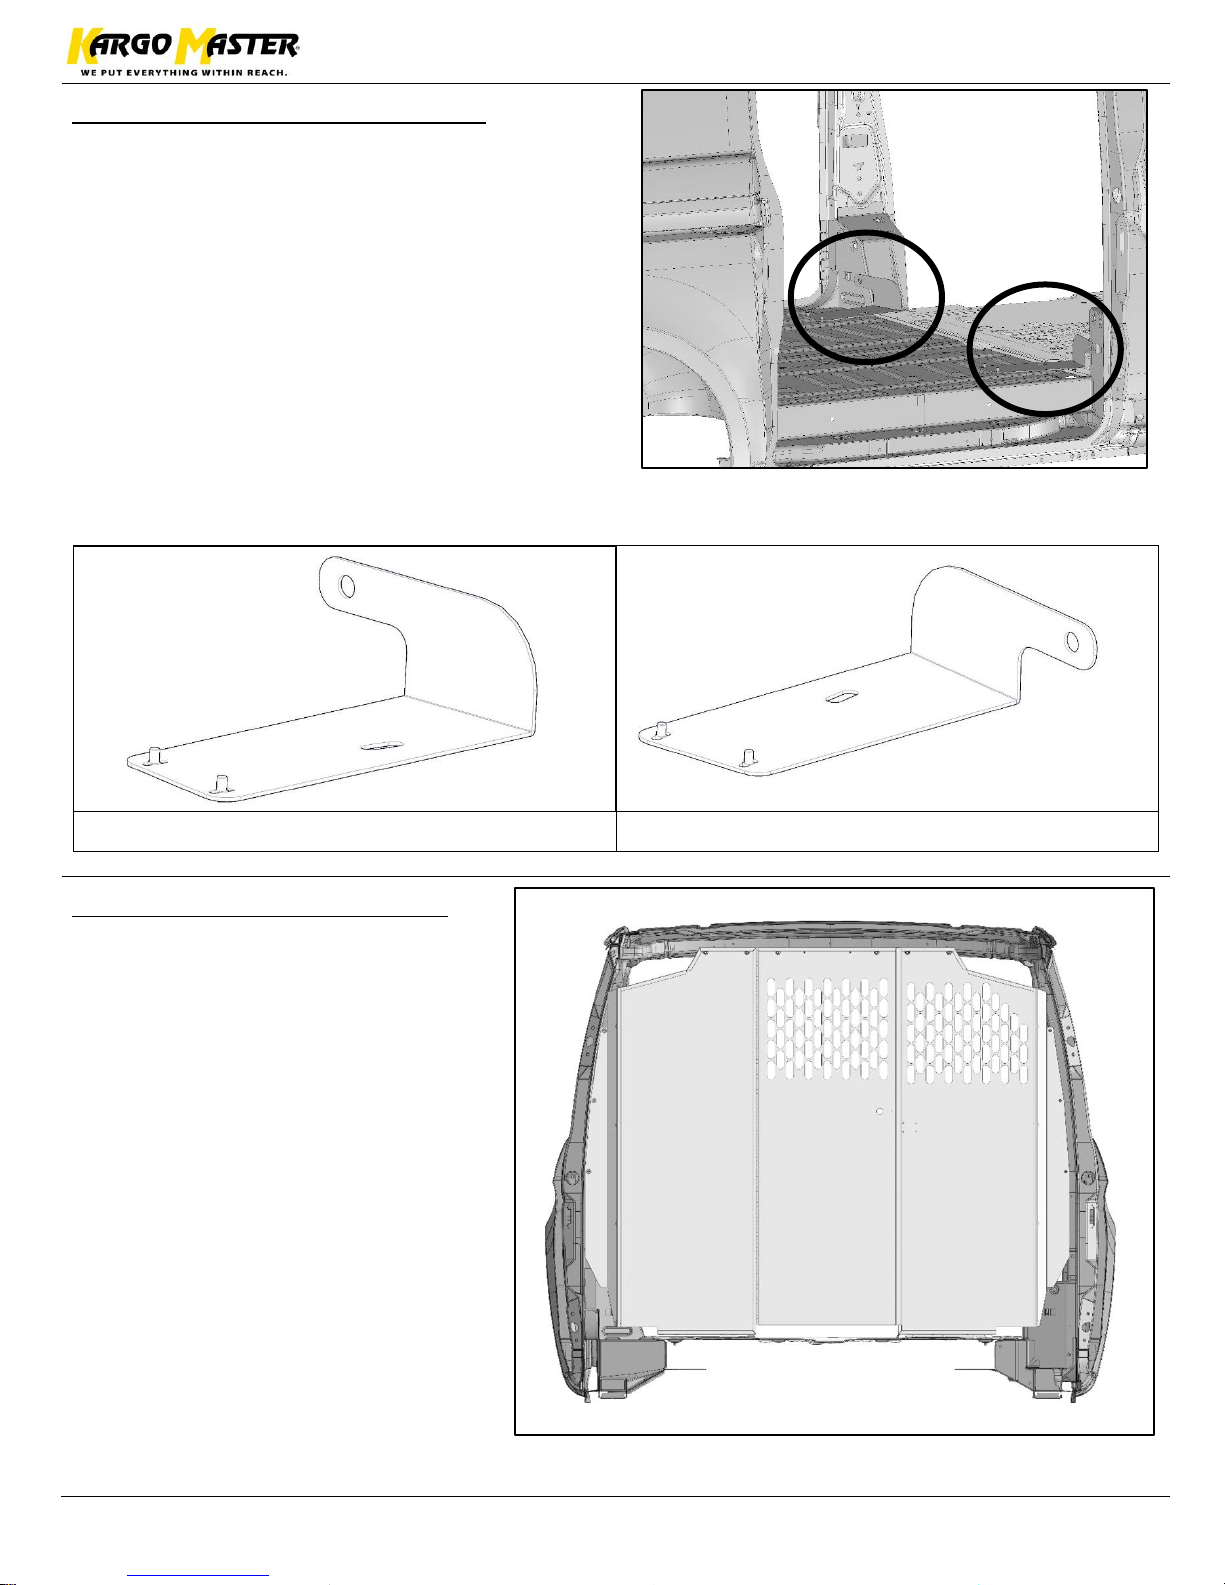
Step 2 – Install Floor Mounts
• Open slider of van, towards the front on the
floor will be a D-Ring and allen head bolt.
• Remove D-Ring and bolt in the floor in the
locations shown.
• Place 1/4" carriage bolts underneath the two
slots at the end of each floor mount bracket
(D&E).
• Place both floor mounts into van. Align with
D-Ring and bolt that is in the floor. Replace
D-Ring and bolt.
• Snug Tighten, But allow movement.
Drivers Side (4064M-00-003-Mirror)
Passenger Side (4064M-00-003)
Step 3 – Prepare “B” Pillar
• Place assembled partition with
wings into van. The bottom of the
partition will sit on top of the 1/4"
carriage bolts from Step 2.
• Have the holes in the partition on
the passenger side and the wings
towards the “B” pillar.
VIEW FROM REAR OF VAN
Page 7
For Technical Support Call: 800-343-7486 Monday-Friday 7AM - 4 PM (PST) Page 6
Install Instructions – 4064M
Step 3 – Prepare “B” Pillar Con’t
• Align and square partition to your liking.
• Press wings firmly against “B” pillar.
• Mark holes along each wing (3x each) and the
outer edge of the wing along each “B” pillar.
• Remove partition with wings from van.
• Prior to drilling or cutting, pry plastic away to
expose underside, ENSURE IT IS SAFE TO DRILL.
• Cut away plastic on “B” pillar to expose
corresponding holes along the metal “B” pillar.
• Option 1, Use a 1” holesaw where holes were
marked.
• Option 2, Cut along edge of wing to expose
more of the metal “B” pillar. This option tends
to make for an easier installation.
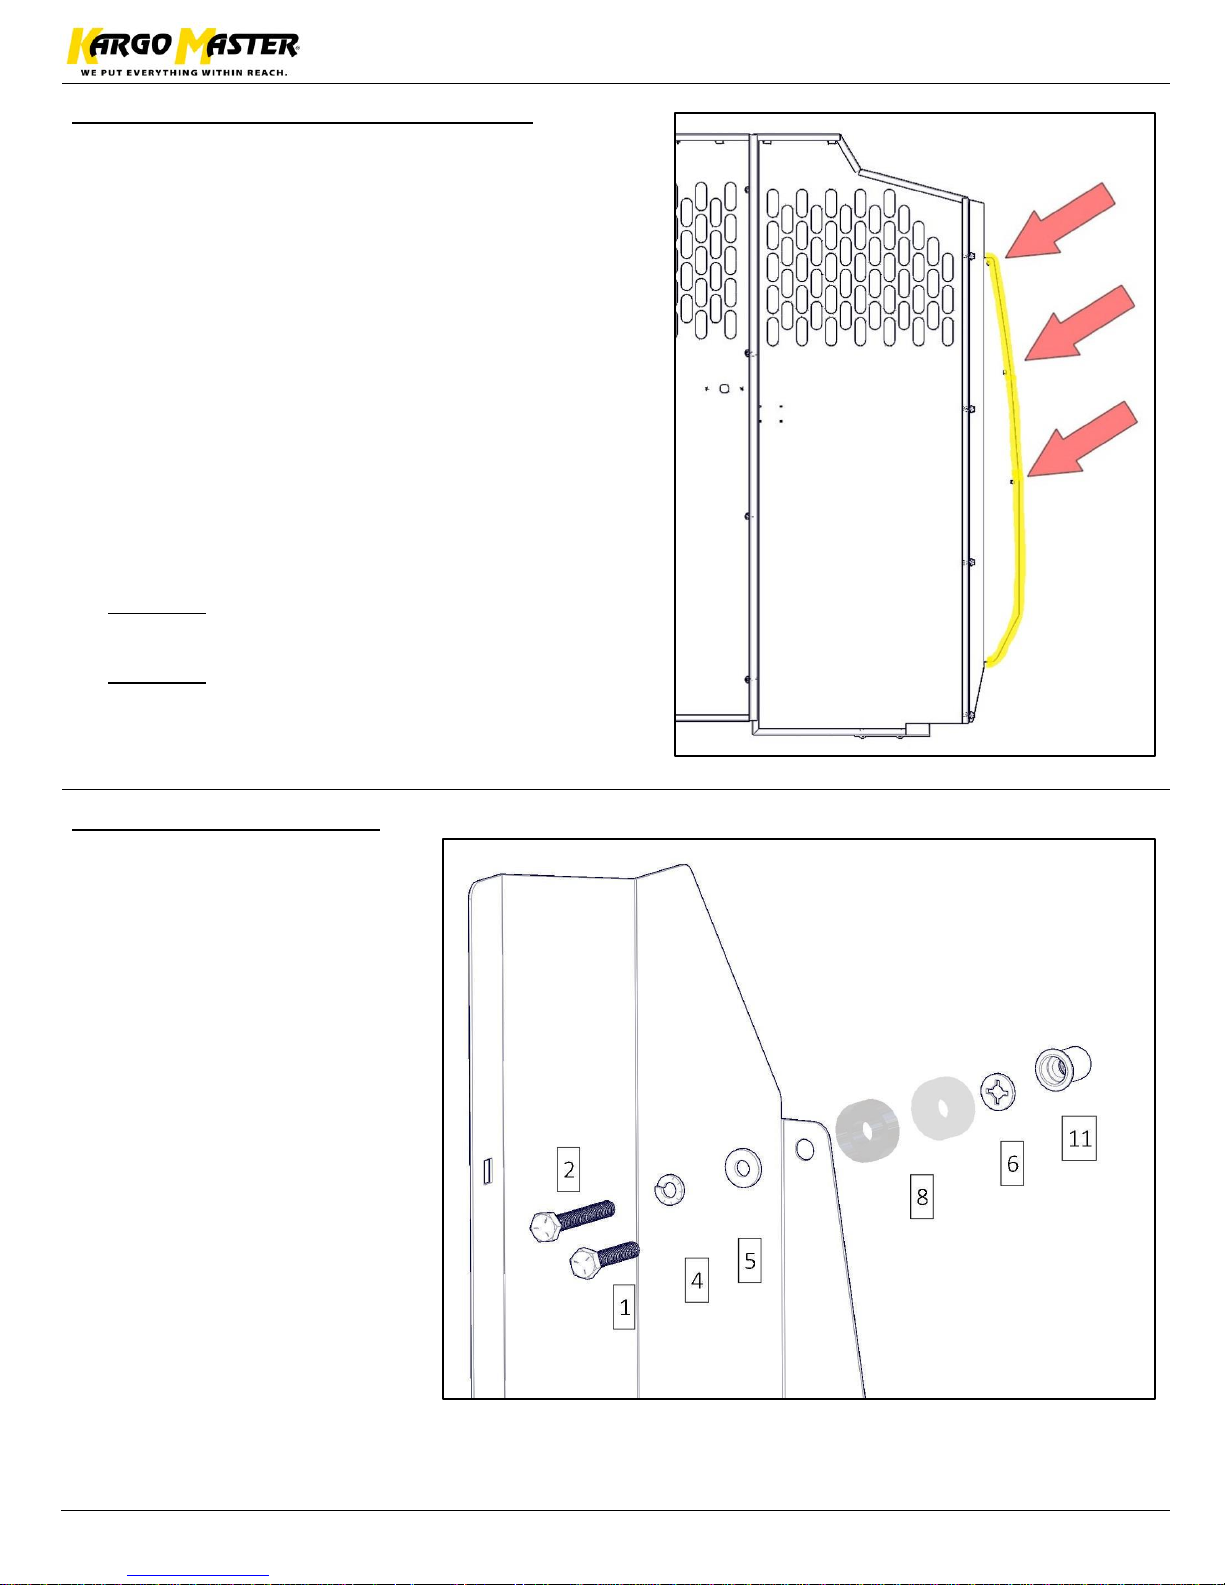
Step 4 – Install Wings
• Locate the holes that
correspond with the wings
along the metal “B” pillar.
These holes will be where
the arrows are shown in
Step 3.
• Drill these 3 holes on each
pillar using a 25/64” bit.
• Install RivNut.
• Bolt wings to previously
installed RivNuts using 1/4"
x 1.5” or 2” HH (1 or 2),
1/4" lock washer (4), 1/4"
flat washer (5), two 3/8"
spacers (8) and a retaining
washer (6) in the order
shown.
• Repeat on both sides, for a total of 6x.
• Snug Tighten, But allow movement.
Page 8
For Technical Support Call: 800-343-7486 Monday-Friday 7AM - 4 PM (PST) Page 7
Install Instructions – 4064M
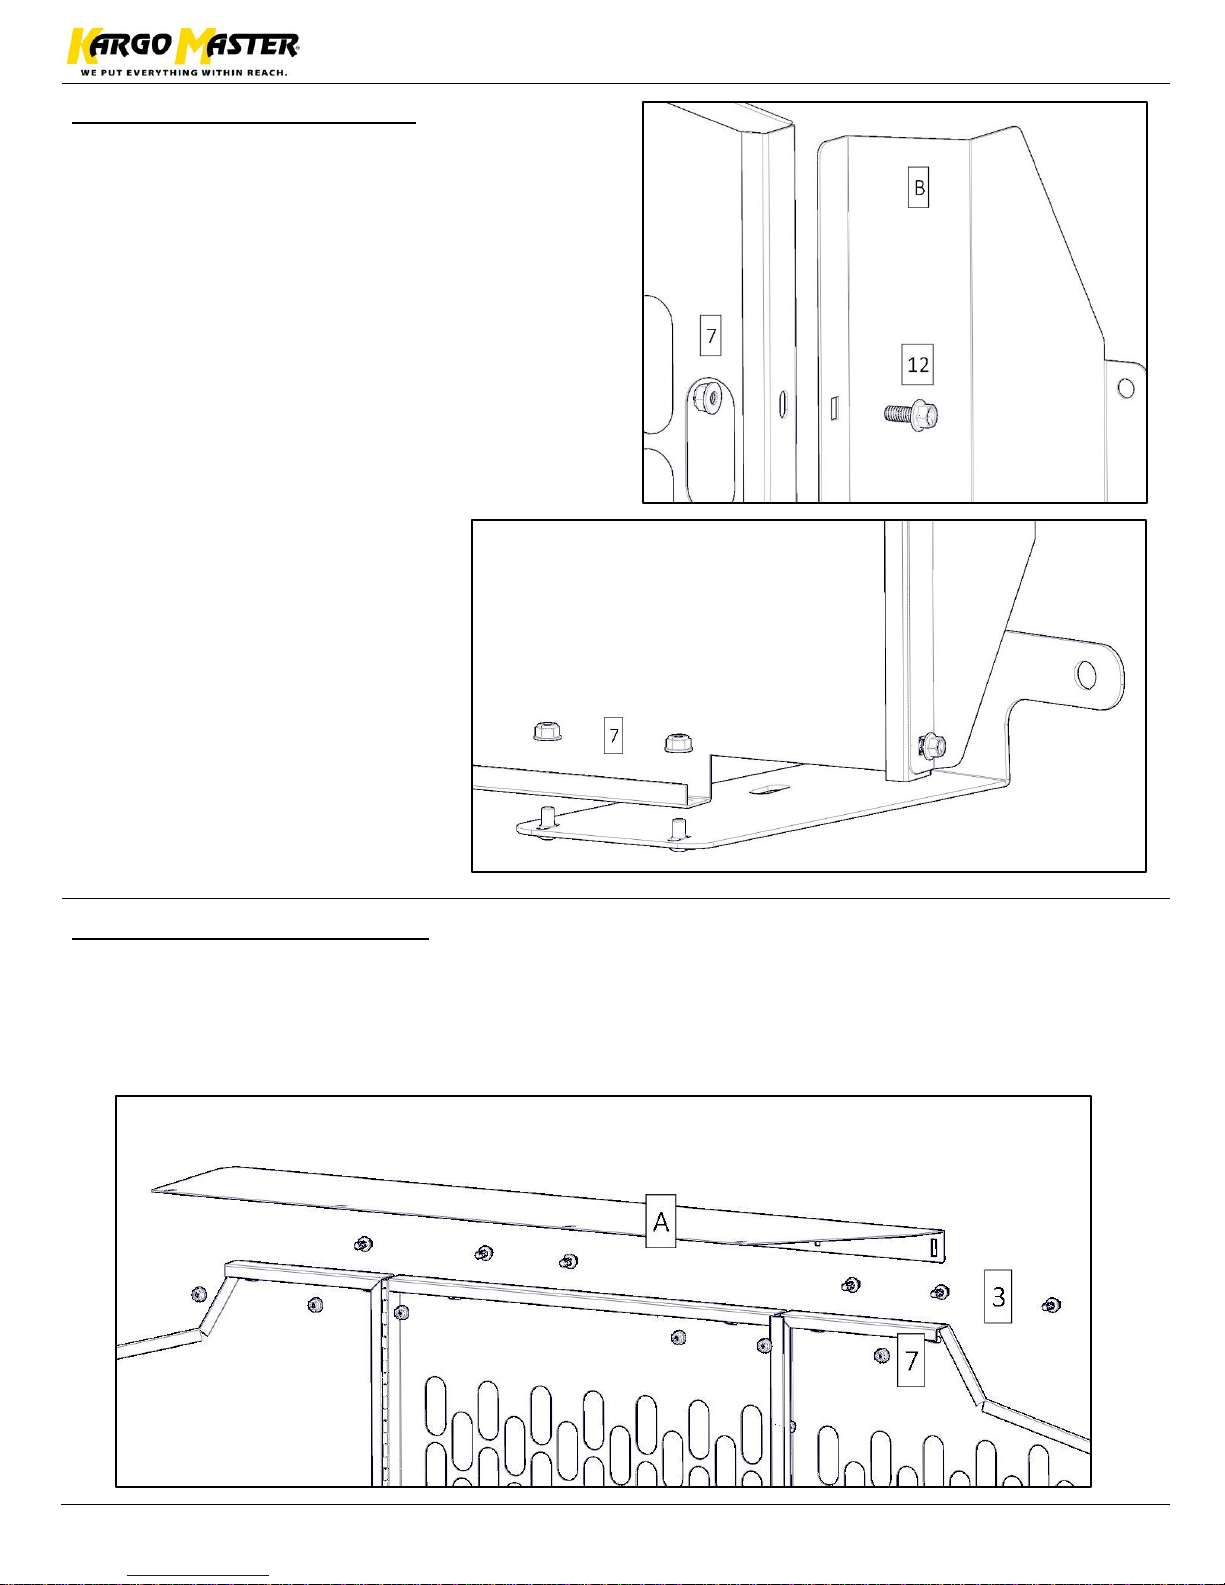
Step 5 – Install Partition
• Place partition back into van.
• Set on top of 1/4” carriage bolts (3)
protruding through the floor mount brackets
(D&E)
• Align and bolt both sides of partition with
previously installed wings using 1/4"-20 x
.625” flanged HH (12) and a 1/4”-20 flanged
nyloc nut (7). Similar to Step 1.
• Repeat for all slots on both wings for a total
of 8x.
• Bolt the bottom of the
parititon to the carriage bolts
using 1/4”-20 flanged nyloc
nuts (7). Repeat for a total of
4x.
• Snug Tighten, but allow
movement.
Step 6 – Install Top Wing
• Install top wing onto the top of the partition.
• The panel will extend towards the rear of the van.
• Bolt top wing (A) to partition using 1/4"-20 x .625” flanged HH (12) and 1/4”-20 flanged nyloc
nuts (7). Repeat for a total of 6x.
Page 9
For Technical Support Call: 800-343-7486 Monday-Friday 7AM - 4 PM (PST) Page 8
Install Instructions – 4064M
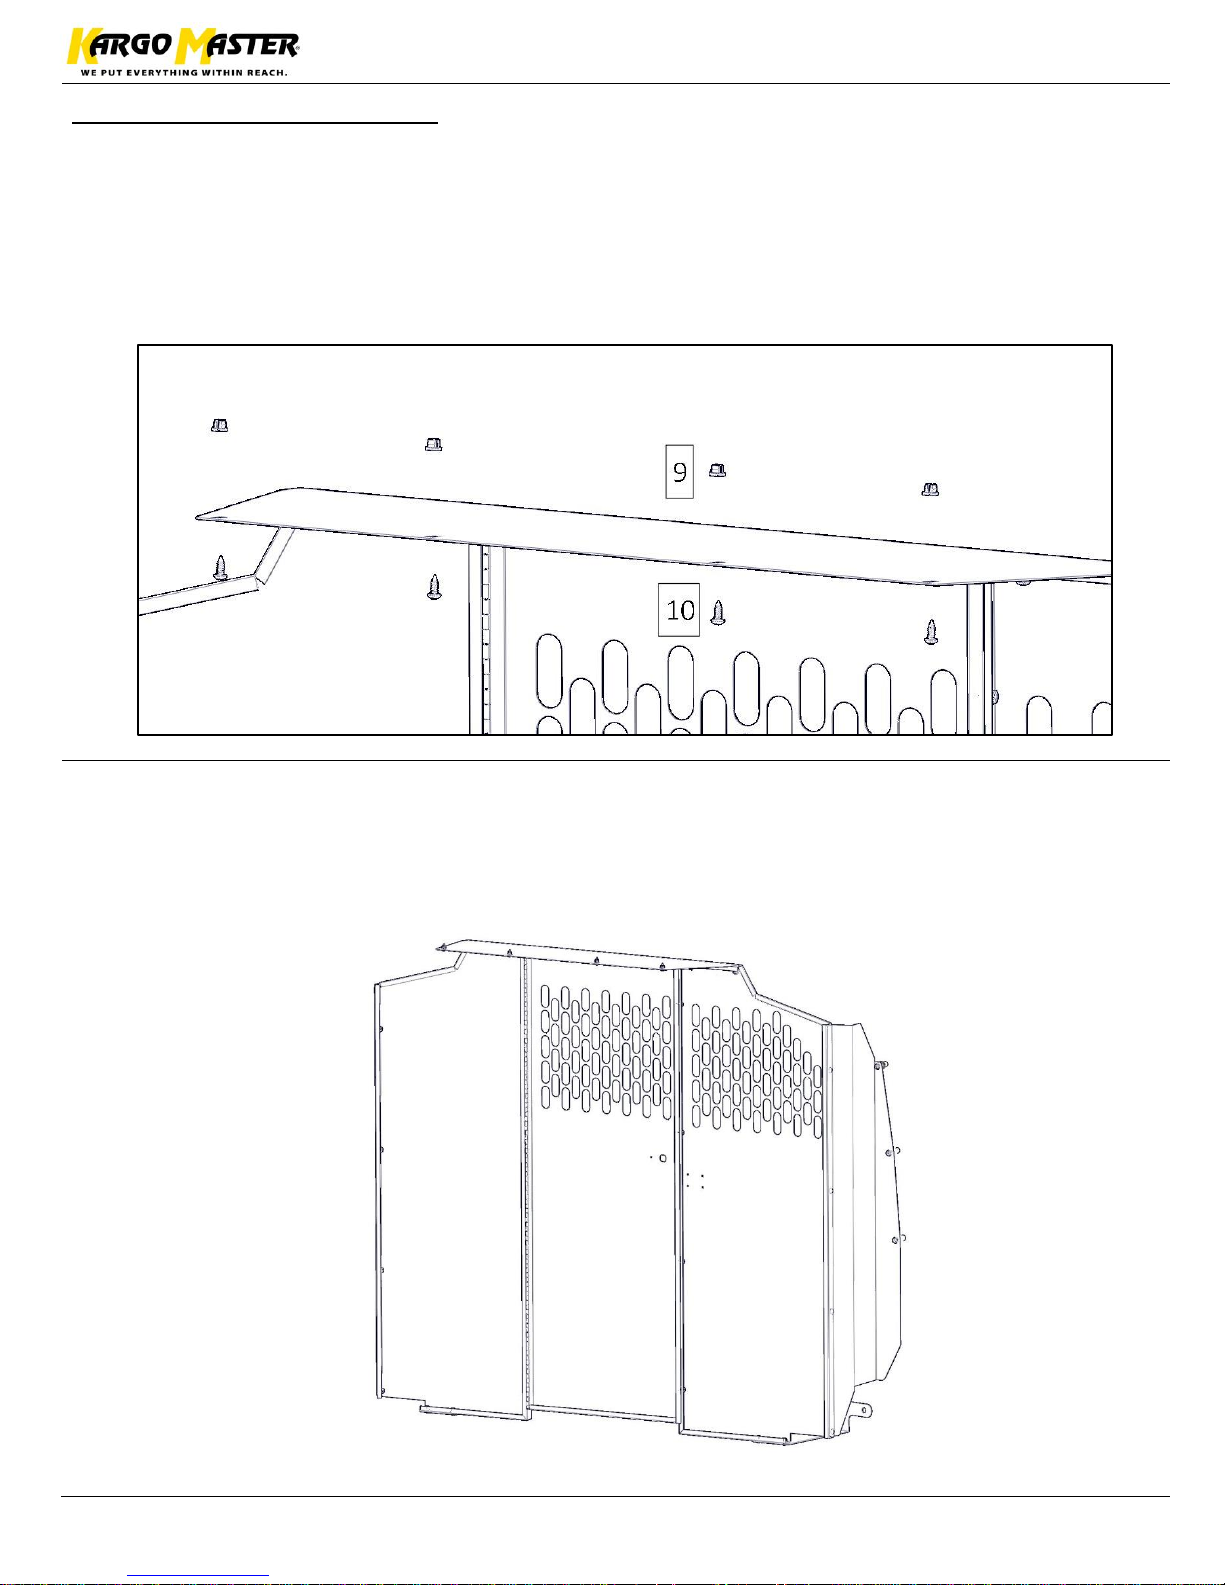
Step 7 – Attach Top Wing
• Along the roof of the van will be a cross support near the slot end of the top panel.
• Along the cross support, near the slots there will be squares cut into the cross support.
• Push plastic nut clip (9) into these squares.
• Press top wing firmly against cross support.
• Screw through the top wing into the nut clips using #12 pan head screw (10).
• Repeat for a total of 4x.
Square and align partition to your liking.
Tighten all bolts from previous steps.
Your installation is now complete.
 Loading...