

Page 1
OPERATOR TELEPHONE SET
TECHNICAL REFERENCE AND USER GUIDE
09/2009
Page 2

OPERATOR
TELEPHONE SET
TECHNICAL
REFERENCE
AND
USER GUIDE
SEPTEMBER - 2009
Page 3

II
Page 4

III
OP50 TTKK – Ver. AAA – 14.09.2009
KAREL reserves the right to make modifications in product features mentioned in
this document for development and improvement purposes, without prior notice.
Individual products may possess characteristics different from those that have be en
mentioned in this document, due to their differences in software and hardware
versions.
Version Table
Software Version Date/Version of Guide
AAA AAA/14.09.2009
Page 5
IV
OP50
Page 6

V
ISSUES TO PAY ATTENTION TO
♦ Read this guide carefully before you use your device and keep it for later
reference.
♦ Any mistake with the connections in your device may damage it or your
exchange. Especially the connection to the exchange must be made by the
Authorized Technical Services. The explanations about connections in the
User’s Guide have been intended to give information only.
♦ A connection box comes with your device. The connections must be made
as described in the installation chapter.
♦ In case you need a connection of plug-outlet type, never apply electric
plugs and outlets; use plugs, outlets and connection components that are
specific to telephones.
♦ Do not make any connection other than the extension connection of the
KAREL telephone system.
♦ There is no part that you can repair or maintain in your device; therefore
call the authorized technical service in case of an y malfunction.
♦ Keep your device away from direct sunlight.
♦ Do not let any liquid substance spill on your device.
♦ Do the exterior cleaning of your device with a slightly moistened piece of
cloth.
♦ Do not apply any chemicals for cle aning.
♦ Please call your authorized dealer in case you would like to change the
place of your device. Use its own packing to carry the device.
♦ Please do not use exterior signal for the test operations or maintenance.
Any signal which is used externally may damage your device.
Page 7

VI
PREFACE
Chapters in this guide have been prepared in order to present detailed technical
information about the OP50 Operator Phones, in addition to giving technical
information about programming and use of those telephones. By this way, one
could understand abilities of the OP50 Operator Phon es, how it will be operated in
accordance with customer demands and things that should be done in order to
operate them with full performance.
The first chapter - “Technical Introduction” – It contains technical information about
the hardware and software structures of the OP50 Operator Phone. Information in
this chapter, for which knowledge in mechanics, electricity and electronics may be
prerequisite, aims to introduce structure of the phone.
The second chapter – “Installation” – The methods to be followed for the
installation of the OP50 Operator Phone are explained. T his chapter must be read
definitely before the installation by the personnel who will perform the installation.
The last chapter – “Program Features” – This chapter gives detalied information
about the software features that will enrich functions of the OP50 Operator Phone
and that could be applied to meet daily communication needs of customers more
comprehensively.
Best Regards,
KAREL
Page 8

VII
CONTENTS
TECHNICAL INTRODUCTION ................................................................... 1
INTRODUCTION...................................................................................... 1
COMPATIBILITY...................................................................................... 1
PARTS LIST ON DELIVERY ................................................................... 1
TECHNICAL SPECIFICATIONS.............................................................. 2
GENERAL APPEARENCE ......................................................................2
USER INTERFACE..................................................................................3
LCD DISPLAY ...................................................................................... 3
INCOMING CALL LED ......................................................................... 5
NAVIGATION KEYS AND SPECIAL FUNCTION KEYS...................... 5
NUMERICAL KEY PAD........................................................................6
VOICE CONTROL KEYS ..................................................................... 7
PROGRAMMABLE SPEED DIAL KEYS..............................................8
FUNCTION PROGRAMMING FOR THE SPEED DIAL KEYS............ 8
INSTALLATION......................................................................................... 11
CONNECTION POINTS......................................................................... 11
OP50 INSTALLATION............................................................................ 11
Required Hardware For The Connection:...................................................12
Connecting OP50 To The Exchange:.........................................................13
Defining Extension Number For OP50 .......................................................14
Number Of OP50s That Can Be Connected To The Exchange And
Connection Distances.................................................................................14
OP50 Usage On Table With Angle Adjustment Or On Wall .......................15
OP50 Start-up State...................................................................................16
PROGRAM FEATURES............................................................................ 17
PROGRAMMING MENUS ..................................................................... 17
CALL OPTIONS.....................................................................................18
Call Diversion...................................................................................... 18
Auto Dial.............................................................................................18
Paging.................................................................................................19
Answered............................................................................................ 19
Dialed.................................................................................................. 19
PHONE SETTINGS................................................................................ 20
Key Settings........................................................................................ 21
Extension....................................................................................................21
Line.............................................................................................................22
Private Pool................................................................................................23
Common Pool.............................................................................................23
Feature.......................................................................................................24
Auto Settings..............................................................................................24
Page 9

VIII
Do Not Disturb....................................................................................26
Reminder ............................................................................................26
Eprom Version.................................................................................... 27
Lazy Mode.........................................................................................27
Language............................................................................................ 27
Headphone.........................................................................................27
Signal Beep Option............................................................................. 28
Price.................................................................................................... 28
Line Access Code............................................................................... 28
PHONE SECURITY ............................................................................... 29
Password............................................................................................ 29
Phone Lock......................................................................................... 29
Phone Unlock ..................................................................................... 29
MESSAGE.............................................................................................. 30
Absent Message................................................................................. 30
Message Listen................................................................................... 30
PHONE BOOK.......................................................................................31
Find.....................................................................................................31
Add...................................................................................................... 32
Change ...............................................................................................32
Delete .................................................................................................33
SYSTEM SETTINGS.............................................................................. 34
Setting Time........................................................................................ 34
Setting Date........................................................................................ 34
Night Mode ......................................................................................... 34
Common Pool Entry............................................................................ 35
ACD .................................................................................................... 35
Parallel Operator:................................................................................ 35
APPENDIX.............................................................................................36
Error Messages .................................................................................. 36
Page 10

OP50 Technical Reference and User Guide
1
TECHNICAL INTRODUCTION
INTRODUCTION
OP50 is an operator telephone set, which can be used with all MS series exchanges of
KAREL, and that provides ease and rapidity to the usage of those systems.
NOTE: OP50 is not compatible with the MS26S exchange, as an exception.
By the OP50 telephone sets;
• Users are provided with the facility of performin g several operations such as call ing back,
auto dialing, follow me, conferencing and alarm setting, by pressing a single key t hrough
special-purpose keys and the display that are on the telephone, without the necessity to
know the system-specific special codes.
• Actions that can be taken for the active services and the call information, which are
indicated on the LCD display, are carried out easily and rapidly through the keys with
special functions that are located below the display.
• The status of the extensions and lines are shown on the Busy Display Panel.
• One-touch extension and/or line calls can be made over the phone book and
programmable keys. (This facility is valid or MS Series soft ware with the version ACA or
better.)
• Statuses of the extensions and/or lines that have been assigned to those keys can be
viewed through the lights (LED) in red, which are embedded into the programmabl e keys.
COMPATIBILITY
The OP50 operator telephone set is compatible with the ACA or later software of the
exchanges of models MS26C, MS38S, MS38C, MS48, MS48S, MS48C, MS128 and
MS224.
PARTS LIST ON DELIVERY
Parts that are included in the OP50 package:
• OP50 telephone,
• Handset,
• Spiral cable of the handset,
• Data cable with RJ11 connectors at two ends,
• Console connection box,
• Technical Reference and User Guide CD,
• Wall hanging leg fixing screws (2 pieces)
• User Guide
Page 11
OP50 Technical Reference and User Guide
2
TECHNICAL SPECIFICATIONS
Weight: Approximately 1 kg
Dimensions: 25 cm x 20 cm (lenght, at the smallest angle) x 20 cm (height, at the bigg est
angle)
Operational Temperature: 5 oC - 40 oC
Storing Temperature: -20 oC - +60 oC
Humidity: 0 - %80
Dialing Method: DTMF (Tone dialing)
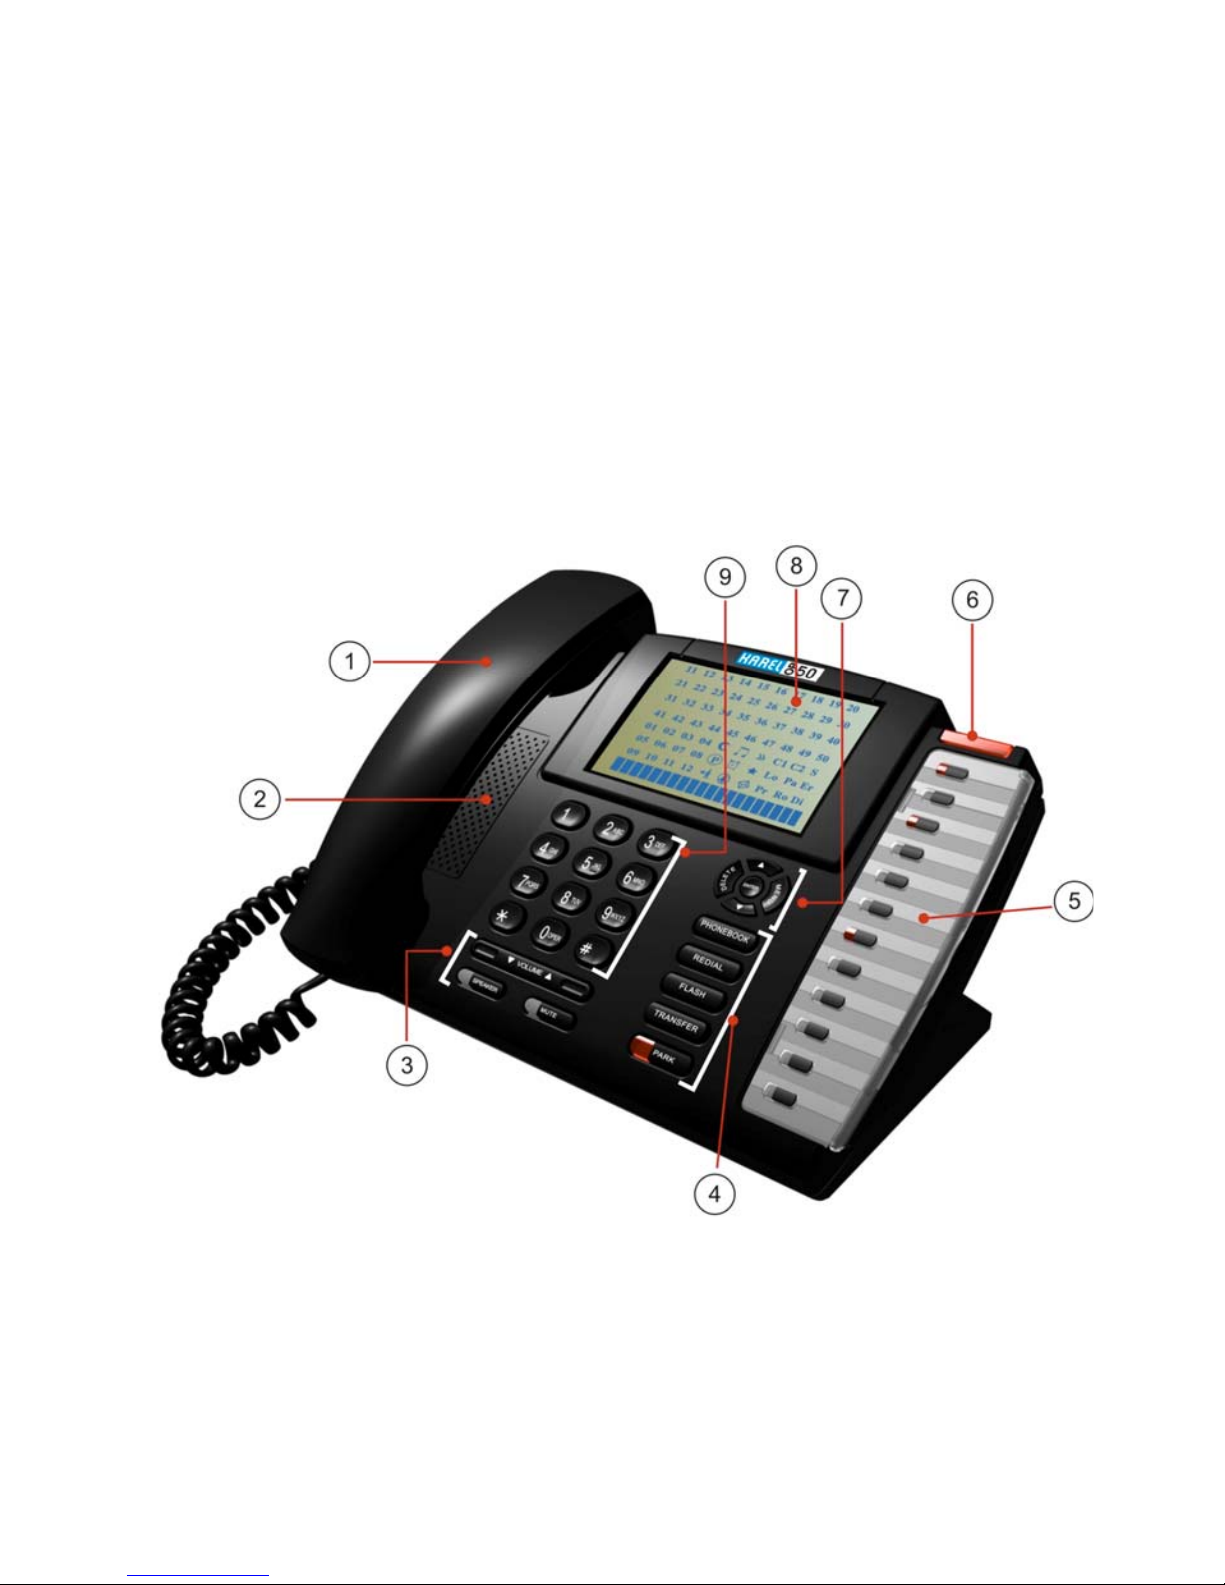
GENERAL APPEARENCE
1 Handset 4 Special Function Keys 7 Navigation Keys
2 HF Speaker 5 Speed Dial Keys 8 Display
3 Voice Control Keys 6 Incoming Call LED 9 Numerical Key Pad
Page 12

OP50 Technical Reference and User Guide
3
USER INTERFACE
LCD DISPLAY
Screen is made up of a busy display panel and a single-line display. LCD screen that
shows the active features in over 20 character display, inc ludes the following information
which simplifies the use:
• The date and time, and the opening message while the console is not busy
• ID numbers during dialing,
• Activated services (such as Auto-dial)
• Call information (Incoming Call Extension 121)
• Action options that can be taken for the active call and service (Call,/Details?)
The Busy Display Panel shows the status of the extensions, lines and some of the system
features by means of their corresponding LEDs. The extension LEDs display the last 2
digits of the physical numbers of the extensions (even if the extension numbers are
changed by Flexible Numbering facility).
Extension Status (LEDs 11-50)
ON : The extension is busy.
OFF : The extension is idle.
BLINKING (slow) : The extension is ringing.
BLINKING (fast) : The extension is calling the operator.
Page 13
OP50 Technical Reference and User Guide
4
Line Status (LEDs 01-12)
ON : The line is busy.
OFF : The line is idle.
BLINKING (slow) : There is a call coming from the line.
BLINKING (fast) : A call is parked on the line.
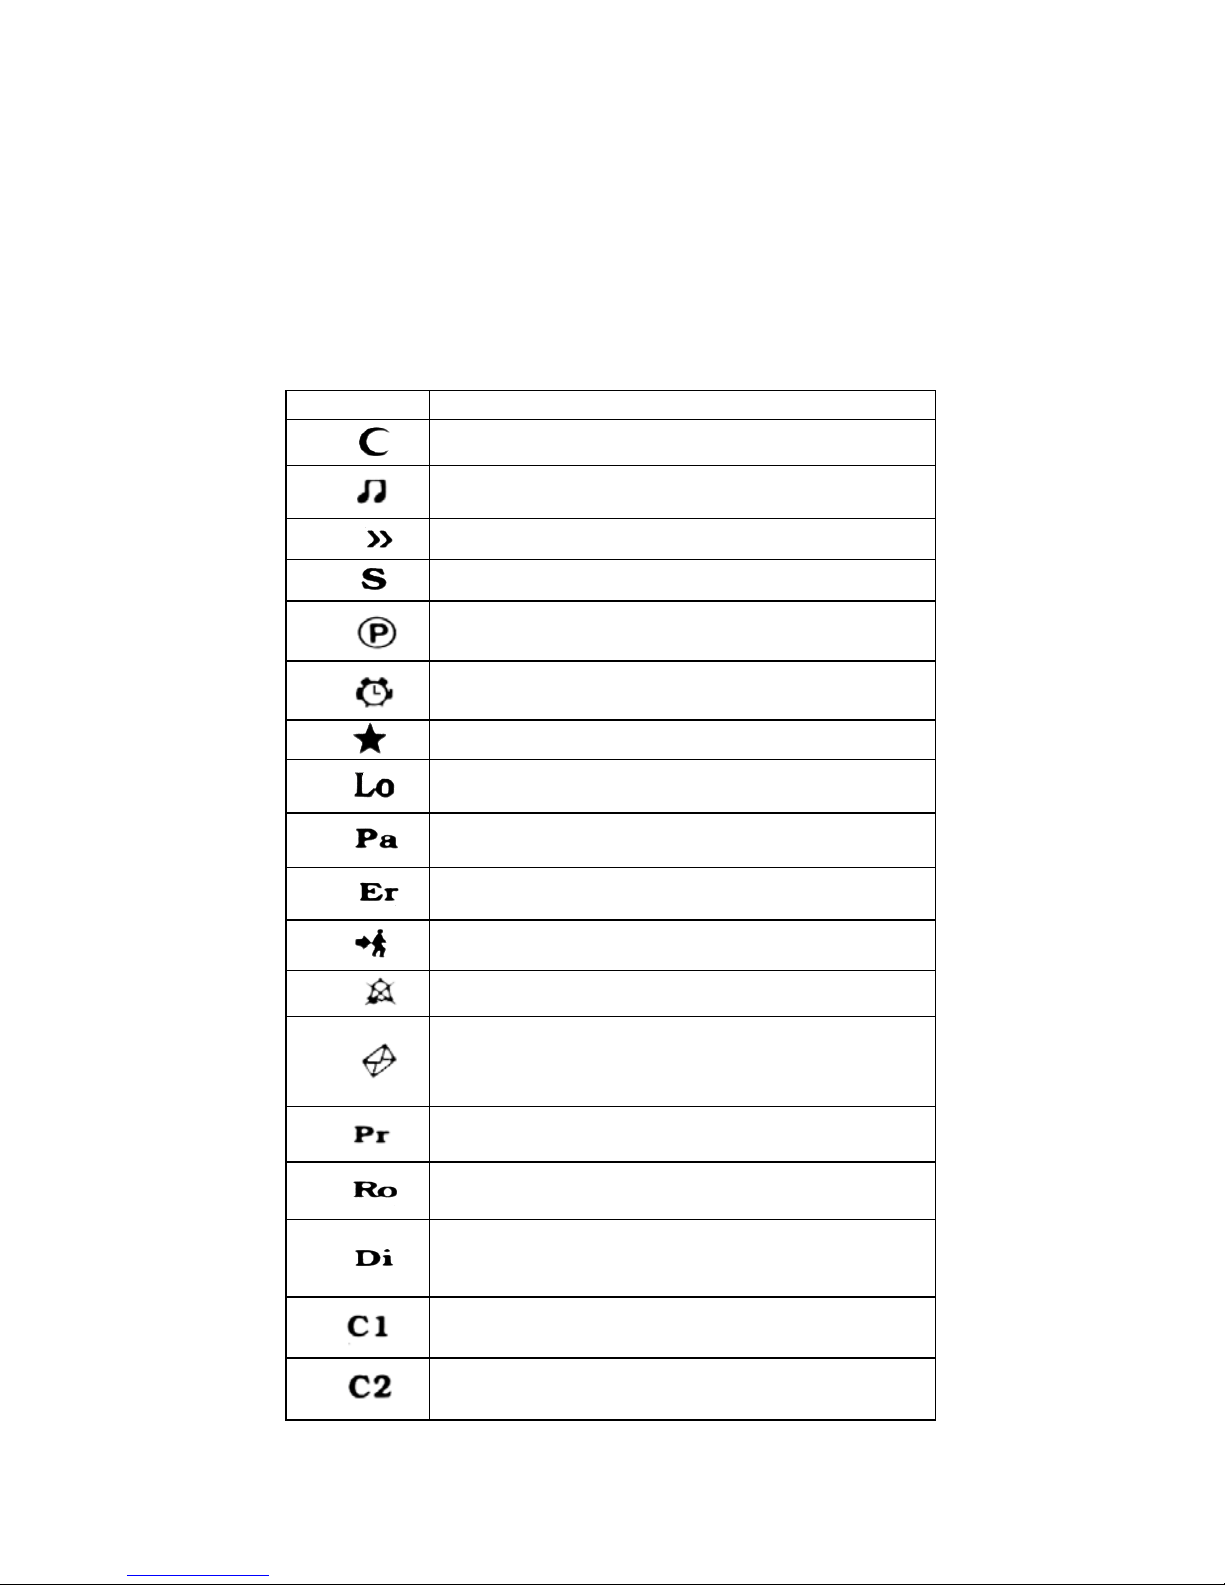
Feature Status
Symbol LED
ON: Night Mode is active
ON: Music On Hold is active
ON: External Call Diversion is active
ON: Handsfree is active
ON: There is a parked call
ON: Reminder is active
BLINKING: Auto-Dial is active
ON: Phone is locked
ON: Parallel Operator is active
ON: System error
ON: Follow Me is active
ON: Do Not Disturb is active
BLINKING: Message Waiting or a call is
waiting in your queue
ON: The system is in programming mode
ON: Auto Attendant (ACD) is active
ON: The doorphone is in use
Reserved for future use
Reserved for future use
Page 14

OP50 Technical Reference and User Guide
5
INCOMING CALL LED
This LED indicates the user by blinking, when there is an incoming call or a new message.
NAVIGATION KEYS AND SPECIAL FUNCTION KEYS
• “Navigation” keys (“ ”, “ ”): User can move between features with these keys,
when there are multiple
options on the screen, also the related option can be enabled with
them too. They are used to pass to the next/previous option or message in all of the
menus.
•
“Menu” key: This key activates the menus by which the telephon e is programmed and
it provides access to the submenus. (After entering the menu, the phone gets into the busy
status. Exiting from the menu does not end the busyness of the phone)
•
“Delete” key: This key provides to turn to the top-menu of active option in the menu.
When this key is used at the standby mode, it brings the information of active services (Do
not disturb etc.) or calls (Missed Calls etc.) to the screen. After pressing this key, the
"Cancel" option for the active services and the “Details" option for the call information on
the screen can be used with ‘Enter’ key.
•
“Enter” key: This key is used for confirming and activating the option on the display.
Functions of this key change according to the options prompted on the display.
•
“Phonebook” key: This key provides access to the telephone book. If there is any
record in this phone book, then those records, which are in alphabetic al order, are directly
displayed. The records that are present in the telephone at that time can be directly
searched by name or number query through the “Find” opt ion on that display. (Search with
this ‘Find’ option can be made in MS Series software with the version ACA or better)
Detailed information about the phone book has been presented in the re levant section.
•
“Redial” key: It dials again the last number that has been dialed. This key functions the
same way as the “Redial” option on the display. The difference between “Redial” and
“Auto-dial” is that the “Auto-dial” option automatically calls the other part y repeatedly until
busyness status is over (cctually, at most 16 times), whereas the “Redial” option calls only
once.
• “Flash” key: It is used for putting the calling party on hold duri ng an internal or externa l
call. It has the same function with the ‘Hold’ option on the screen. A single call can be put
on hold at a time by this key. When it is pressed for a second time, the call on hold is
retrieved, or the call can be retrieved by the “Retrieve” option that a ppears when the ‘Enter’
key is pressed. It drops the line when it is used while the other party has not yet picked up
the phone. There is no limit for the duration to press the key; ho wever, in the event that the
line that has been put on hold has not still be retrieved at the end of a certain period that is
determined by the exchange software, the line may automaticall y be dropped.
•
“Transfer” key: It is used for transferring an ongoing call to another call that is on hold.
In order to actualize the transfer operation, first of all the conversing party should b e put on
hold by using the flash key or the “Hold” / “Park” option on the display. Afterwards, the
number to which the transfer operation will be done is dialed. At this point, the operation is
Page 15

OP50 Technical Reference and User Guide
6
accomplished by pressing the transfer key before or after conversing with the extension to
which the call is to be transferred. It has the same function with the ‘Transfer’ option on the
screen.
• “Park” key: A line or an internal conversation can be parked t hrough this key during the
conversation. When the call is parked by using that key, “parked line” information and
‘Retrieve’ option for the line appear on the display. The call can be retrieved by pressing
the “Enter” key or by pressing the “Park” key for a second time. A call can be parked more
than once and more than one line can be parked at the same time. When a line has been
parked, the telephone can be used independently from that external conversation, i.e.,
internal and external calls can be made by making use of the entire features. For OP50
users, if there are parked line and also parked internal call and if the other service is
activated, the internal line call will be retrieved in turn with this key. (The first call which is
parked will be displayed in the first rank of the park list.)
The second function of this key is, on the other hand, providing the relation between the
exchange and the console. The key is employed when it is required to change the number
of the telephone or to reset the connection to the exchange. When the key is pressed until
the “beep” is received and then it is released, the telephone prompts for the extension
number to be put on the data line of the exchange. In order to enter the “Terminal no=AA”
value of OP50, this key is pressed consecutively to proceed until the correct extension
number is displayed and the extension number will have been entered to the telephone
upon lifting and then replacing the handset.
NUMERICAL KEY PAD
It is composed of 3x4 (DTMF) key matrix. Moreover, these keys are used for number or
character (letter, figure or symbol) entry during the operations related to the “Phone Book”.
If any programmable key is pressed when the letter entry is being made with capital letters,
the entry starts to be made by small letters. By the same way, if any programmable ke y is
pressed again, small letters turn into the capital letters. Grouping of the characters with
respect to the keys are as follows. Standards that apply for similar applications have been
complied with for this subject.
Group of “1”: (space) 1 $ % &
Group of “2”: A B C 2 # (a b c)
Group of “3”: D E F 3: (d e f)
Group of “4”: G H I 4 - (g h i)
Group of “5”: J K L 5 ( (j k l)
Group of “6”: M N O 6 ) (m n o)
Group of “7”: P Q R S 7 (p q r s)
Group of “8”: T U V 8 + (t u v)
Group of “9”: W X Y Z 9 (w x y z)
Group of “0”: 0 → ! ? =
Page 16

OP50 Technical Reference and User Guide
7
VOICE CONTROL KEYS
Control of voice features of OP50 telephones are fulfilled by making use of three keys:
“Speaker” key: This is the key with red icon that puts the telepho ne into the “handsfree”
status and that signifies this through an embedded LED. The key is called H/F ke y, and the
LED inside it is called H/F LED.
(Handsfree: It is a feature of telephone that it emits voices into the room or transmits voices
inside the room to the other parties while the handset is still on hook.)
“Speaker” key performs different functions in different cases. These are:
• When it is pressed while the handset is on hook, the telephone is picked up as
“handsfree” and the H/F LED lights. In this case, a number can be dialed and a
conversation can be made without lifting the handset. Pressing the key during a
conversation terminates the conversation.
• The H/F LED starts to blink if it is pressed while dial tone or busy tone is being
received over the handset or while a conversation is being made. If the handset is
replaced before the H/F LED goes out, then one continues to rec eive dial tone or busy
tone, or one can go on with the conversation. The conversation is terminated if the
handset is replaced after the H/F LED has become off.
• If the handset is lifted during the handset status, then the rest of the conversatio n goes
on via the handset. Replacing the handset terminates the conversation.
• While the handset is on hook, in the event that this key is pressed twice consecutively,
the other party can be heard both via the handset and the H/F spe aker. The opposite
party would hear the things spoken via the handset only, but no voice would be
transmitted to the opposite party via the H/F microphone. T he conversation terminates
by replacing the handset at this status.
• If ‘Headset’ usage has been activated through menu options, then this ke y may also
be used for putting the headset on line. Headset usage has been explained in detai l in
the relevant section.
“Volume " key: It is used to decrease the level of voice received during conversation
while in the Handsfree mode.
“Volume ” key: It is used to increase the level of voice received during conversation
while in the Handsfree mode.
“MUTE” key: It is the key that provides interruption of the outgoing voices during the all
conversations and which signifies that via the LED inside it. Pressing the key for a second
time will maintain the voice transmission to the opposite party again.
Page 17

OP50 Technical Reference and User Guide
8
PROGRAMMABLE SPEED DIAL KEYS
Two functions can be programmed for each of the speed dial keys, which consist of 12
keys with lights. Features that can be assigned to these keys through programming:
• Extension Number
• Line Number
• Private and Common Pool Number
• Function Services (Services such as Follow Me, Call Back, Do Not Disturb,
Telephone Lock, Conference, Night Mode)
These assignments are done to the first or the second functions of the key during the
program entry done by pressing the “menu” option. Assignment is done to the first function
if the key is pressed for a short time, and it is done to the second one if the key is pressed
for a longer period. Transition of the key to the first or second function is indicated by a
short or a long beep, respectively.
When the keys that have been programmed for extension, line, private or common pool are
pressed, these numbers are called directly.
When the keys that have been programmed for the servic es such as Follow Me and Call
Back are pressed, these services are activated directly or a necessary in put is prompted.
(Such as the extension number, to which the Follow Me action will be carried out.)
FUNCTION PROGRAMMING FOR THE SPEED DIAL
KEYS
This feature provides for taking advantage of some functions that have been defined for
OP50 in the exchange properties, by pressing a single key. A user may program for thos e
keys the features presented by the Karel telephone branch exchange, which s/he would
use most frequently.
Different methods can be employed for assigning functions to the programmable keys of
the OP50 operator telephone sets. These operations are carried out for OP50 throu gh the
submenus of Function, Private Pool or Automatic Programming in the Phone Settings >
Key Settings option.
By the Function Programming Menu:
Features most frequently employed by users are among those opti ons. The programming
can be carried out by assigning desired ones out of the options that have been presented
in the Key Settings > Feature submenu, in or der to apply that programming option. First
the key to be used is selected, then the desired one out of the presented functions is
brought to the display through the right/left navigation keys and the programming is
completed by the “Enter” key. These selections have been explained bel ow:
Page 18

OP50 Technical Reference and User Guide
9
• Follow Me Key: If this key is pressed and then if number of an extension is
entered, then forwarding to that extension is actualized and then red LED li ghts. If it is
pressed again, then the forwarding is cancelled and the LED goes out.
•
Call Back Key: If a called extension is busy or not answering and if busy tone is
received upon attempting to access a line, then that extension/line is called back by
pressing this key. In order to cancel the call back operation, the key is pressed again.
•
Do Not Disturb Key: It puts that extension into the “Do N ot Disturb” mode if it is
pressed and the red LED starts to blink. In that case, telephone rings once when the
extension is called. If it is pressed again, then the “Do Not Disturb” service is cancelled
and the LED goes out.
• Telephone Lock Key: If this key is pressed and the password that have been
defined before in Phone Security>Password menu, is entered afterwards, then the
telephone will be closed for external calls. The telephone will be open for exte rna l calls
again, if the procedure is repeated in that mode. The corresponding red LED is on
while the telephone is locked and goes out when it is unlocked.
•
Conference Key: During a call with an extension or line, this key is employed for
including another extension or line into the conference. If a line is desired to be
included into the conference, the line with which the conversation is g oing on is put on
hold by pressing this key and one proceeds to conv ersation status with the line to be
included into the conference. A triple conference is established upon pressing this key
again. (At the time of conference the “Mute” key can be used in order to provide the
interruption of the outgoing voice.) During the confer ence, using the "Leave" option on
the screen with "Enter" key or replacing the handset provides extension to leave the
conference. But this case does not end the conversation between the other two
people.
• Night Mode Key: It can be employed only through the telepho nes that have been
defined as the operator. It puts the system into the Night Mode when it is pressed and
the LED will be turned on. If it is pressed again, then it puts the system into the Day
Mode and the LED goes out. (For this service only, the "Cancel" option is not avail able
after pressing the “Delete” key.)
• Auto Dial Key: The telephone automatically calls the correspondi ng number when
the auto-dialer is activated. If the called party is busy, then the calling action is
performed repeatedly in every 15 seconds. As soon as the business of the opposite
party is over, the telephone notifies that by ringing itself or by short beep.
If it is
pressed again, then the auto-dial is cancelled and the LED goes out.
• Message Key: If there is an EVM module placed on the system and a voice
message is left to the extension, the LED of this message key will blink to inform the
extension a new message left. All voice messages left to you can be listened
successively if this key is pressed. If a password has been defined before, a message
“Please enter your password” will be displayed when the message key is pressed.
After entering the password the voice messages can be listened. Also a mesag e can
be left to the busy or unanswered extension with this key.
Page 19

OP50 Technical Reference and User Guide
10
Code Programming:
By the Private Pool Programming Menu:
Nine most frequently called external numbers can be programmed into the pri vate pool of
the telephone. Moreover, functions supported by the exchange can also be assigned to the
keys by applying private pool programming. (Please refer to the user’s guide of your
exchange for information related to the functions supported by the exchange and the codes
to program them.)
After entering “Register no=” via Key Settings > Private Pool submenu, codes of the entire
features presented to users can be programmed for the “no=” option b y primarily pressing
the “*” key.
Example: An extension using the MS48 exchange can mak e conversation with a party at
the door over telephone, provided that there is a door phone (the device for the action
being mentioned) connected to the exchange and s/he can open the door upon wish
through telephone, if the door connection has been made to her/his exchange. OP50 user
that employs those features frequently can facilitate utilization by programming those
functions for the keys of the telephone. In order to do that, first the user’s guide of the
exchange should be referred to for information about the topics “Door phone Conversation”
and “Door Opener”. By this way, one would learn whether the exchange code for Door
phone Conversation is 110 or 10 and the code for Door Opener is 151 or 129, as well as
properties of the functions. Then, by accessing OP50 menu, submenus of “Phone
Settings”, “Key Settings” and “Private Pool” are selected, respectively. Upon the displayed
warning, “Press Key”, the memory key that will be used for door phone conversation is
pressed. (In case there is another function or extension number that has previously
programmed for that key, it will be deleted.) Once the key to be employed has been
selected, the prompt “Register no=” is displayed. Each user has a capacity of 9 num bers
reserved for her/him. A memory number in the range 01-09 is entered corresponding to the
“Register no=” prompt on the display and the entere d value is a utomaticall y confirmed. T he
sign “no=” appears on the display, afterwards. At this step, the exchange code of door
phone is entered after pressing the “*” key shortly: (*110) or (*10). The programming is
completed by pressing the “Enter” key. The display reverts to the “Private Pool” menu. The
actions explained above are repeated for the door opener function as well; codes (*151) or
(*29) is entered, then they are confirmed by the “Enter” key and the operation is thus
accomplished. One reverts to the Key Settings submenu screen by pressing the “Delet e”
key. Then the user can talk over the door phone or open a door, each by pressing a singl e
key that s/he has previously chosen.
By Automatic Programming Menu:
In OP telephone sets, possibility of assigning different functions to the entire keys
simultaneously is provided via the Auto Setting opti on under the Key Settings menu. This
feature will be explained in detail later in the section “Auto Settings”. Via the automatic
programming, about 20 functions can be programmed for the OP telephone sets at the
same time. These functions can be changed later one by one, as already ex plained in the
sections above, or they can be cleared through the “Clear All?” option in the same menu.
Page 20

OP50 Technical Reference and User Guide
11
INSTALLATION
CONNECTION POINTS
Under OP50, there are five connection points and a switch that provides selection b et ween
the low/high voice levels. Connections and their characteristics have been illustrated
below.
1 ISDN Connection
2 Optional Connection
3 Optional Connection
4 Handset Connection
5 Headset Connection
6 Ring Tone Low/High
Page 21

OP50 Technical Reference and User Guide
12
OP50 INSTALLATION
In order to operate the telephone, first, the spiral handset cable is connected to the
connection point under the telephone and to the handset. T hen OP50 must be connected
to the KTS line of the Exchange.
Required Hardware For The Connection:
OP50 is presented to the user together with a “telephone data cable” of length 2.5 m. and a
connection box. There are 6-pin, RJ-type male c onnectors at both ends of the “telephone
data cable”. One end of this cable has been attached to a 6-pin, RJ-type female connector
that is on the connection box. The connector at the other end of the cable will be attach ed
to its correspondent under OP50. The cavity, which is on the side of the connection box
without the 6-pin, RJ-type female connector, has been left for other cabling that would be
carried out on the box. (Parallel connection of the DATA / +12 VDC / GROUND (GND)
signals and A / B terminal connections.)
In addition to the telephone data cable, another cable that can be used during installation is
the “system data cable”, which is distributed as one for each exchange. One end of the
“system data cable” has been attached to its connection box. On the other, there is a
connector at the free end of the cable, which is fit for the KTS (serial data) port socket of
the corresponding exchange.
The 6-pin, RJ-type male connector on the other side of the connection box will be
employed for parallel connection of data / +12 VDC / ground signals.
Those signals are present on the console connection box that is included in the
OP50 hardware:
1. + 12 VDC
2. No connection
3. B (Tip) signal coming from the corresponding extension
4. A (Ring) signal coming from the corresponding extension
5. Ground (GND)
6. Data signal
If the distance between the exchange and OP50 is mor e than the total lengths of the two
cables mentioned above (approximately 4 meters ), then it would be necessary to obtain flat
telephone cable in order to make the connection between the t wo connection boxes. Note
that the cable should comply with the standards.
Page 22

OP50 Technical Reference and User Guide
13
Connecting OP50 To The Exchange:
Cabling of the first telephone to be connected to the KTS line of the
exchange:
1) Free end of the “system data cable” is attached to the KTS port socket of the system.
2) One end of the “telephone data cable” is attached to the connection box that is at the
end of the system data cable. The other end is connected to the OP50 telephon e.
3) Connection of the A-B wires of the corresponding extension is made to the connection
box. In order to do that, two wires taken from the corresponding extension connect or of the
exchange are attached to the red and green points on the connectio n box.
NOTE: If the exchange is MS26C, MS38S or MS224, and if the first OP50 will be
connected to the operator, then connections of the extension wires should not be made,
because the A and B connections for the operator are also ready on the KT S sockets of
those exchanges. Additional realization of those connections may prevent the exchange
from operating.
4) After the telephone has been connected, the extensi on settings should be done, as will
be explained in the next section.
Cabling of the telephone while there is another device connected to the KTS
line of the exchange:
1) Parallel connection should be made from the connection box of the device that has
previously been connected to the KTS line to the wires that carry data ( white), +12 VDC
(blue) and ground (black) signals and this connection should be mad e in the same order to
the connection box of the OP50 that is newly to be connected to the exchange.
NOTE: Short circuit or wrong order of the wires during the installation may result in
improper operation or malfunction of the exchange or the other devices that have been
connected to the KTS line.
2) Then, extension connection to OP50 should be made. In order to do that, two wires
taken from the corresponding extension connector of the exchange should be attached to
the red and green points on the connection box of OP50.
3) After the telephone has been connected, the extension settin gs should be done, as will
be explained in the next section.
IMPORTANT NOTE: If OP50 is to be connected over a distance longer than 5 meters, then
A-B (ring-tip) and serial data (KTS) wires should be carried over separate cables, one
should especially pay attention to employ shi elded cables for long-distance installations of
serial data wires.
Page 23

OP50 Technical Reference and User Guide
14
Defining Extension Number For OP50
At the first moment OP50 is connected to the exchange, the two-digit extension number is
displayed in the “Terminal no=aa” format. That number has been set as “11” as factory
default and it signifies the last two digits of the extension number.
If the data on the LCD display are changing upon lifting and replacing the handset, then
that indicates extension settings are correct. However, if those data are not changing, then
the extension number of OP50 must be set. In order to do that:
1) The “Park” key is pressed until the message “Terminal no=aa” appears on the display
(aa= a two-digit number – last two digits of the physical number of the extensio n.)
2) One proceeds by pressing the “Park” key in short whiles until the e xtension number that
is desired to be set appears on the LCD display.
3) When the desired number has appeared on the display, the handset is lifted and
replaced once. From then on, OP50 will operate at that defined extension.
NOTE: When number of another extension of the exchange is entered to OP50, the
speech channel is activated; however, the data line does not function.
Number Of OP50s That Can Be Connected To The Exchange And
Connection Distances
1) The OP50 telephones can be connected to the first 16 extensions of the exchange.
2) Number of OP50s that will be connected to the exchange and accessories using the
external data line of the exchange should not exc eed 8 in total. The maximum number of
OP50 which will be connected to the system can be 8.
3) If “data / 12 VDC / ground” signals and the “A / B” wires are carried to OP50 over
separate cables, then an OP50 can be located at most 250 meters far from the exc hange
in the event that ordinary cables are employed.
That distance would decrease as the number of feature tele phone sets that are connected
to the exchange increase. For example, when 8 OP50s are connected to the exchange as
previously explained, the maximum allo wed distance between the telephone sets and the
exchange drops to 25 meters.
In such a case, if the “12 VDC” signal amplitude of the last OP50 drops b elow +8.5 VDC,
then the performance may be improved by connecti ng a +12 VDC power supply between
12VDC and ground terminals.
Page 24

OP50 Technical Reference and User Guide
15
OP50 Usage On Table With Angle Adjustment Or On Wall
When used as a desktop phone, with the help of its adjustab le stand, the angle between
the phone and table can vary between 20 and 60 degrees.
To adjust the angle the telephone must be moved up-down by pressing the point sho wn in
the figure below.
To hang the telephone on wall, two vertical holes (8 cm apart from each ot her) appropriate
for the anchor plug and screws must be placed on the vertical surface where the telephone
will be hung.
The anchor plugs must be placed in the holes and the screws must be placed in these
plugs such that their heads are 3 mm outside of the hanging surface.
Then the telephone’s leg must be adjusted to its horizontal position and as shown in the
figure below, the stand must be fixed to the telephone mold with the help of scre ws. Then
the screw dents at the backside of the telephone can be hung to the screw heads on the
hanging surface.
Page 25

OP50 Technical Reference and User Guide
16
1. Fixing screws
2. Hanging dents
OP50 Start-up State
The telephone set would be ready for operation after the required connections have been
made and the correct extension number has been defined. The display and the
programmable keys start to perform their functions.
By default, there is no program assignment for the programmable keys. These keys are to
be programmed by user according to needs. Please refer to the section “Key Settings and
Automatic Settings” in this guide for detailed information. In order to change settings of
your telephone and other settings of your exchange, refer to the section “Phone Settings”.
Settings of telephone set are not cleared as the exchange is shut down and then powered.
If the telephone set has previously been connected to the system and if it is connected
again after having been removed, then it gets ready for use within a few seconds. In that
short period, first the version information of OP50, then the “Terminal No:AA” message
appear on the display. After that message the telephone would be ready for util ization.
In the event that the exchange is reset or is shut down and restarted while the telephone
has been connected to the exchange, the telephone first waits for the system to start and
display the version information of OP50 and then the message “Terminal No: AA" (for 15
sec.), then it establishes the connection with the exchange after that waiting period.
Page 26

OP50 Technical Reference and User Guide
17
PROGRAM FEATURES
PROGRAMMING MENUS
The user performs entrance to programming by making use of the flexibly functional
selection key that is under the option “menu” that appears on the display or specially
functional MENU key, while the telephone is off hook and dial tone is being received.
The programming features consist of 6 main menus and their subm enus. Character istics of
the entire menus have been explained below.
Page 27

OP50 Technical Reference and User Guide
18
CALL OPTIONS
Submenu titles:
• Call Diversion
o All Calls/ Extension No=
o No Answer/ Extension No=
o No Answer Cancel
• Auto Dial
o Last Number
o Private Pool/ Register No=
o Common Pool/ Register No=
• Paging
o All /Read Message
o Group/ Extension No=
o Extension/ Extension No=
• Missed Calls
• Answered
• Dialed
Call Diversion
- When All Calls is selected and an extension number is entered within 30 seconds, all
calls coming to the OP user rings at the extension specified here.
- When No Answer is selected and an e xtension number is entered within 30 seconds,
an incoming call is forwarded to the extension specified here, if it is still not ans wered
although it has rung three times.
- No Answer Cancel option can be selected to cancel the previously activated Follow Me
No answer feature.
Auto Dial
The telephone automatically calls the corresponding number when the auto-dialer is
activated. If the called party is busy, then the calling action is performed repeatedly in
every 15 seconds. As soon as the busyness of the opposite party is over, the telephone
notifies that by ringing itself or by short beep. This feature can be deactivated by us ing the
“Cancel” option on the display.
- By selecting the Last Number option, the most recent number that has been dialed is
automatically called.
- When the Private Pool option is activated, the private pool numbers, which have
previously been entered into the memory by the menu “Private Pool Entry”, are
automatically called. The value to be entered her e is one of the private pool indices in
the range 01-09 for OP50.
- By the Common Pool option, the common pool numbers, who have been stored in the
exchange and whose entries have been done by the operator only are automatically
Page 28

OP50 Technical Reference and User Guide
19
called. The value to be entered here is one of the common pool i ndices in th e range 0099 for OP50.
Paging
In connection with the handsfree feature, pagings in several forms could be done i n order
to be heard through the speakers of the telephones while dial ton e is being received.
- All
- Group
- Private
Missed Calls
Information about the most recent 20 Missed Calls for OP50 successively viewed including
source and time of the call. In the event that there are more than one Misse d Calls, they
can be browsed by using the navigation keys on the display. In case the source of the
unanswered call is an extension, if name of the extension is present in the phone book,
then that name is displayed instead of the number. T he “Call” option in that men u does not
provide for direct calling of the line number; instead, it provides d ial tone by accessing to
the line, which the call has come from
.
If any call or active service information comes while the missed calls are displaye d on the
screen, the missed call information is assumed as unread and does not deleted from the
list. When user wants to see the all missed calls, that will have the opportunity to se e this
missed call again.
Answered
Information about the most recent 20 Answered Calls can be successively viewed
including source and time of the call. In the event that there are more than one Ans wered
Calls, they can be browsed by using the navigation keys on the display. In case the source
of the answered call is an extension, if name of the extension is prese nt in the phone book,
then that name is displayed instead of the number. T he “Call” option in that men u does not
provide for direct calling of the line number; instead, it provides d ial tone by accessing to
the line, which the call has come from.
Dialed
Information about the most recent 20 Dialed Calls can be successively viewed including
source and time of the call. In the event that there are more than one Dialed Calls, they
can be browsed by using the navigation keys on the display. In case the source of the
dialed call is an extension, if name of the extension is prese nt in the phone book, then that
name is displayed instead of the number. T he “Call” option in that menu does not provide
for direct calling of the line number; instead, it provides dial tone by accessing to the l ine,
which the call has come from.
Page 29

OP50 Technical Reference and User Guide
20
PHONE SETTINGS
Submenu titles:
• Key Settings
o Extension
• Press Key/ Extension No=
o Line
• Press Key/ Line No=
o Private Pool
• Press Key/ Register No=/ No=
o Common Pool
• Press Key/ Register No=
o Feature
• Press Key
o Follow Me
o Call Back Key
o Do Not Disturb Key
o Phone Lock Key
o Conference Key
o Night Mode Key
o Auto Dial Key
o Message Listen Key
o Auto Setting
• Option1
• Option2
• Option3
• Option4
• Clear All?
• Do Not Disturb
o Enable/ Disable
• Background Music
o Enable/ Disable
• Reminder
o Without Message/ Time=
o With Message/ Time= / Please Leave Message
o Disable
• Eprom Version
Page 30

OP50 Technical Reference and User Guide
21
o System Version
o OP Version
• Lazy Mode
o Enable/ Disable
• Language
• Headphone
o Disable
o With Handsfree
o Without Handsfree
• Signal Beep Option
o Enable / Disable
• Price
• Line Access Code
• Return Factory Set.
• Backlight
Key Settings
Number of keys that can be programmed is 12 in total and assignments of pro grams are
done to those. In case the user presses those keys continuously for one second, the
second function of the key is detected. Therefore, total number of features that can be
programmed becomes 24. During programming, the LED that be longs to the keys signifies
to which key and to which function of the key the assignment is done by lighting in red.
When the LED is observed to be lighting in red by pressing the key u ntil the single short
beep is received, the first function will have been assigned and the second function will
have been assigned when the LED is observed to be lighting in red by pressing the key
until the short beep is received for the second time (for 1 second.)The keys become active
after the programming mode is exited.
The assignments performed on these keys cannot be cancel led one by one; ho wever, new
assignments can be done to them without encountering the error signal. Cancellation of
contents of the programmable keys can be carried out by selecting Phone Settings > Key
Settings > Auto Setting> Clear All.
Extension
You can reach an extension you call frequently through a single key by programming
her/his number on that key. In order to do that, one first proceeds to the programming
menu.
♦ Press Key: The ke y, on which the programm ing will be done, is press ed for a short or
a long period in order to select the first or the second function, respectively.
Page 31

OP50 Technical Reference and User Guide
22
♦ Extension no: Then the “Extension No=”menu comes to view. In this menu, the
display cursor enables data entry. After the user enters the e xtension n umber by usi ng
the numeric keypad, s/he confirms the extension number s/he has entered by pressi ng
the “Enter” key. The extension number is of 3 digits for OP50. In case an OP50 user
attempts to enter an extension number with more than 3 digits, the program takes the
first three digits as the extension number and then proceeds to the next menu.
After the acceptance of the extension number, if the extension number, which is desired to
be programmed, has previously been set on any key before, then the pre-progr ammed key
is cancelled and the new one is used. (An extension number can be assigned to a single
key only.) If, on the other hand, the number has not been programmed before, then OP
checks whether the entered number is a correct one (whether it is defined in the system.)
In the event that the entered number on OP50 is not correct (defined in the system) the
“Erroneous Number” message is displayed for 1 second and error tone is received.
After the programming mode is exited and those keys are pressed, the extensi on that has
been stored on the key is directly called. In addition to the calling function, status of the
extension, which has been programmed as the first function of the pr ogr ammable ke ys can
be viewed by the LED next to it, as described below.
Extension Status LED Status
On Hook Off
Busy Continuously On
Ringing Blinking
Calling the Operator Blinking fast
Line
It enables you to program a specific line number on a key. By pressi ng that key, you can
access the line that has been programmed on the key and make a call (provide d that it is
vacant) and you can access that number by a single key. In order to do that, one proceeds
to the extension programming menu.
♦ Press Key: The ke y, on which the programm ing will be done, is press ed for a short or
a long period in order to select the first or the second function, respectively.
♦ Line no: If a determined line number is entered a nd confirmed, then that line number
will have been assigned to that key.
Programming one of the line access codes such as 01,02… for OP50 is sufficient for
accessing the line directly when the programmed key is pressed. The programmed key
detects the number as 701,702… and provides making calls by accessing the line. If an
incorrect code is entered, on the other hand, the user is warned by the message
“Erroneous Number”.
Page 32

OP50 Technical Reference and User Guide
23
A line access code can be assigned to a single key only. After the programming mode has
been exited, upon pressing those keys, it is possible to access the programmed line,
without pressing 9. While a line that has been assigned to a programmable key has
already been accessed, if that key is pressed, then the line is park ed. The line is retrieved
upon pressing the key again. Status of the line, which has been programme d as the first
function of the key can be viewed by the LED next to it, as described below.
Line Status LED Status
Vacant Off
Busy Continuously On
Call request is being received Blinking
Parked Blinking fast
Private Pool
You can program 9 line numbers for FT15, which yo u call most frequently on the private
pool of your telephone. You could shorten duration of calling action by programming the
memory numbers on the keys. On the other hand, it can be used for OP50 for two kinds of
programming. The first of them is a kind of memory storage, in which 01-09 entries ca n be
stored and determined numbers are entered by the “no=” option. In the second of them,
the entire programming codes out of the service options that have been specified in the
user’s guide can be assigned to the programmable keys by entering the Feature codes.
♦ Press Key: The ke y, on which the programm ing will be done, is pressed for a short or
a long period in order to select the first or the second function, respectively.
♦ Register no: Afterwards, the “Register no=” menu is displayed. In this menu, the
display cursor enables data entry. As soon as the user enters the second digit of the
number s/he has started to enter (01-09), OP50 automatically confirms the number
and checks whether the memory number that has already been entered has
previously been assigned to any key (this system is like the one in the extension
programming.)
♦ No: The desired line number or access code is entere d. In order to assign the service
codes, on the other hand, first of all one of the codes that are mentioned in the user’s
guide of the exchange is dialed after pressing the “*” key and then it is confirmed. By
this way the service code is assigned to the key.
Common Pool
Line numbers that have been stored in the comm on pool memor y fields with number 00-99
by the operator can easily be assigned to the programmable keys.
♦ Press Key: The ke y, on which the programm ing will be done, is press ed for a short or
a long period in order to select the first or the second function, respectively.
Page 33

OP50 Technical Reference and User Guide
24
♦ Register no: Indices that belong to the line numbers, which have been entered into
the common pool of the exchange, are assigned to the programmable keys by this
menu option. After exiting the programming mode, when these keys are pressed, the
common pool number that has been assigned to the key is directly called.
Feature
It provides making use of some functions that have been defined in the system by pressing
a single key. For example, in order for the call requests coming to you to ring at some other
extension, you can press the key that has previously been programmed and enter the
number of the extension, to which you would like your calls to be forwarded.
♦ Press Key: The ke y, on which the programm ing will be done, is press ed for a short or
a long period in order to select the first or the second function, respectively.
♦ Then the “Function/ Follow Me Key” menu is displayed. Through the down key, the
desired feature is reached in this menu. After the user has reached the function s/he
wants, confirms it by pressing the “Enter” key. If the selected function has previously
been set on any key before, then the pre-programmed key is cancelled a nd the new
one is used (this system is like the one in the extension programming).
The functions are as follows:
• Follow Me
• Call Back
• Do Not Disturb
• Telephone Lock
• Conference
• Night Mode *
• Auto Dial Key
• Message Listen Key
* It applies only when the user is the operator.
Auto Settings
There are five different options in order to program the programmable keys automaticall y.
The keys are automatically programmed upon proceeding to the desired option and
selecting it.
♦ Option 1 (Extension Numbers)
♦ Option 2 (Line Numbers)
♦ Option 3 (Common Pool Numbers)
♦ Option 4 (Automatic Functions)
♦ Clear All
How the keys will be programmed by each option has been illustrated through diagrams
below. Here, “E” is the abbreviation for extension numb ers, “L” for line nu mbers an d
“CP” for the common pool.
Page 34

OP50 Technical Reference and User Guide
25
Option 1
1.key
Func1 E 111
Func2 E 123
9.key
Func1 E 117
Func2 E 129
2.key
Func1 E 112
Func2 E 124
10.key
Func1 E 118
Func2 E 130
3.key
Func1 E 113
Func2 E 125
11.key
Func1 E 119
Func2 E 131
4.key
Func1 E 114
Func2 E 126
12.key
Func1 E 120
Func2 E 132
5.key
Func1 E 115
Func2 E 127
13.key
Func1 E 121
Func2 E 133
6.key
Func1 E 116
Func2 E 128
14.key
Func1 E 122
Func2 E 134
Option 2
1.key
Func1 L 1
Func2 L 13
9.key
Func1 L 7
Func2 L 19
2.key
Func1 L 2
Func2 L 14
10.key
Func1 L 8
Func2 L 20
3.key
Func1 L 3
Func2 L 15
11.key
Func1 L 9
Func2 L 21
4.key
Func1 L 4
Func2 L 16
12.key
Func1 L 10
Func2 L 22
5.key
Func1 L 5
Func2 L 17
13.key
Func1 L 11
Func2 E 23
6.key
Func1 L 6
Func2 L 18
14.key
Func1 L 12
Func2 E 24
Option 3
1.key
Func1 CP 00
Func2 CP 12
9.key
Func1 CP 06
Func2 CP 18
2.key
Func1 CP 01
Func2 CP 13
10.key
Func1 CP 07
Func2 CP 19
3.key
Func1 CP 02
Func2 CP 14
11.key
Func1 CP 08
Func2 CP 20
4.key
Func1 CP 03
Func2 CP 15
12.key
Func1 CP 09
Func2 CP 21
5.key
Func1 CP 04
Func2 CP 16
13.key
Func1 CP 10
Func2 CP 22
6.key
Func1 CP 05
Func2 CP 17
14.key
Func1 CP 11
Func2 CP 23
Page 35

OP50 Technical Reference and User Guide
26
Option 4
1.key
Func1 Phone Lock
Func2 Door Opener
9.key
Func1 Call Park
Func2 E 113
2.key
Func1 Message Listen
Func2 Door Phone
10.key
Func1 Parallel Operator
Func2 E 114
3.key
Func1 Auto-Dial
Func2 Hookflash
11.key
Func1 ACD
Func2 E 115
4.key
Func1 Reminder
Func2 Conference
12.key
Func1 Mute
Func2 E 116
5.key
Func1 Do Not Disturb
Func2 E 111
13.key
Func1 Night Mode
Func2 E 117
6.key
Func1 Follow Me
Func2 E 112
14.key
Func1 Music
Func2 E 118
Do Not Disturb
♦ When Enable is selected, telephone rings once for an incoming call.
♦ Do Not Disturb mode is cancelled upon selection of Disable.
Background Music
♦ By the selection of Enable, music that has been loaded to the exchange can be
listened to. This option can be employed especially for the lines that are put on hold.
♦ Listening to music option is deactivated by Disable.
Reminder
♦ Without message: It provides for receiving of the reminder tone until the teleph one is
picked up and then hanged up at the time of reminding, which has been entered in
“HHMM”.
♦ With message: Following the entry of the reminder time in “HHMM” format, a
message with maximum duration of 30 seconds could be recorded without waiting for
any notification signal. Whenever the remind er is active, the reminder tone is rec eived
from the telephone. In the meantime, the recorded message can be listened to
repeatedly upon pressing the H/F key. In that case, upon using the H/F key once
again, the message and the reminder are cancelled. This option is displayed only
when there is an EVM module installed in the system.
♦ All messages can be cancel led by Disable.
Page 36

OP50 Technical Reference and User Guide
27
Eprom Version
By this menu option, one can reach version information of the exchange and the telephone
set.
♦ System Version; Example: -MS48 AAA
♦ OP Version: Example: OP50 V AAA
Lazy Mode
♦ Enable; When the lazy mode is activated, the tele phone is picked up automatically in
handsfree mode and the call is answered. (If the headset is active, it is picked up
automatically in headset.)
♦ By selecting Disable, the lazy mode is exited; hence the telephone is not
automatically picked when a call is received.
Language
Any desired one out of the language options that are displayed here, such as Turkish,
Russian, English, Spanish, Afrikaans, Portuguese, French and Greek can be selected and
the telephone starts to display menu messages in the selected languag e.
Headphone
The “Headset” option, which is presented in order to make use of the telephone
comfortably by a headset, offers three different options as disable, with handsfree and
without handsfree.
♦ Disable mode is already active when the “headset ” option is selected for the first time.
It is employed for canceling the different later options.
♦ When With handsfree is selected, the telephone is picked up through the headset
while it is on hook, by the fast handsfree key. Upon pressing it again, the headset is
turned off and the telephone gets into the HF mode. The HF is switched off and the
conversation ends, in the third use of the key. If the handset is lifted up during the
conversation with headset, voice is divided into two, so volume decreases.
♦ When Without handsfree is selected, the telephone is picked up through the headset
while it is on hook, by the fast handsfree key. Upon pressing it again, the headset is
turned off, the telephone does not get into the HF mode so the conversation is
finished. If the handset is lifted up during the conversation with headset, voice is
divided into two, so volume decreases again.
In order to facilitate the headset utilization “Lazy Mode” can be selected too.
Page 37

OP50 Technical Reference and User Guide
28
Signal Beep Option
♦ When the Enable option is selected, a special warning tone is received for an
incoming call, in case the phone is busy.
♦ The warning tone is cancel led through the Disable option.
Moreover, while the warning sound is active or not, the "Warning AA" is shown on the
screen when the extension is warned in the busy status. Here, AA in dicates the number of
the extension who makes the warning.
Price
♦ Meter Pulse Price; By this menu, upon entering the pricing data of maximum five
digits, which is considered to correspond to one pulse price, the pricing information
based on that pulse price information is shown on the display durin g conversations. In
line conversations, which the line pricing program was entered, price based on the
credit information can be seen on the display of OP.
♦ By the Last Call selection, pricing of the last line, over which the call has been made
is done.
.
Line Access Code
With this facility, the number information of the call will come with the informatio n of the line
access code, which has been defined before.
When the facility is selected, there is a cursor which supplies maximum 1 digits to be
entered displayed on the screen. With this cursor the desired “line access code” is entered
and then it is confirmed in order to be saved into the memory of the phone.
The existing line access code (D) will be shown on the right side of the display when the
“Line Access Code” menu is entered.
Return Factory Set.
With this facility, you can return back to the original settings of your telephone: the
language will be set to Turkish and the keys are automatically programmed as Option1.
Before the original settings are applied, the confirmation of the user is required.
Backlight
♦ With Level option the backlight of the LCD can be adjusted in 8 different levels.
♦ The options ON / OFF / Auto can be used to turn off or turn on the b acklight of the
LCD. It is also possible to turn off the backlight automatically after 10 seconds of idle
state.
Page 38

OP50 Technical Reference and User Guide
29
PHONE SECURITY
Operations of defining / changing passwords, which are required in ord er to make use of
features such as making calls or listening to messages through another extension within
one’s own authorization limits, can be carried out through this upper menu item.
Submenu titles:
• Password
o Define (If there is no password)
o Change (If there is a password)
o Cancel (If there is a password)
• Phone Lock (If password has been defined)
• Phone Unlock (If telephone is locked)
Password
In case the user has no defined password:
♦ When Define is selected, a password consisting of 3 digits (000…250) is expected to
be entered.
In case the user has previously entered a password of her/his own:
♦ By the Change option, an existing password can be changed. First of all, the old
password is entered and confirmed, and then the new one is entered. The new
password will be active for later operations. (If new password is not entered before
returning back to the top menu, password is canceled out.)
♦ By the Cancel option, the currently used password is cancelled and operation
requiring a password cannot be done from then on. A password must be defined in
order to enable such operations.
Phone Lock
♦ Password: This menu appears only when the telephone is not locked and becomes
active, if a password has been defined before. By this menu option, password quer y
before line access, as well as telephone locking, is provided.
Phone Unlock
♦ Password: This menu appears only in the event that the telephone is locked. The
telephone can be unlocked by using the “Unlock” option an d then entering password.
Page 39

OP50 Technical Reference and User Guide
30
MESSAGE
It appears only when there is an installed EVM module (and DRAM module for the twochannel EVM).
Submenu titles:
• Absent Message
o Read Message
• Message Listen
o All Messages
Message
Password= (If password has been defined)
o New Messages
Message
Password= (If password has been defined)
Absent Message
♦ Read messag e: By this menu, you could leave a message to be announce d to people
who call you when you are not at your place, provided that you confirm the message
through the “Enter” key. In case the absent message is employed, the telephone does
not ring when a call is received; instead, the calling party hears the recorded message.
The maximum message duration is 30 seconds. If one uses the phone for any reason
(such as making a call) the ‘Absent Message’ is canceled.
Message Listen
You can successively listen to the messages you have received. With the message key
which informs that there is a new message through the related LED which blinks, the ne w
message can easily be listened to. If a password has been defined, you will be required to
enter it.
♦ All messages: By this menu option, you can listen to the entire (actually, the ones
which have not been *erased.) messages you have received.
♦ New messages : By this menu option, you can listen to the new messages you have
received.
NOTE: * The messages, which are listened to by using the “New messages” menu option
are erased in 15 minutes unless they are “locked”.
Page 40

OP50 Technical Reference and User Guide
31
PHONE BOOK
A phone book of 60 entries in total can be created by using this upper menu item. 16
characters are reserved for the entry of name/number into the Phone Book. In the event
that any information of call, conversation, Missed Call, hold, park or forwarding that is
related to a number stored in the phone book is received, the name correspon ding to that
information is displayed. The “Find”, “Add”, “Change” and “Delete” options in this menu can
be accessed by the navigation keys. (The “Add” option is not shown while the phone book
is full.)
If there are no records that have previously been stored in the phone, that upper menu
item presents only two options, namely, “Add” and “Change”. The option “Change” here
applies only for the permanent message that will be displayed continuousl y on the off-hook
display of the telephone. 18 characters are reserv ed for the entry of the constant message.
Once the option “Add” is employed, additional options are also presented to the user. Note
that, while operations related to the entire options are being done, the up key on the
display can be employed for deleting letters or figures.
Submenu titles:
• Find
o Find By Name/ Name=
o Find By Number/ No=
• Add
o Name=/ No=
• Change
o Find By Name/ Name=
o Find By Number/ No=
o Constant Message/ Record Message
• Delete
o Find By Name/ Name=
o Find By Number/ No=
o Clear All
Find
Searches can be performed among the records in the phone book by using this menu.
Submenus “Find by name” and “Find by number” are located within this menu. (OP50
users can use this facility if the MS system software version is ACA or better.)
♦ Find by name: By using this menu, characters are entered and the find operatio n is
performed. When the OP telephone set finds the matching name within the records,
that entry is displayed. In case the telephone could not find the exact name, the most
similar entry starting with the same letter as the searched name is displayed. On the
other hand, in the event that no entry starting with the same letter as the searched
name is found, the telephone set displays the first entry that starts with the
alphabetically first letter.
Page 41

OP50 Technical Reference and User Guide
32
♦ Find by number: By using this menu, the user enters a number and carries out the
find operation. In case no record that matches the entered number is found, the
telephone set presents the entry within the records, which comes first with respect to
the alphabetical order of their first letters. When any record is found, the other entries
could also be inspected by using the navigation keys. While those records are being
displayed, the user can exit the records and go back to the main menu by using the
key “Delete”.
Add
The user can store data into the phone book by using this menu. When this menu is
accessed, the telephone set prompts the user to enter a name (at most 16 characters).
After the user confirms the name by the “Enter” key, the telephone set prompts the user to
enter the number. (If the entered name is 16 characters, the phone s witches to the number
section automatically.) Following the number entry, storing operation is completed by
pressing the “Enter” key again.
Change
The submenus “Find by name”, “Find by number” and “Constant message” are located
within this menu. The entry to be changed is found by using search menus, as described
above. When the searched entry is found, while the records ar e being displayed, the quer y
“Change?” is also displayed. The user initiates the change operation by pressing the
“Enter” key. After the necessary changes have been made on the record, the user
terminates the change operation by pressing the “Enter” key again.
♦ Find by name: By using this menu, characters are entered and the change operati on
is performed. When the OP telephone set finds the matching name within the records,
that entry is displayed. In case the telephone could not find the exact name, the most
similar entry starting with the same letter as the searched name is displayed. On the
other hand, in the event that no entry starting with the same letter as the searched
name is found, the telephone set displays the first entry that starts with the
alphabetically first letter.
♦ Find by number: By using this menu, the user enters a number and carries out the
change operation. In case no record that matches the entered number is found, the
telephone set presents the entry within the records, which comes first with respect to
the alphabetical order of their first letters. When any record is found, the other entries
could also be inspected by using the navigation keys. While those records are being
displayed, the user can exit the records and go back to the main menu by using the
key “Delete”.
♦ When Constant Message is selected, the entry message can be recorded or
changed. Content of the entry message is KAREL by default.
Page 42

OP50 Technical Reference and User Guide
33
Delete
The submenus “Find by name” and “Find by number” are located within this menu. The
entry to be deleted is found by using search menus, as described above. When the
searched entry is found, while the records are being displayed, the query “Delete?” is a lso
displayed. The user accomplishes the deleting operation by pressing the “Enter” key.
♦ Find by name: By using this menu, characters are entered and the d eleting operation
is performed for any desired record.
♦ Find by number: By using this menu, a number is entered and deleting operation is
performed for any desired record.
♦ Delete All: When the “Enter” key is pressed in this menu, the entire phone book
records and the entry message is deleted from the memory.
Things to pay attention to while entering names and numbers to the phone
book:
Numeric keypad is employed to enter names in any one of the submenus of the phone
book main menu. Characters, which these keys contain, have been explained under the
title “Numeric Key Pad”.
• When one uses the “Add” option, first a blank screen is seen to enter the name of the
entry. Upon the name is confirmed by the ‘Enter’ key, a bla nk screen is seen ag ain to enter
the number of the entry. Storing operation is completed by pressing the ‘Enter’ key again.
• The display cursor enables data entry, when typing letters on the display is required
(name or permanent message.) Until the letter to be typed appears on the display, the
corresponding key is repeatedly pressed without any break. In order to type the next letter,
corresponding key of that letter is pressed as many times as necessary. If two letters that
will be typed consecutively are on the same key, then it takes two seconds for the cursor to
move to the next digit after the first letter is typed.
• If any programmable key is pressed when the letter entry is being made with capital
letters, the entry starts to be made by small letters. By the same way, if any programmable
key is pressed again, small letters turn into the capital letters. If the small letters are started
to use the “^” is displayed on the right side of the screen.
• Upon pressing the “Enter” key without entering any letter/number or after deleti ng all the
letters/numbers on the display, the error message “Enter a correct name/number.” is
displayed.
• In the event that any information of call, talking, Missed Call, hold, park or forwarding that
is related to a number stored in the phone book is received, the name corresponding to
that information is displayed. Maximum 16 characters can be displayed on the screen.
Page 43

OP50 Technical Reference and User Guide
34
SYSTEM SETTINGS
Only the system supervisor is authorized to use this menu. That is, this menu is displayed
only on OP50s that are employed as the operator teleph one and some special operations
can be carried out via this upper menu option.
Submenu titles:
• Setting Time
o HH:MM=
• Setting Date
o DD/MM/YY=
• Night Mode
o Enable/Disable?
• Common Pool
o Register No=/ No=
• ACD
o Enable/Disable?
• Parallel Operator
o Enable/Disable?
Setting Time
♦ HH:MM=: In this menu, the display cursor enabl es data entry and the user is required
to enter the system time in 24-hour format. As soon as the user enters the hour, the
character “:” automatically appears on the display and the user is expected to enter
the minute.
Setting Date
♦ DD/MM/YY=: In this menu, the display cursor enables data entry. As the user enters
the day and the month, the character “/” automatically appears on the d isplay.
Night Mode
♦ Enable?: The exchange is taken into the night mode.
♦ Disable?: The exchange is taken out of the night mode.
Page 44

OP50 Technical Reference and User Guide
35
Common Pool Entry
♦ In the Register no section, OP50 primaril y prompts the operator for the common po ol
number. Then the operator enters it. That number should be of 2 digits in the range
00-99 for OP50.
♦ No: It prompts the operator for the number to be stored in the common pool. The
number does not need to start with line access code.
ACD
♦ Enable?: ACD is put on line.
♦ Disable?: ACD is put off line.
Parallel Operator:
♦ Enable?: Parallel operator is put on line.
♦ Disable?: Parallel operator is put off line.
Page 45

OP50 Technical Reference and User Guide
36
APPENDIX
Error Messages
1) In case the user starts to enter an incorrect access code, s/he can obtain [Error]
information by entering a number that does not exist in the system, so that s/he could
have the opportunity to enter the access code again after pressing the ‘Enter’ key.
2) The system takes no action for the keys pressed during display of the messages
(Error message, Line back...) that resides on the display for a specific period of time.
(After the “Clear” option is confirmed by using the ‘Enter’ key, any process can be
done.
3) In the event that an incorrect operation is done while in the programming mode, the
error message is displayed for one second. The user receives erroneous actio n tone
from the handset during that period. No key pressed in the meantime is d etected and
the telephone returns to the upper menu after the error display is over.
4) Whenever you see the SERIAL ERROR message, this indicates that your telephone
can not communicate with the exchange. In that case, the upper group keys and
special keys of your telephone do not work. In such cases call your authorized
reseller.
Page 46

09/2009
 Loading...