

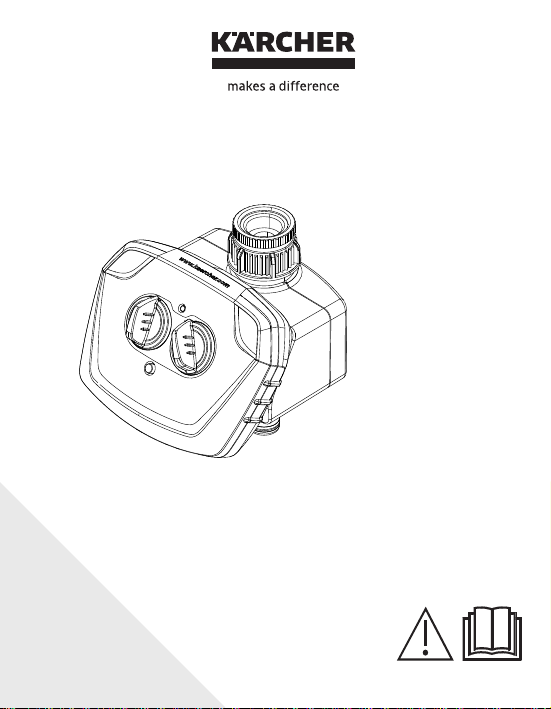
Kärcher WT 4 Original Instructions Manual
Register and win!
www.kaercher.com
WT 4
Deutsch 5
English
Français
Italiano
Nederlands 4
Español
Português
Ελληνικά
59681610
14
2
3
5
61
70
(10/17)

234

Inhaltsverzeichnis
Geräteabbildung 3
Allgemeine Hinweise 5
Sicherheitshinweise 7
Bedienung 8
Pflege und Wartung
Hilfe bei Störungen
Zubehör und Ersatzteile 13
Technische Daten 13
11
12
Allgemeine Hinweise
Sehr geehrter Kunde,
Lesen Sie vor der ersten Benutzung Ihres Gerätes diese
wahren Sie diese für späteren Gebrauch oder für Nachbesitzer auf.
– Dieses Gerät wurde für den privaten Gebrauch entwickelt und is
– Dieses Gerät ist zum Anschluss an einen Wasserhahn vorgese-
Originalbetriebsanleitung, handeln Sie danach und be-
Bestimmungsgemäße Verwendung
icht für die Beanspruchungen des gewerblichen Einsatzes vor-
n
gesehen.
hen und steuert automatisch den Wasserfluss in Bewässerungssystemen.
Bitte beachten Sie beim Anschluss dieses Produktes an
T
rinkwassernetz die Anforderungen der EN 1717 und
Sie sich bei eventuellen F
ragen an Ihren Sanitärfachbetrieb.
das
wenden
t
Deutsch 5
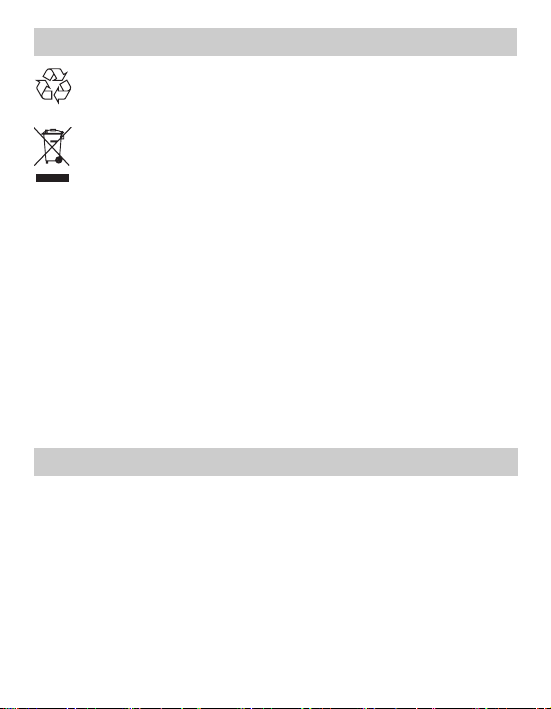
Umweltschutz
Die Verpackungsmaterialien sind recyclebar. Bitte werfen Sie
die Verpackungen nicht in den Hausmüll, sondern führen Sie
diese einer Wiederverwertung zu.
Altgeräte enthalten wertvolle recyclebare Materialien, die einer
Verwertung zugeführt werden sollten. Batterien und Akkus
enthalten Stoffe, die nicht in die Umwelt gelangen dürfen. Bitte
Altgeräte sowie Batterien oder Akkus umweltgerecht entsorgen.
Elektrische und elektronische Geräte enthalten oft Bestandteile, die
bei falschem Umgang oder falscher Entsorgung eine potentielle Gefahr für die menschliche Gesundheit und die Umwelt darstellen können. Für den ordnungsgemäßen Betrieb des Gerätes sind diese
Bestandteile jedoch notwendig. Mit diesem Symbol gekennzeichnete
Geräte dürfen nicht mit dem Hausmüll entsorgt werden.
Hinweise zu Inhaltsstoffen (REACH)
Aktuelle Informationen zu Inhaltsstoffen finden Sie unter:
www.kaercher.de/REACH
Garantie
In jedem Land gelten die von unserer zuständigen Vertriebsgesellschaft herausgegebenen Garantiebedingungen. Etwaige Störungen
an Ihrem Gerät beseitigen wir innerhalb der Garantiefrist kostenlos,
sofern ein Material- oder Herstellungsfehler die Ursache sein sollte.
Im Garantiefall wenden Sie sich bitte mit Kaufbeleg an Ihren Händler
oder die nächste autorisierte Kundendienststelle.
(Adresse siehe Rückseite)
6 Deutsch

Symbole in der Betriebsanleitung
VORSICHT
Für eine möglicherweise gefährliche Situation, die zu leichten Verletzungen oder zu Sachschäden führen kann.
Sicherheitshinweise
VORSICHT
Bewässerungsautomat nicht in Trinkwassersystemen betreiben.
Bewässerungsautomat nur mit unbehandeltem, klarem Süßwas-
ser mit einer Temperatur bis maximal 35°C betreiben.
Bewässerungsautomat nur im Außenbereich installieren.
Bewässerungsautomat vor Spritzwasser schützen und nie in
Wasser tauchen.
Bewässerungsautomat vor jedem Betrieb auf Schäden prüfen,
b
ei sichtbaren Beschädigungen Betrieb einstellen.
Bewässerungsautomat nur in vertikaler Position anbringen.
Keine Dichtmasse und keine Schmiermittel verwenden, um den
ässerungsautomat am Wasserhahn anzuschließen.
Bew
Nicht am angeschlossenen Schlauch ziehen.
Nur 9V Batterien (Typ 6LR61 / Alkaline) verwenden.
Keine aufladbaren Batterien verwenden.
Bewässerungsautomat nicht an Orten installieren, an denen sich
Kondenswasser bildet, da hierdurch die Batterie beschädigt werden kann.
Bewässerungsautomat nicht in der Nähe von Wärmequellen ins-
tallieren (maximale Umgebungstemperatur 60°C).
Bewässerungsautomat nicht in der Nähe von unter Spannung
stehenden Geräten betreiben.
Deutsch 7
Bedienung
Prüfen Sie beim Auspacken den Packungsinhalt auf Vollständigkeit
und Beschädigungen. Benachrichtigen Sie bei Beanstandungen bitte
Ihren Händler.
Abbildungen siehe Ausklappseite!
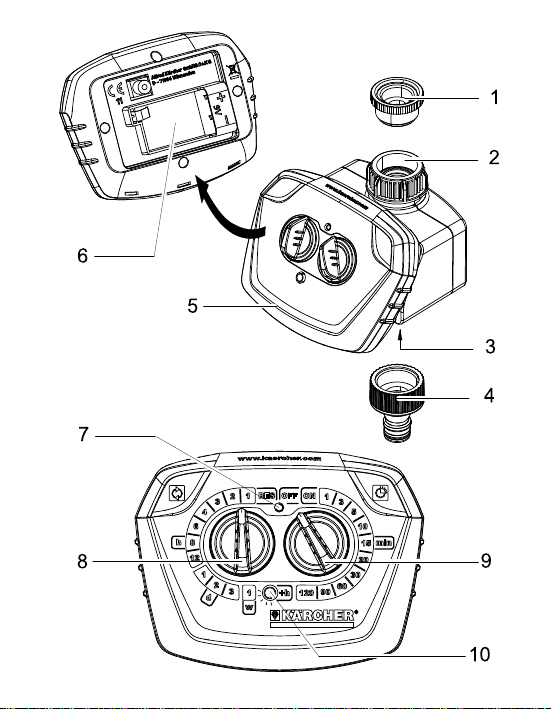
Gerätebeschreibung
1 Reduzierstück (G
2 Wasseranschluss (G 1) mit Filterdichtung
3 Schlauchanschluss
4 Kupplungsteil für Schlauchanschluss
5 Gehäuseoberteil
6 Batteriefach
7 Signalleuchte
8 Regler für Bewässerungshäufigkeit
9 Regler für Bewässerungsdauer
10 Taste zum Ändern der Startzeit / zur Funktionskontrolle
Gehäuseoberteil abnehmen.
9V Batterie (Typ 6LR61 / Alkaline) einlegen.
Gehäuse schließen, auf richtigen Sitz achten.
Kupplungsteil auf Schlauchanschluss schrauben.
Bei Bedarf Reduzierstück auf Wasseranschluss schrauben.
Bewässerungsautomat am Gehäuse halten und Wasseranschluss
auf den Wasserhahn schrauben.
VORSICHT
Bewässerungsautomat nie ohne mitgelieferte Filterdichtung an den
Wasserhahn anschließen.
3
/4)
Vor Inbetriebnahme
8 Deutsch

Inbetriebnahme
Bewässerungsdauer einstellen
Regler für die Bewässerungsdauer auf die gewünschte Dauer,
z.B. 15min einst
Bewässerungshäufigkeit und Startzeitpunkt einstellen
Hinweis: Der Startzeitpunkt des Bewässerungsrhythmus entspricht
unmittelbar dem Einstellzeitpunkt der Bewässerungsdauer. Die Veränderung des Startzeitpunktes ist optional möglich und nachfolgend
mit beschrieben.
ellen.
Regler für die Bewässerungshäufigkeit auf Stellung RES drehen.
D
ie Signalleuchte blinkt rot, der Programmiermodus ist für 30se
a
ktiviert.
c.
Taste zum Ändern der Startzeit betätigen (optional). Pro Betäti-
gung erfolgt eine Verschiebung der Startzeit um 60min
z.B.: F
ür Verschiebung der Startzeit u
ktuellen Uhrzeit, Knopf 3x betätigen. Die Signalleuchte leucht
a
b
ei jeder Betätigung grün auf.
m 3h, ausgehend von der
.
et
Regler für die Bewässerungshäufigkeit auf gewünschten Zyklus
e
instellen.
h = Zyklus in Stunden, z.B alle 4 Stunden
d = Zyklus in Tagen, z.B alle 2 Tage
w = Zyklus wöchentlich
Einstellungen zurücksetzen
Um eine Eingabe zu korrigieren oder ein bereits eingestelltes Programm zu löschen
Regler für die Bewässerungshäufigkeit auf Stellung RES drehen.
Deutsch 9

Betrieb
Programmgesteuerte Bewässerung
Die Bewässerung erfolgt automatisch gemäß des eingestellten Programmes (zum Beispiel alle 2 Tage für 15 Minuten).
Durch Betätigen der Taste zur Funktionskontrolle kann jederzeit der
aktuelle Status abgefragt werden. Bei aktivem Programm leuchtet d ie
Signalleuchte kurz grün.
Hinweis: Bei leerer Batterie wird das Bewässerungsprogramm automatisch unterbrochen, die Signalleuchte leuchtet rot. Wird der Bewässerungsautomat längere Zeit unbeaufsichtigt verwendet,
vorsorglich eine neue Batterie einlegen.
Manuelle Bewässerung
Die Bewässerung kann jederzeit manuell gestartet werden, die eingestellten Programme bleiben davon unberührt.
Start manuelle Bewässerung
Regler für die Bewässerungsdauer auf Stellung ON drehen, Sig-
nalleuchte leuchtet kurz grün, das Ventil öffnet.
Nach 30 Minuten wird der Bewässerungsvorgang aut
eendet.
b
Stopp manuelle Bewässerung
omatisch
Regler für die Bewässerungsdauer auf Stellung OFF drehen, Si-
gnalleuchte leuchtet kurz rot, das Ventil schließt.
Hinweis: Ist am Bewässerungsautomat ein Bewässerungsprogramm festgelegt, muss nach Beendigung der manuellen Bewässerung der Regler für die Bewässerunghsdauer wieder auf die
gewünschte Dauer eingestellt werden. Steht der Regler auf OFF erfolgt keine Bewässerung, obwohl der interne Bewässerungsrhythmus weiterläuft.
10 Deutsch

Betrieb beenden
Am Ende der Bewässerungssaison
Wasserhahn schließen.
Bewässerungsautomat von Wasserhahn und Wasserschlauch
t
rennen.
Manuelle Bewässerung aktivieren, damit restliches Wasser aus
d
em Bewässerungsautomaten abfließen kann.
Regler für die Bewässerungshäufigkeit auf Stellung RES drehen.
Batterie entfernen.
Pflege und Wartung
Filterdichtung reinigen
Filterdichtung im Wasseranschluss regelmäßig entnehmen und
nter fließendem Wasser ausspülen.
u
Batterie
Batterie wechseln
Vor jeder Bewässerungssaison oder bei rot leuchtender Signalleuchte.
Gehäuseoberteil abnehmen.
Neue 9V Batterie (Typ 6LR61 / Alkaline) einlegen.
Verbrauchte Batterie gemäß den geltenden Bestimmungen entsorgen.
Hinweis: Die Sicherheitseinrichtung des Bewässerungsautomaten schließt bei leerer Batterie automatisch das Ventil.
Gehäuse schließen, auf richtigen Sitz achten.
Deutsch 11
Wartung
Das Gerät ist wartungsfrei.
Lagerung
Bewässerungsautomat vollständig von Wasser entleeren.
Batterie entfernen.
Bewässerungsautomat an einem trockenen und frostsicheren
t lagern.
Or
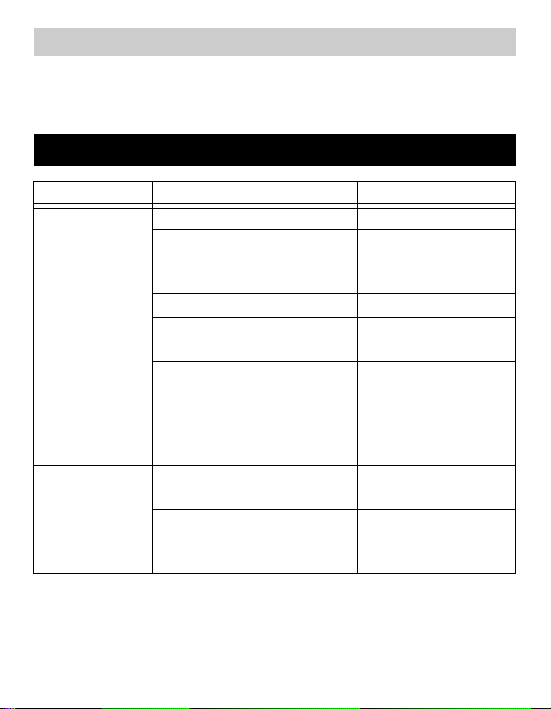
Hilfe bei Störungen
Störung Ursache Behebung
Bewässerung erfolgt trotz Programmierung
nicht.
Leckage am
Wasseranschluss.
Bei Fragen oder Störungen hilft Ihnen unsere Kärcher-Niederlassung
gerne weiter. Adresse siehe Rückseite.
Wasserhahn geschlossen. Wasserhahn öffnen.
Batterie leer. Neue 9V Batterie (Typ
Batterieanschlusskontakte
oxidiert.
Filterdichtung verstopft. Filterdichtung reinigen.
Bewässerungsprogramm manuell unterbrochen. Regler für
Bewässerungsdauer steht auf
OFF.
Filterdichtung defekt. Filterdichtung ersetzen.
Wasseranschluss am Wasserhahn hat sich gelöst.
6LR61 / Alkaline) einlegen.
Kontakte reinigen.
Regler für die Bewässerungsdauer auf die
gewünschte Dauer,
z.B. 15min einstellen.
Wasseranschluss wieder festschrauben.
12 Deutsch
Zubehör und Ersatzteile
Nur Original-Zubehör und Original-Ersatzteile verwenden, sie bieten
die Gewähr für einen sicheren und störungsfreien Betrieb des Gerätes.
Informationen über Zubehör und Ersatzteile finden Sie unter www.kaercher.com.
Technische Daten
Betriebsdruck 0,1 - 1,0 (1 - 10) MPa (bar)
Zulauftemperatur (max.) 35 °C
Umgebungstemperatur +1 -> +60 °C
Batterietyp 9V (6LR61 / Alkaline)
Technische Änderungen vorbehalten!
Deutsch 13
Contents
Illustration of appliance 3
General information 14
Safety instructions 16
Operation 17
Care and maintenance 20
Troubleshooting 21
Accessories and Spare Parts 22
Technical specifications 22
General information
Dear Customer,
Please read and comply with these original instructions
them for later use or subsequent owners.
– This appliance has been designed for use in private households
– This appliance is designed to be connected to a water tap and au-
prior to the initial operation of your appliance and store
Proper use
and is not intended
tomatically regulates the water flow in irrigation systems.
Please observe the requirements of EN 1717 when connecting
this product to the drinking water network and contact your sanitation specialists if you have any questions.
for commercial use.
14 E
nglish
Environmental protection
The packaging material can be recycled. Please do not place
the packaging into the ordinary refuse for disposal, but arrange
for the proper recycling.
Old appliances contain valuable recyclable materials that
should be recycled properly. Batteries and accumulators con-
tain substances that must not enter the environment. Please
dispose of old devices and batteries or accumulators in an environmentally friendly way.
Electrical and electronic devices often contain components which
could potentially pose a danger to human health and the environment
if handled or disposed of incorrectly. However, these components are
necessary for the proper operation of the device. Devices marked
with this symbol must not be disposed of with regular household rubbish.
Information on ingredients (REACH)
The latest information on ingredients can be found at:
www.kaercher.de/REACH
Warranty
The warranty terms published by the relevant sales company are applicable in each country. We w
ance within the warranty period free of charge, provided that such
failure is caused by faulty material or defects in manufacturing. In the
event of a warranty claim please contact your dealer or the nearest
authorized Customer Service centre. Please submit the proof of purchase.
(See address on the reverse)
ill repair potential failures of your appli-
English 15

Symbols in the operating instructions
CAUTION
Possible hazardous situation that could lead to mild injury to persons
or damage to property.
Safety instructions
CAUTION
Do not use the irrigation device in drinking water systems.
Only operate the irrigation device with untreated, clear fresh wa-
ter at a temperature of max. 35°C.
Only install the device outside.
Protect the irrigation device from water spray and never sub-
merge in water.
Check the irrigation device for damages prior to each use and
stop using it if there are visual damages.
Only mount irrigation device in a vertical position.
Do not use sealant or lubrication to connect the irrigation device
to the water tap.
Do not pull on the attached hose.
Only use 9V batteries (type 6LR61 / Alkaline).
Do not use rechargeable batteries.
Do not install the irrigation device in areas where condensation
water may be generated, as this may damage the battery.
Do not install the irrigation device near heat sources (max. ambi-
ent temperature 60°C).
Do not install the irrigation device near powered devices.
16 English
Operation
Check the contents of the packaging for completeness and damages
when unpacking. If you detect any damages please contact your
dealer.
Illustrations on fold-out page!
Description of the Appliance
3
1 Reduction piece (G
2 Water connection (G 1) with filter gasket
3 Hose connection
4 Coupling element for hose connection
5 Housing top
6 Battery compartment
7 Signal lamp
8 Regulator irrigation frequency
9 Regulator irrigation duration
10 Button to change the start time / for function control
Remove the top part of the casing.
Insert a 9V battery (type 6LR61 / Alkaline).
Close the casing and ensure a proper fit.
Screw the coupling element onto the hose connection.
If necessary, screw the reduction piece onto the water connec-
tion.
Hold the irrigation device to the casing and screw the water con-
nection onto the water tap.
/4)
Before Startup
English 17

CAUTION
Never connect the irrigation device to the water tap without using the
supplied filter gasket.
Start up
Setting the irrigation duration
Set the regulator for the irrigation duration to the desired duration,
e
.g. 15 minutes.
Set the irrigation frequency and the start time
Note: The start time of the irrigation rhythm corresponds directly to
the set time of the irrigation duration. The start can be optionally
changed and is also described below.
Turn the regulator for the irrigation frequency to the RES position.
T
he signal lamp blinks red, the programming mode is activated
for 30 seconds.
Activate the button to change the start time (option). Every use
mo
ves the start
e
.g.: To delay the start time by 3 hours, press the button thre
imes (from the current time). The signal lamp glows green ever
t
ime it is used.
t
time by 60 minutes.
e
Turn the regulator for the irrigation frequency to the desired cycle.
h = cycle time in hours, e.g. every 4 hours
d = cycle time in days, e.g. every 2 days
w = weekly cycle
Reset setting
In order to correct an entry or to delete a preset programme
Turn the regulator for the irrigation frequency to the RES position.
y
18 E
nglish

Operation
Programme-controlled irrigation
The irrigation will take place automatically as per the preset programme (e.g. every 2 days for 15 minutes each).
Actuating the button for function control lets you check the current
status at any time. While the programme is active, the signal lamp will
briefly light up green.
Note: If the battery is depleted, the irrigation programme will be interrupted automatically and the signal lamp will glow red. If the irrigation
device is to be used over longer periods without supervision, you
should insert a new battery.
Manual irrigation
The irrigation can be started manually at any time; the preset programmes will not be affected by this.
Start manual irrigation
Turn the regulator for the irrigation duration to the ON position;
the signal lamp will briefly light up green, the valve will open.
After 30 minutes, the irrigation process will end automatically.
Stop manual irrigation
Turn the regulator for the irrigation duration to the OFF position;
the signal lamp will briefly light up red, the valve will close.
Note: If an irrigation programme is set on the irrigation unit, the regulator for the irrigation duration must be reset to the desired times after the manual irrigation is c
there will be no irrigation, even though the internal irrigation rhythm
will continue.
ompleted. If the regulator is set to OFF,
English 19

Finish operation
At the end of the irrigation season
Turn off tap.
Remove the irrigation device from the water tap and the water
hose.
Activate manual irrigation to drain the remaining water from the
irrigation device.
Turn the regulator for the irrigation frequency to the RES position.
Remove the battery.
Care and maintenance
Clean the filter gasket
Regularly remove the filter gasket from the water connection and
rinse under running water.
Battery
Change the battery
Prior to each irrigation season or of the signal lamp glows red.
Remove the top part of the casing.
Insert a new 9V battery (type 6LR61 / Alkaline).
Dispose of the used battery according to the local provisions.
Note: The safety unit of the irrigation device will automatically
close the valve if the battery is depleted.
Close the casing and ensure a proper fit.
Maintenance
The appliance is maintenance free.
20 English
Storage
Completely drain all water from the irrigation device.
Remove the battery.
Store the irrigation device at a dry and frost-free location.
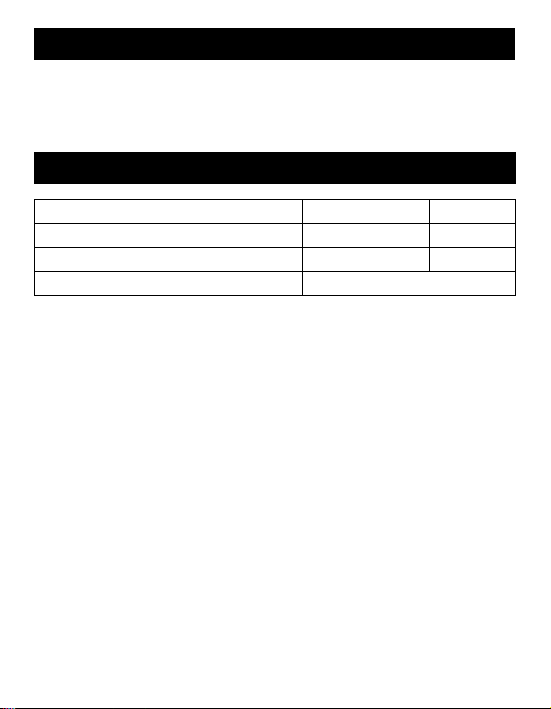
Troubleshooting
Fault Cause Remedy
The irrigation
does not take
place in spite
of the programming.
Leakage at
the water connection.
Our Kärcher branch will be pleased to help you further in the case of
questions or faults. See address on the reverse.
Water tap is closed. Open tap.
Battery depleted. Insert a new 9V bat-
tery (type 6LR61 /
Alkaline).
Battery contacts oxidized. Clean the contacts.
Filter gaskets blocked. Clean the filter gas-
ket.
Irrigation programme inter-
rupted manually. Regulator for irrigation duration
set to OFF.
Filter gasket defective. Replace the filter
The water connection at
the water tap has become
loose.
Set the regulator for
the irrigation dura-
tion to the desired
duration, e.g. 15
minutes.
gasket.
Reconnect the wa-
ter connection.
English 21
Accessories and Spare Parts
Only use original accessories and spare parts, they ensure the safe
and trouble-free operation of the device.
For information about accessories and spare parts, please visit
www.kaercher.com.
Technical specifications
Operating pressure 0,1 - 1,0 (1 - 10) MPa (bar)
Max. feed temperature 35 °C
Ambient temperature +1 -> +60 °C
Battery type 9V (6LR61 / Alkaline)
Subject to technical modifications!
22 English

Table des matières
Illustration de l'appareil 3
Consignes générales 23
Consignes de sécurité 25
Utilisation 26
Entretien et maintenance 30
Assistance en cas de panne 31
Accessoires et pièces de rechange 32
Caractéristiques techniques 32
Consignes générales
Cher client,
Lire cette notice originale avant la première utilisation de
la conserver pour une utilisation ultérieure ou pour le propriétaire futur.
– Cet appareil ne doit être utilisé que pour un usage domestique.
– Le présent appareil est destiné au raccord à un robinet d'eau
votre appareil, se comporter selon ce qu'elle requièrt et
Utilisation conforme
et
pilote automatiquement le flux d'eau dans les systèmes d'arrosage.
Lors du raccordement de ce produit au réseau d'eau potable, respecter les exigences de la norme EN 1717 et s’adresser à un
spécialiste sanitaire pour toute question.
Français 23
Protection de l’environnement
Les matériaux constitutifs de l’emballage sont recyclables. Ne
pas jeter les emballages dans les ordures ménagères, mais
les remettre à un système de recyclage.
Les appareils ancien modèle contiennent des matériaux précieux recyclables qui doivent être amenés à un système de re-
cyclage. Les batteries et les accumulateurs contiennent des
substances ne devant pas être tout simplement jetées. Veuillez éliminer les anciens appareils ainsi que les batteries ou les accumulateurs
d'une manière respectueuse de l'environnement.
Les appareils électriques et électroniques renferment souvent des
composants qui peuvent représenter un danger potentiel pour l'intégrité physique et l'environnement s'ils sont mal utilisés ou éliminés.
Ces composants sont pourtant nécessaires au bon fonctionnement
de l'appareil. Les appareils qui présentent ce symbole ne doivent pas
être jetés avec les déchets ménagers.
Instructions relatives aux ingrédients (REACH)
Les informations actuelles relatives aux substances se trouvent à
l'adresse :
www.kaercher.de/REACH
Garantie
Dans chaque pays, les conditions de garantie en vigueur sont celles
publiées par notre société de distribution responsable. Les éventuelles pannes sur l’appareil
de validité de la garantie, dans la mesure où celles-ci relèvent d'un
défaut matériel ou d'un vice de fabrication. En cas de recours en garantie, adressez-vous à votre revendeur ou au service après-vente
agréé le plus proche munis de votre preuve d'achat.
(Adresse au dos)
sont réparées gratuitement dans le délai
24 Fr
ançais

Symboles utilisés dans le mode d'emploi
PRÉCAUTION
Pour une situation potentiellement dangereuse qui peut avoir pour
conséquence des blessures légères ou des dommages matériels.
Consignes de sécurité
PRÉCAUTION
Ne pas exploiter l'arroseur automatique dans des systèmes
d'eau potable.
N'exploiter l'appareil d'arrosage qu'avec de l'eau claire non trai-
tée, à une température maximale de 35°C.
Installer l'arroseur automatique uniquement en zone extérieure.
Protéger l'appareil d'arrosage contre les éclaboussures d'eau et
ne jamais le plonger dans l'eau.
Contrôler avant chaque utilisation que l'arroseur automatique
n'est pas endommagé, en arrêter l'exploitation en cas de dommages visibles.
Disposer l'arroseur automatique uniquement en position verticale.
Ne pas utiliser de masse d'étanchéification ni de lubrifiant pour
raccorder l'arroseur automatique au robinet d'eau.
Ne pas tirer sur le tuyau raccordé.
Utiliser uniquement des piles de 9V (type 6LR61 / Alkaline).
Ne pas utiliser de batteries rechargeables.
Ne pas installer l'arroseur automatique en des sites où il se forme
de la condensation d'eau car cela pourrait endommager la pile.
Ne pas installer l'arroseur automatique près de sources de cha-
leur (température ambiante max. 60° C).
Ne pas utiliser l'arroseur automatique à proximité d'appareils
sous tension électrique.
Français 25
 Loading...