

Page 1

SB MB
59638780 04/17
Page 2

2
Page 3

- 1
Please read and comply with
these original instructions prior
to the initial operation of your appliance and
store them for later use or subsequent owners.
Before first start-up it is definitely necessary to read the safety indications Nr.
5.956-309.0!
– All users: Users include trained auxilia-
ry personnel, operators and experts.
– Experts: Experts are individuals, who
are, according to their professional education, able to install the equipment
and to operate the same.
To understand this operating instructions
manual it is first necessary to know these
terms. The technical terms indicated in bold
are used through out the operating instructions manual.
raw water, tap water, city water
Water softening unit
Soft water
Reverse osmosis
Waste water enriched with salts and minerals from the reverse osmosis process
Osmosis water, demineralised water, fully
desalinated water
Water from an organic water treatment system.
Please do not expose motor oil, fuil, diesel
and gazoline into the environment. Please
protect the ground and dispose of used oil
properly.
Notes about the ingredients (REACH)
You will find current information about the
ingredients at:
www.kaercher.com/REACH
Mishandling or misuse can prove to be hazardous to the operator and other persons
through
– high water pressure,
– hot water,
– Hot exhausts
– high electrical voltage,
– Detergent,
– damage to stomach and food pipe by
drinking large quantities of permeate.
To avoid danger to persons, animals and
property before the first operation of the
system, read:
– the operation instructions
– all safety notices
– according to the national requirements
of each country
– that safety notices included in the
cleaning agents used (normally on top
of the package stated).
Please remember:
– that you have understood all the in-
structions
– that all users of the plant are informed
about the instructions and have under-
stood them.
All individuals,who are involved, in the installation, the operation, the maintenance
and service of this equipment, must be
– qualified accordingly,
– they must know and obey the operation
instructions,
– they must know the appropriate regula-
tions, and must obey the same.
In the operation of self service, the owner
must provide cleaned and well exposed notice signs, which have to state
– possible danger,
– Safty device,
– Operating the equipment
If the equipment is operated in a close room
– , exhaust must be lead through appro-
priate pipes or chimneys,
– and there has to be sufficient fresh air
circulation.
DANGER
Risk of burns due to hot exhaust gases;
hence, do not reach over the exhaust opening. Do not touch the chimney cover.
Risk of burns due to hot system parts such
as pumps and motors. Be careful when
opening the system; allow system parts to
cool down first.
몇 WARNING
Do not use the system in the vicinity of people, unless they are wearing protective
gear.
The jet must not be directed by the user at
him/herself or at other persons to clean
clothing or footwear.
High-pressure hoses, fixtures and couplings are important for the safety of the appliance. Only use high-pressure hoses, fixtures and couplings recommended by the
manufacturer.
The system must not be used if a connecting line or important parts of the appliance,
e.g. safety devices, high-pressure hoses,
spray guns, are damaged.
– Please follow the national rules and
regulations for fluid spray jets of the respective country.
– All national laws and regulations about
installation of electrical appliances must
also be followed.
– Please follow the national rules and
regulations for accident prevention of
the respective country. Fluid spray jets
must be tested regularly and the results
of these tests must be documented in
writing.
– The heating appliance of the machine is
an ignition plant. All national laws and
regulations about heating systems
must also be followed.
– If the plant is operated in rooms, then
there should be adequate measures for
safely diverting the exhaust gases out
of the room (smoke gas pipes without
draught interceptors). Further, there
must also be adequate supply of fresh
air.
– Only Customer Service engineers
trained by Kärcher may perform settings and carry out maintenance tasks
and repairs.
– The local guidelines must be followed
while installing the chimney.
Before installing the machine, it is necessary to get the approval of the gas supply
company and the local chief chimney
cleaner.
The statutory requirements of civil engineering laws, trade laws and emission control norms must be followed at the time of
installation. We wish to bring to your notice
the following statutory regulations, guidelines and standards:
– The device may only be installed by a
specialized company according to the
national regulations.
Contents
About this operating instructions
manual. . . . . . . . . . . . . . . . . . . EN 1
Environmental protection. . . . . EN 1
Safety instructions . . . . . . . . . . EN 1
Operation. . . . . . . . . . . . . . . . . EN 2
Open the system . . . . . . . . . . . EN 4
Settings . . . . . . . . . . . . . . . . . . EN 5
Filling in detergents . . . . . . . . . EN 11
Manual interventions . . . . . . . . EN 11
Sales indicator . . . . . . . . . . . . . EN 12
Frost protection . . . . . . . . . . . . EN 12
Shutting down . . . . . . . . . . . . . EN 14
Shutdown. . . . . . . . . . . . . . . . . EN 14
Function. . . . . . . . . . . . . . . . . . EN 15
Technical specifications. . . . . . EN 23
Maintenance and care . . . . . . . EN 26
Troubleshooting. . . . . . . . . . . . EN 34
Accessories . . . . . . . . . . . . . . . EN 44
Warranty . . . . . . . . . . . . . . . . . EN 44
Transport . . . . . . . . . . . . . . . . . EN 44
Storage . . . . . . . . . . . . . . . . . . EN 44
Installing the unit (only for ex-
perts) . . . . . . . . . . . . . . . . . . . . EN 45
EU Declaration of Conformity . EN 51
Log of high pressure testing . . EN 52
About this operating
instructions manual
Target group for these instructions
Technical terms
Fresh water
Base exchanger
De-hardened or softened water
Reverse Osmosis (Abbreviation: RO)
Concentrate
Permeate
Processed water
Environmental protection
The packaging materials are recyclable. Please do not throw
packaging in the domestic waste
but pass it on for recycling.
Old units contain valuable recyclable materials. Batteries, oil
and similar substances may not
be released into the environment.
Therefore please dispose of old
units through suitable collection
systems.
Safety instructions
General
Specifications and Guidelines
Gas burner (option)
3EN
Page 4
- 2
– Installation of gas pipes - especially the
gas connections to the machine should only be done by a technical
company that has been approved by
the Industrial Association for Gas and
Water Installations.
– Settings, maintenance tasks and re-
pairs on the gas burner must only be
performed by authorised expert staff of
the burner manufacturers.
DANGER
Pointer to immediate danger, which leads
to severe injuries or death.
몇 WARNING
Pointer to a possibly dangerous situation,
which can lead to severe injuries or death.
몇 CAUTION
Pointer to a possibly dangerous situation,
which can lead to minor injuries.
ATTENTION
Pointer to a possibly dangerous situation,
which can lead to property damage.
DANGER
Risk of injury from the high-pressure jet. Do
not point the high-pressure jet to humans or
animals. Risk of injury from electric shock.
Do not point the high pressure jet towards
electrical devices, cables and the system.
The sound level in the plant amounts to 65
dB(A). If parts (such as large sheets) that
amplify sound are shot blasted, it can give
rise to higher noise levels. If so, wear ear
plugs.
Turn the programme selection switch at
the operating panel to "STOP".
This SB washing system is to be used for
cleaning
– Vehicles and
– Trailers
with water and detergents added to it.
It is wrong and therefore prohibited to use
the plant for cleaning
– human beings and animals. There is a
high risk of injury due to the high pres-
sure jet.
– Loose parts. These can get thrown off
due to the high pressure jet and can
cause damage to persons or other parts
of the plant.
To disconnect from the drinking water network, a system separator type BA, category 4 must be installed between the system
and the drinking water network. In addition
to that, the local regulations must be adhered to.
ATTENTION
Risk of damage to the plant if water supply
is not of suitable quality. The system must
only be supplied with water in drinking water quality.
The plant may be used for diverting combustible gases only in the open.
If the plant is to be housed under a roof or
in a closed room, then it must be connected
to a chimney to provide an outlet for the exhaust gases. If the plant is to be connected
to a chimney, then the burner needs to be
adjusted and the exhaust values must be
checked by the concerned chimney cleaner.
ATTENTION
The system is frost-safe up to -20°C under
the conditions outlined in the section
"Frost-protection" and must be shut down if
the temperatures fall below this limit.
– Coins are thrown in at the control panel
and the washing programme is selected.
– Cleaning is done using the hand-spray
gun.
DANGER
Risk of injury, risk of burns. Washing operation only when the system is locked.
– The inner areas of the plant should only
be accessed by trained persons for
maintenance tasks. The door must be
closed when the plant is in operation.
Turn the programme selection switch at
the operating panel to "STOP".
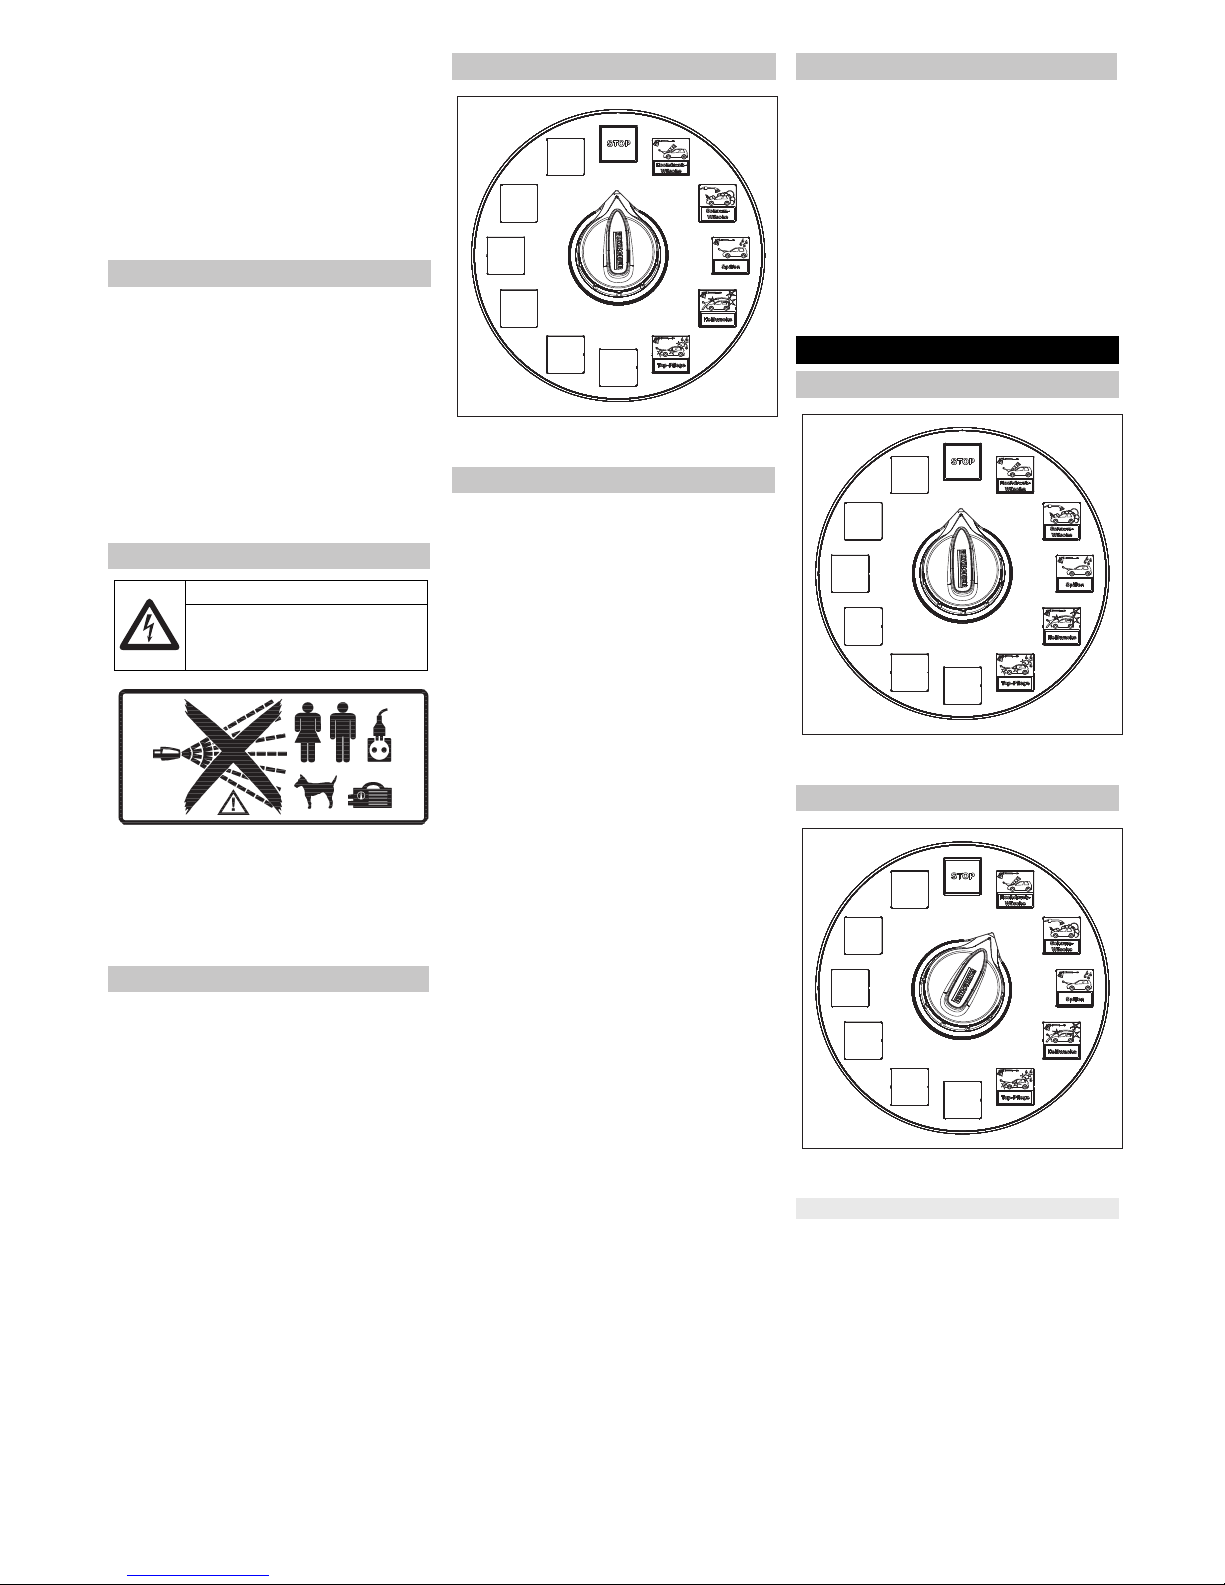
The following washing programs are available:
Stop
Interrupts the programme.
Basic position, washing tools in the tool
holders.
Note:
"STOP" function is active in all switch positions without washing programme.
High-pressure wash
Removes coarse dirt.
Warm water with shampoo
Distance of high pressure nozzle approx 30 cm.
Hazard levels
Symbols on the plant
Risk of electric shock!
Only electricians or authorised
technicians are permitted to
work on parts of the plant.
Hearing protection
Behaviour in emergency situations
Proper use
Workstation
Operation
Switch-off in case of emergency
Washing programmes
Standard programmes
4 EN
Page 5

- 3
Foam Wash
Deep cleaning with active foam.
Only use foam brush when the programme
is running and after the high-pressure
wash.
Rinse
Rinse off shampoo and foam.
Distance of high pressure nozzle approx 50 cm.
Hot wax
Warm water with paint protection.
Use after rinsing.
Distance of high pressure nozzle approx 80 cm.
Top care
For Spot-free drying.
Demineralised water leaves a spot-free
high gloss finish.
Distance of high pressure nozzle approx 80 cm.
Dirt Loosening
Removes persistent dirt.
Warm water with special detergent.
Distance of high pressure nozzle approx 30 cm.
Micro emulsion, model A
Removes persistent dirt.
Warm water with special detergent.
Distance of high pressure nozzle approx 30 cm.
Micro emulsion, model B, with external
high pressure pump
Removing bitumen road coating residue.
Spraying a special detergent.
Insects Loosening
Loosens insects.
Warm water with special insect removing
detergent.
Distance of high pressure nozzle approx 30 cm.
Rim cleaning, model A, with dosing
pump
Loosens brake dust.
Warm water with special or increased detergent addition.
Alkaline-based detergents only.
Distance of high pressure nozzle approx 30 cm.
Application before the car wash and only
on coated or painted wheels.
Rim cleaning, model B, with external
high pressure pump and mixing tank
Loosens brake dust.
Cold water with special high-dose detergent addition while mixing in compressed
air.
Application before the car wash and only
on coated or painted wheels.
Intensive foam
Loosens persistent contamination.
Foam with special detergent addition.
Distance of foam nozzle approx 30 cm.
Under-chassis Wash
Removing coarse dirt from the underchassis.
Washing cycle begins with a delay of approx. 10 seconds; drive the vehicle backwards and forwards over the under-chassis
wash.
1 Rest value display
2 Program selection switch
3 Throwing in the coin
1 Rest value display
2 Program selection switch
3 Throwing in the coin
Select the washing programme using
the programme selection switch.
Throw in the coin.
1 Washing brush
2 Locking lever
3 Hand spray gun
4 Lever for trigger gun
5 Safety lever
Press the locking lever for washing us-
ing high-pressure jet; pull the washing
brush towards the rear and lock it in.
To wash using the washing brush,
press the locking lever, push the wash-
ing brush forward and lock it in.
Unlock the trigger gun and pull the lever
of the gun.
The hand-spray gun and washing brush
are available as separate tools.
Hand spray gun:
Unlock the trigger gun and pull the lever
of the gun.
Washing brush:
Clean the washing brush with the hand
spray gun prior to use.
Set the washing programme "foam
wash" and clean the vehicle.
– Washing time starts after the coin is
thrown in.
– The remaining value display shows the
remaining washing credit in washing
units.
Note:
The washing time is running even if the programme selector switch is in the "STOP"
position.
If more coins are thrown in during the washing time, the same are registered and added to the existing washing time.
Additional programmes (option)
Operations procedure
Single tool version
Double tool version (optional)
Washing time
5EN
Page 6
- 4
1 Coin acceptor door lock
only for SB MB Comfort
2 Coin cassette lock (optional)
only for SB MB Comfort
3 Unlock the coin acceptor door
Only for SB MB standard
Pull down to unlock.
4 Front door unlock
Lift up to unlock.
5 Unlock of left rear door
Lift up to unlock.
6 Unlock of right rear door
Lift up to unlock.
Open the system
6 EN
Page 7

- 5
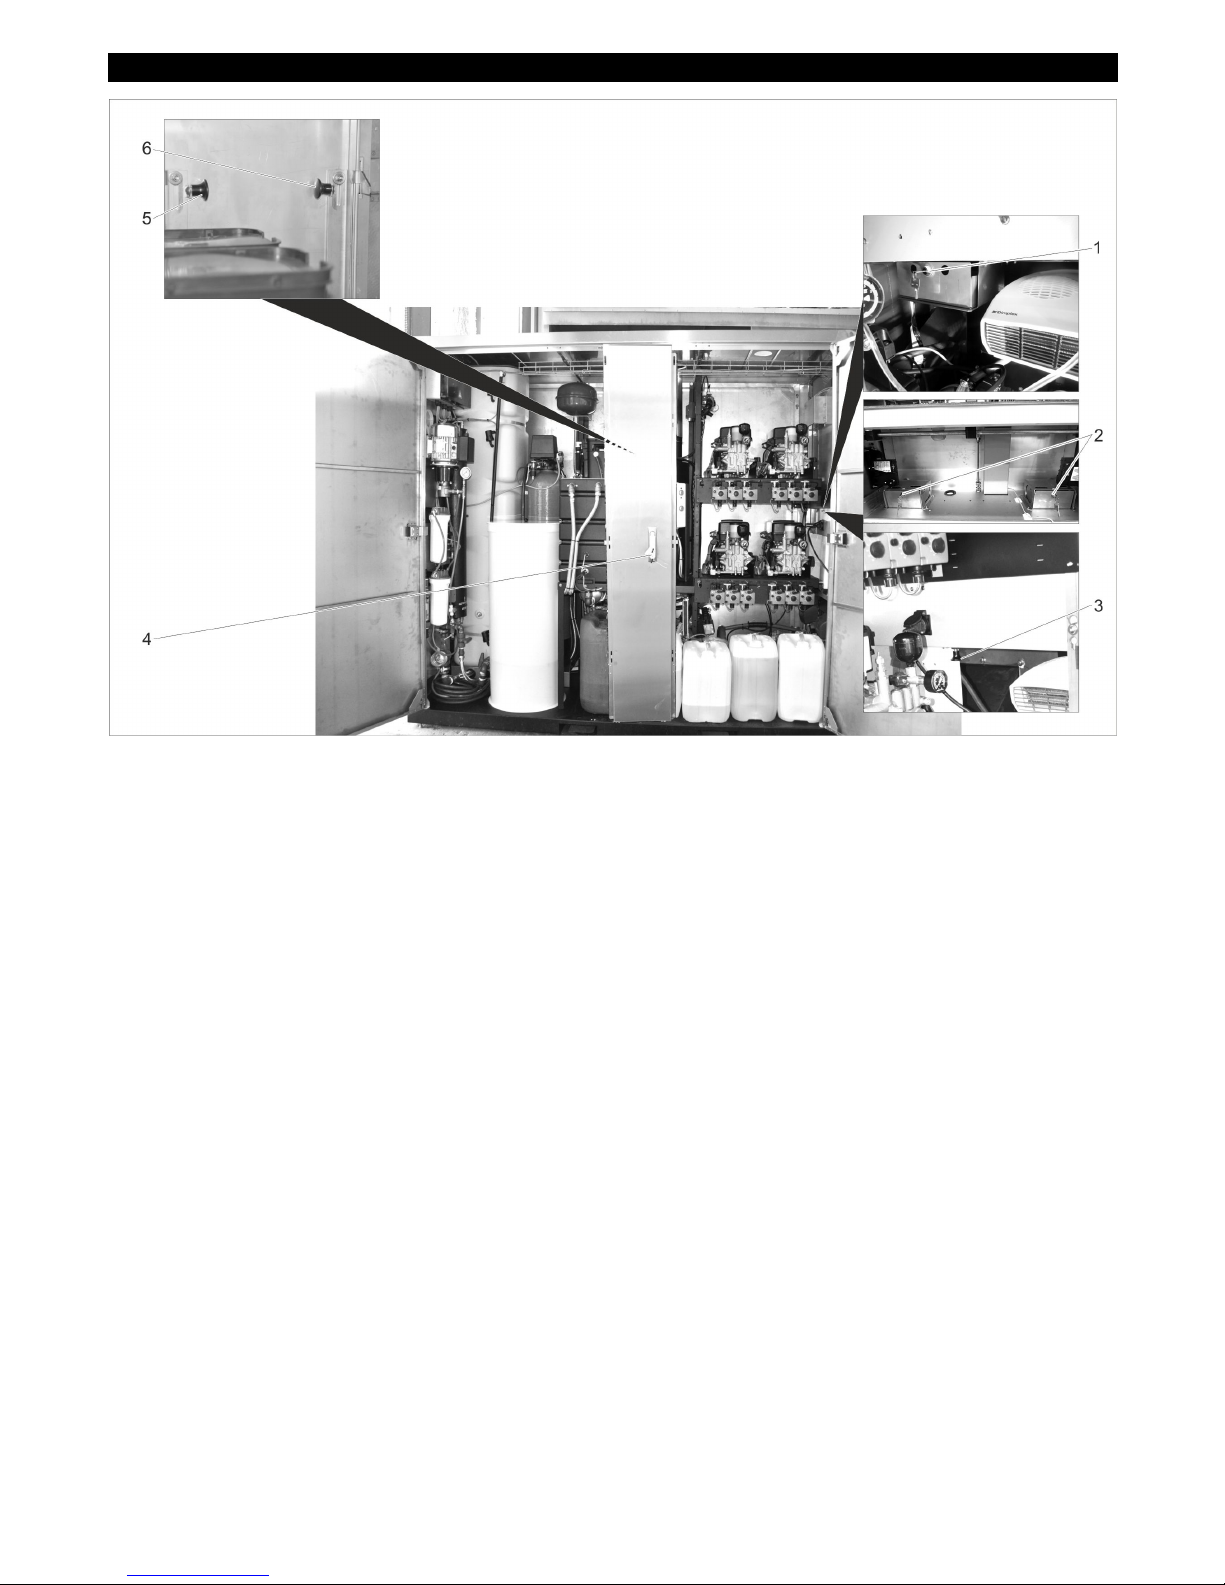
1 Dry foam station
2 Display of control (in control cabinet)
3 Display of control
Only for SB MB standard
4 Control board
5 Main switch
6 Dosing pump, dry foam station
7 Hot air blower
8 Dosing pumps
9 Frost protection with lost water (option),
installation site 2
10 Frost protection with lost water (option),
installation site 1
11 Emergency frost protection (option)
12 Rim cleaner (option)
13 Heat exchanger washing station heater
14 Head of base exchanger
15 Blending device (option)
1 Pressure switch air
2 Manometer
3 Compressed air connection for service
work
4 Pressure reducer
Set pressure reducer to 0.4...0.5 MPa
(4...5 bar).
1 Dosing pump high pressure wash (DP 1)
2 Dosing pump hot wax (DP 2)
3 Dosing pump top care (DP 3)
4 Dosing pump optional (DP 4), for addi-
tional programmes
The dosing pumps dose the washing water
with the detergents in accordance with the
wash programme and the equipment of the
system.
Note:
The dosage amount is optimally set by the
fitter when the system is assembled. Generally no reset is necessary.
Fine adjustments are made on the control
(see Settings/Control). The standard setting of the dosing pumps remains unchanged.
Settings
Main switch
Position
1 Plant is working.
Frost protection (option) is active.
0 Entire system turned off (frost
protection also).
Adjust compressor Setting dosing pumps
7EN
Page 8
- 6
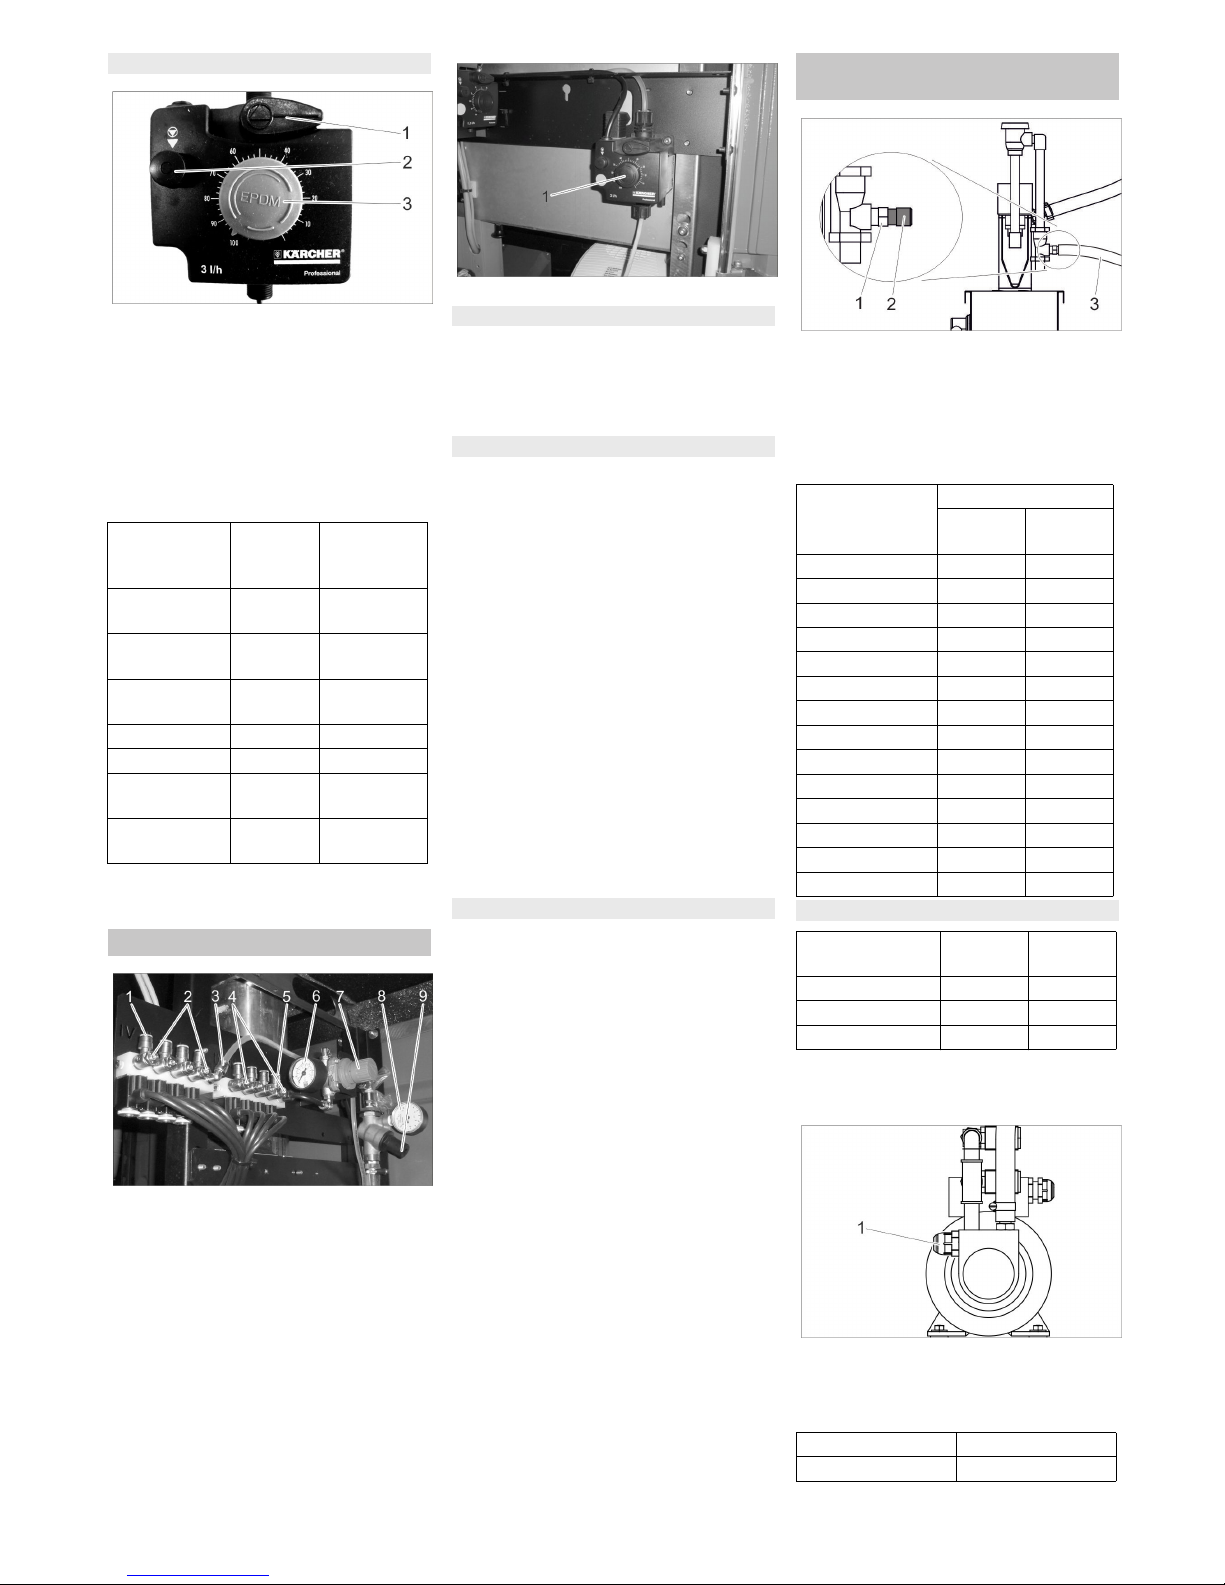
1 Ventilation lever
2 Ventilation button
3 Adjustment knob dosing volume
Pull out the adjustment knob for the
dosing volume.
Press and release the ventilation button
repeatedly and at the same time, rotate
the adjustment knob to the desired set-
ting.
Release the ventilation key.
Push in the adjustment knob for the
dosing volume.
1 Outlet water/detergent
2 Dosing valve water/detergent
3 Inlet water/detergent
4 Dosing valve air
5 Output air
6 Manometer compressed air
7 Pressure reducer air
8 Manometer water
9 Pressure reducer water
1 Dosing pump for dry foam
Open fresh water supply.
Use wash programme "Foam wash" at
a washing area.
Set pressure reducer for water to 0.25
MPa (2.5 bar).
Set the dosing pump for dry foam to
20%.
See "Adjusting dosing pumps" for procedure.
Open fresh water supply.
Remove the hose at the distribution
block water/chemicals outlet and replace with a 400 mm hose piece (PVC
hose 6/4).
Use wash programme "Foam wash" for
this washing area.
Set the fluid stream from the hose piece
by adjusting the dosing valve water/detergent to 300 ml/min (measure with
measuring cylinder).
End wash programme "foam wash".
Remove the hose piece and reconnect
the hose to the washing area.
Repeat the setting of the dosing valves
water/chemicals for the remaining
washing areas.
Set pressure reducer for air to 0.25
MPa (2.5 bar).
Use the service tool 6.901-074.0 be-
tween the output air and the hose to the
washing area.
Use wash programme "Foam wash" for
this washing area.
Adjust the dosing valve air so that the
pressure gauge of the service tool displays 0.15 MPa (1.5 bar).
End wash programme "foam wash".
Remove the service tool and reconnect
the hose to the washing area to the distributor block air.
Repeat the setting of the dosing valves
air for the remaining washing areas.
Note:
After performing the basic setup, the consistency of the foam should only be
changed by adjusting the dosing valves air.
1 Input of detergent
2 Nozzle insert
3 Suction hose for detergent
Pull off the suction hose.
Select the nozzle insert for the desired
mixing ratio:
Slide the nozzle insert all the way into
the detergent input.
Insert the suction hose.
1 Adjustment screw
Adjust the pressure via the adjustment
screw:
Basic adjustment
Detergent Position of
adjustment
knob (%)
High pressure
wash
RM 806 50
Wet foam
(Option)
RM 806 50
Dry foam (option)
RM 812 50
Hot wax RM 820 50
Top care RM 821 50
Contaminant removal (option)
RM 806 50
Insect removal
(option)
RM 803 50
Dry foam station
Basic setting water
Basic setting water/chemicals
Basic setting air
Wheel cleaner/intensive foam
(option)
Nozzle colour Water/detergent
Wheel
cleaner
Intensive
foam
no nozzle 1:1 4:1
grey 1.2:1 5:1
black 2:1 6:1
beige 4:1 8:1
red 6:1 17:1
white 9:1 23:1
blue 10:1 25:1
light brown 13:1 36:1
green 21:1 48:1
orange 26:1 64:1
brown 30:1 75:1
yellow 38:1 90:1
purple 50:1 120:1
pink 100:1 240:1
Basic setting water/chemicals
Rim clean-erIntensive
foam
Detergent RM 801 RM 838
Nozzle colour blue yellow
Mixing ratio 10:1 38:1
Rim cleaner Intensive foam
8.0...8.5 bar
8 EN
Page 9

- 7
Adjust the air pressure reducer:
ATTENTION
Risk of damage due to acidic detergents.
Only use alkaline detergents for wheel
cleaning.
Note:
After performing the basic setup, the spray
pattern should only be changed by adjusting the pressure reducer for air.
Wheel cleaner:
The uniform application onto the rims is facilitated if a suitable colouring agent is added to the rim cleaner concentrate.
1 Adjustment screw
Adjust the pressure of the micro emul-
sion as needed by turning the adjust-
ment screw.
The booster heater is supplied with partly
softened water with a water hardness of
7° dH.
For this purpose, the blending device mixes
fresh water and softened water.
1 Sampling tap
2 Outlet valve (to the booster heater)
3 Adjusting screw, fine adjustment
4 Adjusting screw, coarse adjustment
5 Inlet valve fresh water
Completely open outlet valve and inlet
valve.
Close both adjusting screws (turn in
clockwise direction).
Establish water inlet to the warm water
tank.
Open the sampling tap.
Slightly open adjusting screw coarse
adjustment.
Collect water from the sampling tap and
measure the water hardness.
Adjust the bypass valve until it is just
under 7° dH.
Set the water hardness to 7° dH using
the adjusting screw fine adjustment.
Close the sampling tap.
1 Key "1/ON"
2 Control lamp operating state
3 Display
4 LEFT key
5 RIGHT key
6 OK button
7 ESC button
1 Display
2 LEFT key
3 RIGHT key
4 OK button
5 ESC button
During normal operating mode, the control
panel display alternates between:
Day of the week, date, time, summer time
(Som)/winter time (Wint)
Operating time of the system on the current
day
Maintenance work due from customer service (example).
If more than one maintenance procedure is
required, these will be shown in sequence.
If no maintenance procedures are required,
nothing will be shown.
Fault occurred (example).
If more than one fault is present, these will
be shown in sequence.
The number in parentheses shows the total
number of faults present.
If no faults are present, nothing will be
shown.
Note:
To acknowledge faults see "Troubleshooting"
Press OK button for more than 2 sec-
onds.
Press the RIGHT button.
Press the OK button.
The menu "customer settings" (see following page) has been reached.
Basic setting air
Rim cleaner Intensive foam
2.5...3.0 bar 3.0 bar
Micro emulsion (option)
Blending device (option)
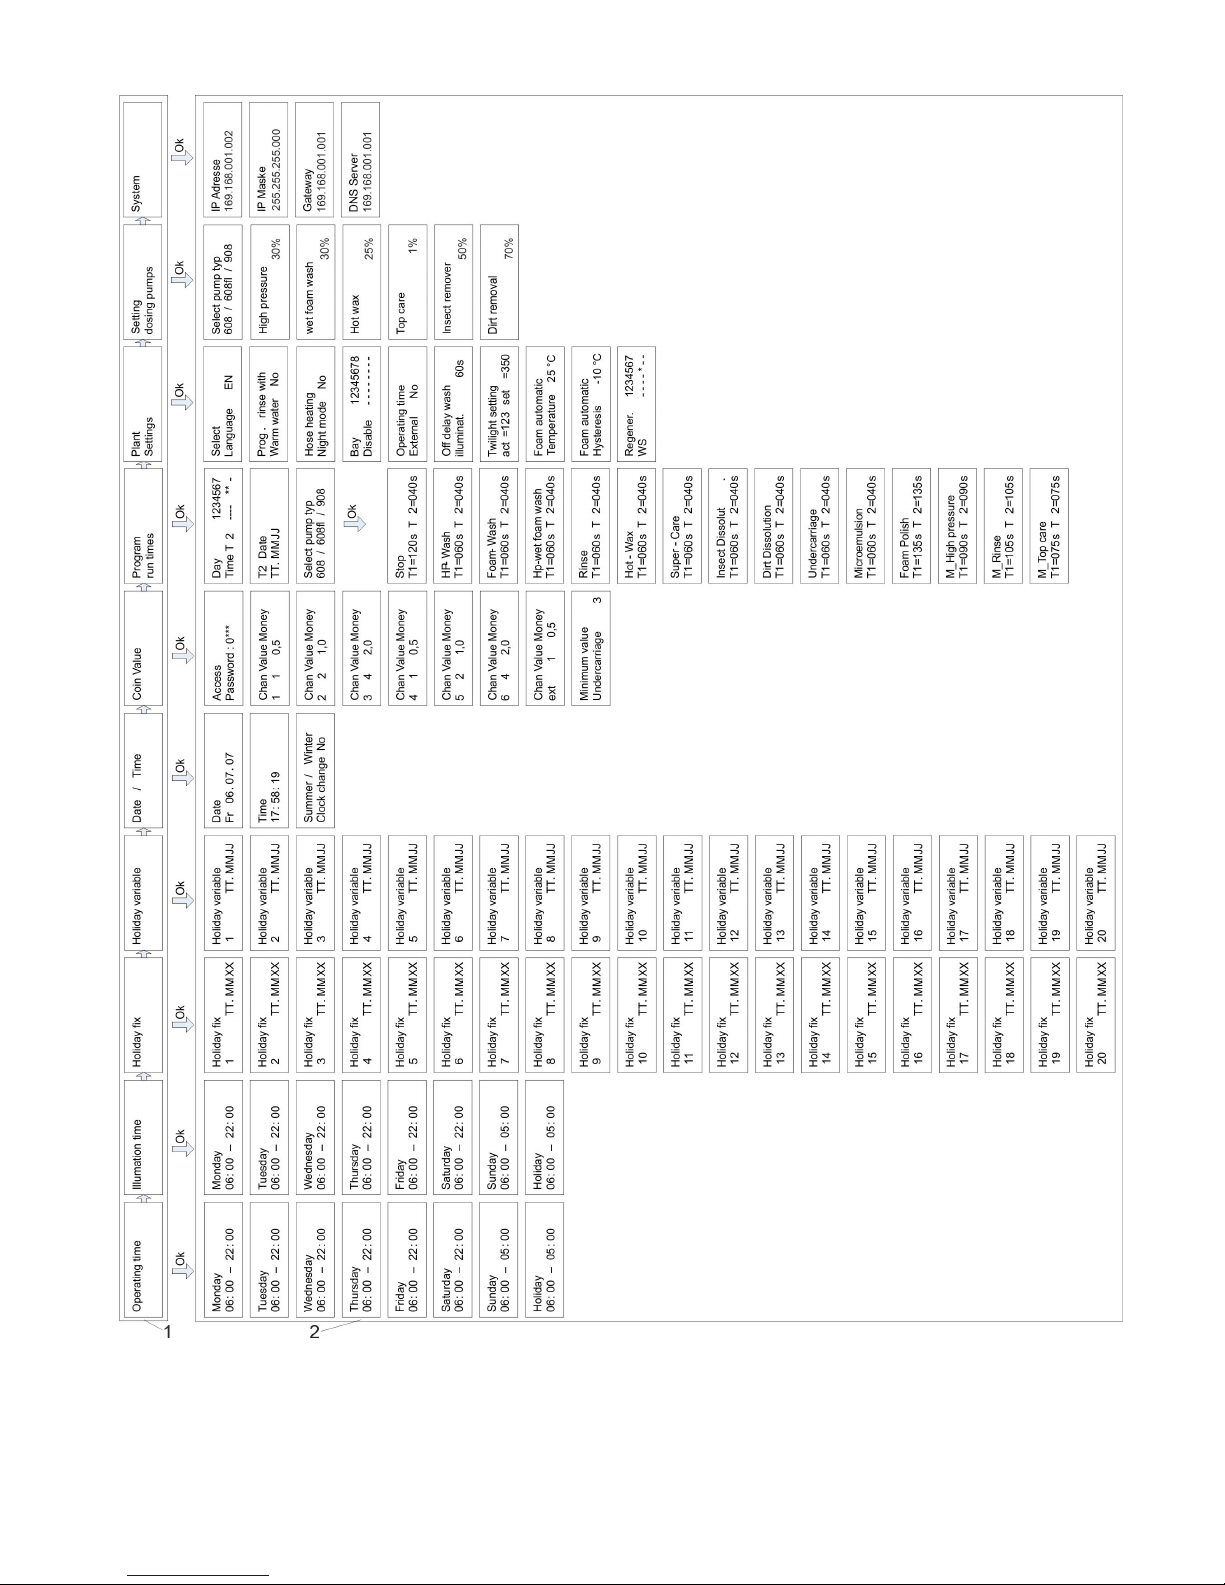
Controls
SB MB standard
SB MB comfort
Normal operation
Open the menu "customer settings"
9EN
Page 10
- 8
1 Menu item
2 Parameter
10 EN
Page 11
- 9
Select the menu item with the buttons
LEFT and RIGHT.
Press OK to open the parameter group.
Use the LEFT and RIGHT buttons to
select the paramater you want to set.
Press the OK button.
The selectable variable blinks.
Use the LEFT and RIGHT buttons to
select the variable value.
Press and hold the button for a swift
change of the variable.
Press the OK button to save the select-
ed value.
or
Press ESC to abort the change.
Press the OK button.
The selectable variable blinks.
Use the LEFT and RIGHT buttons to
select the variable value.
Press and hold the button for a swift
change of the variable.
Press OK briefly to save the value and
to jump to the next variable.
Press the OK button for more than 1
second to save set values.
or
Press ESC to abort the change.
Press the ESC ro return to the next
higher menu.
The plant is open during the operating time.
The plant is locked outside the operating
time.
24 hours open: Set beginning and end of
the operating time to the same value.
24 hours closed: Set the end of the operating time to an earlier value than the beginning of the operating time
During the lighting time, the washing station lights can be adjusted by a dimmer
switch.
Fixed public holidays are on the same day
every year.
On the set public holidays the operating
time selected for public holidays applies.
Note:
Set the date to 00.00.XX for unused public
holidays.
Variable public holidays are on different
days every year. They must newly be set
every year.
On the set public holidays the operating
time selected for public holidays applies.
Note:
Set the date to 00.00.00 for unused public
holidays.
Setting date, time and summer/winter time
change
Auto summer / winter time = YES:
Automatic change active. Summer time
(daylight saving time) begins on the last
sunday in March at 2:00 o'clock. Winter
time (normal time) begins on the last sunday in October at 3:00 o'clock.
Auto summer / winter time = NO:
No automatic time change.
Note:
If automatic switching is active, either
"Som" (for summer) or "Wint" (for winter) is
displayed along with the date and time in
the right bottom corner of the display during
normal operation.
The coin value, as well as the coins, will tell
the different canals of the coin inspector,
how to evaluate them.
Note:
Upon the initial start-up, the password is
"1111“. For security reasons, we recommend changing the password during the
first use (see "Changing password" at the
end of the chapter).
Use the LEFT and RIGHT buttons to
select the blinking location of the password.
Confirm your entry using the "OK" key.
Set the other characters of the pass-
word in the same fashion.
Press the "OK" key for more than 1 sec-
ond to save the password.
Select the menu item with the buttons
LEFT and RIGHT.
Value: Value of the coins in washing units.
Re: Value in currency units (e.g. Euro).
Undercarriage wash:
Minimum number of required washing units
to execute the undercarriage washing programme.
Here, the run time of the different washing
programmes are set per washing unit.
If the system includes different high pressure modules, different run times can be
set up of each type of pump.
Selecting pump type:
Two washing times can be set up for each
programme:
T1: Standard washing time
T2: Special washing time, applies to certain weekdays or to a certain date
T2 applies to weekdays marked with an "*".
1=Monday,,,7=Sunday. T1 will apply on the
other days.
Additionally, T2 is applied on the set date.
1 Washing programme
2 Standard washing time T1 per washing
unit
3 Standard washing time T2 per washing
unit
Display language.
YES: Programme "Rinse" is executed with
warm water.
NO: Programme "Rinse" is executed with
cold water.
Temperature in the swimmer tank for warm
water. Can be adjusted between 30 and 60
°C.
Note:
If the circulation pump washing station
heating is in use, the water is automatically
heated to 60 °C.
YES: The burner shuts off after operation
and restarts 10 minutes prior to operation.
Note:
If the circulation pump for the washing station heating is turned on for frost protection,
the burner will turn on in spite of night
mode.
NO: The burner keeps the warm water in
the swimmer container at nominal temperature, even outside operating hours.
Select the parameter you want to set
Set the parameter with a variable
Settng a parameter with several
variables
Exiting the menu
Operating times
Lighting time
Fixed holidays
Non-fixed holidays
Date / Time
Coin value
Programme run times
System settings
11EN
Page 12

- 10
YES: The hose heater is switched off after
operation and restarts one hour prior to operation.
NO: The hose heater is also active outside
the operating hours.
The washing stations marked with an "*"
are blocked. These washing stations will
not accept coins.
This function is provided for maintenance
work or repairs.
YES: Operating time and lighting time are
controlled externally, bypassing the settings in the control. The holiday settings are
ineffective.
NO: The washing station is operated as set
up in the control.
actual: currently measuring dimming value.
nominal: Set dimming value, from which
point forward the basic and washing station
lights are switched on within the set up
lighting time.
Forced regeneration of base exchanger
1 = Monday...7 = Sunday.
Regeneration starts on the set day at 2:00.
– Adjustable between 1% and 100%.
– Off = pulse off (0%)
The adjustment of the dosing pumps is executed as described in the beginning of this
chapter (see "Adjusting parameter with one
variable“).
This menu item is not used.
Two hot air ventilators heat up the inside
room of the plant to protect it against freezing.
몇 WARNING
Risk of fire from overheating of the fan
heater. The incoming and outgoing air
openings may not be covered up.
1 Output regulator
2 Thermostat
1 Thermostat mixing valve
The thermostat mixing valve regulates the
feed temperature depending on the return
flow temperature.
Basic setting: 22°C=Value 3 on the scale
Rectify the setting, if required, accord-
ing to the following table:
This frost protection system is activated by
the control if there is a risk of frost.
Fresh water flows through the high pressure lines and hand spray guns, and these
are thus protected from freezing.
1 Pressure reducer
Switch on the frost protection pump
(see Chapter "Manual procedures").
Adjust the pressure reducer so that at
least 0.5 l/min of water flows from each
hand spray gun.
Switch the frost protection pump off.
The emergency frost protection is activated
in case of a power outage.
Fresh water flows through the high pressure lines and hand spray guns, and these
are thus protected from freezing.
1 Pressure reducer
Turn the main switch to position “0”.
Adjust the pressure reducer so that at
least 0.5 l/min of water flows from each
hand spray gun.
The external thermostat switches on the
following anti-frost equipment depending
on the external temperature:
– below +3°C:
Hose heater dry foam (option)
Heating cartridge and trace heating
ABS fuel oil tank (option)
– below +1°C:
Circulation pump for washing place
heating
Circulation pump for anti-frost
Note:
The switching temperature of the exterior
thermostat can be set by customer service.
Setting the dosing pumps
System
Regener. 1234567
WS ----*--
Hot blowers
Hot air ventilator SB MB
Hot air blower
0°C... -10°C
-10°C...-20°C
Up Output regulator II II
Thermostat II III
Down Output regulator II II
Thermostat * I
Washing station heater
Value on the
scale
012345
Return flow temp °C10 14 18 22 26 30
Value on the
scale
678910–
Return flow temp °C34 38 42 46 50 –
Frost protection with lost water
Emergency frost protection
External thermostat
12 EN
Page 13
- 11
1 Softening salt
2 Detergent
ATTENTION
If the detergent container is empty, the
high-pressure pump will draw air and can
get damaged. Check the detergent tank at
regular intervals.
DANGER
Risk from hazardous materials. All
KÄRCHER cleaning agents to contain
safety, and application notices. Notices
concerning the application must be read
and obeyed. Wear specified protective
clothing/protective equipment.
Only use KÄRCHER-approved detergents.
This system uses undiluted detergents.
Hang in the detergent hose into the de-
tergent can.
1 Ventilation lever
2 Ventilation button
3 Adjustment knob dosing volume
The compressed air supply of the system
must be operating.
Turn the ventilation lever in an anti-
clockwise direction until it stops.
Set the dosing volume to 100%.
Press the ventilation key until the deter-
gent emerges from the ventilation line
at the bottom of the dosing pump with-
out bubbles.
Set the dosing volume to the required
value.
Turn the ventilation lever in a clockwise
direction until it stops.
DANGER
Risk of fire. Observe local regulations for
handling fuels.
Do not use unsuitable fuels, as they may be
dangerous.
ATTENTION
If the fuel tank is empty, the fuel pump runs
dry and can get damaged. Check the fuel
tank regularly.
Wrong fuel can cause functional disruptions in the burner and poor combustion.
Use only the fuel specified in the "Technical
data" section.
Use heating oil with additives (flow promoters) while operating in winter if there is risk
of frost
Fuel expands on heating and can overflow.
Do not fill the fuel tank up to the brim.
1 Filling level display
2 Filling nozzle
3 Inspection opening
Close the lid of the filling nozzle.
Fill fuel till the filling level display indi-
cates full level.
Note:
Ensure that no fuel overflows and goes into
the inspection opening. This fuel can be
taken for a leakage during subsequent inspection.
Close the filling nozzle.
ATTENTION
Risk of functional disturbances. While filling
the softening salts, use only the softening
salt in the tablet form listed in the chapter
"Accessories".
Open the salt tank.
Fill the softening salt right until the top.
Close the salt tank.
Note:
An empty salt tank will cause a malfunction!
Fill the salt tank at the latest when water is
visible in the salt tank while removing the
lid. Filling the salt container to the top does
not mean that there will be an increase in
salt consumption.
When the system is functioning properly,
the ratio of salt consumption to water consumption remains constant.
We recommend documenting the salt and
water consumption in an operations log.
In normal operating mode, press the
"OK" key on the control longer than 2
seconds.
Press the LEFT button.
Press the RIGHT button twice.
Press the OK button.
Select the menu item with the buttons
LEFT and RIGHT.
Every pressing of the "OK" key increases
the washing credit of the selected washing
station (box) by one washing unit.
When the "OK" key is pressed, the washing
station lights turn on for 3 minutes.
If the "OK" key is pressed again prior to the
time elapse, the function is terminated.
Pressing the "OK" key activates the permeate production in the ABS WSO. Permeate
production will end when the buffer tank is
filled with permeate. If the buffer tank is already full when permeate production starts,
the permeate production cycle will end after
3 minutes.
If the "OK" key is pressed again prior to the
time elapse, the function is terminated.
Pressing the "OK" key activates the regeneration of the base exchanger in the ABS
WSO. The regeneration cannot be exited.
Filling in detergents
Provide detergent
Detergent
High pressure wash / wet
foam
RM 806
Dry foam RM 812
Hot wax RM 820
Top care RM 821
Rim cleaner
(Model B)
RM 801
Intensive foam RM 838
Bleed dosing pump.
Refill fuel
Fill softening salts
Manual interventions
Menu for manual interventions
13EN
Page 14
- 12
When the "OK" key is pressed, the circulation pump activates frost protection for 3
minutes.
If the "OK" key is pressed again prior to the
time elapse, the function is terminated.
When the "OK" key is pressed, the washing
station heater is activated for 3 minutes.
If the "OK" key is pressed again prior to the
time elapse, the function is terminated.
When the "OK" key is pressed, the foam
hose heater is activated for 3 minutes.
If the "OK" key is pressed again prior to the
time elapse, the function is terminated.
In normal operating mode, press the
"OK" key on the control longer than 2
seconds.
Press the LEFT button.
Press the RIGHT button three times.
Press the OK button.
Note:
Upon the initial start-up, the password is
"1111“. For security reasons, we recommend changing the password during the
first use (see "Changing password" at the
end of the chapter).
Use the LEFT and RIGHT buttons to
select the blinking location of the pass-
word.
Confirm your entry using the "OK" key.
Set the other characters of the pass-
word in the same fashion.
Press the "OK" key for more than 1 sec-
ond to save the password.
Select the menu item with the buttons
LEFT and RIGHT.
Total sales since start-up of the washing
system.
Sales per washing station since start-up of
the washing system.
Total sales since the the beginning of the
day (0:00 Uhr).
Sales per washing station since the the beginning of the day (0:00 Uhr).
Sales from the manually increased washing units per washing station (see "Manual
interventions").
Press the "OK" key to change the password.
YES: The daily storage on an USB flash
drive contains the sales data.
NO: The daily storage does not contain any
sales data.
Note:
Press "ESC" to cancel the change of the
password.
Upon the initial start-up, the password is
"1111“. For security reasons, we recommend changing the password upon the first
use.
For security reasons, the password may
only be changed by the operator.
Use the LEFT and RIGHT buttons to
select the blinking location of the password.
Confirm your entry using the "OK" key.
Set the other characters of the pass-
word in the same fashion.
Press the "OK" key for more than 1 sec-
ond to save the password.
Reenter the password as described
above to confirm.
The successful change of the password will
be confirmed.
The anit freeze equipment contains:
– Recirculation blower
– Hot air blower
– Frost protection circuit or frost protec-
tion without lost water
– Washing station heater
– Emergency frost protection
– Heating cartridge in the oil tank
몇 WARNING
Risk of accident due to ice formation. In
case of ice formation the plant must be
closed off to prevent ice-related accidents.
Note:
The following functions are guaranteed:
– Unrestricted washing with the high-
pressure spray lance up to -15°C.
For systems with 4 washing stations it is
recommended to lock one washing sta-
tion at temperatures below -10 °C (for
systems with 4 high-pressure modules
type 908 already at a warmer tempera-
ture).
– Restricted washing operations using
washing brush at temperatures sub-
zero temperatures.
During restricted washing, all washing
brushes must be checked for ice-forma-
tion at regular intervals. Foam wash
with frozen washing brushes can dam-
age the vehicle. Take the following
steps if the washing brushes are frozen:
– The system is frost-safe up to -20°C.
The device must be shut down at tem-
peratures below -20°C in accordance
with the instructions in "Shutdown in
case of frost".
Sales indicator
Changing the password
Frost protection
14 EN
Page 15

- 13
Note:
The pre-requisites for frost protection are:
– The main switch must be in position 1.
– The doors of the system must be
closed.
– Uninterrupted power, water and fuel
supply must be ensured.
– Water supply must also be protected
against freezing.
– The fuel supply must be protected
against frost (e.g. heating cartridge in
the tank, trace heating),
– Instructions for assembling and installa-
tion are given in chapter "Installing the
plant".
– The hot air ventilators have been set
correctly.
– All maintenance steps according to
"Maintenance and Care" have been
carried out correctly.
– All cleaning tools are placed back in the
storage compartment.
– The trigger guns with frost protection
holes that are part of the system are installed.
Note:
The washing place heating can function
properly provided the washing area has
been built properly according to the
KÄRCHER recommendations.
The heating power is sufficient for a heated
washing station surface of 50/60* m
2
. If the
heated surface exceeds this value, the frost
protection cannot be guaranteed.
Snow layers and large volumes of ice pieces fallen from the vehicles require a very
high heating capacity. It is necessary to remove these deposits.
* 50 m
2
with gas burner (64 kW); 60 m2 with
oil burner (72 kW); with 4 high-pressure
modules type 908 the washing station surface must be further reduced.
Before the onset of the frost period,
maintenance tasks must be carried out
"every year before the onset of the forst
period" according to section "Maintenance and Care".
Carry out the following tasks for keep-
ing the frost protection intact.
Note:
Maintenance not being done on time or
from experts will mean, that there is no
guarantee concerning frost damage.
1 Locking valve 1 Throttle with sieve (marked red), 1-tool-
model
1 Filter for frost-protection pump
Washing station heater Maintenance jobs before and during
the frost period
Time Activity Assembly affected Performance By whom
many times
daily
opinion Washing brush Check for dirt and ice formation; lock foam wash if needed. Operator
daily Clean the
filter
Filter for frost-protection
pump
Clean the filter and replace Operator
opinion Hot blowers Are the hot air ventilators working (even for ABS fuel tank, option)? Operator
Recirculation blower Check function. Operator
Initially daily,
later on based
on experience
opinion Filling level of the fuel tank Will the heating oil be sufficient till next inspection? Take into ac-
count increased consumption due to anti-frost equipment. Insuffi-
cient fuel can lead to failure and damage to the system.
Operator
weekly opinion Heating ABS heating oil
tank (option)
With temperatures below 3°C, check if the trace heating of the heat-
ing oil line between the heating oil tank and SB MB is warm.
Operator
monthly or after 200 operating hours;
more frequently if
needed
opinion Quantity of frost water pro-
tection in the frost protection circuit
Target value: approx. 0.5 l/min per washing tool
Water quantity is higher: Change the node piece in the hand-spray
gun.
몇 WARNING
Risk of injury and damage. If the frost protection water volume is big-
ger than the admissible value, the cleaning tool may move uncon-
trollably due to the exiting water stream. If the frost protection water
volume is too big, replace the union piece in the trigger gun by all
means.
Water quantity is lesser Clean filter for frost protection pump; clean
sieve in throttle, clean pipes, check the rotation direction of the
pump.
Operator
15EN
Page 16

- 14
Turn the main switch to position "0"
Turn the main switch to position "1".
Lock the operating time at the control.
Filling the fuel tank.
If the equipment is to be shut down, and
there is not danger of frost,
disconnect the water input,
disconnect the power supply.
Screw off water supply hose and high
pressure hose.
Remove the RO membrane and store it
under anti-freezing conditions.
Empty all swimmer containers; unscrew
the hoses and let the water drain off.
Empty the permeate buffer tank.
Disconnect the water pipe between
base exchanger and swimmer tank for
warm water.
Rinse the plant (without base exchang-
er) with an anti-frost solution.
Rinse the base exchanger with concen-
trated salt solution.
Unscrew both the hoses under the boil-
er and let the water drain off.
Blow out all water-carrying parts with
oil-free compressed air.
Note:
All parts of the plant except the base exchanger must be rinsed with anti-frost solution during longer operational breaks to
prevent the system against corrosion.
In case of doubt, call Customer Service to
carry out the shutdown operations.
Shutting down
Shutdown during Frost Conditions
Shutdown
Shutdown during frost period
16 EN
Page 17

- 15
Washing station 3 and 4 not shown.
1 Fine filter for fresh water (80-100 μm,
option)
2 Locking valve for fresh water
3 Locking water for fresh water for soften-
ing
4 Locking valve for softened water
5 Salt tank
6 Hardness sensor
7 Water counter *
8 Control head of base exchanger
9 Base exchanger bottle
10 RO membrane
11 Flowmeter permeate *
12 Distribution block
13 Restrictor
14 Swimmer tank for cold water
15 Level sensor BUFFER TANK FULL
16 Level switch PUMP RO ON *
17 Level sensor BUFFER TANK EMPTY
18 Locking valve for permeate tank
19 Buffer tank for permeate
20 Pressure switch for RO water shortage
21 Manometer working pressure
22 RO pump
23 Discharge valve for softened water
24 Active carbon filter
25 Ultra-fine filter *
26 Solenoid valve in salt tank
27 Solenoid valve for cold water
28 Solensoid valve for permeate
29 Bypass valve semi load with throttle,
only for high pressure module type 908
30 High pressure pump
31 Overflow valve
32 Hand-spray gun with washing brush
33 Dosing pump
34 Pressure switch air (optional)
35 Compressor
36 Suction hose for detergent
37 Detergent filter, foot valve
38 Solenoid valve for warm water
39 Drain valve
40 Water shortage safeguard
41 Swimmer tank for warm water
42 Circulation pump for warm water
43 Temperature sensor warm water
44 Flow indicator
45 Temperature sensor for burner outlet
46 Burner inclusive flow-type heater
47 Fuel tank (Option)
48 Burner blower with fuel pump
49 Solenoid valve for fuel
50 Exhaust thermostat
51 Flame indicator
52 Blending device (option)
Double tool version (Option)
A Solenoid valve for high-pressure
B Solenoid valve for foam
C Hand-spray gun with spray pipe
D Washing brush
* Only for SB MB standard
Function
Flowchart system with wet foam
17EN
Page 18

- 16
Washing station 3 and 4 not shown.
1 Fine filter for fresh water (80-100 μm,
option)
2 Locking valve for fresh water
3 Locking water for fresh water for soften-
ing
4 Locking valve for softened water
5 Salt tank
6 Hardness sensor
7 Water counter *
8 Control head of base exchanger
9 Base exchanger bottle
10 RO membrane
11 Flowmeter permeate *
12 Distribution block
13 Restrictor
14 Swimmer tank for cold water
15 Level sensor BUFFER TANK FULL
16 Level switch PUMP RO ON *
17 Level sensor BUFFER TANK EMPTY
18 Locking valve for permeate tank
19 Buffer tank for permeate
20 Pressure switch for RO water shortage
21 Manometer working pressure
22 RO pump
23 Discharge valve for softened water
24 Active carbon filter
25 Ultra-fine filter *
26 Solenoid valve in salt tank
27 Solenoid valve for cold water
28 Solensoid valve for permeate
29 Bypass valve semi load with throttle,
only for high pressure module type 908
30 High pressure pump
31 Overflow valve
32 Foam lance (2 tool version)
33 Foam mixing chamber (double tool ver-
sion)
34 Hand spray gun (2 tool version)
35 Dosing pump
36 Hand-spray gun with washing brush
(single tool version)
37 Foam mixing chamber (single tool ver-
sion)
38 Solenoid valve for pressure relief
39 Pressure switch air (optional)
40 Compressor
41 Suction hose for detergent
42 Detergent filter, foot valve
43 Solenoid valve for warm water
44 Drain valve
45 Water shortage safeguard
46 Swimmer tank for warm water
47 Circulation pump for warm water
48 Temperature sensor warm water
49 Flow indicator
50 Temperature sensor for burner outlet
51 Burner inclusive flow-type heater
52 Fuel tank (Option)
53 Burner blower with fuel pump
54 Solenoid valve for fuel
55 Exhaust thermostat
56 Flame indicator
57 Pressure reducer air
58 Solenoid valve
59 Distribution block air
60 Air dosing valve
61 Pressure reducer water
62 Dosing pump
63 Chemical container
64 Distributor water/detergent
65 Solenoid valve water/chemicals
66 Water/chemicals dosing valve
67 Blending device (option)
* Only for SB MB standard
Flowchart system with dry foam
18 EN
Page 19

- 17
1 Fine filter for fresh water (80-100 μm,
option)
2 Pump attachment kit disconnection
from mains (optional)
3 Swimmer tank for cold water
Attachment kit disconnection from mains (optional)
19EN
Page 20

- 18
A Rim cleaner
B Intensive foam
C Node piece
1 Swimmer valve
2 Manometer
3 Detergent solution (water + detergent)
4 Pump for detergent solution
5 Cleaning agent container
6 Injector
7 Sieve
8 Compressor
9 Pressure reducer
10 Solenoid valve for compressed air,
washing station 1
11 Solenoid valve for detergent solution,
washing station 1
12 Throttle, for volume control
13 Backflow valve
14 Foam device
15 High-pressure pump
16 Ceiling gyroscope
17 Trigger gun
1 Ceiling gyroscope
2 Spray tool
3 Solenoid valve for micro emulsion,
washing station 1
4 Micro emulsion pump
5 Micro emulsion container
1 High pressure pump
2 Backflow valve with throttle and sieve
3 Hand-spray gun with washing brush
4 Solenoid valve, interrupts frost protec-
tion with dry foam operation
5 Locking valve for fresh water
6 Swimmer tank with anti-freeze
7 2.0 mm throttle
8 filter anti freeze pump
9 Anti-frost pump
Wheel cleaner/intensive foam (option)
Micro emulsion (option) Frost protection 1-tool (option, SB-
MB 2 pump Fp only)
20 EN
Page 21

- 19
1 Washing brush
2 Backflow valve with throttle and sieve
3 Solenoid valve for high-pressure
4 Solenoid valve for foam
5 High pressure pump
6 Hand-spray gun with spray pipe
7 Locking valve for fresh water
8 2.0 mm throttle
9 Swimmer tank with anti-freeze
10 Anti-frost pump
11 filter anti freeze pump
A 4. Type of water
B Fresh water
C Softened water, warm
D Permeate
E to high-pressure pump
1 Temperature sensor (option)
2 Drain valve float container warm water
Frost protection 2-tool, wet foam
(option, SB-MB 2 pump Fp only)
4. Type of water
21EN
Page 22

- 20
1 Hand spray gun (2 tool version)
2 High pressure pump
3 Backflow valve with throttle and sieve
4 Solenoid valve with backflow valve,
throttle and sieve
5 Backflow valve with mixing chamber for
foam and pressure release valve
6 Hand-spray gun with washing brush
(single tool version)
7 Receptacle
8 Restrictor
9 Frost protection circulation pump
10 Filter
11 Overflow
12 Container for the anti frost circuit water
13 Swimmer valve for soft water supply
Note:
With the 2 tool model with dry foam, electrically heated foam hoses are used for frost
protection.
For washing station 3 and 4, the frost protection water is lost.
Internal frost protection (optional)
22 EN
Page 23

- 21
1 Hand spray gun (2 tool version)
2 High pressure pump
3 Backflow valve with throttle and sieve
4 Solenoid valve with backflow valve,
throttle and sieve
5 Backflow valve with mixing chamber for
foam and pressure release valve
6 Hand-spray gun with washing brush
(single tool version)
7 Receptacle
8 Filter
9 Overflow
10 Swimmer valve for fresh water.
11 Collection box anti frost water station 3
Note:
With the 2 tool model with dry foam, electrically heated foam hoses are used for frost
protection.
External frost protection (optional)
23EN
Page 24

- 22
Washing station 3 and 4 not shown.
1 Burner inclusive flow-type heater
2 Circulation pump for warm water
3 Balancing vessel
4 Swimmer tank for warm water
5 Safety valve
6 Locking valve of feeder pipe
7 Pipes of washing place heating
8 Thermostat mixing valve
9 Heat exchanger
10 Locking valve for filling pipe
11 Circulation pump for washing place
heating
– Opens when the permissible operating
pressure is exceeded - also even the le-
ver for hand-spray gun is released and
circulates the water. The high-pressure
jet is available when the hand-spray
gun is opened again.
The overflow valve is set by the manufacturer and sealed. Setting only by customer
service.
– The safety valve protects the heating
circuit of washing place heating (option)
against excess pressure.
– Regulates the feed temperature for the
washing place heating (option) depend-
ing on the return flow temperature.
If the burner does not ignite or the flame extinguishes during operation, then the flame
monitor closes the fuel solenoid valve and
switches off the burner blower.
– If the exhaust temperature exceeds the
permissible value, then the exhaust
thermostat automatically switches off
the burner and locks it.
– If the water temperature in the swimmer
tank for warm water falls when hot water is removed and cold water flows in,
the tempreature sensor of the warm water circulation pump switches on and
switches off again when the maximum
temperature is reached.
– Prevents the formation of steam in the
boiler.
– The flow monitor switches on the burner
after the warm water circulation pump
has been started.
– Switches off the burner if there is very
little water in the warm water swimmer
tank.
– The motor protection switch interrupts
the electric circuit if the motor is overloaded.
SB MB standard:
If the residual hardness of the softened water exceeds a marginal value, the control
will calculate the residual capacity of the
base exchanger cylinder.
At the latest in the following night, the regeneration of the base exchanger bottle is
started.
SB MB comfort:
If the residual hardness of the softened water exceeds a limit value, the regeneration
of the base exchanger bottle begins immediately.
If there is no water, the plant is stopped in
order to prevent dry running of the pump.
Switches off the pump when the buffer tank
for permeate is full.
Switches on the RO pump to produce permeate.
Emits a signal to the system when the permeate buffer tank is empty.
Prevents the externally added water over
60°C from being led to the HP pumps and
damaging them.
In case of a malfunction, the system switches to an alternative water type (is set by the
service technician upon initial startup).
Washing place heating (option)
Monitoring and safety devices
Overflow valve of high-pressure pump
Safety valve
Thermostat mixing valve
Flame monitoring
Exhaust thermostat
Temperature controller
Temperature controller
Flow monitor
Water shortage safeguard
Motor protection switch
Hard water sensor
Pressure switch for RO water shortage
Level switch Buffer tank is full
Level sensor pump RO on
Level switch Buffer tank is empty
Temperature limiter 4. type of water /
warm (option)
24 EN
Page 25

- 23
Technical specifications
SB MB 5/10-2 9/12-2SB MB 5/10-3 9/12-
3
5/10-4 9/12-
4
High-pressure module 608, 608fl Piece 2 1 - 3 2 1 - 4 3 2 1 High pressure module 908 Piece - 1 2 - 1 2 3 - 1 2 3 4
Electrical connection
Voltage V/~/Hz 400/3~/50
Maximum allowed net impedance Ohm 0.301 + j 0.188
Protection version CAB (SKID version) IP X5 (IP X1)
Connected load kW 10 17 13 13 14 16 17 16 17 19 20 22
Connected load kW 10 17 13 13 14 16 17 16 17 19 20 22
Prefuse A 35 35 35 35 35 50 50 50 50 50 50 50
Output of connection (with frost protection) kW 15 17 18 18 20 21 23 21 22242527
Pre-fuse (with frost protection) A 35 35 50 50 50 50 50 50 50 63 63 63
Water connection
Water pressure, dynamic MPa (bar) 0.3...0.6 (3...6)
Nominal width (DN) mm 25
Input amount fresh water/4. water type m
3
/h 1.7 2.0 2.3 2.2 2.6 2.9 3.3 2.7 3.2 3.5 3.9 4.2
Input amount warm water by customer
2
m3/h 1.2 1.5 1.8 1.8 2.1 2.4 2.7 2.4 2.7 3.0 3.3 3.6
Container capacity
Swimmer tank for warm water l 80
Swimmer tank for cold water l 2.5 2 x 2.5
Performance data
Working pressure with supplied nozzle
1
MPa (bar) approx. 10 (100) / approx. 10 (100) / approx. 12 (120)
Working pressure for program hot wax, foam
wash
1
MPa (bar) approx. 3 (30) / approx. 10 (100) / approx. 4.5 (45)
Nozzle size
1
5004 / 5004 /4007
Recoil force of the trigger gun with supplied
nozzle
1
N 17 / 17 /29
Water consumption per washing station
1
l/h (l/min) approx. 500 (8.3) / approx. 500 (8.3) / approx. 900 (15)
Water consumption for program hot wax,
foam wash
1
l/h (l/min) approx. 250 (4.2) / approx. 500 (8.3) / approx. 450 (7.5)
Max. hot water temperature °C 60
Hot water temperature for continuous operation, all high-pressure modules type 608
3
°C about 55 about 42 about 30
Hot water temperature for continuous operation, all high-pressure modules type 608fl
4
°C about 28 about 20 about 16
Hot water temperature for continuous operation, all high-pressure modules type 908
5
°C about 40 about 32 about 22
Base exchanger
Capacity °dH/m
3
220 300 220 300
Hardness of softened water ° dH 0...0.3
Salt tank, CAB l 120 150 120 150
Salt tank, SKID l 120 200 120 200
RO plant
Min. permeate output (at 15 °C water temperature), CAB
l/h 200 300 200 400 300 400
Min. permeate output (at 15 °C water temperature), SKID
l/h 200
Operating pressure in new state, max. MPa (bar) 1.4 (14)
Desalination rate of membrane % 98...99
Water temperature range °C 2...30
Max. ambient temperature °C 40
Residual hardness of feed water ° dH 0...0.3
Max. conductivity of permeate for stain-free
drying
μS/cm under 100
Permeate buffer tank, CAB/SKID l 280/700
Miscellaneous
Oil quantity of HP pump l 0.7
Oil grade Hypoid SAE 90 (6.288-016.0)
1
high-pressure module 608 / high-pressure module 608fl / high-pressure module 908
2
for customer warm water supply the fresh water requirement decreases by the corresponding amount
3
Water supply temperature +8°C, floor heating not in operation, burner power 64 kW
4
Water supply temperature +8°C, floor heating not in operation, burner power 40 kW
5
Water supply temperature +8°C, floor heating not in operation, burner power 72 kW (only oil burner)
25EN
Page 26

- 24
General
Values determined as per EN 60335-2-79
Hand-arm vibration value
Hand spray gun m/s
2
<2.5
Spray lance m/s
2
<2.5
Uncertainty K m/s
2
0.1
Sound pressure level L
pA
dB(A) 65
Uncertainty K
pA
dB(A) 3
Sound power level L
WA
+ Uncertainty K
WA
dB(A) 86
Dimensions SB MB CAB
Width mm 2700
Depth mm 900
Height mm 2100
Empty weight, max. (with 30 kg of packaging) kg 1100
Maximum weight kg 1750
Data depending on the burner
SB MB 5/
10-2
SB
MB 9/
12-2
SB MB 5/10-3 SB
MB 9/
12-3
SB MB 5/10-4 SB
MB 9/
12-4
Oil burner
Heating output kW 34.5 50 72
Fuel consumption heating oil (11.86kWh/kg) kg/h 3.3 4.8 6.9
Fuel nozzle 0.85/60° 1.25/60° 1.75/60°
Fuel pressure MPa (bar) 1.025 (10.25) 40 kW: 1.05 (10.5)
64 kW: 1 (10)
1.05 (10.5)
Temperature difference between exhaust and
air
K 170
Exhaust gas loss with a burner power of less
than 50 kW (more than 50 kW)
% 10 (9)
Soot figure 0...1
Fuel Fuel oil EL or Diesel
ABS Fuel tank
Heating oil
l 60/700
Gas burner
Heating output kW 34.5 50 max. 64
Fuel consumption natural gas (9.4 kWh/m
3
)m3/h 4.1 5.9 7.6
Fuel consumption liquid gas (25.5 kWh/m
3
)m3/h 1.5 2.2 2.8
Nominal width supply line gas Inch 3/4
Fuel pressure (gas pressure supply line), nat-
ural gas *
mbar >22
Fuel pressure (gas pressure supply line), liquid gas *
mbar >50
Temperature difference between exhaust and
air
°C approx. 200...230
* depending on the local gas type, exact values available at the customer service
For further technical data of the gas burner, please see the operating instructions and data sheets of the burner manufacturer
26 EN
Page 27

- 25
Water type in the washing programme
Fresh water
De-hardened or softened water
Permeate
Used water
warm
cold
High-pressure wash X O * X
Foam wash, wet foam O
Foam wash, dry foam X X
Rinsing X O X
Hot wax X O * X
Top care X X
Dirt removal X O * X
Micro emulsion A X X
Micro emulsion B
Insect removal X O * X
Wheel cleaning A X X
Wheel cleaning B X
Intensive foam X X
Undercarriage
X = Standard, O = Option, * processed water must be heated on site
27EN
Page 28

- 26
1 Balancing vessel
2 Fuel filter and fuel pump
3 Burner inclusive flow-type heater
4 High pressure pump 2
5 High pressure pump 3
6 High pressure pump 1
7 High pressure pump 4
8 Manometer for high-pressure pump
9 Fan heater
10 Tool storage box
11 Filter anti freeze pump
12 Detergent reservoir for top care
13 Detergent reservoir hot wax
14 Detergent reservoir high pressure wash
15 Detergent reservoir dry foam
16 Fuel tank, 60 l (option) *
17 Pump attachment kit disconnection
from mains (optional)
18 Wheel cleaner (option) *
19 Salt tank
20 Drain valve
21 Locking valve for fresh water
22 Circulation pump for washing place
heating
23 Thermostat mixing valve
24 Safety valve
25 Manometer for washing place heating
26 Active carbon filter WSO
27 Fine filter WSO
28 Swimmer tank for warm water
29 Recirculation blower
30 Blending device (option)
* Depending on the equipment of the system, the assembly intensive foam can be
attached in theses positions.
In normal operating mode, press the
"OK" key on the control longer than 2
seconds.
Press the LEFT button.
Press the RIGHT button four times.
Menu overview on next page.
Maintenance and care
System overview
Show system status
28 EN
Page 29

- 27
29EN
Page 30

- 28
1 Appliance component
2 Time until next maintenance (minus
symbol if maintenance is due)
3 Date of last maintenance
Current value of the control voltage
Exterior temperature measured by exterior
temperature sensor.
Software version and data set version of
control
Display of the core module (processor)
Water temperature in the swimmer tank for
warm water.
Water temperature at the outlet of the continuous heater. At temperatures above
96°C, the burner is turned off.
Minimal break between switching the burner off and back on.
Trailing time of the burner fan after the
burner has been turned off.
Trailing time of the circulation pump for
warm water after the burner has been
turned off.
Select the washing station number
(box) with the buttons LEFT and
RIGHT.
Press the OK button.
The status of the selected washing station
is shown.
Currently selected washing programme.
Remaining value of the washing credit in
washing units.
Remaining run time in seconds.
Current pickup of the high pressure pump.
Active outputs of the pump electronics.
Run times of the individual washing programmes since system start-up.
Voltage supply to the remote controls.
A Overview of status
B Details of status
1 Status of base exchanger
2 Status of reverse osmosis
3 Status of buffer tank for permeate
Press the OK button.
Select the desired display using the
"LEFT" and "RIGHT" keys.
Depending on the operating state, one of
the displays below may appear.
Base exchanger in operation, XXXX litres
of water de-hardended since the last regeneration.
Calculated residual capacity until the next
regeneration.
Regeneration was activated, control has
been waiting for response from base exchanger for XXX seconds.
Base exchanger has been conducting regeneration for XXX minutes.
Maintenance
Version / info
Status burner
Status of washing stations
Status WSO
30 EN
Page 31

- 29
The salt solution in the salt tank is regenerated. The process is completed within XXX
minutes. There can be no regeneration of
the base exchanger before then.
There was an error in the base exchanger.
Reverse Osmosis is ready.
The prerinse of the RO membrane will be
completed in X seconds.
The reverse osmosis produces permeate.
The final rinse of the RO membrane will be
completed in XX seconds.
Permeate production blocked as the base
exchanger is performing a regeneration.
No water pressure at inlet of the system.
Buffer container for permeate filled with
permeate to the level sensor BUFFER
CONTAINER FULL.
Water level in the buffer container for permeate is below level sensor BUFFER
CONTAINER FULL.
Water level in the buffer container for permeate is below level sensor BUFFER
CONTAINER EMPTY.
Dry run delay active after XXX minutes.
During this period, the SB-C is supplied
with cold water.
The buffer container for permeate is empty,
the SB-C is supplied with cold water.
Here, the operaing hours of the individual
system components since system start-up
are shown.
The different menu items are shown in the
overview at the beginning of this chapter.
The bases of a safe operating of the equipment is thr regularly maintenance according to the following maintenance plan.
Use only original parts of the manufacturer
or part suggested by him, such as
– parts and wearing parts,
– accessories parts,
– operating materials,
– cleaning agents.
DANGER
Risk of accident while working on the unit!
During all tasks:
Turn off the water supply; close the
fresh water tap,
First switch-on in voltage-less state,
switch off the emergency stop switch in
the building and secure it against being
switched on again.
ATTENTION
Risk of damage. Never use a high-pressure
jet to clean the inside of the system.
– Operator
Work designated with the sign “Operator” may only be carried out by persons
who have been instructed in the safe
operation and maintenance on the
washing system.
– Customer Service
Work designated with the sign “Customer Service” may only be done by the
fitters of Kärcher Customer Service.
In order to ensure a reliable operation of the
plant, we recommend that you conclude a
maintenance contract with us. Please refer
to you local KÄRCHER service department.
DANGER
Risk of injury due to high-pressure jet exiting possibly defective components, risk of
burns due to hot plant parts. When working
on the opened plant, proceed with particular care and observe all safety instructions.
The following parts are possible to be hotter than 50 °C:
– exhaust pipe and exhaust opening
– Burner inclusive flow-type heater
– cylinder head of the high pressure
pump
– high pressure hose
Operating hours
Maintenance instructions
Who may perform maintenance?
Maintenance contract
31EN
Page 32

- 30
Maintenance schedule
Time Activity Assembly affectedPerformance By whom
once a year
before the
frosting period starts
Clean the filter Antifreezing circula-
tion
Empty and clean the collection chute for the frost protection water.
Clean the filter on the immersion pump.
Clean the filter of the frost protection pump (in the casing of the SB
MB).
Clean the tool compartment and check for free flow.
Clean the throttle valve (in the area of the high pressure pump outlet).
Fill the collection chute for the frost protection water with fresh water.
Operator/
Customer
Service
opinion Washing station
heater
Check functioning and rotation direction of the circulation pump
Check concentration of anti-freezing agent: Take out a little anti-freez-
ing solution from the safety valve and check its correct concentration
using a special tester (6.419-070.0). Target value -25°C
Check pressure in the heating circuit. Nominal value with running circulation pump of the washing station heater 0.07...0.15 MPa (0.7...1.5
bar)
Check setting of the thermostat mixing valve.
Check the function of the balancing vessel: Remove the valve flap.
Press in the valve pin briefly using a matchstick. The balancing vehicle
is OK if air comes out. If water comes out, then the balancing vessel
needs to be replaced. If nothing comes out, then use a car air pump to
pump in air in the balancing vehicle according to the values on the type
plate.
opinion External thermostatCheck function. Operator
opinion Recirculation blow-erCheck function. Operator
opinion Hot blowers Have the regulators been set correctly? (See section "Settings/hot air
ventilator".)
Operator
opinion Frost protection
with lost water
Switch on the frost protection pump (see Chapter "Manual procedures").
Check if at least 0.5 l/min of water exits each hand spray gun, if neces-
sary, readjust the pressure reducer.
Operator
opinion Emergency frost
protection
Turn the main switch to position “0”.
Check if at least 0.5 l/min of water exits each hand spray gun, if neces-
sary, readjust the pressure reducer.
Operator
Clean the filter Pass boiler Recommendation: These half-yearly maintenance tasks are to be done
before the frosting period starts.
Customer
Service
measuring Burner
daily opinion High pressure hos-
es, foam hoses
(with 2 tool model)
Check high pressure hoses for mechanical damages such as scraping,
visible hose duck, bends, porous and cracked rubber. Replace dam-
aged high pressure hoses.
Operator
opinion Information signs at
the washdown yard
Check whether the warning boards for the users are available and leg-
ible.
Operator
opinion Washing station
lighting
Check the function of the washing station lighting and replace defective
lights.
Operator
opinion Spray lance Check for tightness; replace O-ring if necessary. Nozzle protection and
handle pipe OK? Replace if necessary.
Operator
opinion Hand spray gun Check for tightness; replace O-ring if necessary. Operator
Can the high-pressure hose be rotated, and is the lever running
smoothly? Lubricate if nessary (see section „Maintenance work“).
opinion Tool storage box Check from the outside for foreing matters and contamination. Remove
coarse contaminants.
Operator
opinion Fill levels of the de-
tergent container
Check filling level, refill or replace if necessary. Operator
empty Coins container Open the coin acceptor doors and empty the coin container. Operator
Initially daily, later on
based on experience
opinion Filling level of the
fuel tank
Will the heating oil be sufficient till next inspection? Take into account
increased consumption due to anti-frost equipment. Insufficient fuel
can lead to failure and damage to the system.
Operator
empty Compressor Drain the condensate from the pressure container of the compressor. Operator
Everyday
under frost
conditions
opinion Anti frost devices Are the hot air ventilators working (even for ABS fuel tank, option)? Operator
Clean the filter Filter for frost-pro-
tection pump
Clean the filter and replace Operator
32 EN
Page 33

- 31
After 40 operating hours
or once a
week
opinion Tightness of systemCheck pumps and pipes for leaks. Inform Customer Service if there is
oil under the high pressure pump, if more than 3 drops of water drop
out of the high pressure pump when the pump is running.
Operator
opinion Oil condition Milky oil indicates that it contains water. Inform Customer Service. Operator
opinion Check oil level in
the high pressure
pumps
The oil level must lie between the MIN and MAX markings; else refill. Operator
opinion Detergent hoses
with filter
Visual inspection of the high-pressure jet whether it contains detergent.
Clean the filter if necessary.
Operator
opinion Entire plant Check the functions of all wash programs. Operator
opinion Salt stock in the salt
tank
Is the salt level above the water level? If required, top up softening
salts.
Operator
opinion Residual hardness
of softened water
Take warm water from the swimmer tank and determine its residual
hardness using test set B (order no. 6.768-003). Target value: below 3
°dH.
Operator
check if the chlorine content in the
fresh water exceeds 0.3 mg/l
Residual chlorine
content after activated carbon filter
Take a water sample between the activated carbon filter and the RO-
membrane. Determine residual chlorine content. If the residual chlorine
content of the water sample exceeds 0.1 mg/l renew activated carbon
filter.
Operator
switch on briefly Washing station
heater
Activate on the frost protection pump as described in Chapter "Manual
procedures".
Operator
Clean the filter Casing exterior
(stainless steel and
plastic
Mix detergent "Wash hall and tile cleaner RM 841“ at 10%, apply to the
surfaces, let it soak for 2 to 3 minutes, do not allow to dry. Rinse thor-
oughly with high pressure jet after the soak time.
Operator
Mix detergent "Wash hall and tile cleaner RM 841“ at 20 %, apply to the
surfaces, let it soak for 2 to 3 minutes. After the soak-in time, clean the
surfaces with a moist pad or microfibre cloth and then rinse thoroughly
by a high pressure jet. If desired, larger areas can be cleaned using a
rubber edged "Squeegee".
Operator
Splash guard tarpaulins
Mix detergent "Wash hall and tile cleaner RM 841“ at 10%, apply to the
surfaces, let it soak for 2 to 3 minutes, do not allow to dry. Rinse thor-
oughly with high pressure jet after the soak time.
ATTENTION
Risk of damage. Do not clean splash guard tarpaulins with solvents or
solvent-containing detergents.
Operator
Care Casing exterior
(stainless steel)
Take care of the stainless steel casing using steel cleaner. Operator
weekly in
case of frost
opinion Heating ABS heat-
ing oil tank (option)
With temperatures below 3°C, check if the trace heating of the heating
oil line between the heating oil tank and SB MB is warm.
Operator
Once, 1
month after
start-up
Exchange filter Fine filter WSO Close the locking valve for fresh water (building site), unscrew the filter
cup, replace the filter inlay, insert the new filter inlay and the filter cup
back into place, open locking valve for fresh water.
Operator
After 80 operating hours
or once every two weeks
Cleaning and preserving
All stainless steel
parts of the case
Remove dirt and deposits. Preserve the parts using special steel care
oil.
Operator
Time Activity Assembly affectedPerformance By whom
33EN
Page 34

- 32
After 200 operating hours
or once a
month
Check the operating pressure
High-pressure
pumps
The manometer must read 9...10 MPa (90...100 bars). Follow the in-
structions in the section "Help in the event of a malfunction" to repair
the defect if the reading is different.
Operator
opinion Quantity of frost wa-
ter protection in the
frost protection circuit
Target value: approx. 0.5 l/min per washing tool
Water quantity is higher: Change the node piece in the hand-spray gun.
몇 WARNING
Risk of injury and damage. If the frost protection water volume is bigger
than the admissible value, the cleaning tool may move uncontrollably
due to the exiting water stream. If the frost protection water volume is
too big, replace the union piece in the trigger gun by all means.
Water quantity is lesser Clean filter for frost protection pump; clean
sieve in throttle, clean pipes, check the rotation direction of the pump.
Operator
Clean the filter Cleaning agent filterRemove filter and rinse it thoroughly with hot water. Operator
Clean the filter Container for the
anti frost circuit water
Clean filter. Operator
Clean the filter Tool storage box Clean the storage boxes. Operator
opinion Salt tank Check water level (approx. 5 ... 25 cm above the sieve plate). Operator
Check for deposits; if required, empty the tank, clean it, fill it up with sof-
tening salts and start it up again. Risk of functional disturbances. While
filling the softening salts, use only the softening salt in the tablet form
listed in the chapter "Accessories".
Operator
Clean the filter Burner Clean the sight glass of the flame monitor (see section „Maintenance
work“).
Operator
Clean and check the ignition electrodes Customer
Service
Clean the filter Fuel filter Clean filters (see section „Maintenance work“). Operator
lubricate Ceiling gyroscope Lubricate with grease gun on lubrication nipples (grease 6.288-055.0) Operator
lubricate Door hinges Lubricate the hinges with grease (order no.: 6.288-072). Operator
preserving Door locks Spray care liquid (order no. 6.288-116) into the locks. Operator
every 6
weeks
check if the chlorine content in the
fresh water drops
below 0.3 mg/l
Residual chlorine
content after activated carbon filter
Take a water sample between the activated carbon filter and the ROmembrane. Determine residual chlorine content. If the residual chlorine
content of the water sample exceeds 0.1 mg/l renew activated carbon
filter.
Operator
Quarterly Clean the filter Coin acceptor Open the coin acceptor door. Clean the coin acceptor (see section
„Maintenance work“).
Operator
After 1000
operating
hours or
once every
six months
opinion Pump head Replace all valves when the valve heads are heavily pocketed. Customer
Service
Oil change High-pressure
pumps
See section "Maintenance work". Operator
remove the soot
and calcium deposits
Pass boiler Remove the soot and calcium deposits from the heating coil. Customer
Service
measuring Burner Measure the exhaust value; clean and adjust the burner, if required Customer
Service
Exchange filter Fine filter WSO Replace filter inlay; do not clean it. Operator
annual
5 x year or as
needed.
Safety check Entire plant Safety check according to the guidelines for fluid spraying equipment /
accident prevention regulations.
Customer
Service
Maintenance Entire plant Maintenance contract including the replacement of all wear parts. Customer
Service
opinion Temperature con-
troller
Check function of both the thermostats. Customer
Service
Exchange filter Filter inlay active
carbon filter WSO
Close the locking valve for fresh water (building site), unscrew the filter
cup and rinse it, replace the filter inlay, insert the new filter inlay and the
filter cup back into place, open locking valve for fresh water, take system into operation.
Operator/
Customer
Service
opinion Pump of RO systemInform Customer Service. Check characteristic line (flow quantity and
pressure).
Customer
Service
Maintenance Gas burner Have maintenance tasks performed by the customer service of the burner manufac-
turer.
Clean the filter Fuel tank Pump off remaining fuel. Empty and dispose of sediments. Clean tank
from the inside.
Tank clean-
ing service
Time Activity Assembly affectedPerformance By whom
34 EN
Page 35

- 33
1 Condensate drain valve
Hold the condensate drain valve over a
duct or a collection container.
Open the condensate drain valve and
drain the condensate.
Close the condensate drain valve.
1 Screw
2 Halves of the handle shell
3 Node piece
4 Needle bearing
5 O ring
6 Contact surface pipe/ handle shell
7 high pressure hose
Unscrew spray pipe.
Loosen 6 screws.
Remove the half of the handle shell.
Fill grease in the needle bearing cham-
ber in the handle shell.
Grease needle bearing and O-Ring.
Grease contact surface pipe/ handle
shell.
Screw back the two halves of the han-
dle shell.
1 Screw
2 Nozzle holder
3 Light sensor
4 Cover
5 Looking glass
6 Pressure plate
Loosen fuel pipe.
Pull out the light sensor sideways from
the holder.
Loosen 3 screws.
Remove the lid with the holder for light
sensor.
Remove the pressure plate from the
nozzle holder.
Clean the looking glass.
Assemble the parts in the reverse se-
quence.
1 Fuel pump
2 Filter casing
Lock the oil supply.
Unscrew the filter casing.
Clean filter with compressed air.
Assemble the parts in the reverse se-
quence.
Open the oil supply.
몇 WARNING
Risk of burns due to hot oil or hot parts of
the plant. Allow the pump to cool down for
minutes before oil change.
Note:
Used oil must only be disposed of by the
designated collection points. Please turn in
used oil there. Polluting the environment
with used oil is prosecutable.
1 Oil container lid
2 Oil drain screw
Keep a collection basin for old oil ready.
Remove the lid of the oil container.
Unscrew the oil drain screw and collect
used oil.
Insert washer and turn in the oil drain
screw.
Slowly fill in new oil until the "MAX"
marking on the oil container.
Close the oil container with the lid.
Deliver the old oil to the respective col-
lection centres.
Open the coin acceptor, and clean the
coin channel with a moist cloth and
washing liquid.
The correct setting of the ignition electrodes is very important for the burner to
function properly. The settings have been
indicated in the above drawing.
Maintenance Works
Draining condensate at the compressor
Lubricate the hand-spray gun
Clean looking glass for flame
monitoring
Cleaning the fuel pump filter
Oil change
Clean the coin mechanism
Electrode setting
35EN
Page 36

- 34
The bases of a safe operating of the equipment is thr regularly maintenance according to the following maintenance plan.
Use only original parts of the manufacturer
or part suggested by him, such as
– parts and wearing parts,
– accessories parts,
– operating materials,
– cleaning agents.
DANGER
Risk of accident while working on the unit!
During all tasks:
Turn off the water supply; close the
fresh water tap,
First switch-on in voltage-less state,
switch off the emergency stop switch in
the building and secure it against being
switched on again.
– Operator
Work designated with the sign “Operator” may only be carried out by persons
who have been instructed in the safe
operation and maintenance on the
washing system.
– Electricians
Persons with a professional training in
the electro-technical area.
– Customer Service
Only KÄRCHER service engineers are
allowed to carry out work with the note
“Customer Service”.
– Customer service of the burner manu-
facturer
Malfunctions on the gas burner must
only be rectified by the customer service of the burner manufacturer.
1 Error display on display of control (in
control cabinet)
1 Error display on the outside of the con-
trol cabinet (only SB MB standard)
Troubleshooting
Who may remedy faults?
Fault indication
Troubleshooting in Switching Cabinet
36 EN
Page 37

- 35
Faults shown in the display
Display Cause Remedy
F 001 Electronic outlets overloaded Acknowledge the fault. If the fault recurs, call cus-
tomer service.
F 004 Dimming sensor defective Call customer service.
F 005 Protective motor switch on high pressure pumps was triggered Reset motor protection switch; call Customer Ser-
vice if the problem recurs.
F 006 Connection to RDS defective Call customer service.
F 007 The pressure switch for air on the compressor does not report any
pressure
Check the compressor and the compressed air
lines.
F 008 Cause: no connection to the electronics "MSWS". Check the plug connection of the data cable with
electronics A1
F 010 No connection to pump electronics at washing station 1 Call customer service.
F 011 Electronic outlets at washing station 1 overloaded Acknowledge the fault. If the fault recurs, call cus-
tomer service.
F 012 Current pickup of high pressure pump at washing station 1 too high
F 013 Current pickup of high pressure pump at washing station 1 too low See "Faults on high pressure pumps"
F 014 Contact of high pressure pump at washing station 1 stuck Call customer service.
F 016 Coiling protection contact of high pressure pump washing station 1 has
triggered.
Acknowledge the fault. If the fault recurs, call cus-
tomer service.
F 017 Oil level of high pressure pump at washing station 1 too low Refill oil, acknowledge the fault.
F 018 Electronics at washing station 1 defective Call customer service.
F 020 No connection to remote control electronics at washing station 1 Check the connector of the data cable with the elec-
tronics of the remote control.
F 021 Fault at coin acceptor at washing station 1 Call customer service.
F 022 Check the microswitch on the mechanical coin ac-
ceptor, replace electronic coin acceptor
F 030 No connection to pump electronics at washing station 2 Acknowledge the fault. If the fault recurs, call cus-
tomer service.
F 031 Electronic outlets at washing station 2 overloaded
F 032 Current pickup of high pressure pump at washing station 2 too high Acknowledge the fault. If the fault recurs, call cus-
tomer service.
F 033 Current pickup of high pressure pump at washing station 2 too low See "Faults on high pressure pumps"
F 034 Contact of high pressure pump at washing station 2 stuck Call customer service.
F 036 Coiling protection contact of high pressure pump washing station 2 has
triggered.
Acknowledge the fault. If the fault recurs, call cus-
tomer service.
F 037 Oil level of high pressure pump at washing station 2 too low Refill oil, acknowledge the fault.
F 038 Electronics at washing station 2 defective Call customer service.
F 040 No connection to remote control electronics at washing station 2 Check the connector of the data cable with the elec-
tronics of the remote control.
F 041 Fault at coin acceptor at washing station 2 Call customer service.
F 042 Check the microswitch on the mechanical coin ac-
ceptor, replace electronic coin acceptor
F 050 No connection to pump electronics at washing station 3 Acknowledge the fault. If the fault recurs, call cus-
tomer service.
F 051 Electronic outlets at washing station 3 overloaded
F 052 Current pickup of high pressure pump at washing station 3 too high Acknowledge the fault. If the fault recurs, call cus-
tomer service.
F 053 Current pickup of high pressure pump at washing station 3 too low See "Faults on high pressure pumps"
F 054 Contact of high pressure pump at washing station 3 stuck Call customer service.
F 056 Coiling protection contact of high pressure pump washing station 3 has
triggered.
Acknowledge the fault. If the fault recurs, call cus-
tomer service.
F 057 Oil level of high pressure pump at washing station 3 too low Refill oil, acknowledge the fault.
F 058 Electronics at washing station 3 defective Call customer service.
F 060 No connection to remote control electronics at washing station 3 Check the connector of the data cable with the elec-
tronics of the remote control.
F 061 Fault at coin acceptor at washing station 3 Call customer service.
F 062 Check the microswitch on the mechanical coin ac-
ceptor, replace electronic coin acceptor
F 070 No connection to pump electronics at washing station 4 Acknowledge the fault. If the fault recurs, call cus-
tomer service.
F 071 Electronic outlets at washing station 4 overloaded
F 072 Current pickup of high pressure pump at washing station 4 too high Acknowledge the fault. If the fault recurs, call cus-
tomer service.
F 073 Current pickup of high pressure pump at washing station 4 too low See "Faults on high pressure pumps"
37EN
Page 38

- 36
F 074 Contact of high pressure pump at washing station 4 stuck Call customer service.
F 076 Coiling protection contact of high pressure pump washing station 4 has
triggered.
Acknowledge the fault. If the fault recurs, call cus-
tomer service.
F 077 Oil level of high pressure pump at washing station 4 too low Refill oil, acknowledge the fault.
F 078 Electronics at washing station 4 defective Call customer service.
F 080 No connection to remote control electronics at washing station 4 Check the connector of the data cable with the elec-
tronics of the remote control.
F 081 Fault at coin acceptor at washing station 4 Call customer service.
F 082 Check the microswitch on the mechanical coin ac-
ceptor, replace electronic coin acceptor
F 177 Current pickup of pump undercarriage wash too high Reset motor protection switch; call Customer Ser-
vice if the problem recurs.
F 200 No connection between the SB MB control and the electronics of the
WSO
Call customer service.
F 201 Outputs of the control SB MB to the WSO overloaded
F 202 Hardness sensor shows hard water after regeneration see "Water remains hard after regeneration"
F 204 Failure in the electronics Call customer service.
F 210 Level sensor BUFFER TANK EMPTY activated Fill the tank to the level sensor BUFFER TANK
EMPTY (max. switch delay 60 minutes)
F 211 Level sensor BUFFER CONTAINER EMPTY and BUFFER CON-
TAINER FULL switch simultaneously
Check level switch.
F 212 Level sensor RO PUMP ON and BUFFER CONTAINER FULL switch
simultaneously
F 213 Water pressure at the pump RO below 0.3 bar. Check the flow pressure of the water supply
Check the water filter
F 214 Site-supplied water preparation reports fault See operating instructions of the site supplied water
preparation
F 220 Water shortage See "Low water level in the swimmer tank for warm
water"
F 221 Exhaust temperature is too high See "Exhaust thermostat switched off“
F 222 Current pickup of circulation pump for warm water too high Reset motor protection switch. If the fault recurs,
call customer service.
F 223 Burner fault See "Burner failure"
F 224 Safety thermostat of the burner has got triggered Reset automatic fuse.
F 225 Burner delay active Wait until the delay time until the burner restart has
elapsed.
F 226 Flow indicator did not open within 5 seconds after the circulation pump
for warm water was turned off.
Call customer service.
F 227 Flow indicator did not close within 3 seconds after the circulation pump
for warm water was turned off.
F 228 Hot water outlet cools off too slowly after the burner is turned off Check the warm water circuit.
F 229 Fault in warm water temperature sensor Call customer service.
F 230 Fault in burner outlet temperature sensor
F 231 Fault in warm water temperature sensor
F 232 Fault in burner outlet temperature sensor
F 233 Water temperature with external supply with warm water hotter than
60°C.
Reduce temperature of the water supply
F 240 Failure exterior temperature sensor Call customer service.
F 241 Failure exterior temperature sensor
F 242 Current pickup of circulation pump for anti frost protection too high Reset motor protection switch or fuse. If the fault re-
curs, call customer service.
F 243 Current pickup of circulation pump for wash station heater too high
F 244 Warm water temperature too low, washing station heater was turned
off
Check the the continuous water heater and the
warm water circuit
F 245 Current pickup of foam hose heater for dry foam too high Reset motor protection switch. If the fault recurs,
call customer service.
F 250 Current pickup of pump for special washing programme too high
F 280 No connection to electronics A6 Acknowledge the fault. If the fault recurs, call cus-
tomer service.
F 281 Outputs of the electronics A6 overloaded
F 282 Current consumption of pump for rim cleaner too high
F 283 Current consumption of pump for rim cleaner too low
F 284 Contactor of pump for rim cleaner is jammed Call customer service.
Display Cause Remedy
38 EN
Page 39

- 37
During normal operation, active faults are
shown alternating in sequence.
The number in parentheses shows the total
number of faults present.
If a fault must be acknowledged, the display will stand still:
Fault code (F: XXX) locate the fault in
the table above and follow the instructions to eliminate the fault.
To acknowledge, press the „ESC“ key.
Press the "OK" button to confirm.
The fault is acknowledged.
Note:
If more faults should be displayed without
confirming the displayed fault, press the
key RIGHT.
The control can store a maximum of 256
occurred faults.
When the fault list is full, the oldest message will be overwritten by the newest one.
Press the "ESC" key repeatedly until
the following display appears:
Press OK button for more than 2 sec-
onds.
Press the LEFT button.
Sum of archived fault messages
Press "OK" in order to get into the most
recently archived fault message.
1 Date of fault occurrence
2 Time of fault occurrence
3 Errow code
4 List position/number of same faults in
the fault list
Browse through the fault list using the
"LEFT" and "RIGHT" keys.
Details of the currently displayed fault
can be viewed via the "OK" key.
1 Error description
2 Errow code
3 Number of same faults in the fault list
Press the keys LEFT and RIGHT simul-
taneously.
Press "OK" in order to delete the fault
list
or
Press "ESC" in order not to delete the
fault list
The control can store a maximum of 256
occurred faults (e.g. activities in water
preparation).
When the event list is full, the oldest message will be overwritten by the newest one.
Press the "ESC" key repeatedly until
the following display appears:
Press OK button for more than 2 sec-
onds.
Press the LEFT button.
Press the RIGHT button.
The subsequent operation is done in the
same way as with "Viewing the fault list".
F 300 No connection to electronics A7 Acknowledge the fault. If the fault recurs, call cus-
tomer service.
F 301 Outputs of the electronics A7 overloaded
F 320 No connection to electronics A8
F 321 Outputs of the electronics A8 overloaded
F 322 Current consumption of pump for micro-emulsion (intensive cleaning
complete) too high
F 323 Current consumption of pump for micro-emulsion (intensive cleaning
complete) too low
F 324 Contactor of pump for micro-emulsion (intensive cleaning complete) is
jammed
Call customer service.
F 340 No connection to electronics A9 Acknowledge the fault. If the fault recurs, call cus-
tomer service.
F 341 Outputs of electronics A9 overloaded
F 342 Power consumption of intensive foam pump too high
F 343 Power consumption of intensive foam pump too low
F 344 Contactor of intensive foam pump jammed Call customer service.
F 440 No connection to electronics A31 Acknowledge the fault. If the fault recurs, call cus-
tomer service.
F 441 Outputs of electronics A31 overloaded
Display Cause Remedy
Acknowledge the faults
Viewing the list of faults
Clearing the error memory
Viewing the event list
39EN
Page 40

- 38
Interruptions in warm water circulation
Fault Possible cause Remedy By whom
Low water level in
the swimmer tank
for warm water
Water supply blocked Open locking tap for fresh water Operator
Sieve in the water shortage safe guard is dirty Clean or replace the filter inlay. Operator
Swimmer valve in the swimmer container for
warm water is not opening
Check swimmer valve; repair, if needed. Operator
Safeguard against water scarcity in the swimmer
container for warm water is jammed or defective
Check the water scarcity safeguard, replace if
necessary.
Operator
Hose pipe is burst or has come off Check the hose lines, replace if necessary. Operator
Pump disconnection from mains (optional) not
working
Check supply voltage.
Check pump.
Customer Service
Water temperature
is too low / too high
Thermostat defective. Check the thermostat, replace if necessary. Customer Ser-
vice
Burner does not
start or interrupts
the heating
Flow monitor is defective Check and clean the flow monitor, replace if nec-
essary.
Customer Service
Warm water circulation has calcium deposits Check water preparation, decalcify circuit. Customer Ser-
vice
Air in the circulation pump for warm water Deaerate the pump at the deaeration screw. Operator
Rotation direction of the circulation pump for
warm water is wrong
Check direction of rotation, modify, if required. Customer Ser-
vice
Thermostat defective. Check the thermostat, replace if necessary. Customer Ser-
vice
Protection for the circulation pump for warm water
is defective
Check the contactor, replace if necessary. Customer Ser-
vice
The motor protection switch of the circulation
pump for warm water has been triggered as the
circulation pump is blocked or the pump is defective
Check circulation pump; repair or replace if necessary. Reset motor protection switch.
Customer Ser-
vice
Malfunctions of the washing station heater
Fault Possible cause Remedy By whom
Circulation pump
for washing station
heater out of order
Temperature in the warm water tank below 10 °C
(fault display "F 244").
Look for the malfunction in the warm water circuit
and fix it.
Operator/Cus-
tomer Service
40 EN
Page 41

- 39
1 Unlocking key for exhaust gas thermo-
stat
2 Unlock button of oil firing unit
3 Electrical box of burner control
Malfunctions on the gas burner must only be rectified by authorised expert staff of the burner manufacturer.
Burner malfunctions with oil-heated devices
Fault Possible cause Remedy By whom
Fault in oil firing (oil
firing unit) has triggered in the electrical box of the burner control)
No ignition sparks exist (can be detected through
the looking glass in the burner lid).
Check electrode setting, ignition transformer and
ignition cable. Clean the electrodes, replace defective parts.
Press the unlock button des oil firing unit.
Customer Service
Looking glass for flame monitoring is contaminat-edClean the sight glass of the flame monitor (see
section „Maintenance work“).
Press the unlock button of the exhaust thermostat.
Operator
Light sensor of flame monitor not in holder or is
defective
Refasten or replace the light sensor.
Press the unlock button of the exhaust thermostat.
Operator, Customer Service
Heating oil level is too low Filling the fuel tank.
Press the unlock button of the exhaust thermostat.
Operator
No flame is formed due to lack of fuel Clean the fuel filters on the fuel pump.
Press the unlock button of the exhaust thermostat.
Operator
Clean the fuel nozzle, replace if necessary.
Press the unlock button of the exhaust thermostat.
Operator
Press the unlock button of the exhaust thermostat.
Fuel solenoid valve, fuel pump or coupling is defective.
Customer Service
No flame is formed due to lack of air Check blower sleeve for damage and ensure that
the belts are sitting correctly.
Press the unlock button of the exhaust thermostat.
Operator
Blower is defective; replace.
Press the unlock button of the exhaust thermostat.
Customer Service
Heavy smoke formation during start
and during operations
Ignition electrode is lying in the fuel stream. Check electrode setting and correct it. Operator, Cus-
tomer Service
Fuel pressure setting was changed (see "Technical Specifications")
Check fuel pressure, reset, if necessary Customer Ser-
vice
Heavy soot formation on the heating coil. Dismantle boiler and clean heating coil. Customer Ser-
vice
Exhaust thermostat (S5) has triggered.
Warm water circulation has calcium deposits Check water preparation, decalcify circuit.
Unlock the exhaust thermostat by pressing the
key.
Customer Service
Heavy soot formation on the heating coil. Dismantle boiler and clean heating coil.
Unlock the exhaust thermostat by pressing the
key.
Customer Service
Burner settings wrong Correct the burner settings.
Unlock the exhaust thermostat by pressing the
key.
Customer Service
Burner malfunctions with gas-heated devices
41EN
Page 42

- 40
Malfunctions at coin mechanism
Fault Possible cause Remedy By whom
All coin acceptors
reject all coins
Main switch is switched off. Set main switch to “1”. Operator
Incorrectly adjusted time of day or operating
times. Night operation lock active
Check the adjustments on the control. Operator
Lack of water (F 220) Check water supply. Operator
Motor protection switch of the high pressure
pumps was triggered
Reset motor protection switch.
Determine the cause if it reoccurs.
Operator
A single coin acceptor rejects all
coins
Coin acceptor dirty Clean the coin acceptor (see section „Maintenance
work“)
Operator
Overcurrent on the high pressure pump Acknowledge the fault on the control. Operator
Faults on high pressure pumps
Fault Possible cause Remedy By whom
Irregular water jet
on the hand spray
gun
High-pressure nozzle clogged Clean high-pressure nozzle. Operator
Amount of water supply is too low. Check water supply level (refer to technical data). Operator
Suction hose kinked Check suction hose. Operator
Reduced pressure
at the high-pressure pump
High-pressure nozzle flushed Replace the high-pressure nozzle. Operator
Incorrect high pressure nozzle installed. Check/replace high-pressure nozzle. Operator
Amount of water supply is too low. Check water supply level (refer to technical data). Operator
Check flushing solenoid valve,swimmer valve and
water quality solenoid valve.
Customer Service
Pressure does not
build up in the
pump
High-pressure hose to the washdown yard leaking
Check the high-pressure line, replace if necessary.Operator, Cus-
tomer Service
Overflow valve misadjusted or leaking Check and repair the overflow valve. Customer Ser-
vice
The high pressure pump sucks air from the
empty detergent tank
Refill detergent. Bleed the suction line (to speed up
the bleeding process briefly squeeze the suction
hose to the pump repeatedly during operation).
Operator
High pressure
pump is knocking;
manometer is
swaying wildly
High pressure pump is sucking in air. Check suction pipes for water and detergent and
ensure that they are leak-proof.
Operator
Detergent container empty? (see above) Operator
Vibration dampener is defective Replace vibration dampener. Operator
Valve in pump head defective or contaminated.Replace defective valves. Customer Ser-
vice
The pump does not
run
Overcurrent on the high pressure pump Acknowledge the fault on the control. Operator
Disturbed detergent supply
Fault Possible cause Remedy By whom
Inadequate or no
flow of detergent
Filter or hose is blocked Clean the parts. Operator
Leaky detergent hose Replace the hose Operator
Dosing pump incorrectly adjusted or defective. Check the dosing pump and the setting. Operator, Cus-
tomer Service
Dosing pump obstructed by condensate. Drain the condensate from the pressure container
of the compressor.
Customer Service
42 EN
Page 43

- 41
1 Sieve
1 Node piece
2 Inlet high pressure with check valve
3 Throttle wheel cleaner (0.6 mm) with
check valve
4 Throttle intensive foam (1.3 mm) with
check valve
5 Inlet compressed air with check valve
6 Foam device
7 Backflow valve
8 Output high-pressure
Malfunctions on the wheel cleaner/intensive foam
Fault Possible cause Remedy By whom
Inadequate or no
flow of water/detergent
Sieve in the water inlet is dirty Clean sieve. Operator
Nozzle insert in the injector clogged. Clean the nozzle insert. Operator
Throttle in node piece obstructed. Clean the parts. Operator, Cus-
tomer Service
Foam device in the hub clogged. Blow out the hub using compressed air or replace
the foam device.
Operator, Customer Service
Faults in the compressor
Fault Possible cause Remedy By whom
Compressor
switches on and off
frequently.
Condensate level in pressure container too
high.
Drain the condensate from the pressure container
of the compressor.
Operator/Customer Service
Faults at the dry foam production (option)
Fault Possible cause Remedy of whom
Bad dry foam quality, foam too dry or
too wet
Detergent container is empty Replace the container. Operator
Suction filter of dosing pump
plugged
Rinse the filter with warm water Operator
Water supply is too low Re-establish the water supply, set pressure reducer foam sta-
tion to 0.25 MPa (2.5 bar).
Operator
Compressor does not supply air Check the compressor
Drain the condensate from the pressure container of the compressor.
Customer Service
Compressor overheated After cooling off, the compressor will automatically start operat-
ing again.
Operator
Pressure reducer foam station
contaminated
Clean pressure reducer Operator
Solenoid valve water/chemicals
does not open
Check the voltage using a magnetic field tester, clean solenoid
valve, replace if required
Operator, Customer Service
Setting of dosing valves water/
chemicals or air incorrect
Perform basic setup (see chapter B Operation and Settings) Customer Service
incorrect detergent, detergent
contaminated or old
Replace detergent Operator
43EN
Page 44

- 42
Interruptions in water preparation
Fault Possible cause Remedy By whom
Base exchanger is
not regenerating
No power supply Check power supply (fuse, plug, switch). Operator/Cus-
tomer Service
Hardness sensor defective Check hardness sensor, replace if required Customer Ser-
vice
Water remains
hard after regeneration
No salt in the salt tank Refill salt, wait for brine formation (approx. 2 hours).
Start new regeneration.
Do not allow the salt level to fall below the water level.
Operator
Injector filter is blocked Clean the filter Customer Ser-
vice
Water flow to the salt tank is inadequate Check the brine filling duration; clean the brine filling
aperture, if required.
Customer Ser-
vice
Rising pipe is leaky Check rising pipe, pilot pipe Customer Ser-
vice
too high salt consumption
too much water in the water tank see below Customer Ser-
vice
wrong salt quantity setting Check salt consumption and salt settings Customer Ser-
vice
Pressure loss Deposits in water inlet Clean the filter Customer Ser-
vice
Deposits in base exchanger Clean valve and resin board Customer Ser-
vice
Too much water in
the salt tank
Rinsing aperture is blocked Clean rinsing aperture Customer Ser-
vice
Injector is blocked Clean injector and filter Customer Ser-
vice
Foreign particles in the solenoid valve Clean the solenoid valve, change the valve seat Customer Ser-
vice
Power failure while filling brine Check power source Customer Ser-
vice
Brine is not getting
sucked in
Water inlet pressure is too low Increase water pressure to at least 0.3 MPa (3 bar). Operator
Rinsing aperture is blocked Clean rinsing aperture Customer Ser-
vice
Injector is blocked Clean injector and filter Customer Ser-
vice
Leak inside the valve Replace valve flaps Customer Ser-
vice
There is always water in the drainage,
even after regeneration
Valve does not execute the correct cycles Check timer programme; replace the valve controls,
if required
Customer Ser-
vice
Foreign particle in the valve Remove the valve control, take out the foreign parti-
cle, check valve in all the positions
Customer Ser-
vice
RO Pump does not
start
Buffer tank for permeate is full Wait until the permeate is consumed. Operator
Level sensor "Buffer container full" defective Check level switch. Customer Ser-
vice
Start-up time of the control has not yet been
completed
Wait. Operator
The pressure switch for water shortage has
tripped.
Fine filter or active carbon filter dirty
Check filter; replace the filter inlay, if required
Operator
Pressure switch for water scarcity is defective Check pressure switch; replace it, if required. Customer Ser-
vice
Regeneration of the base exchanger is running Wait for regeneration to end. Operator
No softened water is coming from the base exchanger
Check the base exchanger. Operator/Cus-
tomer Service
Pump disconnection from mains (optional) not
working
Check supply voltage.
Check pump.
Customer Ser-
vice
RO pump starts
only after several
rinsing cycles
Too low mains water pressure Check mains water supply; open the inlet valve fully,
if required.
Operator
Fine filter or active carbon filter dirty Check filter; replace the filter inlay, if required Customer Ser-
vice
44 EN
Page 45

- 43
Permeate output is
too low; buffer tank
of permeate is often
empty
Water inlet temperature is too low Measure the temperature of the softened water and
compare it with the technical data.
Operator
Operating pressure is too low Reset the operating pressure. Customer Ser-
vice
There are calcium or mineral deposits on the filter surface of the RO membrane.
Decalcify the membrane; replace it, if necessary Customer Ser-
vice
Level switch Buffer tank is "full" is defective Check level switch. Customer Ser-
vice
There are bacteria or algae deposits on the filter
surface of the RO membrane.
Rinse the membrane thoroughly for a long time; replace it if necessary. In future remember: Water is of
potable quality; avoid long idling periods.
Customer Ser-
vice
There are stains on
the car paint during
Top Care (permeate has not been
adequately demineralised)
The mineral content of the softened water is too
high
Check conductivity of softened water. Customer Ser-
vice
RO membrane has ruptured; defective sealing Replace washer or membrane. Check conductivityCustomer Ser-
vice
Mixing of permeate and softened water Comparison of conductivity of the permeate from
the spray pipe and water from the buffer tank of permeate.
Customer Ser-
vice
Fault Possible cause Remedy By whom
Faults on the frost protection units)
Fault Possible cause Remedy By whom
Convector is not
running
Convector set incorrectly Check adjustment (see Chapter "Settings") Operator
Convector defective Replace the convector. Customer Ser-
vice
Frost protection is
not working
Power supply has been interrupted Check power supply and ensure proper supply. Operator
Exterior temperature sensor installed incorrectly.
See section "Installing system". Customer Ser-
vice
Spray pipe, handspray gun and highpressure hose are
frozen
Sieve with throttle plugged (marked red) Open the screw connection. Clean sieve. Check to
see whether the throttle boring moves freely.
Operator
Filter of the anti frost pump plugged Clean the filter and replace Operator
Wash station heater will not work during frost
Exterior temperature sensor installed incorrectly.
See section "Installing system". Customer Ser-
vice
Heat exchanger or circulation pump is defectiveCheck heat exchanger, pump and pipe system; re-
pair, if required.
Customer Ser-
vice
Burner fault Fix burner fault. Operator
Motor protection switch for circulation pump of
washing station heater has triggered
Unlock the motor protection switch; find out the
cause if fault occurs.
Operator, Cus-
tomer Service
45EN
Page 46

- 44
Order no. : 6.761-284.0
Order no. 6.768-004.0
for determining the fresh water hardness.
Order no. 6.768-003.0
For determining the residual hardness of
the softened water.
Order no. 6.548-066.0
to determinate the residual chlorine content
of the softened water and the fresh water.
Order no. : 6.287-016.0
Order no. : 6.288-016.0
Order no. : 6.288-055.0
Order no. : 6.288-028.0
Order no. : 6.288-116.0
Order no. : 6.290-911.0
Order no. : 6.228-001.0
Order no. : 6.295-515.0
Order no. : 6.295-517.0
Order no. : 6.295-519.0
Order no. : 6.295-521.0
Order no. : 6.295-523.0
Order no. : 6.295-553.0
Order no. : 6.295-428.0
Order no. : 6.295-838.0
Order no. : 6.295-419.0
Order no. : 6.907-200.0
Order no. : 6.394-374.0
6.394-255.0
Order no. : 6.999-023.0
6.999-080.0
6.999-046.0
Order no. : 6.999-017.0
RM 100 ASF
RM 101 ASF
The warranty terms published by our competent sales company are applicable in
each country. We will repair potential failures of your accessory within the warranty
period free of charge, provided that such
failure is caused by faulty material or defects in fabrication. In the event of a warranty claim please contact your dealer or the
nearest authorized Customer Service center. Please submit the proof of purchase.
몇 CAUTION
Risk of personal injury or damage! Mind the
weight of the appliance during transport.
When transporting in vehicles, secure
the appliance according to the guidelines from slipping and tipping over.
몇 CAUTION
Risk of personal injury or damage! Consider the weight of the appliance when storing
it.
Accessories
Attachment sets
Water filter G 1"
Test kits
Test set A
Test set B
Test set C
Fuel
Water softening salt in form of tabletts
Engine oil Hypoid SAE 90
Heavy duty grease
Silicon grease
Lock grease
Steel care product
Moisture protection spray
Detergent
Intensive dirt dissolver CP930 ASF, 20 l
HP wash CP 935 ASF, 20 l
Active foam CP 940 ASF, 20 l
Thermal wax CP 945 ASF, 20 l
Top care CP 950 ASF, 20 l
HP wash RM 806, 20 l
Hot wax RM 820 ASF, 20 l
Foam cleaner RM 838 ASF, 20 l
Appliance care
Wash hall and tile cleaner RM 841, 20 l
Squeegee
Spray bottle 1 l
RM Sprayer 5 l
Telescoping bar
Pad holder
White pads
Micro fibre cloth, blue
Lime solvent
Warranty
Transport
Storage
46 EN
Page 47

- 45
Note:
The equipment may only be installed by
– KÄRCHER service engineers
– persons authorized by KÄRCHER
몇 WARNING
Please ensure that there are no exhaust
emissions near the air inlets.
Sufficient ventilation is very important and
exhaust gases must be ventilated as instructed by local regulations.
The following requirements are necessary
in order to install the equipment:
– Horizontal, even foundation according
to separate drawing (ask for it at
KÄRCHER).
– For electrical connection refer to techni-
cal specifications.
– For water connection refer to technical
specifications.
– Ensure adequate insulation / heating
for water and fuel pipes while operating
in winter.
– Drain water shaft and required drain
water disposal.
– Adequate lighting at washing place to
ensure safe working for the customers
using the washing system.
Unpack the equpiment and dispose of the
packing material properly.
Align the system on an even and hori-
zontal installation site using the adjusting screws on the base frame.
Place the exhaust nozzle from outside
on the roof and fasten it from inside using the enclosed screws.
Connect the high pressure hose to the
system.
Connect high pressure hose to hand
spray gun
Connect spray lance to trigger gun.
Tighten all covering nuts firmly by hand.
To disconnect from the drinking water network, a system separator type BA, category 4 must be installed between the system
and the drinking water network. In addition
to that, the local regulations must be adhered to.
Note:
Impurities in the inlet water can damage the
system. Kärcher recommends the use of a
water filter (see "accessories").
ATTENTION
Risk of damage to the plant if water supply
is not of suitable quality. The system must
only be supplied with water in drinking water quality.
Quality requirements for tap water:
For connection values refer to technical
specifications.
Insert the inlet hose from the bottom
through the plant opening and connect
it.
When a water distributor block 4. type of
water is used, processed water can also be
used with certain washing programmes.
Requirements on the quality for processed
water:
DANGER
Risk of electric shock!
The mains must be connected by an experienced electrician and the requirements of
the IEC 60664-1 must be fulfilled.
The plant must be secured through a wrong
current protection switch with a triggering
current lesser than or equal to 30 mA.
Note:
A clearly noticeable EMERG STOP switch
must be installed in the supply line to the
system, which can be used to turn the entire system off.
After connecting the ssytem, check the
rotating direction of the warm water circulation pump and the circulation pump
for heating the washing place (optional).
Note:
The maximum permissible vacuum in the
fuel pipe (measured between the fuel filter
and the fuel pump) is 0.4 bar.
The underpressure depends on:
– Length of pipe
– Suction height
– Fixtures, branchings and angles in the
suction pipe (dotted line in the diagram)
– Pipe cross-section (from +4°C the heat-
ing oil EL will separate the paraffin that
will then get deposited on the insides of
the pipe)
– Viscosity of the heating oil (depending
on temperature)
Measures against very high level of underpressure are:
– Minimum inner diameter of pipe 6 mm
– Short, straight pipes (as far as possible)
– Maximum viscosity 4...6 cSt at 20°C
– In extreme cases, use separate fuel
pipe with pump
– Pre-heat the heating oil; use heating for
the suction pipe
– Use heating oil with additives (flow pro-
moters) (winter heating oil) if there is
risk of frost
Installing the unit (only for experts)
Preparing the installation place
Unpack the equipment
Aligning the unit and installing it
Assemble the installation parts
Exhaust nozzle
Cleaning tools
Water connection
Parameter Value
pH value 6.5...9.5
electrical conductivity max. 1000
μS/cm
Hydrocarbons < 0,01 mg/l
Chloride < 250 mg/l
Calcium < 200 mg/l
Total hardness < 28 °dH
Iron < 0,2 mg/l
Manganese < 0,05 mg/l
Copper < 0,02 mg/l
Sulphate < 240 mg/l
Active chloride < 0,1 mg/l
free of bad odours
4. type of water (option)
Parameter Value
pH value 6.5...9.5
electrical conductivity < Measured value
fresh water + 1200
μS/cm, max 2000
μS/cm
removable materials <0.5 ml/l*
total suspended solids **< 50 μm
Hydrocarbons <20 mg/l
Chloride < 300 mg/l
Calcium < 200 mg/l
Total hardness < 28 °dH
Iron < 0.5 mg/l
Manganese < 0,05 mg/l
Copper < 2 mg/l
Sulphate < 240 mg/l
Active chloride < 0.3 mg/l
free of bad odours
* Test volume 1litre, Settling time 30 minutes
** no abrasive substances
Electrical connection
Fuel pipe to the external fuel tank
47EN
Page 48

- 46
Note:
The washing place heating can function
properly provided the washing area has
been built properly according to the
KÄRCHER recommendations.
Connect the site-supplied pipelines of
the washing station heater to the distrib-
utors in the system .
Install the external temperature sensor:
– protected from direct sunlight (north of
the equator on the northern hemi-
sphere, south of the equator on the
southern hemisphere),
– protected aginst warm walls,
– protected aginst warm air currents.
1 Locking valve of feeder pipe
2 Filling valve
Connect the submersion pump to fill the
washing station heater with the fill valve
(on the red distributor).
Return line from the fill valve to the blue
distributor to the container with the frost
protection solution.
Open the locking valves of feeder and
return pipes.
Pump frost protection mixture for a frost
safety for up to -25°C into the system.
Switch on the floor heating pump (see
Chapter "Manual procedures").
Perform the filling process until there
are no more bubbles in the return line.
Close the fill valve for the return line (on
the blue distributor) and fill in more frost
protection until the manometer shows
approx. 1.5 bar.
Close locking valve of feeder pipe.
Let the pump of the floor heating run for
at least 15 more minutes.
If necessary, fill in more frost protection
until the manometer shows 1.5 bar.
Remove the hose; while doing so col-
lect the residual frost protection solution
and dispose of it.
Check hose and pipe screws for ab-
sence of leakness.
Adjust the thermostat mixing valve; see
Chapter "Settings/Washing station
heater",
The oil level in both the high-pressure
pumps must lie between MIN and MAX.
Cut off tip of oil container.
See section "Filling fuel" in the earlier part
of the Operating Instructions.
Note:
The softening salt is added to the salt tank
while starting up the base exchanger.
Hence, do not fill in any softening salt yet.
Open the water supply.
1 Deaeration screw
Deaerate the warm water circulation
pump; loosen first the deaeration screw
and then tighten it again.
Set main switch to “1”.
1 Deaeration screw
Deaerate the frost protection circulation
pump; loosen first the deaeration screw
and then tighten it again.
Inser the overflow hoses of base ex-
changer and salt tank in the drainage
pipe of the building.
Fill the salt tank with water (approx. 10
cm above top edge of the sieve) Do not
add any salt yet!
Open the locking valve for fresh water
slowly and wait until the pressure tank
is filled with water.
Remove the covering lid of the control
valve.
1 Programming knob
Press the programme button and select
the function "Backwash" by turning the
button in the direction of the arrow.
Water and air escapes through the
drainage connection until the plant is
completely deaerated.
Note:
Restrict backwashing to the absolute minimum because otherwise the sensor measuring cell can get exhausted and this may
necessitate a complete regeneration of the
concerned exchange tank.
Pull out the suction sieve fitted at the
brine hose from the guide pipes in the
salt tank.
Press the valve flap (NR1) (directly be-
hind the programming system) using a
screw-driver.
The air closure valve gets filled and air
escapes through the suction sieve.
When air no longer escapes from the
suction sieve, release the valve flap.
Insert the suction sieve back into the
guide pipes.
Press the programme button and select
the function "Salt+Wash" by turning the
button in the direction of the arrow.
Water level in the salt tank falls continuously.
Note:
The suction system needs to be deaerated if there is air formation in the air
closure valve before the salt tank is
empty (residual level in the salt tank,
when empty, is approx. 7 cm) and the
ball floating in the air closure glass falls
down.
Connect the washing station heater
and start it up
Check oil level
Filling in detergents
Initial startup
Turning the base exchanger on
Backwash
Regeneration
48 EN
Page 49

- 47
Press the programme button and select
the function "Fill+Rinse clear" by turn-
ing the button in the direction of the ar-
row.
The control valve automatically moves
to the function "Operations". The salt
tank is filled with water.
When the water level is correct, fill the
salt tank with salt tablets according to
DIN 19604 (also see chapter on Acces-
sories).
The plant is ready for operations when
these jobs are completed. Conclude the
start-up activities by doing a soft water test.
During first start-up:
Fill the membrane with initial tap water
pressure (net it).
Rinse the memrane for 10 ... 20 min-
utes (foam formation during this proce-
dure is normal).
During fresh start-up after shutdown:
Let the rinsing run until there are no
bubbles to be seen at the throughflow
meter of the permeate.
1 Adjustment screw
Check the pressure of the detergent so-
lution.
Target value: 0.9...1.0 MPa (9...10
bars).
Adjust the pressure as needed by turn-
ing the adjustment screw.
Check burner setting.
Check all functions of the system.
Check all washing programmes on all
washing stations.
Check the plant for leaks; tighten
screws if required.
The initial startup of the gas burner must
only be performed by authorised expert
staff of the burner manufacturer.
– The device must be connected to a sep-
arate chimney.
– The exhaust system must be designed
according to the local rules and regulations after consulting the concerned
chimney expert.
Type B23
Gas appliances without flow controller
where all parts of the exhaust system that
are subjected to excess pressure are free
of combustion air. The B23 installation
opens new options of connecting the appliance to a traditional single-draught chimney according to DIN 18160 and operating
it depending on the air conditions in the
room. The only requirement is that the
chimney must be suitable for being connected to combustion devices (i.e. it has
been cleaned by inserting a stainless steel
pipe).
Refill / Clean washing
Filling the salt tank
Start-up of the RO plant
Check the pressure of rim cleaner
(option)
Check the function of the system
Starting up the gas burner (option)
Gas appliances with an exhaust
system that sucks out the combustion
air from the installation room
49EN
Page 50

- 48
* SB MB standard
** SB MB comfort
Dimension drawing for CAB model
50 EN
Page 51

- 49
* SB MB standard
** SB MB comfort
Dimension drawing for SKID model
51EN
Page 52

- 50
Dimension drawing for SKID model with WSO upgrade kit
52 EN
Page 53

- 51
We hereby declare that the machine described below complies with the relevant
basic safety and health requirements of the
EU Directives, both in its basic design and
construction as well as in the version put
into circulation by us. This declaration shall
cease to be valid if the machine is modified
without our prior approval.
The undersigned act on behalf and under
the power of attorney of the company management.
Authorised Documentation Representative
S. Reiser
Alfred Kärcher GmbH Co. KG
Alfred-Kärcher-Str. 28 - 40
71364 Winnenden (Germany)
Phone: +49 7195 14-0
Fax: +49 7195 14-2212
Winnenden, 2017-04-01
EU Declaration of Conformity
Product: High pressure cleaner
Type: 1.070-xxx
Relevant EU Directives
2006/42/EC (+2009/127/EC)
2014/30/EU
2000/14/EC
Applied harmonized standards
EN 55014–1: 2006+A1: 2009+A2: 2011
EN 55014–2: 2015
EN 60335–1
EN 60335–2–79
EN 61000–3–2: 2014
EN 61000–3–3: 2006
EN 62233: 2008
Applied conformity evaluation method
2000/14/EC: Appendix V
Sound power level dB(A)
Measured: 83
Guaranteed: 86
CEO
Head of Approbation
53EN
Page 54

- 52
Testing done on:
Findings:
Testing done on:
Findings:
Testing done on:
Findings:
Testing done on:
Findings:
Log of high pressure testing
Plant type: Manufact. no.: Start-up on:
Signature
Signature
Signature
Signature
54 EN
 Loading...