

Page 1

KB 2020
5.961-439
(2009246-11-04)
Operating Instructions
PRESSURE WASHER
PLEASE READ THIS LEAFLET CAREFULLY
BEFORE OPERATING YOUR MACHINE
Page 2
THANK YOU FOR PURCHASING A KARCHER
PRESSURE WASHER
PLEASE READ THIS LEAFLET CAREFULLY
BEFORE OPERATING YOUR MACHINE.
WHAT IS A PRESSURE WASHER?
A Pressure Washer is essentially a powerful electric motor driving a set
of pistons that force water through a small nozzle, thus creating a
pressurised jet of water. This provides the cleaning power behind the
Karcher Pressure Washer.
A Karcher Pressure Washer can be used for an endless list of applications
around the home and garden. It provides an efficient, economical and
labour saving way of cleaning with excellent results.
All Karcher domestic pressure washers are designed to run from a
suitable cold water supply although some models will accept a water inlet
temperature of between 40 °C and 60 °C.
Environmental Comment - Save water with high pressure.
The Karcher Pressure Washer is environmentally friendly enabling you
to reduce your water consumption compared to a normal garden hose.
A definite advantage with a metered water supply
OR
with the added benefit of suction mode, water can be drawn from an
open container such as a water butt.
2
Page 3

INDEX
1. APPLICATIONS
2. SAFETY INSTRUCTIONS
3. GETTING STARTED
3.1 Contents
3.2 Water Connection
3.3 Electrical Connection
3.4 Suction Mode
3.5 Detergent
4. OPERATING YOUR PRESSURE WASHER
4.1 High Pressure Operation
4.2 Low Pressure Operation Without Brush
4.3 Low Pressure Operation With Brush
4.4 End Of Operation
5. IMPORTANT CARE AND MAINTENANCE
6. ACCESSORIES / SPARE PARTS
7. PROBLEM CHECKLIST / TROUBLESHOOTING
8. HELP-LINE
9. TECHNICAL DATA
10. ASSEMBLY
3
Page 4

1. APPLICATIONS
The main applications for this product are DOMESTIC
cleaning tasks:
Cars, motorbikes, caravans, boats and bicycles
Patios, fences, garden walls, pathways, driveways and house
facades particularly useful for cleaning block driveways
Removal of algae and moss from roofs, brickwork and
guttering
Garden tools and machinery, furniture and barbecues
Hygienic cleaning of animal pens and their surroundings
With the addition of Karcher accessories, the list
continues .............
Clearing blocked drains and pipes
Removal of old paint and rust from garden furniture and gates
Spraying insecticide onto trees, plants and lawns
BEFORE STARTING UP YOUR PRESSURE WASHER PLEASE
CHECK YOU HAVE THE FOLLOWING:
We recommend you purchase these items from a reputable store.
RCD plug and socket that will interrupt electrical supply in an
emergency.
A typical garden hose (minimum length 7.5 metres) with suitable
hose connection (Hoselock/Gardena type) to match the coupling
on the machine (hose and connector not supplied).
4
Page 5
2. SAFETY INSTRUCTIONS
Electrical Connection
Never use defect connection or extension lines! If the connection line
is damaged, it must be replaced with a special connection line that is
available from the manufacturer or his customer service.
Please make sure that the connection or extension lines are not
damaged by being ran over, pulled or dragged. Protect the
connection lines from heat, oil, and sharp edges.
Never touch the mains plug and the socket with wet hands.
The connection between connection line and extension line must not
lie in the water.
All current-carrying components within the working area must be
jet-proof.
The appliance may only be connected to an electrical connection that
was performed by an electrician according to IEC 60364.
Only connect the appliance to alternating current. The voltage must
comply with the voltage specified on the typeplate.
To avoid electric accidents, we recommend to use sockets with a
series connected residual current operated device (rated breaking
current max. 30 mA).
Warning: Inappropriate extension lines may be dangerous. If you
work outside, only use extension lines that are approved and specifically labelled and provide of a sufficient conductor cross section:
1 to 10 m: 1.5 mm² 10 to 30 m: 2.5 mm²
The plug and the coupling of an extension line must be waterproof.
Always unwind the extension line completely from the cable drum.
5
Page 6
Safety Instructions
The operation of the device in hazardous locations is not admissible.
Please comply with the corresponding safety instructions if you use
the appliance in danger areas (e.g. filling stations).
Do not turn on the appliance if the power supply line or important
components of the appliance, such as safety components, highpressure hoses, spray jet, are damaged.
Warning: High-pressure hoses, fittings, and couplings are of
importance for the appliance safety. Only use high-pressure hoses,
fittings, and couplings recommended by the manufacturer.
The appliance is not intended for use by young children or infirm
persons without supervision.
Young children should be supervised to ensure that they do not play
with the appliance.
The operator must use the appliance properly. He must take the local
conditions into consideration and must pay attention to third persons,
in particular children, while working with the appliance.
Warning: Do not use the appliance if third persons are within the
reach of the appliance unless such persons wear protective clothes.
Warning: High-pressure jets may be dangerous if they are used
improperly.
The jet must not be directed at people, animals, active electrical
equipment, or the appliance itself.
Never direct the jet at yourself or third persons to clean clothes or
shoes.
Never use the appliance to spray objects containing hazardous
substances (e.g. asbestos).
6
Page 7

Warning: Vehicle tyres/tyre valves may be damaged and burst by
the high-pressure jet. A first sign is the discoloration of the tyre.
Damaged vehicle tyres/tyre valves are hazardous. Always perform
the cleaning with a minimum distance of 30cm.
Cleaning operations during which oil saturated waste water is
generated, such as engine cleaning and underbody cleaning, may
only be performed in cleaning locations that are equipped with an oil
separator.
If you clean varnished surfaces, please respect a minimum distance
of 30cm to avoid damages.
Never take in solvent-containing liquids or undiluted acids and
solvents! These include, for example, benzene, paint thinner, or
heating oil. The spray is highly inflammable, explosive, and toxic. Do
not use acetone, undiluted acids, and solvents as they affect the
materials used on the appliance.
If required, wear appropriate protective clothes and glasses to protect
yourself from return spray.
Never leave the appliance unattended as long as it turned on.
Warning: This appliance has been developed for the use of
detergents that are supplied or recommended by the manufacturer.
The use of other detergents or chemicals may affect the safety of
the appliance.
7
Page 8
3. GETTING STARTED
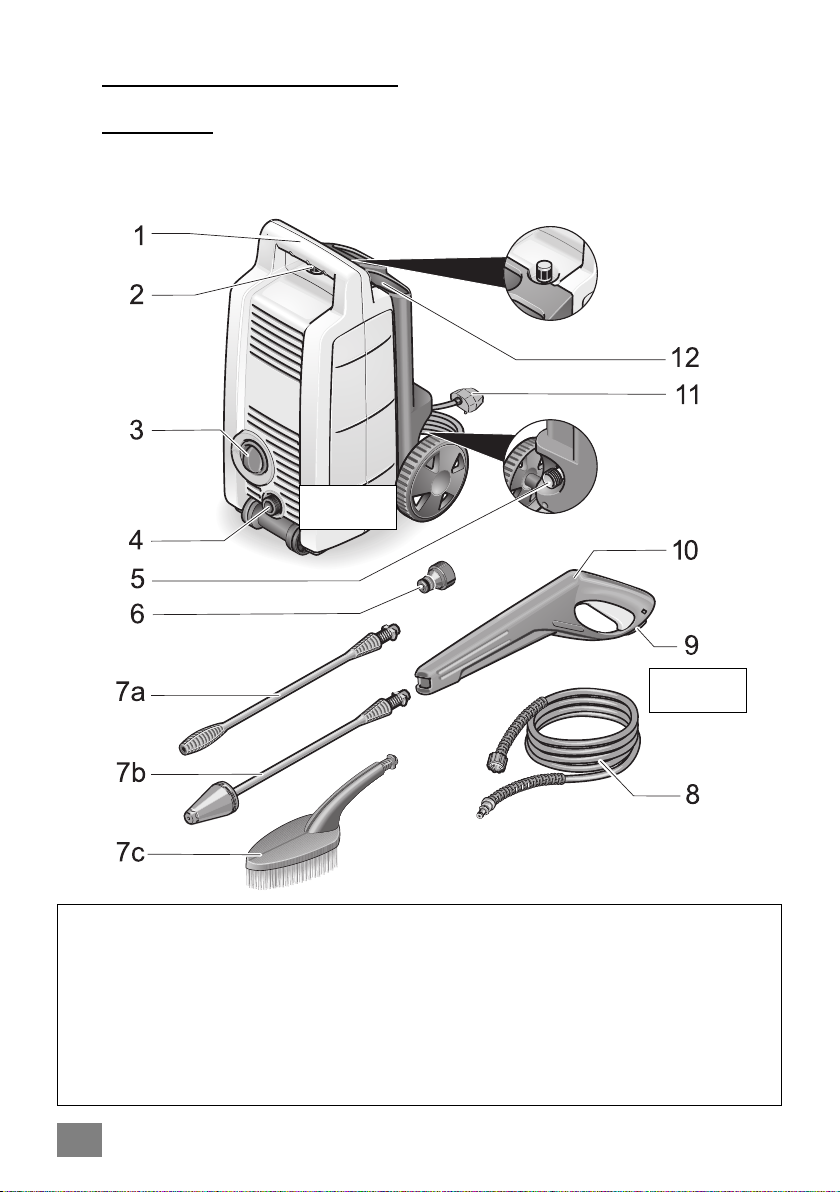
3.1 Contents
Upon opening the carton, if you do not have all the items as detailed
please contact the Customer Helpline (see page 19).
Assembly
see Page 21
1 Drawing bar
2 Detergent Suction Tube
3 On/Off Switch
4 High Pressure Outlet
5 Inlet Water Connection (with Strainer)
6 Hosepipe Connector
7a High Pressure Lance
7b Dirtblaster Lance
8
Assembly
see Page 21
7c Wash Brush
8 High Pressure Hose
9 Safety Lock Device
10 Spray Gun with Built-in
Low Presure Jet
11 Mains Electric Lead with Plug
12 Accessory compartment
Page 9
Please follow these instructions carefully for
troublefree cleaning
Use the diagram on Page 8 for reference purposes
3.2 Water Connection
The minimum length of supply hosepipe advised for maximum user
convenience is 7.5 metres with a diameter of 12.5 mm (1/2") to avoid
backpressure and any associated potential damage to your machine.
Attach your supply hosepipe with its connector to the coupling on the
machine (No. 6) and the other end should be connected to a suitable
water supply.
3.3 High Pressure Connection
Assemble the Spray Gun (No. 10) and the High Pressure Hose (No.
8) as shown on page 21.
Attach the High Pressure Hose (No. 8) to the High Pressure Outlet
(No. 4) of the unit.
Safety Assurance
As an added precaution, your pressure washer is fitted with a Safety
Lock Device (No. 9) on the Spray Gun.
3.4 Electrical Connection
Ensure the Power Switch (No.3) is in the OFF position before
connecting the factory fitted Plug attached to the Mains Electric Lead
(No.11) into an earthed socket.
If using an Extension Cable make sure it is completely unwound
from the cable drum and is the correct diameter.
9
Page 10

3.5 Detergent
Only cleaning agents recommended by Karcher (UK) Ltd.
should be used. Unsuitable detergents could damage your
Pressure Washer and the object being cleaned.
Recommended Detergents
1. The following cleaning agent may be used undiluted:
(But further dilution is practical but trial before application)
Universal Cleaner .............................. Profi RM 555 ASF
2. The following cleaning agents are available as concentrate
and must be diluted with 9 parts of water (1 : 9) before use:
Universal Cleaner .............................. Profi RM 555 ULTRA
Automotive Cleaner ........................... Profi RM 565 ULTRA
House & Garden Cleaner .................. Profi RM 570 ULTRA
Boat Cleaner ..................................... Profi RM 575 ULTRA
3. Detergent tablets are also available from some stores
Karcher Clean Tabs (10 tablets per box)
10 Tablets dissolved in clean water provide 5 litres of cleaning
detergent.
10
Page 11

4. OPERATING YOUR PRESSURE WASHER
If you have followed all the instructions so far, you are
now ready to have fun cleaning the KARCHER way!!!
Turn on the supply water and squeeze the Spray Gun lever (No.10)
until the water flows freely and removes all air locks from the hoses.
You may now attach the High Pressure Lance (No.7a) or required
accessory to the Spray Gun.
All accessories are bayonet fit, simply push in and twist
until they click into position !
Once water is flowing through the machine, you may now
switch on your Karcher Pressure Washer using the Power
Switch (No.3).
WHEN USING YOUR KARCHER PRESSURE WASHER ON
THE HIGH PRESSURE SETTING, THE RECOMMENDED
WORKING DISTANCE BETWEEN THE NOZZLE AND THE
OBJECT OR SURFACE TO BE CLEANED IS 30 CM.
IT CAN BE CLOSER IF REQUIRED FOR PATIOS OR MASONERY
It is your responsibility to check the suitability of the surface to be cleaned.
Karcher (UK) Ltd. cannot be held responsible for any damaged caused.
11
Page 12

4.1 High Pressure
Ensure the High Pressure Lance (No.7a) is attached securely to the
Spray Gun (No.10).
Aim the lance towards the object to be cleaned making sure the
recommended working distance is used for reference (See Page 11).
Release the Safety Lock Device (No.9) and squeeze the lever.
Switch on the pressure washer (No.3).
Dirtblaster Lance (No.7b)
A rapidly rotating pencil jet achieves a very high impact pressure so
that it has a very good cleaning effect. Use it to remove loose paint,
stubborn algae and moss from hard surfaces.
The pressurised water jet alone is capable of fulfilling most
cleaning tasks around the garden or on building work but
detergent and wash brush are advantageous when cleaning
vehicles or other paint finishes.
4.2 Low Pressure Operation
Dilute the detergent in a suitable container to the required concentra-
tion before using. (The correct dilution is dependent on the degree of
soiling of surface and is best determined by experience).
Hang the Detergent Suction Tube (No.2) in the Detergent container.
Use the Spray Gun (No.10) without Spray Lance.
Aim the Spray Gun towards the object to be cleaned, release the
Safety Lock Device (No.9) on the Spray Gun and squeeze the lever
to apply the detergent to the working area.
Switch on the pressure washer (No.3).
To rinse the detergent away, close the Spray Gun, attach the High
Pressure Lance (No.7a). No detergent can be drawn in with a high
working pressure. Spray with the high pressure jet until no trace of
detergent can be found.
12
Page 13

4.3 Low Pressure Operation with Brush
When cleaning surfaces with a grease contamination - typically car
paintwork that always has a greasy traffic film covering. Follow the
procedure of:
Washing loose dirt away with the clean water high pressure spray.
Apply the detergent in low pressure mode by removing the bayonet
fit spray lance and fitting the Washing Brush (No.7c) to the Spray
Gun.
Leave for 2-4 minutes for the detergent to have maximum effect.
With or without the pressure washer switched on, brush down the
surface being cleaned, this physical agitation removes all trace of
traffic film.
Finally revert to the high pressure operation with the Spray Lance
and complete the wash down.
We recommend the following cleaning method:
Step 1:
Remove loose dirt by washing over the surface to be cleaned with the
high pressure jet.
Step 2:
Spray on the detergent and leave for 1-4 minutes, so assisting the easy
removal of fine dirt and associated greasy adhesions.
Step 3:
Finally, spray off the loosened dirt with the high pressure spray.
4.4 End Of Operation
ALWAYS REMEMBER TO RINSE YOUR PRESSURE WASHER
AFTER USING DETERGENT BY HANGING THE DETERGENT
SUCTION TUBE IN A CONTAINER WITH CLEAN WATER AND
RUN THE PUMP FOR APPROXIMATELY ONE MINUTE IN LOW
PRESSURE SETTING.
13
Page 14
In the event of a break of 5 minutes in the operation of your
Karcher Pressure Washer, always switch off the pump to avoid
damage due to overheating.
Switch off the pressure washer by the Power Switch (No.3) and
unplug the Mains Electric Lead (No.11) from the socket .
Close the water inlet (tap) and disconnect the hosepipe.
Squeeze the lever to remove all pressure from the machine.
Release the lever and then secure the lever with the Safety
Locking Device to prevent accidental opening.
AFTER USE, ALWAYS REMOVE THE PLUG FROM THE SOCKET
BEFORE CLEANING YOUR PRESSURE WASHER.
4.5 STORAGE
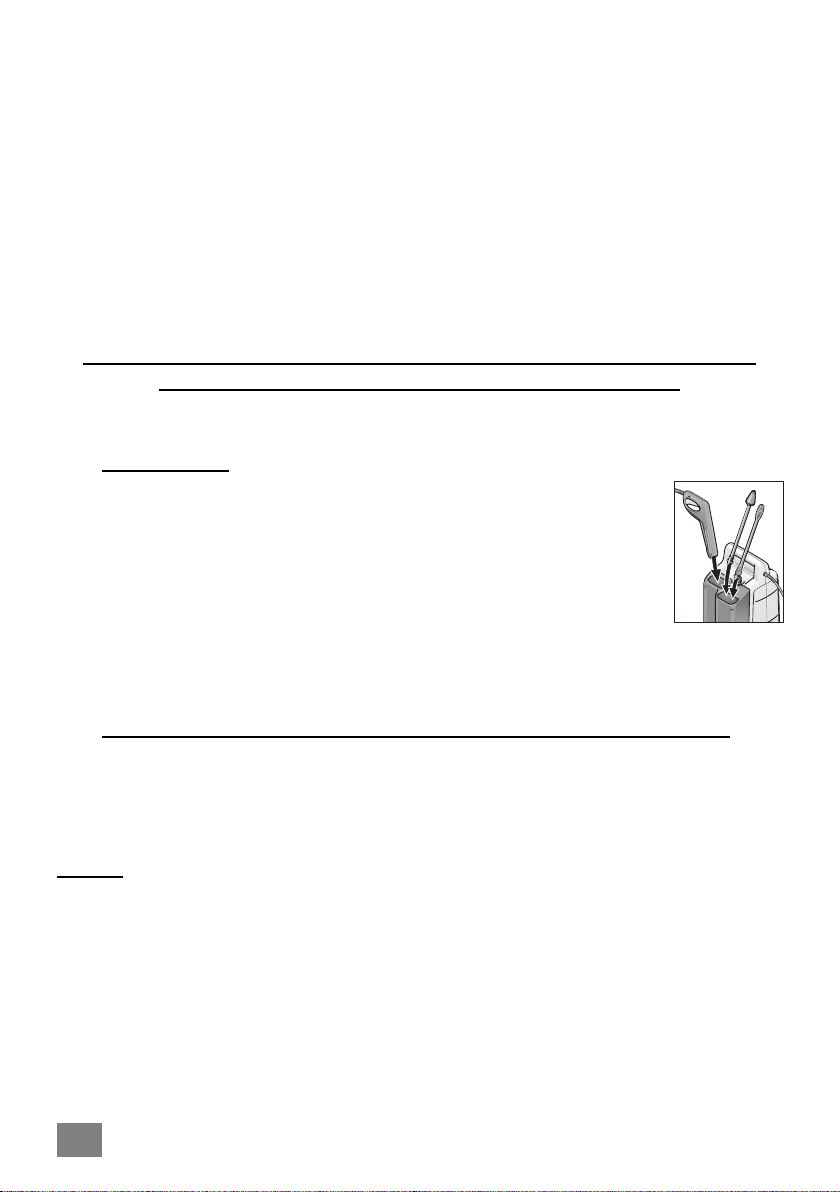
The Spray Gun (No.10), the High Pressure Lance
(No.7a), the Dirtblaster Lance (No.7b) and the Wash
Brush (7c) can be stored with the Pressure Washer.
The Mains Electric Lead (No.13) can be wound up over
the drawing bar.
5. IMPORTANT CARE AND MAINTENANCE
To ensure prolonged life and trouble-free use of your
Karcher Pressure Washer we strongly recommend
that you always adopt the following procedures:
Water
Before use, always check the inlet filter for dirt or debris.
Visually check to see if the nozzle is blocked by dirt or grit, if so, re-
move the dirt from the nozzle hole with a needle and rinse with water
from the front.
Failure to do this will seriously damage your machine and
invalidate the warranty.
14
Page 15
Connect the water supply hose and, without the lance attached,
squeeze the Spray Gun lever to run water through your pressure
washer until the water flow is constant. Then plug in to the electric
supply.
Unless drawing water from an open water source such as a water
butt, always have a
between the water tap and your machine. The internal diameter of
the feed water hose should be 12 mm (1/2).
Water Regulations require the use of a back-flow preventer valve at
the tap end of the supply hose.
Only use a full flow connector to connect the hose to the machine.
minimum of 10 metres (25 feet) of uncoiled hose
Electricity
If using an electrical extension lead it must be rated at a minimum of
13 amps.
Always
fully uncoil any extension lead when used.
Chemicals
Use of chemicals other than those recommended by Karcher could
cause significant damage which may not be covered by your warranty.
After using chemicals, always run fresh water through your machine.
The high pressure hose of your Karcher Pressure Washer should not
be mistreated. It is designed to withstand high pressure operation so
vehicles should NOT run over it, nor should it be pulled across sharp
or abrasive edges. These actions may weaken the hose and cause
ballooning.
IMPORTANT
REMEMBER FROST WILL DAMAGE YOUR KARCHER
PRESSURE WASHER IF IT HAS NOT BEEN COMPLETELY
EMPTIED OF WATER AFTER USE.
ALWAYS STORE IN A FROST FREE AREA.
15
Page 16
6. ACCESSORIES
A wide range of popular accessories are available from your
local store selling Karcher Pressure Washers.
4.767-054 Dirt Blaster/Rotary Jet
A rapidly rotating pencil jet used to remove loose paint, stubborn algae and moss from hard surfaces.
4.760-499 Triple Nozzle Lance
An integral fan jet, pencil jet and low pressure chemical jet in one unit allows optimal nozzle selection.
2.640-979 Hose & Handgun
2.640-978 Universal Wash Sponge
2.640-977 Large Wash Sponge
6.290-249 Detergent RM 555 (5 litre)
2.640-212 T-Racer
16
Page 17
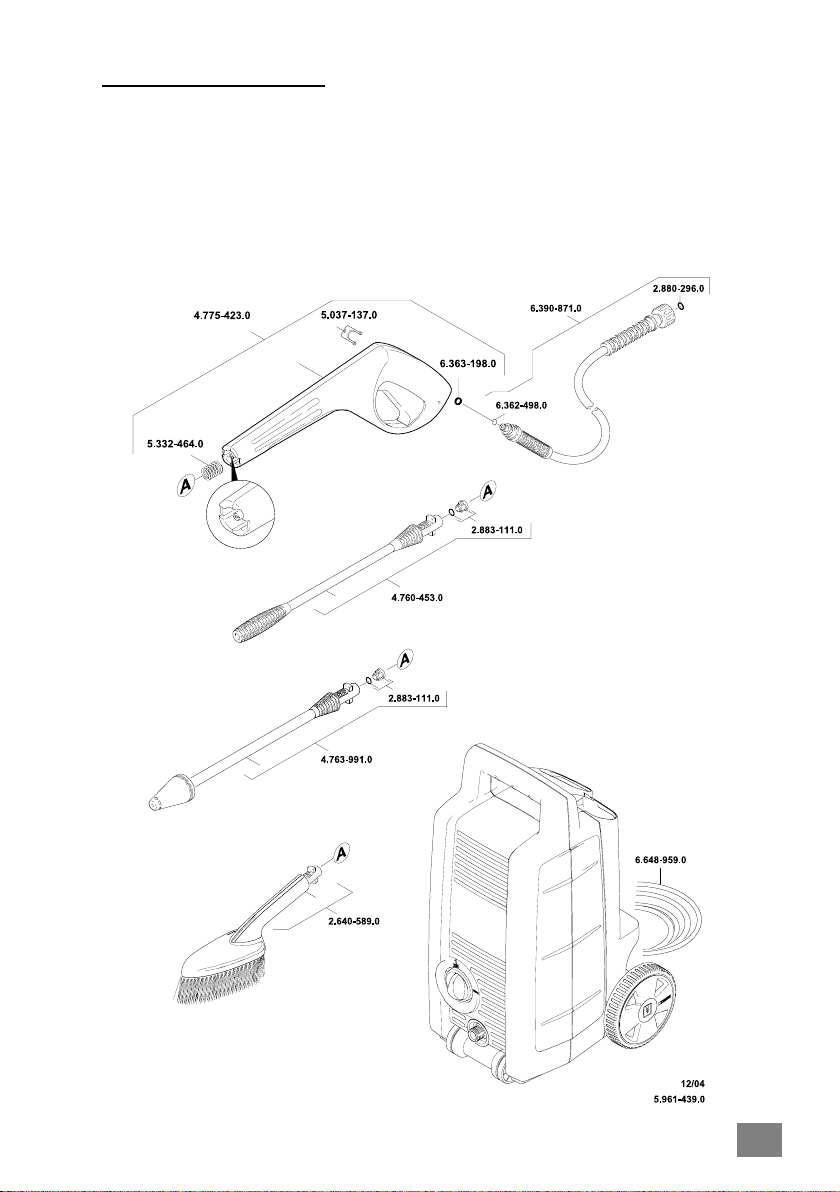
6. SPARE PARTS
In the event that your Karcher Pressure Washer requires replacement
parts please refer to the diagram below AND identify the particular
model of your machine by reference to the data plate on the underside.
Please write, email or fax Karcher (see page 19) with any parts order
you wish to place. A premium rate Help-line Number is available for
telephone enquires of any type.
17
Page 18
7. PROBLEM CHECKLIST
The machine you have chosen is of the highest quality. Correctly stored
away from frost it should operate without problems. If a problem does
arise, please check the following chart as a solution may be at hand.
PROBLEM POSSIBLE CAUSE CORRECTION
Machine refuses
to start
Plug not connected
Defective socket
Connect plug
Try another socket
Fuse blown
Defective extension cable
Wrong mains voltage
Pump stops Fuse blown
Overheating due to poor
water Supply
Strong pressure
fluctuations
Machine does not
reach operating
pressure
No detergent
suction
Nozzle partly blocked Clean dirt from nozzle hole with needle
Nozzle blocked/worn out
Inadequate mains water
Inlet hose squeezed
Water filter clogged
(3.1 item 5)
Inlet hose blocked
Wrong pressure
Blocked Detergent Filter
Change the fuse
Try without extension cable
Check mains voltage corresponds to
specifications of machin
Change fuse and check size of extension
cable
Check inlet water flow rate - hose should
fill a 10 litre bucket in one minute
and rinse from the front
Clean/replace nozzle
Check inlet water flow rate
Straighten out hose
Clean filter
Check hose for leaks or blockages
Use SprayGun without Spray Lance
Unblock Filter
In the unlikely event that you need to return your machine to your supplier, please ensure that this is returned, complete with hose, gun and
all accessories.
18
Page 19

8. HELP - LINE
Karcher (UK) Limited operate a help-line allowing customers to discuss
any problems experienced with our products.
The help-line operates during normal business hours, if you have difficulty getting through, please understand that there are peak periods
during the day when our consultants are unable to take all calls coming
in. In these circumstances we would ask that you try to contact us again
later in the day.
The help-line number is 0906 6800632
(calls at this number are charged at 25p per minute)
From 8.30am to 5.00pm Monday Friday
It helps us if you have the model number and data plate details to
hand before making your call as there are very many different models of
Karcher Pressure Washers in use.
Alternatively you may write or e-mail to the address below:
Karcher (UK) Limited
Karcher House
Beaumont Road
Banbury
Oxon, OX16 1TB
FAX: 01295 752030
E-mail: [email protected]
19
Page 20
9. TECHNICAL DATA
Power Connection
Voltage .................................................................. 230-240 V-AC
Current ....................................................................... 1~50 Hz
Connected/Load ............................................................ 1.3 KW
Mains Fuse .................................................................... 13 AMP
Water Connection
Supply Temperature (Max) ............................................ 40 °C
Supply Rate (Min) ............................................................ 8 litres per minute
Supply Pressure (Max) .............................. (12 bar) .... 1,2 MPa
Supply Hose Length...................................................... 7.5 metres
Diameter .................................................. 1/2 inch
Performance Data
Pump Pressure (Max at bypass).............. (100 bar) ..... 10 MPa
Operating Pressure .................................... (80 bar) ....... 8 MPa
Flow Rate ................................................. (330 l/h) ...... 5,5 litres per minute
Detergent Intake ........................................................... 0,4 litres per minute
Recoil Force of Spray Gun at Max. Pressure ................ 10 N
Optimum Working Distance on High Pressure .............. 30 cm
Hand-transmitted vibration (ISO 5349) ......................... 0,8 m/s²
Sound pressure level LPA(EN 60704-1) .......................... 69 dB(A)
Sound power level LWA(2000/14/EC).............................. 83 dB(A)
Dimensions
Length .......................................................................... 260 mm
Width ............................................................................ 250 mm
Height ........................................................................... 470 mm
Weight .............................................................................. 6 Kg
20
Page 21
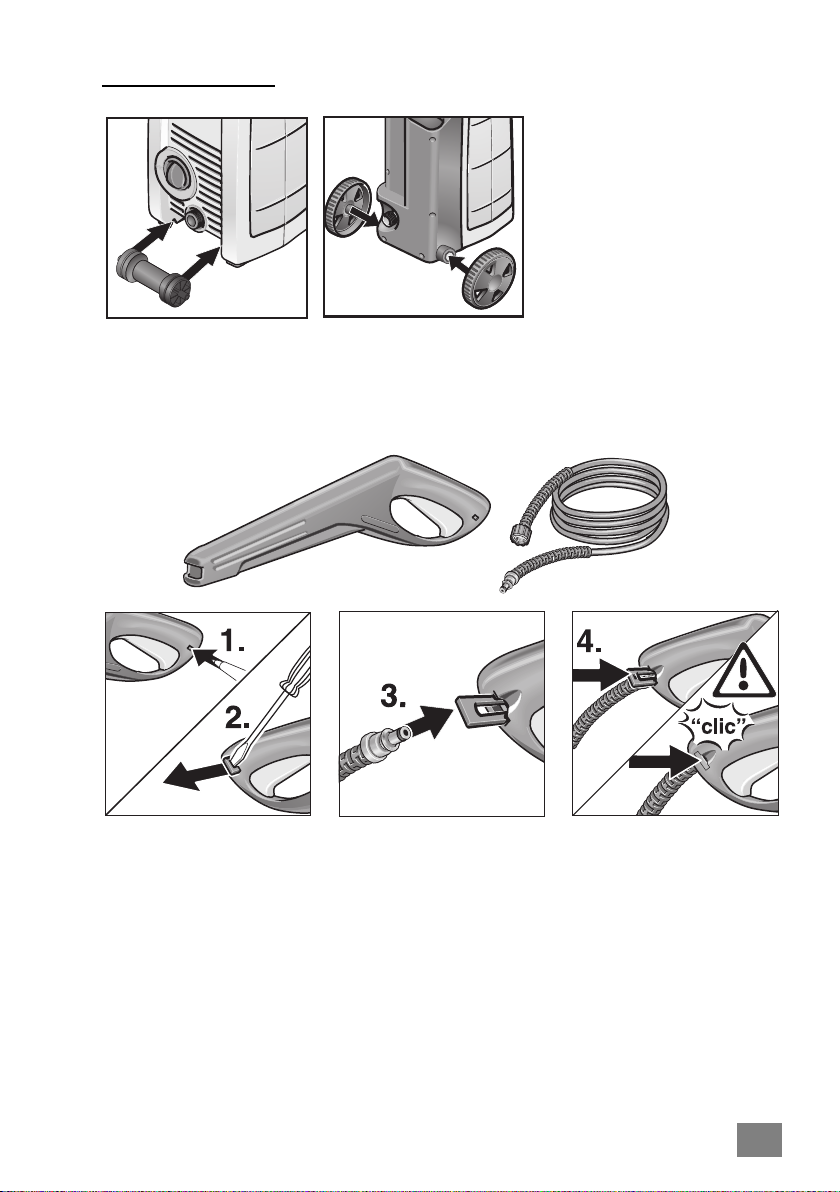
10.ASSEMBLY
High Pressure Hose (No.8) and Spray Gun (No.10) Assembly
21
Page 22
EU Declaration of Conformity
We hereby declare that the equipment described below conforms to the relevant
fundamental safety and health requirements of the appropriate EU Directives, both in
its basic design and construction as well as in the version marketed by us. This
declaration will cease to be valid if any modifications are made to the machine without
our express approval.
Product: High-pressure cleaner
Model: 1.400-xxx
Relevant EU Directives:
98/37/EC
73/23/EEC (+ 93/68/EEC)
89/336/EEC (+ 91/263/EEC, 92/31/EEC, 93/68/EEC)
2000/14/EC
Harmonised standards applied:
DIN EN 55014 1: 2000 + A1: 2001 + A2: 2002
DIN EN 55014 2: 1997
DIN EN 60335 1
DIN EN 60335 2 79
DIN EN 61000 3 2: 2000
DIN EN 61000 3 3: 1995 + A1: 2001
Appropriate internal measures have been taken to ensure that series-production units
conform at all times to the requirements of current EU Directives and relevant
standards. The signatories are empowered to represent and act on behalf of the
company management.
Conformity assessment procedure followed:
Annex V
Sound power level
Measured: 81 dB(A)
Guaranteed: 83 dB(A)
Alfred Kärcher Kommanditgesellschaft. Sitz Winnenden.
Registergericht: Waiblingen, HRA 169.
Persönlich haftende Gesellschafterin: Kärcher Reinigungstechnik GmbH. Sitz Winnenden, 2404 Registergericht Waiblingen, HRB
Geschäftsführer: Dr. Bernhard Graf, Hartmut Jenner, Georg Metz
Alfred Kärcher GmbH & Co. KG
Cleaning Systems
Alfred - Kärcher - Str. 28-40
P.O. Box 160
D - 71349 Winnenden
Tel.: +49 7195 14-0
Fax: +49 7195 14-2212
H. Jenner
S. Reiser
5.957-741/11.04
22
Page 23

Notes
23
Page 24

 Loading...