

Page 1
K 2 Plus
OPERATOR MANUAL
High-Pressure Washer . . . . . . . . . 2
MANUEL D’UTILISATION
Nettoyeur haute pression . . . . . 16
MANUAL DE USUARIO
Limpiador de alta presión . . . . . 32
59669910 (2015.12)
Page 2
HIGH-PRESSURE WASHER OPERATOR MANUAL
Model Overview 3
Important Safety Instructions 4
Assembly Instructions 5
Operating Instructions 6
Using the Accessories 8
Working with Detergents 8
Taking a Break 9
Shutting Down and Clean-Up 9
Winterizing and Long-Term Storage 10
Maintenance Instructions 10
Cleaning Tips 11
Optional Cleaning Accessories 12
Troubleshooting 14
Safety Alert Symbols
DANGER
indicates “an imminently hazardous situation which, if not avoided, will result in
death or serious injury.”
WARNING
indicates “a potentially hazardous situation which, if not avoided, could result in
death or injury.”
몇 CAUTION
indicates “a potentially hazardous situation which, if not avoided, may result in
minor or moderate injury or in property
damage incidents.”
Specifications
Max. Pressure 1600 PSI
Max. Water Flow 1.25 GPM
Amp draw 13 AMPS
Voltage 120 V
Part No. 1.602-224.0
Serial no.
Owner/User Responsibility
The owner and/or user must have an understanding of the manufacturer’s operating instructions and warnings before
using this pressure washer.
Warning information should be emphasized and understood.
If the operator is not fluent in English,
the manufacturer’s instructions and
warnings shall be read to and discussed
with the operator in the operator’s native
language by the purchaser/owner, making sure that the operator comprehends
its contents.
Owner and/or user must study and
maintain for future reference the manufacturers’ instructions.
For household use only!
Customer Support
USA and Canada
In the U.S. or Canada, please call
1-800-537-4129 for warranty issues and
visit www.karcher-help.com for technical support and product assistance.
Please take a moment to register your
pressure washer online at
www.karcher-register.com. Be sure to
save your purchase receipt, it will be required for repairs covered by warranty.
Customer Support Mexico
Call: 01-800-024-13-13 for help or visit
our website: www.karcher.com.mx
2 English
Page 3
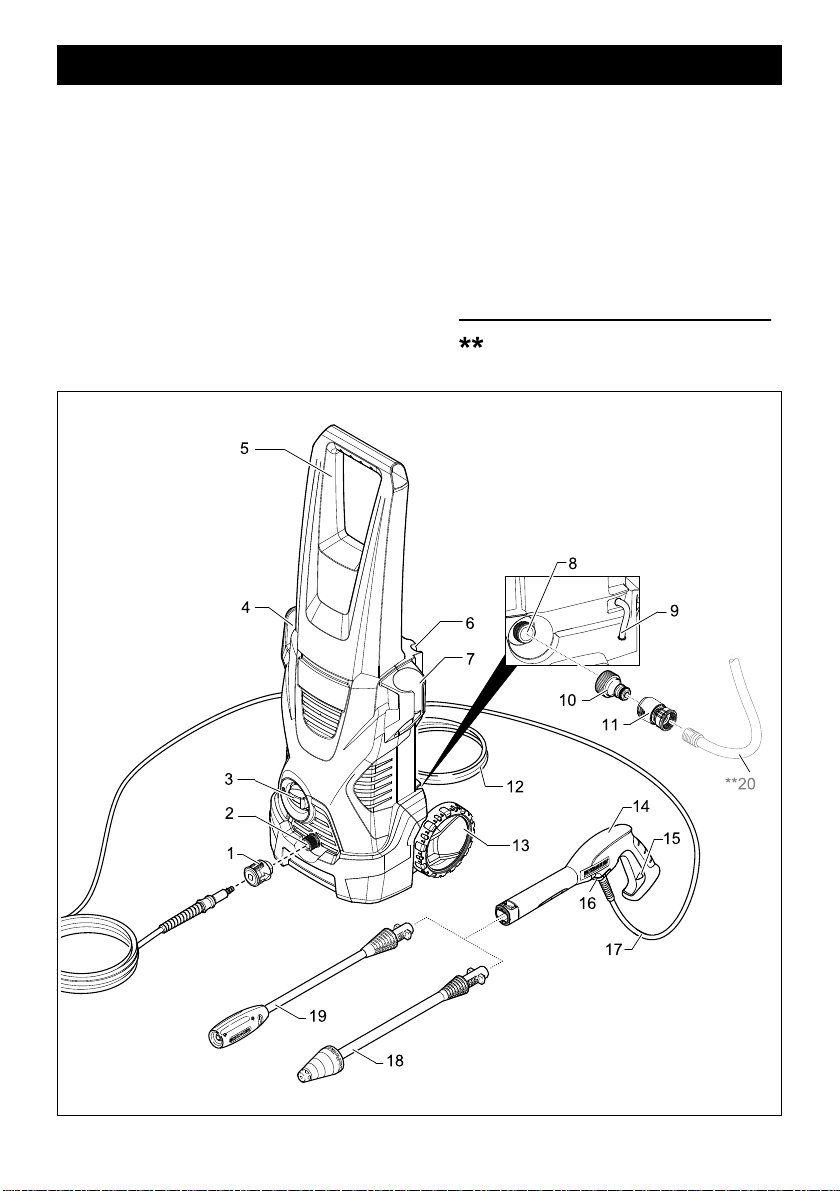
MODEL OVERVIEW
1 Quick connect high-pressure outlet
2 High-pressure outlet
3 ON/OFF switch
4 Hose/Cord Hook
5 Transport handle
6 Spray Wand Storage
7 Trigger gun holder
8 Water inlet
9 Detergent siphon tube with filter
10 Water inlet connector
11 Garden hose connector (female)
12 Power cord with Ground Fault Circuit
Interrupter (GFCI)
13 Wheels
14 Trigger gun
15 Trigger gun safety lock
16 Locking slide for high pressure hose
17 High-pressure hose
18 Dirtblaster ® (Rotary spray wand)
19 Vario Power Spray wand
Not included in the delivery
20 Garden hose
English 3
Page 4

IMPORTANT SAFETY INSTRUCTIONS
WARNING
When using this product basic precautions should always be followed, including the following:
Read all the instructions before using
the product.
To reduce the risk of injury, close su-
pervision is necessary when a product is used near children.
Know how to stop the product and
bleed pressures quickly. Be thoroughly familiar with the controls.
Stay alert – watch what you are doing.
Do not operate the product when fa-
tigued or under the influence of alcohol or drugs.
Keep operating area clear of all persons.
Do not overreach or stand on unsta-
ble support. Keep good footing and
balance at all times.
Follow the maintenance instructions
specified in the manual.
This product is provided with a
Ground Fault Circuit Interrupter built
into the power cord plug. If replacement of the plug or cord is needed,
use only identical replacement parts.
WARNING
Risk of Injection or Injury – Do Not
Direct Discharge Stream At Persons.
High-pressure jets can be dangerous
if misused. The jet must not be directed at persons, animals, electrical
devices, or the unit itself.
Wear safety goggles.
WARNING
Risk Of Explosion – Do not spray
flammable liquids.
Do not use acids, alkaline, solvents,
or any flammable material in this
product. These products can cause
physical injuries to the operator and
irreversible damage to the machine.
WARNING – Risk of Electrocution
Inspect cord before using – Do not
use if cord is damaged.
Keep all connections dry and off the
ground.
Do not touch plug with wet hands.
Do not use extension cord with this
product.
Connect to individual branch circuit
only.
몇 CAUTION
This unit has been designed for use with
cleaning detergents recommended by
the manufacturer. The use of other
cleaning detergents may affect the operation of the machine and void the warranty.
몇 CAUTION
Gun kicks back – Hold with both
hands.
The Spray Gun Safety Lock prevents
the spray from accidentally being en-
gaged. This safety feature DOES
NOT lock spray in the ON position.
WARNING
DO NOT SPRAY ELECTRICAL APPA-
RATUS AND WIRING.
DO NOT USE WITH FLAMMABLE LIQ-
UIDS AND TOXIC CHEMICALS.
HIGH-PRESSURE. KEEP CLEAR OF
NOZZLE.
INJECTION HAZARD: EQUIPMENT
CAN CAUSE SERIOUS INJURY IF
THE SPRAY PENETRATES THE
SKIN. DO NOT POINT THE GUN AT
ANYONE OR ANY PART OF THE
BODY. IN CASE OF PENETRATION
SEEK MEDICAL AID IMMEDIATELY.
THIS SYSTEM IS CAPABLE OF PRO-
DUCING 1600 PSI TO AVOID RUP-
TURE AND INJURY, DO NOT
OPERATE THIS PUMP WITH COM-
PONENTS RATED LESS THAN
4 English
Page 5

1600 PSI WORKING PRESSURE (INCLUDING BUT NOT LIMITED TO
SPRAY GUNS, HOSE AND HOSE
CONNECTIONS).
BEFORE SERVICING, CLEANING OR
REMOVING ANY PARTS, SHUT OFF
POWER AND RELIEVE PRESSURE.
IF CONNECTION IS MADE TO A PO-
TABLE WATER SYSTEM, THE SYSTEM SHALL BE PROTECTED
AGAINST BACK FLOW.
SERVICING OF A DOUBLE-
INSULATED PRODUCT
In a double-insulated product, two systems of insulation are provided instead
of grounding. No grounding means is
provided on a double-insulated product,
nor should a means for grounding be
added to the product. Servicing a double-insulated product requires extreme
care and knowledge of the system, and
should be done only by qualified service
personnel. Replacement parts for a double-insulated product must be identical
to the parts they replace. A doubleinsulated product is marked with the words
“DOUBLE INSULATION” or “DOUBLE
INSULATED”. The symbol “ ” may also
be marked on the product.
GROUND FAULT CIRCUIT
INTERRUPTER PROTECTION
This pressure washer is provided with a
ground-fault circuit-interrupter (GFCI)
built into the plug of the power-supply
cord. This device provides additional
protection from the risk of electric shock.
Should replacement of the plug or cord
become necessary, use only identical
replacement parts that include GFCI
protection.
ASSEMBLY INSTRUCTIONS
WATER SUPPLY
(Cold Water Only)
몇 CAUTION
When connecting the water inlet to the
water supply mains, local regulations of
your water company must be observed.
In some areas the unit must not be connected directly to the public drinking water supply. This is to ensure that there is
no feedback of chemicals into the water
supply. Direct connection via a receiver
tank or backflow preventer, for example,
is permitted.
Dirt in the feed water will damage the
unit. To avoid this risk, we recommend
fitting a water filter.
Garden hose must be at least 13 mm
or 16 mm (1/2 inch or 5/8) inch in di-
ameter.
Flow rate of water supply must not
fall below 7.6 L/min. (2 GPM/gallons
per minute).
Flow rate can be determined by run-
ning the water for one minute into an
empty 20 litre (5-gallon) container.
The water supply temperature must
not exceed 40°C/104°F.
Never use the pressure washer to
draw in water contaminated with sol-
vents, e.g. paint thinners, gasoline,
oil, etc.
Always prevent debris from being
drawn into the unit by using a clean
water source.
SAVE THESE INSTRUCTIONS!
Assembly
STEP 1:
English 5
Page 6
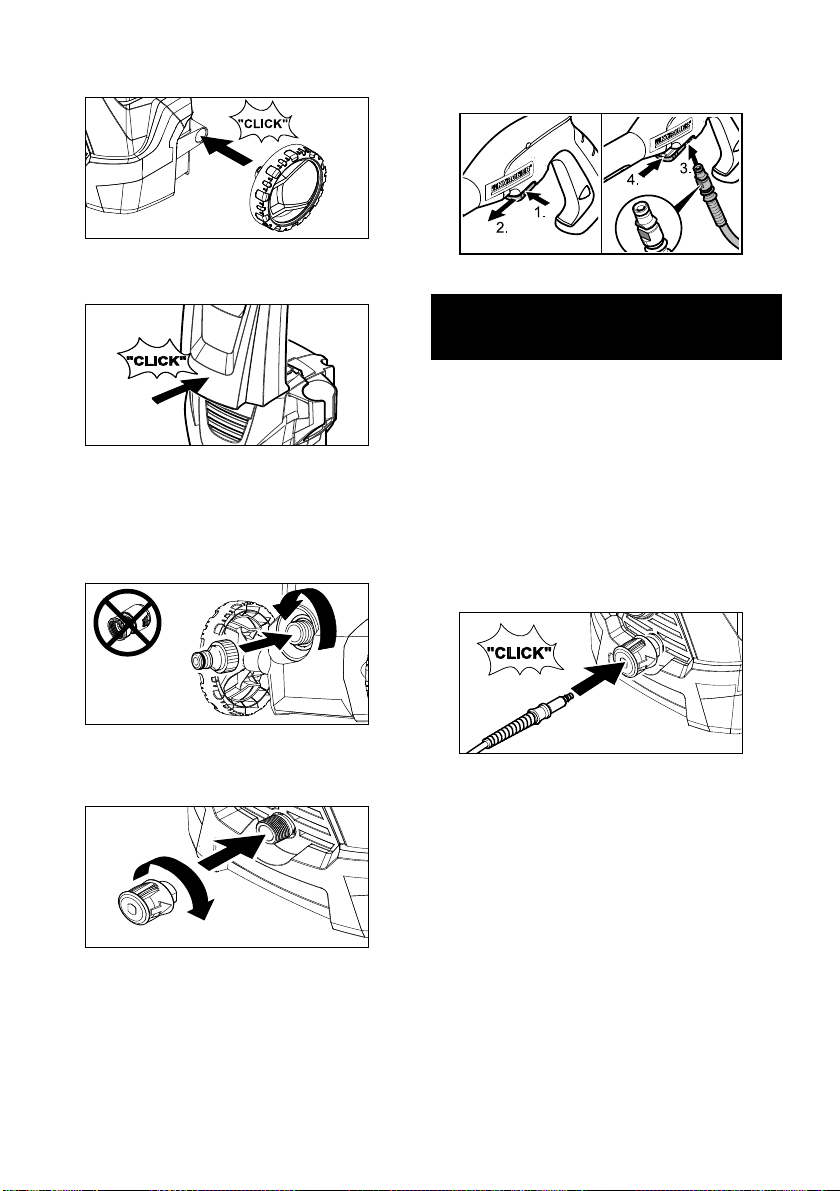
Insert wheels into the body of the
unit.
STEP 2:
Slide the transport handle into place.
STEP 3:
Install the water inlet connector to the
unit’s water inlet.
Note: Never attach the garden hose
connector to the unit’s water inlet!
– Push the locking slide back into the
trigger gun to lock the hose in posi-
tion.
OPERATING
INSTRUCTIONS
STEP 1:
Insert one end of the high-pressure
hose tightly into the quick connect on
the unit, it will lock in audibly.
Note: Make sure the connection nip-
ple is aligned correctly. Check the
connection by pulling on the high-
pressure hose.
Check the secure connection by pull-
ing on the high-pressure hose.
STEP 4:
Fasten the quick connect to the highpressure outlet.
STEP 5:
– Pull out the locking slide of the trigger
gun handle.
– Insert the small end of the high-pres-
sure hose into place.
6 English
STEP 2:
Insert the spray wand of your choice
into the trigger gun. Press in against
the spring tension and twist into
locked position.
Page 7
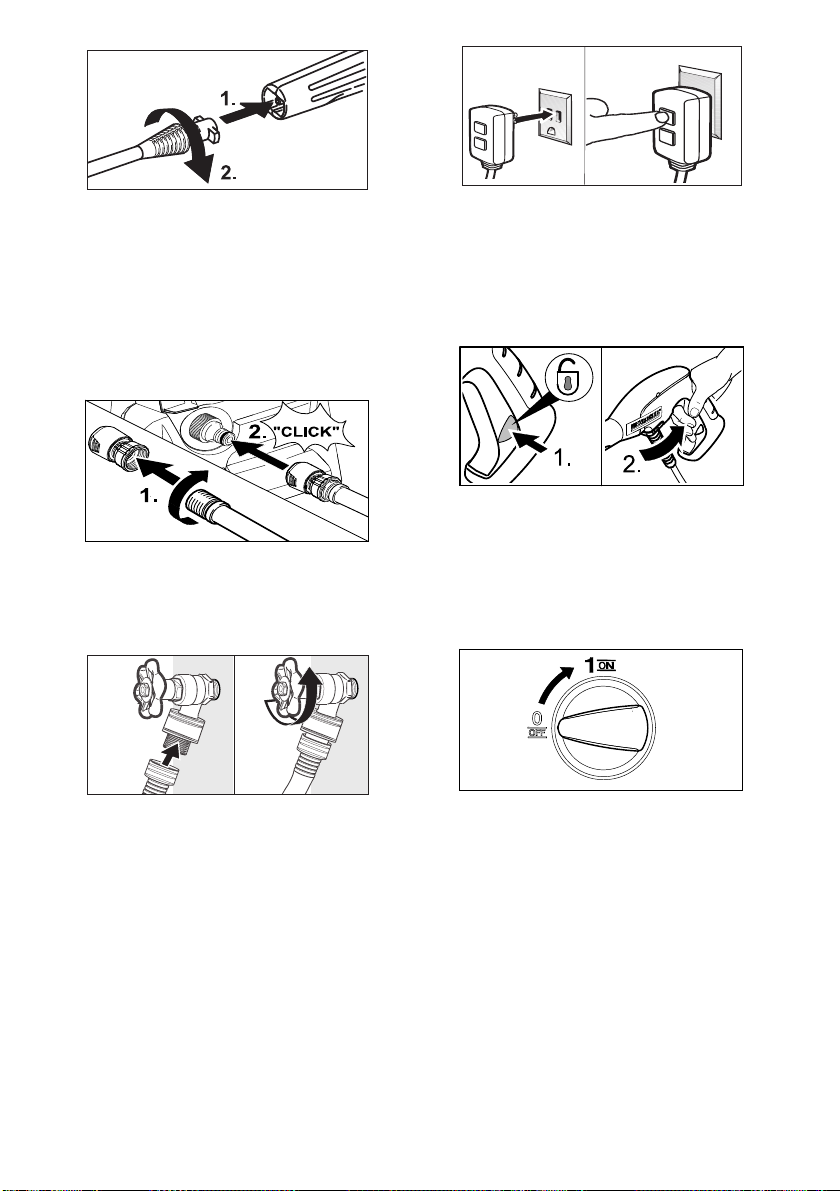
STEP 3:
1 Screw the supplied garden hose con-
nector on to the end of your garden
hose.
2 Push the garden hose connector on
to the water inlet connector and
make sure you hear it click into place
before proceeding.
STEP 4:
Connect garden hose to the cold water source and turn water on completely.
STEP 6:
Unlock the trigger gun safety lock.
Trigger the gun to eliminate trapped
air, wait for a steady flow of water to
emerge from the spray nozzle.
STEP 7:
Turn on the high-pressure washer (I/
ON).
The motor starts only if the trigger
of the gun is pulled and shuts off
when the trigger is released.
STEP 5:
Plug the Ground Fault Circuit Interrupter (GFCI) into a working outlet.
We recommend that you test the GFCI as
part of your startup procedure each time
you use your pressure washer. To learn
how to peform this test on your unit, visit
http://www.karcherresidential.com/
gfci_test.php for detailed instructions for
your type of GFCI.
WARNING
Do not use if above test fails.
Note: The actual appearance of the GFCI
may be different from this illustration.
English 7
Page 8
USING THE ACCESSORIES
WARNING
To avoid serious injury never point spray
nozzle at yourself, other persons or animals.
몇 CAUTION
Always test an inconspicuous area before cleaning with high-pressure.
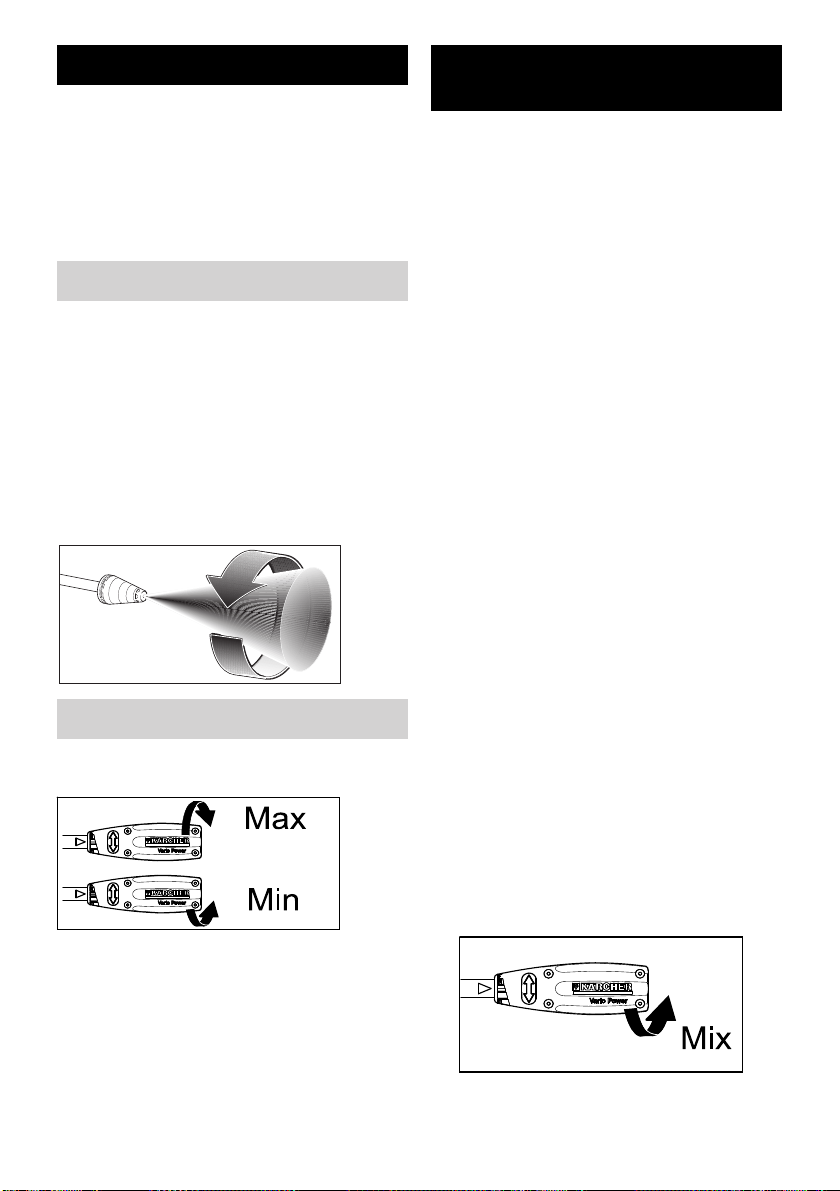
Dirtblaster
This nozzle features a 0º pencil jet which
rotates 360º for maximum dirt cutting action, effectively increasing cleaning performance up to 50%. This nozzle
combines the cleaning performance of a
0º pencil jet with the surface coverage of
a wide angle nozzle.
Not recommended for soft materials,
siding, painted surfaces, decks or autos.
Vario Power Spray Wand
The Vario Power Spray Wand allows
you to adjust the cleaning pressure.
®
WORKING WITH
DETERGENTS
For best results see Cleaning Tips for
specific information on how to clean
different surfaces.
Always Use Kärcher® Detergent for
Best Results
Kärcher ® biodegradable detergents are
specially formulated to protect the environment and your pressure washer. The
special formula won’t clog the suction
tube filter and will protect the internal
parts of the pressure washer for a longer
life. For Kärcher ® detergents, check
your retailer or visit our website:
www.buykarcher.com
몇 CAUTION
Never use:
– Bleach, chlorine products and other
corrosive chemicals
– Liquids containing solvents (i.e.,
paint thinners, gasoline, oils)
– Tri-sodium phosphate products
– Ammonia products
– Acid-based products
These chemicals will harm the unit and
will damage the surface being cleaned.
Use of these items will void the warranty.
STEP 1:
Detergents can only be applied at
low pressure.
Install the Vario Power Spray Wand.
Set the spray wand to the low pres-
sure setting (Mix).
To clean at maximum pressure, the
wand must be positioned to the highpressure setting (Max).
For reduced pressure turn the wand
collar in the "Min" direction.
To apply detergent, the wand must
be positioned to the low-pressure
setting (Mix).
8 English
Page 9
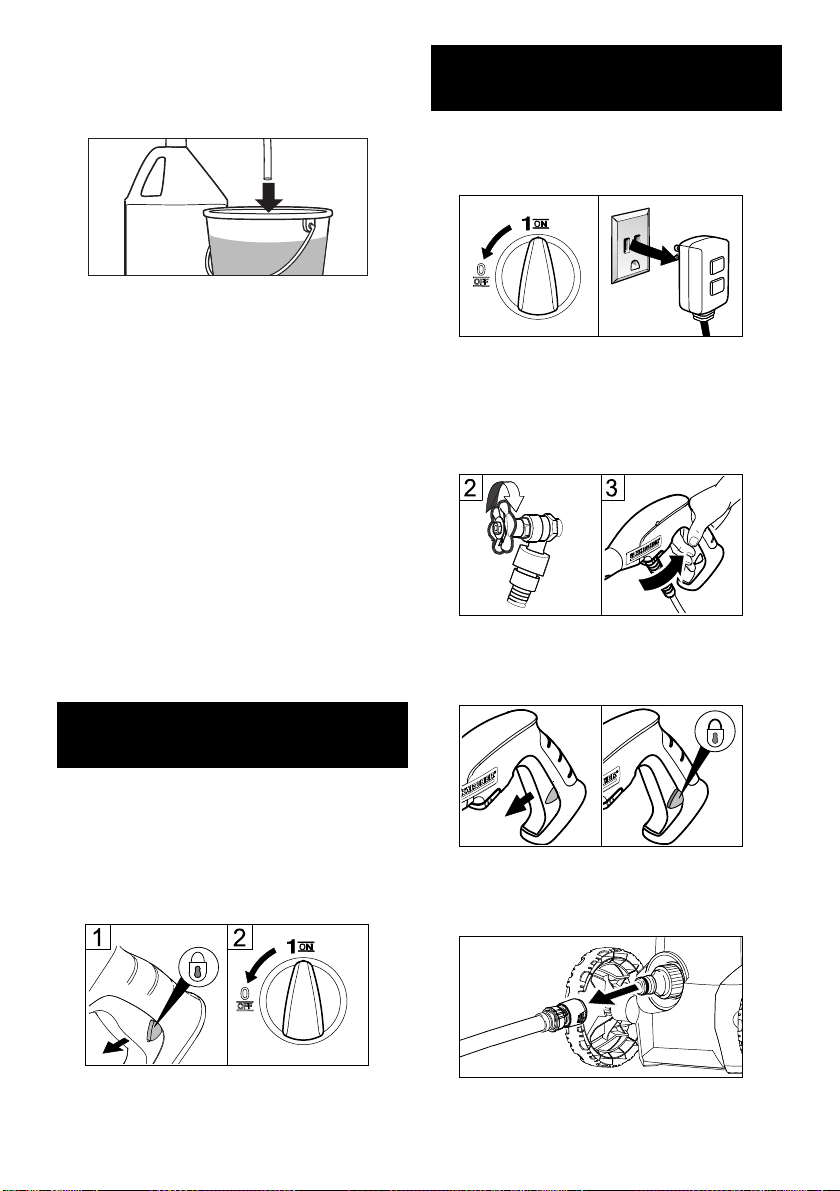
STEP 2:
Fill a container with Kärcher detergent. Place the filter end of detergent
siphon tube into the container.
STEP 3:
Turn on the pressure washer (I). Pull
trigger to operate unit. Liquid detergent is drawn into the unit and mixed
with water. Apply detergent to work
area. Do not allow detergent to dry
on surface.
STEP 4:
To rinse, insert the spray wand and
pull trigger to operate unit.
STEP 5:
Cleaning up: Always draw fresh water through the detergent tank or siphon tube when done to flush any
remaining detergents from the injection system.
SHUTTING DOWN &
CLEAN-UP
STEP 1:
Turn the switch to OFF (0) position
and unplug cord from outlet.
STEP 2:
Turn off the water source.
STEP 3:
Press trigger to release water pres-
sure.
STEP 4:
Release trigger and engage gun
safety lock.
TAKING A BREAK ... five
minutes or more
STEP 1:
Release trigger and engage gun
safety lock.
STEP 2:
Turn pressure washer to OFF (0) position.
STEP 5:
Disconnect the garden hose from the
water inlet on the unit.
English 9
Page 10
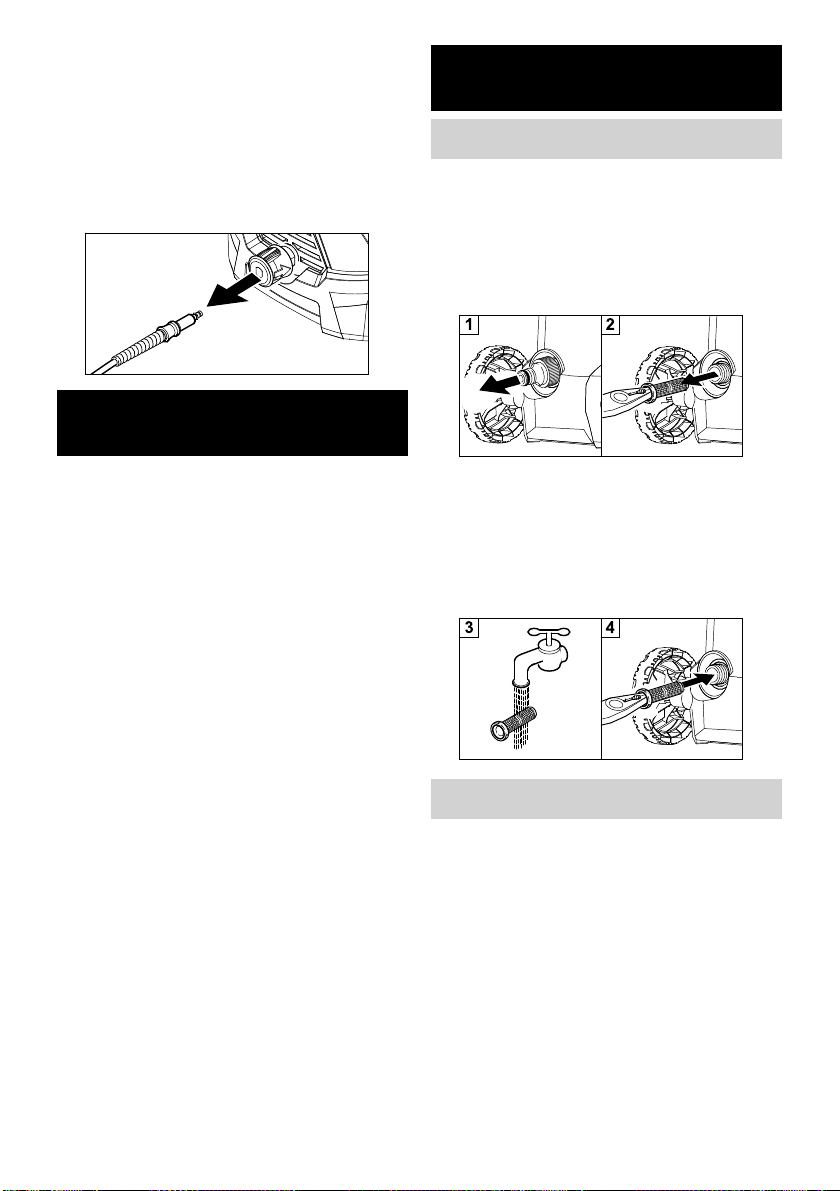
몇 CAUTION
When disconnecting the supply or highpressure hose, warm water may leak
from the connector after operation.
STEP 6:
Push the housing of the quick connect toward the rear and disconnect
the high-pressure hose from the unit.
WINTERIZING AND LONG-
TERM STORAGE
1 Disconnect all water connections.
2 Turn on the machine for a few sec-
onds, until the water which had remained in the pump exits, turn off
immediately.
3 Do not allow high-pressure hose to
become kinked.
4 Store the machine and accessories
in a room which does not reach
freezing temperatures. DO NOT
store near furnace or other sources
of heat as it may dry out the pump
seals.
몇 CAUTION
Failure to follow the above directions will
result in damage to the pump assembly
and accessories and will void the warranty.
Kärcher® also recommends the regular
practice of using a pump protector like
“Kärcher® Pump Guard” to prevent cold
weather damage during storage in the
winter months.
CARE AND MAINTENANCE
INSTRUCTIONS
Cleaning the water inlet filter
STEP 1:
Disconect the connector from the
water inlet.
STEP 2:
Pull out water inlet filter with flat-nose
pliers.
STEP 3:
Rinse out water inlet filter in warm
water.
STEP 4:
Reinsert water inlet filter into the wa-
ter inlet.
Maintenance
The unit is maintenance-free.
10 English
Page 11

CLEANING TIPS
몇 CAUTION
Before cleaning any surface an in-
conspicuous area should be cleaned
to test spray pattern and distance for
maximum cleaning results.
If painted surfaces are peeling or
chipping, use extreme caution as
pressure washer may remove the
loose paint from the surface.
When using on surfaces which might
come in contact with food, flush surfaces with plenty of drinking water.
For additional cleaning tips and a com-
plete video library, visit our website:
www.karcherresidential.com
Deck Cleaning
(with or without detergent). Pre-rinse
deck and surrounding area with fresh
water. If using detergent, apply to surface at low pressure. For best results,
limit your work area to smaller sections
of approximately 2.3 m² (25 sq. ft.). Allow detergent to remain on surface 1-3
minutes. Do not allow detergent to dry
on surface. Rinse at high-pressure in a
long sweeping motion keeping the spray
nozzle approximately 7.5-15 cm (3-6 in.)
from the cleaning surface. Always clean
from top to bottom and from left to right.
When moving on to a new section of the
cleaning surface, be sure to overlap the
previous section to eliminate stop marks
and ensure a more even cleaning result.
House Siding
(with or without detergent). Pre-rinse
cleaning surface with fresh water. If using detergent, apply to surface at low
pressure (for best results, limit your
work area to sections of approximately
1.8 m (6 ft.) and always apply detergent
from bottom to top). Allow detergent to
remain on surface 1-3 minutes. Do not
allow detergent to dry on surface, if surface appears to be drying, simply wet
down surface with fresh water. If needed, use special wash brush attachment
(not included) to remove stubborn dirt.
Rinse at high-pressure from top to bottom in an even sweeping motion keeping the spray nozzle approximately
1.8 m (6 ft.) from the cleaning surface.
Cement Patios, Brick and Stone
(with or without detergent). Pre-rinse
cleaning surface with fresh water. If using detergent or Degreaser, apply to
surface at low pressure. For best results, limit your work area to smaller sections of approximately 2.3 m² (25 sq. ft.).
Allow detergent or Degreaser to remain
on surface 1-3 minutes. Do not allow detergent to dry on surface. Rinse at highpressure in a sweeping motion keeping
the spray nozzle approximately 7.515 cm (3-6 in.) from the cleaning surface. Always clean from top to bottom
and from left to right. For removing extremely stubborn stains, use the
Dirtblaster ® Nozzle.
Cars, Boats and Motorcycles
(with or without detergent). Pre-rinse
vehicle with fresh water. If using detergent, apply to surface at low pressure.
For best results, clean one side of vehicle at a time and always apply detergent
from bottom to top, do not allow detergent to dry on surface. If needed, use
special wash brush attachment (not included) to remove stubborn dirt. Rinse
at high-pressure in a sweeping motion
keeping the spray nozzle approximately
15-20 cm (6-8 in.) from the cleaning surface (distance should increase when
rinsing pin-striping or other sensitive
surfaces). Always clean from top to bot-
English 11
Page 12

tom and from left to right. For best results, wipe surface dry with a chamois or
soft dry cloth.
Barbecue Grills, Outdoor Power
Equipment and Gardening Tools
(with or without detergent). Pre-rinse
cleaning surface with fresh water. If using detergent or Degreaser, apply detergent at low pressure. Allow detergent to
remain on surface 1-3 minutes. Do not
allow detergent to dry on surface. Rinse
at high-pressure keeping the spray nozzle approximately 7.5-15 cm (3-6 in.)
from the cleaning surface. For removing
extremely stubborn dirt, it may be necessary to move the spray nozzle even
closer to the surface for greater dirt cutting action.
OPTIONAL CLEANING
ACCESSORIES
Optional accessories are available to
further enhance your cleaning capabilities. These accessories are accurate as
of the printing date of this manual.
Please check our website for pricing and
up-to-date information.
Pump Guard
Specially formulated to protect your
pressure washer from freezing, corrosion and premature wear. The Pump
Guard also adds lubrication to valves
and seals to prevent sticking. Highly recommended for all Kärcher ® pressure
washers!
Part No. 9.558-998.0
Patio and Lawn Furniture
(with or without detergent). Pre-rinse
furniture and surrounding area with
fresh water. If using detergent, apply to
surface at low pressure. Allow detergent
to remain on surface 1-3 minutes. Do
not allow detergent to dry on surface. If
needed use special Wash Brush Attachment (not included) to remove stubborn
dirt. Rinse at high-pressure in a sweeping motion keeping the spray nozzle approximately 7.5-15 cm (3-6 in.) from the
cleaning surface. For best results, clean
from top to bottom and from left to right.
7.5 m (25 ft.) Extension HighPressure Hose
Extension Hose for all Kärcher ® highpressure washers between the original
equipment hose and gun up to
2000 PSI.
Part No. 2.642-588.0
1.67 m (66 in.) Extension Wand
(four-piece)
Need to clean second story windows or
other high areas? Increase the reach of
your pressure washer by up to 1.67 m
(66 in.) with this extension kit. Includes 4
aluminum sections for variable length.
1.67 m (66 in.) fully assembled. Fits
most Kärcher ® pressure washers up to
2300 PSI. (bayonet)
Part No. 2.640-746.0
12 English
Page 13

Rotating Wash Brush (bayonet)
Wet Sandblasting Kit (bayonet)
For more effortless cleaning of all
smooth surfaces (painted, glass and
plastic) try the Kärcher ® Rotating Wash
Brush. Use it on your automobile, house
siding or windows. The water pressure
from your pressure washer causes the
inner brushes to gently spin, making
your cleaning job much easier. The angle of brush head is adjustable to help
you reach difficult areas. Excellent for
the application of detergent. A musthave accessory designed for Kärcher ®
pressure washers up to 2300 PSI. (bayonet)
Part No. 2.640-743.0
Soft Clean Washing Brush
Made with soft bristles that will not harm
painted surfaces. Easily attaches directly to the trigger gun. Ideal for stubborn
dirt on cars, boats, patio furniture and
other surfaces. Great for applying detergent. Fits most Kärcher ® pressure
washers up to 2300 PSI. (bayonet)
Part No. 2.640-740.0
7.5 m (25 ft.) Pipe Cleaning Kit
(bayonet)
Need to clean blocked pipes, drains or
downspouts? The Kärcher ® pipe cleaning kit is the answer! The pipe cleaner
propels itself forward while simultaneously flushing out debris. For example,
insert the cleaning nozzle in the base of
a downspout, pull the trigger on the
pressure washer gun and watch as the
nozzle shoots out leaves and other debris while climbing upward. Connects directly to the trigger gun of most
Kärcher ® pressure washers up to
2300 PSI. (bayonet)
Part No. 2.640-747.0
Why spend hours stripping old paint and
rust by hand using harsh chemicals? Let
the Kärcher ® Wet Sandblasting Kit do
the work! Attach the kit to your pressure
washer, add abrasive material and attack the rust and paint with our ecofriendly alternative. Fits most Kärcher ®
pressure washers up to 2300 PSI. (bayonet)
Part No. 2.638-792.0
Detergent Foamer Attachment
Ideal for applications which require a
thick foam. Simply fill the resevoir cup
with liquid pressure washer detergent to
generate a foam spray. Connects directly to the trigger gun. Fits most Kärcher ®
pressure washers up to 2300 PSI. (bayonet)
Part No. 6.964-507.0
T 200 Wide Area Surface Cleaner
For cleaning surfaces such as patios,
terraces and driveways without splashback, there is no better solution than the
Kärcher ® T 200. It saves time by cleaning a 30 cm (1 ft.) wide area gently as it
hovers, providing consistent, streak-free
cleaning. When you finish cleaning the
patio and driveway, remove the wand
and use the handle to clean garage
doors and other vertical surfaces. Includes two nozzles which spin at high
speed for optimum results. Our top selling accessory for Kärcher ® pressure
washers up to 2300 PSI. (bayonet)
Part No. 2.642-188.0
English 13
Page 14
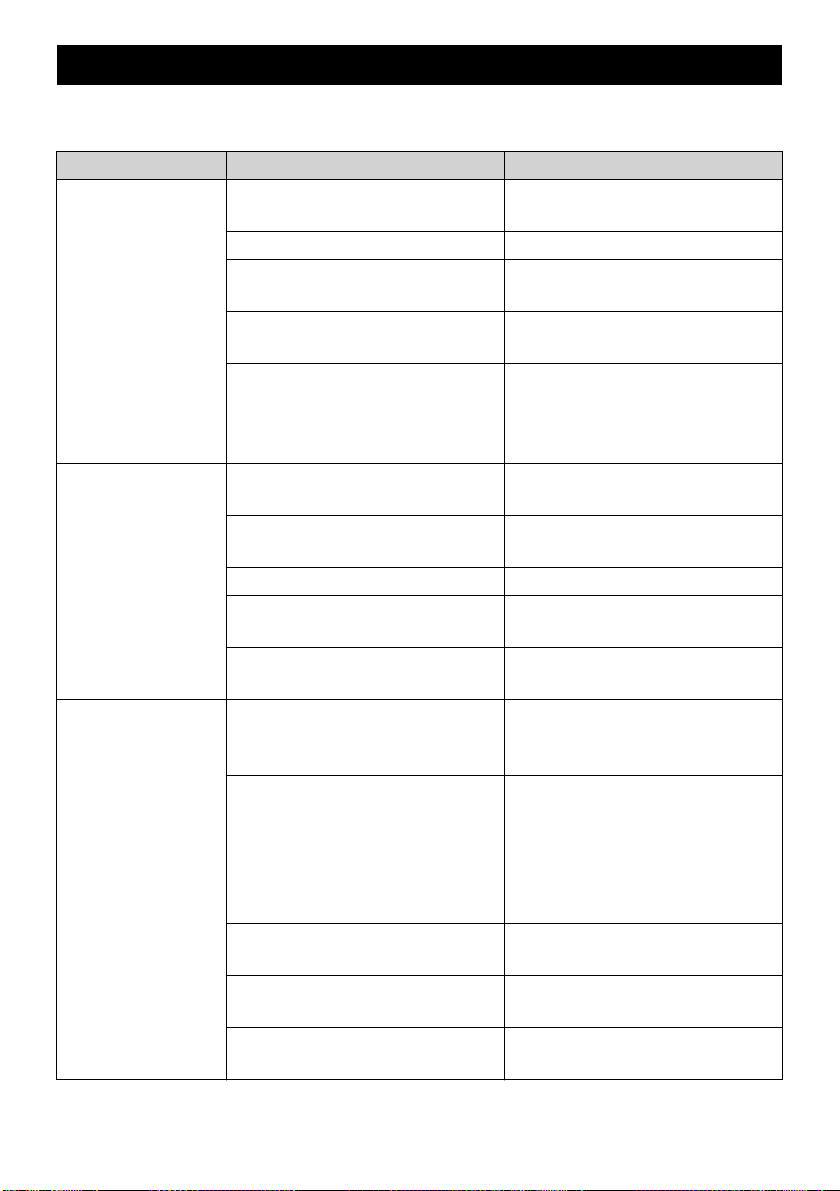
TROUBLESHOOTING
WARNING
Disconnect the unit from the power source before making any repair.
Issue Cause Solution
Motor will not start On/Off switch is in the “OFF”
(0) position.
Power cord is not plugged in. Plug in power cord.
Electrical outlet does not
supply adequate power.
Tripped GFCI plug. Press “RESET” button on
Tripped circuit breaker. Switch off pressure washer.
Unit does not
reach highpressure.
Output pressure
varies high and
low.
Diameter of garden hose is too
small.
Water supply is restricted. Check garden hose for kinks,
Not enough inlet water supply. Open water source full force.
Water inlet filter is clogged. Remove filter and rinse out in
Spray wand is on low-pressure
position.
Not enough inlet water supply. Turn water on full force. Check
Pump is sucking air. Check that hoses and fittings
Water inlet filter is clogged. Remove filter and rinse out in
Discharge nozzle is
obstructed.
Calcified gun, hose or spray
wand.
Turn switch to the “ON” (I)
position
Try a different outlet.
GFCI plug.
The reset comes automatically
once the temperature of the
unit drops.
Replace with a 16 mm (5/8
inch) or larger garden hose.
leaks and blockage.
warm water.
Turn spray wand to high-
pressure position.
garden hose for kinks, leaks or
blockage.
are air tight. Turn off machine
and purge pump by squeezing
trigger gun until a steady flow
of water emerges through the
nozzle.
warm water.
Blow out or remove debris with
a fine needle.
Run distilled vinegar through
detergent suction tube.
14 English
Page 15
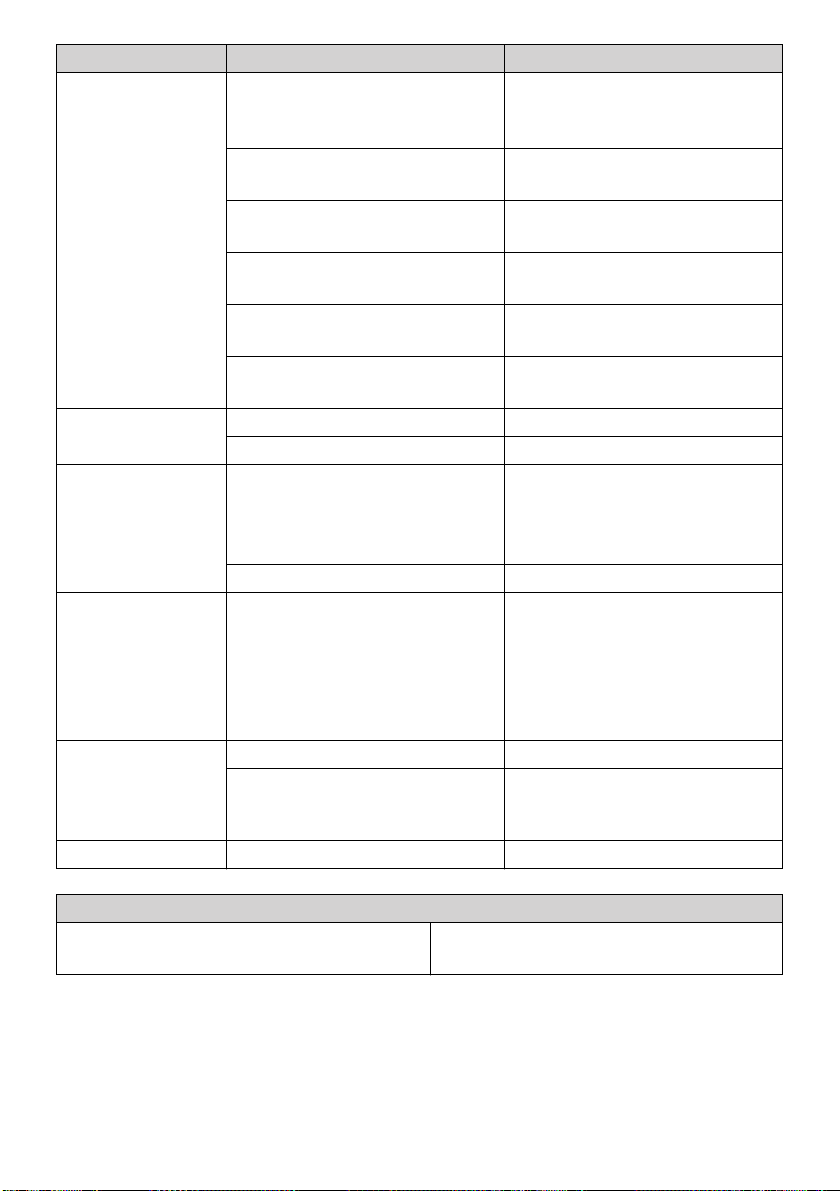
Issue Cause Solution
No detergent. Detergent siphon tube not
Check connection.
properly connected to the
machine.
Detergent is too thick. Dilute detergent, for best
results use Kärcher detergent.
Filter on detergent siphon tube
is clogged.
Damaged or clogged detergent
siphon tube.
Spray wand is in high-pressure
position.
Discharge nozzle is
obstructed.
Garden hose
connection leaks.
Loose fittings. Tighten fittings.
Missing/worn rubber washer. Insert new washer.
Spray wand leaks. Spray wand not properly
attached.
Run warm water through filter
to remove debris.
Remove obstruction or replace
detergent siphon tube.
Turn spray wand tip to low-
pressure position.
Blow out or remove debris with
fine needle.
Insert the spray wand into the
trigger gun. Carefully press in
against the spring tension and
twist into the locked position.
Broken o-ring or plastic insert. Call Customer Support
Pump is noisy. Pump is sucking air. Check that hoses and fittings
are air tight. Turn off machine
and purge pump by squeezing
trigger gun until a steady flow
of water emerges through the
nozzle.
Water leaks from
pump (up to 10
drops per minute
Loose fittings. Check that all fittings are tight.
Water seals are damaged or
Call Customer Support
worn.
is permissible).
Oil drip. Oil seals are damaged or worn. Call Customer Support
If you encounter any additional difficulties not listed, please visit our website.
USA / Canada:
www.karcher-help.com
Mexico:
www.karcher.com.mx
English 15
 Loading...