

Page 1
BD 50/60 C Ep Classic
'HXWVFK
(QJOLVK
)UDQoDLV
,WDOLDQR
1HGHUODQGV
(VSDxRO
3RUWXJXrV
'DQVN
1RUVN
6YHQVND
6XRPL
ǼȜȜȘȞȚțȐ
7UNoH
Ɋɭɫɫɤɢɣ
0DJ\DU
ýHãWLQD
6ORYHQãþLQD
3ROVNL
5RPkQHúWH
6ORYHQþLQD
+UYDWVNL
6USVNL
Ȼɴɥɝɚɪɫɤɢ
(HVWL
/DWYLHãX
/LHWXYLãNDL
ɍɤɪɚʀɧɫɶɤɚ
166
,QGRQHVLD
Ё᭛
ѳъѕ
Page 2

- 1
Please read and comply with
these original instructions prior
to the initial operation of your appliance and
store them for later use or subsequent owners.
Before using the appliance for the first time,
read and observe these operating instructions and the accompanying brochure:
Safety information for brush cleaning units
and spray-extraction units, No.
5.956-251.0.
The device may only be operated when
the cover and all lids are closed.
The appliance must only be operated on
surfaces that do not exceed the max. permitted incline (see "Technical Specifications").
n WARNING
Do not use the appliance on inclines.
Safety devices serve to protect the user
and must not be rendered in operational or
their functions bypassed.
If the safety switch is released, the brush
drive shuts off.
DANGER
For an immediate danger which can lead to
severe injuries or death.
n WARNING
For a possibly dangerous situation which
could lead to severe injuries or death.
n CAUTION
Pointer to a possibly dangerous situation,
which can lead to minor injuries.
ATTENTION
Pointer to a possibly dangerous situation,
which can lead to property damage.
The scrubbing vacuum cleaner is used for
the wet cleaning of level floors.
– The device can be easily adjusted to
the respective cleaning task by adjusting the water volume and the detergent
volume.
The detergent dosing unit can be adjusted via the addition in the tank.
– The appliance is equipped with a fresh
water and a wastewater reservoir (60 litres each). These allow an effective
cleaning with a long usage life.
– A working distance of 500 mm will im-
prove the efficiency when you are using
the appliance for a long period.
– Propulsion is accomplished by manual-
ly pushing the device and is supported
by the rotation of the brushes.
– The power supply operation allows a
high capacity without a restriction of the
working time.
Note:
The appliance can be equipped with various accessories depending on the cleaning
task.
Please request our catalogue or visit us on
the Internet at www.kaercher.com.
Use this appliance only as directed in these
operating instructions.
– The appliance may only be used for the
cleaning of hard surfaces that are not
sensitive to moisture and polishing op-
erations.
– The appliance is not suited for the
cleaning of frozen grounds (e.g. in cold
stores).
– The appliance may only be equipped
with original accessories and spare
parts.
– The appliance is not suited for the use
in potentially explosive environments.
– The machine should not be used to
suck in inflammable gases, undiluted
acids or solvents.
This includes petrol, thinning agents or
hot oil that can form an explosive mix-
ture when it comes in contact with
sucked air. Do not use acetone, undilut-
ed acids and solvents as they are ag-
gressive towards the materials from
which the appliance is made.
– The machine has been approved for
use on surfaces with max. gradients as
listed under "Technical Specifications".
Information on ingredients (REACH)
The latest information on ingredients can
be found under:
www.kaercher.de/REACH
The warranty terms published by our competent sales company are applicable in
each country. We will repair potential failures of your accessory within the warranty
period free of charge, provided that such
failure is caused by faulty material or defects in fabrication. In the event of a warranty claim please contact your dealer or the
nearest authorized Customer Service center. Please submit the proof of purchase.
Contents
Safety instructions . . . . . . . . . . EN 1
Function. . . . . . . . . . . . . . . . . . EN 1
Proper use . . . . . . . . . . . . . . . . EN 1
Environmental protection. . . . . EN 1
Warranty . . . . . . . . . . . . . . . . . EN 1
Operating and Functional Ele-
ments. . . . . . . . . . . . . . . . . . . . EN 2
Before Startup . . . . . . . . . . . . . EN 3
Operation. . . . . . . . . . . . . . . . . EN 3
Shutting Down the Appliance . EN 4
Transport . . . . . . . . . . . . . . . . . EN 4
Storage . . . . . . . . . . . . . . . . . . EN 4
Care and maintenance . . . . . . EN 4
Frost protection . . . . . . . . . . . . EN 5
Faults. . . . . . . . . . . . . . . . . . . . EN 5
Accessories . . . . . . . . . . . . . . . EN 6
Technical specifications. . . . . . EN 6
Spare parts . . . . . . . . . . . . . . . EN 6
EC Declaration of Conformity . EN 6
Safety instructions
Safety Devices
Safety Switch
Danger or hazard levels
Function
Proper use
Environmental protection
The packaging material can be
recycled. Please do not throw
the packaging material into
household waste; please send it
for recycling.
Old appliances contain valuable
materials that can be recycled.
Please arrange for the proper recycling of old appliances. Please
dispose your old appliances using appropriate collection systems.
Warranty
(1
Page 3
- 2
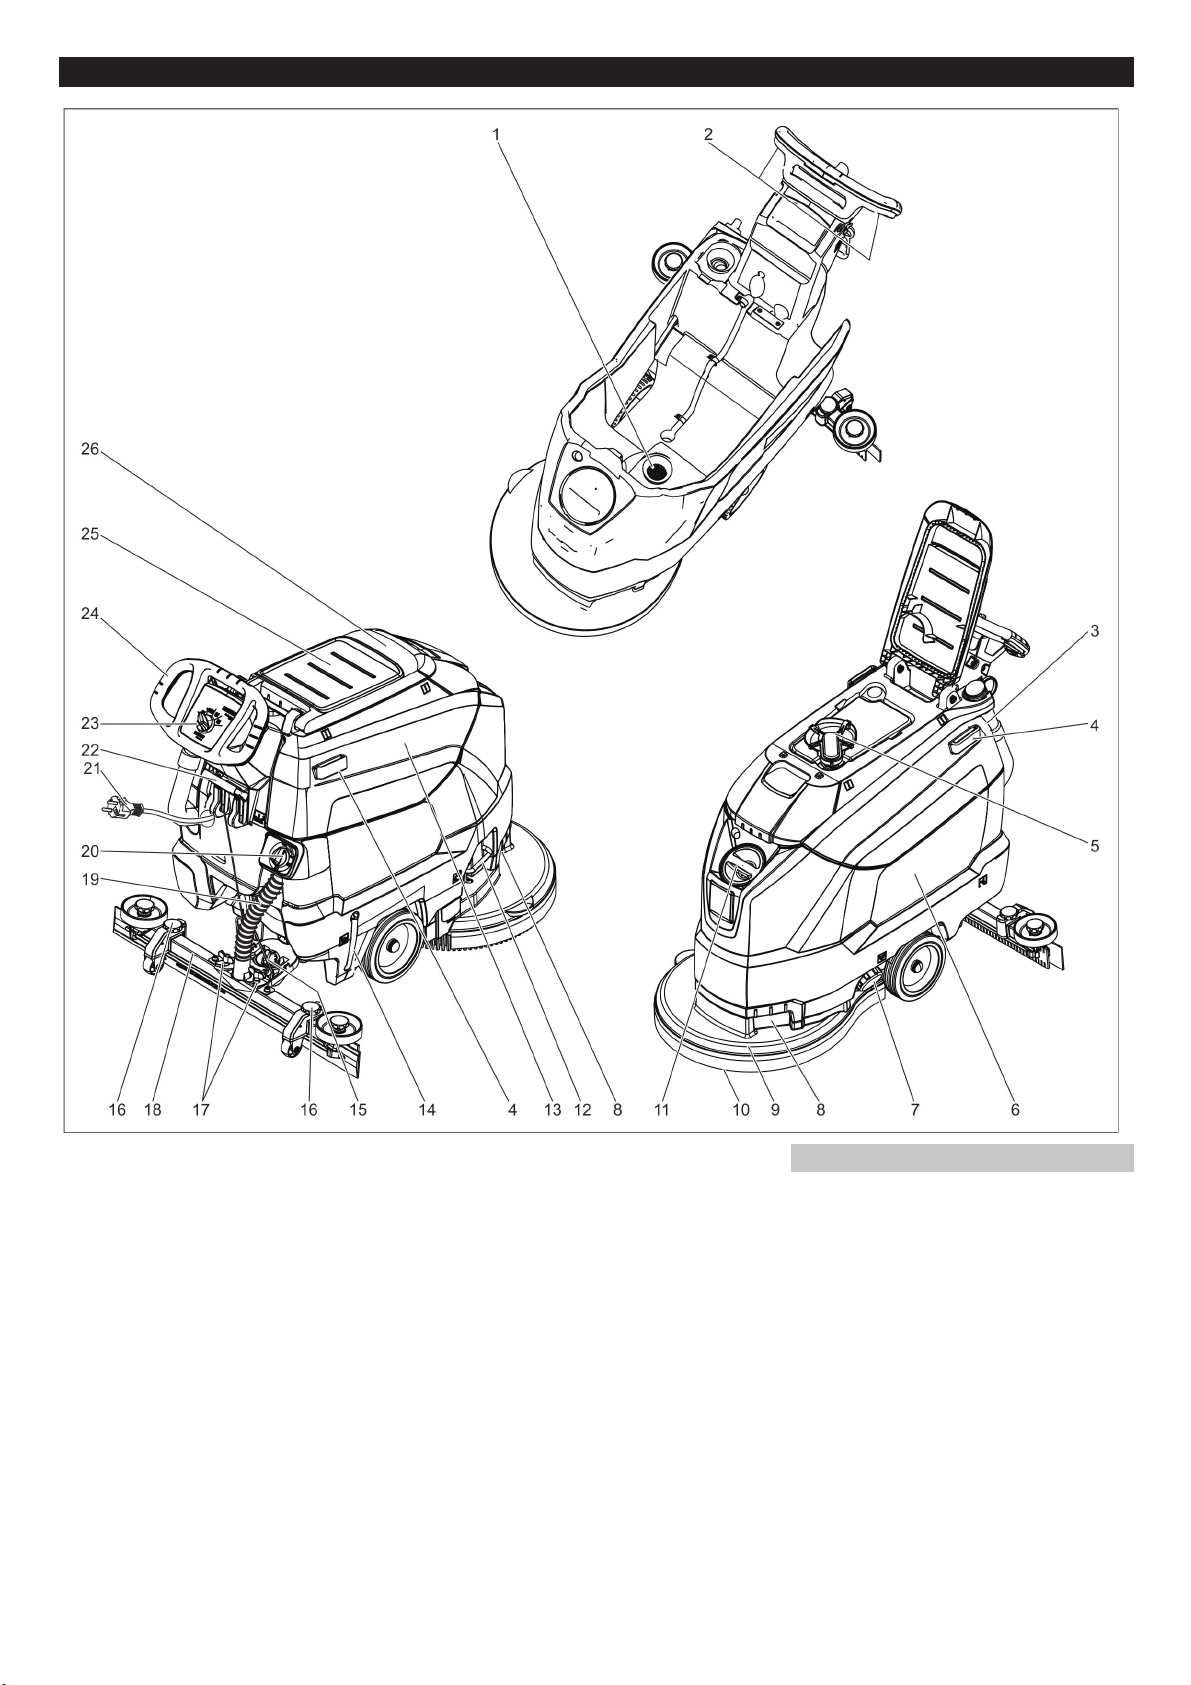
1 Fluff filter
2 Safety button
3 Drain hose for wastewater with dosing
unit
4 Holding rail for home base
5 Float
6 Fresh water tank
7 Fresh water tank lock
8 Recessed grip
9 Cleaning head
10 Disc brush
11 Fresh water reservoir filler neck
12 Bow brush change
13 waste water tank
14 Fresh water level display
15 Rotary handle to incline the vacuum bar
16 Height adjustment of suction bar *
17 Wing nuts for fastening the vacuum bar
18 Vacuum bar *
19 Suction hose
20 Water quantity regulator
21 Mains cable with mains plug
22 Vacuum bar lowering lever
23 Operator console
24 Push handle
25 Storage surface for cleaning set "Home
base box“
26 Cover waste water tank
* not included in the delivery
– The operating elements for the cleaning
process are yellow.
– The controls for the maintenance and
service are light gray.
Operating and Functional Elements
Colour coding
(1
Page 4

- 3
1 OFF
Device is switched off
2 Normal mode
Wet clean the floor and vacuum up dirt
water.
3 Intense mode
Wet clean the floor and allow the deter-
gent to react.
4 Vacuum mode
Suck in the dirt fleet.
5 Program selection switch
6 Indicator light voltage supply
Glows when the mains plug is inserted
and when there is mains voltage.
** option
Î Unscrew the screws from the middle
board of the pallet.
Î Push down the device holding the push
handle and pull out the middle board.
Î Remove the chocks in front of and next
to the wheels.
Î Push down the device holding the push
handle and push it forwards up to the
edge of the pallet.
Î Lift the device off the pallet and set it on
the floor.
Î Insert the vacuum bar into the vacuum
bar suspension in such a manner that
the profiled sheet is positioned above
the suspension.
Î Tighten the wing nuts.
Î Insert the suction hose.
DANGER
Risk of injury!
In dangerous situations, release the safety
switch/drive lever.
Î Open the lock of the fresh water reser-
voir.
Î Fill fresh water (maximum 60 °C) until
the lower edge of the filling nozzle.
Î Close the lock of the fresh water reser-
voir.
n WARNING
Risk of damage. Only use the recommended detergents. With other detergents, the
operator bears the increased risk regarding
the operational safety and danger of accident.
Only use detergents that are free from solvents, hydrochloric acid and hydrofluoric acid.
Follow the safety instructions for using detergents.
Note:
Do not use highly foaming detergents.
Recommended detergents:
Î Add the detergent to the fresh water
reservoir.
Note:
If the fresh water tank is empty, the cleaning head continues working without liquid
supply.
Î Adjust the water quantity using the reg-
ulating button according to the dirt on
the floor covering.
Note:
Carry out initial cleaning attempts with low
water volume. Increase water volume stepby-step until the desired cleaning result is
achieved.
To improve the vacuuming result on tiled
floors the vacuum bar can be turned to an
oblique position of up to 5°.
Î Loosen the wing nuts.
Î Turn the vacuum bar.
Î Tighten the wing screws.
If the vacuum result is unsatisfactory the inclination of the straight vacuum bar can be
modified.
Î Adjust the rotary handle to incline the
suction bar.
The bend of the suction lips upon contact
with the floor is influenced with the height
adjustment.
Î Try adjusting the twist handles of the
height adjustment until the best vacuuming result is achieved.
Operator console
Symbols on the machine
Mains plug
Lashing point
Mop holder **
Filling level fresh water
tank 25%
Bow brush change
Vacuum bar lowering lever
Drain outlet fresh water
tank
Dirt water discharge
hose
Before Startup
Unloading
Installing the Vacuum Bar
Operation
Filling in detergents
Fresh water
Detergent
Application Detergent
Routine cleaning of all water
resistant floors
RM 746
RM 780
Routine cleaning of glossy
surfaces (e.g. granite)
RM 755 es
Routine cleaning and basic
cleaning of industrial floors
RM 69 ASF
Routine cleaning and basic
cleaning of fine stoneware
tiles
RM 753
Routine cleaning of tiles in
sanitary areas
RM 751
Cleaning and disinfection in
sanitary areas
RM 732
Removal of coating from all
alkali-resistant floors (e.g.
PVC)
RM 752
Removal of coating from linoleum floors
RM 754
Setting the water quantity
Setting the Vacuum Bar
Oblique position
Inclination
Height
(1
Page 5

- 4
ATTENTION
Risk of damage to the floor covering. Do
not operate the appliance on the spot.
Î Insert the end of the extension cable as
a loop in the strain relief clamp.
Î Connect the mains plug of the device to
the extension cable.
Î Insert the mains plug of the extension
cable into a socket.
Î Turn the program selection switch to
the desired cleaning program.
Î Operate the safety switch.
Î Pull the lever out and press it down; the
vacuum bar is lowered.
Note:
– For cleaning tiled floors, adjust the
straight suction bar in such a way that
cleaning is not done at an angle of 90
degrees to the joints.
– The inclined position and the inclination
of the suction bar can be adjusted to
achieve better suction results (see "Ad-
justing the suction bar").
–
If the waste water tank is full, the float
closes the suction opening and the suc-
tion turbine runs at an increased speed. If
this is the case, shut the vacuum off and
drive to empty the waste water tank.
Î Close the regulatory button for setting
the water quantity.
Î Briefly drive forward and suck of the re-
maining water.
Î Raise the vacuum bar.
Î Set the programme selector switch to
"OFF".
Î Disconnect the mains plug from the
socket.
n WARNING
Please observe the local provisions regarding the wastewater treatment.
Î Take the water discharge hose from the
support and lower above a suited col-
lection device.
Î Crush or bend the dosing equipment.
Î Open the lid of the dosing equipment.
Î Drain off the dirt water - regulate the
water quantity by pressing or bending.
Î Rinse the waste water tank with clear
water.
Î Unscrew the lock of the fresh water res-
ervoir.
DANGER
Risk of injury! When loading or unloading
the machine, it may only be operated on
gradients up to the maximum value (see
"Technical Specifications"). Drive slowly.
n CAUTION
Risk of personal injury or damage! Mind the
weight of the appliance during transport.
Î Press down and push the device using
the push handle.
Î When transporting in vehicles, secure
the appliance according to the guidelines from slipping and tipping over.
n CAUTION
Risk of personal injury or damage! Consider the weight of the appliance when storing
it.
This appliance must only be stored in interior rooms.
DANGER
Risk of injury! Set the programme selector
switch to "OFF" and disconnect the mains
plug prior to performing any work on the device.
Î Drain and dispose of the dirt water and
the residual fresh water.
ATTENTION
Risk of damage. Do not sluice the appliance with water and do not use aggressive
detergents.
Î Drain off dirt water.
Î Rinse the waste water tank with clear
water.
Î Clean the outside of the appliance with
a damp cloth which has been soaked in
mild detergent.
Î Check the fluff filter, clean if required.
Î Clean the vacuum lips and the wiping
lips, check for wear and replace if required.
Î Check the brush for wear and replace if
required (see "Maintenance tasks").
Î Clean the seals between waste water
tank and cover and check for tightness,
replace if required.
Î Have the prescribed inspection carried
out by the customer service.
1 Wear indicator
2 Vacuum lip
The vacuum lips must be replaced or reversed if they are worn down to the wear indicator.
Î Remove the vacuum bar.
Î Unscrew the star grips.
Î Remove the plastic parts.
Î Remove the vacuum lips.
Î Insert new or reversed vacuum lips.
Î Insert the plastic parts.
Î Screw in and tighten the star grips.
Î Push down the device holding the push
handle so that the cleaning head is
raised.
Î Press the pedal for changing the brush-
es downward beyond its resistance.
Cleaning
Lower the vacuum bar
Shutting Down the Appliance
Drain off dirt water
Drain off clean water
Transport
Storage
Care and maintenance
Maintenance schedule
After each operation
Monthly
Yearly
Maintenance Works
Replace or turn vacuum lips
Replacing the disk brushes
(1
Page 6

- 5
Î Pull the device towards the back so that
the disc brush becomes accessible.
Î Place a new disc brush on the floor in
front of the device.
Î Drive the device with the raised clean-
ing head over the new disc brush and
lower the cleaning head.
The brush locks into the drive.
Î Drain off dirt water.
Î Lift up the waste water tank and put it
aside.
To ensure a reliable operation of the appliance maintenance contracts can be concluded with the competent Kärcher sales
office.
In case of danger of frost:
Î Empty the fresh and waste water tank.
Î Store the appliance in a frost-protected
room.
DANGER
Risk of injury! Set the programme selector
switch to "OFF" and disconnect the mains
plug prior to performing any work on the device.
Î Drain and dispose of the dirt water and
the residual fresh water.
Removing the waste water tank
Maintenance contract
Frost protection
Faults
Failure Correction
Appliance cannot be
started
Turn the program selection switch to the desired programme.
Operate the safety switch.
Insert the mains plug into the socket.
Is the indicator light voltage supply on?
Insufficient water quantity
Check fresh water level, refill tank if necessary.
Increase the water volume on the regulating knob for water volume.
Insufficient vacuum performance
Clean the seals between waste water tank and cover and check for tightness, replace if required.
Check the seals between waste water tank and fresh water tank for damage, replace if necessary.
Wastewater reservoir is full; shut off the appliance and empty the wastewater reservoir
Clean the fluff filter.
Clean the vacuum lips on the vacuum bar, replace if required
Check if the cover on the dirt water discharge hose is closed
Check the setting of the vacuum bar.
Check suction hose for blockages; clean if required.
Check the suction hose for tightness; replace if required.
Insufficient cleaning result
Check the brushes for wear, replace if required.
Suction turbine is running rough
Clean the swimmer.
Brush does not turn Check if foreign objects block the brush; remove foreign object if required.
Release the safety switch.
Wait for a while.
Operate the safety switch.
Vibrations during cleaning
You might need to use a softer brush.
In case of faults that cannot be remedied using the table below please contact the customer service.
(1
Page 7

- 6
– Only use accessories and spare parts
which have been approved by the manufacturer. The exclusive use of original
accessories and original spare parts
ensures that the appliance can be operated safely and trouble free.
– At the end of the operating instructions
you will find a selected list of spare
parts that are often required.
– For additional information about spare
parts, please go to the Service section
at www.kaercher.com.
We hereby declare that the machine described below complies with the relevant
basic safety and health requirements of the
EU Directives, both in its basic design and
construction as well as in the version put
into circulation by us. This declaration shall
cease to be valid if the machine is modified
without our prior approval.
The undersigned act on behalf and under
the power of attorney of the company management.
Authorised Documentation Representative
S. Reiser
Alfred Kärcher GmbH Co. KG
Alfred-Kärcher-Str. 28 - 40
71364 Winnenden (Germany)
Phone: +49 7195 14-0
Fax: +49 7195 14-2212
Winnenden, 2015/05/01
Accessories
Description Part no.: Description
Disk brush, red (medium, standard) 4.905-026.0 For the use with all common cleaning tasks.
Disk brush, natural (white) 4.905-027.0 Made of natural fibres for spot cleaning and polishing.
Disk brush, black (hard) 4.905-029.0 For heavy soiling and for deep cleaning. For robust floorings
only.
Driver plate pad 4.762-534.0 For cleaning with pads. With quick change coupling and center
lock.
Pad, red (medium soft) 6.369-079.0 For cleaning and cleanering of all floors.
Pad, green (medium hard) 6.369-078.0 For cleaning heavily soiled floors and for deep cleaning.
Pad, black (hard) 6.369-077.0 With stubborn soiling and for deep cleaning.
Pad, beige (light grain) 6.369-468.0 For polishing and refreshing of hard and flexible floorings.
Pad, beige (natural hair proportion) 6.371-146.0
Suction bar, 850 mm, straight 4.777-401.0
Suction bar, 850 mm, bent 4.777-411.0
Set homebase box 4.035-406.0
Mop holder 9.753-023.0
Technical specifications
Power
Nominal voltage V 230
Average power consump-
tion
W 1350
Rated power suction turbine
W 550
Rated power brush drive W 800
Vacuuming
Vacuum power, air volume (max.)
l/s 20
Vacuuming power, negative pressure (max.)
kPa
(mbar)
14,0
(140)
Cleaning brushes
Brush speed 1/min 140
Brush diameter mm 510
Dimensions and weights
Theoretical surface
cleaning performance
m²/h 2000
Max. working range incline
% 2
Fresh/waste water tank
volume
l 62/62
Max. water temperature °C 60
Ambient temperature °C 5...40
Net weight (transport
weight)
kg 60
Total weight (ready to operate)
kg 122
Values determined as per EN 60335-272
Total oscillation value m/s
2
<2,5
Uncertainty K m/s
2
0,2
Sound pressure level L
pA
dB(A) 67
Uncertainty K
pA
dB(A) 2
Sound power level L
WA
+
Uncertainty K
WA
dB(A) 81
Spare parts EC Declaration of Conformity
Product: Floor cleaner
Type: 1.127-xxx
1.515-xxx
Relevant EU Directives
2006/42/EC (+2009/127/EC)
2004/108/EC
Applied harmonized standards
EN 55012: 2007 + A1: 2009
EN 60335–1
EN 60335–2–72
EN 61000–6–2: 2005
EN 62233: 2008
Applied national standards
-
CEO
Head of Approbation
(1
Page 8

- 1
Lire ce manuel d'utilisation origi-
nal avant la première utilisation
de votre appareil, le respecter et le conserver pour une utilisation ultérieure ou pour le
futur propriétaire.
Lire le présent mode d'emploi ainsi que la
brochure ci-jointe Consignes de sécurité
pour les aspirateurs eau/poussières n°
5.956-251.0 avant d'utiliser l'appareil et
respecter les instructions.
L'appareil ne peut être utilisé que si le
capot et tous les couvercles sont fermés.
L'appareil doit uniquement être utilisé sur
des surfaces qui ne dépassent pas la pente
maximale autorisée ; cf. section "Données
techniques".
n AVERTISSEMENT
Ne pas utiliser l'appareil sur des plans inclinés.
Les dispositifs de sécurité ont pour but de
protéger l'utilisateur et ils ne doivent donc
jamais être désactivés ni évités.
Lorsque le commutateur de sécurité est relâché, l'entraînement de la brosse s'arrête.
DANGER
Signale la présence d'un danger imminent
pouvant entraîner de graves blessures corporelles et même avoir une issue mortelle.
n AVERTISSEMENT
Signale la présence d'une situation éventuellement dangereuse pouvant entraîner
de graves blessures corporelles et même
avoir une issue mortelle.
n PRÉCAUTION
Remarque relative à une situation potentiellement dangereuse pouvant entraîner
des blessures légères.
ATTENTION
Remarque relative à une situation éventuellement dangereuse pouvant entraîner
des dommages matériels.
Cette aspirateur à friction est mis en œuvre
pour nettoyer des sols plans par voie humide.
– L'appareil peut être facilement adapté à
la tâche de nettoyage par un réglage du
débit d'eau et de la quantité de détergent.
Le dosage du détergent est ajustable
lors de l'ajout dans le réservoir.
– L'appareil dispose d'un réservoir d'eau
propre et un réservoir d'eau sale (chacun d'une contenance de 60 litres).
Cela garantit un nettoyage efficace
pendant une longue durée d'utilisation.
– Une largeur de travail de 500 mm per-
met une exécution effective en cas
d'une haute durée de travail.
– L'avance se fait en poussant à la main
et est soutenue par la rotation des
brosses.
– Un fonctionnement par courant permet
d'obtenir une capacité élevée sans limi-
tation de la durée de travail.
Remarque :
L'appareil peut être équipé de différents accessoires en fonction de l'application respective.
De plus amples détails figurent dans notre
catalogue ou sur notre site Internet
www.kaercher.com.
L'utilisation de l'appareil doit être faite en
conformité avec les consignes figurant
dans les instructions de service.
– L'appareil doit uniquement être utilisé
pour nettoyer des surfaces planes non
sensibles à l'humidité ni au polissage.
– L'appareil n'est pas approprié pour net-
toyer des sols gelés (par exemple dans
des entrepôts frigorifiques)
– L'appareil doit uniquement être équipé
d'accessoires et de pièces de rechange
d'origine.
– L'appareil n'est pas approprié pour l'ap-
plication dans des environnements à
risque d'explosion.
– Ne pas aspirer avec l'appareil des
gazes combustibles, acides ou solvants
non dilués.
Ces-ci sont essence, dilutif de couleurs
ou fuel, qui peuvent former des mé-
langes explosives en touillant avec l'air
d'aspiration. Ne pas utiliser d’acétone,
d’acides ou de solvants non dilués, du
fait de leur effet corrosif sur les maté-
riaux constituant l’appareil.
– L'appareil n'est autorisé au fonctionne-
ment que sur des surfaces ayant la
pente maximale indiquée dans les
« Caractéristiques techniques ».
Instructions relatives aux ingrédients
(REACH)
Les informations actuelles relatives aux ingrédients se trouvent sous :
www.kaercher.de/REACH
Dans chaque pays, les conditions de garantie en vigueur sont celles publiées par
notre société de distribution responsable.
Les éventuelles pannes sur les accessoires sont réparées gratuitement dans le
délai de validité de la garantie, dans la mesure où celles-ci relèvent d'un défaut matériel ou d'un vice de fabrication. En cas de
recours en garantie, adressez-vous à votre
revendeur ou au service après-vente agréé
le plus proche munis de votre preuve
d'achat.
Table des matières
Consignes de sécurité . . . . . . . FR 1
Fonction. . . . . . . . . . . . . . . . . . FR 1
Utilisation conforme . . . . . . . . . FR 1
Protection de l’environnement . FR 1
Garantie. . . . . . . . . . . . . . . . . . FR 1
Eléments de commande et de
fonction . . . . . . . . . . . . . . . . . . FR 2
Avant la mise en service . . . . . FR 3
Fonctionnement. . . . . . . . . . . . FR 3
Arrêt et mise hors marche de
l'appareil . . . . . . . . . . . . . . . . . FR 4
Transport . . . . . . . . . . . . . . . . . FR 4
Entreposage . . . . . . . . . . . . . . FR 4
Entretien et maintenance. . . . . FR 4
Protection antigel. . . . . . . . . . . FR 5
Pannes . . . . . . . . . . . . . . . . . . FR 5
Accessoires . . . . . . . . . . . . . . . FR 6
Caractéristiques techniques . . FR 6
Pièces de rechange. . . . . . . . . FR 6
Déclaration de conformité CE . FR 6
Consignes de sécurité
Dispositifs de sécurité
Coupe-circuit
Niveaux de danger
Fonction
Utilisation conforme
Protection de
l’environnement
Les matériaux constitutifs de
l’emballage sont recyclables. Ne
pas jeter les emballages dans
les ordures ménagères, mais les
remettre à un système de recyclage.
Les appareils usés contiennent
des matériaux précieux recyclables lesquels doivent être apportés à un système de recyclage. Pour cette raison, utilisez
des systèmes de collecte adéquats afin d'éliminer les appareils usés.
Garantie
)5
 Loading...