

Page 1
BD 80/100 W Classic Bp
Register
your product
www.kaercher.com/welcome
English 3
Français 15
Español 28
59688290 (04/19)
Page 2

Page 3
Contents
IMPORTANT SAFETY INSTRUCTIONS .......................... 3
OPERATING SAFETY RULES AND PRACTICES........... 3
MAINTENANCE AND REBUILD PRACTICES ................. 4
FIRE SAFETY STANDARD .............................................. 4
General notes ................................................................... 4
Function ............................................................................ 4
Intended use ..................................................................... 4
Environmental protection .................................................. 5
Accessories and spare parts............................................. 5
Scope of delivery .............................................................. 5
Safety instructions ............................................................ 5
Description of the unit ....................................................... 6
Installation......................................................................... 7
Initial startup ..................................................................... 9
Operation .......................................................................... 9
Transport........................................................................... 11
Storage ............................................................................. 11
Care and service............................................................... 11
Troubleshooting guide ...................................................... 13
Warranty ........................................................................... 14
Accessories ...................................................................... 14
Technical data ................................................................... 14
IMPORTANT SAFETY INSTRUCTIONS
READ ALL INSTRUCTIONS BEFORE USING THIS APPLIANCE
몇 WARNING
To reduce the risk of fire, electric shock, or injury:
DO NOT LEAVE appliance unattended when plugged in.
Unplugfrom outlet when not in use and before servicing.
몇 WARNING
TO REDUCE THE RISK OF ELECTRIC SHOCK-USE INDOORS ONLY
Do not allow to be used as a toy. Close attention is nec-
essary when used by or near children.
Use only as described in this manual. Use only manu-
facturer’s recommended attachments.
Do not use with damaged cord or plug. If the unit is not
working as it should, has been dropped, damaged, left
outdoors, or dropped into water, return it to a service
center.
Do not pull or carry by the cord, do not use cord as a
handle, do not close a door on the cord, or pull cord
around sharp edges or corners. Do not run appliance
over cord. Keep cord away from heated surfaces.
DO NOT UNPLUG BY PULLING CORD. To unplug,
grasp plug, not cord.
Do not handle plug or appliance with wet hands.
Do not put any objects into openings. Do not use if
openings are blocked; keep free of dust, lint, hair, and
anything that may reduce air flow.
KEEP HAIR, CLOTHING, LOOSE JEWELRY, FIN-
GERS and all parts of the body away from openings and
moving parts.
Turn off all controls before unplugging.
Use extra care when cleaning on stairs.
Do not use to pick up flammable or combustible liquids,
such as gasoline, or use in areas where they may be
present.
Connect to a properly grounded outlet only. See
Grounding Instructions.
Always disconnect cord from electrical outlet before ser-
vicing appliance.
Never sweep off explosive liquids, combustible gases or
undiluted acids and solvents. This includes petrol, paint
thinner or heating oil which can generate explosive
fumes or mixtures upon contact with the air. Acetone,
undiluted acids and solvents must also be avoided as
they can harm the materials on the machine.
Do not vacuum up burning or smouldering objects!
GROUNDING INSTRUCTIONS
This device must be grounded. If it should malfunction or
break down, grounding provides a path of least resistance
for electric current to reduce the risk of electric shock.
This device is equipped with a cord having an equipment
grounding conductor and ground plug.
The plug must be plugged into an appropriate outlet that is
properly installed and grounded in accordance with all local codes and ordinances.
DANGER
Improper connection of the equipmentgrounding conductor can result in a risk of electrocution.
Check with a qualified electrician or service personnel if
you are in doubt as to whether the outlet is properly
grounded.
Do not modify the plug provided with the product - if it will
not fit the outlet, have a proper outlet installed by a qualified electrician.
Do not use any type of adapter with this product.
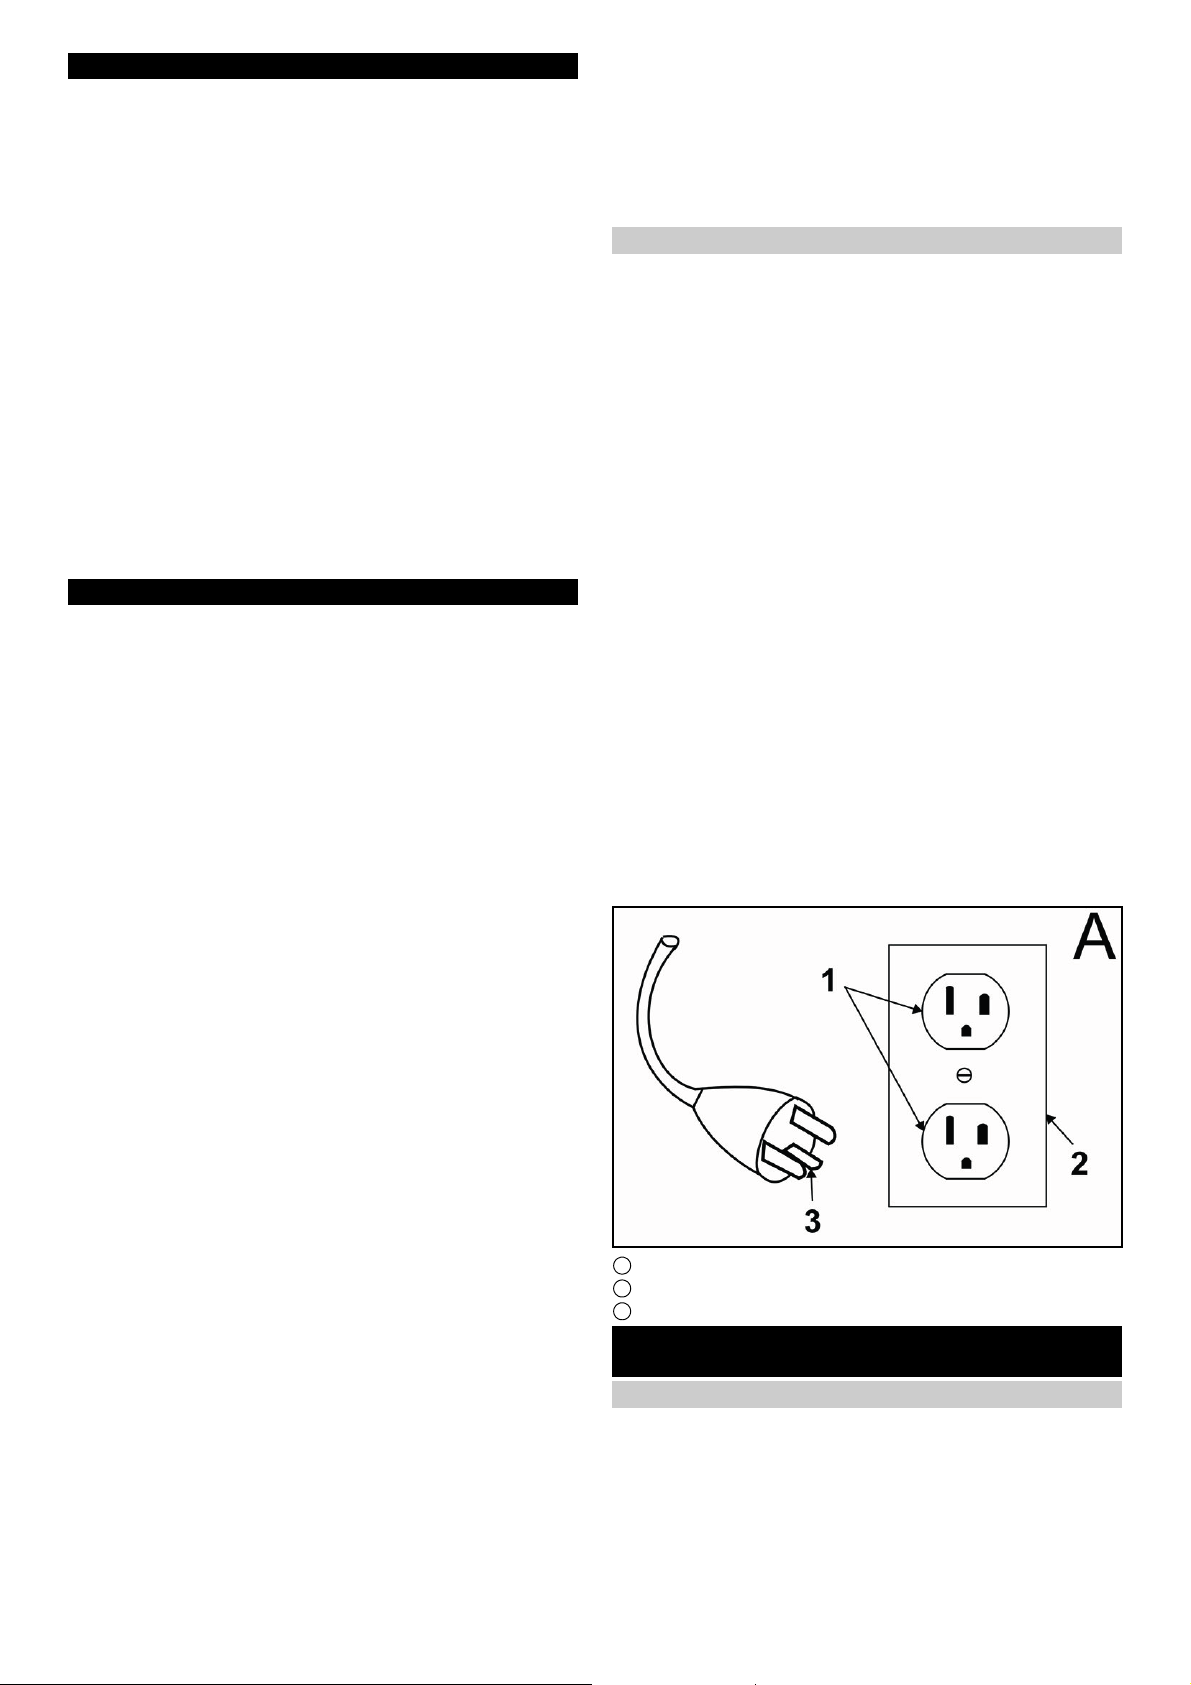
This appliance is for use on a nominal 120-volt circuit and
has a grounding attachment plug that looks like the plug illustrated in sketchpicture A.
Make sure that the appliance is connected to an outlet having the same configuration as the plug.
No adaptor should be used with this appliance.
CONNECT TO A PROPERLY GROUNDED OUTLET ONLY
1 Grounded outlet
2 Grounded outlet box
3 Grounded pin
OPERATING SAFETY RULES AND
PRACTICES
Owner/User Responsibility
The owner and/or user must have an understanding of the
manufacturer’s operating instructions and warnings before
using this device.
Warning information should be emphasized and understood.
If the operator is not fluent in English, the manufacturer’s
instructions and warnings shall be read to and discussed
English 3
Page 4

with the operator in the operator’s native language by the
purchaser/ owner, making sure that the operator comprehends its contents.
Owner and/or user must study and maintain for future reference the manufacturers’ instructions.
General
Before starting operation, the device must be in the operating position.
Do not start or operate the device, any of its functions or
attachments, from any place other than from the designated operator's position.
Before leaving the operator’s position:
1 bring the device to a complete stop;
2 if the device must be on an incline, block the wheels.
Maintain a safe distance from the edge of ramps, platforms, and other similar working surfaces.
Do not add to, or modify the device.
Do not block access to fire aisles, stairways or fire equipment.
Traveling
Yield the right of way to pedestrians and emergency vehicles such as ambulances and fire trucks.
Cross railroad tracks at an angle wherever possible. Do
not park closer than 6 ft (1800 mm) to the nearest rail of a
railroad track.
Keep a clear view of the path of travel and observe for other traffic, personnel, and safe clearances.
Under all travel conditions, operate the device at a speed
that will permit it to be brought to a stop in a safe manner.
Do not indulge in stunt driving or horseplay.
Slow down for wet and slippery floors. Before driving over
a dockboard or bridge plate, be sure that it is properly secured. Drive carefully and slowly across the dockboard or
bridge plate, and never exceed its rated capacity.
When negotiating turns, reduce speed to a safe level consistent with the operating environment. Make the turns
smoothly.
Operator care of the device
If the device is found to be in need of repair or in any way
unsafe, or contributes to an unsafe condition, the matter
shall be reported immediately to the user’s designated authority, and the device shall not be operated until it has
been restored to safe operating condition.
If during operation the device becomes unsafe in any way,
the matter shall be reported immediately to the user’s designated authority, and the device shall not be operated until
it has been restored to safe operating condition.
Do not make repairs or adjustments unless specifically authorized to do so.
MAINTENANCE AND REBUILD PRACTICES
Operation of the device may be hazardous if maintenance
is neglected or repairs, rebuilds, or adjustments are not
performed in accordance with the manufacturer’s design
criteria. Therefore, maintenance facilities (on or off premises), trained personnel, and detailed procedures shall be
provided.
Maintenance and inspection of the device shall be performed in conformance with the following practices:
1 a scheduled planned maintenance, lubrication, and in-
spection system shall be followed; consult the manufacturer’s recommendations.
2 Only trained and authorized persons shall be permitted
to operate a powered floor scrubber. Operators of powered floor scrubbers shall be qualified as to visual, auditory, physical, and mental ability to operate the
equipment safely.
Avoid fire hazards and have fire protection equipment
present in the work area. Do not use open pans of fuel or
flammable cleaning fluids for cleaning parts.
FIRE SAFETY STANDARD
Any device not in safe operating condition shall be removed from service.
Repairs shall not be made in Class I, Class II, and Class III
locations.
Fire Prevention.The device shall be kept in a clean condition and reasonably free of lint, excess oil, and grease.
Noncombustible agents are preferred for cleaning the device. Flammable liquids [those having flash points at or
above 100°F (37,8°C)] are not allowed. Precautions regarding toxicity, ventilation, and fire hazard shall be appropriate for the agent or solvent used.
Nameplate Visibility. The device type designations as
shown on the nameplate and the type markers shall not be
covered over with paint so that their identification information is obscured.
General notes
Read these original operating instructions and
the enclosed safety instructions before using
the device for the first time. Proceed accordingly.
Keep both books for future reference or for future owners.
Function
This scouring and vacuum machine is used for wet cleaning of level floors.
The device can be adjusted to suit the respective cleaning
task by setting the water volume and detergent volume appropriately. The detergent dosing unit is adjusted via the
amount added to the tank.
The working width and the capacity of the fresh water and
waste water tanks (see chapter Technical data) allow effective cleaning over long working times.
The device has a drive. The device is supplied from 4 batteries.
Note
The device can be equipped with various accessories to
suit the respective cleaning order. Request a copy of our
catalog or visit our Internet website at www.kaercher.com.
Intended use
This device is suitable for commercial and industrial use,
e.g. in hotels, schools, hospitals, factories, shops, offices,
and rental companies. Use the device only in accordance
with the information in these operating instructions.
The device may only be used for cleaning smooth sur-
faces that are insensitive to water and polishing.
The device is not suitable for cleaning frozen floors (e.g.
in cold stores).
The device is not suitable for use in potentially explosive
environments.
The device is approved for operation on surfaces with a
maximum slope (see chapter Technical data).
4 English
Page 5
Environmental protection
The packing materials can be recycled. Please dispose of packaging in accordance with the environ-
mental regulations.
Electrical and electronic appliances contain valuable,
recyclable materials and often components such as
batteries, rechargeable batteries or oil, which - if handled or disposed of incorrectly - can pose a potential threat
to human health and the environment. However, these
components are required for the correct operation of the
appliance. Appliances marked by this symbol are not allowed to be disposed of together with the household rubbish.
Notes on the content materials (REACH)
Current information on content materials can be found at:
www.kaercher.de/REACH
Accessories and spare parts
Only use original accessories and original spare parts. They
ensure that the appliance will run fault-free and safely.
Information on accessories and spare parts can be found
at www.kaercher.com.
Scope of delivery
During unpacking, check the contents for completeness. If
any accessories are missing or in the event of any shipping
damage, please notify your dealer.
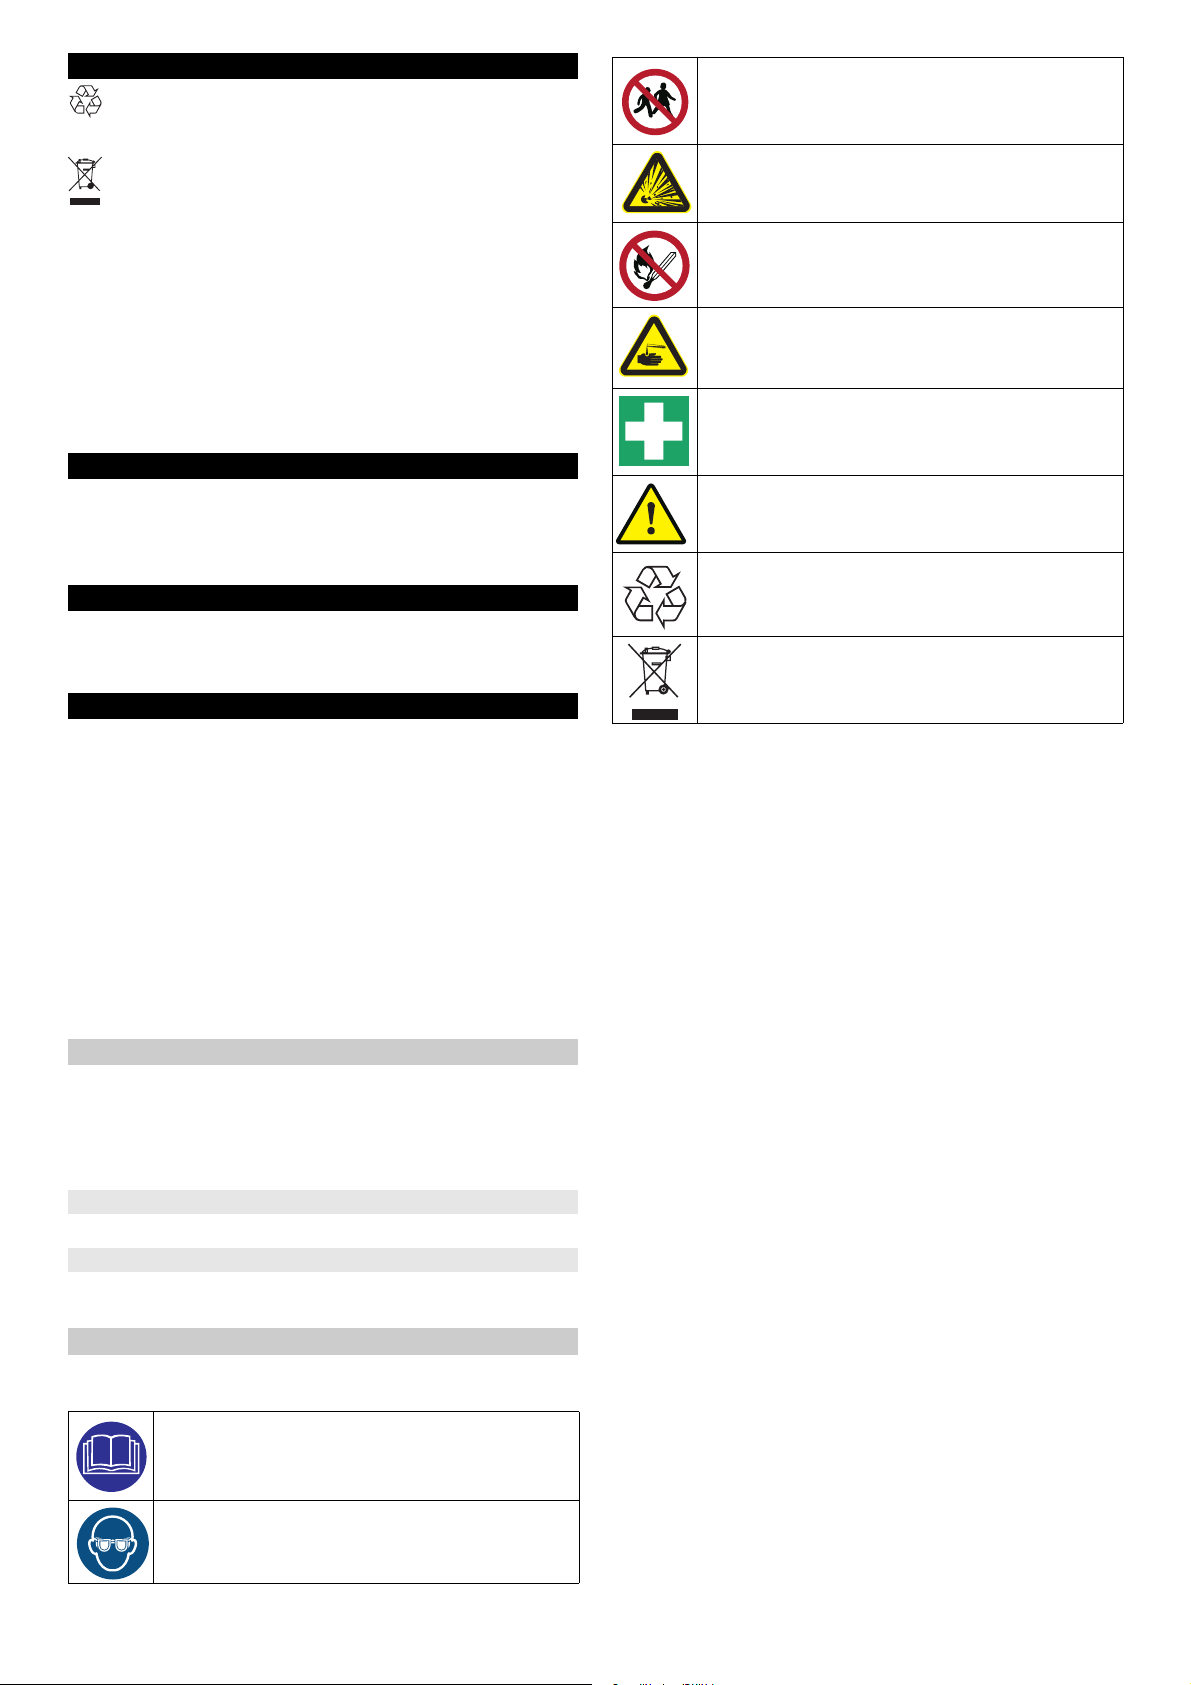
Keep acids and batteries away from children.
Risk of explosion
Fire, sparks, open flames and smoking are prohibited.
Risk of acid burns
First aid.
Warning note
Disposal
Do not throw batteries in the bin.
Safety instructions
Before using the device for the first time, read and observe
these operating instructions and the accompanying brochure: Safety instructions for brush cleaning units spray retraction devices, No. 5.956-251.0.
The device is approved for operation on surfaces with a
specified limited slope (see Chapter Technical data).
몇 WARNING
Device tipping over
Danger of injury
Do not operate the device on sloping surfaces.
The device may only be operated when the hood and all
covers are closed.
Safety devices
몇 CAUTION
Missing or modified safety devices
Safety devices are provided for your own protection.
Never modify or bypass safety devices.
Safety button
The device switches off when the safety button is released.
Key-operated switch
Pulling the key out of the key-operated switch secures the
device against unauthorized use.
Warning symbols
Observe the following warnings when handling the batteries:
Observe notes in the instructions of the battery,
on the battery and in these operating instructions.
Wear eye protection.
English 5
Page 6

18
19
20
21
22
23
22
24
20
25
26
27
28
29
30
31
32
33
9
4
5
17
1
3
6
7
8
9
10
11
13
5
1415
16
2
12
Description of the unit
Overview of the device
1 Coarse dirt sieve
2 Fluff filter
3 Float
4 Cleaning head
5 Brush replacement pedal
6 Push handle
7 Safety button
8 Waste water tank cap
9 Homebase retaining rail
10 Waste water tank
11 ** Battery
12 Fresh water filter
13 Fresh water tank lock
14 Disc brush
15 Fresh water tank
16 Type plate
17 Hose switch
18 Fresh water tank filling hole
6 English
Page 7
19 Suction bar
20 Suction bar height adjustment
21 Suction bar inclination adjustment
22 Wing nuts for fastening the suction bar
23 Suction hose
24 Fresh water filling level display
Fresh water drain hose
25 Cleaning head lever
26 Water volume regulation knob
27 Suction bar lever
28 Battery plug connector
29 Key-operated switch
30 Display
31 Working speed rotary knob
32 Travel direction switch
33 Waste water tank drain hose with dosing unit
** Not in scope of delivery
Color coding
Control elements for the cleaning process are yellow.
Control elements for maintenance and servicing are
light gray.
Symbols on the device
Fresh water tank drain opening
Waste water tank drain opening
Increased cleaning head contact pressure
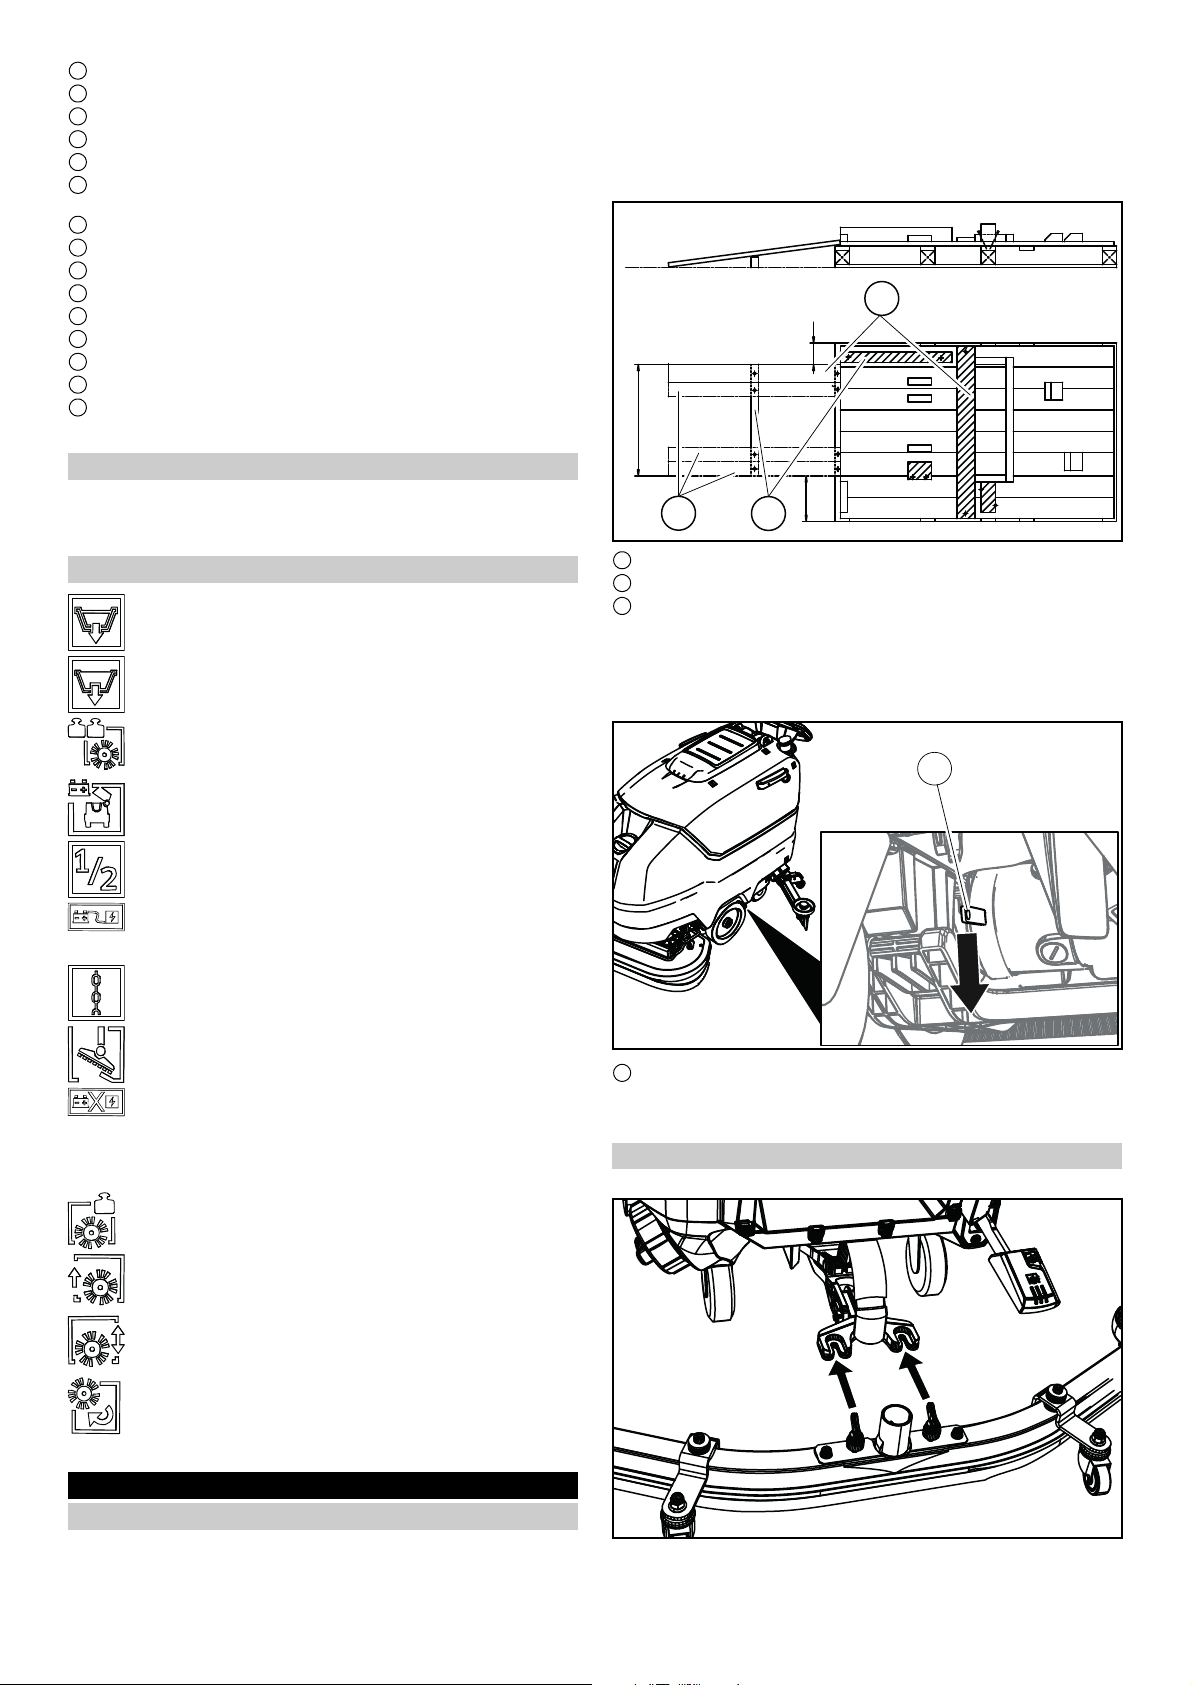
3. Remove the wooden blocks fastened to the pallet by
screws.
4. Using the 3 upper reinforcing boards of the carton packaging (80x24x970 mm) and the board screwed laterally
on the pallet (100x24x970 mm), place a ramp in front of
the pallet and secure it using board pallet screws.
3
120
625
2
1 Beam 80x60x625 mm
2 Board 80x24x970 mm
3 Board 100x24x970 mm
5. Push the beam which has been unscrewed from the pallet (80x60x625 mm) under the ramp for support and
screw into place.
6. Press the brake lever down.
225
1
Battery access
Fresh water tank filling level (50%)
Insert the charger plug here
Eyelet point
* Mop holder
ATTENTION
Incorrect socket
Risk of damage
DO NOT insert the charger plug here
Normal cleaning head contact pressure
Raise the cleaning head
Pedal for raising/lowering the cleaning head
1
1 Brake lever
7. Push the device forwards from the pallet.
8. Press the brake lever up.
Installing the suction bar
1. Insert the suction bar in the suction bar mount.
Brush replacement pedal
* optional
1. Remove the carton.
2. Remove the straps.
Installation
Unloading
2. Tighten the wing nuts.
3. Fit the suction hose.
English 7
Page 8
Batteries
+
+
+
+
-
-
-
-
1
Recommemded batteries
Description Order No. Volume
185 Ah - maintenance-free
(C20)
180 Ah - maintenance-free
(C5)
240 Ah - maintenance-free
(C5)
330 Ah - maintenance-free
(C20)
* Minimum volume of the battery charging room
** Minimum air flow between the battery charging room
and the surroundings
The device requires 4 batteries.
1 Complete set (24 V / 185 Ah) incl. connectingcable, or-
der no. 4.035-388.0
2 Complete set (24 V / 180 Ah) incl. connectingcable, or-
der no. 4.035-387.0
3 Complete set (24 V / 240 Ah) incl. connectingcable, or-
der no. 4.035-393.0
4 Complete set (24 V / 330 Ah) incl. connectingcable, or-
der no. 4.035-572.0
Low-maintenance batteries (wet batteries)
6.654-242.0
6.654-124.0
6.654-119.0
8.629-184.0
3
(m
)*
1)
--
2)
--
3)
--
4)
11,88 4,752
Air flow (m3/
h)**
DANGER
Refilling discharged batteries with water
Danger of acid burns from escaping acid, destruction of
clothes
Wear safety goggles when handling the batteries.
Observe the applicable regulations.
Immediately rinse off any splashed acid from the skin or
clothes using copious amounts of water.
ATTENTION
Using water with additives
Defective batteries, loss of warranty claim
Top up the batteries using only distilled or desalinated water (EN 50272-T3).
Do not use any foreign additives, so-called enhancing
agents, because this will invalidate the warranty.
1. Add distilled water one hour before the charging process comes to an end. Observe the correct acid level
according to the battery label.
All cells must produce gas at the end of the charging
process.
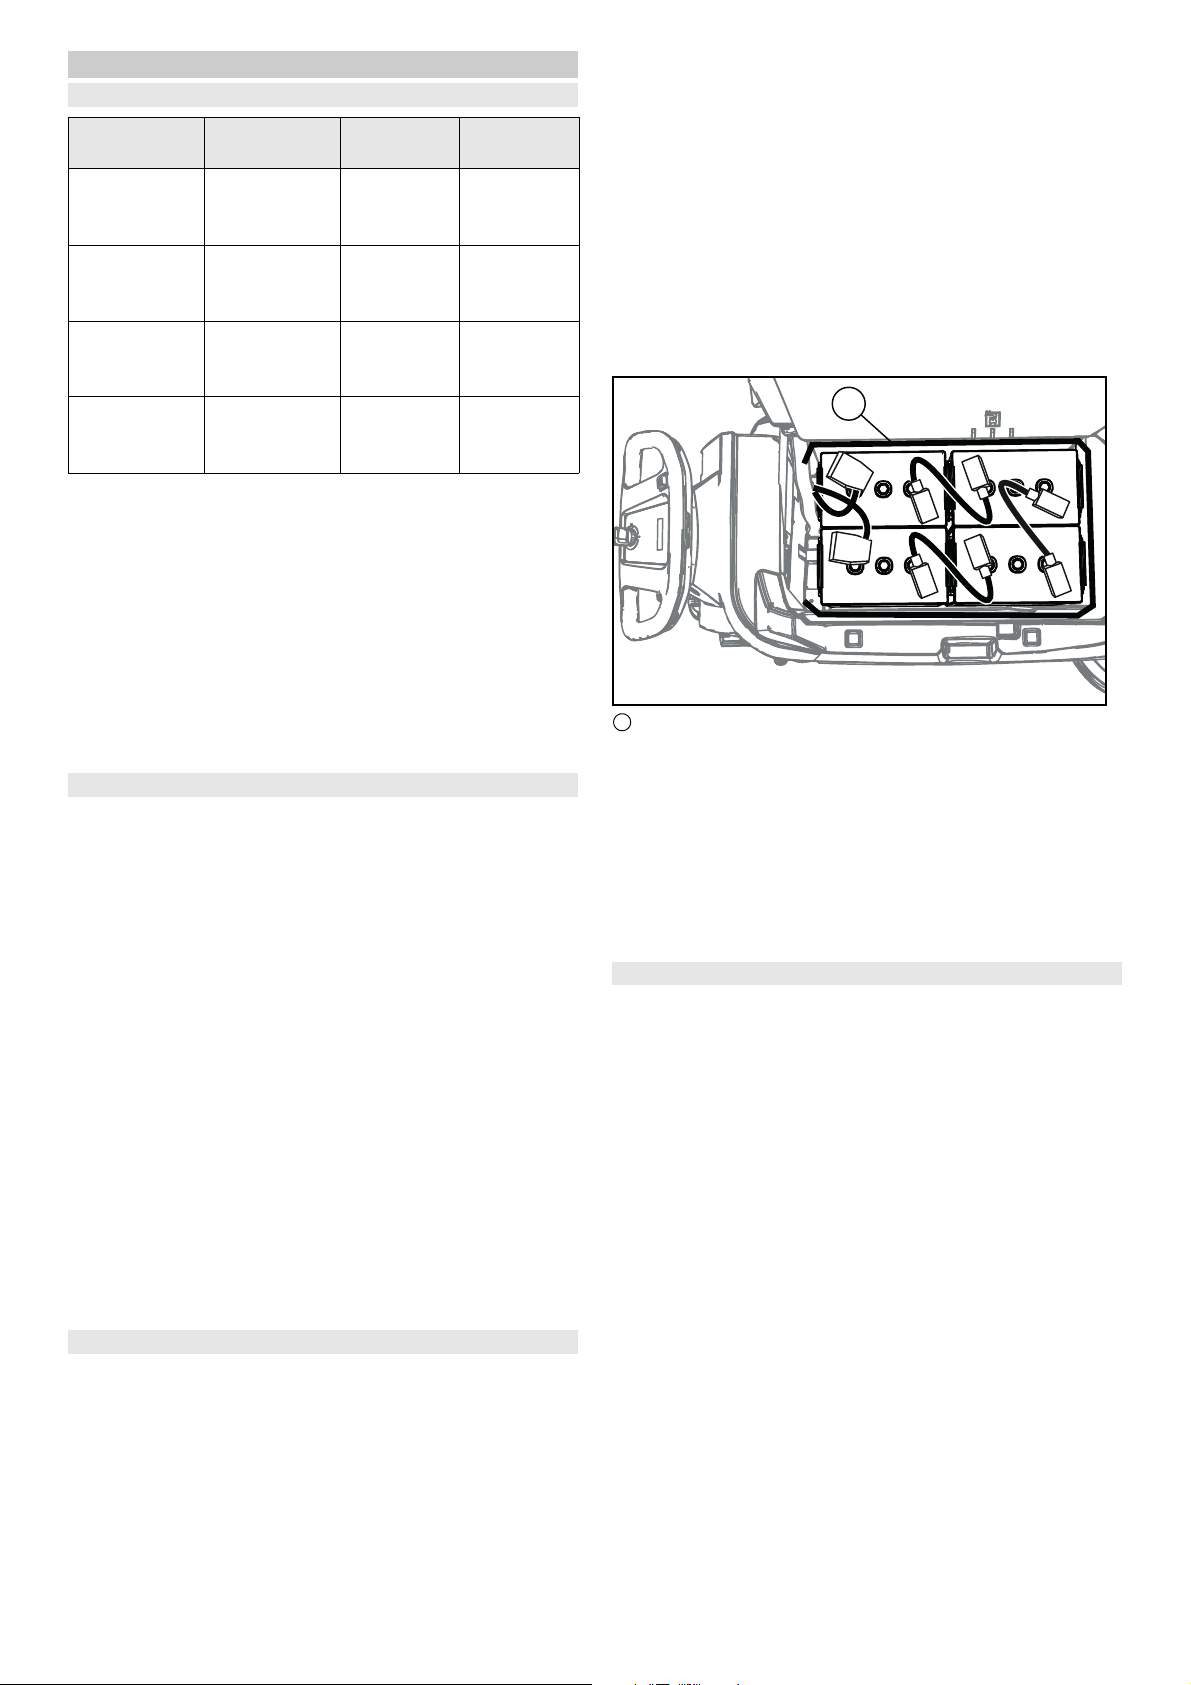
Installing and connecting batteries
몇CAUTION
Removing and installing the batteries
Unstable machine position
Ensure that the machine is positioned stably when removing and installing the batteries.
ATTENTION
Incorrect connection polarity
Destruction of the control electronics
Take care to ensure the correct polarity when connecting
the batteries.
ATTENTION
Deep discharge
Risk of damage
Charge the batteries before starting the device.
1. Drain the waste water.
2. Pivot the waste water tank upwards.
3. Place the battery in the device.
1 Strap
4. Fit the strap around the battery.
5. Clamp the batteries towards the rear using the strap.
6. Connect the battery terminals using the connecting cables provided.
7. Clamp the connecting cable to the (+) and (-) battery terminals that are still free.
8. Connect the device-side battery connector to the battery-side battery connector.
9. Pivot the waste water tank downwards.
Removing the battery
몇 CAUTION
Removing and installing the batteries
Unstable machine position
Ensure that the machine is positioned stably when removing and installing the batteries.
1. Turn the key-operated switch to "0" and remove the key.
2. Pull out the battery plug.
3. Drain the waste water.
4. Pivot the waste water tank upwards.
5. Disconnect the cable from the minus terminal at the battery.
6. Disconnect the remaining cables from the battery.
7. Release the strap.
8. Remove the battery.
9. Dispose of the used batteries in accordance with statutory provisions.
8 English
Page 9
Initial startup
1
1
2
Charging the battery
DANGER
Inappropriate use of the charger
Electric shock
Adhere to the mains voltage and fuse values specified on
the device type plate.
Only use the charger in dry rooms with sufficient ventilation.
ATTENTION
Accumulation of dangerous gases under the tank
during the charging process
Risk of explosion
Pivot the waste water tank upwards before charging lowmaintenance batteries.
ATTENTION
Using an unsuitable charger
Risk of damage
Do not connect the charger to the device-side battery connector.
Use only a charger suitable for the type of battery installed.
Read the operating instructions of the charger manufacturer and observe the safety instructions in particular.
Battery type Charger
6.654-242.0 6.654-434.0
6.654-124.0 6.654-434.0
6.654-119.0 6.654-435.0
8.629-184.0 6.654-419.0
The average charging time is approx. 10-15 hours.
The device cannot be used during the charging process.
Note
The device has deep discharge protection, i.e. the brush
motor and turbine are switched off automatically when the
permitted minimum capacity level is reached.
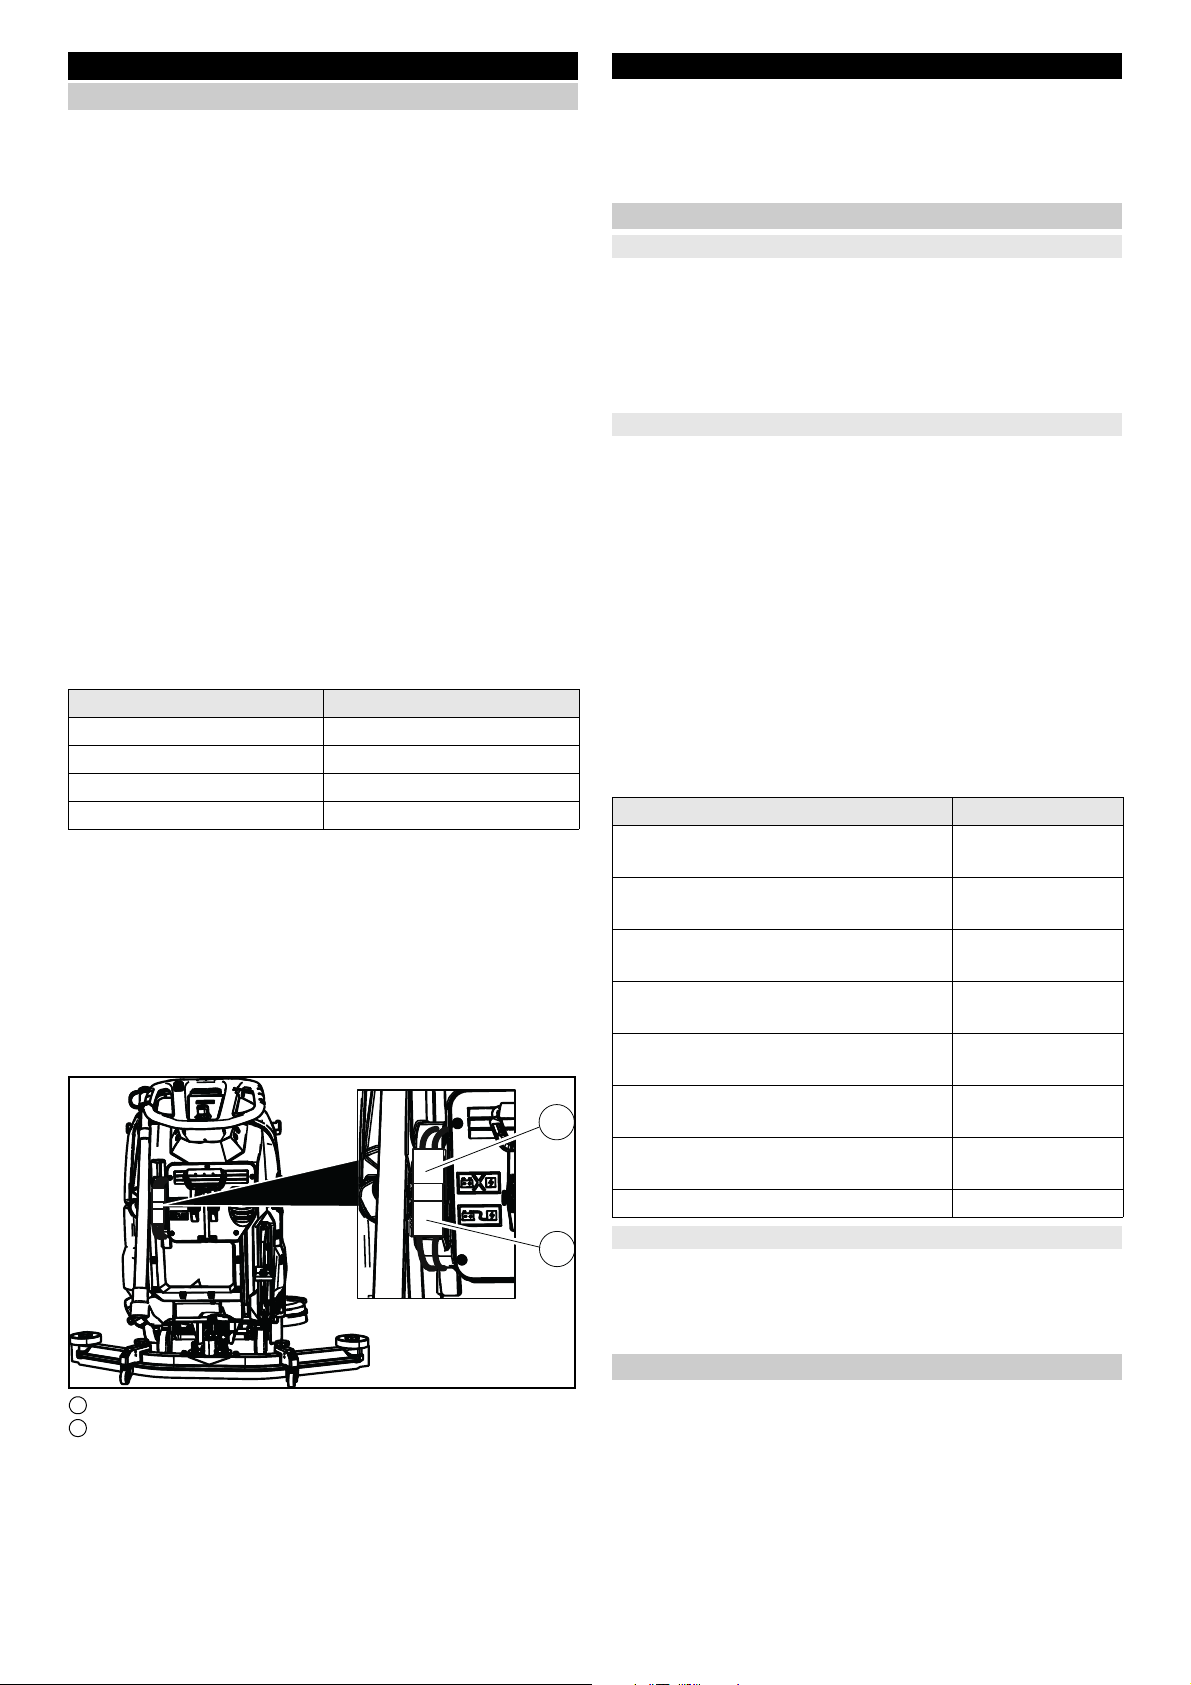
1. Drive the device directly to the charger and do not drive
on slopes.
2. Pull out the device-side battery connector.
1 Battery plug, device side
2 Battery plug, battery side
3. Connect the battery-side battery connector to the charger.
4. Plug the mains plug of the charger into the socket.
5. Carry out the charging process in accordance with the
6. Connect the device-side battery connector to the bat-
operating instructions for the charger.
tery-side battery connector.
Operation
ATTENTION
Risks during operation
Danger of injury
Release the safety button in the case of danger.
Filling with operating materials
Filling with fresh water
1. Open the fresh water tank lock.
2. Fill fresh water (max. 60 °C) to the lower edge of the filling nozzle.
Note: The fresh water hose can be clamped in the hose
switch during filling.
3. Close the fresh water tank lock.
Notes on detergents
몇 WARNING
Unsuitable detergents
Health risk, damage to the device
Use only recommended detergents. The operator carries
all increased risks relating to operational safety and increased risk of accidents if using other detergents.
Use only detergents free of solvents, salt and hydrofluoric
acid.
Adhere to the safety instructions stated on the detergent
packaging.
Note
Do not use heavily foaming detergent.
Recommended detergents
Usage Detergent
Maintenance cleaning of all water-resistant floors
Maintenance cleaning of polished
hard surfaces (e.g. granite)
Maintenance cleaning and basic
cleaning of industrial floors
Maintenance cleaning and basic
cleaning of fine stone tiles
Maintenance cleaning of tiles in sanitary areas
Cleaning and disinfection in sanitary
areas
Coating removal on all alkaline-resistant floors (e.g. PVC)
Coating removal on linoleum floors RM 754
Detergent
1. Fill the detergent into the fresh water tank.
Note: The cap of the fresh water tank filling hole can be
used for measuring the detergent. It is fitted with a scale
on the inside.
RM 746
RM 780
RM 755 es
RM 69 ASF
RM 753
RM 751
RM 732
RM 752
Adjusting the water volume
1. Adjust the water volume via the regulating knob to suit
the degree of contamination of the floor covering.
Note
Perform initial cleaning tests with a low water volume.
Increase the water volume step by step until achieving
the desired cleaning result.
English 9
Page 10
Note
1
10 mm
1
2 3
The cleaning head continues operating without a liquid
supply if the fresh water tank is empty.
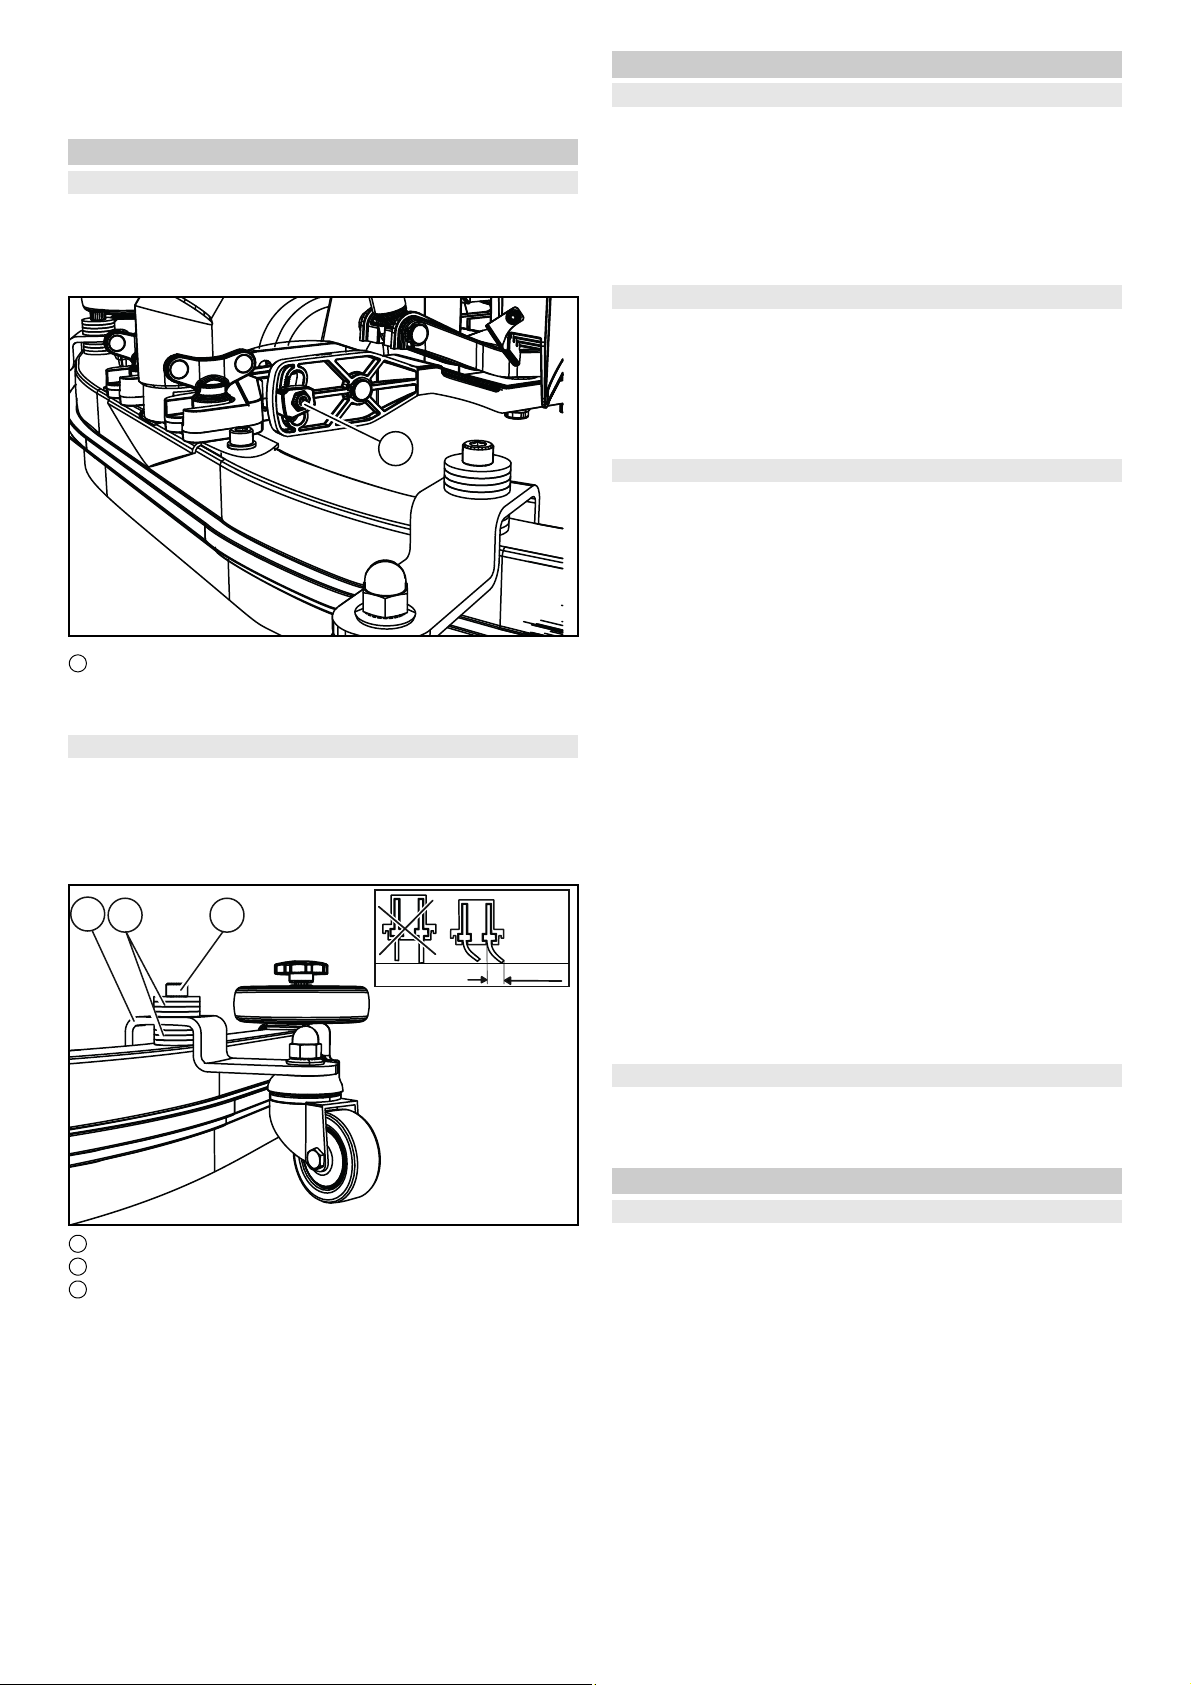
Adjusting the suction bar
Adjusting the inclination
The inclination must be adjusted so that the suction lips of
the suction bar make even contact with the floor over the
entire length of the suction bar.
1. Loosen the screw.
1 Screw
2. Adjust the inclination of the suction bar.
3. Tighten the screw.
Adjusting the height
The height adjustment affects the bending of the suction
lips on contact with the floor.
1. Push the device a small distance forwards.
2. Compare the bending of the suction lips with the illustration below.
´
1 Spacer roller with holder
2 Washer
3 Screw
3. Unscrew the screw.
4. Position a sufficient number of washers between the
suction bar and spacer roller so that the suction lips
have the correct bend.
5. Fit the remaining washers above the spacer roller.
6. Screw in and tighten the screw.
7. Repeat the entire procedure at the other spacer roller.
8. Push the device a small distance forwards.
9. Check the bending of the suction lips over the entire
length.
10.If necessary, repeat the entire adjustment process.
Cleaning
Switching the device on
1. Turn the key-operated switch to "1".
The display shows the following one after the other:
Period of time until the next after-sales Customer Ser-
vice
Software version, control panel
Charging state of the battery and number of operating
hours
Driving
Note
The travel direction can be changed during the cleaning
operation. This way, a certain position can be intensively
cleaned by driving back and forth several times.
1. Set the travel direction switch to "forward".
Cleaning
Note
The inclination and height of the suction bar can be adjusted to improve the vacuuming results (see chapter Adjusting the suction bar).
Note
When the waste water tank is full, the float switch closes
the suction opening and the suction turbine runs at a higher speed. In this case, raise the suction bar and drive to the
location for emptying the waste water tank.
1. Turn the working speed rotary knob to the desired value.
The speed is shown on the display during the adjustment. The display is shown in percentage of the maximum speed.
2. Set the water volume at the regulating valve.
3. Press the suction bar lever downwards.
The suction bar lowers.
Suctioning begins.
4. Press the cleaning head lever downwards, unlatch it
and allow it to move upwards.
5. Pull the safety button towards the push handle.
The cleaning head starts up and the device moves at
the set speed.
Increasing the brush contact pressure
1. Let go of the safety button.
2. Lift the cleaning head lever up with your hand and engage it towards the right.
Finishing operation
Finishing cleaning
1. Let go of the safety button.
2. Press the cleaning head lever downwards and engage
it towards the right.
3. Continue moving a short distance.
The residual water is vacuumed up.
4. Lift the suction bar.
The suctioning continues to run for 10 seconds afterwards.
5. Turn the key-operated switch to "0".
6. Charge the batteries if necessary.
10 English
Page 11
Draining the waste water
몇 WARNING
Improper disposal of waste water
Environmental pollution
Observe the local waste water treatment regulations.
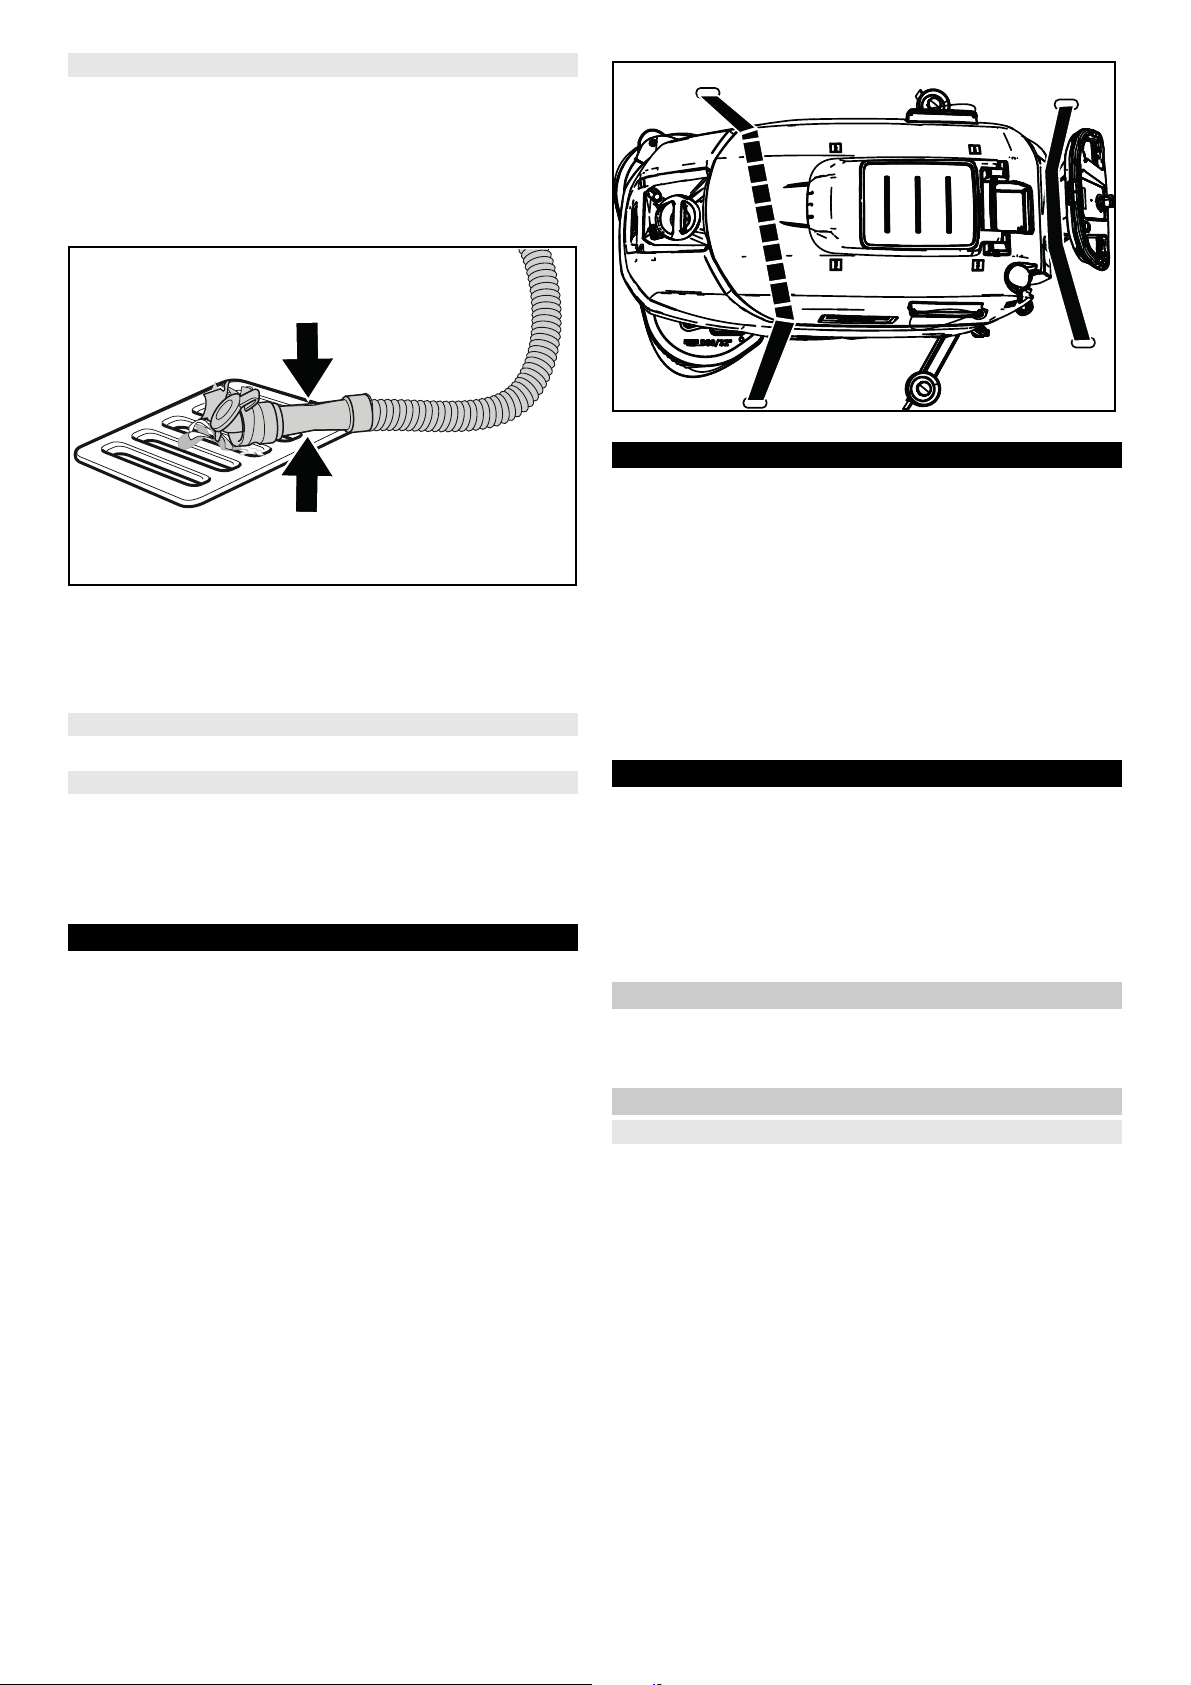
1. Remove the drain hose from the support and lower it
over a suitable collecting device.
2. Press the dosing device together or kink the hose.
3. Open the dosing device cover.
4. Drain the waste water. Regulate the water volume by
pressing or kinking.
5. Rinse the waste water tank with clear water.
Draining fresh water
1. Pull off the filling level display hose and swivel it down.
Draining fresh water quickly
1. Unscrew the fresh water tank lock.
2. Allow the fresh water to drain away.
3. Fit the fresh water tank lock and screw into place.
Note: Ensure that the hose connection in the fresh water tank lock lies at the lowest point after screwing tight.
Transport
DANGER
Driving on slopes
Danger of injury
Observe the maximum permissible inclination when driving the device on slopes for loading and unloading purposes (see chapter Technical data).
Drive slowly.
1.
2.
7. First fit the strap under the waste water tank.
Storage
몇 CAUTION
Failure to observe the weight
Risk of injury and damage
Be aware of the weight of the device during storage.
ATTENTION
Frost
Destruction of the device through freezing water
Drain all water from the device.
Store the device in a frost-free location.
This device may only be stored indoors.
Care and service
DANGER
Inadvertently starting up device
Risk of injury, electric shock
Turn the key-operated switch to "0" and remove the key
before performing any work on the device.
Pull out the charger mains plug.
Drain and dispose of the waste water and fresh water.
Safety inspection/maintenance contract
You can agree on regular safety inspections or close a
maintenance contract with your dealer. Please seek advice
on this.
Maintenance intervals
Each time after use
몇 CAUTION
Failure to observe the weight
Risk of injury and damage
Be aware of the weight of the device during transportation.
1. Press the cleaning head lever downwards and engage
it towards the right.
2. Raise the suction bar.
3. Turn the key-operated switch to "1".
4. Select the travel direction at the travel direction switch.
5. Pull the safety button towards the push handle.
6. When transporting in vehicles, secure the device
against slipping and tipping over according to the applicable guidelines.
English 11
ATTENTION
Incorrect cleaning
Risk of damage.
Do not spray the device with water.
Do not use aggressive detergents.
A detailed description of the individual maintenance work
is provided in Chapter Maintenance work.
Drain the waste water.
Rinse the waste water tank with clear water.
Clean the exterior of the device using a damp cloth, wet-
ted with a mild washing lye.
Check the fluff filter and clean if required.
Clean the coarse dirt sieve.
Clean the suction lips, check for wear and tear and re-
adjust or replace if necessary.
Check the disc brushes for wear and tear and replace if
necessary.
Page 12
Charge the battery.
CHANGE LIP
2
1
1.
1.
2.
3.
1
12
If the charging state of the battery is below 50%,
charge the battery fully and without interruption.
If the charging state of the battery is above 50%, only
recharge the battery if the entire operating duration
will be required when next used.
Weekly
When used regularly, charge the battery fully and with-
out interruption at least once a week.
Monthly
A detailed description of the individual maintenance work
is provided in Chapter Maintenance work.
1. Drain the fresh water tank and flush out deposits.
2. Clean the fresh water filter.
3. Clean the float and fluff filter.
4. Check battery poles for oxidation, brush off if necessary.
Make sure the connection cables are firmly in place.
5. Clean the seals between the waste water tank and the
cover, check for leaks and replace if necessary.
6. Check the acid density of the cells if the batteries are not
maintenance-free.
7. For a longer downtime, shut down the device when the
battery is fully charged. Fully charge the battery at least
once a month.
Annually
Have the prescribed inspection performed by Customer
Service.
Maintenance work
Turn over or replace the worn suction lips
The suction lips must be turned over or replace when they
have worn down to the wear mark.
3. Pull off the plastic parts.
4. Pull off the suction lips.
5. Push in the turned over or new suction lips.
6. Push on the plastic parts.
7. Screw in and tighten the star handles.
Cleaning the coarse dirt sieve
1. Open the waste water tank cover.
1 Coarse dirt sieve
2. Pull the coarse dirt sieve upwards and off.
3. Rinse off the coarse dirt sieve under running water.
4. Reinsert the coarse dirt sieve into the waste water tank.
Cleaning the fresh water filter
1. Drain the fresh water (see Chapter Draining fresh water).
2. Unscrew the fresh water tank lock.
1 Wear mark
2 Suction lip
1. Remove the suction bar.
2. Unscrew the star handles.
12 English
1 Fresh water tank lock
2 Fresh water filter
3. Pull out the fresh water filter and rinse with clean water.
4. Insert the fresh water filter.
5. Fit the fresh water tank lock.
Note: Ensure that the hose connection in the fresh water tank lock lies at the lowest point after screwing tight.
Page 13

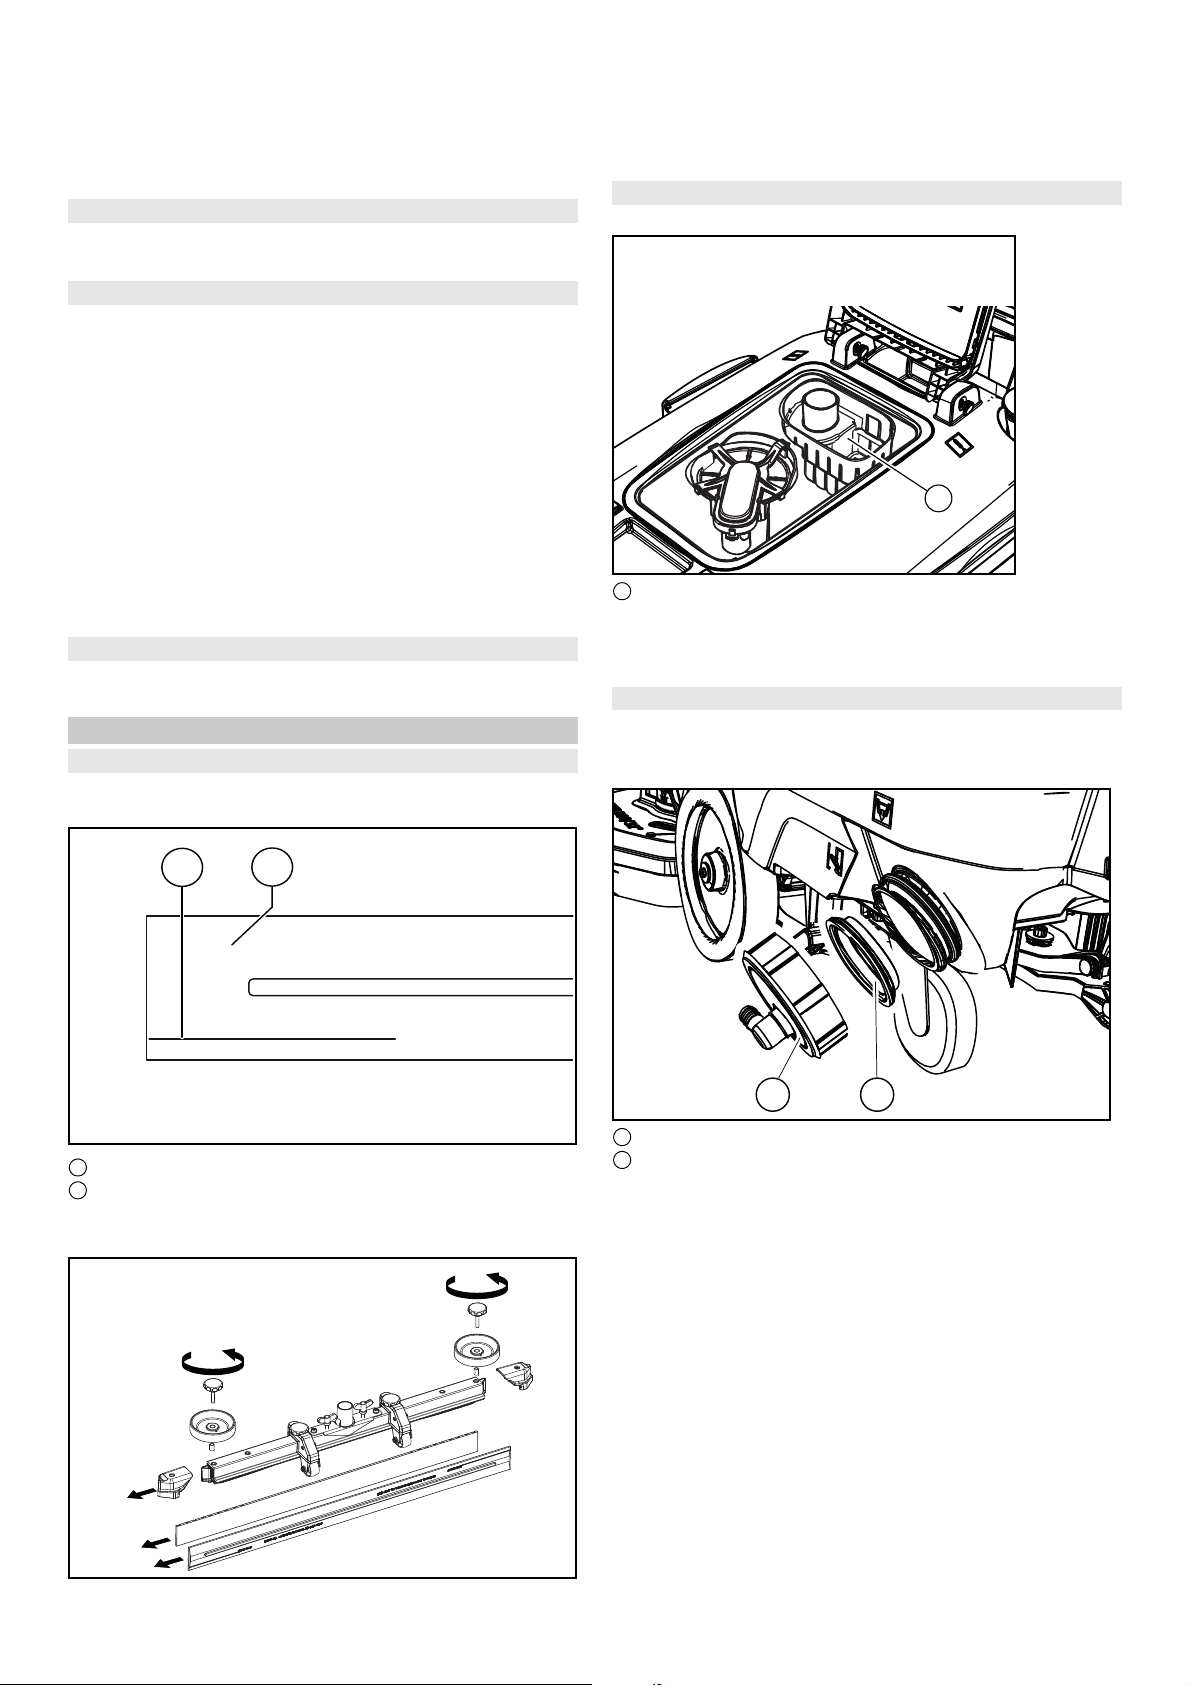
Clean the float and fluff filter
1
2
3
4
1. Open the waste water tank cover.
1 Latching hooks
2 Fluff filter
3 Float
4 Float housing
2. Release the latching hooks.
3. Pull the float housing downwards and off.
4. Remove the float from the float housing and clean it.
5. Clean the fluff filter.
6. Assemble all parts in the reverse order.
Replacing the disc brushes
1. Raise the cleaning head.
2. Press the brush replacement pedal down, beyond the
zone of resistance.
3. Pull the 1st disc brush sideways and out from underneath the cleaning head.
4. Hold the new disc brush under the cleaning head, then
press upwards and latch it into position.
5. Repeat the procedure for the 2nd disc brush.
Troubleshooting guide
DANGER
Inadvertently starting up device
Risk of injury, electric shock
Turn the key-operated switch to "0" and remove the key
before performing any work on the device.
Malfunction Rectification
The device cannot be
started
The water volume is insufficient
The suction performance
is too low
The cleaning results are
unsatisfactory
The suction turbine runs
at an increased speed
The brushes do not rotate 1 Check if the brushes are blocked by a foreign body and remove the foreign body if nec-
The device vibrates during
cleaning
1 Turn the key-operated switch to "1".
2 Actuate the safety button.
3 Insert the battery plug.
4 Check the battery and charge if necessary.
5 Check that the battery terminals are correctly connected.
1 Check the fresh water filling level and fill the tank if necessary.
2 Increase the water volume at the water volume regulating knob.
3 Clean the fresh water filter.
4 Check the hoses for clogging and clean if necessary.
1 Shut down the device and drain the waste water.
2 Clean the seals between the waste water tank and the cover, check for leaks and replace
if necessary.
3 Check that the suction hose is correctly connected to the waste water tank.
4 Check the fluff filter for contamination and clean if necessary.
5 Clean the suction lips at the suction bar, turn over or replace if necessary.
6 Check that the cap on the waste water drain hose is closed.
7 Check the adjustment of the suction bar.
8 Check the suction hose for clogging and clean if necessary. When fitting the suction hose
again, the white marking on the hose must lie at the retaining clip.
9 Check the suction hose for leaks and replace if necessary.
1 Reduce the driving speed.
2 Check the brushes for wear and tear and replace if necessary.
3 Check the suitability of the brush type and detergent used.
1 Drain the waste water.
2 Clean the float.
3 Check the fluff filter and clean if necessary.
4 Check the suction hose for clogging and clean if necessary.
5 Check the suction bar for clogging and remove any clogging if necessary
essary.
1 Use a softer brush.
Pull out the charger mains plug.
Drain and dispose of the waste water and fresh water.
Contact Customer Service in the case of malfunctions
that cannot be corrected using this table.
English 13
Page 14

Warranty
The warranty conditions issued by our relevant sales company apply in all countries. We shall remedy possible malfunctions on your appliance within the warranty period free
of cost, provided that a material or manufacturing flaw is
the cause. In a warranty case, please contact your dealer
(with the purchase receipt) or the next authorized customer service site.
(See overleaf for the address)
Accessories
Description Part
no.
Disc brush, red
(medium, stan-
4.905-
000.0
dard)
Disc brush, black
(hard)
Disc brush, natural color (soft)
Disc brush, white
(soft)
4.905-
032.0
4.905-
031.0
4.905-
030.0
Pad drive board 4.762-
447.0
Pad, white 6.371-
331.0
Pad, red (medium
soft)
Pad, green (medium hard)
6.371-
332.0
6.371-
333.0
Pad, black (hard) 6.371-
334.0
Pad, brown 6.371-
335.0
Pad, microfiber 6.371-
336.0
Suction bar, 1160
mm, curved
4.777-
102.0
Mop holder set 9.753-
023.0
Description
For use in all common cleaning
orders
For heavy contamination and
basic cleaning, only for nonsensitive surfaces
Made of natural fibers for
cleaning and polishing
For cleaning lightly contaminated or sensitive floors
For cleaning with pads, with
quick-change coupling and
center-lock
For polishing floors
For cleaning all floors
For cleaning heavily contaminated floors and for basic
cleaning
For stubborn soiling and for basic cleaning
For protective film application
on hard and elastic surfaces
For effective cleaning of microporous surfaces
Technical data
BD 80/100
W Classic
Waste water tank volume gal (l) 26.4 (100)
Water temperature max. °F (°C) 140 (60)
Water pressure max. psi (bar) 0.87 (0.06)
Max. working area slope % 2
Suctioning
Suction performance, air quantity CFM (l/s) 50.8 (24)
Suction performance, depression psi (kPa) 2.3 (16)
Cleaning brushes
Working width in (mm) 31.5 (800)
Brush diameter in (mm) 16.2 (410)
Brush speed 1/min 140
Brush contact pressure lbf (N) 88 / 200
(392 / 890)
Dimensions and weights
Approved total weight lbs (kg) 959 (435)
Net weight (transport weight) lbs (kg) 716 (325)
Battery compartment dimensions in (mm) 24.5 x 15.1
(622 x 384)
Determined values in acc. with EN 60335-2-72
Overall vibration value m/s
2
<2.5
Uncertainty K dB(A) 0.2
Sound pressure level L
Uncertainty K
Sound power level L
tainty
WA
pA
WA
pA
+ K uncer-
dB(A) 65
dB(A) 2
dB(A) 81
Subject to technical changes without notice.
BD 80/100
W Classic
Device performance data
Nominal voltage V 24
Battery capacity Ah 185 (C20) /
180 (C5) /
240 (C5) /
330 (C20)
Mean power input W 1320
Engine power W 300
Suction turbine power W 500
Brush drive power W 2 x 500
Theoretical surface performance ft
2
/h (m2/h)43000
(4000)
Fresh water tank volume gal (l) 26.4 (100)
14 English
Page 15

Contenu
CONSIGNES DE SÉCURITÉ IMPORTANTES ................ 15
REGLES DE SECURITE ET PRATIQUES RELATIVES A
L'UTILISATION ................................................................. 16
PROCEDURES D'ENTRETIEN ET DE REMISE EN ETAT 16
NORMES DE SECURITE INCENDIE............................... 16
Remarques générales....................................................... 17
Fonctionnement ................................................................ 17
Utilisation conforme .......................................................... 17
Protection de l'environnement .......................................... 17
Accessoires et pièces de rechange .................................. 17
Étendue de livraison ......................................................... 17
Consignes de sécurité ...................................................... 17
Description de l'appareil.................................................... 19
Montage............................................................................ 20
Mise en service................................................................. 22
Fonctionnement ................................................................ 22
Transport........................................................................... 24
Stockage........................................................................... 24
Entretien et maintenance.................................................. 24
Dépannage en cas de défaut............................................ 26
Garantie ............................................................................ 27
Accessoires ...................................................................... 27
Caractéristiques techniques.............................................. 27
CONSIGNES DE SÉCURITÉ IMPORTANTES
LIRE TOUTES LES INSTRUCTIONS AVANT D'UTILISER CET APPAREIL
몇 AVERTISSEMENT
Pour réduire les risques d'incendie, de choc électrique
ou de blessures :
NE PAS LAISSER l'appareil sans surveillance lorsqu'il est
branché. Débrancher la fiche de la prise en cas de non utilisation et d'entretien.
몇 AVERTISSEMENT
POUR RÉDUIRE LE RISQUE DE CHOC ÉLECTRIQUE UTILISATION EN INTÉRIEUR UNIQUEMENT
N’autorisez pas que l’appareil serve de jouet. Lors de
l’utilisation de l’appareil par des enfants ou à proximité
d’enfants, la plus grande attention est requise.
Utilisation uniquement comme cela est décrit dans ce
manuel. Utiliser uniquement les accessoires recommandés par le fabricant.
Ne pas utiliser avec un câble ou une prise endomma-
gés. Si l'unité ne fonctionne pas comme elle le devrait,
si elle est tombée, est endommagée, a été laissée dehors ou est tombée dans l'eau, la renvoyer à un centre
de SAV.
Ne pas tirer ou porter l'appareil avec le câble, ne pas uti-
liser de câble comme poignée, ne pas fermer une porte
sur le câble ou faire passer le câble au niveau de coins
ou d'angles coupants. Ne faire passer aucun appareil
sur le câble. Maintenir le câble à distance des surfaces
chaudes.
NE PAS DEBRANCHER LA FICHE SECTEUR DE LA
PRISE DE COURANT EN TIRANT SUR LE CABLE DE
BRANCHEMENT AU SECTEUR. Pour débrancher le
secteur, tirer sur la fiche secteur, pas sur le câble de
branchement au secteur.
Ne pas brancher la fiche ou l'appareil avec des mains
humides.
N’introduisez pas d'objet dans les ouvertures. N'utilisez
pas l'appareil lorsque les ouvertures sont colmatées.
Veillez à les garder exemptes de poussière, cheveux,
peluches ainsi que de tout ce qui serait susceptible
d’entraver le flux d'air.
Maintenir les CHEVEUX, VETEMENTS, BIJOUX PEN-
DANTS, DOIGTS et tous les membres du corps éloignés des ouvertures et des pièces mobiles.
Eteindre toutes les commandes avant de débrancher.
Soyez particulièrement prudents lors du nettoyage dans
les escaliers.
N’utilisez pas l’appareil pour aspirer des liquides inflam-
mables ou combustibles, par exemple de l’essence, et
ne placez pas l’appareil dans des endroits dans lesquels de tels liquides pourraient se trouver.
Raccordement uniquement à une prise mise à la terre
correctement. Voir Instructions de mise à la terre.
Débrancher toujours le câble de la prise électrique
avant d'entretenir l'appareil.
Ne jamais balayer des liquides explosifs, des gaz com-
bustibles ou des acides et des solvants non dilués. Cela
comprend l'essence, les diluants de peinture ou le fuel
domestique qui peuvent générer des fumées ou des
mélanges explosifs au contact de l'air. L'acétone, les
acides non dilués et les solvants doivent également être
évités car ils peuvent abîmer les matériaux sur la machine.
Ne pas aspirer des objets qui brûlent ou se consument.
INSTRUCTIONS DE MISE À LA TERRE
Cet appareil doit être mis à la terre. En cas de dysfonctionnement ou de panne, la mise à la terre fournit un chemin
de moindre résistance pour le courant électrique afin de
réduire le risque de choc électrique.
Cet appareil est équipé d'un câble disposant d'un connecteur de mise à la terre de l'équipement et d'une fiche de
terre.
La fiche doit être branchée dans une prise appropriée installée correctement et mise à la terre conformément à
toutes les normes et ordonnances locales.
DANGER
Tout raccordement inapproprié du conducteur de
mise à la terre de l'équipement peut entraîner un
risque d'électrocution.
En cas de doute concernant la mise à la terre correcte
d'une prise de courant, faire appel à un électricien qualifié
ou au personnel de service.
Ne pas modifier la fiche fournie avec le produit - si elle ne
correspond pas à la prise de courant, faire installer une
prise de courant appropriée par un électricien qualifié.
Ne pas utiliser d'adaptateur avec ce produit.
Cet appareil est prévu pour être utilisé sur un circuit 120 V
nom. et dispose d'une fiche de branchement de terre qui
ressemble à la fiche illustrée sur la figure A.
Vérifier que l'appareil est raccordé à une prise de courant
ayant la même configuration que la fiche.
Aucun adaptateur ne doit être utilisé avec cet appareil.
RACCORDER UNIQUEMENT À UNE PRISE MISE À LA
TERRE CORRECTEMENT
Français 15
Page 16

1 Prise de terre
2 Boîtier prise de terre
3 Broche à la masse
REGLES DE SECURITE ET PRATIQUES
RELATIVES A L'UTILISATION
Responsabilité du propriétaire/de l'utilisateur
Avant d'utiliser ce nettoyeur pression, le propriétaire et/ou
l'utilisateur doit impérativement avoir pris connaissance
des consignes d'utilisation et mises en garde du fabricant.
Il est nécessaire d'insister sur les avertissements et de les
comprendre.
Si l'utilisateur ne parle pas couramment l'anglais, l'acheteur/le propriétaire doit lire les consignes et mises en
garde du fabricantavec l'utilisateur dans la langue maternelle de ce dernier et s'assurer qu'il en comprend bien le
contenu.
Le propriétaire et/ou l'utilisateur doit se familiariser avec
les consignes du fabricant et les conserver afin de pouvoir
s'y référerultérieurement.
Généralités
Avant de commencer à faire fonctionner l'unité, soyez
dans une position d'opération.
Ne pas démarrer ou utiliser l'appareil, ni aucune de ses
fonctions ou accessoires, à partir d'un autre endroit que
celui réservé à l'utilisateur.
Avant de quitter le poste de l'utilisateur :
1 arrêter l'appareil ;
2 si l'appareil doit stationner sur une pente, caler les
roues.
Conserver une distance de sécurité avec les bords des
rampes, des plates-formes et de toutes les autres surfaces
de travail du même type.
Ne pas ajouter d''accessoires à l'appareil ni le modifier de
quelque manière que ce soit.
Ne pas stationner à un endroit où l'appareil risque d'entraver les issues de secours, les cages d'escaliers ou les
équipements de lutte contre l’incendie.
Conduite
Céder la priorité aux piétons ainsi qu'aux véhicules d'urgence comme les ambulances et les camions de pompiers.
Traverser les voies ferrées à angle droit lorsque c'est possible. Ne pas garer l'appareil à moins de 1,8 m de la voie
ferrée ou du rail le plus proche.
Veiller à conserver une vue bien dégagée du trajet à emprunter et être attentif à la circulation des autres véhicules,
aux déplacements des membres du personnel, ainsi
qu'aux espaces de dégagement.
Quelles que soient les conditions de circulation, conserver
une vitesse permettant d'arrêter l'appareil en toute sécurité.
Ne jamais adopter de conduite dangereuse (cascades,
acrobaties etc.)
Ralentir sur les sols mouillés et glissants. Avant de déplacer l'appareil sur un pont de chargement ou un pont de laison, s'assurerque celui-ci est correctement sécurisé.
Avancer prudemment et lentement sur le pont de chargement ou pont de liaison. Ne jamais dépasser la charge
maximale autorisée.
Dans les virages, ralentir et adopter une vitesse de sécurité adaptée à l'environnement d'utilisation. Les virages
doivent être abordés sans à-coups.
Entretien de l'appareil par l'utilisateur
Si le véhicule a besoin d'être réparé ou présente un risque
quelconque, l'utilisateur doit le signaler immédiatement à
son responsable et ne pas utiliser l'appareil avant résolution du problème.
Si, en cours d'utilisation, le véhicule s'avère dangereux de
quelque façon que ce soit, signaler immédiatement le problème au responsable concerné et cesser l'utilisation de
l'appareil avant résolution du problème.
Ne pas effectuer de réparations ou réglages à moins d'y
être expressément autorisé.
PROCEDURES D'ENTRETIEN ET DE REMISE
EN ETAT
L'utilisation de l'appareil peut devenir dangereuse si l'entretien est négligé ou si la remise en état ou les réglages
nécessaires ne sont pas effectués en conformité avec les
recommandations du fabricant. Par conséquent, il est nécessaire de prévoir des ateliers de maintenance, à l'intérieur ou l'extérieur des bâtiments, avec du personnel
dûment formé, ainsi que d'établir des procédures détaillées.
La maintenance et l'inspection de l'appareil doivent être effectuées conformément aux procédures suivantes :
1 Les intervalles prescrits pour la maintenance, la lubrifi-
cation et le contrôle du système doivent être respectés;
se reporter aux instructions du fabricant.
2 Seules les personnes formées et habilitées sont autori-
sées à utiliser les autolaveuses motorisées. Les utilisateurs de ces appareils doivent avoir les aptitudes
visuelles et auditives ainsi que les capacités physiques
et mentales requises pour utiliser cet équipement en
toute sécurité.
Eviter les risques d'incendie et s'assurer que les locaux
sont dotés des équipements nécessaires pour la lutte
contre l'incendie. Ne jamais utiliser de bacs ouverts contenant du carburant ou des produits de nettoyage inflammables pour nettoyer les composants de l'autolaveuse
motorisée.
NORMES DE SECURITE INCENDIE
Tout appareil dont le fonctionnement représente un risque
doit être mis hors service.
Les réparations ne doivent pas être effectuées dans les
zones de classe I, II et III.
Prévention des incendies : L'autolaveuse motorisée doit
être tenue propre et dans la mesure du possible, protégée
des peluches, des déversements d'huile et de la graisse.
16 Français
Page 17

L'utilisation de produits non inflammables est recommandée pour le nettoyage de l'autolaveuse motorisée. Les liquides inflammables dont le point d'ignition est égal ou
supérieur à 37,8 °C (100 °F) ne sont pas autorisés.
Prendre les mesures appropriées concernant la toxicité,
l'aération, et les risques d'incendie selon le produit ou solvant utilisé.
Visibilité de la plaque signalétique : Les données techniques figurant sur la plaque signalétique de l'appareil ne
doivent pas être recouvertes de peinture et les informations d'identification doivent rester visibles.
Remarques générales
Veuillez lire le présent le manuel d'instructions
original et les consignes de sécurité jointes
avant la première utilisation de l'appareil. Suivez ces instructions.
Conservez les deux manuels pour une utilisation ultérieure
ou pour le propriétaire suivant.
Fonctionnement
Cette autolaveuse est utilisée pour le nettoyage à l'eau de
sols plats.
L'appareil peut être adapté à chaque de tâche de nettoyage en réglant la quantité d'eau et de détergent. Le dosage du détergent est adapté par ajout dans le réservoir.
La largeur de travail et la capacité du réservoir d'eau
propre et du bac d'eau sale (voir le chapitre Caractéristiques techniques) permettent un nettoyage efficace et une
durée d'utilisation élevée.
L'appareil est équipé d'un entraînement de traction. L'appareil est alimenté par 4 batteries.
saires pour le fonctionnement correct de l'appareil. Les appareils marqués par ce symbole ne doivent pas être jetés
dans les ordures ménagères.
Remarques concernant les matières composantes
(REACH)
Les informations actuelles concernant les matières composantes sont disponibles sous : www.kaercher.com/
REACH
Accessoires et pièces de rechange
Utiliser exclusivement des accessoires et pièces de rechange originaux. Ceux-ci garantissent le fonctionnement
sûr et sans défaut de votre appareil.
Des informations sur les accessoires et pièces de rechange sont disponibles sur le site Internet www.kaer-
cher.com.
Étendue de livraison
Lors du déballage, vérifiez que le contenu de la livraison
est complet. Si des accessoires manquent ou en cas de
dommage dû au transport, veuillez informer votre distributeur.
Consignes de sécurité
Avant la première utilisation de l'appareil, veuillez lire et
observer cette notice d'utilisation la brochure de consignes
de sécurité fournie pour les appareils de nettoyage à
brosses et les appareils d'injection-extraction, n° 5.956-
251.0 et agir en conséquence.
L'appareil est autorisé pour un fonctionnement sur des surfaces d'une inclinaison limitée (voir le chapitre Caractéristiques techniques).
Remarque
L'appareil peut être équipé de différents accessoires en
fonction des tâches de nettoyage souhaitées. Demandez
notre catalogue ou visitez notre site internet www.kaer-
cher.com.
Utilisation conforme
Cet appareil est conçu pour une utilisation professionnelle
et idustriels, p. ex. dans les hôtels, les écoles, les hôpitaux,
les usines, les bureaux et les magasins de loueurs. Utilisez
cet appareil uniquement suivant les indications dans cette
notice d'utilisation.
Utiliser l'appareil uniquement pour le nettoyage de sols
plats résistants à l'humidité et au polissage.
L'appareil n'est pas adapté au nettoyage de sols gelés
(p.ex. dans les chambres froides).
L'appareil n'est pas adapté à une utilisation dans des
environnements à risque d'explosion.
L'appareil est autorisé pour un fonctionnement sur des
surfaces d'une inclinaison maximale (voir le chapitre
Caractéristiques techniques).
Protection de l'environnement
Les matériaux d'emballage sont recyclables. Veuillez
éliminer les emballages dans le respect de l’environ-
nement.
Les appareils électriques et électroniques contiennent
des matériaux précieux recyclables et souvent des
composants tels que des piles, batteries ou de l’huile
représentant un danger potentiel pour la santé humaine et
l'environnement, s'ils ne sont pas manipulés ou éliminés
correctement. Ces composants sont cependant néces-
몇 AVERTISSEMENT
Basculement de l'appareil
Risque de blessures
N'utilisez pas l'appareil sur des surfaces inclinées.
Utilisez l'appareil uniquement si le capot et tous les couvercles sont fermés.
Dispositifs de sécurité
몇 PRÉCAUTION
Dispositifs de sécurité manquants ou modifiés
Les dispositifs de sécurité servent à vous protéger.
Ne modifiez, ni ne contournez jamais les dispositifs de sécurité.
Interrupteur de sécurité
Lorsque vous relâchez l'interrupteur de sécurité, l'appareil
s'éteint.
Interrupteur à clé
Si vous retirez l'interrupteur à clé, l'appareil est protégé
contre toute utilisation non autorisée.
Symboles d'avertissements
Respecter les avertissements suivants lors de la manipulation de batteries :
Observer les remarques dans le manuel d'utilisation de la batterie et sur la batterie ainsi que
dans ce manuel d'utilisation.
Porter une protection oculaire.
Français 17
Page 18

Tenir les enfants éloignés d'acides et de batteries.
Risque d'explosion
Le feu, les étincelles, les flammes nues et fumer
sont interdits.
Risque de brûlure chimique
Premiers secours.
Remarque d'avertissement
Élimination
Ne pas jeter la batterie à la poubelle.
18 Français
Page 19

18
19
20
21
22
23
22
24
20
25
26
27
28
29
30
31
32
33
9
4
5
17
1
3
6
7
8
9
10
11
13
5
1415
16
2
12
Description de l'appareil
Vue d'ensemble de l'appareil
1 Filtre à impuretés grossières
2 Filtre anti-peluches
3 Flotteur
4 Tête de nettoyage
5 Pédale de changement de brosse
6 Guidon
7 Interrupteur de sécurité
8 Couvercle du bac d'eau sale
9 Rail de retenue pour la station d'accueil
10 Bac d'eau sale
11 ** Batterie
12 Filtre d'eau propre
13 Fermeture du réservoir d'eau propre
14 Brosse à vitres
15 Réservoir d'eau propre
16 Plaque signalétique
17 Porte-flexible
18 Ouverture de remplissage du réservoir d'eau propre
Français 19
Page 20

19 Barre d'aspiration
1
20 Réglage en hauteur de la barre d'aspiration
21 Réglage de l'inclinaison de la barre d'aspiration
22 Écrou papillon pour la fixation de la barre d'aspiration
23 Tuyau d'aspiration
24 Indicateur du niveau de remplissage en eau propre
Flexible de vidange de l'eau propre
25 Levier de la tête de nettoyage
26 Bouton de réglage de la quantité d'eau
27 Levier de la barre d'aspiration
28 Fiche de la batterie
29 Interrupteur à clé
30 Écran
31 Molette de réglage de la vitesse de travail
32 Interrupteur du sens de marche
33 Flexible de vidange d'eau sale avec dispositif de do-
sage
** Non inclus dans l'étendue de la livraison
Code couleur
Les éléments de commande pour le processus de net-
toyage sont jaunes.
Les éléments de commande pour la maintenance et le
service sont gris clair.
Symboles sur l'appareil
Ouverture de vidange du réservoir d'eau
propre
Ouverture de vidange du bac d'eau sale
Pression d'appui augmentée de la tête de nettoyage
Montage
Déchargement
1. Retirer le carton.
2. Retirer les bandes de serrage.
3. Dévisser les cales de bois fixées à l'aide de vis sur la palette.
4. Avec les 3 planches de rigidité supérieures (80x24x970 mm)
de l’emballage en carton et la planche vissée à la transversale sur la palette (100x24x970 mm), poser une rampe devant la palette et la fixer à l’aide de vis pour contreplaqué.
3
120
625
2
1 Bois équarri 80x60x625 mm
2 Planche 80x24x970 mm
3 Planche 100x24x970 mm
5. Pousser le bois équarri (80x60x625 mm) dévissé de la
palette sous la rampe, pour supporter, et le visser.
6. Appuyer le levier du frein vers le bas.
225
1
Accès à la batterie
Niveau de remplissage du réservoir d'eau
propre (50%)
Brancher ici la fiche du chargeur
Point d'arrimage
* Support du balai laveur
ATTENTION
Mauvais emplacement
Risque d'endommagement
NE PAS brancher la fiche du chargeur ici
Pression d'appui normale de la tête de nettoyage
Tête de nettoyage levée
Pédale lever / baisser la tête de nettoyage
Pédale de changement de brosse
1 Levier du frein
7. Pousser l'appareil en marche avant de la palette.
8. Appuyer le levier du frein vers le haut.
Monter la barre d'aspiration
1. Accrocher la barre d'aspiration dans la suspension pour
la barre d'aspiration.
* en option
20 Français
Page 21

2. Serrer les écrous papillon.
+
+
+
+
-
-
-
-
1
3. Brancher le tuyau d'aspiration.
Batteries
Batteries recommandées
Description N° de com-
mande
185 Ah - sans
maintenance
(C20)
180 Ah - sans
maintenance
(C5)
240 Ah - sans
maintenance
(C5)
330 Ah - sans
maintenance
(C20)
* Volume minimum du local de remplacement de la batterie
** Débit d'air minimum entre le local de remplacement de
la batterie et l'environnement
Le dispositif a besoin de 4 batteries.
1 Kit complet (24 V / 185 Ah) avec câble de raccorde-
ment, n° de commande 4.035-388.0
2 Kit complet (24 V / 180 Ah) avec câble de raccorde-
ment, n° de commande 4.035-387.0
3 Kit complet (24 V / 240 Ah) avec câble de raccorde-
ment, n° de commande 4.035-393.0
4 Kit complet (24 V / 330 Ah) avec câble de raccorde-
ment, n° de commande 4.035-572.0
Batteries sans maintenance (batteries à éléments
6.654-242.0
6.654-124.0
6.654-119.0
8.629-184.0
humides)
Volume
3
(m
)*
1)
--
2)
--
3)
--
4)
11, 88 4 752
Débit d'air
3
(m
/h)**
DANGER
Remplir en eau lorsque la batterie est déchargée
Risque de brûlure dû à une fuite d'acide, destruction des
vêtements
Utilisez des lunettes de protection lors de la manipulation
d'acide de batterie.
Respectez les consignes.
Rincez immédiatement avec beaucoup d'eau les éventuelles projections d'acide sur la peau ou les vêtements.
ATTENTION
Utilisation d'eau avec des additifs
Batteries défectueuses, perte de garantie
Pour remplir les batteries, utilisez uniquement de l'eau distillée ou de l'eau déssalinisée (EN 50272-T3).
N'utilisez aucun additif externe, appelés améliorants, sous
peine d'annuler la garantie.
1. Ajouter de l'eau distillée une heure avant la fin du processus de charge. Ce faisant, observer le niveau
d'acide sur le repère de la batterie.
Toutes les cellules doivent expulser du gaz à la fin du
processus de charge.
Insérer et raccorder les batteries
Attention à la bonne stabilité de la machine lors du démontage et du montage des batteries.
ATTENTION
Inversion de polarité
Destruction de l'électronique de commande
Respectez la polarité lorsque vous raccordez la batterie.
ATTENTION
Décharge totale
Risque d'endommagement
Chargez les batteries avant la mise en service der l'appareil.
1. Vidanger l'eau sale.
2. Pivoter le bac d'eau sale vers le haut.
3. Insérer les batteries dans l'appareil.
1 Sangle de serrage
4. Entourer les batteries de la sangle de serrage.
5. Tendre les batteries vers l'arrière à l'aide de la sangle de
serrage.
6. Raccorder les pôles aux câble de raccordement fournis.
7. Brancher le câble de raccordement aux pôles encore
libres de la batterie (+) et (-).
8. Raccorder la fiche de la batterie côté appareil à la fiche
de la batterie côté batterie.
9. Pivoter le bac d'eau sale vers le bas.
Démontage de la batterie
몇 PRÉCAUTION
Démontage et montage des batteries
Manque de stabilité de la machine
Attention à la bonne stabilité de la machine lors du démontage et du montage des batteries.
1. Mettre l'interrupteur à clé à « 0 » et retirer la clé.
2. Retirer la fiche de la batterie.
3. Vidanger l'eau sale.
4. Pivoter le bac d'eau sale vers le haut.
5. Débrancher le câble du pôle moins de la batterie.
6. Débrancher les autres câbles des batteries.
7. Desserrer la sangle de serrage.
8. Sortir les batteries.
9. Éliminer les batteries usagées conformément aux dispositions en vigueur.
몇PRÉCAUTION
Démontage et montage des batteries
Manque de stabilité de la machine
Français 21
Page 22

Mise en service
1
1
2
Chargement de la batterie
DANGER
Utilisation non conforme du chargeur
Choc électrique
Respectez la tension du secteur et le fusible sur la plaque
signalétique de l'appareil.
N'utiliser le chargeur que dans les pièces sèches et suffisamment aérées.
ATTENTION
Accumulation de gaz dangereux sous le réservoir pendant la charge
Risque d'explosion
Avant de charger les batteries sans maintenance, pivotez
le bac d'eau sale vers le haut.
ATTENTION
Utilisation d'un chargeur non adapté
Risque d'endommagement
Ne raccordez pas le chargeur à la fiche de la batterie côté
appareil.
Utilisez uniquement un chargeur adapté au type de batterie installée.
Veuillez lire la notice d'utilisation du fabricant du chargeur
et respecter, en particulier, les consignes de sécurité.
Type de batterie Chargeur
6.654-242.0 6.654-434.0
6.654-124.0 6.654-434.0
6.654-119.0 6.654-435.0
8.629-184.0 6.654-419.0
La durée de charge est d'env. 10-15 heures.
Ne pas utiliser l'appareil pendant le processus de charge.
Remarque
L'appareil dispose d'une protection contre la décharge
complète, c'est à dire que lorsque la valeur minimale autorisée de capacité est atteinte, le moteur de brosse et la turbine sont éteints.
1. Déplacer l'appareil jusqu'au chargeur en évitant les
pentes.
2. Retirer la fiche de la batterie côté appareil.
5. Exécuter le processus de charge suivant les instructions dans la notice d'utilisation du chargeur.
6. Raccorder la fiche de la batterie côté appareil à la fiche
de la batterie côté batterie.
Fonctionnement
ATTENTION
Situation à risque pendant le fonctionnement
Risque de blessures
Relâcher l'interrupteur de sécurité en cas de danger.
Remplissage en fluides de fonctionnement
Remplissage en eau propre
1. Ouvrir la fermeture du réservoir d'eau propre.
2. Remplir en eau propre (60°C maximum) jusqu'au nord
inférieur de la tubulure de remplissage.
Remarque : Le flexible d'eau propre peut être coincé
avec le porte-flexible pendant le remplissage.
3. Fermer la fermeture du réservoir d'eau propre.
Consignes pour les détergents
몇 AVERTISSEMENT
Détergents non adaptés
Risque pour la santé, endommagement de l'appareil
Utilisez uniquement les détergents recommandés. En cas
d'utilisation d'autres détergents, l'exploitant est responsable du risque élevé envers la sécurité de fonctionnement
et le risque d'accident.
Utilisez uniquement des détergents sans solvant, sans
acide chloridrique ni acide fluorhydrique.
Respectez les consignes de sécurité sur les détergents.
Remarque
N'utilisez pas de détergents fortement moussants.
Détergents recommandés
Utilisation Détergents
Nettoyage d'entretien de tous les sols
résistant à l'eau
Nettoyage d'entretien de surfaces brillantes (granit, p.ex.)
Nettoyage d'entretien et nettoyage de
fond de sols industriels
Nettoyage d'entretien et nettoyage de
fond de carreaux de faïence
Nettoyage d'entretien de carrelages
dans les espaces sanitaires
Nettoyage et désinfection dans les espaces sanitaires
Désincrustation de tous les sols résistant aux alcalins (PVC, p.ex.)
Désincrustation de sols en linoléum RM 754
RM 746
RM 780
RM 755 es
RM 69 ASF
RM 753
RM 751
RM 732
RM 752
1 Fiche de la batterie, côté appareil
2 Fiche de la batterie, côté batterie
3. Raccorder la fiche de la batterie côté batterie au char-
4. Brancher la fiche secteur du chargeur dans la prise de
22 Français
geur.
courant.
Détergents
1. Verser le détergent dans le réservoir d'eau propre.
Remarque : Vous pouvez utiliser le couvercle de l'ouverture de remplissage du réservoir d'eau propre pour
doser le détergent. Il est équipé d'une échelle à l'intérieur.
Régler la quantité d'eau
1. Régler la quantité d'eau sur la molette de réglage en
fonction de l'encrassement du revêtement de sol.
Page 23

Remarque
1
10 mm
1
2 3
Réaliser les premiers essais de nettoyage avec une
faible quantité d'eau. Augmenter petit à petit la quantité
d'eau jusqu'à l'obtention du résultat de nettoyage souhaité.
Remarque
Lorsque le réservoir d'eau propre est vide, la tête de
nettoyage continue à fonctionner sans apport en liquide.
Régler la barre d'aspiration
Régler l'inclinaison
régler l'inclinaison de manière à ce que les lèvres d'aspiration de la barre d'aspiration soient appuyées régulièrement
sur le sol, sur toute leur longueur.
1. Desserrer la vis.
5. Placer les autres rondelles au-dessus du rouleau
d'écartement.
6. Insérer et serrer la vis.
7. Répéter la procédure sur le deuxième rouleau d'écartement.
8. Pousser l'appareil légèrement vers l'avant.
9. Contrôler de nouveau le pli des lèvres d'aspiration sur
toute leur longueur.
10.Répéter le réglage si besoin.
Nettoyer
Démarrer l'appareil
1. Mettre l'interrupteur à clé sur « 1 ».
L'écran affiche successivement :
La durée avant le prochain service après-vente
La version du logiciel, l'élément de commande
L'état de charge de la batterie et le nombre d'heures de
service
Conduite
Remarque
Vous pouvez modifier le sens de la marche pendant le nettoyage. En avançant et en reculant plusieurs fois, il est
alors possible de nettoyer intensément l'emplacement
choisi.
1. Mettre l'interrupteur du sens de la marche sur
« avance ».
Nettoyer
1 Vis
2. Régler l'inclinaison de la barre d'aspiration.
3. Serrer la vis.
Réglage de la hauteur
Le réglage de la hauteur adapte le pli des lèvres d'aspiration lors du contact avec le sol.
1. Pousser l'appareil légèrement vers l'avant.
2. Comparer le pli des lèvres d'aspiration au schéma cidessus.
´
1 Rouleau d'écartement avec support
2 Rondelle
3 Vis
3. Desserrer la vis.
4. Placer autant de rondelles entre la barre d'aspiration et
le rouleau d'écartement pour obtenir le pli de la lèvre
d'aspiration souhaité.
Remarque
Pour améliorer le résultat de l'aspiration, vous pouvez régler l'inclinaison et la hauteur de la barre d'aspiration (voir
le chapitre Régler la barre d'aspiration).
Remarque
Dès que le bac d'eau sale est plein, le flotteur ferme l'ouverture d'aspiration et la vitesse de rotation de la turbine
augmente. Dans ce cas, soulever la barre d'aspiration et la
déplacer pour vider le bac d'eau sale.
1. Tourner la molette de réglage de la vitesse de travail sur
la valeur souhaitée.
La vitesse est indiquée à l'écran pendant le réglage.
L'affichage est représenté en pour-cent de la vitesse
maximum.
2. Régler la quantité d'eau sur la vanne de régulation.
3. Appuyer le levier de la barre d'aspiration vers le bas.
La barre d'aspiration s'abaisse.
L'aspiration débute.
4. Appuyer le levier de la tête de nettoyage vers le bas, le
déclencher et le laisser remonter.
5. Tirer l'interrupteur de sécurité vers le guidon.
La tête de nettoyage démarre et l'appareil se déplace à
la vitesse réglée.
Augmenter la pression d'appui de la brosse
1. Relâcher l'interrupteur de sécurité.
2. Lever à la main le levier de la tête de nettoyage et l'enclencher à droite.
Terminer l'utilisation
Terminer le nettoyage
1. Relâcher l'interrupteur de sécurité.
2. Baisser à la main le levier de la tête de nettoyage et l'enclencher à droite.
Français 23
Page 24

3. Réaliser encore un petit déplacement.
L'eau résiduelle est aspirée.
4. Lever la barre d'aspiration.
L'aspiration continue encore pendant 10 secondes.
5. Mettre l'interrupteur à clé sur « 0 ».
6. Charger la batterie le cas échéant.
Vidange de l'eau sale
몇 AVERTISSEMENT
Élimination non conforme des eaux usées
Pollution
Respectez les prescriptions locales de traitement des
eaux usées.
1. Sortir le flexible de vidange du support et l'abaisser audessus d'un bac de collecte adapté.
4. Sélectionner le sens de la marche sur l'interrupteur du
sens de la marche.
5. Tirer l'interrupteur de sécurité vers le guidon.
6. En cas de transport de l'appareil dans des véhicules, le
bloquer contre le glissement et le basculement suivant
les normes en vigueur.
1.
2.
7. Poser d'abord la sangle de serrage sous le bac d'eau
sale.
Stockage
2. Presser ou plier le dispositif de dosage.
3. Ouvrir le couvercle du dispositif de dosage.
4. Vidanger l'eau sale. Réguler la quantité d'eau en pressant ou en pliant.
5. Rincer le bac d'eau sale à l'eau claire.
Vidanger l'eau propre
1. Retirer le flexible de l'indicateur de niveau de remplissage et le pivoter vers le bas.
Vidanger rapidement l'eau propre
1. Dévisser la fermeture du réservoir d'eau propre.
2. Laisser l'eau propre s'écouler.
3. Poser et visser la fermeture du réservoir d'eau propre.
Remarque : Veiller à ce que le raccord de flexible dans
la fermeture du réservoir d'eau propre soit placé au
point le plus bas après le vissage.
Transport
DANGER
Conduite en pente
Risque de blessures
Utilisez l'appareil pour le chargement et le déchargement
uniquement sur des pentes d'une valeur maximale de (voir
le chapitre Caractéristiques techniques).
Conduisez lentement.
몇 PRÉCAUTION
Non-observation du poids
Risque de blessure et d'endommagement
Observer le poids de l’appareil pour le transport.
1. Baisser à la main le levier de la tête de nettoyage et l'enclencher à droite.
2. Soulever la barre d'aspiration.
3. Mettre l'interrupteur à clé sur « 1 ».
몇 PRÉCAUTION
Non-observation du poids
Risque de blessure et d'endommagement
Tenir compte du poids de l’appareil pour le stockage.
ATTENTION
Gel
Destruction de l'appareil par le gel d'eau
Videz complètement l'appareil de toute son eau.
Rangez l'appareil à un endroit hors gel.
Stocker cet appareil uniquement à l'intérieur.
Entretien et maintenance
DANGER
Démarrage intempestif de l'appareil
Risque de blessures, risque d'électrocution
Avant les travaux, mettre l'interrupteur à clé de l'appareil à
« 0 » et retirer la clé.
Débranchez la fiche secteur du chargeur.
Vidanger et éliminer l'eau sale et l'eau propre.
Inspection de sécurité/contrat de maintenance
Vous pouvez convenir d'une inspection de maintenance
régulière ou conclure un contrat de maintenance avec
votre distributeur. Demandez conseil.
Intervalles de maintenance
Après chaque fonctionnement
ATTENTION
Nettoyage non conforme
Risque d'endommagement.
Ne projetez pas d'eau sur l'appareil.
Ne pas utiliser de détergent agressif.
Pour la description détaillée des différents travaux de
maintenance, voir le chapitre Travaux de maintenance.
Vidanger l'eau sale.
Rincer le bac d'eau sale à l'eau claire.
24 Français
Page 25

Nettoyer l'extérieur de l'appareil à l'aide d'un chiffon hu-
CHANGE LIP
2
1
1
12
mide imbibé d'une solution basique de nettoyage.
Contrôler le filtre à peluches, le nettoyer si besoin.
Nettoyer le filtre à impuretés grossières.
Nettoyer les lèvres d'aspiration, en vérifier l'usure, si be-
soin régler la hauteur ou remplacer.
Vérifier l'usure des brosses à vitre, les remplacer si be-
soin.
Charger la batterie.
Si le niveau de charge est inférieur à 50%, charger
complètement et sans interruption la batterie.
Si le niveau de charge est supérieur à 50%, charger la
batterie uniquement si la prochaine utilisation requiert
la durée de fonctionnement complète.
Toutes les semaines
En cas d'utilisation fréquente, charger la batterie com-
plètement et sans interruption au moins une fois par semaine.
Tous les mois
Pour la description détaillée des différents travaux de
maintenance, voir le chapitre Travaux de maintenance.
1. Vider le réservoir d'eau propre et rincer les dépôts.
2. Nettoyer le filtre d'eau propre.
3. Nettoyer le flotteur et le filtre à peluches.
4. Vérifier l'oxydation des pôles de la batterie, les brosser
si besoin. Vérifier la bonne fixation des câbles de liaison.
5. Nettoyer les joints entre le bac d'eau sale et le couvercle
et en vérifier l'étanchéité, les remplacer si besoin.
6. Sur les batteries sans maintenance, vérifier l'étanchéité
à l'acide des cellules.
7. Après des arrêts prolongés, ranger l'appareil avec les
batteries complètement chargées. Charger la batterie
complètement au moins une fois par mois.
Tous les ans
Faire réaliser l'inspection prescrite par le service après-
vente.
Travaux de maintenance
Retourner ou remplacer les lèvres d'aspiration
Lorsque les lèvres d'aspiration sont usées jusqu'au repère
d'usure, elles doivent être retournées ou remplacées.
1.
1.
2.
3.
3. Retirer les pièces en plastique.
4. Retirer les lèvres d'aspiration.
5. Insérer les lèvres d'aspiration retournées ou neuves.
6. Placer les pièces en plastique.
7. Visser et serrer les poignées étoiles.
Nettoyer le filtre à impuretés grossières
1. Ouvrir le couvercle du bac d'eau sale.
1 Filtre à impuretés grossières
2. Sortir le filtre à impuretés grossières vers le haut.
3. Rincer le filtre à impuretés grossières sous l'eau courante.
4. Insérer le filtre à impuretés grossières dans le bac d'eau
sale.
Nettoyer le filtre d'eau propre
1. Vidanger l'eau propre (voir le chapitre Vidanger l'eau
propre).
2. Dévisser la fermeture du réservoir d'eau propre.
1 Repère d'usure
2 Lèvre d'aspiration
1. Retirer la barre d'aspiration.
2. Dévisser les poignées étoiles.
1 Fermeture du réservoir d'eau propre
2 Filtre d'eau propre
3. Sortir le filtre d'eau propre et le rincer à l'eau claire.
Français 25
Page 26

4. Insérer le filtre d'eau propre.
1
2
3
4
5. Poser la fermeture du réservoir d'eau propre.
Remarque : Veiller à ce que le raccord de flexible dans
la fermeture du réservoir d'eau propre soit placé au
point le plus bas après le vissage.
Nettoyer le flotteur et le filtre anti-peluches
1. Ouvrir le couvercle du bac d'eau sale.
Dépannage en cas de défaut
1 Cran
2 Filtre anti-peluches
3 Flotteur
4 Logement du flotteur
2. Défaire le cran.
3. Sortir le logement du flotteur vers le bas.
4. Sortir le flotteur du logement du flotteur et le nettoyer.
5. Nettoyer le filtre anti-peluches.
6. Remonter toutes les pièces dans l'ordre inverse.
Remplacer les brosses à vitre
1. Soulever la tête de nettoyage.
2. Appuyer la pédale de changement de brosse vers le bas
au-delà de la résistance.
3. Sortir la 1ère brosse à vitre sur le côté, sous la tête de
nettoyage.
4. Maintenir la nouvelle brosse à vitre sous la tête de nettoyage, appuyer vers le haut et l'enclencher.
5. Répéter la procédure pour la 2ème brosse à vitre.
DANGER
Démarrage intempestif de l'appareil
Risque de blessures, risque d'électrocution
Avant les travaux, mettre l'interrupteur à clé de l'appareil à
« 0 » et retirer la clé.
Dysfonctionnement Résolution
Impossible de démarrer
l'appareil
La quantité d'eau est insuffisante
La puissance d'aspiration
est trop faible
Le résultat de nettoyage
est insuffisant
La turbine d'aspiration
fonctionne à vitesse augmentée
Le brosse ne tourne pas 1 Vérifier qu'aucun corps étranger ne bloque la brosse, retirer le corps étranger si besoin.
L'appareil vibre pendant le
nettoyage
1 Mettre l'interrupteur à clé sur « 1 ».
2 Actionner l'interrupteur de sécurité.
3 Brancher la fiche de la batterie.
4 Vérifier les batteries, les charges si besoin.
5 Vérifier que les pôles de la batterie sont raccordés.
1 Vérifier le niveau de remplissage du réservoir d'eau propre, remplir le réservoir si besoin.
2 Augmenter la quantité d'eau sur la molette de réglage de quantité d'eau.
3 Nettoyer le filtre d'eau propre.
4 Vérifier les éventuels colmatages des flexibles, les nettoyer si besoin.
1 Arrêter l'appareil et vidanger l'eau sale.
2 Nettoyer les joints entre le bac d'eau sale et le couvercle et en vérifier l'étanchéité, les
remplacer si besoin.
3 Vérifier que le flexible d'aspiration est bien raccordé avec le bac d'eau sale.
4 Vérifier l'encrassement du filtre anti-peluches, le nettoyer si besoin.
5 Nettoyer les lèvres d'aspiration sur la barre d'aspiration, les retourner ou remplacer si besoin.
6 Vérifier que le couvercle du flexible de vidange de l'eau sale est fermé.
7 Vérifier le réglage de la barre d'aspiration.
8 Vérifier les éventuels colmatages du flexible d'aspiration, le nettoyer si besoin. Lors de la
remise en place du flexible d'aspiration, le repère blanc du flexible doit se trouver sur les
agrafes de maintien.
9 Vérifier l'étanchéité du flexible d'aspiration, le remplacer si besoin.
1 Réduire la vitesse.
2 Vérifier l'usure des brosses, les remplacer si besoin.
3 Vérifier l'aptitude du type de brosse et du détergent.
1 Vidanger l'eau sale.
2 Nettoyer le flotteur.
3 Vérifier le filtre anti-peluches, le nettoyer si besoin.
4 Vérifier les éventuels colmatages du flexible d'aspiration, le nettoyer si besoin.
5 Vérifier les éventuels colmatages de la barre d'aspiration, éliminer les colmatages si besoin
1 Utiliser une brosse plus douce.
Débranchez la fiche secteur du chargeur.
Vidanger et éliminer l'eau sale et l'eau propre.
En cas de défauts ne pouvant pas être résolus à l'aide
de ce tableau, contacter le service après-vente.
26 Français
Page 27

Garantie
Les conditions de garantie publiées par notre société commerciale compétente s'appliquent dans chaque pays.
Nous remédions gratuitement aux défauts possibles sur
votre appareil dans la durée de garantie dans la mesure où
la cause du défaut est un vice de matériau ou de fabrication. En cas de garantie, veuillez vous adresser à votre distributeur ou au point de service après-vente autorisé le
plus proche avec la facture d'achat.
(Voir l'adresse au dos)
Accessoires
Désignation Pièce n°Description
Brosse à vitre,
rouge (moyenne,
4.905-
000.0
À utiliser pour toutes les tâches
de nettoyage conventionnelles
standard)
Brosse à vitre,
noire (dure)
4.905-
032.0
Pour les encrassements profonds et le nettoyage de fond,
uniquement pour les revêtements non fragiles
Brosse à vitre, nature (douce)
Brosse à vitre,
blanche (très
4.905-
031.0
4.905-
030.0
En fibres naturelles pour le nettoyage et le polissage
Pour le nettoyage de sols peu
encrassés ou fragiles
douce)
Porte-disque de
pad
4.762-
447.0
Pour le nettoyage avec des
pads, avec accouplement rapide et Centerlock
Pad, blanc 6.371-
Pour le polissage de sols
331.0
Pad, rouge
(moyennement
6.371-
332.0
Pour le nettoyage et le décrassage de tous les sols
doux)
Pad, vert (moyen-
nement dur)
6.371-
333.0
Pour le nettoyage de sols fortement encrassés et pour le nettoyage de fond
Pad, noir (dur) 6.371-
334.0
Pour les encrassements tenaces et pour le nettoyage de
fond
Pad, marron 6.371-
335.0
Pour l'assainissement de film
d'entretien de surfaces dures
et élastiques
Pad, microfibres 6.371-
336.0
Barre d'aspiration,
1160 mm, cintrée
Jeu de support de
balai à laver
4.777-
102.0
9.753-
023.0
Pour le nettoyage efficace de
surfaces microporeuses
Caractéristiques techniques
BD 80/100
W Classic
Puissance du moteur de traction W 300
Puissance de la turbine d'aspira-
W500
tion
Puissance de l'entraînement de la
W2 x 500
brosse
Rendement surfacique théorique ft
2
/h (m2/h)43000
(4000)
Volume du réservoir d'eau propre gal (l) 26.4 (100)
Volume du bac d'eau sale gal (l) 26.4 (100)
Température max. de l’eau °F (°C) 140 (60)
Pression max. de l'eau psi (bar) 0.87 (0.06)
Inclinaison max. de la zone de tra-
%2
vail
Aspiration
Puissance d'aspiration, débit d'air CFM (l/s) 50.8 (24)
Puissance d'aspiration, dépression psi (kPa) 2.3 (16)
Brosses de nettoyage
Largeur de travail in (mm) 31.5 (800)
Diamètre de la brosse in (mm) 16.2 (410)
Vitesse de rotation de la brosse 1/min 140
Pression d'appui au sol de la
brosse
lbf (N) 88 / 200
(392 / 890)
Dimensions et poids
Poids total autorisé lbs (kg) 959 (435)
Poids à vide (poids de transport) lbs (kg) 716 (325)
Dimensions du compartiment des
batteries
in (mm) 24.5 x 15.1
(622 x
384)
Valeurs déterminées selon EN 60335-2-72
Valeur de vibration totale m/s
2
<2,5
Incertitude K dB(A) 0.2
Niveau de pression acoustique L
Incertitude K
pA
Niveau de puissance acoustique
L
+ incertitude K
WA
WA
dB(A) 65
pA
dB(A) 2
dB(A) 81
Sous réserve de modifications techniques.
BD 80/100
W Classic
Caractéristiques de puissance de l’appareil
Tension nominale V 24
Capacité de la batterie Ah 185 (C20)
/ 180 (C5)
/ 240 (C5)
/ 330 (C20)
Puissance moyenne absorbée W 1320
Français 27
Page 28

Índice de contenidos
INSTRUCCIONES IMPORTANTES DE SEGURIDAD ..... 28
NORMAS Y PRÁCTICAS DE SEGURIDAD PARA EL
FUNCIONAMIENTO ......................................................... 29
MANTENIMIENTO Y PRÁCTICAS DE RECONSTRUC-
CIÓN................................................................................. 29
NORMA DE SEGURIDAD CONTRA INCENDIOS ........... 29
Avisos generales............................................................... 29
Función ............................................................................. 29
Uso previsto...................................................................... 30
Protección del medioambiente.......................................... 30
Accesorios y recambios.................................................... 30
Alcance de suministro....................................................... 30
Instrucciones de seguridad............................................... 30
Descripción del equipo...................................................... 31
Montaje ............................................................................. 32
Puesta en funcionamiento ................................................ 33
Servicio ............................................................................. 34
Transporte......................................................................... 36
Almacenamiento ............................................................... 36
Conservación y mantenimiento......................................... 36
Ayuda en caso de fallos.................................................... 38
Garantía............................................................................ 39
Accesorios ........................................................................ 39
Datos técnicos .................................................................. 39
INSTRUCCIONES IMPORTANTES DE SEGURIDAD
LEER TODAS LAS INSTRUCCIONES ANTES DE USAR
ESTE APARATO
Desconectar todos los controles antes de desenchufar.
Tenga especial cuidado cuando limpie escaleras.
No utilice el equipo para absorber líquidos inflamables
o combustibles, como gasolina, y no lo utilice en áreas
donde dichos líquidos puedan estar presentes.
Conectar únicamente a una toma que esté puesta a tie-
rra correctamente. Véanse las Instrucciones de puesta
a tierra.
Desconectar siempre el cable de la toma eléctrica antes
de realizar el mantenimiento del dispositivo.
No barrer nunca líquidos explosivos, gases combusti-
bles o ácidos y disolventes no diluidos. Esto incluye gasolina, disolvente o gasóleo que pueden generar humos
o mezclas explosivas al entrar en contacto con el aire.
También se deben evitar la acetona, los ácidos sin diluir
y los disolventes porque pueden dañar los materiales
de la máquina.
No aspirar objetos ardiendo o humeantes.
INSTRUCCIONES DE PUESTA A TIERRA
Este dispositivo debe estar puesto a tierra. En caso de un
fallo de funcionamiento o avería, la conexión a tierra proporciona un camino de menor resistencia para que la corriente eléctrica reduzca el peligro de choque eléctrico.
Este dispositivo está equipado con un cable que tiene un conductor de puesta a tierra y un conector de puesta a tierra.
El conector debe estar conectado a una toma apropiada
que esté instalada y puesta a tierra correctamente conforme a todos los códigos y ordenanzas locales.
몇 ADVERTENCIA
Para reducir el peligro de incendio, choque eléctrico o
lesión:
NO DEJAR el aparato sin vigilancia cuando se enchufe.
Desenchufar de la toma cuando no se esté usando y antes
del mantenimiento.
몇 ADVERTENCIA
PARA REDUCIR EL PELIGRO DE CHOQUE ELÉCTRICO UTILIZAR ÚNICAMENTE EN INTERIORES
No deje que el equipo se utilice como si fuera un juguete.
Cuando niños usan el equipo o cuando el equipo se encuentra cerca de niños, hay que extremar la precaución.
Utilizar únicamente como se describe en este manual.
Utilizar únicamente los accesorios recomendados por el
fabricante.
No utilizar con un cable o conector dañados. Si la uni-
dad no está funcionando como debería, se ha caído,
dañado, dejado al aire libre o caído al agua, devolver a
un centro de servicio.
No tirar del cable o llevar mediante el cable, no usar el
cable como asa, no cerrar una puerta en el cable o tirar
del cable alrededor de bordes o esquinas afilados. No
pasar el aparato por encima del cable. Mantener el cable alejado de superficies calientes.
NO TIRAR DEL CONECTOR DE RED TIRANDO DE
LA TOMA DE TIERRA DEL CABLE DE CONEXIÓN DE
RED. Para desconectar la red eléctrica, tirar del conector de red, no del cable de conexión de red.
No manipular el conctor o el aparato con las manos mo-
jadas.
No introduzca objetos en las aberturas. No utilice el
equipo si las aberturas están obstruidas. Asegúrese de
mantenerlas libres de polvo, pelusa, pelo y cualquier
cosa que pueda obstruir el flujo de aire.
Mantener alejado PELO, ROPA, SUCIEDAD SUELTA,
DEDOS y todas partes del cuerpo de las aberturas y
piezas móviles.
PELIGRO
Una conexión incorrecta del conductor de puerta a tierra puede provocar riesgo de electrocución.
Consultar con un electricista o personal de servicio en caso de dudas acerca la puesta a tierra correcta de la toma.
No modificar el conector que se suministra con el producto. Si no encaja en la toma, contratar a un electricista para
instalar correctamente la toma.
No usar ningún tipo de adaptador con este producto.
Este aparato es para uso en un circuito nominal de 120
voltios y tiene un conector de puesta a tierra parecido al
conector que se ilustra en el dibujo A.
Garantizar que el aparato está conectado a una toma que
tenga la misma configuración que el conector.
No se debe usar ningún adaptador con este aparato.
CONECTAR ÚNICAMENTE A UNA TOMA PUESTA A
TIERRA CORRECTAMENTE
1 Toma puesta a tierra
2 Caja de distribución puesta a tierra
3 Pivote puesto a tierra
28 Español
Page 29

NORMAS Y PRÁCTICAS DE SEGURIDAD
PARA EL FUNCIONAMIENTO
Responsabilidades del propietario/usuario
El propietario y/o el usuario deben comprender bien las
instrucciones de servicio y advertencias del fabricante antes de empezar a utilizar este limpiador de alta presión.
Debe prestarse especial atención y tener muy claras las
advertencias.
Si el operador no habla bien el español, el propietario/comprador debe responsabilizarse de leer y comentar las instrucciones y las advertencias en su lengua natal, y
asegurarse de que entienda a la perfección su contenido.
El propietario y/o el usuario deben leer y guardar como referencia para el futuro las instrucciones del fabricante.
Generalidades
Antes de poner en funcionamiento la unidad,ésta deberá
encontrarse en la posición de servicio.
No arrancar ni poner en funcionamiento la unidad, cualquiera de sus funciones o complementos, en otro sitio que
no sea la posición designada de operario.
Antes de dejar la posición del operario:
1 parar completamente el equipo;
2 si el equipo tiene que estar en una inclinación, bloquear
las ruedas.
Mantenerse a una distancia segura del borde de rampas,
plataformas y otras superficies de trabajo.
No realice modificaciones ni añadidos al equipo.
No bloquear el acceso a las salidas de emergencias de incendios, escaleras o equipo antiincendios.
Conducción
Ceder el paso a peatones y vehículos de emergencias como ambulancias o camiones de bomberos.
Cruce vías de tren en ángulo siempre que sea posible. No
aparcar a menos de 1800 mm de la vía del tren.
Mantener una buena vista del camino por el que conduce
y preste atención al tráfico, personal y seguridad.
Operar el equipo siempre a una velocidad que permita parar de manera segura.
No permita realizar escenas peligrosas ni juguetear con el
equipo.
Reducir la velocidad en suelos húmedos y resbaladizos.
Antes de conducir sobre un muelle o puente, asegúrese
de que esté bien seguro. Conducta con cuidado y lentamente por el muelle o puente, y no exceda nunca la capacidad indicada.
Al sortear curvas, reduzca la velocidad a un nivel seguro
de acuerdo con el ambiente de funcionamiento. Sortear
las curvas con cuidado.
Cuidados del equipo realizados por el operario
Si el equipo necesita ser reparado o es inseguro, o favorece una situación insegura, se deberá informar del problema inmediatamente al encargado designado por el
usuario, y no se pondrá en funcionamiento el equipo hasta
que se recupere el estado de funcionamiento seguro.
Si el equipo se vuelve inseguro de cualquier modo durante
su funcionamiento, se deberá informar del problema inmediatamente al encargado designado por el usuario, y no se
pondrá en funcionamiento el equipo hasta que se recupere el estado de funcionamiento seguro.
No realizar reparaciones o ajustes a no ser que se autorizado específicamente.
MANTENIMIENTO Y PRÁCTICAS DE
RECONSTRUCCIÓN
El funcionamiento del equipo puede resultar peligros si no
realiza el mantenimiento o se llevan a cabo reparaciones,
reconstrucciones o ajustes que no correspondan con los
criterios de diseño del fabricante. Por lo tanto, se deben
poner a disposición lugares de mantenimiento (en el mismo local o en otro lugar), personal cualificado, y procedimientos detallados.
El mantenimiento e inspección de la unidad se realizará de
acuerdo con las siguientes prácticas:
1 a un mantenimiento planificado, le seguirán lubricación
e inspección del sistema: consulte las recomendaciones del fabricante.
2 Sólo se permitirá operar un aparato para limpieza de
suelos motorizado a personas formadas y autorizadas.
Los operarios de aparatos de limpieza de suelos motorizados deberán estar cualificados y tener la capacidad
visual, auditiva, física y mental para operar equipos de
forma segura.
Evitar los riesgos de incendios y tener equipo de protección de incendios en el área de trabajo. No usar recipientes abiertos de fuel o líquidos inflamables de limpieza para
las limpiar las piezas.
NORMA DE SEGURIDAD CONTRA
INCENDIOS
Cualquier unidad que no esté en un estado de funcionamiento seguro será retirada de servicio.
No se realizarán reparaciones en ubicaciones de clase I,
clase II y clase III.
Prevención de incendios.Se mantendrá el equipo limpio
y sin pelusas, exceso de aceite y grasa en la medida de lo
posible.
Es preferible utilizar productos no combustibles para limpiar el equipo. No está permitido utilizar líquidos inflamables [aquellosque tengan puntos de inflamación de o
superior a 37,8ºC (100ºF)]. Se deberá tomar precauciones
ante la toxicidad, ventilación e incendios con el producto o
disolvente usado.
Visibilidad de la placa identificadora.Las denominaciones de tipo de equipo se indican en la placa identificadora
y no se deben cubrir las marcas de tipo con pintura para
que no se vea la información de identificación.
Avisos generales
Antes de poner en marcha por primera vez el
equipo, lea este manual de instrucciones y las
instrucciones de seguridad adjuntas. Actúe conforme a estos documentos.
Conserve estos dos manuales para su uso posterior o para propietarios ulteriores.
Función
La presente fregadora aspiradora sirve para limpiar en húmedo suelos llanos.
El equipo puede adaptarse a la tarea de limpieza correspondiente mediante el ajuste de la cantidad de agua y detergente. La dosificación del detergente se ajusta
mediante adición al depósito.
El ancho útil y el volumen útil de los depósitos de agua limpia y sucia (véase el capítulo Datos técnicos) posibilitan
una limpieza efectiva en aplicaciones prolongadas.
El equipo está equipado con un motor. La alimentación del
equipo se lleva a cabo con 4 baterías.
Español 29
Page 30

Nota
El equipo puede equiparse con diferentes accesorios en
función de la tarea de limpieza en cuestión. Solicite nuestro catálogo o visítenos en internet en la página www.kaer-
cher.com.
Uso previsto
Este equipo es apto para el uso profesional e industrial,
por ejemplo, en hoteles, escuelas, hospitales, fábricas,
tiendas, oficinas y negocios de alquiler. Utilice este equipo
únicamente de conformidad con las indicaciones de este
manual de instrucciones.
El equipo solo puede utilizarse para la limpieza de sue-
los planos resistentes a la humedad y al pulido.
El equipo no es apto para la limpieza de suelos conge-
lados (p. ej., en almacenes frigoríficos).
El equipo no es apto para su utilización en entornos po-
tencialmente explosivos.
El equipo está autorizado para su uso sobre superficies
con una pendiente máxima (véase el capítulo Datos
técnicos).
Protección del medioambiente
Los materiales del embalaje son reciclables. Elimine
los embalajes de forma respetuosa con el medioam-
biente.
Los equipos eléctricos y electrónicos contienen materiales reciclables y, a menudo, componentes, como
baterías, acumuladores o aceite, que suponen un
riesgo potencial para la salud de las personas o el
medioambiente en caso de manipularse o eliminarse de
forma inadecuada. Sin embargo, dichos componentes son
necesarios para un servicio adecuado del equipo. Los
equipos identificados con este símbolo no pueden eliminarse con la basura doméstica.
Avisos sobre sustancias contenidas (REACH)
Encontrará información actual sobre las sustancias contenidas en: www.kaercher.com/REACH
Dispositivos de seguridad
몇 PRECAUCIÓN
Dispositivo de seguridad faltantes o modificados
Los dispositivos de seguridad velan por su seguridad.
Nunca modifique ni manipule los dispositivos de seguridad.
Interruptor de seguridad
Si se suelta el interruptor de seguridad, el equipo se desconecta.
Interruptor de llave
Si se extrae el interruptor de llave, el equipo queda protegido contra usos no autorizados.
Símbolos de los avisos
A la hora de manipular baterías debe tener en cuenta los
siguientes avisos:
Tenga en cuenta los avisos de las instrucciones
de uso de la batería, los avisos impresos sobre
la propia batería y los avisos de este manual de
instrucciones.
Utilizar protección para los ojos.
Mantenga alejados a los niños de la batería y el
ácido.
Peligro de explosión
Prohibido encender fuego, originar chispas, aplicar luz directa y fumar.
Peligro de quemadura por ácido
Accesorios y recambios
Utilice únicamente accesorios y recambios originales, estos garantizan un servicio seguro y fiable del equipo.
Encontrará información sobre los accesorios y recambios
en www.kaercher.com.
Alcance de suministro
Compruebe la integridad del alcance de suministro durante el desembalaje. Póngase en contacto con su distribuidor si faltan accesorios o en caso de daños de transporte.
Instrucciones de seguridad
Antes de utilizar por primera vez el equipo, lea y tenga en
cuenta el presente manual de instrucciones y el folleto adjunto relativo a las instrucciones de seguridad para equipos de limpieza con cepillos y equipos de pulverización,
n.º 5.956-251.0, y respételas.
El equipo está autorizado para su uso sobre superficies
con una pendiente limitada (véase el capítulo Datos técnicos).
몇 ADVERTENCIA
Vuelco del equipo
Peligro de lesiones
No utilice el equipo sobre superficies en pendiente.
El equipo solo debe utilizarse cuando todas las cubiertas
y tapas están cerradas.
Primeros auxilios.
Nota de advertencia
Eliminación de residuos
No deseche la batería en el cubo de basura.
30 Español
Page 31

18
19
20
21
22
23
22
24
20
25
26
27
28
29
30
31
32
33
9
4
5
17
1
3
6
7
8
9
10
11
13
5
1415
16
2
12
Descripción del equipo
Sinopsis del equipo
1 Filtro de partículas de suciedad gruesas
2 Filtro de pelusas
3 Flotador
4 Cabezal de limpieza
5 Pedal del cambio de cepillos
6 Asa de empuje
7 Interruptor de seguridad
8 Tapa del depósito de agua sucia
9 Riel de soporte para Homebase
10 Depósito de agua sucia
11 **Batería
12 Filtro de agua limpia
13 Cierre del depósito de agua limpia
14 Cepillo circular
15 Depósito de agua limpia
16 Placa de características
17 Portamangueras
18 Orificio de llenado del depósito de agua limpia
Español 31
Page 32

19 Barra de aspiración
1
20 Ajuste de altura de la barra de aspiración
21 Ajuste de inclinación de la barra de aspiración
22 Tuerca de mariposa para la fijación de la barra de aspi-
ración
23 Manguera de aspiración
24 Indicador del nivel de llenado de agua limpia
Manguera de desagüe de agua limpia
25 Palanca del cabezal de limpieza
26 Botón de regulación de la cantidad de agua
27 Palanca de la barra de aspiración
28 Conector de la batería
29 Interruptor de llave
30 Pantalla
31 Botón giratorio de velocidad de trabajo
32 Interruptor de dirección de marcha
33 Manguera de desagüe de agua sucia con dispositivo de
dosificación
** No incluido en el alcance del suministro
Código de colores
Los elementos de control de la limpieza se muestran en
amarillo.
Los elementos de control del mantenimiento se mues-
tran en gris claro.
Símbolos en el equipo
Boca de salida del depósito de agua limpia
Boca de salida del depósito de agua sucia
Presión de empuje aumentada del cabezal de
limpieza
Montaje
Descarga
1. Retirar la caja de cartón.
2. Retirar las cintas de sujeción.
3. Desatornillar los bloques de madera fijados sobre la paleta con tornillos.
4. Colocar una rampa delante de la paleta con las 3 tablas de
refuerzo (80 x 24 x 970 mm) del embalaje de cartón y con
la tabla (100 x 24 x 970 mm) atornillada transversalmente
a la paleta y fijar con tornillos para tableros de aglomerado.
3
120
625
2
1 Madera escuadrada 80 x 60 x 625 mm
2 Tabla 80 x 24 x 970 mm
3 Tabla 100 x 24 x 970 mm
5. Empujar la madera escuadrada (80 x 60 x 625 mm) desatornillada de la paleta hasta colocarla debajo la rampa
como soporte y atornillar.
6. Presionar hacia abajo la palanca de freno.
225
1
Acceso a la batería
Nivel de llenado del depósito de agua limpia
(50 %)
Conectar aquí el conector del cargador
Punto de amarre
*Portafregonas
CUIDADO
Puesto de enchufe incorrecto
Peligro de daños
NO conectar aquí el conector del cargador
Presión de empuje normal del cabezal de limpieza
Cabezal de limpieza elevado
Pedal para elevar/bajar el cabezal de limpieza
1 Palanca de freno
7. Empujar el equipo de la paleta hacia delante.
8. Presionar hacia arriba la palanca de freno.
Montaje de la barra de aspiración
1. Insertar la barra de aspiración en la suspensión para la
barra de aspiración.
Pedal del cambio de cepillos
* Opcional
32 Español
Page 33

2. Apretar las tuercas de mariposa.
+
+
+
+
-
-
-
-
1
3. Conectar la manguera de aspiración.
Baterías
Baterías recomendadas
Descripción N.º de pedido Volumen
185 Ah - sin
mantenimiento (C20)
180 Ah - sin
mantenimiento (C5)
240 Ah - sin
mantenimiento (C5)
330 Ah - sin
mantenimiento (C20)
* Volumen mínimo de la sala de carga de batería
** Caudal de aire mínimo entre la sala de carga de batería
y los alrededores
El dispositivo necesita 4 baterías.
1 Juego completo (24 V/185 Ah), incluido el cable de co-
nexión, n.º de pedido 4.035-388.0
2 Juego completo (24 V/180 Ah), incluido el cable de co-
nexión, n.º de pedido 4.035-387.0
3 Juego completo (24 V/240 Ah), incluido el cable de co-
nexión, n.º de pedido 4.035-393.0
4 Juego completo (24 V/330 Ah), incluido el cable de co-
nexión, n.º de pedido 4.035-572.0
Baterías de bajo mantenimiento (baterías húmedas)
6.654-242.0
6.654-124.0
6.654-119.0
8.629-184.0
3
(m
)*
1)
--
2)
--
3)
--
4)
11,88 4,752
Caudal de
aire (m
3
/h)**
PELIGRO
Rellenado de agua en estado descargado de la batería
Peligro de quemaduras por salida de ácido, daños en la
ropa
Utilice gafas de protección al manipular el ácido de la batería.
Tenga en cuenta las instrucciones.
Lave inmediatamente con abundante agua cualquier posible salpicadura de ácido sobre la piel o la ropa.
CUIDADO
Uso de agua con aditivos
Baterías defectuosas, pérdida del derecho de garantía
Para el rellenado de las baterías utilice únicamente agua
destilada o desionizada (EN 50272-T3).
No utilice otros aditivos ajenos, como los llamados agentes de mejora, de lo contrario se extingue la garantía.
1. Añadir agua destilada una hora antes de que finalice el
proceso de carga. Prestar atención al nivel de ácido correcto conforme al marcado de la batería.
Al final del proceso de carga deben gasear todas las
celdas.
Colocación y conexión de las baterías
몇PRECAUCIÓN
Desmontaje y montaje de las baterías
Posición inestable de la máquina
Preste atención a que la máquina esté en una posición segura durante el desmontaje y el montaje de las baterías.
CUIDADO
Intercambio de la polaridad
Destrucción de la electrónica de control
Preste atención a la polaridad correcta al conectar la batería.
CUIDADO
Descarga completa
Peligro de daños
Cargue las baterías antes de la puesta en funcionamiento
del equipo.
1. Purgar el agua sucia.
2. Girar hacia arriba el depósito de agua sucia.
3. Colocar las baterías en el equipo.
1 Correa de sujeción
4. Colocar la correa de sujeción alrededor de las baterías.
5. Tensar hacia atrás las baterías con la correa de sujeción.
6. Conectar los polos con los cables de conexión adjuntos.
7. Embornar el cable de conexión a los polos de batería todavía libres (+) y (-).
8. Conectar el conector de la batería del lado del equipo
con el conector de la batería del lado de la batería.
9. Girar hacia abajo el depósito de agua sucia.
Desmontaje de la batería
몇 PRECAUCIÓN
Desmontaje y montaje de las baterías
Posición inestable de la máquina
Preste atención a que la máquina esté en una posición segura durante el desmontaje y el montaje de las baterías.
1. Poner el interruptor de llave a "0" y extraer la llave.
2. Extraer el conector de la batería.
3. Purgar el agua sucia.
4. Girar hacia arriba el depósito de agua sucia.
5. Desembornar el cable del polo negativo de la batería.
6. Desembornar el resto de cables de las baterías.
7. Soltar la correa de sujeción.
8. Extraer las baterías.
9. Eliminar las baterías usadas de conformidad con las
disposiciones vigentes.
Puesta en funcionamiento
Carga de la batería
PELIGRO
Uso incorrecto del cargador
Descarga eléctrica
Respete la tensión de red y la protección por fusible de la
placa de características del equipo.
Español 33
Page 34

Utilice el cargador únicamente en entornos secos con una
1
1
2
ventilación adecuada.
CUIDADO
Acumulación de gases peligrosos bajo el depósito durante el proceso de carga
Peligro de explosión
Antes de cargar las baterías de bajo mantenimiento, gire
hacia arriba el depósito de agua sucia.
CUIDADO
Uso de un cargador inadecuado
Peligro de daños
No conecte el cargador con el conector de la batería del
lado del equipo.
Utilice únicamente un cargador compatible con el tipo de
baterías montado.
Lea el manual de instrucciones del fabricante del cargador
y tenga en cuenta, en particular, las instrucciones de seguridad.
Tipo de batería Cargador
6.654-242.0 6.654-434.0
6.654-124.0 6.654-434.0
6.654-119.0 6.654-435.0
8.629-184.0 6.654-419.0
El tiempo de carga medio asciende a aprox. 10-15 horas.
No se puede utilizar el equipo durante el proceso de carga.
Nota
El equipo dispone de una protección contra descarga
completa; es decir, si se alcanza el nivel mínimo admisible
de capacidad, se desconecta el motor de cepillos y la turbina.
1. Llevar el equipo directamente al cargador evitando pendientes.
2. Extraer el conector de la batería del lado del equipo.
1 Conector de la batería, lado del equipo
2 Conector de la batería, lado de la batería
3. Conectar el conector de la batería del lado de la batería
con el cargador.
4. Enchufar el conector de red del cargador en una caja de
enchufe.
5. Ejecutar el proceso de carga siguiendo las indicaciones
del manual de instrucciones del cargador.
6. Conectar el conector de la batería del lado del equipo
con el conector de la batería del lado de la batería.
Servicio
CUIDADO
Situación de peligro durante el funcionamiento
Peligro de lesiones
En caso de peligro suelte el interruptor de seguridad.
Llenado de materiales necesarios
Llenado de agua limpia
1. Abrir el cierre del depósito de agua limpia.
2. Añadir agua limpia (máximo 60 °C) hasta el borde inferior de la tubuladura de llenado.
Aviso: El tubo flexible de agua limpia puede engancharse con el portamangueras durante el llenado.
3. Cerrar el cierre del depósito de agua limpia.
Indicaciones sobre los detergentes
몇 ADVERTENCIA
Detergentes inadecuados
Peligro para la salud, daños en el equipo
Utilice únicamente detergentes recomendados. Si se utilizan otros detergentes, el operador asume un elevado riesgo en cuanto a la seguridad operacional y de accidentes.
Utilice únicamente detergentes que no contengan disolventes, ácido fluorhídrico ni ácido clorhídrico.
Tenga en cuenta las instrucciones de seguridad del detergente.
Nota
No utilice detergentes muy espumosos.
Detergentes recomendados
Uso Detergente
Limpieza de mantenimiento de todo tipo de suelos resistentes al agua
Limpieza de mantenimiento de superficies pulidas (p. ej., granito)
Limpieza de mantenimiento y limpieza
a fondo de suelos industriales
Limpieza de mantenimiento y limpieza
a fondo de azulejos de gres cerámico
fino
Limpieza de mantenimiento de azulejos en instalaciones sanitarias
Limpieza y desinfección en instalaciones sanitarias
Decapado de suelos resistentes a los
álcalis (p. ej., PVC)
Decapado de suelos de linóleo RM 754
Detergente
1. Introducir el detergente en el depósito de agua limpia.
Aviso: Se puede utilizar la tapa del orificio de llenado
del depósito de agua limpia para medir la cantidad de
detergente. Dispone de una escala en el lado interior.
RM 746
RM 780
RM 755 es
RM 69 ASF
RM 753
RM 751
RM 732
RM 752
Ajuste de la cantidad de agua
1. Ajustar la cantidad de agua con el botón regulador en
función de la suciedad del recubrimiento del suelo.
Nota
Realizar los primeros intentos de limpieza con poca cantidad de agua. Aumentar gradualmente la cantidad de agua
hasta alcanzar el resultado de limpieza deseado.
34 Español
Page 35

Nota
1
10 mm
1
2 3
Si el depósito de agua limpia está vacío, el cabezal de
limpieza sigue funcionando sin suministro de fluido.
Ajuste de la barra de aspiración
Ajuste de la inclinación
La inclinación debe ajustarse de modo que los labios de
aspiración de la barra de aspiración se apoyen sobre el
suelo en toda su longitud y de forma uniforme.
1. Aflojar el tornillo.
1 Tornillo
2. Ajustar la inclinación de la barra de aspiración.
3. Apretar el tornillo.
Ajuste de la altura
El ajuste de altura influye en la flexión de los labios de aspiración en contacto con el suelo.
1. Deslizar un poco el equipo hacia delante.
2. Comparar la flexión de los labios de aspiración con la figura inferior.
´
1 Rueda distanciadora con soporte
2 Arandela
3 Tornillo
3. Desenroscar el tornillo.
4. Colocar las arandelas necesarias entre la barra de aspiración y la rueda distanciadora para alcanzar la flexión
correcta del labio de aspiración.
5. Colocar el resto de arandelas sobre la rueda distanciadora.
6. Enroscar y apretar el tornillo.
7. Repetir el proceso en la segunda rueda distanciadora.
8. Deslizar un poco el equipo hacia delante.
9. Volver a comprobar la flexión de los labios de aspiración
en toda su longitud.
10.En caso necesario, repetir el proceso de ajuste.
Limpieza
Conexión del equipo
1. Colocar el interruptor de llave en "1".
La pantalla muestra sucesivamente:
El periodo hasta el próximo servicio técnico.
La versión de software, parte de manejo.
El estado de carga de la batería y la cantidad de horas
de servicio.
Circulación
Nota
Se puede cambiar la dirección de marcha durante la limpieza. De esta manera se puede avanzar y retroceder en
zonas que haya que limpiar de forma intensiva.
1. Colocar el interruptor de dirección de marcha en "hacia
delante".
Limpieza
Nota
Es posible ajustar la inclinación y la altura de la barra de
aspiración para mejorar el resultado de aspiración (véase
el capítulo Ajuste de la barra de aspiración).
Nota
Si se llena el depósito de agua sucia, el flotador cierra el
orificio de aspiración y la turbina de aspiración funciona a
revoluciones elevadas. En ese caso, elevar la barra de aspiración y circular hasta el vaciado del depósito de agua
sucia.
1. Girar el botón giratorio de velocidad de trabajo al valor
deseado.
La velocidad se muestra en la pantalla durante el ajuste.
La indicación aparece en porcentaje de la velocidad
máxima.
2. Ajustar la cantidad de agua en la válvula de control.
3. Presionar hacia abajo la palanca de la barra de aspiración.
Desciende la barra de aspiración.
Se inicia la aspiración.
4. Presionar hacia abajo la palanca del cabezal de limpieza, desenclavarla y dejarla subir.
5. Tirar del interruptor de seguridad para el asa de empuje.
Se pone en marcha el cabezal de limpieza y el equipo
circula con la velocidad ajustada.
Aumento de la presión de aplicación de cepillos
1. Soltar el interruptor de seguridad.
2. Levantar con la mano la palanca del cabezal de limpieza y encajarla a la derecha.
Finalización del servicio
Finalización de la limpieza
1. Soltar el interruptor de seguridad.
2. Presionar hacia abajo la palanca del cabezal de limpieza y encajarla a la derecha.
3. Seguir circulando durante una distancia corta.
Se aspira el agua restante.
4. Elevar la barra de aspiración.
La aspiración sigue funcionando durante 10 segundos.
5. Colocar el interruptor de llave en "0".
6. En caso necesario, cargar la batería.
Español 35
Page 36

Purga de agua sucia
몇 ADVERTENCIA
Eliminación incorrecta de aguas residuales
Contaminación del medioambiente
Tenga en cuenta las normativas locales en materia de tratamiento de aguas residuales.
1. Retirar la manguera de desagüe de la sujeción y bajarla
sobre una instalación de recogida adecuada.
1.
2.
7. Colocar en primer lugar la correa de sujeción bajo el depósito de agua sucia.
Almacenamiento
몇 PRECAUCIÓN
Inobservancia del peso
Peligro de lesiones y daños
Tenga en cuenta el peso del equipo para su almacenamiento.
2. Presionar o torcer el dispositivo de dosificación.
3. Abrir la tapa del dispositivo de dosificación.
4. Purgar el agua sucia. Regular la cantidad de agua aplicando presión o doblando.
5. Enjuagar el depósito de agua sucia con agua limpia.
Purga de agua limpia
1. Extraer la manguera del indicador del nivel de llenado y
girarla hacia abajo.
Purga rápida de agua limpia
1. Desenroscar el cierre del depósito de agua limpia.
2. Dejar que salga el agua limpia.
3. Colocar el cierre del depósito de agua limpia y apretarlo.
Aviso: Prestar atención a que la conexión de manguera
en el cierre del depósito de agua limpia esté en el punto
más bajo tras el apretado.
Transporte
PELIGRO
Circulación por superficies inclinadas
Peligro de lesiones
Utilice el equipo para la carga y descarga únicamente sobre superficies inclinadas de hasta el valor máximo (véase
el capítulo Datos técnicos).
Circular a baja velocidad.
몇 PRECAUCIÓN
Inobservancia del peso
Peligro de lesiones y daños
Tenga en cuenta el peso del equipo durante el transporte.
1. Presionar hacia abajo la palanca del cabezal de limpieza y encajarla a la derecha.
2. Elevar la barra de aspiración.
3. Colocar el interruptor de llave en "1".
4. Seleccionar la dirección de marcha en el interruptor de
dirección de marcha.
5. Tirar del interruptor de seguridad para el asa de empuje.
6. Al transportar el equipo en vehículos, asegurarlo para
evitar que resbale y vuelque conforme a las directivas
vigentes.
CUIDADO
Helada
Destrucción del equipo debido a agua congelada
Vacíe todo el agua del equipo.
Conserve el equipo en un lugar sin heladas.
Este equipo solo debe almacenarse en interiores.
Conservación y mantenimiento
PELIGRO
Arranque involuntario del equipo
Riesgo de lesiones, descarga eléctrica
Antes de realizar cualquier trabajo en el equipo, coloque el
interruptor de llave en "0" y extraiga la llave.
Extraiga el conector de red del cargador.
Purgar y eliminar el agua sucia y el agua limpia.
Inspección de seguridad/contrato de mantenimiento
Puede acordar con su distribuidor una inspección de seguridad periódica o firmar un contrato de mantenimiento. Obtenga asesoramiento.
Intervalos de mantenimiento
Tras cada servicio
CUIDADO
Limpieza incorrecta
Peligro de daños.
No pulverice el equipo con agua.
No utilice detergentes agresivos.
Para la descripción detallada de los diferentes trabajos de mantenimiento, véase el capítulo
Purgar el agua sucia.
Enjuagar el depósito de agua sucia con agua limpia.
Limpiar el exterior del equipo con un paño humedecido
en lejía.
Limpiar el filtr
Comprobar el filtro de pelusas y limpiarlo en caso necesario.
o de partículas de suciedad gruesas.
Limpiar los labios de aspiración, comprobar el desgaste
y, en caso necesario, reajustar la altura o sustituirlos.
Comprobar el desgaste de los cepillos circulares y sus-
tituirlos en caso necesario.
Trabajos de mantenimiento
.
36 Español
Page 37

Cargar la batería.
CHANGE LIP
2
1
1.
1.
2.
3.
1
12
Si el estado de carga es inferior al 50 %, cargar com-
pletamente la batería sin interrupción.
Si el estado de carga es superior al 50 %, recargar la
batería solo si se necesita un tiempo de funcionamiento completo durante la próxima utilización.
Semanalmente
Con un servicio regular, cargar la batería por completo
y sin interrupción una vez por semana como mínimo.
Mensualmente
Para la descripción detallada de los diferentes trabajos de mantenimiento, véase el capítulo
1. Vaciar el depósito de agua limpia y limpiar las incrustaciones.
2. Limpiar el filtro de agua limpia.
3. Limpiar el flotador y el filtro de pelusas.
4. Comprobar la oxidación de los polos de la batería y cepillarlos en caso necesario. Comprobar que el cable de
conexión está bien fijado.
5. Limpiar las juntas entre el depósito de agua sucia y la tapa
y comprobar la estanqueidad. Sustituir en caso necesario.
6. Si se trata de baterías que necesitan mantenimiento,
comprobar la densidad del ácido de las celdas.
7. Durante largos tiempos de inactividad, desconectar el
equipo con la batería completamente cargada. Cargar
completamente la batería una vez al mes como mínimo.
Solicitar al servicio técnico la inspección obligatoria.
Trabajos de mantenimiento
Anualmente
.
Trabajos de mantenimiento
Giro o sustitución de los labios de aspiración.
Si los labios de aspiración están desgastados hasta la
marca de desgaste, deben girarse o sustituirse.
3. Extraer las piezas de plástico.
4. Extraer los labios de aspiración.
5. Introducir los labios de aspiración girados o nuevos.
6. Colocar las piezas de plástico.
7. Enroscar y atornillar las empuñaduras de estrella.
Limpieza del filtro de partículas de suciedad gruesas
1. Abrir la tapa del depósito de agua sucia.
1 Filtro de partículas de suciedad gruesas
2. Extraer hacia arriba el filtro de partículas de suciedad
gruesas.
3. Enjuagar el filtro de partículas de suciedad gruesas con
agua corriente.
4. Introducir el filtro de partículas de suciedad gruesas en
el depósito de agua sucia.
Limpieza del filtro de agua limpia
1. Purgar el agua limpia (véase el capítulo Purga de agua
limpia).
2. Desenroscar el cierre del depósito de agua limpia.
1 Marca de desgaste
2 Labio de aspiración
1. Retirar la barra de aspiración.
2. Desenroscar las empuñaduras de estrella.
1 Cierre del depósito de agua limpia
2 Filtro de agua limpia
3. Extraer el filtro de agua limpia y enjuagarlo con agua
limpia.
4. Colocar el filtro de agua limpia.
5. Colocar el cierre del depósito de agua limpia.
Aviso: Prestar atención a que la conexión de manguera
en el cierre del depósito de agua limpia esté en el punto
más bajo tras el apretado.
Español 37
Page 38

Limpieza del flotador y el filtro de pelusas
1
2
3
4
1. Abrir la tapa del depósito de agua sucia.
1 Gancho de enclavamiento
2 Filtro de pelusas
3 Flotador
4 Carcasa del flotador
2. Soltar los ganchos de enclavamiento.
3. Extraer hacia abajo la carcasa del flotador.
4. Extraer el flotador de la carcasa del flotador y limpiarlo.
5. Limpiar el filtro de pelusas.
6. Realice el montaje de todos los componentes en el orden contrario.
Sustitución de los cepillos circulares
1. Elevar el cabezal de limpieza.
2. Presionar hacia abajo el pedal de cambio de cepillos
completamente.
3. Extraer el primer cepillo circular lateralmente por debajo
del cabezal de limpieza.
4. Mantener el nuevo cepillo circular bajo el cabezal de
limpieza, presionar hacia arriba y encajarlo.
5. Repetir el proceso en el segundo cepillo circular.
Ayuda en caso de fallos
PELIGRO
Arranque involuntario del equipo
Riesgo de lesiones, descarga eléctrica
Antes de realizar cualquier trabajo en el equipo, coloque el
interruptor de llave en "0" y extraiga la llave.
Fallo Solución
El equipo no se puede en-
cender
La cantidad de agua es insuficiente
La potencia de aspiración
es insuficiente
El resultado de limpieza es
deficiente
La turbina de aspiración
funciona a revoluciones
elevadas
El cepillo no gira 1 Comprobar si hay algún cuerpo extraño que bloquea el cepillo y retirar el cuerpo extraño
El equipo vibra durante la
limpieza
1 Colocar el interruptor de llave en "1".
2 Accionar el interruptor de seguridad.
3 Conectar el conector de la batería.
4 Comprobar las baterías y recargar en caso necesario.
5 Comprobar si los polos de la batería están conectados.
1 Comprobar el nivel de llenado de agua limpia y rellenar el depósito en caso necesario.
2 Aumentar la cantidad de agua con el botón de regulación de la cantidad de agua.
3 Limpiar el filtro de agua limpia.
4 Comprobar si las mangueras están obstruidas y limpiarlas en caso necesario.
1 Desconectar el equipo y evacuar el agua sucia.
2 Limpiar las juntas entre el depósito de agua sucia y la tapa y comprobar la estanqueidad.
Sustituir en caso necesario.
3 Comprobar si la manguera de aspiración está conectada correctamente con el depósito
de agua sucia.
4 Comprobar si el filtro de pelusas está sucio y limpiarlo en caso necesario.
5 Limpiar los labios de aspiración en la barra de aspiración y, en caso necesario, girarlos
o sustituirlos.
6 Comprobar si la tapa de la manguera de desagüe de agua sucia está cerrada.
7 Comprobar el ajuste de la barra de aspiración.
8 Comprobar si la manguera de aspiración está obstruida y limpiarla en caso necesario. Al
volver a colocar la manguera de aspiración, la marca blanca de la manguera debe estar
en el clip de sujeción.
9 Comprobar la estanqueidad de la manguera de aspiración y sustituirla en caso necesario.
1 Reducir la velocidad.
2 Comprobar el desgaste de los cepillos y sustituirlos en caso necesario.
3 Comprobar que el tipo de cepillos y el detergente sean adecuados.
1 Purgar el agua sucia.
2 Limpiar el flotador.
3 Comprobar el filtro de pelusas y limpiarlo en caso necesario.
4 Comprobar si la manguera de aspiración está obstruida y limpiarla en caso necesario.
5 Comprobar si la barra de aspiración está obstruida y subsanar la obstrucción.
en caso necesario.
1 Utilizar un cepillo más suave.
Extraiga el conector de red del cargador.
Purgar y eliminar el agua sucia y el agua limpia.
En caso de fallos que no puedan subsanarse con la
ayuda de esta tabla, ponerse en contacto con el servicio
técnico.
38 Español
Page 39

Garantía
En cada país se aplican las condiciones de garantía indicadas por nuestra compañía distribuidora autorizada.
Subsanamos cualquier fallo en su equipo de forma gratuita dentro del plazo de garantía siempre que la causa se
deba a un fallo de fabricación o material. En caso de garantía, póngase en contacto con su distribuidor o con el
servicio de postventa autorizado más próximo presentando la factura de compra.
(Dirección en el reverso)
Accesorios
Denominación N.º de
referencia
Cepillo circular,
rojo (medio, es-
4.905-
000.0
tándar)
Cepillo circular,
negro (duro)
Cepillo circular,
natural (suave)
Cepillo circular,
blanco (muy sua-
4.905-
032.0
4.905-
031.0
4.905-
030.0
ve)
Plato impulsor de
cepillo de esponja
Cepillo de esponja, blanco
Cepillo de esponja, rojo (medio
4.762-
447.0
6.371-
331.0
6.371-
332.0
suave)
Cepillo de espon-
ja, verde (medio
6.371-
333.0
duro)
Cepillo de espon-
ja, negro (duro)
Cepillo de espon-
ja, marrón
Cepillo de esponja, microfibras
Barra de aspiración, 1160 mm,
6.371-
334.0
6.371-
335.0
6.371-
336.0
4.777-
102.0
curvada
Conjunto de por-
tafregonas
9.753-
023.0
Descripción
Para uso en todas las tareas
de limpieza habituales
Para suciedad incrustada y para limpieza a fondo, solo en superficies resistentes
De fibras naturales para la limpieza por pulverización y el pulido
Para la limpieza de suelos poco sucios o delicados
Para la limpieza con cepillos de
esponja, con acoplamiento de
acción rápida y Centerlock
Para el pulido de suelos
Para la limpieza y la limpieza
por pulverización de todos los
suelos
Para la limpieza de suelos muy
sucios y la limpieza a fondo
Para suciedad difícil de eliminar y la limpieza a fondo
Para el saneamiento de la película de mantenimiento de superficies duras y elásticas
Para la limpieza efectiva de superficies microporosas
Datos técnicos
BD 80/100
W Classic
Consumo medio de energía W 1320
Potencia del motor W 300
Potencia de la turbina de aspiración W 500
Potencia del accionamiento de ce-
W 2 x 500
pillos
Rendimiento teórico en superficie ft
2
/h (m2/h)43000
(4000)
Volumen del depósito de agua lim-
gal (l) 26.4 (100)
pia
Volumen del depósito de agua su-
gal (l) 26.4 (100)
cia
Temperatura del agua máx. °F (°C) 140 (60)
Presión del agua máx. psi (bar) 0.87
(0.06)
Pendiente máx. de la zona de tra-
%2
bajo
Aspirar
Potencia de aspiración, volumen de
CFM (l/s) 50.8 (24)
aire
Potencia de aspiración, baja pre-
psi (kPa) 2.3 (16)
sión
Cepillos de limpieza
Ancho útil in (mm) 31.5 (800)
Diámetro de cepillos in (mm) 16.2 (410)
Velocidad de rotación de cepillos 1/min 140
Presión de aplicación de cepillos lbf (N) 88 / 200
(392 /
890)
Peso y dimensiones
Peso total admisible lbs (kg) 959 (435)
Tara (peso para el transporte) lbs (kg) 716 (325)
Dimensiones del compartimiento
de baterías
in (mm) 24.5 x
15.1
(622 x
384)
Valores calculados conforme a EN 60335-2-72
Nivel de vibraciones total m/s
2
<2,5
Inseguridad K dB(A) 0.2
Nivel de presión acústica L
Inseguridad K
Intensidad acústica L
Inseguridad K
pA
WA
WA
+
pA
dB(A) 65
dB(A) 2
dB(A) 81
Reservado el derecho a realizar modificaciones.
BD 80/100
W Classic
Datos de potencia del equipo
Tensión nominal V 24
Capacidad de la batería Ah 185 (C20)
/ 180 (C5)
/ 240 (C5)
/ 330
(C20)
Español 39
Page 40

advantages.
vielen Vorteilen.
avantages.
Registre su producto y aproveche de muchas ventajas.
Bewerten Sie Ihr Produkt und sagen Sie uns Ihre Meinung.
Rate your product and tell us your opinion.
Évaluer votre produit et dites-nous votre opinion.
Reseñe su producto y díganos su opinión.
www.kaercher.com/welcome
www.kaercher.com/dealersearch
Alfred Kärcher SE & Co. KG
Alfred-Kärcher-Str. 28-40
71364 Winnenden (Germany)
Tel.: +49 7195 14-0
Fax: +49 7195 14-2212
DANKE!
THANK YOU!
MERCI!
GRACIAS!
!
 Loading...