

Karbonn Titanium Mach Five User Manual

User Manual
TITANIUM MACHFIVE

TITANIUM MACHFIVE
Thanks for choos ing our Android smart phone. If you’d like
your phone to li ve a long and faith full life, please read this
guide carefully and keep it for future reference. You never
know when you might need it.
And don’t worry if the pictures we use to demonstrate your
phone’s functions look a little different from what you see on
its screen. It’s the functions that matter.
Disclaimer
Karbonn Mobiles reserves all the rights to change the
specifications and t he content of this product without any
prior information.
Some contents and services accessible through this device
belong to third parties and are protected by copyright, patent,
trademark and or other intellect ual laws.
Third Party services may be terminated or interrupted at any
time. We do not bear any responsibility or authority for the
warranty or usage of these applications.
Never attempt to disasse mble your phone. You alone are
responsible for how you use your phone and a ny
consequences of its u se.
INTRODUCTION

CONTENT
Get started ............................................................................ 1
Insert sim card ................................................................. 1
Insert memory card ......................................................... 1
Charge the battery or connect to a computer .................. 2
Key and parts ......................................................................... 2
Make it yo urs ......................................................................... 3
Add widgets and icons to home screen ................................. 4
Browser the web ................................................................... 9
Enjoy music ......................................................................... 10
Download applications from android market ..................... 10
Manage apps ....................................................................... 11
System setting s .................................................................... 11
Wireless & network ....................................................... 11
Device ............................................................................ 12
Personal ......................................................................... 13
System ........................................................................... 13
Special featu res ................................................................... 14
1. Messages .......................................................... 14
2. Missed calls ....................................................... 14
3. Gmail/e-mail ..................................................... 14
4. Shake screen shot ............................................. 14
5. Multi gesture .................................................... 14
6. Screen shot and float of vi deo ........................... 15
7. Gesture ............................................................. 15
8. Peel infrared remote controller
......................... 16

Download applications ........................................................ 17
Manage applications ........................................................... 17
Maintenance & safety ......................................................... 18
Environmental concern ....................................................... 20
Sar value .............................................................................. 22
Rohs declaration .................................................................. 23
SD
SIM1
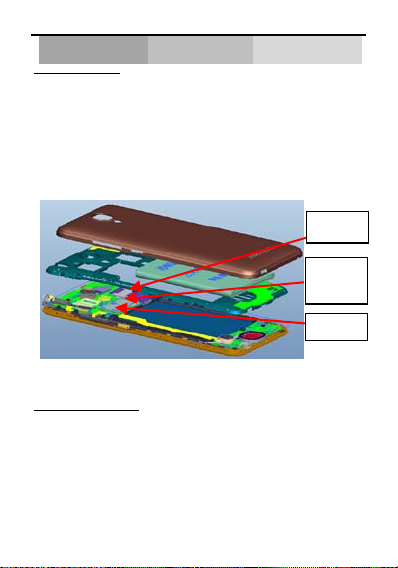
Get started
Insert SIM card
The phone is a Dual S IM mobile p hone allowin g you to use the
facility of two networks.
To insert SIM cards :
1. Switch off the mobile phone an d remove the rear cover and
ba tte ry.
2. Insert the SIM card correctly in the card slots (See figure
below)
3. Finally insert the battery and replace the rear cover of the
mobile phone.
Insert Memory card
1. Power off the mobile phone and remove the rear cover and
ba tte ry.
2. Insert the Micro SD card into the slot.
3. Finally insert the battery and the rear cover of the mobile
phone.
Note: Use only compatible memory cards for use with this
1
Micro
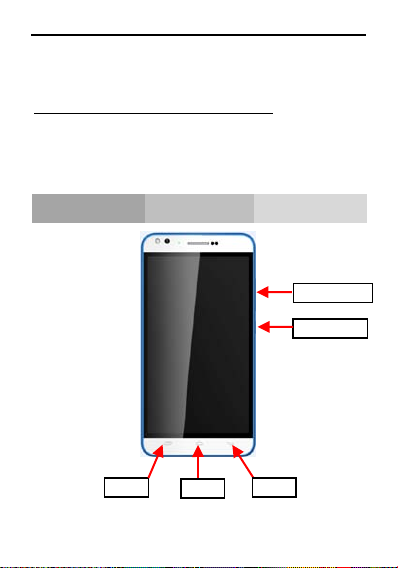
Volume key
Power key
Home
device. Incompatible memory cards may damage the card or
the device and corrupt the data stored in the card.
Charge the Batter y or Connect to a computer
You can charge your battery using the charger or connect the
USB cable (suppl ied with this phone) to the co mputer.
Note: Please use the specific battery, otherwise it may cause
explosion.
Key and parts
Menu
2
Back

1. Home screen: It is your starting point to access all the
features on your phone. It displays application icons, wid gets,
shortcuts, and other features. Long press home screen and
Modify Wallpaper.
2. Notification Bar: At the t op of the screen, the Status Bar
displays the time, status, and notifications. If there is a new
message, missed call or so mething in the noti fication bar, you
can drag it down to open not ification pan el and click the
desired one to have a view. When you finished, you can c lose
it by dragging t he panel up or pressing “Back”.
Make it yours
3
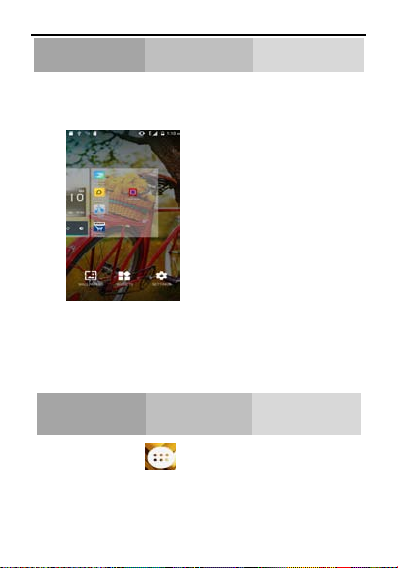
Long press Home screen, a nd then you can Modify Wallpaper;
or enter Launcher and long press and hold an application t ill
the screen vibrates, and then release your finger hold.
Add Widgets and icons to Home Screen
Long press and hold the widget or icon you w ant to move.
Once the phone vibrates, don’t release your hold on the icon.
Drag the widget or icon to a new location on the screen Press
and hold on an icon till the phone vibrates, and drag the
widgets or icon to the trash to remove!
At idle screen touch
The Launcher holds icons for all of the applications on yo ur
phone, including any application that you downloaded from
Android Market or other sources
Open and Switch Applications
Enter launcher
enter launcher
4

Any interface Hold down
Switch to Rece ntly Used Application
Slide the Launcher left or right to
bring more icons
Touch an applicat ion to open it
Touch an icon to
open an application
and slide it to the
5
 Loading...