

Page 1

KT-NCC
Network Communications Controller
Quick Configuration Guide
DN1656-0606
Page 2

Purpose of this Document
This Quick Setup Guide is intended for users who are already familiar with Kantech products and have some
knowledge of network configuration.
This document is aimed at describing the configuration steps required to establish communication between
EntraPass Global Edition and one or several KT-NCC communication controllers, taking into account your
environment and your network architecture.
Note that this document does not replace the reference guide that came with the KT-NCC communication
controller and the EntraPass Global Edition software.
Reference Documents
The following documents are reference documents for EntraPass Global Edition and the KT-NCC
communications controller:
• KT-NCC Network communication controller, Installation Manual, DN1611.
• EntraPass Global Edition Reference Manual DN1316.
• How to Migrate to the KT-NCC DN1661.
DN1656-0606
Telephone: 1 (450) 444-2030 • Toll free: 1 (888) 222-1560 • Fax: 1 (450) 444-2029 • Internet: www.kantech.com
2006 Tyco Safety Products, Canada, Ltd. All rights reserved • Specifications may change without notice
page 1 of 39
Page 3

Table of Contents
Purpose of this Document ........................................................................................................ 1
Reference Documents .............................................................................................................. 1
Table of Contents ..........................................................................................................2
Introduction ..................................................................................................................3
How to Proceed ....................................................................................................................... 3
Network Architectures ..................................................................................................4
Local Area Network (LAN) Architecture ..................................................................................... 4
Possible LAN Configurations ....................................................................................................4
Wide Area Network (WAN) Architecture .................................................................................... 7
Network Configuration Scenario ...................................................................................8
Default KT-NCC Parameters ..................................................................................................... 8
KT-NCC Connections Diagram ................................................................................................ 9
Flash Patterns of the LED Indicator .........................................................................................10
Table of Communication Timings .............................................................................................10
Before Connecting and Configuring the KT-NCC .......................................................................11
Configuring a Static IP Address (LAN) ........................................................................ 12
To Configure a Static Address (LAN) .......................................................................................12
Initializing the KT-NCC in Factory Reset Mode .....................................................................13
Connecting the KT-NCC to the Network ...............................................................................13
Assigning the KT-NCC Static IP Address .............................................................................13
Registering the KT-NCC on the EntraPass Global Edition Server ..........................................16
Configuring the KT-NCC in EntraPass Global Edition ........................................................... 16
Verifying the Connection Status ..........................................................................................19
Configuring the EntraPass DHCP IP Address (LAN) ...................................................20
To configure an EntraPass DHCP Address (LAN) .....................................................................20
Initializing the KT-NCC in Factory Reset Mode .....................................................................20
Registering the KT-NCC to the EntraPass Global Edition Server ...........................................21
Activating the EntraPass DHCP ...........................................................................................22
Configuring the KT-NCC in EntraPass Global Edition ........................................................... 22
Connecting the KT-NCC to the Network ...............................................................................23
Verifying the Connection Status ..........................................................................................25
Configuring a Enterprise DHCP IP Address (LAN) .....................................................26
To configure a Enterprise DHCP address (LAN) .......................................................................26
Initializing the KT-NCC in Factory Reset Mode .....................................................................26
Connecting the KT-NCC to the Network ...............................................................................27
Registering the KT-NCC to the EntraPass Global Edition Server ...........................................27
Configuring the KT-NCC in EntraPass Global Edition ........................................................... 28
Verifying the Connection Status ..........................................................................................31
WAN Network .............................................................................................................. 32
Configuring a DHCP Address (WAN) ........................................................................................33
Initializing the KT-NCC in Factory Reset Mode .....................................................................33
Port Forwarding ................................................................................................................. 33
Connecting the KT-NCC ...................................................................................................... 33
Registering the KT-NCC to the EntraPass Global Edition Server ...........................................34
Entering Router Parameters on the Server ........................................................................... 35
Configuring the KT-NCC in EntraPass Global Edition ........................................................... 35
Verifying the Connection Status ..........................................................................................37
My Network Configuration ...........................................................................................38
DN1656-0606
Telephone: 1 (450) 444-2030 • Toll free: 1 (888) 222-1560 • Fax: 1 (450) 444-2029 • Internet: www.kantech.com
2006 Tyco Safety Products, Canada, Ltd. All rights reserved • Specifications may change without notice
page 2 of 39
Page 4

Introduction
How to Proceed
DN1656-0606
Before you start installing KT-NCC hardware, you have to determine the configuration that best corresponds
to your network architecture. This information is crucial for the good operation of the Kantech products that
you will install.
We suggest that you contact the Network Administrator of the site where you will install the KT-NCC so that
he can provide you with all network information that is essential for the good operation of the KT-NCC.
First, determine the architecture of the site and the corresponding configuration scenario.
Next, you should:
• assemble the network information required to configure the KT-NCC;
• register and configure the KT-NCC in EntraPass Global Edition.
We have divided this manual so that, as soon as you determine the pertaining type of architecture and
environment, you can follow the configuration instructions that correspond to your environment before
connecting additional components.
Telephone: 1 (450) 444-2030 • Toll free: 1 (888) 222-1560 • Fax: 1 (450) 444-2029 • Internet: www.kantech.com
2006 Tyco Safety Products, Canada, Ltd. All rights reserved • Specifications may change without notice
page 3 of 39
Page 5

Network Architectures
There are two types of network architectures: Local Area Network (LAN) and Wide Area Network (WAN).
Each of these types of architecture has various possible configurations. In addition, you will notice that there
are two constants in LAN and WAN network configuration: assigning the IP address for communication
between the controllers and the server by assigning a fixed address or by letting the DHCP server to assign a
dynamic IP address.
We suggest that you carefully read the following section in order to correctly select the scenario that best
matches the environment where you will install the KT-NCC.
Local Area Network (LAN) Architecture
A local network enables users to communicate, exchange data and share resources in an internal network. A
local network can be made up of a server and one or several controllers connected to the server through a
hub or switch.
Whatever the case, an IP address has to be assigned so that the KT-NCC controllers and the EntraPass
server can communicate. When the EntraPass server is used, a static or DHCP address can be assigned to
establish the communication. When the Enterprise server is used, the DHCP server assigns a dynamic IP
address.
Possible LAN Configurations
There are three possible ways of configuring the KT-NCC in EntraPass Global Edition:
Static IP Address: You will use this type of configuration in an environment where the Network
•
Administrator will determine the IP addresses for communication between the EntraPass server and
the KT-NCC controller. The IP address will be configured using the KT-NCC Web Configuration tool.
EntraPass DHCP IP Address: You will use this type of configuration in an environment where the
•
EntraPass DHCP server assigns the reserved IP addresses automatically for communication with the
KT-NCC controller(s). The IP address will be configured directly in the EntraPass Global Edition
software.
DN1656-0606
Note: You will use the EntraPass DHCP server only when there are no other DHCP servers on the local
network.
• Enterprise DHCP IP Address: You will use this type of configuration in an environment where the
Enterprise DHCP server will assign IP addresses automatically for communication with the KT-NCC
controller(s).
Note: Figure 1 on page 5 shows a LAN architecture with a static IP address; figure 2 shows a LAN
architecture with an EntraPass DHCP server. Figure 3 on page 6 shows a LAN architecture with a
Enterprise DHCP server.
Telephone: 1 (450) 444-2030 • Toll free: 1 (888) 222-1560 • Fax: 1 (450) 444-2029 • Internet: www.kantech.com
2006 Tyco Safety Products, Canada, Ltd. All rights reserved • Specifications may change without notice
page 4 of 39
Page 6

EntraPass Server
DN1656-0606
KT-NCC
Switch
Figure 1: Local Network with EntraPass Server for Static IP Address
EntraPass
DHCP Server
KT-NCC
Switch
Figure 2: Local Network with EntraPass DHCP Server
Telephone: 1 (450) 444-2030 • Toll free: 1 (888) 222-1560 • Fax: 1 (450) 444-2029 • Internet: www.kantech.com
2006 Tyco Safety Products, Canada, Ltd. All rights reserved • Specifications may change without notice
page 5 of 39
Page 7

DN1656-0606
EntraPass Server
Enterprise DHCP Server
already installed
Switch
KT-NCC
Figure 3: Local Network with Enterprise DHCP Server
Telephone: 1 (450) 444-2030 • Toll free: 1 (888) 222-1560 • Fax: 1 (450) 444-2029 • Internet: www.kantech.com
2006 Tyco Safety Products, Canada, Ltd. All rights reserved • Specifications may change without notice
page 6 of 39
Page 8

Wide Area Network (WAN) Architecture
A wide area network is generally deployed on a long geographic distance and connects two or several local
networks. The wide area network may use public networks to communicate and transmit data between the
distant networks.
In a WAN, IP addresses can be reserved or the server could be left to assign IP addresses automatically
(DHCP).
Note: We prefer the use of a static IP address for the KT-NCC since the routers have to be configured
to forward ports with static addresses.
When sites that are distant from the network are protected by routers, a public address will be used for
communication between the EntraPass server and the remote KT-NCC controller(s). The supplier of the
public network or the Network Administrator should be able to provide you with this public IP address.
Figure 4 shows an example of an architecture in a WAN network.
EntraPass Server
DN1656-0606
W A N
Router #1 Router #2
Figure 4: Wide Area Network (WAN)
KT-NCC
Telephone: 1 (450) 444-2030 • Toll free: 1 (888) 222-1560 • Fax: 1 (450) 444-2029 • Internet: www.kantech.com
2006 Tyco Safety Products, Canada, Ltd. All rights reserved • Specifications may change without notice
page 7 of 39
Page 9

Network Configuration Scenario
In the previous section, we determined that there are two types of network architecture: LAN and WAN, and
that, for every type of architecture, we can either assign reserved IP addresses or let the DHCP server
assign addresses dynamically.
Now that you have determined the appropriate configuration scenario, and before proceeding with the
installation and configuration of the KT-NCC and the EntraPass Global Edition, you have to assemble the
network information that is required to configure the KT-NCC controller.
To facilitate the task for you, we have prepared diagrams to illustrate every configuration scenario
presented in the previous section. We have thus included a blank page and a table at the end of the
manual that you can use to insert your specific configuration if it does not match the models shown.
Note: Please note that information such as the IP address entered in all dialog boxes in this manual
are fictional. They are used only as examples.
It is important at this stage, if you have not already done so, to contact the Network Administrator where the
KT-NCC will be installed to obtain as much information as possible so that you can enter it in the diagram
that matches your network environment. We suggest that you always have a copy of the diagram close by,
and keep a copy with your KT-NCC controller.
Default KT-NCC Parameters
You will use the following parameters when configuring the KT-NCC.
DN1656-0606
Ethernet Port #1
DHCP
MAC Addresses
• Ethernet Port #1 is DHCP and is used to connect the KT-NCC to the EntraPass server.
Ethernet Port #1 is configured in DHCP mode by default. It is advisable to always use the default value
•
Activated
00-50-F9-XX-XX-XX
18710. However, in an environment where you would have to do port forwarding and where you have to
configure several KT-NCCs on the same network segment, ensure that every KT-NCC has a unique
port number in order to avoid IP address conflicts.
• The
MAC Address is found on the top right, under Ethernet Port #1 of the KT-NCC printed circuit. (See
Figure 5: KT-NCC Connections Diagram on page 9.)
Ethernet Port #2
Static IP Address
Subnet Mask
MAC Addresses
• Ethernet Port # 2 is used to configure the KT-NCC using the KT-NCC Web Configuration tool. It can
also be used to connect TCP/IP sites.
• The
MAC Address is found on the top right, under Ethernet Port #2 of the KT-NCC printed circuit. (See
Figure 5: KT-NCC Connections Diagram on page 9.)
192.168.0.2
255.255.255.0
00-50-F9-XX-XX-XX
Telephone: 1 (450) 444-2030 • Toll free: 1 (888) 222-1560 • Fax: 1 (450) 444-2029 • Internet: www.kantech.com
2006 Tyco Safety Products, Canada, Ltd. All rights reserved • Specifications may change without notice
page 8 of 39
Page 10

KT-NCC Connections Diagram
The KT-NCC connections diagram in Figure 5 below shows the top section of the KT-NCC printed circuit. The
diagram shows you the key items to which we will be referring when configuring the KT-NCC in the EntraPass
Global Edition software.
It contains Ethernet Ports #1 and #2 on the top right, the RS-232 connection port on the top left, MAC
addresses #1 and #2 under the corresponding Ethernet ports, as well as the Vital indicator (LED), under the
RS-232 connection.
DN1656-0606
Ethernet Network
Ethernet Port #1
RS-232 Connection
Vital LED light
MAC Address #1
MAC Address #2
Ethernet Port #2
JP2
JP3
For further information on the installation of the KT-NCC, please refer to the KT-NCC Manual - Network
Communications Controller, Installation Manual DN1611.
Telephone: 1 (450) 444-2030 • Toll free: 1 (888) 222-1560 • Fax: 1 (450) 444-2029 • Internet: www.kantech.com
2006 Tyco Safety Products, Canada, Ltd. All rights reserved • Specifications may change without notice
Reset button
Figure 5: KT-NCC Connections Diagram
page 9 of 39
Page 11

Flash Patterns of the LED Indicator
A blue LED indicator has been placed on the KT-NCC printed circuit enabling you to see the various states of
the system. The indicator is located on top of the circuit, under the RS-232 connection
(See Figure 5: KT-NCC Connections Diagram on page 9.)
Pulses Description Patterns
1 flash/sec KT-NCC is communicating with the server.
Fast flashes KT-NCC is no longer communicating with the server.
DN1656-0606
Steady on
(15-30 sec)
Quick flashes
(May last from
15-30 sec)
Quick flashes
(May last up to
90 sec.)
1 long flash/sec KT-NCC is in factory reset mode.
4 flashes on per
sec/1 sec
steady off
KT-NCC is starting up.
Preparing to reboot.
DO NOT POWER DOWN OR RESET DURING THIS
PROCESS.
Firmware update.
DO NOT POWER DOWN OR RESET DURING THIS
PROCESS.
KT-NCC is in hard reset mode.
Table of Communication Timings
A communication timing parameter can be configured for the KT-NCC in a WAN architecture. This parameter
determines the communication frequency (latency period) between the EntraPass server and the KT-NCC.
This parameter will be adjusted based on the complexity and size of the network. For example, when the
network architecture is simple, a communication timing will be set to faster. On the other hand, when the
network architecture is large and complex a slower communication timing will be more appropriate. It is
important for the communication timing to be well configured in order to avoid communication breakdowns.
Once more, we suggest that you consult the Network Administrator in order to measure the complexity of the
network architecture where you will install the KT-NCC.
The communication timing parameter is found in the Gateway dialog, under the
EntraPass Global Edition.
Table 1: Vital LED Flash Patterns
Ethernet Port #1 tab of the
Telephone: 1 (450) 444-2030 • Toll free: 1 (888) 222-1560 • Fax: 1 (450) 444-2029 • Internet: www.kantech.com
2006 Tyco Safety Products, Canada, Ltd. All rights reserved • Specifications may change without notice
page 10 of 39
Page 12

Parameter Communication timing
Very fast Latency period: max 300 ms
Fast Latency period: max 800 ms
Average Latency period: max 1500 ms
Slow Latency period: max 2500 ms
Ver y slow Latency period: max 4000 ms
Extremely slow Latency period: max 6000 ms
Table 2: KT-NCC Communication Timings
Before Connecting and Configuring the KT-NCC
• Before connecting the KT-NCC to the Entrapass network, ensure that you have version 3.17 or later of
the EntraPass Global Edition software.
• Use an appropriate network cable (minimum CAT-5) to connect the KT-NCC to the network that houses
the EntraPass server Global Edition.
DN1656-0606
Telephone: 1 (450) 444-2030 • Toll free: 1 (888) 222-1560 • Fax: 1 (450) 444-2029 • Internet: www.kantech.com
2006 Tyco Safety Products, Canada, Ltd. All rights reserved • Specifications may change without notice
page 11 of 39
Page 13
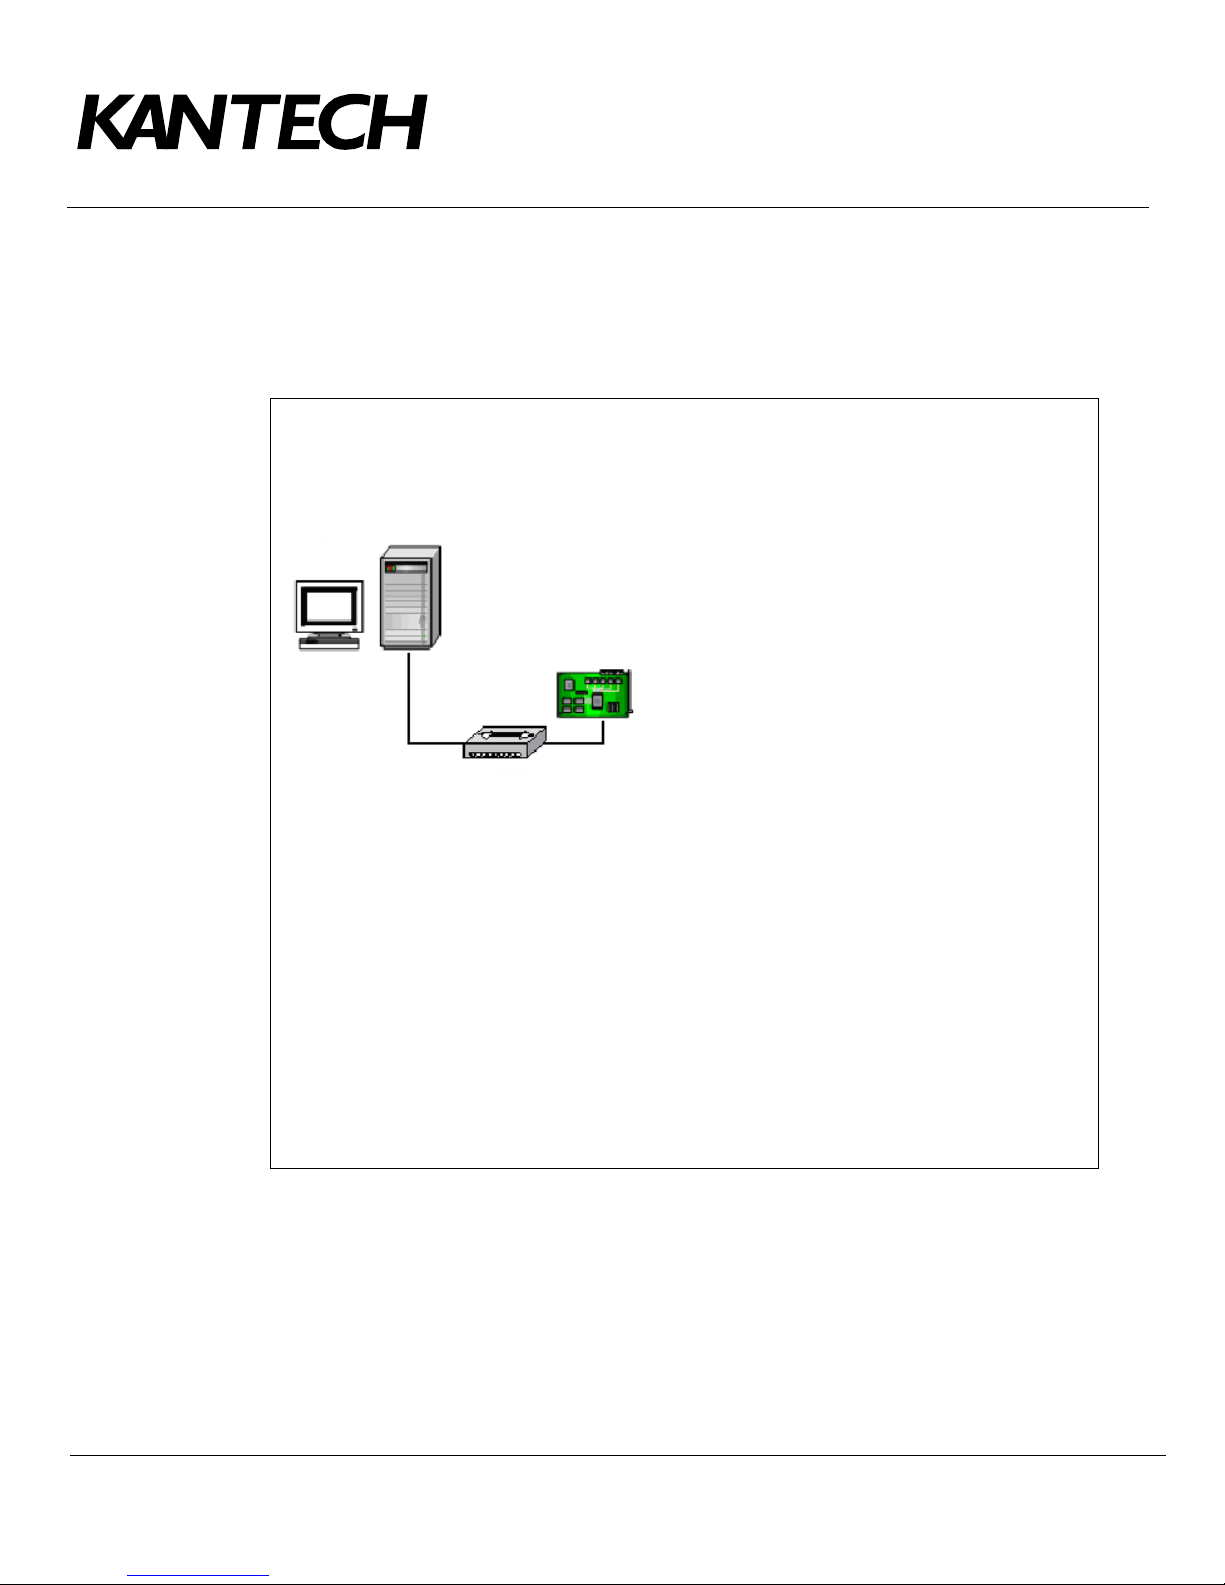
Configuring a Static IP Address (LAN)
You have determined that communication between the EntraPass server and the KT-NCC controller(s) will be
done through a static address. These addresses will be configured using the KT-NCC Web Configuration tool
for communication between the EntraPass server and the KT-NCC controller(s).
EntraPass Server
1 Server IP Address:_____._____._____._____
DN1656-0606
Switch
Figure 6: Static IP Address Configuration Diagram - LAN
To Configure a Static Address (LAN)
Six steps are required to configure the KT-NCC in a local network using a static address:
• Initialize the KT-NCC in factory reset mode;
• connect the KT-NCC to a PC;
• assign the static IP address of the KT-NCC using the KT-NCC Web Configuration tool;
• register the KT-NCC on the EntraPass Global Edition server;
• configure the KT-NCC in EntraPass Global Edition;
• check the connection status.
KT-NCC
Ethernet Port #1
2 MAC Address: 00-50-F9-_____-_____-_____
3 DHCP: Disable
4 KT-NCC IP Address: _____._____._____._____
5 Subnet Mask: 255.255.255.0
OR: ______________________________
6 Gateway IP Address: _____._____._____._____
7 Port: 18710 OR ________________________
Telephone: 1 (450) 444-2030 • Toll free: 1 (888) 222-1560 • Fax: 1 (450) 444-2029 • Internet: www.kantech.com
2006 Tyco Safety Products, Canada, Ltd. All rights reserved • Specifications may change without notice
page 12 of 39
Page 14
Initializing the KT-NCC in Factory Reset Mode
A factory reset will erase the entire configuration of the KT-NCC, including the IP address. It is recommended to
reinitialize the KT-NCC before starting the configuration.
1. Use needle nose pliers to remove jumpers JP2 and JP3. (see Figure 5: KT-NCC Connections Diagram
on page 9).
2. Press Reset.
3. Reinstall jumpers JP2 and JP3.
Connecting the KT-NCC to the Network
1. Connect the configuration PC to Ethernet Port #2 of the KT-NCC.
• If your KT-NCC has to be connected directly to the computer where the Web configuration will be
done, you should use a crossover network cable to connect it from Ethernet port #2 to the
computer.
• If you use a switch to communicate between the KT-NCC and the computer where the Web
configuration will be done, you should connect an appropriate network cable (at least CAT-5) from
Ethernet port #2 to the switch.
DN1656-0606
OR
Assigning the KT-NCC Static IP Address
To be able to assign a static address to the KT-NCC, use the KT-NCC Web Configuration tool. To do this, you
have to configure the configuration computer with a valid IP address. It is advisable to use the address
192.168.0.5 and the subnet mask 255.255.255.0.
Note: NEVER use the address 192.168.0.2 to configure the IP address of the PC. This address is
assigned by default to Ethernet port #2 of the KT-NCC.
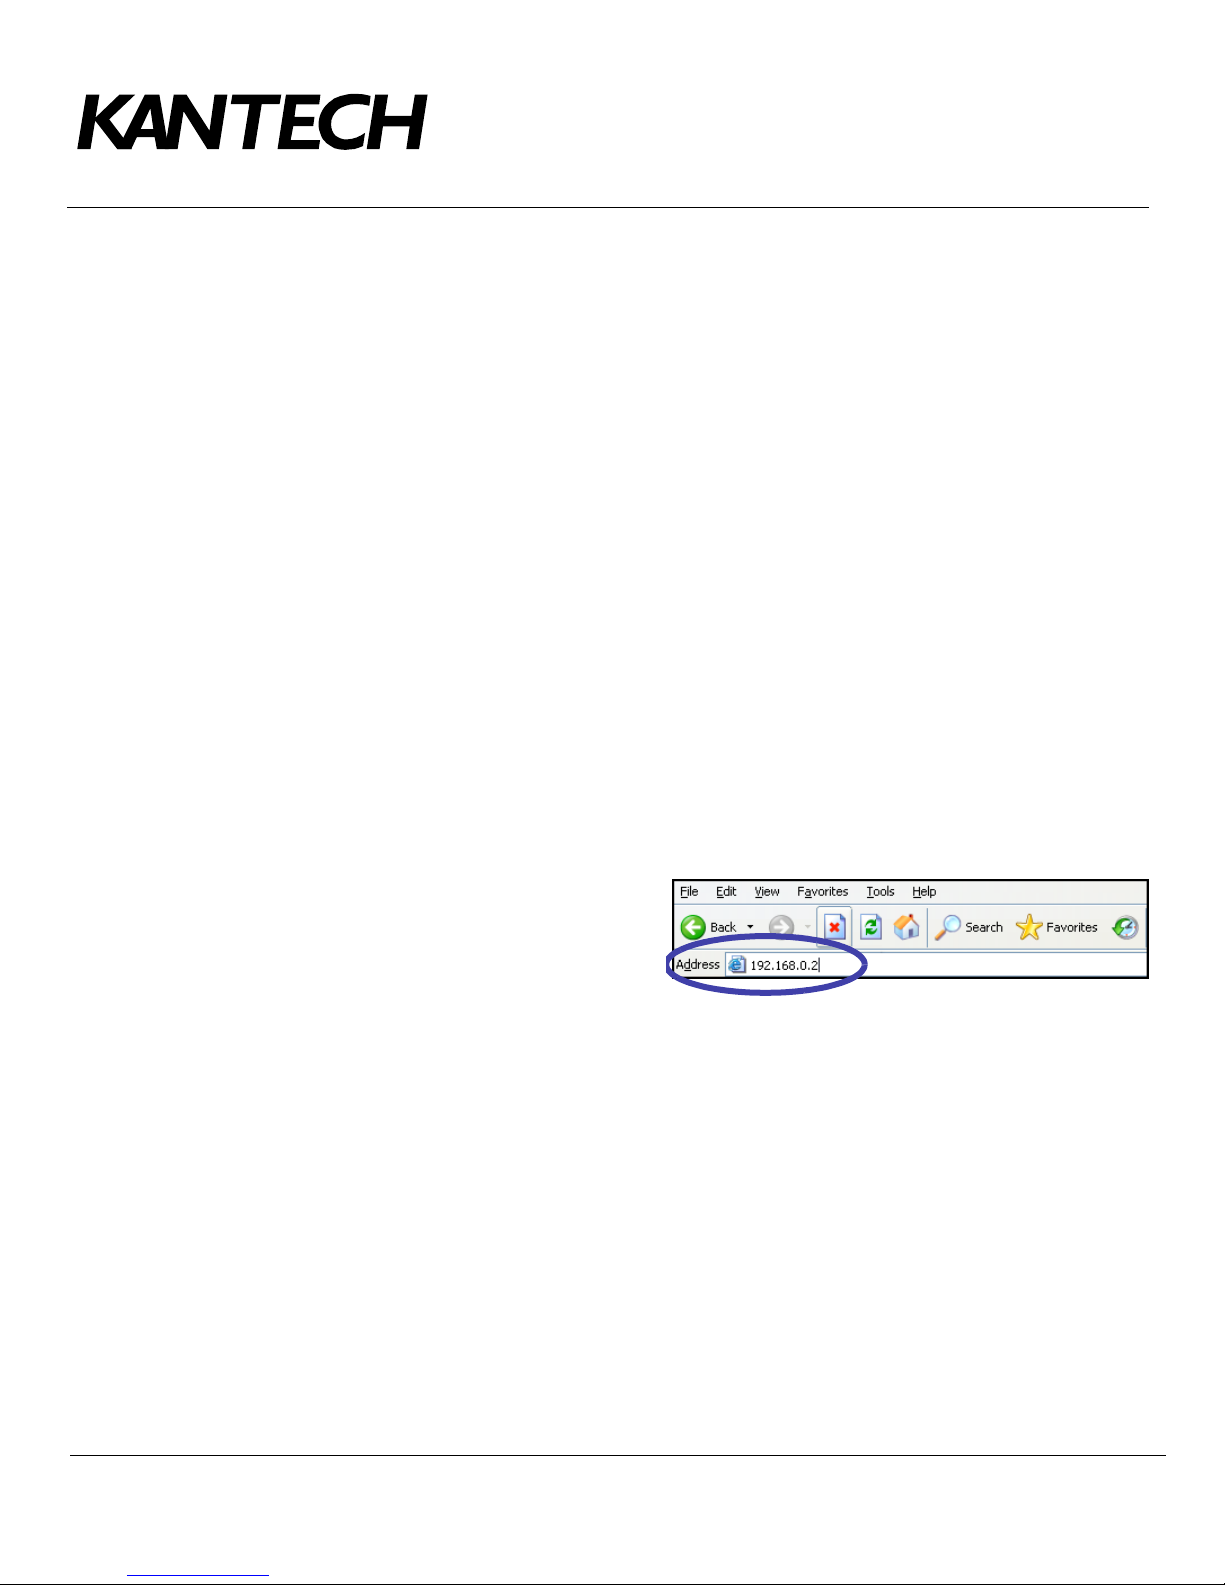
1. Start Internet Explorer.
2. In the Address field, enter the IP address of
the KT-NCC; that is, 192.168.0.2. (No. 4 in
the diagram on page 12).
3. Press Enter.
Telephone: 1 (450) 444-2030 • Toll free: 1 (888) 222-1560 • Fax: 1 (450) 444-2029 • Internet: www.kantech.com
2006 Tyco Safety Products, Canada, Ltd. All rights reserved • Specifications may change without notice
page 13 of 39
Page 15
DN1656-0606
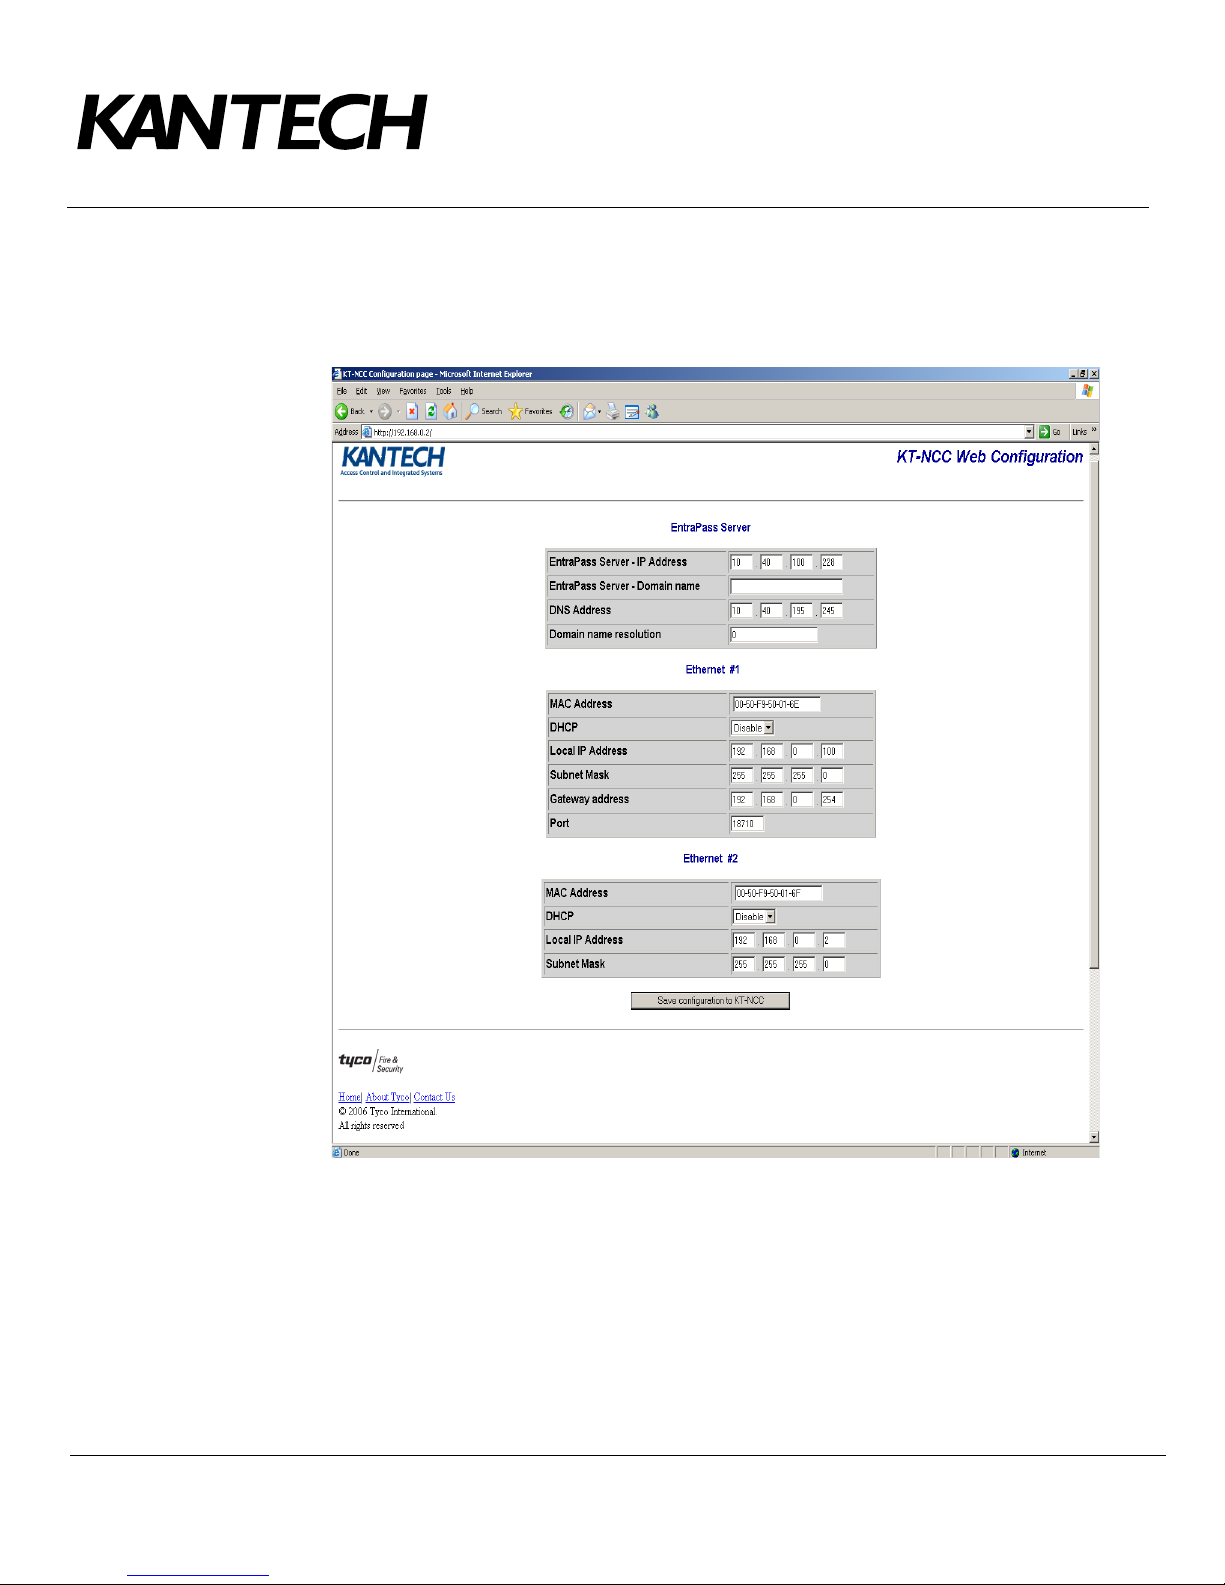
4. The KT-NCC Web Configuration page will appear on the screen.
Note: Once the KT-NCC is registered on the server, the Web configuration page will no longer be
accessible.
5. In the EntraPass Server section, enter the IP address of the EntraPass server (No. 1 in the diagram on
page 12).
6. In the Ethernet #1 field:
• the
• Ensure that the
• Enter the IP address of the KT-NCC that you received from the Network Administrator. (No. 4 in
• Enter the subnet mask of the KT-NCC 255.255.255.0. (No. 5 in the diagram on page 12).
Telephone: 1 (450) 444-2030 • Toll free: 1 (888) 222-1560 • Fax: 1 (450) 444-2029 • Internet: www.kantech.com
2006 Tyco Safety Products, Canada, Ltd. All rights reserved • Specifications may change without notice
MAC Address of the KT-NCC (no. 2 in the diagram on page 12) is already configured. The
MAC address is found on the top right of the KT-NCC circuit, under Ethernet Port #1. (See Figure
5: KT-NCC Connections Diagram on page 9.)
the diagram on page 12).
DHCP parameter is disabled.
page 14 of 39
Page 16
DN1656-0606
• The Port number is already configured. It is advisable to always use the value 18710 by default.
7. The fields in the section Ethernet #2 are already configured. You do not have to change these
parameters.
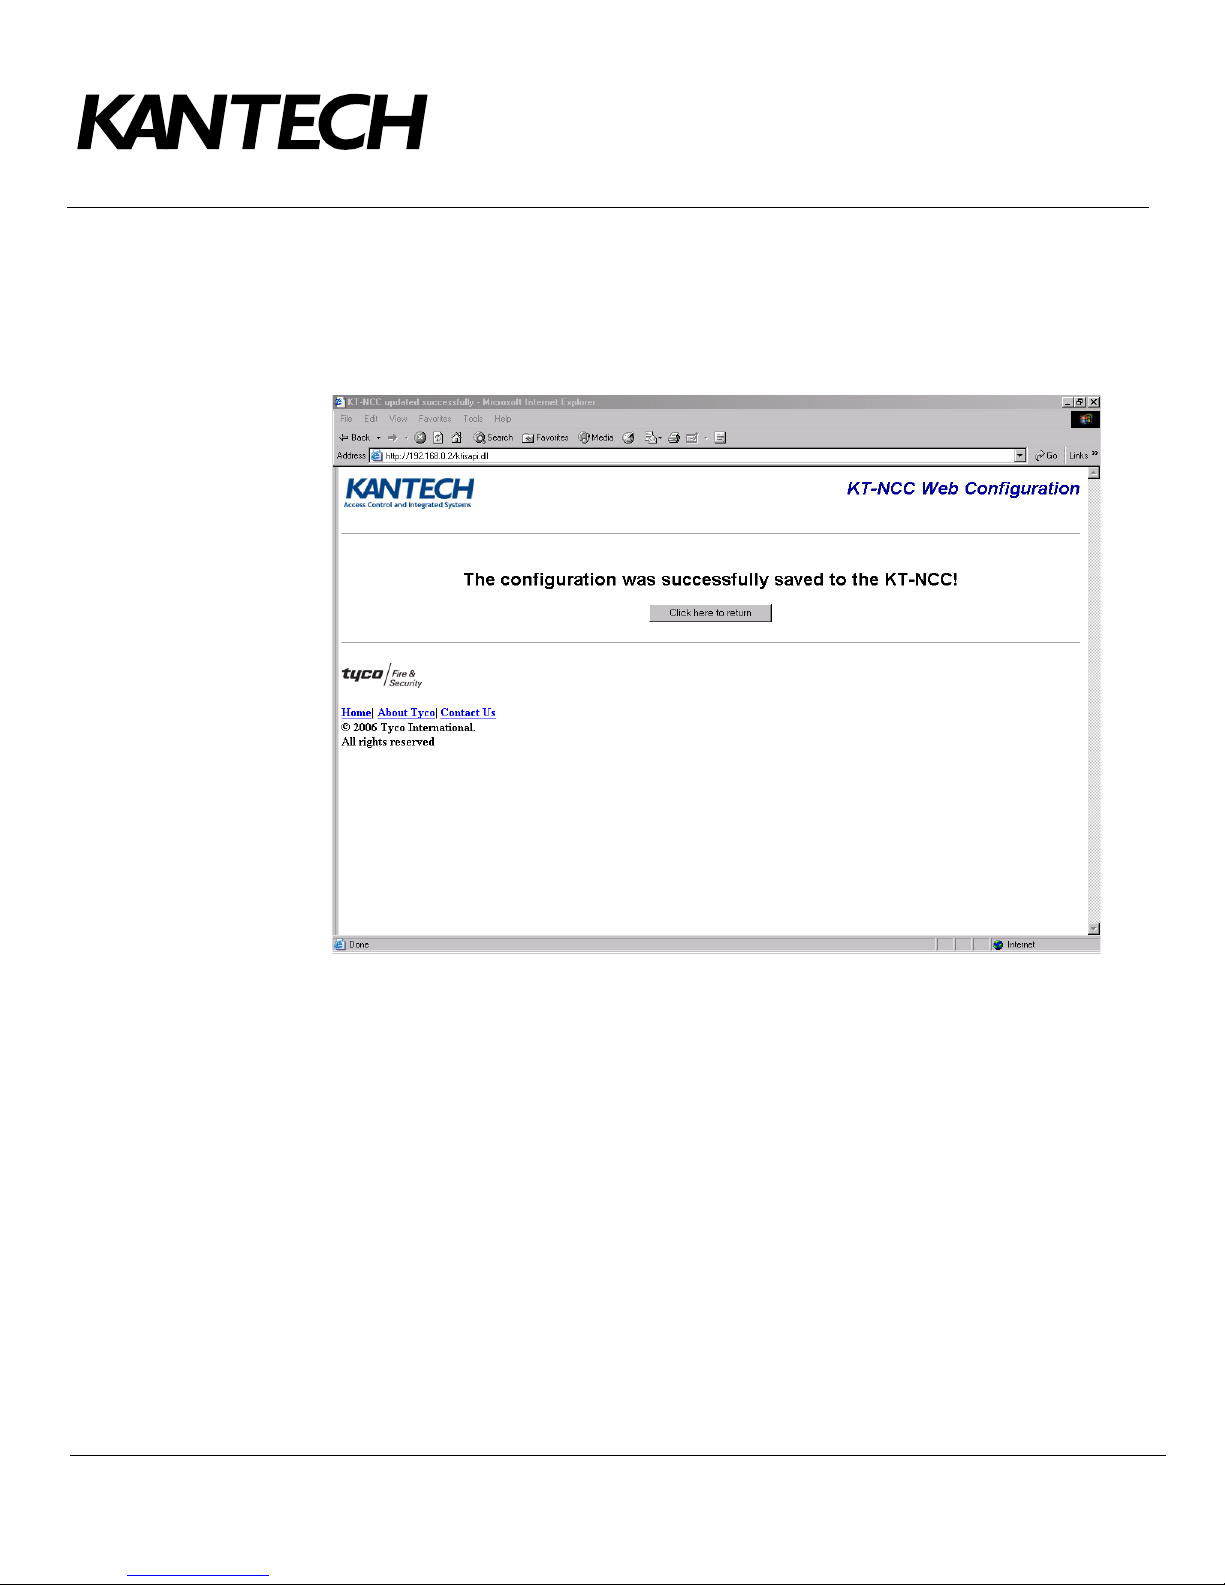
8. Click Save Configuration to KT-NCC. A message showing that the configuration is saved and that the
KT-NCC is reinitializing will appear on the screen.
9. Click Click here to return. The main window of the KT-NCC Web Configuration tool will reappear on the
screen. Meanwhile, the KT-NCC will reset.
• The blue pilot light (Vital LED) of the KT-NCC will blink quickly to signal that the controller is in
reset mode.
• The blue pilot light (Vital LED) of the KT-NCC will remain lit for 15 seconds to signal that the
controller is in startup mode.
• The blue pilot light (Vital LED) of the KT-NCC will blink 4 times to signal that the controller has
reset but it is not yet registered on the EntraPass server. (Hard reset mode.)
Note: For details, refer to Flash Patterns of the LED Indicator on page 10.
10. Close the KT-NCC Web Configuration window.
11. Disconnect the cable of Ethernet port #2.
12. Connect the network cable on Ethernet port #1 of the KT-NCC.
Telephone: 1 (450) 444-2030 • Toll free: 1 (888) 222-1560 • Fax: 1 (450) 444-2029 • Internet: www.kantech.com
2006 Tyco Safety Products, Canada, Ltd. All rights reserved • Specifications may change without notice
page 15 of 39
Page 17
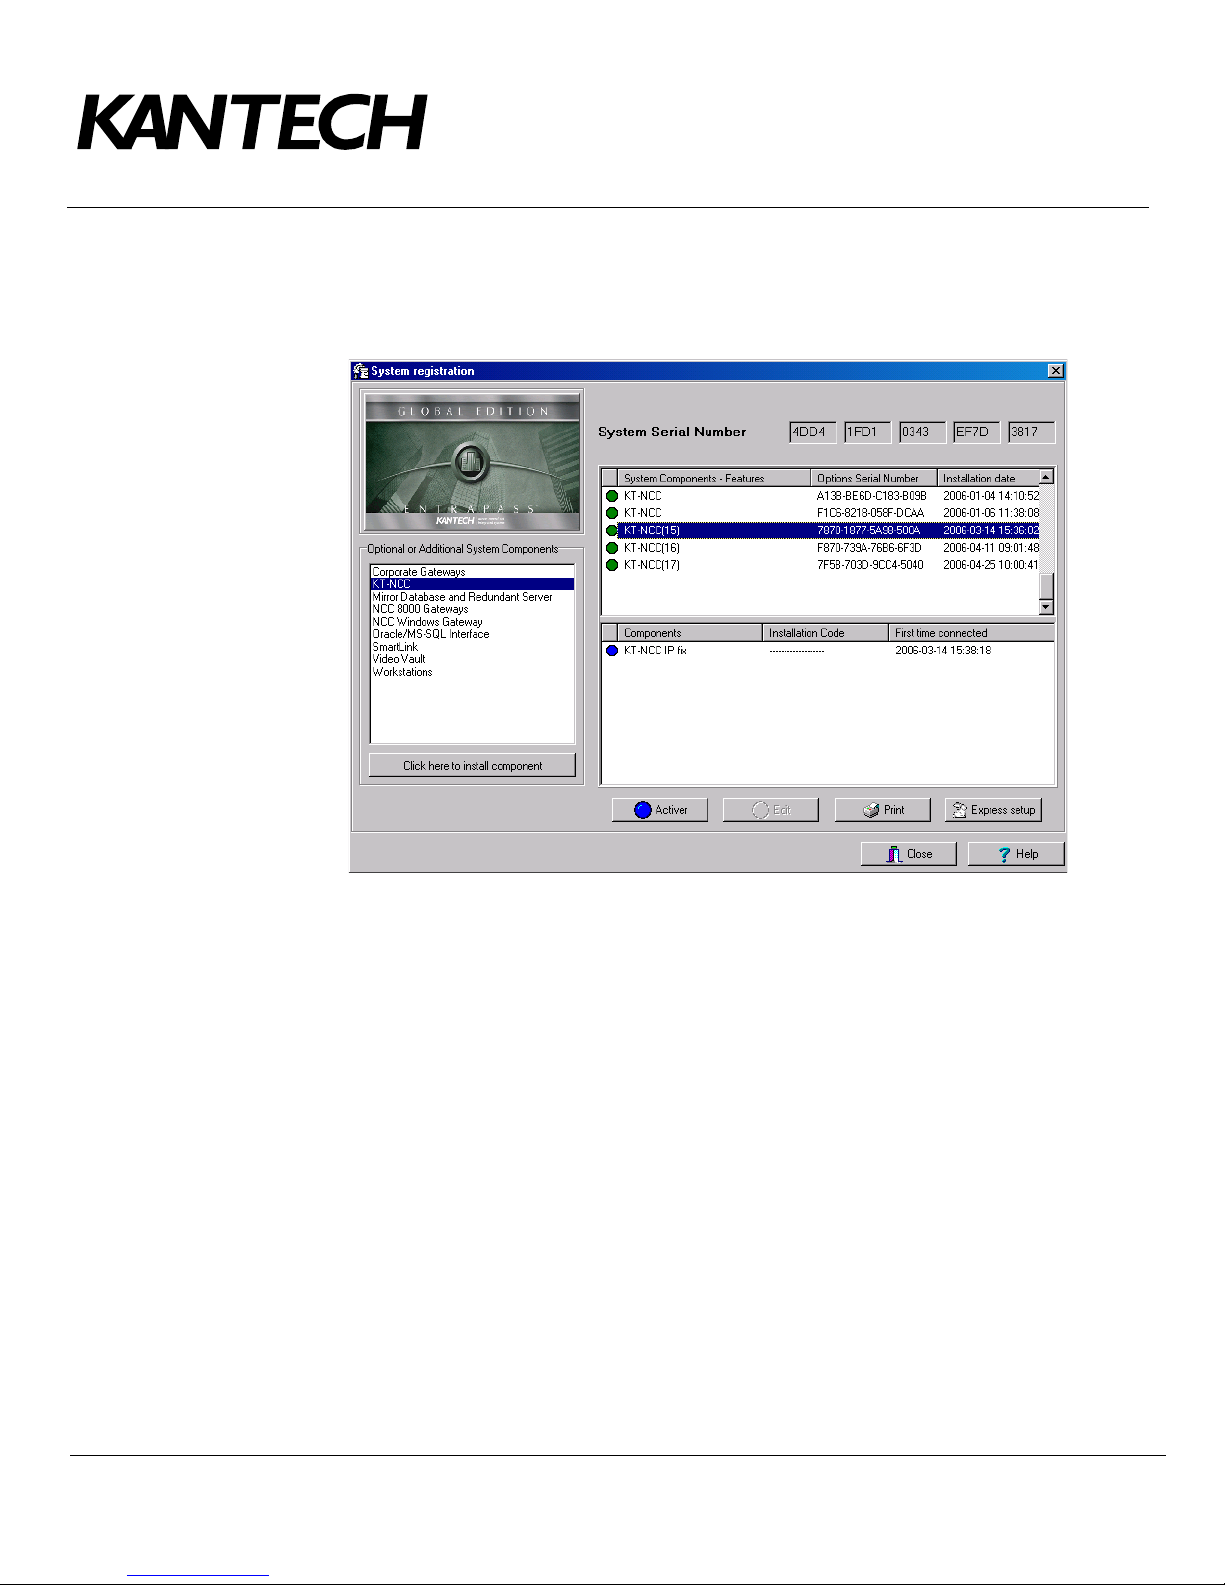
Registering the KT-NCC on the EntraPass Global Edition Server
1. In the application Entrapass Global Edition - Server, open the System Registration window found under
the
Connection tab.
DN1656-0606
Note: It is not necessary to contact the Kantech Technical Support department to register the KT-
NCC in EntraPass Global Edition.
2. In the section Optional or Additional System Components, select KT-NCC.
3. Click here to install component. The list on the right will display the new KT-NCC preceded by a blue
dot.
4. Select the new KT-NCC component from the list. The Activate button will activate.
5. Click Activate to save the KT-NCC in EntraPass Global Edition.
• The blue dot will change to green and the new KT-NCC controller will be added to the list of
components at the top of the screen.
• The Edit button will activate to enable you to configure the security options and rename the KT-
NCC.
6. Close the System registration window.
Configuring the KT-NCC in EntraPass Global Edition
1. In the application EntraPass Global Edition - Workstation, open the Gateway window that is found under
the
Devices tab.
2. From the EntraPass Application drop-down list, select the KT-NCC that you just saved in EntraPass.
3. From the Gateway(s) drop-down list, select the KT-NCC gateway that you would like to configure.
• You can rename the KT-NCC gateway in the
Telephone: 1 (450) 444-2030 • Toll free: 1 (888) 222-1560 • Fax: 1 (450) 444-2029 • Internet: www.kantech.com
2006 Tyco Safety Products, Canada, Ltd. All rights reserved • Specifications may change without notice
French and English fields.
page 16 of 39
Page 18
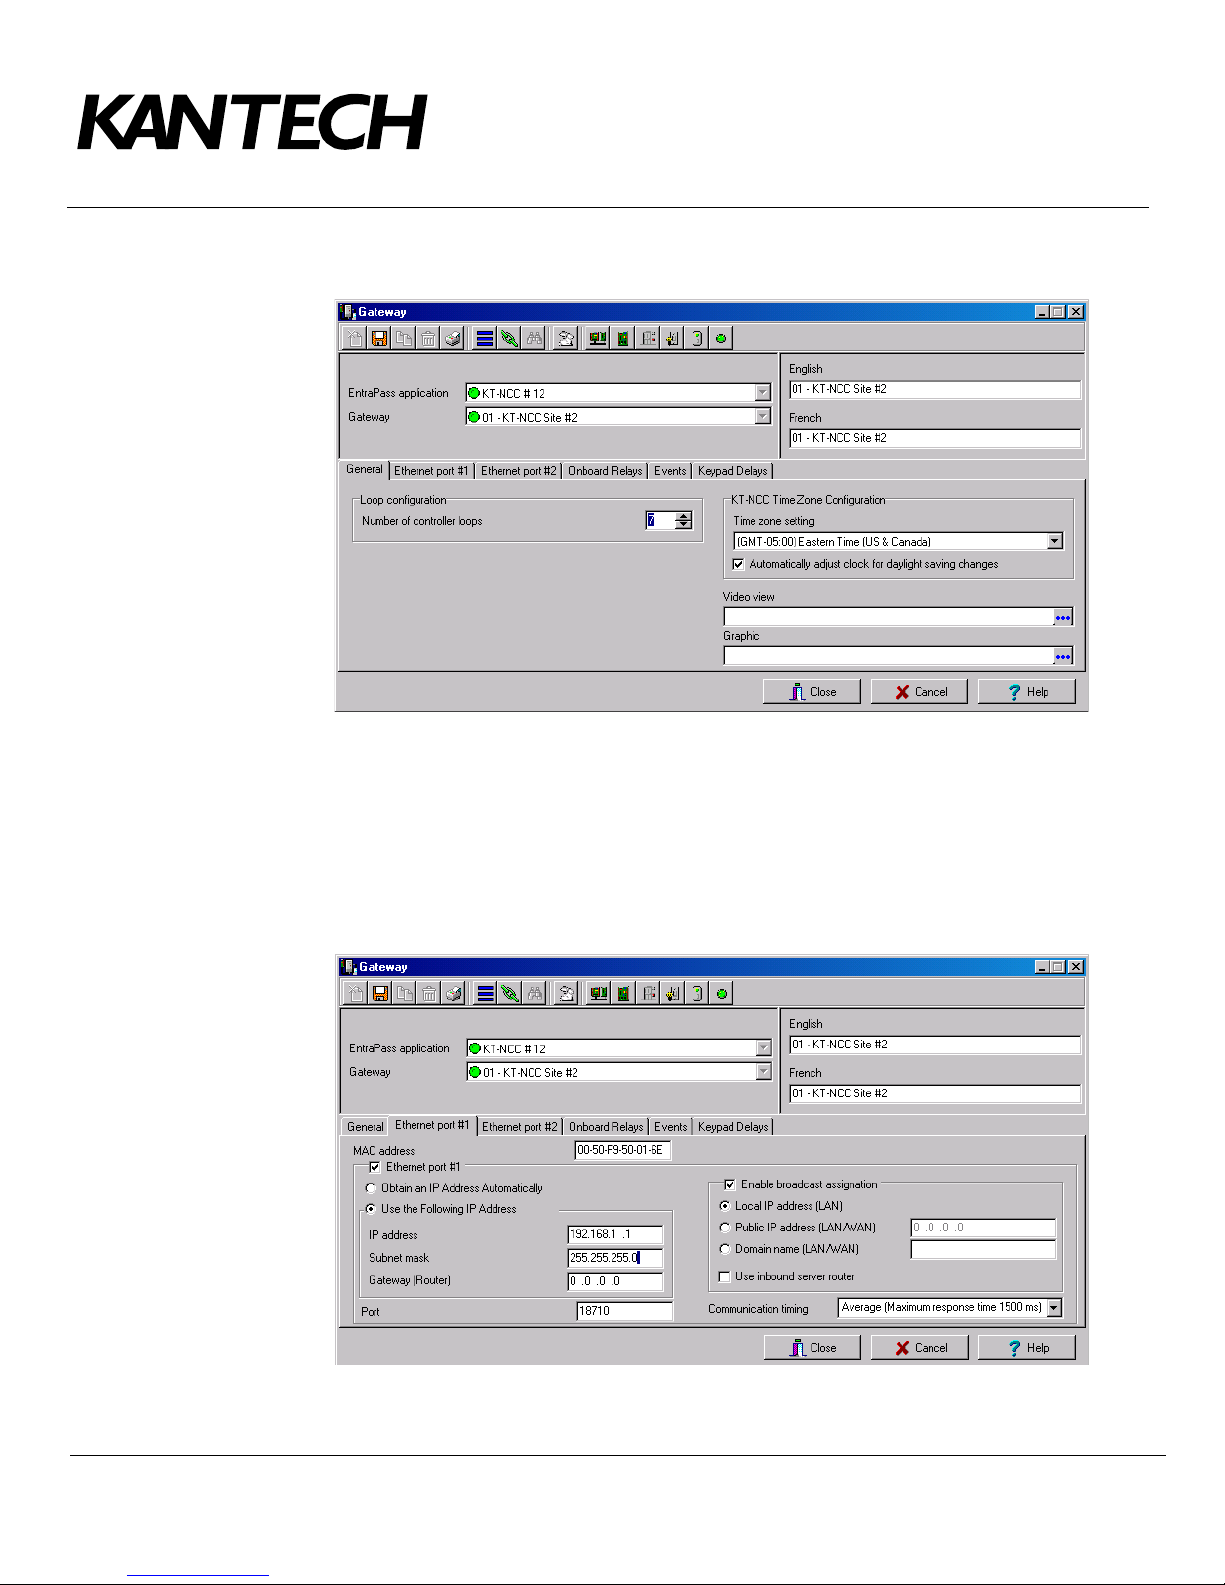
4. Select the General tab:
DN1656-0606
• Enter the Number of controller loops that connect to the KT-NCC. The system supports up to 7
loops (2 RS-485 loops, 1 RS-232 loop and 4 IP loops).
• Configure the
• When necessary, check the box Automatically adjust clock for daylight saving changes.
KT-NCC Time Zone Configurations
Note: It is advisable to check with the Network Administrator if the site where you are installing the
KT-NCC is situated in an area where daylight saving time is in effect.
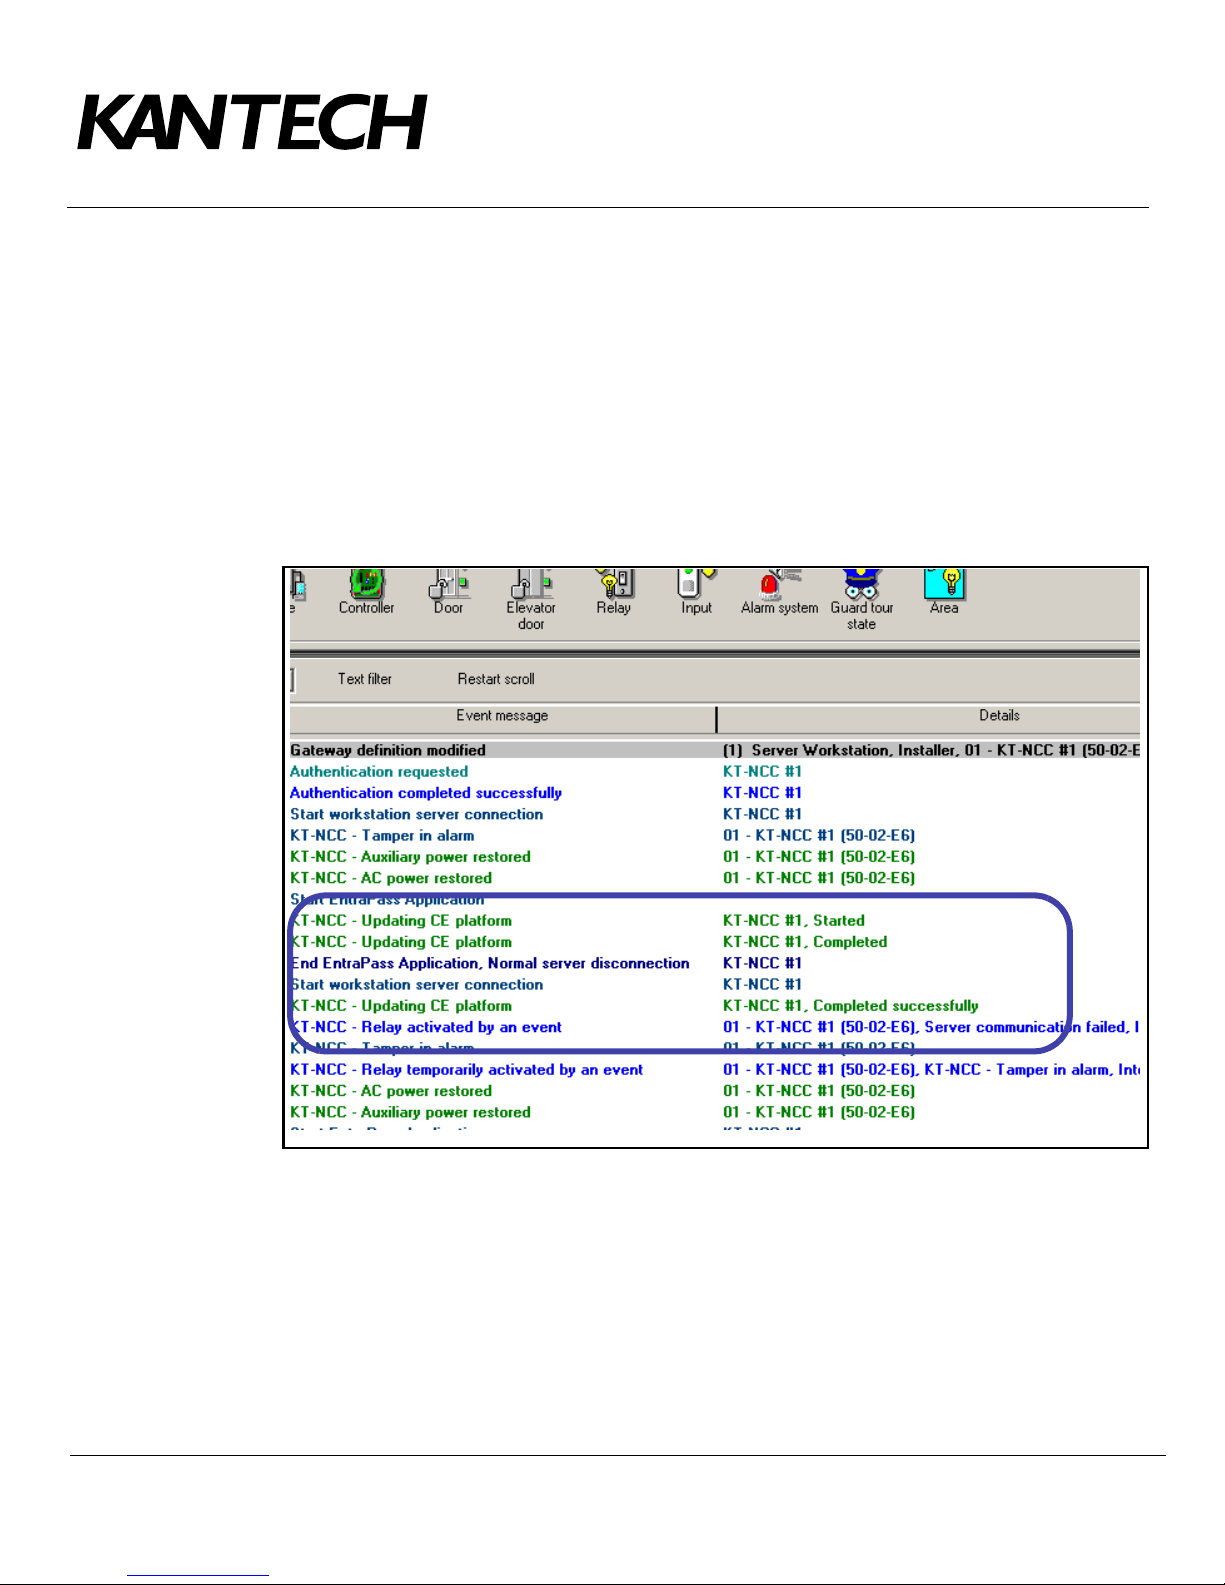
5. Select the Ethernet Port #1 tab.
• Enter the
• Check the box
Telephone: 1 (450) 444-2030 • Toll free: 1 (888) 222-1560 • Fax: 1 (450) 444-2029 • Internet: www.kantech.com
2006 Tyco Safety Products, Canada, Ltd. All rights reserved • Specifications may change without notice
MAC Address of the KT-NCC. (No. 2 in the diagram on page 12).
Ethernet port #1.
page 17 of 39
Page 19
DN1656-0606
• Select the option Use the Following IP Address.
• Enter the IP address of the KT-NCC (No. 4 in the diagram on page 12).
• Enter the
• When necessary, enter the KT-NCC
(No. 6 in the diagram on page 12).
• Port
• The case
• Select the appropriate
6. Click the save icon and close the Gateway dialog.
At this stage, the system checks if the version number of the software and the controller are the same. If not,
the system will automatically update the KT-NCC firmware. Three messages will appear on the EntraPass
workstation list of messages to indicate that the update has been completed.
Subnet mask address (No. 5 in the diagram on page 12).
Gateway address that the Network Administrator provided you
18710 is automatically assigned to the KT-NCC by default. It is advisable not to modify it.
Enable broadcast assignation is selected by default. Leave this option as is.
Communication timings. (Consult Table 2 on page 11).
The messages to lookout for are:
• KT-NCC Update of platform CE - KT-NCC, Started
• KT-NCC Update of platform CE - KT-NCC, Completed
• KT-NCC Update of platform CE - KT-NCC, Completed successfully.
Telephone: 1 (450) 444-2030 • Toll free: 1 (888) 222-1560 • Fax: 1 (450) 444-2029 • Internet: www.kantech.com
2006 Tyco Safety Products, Canada, Ltd. All rights reserved • Specifications may change without notice
page 18 of 39
Page 20
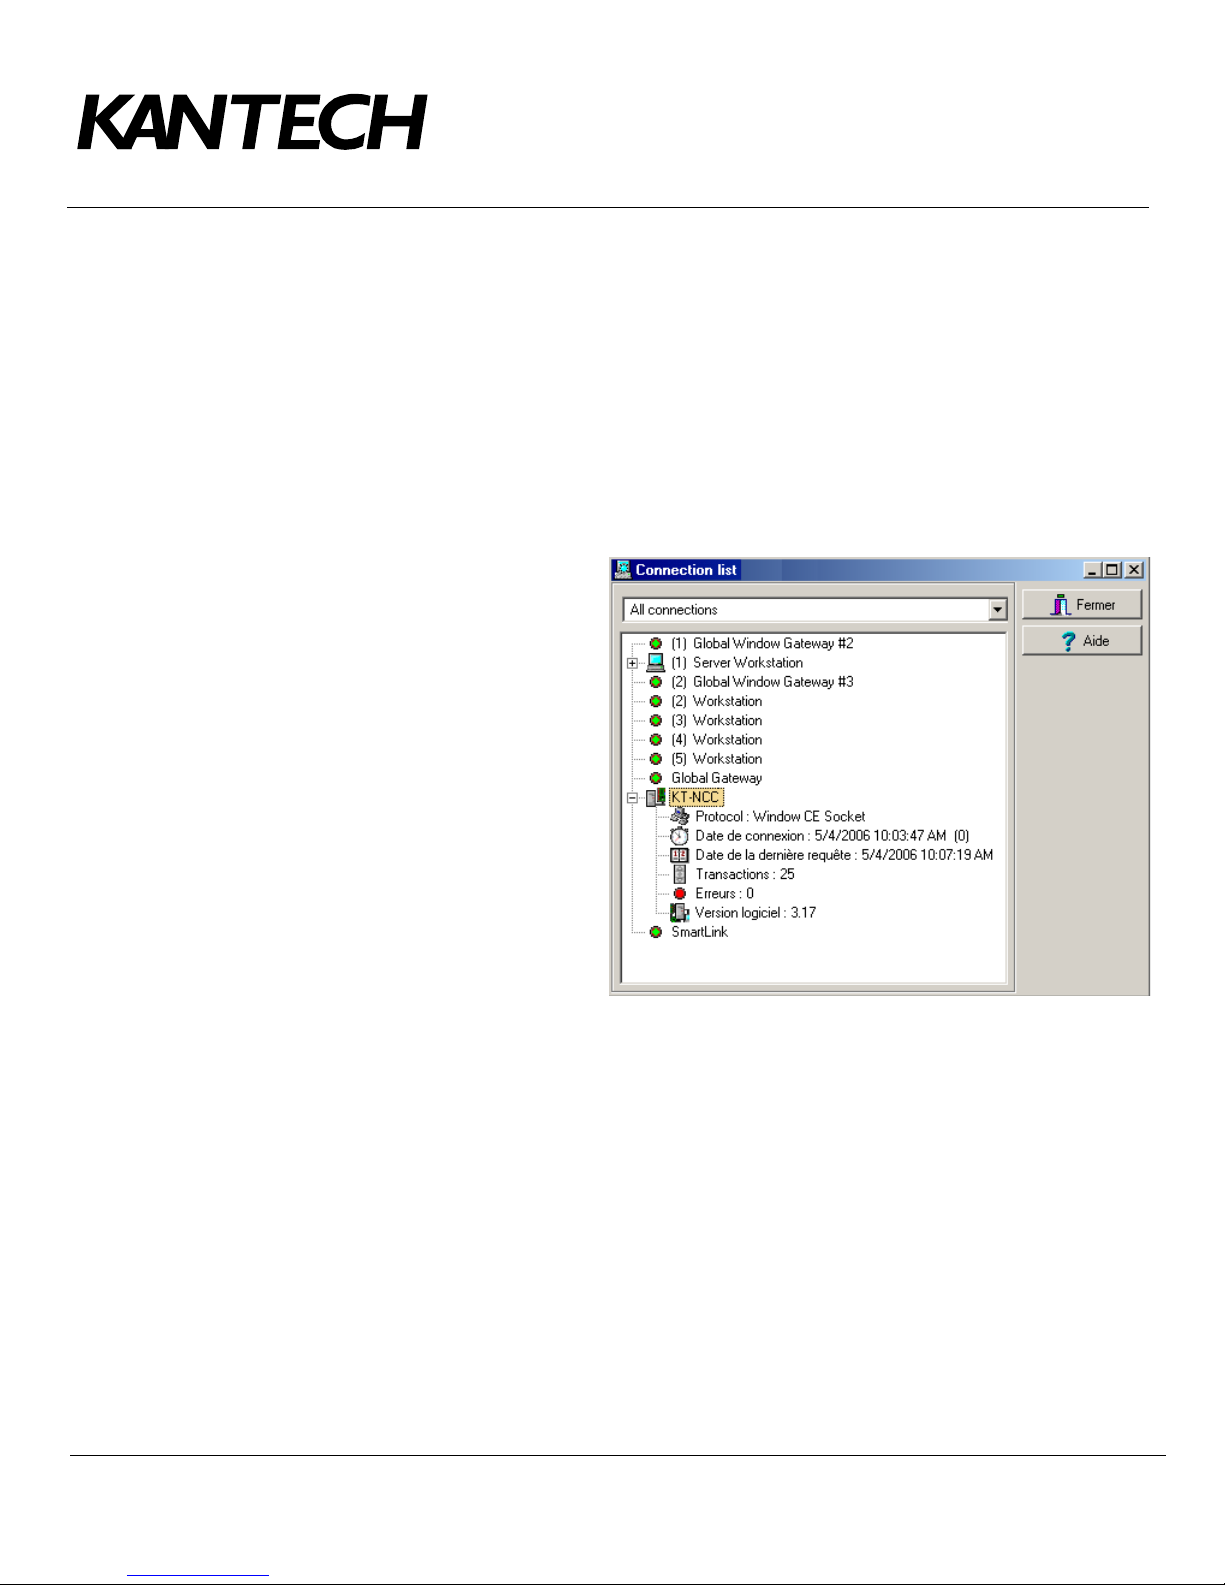
Verifying the Connection Status
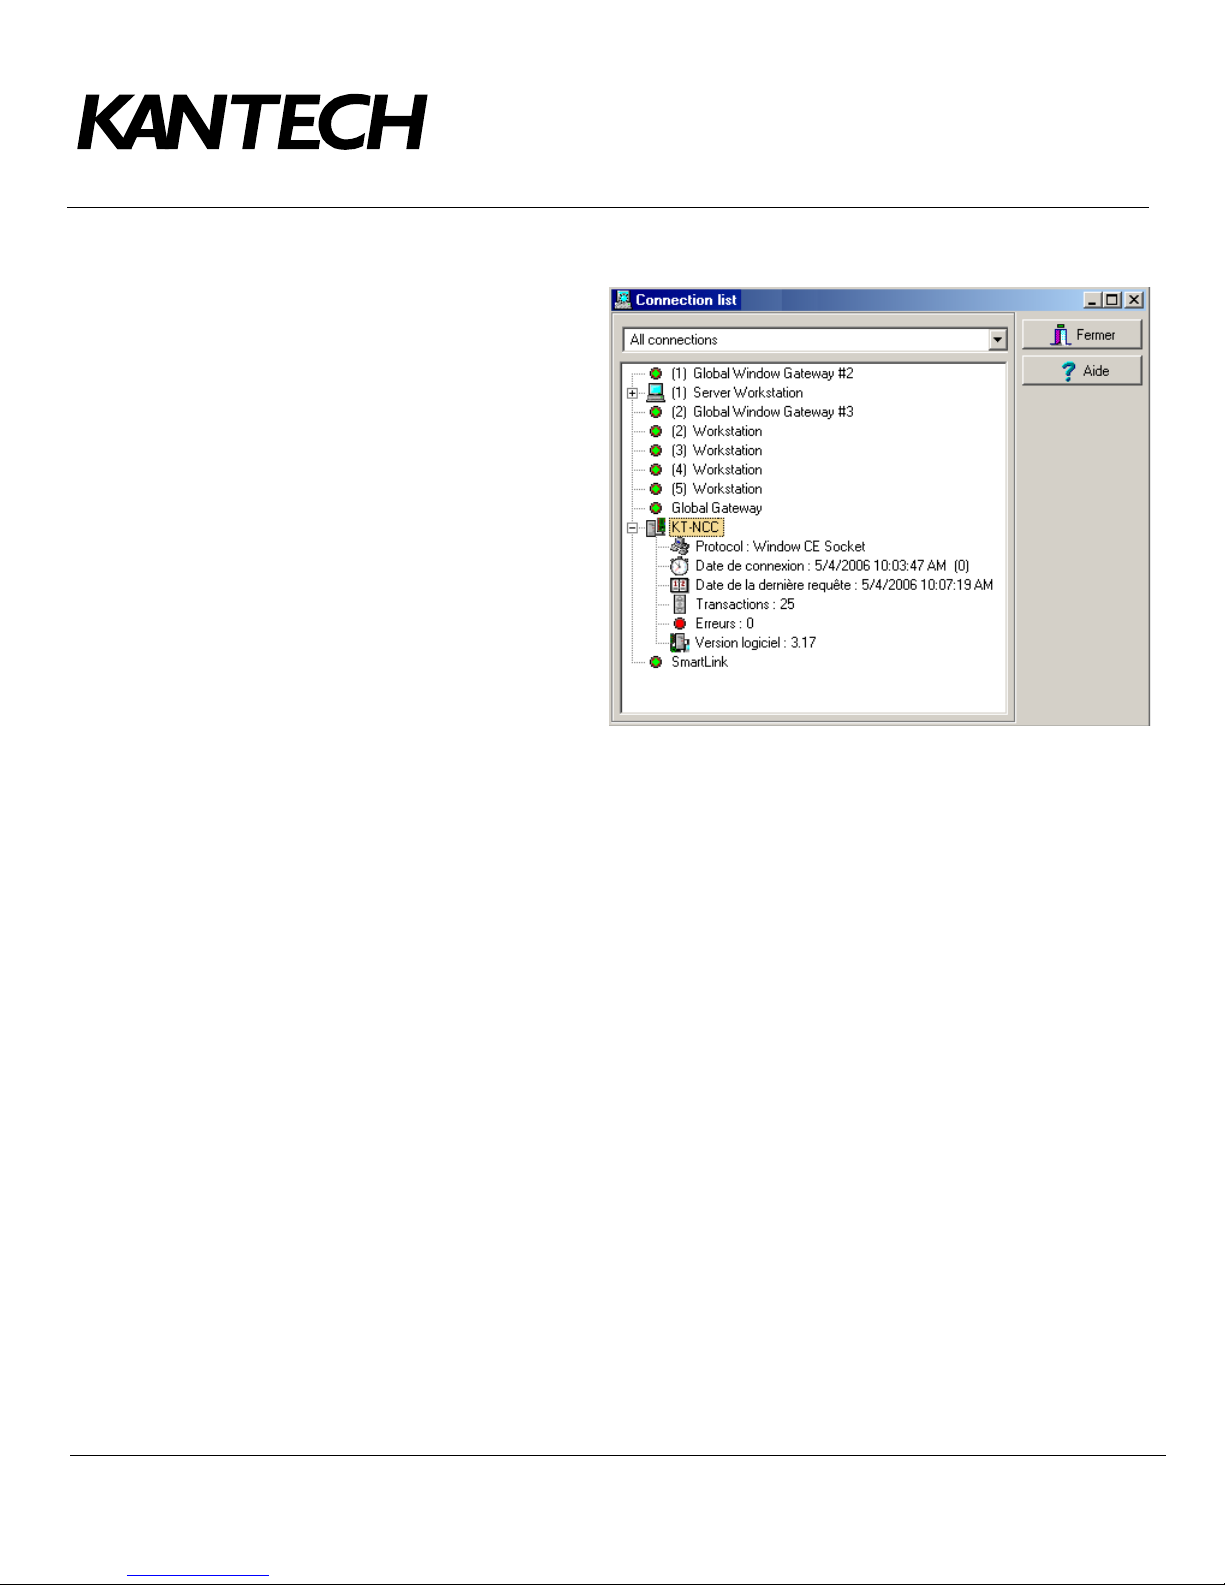
1. In the application EntraPass Global
Edition - Server, open the
Connection list that is found under
the Connection tab, and check the
connection status of the KT-NCC
that you just saved.
The next step will consist in configuring
the system loops. To do so, please
consult Chapter 4 of the EntraPass
Global Edition Reference Guide
DN1316.
DN1656-0606
Telephone: 1 (450) 444-2030 • Toll free: 1 (888) 222-1560 • Fax: 1 (450) 444-2029 • Internet: www.kantech.com
2006 Tyco Safety Products, Canada, Ltd. All rights reserved • Specifications may change without notice
page 19 of 39
Page 21
Configuring the EntraPass DHCP IP Address (LAN)
E
DHCP S
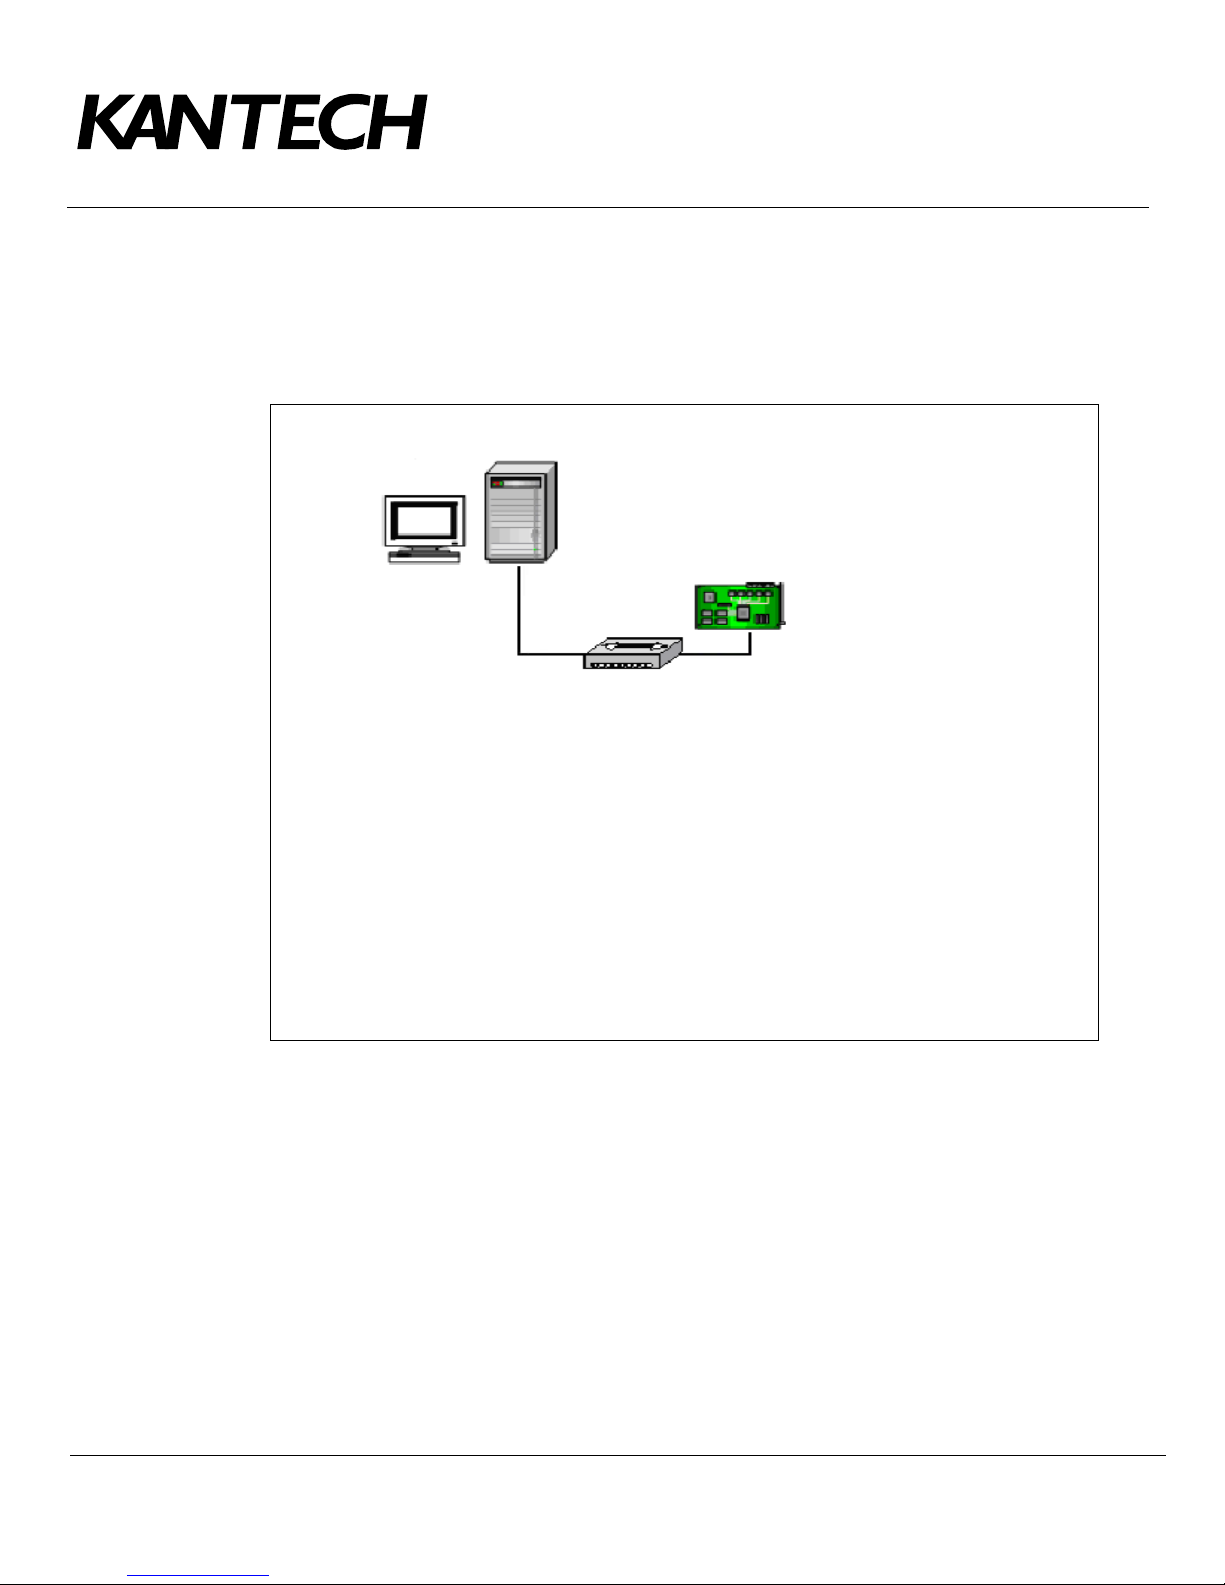
You have determined that the EntraPass DHCP server will automatically assign IP addresses for
communication with the KT-NCC controller(s).
IMPORTANT : You will use the EntraPass DHCP server only when there is no other DHCP server on
the local network in order to avoid serious network conflicts.
DN1656-0606
ntraPass
erver
KT-NCC
Switch
Ethernet Port #1
1 MAC Address: 00-50-F9-_____-_____-_____
2 IP Address: ______.______._______.______
3 Subnet Mask: 255.255.255.0
OR: ____.____.____.____
4 Port: 18710
OR: ________________
Figure 7: Configuration Diagram of the EntraPass DHCP IP Address - LAN
To configure an EntraPass DHCP Address (LAN)
Six steps are required to configure the KT-NCC in a local network with a DHCP address:
• Initialize the KT-NCC in factory reset mode;
• register the KT-NCC on the EntraPass Global Edition server;
• activate the EntraPass DHCP;
• configure the KT-NCC in EntraPass Global Edition;
• connect the KT-NCC to the network;
• check the connection status.
Initializing the KT-NCC in Factory Reset Mode
A factory reset will delete the entire configuration of the KT-NCC, including the IP address. It is advisable to
reinitialize the KT-NCC before starting the configuration.
Telephone: 1 (450) 444-2030 • Toll free: 1 (888) 222-1560 • Fax: 1 (450) 444-2029 • Internet: www.kantech.com
2006 Tyco Safety Products, Canada, Ltd. All rights reserved • Specifications may change without notice
page 20 of 39
Page 22
1. Use needle nose pliers to remove jumpers JP2 and JP3 (see Figure 5: KT-NCC Connections Diagram
on page 9).
2. Press Reset.
3. Reinstall jumpers JP2 and JP3.
Registering the KT-NCC to the EntraPass Global Edition Server
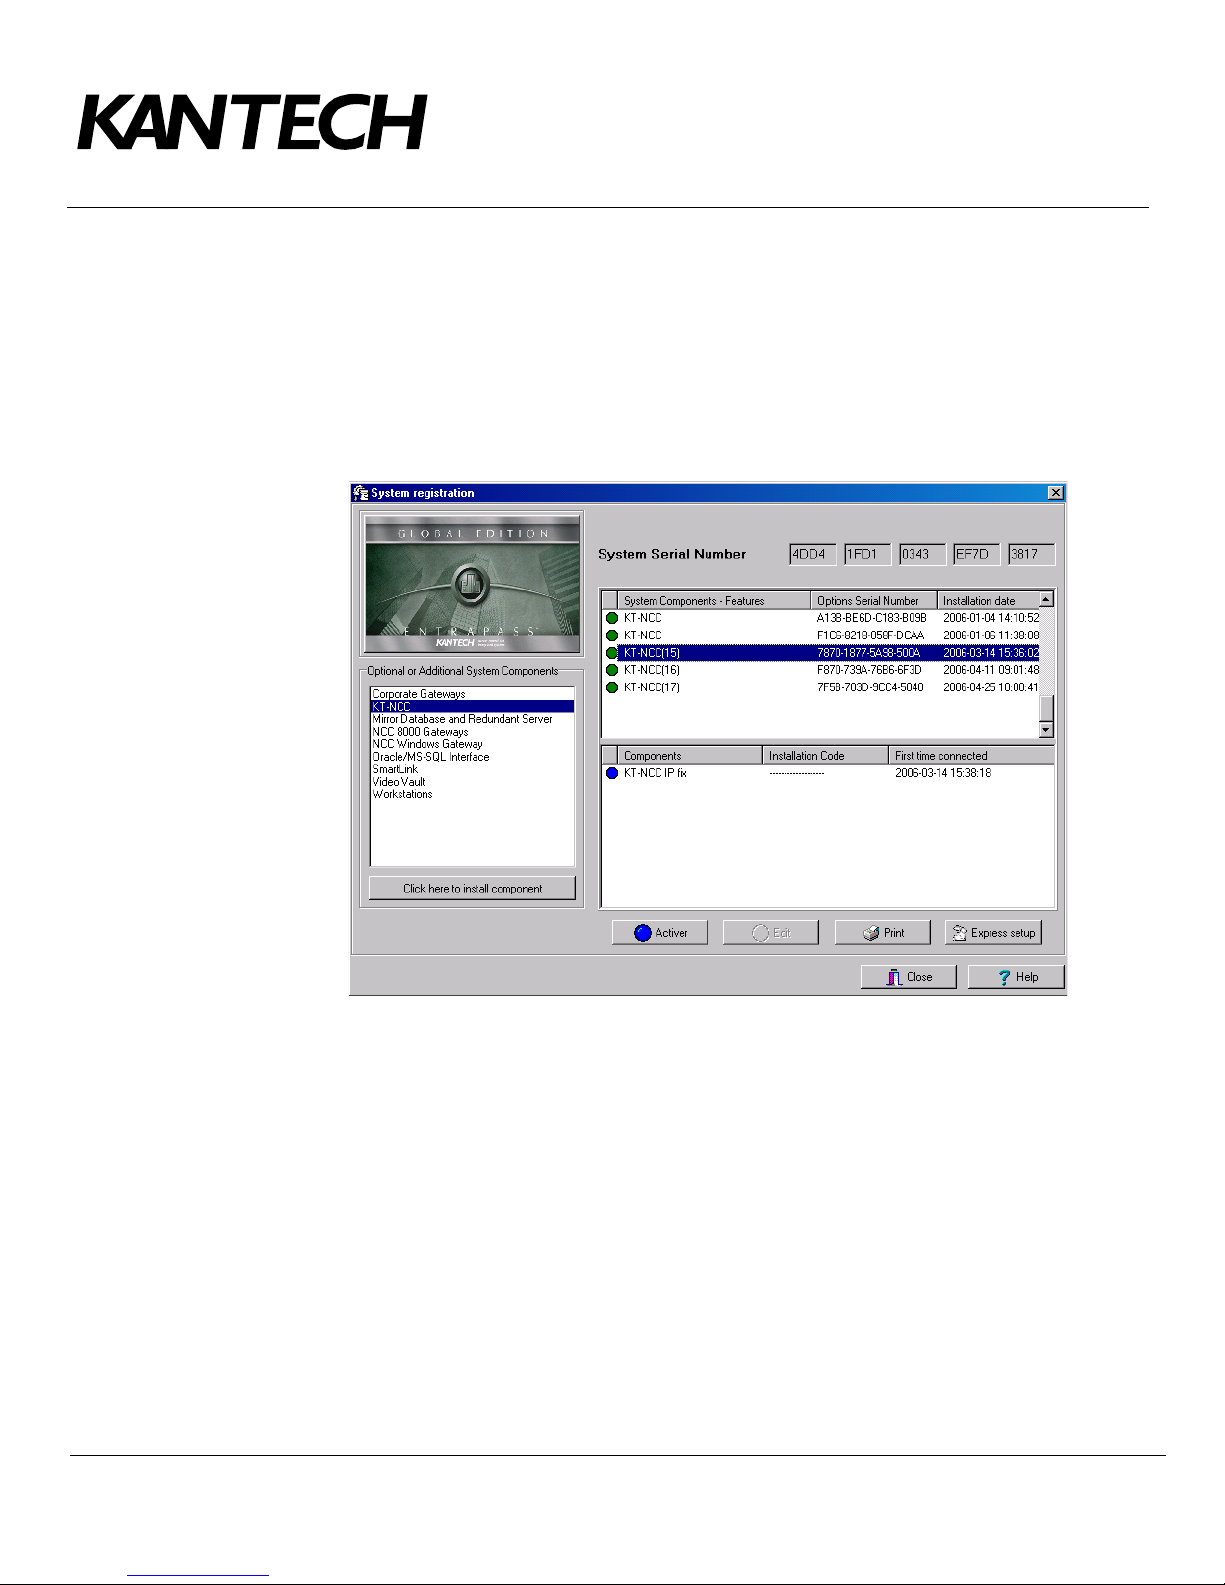
1. In the application EntraPass Global Edition - Server, open the System registration window that is found
under the
Connection tab.
DN1656-0606
Note: It is not necessary to contact the Kantech Technical Support department to register the KT-
NCC in EntraPass Global Edition.
2. In the section Optional or Additional System Components, select KT-NCC.
3. Click here to install Component. The list on the right will display the new KT-NCC preceded by a blue
dot.
4. Select the new KT-NCC component from the list. The Activate button will activate.
5. Click Activate to save the KT-NCC in EntraPass Global Edition.
• The blue dot will change to green and the new KT-NCC controller will be added to the list of
components at the top of the screen.
• The
Edit button will activate to enable you configure the security options and rename the KT-NCC.
6. Close the System registration window.
Telephone: 1 (450) 444-2030 • Toll free: 1 (888) 222-1560 • Fax: 1 (450) 444-2029 • Internet: www.kantech.com
2006 Tyco Safety Products, Canada, Ltd. All rights reserved • Specifications may change without notice
page 21 of 39
Page 23
Activating the EntraPass DHCP
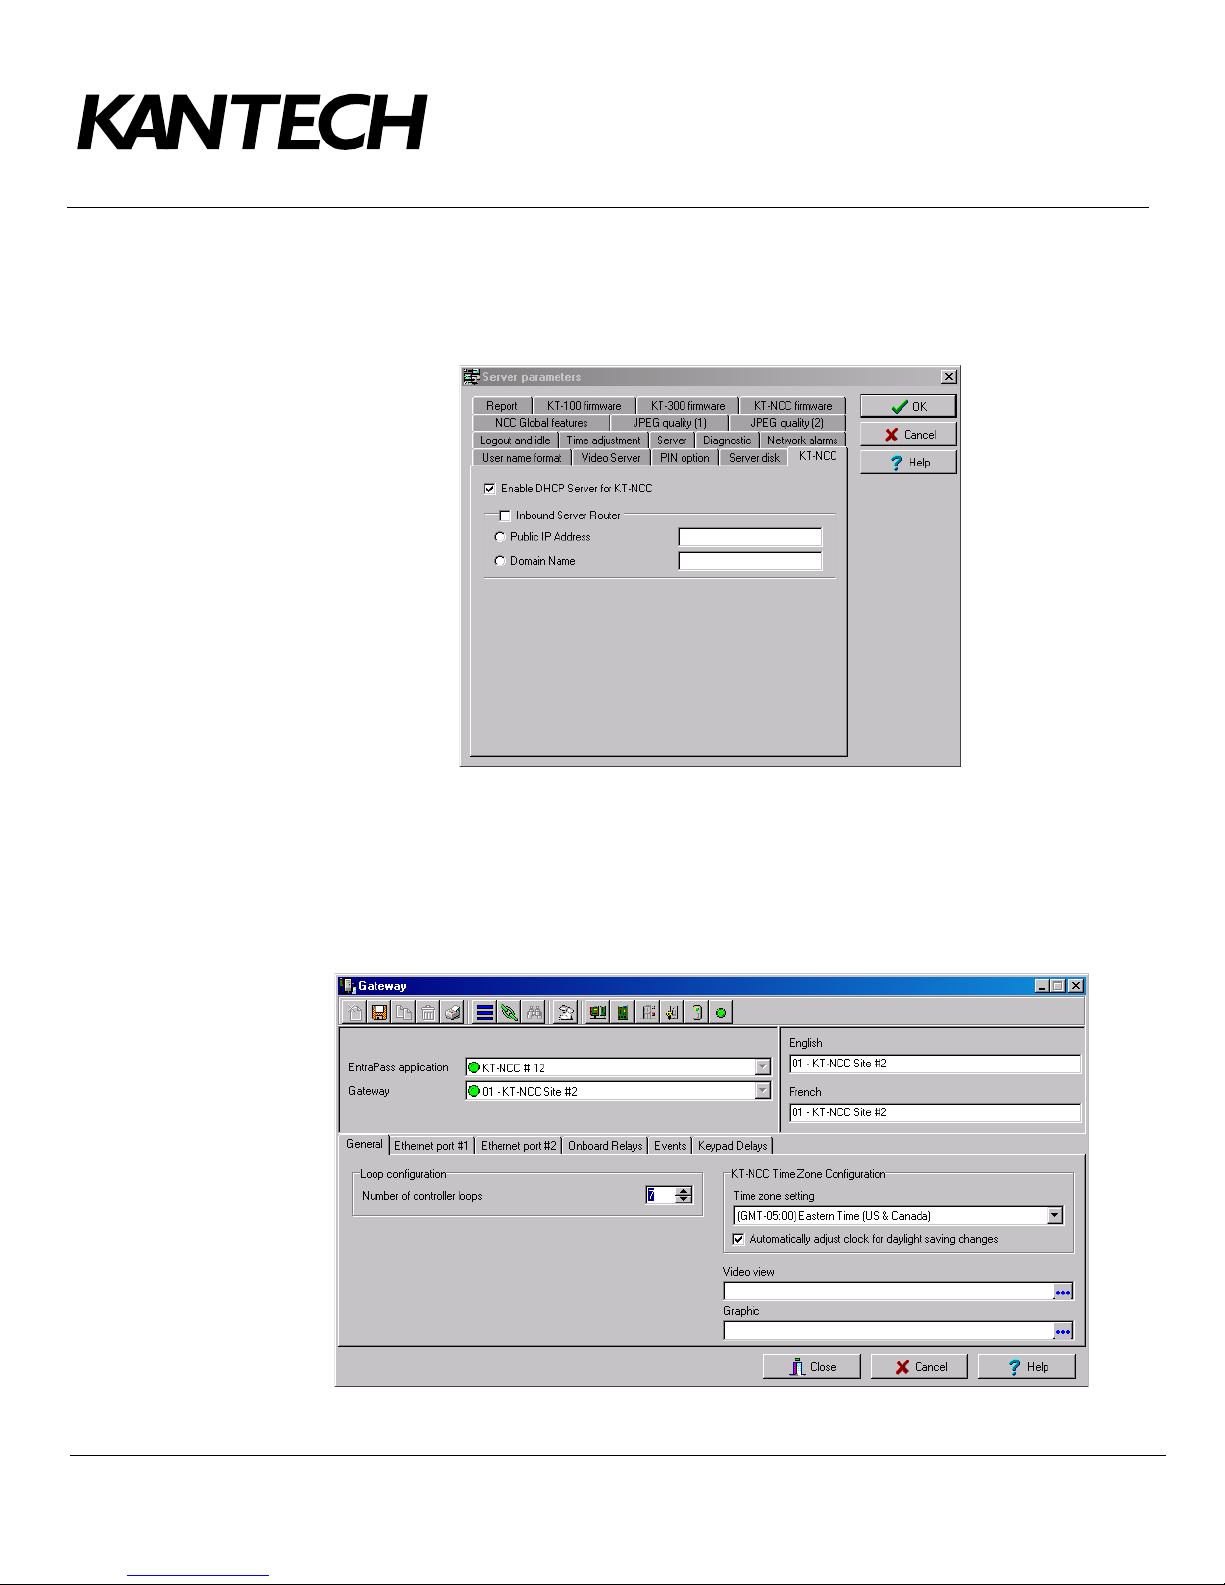
1. In the application EntraPass Global Edition - Server, click the Server parameters icon found under the
Options tab to open the Server parameters window.
DN1656-0606
2. Under the KT-NCC tab, check the box Activate DHCP server for KT-NCC.
3. Click OK to save the configuration and close the dialog.
Configuring the KT-NCC in EntraPass Global Edition
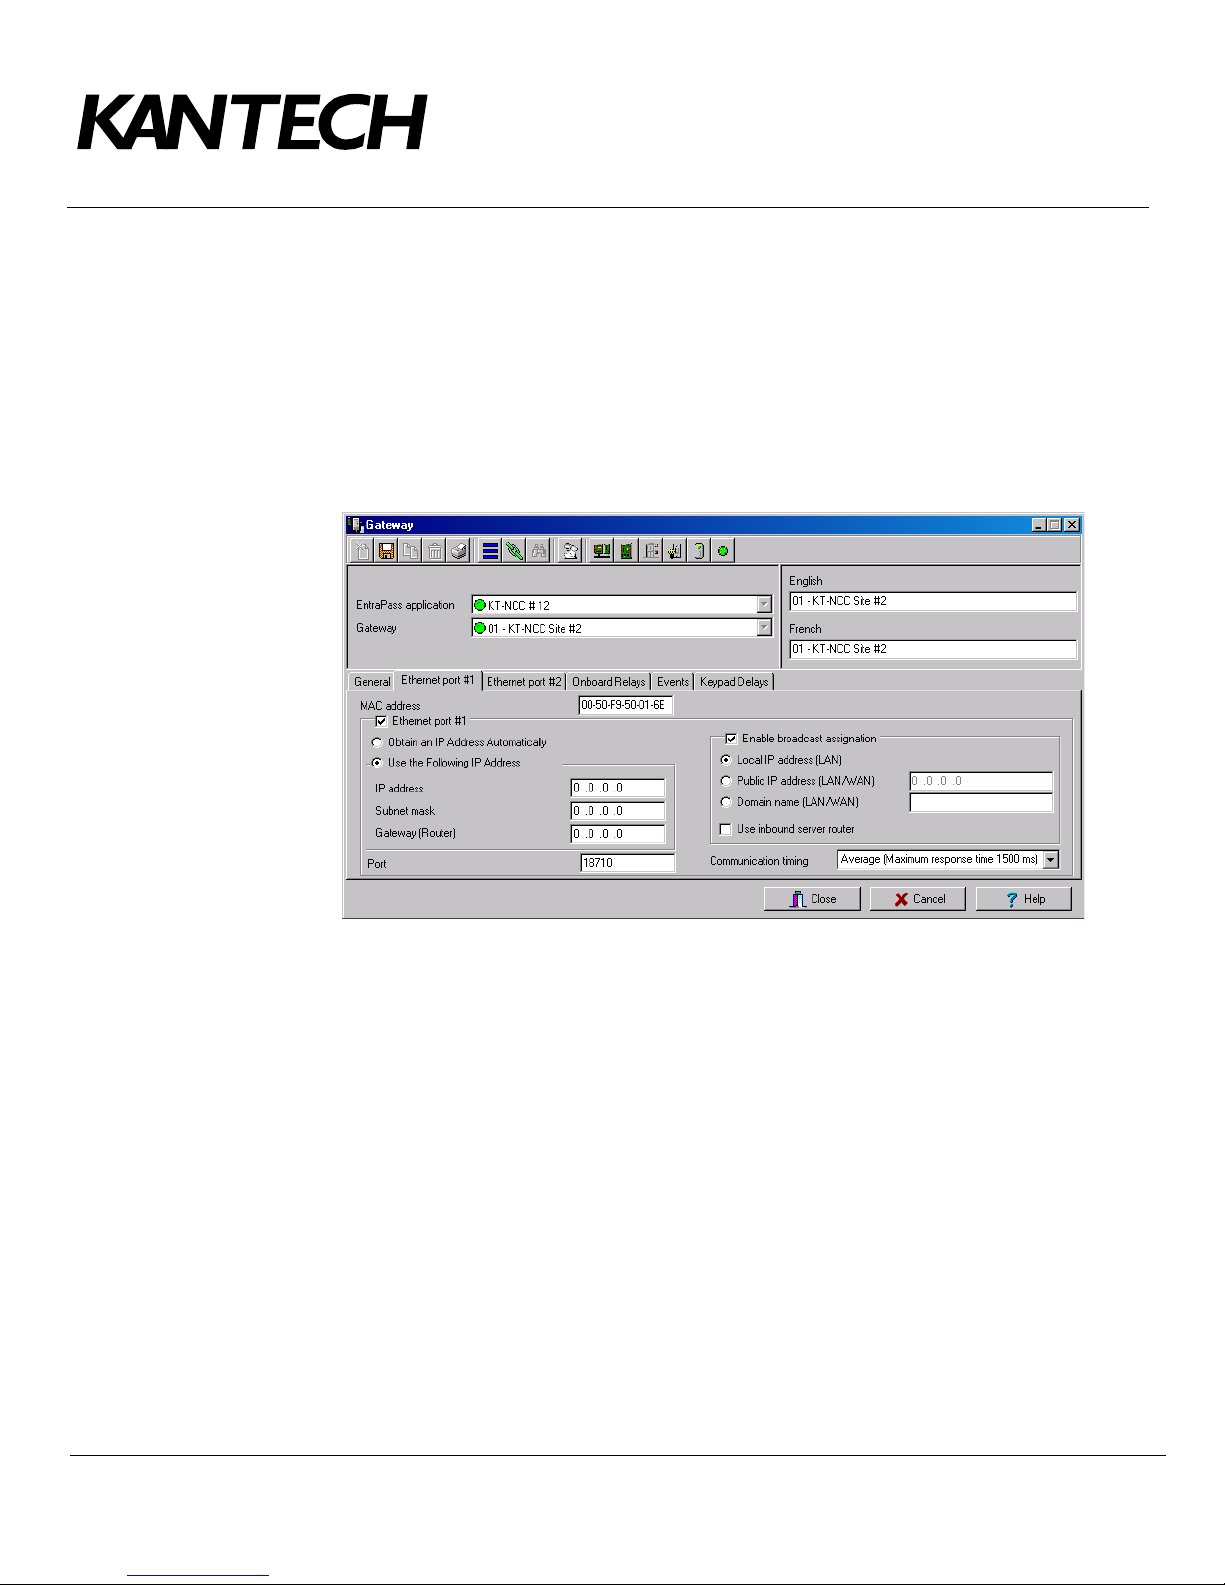
1. In the application EntraPass Global Edition - Workstation, open the Gateway window under the Devices
tab.
2. From the EntraPass Application drop-down list, select the KT-NCC that you just saved in EntraPass.
Telephone: 1 (450) 444-2030 • Toll free: 1 (888) 222-1560 • Fax: 1 (450) 444-2029 • Internet: www.kantech.com
2006 Tyco Safety Products, Canada, Ltd. All rights reserved • Specifications may change without notice
page 22 of 39
Page 24
DN1656-0606
3. From the Gateway(s) drop-down list, select the KT-NCC gateway that you would like to configure.
• You can rename the KT-NCC gateway in the
4. Select the General tab:
• Enter the Number of controller loops that connect to the KT-NCC. The system supports up to 7
loops (2 RS-485 loops, 1 RS-232 loop and 4 IP loops).
• If necessary, check the box
Automatically adjust clock for daylight saving changes.
Note: It is advisable to check with the Network Administrator if the site where you are installing the
KT-NCC is situated in an area where daylight saving time is in effect.
5. Select the Ethernet Port #1 tab. The section Use the Following IP Address will be empty.
French and English fields.
• Enter the MAC Address of the KT-NCC. (No. 1 in the diagram on page 20).
• Check the box Ethernet port #1.
• Select the option
• Enter the KT-NCC
• Enter the KT-NCC
• Port
• The box
• Select the appropriate Communication timing. (Consult Table 2 on page 11).
18710 is automatically assigned to the KT-NCC by default. It is advisable not to modify it.
Enable broadcast assignation is selected by default. Leave this option as is.
Use the following IP Address Automatically.
IP Address (No. 2 in the diagram on page 20).
Subnet mask (No. 3 in the diagram on page 20).
6. Click the save icon.
7. Close the Gateway dialog.
Connecting the KT-NCC to the Network
1. Connect the KT-NCC to the network via KT-NCC Ethernet port #1. The KT-NCC will place a request to
obtain the IP address of the EntraPass DHCP server automatically.
• The blue pilot light (Vital LED) of the KT-NCC will blink quickly to signal that the controller is in
reset mode.
• The blue pilot light (Vital LED) of the KT-NCC will remain lit for 15 seconds to signal that the
controller is in startup mode.
Telephone: 1 (450) 444-2030 • Toll free: 1 (888) 222-1560 • Fax: 1 (450) 444-2029 • Internet: www.kantech.com
2006 Tyco Safety Products, Canada, Ltd. All rights reserved • Specifications may change without notice
page 23 of 39
Page 25
DN1656-0606
• The blue pilot light (Vital LED) of the KT-NCC will blink once/second to signal that it is
communicating with the server.
Note: For details, refer to Flash Patterns of the LED Indicator on page 10
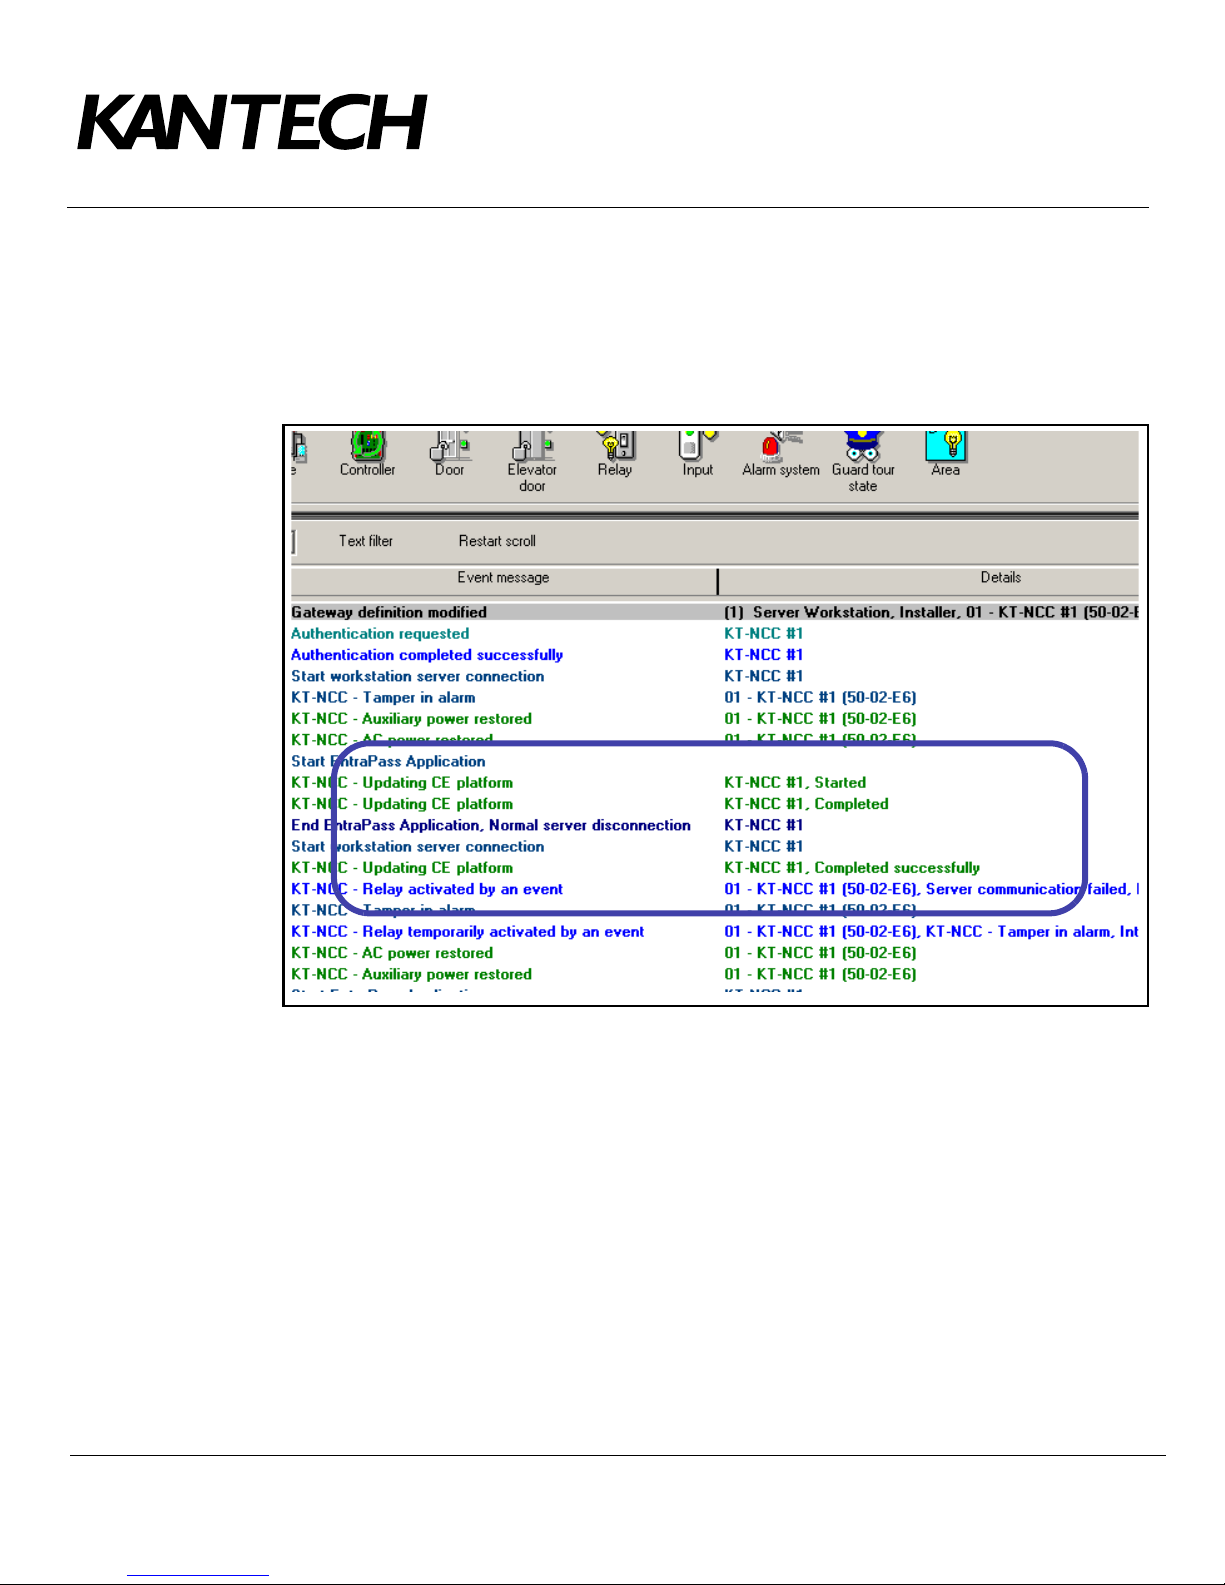
At this stage, the system checks if the version number of the software and controller are the same. If not, the
system updates the KT-NCC firmware automatically. Three messages will appear on the list of messages of
the EntraPass workstation to indicate that the update has been completed.
The messages to lookout for are:
• KT-NCC Update of platform CE - KT-NCC, Started
• KT-NCC Update of platform CE - KT-NCC, Completed
• KT-NCC Update of platform CE - KT-NCC, Successfully completed.
Telephone: 1 (450) 444-2030 • Toll free: 1 (888) 222-1560 • Fax: 1 (450) 444-2029 • Internet: www.kantech.com
2006 Tyco Safety Products, Canada, Ltd. All rights reserved • Specifications may change without notice
page 24 of 39
Page 26
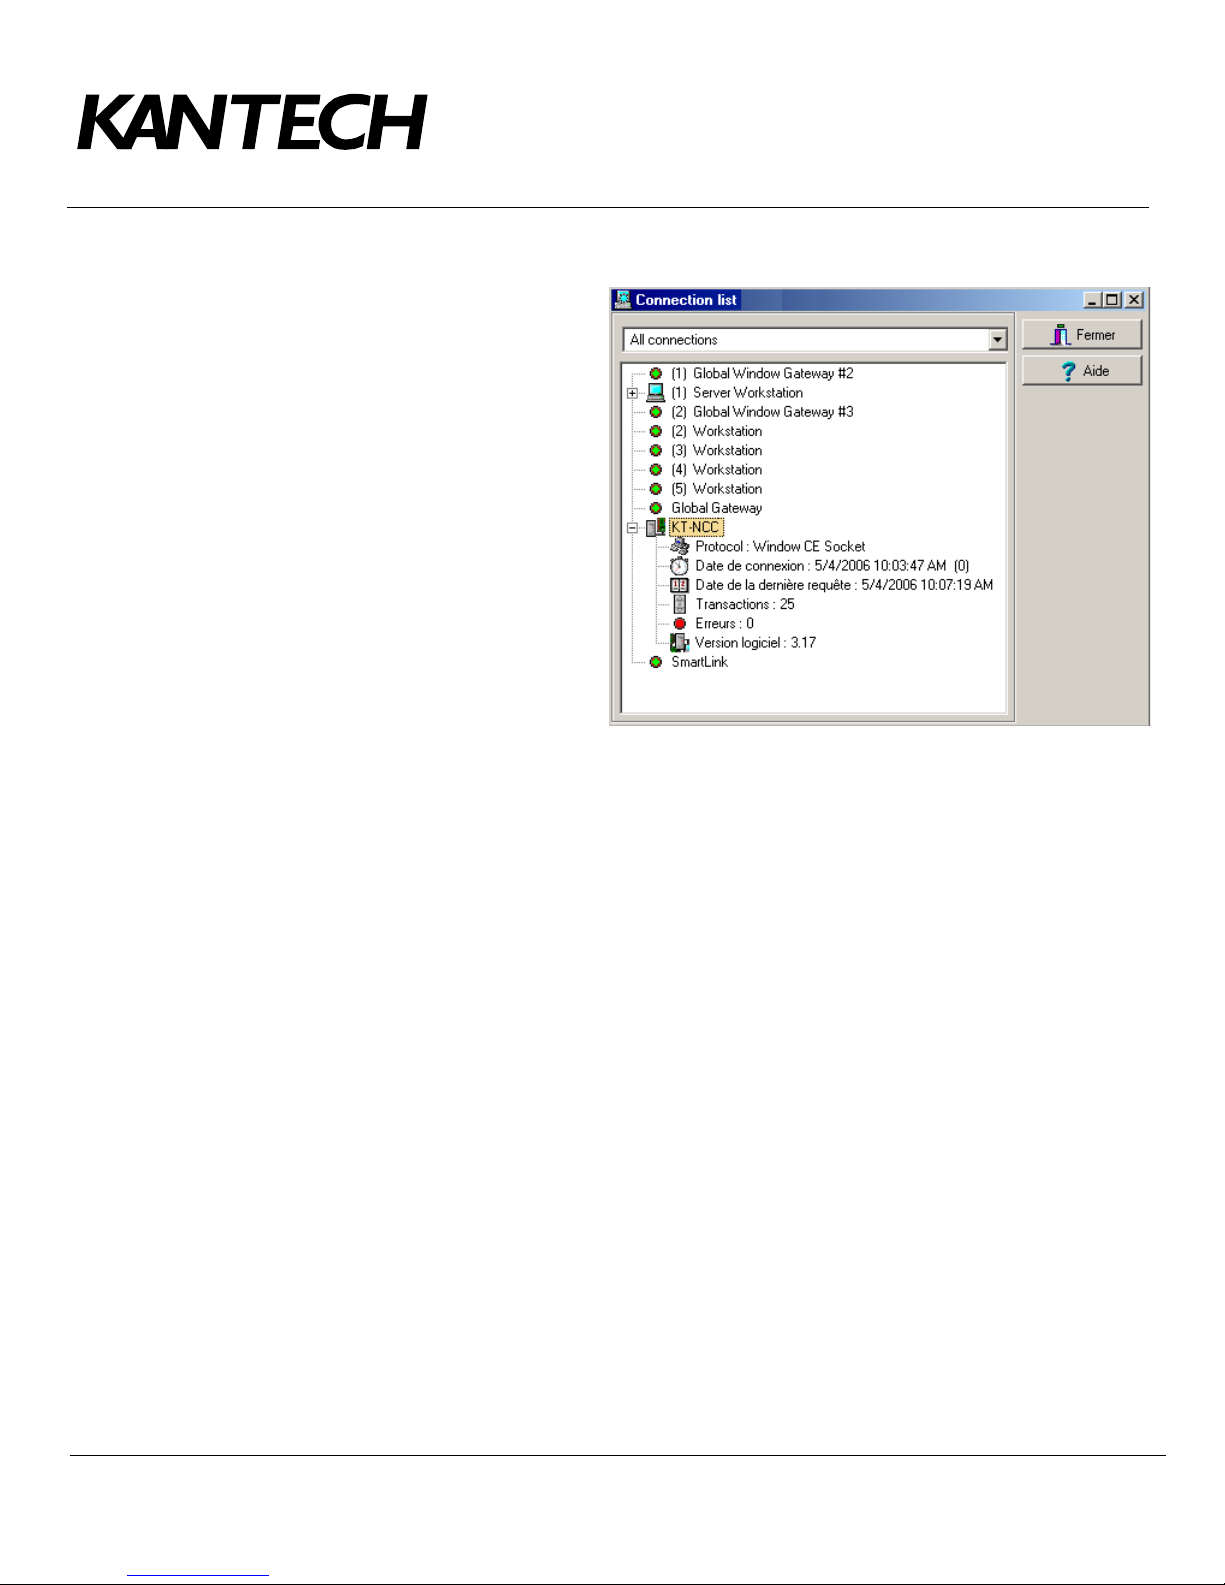
Verifying the Connection Status
1. In the application EntraPass Global
Edition - Server, open the List of
connections that is found under the
Connection tab, and check the
connection status of the KT-NCC
that you just saved.
The next step will consist in configuring
the system loops. For this, please
consult Chapter 4 of the EntraPass
Global Edition Reference Guide
DN1289.
DN1656-0606
Telephone: 1 (450) 444-2030 • Toll free: 1 (888) 222-1560 • Fax: 1 (450) 444-2029 • Internet: www.kantech.com
2006 Tyco Safety Products, Canada, Ltd. All rights reserved • Specifications may change without notice
page 25 of 39
Page 27
Configuring a Enterprise DHCP IP Address (LAN)
You have determined that the Enterprise DHCP server will assign IP addresses automatically for
communication with the KT-NCC controller(s).
Note: We suggest the use of a reserved IP address for the MAC address of the KT-NCC.
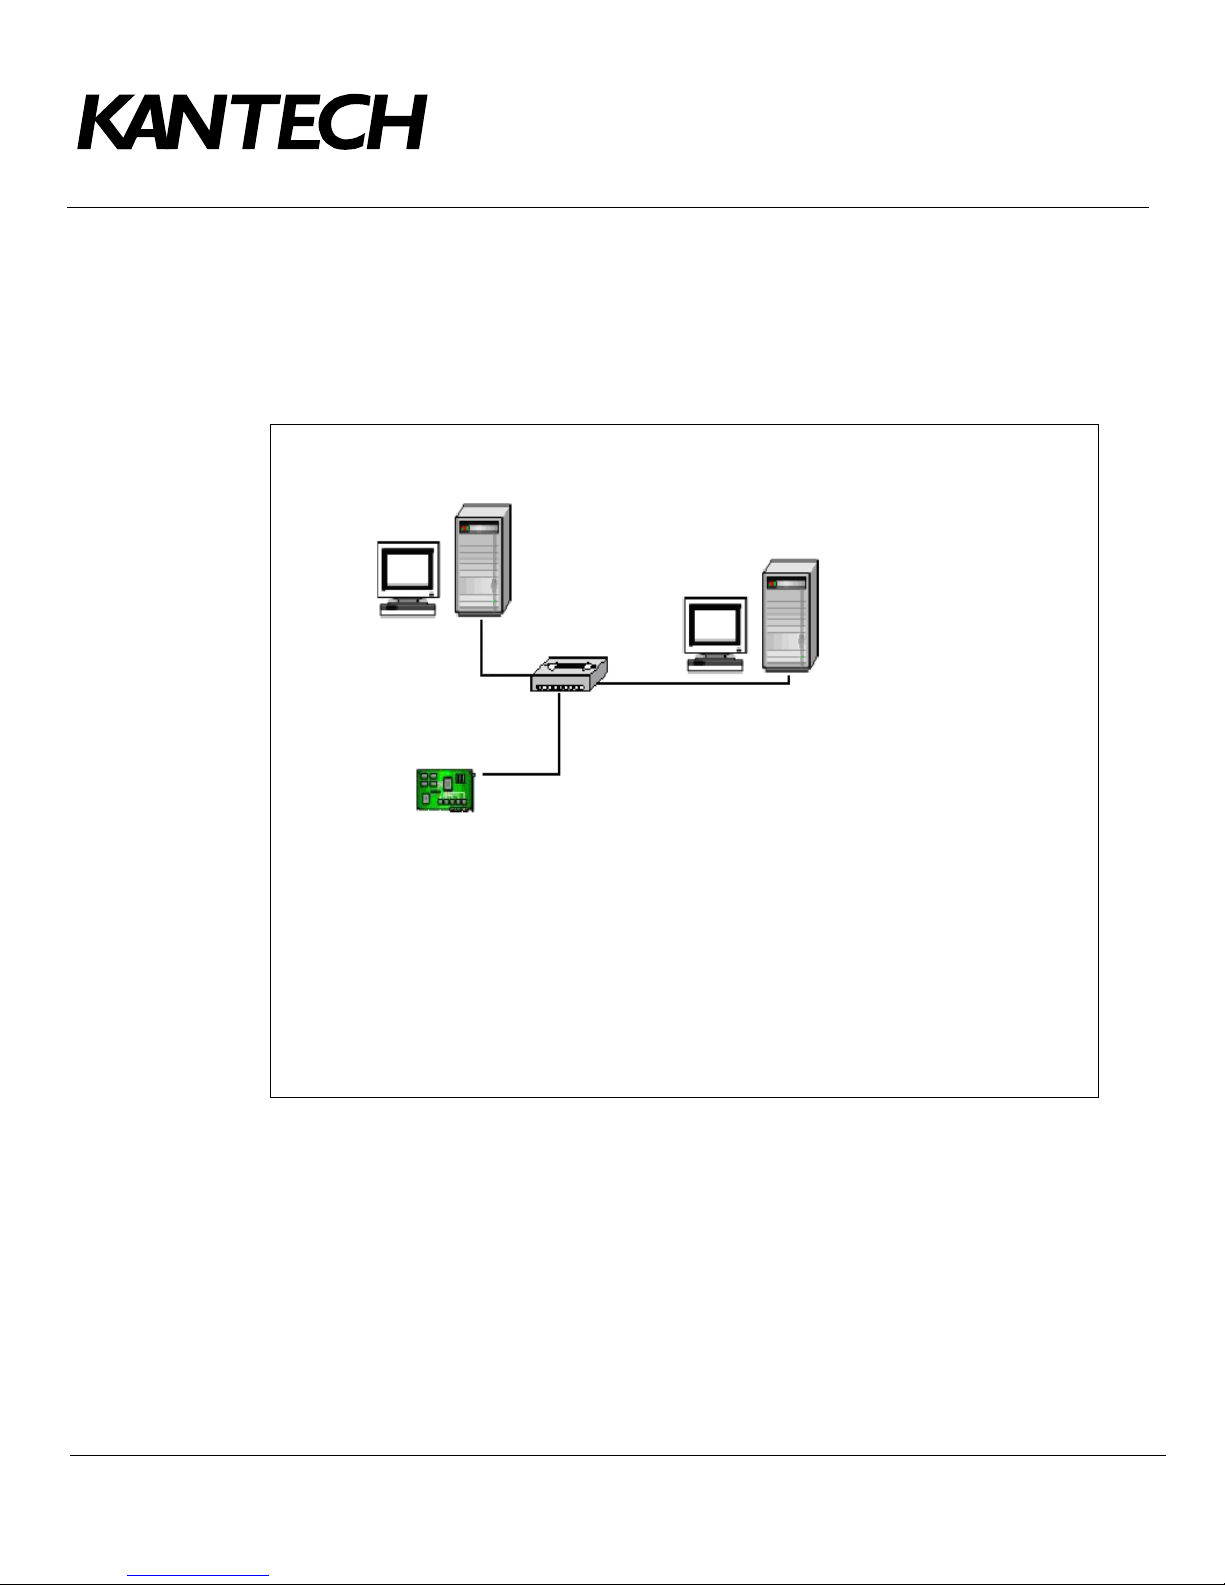
EntraPass Server
Enterprise DHCP Server
Already installed
DN1656-0606
KT-NCC
Ethernet Port #1
1 MAC Address: 00-50-F9-_____-_____-_____
2 KT-NCC IP Address: ______-______-_______-______
3 Subnet Mask: 255.255.255.0 OR ____.____.____.____
4 Port: 18710 OR ___________________
Figure 8: Configuration Diagram for Enterprise DHCP IP Address - LAN
To configure a Enterprise DHCP address (LAN)
Five steps are required to configure the KT-NCC in a local network with a DHCP address:
• Initialize the KT-NCC in factory reset mode.
• connect the KT-NCC to the network.
• register the KT-NCC to the EntraPass Global Edition server.
• configure the KT-NCC in EntraPass Global Edition.
• check the connection status.
Initializing the KT-NCC in Factory Reset Mode
A factory reset will delete all configurations of the KT-NCC, including the IP address. We recommend that you
reinitialize the KT-NCC before starting the configuration.
Telephone: 1 (450) 444-2030 • Toll free: 1 (888) 222-1560 • Fax: 1 (450) 444-2029 • Internet: www.kantech.com
2006 Tyco Safety Products, Canada, Ltd. All rights reserved • Specifications may change without notice
page 26 of 39
Page 28
1. Use needle nose pliers to remove jumpers JP2 and JP3 (see Figure 5: KT-NCC Connections Diagram
on page 9).
2. Press Reset.
3. Reinstall jumpers JP2 and JP3.
Connecting the KT-NCC to the Network
1. Connect the KT-NCC to the network via Ethernet port #1 of the KT-NCC. The KT-NCC will place a DHCP
request to obtain an IP address.
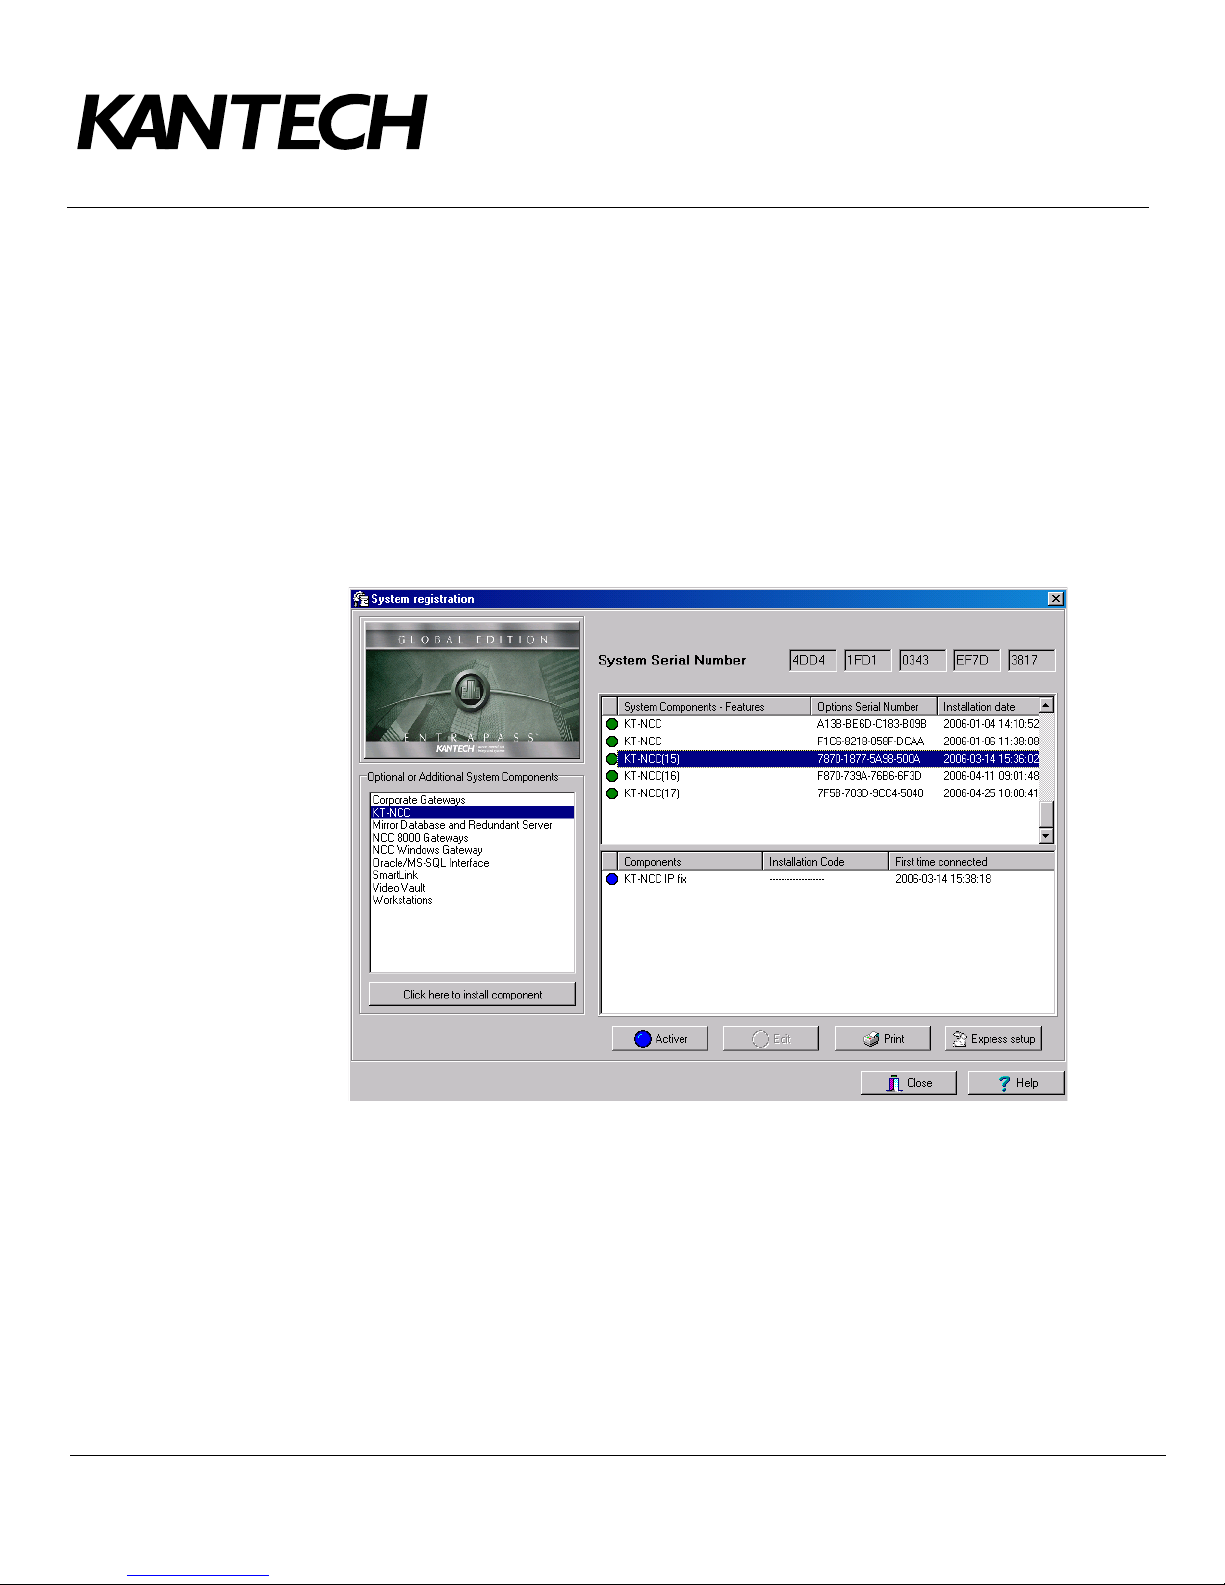
Registering the KT-NCC to the EntraPass Global Edition Server
1. In the application EntraPass Global Edition - Workstation, open the Gateway window found under the
Devices tab.
DN1656-0606
Note: It is not necessary to contact the Kantech Technical Support department to register the KT-
NCC in EntraPass Global Edition.
2. In the section Optional or Additional System Components, select KT-NCC.
3. Click here to install component. The list on the right will display the new KT-NCC preceded by a blue
dot.
4. Select the new KT-NCC component from the list. The Activate button will activate.
5. Click Activate to save the KT-NCC in EntraPass Global Edition.
• The blue dot will change to green and the new KT-NCC controller will be added to the list of
components at the top of the screen.
• The
Edit button will activate to enable you configure the security options and rename the KT-NCC.
6. Close the System registration window.
Telephone: 1 (450) 444-2030 • Toll free: 1 (888) 222-1560 • Fax: 1 (450) 444-2029 • Internet: www.kantech.com
2006 Tyco Safety Products, Canada, Ltd. All rights reserved • Specifications may change without notice
page 27 of 39
Page 29
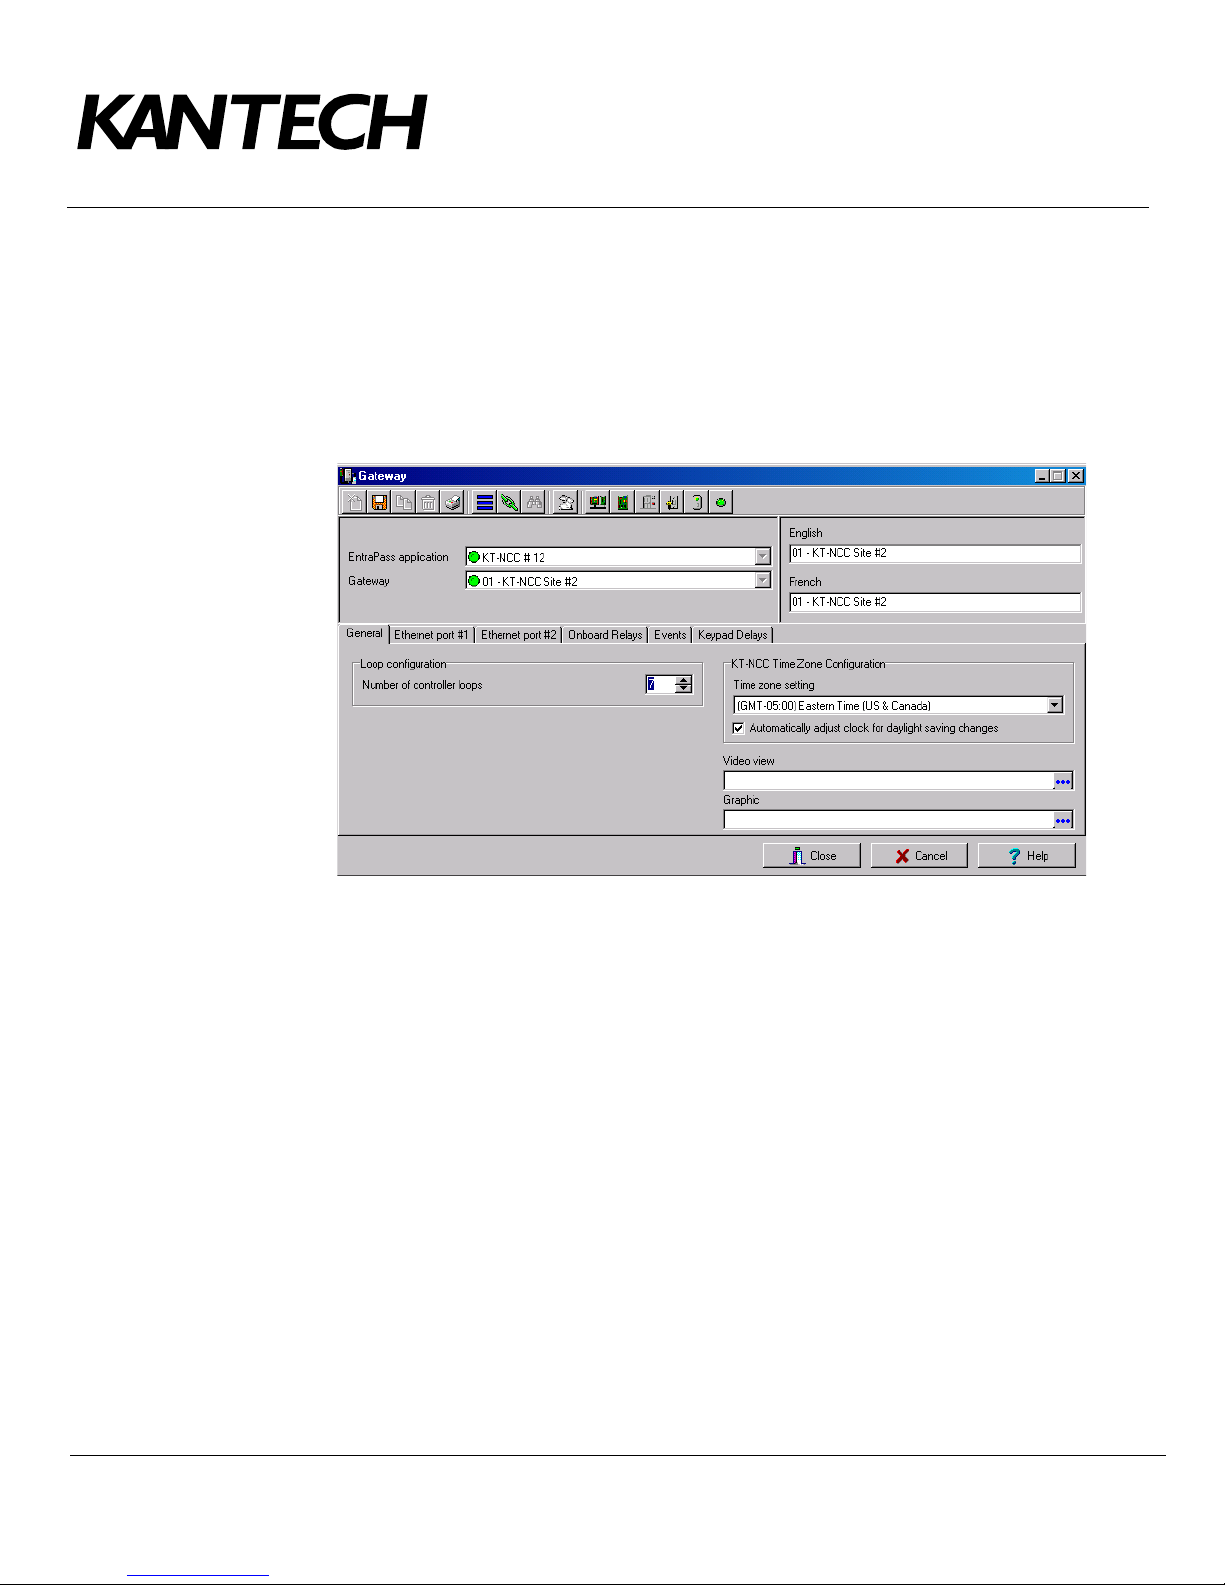
Configuring the KT-NCC in EntraPass Global Edition
1. In the application EntraPass Global Edition - Workstation, open the Gateway window found under the
Devices tab.
2. From the EntraPass Application drop-down list, select the KT-NCC that you just saved in EntraPass.
3. From the Gateway(s) drop-down list, select the KT-NCC gateway that you would like to configure.
• You can rename the KT-NCC gateway in the French and English fields.
4. Select the General tab:
DN1656-0606
• Enter the Number of controller loops that connect to the KT-NCC. The system supports up to 7
loops (2 RS-485 loops, 1 RS-232 loop and 4 IP loops).
• Configure the KT-NCC
• When necessary, check the box
Time Zone Configuration.
Automatically adjust clock for daylight saving changes.
Note: It is advisable to check with the Network Administrator if the site where you are installing the
KT-NCC is situated in an area where daylight saving time is in effect.
Telephone: 1 (450) 444-2030 • Toll free: 1 (888) 222-1560 • Fax: 1 (450) 444-2029 • Internet: www.kantech.com
2006 Tyco Safety Products, Canada, Ltd. All rights reserved • Specifications may change without notice
page 28 of 39
Page 30
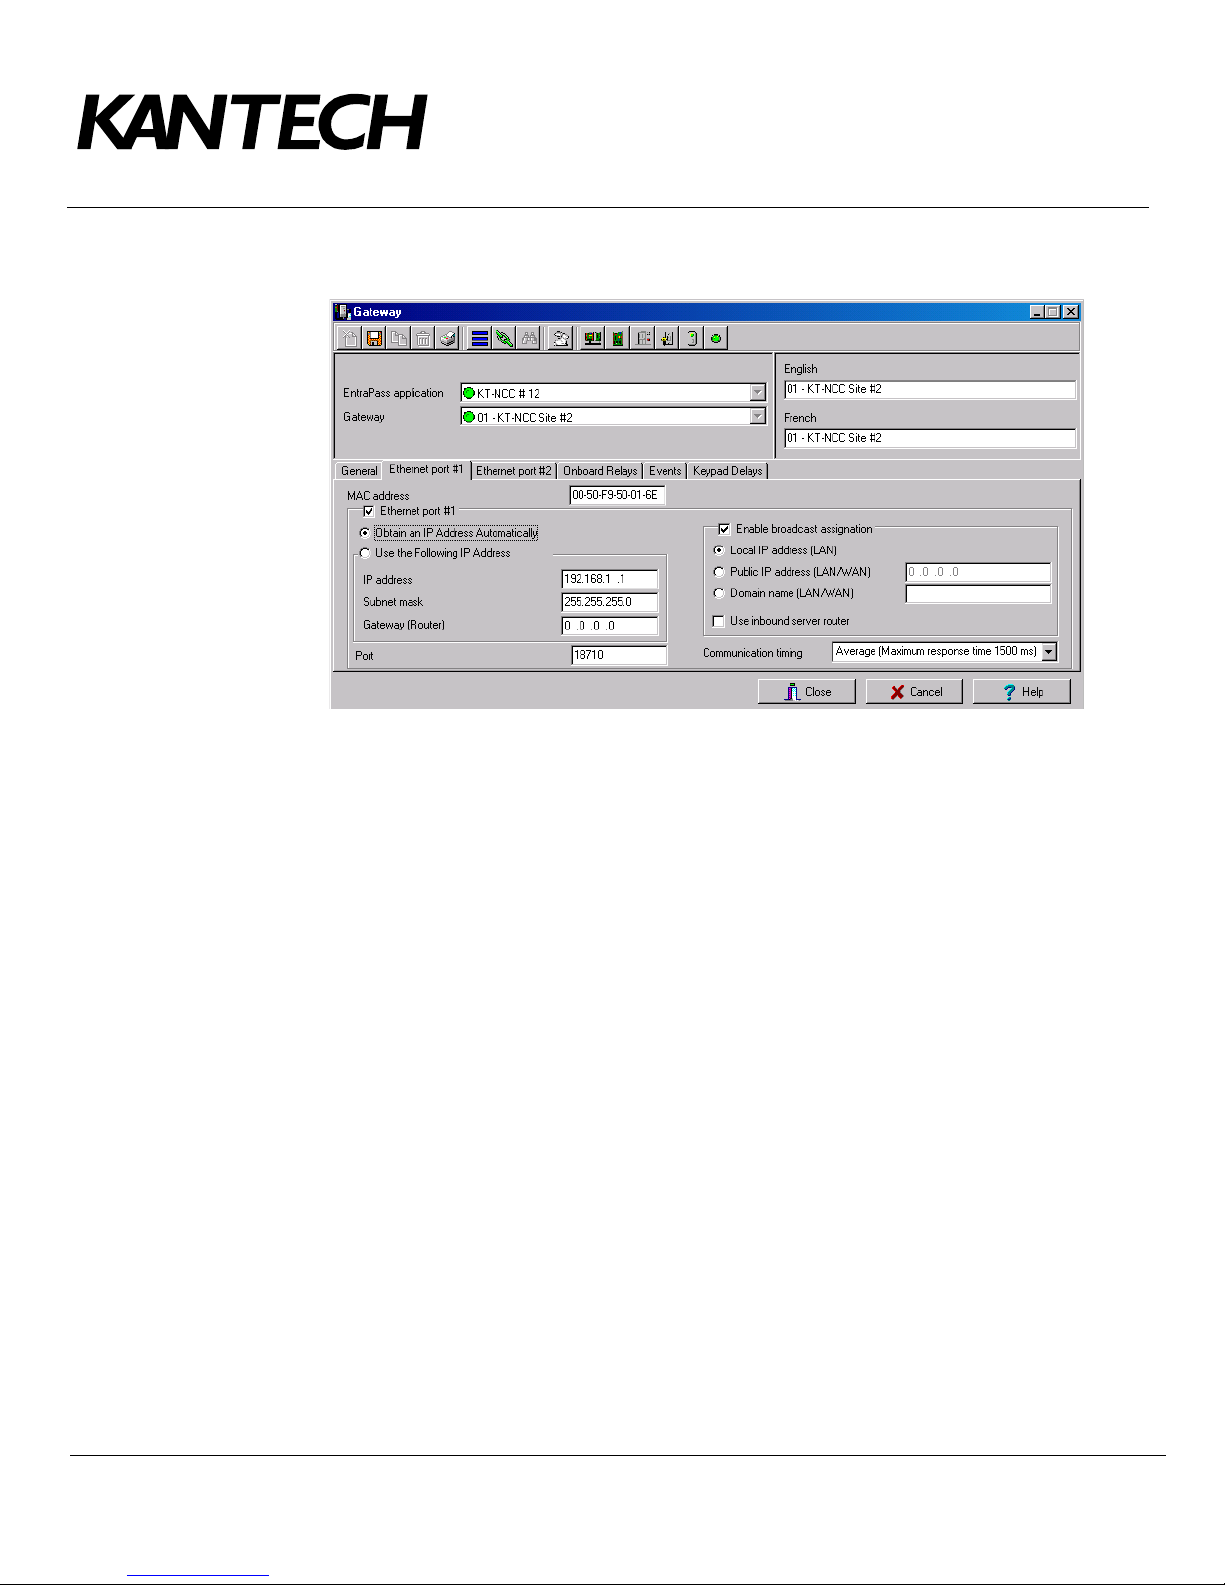
5. Select the Ethernet Port #1 tab.
DN1656-0606
• Enter the MAC Address of the KT-NCC. (No. 1 in the diagram on page 32).
• Check the box Ethernet port #1.
• Select the option
• Port
• The box Enable broadcast assignation is selected by default. Leave this option as is.
• Select the appropriate
18710 is automatically assigned to the KT-NCC by default. It is advisable not to modify it.
Obtain an IP Address Automatically.
Communication timings. (Consult Table 2 on page 11).
6. Click the save icon and close the Gateway dialog. The section Use the Following IP Address will be
refreshed to include the KT-NCC parameters.
7. Close the Gateway dialog.
Telephone: 1 (450) 444-2030 • Toll free: 1 (888) 222-1560 • Fax: 1 (450) 444-2029 • Internet: www.kantech.com
2006 Tyco Safety Products, Canada, Ltd. All rights reserved • Specifications may change without notice
page 29 of 39
Page 31
DN1656-0606
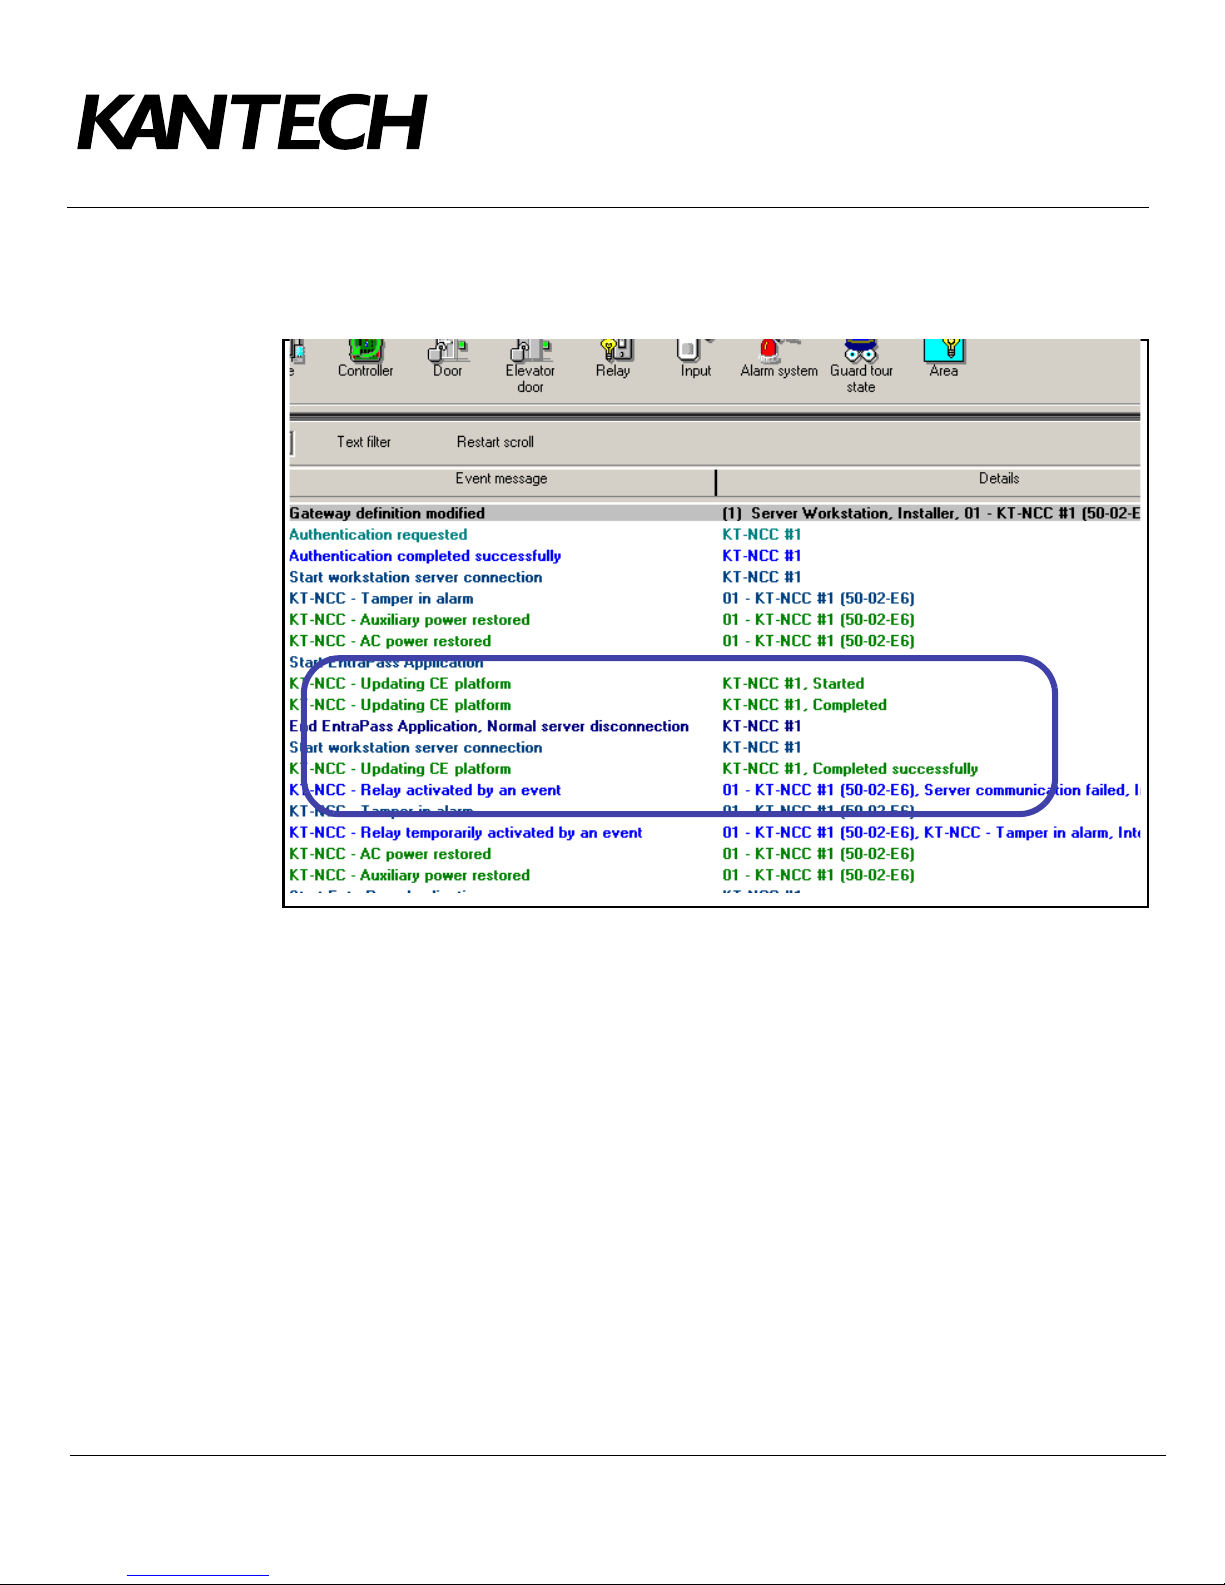
At this stage, the system checks if the version number of the software and controller are the same. If not, the
system updates the KT-NCC firmware automatically. Three messages will appear on the list of messages of
the EntraPass workstation to indicate that the update has been completed.
The messages to lookout for are:
• KT-NCC Update of platform CE - KT-NCC, Started
• KT-NCC Update of platform CE - KT-NCC, Completed
• KT-NCC Update of platform CE - KT-NCC, Successfully completed.
Telephone: 1 (450) 444-2030 • Toll free: 1 (888) 222-1560 • Fax: 1 (450) 444-2029 • Internet: www.kantech.com
2006 Tyco Safety Products, Canada, Ltd. All rights reserved • Specifications may change without notice
page 30 of 39
Page 32
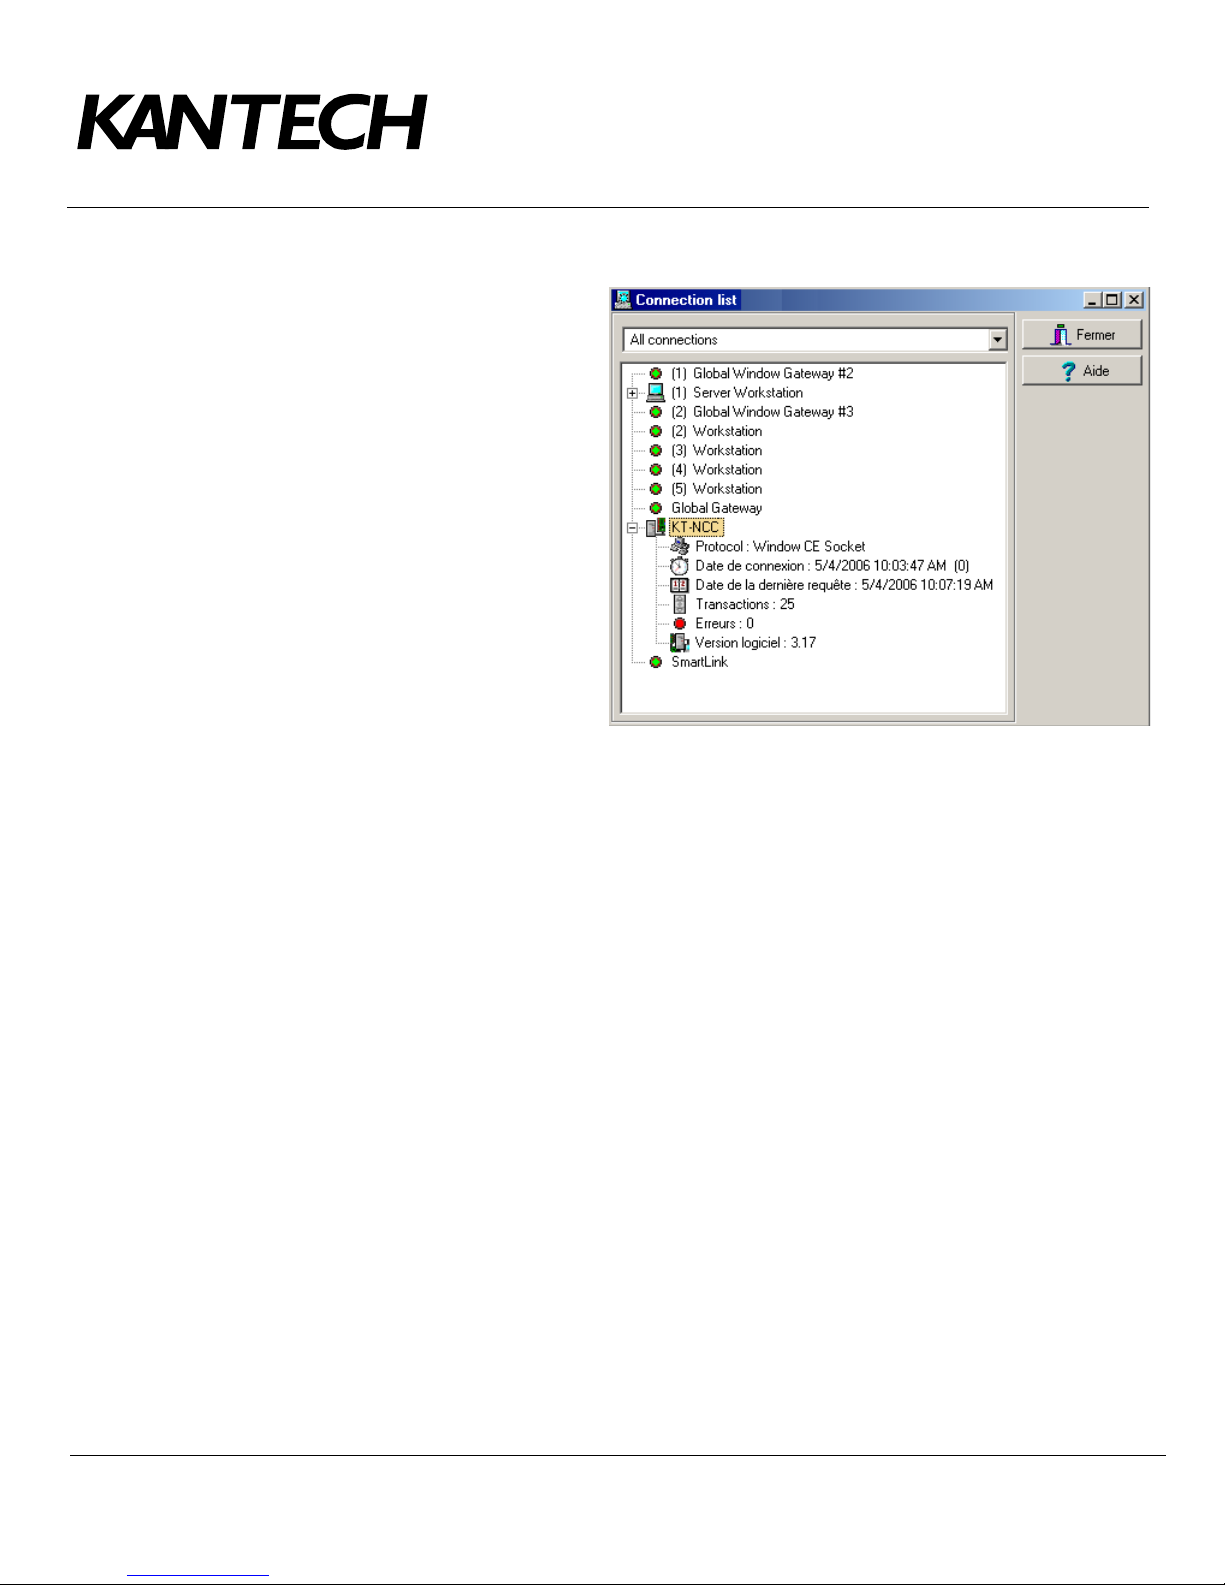
Verifying the Connection Status
1. In the application EntraPass Global
Edition - Server, open the List of
connections that is found under the
Connection tab, and check the
connection status of the KT-NCC
that you just saved.
The next step will consist in configuring
the system loops. For this, please
consult Chapter 4 of the EntraPass
Global Edition Reference Guide
DN1316.
DN1656-0606
Telephone: 1 (450) 444-2030 • Toll free: 1 (888) 222-1560 • Fax: 1 (450) 444-2029 • Internet: www.kantech.com
2006 Tyco Safety Products, Canada, Ltd. All rights reserved • Specifications may change without notice
page 31 of 39
Page 33
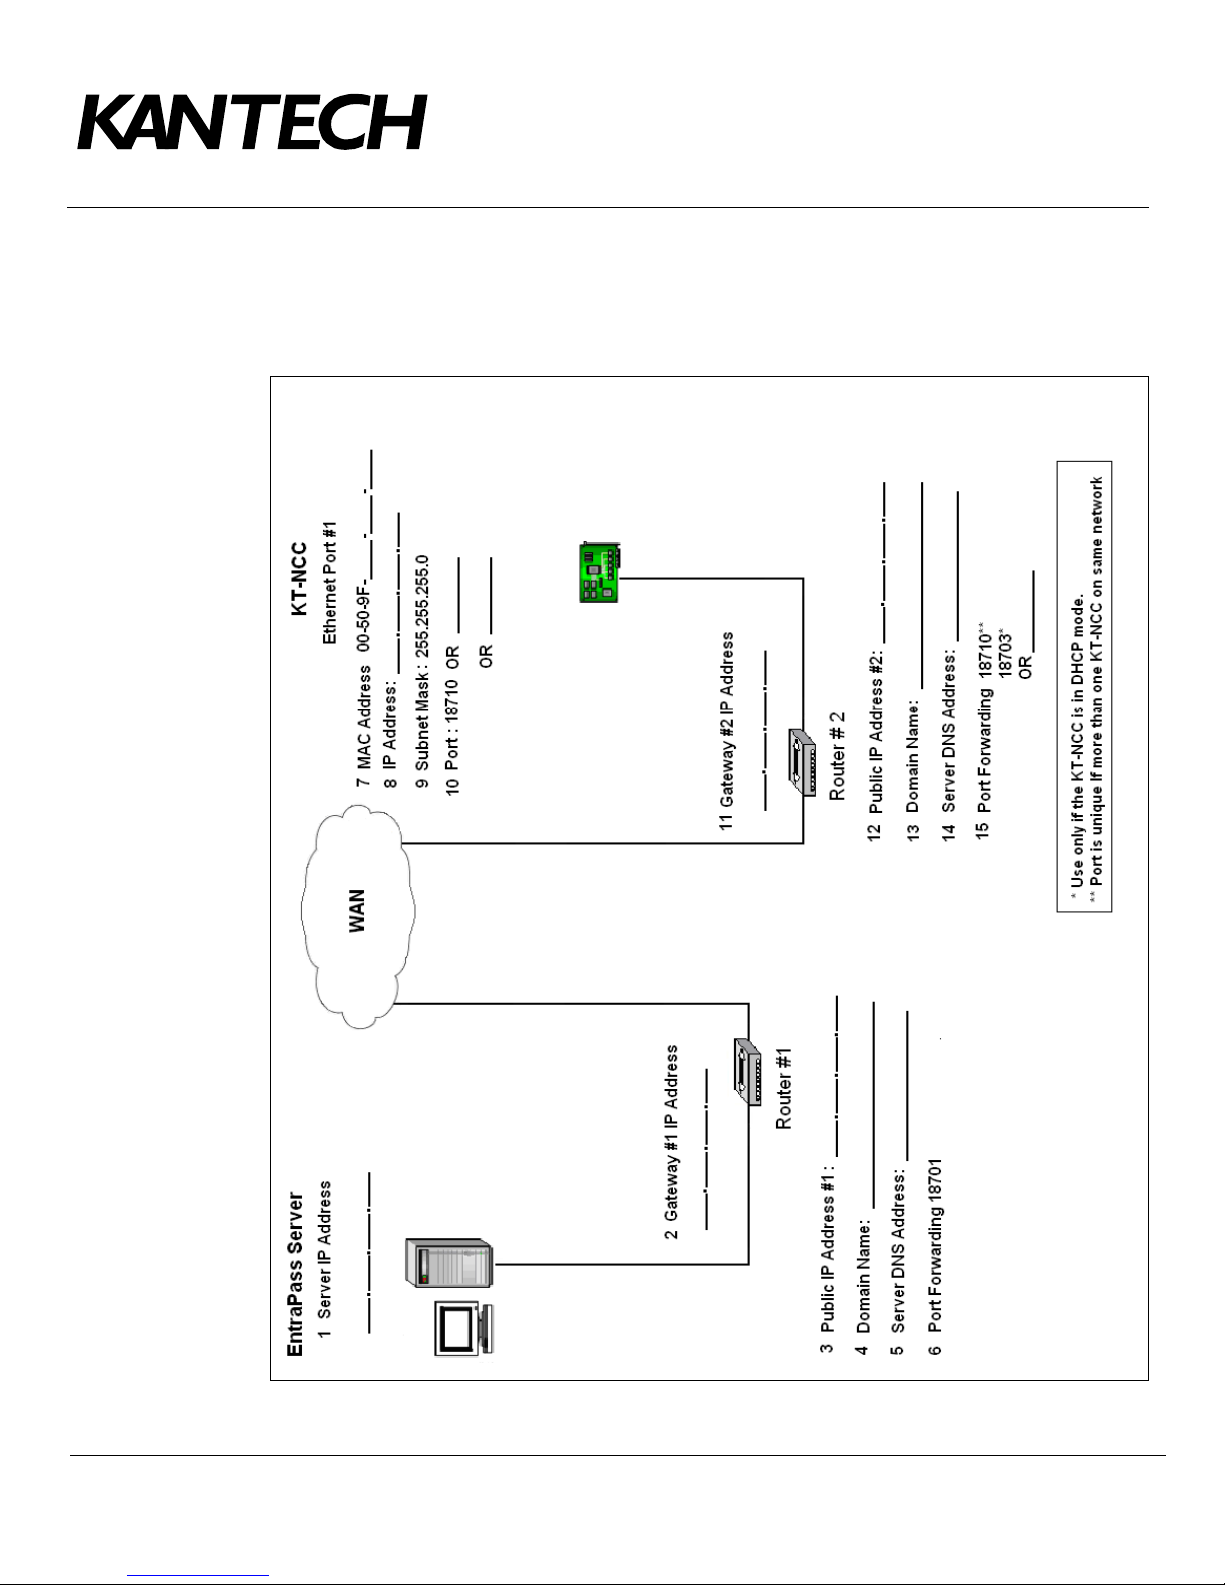
WAN Network
The following diagram shows a type of architecture in a WAN network when the site of the EntraPass Server
is distant from the site of the KT-NCC module and the two communicate through a public network.
DN1656-0606
Telephone: 1 (450) 444-2030 • Toll free: 1 (888) 222-1560 • Fax: 1 (450) 444-2029 • Internet: www.kantech.com
2006 Tyco Safety Products, Canada, Ltd. All rights reserved • Specifications may change without notice
Figure 9: WAN Configuration Diagram
page 32 of 39
Page 34

Configuring a DHCP Address (WAN)
Six steps are required to configure the KT-NCC in a wide area network (WAN) using a reserved DHCP
address:
• Initialize the KT-NCC in factory reset mode.
• verify the port forwarding configuration with the Network Administrator.
• connect the KT-NCC to the network.
• register the KT-NCC to the EntraPass Global Edition server.
• enter TCP/IP parameters in the EntraPass server.
• configure the KT-NCC in EntraPass Global Edition.
Initializing the KT-NCC in Factory Reset Mode
A factory reset will delete the entire configuration of the KT-NCC, including the IP address. It is recommended to
reinitialize the KT-NCC before starting the configuration.
1. Use needle nose pliers to remove jumpers JP2 and JP3 (see Figure 5: KT-NCC Connections Diagram
on page 9).
2. Press Reset.
3. Reinstall jumpers JP2 and JP3.
DN1656-0606
Port Forwarding
After collecting the network information necessary to configure the system from the Network Administrator,
ensure that the routers are well configured (port forwarding).
• Port forwarding configuration is only done on static IP or reserved DHCP addresses.
• Port forwarding is done to the same IP address. If you use more than one KT-NCC with a router, you
should use different ports for every KT-NCC.
To help you understand how to configure routers, please refer to the diagram on page 32.
Site Server Router (Router No. 1)
• Ensure that port 18701 is well forwarded to the address of the EntraPass server (no 1 in the
diagram on page 32).
• Ensure that UDP protocol is selected.
KT-NCC Site Router (Router No. 2)
• Ensure that the port at no 15 in the diagram on page 32 is well forwarded to the KT-NCC address.
• Ensure that UDP protocol is selected.
Connecting the KT-NCC
1. Connect the network cable to Ethernet port #1 of the KT-NCC.
• The blue pilot light (Vital LED) of the KT-NCC will blink quickly to signal that the controller is in
reset mode.
• The blue pilot light (Vital LED) of the KT-NCC will remain lit for 15 seconds to signal that the
controller is in start mode.
• The blue pilot light (Vital LED) of the KT-NCC will blink once/second to signal that the controller
has been reset but it is not yet registered on the EntraPass server. The KT-NCC is in factory default
mode.
Note: For details, refer to Flash Patterns of the LED Indicator on page 10
Telephone: 1 (450) 444-2030 • Toll free: 1 (888) 222-1560 • Fax: 1 (450) 444-2029 • Internet: www.kantech.com
2006 Tyco Safety Products, Canada, Ltd. All rights reserved • Specifications may change without notice
page 33 of 39
Page 35
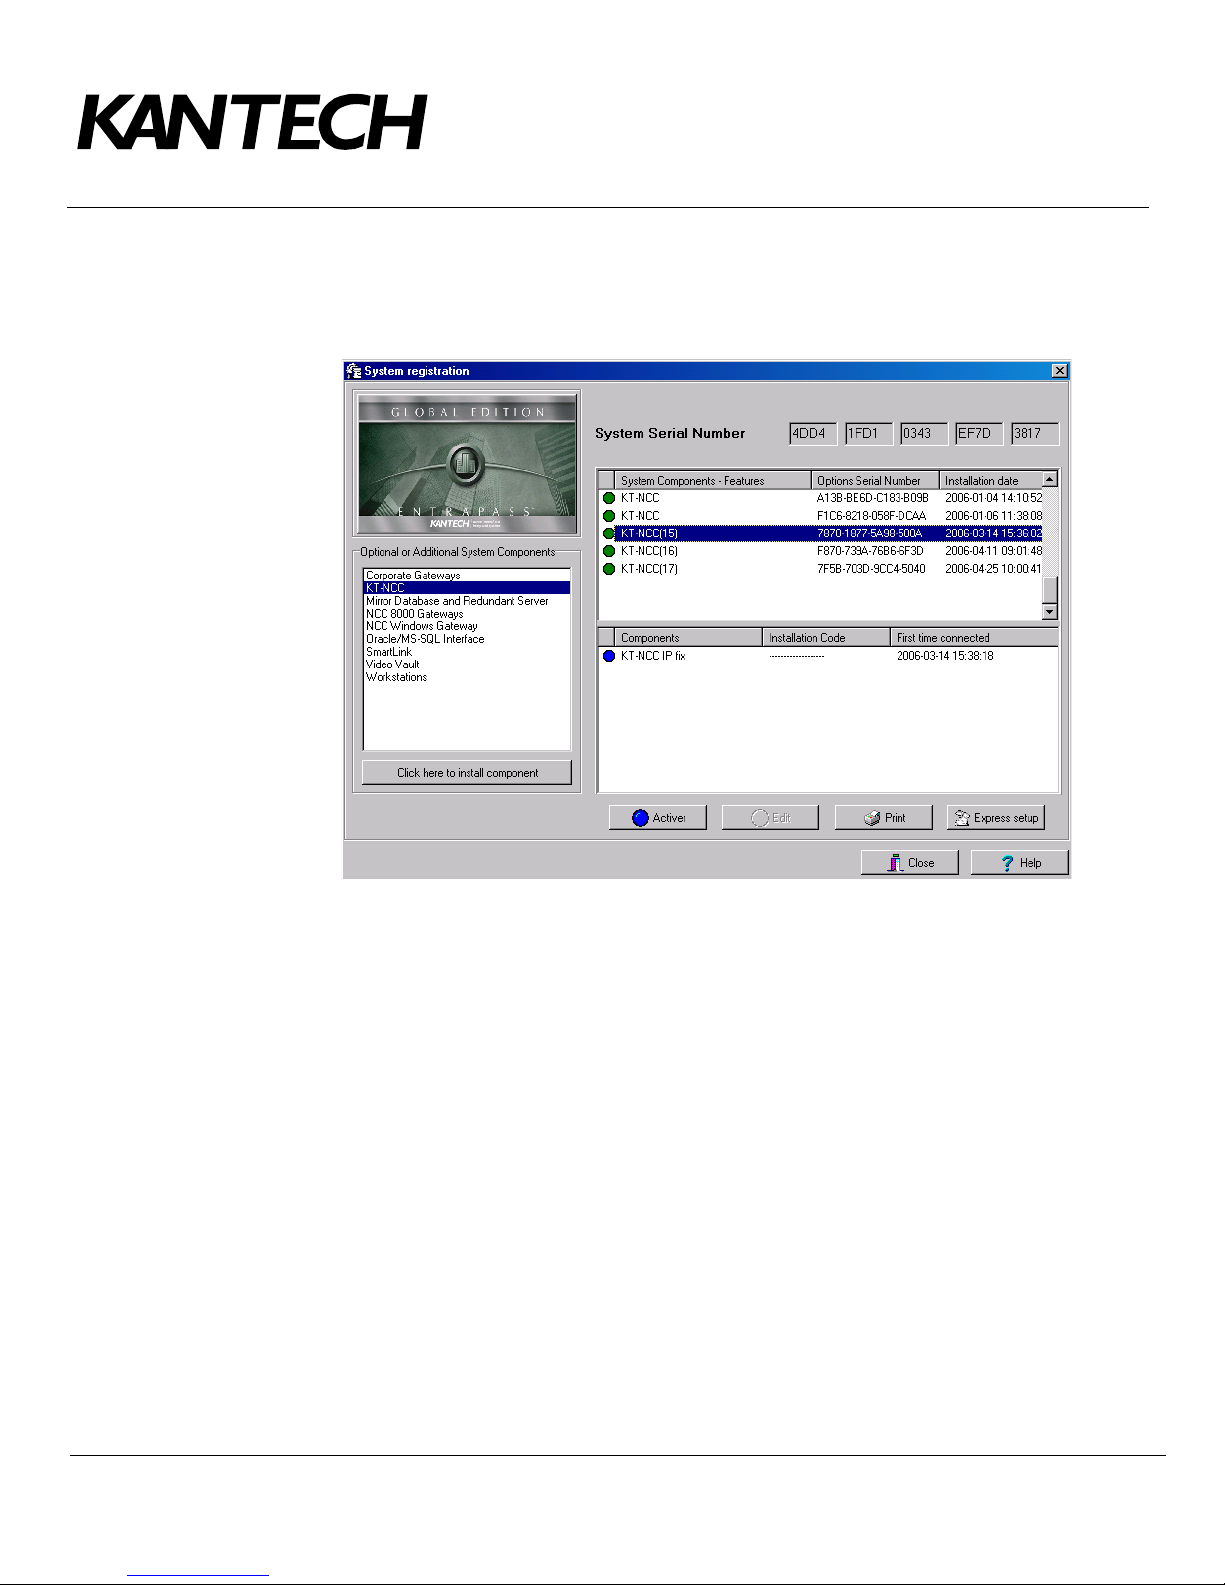
Registering the KT-NCC to the EntraPass Global Edition Server
1. In the application EntraPass Global Edition - Server, open the System registration window that is found
under the
Connection tab.
DN1656-0606
Note: It is not necessary to contact the Kantech Technical Support department to register the KT-
NCC in EntraPass Global Edition.
2. In the section Optional or Additional System Components, select KT-NCC.
3. Click here to install component. The list on the right will display the new KT-NCC preceded by a blue
dot.
4. Select the new KT-NCC component from the list. The Activate button will be activated.
5. Click Activate to save the KT-NCC in EntraPass Global Edition.
• The blue dot will change to green and the new KT-NCC controller will be added to the list of
components at the top of the screen.
• The
Edit button will activate to enable you to configure the security options and rename the KT-
NCC.
6. Close the System registration window.
Telephone: 1 (450) 444-2030 • Toll free: 1 (888) 222-1560 • Fax: 1 (450) 444-2029 • Internet: www.kantech.com
2006 Tyco Safety Products, Canada, Ltd. All rights reserved • Specifications may change without notice
page 34 of 39
Page 36
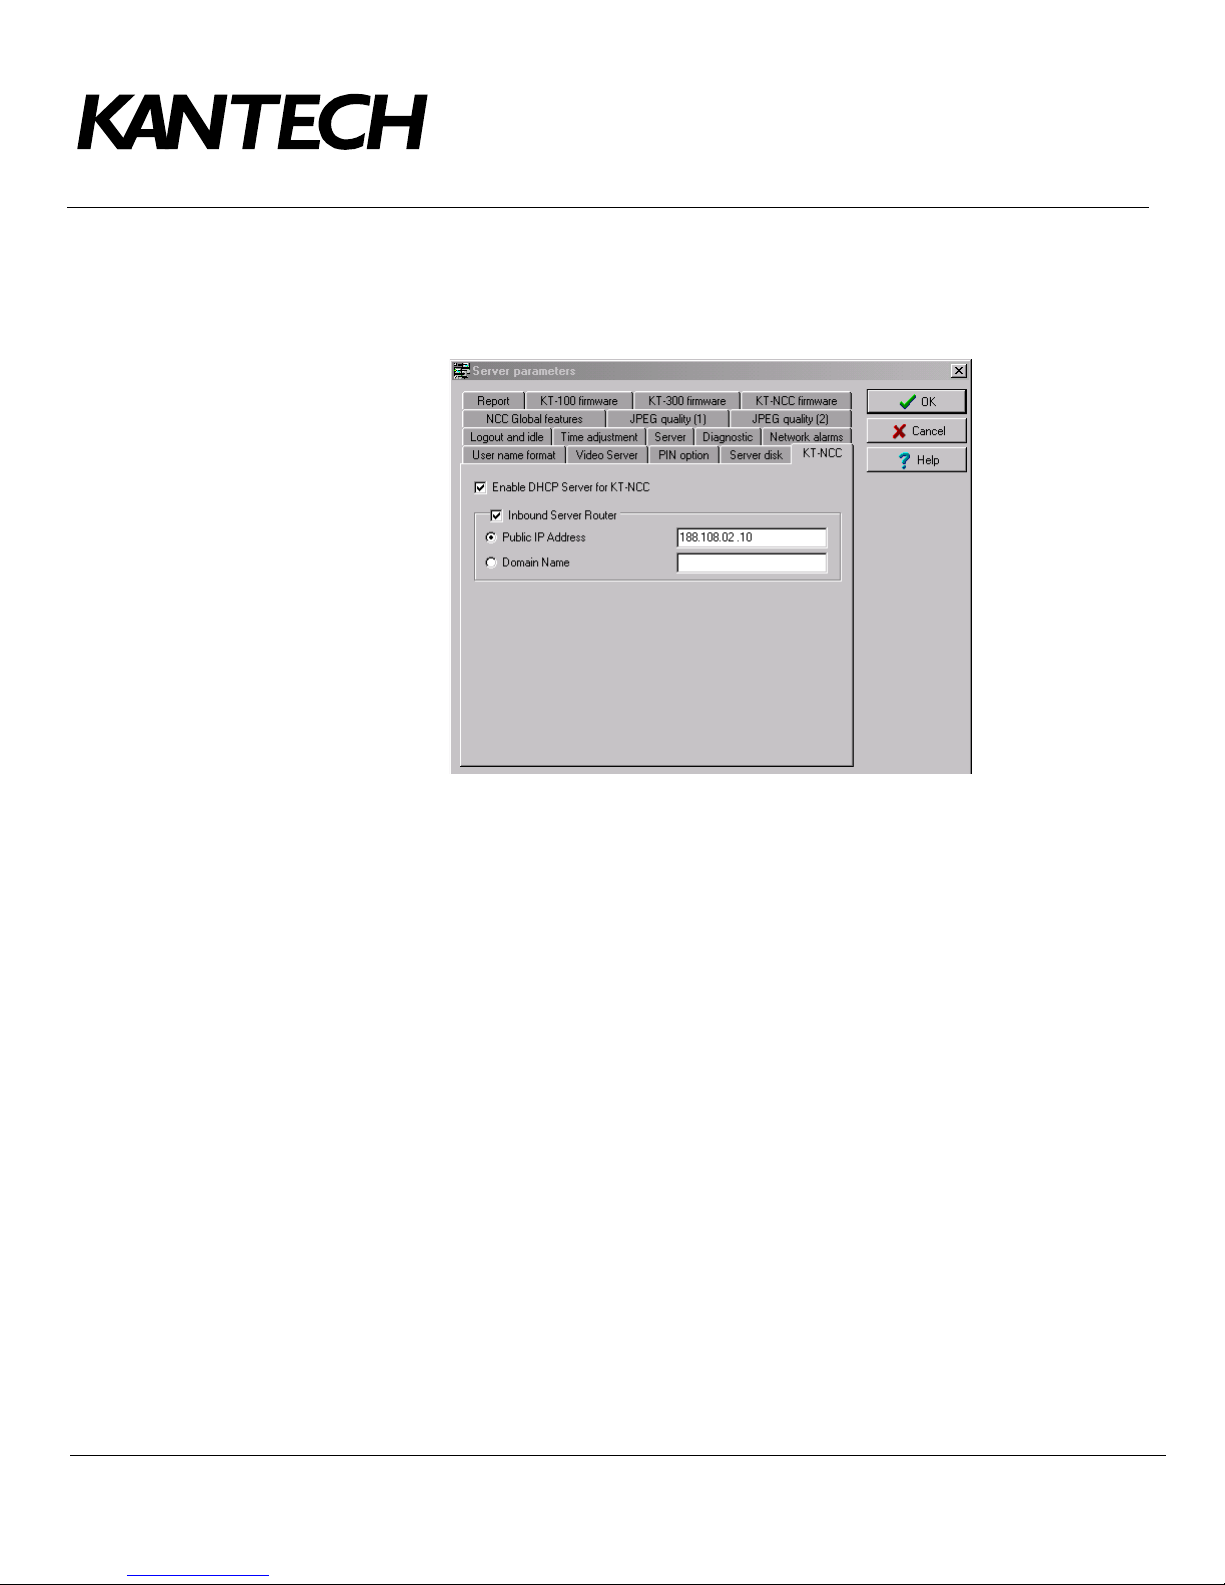
Entering Router Parameters on the Server
1. In the application EntraPass Global Edition - Server, click the Server Parameters icon under the Options
tab to open the Server parameters window.
DN1656-0606
2. Under the KT-NCC tab:
• Check the box
• Check the box
• Enter the Public IP Address #1 of inbound router #1 (no. 3 in the diagram on page 32) or the
Inbound Server Router.
Public IP Address.
Domain Name (no. 4 in the diagram on page 32). This address is assigned by the public network
provider with whom you are connected.
3. Click OK to save the configuration and close the dialog.
Configuring the KT-NCC in EntraPass Global Edition
1. In the application EntraPass Global Edition - Workstation, open the Gateway window that is found under
the
Devices tab.
2. From the EntraPass Application drop-down list, select the KT-NCC that you just saved in EntraPass.
3. From the Gateway(s) drop-down list, select the KT-NCC gateway that you would like to configure.
Telephone: 1 (450) 444-2030 • Toll free: 1 (888) 222-1560 • Fax: 1 (450) 444-2029 • Internet: www.kantech.com
2006 Tyco Safety Products, Canada, Ltd. All rights reserved • Specifications may change without notice
page 35 of 39
Page 37
DN1656-0606
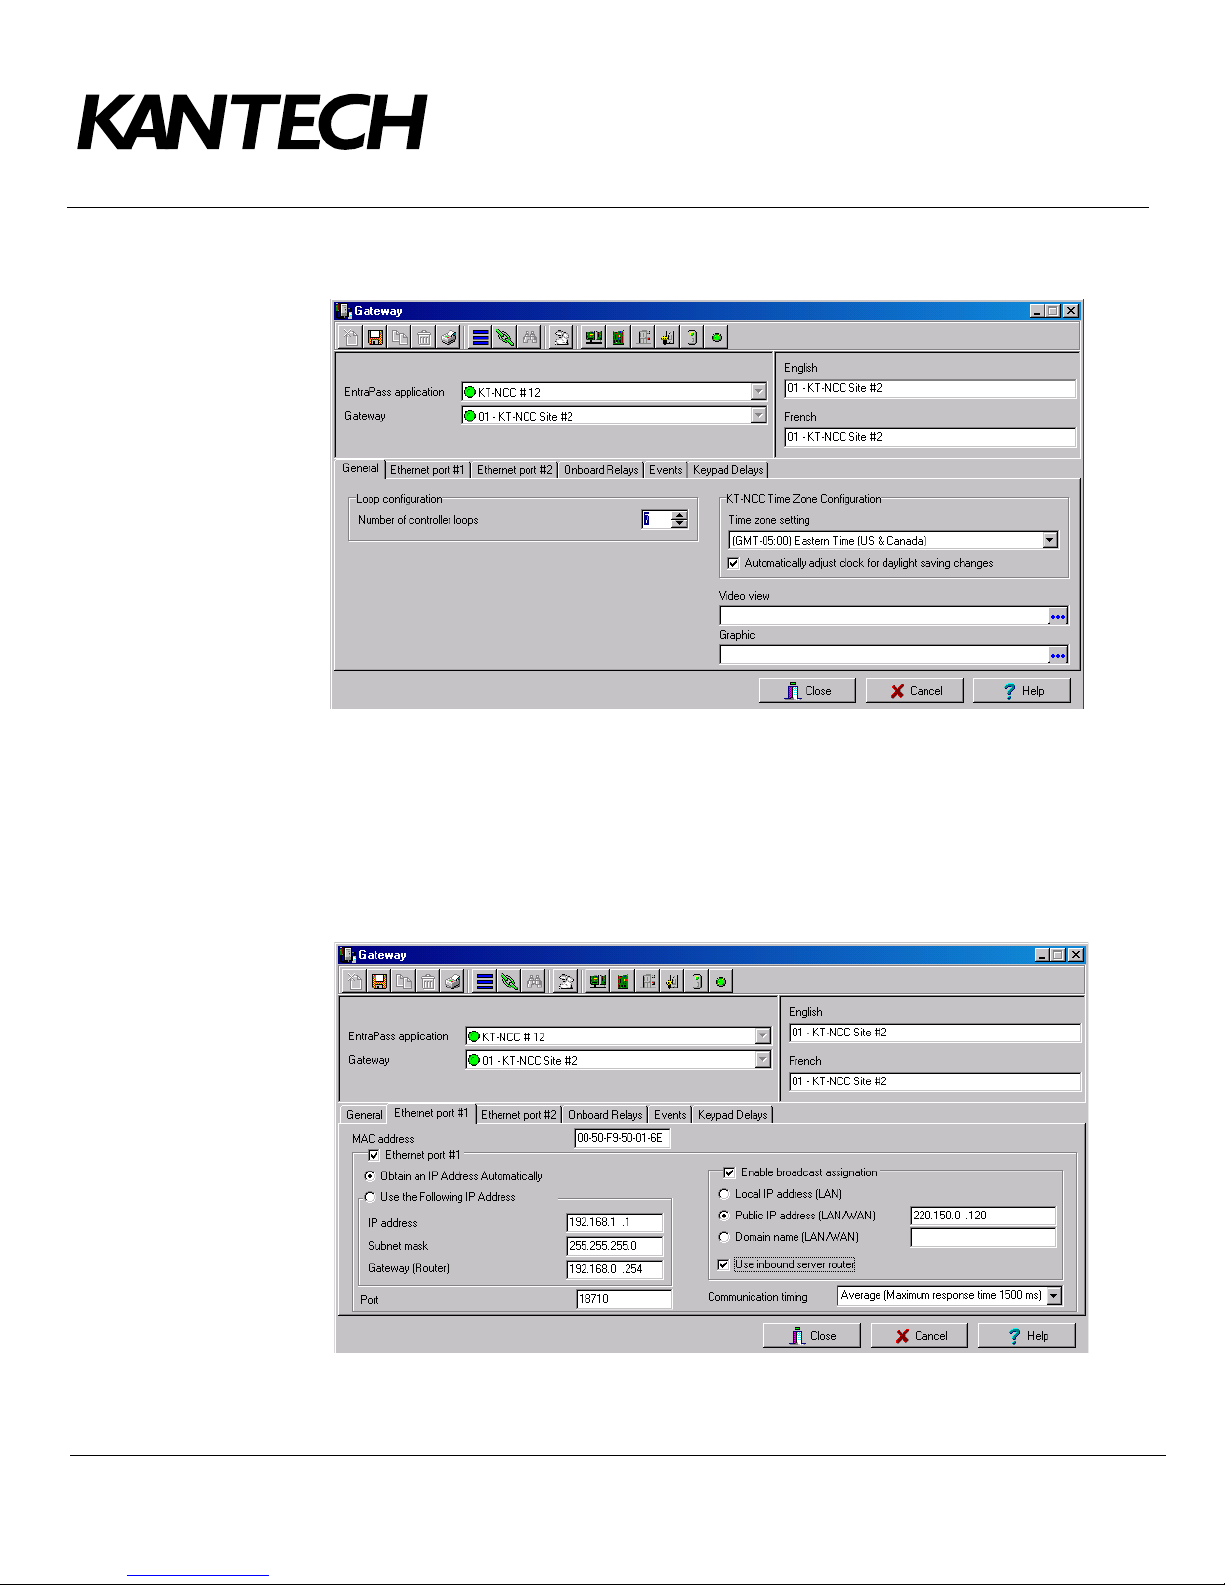
• You can rename the KT-NCC gateway in the French and English fields. Select the General tab:
• Enter the Number of controller loops that connect to the KT-NCC. The system supports up to 7
loops (2 RS-485 loops, 1 RS-232 loop and 4 IP loops).
• Configure the
• When you check the box Automatically adjust clock for daylight saving changes, you enable
EntraPass to manage the time change twice per year. If your network has several time zones and
the time changes are not synchronized, we suggest that you not check this box and manually
adjust the clock during time changes.
KT-NCC Time Zone Configuration.
4. Select the Ethernet Port #1 tab.
• Enter the
• Check the box
Telephone: 1 (450) 444-2030 • Toll free: 1 (888) 222-1560 • Fax: 1 (450) 444-2029 • Internet: www.kantech.com
2006 Tyco Safety Products, Canada, Ltd. All rights reserved • Specifications may change without notice
MAC Address of the KT-NCC (No. 7 in the diagram on page 32).
Ethernet port #1.
page 36 of 39
Page 38
• Check the option Obtain an IP Address Automatically.
• Port
• The box
• Select the option
• Check the option
• Select the appropriate
18710 is automatically assigned to KT-NCC by default. It is advisable not to modify it.
However, if you have to configure several KT-NCCs, ensure that every KT-NCC has a unique port.
This is necessary when forwarding ports to an IP address.
Enable broadcast assignation is selected by default.
Public IP address (LAN/WAN) and enter the IP address corresponding to no. 12 in
the diagram on page 32.
Use inbound server router.
5. Click the save icon and close the Gateway dialog.
Verifying the Connection Status
1. In the application EntraPass Global
Edition - Server, open the List of
connections that is found under the
Connection tab, and check the
connection status of the KT-NCC
that you just saved.
The next step will consist in configuring
the loops of the system. For this, please
consult Chapter 4 of the EntraPass
Global Edition Reference Guide
DN1316.
DN1656-0606
Communication timing (Consult Table 2 on page 11).
Telephone: 1 (450) 444-2030 • Toll free: 1 (888) 222-1560 • Fax: 1 (450) 444-2029 • Internet: www.kantech.com
2006 Tyco Safety Products, Canada, Ltd. All rights reserved • Specifications may change without notice
page 37 of 39
Page 39

My Network Configuration
If none of the options provided in this document corresponds to your network architecture, you can use the
following pages to illustrate your specific network and list the parameters of your network.
DN1656-0606
Telephone: 1 (450) 444-2030 • Toll free: 1 (888) 222-1560 • Fax: 1 (450) 444-2029 • Internet: www.kantech.com
2006 Tyco Safety Products, Canada, Ltd. All rights reserved • Specifications may change without notice
page 38 of 39
Page 40

DN1656-0606
Network component IP address Notes
1
2
3
4
5
6
7
8
9
10
11
12
13
14
15
16
17
18
19
20
Telephone: 1 (450) 444-2030 • Toll free: 1 (888) 222-1560 • Fax: 1 (450) 444-2029 • Internet: www.kantech.com
2006 Tyco Safety Products, Canada, Ltd. All rights reserved • Specifications may change without notice
page 39 of 39
 Loading...