

Page 1
DN2055-1404
V 1.0
Access Control and Video Software Management
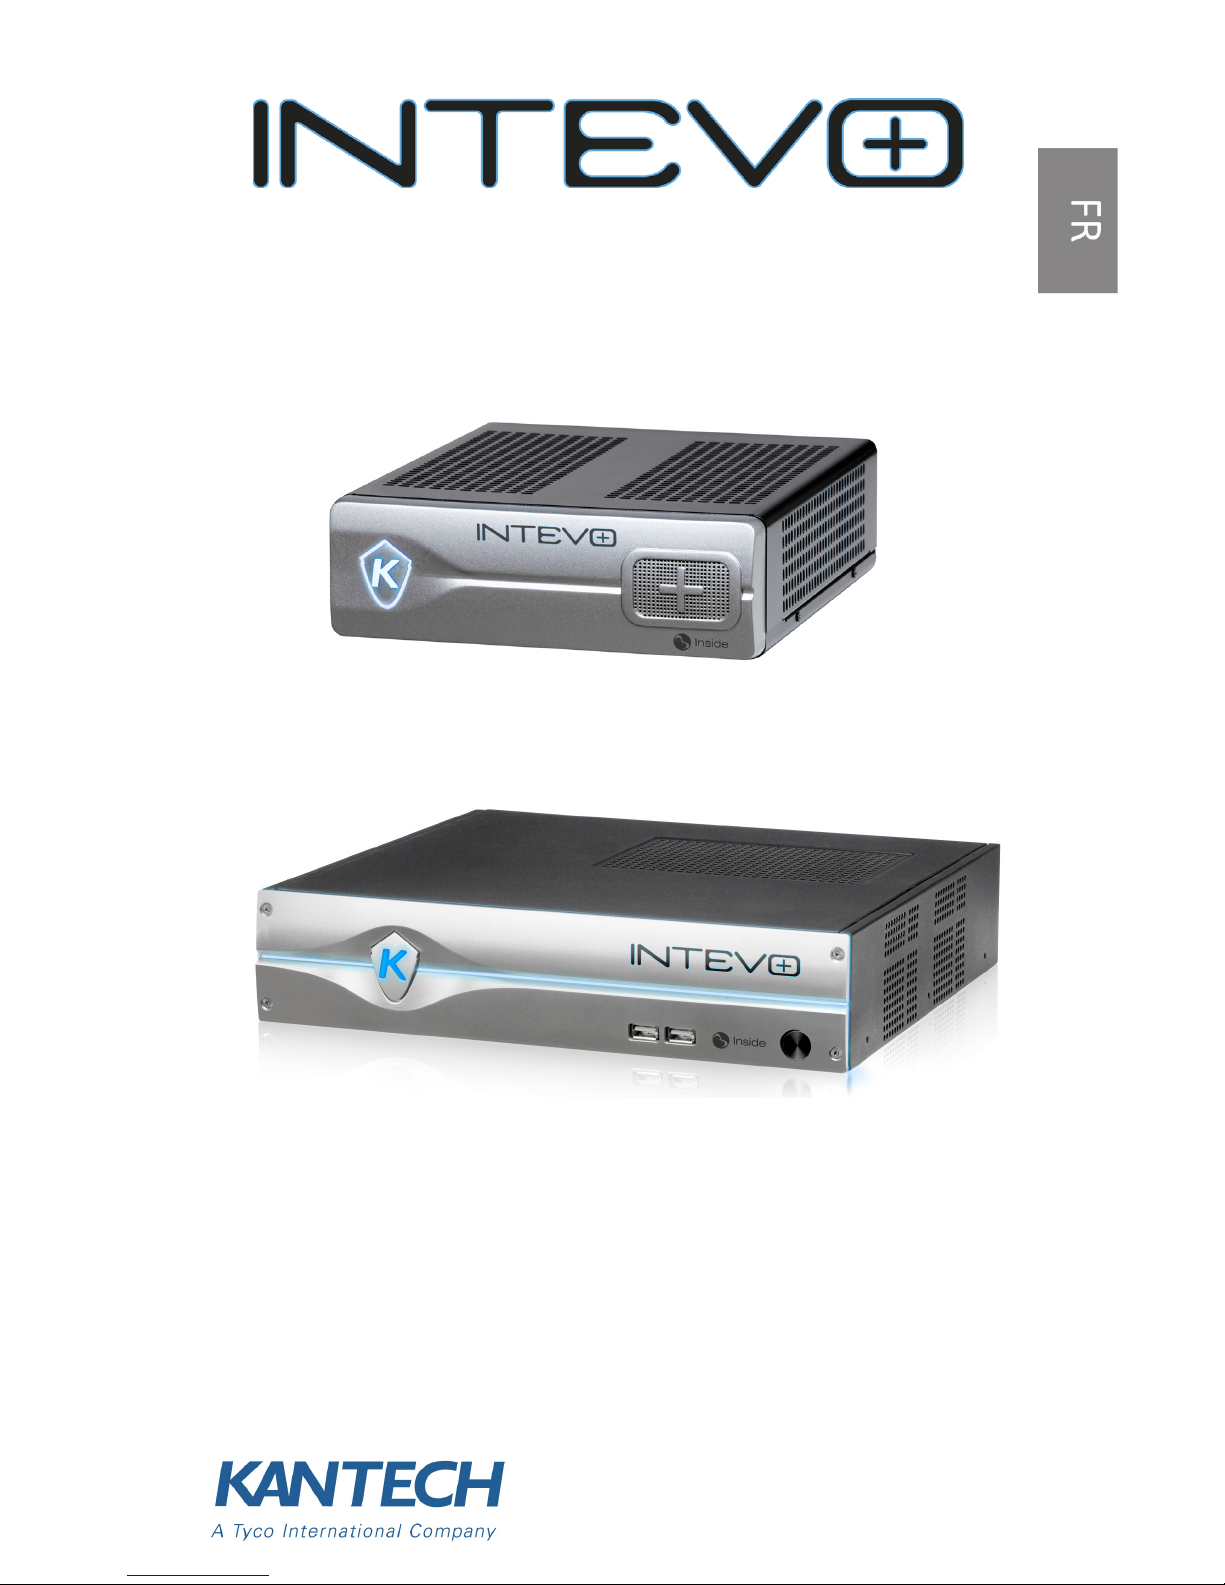
Intevo Compact (Model Intevo-CMP-1TB)
Intevo Advanced (Model Intevo-ADV-3TB)
Quick Setup Guide
Advanced and Compact models
Page 2

Page 3

1
Copyright
Under copyright laws, the contents of this manual may not be copied, photocopied,
reproduced, translated or reduced to any electronic medium or machine-readable form,
in whole or in part, without prior written consent of Tyco International Ltd.© 2012 and
its respective companies. All Rights Reserved.
Notice of Use
• Please read this manual carefully before use. All requirements should be followed before
using this server.
• We reserve the right to change the product and manuals without prior notice.
• Keep this document for future reference.
• The server is for indoor use only.
• Keep the server and other accessories in a dry environment.
• We are not responsible for any damage caused by inappropriate use.
• The Installer shall instruct the USER regarding ALL THE SAFETY INSTRUCTIONS that shall be
observed during the use of the equipment.
Warranty
• The server will be sold with a warranty period of 3 years starting the day of purchase by
the dealer / installer.
• The server manufacturer must offer this warranty as any defective unit will be returned to
them for replacement.
Important:
• This Intevo device shall be used and installed within an environment that provides the
pollution degree max. 2 and overvoltages category II NON HAZARDOUS LOCATIONS,
indoor only. The equipment is FIXED or DESKTOP and CORD CONNECTED and is designed
to be installed by service persons only; [a service person is defined as a person having the
appropriate technical training and experience necessary to be aware of hazards to which
that person may be exposed in performing a task and of measures to minimize the risks to
that person or other persons.]
• There is no ON/OFF SWITCH for the power supply. The AC power supply coupler serves as
a means of disconnection from the supply mains.
Safety Instructions
• Select a place that is free from vibration and shock.
• Do not locate this product where persons can walk on the cables.
• Do not connect the server to electrical outlets on the same circuit as large appliances.
• Do not select a place that exposes the server to direct sunlight, excessive heat, moisture,
vapors, chemicals or dust.
• Do not install this equipment near water (e.g., bathtub, wash bowl, kitchen/laundry sink,
wet basement, or near a swimming pool).
• Do not install this equipment and its accessories in areas where there is a risk of
explosion.
• Do not connect this server to electrical outlets controlled by switches or automatic timers.
• AVOID sources of radio interference.
• AVOID setting up the equipment near heaters, air conditioners, ventilators, and/or
refrigerators.
• Ensure that cables are positioned so that accidents can not occur. Connected cables must
not be subject to excessive mechanical strain.
Page 4

2
• Use the included AC power supply and cord only.
Technical Specifications
• Operating Temperatures: 0°C to 40°C (32°F to 104°F) indoor use only.
• Humidity Level: 93% max. (relative humidity non-condensing).
• Cabinet Dimensions (Height-Width-Depth):
• Advanced: 6.4cm (2.52in) x 30cm (11.8in) x 28.9cm (11.38in).
• Compact: 5.4cm (2.25in) x 19cm (7.5in) x 21.5 cm (8.5in)
• Input: 100-240V, 50-60Hz, 2.0A.
• Output: 12V, 84W max.
This product contains a lithium battery that shall be
replaced only by an authorized service person. CAUTION:
Risk of explosion if battery is replaced by an incorrect
type. Dispose of used batteries according to the applicable
local legislation and instructions.
Page 5
3
Quick Setup Guide
What Is In The Box?
• Intevo Unified Server
• Power cord
• Quick Setup Guide
• Wall mount brackets (2)
• Screws (6 for Advanced; 4 for Compact)
• USB Key (including: documentation, Configuration Tool, EntraPass
and IP video softwares).
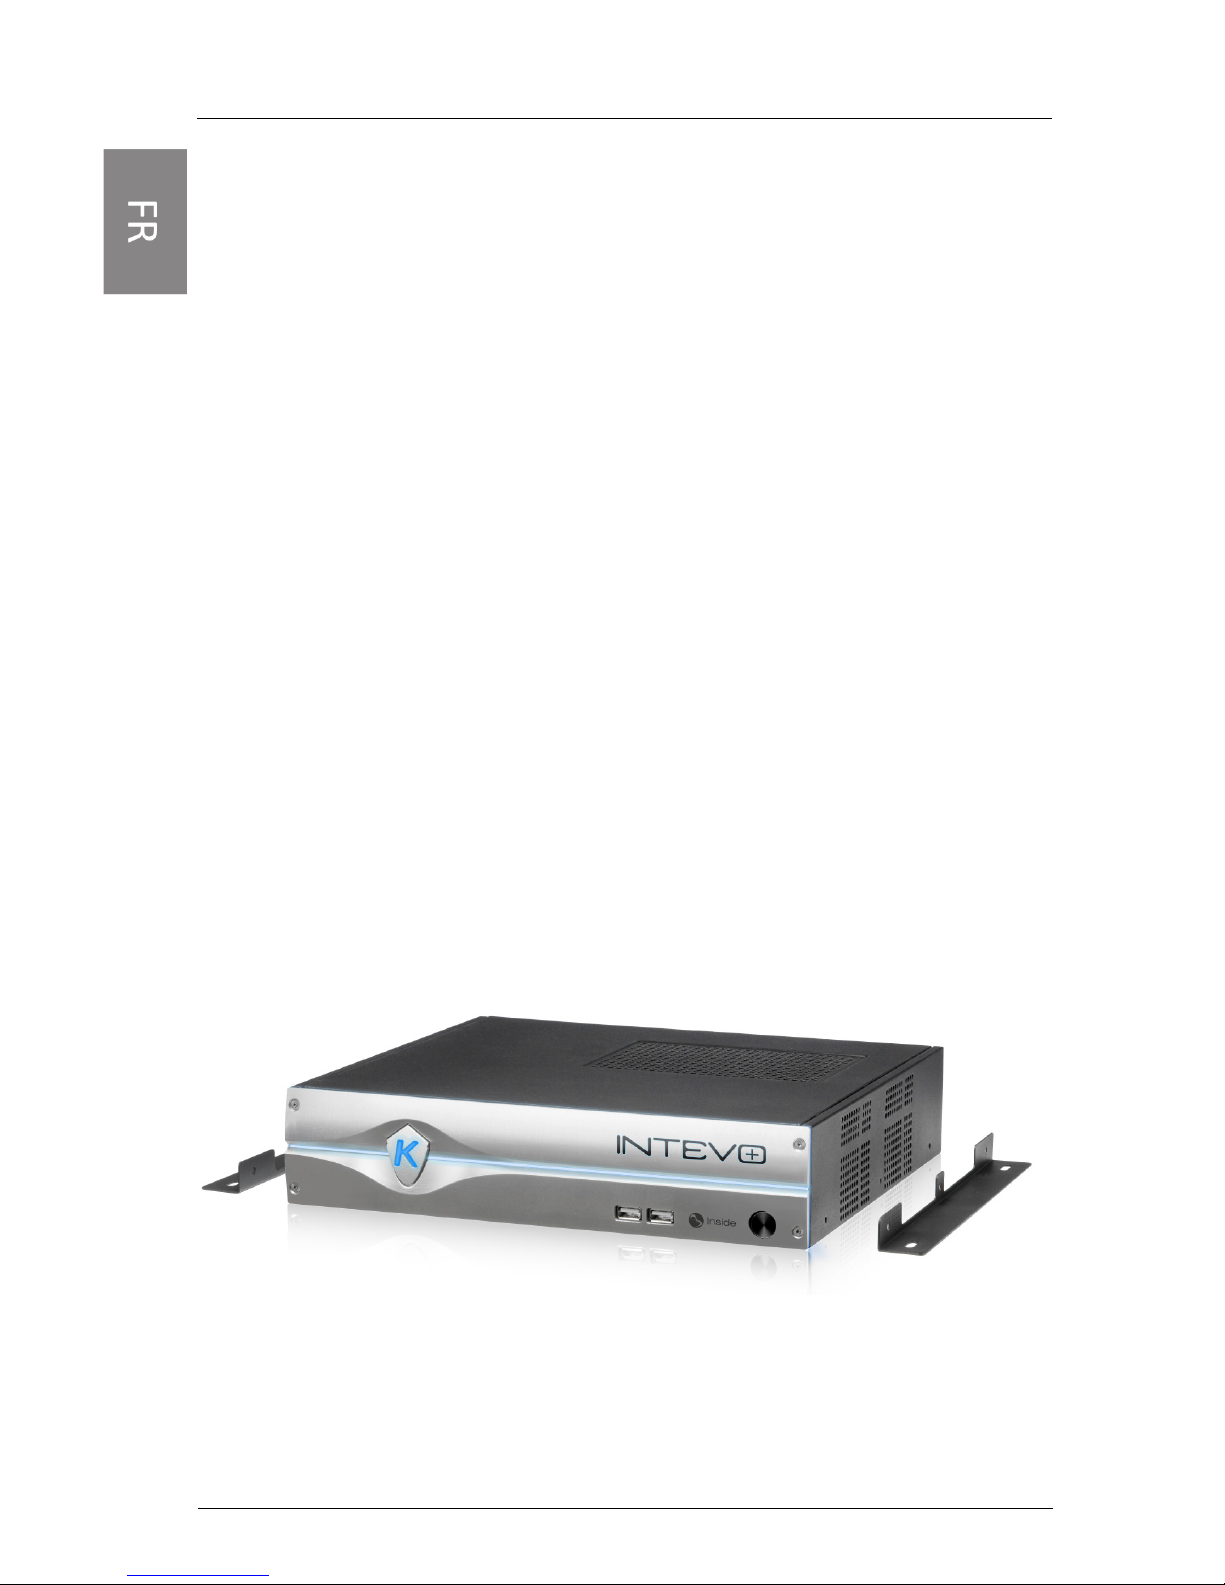
Installation
Desktop Installation
Be very careful not to block the vents on the right side and on top
of the Intevo case. Avoid storing anything near the device that
could block air flow.
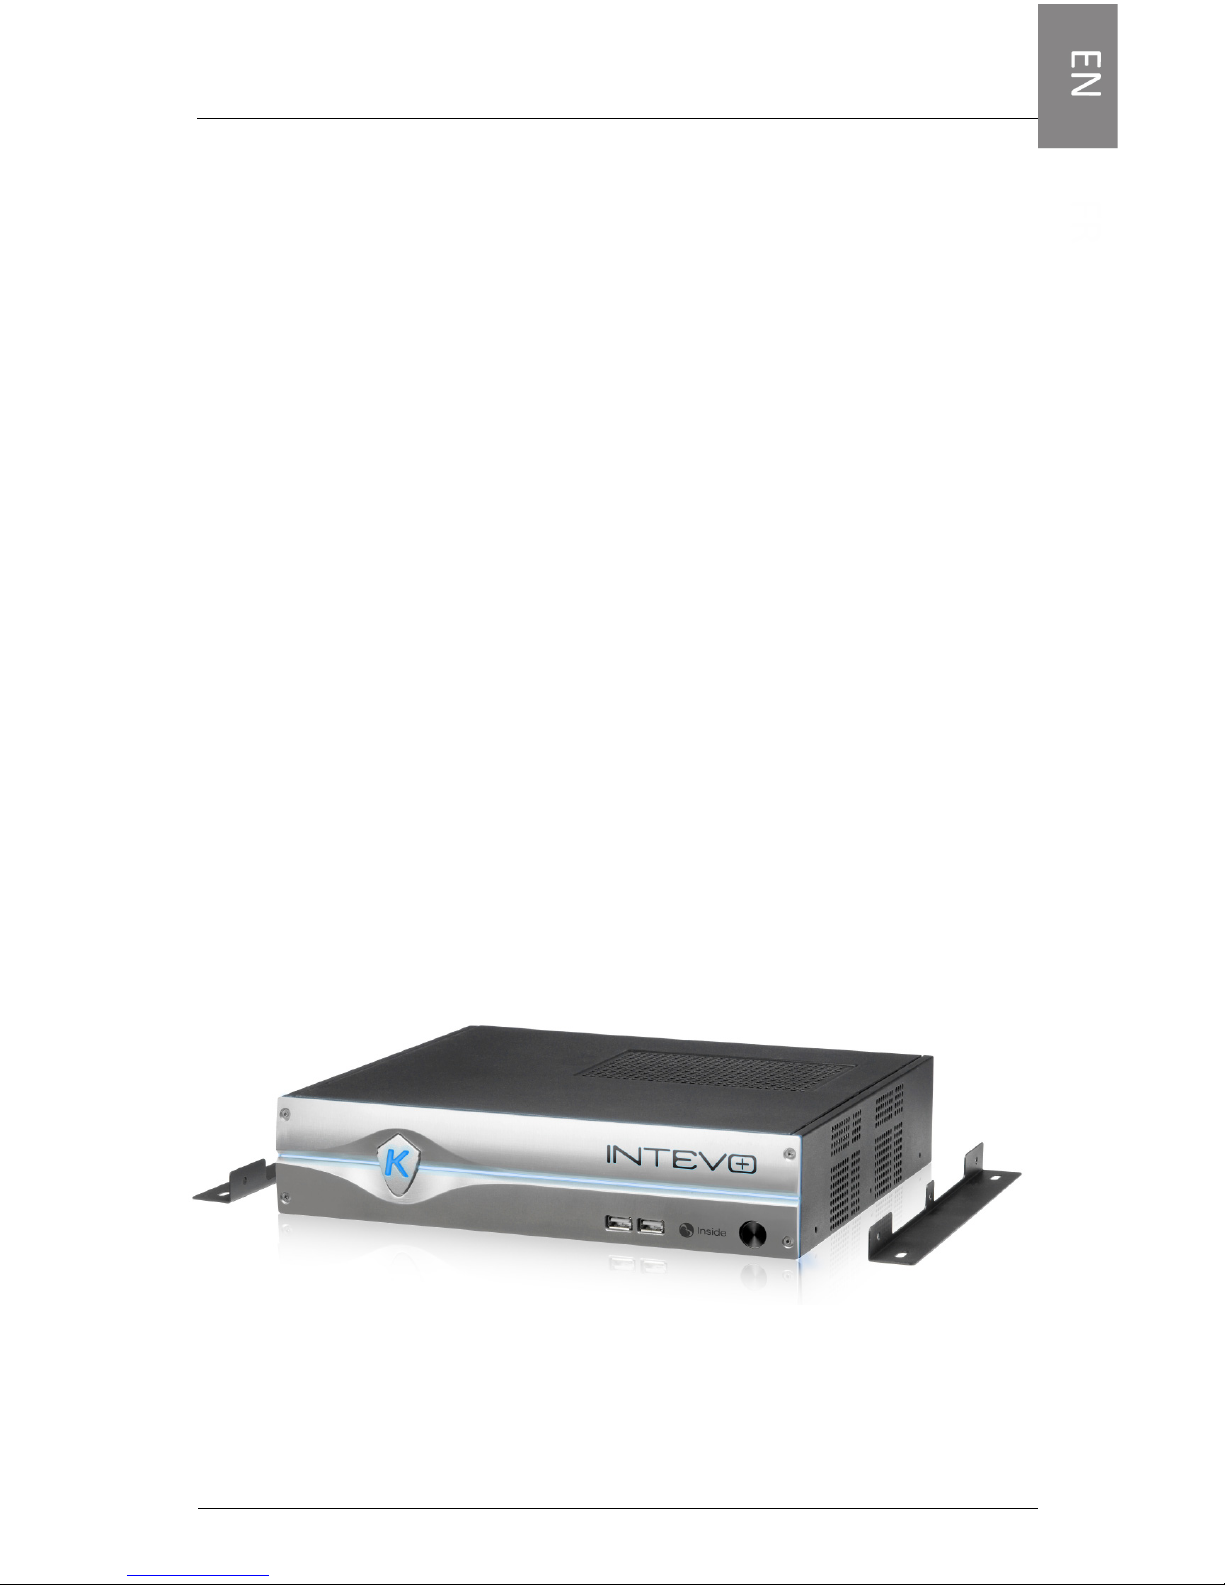
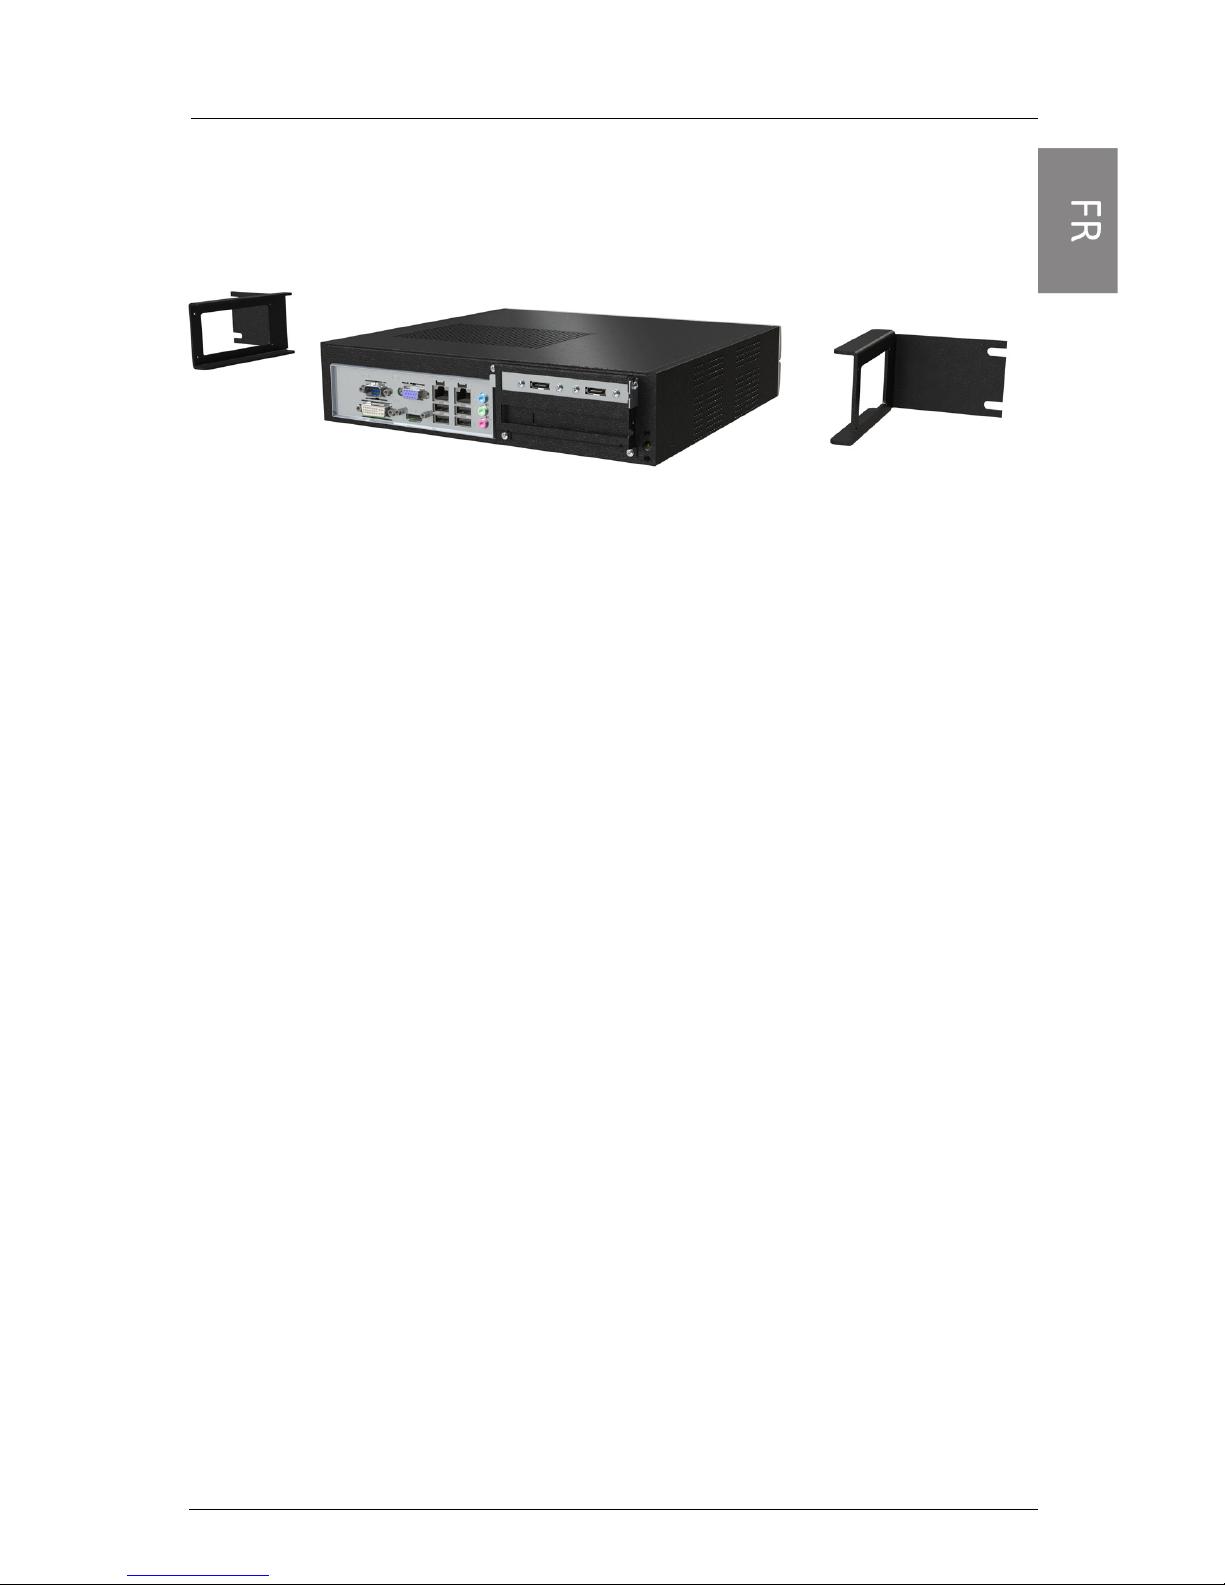
Wall Mount Installation (both models)
1- Fix the brackets on each side of the housing with the supplied
screws.
2- Fix to the wall the Intevo housing with the brackets provided using
four (4) screws (not included). We recommend stainless steel
Phillips tapping screws M4.2 x 32mm (#8 x 1.25'') (Spaenaur ST631P or equivalent). Drywall mounting must also use four (4)
plastic anchors (Spaenaur EX-S5 or equivalent; not included).
Page 6
4
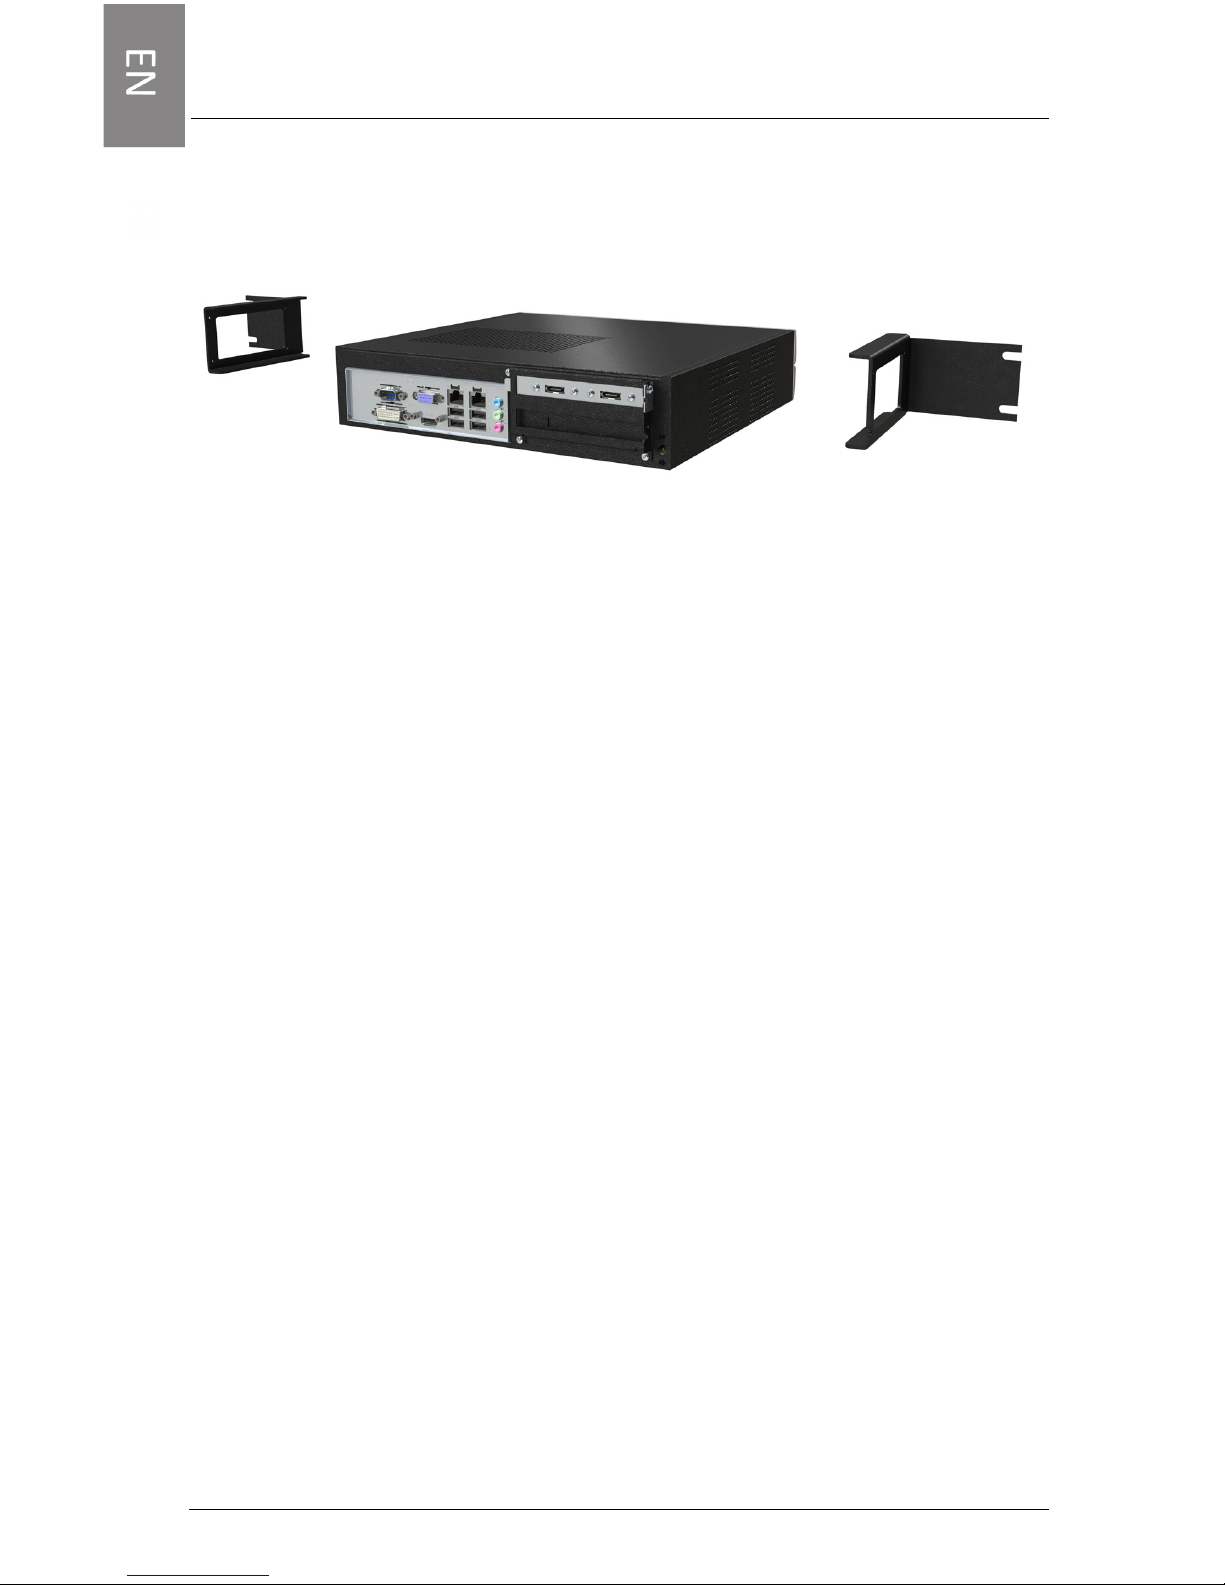
Rack Mount Installation (Not included; only for
Advanced model)
Precautions
• Elevated Operating Ambient - If installed in a closed or multi-unit
rack assembly, the operating ambient temperature of the rack
assembly may be greater than the room temperature. Therefore,
consideration should be given to installing the equipment in an
environment compatible with the maximum ambient temperature
(Tma) specified by the manufacturer.
• Reduced Air Flow - Installation of the equipment in a rack should be
such that the amount of air flow required for safe operation of the
equipment is not compromised.
• Mechanical Loading - Mounting of the equipment in the rack should
be such that an hazardous condition is not achieved due to uneven
mechanical loading.
• Circuit Overloading - Consideration should be given to the
connection of the equipment to the supply circuit and the effect
that overloading of the circuits might have on overcurrent
protection and supply wiring. Appropriate consideration of
equipment nameplate ratings should be used when addressing this
concern.
• Reliable Earthing - Reliable earthing of rack-mounted equipment
should be maintained. Particular attention should be given to
supply connections other than direct connections to the branch
circuit (e.g. use of power strips).
Connections
Proceed with the following connections:
1- Connect your local network cable to ETH1.
2- Connect your camera network cable to ETH2.
Page 7
5
3- Connect the monitor to VGA, DVI or HDMI port (for local access
only).
4- Connect a keyboard and a mouse to a USB port, on the back or the
front of the device (for local access only).
NOTE: DVI and HDMI ports cannot be used simultaneously.
NOTE: Intevo can be used without a monitor or mouse with a remote
access.
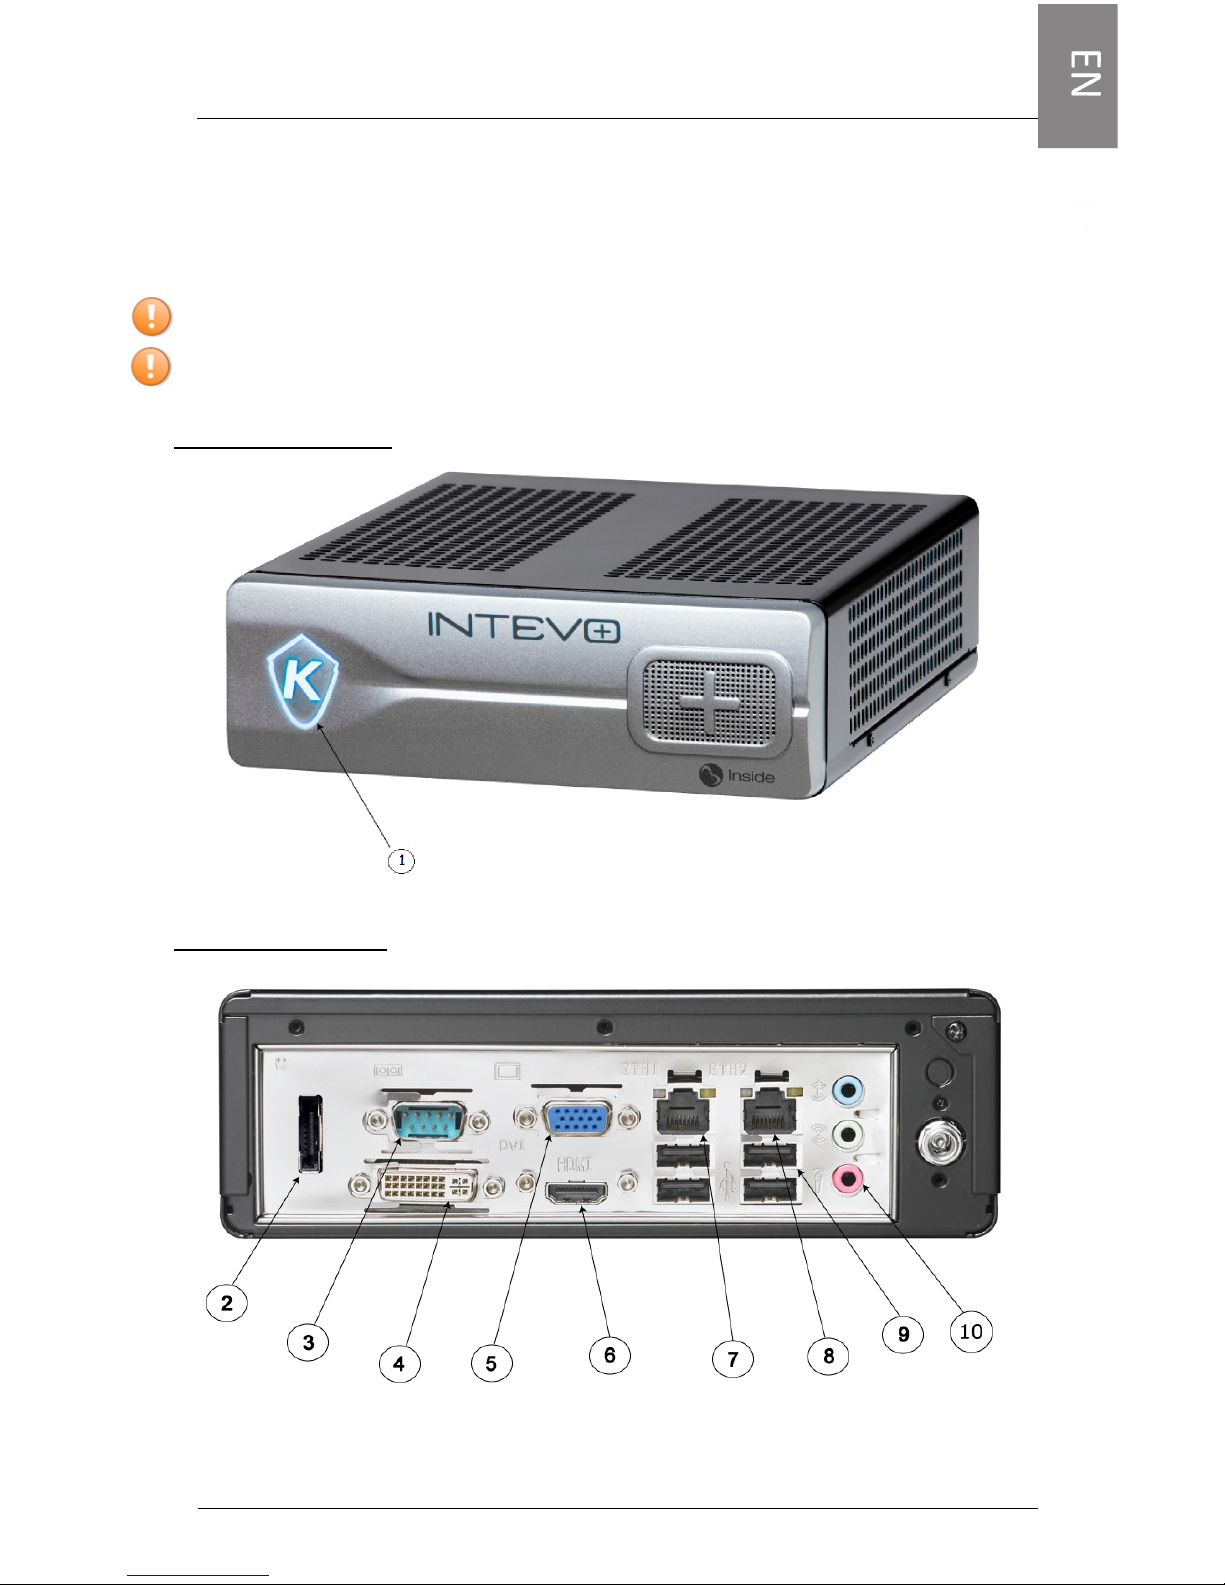
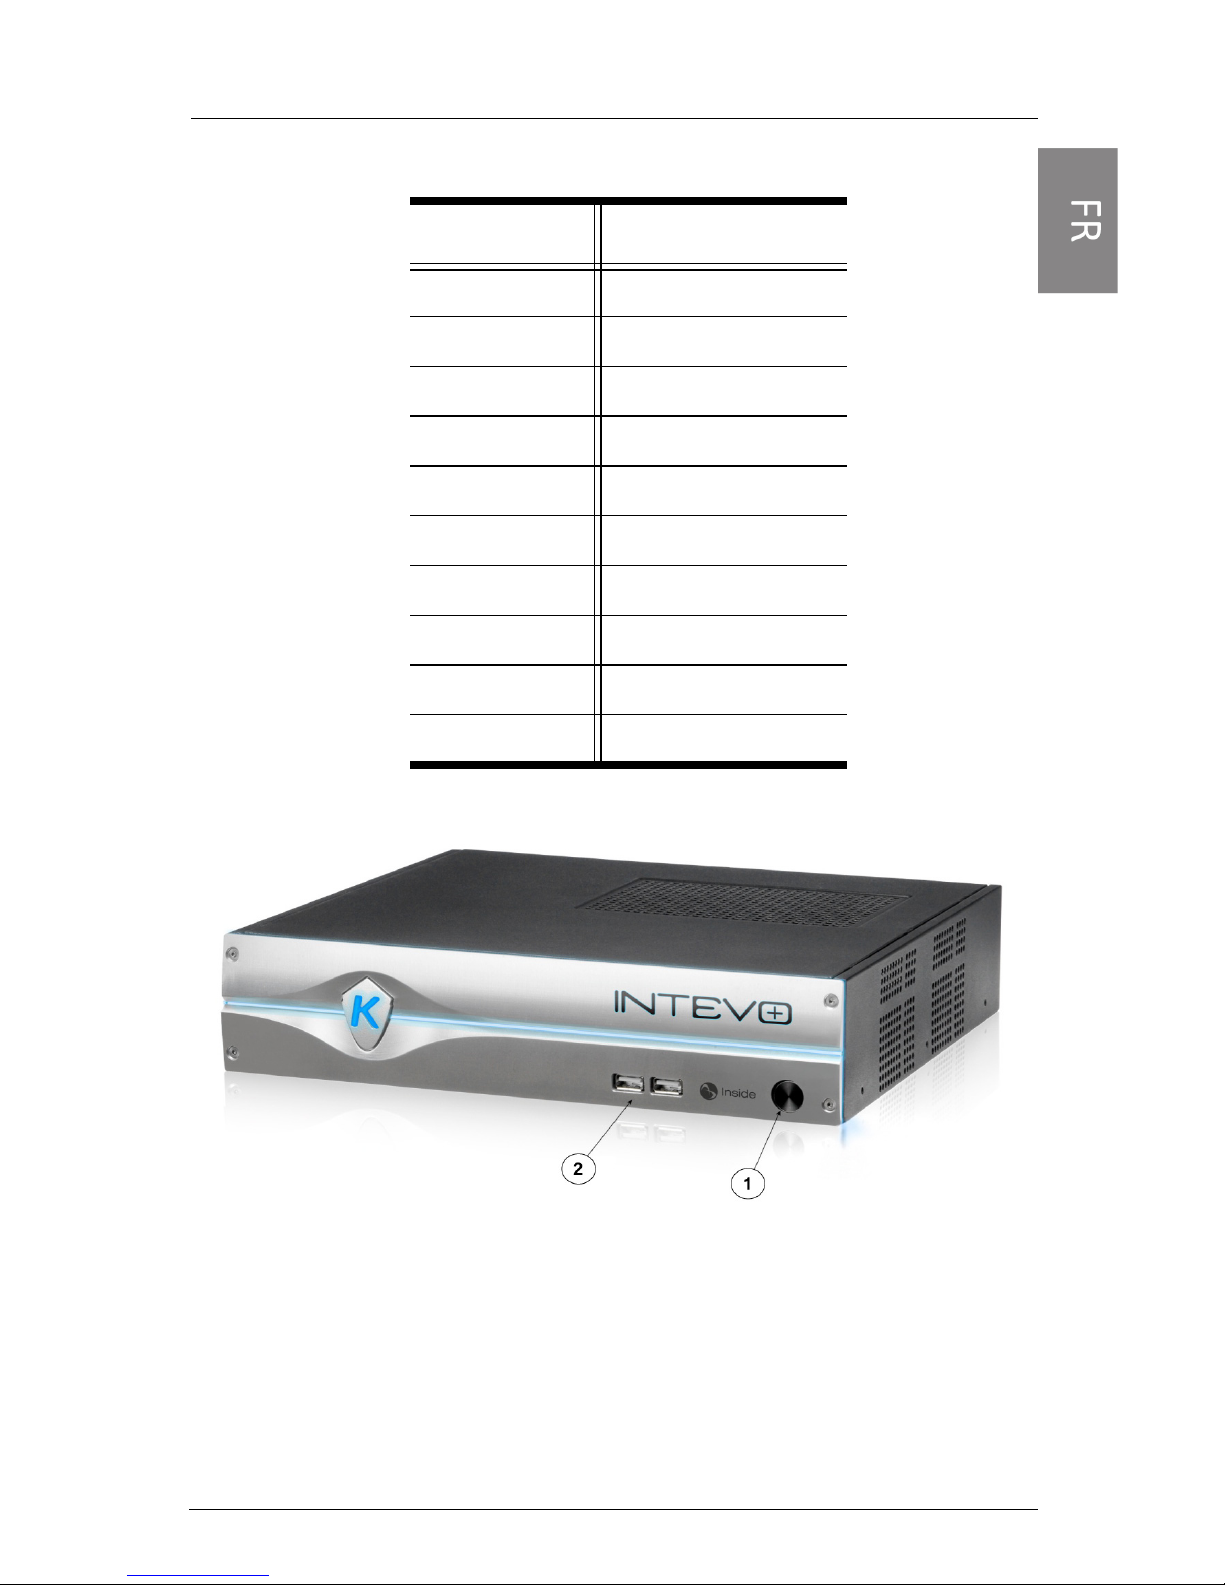
Compact front panel:
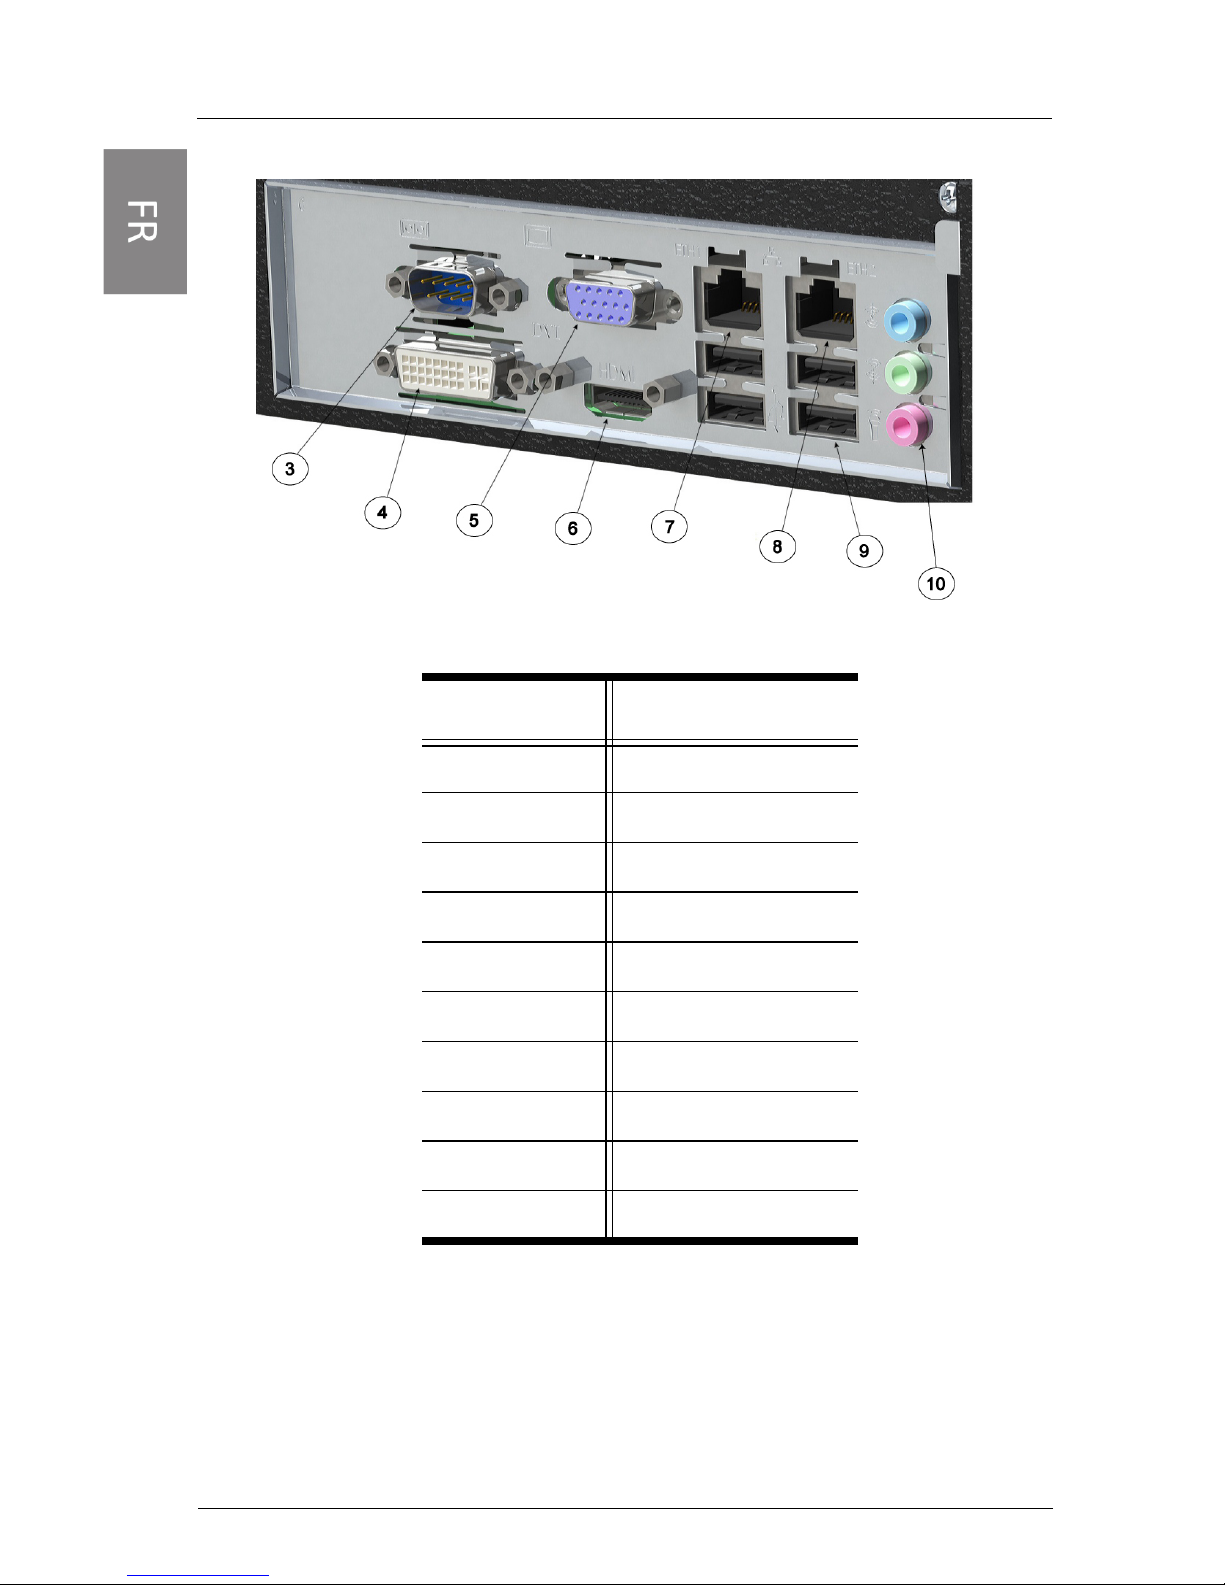
Compact back panel:
Page 8
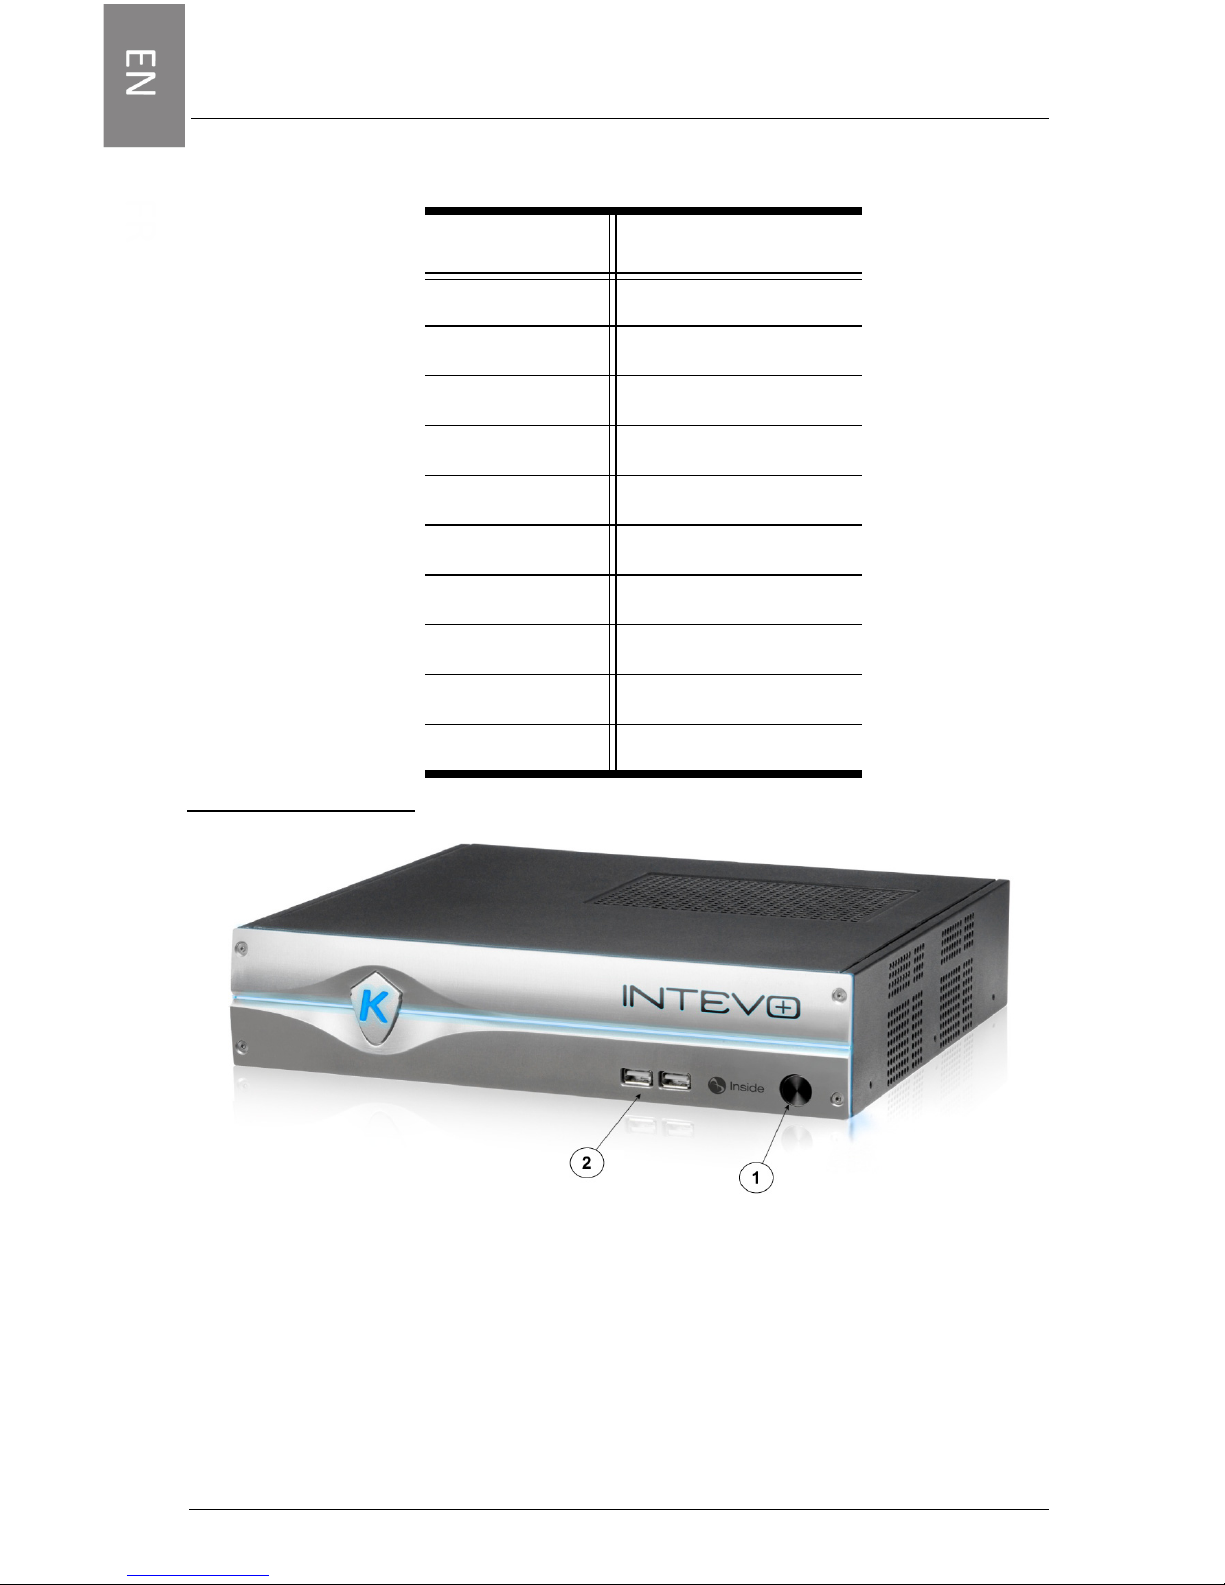
Number Port
1 Power button
2 eSATA
3 Serial
4 DVI
5 VGA
6 HDMI
7 Ethernet 1
8 Ethernet 2
9 USB ports
10 Audio ports
6
Compact
Advanced front panel:
Page 9

7
Advanced back panel:
Number Port
1 Power button
2 USB
3 Serial
4 DVI
5 VGA
6 HDMI
7 Ethernet 1
8 Ethernet 2
9 USB ports
10 Audio ports
Advanced
Page 10
8
First Start Configuration
User Names and Passwords:
1- To log into the INTEVO unit, enter the following credentials:
Administrator:
User name: admin Password: admin
Operator:
User name: operator Password: (leave blank)
2- To log into the EntraPass software, enter the following credentials:
Installer:
User name: kantech Password: kantech
Administrator:
User name: kantech1 Password: kantech
Guard:
User name: kantech2 Password: kantech
Web access:
User name: intevo1 Password: intevo1
3- To log into the American Dynamics IP Video software (HDVR), enter
the following credentials:
Administrator:
User name: admin Password: admin256
Steps to follow for local access:
1- Power on the Intevo (done automatically when connecting the AC
power cable).
2- Follow the steps in the First Boot Wizard.
Steps to follow for remote access:
1- Power on the Intevo (done automatically when connecting the AC
power cable).
2- Insert the included USB key in the remote PC.
Page 11
9
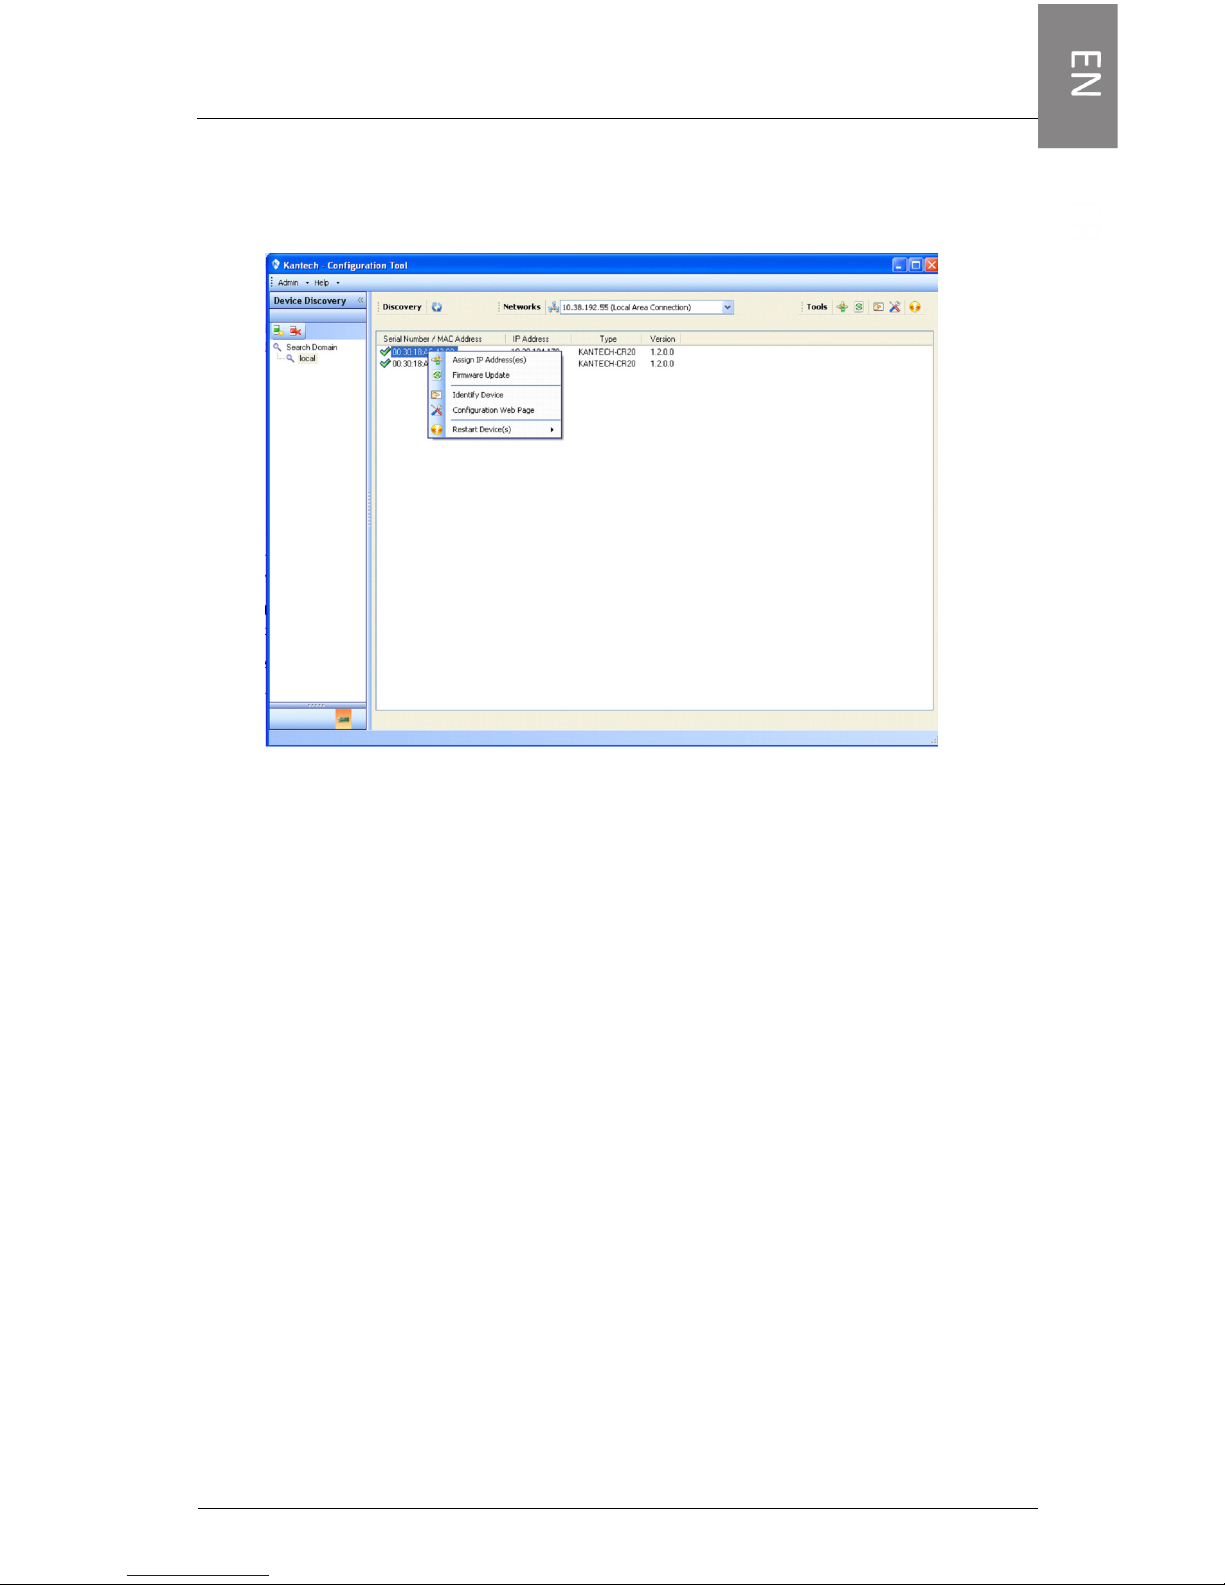
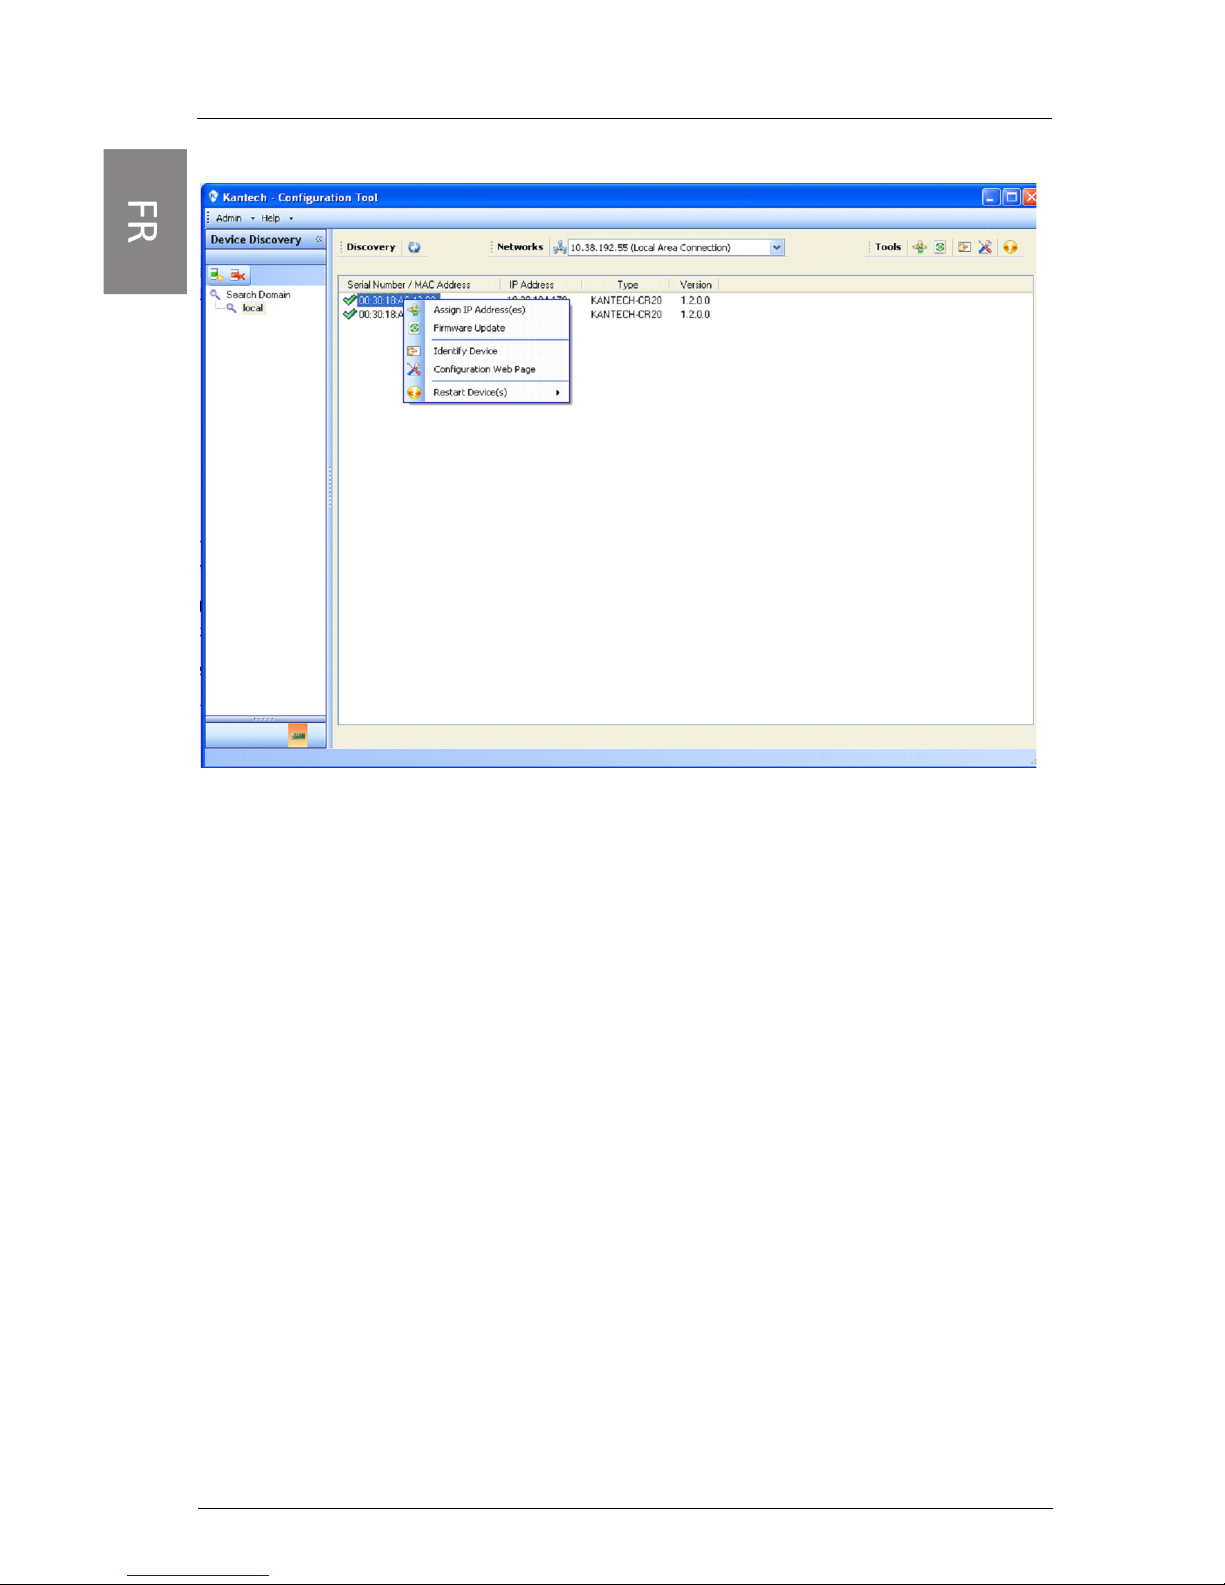
3- Locate the IntevoConfigTool.exe file on the USB key and launch
the application.
4- To assign a new IP address, right-click on a MAC address and select
Assign IP address.
5- Click the Launch Configuration Web Page button located on the
upper right side of the screen.
6- Enter “admin” as an ID and password.
7- Follow the steps in the Language Wizard.
8- Launch Remote Desktop Access application with the address
entered in step 4.
Please refer to the User Manual for further information.
How to activate IP camera channels on INTEVO using
American Dynamics Illustra 400 or 600 series IP cameras:
1- Install and log into your INTEVO unit
2- Log into the AD IP Video (HDVR) software
3- Go to Configurations / HDVR server / System setup.
4- Take note of the MAC address of your INTEVO unit.
5- Go to the Kantech web registration page by going to the address
below:
Page 12

10
http://www.kantech.com/Support/KantechRegistration.aspx
NOTE: You must be logged into the Kantech website in order to have
access to the registration page. If you do not have a valid login for the
Kantech website, go to http://www.kantech.com/Register/Register.aspx
and fill out the registration form.
6- Click on INTEVO Camera registration
7- Enter your email address. A copy of the license key will be sent to
this address when the process is completed.
8- Click on “would you like to register an American Dynamics Illustra
camera?”.
9- Enter the following information:
• Camera MAC Address (See AD Illustra 400 or 600 user manual
for info)
• INTEVO Server MAC address (see step 4 above)
10- Click “REGISTER”.
11- If you are activating multiple camera channels, click “Click here to
create an additional key” and enter the other the additional
information.
12- Take the “KEY” information and go to: Configurations / HDVR
server / System Setup in the HDVR software.
13- Enter the “KEY” information in the “LICENSE” field and click
“APPLY”.
NOTE: The license key is case sensitive.
14- Your INTEVO camera channels are now activated and ready to use.
How to activate IP camera channels on INTEVO using an
INTEVO-IPCAM01 license.
1- Install and log into your INTEVO unit
2- Log into the AD IP Video (HDVR) software
3- Go to Configurations / HDVR server / System setup.
4- Take note of the MAC address of your INTEVO unit.
5- Go to the Kantech web registration page by going to the address
below:
http://www.kantech.com/Support/KantechRegistration.aspx
NOTE: You must be logged into the Kantech website in order to have
access to the registration page. If you do not have a valid login for the
Kantech website, go to http://www.kantech.com/Register/Register.aspx
and fill out the registration form.
Page 13

11
6- Click on INTEVO Camera registration
7- Enter your email address. A copy of the license key will be sent to
this address when the process is completed.
8- Enter the following information:
• INTEVO-IPCAM01 serial number
• INTEVO Server MAC address (see step 4 above)
9- Click “REGISTER”.
10- If you are activating multiple camera channels, click “Click here to
create an additional key” and enter the other the additional
information.
11- Take the “KEY” information and go to: Configurations / HDVR
server / System Setup in the HDVR software.
12- Enter the “KEY” information in the “LICENSE” field and click
“APPLY”.
13- Your INTEVO camera channels are now activated and ready to use.
NOTE: INTEVO IP channel registration can be done through the web
browser on the INTEVO or by any other computer with a connection to
the internet. If these options are not available, please contact Kantech
Technical Support for assistance.
Page 14

12
Page 15
DN2055-1404
V 1.0
Contrôle d'accès et gestion vidéo
Intevo Compact (modèle Intevo-CMP-1TB)
Intevo Avancé (modèle Intevo-ADV-3TB)
Guide de configuration rapide
Modèles avancé et compact
Page 16

1
Copyright
Le contenu de ce manuel est protégé par les lois sur le droit d'auteur et ne peut être
copié, photocopié, reproduit, traduit ou converti à un format électronique ou lisible
par machine, en totalité ou en partie, sans le consentement écrit préalable de Tyco
International Ltée © 2012 et ses compagnies respectives. Tous droits réservés.
Notice d'utilisation
• Veuillez lire ce manuel attentivement avant d'utiliser le produit. Vous devez satisfaire à
toutes les conditions avant de pouvoir utiliser ce serveur.
• Nous nous réservons le droit de modifier ce produit et ses manuels sans avis préalable.
• Veuillez conserver ce document aux fins de référence ultérieure.
• Ce serveur est destiné à une utilisation à l'intérieur seulement.
• Gardez le serveur et tous ses accessoires dans un environnement sec.
• Nous déclinons toute responsabilité pour les dommages causés par une utilisation
inappropriée.
• L'installateur doit informer l'UTILISATEUR de TOUTES LES INSTRUCTIONS DE SÉCURITÉ
relatives à l'utilisation de ce matériel.
Garantie
• Le serveur est vendu avec une garantie de 3 ans à compter de la date d'achat par le
distributeur/installateur.
• Le fabricant du serveur doit offrir cette garantie, car tout appareil défectueux lui sera
retourné aux fins de remplacement.
Important:
• Ce matériel Intevo ne doit être installé et utilisé que dans un environnement dont le
niveau de pollution est au maximum 2, en zone de protection contre les surtensions II
(ZONE NON DANGEREUSE), et en intérieur seulement. Cet équipement est FIXE ou sur
un BUREAU et RELIÉ PAR UN CORDON, et il est conçu pour être installé uniquement par
une personne du service de maintenance (c'est à dire qui possède la formation
technique et l'expérience nécessaires pour être consciente des risques auxquels elle
s'expose en accomplissant sa tâche et des mesures à prendre afin de réduire ces risques
pour elle-même et pour les autres).
• L'alimentation électrique ne possède pas de COMMUTATEUR MARCHE/ARRÊT. La
connexion de l'alimentation CA permet de déconnecter l'appareil du secteur.
Instructions de sécurité
• Choisissez un emplacement exempt de vibrations et de chocs.
• Ne placez pas cet appareil à un endroit où quelqu'un pourrait marcher sur les câbles.
• Ne branchez pas le serveur sur des prises de courant appartenant au même circuit que
de gros appareils.
• Évitez les endroits où le serveur pourrait être exposé à la lumière directe du soleil, à une
chaleur excessive, à l'humidité, à des vapeurs, à des produits chimiques ou à la
poussière.
• N'installez pas cet équipement à proximité de l'eau (par exemple baignoire, lavabo, évier
de cuisine ou de salle de bain sous-sol humide ou piscine).
• N'installez pas ce matériel et ses accessoires dans un endroit présentant des risques
d'explosion.
• Ne branchez pas ce serveur à une prise de courant contrôlée par un interrupteur ou une
minuterie automatique.
Page 17

2
• ÉVITEZ toute source d'interférence radio.
• ÉVITEZ d'installer ce matériel à proximité d'un radiateur, d'un climatiseur, d'un
ventilateur et/ou d'un réfrigérateur.
• Assurez-vous que les câbles sont placés de façon à éviter tout accident. Les câbles
branchés ne doivent pas être soumis à des contraintes mécaniques excessives
• N'utilisez que l'alimentation CA et le câble fournis.
Spécifications techniques
• Températures de fonctionnement : 0 °C à 40 °C (32 °F à 104 °F), à l'intérieur uniquement.
• Seuil d'humidité : 93 % maximum (humidité relative, sans condensation).
• Dimensions du boîtier (hauteur/largeur/profondeur) :
• Advanced: 6.4cm (2.52po) x 30cm (11.8pon) x 28.9cm (11.38po).
• Compact: 5.4cm (2.25po) x 19cm (7.5po) x 21.5 cm (8.5po)
• Entrée : 100-240 V, 50-60 Hz, 2,0 A.
• Sortie : 12 V, 84 W max.
Ce produit contient une pile au lithium qui ne doit être
remplacée que par le personnel de maintenance autorisé. ATTENTION : Risque d’explosion si la pile est rem-
placée par un modèle incorrect. Les piles usagées
doivent être mises au rebut en conformité avec la lég-
islation locale et les instructions applicables.
Page 18
3
Guide de configuration rapide
Contenu de la boîte
• Serveur unifié Intevo
• Cordon d'alimentation
• Guide de configuration rapide
• Pattes de fixation murale (2)
• Vis (6 pour le modèle Avancé; 4 pour le modèle Compact)
• Clé USB (contenant : documentation, outil de détection, EntraPass
et logiciel de vidéo IP).
Installation
Installation sur le bureau
Soyez très attentif à ne pas obstruer les ouïes de ventilation sur
le côté droit et le dessus du boîtier du serveur Intevo. Évitez de
stocker quoi que ce soit à proximité de l'appareil, afin de ne pas
nuire à la circulation d'air.
Installation murale (les deux modèles)
1- Fixez les pattes de chaque côté du boîtier à l'aide des vis fournies.
2- Fixez le boîtier du serveur Intevo au mur à l'aide des pattes et de
quatre (4) vis (non fournies). Nous recommandons des vis
taraudeuses Phillips en acier inoxydable de type M 4,2 x 32 mm
(#8 x 1,25 po) (Spaenaur ST-631P ou équivalent). La fixation à une
cloison sèche nécessite de plus quatre (4) chevilles en plastique
(Spaenaur EX-S5 ou équivalent, non fournies).
Page 19
4
Installation en armoire (non fournie; modèle avancé
seulement)
Précautions
• Température de fonctionnement élevée : si le serveur est installé
dans une armoire close ou contenant plusieurs unités, la
température de fonctionnement ambiante de l'armoire peut être
supérieure à la température de la pièce. Dans ce cas, vous devez
veiller à installer le matériel dans un environnement compatible
avec la température ambiante maximale indiquée par le fabricant.
• Circulation d'air réduite : l'installation du matériel dans une
armoire doit permettre la circulation d'air requise pour que le
fonctionnement sécuritaire de celui-ci ne soit pas compromis.
• Charge mécanique : le montage du matériel dans l'armoire ne doit
présenter aucun danger pour cause de charge mécanique inégale.
• Surcharge du circuit électrique : vous devez veiller à ce que la
connexion du matériel ne surcharge pas le circuit d'alimentation et
n'affecte pas la protection contre les surtensions ni le câblage
d'alimentation. À ce propos, vous devez prendre en compte les
indications apposées sur le matériel.
• Mise à la terre fiable : une mise à la terre fiable du matériel installé
en armoire doit être assurée. Vous devez porter une attention
particulière aux connexions électriques autres que les connexions
au secteur (par exemple, l'utilisation de barres d'alimentation).
Connexions
Procédez aux connexions suivantes :
1- Connectez le câble du réseau local à ETH1.
2- Connectez le câble du réseau vidéo à ETH2.
3- Connectez le moniteur au port VGA, DVI ou HDMI (pour un accès
local seulement).
Page 20

5
4- Connectez un clavier et une souris à un port USB, à l'arrière ou à
l'avant de l'appareil (pour un accès local seulement).
REMARQUE: Les ports DVI et HDMI ne peuvent pas être utilisés
simultanément.
REMARQUE: Le serveur Intevo peut être utilisé sans moniteur
ni souris, à l'aide d'un accès à distance.
Panneau frontal compact:
Panneau arrière compact:
Page 21
Numéro Port
1 Bouton Marche/Arrêt
2 eSATA
3 Série
4 DVI
5 VGA
6 HDMI
7 Ethernet 1
8 Ethernet 2
9 USB
10 Audio
6
Compact
Panneau frontal avancé
Page 22
7
Panneau arrière avancé
Numéro Port
1 Bouton Marche/Arrêt
2 USB
3 Série
4 DVI
5 VGA
6 HDMI
7 Ethernet 1
8 Ethernet 2
9 USB
10 Audio
Avancé
Page 23

8
Configuration au premier démarrage
Noms d’utilisateur et mots de passe :
1- Pour vous connecter à l’unité INTEVO, saisissez votre nom
d’utilisateur et mot de passe :
Administrateur:
Nom d’utilisateur: admin Mot de passe: admin
Opérateur:
Nom d’utilisateur: operator Mot de passe: (ne rien
inscrire)
2- Pour vous connecter au logiciel EntraPass, saisissez votre nom
d’utilisateur et mot de passe :
Installateur:
Nom d’utilisateur: kantech Mot de passe: kantech
Administrateur:
Nom d’utilisateur: kantech1 Mot de passe: kantech
Guardien:
Nom d’utilisateur: kantech2 Mot de passe: kantech
Accès Web:
Nom d’utilisateur: intevo1 Mot de passe: intevo1
3- Pour vous connecter au logiciel IP Video (HDVR) d’American
Dynamics, saisissez votre nom d’utilisateur et mot de passe :
Administrateur:
Nom d’utilisateur: admin Mot de passe: admin256
Procédure à suivre pour un accès local:
1- Mettez le serveur Intevo sous tension (automatique lors de la
connexion du câble d'alimentation CA).
2- Suivez les indications du First Boot Wizard.
Procédure à suivre pour un accès à distance :
1- Mettez le serveur Intevo sous tension (automatique lors de la
connexion du câble d'alimentation CA).
2- Insérez la clé USB fournie dans l'ordinateur distant.
3- Recherchez le programme IntevoConfigTool.exe sur la clé USB et
lancez l'application.
Page 24
9
REMARQUE: Pour faire afficher l’interface du Configuration
Tool en français, il suffit de cliquer sur Admin en haut à gauche
puis de sélectionner Français à partir de la liste déroulante.
4- Pour affecter une nouvelle adresse IP, cliquez avec le bouton droit
sur une adresse MAC et choisissez Assign IP address (Affecter
une adresse IP).
5- Cliquez sur le bouton Launch Configuration Web Page (Lancer la
page Web de configuration) situé dans le coin supérieur droit de
l'écran.
6- Entrez « admin » comme ID utilisateur et comme mot de passe.
7- Suivez les indications du First Boot Wizard.
8- Lancez l'application Remote Desktop Access (Accès à distance au
Bureau) avec l'adresse entrée à l'étape 4.
Pour en savoir plus, reportez-vous au Manuel d’installation.
Comment activer les canaux de caméras IP sur INTEVO
avec des caméras IP American Dynamics Illustra série
400 ou 600
1- Installez votre appareil INTEVO et ouvrez une session.
2- Connectez-vous au logiciel vidéo IP (HDVR) de AD.
Page 25

10
3- Allez à Configurations / HDVR server / System setup.
4- Notez l'adresse MAC de votre appareil INTEVO.
5- Allez à la page web d'enregistrement de Kantech en cliquant sur
l'adresse ci-dessous :
http://www.kantech.com/Support/KantechRegistration.aspx
REMARQUE: Vous devez être connecté au site web de Kantech
pour avoir accès à la page d'enregistrement. Si vous ne possédez
pas de nom d'utilisateur valide pour accéder au site web de
Kantech, allez à http://www.kantech.com/Register/
Register.aspx et remplissez le formulaire d'enregistrement.
6- Cliquez sur INTEVO Camera registration.
7- Entrez votre adresse de courriel. Une copie de la licence sera
envoyée à cette adresse à la fin du processus.
8- Cliquez sur Would you like to register an American Dynamics
Illustra camera?
9- Entrez les informations suivantes :
• Adresse MAC de la caméra (reportez-vous au manuel de
l'utilisateur AD Illustra 400 ou 600 pour en savoir plus).
• Adresse MAC du serveur INTEVO (voir étape 4 ci-dessus).
10- Cliquez sur REGISTER.
11- Si vous activez plusieurs canaux de caméras, cliquez sur Click here
to create an additional key et entrez le reste des informations.
12- Notez les informations du champ KEY et allez à : Configurations /
HDVR server / System Setup dans le logiciel HDVR.
13- Entrez les informations du KEY dans le champ LICENSE et cliquez
sur APPLY.
14- Vos canaux de caméras INTEVO sont maintenant activés et prêts
à être utilisés.
Comment activer les canaux de caméras sur INTEVO avec
une licence INTEVO-IPCAM01
1- Installez votre appareil INTEVO et ouvrez une session.
2- Connectez-vous au logiciel vidéo IP (HDVR) de AD.
3- Allez à Configurations / HDVR server / System setup.
4- Notez l'adresse MAC de votre appareil INTEVO.
5- Allez à la page web d'enregistrement de Kantech en cliquant sur
l'adresse ci-dessous :
Page 26

11
http://www.kantech.com/Support/KantechRegistration.aspx
REMARQUE: Vous devez être connecté au site web de Kantech
pour avoir accès à la page d'enregistrement. Si vous ne
possédez pas de nom d'utilisateur valide pour accéder au site
web de Kantech, allez à http://www.kantech.com/Register/
Register.aspx et remplissez le formulaire d'enregistrement.
6- Cliquez sur INTEVO Camera registration.
7- Entrez votre adresse de courriel. Une copie de la licence sera
envoyée à cette adresse à la fin du processus.
8- Entrez les informations suivantes :
• Numéro de série INTEVO-IPCAM01
• Adresse MAC du serveur INTEVO (voir étape 4 ci-dessus).
9- Cliquez sur REGISTER.
10- Si vous activez plusieurs canaux de caméras, cliquez sur Click
here to create an additional key et entrez le reste des
informations.
11- Notez les informations du champ KEY et allez à : Configurations /
HDVR server / System Setup dans le logiciel HDVR.
12- Entrez les informations du KEY dans le champ LICENSE et cliquez
sur APPLY.
REMARQUE: La clé de licence est sensible à la casse.
13- Vos canaux de caméras INTEVO sont maintenant activés et prêts
à être utilisés.
REMARQUE: L'enregistrement des canaux IP INTEVO peut se
faire à l'aide du navigateur web sur l'appareil INTEVO ou sur
n'importe quel autre ordinateur connecté à Internet. Si ces
options ne sont pas possibles, veuillez communiquer avec
Kantech pour obtenir de l'aide.
Page 27

12
Page 28
DN2055-1404
V 1.0
Control de acceso y gestión vídeo
Intevo Compacto (modelo Intevo-CMP-1TB)
Intevo Avanzado (modelo Intevo-ADV-3TB)
Guía de configuración rápida
Modelos avanzados y compactos
Page 29
1
Derechos de autor
Bajo las leyes de propiedad intelectual, el contenido de este manual no debe ser
copiado, fotocopiado, reproducido, traducido, o trasformado en cualquier medio
electrónico o alguna otra máquina de reproducción de lectura, ya sea el documento
entero o partes sin el permiso escrito de TYCO Internacional Ltd. © 2012 y de sus
compañias respectivas. Todos los derechos reservados.
Aviso de utilisación
• Por favor lea este guía con cuidado antes de utilizar el producto. Todos los requisitos
deben ser seguidos antes de utilizar el servidor.
• Nos reservamos el derecho de proceder a cambios en el producto o el guía sin previo
aviso.
• Guarde este guía como referencia.
• El servidor es sólo para uso interior.
• Guarde el servidor y otros accesorios en un lugar seco.
• No somos responsables de cualquier daño causado por el uso inapropiado.
• El instalador debe instruir el utilisador a propósito de las reglas de seguridad que deben
ser observadas durante la utilisación del equipo.
Garantía
• El servidor es vendido con una garantía de 3 años, comenzando el día de la compra por el
distribuidor o instalador.
• El fabricante del servidor debe ofrecer esta garantía, cualquier unidad que sea
defectuosa será regresada para reemplazo.
Importante:
• Este equipo Intevo debe ser instalado y utilizado en un medio ambiente de polución de
grado máximo 2 y una sobretensión de categoría II EN UN LUGAR QUE NO SEA
PELIGROSO, al interior solamente. El equipo es FIJO o sobre ESCRITORIO y con cables
connectados y es deseñado para ser installado por una persona de servicio solamente,
(una persona de servicio es definida como una persona que tiene el conocimiento técnico
y la experiencia necesaria para estar al corriente de los peligros a los que la persona se
expone al realizar un trabajo y las medidas que reducen los riesgos de esa persona y los
demás).
• No hay un interruptor de ENCENDER/APAGAR para la fuente de alimentación. El
aclopador de la fuente de alimentación C.A sirve solamente como medio de desconexión
de la fuente de alimentación principal.
Instrucciones de seguridad
• Escoja un lugar sin vibraciones o choques.
• No localice este producto en un lugar dónde las personas puedan tropezarse con los
cables.
• No conecte el servidor en un toma corriente dónde se hayan conectados equipos que
necesitan alta tensión.
• No instale el servidor en un lugar dónde da la luz del sol directamente, color exesivo,
humedad, vapores, químicos o polvo.
• No instale el equipo cerca del agua (ejemplo : duchas, baños, cocina, lavandería, sótanos
húmedos o cerca de una piscina).
• No instale el equipo o sus accesorios en un lugar dónde hay riesgo de explosión.
Page 30

2
• No instale el servidor en un toma corrente controlado por un interruptor o cronómetro
automático.
• EVITE fuentes de interferencia radio .
• EVITE de instalar el equipo cerca de radiadores, aires acondicionados, ventiladores y
refrigeradoras.
• Asegurese que los cables están posicionados para evitar accidentes. Los cables
conectados no deben estar expuestos a un exceso de tensión.
• Utilice solamente el cable de alimentación C.A incluido.
Especificaciones técnicas
• Temperaturas de trabajo : 0 C a 40 c (32 F a 104 F); para uso interior solamente.
• Nivel de humedad : 93% max. (humedad retaliva sin condensación).
• Dimenciones (Alto x Ancho x Prof) :
• Avanzado: 6.4cm (2.52in) x 30cm (11.8in) x 28.9cm (11.38in).
• Compacto: 5.4cm (2.25in) x 19cm (7.5in) x 21.5 cm (8.5in)
• Alimentación de entrada : 100-240v, 50-60hz, 2.0A.
• Alimentación de salida : 12v, 84w max.
Este producto contiene una batería de litio que se
puede sustituir sólo por una persona de servicio
autorizada. PRECAUCIÓN: Riesgo de explosión si la
batería se sustituye por otra de tipo incorrecto.
Deshágase de las baterías usadas con acuerdo a la
legislación local aplicable y sus instrucciones.
Page 31

3
Guía de configuración rápida
Qué está incluido en la caja?
• Servidor unificado Intevo
• Cable de alimentación
• Guía de configuración rápida
• Soportes de montado a la pared (2)
• Tornillos (6 para Avanzado, 4 para Compacto)
• Llave USB (incluido: documentación, herramienta de
configuración, EntraPass y programa de video IP).
Instalación
Instalación de escritorio
Asegurese de no obstruir las ventilaciones en el costado derecho
y la parte superior del servidor Intevo. Asegurese de no
encombrar el alrededor del dispositivo que pueda bloquear las
corrientes de aire.
Instalación sobre muro (Ambos modelos)
1- Fije los soportes en cada costado del servidor con las tornillos
incluidos.
2- Fije el servidor Intevo con los soportes en la pared con 4 tornillos
(no incluidos). Recomendamos tornillos de acero inoxidable
Phillips M4.2 x 32 mm (#8 x 1.25” ) (Spaenaur ST-631P o
equivalente). La instalación en tabla roca también necesita 4
anclas de plastic (Spaenaur EX-S5 o equivalente, no incluido).
Page 32

4
Instalación en un armario bastidor (no incluido; solo
modelo avanzado)
Precauciones
• Ambiente de operación elevado - Si se instala en un armario
bastidor cerrado o con varias unidades, la temperatura ambiente
de funcionamiento del armario bastidor puede ser más elevada
que la temperatura ambiente. Debe considerarse la posibilidad de
instalar este equipo en un lugar compatible con la temperatura
ambiente máxima (Tma) especificada por el fabricante.
• Corriente de aire reducida - Instalación del equipo en un armario
bastidor debe ser tal que la cantidad de corriente de aire
necesaria para la operación segura del equipo no sea
comprometida.
• Carga mecánica - El montaje del equipo en el armario bastidor
debe ser tal que una condición peligrosa no se consigue debido a
una instalación desequilibrada o desigual.
• Sobrecarga del circuito - Se debe considerar la conexión del equipo
al circuito eléctrico y el efecto que puede tener la sobrecarga de
los circuitos sobre los equipos de protección de sobrecarga y
cableado eléctrico. Las especificaciones de operación en las placas
indicadoras de los equipos deben ser consideradas
adecuadamente.
• Puesta a tierra fiable - Debe mantener una puesta a tierra fiable de
los equipos instalados en un armario bastidor. Se debe prestar
atención al uso de alargadores eléctricos.
Conexiones
Continuar con las siguientes conexiones:
1- Conectar el cable de red local al conector ETH1.
2- Conectar el cable de red de la cámara al conector ETH2.
Page 33

5
3- Conectar el monitor al conector VGA, DVI o HDMI (para acceso
local solamente).
4- Conectar un teclado y un ratón a cualquier puerto USB adelante o
atrás del equipo (para acceso local solamente).
NOTA: Puertos DVI y HDMI no se pueden usar
simultáneamente.
NOTA: Intevo puede ser operado sin teclado o ratón con acceso
remoto.
Panel frontal compacto:
Panel posterior compacto:
Page 34

Número Puerto
1 Botón de encendido
2 eSATA
3 Serie
4 DVI
5 VGA
6 HDMI
7 Ethernet 1
8 Ethernet 2
9 USB
10 Audio
6
Compacto
Panel frontal avanzado
Page 35

7
Panel posterior avanzado
Número Puerto
1 Botón de encendido
2 USB
3 Serie
4 DVI
5 VGA
6 HDMI
7 Ethernet 1
8 Ethernet 2
9 USB
10 Audio
Avanzado
Page 36

8
Configuración inicial
Nombres de usuario y contraseñas:
1- Para iniciar sesión en la unidad de INTEVO, introduzca los
siguientes datos:
Administrador:
Nombre de usuario: admin Contraseña: admin
Operador:
Nombre de usuario: operator Contraseña: (dejar en
blanco)
2- Para iniciar sesión en el software de EntraPass, introduzca los
siguientes datos:
Instalador:
Nombre de usuario: kantech Contraseña: kantech
Administrador:
Nombre de usuario: kantech1 Contraseña: kantech
Guardia:
Nombre de usuario: kantech2 Contraseña: kantech
Acceso de Web:
Nombre de usuario: intevo1 Contraseña: intevo1
3- Para iniciar sesión en el software de vídeo IP de American
Dynamics (HDVR), introduzca los siguientes datos:
Administrador:
Nombre de usuario: admin Contraseña: admin256
Etapas a seguir para un acceso local:
1- Prender el Intevo (se prende automáticamente cuando se conecta
el cable de alimentación AC).
2- Seguir las etapas del First Boot Wizard.
Etapas a seguir para un acceso remoto:
1- Prender el Intevo (se prende automáticamente cuando se conecta
el cable de alimentación AC).
2- Insertar la llave USB en un puerto USB del computador remoto.
3- Buscar el programa IntevoConfigTool.exe en la llave USB y
ejecutar la aplicación.
Page 37

9
4- Para asignar una nueva dirección IP, haga clic en un Dirección MAC
y seleccione Assign IP address.
5- Haga clic en el botón Launch Configuration Web Page localizado
en el lado superior derecho de la pantalla.
6- Escriba “admin” como identificador y contraseña
7- Seguir las etapas del First Boot Wizard.
8- Iniciar la aplicación Escritorio remoto con la dirección IP entrada
en la etapa 4.
Por favor, consulte el Manual de instalación para mayor
información.
Cómo activar los canales de las cámaras IP en INTEVO
utilizando las cámaras IP American Dynamics Illustra,
serie 400 ó 600:
1- Instale su unidad de INTEVO e inicie una sesión
2- Inicie una sesión en el software de video IP de AD (HDVR)
3- Vaya a Configurations/HDVR Server/System setup
4- Tome nota de la dirección MAC de su unidad de INTEVO.
5- Vaya a la página web de registro de Kantech:
Page 38

10
http://www.kantech.com/Support/KantechRegistration.aspx
NOTA: Para tener acceso a la página de registro, debe haber
iniciado la sesión en el sitio web de Kantech. Si no tiene una
cuenta válida para abrir una sesión en el sitio web de Kantech,
vaya a http://www.kantech.com/Register/Register.aspx y llene
el formulario de registro.
6- Haga clic en “INTEVO Camera registration”
7- Introduzca su dirección de email. Una vez que haya finalizado el
proceso, se enviará una copia de la clave de licencia a esa
dirección.
8- Haga clic en “would you like to register an American Dynamics
Illustra camera?”.
9- Introduzca los siguientes datos:
• Dirección MAC de la cámara (para más información, consulte
el manual del usuario de la AD Illustra 400 ó 600)
• Dirección MAC del servidor de INTEVO (consulte el paso 4 que
se menciona arriba)
10- Haga clic en “REGISTRAR”.
11- Si desea activar varios canales de la cámara, haga clic en “Click
here to create an additional key” e introduzca y los datos
adicionales que se soliciten.
12- Tome los datos de la “CLAVE” y vaya a: Configurations / HDVR
Server / System Setup del software del HDVR.
13- Introduzca la información de la “CLAVE” en el campo “LICENCIA”
y haga clic en “APLICAR”.
NOTA: En la clave de la licencia, las mayúsculas son distintas a
las minúsculas.
14- Los canales de su cámara de INTEVO ya están activados y listos
para usarse.
Cómo activar los canales de las cámaras IP en INTEVO
utilizando una licencia de INTEVO-IPCAM01.
1- Instale su unidad de INTEVO e inicie una sesión
2- Inicie una sesión en el software de video IP de AD (HDVR)
3- Vaya a Configurations / HDVR Server / System Setup
4- Tome nota de la dirección MAC de su unidad de INTEVO.
5- Vaya a la página web de registro de Kantech:
Page 39

11
http://www.kantech.com/Support/KantechRegistration.aspx
NOTA: NOTA: Para tener acceso a la página de registro, debe
haber iniciado la sesión en el sitio web de Kantech. Si no tiene
una cuenta válida para abrir una sesión en el sitio web de
Kantech, vaya a http://www.kantech.com/Register/
Register.aspx y llene el formulario de registro.
6- Haga clic en “INTEVO Camera registration”
7- Introduzca su dirección de email. Una vez que haya finalizado el
proceso, se enviará una copia de la clave de licencia a esa
dirección.
8- Introduzca los siguientes datos:
• Número de serie de INTEVO-IPCAM01
• Dirección MAC del servidor de INTEVO (consulte el paso 4 que
se menciona arriba)
9- Haga clic en “REGISTRAR”.
10- Si desea activar varios canales de la cámara, haga clic en “Click
here to create an additional key” e introduzca y los datos
adicionales que se soliciten.
11- Tome los datos de la “CLAVE” y vaya a: Configurations / HDVR
Server / System Setup del software del HDVR.
12- Introduzca la información de la “CLAVE” en el campo “LICENCIA”
y haga clic en “APLICAR”.
13- Los canales de su cámara de INTEVO ya están activados y listos
para usarse.
NOTA: El registro del canal IP en INTEVO se puede realizar a
través del navegador web de INTEVO o con cualquier otro
equipo con conexión a Internet. Si estas opciones no están
disponibles, por favor póngase en contacto con el departamento
de Soporte Técnico de Kantech para obtener ayuda.
Page 40

DN2055-1404
V 1.0
Gestão de Software de Vídeo e Controlo de Acessos
Intevo Compacto (modelo Intevo-CMP-1TB)
Intevo Avançado (modelo Intevo-ADV-3TB)
Manual de Configuração Rápida
Modelos Avançado e Compacto
Page 41

1
Direitos de Autor
Em conformidade com as leis de direitos de autor, o conteúdo deste manual não pode
ser copiado, fotocopiado, reproduzido, traduzido ou convertido num formato
eletrónico ou passível de leitura por uma máquina, no todo ou em parte, sem o
consentimento prévio por escrito da Tyco International Ltd.© 2012 e das suas
Respetivas Empresas. Todos os Direitos Reservados.
Aviso de Utilização
• Leia este manual cuidadosamente antes de utilizar o produto. Todos os requisitos devem
ser observados antes de utilizar este servidor.
• A Tyco reserva o direito de alterar o produto e os manuais sem aviso prévio.
• Guarde este documento para futura referência.
• O servidor destina-se a ser usado apenas em ambientes de interior.
• Mantenha o servidor e todos os restantes acessórios num ambiente seco.
• A Tyco não é responsável por quaisquer danos resultantes de utilização indevida.
• O Técnico de instalação fornecerá aos UTILIZADORES TODAS AS INSTRUÇÕES DE
SEGURANÇA a serem observadas durante a utilização do equipamento.
Garantia
• O servidor será vendido com uma garantia de 3 anos a partir do dia da compra pelo
revendedor/instalador.
• O fabricante do servidor tem de oferecer esta garantia uma vez que todas as unidades
com defeitos de fabrico lhes serão devolvidas para substituição.
Importante:
• Este equipamento Intevo será usado e instalado num ambiente que apresente um grau
máximo de poluição 2 e com uma categoria de tensão do tipo II LOCALIZAÇÕES NÃO
PERIGOSAS, apenas em ambientes interiores. O equipamento é FIXO ou de SECRETÁRIA e
LIGADO POR UM CABO tendo sido concebido para ser instalado apenas por técnicos de
assistência; [um técnico de assistência é definido como uma pessoa que dispõe da
formação e experiência técnicas adequadas para ter a perceção dos perigos a que o
instalador fica sujeito durante a tarefa da instalação e conhecedor das medidas a tomar
para minimizar os riscos a que essa pessoa e outros poderão estar expostos.]
• Não existe nenhum BOTÃO LIGAR/DESLIGAR para a fonte de alimentação. O dispositivo
de ligação da fonte de alimentação CA serve para desligar a alimentação proveniente da
tomada elétrica.
Instruções de Segurança
• Selecione um local isento de vibrações e choques.
• Não instale o produto num local onde as pessoas possam pisar os cabos.
• Não ligue o servidor a tomadas elétricas que partilhem o circuito com outros aparelhos
de grandes dimensões.
• Não selecione um local que exponha o servidor à luz solar direta, calor em excesso,
humidade, vapores, químicos ou poeiras.
• Não instale o equipamento próximo de água (por exemplo, junto a uma banheira, tanque
de lavagem, lavatório/pia de cozinha, cave húmida ou piscina).
• Não instale este equipamento e os seus acessórios em áreas sujeitas a perigo de
explosão.
• Não ligue este servidor a tomadas elétricas controladas por comutadores ou
temporizadores automáticos.
Page 42

2
• EVITE fontes de interferência rádio.
• EVITE instalar o equipamento junto a aquecedores, ar condicionados, ventiladores e/
ou frigoríficos.
• Certifique-se de que os cabos estão corretamente posicionados para evitar acidentes.
Os cabos ligados não podem ser sujeitos a um esforço mecânico excessivo.
• Utilize apenas a fonte de alimentação CA e cabos incluídos.
Especificações Técnicas
• Temperaturas de Funcionamento: 0°C a 40°C (32°F a 104°F) apenas para interiores.
• Nível de Humidade: 93% máx. (humidade relativa sem condensação).
• Dimensões do Armário (Altura-Largura-Profundidade):
• Avançado: 6.4cm (2.52in) x 30cm (11.8in) x 28.9cm (11.38in).
• Compacto: 5.4cm (2.25in) x 19cm (7.5in) x 21.5 cm (8.5in)
• Alimentação de Entrada: 100-240V, 50-60Hz, 2,0A.
• Alimentação de Saída: 12V, 84W máx.
Este produto contém uma bateria de lítio que ape-
nas pode ser substituída por um técnico de assistên-
cia autorizado. CUIDADO: Risco de Explosão se a
Bateria for substituída por outra de Tipo Incorreto.
Elimine as Baterias Usadas em Conformidade com a
Legislação Local aplicável e com as Instruções.
Page 43

3
Manual de Configuração Rápida
O Que Está Dentro da Caixa?
• Intevo Unified Server
• Cabo de Alimentação
• Manual de configuração Rápida
• Suportes de montagem na parede (2)
• Parafusos (6 para Avançado, 4 para Compacto)
• Cartão de Memória USB (que inclui: Documentação, Ferramenta
de configuração, EntraPass e software de vídeo por IP).
Instalação
Instalação de Secretária
Tenha o cuidado de não bloquear as ranhuras de ventilação
localizadas no lado direito e na parte superior da caixa do Intevo.
Evite armazenar qualquer tipo de material em redor do
dispositivo já que poderá bloquear a circulação de ar junto ao
aparelho.
Instalação com Montagem na Parede (Ambos os
modelos)
1- Fixe os suportes de cada lado da estrutura com os parafusos
fornecidos.
2- Fixe a estrutura do Intevo com os suporte à parede usando quatro
(4) parafusos (não incluídos). Recomendamos a utilização de
parafusos em aço inoxidável com cabeça do tipo Phillips de
Page 44

4
tamanho M4.2 x 32mm (#8 x 1.25'') (Spaenaur ST-631P ou
equivalente). Na montagem em paredes falsas também tem de
usar quatro (4) fixadores de plástico (Spaenaur EX-S5 ou
equivalente; não incluídos).
Instalação com Montagem em Bastidor (Não Incluído;
apenas para o modelo avançado)
Precauções
• Ambiente de Funcionamento com Temperaturas Elevadas - Se
for instalado num bastidor fechado multi unidades, a
temperatura de funcionamento ambiente do bastidor poderá
ser superior à temperatura da sala onde está localizado o
bastidor. Como tal, o equipamento deve ser instalado num
ambiente compatível com a temperatura ambiente máxima
(TMA) especificada pelo fabricante.
• Circulação de Ar Reduzida - A instalação do equipamento num
bastidor deve ser feita de forma a que a quantidade de fluxo de
ar necessária para uma utilização segura do equipamento não
seja comprometida.
• Carga Mecânica - A montagem do equipamento num bastidor
deve ser feita de forma a que não se verifique uma situação de
perigo resultante da ocorrência de uma carga mecânica
desequilibrada.
• Sobrecarga do Circuito - A ligação do equipamento à corrente
elétrica deve ser feita de forma que não ocorra uma sobrecarga
dos circuitos que resulte no espoletar da proteção contra
excesso de corrente e em danos nos cabos elétricos. Devem ser
respeitadas as indicações das placas de classificação do
equipamento quando se avaliar esta situação.
• Ligação à Terra Fiável - Deve ser assegurada uma ligação à terra
fiável do equipamento montado em bastidor. Deve ter-se
particular atenção às ligações elétricas para além das ligações
Page 45

5
diretas ao circuito de alimentação (por exemplo, a utilização de
extensões elétricas).
Ligações
Efetue as seguintes ligações:
1- Ligue o cabo de rede local à porta ETH1.
2- Ligue o cabo de rede da câmara à porta ETH2.
3- Ligue o monitor à porta VGA, DVI ou HDMI (apenas para acesso
local).
4- Ligue um teclado e rato à porta USB na parte da frente do
dispositivo (apenas para acesso local).
NOTA: As portas DVI e HDMI não podem ser usadas em
simultâneo.
NOTA: O Intevo pode ser usado sem monitor ou rato através de
um acesso remoto.
Painel frontal compacto:
Page 46

6
Painel posterior compacto:
Número Porta
1 Botão de alimentação
2 eSATA
3 Série
4 DVI
5 VGA
6 HDMI
7 Ethernet 1
8 Ethernet 2
9 Portas USB
10 Auditivo
Compacto
Page 47

7
Painel frontal avançado
Painel posterior avançado
Número Porta
1 Botão de alimentação
2 Portas USB
3 Série
4 DVI
5 VGA
6 HDMI
7 Ethernet 1
8 Ethernet 2
9 Portas USB
10 Auditivo
Avançado
Page 48

8
Configuração Inicial
Nomes de Utilizador e Palavras-Passe:
1- Inicie sessão no aparelho INTEVO e introduza as seguintes
credenciais:
Administrador:
Nome de utilizador: admin Palavra-passe: admin
Operador
Nome de utilizador: operator Palavra-passe: (deixar
em branco)
2- Para iniciar sessão no software EntraPass, introduza as
seguintes credenciais:
Instalador:
Nome de utilizador: kantech Palavra-passe: kantech
Administrador:
Nome de utilizador: kantech1 Palavra-passe: kantech
Guarda:
Nome de utilizador: kantech2 Palavra-passe: kantech
Acesso de Web:
Nome de utilizador: intevo1 Palavra-passe: intevo1
3- Para iniciar sessão no software American Dynamics IP Video
(HDVR), introduza as seguintes credenciais:
Administrador:
Nome de utilizador: admin Palavra-passe: admin256
Passos a seguir para um acesso local:
1- Ligue o Intevo (efetuado automaticamente quando liga o cabo
de alimentação CA à tomada).
2- Siga os passos no First Boot Wizard.
Passos a seguir para um acesso remoto:
1- Ligue o Intevo (efetuado automaticamente quando liga o cabo
de alimentação CA à tomada).
2- Introduza o cartão de memória USB no PC remoto.
3- Localize a aplicação IntevoConfigTool.exe no cartão de memória
USB e inicie a aplicação.
Page 49

9
4- Para atribuir um novo endereço IP, clique com o botão direito do
rato num Endereço MAC e selecione Atribuir endereço IP.
5- Clique no botão Iniciar Página Web de Configuração localizado no
canto superior direito do ecrã.
6- Introduza “admin” como ID e palavra-passe.
7- Siga os passos no First Boot Wizard.
8- Inicie a aplicação Ligação ao Ambiente de Trabalho Remoto com
o endereço IP especificado no passo 4.
Consulte o Manual do instalação para obter mais informações.
Como ativar os canais da câmara IP no INTEVO usando
câmaras IP da série 400 ou 600 da American Dynamics
Illustra :
1- Instalar e registar a sua unidade INTEVO
2- Registar o software AD IP Video (HDVR)
3- Vá para Configurations / HDVR server / System setup.
4- Tome nota do endereço MAC da sua unidade INTEVO.
5- Vá para a página Web de registo da Kantech através do endereço
abaixo:
Page 50

10
http://www.kantech.com/Support/KantechRegistration.aspx
NOTA: Tem de ter sessão iniciada no Web site da Kantech para
poder aceder à página de registo. Se não tiver um início de
sessão válido para o Web site da Kantech, vá para http://
www.kantech.com/Register/Register.aspx e preencha o
formulário de registo.
6- Clique em INTEVO Camera registration
7- Introduza o seu endereço de correio eletrónico. Quando o
processo estiver concluído, será enviada uma cópia da chave
de licença para este endereço.
8- Clique em “would you like to register an American Dynamics
Illustra camera?”.
9- Introduza as seguintes informações:
• Endereço MAC da câmara (Consulte o manual do utilizador
da AD Illustra 400 ou 600 para obter esta informação)
• Endereço MAC do Servidor INTEVO (consulte o passo 4
acima)
10- Clique em “REGISTO”.
11- Se estiver a ativar múltiplas câmaras, clique em “Click here to
create an additional key” e introduza as informações
adicionais.
12- Obtenha as informações “CHAVE” e vá para: Configurations /
HDVR server / System setup no software HDVR.
13- Introduza as informações da “CHAVE” no campo “LICENÇA” e
clique em “APLICAR”.
NOTA: A chave de licença é sensível a maiúsculas e
minúsculas.
14- Os canais da câmara INTEVO estão ativados e prontos a usar.
Como ativar os canais da câmara IP no INTEVO usando
uma licença INTEVO-IPCAM01.
1- Instalar e registar a sua unidade INTEVO
2- Registar o software AD IP Video (HDVR)
3- Vá para Configurações / Servidor HDVR/ Configuração do
sistema.
4- Tome nota do endereço MAC da sua unidade INTEVO.
5- Vá para a página Web de registo da Kantech através do
endereço abaixo:
Page 51

11
http://www.kantech.com/Support/KantechRegistration.aspx
NOTA: Tem de ter sessão iniciada no Web site da Kantech para
poder aceder à página de registo. Se não tiver um início de
sessão válido para o Web site da Kantech, vá para http://
www.kantech.com/Register/Register.aspx e preencha o
formulário de registo.
6- Clique em INTEVO Camera registration
7- Introduza o seu endereço de correio eletrónico. Quando o
processo estiver concluído, será enviada uma cópia da chave de
licença para este endereço.
8- Introduza as seguintes informações:
• Número de série da INTEVO-IPCAM01
• Endereço MAC do Servidor INTEVO (consulte o passo 4 acima)
9- Clique em “REGISTO”.
10- Se estiver a ativar múltiplas câmaras, clique em “Click here to
create an additional key” e introduza as informações adicionais.
11- Obtenha as informações “CHAVE” e vá para: Configurations /
HDVR server / System setup no software HDVR.
12- Introduza as informações da “CHAVE” no campo “LICENÇA” e
clique em “APLICAR”.
13- Os canais da câmara INTEVO estão ativados e prontos a usar.
NOTA: Registo de canal IP INTEVO pode ser feito através do Web
browser no INTEVO ou de qualquer outro computador com
ligação à Internet. Se estas opções não estiverem disponíveis,
contacte o Suporte Técnico da Kantech para obter assistência.
Page 52

DN2055-1404
V 1.0
Management fur Zügangskontroll - und Videosoftware
Intevo Kompakt (Intevo-CMP-1TB)
Intevo Erweitertes (Intevo-ADV-3TB)
Kurzanleitung
Erweiterte und Kompaktmodelle
Page 53

1
Copyright
Gemäß den Urheberrechtsgesetzen darf der Inhalt dieses Handbuchs ohne die
vorherige schriftliche Genehmigung von Tyco International Ltd. © 2012 und den
jeweiligen Unternehmen weder als Ganzes noch teilweise kopiert, fotokopiert,
reproduziert, übersetzt oder auf ein elektronisches Medium oder eine
maschinenlesbare Form reduziert werden. Alle Rechte vorbehalten.
Nutzungshinweis
• Bitte lesen Sie dieses Handbuch vor dem Verwenden des Servers aufmerksam. Bevor Sie
diesen Server verwenden, sollten alle Anforderungen erfüllt sein.
• Wir behalten uns das Recht vor, das Produkt und die Handbücher ohne vorherige
Benachrichtigung zu verändern.
• Bewahren Sie dieses Dokument zwecks zukünftiger Bezugnahme auf.
• Der Server darf nur in Innenräumen genutzt werden.
• Bewahren Sie den Server und das Zubehör trocken auf.
• Wir übernehmen keine Verantwortung für Schäden durch unsachgemäße Nutzung.
• Der Installateur muss den ANWENDER in Bezug auf ALLE SICHERHEITSANWEISUNGEN
instruieren, die während der Verwendung des Geräts berücksichtigt werden müssen.
Garantie
• Der Server wird mit einer Garantie von drei Jahren ab dem Kauf durch den Händler/
Installateur verkauft.
• Der Hersteller des Servers muss diese Garantie anbieten, da alle defekten Geräte
zwecks Ersatz an den Hersteller geschickt werden.
Wichtig:
• Dieses Intevo-Gerät muss in einer Umgebung mit einem Verschmutzungsgrad von
maximal 2 und einer Überladungskategorie II UNGEFÄHRLICHE ORTE, nur innen,
eingesetzt werden. Das Gerät wird FEST oder AUF EINEM TISCH INSTALLIERT und AN EIN
KABEL ANGESCHLOSSEN und darf nur von Servicemitarbeitern installiert werden [als
Servicemitarbeiter gilt eine Person mit der technischen Schulung und Erfahrung, die
erforderlich ist, um die Risiken zu kennen, denen Personen ausgesetzt sein können, die
eine Aufgabe durchführen, und die Maßnahmen ergreifen zu können, um das Risiko für
diese und andere Personen zu minimieren].
• Es gibt keinen EIN-/AUS-Schalter für die Stromzufuhr. Der Netzanschlusskoppler dient zur
Unterbrechung der Stromzufuhr.
Sicherheitsanweisungen
• Wählen Sie einen Standort ohne Vibrationen und Stöße.
• Stellen Sie dieses Gerät nicht dort auf, wo Menschen über die Kabel laufen können.
• Schließen Sie den Server nicht an Steckdosen an demselben Stromkreis wie große Geräte
an.
• Wählen Sie keinen Standort, an dem der Server direktem Sonnenlicht, übermäßiger
Hitze, Feuchtigkeit, Dämpfen, Chemikalien oder Staub ausgesetzt ist.
• Installieren Sie dieses Gerät nicht in der Nähe von Wasser (z. B. Badewanne,
Waschbecken, Küchen-/Waschküchenspülbecken, feuchter Keller oder in der Nähe eines
Swimmingpools).
• Installieren Sie das Gerät und das Zubehör nicht in Bereichen, in denen Explosionsgefahr
besteht.
Page 54

2
• Schließen Sie den Server nicht an Steckdosen an, die von Schaltern oder automatischen
Zeitschaltuhren gesteuert werden.
• VERMEIDEN Sie Quellen von Funkinterferenzen.
• VERMEIDEN Sie es, das Gerät in der Nähe von Heizungen, Klimaanlagen, Ventilatoren
und/oder Kühlschränken aufzustellen.
• Stellen Sie sicher, dass die Kabel so positioniert sind, dass keine Unfälle geschehen
können. Angeschlossene Kabel dürfen keiner übermäßigen mechanischen
Beanspruchung ausgesetzt sein.
• Verwenden Sie ausschließlich den mitgelieferten Netzstecker und das mitgelieferte
Kabel.
Technische Spezifikationen
• Betriebstemperatur: 0 °C bis 40 °C (32°F bis 104°F), ausschließlich in Innenräumen
• Luftfeuchtigkeit: max. 93 % (relative Luftfeuchtigkeit, nicht kondensierend)
• Gehäuseabmessungen (Höhe - Breite - Tiefe):
• Erweiterte: 6.4cm (2.52in) x 30cm (11.8in) x 28.9cm (11.38in).
• Kompakt: 5.4cm (2.25in) x 19cm (7.5in) x 21.5 cm (8.5in)
• Eingangsleistung: 100 - 240 V, 50 - 60 Hz, 2,0 A
• Ausgangsleistung: max. 12 V, 84 W
Dieses Produkt enthält eine Lithiumbatterie, die nur
von zugelassenem Servicepersonal ausgetauscht
werden darf. ACHTUNG: Wenn die Batterie durch
eine Batterie der falschen Art ersetzt wird, besteht
Explosionsgefahr. Entsorgen Sie alle gebrauchten
Batterien entsprechend den geltenden örtlichen
Gesetzen und Anweisungen.
Page 55

3
Kurzanleitung
Was ist im Lieferumfang enthalten?
• Intevo Unified Server
• Netzkabel
• Kurzanleitung für die Konfiguration
• Bügel für die Wandmontage (2)
• Schrauben (6 für das Erweiterte Modell, 4 für das Kompaktmodell)
• USB-Stick (enthält: Dokumentation, Konfiguration Tool, EntraPass
und IP-Videosoftware)
Installation
Tischinstallation
Achten Sie sorgfältig darauf, die Lüftungsschlitze auf der
rechten Seite und der Oberseite des Intevo-Gehäuses nicht zu
blockieren. Vermeiden Sie es, etwas neben dem Gerät
aufzustellen, was den Luftfluss blockieren könnte.
Installation mit Wandmontage (Beide Modelle)
1- Befestigen Sie die Bügel mit den sechs mitgelieferten Schrauben
an den beiden Seiten des Gehäuses.
2- Befestigen Sie das Intevo-Gehäuse mit den Bügeln mit vier (4)
Schrauben (nicht im Lieferumfang enthalten) an der Wand. Wir
empfehlen Edelstahl-Kreuzschlitzblechschrauben M 4,2 x 32 mm
(# 8 x 1, 25 '') (Spaenaur ST-631P oder gleichwertig). Für die
Montage an Trockenbauwänden müssen vier (4) Plastikdübel
Page 56

4
(Spaenaur EX-S5 oder gleichwertig; nicht im Lieferumfang
enthalten) verwendet werden.
Gestellmontage (nicht im Lieferumfang enthalten; nur
erweitertes Modell)
Sicherheitsmaßnahmen
• Erhöhte Betriebsumgebung ‒ Bei Montage auf einem
geschlossenen oder einem Gestell mit mehreren Geräten kann
die Umgebungstemperatur des Aufbaus die Raumtemperatur
überschreiten. Deshalb sollte berücksichtigt werden, dass das
Gerät in einer Umgebung installiert werden muss, die mit der vom
Hersteller angegebenen maximalen Umgebungstemperatur
kompatibel ist.
• Verringerter Luftdurchfluss ‒ Das Gerät sollte so auf dem Gestell
montiert werden, dass der für den sicheren Betrieb des Geräts
benötigte Luftfluss nicht beeinträchtigt wird.
• Mechanisches Laden ‒ Das Gerät sollte so auf dem Gestell
montiert werden, dass keine Gefahr aufgrund ungleicher
mechanischer Belastung entsteht.
• Überlastung des Stromkreises ‒ Der Anschluss des Geräts an den
Stromkreis sollte ebenso in Betracht gezogen werden wie der
Effekt, den eine Überlastung des Stromkreislaufs auf den
Überlastungsschutz und die Netzverkabelung hat. Bei der
Behandlung dieses Problems müssen auch die Nennwerte
berücksichtigt werden.
• Sichere Erdung ‒ Auf Gestellen montierte Geräte müssen korrekt
geerdet werden. Insbesondere Stromanschlüsse ohne direkte
Verbindung zum Abzweigkreis (z. B. bei Verwendung von
Mehrfachsteckdosen) sollten geprüft werden.
Anschlüsse
Beginnen Sie mit den folgenden Anschlüssen:
Page 57

5
1- Schließen Sie Ihr lokales Netzwerkkabel an ETH1 an.
2- Schließen Sie Ihr Kameranetzwerkkabel an ETH2 an.
3- Schließen Sie den Bildschirm an den VGA-, DVI- oder HDMI-Port
(nur für lokalen Zugriff) an.
4- Schließen Sie eine Tastatur und eine Maus an einen USB-Port an
der Vorder- oder Rückseite des Geräts an (nur für lokalen Zugriff).
HINWEIS: DVI- und HDMI-Ports können nicht gleichzeitig verwendet
werden.
HINWEIS: Intevo kann bei Remote-Zugriff ohne Bildschirm oder Maus
verwendet werden.
Kompaktmodell Fronttafel:
Kompaktmodell Rückplatte:
Page 58

Zahl Ports
1 An-/Aus-Schalter
2 eSATA
3 Serieller Anschluss
4 DVI
5 VGA
6 HDMI
7 Ethernet 1
8 Ethernet 2
9 USB-Ports
10 Audio
6
Kompaktmodell
Erweitertes Modell Fronttafel:
Page 59

7
Erweitertes Modell Fronttafel:
Zahl Ports
1 An-/Aus-Schalter
2 USB-Ports
3 Serieller Anschluss
4 DVI
5 VGA
6 HDMI
7 Ethernet 1
8 Ethernet 2
9 USB-Ports
10 Audio
Erweitertes Modell
Page 60

8
Erstkonfiguration
Anwendernamen und Passwörter:
1- Um sich an der INTEVO-Einheit anzumelden, geben Sie bitte die
folgenden Daten ein:
Administrator:
Anwendername: admin Passwort: admin
Anwender:
Anwendername: operator Passwort: (keine Eingabe)
2- Um sich in der EntraPass-Software anzumelden, geben Sie bitte
die folgenden Daten ein:
Monteur:
Anwendername: kantech Passwort: kantech
Administrator:
Anwendername: kantech1 Passwort: kantech
Wächter:
Anwendername: kantech2 Passwort: kantech
Webzugang:
Anwendername: intevo1 Passwort: intevo1
3- Um sich in der American Dynamics IP-Video-Software (HDVR)
anzumelden, geben Sie bitte die folgenden Daten ein:
Administrator:
Anwendername: admin Passwort: admin256
Schritte für lokalen Zugriff:
1- Schalten Sie das Intevo-Gerät ein (geschieht automatisch beim
Anschließen des Netzkabels).
2- Befolgen Sie die im Sprachassistenten angegebenen Schritte.
Schritte für Remote-Zugriff:
1- Schalten Sie das Intevo-Gerät ein (geschieht automatisch beim
Anschließen des Netzkabels).
2- Schließen Sie den mitgelieferten USB-Stick an den Remote-PC an.
3- Suchen Sie auf dem USB-Stick die Datei IntevoConfigTool.exe und
starten Sie die Anwendung.
Page 61

9
4- Um eine neue IP-Adresse zuzuordnen, klicken Sie mit der rechten
Maustaste auf eine MAC-Adresse und wählen Sie IP-Adresse
zuordnen.
5- Klicken Sie die Schaltfläche Launch Configuration Web Page
(Konfigurationswebseite öffnen) oben rechts auf dem Bildschirm
an.
6- Geben Sie „admin“ als ID und als Passwort ein.
7- Befolgen Sie die im Sprachassistenten angegebenen Schritte.
8- Starten Sie die Anwendung für den Remote-Desktop-Zugriff mit
der in Schritt 4 eingegebenen Adresse.
Weitere Informationen finden Sie im Installationshandbuch.
So aktivieren Sie die IP-Kamerakanäle auf INTEVO für IPKameras der Serien American Dynamics Illustra 400 und
600:
1- Installieren Sie Ihre INTEVO-Einheit und melden Sie sich an.
2- Melden Sie sich in der AD IP Video-Software (HDVR) an.
3- Gehen Sie zu „Configuration/HDVR Server/System Setup“.
4- Notieren Sie sich die MAC-Adresse Ihrer INTEVO-Einheit.
Page 62

10
5- Gehen Sie zur Kantech-Website für die Registrierung, indem Sie
die nachstehende Adresse aufrufen:
http://www.kantech.com/Support/KantechRegistration.aspx
HINWEIS: Um Zugang zur Registrierungsseite zu erhalten, müssen Sie
auf der Kantech-Website angemeldet sein. Wenn Sie keine gültigen
Anmeldedaten für die Kantech-Website haben, gehen Sie zu http://
www.kantech.com/Register/Register.aspx und füllen Sie das
Registrierungsformular aus.
6- Klicken Sie auf INTEVO Camera Registration.
7- Geben Sie Ihre E-Mail-Adresse ein. Wenn der Prozess
abgeschlossen ist, wird eine Kopie des Lizenzschlüssels an diese
Adresse geschickt.
8- Klicken Sie auf „Would you like to register an American Dynamics
Illustra camera?“.
9- Geben Sie die folgenden Daten ein:
• MAC-Adresse der Kamera (diese Information finden Sie in der
Bedienungsanleitung der AD Illustra 400 oder 600)
• MAC-Adresse des INTEVO-Servers (siehe Schritt 4 oben)
10- Klicken Sie auf „REGISTRIEREN“.
11- Wenn Sie mehrere Kamerakanäle aktivieren, klicken Sie auf
„Click here to create an additional key“, und geben Sie die
zusätzlichen Informationen ein.
12- Nehmen Sie die „KEY“-Daten und gehen Sie zu: „Configuration/
HDVR Server/System Setup“ in der HDVR-Software.
13- Geben Sie die „KEY“-Daten in das Feld „LIZENZ“ ein und klicken
Sie auf „ÜBERNEHMEN“.
HINWEIS: Beim Lizenzschlüssel müssen Groß- und Kleinschreibung
beachtet warden.
14- Ihre INTEVO-Kamerakanäle sind jetzt aktiviert und bereit zur
Nutzung.
So aktivieren Sie IP-Kamerakanäle auf INTEVO unter
Nutzung einer INTEVO-IPCAM01-Lizenz.
1- Installieren Sie Ihre INTEVO-Einheit und melden Sie sich an.
2- Melden Sie sich in der AD IP Video-Software (HDVR) an.
3- Gehen Sie zu „Configuration/HDVR Server/System Setup“.
4- Notieren Sie sich die MAC-Adresse Ihrer INTEVO-Einheit.
5- Gehen Sie zur Kantech-Website für die Registrierung, indem Sie
die nachstehende Adresse aufrufen:
Page 63

11
http://www.kantech.com/Support/KantechRegistration.aspx
HINWEIS: Um Zugang zur Registrierungsseite zu erhalten, müssen Sie
auf der Kantech-Website angemeldet sein. Wenn Sie keine gültigen
Anmeldedaten für die Kantech-Website haben, gehen Sie zu http://
www.kantech.com/Register/Register.aspx und füllen Sie das
Registrierungsformular aus.
6- Klicken Sie auf INTEVO Camera Registration.
7- Geben Sie Ihre E-Mail-Adresse ein. Wenn der Prozess
abgeschlossen ist, wird eine Kopie des Lizenzschlüssels an diese
Adresse geschickt.
8- Geben Sie die folgenden Daten ein:
• Seriennummer der INTEVO-IPCAM01
• MAC-Adresse des INTEVO-Servers (siehe Schritt 4 oben)
9- Klicken Sie auf „REGISTRIEREN“.
10- Wenn Sie mehrere Kamerakanäle aktivieren, klicken Sie auf „Click
here to create an additional key“, und geben Sie die zusätzlichen
Informationen ein.
11- Nehmen Sie die „KEY“-Daten und gehen Sie zu: Konfigurationen/
HDVR-Server/System-Setup in der HDVR-Software.
12- Geben Sie die „KEY“-Daten in das Feld „LIZENZ“ ein und klicken
Sie auf „ÜBERNEHMEN“.
13- Ihre INTEVO-Kamerakanäle sind jetzt aktiviert und bereit zur
Nutzung.
HINWEIS: Die Registrierung von INTEVO-IP-Kanälen kann über den
Webbrowser auf der INTEVO-Einheit oder über einen anderen Computer
mit einer Internetverbindung erfolgen. Wenn diese Optionen nicht zur
Verfügung stehen, wenden Sie sich bitte an den technischen Support von
Kantech, um Unterstützung zu erhalten.
Page 64

DN2055-1404
V 1.0
Controllo di accessi e di gestione video
Intevo Compatto (modello Intevo-CMP-1TB)
Intevo Avanzato (modello Intevo-ADV-3TB)
Guida rapida di configurazione
Modelli compatto e avanzato
Page 65

1
Copyright
Secondo le leggi sul copyright, il contenuto di questo manuale non può essere copiato,
fotocopiato, riprodotto, tradotto o portato su qualsiasi supporto elettronico o in forma
leggibile da una macchina, in toto o parzialmente, senza la preventiva autorizzazione
della Tyco International Ltd.© 2012 e delle società che la rappresentano. Tutti i diritti
riservati.
Avviso d’uso
• Si prega di leggere attentamente questo manuale prima dell’uso. Tutti i requisiti devono
essere soddisfatti prima di usare questo server.
• Ci riserviamo il diritto di modificare il prodotto senza doverne dare preventiva
comunicazione.
• Conservare questo documento per riferimento futuro.
• Questo server è solo per uso interno.
• Conservare il server e gli altri accessori in un ambiente asciutto.
• Non siamo responsabili per qualsiasi danno causato da un uso non appropriato.
• L’installatore deve istruire l’UTENTE circa TUTTE LE ISTRUZIONI DI SICUREZZA che devono
essere osservate durante l’uso dell’attrezzatura.
Garanzia
• Il server sarà venduto con un periodo di garanzia di 3 anni a partire dalla data di
acquisto da parte del venditore/installatore.
• Il costruttore del server deve fornire questa garanzia per qualsiasi apparecchio difettoso
gli venga restituito per la sostituzione.
Importante:
• Questa apparecchiatura Intevo deve essere installata e utilizzata in un ambiente che
garantisca un grado di inquinamento massimo di 2 e una protezione contro i
sovraccarichi di categoria II. Solo UBICAZIONE NON PERICOLOSA interna. L’attrezzatura
è FISSA oppure SU TAVOLO oppure COLLEGATA VIA CAVO ed è progettata per essere
installata da solamente da personale qualificato; [per personale qualificato si intendono
delle persone che possiedono l’istruzione tecnica e l’esperienza necessarie da renderli
consapevoli dei rischi ai quali può essere esposta una persona nello svolgere la propria
attività e in grado di minimizzare i rischi per questa e altre persone].
• Non c’è un INTERRUTTORE GENERALE per l’alimentazione elettrica. L’accoppiatore di
alimentazione in C. A. serve da mezzo di scollegamento dall’alimentazione principale.
Istruzioni di sicurezza
• Scegliere un luogo esente da vibrazioni e al riparo da urti.
• Non collocare questo prodotto in luoghi ove delle persone possano camminare sui cavi.
• Non collegare il server sullo stesso circuito cui sono collegati grossi apparecchi.
• Non scegliere una collocazione nella quale il server si trovi esposto alla luce diretta del
sole, a eccessivo calore, umidità, vapori, agenti chimici o polvere.
• Non installare questo apparecchio vicino all’acqua (per esempio una vasca, un lavabo, un
lavandino da cucina o a un lavatoio, a un pavimento bagnato o una piscina).
• Non installare questo apparecchio e i suoi accessori in zone ove sia presente un rischio di
esplosioni.
• Non collegare questo server a prese elettriche controllate da interruttori o da
temporizzatori automatici.
• EVITARE sorgenti di frequenze radio.
Page 66

2
• EVITARE di installare l’apparecchiatura in prossimità di termosifoni, condizionatori
d’aria, ventilatori e/o refrigeratori.
• Assicurarsi che i cavi siano posizionati in modo fa evitare qualsiasi incidente. I cavi
collegati non devono essere soggetti a eccessive sollecitazioni meccaniche.
• Usare solamente l’alimentatore C. A. e il cavo di alimentazione forniti.
Specifiche tecniche
• Temperature di funzionamento: da 0°C a 40°C (da 32°F a 120°F) solo uso all’interno.
• Livello di umidità: 93% massimo. (umidità relativa senza condensa).
• Dimensioni armadietto: (altezza-larghezza-profondità):
• Avanzato: 6.4cm (2.52in) x 30cm (11.8in) x 28.9cm (11.38in).
• Compatto: 5.4cm (2.25in) x 19cm (7.5in) x 21.5 cm (8.5in)
• Ingresso: 100-240 V, 50-60 Hz, 2,0 A
• Uscita: 12 V, 84 W massimo
Questo prodotto contiene una batteria al litio che
deve essere sostituita solo da una persona autoriz-
zata. ATTENZIONE: Rischio di esplosione se la batte-
ria è sostituita con un tipo non corretto. Smaltire le
batterie esauste secondo la legislazione vigente
localmente e le istruzioni.
Page 67

3
Guida rapida di configurazione
Cosa c’è nella scatola?
• Server unificato Intevo
• Cavo di alimentazione
• Guida rapida di configurazione
• Staffe di montaggio a muro (2)
• Viti (6 per avanzato; 4 per compatto)
• Chiave USB (che comprende: documentazione, strumento di
rilevazione, software EntraPass e video IP).
Installazione
Installazione su tavolo
Fare molta attenzione a non ostruire le aperture laterali a destra
del contenitore Intevo. Evitare di riporre intorno al dispositivo
qualsiasi oggetto che possa bloccare il flusso d’aria.
Installazione a muro (Entrambi i modelli)
1- Fissare le staffe su ciascun lato del corpo con le 6 viti in
dotazione.
2- Fissare l’alloggiamento housing con le staffe al muro usando
quattro (4) viti (non in dotazione). Raccomandiamo viti
autofilettanti in acciaio inox Phillips M4.2 x 32 mm (#8 x 1.25'')
(Spaenaur ST-631P o equivalenti). Il montaggio su cartongesso
richiede anche l’utilizzo di quattro (4) ancoraggi di plastica
(Spaenaur EX-S5 o equivalenti; non in dotazione).
Page 68

4
Montaggio a rastrelliera (Non in dotazione; solo
modello avanzato)
Precauzioni
• Ambiente operativo elevato - Se installato in un assemblaggio
chiuso o a più rastrelliere, la temperatura ambiente operativa
della rastrelliera potrebbe essere maggiore di quella della
stanza. Pertanto si deve considerare di installare
l’apparecchiatura in un ambiente compatibile come
temperatura con la massima temperatura ambiente (Tma)
specificata dal costruttore.
• Flusso d’aria ridotto - L’installazione dell’apparecchiatura in una
rastrelliera deve essere tale che il flusso d’aria richiesto per il
funzionamento dell’apparecchio in sicurezza non sia
compromesso.
• Carico meccanico - Il montaggio dell’apparecchiatura nella
rastrelliera deve essere tale che non si crei una situazione di
pericolo a causa di un carico meccanico irregolare.
• Sovraccarico dei circuiti - Collegando l’apparecchiatura al
circuito di alimentazione si deve tenere in considerazione
l’effetto che il sovraccarico dei circuiti può provocare sulla
protezione contro le sovracorrenti e sul cablaggio. Quando si
affronta questo problema occorre tenere in considerazioni le
indicazioni riportate sulle targhette delle apparecchiature.
• Messa a terra affidabile - Deve essere garantita una messa a
terra affidabile dell’apparecchiatura montata su rastrelliera. Si
deve prestare particolare attenzione alle connessioni di
alimentazione non dirette al circuito derivato (per esempio l’uso
di prese multiple).
Collegamenti
Procedere con i seguenti collegamenti:
Page 69

5
1- Collegare il vostro cavo di rete locale a ETH1.
2- Collegare il vostro cavo di rete delle telecamere a ETH2.
3- Collegare il monitor alla porta VGA, DVI o HDMI (solo per accesso
locale).
4- Collegare una tastiera e un mouse a una porta USB, sul retro o sul
fronte del dispositivo (solo per accesso locale).
NOTA: Le porte DVI e HDMI non possono essere usate
simultaneamente.
NOTA: Intevo può essere usato senza un monitor o un mouse con
un accesso remoto.
Pannello anteriore compatto:
Pannello posteriore compatto:
Page 70

Numero Porte
1 Bottone alimentazione
2 eSATA
3 Seriale
4 DVI
5 VGA
6 HDMI
7 Ethernet 1
8 Ethernet 2
9 Porte USB
10 Audio
6
Compatto
Pannello anteriore avanzato:
Page 71

7
Pannello posteriore avanzato:
Numero Porte
1 Bottone alimentazione
2 Porte USB
3 Seriale
4 DVI
5 VGA
6 HDMI
7 Ethernet 1
8 Ethernet 2
9 Porte USB
10 Audio
Avanzato
Page 72

8
Configurazione primo avvio
Nomi utenti e password:
1- Per accedere all'unità INTEVO, inserire le credenziali seguenti:
Amministratore:
Nome utente: admin Password: admin
Operatore:
Nome utente: operator Password: (lasciare vuota)
2- Per accedere al software EntraPass, inserire le credenziali
seguenti:
Installatore:
Nome utente: kantech Password: kantech
Amministratore:
Nome utente: kantech1 Password: kantech
Guardia:
Nome utente: kantech2 Password: kantech
Accesso di Web:
Nome utente: intevo1 Password: intevo1
3- Per accedere al software American Dynamics IP Video software
(HDVR), inserire le credenziali seguenti:
Amministratore:
Nome utente: admin Password: admin256
Passi da seguire per l’accesso locale:
1- Alimentare Intevo (eseguito automaticamente collegando il
cavo di alimentazione in C. A.).
2- Seguire i passi della Procedura guidata lingua.
Passi da seguire per l’accesso remoto:
1- Alimentare Intevo (eseguito automaticamente collegando il
cavo di alimentazione in C. A.).
2- Inserire la chiave USB in dotazione sul PC remoto.
3- Cercate IntevoConfigTool.exe sulla chiave USB e avviate
l’applicazione.
Page 73

9
4- Per assegnare un nuovo indirizzo IP, fare clic con il tasto destro su
di un Indirizzo MAC e selezionare Assegna indirizzo IP.
5- Cliccare il bottone Avvia pagina web di configurazione che si
trova in alto a destra dello schermo.
6- Inserire “admin” sia come ID sia come password.
7- Seguire i passi della First Boot Wizard.
8- Avviare l’applicazione Accesso desktop remoto con l’indirizzo
inserito al passo 4.
Per ulteriori informazioni, fare riferimento al Manuale di
installazione.
Come attivare canali di telecamere IP su INTEVO usando
telecamere IP della American Dynamics Illustra 400 o
600:
1- Installare e accedere all’unità INTEVO
2- Accedere al software AD IP Video (HDVR)
3- Andare a “Configurations / HDVR Server / System Setup”.
4- Prendere nota dell’indirizzo MAC dell’unità INTEVO.
5- Andare alla pagina web Kantech di registrazione che si trova al
seguente indirizzo:
Page 74

10
http://www.kantech.com/Support/KantechRegistration.aspx
NOTA: Per avere accesso alla pagina web Kantech di
registrazione si deve effettuare l’accesso al sito web. Se non
si possiede un log-in valido per il sito web Kantech, andare su
http://www.kantech.com/Register/Register.aspx e compilare
il modulo di iscrizione.
6- Cliccare su “INTEVO Camera registration”.
7- Inserire il proprio indirizzo e-mail. Una copia della chiave di
licenza sarà inviata a questo indirizzo quando la procedura sarà
stata completata.
8- Cliccare su “Would you like to register an American Dynamics
Illustra camera?”.
9- Inserire i dati seguenti:
• Indirizzo MAC della telecamera (Vedere il Manuale Utente
di AD Illustra 400 o 600 per ulteriori informazioni)
• L’indirizzo MAC del server INTEVO (vedere i 4 punti sopra)
10- Clicca “ISCRIVITI”.
11- Se si stanno attivando canali multipli di telecamere, cliccare
“Clicca qui per creare una chiave aggiuntiva” e inserire gli altri
dati aggiuntivi.
12- Prendere il dato “CHIAVE” e andare a: Configurations / HDVR
Server / System setup nel software HDVR.
13- Inserire il dato “CHIAVE” nel campo “LICENZA” e cliccare
“APPLICA”.
NOTA: La licenza tiene conto di maiuscole e minuscole.
14- I vostri canali di telecamere INTEVO sono ora attivati e pronti
all’uso.
Come attivare canali di telecamere IP su INTEVO
utilizzando una licenza INTEVO-IPCAM01.
1- Installare accedere all’unità INTEVO
2- Accedere al software AD IP Video (HDVR)
3- Andare a “Configurations / HDVR server / System setup”.
4- Prendere nota dell’indirizzo MAC dell’unità INTEVO.
5- Andare alla pagina web Kantech di registrazione che si trova al
seguente indirizzo:
Page 75

11
http://www.kantech.com/Support/KantechRegistration.aspx
NOTA: Per avere accesso alla pagina web Kantech di
registrazione si deve effettuare l’accesso al sito web. Se non si
possiede un log-in valido per il sito web Kantech, andare su
http://www.kantech.com/Register/Register.aspx e compilare il
modulo di iscrizione.
6- Cliccare su “INTEVO Camera registration”.
7- Inserire il proprio indirizzo e-mail. Una copia della chiave di
licenza sarà inviata a questo indirizzo quando la procedura sarà
stata completata.
8- Inserire i dati seguenti:
• Numero di serie INTEVO-IPCAM01
• Indirizzo MAC del server INTEVO (vedere i 4 punti sopra)
9- Clicca “ISCRIVITI”.
10- Se si stanno attivando canali multipli di telecamere, cliccare
“Click here to create an additional key” e inserire gli altri dati
aggiuntivi.
11- Prendere il dato “CHIAVE” e andare a: Configurations / HDVR
server / System setup nel software HDVR.
12- Inserire il dato “CHIAVE” nel campo “LICENZA” e cliccare
“APPLICA”.
13- I vostri canali di telecamere INTEVO sono ora attivati e pronti
all’uso.
NOTA: La registrazione do canali IP INTEVO si può effettuare per
mezzo del browser su INTEVO o su qualsiasi altro computer che
disponga di una connessione a Internet. Se queste opzioni non
sono disponibili, contattare l’Assistenza Tecnica della Kantech
per assistenza.
Page 76

DN2055-1404
V 1.0
ઘݏӲչંைўࣲ
বӘֺ ( ֺ՚ Intevo-CMP-1TB)
( ֺ՚ Intevo-ADV-3TB)
ڽବગܶԧ
չবӘֺ՚
Page 77

1
࢝בރ
߿݇࣍ߓࡣߌࡪ֢எ߄ஒҸ՛չҿ՟Ҹ՛аவકՕЉڱ৬ઠ۪ӭӗ澝
ܯા澝ڧԭ澝זӲߎ۴ӆҶୂ۪ୂӣӄؠӱѠѾѽ۪ߑ֘Օયڥڔ澞2012
ٶ࣍ߓ۱߄澞 ґ۱߄ߓӯ澞
࣐҄ࡉڿж
•҅ӹબєূஃયߎ۴ӆ澞 ҅થ߆ԇ֘ӹځڢସڲ۱߄ࡌ澞
•۩ћґ݅фսչ۴ӆߓӯ㕀ЉՐପ澞
•ґѡކўљ҈رߛՀৰ澞
•થ߆ԇ֘юଠйӄ澞
•֨ٴ䓓࣪Иґ߆ԇ֘չҿѕў澞
•۩ћث҅ЉڢଭۨѠѾ݃עЉ܈ܛુѠ澞
•֨ગו҅ଋИ؍ыմځڢ߿݇ځସ،۱߄؍Ҷ۴ӆܶحۯ澞
ҐҒާԆ
•થ߆ԇ֘ґғߊ୦ / ؍ыմбФޙڐОߊ 3 ٶ澞
•߆ԇ֘Ӳଭڷீݕ҈࠴ґғ߆ԇ֜ОѠѾԥҫرଏ֛োӲଭљҎ
݅澞
ଜܶ͵
•intevo ગוځ֨ࡑ߯چ߂םО 2澝ଋԹঝӰО II ࣪ӄ؍չ҅ٷЌՑ
؍࡚֨߄Ԯகӄ࣪澞 થગוީ۪֡ؔՖڔٷЌ߄କݎিљՃюପଋ
ܔыմ؍ ;[ ܔыմީܶпݎՉଋଠڢ܉ߐׁઐٷܨ߄▲ؔыմѕ
ћל۞જӱ֨ۼѠԇଋИՕӱԮகٷלՈځݒޑ߂םஒچ֪
ѺпԮகثٜ۪ҿѕыଭۨக ]澞
•৲Ќ࡚߄࢛ڐҼ澞 AC ࢛凥ՠ֘ҁОލڐП࢛ސڔ澞
،ҵރ
•ଣܫޗ㞦ԈչӏӠ֪ސ澞
•બԓرߎфս؍֨ыћՕѫ૫Ї֪ސ澞
•બԓرથܕ߆ԇ֘Њםֺ֘҅գ▲૨࢛ݖڇ澞
•બԓଣܫՕரથ߆ԇ֪֘ސљஅஆҰذ澝ଋךࢽ澝ࡊӣ澝嘜ࡈ澝ԗ؆࣒
ૅ۪ࢱظ澞
•બԓ֨ழࡊ֪ސ؍થગו҆ײࢀ儏澝䥝澝⨟۰ / ࡊࠤ澝䉸֪࢘Ј
Ճ䀽ࡐ澞
•બԓ֨ࣇࢴԮகԚֿ؍ߎગוՃҿў澞
•બԓرથ߆ԇ֘କݎӱڐҼ۪Ԉؔޞ֘ݏӲ࢛ݖڇЇ澞
•ହҲޗিٴ܃࢛澞
•ହҲرગו؍֨ࢽࡊ֘澝લ澝ପગוչ / ۪ӎঔ澞
•ґѹљஅՇࣿзݻ澞 କݎЉځՉӱଋچߑࠑځԃ澞
•҅۱ԕխ AC ࢛չ࢛ি澞
۪ޱ
•ٗҁچ 0°C ӱ 40°C (32°F - 104°F) юӄ҅澞
•࢘چࡊٵ ߂םО 93% ث࢘چளӒ⢹澞
•ߑ߱םش چ - ءچ - Լچ
• : 6.4cm (2.52in) x 30cm (11.8in) x 28.9cm (11.38in).
• : 5.4cm (2.25in) x 19cm (7.5in) x 21.5 cm (8.5in)
Page 78

2
•૿ҵԹ 100-240V, 50-60Hz, 2.0A.
•૿ӟԹ 12V߂ם 84W澞
И֢ۯࡨ۞ юଠйࢁܣ 2000m љЈ֪Ԛ؍Ҷ҅
юଠйளࢽ٫ࡈҘߚўЈ֪Ԛ؍Ҷ҅
ߎфսԕխ▲З敏ࡐځڢՑ݉ߓܔ
ыմ݅澞 ࡨ۞ײߧࡐ݅ЉڢՕՇࣿ
ࣇࢴԮக澞બ߿݇ڢ֪ځࡣઁչપޢהࣲ
څޛࡐ澞
Page 79

3
ڼૻܗԦ
ڏդ㕭ѪӰ͵
•Intevo ▲߆ԇ֘
•࢛ি
•ڽବ؍ܶԧ
•אܵݵ߫ 2
•夊В ֺ՚О 6 ͺবӘֺ՚О 4
•USB إୗԕܬކࠈ澝Շ࣫ٗӀ澝EntraPass չ IP ંைў澞
،
ߦ،
ڢڶЉஊܺIntevoߑדҋչୂପՍ澞 ହҲ֨ગוյ֠
ҥБљஅஊ࠲ࡈࡶପ澞
ܖړ، ( Гֹՙ )
1- ҅۱ݕ҈ З夊В֡ؔߑדҋݵ߫澞
2- ҅ 4 З夊ВޭԔլر Intevo ߑד֡ؔ֨வЇ澞 ڏઑ҅
Љ敕ୖ Phillips ݸ夊В M4.2 x 32mm (#8 x 1.25'') (Spaenaur
ST-631P ۪գঈֺ՚澞 ٴ䓓வ؍ଐڷீ҅ 4 З⸾މ
୫Spaenaur EX-S5 ۪գঈֺ՚ͺޭԔլ澞
Page 80

4
ߌ، ЈԔ܍ ; эளঃֹՙ
ࡉڿж
•߫ٗҁ࣪ - ײߧ؍֨▲Зد۪ךԥҫߑ߫ুўИߑ߫
ٗҁ࣪چՕй澞 ֜࠴ځৰ֨অՠӲଭ
۱ܶؔ߂࣪چ Tma࣪И؍ગו澞
•ӗصࡈࡶପ - ֨ߑ߫И؍ગוځથЉѫѺڧրગו؍
Ҷ۱ࡈࡶԈ澞
•ߑࠑૺ - ֨ߑ߫И؍ગוځથйߑࠑિЉٵ৲࡚߄
Ԯகࣙӑ澞
•૨ଋૺ - ځৰ҈ি૨չગוକݎљՃ૨ૺՕث
ଋࡶґܔչ࢛িڧր澞 આӐ▲ொޞځଠڢৰગ
ו政࣎ௌؔқ澞
•Օழݎ֪ - ځڢܔߑ߫؍ڔગוՕழݎ֪澞 ځથࣔӰ
ࡨ۞࢛କݎ৲ЉީЊӣݵ૨କ ײ࢛҅ݖ
ڇ澞
ܯ
Јӧକݎ
1- رߎ֪ৠৌিକݎ ETH1澞
2- رݡҦףৠৌিକݎ ETH2澞
3- رݏ֘କݎ VGA澝 DVI ۪ HDMI ঀՍ юйߎ֪ઘ
澞
4- ر୰չ௵߶କݎӱગוե۪ӹவ USB ঀՍ юйߎ
֪ઘ澞
DVI չ HDMI ঀՍЉգޞ҅澞
࡚߄ު۪֘௵߶ޞՕପଋଓઘ҅ Intevo澞
Page 81

5
ӗֹՙӸ߂ :
ӗֹՙդ߂ :
Page 82

՚ Ռ
1
࢛ܷ
2 eSATA
3
К
4 DVI
5 VGA
6 HDMI
7
㖇㔒ㄥ
8
㖇㔒ㄥ
9
USB ঀՍ
10
ை
6
ளঃֹՙդ߂
Page 83

7
ளঃֹՙӸ߂
՚ Ռ
1
࢛ܷ
2
USB ঀՍ
3
К
4 DVI
5 VGA
6 HDMI
7
㖇㔒ㄥ
8
㖇㔒ㄥ
9
USB ঀՍ
10
ை
Page 84

8
நࠊծԇକ
࣐ېգոؤ͵
1- ڣ INTEVO ԥҫબ૿ҵљЈڣҒێ
ࣲմ
ۯդadmin إadmin
ݱҁմ
ۯդoperator إ
2- ڣ EntraPass ўબ૿ҵљЈڣҒێ
؍پ :
ۯդ : kantech إ : kantech
ࣲմ :
ۯդ : kantech1 إ : kantech
ܔ⣕֘ :
ۯդ : kantech2 إ : kantech
Ѕৠઘ :
ۯդ : intevo1 إ : intevo1
3- ڣ২֢Ԉہ IP ંைў (HDVR)બ૿ҵљЈڣҒێ
ࣲմ
ۯդadmin إadmin256
ޯ֩ୋଇڱࣩࠖற͵
1- ۸ڐ Intevo କݎ AC ࢛িեԈ؏ۨ澞
2- ܷࣁ First Boot Wizard И࠵澞
ૢୋଇڱࣩࠖற͵
1- ۸ڐ Intevo କݎ AC ࢛িեԈ؏ۨ澞
2- ر۱խ USB إୗݖҵӱଓ PC澞
3- ؔѹ USB إୗЇ IntevoConfigTool.exe ٷկԈځپ澞
Page 85

9
4- ӣޏ IP ֪֭Ӡپӧ՚ٷଣܫӢକ IP ֩֬澞
5- ࢵӠѹйىٳЇઅ Launch Configuration Web Page ܷ
澞
6- ૿ҵ “admin” ID չإ澞
7- ܷࣁ First Boot Wizard И࠵澞
8- ҅࠵ 4 И૿ҵ֪֭կԈ Remote Desktop Access ځ
پ澞
ײךҒێબՀ࣐ېەӅ澞
ױѽ࣐҄ American Dynamics Illustra 400 ۋ 600 Ӧ
IP ݂ҥࢍࡕ INTEVO Іࣩ IP ݂ҥૹଂ͵
1- ؍ٷڣ INTEVO
2- ڣ AD IP Video (HDVR) ў
3- ӱ“ / HDVR ߆ԇ֘/ગ”澞(Configurations / HDVR
server / System setup)
4- ઓڣ INTEVO MAC ֪֭澞
5- ࢵӠљЈ֪֭ӱ Kantech ৠࡨӆவ
Page 86

10
http://www.kantech.com/Support/KantechRegistration.aspx
ࡨ۞ڷீڣ Kantech ৠ۵ઘࡨӆவ澞. ۓعޗ߄
ݼ Kantech ৠڣҒێબӱ http://www.kantech.com/
Register/Register.aspx ӊࡨӆ澞
6- ࢵӠ INTEVO ݡҦߑࡨӆ (INTEVO Camera registration)
7- ૿ҵۓଽў֪֭澞؏ۨࡨӆե۩ћѫرકՕإୗՇଟ
થ֪֭澞
8- ࢵӠ “ ۓࡨӆ American Dynamics Illustra ݡҦߑը; ”澞
(“Would you like to register an American Dynamics Illustra
camera?”)
9- ૿ҵљЈҒێ
• ݡҦߑ MAC ֪߲֭ AD Illustra 400 ۪ 600 ۯ۴ӆ
Ո࠴Ғێ
• INTEVO ߆ԇ֘ MAC ֪֭ ߲Їଚ࠵ 4
10- ࢵӠ “ ࡨӆ ”澞
11- ࢬࡴךЗݡҦߑପଳࢵӠ “ ࢵӠ࠴הӫڏҿѕإୗ ” ٷ
૿ҵҿѕԆҒێ澞 (“Click here to create an additional key”)
12- Ո“إୗ”Ғێٷӱ HDVR ўИ“/HDVR ߆ԇ֘/
ગ ”澞 (Configurations / HDVR server / System Setup )
13- ֨ “ કՕ ” ࠼И૿ҵ “ إୗ ” ҒێٷࢵӠ “ ځ ”澞
ࡨ۞કՕإୗԚӣםشӊ澞
14- ۓ INTEVO ݡҦߑପଳ࣫ٝࢬࡴՕசޞ҅澞
ױѽ࣐҄ INTEVO-IPCAM01 Քࢍࡕ INTEVO Іࣩ
IP ݂ҥૹଂ澞
1- 1- ؍ٷڣ INTEVO
2- ڣ AD IP Video (HDVR) ў
3- ӱ“/ HDVR ߆ԇ֘/ગ”澞(Configurations / HDVR
server / System Setup )
4- ઓڣ INTEVO MAC ֪֭澞
5- ࢵӠљЈ֪֭ӱ Kantech ৠࡨӆவ
http://www.kantech.com/Support/KantechRegistration.aspx
ࡨ۞ڷீڣ Kantech ৠ۵ઘࡨӆவ澞. ۓعޗ߄
ݼ Kantech ৠڣҒێબӱ http://www.kantech.com/
Register/Register.aspx ӊࡨӆ澞
Page 87

11
6- ࢵӠ INTEVO ݡҦߑࡨӆ (INTEVO Camera registration)
7- ૿ҵۓଽў֪֭澞؏ۨࡨӆե۩ћѫرકՕإୗՇଟ
થ֪֭澞
8- ૿ҵљЈҒێ
• INTEVO-IPCAM01 پӧ՚
• INTEVO ߆ԇ֘ MAC ֪֭ ߲Їଚ࠵ 4
9- ࢵӠ “ ࡨӆ ”澞
10- ࢬࡴךЗݡҦߑପଳࢵӠ“ࢵӠ࠴הӫڏҿѕإୗ”ٷ૿
ҵҿѕԆҒێ澞 (“Click here to create an additional key”)
11- Ո“ إୗ”Ғێٷӱ HDVR ўИ“/HDVR ߆ԇ֘/
ગ ”澞 (Configurations / HDVR server / System Setup )
12- ֨ “ કՕ ” ࠼И૿ҵ “ إୗ ” ҒێٷࢵӠ “ ځ ”澞
13- ۓ INTEVO ݡҦߑପଳ࣫ٝࢬࡴՕசޞ҅澞
ࡨ۞ପଋ INTEVO Їৠࡻઃ۪֘ѠѾҿѕ৻ৠઋߑՕ
؏ۨ INTEVO IP ପଳࡨӆ澞пଣா֮ЉՕબ৻
Kantech ܉ߐݵܴ߆ԇИڶجࡌԣԉ澞
Page 88

DN2055-1404
V 1.0
Erişim Denetimi ve Video Yazılımı Yönetim
Intevo Kompakt (model Intevo-CMP-1TB)
Intevo Gelişmiş (model Intevo-ADV-3TB)
Hızlı Kurulum Kılavuzu
Gelişmiş ve Kompakt modeller
Page 89

1
Telif Hakkı
Telif hakkı yasaları uyarınca işbu kı lavuzun içeriği, Tyco International Ltd.© 2012 ve
onun ilgili Şirketlerinin önceden yazı lı izni olmadan kı smen veya tamamen
kopyalanamaz, fotokopi çekilemez, çoğaltılamaz, çevrilemez veya herhangi elektronik
ortam veya makineyle okunabilir forma indirgenemez. Tüm Hakları Saklı dır.
Kullanım Bildirimi
• Lütfen kullanımdan önce bu kılavuzu dikkatlice okuyunuz. Bu sunucuyu kullanmadan önce
tüm gereksinimler gözetilmelidir.
• Önceden bilgilendirmeksizin ürün ve kılavuzlarda değişiklik yapma hakkımızı saklı
tutmaktayız.
• Bu belgeyi gelecekteki başvurularınız için saklayınız.
• Sunucu yalnızca iç mekanda kullanım içindir.
• Sunucu ve diğer aksesuarlarını kuru bir ortamda saklayınız.
• Yanlış kullanı mın neden olduğu hasardan sorumluluk kabul etmemekteyiz.
• Kurucu, ekipmanın kullanımı boyunca gözetilmesi gereken TÜM EMNİYET TALİMATLARI
konusunda KULLANICIYI bilgilendirecektir.
Garanti
• Sunucu, bayi / kurucunun satın aldığı günden başlayan 3 yıllık bir garanti süresiyle
satılacaktır.
• Sunucunun üreticisi, herhangi bir kusurlu birim değiştirilmek üzere iade edildiğinde bu
garantiyi sağlamalıdır.
Önemli:
• Bu ekipman, intevo, maksimum 2 derece kirlenme ve aşırı gerilim kategorisi II’yi sağlayan,
TEHLİKELİ OLMAYAN KONUMLARDA yalnızca iç mekanda kurulmalı ve kullanılmalıdır.
Ekipman SABİT veya MASAÜSTÜNDE ve KABLO BAĞLANTILIDIR ve yalnızca servis
elemanlarınca kurulmak üzere tasarlanmıştır; [servis elemanı, bir görevi yerine getirirken
maruz kalabileceği tehlikeler ve kendisine veya diğer kişilere gelebilecek tehlikeleri
minimize etmek için gereken tedbirler konusunda bilgili olacak şekilde uygun teknik
eğitim ve deneyime sahip bir kişi olarak tanımlanır.]
• Güç beslemesinin AÇMA/KAPATMA DÜĞMESİ yoktur. AC güç besleme kuplörü, besleme
şebekesinden bağlantıyı kesmeye yarar.
Emniyet Talimatları
• Titreşim ve sarsıntıdan yoksun bir yeri seçin.
• Bu ürünü insanların kablolar üzerinde yürüyebileceği yerde konumlandırmayın.
• Sunucuyu büyük aygıtlarla aynı devrede olan elektrik prizlerine bağlamayın.
• Sunucuyu doğrudan güneş ışığı, fazla ısı, nem, buharlar, kimyasal maddeler veya toza
maruz bırakan bir yeri seçmeyin.
• Bu ekipmanı su yakınında kurmayın (örneğin banyo küveti, lavabo, mutfak/lavabo evyesi,
ıslak bodrum veya bir yüzme havuzu yakınında).
• Bu ekipmanı ve aksesuarlarını patlama tehlikesi olan alanlarda kurmayın.
• Bu sunucuyu anahtarlar veya otomatik zamanlayıcıların kontrol ettiği elektrik prizlerine
bağlamayın.
• Radyo girişim kaynaklarından sakının.
• Ekipmanı ısıtıcılar, klimalar, vantilatörler ve/veya buz dolaplarının yakınında kurmaktan
sakının.
Page 90

2
• Kabloların kazaların oluşmamasını sağlayacak şekilde konumlandırıldığından emin
olun. Bağlı kablolar aşırı mekanik gerilmeye maruz kalmamalıdır.
• Yalnızca dahili AC güç kaynağı ve kablosunu kullanın.
Teknik Özellikler
• Çalışma Sıcaklı kları: 0°C ila 40°C (32°F ila 104°F) yalnızca iç mekanda kullanım.
• Nemlilik Düzeyi: %93 maks. (nispi nem yoğuşmayan).
• Kasa Boyutları (Yükseklik-Genişlik-Derinlik):
• Gelişmiş: 6.4cm (2.52in) x 30cm (11.8in) x 28.9cm (11.38in).
• Kompakt: 5.4cm (2.25in) x 19cm (7.5in) x 21.5 cm (8.5in)
• Giriş: 100-240 V, 50-60 Hz, 2,0 A.
• Çıkış: 12 V, 84 W maks.
Bu ürün, yalnızca yetkili bir servis elemanı tarafından
değiştirilmesi gereken bir lityum pili içermektedir.
DİKKAT: Eğer Pil, yanlış bir Pil türüyle değiştirilirse
Patlama Tehlikesi Vardır. Kullanılmış Pilleri geçerli
Yerel Mevzuat ve Talimatlar Uyarınca Bertaraf Edin.
Page 91

3
Hızlı Kurulum Kılavuzu
Kutunun İçindekiler
• Intevo Birleşik Sunucu
• Güç Kablosu
• Hızlı Kurulum Kılavuzu
• Duvara montaj braketleri (2)
• Vidalar (Gelişmiş için 6; Kompakt için 4)
• USB Anahtarı (Dahil: Dokümantasyon, Keşif Aracı, EntraPass ve IP
video yazılımı).
Kurulum
Masaüstüne Kurulum
Intevo kasasının sağ tarafında ve üstündeki havalandırma
menfezlerini kapatmamaya çok özen gösterin. Hava akışını
engelleyebilecek şeyleri aygıt etrafında bırakmayın.
Duvara Monte Kurulum (Her iki model)
1- Sağlanan vidayla kasanın her yanına braketleri sabitleyin.
2- Dört (4) vida kullanarak (dahil değil) braketleriyle birlikte Intevo
kasasını duvara sabitleyin. Biz, paslanmaz çelikten M4,2 x 32 mm
(#8 x 1,25'') (Spaenaur ST-631P veya eşdeğeri) Phillips kılavuzlu
vidaların kullanımını öneriyoruz. Alçıpana montaj için ayrıca dört
(4) plastik dübel (Spaenaur EX-S5 veya eşdeğeri; dahil değil)
kullanılmalıdır.
Page 92

4
Rafa Monte Kurulum (Dahil Değil; yalnızca gelişmiş
model)
Önlemler
• Yüksekte Yerleşen Çalışma Ortamı - Eğer kapalı veya çok birimli
bir raf düzeneğine kurulursa, raf düzeneğinin çalışma ortamı
sıcaklığı, oda sıcaklığından daha yüksek olabilir. Bu yüzden
ekipmanı üreticinin belirlediği maksimum ortam sıcaklığıyla
(Tma) uyumlu olan bir ortamda kurmaya özen gösterilmelidir.
• Düşük Hava Akımı - Ekipmanın bir rafa kurulumu, ekipmanın
güvenli çalışması için gereken hava akım miktarından ödün
vermeyecek şekilde olmalıdır.
• Mekanik Yüklenme - Ekipmanın rafa montajı, eşit olmayan
mekanik yüklenmeden dolayı tehlikeli bir durumun oluşmasını
önleyecek şekilde olmalıdır.
• Devre Aşırı Yüklenmesi - Ekipmanın besleme devresine
bağlantısına ve devrelerin aşırı yüklenmesinin aşırı akım
koruması ve besleme kabloları üzerindeki etkisine dikkat
edilmelidir. Bu husus konusunda isim levhası üzerindeki
değerler gözetilmelidir.
• Güvenilir Topraklama - Rafa monte ekipmanın güvenilir
topraklaması sağlanmalıdır. Branşman devreye doğrudan
bağlantılar (örneğin uzatma kabloları) dışındaki besleme
bağlantılarına özellikle dikkat edilmelidir.
Bağlantılar
Aşağıdaki bağlantıları sağlayın:
1- Yerel ağ kablonuzu ETH1’e bağlayın.
2- Kamera ağ kablosunu ETH2’ye bağlayın.
3- Monitörü VGA, DVI veya HDMI portuna (yalnızca yerel erişim
için) bağlayın.
Page 93

5
4- Aygıtın arkası veya önündeki bir USB bağlantı noktasına bir klavye
veya bir fareyi bağlayın (yalnızca yerel erişim için).
NOT: DVI ve HDMI bağlantı noktaları eşzamanlı kullanılamaz.
NOT: Intevo bir monitör veya fare olmadan uzak erişimle
kullanılabilir.
Kompakt ön panel
Kompakt arka panel:
Page 94

Numara Bağlantı noktaları
1 Güç düğmesi
2 eSATA
3 Seri
4 DVI
5 VGA
6 HDMI
7 Ethernet 1
8 Ethernet 2
9 USB bağlantı noktaları
10 Ses bağlantı noktası
6
Kompakt
Gelişmiş ön panel:
Page 95

7
Gelişmiş arka panel:
Numara Bağlantı noktaları
1 Güç düğmesi
2 USB bağlantı noktaları
3 Seri
4 DVI
5 VGA
6 HDMI
7 Ethernet 1
8 Ethernet 2
9 USB bağlantı noktaları
10 Ses bağlantı noktası
Gelişmiş
Page 96

8
İlk Başlangıç Yapılandırma
Kullanıcı Adları ve Parolaları:
1- INTEVO birimine giriş yapmak için aşağıdaki bilgileri girin:
Yönetici:
Kullanıcı adı: admin Parola: admin
Operatör:
Kullanıcı adı: operator Parola: (boş bırakın)
2- EntraPass yazılımına giriş yapmak için aşağıdaki bilgileri girin:
kuran:
Kullanıcı adı: kantech Parola: kantech
Yönetici:
Kullanıcı adı: kantech1 Parola: kantech
koruma:
Kullanıcı adı: kantech2 Parola: kantech
Web access:
Kullanıcı adı: intevo1 Parola: intevo1
3- American Dynamics IP Video yazılımına (HDVR) giriş yapmak
için aşağıdaki bilgileri girin:
Yönetici:
Kullanıcı adı: admin Parola: admin256
Yerel erişim için izlenecek adımlar:
1- Intevo’nun gücünü açın (AC güç kablosu bağlandığında
otomatik gerçekleşir).
2- Dil Sihirbazı’ndaki adımları izleyin.
Uzak erişim için izlenecek adımlar:
1- Intevo’nun gücünü açın (AC güç kablosu bağlandığında
otomatik gerçekleşir).
2- Birlikte gelen USB anahtarını uzak PC’ye takın.
3- USB anahtarındaki IntevoConfigTool.exe’a gidin ve uygulamayı
başlatın.
Page 97

9
4- Yeni bir IP adresi atamak için bir seri numarası üzerine sağ tıklayın
ve IP adresi ata’yı seçin.
5- Ekranın sağ üst tarafında bulunan Yapılandırma Web Sayfasını
Başlat düğmesini tıklayın.
6- Kimlik ve parola olarak “admin”i girin.
7- Dil Sihirbazı’ndaki adımları izleyin.
8- Adım 4’te girilen adresle Uzak Masaüstü Erişimi uygulamasını
başlatın.
Daha fazla bilgi için lütfen Kullanım Kılavuzu’na başvurun.
American Dynamics Illustra 400 veya 600 seri IP
kameralarını kullanarak INTEVO'da IP kamera kanalları
nasıl etkinleştirilir
1- INTEVO biriminizi kurun ve oturum açın
2- AD IP Video (HDVR) yazılımınızda oturum açın
3- Configurations / HDVR server / System setup'a gidiniz.
4- INTEVO biriminizin MAC adresini not edin.
5- Aşağıdaki adrese giderek Kantech web kayıt sayfasına gidin:
Page 98

10
http://www.kantech.com/Support/KantechRegistration.aspx
NOT: Kayıt sayfasına erişim elde etmek için Kantech web
sitesinde oturum açmı ş olmalısı nı z. Kantech web sitesi için
geçerli bir kimliğiniz yoksa http://www.kantech.com/
Register/Register.aspx adresine gidin ve kayıt formunu
doldurunuz.
6- INTEVO Camera registration'a tıklayınız.
7- E-posta adresinizi girin. İşlem tamamlandığında lisans
anahtarının bir kopyası bu adrese gönderilecektir.
8- "Bir American Dynamics Illustra kamerasını kaydetmek istiyor
musunuz?"a tıklayın.
9- Aşağıdaki bilgileri girin:
• Kamera MAC Adresi (bilgi için AD Illustra 400 veya 600
kullanıcı kılavuzuna bakınız)
• INTEVO Sunucu MAC adresi (yukarıdaki 4. adıma bakınız)
10- "KAYDET"e tıklayın.
11- Birden çok kamera kanalını etkinleştiriyorsanız “Click here to
create an additional key”a tıklayın ve diğer ek bilgiyi giriniz.
12- "ANAHTAR" bilgisini alın ve HDVR yazılımında: Configurations
/ HDVR server / System Setup'a gidiniz.
13- "LİSANS" alanına "ANAHTAR" bilgisini girin ve "UYGULA"ya
tıklayın.
NOT: Lisans anahtarı büyük/küçük harfe duyarlıdır.
14- INTEVO kamera kanallarınız şimdi etkin ve kullanıma hazırdır.
Bir INTEVO-IPCAM01 lisansını kullanarak INTEVO'da
IP kamera kanalları nasıl etkinleştirilir
1- INTEVO biriminizi kurun ve oturum açın
2- AD IP Video (HDVR) yazılımınızda oturum açın
3- Configurations / HDVR server / System setup'a gidiniz.
4- INTEVO biriminizin MAC adresini not edin.
5- Aşağıdaki adrese giderek Kantech web kayıt sayfasına gidin:
http://www.kantech.com/Support/KantechRegistration.aspx
NOT: Kayıt sayfasına erişim elde etmek için Kantech web
sitesinde oturum açmı ş olmalısı nı z. Kantech web sitesi için
geçerli bir kimliğiniz yoksa http://www.kantech.com/
Register/Register.aspx adresine gidin ve kayıt formunu
doldurunuz.
Page 99

11
6- INTEVO Camera registration'a tıklayınız.
7- E-posta adresinizi girin. İşlem tamamlandığında lisans anahtarının
bir kopyası bu adrese gönderilecektir.
8- Aşağıdaki bilgileri girin:
• INTEVO-IPCAM01 seri numarası
• INTEVO Sunucu MAC adresi (yukarıdaki 4. adıma bakınız)
9- "KAYDET"e tıklayın.
10- Birden çok kamera kanalını etkinleştiriyorsanız “Click here to
create an additional key”a tıklayın ve diğer ek bilgiyi giriniz.
11- "ANAHTAR" bilgisini alın ve HDVR yazılımında: Configurations /
HDVR server / System Setup'a gidiniz.
12- "LİSANS" alanına "ANAHTAR" bilgisini girin ve "UYGULA"ya
tıklayın.
13- INTEVO kamera kanallarınız şimdi etkin ve kullanıma hazırdır.
NOT: INTEVO IP kanal kaydı, INTEVO'daki web tarayıcısı
üzerinden veya internet bağlantısı olan herhangi bir bilgisayarla
yapı labilir. Eğer bu seçenekler mevcut değilse lütfen yardım için
Kantech Teknik Desteği ile irtibat kurun.
Page 100

DN2055-1404
V 1.0
Toegangsregelings- en videosoftwarebeheer
Intevo Compact (model Intevo-CMP-1TB)
Intevo Geavanceerd (model Intevo-ADV-3TB)
Snelle configuratiehandleiding
Geavanceerde en compacte modellen
 Loading...